chemical protective suits instructions for use alphatec flash
TRANSCRIPT

EN 943
Chemical Protective SuitsInstructions for UseAlphaTec® FLASH

CO
NTE
NTS
1. Safety considerations.............................................................................. 51.1 Definitions of signal icons used in the instructions .......................... 51.2 Definitions of pictograms used on the suit label ............................... 62. Description of suit ..................................................................................... 73. Approvals ....................................................................................................... 83.1 European EU Type approval........................................................................... 83.2 NFPA .............................................................................................................................. 84. Proper use ...................................................................................................... 94.1 Intended use ............................................................................................................. 94.2 Limitations of use .................................................................................................. 94.2.1 Explosive environments.................................................................................................... 94.3 Temperature of use .............................................................................................. 95. Pre-use ...........................................................................................................105.1 Donning – Encapsulating (type CV/VP1) suit .....................................105.2 Donning – Non-encapsulating (type T) suit.........................................115.2.1 Hood adjustment ............................................................................................................... 115.2.2 Fitting the face piece ....................................................................................................... 125.2.3 Donning the suit ................................................................................................................. 12
6. In use ...............................................................................................................146.1 Procedure for checking manometer/pressure gauge ..................146.2 Regulating the suit ventilation ....................................................................147. After use ........................................................................................................157.1 Initial decontamination ...................................................................................157.2 Taking off the suit................................................................................................157.3 Final decontamination .....................................................................................158. Storage ...........................................................................................................168.1 Storage conditions ..............................................................................................168.2 Storage methods ..................................................................................................168.3 Shelf life .....................................................................................................................168.4 Folding the suit .....................................................................................................179. Maintenance ..............................................................................................18

CO
NTE
NTS
9.1 Maintenance schedule .....................................................................................189.2 Visual inspection of suit ..................................................................................199.3 Test of gas-tightness according to ISO 17491-1 ...............................199.3.1 Testing encapsulating suit type CV/VP1 ............................................................. 199.3.2 Testing non-encapsulating suit type T ................................................................. 209.3.3 Testing non-encapsulating type T suit with attached mask ................... 219.4 Cleaning ....................................................................................................................219.4.1 Hand wash ............................................................................................................................. 219.4.2 Machine wash ...................................................................................................................... 219.5 Zipper .........................................................................................................................229.5.1 Function ................................................................................................................................... 229.5.2 Maintenance ......................................................................................................................... 229.6 Bayonet ring ............................................................................................................239.6.1 Function ................................................................................................................................... 239.6.2 Maintenance ......................................................................................................................... 249.7 Replacing gloves ..................................................................................................259.8 Replacing rubber cuff .......................................................................................289.9 Replacing rubber diaphragm in AlphaTec Exhaust valve..........299.10 Service of Regulating valve & passthrough ......................................319.11 Patching ..................................................................................................................319.12 Marking on the suit ..........................................................................................3110. Disposal ......................................................................................................3210.1. Retirement consideration...........................................................................3211. Technical Data Package ..................................................................3311.1 Suit sizes .................................................................................................................3311.2 Suit weight ............................................................................................................3311.3 Suit colour .............................................................................................................3311.4 Materials ................................................................................................................3411.5 Seam types & attachments .........................................................................3511.6 List of spare parts & accessories ..............................................................3611.7 EU type approval data ...................................................................................3812. Warranty ....................................................................................................43


5
1. Safety considerations
• These instructions for use (IFU) are valid only for AlphaTec® FLASH.• The suit may only be used by trained personnel who are familiar with the contents
of this IFU.• Use the suit only for the purposes specified herein.• Do not use a damaged or incomplete suit, and do not modify the suit.• For repair and maintenance, only use genuine AlphaTec® (TRELLCHEM®) spare parts, or
the function may be impaired.
1.1 Definitions of signal icons used in the instructions
The following icons are used in this IFU to highlight the user on situations or actions that need special attention not to risk the safety of user, suit or environment.
WARNINGIndicates a potentially hazardous situation which, if not avoided, could result in death or serious injury.
CAUTIONIndicates a potentially hazardous situation which, if not avoided, could result in physical injury, or damage to product or environment.
NOTICEIndicates additional information on how to use the suit.
* Formerly known as TRELLCHEM® VPS Flash.

6
1.2 Definitions of pictograms used on the suit label
The suit has EU type approval and com-plies with the EU Regulation 2016/425 on Personal Protective Equipment. Chemical protective clothing is catego-ry III according to the regulation and 0598 is the number of the notified body that is responsible for production control. 0598 is SGS Fimko Oy.
This manual has to be read.
The suit offers chemical protection.
The size of the suit (see chapter 11.1)
The suit offers protection against infective agents (EN 14126).
The suit offers protection against radioactive particles (EN 1073-2)

7
2. Description of suit
AlphaTec® FLASH is • A gastight chemical protective suit• Intended for use with a positive pressure self-contained breathing apparatus (SCBA)
and a full-face mask*• Single-skin, i.e. no overcover is needed• Re-usable
AlphaTec® FLASH is available in the following designs:• Type CV: Encapsulating suit/type 1a, designed for use with an SCBA worn inside the suit.• Type VP1: Encapsulating suit/type 1a with extra large visor, designed for use with an SCBA
worn inside the suit.• Type T: Non-encapsulating suit/type 1b, designed for use with an SCBA worn outside the
suit.
The suit is fitted with:• Sewn-in socks or attached boots• Replaceable gloves• Suit ventilation
The following accessories are delivered with every suit:• Cotton comfort inner gloves• Silicone coated oversocks, if fitted with sewn-in socks• Mini Hood, if non-encapsulating/type T suit• Inside hump padding• Maintenance kit for zipper and Bayonet ring system• Extra safety locking pins for the Bayonet ring system• Suit hanger• Black plastic bag• AlphaTec® Bag• Instructions for use
* The suit will accommodate the major brands of SCBAs, such as Interspiro, Scott, Dräger and MSA. For European users the SCBA must be certified to EN 137.
The suit has to be worn with overboots, if sock version, and and a safety helmet.
For more information about materials, components & accessories, see chapter 11.

8
3. Approvals
3.1 European EU Type approval
AlphaTec® FLASH is CE-marked and has EU type approval under the EU Regulation 2016/425 on Personal Protective Equipment and the following European standards:
• EN 943-1:2015 + A1:2019• EN 943-2:2019• EN 14126:2003 infective agent protection• EN 1073-2:2002 radioactive particle protection• EN 1149-5:2008 antistatic suit material
AlphaTec® FLASH has been tested and approved by notified body no 0200; FORCE Certification A/S, Park Allé 345, DK-2605 Bröndby, Denmark.
The suit has been assessed to be safe for use in explosive atmospheres Zone 2/21, 22, Group IIA according to ATEX Directive and EN 13463-1. See test and assessment report DEKRA 12EXAM 10684c BVS-Schw/BI, November 2012.
Link to EU Declarations of Conformity page on Ansell Protective Products’ website:
The standards according to which the chemical protective suit is approved are marked on the suit inner label.
3.2 NFPA
AlphaTec® FLASH encapsulating versions type CV/VP1-ET with sock are certified to NFPA 1991:2016, “Standard on vapor-protective ensembles for hazardous materials emergencies”, including the Optional Chemical Flash Fire protection requirements and the Optional Liquefied Gas protective requirements.
AlphaTec® FLASH is certified by SEI (Safety Equipment Institute, USA).
See separate IFU for NFPA 1991 certified suits.
Cert. Mod. (NFPA 1991, 2016 edition)

9
4. Proper use
4.1 Intended use
The suit protects against chemicals in gaseous, liquid, aerosol and solid form. It also protects against infectious agents, i.e. bacteria, virus and fungi, and against radioactive particles.
4.2 Limitations of use
• Avoid extensive heat and open flames. • The suit is not intended for firefighting.• The suit does not protect against radiation i.e. alfa, beta, gamma or X-ray radiation.• Avoid explosive environments
4.2.1 Explosive environmentsAlphaTec® FLASH is approved for use in explosive environments according to ATEX, see chapter 3.1.
For the approval to be valid the suit must be:• Worn with the Tear-off/ATEX lens attached to the outside of the visor at all times. • Any other equipment used together with the suit must also be suitable for use in potentially explosive atmospheres. This includes the SCBA (when worn outside the suit), separate boots and any overgloves worn on top of the suit’s rubber gloves.• If used with the AlphaTec® Overglove #58-800, these gloves are not electrically conductive so e.g. hand held metal tools may require additional means of grounding.
For added safety the suit may be sprayed with water before and during use.
4.3 Temperature of use
- 40°C to +65°C
Short-term use in higher or lower temperatures is possible (ref. NFPA 1991 optional Flash Fire and Liquefied gas tests) but great caution must be taken with regards to heat stress/burn injuries and frost bite for the user.
Most performance properties of the vapour protective suit or individual element cannot be tested by the user in the field.

10
5. Pre-use
Before use, make sure:• The suit is pressure tested/leak tight and undamaged (see chapter 9)• The suit and gloves have the correct size (see chapter 11.1)• Type T suit: The elastic band is properly adjusted and installed (see chapter 5.2.1)• Anti-fog visor or anti-fog gel is applied to the inside of the suit visor (see chapter 11.6)• Anti-fog gel is applied to the outside of the mask visor• To wear undergarments suited for the situation, e.g. station wear or fire turn-out gear.
If cold weather or risk of contact with cold chemicals, wear insulating underwear.
Never use a suit which is not passing the pressure test or is damaged.
5.1 Donning – Encapsulating (type CV/VP1) suit
Always have an assistant to help you while donning and try to find a clean area to stand on.
1) (Sit on a chair) Place both legs into the suit and into the sewn-in socks or boots.2) If sewn-in socks, put on the silicone oversocks and then put on the safety boots.3) (Stand up) Put on the breathing apparatus (SCBA) and the mask and open the air flow.4) Put on the helmet.5) Put on the comfort gloves. Insert the right arm into the right sleeve and glove.6) Pull the hood over your head and the hump over the cylinder.7) Insert the left arm into the left sleeve and glove.8) Connect the ventilation hose to the inlet of the valve.
9) Close the zipper and fold the splash guard over it. Pull the zipper straight, using two hands. Never force it! If it jams, gently pull it back and try again. Make sure the zipper is fully closed.
Handle the zipper with care. A damaged zipper can cause serious injury or death.
8

11
5.2 Donning – Non-encapsulating (type T) suit
5.2.1 Hood adjustment
The elastic band shall be attached before the suit is donned.
The suit is delivered with a separate elastic band intended to be used inside the hood to get a tight fit of the face seal around the face. It is optional to use but it is recommended if the wearer has a small or narrow face. When fitted in the hood the elastic band makes it possible to adjust the fit of the face seal.
1) The elastic band is shaped as a cross. Place the cross “upside down” inside the hood (sewn arrow pointing down).
2. Attach the band in the loops inside the hood, using the Velcro closing.
There are three loop positions to be able to adjust the band in height to obtain an optimal fit, which is individual for each user.
1
2

12
5.2.2 Fitting the face pieceIt is very important that the correct size of suit is selected and the fitting and positioning of the RPE (Respiratory Protective Equipment) face piece is done correctly on top of the suit/hood face seal, as described below. Please consult the RPE IFU and any RPE Selection and Use programs in place in the local workplace, regarding fitting and checking of the RPE.
Incorrect fitting may result in poor fit, reduction in protection or leakage.
Increased protection from liquid splashes may be achieved using the AlphaTec® Mini Hood.
5.2.3 Donning the suit
Always have an assistant to help you while donning and try to find a clean area to stand on.
1) (Sit on the chair) Place both legs into the suit and into the sewn-in socks or boots.2) If sewn-in socks, then put on the silicone oversocks and then put on the safety boots.3) Put on the comfort gloves. (Stand up) Insert the right arm into the right sleeve and glove.4) Insert the left arm into the left sleeve and glove.5) Pull the hood over your head and adjust the face seal.6) Close the zipper and fold the splash guard over it. Pull the zipper straight, using two
hands. Never force it! If it jams, gently pull it back and try again. Make sure the zipper is fully closed.
Handle the zipper with care. A damaged zipper can cause serious injury or death.
7) Put on the breathing apparatus, except the mask.8) Connect the ventilation hose to the inlet of the Regulating valve.
8

13
9) Put on the face mask. Position it on top of the grey face seal. Start at the chin and make sure the face mask tightens against the face seal (not to the suit material). Pull the harness over the head and tighten the straps.
10) Have someone check the mask position and make sure there are no folds on the face seal, which can cause leakage.
11) If risk for splash of liquid chemicals, also put on the Mini Hood.12) Put on the helmet. Ready
DISCLAIMER: AlphaTec® type T suits have been tested and approved to the requirements of the EU Regulation 2016/425 on PPE, EN 943-1 and EN 943-2 using two different brands of SCBA (Interspiro and Dräger). It is impossible for Ansell to know beforehand what will be the resulting protection factor of the RPE plus suit system for different brands and types of RPE, different face masks, different users, different work operations and various work place conditions and scenarios of use etc.
Specific notice to users in the United Kingdom:In addition to the EU Regulation 2016/425, and in addition to any local workplace program that may be in place for selection and use of RPE, the approved code of practice for the Control of Substances Hazardous to Health Regulations 2002 (as amended) and the OC 282/28 guidance on the carrying out of fit tests, require face fit testing to be carried out with other personal protective equipment in place. This testing should be carried out to ensure a device fits adequately before the device is first worn, and thereafter if there is a change in circumstances, such that there could be alteration to the wearers face shape.

14
6. In use
During the intervention, make sure to:• Minimize the exposure to chemicals• Avoid direct contact with the chemicals as far as possible
6.1 Procedure for checking manometer/pressure gauge
Applicable to encapsulating (type CV/VP1) suits.
To check the manometer/pressure gauge, the hand has to be retracted from the glove:1) Grab the right glove with your left hand2) Pull the right hand into the suit3) Check the manometer/radio/other4) Put the right hand back into the glove again5) To pull the left hand into the suit, instead grab the left glove with your right hand
6.2 Regulating the suit ventilation
Suit ventilation is not required according to the product standard, and hence it is optional to use.
• 2 litres/minute: The standard ventilation rate, which gives an overpressure in the suit and thereby protects against chemicals coming into the suit in case of a puncture.
• 30 litres/minute: When the air inside the suit gets moist and warm, the user can choose to temporarily adjust the ventilation rate to 30 litres/minute while at the same time compressing the suit. This exercise empties the suit of moist and warm air, which will provide a slightly more comfortable inside environment in the suit.
• 100 litres/minute: Increases the comfort for the user, but shall be used only if the suit is fitted with an airline passthrough (applicable to CV/VP1 suits) with external air-supply.
Never use 100 litres/minute ventilation rate if only the SCBA cylinder is used, as this will empty the air quickly, leaving the user without breathing air and risk of suffocation.

15
7. After use
7.1 Initial decontamination
After a response in hazardous environment, the suit must be decontaminated before taking it off, to protect the wearer from contamination. • Make sure to have an assistant for the decontamination. • The assistant also needs to wear suitable protective clothing and possibly respiratory
protection.• Rinse the suit with plenty of water, preferably with added detergent.
7.2 Taking off the suit
After decontamination, take off the suit in reverse order of that described for donning above, and have someone assist you.
7.3 Final decontamination
If the initial decontamination is not enough, a second decontamination is necessary.• Use protective clothing/equipment when handling the contaminated suit.• Acids and Alkaline chemicals can be decontaminated using large amount of water.
When the rinsing water has pH 7 the suit is clean.• Inorganic chemicals can often be decontaminated using large amount of water and
detergent.• Volatile chemicals can be aired out of the suit. Hang the suit outdoors or in a
well-ventilated area with the zipper fully open. Check the air for residual chemicals by using simple gas detecting tubes.
• Chemical Warfare Agents (CWA) can be decontaminated using e.g. 30% calcium hypochlorite water solution.
• For chemicals such as oil/petroleum and other organic chemicals, special decontamination agents may be needed. The type of agents available differ between countries and regions. Contact a local supplier.
• Biological agents (i.e. bacteria, viruses) can be decontaminated using e.g. 3% hydrogen peroxide water solution or other similar disinfectants.

16
8. Storage
When stored the suit should be unfolded and inspected once a year (see chapter 9).
8.1 Storage conditions
• Dry, humidity 50 ± 30%• Room temperature, 5 - 30 °C• Away from direct sunlight• Away from ozone-generating sources, for example electrical engines, fluorescent lamps
and air-conditioners
8.2 Storage methods
The suit should be stored:• Folded as upon delivery or hanging• In the plastic bag delivered with it or in another tight bag or box• If stored in a soft bag, never store suits on top of each other, as too much weight or high
pressure may damage the visor• If stored in a box, make sure the box is large enough to easily accommodate the suit
without pushing, pressing or squeezing it. Please refer to the boxes listed in the AlphaTec® Gross Price List.
• If stored hanging, suits with boots should have the boots on the floor to avoid excess strain on the shoulders
• If stored folded, the face seal should be as flat as possible, avoiding sharp folds• The zipper should be almost closed with approximately 10 cm open
If storing the suit on vehicles or containers, abrasion through permanent friction with the contact surface has to be avoided.
8.3 Shelf life
Shelf life refers to suits in storage, without being used. The storage/shelf life applies under optimal storage conditions (see above) and does not form a guarantee. The recommended Shelf life is 7 years from date of manufacture but this may be exceeded or be less, however maximum 15 years. Therefore the condition of the suit needs to be checked regularly to evaluate whether it is in good condition or not (see chapter 9).

17
b) Sock model: Fold the sock into the leg and then fold the leg to the waist.
5) Fold the suit on the middle.
a) If type T suit: Make sure to place the face seal as flat as possible.
6) Place the suit in the storage bag or storage box.
4b
5a
8.4 Folding the suit
1) Close the zipper with approx. 10 cm open.
2) Turn suit upside down.a) Type CV/VP1: Fold the hump flat.
3) Fold the sleeves to the middle.
4) Fold the legs as follows:a) Boot model: Fold the boot to the waist.
1
2a
3
4a
5

18
9. Maintenance
9.1 Maintenance schedule
The specified intervals below are Ansell recommendations. For auxiliary equipment (SCBA, full-face mask, helmet etc.), refer to the relevant Instructions for Use.
The maintenance described below can be done by personnel without formal training, provided the instructions in this IFU are followed. For a list of spare parts & accessories, see chapter 11.6.
Area (chapter)Upon
DeliveryAfter Use
After Repair
Annu-ally
Every 5 years
If Broken
Visual inspection (9.2) X X X X
Test of gas-tightness (9.3) X X X X
Cleaning (9.4) X
Lubricate zipper (9.5) X X
Lubricate Bayonet O-Rings (9.6) X X
Repair & Replacements
Patching suit material (9.11) X
Barrier inner gloves (9.7) X X
Rubber gloves (9.7) X (*) X
Rubber cuff (9.8) X X
Face seal X X
Bayonet O-rings (9.6) X X
Bayonet locking pins (9.6) X X
Diaphragm in AlphaTec® Exhaust valve (9.9)
X X
Service of Regulating valve & Passthrough (9.10)
X X
(*) Rubber gloves to be replaced after use, if chemically contaminated.
For repair or replacement of face seal, visor, boots and zipper, contact an Ansell Service Center, or take a Training course provided by Ansell.

19
9.2 Visual inspection of suit
The inspection shall consist of the following steps:• Visual inspection of both inside and outside.• Look for surface damages on material, seams, visor or face seal, boots (if fitted), inner and
outer gloves.• Look for changes in the material properties such as brittleness, stiffness, swelling, stickiness
or other phenomena which could be evidence of chemical degradation or aging.• Check function of zipper and zipper fitting.• Check function of the Bayonet glove ring system• Check the function of the exhaust valves and, if fitted, suit ventilation regulating valve/
passthrough. Make certain that they are firmly mounted and not damaged.
If any defect/malfunction is found, the suit must be taken out of service.
Note any remarks, found during the inspection, in the inspection log.
9.3 Test of gas-tightness according to ISO 17491-1
ISO 17941-1 replaces EN 464.Test equipment: AlphaTec® (Trelltest) test equipment, see chapter 11.6. Other euipment i.e. LabTech tester with adapters for AlphaTec® suits can also be used.
9.3.1 Testing encapsulating suit type CV/VP1
Procedure:1) Place the suit on a clean surface, preferably a table.2) Exhaust valve no 1: Remove the outer exhaust valve cover (see chapter 9.9) and insert
the sealing plug.3) Add the retaining collar (1 pce) on the sealing plug and tighten clockwise. 4) Exhaust valve no 2: Remove the outer exhaust valve cover and the diaphragm
(see chapter 9.9). 5) Put the retaining collar (1 pce) on the black adapter.6) Screw the black adapter onto the grey test adapter, ensuring a tight connection.7) Push the black adapter into the exhaust valve, then tighten the retaining collar.8) Close the zipper.9) Connect the pressure gauge via the nipple on the test adapter.10) Inflate the suit with an air pistol to 1750 Pa/17.5 mbar.11) Lower the pressure to 1700 Pa/17.0 mbar using the valve on the adapter. This is the
pre-test expansion pressure. Maintain this pressure for 10 minutes, adding air if necessary.12) Adjust the pressure to 1650 Pa/16.5 mbar. This is the test pressure. Set and start the
timer and wait for 6 minutes.

20
Do not touch the suit during the test period of time.
13) Note the pressure after 6 minutes. If this pressure is 1350 Pa/13.5 mbar or more, the suit has passed the test. Note the final pressure in the suit log.
14) After the pressure test is completed, disconnect the pressure gauge from the test adapter and remove the test adapter and the sealing plug from the exhaust valves.
15) Before re-fitting the diaphragm, ensure it is free from dust.16) Re-fit the covers of both exhaust valves.
If the suit does not pass this test, the suit shall be removed from service.
9.3.2 Testing non-encapsulating suit type T
Procedure:1) Place the suit on a clean surface, preferably a table.2) Remove outer exhaust valve cover (see chapter 9.9) and insert the sealing plug.3) Add the retaining collar (1 pce) on the sealing plug and tighten clockwise.4) Install the face plate in the face seal: • Unscrew the nuts on the face seal plate and
detach the top ring. • Place the plate under the face seal (insert from inside). • Adjust the face seal so that it covers the outer part of the plate without being in contact with the screws. • Put the top ring back and tighten the nuts.
5) Close the zipper. 6) Connect the pressure gauge via the nipple on the face seal plate.7) Inflate the suit with an air pistol to 1750 Pa/17.5 mbar.8) Lower the pressure to 1700 Pa/17.0 mbar using the valve on the face seal plate/adapter.
This is the pre-test expansion pressure. Maintain this pressure for 10 minutes, adding air if necessary.
9) Adjust the pressure to 1650 Pa/16.5 mbar. This is the test pressure. Set and start the timer and wait for 6 minutes.
Do not touch the suit during the test period of time.
10) Note the pressure after 6 minutes. If this pressure is 1350 Pa/13.5 mbar or more, the suit has passed the test. Note the final pressure in the suit log.
11) After the pressure test is completed, disconnect the pressure gauge from the face plate, remove the face plate and remove the sealing plug from the exhaust valve.
12) Re-fit the cover of the exhaust valve.
If the suit does not pass this test, the suit shall be removed from service.

21
9.3.3 Testing non-encapsulating type T suit with attached mask
Procedure:1) Place the suit on a clean surface, preferably a table.2) Plug the breathing valve connection with plugs from the mask supplier.3) Continue according to the procedure in chapter 9.3.1, paragraph 4.
9.4 Cleaning
For decontamination guidelines, see chapter 7.
9.4.1 Hand washAnsell recommends hand washing the suit:• Hand wash in warm water (40 °C) with added mild detergent.• Use a piece of soft rag or a smooth brush to clean the suit.
Care should be taken not to scratch or damage the material.
• Let the suit air-dry or use a fan (alternatively a cleaning system such as the TopTrock® may be used).
• Stains of oil or other substances may be washed off carefully with white spirit, after which the suit should be rinsed with lukewarm water with a mild detergent followed by water.
Do not use garments that are not thoroughly cleaned and dried.
The suit material will withstand most commercial disinfectants. Your AlphaTec® dealer or Ansell Protective Solutions AB may be contacted for advice.
9.4.2 Machine washIf the customer uses washing machine, the machine should be specially designed for washing chemical protective suits:• Large diameter of the drum• Using extra amounts of water• No rotating drum but only oscillating drum• Mild washing powder
Machine washing the suit is the customer’s choice and responsibility. AlphaTec® dealer or Ansell Protective Solutions AB may be contacted for advice.

22
9.5.2 Maintenance
Procedure:1) Make sure the metal elements are clean.2) Open the zipper. 3) Check along each side of the chain for
damage by carefully bending the chain: a) A healthy zipper has a rounded bend.
b) A broken zipper has a V-shaped bend.
3a
3b
9.5 Zipper
9.5.1 FunctionThe zipper is an important part of the suit and also a delicate piece of equipment, that has to be handled carefully.
A damaged zipper can cause serious injury or death.
• Pull the slide using two fingers in the loop attached to the slide. • Always pull the slide parallel and straight along the zipper. A pull sideways may seriously
damage the zipper. • When closing, make sure that neither suit material nor undergarment material is caught
in the zipper. • If the slide gets jammed or is hard to pull, then pull it back, trace the reason (e.g. dirt or
clothing material caught in the chain) and solve the problem. Then slowly try to pull it again. • Never try to overcome a problem by pulling harder as this will damage the zipper.
4) Close the zipper.5) Lubricate the metal elements, inside and
outside, with the wax stick.
The suit must be pressure tested before it is used again.
5

23
9.6 Bayonet ring
9.6.1 FunctionThe AlphaTec® (TRELLCHEM®) Bayonet ring system consists of the following parts:
Sleeve ring – glued to the suit sleeveGlove ring – where the glove is mountedInner ring*– goes inside the shaft of the rubber gloveViton® rubber O-rings – one in the sleeve ring and one in the glove ring. Together with the rubber glove they provide a triple sealing of the system.Safety locking pin – prevents the system from unintentional opening
Closed positionGreen marks opposite white marks. To open the system and detach the glove assembly, remove the red locking pin, push the two rings together and twist counter-clockwise until the white marks meet.
Open (detach/attach) positionWhite marks opposite white marks. To attach the glove ring, match thewhite marks, push the two rings together and twist clockwise until the white marks meet the green marks. Insert the red locking pin.
* If the suit is fitted with a 2 or 3-part glove assembly that includes the inner barrier glove, then the inner ring is welded to the barrier glove shaft.

24
9.6.2 Maintenance
Procedure:1) Open the Bayonet ring and take out the
two O-rings.
2) Apply Molycote all around the groove.
3) If replacing the O-rings: Put the two new O-rings into place.
4) Use a small paintbrush to spread the grease evenly.
The two O-rings are different size: The one with larger diameter goes into the glove ring and the smaller diameter into the sleeve ring.
The suit must be pressure tested before it is used again.
4
When functioning properly, the safety locking pin “snaps” into place when pushing it with a finger. The pin may after repeated use become too easy to push into place, i.e. it gets worn out, and must then be replaced.
25
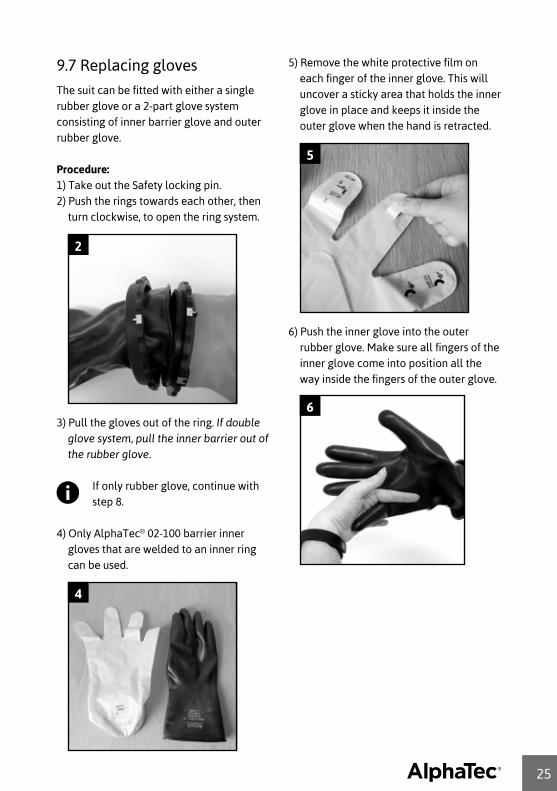
5) Remove the white protective film on each finger of the inner glove. This will uncover a sticky area that holds the inner glove in place and keeps it inside the outer glove when the hand is retracted.
6) Push the inner glove into the outer rubber glove. Make sure all fingers of the inner glove come into position all the way inside the fingers of the outer glove.
5
6
9.7 Replacing gloves
The suit can be fitted with either a single rubber glove or a 2-part glove system consisting of inner barrier glove and outer rubber glove.
Procedure:1) Take out the Safety locking pin.2) Push the rings towards each other, then
turn clockwise, to open the ring system.
3) Pull the gloves out of the ring. If double glove system, pull the inner barrier out of the rubber glove.
If only rubber glove, continue with step 8.
4) Only AlphaTec® 02-100 barrier inner gloves that are welded to an inner ring can be used.
2
4

26
7) Press the fingers of the outer and inner gloves together so that they stick together.
8a) If only rubber gloves, place the black inner ring approximately 5 cm/2 inches into the rubber glove.
8b) If double glove system, push the ring of the inner glove approximately 5 cm/2 inches into the rubber glove.
7
5 cm
8
9) If double glove system, put one hand inside the gloves and curl a fist. At the same time, put a finger of the other hand between the ring and the outer glove to release air that is trapped between the gloves.
10) Lubricate the O-rings with Molycote.
11) Push the glove through the glove ring and align the thumb of the glove with the green mark on the glove ring. Push it firmly into place using your thumbs.
12) Fold the glove shaft into the glove ring.
13) Position the glove ring and the sleeve ring so that the two white marks are opposite each other.
9
11

27
14) Now push the two rings towards each other and turn counter-clockwise, so that the white and the green marks meet.
15) Attach the safety locking pin.
The suit must be pressure tested before it is used again.
14

28
9.8 Replacing rubber cuff
The rubber cuff is an optional accessory, which adds safety if the outer glove is punctured.
Procedure:1) Pull out the old cuff from inside the suit
sleeve.
2) Push the new cuff ring assembly into the sleeve ring from inside the suit.
1
2
3) Make sure the cuff is aligned straight. Push it firmly into place. Make sure no suit material gets caught between the cuff and the sleeve ring.
The suit must be pressure tested before it is used again.
3

29
Do not try to lever the lug and valve body stop apart, as this could damage the exhaust valve.
3) Slowly turn valve cover anti-clockwise over the blade, this allows the cover lug to move past the body stop. Repeat this action until the valve cover is unscrewed from the valve body
Procedure:1) To remove outer valve cover, first rotate
cover clockwise so the cover lug is 6-8 mm past the valve body stop.
2) Carefully insert a thin blade (do not use a knife) between the ‘‘cover lug and the body stop.
1
2
Follow these instructions to remove the cover from the AlphaTec® exhaust valve.
Lay the suit out on a flat surface and locate the exhaust valve on the chest.
When removing the valve cover, do not hold the inner valve retaining collars, as this may loosen the valve from the suit.
3
9.9 Replacing rubber diaphragm in AlphaTec Exhaust valve

30
4) Remove the old diaphragm and scrap it.
5) Check that the new diaphragm is clean before mounting it.
6) To refit the exhaust valve cover, screw the cover clockwise onto the valve body, turning the cover until there has been 3 clicks on the cover lug and valve body stop.
Take care not to cross thread.
The suit must be pressure tested before it is used again.
4

31
9.10 Service of Regulating valve & passthrough
Instructions are enclosed with the AlphaTec® (TRELLCHEM®) Service Kit (see chapter 11.6).
The maintenance interval described in the maintenance schedule above applies only if the fitted valve/passthrough is of AlphaTec® (TRELLCHEM®) brand. For passthroughs of other brands, please see the manufacturer’s instructions.
9.11 Patching
Minor damage, e.g. tears, punctures, scratches, can be patched using the AlphaTec® (TRELLCHEM®) Repair Kit, which also contains instructions (see chapter 11.6).
9.12 Marking on the suit
Marking on the suit can be made by a “permanent marker” type of pen.
Make sure the ink has dried before folding/packing the suit for storage.
Special labels for marking of the suit are available as an option.

32
10. Disposal
Worn out suits should be disposed of according to local regulations for rubber/plastic waste. Incineration is recommended.
Suits that are not completely decontaminated must be disposed of in a safe manner, taking local regulations for the specific chemical into account.
10.1. Retirement consideration
A suit should be retired when fulfilling one or more of the below criteria:
Criteria for retirement: Explanation
Age Regardless of how the suit has been used, and although it may still pass inspection and pressure test, it must be retired when reaching 15 years of age.
Beyond repair
The damage is too big and therefore not possible/not safe to repair.
The suit has already been patched 10 times.
The cost for repair is higher than to buy a new suit.
Chemically degraded Chemical degradation cannot be stopped or repaired.
A suit that is being retired due to age, or beyond repair, can still be used for training.
Clearly mark the training suit “TRAINING”, so it is not mistaken for a real/active suit.

33
11. Technical Data Package
11.1 Suit sizes
SUIT SIZE HEIGHT (cm) CHEST/BUST GIRTH
XXS 158-170 80-88
XS 164-176 84-92
S 170-182 88-96
M 176-188 92-100
L 182-194 96-104
XL 188-200 100-108
XXL 194-206 104-112
XXXL 200-212 108-116
NOTE: The data refers to a wearer without SCBA or any other equipment.
11.2 Suit weight
Approx. 6.0 kg / 13 lbs for a type CV/VP1 suit size L with sewn-in socks. Approx. 5.0 kg / 11 lbs for a type T suit size L with sewn-in socks. Attached boots or separate safety boots add approx. 2 kg / 4.5 lbs.
11.3 Suit colour
Orange with white inside. Optional colour is olive green with white inside.

34
11.4 Materials
Suit part/Component Description
Suit material: Aramid fabric coated on the outside with chloroprene rubber and on inside a polymer barrier laminate. Proprietary to Ansell Protective Solutions AB.
Visor material: 2 mm high impact resistant PVC
Face seal material: Natural rubber/Chloroprene rubber
Glove materials:Inner glove:
Rubber glove:
2-part glove system:AlphaTec® #02-100 inner glove made from a barrier laminateAlphaTec® #38-628 made from Viton®/ butyl rubber
Footwear material:Sewn-in sock:
Attached boot:Made of the suit materialNitrile rubber
Zipper material:
Length:
Tape:
Chain:Slide:
Heavy-duty zipper protected by an outside splash guard, closing with Velcro.
Type CV/VP1 suits: 1350 mmType T suits: 1050 mm
Polyester fabric coated with chloroprene rubber on the outside and inside, and with a built-in barrier film (HCR zipper)White copper alloyBronze (copper/tin alloy)
Exhaust valves:
Valve seat/washer/ nut/cover:
Valve/Suit gasket:Diaphragm
(membrane):
Encapsulating suits: 2 pcs/suit, placed in the back of the hood Non-encapsulating suits: 1 pce/suit, placed on the chest
Construction:
Glass-fibre reinforced polypropyleneChloroprene rubber
Silicone

35
11.5 Seam types & attachments
Seam/Attachment Description
Suit material seam:
Thread:Inner tape:Outer tape:
Aramid fabric coated on the outside with chloroprene rubber and on inside a polymer barrier laminate. Proprietary to Ansell Protective Solutions AB.AramidBarrier laminate tape, heat welded to the seamChloroprene rubber tape, glued to the seam
Visor attachment:
Inner tape:Outer tape:
The visor is glued to the suit and sealed both inside and outside.
Textile reinforced rubber coated tape, glued to the seamChloroprene rubber tape, glued to the seam
Face seal attachment:
Inner tape:Outer tape:
The face seal is glued to the suit and sealed both inside and outside.
Textile reinforced rubber coated tape, glued to the seamChloroprene rubber tape, glued to the seam
Glove attachment: Gloves are attached with a Bayonet ring system (see chapter 9.6). The ring is glued to the suit.
Boot attachment: Boots are attached with a metal band/plastic ring system.
Zipper attachment:
Thread:Inner tape:Outer tape:
The zipper is stitched to the suit and sealed both inside and outside.
AramidTextile reinforced rubber coated tape, glued to the seamChloroprene rubber tape, glued to the seam
Exhaust valves: Attached to the suit with a screw and nut
Regulation valve & Passthroughs:
Attached to the suit with a screw and nut

36
11.6 List of spare parts & accessories
Description & Name Sizes Article no
Gloves:
AlphaTec® #02-100 inner glove 1011
K72 251 365K72 251 465
AlphaTec® #38-628 Viton®/butyl rubber glove 891010.511
K72 818 339K72 818 340K72 818 341K72 818 342K72 818 343
AlphaTec® #58-800 Overglove 11 K72 252 215
Cotton comfort glove 10 K72 240 200
Footwear:
Nitrile rubber boot 40.54243444546.548
K72 204 410K72 204 420K72 204 430K72 204 440K72 204 450K72 204 470K72 204 480
Visor/face seal accessories:
Anti-fog lens CVVP1
K72 270 400K72 270 300
Anti-fog gel K69 000 710
Tear-off (anti-scratch) lens, 10 pcs CVVP1
487 030 050487 030 040
Hands-Free Visor Light* CVVP1
487 030 101487 030 100
Face seal T K72 502 000
Suit ventilation & Airline Passthrough:
AlphaTec® (TRELLCHEM®) Regulating valve* CV/VP1T
K72 141 600K72 141 500
AlphaTec® (TRELLCHEM®) combined Regulating valve & Passthrough*
CV/VP1 Contact your supplier or Ansell
*Instructions included

37
Description & Name Sizes Article no
Storage:
AlphaTec® Bag 487 100 440
Hanger CV/VP1T
K72 400 200K72 400 100
Storage box, plastic CV/VP1T
K78 700 130K78 700 120
Test equipment:
AlphaTec® (Trelltest) Test Equipment* CV/VP1/T 487 090 078
Maintenance & Repair:
Zipper wax kit K70 000 410
Lubrication for Bayonet ring system K69 095 005
Viton O-rings for Sleeve ring, 10 pcs K72 000 606
Viton O-rings for Glove ring, 10 pcs K72 000 611
Safety locking pin for Bayonet ring system K73 103 585
AlphaTec® Exhaust valve, complete K73 103 000
AlphaTec® Exhaust valve diaphragm K73 102 050
Service kit AlphaTec® (TRELLCHEM®) Regulating valve & Passthrough*
K72 141 100
Repair kit for AlphaTec® FLASH, orange* 487 080 420
*Instructions included

38
11.7 EU type approval data
See EU type approval on page 8. Tests and classification according to EN 14325:2004, EN 14325:2018 and EN 14126:2003.
It should be noted that all chemical testing was performed on swatches of suit material under laboratory conditions, not under actual workplace environments. The user must determine the applicability of the results obtained under laboratory conditions to the actual conditions of use. Information presented is subject to change without notice.
SUIT MATERIAL AND SEAM - MECHANICAL DATA
PROPERTY TEST METHOD CLASS REQUIREMENT CLASS
Abrasion resistanceEN 14325:2004/2018, EN 530
> 2000 cycles 6
Flex cracking resistanceEN 14325:2004, ISO 7854:B
> 15000 cycles 4
Flex cracking resistanceEN 14325:2018,ISO 7854:B
> 8000 cycles 4
Flex cracking @ -30°C ISO 7854:B > 4000 6
Tear resistance EN ISO 9073-4 > 40 N 3
Tensile strength EN ISO 13934-1 > 1000 N 6
Puncture resistance EN 863 > 50 N 3
Resistance to flame EN 13274-4 method 35 sec in flame, leak tight
afterwards3
Limited flame spread index (LFI)
EN ISO 14116:2015No hole. Afterflame/
afterglow < 2 s3
Antistatic properties, garment material
EN 1149-5:2008 t50 < 4 s Pass
Seam strength ISO 5082 > 500 N 6
Zipper strengthEN 943-1:2015, ISO 5978
> 500 N 6

39
SUIT MATERIAL AND SEAMS - RESISTANCE TO PERMEATION BY CHEMICALS
CHEMICALSUIT
MATERIALSEAM
VISOR SEAM
Acetone 6 6 6
Acetonitrile 6 6 6
Anhydrous ammonia (gas) 6 6 6
Carbon disulfide 6 6 6
Chlorine (gas) 6 6 6
Dichloromethane 6 6 4
Diethyl amine 6 6 6
Ethyl acetate 6 6 6
Heptane 6 6 -
Hexane 6 6 6
Hydrogen chloride (gas) 6 6 6
Methanol 6 6 6
Sodium hydroxide, 40% 6 6 6
Sulphuric acid, 96% 6 6 6
Tetrahydrofuran 6 6 5
Toluene 6 6 6
CLASSIFICATION OF PERMEATION BREAKTHROUGH TIME
CLASS 1 2 3 4 5 6
PERMEATION TIME > 10 min > 30 min > 1 hr > 2 hr > 4 hr > 8 hr

40
COMPONENTS - RESISTANCE TO PERMEATION BY CHEMICALS
CHEMICAL VISORNITRILE RUBBER
BOOTSHCR
ZIPPER
Acetone 5 5 6
Acetonitrile 6 5 6
Anhydrous ammonia (gas) 6 6 6
Carbon disulfide 6 6 5
Chlorine (gas) 6 6 6
Dichloromethane 4 3 3
Diethyl amine 6 6 2
Ethyl acetate 6 6 6
Heptane 6 ≥3 6
Hexane 6 6 6
Hydrogen chloride (gas) 6 6 6
Methanol 6 6 5
Sodium hydroxide, 40% 6 6 6
Sulphuric acid, 96% 6 6 6
Tetrahydrofuran 5 5 1
Toluene 6 6 6

41
COMPONENTS - RESISTANCE TO PERMEATION BY CHEMICALS
CHEMICALALPHATEC® #38-628
GLOVESALPHATEC® #02-100
GLOVES
Acetone 6 6
Acetonitrile 6 6
Anhydrous ammonia (gas) 6 11
Carbon disulfide 6 6
Chlorine (gas) 6 51
Dichloromethane 32 21,2
Diethyl amine 21 6
Ethyl acetate 41 6
Heptane 6 6
Hexane 6 6
Hydrogen chloride (gas) 6 51
Methanol 6 6
Sodium hydroxide, 40% 6 6
Sulphuric acid, 96% 6 6
Tetrahydrofuran 21 6
Toluene 6 6
1) The combination of the barrier inner glove and another glove will at least give protection as the better of the two gloves. If the barrier inner glove is used alone (not recommended), it provides only limited protection against ammonia.2) If the barrier inner glove is used in combination with the AlphaTec® #38-628 glove, class 5 is obtained for dichloromethane.

42
SUIT MATERIAL – RESISTANCE TO PENETRATION BY INFECTIVE AGENTS
CHEMICAL SUIT MATERIAL
Synthetic blood (ISO 16603:2004) 6
Phi-X174 bacteriophage (ISO 16604:2004) 6
Penetration by biologically contaminated aerosols, using Staphylococcus aureus ATCC 6538 (ISO/DIS 22611:2003)
3
Dry microbial penetration, using Bacillus subtilis (ISO 22612:2005)
3
Wet bacterial penetration, using Staphylococcus aureus ATCC 29213 (EN ISO 22610)
6
Tests and classification according to EN 14126 - infective agents.

43
12. Warranty
In case of faults or defects, if any, in the protective suits, including gloves and other accessories, the following is applicable:
If a fault or defect appears in the protective suit as a result or in the course of any use, function or state of the protective suit, the purchaser is requested to contact the company from which the suit was purchased. The terms of sale agreed upon between the purchaser and the said company shall apply in this case. Ansell Protective Solutions AB shall have no liability to purchasers of the protective suits other than when the suit in question was purchased directly from Ansell Protective Solutions AB.
The liability of Ansell Protective Solutions AB for faults or defects of a protective suit shall be subject to the Standard Warranty set forth in its General Conditions of Delivery for Industrial Rubber Products, unless otherwise stated in a separate agreement in writing between Ansell Protective Solutions AB and the purchaser. The General Conditions of Delivery are available on request and for download on http://protective.ansell.com/en/About/Trade-conditions/
This manual does not in any way comprise a guarantee or warranty on the part of Ansell Protective Solutions AB, and Ansell Protective Solutions AB expressly excludes any implied warranty of merchantability or fitness. Ansell Protective Solutions AB is not in any way nor under any conditions liable for compensation to the purchaser or commercial user of a protective suit for injury to (including death of) any person or loss of or damage to property of any kind or for costs, loss of profits or other damage or loss of any nature whatsoever.

44

45

46


Ansell, ® and ™ are trademarks owned by Ansell Limited or one of its affiliates, except as otherwise indicated. TRELLCHEM® is a registered trademark owned by Trelleborg AB. VITON® is a registered trademark owned by DuPont Perfomance Elastomers L.L.C. ©2020 Ansell Limited. All Rights Reserved.
99
7 1
01
33
0 A
NS
EL
L 1
91
0 [
EN
G]
Ansell Protective Solutions ABArenagatan 8B 215 33 Malmö, SwedenTel. + 46 (0)10 205 [email protected]://protective.ansell.com