child restraint owner’s manual read this...
TRANSCRIPT

www.gracobaby.comContender™ 65 Child Restraint
Owner’s Manual
FAILURE TO PROPERLY USE THIS CHILD RESTRAINT INCREASES THE
RISK OF SERIOUS INJURY OR DEATH IN A SUDDEN STOP OR CRASH.
READ THIS MANUAL.Do not install or use this child restraint
until you read and understand the instructions in this manual.
PD250304A© 2013 Graco 10/13 US
2
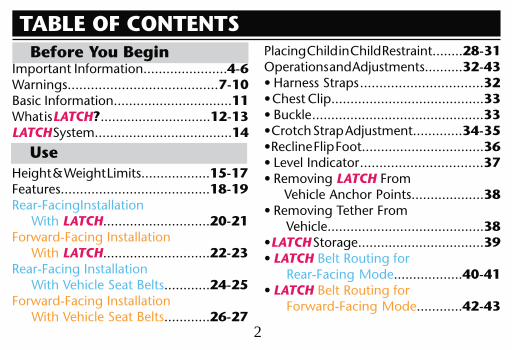
TABLE OF CONTENTS
Important Information......................4-6Warnings.......................................7-10Basic Information...............................11What is LATCH?.............................12-13LATCH System....................................14
Before You Begin
UseHeight & Weight Limits..................15-17Features.......................................18-19Rear-FacingInstallation With LATCH............................20-21Forward-Facing Installation With LATCH............................22-23Rear-Facing Installation With Vehicle Seat Belts............24-25Forward-Facing Installation With Vehicle Seat Belts............26-27
Placing Child in Child Restraint........28-31Operations and Adjustments..........32-43
323333
34-353637
LATCH From Vehicle Anchor Points...................38
Vehicle.........................................38LATCH Storage.................................39LATCH Belt Routing for
Rear-Facing Mode..................40-41LATCH Belt Routing for
Forward-Facing Mode............42-43
3
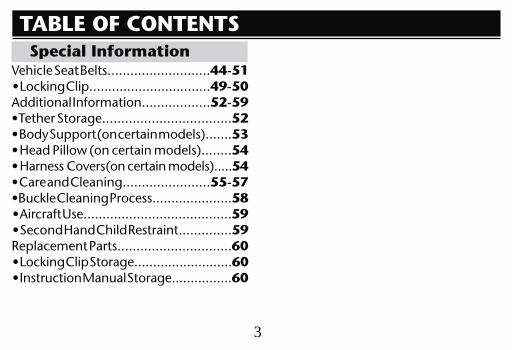
Vehicle Seat Belts...........................44-5149-50
Additional Information..................52-5952 53 54 54
55-5758 5959
Replacement Parts..............................60 60 60
TABLE OF CONTENTS

4
Read and understand instruction manual and child restraint labels.
must use child restraint rear-facing. Infants or toddlers 20 to 40 lbs.
may be rear-facing.Do not use child restraint rear-facing
Secure children in rear seat of
Install child restraint securely with LATCH belt.
Do not use after the useful life date
without first understanding all instructions.
No child restraint can guarantee protection from injury in every situation, but proper use helps reduce the risk of serious injury or death.
READ THIS MANUAL CAREFULLY.
IMPORTANT INFORMATION

5
IMPORTANT INFORMATION
manufacture can be found on a label on the child restraint. Fill out the prepaid registration postcard attached to the harness and mail it today. Child restraints could be recalled for safety reasons. You must register this
model number and date of manufacture to:
Graco Children’s Products, Inc.Attn: Customer Service, 3 Glenlake Parkway Atlanta, GA 30328
or call 1-800-345-4109 or register online athttp://www.gracobaby.com/carseatregistration
Registration Information Model Number: Date of Manufacture: Purchase Date:
Register Your Child Restraint
6
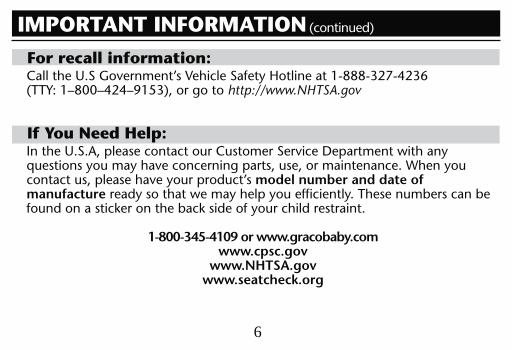
For recall information:
http://www.NHTSA.gov
If You Need Help:
model number and date of
manufacture
1-800-345-4109 or www.gracobaby.comwww.cpsc.gov
www.NHTSA.govwww.seatcheck.org
IMPORTANT INFORMATION
7
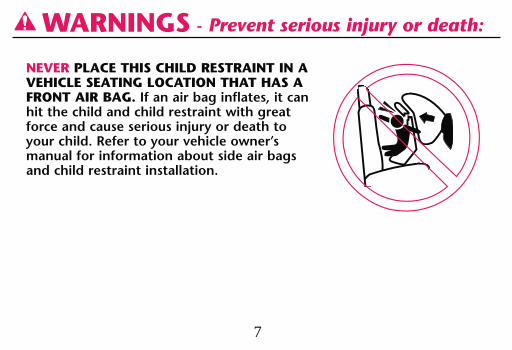
NEVER PLACE THIS CHILD RESTRAINT IN A VEHICLE SEATING LOCATION THAT HAS A FRONT AIR BAG. If an air bag inflates, it can hit the child and child restraint with great force and cause serious injury or death to your child. Refer to your vehicle owner’s manual for information about side air bags and child restraint installation.
WARNINGS - Prevent serious injury or death:
8
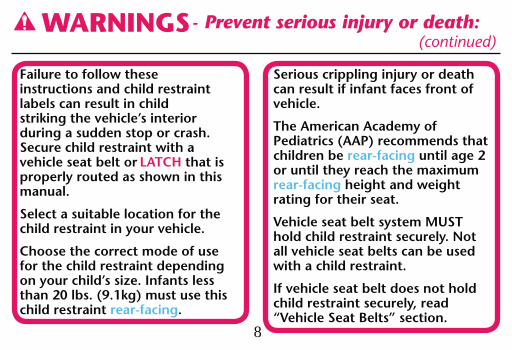
Failure to follow these instructions and child restraint labels can result in child striking the vehicle’s interior during a sudden stop or crash. Secure child restraint with a vehicle seat belt or LATCH that is properly routed as shown in this manual.
Select a suitable location for the child restraint in your vehicle.
Choose the correct mode of use for the child restraint depending on your child’s size. Infants less than 20 lbs. (9.1kg) must use this child restraint rear-facing.
Serious crippling injury or death can result if infant faces front of vehicle.
The American Academy of Pediatrics (AAP) recommends that children be rear-facing until age 2 or until they reach the maximum rear-facing height and weight rating for their seat.
Vehicle seat belt system MUST hold child restraint securely. Not all vehicle seat belts can be used with a child restraint.
If vehicle seat belt does not hold child restraint securely, read “Vehicle Seat Belts” section.
WARNINGS- Prevent serious injury or death: (continued)
9
Never put a child restraint in a front vehicle seat unless recommended by vehicle owner’s manual. National Highway Traffic Safety Administration (NHTSA) alerts vehicle owners that according to accident statistics, children are safer in the rear seat. For vehicles with air bags, refer to vehicle owner’s manual for child restraint installation information.
If child restraint is in a crash, it must be replaced. DO NOT use it again! A crash can cause unseen damage and using it again could result in serious injury or death. DO NOT use child restraint if it is damaged or missing parts.
DO NOT use accessories or parts other than those provided by Graco. Their use could alter the performance of the child restraint.Rear-facing child restraint must be properly leveled:
injury or ejection.
breathing difficulties.
WARNINGS- Prevent serious injury or death: (continued)
10
Never leave child unattended, even when sleeping. Child may become tangled in harness straps and suffocate or strangle.
DO NOT remove LATCH system from child restraint. If using vehicle seat belt to secure child restraint, LATCH connectors must be stored. (see section “LATCH storage”)
Never attach two LATCH connectors to one vehicle lower anchor point unless specifically allowed by the vehicle manufacturer.
WARNINGS- Prevent serious injury or death: (continued)
11
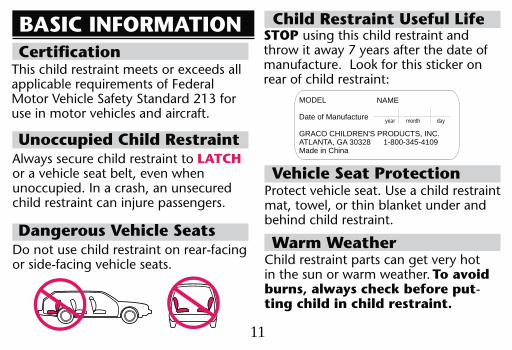
BASIC INFORMATIONCertification
applicable requirements of Federal
Unoccupied Child Restraint
Dangerous Vehicle Seats
Child Restraint Useful Life
Always secure child restraint to LATCH
child restraint can injure passengers.
Do not use child restraint on rear-facing
STOP using this child restraint and
manufacture. rear of child restraint:
Warm Weather
in the sun or warm weather. To avoid burns, always check before put-ting child in child restraint.
Vehicle Seat Protection
behind child restraint.
MODEL
Date of Manufacture
GRACO CHILDREN'S PRODUCTS, INC.ATLANTA, GA 30328 1-800-345-4109Made in China
PD
2069
38A
NAME
year month day
12
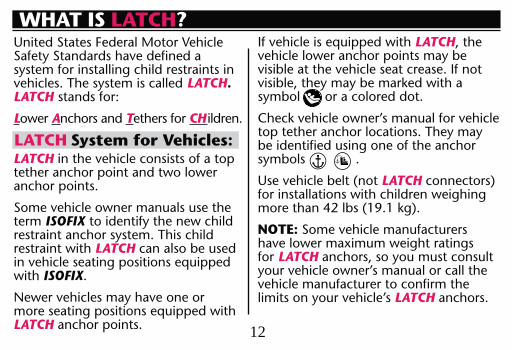
WHAT IS LATCH?
system for installing child restraints in
LATCH. LATCH stands for:
Lower Anchors and Tethers for CH ildren.
LATCHtether anchor point and two lower anchor points.
term ISOFIX to identify the new child
restraint with LATCH can also be used
with ISOFIX.
more seating positions equipped with LATCH anchor points.
LATCH
symbol or a colored dot.
be identified using one of the anchor symbols .
LATCHfor installations with children weighing
NOTE:
for LATCH
LATCH anchors.
13
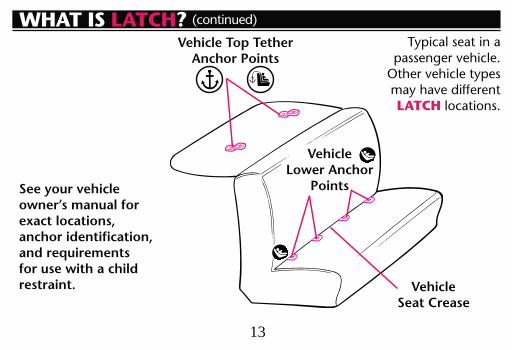
Vehicle Top Tether Anchor Points
VehicleLower Anchor
Points
VehicleSeat Crease
LATCH locations.
See your vehicle owner’s manual for exact locations, anchor identification, and requirements for use with a child restraint.
WHAT IS LATCH?
14
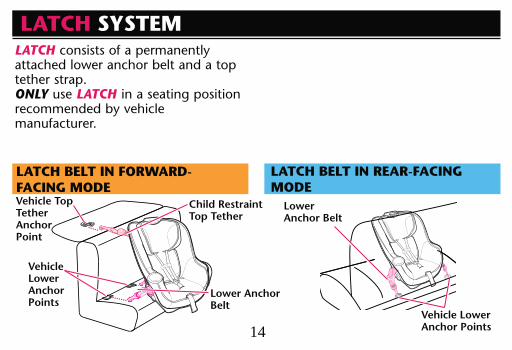
LATCH SYSTEM
Child Restraint Top Tether
LATCH consists of a permanently attached lower anchor belt and a top tether strap.ONLY use LATCH in a seating position
manufacturer.
LATCH BELT IN FORWARD-FACING MODEVehicle Top Tether AnchorPoint
Vehicle Lower Anchor Points
Vehicle Lower Anchor Points
Lower Anchor Belt
Lower Anchor Belt
LATCH BELT IN REAR-FACING MODE
15
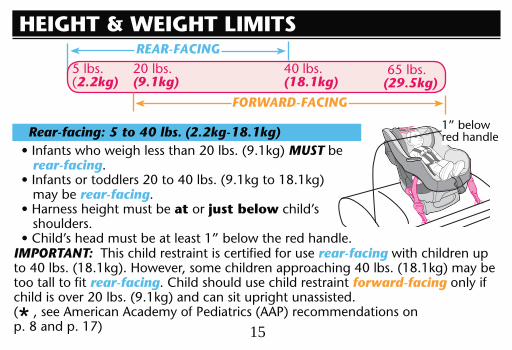
HEIGHT & WEIGHT LIMITS
IMPORTANT: rear-facing with children up
too tall to fit rear-facing. Child should use child restraint forward-facing only if
*
Rear-facing: 5 to 40 lbs. (2.2kg-18.1kg)
2.2kg)
40 lbs. (18.1kg)
20 lbs. (9.1kg)
(29.5kg)
REAR-FACING
FORWARD-FACING
red handle MUST be rear-facing.
may be rear-facing.
at or just below shoulders.
16
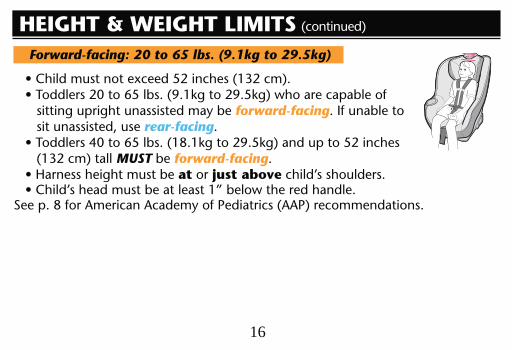
Forward-facing: 20 to 65 lbs. (9.1kg to 29.5kg)
sitting upright unassisted may be forward-facing. If unable to
rear-facing.
MUST be forward-facing.at or just above
HEIGHT & WEIGHT LIMITS
17
A preterm infant or low birth weight infant
or aircraft.
According to the American Academy of
breathing difficulties if improperly reclined in a child restraint.
When installing the child restraint rear-facing
your infant and recommend the proper child restraint or car bed before you and your infant
Preterm or Low Birthweight Infants *
18
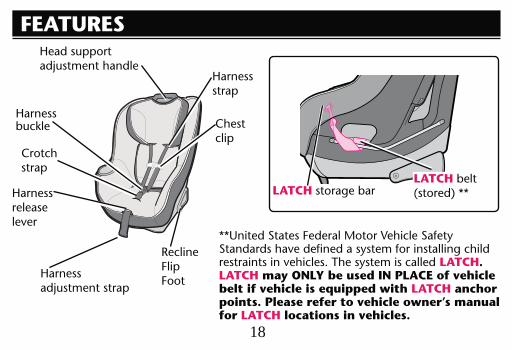
FEATURES
LATCH belt LATCH storage bar
LATCH. LATCH may ONLY be used IN PLACE of vehicle belt if vehicle is equipped with LATCH anchor points. Please refer to vehicle owner’s manual for LATCH locations in vehicles.
Harness
Crotch strap
Harness release
Harness adjustment strap
Harness strap
Chest clip
Recline Flip Foot
Head support adjustment handle
19
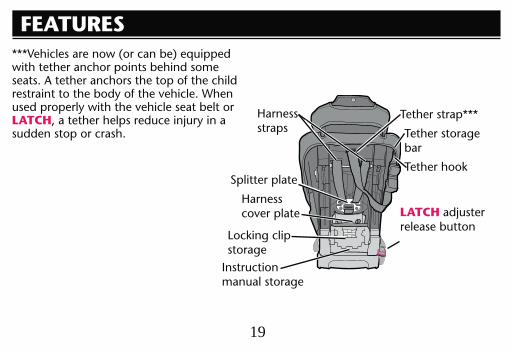
FEATURES
with tether anchor points behind some seats. A tether anchors the top of the child
LATCHsudden stop or crash.
bar
LATCH adjuster release button
Splitter plate
Harness straps
Harness
Instruction manual storage
storage
20
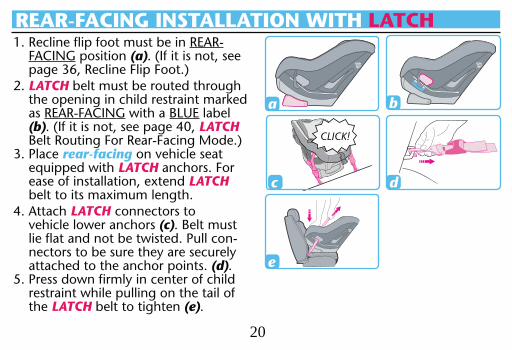
REAR-FACING INSTALLATION WITH LATCHREAR-
position (a)
2. LATCH belt must be routed through
as with a label (b) LATCH
rear-facing equipped with LATCH anchors. For
LATCH
4. Attach LATCH connectors to (c). Belt must
-nectors to be sure they are securely attached to the anchor points. (d).
restraint while pulling on the tail of the LATCH belt to tighten (e).
a b
d
e
c
CLICK!
21
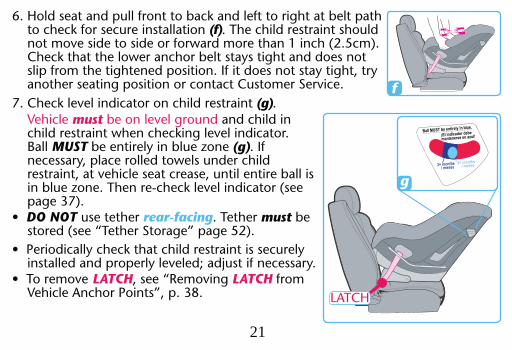
f
g
Hold seat and p(f)
(g).
Vehicle must and child in
Ball MUST be entirely in blue zone (g). If
DO NOT use tether rear-facing must be
LATCH LATCH from
22
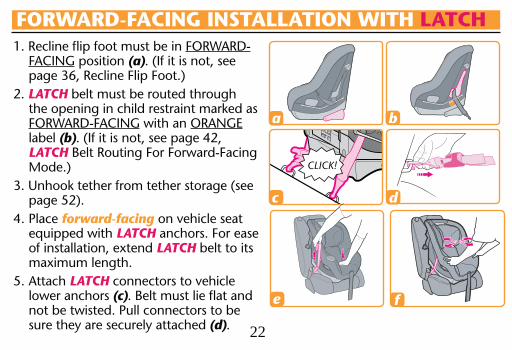
FORWARD- position (a)
2. LATCH belt must be routed through
with an label (b)LATCH Belt Routing For Forward-Facing
4. Place forward-facing equipped with LATCH anchors. For ease
LATCH belt to its
LATCHlower anchors (c)not be twisted. Pull connectors to be sure they are securely attached (d).
FORWARD-FACING INSTALLATION WITH LATCH
a
dc
b
CLICK!
e f
23
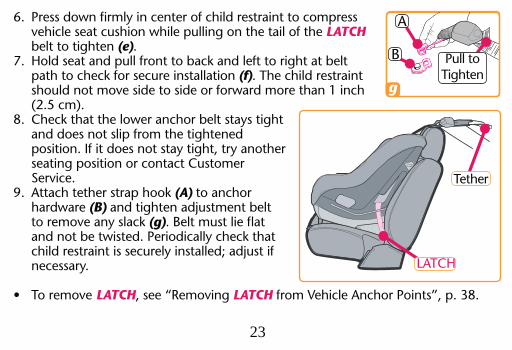
LATCH belt to tighten (e).
(f)
and does not slip from the tightened
seating position or contact Customer
(A) to anchor hardware (B) and tighten adjustment belt
(g)
necessary.
LATCH LATCH
g
Pull to
A
B
24
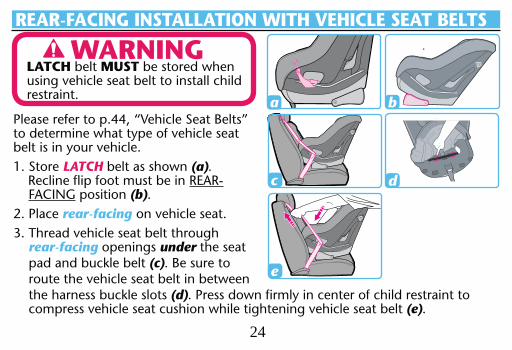
LATCH belt as shown (a). REAR- position (b). 2. Place rear-facing
rear-facing openings under the seat
(c). Be sure to
(d). Press down firmly in center of child restraint to (e).
LATCH belt MUST be stored when
restraint.
REAR-FACING INSTALLATION WITH VEHICLE SEAT BELTS
WARNING
a b
e
c d
25
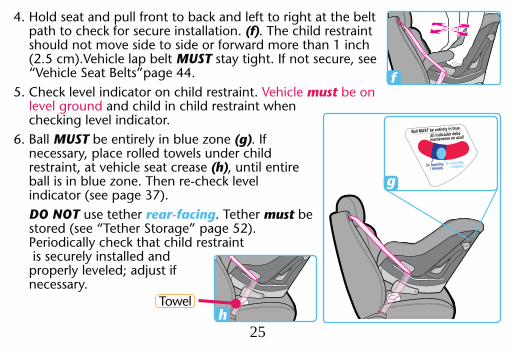
(f)
MUST
Vehicle must be on and child in child restraint when
MUST be entirely in blue zone (g). If
(h)
indicator . DO NOT use tether rear-facing must be
is securely installed and
necessary.
g
f
h
26
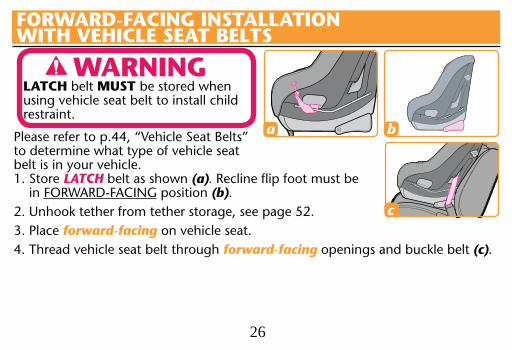
LATCH belt MUST be stored when
restraint.
Store LATCH belt as shown (a). in position (b).
forward-facing
forward-facing (c).
FORWARD-FACING INSTALLATIONWITH VEHICLE SEAT BELTS
WARNING
a b
c
27
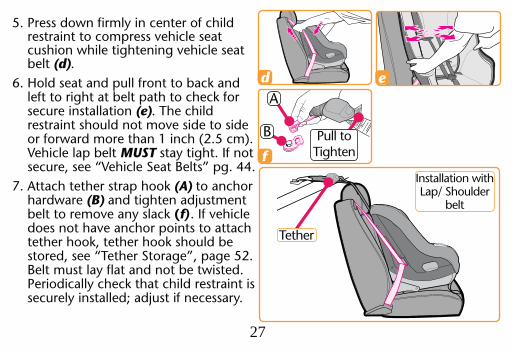
belt (d).
secure installation (e)
Vehicle lap belt MUST stay tight. If not
(A) to anchor hardware (B) and tighten adjustment
(f)
e
Installation with Lap/ Shoulder
belt
fPull to
A
B
d
28
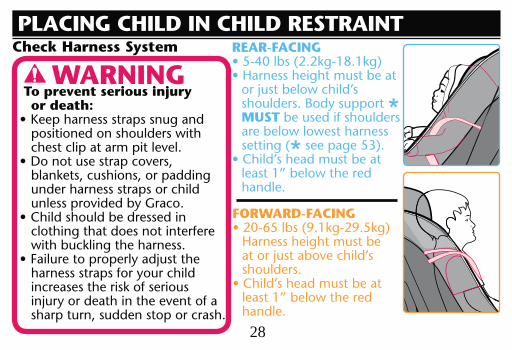
PLACING CHILD IN CHILD RESTRAINT
To prevent serious injury or death:Keep harness straps snug and positioned on shoulders with
under harness straps or child
Child should be dressed in clothing that does not interfere
Failure to properly adjust the harness straps for your child
FORWARD-FACING
Harness height must be
shoulders.
handle.
REAR-FACING
shoulders. Body support * MUST be used if shoulders are below lowest harness
*handle.
Check Harness System
WARNING
29
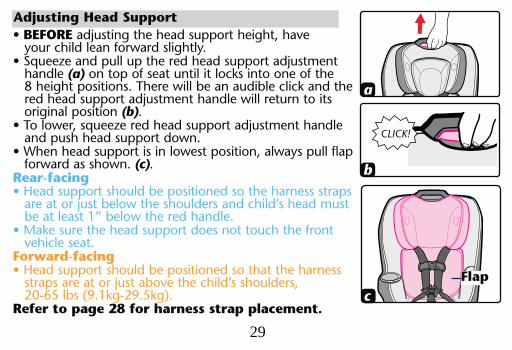
BEFORE your child lean forward slightly.
handle (a)
red head support adjustment handle will return to its original position (b).
and push head support down.
forward as shown. (c).Rear-facing
Forward-facing
Refer to page 28 for harness strap placement.
Adjusting Head Support
a
b
cFlap
CLICK!
30
PLACING CHILD IN CHILD RESTRAINT
Chest Clip
HarnessAdjustment
Strap
Crotch Strap
31
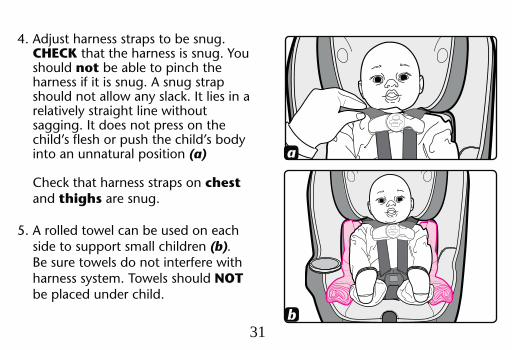
4. Adjust harness straps to be snug. CHECK that the harness is snug. You should not be able to pinch the harness if it is snug. A snug strap
sagging. It does not press on the
into an unnatural position (a)
chest and thighs are snug.
side to support small children (b). Be sure towels do not interfere with
NOT be placed under child.
a
b
32
(a)(b) while pulling shoulder
harness straps (c).
OPERATIONS & ADJUSTMENTS
c
Harness Strap
Chest Clip
Harness Adjustment
Strap
a
b
33
(d)
by pulling out on each half. (e)
(f). strap (g)
pulling shoulder harness straps (h). Press in the red button (i) and
(j)
Chest Clip:
Buckle:
d e
f
h
g
i
j
CLICK!
34
Check the crotch strap: Choose the position that is closest to but not under your child.
forward-facing position (k).
push it through slot easier (l).(m).
LATCH belt must pass between the LATCH belt lines as shown (n).
(o). Pull up on crotch strap to be sure it is secure.
Crotch Strap Adjustment:
OPERATIONS & ADJUSTMENTS
35
o
k l m
Rear Crotch Strap Position
Front Crotch Strap Position
n

36
OPERATIONS & ADJUSTMENTS
For Rear-Facing: (a) to rear-facing position (b).
entirely in blue (c)
(d).
and child in child restraint when
NOTE: Level indicator is for rear-facing use only.
For Forward-Facing:(e) to forward-facing position (f).
Recline Flip Foot
a b
c d
e f

37
in age.
- If the ball is in RED NOT recline position.
FAILURE TO PROPERLY recline the
death.
WARNINGOPERATIONS & ADJUSTMENTSLevel Indicator

38
Removing LATCH from Vehicle Anchor Points:
OPERATIONS & ADJUSTMENTS
LATCH pulling on the LATCH belt as shown (a).
2. Press and hold LATCH release hinge (b).
(c). 4. Repeat step 1 2 and 3 for other connector.
a
cRemoving Tether from Vehicle
(d). 2. Press and hold tether release hinge. (e).
(e).
d
e
b
39
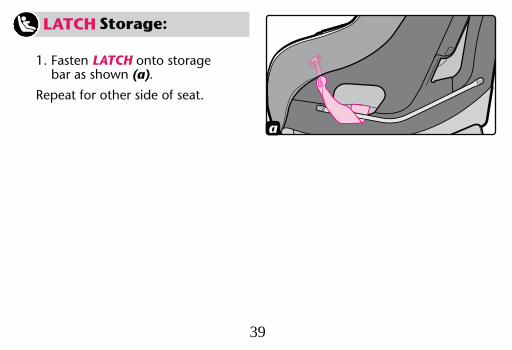
LATCH onto storage bar as shown (a).
Repeat for other side of seat.
a
40
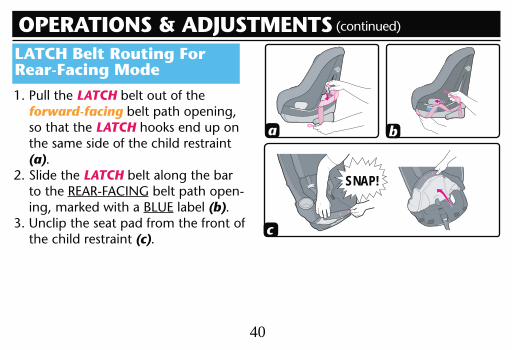
OPERATIONS & ADJUSTMENTSLATCH Belt Routing For Rear-Facing Mode
LATCH belt out of the forward-facingso that the LATCHthe same side of the child restraint (a).
2. Slide the LATCH belt along the bar to the belt path open-
label (b).
the child restraint (c).c
a b
SNAP!

41
OPERATIONS & ADJUSTMENTSLATCH Belt Routing For Rear-Facing Mode
4. Feed the LATCH
belt path opening (d). Be sure to route the LATCH belt in
(e). Ensure
front of the child restraint (f).
d e
f
SNAP!
42
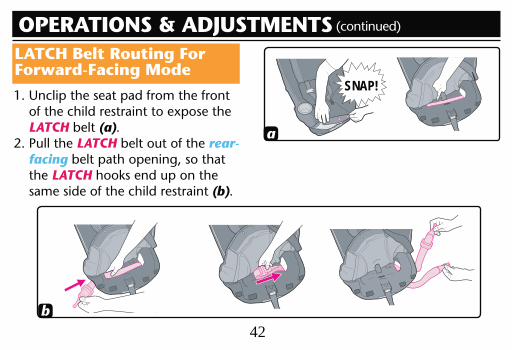
OPERATIONS & ADJUSTMENTSLATCH Belt Routing For Forward-Facing Mode
LATCH belt (a).2. Pull the LATCH belt out of the rear-
facingthe LATCHsame side of the child restraint (b).
a
b
SNAP!
43
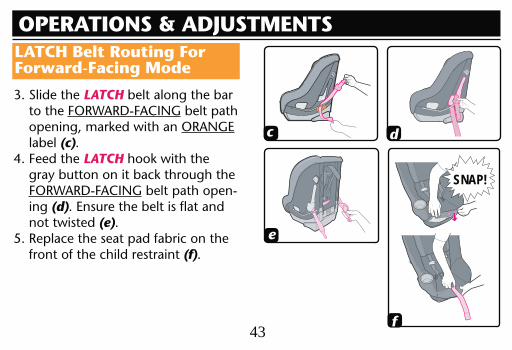
OPERATIONS & ADJUSTMENTSLATCH Belt Routing For Forward-Facing Mode
LATCH belt along the bar to the belt path
label (c).
4. Feed the LATCH
belt path open-ing (d)not twisted (e).
front of the child restraint (f).
c
e
f
SNAP!
d
44
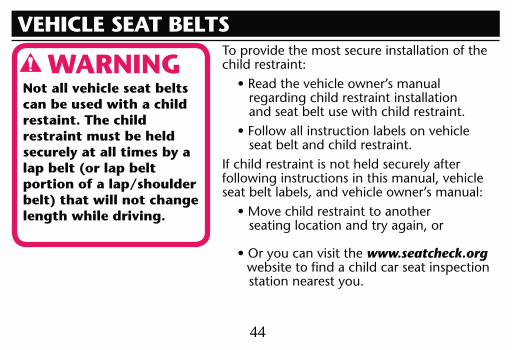
Not all vehicle seat belts can be used with a child restaint. The child restraint must be held securely at all times by a lap belt (or lap belt portion of a lap/shoulder belt) that will not change length while driving.
child restraint:
regarding child restraint installation and seat belt use with child restraint.
seat belt and child restraint.If child restraint is not held securely after
www.seatcheck.org website to find a child car seat inspection station nearest you.
VEHICLE SEAT BELTS
WARNING
45
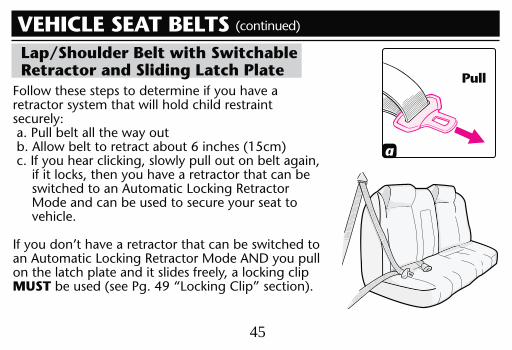
retractor system that will hold child restraint securely: a. Pull belt all the way out
Mode and can be used to secure your seat to
MUST
VEHICLE SEAT BELTSLap/Shoulder Belt with Switchable Retractor and Sliding Latch Plate
a
Pull
46
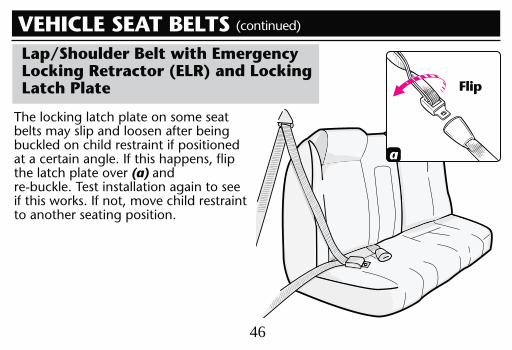
belts may slip and loosen after being
(a) and
to another seating position.
a
Flip
VEHICLE SEAT BELTSLap/Shoulder Belt with Emergency Locking Retractor (ELR) and Locking Latch Plate
47
a
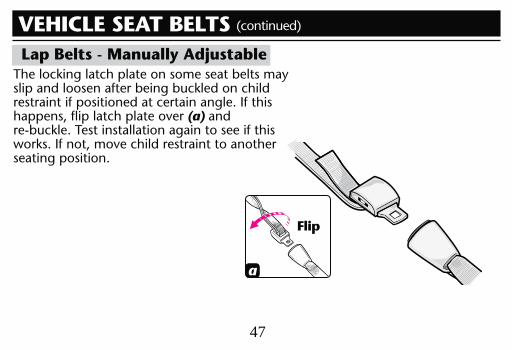
Lap Belts - Manually Adjustable
restraint if positioned at certain angle. If this(a) and
seating position.
Flip
VEHICLE SEAT BELTS
48
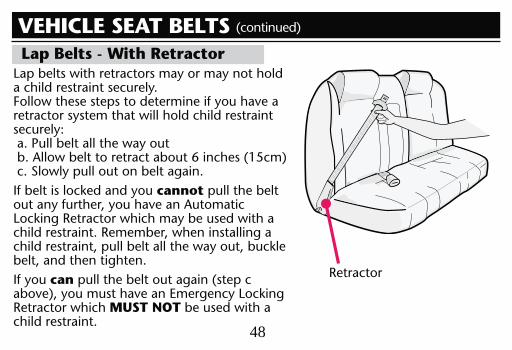
Lap Belts - With RetractorLap belts with retractors may or may not hold a child restraint securely.
retractor system that will hold child restraint securely: a. Pull belt all the way out
c. Slowly pull out on belt again. cannot pull the belt
If you can
Retractor which MUST NOT be used with a child restraint.
Retractor
VEHICLE SEAT BELTS

49
Avoid serious injury or death:
where required will result in child restraint not being securely held in place.
seat belts when not being used with child restraint.
vehicle seat belt shortener.
You MUST
slides freely through the latch plate or the lap belt cannot be tightly secured.
Lap/Shoulder Belt with Emergency Locking Retractor (ELR) and Sliding Latch Plate
VEHICLE SEAT BELTS
WARNINGLocking Clip
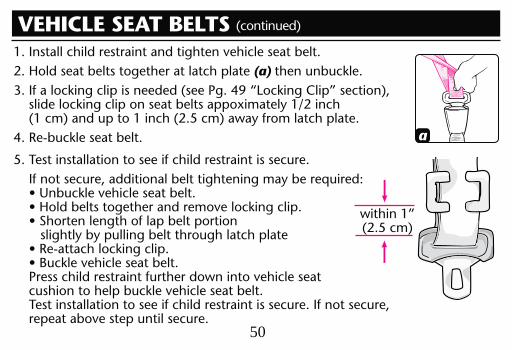
50
2. Hold seat belts together at latch plate (a)
slightly by pulling belt through latch plate
a
VEHICLE SEAT BELTS
51
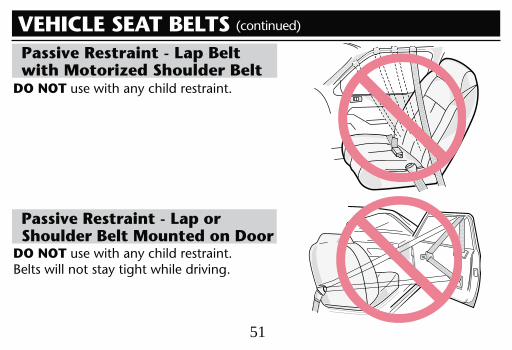
DO NOT use with any child restraint.
DO NOT use with any child restraint.
Passive Restraint - Lap Beltwith Motorized Shoulder Belt
Passive Restraint - Lap orShoulder Belt Mounted on Door
VEHICLE SEAT BELTS
52
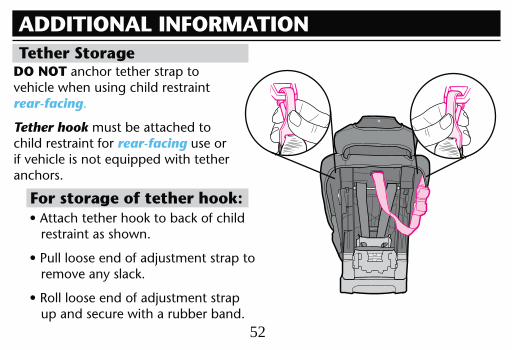
DO NOT anchor tether strap to
rear-facing.
Tether hook must be attached to child restraint for rear-facing use or
anchors.
restraint as shown.
up and secure with a rubber band.
ADDITIONAL INFORMATION
53
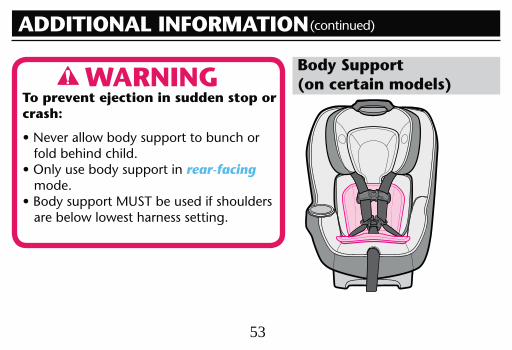
Body Support (on certain models)
To prevent ejection in sudden stop or crash:
fold behind child. Only use body support in rear-facing
mode.
are below lowest harness setting.
WARNING
ADDITIONAL INFORMATION
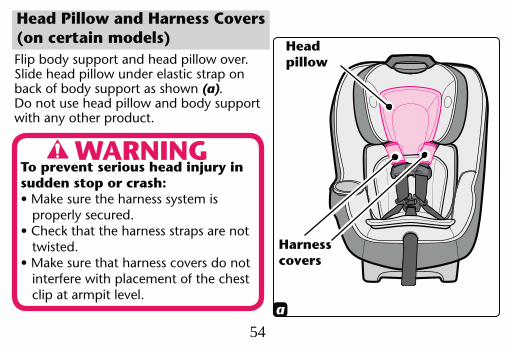
54a
Slide head pillow under elastic strap on(a).
Do not use head pillow and body supportwith any other product.
Head Pillow and Harness Covers (on certain models)
Harness covers
Head pillow
To prevent serious head injury in sudden stop or crash:
properly secured.
twisted.
interfere with placement of the chest
WARNING
55
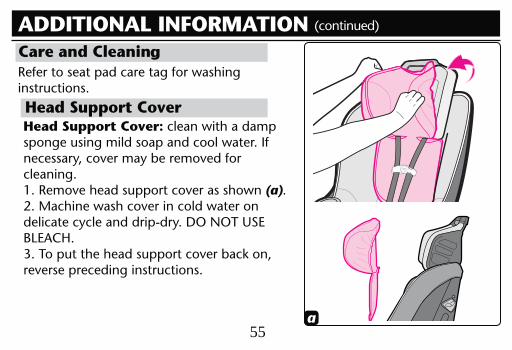
Head Support Cover: clean with a dampsponge using mild soap and cool water. If
cleaning.(a).
BLEACH.
Head Support Cover
a
ADDITIONAL INFORMATION
Refer to seat pad care tag for washing instructions.
Care and Cleanin
56
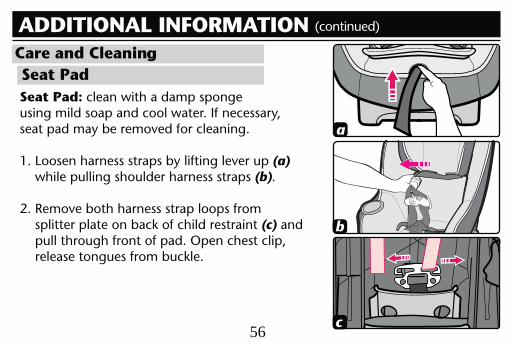
Seat Pad: clean with a damp sponge
(a) while pulling shoulder harness straps (b).
(c) and
Seat Pad
ADDITIONAL INFORMATION
a
b
c
Care and Cleanin

57
ADDITIONAL INFORMATION
of seat as shown (d).
(e).
straps and crotch strap through seat pad.
BLEACH.
preceding instructions.
d
e
58
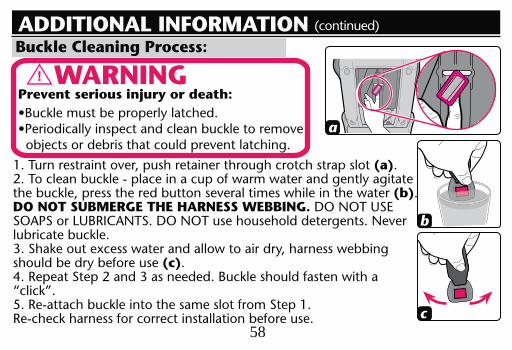
WARNINGPrevent serious injury or death:
(a).
(b). DO NOT SUBMERGE THE HARNESS WEBBING.
should be dry before use (c).
ADDITIONAL INFORMATIONBuckle Cleaning Process:
b
a
c
59
Surface wash only with mild soap
or LATCH
or LATCH belt.If harness straps or LATCH belt
Harness Straps & LATCH Belt:
Aircraft Use
Second Hand Child Restraint
airline about their policy.
aircraft seats.Install child restraint on an aircraft the same
loaning or passing along a child restraint.
ADDITIONAL INFORMATION
60
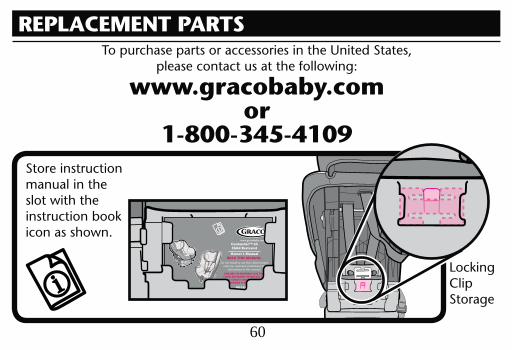
Store instruction manual in the slot with the
icon as shown.
ClipStorage
please contact us at the following:
www.gracobaby.comor
1-800-345-4109
REPLACEMENT PARTS