christini awd 450ds manual 2016-rev1 · page 2 introduction congratulations for making the choice...
TRANSCRIPT


Page 2
Introduction
Congratulations for making the choice to become and AWD rider!
The instructions in this book will provide a simple and understandable guide to your motorcycle’s operation and
maintenance.
Whenever you see the symbols shown below, heed their instructions!
Always follow safe operating and maintenance practices.
If improperly conducted, the sport has the potential to cause environmental problems as well as conflicts with other
people. Responsible use of your motorcycle will ensure that these problems and conflicts do not occur.
TO PROTECT THE FUTURE OF YOUR SPORT, MAKE SURE YOU USE YOUR BIKE LEGALLY, SHOW
CONCERN FOR THE ENVIRONMENT, AND RESPECT THE RIGHTS OF OTHER PEOPLE.
This manual should be considered a permanent part of the motorcycle and should remain with the motorcycle when
resold or otherwise transferred to a new owner or operator.
We reserve the right to amend this motorcycle service manual due to periodic improvements and upgrades.
WARNING This warning symbol identifies special instructions or procedures which, if not correctly followed, could result in personal
injury, or loss of life.
CAUTION This caution symbol identifies special instructions or procedures which, if not strictly observed, could result in
damage to or destruction of equipment.
NOTE This note symbol indicates points of particular interest for more efficient and convenient operation.

Page 3
Table of Contents
General Bike Service
General Information 5
Lubricant System Specifications 7
Cooling System Specifications 7
Tire Specifications 8
Battery Specifications 8
Spark Plug Specifications 8
Basic Operating Instructions 9
Precaution 9
Pre-Ride Inspection 10
Starting/Stopping Engine 11
Break-In 12
Maintenance 13
General Service Information 13
Maintenance Schedule 13
Service Information 16
General Specifications 5
Wiring Diagram 33
Page 4
Table of Contents
AWD Service
Required tools 35
AWD detailed illustration 36
Routine maintenance schedule 38
AWD clutch test 39
AWD sprag test 40
AWD chain removal 41
AWD engagement switch 45
Front wheel removal 50
Front wheel service 52
Fork removal and installation 59
Dropout service 61
Fork spline bearing service 70
Boot Replacement 75
Triple clamp removal 77
Triple clamp service 79
Main drive shaft removal 94
Head tube bearing service 95
Triple Clamp Installation 98
Gearbox removal 102
Gearbox service 103
AWD clutch removal 108
AWD clutch Service 109
Troubleshooting 113
Warranty 114
Main drive shaft installation 97

Page 5
ITEM TECHNICAL DATA OFFROAD DUAL SPORT MOTARD
DIMENSIONS
OVERALL LENGTH 2175mm OVERALL W IDTH 810mm OVERALL HEIGHT 1240mm F/R W HELL AXIS DIS-TANCE 1505mm SEAT HEIGHT 960mm GROUND CLEARANCE 320mm N.W 118kg 130kg 130kg
CHASSIS
FRAME TYPE ALUMINIUM ALLOY TW IN-SPAR FRONT TIRE SIZE 80/100-21 80/100-21 110/70-17 REAR TIRE SIZE 110/90-19 ’ ’ 110/100-18 140/70-17 FRONT SUSPENSION INVERTED CARTRIDGE FORK W ITH RE-
BOUND COMPRESSION-DAMPING ADJUST REAR SUSPENSION MONOSHOCK W ITH SPRING-PRELOAD, RE-
BOUND AND COMPRESSION-DAMPING AD-JUST
FUEL TANK CAPACITY 8.0L W ITH RESERVE VALVE
ENGINE TYPE SINGLE CYLINDER, 4-STROKE, LIQUID COOLED MAX POWER 32KW /7500RPM : 43.5HP/7500RPM
General Specifications
General Information

Page 6
General Information
RATED POWER 30.5KW /7000RPM MAX TORQUE 42.5NM/6500RPM IDLE SPEED 1700±150 RPM FUEL CONSUMPTION
≤340 g/kW.h BORE X STROKE 96×62.1 mm DISPLACEMENT 449 ml COMPRESSION RATIO 11:1 VALVE TRAIN CHAIN DRIVE SOHC FOUR VALVE LUBRICATION TYPE PRESSURE SPRAY LUBRICATION OIL TYPE SAE 10W-40 IGNITION ADVANCE DEGREE 12°BTDC [3000RPM] VALVE CLEARANCE(COOL) INTAKE VALVE: 0.16+0.03 mm
EXHAUST VALVE: 0.28+0.03 mm DECOMPRESS CLEARANCE EX VALVE CLEARANCE (0.28mm)+0.15mm=0.43mm SPARK PLUG TYPE DENSO IK24/IK27 DIMENSION 350mm×297mm×423 mm DRIVE TYPE CHAIN DRIVE SPROCKET 13T CLUTCH TYPE MANUAL, MULTI-WET TRANSMISSION TYPE CONSTANT MESH, 5 SPEED, LEFT FOOT OPERATED PRIMARY ADJUCTION RATIO 2.739(63/23)
GEAR RATIO
1ST 2.230(29/13); 2ND 1.625(26/16) 3RD 1.235(21/17) 4TH 1.000(19/19) 5TH 0.826(19/23)
IGNITION TYPE DC/AC CDI STARTER KICK / ELECTRIC STARTING CAPACITY
≤15 s
General Specifications — Continued

Page 7
General Information
Lubrication System ITEM DATA ENGINE OIL 870ml
API SG or h igher
SAE10W-40
AT DRAINING 670 ml AT FILTER CHANGE 700ml AT DISASSEMBLY 870ml
TRANSMISSION OIL 950ml
API SG or higher
SAE 10W-40
AT DRAINING 850ml AT DISASSEMBLY 900ml (Approximate ly One Quar t )
ITEM DATA COOLANT CAPACITY AT CHANGE 1.11 l i ter
DISASSEMBLY 1.20 l i ter ANTIFREEZE HIGH QUALITY ETHYLENE GLYCOL ANTIFREEZE
CONTAINING SILICATE-FREE CORROSION IN-HIBITORS
STANDARDS COOLANT CONCENTRA-TION 1:1 MIXTURE W ITH DISTILLED W ATER
Coolant System
WARNING: Low Oil level in Transmission can cause transmission failure.
Warranty Void if transmission oil is not kept at mandatory level.
Failure to change transmission oil and oil filter on scheduled maintenance and
at recommended level of 950ml can cause the transmission to lock and cause
serious injury or death.

Page 8
General Information
ITEM STANDARDS REPAIR L IMIT COLD TIRE PRESSURE 33/2.3 (ps i /bar ) MAX LOAD FRONT 430 / 195 ( lbs /kgs)
REAR 548 / 265 ( lbs /kgs)
Tire Specifications
ITEM DATA
BATTERY CAPACITY 12V-6Ah CURRENT CONSUMPTION MAX 0.1mA VOLTAGE(20 0 /68 0F) FULL 13.0-13.2V
Battery Specifications
ITEM DATA
SPARK PLUG STANDARDS DENSO IK24 OPTIONAL NGK IFR8H-11
Spark Plug Specifications

Page 9
Basic Operating Instructions
PRECAUTION For your safety, you must obey the following 9 rules while riding the motorcycle:
- Wear your helmet: Safe ride begins with putting on helmet. You must wear helmet while riding.
- Wear simple and convenient clothes. Pay attention to avoid wearing loose clothing. Please wear tight and
closed clothes to ensure that your hands and feet move freely.
- Check the pre-ride inspection before riding: Always check before starting the engine.
- Get familiar with the assembly and performance of this motorcycle
-Your riding skills and knowledge of this motorcycle are the basis of safe riding. You should practice riding
in an open area without vehicles to master riding skills.
- Get to know the speed limit of safe riding
-The motorcycle’s safe riding speed depends on the ground condition and your riding skills. Knowing the
speed limit based on your riding ability can avoid accidents.
- Do not ride after drinking or taking medicine.
- This bike is designed for adult operators only. Be sure you are allowed to ride this kind of motorcycle
based on your local laws.
- Pay special attention to riding in rain
-Riding on wet roads is very dangerous. Turn during acceleration and a keep safe distance from vehicles in front of your motorcycle. Remember that the braking distance in rain is twice of that in sunny days, and
please pay special attention to traffic signs. Once the condition of the road changes, reduce your speed.
-Exhaust gas contains harmful substance such as carbon monoxide. Only start the engine in well-ventilated places.

Page 10
Basic Operating Instructions
PRE-RIDE INSPECTION Check the following before each ride.
For Enduro and Super Moto Models version check below for additional requirements
Inspection Item Inspection Objective
Engine oil Inspect for proper fill level Transmission oil Inspect for proper fill level (900ml) Coolant Inspect for proper fill level Fuel Be sure there is enough fuel to ride planned distance Cooling system Inspect for leaks, cracks, and fluid flow Throttle Check for free travel of throttle grip and that the throttle grip has a smooth
operation and in both the forward and back to the closed position Clutch Adjust the clutch cable to fully disengaged Steering Be sure the bars move freely from lock to lock and steering head is tight Brake Inspect for free travel of pedal and lever and that there is full braking power Tire Check tire pressure and inspect tires for cracks Spokes Inspect and tighten loose spokes if necessary Other Bolts and Parts Inspect attachment points and other bolts to ensure they are tight
Exhaust muffler Inspect for loose bolts and the exhaust is secure
WARNING You should practice driving in a safe and spacious area if you ride this type of motorcycle for the first time
Riding with one hand is extremely dangerous; you should hold the two handle bars tightly with your both hands. In no cir-
cumstances can you release the handle bars.
Do not accelerate when turning. You must reduce the speed to safety range.
If the ground is wet or slippery, you must reduce the speed.
At the exit of a tunnel or valley or when meeting large vehicles, you must be careful and reduce the speed.
Obey the transportation rules and limit your speed.

Page 11
Basic Operating Instructions
Starting the engine — EFI Models Shift the transmission into neutral.
Pull in the clutch lever when starting the engine. For Dual Sport and motard ver-sion, turn the ignition switch to “ON” and push the engine start/stop switch to
right side.
(For Off-road 450E version, the right switch should be turned to the left)
Close the throttle grip(11), operate the kick starter starting from the top of the
kick starter stroke, kick through to the bottom with rapid, continuous motion.
COLD START:
For Electric Start, push and hold the button for 2-3 seconds. Then release. Then Push and hold button again for 5 seconds. If the bike does not start, repeat pro-
cedure.
If the engine backfires, it may be flooded. If this happens, Cycle the key switch on/off then back on. Then hold the throttle 100% open and crank the engine
with the starter. This disables the Fuel Injection and cleans out the cylinder.
If you still have starting issues, the battery may be low and try kick starting the
bike.
Once engine is started, let the EFI go through the high idle warm up for 10-20
seconds.
Stop the engine
Shift the transmission into neutral
Push the stop button(4) (or push the engine start/stop switch to left side for enduro and motard version)
In case emergency engine stop, press the stop button directly (or push the engine start/stop switch to left side for enduro and
motard version)
Turn the ignition switch to “OFF” if available on your bike
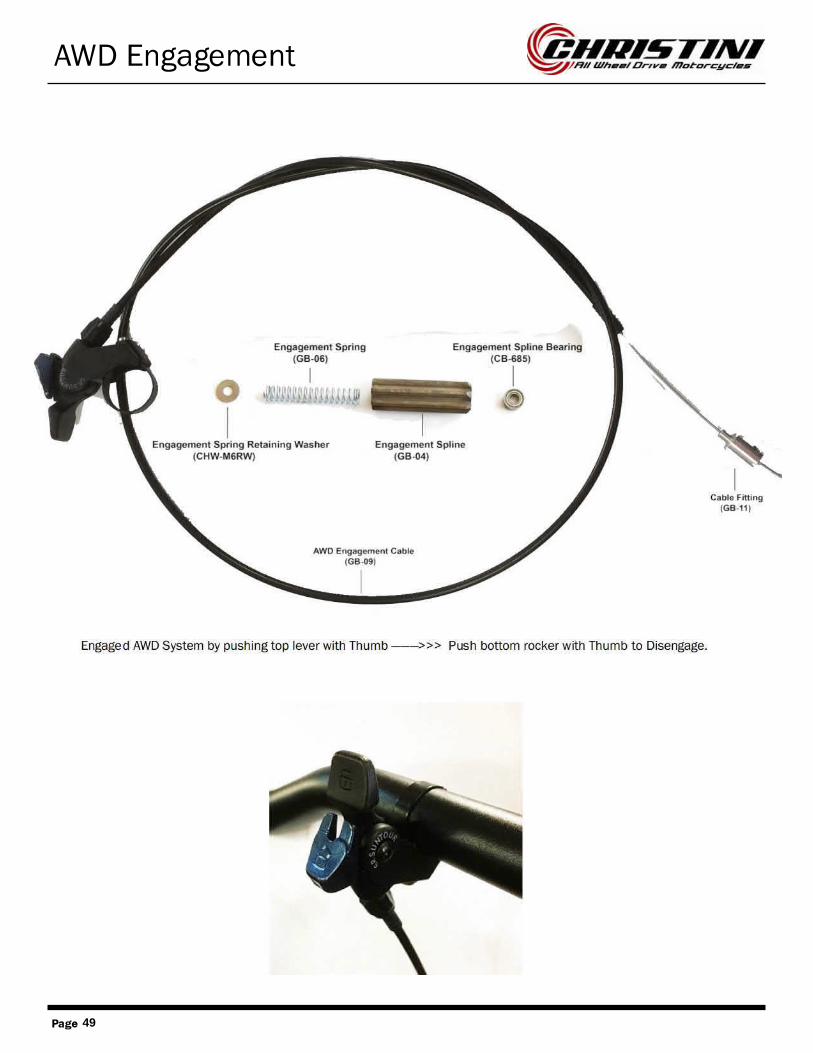
AWD Engagement
Switch Forward will switch OFF the AWD system. You can do this at any speed.
Switch Backward will turn ON the AWD system. This should only be done at low speeds (first gear).
CAUTION Do not keep the starter button pressed for more than 5 seconds at a time. Release the starter button for approximately 10 seconds
before pressing it again.
If the clutch lever(8) is pulled, the engine could be started in any gear.

Page 12
Basic Operating Instructions
BREAK-IN
During initial break-in newly machined surfaces will be in contact with each other and these surfaces will wear in quickly. Break-in maintenance at 150km is designed to compensate for this initial minor wear. Timely performance of the break-in maintenance will
ensure optimum service life and performance from the engine.
The general rules as follows:
Start the engine and let it run at idle until the engine is thoroughly warmed up.
Avoid full-throttle starts and rapid acceleration.
Maximum continuous engine speed during the first 150km must not exceed 5,000 rpm (or 10 hours Max)
After 150km ride maintenance the machine per the maintenance schedule.
After the break-in procedure has been properly carried out, the motorcycle is ready for regular operation. However, since premature high r/min (rpm) will lead to engine trouble, take care to use the necessary skill and technique in operating the
motorcycle.
Never run the engine with full throttle at low speed operation. This rule is applicable not only during break-in but at all
times.
This procedure should be followed each time:
• Piston is replaced
• Piston rings are replaced
• Cylinder is replaced
• Crankshaft or crank bearing are replaced
CAUTION The motorcycle is shipped with break in Oil only! Once the engine is run for an initial 30 minutes, drain and
replace the oil with a Synthetic API SG or higher SAE 10W-40
Failure to do so may decrease the engine transmission life or cause premature failure.

Page 13
Maintenance
The Maintenance Schedule specifies how often you should have your motorcycle served, and what things need attention. It is es-sential that your motorcycle be served as scheduled to retain its high level of safety, dependability, and emission control perform-
ance. Remember, proper maintenance is your responsibility.
PRECAUTION
Make sure the engine is off before you begin any maintenance or repairs.
Exhaust contains poisonous carbon monoxide. Be sure there is adequate ventilation whenever you operate the engine.
Let the engine and exhaust system cool before touching
Be careful when working around gasoline. Keep cigarettes, spark, and flames away from all fuel related parts
MAINTENANCE RULE
Place the motorcycle on the firm level ground using optional work stand or equivalent support
Use genuine or recommend part and lubricants or other equivalents. Parts that do not meet design specifications may cause dam-
age to the motorcycle
Use only metric tools when servicing the motorcycle, metric nuts, bolts, screws are not interchangeable with British fasteners.
Always replace with new gaskets, O-rings, cotter pins, piston pin clips, snap rings, etc after disassemble engine
When tightening bolts and nuts, begin with larger diameter or inner bolt first. Then tighten to specified torque diagonally in incre-
mental steps unless a particular sequence is specified.
Clean parts in cleaning solvent upon disassembly ,lubricate and sliding surface before assembly.
Always inspect all parts for proper installation and operation after reassemble
Route all electrical wires, cables and harness routing as designed.
MAINTENANCE SCHEDULE Required maintenance schedule is based upon average riding condition. Sustained high speed operation, or operation in unusually wet or dusty conditions, will require more frequent service than specified in the REQUIRED MAINTENANCE SCHEDULE. See SPECIAL
MAINTANCE SCHEDULE for competition maintenance need.
Perform the Pre-ride inspection at each scheduled maintenance period
Symbol in maintenance schedule means:
I Inspect and Clean , Adjust , Lubricate or Replace if necessary.
C Clean.
R Replace.
A Adjust.
L Lubricate.
* Unless the rider is mechanically qualified and has proper tools, see authorized dealer for service
* * Special maintenance strongly recommend to look for authorized dealer service.
NOTE1. Clean after every ride for dusty conditions
NOTE2. Replace every 2 years. Replacement requires mechanical skill
NOTE3. Replace after the first break-in ride
NOTE4. Inspect after the first break-in ride
NOTE5. Replace the transmission oil once change the clutch plate

Page 14
Maintenance
Required Maintenance Schedule
Maintenance Schedule in Kilometers ITEMS
NOTE
km 150 1500 3500 6000 9000 12000 15000
Time 10 Hrs
* ENGINE OIL (NOTE 3) R R R R R R R
* ENGINE OIL FILTER (NOTE 3) R R R
TANSMISSION OIL R R R R R R R
AIR CLEANER (NOTE 1) R R
RADIATOR COOLANT (NOTE 3) R R
* VALVE CLEARANCE (NOTE 4 ) I I
SPARK PLUG R R
* * FUEL FILTER (In Tank) C C
* THROTTLE CABLE I I I I I I I
* THROTTLE OPERATION I I I I I I I
CRANKCASE BREATHER (NOTE 2) I I I I I I I
COOLING SYSTEM I I I I I I I
SECONDAY AIR SUPPLY (NOTE 2) I I I I I I I
DECOMPRESSOR SYSTEM I I I I I I I
ENGINE IDLE SPEED (NOTE 4) I I I I I I I
DRIVE CHAIN (NOTE1) I, L I, L I, L I, L I, L I, L I, L
DRIVE CHAIN SLIDER (NOTE1) I I I I I I I
BRAKE FLUID (NOTE3) I I I I I I I
BRAKE PAD WEAR I I I I I I I
BRAKE SYSTEM I I I I I I I
* HEADLIGHT FOCUS I I I I I I I
CLUTCH SYSTEM I I I I I I I
SIDE STAND I I I I I I I
* SUSPENSION I I I I I I I
* MUFFLER I I I I I I I
* NUTS .BOLTS .FASTENERS I I I I I I I
* * WHEEL / TIRES I I I I I I I
* * STEERING HEAD BEARINGS I I I I I I I

Page 15
Maintenance
SPECIAL MAINTENANCE SCHEDULE
FREQUENCY
ITEMS NOTE About
2.5hs About
7.5 hs About
15hs About
22.5hs About
30hs SWING ARM/SHOCK LINKAGE L FORK OIL
FORK TUBE/SLIDER (NOTE3) R DAMPER R
NUTS . BOLTS. FASTENERS I WHEELS / TIRES I STEERING HEAD BEARINGS I

Page 16
Maintenance
ENGINE
CHASSIS
NOTE: These parts and their possible replacement schedule are based upon average riding conditions.
Machines subjected to severe use require more frequent servicing.
ITEM CAUSE REMARK Cylinder head gasket
Clutch disc
Cylinder gasket
Right crankcase cover gasket
Compression leak
Wear or discoloration
Leakage
Damage
Replace whenever disassembled
Replace whenever disassembled
Replace whenever disassembled
ITEM CAUSE REMARKS Front / rear tire
Front / rear brake pad
Sub-frame mounting bolts
Chain guide plate
Side cover
Front number plate
Front / rear fender
Clutch lever / holder
Brake lever
Air throttle lever
Handlebar
Throttle housing
Grip rubber
Gearshift pedal
Brake pedal
Chain adjuster / bolt
Air cleaner
wear
wear
Fatigue or damage
Wear or damage
Damage
Damage
Damage
Free play or damage
Free play or damage
Free play or damage
Free play or damage
Bends or cracks
Damage
Damage
Damage
Damage
Damage
Minimum knob height:8mm
Minimum thickness:1mm

Page 17
Maintenance
FUEL LINE
• Inspect the fuel line for damage or leak, if necessary replace fuel line.
FUEL FILTER SURFACE
• Remove the fuel tank. Drain the gasoline into a container and remove the fuel line, nuts ,and the clamps.
• Wash the fuel filter and reinstall the O-ring and reinstall components onto the fuel tank.
• Reinstall the fuel tank on the motorcycle . Make sure the tank does not leak.
THROTTLE OPERATION
• Check for smooth throttle grip at full opening and automatic full closing in all steering positions.
• Check the throttle cable and replace them if they are deteriorated, kinked or damaged.
• Lubricate the throttle cable if throttle operation is not smooth.
• Measure the free play at the throttle grip flange.
FREE PLAY : 3-5mm(1/8-3/16in)
• Throttle grip free play can be adjusted at either end of the throttle cable.
• Minor adjustments are made with the upper adjuster. Remove the dust cover from the adjuster. Adjust the free play by
• Loosening the lock nut and turning the adjuster.
• Tighten the lock nut after making the adjustment. Reinstall the dust cover and recheck the throttle operation.
• Major adjustments are made with the carburetor end of cable.

Page 18
Maintenance
AWD Lever FREE PLAY: 2-3mm(1/8-3/16in)
• Check for smooth Lever operation and lubricate the cable if required.
• Inspect the cable for cracks which could allow moisture to enter. Replace
the cable if necessary.
• Measure the lever free play at the lever end. Lever free play can be ad-justed. Adjust the free play by loosening the lock nut and turning the ad-
juster.
• Tighten the lock nut. Reinstall the dust cover. Recheck the free play at the
lever.
AIR FILTER • Loosen the air cleaner retaining bolt. Remove the air filter.
• Remove the air filter from the holder.
• Thoroughly wash the air filter in clean non-flammable or high flash-point cleaning solvent. Then wash the element again in a solution of hot water
and dishwashing liquid soap. Clean the inside of the air cleaner housing.
• After cleaning, be sure there is no dirt or sand trapped between the inner
and outer layer of the cleaner. Wash again if necessary.
• Allow the air cleaner to dry thoroughly. After drying, soak the air filter in
clean Foam Filter Oil or an equivalent.
• Apply air filter oil to the entire surface of the air filter and rub it with both
hands to saturate the element with oil.
• Gently squeeze out excess oil. It is important not to over oil or under oil the element. Apply a thin coat of grease or an equivalent to the sealing
surface.
• Assemble the air filter and the holder .Slip the air cleaner retaining bolt
through the assembly. Tighten the retaining bolt securely.
NOTICE: If the air filter assembly is not installed correctly ,dirt and dust may
enter the engine resulting in wear of the piston ring and cylinder.
CRANKCASE BREATHER • Remove the breather hose drain plug, then drain any fluids or dirt from
the hose into a proper container. Reinstall the drain plug.
Page 19
Maintenance
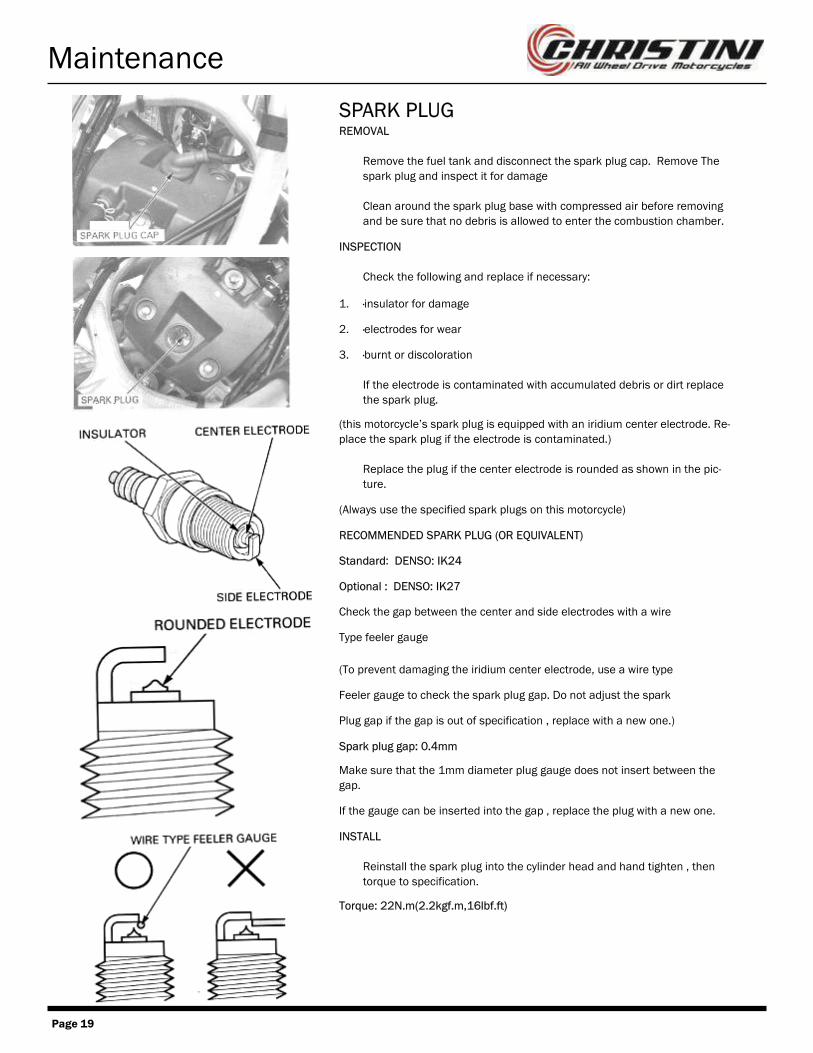
SPARK PLUG REMOVAL
• Remove the fuel tank and disconnect the spark plug cap. Remove The
spark plug and inspect it for damage
• Clean around the spark plug base with compressed air before removing
and be sure that no debris is allowed to enter the combustion chamber. INSPECTION
• Check the following and replace if necessary:
1. ·insulator for damage
2. ·electrodes for wear
3. ·burnt or discoloration
• If the electrode is contaminated with accumulated debris or dirt replace
the spark plug. (this motorcycle’s spark plug is equipped with an iridium center electrode. Re-
place the spark plug if the electrode is contaminated.)
• Replace the plug if the center electrode is rounded as shown in the pic-
ture.
(Always use the specified spark plugs on this motorcycle)
RECOMMENDED SPARK PLUG (OR EQUIVALENT)
Standard: DENSO: IK24
Optional : DENSO: IK27
Check the gap between the center and side electrodes with a wire Type feeler gauge
(To prevent damaging the iridium center electrode, use a wire type
Feeler gauge to check the spark plug gap. Do not adjust the spark
Plug gap if the gap is out of specification , replace with a new one.)
Spark plug gap: 0.4mm
Make sure that the 1mm diameter plug gauge does not insert between the
gap.
If the gauge can be inserted into the gap , replace the plug with a new one.
INSTALL
• Reinstall the spark plug into the cylinder head and hand tighten , then
torque to specification.
Torque: 22N.m(2.2kgf.m,16lbf.ft)

Page 20
Maintenance
RADIATOR COOLANT • Inspect the level of the radiator coolant should be between “upper” and
“lower” when the motorcycle running under the normal temperature.
If need , put recommended coolant fluid in:
• Remove the radiator cap . Put standard coolant concentration 1:1 to the
upper line and then reinstall the cap.
Recommended antifreeze
Professional coolant or an equivalent high quality ethylene glycol antifreeze
containing silicate free corrosion inhibitors. COOLING SYSTEM • Remove the radiator grills. Check the radiator air passage for clogs or
damage.
• Inspect the hoses for cracks and deteriorations.
• Use low pressure water and a soft brush to wash off any dirt that may be
stuck in the radiator core.
• Replace if necessary. Check the tightness of the hose clamps and radiator
mounting bolts.

Page 21
Maintenance
VALVE CLEANCE / DECOMPRESSOR SYSTEM VALVE CLEARANCE INSPECTION
• Inspect and adjust the valve cleanse while the engine is cold
(below35℃/950f)
• Remove the cylinder head cover.
• Remove the crankshaft hole cap and O-ring.
• Turn the crankshaft clockwise to align the punch mark with the index mark on the right crankcase cover. Make sure the piston is at TDC(Top
Dead Center) on the compression stroke.
• Check that the index line on the cam sprocket aligns with the ”△” mark
on the cam holder.

Page 22
Maintenance
INTAKE VALVE:
• Insert the feeler gauge between the valve lifter and the cam labe.
• Check the valve clearance for the intake valves using a feeler gauge.
Valve clearance IN: 0.16+0.03mm
EXHAUST VALVE:
• Insert the feeler gauge between the rocker arm and shim.
• Check the valve clearance for the exhaust valves using a feeler gauge.
Valve clearance Ex: 0.28+0.03mm
VALVE CLEANCE ADJUSTMENT:
• Remove the camshaft holder assembly
• The shims my stick to the inside of the valve lifter.
• Do not allow the shims to fall into the crankcase.
• The shims can be easily removed with tweezers or a magnet.
• Clean the valve shim contact area in the valve lifter with compressed air.
• Measure the shim thickness and record it.

Page 23
Maintenance
Seventy-three different shim series are available from 1.2000mm to 3.000mm
in intervals of 0.025mm.
• Calculate the new shim thickness using the equation below:
A=(B-C)+D
A: new shim thickness
B: recorded valve clearance
C: specified valve clearance
D: old shim thickness
• Make sure of the correct shim thickness by measuring the shim using a
micrometer
• Reface the valve seat if carbon deposits result in a calculated dimension
of over 3.000mm.
• Install the valve lifters into the camshaft holder assembly.
• Install the camshaft holder assembly
• With the valve clearance adjusted , check and adjust the decompressor
clearance
• Reinstall the cap and hand tighten , then torque to specification.
Torque: 15N.m(1.5kgf,11 lbf.ft)

Page 24
Maintenance DECOMPRESSOR CLEARANCE INSPECTION / ADJUSTMENT:
• Inspect and adjust the decompressor clearance while the engine is cold
(below 350C/950F)
• Remove the crankshaft hole cap.
• Turn the crankshaft clockwise to align the punch mark with the index
mark on the right crankcase cover.
• Make sure that the piston is at Top Dead Center on the compression
stroke.
• Measure the decompressor arm clearance by inserting a feeler gauge between the decompressor arm adjusting screw and right side rocker arm.
DECOMPRESSOR CLEARANCE:
RIGHT SIDE EXHAUST VALVE CLEARANCE+ 0.15mm
EXAMPLE:
If measured right exhaust valve clearance is 0.28mm,
decompressor clearance is :0.28mm +0.15mm =0.43mm
If decompressor clearance needs adjustment, see following procedure.
• Measure the right exhaust valve clearance by inserting a feeler gauge
between the right side rocker arm and shim.
VALVE CLEARANCE:
EX:0.28mm±0.03mm
• Pull out the feeler gauge between the rocker arm and shim
• Insert the feeler gauge (right exhaust valve clearance +0.15mm between
the adjusting screw and right side rocker arm.
• Loosen the lock nut and turn the adjusting screw until there is a slight
drag on the feeler gauge.
• Hold the adjusting screw and tighten the lock nut.
TORQUE : 10N.M
• Recheck the decompressor clearance.
• Reinstall the cylinder head and the cap.

Page 25
Maintenance
ENGINE IDLE SPEED The engine must be warm for an accurate idle inspection and adjustment. Ten
minutes of stop and go riding is sufficient.
• Warm up the engine, shift the transmission into neutral and hold the mo-
torcycle upright.
• Use long 4mm ball end allen screw to adjust idle
• Turn the throttle stop screw to obtain the specified idle speed.
• Cycle the key switch off then on to reset the ECU.
• NOTE: If idle becomes unstable and cycles up and down, the idle has been set too high and the ECU will self adjust. If this occurs, back the idle
screw out two turns, cycle key switch, then adjust in to set idle correctly.
IDLE SPEED: 1,800+100 rpm
Fuel Injector Service/Cleaning If the engine starts to run idle rough and stall, the injector may need
cleaning.
• Remove Tank bolts from top of shroud
• Carefully remove tank until you can see the fuel hose clip at bot-
tom of pump.
• Squeeze quick release on fuel pump hose to disconnect pump.
• Cap the fuel pump outlet with rubber stopper to prevent fuel from
leaking or drain fuel if no stopper is available.

Page 26
Maintenance Fuel Injector Removal
• Use a long Phillips head screwdriver to loosen the screw on the back side of the aluminum injector cover.
• Unplug injector wire by pulling the metal clip back and then sliding connector apart
• Pull off aluminum injector cover to expose the injector
• Pull out black injector. The injector is held in place with O-rings. Be careful not to lose the O-rings
• Clean the injector inlet by tapping on hard surface to loosen any debris. Then clean with a squirt of degreaser/brake
cleaner.
• Re-Install injector the same method as removal.

Page 27
Maintenance
ENGINE OIL / OIL FILTER OIL LEVEL INSPECTION
• Run the engine at idle speed for 3 minutes, then stop it for 3 Minutes.
• Support the motorcycle in an upright position on a level surface.
• Remove the oil filter cap/dipstick and wipe the oil with clean cloth.
• Insert the dipstick without screw in, take it out and check the oil level.
• If the oil level is lower or near the lower level line on the stick, add recom-
mended oil to the upper level line through the hole.
• Reinstall the engine oil filter cap (other viscosities shown in the chart may be used when the average temperature in your
riding area is within the indicated range)
RECOMMENDED ENGINE OIL: HP4M (with molybdenum additives) 4-stroke oil , or equivalent motor oil
API service classification : SG or higher
JASO T 903 STANDARD :MA or MB, viscosity : SEA 10W -40
OIL CAPACITY
0.67liter at draining
0.70liter at oil filter change

Page 28
Maintenance ENGINE OIL & FILTER CHANGE
• Run the engine for 3 minutes. Stop the engine for 3 minutes and re-
move the oil filter cap.
• Remove the left side engine guard.
• Place an oil pan under the engine to catch the oil and remove the en-
gine oil drain bolt and sealing washer to drain the engine oil.
• Operate the kick starter pedal several times while pushing the engine
stop switch , so the engine oil completely drains.
• Remove the bolts and oil filter cover.
• Remove the oil filter and spring.
• Install the engine oil drain bolt with a new sealing washer.
• Tighten the engine oil drain bolt to the specified torque.
TORQUE: 16N.m
• Apply grease to the filter side of the spring end. Install the spring into
the oil filter as shown.
• Install the oil filter with the “OUT SIDE” mark facing out. Installing the
oil filter backwards will result in severe engine damage.
• Apply engine oil to a new O-ring and install it to the oil filter cover.
• Install the oil filter cover and tighten the bolt to the specified torque.
• Fill the engine with the recommended engine oil and Install the oil filter
cap.
• Start the engine and let it idle for a few minutes.
• Stop the engine and recheck the oil level and check for leaks.
• Install the engine left side guard

Page 29
Maintenance
TRANSMISSION OIL CHECKING OIL
• Run the engine at Idle for 3minutes, turn off engine and wait 3 minutes.
• Support the motorcycle on a level surface and remove the transmission oil filler cap, engine check bolt and sealing washer from the right crankcase
cover. A small amount of oil should flow out of the check bolt hole.
• If no oil flow out, fill with recommended transmission oil through fueling
hole until it can flow out of the hole.
• Reinstall the oil check bolt and engine oil filler cap. Repeat steps above
• After checking the oil level or filling, install the oil check bolt with a new
sealing washer, tighten the oil check bolt and oil filler cap.
CHANGING ENGINE OIL
• Run the engine to let it get hot before draining oil.
• Support the motorcycle in an upright position on a level surface and re-
move the engine oil filler cap from the right crankcase cover
• Place an oil drain pan under the engine to catch the oil. Then remove the
drain bolt and sealing washer.
• After the oil has drained, install the drain bolt with a new sealing bolt to
the specified torque
Torque: 22N.M
• Fill the recommend oil to the engine.
Recommended transmission oil: APLGL
Viscosity: SAE 10w-40
Capacity: 0.85 liter at draining
0.900 liter at removing
• Inspect the oil level as the steps of oil level checking proce-
dure.

Page 30
Maintenance
DRIVE CHAIN The drive chain must be checked, adjusted, and lubricated in accordance with the Maintenance Schedule. If the chain becomes
badly worn or maladjusted, being either too loose or too tight the chain could jump off the sprockets or break.
Under severe usage, or when the vehicle is ridden in unusually dusty or muddy areas, more frequent maintenance will be neces-
sary.
WARNING:
A chain that breaks or jumps off the sprockets could snag on the engine sprocket or lock the rear wheel, severely damaging the
motorcycle and causing it to go out of control. DRIVE CHAIN SLACK INSPECTION
• Turn the engine off, raise the rear wheel off the ground by placing the optional work
stand.
(Don’t inspect and adjust the drive chain when the engine running)
• Check slack in the upper drive chain run midway between the sprockets.
Drive chain slack: 25-35mm
Notice:Excessive chain slack(50mm/2.0in) may damage the vehicle.
• In addition to checking the slack, rotate the rear wheel to inspect the drive chain and sprockets for damaged rollers, loose pin and links, unevenly or excessively worn
or damaged teeth.
ADJUSTMENT
• Adjust the chain if the slack is too much or too little.
• Loosen the axle nut and adjuster lock nuts and turn the adjusting bolts.
• Check that the chain adjuster index marks are in the same position on both sides, then tighten the axle nut..
• Tighten the adjusting bolt lock nut against the axle adjustment plates.
REPLACEMENT
If adjustment procedure can not apply proper chain slack or the chain has damaged rollers, loose fitting links, replace with new
one.
Whenever the chain is replaced, inspect both the countershaft and rear sprockets, and replace them if necessary. Worn sprockets
will cause a new chain to wear quickly.
CLEANING AND LUBRICATION
Clean the chain in non-flammable or high flash-point solvent by soft brush. Wipe it dry.
Be sure the chain is completed dry before lubricating.
Lubricate the drive chain with #80-90 gear oil or drive chain lubricant designed specifically for use with O-ring chains. Apply oil to the side of the rollers so that it will penetrate to the rollers and bushings. Wipe off any excess oil.
Page 31
Maintenance
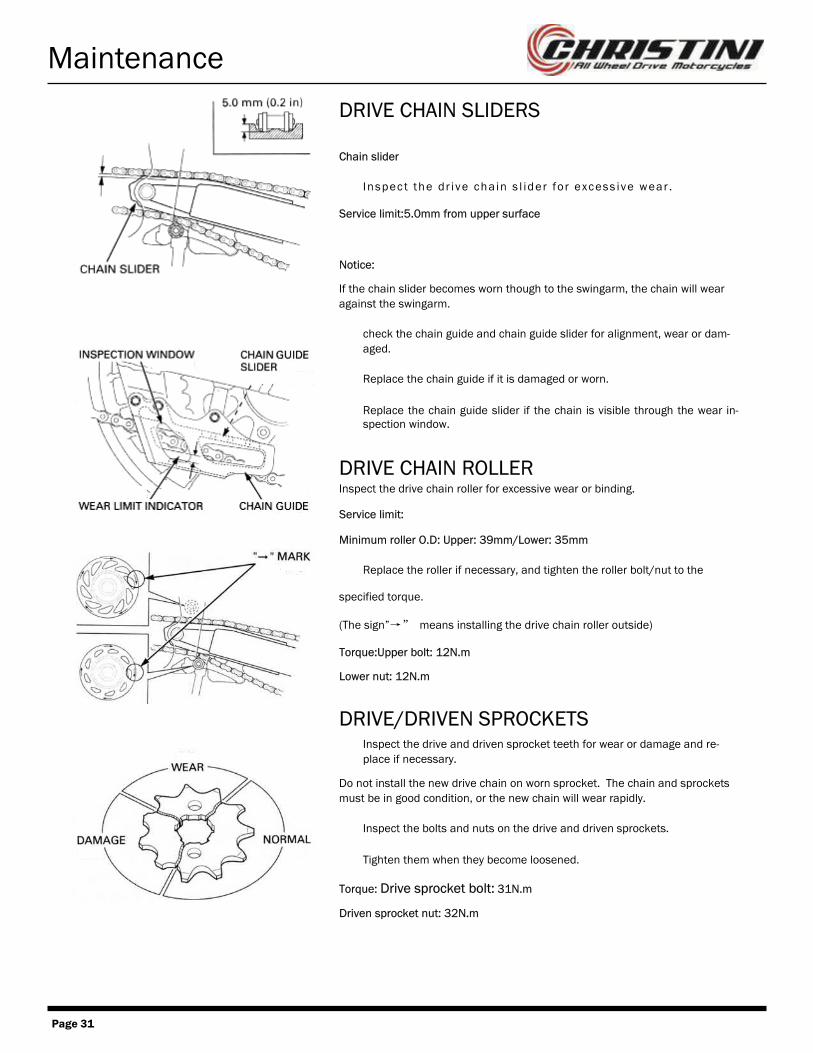
DRIVE CHAIN SLIDERS
Chain slider
• Inspec t the dr ive cha in s l ider for excess ive wear .
Service limit:5.0mm from upper surface
Notice:
If the chain slider becomes worn though to the swingarm, the chain will wear
against the swingarm.
• check the chain guide and chain guide slider for alignment, wear or dam-
aged.
• Replace the chain guide if it is damaged or worn.
• Replace the chain guide slider if the chain is visible through the wear in-spection window.
DRIVE CHAIN ROLLER Inspect the drive chain roller for excessive wear or binding.
Service limit:
Minimum roller O.D: Upper: 39mm/Lower: 35mm
• Replace the roller if necessary, and tighten the roller bolt/nut to the
specified torque.
(The sign”→” means installing the drive chain roller outside)
Torque:Upper bolt: 12N.m
Lower nut: 12N.m
DRIVE/DRIVEN SPROCKETS • Inspect the drive and driven sprocket teeth for wear or damage and re-
place if necessary.
Do not install the new drive chain on worn sprocket. The chain and sprockets
must be in good condition, or the new chain will wear rapidly.
• Inspect the bolts and nuts on the drive and driven sprockets.
• Tighten them when they become loosened.
Torque: Drive sprocket bolt: 31N.m
Driven sprocket nut: 32N.m
Page 32
Maintenance
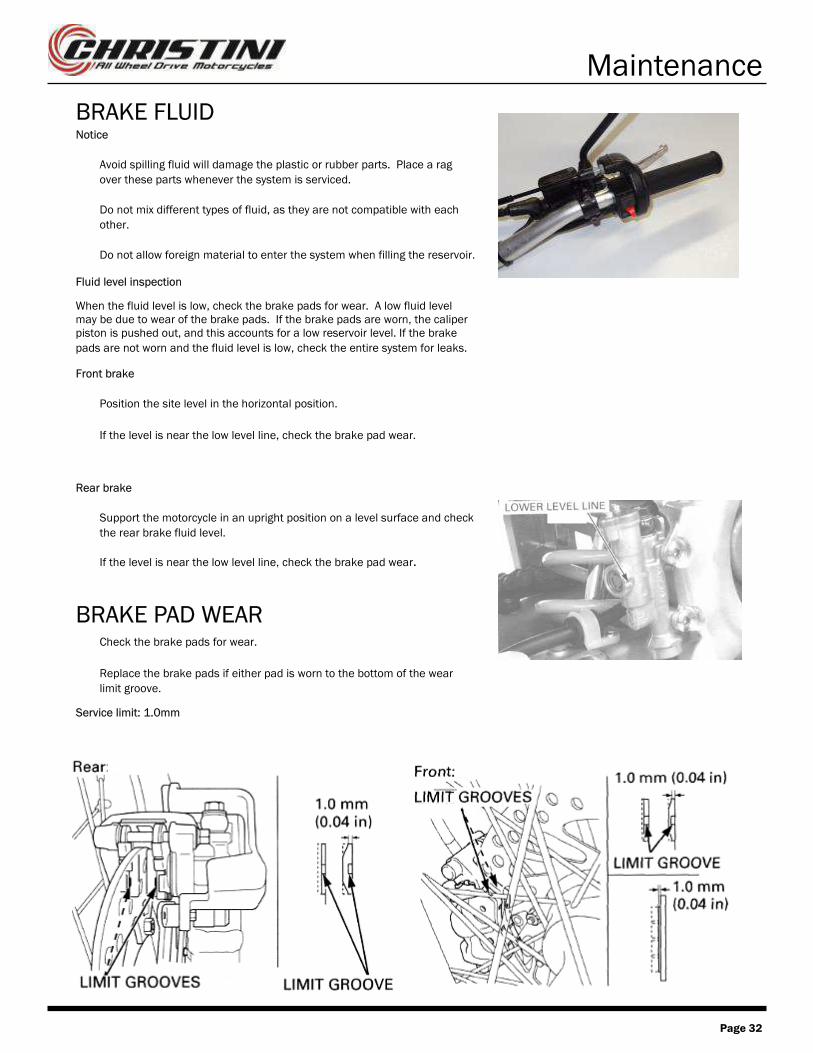
BRAKE FLUID Notice
• Avoid spilling fluid will damage the plastic or rubber parts. Place a rag
over these parts whenever the system is serviced.
• Do not mix different types of fluid, as they are not compatible with each
other.
• Do not allow foreign material to enter the system when filling the reservoir.
Fluid level inspection
When the fluid level is low, check the brake pads for wear. A low fluid level may be due to wear of the brake pads. If the brake pads are worn, the caliper piston is pushed out, and this accounts for a low reservoir level. If the brake
pads are not worn and the fluid level is low, check the entire system for leaks.
Front brake
• Position the site level in the horizontal position. • If the level is near the low level line, check the brake pad wear.
Rear brake
• Support the motorcycle in an upright position on a level surface and check
the rear brake fluid level.
• If the level is near the low level line, check the brake pad wear.
BRAKE PAD WEAR • Check the brake pads for wear.
• Replace the brake pads if either pad is worn to the bottom of the wear
limit groove. Service limit: 1.0mm

Page 33
Maintenance
BRAKE SYSTEM level position inspection
The brake level position can be adjusted by loosening the lock nut and turning the adjuster. Turning the adjuster clockwise moves the brake lever farther away from the grip; turning the adjuster counterwork wise moves the brake lever closer the grip.
After adjustment, hold the adjuster and tighten the lock nut to the specified torque.
Torque: 5.9N.m
If the brake lever free play exceeds 20mm,there is air in the system that must be bled.
Brake pedal height
• Adjust the brake pedal to the desired height by loosening the lock
nut and turning the pedal height adjusting bolts.
Standard height: 79.6mm
• Tighten the lock nut to the specified torque
Torque: 5.9N.m

Page 34
Maintenance
SWINGARM/SHOCK LINKAGE • Raise the rear wheel off the ground by placing a work stand or equiva-
lent under the engine.
• Check for worn swingarm bearings by grabbing the rear swingarm and attempting
to move the swingarm side-to -side.
• Replace the bearing if excessively worn.
• Check the shock linkage and replace any damaged needle bearings.
• Disassemble, clean, and inspect the swingarm and shock linkage pivot bearing and
related seals every three races or about 7.5 hours of operation.
WHEELS/TIRES
• Support the frame by the bracket under the engine, so that the front
wheel off the ground.
• Grab the bottom of front suspension and rock the front wheel on both
sides to check whether the front wheel axle is loose.
• Grab the rocker and rock the rear wheel on both sides to check whether
the rear wheel axle has problem.
• Check the tires for cuts, embedded nails, or other damage.
• Check the cold tire pressure (Remember to do it when the tire is cold).
• Check the rims and spoke for damage.
• Tighten all the loose wheel spokes and lock (valve nut)
Torque Specs
• Tire pressure Front wheel :98kPa(1.0kgf/cm2,14psi)
• Rear wheel:98kPa(1.0kgf/cm2,14psi)
• Tools:Front wheel:Spoke wrench Rear wheel: Spoke wrench 6.6mm
• Torque Front wheel spoke:3.68N.m(0.4kgf.m,2.7lbf.ft)
• Rear wheel spoke:3.7N.m(0.4kgf.m,2.7lbf.ft)
• Valve nut:13N.m(1.2kgf.m,9lbf.ft)

Page 35
Main Wiring Diagram

Page 36
EFI Wiring Diagram
Page 37
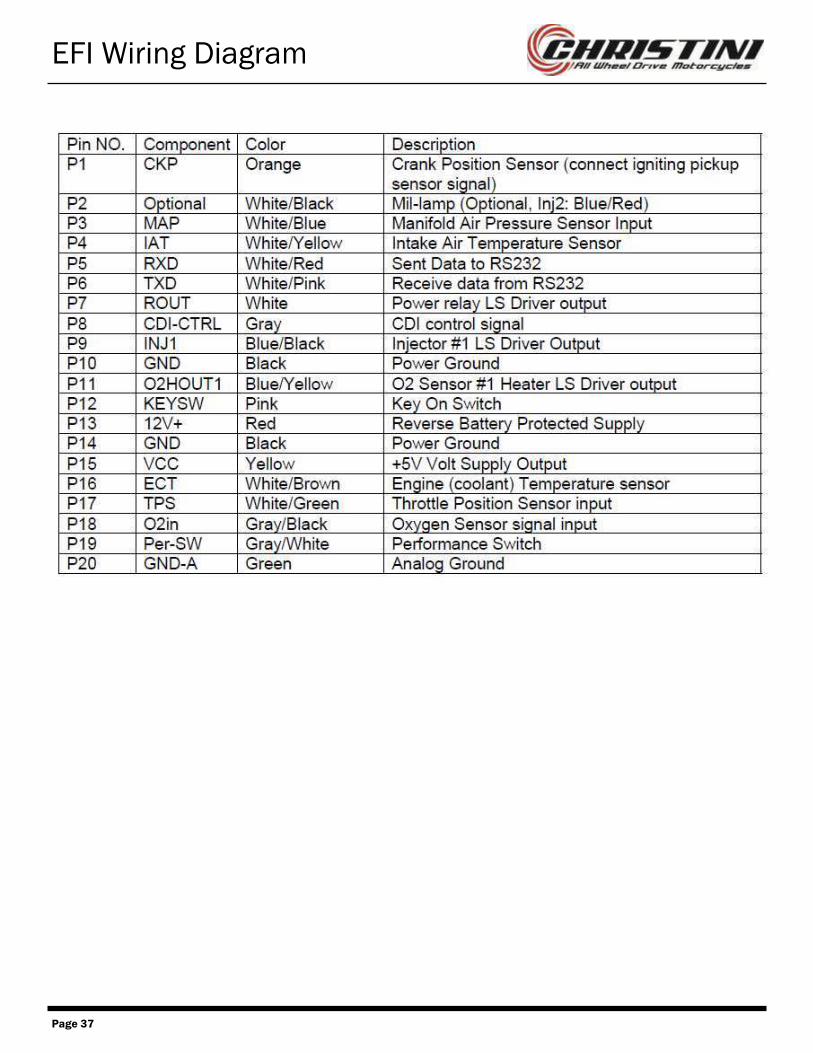
EFI Wiring Diagram

Page 38
AWD Service Section
AWD Service

Page 39
• Socket set, metric
• Pliers set
• Ball peen/ dead blow hammers
• Soft tip metal punch (brass/aluminum)
• Screw driver set
• AWD clutch wrench (optional)
• Open ended wrenches, metric
• Allen key set, metric
• Snap ring pliers, 45 or 90 degree
• Bearing punch set
• Blind side bearing removal kit (Motion Pro 08-0292)
• 2 large adjustable wrenches
• Torque wrench 0-75 ft-lbs
• Split bearing puller
• Small pick or awe
• Safety wire pliers
• Safety wire .032”
• Grease gun (included with bike purchase, customer must supply grease below)
• Shell Albida EP1 Lithium grease (do not substitute)
• Spectro SPL grease or equivalent
• Blue Loctite #242
• Red Loctite #262
• Green Loctite #609
The Tools You Will Need for Maintenance
Required Tools

Page 40
AWD Detail Illustration
Page 41
• Do not adjust the choke while the bike is moving!
• Do not over tighten the front axle as it can damage the inside Axle Clamp Bear-
ings.
• Do not engage the AWD system while at high speeds. Disengagement of the
AWD system can occur at any speed.
• Be cautious when power washing bike, especially around front drive hubs and
AWD seals. Spraying high pressure water into these areas can damage seals and
bearings.
Warnings
Page 42
Pre-ride check list:
• Check secondary AWD chain tension.
• Lube secondary AWD chain.
• Check clutch setting (see “AWD Clutch Test” section).
• Check front wheel for proper function (see “Front Wheel Sprag
Test” section)
• Check front wheel rim lock nut torque.
As Needed
• Replace bearings if excessive noise or friction develops.
• Lubricate spline shafts through grease port with supplied grease
gun and Shell grease.
• Replace worn or damaged seals and boots.
Routine Maintenance
AVOID:
• Pressure washing the dropouts, head tube area, side bar
and main gearbox.

Page 43
AWD Clutch Test
• Place the bike on a stand and make sure that the front wheel
is not touching the ground.
• Shift the bike into gear.
• Turn the AWD switch to the on position and check to make
sure the AWD is engaged.
• Grab the front wheel with two hands and try to spin it back-
wards. The front wheel should spin backwards but require a
large amount of effort to do so. If the wheel will not break
free, the clutch is set too high. If the wheel turns backwards
very easily, the clutch is set too low.
• If the clutch needs to be adjusted, pull the gas tank off the
bike.
• Loosen the set screw on the clutch locknut.
• Turn the locknut in or out a 1/2 turn at a time until the front
wheel moves backward with the correct amount of force. To
keep driveshaft from spinning apply front brake.
• Make sure the set screw is positioned over a flat in the clutch
hub and tighten the set screw down and reinstall the tank.

Page 44
Note: Before performing this test, make sure the AWD Clutch is set
correctly.
• Place the bike on a stand and make sure that the wheels are not
touching the ground.
• Turn the AWD switch to the on position and check to make sure
the AWD is engaged.
• Center the handlebars.
• Hold down the front and rear brakes.
• Turn handlebars to the left and back to center. There should be
steering resistance from the AWD system when this is performed.
• Release brakes and center handlebars.
• Hold down front and rear brakes again and turn handlebars to the
right and back to center. There should be steering resistance
from the AWD system.
• If no resistance is felt, or there is only resistance in one direction,
check the front wheel to ensure the sprag bearings are not slip-
ping or damaged. See “Front Wheel Service” section.
Front Wheel Sprag Test

Page 45
Cover and Chain Removal

Page 46
Cover and Chain Removal

Page 47
• Remove the 6 cover bolts with an 8mm socket or t-handle and pull
cover off of the frame.
• To remove the chain, pull the tensioner back with a flat blade
screwdriver and pull the sprocket out with fingers or non-marring
pliers. Remove the chain from countershaft sprocket.
• Check the following and replace if needed:
1. Sidebar bearing and cover bearing should be smooth turn-
ing.
2. Check engagement spline action by engaging and disen-
gaging switch on handle bars.
3. Sidebar seal and cover seal for wear.
4. Excessive wear on chain tension block.
Warning: Do not use an O-ring chain as there is not enough
clearance for one and it would rub the frame.
Cover and Chain Removal

Page 48
• Reinstall chain and top sprocket.
• Adjust chain tensioner using a 4mm Allen wrench and by sliding
the tensioner up the sidebar until the front side of the chain has
roughly 10-15mm (0.4-0.6in) of give when pressure is applied.
• Replace chain cover. Torque sidebar cover bolts to 8 ft-lb.
Note: If cover does not seat on the sidebar, the top sprocket is
not fully seated in the bearing.
Cover and Chain Removal
49

50

51

52

53

Page 54
Note: Due to AWD hub design, front wheel removal and installation is
aided by removing front caliper first.
• Remove front brake caliper (note: do not squeeze front brake
lever while caliper is off.
• Remove axle bolt from axle.
• Loosen axle pinch bolts on both sides of dropout.
• Slide axle through wheel and remove.
• Remove front wheel from dropouts.
Note: The hub inserts will not fall out like the spacers on a normal hub.
They will also rotate independent of each other; this is ok.
Front Wheel Removal

Page 55
• Lightly grease dropout o-rings and hub seals before installing the
front wheel.
• With brake caliper removed, install front wheel into forks by care-
fully aligning right drive carrier on dropouts with hub inserts. Once
the right carriers are seated, slide axle through to other end of
hub.
• Carefully align left carriers and slide axle completely through to the
other side. Note, a flat blade screw may be needed to align hub
insert with drive carrier. Note that the hub inserts will only rotate
in one direction in the hub.
• Thread axle bolt back into the end of axle and tighten to 12ft-lb.
Tighten axle pinch bolts to 12 ft-lb. Note: If wheel does not spin
freely, axle bolt is too tight!
• Reinstall front brake caliper.
Front Wheel Installation

Page 56
Front Wheel Service

Page 57
Front Wheel Service
Warning: Before taking hub apart, make sure that you
have a full set of spare sprag bearings. Sprag bearings are
likely to be damaged during the disassembly process and
new ones may be required.
• Using a soft punch, remove the hub inserts from either
side of the hub.

Page 58
Front Wheel Service
• Pry the insert seals out of the inserts using a flat bladed
screwdriver.
• Remove the hub insert o-rings with a pick.
• Punch the axle bearings out of the inserts using the ac-
cess holes in the back of the inserts.

Page 59
• Using a bearing punch, install the axle bearings into the
hub inserts.
• Press the axle seals into the hub inserts.
• Install the hub insert o-rings.
Front Wheel Service

Page 60
Front Wheel Service
Warning: Sprag bearings must be installed in the correct orientation in the hub for the AWD sys-
tem to work properly. If the sprag bearings are not installed correctly, the AWD system can be
damaged.
• Press CB-6905 bearing into the Hub Inner Race
• Be sure that the bearing is seated completely
• Insert sprag bearing into hub shell. (correct direction
will be determined in next steps.). Lightly grease inside
of sprag bearing with Shell grease.

Page 61
F
• Test fit hub insert into hub, twisting as it is in-
serted.
• Spin the hub insert and check to make sure it is free-
wheeling in the correct direction. If it is not, remove the
hub insert and flip the sprag bearing around. Recheck
to verify that hub insert freewheels in the correct direc-
tion before moving on to next step.
Front Wheel Service

Page 62
F
• Remove hub insert and press insert bearings into hub.
• Grease hub insert seal, and slip hub insert into hub. It
may be required to tap hub insert into hub with a soft
faced hammer.
•
• Grease axle seal.
• Repeat procedure for the other side of hub.
Front Wheel Service

Page 63
Warning: If removing forks for rebuild service, the fork dropouts must
be disassembled so that the drive system parts are not contaminated
during the service.
• Loosen the housing cap from the linear bearing housing and un-
screw it completely
• Slide the housing down off the sprocket driveshaft
• Looser top and bottom triple clamp bolts. Be sure to hold fork
while loosening bolts so it does not fall out. Slide fork out of triple
clamps and remove.
Warning—When fork is off the bike do not apply side pressure to spline
shafts as it is possible to bend them if enough force is applied.
Fork Removal

Page 64
• Carefully slide forks into triple clamps.
• Set desired fork height and torque triple clamp bolts to the follow-
ing:
15 ft-lbs Lower
17ft-lbs Upper
• Slide the linear bearing housing over the drive sprocket shaft
• Tighten the housing cap down with 2 adjustable wrenches
•
Fork Installation
Page 65
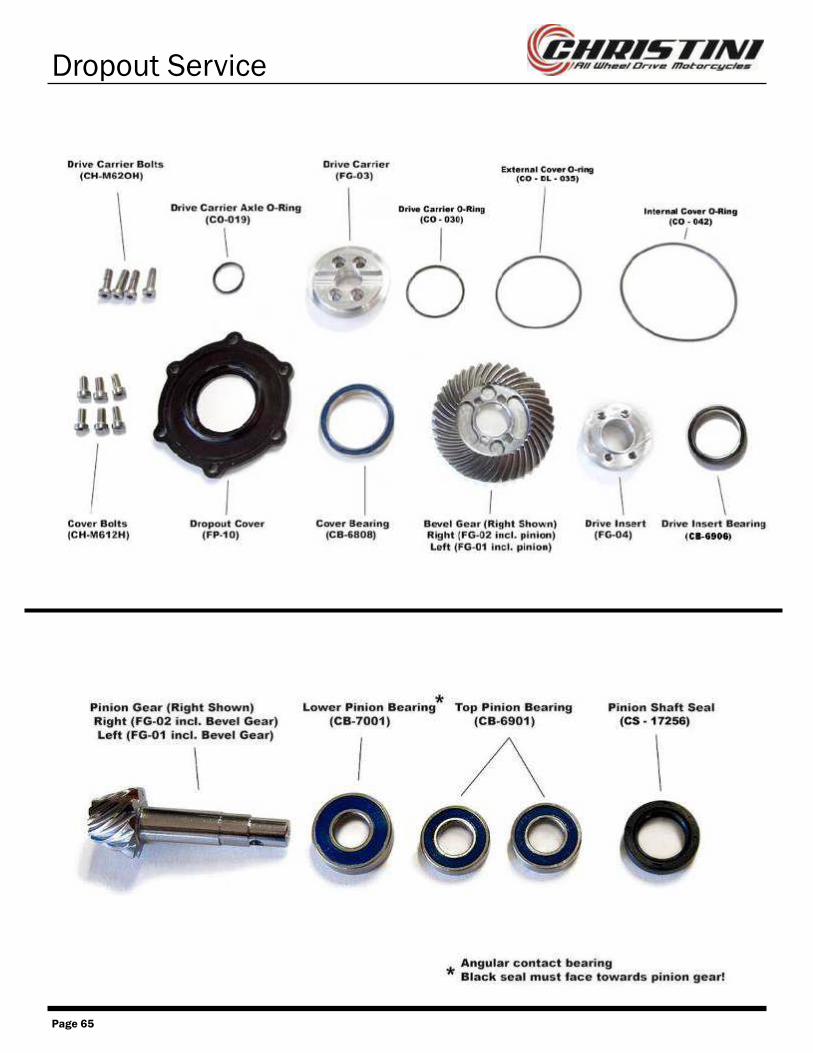
Dropout Service

Page 66
• Remove the front wheel and front fork.
• Remove bellow clamp and bellow from spline driveshaft. Pry
gently with small flathead screw driver to undo clasp on clamp.
The clamps are not reusable!
• Remove set screw from driveshaft with 2.5mm Allen key.
• Remove driveshaft from pinion gear by lightly tapping lower
driveshaft with a plastic hammer while pulling the driveshaft
away from the dropout.
• Remove 6 cover bolts on the outside of the gearbox using a
4mm Allen wrench.
• Rotate the cover and pull it off of the dropout.
Dropout Service

Page 67
• Remove drive insert bearing from inside of dropout. Bearing is a slip fit so only light pressure from screw driver is required to
remove.
• Tap down on pinion gear with plastic face hammer. After pinion is removed, slide the bottom bearing out of dropout bore. If bearing stays on pinion shaft, remove by hand or with split bearing puller. Note: lower pinion bearing is angular contact so if pressure is applied in the wrong direction it may come apart. If bearing comes
apart, it must be replaced.
• Remove top driveshaft seal from dropout using small flat blade
screwdriver. Be careful not to scratch inner bore.
• Remove top pinion bearings from upper bore by tapping them
lightly tapping from inside the dropout with non-marring punch.
• Pry axle o-ring from dropout using small pick.
Dropout Service

Page 68
• Remove 4 drive carrier bolts with 4mm Allen wrench. The inner hardened bevel gear can be clamped with soft jaws in a vise or the drive carrier can be held with square bar stock to keep the
assembly from moving as you unscrew the bolts.
• Lightly tap the outside face of drive carrier with plastic hammer to
break it free from gear and drive insert.
• Remove axle o-ring from drive carrier with pick.
• Remove cover o-rings and drive carrier o-ring.
Dropout Service

Page 69
• Remove cover bearing with bearing removal punch. Note o-ring lip near inner race of bearing is easily damaged. Only apply pressure
to inner race of bearing.
• Remove drive insert from gear with hammer and bearing removal
tool.
• Before reassembly of dropouts, all parts must be cleaned and inspected individually for damage or wear. Parts can be cleaned with solution no different then OEM fork. Be sure to blow dry
dropouts and parts prior to reassembly if cleaning solution is used.
• Pinion and bevel gear must be replaced as a set.
• If bearings are seized or hard to turn by hand they must be
replaced or cleaned and repacked with grease.
• Be sure to grease all o-rings and gears during reassembly.
Dropout Service

Page 70
• Install cover bearing into cover with bearing installation tools.
• Install internal and external cover 0-rings. Note: all 0-rings should
be lightly coated with grease before being reassembled.
• Insert drive carrier o-ring on drive carrier and insert drive carrier into cover and tap into place. Note: face of drive carrier should be
flush with cover bearing and machined cover surface.
• Place drive insert on tooth side of bevel gear and line up all four
threaded holes with clearance holes on gear.
• Set cover and drive carrier on top of bevel gear assembly, with smooth side of gear facing the cover. Line up 4 bolt holes and thread drive carrier bolts into drive insert. Blue Loctite should be used on bolts. Final tightening of bolts will require a square bar or
soft jaws to keep gear from spinning. Torque bolts to 8ft ft-lbs.
• Check that bevel gear spins freely on cover. If it does not spin freely, check to make sure all o-rings and the cover bearing are properly seated. If new o-rings are used, there may be more
friction until o-rings seat and break in.
• Insert axle o-ring into drive carrier.
Dropout Service

Page 71
Note: Be sure dropout is clean before proceeding
• Insert top pinion bearings and seal into driveshaft bore at top of
dropout using bearing driver. Note, be careful not to damage seal
or nick chrome fork plating with hammer. Use plastic faced
hammer.
• Apply light grease to pinion seal
• Insert bottom pinion bearing onto pinion gear.
WARNING: black seal must be facing down towards gear teeth. If
bearing is not inserted correctly, severe damage can occur!
• Slide bearing and pinion gear into bore. Make sure bearing is fully
seated.
Dropout Service
Warning: Bevel gears are right and left hand specific and must be installed in the correct dropout or damage to the
system can occur. The Left Bevel Gear Set shown below must go in the disk side dropout. Note the difference in the
spiral direction on each gear set.
Page 72
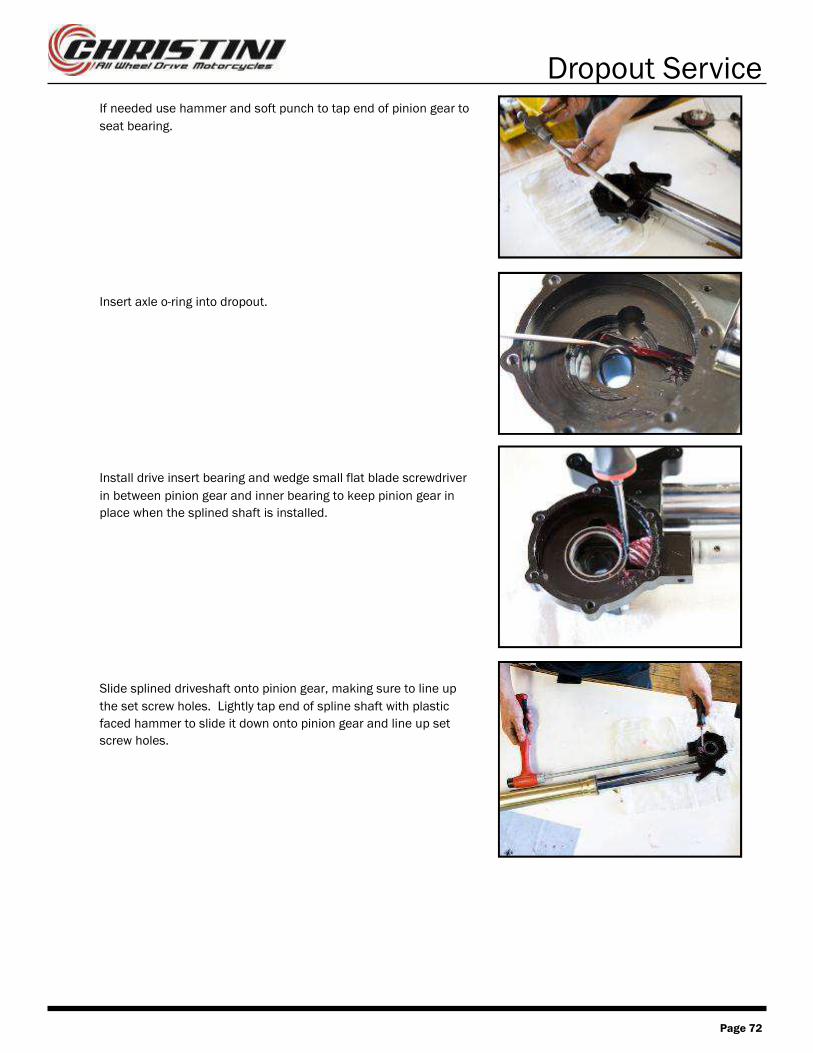
• If needed use hammer and soft punch to tap end of pinion gear to
seat bearing.
• Insert axle o-ring into dropout.
• Install drive insert bearing and wedge small flat blade screwdriver
in between pinion gear and inner bearing to keep pinion gear in
place when the splined shaft is installed.
• Slide splined driveshaft onto pinion gear, making sure to line up
the set screw holes. Lightly tap end of spline shaft with plastic
faced hammer to slide it down onto pinion gear and line up set
screw holes.
Dropout Service
Page 73
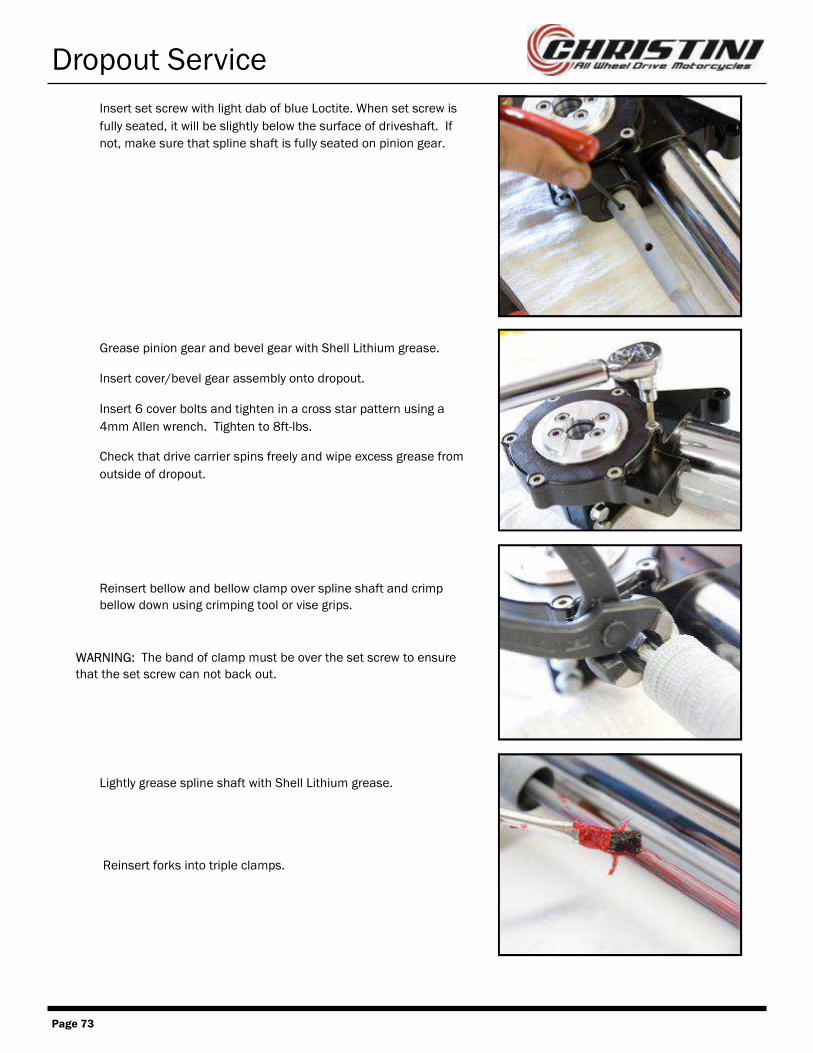
• Insert set screw with light dab of blue Loctite. When set screw is
fully seated, it will be slightly below the surface of driveshaft. If
not, make sure that spline shaft is fully seated on pinion gear.
• Grease pinion gear and bevel gear with Shell Lithium grease.
• Insert cover/bevel gear assembly onto dropout.
• Insert 6 cover bolts and tighten in a cross star pattern using a
4mm Allen wrench. Tighten to 8ft-lbs.
• Check that drive carrier spins freely and wipe excess grease from
outside of dropout.
• Reinsert bellow and bellow clamp over spline shaft and crimp
bellow down using crimping tool or vise grips.
WARNING: The band of clamp must be over the set screw to ensure
that the set screw can not back out.
• Lightly grease spline shaft with Shell Lithium grease.
• Reinsert forks into triple clamps.
Dropout Service
Page 74
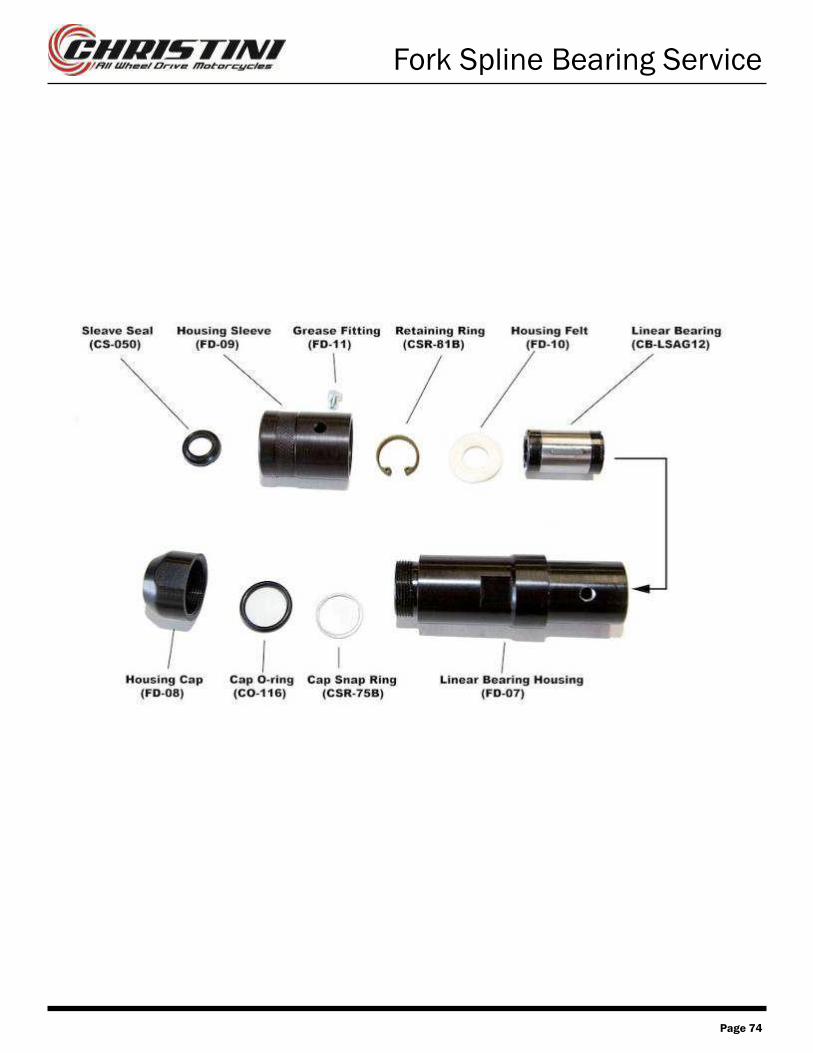
Fork Spline Bearing Service

Page 75
• Cut Black Zip Tie from boot and slide it off the housing.
• Remove forks from triple clamps (see “Fork Removal” section).
• Slide housing assembly off of linear driveshaft.
Fork Spline Bearing Service
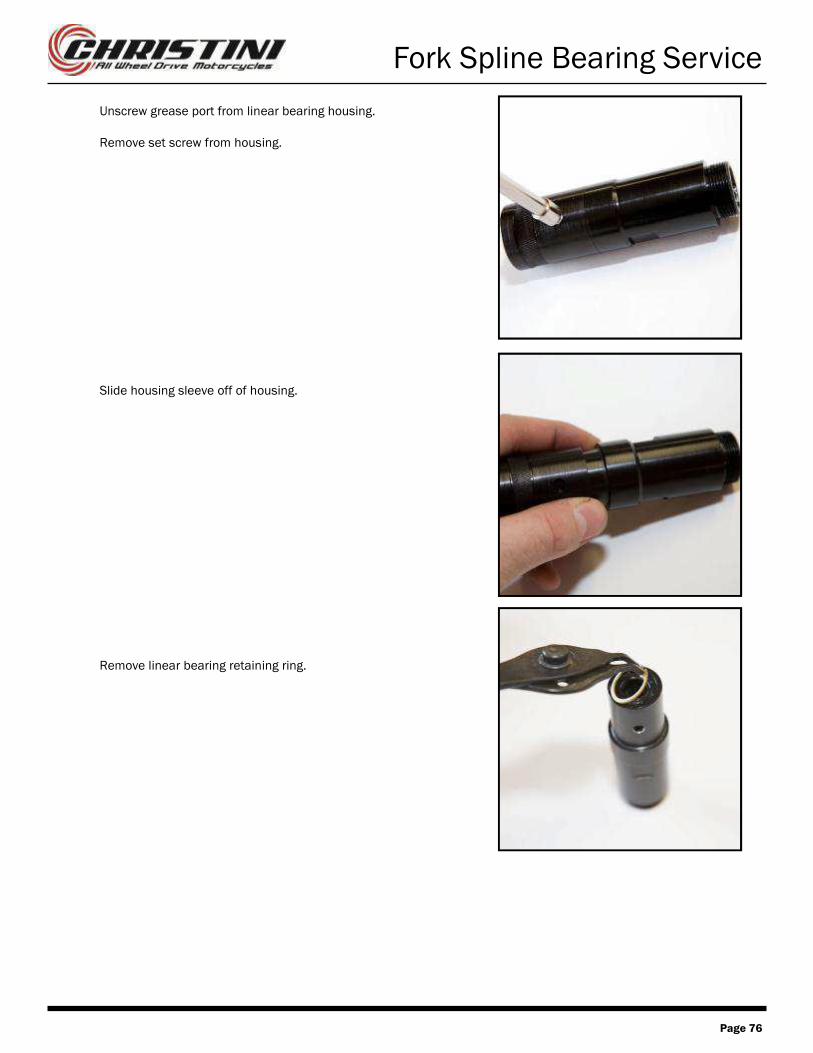
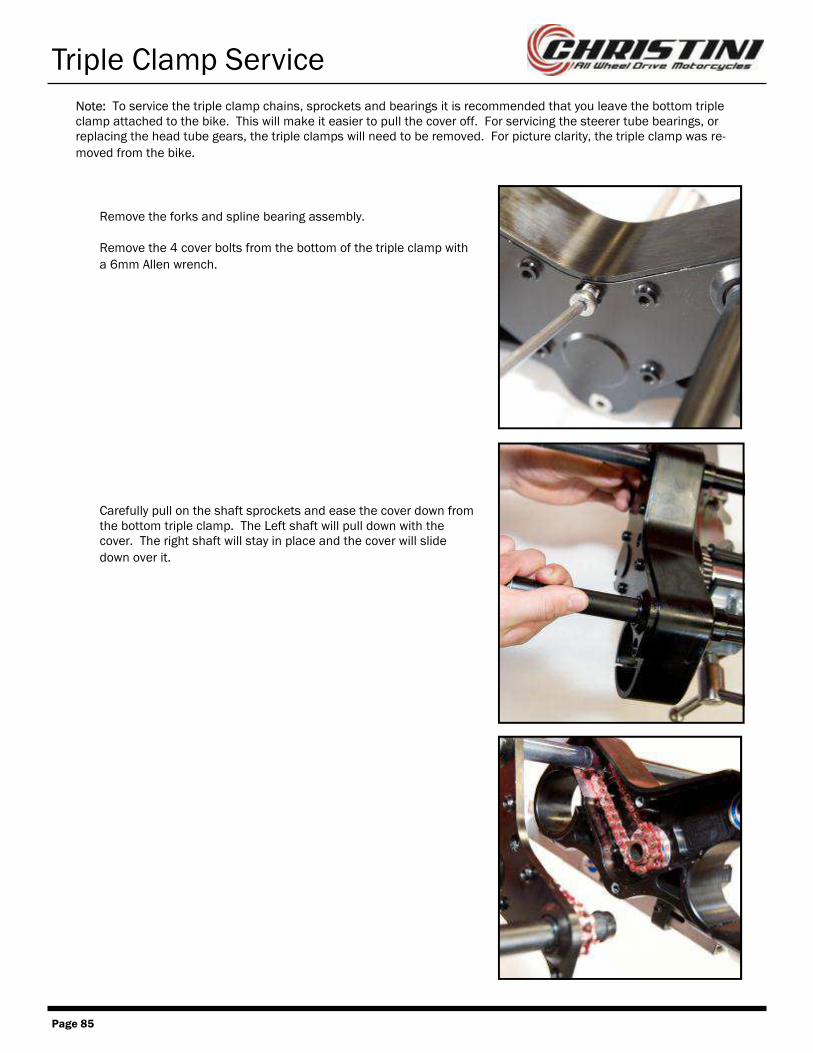
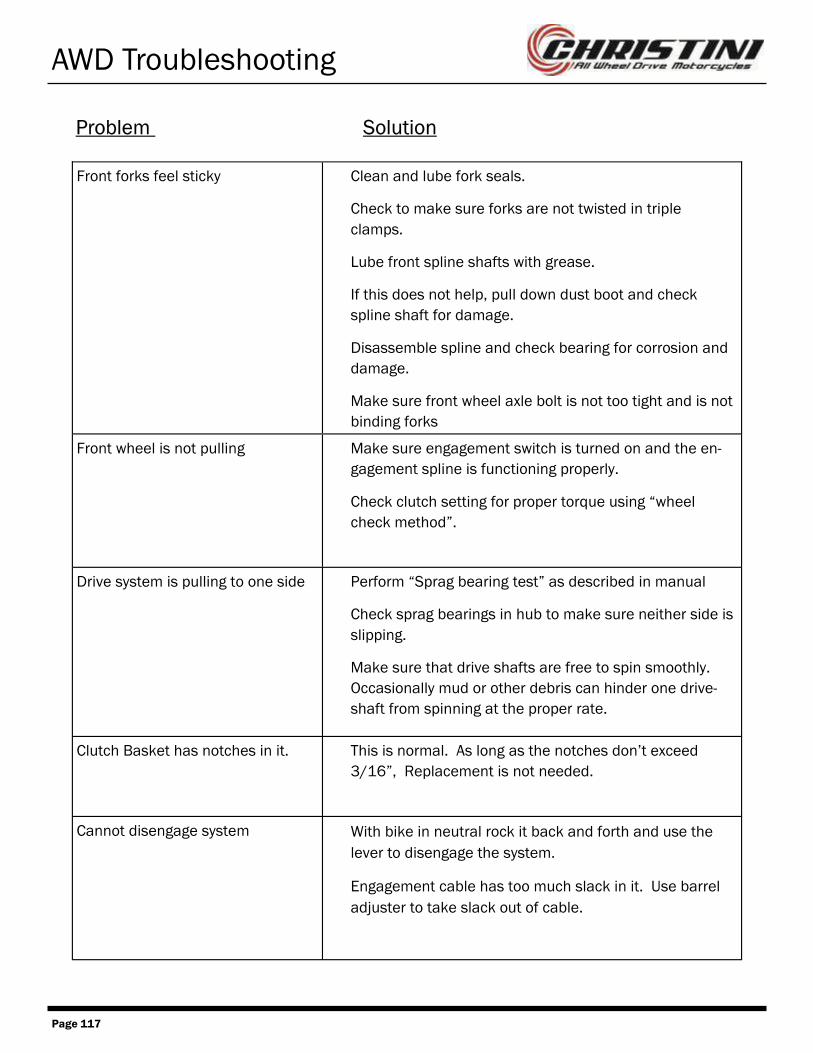
Page 76
• Unscrew grease port from linear bearing housing.
• Remove set screw from housing.
• Slide housing sleeve off of housing.
• Remove linear bearing retaining ring.
Fork Spline Bearing Service

Page 77
• Slide linear bearing out of housing and inspect. If ball bearings
inside of the case are corroded or worn, replace linear bearing.
Warning: Do not use hammer and punch to remove bearing as it may damage the bearing. If bearing will not slide out apply pressure to the
bearing lip with an 8mm nut driver to remove it.
• If shaft seal is damaged or worn, pry it out and replace it with a
new seal.
• Remove felt from housing sleeve and inspect. If needed, replace
felt.
Note: Dirt will pack up in felt. The felt can be cleaned and reused.
Fork Spline Bearing Service

Page 78
• Saturate felt with gear oil and place it back in housing sleeve.
• Reassembly of linear bearing housing is the reverse of
disassembly.
Warning: Use red Loctite on grease fitting or it may back out and cause
the housing sleeve to slide down while riding.
Warning: When sliding linear bearing housing back unto driveshaft, carefully align the ball bearings with the grooves in the driveshaft. Do not force the housing onto the driveshaft. Groove should be
approximately 90 degrees to the grease fitting.
Fork Spline Bearing Service

Page 79
Boot Replacement
• Remove Fork Guard
• Remove upper and lower boot clips
with wire cutters
• Pull up boot and loosen drive shaft set screw
• Insert screw drive in vent holes and tap up on screwdriver.
• Slide shaft upwards. Note: Do not slide shaft down and remove
from linear bearing.
Note: To remove and replace the drive shaft boots, it is not necessary to remove the forks. The service can be done
by removing the fork guards and following the instructions below.

Page 80
Boot Replacement
• Remove old boot and slide new boot onto driveshaft.
• Add a new clip on the bottom of the shaft.
• Insert driveshaft onto pinion gear and tighten set screw.
• Slide boot over bottom section of shaft and install set screw.
• Crimp the clamp around the boot and set screw.
• Pull top of boot over linear bearing housing and secure with low
profile zip tie.
• Reinstall the fork guard.

Page 81
Triple Clamp Removal
• Remove forks and front fender from triple clamps.
• Loosen the two preload bar pinch bolts.
• Remove the preload bolts with a 22mm Wrench.
• With a plastic faced hammer, tap the bottom triple clamp to
unseat it from the frame.
Note: To service the triple clamp chains, sprockets and bearings it is recommended that you leave the bottom triple clamp attached to the bike. This will make it easier to pull the cover off. For servicing the steerer tube bearings, or
replacing the head tube gears, the triple clamps will need to be removed.

Page 82
Triple Clamp Removal
• Slide the bottom triple clamp out of the frame.
• Pull the top triple clamp assembly out of the frame.
Note: It may be necessary to tap the underside of the top triple clamp
with a plastic faced hammer to unseat it from the frame.

Page 83
Triple Clamp Service

Page 84
Triple Clamp Service
Page 85
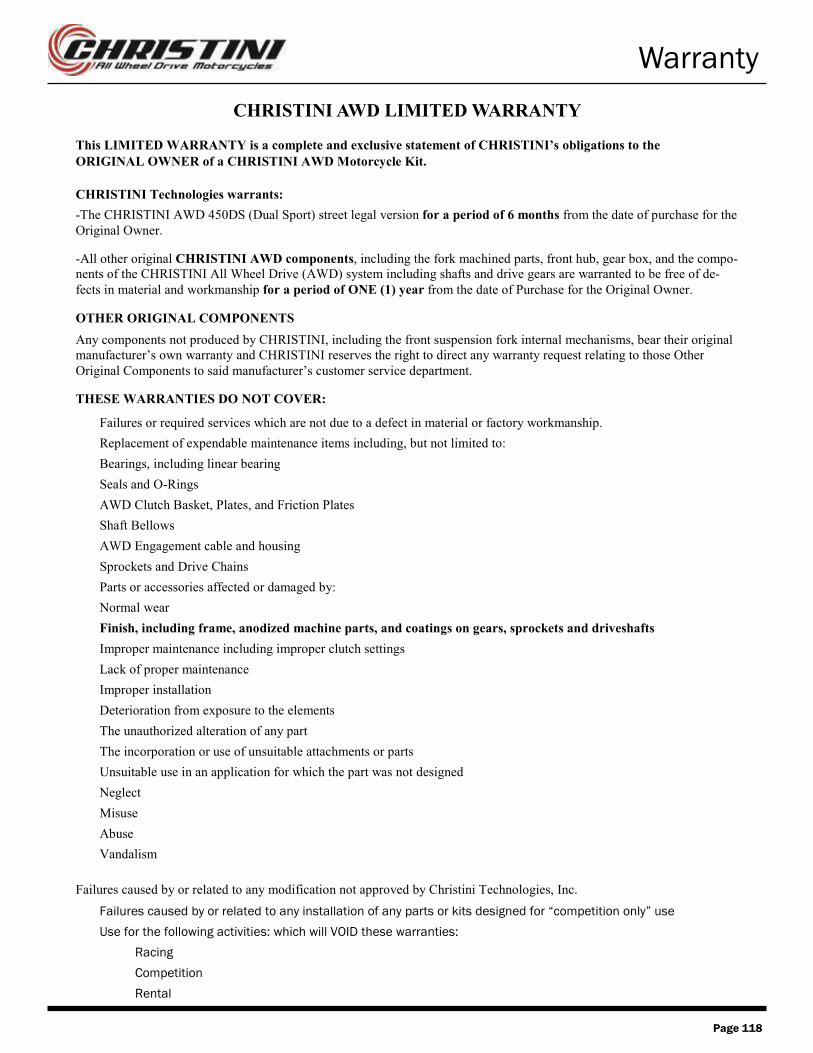
• Remove the forks and spline bearing assembly.
• Remove the 4 cover bolts from the bottom of the triple clamp with
a 6mm Allen wrench.
• Carefully pull on the shaft sprockets and ease the cover down from the bottom triple clamp. The Left shaft will pull down with the cover. The right shaft will stay in place and the cover will slide
down over it.
Note: To service the triple clamp chains, sprockets and bearings it is recommended that you leave the bottom triple clamp attached to the bike. This will make it easier to pull the cover off. For servicing the steerer tube bearings, or replacing the head tube gears, the triple clamps will need to be removed. For picture clarity, the triple clamp was re-
moved from the bike.
Triple Clamp Service

Page 86
• Remove the right shaft sprocket and the chain inside of triple
clamp cavity.
• Pull center bottom sprocket off of the cover and remove the chain.
• Pull both shaft sprockets out of cover. Be careful of seal as it
slides over snap ring grooves as it can tear the seal.
Triple Clamp Service

Page 87
• Remove cover bearings from cover with bearing puller if they need
to be replaced.
• Remove cover seals and inspect. Replace if needed.
Triple Clamp Service

Page 88
• Remove sprocket snap ring .
• Remove sprocket and gear by tapping the gear through the sprocket with a plastic faced hammer and pulling it out the top of
the steerer tube.
• Remove gear from steerer tube. If bearing comes out with gear, remove bearing from gear with split bearing puller if it does not
slide off easily.
• If top bearing remains in steerer use a punch to remove it.
Triple Clamp Service

Page 89
• Tap the bottom output bearing from the bottom steerer tube.
• Inspect gears and bearing and replace any parts if needed.
Note: Head tube gears must be replaced in sets.
Triple Clamp Service

Page 90
Warning: Replacing the taper bearing is a job for your dealer. Do not
attempt to do this on your own.
• Remove the preload bars from the bottom triple clamp.
• Press the steerer tube out of the bottom triple clamp with an arbor or hydraulic press. The steering stops should be supporting the
triple clamp as the steerer is pressed out.
• Press the taper bearing and seal off of steerer tube with an
aluminum sleeve available from Christini.
• Press new taper bearing and seal onto steerer tube.
• Coat mating surface of triple clamp and steerer tube with green
Loctite.
• Press steer tube into triple clamp.
Triple Clamp Service

Page 91
• Press steerer bearing into the top of the steerer tube.
• Press steerer bearing into bottom of the steerer tube.
• Install bottom output gear and tap sprocket back onto bottom of gear using a plastic faced hammer. Sprocket is fully seated when
the end of it is flush with the snap ring groove.
• Replace snap ring.
Triple Clamp Service

Page 92
• Install cover seals.
• Press cover bearings back into outer bores of cover.
• Insert Teflon chain guides into cover if they were removed. Note the wear pattern and be sure that the guides are placed on the
same side as they were removed from.
Triple Clamp Service

Page 93
• Insert triple clamp bearing onto top of the right shaft sprocket. It
will be a slip fit.
• Wrap chain around top center sprocket and right shaft sprocket.
• insert shaft sprocket and bearing into bearing bore on triple clamp.
It will be a slip fit.
• Insert triple clamp bearing onto bottom center sprocket.
• Push left shaft sprocket through cover.
• Wrap the chain around the left shaft sprocket and bottom center
sprocket.
• Insert bottom center sprocket with bearing into the center cover
hole.
• If needed, grease chains with Shell grease.
• Slide cover and left shaft sprocket up into bottom triple clamp until the cover meets flush the lip of the bottom triple clamp. If needed use a small screwdriver or pick to push the right chain away from
the Teflon block as the cover slides into place.
Hint: once the cover makes contact with the bottom triple clamp, rotate the shaft sprockets as you are pushing the cover into its final position.
This helps to line everything up correctly.
Warning: Left and right shaft sprockets must be installed on the correct side or severe damage to the AWD system can occur. A simple rule to remember is that the lower shaft sprocket goes on the rider’s
left side (ie: Left=Low).
Triple Clamp Service

Page 94
• When cover is in place screw down the cover bolts with a 6mm
Allen wrench.
Note: Use blue Loctite on cover bolts. Torque bolts to 12 ft-lbs
Triple Clamp Service

Page 95
• Pull top output gear and bearing out of top steerer. If bearing does not come out with gear, use blindside bearing puller to remove the
bearing
• If bearing is seized or hard to turn by hand, it should be replaced.
• Inspect output gear for wear. If it needs to be replaced, all gears in
the head tube must be replaced at the same time.
Triple Clamp Service

Page 96
Warning: Replacing the taper bearing is a job for your dealer. Do not
attempt to do this on your own.
• Loosen steerer set screw in triple clamp and remove the steerer
tube.
• Press taper bearing and seal off of steerer tube with an arbor or
hydraulic press.
Note: A new seal will be needed as it will be damaged when the taper
bearing is pressed off the steerer.
• Press new taper bearing and seal onto steerer tube.
• Insert steerer tube into top triple clamp and tighten set screw to
secure steerer tube.
Triple Clamp Service

Page 97
• Slide the steerer tube bearing back onto the output gear.
• Press gear and bearing into top steerer tube.
Triple Clamp Service

Page 98
• Remove triples clamps as previously described.
• Remove the head tube cover from the front of the head tube.
• Slide the input head tube gear and main driveshaft out the head tube access port. The driveshaft will need to slide out of the clutch
hub.
• If the 3 input bearings do not come out with the input gear and need to be replaced, gently tap them out with a punch. Make sure
they do not get cocked as they are being tapped out.
Warning: If any of the head tube gears are damaged and need to be replaced, all of the head tube gears must be replaced together as a
set.
Main Drive Shaft Service

Page 99
Head Tube Bearing Service
* Picture above shows a head tube not
welded to the frame for reference.
*

Page 100
• Use a punch and remove the inner B543 bearings.
• If the taper bearing races are corroded or pitted, remove them with
a punch.
• Clean the headset bearing surfaces with degreaser and apply a
few drops of green Loctite.
• Install the inner B543 bearings using a bearing punch.
• Install the taper bearing races using a bearing punch.
Head Tube Bearing Service

Page 101
• Slide the input bearings onto the head tube gear.
• Slide the driveshaft partially through the frame and install the
clutch hub. Be sure the clutch retaining snap ring is on the
driveshaft before sliding the clutch hub onto the driveshaft.
• Slide the driveshaft the rest of the way through the frame, seating
the input bearings and gear in the head tube and the clutch hub
with the clutch basket. Use a soft punch and lightly tap the gear to
be sure it is fully seated.
• Move the clutch retaining snap ring into the groove closest to the
clutch hub.
Main Drive Shaft Removal

Page 102
• Grease the top and bottom taper bearings with Spectro SPL or equivalent waterproof grease. Grease output gears with Shell
grease.
• Check to make sure input head tube gear and bearings are
completely seated in the back of the head tube.
• Slide top triple clamp assembly into the head tube.
• Before seating the top triple clamp assembly, make sure the
output gear and input gear are beginning to mesh correctly.
Note: If the two gears are not meshing, it will not be possible to seat
the top triple clamp correctly.
• Tap the top triple clamp with a plastic faced hammer to seat it
completely.
Triple Clamp Installation

Page 103
• Slide the bottom triple clamp into the head tube. Note: Make sure bottom output gear is meshing with the input gear before fully
seating the bottom triple clamp.
• Once gears are meshing correctly, tap triple clamp with soft faced
mallet to fully seat.
• Slide top triple clamp into head tube, aligning preload bars.
Triple Clamp Installation

Page 104
• Spin the left side sprocket driveshaft to align the bottom center sprocket (located inside the cavity) with the steerer driveshaft. Once turning the sprocket driveshaft also turns the top output
gear, everything is aligned correctly.
• Ensure the top output gear is meshing with the back input gear and tap top triple clamp into place with soft faced mallet until it is
fully seated.
• Screw the preload bolts down until they are flush with the top triple
clamp.
Triple Clamp Installation

Page 105
• Turn the preload bolts evenly until there is no play in the head tube
bearings (usually 1/2-3/4 of a turn).
• Tighten the preload bar pinch bolts.
Triple Clamp Installation

Page 106
• Remove chain cover, chain and sprocket from frame (see “Cover/
chain removal” section).
• Remove cable and engagement spline from gearbox (see “AWD
engagement cable” section).
• Slide clutch retaining snap ring up main drive shaft 6 inches or
more.
• Slide clutch hub assembly up main driveshaft unit it clears the
clutch basket.
• Remove 4 shoulder bolts from sidebar with 4mm Allen wrench.
• With Shoulder bolts removed, slide gearbox out of frame.
Gear Box Removal

Page 107
Gear Box Service

Page 108
• Slide clutch basket off output gear.
• Remove output seals from gear box.
• Remove output snap ring.
Gear Box Service

Page 109
• Slide output gear and bearings out of gearbox.
• Remove input gear and bearing from gearbox by tapping them out
through the access holes in the back of the gearbox.
Gear Box Service

Page 110
• Remove output retaining ring.
• Use split bearing puller to press output bearings partially off of the gear. After the bearings move away from the gear, use press to
remove bearings completely.
• Use same steps to remove input bearing from input gear.
• Inspect gears and bearings and replace if needed.
• Carefully press new output bearings onto driven gear and replace
retaining ring.
• Carefully press input bearing onto drive gear and replace
engagement spline snap ring if it was removed.
Gear Box Service

Page 111
Note: Make sure engagement spline snap ring is install on input gear
before it is pressed into the gearbox
• Press input bearing onto gear and insert gear and bearing into
gearbox.
• An aluminum punch and hammer may be needed to gently tap input bearing and drive gear back into place. Make sure bearing is
fully seated at the back of the gearbox.
• Insert output gear and bearings into gearbox. Make sure gears
mesh correctly as you are pushing the output gear into place.
• Reinstall output snap ring.
• Grease input and output gears using Shell Lithium grease.
• Install output seals into gearbox making sure seals are installed
markings facing out.
• Grease lip of seals and push clutch basket back onto output gear.
• Clean any excess grease off of clutch basket.
Gear Box Service

Page 112
• Remove chain cover and AWD chain (see “Cover/chain removal”
section).
• Slide clutch snap ring up main driveshaft.
• Slide clutch up main driveshaft away from clutch basket.
• Remove 4 shoulder connect gearbox from sidebar.
• Move gearbox out of the way.
• Slide clutch off main driveshaft.
Clutch Removal

Page 113
Clutch Service Clutch Service

Page 114
• Loosen locknut set screw so it will not interfere with the hub
threads.
Warning: Failure to loosen set screw will damage threads in clutch
hub.
• Loosen locknut while clutch assembly is still on main driveshaft.
To keep driveshaft from spinning apply front brake and put bike in
gear.
• Remove clutch assembly from bike (see “Clutch Removal” sec-
tion).
• Completely unscrew locknut. Remove spring washers, fiber pads
and clutch plates and inspect for wear or damage.
Note: If metal plates are not scored or warped, they do not need to be
replaced. Simply replace fiber plates during standard rebuilt.
Clutch Service

Page 115
• Reassemble clutch hub noting the order of the plates, fibers and
spring washers. Be sure the spring washers are in the correct ori-
entation:
))
• Apply anti seize compound to hub thread and thread locknut onto
the hub by hand. Note: Use thread file to clean galled hub threads
if needed.
Clutch Service

Page 116
• Reinstall clutch on bike.
• Reinstall clutch basket and gearbox.
• Tighten locknut until it is approximately flush with the hub.
• Check clutch settings and adjust as necessary (see “AWD Clutch
Test” section).
• Adjust locknut so set screw hole lines up with the nearest flat sec-
tion on the hub, and tighten set screw.
Warning: Once set screw is tightened, do try to turn locknut as this will
damage the hub threads.
Clutch Installation
Page 117
Front forks feel sticky
• Clean and lube fork seals.
• Check to make sure forks are not twisted in triple
clamps.
• Lube front spline shafts with grease.
• If this does not help, pull down dust boot and check
spline shaft for damage.
• Disassemble spline and check bearing for corrosion and
damage.
• Make sure front wheel axle bolt is not too tight and is not
binding forks
Front wheel is not pulling • Make sure engagement switch is turned on and the en-
gagement spline is functioning properly.
• Check clutch setting for proper torque using “wheel
check method”.
Drive system is pulling to one side • Perform “Sprag bearing test” as described in manual
• Check sprag bearings in hub to make sure neither side is
slipping.
• Make sure that drive shafts are free to spin smoothly.
Occasionally mud or other debris can hinder one drive-
shaft from spinning at the proper rate.
Clutch Basket has notches in it. • This is normal. As long as the notches don’t exceed
3/16”, Replacement is not needed.
Cannot disengage system • With bike in neutral rock it back and forth and use the
lever to disengage the system.
• Engagement cable has too much slack in it. Use barrel
adjuster to take slack out of cable.
AWD Troubleshooting
Problem Solution
Page 118
CHRISTINI AWD LIMITED WARRANTY
This LIMITED WARRANTY is a complete and exclusive statement of CHRISTINI’s obligations to the
ORIGINAL OWNER of a CHRISTINI AWD Motorcycle Kit.
CHRISTINI Technologies warrants:
-The CHRISTINI AWD 450DS (Dual Sport) street legal version for a period of 6 months from the date of purchase for the
Original Owner.
-All other original CHRISTINI AWD components, including the fork machined parts, front hub, gear box, and the compo-
nents of the CHRISTINI All Wheel Drive (AWD) system including shafts and drive gears are warranted to be free of de-
fects in material and workmanship for a period of ONE (1) year from the date of Purchase for the Original Owner.
OTHER ORIGINAL COMPONENTS
Any components not produced by CHRISTINI, including the front suspension fork internal mechanisms, bear their original
manufacturer’s own warranty and CHRISTINI reserves the right to direct any warranty request relating to those Other
Original Components to said manufacturer’s customer service department.
THESE WARRANTIES DO NOT COVER:
• Failures or required services which are not due to a defect in material or factory workmanship.
• Replacement of expendable maintenance items including, but not limited to:
• Bearings, including linear bearing
• Seals and O-Rings
• AWD Clutch Basket, Plates, and Friction Plates
• Shaft Bellows
• AWD Engagement cable and housing
• Sprockets and Drive Chains
• Parts or accessories affected or damaged by:
• Normal wear
• Finish, including frame, anodized machine parts, and coatings on gears, sprockets and driveshafts
• Improper maintenance including improper clutch settings
• Lack of proper maintenance
• Improper installation
• Deterioration from exposure to the elements
• The unauthorized alteration of any part
• The incorporation or use of unsuitable attachments or parts
• Unsuitable use in an application for which the part was not designed
• Neglect
• Misuse
• Abuse
• Vandalism
Failures caused by or related to any modification not approved by Christini Technologies, Inc.
• Failures caused by or related to any installation of any parts or kits designed for “competition only” use
• Use for the following activities: which will VOID these warranties:
• Racing
• Competition
• Rental
Warranty

Page 119
LIMITED REMEDY
Unless otherwise provided, the sole remedy under the above warranty or any implied warranty is limited to the replacement
of defective parts with those of equal or greater value at the sole discretion of CHRISTINI. No cash refunds will be offered
under this warranty and you will be responsible for labor costs associated with warranty replacements. IN NO EVENT
WILL CHRISTINI AWD BE RESPONSIBLE FOR INCIDENTAL OR CONSEQUENTIAL DAMAGES, WHETHER
BASED ON CONTRACT, WARRANTY, NEGLIGENCE, OR STRICT PRODUCTS LIABILITY, INCLUDING, WITH-
OUT LIMITATION, PERSONAL INJURY DAMAGES, PROPERTY DAMAGE, OR ECONOMIC LOSSES.
Note: In those states that do not allow the exclusion or limitation of incidental or consequential damages, the above limita-
tion or exclusion may not apply to you.
EXCLUSIONS The above warranty, or any implied warranty, does not cover normal WEAR AND TEAR, and all warranties are void if the motorcycle is used for other than normal activities, including, but not limited to, the failure to follow the directions for assembly, the instructions, warnings and advice found in the owner's manual or using the motorcycle for commer-cial activities or in competitive events, including off road racing, motocross racing, stunt riding, ramp jumping or simi-lar activities and training for such activities, or events. This warranty does not cover any damage, failure, or loss caused by accident, misuse, abuse, neglect, improper assembly, improper maintenance, or use of parts or devices not
consistent with the original intent for the product sold.
CHRISTINI TECHNOLOGIES MAKES NO OTHER WARRANTIES, EITHER EXPRESSED OR IMPLIED. ALL IM-
PLIED WARRANTIES, INCLUDING THE WARRANTIES OF MERCHANTABILITY AND FITNESS FOR A PAR-
TICULAR PURPOSE, ARE LIMITED, IN DURATION TO THAT OF THE EXPRESS WARRANTIES STATED
ABOVE. Some states do not allow limitations on how long an implied warranty lasts so the above limitation may not apply
to you. The warranty gives you specific legal rights, and you may also have other rights, which vary from state to state.
WHAT YOU SHOULD DO
Always wear a helmet while riding. Please remember to always ride safely and in control and within your capabilities and limitations. Even under normal riding, motorcycles can be dangerous due to changing and variable riding condi-
tions including known and unknown hazards.
WARRANTY CLAIM PROCEDURE
• If a part is determined to be defective, return said part to your dealership for verification of a defect.
• The dealer will verify whether the part is defective. If the part is determined to be defective by the dealer, the part will be replaced and the amount of the replacement part will be charged to the customers credit card until it is
returned to Christini for verification.
• Alternatively, the dealer may opt to send the part in for verification before replacement.
• Upon receipt of the defective part/parts, Christini will determine if the part is eligible for warranty compensation.
• If the part is found to be defective, the customer will be credited the full amount of the replacement part.
This Warranty applies only to the Original Owner (first retail purchaser from motorcycle dealer, distributor, or direct
from Christini)
Freight costs and any labor charges for part change overs, assembly, repair, or disassembly are the responsibility of
the Original Owner and this Warranty offers no cash refunds.
CHRISTINI AWD
421 N. 7th Street
Philadelphia, PA 19123
Phone: (215) 351 9895
Warranty

Page 120
Warranty
