chunirmlcda 6 in 1 universal remote with lcd user …€¢ when using the record button “ ” in a...
TRANSCRIPT

Table of ContentsKeys and corresponding functions.....................................................................................................2Usage Notes.................................................................................................................................................3Battery Installation....................................................................................................................................3
Operational Interfaces...................................................................................................................................3Sub-menus...................................................................................................................................................4
Remote Control Settings ............................................................................................................................4Method A: code entry..............................................................................................................................4Method B: manual code search............................................................................................................5Method C: Automated Search..............................................................................................................6
Learning Function...........................................................................................................................................7Cancelling the learning function..........................................................................................................8
Other Functions...............................................................................................................................................9Time/Clock Function and Factory Settings.....................................................................................9Set/Cancel Alarm Clock Function.......................................................................................................9Key Sounds ON/OFF..............................................................................................................................10Sound Sharing Function........................................................................................................................10
Macro Instructions..........................................................................................................................................11Macro Settings...........................................................................................................................................12Start/Cancel Macro Instruction Settings.........................................................................................13Set/Cancel Key Transfer........................................................................................................................14
Low Power Reminder...................................................................................................................................16Kogan TV Linking Codes............................................................................................................................16
1
6-in-1 Universal Remote with LCD ScreenCHUNIRMLCDA
User Manual
Thank you for purchasing our universal remote. This manual will explain how to set up and use your remote control. Please keep a copy of this manual handy for future reference.
This remote control features an LCD screen, learning functionality plus a powerful built-in code base. Through simple settings, it can control many infra-red controlled household appliances such as televisions, DVD players, blu-ray players, satellite/cable/PVR boxes, air conditioners etc..
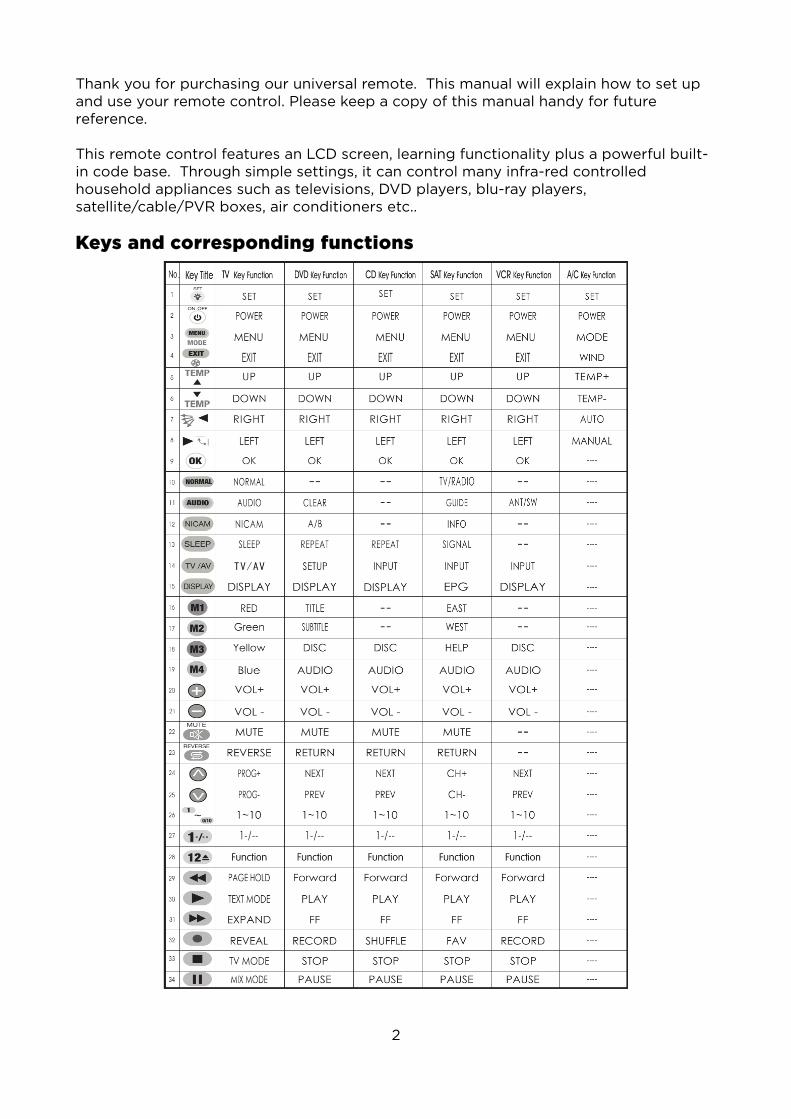
Keys and corresponding functions
2

Usage Notes• When using the record button “ ” in a VCR or DVD player, the record button
“ ” will need to be pressed and held for approximately 2 seconds.• Once you turn on the learning function on the remote control, the built-in clock
will stop working. You will have to reset the clock after each time you use the learn function. For this reason, we recommend you teach the remote controller signals for as many devices as you can at one time.
• When you are connected to an A/C, the keys “ ” can be used for learning. For all other appliances, all of the function keys are usable.
• In regards to the Learn code and the Key Transfer code, be sure to put the key in the same storage area when using the one home appliance, so that the codes willcover each other. When using a single home appliance, the same key cannot store both the Learn code and the Key Transfer code concurrently.
• While using the menu, if you do not press any keys within 2~3 minutes, the system will back out from the menu. If you do not press any keys within 5~6 minutes, the LCD screen will power off.
Battery InstallationOpen the battery compartment cover as shown below, then install 3 new AAA batteries,making sure the + and – polarities match the markings inside the compartment.
Precautions:1. Do not use old and new batteries, or different brand batteries at the same time.2. In the event of any liquid leaking from a battery, be sure to remove the battery
and to clean the battery compartment before replacing with a new battery.3. Be sure to remove the batteries from the remote if you will not be using the
remote controller for a long period of time.
Operational InterfacesThere are six different interfaces for this remote controller, each suited to different household equipment: TV, VCR, SAT, DVD, CD and A/C (air conditioner). It is possible tosimply press the equipment key to select.
3

Sub-menusPress the 'SET' key for about 5 seconds to enter the sub-menu settings. There are 10 sub-menus in total, and you can press “ ” or “ ” to shift between them.
Remote Control Settings The remote controller can be set by three different methods (A, B or C). You can select whichever method suits you best.
Code RangesTV: 0000 – 0974 VCR: 1000 – 1250 SAT: 2000 – 2998
DVD: 3000 – 3520 CD: 4000 – 4179 A/C: 5000 - 5319
Method A: code entryFind the brand of your home appliance on the code list. Set for this brand from the first code, until you can then locate the code for the specific home appliance from there. If by setting the codes via this method you are not able to use the remote control as expected (or if the brand of the home appliance is not in the list), then go on to use Method B or Method C.
1. Manually turn the appliance you want to use on. Then locate the first code for your home appliance from the code list. For this example, if the DVD player is SONY branded, then the first code will be 3017.
4

2. Press the DVD key to switch to DVD interface.
3. Hold the SET button for 5 seconds to enter the submenu “CODE” state.
4. Press OK to enter the setup menu.
5. Enter the four figure code 3017. The remote will return to the “CODE” sub-menu when the input is correct, and a tone will be heard. Press EXIT to exit and save your settings. Check that all of the keys as expected (with the exception of the equipment key and the SET key) are all valid and operating. If so, then the settings are complete. If not, repeat steps 4-5. (A quickly repeating “beep-beep-beep” tone will sound if the code input is wrong. If this occurs, enter it again.)
Method B: manual code search1. Manually turn the appliance you want to use on. Aim the remote control at the
appliance that has been turned on. For this example, we will connect the remote to a TV.
2. Press the TV key once to switch to the TV interface.
3. Hold the SET key for 5 seconds to enter the sub-menu “CODE”. Then press the “ ” key to show “SEARCH”, then press the OK key. “MANUAL” will flash.
4. Press the OK key once and “CODE” will flash.
5

5. Aim the remote control at the TV, then click the “ ” key until the screen shows “VOLUME”. Press OK to return to the MANUAL state.
Note: except for A/C (air-conditioner) showing Turned On, all other home appliances will show “VOLUME”. Therefore, when doing settings make sure you turn the A/C on, leaving it in standby. Other appliances can remain on their normal operative states.
6. Check whether other keys are valid ( , EXIT, SET, equipment Key and the confirm key excepted). If yes, press EXIT once to return to the “SEARCH” menu, then press EXIT to exit. Settings are complete. If not, then please repeat steps 4-6.
Method C: Automated Search1. Manually turn the appliance you want to use on. Aim the remote control at the
appliance that has been turned on. For this example, we will connect the remote to a TV.
2. Press the TV key to switch to the TV interface.
3. Hold down the SET key for 5 seconds to enter the “CODE” sub-menu, then press “ ” to set the menu screen to “SEARCH”, then press OK. At this point “MANUAL” will flash.
4. Press “ ” once and the screen will show “AUTO”.
6

5. Press OK and the system will enter the Automatic Search mode.Press “ ” to move to the previous code.Press “ ” to move to the next code.
6. When the home appliance that you want the remote control to connect to turns off, press the OK button to save the code to the particular appliance. (Note: TV's and Satellite boxes will turn off. Air-conditioners will turn on. VCR, DVD and CD players will play.)
7. Check to see that the other buttons are valid ( , EXIT, SET, equipment key and OK button will not function). If the remote appears to be usable, press EXIT to return to the “SEARCH” mode, then press EXIT again to exit. The settings should now be complete.
Learning FunctionThis remote control is able to learn the functions of other household appliances that are controlled via infrared interfaces. When an interface is being set, all keys on the remote control (with the exception of the equipment keys and SET) will have learning function abilities.
1. Aim the appliances remote controller towards the signal window of the learning remote at a distance of approximately 3 ~ 5cm.
2. Hold the SET key for about 5 seconds, then enter the sub-menu “CODE”, then press the “ ” key to set the menu to “LEARN”.
7

3. Press OK, and “ ” will blink. Press OK again to enter learning mode, and “ ” will blink.
4. Press the equipment key to switch to the appliance mode of the household appliance to be learnt. (For example, if you are learning from your TV remote, press the TV key).
5. Press and hold a certain function on the target remote controller to send out it's code until the “ ” icon stops flashing, then release the key. This means the codefrom the original remote has been learned.
6. Press the corresponding key to be learned on the learning remote, at which point “ ” will blink again. Now, other keys from the remote controller can be learned. Learn each key as required until all keys have been learned. Press the SET key once to exit from learning mode. Press the EXIT key to return to the TV interface.
Cancelling the learning functionPress SET to shift to the TV interface hold the SET key for about 5 seconds to go into →Settings mode press the “ ” key to go to “LEARN” mode press the OK button → → →press “ ” to shift to the “ ” mode.
Press OK to go into “ ” mode press the key for the function that has been learned, →at which point the “ ” in “ ” will blink once, meaning the key has been cancelled. Repeat these steps to cancel all information you want removed press SET to withdraw→and return to the “LEARN” mode, then press EXIT to return to the TV interface.
8

Other Functions
Time/Clock Function and Factory SettingsOn the TV, VCR, DVD, CD, SAT and A/C pages, you can do the following:
1. Press and hold the SET key for 5 seconds to enter settings.
2. Press “ ” or “ ” on the menu, thenselect CLOCK on the LCD.
2. Press “ ” or “ ” on the menu, then select RESET on the LCD.
3. Press OK once, then press “ ” to set the time on the clock.
3. Press OK and you will hear a beep. The remote controller will regain factory settings. Press EXIT to go back and return to the menu.
4. Press “ ” or “ ” on the menu to set the hour and minute.
5. Press OK once to complete the settings.
6. Press EXIT to return to normal mode.
Set/Cancel Alarm Clock Function1. Press SET for 5 seconds to enter “SETTINGS” mode.2. Press “ ” or “ ” on the menu to select “ALARM” mode.3. Press OK once, then press “ ” to set the alarm clock.4. Press “ ” or “ ” on the menu to set the hour and minute.5. Press OK, then press “ ” once.
6. TURN ALARM ON: press OK once to turn the alarm on, then press EXIT. The screen will display “ ”.
6. TURN ALARM OFF: press OK tocancel the alarm, then press EXIT. The screen will no longer display “ ”.
9

Key Sounds ON/OFF1. Hold the SET key for 5 seconds to enter “SETTINGS” mode.2. Press “ ” or “ ” to select “SOUND”.3. Press OK, then press “ ”.
4. SOUND ON: press OK once to turn sound on, then press EXIT.
4. SOUND OFF: press OK once to turn sound off, then press EXIT.
Sound Sharing FunctionAfter setting this function, you can take control of the sound volume on four different home appliances (VCR, SAT, DVD and CD) by using the volume keys on the TV.Note: This function has no effect on air-conditioners.
This example is using the DVD player.
1. Press the DVD button to switch to the DVD interface.
2. Hold the SET button for 5 seconds to go into settings mode.
3. Press “ ” or “ ” on the menu or select the mode on the LCD.
4. Press the OK button once, then press the “ ” button on the menu.
5. Press OK to turn Sound Sharing on, then press EXIT to return to the previous menu.
5. Press OK to turn Sound Sharingoff, then press EXIT to return to the previous menu.
Note: after turning on the sound sharing function, the sound keys on the Settings interface (VOL+, VOL- and mute) can all be controlled by the volume keys. When you replace the batteries, you will need to redo the settings.
10

Macro InstructionsThis remote controller has four multi-function keys: M1, M2, M3 and M4. Each multi-function key can store 15 key codes. This function allows you to integrate many continuous or routine key control motions into one. After finishing the settings, if you press your pre-set multi-function key, this remote controller will emit your pre-set control codes in their set order.
Notes• The macro instruction keys are not affiliated with any particular home appliances.
Therefore, when you press the macro instruction keys, no matter which interface the remote is running under, the same instruction codes will be sent out.
• When a macro is triggered, the top right corner of the LCD screen will display “M”. If the timing function for the macro instruction has been turned on, the screen will display “TM”. To view which macro instructions have been equipped with timing functions, you can enter the “Mx ADD” menu. If any of the macros have timing functions, the screen will display “ON” next to it.
• When adding a macro instruction, the added instruction is displayed under the current code of the current home appliance. Once successfully added however, the current home appliance will have no bearing on the instructions being sent.
11

Macro SettingsExample 1: Operating steps: switch on the power to the TV set shift between TV/VCR →
switch on the power to the VCR start playing, using multi-function button M1 to take→ →control.
1. Press the TV button once to switch to the TV interface.
2. Press the SET button for 5 seconds to enter the sub-menu, then press “ ” or “ ” to set the menu to MACRO, then press OK.
3. Press the “ ” button.
4. Press OK again. The LCD will display [M1 00].(If the display does not show M1:00, press the equipment button to adjust)
5. Press ON/OFF until the LCD displays [M1 25], then release the button. The LCD will now display [M1 01].
6. Press the TV/AV button until the LCD displays [M1 25], then release the button. The LCD will now display [M1 02].
7. Press SET once, and the LCD will display [M1 TM].
8. Press EXIT twice to return to the TV interface. Press VCR once to go into the VCR interface.
9. Press SET for 5 seconds to go into settings mode.
10. Press “ ” or “ ” to set the menu to MACRO.
11. Press OK, then press “ ” and the LCD will display [M1 ADD].
12. Press OK again, and the LCD will display [M1 02].
13. Press ON/OFF until the LCD displays [M1 25], then release the button. The LCD will display [M1 03].
14. Press “ ” until the LCD displays [M1 25], then release the button. The LCD will display [M1 04].
15. Press SET once. The LCD will display [M1 TM].
16. Press EXIT twice, returning you to the VCR interface. You can now use the M1 multi-function button to switch on the TV, shift from TV to VCR, switch on the VCR and start playing whatever is in it.
12

Start/Cancel Macro Instruction Settings1. Press the SET button for 5 seconds to go into settings mode.
2. Press “ ” or “ ” on the menu to select the MACRO mode.
3. Press OK, then press “ ”.
START MACRO INSTRUCTION
4. Press OK to start the multi-function button function. At thistime, only the M1, M2, M3 and M4buttons will serve as multi-function buttons. The home appliance specific buttons will be non-functional.
CANCEL MACRO INSTRUCTION
4. Press OK to cancel the multi-function button function. At this time, the M1, M2, M3 and M4 buttonswill not function as multi-function buttons. The home appliance specific buttons will be functional.
5. Press EXIT to store settings and withdraw from the settings state. The LCD will display “M” which means the multi-function button settings have started.
5. Press EXIT to store settings and withdraw from the settings state. The “M” on the LCD will disappear, meaning the multi-function button settings have been cancelled.
Example 2: Automatically turn the TV on and play the show on Channel 10 at 7:30pm.
1. Press the TV button once to switch to the TV interface.
2. Press the SET button for 5 seconds to enter the sub-menu state, then press “ ”or “ ” to set the menu to MACRO, then press the OK button.
3. Click the “ ” button on the menu.
13

4. Press the OK button again, and the LCD will display [M1 00].(If the display is not showing M1-00, press the equipment key to adjust).
5. Press the ON/OFF button until the LCD displays [M1 25], then release the button. The LCD will display [M1 01].
6. Press the “ ” button until the LCD displays [M1 25], then release the button. The LCD will display [M1 02].
7. Press the 1 button until the LCD displays [M1 25], then release the button. The LCD will display [M1 03].
8. Press the 0 button until the LCD displays [M1 25], then release the button. The LCD will display [M1 04].
9. Press the SET button until the LCD displays [M1 TM].
10. Press “ ” or “ ” on the menu to set the time clock:
11. Press “ ” or “ ” on the menu to set the hour and minute:
12. Press OK to complete the settings.
13. Press the EXIT button to return to the TV page.
14. Aim the transmitting end of the remote controller at the TV. When the remote controller clock reaches 19:30, the remote controller will turn the TV on and play the program on Channel 10.
Set/Cancel Key TransferTransferring the function button of a home appliance to the function button of another appliance.
Notes:
1. The button transfer code and learning code are both X999. After starting the button transfer function, you may have to set a code before using the button transfer function. The TV code is pre-set to be 0999, the VCR code is pre-set to be 1999, the SAT code is pre-set to be 2999, the DVD code is pre-set to be 3999 and the CD code is pre-set to be 4999.
2. When doing the button transfer, be sure to use a code that is NOT X999.
3. When doing the button transfer, the user will be reminded to choose a home appliance. Remember that the code to be transferred will be the currently set code for the home appliance in question. If the current code is X999, then you cannot perform the button transfer.
4. No button transfer functionality is available for the air-conditioner.
14

Example: Transferring the information from the “6” button of the SAT to the “7” button of the VCR, then cancelling the transfer.
1. Press VCR once to switch to the VCR interface.
2. Press the SET button for 5 seconds to enter the CODE sub-menu, then press the OK button.
3. Enter a four digit code 1999. If the code entered is correct, you will hear a beep sound and the system will return to the CODE sub-menu.
4. Press “ ” or “ ” on the menu to select the KEYMOV mode.
5. Press OK, then press the “ ” button.
SET BUTTON TRANSFER
6. Press the OK button once and theLCD screen will display:
CANCEL BUTTON TRANSFER
6. Press the OK button once and theLCD screen will display
7. Press the “” button on the menu, and the LCD will display SAT.
7. Press the button whose information was transferred. The LCD will display:
Repeat this step to cancel the transferred button information.
8. Press the OK button. The LCD will display FR KEY. Press the function button 6 and the LCD will display TO KEY, then press the function button 7. Repeat this step to transfer the target button.
8. Press the SET button and the LCD will display KEYMOV.
9. Press the SET button. The LCD will display KEYMOV. Then press EXIT to return to the VCR page.
9. Press the EXIT button to return tothe normal operational state.
15

Low Power Reminder
When the battery is running low on power, the screen will show a “ ” icon, notifying you that the battery power is low and you should consider changing it over for a fresh battery when you next have the opportunity.
Kogan TV Linking Codes
If you are using this remote to link to your Kogan.com TV, please compare the remote control to the table below and overleaf to find the correct remote. The code is shown below the remote control image.
1963 1964 1965 1966 1967 1968
16

1969 1970 1971 1972 1973 1974
1975 1976 1977 1978 1979 1980
If you have futher questions or concerns regarding the use of this product, please contact the retailer you purchased from.
17