ci - screen preparation for proper pinhole prevention … · screen preparation for proper pinhole...
TRANSCRIPT
TECHNICAL INFORMATION
. KIWO Inc. 1929 Marvin Circle Seabrook, TX 77586 Tel: +1-281-474-9777 Tel: (800) KIWO USA Fax: +1-281-474-7325 e-mail: [email protected]
SCREEN PREPARATION FOR PROPER PINHOLE PREVENTION Screen printers the world over battle with the ubiquitous pinhole. For many years the pinhole has been responsible for increasing screen processing times and reducing the efficiency and profitability of the printing process. When screen printers estimate the price to charge the print buyer, they must factor in the cost of materials used, the cost of labor, and the time required for completing the job. Screen printers who better control these costs and can complete the job more efficiently, will be more profitable and more competitive in this market. Printers who are continuously plagued with pinholes find they are spending more time and money to complete the job than their competitors who have taken the necessary steps to reduce, if not eliminate, pinholes in their production process. In this report, we will take a look at the many causes of pinholes, and fisheyes, for that matter, and what steps can be taken during screen preparation to properly prevent pinholes. Let’s first define pinhole and fisheye. The SGIA Glossary of Screen Printing defines a pinhole as an imperfection in the form of tiny transparent dots that appear in printing screens or in process films after development.
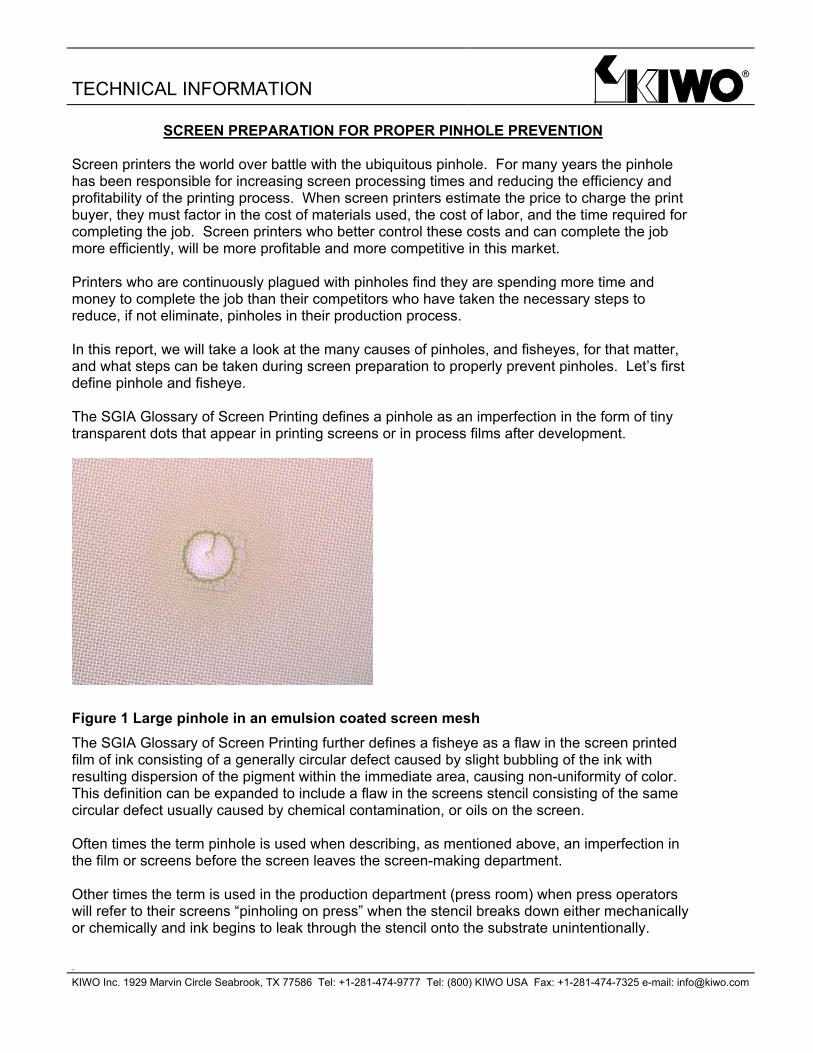
Figure 1 Large pinhole in an emulsion coated screen mesh The SGIA Glossary of Screen Printing further defines a fisheye as a flaw in the screen printed film of ink consisting of a generally circular defect caused by slight bubbling of the ink with resulting dispersion of the pigment within the immediate area, causing non-uniformity of color. This definition can be expanded to include a flaw in the screens stencil consisting of the same circular defect usually caused by chemical contamination, or oils on the screen. Often times the term pinhole is used when describing, as mentioned above, an imperfection in the film or screens before the screen leaves the screen-making department. Other times the term is used in the production department (press room) when press operators will refer to their screens “pinholing on press” when the stencil breaks down either mechanically or chemically and ink begins to leak through the stencil onto the substrate unintentionally.
TECHNICAL INFORMATION
. KIWO Inc. 1929 Marvin Circle Seabrook, TX 77586 Tel: +1-281-474-9777 Tel: (800) KIWO USA Fax: +1-281-474-7325 e-mail: [email protected]
This report is broken down into two sections: prepress pinholes and on press pinholes. I will identify the contributing factors that cause pinholes one at a time for each section and offer ways of overcoming them. The following table lists factors contributing to prepress pinholes and on-press pinholes: CAUSES OF PREPRESS PINHOLES
CAUSES OF ON-PRESS PINHOLES
Mesh Contamination Chemical Breakdown Poor Post Degreasing Drying Techniques Mechanical Breakdown Dirty Screen-Making Department Improper Coating Technique Improper Preparation Of Emulsion Particles In The Emulsion Or Film Cheap Emulsion Coating Speed & Trough Design Incomplete Drying Of The Emulsion Improper Exposure Contaminated Glass and/or Film Positives
Table 1 CAUSES OF PREPRESS PINHOLES: Mesh Contamination All mesh requires thorough degreasing and rinsing prior to coating. Even new mesh is not clean mesh. Sizing and lubricants are used during mesh manufacturing and may still remain on the mesh even though most manufacturers do wash the mesh after the weaving process. Additionally dust, dirt, and oils will likely accumulate on the mesh due to the handling of the mesh by the manufacturer and/or by the local distributor during packaging. A commercial grade mesh degreaser should be used with a soft nylon tipped brush, making sure to brush both sides of the mesh. A complete rinsing should follow. This can be done with a pressure washer to thoroughly dislodge any debris caught in the mesh openings. Be particularly careful and thorough when rinsing frames that have channels and grooves in them. These frames are more apt to hold contaminated water and chemicals in the channels and grooves that may drip onto the mesh after rinsing resulting in fisheyes and/or pinholes. A low pressure, high volume rinse to remove any contamination caused by potential “blowback” from the washout booth, should complete the process. Many screen printers are now purchasing automatic ink washout and emulsion removal systems. If you are not among those fortunate screen printers, and are using one washout booth for all steps of the reclaiming process, a word of caution. When using one booth for several wet processes like degreasing, developing, reclaiming, and ink or haze removal, one should be prepared to carefully clean the entire washout booth daily to reduce the chance of debris splashing back onto a clean screen. It is best to have dedicated washout booths. One booth for degreasing and developing, another dedicated to reclaiming, and if possible a third for ink residue and/or haze removing. A dedicated re-circulating tank just for ink residue removal is also an option.
TECHNICAL INFORMATION
. KIWO Inc. 1929 Marvin Circle Seabrook, TX 77586 Tel: +1-281-474-9777 Tel: (800) KIWO USA Fax: +1-281-474-7325 e-mail: [email protected]
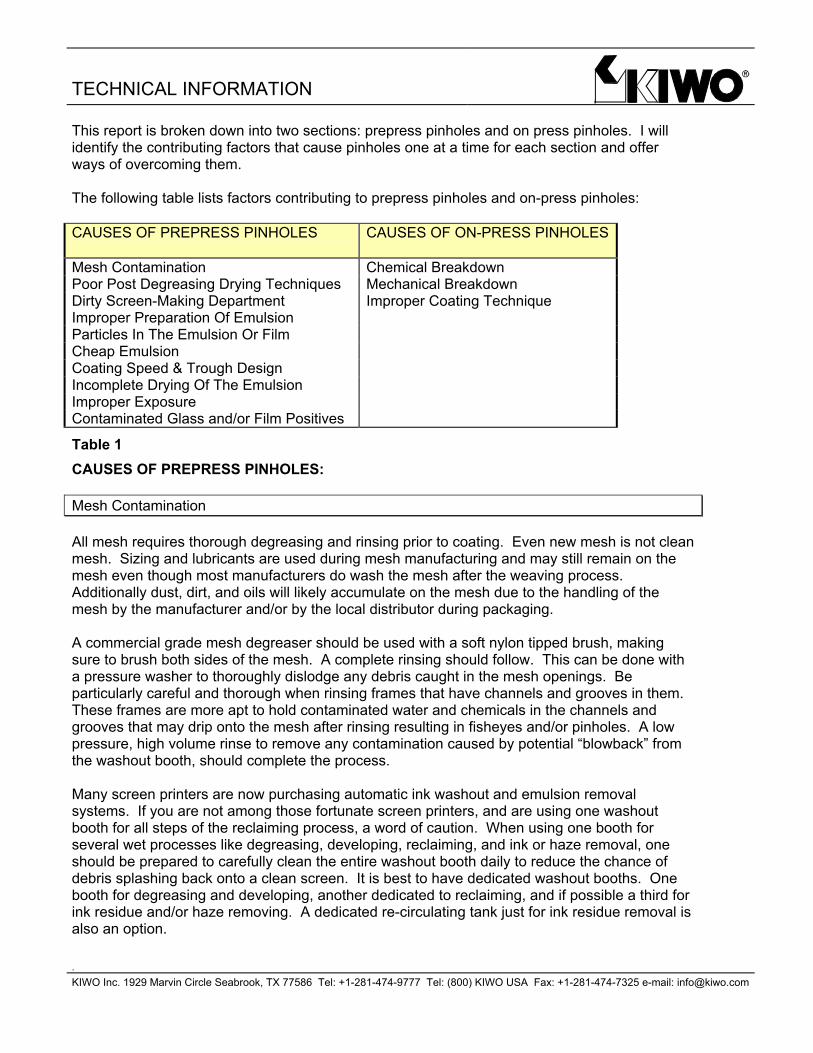
Use of mesh abraders should only be used with indirect and capillary films when necessary to increase stencil adhesion. When properly degreased, coated, and exposed, direct emulsion screens should not need abrading because the emulsion encapsulates the mesh to form a very durable stencil. Poor Post Degreasing Drying Techniques A common technique for drying a freshly degreased screen is to set the wet screen on the floor in front of fans. The problem with this technique is that the floor and the fans are usually the dirtiest things in the room. To illustrate this point try wiping the floor with your hand to see if you pick up any dirt. If you do, there is a good chance the fans are also picking the dirt up and blowing it onto the wet screen. Also wipe the fan blades and grill with your hand. Please do not do this while the fan is on! If this results in a collection of dust and dirt… well, I think you understand where I am going with this. Another technique I am not an advocate for is to set the wet screens outside in the sun to dry. Of course it is nice to take advantage of the warmth of the sun, and the fresh breeze of the wind to dry the screens, but again not the cleanest environment for a wet screen. Yet another technique is to simply drip-dry the screens either on the floor or in a rack, without the use of fans. Although this is probably the best of the methods mentioned so far, it still involves a wet screen mesh that takes an unnecessarily long time to dry. When water is allowed to sit on the mesh, it acts like a magnet attracting just about anything airborne in its path. Examples of airborne contaminate include dust, lint, skin, hair, and threads from clothing. It is best to get as much water off the screen as soon as possible.
Figure 2 Water vacuum to help speed processing and reduce contamination A water extraction device i.e. a wet/dry vacuum, that is equipped with a special wand designed especially for screens, works well for immediately removing over 90% of the water from the screen. These can be purchased from your local supplier (distributor) of screen-printing products. Often printers will buy a wet/dry shop vacuum from places like Home Depot or Sears then purchase the special wand attachment from their distributor.
TECHNICAL INFORMATION
. KIWO Inc. 1929 Marvin Circle Seabrook, TX 77586 Tel: +1-281-474-9777 Tel: (800) KIWO USA Fax: +1-281-474-7325 e-mail: [email protected]
When using a vacuum device, it is important to keep the slotted tip of the vacuum clean. The wand should be clipped to the washout booth or wall for storage and not allowed to touch the floor. After vacuuming water from the screen, the frame should be wiped off with clean rags or towels and stored in a clean place, preferably off the floor. Screen cart racking systems are often used for this purpose. Using this technique will help improve your screen turn around time because the screens will dry in about five to ten minutes instead of 45 to 60 minutes. Secondly, screen contamination is reduced significantly resulting in fewer pinholes. Some printers use compressed air to dry their screens, but we find this is a slower process and if the air is not completely clean and oil free, it can re-contaminate the mesh. Screens should be coated as soon as they are completely dry. The longer the screens sit before coating, the more contaminated they become. If they have sat for some time, using a tacky roller will remove loose debris that has collected on the mesh. Read more about temperature and humidity recommendations for drying in the section titled Chemical Breakdown. Dirty Screen-Making Department The screen-making department is where the printing plate is manufactured. Lets remember how important our printing plate (screen) is to our process, just as it is to all other printing processes. The screen making process should be done in a clean room environment. The screen coating and drying area should be the cleanest area in the department because airborne contamination is attracted to a freshly coated wet screen. Unfortunately this area is often neglected. An ideal screen coating and drying room is one where the walls and ceiling have a flat surface and are painted with gloss finish paint. Flat surfaces have less surface area for dust to collect and are easier to clean. The gloss finish will provide a durable finish that can withstand frequent washing. The same principle applies to the floor. The flatter the surface, the easier to clean. Using a sealant on the floor will also help. Whether you are a T-shirt printer or a glass printer, rooms set up this way will be much easier and faster to clean. Cleaning involves washing all surfaces as frequently as necessary to keep the dust down to an absolute minimum. Some shops damp mop their floors every day just prior to coating screens. Incorporating a portable air purifier in the coating and drying area helps to clean or “scrub” the air, and is recommended for achieving an even cleaner environment. For less than $200 these units will filter airborne particulate down to .3 of one micron. Most use a HEPA (hospital grade) filter, as well as a charcoal filter, and often times an ionizer. An air purifier will exchange the air in the room up to several times per hour and provide a better method of circulating the air than a dirty fan.
TECHNICAL INFORMATION
. KIWO Inc. 1929 Marvin Circle Seabrook, TX 77586 Tel: +1-281-474-9777 Tel: (800) KIWO USA Fax: +1-281-474-7325 e-mail: [email protected]
Improper Preparation Of Emulsion If the diazo is not thoroughly dissolved when using diazo sensitized emulsion, hard insoluble agglomerations (particles) may form on the screen. These particles show up after developing the screen as specs of emulsion locked into the mesh throughout the coated area of the screen. Make sure the diazo is totally dissolved in the water before adding to the emulsion. Then make sure the sensitizer is thoroughly mixed into the emulsion. When mixing the emulsion in a room with yellow safelights, it is often difficult to see if the sensitizer has been thoroughly stirred in because the yellow safelights mask the yellow color of the diazo. By taking the mixed emulsion into a room with white light it will be very easy to see if the sensitizer has been properly mixed and thus will not harm the product. The emulsion is not very reactive in the bucket since there is so much water present in the emulsion. They do not become fully light reactive until the water is removed. This is why we need to get emulsion-coated screens thoroughly dry before exposing them. Distilled water is recommended when mixing the diazo. If the water has high iron content, it can have adverse effects on the emulsion. Using warm water will make it easy to dissolve. I use the analogy of stirring sugar into iced tea versus stirring sugar into coffee. It is difficult to fully dissolve the sugar into the iced tea. It is also helpful to fill the diazo bottle only half full initially, so that when shaken the agitation of the water will better dissolve the diazo. Pour the dissolved diazo into the emulsion and fill the bottle only half full again. Shake to dissolve any remaining residue and pour the rest of the bottle into the emulsion. After mixing diazo sensitized emulsions, let the air bubbles escape by allowing the emulsion to sit undisturbed for a couple of hours, or preferably overnight. Any air bubbles remaining in the emulsion after mixing can transfer to the mesh if coated too soon. When using pre-sensitized SBQ “pure photopolymer” emulsions or their derivatives, it is not necessary to stir before use. This will only introduce air bubbles into the emulsion and delay the use of the product while the air disperses. Stir only if there is water on the surface of the emulsion due to condensation build up in the bucket, or if there is an obvious separation of the product. Read more about selecting the proper emulsion in the section titled Chemical Breakdown. Particles In The Emulsion Or Film On rare occasions the components of the emulsion can form hard insoluble particles that do not react with the sensitizer. This is a condition that cannot be totally controlled in the manufacturing, as it can occur at any stage in the life of an emulsion. These solid particles are actually “false” or “pseudo” pinholes. They appear as clear bright spots when viewed against a backlight, but actually no pinhole is present, as the mesh is completely blocked by this clear particle that pigment did not penetrate. Depending on ink and solvents used in printing, they may or may not leak through during the print run “on-press pinholes”.
TECHNICAL INFORMATION
. KIWO Inc. 1929 Marvin Circle Seabrook, TX 77586 Tel: +1-281-474-9777 Tel: (800) KIWO USA Fax: +1-281-474-7325 e-mail: [email protected]
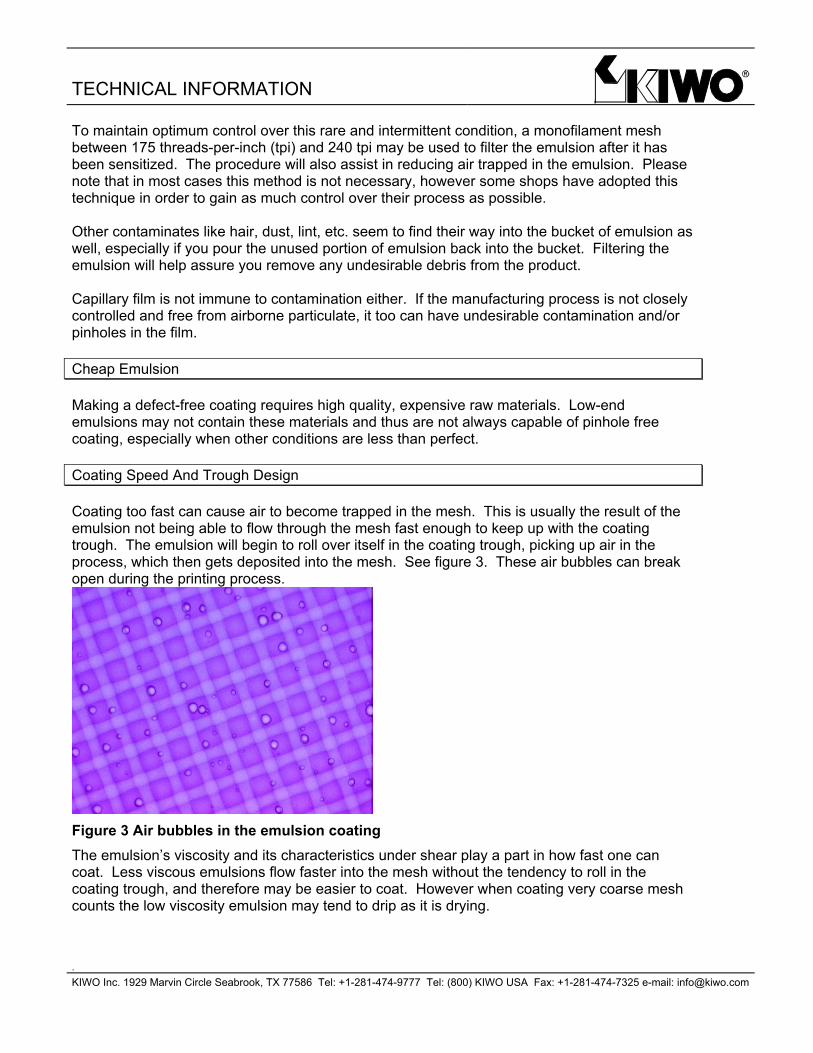
To maintain optimum control over this rare and intermittent condition, a monofilament mesh between 175 threads-per-inch (tpi) and 240 tpi may be used to filter the emulsion after it has been sensitized. The procedure will also assist in reducing air trapped in the emulsion. Please note that in most cases this method is not necessary, however some shops have adopted this technique in order to gain as much control over their process as possible. Other contaminates like hair, dust, lint, etc. seem to find their way into the bucket of emulsion as well, especially if you pour the unused portion of emulsion back into the bucket. Filtering the emulsion will help assure you remove any undesirable debris from the product. Capillary film is not immune to contamination either. If the manufacturing process is not closely controlled and free from airborne particulate, it too can have undesirable contamination and/or pinholes in the film. Cheap Emulsion Making a defect-free coating requires high quality, expensive raw materials. Low-end emulsions may not contain these materials and thus are not always capable of pinhole free coating, especially when other conditions are less than perfect. Coating Speed And Trough Design Coating too fast can cause air to become trapped in the mesh. This is usually the result of the emulsion not being able to flow through the mesh fast enough to keep up with the coating trough. The emulsion will begin to roll over itself in the coating trough, picking up air in the process, which then gets deposited into the mesh. See figure 3. These air bubbles can break open during the printing process.
Figure 3 Air bubbles in the emulsion coating The emulsion’s viscosity and its characteristics under shear play a part in how fast one can coat. Less viscous emulsions flow faster into the mesh without the tendency to roll in the coating trough, and therefore may be easier to coat. However when coating very coarse mesh counts the low viscosity emulsion may tend to drip as it is drying.
TECHNICAL INFORMATION
. KIWO Inc. 1929 Marvin Circle Seabrook, TX 77586 Tel: +1-281-474-9777 Tel: (800) KIWO USA Fax: +1-281-474-7325 e-mail: [email protected]
Coating troughs are designed with different diameter edges ranging from less than 1millimeter to about 2.5 millimeters. Each has their place and function, but be careful with the sharper designed troughs, as they may tend to create more air in the coating. When possible use a trough design with a larger diameter edge. This will reduce the chance of transferring air into the mesh, as the emulsion will flow more freely and quickly over its edge. Read more about coating techniques in the section titled Improper Coating Techniques. Incomplete Drying Of The Emulsion If the emulsion is not absolutely dry when the screen is placed into the exposure unit, the stencil will show signs of underexposure. This can happen even when the appropriate exposure time has been calculated and is used. This can be deceiving because the emulsion may feel dry to the touch; and the screen may have been coated days ago so we assume that certainly the screen must be dry.
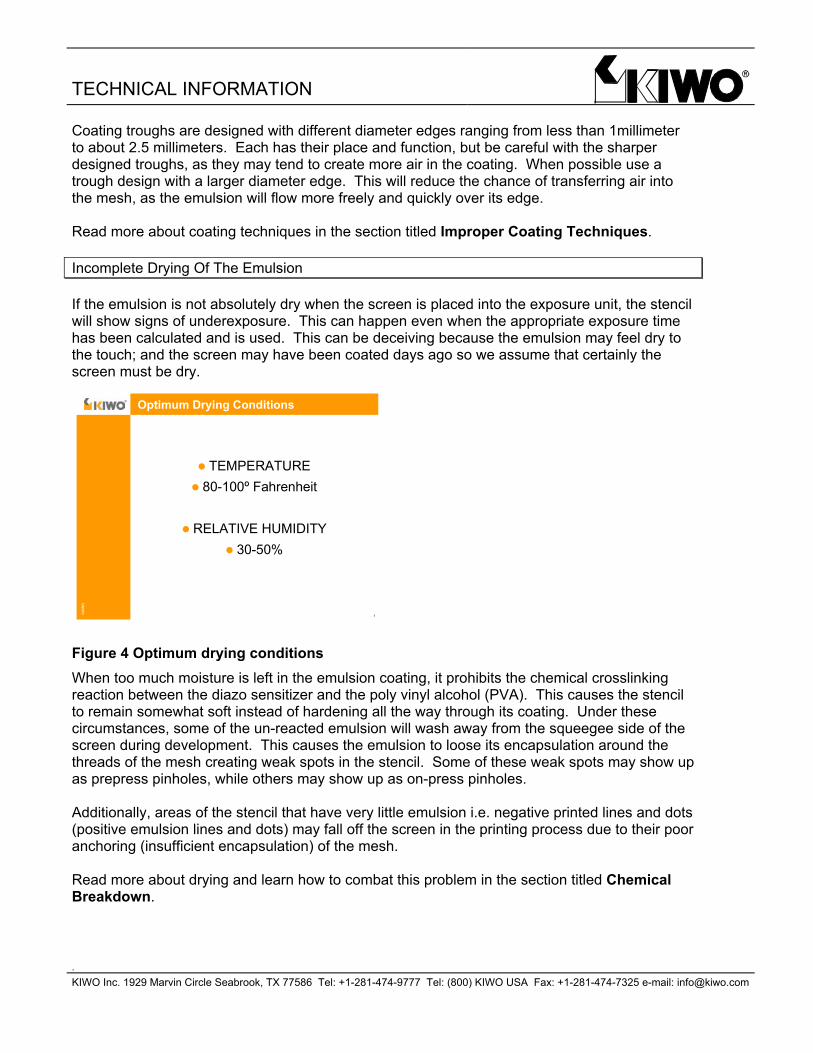
Figure 4 Optimum drying conditions When too much moisture is left in the emulsion coating, it prohibits the chemical crosslinking reaction between the diazo sensitizer and the poly vinyl alcohol (PVA). This causes the stencil to remain somewhat soft instead of hardening all the way through its coating. Under these circumstances, some of the un-reacted emulsion will wash away from the squeegee side of the screen during development. This causes the emulsion to loose its encapsulation around the threads of the mesh creating weak spots in the stencil. Some of these weak spots may show up as prepress pinholes, while others may show up as on-press pinholes. Additionally, areas of the stencil that have very little emulsion i.e. negative printed lines and dots (positive emulsion lines and dots) may fall off the screen in the printing process due to their poor anchoring (insufficient encapsulation) of the mesh. Read more about drying and learn how to combat this problem in the section titled Chemical Breakdown.
©KIWO
©K
IWO
1
®
TEMPERATURE80-100º Fahrenheit
RELATIVE HUMIDITY30-50%
Optimum Drying Conditions

TECHNICAL INFORMATION
. KIWO Inc. 1929 Marvin Circle Seabrook, TX 77586 Tel: +1-281-474-9777 Tel: (800) KIWO USA Fax: +1-281-474-7325 e-mail: [email protected]
Improper Exposure Under exposed screens can suffer the same consequence as screens that were not dried properly, a soft, weak stencil prone to pinholes and premature stencil breakdown. Other consequences of under exposure are difficulty in reclaiming the emulsion due to solvent lock in, and increased ghost/haze problems. An aged light bulb can contribute to excessive pinholes even when the screens are dry and the exposure times are properly calculated. Over time metal halide bulbs, the preferred light source, loose intensity and experience a spectral shift as the additives of the bulb are used up. Some manufacturers of these bulbs recommend replacing them after six months or 1,000 hours of use. Other manufacturers recommend replacing them when their intensity falls to 50%. Many of the light integrators used today in conjunction with the lights can calculate this information automatically. During exposure, the diazo sensitizer forms a gas. Normally the gas bubbles get dispersed through the emulsion layer, however at times they can be trapped and cause pinholes. Read more about how to calculate proper exposure times to avoid pinholes in the section titled Chemical Breakdown. Contaminated Glass and/or Film Positives Dust and dirt caught anywhere in the path between the light source and the emulsion cause pinholes. It can get between the vacuum frame glass and the film positive or emulsion, on the other side of the glass, or between the film positive and the emulsion. Scratches on the glass are even more problematic as they diffuse and refract light and can cause pinholes. Film positives that have not been processed correctly also contribute to pinholes. Today there are many alternatives to the traditional photographic film positives. Some examples include: paper and vellum positives, newer plastic vellum-like positives that have better densities and their bases are more optically clear, some for use with inkjet printers and others for use with laser printers, and some use thermal image setters. Vellum positives are particularly difficult because they do not have a clear base, which means in order to reduce pinholes an increased exposure time of approximately 30% or more is needed for the light to sufficiently penetrate through it. It is a double-edged sword, however, because the density of the black is poor so care must be taken to avoid exposing through the image. Image enhancing sprays and liquids are available to give vellum positives a boost in their densities. With such a wide variety of positives, all ranging in density and optical clarity, it can be a task achieving the optimum hard stencil without incurring some pinholes along the way. Minimum densities of 3.8 or higher are recommended for consistency. Many printers do not have transmission densitometers at their disposal so they may have no way of verifying what the densities of their film positives are.
TECHNICAL INFORMATION
. KIWO Inc. 1929 Marvin Circle Seabrook, TX 77586 Tel: +1-281-474-9777 Tel: (800) KIWO USA Fax: +1-281-474-7325 e-mail: [email protected]
One should also try to avoid piecing positives together in multiple layers. Each layer diffuses and refracts the light causing inconsistent stencil hardening, and may result in weak spots in the stencil. The emulsion coated surface of the film positive should be in direct contact with the emulsion coated screen. CAUSES OF ON-PRESS PINHOLES: The stencil may have failed on-press for a number of reasons other than the ones we normally associate with pinholes. This section is devoted to on-press pinholes that are not necessarily related to prepress pinholes. Chemical breakdown, mechanical breakdown, and improper coating techniques are the three primary causes of on-press pinholes. The following sections analyze these causes and make recommendations how to correct them. Chemical Breakdown Chemical breakdown is a reaction between the emulsion and another chemical that causes the emulsion to change its chemical structure. Chemical breakdown is apparent when the emulsion becomes extremely tacky and begins to soften. The emulsion will often change back to its original color in its container prior to coating. The chemical structure of the emulsion is being attacked by another chemical structure such as the inks, solvents or water used in the printing process. There are three primary causes for this: Using An Incompatible Emulsion For The Job Requirement There is often merit to the old adage “keep it simple”, and printers like to keep things as simple as possible in the screen-making department. They often want to use a single emulsion for a multitude of printing applications and this is understandable. However there are times when this practice may cause printing nightmares because the emulsion is not living up to their expectations and begins breaking down prematurely. This leads to prolonged down time on press and/or excessive time and material costs because extra sets of screens have to be made to complete the job. Scrap rates multiply due to the screens premature breakdown. All emulsions are not created equally. Each type of emulsion -- i.e. diazo sensitized, diazo-photopolymer sensitized a.k.a. “dual cure”, SBQ sensitized or their derivative a.k.a. “pure photopolymer” – has uniquely different characteristics. Manufacturers formulate emulsions to fulfill many criteria on a scale of more or less: solvent resistance, water resistance, abrasion resistance, elasticity, durability, resolution, exposure latitude, exposure speed, ease of reclaiming, etc. Therefore, the process is not as simple as one might think. A prerequisite for selecting the right emulsion for trouble free printing is a good understanding of the job requirements. For example, what type of inks and additives will be used? Are they abrasive in nature? What type of solvents will be used for cleanup? What type of substrate does it call for? Is it flat or contoured, rough or smooth? How many pieces will be printed? What kind of detail is required, and what mesh count/s will be used? All of this information will help you when it comes time to pick the emulsion best suited for the job. Select an emulsion that meets the criteria of the job requirements. Most emulsion manufacturers have screen-printing application guides to assist you with your selection. If you are unsure if the emulsion you use is up to the task, contact your local distributor or the manufacturer for help.
TECHNICAL INFORMATION
. KIWO Inc. 1929 Marvin Circle Seabrook, TX 77586 Tel: +1-281-474-9777 Tel: (800) KIWO USA Fax: +1-281-474-7325 e-mail: [email protected]
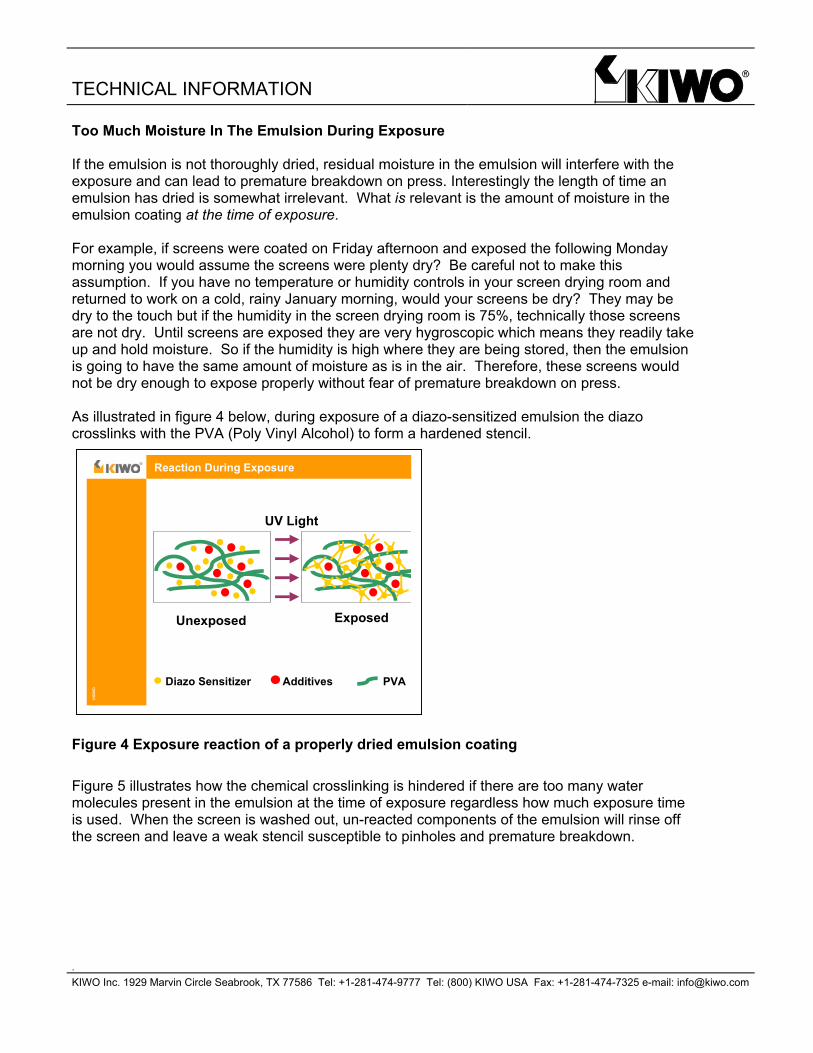
Too Much Moisture In The Emulsion During Exposure If the emulsion is not thoroughly dried, residual moisture in the emulsion will interfere with the exposure and can lead to premature breakdown on press. Interestingly the length of time an emulsion has dried is somewhat irrelevant. What is relevant is the amount of moisture in the emulsion coating at the time of exposure. For example, if screens were coated on Friday afternoon and exposed the following Monday morning you would assume the screens were plenty dry? Be careful not to make this assumption. If you have no temperature or humidity controls in your screen drying room and returned to work on a cold, rainy January morning, would your screens be dry? They may be dry to the touch but if the humidity in the screen drying room is 75%, technically those screens are not dry. Until screens are exposed they are very hygroscopic which means they readily take up and hold moisture. So if the humidity is high where they are being stored, then the emulsion is going to have the same amount of moisture as is in the air. Therefore, these screens would not be dry enough to expose properly without fear of premature breakdown on press. As illustrated in figure 4 below, during exposure of a diazo-sensitized emulsion the diazo crosslinks with the PVA (Poly Vinyl Alcohol) to form a hardened stencil.
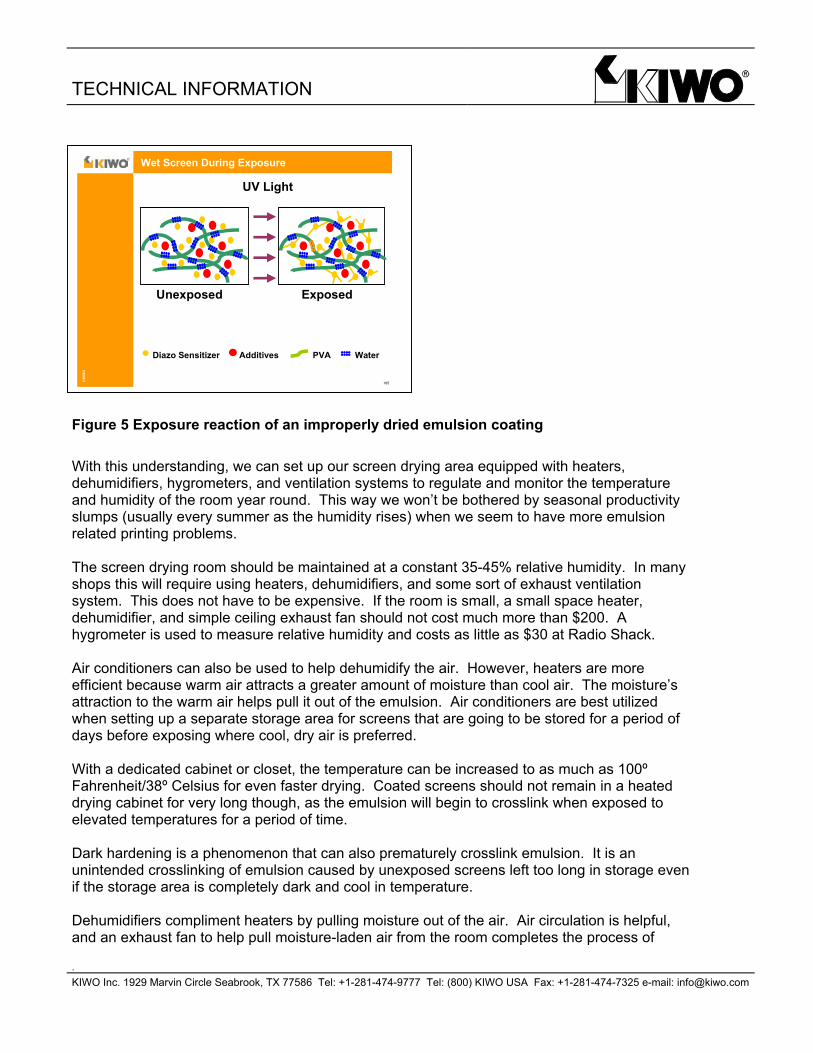
Figure 4 Exposure reaction of a properly dried emulsion coating Figure 5 illustrates how the chemical crosslinking is hindered if there are too many water molecules present in the emulsion at the time of exposure regardless how much exposure time is used. When the screen is washed out, un-reacted components of the emulsion will rinse off the screen and leave a weak stencil susceptible to pinholes and premature breakdown.
©KIWO
©K
IWO
®
Diazo Sensitizer Additives PVA
Unexposed Exposed
UV Light
Reaction During Exposure
TECHNICAL INFORMATION
. KIWO Inc. 1929 Marvin Circle Seabrook, TX 77586 Tel: +1-281-474-9777 Tel: (800) KIWO USA Fax: +1-281-474-7325 e-mail: [email protected]
Figure 5 Exposure reaction of an improperly dried emulsion coating With this understanding, we can set up our screen drying area equipped with heaters, dehumidifiers, hygrometers, and ventilation systems to regulate and monitor the temperature and humidity of the room year round. This way we won’t be bothered by seasonal productivity slumps (usually every summer as the humidity rises) when we seem to have more emulsion related printing problems. The screen drying room should be maintained at a constant 35-45% relative humidity. In many shops this will require using heaters, dehumidifiers, and some sort of exhaust ventilation system. This does not have to be expensive. If the room is small, a small space heater, dehumidifier, and simple ceiling exhaust fan should not cost much more than $200. A hygrometer is used to measure relative humidity and costs as little as $30 at Radio Shack. Air conditioners can also be used to help dehumidify the air. However, heaters are more efficient because warm air attracts a greater amount of moisture than cool air. The moisture’s attraction to the warm air helps pull it out of the emulsion. Air conditioners are best utilized when setting up a separate storage area for screens that are going to be stored for a period of days before exposing where cool, dry air is preferred. With a dedicated cabinet or closet, the temperature can be increased to as much as 100º Fahrenheit/38º Celsius for even faster drying. Coated screens should not remain in a heated drying cabinet for very long though, as the emulsion will begin to crosslink when exposed to elevated temperatures for a period of time. Dark hardening is a phenomenon that can also prematurely crosslink emulsion. It is an unintended crosslinking of emulsion caused by unexposed screens left too long in storage even if the storage area is completely dark and cool in temperature. Dehumidifiers compliment heaters by pulling moisture out of the air. Air circulation is helpful, and an exhaust fan to help pull moisture-laden air from the room completes the process of
©KIWO
©K
IWO
185
®
Unexposed Exposed
Diazo Sensitizer Additives PVA Water
UV Light
Wet Screen During Exposure
TECHNICAL INFORMATION
. KIWO Inc. 1929 Marvin Circle Seabrook, TX 77586 Tel: +1-281-474-9777 Tel: (800) KIWO USA Fax: +1-281-474-7325 e-mail: [email protected]
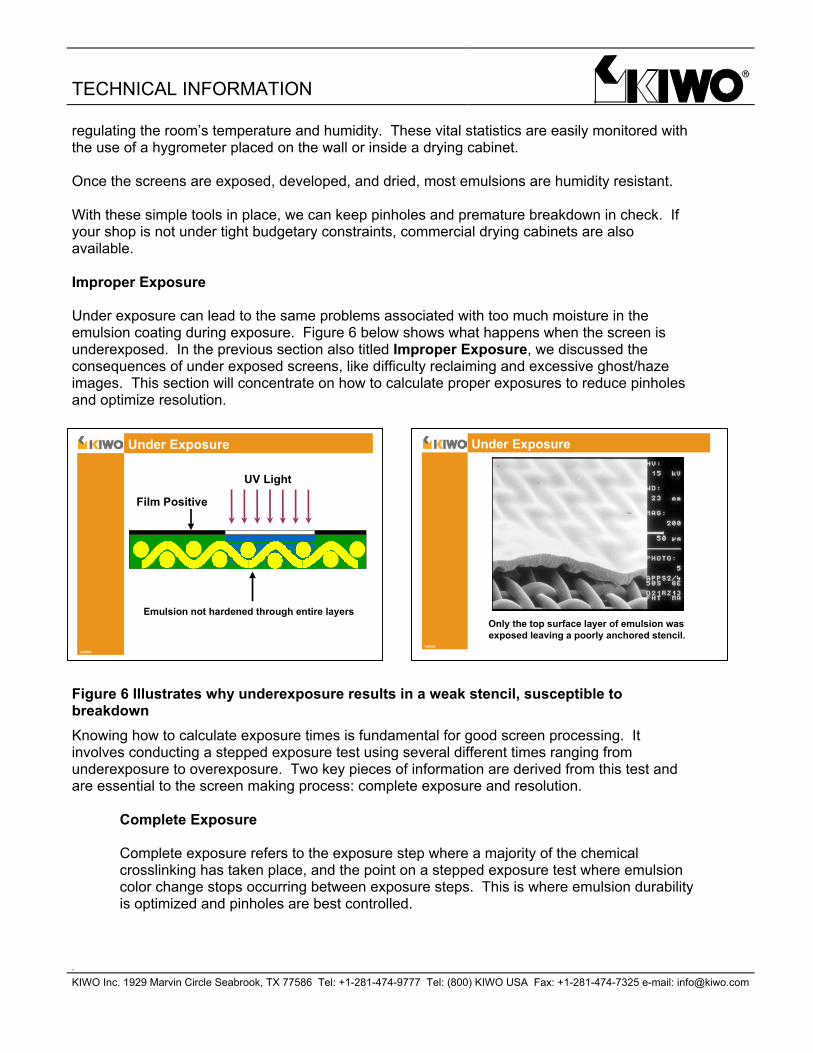
regulating the room’s temperature and humidity. These vital statistics are easily monitored with the use of a hygrometer placed on the wall or inside a drying cabinet. Once the screens are exposed, developed, and dried, most emulsions are humidity resistant. With these simple tools in place, we can keep pinholes and premature breakdown in check. If your shop is not under tight budgetary constraints, commercial drying cabinets are also available. Improper Exposure Under exposure can lead to the same problems associated with too much moisture in the emulsion coating during exposure. Figure 6 below shows what happens when the screen is underexposed. In the previous section also titled Improper Exposure, we discussed the consequences of under exposed screens, like difficulty reclaiming and excessive ghost/haze images. This section will concentrate on how to calculate proper exposures to reduce pinholes and optimize resolution.
Figure 6 Illustrates why underexposure results in a weak stencil, susceptible to breakdown Knowing how to calculate exposure times is fundamental for good screen processing. It involves conducting a stepped exposure test using several different times ranging from underexposure to overexposure. Two key pieces of information are derived from this test and are essential to the screen making process: complete exposure and resolution.
Complete Exposure Complete exposure refers to the exposure step where a majority of the chemical crosslinking has taken place, and the point on a stepped exposure test where emulsion color change stops occurring between exposure steps. This is where emulsion durability is optimized and pinholes are best controlled.
©KIWO
Under Exposure
Emulsion not hardened through entire layers
Film Positive
UV Light
©KIWO
Under Exposure
Only the top surface layer of emulsion wasexposed leaving a poorly anchored stencil.
TECHNICAL INFORMATION
. KIWO Inc. 1929 Marvin Circle Seabrook, TX 77586 Tel: +1-281-474-9777 Tel: (800) KIWO USA Fax: +1-281-474-7325 e-mail: [email protected]
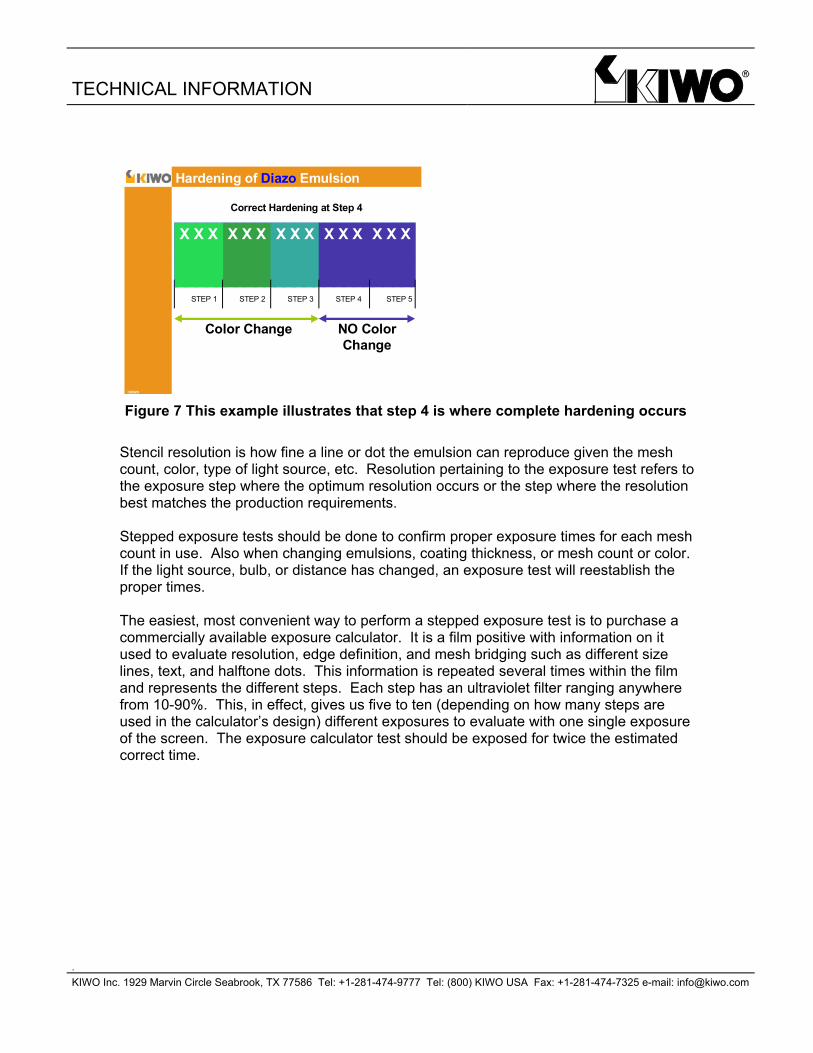
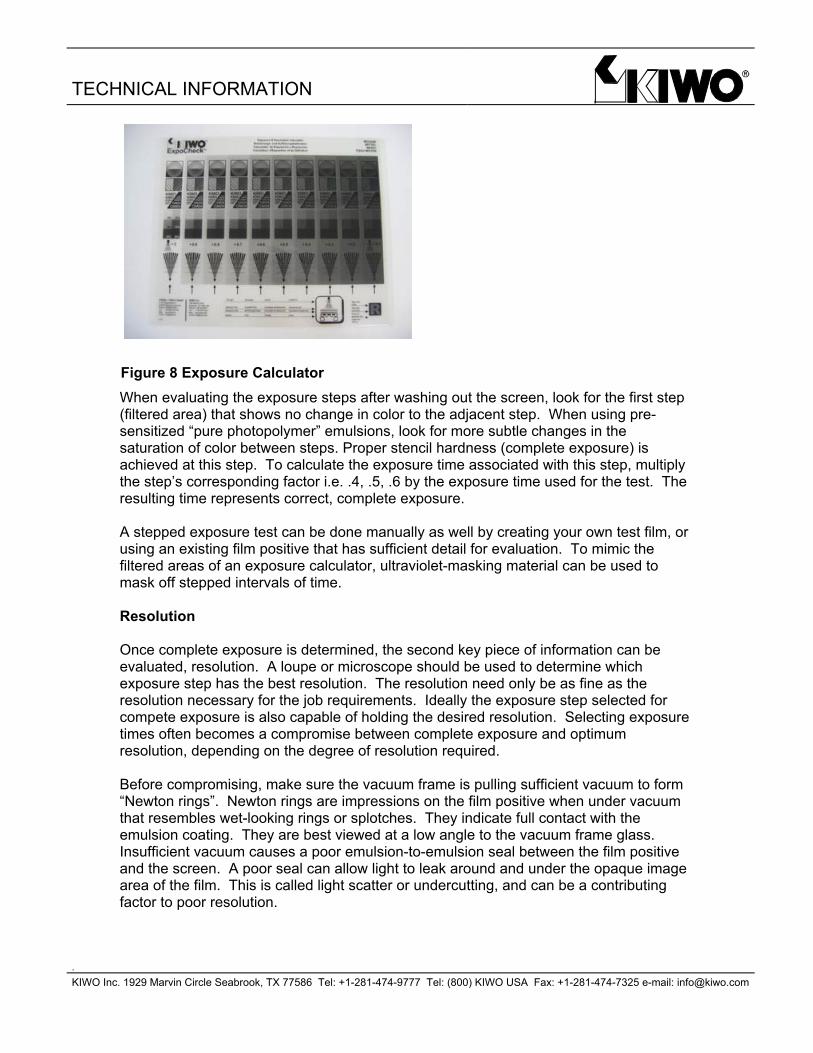
Figure 7 This example illustrates that step 4 is where complete hardening occurs Stencil resolution is how fine a line or dot the emulsion can reproduce given the mesh count, color, type of light source, etc. Resolution pertaining to the exposure test refers to the exposure step where the optimum resolution occurs or the step where the resolution best matches the production requirements. Stepped exposure tests should be done to confirm proper exposure times for each mesh count in use. Also when changing emulsions, coating thickness, or mesh count or color. If the light source, bulb, or distance has changed, an exposure test will reestablish the proper times. The easiest, most convenient way to perform a stepped exposure test is to purchase a commercially available exposure calculator. It is a film positive with information on it used to evaluate resolution, edge definition, and mesh bridging such as different size lines, text, and halftone dots. This information is repeated several times within the film and represents the different steps. Each step has an ultraviolet filter ranging anywhere from 10-90%. This, in effect, gives us five to ten (depending on how many steps are used in the calculator’s design) different exposures to evaluate with one single exposure of the screen. The exposure calculator test should be exposed for twice the estimated correct time.
©KIWO
Hardening of Diazo Emulsion
X X X X X XX X X X X XX X X
» STEP 2 » STEP 3 » STEP 4 » STEP 5
Color Change NO ColorChange
» STEP 1
Correct Hardening at Step 4
TECHNICAL INFORMATION
. KIWO Inc. 1929 Marvin Circle Seabrook, TX 77586 Tel: +1-281-474-9777 Tel: (800) KIWO USA Fax: +1-281-474-7325 e-mail: [email protected]
Figure 8 Exposure Calculator When evaluating the exposure steps after washing out the screen, look for the first step (filtered area) that shows no change in color to the adjacent step. When using pre-sensitized “pure photopolymer” emulsions, look for more subtle changes in the saturation of color between steps. Proper stencil hardness (complete exposure) is achieved at this step. To calculate the exposure time associated with this step, multiply the step’s corresponding factor i.e. .4, .5, .6 by the exposure time used for the test. The resulting time represents correct, complete exposure. A stepped exposure test can be done manually as well by creating your own test film, or using an existing film positive that has sufficient detail for evaluation. To mimic the filtered areas of an exposure calculator, ultraviolet-masking material can be used to mask off stepped intervals of time. Resolution Once complete exposure is determined, the second key piece of information can be evaluated, resolution. A loupe or microscope should be used to determine which exposure step has the best resolution. The resolution need only be as fine as the resolution necessary for the job requirements. Ideally the exposure step selected for compete exposure is also capable of holding the desired resolution. Selecting exposure times often becomes a compromise between complete exposure and optimum resolution, depending on the degree of resolution required. Before compromising, make sure the vacuum frame is pulling sufficient vacuum to form “Newton rings”. Newton rings are impressions on the film positive when under vacuum that resembles wet-looking rings or splotches. They indicate full contact with the emulsion coating. They are best viewed at a low angle to the vacuum frame glass. Insufficient vacuum causes a poor emulsion-to-emulsion seal between the film positive and the screen. A poor seal can allow light to leak around and under the opaque image area of the film. This is called light scatter or undercutting, and can be a contributing factor to poor resolution.
TECHNICAL INFORMATION
. KIWO Inc. 1929 Marvin Circle Seabrook, TX 77586 Tel: +1-281-474-9777 Tel: (800) KIWO USA Fax: +1-281-474-7325 e-mail: [email protected]
When evaluating an exposure calculator’s resolution, be careful to keep in mind the mesh count used, as it will influence the degree of achievable resolution. Most exposure calculators provide only one film containing very fine detail. If this type of calculator is used on a coarse mesh, the finest detail will often be closed in. This does not mean the exposure time is incorrect. In other words, do not get hung up on trying to resolve the finest detail of an exposure calculator if it is not representative of the type of printing to be performed on that given mesh count. The finest detail on many exposure calculators is as fine as .001 inch (25 microns). This is finer that the thinnest threads used for weaving polyester mesh.
Mechanical Breakdown Mechanical breakdown is a wearing down of the emulsion caused by the friction generated between the emulsion and the ink, substrate, squeegee, and/or floodbar. The following is a list of some of the common forms of mechanical breakdown. Abrasive inks like ones that have frit in them and rough substrates will wear down the emulsion over time. Rough, sharp, or contoured substrates contribute to mechanical wear on the emulsion. The ends of the squeegee and floodbar often cause the emulsion to breakdown at the edges of the coating. Several factors contribute to this type of breakdown such as: excessive off-contact, too little clearance between the ends of the squeegee/floodbar and the inside dimension of the frame, too much squeegee/floodbar pressure, too little screen tension, and off-contact set too high. The edges of the emulsion are most susceptible because this is where the mesh and emulsion undergo the most stretch and interface pressure, resulting in undue stress. This can be minimized by: Rounding the corners of the squeegee Increasing screen tension and lowering the off-contact distance Reducing squeegee and floodbar pressures if possible Increasing the free mesh area – the distance between the inside dimension of the frame and
the outside edges of the squeegee and floodbar When possible this can be done by using a larger frame, using shorter squeegees and
floodbars, or centering the image Over drying of the screens making it so dry it becomes brittle, or grossly over exposed screens, can cause the emulsion to crack into little micro-fractures. Excessive stretching of the emulsion can cause these fractures as well. In cases where the squeegee rides over the edge of a hard, thick substrate at the beginning or end of the print stroke, the emulsion will break down over time. An easy fix would be to shorten the squeegee stroke to within the length of the substrate, but often times this is not possible because a full bleed is required on the print. If this is the case, try to frame or nest the substrate with shim stock of the same thickness that butts right up to the edges of the substrate. Belt presses coated with an adhesive to hold the substrate down can literally tear the emulsion off the mesh where the belt comes in direct contact with the stencil.
TECHNICAL INFORMATION
. KIWO Inc. 1929 Marvin Circle Seabrook, TX 77586 Tel: +1-281-474-9777 Tel: (800) KIWO USA Fax: +1-281-474-7325 e-mail: [email protected]
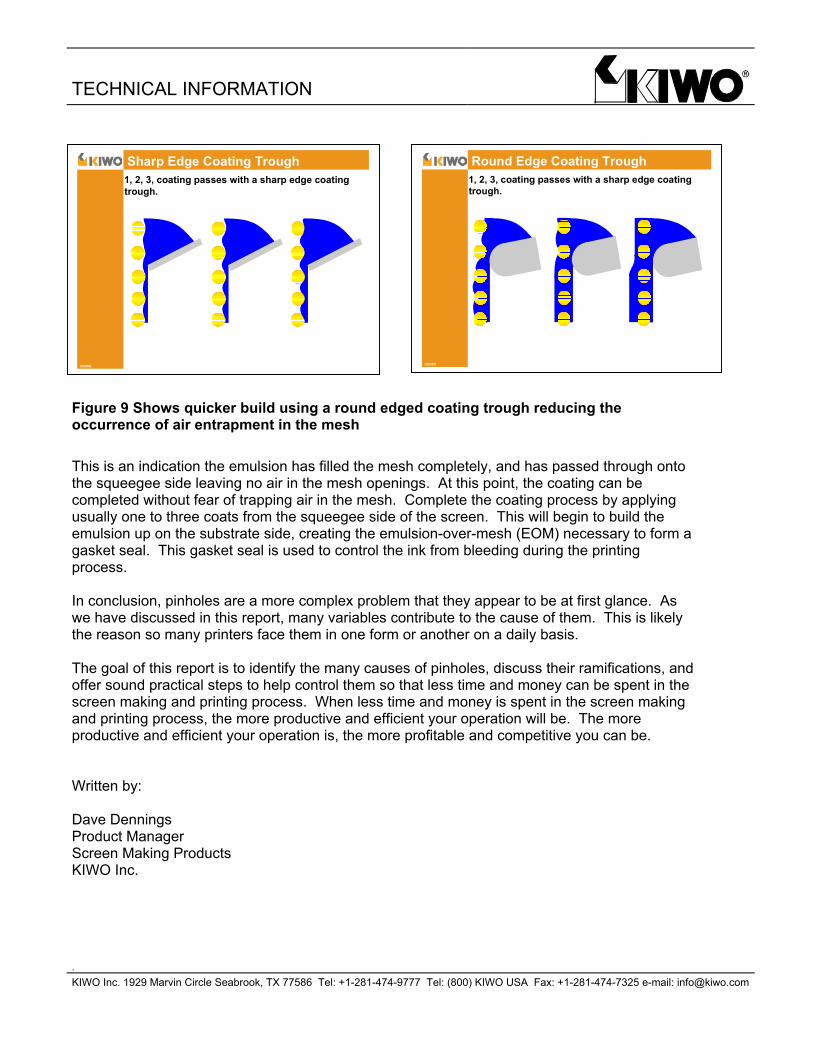
An emulsion formulated for greater abrasion, resistance, and elasticity will help reduce these problems. When selecting an emulsion, keep in mind that abrasion resistance may be just one of the key requirements needed for the job; for example, the job may call for 10,000 pieces using a water-based ink. In which case, the emulsion needs to possess both excellent abrasion resistance and long run water resistance as well. Improper Coating Techniques Improper coating techniques may be the cause of a slow progression of small pinholes developing throughout a print run. The route cause of these small pinholes may be air bubbles trapped in the mesh openings. Contributing factors include: coating too fast, using a sharp edged coating trough, and insufficient coating passes or sequence. Coating Too Fast Coating too fast causes air bubbles to form in the coating trough that transfer into the mesh openings. When the emulsion’s ability to flow can’t keep up with the speed of the coating trough, the emulsion begins to roll in the trough introducing air that gets coated into the mesh. The thicker the emulsion, the slower the coating technique should be. Slowing down the coating speed allows for a less turbulent, smooth flow of emulsion through the mesh. Using A Sharp Edged Coating Trough Using a sharp edged coating trough has a similar effect. The emulsion doesn’t flow as smoothly over a sharp edge as it does a round edge. Again, the emulsion may tend to roll in the trough picking up air as it’s rolling. The emulsion flows over the edge of a round trough more smoothly with less turbulence. Less air is generated and a quick build-up of emulsion is achieved with fewer coating passes. Even printing applications that require very little stencil i.e. printing with UV ink, four-color-process printing, etc., will often benefit from using a round edged coating trough. Finer meshes have very little open area and therefore impede the flow through them, ink or emulsion. Even when a thin emulsion thickness is desired, it can usually be achieved with a round edged trough. Keep in mind that even high solids direct emulsions may contain over 50% water. So what appears to be a very thick emulsion buildup when wet is going to shrink back to less than 50% of its wet film thickness as it dries. Insufficient Coating Passes Or Improper Coating Sequence If not enough coats of emulsion are applied to the substrate side of the screen, air can become trapped in the mesh openings. The emulsion partially fills the mesh from the substrate side, but before it surfaces on the squeegee side; the squeegee side of the screen is coated, thus trapping air in the mesh openings. Coating should begin on the substrate side of the screen. Continue on this same side until a smooth, glossy, mirror-like finish is noticeable from the opposite (squeegee) side of the screen when viewed under lights at a low angle. If after one coating pass from the substrate side, the squeegee side still has a dull, matte finish, or is blotchy in appearance, more coats should be applied to the substrate side until the glossy finish is apparent on the squeegee side.
TECHNICAL INFORMATION
. KIWO Inc. 1929 Marvin Circle Seabrook, TX 77586 Tel: +1-281-474-9777 Tel: (800) KIWO USA Fax: +1-281-474-7325 e-mail: [email protected]
Figure 9 Shows quicker build using a round edged coating trough reducing the occurrence of air entrapment in the mesh This is an indication the emulsion has filled the mesh completely, and has passed through onto the squeegee side leaving no air in the mesh openings. At this point, the coating can be completed without fear of trapping air in the mesh. Complete the coating process by applying usually one to three coats from the squeegee side of the screen. This will begin to build the emulsion up on the substrate side, creating the emulsion-over-mesh (EOM) necessary to form a gasket seal. This gasket seal is used to control the ink from bleeding during the printing process. In conclusion, pinholes are a more complex problem that they appear to be at first glance. As we have discussed in this report, many variables contribute to the cause of them. This is likely the reason so many printers face them in one form or another on a daily basis. The goal of this report is to identify the many causes of pinholes, discuss their ramifications, and offer sound practical steps to help control them so that less time and money can be spent in the screen making and printing process. When less time and money is spent in the screen making and printing process, the more productive and efficient your operation will be. The more productive and efficient your operation is, the more profitable and competitive you can be. Written by: Dave Dennings Product Manager Screen Making Products KIWO Inc.
©KIWO
Sharp Edge Coating Trough 1, 2, 3, coating passes with a sharp edge coating
trough.
©KIWO
Round Edge Coating Trough 1, 2, 3, coating passes with a sharp edge coating
trough.