ci/fep300/feh300-en processmaster / hygienicmaster · pdf fileci/fep300/feh300-en...
TRANSCRIPT

CI/FEP300/FEH300-EN ProcessMaster / HygienicMaster
Commissioning Instructions Electromagnetic Flowmeter FEP300/FEH300

Neu
Electromagnetic Flowmeter
ProcessMaster / HygienicMaster
Commissioning Instruction - EN CI/FEP300/FEH300-EN
06.2009
Rev. A
Manufacturer: ABB Automation Products GmbH Dransfelder Straße 2 D-37079 Göttingen Germany Tel.: +49 551 905-534 Fax: +49 551 905-555 [email protected]
© Copyright 2009 by ABB Automation Products GmbH Subject to changes without notice
This document is protected by copyright. It assists the user in safe and efficient operation of the device. The contents of this document, whether whole or in part, may not be copied or reproduced without prior approval by the copyright holder.
Contents

Contents
2 - EN ProcessMaster / HygienicMaster CI/FEP300/FEH300-EN
1 Safety....................................................................................................................................................................4 1.1 General information and notes for the reader ................................................................................................4 1.2 Intended use...................................................................................................................................................5 1.3 Improper use ..................................................................................................................................................5 1.4 Target groups and qualifications ....................................................................................................................5 1.5 Warranty provisions........................................................................................................................................5
1.5.1 Safety/warning symbols, note symbols...................................................................................................6 1.6 Transport safety information ..........................................................................................................................7 1.7 Installation safety information.........................................................................................................................7 1.8 Electrical installation safety information .........................................................................................................7 1.9 Safety instructions for operation.....................................................................................................................8 1.10 Technical limit values .....................................................................................................................................8 1.11 Allowed Fluids ................................................................................................................................................8
2 Device designs ....................................................................................................................................................9 2.1.1 Compact design ......................................................................................................................................9 2.1.2 Remote design ........................................................................................................................................9
3 Transport............................................................................................................................................................10 3.1 Inspection .....................................................................................................................................................10 3.2 Transport of flanged units smaller than DN 450 ..........................................................................................10 3.3 Transport of flanged units larger than DN 400.............................................................................................10
4 Mounting ............................................................................................................................................................11 4.1 General information on installation...............................................................................................................11
4.1.1 Supports for meter sizes larger than DN 400........................................................................................11 4.1.2 Mounting the measuring tube................................................................................................................12
4.2 Torque information .......................................................................................................................................13 4.2.1 Flanged units ProcessMaster and HygienicMaster ..............................................................................13 4.2.2 Wafer type unit (HygienicMaster)..........................................................................................................15 4.2.3 Variable process connections (HygienicMaster)...................................................................................15
4.3 Information on EHEDG conformity...............................................................................................................16 4.4 Information on 3A conformity .......................................................................................................................16 4.5 Installation Requirements.............................................................................................................................17
4.5.1 Electrode axis........................................................................................................................................17 4.5.2 In- and outlet pipe sections ...................................................................................................................17 4.5.3 Vertical connections ..............................................................................................................................17 4.5.4 Horizontal connections..........................................................................................................................17 4.5.5 Free inlet or outlet .................................................................................................................................17 4.5.6 Strongly contaminated fluids.................................................................................................................17 4.5.7 Installation in the vicinity of pumps .......................................................................................................18 4.5.8 Installing the high temperature design ..................................................................................................18 4.5.9 Installation in pipelines with larger nominal diameters..........................................................................18
4.6 Ground..........................................................................................................................................................19 4.6.1 General information on ground connections .........................................................................................19

Contents
CI/FEP300/FEH300-EN ProcessMaster / HygienicMaster EN - 3
4.6.2 Metal pipe with fixed flanges.................................................................................................................19 4.6.3 Metal pipe with loose flanges................................................................................................................20 4.6.4 Plastic pipes, non-metallic pipes or pipes with insulating liner .............................................................20 4.6.5 Sensor type HygienicMaster .................................................................................................................21 4.6.6 Ground for devices with hard rubber lining ...........................................................................................21 4.6.7 Ground for devices with protective plates .............................................................................................21 4.6.8 Ground with conductive PTFE grounding plate ....................................................................................21
5 Electrical connection ........................................................................................................................................22 5.1 Preparing and routing the signal and magnet coil cable ..............................................................................22
5.1.1 Protection class IP 68 ...........................................................................................................................24 5.2 Connecting the transmitter ...........................................................................................................................26
5.2.1 Connecting the supply power................................................................................................................26 5.2.2 Transmitter ............................................................................................................................................27 5.2.3 Interconnection Diagrams .....................................................................................................................28
6 Commissioning..................................................................................................................................................31 6.1 Preliminary checks prior to start-up..............................................................................................................31 6.2 Operation......................................................................................................................................................31
6.2.1 Menu navigation....................................................................................................................................32 6.2.2 Process display .....................................................................................................................................32
6.3 Configuring the current output......................................................................................................................33 6.4 Commissioning the unit ................................................................................................................................34
6.4.1 Downloading the system data...............................................................................................................34 6.4.2 Parametrizing via the "Easy Set-up" menu function .............................................................................35
7 Parameter overview...........................................................................................................................................38 8 Error messages .................................................................................................................................................41
8.1 LCD display ..................................................................................................................................................41 9 Appendix ............................................................................................................................................................42
9.1 Additional documents ...................................................................................................................................42 9.2 Approvals and certifications .........................................................................................................................42

Safety
4 - EN ProcessMaster / HygienicMaster CI/FEP300/FEH300-EN
1 Safety
1.1 General information and notes for the reader
Read these instructions carefully prior to installing and commissioning the device.
These instructions are an important part of the product and must be kept for later use.
These instructions are intended as an overview and do not contain detailed information on all designs for this product or every possible aspect of installation, operation and maintenance.
For additional information or in case specific problems occur that are not discussed in these instructions, contact the manufacturer.
The content of these instructions is neither part of any previous or existing agreement, promise or legal relationship nor is it intended to change the same.
This product is built based on state-of-the-art technology and is operationally safe. It has been tested and left the factory in a safe, maintenance-free state. The information in the manual must be observed and followed in order to maintain this state throughout the period of operation.
Modifications and repairs to the product may only be performed if expressly permitted by these instructions.
Only by observing all of the safety information and all safety/warning symbols in these instructions can optimum protection of both personnel and the environment, as well as safe and fault-free operation of the device, be ensured.
Information and symbols directly on the product must be observed. They may not be removed and must be fully legible at all times.
Important For a list of all additional documents associated with the product, see section 9.1, "Additional documents".
Important
• An additional document with Ex safety information is available for measuring systems that are used in potentially explosive areas.
• Ex safety information is an integral part of this manual. As a result, it is crucial that the installation guidelines and connection values it lists are also observed.
The icon on the name plate indicates the following:

Safety
CI/FEP300/FEH300-EN ProcessMaster / HygienicMaster EN - 5
1.2 Intended use
This device is intended for the following uses:
• To transmit fluid, pulpy or pasty substances with electrical conductivity.
• To measure the flowrate of the operating volume or mass flow units (at constant pressure / temperature), if a mass engeineering unit is selected.
The following items are included in the intended use:
• Read and follow the instructions in this manual.
• Observe the technical ratings; refer to the section “Technical limit values”.
• Use only allowed liquids for measurement; refer to the section “Allowed fluids”.
1.3 Improper use
The following are considered to be instances of improper use of the device:
• Operation as a flexible adapter in piping, e.g., to compensate for pipe offsets, pipe vibrations, pipe expansions, etc.
• As a climbing aid, e. g., for mounting purposes
• As a support for external loads, e. g., as a support for piping, etc.
• Adding material, e. g., by painting over the name plate or welding/soldering on parts
• Removing material, e. g., by spot drilling the housing
Repairs, alterations, and enhancements, or the installation of replacement parts, are only permissible insofar as these are described in the manual. Approval by ABB Automation Products GmbH must be sought for any activities beyond this scope. Repairs performed by ABB-authorized specialist shops are excluded from this.
1.4 Target groups and qualifications
Installation, commissioning, and maintenance of the product may only be performed by trained specialist personnel who have been authorized by the plant operator to do so. The specialist personnel must have read and understood the manual and comply with its instructions.
Prior to using corrosive and abrasive materials for measurement purposes, the operator must check the level of resistance of all parts coming into contact with the materials to be measured. ABB Automation Products GmbH will gladly support you in selecting the materials, but cannot accept any liability in doing so.
The operators must strictly observe the applicable national regulations with regards to installation, function tests, repairs, and maintenance of electrical products.
1.5 Warranty provisions
Using the device in a manner that does not fall within the scope of its intended use, disregarding this instruction, using underqualified personnel, or making unauthorized alterations releases the manufacturer from liability for any resulting damage. This renders the manufacturer's warranty null and void.

Safety
6 - EN ProcessMaster / HygienicMaster CI/FEP300/FEH300-EN
1.5.1 Safety/warning symbols, note symbols
DANGER – <Serious damage to health / risk to life>
This symbol in conjunction with the signal word "Danger" indicates an imminent danger. Failure to observe this safety information will result in death or severe injury.
DANGER – <Serious damage to health / risk to life>
This symbol in conjunction with the signal word "Danger" indicates an imminent electrical hazard. Failure to observe this safety information will result in death or severe injury.
WARNING – <Bodily injury> This symbol in conjunction with the signal word “Warning“ indicates a possibly dangerous situation. Failure to observe this safety information may result in death or severe injury.
WARNING – <Bodily injury>
This symbol in conjunction with the signal word "Warning" indicates a potential electrical hazard. Failure to observe this safety information may result in death or severe injury.
CAUTION – <Minor injury> This symbol in conjunction with the signal word “Caution“ indicates a possibly dangerous situation. Failure to observe this safety information may result in minor or moderate injury. This may also be used for property damage warnings.
ATTENTION – <Property damage>!
The symbol indicates a potentially damaging situation.
Failure to observe this safety information may result in damage to or destruction of the product and/or other system components.
IMPORTANT (NOTICE) This symbol indicates operator tips, particularly useful information, or important information about the product or its further uses. It does not indicate a dangerous or damaging situation.

Safety
CI/FEP300/FEH300-EN ProcessMaster / HygienicMaster EN - 7
1.6 Transport safety information
• Depending on the device, the center of gravity may not be in the center of the equipment.
• The protection plates or protective caps installed on the process connections of devices lined with PTFE / PFA must not be removed until just before installation; to prevent possible leakage, make sure that the liner on the flange is not cut or damaged.
1.7 Installation safety information
Observe the following instructions:
• The flow direction must correspond to the direction indicated on the device, if labeled.
• Comply with the maximum torque for all flange bolts.
• Install the devices without mechanical tension (torsion, bending).
• Install flange and wafer type units with coplanar counter flanges.
• Only install devices for the intended operating conditions and with suitable seals.
• Secure the flange bolts and nuts against pipeline vibrations.
1.8 Electrical installation safety information
The electrical connection may only be performed by authorized specialists according to the electrical plans.
Comply with electrical connection information in the manual. Otherwise, the electrical protection can be affected.
Ground the flowmeter and sensor housing.
The line for the supply power must be installed according to the relevant national and international standards. A separate fuse must be connected upstream and in close proximity to each unit. The fuses must be identified accordingly. The unit has a protection class of I and overvoltage class II (IEC664).
The power supply and the electrical circuit for the coils of the sensor are dangerous and pose a contact risk.
The coils and signal circuit can be connected with ABB sensors only. Use the supplied cable.
Only electrical circuits that do not pose a contact risk can be connected to the remaining signal inputs and outputs.

Safety
8 - EN ProcessMaster / HygienicMaster CI/FEP300/FEH300-EN
1.9 Safety instructions for operation
During operation with hot fluids, contact with the surface may result in burns.
Aggressive fluids may result in corrosion or abrasion of the parts that come into contact with the medium. As a result, pressurized fluids may escape prematurely.
Wear to the flange gasket or process connection gaskets (e.g., aseptic threaded pipe connections, Tri-Clamp, etc.) may enable a pressurized medium to escape.
When using internal flat gaskets, these can become embrittled through CIP/SIP processes.
If pressure shocks exceeding the device's permissible nominal pressure occur continuously during operation, this can have a detrimental effect on the device's service life.
Warning – Risk to persons! Bacteria and chemical substances can contaminate or pollute pipeline systems and the materials they are made of. The appropriate installation conditions must be observed in order to achieve an installation that complies with EHEDG requirements. For an installation to comply with EHEDG requirements, the process connection/gasket combinations created by the operator must always be made of parts that conform to EHEDG stipulations (EHEDG Position Paper: "Hygienic Process connections to use with hygienic components and equipment").
1.10 Technical limit values
The device is designed for use exclusively within the stated values on the name plate and within the technical limit values specified in the data sheets.
The following technical limit values must be observed:
• The permissible operating pressure (PS) in the permissible temperature (TS) may not exceed the pressure-temperature ratings.
• The maximum operating temperature may not be exceeded.
• The permitted operating temperature may not be exceeded.
• The housing protection system must be observed.
• The flowmeter sensor may not be operated in the vicinity of powerful electromagnetic fields, e.g., motors, pumps, transformers, etc. A minimum spacing of approx. 1 m (3.28 ft) should be maintained. For installation on or to steel parts (e.g., steel brackets), a minimum spacing of approx. 100 mm (3.94 inch) should be maintained (based on IEC801-2 and IECTC77B).
1.11 Allowed Fluids
When measuring fluids, the following points must be observed:
• Fluids may only be used if, based on state-of-the-art technology or the operating experience of the user, it is assured that chemical and physical properties of the components coming into contact with the fluids (signal electrodes, ground electrodes, liners and, possibly, process connections, protective plates or protective flanges) are not affected during the operating life.
• Fluids with unknown properties or abrasive fluids may only be used if the operator can perform regular and suitable tests to ensure the safe condition of the device.
• Observe the information on the name plate.

Device designs
CI/FEP300/FEH300-EN ProcessMaster / HygienicMaster EN - 9
2 Device designs
Important An additional document with Ex safety instructions is available for measuring systems that are used in explosion hazardous areas. As a result, it is crucial that the specifications and data it lists are also observed.
2.1.1 Compact design
The transmitter and the sensor comprise a single mechanical entity.
ProcessMaster FEP311 HygienicMaster FEH311
Fig. 1
2.1.2 Remote design
The transmitter is mounted at a separate location from the sensor. The electrical connection between the transmitter and the sensor is provided by a signal cable.
Up to 50 m (164 ft) cable length for a minimum conductivity of 5 µS/cm without pre-amplifier.
With pre-amplifier, the maximum signal cable length is 200m (656 ft).
ProcessMaster FEP321 HygienicMaster FEH321
Fig. 2

Transport
10 - EN ProcessMaster / HygienicMaster CI/FEP300/FEH300-EN
3 Transport
3.1 Inspection
Check the devices for possible damage that may have occurred during transport. Damages in transit must be recorded on the transport documents. All claims for damages must be claimed without delay against the shipper and before the installation.
3.2 Transport of flanged units smaller than DN 450
Warning – Danger of injuries due to slipping meter. The center of gravity for the complete device may be higher than the lifting straps. Make sure the device has not rotated or slipped unintentionally during transport. Support the meter laterally.
For transport of flanged units smaller than DN 450 use a lifting strap. Wrap the straps around both process connections when lifting the device. Avoid chains since these may damage the housing.
Fig. 3: Transport of flanged units smaller than DN 450
3.3 Transport of flanged units larger than DN 400
Notice - Potential damage to device! Use of a forklift to transport the device can bend the housing and damage the internal magnet coils. Flanged units may not be lifted at the middle of the housing when transporting via forklift.
Flanged units may not be lifted by the terminal box or at the middle of the housing. Use only the eye bolts on the device to lift and install it in the pipeline.
Fig. 4: Transport of flanged units larger than DN 400

Mounting
CI/FEP300/FEH300-EN ProcessMaster / HygienicMaster EN - 11
4 Mounting
4.1 General information on installation
Important An additional document with Ex safety instructions is available for measuring systems that are used in explosion hazardous areas. As a result, it is crucial that the specifications and data it lists are also observed.
The following points must be observed for the installation:
• The flow direction must correspond to the identification if present.
• The maximum torque for all flange connections must be complied with.
• The devices must be installed without mechanical tension (torsion, bending).
• Install flange and wafer type units with coplanar counter flanges and use only appropriate gaskets.
• Use only gaskets made from a compatible material for the fluid and fluid temperatures.
• Gaskets must not extend into the flow area since possible turbulence could influence the device accuracy.
• The pipeline may not exert excessive forces or torques on the device.
• Do not remove the plugs in the cable connectors until you are ready to install the electrical cable.
• Make sure the gaskets for the housing cover are seated properly. Carefully seal the cover. Tighten the cover fittings.
• A separate transmitter must be installed at a largely vibration-free location.
• Do not expose the transmitter and sensor to direct sunlight. Provide appropriate sun protection if necessary.
• When installing the transmitter in a control cabinet, make sure adequate cooling is provided.
4.1.1 Supports for meter sizes larger than DN 400
Notice - Potential damage to device! Improper support for the device may result in deformed housing and damage to internal magnet coils. Place the supports at the edge of the housing (see arrows in the figure).
Devices with meter sizes larger than DN 400 must be mounted with support on a sufficiently strong foundation.
Fig. 5: Support for meter sizes larger than DN 400

Mounting
12 - EN ProcessMaster / HygienicMaster CI/FEP300/FEH300-EN
F
4.1.2 Mounting the measuring tube
The device can be installed at any location in a pipeline under consideration of the installation conditions.
Notice - Potential damage to device!
Use of graphite with the flange or process connection gaskets is prohibited. In some instances, an electrically conductive coating may form on the inside of the measuring tube. Vacuum shocks in the pipelines should be avoided to prevent damage to the liners (PTFE). Vacuum shocks can destroy the device.
1. Remove protective plates, if present, to the right and left of the measuring tube. To prevent possible leakage, make sure that the liner on the flange is not cut or damaged.
2. Position the measuring tube coplanar and centered between the pipes.
3. Install gaskets between the surfaces.
Important
For best results, make sure the flowmeter sensor gaskets fit concentrically with the measuring tube.
4. Use the appropriate bolts for the flanges as per the section "Torque information”.
5. Slightly grease the threaded nuts.
6. Tighten the nuts in a crosswise manner as shown in the figure. Observe the torque values specified under "Torque information".
First tighten the nuts to 50 % of maximum torque, then to 80 % and finally on the third time tighten to the maximum. Do not exceed the maximum torque.
G00034
1
2
7
8
5
3
4
6
1
2
3
4
Fig. 6

Mounting
CI/FEP300/FEH300-EN ProcessMaster / HygienicMaster EN - 13
4.2 Torque information
4.2.1 Flanged units ProcessMaster and HygienicMaster
Meter size DN Nominal pressure Screws Max. tightening
torque
mm Inch PN Nm 40 4 x M12 8
CL 150 4 x M12 6 3 ... 101) 1/10 ... 3/8“1) CL 300 4 x M12 7
40 4 x M12 10 CL 150 4 x M12 6 15 1/2“ CL 300 4 x M12 7
40 4 x M12 16 CL 150 4 x M12 8 20 3/4“ CL 300 4 x M16 13
40 4 x M12 21 CL 150 4 x M12 10 25 1“ CL 300 4 x M16 18
40 4 x M16 34 CL 150 4 x M12 15 32 1 1/4“ CL 300 4 x M16 27
40 4 x M16 43 CL 150 4 x M12 20 40 1 1/2“ CL 300 4 x M20 43
40 4 x M16 56 CL 150 4 x M16 39 50 2“ CL 300 8 x M16 28
16 4 x M16 34 40 8 x M16 39
CL 150 4 x M16 49 65 2 1/2“
CL 300 8 x M20 43 40 8 x M16 49
CL 150 4 x M16 69 80 3“ CL 300 8 x M20 62
16 8 x M16 47 40 8 x M20 77
CL 150 8 x M16 49 100 4“
CL 300 8 x M20 92 16 8 x M16 62 40 8 x M24 120
CL 150 8 x M20 76 125 5“
CL 300 8 x M20 120 16 8 x M20 83 40 8 x M24 155
CL 150 8 x M20 96 150 6“
CL 300 8 x M20 100 10 8 x M20 120 16 12 x M20 81 25 12 x M24 120 40 12 x M27 200
CL 150 8 x M20 135
200 8“
CL 300 12 x M24 170 Continued on next page

Mounting
14 - EN ProcessMaster / HygienicMaster CI/FEP300/FEH300-EN
Meter size DN Nominal
pressure Screws Max. tightening torque
mm Inch PN Nm 10 12 x M20 97 16 12 x M24 120 25 12 x M27 175 40 12 x M30 320
CL 150 12 x M24 135
250 10“
CL 300 16 x M27 185 10 12 x M20 115 16 12 x M24 160 25 16 x M27 175 40 16 x M30 340
CL 150 12 x M24 180
300 12“
CL 300 16 x M30 265 10 16 x M20 145 16 16 x M24 195 350 14“ 25 16 x M30 280 10 16 x M24 200 16 16 x M27 250 400 16“ 25 16 x M33 365
500 20“ 10 20 x M24 200 600 24“ 10 20 x M27 260 700 28“ 10 24 x M27 300 800 32“ 10 24 x M30 390 900 36“ 10 28 x M30 385
1000 40“ 10 28 x M33 480 1) Connection flange DIN EN1092-1 = DN10 (3/8"), connection flange ASME = DN15 (1/2")

Mounting
CI/FEP300/FEH300-EN ProcessMaster / HygienicMaster EN - 15
4.2.2 Wafer type unit (HygienicMaster)
Meter size DN Nominal pressure Screws Max. tightening
torque
mm Inch PN Nm 40 4 x M12 2,3
CL 150 4 x M12 upon request 3 ... 81) 1/10 ... 5/16“1) CL 300 4 x M12 upon request
40 4 x M12 7 CL 150 4 x M12 upon request 10 3/8“1) CL 300 4 x M12 upon request
40 4 x M12 7 CL 150 4 x M12 upon request 15 1/2“ CL 300 4 x M12 upon request
40 4 x M12 11 CL 150 4 x M12 upon request 20 3/4“ CL 300 4 x M16 upon request
40 4 x M12 15 CL 150 4 x M12 upon request 25 1“ CL 300 4 x M16 upon request
40 4 x M16 26 CL 150 4 x M12 upon request 32 1 1/4“ CL 300 4 x M20 upon request
40 4 x M16 33 CL 150 4 x M12 upon request 40 1 1/2“ CL 300 4 x M20 upon request
40 4 x M16 46 CL 150 4 x M16 upon request 50 2 CL 300 8 x M16 upon request
16 8 x M16 30 65 2 1/2“ CL 150 4 x M16 upon request 16 8 x M16 40 80 3 CL 150 4 x M16 upon request 16 8 x M20 67 100 4 CL 150 8 x M16 upon request
1) Connection flange DIN EN1092-1 = DN10 (3/8"), connection flange ASME = DN15 (1/2")
4.2.3 Variable process connections (HygienicMaster)
Meter size DN Max. tightening torque
mm inch Nm 3 ... 10 3/8“ 8
15 1/2“ 10 20 3/4“ 21 25 1 31 32 1 1/4“ 60 40 1 1/2“ 80 50 2 5 65 2 1/2“ 5 80 3 15 100 4 14

Mounting
16 - EN ProcessMaster / HygienicMaster CI/FEP300/FEH300-EN
4.3 Information on EHEDG conformity
Warning – Risk to persons! Bacteria and chemical substances can contaminate or pollute pipeline systems and the materials they are made of. The appropriate installation conditions must be observed in order to achieve an installation that complies with EHEDG requirements. For an installation to comply with EHEDG requirements, the process connection/gasket combinations created by the operator must always be made of parts that conform to EHEDG stipulations (EHEDG Position Paper: "Hygienic Process connections to use with hygienic components and equipment").
All weld stub combinations provided by ABB are approved.
The threaded pipe connection conforming to DIN11851 is approved when used in conjunction with an EHEDG-approved process gasket (e.g. Siersema brand).
4.4 Information on 3A conformity
The device may not be installed vertically with the terminal box or transmitter housing pointing downward. The "bracket mounting" option no longer applies.
G00655-01
1
Fig. 7 1 Bracket
Please ensure that the leakage hole of the process connection is located at the deepest point of the installed device.
G00169
1
Fig. 8 1 Leakage hole

Mounting
CI/FEP300/FEH300-EN ProcessMaster / HygienicMaster EN - 17
Change from one to two columns
4.5 Installation Requirements
The device measures the flowrate in both directions. Forward flow is the factory setting, as shown in Fig. 9.
Fig. 9
4.5.1 Electrode axis
Electrode axis (1) should be horizontal if at all possible or no more that 45° from horizontal.
G00041
max. 45°
1
Fig. 10
4.5.2 In- and outlet pipe sections
Straight inlet section Straight outlet section ≥ 3 x DN ≥ 2 x DN
DN = Flowmeter sensor size • Do not install fittings, manifolds, valves etc. directly in front of the
meter tube (1). • Butterfly valves must be installed so that the valve plate does not
extend into the flowmeter sensor. • Valves or other turn-off components should be installed in the
outlet pipe section (2). • For compliance with the measuring accuracy, observe the inlet
and outlet pipe sections.
G00037
1 2
3xDN 2xDN Fig. 11
4.5.3 Vertical connections
• Vertical installation for measurement of abrasive fluids, flow preferably from below to above.
Fig. 12
4.5.4 Horizontal connections
• Meter tube must always be completely full. • Provide for a slight incline of the connection for degassing.
G00038
3°
Fig. 13
4.5.5 Free inlet or outlet
• Do not install the flowmeter at the highest point or in the draining- off side of the pipeline, flowmeter runs empty, air bubbles can form (1).
• Provide for a siphon fluid intake for free inlets or outlets so that the pipeline is always full (2).
G00040
1
2
Fig. 14
4.5.6 Strongly contaminated fluids
• For strongly contaminated fluids, a bypass connection according to the figure is recommended so that operation of the system can continue to run without interruption the during the mechanical cleaning.
G00042 Fig. 15

Mounting
18 - EN ProcessMaster / HygienicMaster CI/FEP300/FEH300-EN
4.5.7 Installation in the vicinity of pumps
• For flowmeter primaries which are to be installed in the vicinity of pumps or other vibration generating equipment, the utilization of mechanical snubbers is advantageous.
G00561 Fig. 16
4.5.8 Installing the high temperature design
The high temperature design allows for complete thermal insulation of the sensor. The pipeline and sensor must be insulated after installing the unit according to the following illustration.
G00654
1
Fig. 17
1 Insulation
4.5.9 Installation in pipelines with larger nominal diameters
Determine the resulting pressure loss when using reduction pieces (1): 1. Calculate the diameter ratio d/D. 2. Determine the flow velocity based on the flow range nomograph
(Fig. 19). 3. Read the pressure drop on the Y-axis in Fig. 19.
Fig. 18 1 d V Δp D
= Flange transition piece = Inside diameter of the flowmeter = flow velocity [m/s] = pressure loss [mbar] = Inside diameter of the pipeline
Nomograph for pressure drop calculations For flange transition piece with α/2 = 8°
Fig. 19
Change from one to two columns

Mounting
CI/FEP300/FEH300-EN ProcessMaster / HygienicMaster EN - 19
4.6 Ground
4.6.1 General information on ground connections
Observe the following items when grounding the device:
• For plastic pipes or pipes with insulating lining, the ground is provided by the grounding plate or grounding electrodes.
• When stray potentials are present, install a grounding plate at the front and back of the flowmeter.
• For measurement-related reasons, the potentials in the station ground and in the pipeline should be identical.
• An additional ground on the terminals is not required.
Important
If the flowmeter is installed in plastic or earthenware pipelines, or in pipelines with an insulating lining, transient current may flow through the grounding electrode in special cases. In the long term, this may destroy the sensor, since the ground electrode will in turn degrade electrochemically. In these special cases, the connection to the ground must be performed using grounding plates.
4.6.2 Metal pipe with fixed flanges
Use a copper wire (at least 2.5 mm² (14 AWG)) to establish the ground connection between the sensor (1), the pipeline flanges and an appropriate grounding point.
Flange design Wafer flange design
Fig. 20: Metal pipe, without liner

Mounting
20 - EN ProcessMaster / HygienicMaster CI/FEP300/FEH300-EN
4.6.3 Metal pipe with loose flanges
1. Solder the threaded nuts M6 (1) to the pipeline and connect the ground as shown in the illustration.
2. Use a copper wire (at least 2.5 mm² (14 AWG)) to establish the ground connection between the sensor (2) and an appropriate grounding point.
Flange design Wafer flange design
Fig. 21: Metal pipe, without liner
4.6.4 Plastic pipes, non-metallic pipes or pipes with insulating liner
For plastic pipes or pipes with insulating lining, the ground for the measuring agent is provided by the grounding plate as shown in the figure below or via grounding electrodes that must be installed in the device (option). If grounding electrodes are used, the grounding plate is not necessary.
1. Install the flowmeter sensor with grounding plate (3) in the pipeline.
2. Connect the terminal lug (2) for the grounding plate (3) and ground connection (1) on the flowmeter sensor with the grounding strap.
3. Use a copper wire (min. 2.5 mm² (14 AWG)) to link the ground connection (1) to a suitable grounding point.
Flange design Wafer flange design
Fig. 22: Plastic pipes, non-metallic pipes or pipes with insulating liner

Mounting
CI/FEP300/FEH300-EN ProcessMaster / HygienicMaster EN - 21
4.6.5 Sensor type HygienicMaster
Ground the stainless steel model as shown in the figure. The measuring fluid is grounded via the adapter (1) and an additional ground is not required.
Fig. 23
4.6.6 Ground for devices with hard rubber lining
For devices with meter sizes DN 100 and larger, the liner contains a conductive element. This element grounds the measuring fluid.
4.6.7 Ground for devices with protective plates
The protective plates are used to protect the edges of the liner in the measuring tube, e.g., for abrasive fluids. In addition, they function as a grounding plate. • For plastic or pipes with insulating lining, electrically connect the protective plate in the same
manner as a grounding plate.
4.6.8 Ground with conductive PTFE grounding plate
For devices with a meter size between DN 10 … 150, grounding plates made of conductive PTFE are available. These are installed similar to conventional grounding plates.

Electrical connection
22 - EN ProcessMaster / HygienicMaster CI/FEP300/FEH300-EN
5 Electrical connection
5.1 Preparing and routing the signal and magnet coil cable
Cut both cable ends to length and terminate them as shown.
Important Use wire end sleeves. • Wire end sleeves 0.75 mm2(AWG 19), for shielding (S1, S2)
• Wire end sleeves 0.5 mm2(AWG 20), for all other wires
The shields may not touch (signal short circuit).
Fig. 24: Flowmeter sensor side, dimensions in mm (inch)
Fig. 25: Transmitter side, dimensions in mm (inch) L1 max. stripped length = 105 (4.10) 1 Measurement potential 3, green
L2 = 70 (2.76) 2 Signal line E1, violet
L2 = 60 (2.36) 3 Shield 1S
L2 = 60 (2.36) 4 Shield 2S
L2 = 60 (2.36) 5 Signal line, E2, blue
L2 = 60 (2.36) 6 Data line, D2, yellow
L2 = 70 (2.76)
7 Data line, D1, orange L2 = 70 (2.76)
8 Magnet coil, M2, red L2 = 90 (3.54)
9 Magnet coil, M1, brown L2 = 90 (3.54)
10 Groundwire, steel 11 SE clamp

Electrical connection
CI/FEP300/FEH300-EN ProcessMaster / HygienicMaster EN - 23
Observe the following points when routing cables:
• A magnet coil cable (red and brown) is run parallel to the signal lines (violet and blue). As a result, only one cable is required between the flowmeter sensor and the transmitter. Do not run the cable over junction boxes or terminal blocks
• The signal cable carries a voltage signal of only a few millivolts and must, therefore, be routed over the shortest possible distance. The max. allowable signal cable length is 50 m (164 ft) without a pre-amplifier and 200 m (656 ft) with a pre-amplifier.
• Avoid routing the cable in the vicinity of electrical equipment or switching elements that can create stray fields, switching pulses, and induction. If this is not possible, run the signal/magnet coil cable through a metal pipe and connect this to the station ground.
• All leads must be shielded and connected to earth ground.
• To shield against magnetic interspersion, the cable features outer shielding which must be attached to the SE clamp.
• The incorporated steel wire must also be connected to the SE clamp
• Do not damage the sheathing of the cable during installation.
• Make sure during installation that the cable is provided with a water trap (1). For vertical installation, align the cable glands pointing downward.
Fig. 26

Electrical connection
24 - EN ProcessMaster / HygienicMaster CI/FEP300/FEH300-EN
5.1.1 Protection class IP 68
For flowmeter sensors with protection class IP 68, the maximum flooding height is 5 m (16.4 ft). The supplied cable (part no. D173D027U01) fulfills all submersion requirements.
Fig. 27 1 Maximum flooding height 5 m (16.4 ft)
The flowmeter sensor has been type-tested in accordance with EN60529. Testing conditions: 14 days with a flooding height of 5 m (16.4 ft).
5.1.1.1 Connection
1. The supplied cable must be used to connect the flowmeter sensor and transmitter.
2. Connect the cable in the flowmeter sensor's terminal box.
3. Route the cable from the terminal box to above the maximum flooding height of 5 m (16.4 ft).
4. Tighten the cable gland.
5. Carefully seal the terminal box. Make sure the gaskets for the cover are seated properly.
Warning - Potentially adverse effect on IP 68 protection class The sensor's IP 68 protection class may be impaired by damage to the signal cable. The sheathing of the signal cable must not be damaged. Otherwise, the protection class IP 68 for the sensor cannot be ensured.
Important As an option, the flowmeter sensor can be ordered with signal cable already connected and a molded terminal box.

Electrical connection
CI/FEP300/FEH300-EN ProcessMaster / HygienicMaster EN - 25
5.1.1.2 Sealing the connection box
If the terminal box is to be sealed subsequently on-site, a special 2-part sealing compound can be ordered separately (order no. D141B038U01). Sealing is only possible if the flowmeter sensor is installed horizontally. Observe the following instructions during work activity:
Warning - General risks! The sealing compound is toxic. Observe all relevant safety measures. Risk notes: R20, R36/37/38, R42/43 Harmful by inhalation. Avoid direct skin contact. Irritating to eyes. Safety advice: P4, S23-A, S24/25, S26, S37, S38 Wear suitable protective gloves and ensure sufficient ventilation. Follow the instructions that are provided by the manufacturer prior to starting any preparations.
Preparation
• Complete the installation before beginning sealing activities in order avoid moisture penetration. Before starting, check all the connections for correct fitting and stability.
• Do not overfill the terminal box. Keep the sealing compound away from the O-ring and the seal/groove (see fig. Fig. 28).
• Prevent the sealing compound from penetrating a thermowell if an NPT ½” thread is used. Procedure
1. Cut open the protective enclosure of the sealing compound (see packaging).
2. Remove the connection clamp associated with the sealing compound.
3. Knead both components thoroughly until a good mix is reached.
4. Cut open the bag at a corner. Perform work activity within 30 minutes.
5. Carefully fill the terminal box with sealing compound until the connecting cable is covered.
6. Wait a few hours before closing the cover in order to allow the compound to dry, and to release any possible gas.
7. Ensure that the packaging material and the drying bag are disposed of in an environmentally sound manner.
Fig. 28 1 Packaging bag 2 Connection clamp 3 Sealing compound
4 Max. filling level 5 Drying bag
Electrical connection
26 - EN ProcessMaster / HygienicMaster CI/FEP300/FEH300-EN
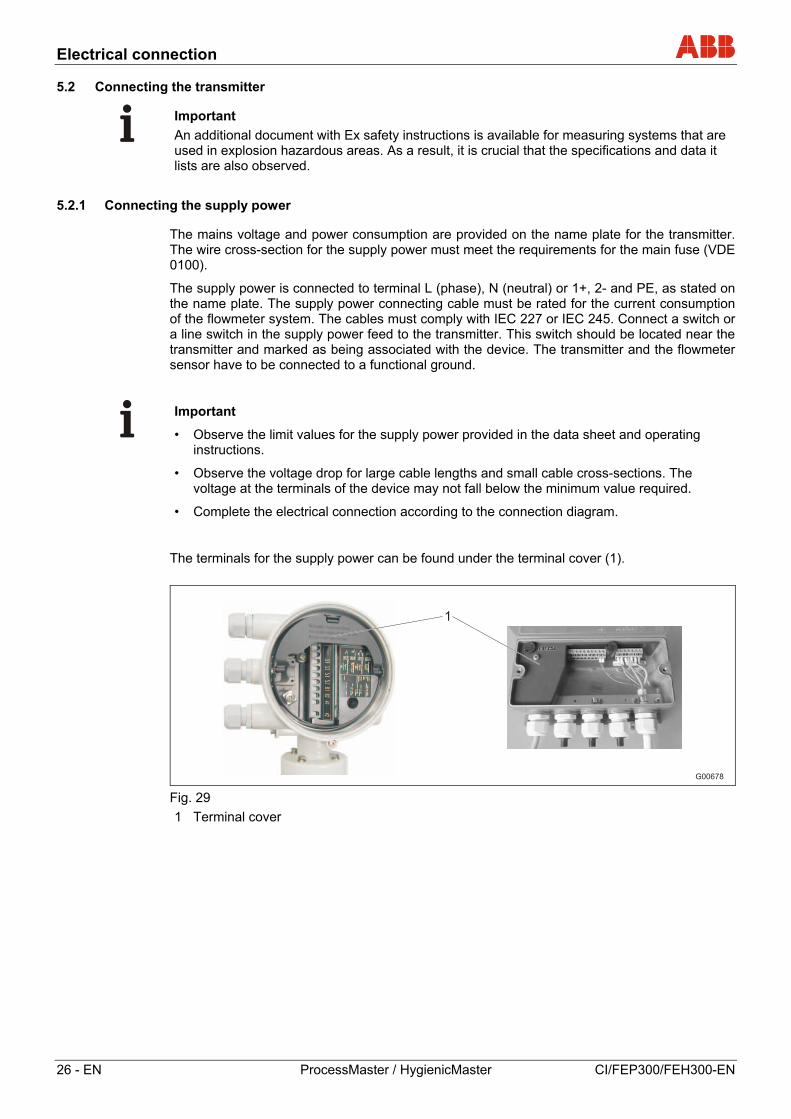
5.2 Connecting the transmitter
Important An additional document with Ex safety instructions is available for measuring systems that are used in explosion hazardous areas. As a result, it is crucial that the specifications and data it lists are also observed.
5.2.1 Connecting the supply power
The mains voltage and power consumption are provided on the name plate for the transmitter. The wire cross-section for the supply power must meet the requirements for the main fuse (VDE 0100).
The supply power is connected to terminal L (phase), N (neutral) or 1+, 2- and PE, as stated on the name plate. The supply power connecting cable must be rated for the current consumption of the flowmeter system. The cables must comply with IEC 227 or IEC 245. Connect a switch or a line switch in the supply power feed to the transmitter. This switch should be located near the transmitter and marked as being associated with the device. The transmitter and the flowmeter sensor have to be connected to a functional ground.
Important
• Observe the limit values for the supply power provided in the data sheet and operating instructions.
• Observe the voltage drop for large cable lengths and small cable cross-sections. The voltage at the terminals of the device may not fall below the minimum value required.
• Complete the electrical connection according to the connection diagram.
The terminals for the supply power can be found under the terminal cover (1).
Fig. 29 1 Terminal cover

Electrical connection
CI/FEP300/FEH300-EN ProcessMaster / HygienicMaster EN - 27
5.2.2 Transmitter
The outer shielding of the cable is attached to the busbar via the clip (3) (from the accessory bag in the connection area).
The shielding for the signal wires function as a driven shield to transmit the measurement signal.
The cable is attached to the sensor and transmitter according to the connection diagram.
Fig. 30 1 Terminal cover 2 Busbar (SE)
3 Clip 4 Signal and magnet coil cable
Important The power supply for the optional pre-amplifier is provided via terminals 1S and 2S. The transmitter automatically detects the sensor and switches to the required supply voltage on terminals 1S and 2S.

Electrical connection
28 - EN ProcessMaster / HygienicMaster CI/FEP300/FEH300-EN
5.2.3 Interconnection Diagrams
Important An additional document with Ex safety instructions is available for measuring systems that are used in explosion hazardous areas. As a result, it is crucial that the specifications and data it lists are also observed.
G00474
31 32
A24 V
51 52 81 82 41 42L N
1+ 2-
M1 M2 D1 D2 3 2S E2 E1 1S
M1 M2 D1 D2 3 2S E2 E1 1S SEB
2 3 4 51 PE
7 8 9 10 11 12 13
6 6
< 50 m (200 m)< 164 ft (656 ft)
SE+ - + - + - + -
Fig. 31
A Transmitter B Flowmeter sensor 1 Supply power:
See name plate 2 Current output (terminals 31/32)
The current output can be operated in "active" or "passive" mode. • Active: 4 ... 20 mA, HART protocol (standard), load: 250 Ω ≤ R ≤ 650 Ω • Passive: 4 ... 20 mA, HART protocol (standard), load: 250 Ω ≤ R ≤ 650 Ω Supply voltage for the current output: Min. 11 V, max. 30 V
3 Digital output DO1 (terminals 51/52) (pulse output or digital output) Function can be configured locally as "Pulse Output" or "Digital Output" using software. Factory setting is "Pulse Output". The output can be configured as an "active" or "passive" output. Configuration is performed using software. • Configuration as pulse output Max. pulse frequency: 5,250 Hz. Pulse width: 0.1 … 2,000 ms. The pulse factor and pulse width are interdependent and are calculated dynamically. • Configuration as contact output Function: System alarm, empty pipe alarm, max./min. alarm, flow direction signaling, other • Configuration as "active" output U = 19 ... 21 V, Imax = 220 mA , fmax ≤ 5,250 Hz • Configuration as "passive" output Umax = 30 V, Imax = 220 mA , fmax ≤ 5,250 Hz
4 Digital input (terminals 81/82) (contact input) Function can be configured locally using software: External output switch-off, external totalizer reset, external totalizer stop, other Data for the optocoupler: 16 V ≤ U ≤ 30 V, Ri = 2 kΩ
5 Digital output DO2 (terminals 41/42) (pulse output or digital output) Function can be configured locally as "Pulse Output" or "Digital Output" using software. Factory setting is "Digital Output", flow direction signaling. The output is always a "passive" output (optocoupler). Data for the optocoupler: Umax = 30 V, Imax = 220 mA , fmax ≤ 5,250 Hz
6 Functional ground 7 Brown 8 Red 9 Orange 10 Yellow 11 Green 12 Blue 13 Violet

Electrical connection
CI/FEP300/FEH300-EN ProcessMaster / HygienicMaster EN - 29
Connection examples for the peripherals current output
Max. permissible load (RB) as a function of the source voltage (U2) A = "Active" configuration:
4 ... 20 mA, HART Load: 0 =R = 650 Ω (300 Ω for Ex zone 1 / Div. 1) Min. load with HART: 250 Ω
G00475
+31
-32
I E
+31
-32
I E
V
A
B
RB
RB
U1 U2
B = "Passive" configuration: 4 ... 20 mA, HART Load: 0 =R = 650 Ω Min. load with HART: 250 Ω Supply voltage for the current output, terminals 31/32: U1: Min. 11 V, max. 30 V
I = internal, E = external G00592
200
250
300
350
400
450
500
550
600
650
700
17 18 19 20 21 22 23 24 25 26 27 28 29 30U [V]2
R[
]B
Ω
Fig. 32 Digital output DO1
Max. permissible load (RB) as a function of the source voltage (U2)
A = "Active" configuration 24V+
-
I E
51
52
RB*
Imax = 220 mA
24V+
-
RB* U
CE
ICE
I E
51
52
G00476-02
A
B
U2
B = "Passive" configuration
G00593
50
150
250
350
450
550
650
750
850
950
1050
1150
1250
1350
1450
1550
16 17 18 19 20 21 22 23 24 25 26 27 28 29 30U [V]2
R[
]B
Ω
I = internal, E = external = Permissible range Fig. 33

Electrical connection
30 - EN ProcessMaster / HygienicMaster CI/FEP300/FEH300-EN
Digital output DO2, e.g., for system monitoring, max./min. alarm, empty meter tube or forward/reverse signal, or counting pulses (function can be configured using software)
G00792
RB*
Imax = 220 mA
RB* U
CE
ICE
+U
I E
41
42
I = internal, E = external
Fig. 34 Digital outputs DO1 and DO2, separate forward and reverse pulses
Digital outputs DO1 and DO2, separate forward and reverse pulses (alternative connection)
G00791
24V+
I E
51
52
41
4224V
I E
51
52
41
42
V +-
I = internal, E = external
Fig. 35 Digital input for external output switch-off or external totalizer reset
I = internal, E = external
Fig. 36

Commissioning
CI/FEP300/FEH300-EN ProcessMaster / HygienicMaster EN - 31
6 Commissioning
Important An additional document with Ex safety instructions is available for measuring systems that are used in explosion hazardous areas. As a result, it is crucial that the specifications and data it lists are also observed.
6.1 Preliminary checks prior to start-up
The following points must be checked before commissioning:
• The supply power must be switched off.
• The supply power must match information on the name plate.
• The pin assignment must correspond to the connection diagram.
• Sensor and transmitter must be grounded properly.
• The temperature limits must be observed.
• The sensor must be installed at a largely vibration-free location.
• The housing cover and the cover safety device must be sealed before switching on the supply power.
6.2 Operation
The LCD display features capacitive keys for operation. These enable the device to be operated with the housing cover closed.
Important The transmitter routinely calibrates the capacitive keys automatically. If the cover is opened during operation, the sensitivity of the keys will initially increase and this can result in operating errors. However, the level of key sensitivity will return to normal as soon as the next automatic calibration routine is performed.

Commissioning
32 - EN ProcessMaster / HygienicMaster CI/FEP300/FEH300-EN
6.2.1 Menu navigation
M00024
43
21
Fig. 37
• The (1), (4), (2) and (3) buttons are available for the menu-controlled configuration.
• The menu/submenu name is displayed above in the LCD display.
• The number/line of the currently selected menu item is displayed in the upper right of the LCD display.
• A scroll bar is located on the right edge of the LCD display which shows the relative position of the currently selected menu item within the menu.
• Both of the and buttons can have various functions assigned to them. The meaning of these buttons is displayed below in the LCD display above the respective button. The following functions are possible.
Button functions Meaning Exit Exit menu. Back Back one submenu. Cancel Exit without saving the selected parameter value. Next Select next position for entering numerical values or letters.
Button functions Meaning Select Select submenu/parameter. Edit Edit parameter. OK Save selected parameter and display stored parameter
value. • You can browse through the menu or select a number within a parameter value using both
or buttons. The button selects the desired menu item.
6.2.2 Process display
The process display appears after switching on the unit.
Q Current flowrate
∑+ Totalizer value for forward flow direction
∑- Totalizer value for reverse flow direction
The meter location is displayed on the upper left (for example, "Boiler 9"). The meter location can be entered in the menu "Device Setup / Sensor / Meter Location TAG".
If several operator pages are preconfigured and the Multiplex mode is activated, the icon appears on the lower left of the screen.
The lock at the bottom middle of the screen indicates that the user is not currently logged in and that the unit's setup cannot be changed.

Commissioning
CI/FEP300/FEH300-EN ProcessMaster / HygienicMaster EN - 33
6.3 Configuring the current output
The factory setting for the current output is 4 ... 20 mA.
The signal can be configured as either "active" or "passive".
The current setting is contained in the order confirmation.
If the signal is configured as "active", no external power may be used as far as the current output is concerned.
If the signal is configured as "passive", external power from the current output is required (similar to pressure and temperature transmitters).
Set the current output as follows:
1. Switch off the supply power.
2. Open the housing cover.
3. Remove the mounting screws for the transmitter electronics unit.
4. Pull out the transmitter electronics unit.
5. Plug in the jumper on the backplane in the transmitter housing to Position A or B.
• A = 4 ... 20 mA output, passive
• B = 4 ... 20 mA output, active
Important The backplane is not installed in the transmitter electronics unit (3) but rather in the transmitter housing (1).
6. Reinstall the transmitter electronics unit in reverse order.
G00679-01
1
2 4 A B
3
A B 4
1
5
Fig. 38 1 Housing cover 2 Transmitter electronics unit 3 Mounting screws for the transmitter
electronics unit 4 Backplane (in the transmitter housing)
5 Jumper SW3 • off: SensorMemory available in
flowmeter sensor (standard) • on: No SensorMemory available in
flowmeter sensor

Commissioning
34 - EN ProcessMaster / HygienicMaster CI/FEP300/FEH300-EN
6.4 Commissioning the unit
Important For additional information about operation and menu navigation, refer to the operating instruction for the device.
6.4.1 Downloading the system data
1. Switching on supply power. After switching on the supply power, the following messages are displayed in the LCD window:
Fig. 39
2. Download the system data as follows:
For a completely new system or initial startup
The flowmeter sensor's calibration data and the transmitter settings are loaded from the SensorMemory1) into the transmitter.
After replacing the complete transmitter or transmitter electronics unit
Select "Transmitter" by pressing the key. The flowmeter sensor's calibration data and the transmitter settings are loaded from the SensorMemory1) into the transmitter.
After replacing the sensor
Select "Sensor" by pressing the key. The flowmeter sensor's calibration data and the transmitter settings are loaded from the SensorMemory1) into the transmitter. The transmitter settings are saved in the SensorMemory1). If the new sensor is a different size, check the currently configured flow range.
3. The flowmeter is ready for operation and will operate with factory settings or settings requested by the customer. To change the factory settings, refer to chapter "Parametrizing via the "Easy Set-up" menu function".
Important System data must only be loaded during initial startup. If the supply power is later switched off, the transmitter automatically loads the data once again the next time it is switched on. A selection as described below (1-3) is not required.
1) The SensorMemory is a data memory integrated into the flowmeter sensor.

Commissioning
CI/FEP300/FEH300-EN ProcessMaster / HygienicMaster EN - 35
6.4.2 Parametrizing via the "Easy Set-up" menu function
The device can be factory parametrized to customer specifications upon request.
If no customer information is available, the device is delivered with factory settings.
The setting of the most current parameters is summarized in the "Easy Set-up" menu. This menu provides the quickest way to configure the device.
The Easy Set-up menu allows you to select the language, engineering unit for flowrate, flow range, totalizer unit, pulse/frequency mode, pulse per unit, pulse width, damping, status of current output during alarm (Iout at Alarm, Iout Low Alarm, Iout High Alarm).
For detailed descriptions of these menus and parameters, see the chapter on the "Parameter overview" menu.
The following section describes parametrization via the "Easy Set-up" menu function.
Press the key to change to the setup level of the process display.
Use the + keys to select the "Standard" menu item.
In the password menu, select "ok" ( key). There is no factory default password.
Select "ok" ( key) to switch to the configuration level without entering a password.
In the configuration level, use the + keys to scroll to the "Easy Set-up" menu item and select it by pressing the key.
Press the key and select the language. After entering the settings, press the key to move to the next menu item.
Press the key and select the mass flow unit. After entering the settings, press the key to move to the next menu item.

Commissioning
36 - EN ProcessMaster / HygienicMaster CI/FEP300/FEH300-EN
Press the key and set the flow range end value Qmax. After entering the settings, press the key to move to the next menu item.
Press the key and set the totalizer unit. After entering the settings, press the key to move to the next menu item.
Press the key and set the operating mode for the pulse output. There are two operating modes available:
• "Pulse mode": In pulse mode, pulses per unit are output. The relevant settings are provided in the next menu.
• "Frequency mode": In the frequency mode, a frequency proportional to the flowrate is output. The maximum frequency corresponding to the mass flow range is configurable.
The factory default is "pulse mode".
Press the key and set the pulses per unit for the pulse output. After entering the settings, press the key to move to the next menu item.
Press the key and set the pulses width for the pulse output. After entering the settings, press the key to move to the next menu item.
Press the key and set the damping. After entering the settings, press the key to move to the next menu item.
Commissioning
CI/FEP300/FEH300-EN ProcessMaster / HygienicMaster EN - 37
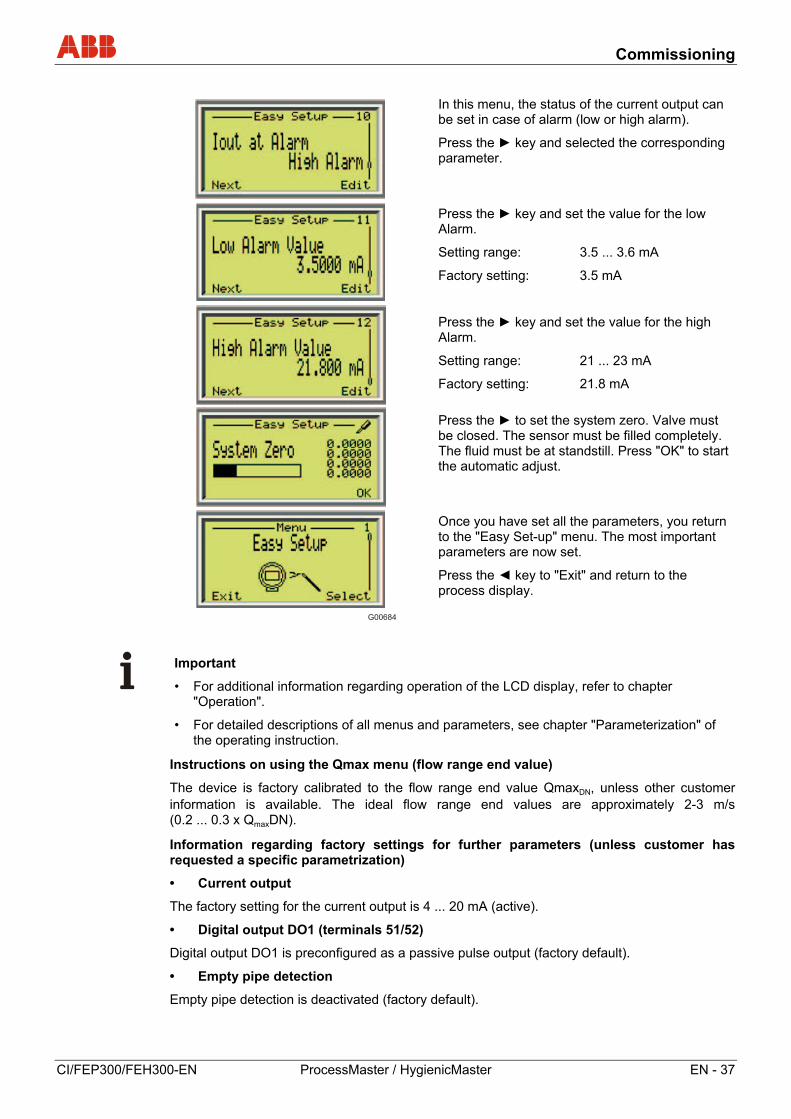
In this menu, the status of the current output can be set in case of alarm (low or high alarm).
Press the key and selected the corresponding parameter.
Press the key and set the value for the low Alarm.
Setting range: 3.5 ... 3.6 mA
Factory setting: 3.5 mA
Press the key and set the value for the high Alarm.
Setting range: 21 ... 23 mA
Factory setting: 21.8 mA
Press the to set the system zero. Valve must be closed. The sensor must be filled completely. The fluid must be at standstill. Press "OK" to start the automatic adjust.
Once you have set all the parameters, you return to the "Easy Set-up" menu. The most important parameters are now set.
Press the key to "Exit" and return to the process display.
Important
• For additional information regarding operation of the LCD display, refer to chapter "Operation".
• For detailed descriptions of all menus and parameters, see chapter "Parameterization" of the operating instruction.
Instructions on using the Qmax menu (flow range end value)
The device is factory calibrated to the flow range end value QmaxDN, unless other customer information is available. The ideal flow range end values are approximately 2-3 m/s (0.2 ... 0.3 x QmaxDN).
Information regarding factory settings for further parameters (unless customer has requested a specific parametrization)
• Current output
The factory setting for the current output is 4 ... 20 mA (active).
• Digital output DO1 (terminals 51/52)
Digital output DO1 is preconfigured as a passive pulse output (factory default).
• Empty pipe detection
Empty pipe detection is deactivated (factory default).

Parameter overview
38 - EN ProcessMaster / HygienicMaster CI/FEP300/FEH300-EN
7 Parameter overview
Easy Setup 1
Language Q (Flowrate) Unit Qmax Totalizer/Pulse Unit Pulse Mode Pulses per unit Pulse width Damping Iout at Alarm Iout low alarm Iout high Alarm
System zero Manual Adjust
Auto Adjust
Device info 2
Sensor
Transmitter
Sensor Type Sensor Size Qmax DN Qmax Span Ss Mains frequency Excitation frequency Coil current Pre-Amp Power Sensor ID SAP/ ERP no. Term Board SW Sensor run hours
Calibration
Properties
First Cal. Date Last Cal. Date Cal. Cert. No. First Cal. Location Last Cal. Location Cal. Mode Cal. Status
Tx Type Tx span Tx zero Transmitter ID SAP/ ERP no. Electrode material
Lining material
Tx Version
Transmitter op. h
Calibration Info
TX Firmware Ver TX Hardware Ver MSP Firmware Ver Bootloader Ver
Manufacturer Street City Telephone
First Cal. Date Last Cal. Date Cal. Cert. No. First Cal. Location Last Cal. Location
Device Setup 3 Access Control
Sensor
Standard password Advanced password Read only switch Custody Switch
Transmitter
Qmax DN Qmax Sensor Location TAG Sensor TAG
italics = Parameter can only be changed at the "advanced" password level.

Parameter overview
CI/FEP300/FEH300-EN ProcessMaster / HygienicMaster EN - 39
Units
Damping
Totalizer/Pulse Unit Q (Flowrate) Unit elocity Unit
Low Flow Cut Off
TX Location TAG Flow Cut Off Level
Hysteresis
TX TAG
Operating mode
Meter Mode Flow Indication
System zero
Noise reduction
Manual Adjust Auto Adjust
Display 4
Language Contrast
Operator Pages
Operator Page 1
Operator Page 2
Display mode 1. line 2. line 3. line Bar graph
Operator Page 3
Autoscroll Flowrate Format Volume Format Date/Time Format Display Test
Operator Page 4
Input/Output 5
Digital Out mode
DO1/DO2 Function DO1 Drive
Logic Setup
Pulse Setup
Digital Input Setup
Current output
DO1 Signal DO1 Alarm Config. DO1Action DO2 Signal DO2 Alarm Config. DO2 Action
Pulse Mode Pulses per Unit Fullscale Frequency Pulse Width Limit Frequency
Iout at Alarm Low Alarm Value High Alarm Value Iout at EP Alarm Iout at Flow >103% Mode
italics = Parameter can only be changed at the "advanced" password level.

Parameter overview
40 - EN ProcessMaster / HygienicMaster CI/FEP300/FEH300-EN
Process alarm 6
Clear alarm hist.
Group Masking
Maintenance required Function test Out of specification
Individual Masking
Alarm Simulation
Min Flowrate Alarm Max Flowrate Alarm Flow >103% MSP Alarm
Off
Communication 7
HART
Cyc. data output
Service port
Device address HART tag HART descriptor HART Message HART Manuf. ID HART Device ID Last HART command
Cyclic Upd. Rate
Data selection
Max. Baud Rate HART access
Flow Group Outputs Group Status Group Coil Group TX Group Vol. Totals Group Electrodes Group
Diagnostics 8 Diagnostic control
Diagnostic Values
Alarm Limits
Empty Pipe Detection Adjust EP Full Threshold Elec. Volt. Meas Elec. Imp. Meas
Simulation mode Output Readings
Elec. +V Alarm Limit Elec. -V Alarm Limit Coil I Alarm Band Coil O/C R Limit Coil S/C R Limit Elec. Alarm Min R Elec. Alarm Max R Min. Flowrate Alarm Max. Flowrate Alarm
Totalizer 9 Reset Vol. Totalizer
Totalizer Fwd Totalizer Rev Totalizer Net All Vol. Totalizer
italics = Parameter can only be changed at the "advanced" password level.

Error messages
CI/FEP300/FEH300-EN ProcessMaster / HygienicMaster EN - 41
8 Error messages
8.1 LCD display
Error message in the process display Information level
Error description with help text
Fig. 40: Error message on LCD display (example)
In case of an alarm, a message consisting of an icon and text appears at the bottom of the process display. Use the key to call up the information level. Use the "Diagnostics" menu to call up the error description with a help text.
In the error description, the error number is displayed in the second line (F232.022). Two further lines are used to describe the error. The last three lines provide help or troubleshooting instructions for the operator.
Use the and keys to scroll through the accumulated errors.
The device status is divided into four groups.
Icon Description
Error / Failure
Functional check (e.g., during simulation)
out of spec (e.g., operating with empty meter pipe)
Maintenance required
The message text beside this icon in the display provides information about where to look for the error. There are the following areas: Electronic unit, sensor, status, operating conditions.

Appendix
42 - EN ProcessMaster / HygienicMaster CI/FEP300/FEH300-EN
9 Appendix
9.1 Additional documents
• Operating Instructions (OI/FEP300/FEH300)
• Ex Safety Instructions (SM/FEP300/FEH300/ATEX/IECEX)
• Ex Safety Instructions (SM/FEP300/FEH300/FM/CSA)
• Data Sheet for ProcessMaster (DS/FEP300)
• Data Sheet for HygienicMaster (DS/FEH300)
9.2 Approvals and certifications
CE mark
The version of the meter in your possession meets the requirements of the following European directives:
- EMC directive 2004/108/EC
- Low voltage directive 2006/95/EC
- Pressure equipment directive (PED) 97/23/EC
- ATEX directive 94/9/EC
Explosion Protection Identification for intended use in potentially explosive atmospheres according
to:
- ATEX directive (marking in addition to CE marking)
- IEC standards
- FM Approvals (US)
- cFM Approvals (Canada)
Important All documentation, declarations of conformity, and certificates are available in ABB's download area. www.abb.com/flow

Appendix
CI/FEP300/FEH300-EN ProcessMaster / HygienicMaster EN - 43

Appendix
44 - EN ProcessMaster / HygienicMaster CI/FEP300/FEH300-EN


A
ABB has Sales & Customer Support expertise in over 100 countries worldwide. www.abb.com/flow
The Company’s policy is one of continuous product improvement and the right is reserved to modify the
information contained herein without notice.
Printed in the Fed. Rep. of Germany (06.2009)
© ABB 2009
3KXF231300R4401
C
I/FE
P30
0/FE
H30
0-E
N
Rev
. A
ABB Limited Oldends Lane, Stonehouse Gloucestershire, GL10 3TA UK Tel: +44 (0)1453 826661 Fax: +44 (0)1453 829671
ABB Inc. 125 E. County Line Road Warminster, PA 18974 USA Tel: +1 215 674 6000 Fax: +1 215 674 7183
ABB Automation Products GmbH Dransfelder Str. 2 37079 Goettingen Germany Tel: +49 551 905-534 Fax: +49 551 905-555 [email protected]