cireson portal for configuration manager - microsoft portal... · cireson portal for configuration...
TRANSCRIPT

© 2016 Cireson – Your System Center Experts
Version: 1.0 PUBLISHED: 13-MAR-17
Cireson Portal for Configuration Manager INSTALLATION GUIDE
Cireson Portal for Configuration Manager
Installation Guide i
Table of Contents Introduction .................................................................................................................................................. 1
Purpose and Audience .............................................................................................................................. 1
Version History .......................................................................................................................................... 1
Related Documentation ............................................................................................................................ 1
Prerequisites and Assumptions ................................................................................................................ 1
Feedback ................................................................................................................................................... 2
Minimum Requirements ............................................................................................................................... 3
Optional Components ............................................................................................................................... 3
Installing the Prerequisites and Cireson Portal for Configuration Manager................................................. 4
Account and group requirements ............................................................................................................. 4
DNS requirements ..................................................................................................................................... 5
Create and configure a new Website ....................................................................................................... 7
Configuring the IIS Application Pool ....................................................................................................... 13
Configuring file security .......................................................................................................................... 20
Create and configuring the new SQL Database ...................................................................................... 20
Running the SQL Scripts .......................................................................................................................... 32
Configuring the Cireson Portal for Configuration Manager ........................................................................ 39
Run the Portal Configuration Wizard ...................................................................................................... 39
Installing the Caching Service ................................................................................................................. 53
Post Installation Configuration ................................................................................................................... 58
Verifying the Portal is Working Correctly ................................................................................................... 61
Backup and Restore .................................................................................................................................... 63
Backing up the Portal .............................................................................................................................. 63
Restoring the Portal ................................................................................................................................ 63
Upgrading to the Preview 2 build ............................................................................................................... 64
Upgrade Procedure ................................................................................................................................. 64

Cireson Portal for Configuration Manager
Installation Guide 1.0 1
Introduction The Cireson Portal for Configuration Manager is a web-based experience to help manage and
standardize daily tasks outside of the native Configuration Manager console.
Productivity-boosting features include:
• Available anywhere, anytime
• Inventory data visibility
• Collection membership visibility
• Software management and deployment
• OSD management and deployment
• MDT integration and deployment
• Templates for software, OSD and deployments
• Role-based administration
• Built-in report viewer
Purpose and Audience The purpose of this document is to explain how to install and perform the initial configuration of the
Cireson Portal for Configuration Manager, referred to as the Portal from here on.
Version History Version Date Author Description
1.0 13th Mar 2017 Cliff Hobbs Final
Related Documentation Ref Document Author Status Version
[1] Cireson Portal for Configuration Manager Administration Guide
Cliff Hobbs Draft 0.0b
[2] Cireson Portal for Configuration Manager Troubleshooting Guide
Cliff Hobbs Draft 0.0a
Prerequisites and Assumptions It is assumed that any readers of this document are competent with installing, configuring and using the
various software components mentioned throughout this guide.
NOTE: Administration and Troubleshooting of the Portal are covered in the Administration [1] and Troubleshooting [2] Guides.
This Installation Guide is based on an environment containing the following versions (see the Minimum
Requirements section for details of supported configurations):
• Windows Server 2012 R2 for server resources
• Windows 10 for using the Portal
• SQL 2014 with Service Pack 2
• System Center Configuration Manager (ConfigMgr) Current Branch

Cireson Portal for Configuration Manager
Installation Guide 1.0 2
If you are using different versions to these in your environment you will need to adjust the steps
accordingly for those versions.
Feedback We are constantly looking to improve everything we do. If you have any feedback on this document of
the Portal itself, please email [email protected].
Likewise, if you have any Feature Suggestions, please submit them in the Configuration Manager Portal
area of the Feature Requests section at https://community.cireson.com

Cireson Portal for Configuration Manager
Installation Guide 1.0 3
Minimum Requirements The Cireson Portal for Configuration Manager can either be installed on the ConfigMgr site server or on
a separate server that has access to the site server and the site database server provided it meets the
following minimum requirements.
NOTE: If you decide to install the Portal on a server other than the ConfigMgr site server, we recommend that server is configured as detailed in this guide.
Regardless of where you install the Portal, the target server has to meet the following minimum
software requirements:
• Microsoft Windows Server 2008 with IIS 7 or later – Any version of Microsoft Windows Server
that is currently supported for ConfigMgr 2012 is currently supported1.
• Microsoft System Center Configuration Manager (ConfigMgr) Current Branch/ ConfigMgr 2012
– Any version of ConfigMgr currently supported by Microsoft.
• Microsoft SQL Server 2012 or later – Any version of Microsoft SQL Server that is currently
supported by Microsoft and that is also supported for ConfigMgr is supported by the Portal with
the exception of SQL 2008 (although it remains supported by ConfigMgr, it is no longer under
mainstream Microsoft support).
• .NET Framework 4 or greater
Optional Components If you are using the Microsoft Deployment Toolkit (MDT) the Cireson Portal for Configuration Manager
can be optionally integrated with this as well as ConfigMgr. This integration can be performed either at
the time the Portal is configured or at a later date.
1 See https://technet.microsoft.com/en-us/library/gg682077.aspx#BKMK_SupConfigServerOS

Cireson Portal for Configuration Manager
Installation Guide 1.0 4
Installing the Prerequisites and Cireson Portal for Configuration Manager The following process needs to be followed in order to install the prerequisites and the Cireson Portal
for Configuration Manager:
• Account and group requirements
• DNS requirements
• Create and configure a new Website
• Configuring the IIS Application Pool
• Configuring file security
• Create and configuring the new SQL Database
• Running the SQL Scripts
NOTE: The initial release of the Portal does not include an installer to automate the installation of the majority of these prerequisites and the Portal itself. Cireson is considering providing an installer in a future release to automate as much of the installation as possible.
Account and group requirements In order to be able to install the Portal you need a standard Active Directory user account that will be
used:
• As the application pool identity
• To pull data from ConfigMgr database
• To interact with the ConfigMgr Portal database
• To interact with the MDT database (if you are using MDT)
• To interact with the ReportServer database
NOTE: If you used a service account to install ConfigMgr you will probably use the same account for the Portal. If you either did not use a service account or would like to use a separate account for the Portal, you need to ensure the account is a Full Administrator user in ConfigMgr which will add it as a member to the site server’s local SMS Admins group in order to have access to the SMS Provider.
Also, if the Portal will be configured with the rights to remove a computer object from Active Directory (AD) if it is deleted from the Portal, those permissions are required for the account used for the Portal in AD.
Administrative access to the Portal is controlled through group membership. Depending on your
environment you could create a local group on the server that will host the Portal called Cireson CM
Portal Admins that will contain the user accounts of anyone requiring administrative access to the
Portal. In this way controlling who has administrative access to the Portal is simply a case of managing
the membership of the Cireson CM Portal Admins group.
Both Local and Domain groups are supported by the Portal.

Cireson Portal for Configuration Manager
Installation Guide 1.0 5
NOTE: Multi Domain/ Forest Environments
In multiple Active Directory (AD) domain / forest environments, a single AD account typically cannot access resources in a foreign domain or forest. In such environments, the Portal allows an account for each domain / forest to be specified allowing the Portal to perform tasks on the domain by using the specified credentials. This includes actions performed on remote ConfigMgr site servers, in SQL and AD, and machine policy download triggers on client computers.
DNS requirements In order to be able to install the Cireson Portal for Configuration Manager you need to create a new
Alias (CNAME record) in your Domain Name System (DNS) pointing to the address for the Portal on the
Internet Information Services (IIS) Server on which the Portal will be installed.
For example:
http://ConfigMgrPortal.mydomain.local
where mydomain.local is the name of your domain.
The following procedure walks you through adding a new alias (CNAME) resource record to a zone in
Windows Server 2012 R2.
To add an alias (CNAME) resource record to a zone:
1. Logon to the server where DNS is controlled.
2. Start Server Manager.
3. Click the Tools menu then select DNS which will start the DNS Manager Microsoft Management
Console (MMC).
Cireson Portal for Configuration Manager
Installation Guide 1.0 6
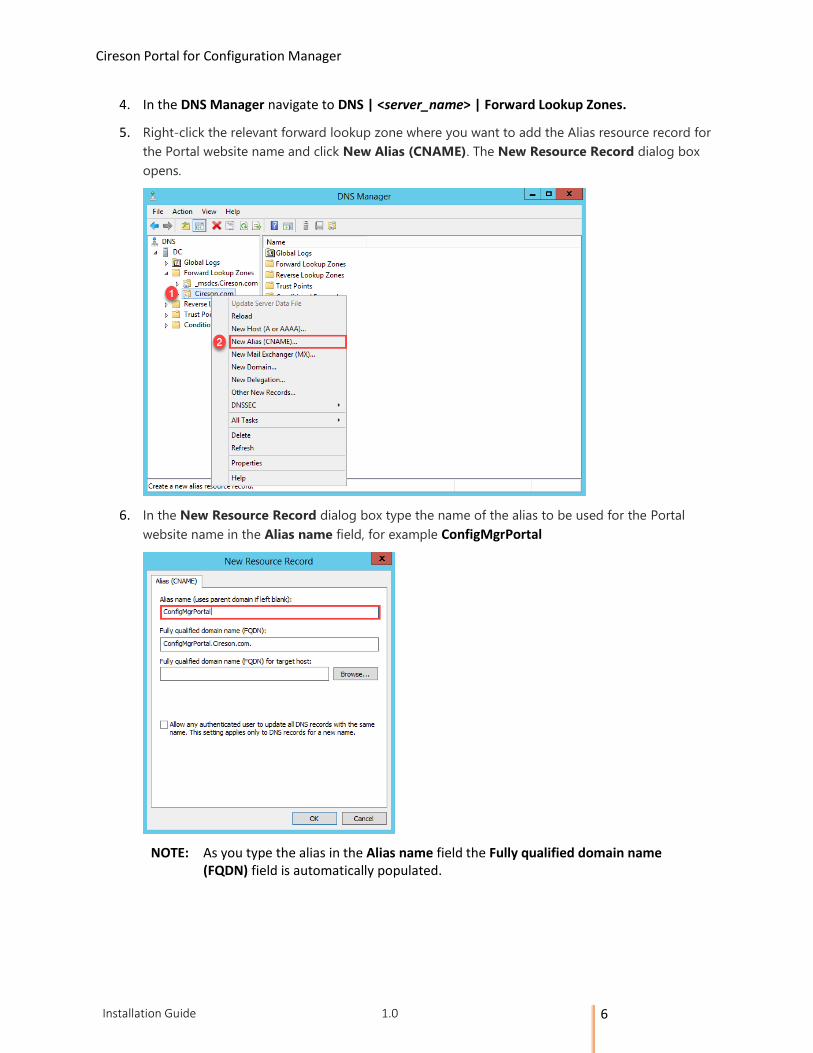
4. In the DNS Manager navigate to DNS | <server_name> | Forward Lookup Zones.
5. Right-click the relevant forward lookup zone where you want to add the Alias resource record for
the Portal website name and click New Alias (CNAME). The New Resource Record dialog box
opens.
6. In the New Resource Record dialog box type the name of the alias to be used for the Portal
website name in the Alias name field, for example ConfigMgrPortal
NOTE: As you type the alias in the Alias name field the Fully qualified domain name (FQDN) field is automatically populated.

Cireson Portal for Configuration Manager
Installation Guide 1.0 7
7. If you use Fully Qualified Domain Names (FQDNs) in your environment, in the Fully qualified
domain name (FQDN) for target host field type the FQDN of the computer on which the Portal
will be stored. Alternatively click the Browse button to browse the DNS namespace for the host
(A) resource record for server on which the Portal will be installed.
8. Click OK to add the new record to the zone.
Create and configure a new Website The next step in the process is to use Internet Information Services (IIS) to create and configure a new
Website for the ConfigMgr Portal.
To create and configure a new Website for the Portal:
1. Logon to the server that will host the Portal.
2. Create a new folder under C:\inetpub to host the new Website, for example ConfigMgr Portal
3. Extract the Cireson ConfigMgr Portal.zip to the new folder created in Step 2.
4. Start Internet Information Services (IIS) Manager.

Cireson Portal for Configuration Manager
Installation Guide 1.0 8
5. Expand the server object in the left hand pane, then right-click Sites and select Add Website.
6. On the Add Website dialog box, type the name of the Website in the Site name field for
example ConfigMgr Portal

Cireson Portal for Configuration Manager
Installation Guide 1.0 9
7. In the Physical path field, either type the path or browse to the folder created in Step 2.
8. In the Host name field, type the name for the website, for example ConfigMgrPortal (no spaces)
then click OK.

Cireson Portal for Configuration Manager
Installation Guide 1.0 10
IMPORTANT: Make sure to enter the name of the Portal in the Host name field and not that of the actual server FQDN. If you enter the FQDN of the server, it will conflict with your Management Point and take it offline causing it to generate Status Message ID 5436:
MP Control Manager detected management point is not
responding to HTTP requests. The HTTP status code and
text is 401, Unauthorized
The new Website will be shown in Internet Information Services (IIS) Manager.
9. Click the newly created Website.
10. Under the IIS section of the ConfigMgr Portal Home page, right-click Authentication and select
Open Feature.
Cireson Portal for Configuration Manager
Installation Guide 1.0 11
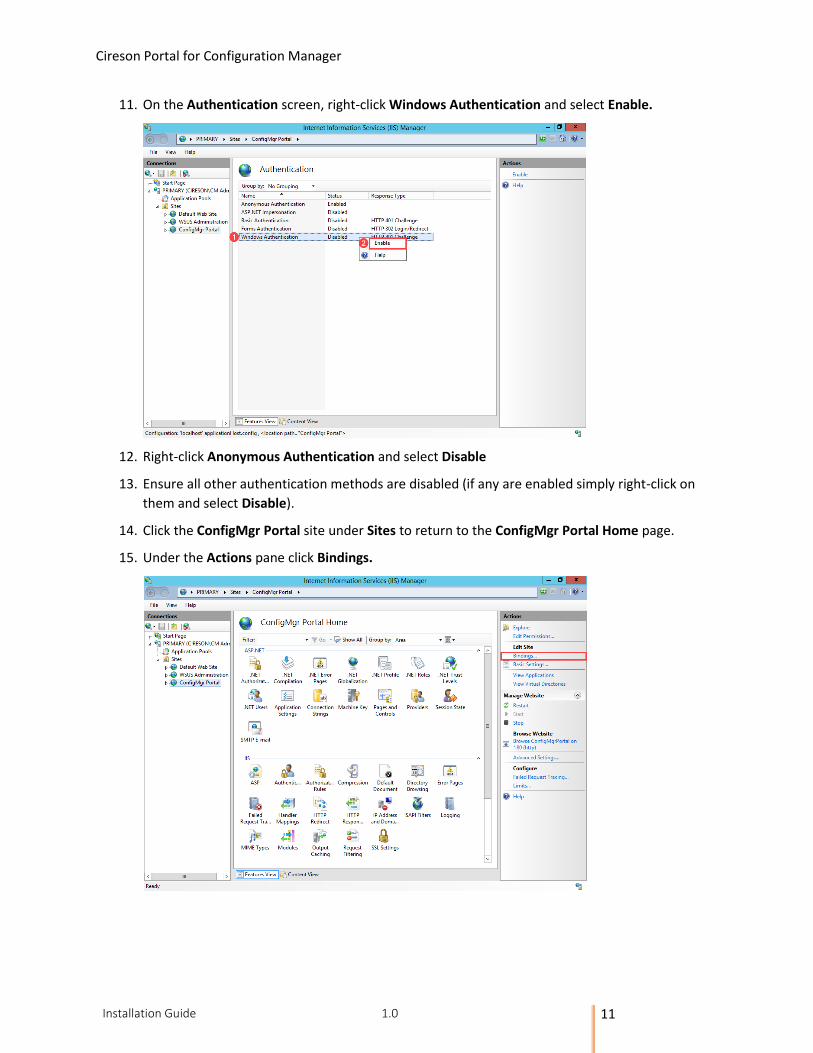
11. On the Authentication screen, right-click Windows Authentication and select Enable.
12. Right-click Anonymous Authentication and select Disable
13. Ensure all other authentication methods are disabled (if any are enabled simply right-click on
them and select Disable).
14. Click the ConfigMgr Portal site under Sites to return to the ConfigMgr Portal Home page.
15. Under the Actions pane click Bindings.
Cireson Portal for Configuration Manager
Installation Guide 1.0 12
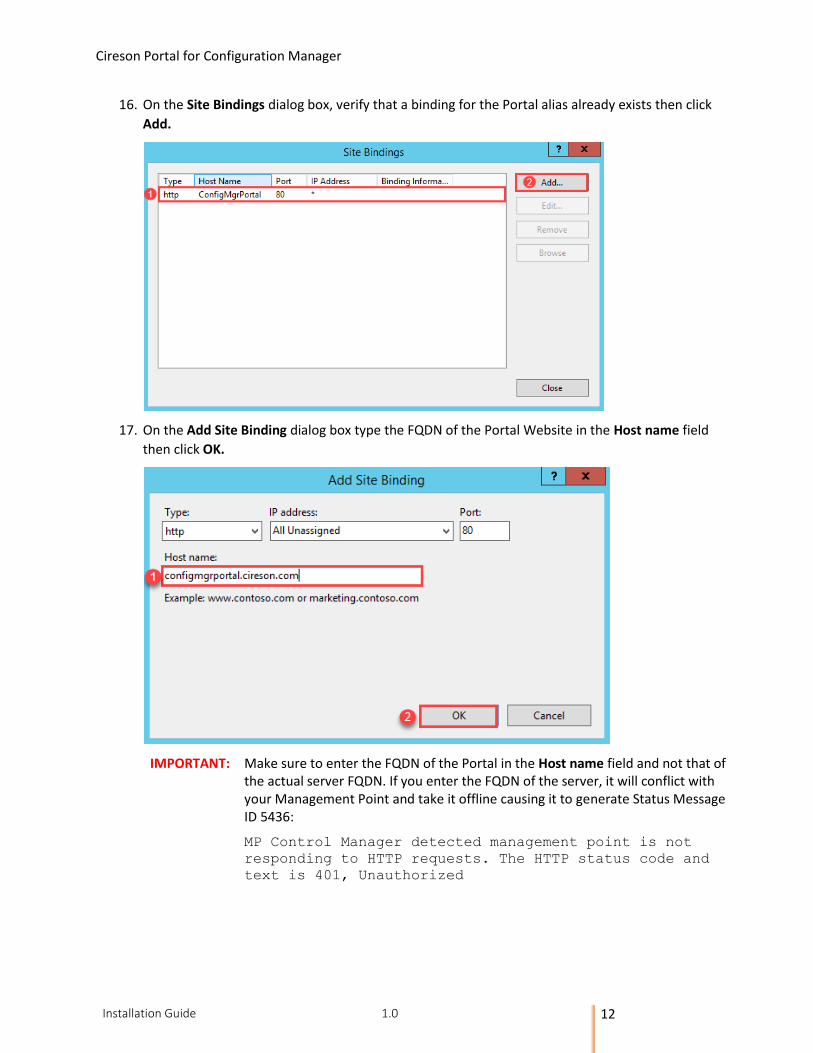
16. On the Site Bindings dialog box, verify that a binding for the Portal alias already exists then click
Add.
17. On the Add Site Binding dialog box type the FQDN of the Portal Website in the Host name field
then click OK.
IMPORTANT: Make sure to enter the FQDN of the Portal in the Host name field and not that of the actual server FQDN. If you enter the FQDN of the server, it will conflict with your Management Point and take it offline causing it to generate Status Message ID 5436:
MP Control Manager detected management point is not
responding to HTTP requests. The HTTP status code and
text is 401, Unauthorized

Cireson Portal for Configuration Manager
Installation Guide 1.0 13
Both of the bindings should now appear on the Site Bindings dialog box.
18. Click Close.
NOTE: Leave Internet Information Services (IIS) Manager open as it is required in the next section.
Configuring the IIS Application Pool The next stage of the installation process involves configuring the Internet Information Services (IIS)
Application Pool.
To configure the IIS Application Pool:
1. Logon to the server that will host the Portal.
2. Start Internet Information Services (IIS) Manager (if it isn’t already).
3. Navigate to <server_name> |Application Pools.

Cireson Portal for Configuration Manager
Installation Guide 1.0 14
4. Right-click the ConfigMgr Portal Application Pool and select Advanced Settings.
5. On the Advanced Settings dialog box verify that the .NET CLR Version under the (General)
section is set to v4.0

Cireson Portal for Configuration Manager
Installation Guide 1.0 15
6. Under the Process Model section click the ellipses ( ) after the Identity field.
7. On the Application Pool Identity dialog box, select the Custom account: option and then click
the Set button.

Cireson Portal for Configuration Manager
Installation Guide 1.0 16
8. On the Set Credentials dialog box enter the credentials (including the domain name), for the
Portal service account created in the Account and group requirements section then click OK. For
example Cireson\Cireson CM Portal.
9. On the Application Pool Identity dialog box, check that the Custom account field contains the
correct value then click OK.
10. To avoid potential performance issues with the initial loading of the Portal we recommend
changing the value for the Idle Time-out (minutes) setting from 20 to 0.

Cireson Portal for Configuration Manager
Installation Guide 1.0 17
MORE INFORMATION:
If you do not change the value of the Idle Time-out (minutes) setting, after 20 minutes of receiving no traffic the Portal’s Application Pool will terminate. Then when traffic is received, the Application Pool for the Portal needs to be created, ASP.NET or other frameworks needs to be loaded, and then the Portal needs to be loaded. All of this can take a few seconds. Changing this setting to 0 should not adversely affected IIS.
The next part of the configuration process involves configuring IIS Recycling.
NOTE: We recommend you configure IIS Recycling to occur at a specific time when the system usually has the lightest load, rather than the default of occurring every 1,740 minutes to avoid unexpected errors in the Portal event log similar to:
Thread was being aborted
General recommendations are provided in the following section but you should configure this setting (or even disable it), depending on your own environment.
To configure IIS Recycling to occur at a specific time:
1. Under the Recycling section, change the value of the Regular Time Interval (minutes) setting
from 1740 to 0 otherwise you will be performing IIS recycling both every 1740 minutes and at
the specific time specified later in this procedure.

Cireson Portal for Configuration Manager
Installation Guide 1.0 18
2. Next click the ellipses ( ) after the Specific Times field.
3. On the TimeSpan Collection Editor dialog box click Add.

Cireson Portal for Configuration Manager
Installation Guide 1.0 19
By default, midnight (00:00:00) is added as the default time.
4. Click OK to close the TimeSpan Collection Editor dialog box.
5. Click the small arrow ( ) preceding the Specific Times field to expand it.

Cireson Portal for Configuration Manager
Installation Guide 1.0 20
6. Verify that the time entry configured in Step 3 is present and set correctly then click OK.
7. Close Internet Information Services (IIS) Manager
Configuring file security To configure file security for the Portal:
1. Logon to the server that is hosting the Portal.
2. Grant the user account that will be used to run the Portal (for example Cireson CM Portal),
Modify permissions to the C:\Inetpub\ConfigMgr Portal folder, and all subfolders and files.
Create and configuring the new SQL Database To create the new SQL database for the Portal:
1. Logon to the server that will host the Portal.
2. Start SQL Server Management Studio and connect to the SQL Server where the Portal database
will be created using an account that has permission to create a database.

Cireson Portal for Configuration Manager
Installation Guide 1.0 21
3. Right-click Databases and select New Database.
4. On the New Database screen, type ConfigMgr_Portal in the Database name field.

Cireson Portal for Configuration Manager
Installation Guide 1.0 22
5. For the ConfigMgr_Portal database, set the Initial Size (MB) value to be whichever is the greater
of either ten percent of the size of the ConfigMgr site database or 500 MB.
6. Click the ellipses ( ) after the Autogrowth / Maxsize value for the ConfigMgr_Portal database
(you may need to make the New Database dialog box bigger to see these).

Cireson Portal for Configuration Manager
Installation Guide 1.0 23
7. In the Change Autogrowth for ConfigMgr_Portal dialog box change the In Megabytes value to
100 then click OK.
8. For the ConfigMgr_Portal SQL Log, set the Initial Size (MB) value to be whichever is the greater
of either ten percent of the size of the ConfigMgr site database log or 100 MB.

Cireson Portal for Configuration Manager
Installation Guide 1.0 24
9. Click the ellipses ( ) after the Autogrowth / Maxsize value for the ConfigMgr_Portal_log SQL
log.
10. In the Change Autogrowth for ConfigMgr_Portal_log dialog box, select the In Megabytes option
and change the value to 100 then click OK.

Cireson Portal for Configuration Manager
Installation Guide 1.0 25
11. Click OK on the New Database screen.
NOTE: By default SQL sets the Recovery Mode for the Portal database to Full which could result in the Transaction Log growing quite large as all transactions are maintained. Consider setting the Recovery Mode to Simple to reduce the size of the Transaction Log.
Leave SQL Server Management Studio open as it is required in the next part of the process which is to
grant the group that will be used for the Portal access to the new database.
To grant the user that will be used for the Portal access to the new database:
1. Logon to the server that will host the Portal.
2. Start SQL Server Management Studio.
3. Navigate to <server_name> | Security | Logins.
NOTE: As the Portal account has already been defined as a Full Administrator in ConfigMgr, a SQL Login will already exist. If a SQL Login doesn’t exist for the Portal account, configure it as a Full Administrator in ConfigMgr before proceeding.

Cireson Portal for Configuration Manager
Installation Guide 1.0 26
4. Double-click the Login for the Portal user account (for example Cireson\Cireson CM Portal).
5. Under the Select a page section select the Server Roles page.

Cireson Portal for Configuration Manager
Installation Guide 1.0 27
6. Verify that public is selected.
7. Under the Select a page section select the User Mapping page.

Cireson Portal for Configuration Manager
Installation Guide 1.0 28
8. Verify that the checkbox in the Map column beside the ConfigMgr database (CM_xxx by default
where xxx is your site code) has been checked.
9. Select the checkbox beside db_datareader.

Cireson Portal for Configuration Manager
Installation Guide 1.0 29
10. Select the checkbox in the Map column beside the ConfigMgr_Portal database.
11. Select the checkbox beside db_owner.

Cireson Portal for Configuration Manager
Installation Guide 1.0 30
12. If MDT has been installed and you want the Portal to integrate with it, select the checkbox in the
Map column beside the MDT database.
13. Select both the db_datareader and db_datawriter checkboxes.
Cireson Portal for Configuration Manager
Installation Guide 1.0 31
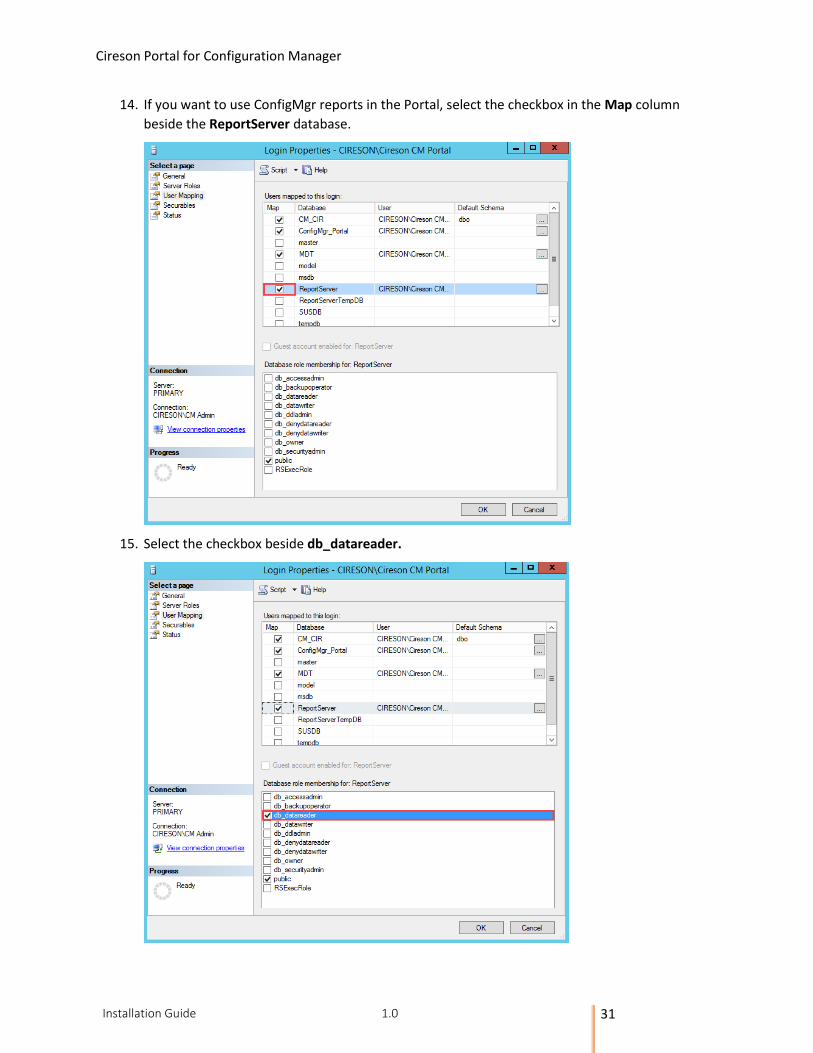
14. If you want to use ConfigMgr reports in the Portal, select the checkbox in the Map column
beside the ReportServer database.
15. Select the checkbox beside db_datareader.

Cireson Portal for Configuration Manager
Installation Guide 1.0 32
16. Click OK to close the Login Properties - <domain>\<Portal_SQL_login> screen.
Running the SQL Scripts The Cireson ConfigMgr Portal Hosting Service uses table states in order to determine if a table scan is
required to update resources in the Portal database from the ConfigMgr and MDT databases. This
technique minimizes the number of database queries for the Portal Caching Service.
This process requires granting the VIEW SERVER STATE permission for the Portal IIS Identity user or the
specified SQL account used in the Portal.
NOTE: This permission needs to be granted on the SQL Master database by someone logged in with an account that has full SQL administrative rights.
If you choose not to grant the VIEW SERVER STATE permission to the Portal account, the Portal will still function properly but it will process all appropriate data each cycle instead of only processing delta updates.
Our recommendation is you grant the VIEW SERVER STATE permission as detailed below.
To run the SQL scripts:
1. Logon to the server hosting Portal.
NOTE: For this procedure, you cannot login as the Portal account otherwise Step 4 will fail.
2. Start SQL Management Studio.
3. Click New Query on the toolbar.

Cireson Portal for Configuration Manager
Installation Guide 1.0 33
4. Enter the following SQL query in the new query window replacing <Domain>\<ConfigMgr Portal
Account> with the domain name and name of the Portal Account created in the Account and
group requirements section. If you are using a SQL account omit the domain.
USE master
GRANT VIEW SERVER STATE TO [<Domain>\<ConfigMgr Portal Account>]
GO
For example, if your domain name is Cireson and the account name is Cireson CM Portal you
would enter:
USE master
GRANT VIEW SERVER STATE TO [Cireson\Cireson CM Portal]
GO

Cireson Portal for Configuration Manager
Installation Guide 1.0 34
5. Click Execute on the toolbar.
The message Command(s) completed successfully will be displayed in the Messages pane.

Cireson Portal for Configuration Manager
Installation Guide 1.0 35
6. Next navigate to Databases and select the ConfigMgr_Portal database.
7. In SQL Management Studio on the File menu select Open | File.
8. Browse to the C:\Inetpub\ConfigMgr Portal\_Setup\Database folder.

Cireson Portal for Configuration Manager
Installation Guide 1.0 36
9. Double-click dbTables.sql which will open it as a query in SQL Management Studio.
10. Click Execute on the toolbar.

Cireson Portal for Configuration Manager
Installation Guide 1.0 37
The message (1 row(s) affected) will be displayed in the Messages pane.
11. In SQL Management Studio on the File menu select Open | File.
12. Browse to the C:\Inetpub\ConfigMgr Portal\_Setup\Database folder.
13. Double-click dbData.sql which will open it as a query in SQL Management Studio.

Cireson Portal for Configuration Manager
Installation Guide 1.0 38
14. Click Execute on the toolbar.
The message (1 row(s) affected) will be displayed numerous times in the Messages pane.
15. Close SQL Management Studio (you can click No when prompted to save any changes to any
SQL queries).
This completes the process to create the appropriate tables and required relationships.

Cireson Portal for Configuration Manager
Installation Guide 1.0 39
Configuring the Cireson Portal for Configuration Manager Now that the Cireson Portal for Configuration Manager has been installed, it can now be configured.
Configuring the Portal is a two-stage process:
• Run the Portal Configuration Wizard
• Install the Caching Service
Run the Portal Configuration Wizard To run the Portal Configuration Wizard:
1. From a browser (preferably Internet Explorer running on a workstation), enter the following URL
in the address field:
http://<configmgrportal>/_setup/default.aspx
where <configmgrportal> matches one of the IIS bindings for the ConfigMgr Web site created in
the Create and configure a new Website section.
For example:
http://configmgrportal/_setup/default.aspx
NOTE: The character before the word Setup is an underscore (“_”) not a space i.e.
_setup
2. Enter your credentials if prompted.
The Configuration Manager Portal Configuration Wizard screen will be displayed.

Cireson Portal for Configuration Manager
Installation Guide 1.0 40
3. Click Start
4. On the License Key page, enter your License Key in the License Key field.

Cireson Portal for Configuration Manager
Installation Guide 1.0 41
5. Click Validate to ensure it is valid.
A message will be displayed stating how long your license is valid until.
Cireson Portal for Configuration Manager
Installation Guide 1.0 42
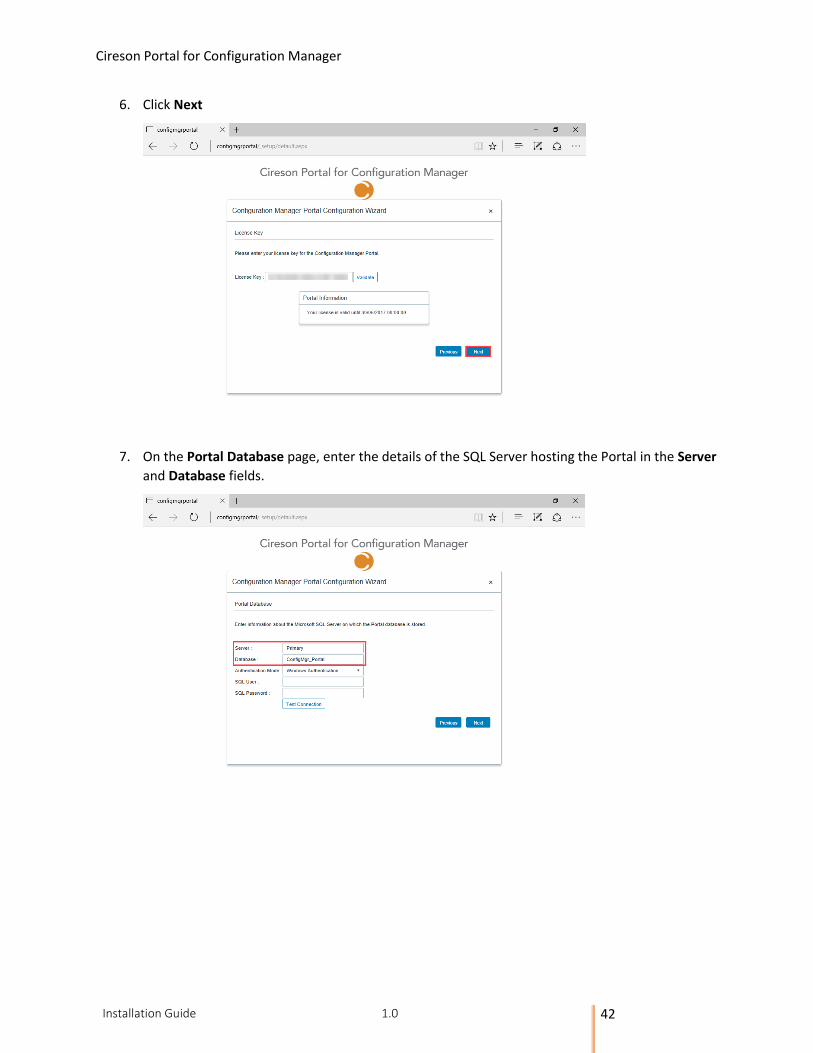
6. Click Next
7. On the Portal Database page, enter the details of the SQL Server hosting the Portal in the Server
and Database fields.

Cireson Portal for Configuration Manager
Installation Guide 1.0 43
8. If you are using Windows Authentication click the Test Connection button. If you are using SQL
Authentication select this from the Authentication Mode dropdown and enter the relevant
details in the SQL User and SQL Password fields before clicking the Test Connection button.
NOTE: If you are using Windows Authentication, the IIS Application Pool identity configured in the Configuring the IIS Application Pool section is used to access the database.
If the connection is successful, you will see the message Successfully connected to the Portal
database on SQL server ‘<server_name>’.

Cireson Portal for Configuration Manager
Installation Guide 1.0 44
9. Click Next
10. On the Configuration Manager page, in the Site Server field enter the name of the ConfigMgr
site server.
NOTE: In a multi-site environment, this must be the Central Administration/ Central Site and cannot be a Secondary Site.

Cireson Portal for Configuration Manager
Installation Guide 1.0 45
11. Click Test connection
If the connection is successful, you will see the message Successfully connected to
‘<ConfigMgr_Site_Server_name>’

Cireson Portal for Configuration Manager
Installation Guide 1.0 46
12. Enter the name of the SQL Server hosting the ConfigMgr database in the SQL Server field and
the name of the ConfigMgr database in the SQL Database field.
13. If you are using Windows Authentication click the Test Connection button. If you are using SQL
Authentication select this from the Authentication Mode dropdown and enter the relevant
details in the SQL User and SQL Password fields before clicking the Test Connection button.
NOTE: If you are using Windows Authentication, the IIS Application Pool identity configured in the Configuring the IIS Application Pool section is used to access the database.

Cireson Portal for Configuration Manager
Installation Guide 1.0 47
If the connection is successful, you will see the message Successfully connected to the
Configuration Manager database on SQL Server ‘<server_name>’.
14. Click Next

Cireson Portal for Configuration Manager
Installation Guide 1.0 48
15. If you plan to integrate the ConfigMgr Portal with the Microsoft Deployment Toolkit (MDT), on
the Microsoft Deployment Toolkit page select the Enable MDT Integration checkbox.
16. Enter the name of the SQL Server hosting the MDT database in the SQL Server field and the
name of the MDT database in the SQL Database field.
Cireson Portal for Configuration Manager
Installation Guide 1.0 49
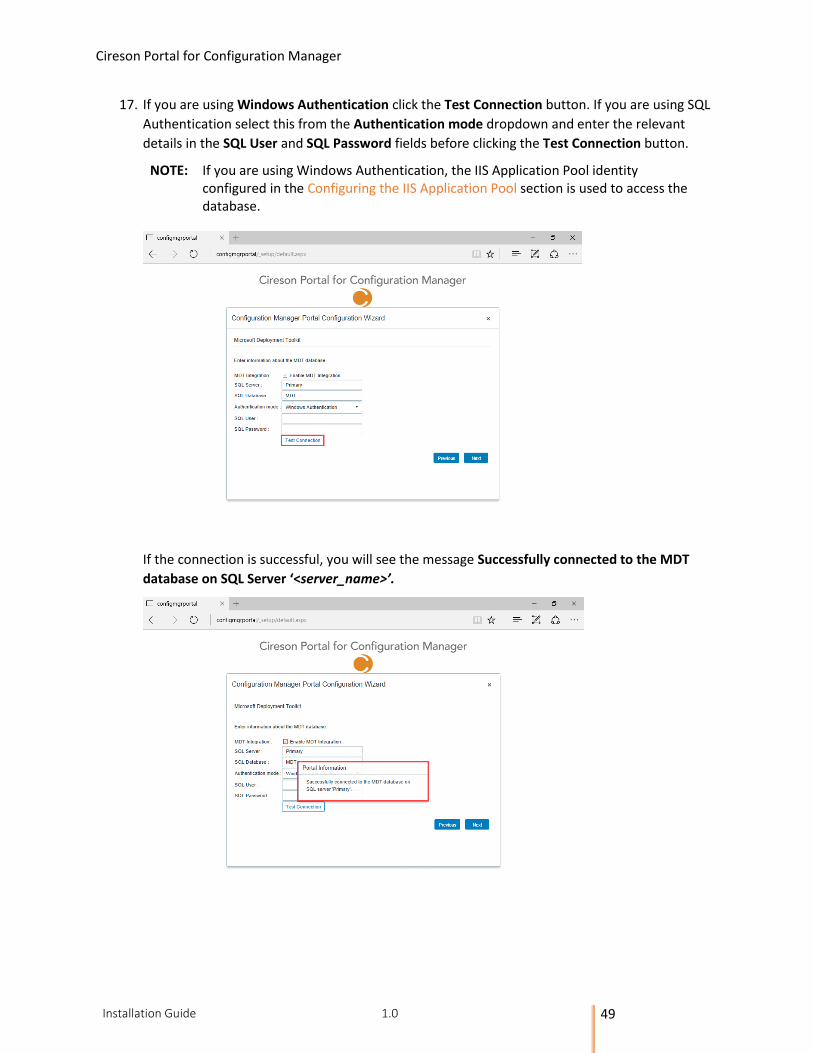
17. If you are using Windows Authentication click the Test Connection button. If you are using SQL
Authentication select this from the Authentication mode dropdown and enter the relevant
details in the SQL User and SQL Password fields before clicking the Test Connection button.
NOTE: If you are using Windows Authentication, the IIS Application Pool identity configured in the Configuring the IIS Application Pool section is used to access the database.
If the connection is successful, you will see the message Successfully connected to the MDT
database on SQL Server ‘<server_name>’.

Cireson Portal for Configuration Manager
Installation Guide 1.0 50
18. Click Next
19. On the Administrators Group page, in the AD Group/User field enter the name of the Active
Directory group/user that will have full access to the Portal in the format <domain>\<name> or
<server_name>\<name>
NOTE: The validation of this group is performed using the IIS Application Pool identity configured in the Configuring the IIS Application Pool section.
It is recommended that the user running the Portal Configuration Wizard is a member of this group.

Cireson Portal for Configuration Manager
Installation Guide 1.0 51
20. Click Validate Membership
If the validation is successful, you will see the message Current user ‘<domain>\<user_name>’
is a member of one or more of the specified Active Directory groups.

Cireson Portal for Configuration Manager
Installation Guide 1.0 52
21. Click Next
22. Click Finish on the Wizard Complete page to complete the installation of the Portal.

Cireson Portal for Configuration Manager
Installation Guide 1.0 53
The Cireson Portal for Configuration Manager page will then be displayed.
Installing the Caching Service
The ConfigMgr Portal uses a caching service to query information from the ConfigMgr database and
insert it into the ConfigMgr Portal database. By default, the Caching Service installs to C:\Program
Files\Cireson\Portal for Configuration Manager\Services.
To install the Portal Caching Service:
1. Logon to the server that is hosting the Portal.
2. Run either Cireson ConfigMgr Portal Service x64.msi or Cireson ConfigMgr Portal Service
x86.msi depending on the architecture of the machine you are running which will start the
Cireson ConfigMgr Portal Service Setup installation.

Cireson Portal for Configuration Manager
Installation Guide 1.0 54
3. Select the I accept the terms in the License Agreement checkbox.
4. Click Install

Cireson Portal for Configuration Manager
Installation Guide 1.0 55
5. Click Yes on the User Account Control dialog box if it is displayed.
Setup will then install the Cireson ConfigMgr Portal Service.
Once the installation has completed, the Completed the Cireson ConfigMgr Portal Service
Setup Wizard screen will be displayed.

Cireson Portal for Configuration Manager
Installation Guide 1.0 56
6. Click Finish to close setup wizard.
7. Navigate to the location where the Caching Service was installed (by default C:\Program
Files\Cireson\Portal for Configuration Manager\Services).
8. Open the XML Configuration file called ConfigMgr Portal Hosting Service.exe.config in Notepad.

Cireson Portal for Configuration Manager
Installation Guide 1.0 57
9. Verify that the BaseFolder key is set correctly to the path of the Portal files, for example
C:\Inetpub\ConfigMgr Portal
10. Start Services.msc and verify that the Cireson ConfigMgr Portal Hosting Service is running. If it
is not start it.
This completes the installation of the Cireson ConfigMgr Portal. The next section looks at the post
installation configuration tasks that need to be completed.

Cireson Portal for Configuration Manager
Installation Guide 1.0 58
Post Installation Configuration Now that the Portal has been installed, there are a few post installation configuration steps that need to
be completed as detailed in this section.
To complete the Portal post installation configuration steps:
1. Start a browser and connect to the Portal (http://configmgrportal/default.aspx).
2. Using the dropdown beside the logged on username, navigate to Configuration Manager
Settings
3. Verify that the settings under both the Configuration Manager Server and Database Settings
For Configuration Manager sections are configured correctly, correcting then saving them if
required.

Cireson Portal for Configuration Manager
Installation Guide 1.0 59
4. Using the dropdown beside the logged on username, navigate to Service Settings
5. Click the Service Tasks tab.

Cireson Portal for Configuration Manager
Installation Guide 1.0 60
6. Select the required setting you wish to configure from the Tasks dropdown.
7. Configure how often the Portal should query the ConfigMgr database for the relevant data then
click Save Changes.
The default frequencies are shown in the table below:
Task Default Frequency of Every…
Group 1 hour
User 20 minutes
Computer 10 minutes
Software 24 hours
DeploymentScope 4 hours
8. Repeat Steps 6 and 7 as required for the other objects you wish to configure.

Cireson Portal for Configuration Manager
Installation Guide 1.0 61
Verifying the Portal is Working Correctly The final part of the process is to verify that the Portal is actually able to successfully retrieve data from
the ConfigMgr database.
To verify the Portal can successfully retrieve data from the ConfigMgr database:
1. Start a browser and connect to the Portal (http://configmgrPortal). The Cireson Portal for
Configuration Manager will be displayed.
2. From the Navigation menu select an option to display the data retrieved from the ConfigMgr
database by the Portal. For example, to retrieve a list of computers navigate to Computers

Cireson Portal for Configuration Manager
Installation Guide 1.0 62
3. Verify the Portal shows only installed ConfigMgr Clients (which is how the default Standard
Computer View for computers is configured).
NOTE: The primary purpose of the Cireson ConfigMgr Portal is for deployment purposes so it defaults to only showing computers you can deploy to i.e. have the ConfigMgr Client installed.
It is possible to create custom views for example to show discovered resources, or those marked as obsolete and even decommissioned computers.
Details of how to create custom views can be found in the Administrators Guide.
This completes the post installation configuration of the Portal.

Cireson Portal for Configuration Manager
Installation Guide 1.0 63
Backup and Restore
This section details how to backup and restore the Portal.
Backing up the Portal
Backing up the Portal is simply a case of making sure that the following are backed up on a regular basis:
• Portal SQL database
• Directory containing the Portal files from the server where the Portal is installed for example
C:\Inetpub\ConfigMgr Portal2
Restoring the Portal
Should you need to restore the Portal for any reason the restore process is a two-step procedure:
1. Restoring the SQL Backup – The most recent backup of the Portal database should be restored
and then checks run using this guide to ensure the security rights are still present.
2. Restoring the ConfigMgr Portal folder structure – The next step is to restore the most recent
backup of the Portal folder structure (for example C:\Inetpub\ConfigMgr Portal). Alternatively
recreate the installation directory as detailed in the Create and configure a new Website section
then overwrite the Configuration.xml and Web.config files created in this directory with the
one from the most recent backup.
2 At a minimum, the Configuration.xml and Web.config files needs to be backed up.

Cireson Portal for Configuration Manager
Installation Guide 1.0 64
Upgrading from Pre-release Versions
This section details how to upgrade the Cireson Portal for Configuration Manager from pre-release
versions.
NOTE: If you are running a pre-release version of the Cireson Portal for Configuration Manager, this section provides the necessary steps to upgrade to the current release.
If this is a new installation of the Cireson Portal for Configuration Manager, follow the procedures in the ‘Installation Guide.PDF’ included in the CMP Build.zip download.
Upgrade Procedure To upgrade from previous versions to the current version:
1. Extract the CMP Build.zip file to a temporary folder
a. This zip file contains the following files:
i. Release Notes.html (the release notes for this build)
ii. Installation Guide.PDF (the installation instructions for new installs)
iii. ConfigMgr Portal.zip (the installation files for the website)
iv. ConfigMgr Portal Service Installers.zip (the Windows Installer files for the
Cireson ConfigMgr Portal Hosting Service installation)
v. Upgrade Guide.PDF (this document)
2. Stop the Portal web site via Internet Information Services Manager
a. This should not be necessary, but it doesn’t hurt to do so ☺
3. Copy your existing Configuration.xml file from your installation location (for example,
C:\Inetpub\ConfigMgr Portal) to a backup location
a. This file will be overwritten during the upgrade and you will want to have your version
of the file to restore later as it contains the configuration of your implementation of the
Cireson Portal for Configuration Manager
4. From Control Panel, uninstall the Cireson ConfigMgr Portal Service
a. This service needs to be upgraded, so uninstall the existing one and in a later step, you
will install the newer version of the service
5. Extract the contents of the ConfigMgr Portal.zip from the temporary folder to your web site
installation folder (such as C:\Inetpub\ConfigMgr Portal)
a. You will be prompted to replace a large number of files (over 1,700), which you should
allow to complete
6. Copy your original Configuration.xml file copied in Step 3 to the web site installation folder
(such as C:\Inetpub\ConfigMgr Portal) overwriting the new version of the file
a. You will need to replace the new Configuration.xml with your own so that you don’t
have to reconfigure a number of settings you had previously completed
7. Ensure that your IIS application pool account has Modify rights to the web site installation folder
(such as C:\Inetpub\ConfigMgr Portal)
a. In the pre-release installation document, it was only listed as needing Read rights to the
folder, and Modify rights to a couple of files. You now should ensure that the account
has Modify rights to the entire folder and all files and subfolders.
8. On the SQL Server computer that is hosting your Cireson Portal for Configuration Manager
database, start SQL Server Management Studio

Cireson Portal for Configuration Manager
Installation Guide 1.0 65
a. Select the Cireson Portal for Configuration Manager database, and then execute the two
SQL scripts that are provided with the Preview 2 release that are now in your
C:\Inetpub\ConfigMgr Portal\_Setup\Database folder):
i. dbTables.sql
ii. dbData.sql
b. Executing these two scripts is necessary due to database schema changes from the
initial Preview release
9. Extract the ConfigMgr Portal Service Installers.zip to a temporary folder, and then run the
appropriate Windows Installer file to install either the 64-bit or 32-bit service
a. The Cireson ConfigMgr Portal Service has changed from the preview release so needs to
be reinstalled
10. From the C:\Program Files\Cireson\Portal for Configuration Manager\Services folder, open the
ConfigMgr Portal Hosting Service.exe.config file in Notepad and verify that the "BaseFolder"
value is correct for your web site installation
a. The default path is set to C:\Inetpub\ConfigMgr Portal. If this is not your web site
installation folder, set the “BaseFolder” value to reflect your installation
11. Start the Cireson ConfigMgr Portal Hosting Service
a. Verify the log files for the service in the
C:\Program Files\Cireson\Portal for Configuration Manager\Services\logs folder
i. hostingService.log (should indicate that the service found your server and
database and started successfully)
ii. CachingService.log (should see it identifying computers, users and software for
your environment)
12. Start the Portal web site via Internet Information Services Manager
a. If you stopped the web site in Step 2, then you need to start it again to use it ☺
13. Verify your version – now visible within the Portal:
a. Start your browser
b. Log into the Portal web site
c. In the upper right corner of the Portal, hover the mouse over your logged-on user name
d. In the Settings menu that appears below your name, click General Settings
e. In the General Settings page, expand the “Product Version” section at the bottom
i. The Version should display as 3.0.1.501
Upon upgrade, the Caching Service will automatically perform a full update cycle just as if it were a new
installation. This is done to retrieve any new values for existing objects that are now implemented
through database schema changes.
As you upgrade, if your trial license has expired, you will be prompted to supply a new license key, which
will automatically take you to the Configuration Manager Portal Configuration Wizard where you can
enter the new license key that you’d receive from the Cireson sales team.

Cireson Portal for Configuration Manager
Installation Guide 1.0 66
With that, you should be all set and ready to enjoy all the new features and functions in the latest
release of the Cireson Portal for Configuration Manager. If you have not already done so, please be sure
to read the included Release Notes as well. That document will note any important known issues in this
release, as well as listing new features and capabilities for your testing.