cisco unified ip phone 7941g, 7941g-ge, 7942g, 7961g ... · 4/5/2018 · cisco unified ip phone...
TRANSCRIPT

Cisco Unified IP Phone 7941G, 7941G-GE, 7942G, 7961G, 7961G-GE,and 7962G User Guide for Cisco Unified Communications Manager9.0 (SCCP and SIP)First Published: 2012-06-19
Last Modified: 2018-04-05
Americas HeadquartersCisco Systems, Inc.170 West Tasman DriveSan Jose, CA 95134-1706USAhttp://www.cisco.comTel: 408 526-4000 800 553-NETS (6387)Fax: 408 527-0883

THE SPECIFICATIONS AND INFORMATION REGARDING THE PRODUCTS IN THIS MANUAL ARE SUBJECT TO CHANGE WITHOUT NOTICE. ALL STATEMENTS,INFORMATION, AND RECOMMENDATIONS IN THIS MANUAL ARE BELIEVED TO BE ACCURATE BUT ARE PRESENTED WITHOUT WARRANTY OF ANY KIND,EXPRESS OR IMPLIED. USERS MUST TAKE FULL RESPONSIBILITY FOR THEIR APPLICATION OF ANY PRODUCTS.
THE SOFTWARE LICENSE AND LIMITEDWARRANTY FOR THE ACCOMPANYING PRODUCT ARE SET FORTH IN THE INFORMATION PACKET THAT SHIPPED WITHTHE PRODUCT AND ARE INCORPORATED HEREIN BY THIS REFERENCE. IF YOU ARE UNABLE TO LOCATE THE SOFTWARE LICENSE OR LIMITED WARRANTY,CONTACT YOUR CISCO REPRESENTATIVE FOR A COPY.
The following information is for FCC compliance of Class A devices: This equipment has been tested and found to comply with the limits for a Class A digital device, pursuant to part 15of the FCC rules. These limits are designed to provide reasonable protection against harmful interference when the equipment is operated in a commercial environment. This equipmentgenerates, uses, and can radiate radio-frequency energy and, if not installed and used in accordance with the instruction manual, may cause harmful interference to radio communications.Operation of this equipment in a residential area is likely to cause harmful interference, in which case users will be required to correct the interference at their own expense.
The following information is for FCC compliance of Class B devices: This equipment has been tested and found to comply with the limits for a Class B digital device, pursuant to part 15of the FCC rules. These limits are designed to provide reasonable protection against harmful interference in a residential installation. This equipment generates, uses and can radiate radiofrequency energy and, if not installed and used in accordance with the instructions, may cause harmful interference to radio communications. However, there is no guarantee that interferencewill not occur in a particular installation. If the equipment causes interference to radio or television reception, which can be determined by turning the equipment off and on, users areencouraged to try to correct the interference by using one or more of the following measures:
• Reorient or relocate the receiving antenna.
• Increase the separation between the equipment and receiver.
• Connect the equipment into an outlet on a circuit different from that to which the receiver is connected.
• Consult the dealer or an experienced radio/TV technician for help.
Modifications to this product not authorized by Cisco could void the FCC approval and negate your authority to operate the product
The Cisco implementation of TCP header compression is an adaptation of a program developed by the University of California, Berkeley (UCB) as part of UCB’s public domain versionof the UNIX operating system. All rights reserved. Copyright © 1981, Regents of the University of California.
NOTWITHSTANDINGANYOTHERWARRANTYHEREIN, ALL DOCUMENT FILES AND SOFTWAREOF THESE SUPPLIERS ARE PROVIDED "AS IS"WITHALL FAULTS.CISCO AND THE ABOVE-NAMED SUPPLIERS DISCLAIM ALL WARRANTIES, EXPRESSED OR IMPLIED, INCLUDING, WITHOUT LIMITATION, THOSE OFMERCHANTABILITY, FITNESS FORA PARTICULAR PURPOSEANDNONINFRINGEMENTORARISING FROMACOURSEOFDEALING, USAGE, OR TRADE PRACTICE.
IN NO EVENT SHALL CISCO OR ITS SUPPLIERS BE LIABLE FOR ANY INDIRECT, SPECIAL, CONSEQUENTIAL, OR INCIDENTAL DAMAGES, INCLUDING, WITHOUTLIMITATION, LOST PROFITS OR LOSS OR DAMAGE TO DATA ARISING OUT OF THE USE OR INABILITY TO USE THIS MANUAL, EVEN IF CISCO OR ITS SUPPLIERSHAVE BEEN ADVISED OF THE POSSIBILITY OF SUCH DAMAGES.
Any Internet Protocol (IP) addresses and phone numbers used in this document are not intended to be actual addresses and phone numbers. Any examples, command display output, networktopology diagrams, and other figures included in the document are shown for illustrative purposes only. Any use of actual IP addresses or phone numbers in illustrative content is unintentionaland coincidental.
Cisco and the Cisco logo are trademarks or registered trademarks of Cisco and/or its affiliates in the U.S. and other countries. To view a list of Cisco trademarks, go to this URL: https://www.cisco.com/go/trademarks. Third-party trademarks mentioned are the property of their respective owners. The use of the word partner does not imply a partnershiprelationship between Cisco and any other company. (1721R)
© 2018 Cisco Systems, Inc. All rights reserved.

C O N T E N T S
P r e f a c e Preface xiii
Introduction xiii
Additional Information xiv
Cisco Unified IP Phone 7900 Series eLearning Tutorials xiv
Safety and Performance Information xv
Power Outage xv
External Devices xv
Phone Behavior During Times of Network Congestion xv
Cisco Product Security Overview xvi
Accessibility Features xvi
C H A P T E R 1 Phone Features 1
Phone Overview 1
Buttons and Hardware 1
Cisco Unified IP Phone 7962G 2
Cisco Unified IP Phone 7961G and 7961G-GE 2
Cisco Unified IP Phone 7942G 3
Cisco Unified IP Phone 7941G and 7941G-GE 3
Buttons and Hardware Identification 3
Line and Call Definitions 6
Line and Call Icons 6
Phone Screen Features 7
Phone Screen Cleaning 8
Feature Buttons and Menus 8
Phone Help System 9
Feature Availability 9
SIP and SCCP Signaling Protocols 11
Cisco Unified IP Phone 7941G, 7941G-GE, 7942G, 7961G, 7961G-GE, and 7962G User Guide for Cisco UnifiedCommunications Manager 9.0 (SCCP and SIP)
iii
Energy Savings 11
C H A P T E R 2 Phone Installation 13
Phone Installation Overview 13
Cisco Unified IP Phone Cable Installation 13
Hookswitch Clip Removal (Required) 14
Adjust Handset Rest 15
Footstand Adjustment 15
Phone Cable Lock 16
TAPS Registration 16
Wired and Wireless Headsets 16
Headset Support 16
Audio Quality 17
Wireless Headset Selection (Cisco Unified IP Phone 7962G or 7942G) 17
C H A P T E R 3 Calling Features 19
Calling Features Overview 19
Basic Call Options 19
Place Call 20
Place Call Using Speakerphone 20
Place Call Using Headset 20
Redial Number 21
Place Call When Another Call Is Active (Using Same Line) 21
Dial from Call Log 21
Additional Call Options 22
Place Call While Another Call is Active (Using Different Line) 22
Dial from Corporate Directory on Personal Computer Using Cisco WebDialer 22
Notify When Busy or Ringing Extension Available (CallBack) 23
Make Priority (Precedence) Call 23
Place Call Using Billing or Tracking Code 23
Make Call from Mobile Phone Using Mobile Voice Access 24
Place Call Using PAB 24
Make Speed Dial Call 24
Dial from Corporate Directory on Phone 25
Dial Personal Address Book (PAB) Entry 25
Cisco Unified IP Phone 7941G, 7941G-GE, 7942G, 7961G, 7961G-GE, and 7962G User Guide for Cisco UnifiedCommunications Manager 9.0 (SCCP and SIP)
iv
Contents

Make Fast Dial Call 25
Call Answer 25
Call Disconnect 27
Hold and Resume 27
Put Call on Hold 28
Remove Call from Hold on Current Line 28
Remove Call from Hold on Different Line 28
Mute 29
Mute or Unmute Call 29
Multiple Calls 29
View Calls on Another Line 29
Switch to Call Overview Mode 30
Switch Between Connected Calls on One Line 30
Switch Between Connected Calls on Different Lines 30
Switch from Connected Call to Answer Ringing Call 30
In-Progress Call Movement 31
Switch In-Progress Call on Desk Phone to Mobile Phone 31
Switch In-Progress Call from Mobile Phone to Desk Phone 31
Switch In-Progress Call from Mobile Phone to Desk Phone Sharing Same Line (Session
Handoff) 32
Call Transfer 32
Transfer Call Without Talking to Transfer Recipient 32
Talk to Transfer Recipient Before Transferring Call (Consult Transfer) 33
Call Transfer To Voice Message System 33
Send Active, Ringing, or On-Hold Call to Voice Message System 33
Call Forward 34
Set Up or Cancel Call Forwarding 35
Set Up and Cancel Call Forward All from Phone 35
Do Not Disturb 35
Turn DND On and Off 36
Set Up DND Settings 36
Conference Calls 36
Ad Hoc Conference 37
Create Conference by Calling Participants 37
Add New Participants to Conference 37
Cisco Unified IP Phone 7941G, 7941G-GE, 7942G, 7961G, 7961G-GE, and 7962G User Guide for Cisco UnifiedCommunications Manager 9.0 (SCCP and SIP)
v
Contents

Join Conference 37
Join Together Existing Calls on Single Phone Line 38
Join Together Existing Calls on Multiple Phone Lines 38
Barge Conference 38
Create Conference by Barging Call on Shared Line 39
Meet Me Conference 39
Start Meet Me Conference 39
Join Meet Me Conference 40
Conference Participants List 40
Control Conference Using Participants List 40
Verify Conference Call Security 41
Intercom Calls 41
Place Intercom Call to Preconfigured Intercom Number 42
Place Intercom Call to Any Intercom Number 42
Receive Intercom Call 42
Advanced Call Handling 42
Speed Dial 42
Make Call Using Speed-Dial Buttons 43
Make Call Using On-Hook Abbreviated Dial 43
Make Call Using Fast Dial 44
Call Pickup 44
Answer Call Ringing on Another Extension Within Call Pickup Group 44
Answer Call Ringing on Another Extension Outside Call Pickup Group 45
Answer Call Ringing on Another Extension in Group or in Associated Group 45
Answer Call Ringing on Particular Extension (Line Number) 45
Call Park 45
Store and Retrieve Active Call Using Call Park 46
Direct and Store Active Call at Directed Call Park Number 46
Direct, Store, and Retrieve Active Call at Assisted Directed Call Park Number 47
Retrieve Parked Call from Directed Call Park Number 47
Hunt Groups 47
Log In and Out of Hunt Groups 48
Shared Lines 48
Remote-In-Use Icon 48
Call Information and Barge 48
Cisco Unified IP Phone 7941G, 7941G-GE, 7942G, 7961G, 7961G-GE, and 7962G User Guide for Cisco UnifiedCommunications Manager 9.0 (SCCP and SIP)
vi
Contents

Privacy 48
Barge, cBarge, and Shared-line Calls 49
Single-Button and Multitouch Barge 49
Barge Features 49
Privacy and Shared Lines 50
Prevent and Allow Others to View or Barge Calls on Shared Line 50
Busy Lamp Field Features 50
Use BLF Pickup to Answer Ringing Call 51
Secure Calls 51
VPN Client 53
Suspicious Call Trace 54
Notify System Administrator About Suspicious or Harassing Call 54
Priority Calls 54
Cisco Extension Mobility 55
Log In to EM 56
Log Out of EM 56
Change Your PIN Using Change Credentials Service 57
Change Your PIN Using ChangePIN Softkey 57
Business Calls Using Single Phone Number 57
Mobile Connect and Mobile Voice Access 58
Put Call Picked Up on Mobile Phone on Hold 59
Connect to Mobile Voice Access 59
Turn On Mobile Connect from Mobile Phone 59
Turn Off Mobile Connect from Mobile Phone 60
Turn On or Off Mobile Connect Access to All Remote Destinations from Desk
Phone 60
C H A P T E R 4 Handset, Headset, and Speakerphone 61
Headset, Handset, and Speaker Overview 61
Handset 61
Headset 62
Important Headset Safety Information 62
Control Wired Headset Sidetone and Headset Send Gain 62
Wireless Headset 63
Wideband Headset 64
Cisco Unified IP Phone 7941G, 7941G-GE, 7942G, 7961G, 7961G-GE, and 7962G User Guide for Cisco UnifiedCommunications Manager 9.0 (SCCP and SIP)
vii
Contents

Speakerphone 64
AutoAnswer with Headset or Speakerphone 64
C H A P T E R 5 Phone Customization 67
Ring and Message Indicator Customization 67
Change Ringtone Per Line 67
Adjust Phone Ringer Volume Level 68
Change Ring Pattern (Flash-Only, Ring Once, Beep-Only) 68
Change Audible Voice-Message Indicator 68
Change How Voice Message Light on Handset Works 68
Phone Screen Customization 69
Change Phone Screen Contrast 69
Change Background Image 69
Change Phone Screen Language 70
Change Line Text Label 70
C H A P T E R 6 Call Logs and Directories 71
Call Logs and Directories Overview 71
Call Logs 71
View Call Logs 72
Display Single Call Record Details 72
Erase All Call Records in All Logs 72
Erase All Call Records in Single Log 73
Erase Single Call Record 73
Dial from Call Log (While Not on Another Call) 74
Dial from Call Log (While Connected to Another Call) 74
Place Call from URL Entry in Call Log 75
Redial International Call from Missed and Received Call Logs 75
Directory Features 76
Corporate Directory 76
Dial from Corporate Directory (While Not on Another Call) 76
Dial from Corporate Directory (While on Another Call) 77
Personal Directory 77
Access Personal Directory (for PAB and Fast Dial Codes) 78
Search for PAB Entry 78
Cisco Unified IP Phone 7941G, 7941G-GE, 7942G, 7961G, 7961G-GE, and 7962G User Guide for Cisco UnifiedCommunications Manager 9.0 (SCCP and SIP)
viii
Contents
Dial from PAB Entry 78
Delete PAB Entry 79
Edit PAB Entry 79
Add New PAB Entry 79
Assign Fast Dial Code to PAB Entry 80
Search for Fast Dial Codes 80
Place Call Using Fast Dial Code 80
Delete Fast Dial Code 81
Log Out of Personal Directory 81
C H A P T E R 7 Voice Messages 83
Voice Messages Overview 83
Voice Message Identification 83
Set Up and Personalize Voice-Message Service 84
Listen to Voice Messages or Access Voice Messages Menu 84
C H A P T E R 8 User Options Web Pages 85
User Options Web Pages Overview 85
User Options Web Page Actions 85
Sign In and Out of User Options Web Pages 85
Select Device from User Options Web Page 86
Select Configuration Option after Logging In 86
Feature and Service Setup on Web 86
Personal Directory on Web 87
Add New Personal Address Book Entry 87
Assign Button for Personal Address Book 87
Edit Personal Address Book Entry 88
Delete Personal Address Book Entry 88
Fast Dials on Web 88
Assign Fast-Dial Code to Personal Directory Entry 89
Assign Fast Dial Code to Phone Number 89
Assign Line Button for Fast Dial 89
Search for Fast Dial Entry 90
Edit Fast-Dial Phone Number 90
Delete Fast Dial Personal Address Book Entry 90
Cisco Unified IP Phone 7941G, 7941G-GE, 7942G, 7961G, 7961G-GE, and 7962G User Guide for Cisco UnifiedCommunications Manager 9.0 (SCCP and SIP)
ix
Contents
Address Book Synchronization Tool 91
Speed Dial Setup on Web 91
Set Up Speed-Dial Codes 91
Set Up Abbreviated Dialing Codes 92
Phone Service Setup on Web 92
Subscribe to Service 93
Search for Services 93
Change or End Services 93
Change Service Name 94
Add Service to Programmable Feature Button 94
User Settings on Web 94
Change Browser Password 95
Change PIN 95
Change User Options Web Page Language Setting 95
Change Phone Display Language 96
Line Settings on Web 96
Set Up Call Forward Per Line 96
Change Voice Message Indicator Setting Per Line 97
Change Audible Voice Message Indicator Setting Per Line 97
Edit Line Text Label for Phone Display 98
Phone and Access List setup for Mobile Connect 98
Create Access List 98
Set Up, View, or Change WebDialer Preferences 99
Add New Remote Destination 99
Cisco WebDialer 100
Use WebDialer with User Options Directory 100
Use WebDialer with Another Online Corporate Directory (Not User Options
Directory) 101
Log Out of WebDialer 101
Set Up, View, or Change WebDialer Preferences 101
C H A P T E R 9 Additional Options 103
C H A P T E R 1 0 Troubleshooting 105
Problems 105
Cisco Unified IP Phone 7941G, 7941G-GE, 7942G, 7961G, 7961G-GE, and 7962G User Guide for Cisco UnifiedCommunications Manager 9.0 (SCCP and SIP)
x
Contents
No Dial Tone or Cannot Complete Call 105
Missing Softkey 106
Cannot Barge Call and Hear Fast Busy 106
Call Disconnects After Barge 106
Cannot Access Settings Menu 107
Cannot Use CallBack 107
Call Forward All Error Message 107
Security Error Message 108
Unresponsive Phone 108
Phone Screen Is Too Light or Too Dark (Cisco Unified IP Phones 7961G, 7961G-GE, 7941G,
and 7941G-GE) 108
Phone Screen Is Too Light or Too Dark (Cisco Unified IP Phones 7962G and 7942G) 109
Phone Troubleshooting Data 109
Quality Reporting Tool 110
A P P E N D I X A Warranty 111
Cisco One-Year Limited Hardware Warranty Terms 111
Cisco Unified IP Phone 7941G, 7941G-GE, 7942G, 7961G, 7961G-GE, and 7962G User Guide for Cisco UnifiedCommunications Manager 9.0 (SCCP and SIP)
xi
Contents

Cisco Unified IP Phone 7941G, 7941G-GE, 7942G, 7961G, 7961G-GE, and 7962G User Guide for Cisco UnifiedCommunications Manager 9.0 (SCCP and SIP)
xii
Contents

Preface
• Introduction, page xiii
• Additional Information, page xiv
• Cisco Unified IP Phone 7900 Series eLearning Tutorials, page xiv
• Safety and Performance Information, page xv
• Cisco Product Security Overview, page xvi
• Accessibility Features, page xvi
IntroductionThis guide provides an overview of the features available on your phone. You can read it completely tounderstand your phone capabilities, or see the following table for pointers to commonly used sections.
Then...If you want to...
Press on the phone when you need assistance.Explore your phone on your own
See Safety and Performance Information, on page xvReview safety information
See Phone Installation, on page 13.Connect your phone
Start with Phone Features, on page 1.Use your phone after it is installed
See Buttons and Hardware, on page 1.Learn what the button lights mean
See Line and Call Definitions, on page 6.Learn about the phone screen
See Basic Call Options, on page 19.Make calls
See Hold and Resume, on page 27.Put calls on hold
See Mute, on page 29Mute calls
Cisco Unified IP Phone 7941G, 7941G-GE, 7942G, 7961G, 7961G-GE, and 7962G User Guide for Cisco UnifiedCommunications Manager 9.0 (SCCP and SIP)
xiii

Then...If you want to...
See Call Transfer, on page 32.Transfer calls
See Conference Calls, on page 36.Make conference calls
See Speed Dial, on page 42.Set up speed dialing
See Shared Lines, on page 48.Share a phone number
See Handset, Headset, and Speakerphone, on page 61.Use your phone as a speakerphone
See Phone Customization, on page 67.Change the ring volume or tone
See Call Logs and Directories, on page 71.View your missed calls
See Voice Messages, on page 83.Listen to your voice messages
See the Quick Reference Card in the front of this guide.See softkey and icon definitions
Additional InformationYou can access the most current Cisco documentation at this URL:
http://www.cisco.com/en/US/products/hw/phones/ps379/tsd_products_support_series_home.html
You can access the Cisco website at this URL:
http://www.cisco.com/
You can access the most current licensing information at this URL:
http://www.cisco.com/en/US/docs/voice_ip_comm/cuipph/all_models/openssl_license/7900_ssllic.html
Cisco Unified IP Phone 7900 Series eLearning Tutorials(SCCP phones only.)
The Cisco Unified IP Phone 7900 Series eLearning tutorials use audio and animation to demonstrate basiccalling features. You can access eLearning tutorials online (for several phone models) from your personalcomputer. Look for the eLearning tutorial (English only) for your phone model in the documentation list atthis URL:
http://www.cisco.com/en/US/products/hw/phones/ps379/products_user_guide_list.html
Although an eLearning tutorial may not be available for your specific Cisco Unified IP Phone, see theCisco Unified IP Phone 7900 Series eLearning tutorials for an overview of the common Cisco Unified IPPhone features and functionality.
Note
Cisco Unified IP Phone 7941G, 7941G-GE, 7942G, 7961G, 7961G-GE, and 7962G User Guide for Cisco UnifiedCommunications Manager 9.0 (SCCP and SIP)
xiv
PrefaceAdditional Information
Safety and Performance InformationThe following sections provide information about the impact of power outages and external devices on yourCisco Unified IP Phone.
Power OutageYour access to emergency service through the phone depends on the phone being powered. If there is a powerinterruption, Service and Emergency Calling Service dialing will not function until power is restored. In caseof a power failure or disruption, you may need to reset or reconfigure the equipment before using the Serviceor Emergency Calling Service dialing.
External DevicesCisco recommends using good quality external devices such as headsets, cables, and connectors that areshielded against unwanted radio frequency (RF) and audio frequency (AF) signals.
Not all Cisco IP Telephony products support external devices, cords or cables. For more information,consult the documentation for your phone.
Note
Depending on the quality of these devices and their proximity to other devices such as mobile phones ortwo-way radios, some audio noise may still occur. In these cases, Cisco recommends that you take one ormore of these actions:
• Move the external device away from the source of the RF or AF signals.
• Route the external device cables away from the source of the RF or AF signals.
• Use shielded cables for the external device, or use cables with a better shield and connector.
• Shorten the length of the external device cable.
• Apply ferrites or other such devices on the cables for the external device.
Cisco cannot guarantee the performance of external devices, cables, and connectors.
In EuropeanUnion countries, use only external speakers, microphones, and headsets that are fully compliantwith the EMC Directive [89/336/EC].
Caution
Phone Behavior During Times of Network CongestionAnything that degrades network performance can affect phone voice and video quality, and in some cases,can cause a call to drop. Sources of network degradation can include, but are not limited to, the followingactivities:
• Administrative tasks, such as an internal port scan or security scan
Cisco Unified IP Phone 7941G, 7941G-GE, 7942G, 7961G, 7961G-GE, and 7962G User Guide for Cisco UnifiedCommunications Manager 9.0 (SCCP and SIP)
xv
PrefaceSafety and Performance Information

• Attacks that occur on your network, such as a Denial of Service attack
Cisco Product Security OverviewThis product contains cryptographic features and is subject to United States and local country laws governingimport, export, transfer, and use. Delivery of Cisco cryptographic products does not imply third-party authorityto import, export, distribute, or use encryption. Importers, exporters, distributors, and users are responsiblefor compliance with U.S. and local country laws. By using this product you agree to comply with applicablelaws and regulations. If you are unable to comply with U.S. and local laws, return this product immediately.
Further information regarding U.S. export regulations may be found at http://www.bis.doc.gov/index.php/regulations/export-administration-regulations-ear.
Accessibility FeaturesThe Cisco Unified IP Phone 7900 Series provides accessibility features for the vision impaired, the blind, andthe hearing and mobility impaired.
For detailed information about the features on these phones, see Accessibility Features for the Cisco UnifiedIP Phone 7900 Series.
You can also find more information about accessibility at this Cisco website:
http://www.cisco.com/web/about/responsibility/accessibility/index.html
Cisco Unified IP Phone 7941G, 7941G-GE, 7942G, 7961G, 7961G-GE, and 7962G User Guide for Cisco UnifiedCommunications Manager 9.0 (SCCP and SIP)
xvi
PrefaceCisco Product Security Overview

C H A P T E R 1Phone Features
• Phone Overview, page 1
• Buttons and Hardware, page 1
• Line and Call Definitions, page 6
• Phone Screen Features, page 7
• Feature Buttons and Menus, page 8
• Feature Availability, page 9
• SIP and SCCP Signaling Protocols, page 11
• Energy Savings, page 11
Phone OverviewCisco Unified IP Phones are full-feature telephones that provide voice communication over the data networkthat your computer uses, which allows you to place and receive phone calls, put calls on hold, transfer calls,make conference calls, and so on.
In addition to basic call-handling features, your phone can provide enhanced productivity features that extendyour call-handling capabilities. Depending on the configuration, your phone supports:
• Access to network data, XML applications, and web-based services.
• Online customizing of call features and services from your Cisco Unified Communications ManagerUser Options web pages.
• A comprehensive online help system that displays information on the phone screen.
Buttons and HardwareThis section describes the phone buttons and hardware.
Cisco Unified IP Phone 7941G, 7941G-GE, 7942G, 7961G, 7961G-GE, and 7962G User Guide for Cisco UnifiedCommunications Manager 9.0 (SCCP and SIP)
1

Cisco Unified IP Phone 7962GThe following figure identifies the important parts of the phone. See Buttons and Hardware Identification,on page 3 for the description of the numbered items.
Cisco Unified IP Phone 7961G and 7961G-GEThe following figure identifies the important parts of the phone. See Buttons and Hardware Identification,on page 3 for the description of the numbered items.
Cisco Unified IP Phone 7941G, 7941G-GE, 7942G, 7961G, 7961G-GE, and 7962G User Guide for Cisco UnifiedCommunications Manager 9.0 (SCCP and SIP)
2
Phone FeaturesCisco Unified IP Phone 7962G

Cisco Unified IP Phone 7942GThe following figure identifies the important parts of the phone. See Buttons and Hardware Identification,on page 3 for the description of the numbered items.
Cisco Unified IP Phone 7941G and 7941G-GEThe following figure identifies the important parts of the phone. See Buttons and Hardware Identification,on page 3 for the description of the numbered items.
Buttons and Hardware IdentificationThe following table describes the buttons and hardware on the phones.
Cisco Unified IP Phone 7941G, 7941G-GE, 7942G, 7961G, 7961G-GE, and 7962G User Guide for Cisco UnifiedCommunications Manager 9.0 (SCCP and SIP)
3
Phone FeaturesCisco Unified IP Phone 7942G
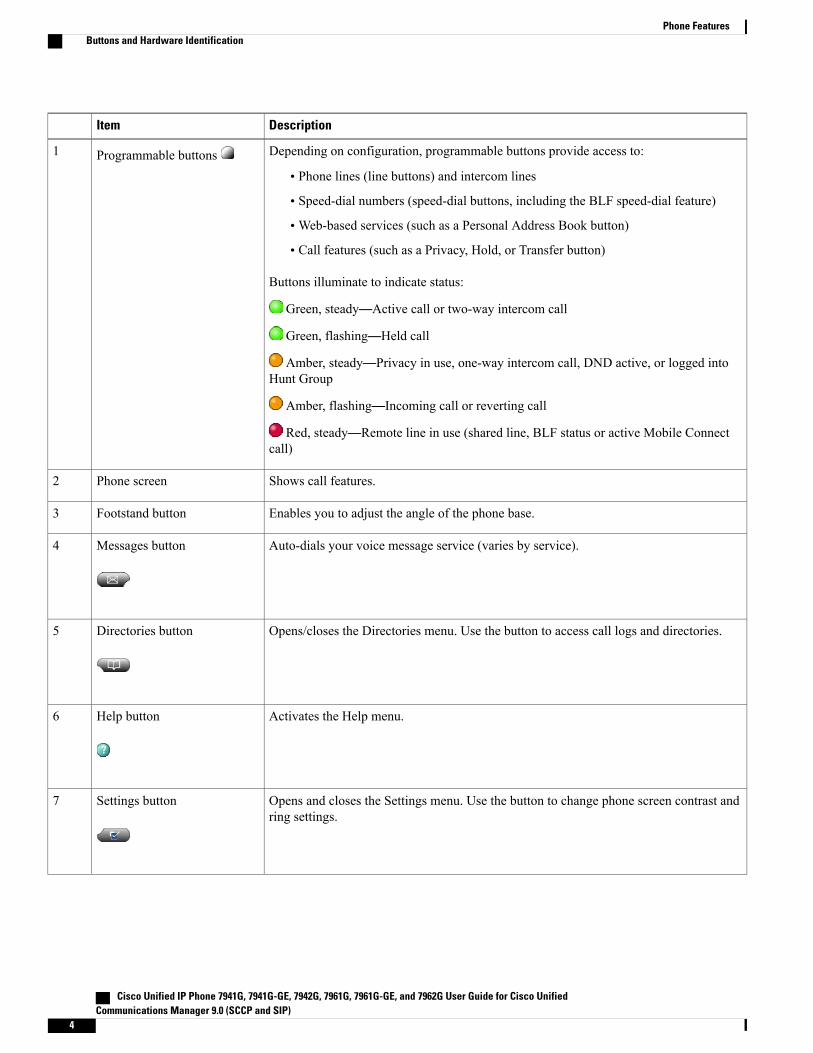
DescriptionItem
Depending on configuration, programmable buttons provide access to:
• Phone lines (line buttons) and intercom lines
• Speed-dial numbers (speed-dial buttons, including the BLF speed-dial feature)
•Web-based services (such as a Personal Address Book button)
• Call features (such as a Privacy, Hold, or Transfer button)
Buttons illuminate to indicate status:
Green, steady—Active call or two-way intercom call
Green, flashing—Held call
Amber, steady—Privacy in use, one-way intercom call, DND active, or logged intoHunt Group
Amber, flashing—Incoming call or reverting call
Red, steady—Remote line in use (shared line, BLF status or active Mobile Connectcall)
Programmable buttons1
Shows call features.Phone screen2
Enables you to adjust the angle of the phone base.Footstand button3
Auto-dials your voice message service (varies by service).Messages button4
Opens/closes the Directories menu. Use the button to access call logs and directories.Directories button5
Activates the Help menu.Help button6
Opens and closes the Settings menu. Use the button to change phone screen contrast andring settings.
Settings button7
Cisco Unified IP Phone 7941G, 7941G-GE, 7942G, 7961G, 7961G-GE, and 7962G User Guide for Cisco UnifiedCommunications Manager 9.0 (SCCP and SIP)
4
Phone FeaturesButtons and Hardware Identification
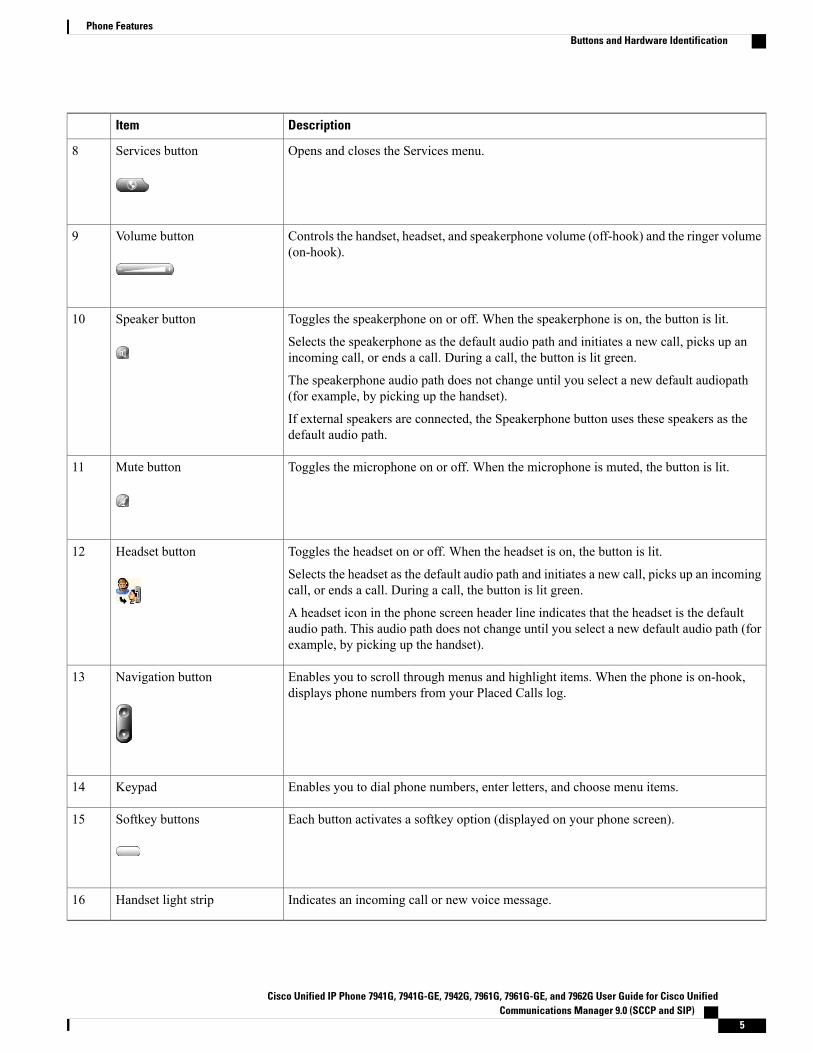
DescriptionItem
Opens and closes the Services menu.Services button8
Controls the handset, headset, and speakerphone volume (off-hook) and the ringer volume(on-hook).
Volume button9
Toggles the speakerphone on or off. When the speakerphone is on, the button is lit.
Selects the speakerphone as the default audio path and initiates a new call, picks up anincoming call, or ends a call. During a call, the button is lit green.
The speakerphone audio path does not change until you select a new default audiopath(for example, by picking up the handset).
If external speakers are connected, the Speakerphone button uses these speakers as thedefault audio path.
Speaker button10
Toggles the microphone on or off. When the microphone is muted, the button is lit.Mute button11
Toggles the headset on or off. When the headset is on, the button is lit.
Selects the headset as the default audio path and initiates a new call, picks up an incomingcall, or ends a call. During a call, the button is lit green.
A headset icon in the phone screen header line indicates that the headset is the defaultaudio path. This audio path does not change until you select a new default audio path (forexample, by picking up the handset).
Headset button12
Enables you to scroll through menus and highlight items. When the phone is on-hook,displays phone numbers from your Placed Calls log.
Navigation button13
Enables you to dial phone numbers, enter letters, and choose menu items.Keypad14
Each button activates a softkey option (displayed on your phone screen).Softkey buttons15
Indicates an incoming call or new voice message.Handset light strip16
Cisco Unified IP Phone 7941G, 7941G-GE, 7942G, 7961G, 7961G-GE, and 7962G User Guide for Cisco UnifiedCommunications Manager 9.0 (SCCP and SIP)
5
Phone FeaturesButtons and Hardware Identification

Line and Call DefinitionsThe terms lines and calls can be easily confused.
• Lines: Each line corresponds to a directory number or intercom number that others can use to call you.Your phone can support up to six lines, depending on your phone and configuration. To see how manylines you have, look at the right side of your phone screen. You have as many lines as you have directorynumbers and phone line icons: .
• Calls: Each line can support multiple calls. By default, your phone supports four connected calls perline, but your system administrator can adjust this number according to your needs. Only one call canbe active at any time; other calls are automatically placed on hold.
Line and Call IconsYour phone displays icons to help you determine the call and line state.
DescriptionLine or Call StateIcon
No call activity on this line.On-hook line
You are dialing a number or an outgoing call is ringing.Off-hook line
You are connected to the other party.Connected call
A call is ringing on one of your lines.Ringing call
You have put the call on hold. See Hold and Resume, on page27.
Call on hold
Another phone that shares your line has a connected call. SeeShared Lines, on page 48, for details.
Remote-in-use
A holding call is reverting to your phone. See Hold and Resume,on page 27.
Reverting call
See Secure Calls, on page 51.Authenticated call
See Secure Calls, on page 51.Encrypted call
See Busy Lamp Field Features, on page 50.BLF-monitored lineis idle
See Busy Lamp Field Features, on page 50.BLF-monitored line isin-use
Cisco Unified IP Phone 7941G, 7941G-GE, 7942G, 7961G, 7961G-GE, and 7962G User Guide for Cisco UnifiedCommunications Manager 9.0 (SCCP and SIP)
6
Phone FeaturesLine and Call Definitions

DescriptionLine or Call StateIcon
See Busy Lamp Field Features, on page 50.BLF-monitored line isringing (BLF Pickup)
See Busy Lamp Field Features, on page 50.Line in Do Not Disturb(BLF feature)
The intercom line is not in use. See Intercom Calls, on page 41Idle Intercom line
The intercom line is sending or receiving one-way audio.See Intercom Calls, on page 41.
NoteOne-way intercom call
You press the intercom line to activate two-way audio with theintercom caller. See Intercom Calls, on page 41.
Two-way intercom call
Phone Screen FeaturesThe following figure shows how your main phone screen may look with an active call.
Displays the phone number (directory number) for your primary phoneline. When several feature tabs are open, the phone number and thetime and date display alternately in this area.
Primary phone line1
Serve as phone line buttons, intercom line buttons, speed-dial buttons,phone service buttons or phone feature buttons. Icons and labels indicatehow these buttons are configured.
Programmable buttons2
Displays a softkey function for the corresponding softkey button .Softkey labels3
Displays audio mode icons, status information, and prompts.Status line4
Displays current calls per line, including caller ID, call duration, andcall state for the highlighted line (standard view). See Line and CallDefinitions, on page 6, and Multiple Calls, on page 29.
Call activity area5
Cisco Unified IP Phone 7941G, 7941G-GE, 7942G, 7961G, 7961G-GE, and 7962G User Guide for Cisco UnifiedCommunications Manager 9.0 (SCCP and SIP)
7
Phone FeaturesPhone Screen Features

Indicates call activity.Phone tab6
Indicate an open feature menu. See Feature Buttons and Menus, onpage 8.
Feature tabs7
The Messages, Directories, and Services screens on your phone may appear in Normal mode or in Widemode depending on how your phone has been set up. A phone window in Wide mode spans the entirewidth of the phone screen. However, neither you nor your administrator can adjust the phone screenviewing mode.
Note
Phone Screen CleaningUse only a soft, dry cloth to clean phone screen. Do not use any liquids or powders on the phone, becausethey can contaminate phone components and cause failures.
When the phone is in power save mode, the touchscreen is blank and the Display button is not lit. When thephone is in this condition, you can clean the screen, as long as you know that the phone remains asleep untilyou finish cleaning. If the phone is likely to wake up during cleaning, wait until it is awake before followingthe preceding cleaning instructions.
Related Topics
Energy Savings, on page 11
Feature Buttons and MenusPress a feature button to open or close a feature menu.
Then...If you want to...
Press a feature button:
Messages
Services
Directories
Settings
Help
Open or close a feature menu
Press the Navigation button.Scroll through a list or menu
Press Exit. Pressing Exit from the top level of a menu, closes the menu.Go back one level in a featuremenu
Cisco Unified IP Phone 7941G, 7941G-GE, 7942G, 7961G, 7961G-GE, and 7962G User Guide for Cisco UnifiedCommunications Manager 9.0 (SCCP and SIP)
8
Phone FeaturesPhone Screen Cleaning

Then...If you want to...
Press a feature tab. Each feature menu has a corresponding tab. The tabis visible when the feature menu is open.
Switch between open featuremenus
Phone Help SystemYour phone provides a comprehensive online help system. Help topics appear on the phone screen.
Then...If you want to...
Press on your phone and wait a few seconds for the menu to display.
Main menu topics include:
• About Your Cisco Unified IP Phone—Details about your phone
• How do I...?—Procedures for common phone tasks
• Calling Features—Descriptions and procedures for calling features
• Help—Tips on using and accessing Help
View the main menu
Press and then quickly press a button or softkey.Learn about a button orsoftkey
Press , , or to display a feature menu. Highlight a menu item,then press twice quickly.
Learn about a menuitem
Press twice quickly. Select the help topic you need.Get help using Help
Feature AvailabilityDepending on your phone system configuration, features included in this phone guide may not be availableto you or may work differently on your phone. Contact your support desk or system administrator forinformation about feature operation or availability.
You can access many features either by using a softkey or by pressing a line button. You can configure somefeatures but your system administrator controls most of them.
Here are some details about using softkeys and line buttons to access features:
Line Button Label and IconSoftkeyFeature
CallBackCallBackCall Back
Forward AllCFwdALLCall Forward
Cisco Unified IP Phone 7941G, 7941G-GE, 7942G, 7961G, 7961G-GE, and 7962G User Guide for Cisco UnifiedCommunications Manager 9.0 (SCCP and SIP)
9
Phone FeaturesPhone Help System

Line Button Label and IconSoftkeyFeature
ParkParkCall Park
PickUpPickUpCall PickUp
ConferenceConfrnConference
Conference ListConfListConference List
Do Not Disturb or Do Not DisturbDNDDo Not Disturb
End CallEndCallEnd Call
Group PickUpGPickUpGroup Pickup
HoldHoldHold
Hunt Group or Hunt GroupHLogHunt Group
Malicious Call IDMCIDMalicious Call Identification
MeetMeMeetMeMeet Me Conferencing
MobilityMobilityMobility
New CallNew CallNew Call
Other PickUpOPickUpOther PickUp
Quality Reporting ToolQRTQuality Reporting Tool
RedialRedialRedial
Remove Last ParticipantRmLstCRemove Last ConferenceParty
TransferTransferTransfer
VideoVidModeVideo Support
Cisco Unified IP Phone 7941G, 7941G-GE, 7942G, 7961G, 7961G-GE, and 7962G User Guide for Cisco UnifiedCommunications Manager 9.0 (SCCP and SIP)
10
Phone FeaturesFeature Availability

SIP and SCCP Signaling ProtocolsYour phone can be configured to work with one of two signaling protocols: SIP (Session Initiation Protocol)or SCCP (Skinny Call Control Protocol). Your system administrator determines this configuration.
Call features can vary depending on the protocol. This phone guide indicates which features areprotocol-specific. To learn which protocol your phone is using, you can contact your system administrator oryou can choose >Model Information > Call Control Protocol on your phone.
Energy SavingsYour phone supports the Cisco EnergyWise program. Your system administrator sets up sleep (power down)and wake (power up) times for your phone to save energy.
Ten minutes before the scheduled sleep time, if the audible alert is enabled by your system administrator, youhear your ringtone play. The ringtone plays according to the following schedule:
• At 10 minutes before power down, the ringtone plays four times
• At 7 minutes before power down, the ringtone plays four times
• At 4 minutes before power down, the ringtone plays four times
• At 30 seconds before power down, the ringtone plays 15 times or until the phone powers down
If your phone is inactive (idle) at the sleep time, you see a message to remind you that your phone is goingto power down. To keep the phone active, press any key on the phone. If you do not press any key, your phonepowers down.
If your phone is active (for example, on a call), your phone waits until it has been inactive for a period of timebefore informing you of the pending power shutdown. Before the shutdown happens, you see a message toremind you that your phone is going to power down.
At the scheduled time, your phone powers up. To wake up the phone before the scheduled time, contact youradministrator.
Wake and sleep times are also linked to the configured days that you normally work. If your requirementschange (for example, your work hours or work days change), see your system administrator to have yourphone reconfigured.
For more information about EnergyWise and your phone, see your system administrator.
Cisco Unified IP Phone 7941G, 7941G-GE, 7942G, 7961G, 7961G-GE, and 7962G User Guide for Cisco UnifiedCommunications Manager 9.0 (SCCP and SIP)
11
Phone FeaturesSIP and SCCP Signaling Protocols

Cisco Unified IP Phone 7941G, 7941G-GE, 7942G, 7961G, 7961G-GE, and 7962G User Guide for Cisco UnifiedCommunications Manager 9.0 (SCCP and SIP)
12
Phone FeaturesEnergy Savings

C H A P T E R 2Phone Installation
• Phone Installation Overview, page 13
• Cisco Unified IP Phone Cable Installation, page 13
• Wired and Wireless Headsets, page 16
Phone Installation OverviewYour system administrator will likely connect your new Cisco Unified IP Phone to the corporate IP telephonynetwork. If that is not the case, see the following sections.
Cisco Unified IP Phone Cable InstallationThe following figure and table show how to connect your phone.
Cisco Unified IP Phone 7941G, 7941G-GE, 7942G, 7961G, 7961G-GE, and 7962G User Guide for Cisco UnifiedCommunications Manager 9.0 (SCCP and SIP)
13
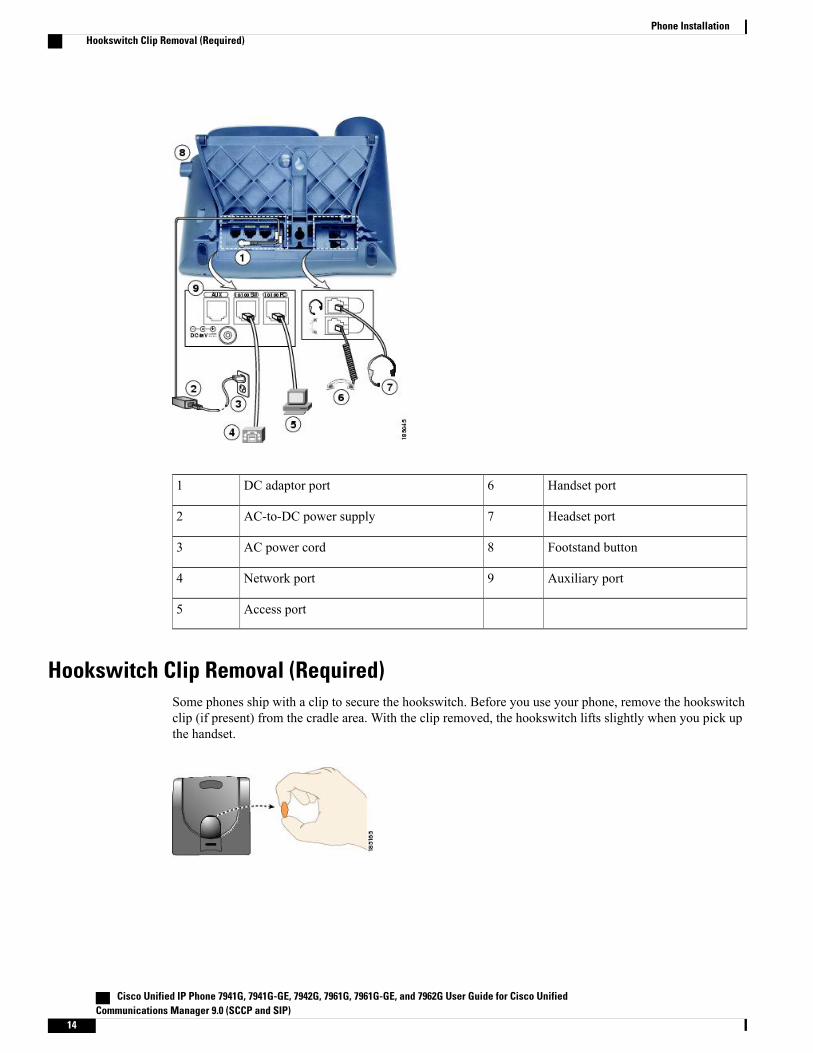
Handset port6DC adaptor port1
Headset port7AC-to-DC power supply2
Footstand button8AC power cord3
Auxiliary port9Network port4
Access port5
Hookswitch Clip Removal (Required)Some phones ship with a clip to secure the hookswitch. Before you use your phone, remove the hookswitchclip (if present) from the cradle area. With the clip removed, the hookswitch lifts slightly when you pick upthe handset.
Cisco Unified IP Phone 7941G, 7941G-GE, 7942G, 7961G, 7961G-GE, and 7962G User Guide for Cisco UnifiedCommunications Manager 9.0 (SCCP and SIP)
14
Phone InstallationHookswitch Clip Removal (Required)

Adjust Handset RestIf your phone is wall-mounted, you may need to adjust the handset rest to ensure that the receiver does notslip out of the cradle.
Procedure
Step 1 Remove the handset from the cradle and pull the plastic tab from the handset rest.Step 2 Rotate the tab 180 degrees.Step 3 Hold the tab between two fingers, with the corner notches facing you.Step 4 Line up the tab with the slot in the cradle and press the tab evenly into the slot. An extension protrudes from
the top of the rotated tab.Step 5 Return the handset to the handset rest.
Footstand AdjustmentThe Cisco Unified IP Phone includes an adjustable footstand.When you place the phone on a desktop surface,you can adjust the tilt height to several different angles in 7.5 degree increments from flat to 60 degrees. Youcan also mount these phones to the wall by using the footstand or by using the optional locking wall mountkit.
To adjust the footstand, push in the footstand adjustment button and adjust the tilt.
Cisco Unified IP Phone 7941G, 7941G-GE, 7942G, 7961G, 7961G-GE, and 7962G User Guide for Cisco UnifiedCommunications Manager 9.0 (SCCP and SIP)
15
Phone InstallationAdjust Handset Rest

Phone Cable LockYou can secure the Cisco Unified IP Phone to a desktop by using a laptop cable lock. The lock connects tothe security slot on the back of the phone, and the cable can be secured to a desktop.
The security slot can accommodate a lock up to 20mm. Compatible laptop cable locks include the Kensington®
laptop cable lock and laptop cable locks from other manufacturers that can fit into the security slot on theback of the phone. See the following figure.
Figure 1: Connecting a Cable Lock to the Cisco Unified IP Phone
TAPS RegistrationTAPS might be used either for a new phone or to replace an existing phone. To register with TAPS, pick upthe handset, enter the TAPS extension provided by your system administrator, and follow the voice prompts.Youmight need to enter your entire extension, including the area code. After your phone displays a confirmationmessage, hang up. The phone restarts.
Wired and Wireless HeadsetsYou can use a wired headset with your Cisco Unified IP Phone. If you use a Cisco Unified IP Phone 7962Gor 7942G, you can use a wireless headset in conjunction with the Wireless Headset Remote HookswitchControl feature.
Headset SupportAlthough Cisco Systems performs limited internal testing of third-party headsets for use with the Cisco UnifiedIP Phones, Cisco does not certify or support products from headset (or handset) vendors.
Cisco Unified IP Phone 7941G, 7941G-GE, 7942G, 7961G, 7961G-GE, and 7962G User Guide for Cisco UnifiedCommunications Manager 9.0 (SCCP and SIP)
16
Phone InstallationPhone Cable Lock

Cisco recommends the use of good quality headsets that are screened against unwanted radio frequency (RF)and audio frequency (AF) signals. Depending on the quality of the headsets and their proximity to otherdevices such as mobile phones and two-way radios, some audio noise or echo may still occur. An audiblehum or buzz may be heard by either the remote party or by both the remote party and the Cisco Unified IPPhone user. Humming or buzzing sounds can be caused by a range of outside sources: for example, electriclights, electric motors, or large PC monitors.
In some cases, hum may be reduced or eliminated by using a local power cube or power injector.Note
These environmental and hardware inconsistencies in the locations where Cisco Unified IP Phones are deployedmeans that there is not a single headset solution that is optimal for all environments.
Cisco recommends that customers test headsets in their intended environment to determine performance beforemaking a purchasing decision and deploying on a large scale.
Audio QualityBeyond the physical, mechanical and technical performance, the audio portion of a headset must sound goodto the user and to the party on the far end. Sound quality is subjective, and Cisco cannot guarantee theperformance of any headsets. However, various headsets from leading headset manufacturers have beenreported to perform well with Cisco Unified IP Phones. For details, contact the headset manufacturer.
Wireless Headset Selection (Cisco Unified IP Phone 7962G or 7942G)To find information about wireless headsets that work in conjunction with the Wireless Headset RemoteHookswitch Control feature on your phone, see http://www.cisco.com/en/US/partner/prod/voicesw/ucphone_headsets.html.
Cisco Unified IP Phone 7941G, 7941G-GE, 7942G, 7961G, 7961G-GE, and 7962G User Guide for Cisco UnifiedCommunications Manager 9.0 (SCCP and SIP)
17
Phone InstallationAudio Quality

Cisco Unified IP Phone 7941G, 7941G-GE, 7942G, 7961G, 7961G-GE, and 7962G User Guide for Cisco UnifiedCommunications Manager 9.0 (SCCP and SIP)
18
Phone InstallationWireless Headset Selection (Cisco Unified IP Phone 7962G or 7942G)

C H A P T E R 3Calling Features
• Calling Features Overview, page 19
• Basic Call Options, page 19
• Additional Call Options, page 22
• Call Answer, page 25
• Call Disconnect, page 27
• Hold and Resume, page 27
• Mute, page 29
• Multiple Calls, page 29
• In-Progress Call Movement, page 31
• Call Transfer, page 32
• Call Transfer To Voice Message System, page 33
• Call Forward, page 34
• Do Not Disturb, page 35
• Conference Calls, page 36
• Intercom Calls, page 41
• Advanced Call Handling, page 42
Calling Features OverviewYou can perform basic call-handling tasks using a range of features and services. Feature availability canvary. For more information, contact your system administrator.
Basic Call OptionsThe following procedures describe some easy ways to place a call on your Cisco Unified IP Phone.
Cisco Unified IP Phone 7941G, 7941G-GE, 7942G, 7961G, 7961G-GE, and 7962G User Guide for Cisco UnifiedCommunications Manager 9.0 (SCCP and SIP)
19

Tips
• You can dial on-hook, without a dial tone (predial). To predial, enter a number, then go off-hook bylifting the handset or pressing Dial, , or .
•When you predial, your phone tries to anticipate the number you are dialing by displaying matchingnumbers (if available) from your Placed Calls log. This is called Auto Dial. To call a number displayedwith Auto Dial, press the number, or scroll to it and go off-hook.
• If you make a mistake while dialing, press << to erase digits.
• If parties on a call hear a beep tone, the call may be monitored or recorded. Contact your systemadministrator for more information.
• You can start or stop a recording by pressing the Record softkey on your phone.
• Your phone may be set up for international call logging, which is indicated by a plus (+) symbol on thecall logs, redial, or call directory entries. Contact your system administrator for more information.
Related Topics
Call Logs, on page 71Handset, Headset, and Speakerphone, on page 61Hold and Resume, on page 27
Place Call
Procedure
Pick up the handset and dial the number.
Place Call Using Speakerphone
Procedure
Step 1 PressStep 2 Enter a number.
Place Call Using Headset
Procedure
Perform one of the following actions:
Cisco Unified IP Phone 7941G, 7941G-GE, 7942G, 7961G, 7961G-GE, and 7962G User Guide for Cisco UnifiedCommunications Manager 9.0 (SCCP and SIP)
20
Calling FeaturesPlace Call
• Press and enter a number.
• If is lit, press New Call and enter a number.
Redial Number
Procedure
Perform one of the following actions:
• Press Redial to dial the last number.
• Press the Navigation button (with the phone idle) to see your Placed Calls.
Place Call When Another Call Is Active (Using Same Line)
Procedure
Step 1 Press Hold.Step 2 Press New Call.Step 3 Enter a number.
Dial from Call Log
Procedure
Step 1 ChooseStep 2 Select one of the following entries:
•Missed Calls
• Received Calls
• Placed Calls
Step 3 Select the listing or scroll to it and go off-hook.
Cisco Unified IP Phone 7941G, 7941G-GE, 7942G, 7961G, 7961G-GE, and 7962G User Guide for Cisco UnifiedCommunications Manager 9.0 (SCCP and SIP)
21
Calling FeaturesRedial Number
Additional Call OptionsYou can place calls using special features and services that may be available on your phone. Contact yoursystem administrator for more information about these additional options.
Tips
• Look for Busy Lamp Field indicators to see if a line associated with a speed-dial, call record, or directorylisting is busy before placing a call to that line.
• To place a call using your Cisco Extension Mobility profile, log in to the Cisco Extension Mobilityservice on a phone.
Related Topics
Busy Lamp Field Features, on page 50Hold and Resume, on page 27Speed Dial, on page 42Call Logs, on page 71Personal Directory, on page 77Fast Dials on Web, on page 88Personal Directory on Web, on page 87
Place Call While Another Call is Active (Using Different Line)
Procedure
Step 1 Press for a new line. The first call is automatically placed on hold.Step 2 Enter a number.
Dial from Corporate Directory on Personal Computer Using Cisco WebDialer
Procedure
Step 1 Open a web browser and go to a WebDialer-enabled corporate directory.Step 2 Click the number that you want to dial.
Cisco Unified IP Phone 7941G, 7941G-GE, 7942G, 7961G, 7961G-GE, and 7962G User Guide for Cisco UnifiedCommunications Manager 9.0 (SCCP and SIP)
22
Calling FeaturesAdditional Call Options

Notify When Busy or Ringing Extension Available (CallBack)
When a call is being chaperoned, the call chaperone cannot use CallBack.Note
Procedure
Step 1 Press CallBack while listening to the busy tone or ring sound.Step 2 Hang up. Your phone alerts you when the line is free.Step 3 Place the call again.
Make Priority (Precedence) CallOnly SCCP phones support priority calling.
Procedure
Enter the Multilevel Precedence and Preemption (MLPP) access number, followed by a phone number.
Place Call Using Billing or Tracking CodeOnly SCCP phones support billing or tracking codes.
Procedure
Step 1 Dial a number.Step 2 After the tone, enter a Client Matter Code (CMC) or a Forced Authorization Code (FAC).
Cisco Unified IP Phone 7941G, 7941G-GE, 7942G, 7961G, 7961G-GE, and 7962G User Guide for Cisco UnifiedCommunications Manager 9.0 (SCCP and SIP)
23
Calling FeaturesNotify When Busy or Ringing Extension Available (CallBack)

Make Call from Mobile Phone Using Mobile Voice Access
Procedure
Step 1 Obtain your Mobile Voice Access number and PIN from your system administrator.Step 2 Dial your assigned Mobile Voice access number.Step 3 Enter your mobile phone number (if requested) and PIN.Step 4 Press 1 to make a call to an enterprise IP Phone.Step 5 Dial a desktop phone number other than your desktop phone number.
Place Call Using PABBefore using this option, your system administrator must configure this feature and assign a service URL tothe line button. For more information, contact your system administrator.
Procedure
Step 1 Press the PAB line button.Step 2 Access the contact and select the number.
The system dials the specified number.
Make Speed Dial Call
Procedure
Perform one of the following actions:
• Press (a Speed Dial button).
• Use the Abbreviated Dial feature.
• Use the Fast Dial feature.
Cisco Unified IP Phone 7941G, 7941G-GE, 7942G, 7961G, 7961G-GE, and 7962G User Guide for Cisco UnifiedCommunications Manager 9.0 (SCCP and SIP)
24
Calling FeaturesMake Call from Mobile Phone Using Mobile Voice Access

Dial from Corporate Directory on Phone
Procedure
Step 1 Choose > Corporate Directory (name can vary).Step 2 Enter a name and press Search.Step 3 Highlight a listing and go off-hook.
Dial Personal Address Book (PAB) Entry
Procedure
Step 1 Choose > Personal Directory to log in.Step 2 Choose Personal Address Book and search for a listing.Step 3 Scroll to a contact or press the index number.
The system dials the specified contact.
Make Fast Dial CallBefore using this option, your system administrator must configure this feature and assign a service URL tothe line button. Contact your system administrator for more information.
Procedure
Step 1 Press the Fast Dial line button.Step 2 To find and select an entry, scroll to or press the index number.
The system dials the specified number.
Call AnswerYou can answer a call by lifting the handset, or you can use other options if they are available on your phone.
Cisco Unified IP Phone 7941G, 7941G-GE, 7942G, 7961G, 7961G-GE, and 7962G User Guide for Cisco UnifiedCommunications Manager 9.0 (SCCP and SIP)
25
Calling FeaturesDial from Corporate Directory on Phone

For more information, see...Then...If you want to...
Handset, Headset, andSpeakerphone, on page 61
Press , if unlit. Or, if is lit, pressAnswer or (flashing).
The ringing line is selectedautomatically. Contact yoursystem administrator for theoptions to select the primary lineeach time.
Note
If you are using a wireless headset, referto the wireless headset documentation.
Answer with a headset
Handset, Headset, andSpeakerphone, on page 61
Press , Answer, or (flashing).
The ringing line is selectedautomatically. Contact yoursystem administrator for theoptions to select the primary lineeach time.
Note
Answer with thespeakerphone
Hold and Resume, on page 27Press Answer, or if the call is ringing ona different line, press (flashing).
Switch from a connectedcall to answer a new call
Hold and Resume, on page 27Press Answer.Answer using call waiting
Call Transfer To Voice MessageSystem, on page 33
Press iDivert.Send a call to a voicemessage system
AutoAnswer with Headset orSpeakerphone, on page 64
Use AutoAnswer.Auto-connect calls
Call Park, on page 45Use Call Park, Directed Call Park, orAssisted Directed Call Park.
Retrieve a parked call onanother phone
Call Pickup, on page 44Use Call Pickup.Use your phone to answer acall ringing elsewhere
Priority Calls, on page 54Hang up the current call and pressAnswer.
Answer a priority call(SCCP phones only)
See Business Calls Using SinglePhone Number, on page 57 .
Set up Mobile Connect and answer yourphone.
When you enableMobile Connect, answerthe call on your mobile phone, and haveup to four IP Phones or Softphoneconfigured as shared lines, the additionalphones stop flashing.
Answer a call on yourmobile phone or otherremote destination
Cisco Unified IP Phone 7941G, 7941G-GE, 7942G, 7961G, 7961G-GE, and 7962G User Guide for Cisco UnifiedCommunications Manager 9.0 (SCCP and SIP)
26
Calling FeaturesCall Answer

Tips
• If parties on a call hear a beep tone, the call may be monitored or recorded. Contact your systemadministrator for more information.
• If you work in a contact center or similar environment, you can create, update, and delete your ownprerecorded greeting that plays automatically if Agent Greeting is configured for your phone. For moreinformation, see your system administrator.
• A Call Chaperone user cannot answer an incoming call while calls are being chaperoned.
Call DisconnectTo end a call, hang up. Here are some more details.
Then...If you want to...
Return the handset to its cradle. Or press EndCall.Hang up while using the handset
Press . Or, to keep headset mode active, press EndCall.
Cisco Unified IP Phones 7962G and 7942G support a wirelessheadset. If you are using a wireless headset, refer to the wirelessheadset documentation for instructions.
Hang up while using the headset
Press or EndCall.Hang up while using the speakerphone
Press EndCall. If necessary, remove the call from hold first.Hang up one call but preserve another callon the same line
Hold and ResumeYou can hold and resume calls. When you put a call on hold, the Hold icon appears on the right in the callinformation area and the corresponding line button flashes green . With a shared line, when you place acall on hold, the line button flashes green and the phone displays the hold icon. When another phone placesa call on hold, the line button flashes red and the phone displays the remote hold icon.
If the Hold Reversion feature is enabled for your phone, a call that you put on hold reverts back to ringingafter a certain period of time. The “reverting” call remains on hold until you resume it or until Hold Reversiontimes out.
Your phone indicates the presence of a reverting call by:
• Alerting you at intervals with a single ring (or flash or beep, depending on your phone line setting).
• Briefly displaying a “Hold Reversion” message in the status bar at the bottom of the phone screen.
• Displaying the animated Hold Reversion icon next to the caller ID for the held call.
• Displaying a flashing amber line button (depending on the line state).
Cisco Unified IP Phone 7941G, 7941G-GE, 7942G, 7961G, 7961G-GE, and 7962G User Guide for Cisco UnifiedCommunications Manager 9.0 (SCCP and SIP)
27
Calling FeaturesCall Disconnect

Tips
• Engaging the Hold feature typically generates music (if Music on Hold is configured) or a beeping tone.
• If you receive an alert for an incoming call and a reverting call at the same time, by default your phoneshifts the focus of the phone screen to display the incoming call. Your system administrator can changethis focus priority setting.
• If you use a shared line, Hold Reversion rings only on the phone that put the call on hold, not on theother phones that share the line.
• Your system administrator determines the duration between Hold Reversion alerts.
•When a call is chaperoned, the call chaperone cannot use Hold.
Put Call on Hold
Procedure
Step 1 Make sure that the call you want to put on hold is highlighted.Step 2 Press Hold.
Remove Call from Hold on Current Line
Procedure
Step 1 Highlight the appropriate call.Step 2 Press Resume.
Remove Call from Hold on Different Line
Procedure
Step 1 Press the appropriate line button: or (flashing). Doing so may cause a held call to resume automatically:
• If there is a reverting call on the line, that call resumes.
• If there is more than one reverting call on the line, the oldest reverting call resumes.
• If a nonreverting held call is the only call on the line, the nonreverting held call resumes.
Cisco Unified IP Phone 7941G, 7941G-GE, 7942G, 7961G, 7961G-GE, and 7962G User Guide for Cisco UnifiedCommunications Manager 9.0 (SCCP and SIP)
28
Calling FeaturesPut Call on Hold

Step 2 If necessary, scroll to the appropriate call and press Resume.
MuteWith Mute enabled, you can hear other parties on a call but they cannot hear you. You can use Mute with thehandset, speakerphone, or headset.
Mute or Unmute Call
Procedure
Step 1 To mute a call, press .Step 2 To unmute a call, press .
Multiple CallsUnderstanding how multiple calls display on your phone can help you organize your call-handling efforts.
In standard viewing mode, your phone displays calls as follows for the highlighted line:
• Calls with the highest precedence and longest duration display at the top of the list.
• Calls of a similar type are grouped together. For example, calls that you have interacted with are groupednear the top, and calls on hold are grouped last.
You can switch between multiple calls on one or more lines. If the call that you want to switch to is notautomatically highlighted, use the Navigation button to scroll to it.
View Calls on Another Line
Procedure
Step 1 Press .Step 2 Immediately press the line button .
Cisco Unified IP Phone 7941G, 7941G-GE, 7942G, 7961G, 7961G-GE, and 7962G User Guide for Cisco UnifiedCommunications Manager 9.0 (SCCP and SIP)
29
Calling FeaturesMute

Switch to Call Overview Mode
Procedure
Step 1 Press for the highlighted line.The phone switches to call overview mode, displaying one call per line. The displayed call is either the activecall or the held call with the longest duration.
Step 2 To return to standard viewing mode, press and then immediately press the line button.
Switch Between Connected Calls on One Line
Procedure
Step 1 Highlight the call you want to switch to.Step 2 Press Resume.
Any active call is placed on hold and the selected call resumes.
Switch Between Connected Calls on Different Lines
Procedure
Step 1 Press for the line that you are switching to.If a single call is holding on the line, the call automatically resumes.
Step 2 If multiple calls are holding, highlight the appropriate call and press Resume.
Switch from Connected Call to Answer Ringing Call
Procedure
Perform one of the following actions:
• Press Answer.
Cisco Unified IP Phone 7941G, 7941G-GE, 7942G, 7961G, 7961G-GE, and 7962G User Guide for Cisco UnifiedCommunications Manager 9.0 (SCCP and SIP)
30
Calling FeaturesSwitch to Call Overview Mode

• If the call is ringing on a different line, press (flashing).
The phone places the active call on hold and the selected call resumes.
In-Progress Call MovementYou can switch in-progress calls between the desktop phone and your mobile phone or other remote destination.
Switch In-Progress Call on Desk Phone to Mobile Phone
Procedure
Step 1 Press theMobility softkey and select Send call to mobile.Step 2 Answer the in-progress call on your mobile phone.
The desktop phone line button turns red and the handset icons and the calling party number appear on thephone display. You cannot use the same phone line for any other calls, but if your desk phone supports multiplelines, you can use another line to make or receive calls.
Switch In-Progress Call from Mobile Phone to Desk Phone
Procedure
Step 1 Hang up the call on your mobile phone to disconnect the mobile phone but not the call.Step 2 Press Resume on your desk phone within 4 seconds and start talking on the desk phone.
Cisco Unified IP Phone 7941G, 7941G-GE, 7942G, 7961G, 7961G-GE, and 7962G User Guide for Cisco UnifiedCommunications Manager 9.0 (SCCP and SIP)
31
Calling FeaturesIn-Progress Call Movement

Switch In-Progress Call from Mobile Phone to Desk Phone Sharing Same Line(Session Handoff)
Procedure
Step 1 While on your mobile phone, enter the access code for the Session Handoff feature (for example, *74). Contactyour system administrator for a list of access codes.
Step 2 Hang up the call on your mobile phone to disconnect the mobile phone but not the call.Step 3 Press Answer on your desk phone within 10 seconds and start talking on the desk phone. Your system
administrator sets the maximum number of seconds you have to answer the call on your desk phone.The other Cisco Unified devices that share the same line display a Remote in Use message.
Call TransferTransfer redirects a connected call. The target is the number to which you want to transfer the call.
Tips
• If on-hook transfer is enabled on your phone, you can either hang up to complete the call, or pressTransfer and then hang up.
• If on-hook transfer is not enabled on your phone, hanging up without pressing Transfer again placesthe call on hold.
• You cannot use Transfer to redirect a call on hold. Press Resume to remove the call from hold beforetransferring it.
•When a call is chaperoned, the call chaperone cannot use transfer.
• To redirect a call to a voice message system, press iDivert. For more information, see Call Transfer ToVoice Message System, on page 33.
Transfer Call Without Talking to Transfer Recipient
Procedure
Step 1 From an active call, press Transfer.Step 2 Enter the target number.Step 3 Press Transfer again to complete the transfer or EndCall to cancel.
You need to wait until you hear ringing before you complete the transfer.
Cisco Unified IP Phone 7941G, 7941G-GE, 7942G, 7961G, 7961G-GE, and 7962G User Guide for Cisco UnifiedCommunications Manager 9.0 (SCCP and SIP)
32
Calling FeaturesSwitch In-Progress Call from Mobile Phone to Desk Phone Sharing Same Line (Session Handoff)
Step 4 If your phone has on-hook transfer enabled, complete the transfer by hanging up.
Talk to Transfer Recipient Before Transferring Call (Consult Transfer)
Procedure
Step 1 From an active call, press Transfer.Step 2 Enter the target number.Step 3 Wait for the transfer recipient to answer.Step 4 Press Transfer again to complete the transfer or EndCall to cancel.Step 5 If your phone has on-hook transfer enabled, complete the transfer by hanging up.
Call Transfer To Voice Message SystemYou can use iDivert to send an active, ringing, or on-hold call to your voice message system. Depending onthe type of call and your phone configuration, you can also use iDivert to send the call to the voice messagesystem of another person.
Tips
• If the call was originally sent to the phone of another person, iDivert allows you to redirect the calleither to your own voice message system or to the voice message system of the originally called party.Your system administrator makes this option available to you.
• If the call was sent to you directly (not transferred or forwarded to you), or if your phone does not supportthe option described above, using iDivert redirects the call to your voice message system.
• If your phone displays a menu that disappears before you make your selection, you can press iDivertagain to redisplay the menu. You can also contact your system administrator regarding a longer timeoutvalue.
•When you switch an in-progress call from your mobile phone to Cisco Unified devices that share thesame line (Session Handoff), the iDivert feature is disabled on the Cisco Unified devices. The iDivertfeature returns when the call ends.
Send Active, Ringing, or On-Hold Call to Voice Message System
Procedure
Step 1 Press iDivert.
Cisco Unified IP Phone 7941G, 7941G-GE, 7942G, 7961G, 7961G-GE, and 7962G User Guide for Cisco UnifiedCommunications Manager 9.0 (SCCP and SIP)
33
Calling FeaturesTalk to Transfer Recipient Before Transferring Call (Consult Transfer)

If you have no redirect options available, the call transfers to your voice message system.
Step 2 If you have redirect options available, your phone displays a new menu. Choose an option to redirect the call.
Call ForwardYou can use Call Forward features to redirect incoming calls from your phone to another number.
Your system administrator may allow you to choose from two types of call forwarding features:
• Unconditional call forwarding (Call Forward All)—Applies to all calls that you receive.
• Conditional call forwarding (Call Forward No Answer, Call Forward Busy, Call Forward NoCoverage)—Applies to certain calls that you receive, according to conditions.
You can access Call Forward All on your phone or from your Cisco Unified Communications Manager UserOptions web pages. Conditional call forwarding features are accessible only from your User Options webpages. Your system administrator determines which Call Forward features are available to you.
Tips
• Enter the Call Forward target number exactly as you would dial it from your phone. For example, enteran access code or the area code, if necessary.
• You can forward your calls to a traditional analog phone or to another IP Phone, although your systemadministrator may restrict the call forwarding feature to numbers within your company.
• Call Forward is phone line specific. If a call reaches you on a line where Call Forward is not enabled,the call rings as usual.
• Your system administrator can enable the Call Forward Override feature that allows the person receivingyour forwarded calls to reach you. With override enabled, a call placed from the target phone to yourphone does not forward, but rings through.
• Your phone may reject your attempt to set up Call Forward All directly on the phone if the target numberthat you enter would create a call forwarding loop or would exceed the maximum number of linkspermitted in a call forwarding chain.
•When you switch an in-progress call from your mobile phone to Cisco Unified devices that share thesame line (Session Handoff), the Call Forward feature is disabled on the Cisco Unified devices. TheCall Forward feature returns when the call ends.
• To verify that Call Forward All is enabled on your primary line, look for:
◦The Call Forward icon above your primary phone number: .
◦The Call Forward target number in the status line.
Cisco Unified IP Phone 7941G, 7941G-GE, 7942G, 7961G, 7961G-GE, and 7962G User Guide for Cisco UnifiedCommunications Manager 9.0 (SCCP and SIP)
34
Calling FeaturesCall Forward

Set Up or Cancel Call ForwardingWhen call forwarding is enabled for any line other than the primary line, your phone does not provide youwith confirmation that calls are being forwarded. Instead, you must confirm your settings in the User Optionsweb pages.
Procedure
Step 1 Log in to your User Options web pages.Step 2 Access your call forwarding settings.
Set Up and Cancel Call Forward All from Phone
Procedure
Step 1 To set Call Forward All, press CFwdALL or Forward All and enter a target phone number.Step 2 To cancel Call Forward All, press CFwdALL or Forward All.
Do Not DisturbDoNot Disturb (DND) turns off all audible and visual notifications of incoming calls. Your system administratorenables DND on your phone.
When DND and Call Forward are enabled on your phone, calls forwards immediately and the caller does nothear a busy tone.
DND interaction with other types of calls includes:
• DND does not affect intercom calls or nonintercom priority calls.
• If both DND and AutoAnswer are enabled, only intercom calls autoanswer.
•When you switch an in-progress call from your mobile phone to Cisco Unified phones that share thesame line (Session Handoff), the phone disables the DND feature. The DND feature returns when thecall ends.
Cisco Unified IP Phone 7941G, 7941G-GE, 7942G, 7961G, 7961G-GE, and 7962G User Guide for Cisco UnifiedCommunications Manager 9.0 (SCCP and SIP)
35
Calling FeaturesSet Up or Cancel Call Forwarding

Turn DND On and Off
Procedure
Step 1 To turn DND on, press DND.Do Not Disturb displays on the phone, the DND lights (solid), and the ringtone turns off.
Step 2 To turn DND off again, press DND.
Set Up DND SettingsIf your system administrator configured DND settings to appear on the User Options page, perform thesesteps:
Procedure
Step 1 Log in to your User Options web pages.Step 2 From the drop-down menu, choose User Options > Device.Step 3 You can set the following options:
• Do Not Disturb: Set to enable/disable DND.
• DND Option: Choose either Call Reject (to turn off all audible and visual notifications) or Ringer Off(to turn off only the ringer).
• DND Incoming Call Alert (applies to either DND option set): Set the alert to beep only, flash only,disable the alert, or choose “None” (to use the “Alert” setting configured by your system administrator).
Conference CallsThe Cisco Unified IP Phone allows you to talk simultaneously with multiple parties in a conference call.
You can create a conference in various ways, depending on your needs and the features that are available onyour phone.
• Conference—Enables you to create a standard (ad hoc) conference by calling each participant. Use theConfrn softkey or the Conference button. Conference is available on most phones.
• Join—Enables you to create a standard (ad hoc) conference by combining existing calls. Use the Joinsoftkey or button.
Cisco Unified IP Phone 7941G, 7941G-GE, 7942G, 7961G, 7961G-GE, and 7962G User Guide for Cisco UnifiedCommunications Manager 9.0 (SCCP and SIP)
36
Calling FeaturesTurn DND On and Off

• cBarge—Enables you to create a standard (ad hoc) conference by adding yourself to a call on a sharedline. Press a line button or use the cBarge softkey or button. cBarge is only available on phones that useshared lines.
• Meet Me—Enables you to create or join a conference by calling a conference number. Use theMeetMesoftkey or button.
Ad Hoc ConferenceConference allows you to call each participant. Conference is available on most phones.
Create Conference by Calling Participants
Procedure
Step 1 From a connected call, pressConfrn or Conference. You may need to press themore softkey to seeConfrn.Step 2 Enter the phone number of the participant.Step 3 Wait for the call to connect.Step 4 Press Confrn or Conference again to add the participant to your call.Step 5 Repeat to add additional participants.
Add New Participants to ConferenceYour system administrator determines whether noninitiators of a conference can add or remove participants.
Procedure
Step 1 From a connected call, pressConfrn or Conference. You may need to press themore softkey to seeConfrn.Step 2 Enter the phone number of the participant.Step 3 Wait for the call to connect.Step 4 Press Confrn or Conference again to add the participant to your call.Step 5 Repeat to add additional participants.
Join ConferenceJoin allows you to combine two or more existing calls to create a conference in which you are a participant.
Cisco Unified IP Phone 7941G, 7941G-GE, 7942G, 7961G, 7961G-GE, and 7962G User Guide for Cisco UnifiedCommunications Manager 9.0 (SCCP and SIP)
37
Calling FeaturesAd Hoc Conference
Tips
• If you frequently join more than two parties into a single conference, you may find it useful to first selectthe calls that you want to join together, and then press Join to complete the action.
•When Join completes, the caller ID changes to Conference.
• You may be able to combine multiple conference calls by using the Join or DirTrfr softkeys. Contactyour system administrator to see if this feature is available to you.
• A Call Chaperone user can conference only the first caller. Subsequent callers can be conferenced bythe other participants in the conference.
Join Together Existing Calls on Single Phone Line
Procedure
Step 1 From an active call, highlight another call that you want to include in the conference and press Select.Selected calls display this icon .
Step 2 Repeat this step for each call that you want to add.Step 3 Press Join. You may need to press themore softkey to see Join.
Join Together Existing Calls on Multiple Phone Lines
Procedure
Step 1 From an active call, press Join. You may need to pressmore to see Join.Step 2 Press the green flashing line button for the calls that you want to include in the conference.
If your phone does not support Join for calls on multiple lines, transfer the calls to a single line beforeusing Join.
Note
Step 3 If a window opens on your phone screen prompting you to select the calls that you want to join, highlight thecalls, press Select, and then press Join to complete the action.The calls are joined.
Barge ConferenceYou can create a conference by using cBarge to add yourself to a call on a shared line. For more information,see Barge, cBarge, and Shared-line Calls, on page 49 and Conference Participants List, on page 40.
Cisco Unified IP Phone 7941G, 7941G-GE, 7942G, 7961G, 7961G-GE, and 7962G User Guide for Cisco UnifiedCommunications Manager 9.0 (SCCP and SIP)
38
Calling FeaturesBarge Conference

Create Conference by Barging Call on Shared Line
Procedure
Step 1 Press the line button for the shared line.Step 2 In some cases, you must highlight the call and press cBarge to complete the action.
If you see the message that you cannot be added, try again.
Meet Me ConferenceMeet Me conferencing allows you to start or join a conference by calling the conference number.
Tips
• If you call a secure Meet Me conference number from a non-secure phone, your phone displays themessage Device Not Authorized. For more information, see Secure Calls, on page 51.
• A Meet Me conference ends when all participants hang up.
• If the conference initiator disconnects, the conference call continues until all participants hang up.
Start Meet Me ConferenceParticipants cannot join the conference until the initiator starts the conference.
Procedure
Step 1 Obtain a Meet Me phone number from your system administrator.Step 2 Distribute the number to participants.Step 3 When you are ready to start the meeting, go off-hook to get a dial tone, then pressMeetMe.Step 4 Dial the Meet Me conference number.
Participants can now join the conference by dialing the Meet Me number.
Cisco Unified IP Phone 7941G, 7941G-GE, 7942G, 7961G, 7961G-GE, and 7962G User Guide for Cisco UnifiedCommunications Manager 9.0 (SCCP and SIP)
39
Calling FeaturesMeet Me Conference
Join Meet Me Conference
Procedure
Step 1 Dial the Meet Me conference number provided by the conference initiator.Step 2 If you hear a busy tone, the conference initiator has not joined the conference. Wait a minute and then try
your call again.
Conference Participants ListDuring a standard (ad hoc) conference, you can view a list of participants and remove participants.
Control Conference Using Participants ListThe conference participants list, ConfList, displays a maximum of 16 participants. Though users can add asmany conference participants as the conference bridge supports, ConfList displays only 16 participants. Asnew participants join the conference, ConfList displays only the last 16 participants who have joined.
Procedure
Step 1 Press ConfList or Conference List.Participants are listed in the order in which they join the conference with the most recent additions at the top.
Step 2 To get an updated list of conference participants, press Update.Step 3 To see who initiated the conference, locate the participant listed at the bottom of the list with an asterisk (*)
next to the name.Step 4 To remove any conference participant, highlight the participant’s name and press Remove.Step 5 To drop the last participant added to the conference, press RMLstC or Remove Last Participant.
You can remove participants only if you initiated the conference call.
Cisco Unified IP Phone 7941G, 7941G-GE, 7942G, 7961G, 7961G-GE, and 7962G User Guide for Cisco UnifiedCommunications Manager 9.0 (SCCP and SIP)
40
Calling FeaturesConference Participants List

Verify Conference Call Security
Procedure
Step 1 To verify conference security, press ConfList or Conference List.Step 2 To verify that a conference call is secure, look for the or icon after Conference on the phone screen.Step 3 To verify that a participant is calling from a secure phone, look for the or icon beside the participant’s
name on the phone screen.
Intercom CallsYou can place an intercom call to a target phone that autoanswers the call in speakerphone mode with muteactivated. The one-way intercom call allows you to deliver a short message to the recipient. The audio playson the handset or headset, if one of these is in use. Any current call activity that your recipient is engaged incontinues simultaneously.
When you receive an intercom-alert tone, you can choose one of these options:
• Listen to the caller with your microphone muted (you can hear the caller, but the caller cannot hear you).
• End the intercom call by pressing EndCall with the intercom call in focus. Do this if you do not wantto hear the message.
• Talk to the caller by pressing the active intercom button and using either the handset, headset, or speaker.The intercom call becomes a two-way connection so that you can converse with the caller.
When using the intercom feature, be aware of the following:
• From an intercom line, you can only dial other intercom lines.
• You can use only one intercom line at a time.
•When your active call is being monitored or recorded, you can receive or place intercom calls.
• You cannot place an intercom call on hold.
If you log into the same phone on a daily basis using your Cisco Extension Mobility profile, ensure thatyour system administrator assigns the phone button template that contains intercom information to thisprofile and assign the phone as the default intercom device for the intercom line.
Note
Cisco Unified IP Phone 7941G, 7941G-GE, 7942G, 7961G, 7961G-GE, and 7962G User Guide for Cisco UnifiedCommunications Manager 9.0 (SCCP and SIP)
41
Calling FeaturesIntercom Calls

Place Intercom Call to Preconfigured Intercom Number
Procedure
Step 1 Press (intercom target line).Step 2 After you hear the intercom-alert tone, begin speaking.
Place Intercom Call to Any Intercom Number
Procedure
Step 1 Press ( ).Step 2 Enter the intercom target number or press a speed-dial number for your target.Step 3 After you hear the intercom-alert tone, begin speaking.
Receive Intercom Call
Procedure
When you hear the intercom-alert tone, handle the call in one of these ways:
• Listen to the message in one-way audio.
• Speak to the caller by pressing (active intercom line).
• Press EndCall with the intercom call in focus.
Advanced Call HandlingAdvanced call-handling tasks involve special features that your system administrator may configure for yourphone depending on your call-handling needs and work environment.
Speed DialSpeed Dial enables you to enter an index number, press a button, or select a phone screen item to place a call.Depending on configuration, your phone can support several speed-dial features:
Cisco Unified IP Phone 7941G, 7941G-GE, 7942G, 7961G, 7961G-GE, and 7962G User Guide for Cisco UnifiedCommunications Manager 9.0 (SCCP and SIP)
42
Calling FeaturesPlace Intercom Call to Preconfigured Intercom Number

• Speed-dial buttons
• Abbreviated Dialing
• Fast Dials
To set up speed-dial buttons and Abbreviated Dial, you must access your User Options web pages. To set upFast Dials, you must access the Personal Directory feature. Alternatively, your system administrator canconfigure speed-dial features for you.
Related Topics
User Options Web Page Actions, on page 85Personal Directory, on page 77Speed Dial Setup on Web, on page 91Busy Lamp Field Features, on page 50Personal Directory on Web, on page 87
Make Call Using Speed-Dial ButtonsIf your phone supports the Busy Lamp Field (BLF) speed-dial feature, you can see if the speed-dial numberis busy before dialing.
Procedure
Step 1 Set up speed-dial buttons.Step 2 To place a call, press (a speed-dial button).
Make Call Using On-Hook Abbreviated Dial
Procedure
Step 1 Set up Abbreviated Dialing codes.Step 2 To place a call, enter the Abbreviated Dialing code and press AbbrDial.
Cisco Unified IP Phone 7941G, 7941G-GE, 7942G, 7961G, 7961G-GE, and 7962G User Guide for Cisco UnifiedCommunications Manager 9.0 (SCCP and SIP)
43
Calling FeaturesSpeed Dial
Make Call Using Fast Dial
Procedure
Step 1 Create a Personal Address Book entry and assign a Fast Dial code.Step 2 To place a call, access the Fast Dial service on your phone.
Call PickupCall PickUp allows you to answer a call that is ringing on a coworker’s phone by redirecting the call to yourphone. You may use Call PickUp if you share call-handling tasks with coworkers.
Tips
• If multiple calls are available for pickup, your phone picks up the oldest call first (the call that has beenringing for the longest time).
• If you press GPickUp or Group PickUp and enter a line number, your phone picks up the ringing callon that particular line (if available).
• If you have multiple lines and want to pick up the call on a non-primary line, first press for the desiredline and then press a Call PickUp softkey or button.
• Depending on how your phone is configured, you may receive an audio or visual alert about a call toyour pickup group.
• If you use the BLF Pickup feature on your phone, see Busy Lamp Field Features, on page 50.
Answer Call Ringing on Another Extension Within Call Pickup Group
Procedure
Step 1 Press PickUp. You might have to go off-hook to display the softkey.If your phone supports autopickup, you are now connected to the call.
Step 2 If the call rings, press Answer to connect to the call.
Cisco Unified IP Phone 7941G, 7941G-GE, 7942G, 7961G, 7961G-GE, and 7962G User Guide for Cisco UnifiedCommunications Manager 9.0 (SCCP and SIP)
44
Calling FeaturesCall Pickup

Answer Call Ringing on Another Extension Outside Call Pickup Group
Procedure
Step 1 Press the GPickUp softkey or the Group PickUp button. You may have to lift the handset to displaythe softkey.
Step 2 Enter the group pickup number.If your phone supports autopickup, you are now connected to the call.
Step 3 If the call rings, press Answer to connect to the call.
Answer Call Ringing on Another Extension in Group or in Associated Group
Procedure
Step 1 Press theOPickUp softkey or theOther PickUp button. Youmay have to lift the handset to display the softkey.If your phone supports autopickup, you are now connected to the call.
Step 2 If the call rings, press Answer to connect to the call.
Answer Call Ringing on Particular Extension (Line Number)
Procedure
Step 1 Press the GPickUp softkey or the Group PickUp button. You may have to lift the handset to displaythe softkey.
Step 2 Enter the line number with the call that you want to pick up. For example, if the call that you want to pick upis ringing on line 12345, enter 12345.If your phone supports autopickup, you are now connected to the call.
Step 3 If the call rings, press Answer to connect to the call.
Call ParkYou park a call when you want to store the call so that you or someone else can retrieve it from another phonein the Cisco Unified Communications Manager system (for example, a phone at a coworker’s desk or in aconference room).
You park a call using these methods:
Cisco Unified IP Phone 7941G, 7941G-GE, 7942G, 7961G, 7961G-GE, and 7962G User Guide for Cisco UnifiedCommunications Manager 9.0 (SCCP and SIP)
45
Calling FeaturesCall Park

• Call Park: Use the Park softkey to store the call. Your phone displays the call park number where thesystem stored your call. You must record this number and then use the same number to retrieve the call.
• Directed Call Park: Press the Transfer softkey during a call. To store the call, dial the Directed CallPark number and press Transfer again.
• Assisted Directed Call Park: Use the Assisted Directed Call Park button displaying an idle line statusindicator. To retrieve the call from any other Cisco Unified IP Phone in your network, press the flashingAssisted Direct Call Park button.
Tips
• You have a limited amount of time to retrieve a parked call before it reverts to ringing at the originalnumber. Contact your system administrator for details.
• Your system administrator can assign Directed Call Park buttons to available line buttons on your CiscoUnified IP Phone or on your Cisco Unified IP Phone Expansion Module, if available and supported byyour phone.
• You can dial Directed Call Park numbers if you do not have Directed Call Park buttons. However, youcannot see the status of the directed call park number.
Store and Retrieve Active Call Using Call Park
Procedure
Step 1 During a call, press Park. You may need to pressmore to see Park.Step 2 Record the call park number displayed on your phone screen.Step 3 Hang up.Step 4 To pick up the parked call, enter the call park number from any Cisco Unified IP Phone in your network.
Direct and Store Active Call at Directed Call Park Number
Procedure
Step 1 During a call, press .Step 2 Dial the directed call park number.Step 3 Press Transfer again to finish storing the call.
Cisco Unified IP Phone 7941G, 7941G-GE, 7942G, 7961G, 7961G-GE, and 7962G User Guide for Cisco UnifiedCommunications Manager 9.0 (SCCP and SIP)
46
Calling FeaturesCall Park

Direct, Store, and Retrieve Active Call at Assisted Directed Call Park Number
Procedure
Step 1 During a call, press the Assisted Directed Call Park button displaying an idle Line Status indicator .Step 2 To retrieve the call, press the flashing Assisted Direct Call Park button.
If your administrator has not configured a reversion directory number, the parked call reverses to the phonethat parked the call.
Retrieve Parked Call from Directed Call Park Number
Procedure
Step 1 From any Cisco Unified IP Phone in your network, enter the park retrieval prefix.Step 2 Perform one of the following actions:
• Dial the directed call park number.
• Press the (flashing) ( ) to connect to the call.
Hunt GroupsIf your organization receives a large number of incoming calls, you may be a member of a hunt group. A huntgroup includes a series of directory numbers that share the incoming call load.When the first directory numberin the hunt group is busy, the system hunts for the next available directory number in the group and directsthe call to that phone.
When you are away from your phone, you can prevent hunt group calls from ringing your phone by loggingout of hunt groups.
Tips
• Logging out of hunt groups does not prevent nonhunt group calls from ringing your phone.
•When logged in, the Hunt Group button is lit.
Cisco Unified IP Phone 7941G, 7941G-GE, 7942G, 7961G, 7961G-GE, and 7962G User Guide for Cisco UnifiedCommunications Manager 9.0 (SCCP and SIP)
47
Calling FeaturesHunt Groups

Log In and Out of Hunt Groups
Procedure
Step 1 To log into a hunt group, press HLog or Hunt Group. You are now logged into the Hunt Group.Step 2 To log out of a hunt group, pressHLog orHunt Group. Your phone screen displays the “Logged out of Hunt
Group” message.
Shared LinesYour system administrator may ask you to use a shared line if you:
• Have multiple phones and want one phone number
• Share call-handling tasks with coworkers
• Handle calls on behalf of a manager
Remote-In-Use Icon
The remote-in-use icon appears when another phone that shares your line has a connected call. You canplace and receive calls as usual on the shared line, even when the remote-in-use icon appears.
Call Information and BargePhones that share a line each display information about calls that are placed and received on the shared line.This information may include caller ID and call duration. See the Privacy, on page 48 section for exceptions.
When call information is visible in this way, you and coworkers who share a line can add yourselves to callsusing either Barge or cBarge. See Barge, cBarge, and Shared-line Calls, on page 49.
PrivacyIf you do not want coworkers who share your line to see information about your calls, enable the Privacyfeature. Doing so also prevents coworkers from barging your calls. See Privacy and Shared Lines, on page50.
The maximum number of calls that a shared line supports can vary by phone.Note
Cisco Unified IP Phone 7941G, 7941G-GE, 7942G, 7961G, 7961G-GE, and 7962G User Guide for Cisco UnifiedCommunications Manager 9.0 (SCCP and SIP)
48
Calling FeaturesShared Lines

Barge, cBarge, and Shared-line CallsYou can use barge features (cBarge or Barge) to add yourself to calls on your shared line. (Calls must benon-private calls. See Shared Lines, on page 48.)
Depending on how your phone is configured, you can add yourself to a non-private call on a shared line usingeither cBarge or Barge:
• cBarge converts the call into a standard conference, allowing you to add new participants. See ConferenceCalls, on page 36 for information about standard conferences.
• Barge allows you to add yourself to the call but does not convert the call into a conference or allow youto add new participants.
Single-Button and Multitouch Barge
Your system administrator determines whether the barge feature on your phone operates as a single-buttonor multitouch feature.
• Single-button barge allows you to press a line button to barge a call (if only one call is on the line).
• Multitouch barge allows you to view call information before barging.
Barge Features
The table below describes how to use barge features (cBarge or Barge) to add yourself to a call on a sharedline.
Then...If you want to...
Look for the remote-in-use icon next to a red line button .See if the shared line is inuse
Press the red line button for the shared line.
One of the following occurs:
• You are added to the call.
• A window opens on your phone screen prompting you to select the callthat you want to barge. Press Barge or cBarge to complete the action.You may need to press themore softkey to display Barge or cBarge.
Add yourself to a call ona shared line
Tips
•When you barge a call, other parties may hear a beep tone announcing your presence. With cBarge,other parties hear a brief audio interruption and the phone screen changes to display conference details.
• If a phone that is using the shared line has Privacy enabled, call information and barge softkeys will notappear on the other phones that share the line.
Cisco Unified IP Phone 7941G, 7941G-GE, 7942G, 7961G, 7961G-GE, and 7962G User Guide for Cisco UnifiedCommunications Manager 9.0 (SCCP and SIP)
49
Calling FeaturesShared Lines

• If a phone that is using the shared line has Privacy disabled and is configured with Private Line AutomatedRingdown (PLAR), the barge and cBarge features will still be available.
• Youwill be disconnected from a call that you have joined using Barge if the call is put on hold, transferred,or turned into a conference call.
Conference Participants List, on page 40
Privacy and Shared LinesIf you share a phone line, use the Privacy feature to prevent others who share the line from viewing or barging(adding themselves to) your calls.
Tips
• If the phone that shares your line has Privacy enabled, you can place and receive calls using the sharedline as usual.
• The Privacy feature applies to all shared lines on your phone. Consequently, if you have multiple sharedlines and Privacy is enabled, coworkers cannot view or barge calls on any of your shared lines.
Prevent and Allow Others to View or Barge Calls on Shared Line
Procedure
Step 1 To prevent others from viewing or barging a call on a shared line,a) Press Private .b) To verify that Privacy is on, look for the Privacy-enabled icon next to an amber line button .
Step 2 To allow others to view or barge calls on a shared line,a) Press Private .b) To verify that Privacy is off, look for the Privacy-disabled icon next to an unlit line button .
Busy Lamp Field FeaturesBusy Lamp Field (BLF) allows you to view the state of a phone line that is associated with a speed-dial button,call log, or directory listing on your phone. If you use BLF Pickup, you can answer a ringing call for the linethat you are monitoring. Your system administrator determines which BLF features are configured for yourphone.
Cisco Unified IP Phone 7941G, 7941G-GE, 7942G, 7961G, 7961G-GE, and 7962G User Guide for Cisco UnifiedCommunications Manager 9.0 (SCCP and SIP)
50
Calling FeaturesBusy Lamp Field Features
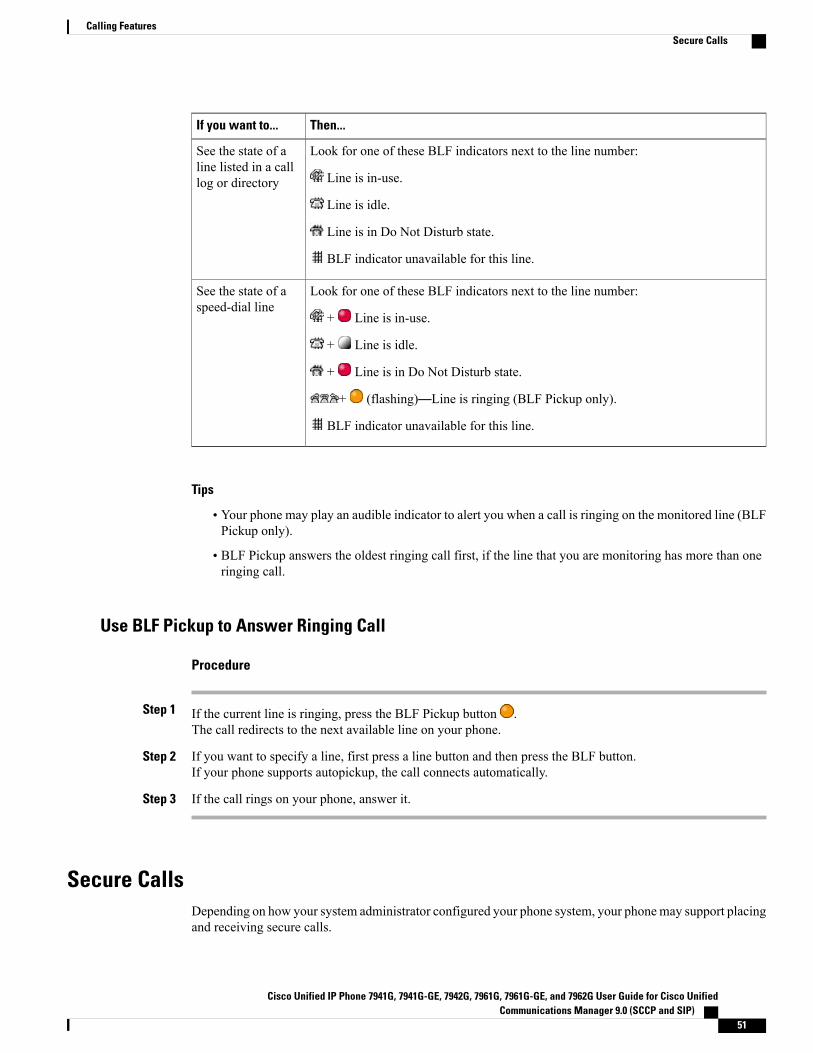
Then...If you want to...
Look for one of these BLF indicators next to the line number:
Line is in-use.
Line is idle.
Line is in Do Not Disturb state.
BLF indicator unavailable for this line.
See the state of aline listed in a calllog or directory
Look for one of these BLF indicators next to the line number:
+ Line is in-use.
+ Line is idle.
+ Line is in Do Not Disturb state.
+ (flashing)—Line is ringing (BLF Pickup only).
BLF indicator unavailable for this line.
See the state of aspeed-dial line
Tips
• Your phone may play an audible indicator to alert you when a call is ringing on the monitored line (BLFPickup only).
• BLF Pickup answers the oldest ringing call first, if the line that you are monitoring has more than oneringing call.
Use BLF Pickup to Answer Ringing Call
Procedure
Step 1 If the current line is ringing, press the BLF Pickup button .The call redirects to the next available line on your phone.
Step 2 If you want to specify a line, first press a line button and then press the BLF button.If your phone supports autopickup, the call connects automatically.
Step 3 If the call rings on your phone, answer it.
Secure CallsDepending on how your system administrator configured your phone system, your phonemay support placingand receiving secure calls.
Cisco Unified IP Phone 7941G, 7941G-GE, 7942G, 7961G, 7961G-GE, and 7962G User Guide for Cisco UnifiedCommunications Manager 9.0 (SCCP and SIP)
51
Calling FeaturesSecure Calls

Your phone can support these types of calls:
• Authenticated call—The identities of the phones participating in the call have been verified.
• Encrypted call—The phone is receiving and transmitting encrypted audio (your conversation) withinthe Cisco Unified Communications Manager network. Encrypted calls are authenticated.
• Protected call—The phone is a secure (encrypted and trusted) device on the Cisco UnifiedCommunications Manager server and is configured as a “Protected Device” in Cisco UnifiedCommunications Manager Administration.
If “Play Secure Indication Tone” is enabled (True) in Cisco Unified Communications ManagerAdministration, the protected phone plays a secure or nonsecure indication tone at the beginning of thecall:
◦When end-to-end secure media is established through the Secure Real-Time Transfer Protocol(SRTP) and the call status is secure, the phone plays the secure indication tone (three long beepswith brief pauses).
◦When end-to-end nonsecure media is established through the Real-Time Protocol (RTP) and thecall status is nonsecure, the phone plays the nonsecure indication tone (six short beeps with briefpauses).
If the Play Secure Indication Tone option is disabled (False), no tone is played.
• Nonprotected call—The phone does not have a “Protected Device” status in Cisco UnifiedCommunications Manager. No secure or nonsecure indication tone is played.
• Nonsecure call—The phone is not protected on the Cisco Unified Communications Manager server andthe call status is nonsecure.
For more information, see your system administrator.
Then...If you want to...
Look for a security icon in the top right corner of the callactivity area, next to the call duration timer:
Authenticated call or conference
Encrypted call or conference
Non-secure call or conference
Check the security level of a call orconference
Cisco Unified IP Phone 7941G, 7941G-GE, 7942G, 7961G, 7961G-GE, and 7962G User Guide for Cisco UnifiedCommunications Manager 9.0 (SCCP and SIP)
52
Calling FeaturesSecure Calls
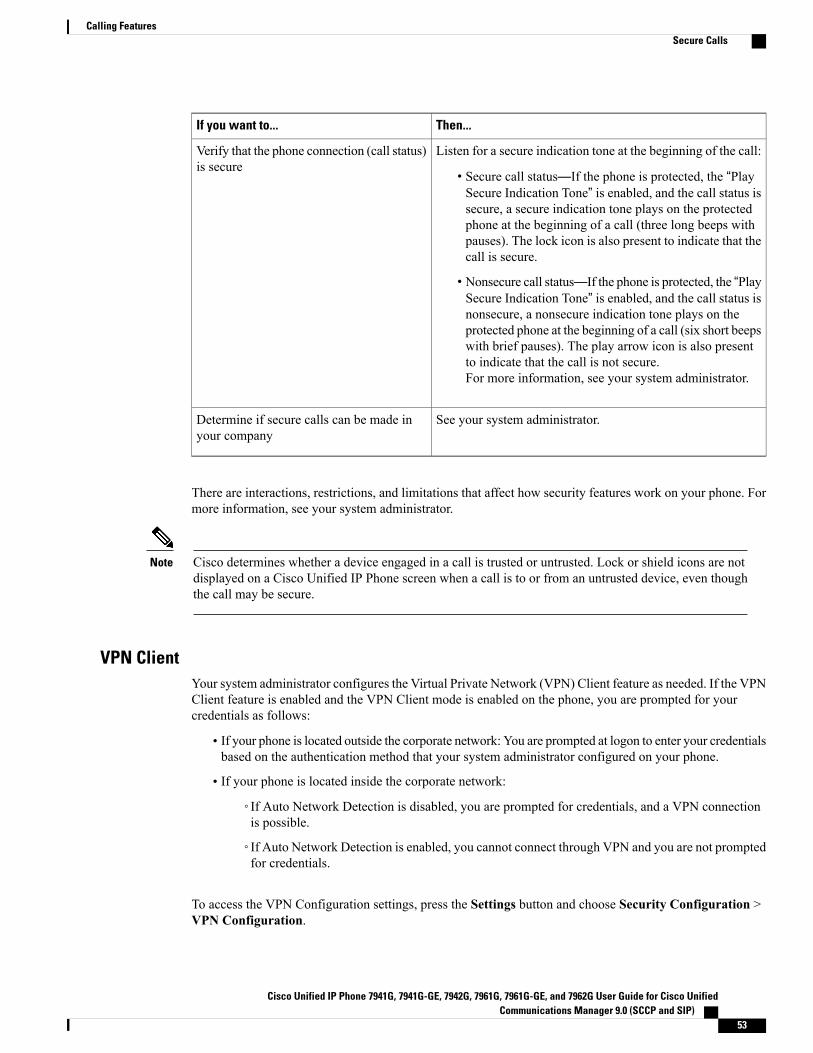
Then...If you want to...
Listen for a secure indication tone at the beginning of the call:
• Secure call status—If the phone is protected, the “PlaySecure Indication Tone” is enabled, and the call status issecure, a secure indication tone plays on the protectedphone at the beginning of a call (three long beeps withpauses). The lock icon is also present to indicate that thecall is secure.
• Nonsecure call status—If the phone is protected, the “PlaySecure Indication Tone” is enabled, and the call status isnonsecure, a nonsecure indication tone plays on theprotected phone at the beginning of a call (six short beepswith brief pauses). The play arrow icon is also presentto indicate that the call is not secure.For more information, see your system administrator.
Verify that the phone connection (call status)is secure
See your system administrator.Determine if secure calls can be made inyour company
There are interactions, restrictions, and limitations that affect how security features work on your phone. Formore information, see your system administrator.
Cisco determines whether a device engaged in a call is trusted or untrusted. Lock or shield icons are notdisplayed on a Cisco Unified IP Phone screen when a call is to or from an untrusted device, even thoughthe call may be secure.
Note
VPN ClientYour system administrator configures the Virtual Private Network (VPN) Client feature as needed. If the VPNClient feature is enabled and the VPN Client mode is enabled on the phone, you are prompted for yourcredentials as follows:
• If your phone is located outside the corporate network: You are prompted at logon to enter your credentialsbased on the authentication method that your system administrator configured on your phone.
• If your phone is located inside the corporate network:
◦If Auto Network Detection is disabled, you are prompted for credentials, and a VPN connectionis possible.
◦If Auto Network Detection is enabled, you cannot connect through VPN and you are not promptedfor credentials.
To access the VPN Configuration settings, press the Settings button and choose Security Configuration >VPN Configuration.
Cisco Unified IP Phone 7941G, 7941G-GE, 7942G, 7961G, 7961G-GE, and 7962G User Guide for Cisco UnifiedCommunications Manager 9.0 (SCCP and SIP)
53
Calling FeaturesSecure Calls

After the phone starts up and the VPN Login screen appears, enter your credentials based on the configuredauthentication method:
• Username and password: Enter the username and password given by your system administrator.
• Password and certificate: Enter the password. Your username is derived from the certificate.
• Certificate: If the phone uses only a certificate for authentication, you do not need to enter authenticationdata. The VPN Login screen displays the status of the phone attempting the VPN connection.
With the authentication methods that require a password, use the << softkey to backspace and correct thepassword.
When the power is lost or reset under some circumstances, the stored credentials are cleared.
To establish the VPN connection, press the Submit softkey.
To disable the VPN login process, press the Cancel softkey.
Suspicious Call TraceIf you are receiving suspicious or malicious calls, your system administrator can add the Malicious CallIdentification (MCID) feature to your phone. This feature enables you to identify an active call as suspicious,which initiates a series of automated tracking and notification messages.
Notify System Administrator About Suspicious or Harassing Call
Procedure
PressMCID orMalicious Call ID.Your phone plays a tone and displays the message MCID successful. Your administrator receivesnotification about the call with supporting information to take appropriate actions.
Priority CallsThis feature applies to SCCP phones only.
In some specialized environments, such as military or government offices, you might need to make and receiveurgent or critical calls. If you have the need for this specialized call handling, your system administrator canadd Multilevel Precedence and Preemption (MLPP) to your phone.
Keep these terms in mind:
• Precedence indicates the priority associated with a call.
• Preemption is the process of ending an existing, lower priority call while accepting a higher priority callthat is sent to your phone.
Then...If you...
Contact your system administrator for a list of correspondingprecedence numbers for calls.
Want to choose a priority (precedence)level for an outgoing call
Cisco Unified IP Phone 7941G, 7941G-GE, 7942G, 7961G, 7961G-GE, and 7962G User Guide for Cisco UnifiedCommunications Manager 9.0 (SCCP and SIP)
54
Calling FeaturesSuspicious Call Trace

Then...If you...
Enter the MLPP access number (provided by your systemadministrator) followed by the phone number.
Want to make a priority (precedence) call
You are receiving a priority (precedence) call. An MLPP icon onyour phone screen indicates the priority level of the call.
Hear a special ring (faster than usual) orspecial call waiting tone
Look for an MLPP icon on your phone screen:
Priority call
Medium priority (immediate) call
High priority (flash) call
Highest priority (flash override) or Executive Override call
Higher priority calls are displayed at the top of your call list. Ifyou do not see an MLPP icon, the priority level of the call isnormal (routine).
Want to view priority level of a call
Answer the call as usual. If necessary, end an active call first.Want to accept a higher-priority call
You or the other party are receiving a call that must preempt thecurrent call. Hang up immediately to allow the higher prioritycall to ring through.
Hear a continuous tone interrupting yourcall
Tips
•When you make or receive anMLPP-enabled call, you will hear special ring tones and call waiting tonesthat differ from the standard tones.
• If you enter an invalid MLPP access number, a verbal announcement alerts you of the error.
• An MLPP-enabled call retains its priority and preemptive status when you:
◦Put the call on hold
◦Transfer the call
◦Add the call to a three-way conference
◦Answer the call using PickUp
• MLPP overrides the Do Not Disturb (DND) feature.
Cisco Extension MobilityCisco ExtensionMobility (EM) allows you to configure any Cisco Unified IP Phone as your own temporarily.After you log in to EM, the phone adopts your user profile, including your phone lines, features, establishedservices, and web-based settings. Your system administrator must configure EM for you.
The ExtensionMobility Change PIN feature allows you to change your PIN from your Cisco Unified IP Phone.
Cisco Unified IP Phone 7941G, 7941G-GE, 7942G, 7961G, 7961G-GE, and 7962G User Guide for Cisco UnifiedCommunications Manager 9.0 (SCCP and SIP)
55
Calling FeaturesCisco Extension Mobility

Tips
• EM automatically logs you out after a certain amount of time. Your system administrator establishesthis time limit.
• Changes that you make to your EM profile from your Cisco Unified Communications Manager UserOptions web pages take effect immediately if you are logged in to EM on the phone; otherwise, changestake effect the next time you log in.
• Changes that you make to the phone from your User Options web pages take effect immediately if youare logged out of EM; otherwise, changes take effect after you log out.
• Local settings controlled by the phone are not maintained in your EM profile.
Log In to EM
Procedure
Step 1 Choose > EM Service (name can vary).Step 2 Enter your user ID and PIN provided by your system administrator.Step 3 If prompted, select a device profile.
Log Out of EM
Procedure
Step 1 Choose > EM Service (name can vary).Step 2 When prompted to log out, press Yes.
Cisco Unified IP Phone 7941G, 7941G-GE, 7942G, 7961G, 7961G-GE, and 7962G User Guide for Cisco UnifiedCommunications Manager 9.0 (SCCP and SIP)
56
Calling FeaturesCisco Extension Mobility
Change Your PIN Using Change Credentials Service
Procedure
Step 1 Choose > Change Credentials.Step 2 Enter your User ID in the User ID field.Step 3 Enter your PIN in the Current PIN field.Step 4 Enter your new PIN in the New PIN field.Step 5 Enter your new PIN again in the Confirm PIN field.Step 6 Press Change. You see the PIN Change Successful message.Step 7 Press Exit.
Change Your PIN Using ChangePIN Softkey
Procedure
Step 1 Choose > EM Service.Step 2 Press ChangePIN.Step 3 Enter your PIN in the Current PIN field.Step 4 Enter your new PIN in the New PIN field.Step 5 Enter your new PIN again in the Confirm PIN field.Step 6 Press Change. You see the PIN Change Successful message.Step 7 Press Exit.
Business Calls Using Single Phone NumberIntelligent Session Control associates your mobile phone number with your business IP phone number. Whenyou receive a call to your remote destination (mobile phone), your desk phone does not ring; only your remotedestination rings. When an incoming call is answered on the mobile phone, the desk phone displays a Remotein Use message.
During a call you can also use any of your mobile phone features. For example, if you receive a call on yourmobile number, you can answer the call from your desk phone or you can hand off the call from your mobilephone to your desk phone.
The following table describes how to transfer calls.
Cisco Unified IP Phone 7941G, 7941G-GE, 7942G, 7961G, 7961G-GE, and 7962G User Guide for Cisco UnifiedCommunications Manager 9.0 (SCCP and SIP)
57
Calling FeaturesBusiness Calls Using Single Phone Number

Then...If you want to...
Use the various features of your mobile phone (for example, *74). Contactyour system administrator for a list of access codes.
Transfer your incomingmobile active call to adesk phone
Mobile Connect and Mobile Voice AccessWith Mobile Connect and Mobile Voice Access installed, you can use your mobile phone to handle callsassociated with your desktop phone number.
When you enable Mobile Connect, your desktop and remote destinations receive calls simultaneously.
When you answer the call on your desktop phone, the remote destinations stop ringing, are disconnected, anddisplay a missed call message.
When you answer the call on one remote destination, the other remote destinations stop ringing, aredisconnected, and a missed call message is shown on the other remote destinations.
Then...If you want to...
Use the User Options web pages to set up remote destinations and create accesslists to allow or block calls from specific phone numbers from being passed tothe remote destinations. See Phone and Access List setup for Mobile Connect,on page 98.
ConfigureMobile Connect
See Call Answer, on page 25.Answer a call using yourmobile phone
See In-Progress Call Movement, on page 31.Switch an in-progress callbetween your desk phoneand mobile phone
See Additional Call Options, on page 22.Make a call from yourmobile phone
Tips
•When calling Mobile Voice Access, you must enter the number you are calling and your PIN if any ofthe following are true:
◦The number you are calling from is not one of your remote destinations.
◦The number is blocked by you or your carrier (shown as Unknown Number).
◦The number is not accurately matched in the Cisco Unified Communications Manager database;for example, if your number is 510-666-9999, but it is listed as 666-9999 in the database, or yournumber is 408-999-6666, but it is entered as 1-408-999-6666 in the database.
Cisco Unified IP Phone 7941G, 7941G-GE, 7942G, 7961G, 7961G-GE, and 7962G User Guide for Cisco UnifiedCommunications Manager 9.0 (SCCP and SIP)
58
Calling FeaturesBusiness Calls Using Single Phone Number

• If you incorrectly enter any requested information (such as mobile phone number or PIN) three timesin a row, the Mobile Voice Access call disconnects, and you are locked out for a period of time. Seeyour system administrator if you need assistance.
Related Topics
In-Progress Call Movement, on page 31
Put Call Picked Up on Mobile Phone on Hold
Procedure
Step 1 Press Enterprise Hold (name may vary).The other party is placed on hold.
Step 2 On your mobile phone, press Resume (name may vary).
Connect to Mobile Voice Access
Procedure
Step 1 From any phone, dial your assigned Mobile Voice Access number.Step 2 Enter the number you are calling from, if prompted, and your PIN.
Turn On Mobile Connect from Mobile Phone
Procedure
Step 1 Dial your assigned Mobile Voice access number.Step 2 Enter your mobile phone number (if requested) and PIN.Step 3 Press 2 to enable Mobile Connect.Step 4 Choose whether to turn Mobile Connect on for all configured phones or just one:
• All phones: Enter 2.
• One phone: Enter 1 and enter the number you want to add as a remote destination, followed by pound(#).
Cisco Unified IP Phone 7941G, 7941G-GE, 7942G, 7961G, 7961G-GE, and 7962G User Guide for Cisco UnifiedCommunications Manager 9.0 (SCCP and SIP)
59
Calling FeaturesBusiness Calls Using Single Phone Number

Turn Off Mobile Connect from Mobile Phone
Procedure
Step 1 Dial your assigned Mobile Voice access number.Step 2 Enter your mobile phone number (if requested) and PIN.Step 3 Press 3 to disable Mobile Connect.Step 4 Choose whether to turn Mobile Connect off for all configured phones or just one:
• All phones: Enter 2.
• One phone: Enter 1 and enter the number you want to remove as a remote destination, followed bypound (#).
Turn On or Off Mobile Connect Access to All Remote Destinations from Desk Phone
Procedure
Step 1 PressMobility to display the current remote destination status (Enabled or Disabled).Step 2 Press Select to change the status.Step 3 Press Exit.
Cisco Unified IP Phone 7941G, 7941G-GE, 7942G, 7961G, 7961G-GE, and 7962G User Guide for Cisco UnifiedCommunications Manager 9.0 (SCCP and SIP)
60
Calling FeaturesBusiness Calls Using Single Phone Number

C H A P T E R 4Handset, Headset, and Speakerphone
• Headset, Handset, and Speaker Overview, page 61
• Handset, page 61
• Headset, page 62
• Speakerphone, page 64
• AutoAnswer with Headset or Speakerphone, page 64
Headset, Handset, and Speaker OverviewYou can use your phone with these audio devices: a handset, headset, or speakerphone.
The phone is off-hook when the handset is lifted or another audio device is in use.
The phone is on-hook when the handset is in its cradle and other audio devices are not in use.
HandsetThe following table describes how to use the handset.
Then...If you want to...
Lift it to go off-hook; replace it to go on-hook.
The ringing line is automatically selected. Contact your systemadministrator about options to always select the primary line.
Use the handset
Press or ( ), then hang up the handset.Switch to the speakerphone or aheadset during a call
Press the Volume button during a call or after invoking a dial tone.
Press Save to preserve the volume level for future calls.
Adjust the volume level for a call
Cisco Unified IP Phone 7941G, 7941G-GE, 7942G, 7961G, 7961G-GE, and 7962G User Guide for Cisco UnifiedCommunications Manager 9.0 (SCCP and SIP)
61

HeadsetYour phone supports four- or six-wire headset jacks for wired headsets. Cisco Unified IP Phones 7962G and7942G also support wireless headsets. For information about purchasing headsets, see Wired and WirelessHeadsets, on page 16.
You can use a headset with all of the controls on your phone, including and .
However, if you use a wireless headset, refer to the wireless headset documentation for instructions.
Then...If you want to...
Press .Toggle headset mode on and off
Lift the handset.Switch to a handset
Press during a call or after invoking a dial tone.
Press Save to preserve the volume level for future calls.
Adjust the volume level for a call
If you use AutoAnswer, see AutoAnswer with Headset or Speakerphone, on page 64.
Your system administrator can set up your phone to record a conversation between you (on your headset), asupervisor (on the phone handset), and your connected party.
Important Headset Safety Information
High Sound Pressure—Avoid listening to high volume levels for long periods to preventpossible hearing damage.
When you plug in your headset, lower the volume of the headset speaker before you put the headset on. Ifyou remember to lower the volume before you take the headset off, the volume will start lower when youplug in your headset again.
Be aware of your surroundings. When you use your headset, it may block out important external sounds,particularly in emergencies or in noisy environments. Don’t use the headset while driving. Don’t leave yourheadset or headset cables in an area where people or pets can trip over them. Always supervise children whoare near your headset or headset cables.
Control Wired Headset Sidetone and Headset Send GainWhen you speak on a telephone using a headset, the sound picked up by the headset microphone can be sentback through the headset speaker. This creates a low-level feedback, known as sidetone. The wired headsetscan result in sidetone and headset send gain. Different wired headsets require different sidetone and send gainsettings. You need to select the best sidetone and send gain level for the wired headset you use.
Cisco Unified IP Phone 7941G, 7941G-GE, 7942G, 7961G, 7961G-GE, and 7962G User Guide for Cisco UnifiedCommunications Manager 9.0 (SCCP and SIP)
62
Handset, Headset, and SpeakerphoneHeadset

Procedure
Step 1 Press .Step 2 Use the Preferences menu and navigate to Headset Sidetone.Step 3 Select Headset Sidetone.Step 4 Select one of the sidetone levels:
• Off
• Lowest
• Default
• Low
• Mid
• Mid-High
• High
• Higher
• Highest
The Off and Lowest levels are applicable only to Cisco Unified IP Phones 7942 and7962.
Note
Step 5 Use the Preferences menu and navigate to Headset Send Gain.Step 6 Select Headset Send Gain.Step 7 Select one of the following levels:
• Lowest
• Lower
• Default
• High
Step 8 Press Save or press Cancel.
Wireless HeadsetCisco Unified IP Phones 7962G and 7942G support wireless headsets. Refer to the wireless headsetdocumentation for information about using the wireless headset’s remote features. Also, check with yoursystem administrator to be sure your phone is enabled to use a wireless headset with the wireless headsetremote hookswitch control feature.
Cisco Unified IP Phone 7941G, 7941G-GE, 7942G, 7961G, 7961G-GE, and 7962G User Guide for Cisco UnifiedCommunications Manager 9.0 (SCCP and SIP)
63
Handset, Headset, and SpeakerphoneWireless Headset
Wideband HeadsetIf you use a headset that supports wideband, you may experience improved audio sensitivity if you enablethe wideband setting on your phone (this setting is disabled by default). To access the setting, choose> User Preferences > Audio Preferences >Wideband Headset.
If the Wideband Headset setting is dimmed, then you cannot control this setting.
Check with your system administrator to be sure your phone system is configured to use wideband. If thesystem is not configured for wideband, you may not detect any additional audio sensitivity even when usinga wideband headset. To learn more about your headset, refer to the headset documentation or contact yoursystem administrator for assistance.
SpeakerphoneIf the handset is in its cradle and is not lit, many of the actions you can take to dial a number or answer acall will trigger speakerphone mode automatically.
Then...If you want to...
Press .Toggle speakerphone mode on or off
Lift the handset.Switch to a handset
Press during a call or after invoking a dial tone.
Press Save to preserve the volume level for future calls.
Adjust the volume level for a call
AutoAnswer with Headset or SpeakerphoneWhen AutoAnswer is enabled, your phone answers incoming calls automatically after a few rings. Yoursystem administrator configures AutoAnswer to use either the speakerphone or a headset. You may useAutoAnswer if you receive a high volume of incoming calls.
When AutoAnswer is enabled, you may hear a short ring. If this is distracting, lower the ringer volume.
Cisco Unified IP Phone 7941G, 7941G-GE, 7942G, 7961G, 7961G-GE, and 7962G User Guide for Cisco UnifiedCommunications Manager 9.0 (SCCP and SIP)
64
Handset, Headset, and SpeakerphoneSpeakerphone
Then...If you...
Keep headset mode active (in other words, keep illuminated), even when you arenot on a call.
To keep headset mode active, perform the following actions:
• Press EndCall to hang up.
• Press New Call or Dial to place new calls.
If your phone is set up to use AutoAnswer in headset mode, calls are automaticallyanswered only if is illuminated.
Otherwise, calls ring normally and you must manually answer them.
Use AutoAnswerwith a headset
Keep the handset in the cradle and headset mode inactive ( unlit).
Otherwise, calls ring normally and you must manually answer them.
Use AutoAnswerwith thespeakerphone
Tip
AutoAnswer is disabled when the Do Not Disturb feature is active.
Cisco Unified IP Phone 7941G, 7941G-GE, 7942G, 7961G, 7961G-GE, and 7962G User Guide for Cisco UnifiedCommunications Manager 9.0 (SCCP and SIP)
65
Handset, Headset, and SpeakerphoneAutoAnswer with Headset or Speakerphone

Cisco Unified IP Phone 7941G, 7941G-GE, 7942G, 7961G, 7961G-GE, and 7962G User Guide for Cisco UnifiedCommunications Manager 9.0 (SCCP and SIP)
66
Handset, Headset, and SpeakerphoneAutoAnswer with Headset or Speakerphone
C H A P T E R 5Phone Customization
• Ring and Message Indicator Customization, page 67
• Phone Screen Customization, page 69
Ring and Message Indicator CustomizationYou can customize how your phone indicates an incoming call and a new voice mail message. You can alsoadjust the ringer volume for your phone.
Tip
You can customize your phone to have up to six distinctive ring tones. In addition, you can have a defaultring tone.
Related Topics
User Options Web Page Actions, on page 85Line Settings on Web, on page 96
Change Ringtone Per Line
Procedure
Step 1 Choose > User Preferences > Rings.Step 2 Choose a phone line or the default ring setting.Step 3 Choose a ringtone to play a sample of it.Step 4 Press Select and Save to set the ringtone, or press Cancel.
Cisco Unified IP Phone 7941G, 7941G-GE, 7942G, 7961G, 7961G-GE, and 7962G User Guide for Cisco UnifiedCommunications Manager 9.0 (SCCP and SIP)
67

Adjust Phone Ringer Volume LevelCheck with your system administrator to see if a minimum ringer volume setting was configured.
Procedure
Press while the handset is in the cradle and the headset and speakerphone buttons are off. The newringer volume is saved automatically.
Change Ring Pattern (Flash-Only, Ring Once, Beep-Only)Before you can access this setting, your system administrator might need to enable it for you.
Procedure
Step 1 Log in to your User Options web pages.Step 2 Access your call ring pattern settings.
Change Audible Voice-Message Indicator
Procedure
Step 1 Log in to your User Options web pages.Step 2 Access your message indicator settings.
Change How Voice Message Light on Handset Works
Procedure
Step 1 Log in to your User Options web pages.Step 2 Choose Change the Message Waiting Lamp policy.Step 3 Access your message indicator settings. Typically, the default system policy is to indicate a new voice message
by displaying a steady light on the handset light strip.
Cisco Unified IP Phone 7941G, 7941G-GE, 7942G, 7961G, 7961G-GE, and 7962G User Guide for Cisco UnifiedCommunications Manager 9.0 (SCCP and SIP)
68
Phone CustomizationAdjust Phone Ringer Volume Level

Phone Screen CustomizationYou can adjust the characteristics of your phone screen.
Related Topics
User Options Web Page Actions, on page 85User Settings on Web, on page 94
Change Phone Screen Contrast
Procedure
Step 1 Choose > User Preferences > Contrast.Step 2 To make adjustments, press Up, Down or .Step 3 Press Save, or press Cancel.
If you accidentally save a very light or very dark contrast and cannot see the phone screen display,see Troubleshooting, on page 105.
Note
Change Background Image
Procedure
Step 1 Choose > User Preferences > Background Images.Step 2 Scroll through available images and press Select to choose an image.
If Background Images and the Select button are grayed out on your phone, this option has beendisabled. For more information, contact your system administrator.
Note
Step 3 Press Preview to see a larger view of the background image.Step 4 Press Exit to return to the selection menu.Step 5 Press Save to accept the image or press Cancel.
Cisco Unified IP Phone 7941G, 7941G-GE, 7942G, 7961G, 7961G-GE, and 7962G User Guide for Cisco UnifiedCommunications Manager 9.0 (SCCP and SIP)
69
Phone CustomizationPhone Screen Customization

Change Phone Screen Language
Procedure
Step 1 Log in to your User Options web pages.Step 2 Access your user settings.Step 3 Select a language.
Change Line Text Label
Procedure
Step 1 Log in to your User Options web pages.Step 2 Access your line text label settings.
Cisco Unified IP Phone 7941G, 7941G-GE, 7942G, 7961G, 7961G-GE, and 7962G User Guide for Cisco UnifiedCommunications Manager 9.0 (SCCP and SIP)
70
Phone CustomizationChange Phone Screen Language

C H A P T E R 6Call Logs and Directories
• Call Logs and Directories Overview, page 71
• Call Logs, page 71
• Directory Features, page 76
Call Logs and Directories OverviewThis section describes how you can use call logs and directories. To access both features, use the Directoriesbutton .
Call LogsYour phone maintains call logs that contain records of your missed, placed, and received calls.
Your system administrator determines if missed calls are logged on your phone in the missed calls directoryfor a given line appearance on your phone.
Tips
• (SCCP and SIP phones) Your phone may be set up for international call logging, which is indicated bya plus (+) symbol on the call logs, redial, or call directory entries. Contact your system administratorfor more information.
• (SCCP phones only) To view the complete call record of a multiparty call (for example, of a call thathas been transferred to you), highlight the call record and press Details. The Details record shows twoentries with the name and number for each missed or received multiparty call:
◦First entry—Last completed multiparty call
◦Second entry—First completed multiparty call
• To see if the line in the call log is busy before placing a call to that line, look for Busy Lamp Fieldindicators.
Cisco Unified IP Phone 7941G, 7941G-GE, 7942G, 7961G, 7961G-GE, and 7962G User Guide for Cisco UnifiedCommunications Manager 9.0 (SCCP and SIP)
71

View Call Logs
Procedure
Step 1 Press .Step 2 Choose one of the following entries:
•Missed Call
• Placed Calls
• Received Calls
Each log stores up to 100 records.
Display Single Call Record Details
Procedure
Step 1 Press .Step 2 Choose one of the following entries:
•Missed Calls
• Placed Calls
• Received Calls
Step 3 Highlight a call record.Step 4 Press Details to display information such as called number, calling number, time of day, and call duration for
placed and received calls only.
Erase All Call Records in All Logs
Procedure
Step 1 Press .Step 2 Press Clear.
Cisco Unified IP Phone 7941G, 7941G-GE, 7942G, 7961G, 7961G-GE, and 7962G User Guide for Cisco UnifiedCommunications Manager 9.0 (SCCP and SIP)
72
Call Logs and DirectoriesView Call Logs

Erase All Call Records in Single Log
Procedure
Step 1 Press .Step 2 Choose one of the following entries:
•Missed Calls
• Placed Calls
• Received Calls
Step 3 Highlight a call record.Step 4 Press Clear. You may need to press themore softkey to display Clear.
Erase Single Call Record
Procedure
Step 1 Press .Step 2 Choose one of the following entries:
•Missed Call
• Placed Calls
• Received Calls
Step 3 Highlight a call record.Step 4 Press Delete.
Cisco Unified IP Phone 7941G, 7941G-GE, 7942G, 7961G, 7961G-GE, and 7962G User Guide for Cisco UnifiedCommunications Manager 9.0 (SCCP and SIP)
73
Call Logs and DirectoriesErase All Call Records in Single Log

Dial from Call Log (While Not on Another Call)
Procedure
Step 1 Press .Step 2 Choose one of the following entries:
•Missed Call
• Placed Calls
• Received Calls
Step 3 Highlight a call record.If the Details softkey appears, the call is the primary entry of a multipartycall.
Note
Step 4 To edit the displayed number, press EditDial followed by << or >>.Step 5 To delete the number, press EditDial followed by Delete. You may need to press themore softkey to display
Delete.Step 6 Go off-hook to place the call.
Dial from Call Log (While Connected to Another Call)
Procedure
Step 1 Press .Step 2 Choose one of the following entries:
•Missed Call
• Placed Calls
• Received Calls
Step 3 Highlight a call record.If the Details softkey appears, the call is the primary entry of a multipartycall.
Note
Step 4 To edit the displayed number, press EditDial followed by << or >>.Step 5 To delete the number, press EditDial followed by Delete. You may need to press themore softkey to display
Delete.Step 6 Press Dial.Step 7 Choose a menu item to handle the original call:
Cisco Unified IP Phone 7941G, 7941G-GE, 7942G, 7961G, 7961G-GE, and 7962G User Guide for Cisco UnifiedCommunications Manager 9.0 (SCCP and SIP)
74
Call Logs and DirectoriesDial from Call Log (While Not on Another Call)
• Hold: Puts the first call on hold and dials the second.
• Transfer: Transfers the first party to the second and drops you from the call. Press Transfer again afterdialing to complete the action.
• Conference: Creates a conference call with all parties, including you. Press Confrn or Conferenceagain after dialing to complete the action.
• EndCall: Disconnects the first call and dials the second call.
Place Call from URL Entry in Call LogSupported only on SIP phones.
Procedure
Step 1 Press .Step 2 Choose one of the following entries:
•Missed Call
• Placed Calls
• Received Calls
Step 3 Highlight the URL entry that you want to dial.Step 4 If you need to edit the entry, press EditDial.
The icon appears to indicate that you can begin editing characters in the URL entry.
Step 5 Press Dial.
Redial International Call from Missed and Received Call Logs
Procedure
Step 1 Press .Step 2 Choose one of the following entries:
•Missed Call
• Received Calls
Cisco Unified IP Phone 7941G, 7941G-GE, 7942G, 7961G, 7961G-GE, and 7962G User Guide for Cisco UnifiedCommunications Manager 9.0 (SCCP and SIP)
75
Call Logs and DirectoriesPlace Call from URL Entry in Call Log

Step 3 Highlight the call record that you want to redial.Step 4 Press EditDial.Step 5 Press and hold the star (*) key for at least 1 second to add a plus (+) sign as the first digit in the phone number.
You can add the + sign only for the first digit of the number.
Step 6 Press Dial.
Directory FeaturesDepending on configuration, your phone can provide corporate and personal directory features:
• Corporate Directory: Corporate contacts that you can access on your phone. Your system administratorsets up and maintains your Corporate Directory.
• Personal Directory: If available, personal contacts and associated speed-dial codes that you can configureand access from your phone and Cisco Unified CommunicationsManager User Options web pages. ThePersonal Directory comprises the Personal Address Book (PAB) and Fast Dials:
◦PAB is a directory of your personal contacts.
◦Fast Dial allows you to assign codes to PAB entries for quick dialing.
Corporate DirectoryYou can use a corporate directory to place calls to coworkers.
Tips
• Use the numbers on your keypad to enter characters on your phone screen. Use the Navigation buttonon your phone to move between input fields.
• To see if the phone line in the directory is busy, look for Busy Lamp Field (BLF) indicators.
Dial from Corporate Directory (While Not on Another Call)
Procedure
Step 1 Choose > Corporate Directory (exact name can vary).Step 2 Use your keypad to enter a full or partial name and press Search.Step 3 To dial, select the listing, or scroll to the listing and lift the handset.
Cisco Unified IP Phone 7941G, 7941G-GE, 7942G, 7961G, 7961G-GE, and 7962G User Guide for Cisco UnifiedCommunications Manager 9.0 (SCCP and SIP)
76
Call Logs and DirectoriesDirectory Features

Dial from Corporate Directory (While on Another Call)
Procedure
Step 1 Choose > Corporate Directory (exact name can vary).Step 2 Use your keypad to enter a full or partial name and press Search.Step 3 Scroll to a listing and press Dial.Step 4 Choose a menu item to handle the original call:
• Hold: Puts the first call on hold and dials the second.
• Transfer: Transfers the first party to the second and drops you from the call. Press Transfer again afterdialing to complete the action.
• Conference: Creates a conference call with all parties, including you. Press Confrn or Conferenceagain after dialing to complete the action.
• EndCall: Disconnects the first call and dials the second.
Personal DirectoryThe Personal Directory feature set contains your Personal Address Book (PAB) and Fast Dials. This sectiondescribes how to set up and use Personal Directory on your phone. Alternately, see Personal Directory onWeb, on page 87.
Tips
• Your system administrator provides you with the user ID and PIN that you need to log in to PersonalDirectory.
• Personal Directory automatically logs you out after a certain amount of time. This time limit can vary.Contact your system administrator for more information.
• Use the numbers on your keypad to enter characters on your phone screen. Use the Navigation buttonon your phone to move between input fields.
• Your phone may be set up for international call logging, which is indicated by a plus (+) symbol on thecall logs, redial, or call directory entries. Contact your system administrator for more information.
Cisco Unified IP Phone 7941G, 7941G-GE, 7942G, 7961G, 7961G-GE, and 7962G User Guide for Cisco UnifiedCommunications Manager 9.0 (SCCP and SIP)
77
Call Logs and DirectoriesPersonal Directory

Access Personal Directory (for PAB and Fast Dial Codes)
Procedure
Step 1 Choose > Personal Directory (exact name can vary).Step 2 Enter your Cisco Unified Communications Manager user ID and PIN, and press Submit.
Search for PAB Entry
Procedure
Step 1 Access Personal Directory.Step 2 choose Personal Address Book.Step 3 Enter search criteria and press Submit.Step 4 Move through the listings using Previous and Next.Step 5 Highlight the PAB listing that you want and press Select.
Dial from PAB Entry
Procedure
Step 1 Search for a listing.Step 2 Highlight the listing and press Select.Step 3 Press Dial. You may need to press themore softkey to see Dial.Step 4 Enter the participant’s phone number.Step 5 Highlight the number that you want to dial and press OK.Step 6 Press OK again to dial the number.
Cisco Unified IP Phone 7941G, 7941G-GE, 7942G, 7961G, 7961G-GE, and 7962G User Guide for Cisco UnifiedCommunications Manager 9.0 (SCCP and SIP)
78
Call Logs and DirectoriesPersonal Directory
Delete PAB Entry
Procedure
Step 1 Search for a listing.Step 2 Highlight the listing and press Select.Step 3 Press Delete.Step 4 Choose OK to confirm the deletion.
Edit PAB Entry
Procedure
Step 1 Search for a listing.Step 2 Highlight the listing and press Edit to modify a name or email address.Step 3 If necessary, choose Phones to modify a phone number.Step 4 Press Update.
Add New PAB Entry
Procedure
Step 1 Access Personal Directory.Step 2 Choose Personal Address Book.Step 3 Press Submit to access the Search page. You do not need to input search information first.Step 4 Press New.Step 5 Use your phone keypad to enter a name and email information.Step 6 Choose Phones and use the keypad to enter phone numbers. Be sure to include any necessary access codes
such as 9 or 1.Step 7 Choose Submit to add the entry to the database.
Cisco Unified IP Phone 7941G, 7941G-GE, 7942G, 7961G, 7961G-GE, and 7962G User Guide for Cisco UnifiedCommunications Manager 9.0 (SCCP and SIP)
79
Call Logs and DirectoriesPersonal Directory

Assign Fast Dial Code to PAB Entry
Procedure
Step 1 Search for a PAB entry.Step 2 Highlight the listing and press Select.Step 3 Press Fast Dial.Step 4 Highlight the number that you want to dial and press Select.Step 5 Highlight an unassigned Fast Dial code that you want to assign to the number and press Select.
Search for Fast Dial Codes
Procedure
Step 1 Choose > Personal Directory > Personal Fast Dials.Step 2 Use Previous or Next to move through listings.Step 3 Highlight the listing that you want and press Select.
Place Call Using Fast Dial Code
Procedure
Step 1 Search for a Fast Dial code.Step 2 Highlight the listing you want and press Select.Step 3 Press Dial.Step 4 Choose OK to complete the action.
Cisco Unified IP Phone 7941G, 7941G-GE, 7942G, 7961G, 7961G-GE, and 7962G User Guide for Cisco UnifiedCommunications Manager 9.0 (SCCP and SIP)
80
Call Logs and DirectoriesPersonal Directory

Delete Fast Dial Code
Procedure
Step 1 Search for a Fast Dial code.Step 2 Highlight the listing you want and press Select.Step 3 Press Remove.
Log Out of Personal Directory
Procedure
Step 1 Choose > Personal Directory (exact name can vary).Step 2 Choose Logout.
Cisco Unified IP Phone 7941G, 7941G-GE, 7942G, 7961G, 7961G-GE, and 7962G User Guide for Cisco UnifiedCommunications Manager 9.0 (SCCP and SIP)
81
Call Logs and DirectoriesPersonal Directory

Cisco Unified IP Phone 7941G, 7941G-GE, 7942G, 7961G, 7961G-GE, and 7962G User Guide for Cisco UnifiedCommunications Manager 9.0 (SCCP and SIP)
82
Call Logs and DirectoriesPersonal Directory
C H A P T E R 7Voice Messages
• Voice Messages Overview, page 83
• Voice Message Identification, page 83
• Set Up and Personalize Voice-Message Service, page 84
• Listen to Voice Messages or Access Voice Messages Menu, page 84
Voice Messages OverviewTo access voice messages, press the Messages button.
Your company determines the voicemail service that your phone uses. For the most accurate and detailedinformation about your service, contact your system administrator.
For information about the commands that your voicemail service supports, see the voicemail service userdocumentation.
Voice Message IdentificationWhen you have a voice message, look for:
• A steady red light on your handset. (This indicator can vary. See Ring and Message IndicatorCustomization, on page 67.)
• A flashing message-waiting icon and text message on your phone screen.
The red light and message-waiting icon display only when you have a message on your primary line,even if you receive voice messages on other lines.
When you have a voice message, listen for:
• A stutter tone from your handset, headset, or speakerphone when you place a call.
The stutter tone is line-specific. You hear it only when using the line with the waiting message.
To send a call to a voice message system, press iDivert. For more information, see Call Transfer To VoiceMessage System, on page 33.
Cisco Unified IP Phone 7941G, 7941G-GE, 7942G, 7961G, 7961G-GE, and 7962G User Guide for Cisco UnifiedCommunications Manager 9.0 (SCCP and SIP)
83

Set Up and Personalize Voice-Message ServiceProcedure
Step 1 Press and follow the voice instructions.Step 2 If a menu appears on your screen, choose an appropriate menu item.
Listen to Voice Messages or Access Voice Messages MenuProcedure
Step 1 Press and follow the voice instructions.Step 2 If a menu appears on your screen, choose an appropriate menu item.
If you are connecting to a voice message service, the line that has a voice message is selected by default. Ifmore than one line has a voice message, the first available line is selected.
To connect each time to the voice message service on the primary line, contact your system administrator forthe options.
Cisco Unified IP Phone 7941G, 7941G-GE, 7942G, 7961G, 7961G-GE, and 7962G User Guide for Cisco UnifiedCommunications Manager 9.0 (SCCP and SIP)
84
Voice MessagesSet Up and Personalize Voice-Message Service

C H A P T E R 8User Options Web Pages
• User Options Web Pages Overview, page 85
• User Options Web Page Actions, page 85
• Feature and Service Setup on Web, page 86
User Options Web Pages OverviewYour Cisco Unified IP Phone is a network device that can share information with other network devices inyour company, including your personal computer. You can use your computer to log in to your Cisco UnifiedCommunications Manager User Options web pages, where you can control features, settings, and servicesfor your Cisco Unified IP Phone. For example, you can set up speed-dial buttons from your User Options webpages.
User Options Web Page ActionsThis section describes how to log in and select a phone device.
Sign In and Out of User Options Web PagesBefore you can access any of your user options, such as Speed Dial or Personal Address Book, you must signin. When you are finished using the User Options web pages, you must sign out.
In some cases, you can access your User Option web pages without having to sign in. For more information,contact your system administrator.
Cisco Unified IP Phone 7941G, 7941G-GE, 7942G, 7961G, 7961G-GE, and 7962G User Guide for Cisco UnifiedCommunications Manager 9.0 (SCCP and SIP)
85

Procedure
Step 1 Obtain the User Options URL, user ID, and default password from your system administrator.Step 2 Open a web browser on your computer and enter the URL.Step 3 If prompted to accept security settings, select Yes or Install Certificate.Step 4 Enter your user ID in the Username field.Step 5 Enter your password in the Password field.Step 6 Select Login.
The Cisco Unified CM User Options home page displays. From this page you can select User Options toselect a device, access User Settings, Directory features, your Personal Address Book, and Fast Dials.
Step 7 To sign out of your User Options web pages, select Logout.
Select Device from User Options Web Page
Procedure
Step 1 On your User Options web page, select User Options > Device.The Device Configuration window displays. Toolbar buttons located at the top of the Device Configurationwindow are specific to the selected device type.
Step 2 (Optional) If you have multiple devices assigned to you, select the appropriate device (phone model, ExtensionMobility profile, or Remote Destination profile) from the Name drop-down menu.
Select Configuration Option after Logging In
Procedure
Step 1 After you have logged in to your User Options web pages, choose User Options to access User Settings,Directory, Personal Address Book, Fast Dials, and Mobility Settings.
Step 2 To return to the Device Configuration page from another page, choose User Options > Device.
Feature and Service Setup on WebThe topics in this section describe how to configure features and services from your User Options web pagesafter logging in. See User Options Web Page Actions, on page 85.
Cisco Unified IP Phone 7941G, 7941G-GE, 7942G, 7961G, 7961G-GE, and 7962G User Guide for Cisco UnifiedCommunications Manager 9.0 (SCCP and SIP)
86
User Options Web PagesSelect Device from User Options Web Page
Personal Directory on WebThe Personal Directory feature set that you can access on your computer consists of:
• Personal Address Book (PAB)
• Fast Dial
• Cisco Unified Communications Manager Address Book Synchronizer
You can also access PAB and Fast Dials from your phone. See Personal Directory, on page 77.
This section describes how to use your PAB from your User Options web pages.
Add New Personal Address Book Entry
Procedure
Step 1 Sign in to your User Options web page.Step 2 Select User Options > Personal Address Book.Step 3 Select Add New.Step 4 Enter information for the entry.Step 5 Select Save.
Assign Button for Personal Address Book
Procedure
Step 1 Sign in to your User Options web page.Step 2 Select User Options > Device.Step 3 Select a phone from the Name drop-down menu.Step 4 Select Service URL.
Your system administrator sets up your phone to display services. For more information, contact your systemadministrator.
Step 5 Select the Personal Address Book service from the Button drop-down list box.Step 6 Enter a phone label for the button.Step 7 Select Save.Step 8 Select Reset and then select Restart to refresh the phone configuration.
You can now press the button to access PAB codes.
Cisco Unified IP Phone 7941G, 7941G-GE, 7942G, 7961G, 7961G-GE, and 7962G User Guide for Cisco UnifiedCommunications Manager 9.0 (SCCP and SIP)
87
User Options Web PagesPersonal Directory on Web

Edit Personal Address Book Entry
Procedure
Step 1 Sign in to your User Options web page.Step 2 Search for a PAB entry.Step 3 Select a nickname.Step 4 Edit the entry as needed and select Save.
Delete Personal Address Book Entry
Procedure
Step 1 Sign in to your User Options web page.Step 2 Search for a PAB entry.Step 3 Select one or more entries.Step 4 Select Delete Selected.
Fast Dials on WebThis section describes how to assign Fast Dials from your User Options web pages.
Tips
• You can create up to 500 Fast Dial and PAB entries.
• You can create a new Fast Dial entry without using a PAB entry. These Fast Dial entries are labeled“raw” in the User Options web pages and do not display a configurable text label.
Related Topics
Personal Directory on Web, on page 87
Cisco Unified IP Phone 7941G, 7941G-GE, 7942G, 7961G, 7961G-GE, and 7962G User Guide for Cisco UnifiedCommunications Manager 9.0 (SCCP and SIP)
88
User Options Web PagesFast Dials on Web

Assign Fast-Dial Code to Personal Directory Entry
Procedure
Step 1 Sign in to Personal Directory. (Use the navigation bar and button to scroll and select.)Step 2 Enter the name information and press the Submit softkey.Step 3 Select the name, then press the FastDial softkey.Step 4 Select a number and press the Select softkey.Step 5 Press the Next softkey.Step 6 Press the Assign softkey for a new fast-dial code that you want to assign to the number.
Assign Fast Dial Code to Phone Number
Procedure
Step 1 Sign in to your User Options web page.Step 2 Select User Options > Fast Dials.Step 3 Select Add New.Step 4 Change the Fast Dial code, if desired.Step 5 Enter a phone number.Step 6 Select Save.
Assign Line Button for Fast Dial
Before you can assign a line button for Fast Dial, your system administrator must configure the phone todisplay services. Contact your system administrator for more information.
Note
Procedure
Step 1 Choose User Options > Device.Step 2 Click Service URL.Step 3 Choose the Fast Dial service from the Button drop-down list box.Step 4 Enter a phone label for the button.Step 5 Click Save.Step 6 Click Reset and then click Restart to refresh the phone configuration.
Cisco Unified IP Phone 7941G, 7941G-GE, 7942G, 7961G, 7961G-GE, and 7962G User Guide for Cisco UnifiedCommunications Manager 9.0 (SCCP and SIP)
89
User Options Web PagesFast Dials on Web

You can now press the line button to access Fast Dial codes.
Search for Fast Dial Entry
Procedure
Step 1 Sign in to your User Options web page.Step 2 Select User Options > Fast Dials.Step 3 Specify search information and select Find.
Edit Fast-Dial Phone Number
Procedure
Step 1 Sign in to your User Options web page.Step 2 Select User Options > Fast Dials.Step 3 Search for the Fast Dial entry that you want to edit.Step 4 Select a component of the entry.Step 5 Change the phone number.Step 6 Select Save.
Delete Fast Dial Personal Address Book Entry
Procedure
Step 1 Sign in to your User Options web page.Step 2 Search for a Fast dial entry.Step 3 Select one or more entries.Step 4 Select Delete Selected.
Cisco Unified IP Phone 7941G, 7941G-GE, 7942G, 7961G, 7961G-GE, and 7962G User Guide for Cisco UnifiedCommunications Manager 9.0 (SCCP and SIP)
90
User Options Web PagesFast Dials on Web

Address Book Synchronization ToolYou can use the Address Book Synchronization Tool (TABSynch) to synchronize your existing MicrosoftWindows Address Book (if applicable) with your PAB. After synchronization, entries from your MicrosoftWindows Address Book are accessible on your Cisco Unified IP Phone and User Options web pages. Yoursystem administrator gives you access to TABSynch and provide detailed instructions.
Speed Dial Setup on WebDepending on configuration, your phone can support several speed-dial features:
• Speed-dial buttons
• Abbreviated Dialing
• Fast Dials
Related Topics
Fast Dials on Web, on page 88Speed Dial, on page 42Personal Directory, on page 77
Set Up Speed-Dial Codes
Procedure
Step 1 On your User Options web page, select User Options > Device.Step 2 Select a phone from the Name drop-down menu.Step 3 Select Speed Dials.Step 4 In the Abbreviated Dial Settings area, enter a number and label for a speed-dial code.Step 5 Select Save.
Cisco Unified IP Phone 7941G, 7941G-GE, 7942G, 7961G, 7961G-GE, and 7962G User Guide for Cisco UnifiedCommunications Manager 9.0 (SCCP and SIP)
91
User Options Web PagesAddress Book Synchronization Tool
Set Up Abbreviated Dialing Codes
Procedure
Step 1 Choose User Options > Device.Step 2 Choose a phone from the Name drop-down menu.Step 3 Click Speed Dials.Step 4 Enter a number and label for an Abbreviated Dialing code.Step 5 Click Save.
Phone Service Setup on WebPhone services can include special phone features, network data, and web-based information (such as stockquotes and movie listings). You must first subscribe to a phone service before accessing it on your phones.
After you log in, you access services on your phone by using one of these buttons:
• Programmable phone button:
◦ ( ) > Services
◦Feature buttons:
◦ Messages
◦ Services
◦ Directories
The services available for your phone depend on the phone system configuration and the services you subscribedto. See your phone system administrator for more information.
If only one service is configured, the service opens by default.
If more than one service is configured, select an option from the menu on the screen.
Cisco Unified IP Phone 7941G, 7941G-GE, 7942G, 7961G, 7961G-GE, and 7962G User Guide for Cisco UnifiedCommunications Manager 9.0 (SCCP and SIP)
92
User Options Web PagesPhone Service Setup on Web

Subscribe to Service
Procedure
Step 1 On your User Options web page, select User Options > Device.Step 2 Select a phone from the Name drop-down menu.Step 3 Select Phone Services.Step 4 Select Add New.Step 5 Select a service from the drop-down list and select Next.Step 6 (Optional) Change the service label or enter additional service information, if available.Step 7 Select Save.
Search for Services
Procedure
Step 1 On your User Options web page, select a device.Step 2 Select Phone Services.Step 3 Select Find.
Change or End Services
Procedure
Step 1 On your User Options web page, search for services.Step 2 Select one or more entries.Step 3 Select Delete Selected.
Cisco Unified IP Phone 7941G, 7941G-GE, 7942G, 7961G, 7961G-GE, and 7962G User Guide for Cisco UnifiedCommunications Manager 9.0 (SCCP and SIP)
93
User Options Web PagesPhone Service Setup on Web

Change Service Name
Procedure
Step 1 On your User Options web page, search for services.Step 2 Select a service name.Step 3 Change the information and select Save.
Add Service to Programmable Feature Button
Procedure
Step 1 On your User Options web page, select User Options > Device.Step 2 Select a phone from the Name drop-down menu.Step 3 Select Service URL.
Your system administrator sets up a service URL button for your phone.Step 4 Select a service from the Button Service drop-down list .Step 5 (Optional) If you want to rename the service, edit the label fields.
If your phone does not support double-byte character sets, it uses ASCII Label fields.
Step 6 Select Save.Step 7 Select Reset to reset your phone to see the new button label on your phone.
User Settings on WebUser settings include your password, PIN, and language (locale) settings.
Your PIN and password allow you to access different features and services. For example, use your PIN to login to Cisco Extension Mobility or Personal Directory on your phone. Use your password to log in to yourUser Options web pages and Cisco WebDialer on your personal computer. For more information, see yoursystem administrator.
Cisco Unified IP Phone 7941G, 7941G-GE, 7942G, 7961G, 7961G-GE, and 7962G User Guide for Cisco UnifiedCommunications Manager 9.0 (SCCP and SIP)
94
User Options Web PagesUser Settings on Web

Change Browser Password
Procedure
Step 1 Sign in to your User Options web pages.Step 2 Select User Options > User Settings.Step 3 Enter your Current Password.Step 4 Enter your New Password.Step 5 Reenter your new password in the Confirm Password field.Step 6 Select Save.
Change PIN
Procedure
Step 1 Sign in to your User Options web pages.Step 2 Select User Options > User Settings.Step 3 Enter your Current PIN.Step 4 Enter your New PIN.Step 5 Reenter your new PIN in the Confirm PIN field.Step 6 Select Save.
Change User Options Web Page Language Setting
You must configure your browser’s Language preference to your preferred language before the UserOptions web page displays properly. For more information, see CallManager 5.x/6.x/7.x: Roles andPermissions on Cisco.com
Note
Procedure
Step 1 Sign in to your User Options web page.Step 2 Select User Options > User Settings.Step 3 In the User Locale area, select an item from the Locale drop-down list.Step 4 Select Save.
Cisco Unified IP Phone 7941G, 7941G-GE, 7942G, 7961G, 7961G-GE, and 7962G User Guide for Cisco UnifiedCommunications Manager 9.0 (SCCP and SIP)
95
User Options Web PagesUser Settings on Web
Change Phone Display Language
Procedure
Step 1 Sign in to your User Options web page.Step 2 Select User Options > Device.Step 3 Select an item from the User Locale drop-down list.Step 4 Select Save.
Line Settings on WebLine settings affect a specific phone line (directory number) on your phone. Line settings can includecall-forwarding, voice message indicators, ring patterns, and line labels.
You can set up other line settings directly on your phone:
• Set up call forwarding for your primary phone line—see Call Forward, on page 34.
• Change rings, display, and other phone-model specific settings—see Phone Customization, on page67.
Set Up Call Forward Per Line
Procedure
Step 1 On your User Options web page, select User Options > Device.Step 2 Select a phone from the Name drop-down menu.Step 3 Select Line Settings.Step 4 If you havemore than one directory number (line) assigned to your phone, select a line from the Line drop-down
menu.Step 5 In the Incoming Call Forwarding area, select call forwarding settings for various conditions.Step 6 Select Save.
Cisco Unified IP Phone 7941G, 7941G-GE, 7942G, 7961G, 7961G-GE, and 7962G User Guide for Cisco UnifiedCommunications Manager 9.0 (SCCP and SIP)
96
User Options Web PagesLine Settings on Web

Change Voice Message Indicator Setting Per Line
Procedure
Step 1 On your User Options web page, select User Options > Device.Step 2 Select a phone from the Name drop-down menu.Step 3 Select Line Settings.Step 4 (Optional) If you have more than one directory number (line) assigned to your phone, select a line from the
Line drop-down menu.Step 5 In the Message Waiting Lamp area, choose from various settings.
Typically, the default message waiting setting prompts your phone to display a steady red light from thehandset light strip to indicate a new voice message.
Step 6 Select Save.
Change Audible Voice Message Indicator Setting Per Line
Procedure
Step 1 On your User Options web page, select User Options > Device.Step 2 Select a phone from the Name drop-down menu.Step 3 Select Line Settings.Step 4 If you havemore than one directory number (line) assigned to your phone, select a line from the Line drop-down
menu.Step 5 In the Audible Message Waiting Lamp area, choose the desired setting.Step 6 Select Save.
Cisco Unified IP Phone 7941G, 7941G-GE, 7942G, 7961G, 7961G-GE, and 7962G User Guide for Cisco UnifiedCommunications Manager 9.0 (SCCP and SIP)
97
User Options Web PagesLine Settings on Web
Edit Line Text Label for Phone Display
Procedure
Step 1 On your User Options web page, select User Options > Device.Step 2 Select a phone from the Name drop-down menu.Step 3 Select Line Settings.Step 4 If you havemore than one directory number (line) assigned to your phone, select a line from the Line drop-down
menu.Step 5 In the Line Text Label area, enter a text label.Step 6 Select Save.
Phone and Access List setup for Mobile ConnectWhen using Cisco Mobile Connect, you must add your mobile and other phones that you want to use to placeand receive calls using the same directory numbers as your desk phone. These phones are called remotedestinations. You can also define access lists to restrict or allow calls from certain numbers to be sent to yourmobile phone.
Create Access List
Procedure
Step 1 Sign in to your User Options web page.Step 2 Select User Options >Mobility Settings > Access Lists.Step 3 Select Add New.Step 4 Enter a name to identify the access list and a description (optional).Step 5 Select whether the access list will allow or block specified calls.Step 6 Select Save.Step 7 Select Add Member to add phone numbers or filters to the list.Step 8 Select an option from the Filter Mask drop-down list box. You can filter a directory number, calls with
restricted caller ID (Not Available), or calls with anonymous caller ID (Private).Step 9 If you select a directory number from the Filter Mask drop-down list box, enter a phone number or filter in
the DN Mask field.You can use the following wild cards to define a filter:
• X (upper or lower case): Matches a single digit. For example, 408555123Xmatches any number between4085551230 and 4085551239.
• !: Matches any number of digits. For example, 408! matches any number starts with 408.
• #: Used as a single digit for exact match.
Cisco Unified IP Phone 7941G, 7941G-GE, 7942G, 7961G, 7961G-GE, and 7962G User Guide for Cisco UnifiedCommunications Manager 9.0 (SCCP and SIP)
98
User Options Web PagesPhone and Access List setup for Mobile Connect

Step 10 To add this member to the access list, select Save.Step 11 To save the access list, select Save.
Set Up, View, or Change WebDialer Preferences
Procedure
Step 1 Access the Make Call page.The Make Call page appears the first time that you use WebDialer (after you click the number that you wantto dial).
Step 2 (Optional) Make changes to your settings.The Make Call page contains the following options:
a) Preferred language—Determines the language used for WebDialer settings and prompts.b) Use preferred device—Identifies the Cisco Unified IP Phone (calling device) and directory number (calling
line) that you will use to place WebDialer calls:
• If you have one phone with a single line, the appropriate phone and line are selected automatically,or you can choose a phone and/or line
• If you have more than one phone, it will be specified by device type and MAC address
To display the host name on the phone, choose >NetworkConfiguration >Host Name.Note
If you have an Extension Mobility profile, you can select your Extension Mobility logged-indevice from the calling device menu.
Note
c) Do not display call confirmation—If selected, prompts WebDialer to suppress the Make Call page. Thispage appears by default after you click a phone number in a WebDialer-enabled online directory.
Add New Remote Destination
Procedure
Step 1 Sign in to your User Options web page.Step 2 Select User Options >Mobility Settings > Remote Destinations.Step 3 Select Add New.Step 4 Enter the following information:
• Name: Enter a name for the mobile (or other) phone.
• Destination Number: Enter your mobile phone number.
Cisco Unified IP Phone 7941G, 7941G-GE, 7942G, 7961G, 7961G-GE, and 7962G User Guide for Cisco UnifiedCommunications Manager 9.0 (SCCP and SIP)
99
User Options Web PagesPhone and Access List setup for Mobile Connect

Step 5 Select your remote destination profile from the drop-down list box. Your remote destination profile containsthe settings that apply to remote destinations that you create.
Step 6 Select theMobile Phone check box to allow your remote destination to accept a call sent from your deskphone.
Step 7 Select the Enable Mobile Connect check box to allow your remote destination to ring simultaneously withyour desk phone.
Step 8 Select one of the following options in the Ring Schedule area (the ring schedule drop-down list boxes includeonly the access lists that you have created):
• All the tim: Select this option if you do not want to impose day and time restrictions on ringing theremote destination.
• As specified below: Select this option and select from the following items to set up a ring schedule basedon day and time:
1 Select a check box for each day of the week you want to allow calls to ring the remote destination.2 For each day, select All Day or select the beginning and ending times from the drop-down lists.3 Select the time zone from the drop-down list box.
Step 9 Select one of these ringing options:
• Always ring this destination.
• Ring this destination only if the caller is in the allowed access list that you select.
• Do not ring this destination if the caller is in the blocked access list that you select.
Step 10 Select Save.
Cisco WebDialerCisco WebDialer allows you to place calls on your Cisco Unified IP Phone to directory contacts by clickingon items in a web browser. Your system administrator configures this feature for you.
Use WebDialer with User Options Directory
Procedure
Step 1 Log in to your User Options web pages.Step 2 Choose User Options > Directory and search for a coworker.Step 3 Click the number that you want to dial.Step 4 If this is your first time using WebDialer, set up preferences on the Make Call page.Step 5 Click Dial.
The call is now placed on your phone.
Cisco Unified IP Phone 7941G, 7941G-GE, 7942G, 7961G, 7961G-GE, and 7962G User Guide for Cisco UnifiedCommunications Manager 9.0 (SCCP and SIP)
100
User Options Web PagesCisco WebDialer

Step 6 To end a call, click Hangup or hang up from your phone.
Use WebDialer with Another Online Corporate Directory (Not User Options Directory)
Procedure
Step 1 Log in to a WebDialer-enabled corporate directory and search for coworkers.Step 2 Click the number that you want to dial.Step 3 When prompted, enter your user ID and password.Step 4 If this is your first time using WebDialer, set up preferences on the Make Call page.Step 5 Click Dial.
The call is now placed on your phone.
Step 6 To end a call, click Hangup or hang up from your phone.
Log Out of WebDialer
Procedure
Click the Logout icon in the Make Call or Hang Up page.
Set Up, View, or Change WebDialer Preferences
Procedure
Step 1 Access the Make Call page.The Make Call page appears the first time that you use WebDialer (after you click the number that you wantto dial).
Step 2 (Optional) Make changes to your settings.The Make Call page contains the following options:
• Preferred language: Determines the language used for WebDialer settings and prompts.
• Use preferred device: Identifies the Cisco Unified IP Phone (Calling device) and directory number(Calling device or line) that you use to place WebDialer calls. If you have one phone with a single line,the appropriate phone and line are automatically selected. Otherwise, choose a phone or line. If you havemore than one phone, it will be specified by device type andMAC address. To display the MAC addresson your phone, choose > Settings > Network Configuration >MAC address.
If you have an Extension Mobility profile, you can select your Extension Mobility logged-indevice from the Calling device menu.
Note
Cisco Unified IP Phone 7941G, 7941G-GE, 7942G, 7961G, 7961G-GE, and 7962G User Guide for Cisco UnifiedCommunications Manager 9.0 (SCCP and SIP)
101
User Options Web PagesCisco WebDialer

• Do not display call confirmation: If selected, prompts WebDialer to suppress the Make Call page. Thispage appears by default after you click a phone number in a WebDialer-enabled online directory.
• Disable Auto Close: If selected, the call window does not close automatically after 15 seconds.
Cisco Unified IP Phone 7941G, 7941G-GE, 7942G, 7961G, 7961G-GE, and 7962G User Guide for Cisco UnifiedCommunications Manager 9.0 (SCCP and SIP)
102
User Options Web PagesCisco WebDialer
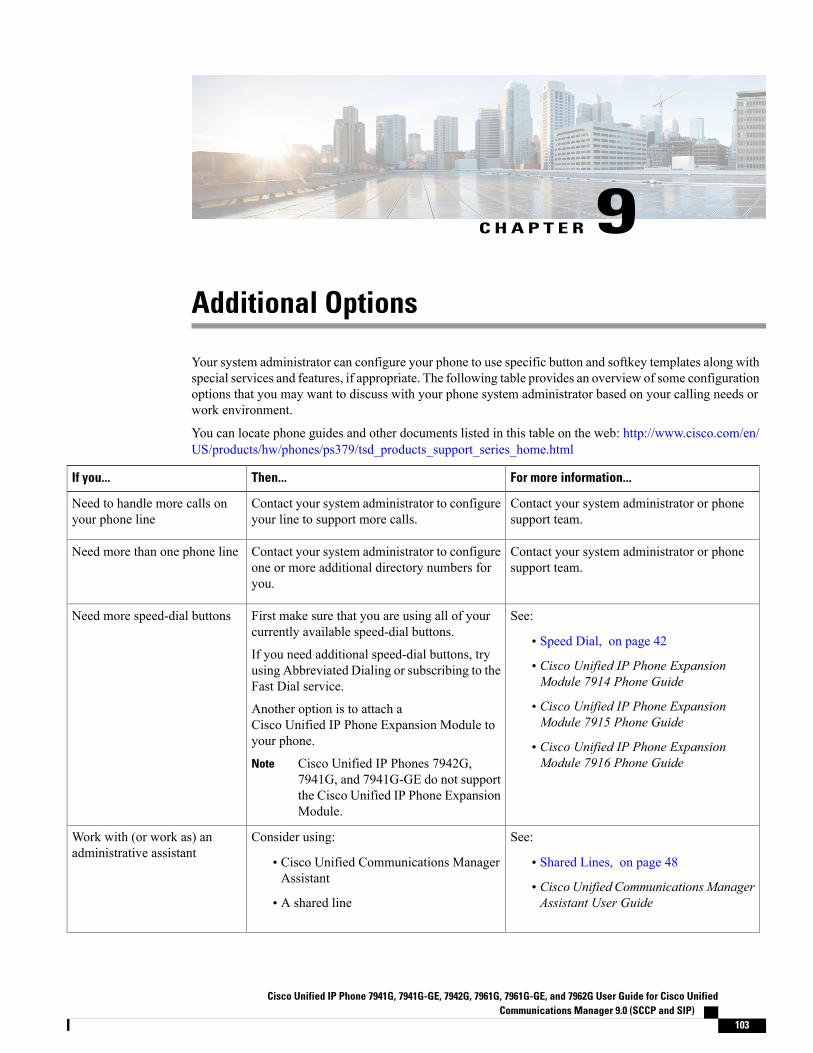
C H A P T E R 9Additional Options
Your system administrator can configure your phone to use specific button and softkey templates along withspecial services and features, if appropriate. The following table provides an overview of some configurationoptions that you may want to discuss with your phone system administrator based on your calling needs orwork environment.
You can locate phone guides and other documents listed in this table on the web: http://www.cisco.com/en/US/products/hw/phones/ps379/tsd_products_support_series_home.html
For more information...Then...If you...
Contact your system administrator or phonesupport team.
Contact your system administrator to configureyour line to support more calls.
Need to handle more calls onyour phone line
Contact your system administrator or phonesupport team.
Contact your system administrator to configureone or more additional directory numbers foryou.
Need more than one phone line
See:
• Speed Dial, on page 42
• Cisco Unified IP Phone ExpansionModule 7914 Phone Guide
• Cisco Unified IP Phone ExpansionModule 7915 Phone Guide
• Cisco Unified IP Phone ExpansionModule 7916 Phone Guide
First make sure that you are using all of yourcurrently available speed-dial buttons.
If you need additional speed-dial buttons, tryusing Abbreviated Dialing or subscribing to theFast Dial service.
Another option is to attach aCisco Unified IP Phone Expansion Module toyour phone.
Cisco Unified IP Phones 7942G,7941G, and 7941G-GE do not supportthe Cisco Unified IP Phone ExpansionModule.
Note
Need more speed-dial buttons
See:
• Shared Lines, on page 48
• Cisco Unified CommunicationsManagerAssistant User Guide
Consider using:
• Cisco Unified Communications ManagerAssistant
• A shared line
Work with (or work as) anadministrative assistant
Cisco Unified IP Phone 7941G, 7941G-GE, 7942G, 7961G, 7961G-GE, and 7962G User Guide for Cisco UnifiedCommunications Manager 9.0 (SCCP and SIP)
103

For more information...Then...If you...
See Shared Lines, on page 48.Request a shared line. This allows you to useone extension for your desk phone and labphone, for example.
Want to use one extension forseveral phones
Contact your system administrator about thesefeatures and see:
• Advanced Call Handling, on page 42
• Shared Lines, on page 48
• Cisco Extension Mobility, on page 55
Consider using:
• Call Park to store and retrieve calls withoutusing the transfer feature.
• Call Pickup to answer calls ringing onanother phone.
• A shared line to view or join coworkers’calls.
• Cisco Extension Mobility to apply yourphone number and user profile to a sharedCisco Unified IP Phone.
Share phones or office spacewith coworkers
See AutoAnswer with Headset orSpeakerphone, on page 64.
Contact your system administrator to set up theAuto Answer feature for your phone.
Answer calls frequently orhandle calls on someone’s behalf
Contact your system administrator foradditional assistance and see theCisco UnifiedVideo Advantage Quick Start Guide and UserGuide.
Consider using Cisco Unified Video Advantage,which enables you to make video calls usingyour Cisco Unified IP Phone, your personalcomputer, and an external video camera.
Need tomake video calls (SCCPphones only)
See Busy Lamp Field Features, on page 50.Contact your system administrator to set up theBusy Lamp Field (BLF) feature for your phone.
Determine the state of a phoneline associated with a speed-dialbutton, call log, or directorylisting on your phone
See Cisco Extension Mobility, on page 55.Contact your system administrator about theCisco Extension Mobility Service.
Want to temporarily apply yourphone number and settings to ashared Cisco Unified IP Phone
Cisco Unified IP Phone 7941G, 7941G-GE, 7942G, 7961G, 7961G-GE, and 7962G User Guide for Cisco UnifiedCommunications Manager 9.0 (SCCP and SIP)
104
Additional Options
C H A P T E R 10Troubleshooting
• Problems, page 105
• Phone Troubleshooting Data, page 109
• Quality Reporting Tool, page 110
ProblemsThis section provides information to help you troubleshoot general problems with your phone. For moreinformation, see your system administrator.
No Dial Tone or Cannot Complete Call
Problem
You cannot hear a dial tone or complete a call.
Cause
One or more of the following factors might apply:
• You are not connected to Extension Mobility service.
• The system requires a Client Matter Code (CMC) or Forced Authorization Code (FAC) after dialing anumber. (SCCP phones only.)
• Your phone has time-of-day restrictions that prevent you from using some features during certain hoursof the day.
Solution
Try the following:
• Log into the Extension Mobility service.
• Enter a CMC or FAC after dialing a number. (SCCP phones only.)
Cisco Unified IP Phone 7941G, 7941G-GE, 7942G, 7961G, 7961G-GE, and 7962G User Guide for Cisco UnifiedCommunications Manager 9.0 (SCCP and SIP)
105

• Change the time-of-day restrictions that prevent you from using some features during certain hours ofthe day. For more information, contact your system administrator.
Missing Softkey
Problem
The softkey that you want to use does not appear.
Cause
One or more of the following factors might apply:
• There are additional softkeys to display.
• The state of the line determines the phone softkeys.
• Your phone is not configured to support the feature associated with that softkey.
Solution
Use one of these options:
• PressMore to reveal additional softkeys.
• Change the line state (for example, go off-hook or have a connected call).
• Contact your system administrator to request access to the feature.
Cannot Barge Call and Hear Fast Busy
Problem
Barge fails and results in a fast busy tone.
Cause
You cannot barge an encrypted call if the phone you are using is not configured for encryption. When yourbarge attempt fails for this reason, your phone plays a fast busy tone.
Call Disconnects After Barge
Problem
You are disconnected from a call that you joined using Barge.
Cause
You are disconnected from a call that you joined using Barge if the call is put on hold, transferred, or turnedinto a conference call.
Cisco Unified IP Phone 7941G, 7941G-GE, 7942G, 7961G, 7961G-GE, and 7962G User Guide for Cisco UnifiedCommunications Manager 9.0 (SCCP and SIP)
106
TroubleshootingMissing Softkey

Solution
Barge into the call again.
Cannot Access Settings Menu
Problem
The Settings button is unresponsive.
Cause
Your system administrator may have disabled on your phone.
Solution
Contact your system administrator.
Cannot Use CallBack
Problem
CallBack fails.
Cause
The other party might have Call Forward enabled.
Call Forward All Error Message
Problem
The phone shows an error message when you attempt to set up Call Forward All.
Cause
Your phone may reject your attempt to set up Call Forward All directly on the phone if the target number thatyou enter would create a Call Forward All loop or would exceed the maximum number of links permitted ina Call Forward All chain (also known as a maximum hop count).
Solution
Contact your system administrator for details.
Cisco Unified IP Phone 7941G, 7941G-GE, 7942G, 7961G, 7961G-GE, and 7962G User Guide for Cisco UnifiedCommunications Manager 9.0 (SCCP and SIP)
107
TroubleshootingCannot Access Settings Menu

Security Error Message
Problem
Your phone displays Security Error.
Cause
Your phone firmware has identified an internal error.
Solution
If the message persists, contact your system administrator.
Unresponsive Phone
Problem
The phone screen appears blank and the Display button is not lit.
Cause
The phone is powered down (sleeping) to save energy.
Solution
The phone will power up (wake) when the system sends the wake up message. You cannot wake the phonebefore its scheduled power up time.
Phone Screen Is Too Light or Too Dark (Cisco Unified IP Phones 7961G,7961G-GE, 7941G, and 7941G-GE)
Problem
The phone screen display appears too light or too dark to read
Cause
You changed the display settings and made the screen display too light or too dark.
Solution
1 Choose .
2 Press 1, 3 on the keypad.
3 Press until you can see the phone screen display.
4 Press Save.
Cisco Unified IP Phone 7941G, 7941G-GE, 7942G, 7961G, 7961G-GE, and 7962G User Guide for Cisco UnifiedCommunications Manager 9.0 (SCCP and SIP)
108
TroubleshootingSecurity Error Message
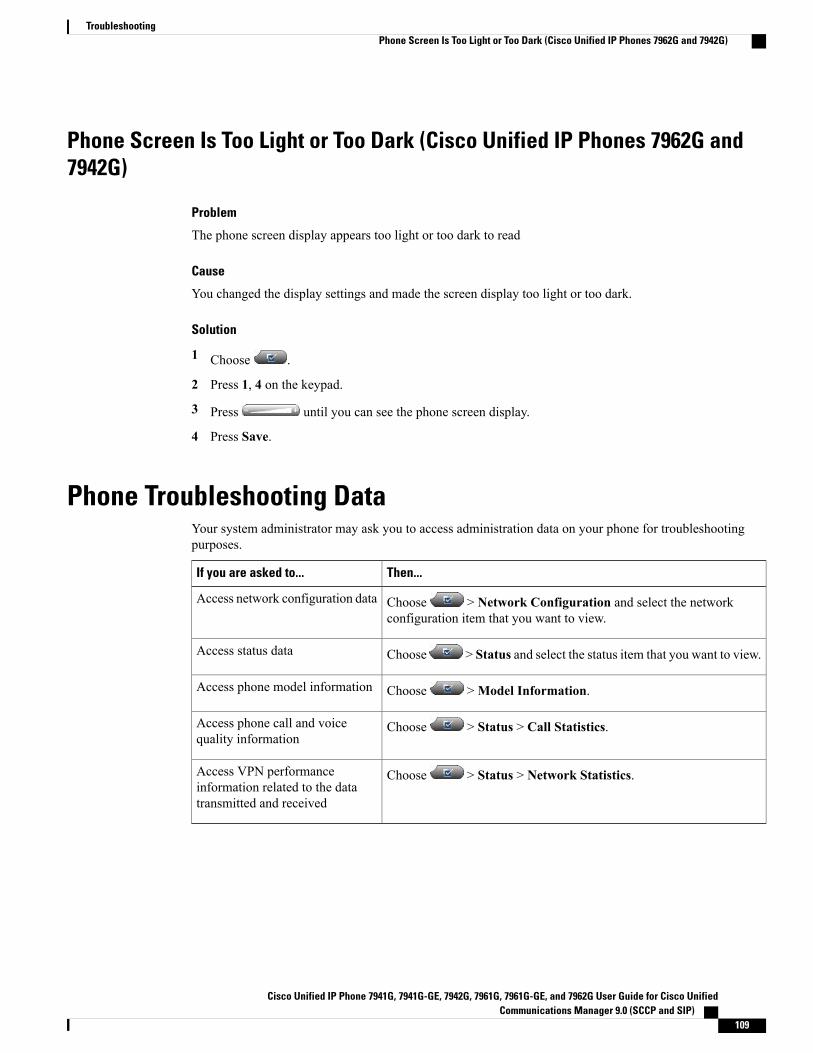
Phone Screen Is Too Light or Too Dark (Cisco Unified IP Phones 7962G and7942G)
Problem
The phone screen display appears too light or too dark to read
Cause
You changed the display settings and made the screen display too light or too dark.
Solution
1 Choose .
2 Press 1, 4 on the keypad.
3 Press until you can see the phone screen display.
4 Press Save.
Phone Troubleshooting DataYour system administrator may ask you to access administration data on your phone for troubleshootingpurposes.
Then...If you are asked to...
Choose > Network Configuration and select the networkconfiguration item that you want to view.
Access network configuration data
Choose > Status and select the status item that you want to view.Access status data
Choose >Model Information.Access phone model information
Choose > Status > Call Statistics.Access phone call and voicequality information
Choose > Status > Network Statistics.Access VPN performanceinformation related to the datatransmitted and received
Cisco Unified IP Phone 7941G, 7941G-GE, 7942G, 7961G, 7961G-GE, and 7962G User Guide for Cisco UnifiedCommunications Manager 9.0 (SCCP and SIP)
109
TroubleshootingPhone Screen Is Too Light or Too Dark (Cisco Unified IP Phones 7962G and 7942G)

Quality Reporting ToolYour system administrator may configure your phone with the Quality Reporting Tool (QRT) to troubleshootperformance problems. You can pressQRT orQuality Reporting Tool to submit information to your systemadministrator. Depending on configuration, use the QRT to:
• Immediately report an audio problem on a current call.
• Select a general problem from a list of categories and choose reason codes.
Cisco Unified IP Phone 7941G, 7941G-GE, 7942G, 7961G, 7961G-GE, and 7962G User Guide for Cisco UnifiedCommunications Manager 9.0 (SCCP and SIP)
110
TroubleshootingQuality Reporting Tool

A P P E N D I X AWarranty
• Cisco One-Year Limited Hardware Warranty Terms, page 111
Cisco One-Year Limited Hardware Warranty TermsSpecial terms apply to your hardware warranty and services that you can use during the warranty period.
Your formalWarranty Statement, including the warranties and license agreements applicable to Cisco software,is available on Cisco.com at the following URL:
http://www.cisco.com/en/US/docs/general/warranty/English/1Y1DEN__.html
Cisco Unified IP Phone 7941G, 7941G-GE, 7942G, 7961G, 7961G-GE, and 7962G User Guide for Cisco UnifiedCommunications Manager 9.0 (SCCP and SIP)
111

Cisco Unified IP Phone 7941G, 7941G-GE, 7942G, 7961G, 7961G-GE, and 7962G User Guide for Cisco UnifiedCommunications Manager 9.0 (SCCP and SIP)
112
WarrantyCisco One-Year Limited Hardware Warranty Terms

I N D E X
A
Abbreviated Dialing 91access list, create 98Ad hoc conference 37add 87, 94, 99
PAB entry 87phone services to button 94remote destination for Mobile Connect 99
Address Book Synchronization Tool (TABSynch) 91answering calls 25assign 87, 89
fast dial code 89fast dial code in Personal Directory 89fast-dial code 89PAB to feature a button 87
audible message indicator, See message indicatorsaudio 17
quality of 17audio problems 110authenticated calls 51Auto Dial 19AutoAnswer 64
B
barge 49, 50and privacy 50using 49
BLF 6BLF Pickup 6browser password 95
change 95Busy Lamp Field (BLF) 50button 42buttons 2, 3
Cisco Unified IP Phone 7941G 3Cisco Unified IP Phone 7941G-GE 3Cisco Unified IP Phone 7942G 3Cisco Unified IP Phone 7961G 2, 3Cisco Unified IP Phone 7961G-GE 2, 3
buttons (continued)Cisco Unified IP Phone 7962G 2, 3
C
cable lock 16connecting to phone 16
call 7, 30, 45, 71, 75activity area 7logs 71, 75
dialing from a URL entry within a log 75using, dialing from, and erasing 71
overview mode 30parking 45
call forward 34configuring on phone 34
call forwarding 96configuring from web page 96
call handling 19, 42advanced 42basic 19
call pickup 44call waiting 25CallBack 23caller ID 7calls 6, 7, 19, 25, 27, 29, 32, 34, 36, 41, 44, 45, 49, 51, 54, 96, 110
answering 25barging 49compared to lines 6conference features 36ending 27forwarding 34, 96holding and resuming 27icons 6intercom 41multiple parties 36muting 29parking 45placing 19prioritizing 54redirecting while ringing 44
Cisco Unified IP Phone 7941G, 7941G-GE, 7942G, 7961G, 7961G-GE, and 7962G User Guide for Cisco UnifiedCommunications Manager 9.0 (SCCP and SIP)
IN-1

calls (continued)reporting problems with 110secure 51storing and retrieving 45transferring 32viewing 7
change 93, 94, 95, 96, 98browser password 95language 95, 96
phone display 96user options web pages 95
locale 95, 96phone display 96user options web pages 95
phone line label 98phone service name 94phone services 93
Cisco Extension Mobility 55Cisco Unified IP Phone xiv, 9, 13, 16, 85, 103, 105
connecting 13documentation for xivfeature configuration for 9, 103registering 16troubleshooting 105web-based services for 85
Cisco Unified IP Phone 7941G 3buttons 3
Cisco Unified IP Phone 7941G-GE 3buttons 3
Cisco Unified IP Phone 7942G 3buttons 3
Cisco Unified IP Phone 7961G 2, 3buttons 2, 3
Cisco Unified IP Phone 7961G-GE 2, 3buttons 2, 3
Cisco Unified IP Phone 7962G 2, 3buttons 2, 3
Cisco Unified IP Phone Expansion Module 103Cisco Unified IP Phones 1
overview 1Cisco Unified Video Advantage 103Cisco WebDialer 100cleaning 8Client Matter Code, See CMCCMC 23, 105conference 37
Ad hoc 37Conference button 37conference call 37
Join 37conference calls 36, 39, 40
Meet-Me 39security and viewing and removing participants 40types 36
corporate directory 22dialing from web page 22
create 98access list for Mobile Connect 98phone line label 98
D
delete 88PAB entry 88
Details softkey 74viewing multiparty calls 74
DHCP 106troubleshooting 106
dialing 19options 19
directed call park 45directory 3, 76, 100
button 3corporate 76personal 76using from web page 100
diverting calls to voice-message system 33DND 35Do Not Disturb (DND) 35documentation xiv
accessing xiv
E
edit 88, 90fast dials 90PAB entry 88
EM 55encrypted calls 51end 93
phone services 93ending a call 27
options 27EnergyWise 8, 11
and phone cleaning 8description 11
Extension Mobility 55external devices xv
caution xvinformation xv
F
FAC 23, 105
Cisco Unified IP Phone 7941G, 7941G-GE, 7942G, 7961G, 7961G-GE, and 7962G User Guide for Cisco UnifiedCommunications Manager 9.0 (SCCP and SIP)
IN-2
Index

Fast Dial 90search 90
fast dial codes 89assign to Personal Directory 89
Fast Dials 80, 88, 89, 90assign a code 89configuring from web page 80, 88dialing with 80edit 90
feature buttons 3directories 3help 3messages 3Services 3Settings 3
feature menus and button 8features 9, 103
availability of 103available on your phone 9
footstand 3button for 3
Forced Authorization Code, See FACforwarding calls 34
options 34
G
GPickUp 44greeting 25group call pickup 44
H
handset 3, 61light strip 3using 61
handset rest 15hanging up 27
options 27headset 16, 20, 25, 27, 61
answering calls 25hanging up 27performance, general 16placing calls 20using 61
Headset 3button 3
help 9using 9
help button 3
hold 27, 32and transferring 32using 27
hold reversion feature 27reverting calls 27
hookswitch clip 14removing 14
hunt groups 47logging out 47
I
icons 6for call states and lines 6for lines 6
idle 6installing 13
Cisco Unified IP Phone 13intercom 6, 41
line idle, icon 6one-way call, icon 6two-way call, icon 6
intercom line 6, 42international call logging 19, 71, 77
J
Join button 37Join conference 37
K
keypad 3
L
language 95, 96change for user options web pages 95change phone display 96
language (locale) settings 94line 97, 98
settings 97voice message indicator 97
text label 98change 98create 98
lines 3, 6, 7, 34, 48, 50, 67, 96and call forward 34and call forwarding 96
Cisco Unified IP Phone 7941G, 7941G-GE, 7942G, 7961G, 7961G-GE, and 7962G User Guide for Cisco UnifiedCommunications Manager 9.0 (SCCP and SIP)
IN-3
Index

lines (continued)buttons 3description and number of supported calls 6icons and call states 6ring patterns for 96ring tones for 67shared 48text label for 96using BLF 50viewing 7voice message indicator setting for 96
locale 95, 96change for user options web pages 95change phone display 96
log in and out, See sign in and outlogging out of hunt groups 47
M
Malicious Call Identification 54MCID 54Meet-Me conferences 39menus 8
using 8message indicators 97
audible, change 97voice, change 97
messages 68, 83indicator for 68, 83listening to 83
messages button 3missed calls 72
records 72MLPP 54
using 54mobile connect 98
setting up access lists 98Mobile Connect 98, 99
add remote destination 99create access list 98
Multilevel Precedence and Preemption (MLPP) 54multiparty calls 74
identifying in call logs 74viewing details 74viewing details of 74
mute 29using 29
Mute button 3
N
Navigation button 3network configuration data 105
locating 105
O
off-hook dialing 20on-hook dialing 19online help 9
using 9
P
PAB 87, 88add 87assign to a feature button 87delete 88edit 88
password 94See also browser passwordchanging 94
See also browser passwordPersonal Address Book (PAB) 77
using on phone 77Personal Directory (PD) 77, 87
using from web page 87phone display 96, 98
change language 96change line label 98create line label 98
phone lines 3, 6, 7buttons 3description and number of supported calls 6viewing 7
phone screen 7, 8, 69adjusting contrast 69changing language 69cleaning 8illustration and features 7
phone services 86, 93, 94See also User Options web pagesadd to button 94change 93change name 94configuring 86end 93search for 93subscribe to 93
See also User Options web pages
Cisco Unified IP Phone 7941G, 7941G-GE, 7942G, 7961G, 7961G-GE, and 7962G User Guide for Cisco UnifiedCommunications Manager 9.0 (SCCP and SIP)
IN-4
Index

PIN 94changing 94
place call 20placed calls 72
records 72placing calls 19
options 19power outage xvpower saving 11, 105
description 11Troubleshooting 105
pre-dialing (dialing on-hook) 19prioritizing calls 54privacy 50
using 50programmable buttons 3, 7
description 3labels 7
Q
QRT 110using 110
Quality Reporting Tool 110
R
received calls 72records 72
redialing 21remote destination 58
See also user optionsremote-in-use icon for shared lines 48resume 27
using 27ring patterns 96
changing 96ring tones 67
changing 67ringer 3
indicator 3
S
safety and performance xvexternal devices xvpower outage xv
safety warnings xvSCCP versus SIP protocol 11
search 90, 93fast dials 90phone services 93
secure calls 51securing the phone with a cable lock 16services 92
See also phone servicessubscribing to 92
See also phone servicesServices button 3Session Handoff 29set up 91
speed-dial codes 91Settings button 3shared lines 48, 49, 50
and remote-in-use icon 48description 48with barge 49with privacy 50
sign in and out 85user options 85
SIP versus SCCP protocol 11softkey buttons 3, 7
description 3labels 7
Speaker 3button 3
speakerphone 20, 25, 27, 61answering calls 25hanging up 27placing calls with 20using 61
speed dial 7, 42, 43, 91configuring 91labels 7, 91using BLF with 43
Speed Dial 91codes 91
set up 91status data 105
locating 105status line 7
viewing 7subscribe to phone services 93subscriptions 92
for phone services 92suspicious calls 54
tracing 54switching between multiple calls 29switching calls 58
Cisco Unified IP Phone 7941G, 7941G-GE, 7942G, 7961G, 7961G-GE, and 7962G User Guide for Cisco UnifiedCommunications Manager 9.0 (SCCP and SIP)
IN-5
Index

T
tabs 7on phone screen 7
TabSynch 91TABSynch 91TAPS 16Tool for Auto-Registered Phones Support (TAPS) 16transferring 32
options 32troubleshooting 105, 106
DHCP 106
U
URL dialing 75from within a call log 75
user options 85, 87, 88, 89, 90, 95, 96, 98, 99fast dials 89, 90
assign a code 89edit 90search 90
mobility 98, 99add remote destination 99create access list 98
PAB 87, 88add entry 87assign to a feature button 87delete entry 88edit entry 88
sign in and out 85user settings 95, 96
change browser password 95
user options (continued)user settings (continued)
change phone display language 96change user options web pages language 95
User Options web pages 85, 86, 92accessing 85configuring features and services with 86subscribing to phone services with 92
using on phone 77
V
voice message indicator 83, 96changing setting for 96
voice message service 83volume 61, 68
for handset, headset or speakerphone 61for phone ringer 68
Volume button 3
W
warnings xvsafety xv
warranty information 111web-based services 85
See also User Options web pagesconfiguring 85
See also User Options web pagesWebDialer 100wideband 64
headset 64
Cisco Unified IP Phone 7941G, 7941G-GE, 7942G, 7961G, 7961G-GE, and 7962G User Guide for Cisco UnifiedCommunications Manager 9.0 (SCCP and SIP)
IN-6
Index