cisco video surveillance 2900 ip camera user guide · vii cisco video surveillance ip ptz dome...
TRANSCRIPT

Cisco Video Surveillance IP PTZ Dome Camera User GuideCisco 2900 Series IP Dome
Americas HeadquartersCisco Systems, Inc.170 West Tasman DriveSan Jose, CA 95134-1706 USAhttp://www.cisco.comTel: 408 526-4000
800 553-NETS (6387)Fax: 408 527-0883
Text Part Number: OL-24281-01

THE SPECIFICATIONS AND INFORMATION REGARDING THE PRODUCTS IN THIS MANUAL ARE SUBJECT TO CHANGE WITHOUT NOTICE. ALL STATEMENTS, INFORMATION, AND RECOMMENDATIONS IN THIS MANUAL ARE BELIEVED TO BE ACCURATE BUT ARE PRESENTED WITHOUT WARRANTY OF ANY KIND, EXPRESS OR IMPLIED. USERS MUST TAKE FULL RESPONSIBILITY FOR THEIR APPLICATION OF ANY PRODUCTS.
THE SOFTWARE LICENSE AND LIMITED WARRANTY FOR THE ACCOMPANYING PRODUCT ARE SET FORTH IN THE INFORMATION PACKET THAT SHIPPED WITH THE PRODUCT AND ARE INCORPORATED HEREIN BY THIS REFERENCE. IF YOU ARE UNABLE TO LOCATE THE SOFTWARE LICENSE OR LIMITED WARRANTY, CONTACT YOUR CISCO REPRESENTATIVE FOR A COPY.
The Cisco implementation of TCP header compression is an adaptation of a program developed by the University of California, Berkeley (UCB) as part of UCB’s public domain version of the UNIX operating system. All rights reserved. Copyright © 1981, Regents of the University of California.
NOTWITHSTANDING ANY OTHER WARRANTY HEREIN, ALL DOCUMENT FILES AND SOFTWARE OF THESE SUPPLIERS ARE PROVIDED “AS IS” WITH ALL FAULTS. CISCO AND THE ABOVE-NAMED SUPPLIERS DISCLAIM ALL WARRANTIES, EXPRESSED OR IMPLIED, INCLUDING, WITHOUT LIMITATION, THOSE OF MERCHANTABILITY, FITNESS FOR A PARTICULAR PURPOSE AND NONINFRINGEMENT OR ARISING FROM A COURSE OF DEALING, USAGE, OR TRADE PRACTICE.
IN NO EVENT SHALL CISCO OR ITS SUPPLIERS BE LIABLE FOR ANY INDIRECT, SPECIAL, CONSEQUENTIAL, OR INCIDENTAL DAMAGES, INCLUDING, WITHOUT LIMITATION, LOST PROFITS OR LOSS OR DAMAGE TO DATA ARISING OUT OF THE USE OR INABILITY TO USE THIS MANUAL, EVEN IF CISCO OR ITS SUPPLIERS HAVE BEEN ADVISED OF THE POSSIBILITY OF SUCH DAMAGES.
Cisco and the Cisco Logo are trademarks of Cisco Systems, Inc. and/or its affiliates in the U.S. and other countries. A listing of Cisco's trademarks can be found at www.cisco.com/go/trademarks. Third party trademarks mentioned are the property of their respective owners. The use of the word partner does not imply a partnership relationship between Cisco and any other company. (1005R)
Any Internet Protocol (IP) addresses and phone numbers used in this document are not intended to be actual addresses and phone numbers. Any examples, command display output, network topology diagrams, and other figures included in the document are shown for illustrative purposes only. Any use of actual IP addresses or phone numbers in illustrative content is unintentional and coincidental.
Cisco Video Surveillance IP PTZ Dome Camera User Guide, Cisco 2900 Series IP Dome © 2011 Cisco Systems, Inc. All rights reserved.

Cisco OL-24281-01
C O N T E N T S
Preface vii
Overview vii
Organization vii
Obtaining Documentation and Submitting a Service Request vii
C H A P T E R 1 Installation 1-1
Overview 1-1
Mounting 1-1
In-Ceiling 1-2
Pendant 1-3
Wiring 1-4
Installing the Dome Drive 1-8
Installing the Lower Dome 1-9
In-Ceiling 1-10
Pendant 1-10
Switch Settings 1-11
C H A P T E R 2 Operation 2-1
System Requirements 2-1
Accessing the IP Device 2-2
Live Video Page 2-2
Live Video Page Icons 2-2
PTZ Controls 2-3
Selecting a Stream 2-4
Primary Stream and Secondary Stream 2-5
QuickView Stream 2-5
Unicast 2-5
Multicast 2-6
Taking a Snapshot 2-6
Displaying Video in the Multiscreen View 2-6
Settings Page 2-7
Accessing the Device Menus 2-7
System Tab 2-7
iiiVideo Surveillance IP PTZ Dome Camera User Guide, Cisco 2900 Series IP Dome
Contents
Changing the Device Name 2-8
Configuring the Time Settings 2-8
Customizing the Appearance of the Text Overlay 2-9
Generating a System Log 2-9
Rebooting the Camera 2-9
Restoring All Camera Defaults 2-9
Network Tab 2-10
Changing the Hostname 2-11
Turning On DHCP 2-11
Turning Off DHCP 2-12
Selecting the Secure Sockets Layer Mode 2-13
Generating a Certificate Request 2-13
Generating a Self-Signed Certificate 2-14
Enabling Secure Shell 2-15
Selecting SNMP Settings 2-15
Configuring SNMP V2c 2-16
Configuring SNMP V3 2-17
Camera Configuration Tab 2-17
Adjusting the Video Properties 2-18
Using On-Screen Display (OSD) to Access Camera Menus 2-19
Configuring a Preset 2-20
Configuring Home Preset 2-20
Selecting a Configured Preset 2-21
Live View Page 2-21
Preset/Pattern Page 2-21
Configuring a Pattern 2-22
Selecting a Configured Pattern 2-22
LiveView Page 2-23
Preset/Pattern Page 2-23
A/V Streams Tab 2-23
Selecting a Video Preset Configuration 2-24
Configuring a Custom Video Stream 2-25
Compression Standards 2-26
Image Rate and Bit Rate 2-26
I-Frame Interval 2-35
Quality of Service for Differentiated Services Code Point 2-35
Advanced Sharpening 2-35
Selecting the Audio Configuration Settings 2-35
Users Tab 2-37
ivCisco Video Surveillance IP PTZ Dome Camera User Guide, Cisco 2900 Series IP Dome
OL-24281-01

Contents
Selecting the Users and Groups Settings 2-38
Creating a New User 2-39
Editing a User 2-40
Deleting a User 2-40
Events Tab 2-40
Creating a System Event Source 2-41
Creating a Timer Event Source 2-41
Editing an Event Source 2-42
Deleting an Event Source 2-42
Creating an Event Handler: Send Email 2-42
Creating an Event Handler: Upload JPEG to FTP Server 2-43
Editing an Event Handler 2-44
Deleting an Event Handler 2-44
Example Handler Filter Setup 2-44
I N D E X
vCisco Video Surveillance IP PTZ Dome Camera User Guide, Cisco 2900 Series IP Dome
OL-24281-01

Contents
viCisco Video Surveillance IP PTZ Dome Camera User Guide, Cisco 2900 Series IP Dome
OL-24281-01

Preface
OverviewThis document, Cisco Video Surveillance IP PTZ Dome Camera User Guide, provides information about installing, configuring, and using the Cisco Video Surveillance 2900 Series Standard Definition IP PTZ cameras.
OrganizationThis manual is organized as follows:
Obtaining Documentation and Submitting a Service RequestFor information about obtaining documentation, submitting a service request, and gathering additional information, see the monthly What’s New in Cisco Product Documentation. That document also lists new and revised Cisco technical documentation. It is available at:
http://www.cisco.com/en/US/docs/general/whatsnew/whatsnew.html
Subscribe to the What’s New in Cisco Product Documentation as a Really Simple Syndication (RSS) feed and set content to be delivered directly to your desktop using a reader application. The RSS feeds are a free service. Cisco currently supports RSS Version 2.0.
Chapter 1, “Installation” Provides instructions for installing the Cisco 2900 Series IP Dome cameras
Chapter 2, “Operation” Describes how to operate the Cisco 2900 IP Dome camera
Appendix A, “Troubleshooting” Provides troubleshooting information for the Cisco 2900 Series IP Dome camera
Appendix B, “Specifications” Lists specifications for the Cisco 2900 Series IP Dome cameras
viiCisco Video Surveillance IP PTZ Dome Camera User Guide, Cisco 2900 Series IP Dome
OL-24281-01

Preface
viiiCisco Video Surveillance IP PTZ Dome Camera User Guide, Cisco 2900 Series IP Dome
OL-24281-01

Cisco Video Surveillance IP PTZ DoOL-24281-01
C H A P T E R 1
InstallationThis chapter provides instructions for installing the Cisco 2900 Series IP Dome cameras.
This chapter includes these topics:
• Overview, page 1-1
• Mounting, page 1-1
• Installing the Dome Drive, page 1-8
• Installing the Lower Dome, page 1-9
• Switch Settings, page 1-11
OverviewThe Cisco 2900 Series IP Dome cameras are designed with ease of installation and ease of maintenance in mind. Each camera consists of three components: a back box, a dome drive, and a lower dome.
The Cisco 2900 Series IP Dome models include the following:
• CIVS-IPC-2911—Indoor, in-ceiling mount, white, smoked dome, 27x zoom, NTSC output
• CIVS-IPC-2916—Indoor, in-ceiling mount, white, smoked dome, 27x zoom, PAL output
• CIVS-IPC-2930—Outdoor, pendant mount, gray, clear dome, 35x zoom, NTSC output
• CIVS-IPC-2935—Outdoor, pendant mount, gray, clear dome, 35x zoom, PAL output
The back box has memory that can be used to store camera and location-specific dome settings, including labels, presets, patterns, and zones.
MountingThe following sections provide instructions for mounting the Cisco 2900 IP Dome:
• In-Ceiling, page 1-2
• Pendant, page 1-3
• Wiring, page 1-4
1-1me Camera User Guide, Cisco 2900 Series IP Dome

Chapter 1 InstallationMounting
In-Ceiling
Step 1 Prepare the ceiling (see Figure 1-1):
a. Locate the center point of the mounting location, and insert the compass tool into the ceiling.
b. Place the end of a pencil in the hole on the end of the compass tool, and draw a circle.
c. Cut out the circle.
Figure 1-1 Preparing the Ceiling
d. Attach a conduit fitting (not supplied), lock nut (not supplied), and safety chain bracket (see Figure 1-2).
Figure 1-2 Attaching the Conduit Fitting, Lock Nut, and Safety Chain Bracket
Step 2 Install a safety chain/cable (not supplied), which will support up to 16 pounds (7.3 kg).
Step 3 Open the hinged door to the back box by pushing the tab lock toward the wall of the unit and lifting the door open.
1-2Cisco Video Surveillance IP PTZ Dome Camera User Guide, Cisco 2900 Series IP Dome
OL-24281-01

Chapter 1 InstallationMounting
Step 4 Pull the wiring into the back box through the conduit fitting.
Step 5 Connect all required wiring (see the “Wiring” section on page 1-4).
Step 6 Install the back box by compressing the spring clips and pushing the back box through the hole.
Step 7 Tighten the screws until you hear a clicking noise.
Pendant
Step 1 Install the mount for the pendant dome.
See the instructions supplied with the mount.
Note If the mount is outdoors, make sure it is properly sealed to keep moisture out.
Step 2 Open the hinged door to the back box by pushing the tab lock towards the wall of the unit and lifting the door open.
Step 3 Pull the wiring into the back box.
Step 4 Connect all required wiring (see the “Wiring” section on page 1-4).
Step 5 Screw the back box onto the mount (see Figure 1-3).
If outdoors, apply thread compound (supplied) to the threads on the back box.
Note Thread compound must be applied. Not doing so may prevent the units from being separated in the future.
Figure 1-3 Attaching the Pendant Back Box to the Mount
1-3Cisco Video Surveillance IP PTZ Dome Camera User Guide, Cisco 2900 Series IP Dome
OL-24281-01

Chapter 1 InstallationMounting
Wiring
Step 1 Open the hinged door to the back box by pushing the tab lock toward the wall of the unit and lifting the door open (see Figure 1-4).
Figure 1-4 Black Box Door
Step 2 Remove the TXB-N from the back box circuit board (see Figure 1-5):
a. Loosen the captive screw on the TXB-N.
b. Carefully unplug the TXB-N from the back box circuit board.
Figure 1-5 Removing the TXB-N
+ -
1-4Cisco Video Surveillance IP PTZ Dome Camera User Guide, Cisco 2900 Series IP Dome
OL-24281-01

Chapter 1 InstallationMounting
Step 3 Connect the auxiliary, alarm, and other wiring to the back box circuit board (see Figure 1-6).
Note Aux 1: Maximum 2 A at low voltage (<40 V). Aux 2: Maximum 30 mA at 32 VDC. If you are installing an environmental back box in a railway application, attach a ground wire from the circuit board power connector to a structural ground using at least 18-gauge wire.
Figure 1-6 Connect the Wiring to the Circuit Board
Step 4 If you plan to use the audio functions, install your audio cables into the audio line-in and line-out connectors on the TXB-N.
1 RJ-45 Connector 7 Standoff
2 Ethernet Cable 8 UTP Connector
3 Video Coaxial Cable 9 Back Box Circuit Board
4 16-Pin Connector 10 Audio Connectors
5 Heat Sink Standoff 11 TXB-N
6 Captive Screw
VIDEO
UTP+ UTP-RX- RX+ TX+TX-PWR- PWR+GND
AUX2GND
GNDNO
NCCOM
7654321
ALARMS
AUX1
1-5Cisco Video Surveillance IP PTZ Dome Camera User Guide, Cisco 2900 Series IP Dome
OL-24281-01

Chapter 1 InstallationMounting
Note To take full advantage of the distance and noise immunity benefits of audio, you must use a 600-ohm impedance matching transformer and twisted pair cable (see Figure 1-7). A stable power supply is required for optimal audio performance.
Figure 1-7 Connecting Audio to the TXB-N
Step 5 Reinstall the TXB-N:
a. Plug the TXB-N into the 16-pin connector located on the back box circuit board.
b. Secure the TXB-N to the standoff on the circuit board using the captive screw on the TXB-N.
Step 6 Plug your network Ethernet cable into the RJ-45 connector on the TXB-N to connect the dome to your existing network.
1 Microphone 5 Line-Out Audio Twisted Pair Cable
2 Amplifier 6 600-Ohm Impedance Matching Transformer
3 600-Ohm Impedance Matching Transformer 7 Amplifier
4 Line-In Audio Twisted Pair Cable 8 Speaker
1-6Cisco Video Surveillance IP PTZ Dome Camera User Guide, Cisco 2900 Series IP Dome
OL-24281-01

Chapter 1 InstallationMounting
Warning An electrical short in the back box may occur if the metal BNC connector on the video coaxial cable is not completely covered by the protective boot.
Step 7 Perform one of the following options:
• View video using both analog and IP connections—Connect the video coaxial cable from the back box circuit board to the coaxial cable coming in from the outside. Make sure that the BNC connector is completely covered by the protective boot.
• View video using only the IP connection—Make sure that the BNC connector is completely covered by the protective boot and is out of the way of the back box door.
Step 8 Before closing the interconnect door, ensure that no wires are between the top of the heat sink standoff and the back box (see Figure 1-8).
Both the video coaxial cable and the Ethernet cable need to be routed carefully to ensure clearance for the heat sink standoff.
Figure 1-8 Routing the Cables in the Back Box
Step 9 Close the interconnect door and snap the tab lock into place.
1 RJ-45 Connector 3 Video Coaxial Cable
2 Ethernet Cable
1-7Cisco Video Surveillance IP PTZ Dome Camera User Guide, Cisco 2900 Series IP Dome
OL-24281-01

Chapter 1 InstallationInstalling the Dome Drive
Table 1-1 shows the maximum distances for video coaxial cable types. A cable must meet these requirements:
• 75-ohm impedance
• All-copper center conductor
• All-copper braided shield with 95 percent braid coverage
Table 1-2 shows the recommended maximum distances for 24 VAC and 24 VDC applications, which are calculated with a 10 percent voltage drop. (Ten percent is generally the maximum allowable voltage drop for AC- or DC-powered devices.)
Note Input power for the dome is 24 VAC or 24 VDC. Using 24 VAC input power, power consumption is 23 VA per dome for indoor models and 73 VA for outdoor models. Using 24 VDC input power, power consumption is 0.7 A (15 W) for indoor models and 3 A (65 W) for outdoor models.
Use a 24 VAC transformer with the following minimum VA:
• 40 VA per dome—For indoor models (without heater)
• 100 VA per dome—For outdoor models (with heater)
Installing the Dome Drive
Step 1 If you will view video using both analog and IP connections, set the DIP switches on the top of the dome drive (see Figure 1-9).
For DIP switch settings, see the labels located on the top of the dome drive, or see the “Switch Settings” section on page 1-11.
If you will view video using the IP connection, you do not need to set the DIP switches.
Table 1-1 Video Coaxial Cable Requirements
Cable Type Maximum Distance
RG59/U 750 ft (229 m)
RG6/U 1,000 ft (305 m)
RG11/U 1,500 ft (457 m)
Table 1-2 24 VAC/24 VDC Wiring Distances
AC/DC Total VA/ Total Watts
Wire Gauge
20 AWG (0.5 mm2) 18 AWG (1.05 mm2) 16 AWG (1.5 mm2) 14 AWG (2.5 mm2)
23VA/15 W 123 ft (38 m) 196 ft (60 m) 311 ft (95 m) 495 ft (151 m)
73 VA/65 W 39 ft (12 m) 62 ft (19 m) 98 ft (30 m) 156 ft (48 m)
1-8Cisco Video Surveillance IP PTZ Dome Camera User Guide, Cisco 2900 Series IP Dome
OL-24281-01

Chapter 1 InstallationInstalling the Lower Dome
Note When connecting more than one Cisco 2900 Series IP Dome to a single controller, terminate the unit farthest from the controller. To terminate the dome drive set the SW2-10 switch to the ON position.
Figure 1-9 Setting the DIP Switches
Step 2 Install the dome drive.
Caution Improper installation of the dome drive can be dangerous and can seriously damage the equipment.
a. Align the blue and red tabs with the blue and red labels on the back box.
b. Push in the red tab and insert that side of the dome drive first.
c. Push in the blue tab and insert the dome drive into the back box the remainder of the way.
d. Continue pushing on the ends of the tabs until both sides click firmly into place.
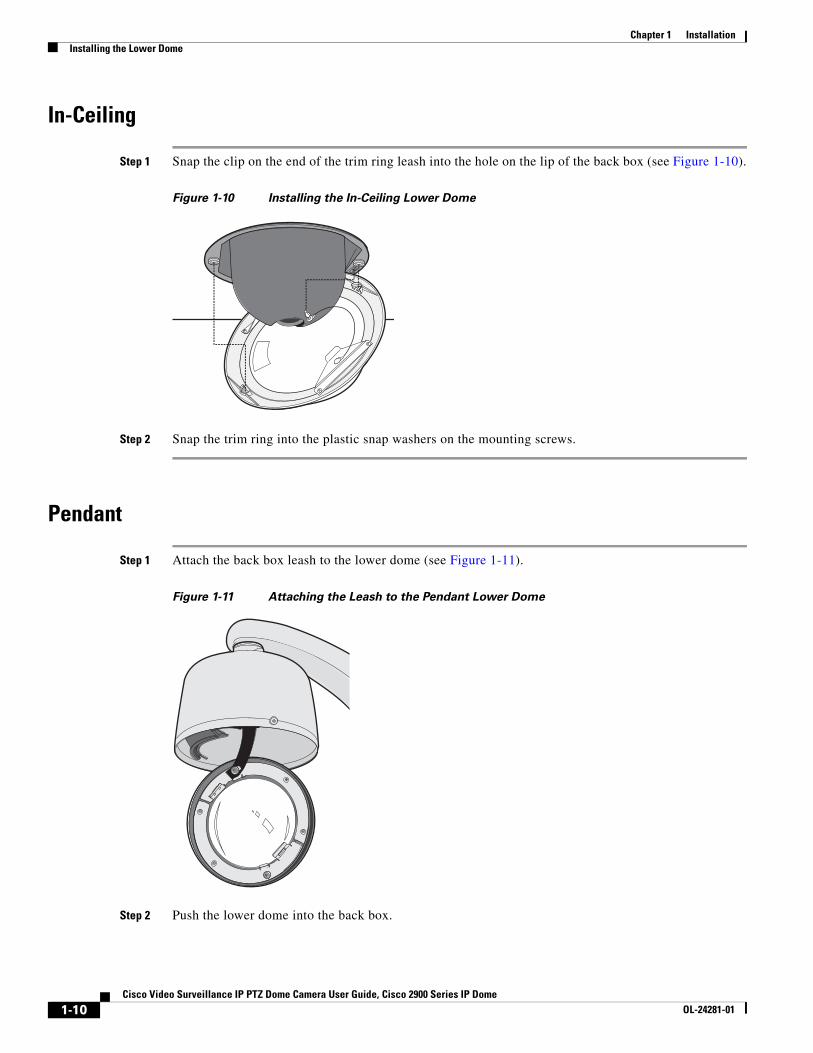
Installing the Lower DomeThe following sections explain how to install the lower dome:
• In-Ceiling, page 1-10
• Pendant, page 1-10
1-9Cisco Video Surveillance IP PTZ Dome Camera User Guide, Cisco 2900 Series IP Dome
OL-24281-01
Chapter 1 InstallationInstalling the Lower Dome
In-Ceiling
Step 1 Snap the clip on the end of the trim ring leash into the hole on the lip of the back box (see Figure 1-10).
Figure 1-10 Installing the In-Ceiling Lower Dome
Step 2 Snap the trim ring into the plastic snap washers on the mounting screws.
Pendant
Step 1 Attach the back box leash to the lower dome (see Figure 1-11).
Figure 1-11 Attaching the Leash to the Pendant Lower Dome
Step 2 Push the lower dome into the back box.
1-10Cisco Video Surveillance IP PTZ Dome Camera User Guide, Cisco 2900 Series IP Dome
OL-24281-01

Chapter 1 InstallationSwitch Settings
Step 3 Tighten the captive Phillips pan head screws to secure the lower dome (see Figure 1-12).
Figure 1-12 Installing the Pendant Lower Dome
Switch SettingsTable 1-3 shows SW2 switch settings.
Note If you are using Pelco D-type or Pelco P-type control, your system may not operate if the baud rate and address switches are not set correctly. The switches are set at the factory using the defaults for Pelco D-type control (2400 baud and address 1).
Table 1-3 Switch Settings for SW2
Special Systems
Switch Number 1 2 3 4 5 6 7 8 9 10
AD-32 Preset System ON
CM9502 Setting ON
Serial Port Settings
Switch Number 1 2 3 4 5 6 7 8 9 10
RS422 OFF OFF
RS485, 4-Wire OFF ON
RS485, 2-Wire ON ON
1-11Cisco Video Surveillance IP PTZ Dome Camera User Guide, Cisco 2900 Series IP Dome
OL-24281-01

Chapter 1 InstallationSwitch Settings
Table 1-4 shows SW1 switch settings for Pelco P-Type control.
Note For Coaxitron controls, SW1 is not used; set all switches to OFF. For Pelco D-type control systems, see Table 1-5 on page 1-13.
Pelco D or Pelco P Protocol Baud Rate
Switch Number 1 2 3 4 5 6 7 8 9 10
2400 Baud (Default for D-type Control) OFF OFF OFF
4800 Baud (Default for P-type Control) ON OFF OFF
9600 Baud OFF ON OFF
Video Cable Type
Switch Number 1 2 3 4 5 6 7 8 9 10
Coaxial Cable OFF
Dome Termination
Switch Number 1 2 3 4 5 6 7 8 9 10
Terminated ON
Not Terminated OFF
Table 1-3 Switch Settings for SW2 (continued)
Table 1-4 Switch Settings for SW1, Pelco P-Type Control
Address
Switch Setting
SW1-1 SW1-2 SW1-3 SW1-4 SW1-5
1 OFF OFF OFF OFF OFF
2 ON OFF OFF OFF OFF
3 OFF ON OFF OFF OFF
4 ON ON OFF OFF OFF
5 OFF OFF ON OFF OFF
6 ON OFF ON OFF OFF
7 OFF ON ON OFF OFF
8 ON ON ON OFF OFF
9 OFF OFF OFF ON OFF
10 ON OFF OFF ON OFF
11 OFF ON OFF ON OFF
12 ON ON OFF ON OFF
13 OFF OFF ON ON OFF
14 ON OFF ON ON OFF
15 OFF ON ON ON OFF
16 ON ON ON ON OFF
1-12Cisco Video Surveillance IP PTZ Dome Camera User Guide, Cisco 2900 Series IP Dome
OL-24281-01

Chapter 1 InstallationSwitch Settings
Table 1-5 shows SW1 switch settings for Pelco D-Type control.
Note For Coaxitron controls, SW1 is not used; set all switches to OFF. For Pelco P-type control systems, see Table 1-4 on page 1-12.
17 OFF OFF OFF OFF ON
18 ON OFF OFF OFF ON
19 OFF ON OFF OFF ON
20 ON ON OFF OFF ON
21 OFF OFF ON OFF ON
22 ON OFF ON OFF ON
23 OFF ON ON OFF ON
24 ON ON ON OFF ON
25 OFF OFF OFF ON ON
26 ON OFF OFF ON ON
27 OFF ON OFF ON ON
28 ON ON OFF ON ON
29 OFF OFF ON ON ON
30 ON OFF ON ON ON
31 OFF ON ON ON ON
32 ON ON ON ON ON
Table 1-4 Switch Settings for SW1, Pelco P-Type Control (continued)
Address
Switch Setting
SW1-1 SW1-2 SW1-3 SW1-4 SW1-5
Table 1-5 Switch Settings for SW1, Pelco D-Type Control
Address
Switch Setting
SW1-1 SW1-2 SW1-3 SW1-4 SW1-5 SW1-6 SW1-7 SW1-8
1 ON OFF OFF OFF OFF OFF OFF OFF
2 OFF ON OFF OFF OFF OFF OFF OFF
3 ON ON OFF OFF OFF OFF OFF OFF
4 OFF OFF ON OFF OFF OFF OFF OFF
5 ON OFF ON OFF OFF OFF OFF OFF
6 OFF ON ON OFF OFF OFF OFF OFF
7 ON ON ON OFF OFF OFF OFF OFF
8 OFF OFF OFF ON OFF OFF OFF OFF
9 ON OFF OFF ON OFF OFF OFF OFF
10 OFF ON OFF ON OFF OFF OFF OFF
1-13Cisco Video Surveillance IP PTZ Dome Camera User Guide, Cisco 2900 Series IP Dome
OL-24281-01

Chapter 1 InstallationSwitch Settings
11 ON ON OFF ON OFF OFF OFF OFF
12 OFF OFF ON ON OFF OFF OFF OFF
13 ON OFF ON ON OFF OFF OFF OFF
14 OFF ON ON ON OFF OFF OFF OFF
15 ON ON ON ON OFF OFF OFF OFF
16 OFF OFF OFF OFF ON OFF OFF OFF
17 ON OFF OFF OFF ON OFF OFF OFF
18 OFF ON OFF OFF ON OFF OFF OFF
19 ON ON OFF OFF ON OFF OFF OFF
20 OFF OFF ON OFF ON OFF OFF OFF
21 ON OFF ON OFF ON OFF OFF OFF
22 OFF ON ON OFF ON OFF OFF OFF
23 ON ON ON OFF ON OFF OFF OFF
24 OFF OFF OFF ON ON OFF OFF OFF
25 ON OFF OFF ON ON OFF OFF OFF
26 OFF ON OFF ON ON OFF OFF OFF
27 ON ON OFF ON ON OFF OFF OFF
28 OFF OFF ON ON ON OFF OFF OFF
29 ON OFF ON ON ON OFF OFF OFF
30 OFF ON ON ON ON OFF OFF OFF
31 ON ON ON ON ON OFF OFF OFF
32 OFF OFF OFF OFF OFF ON OFF OFF
33 ON OFF OFF OFF OFF ON OFF OFF
34 OFF ON OFF OFF OFF ON OFF OFF
35 ON ON OFF OFF OFF ON OFF OFF
36 OFF OFF ON OFF OFF ON OFF OFF
37 ON OFF ON OFF OFF ON OFF OFF
38 OFF ON ON OFF OFF ON OFF OFF
39 ON ON ON OFF OFF ON OFF OFF
40 OFF OFF OFF ON OFF ON OFF OFF
41 ON OFF OFF ON OFF ON OFF OFF
42 OFF ON OFF ON OFF ON OFF OFF
43 ON ON OFF ON OFF ON OFF OFF
44 OFF OFF ON ON OFF ON OFF OFF
45 ON OFF ON ON OFF ON OFF OFF
Table 1-5 Switch Settings for SW1, Pelco D-Type Control (continued)
Address
Switch Setting
SW1-1 SW1-2 SW1-3 SW1-4 SW1-5 SW1-6 SW1-7 SW1-8
1-14Cisco Video Surveillance IP PTZ Dome Camera User Guide, Cisco 2900 Series IP Dome
OL-24281-01

Chapter 1 InstallationSwitch Settings
46 OFF ON ON ON OFF ON OFF OFF
47 ON ON ON ON OFF ON OFF OFF
48 OFF OFF OFF OFF ON ON OFF OFF
49 ON OFF OFF OFF ON ON OFF OFF
50 OFF ON OFF OFF ON ON OFF OFF
51 ON ON OFF OFF ON ON OFF OFF
52 OFF OFF ON OFF ON ON OFF OFF
53 ON OFF ON OFF ON ON OFF OFF
54 OFF ON ON OFF ON ON OFF OFF
55 ON ON ON OFF ON ON OFF OFF
56 OFF OFF OFF ON ON ON OFF OFF
57 ON OFF OFF ON ON ON OFF OFF
58 OFF ON OFF ON ON ON OFF OFF
59 ON ON OFF ON ON ON OFF OFF
60 OFF OFF ON ON ON ON OFF OFF
61 ON OFF ON ON ON ON OFF OFF
62 OFF ON ON ON ON ON OFF OFF
63 ON ON ON ON ON ON OFF OFF
64 OFF OFF OFF OFF OFF OFF ON OFF
65 ON OFF OFF OFF OFF OFF ON OFF
66 OFF ON OFF OFF OFF OFF ON OFF
67 ON ON OFF OFF OFF OFF ON OFF
68 OFF OFF ON OFF OFF OFF ON OFF
69 ON OFF ON OFF OFF OFF ON OFF
70 OFF ON ON OFF OFF OFF ON OFF
71 ON ON ON OFF OFF OFF ON OFF
72 OFF OFF OFF ON OFF OFF ON OFF
73 ON OFF OFF ON OFF OFF ON OFF
74 OFF ON OFF ON OFF OFF ON OFF
75 ON ON OFF ON OFF OFF ON OFF
76 OFF OFF ON ON OFF OFF ON OFF
77 ON OFF ON ON OFF OFF ON OFF
78 OFF ON ON ON OFF OFF ON OFF
79 ON ON ON ON OFF OFF ON OFF
80 OFF OFF OFF OFF ON OFF ON OFF
Table 1-5 Switch Settings for SW1, Pelco D-Type Control (continued)
Address
Switch Setting
SW1-1 SW1-2 SW1-3 SW1-4 SW1-5 SW1-6 SW1-7 SW1-8
1-15Cisco Video Surveillance IP PTZ Dome Camera User Guide, Cisco 2900 Series IP Dome
OL-24281-01

Chapter 1 InstallationSwitch Settings
81 ON OFF OFF OFF ON OFF ON OFF
82 OFF ON OFF OFF ON OFF ON OFF
83 ON ON OFF OFF ON OFF ON OFF
84 OFF OFF ON OFF ON OFF ON OFF
85 ON OFF ON OFF ON OFF ON OFF
86 OFF ON ON OFF ON OFF ON OFF
87 ON ON ON OFF ON OFF ON OFF
88 OFF OFF OFF ON ON OFF ON OFF
89 ON OFF OFF ON ON OFF ON OFF
90 OFF ON OFF ON ON OFF ON OFF
91 ON ON OFF ON ON OFF ON OFF
92 OFF OFF ON ON ON OFF ON OFF
93 ON OFF ON ON ON OFF ON OFF
94 OFF ON ON ON ON OFF ON OFF
95 ON ON ON ON ON OFF ON OFF
96 OFF OFF OFF OFF OFF ON ON OFF
97 ON OFF OFF OFF OFF ON ON OFF
98 OFF ON OFF OFF OFF ON ON OFF
99 ON ON OFF OFF OFF ON ON OFF
100 OFF OFF ON OFF OFF ON ON OFF
101 ON OFF ON OFF OFF ON ON OFF
102 OFF ON ON OFF OFF ON ON OFF
103 ON ON ON OFF OFF ON ON OFF
104 OFF OFF OFF ON OFF ON ON OFF
105 ON OFF OFF ON OFF ON ON OFF
106 OFF ON OFF ON OFF ON ON OFF
107 ON ON OFF ON OFF ON ON OFF
108 OFF OFF ON ON OFF ON ON OFF
109 ON OFF ON ON OFF ON ON OFF
110 OFF ON ON ON OFF ON ON OFF
111 ON ON ON ON OFF ON ON OFF
112 OFF OFF OFF OFF ON ON ON OFF
113 ON OFF OFF OFF ON ON ON OFF
114 OFF ON OFF OFF ON ON ON OFF
115 ON ON OFF OFF ON ON ON OFF
Table 1-5 Switch Settings for SW1, Pelco D-Type Control (continued)
Address
Switch Setting
SW1-1 SW1-2 SW1-3 SW1-4 SW1-5 SW1-6 SW1-7 SW1-8
1-16Cisco Video Surveillance IP PTZ Dome Camera User Guide, Cisco 2900 Series IP Dome
OL-24281-01

Chapter 1 InstallationSwitch Settings
116 OFF OFF ON OFF ON ON ON OFF
117 ON OFF ON OFF ON ON ON OFF
118 OFF ON ON OFF ON ON ON OFF
119 ON ON ON OFF ON ON ON OFF
120 OFF OFF OFF ON ON ON ON OFF
121 ON OFF OFF ON ON ON ON OFF
122 OFF ON OFF ON ON ON ON OFF
123 ON ON OFF ON ON ON ON OFF
124 OFF OFF ON ON ON ON ON OFF
125 ON OFF ON ON ON ON ON OFF
126 OFF ON ON ON ON ON ON OFF
127 ON ON ON ON ON ON ON OFF
128 OFF OFF OFF OFF OFF OFF OFF ON
129 ON OFF OFF OFF OFF OFF OFF ON
130 OFF ON OFF OFF OFF OFF OFF ON
131 ON ON OFF OFF OFF OFF OFF ON
132 OFF OFF ON OFF OFF OFF OFF ON
133 ON OFF ON OFF OFF OFF OFF ON
134 OFF ON ON OFF OFF OFF OFF ON
135 ON ON ON OFF OFF OFF OFF ON
136 OFF OFF OFF ON OFF OFF OFF ON
137 ON OFF OFF ON OFF OFF OFF ON
138 OFF ON OFF ON OFF OFF OFF ON
139 ON ON OFF ON OFF OFF OFF ON
140 OFF OFF ON ON OFF OFF OFF ON
141 ON OFF ON ON OFF OFF OFF ON
142 OFF ON ON ON OFF OFF OFF ON
143 ON ON ON ON OFF OFF OFF ON
144 OFF OFF OFF OFF ON OFF OFF ON
145 ON OFF OFF OFF ON OFF OFF ON
146 OFF ON OFF OFF ON OFF OFF ON
147 ON ON OFF OFF ON OFF OFF ON
148 OFF OFF ON OFF ON OFF OFF ON
149 ON OFF ON OFF ON OFF OFF ON
150 OFF ON ON OFF ON OFF OFF ON
Table 1-5 Switch Settings for SW1, Pelco D-Type Control (continued)
Address
Switch Setting
SW1-1 SW1-2 SW1-3 SW1-4 SW1-5 SW1-6 SW1-7 SW1-8
1-17Cisco Video Surveillance IP PTZ Dome Camera User Guide, Cisco 2900 Series IP Dome
OL-24281-01
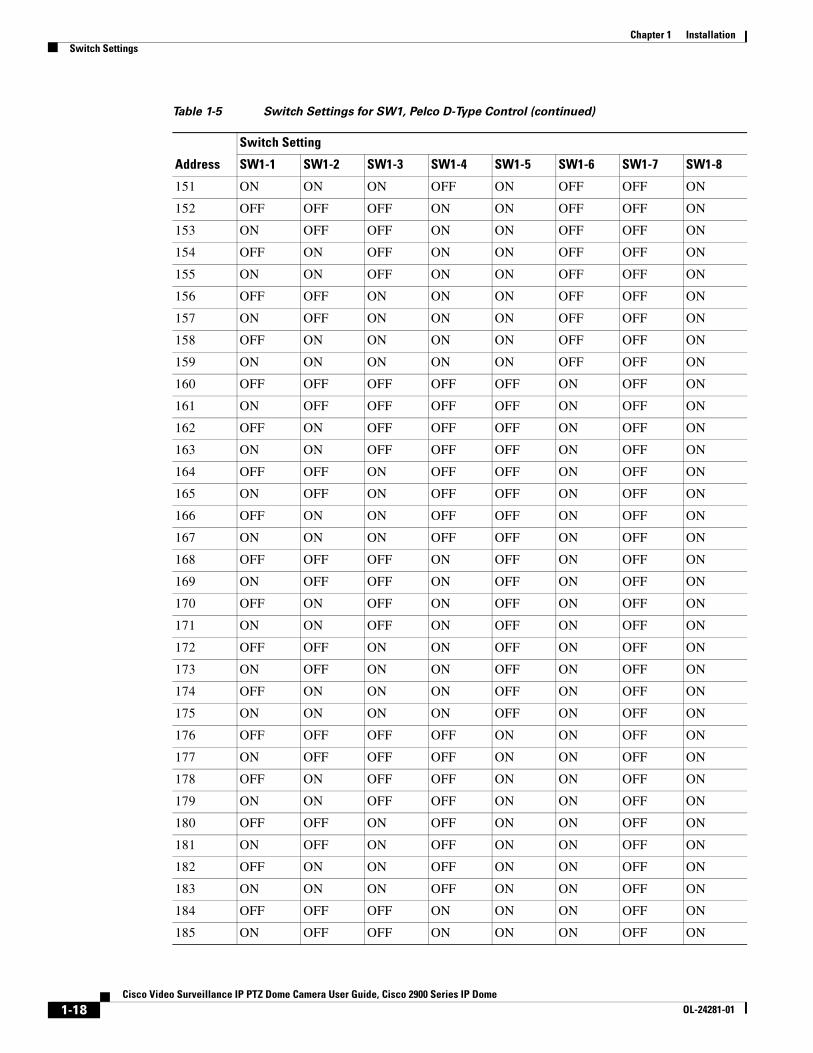
Chapter 1 InstallationSwitch Settings
151 ON ON ON OFF ON OFF OFF ON
152 OFF OFF OFF ON ON OFF OFF ON
153 ON OFF OFF ON ON OFF OFF ON
154 OFF ON OFF ON ON OFF OFF ON
155 ON ON OFF ON ON OFF OFF ON
156 OFF OFF ON ON ON OFF OFF ON
157 ON OFF ON ON ON OFF OFF ON
158 OFF ON ON ON ON OFF OFF ON
159 ON ON ON ON ON OFF OFF ON
160 OFF OFF OFF OFF OFF ON OFF ON
161 ON OFF OFF OFF OFF ON OFF ON
162 OFF ON OFF OFF OFF ON OFF ON
163 ON ON OFF OFF OFF ON OFF ON
164 OFF OFF ON OFF OFF ON OFF ON
165 ON OFF ON OFF OFF ON OFF ON
166 OFF ON ON OFF OFF ON OFF ON
167 ON ON ON OFF OFF ON OFF ON
168 OFF OFF OFF ON OFF ON OFF ON
169 ON OFF OFF ON OFF ON OFF ON
170 OFF ON OFF ON OFF ON OFF ON
171 ON ON OFF ON OFF ON OFF ON
172 OFF OFF ON ON OFF ON OFF ON
173 ON OFF ON ON OFF ON OFF ON
174 OFF ON ON ON OFF ON OFF ON
175 ON ON ON ON OFF ON OFF ON
176 OFF OFF OFF OFF ON ON OFF ON
177 ON OFF OFF OFF ON ON OFF ON
178 OFF ON OFF OFF ON ON OFF ON
179 ON ON OFF OFF ON ON OFF ON
180 OFF OFF ON OFF ON ON OFF ON
181 ON OFF ON OFF ON ON OFF ON
182 OFF ON ON OFF ON ON OFF ON
183 ON ON ON OFF ON ON OFF ON
184 OFF OFF OFF ON ON ON OFF ON
185 ON OFF OFF ON ON ON OFF ON
Table 1-5 Switch Settings for SW1, Pelco D-Type Control (continued)
Address
Switch Setting
SW1-1 SW1-2 SW1-3 SW1-4 SW1-5 SW1-6 SW1-7 SW1-8
1-18Cisco Video Surveillance IP PTZ Dome Camera User Guide, Cisco 2900 Series IP Dome
OL-24281-01

Chapter 1 InstallationSwitch Settings
186 OFF ON OFF ON ON ON OFF ON
187 ON ON OFF ON ON ON OFF ON
188 OFF OFF ON ON ON ON OFF ON
189 ON OFF ON ON ON ON OFF ON
190 OFF ON ON ON ON ON OFF ON
191 ON ON ON ON ON ON OFF ON
192 OFF OFF OFF OFF OFF OFF ON ON
193 ON OFF OFF OFF OFF OFF ON ON
194 OFF ON OFF OFF OFF OFF ON ON
195 ON ON OFF OFF OFF OFF ON ON
196 OFF OFF ON OFF OFF OFF ON ON
197 ON OFF ON OFF OFF OFF ON ON
198 OFF ON ON OFF OFF OFF ON ON
199 ON ON ON OFF OFF OFF ON ON
200 OFF OFF OFF ON OFF OFF ON ON
201 ON OFF OFF ON OFF OFF ON ON
202 OFF ON OFF ON OFF OFF ON ON
203 ON ON OFF ON OFF OFF ON ON
204 OFF OFF ON ON OFF OFF ON ON
205 ON OFF ON ON OFF OFF ON ON
206 OFF ON ON ON OFF OFF ON ON
207 ON ON ON ON OFF OFF ON ON
208 OFF OFF OFF OFF ON OFF ON ON
209 ON OFF OFF OFF ON OFF ON ON
210 OFF ON OFF OFF ON OFF ON ON
211 ON ON OFF OFF ON OFF ON ON
212 OFF OFF ON OFF ON OFF ON ON
213 ON OFF ON OFF ON OFF ON ON
214 OFF ON ON OFF ON OFF ON ON
215 ON ON ON OFF ON OFF ON ON
216 OFF OFF OFF ON ON OFF ON ON
217 ON OFF OFF ON ON OFF ON ON
218 OFF ON OFF ON ON OFF ON ON
219 ON ON OFF ON ON OFF ON ON
220 OFF OFF ON ON ON OFF ON ON
Table 1-5 Switch Settings for SW1, Pelco D-Type Control (continued)
Address
Switch Setting
SW1-1 SW1-2 SW1-3 SW1-4 SW1-5 SW1-6 SW1-7 SW1-8
1-19Cisco Video Surveillance IP PTZ Dome Camera User Guide, Cisco 2900 Series IP Dome
OL-24281-01

Chapter 1 InstallationSwitch Settings
221 ON OFF ON ON ON OFF ON ON
222 OFF ON ON ON ON OFF ON ON
223 ON ON ON ON ON OFF ON ON
224 OFF OFF OFF OFF OFF ON ON ON
225 ON OFF OFF OFF OFF ON ON ON
226 OFF ON OFF OFF OFF ON ON ON
227 ON ON OFF OFF OFF ON ON ON
228 OFF OFF ON OFF OFF ON ON ON
229 ON OFF ON OFF OFF ON ON ON
230 OFF ON ON OFF OFF ON ON ON
231 ON ON ON OFF OFF ON ON ON
232 OFF OFF OFF ON OFF ON ON ON
233 ON OFF OFF ON OFF ON ON ON
234 OFF ON OFF ON OFF ON ON ON
235 ON ON OFF ON OFF ON ON ON
236 OFF OFF ON ON OFF ON ON ON
237 ON OFF ON ON OFF ON ON ON
238 OFF ON ON ON OFF ON ON ON
239 ON ON ON ON OFF ON ON ON
240 OFF OFF OFF OFF ON ON ON ON
241 ON OFF OFF OFF ON ON ON ON
242 OFF ON OFF OFF ON ON ON ON
243 ON ON OFF OFF ON ON ON ON
244 OFF OFF ON OFF ON ON ON ON
245 ON OFF ON OFF ON ON ON ON
246 OFF ON ON OFF ON ON ON ON
247 ON ON ON OFF ON ON ON ON
248 OFF OFF OFF ON ON ON ON ON
249 ON OFF OFF ON ON ON ON ON
250 OFF ON OFF ON ON ON ON ON
251 ON ON OFF ON ON ON ON ON
252 OFF OFF ON ON ON ON ON ON
253 ON OFF ON ON ON ON ON ON
254 OFF ON ON ON ON ON ON ON
Table 1-5 Switch Settings for SW1, Pelco D-Type Control (continued)
Address
Switch Setting
SW1-1 SW1-2 SW1-3 SW1-4 SW1-5 SW1-6 SW1-7 SW1-8
1-20Cisco Video Surveillance IP PTZ Dome Camera User Guide, Cisco 2900 Series IP Dome
OL-24281-01

Cisco Video Surveillance IP PTZ DoOL-24281-01
C H A P T E R 2
OperationThis chapter describes how to operate the Cisco 2900 Series IP Dome camera.
Before you begin, install the dome as described in Chapter 1, “Installation.” After installed, apply power to the system. The system will complete a configuration sequence.
This chapter includes these topics:
• System Requirements, page 2-1
• Accessing the IP Device, page 2-2
• Live Video Page, page 2-2
• Settings Page, page 2-7
• System Tab, page 2-7
• Network Tab, page 2-10
• Camera Configuration Tab, page 2-17
• A/V Streams Tab, page 2-23
• Users Tab, page 2-37
• Events Tab, page 2-40
System RequirementsNetwork and processor bandwidth limitations might cause the video stream to pause or appear pixilated when additional Web-interface users connect to the camera. Decrease the images per second (ips), resolution, compression, or bit rate settings of the Web interface video streams to compensate for network/processor limitations.
The following system requirements are needed to use a web browser with the camera:
• Processor—Intel Core 2 Duo microprocessor, 2.6 GHz
• Operating system—Microsoft Windows XP
• Memory—2 GB RAM
• Network interface card—100 megabits or greater
• Monitor—Minimum of 1024 x 768 resolution, 16- or 32-bit pixel color resolution
• Web browser—Internet Explorer 8.0 or later
• Media player—QuickTime 7.6.5 for Windows XP
2-1me Camera User Guide, Cisco 2900 Series IP Dome

Chapter 2 OperationAccessing the IP Device
Accessing the IP DeviceThe first time you access the device, the Live Video page appears. By default, you are viewing the video as a public user and only have access to the single stream live view.
If, for security purposes, users should not be allowed to view video without first logging in to the camera, change the permissions for public users.
To log in to the device, follow these steps:
Step 1 Open the Web browser.
Step 2 Type the device’s IP address in the browser address bar.
Step 3 Click the Login button in the navigation bar; a dialog box appears.
Step 4 Type your user ID and password.
Note If you are logging in to the camera as the administrator for the first time, the default User ID and Password are admin (all lowercase). For security purposes, change the password after you log on for the first time.
Step 5 Click Log In.
See the following section for more information:
• Editing a User, page 2-40
Live Video PageThe Live Video page allows you to manage the way you view live video and capture images. You can also view live video from this page and access menus on the navigation bar (based on user permissions).
Note The PTZ controls are viewable only after you have logged in to the device.
See the following sections for more information:
• Live Video Page Icons, page 2-2
• PTZ Controls, page 2-3
• Selecting a Stream, page 2-4
• Taking a Snapshot, page 2-6
• Displaying Video in the Multiscreen View, page 2-6
Live Video Page IconsViewable icons are based on user permissions.
2-2Cisco Video Surveillance IP PTZ Dome Camera User Guide, Cisco 2900 Series IP Dome
OL-24281-01

Chapter 2 OperationLive Video Page
PTZ ControlsThe PTZ controls are viewable only after you have logged on to the device.
Table 2-1 Live Video Page Icons
Icon Description
Show Device List: Displays a list of viewable cameras connected to the same virtual local area network (VLAN) as the camera to which you are logged on.
Disable Viewer: Closes the live view window.
1 x 1 Mode: Displays a single video pane.
2 x 2 Mode: Displays 4 video panes in rows of two.
3 x 3 Mode: Displays 9 video panes in rows of three.
4 x 4 Mode: Displays 16 video panes in rows of four.
Select Stream: Selects the viewable video stream that is displayed in live view (primary or secondary) and selects unicast or multicast settings.
Maximize Viewing Area: Scales the image to the full size of the browser. To resize the video pane to normal view, click the Show Toolbar button in the upper-right corner of the window.
Show Toolbar: Returns the window to normal view. This option is only available after the window has been set to maximize the viewing area.
Open Stream in New Window: Opens the video in a scalable, independent window. Opening the video in a separate window allows you to view the video while other applications are running. This window can be minimized, maximized, or closed using the title bar buttons of the active window. The window can also be resized by dragging the lower-right corner of the window.
Take a Snapshot: Captures the image displayed in the video pane and then saves it as a JPEG file.
Center Viewing Area: Centers the camera on an area in the video pane. To center a viewing area, click the desired location in the video pane.
This icon is available only when the QuickView Stream is selected.
Pan and Tilt: Controls the pan and tilt functions. Click and drag the mouse to the left or right to pan the camera. Click and drag the mouse up or down to tilt the camera.
This icon is available only when the QuickView Stream is selected.
Resize Viewing Area: Zooms in on an area of interest. Click and drag the mouse over the view pane to zoom in on an object.
This icon is available only when the QuickView Stream is selected.
2-3Cisco Video Surveillance IP PTZ Dome Camera User Guide, Cisco 2900 Series IP Dome
OL-24281-01

Chapter 2 OperationLive Video Page
Note If OSD is enabled, the PTZ function does not work on the camera.
Selecting a Stream
Step 1 Click the Select Stream button.
Step 2 Select one of the following stream options from the Select Stream page:
• Primary Stream—To select this stream, click the button next to Primary Stream.
• Secondary Stream—To select this stream, click the button next to Secondary Stream.
• QuickView Stream—To select this stream, click the button next to QuickView Stream.
• Event Stream—To select this stream, click the button next to Event Stream.
If the secondary stream has not been configured, only Primary Stream, Event Stream, and QuickView Stream are available.
Step 3 Select one of the following options to adjust the stream settings:
• MPEG-4 or H.264 compression—Select the video transmission type from the Transmission drop-down menu. Available settings include Unicast and Multicast. Select the media player from the Player drop-down menu. Available settings include Pelco Media Player or QuickTime.
Table 2-2 PTZ Controls
Control Description
Zoom In: Click and hold the button to zoom the lens in
Zoom Out: Click and hold the button to zoom the lens out
Tilt Up: Click and hold the button to tilt the camera up
Tilt Down: Click and hold the button to tilt the camera down
Pan Left: Click and hold the button to pan the camera left
Pan Right: Click and hold the button to pan the camera right
Focus Near: Click and hold the button to focus on an object near the camera
Focus Far: Click and hold the button to focus on an object far away from the camera
Iris Close: Click and hold the button to close the iris and darken the image
Iris Open: Click and hold the button to open the iris and lighten the image
2-4Cisco Video Surveillance IP PTZ Dome Camera User Guide, Cisco 2900 Series IP Dome
OL-24281-01

Chapter 2 OperationLive Video Page
• JPEG compression—Select the image rate for the stream from the Image Rate drop-down menu. The available settings for the primary and secondary streams depend on the Image Rate setting. The QuickView Stream has only two image rate settings: 2 ips and 1 ips.
Step 4 Click the Select button to save the stream settings.
See the following sections for more information:
• Primary Stream and Secondary Stream, page 2-5
• QuickView Stream, page 2-5
• Unicast, page 2-5
• Multicast, page 2-6
• Compression Standards, page 2-26
• Image Rate and Bit Rate, page 2-26
Primary Stream and Secondary Stream
The primary stream and secondary stream are video streams that include compression, resolution, image rate, and bit rate settings. The streams can be set up using a video preset setting, or they can be customized using the video configuration settings.
A video preset is a predefined video configuration that offers a good balance between video performance and bandwidth usage. For easy stream configuration, use the Video Preset page located in the drop-down menu of the A/V Streams Tab.
To customize the Primary Stream or Secondary Stream use the Video Configuration page located in the drop-down menu of the A/V Streams Tab. Configurable settings include the stream name, compression standard, resolution setting, image rate, and bit rate. The default names for the streams are Primary Stream and Secondary Stream; however, if these stream names have been changed, the new names will replace the default names (Primary Stream and Secondary Stream) on the Select Stream page.
QuickView Stream
The QuickView stream is a predefined JPEG video stream with VGA resolution. This low resolution, low frame rate stream is displayed when the Imaging Tab settings are configured. This allows users to view changes to exposure, white balance, and tone map settings as they are configured and before the settings are saved.
The QuickView Stream is also ideal for users who are connected to a network with processor bandwidth limitations that might cause a high resolution, high frame rate video stream to pause or appear pixilated.
The aspect ratio of the QuickView Stream mirrors that of the Primary Stream. The only stream setting that is selectable is the framerate: 2 ips or 1 ips.
Unicast
A unicast transmission sends a separate video stream to each user that is requesting data. Although multiple users might request the same data from the camera at the same time, duplicate video streams are transmitted to each user. Every unicast user that connects to the camera consumes additional processing power, which limits the number of simultaneous users who can access the camera.
The camera supports a maximum of 20 simultaneous users.
2-5Cisco Video Surveillance IP PTZ Dome Camera User Guide, Cisco 2900 Series IP Dome
OL-24281-01

Chapter 2 OperationLive Video Page
Multicast
A multicast transmission sends data to multiple users at the same time using one transmission stream. Each multicast user that connects to the camera consumes no additional processing power; therefore, multicast video streams can be sent to an unlimited number of simultaneous users.
Taking a Snapshot
Step 1 Click the “Take a Snapshot” button.
The File Download dialog box opens, and the following message appears: “Do you want to open or save this file?”
Step 2 Select one of the following options:
• Open—Your computer’s photo editing program opens and displays the screen image. This function is available only when using Microsoft Internet Explorer 7.0 (or later).
• Save—The image is saved as a JPEG file on your computer.
• Cancel—The captured image is not saved or displayed and the dialog box closes.
Note If you are using JPEG, the captured image will be the size of the largest MJPEG stream. If you are using MPEG-4 or H.264, the image is captured using the QuickView Stream, which is approximately VGA resolution.
Displaying Video in the Multiscreen ViewDevices connected to the same virtual local area network (VLAN) as the device to which you are logged on can be displayed in a multiscreen view. Use the 4-camera, 9-camera, or 16-camera view mode buttons to display video from multiple devices simultaneously.
The device you are logged on to is the default display for the upper-left video pane in the multiscreen view. The device name is displayed in the gray area near the top of the page.
Note Using Primary and Secondary streams in multiscreen view will limit the available processing power and create responsiveness issues for the device and PC. If you experience latency issues, set the device streams to QuickView. Available processing power is determined by the settings for compression standards, resolution, image rate, bit rate, and analytic configuration.
To select video to display in the individual multiscreen panes:
Step 1 Click the desired View Mode display button.
Step 2 Click the Show Device List button above the selected video pane.
A list of cameras connected to the same VLAN as the camera to which you are logged on appears in the video pane.
2-6Cisco Video Surveillance IP PTZ Dome Camera User Guide, Cisco 2900 Series IP Dome
OL-24281-01

Chapter 2 OperationSettings Page
Step 3 Click the name of the camera you want to view. The live video of the selected camera appears in the video pane.
Step 4 Repeat Step 1 through Step 3 for the remaining video panes.
Settings PageDepending on user permissions, the Settings page allows you to manage camera system settings, set up users, configure events, and control the camera.
Note The Settings menu might not be available if the user does not have permission to access this feature.
Accessing the Device Menus
Step 1 Log on to the device.
Step 2 Click the Settings link in the navigation bar located in the upper-right corner of the page; a list of menu tabs appears.
Step 3 Place the mouse pointer over a tab to display a list of submenus.
See the following sections for more information:
• System Tab, page 2-7
• Network Tab, page 2-10
• Camera Configuration Tab, page 2-17
• Users Tab, page 2-37
• Events Tab, page 2-40
System TabUse the System tab to change the device name, configure the time settings, set up the text overlay for the live view, and display system information. You can also use the System tab to generate a system log, reboot the camera, or to restore the camera's factory default settings.
General Settings
The General Settings page includes configurable fields for the device name, time server, and text overlay settings. The device name is the user-friendly description of the camera displayed in the gray area near the top of screen.The time server is an external server that uses Network Time Protocol (NTP) to synchronize the camera date and time settings. The text overlay settings allow you to customize the appearance of the Web browser by displaying the device name and the date and time at the top or bottom of the live view.
2-7Cisco Video Surveillance IP PTZ Dome Camera User Guide, Cisco 2900 Series IP Dome
OL-24281-01

Chapter 2 OperationSystem Tab
You can also use the General Settings page to turn the camera’s power LED on or off and to configure the Simple Mail Transfer Protocol (SMTP) server to send an e-mail notification when an event handler is activated.
Note Consult your network administrator for information about configuring e-mail notification on your local network.
Information Settings
The System Information page fields are read-only and include the firmware version, hardware version, model number, and serial number of the system. This information is typically required by Pelco Product Support for troubleshooting purposes.
Changing the Device Name
Step 1 Place your mouse pointer over the System tab.
Step 2 Select General Settings from the drop-down menu.
Step 3 Click the Device Name box and highlight the text.
Type a user-friendly name into the Device Name box (2 to 63 characters).
A user-friendly name makes it easier to recognize the device on the network. Examples of user-friendly names are Front Door, Lobby, or Parking Lot.
Step 4 Click Save to save the new device name, or click Reset to restore to the previously saved device name.
Configuring the Time SettingsIf the camera is connected to a Dynamic Host Configuration Protocol (DHCP) network that has time server properties configured, the camera will synchronize automatically with the time server. If the DHCP network’s time server properties are not configured or the network does not have a time server, you need to configure the DHCP settings manually.
Step 1 Click the System tab.
Step 2 Select General Settings from the drop-down menu.
Step 3 Type the IP address of the time server in the Time Server field.
The time server is an external server that uses Network Time Protocol (NTP) to synchronize the camera date and time settings.
Step 4 Select the Time Zone option. Select the continent and the region that are closest to the camera’s location from the Time Zone drop-down menus.
Note If your location observes a form of daylight saving time, the system will automatically change the time on the associated dates.
2-8Cisco Video Surveillance IP PTZ Dome Camera User Guide, Cisco 2900 Series IP Dome
OL-24281-01

Chapter 2 OperationSystem Tab
Step 5 Click the Save button to save the settings, or click the Reset button to clear all of the information you entered without saving it.
Customizing the Appearance of the Text Overlay
Step 1 Click the System tab.
Step 2 Select General Settings from the drop-down menu.
Step 3 Set the Text Overlay settings:
• Date/Time Overlay—Select Show to display the date and time in the live view overlay. The default setting is Hide.
• Camera Name Overlay—Select Show to display the device name in the live view overlay. The default setting is Hide.
Step 4 Select the display position for the overlay from the Position drop-down menu.
Selections include Top Right, Top Center, Top Left, Bottom Right, Bottom Center, and Bottom Left.
Step 5 Click the Save button to save the settings, or click the Reset button to clear all of the information you entered without saving it.
Generating a System Log
Step 1 Click the System tab.
Step 2 Click the Generate System Log button to create a system log that can be used by the Cisco TAC for troubleshooting.
Rebooting the Camera
Step 1 Click the System tab.
Step 2 Select General Settings from the drop-down menu.
Click the Reboot Camera button to restart the camera.
Rebooting the camera does not change the configured camera settings.
Restoring All Camera Defaults
Caution This process cannot be undone; all user and custom settings will be lost.
2-9Cisco Video Surveillance IP PTZ Dome Camera User Guide, Cisco 2900 Series IP Dome
OL-24281-01

Chapter 2 OperationNetwork Tab
Step 1 Click the System tab.
Step 2 Select General Settings from the drop-down menu.
Step 3 Click the Restore All Camera Defaults button to restore the camera’s factory default settings.
Note If the camera is not connected to a Dynamic Host Configuration Protocol (DHCP) network, the IP address settings for the camera will be lost and the server will not recognize the camera. DHCP On is the default setting for the camera IP address.
See the following sections for more information:
• Turning Off DHCP, page 2-12
• Selecting the Audio Configuration Settings, page 2-35
Network TabUse the Network tab to change the camera’s general network settings, select the Secure Sockets Layer (SSL) settings, enable Secure Shell (SSH), and select Simple Network Management Protocol (SNMP) settings.
General Network Settings
The General Network page includes configurable and read-only fields for network communication settings. Available settings include the Hardware Address, Hostname, IP Address, Subnet Mask, Gateway, and DNS Servers.
You can also enable or disable the Dynamic Host Configuration Protocol (DHCP) server from the General Network page. DHCP automatically assigns an IP address to the device if there is a DHCP server on the network. If DHCP is set to On, the IP address, subnet mask, gateway, and DNS server settings are read-only text. If DHCP is set to Off, these settings must be manually changed. The default camera setting for DHCP is On.
SSL Settings
To ensure security on the Internet, all Web browsers provide several security levels that can be adjusted for sites that use SSL technology to transmit data. SSL encrypts communications, making it difficult for unauthorized users to intercept and view user names and passwords.
SSL requires signed certificates to determine if the Web browser accessing the camera has the required authentication. The camera can generate a certificate signing request (CSR) that can be sent to a certificate authority for a signature (for example, VeriSign), or it can generate a self-signed certificate using the Generate Self-Signed Certificate option.
SSH Settings
SSH is a user-enabled protocol that allows Pelco Product Support to log on to and service the camera for advanced troubleshooting purposes. From this page, users with the appropriate permissions can enable or disable SSH access to the camera.
2-10Cisco Video Surveillance IP PTZ Dome Camera User Guide, Cisco 2900 Series IP Dome
OL-24281-01

Chapter 2 OperationNetwork Tab
SNMP
SNMP is an application layer protocol used to manage TCP/IP-based networks from a single workstation or several workstations. The camera supports SNMP versions 2c and 3 and can be configured to send data using a trap.
See the following sections for more information:
• Network Tab, page 2-10
• Changing the Hostname, page 2-11
• Turning On DHCP, page 2-11
• Turning Off DHCP, page 2-12
• Selecting the Secure Sockets Layer Mode, page 2-13
• Generating a Certificate Request, page 2-13
• Generating a Self-Signed Certificate, page 2-14
• Enabling Secure Shell, page 2-15
Changing the Hostname
Step 1 Place your mouse pointer over the Network tab.
Step 2 Select General from the drop-down menu.
Step 3 Click in the Hostname box and highlight the text.
Step 4 Type a user-friendly name into the Hostname box (1 to 21 characters) using any combination of alphanumeric characters.
A user-friendly name makes it easier to recognize the device on the network.
Step 5 Click the Save button to save the settings, or click the Reset button to clear all of the information you entered without saving it.
Turning On DHCPThe default Dynamic Host Configuration Protocol (DHCP) setting for the camera is DHCP On. If the DHCP option is set to Off, complete the following steps to reset it to On.
Step 1 Place your mouse pointer over the Network tab.
Step 2 Select General from the drop-down menu.
Step 3 Select the On option for DHCP.
2-11Cisco Video Surveillance IP PTZ Dome Camera User Guide, Cisco 2900 Series IP Dome
OL-24281-01

Chapter 2 OperationNetwork Tab
Step 4 Click the Save button to save the settings, or click the Reset button to clear all of the information you entered without saving it.
Note If the camera is not connected to a DHCP server but DHCP is set to On, the default IP address 192.168.0.20 on subnet mask 255.255.255.0 is automatically assigned to the camera. After the first camera is connected and assigned the default IP address, the system will automatically look for other cameras on the auto IP address system and assign IP addresses in sequential order as required. For example, if three cameras are connected to a network without a DHCP server, the first camera will be assigned address 192.168.0.20, the second camera will be assigned address 192.168.0.21, and the third camera will be assigned address 192.168.0.22.
Turning Off DHCP
Caution Contact your network administrator to avoid any network conflicts before setting or changing the IP address of the device.
Step 1 Place your mouse pointer over the Network tab.
Step 2 Select General from the drop-down menu.
Step 3 Select the Off option for the Dynamic Host Configuration Protocol (DHCP).
Step 4 Change the following network settings as required:
• IP Address—The address of the camera connected to the network.
• Subnet Mask—The address that determines the IP network that the camera is connected to (relative to its address).
• Gateway—The router that accesses other networks.
• DNS Servers—The addresses of the dedicated servers that translate the names for Web sites and hostnames into numeric IP addresses.
Step 5 Click the Save button to save the settings, or click the Reset button to clear all of the information you entered without saving it.
2-12Cisco Video Surveillance IP PTZ Dome Camera User Guide, Cisco 2900 Series IP Dome
OL-24281-01
Chapter 2 OperationNetwork Tab
Selecting the Secure Sockets Layer Mode
Figure 2-1 SSL Configuration Page
Step 1 Place your mouse pointer over the Network tab.
Step 2 Select SSL from the drop-down menu.
Step 3 Select one of the following modes:
• Required—A signed Secure Sockets Layer (SSL) certificate must be installed, and a secure URL that begins with the protocol name “https:” must be used to access the camera. Sensitive data is always encrypted during transmission. A URL that begins with the “http:” protocol rather than the “https:” protocol will be redirected to the secure URL automatically.
• Optional—A signed SSL certificate must be installed, but a secure URL that begins with the protocol name “https:” is optional when accessing the camera. You can also access the camera using a standard URL with the “http:” protocol, but sensitive data is not encrypted during transmission. To ensure that sensitive data is encrypted, you must use a secure URL with the “https:” protocol.
• Disabled (default)—Turns off access to the Web client through SSL. Sensitive data will not be encrypted during transmission.
Note If the SSL mode is set to disabled, you cannot access the camera using a URL that begins with an “https:” protocol. Your Web browser displays an error message if you do not type the camera URL correctly.
See the following sections for more information:
• Generating a Certificate Request, page 2-13
• Generating a Self-Signed Certificate, page 2-14
Generating a Certificate Request
Step 1 Place your mouse pointer over the Network tab.
Step 2 Select SSL from the drop-down menu.
2-13Cisco Video Surveillance IP PTZ Dome Camera User Guide, Cisco 2900 Series IP Dome
OL-24281-01

Chapter 2 OperationNetwork Tab
Step 3 Click the Install Certificate button located at the bottom of the SSL Configuration page.
The Select Certificate Install Method option buttons appear on the page.
Step 4 Select Generate Certificate Request, and then click Next. The Certificate Request Form opens.
Step 5 Fill in all of the fields, and then click Generate Request.
The following progress message appears on the page: “Generating certificate signing request, please wait.”
Step 6 Send the CSR, which looks like an encrypted block of undecipherable text, to a third-party certificate authority of your choice for a signature.
Step 7 After you receive the signed certificate, click the Install Certificate button to upload the signed certificate to the device.
Step 8 After the certificate is uploaded, select the desired mode.
Step 9 Click Save.
Note Depending on the third-party certificate authority that signed your certificate, you might need to renew your certificate after a specified amount of time. Consult the certificate authority for more details.
Generating a Self-Signed Certificate
Step 1 Place your mouse pointer over the Network tab.
Step 2 Select SSL from the drop-down menu.
Step 3 Click the Install Certificate button located at the bottom of the SSL Configuration page.
The Select Certificate Install Method option buttons appear on the page.
Step 4 Select the “Generate Self-signed Certificate” option, and then click Next. The “Self-signed Certificate Information Form” opens.
Step 5 Fill in all of the fields, and then click Generate Request.
The following progress message appears on the page: “Your changes are being applied. This process might take up to 3 minutes.” After 3 minutes, the certificate is uploaded to the device.
Step 6 After the certificate is uploaded, select the desired mode.
Step 7 Click Save.
Note Self-signed certificates are valid for one year. The certificate’s expiration date is listed in the Installed Certificate information section. If the certificate has expired and you attempt to access the camera using a secure URL, the Web browser displays a message. Repeat this procedure to generate and upload a new certificate.
2-14Cisco Video Surveillance IP PTZ Dome Camera User Guide, Cisco 2900 Series IP Dome
OL-24281-01

Chapter 2 OperationNetwork Tab
Enabling Secure Shell
Figure 2-2 SSH Settings Page
Step 1 Place your mouse pointer over the Network tab.
Step 2 Select SSH from the drop-down menu.
Step 3 Select the Enabled check box.
Note The username is always root and cannot be changed. The username and password are required when accessing the camera through a third-party SSH client.
Step 4 Click in the Password box and type a password (4 to 16 alphanumeric characters). Passwords are case-sensitive.
Step 5 Click in the Re-type Password box and retype your password.
Step 6 Click the Save button to save the password and enable SSH, or click the Reset button to clear all of the information you entered without saving it.
Selecting SNMP Settings
Note The Simple Network Management Protocol (SNMP) settings are advanced controls. Consult your network administrator to obtain the required information to configure SNMP settings.
Step 1 Place your mouse pointer over the Network tab.
Step 2 Select SNMP from the drop-down menu.
Step 3 Select the SNMP Version: None, V2c, or V3.
None disables the SNMP configuration and is the default setting.
2-15Cisco Video Surveillance IP PTZ Dome Camera User Guide, Cisco 2900 Series IP Dome
OL-24281-01

Chapter 2 OperationNetwork Tab
Note SNMP V2c and SNMP V3 configuration settings are independent of each other, but only one SNMP version can be active at a time.
Configuring SNMP V2c
Figure 2-3 SNMP V2c Settings
Step 1 Place your mouse pointer over the Network tab.
Step 2 Select V2c as the SNMP Version.
Step 3 Type the community name in the Community String box.
The default name for the Community String is “public.”
Step 4 Configure the Trap Configuration settings.
• Address—Type the hostname or IP address of the recipient of the trap message.
• Community String—Type the name of the community that should receive the trap message.
Step 5 Click the Save button to save the settings, or click the Reset button to clear all of the information you entered without saving it.
2-16Cisco Video Surveillance IP PTZ Dome Camera User Guide, Cisco 2900 Series IP Dome
OL-24281-01

Chapter 2 OperationCamera Configuration Tab
Configuring SNMP V3
Figure 2-4 SNMP V3 Settings
Step 1 Place your mouse pointer over the Network tab.
Step 2 Select V3 as the SNMP Version.
Step 3 Type the SNMP user name in the SNMP user field.
Step 4 Select the encryption algorithm for authentication from the Authentication drop-down menu: None, MD5, or SHA.
If you use authentication method MD5 or SHA, type a password in the text box to the right of the selected Authentication encryption.
Step 5 Select the privacy encryption algorithm setting from the Privacy drop-down menu: None, DES, or AES.
If you use privacy method DES or AES, type a password in the text box to the right of the selected Privacy encryption.
Step 6 Configure the address for the Trap Configuration.
The Address is the hostname or IP address of the recipient of the trap message.
Step 7 Click the Save button to save the settings, or click the Reset button to clear all of the information you entered without saving it.
Camera Configuration TabUse the Camera Configuration tab to configure general camera settings, access the main menu of the camera system, or configure presets and patterns using a Web browser.
General
The General Settings page allows you to easily adjust the video properties of the image without accessing the main menu of the camera system. Change the brightness, saturation, hue, or contrast of the image by moving a slider bar to the right or left. As you move the slider, you will see the changes to the image in the preview pane of the Web browser.
All changes to the image are stored in the built-in memory of the camera system.
2-17Cisco Video Surveillance IP PTZ Dome Camera User Guide, Cisco 2900 Series IP Dome
OL-24281-01
Chapter 2 OperationCamera Configuration Tab
OSD
All camera system menus can be accessed through the Web browser using the On-Screen Display (OSD) page. The viewed camera system menus are displayed in the preview pane of the Web browser. Use the keys on your keyboard to navigate through the camera system menus.
Note If OSD is enabled, the PTZ function does not work on the camera.
Presets/Patterns
Use the Preset/Patterns page to easily configure presets and patterns without accessing the camera system menus. You can configure up to 15 preset positions and up to eight patterns using the Web browser. All configured presets and patterns are stored in the built-in memory of the camera system.
See the following sections for more information:
• Adjusting the Video Properties, page 2-18
• Using On-Screen Display (OSD) to Access Camera Menus, page 2-19
• Configuring Home Preset, page 2-20
• Selecting a Configured Preset, page 2-21
• Configuring a Pattern, page 2-22
• Selecting a Configured Pattern, page 2-22
Adjusting the Video Properties
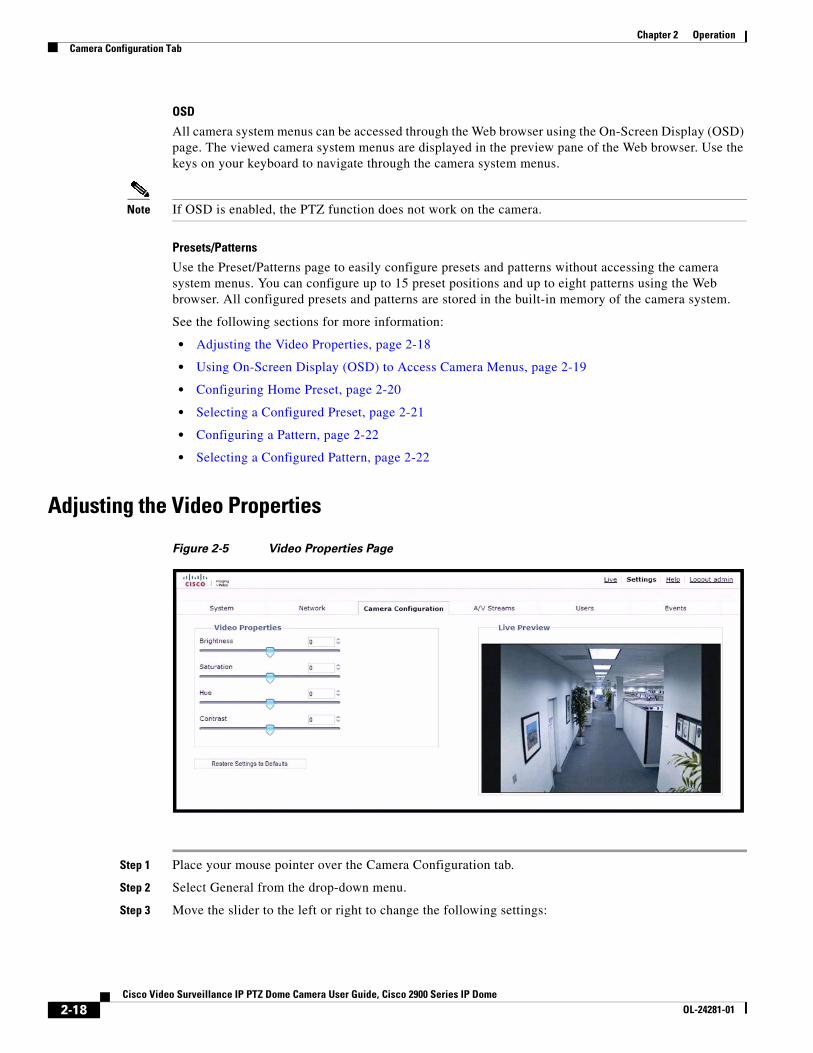
Figure 2-5 Video Properties Page
Step 1 Place your mouse pointer over the Camera Configuration tab.
Step 2 Select General from the drop-down menu.
Step 3 Move the slider to the left or right to change the following settings:
2-18Cisco Video Surveillance IP PTZ Dome Camera User Guide, Cisco 2900 Series IP Dome
OL-24281-01

Chapter 2 OperationCamera Configuration Tab
• Brightness:—Controls the lighting detail in a scene. Move the slider to the right to lighten the image; move the slider to the left to darken the image. The range of adjustment is –100 to 100; the default setting is 0 (zero).
• Saturation—Controls how intense or vivid the colors are in a scene. Move the slider to the right to increase the saturation level; move the slider to the left to decrease the saturation level. The range of adjustment is –100 to 100; the default setting is 0 (zero).
• Hue— Controls the red and blue hue in the camera image. Move the slider to the right to increase the red hue; move the slider to the left to increase the blue hue. The range of adjustment is –100 to 100; the default setting is 0 (zero).
• Contrast—Controls gradations between the darkest and lightest portions of the scene. Move the slider to the right to increase the contrast; move the slider to the left to decrease the contrast. The auto range of adjustment is –100 to 100; the default setting is 0 (zero).
Using On-Screen Display (OSD) to Access Camera Menus
Step 1 Place your mouse pointer over the Camera Configuration tab.
Step 2 Select OSD from the drop-down menu.
Step 3 Use the arrow keys on your keyboard to navigate through the menus.
Step 4 Press the Enter key on your keyboard to make a menu selection.
2-19Cisco Video Surveillance IP PTZ Dome Camera User Guide, Cisco 2900 Series IP Dome
OL-24281-01
Chapter 2 OperationCamera Configuration Tab
Configuring a Preset
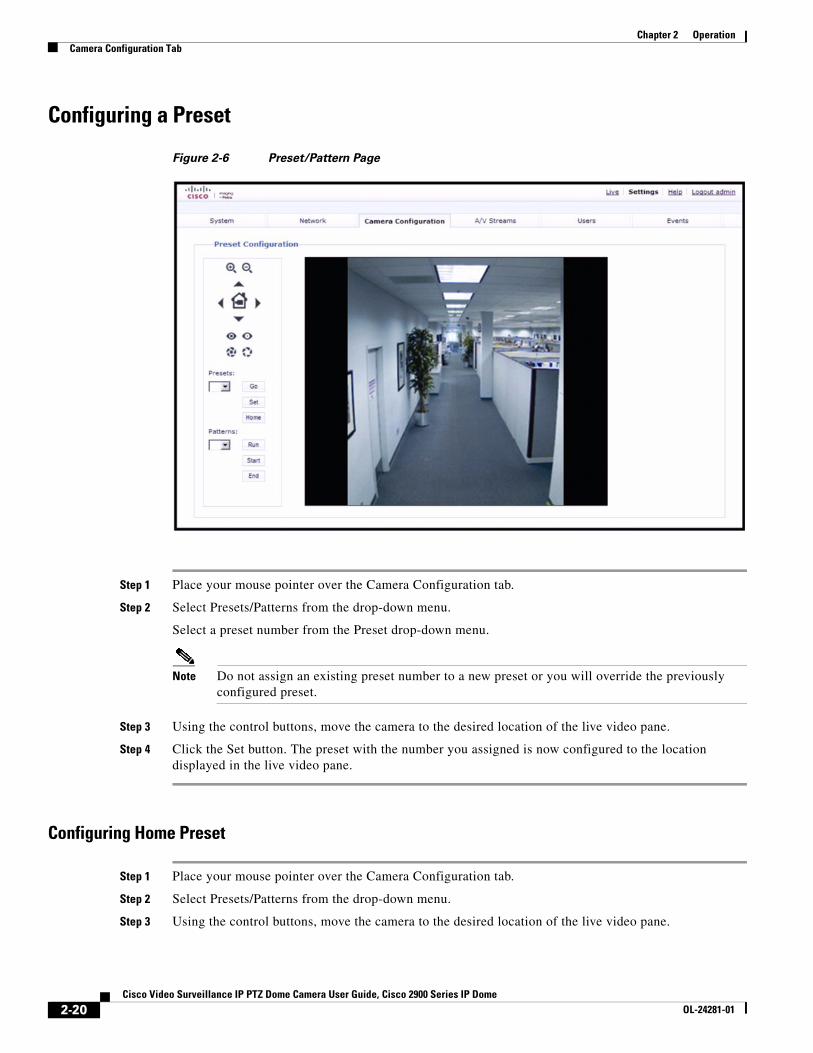
Figure 2-6 Preset/Pattern Page
Step 1 Place your mouse pointer over the Camera Configuration tab.
Step 2 Select Presets/Patterns from the drop-down menu.
Select a preset number from the Preset drop-down menu.
Note Do not assign an existing preset number to a new preset or you will override the previously configured preset.
Step 3 Using the control buttons, move the camera to the desired location of the live video pane.
Step 4 Click the Set button. The preset with the number you assigned is now configured to the location displayed in the live video pane.
Configuring Home Preset
Step 1 Place your mouse pointer over the Camera Configuration tab.
Step 2 Select Presets/Patterns from the drop-down menu.
Step 3 Using the control buttons, move the camera to the desired location of the live video pane.
2-20Cisco Video Surveillance IP PTZ Dome Camera User Guide, Cisco 2900 Series IP Dome
OL-24281-01

Chapter 2 OperationCamera Configuration Tab
Step 4 Click the Home button.
The home preset is now configured to the location displayed in the live video pane.
Selecting a Configured PresetBased on your user permissions, you can use a Web browser to call up presets 1 through 15.
Configured presets can be selected from the Live View page or the Preset/Patterns page.
Live View Page
Select a preset number from the Preset drop-down menu. The camera moves to the preset location and displays it in the live video pane.
Preset/Pattern Page
Step 1 Place your mouse pointer over the Camera Configuration tab.
Step 2 Select a preset number from the Preset drop-down menu.
Step 3 Click the Go button. The camera moves to the preset location and displays it in the live video pane.
2-21Cisco Video Surveillance IP PTZ Dome Camera User Guide, Cisco 2900 Series IP Dome
OL-24281-01

Chapter 2 OperationCamera Configuration Tab
Configuring a Pattern
Figure 2-7 Preset/Pattern Page
Step 1 Place your mouse pointer over the Camera Configuration tab.
Step 2 Select Presets/Patterns from the drop-down menu.
Step 3 Select a pattern number from the Pattern drop-down menu.
Note Do not assign an existing pattern number to a new pattern or you will override the previously configured pattern.
Step 4 Click Start.
Step 5 Using the pan, tilt, and zoom control buttons, move the camera to a desired series of locations.
Step 6 Click End to save the pattern settings.
Selecting a Configured PatternConfigured patterns can be selected from the Live View page or the Preset/Patterns page.
2-22Cisco Video Surveillance IP PTZ Dome Camera User Guide, Cisco 2900 Series IP Dome
OL-24281-01

Chapter 2 OperationA/V Streams Tab
LiveView Page
Select a pattern number from the Pattern drop-down menu. The camera runs the selected pattern.
Preset/Pattern Page
Step 1 Place your mouse pointer over the Camera Configuration tab.
Step 2 Select a pattern number from the Pattern drop-down menu.
Step 3 Click Run. The pattern is displayed in the live video pane.
A/V Streams TabUse the A/V Streams tab to configure the video and audio streams for the camera. The A/V Streams tab includes a Video Presets page, a Video Configuration page, and an Audio Configuration page.
Video Presets
The Video Preset page includes three fully-configured video presets, which include primary and secondary video stream settings for easy setup. These presets may also be used as a starting point for a custom video configuration. These preset configurations vary depending on camera model.
Video Configuration
The Video Configuration page allows you to customize the compression, resolution, image rate, and bit rate of the video streams. The default names for the streams are Primary Stream and Secondary Stream. Although each stream can be configured independently, the settings of one stream can limit the options available to the other stream, depending on the processing power used.
Always configure the primary stream before the secondary stream. The primary stream should always be the most resource-intensive of the streams.
Audio Configuration
The Audio Configuration page allows you to setup the internal audio device or an external audio device. The default setting for Audio is disabled, which means that no audio is transmitted from the camera. When enabled, audio is transmitted from the camera to the PC. Based on your system configuration, images and audio may not be synchronized.
Note Improper use of audio/visual recording equipment may subject you to civil and criminal penalties. Applicable laws regarding the use of such capabilities vary between jurisdictions and may require, among other things, express written consent from the recorded subjects. You are solely responsible for insuring strict compliance with such laws and for strict adherence to any/all rights of privacy and personalty.
See the following sections for more information:
• Selecting a Video Preset Configuration, page 2-24
• Configuring a Custom Video Stream, page 2-25
• Compression Standards, page 2-26
2-23Cisco Video Surveillance IP PTZ Dome Camera User Guide, Cisco 2900 Series IP Dome
OL-24281-01
Chapter 2 OperationA/V Streams Tab
• Image Rate and Bit Rate, page 2-26
• I-Frame Interval, page 2-35
• Quality of Service for Differentiated Services Code Point, page 2-35
• Advanced Sharpening, page 2-35
Selecting a Video Preset Configuration
Figure 2-8 Select Video Preset Configuration Page
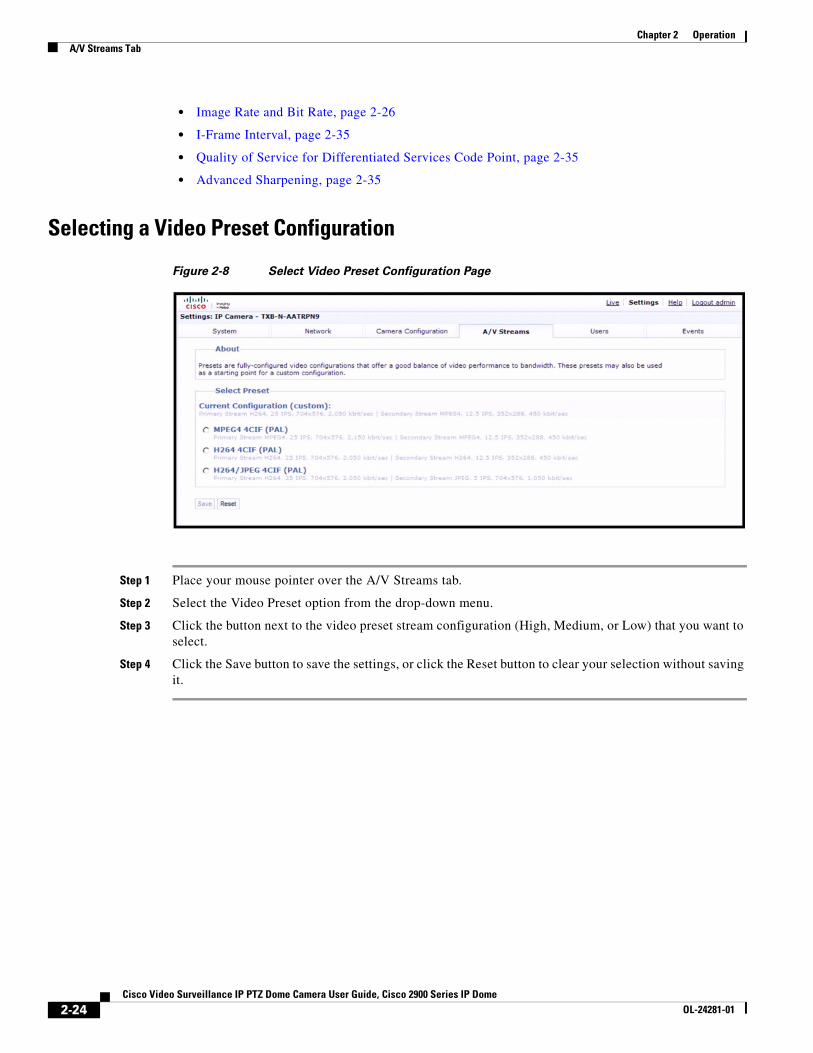
Step 1 Place your mouse pointer over the A/V Streams tab.
Step 2 Select the Video Preset option from the drop-down menu.
Step 3 Click the button next to the video preset stream configuration (High, Medium, or Low) that you want to select.
Step 4 Click the Save button to save the settings, or click the Reset button to clear your selection without saving it.
2-24Cisco Video Surveillance IP PTZ Dome Camera User Guide, Cisco 2900 Series IP Dome
OL-24281-01

Chapter 2 OperationA/V Streams Tab
Configuring a Custom Video Stream
Figure 2-9 Custom Video Stream Configuration Page
Step 1 Place your mouse pointer over the A/V Streams tab.
Step 2 Select Video Configuration from the drop-down menu.
Step 3 Click both of the Clear buttons to delete the primary and secondary streams settings.
Step 4 Optional: In the Primary Stream section, type a user-friendly name in the Name box (2 to 64 characters).
A user-friendly name makes it easier to recognize the stream (for example, Live and Recording).
Step 5 Configure the Compression Standard, Resolution, Image Rate, and Bit Rate settings for the primary stream.
Note The compression standard, resolution, image rate, and bit rate settings are dependent on each other. You must first decide the priority setting before you configure a stream. For example, if you want an image rate of 30 ips, set the image rate before you configure the other settings.
Step 6 Repeat Step 3 through Step 5 for the Secondary stream.
Step 7 Click the Save button to save the settings, or click the Reset button to clear all of the information you entered without saving it.
2-25Cisco Video Surveillance IP PTZ Dome Camera User Guide, Cisco 2900 Series IP Dome
OL-24281-01

Chapter 2 OperationA/V Streams Tab
Compression Standards
• JPEG—A commonly used video compression scheme, also known as MJPEG. JPEG has the least impact on the camera’s processor, but it requires the most bandwidth.
• MPEG-4—A full-motion video standard used by most DVD recorders. MPEG-4 is less processor-intensive than JPEG, but it uses more bandwidth than H.264.
• H.264—A new version of MPEG-4 compression used in high-definition video players such as Blu-ray and HD-DVD. H.264 is the most processor-intensive, but it requires the least amount of bandwidth.
Image Rate and Bit Rate
The following tables show supported primary and secondary video stream combinations when using H.264 or MJPAG compression on the primary stream:
• Table 2-3 on page 2-27—Supported video stream combinations when using H.264 compression on the primary stream (NTSC)
• Table 2-4 on page 2-30—Supported video stream combinations when using MJPEG compression on the primary stream (NTSC)
• Table 2-5 on page 2-32—Supported video stream combinations when using H.264 compression on the primary stream (PAL)
• Table 2-6 on page 2-34—Supported video stream combinations when using MJPEG compression on the primary stream (PAL)
Note When you change any of the video stream configuration settings, the camera automatically adjusts the bit rate. If you manually reduce the bit rate lower than the camera's automatic setting, the image quality might be reduced and the stream selection options might be limited
2-26Cisco Video Surveillance IP PTZ Dome Camera User Guide, Cisco 2900 Series IP Dome
OL-24281-01

Chapter 2 OperationA/V Streams Tab
Table 2-3 Supported Stream Combinations when using H.264 Compression on Primary Stream (NTSC)
Primary Stream using H.264 Encoding
Secondary Stream: H.264 Secondary Stream: MJPEG
ResolutionFrame Rate (FPS) Bit Rate (kbps) Resolution
Frame Rate (FPS) Bit Rate (kbps)
4CIF 30 FPS @ 3 Mbps
4CIF 3 256 4CIF 7.5 1024
1 128 6 768
5 768
3 256
2 256
1 128
CIF 3 256 CIF 15 2000
1 128 10 2000
7.5 1024
6 768
5 768
3 256
2 256
1 128
4CIF 30 FPS @ 2 Mbps
4CIF 5 512 4CIF 10 2000
3 256 7.5 1024
1 128 6 768
5 768
3 256
2 256
1 128
CIF 5 512 CIF 15 2000
3 256 10 2000
1 128 7.5 1024
6 768
5 768
3 256
2 256
1 128
2-27Cisco Video Surveillance IP PTZ Dome Camera User Guide, Cisco 2900 Series IP Dome
OL-24281-01

Chapter 2 OperationA/V Streams Tab
4CIF 15 FPS @ 1.5 Mbps
4CIF 15 1500 CIF 7.5 1024
7.5 1024 5 768
5 768 3 256
3 256 1 128
1 128
CIF 15 1500 CIF 15 2000
7.5 1024 7.5 1024
5 512 5 768
3 256 3 256
1 128 1 128
4CIF 10 FPS @ 1024 kbps
4CIF 10 1024 4CIF 10 768
5 768 5 768
3 256 2 256
1 128 1 128
CIF 10 768 CIF 10 768
5 512 5 512
3 256 2 256
1 128 1 128
4CIF 5 FPS @ 768 kbps
4CIF 5 768 4CIF 5 768
3 256 3 256
1 128 1 128
CIF 5 512 CIF 5 768
3 256 3 256
1 128 1 128
4CIF 3 FPS @ 256 kbps
4CIF 3 256 4CIF 3 256
1 128 1 128
CIF 3 256 CIF 3 256
1 128 1 128
4CIF 1 FPS @ 128 kbps
4CIF 1 128 4CIF 1 128
CIF 1 128 CIF 1 128
Table 2-3 Supported Stream Combinations when using H.264 Compression on Primary Stream (NTSC) (continued)
Primary Stream using H.264 Encoding
Secondary Stream: H.264 Secondary Stream: MJPEG
ResolutionFrame Rate (FPS) Bit Rate (kbps) Resolution
Frame Rate (FPS) Bit Rate (kbps)
2-28Cisco Video Surveillance IP PTZ Dome Camera User Guide, Cisco 2900 Series IP Dome
OL-24281-01

Chapter 2 OperationA/V Streams Tab
CIF 30 FPS @ 3 Mbps
CIF 15 1500 CIF 15 2000
10 1024 10 2000
5 768 7.5 1024
3 256 6 768
1 128 5 768
3 256
2 256
1 128
CIF 30 FPS @ 2 Mbps
CIF 15 1500 CIF 15 2000
10 768 10 2000
5 512 7.5 1024
3 256 6 768
1 128 5 768
3 256
2 256
1 128
CIF 15 FPS @ 1.5 Mbps
CIF 15 1500 CIF 15 2000
7.5 1024 7.5 1024
5 512 5 768
3 256 3 256
1 128 1 128
CIF 10 FPS @ 768 kbps
CIF 10 768 CIF 10 768
5 512 5 512
3 256 2 256
1 128 1 128
CIF 5 FPS @ 512 kbps
CIF 5 512 CIF 5 768
2.5 256 2.5 256
1 128 1 128
CIF 3 FPS @ 256 kbps
CIF 3 256 CIF 3 256
1 128 1 128
CIF 1 FPS @ 128 kbps
CIF 1 128 CIF 1 128
Table 2-3 Supported Stream Combinations when using H.264 Compression on Primary Stream (NTSC) (continued)
Primary Stream using H.264 Encoding
Secondary Stream: H.264 Secondary Stream: MJPEG
ResolutionFrame Rate (FPS) Bit Rate (kbps) Resolution
Frame Rate (FPS) Bit Rate (kbps)
2-29Cisco Video Surveillance IP PTZ Dome Camera User Guide, Cisco 2900 Series IP Dome
OL-24281-01

Chapter 2 OperationA/V Streams Tab
Table 2-4 Supported Stream Combinations when using MJPEG Compression on Primary Stream (NTSC)
Primary Stream using MJPEG Encoding
Secondary Stream: H.264 Secondary Stream: MJPEG
ResolutionFrame Rate (FPS) Bit Rate (kbps) Resolution
Frame Rate (FPS) Bit Rate (kbps)
4CIF 30 FPS @ 5.4 Mbps
4CIF 15 1500 4CIF 15 2000
10 1024 10 2000
5 768 7.5 1024
3 256 6 768
1 128 5 768
3 256
2 256
1 128
CIF 15 1500 CIF 15 2000
10 768 10 2000
5 512 7.5 1024
3 256 6 768
1 128 5 768
3 256
2 256
1 128
4CIF 15 FPS @ 2.7 Mbps
4CIF 15 1500 4CIF 15 2000
10 1024 7.5 1024
5 768 5 768
3 256 3 256
1 128 1 128
CIF 15 1500 CIF 15 2000
10 768 7.5 1024
5 512 5 768
3 256 3 256
1 128 1 128
4CIF 10 FPS @ 1.8 Mbps
4CIF 10 1024 4CIF 10 768
5 768 5 512
3 256 2 256
1 128 1 128
CIF 10 768 CIF 10 768
5 512 5 512
3 256 2 256
1 128 1 128
2-30Cisco Video Surveillance IP PTZ Dome Camera User Guide, Cisco 2900 Series IP Dome
OL-24281-01
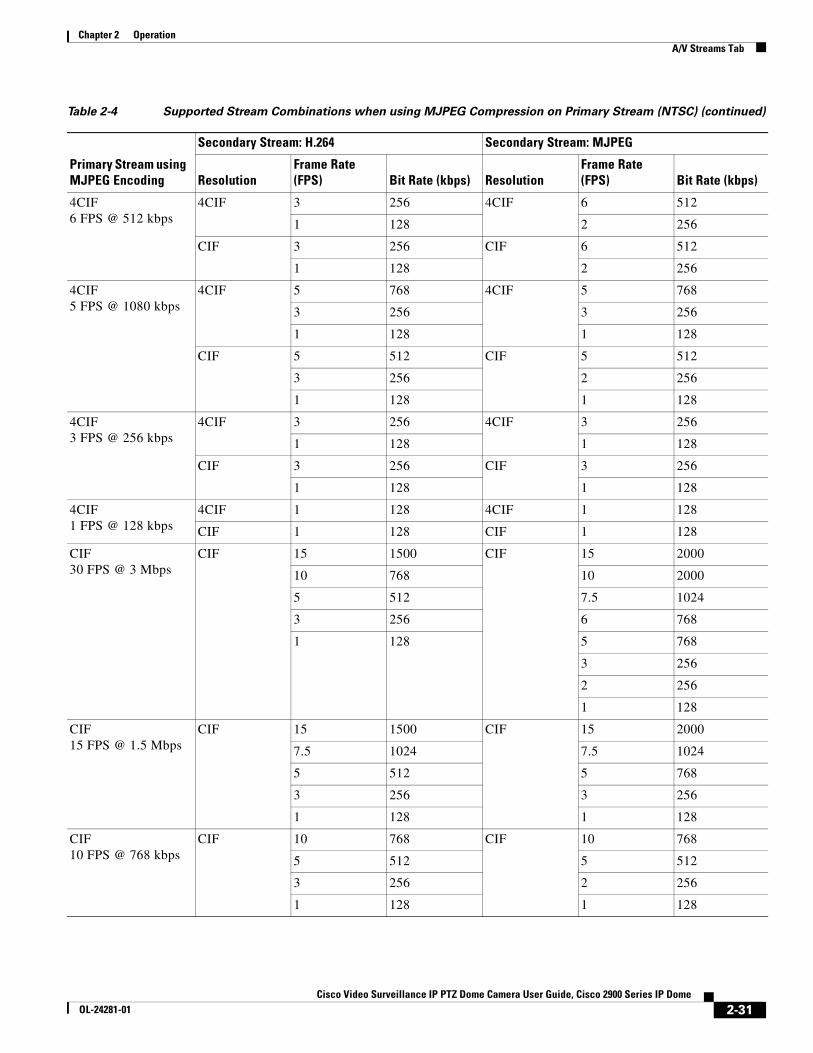
Chapter 2 OperationA/V Streams Tab
4CIF 6 FPS @ 512 kbps
4CIF 3 256 4CIF 6 512
1 128 2 256
CIF 3 256 CIF 6 512
1 128 2 256
4CIF 5 FPS @ 1080 kbps
4CIF 5 768 4CIF 5 768
3 256 3 256
1 128 1 128
CIF 5 512 CIF 5 512
3 256 2 256
1 128 1 128
4CIF 3 FPS @ 256 kbps
4CIF 3 256 4CIF 3 256
1 128 1 128
CIF 3 256 CIF 3 256
1 128 1 128
4CIF 1 FPS @ 128 kbps
4CIF 1 128 4CIF 1 128
CIF 1 128 CIF 1 128
CIF 30 FPS @ 3 Mbps
CIF 15 1500 CIF 15 2000
10 768 10 2000
5 512 7.5 1024
3 256 6 768
1 128 5 768
3 256
2 256
1 128
CIF 15 FPS @ 1.5 Mbps
CIF 15 1500 CIF 15 2000
7.5 1024 7.5 1024
5 512 5 768
3 256 3 256
1 128 1 128
CIF 10 FPS @ 768 kbps
CIF 10 768 CIF 10 768
5 512 5 512
3 256 2 256
1 128 1 128
Table 2-4 Supported Stream Combinations when using MJPEG Compression on Primary Stream (NTSC) (continued)
Primary Stream using MJPEG Encoding
Secondary Stream: H.264 Secondary Stream: MJPEG
ResolutionFrame Rate (FPS) Bit Rate (kbps) Resolution
Frame Rate (FPS) Bit Rate (kbps)
2-31Cisco Video Surveillance IP PTZ Dome Camera User Guide, Cisco 2900 Series IP Dome
OL-24281-01

Chapter 2 OperationA/V Streams Tab
CIF 6 FPS @ 512 kbps
CIF 3 256 CIF 6 512
1 128 2 256
1 128
CIF 5 FPS @ 512 kbps
CIF 5 512 CIF 5 512
3 256 2 256
1 128 1 128
CIF 3 FPS @ 256 kbps
CIF 3 256 CIF 3 256
1 128 1 128
CIF 1 FPS @ 128 kbps
CID 1 128 CID 1 128
Table 2-5 Supported Stream Combinations when using H.264 Compression on Primary Stream (PAL)
Primary Stream using H.264 Encoding
Secondary Stream: H.264 Secondary Stream: MJPEG
ResolutionFrame Rate (FPS) Bit Rate (kbps) Resolution
Frame Rate (FPS) Bit Rate (kbps)
4CIF 25 FPS @ 3 Mbps
4CIF 2.5 256 4CIF 5 512
1 128 2.5 256
1 128
CIF 12.5 640 4CIF 12.5 1024
5 511 5 768
2.5 255 2.5 256
1 128 1 128
4CIF 12.5 FPS @ 2 Mbps
4CIF 12.5 1500 4CIF 12.5 1500
2.5 256 2.5 256
CIF 12.5 640 CIF 12.5 1500
2.5 256 2.5 256
4CIF 12.5 FPS @ 1.5 Mbps
4CIF 2.5 256 4CIF 12.5 1500
1 128 2.5 256
CIF 12.5 640 CIF 12.5 1500
2.5 256 2.5 256
Table 2-4 Supported Stream Combinations when using MJPEG Compression on Primary Stream (NTSC) (continued)
Primary Stream using MJPEG Encoding
Secondary Stream: H.264 Secondary Stream: MJPEG
ResolutionFrame Rate (FPS) Bit Rate (kbps) Resolution
Frame Rate (FPS) Bit Rate (kbps)
2-32Cisco Video Surveillance IP PTZ Dome Camera User Guide, Cisco 2900 Series IP Dome
OL-24281-01

Chapter 2 OperationA/V Streams Tab
4CIF 5 FPS @ 1024 kbps
4CIF 5 1024 4CIF 5 768
2.5 256 2.5 256
1 128 1 128
CIF 5 511 CIF 5 768
2.5 256 2.5 256
1 128 1 128
4CIF 2.5 FPS @ 512 kbps
4CIF 2.5 256 4CIF 2.5 256
CIF 2.5 256 CIF 2.5 256
4CIF 2.5 FPS @ 256 kbps
4CIF 2.5 256 4CIF 2.5 256
CIF 2.5 256 CIF 2.5 256
4CIF 1 FPS @ 128 kbps
4CIF 1 128 4CIF 1 128
CIF 1 128 CIF 1 128
CIF 25 FPS @ 3 Mbps
CIF 25 2000 CIF 25 2000
12.5 640 12.5 1500
5 511 5 768
2.5 256 2.5 256
1 128 1 128
CIF 25 FPS @ 2 Mbps
CIF 25 2000 CIF 25 2000
12.5 640 12.5 1500
5 511 5 768
2.5 256 2.5 256
1 128 1 128
CIF 12.5 FPS @ 1.5 Mbps
CIF 12.5 640 CIF 12.5 1500
2.5 256 2.5 256
CIF 12.5 FPS @ 768 kbps
CIF 12.5 640 CIF 12.5 1500
2.5 256 2.5 256
CIF 5 FPS @ 512 kbps
CIF 5 511 CIF 5 768
2.5 256 2.5 256
1 128 1 128
CIF 2.5 FPS @ 256 kbps
CIF 2.5 256 CIF 2.5 256
CIF 1 FPS @ 128 kbps
CIF 1 128 CIF 1 128
Table 2-5 Supported Stream Combinations when using H.264 Compression on Primary Stream (PAL) (continued)
Primary Stream using H.264 Encoding
Secondary Stream: H.264 Secondary Stream: MJPEG
ResolutionFrame Rate (FPS) Bit Rate (kbps) Resolution
Frame Rate (FPS) Bit Rate (kbps)
2-33Cisco Video Surveillance IP PTZ Dome Camera User Guide, Cisco 2900 Series IP Dome
OL-24281-01

Chapter 2 OperationA/V Streams Tab
Table 2-6 Supported Stream Combinations when using MJPEG Compression on Primary Stream (PAL)
Primary Stream using H.264 Encoding
Secondary Stream: H.264 Secondary Stream: MJPEG
ResolutionFrame Rate (FPS) Bit Rate (kbps) Resolution
Frame Rate (FPS) Bit Rate (kbps)
4CIF 25 FPS @ 5.4 Mbps
4CIF 12.5 1500 4CIF 25 2500
5 1024 12.5 1500
2.5 256 5 768
1 128 2.5 256
1 128
CIF 25 2000 CIF 25 2500
12.5 640 12.5 1500
5 511 5 768
2.5 256 2.5 256
1 128 1 128
4CIF 12.5 FPS @ 2.7 Mbps
4CIF 12.5 1500 4CIF 12.5 1500
2.5 256 2.5 256
CIF 12.5 640 CIF 12.5 1500
2.5 256 2.5 256
4CIF 5 FPS @ 1050 kbps
4CIF 5 1024 4CIF 5 768
2.5 256 2.5 256
1 128 1 128
CIF 5 511 CIF 5 768
2.5 256 2.5 256
1 128 1 128
4CIF 2.5 FPS @ 256 kbps
4CIF 2.5 256 4CIF 2.5 256
CIF 2.5 256 CIF 2.5 256
4CIF 1 FPS @ 128 kbps
4CIF 1 128 4CIF 1 128
CIF 1 128 CIF 1 128
CIF 25 FPS @ 3 Mbps
CIF 25 1500 CIF 25 2000
12.5 1024 12.5 1500
5 512 5 768
2.5 256 2.5 256
1 128 1 128
CIF 12.5 FPS @ 1.5 Mbps
CIF 12.5 768 CIF 12.5 1500
2.5 256 2.5 256
CIF 5 FPS @ 512 kbps
CIF 5 512 CIF 5 768
2.5 256 2.5 256
1 128 1 128
2-34Cisco Video Surveillance IP PTZ Dome Camera User Guide, Cisco 2900 Series IP Dome
OL-24281-01

Chapter 2 OperationA/V Streams Tab
I-Frame Interval
The I-frame interval configures the number of partial frames that occur between full frames in the video stream. For example, in a scene where a door opens and a person walks through, only the movements of the door and the person are stored by the video encoder. The stationary background that occurs in the previous partial frames is not encoded, because no changes occurred in that part of the scene. The stationary background is only encoded in the full frames. Partial frames improve video compression rates by reducing the size of the video. As the I-frame interval increases, the number of partial frames increases between full frames. Higher values are only recommended on networks with high reliability. This setting is only available with H.264 and MPEG-4 compression standards.
Quality of Service for Differentiated Services Code Point
Quality of Service (QoS) for Differentiated Services Code Point (DSCP) is a code that allows the network to prioritize the transmission of different types of data. This setting is only available with H.264 and MPEG-4 compression standards.
Note • If you are not familiar with DSCP, contact your network administrator before changing this setting.
• Your network must be configured to use QoS. If you are unsure if your network is QoS-aware, contact your network administrator.
Advanced Sharpening
The Advanced Sharpening setting enhances picture detail by sharpening the edges in the picture. When this mode is enabled, there is a trade-off between image quality and the resources required for processing power. The maximum camera resolution and image rate will not be available, but the edges of the image seem sharper. Only use this setting if you cannot achieve the sharpness level you want by adjusting the digital processing settings of the camera. The default setting for Advanced Sharpening is Off.
Selecting the Audio Configuration Settings
Note Audio is not supported when using the camera with Cisco Video Surveillance Manager (VSM).
CIF 2.5 FPS @ 256 kbps
CIF 2.5 256 CIF 2.5 256
CIF 1 FPS @ 128 kbps
CIF 1 128 CIF 1 128
Table 2-6 Supported Stream Combinations when using MJPEG Compression on Primary Stream (PAL) (continued)
Primary Stream using H.264 Encoding
Secondary Stream: H.264 Secondary Stream: MJPEG
ResolutionFrame Rate (FPS) Bit Rate (kbps) Resolution
Frame Rate (FPS) Bit Rate (kbps)
2-35Cisco Video Surveillance IP PTZ Dome Camera User Guide, Cisco 2900 Series IP Dome
OL-24281-01

Chapter 2 OperationA/V Streams Tab
To use audio with the camera you must have an audio device connected to the accessory port located on the back of the camera. After the device is connected, audio can only be enabled through the primary stream.
Audio and video may not be synced when viewing and listening to the primary stream through a Web browser. You may experience a three-second delay in video when viewing the primary stream with audio.
Note Improper use of audio/visual recording equipment may subject you to civil and criminal penalties. Applicable laws regarding the use of such capabilities vary between jurisdictions and may require, among other things, express written consent from the recorded subjects. You are solely responsible for ensuring strict compliance with such laws and for strict adherence to all rights of privacy and personalty.
Figure 2-10 Audio Configuration Page
Step 1 Place your mouse pointer over the A/V Streams tab.
Step 2 Select the Audio Configuration option from the drop-down menu.
Step 3 Select the Enabled option in the Audio section.
Step 4 Select the audio device setting from the Audio Device drop-down box.
• USB Line In—Enables audio from a microphone connected to the USB accessory port.
• Native Line In—Enables audio from a microphone connected to the audio-in connector.
Step 5 Select the sample rate from the Sample Rate drop-down box
The sample rate is the quality of the audio stream (rendered in hertz per second). The higher the value, the higher the audio quality. Available sample rate settings are 8000, 11025, 16000, 22050, 32000, 44100, and 48000 Hz. The default setting is 8000 Hz.
Step 6 Select the encoding method for the audio device from the Encoding drop-down box.
Available encoding methods are PCMU, PCMA, and PM16. The default setting is PCMU.
Step 7 Set the sensitivity of the input level by moving the Input Level slider.
Move the slider to the right to increase the sensitivity level; move it to the left to decrease the sensitivity level. For example, if the camera is installed in a noisy environment or the connected microphone has a built-in line amplifier, set the sensitivity to a low setting. The setting range is 0 to 100.
2-36Cisco Video Surveillance IP PTZ Dome Camera User Guide, Cisco 2900 Series IP Dome
OL-24281-01

Chapter 2 OperationUsers Tab
Note Do not use the mute button on an audio device, as it will override the audio software settings. To mute the audio device, select the Mute option located on the Audio Configuration page.
Step 8 Click the Save button to save the settings, or click the Reset button to clear all of the information you entered without saving it.
Users TabUse the Users tab to create and manage user accounts and to change the way the camera manages the users settings.
General Settings
Use the General Settings page to set the public user access level. This access level is a predefined set of user permissions that allow the camera to be accessed without logging on. The permission levels are Operator, Viewer, and Disabled.
The General Settings page also allows you to change the way the camera manages users and groups settings. These settings can be managed on a camera-to-camera basis or by using a centralized server to apply changes to multiple cameras. General settings for users and groups include Standalone, Node, and Mixed settings. An example of a Mixed management mode would be using a Lightweight Directory Access Protocol (LDAP) server like Microsoft® Active Directory for authentication.
Users
User accounts are created to limit the permissions of individuals who are logged onto the camera. The Users page also includes four predefined access level settings that include Administrator, Manager, Operator, and Viewer permissions.
See the following sections for more information:
• Selecting the Users and Groups Settings, page 2-38
• Creating a New User, page 2-39
• Editing a User, page 2-40
• Deleting a User, page 2-40
2-37Cisco Video Surveillance IP PTZ Dome Camera User Guide, Cisco 2900 Series IP Dome
OL-24281-01

Chapter 2 OperationUsers Tab
Selecting the Users and Groups Settings
Figure 2-11 General Settings Page for Users
Caution The Node and Mixed settings are advanced controls. Consult your network administrator to obtain the required information.
Step 1 Place your mouse pointer over the Users tab.
Step 2 Select General Settings from the drop-down menu.
Step 3 Select an access level from the Public User Access Level drop-down menu.
• Disabled—The public user has no permissions and cannot access the live view page without a password. The Login screen will appear when the camera's IP address is typed in the address bar of a Web browser.
• Viewers—The permissions for this user are view video and API access. Viewers is the default setting.
• Operators—The permissions for this user are view video, PTZ functions, and API access.
Step 4 Select a user and group management mode by clicking one of the following options:
• Standalone—The camera manages its users and groups locally. Any changes to users and groups affect only the camera that you are accessing. Standalone is the default setting.
• Node—The camera uses a centralized server to manage users and groups. In this mode, the users and groups page is disabled and all management is done on the central server. Any changes to users and groups affect all cameras connected to the central server.
When you click the Node option, a Server box appears. Click in the Server box, and then type the name of the central server to manage users and groups.
• Mixed—The camera verifies user names and passwords against a central server but manages the group settings locally. This is useful if you want to use a departmental or corporate server for user names and passwords. In this mode, the settings on the users page are limited, and any changes to user names and passwords are done on the Lightweight Directory Access Protocol (LDAP) server. While changes to user names and passwords affect all cameras connected to the LDAP server, group permissions must be managed from each camera individually.
2-38Cisco Video Surveillance IP PTZ Dome Camera User Guide, Cisco 2900 Series IP Dome
OL-24281-01
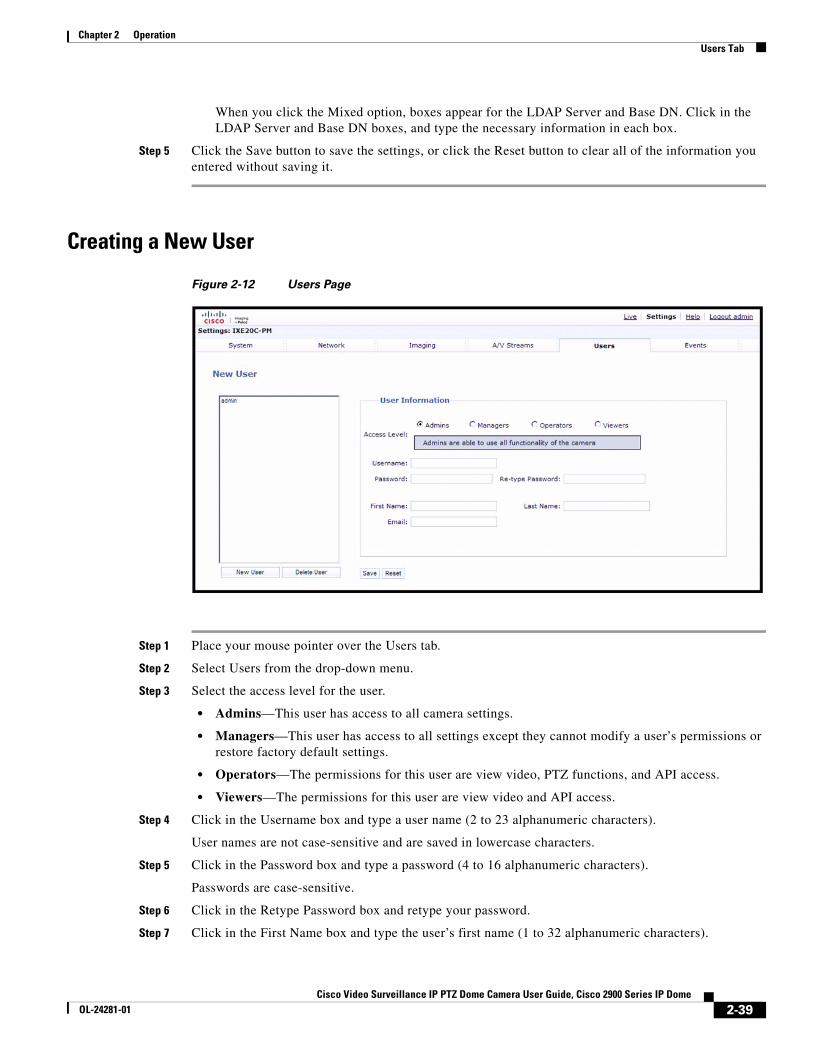
Chapter 2 OperationUsers Tab
When you click the Mixed option, boxes appear for the LDAP Server and Base DN. Click in the LDAP Server and Base DN boxes, and type the necessary information in each box.
Step 5 Click the Save button to save the settings, or click the Reset button to clear all of the information you entered without saving it.
Creating a New User
Figure 2-12 Users Page
Step 1 Place your mouse pointer over the Users tab.
Step 2 Select Users from the drop-down menu.
Step 3 Select the access level for the user.
• Admins—This user has access to all camera settings.
• Managers—This user has access to all settings except they cannot modify a user’s permissions or restore factory default settings.
• Operators—The permissions for this user are view video, PTZ functions, and API access.
• Viewers—The permissions for this user are view video and API access.
Step 4 Click in the Username box and type a user name (2 to 23 alphanumeric characters).
User names are not case-sensitive and are saved in lowercase characters.
Step 5 Click in the Password box and type a password (4 to 16 alphanumeric characters).
Passwords are case-sensitive.
Step 6 Click in the Retype Password box and retype your password.
Step 7 Click in the First Name box and type the user’s first name (1 to 32 alphanumeric characters).
2-39Cisco Video Surveillance IP PTZ Dome Camera User Guide, Cisco 2900 Series IP Dome
OL-24281-01

Chapter 2 OperationEvents Tab
Step 8 Click in the Last Name box and type the user’s last name (1 to 32 alphanumeric characters).
Step 9 Click in the Email box and type the e-mail address of the user.
Step 10 Click the Save button to save the settings and create a new user (the new user profile appears in the box on the left side of the page), or click the Reset button to clear all of the information you entered without saving it.
Editing a User
Step 1 Place your mouse pointer over the Users tab.
Step 2 Select Users from the drop-down menu.
Step 3 Click the user profile that you want to edit from the box on the left side of the page.
Step 4 If required, select a different Access Level for the user.
Step 5 Double-click in each of the text boxes to highlight the text. Type the new information in each text box.
Note The Username cannot be modified; this text box is read-only.
Step 6 Click the Save button to save the settings, or click the Reset button to clear all of the information you entered without saving it.
Deleting a UserPlace your mouse pointer over the Users tab.
Step 1 Select Users from the drop-down menu.
Step 2 Click the user profile that you want to delete from the defined users section located in the box on the left side of the page.
Step 3 Click the Delete User button. A dialog box appears with the message “Are you sure you want to delete the user?”
Step 4 Click OK. The user profile is deleted from the defined user profiles section.
Note The “admin” user cannot be deleted.
Events TabUse the Events tab to configure camera events and analytics.
2-40Cisco Video Surveillance IP PTZ Dome Camera User Guide, Cisco 2900 Series IP Dome
OL-24281-01

Chapter 2 OperationEvents Tab
Events are activated by user-defined event sources that tell the device how to react when an event occurs. Event handlers are the actions that the device takes when an event occurs. For example, a system source can be configured to send e-mail to an operator if the system shuts-down and restarts.
Sources
The camera supports one physical input alarm event source, a system event source, and a timer event source. The alarm event source is the camera input for an external signaling device, such as a door contact or motion detector. The system event source is activated when the camera restarts. The timer event source is a user-defined event that activates an event after a specified amount of time.
Handlers
The device supports a Send Email handler, and an Upload JPEG to FTP Server handlers. The Send Email handler sends an e-mail to a defined e-mail address when an event is activated.The Upload JPEG to FTP Server handler saves a JPEG of the activated event to a defined FTP server.
See the following sections for more information:
• Creating a System Event Source, page 2-41
• CCreating a Timer Event Source, page 2-41
• Editing an Event Source, page 2-42
• Deleting an Event Source, page 2-42
• Creating an Event Handler: Send Email, page 2-42
• Creating an Event Handler: Upload JPEG to FTP Server, page 2-43
• Editing an Event Handler, page 2-44
• Deleting an Event Handler, page 2-44
• Example Handler Filter Setup, page 2-44
Creating a System Event Source
Step 1 Place your mouse pointer over the Events tab.
Step 2 Select Sources from the drop-down menu.
Step 3 Click in the Name box and type a user-friendly name (2 to 23 alphanumeric characters).
Step 4 Select System from the Type drop-down menu.
Step 5 Select the Boot check box to activate an event when the camera reboots.
Step 6 Click the Submit button to save the settings, or click the Reset button to clear all of the information you entered without saving it.
Creating a Timer Event Source
Step 1 Place your mouse over the Events tab.
Step 2 Select Sources from the drop-down menu.
Step 3 Click in the Name box and type a user-friendly name (2 to 23 alphanumeric characters).
2-41Cisco Video Surveillance IP PTZ Dome Camera User Guide, Cisco 2900 Series IP Dome
OL-24281-01

Chapter 2 OperationEvents Tab
Step 4 Select Timer from the Type drop-down menu.
Step 5 Click in the Frequency box and type a number. Select seconds, minutes, hours, or days from the Frequency drop-down menu.
Step 6 Click the Submit button to save the settings, or click the Reset button to clear all of the information you entered without saving it.
Editing an Event Source
Step 1 Place your mouse pointer over the Events tab.
Step 2 Select Sources from the drop-down menu.
Step 3 Click the source profile that you want to delete from the defined source box located on the left side of the page.
Step 4 Make any necessary changes to the available fields.
Step 5 Click the Submit button to save the settings, or click the Reset button to clear all of the information you entered without saving it.
Deleting an Event Source
Step 1 Place your mouse pointer over the Events tab.
Step 2 Select Sources from the drop-down menu.
Step 3 Click the source profile that you want to delete from the defined source box located on the left side of the page.
Step 4 Click the Delete Source button. A dialog box appears with the message “Are you sure you want to delete the source?”
Step 5 Click OK. The source profile is deleted from the defined source box.
Creating an Event Handler: Send Email
Note To use e-mail notification, the camera must be connected to a local area network (LAN) that maintains an SMTP mail server. Consult your network administrator for information on configuring e-mail notification on your local network.
Step 1 Configure the SMTP server to send e-mail.
Step 2 Place your mouse pointer over the Events tab.
Step 3 Select Handler from the drop-down menu.
2-42Cisco Video Surveillance IP PTZ Dome Camera User Guide, Cisco 2900 Series IP Dome
OL-24281-01

Chapter 2 OperationEvents Tab
Step 4 Click in the Name box and type a user-friendly name (2 to 23 alphanumeric characters).
Step 5 Select Send Email from the Type drop-down menu.
Step 6 Click in the text boxes (To, From, Subject, and Message), and then type the necessary information in each text box.
Step 7 Select the JPEG Snapshot box if you want to send a JPEG as an attachment.
Step 8 Select the Attach Raw Event Data box if you want the e-mail to include extra data about the event.
For example, select this box if the event is triggered by an alarm and you want to receive data about the state, time, or type of alarm.
Step 9 If you do not want the handler activated every time an event occurs, set filters for the handler.
a. Select the day(s) of the week on which you want e-mails to be sent.
b. Type times in the Start and End boxes for the days you have selected. Use time values in 24-hour notation (for example, use 0800 for 8:00 a.m., 1600 for 4:00 p.m.).
Step 10 Select one or more event sources to send an e-mail when those event sources are activated.
Step 11 Click the Submit button to save the settings, or click the Reset button to clear all of the information you entered without saving it.
See the following sections for more information:
• System Tab, page 2-7
• Example Handler Filter Setup, page 2-44
Creating an Event Handler: Upload JPEG to FTP Server
Step 1 Place your mouse pointer over the Events tab.
Step 2 Select Handlers from the drop-down menu.
Step 3 Click in the Name box and type a user-friendly name (2 to 23 alphanumeric characters).
Step 4 Select “Upload JPEG to FTP Server” in the Type drop-down menu.
Step 5 Click in the Server box and type the server address (1 to 32 alphanumeric characters).
Step 6 Click in the Username box and type the user’s name (1 to 32 alphanumeric characters).
Step 7 Click in the Password box and type a password (4 to 16 alphanumeric characters).
Step 8 Click in the Base Path box and type the base path (1 to 32 alphanumeric characters).
Step 9 The JPEG files uploaded to the FTP server will be given file names that correspond to the date and time of the event. Select a time standard from the “File name” drop-down menu.
Step 10 If you do not want the handler activated every time an event occurs, set filters for the handler.
a. Select the day(s) of the week on which you want JPEGs saved to the FTP server.
b. Type times in the Start and End boxes for the days you have selected. Use time values in 24-hour notation (for example, 0800 for 8:00 a.m. and 1600 for 4:00 p.m.).
Step 11 Select one or more sources to save a JPEG to the FTP server when those event sources are activated.
2-43Cisco Video Surveillance IP PTZ Dome Camera User Guide, Cisco 2900 Series IP Dome
OL-24281-01

Chapter 2 OperationEvents Tab
Step 12 Click the Submit button to save the settings, or click the Reset button to clear all of the information you entered without saving it.
See the following section for more information:
• Example Handler Filter Setup, page 2-44
Editing an Event Handler
Step 1 Editing an Event Handler (Task)
Step 2 Place your mouse pointer over the Events tab.
Step 3 Select Handlers from the drop-down menu.
Step 4 Click the handler profile that you want to delete from the defined handler box located on the left side of the page.
Step 5 Make any necessary changes to the available fields.
Step 6 Click the Submit button to save the settings, or click the Reset button to clear all of the information you entered without saving it.
Deleting an Event Handler
Step 1 Place your mouse pointer over the Events tab.
Step 2 Select Handlers from the drop-down menu.
Step 3 Click the handler profile that you want to delete from the defined handler box located on the left side of the page.
Step 4 Click the Delete Handler button. A dialog box appears with the message “Are you sure you want to delete the handler?”
Step 5 Click OK
The handler profile is deleted from the defined handler box.
Example Handler Filter SetupIf you do not want a handler activated every time an event occurs, use the filter fields to limit handlers. For example, you only want a handler activated when an event occurs after business hours. Your business is open Monday through Saturday, 8:00 a.m. (0800) to 6:00 p.m. (1800), and it is closed on Sunday.
2-44Cisco Video Surveillance IP PTZ Dome Camera User Guide, Cisco 2900 Series IP Dome
OL-24281-01

Chapter 2 OperationEvents Tab
Step 1 Create a handler for Monday through Saturday:
a. Select the day filter fields Monday through Saturday.
b. Type 0000 in the Start box and 0800 in the End box.
c. Click the plus button (+) to add another time range. Type 1800 in the second Start box and type 2400 in the second End box.
d. Select the source(s) that activates the handler.
e. Click the Submit button to save the handler.
Step 2 Create a second handler for Sunday:
a. Select Sunday from the day filter fields.
b. Do not set a Start time or End time as this is a 24-hour event.
c. Select the source(s) that activates the handler.
d. Click the Submit button to save the second handler.
2-45Cisco Video Surveillance IP PTZ Dome Camera User Guide, Cisco 2900 Series IP Dome
OL-24281-01

Chapter 2 OperationEvents Tab
2-46Cisco Video Surveillance IP PTZ Dome Camera User Guide, Cisco 2900 Series IP Dome
OL-24281-01

Cisco Video Surveillance IP PTZ Dome CaOL-24281-01
A
P P E N D I X A TroubleshootingTable A-1 provides information that may help you if you need to troubleshoot a Cisco 2900 Series IP Dome. Do not try to repair a unit yourself. Leave maintenance and repairs to qualified technical personnel only.
Table A-1 Troubleshooting the Cisco 2900 IP Dome
Issue Possible Cause Suggested Resolution
Dome does not start properly after installation.
The circuit board fuse may need to be replaced.
Check the fuse on the circuit board inside the back box for continuity. Replace the fuse if needed.
The back box may not be receiving proper voltage.
Check the wiring with a volt meter to ensure that the back box is receiving proper voltage.
Dome starts correctly, but you do not have accurate control.
Switch settings on the dome drive are set incorrectly.
Check the signal with a volt meter or an oscilloscope. (This step does not apply if you are using Coaxitron control.)
Ensure that the switch settings on the dome drive are set correctly (see the “Switch Settings” procedure on page 1-11).
No video is displayed. Power is not connected. Check the power connector.
Video cable is not connected. Check the video connector.
TXB-N module is not inserted properly.
Reinstall the TXB-N module. Make sure the pins on the module are inserted correctly.
A-1mera User Guide, Cisco 2900 Series IP Dome

Appendix A Troubleshooting
The audio signal is weak. You are not using the correct type of transformer.
Make sure you are using a 600-ohm impedance matching transformer.
The wiring distance connecting the audio equipment may be too long.
Test the equipment using a shorter wiring distance.
The gain is not properly adjusted.
If you are using an external amplifier and it has an adjustable gain, increase the gain until the signal is acceptable.
There is an echo when audio is received.
The speaker volume is too high. Lower the speaker volume
he microphone and the speaker are too close together.
If your call station does not have built-in echo cancellation, move the microphone and speaker farther apart
Your call station does not have built-in echo cancellation.
Use a call station with built-in echo cancellation.
Table A-1 Troubleshooting the Cisco 2900 IP Dome (continued)
Issue Possible Cause Suggested Resolution
A-2Cisco Video Surveillance IP PTZ Dome Camera User Guide, Cisco 2900 Series IP Dome
OL-24281-01
Cisco Video Surveillance IP PTZ Dome CaOL-24281-01
A
P P E N D I X B SpecificationsTable B-1 lists specifications for the Cisco 2900 Series IP Dome cameras.
Table B-1 Cisco 2900 Series IP Dome Camera Specifications
Item Specification
Protocols
Supported protocols TCP/IP, UDP/IP (Unicast, Multicast IGMP), UPnP, DNS, DHCP, RTP, RTSP, NTP, IPv4, SNMP, QoS, HTTP, HTTPS, LDAP (client), SSH, SSL, SMTP, FTP, mDNS (Bonjour)
Camera Optics
Signal format • Day/night (35X zoom) pendant:
– NTSC (CIVS-IPC-2930)
– PAL (CIVS-IPC-2935)
• Day/night (27X zoom) in-ceiling:
– NTSC (CIVS-IPC-2911)
– PAL (CIVS-IPC-2916)
Scanning system Interlace/progressive selectable
Image sensor 1/4-inch Sony EXview HAD
Effective pixels • NTSC—768(H) X 494 (V)
• PAL—752(H) X 582 (V)
Horizontal resolution >540 TV lines
Lens • Day/night (35X zoom) pendant—f/1.4 (focal length, 3.4 ~ 119 mm)
• Day/night (27X zoom) in-ceiling—f/1.4 (focal length, 3.4 ~ 91.8 mm)
Zoom • Day/night (35X zoom) pendant—35X optical, 12X digital
• Day/night (27X zoom) in-ceiling—27X optical, 12X digital
Zoom speed (optical range) 3.2/4.6/6.6 seconds
Horizontal 55.8° at 3.4 mm wide zoom
Angle of View • Day/night (35X zoom) pendant—1.7° at 119 mm telephoto zoom
• Day/night (27X zoom) in-ceiling—2.3° at 91.8 mm telephoto zoom
B-1mera User Guide, Cisco 2900 Series IP Dome

Appendix B Specifications
Focus Automatic with manual override
Maximum Sensitivity at 35 IRE
• NTSC/EIA:
– 0.55 lux at 1/60 sec (color)
– 0.018 lux at 1/2 sec (color)
– 0.00018 lux at 1/2 sec (b/w)
• PAL/CCIR:
– 0.45 lux at 1/50 sec (color)
– 0.015 lux at 1/1.5 sec (color)
– 0.00015 lux at 1/1.5 sec (b/w)
Sync system Internal/AC line lock, phase adjustable, V-sync
White balance Automatic with manual override
Shutter Speed Automatic (electronic iris)/manual
• NTSC—1/2 ~ 1/30,000
• PAL—1/1.5 ~ 1/30,000
Iris control Automatic, with manual override
Gain control Automatic/OFF
Video output 1 Vp-p, 75 ohms
Video signal-to-noise ratio >50 dB
Wide dynamic range 128X
Electronic image stabilization
• Day/night (35X zoom) pendant—Integrated/selectable
• Day/night (27X zoom) in-ceiling—Not available
Image enhancement • Day/night (35X zoom) pendant—Integrated/selectable
• Day/night (27X zoom) in-ceiling—Not available
Motion detection Integrated
Electrical
Ports • RJ-45 connector for 100BASE-TX
• Auto MDI/MDI-X, autonegotiate/manual setting
Cabling type Cat5 or better for 100BASE-TX
Input voltage • 18 to 32 VAC; 24 VAC nominal
• 22 to 27 VDC; 24 VDC nominal
Input power • 24 VAC:
– 23 VA nominal (without heater)
– 73 VA nominal (with heater)
• 24 VDC:
– 0.7A nominal (without heater)
– 3A nominal (with heater)
Table B-1 Cisco 2900 Series IP Dome Camera Specifications (continued)
Item Specification
B-2Cisco Video Surveillance IP PTZ Dome Camera User Guide, Cisco 2900 Series IP Dome
OL-24281-01

Appendix B Specifications
Fuse 1.25A
Alarm inputs 2
Auxiliary outputs 7
Mechanical (dome drive only)
Pan movement 360° continuous pan rotation
Vertical tilt Unobstructed +2° to -92°
Manual pan/tilt speeds • Pan—0.1° to 80°/sec manual operation, 150°/sec turbo
• Tilt—0.1° to 40°/sec manual operation
Preset Speeds • Pan—400°/sec
• Tilt—200°/sec
Audio
Streaming Bidirectional; full- or half-duplex
Input/output Terminal block, analog for microphone and speaker; 600-ohm differential; 1 Vp-p maximum signal level
Compression G.711 PCM 8-bit, 8 KHz mono at 64 kbit/s
Video
Video encoding H.264 high, main, or base profile and MJPEG
Video streams Up to 2 simultaneous streams; the second stream is variable based on the setup of the primary stream
Frame rate Up to 30, 25, 24, 15, 12.5, 12, 10, 8, 7.5, 6, 5, 4, 3, 2, 1 (dependent upon coding, resolution, and stream configuration)
Resolutions • NTSC:
– 704 x 480
– 352 x 240
• PAL—704 x 576
Physical
Construction • Black Box—Aluminum
• Dome Drive—Aluminum, thermoplastic
• Lower Dome—Acrylic
Light attenuation • Smoked—f/0.5 light loss
• Clear—0 light loss
Cable entry • Day/night (35X zoom) pendant—Through 1.5 inch pendant mount
• Day/night (27X zoom) in-ceiling—0.75 inch conduit fitting
Weight • Day/night (35X zoom) pendant—7.6 lb (3.5 kg)
• Day/night (27X zoom) in-ceiling—5.2 lb (2.4 kg)
Color • Day/night (35X zoom) pendant—Gray
• Day/night (27X zoom) in-ceiling—White
Table B-1 Cisco 2900 Series IP Dome Camera Specifications (continued)
Item Specification
B-3Cisco Video Surveillance IP PTZ Dome Camera User Guide, Cisco 2900 Series IP Dome
OL-24281-01

Appendix B Specifications
Environmental
Operating temperature • Day/night (35X zoom) pendant—Integrated/selectable:
– 140°F (60°C) absolute maximum; 122°F (50°C) sustained maximum
– –60°F(–51°C) Absolute minimum; prevents icing at sustained minimum of -50°F (–45°C); de-ices 0.1 inch (2.5 mm) within 3 hours after power-up
• Day/night (27X zoom) in-ceiling—32 to 122°F (0 to 50°C)
Outdoor use • Day/night (35X zoom) pendant—Yes
• Day/night (27X zoom) in-ceiling—No
Outdoor rating • Day/night (35X zoom) pendant—NEMA Type 4X, IP66 when installed properly
• Day/night (27X zoom) in-ceiling—Not applicable
Table B-1 Cisco 2900 Series IP Dome Camera Specifications (continued)
Item Specification
B-4Cisco Video Surveillance IP PTZ Dome Camera User Guide, Cisco 2900 Series IP Dome
OL-24281-01

Cisco Video Surveillance IP PTZ DoOL-24281-01
I N D E X
A
A/V Streams tab
Audio Configuration page 2-23
description 2-23
Video Configuration page 2-23
Video Presets page 2-23
accessing, Cisco 2900 Series IP Dome 2-2
access level 2-39
advanced sharpening 2-35
alarm event source, description 2-41
audio, configuration settings 2-36
B
bit rate 2-26
brightness 2-19
C
Camera Configuration tab
description 2-17
General Settings page 2-17
On-Screen Display (OSD) page 2-18
Preset/Patterns page 2-18
ceiling, mounting Cisco 2900 Series IP Dome in 1-2
certificate
generating request 2-13
self-signed 2-14
Cisco 2900 Series IP Dome
accessing 2-2
models 1-1
mounting
in-ceiling 1-2
pendant 1-3
name 2-8
rebooting 2-9
restoring default values 2-10
specifications B-1
system requirements for accessing 2-1
coaxial cable, distance 1-8
compression 2-26
contrast 2-19
custom video stream 2-25
D
default values, restoring for Cisco 2900 Series IP Dome 2-10
DHCP
disabling 2-12
enabling 2-11
dome drive, installing 1-8
E
electrical cable, distance 1-8
event handler
deleting 2-44
filter 2-44
event source
alarm 2-41
deleting 2-42
editing 2-42
system 2-41
IN-1me Camera User Guide, Cisco 2900 Series IP Dome

Index
timer 2-41
Events tab, description 2-40
H
H.264 2-26
handler
Send Email 2-41
Upload JPEG to FTP Server 2-41, 2-43
home preset 2-20
hostname, changing 2-11
hue 2-19
I
I-frame interval 2-35
image rate 2-26
installing
dome drive 1-8
lower dome
in-ceiling 1-10
with pendant 1-10
J
JPEG 2-26
L
Live Video page
description 2-2
icons 2-2
lower dome, installing
in-ceiling 1-10
with pendant 1-10
IN-2Cisco Video Surveillance IP PTZ Dome Camera User Guide, Cisco 2
M
models, Cisco 2900 Series IP Dome 1-1
mounting
in-ceiling 1-2
pendant 1-3
wiring 1-4
MPEG-4 2-26
multicast, stream 2-6
multiscreen view 2-6
N
name, of Cisco 2900 Series IP Dome 2-8
Network tab
description 2-10
General Network page 2-10
SNMP settings 2-11
SSH settings 2-10
SSL settings 2-10
O
OSD (on-screen display) 2-19
P
pattern
configuring 2-22
selecting 2-22
pendant, mounting Cisco 2900 Series IP Dome with 1-3
preset
configuring 2-20
home 2-20
selecting 2-21
Preset/Pattern page 2-21, 2-23
presets/patterns, description 2-18
primary stream 2-5
900 Series IP DomeOL-24281-01

Index
PTZ controls
descriptions 2-3
viewing 2-2
Q
Quality of Service (QoS) 2-35
QuickView stream 2-5
R
rebooting, Cisco 2900 Series IP Dome 2-9
S
saturation 2-19
secondary stream 2-5
selecting stream 2-4
Send Email handler, description 2-41
Settings page
accessing 2-7
description 2-7
sharpening 2-35
snapshot 2-6
SNMP
description 2-11
settings 2-15
V2c 2-16
V3 2-17
specifications, of Cisco 2900 Series IP Dome B-1
SSH
description 2-10
enabling 2-15
SSL
certificate request 2-13
description 2-10
selecting layer mode 2-13
self-signed certificate 2-14
Cisco Video Surveillance OL-24281-01
stream
multicast 2-6
primary and secondary combinations supported 2-26
QuickView 2-5
secondary 2-5
selecting 2-4
unicast 2-5
stream, primary 2-5
SW1, switch settings
Pelco D-Type 1-13
Pelco P-Type 1-12
SW2, switch settings 1-11
switch settings
SW1
Pelco D-Type 1-13
Pelco P-Type 1-12
SW2 1-11
system event source
creating 2-41
description 2-41
system log 2-9
system requirements, for accessing Cisco 2900 Series IP Dome 2-1
System tab
description 2-7
General Settings page 2-7
System Information page 2-8
T
text overlay 2-9
timer event source
creating 2-41
description 2-41
time settings 2-8
troubleshooting A-1
IN-3IP PTZ Dome Camera User Guide, Cisco 2900 Series IP Dome

Index
U
unicast stream 2-5
Upload JPEG to FTP Server handler
creating 2-43
description 2-41
user
access level 2-39
creating 2-39
deleting 2-40
editing 2-40
management mode 2-38
settings 2-38
user group
management mode 2-38
settings 2-38
Users tab
description 2-37
General Settings page 2-37
Users page 2-37
V
video
advanced sharpening 2-35
bit rate 2-26
compression 2-26
custom stream configuration 2-25
I-frame interval 2-35
image rate 2-26
multiscreen view 2-6
preset configuration, selecting 2-24
properties 2-18
W
wiring, for mounting 1-4
IN-4Cisco Video Surveillance IP PTZ Dome Camera User Guide, Cisco 2
900 Series IP DomeOL-24281-01