city multi commissioning logbook
TRANSCRIPT
To be filled in by installing contractor
PROJECT NAME
Site Address SUBURB STATE P/C
Installing Contractor Tel.No:
Name Contractor licence
Installing Company Number
Name Refrigerant Handling
Installing Date Licence Number
YES NO
Before running the system, carry out a full pre commissioning check of the following points:
PART 1. Refrigerant Pipe Work
PART 2. Additional Refrigerant Charge
PART 3. Unit Address Settings and Information
3.1 Outdoor Units
3.2 Branch Controllers (Heat Recovery Systems Only)
3.3 Indoor Units
PART 4. System Wiring
4.1 Communication Wiring, Screened and 1.25mm or greater
4.2 Power Wiring, Correct Voltages and Phases, Earths, Neutrals
Appendix: How to Address the System, Sensing Location Switches
Note: Power supply to the Outdoor Units must be left on for 12 hours before operation for
crankcase heater. Make sure power to indoor units are off.
All condensate drain pipe work must be complete.
NOTE:Commissioning Logbook should be returned to the following address before Mitsubishi Technician
will attend site for commissioning:
Email Email Address of Project/Commissioning Engineer for Each State
Fax Fax number for Each State
Post Project/Commissioning Engineer for Each State
Mitsubishi Electric Australia
348 Victoria Road,
Rydalmere
NSW 2116
Please do not install VRF units if you have not been formally trained by Mitsubishi Electric Staff.
Training is available every month in each state and on-site training is available upon request.
Random Testing for Moisture, Acidity and Carbon present in pipework of installed systems.
NITROGEN HAS TO BE USED WHEN BRAZING COPPER PIPEWORK
CITY MULTI COMMISSIONING LOGBOOK
CM - Installation/ Commissioning
Course Attended?

Pressure Testing
1 3 bar (N2) (44psi or 300kpa)
2 15 bar (N2) (217psi or 1500kpa)
3 32 bar (N2) (464psi or 3200kpa)
pressure should be held for a minimum of 24 hours. Taking into
Triple evacuation method statement
Evacuate the system to 10000 Micron from both service valves. System manifold gauges must not be used to measure vacuum. A Torr or Micron gauge must be use at all times.Break the vacuum with Nitrogen (N2) into "suction" service valve port till 1 Bar(100 Kpa) has registered at the"discharge"service valve port.
3Evacuate to 5000 Micron from "discharge"service valve port.
4Repeat step 2. Then continue to step 5.Evacuate through both service valves to the lowest pressure vacuum pump will achievebelow 500 Microns for 1 hour minimumPressure Rise Test must then be carried out for a minimum of 30 minutes. If the pressurerises on the Torr or Micron gauge repeat steps 2 and 5 till no rise is detected.
PART 1: REFRIGERANT PIPE WORK
Method Statement 1 Strength & Leak Test
4
NITROGEN HAS TO BE USED WHEN BRAZING COPPER PIPEWORK
Method Statement 2 Triple Evacuation
6 Steps
41.5 bar (N2)
33 bar (N2)
to show any deformation in the pipe work.After step 4,drop pressure to 33 bar for final leak test. The
5
(600psi or 4150kpa)
(478psi or 3300kpa)
2
6
5
1
5 Steps
Minimum of 3 minutes
Minimum of 3 minutes
Strength test for a period of time that is acceptable -
Minimum of 3 minutes
account the ambient temperatures across the 24 hours.

P200 P250 P300 P350 P400 P450 EP200 EP250 EP300 EP350
9.5 9.5 9.5 11.8 11.8 11.8 9.5 11.8 11.8 11.8
LENGTH OF PIPE RUN IN METRES
(m) (Kg)
28.58 1 1/8 x 0.36 = L1
#VALUE! 22.2 7/8 x 0.23 = L2
#VALUE! 19.05 3/4 x 0.16 = L3
15.88 HIGH PRESS 5/8 x 0.11 = L4
#VALUE! 15.88 LIQUID 5/8 x 0.2 = L5
INDOOR UNITS SIZE QUANTITY #VALUE! 12.7 1/2 x 0.12 = L6
= 20 x #VALUE! 9.52 3/8 x 0.06 = L7
= 25 x #VALUE! 6.35 1/4 x 0.024 = L8
= 32 x #VALUE! αααα1 =
= 40 x #VALUE! Note: High Pressure line is between Outdoor & αααα2 =
= 50 x #VALUE! Branch Box. αααα3 =
= 63 x #VALUE! Liquid Line is between Branch Box & Indoors. αααα4 == 71 x #VALUE!
= 80 x #VALUE! ADDITIONAL CHARGE = L1 + L2 + L3 + L4 + L5+ L6 + L7 +L8+αααα1+αααα2+αααα3+αααα4
= 100 x #VALUE!
= 125 x TOTAL SYSTEM ADDITIONAL CHARGE = Kg
= 140 x
= 200 x
= 250 x TOTAL SYSTEM PIPE LENGTH (m)
TOTAL INDEX
.
.
Total Index Capacity of Indoor Units Connected 00~80 81~160 161~330 331~390 391~480 481~630 631~710
Kg to be added 2.0Kg 2.5Kg 3.0Kg 3.5Kg 4.5Kg 5.0Kg 6.0Kg
711~800 801~890 891~1070 1071~1250 1251~
8.0Kg 9.0Kg 10.0Kg 12.0Kg 14.0Kg
αααα2 Additional charge standard
Kg to be added
α3α3α3α3 If BC controller (Main is "HA" type then add another 2.0Kg Refrigerant)
αααα4 BC controller (SUB) TOTAL NUMBER OF BC SUB CHARGE
Kg to be added 1
2
PART 2: ADDITIONAL REFRIGERANT CHARGE
(E)P550 - (E)P900
2.0Kg
3.0Kg
5.0Kg
FOR R2 (HEAT RECOVERY SYSTEMS) PURY - P***Y(S)JM-A
BASE CHARGE FOR
YJM Series
1
2
αααα1
MODEL CHARGE
(E)P200
(E)P250 - (E)P500
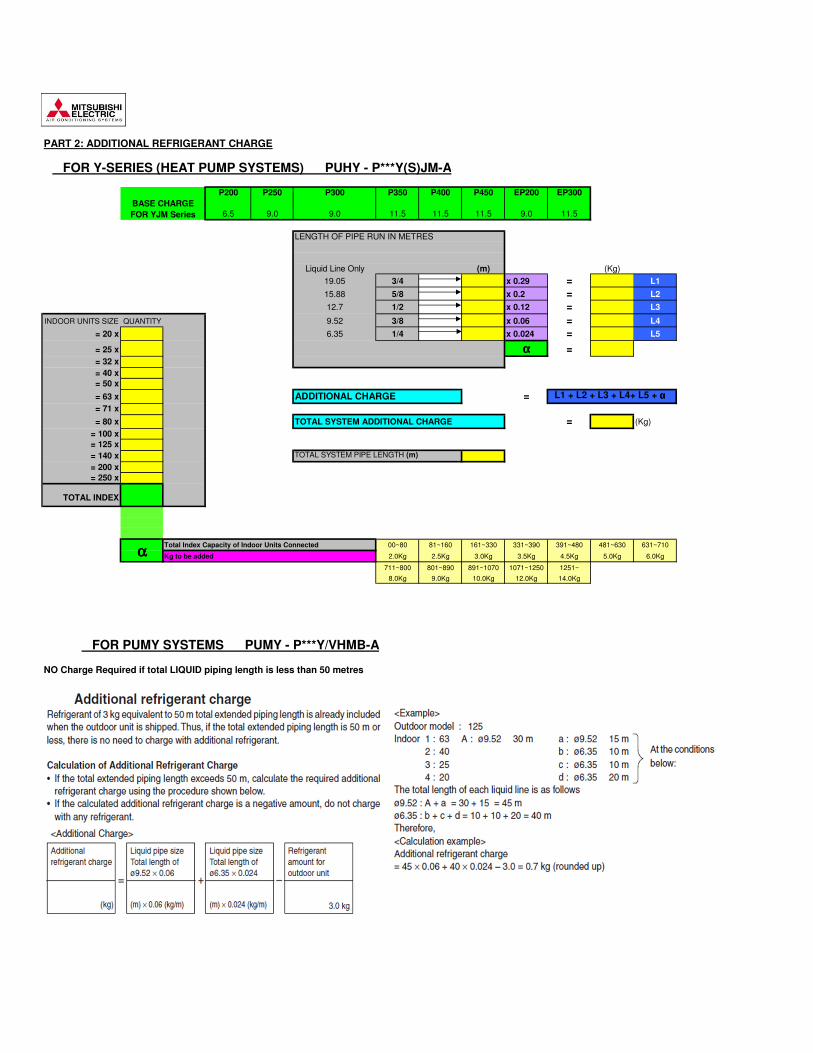
P200 P250 P300 P350 P400 P450 EP200 EP300
6.5 9.0 9.0 11.5 11.5 11.5 9.0 11.5
LENGTH OF PIPE RUN IN METRES
Liquid Line Only (m) (Kg)
19.05 3/4 x 0.29 = L1
15.88 5/8 x 0.2 = L2
12.7 1/2 x 0.12 = L3
INDOOR UNITS SIZE QUANTITY #VALUE! 9.52 3/8 x 0.06 = L4
= 20 x #VALUE! 6.35 1/4 x 0.024 = L5
= 25 x #VALUE! αααα = = 32 x #VALUE!
= 40 x #VALUE!
= 50 x #VALUE!
= 63 x #VALUE! ADDITIONAL CHARGE = L1 + L2 + L3 + L4+ L5 + αααα
= 71 x #VALUE!
= 80 x #VALUE! TOTAL SYSTEM ADDITIONAL CHARGE = (Kg)
= 100 x #VALUE!
= 125 x #VALUE!
= 140 x #VALUE! TOTAL SYSTEM PIPE LENGTH (m)
= 200 x #VALUE!
= 250 x
TOTAL INDEX
Total Index Capacity of Indoor Units Connected 00~80 81~160 161~330 331~390 391~480 481~630 631~710
Kg to be added 2.0Kg 2.5Kg 3.0Kg 3.5Kg 4.5Kg 5.0Kg 6.0Kg
711~800 801~890 891~1070 1071~1250 1251~
8.0Kg 9.0Kg 10.0Kg 12.0Kg 14.0Kg
NO Charge Required if total LIQUID piping length is less than 50 metres
αααα
PART 2: ADDITIONAL REFRIGERANT CHARGE
BASE CHARGE
FOR YJM Series
FOR Y-SERIES (HEAT PUMP SYSTEMS) PUHY - P***Y(S)JM-A
FOR PUMY SYSTEMS PUMY - P***Y/VHMB-A
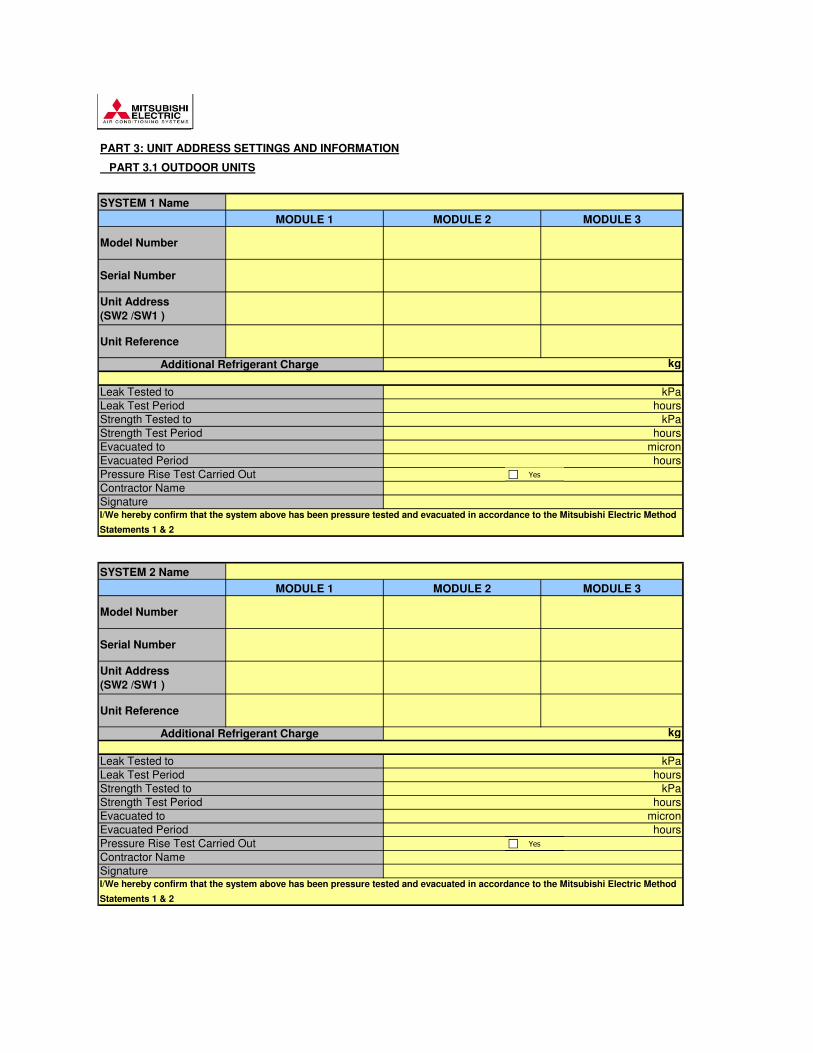
SYSTEM 1 Name
Unit Address
(SW2 /SW1 )
Unit Reference
SYSTEM 2 Name
Unit Address
(SW2 /SW1 )
Unit Reference
SignatureI/We hereby confirm that the system above has been pressure tested and evacuated in accordance to the Mitsubishi Electric Method
Statements 1 & 2
micron
Evacuated Period hours
Pressure Rise Test Carried Out
Contractor Name
Leak Tested to kPa
Leak Test Period hours
Strength Tested to kPa
Additional Refrigerant Charge kg
I/We hereby confirm that the system above has been pressure tested and evacuated in accordance to the Mitsubishi Electric Method
Statements 1 & 2
hours
kPa
hours
kPa
Additional Refrigerant Charge kg
hours
micron
Pressure Rise Test Carried Out
Leak Tested to
Leak Test Period
Strength Tested to
Strength Test Period
Evacuated to
Evacuated Period
Signature
Contractor Name
PART 3.1 OUTDOOR UNITS
Strength Test Period hours
Evacuated to
MODULE 1 MODULE 2 MODULE 3
Model Number
Serial Number
PART 3: UNIT ADDRESS SETTINGS AND INFORMATION
MODULE 1 MODULE 2 MODULE 3
Model Number
Serial Number
Yes
Yes

SYSTEM 3 Name
Unit Address
(SW2 /SW1 )
Unit Reference
SYSTEM 4 Name
Unit Address
(SW2 /SW1 )
Unit Reference
I/We hereby confirm that the system above has been pressure tested and evacuated in accordance to the Mitsubishi Electric Method
Statements 1 & 2
Pressure Rise Test Carried Out
Contractor Name
Signature
Strength Test Period hours
Evacuated to micron
Evacuated Period hours
Leak Tested to kPa
Leak Test Period hours
Strength Tested to kPa
Serial Number
Additional Refrigerant Charge kg
I/We hereby confirm that the system above has been pressure tested and evacuated in accordance to the Mitsubishi Electric Method
Statements 1 & 2
Model Number
Pressure Rise Test Carried Out
Contractor Name
Signature
Strength Test Period hours
Evacuated to micron
Evacuated Period hours
Additional Refrigerant Charge kg
Leak Tested to kPa
Leak Test Period hours
MODULE 1 MODULE 2 MODULE 3
Model Number
MODULE 1 MODULE 2 MODULE 3
Strength Tested to kPa
Serial Number
PART 3.1 OUTDOOR UNITS CONTINUED
Yes
Yes

SYSTEM 5 Name
Unit Address
(SW2 /SW1 )
Unit Reference
SYSTEM 6 Name
Unit Address
(SW2 /SW1 )
Unit Reference
I/We hereby confirm that the system above has been pressure tested and evacuated in accordance to the Mitsubishi Electric Method
Statements 1 & 2
Pressure Rise Test Carried Out
Contractor Name
Signature
Strength Test Period hours
Evacuated to micron
Evacuated Period hours
Leak Tested to kPa
Leak Test Period hours
Strength Tested to kPa
Additional Refrigerant Charge kg
Serial Number
I/We hereby confirm that the system above has been pressure tested and evacuated in accordance to the Mitsubishi Electric Method
Statements 1 & 2
MODULE 1 MODULE 2 MODULE 3
Model Number
Pressure Rise Test Carried Out
Contractor Name
Signature
Strength Test Period hours
Evacuated to micron
Evacuated Period hours
Leak Tested to kPa
Leak Test Period hours
Strength Tested to kPa
Additional Refrigerant Charge kg
Serial Number
PART 3.1 OUTDOOR UNITS CONTINUED
MODULE 1 MODULE 2 MODULE 3
Model Number
Yes
Yes

SYSTEM 1 Name
Unit Address
(SW2 /SW1 )
Unit Reference
SYSTEM 2 Name
Unit Address
(SW2 /SW1 )
Unit Reference
SYSTEM 3 Name
Unit Address
(SW2 /SW1 )
Unit Reference
SYSTEM 4 Name
Unit Address
(SW2 /SW1 )
Unit Reference
PART 3.2 BRANCH CONTROLLERS (Heat Recovery Systems Only)
Serial Number
MAIN BC SUB BC1 SUB BC2
Model Number
Serial Number
MAIN BC SUB BC1 SUB BC2
Model Number
Serial Number
MAIN BC SUB BC1 SUB BC2
Model Number
Serial Number
MAIN BC SUB BC1 SUB BC2
Model Number

SYSTEM 5 Name
Unit Address
(SW2 /SW1 )
Unit Reference
SYSTEM 6 Name
Unit Address
(SW2 /SW1 )
Unit Reference
Serial Number
MAIN BC SUB BC1 SUB BC2
Model Number
Serial Number
PART 3.2 BRANCH CONTROLLERS CONTINUED
MAIN BC SUB BC1 SUB BC2
Model Number

Model No. Unit Address No.
Serial No. SW12 SW11 SW14 ON OFF ON OFF
Unit Ref. No.
Location
Outdoor System
Model No. Unit Address No.
Serial No. SW12 SW11 SW14 ON OFF ON OFF
Unit Ref. No.
Location
Outdoor System
Model No. Unit Address No.
Serial No. SW12 SW11 SW14 ON OFF ON OFF
Unit Ref. No.
Location
Outdoor System
Model No. Unit Address No.
Serial No. SW12 SW11 SW14 ON OFF ON OFF
Unit Ref. No.
Location
Outdoor System
Model No. Unit Address No.
Serial No. SW12 SW11 SW14 ON OFF ON OFF
Unit Ref. No.
Location
Outdoor System
Model No. Unit Address No.
Serial No. SW12 SW11 SW14 ON OFF ON OFF
Unit Ref. No.
Location
Outdoor System
Model No. Unit Address No.
Serial No. SW12 SW11 SW14 ON OFF ON OFF
Unit Ref. No.
Location
Outdoor System SW14 is left on 0 for heat pump (Y-Series)
SW 1-1 SW 3-8
SW14 is left on 0 for heat pump (Y-Series)
INDOOR UNIT 7
SW14 is left on 0 for heat pump (Y-Series)
INDOOR UNIT 6
SW 1-1 SW 3-8
SW 1-1 SW 3-8
SW14 is left on 0 for heat pump (Y-Series)
INDOOR UNIT 5
SW14 is left on 0 for heat pump (Y-Series)
INDOOR UNIT 4
SW 1-1 SW 3-8
SW14 is left on 0 for heat pump (Y-Series)
INDOOR UNIT 3
SW 1-1 SW 3-8
SW 1-1 SW 3-8
SW14 is left on 0 for heat pump (Y-Series)
SW 1-1 SW 3-8
INDOOR UNIT 1
PART 3.3 INDOOR UNITS
INDOOR UNIT 2

Model No. Unit Address No.
Serial No. SW12 SW11 SW14 ON OFF ON OFF
Unit Ref. No.
Location
Outdoor System
Model No. Unit Address No.
Serial No. SW12 SW11 SW14 ON OFF ON OFF
Unit Ref. No.
Location
Outdoor System
Model No. Unit Address No.
Serial No. SW12 SW11 SW14 ON OFF ON OFF
Unit Ref. No.
Location
Outdoor System
Model No. Unit Address No.
Serial No. SW12 SW11 SW14 ON OFF ON OFF
Unit Ref. No.
Location
Outdoor System
Model No. Unit Address No.
Serial No. SW12 SW11 SW14 ON OFF ON OFF
Unit Ref. No.
Location
Outdoor System
Model No. Unit Address No.
Serial No. SW12 SW11 SW14 ON OFF ON OFF
Unit Ref. No.
Location
Outdoor System
Model No. Unit Address No.
Serial No. SW12 SW11 SW14 ON OFF ON OFF
Unit Ref. No.
Location
Outdoor System SW14 is left on 0 for heat pump (Y-Series)
SW14 is left on 0 for heat pump (Y-Series)
INDOOR UNIT 14
SW 1-1 SW 3-8
SW 1-1 SW 3-8
SW14 is left on 0 for heat pump (Y-Series)
INDOOR UNIT 13
SW14 is left on 0 for heat pump (Y-Series)
INDOOR UNIT 12
SW 1-1 SW 3-8
SW 1-1 SW 3-8
SW14 is left on 0 for heat pump (Y-Series)
INDOOR UNIT 11
SW14 is left on 0 for heat pump (Y-Series)
INDOOR UNIT 10
SW 1-1 SW 3-8
SW14 is left on 0 for heat pump (Y-Series)
INDOOR UNIT 9
SW 1-1 SW 3-8
SW 3-8
PART 3.3 INDOOR UNITS CONTINUED
INDOOR UNIT 8
SW 1-1

Model No. Unit Address No.
Serial No. SW12 SW11 SW14 ON OFF ON OFF
Unit Ref. No.
Location
Outdoor System
Model No. Unit Address No.
Serial No. SW12 SW11 SW14 ON OFF ON OFF
Unit Ref. No.
Location
Outdoor System
Model No. Unit Address No.
Serial No. SW12 SW11 SW14 ON OFF ON OFF
Unit Ref. No.
Location
Outdoor System
Model No. Unit Address No.
Serial No. SW12 SW11 SW14 ON OFF ON OFF
Unit Ref. No.
Location
Outdoor System
Model No. Unit Address No.
Serial No. SW12 SW11 SW14 ON OFF ON OFF
Unit Ref. No.
Location
Outdoor System
Model No. Unit Address No.
Serial No. SW12 SW11 SW14 ON OFF ON OFF
Unit Ref. No.
Location
Outdoor System
Model No. Unit Address No.
Serial No. SW12 SW11 SW14 ON OFF ON OFF
Unit Ref. No.
Location
Outdoor System SW14 is left on 0 for heat pump (Y-Series)
SW14 is left on 0 for heat pump (Y-Series)
INDOOR UNIT 21
SW 1-1 SW 3-8
SW 1-1 SW 3-8
SW14 is left on 0 for heat pump (Y-Series)
INDOOR UNIT 20
SW14 is left on 0 for heat pump (Y-Series)
INDOOR UNIT 19
SW 1-1 SW 3-8
SW 1-1 SW 3-8
SW14 is left on 0 for heat pump (Y-Series)
INDOOR UNIT 18
SW14 is left on 0 for heat pump (Y-Series)
INDOOR UNIT 17
SW 1-1 SW 3-8
SW14 is left on 0 for heat pump (Y-Series)
INDOOR UNIT 16
SW 1-1 SW 3-8
SW 3-8
PART 3.3 INDOOR UNITS CONTINUED
INDOOR UNIT 15
SW 1-1

Model No. Unit Address No.
Serial No. SW12 SW11 SW14 ON OFF ON OFF
Unit Ref. No.
Location
Outdoor System
Model No. Unit Address No.
Serial No. SW12 SW11 SW14 ON OFF ON OFF
Unit Ref. No.
Location
Outdoor System
Model No. Unit Address No.
Serial No. SW12 SW11 SW14 ON OFF ON OFF
Unit Ref. No.
Location
Outdoor System
Model No. Unit Address No.
Serial No. SW12 SW11 SW14 ON OFF ON OFF
Unit Ref. No.
Location
Outdoor System
Model No. Unit Address No.
Serial No. SW12 SW11 SW14 ON OFF ON OFF
Unit Ref. No.
Location
Outdoor System
Model No. Unit Address No.
Serial No. SW12 SW11 SW14 ON OFF ON OFF
Unit Ref. No.
Location
Outdoor System
Model No. Unit Address No.
Serial No. SW12 SW11 SW14 ON OFF ON OFF
Unit Ref. No.
Location
Outdoor System SW14 is left on 0 for heat pump (Y-Series)
SW14 is left on 0 for heat pump (Y-Series)
INDOOR UNIT 28
SW 1-1 SW 3-8
SW 1-1 SW 3-8
SW14 is left on 0 for heat pump (Y-Series)
INDOOR UNIT 27
SW14 is left on 0 for heat pump (Y-Series)
INDOOR UNIT 26
SW 1-1 SW 3-8
SW 1-1 SW 3-8
SW14 is left on 0 for heat pump (Y-Series)
INDOOR UNIT 25
SW14 is left on 0 for heat pump (Y-Series)
INDOOR UNIT 24
SW 1-1 SW 3-8
SW14 is left on 0 for heat pump (Y-Series)
INDOOR UNIT 23
SW 1-1 SW 3-8
SW 3-8
PART 3.3 INDOOR UNITS CONTINUED
INDOOR UNIT 22
SW 1-1
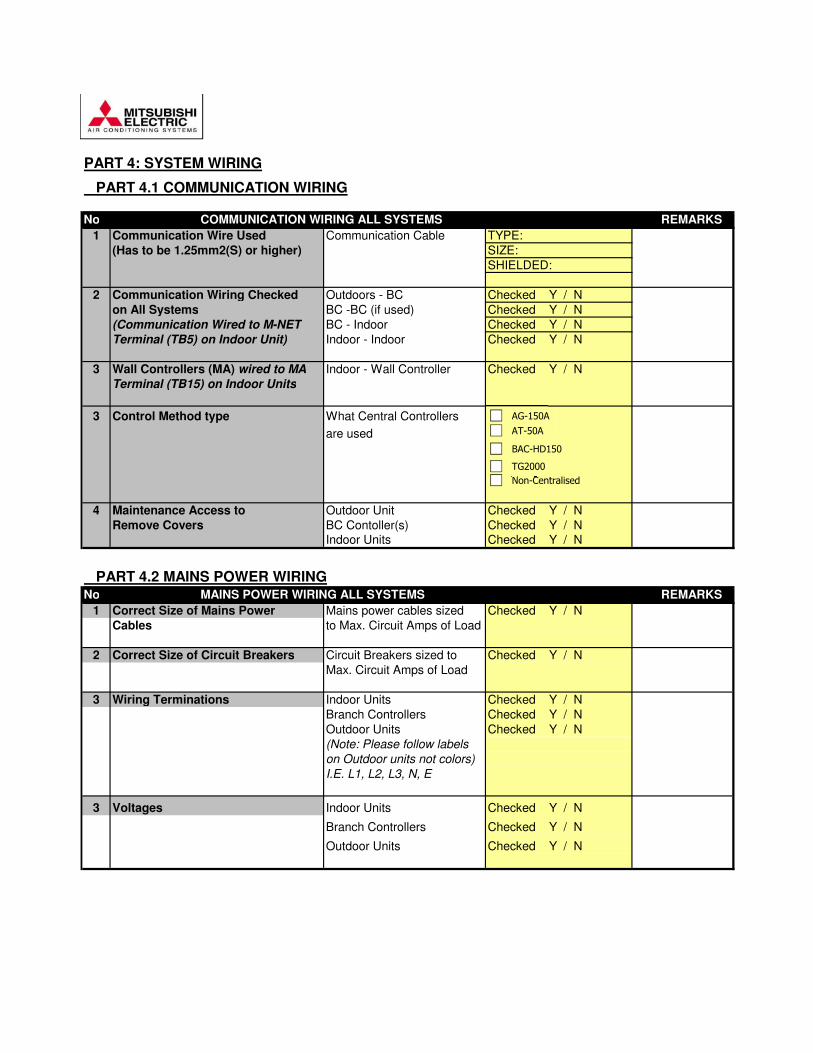
No COMMUNICATION WIRING ALL SYSTEMS REMARKS
1 Communication Wire Used Communication Cable
(Has to be 1.25mm2(S) or higher)
2 Communication Wiring Checked Outdoors - BC Checked Y / N
on All Systems BC -BC (if used) Checked Y / N
(Communication Wired to M-NET BC - Indoor Checked Y / N
Terminal (TB5) on Indoor Unit) Indoor - Indoor Checked Y / N
3 Wall Controllers (MA) wired to MA Indoor - Wall Controller Checked Y / N
Terminal (TB15) on Indoor Units
3 Control Method type What Central Controllers
are used
4 Maintenance Access to Outdoor Unit
Remove Covers BC Contoller(s)Indoor Units
No MAINS POWER WIRING ALL SYSTEMS REMARKS
1 Correct Size of Mains Power Mains power cables sized
Cables to Max. Circuit Amps of Load
2 Correct Size of Circuit Breakers Circuit Breakers sized to
Max. Circuit Amps of Load
3 Wiring Terminations Indoor Units
Branch Controllers
Outdoor Units
(Note: Please follow labels
on Outdoor units not colors)
I.E. L1, L2, L3, N, E
3 Voltages Indoor Units
Branch Controllers
Outdoor Units
Checked Y / N
Checked Y / N
Checked Y / N
Checked Y / N
TYPE:
SIZE:
SHIELDED:
Checked Y / N
Checked Y / N
Checked Y / N
Checked Y / N
PART 4: SYSTEM WIRING
PART 4.1 COMMUNICATION WIRING
PART 4.2 MAINS POWER WIRING
Checked Y / N
Checked Y / N
Checked Y / N
Non-Centralised
AG-150A
TG2000
BAC-HD150
AT-50A

Adjust three rotary switches SW14, SW12, SW11 in the FAN COIL UNITS
SW12 is the 10s digit of the Address Number (shown on Mitsubishi schematic)
SW11 is the 1s digit of the Address Number(shown on Mitsubishi schematic)
SW14 is the Port Number on the Branch Controller that is connected to that FCU.
(Not Shown on Mitsubishi schematic, check with techinican on connected port for each FCU)
Heat Pump System has No Branch Controller, leave SW14 on 0.
(NOTE: port 10 is shown as A, port 11 is shown as B, Port 12 is shown as C, and so on…)
(NOTE: if two ports are used on 1 FCU, address it as the lowest number)
Outdoor units & branch controllers only have 2 rotary switches.
SW2 is the 10s digit of the Address Number (shown on Mitsubishi schematic)
SW1 is the 1s digit of the Address Number(shown on Mitsubishi schematic)
Adjust 10s and 1s digit rotary switches according to Mitsubishi schematic.
Remote Sensor/Return Air Sensor
Set DIPSWITCH, SW3-8 to ON
Remote Sensor plugs into CN20 on Indoor Control Board
Wall Controller
Set DIPSWITCH, SW1-1 to ON.
INDOOR UNITS (FCUs)
APPENDIX: HOW TO ADDRESS THE SYSTEM
OUTDOOR UNITS & BRANCH CONTROLLERS
SENSING LOCATION FOR FCUs