civilization starter kit
TRANSCRIPT

DVD
Global
Village
Construction
Set
.01
Civilization Starter Kit

Documentationis how weteach other peoplehow to do thisall over the world.

Foreword
The Open Source Ecology Paradigm GlobalVillageConstructionSet:RolloutPlan GettingInvolved FromtheFounder:MyStory
Compressed Earth Brick Press: The Liberator
DesignRationale FabricationDrawings FabricationManual FabricationManual-BillofMaterials UserManual
Tractor: LifeTrac
DesignRationale FabricationDrawings FabricationManual FabricationManual-BillofMaterials UserManual
Soil Pulverizer
DesignRationale FabricationDrawings FabricationManual FabricationManual-BillofMaterials UserManual
Modular Hydraulic Power Unit: Power Cube
DesignRationale FabricationDrawings FabricationManual FabricationManual-BillofMaterials UserManual HydraulicPumpFailureModes&Troubleshooting
Appendix
CivilizationStarterKitv.0.01Credits OpenSourceEcologyLicenseforDistributiveEconomics OpenSourceEcologySpecifications TractorScalingCalculationsandCAEAnalysis HydraulicSystemTroubleshooting
Table of Contents

ForewordCivilization Starter Kit

The Open Source Ecology Paradigm

The Open Source Ecology Paradigm
Open Source Ecology:CivilizationStarterKitv.0.01
Foreword
The Open Source Ecology ParadigmMarcinJakubowski,Ph.D.,12.24.2011
Introduction
The Open Source Ecology Paradigm is an idea that the open source economy is a route to human prosperityinharmonywithnaturallifesupportsystems.
OpenSourceEcology(OSE)isamovementtocreatetheopensourceeconomy.Themovementconsistsofhundredsofentrepreneurs,producers,engineers,makers,andsupportersaroundtheworld–whobelieveinthepowerofopen–whosharetheopenethic.The‘Ecology’inthenamerefers to the interactionofnatural andhumanecosystems– theenvironmental, societal, andtechnologicalsystems–astheyinteractalongopenprinciples.ReadafurtherdescriptionoftheOSEconceptasitwasformulatedinitiallyin2003(seeAppendixbelow).Sincethen,theconcepthasevolvedtoaplatformforcreatingdistributiveenterprise,asasolidfoundationforasoundeconomy - a thirdeconomicoptionbeyond capitalismor socialism. Thedistributiveeconomyparadigmcentersaroundopenaccesstoefficientproductionasameanstotranscendartificialmaterial scarcity. The paradigmuses open source tools and techniques to produce advancedcivilization–byunleashingthepoweroftheresponsibleuseoftechnology.
ThemaincurrentprojectofOSE is theGlobalVillageConstructionSet–asetof50 IndustrialMachinesthatallowforthecreationofasmallscalecivilizationwithmoderncomforts.
OSE Mission
ThemissionofOpenSourceEcology is tocreateanopensourceeconomy-aneconomythatoptimizes both production and distribution, while providing environmental regeneration andsocialjustice.
Overview of the OSE Paradigm
The backboneofOpen Source Ecology is open access to economically-significant information– product designs, techniques, and rapid learning materials for achieving this. Collaborativedevelopment,24/7aroundtheglobe,leadstobestpracticedesigns-accessibleopenlyviatheinternet.Wheneconomicproductivityisunleashedassuch,thereisadirecteffectoncommunityprosperity.Asaresultof loweredbarrierstoentry,eachcommunitycanincreasetherangeofproductsandservicesthatitcanprovide.Globalcollaborationinopenproductandprocessdesignleadstobestpracticesbeingcommonlyavailable.Thisisopposedtothedominantparadigmoftoday–whereafewcompanieshavingthebestproductsormonopolycontrol,andbydefinition,therestismediocre.Openeconomicdevelopmenthasthepotentialtoraisethebaronthequalityofproductsintheproductiveeconomy–asopposedtotheenforcementofmediocritythroughprotectionismandmonopoly.
Allwealthcomesfromnature–rocks,plants,sunlight,andwater.Thesearefoundubiquitously.

The Open Source Ecology Paradigm
Open Source Ecology:CivilizationStarterKitv.0.01
Foreword
Yetthepresenceofstrategicresourcesresultsinconflictsovertheirappropriation.“Hey,that’smyoilunderyour land.”Opensourcetechnologycanaddressthisproblem–viaprinciplesofsubstitutability. There are many routes to producing any economically significant product orservice. Resilience of communities depends on having a diversity of options. As open accessto technologybecomes commonplace, every community can increase its levelofproductivityandappropriatetechnology–tothepointthatitcansubstituteanystrategicmaterialwithlocaloptions–withoutanyreductioninthestandardofliving–whilecontributingpositivelytoglobalpeace.
Transparency of the connection between technology and naturemeans that people begin torespectnature.Thishappenswhenpeoplebegin to respect that theirwell-beingcomes fromnature.Thistransparencyisfacilitatedwheneconomicallyproductiveactivitieshappenasclosetothecommunityaspossible–notoutofsight,outofmind inremote locations.This is trueenvironmentalaccountability–asonetendstonotdestroytheirownenvironment.Thus,thereisadirectconnectionbetweentransparencyofproductiontonaturalregeneration–aspeoplebegintomakemoresoundproductionchoices–byunderstandingtheconnectionofproductiontotheland.Thismeansthatindustrynolongerneedstooccurintheformoftoxicwastelands–but instead–eco-industry,onahumanscale–servingtheneedsofpeople,notcentralizedindustriescompetingforworlddomination.
Thus,technologyandtechnologicalliteracyareawaytoreconnecttonature–nottodestroyit.
Theabovedependsonincreasingthedensityofknowhowandtechnologyineverycommunity–whichcomes fromtheopenparadigm–open information,opencommunication,andopeneverything.Thelimitofoptimaldensityofproductiveknowhowisthepointthatanycommunityiscapableofproducingthefullrangeofessentialresourcesnecessaryforittoexist,grow,andprosper.This isnottosaythattradeshouldnothappen–butforcommunitystability–tradeshouldbeavoidedonessentialproductsthatthecommunityneeds.Asmuchasacommunitywouldwantotherwise–whenplacedinascarcitycondition–rationalitygoesoutthewindowandpeoplestarttokilleachother.
Forthefirsttimeinhistory–wehaveachancetodootherwise.Unleashedaccesstoinformationandtechnology–asavailedbythecomputerage–meansthatanyconflictsrelatedtomaterialscarcitycanbecomeathingofthepast.Thisincludesresourceconflicts,poverty,overpopulation,and even bureaucracy – as bureaucracy is not much more than a mechanism to managescarceresources.Further,regulatorycostsareminimizedviatechnological transparency-asatechnologically-literatepopulaceoftheopensourceagebecomesincreasinglyresponsibleforitsownactions.
Thisisnotacaseforconflictbetweentherichandpoor,thecityorthecountry,thefirstorthirdworlds–itisacasewhereopenaccesstoinformationhelpseveryone.Asbarrierstoentryarelowered,socialupheaval isminimized.Asproductionremainshigh–and increasesduetotheeliminationofcompetitivewaste–prosperitycanonlyincrease.
Thisisaparadigmshift.ThatisthecoreofOpenSourceEcology.

Open Source Ecology:CivilizationStarterKitv.0.01
Foreword
Thisdoesnotaddressevolvingashumans–inculturalandscientificadvancement-orinwisdomthatpreventsusfromrevertingtoinsanity.OpenSourceEcologyonlylaysastartingpointandfoundation-fromwhichevolutionbecomespossible.
Open
Wesupporteverythingopen.SeethenotionsofopenattheShuttleworthFoundation-http://www.shuttleworthfoundation.org/about-us/our-philosophy/communication/
Economy and Ecology
Distributive Enterprise - Thedistinguishing feature of this paradigm is a focus ondistributiveenterprise–openpublishingofnotonlyproductdesigns,butalsoofopenenterprisemodelssothatotherscanreplicatebestpractices.Thereisadirectrelationshipbetweenopendesignand loweringofbarriers toentry.Productiveenterprise formsthebackboneforcommunities’infrastructuresandtheirprosperity.Openaccesstounprecedentedhighdensitiesofproductiveinformationmeanseconomicprosperity–andeverybodywins.
Theopensourceeconomyisaneconomicsystemmarkedbyopenaccesstobest-practicedesignsandtechniquesforproducingeconomically-significantproductsandservices.Onefeatureoftheopensourceeconomy is Industry2.0–ordistributed,flexibleproduction–whereaccesstoadown-loadable repository of open source design feeds local, multipurpose digital fabricationfacilities. Such facilities - or powerful Microfactories - can produce just about anything thata communitywill need - local food, energy, housing, or cars. This is distinct from centralizedproductionfacilitiesthatexisttoday.
An open source economy produces designs by global collaboration,with development cycles24/7aroundtheglobe.Whenasufficientnumberofstakeholdersjoinadevelopmentprocess,itisamatteroftimebeforethedevelopmentcycleyieldsthebestdesigns–andthesedesignsevolvecontinuously.
Integrated Economy–openfostersrapidlearning(openIP)andlowcapitalization(opensourceproducts)–i.e.,lowerbarrierstoentry.Lowerbarrierstoentryindicatethatasingleeconomicagentcanhaveabroaderrangeofproductivity,thereforemoreresiliencefromeconomicshocks.In the limit of extremediversity on the part of the producers, every community can attain acompleteeconomy.Ifproductevolutioninvolvesadvancedtechniquesformaterialsubstitution,then every community can attain a complete economy based on local resources. This is thesolutiontoresourceconflicts.Thisisstabilityinthefaceofglobaleconomicupheaval.
The end of artificial material scarcity–Artificialmaterialscarcitymaybedefinedastheconditionwhere– intheabsoluteabundanceofresources–namelyrocks,plants,water,andsunlight–thedistributiontohumans isdrasticallyuneven.Loweringbarrierstoentryhelpstodistributeproductionmorewidely.Productoptimizationfromopendevelopmentincludesoptimizationforlifetimeofuse.Lifetimedesign(i.e.,lowermaintenancecosts),combinedwithhighproductivity
The Open Source Ecology Paradigm

Open Source Ecology:CivilizationStarterKitv.0.01
Foreword
andlowbarrierstoentry-indicatesthatmaterialabundancecanbethegeneralhumancondition.Thisisasolutiontopoverty.
Transparency of Resource Use and Feedback – Rapid learning in the open source economyhelps people gain numeracy and technological literacy. Technological literacy promotes theunderstandingofproduction–andspecifically,therelationshipbetweennaturalresourcesandhumanpopulation.Localresourceusefostersahighlevelofresourcefeedbackloops–asthestate of the local environment is easily observable. Such transparency of resource use is thesolutiontooverpopulationinarational(materiallyabundant)society.
Lower Cost–byeliminatingcompetitivewaste,thecostofbuyingormakingopensourceproductsisreducedsignificantly.
Competitiveness with Globalization-WhenIPaccessbarriersareeliminatedintheopensourceeconomy, cost of production is reduced to production capitalization and labor. The cost ofproductioncapitalization,undertheassumptionofflexiblefabricationassistedbyautomation-goestozerointhescenarioofcommunity-supportedmanufacturing(thinkOpenSourceFabLabineverycommunity).IntheopeneconomyofDIYethicsandlocalcapacityandtransparency-thecostoflaborgoesdown–astheusercanalsolearntobetheproducer.InthelimitofDIYethic,thiscost,definedascostofexternallabor-goestozero–andisreplacedbyone’stime.Further,inthelimitoflifetime-designproducts,thetimerequiredforproductionisminimized,asproductionhas tohappenonlyonce.Thus, competitivenesswithglobalization is achievedby zeroaccessbarriersandlocalskill,andlocalsocialcapital–adifferentparadigm.
Ecology
Closing the Nature-Technology Divide–Trulysoundtechnologyisnotatoddswithnature.Wehave a choice to produce technology in an environmentally soundway. For just about everyharmfulandpolluting industrialprocess,a cleanalternativemaybe found.Biomimicry showsusthewaytodothis inmanycases.Moreover,trulysoundtechnologyshouldbringusclosertonature-i.e.,ifweappreciatethatnatureprovidesallmaterialwealth,weareinclinedtotakecareofnature.Thisisacaseforeducatinggeneralists–nottechnologistsorenvironmentalists–peoplewhounderstandtechnologydeeplytothepointthattheyrespectnature–andpeoplewhounderstandtheenvironmentdeeplytothepointthattheyrespecttechnology.Technologicalliteracyisfacilitatedbyintroductionoftruetechnicaleducation,asopposedtoindustrystandardmarketingforces.
Product Development Ecology – In the mainstream, the designer is not the draftsman, thedraftsmanisnottheengineer,theengineerisnotthefabricator,thefabricatorisnottheuser,andtheuserisnottherepairman.Whileistoutedasthepinnacleofspecialization,thisintroducesa lackof accountability betweenall these steps, and therefore, inferior product designwhenconsideredfromthehumanergonomicfactors,productservice,environmentalissues,orwealthdistributionissues.Opensourcedesignaddressesthis,asitisdesignbythepeople,forthepeople–anditisinfinitelycustomizable.
The Open Source Ecology Paradigm

Open Source Ecology:CivilizationStarterKitv.0.01
Foreword
Environmental Regeneration – There is a direct link between open source technology andenvironmental integrity. Open technology implies optimal technology – and one part ofoptimization is optimization for environmental friendliness. Thus, the trend of environmentaldegradationcanbereversedtoregeneration.
Appendix
ArchivedonFebruary10,2005,seeMissionat-http://web.archive.org/web/20050210084651/http://sourceopen.org/Ca
The Open Source Ecology Paradigm

Open Source Ecology:CivilizationStarterKitv.0.01
Foreword
Our MissionByMarcinJakubowski,11.30.03
I. What is Open Source?
OpenSourcereferstothemodelofprovidinggoodsandserviceswhichincludesthepossibilityoftheend-user’sparticipationintheproductionofthesegoodsandservices.ThisconcepthasalreadybeendemonstratedinLinux,theopensourcecomputingsystem.WithLinux,alargenumberofsoftwaredevelopershavecontributedtocreatingaviablealternativetotheproprietaryWindowscomputeroperatingsystem.Manypeoplecanreadilyseetheadvantages-allLinuxsoftwareisfree.PleasereadthesearticlesontheconceptofOpenSourcesoftwareanditsimplicationsforchangingbusiness.
II. What is Open Source Economics?
OurmissionistoextendtheOpenSourcemodeltotheprovisionanygoodsandservices-OpenSourceEconomics.Thismeansopeningaccesstotheinformationandtechnologywhichenablesadifferenteconomicsystemtoberealized,onebasedontheintegrationofnaturalecology,socialecology,andindustrialecology.Thiseconomicsystemisbasedonopenaccess-basedonwidelyaccessible informationandassociatedaccess toproductivecapital-distributed into thehandsofanincreasednumberofpeople.Readaboutaninspiringexampleofsuchaneconomicmodelbeingcurrentlyputintopracticewithrespecttomanufacturingvehicles.
Webelievethatahighlydistributed,increasinglyparticipatorymodelofproductionisthecoreofademocraticsociety,wherestabilityisestablishednaturallybythebalanceofhumanactivitywithsustainableextractionofnaturalresources.Thisistheoppositeofthecurrentmainstreamofcentralizedeconomies,whichhaveastructurallybuilt-intendencytowardsofoverproduction.
III. What is Open Source Ecology?
Wederiveourorganization’snamefromaconceptwhichreferstotheintegrationofthenatural,societal,andindustrialecologies-OpenSourceEcology-aimingatsustainableandregenerativeeconomics.Weareconvincedthatapossibilityofaqualitylifeexists,wherehumanneedsareguaranteedtotheworld’sentirepopulation-aslongasweaskourselvesbasicquestionsonwhatsocietalstructuresandproductiveactivitiesaretrulyappropriatetomeetinghumanneedsforall.Attheendoftheday,thegoalistoliberateourtimetoengageinexactlythatwhicheachofuswantstobedoing-insteadofwhatweneedtodotosurvive.Allhavethepotentialtothrive.Today,anincreasinglysmallerpercentageoftheworld’spopulationisinthisposition.
The Open Source Ecology Paradigm

Global Village Construction Set: Rollout Plan

GlobalVillageConstructionSet:RolloutPlan
Open Source Ecology:CivilizationStarterKitv.0.01
Foreword
Tactical Approach
Tocreateanopensourceeconomy,wearestartingwithasmallbutsufficientsubset,theGVCS50. By developing the GVCS technology kernel, we enable the community-based solution ofrelocalized production. Because the GVCS tools are selected based on their large economicsignificance,thishaswidespreadapplications–suchasenterprisestartup,regenerationofurbandecay,andbuildingofcommunities–bothinthedevelopedanddevelopingworld.BecausetheGVCSiscomprehensive, it isdesignedtoprovidearobustsolutionforrebuildingcommunitiesfromthegroundup.
We currently have $1/2M of funding to begin rapid parallel development of the GVCS, withdevelopmentof14furthertoolsstartingJanuary1,2012.WeaimtoproducebetaproductreleasesofmostofthesetoolsbyApril1,2012.Fromthen,wewilldeploytheremaining32technologies,whiledocumentingallresultswithglobalCADandinstructionalssupport.Ourgoalistosecureatotalof$5.5Mfor2012byJanuary31,2012.Weareincluding$2.5Mforprototyping,$2.5Mfordocumentationandfieldtesting,and$1/2Mfordeployingthefully-featured,opensourceCAD/CAMsolution.SeeOSEEnterprisePlanvideo.
Wehavegrownfromabout$20k/yearforthepast4yearsto$500kinthelast2months,andwehavetheambitiousgoalof$5Mmoresecuredwithinonemonth.Weprideourselvesinefficiencyofresourceallocations.Wespendabout98%ofourresourcesdirectlyonprototypesbuilt,andouroverheadfor thenonprofitsectordonations is2%viaafiscalsponsor.Weencourageyoutodonateandtoputyourenergy intothiswork.Wearedoinga lotofthedevelopmentwithvolunteers,andFactoreFarmisthemaindevelopmentfacility.Wearealsooutsourcingasmuchofthedesign,prototyping,anddocumentationworkaspossible–asfundingallows.Increasedresourcesmeanincreasedburn-downratefortheGVCS50technologies.
The next 14 tools are:
CNC Multimachine–wearecurrentlyconsideringDanGranett,aprecisionmachiningexpert–tobuildouttheCNCMultimachine,whileutilizinganyrelevanttechniquesfromacollaboratinggroup-theOpenSourceMultimchineproject
CNC Circuit Mill–YoonseoKangistheprojectleadonthisatFactoreFarm,andweareconsideringtheSnapLockCNCasourplatformofchoice,evaluatingitatpresentbeforestartingdeploymentinJanuary.ProposalBriefisforthcoming.
Ironworker Machine – Brianna Kufa is project lead, with initial design work completed, andProposalBriefforthcoming.WecurrentlyhaveadesignchallengeuponGrabCADtodevelopanopensourcecuttingbladedesign.
CNC Torch Table – prototype I has been tested in producing tractor parts with success, andoptimization isneededfor thesoftwaretool-chain.WearecurrentlyconsideringanupgradedgantryshownunderPrototypeIIonthewiki,asimpleDIYdesignwhichhasseenmanyhundredsofhoursofproductiontimeandisastabledesign.Zheightcontrolneedstobedeveloped.

GlobalVillageConstructionSet:RolloutPlan
Open Source Ecology:CivilizationStarterKitv.0.01
Foreword
Induction Furnace–conceptualdesigndone.ConsideringrecruitingconsultingassistancefromSuperiorInduction.Lookingforsubjectmatterexpertstojointhisproject,DedicatedProjectVisitorremotecollaboration.
Sawmill–PrototypeI75%complete,readyformotorandbladeattachment;lookingforDedicatedProjectVisitorforfieldtesting.
Backhoe–EnnissInc.isbeingconsideredforprototyping.
Bulldozer– consideringmodifiedLifeTrac frameandweights, jack shaftwheeldriveandsteelwheels like inoldagricultural tractionengines from100years ago;10,000 lb.weight forfirstprototype.
Well-drilling rig – considering design consulting from Enniss, Inc. Looking for subjectmatterexperts.
Modern Steam Engine – current plan is to use theWally Munster scalable modern design.CollaborationwithTomKimmelofSteamAutoClubofAmericatodevelopaplantforthenextgenerationofmodernsteamPowerCubes,about4x3x3feetinsizefors25hpPrototype1.PlantincludesGasifierBurner,HeatExchanger,oilpump,waterpump.PlanforHeatExchangeristoworkwithTomusinghisopensourcecoilwinder.
Gasifier Burner–LarryDobson iscompletingplans foranadvancedgasifierburnerwithheatexchangerforheatingwater.PlanswillbecompletedonJanuary31,2011.Pelletizer–Needdesignandfabricationdrawings.CanbefabricatedbySweigerShopreadily.Seepelletizerdiesonresearchanddevelopmentpage-anddesignaroundthose.
Power Inverter–followingthedevelopmentoftheCNCcircuitmill,wewillprototypetheinverter.Needpowerelectronicssubjectmatterexpertstojointheteam.
Solar Concentrator–thecurrentplanistobuildondocumentationavailablefromtheSolarFireproject.CollaboratingwithDr.PeterSchwartzofCalPolyondesignevaluation.

Getting Involved

GettingInvolved
Open Source Ecology:CivilizationStarterKitv.0.01
Foreword
Getting Involved
Weaimtomakethisoneofthemostcollaborativeprojects intheworld,andweaimtotrainmovemententrepreneursdedicatedtodevelopingdistributiveenterprise.
So, You Want to Build a New Civilization?
Allright.PleasegototheOSEWikiandsignin.Youwillseealistofthe50GVCStechnologies,ThereisplentyofworkleftontheGVCS50.Pickone,andstartcontributinginformation.Thereisresearchanddevelopment,whereyoucancontributeconceptualdesign,analysisofindustrystandards, diagrams, prior art, background research, and other supporting information. Thencomesthedesignstage–CAD,calculations,simulations,CAEanalysis,fabricationdrawings,etc.Peerreviewisuseful.Thencomesthebuild–whichrequiresabillofmaterials.sourcing,andafacilitytobuild.Weencourageyoutoworkremotelyandcontributetestdata.WeinviteyoutowriteaProposalBrief,andwecanfundyourworkupontechnicalmerit.OryoucancomeforaDedicatedProjectVisittoFactoreFarm.
ThefirststepyoushouldtakewhenyougetinvolvedistofillouttheTeamCulturingSurvey.Thishelpstoprovidetransparencyandtointroduceyoutotherestoftheglobalteam.Thebeautyoftheprojectisthatcollaborativedevelopmentisbeginningtotakeplace24/7aroundtheworld.Weshouldalsodevelopabetterhumanresourcesplatform–wherepeoplearelistedbytheirskills and contributions, promises anddeliveredproducts – so it becomes transparentwho isdoingworkandfulfillingontheirpromises.Thisappliestovolunteersandpaidpeople.
Howdoyouknowwhatarethecurrentpriorities?First,seetheWiki,andthebasicapproachis -“If it isnotonthewiki, itdoesn’texist.”Fromthispoint,youhavetoanalyzethestateofdevelopmentcritically.Ifitisnotclearlydocumentedonthewiki,itisprobablyindevelopmentoruntested.Clickonanydeviceatthe50GVCStechnologiespage.Askyourself:Isthereaprojectleader?What preliminary research has been done? Does full CAD exist? Are full fabricationproceduresdocumented?Doesa completePDFofplansexist that you can take to your localfabricator?Doeseconomicanalysisexistsoyoucanstartyourownenterprise?Ifnot,thosearetobecompleted–anditisachanceforyoutogetinvolved.
Current project leaders as of 12/25/11 include:
YoonseoKang–CNCCircuitMill,InvertercomponentoftheUniversalPowerSupplyBriannaKufa–IronworkerMachineMarkNorton–ModernSteamEngineLarryDobson–GasifierBurnerandHeatExchangerJamesSlade,MikeApostol–CEBPress,LifeTracTomGriffing–PowerCubeMarcinJakubowski–CNCTorchTable,InductionFurnaceAaronMakaruk–ResourceDevelopmentMikeApostol–OSCAD/CAMsolution

GettingInvolved
Open Source Ecology:CivilizationStarterKitv.0.01
Foreword
Contacttheseleadersonthelatestprogress.
The wiki is a huge sandbox, and themagic of it is that over time, even withmany randomcontributions,editorsorganizecontentintoamorecohesiveform.ThebasicproducttemplateforeachofthetechnologiesattheGVCS50pagecontainsgeneralheadings.Youcansearchforinformationonthewiki,andifyoufindsomethingrelevanttooneoftheheadings,youcanedittoputthecontentattherightplace.
Isatechnologyofyourchoicenotpartoftheofficial50GVCSlist?Thenstartnewpagesonthewikifornon-GVCStools.Thewikiisinfinitelyexpandable.TheGVCSisonlyalimitedbutsufficientset–limitedsoitremainsatractableprojectwithacleardeliverable.Wedon’treallyknowifthechoicesmadearethebest–butwewillreevaluateafterthesetisdonebyyear-end2012.Wecan’ttelluntilweseeallthedevicesworktogetherasacompleteset.Wejustselectedthe50bestonesaccordingtoOSESpecificationsandtheProductSelectionMetricalmost4yearsago.
If you are a subjectmatter expert, designer, video editor, CAD draftsman, or other technicalcontributor inanyof the50technologies–youarewelcometobidonwork.WesuggestyousubmitaProposalBrief.Thekeytotheprojectisfindingqualifiedpeople–andwefoundthatwordofmouthandreferencesfromtrustedsourcestendtoprovidebestresults.Helpusfindthesepeople.
WearealsolookingforfulltimepeopletojoinFactoreFarm–masterbuilder,farmer,fabricationmanager, CEO, CTO, and co-founder.With the farmer -weneed to continuefield testing theequipment while feeding our team. With the builder, we want to continue building outinfrastructure,buildingoutourelectricalgrid.Withthefabricationmanager,wewanttocontinueproductionrunsasafirst-handtestofoureconomicsignificance,andtocontinuebuildingthetoolsthatweuseonsite.Wearelookingforstartupinstigators,notemployees–asthistypeofrisk-sharingispartoftheresponsibilitythatweseekinourpartners.
Thereareothersupportroles.Wealsowelcomeyoutojoinusinresourcedevelopment–theOSEEnterpriseisanopenbusinessplanthatyoucanuse.Weareworkingondevelopingremotevideoediting capacity,whereyoucanedit remotelyafterdownloading footage fromour repository–suchasYouTube.Ourcurrentplantistousesmartphonesforconstantuploadsofcontent–indexedby topic.Then, remoteeditors can take thecontent tomakequalityvideos fromtherawfootage.WearealsolookingforongoingCAD,fabricationdrawing,simulation,andanalysissupportforprototyping.
At best, as the team grows at Factor e Farm, remote support functions would include:
• Video Editing Support–ongoinginstructionals• CAD Support –convertingvideoswithmeasurementsintoCADfiles;• Fabrication Drawing Support–convertingCADfilesintofabricationdrawingsthatonecan
taketoalocalfabricator• CAE Support – converting CAD files into CAE analysis for structural, thermal and other

GettingInvolved
Open Source Ecology:CivilizationStarterKitv.0.01
Foreword
properties;• Modeling Support–animationsmodelingthefunctionofmachines,aspartofexplanatory• Material Blogging Support–keepingtrackofaprojectwiththeprojectleadtoprovideregular• Blog Updates on a Given Project – such as checking in½hour eachweekbyphone and
writingablogpost.Strongjournalism/reporting/creativewritingskillsarerequiredtoprovidecontext and topique the reader’s interest. This is critical aswehavea regularbacklogofreportingfromFactoreFarmandotherlocations.
• Collaboration Support–dedicatedsearchingforalliedefforts,collaborators,peerreviewers,funding support, bidders, subjectmatter experts, and any other support thatmedia andmusicrepositorysupport–keepingarepositoryofhighresolutionmedia,graphics,diagrams,andothermaterialsforuseinpressreleases,reports,andotherpublications;opensourcesoundtrackrepositoryforvideos
• Nonprofit Fundraising–joinAaronMakarukinraisingfundsforOSE.Seehissamplecontracthttp://opensourceecology.org/wiki/Contract_Aaron
OSE Branches and Allied Efforts
There are 3 main forms of OSE-related operations: independent OSE efforts, chartered OSEorganizations,andcertifiedOSE/GVCSProducers
Independent OSE Efforts
OSE isamovementtocreateanopensourceeconomybydevelopingandusingeconomicallysignificant, open source information (open product and process design and techniques ofproduction).OSEreferstomorethanjustanopensourceeconomy.ThedistinctionisthatOSEproducesnotonlyopendesign,butalsoproducesdistributiveenterpriseasthemeanstoaffecttheeconomicprocess.Ontopofthis,itconnectstoenvironmentalregenerationandsocialjusticeasdiscussedattheOSEParadigmsection.
WeencouragethattheOSEmessagebespreadfarandwideasthethirdeconomicparadigm.Tothisend,wedonotrestrictanybodyfromusingtheOSEnameaslongastheyarefollowingtheOSEParadigm.OthersarewelcometousetheofficialOSEnameorofficiallogoinbrandingtheirworkorgroupasanindependentOSEeffort,withoutexplicitpermission,iftheyareanindividual,group,ororganization.IndependentOSEEffortsareintendedtopromotethatworkofOSE,whilenotdemandingthatanyresourcesonthepartofOSEInternational.
To be an independent OSE effort in good standing – the effort may be one or more of the following:
• AuserofGVCStechnologies• Doing outreach about the OSE Paradigm• DeveloperorprototyperofGVCStechnologies• Engaginginthedevelopmentofanyother,non-GVCStechnologieswhilepublishingdesigns
andopenbusinessmodels.Webelieveinopeneverything,andthewikiisinfinitelyexpandable.WerecommendthatyoupublishontheOSEWikiforrecognition.
• Aneffortforraisingmoney(nonprofitsectororotherwise)byusingtheOSEbrand.Inthecase

GettingInvolved
Open Source Ecology:CivilizationStarterKitv.0.01
Foreword
thatyouareraisingmoney,werequestthat ifyouusetheOSEbrand,thatyoucontribute25%ofyournetfundingraisedtopromotetheworkofOSEInternational.ThismoneywillbeuseddirectlyforGVCSprototypingin2012,soyourfundingwillhelptheentiremovementtoachieveitsgoalsfaster.
WhileothersareallowedtousetheGVCSdesignsforprofit-theyarenotallowedtousetheofficialOSE logo tobrand theirproducts. Theyarewelcome to sellproductsunder theirownlabel. Ifonewants tosellproductsunder theofficialOSE/GVCS label, thenone is requiredtobecomeacertifiedOSE/GVCSproducer,asdiscussedbelow.
IfyouareusingtheOSEidentitytorunsomeformofoperationoreffort,pleaseletthegreatercommunity knowas amatterof courtesy, by posting your organization’s name, date formed,contactdetails,andactivitiesatIndependentOSEGroupsonthewiki.CharteredOSEOrganizations–OSEDevelopmentFacilities
OSEhasa good chance to change theworld. Tomaintainandenhancea strong identityas aworld-changing organization that produces transformation of economies,we are setting highstandardsfornewfacilities.Newfacilities,ifcharteredasanofficialpartofthecoredevelopmentworkofOSE,mustcomplywiththedistributiveeconomicgoalsoftheOSEParadigm.Moreover,iftheOSEParadigmisindeedeffective–thentheneworganizationshouldhaveasignificantandvisibleeffectontheeconomy–notonlyintermsofachievingapost-scarcityeconomyonitsownsoil–butalsoininstigatingthesameinsurroundingcommunities.Visibleeconomicandpoliticaltransformation should occur on sub-decade timescales in these communities. A network ofthousandsofcommunitiesassuchisexpectedtoarisewithinabout3yearsofGVCScompletionofyear-end2012.Thisisaseedforthoroughglobaltransitiontotheopensourceeconomy,andtoOpenSourceEcology.
To achieve this, a Chartered OSE Organization must be:
• Aland-basedfacility,wherethelandisplacedinatrustasasiteofpermanenthumanheritage.Thisisintendedtoguaranteecontinuityandsignificancetoanyneweffortofthisnature.
• Abeaconoflightforitslocalcommunity,whichdemonstratesinitselfafunctionalcommunityoperatingundertheconditionsofmaterialpost-scarcity.
• Adevelopmentandeducationcenterandaplaceoflifelonglearning,withtheidealofcreatingthenextgenerationofresponsiblestewardsoftheircommunitiesandofthegreaterworldinthecontextoftheopensourceeconomy.
• Aproductivefacilityandaproductdevelopmentcentercapableofproducingallofitsessentialneedsfromlocalresources.
• A change agent for surrounding communities, the success of which is measured by theadoptionofopensourceeconomicandOSEpracticesinthesurroundingcommunities
• Populatedbyfull-timeindividualswholiveapost-scarcityeconomylifestyle–whereahighstandardoflivingisachievedfromlocalproductivity.
Theenabling technologybase for suchacommunity is thecompletesetof50GVCS tools,ora related infrastructurepackage thatprovides forallof the community’smaterial andenergy

GettingInvolved
Open Source Ecology:CivilizationStarterKitv.0.01
Foreword
resources.
Theaboveisnotaneasytask,andwearelookingforinitialdiscussionswithsmallcoregroupsofmovemententrepreneursinterestedinstartingsuchnewfacilities.Thesecoregroupsmusthavedemonstratedthepractical,tactical,andpeopleskillstoorganizerapidlearninganddevelopmenteffortsrequiredforthesuccessfulstartupofsuchcommunities.
ThebenefitofOSE-charteredstatus isthepublicity, funding,andaccessthatcomesfromthatrelationship.Wearewilling to consider other types of charteredorganizations under specificterms.Otherwise,anotherroute isoperatingasan independentOSEeffortas in theprevioussection.
Certified OSE Producers
OSE International is currently developing training programs and infrastructures for producertraining.Typically,aproducerisaskilledcraftsmanwhopicksupadditionalskillsduringabuildofoneormorecompletemachinesaspartoftheirtraining.AnotherroutetoproducertrainingisforindependentproducerstosubmitfinishedcopiesofdevicesforqualitycontrolapprovalbymembersoftheOSEInternationalcertificationcommittee.
CertifiedproducersmaysellundertheOSEbrand.OSEcanprovidemarketingassistance.Inreturnforcertification,OSECertifiedProducersarerequiredtopay5%oftheirnet.ThisfundinggoestosupportthedevelopmentoftheGVCSandthereplicationofOSEDevelopmentFacilities.Non-certifiedproducersdonothavetopayalicensefeeiftheysellundertheirownlabel.
Chartered OSE Organizations
BecomingacharteredOSEOrganizationisnotatasktobetakenlightly,asthegoalofOSEasamovementistoproducedisruptivechange.Startingabranchmeanscreatingthesubstanceofthenexteconomy.OurgoalistocreateastrongidentityforOSEasaclearandpositivechangeagentwhodeliverstangibleresults.Anythingshortofthisisdilutingthemessage,anddoesnothelpthemovementasawhole.
IfyouwouldliketobeendorsedasanofficialOSEfacility,thefirstthingisacharter–definingyourgoalsclearly.Thisincludestheresourcesyouaimtosecure,distributiveenterprisesthatyouaimtodevelop–andtheteamthatwillhelpyougetthere.
Weareinterestedinassistingstartupfacilitiesinthefullcapitalizationandinfrastructuretocreatepowerfuldevelopmentandproductivefacilities–startingwithland.Tofacilitatethis–wesuggestthat thetiming for thiswouldoccurafter the50GVCS tools aredeveloped,or afterDec.21,2012.Thereasonforthisisthatoncethe50toolsareavailable,startupcostswillbedecreasedsignificantly–perhapsfrom$1Mforanewfacilityto$100k.
We aim to provide startup assistance in the form of immersion training and capitalizationassistance.Wesuggestthatacoreteamof2-4peoplecometoFactoreFarmfor6monthsof

GettingInvolved
Open Source Ecology:CivilizationStarterKitv.0.01
Foreword
immersiontraining.Thecoreteamwouldpickupawiderangeofpracticalvillageconstructionskills–fromdigitalfabrication,integratedagriculture,renewableenergy,housingconstruction,andothers.Thistrainingmaybefundedbygrantsorproductionearnings.
Capitalization Assistance Model
Duringtheimmersiontraining,traineeswillhaveachancetobuildrealproductsthatcanbesold.WiththeeconomicpoweroftheGVCSandsocialcapitalofOSE,marketingisnotexpectedtobeabarriertosuccessfulfundraisingbyproduction.Weexpectthatasingletraineeshouldbeabletogenerate$5kofvaluepermonth,assuming½timeparticipationinproductionat50%capacitycomparedtoaprofessionalfabricator.Wehaveinitialevidencethatwithproperguidanceandsoundergonomicdesignoftheworkshop–thisisarealisticproposition.Fora6monthduration,that is $30k value generated per person. This is sufficient to generate significant capital forstartup.Ifthecostoftrainingis$10kperperson,thenacoreteamof4traineescanleavetheir6monthimmersiontrainingwith:(1),ahighlyintegrated,practicalskillsetcoveringallsectorsoftheproductiveeconomy(agriculture,construction,energy,technology);(2),connectiontoanetworkofchangeagentsaroundtheglobe;and(3),$80kofstartupcapitalfortheirownfacility.
Thisisthetypeofcommitmentthatweexpectfromstartupinstigatorsinotherlocationsaroundtheworld–iftheexpectationisfullendorsementandsupportfromOSEheadquarters.
Note On Strategy
In2013,wewillbeexpandingtoothergoodsandservices,butfornow,wearefocusingontheGVCS50asthestrategiccore.Oncedeveloped,thiswillprovidethetrackrecord,process,andeconomicpowertodiversifyintootherproductsandtofacilitatethecreationofcommunities,enterprises,andnewcountries.RememberthatthisisanApolloProgramfortheGVCS–andweexpecttofinishthe50betaproductreleasesbyDecember21,2012.Ifthingscontinueastheyarenow,wemaybedoneaheadofschedule.CompletionoftheGVCSprovideseveryonewithamuchlargerindexofpossibilitiesfor2013.
Strategically,OSEInternationalisputtingallitseffortintosecuringandallocatingthe$5.5MthatitwilltaketodeveloptheGVCS50byyear-end2012.Thisisamonumentalorganizationaltask,anditrequiresourfullattention.Anythingnotrelatedtothisplanisadistractiontothecoreeffort.WeasktherestofthecommunitytohelpoutintheGVCS50,andinparticular,intheFactoreFarmexperiment.Thisfocushastohappenforonly1year.Accesstoallthe50technologieswillmeanabouta10xreductioninstartupcostofanynewOSE-relatedeffort.TheGVCS50isthekeytoviralreplication.Therefore,itisbetterforthewholemovementthatalleffortisspentontheGVCS50–andgetitdoneevenaheadofschedule.Then,thepossibilityofviralreplicationwillbereal.
Ifyouareconsideringreplicationrightnow–youhavetoconsiderthatwehaveonly4betaproductreleases–whichdoesnotaddressfuel,power,orfabricationaspectsofarobustcommunity.Yes,newfacilitiescanbebuiltrightnow–butathighstartupcosts.Mypersonalfrustrationisthateveryonethinksthatwehaveallthetechnologyalready.Wedon’t–weareindevelopment–

GettingInvolved
Open Source Ecology:CivilizationStarterKitv.0.01
Foreword
andmoreover,theseproductsneedtogothroughthethousandsofhoursnecessaryforgeneraladoptionbytherestoftheworld.AssuchIaskthisChristmasdaythatweallworktogethertogetthere,andmagicwillfollow.
Iknowthatmanypeopleareitchingtogetinvolved–thiswasexactlymystateabout6yearsago.Ifoundoutthataccesstotheenablingtoolscrushedmywholeinitialplan.Thatisaconditionthatanyonewillstillfacetoday–untilmanymoreoftheGVCS50toolsaredone.Wehavetoofewofthetoolsdevelopedasofyettomakereplicationapainlessprocess.Evenwithallthetoolsavailable–thereareenoughthingsthatcangowrong–thatmybestadvicetoanyoneisnottodothisuntilallthetoolsareavailable.Itwillsimplybeeasierforeverybodyinvolved.
Wewouldliketocontinuemakingthisoneofthemostcollaborativeprojectsintheworld:openengineering, open economic development, anddistributive enterprise for the common good.Let’sworktogethertomakethishappen.

From the Founder: My Story

FromtheFounder:MyStory
Open Source Ecology:CivilizationStarterKitv.0.01
Foreword
From the Founder: My StoryMarcinJakubowski,12.24.2011
Ihavebeenaskedanumberoftimes–whatexperiencesledmetostartOSE?Iamsharingmystoryheretoshedsomelightontheformativeexperiencesinfluencingthiswork,withthehopethattheymayhelptoclarifytheapproach.
EversinceIwasalittlechildIwantedtoapplysciencetocreatinghumanprosperity.Wow–withalltheAmazingtechnologyaroundus–lifeshouldbegood.Myfatherisamolecularbiologist,andusheredmetogohigh inacademia.But the further Iwent themoreuseless I felt,whilenoticingthattherewerepressingglobalillstosolve.ItwasduringmyPh.D.PrograminMadison,WI,thatIgotradicalized.Idiscoveredfirsthandthemythoftechnology–witheverimprovingtechnology;peoplearestillworkingharderandharder,missingoutonthefinerthingsinlife.Thistroubledmegreatly.
InMadison, therewas a string of events that ledme to formulate theOpen Source Ecologyconcept.ItactuallystartedatPrincetonU,whereIwentformyundergraduatestudies.IfoundPrincetontobeashockingwake-upcall–moreabreedingplaceforthepowerstructureoftheworld–lessaplaygroundforideologuesimprovingthehumancondition.Ivowedafterthisneverto go to another Ivy League, and foundmyself atU.Wisconsin,Madison, for grad school - aprogressive, rabble-rousingenvironment.Soonenough, Ibecametotallydisillusionedwithmystudies– Iwasbecomingmorespecializedanduselesseveryday–and Iwas learning theoryaboutthingsthatdidn’texist.Ifeltthatwasagreatabnegationofhumanresponsibility–giventhattherearepressingissuesintheworldtosolve.
SoIstartedgettinginvolvedinthestudentcommunitytoremainsane.IstartedthePolishClubtobringthePolishcrowdstogether,thenGlobalConnections,togetalltheinternationalstogether.ThenImovedontoorganizeinterdepartmentalgradstudentsocials–sinceweneverhadachancetointeractwithanyoneoutsideofourdepartment.SinceIwasinterestedinenergy,IstartedaGlobalEnergyForum,andthenSustainabilityForumto immerse intellectually insustainabilityissues,thenGandhiNetworktogetsomehands-onexperiencebeyondthemind,suchasbuildingasolardehydrator.
Throughalloftheseevents,Ilearned2things.First,peoplerarelycollaborateorcrossdisciplinesin their work. Second – people did not have time to do cool things anymore. Lectures andworkshopswereallfunandgames–buttheywerereallybriefsessionsofescapism-asnobodyreallyhadthetimetopursueanyofthetopicsdiscussedmoredeeply.Peoplegotothetalksandworkshops-thentheygobacktoworkforthemanonMonday.Whatwasneededwasadifferentlifestyle,aneweconomy–wherepeoplewerenotsoalienatedfromtheirwork,wheretheycouldpursuethethingsthattheyreallycareabout.ItisthenthatIthoughtthatcivilizationneededathoroughreboot in termsof right livelihoodandmeaning inpeoples’ lives.Theeconomyandenvironmentandsocial justicewereall inhavocallovertheworld–yeteverybodywasgoingaboutbusinessasusual.
Thenitbecamecrystalcleartome–onlyifwecollaboratetrulyopenly–asincreatinganopen

FromtheFounder:MyStory
Open Source Ecology:CivilizationStarterKitv.0.01
Foreword
sourceeconomywherepeopleactuallybuildfreelyoneachother’sprogress–onlythencanweachieveasoundeconomy–andsparetime.ThisbecamecleartomewhenIcouldnotdiscussmyPhDresearchopenlywithotheruniversitygroups–becausewehadhotstuffandcompetitiveadvantageforfunding.Thus,mylearningprocesswashampered.ThatfrustratedmetothepointthatIdecidedIwouldworkwholeheartedlytochangethisaspectofmoderncivilization.
InmylastyearofthePh.D.Program,IcoinedtheOpenSourceEcologyconcept. Itwasaboutcreatinganopensourceeconomy–basedontheprinciplesofcollaborationthatcamefromtheopensourcesoftwaremovement.Iclaimedthatifweoperateopenly,welearnmore,webecomemoreresponsible,whichincludesresponsibilityfortakingcareofnature–asitisthesourceofallofourmaterialwell-being.Therefore,opensourceecologyreferstotheintegrationofhumanandnaturalecosystemintoaharmonioussystemofinteractions,basedonopensourceprinciplesofcooperation.
Anycivilizationstartswithaccess to land– so inmyowncivilization rebootexperiment, landwasthefirstthingIsecuredaftermyPhD.Intheinitialphases,withlittlemoneyandbigdreams,voluntarysimplicitywasmyonlyoption,andIexploredthelimitsofhowlittleonecoulddowith.Butthatgotoldaftersometime.Iwaslivinglikeahippieinthewoodswithapocketknife,anditoccurredtomequicklythatafirmeconomicfoundationandpowerfultoolswerenecessaryifoneistofacenatureandaskhertoprovidedirectlyforone’sneeds.Ialsolearnedquicklythatuseofnaturedoesnothavetomeanabuseofnature.Ialsolearnedthatwehavethetechnologytodothingsright– inharmonywithnature–andit isonlygreedandmythsthatdictatethathumanprosperityshouldbeatoddswithnature.Ilearnedfirsthandfromtheland-thatnatureisabundant–andthatgeneralhumanprosperityisamatterofdistribution–notproduction.
Sowiththis,mytractorbroke,andtherestishistoryasyouseeinmyGVCSTEDTalkof2011.Point is:wecancreateopensourceequivalents to industrystandards–ANDtakecareof theenvironment,ANDinfact,wecandomuchbetteralltogetherbyeliminatingtheinefficienciesofcompetitivewasteinallitsforms.Globalizationisasimplemanifestationofcompetitivewaste–competingforstrategicresourcesbecausewerefusetolearnhowtouselocalresourcesmorecunninglytoachievethesameends.
I also come fromPoland,with its longhistoryofwar, surroundedbypowerfulneighbors.MygrandfatherwasinthePolishundergroundengagingsabotageactionsagainstNazisduringWWII,andhewasahorsebacksoldierinWWI.Mygrandmotherwasinaconcentrationcamp.Ireadalltypesofbooksonthesetroublingtopics,astheyarefascinating–regardingthenatureofthehumanspiritunderextremesofconditions–playingoutthegoodoldfightofgoodversusevil.
Ipicturedmyself living in thosetimes,andstillhavebaddreamsfromtimetotime-andputmyselfintheplaceofthepeopleinthesebooks-andconsiderhowIwouldactmyself.Andtoday,Igrasptounderstandwhywearestillsoun-evolvedashumans,stillkillingoneanother.
ThemostfascinatingexplanationIhaveyetreadonthetopic–andinterestingly–fromasurvivorofturbulentpoliticaltimesofpost-WWIIPolandhimself–isPoliticalPonerology:aScienceontheNatureofEvilAdjustedforPoliticalPurposes.Thatisthemostimportantbookonthetopicof

FromtheFounder:MyStory
Open Source Ecology:CivilizationStarterKitv.0.01
Foreword
achievinggeneralhumanprosperitythatIhaveread.Itisapsychologicalstudythatexplainswhypsychopathstendtomoveupincorporateboardroomsandinpositionsofpower–andhowallofussupportthem-ingettingthere.
Today Idomypart in theopensource ‘underground’–a fringemovementstill,waitingtobethenexttrilliondollarindustry.Exceptthistime,itwillnotbeacentralistphenomenon–butamovementcreatedbymanyindependentplayers.Ifweopensourceafewcriticalyetsufficienttechnologiesforsurvivalasaspecies–thenashiningexamplecanbeset,andasolideconomicfoundationcanbelaid–forhumanprogress.Myroleistoseedakernel,intheformoftheGVCS50tools–andtheeconomicpowercreatedwilltakecareoftherest.
Whatistherest?Whenpeopleaddressbasicmaterialscarcity–aneweconomy,andnewpolitics,willfollow.Itwillbeanewparadigm.WhatdoIseemyselfdoingthen?Iwillbespendingmyfullattentiononhowtobecomeabetterhuman,andhelpingotherstodothesame.Thisdependsonmaterialscarcitybeingremovedasoneofthestressesaffectinghumanity,asmasteringmaterialsecurityisaprerequisiteifwewanttohaveafairchance–ofevolvingtofreedom.
Neweducation,newcommunities,andnewpolitics–theyareallaroundthecorner.Evenwhentheworldiscrackingattheseams,thehumanspiritwillneverdie.
How are you doing your part to play this out?

The LiberatorCompressed Earth Brick Press

Design Rationale

DesignRationale
Open Source Ecology:CivilizationStarterKitv.0.01
Compressed Earth Brick Press
Design Rationale
TheOSECEBpressisaverticalpress,wheresoilfallsbygravitydirectlyfromthehopperintothecompressionchamber.Themaincylindercompressessoil,andthesoil loadingdrawercloses/opensthecompressionchamberandejectsbricksfromthemachine.
Results and Improvements Made
Noteonthebrickpressingrate:maximumof16thinbricksperminutewith54hp,withoutusinggrateshaker.
ThemainadditiontotheCEBmachinedesignsincelastyearistheincreaseofmachineheightfroman8”toa12”mainpressingcylinder,sothattheresultingbricksare(2”-6”)x(6”x12”)asopposedtothe(2”-4”)bricks.
Thismeansthepressingrateisreducedbutlargerbricksaremade.
Becauseitwaslateintheseasonandthesoilwastypicallytoowet,wehadbridgingproblemsandwecouldrunthemachineonlyathalfitsratedpower,or27hp.
Brickpressingratewas4bricksperminutewith27hpforfull-size(6”x6”x12”)bricks.
Thecompressionchamberfrontandbacku-channelwasreinforcedwitha1/2”x2”baralongitslengthtopreventitfrombulgingout;thisfailurewasnotobservedinPrototypeIandIIbecausethewidthofthemainchamberwas4”and3”smaller.
Improvements Needed
Themachineiscurrentlymovedintoplacebyforks,butatrailerwillbeaddedtoimprovemobility.Sideswillbeaddedtothegratetopreventsoilfromfallingoffthegrate.Flatbarwillbeusedinsteadofrebarasthegratetofacilitatesoilfallingthroughthegrate.
Physics of Why the CEB Press Works
Bricksaremadeof20%-30%clay,therestbeingsandandsilt.Acombinationofmechanicalandelectrostaticforcesisresponsibleforthehighstrengthofcompressedearthblocks.
Compressionphysicallyremovesvoidsfromtheearth.Asparticlescomecloser,mechanicalforcesofroughparticlestouchingeachotherlockparticlesintoplace.Formicroscopicparticlesofclay,whicharelessthan4micronsinsize-electrostaticforcesofintermolecularattractionbegintoplayarole.
Forstabilizedbricks,chemicalbinding forcesof thebinder - suchascement -are responsibleforthestrength.Cementbinderstendtobindlargerparticlesofsandandaggregate,andlime

Open Source Ecology:CivilizationStarterKitv.0.01
binderstendtobindthefinerparticlesofclay.
Itappearsthattheexactnatureofthelargecompressivestrengthofpressedearthisnotwellunderstood.
DesignRationaleCompressed Earth Brick Press

Fabrication Drawings

Fabrication Manual

Open Source Ecology:CivilizationStarterKitv.0.01
FabricationManualCompressed Earth Brick Press
CEB
Complete Fabrication Instructions, 2011
Open Source Ecology Compiled by Brianna Kufa

Open Source Ecology: Civilization Starter Kit v.0.01
Fabrication ManualCompressed Earth Brick Press
CEB Introduction
The purpose of this guide is to provide all information to make the 2011 version CEB Press from stock steel and parts. More information, and a constantly updated procedure can be found on the OSE wiki CEB Manufacturing page.
This guide is broken into 3 main fabrication steps: Mechanical Fabrication, Electronic Components, and Machine Integration. The steps in Mechanical Fabrication and Electronic Components are independent of each other, but within each category, the suggested order should be followed. Once both are finished, you the machine’s mechanical and electronic components can be integrated. At that point, your machine can be used.
Mechanical Fabrication begins with the cutting of all stock steel. After that, it is broken into two sections: Parts Fabrication, and Parts Assembly. Parts fabrication focuses on cutting, drilling, punching, bolting and welding the steel into individual parts, and is organized by machine systems. Parts assembly joins all of the sub-parts into the whole machine. To complete mechanical fabrication, the machine must be painted.
This video offers good insight on how to do many of the steps in assembly. Some steps will vary though. The written instructions are correct.
The Electronic Components section covers preparing all of the components which automate the machine. It requires the preparation of the machine sensors, and all of the components which reside in the controller box.
Machine Integration links the hydraulic, mechanical, and electrical components into a functioning CEB.

Open Source Ecology:CivilizationStarterKitv.0.01
Fabrication Manual - Bill of MaterialsCompressed Earth Brick Press
CEB Bill of Materials Steel
Type Size Total (inches) Total (feet)
Angle .25x2x2 291 24.25 Angle .5x4x4 105 8.75 Angle .5x4x6 288 24 Angle .5x4x7 12 1 C-Channel 3 3 0.25 C-Channel 6 heavy 274 22.83333333 DOM Round 1.5 14.5 1.208333333 Dom tubing 1.5 ID 2.0OD 3 0.25 Flat .25x1 14 1.166666667 Flat .25x2 71.5 5.958333333 Flat .1875x2.5 72 6 Flat .25x3 6 0.5 Flat .25x6 27 2.25 Flat .25x7 27 2.25 Flat .25x8 44.5 3.708333333 Flat .375x 3 51 4.25 Flat .5x2 72 6 Flat .5x3 93.5 7.791666667 Flat .5x6 12 1 Flat 1/8x3 288 24 Flat 1x1 5 0.416666667 Flat 1x2 11 0.916666667 Flat 1x4 10 0.833333333 Flat 1x6 12 1 Flat 1x7 12 1 Pipe .75ID 1OD 2 0.166666667 Rebar 0.375 9 0.75 Rebar 0.5 1122 93.5 Rebar 1 14 1.166666667 Round 1 7.25 0.604166667 Threaded Rod 0.75 40.75 3.395833333 Tubing .1875x2.5x2.5 84 7 Tubing .25x2x2 288 24 Tubing .5x6x6 12 1
Sheet 1/8"x5'x10' 1 full sheet
1/8"x5'x23.5" Part of a sheet.

Open Source Ecology:CivilizationStarterKitv.0.01
Compressed Earth Brick Press
Fasteners Description Quantity
Bolt, HHCS, 0.313"-18x0.625"x0.625" 8
Bolt, HHCS, 0.375"-16x2"x2" 4 Bolt, HHCS, 0.5"-13x1"x1" 16 Bolt, HHCS, 0.5"-13x2"x1.25" 5 Bolt, HHCS, 0.5"-13x4"x4" 2 Bolt, HHCS, 0.75"-10x1.5"x1.5" 9 Bolt, HHCS, 0.75"-10x2"x2" 34 Bolt, HHCS, 0.75"-10x2"x2" 19 Bolt, HHCS, 0.75"-10x2.5"x2.5" 6 Bolt, HHCS,0.75"-10x3"x3" 6 M12 Bolt, Modified- 55mm 4 Bolt, HHCS, 0.25"x2" 1 B18.2.4.1M - Hex nut, Style 1, M12 x 1.75-D-C 4 Nut, Hex, 0.375"-16 4 Nut, Hex, 0.5"-13 24 Nut, Hex, 0.75"-10 77 Nut, Hex, Steel, 0.75"x10 12 Nut, Hex, .25"-16, Lock 1 Washer, Plain, Narrow, B18.22.M, 12mm 4 Washer, Wide, 0.375" 8 Washer, Wide, 0.5" 28 Washer, Wide, 0.75" 74 Washer, Lock, 0.25" 1
Hydraulics
Type Item Qty. Source
Cylinder 5x12x2.5 Crosstube 1
https://www.surpluscenter.com/item.asp?item=9-1143-12&catname=hydraulic
2.5x14x1.125 Clevis 1
https://www.surpluscenter.com/item.asp?catname=hydraulic&qty=1&item=9-7619-14
Motor Dynamic Hydraulic Motor 1
https://www.surpluscenter.com/item.asp?item=9-7077-50&catname=hydraulic
Hoses 1/4"x12" NPTM 1 https://www.surpluscenter.com/item.asp?item=916-1412&catname=hydraulic
1/2"x36" NPTM 3 https://www.surpluscenter.com/item.asp?item=905-1236&catname=hydraulic
1/2"x56" NPTM 2 https://www.surpluscenter.com/item.asp?item=905-1260&catname=hydraulic
FabricationManual-BillofMaterials

Open Source Ecology:CivilizationStarterKitv.0.01
Compressed Earth Brick Press
Type Item Qty. Source
Valves 1/2" NPT Needle Valve 1
http://www.surpluscenter.com/item.asp?item=9-7960-8&catname=hydraulic
1/2" Flow Control and Relief Valve 1
https://www.surpluscenter.com/item.asp?item=9-064-50&catname=hydraulic
1/2" NPTF Check Valve 1
https://www.surpluscenter.com/item.asp?item=9-7933-8-5&catname=hydraulic
Fittings SAE 4M to 1/4" NPTF Swivel 1
https://www.surpluscenter.com/item.asp?item=9-6900-4-4-S&catname=hydraulic
SAE 6M to 1/2" Swivel 6
https://www.surpluscenter.com/item.asp?item=9-6900-6-8&catname=hydraulic
SAE 12M to 3/4" Swivel 2
https://www.surpluscenter.com/item.asp?catname=&qty=1&item=9-6900-12-12
3/8" NPT Hex Nipple 2
http://www.surpluscenter.com/item.asp?item=9-7184&catname=hydraulic
1/2" NPT Hex Nipple 6
https://www.surpluscenter.com/item.asp?item=9-5404-8-8&catname=hydraulic
1/2" NPTM to 1/4" NPTF bushing 1
https://www.surpluscenter.com/item.asp?item=9-5406-8-4&catname=hydraulic
1/2" NPT to 3/8" NPT bushing 2
http://www.surpluscenter.com/item.asp?item=9-5406-8-6&catname=hydraulic
3/4" to 1/2" NPT Bushing 2
https://www.surpluscenter.com/item.asp?item=9-5406-12-8&catname=hydraulic
1/2" NPTM to 1/2" NPTF 90 Elbow 3
https://www.surpluscenter.com/item.asp?item=9-5502-8-8&catname=hydraulic
1/2" NPTM Elbow 2
https://www.surpluscenter.com/item.asp?item=9-5500-8-8&catname=hydraulic
1/2" NPTF Tee 2 https://www.surpluscenter.com/item.asp?item=9-5605-8-8-8&catname=hydraulic
1/2" Quick Coupler Pair 5
https://www.surpluscenter.com/item.asp?item=928&catname=hydraulic
3/4" Quick Coupler pair 1
https://www.surpluscenter.com/item.asp?item=928-C&catname=hydraulic
Solenoid
Daman Manifold AD05S033S or Dalton part# 240-712 1
Call Dalton to order http://stores.daltonhydraulic.com/StoreFront.bok
FabricationManual-BillofMaterials

Open Source Ecology:CivilizationStarterKitv.0.01
Compressed Earth Brick Press
Solenoid Valve for motor Type H, Dalton Part #: 240-241 1
http://stores.daltonhydraulic.com/-strse-675/Solenoid-Directional-Control-Valve%2C/Detail.bok?category=Control+Valves+-+Solenoid%3AD05+40GPM+Directional+Valves+-+DC
Solenoid Valve for rams Type C, Dalton Part #: 240-244 2
http://stores.daltonhydraulic.com/-strse-674/Solenoid-Directional-Control-Valve%2C/Detail.bok?category=Control+Valves+-+Solenoid%3AD05+40GPM+Directional+Valves+-+DC
Other
Description Quantity Source
Generic Door Hinge 12 Home depot
1" Keyed Coupler 1 https://www.surpluscenter.com/item.asp?item=1-1563-E&catname=powerTrans
12mm x 3mm N42 Epoxy Coated Disc Magnet
6 http://www.gaussboys.com/ndfeb-magnets/D1203E-N42.html
Pillow Block Bearing - 1" 2 https://www.surpluscenter.com/item.asp?item=1-205-16-P-
C&catname=powerTrans
V-Groove Bearing 4 http://www.vxb.com/page/bearings/PROD/Kit8406
Power Clamps, AKA Hose Clamps- 1” Max OD
4 Automotive Store, see http://opensourceecology.org/wiki/File:Hose_Clamps.jpg
Electronics Item Qty. Source Notes
50ft 16AWG Extension Cord 1 Electronics Store http://opensourceecology.org/wiki/File:50ft3Wire16AWGExtensionCord.jpg
Pair of Large Alligator Clips (Black and Red) 1 Electronics Store
http://opensourceecology.org/wiki/File:AlligatorClips.jpg
Female Insulated Connector 16-22AWG 1 Electronics Store
http://opensourceecology.org/wiki/File:FemaleInsulated16to22AWGConnector.jpg
Outdoor Main Lug Box 1 Hardware Store http://opensourceecology.org/wiki/File:LugBox.png
Wire Clamps 2 Hardware Store http://opensourceecology.org/wiki/File:WireClamps.jpg
Toggle Switch 1 Hardware Store http://opensourceecology.org/wiki/File:ToggleSwitch.jpg
Washer 1.25" OD .5" ID 2 Hardware Store http://opensourceecology.org/wiki/File:Washer1-25OD0-5ID.jpg
FabricationManual-BillofMaterials

Open Source Ecology:CivilizationStarterKitv.0.01
Compressed Earth Brick Press
Fuse Holder 1 Electronics Store http://opensourceecology.org/wiki/File:FuseHolder.jpg
Male Insulated Connector 10-12AWG 1 Electronics Store
Ring Insulated Connector Small Hole 10-12AWG 2 Electronics Store
Buss Fuse 10Amp 1 Electronics Store http://opensourceecology.org/wiki/File:10ABussFuse.jpg
Ring Insulated Connector 10-12AWG 20 Electronics Store 12cm by 7.5cm by 0.4cm HDPE Plate (4.75"x3"x5/32") 2 Hardware Store
M3 20mm Machine Screws 4 Hardware Store
M3 Nylon-threaded Locknuts 4 Hardware Store
8-32 machine screws of 3/8 inch length 7 Hardware Store
8-32 machine screws of ¾ inch length 4 Hardware Store
Arduino Uno Microcontroller 1 Digikey
http://www.digikey.com/1/parts/2412553-arduino-uno-board-a000046.html
Underground Telephone Wire (4-wire) 3m length 1
Shrink Tubing 16-22AWG 18cm length 1 Electronics Store
Hall Effect Sensor 2 Digikey http://www.sparkfun.com/products/9312 PVC Pipe with 1" Outer Diameter, 9/16" Inner Diameter, 3.5" Length 2 Hardware Store
Silicone 250ml 1 Hardware Store Transparent Silicone Caulking
Ring Insulated Connector 14-16AWG 20
Red Wire 18AWG 25ft 1 Electronics Store
Black Wire 18AWG 25ft 1 Electronics Store
FabricationManual-BillofMaterials
Open Source Ecology:CivilizationStarterKitv.0.01
Compressed Earth Brick Press
Solenoid Driver – Note: this is included separately from electronics in case you choose to make a different driver board.
Description Qty. Source
Power N MOSFET 5 http://search.digikey.com/scripts/DkSearch/dksus.dll?Detail&name=RFD16N05LSM9ACT-ND
Green LED 7 http://search.digikey.com/scripts/DkSearch/dksus.dll?Detail&name=160-1169-1-ND
Diode 5 http://search.digikey.com/scripts/DkSearch/dksus.dll?Detail&name=641-1331-1-ND
499 Resistor 5 http://search.digikey.com/scripts/DkSearch/dksus.dll?Detail&name=311-499FRCT-ND
49.9k Resistor 5 http://search.digikey.com/scripts/DkSearch/dksus.dll?Detail&name=311-49.9KFRCT-ND
10k Resistor 2 http://search.digikey.com/scripts/DkSearch/dksus.dll?Detail&name=311-10.0KFRCT-ND
2 Pos Terminal 9 http://search.digikey.com/scripts/DkSearch/dksus.dll?vendor=0&keywords=ED1514-ND
reset switch 1 http://search.digikey.com/scripts/DkSearch/dksus.dll?Detail&name=SW262CT-ND
6 Pos Header 2 http://search.digikey.com/scripts/DkSearch/dksus.dll?vendor=0&keywords=a1913-nd
8 Pos Header 2 http://search.digikey.com/scripts/dksearch/dksus.dll?pname&site=us&lang=en&WT.z_cat_cid=Dxn_US_US2011_Catlink&name=A1914-ND
PCB 1 http://search.digikey.com/scripts/DkSearch/dksus.dll?Detail&name=473-1002-ND
100 Resistor 2 http://search.digikey.com/scripts/DkSearch/dksus.dll?Detail&name=311-100FRCT-ND
FabricationManual-BillofMaterials

Open Source Ecology: Civilization Starter Kit v.0.01
Fabrication ManualCompressed Earth Brick Press
CEB Cut List Cut the steel into the following lengths. Label and separate cuts by "Step" number so you can easily find cuts for each step during the fabrication stage. The step number for each sub-guide is listed in parenthesis in the upper left corner in the header.
Type Size (") Length (") Qty Primary Part Name Secondary Part Name Step #
Angle .25x2x2 6 2 Main Frame Dirt Blockers 17
6 2 Wide cylinder support 12
10 2 Soil Shaker Side of guard 3
16 2 Soil Shaker top and bottom of guard 3
35.5 2 Soil Grate 9 72 2 Soil Grate 9 Angle .5x4x4 8 1 Soil Shaker 3
21 1 Soil Shaker 3 38 2 Grate supports 6 Angle .5x4x6 72 2 Secondary Arms 2 72 2 Primary Arms 2 Angle .5x4x7 12 1 Soil Loading Drawer Back 10
C-Channel 3 1.5 2 Main Frame Small Components Thin Cylinder support 13
C-Channel 6 heavy 13 2 Main Frame Spacers 17
21 4 Main Frame Horizontal Members 14
29 2 Wide cylinder support 12 53 2 Main Frame Vertical Members 14 DOM Round 1.5 3.5 1 Main Cylinder Fill in rod tubing 16 11 1 Main Frame Cylinder Pin 18
Dom tubing 1.5 ID 2.0OD 1.5 2 Main Frame
Horizontal Members, cylinder mounting 18
Flat .1875x2.5 36 2 Soil Loading Drawer Outer Rails 10
Flat .25x1 14 1 Main Frame Small Components Magnet Holder 13
Flat .25x2 12 1 Controller Mount 1 71.5 1 Soil Grate Cross piece 9 Flat .25x3 6 1 Controller Mount Bottom piece 1 Flat .25x6 12 1 Valve Mount 1 15 1 Controller Mount 1 Flat .25x7 13.5 2 Soil Loading Drawer Sides 10 Flat .25x8 8 4 Feet 2 Flat .25x8 12.5 1 Soil Loading Drawer Roof 10
Flat .375x 3 24 2 Main Frame Horizontal Members Reinforcement 17

Open Source Ecology: Civilization Starter Kit v.0.01
Fabrication ManualCompressed Earth Brick Press
3 1 Roller Guides Spacer Plate 11 Flat .5x2 36 2 Soil Loading Drawer Inner Rails 10 Flat .5x3 3 1 Secondary arms Eye for 2nd cyl a5
3 1 Soil Loading Drawer Tongue 10
11.25 2 Hopper Mounting Plate 8
15 2 Hopper Mounting Plate 8
16 2 Roller Guides Main Plate 11 Flat .5x6 12 1 Soil Loading Drawer Vertical Supports 10 Flat 1/8x3 36 8 Hopper Sheet Metal Hinge Plates 7
Flat 1x1 2.5 2 Preparing the Main Cylinder Press foot supports 16
Flat 1x2 5 1 Soil Shaker Hammer 4 6 1 Soil Shaker Hammer 4
Flat 1x4 10 1 Preparing the Main Cylinder Lower Press Foot 15
Flat 1x6 12 1 Preparing the Main Cylinder Upper Press foot 15
Flat 1x7 12 1 Soil Loading Drawer Press Plate 10
Pipe .75ID 1OD 1 2 Main Frame Small Components Thin Cylinder support 13
Rebar 0.375 3 1 Main Frame Small Components Sensor Holder 13
6 1 Main Frame Small Components Sensor Holder 13
Rebar 0.5 34 33 Soil Grate 9 Rebar 1 7 2 Soil Shaker 3 Round 1 7.25 1 Soil Shaker 4 Threaded Rod 0.75 1.25 1
Main Frame Small Components Magnet Holder 13
3.5 1 Main Frame Small Components Sensor Holder 13
3.5 1 Main Frame Small Components Sensor Holder 13
6.25 2 Main Frame Small Components Thin Cylinder support 13
3.75 4 Main Frame Drawer member drawer adjuster bolts 14
2.5 2 Main Cylinder Upper Press foot 15
Tubing .1875x2.5x2.5 6 14 Leg Holders 2
Tubing .25x2x2 48 4 Legs 2 2 Hopper Supports 6 Tubing .5x6x6 12 1 Soil Loading Drawer Spacer 10
6x12 50 1 Optional Jig for Main Frame Assembly 17

Open Source Ecology: Civilization Starter Kit v.0.01
Fabrication ManualCompressed Earth Brick Press
1/8” sheets, to be torched: After torching, grind the edges smooth.
Full sheet:
Partial Sheet:

Open Source Ecology: Civilization Starter Kit v.0.01
Fabrication ManualCompressed Earth Brick Press
CEB Simple Plates
See the Sketchup Model.
Tools Needed: Hole Puncher Drill Press Center Punch Hammer Welder
Brick holder Plate, Dirt Keeper Plate, Valve Mount Punch or drill the holes as shown.
Materials Needed: 1/8” Sheet- 17.5”x29” Brickholder Plate 1/8” Sheet- 13.5”x29” Dirt-Keeper Plate ¼”x6” Flat- 12” Valve Mount ¼”x6” Flat- 15” Controller Mount ¼”x3” Flat- 6” Controller Mount ¼”x2” Flat- 12” Controller Mount

Open Source Ecology: Civilization Starter Kit v.0.01
Fabrication ManualCompressed Earth Brick Press
Controller Plate 1. Find your controller box (also called outdoor
main lug box) and locate its mounting holes on the back.
2. Place it on top of the 6x15 plate so it is square and the top hole is about ½” away from the top. Transfer punch the holes on the controller box to the plate.
3. Drill those as ¼” holes. 4. Punch the holes in the bottom piece. 5. Weld the bottom piece to the large plate. Make
sure it is square. 6. Weld the 1/4"x2 to the back as well.

Open Source Ecology: Civilization Starter Kit v.0.01
Fabrication ManualCompressed Earth Brick Press
CEB Frame Structural Support Components
This section covers:
Leg Holders-Model Feet- Model Legs- Model Secondary Arms- Model Primary Arms- Left Primary Arm Model,
o Right Primary Arm Model
Leg Holders You will need 14 Leg Holders for the CEB. 12 will be used in this section. Save the remaining ones for later.
Make all leg holders at once to save time. These require:
o 3/16”x2.5”x2.5” square tubing- 6” (14) o ¾” Steel Nuts (14) o ¾”x1.5” Bolts (14)
Feet
You need to make 4 of these. These require:
o Leg Holders (4) o ¼”x 8” Plate- 8” (4)
1. Center a leg holder on the ¼”x8”x8” plate, insuring it is square in all
directions.
2. Weld it 100% to the plate.
1. Torch a 3/4” hole in the center of one of the faces of the tubing; make sure it's large enough for a 3/4” bolt.
It's not crucial that the hole be centered. It just needs to be somewhere close to the center.
2. Weld the nut over the hole, ensuring the nut is level, and the hole is clear.
3. Make sure no spatter goes into the threads by covering the top of the nut.
4. Thread the bolt onto the nut.
Tools Needed: Angle grinder Speed Square Welder Hole Puncher Torch

Open Source Ecology: Civilization Starter Kit v.0.01
Fabrication ManualCompressed Earth Brick Press
Secondary Arms These require:
o Leg Holders (4) o ½”x4”x6” Angle- 72” (2)
1. Punch the 3/4" holes 2. Place the leg holders in their proper locations.
Make sure they are square with the angle iron and centered vertically. 3. Weld them to the angle.
Primary Arms These require:
o ½”x4”x6” Angle- 72” (2)
1. Punch all holes. 2. Label each arm with either "right" or "left."

Open Source Ecology: Civilization Starter Kit v.0.01
Fabrication ManualCompressed Earth Brick Press
Legs These require:
o ¼”x2”x2” Square tubing- 48” (4) There are no steps for these, just cut them.

Open Source Ecology: Civilization Starter Kit v.0.01
Fabrication ManualCompressed Earth Brick Press
CEB Shaker – Mount
Sketchup Model Tools Needed:
Angle Grinder Welder Hole Puncher Torch
The Guard 1. Torch the guard sheet metal
as in the image. Note: the shape
shown is centered. 2. Weld the top and side 2x2
angle pieces to it as shown.
Materials Required: ¼”x2”x2” Angle- 10” (2) Sides of Guard ¼”x2”x2” Angle- 16” (2) Top and Bottom of Guard 1/8”x10”x16” Sheet- (1) Guard ½”x4”x4” Angle-(1) 8” ½”x4”x4” Angle- (1) 21” 1” Rebar- 7” (2) Braces

Open Source Ecology: Civilization Starter Kit v.0.01
Fabrication ManualCompressed Earth Brick Press
Mount Base 1. Punch the holes in the 4x4 angle.
Not all holes will be accessible with a punch. Torch the rest.
21” Angle
8” Angle

Open Source Ecology: Civilization Starter Kit v.0.01
Fabrication ManualCompressed Earth Brick Press
2. Torch the hole for mounting the motor in the 8" piece of 4x4 angle. Grind off the slag.
Double check that the hole is large enough by putting on the motor and making sure the raised portion in the center goes all the way thru.
You can torch separate holes for the bolts, or do one large, odd shaped one like is pictured.
3. Weld it together Weld the bottom 2x2 to the 21" 4x4. Weld the two 4x4 angle pieces together as
pictured, insuring they are perfectly flush and square.
Skip around while welding so it doesn't warp one way or another.
Grind off the top weld linking the 4x4's so the bearing will be able to sit flush on it Also grind off near the bolt holes on the bottom. Weld the guard and braces to the mount.

Open Source Ecology: Civilization Starter Kit v.0.01
Fabrication ManualCompressed Earth Brick Press
CEB Shaker - Hammer and Shaft
Sketchup Model Tools Needed:
Welder Something to mark steel with Drill Press Hole puncher
1. Prepare the hammer 1. Drill or punch the hole in the flatbar. 2. Weld the two pieces of flatbar together
This needs to be a really strong weld! The hammer will be under a lot of stress, and if it's not a solid weld, it could fly off! (This is why the guard is there).
3. Tack the shaft into the hole so there's about a 1/4" distance between the end of the shaft and the opposite side of the hammer.
Materials Required: 1”x2” Flat- 6” (1) Hammer 1”x2” Flat-5” (1) Hammer 1” Round- 7.25” (1) Shaft 1” Keyed Coupler (1) ¼”x2” Bolt (1) Shaker Motor Shaker Mount

Open Source Ecology: Civilization Starter Kit v.0.01
Fabrication ManualCompressed Earth Brick Press
2. Couple the shaft
1. Cut the coupler down so it's 2" long. It doesn't matter from which side you cut it.
2. Get the shaker motor, the mount you made, the shaft/hammer, and the coupler. 3. Put the shaker motor onto the mount and couple the
shaft to it. Mark where the shaft enters the coupler. Make sure the coupler won't be rubbing on
mount while it spins. 4. Make sure the hammer has about 5/8" clearance from
the mount. If not, you can pull it out of the coupler a
little, but make sure the bolt won't be too close to the edge.
Otherwise, you can grind away the tacks on the hammer and tack it properly.
3. Drill Hole for bolt in coupler
1. Remove the motor and shaft from the mount 2. Put the coupler back onto the shaft. 3. Drill the 1/4" hole thru the coupler and rod, using the mark
you made to make sure the rod is inside the coupler the proper amount.
The hole should be 3/8" away from the edge of the coupler.
Drill thru both at the same time. You will need some sort of vice to hold it down while you drill.
4. Double check that your bolt will fit thru. If not, either re-drill it.

Open Source Ecology: Civilization Starter Kit v.0.01
Fabrication ManualCompressed Earth Brick Press
CEB Shaker – Hydraulics Assembly
Tools Needed: Vise Various Wrenches
Things to know about working with hydraulics: Thread tape is necessary between each connection unless otherwise stated. Always wrap thread tape clockwise when facing the threaded portion. Always keep the end caps on hoses and fittings until you need to take them off. They need to stay
protected inside.
1. Attach all of the fittings and the 2 hoses to the Tee, except the small swivel.
2. Tighten the tee assembly into the correct port (see the photo)
3. Install the swivel and tighten the small hose to it. The swivel doesn’t need thread tape.
4. Put the other 36" hose into the remaining port on the motor.
Materials Required: Thread tape Shaker motor Buy 1/2" NPT Needle Valve (1) Buy 1/4"x12" NPTM Hydraulic hose (1)Buy 1/2"x36" NPTM Hydraulic hoses (2) SAE 4M to 1/4" NPTF Swivel (1)Buy 1/2" NPT Hex Nipple (2) Buy 1/2" NPTF Tee (1) Buy 1/2" NPTM to 1/4" NPTF bushing Buy

Open Source Ecology: Civilization Starter Kit v.0.01
Fabrication ManualCompressed Earth Brick Press
CEB Hopper and Grate Supports
Hopper Support Model Grate Support Model
Tools Needed: Angle Grinder Welder Hole Puncher Torch
Hopper Supports 1. Torch away the necessary areas. See diagrams.
The holes for the hopper mounting need to be 28" away from the bottom side. Mark 28" on the opposite tubing walls and torch 1/2" holes. Insure a 1/2" bolt goes all the way thru.
Torch the cutaway at the top and the slot.
2. Grind away any slag.
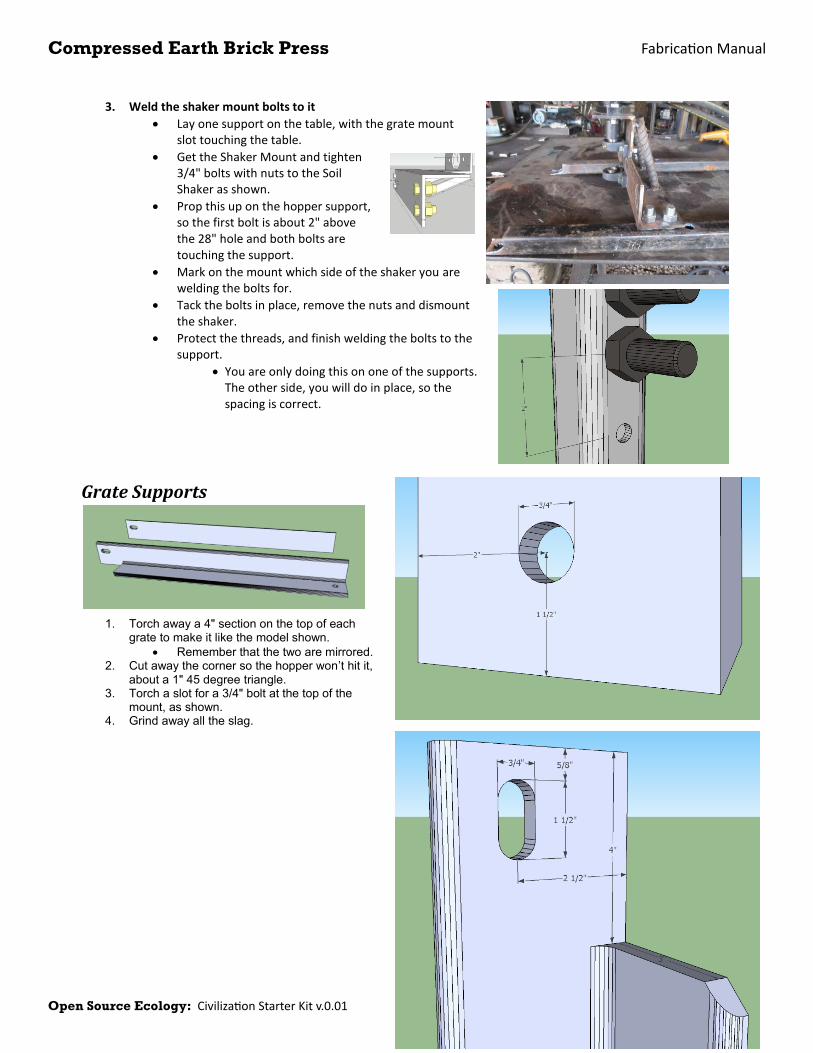
Materials Required: ¼”x2”x2” Tubing- 48” (2) Hopper supports ½”x4”x4” Angle- 38” (2) Grate Supports Shaker mount ¾”x1.5” Bolts (2) ¾” Nuts (2)
Open Source Ecology: Civilization Starter Kit v.0.01
Fabrication ManualCompressed Earth Brick Press
3. Weld the shaker mount bolts to it Lay one support on the table, with the grate mount
slot touching the table. Get the Shaker Mount and tighten
3/4" bolts with nuts to the Soil Shaker as shown.
Prop this up on the hopper support, so the first bolt is about 2" above the 28" hole and both bolts are touching the support.
Mark on the mount which side of the shaker you are welding the bolts for.
Tack the bolts in place, remove the nuts and dismount the shaker.
Protect the threads, and finish welding the bolts to the support.
You are only doing this on one of the supports. The other side, you will do in place, so the spacing is correct.
Grate Supports
1. Torch away a 4" section on the top of each
grate to make it like the model shown. Remember that the two are mirrored.
2. Cut away the corner so the hopper won’t hit it, about a 1" 45 degree triangle.
3. Torch a slot for a 3/4" bolt at the top of the mount, as shown.
4. Grind away all the slag.

Open Source Ecology: Civilization Starter Kit v.0.01
Fabrication ManualCompressed Earth Brick Press
CEB Hopper Sheet metal
Sketchup Model Tools Needed:
Angle Grinder Welder Hole Puncher Torch Wrenches or Sockets
1. Prepare the Hinge plates
Punch holes in 4 of the hinge plates as shown Weld one plate with holes, one without holes,
and 3 hinges together as shown. Make sure the side of the hinge that
sticks out most is on the top; this way it won't interfere with the hopper metal below when installing the hopper. (See photo)
Make 3 more of these. (4 Total)
Materials Needed: Torched Hopper Sheet Metal (see cut list) 1/8”x3” Flat- 24” (12) Hinge plates Hinges (12) 1/2"x1" Bolts (12) 1/2" Nuts (12) 1/2" Washers (12)

Open Source Ecology: Civilization Starter Kit v.0.01
Fabrication ManualCompressed Earth Brick Press
2. Hopper Sheet Metal
Torch the holes shown in the front piece. Punch all of the holes shown in the side pieces and
dirt deflector.
3. Weld the bolts Place 1/2" bolts thru the side pieces and weld them.
o Make sure you are making them mirror images of each other.
4. Assemble Bolt the hinge plate assemblies to the side pieces using a washer,
lock washer, and nut on each bolt

Open Source Ecology: Civilization Starter Kit v.0.01
Fabrication ManualCompressed Earth Brick Press
CEB Hopper Mounting Plate
Sketchup model Tools Needed:
Angle Grinder Welder Hole Puncher
1. Punch the holes in the 15" pieces. They are both the same.
2. Weld the pieces together,
insuring everything is square.
There should be a 6" space between the 15" pieces.
Skip around so the plate doesn’t warp.
Weld both sides on all seams
3. Grind away the welds on one side of the plate.
Materials Needed: ½”x3” Flat- 15” (2) ½”x3” Flat-11.25” (2)

Open Source Ecology: Civilization Starter Kit v.0.01
Fabrication ManualCompressed Earth Brick Press
CEB Grate
Sketchup Model Tools Needed:
Angle Grinder Welder Torch
1. Prepare the frame
1. Torch all holes and slots in the 72” 2x2’s as shown. Note that the slots are ½” tall.
Make sure you can fit the proper size bolt through each hole.
2. Grind away any slag 3. Weld the nuts to the proper 2x2.
Protect the threads while you weld.
Materials Needed: ½”x2”x2” Angle- 72” (2) ½”x2”x2” Angle- 35.5” (2) ½”x2 Flat- 71.5” (1) Cross Piece ½” Rebar- 34” (33) ¾” Steel Nuts (2)

Open Source Ecology: Civilization Starter Kit v.0.01
Fabrication ManualCompressed Earth Brick Press
2. Weld the angle together to make the frame. The short
pieces are sandwiched between the long pieces. See the diagram.
3. Weld all of the rebar inside of the frame.
It would help to find some 1.5" spacers laying around the shop so you can place them between
the rebars quickly and be sure they are square. Nuts and hydraulic fittings might be the right size.
4. Weld the cross support (the 1/4 x 2 flatbar) in centered and perpendicular to the plane of the frame

Open Source Ecology: Civilization Starter Kit v.0.01
Fabrication ManualCompressed Earth Brick Press
CEB Soil Loading Drawer
Sketchup model Tools Needed:
Angle Grinder Welder Squares
Step 1 — Weld Press Plate to Spacer 1. Lay the spacer tube on top of the press plate, align the
sides and make the back edge flush. Insure all edges are tight and squared; this
piece is critical, it must be a uniform height throughout the entire item. Grind off any imperfections.
2. Tack weld the two together in many places (at least 3 on each seam).
Double check everything for squareness!! 3. Weld the two together on all edges where they touch
It is a good idea to weld in 1” or 2” increments, skipping around to different places to prevent warpage. You will need to weld multiple layers where the tubing is rounded.
StockSize Size (Inches) Length (Inches) QTY. Primary Part Name
Angle .5x4x7 12 1 Back Flat .1875x2.5 36 2 Outer Rails Flat .25x7 13.5 2 Sides Flat .25x8 12.5 1 Roof Flat .5x2 36 2 Inner Rails Flat .5x3 3 1 Tongue Flat .5x6 12 1 Vertical Supports Flat 1x7 12 1 Press Plate Tubing .5x6x6 12 1 Spacer
Materials Needed:

Open Source Ecology: Civilization Starter Kit v.0.01
Fabrication ManualCompressed Earth Brick Press
Step 2 — Weld the vertical support 1. Place the vertical support and tack it in multiple places 2. Weld the vertical support to the press plate and spacer
tube assembly. 3. Grind down the welds on the open end of the tube so
they are flush with the rest of the tube.
Step 3 — Tack Sides 1. Lay the spacer/press plate assembly down so the press
plate is touching the table. 2. Align side pieces with spacer and press plate assembly. 3. Insure the two are square vertically and horizontally with
the spacer, that they are parallel, and that everything is touching the table.
It helps to use angle iron tacked to your table and the sides, so it insures they are vertically square. This also makes it a bit easier to align everything else. Video Help
Also, it may help to use paper shims (see between the sides and the tube to properly space them. Video Help
4. Tack the sides to the tube on all sides in multiple places except where it is touching the table. Add a few 1" seams to prohibit them from moving.
Do a few light tacks first, and double check it's still square. If not, grind off the tacks and start over.
Step 4 — Tack the back 1. Tack the back piece in a few spots, with a 1" seam on each
side.

Open Source Ecology: Civilization Starter Kit v.0.01
Fabrication ManualCompressed Earth Brick Press
Step 5 — Tack Roof, Inner Rails 1. Grind off the welds for the back and side
pieces so that the entire drawer is flush. 2. Flip the drawer over and tack the sides from
the top. 3. Place the roof and inner rails in their
respective places. See Diagram. 4. Insure inner rails are perfectly parallel
(varying no more than a 16th of an inch) and square throughout the entire length.
5. Tack them in multiple places except where they are touching the table.
Step 6 — Tack Outer Rails Insure they are perfectly parallel; otherwise they will
leave the roller guides. Insure they vary no more than 1/16" over the entire length.
Hint: Use paper shims for this.
Step 7 — Weld Entire Drawer All the seams should be completely welded except the difficult
to reach places between the inner and outer rails, those can be welded about 50%.
Weld short lengths at a time and jump around a lot to minimize warping.
You may want to grind off the welds in between passes around the drawer to allow it to cool.
Step 8 — Grind the entire drawer flush There cannot be any outstanding bumps or welds anywhere;
the drawer will be sliding in and out of a tight spot and bumps will catch on the frame crossmembers.
Make sure there's no welding spatter where the rollers will be rolling. Grind any off with a small grinder.

Open Source Ecology: Civilization Starter Kit v.0.01
Fabrication ManualCompressed Earth Brick Press
Step 9 — Check the Rails The rails likely got warped outwards on the side with the
back while you were welding. If they are not still parallel, you will need to pinch them
inwards so that they are. You can do so using two C-Clamps as shown.
Step 10 — Weld Tongue In place Prepare as shown in the diagram Weld it to the back of the drawer, insuring it is square and
centered.
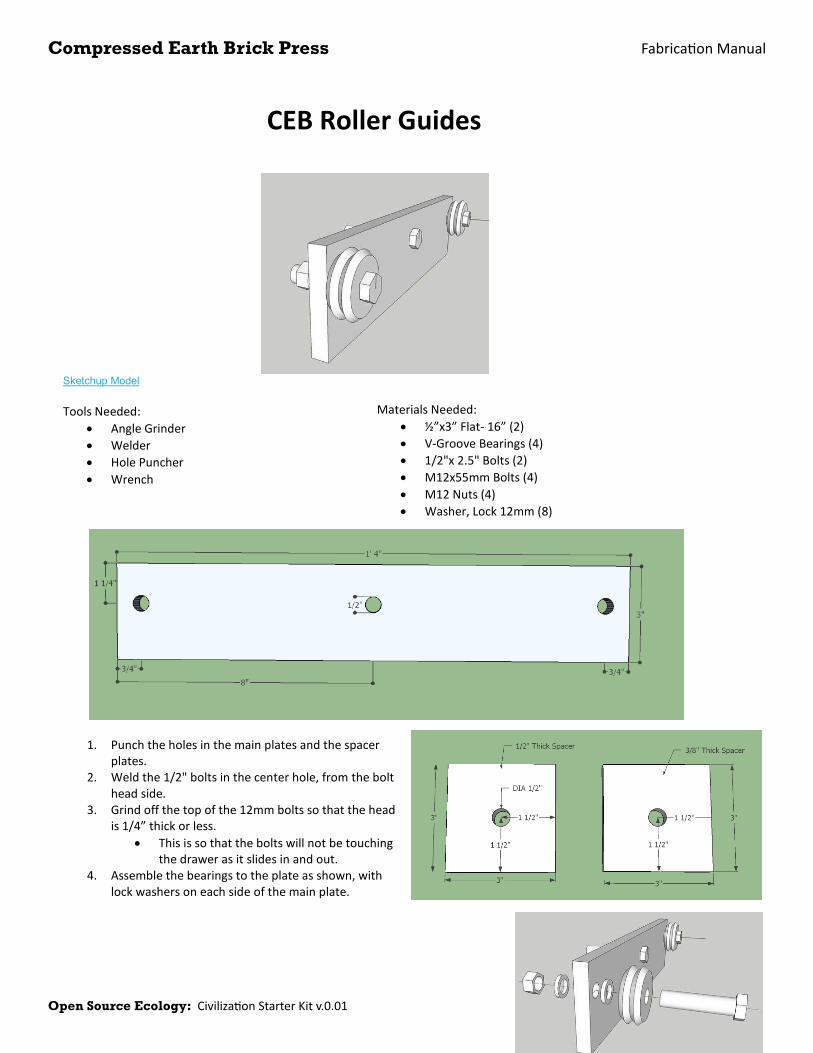
Open Source Ecology: Civilization Starter Kit v.0.01
Fabrication ManualCompressed Earth Brick Press
CEB Roller Guides
Sketchup Model Tools Needed:
Angle Grinder Welder Hole Puncher Wrench
1. Punch the holes in the main plates and the spacer
plates. 2. Weld the 1/2" bolts in the center hole, from the bolt
head side. 3. Grind off the top of the 12mm bolts so that the head
is 1/4” thick or less. This is so that the bolts will not be touching
the drawer as it slides in and out. 4. Assemble the bearings to the plate as shown, with
lock washers on each side of the main plate.
Materials Needed: ½”x3” Flat- 16” (2) V-Groove Bearings (4) 1/2"x 2.5" Bolts (2) M12x55mm Bolts (4) M12 Nuts (4) Washer, Lock 12mm (8)

Open Source Ecology: Civilization Starter Kit v.0.01
Fabrication ManualCompressed Earth Brick Press
CEB Wide Cylinder Supports
Sketchup Model Tools Needed:
Angle Grinder Welder Square
You need to make two of these. They can be exactly the same.
1. Torch the hole in the 2x2 angle as shown. 2. Weld the angle centered on the U-channel. (see image above) 3. Weld a 3/4" bolt over the hole.
Protect the threads 4. Put a galvanized nut on a 3/4"x2" bolt and thread through the welded nut on
each side.
Materials Needed: 6” Heavy U-channel - 21” (2) ¼”x2”x2”Angle - 6” (2) ¾” Steel Nuts (2) ¾” Galvanized nuts (2) ¾”x2” Bolts (2)

Open Source Ecology: Civilization Starter Kit v.0.01
Fabrication ManualCompressed Earth Brick Press
CEB Main Frame Small Components
Sketchup Model Tools Needed:
Welder
Sensor Holders One is for the main frame, and one goes in the
primary arms. 1. Weld the rebar to the threaded rod at a
right angle. Protect the threads on the
threaded rod by welding. (A small pipe works well)
2. Thread a nut onto it.
Materials Needed: ¾” Steel Nuts (2) ¾” Galvanized Nuts (3)
StockSize Size (Inches)
Length (Inches) QTY. Primary Part Name Make
Page C-Channel 3 1.5 2 Thin Cylinder support 3 Flat .25x1 14 1 Magnet Holder 3 Pipe .75ID 1OD 1 2 Thin Cylinder support 3 Rebar 0.375 3 1 Sensor Holder 3 Rebar 0.375 6 1 Sensor Holder 3 Threaded Rod 0.75 1.25 1 Magnet Holder 3 Threaded Rod 0.75 3.5 1 Sensor Holder 13 Threaded Rod 0.75 3.5 1 Sensor Holder 13 Threaded Rod 0.75 6.25 2 Thin Cylinder support 13
13
13
13
13
13
13

Open Source Ecology: Civilization Starter Kit v.0.01
Fabrication ManualCompressed Earth Brick Press
Thin Cylinder Supports Weld the 1" pipe to the 3" U-channel, in the center. 4-8 good tacks is sufficient. Make (2) 6" long 3/4" bolts, by using a nut and 6.25" of threaded rod. See Making Bolts.
Magnet Holder
1. Weld the flatbar to the 1.25" piece of threaded rod.
Protect the threads. Make sure they are perfectly paralell!
2. Thread a nut onto the threaded rod.
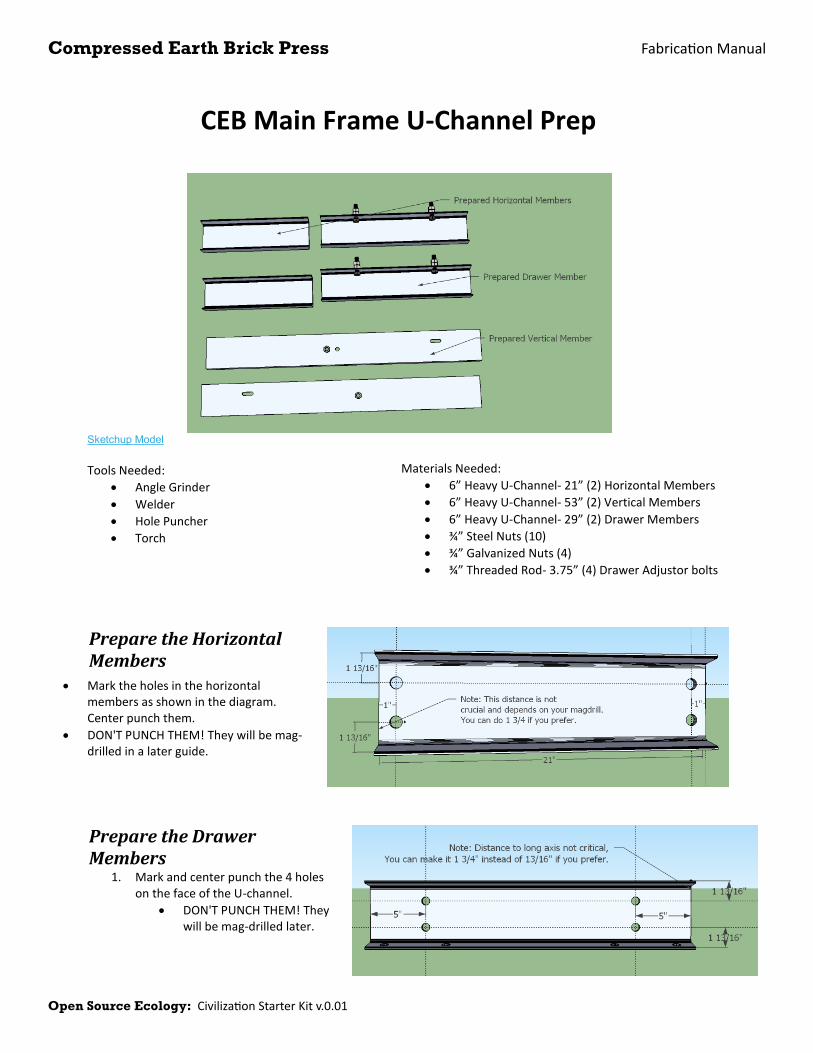
Open Source Ecology: Civilization Starter Kit v.0.01
Fabrication ManualCompressed Earth Brick Press
CEB Main Frame U-Channel Prep
Sketchup Model Tools Needed:
Angle Grinder Welder Hole Puncher Torch
Prepare the Horizontal Members
Mark the holes in the horizontal members as shown in the diagram. Center punch them.
DON'T PUNCH THEM! They will be mag-drilled in a later guide.
Prepare the Drawer Members
1. Mark and center punch the 4 holes on the face of the U-channel.
DON'T PUNCH THEM! They will be mag-drilled later.
Materials Needed: 6” Heavy U-Channel- 21” (2) Horizontal Members 6” Heavy U-Channel- 53” (2) Vertical Members 6” Heavy U-Channel- 29” (2) Drawer Members ¾” Steel Nuts (10) ¾” Galvanized Nuts (4) ¾” Threaded Rod- 3.75” (4) Drawer Adjustor bolts

Open Source Ecology: Civilization Starter Kit v.0.01
Fabrication ManualCompressed Earth Brick Press
2. Torch holes for 3/4" drawer adjustment bolts as shown in the diagram.
3. Grind away the slag.
4. Weld 3/4" nuts to the outside of the U channel where the holes are torched.
Weld it with a bolt coming thru the other side so it protects the threads and so you know the nut won't get off center.
5. Grind away any spatter between the bolts. 6. Make (4) 3/4" x 3.5" bolts using 3.75" threaded rod and
steel nuts. See Making Bolts. 7. Thread the bolts through the nuts and thread another nut on top as shown.
Prepare the Vertical Members 1. Punch the holes as shown.
2. Torch the roller slots as shown.
3. Grind away the slag.
4. Weld the the thin cylinder support nuts, taking care to protect the threads.

Open Source Ecology: Civilization Starter Kit v.0.01
Fabrication ManualCompressed Earth Brick Press
CEB Prepare the Press Feet
Sketchup Model Tools Needed:
Angle Grinder Welder Hole Puncher Drill Press or Mag Drill with 13/16” Bit
Lower Press Foot 1. Mark and drill or punch the holes (13/16") in the lower press foot.
2. Place this centered on the upper press plate and transfer punch the hole locations. 3. Mag-drill these holes.
Materials Needed: 1”x4” Flat- 10” (1) Lower Press Foot 1”x6” Flat- 12” (1) Upper Press Foot ¾” Threaded Rod- 2.5” (2) Upper Press
Foot

Open Source Ecology: Civilization Starter Kit v.0.01
Fabrication ManualCompressed Earth Brick Press
4. Torch out the hole in the center of the lower press plate. 5. Grind it smooth.
Upper Press Foot 1. Plug weld the threaded rod into the upper press
plate, so that the threaded rod is about 1/4" deep in the plate.
2. Fill the hole with weld, then grind it flush. The upper press foot NEEDS to be 12" exactly
across at the top of it (the side without the bolts sticking up) or there will be "fuzzy edges" on your bricks. See the video for more info.

Open Source Ecology: Civilization Starter Kit v.0.01
Fabrication ManualCompressed Earth Brick Press
CEB Prepare the Main Cylinder
Sketchup Model Tools Needed:
3/8" Allen Wrench Bucket and Water for cooling cylinder Hydraulic Pump Large Square Speed Square Thread Tape Vise Welder Various wrenches
Step 1-- Prepare the Hydraulic Couplers Thread tape is necessary between each
connection. Always wrap thread tape clockwise when facing the threaded portion.
You will need to make 2 of these, one with male quick couplers and one with a female.
1. Put the hex nipple in the vise and tighten the quick coupler onto it. Put the elbow in the vise, male side up, and tighten the bushing onto it.
2. Rotate the elbow in the vise and tighten the quick coupler/ nipple onto it.
Materials Needed: The Press Feet The Main Cylinder 1/4" to 1/2" Bushing (2) 1/2" NPTM to 1/2" NPTF Elbow
(2) 1/2" Hex Nipple (2) 1/2" Quick Coupler Set (1) 3/4" Galvanized Nuts (2) 3/4" Steel Nuts (1)

Open Source Ecology: Civilization Starter Kit v.0.01
Fabrication ManualCompressed Earth Brick Press
Step 2 — Install the Couplers 1. Remove the plugs on the cylinder.
The Prince brand cylinder uses a really large allen wrench for their plugs. If you can't find one, you can make one like we did.
Make sure the ports are facing up as there might be fluid in the cylinder and you don't want it to leak.
2. Tighten the coupler assembly into the holes, so that when the cylinder is lying on its side, neither one will hit the table.
Step 3 – Weld the Filler Rod 1. Expand the cylinder so the shaft is fully extended, using a hydraulic pump. 2. Weld a 3.5" piece of 1.5" DOM roundstock inside of the tubing at the end of the
shaft Take care that the top of the shaft doesn't get hot; there is a rubber
seal between that and the cylinder that will melt and cause leaking if you're not careful. If it starts getting warm, dunk the shaft in water to cool it down.
Step 4 — Tack the Lower Press Foot to the Cylinder 1. Stand the cylinder up vertically and prop it up using some sort stand so
it is as close to square vertically as possible. Another option is to support it using some sort of rope.
2. Place the tubing at the end of the shaft inside of the hole in the lower press foot.
3. Insure the cylinder is square to the plate in all directions. See video. Since there is a lip on the cylinder, its hard to tell if it's square
unless you use two squares, one on the lip and against the other one which rests on the table.
4. Tack the lower press foot from all accessible dimensions. 5. Insure the cylinder is still square with it, if not, remove the tacks and fix
it.
Step 5 – Weld the top 1. Weld the two together on the top. There will need to be at least 2 layers
of weld. Warning: Dunk this frequently, even if the shaft is not getting
hot! The plate will warp upwards and cause you lots of woe if you do not.
2. Weld the press foot support pieces as close as you can to the tubing and the press plate.

Open Source Ecology: Civilization Starter Kit v.0.01
Fabrication ManualCompressed Earth Brick Press
Step 6 – Weld the Bottom 1. Lower the cylinder and flip it upside down. 2. Fill in the bottom side of it with welds.
This will require many layers of welds and many dunks to cool it.
3. Grind it flush with the rest of the plate. A few spots where the welds are below the surface is
OK, but the majority of the surface should be level.
Step 7 — Install the Upper Press Plate 1. Put the upper press foot into the lower one and tighten
nuts onto the threaded rod. 2. Stand the cylinder up again and insure the press plate is
still square with the cylinder. See video. If it’s not, you'll need to add shims between the
two press plates until they are square with the cylinder.
Step 8 — Weld the magnet holder nut Weld the nut in the corner of the lower press plate, as shown.
This should be on the opposite side of the ports of the cylinder, flush with the press foot, and as near to the corner as you can get it. It can even hang off a bit.
o Make sure you protect the threads.

Open Source Ecology: Civilization Starter Kit v.0.01
Fabrication ManualCompressed Earth Brick Press
CEB Frame U-Channel Assembly
Sketchup Model Tools Needed:
Large Square Mag-Drill Vise Grips Welder c clamps
Step 1 — Clamp the Vertical Pieces 1. Gather materials for the “Jig”; this means 6”x12” tubing
(52”) and any extra heavy U Channel. If you don't have any laying around, you can use one drawer member, and one spacer on each side.
2. Clamp the vertical pieces to the "Jig" on each end, with extra U channel in between the tubing and the vertical pieces.
Make sure they are both orientated properly, that is that both roller slots are at the same end of the jig.
Insure the two verticals are flush at the top end.
Materials Needed: The Prepared U-Channel Wide Cylinder Supports ¼”x2”x2” Angle- 6” (2) Dirt Blockers 3/8”x3” Flat- 24” (2) Drawer Member Reinforcements 6” Heavy U-Channel- 13” (2) Spacers 3/4"x2" Bolts (16) 3/4" Galvanized Nuts (16) 3/4" Washers (16) 6”x12” Tubing – 52” Optional Jig

Open Source Ecology: Civilization Starter Kit v.0.01
Fabrication ManualCompressed Earth Brick Press
Step 2 — Clamp the Horizontals. 1. Clamp one horizontal member at each end of the jig.
Make sure they are flush with the ends of the verticals and centered on them.
Insure they are square with the jig by using a large square.
2. Clamp using 1 or 2 vise grips on either side. If you didn't need to use the drawer members
for the jig, you can drill those and the wide cylinder support holes now too so you won't have to handle the material twice. See below for how to do it.
It really helps to label each member, so that if you end up unbolting the piece later, you'll know exactly where it goes and in what orientation. Mark which side will be the top of the machine (could be either end at this time), and which member goes where.
Step 3 — Mag-Drill the holes and bolt to frame 1. Use a Mag-Drill to drill the 3/4" holes each place where the horizontal
members overlap the vertical members.
2. Bolt the horizontal members tightly to the vertical members. 3. Flip the jig over so you have access to drill the other holes. See video for
help. 4. Clamp the other 2 horizontal members in place.
5. Align the other horizontal members with the ones below the jig, so that they are both at the same location relative to the vertical members.
This is crucial so that the machine will stand up straight and there won't be any gap between the drawer and the top horizontal members.
6. Insure once more that the horizontal members are square with the vertical members.
7. Mag Drill them.

Open Source Ecology: Civilization Starter Kit v.0.01
Fabrication ManualCompressed Earth Brick Press
8. Remove the clamps and the jig from the frame. 9. Bolt the horizontals tightly to the frame. 10. Double check to make sure everything is still square.
If not, loosen the bolts and square it up on what you labeled top first and tighten those bolts. Then square out the other side and torch out any spots prohibiting the bolts from going thru.
Bolt it back when you're done.
Step 6 — Mag-Drill the holes for the wide cylinder supports and drawer members
1. Clamp the drawer member centered, 7" from the upper cross member.
The drawer slots should be on this side, not opposite.
Make sure the adjustment nuts are facing where the drawer was, look at the picture.
2. Clamp the wide cylinder support adjacent to it.
3. Make sure you label each component for re-assembly later.
4. Mag-Drill 1" holes at these centers. 5. Don't bolt these yet, you'll do that later.
Step 7 — Re-inforce the drawer members
Place the 1/2"x3"x24" flats on the drawer members centered as shown.
Weld them in place, using about a 50% weld.
Step 8 — Tack the Spacers
Note: You not welding them because when you stretch the frame, it may "move" their location.
1. With the frame laid down, and one of the drawer members under it to support the spacers, place the spacers on each side.
The end of them is to be 7 1/32" away from the upper cross member. Look at the diagram.
2. Insure they are parallel and flush with the U-channel and C-clamp in two places for each.
3. Tack them on this side in 3 spots. You may need to grind this off later, so make sure the
tacks aren't longer than 1/4" or so. 4. Flip over the frame and tack the other side.

Open Source Ecology: Civilization Starter Kit v.0.01
Fabrication ManualCompressed Earth Brick Press
Step 9 — Weld the Dirt Blockers 1. Put the dirt blockers in place, between the vertical members,
so the bottom side of them is about 1/8" above the bottom of the upper crossmembers.
2. Weld the portion inside of the vertical members, taking care to not weld them to the crossmembers.

Open Source Ecology: Civilization Starter Kit v.0.01
Fabrication ManualCompressed Earth Brick Press
CEB Fit the Main Cylinder
Sketchup Model You need to fit the cylinder into the frame so that when it is fully extended, the press foot is in the correct spot to eject the brick. You will need to torch holes in the horizontals for the pin which goes thru the cylinder, and weld DOM tubing to hold the pin. We recommend you watch the instructional video. Tools Needed:
Angle Grinder Welder 1/8” thick washer MIG welder Speed Square Spray paint Torch
Step 1 — Position the Cylinder 1. Lay the frame down, with all of the crossmembers and
drawer members in place except the upper crossmember and drawer member which are facing up.
2. Place the assembled cylinder lying down so that the press feet are between the spacers. You need to insure that the vertical height is correct, and that the cylinder is centered.
Insure the magnet holder nut (welded to the press feet) is on the same side as the sensor holder hole (hole in one vertical).
The top of the upper press foot should be 6 3/4" for monster away from the bottom of the upper crossmembers.
Materials Needed: Prepared main cylinder Pin-1 1/2" DOM Roundstock, 11" Pin Receptors: 1.5" inner
diameter, 2" outer diameter DOM tubing: 1.5" (2)

Open Source Ecology: Civilization Starter Kit v.0.01
Fabrication ManualCompressed Earth Brick Press
Step 2 — Squaring the cylinder Add a 1/8" spacer (big washers work great) under the cylinder, where it
contacts the lower crossmember. This insures the cylinder is centered vertically. Where to put it is circled in the first image.
Make sure the cylinder is centered, using a speed square pressed against the side of the cylinder, and a tape measure to the to the vertical members as shown.
Make sure the tubing for the pin is square with the lower crossmember using a speed square.
Step 3 — Marking hole locations 1. Mark the location for the hole for the pin on the bottom
horizontal member using spray paint. 2. Put the top horizontal member on, and put in at least 3 bolts. 3. Spray mark this location as well, from the other side. 4. Remove the horizontal members from the frame.
This is possible to do without removing the cylinder, just prop it up on something to remove the lower member.
5. Place one of the DOM tubing pieces in the center of each of the sprayed marks and spray paint around this to mark where you will torch.

Open Source Ecology: Civilization Starter Kit v.0.01
Fabrication ManualCompressed Earth Brick Press
Step 4 — Torching 1. Torch out the hole, and grind away the slag.
Insure the tubing will go thru each hole. If not, retorch it. Grind off the slag.
2. Lay the cylinder back down, with the 1/8" spacer in, and replace the crossmembers, with their bolts. Place the tubing in the torched holes.
3. Insure the pin will go thru the tubing and the cylinder. If not, retorch the holes so that it will.
Step 5 — Welding 1. With the pin held in, tack the tubing on the top in place.
Make sure the tubing is pressed up against the cylinder, that is that it’s as far into the hole as possible.
You’ll want to tack it in many places before welding around it, at least 8 on each side.
2. Tack it as best you can on the bottom by hanging the frame off of the table and overhead welding. Again, insure the tubing is pressed up against the cylinder.
3. Remove cylinder and pin, as well as the two crossmembers. 4. Fully weld the tubing on both sides. Jump around a lot to
minimize any warping on the tubing. Block the insides of the tubing so no spatter goes
inside. Big washers work well for this.
Step 6 — Re-Assembly
1. Replace the crossmembers and the cylinder. 2. Insure the pin still fits and hammer it thru.
If the pin doesn't fit, you will need to make it fit. Tighten the bolts on only the bottom
crossmember. Put the pin thru the crossmembers and the tube.
Mark where the bolt holes need to be torched away for the bolts to fit through. Torch it and you're done.

Open Source Ecology: Civilization Starter Kit v.0.01
Fabrication ManualCompressed Earth Brick Press
CEB Stretching the Frame
Tools Needed:
Hydraulic Pump
See the Video.
Step 1-- Stretch the frame 1. Attach the cylinder to a hydraulic pump or
power cube and contract the cylinder at least 1".
2. Stand up the frame so the press feet are facing down.
3. Insert the Soil loading drawer on top of the horizontal members so that the press plate is facing the press feet.
If the drawer doesn't fit because of the spacers, you welded them too close. Grind off the tacks and tack them a little higher.
4. Position the drawer so that the press plate will be fully contacted by the press feet.
5. Bolt the drawer members on finger tight. 6. Use the pump to expand the cylinder as much as possible. The pump will likely stall out.
If the pump stalls, turn it back on and expand it fully once more. 7. Expand at least 3 times. 8. Contract it, so you can weld the spacers in. Then detach from the pump.
Step 2 — Observations 1. Remove the drawer members. 2. Look where the spacers are near the drawer.
The spacers should be very close to the drawer (less than 1/32") See quality control video if you wonder why.
If they are too far, grind off the welds and re-tack them so they are lightly contacting the drawer. Yet again, make sure they are perfectly square with the verticals.
Materials Needed: Main Frame Wide Cylinder Supports Soil Loading Drawer ¾”x2” Bolts (8) ¾” Nuts (8)

Open Source Ecology: Civilization Starter Kit v.0.01
Fabrication ManualCompressed Earth Brick Press
CEB Welding the Spacers
Tools Needed: Angle Grinder Welder
Weld The Spacers 1. Lay the frame on its side. 2. Protect the cylinder and press feet so that when you weld, spatter won't stick. You could use some piece
of metal or a nonflammable cloth. 3. On the inside, bottom edge, weld the interior of the spacer inwards as far as you can. This should be an
inch or more. Do this in all 4 corners accessible from this side of the frame. See the photo. 4. Weld the top 100%, and grind it flush. 5. Flip over the frame. 6. Weld this side as you did the other side, also welding inside the spacers.
Materials Needed: Main Frame

Open Source Ecology: Civilization Starter Kit v.0.01
Fabrication ManualCompressed Earth Brick Press
CEB Frame- Installing the Small Components
Sketchup Model Tools Needed:
Wrenches Welder
Step 1 — Install the thin Cylinder Supports
1. Install the thin cylinder supports by screwing the bolt in with an extra nut on it as shown, and placing the u-channel against the cylinder.
2. Get both of them snug so the cylinder is centered with pressure on each side.
3. Tighten down the nut to lock it.
Materials Needed: Main Frame Sensor Holder Thin Cylinder Supports Magnet Holder Leg Holders (2) ¾” Nuts (3)

Open Source Ecology: Civilization Starter Kit v.0.01
Fabrication ManualCompressed Earth Brick Press
Step 2 — Install the magnet holder 1. Install the magnet holder onto the press foot.
The flatbar needs to be parallel with the verticals. If not, bend it so it is.
2. Lock it down with the nut.
Step 3 — Install the Sensor Holder Install the 6" sensor holder so the end of it is overlapping the path of the
magnet holder as shown. The other sensor holder will be installed later.
Step 4 — Weld the Leg Holders 1. Position them on the upper horizontal members as shown.
Use the location of the roller guides to insure you attach them to the right side.
Insure they are square in all directions 2. Weld them to the horizontal members fully.

Open Source Ecology: Civilization Starter Kit v.0.01
Fabrication ManualCompressed Earth Brick Press
CEB Fit the Drawer Members
Sketchup Model Tools Needed:
Various Wrenches
Step 1 — Install the Roller Guides 1. Position frame so it is standing upside down as in picture on
right. 2. Install the Roller guides as shown in the illustration. One side
should have a 1/2" spacer, and the other should have a 3/8" spacer plate.
3. Tighten the bolts snug, but so that they can still move up and down.
Materials Needed: Roller Guides Soil Loading Drawer Wide Cylinder Supports Drawer Members 3/4"x2" Bolts (16) 3/4" Nuts (16) 3/4" Washers (16) 1/2" Washer (2) 1/2" Lock Washer (2) 1/2" Nut (2)

Open Source Ecology: Civilization Starter Kit v.0.01
Fabrication ManualCompressed Earth Brick Press
Step 2 – Bolt in Drawer Members 1. Replace the drawer as if you're going to stretch the
cylinder again. The roller bearings should be on top of the rails
on the drawer, and be putting no pressure on the drawer.
2. Loosely bolt on the drawer members. 3. Adjust them horizontally so that the adjustment bolts
are centered on the roller guides. See image. 4. Finger tighten the bolts on the drawer members, as they
are sitting on top of the drawer.
Step 3—Adjust Drawer Members
1. Try to slide the drawer in and out. If the drawer gets stuck somewhere, investigate and find where it's hitting. (It almost certainly will).
You'll probably need to loosen one, or both of the drawer members and move it up a bit.
This can be done uniformly using cardboard shims. See photo. Place the shim between the drawer and the crossmember. Tighten the bolts again. Remove the shims by "jiggling" the drawer.
If it's hitting a spacer, grind down the spacer. If the drawer itself is prohibitive in some spots, it wasn't
grinded evenly. Grind down the high spots.
Step 4- Tighten all Bolts 1. Once the drawer is properly adjusted, tighten these bolts all the
way. Make sure the drawer adjustment nuts are still centered
on the roller guides. 2. Tightly bolt the wide cylinder supports to the frame, leaving no
gap between them and the drawer members. 3. Tighten the bolts at the top of the wide cylinder supports so they
are touching the cylinder on each side. Tighten the lock nut. 4. Go back through the entire frame and make sure every bolt is
tight.

Open Source Ecology: Civilization Starter Kit v.0.01
Fabrication ManualCompressed Earth Brick Press
CEB Secondary Cylinder Hydraulics Prep
Tools Needed:
Various wrenches Vise
Procedure
Thread Tape is needed between each connection.
Always wrap thread tape clockwise when facing the threaded portion.
Always keep the end caps on hoses and fittings until you need to take them off. They need to stay protected inside.
1. Assemble the individual assemblies as shown, and prepare the two 96" hoses by putting a male quick coupler onto one end of each.
2. Install Assembly #1 into the rod end of the cylinder (image above). Insure the quick coupler will be facing towards the ground when the cylinder is installed.
When you remove the plug on the cylinder, fluid may spill out, so keep some rags or a jar handy.
You will install the remaining components later upon installing the secondary cylinder.
Materials Needed: Thread tape 3/8" NPT Hex nipple (2) Buy 1/2" NPT to 3/8" NPT bushing (2) Buy 1/2" NPTF to 1/2" NPTM 90 Elbow
(1) Buy 1/2" M Elbow (2) Buy 1/2" Flow Control and Relief Valve Buy 1/2"x36" NPTM Hydraulic hose (1) 1/2"x96" Hose (2) 1/2" Quick Coupler Set (5) Buy 1/2" Check Valve (1) Buy 1/2" F Tee Buy 1/2" Hex Nipple (4)Buy

Open Source Ecology: Civilization Starter Kit v.0.01
Fabrication ManualCompressed Earth Brick Press
CEB Assembly- Structural Components
Tools Needed:
Angle Grinder Welder C-Clamps Vise Clamps Wrenches Torch
Step 1 — Position the main frame Set the main frame somewhere on level ground where you have access to a
welder and torch and where you have at least an 8' radius of empty space. The CEB takes up a lot of room!
Set it so the cylinder pin is near the ground.
Step 2 — Assemble the Secondary Arms 1. Gather the secondary arms, the legs and the feet. 2. Onto the end of each leg, tighten a foot to one of its
ends. Get the bolt tight enough so it won't fall off. 3. Insert one leg/foot into each of the outside leg
holders on the secondary arms. 4. Adjust the height so that the top of the secondary
arms will be very close to the height at the bottom of the primary arms.
5. Tighten the bolts in the leg holders so they are snug, but not too tight.
Step 3 — Place the Primary Arms Clamp them on the drawer members on
the frame so that they are in the proper orientation. See image.
o If the machine is going to tip over, have a friend move the assembled secondary arms to support it so it doesn't tip.
Materials Needed: Prepared Structrual Components Main Frame ¾”x2.5” Bolts (4) ¾”x2” Bolts (12) ¾” Nuts (17)

Open Source Ecology: Civilization Starter Kit v.0.01
Fabrication ManualCompressed Earth Brick Press
Step 4 — Attach the secondary arms to the primary arms
1. Loosely bolt the 2 sets of arms together. You may need to loosen the clamps on
the primary arms. This is OK. 2. Make sure the arms are all square to each
other. 3. Tighten all bolts. 4. Loosen the clamps attaching primary arms to
the frame. 5. Square the arms to the frame.
Step 5 — Attach the primary arms to the frame
1. Torch the holes in the frame through the holes in the primary arms.
Make sure bolts go through all holes. 2. Remove the clamps and grind away any slag 3. Bolt the primary arms to the frame.
Step 6 — Install Brick Holder plate, Dirt keeper plate, and sensor holder
The plates go on the bottom side of the primary arms.
If not all the bolts go through, torch away whatever is preventing it.
Bolt them down so the bolt head is on the top. Tighten the nuts snug.
Install the sensor on the right primary arm. Its location is circled in the diagram.

Open Source Ecology: Civilization Starter Kit v.0.01
Fabrication ManualCompressed Earth Brick Press
CEB Assembly- Soil Loading System
Tools Needed: Angle grinder Spray paint Vise clamps Welder C- clamps Torch Various wrenches
Step 1 — Torch the holes for the hopper mounting plate
1. Clamp the hopper mounting plate to the top of the main frame, positioned as shown, with the cutaways positioned by the leg holders.
Clamp it so that the side you grinded down the welds on is touching the main frame.
2. Torch the holes thru to the main frame. Check that the fit is good by
putting bolts in all the holes. 3. Grind away all the slag. 4. Bolt the mount to the frame.
Materials Needed: All Components of Soil Loading
System Assembled Main frame ¾” Galvanized Nuts (10) 1/2" lock nuts (2) 1/2" nuts (2) 3/4"x1.5" bolts (8) 3/4"x2.5" bolts (2) 1/2"x2.5" bolts (2) 1/2"x3" bolt (2) 1/2" washers (8) 3/4" washers (6) 1/2"x1" Bolts (4)

Open Source Ecology: Civilization Starter Kit v.0.01
Fabrication ManualCompressed Earth Brick Press
Step 2 — Install hopper supports and prepare shaker mount.
1. Install the hopper supports into the leg holders. Make sure you put the support with bolts on it on the correct
side (refer to your shaker motor and look where you marked it.)
Their bottom side should be flush with the bottom of the leg holders on the frame.
Make sure they are orientated correctly. See photo. 2. On the side of the shaker motor that you didn't weld bolts for, put a bolt
(3/4"x1.5") thru both holes and tighten nuts onto them.
Step 3 — Tack shaker bolts to hopper support
1. Place the shaker onto the bolts already welded to the hopper supports.
2. Clamp the other side to the hopper support. Use a square to make sure the shaker mount
is square with the hopper supports. 3. Tighten nuts onto the side with the welded bolts. 4. Tack the bolts to the hopper support.
Make sure you tack them to the hopper support, NOT the shaker mount.
Tack as much as you can from this position.
Step 4 — Weld shaker bolts. 1. Loosen all the nuts and remove the shaker. 2. Protect the threads on the bolts. 3. Weld all the way around the bolt to the hopper
supports. Don't remount the shaker yet.

Open Source Ecology: Civilization Starter Kit v.0.01
Fabrication ManualCompressed Earth Brick Press
Step 5 — Clamp the hopper back to supports and torch holes
1. Clamp the hopper back to the hopper supports. It should be centered horizontally between them, and
touching the supports all the way down to the hopper mounting plate.
2. Torch through the holes circled in the diagram, so you torch through the hopper sheet metal.
Torch through it on each side, just enough so you have 2 small holes.
3. Un-clamp the sheet metal and torch 1/2" holes for the bolt. 4. Grind off the slag from torching.
Step 6 — Remount the first plate, and prepare to weld
1. Mount the first plate back to the hopper supports. Use a 1/2"x3" bolt and a nut with washers on each side.
2. Lift the side pieces and clamp them to the first plate via the hinge plates.
Minimize the gap between them as much as you can by pushing them together tightly.
Step 7 — Weld the hinge plates to the back piece Weld it about 50%, as no more is necessary. o Weld in 3-4 inch sections.
Step 8 — Clamp and weld the front piece 1. Clamp the final piece in place to the other side of the
side pieces. Yet again, minimize the gap between the two. You may need somebody to get inside of the
hopper and push out so you can clamp it well. 2. Weld the last piece like you welded the first one.

Open Source Ecology: Civilization Starter Kit v.0.01
Fabrication ManualCompressed Earth Brick Press
Step 9 — Place the grate and bolt it to the hopper supports 1. Get a friend or two and lift the grate on top of the
hopper. The front end (with the slots) should be
as shown, and the grate should be inside of the hopper on the other side (the side with the nuts).
Have your friend hold the grate in place for the next step, or use C-Clamps to clamp the grate to the supports.
2. Bolt the grate to the hopper supports (1/2"x 2.5" bolt and lock nut). Bolt both loosely, and then tighten them.
You'll need 2 washers on each side, as the holes are slots and a 1/2" washer will be too small to prevent the washer from warping. Use a 3/4" washer as the other one.
You may want to use a large nut in place of a washer on the hopper support side. (see photo)
Step 10 — Install the grate supports 1. Loosely bolt the grate supports to the primary
arms 2. Bolt (3/4"x2.5" bolt) The grate mounts through
the hopper to the grate. Use a 3/4" washer where the bolt
goes thru the grate support. 3. Tighten all bolts
Step 11 — Re-install the shaker 1. Install the motor (next section) on the shaker
motor mount if you haven't already. 2. Place it on the bolts on the hopper supports.
If for some reason it doesn't fit, torch away whatever metal is preventing it.
3. Tighten nuts onto it.
Step 12 — Install the Dirt Deflector Plate
Bolt it to the grate.

Open Source Ecology: Civilization Starter Kit v.0.01
Fabrication ManualCompressed Earth Brick Press
CEB Shaker Assembly
Sketchup Model Tools Needed:
Allen Wrench Various Wrenches
Step 1 — Mount Motor Loosely bolt the assembled motor to the mount, as
shown, using washers on both sides, and a lock washer touching the nut.
Materials Needed: Shaker Mount Shaker Motor Shaker Hammer and coupler 1" Pillow Block Bearings(2) 1/4"x2" Bolt (1) 3/8"x2" Bolts (4) 1/2"x2" Bolts (2) 3/8" Lock Nuts (4) 1/2" Lock Nuts (2) 3/8" Washers (8) 3/8" Lock Washers (4) 1/2" Washers (4) 1/2" Lock Washers (4)

Open Source Ecology: Civilization Starter Kit v.0.01
Fabrication ManualCompressed Earth Brick Press
Step 2—Prepare Hammer and Shaft 1. Put the bearings onto the shaft, insuring the
eccentric side is facing inwards. Remember to put the eccentrics in
between the two bearings. The eccentrics are little collars with
lopsided circles inside of them. This makes it so it can lock into the bearings.
Insure both collars are facing the right direction (So it will lock onto the lip) and so are the bearings.
Put the coupler onto the shaft. Make sure you can see thru the holes, (it
could be off 180 degrees and a little crooked) then put on the bolt, lock washer, and lock nut. Tighten
2. Couple it to the motor, tightening down the set screw.
Step 3 – Attach bearings 1. Tighten the motor mount bolts. 2. Bolt the bearing closest to the motor to the mount
with a washers, a lock washer, and a lock nut. Tighten these down.
3. Insure the hammer rotates freely still. It may require some force, but shouldnt
need much. If the hammer won't rotate, loosen the
motor mount bolts, retighten them, and recheck it.
4. Position the other bearing and tighten it down, still insuring it will rotate without much force.
5. Lock the eccentrics by pushing them towards the lip on the bearing and twisting it.
6. Tighten the set screw on the eccentrics.

Open Source Ecology: Civilization Starter Kit v.0.01
Fabrication ManualCompressed Earth Brick Press
CEB Assembly- Adjusting The Drawer
See Videos:
• Adjusting the drawer • Properly adjusted drawers
Tools Needed:
• Mallet • Various Wrenches
Step 1 — Put the drawer in • Insert the drawer into the chamber as shown, in
the fully retracted position. Its important that it be in the right orientation.
o The adjustment bolts should be lowered so that the roller guides are below the rails.
Materials Needed: • Assembled CEB • Soil Loading Drawer

Open Source Ecology: Civilization Starter Kit v.0.01
Fabrication ManualCompressed Earth Brick Press
Step 2 — Align the rails with the center of the v's in the rollers.
• If for some reason the rails and the rollers aren't spaced properly (the guides need to be closer or further apart) remove one of the guides and switch out the spacer on it to one that will space them properly.
• If only one roller of the four is off, the guide is not parallel with the drawer.
o Try tightening the nut that attaches the rollers to the frame.
o If that doesn't work, you might have welding spatter or something between the guide and the frame. Remove it and check.
• If none of the above steps make all the rollers align, your drawer is likely flawed.
o The rails are probably not parallel. Take the drawer out and double check by measuring the separation of the rails. If they aren't parallel, see this page.
Step 3 — Tighten the rollers against the rails
• Tighten the adjustment bolts so they push the rollers up to the rail, so all of the rollers are contacting the rails.
o The two should be touching snugly, but not forcefully.

Open Source Ecology: Civilization Starter Kit v.0.01
Fabrication ManualCompressed Earth Brick Press
Step 4 — Move the drawer and re-adjust bolts
• Move the drawer to the fully extended position. o The drawer will likely get stuck along some
points of its travel. Its OK to hit it with a hammer. Remember the secondary cylinder will be applying tons of force to move it.
o If you need to hammer it REALLY hard, either your drawer is hitting something, or the rollers are too tight on the rails. Investigate the cause.
• When the drawer is in position, check the rollers again. They should all still be touching the rails.
o If one is below the rail, tighten the bolt so the rail and roller are touching.
Step 5 — Slide the drawer in and out • You will likely need to try sliding it in and out a few times before you can find the perfect amount of adjustment. • Keep checking the contact as you slide it out. • Your work is done when you can slide the drawer in and out and the rails stay on the roller the whole time. o Using a hammer is OK, but if you have to use too much force something is wrong.

Open Source Ecology: Civilization Starter Kit v.0.01
Fabrication ManualCompressed Earth Brick Press
CEB Assembly – Installing the Secondary Cylinder
Tools Needed:
Various Wrenches Welder Hole Puncher
Step 1 — Mark the center between the primary arms on the secondary arm.
o This is on the opposite side of the CEB of the brickholder plate.
Step 2 — Position the drawer
The drawer needs to be in the fully retracted position.
o This is when the drawer is about to eject the brick, the press plate will be back 1/4" from the inside of the compression chamber.
Materials Needed: Assembled CEB Secondary Cylinder Prepared secondary cylinder hydraulics ½”x3” Flat – 3”(1)

Open Source Ecology: Civilization Starter Kit v.0.01
Fabrication ManualCompressed Earth Brick Press
Step 3 — Prepare the cylinder mount. Punch a 1" hole in the center of a 3"x3" piece of 1/2" thick steel.
Step 4 — Place the cylinder The base of the cylinder attaches to the secondary cylinder.
The side of the cylinder with the rod attaches to the drawer.
On the side which attaches to the secondary arm, put the pin through the mount, a 1" washer, and the cylinder.
o Both sides will need a 1" washer to act as a spacer so the cylinder can't slide back and forth.
When the cylinder is attached to the drawer, place the mount on your center mark.
Square the mount in all directions.
Step 5 — Weld the mount in place
1. Tack the mount in a few places. 2. Remove the pin and move the cylinder out of the
way of the mount. You can slide the drawer away so you
don't need to remove that side. 3. Weld the mount solid, all the way around. Make
sure it stays square.

Open Source Ecology: Civilization Starter Kit v.0.01
Fabrication ManualCompressed Earth Brick Press
Step 6 — Install hoses 1. Return the secondary cylinder and re-mount it. Don't forget the washer. 2. Remove the plug from the port on top of the cylinder. The cylinder may have fluid in it, so keep a jar
handy to catch any that spills. 3. Install Assembly #2 into this port. 4. Couple the remaining assemblies and hoses in place.

Open Source Ecology: Civilization Starter Kit v.0.01
Fabrication ManualCompressed Earth Brick Press
CEB Hardlining the Main Cylinder
Tools Needed:
Various Wrenches Thread tape
Procedure
1. Remove the couplers and hex nipples at the elbow using a wrench.
2. Tighten the hoses (with thread tape) into the elbows.
Materials Needed: ½”x56” Hydraulic Hose (2)

Open Source Ecology: Civilization Starter Kit v.0.01
Fabrication ManualCompressed Earth Brick Press
CEB Painting the Machine
Procedure
1. Cover the hydraulics and any other place that should not be painted. 2. Check all external surfaces for sharp edges and smooth with angle grinder. 3. Remove any surface rust with wire brush and / or sandpaper. 4. Apply a thorough coating of paint to all steel surfaces. 5. Allow 24 hours to dry before handling.

Open Source Ecology: Civilization Starter Kit v.0.01
Fabrication ManualCompressed Earth Brick Press
CEB Electronics – Linked Extension Cord
See video first. Tools Needed:
Straight Pattern Tin Snips Wire Strippers Compatible with 16 Gauge Crimpers Compatible with 16 to 22 Gauge Connectors Measuring Tape Handiworks Compatible Set of a Soldering Iron and Solder Soldering Stand Wet Sponge or Wet Paper Towel
Procedure
1. Using the tin snips, cut the extension cord such that the male cord is 6 feet in length. The cutting tolerance is 8”.
2. Using the tin snips, strip the loose sleeves of the male and female cords such that 12” of insulated wires are unsleeved. The stripping tolerance is 2”.
3. Using the tin snips, cut the green wire of the male and female cords such that none or little of the green wire is visible. The cutting tolerance is 1.25”.
4. Using the wire strippers, strip the white and black wires of the male and female cords by 0.75”. The stripping tolerance is 0.25”.
5. Using the crimpers, crimp the female connector onto the white wire of the male cord. Insure that no exposed wire lies between the wire insulation and the connector insulation.
6. Insert 1 alligator clip insulation into each of the white and black wires of the female cord. 7. Using the soldering set, solder the white and black wires of the female cord to the alligator clips. 8. Slide the inserted insulation pieces over the alligator clip handles. 9. Link the male and female cords together by their plugs.
Materials Needed: Extension Cord of 50 feet (about
15 meters) having 16 Gauge Wires
Female Insulated Electrical Connector for 16 to 22 Gauge
Battery Alligator Clips (2)

Open Source Ecology: Civilization Starter Kit v.0.01
Fabrication ManualCompressed Earth Brick Press
CEB Electronics – Sensor Unit
See video first. Tools Needed:
Compatible Set of Soldering Iron and Solder Soldering Stand Wet Sponge or Wet Paper Towel Straight Pattern Tin Snips Wire Strippers Compatible With 22 Gauge Wire Heat Gun Pliers Helping Hand Measuring Tape Wire Strippers Compatible With 8 Gauge Wire
Procedure 1. Using the tin snips, cut the sleeve of the telephone wire by 5cm and 20cm at both ends. The cutting
tolerance is 2cm. 2. Using the tin snips, cut the orange-white wire at both ends of the telephone wire. 3. Using the wire strippers, strip the bluewhite, blue, and orange wires of the telephone wire by 2cm at the
5cm end and by 1cm at the 20cm end. The stripping tolerance is 0.5cm. 4. Insert 3cm shrinktubing into the 5cm blue, blue-white, and orange wires. 5. Bend the sensor prongs and the exposed metal of the 5cm wires into hooks such that the 3 prong hooks
can latch onto the 3 wire hooks to facilitate soldering. Use pliers to pinch the hook connections during the soldering process.
6. Using the soldering set and the helping hand, solder the hall-effect sensor prongs to the 5cm wires. The orientation of the soldering connections is such that, when you can see the sensor text and its prongs pointing downward, from left to right the colour of the wires to be soldered are: bluewhite (for 5V+), blue (for GND), and orange (for Signal).
7. Using the heat gun, cover the soldered prong-to-wire connections with the shrinktubing then apply heat to the now-covered connections. The shrinktubing should shrink, forming a tight insulating seal for each of the prong-to-wire connections.
8. Pour the silicone into the tube such that the tube is completely filled in. 9. Insert the wired hall-effect sensor into the PVC tube leaving 2cm of space at the non-insertion end of the
tube. 10. Gently set the sensor unit on a flat surface and wait 24 hours for the silicone to cure.
Materials Needed: Hall Effect Sensor 1.5m of 4 Wire Underground
Telephone Cable Silicone [3] 3cm lengths of Shrink Tubing PVC Pipe with 2.5cm Outer
Diameter, 1.5cm Inner Diameter, 9cm Length

Open Source Ecology: Civilization Starter Kit v.0.01
Fabrication ManualCompressed Earth Brick Press
CEB Solenoid Driver
This is a complicated step. See the wiki for troubleshooting and additional techniques or upgrades.
Procedure 1. Either mill your board using this model, OR complete
the remainder of this step.
1) Print the image on the right on laser photo paper, with dimensions of 3”x4.5.”
2) Tape the paper onto the copper board.
3) Using a laundry iron, heat the paper until discolored.
4) Soak in water and peel the paper away.
5) Agitate in pcb etchant solution for 20-30 min until copper is gone.
6) Apply accetone to a cloth and wipe away toner.
7) Check and fix errors.
Places where not enough was etched away or where too much was. Can fix by soldering or sanding.
Materials Needed: Description Qty. Power N MOSFET 5 Green LED 7 Diode 5 499 Resistor 5 49.9k Resistor 5 10k Resistor 2 2 Pos Terminal 9 reset switch 1 6 Pos Header 2 8 Pos Header 2 PCB 1 100 Resistor 2
Tools Needed: Oxide Remover Solution - Ex.
Isopropyl Masking Tape Etching Solution - Ex. Ferric Chloride Toner Removal Solution - Ex. Acetone Glass Bowl that fits 3" x 4.5" area
dimensions with at least 1" depth Paper towel Compatible Set of Computer and
Laser Printer with Glossy Paper Laundry Iron Drill Press with Number 58 Twist Drill
Bit Compatible Set of Soldering Iron,
Low-diameter Solder, Flux and Brush, Soldering Stand, and Wet Sponge or Wet Paper Towel

Open Source Ecology: Civilization Starter Kit v.0.01
Fabrication ManualCompressed Earth Brick Press
2. Drill the etched board at the two rows of small grey squares where the pins would be (28 holes) and all grey circles of where the screw terminals would be (18 holes) as shown in the following diagram.
3. Surface-mount solder the etched and drilled copper clad board with the complete board diagram above. The 6 POS Headers go in the top drilled holes, and the 8 POS Headers go in the bottom holes.

Open Source Ecology: Civilization Starter Kit v.0.01
Fabrication ManualCompressed Earth Brick Press
CEB Electronics – Case
See video first.
Procedure 1. Open the lug box 2. Using the screwdriver and the half inch flathead bit, unscrew and remove the terminal components inside
the lug box 3. Using the safety glasses, hammer and the centre punch, remove the inner lids at the bottom-left, bottom-
middle, bottom-right, and right-bottom of the lug box 4. Mount the two wire clamps onto the bottom-left and right-bottom holes of the lug box 5. Mount the toggle switch onto the bottom-right hole of the lug box; in the process, put the 3.2cm OD
washers on both sides of the lug wall. 6. Using the crimper, crimp the small ring connector and the male connector onto the two ends of the fuse
holder; then insert the buss fuse. 7. Using the crimper, crimp the ring connector to the black wire of the male end of the linked extension
cord.
Materials Needed: Outdoor Main Lug Box [2] Wire Clamps Toggle Switch [2] 3.2cm OD, 1.27cm ID Washers (1/2” Washer) Fuse Holder Male Insulated Connector for 10-12 Gauge Wire Ring Insulated Connecter with Small Hole for 10-12
Gauge Wire 10 Amp Buss Fuse Ring Insulated Connector for 10-12 Gauge Wire [2] 12cm by 7.5cm by 0.4cm high density
polyethylene plate [4] M3 machine screws of 20mm length [4] M3 nylon-threaded lock nuts [4] 8-32 machine screws of 3/4 inch length [7] 8-32 machine screws of 3/8 inch length Arduino Uno Microcontroller Arduino Uno Serial Issue Solution, Replies 2 and
4 Note: for Arduino Uno Version R2, the contact point for entering DFU mode is the top-left male pin instead of the top-left pad. You'll need to perform this solution method if initial serial communication tests prove buggy. You cannot perform this after mounting the microcontroller inside the case.
Linked Extension Cord (from prior guide)
Tools Needed: Screwdriver with the following
bits: Quarter Inch Flathead, Half Inch Flathead, Number 1 Phillips, and Number 2 Phillips
Hammer Centre Punch Crimper Cordless Drill with the following
twist drill bits: 9 by 64 inch, 1 by 8 inch, 3 by 16 inch
Needlenose Pliers Electrical Tape Tap Wrench with 8-32 Tap

Open Source Ecology: Civilization Starter Kit v.0.01
Fabrication ManualCompressed Earth Brick Press
8. Using the safety glasses, cordless drill and the 9 by 64 inch drill bit, drill holes on the first plastic plate such that 5 terminal holes are approximately evenly spaced along an axis near the top edge, and such that 2 terminal holes are located near the bottom corners.
9. Using the safety glasses, cordless drill and the 1 by 8 inch drill bit, position the Arduino microcontroller board on a second plastic plate then drill through the board mounting holes through the plastic such that the holes of the board and those of the plastic align. Use M3 Machine Screws to help align the drilled holes during the process. Be careful not to excessively ream the Arduino board.
10. Using the safety glasses, cordless drill, and the 3 by 16 inch drill bit, drill 2 mounting holes near the far edges of the first and second plastic plates.
11. Using the safety glasses, cordless drill, and the 9 by 64 inch drill bit, drill holes on the back of the lug box such that they align with the mounting holes of the first and second plastic platforms. The Arduino platform should be positioned closer to the top than the terminal platform. Leave enough room surrounding the edges of the platforms to facilitate assembly, disassembly, and wiring.
12. Using the metal file, deburr the lug box's platform mounting holes. 13. Using the tap wrench and the 8-32 tap, tap the 7 terminal holes of the terminal platform and the 4
platform mounting holes of the lug box. 14. Using the screwdriver with the number 1 phillips bit and pliers, mount the Arduino microcontroller board
onto the Arduino platform through the 4 mounting holes with the 20mm M3 machine screws and the 4 M3 nylon-threaded lock nuts.
15. Using the screwdriver with the number 2 phillips bit, mount the Arduino platform and the terminal platform onto the back of the lug box by screwing the 3 by 4 inch length 8-32 machine screws through the 4 mounting holes. Use 1/2-13 nuts to act as spacers between the platforms and the back of the lug box. The arduino platform should be mounted closer to the top of the lug box than the terminal platform.
16. Insert the non-clip end of the linked extension cord into the lug box through the bottom-left hole, then connect the black wire's female connector to the fuse holder's male connector. Wrap electrical tape around the exposed male-female connection and put a small fold at the end of the tape piece for ease of disassembly.
17. Using the screwdriver with the number 2 phillips bit, connect the fuse holder's ring connector to one terminal of the toggle switch. Then connect the linked extension cord's black wire ring connector to the bottom-right screw terminal on the terminal platform.
18. Using the screwdriver with the number 2 phillips bit, tighten the screws of the wire clamp at the bottom-left of the lug box.

Open Source Ecology: Civilization Starter Kit v.0.01
Fabrication ManualCompressed Earth Brick Press
CEB Electronics- Controller Box
See Video Tools Needed:
Straight Pattern Tin Snips Wire Strippers Compatible with 18 and 22 Gauge Crimpers 2.3mm Flathead Screwdriver Screwdriver with Number 2 Philips Bit Needlenose Pliers Measuring Tape
Procedure 1. Mount the solenoid driver on top of the Arduino microcontroller. 2. Using the tin snips, cut 6 pieces of 20cm black wire, 2 pieces of 20cm red wire, 5 pieces of 1.5m black
wire, and 1 piece of 1.5m red wire. 3. Using the wire strippers at 22 gauge, strip half a centimetre at one end of the 6 pieces of 20cm black wire
and 1 piece of 20cm red wire. 4. Using the wire strippers at 18 gauge, strip a centimetre at the other ends of the 6 pieces of 20cm black
wire and the 1 piece of 20cm red wire, as well as both ends of the other 1 piece of 20cm red wire, the 5 pieces of 1.5m black wire, and the 1 piece of 1.5m red wire.
5. Using the crimper, crimp the 10 to 12 gauge ring insulated connector at one of the 1 centimetre stripped ends of the 6 pieces of 20cm black wire, the 2 pieces of 20cm red wire, the 5 pieces of 1.5m black wire, and the 1 piece of 1.5m red wire.
6. Also crimp the 10 to 12 gauge small hole ring insulated connector at the remaining 1cm end of the 20cm red wire and crimp the 14 to 16 gauge ring connector to the remaining 1cm ends of the 5 pieces of 1.5m black wire and 1 piece of 1.5m red wire.
7. Using the screwdriver with the number 2 philips bit, connect the small ring end of the 20cm red wire to the remaining power switch terminal.
8. Insert the large ring end of the 6 1.5m wires through the bottom-middle hole of the lug box. 9. Using the screwdriver with the number 2 philips bit, connect the large ring end of the 1.5m red wire, the
remaining ring end of the switch-connected 20cm red wire, and the ring end of the other 20cm red wire to the bottom-left screw of the terminal platform.
10. Connect the large ring end of the 5 1.5m black wires and the ring end of 5 20cm black wires to the top 5 screws of the terminal platform. Then connect the ring end of the remaining 20cm black wire to the bottom-right screw of the terminal platform.
11. Using the flathead screwdriver, connect the half centimetre ends of the 6 pieces of 20cm black wire to the lower terminal of the 5 mosfet terminal blocks, and the left terminal of the power terminal block. Note that the mosfet connections from left to right on the terminal platform should go from bottom to top on the solenoid driver. Also connect the half centimetre end of the 1 piece of 20cm red wire to the right terminal of the power terminal block.
Materials Needed: Case [2] Sensor Units Solenoid Driver v2 18 Gauge Red Wire 18 Gauge Black Wire Ring Insulated Connector with
Small Hole for 10-12 Gauge [14] Ring Insulated Connectors
for 10-12 Gauge [6] Ring Insulated Connectors for
14-16 Gauge

Open Source Ecology: Civilization Starter Kit v.0.01
Fabrication ManualCompressed Earth Brick Press
12. Insert the 2 sensor units by their wire end into the right-bottom hole of the lug box. 13. Using the flathead screwdriver, connect the bluewhite wires, orange wires, and blue wires into the top,
middle, and bottom terminal blocks, respectively, on the right side of the solenoid driver. 14. Using the screwdriver with the number 2 philips bit, screw-tighten the wire clamp at the right-bottom
hole of the lug box.

Open Source Ecology: Civilization Starter Kit v.0.01
Fabrication ManualCompressed Earth Brick Press
CEB Mount Solenoid Valve Set and Controller Box
The CEB Assembly video also shows how to do this step. Note that the video is different than the written instructions in that they use quick couplers whereas the written instructions do not.
Install Controller 1. Bolt Controller Box to Controller Mount 2. Bolt controller mount to CEB. 3. Power clamp the sensor that has its orange (signal) wire in
Arduino pin A0 (aka pin 14) next to the primary cylinder bar. Attach 3 magnets to the primary cylinder bar such that
they are vertically aligned and their terminals are reversing ex. NSN or SNS.
Space the magnets approximately 5cm apart. Change the magnet positions during testing to achieve the
Materials Needed: 3/4" Quick Coupler Set (1) SAE 12M to 3/4" Swivel (2) SAE 6M to 1/2" Swivel (6) Bolts and nuts for mounting
on valve mount and controller
3/4"x1.5" Bolts (4) 3/4" Nuts (4) Power Clamps (4) Rare Earth Magnets (6) Prepared Controller Box Prepared Controller Mount
Prepared Valve Mount
Tools Needed: Various Wrenches

Open Source Ecology: Civilization Starter Kit v.0.01
Fabrication ManualCompressed Earth Brick Press
desired soil loading position, maximum compression position, and press foot ejection position.
4. Power clamp the sensor that has its orange (signal) wire in
Arduino pin A1 (aka pin 15) next to the secondary cylinder and soil loading drawer.
Attach 3 magnets to the soil loading drawer such that they are vertically aligned and their terminals are reversing ex. NSN or SNS.
Space the magnets approximately 5cm apart. Change the magnet positions during testing to achieve the desired soil loading position, compression position, and maximum ejection position.
Prepare Solenoid 1. Install the solenoid valves on the manifold in the order C-C-H, going from left to right, with the ports at
the top. 2. Install the quick connect inlet and outlet in the side ports on the manifold. DON'T use thread tape for any
connections to the manifold. 3. Onto the top of the manifold, install the 6 swivel fittings into the ports.
Install Solenoid on Machine 1. Bolt the solenoid to the valve mount. 2. Bolt the solenoid and valve mount to the primary arms on the assembled CEB. 3. Attach hoses from cylinders and shaker to manifold. See illustration for number locations.
1=Main Cylinder Top 2=Main Cylinder Bottom 3=Secondary Cylinder Tee 4=Secondary Cylinder Control
Valve 5=Shaker Non Return Line 6=Shaker Return Line (Side with
Needle Valve and Tee)

Open Source Ecology: Civilization Starter Kit v.0.01
Fabrication ManualCompressed Earth Brick Press
CEB Electrohydraulic Integration
See video first. Note that this process should occur only if the solenoid valve set and controller box are already mounted on the CEB press. The process is shown separately from the CEB press for clarity.
Wiring Diagram
Procedure 1. Using the tin snips, cut 2 pieces of 30cm red wire. 2. Using the wire strippers, strip 1cm at all ends of the 2 pieces of red wire. 3. Using the crimpers, crimp the ring connectors at all ends of the 2 pieces of red wire.
Materials Needed: Controller Box
o Ensure that the connections between the top 5 terminals of the terminal platform and the left 5 (MOSFET) terminals of the solenoid driver are such that left to right (terminal platform) corresponds with bottom to top (solenoid driver), respectively. In this case, from left to right the top terminals of the terminal platform are indirectly connected to Arduino pins 11, 10, 9, 6, and 3, respectively.
Solenoid Valve Set o Ensure that the solenoid valves are
mounted to the subplate such that, when the work ports open away from you, from left to right the solenoid valve types are C, C, and H, respectively.
18 Gauge Red Wire [4] Ring Insulated 14-16 Gauge Connectors
Tools Needed: Screwdriver with Number 2
Philips Bit Straight Pattern Tin Snips Wire Strippers compatible with
18 gauge Crimper 10mm Hex Key Measuring Tape
Open Source Ecology: Civilization Starter Kit v.0.01
Fabrication ManualCompressed Earth Brick Press
4. Orient the solenoid valve set such that its work ports open away from you. 5. Using the hex key, unscrew the 3 hex caps closer to you. 6. Using the screwdriver with the number 2 philips bit, unscrew and remove the lids of the solenoid valve
electronics. 7. Ensure and relocate if necessary the solenoid valve jumpers such that each solenoid valve has its left-
middle and left-top terminals linked. 8. Screw the small ring end of the long red 1.5m wire to the left-top terminal of the rightmost solenoid
valve. 9. Screw the small ring ends of the 30cm red wire to the left-middle terminal of the rightmost solenoid valve
and the left-top terminal of the middle solenoid valve. 10. Screw the small ring ends of the other 30cm red wire to the left-middle terminal of the middle solenoid
valve and the left-top terminal of the leftmost solenoid valve. 11. Screw the small ring end of the long black wire of pin 11 to the right-bottom terminal of the rightmost
solenoid valve, pin 10 to the right-bottom terminal of the middle solenoid valve, pin 9 to the right-middle terminal of the middle solenoid valve, pin 6 to the right-middle terminal of the leftmost solenoid valve, and pin 3 to the right-bottom terminal of the leftmost solenoid valve.
12. Screw on the lids of the solenoid valve electronics.
Open Source Ecology: Civilization Starter Kit v.0.01
Fabrication ManualCompressed Earth Brick Press
CEB Code Upload
Procedure Note that you may have to rotate the sensors about their position for the CEB Press to function properly. The hall effect sensors within the sensor units must have the correct orientation with respect to the magnets. Use the CEB Testing Code, python GUI, and Arduino serial monitor to ensure that the sensor is picking up the magnetic field from movement of the magnets.
1. Using the computer, open the Arduino Integrated Development Environment. 2. Within the Arduino IDE, click File > Open (a search box should pop up). 3. Within the Arduino IDE Search Box, navigate to and click on the .ino file in which the desired CEB code
exists, then click Open. 4. Within the Arduino IDE, click Compile (if compiling failed, fix the code). 5. Connect the computer to the Arduino microcontroller via the USB cable. 6. Within the Arduino IDE, click Tools then check Serial Port for a connection and check Board for the correct
microcontroller type selection. 7. Within the Arduino IDE, click Upload and wait for upload completion. 8. Disconnect the USB cable from the Arduino microcontroller.
Tools Needed: Computer USB Cable CEB Press Arduino Integrated Development Environment Software
http://www.arduino.cc/en/Main/software
CEB Control Code V5 Annotated

User Manual

Open Source Ecology:CivilizationStarterKitv.0.01
Operation, Safety, and Maintenance
TheUsershouldacknowledgefirst that theMachine isaheavypieceofpoweredequipment,andposes inherentrisksof injuryordeaththatmayresult fromimproperusageoraccidents.Ifalloperating,safety,andmaintenanceproceduresarefollowed,theserisksareminimizedornonexistent.
Inherent risks for theMachinearise fromseveral sources.First, this isamachinepoweredbyhydraulic fluid pressure, as produced by an external power source. Second, there are risksassociatedwithmoving parts. Third, there are risks associatedwith the heavyweight of themachine.Fourth, thereare risksassociatedwith theelectricalpowerdelivery to themachineelectronics. Fifth, theremay be risks associatedwith the power unit usedwith themachine.Sixth,themachineistypicallyusedunderaworkflowinvolvingotherheavymachineryusedforancillarypurposessuchassoilpreparationandloading.Alltheserisks,whileinsignificantundernormaloperatingconditions,canbeinjuriousordeadlywhenproperproceduresarenotfollowed.
Hydraulic Fluid Power - General Safety Considerations
Hydraulicfluidpowerisusedtopowerthemachine.Themachineispluggedintoapowersourceviahydraulichoses.Thehydraulicpowerisgeneratedbyanexternalpowerunit,whereinagas,diesel,electric,orotherenginedrivesahydraulicpump-whichinturnpumpshydraulicfluidathighpressurethroughthehydrauliccircuit.Dependingonthepowerunitused,thefluidgoingintothemachinemaybeanywherefrom2000to5000PSI.Thisisextremelyhighpressure,andmaybeadangertotheuserincaseofdirectcontact.Forexample,deathorinjurymayresultfromahoserupturingandhot,hydraulicfluidhittingapersondirectly.Itshouldbenotedthathydraulicfluidundernormalworkingconditionsreaches180F(82C) intemperature,whichcanproduceaburnon thebody, andwill cause serioushumanbodydamage if deliveredunderpressure.Moreover,loosehosesmayspringbackandforthaspressureisappliedandreleasedwithinthem,sothereissomedangerofbeinghitbyaflexinghose.
Forsafety,oneshouldtakeseveralsteps.First,hydraulichoses,andespeciallyexposedhydraulichoses,shouldbeinspectedfortheir integrity.Whenahoseisdamagedorwornout, itshouldbereplacedimmediately.Second,allhosesshouldbesecuredsuchthattheymoveas littleaspossibleuponpressurebeingcycled.Moreover,hosesshouldbesecuredinsuchafashionthattheydonotrubagainsteachotheroragainstothermetalparts.Thispreventsthemfromwearingout-astherubbercoveringwillbeabradedreadily,andthemetalbraidsinsidewillbedamagedsubsequently,placingthehoseatariskofrupture.Fourth,oneshouldstayawayfromthehydraulichosesasfaraspossibleduringmachineoperationandoneshouldwearsafetyglasseswhennearthemachineincaseofhoserupture.Hoseruptureistheonlyriskthatthemachinepresentstotheuserevenwhentheuserisnottouchingthemachineinanyway.
Moving Parts Safety Issues
TheMachinehas3movingparts:themaincylinderanditsassembly;thesecondarycylinderwith
UserManualCompressed Earth Brick Press

Open Source Ecology:CivilizationStarterKitv.0.01
thesoil-loadingdrawer;thesoilshaker.AnyusershouldstaybehindtheSafetyRopeatalltimeswhenthemachineisinoperation.Userswithlonghairshouldmakesurethattheydonotcatchtheirhairinthegrateshakermotor.Iftheuserputstheirhandinthewayofanypinchpoint,theuserrunsaseriousriskoflosingalimbimmediately,anddeathintheworstcase.Theforceofthemaincylinderisabout40,000lb.,andtheforceofthesecondarycylinderisabout10,000lb.Also,notethatthehosesflexlikeastiffmusclewhenpressurized,somakesurethatyouareawareofthismotion.
Heavy Weight Issues
Themachineweighsabout1600lb.total.Theusershouldavoidanysituationinwhichthereisariskofthemachinetopplingontopoftheuser,asinjuryordeathbycrushingmayoccur.Thisisespeciallytrueifthemachineisbeingmoved.Themachineisdesignedtobemovedbyforklift,withforkliftarmsplacedunderthemachinearmsclosesttothemaincylinderframe.Whenevermovingthemachine,theUsershouldsecuretheMachinetotheforkswithchains.Whenplacingthemachineontheground,oneshouldselectasitewiththeflooraslevelaspossible,tominimizethepossibilityofthemachinemoving.Thegrounddirectlyunderthe10”x10”feetofthemachineshouldbeleveledsothatthefeetlieflatontheground.
Electronics Safety
TheMachineelectronicsarepoweredby12voltsviathebatteryclamps.Typically,thebatterythatcomeswiththepowerunitistapped.Oneshouldbeawareofthestandarddangersofelectricshockwhenworkingwith12Vbatteries.
Power Unit Safety
Thepowerunitmayemitloudnoise,inwhichcaseanyuserincloseproximityshouldwearearprotection. Standard safety procedures should be takenwhendealingwith engines - such asstayingawayfrommovingparts,notusingindoorsforriskorgaseouspoisoning,andconsideringtheriskofflammabilityandexplosionassociatedwithliquidorotherfuels.SincethepowerunitconnectstotheMachineviahydraulichoses,careshouldbetakennottosteponortripoverthem.Careshouldbetakennottodamagethehoses,andtomakesurethathosequickconnectionsaresecurelycoupledwhenstartingthemachine.Thereisariskofdamagingthepowerunitincaseofhosesbeingdisconnectedifthepowerunitdoesnothaveaninternalpressurereliefbypass.Ifthereisnointernalpressurereliefandahoseisnotconnected,hosesonthepowerunitrunariskofruptureduetohighpressurebuildupuponstartupofthepowerunit.Moreover,userswithlonghairshouldtakeprecautionstomakesurethattheirhairdoesnotgetcaughtinanymovingpartsofthepowerunit.
Workflow Safety Issues
TheworkflowofaCEBproductionoperationmayinvolveanumberofpeopleandheavyequipment.TheUsershouldstayawayfromtheworkingpathoftractorsorotherheavyequipment,andwear
UserManualCompressed Earth Brick Press

Open Source Ecology:CivilizationStarterKitv.0.01
protectiveeyewearandahardhat.
Thegeneralworkflow immediatelysurrounding themachinemayconsistof: (1),oneormoretractors loading theMachinehopper from the frontof themachine; (2) oneormorepeopleunloadingthemachinefromtheoppositeside.Theworkflowshouldincludeasetofrollersorsometablesurface,suchthatthepeopleunloadingthemachineare20feetorfartherawayfromthehopper of themachine. This helps to prevent any accidents related to the loader-tractoroperator losingcontrolofthetractorandrammingintotheMachine,andthemachinehittingpeopleontheoppositeside.
TheMachinesoil-loader-tractoroperatorshouldattendtocomingtoafullstoppriortoreleasingthebuckettoassureacontrolledsoildrop,andtoavoidbumpingthemachine.
ThehoppershakerwillgoonandoffautomaticallyaccordingtotheprogrammingoftheMachine,sotheUsershouldbeawareofthissoasnottobestartledbythevigorousshaking.
Weather Issues
There are inherent risks associatedwith operating themachine in foul weather. One shouldneveroperatethemachinewhenthereis lightninginthearea,andoneshouldavoidpressingoperationswhenitisrainingorwet.Slipperygroundmaybedangerouswhenonefallsandtripsontothemachineandslippingmaybedangerouswhenone iscarryinga loadofblocks.Eachblockweighs10-20lb.,sooneshouldwearsolidbootstopreventinjuriesrelatedtobricksfalling.Duringextremelyhotweather,oneshouldpayattentiontothetemperatureofthepowerunitandthehydraulicfluid,anddiscontinueoperationsifthehydraulicfluidgetstoohot.Inextremelycoldweather,oneshouldfirstwarmthemachineupbyrunningonidle,orunduestressresultinprematurehydraulichoserupture.
Safety Features
The Machine is built with a number of safety features:
Pressure Reliefs - TheMachine features 2 pressure relief valves to release hydraulic systempressure above 2200PSI, in order to prevent pressure buildup that could potentially rupturehydraulichoses.Thepressurereliefsmaybeactivatedupon:(1),jammingorotherunforeseenmachinecondition;(2),endofthecompressionstrokeofthemaincylinder;(3)cylindersreachingtheirlimits.ThepressurereliefsareessentialtothesafeandefficientoperationoftheMachine,andtheyareactivatedonacontinuousbasis.Themainpressurerelief is locatedonthemainhydraulichoses,andthesecondpressurereliefislocatedonthesolenoidvalve.
Kill Switch -thesafetyropearoundthemachine,whichalsoservesasthepowercordfortheautomaticcontrols,servesasakillswitch.Whenthisropeispulledfromanyofthe3sidesotherthanthecontrolpanelside,powerisshutofftothemachine.Anotherpowerswitchislocatedonthebottomofthecontrollerbox.
UserManualCompressed Earth Brick Press

Open Source Ecology:CivilizationStarterKitv.0.01
Hopper Orientation-Thehopperisorientedinsuchafashionthatthetractor-loaderapproachesthemachinefromoneside,andbricksareejectedfromtheotherside.Themachineisdesignedforusewithbrickrollers,suchthatbrickrollersshouldbeattachedtoejectionsideoftheMachine.With brick rollers in place, people are removed away from themachine by a recommendeddistanceof20feetormore.
Moving Part Covers-Allmovingpartsareinaccessibletotheuserwhentheuserremainsbehindthesafetyrope.Themaincylinderiswithinthemainpressingframe,shieldedon4sidesfromtheuser.Thehoppershakereccentricislocatedbehindasafetyshield,awayfromusers.
Machine Testing Code - cylinder, bypass valve, and shaker motor functions may be testedindependentlywithsupportingcontrolcodetodetermineproperfunctioningofthesecomponents
Indicator Light on the Power Switch -Machine on-conditionmay be determined visually byobservingwhetherthepowerswitchislit.
Indicator Lights on Control Circuit-Fortroubleshootingpurposes,indicatorlightsonthesolenoiddriverboardlightuptoindicatewhichsolenoidsectionsareactivated.Wearprotection-Thereare4adjustmentboltstokeepthepressfootpositionedawayfromthewallsofthecompressionchamber. This minimizes and at best eliminates metal-on-metal contact in the compressionchamber,toextendmachinelife.Thehopperloadingdrawerridesonv-grooverollersabovethetablesurface,sowearisminimizedonthedrawersurfaces.
Operation and Maintenance Procedures
Forsafeoperationofthemachine,allthepointsintheaboveOperation,Safety,andMaintenancesectionmustbekeptinmindandfollowed.Inaddition,herearefurther,specificoperationandmaintenancepoints: Assembly
FollowtheCEBAssemblyVideotoputthemachinetogether.
CompletetheMachineassemblypriortotestingandrunningthemachine.
First Run and Setup
Follow the Initial Setup and Testing Procedure on thewiki, and verify that the relief valve, 2cylinders,andhoppershakerareinworkingorder.
Inspectallhosesandhoseconnections.
Tightenanyboltsonthemainframesectionandanyotherboltsthatmayhaveloosenedduringshipping.
UserManualCompressed Earth Brick Press

Open Source Ecology:CivilizationStarterKitv.0.01
Followallpointsrelevanttoeverymachineruninthenextsection.
Set thebrick thicknessandmachinespeedasneeded,by followingtheMachineAdjustmentssection.
Every Run
Staybehind the safety ropeat all timesduringoperation, and remain20 feet away from themachineunlessyouneedtobecloser.
Inspect all hydraulic hoses for wear prior to beginning of brick production, and replace anydefectivehoses.
Ifthemachinelocksupforanyreason,turnthepoweroffimmediately,identifyandcorrecttheproblem,andrestartmachine.
Donottouchthemachinewhileitisinoperation.
Ifyouhavelonghair,makesurethatitiskeptawayfromthehoppershakermotor.Yourhairmaygetwrappedupinthemotorandpullyouin,potentiallykillingyou.
Donotloosenthelegboltswhenthemachineisstanding.Machineleveladjustmentshouldbeperformedonlywhenasetoftractorforksorotherjackisinusedtopreventthemachinefromfallingdownwhenthemachinelevelingisbeingadjusted.
Wearsafetygogglesandahardhatduringmachineoperation,andearprotection incasethepowerunitmakesalotofnoise.
Listentothereliefvalvesystemtomakesurethatitisworkingproperly.Youshouldhearahisseverytimethebypassconditionhappens.
Ifyouhearthatthepowersourceisboggeddownorifitstops,disabletheMachineimmediatelyandidentifytheissue.
Checkallaccessibleboltsbyhandorvisuallytomakesurethantheyhavenotloosenedduringoperation.
Maintenance and Repair
Thereis littlemaintenancethatneedstobedonetothemachine.This isdueprimarilytotheabsenceofapowerunitonthemachine.Forstorage,takeoffthehoppergrateandcleansoilfromthemachine.Storethemachineindoorstopreventrusting.Capthehoseendssothatdirtdoesnotgetintothehoses.
Ifanypartsbecomedamagedstructurallyforanyreason,assessthedamageandreplacethepart
UserManualCompressed Earth Brick Press

Open Source Ecology:CivilizationStarterKitv.0.01
ifneeded.Allpartsareeitherstocksteeloroff-shelfcomponents.Mostofthemachinefeaturesbolt-together,design-for-disassembly,andmostpartsmaybereplacedreadily.Theentiremachinecanbetakenapartinabout5hoursforstudyorrefurbishing,andaslongasthemachineiskeptfreefromrust,itshouldlastfromgenerationtogeneration.Werecommendanewpaintjobevery10years,includingtheinsidethemainframe.Theinsideofthecompressionchamberistheonlypart thatmaywearout intime.Replacementof thefrontandbacku-channelpieces involvesapproximatelya2hourjobinvolvingthedrillingofholesandminorwelding,andreplacementofthesidewearplatesinvolvestorchingofftheoldonesandweldingonnewones,whichisabouta2hourjobifthemachineframeisalreadytakenapart.MaterialcostsfortheserepairsinvolveatotalofaboutUS$40.
Troubleshooting
For the machine to operate properly:
• Hydraulicpowermustbeavailablebyapowersource.• Hydraulicpowermustbedeliveredtotheactuator.• Electricalpowermustbeavailablefromanelectricalsource.• Electricalpowermustbedeliveredtothepowerusagepoints.• Thelogicsystemmustbeprovidingcontrollogic.• Controllogicmustreceivepositionfeedbackfromsensors.
Totroubleshootthehydraulicsystem-seeAppendix: Hydraulic System Troubleshooting
Electric System Troubleshooting:
• Isthepowerturnedon?• Isthereamasterpowerswitchthatisturnedoff?• Isthereanindicatorlightthattellsthatpowerison?• Checkthatanelectricsourcehaselectricpower• Checkpolarityofconnectiontopowersource.• Checktheconnectionfromtheelectricpowersourcetowires.• Checktheintegrityofwires.• Checktheconnectionofwirestothecomponentthatusespower• Checkforlooseconnectionsonthedevicereceivingpower• Checkthatadeviceisgroundedproperly• Checkforfrayedorbrokeninsulation• Checkwhetherafuseisburnedout• Checkifanysafetycomponentorbreakeristripped• Checkwhethervoltageisbeingdeliveredtoadevice
Mechanical System Troubleshooting:
• Checkthatbearingsarerollingsmoothly• Aftertighteningbearingsandshafts,makesurethatshaftisalignedanditspinsfreely
UserManualCompressed Earth Brick Press

Open Source Ecology:CivilizationStarterKitv.0.01
• Checkforobstructiononanymovingparts,suchasrocks,metal,orwoodbranches• Checkthatboltsaresecuredandnotloose• Checkforanybrokenpartsbyvisualinspection• Checkforsignsofwearorrubbingofmechanicalparts• Checkthatpartsaregreasedasneeded
User Responsibilities
TheUsertakesonthefullresponsibilityofusingtheplanstobuildaCEBmachine,byensuringthattheUserfollowsallCEBbuild,safety,maintenance,andoperationprocedures.Itisthedutyof theUser to accept that accidents and unforeseen circumstancesmay occur by using, andthat suchhappeningsmayplace theUser indangerof injuryorevendeath.TheUseragreestonotholdOSEliableforanyaccidentsordeaths,andtheUseragreestonotpursueanylegalactionagainstOSEandhisorheragentsandcollaboratorsinthecaseofharm,injury,ordeathresultingfromuseoftheMachine,regardlessofthecauseorreasonfortheaccident.ItisthedutyoftheUserandhis/hercollaboratorsorworkcrewtoreadandunderstandtheAssembly,SetupandTestingProcedure,MachineAdjustment,Troubleshooting,andalloftheabovesafety,maintenance,andoperationprocedures.Furthermore,theUseragreestonotsolicittheservicesofanyagents,assigns,orotherthirdpartiestopursuelegalactionagainsttheProducerinthecaseofaccidentsordeathrelatedtouseoftheMachine.IftheUserallowsanyotherpersonorgrouptousethemachineorparticipateinbrickproduction,theUserlikewiseagreestotakeonthefullresponsibilityandliabilityassociatedwithanyharmorinjurythatmayhappentoanyoneinvolvedinusingtheMachine,andshallholdtheProducerinindemnity.
Therefore,theUserherebyagreestoreleaseandforeverdischargeOSEfromanyandallliability,claims,anddemandsofwhateverkindeitherinlaworinequity,whichariseormayhereafterarisefromthebuildingoruseoftheMachineby:(1),theUser,(2),othersinvolvedwiththeUserinthebuildoruseoftheMachine,and(3),otherstowhomtheUsergrantsuseoftheMachine.TheUserfurthermoreagreesandunderstandsthatthiscontractdischargesOSEfromanyliabilityor claim that theUsermayhaveagainstOSEwith respect tobodily injury,personal injury,orpropertydamages thatmay result fromtheUser’sandBeneficiary’sproductionoruseof themachine,wherevertheMachinemaybeused.TheUseralsounderstandsthattheProducerdoesnotassumeanyresponsibilityfororobligationstoprovidefinancialorotherassistance,includingbutnotlimitedtomedical,health,ordisabilityinsuranceintheeventofinjuryorloss–unlessOSEagreestohelptheUserorBeneficiaryoutofvoluntary,goodfaithandhonor.
UserManualCompressed Earth Brick Press

LifeTracTractor

Design Rationale

DesignRationale
Open Source Ecology:CivilizationStarterKitv.0.01
Tractor
Design Rationale
Definition: LifeTrac is a low-cost, multipurpose open source tractor. LifeTrac is a versatile,4-wheeldrive,full-sized,hydraulically-driven,skid-steeringtractorof18-75hpwithoptionalsteeltracks.LifeTracisintendedtobeaminimalistbuthigh-performance,lifetimedesign,design-for-disassemblyworkhorseandpowerunitofanylandstewardshipoperation.Itfeaturesfeaturingeasyserviceabilitybytheuser. Itsmodularnatureallowsforquickattachmentof implements;interchangeability/stackabilityofmultiplepowerunits(PowerCubes)foradoptingpowerleveltothetaskathand;quickattachmentofallhydrauliccomponentsviaquick-couplinghoses;includingquickinterchangeabilityofhydraulicmotorsforuseinotherapplications.Itcanbefittedwithuptotwosetsofloaderarms.LifeTracisintendedtobeusedwithmodernsteamenginePowerCubemoduleforfuelflexibility,suchthatlocally-harvested,pelletizedbiomasscrop,suchashay,maybeusedforfuel.Regardingsafetyfeatures,LifeTracreplacedthetraditionalpowertake-off(PTO)shaft for driving other implementswith a detachable hydraulicmotor for the samepurpose,wherethismotormaybemountedonthetractor,ontheimplement,orwhereveritisrequired.
Problem Statement–Industrialtractorsarebeingdesignedincreasinglyforplannedobsolescencewith10yearlifespans,andtheusertypicallycannotservicetheirowntractorduetocomplexityofdesign.Powertransmissionandenginesystemsarethedominantfailuremodesoftractors.Fuelcostsareasignificantexpenseofoperatinga tractor.Capitalcostsofpurchasing tractorstypicallyplacetheirusersindebt.
Solution–LifeTracisdesignedtobethepeoples’tractor.Theuserisabletoservice,modify,andproduce fuel for the tractor.Gear transmission is replacedwithahydraulicdrive train,wherequick-connect,flexiblehosesarethemeansoftransferringpower.Lifetimedesign(bolt-togetherconstruction,modularity)withgeneralpurposepartsallowsthetractortobepasseddownfromgenerationtogeneration,beforeitslife-cycleiscompletedasfeedstockfortheinductionfurnace.The absolute simplest design facilitates creation of small-scale enterprise for manufacturingthesetractorsinaslittleas3daysoftimeusingaRepLab1facility.Thisallowscommunitiestobeentirelyself-sufficientintheirmechanicalpowerinfrastructures,whilereducinglifetimecostsoftractorsbyafactorofatleast10.
Development Status and Needs – We have completed Prototype I-III, and we are currentlyon Prototype IV. Prototype I (ref)was an articulated version of the tractorwithout roll cage,andPrototype II (ref)was anenclosed versionwith tracks and skid steering. Prototype II hasdemonstratedquick-attachmentandstackabilityofpowerunits(ref),aswellasinterchangeabilityof wheel motors and control valves via quick-couplers for repurposing in other applications.Prototype IIIwasashortenedversionofPrototype IIwithonlyonesetof loaderarms,and itfeaturedCNCTorchTableassistinitsfabrication.PrototypeIV(CurrentasofDec.2011)introducesQuickConnectWheels.Moreover,minorredesign(thickerwheelshaftsandbearings(2.5”insteadof1-7/8”)ofLifeTraclendthemselvestoadaptationasatrackedbulldozer–viaadditionofchaingearreductiontothedirect-coupledwheeldrive.
LifeTrac satisfies many of the OSE Core Values

Open Source Ecology:CivilizationStarterKitv.0.01
Open Source:TheLifeTracwasdesignedfromthegroundupwiththeintentionofmakingfreelyavailablenotonlythedesign,butalsotheeducationnecessarytounderstand,use,andimprovethedesign.
Low Cost:Ascomparedtoitscommercialequivalent,theLifeTracis1/5ofthecosttoacquire.Thereareevenmoredramaticreductionsinthecosttoown.
Do-It-Yourself:Mostofthecomponentsandsub-assembliesareheldtogetherwithbolts.Ifyou’vegotawrenchyou’vegotatractor.
Closed-Loop Manufacturing:BecausethematerialstheLifeTracismadeoutofrequiresolittlemachining,theycanbeproducedbyfutureGVCSmachines.Noneedforexoticmaterialsorfancyinjectionmolding.
Industrial Efficiency: The LifeTrac’s performance is designed to be comparable to industrystandards,andweareapproachingthatpointquickly.
Lifetime Design: Unlike what is available commercially, the LifeTrac is designed to functionindefinitely.Designforobsolescenceisavoided,asmaximumservicetotheuserispartofthedesign.
Robustness:Itugly,butitworks.
Technological Recursion:LifeTracispartoftechnologicalrecursionatthedeepestlevel,inthatitisresponsibleinpartforextractingrawresourcesfromwhichallthingsaremade.
Local Resources:Whatgoodaretheresourcesunderyourfeetifyoucan’tusethem?TheLifeTracopensupnewavenuesforself-sourcing.
Replicability:Withfulldocumentationofhowtosourcethematerials,buildthetractor,anduseitinthefield,theLifeTraceradicatesbarrierstoentry.
DesignRationaleTractor

Fabrication Drawings

Fabrication Manual

Open Source Ecology: Civilization Starter Kit v.0.01
Fabrication ManualTractor
LifeTrac
Fabrication Report

Open Source Ecology: Civilization Starter Kit v.0.01
Fabrication ManualTractor
Disclaimer:
When building this tractor you are explicitly assuming full responsibility for the safety of yourself,
anyone who helps you, anyone who wanders past, and anyone who uses the tractor or is nearby while it
is being used. OSE accepts no responsibility for the quality of your work.
Warning:
This tractor is a heavy piece of equipment and carries with it significant operating risks inherent to
heavy, mobile machinery. OSE recommends that you obtain experience in construction, agriculture,
engines and heavy equipment operation prior to building this tractor.
Warning:
The current design does not include a seat belt, safety bar, or operator cage. However, it does not
prohibit them either.
Warning:
Do not use on hillsides or uneven terrain which may cause the tractor to tip.
Warning:
Neither axle should support more than 70% of the combined weight of the tractor and load. Do not lift
objects more than 1,000 lbs without ballasting the rear of the tractor to maintain at least this 70/30
distribution. The maximum load the tractor can handle is 4,000 lbs, with proper ballast, or 8,000 lbs if
the rear of the tractor is fastened down.
Note:
This tractor is currently in the beta release stage. If you build the tractor you are a developer. It is
strongly suggested that you contact OSE prior to building and remain in contact throughout the process.
Note:
This report is the last step in a distributed collaboration process. It is recommended that you obtain the
digital OpenProj file and a copy of OpenProj (free and open source). You will be able to organize your
fabrication project with only a few mouse clicks. Track your progress with the digital tool, then send
your final file back and it can be used to improve the machine and the documentation.
Editor: Matthew Maier
Photographs: Marcin Jakubowski, Ian Midgley
Frame Jig: Matt Griffing
Cover tractor image: Isaiah Saxon
Illustrations: Matthew Maier
Advisors: Marcin Jakubowski PhD, Herbert Maier PhD, Brianna Kufa
Published by: Open Source Ecology
Date Published: 25 February 2012

Open Source Ecology: Civilization Starter Kit v.0.01
Fabrication ManualTractor
Introduction
This guide will walk you through the entire process of fabricating LifeTrac, Open Source Ecology's
general purpose tractor.
This guide documents Prototype III. Prototype IV has bent loader arms and quick attach wheels.
Prototype IV has about 20 hours of run time as of 7 February 2012. The upgrades are recommended,
however, documentation is not complete.
There are two primary sections: Definitions & Project Steps. Definitions are sufficient for an
experienced fabricator to replicate the LifeTrac. Project Steps are an addition that makes organizing the
effort easier and provides a standardized format to guide discussion and feedback.

Open Source Ecology:CivilizationStarterKitv.0.01
Fabrication Manual - Bill of MaterialsTractor
Bill of Materials
Tools
Metal Saw
Drill
Cutting Torch
welding torch
Tape Measure
hand-held grinder
pipe wrench
Lathe
Center Punch
5/16" hex wrench
9/16" wrench
3/4" wrench
cinder block
Frame Hole Jig
Consumables
grease
Teflon tape ~15 feet
1/8" drill bit
1/4" drill bit
1/2" drill bit
5/8" drill bit
3/4" drill bit
13/16" drill bit
1" drill bit
Bar
1" dia by 6" bar x10
1 3/8" dia by 6" splined shaft x4
1 7/8" dia by 26" bar x4
1 7/8" dia by 56" bar

Open Source Ecology:CivilizationStarterKitv.0.01
FabricationManual-BillofMaterialsTractor
Tube
1 7/8" inner dia by 3 1/2" tube x2
1 7/8" inner dia by 4 1/2" tube x2
1 7/8" inner dia by 6" tube x4
3" x 3" by 9" square tube x3
3" x 3" by 51" square tube x2
3" x 6" x 3/8" by 45" rectangle tube x1
3" x 6" x 3/8" by 100" rectangle tube x2
4" x 4" x 1/4" by 44" square tube x3
4" x 4" x 1/4" by 52" square tube x2
4" x 4" x 1/4" by 55" square tube x2
4" x 4" x 1/4" by 59" square tube x2
4" x 4" x 1/4" by 60" square tube x3
4" x 4" x 1/4" by 68" square tube x2
4" x 4" x 1/4" by 76" square tube x4
Flat
2" x 1/2" by 51" flat
3" x 1/2" by 3" flat x4
3" by 1/2" by 6" flat x4
3" x 1/2" by 51" flat
4" x 1/4" by 26" flat
4" x 1/4" by 44" flat
4" x 1/4" by 76" flat
4" x 1/2" by 4" flat x17
4 1/2" x 2" by 8" flat x2
8" x 3/8" by 12 1/2" flat x4
8" x 1/2" by 6" flat x4
8" x 1/2" by 10" flat x12
12" x 1/2" by 4" flat x4
12" x 1/2" by 12" flat x6
Angle
4" x 6" x 1/2" by 6" angle x4
4" x 4" x 1/4" by 36” angle x3
Hardware

Open Source Ecology:CivilizationStarterKitv.0.01
FabricationManual-BillofMaterialsTractor
Nuts
9/16" locknut x32
3/4" locknut x114
1" nut x12
Washers
9/16" washer x64
3/4" washer x238
1 7/8" washer x20
Bolts
9/16" by 2" bolt x32
3/4" by 2" bolt x8
3/4" by 4 1/2" bolt x18
3/4" by 5 1/2" bolt x46
3/4" by 9 1/2" bolt x42
Misc
1/8" cotter pin x10
1 7/8" lock collar x18
Hydraulics
1/4” Hex
1/4" NPT female quick coupler x4
1/4" NPT male quick coupler x5
1/4" NPTF 90 elbow
1/4" NPTF tee x3
SAE 4 to 1/4" NPT nipple x4
1/4" NPTM hex nipple x4
1/2” Hex
1/2" NPT female quick coupler x9
1/2" NPT male quick coupler x9
1/2" NPTF tee x8
SAE 10 to 1/2" NPT nipple x10
1/2" NTPM hex nipple x4

Open Source Ecology:CivilizationStarterKitv.0.01
FabricationManual-BillofMaterialsTractor
SAE 10 to 1/2" NPT swivel x8
1/2" NPT swivel
3/8" to 1/2" NPT swivel x6
3/8" to 1/2" NPT 90 elbow swivel x2
3/4” Hex
3/4" NPT female quick coupler x8
3/4" NPT male quick coupler x8
3/4" NPTF 90 elbow
3/4" NPTF tee x2
3/4" hex nipple x10
3/4" power beyond sleeve x2
Hoses
1/4" by 36" hose
1/4" by 60" hose x2
1/4" by 72" hose
1/2" by 12" hose x2
1/2" by 36" hose x10
1/2" by 48" hose x7
1/2" by 60" hose
1/2" by 120" hose
1/2" by 144" hose
3/4" by 96" hose x4
Valves
1/2" cushion valve
3/4" NPT check valve x2
2-spool valve
3-spool valve
Actuators
30" cylinder x2
36" cylinder x2
31.88 cubic inch motor x4

Open Source Ecology: Civilization Starter Kit v.0.01
Fabrication ManualTractor
Frame Hole Jig
Cut a piece of 4” wide flat stock to 76” long. Starting at one end, mark (centered) and drill 1/4” holes at
the following distances:
• 2”
• 6”
• 9”
• 10”
• 11 1/2”
• 13”
• 14”
• 20 1/2”
• 26”
• 28”
• 30”
• 38”
• 42”
• 46”
• 49”
• 50”
• 53”
• 54”
• 57”
• 58”
• 62”
• 63”
• 66”
• 67”
• 70”
• 74”

Open Source Ecology: Civilization Starter Kit v.0.01
Fabrication ManualTractor
Definitions
Frame Tube Lengths & Hole Positions
• All frame members are 4” x 4” x 1/4” steel tube.
• Use the Frame Jig to mark matching holes on opposite sides of the tube.
• Drill each mark 13/16” (unless otherwise specified).
• Do not drill all the way through the tube from one side unless using a drill press.
Part Illustration
Outer Base
Inner Base
Bottom Crossbar

Open Source Ecology: Civilization Starter Kit v.0.01
Fabrication ManualTractor
A-Pillar
B-Pillar
C-Pillar
Top Crossbar

Open Source Ecology: Civilization Starter Kit v.0.01
Fabrication ManualTractor
Cant Rail
The big hole at
46” should be
2 3/8”. Use a
cutting torch.
Power Cube Mount
Part Illustration
Power Cube
Mount
Holes 13/16
unless otherwise
noted. The angle
of the ramp
needs to match
the Power Cube.
A good estimate
is to leave a 3/4”
gap between the
top edge of the
ramp and the top
edge of the
angle.
Hydraulic Valve Mount
Part Illustration

Open Source Ecology: Civilization Starter Kit v.0.01
Fabrication ManualTractor
Hydraulic Valve
Mount
Additional holes
for the hydraulic
valves will be
necessary. Use
your specific
hardware to
mark the holes.
Loader Arm Crossbar Support
Part Illustration
Loader Arm
Crossbar
Support
Base Cylinder Mount

Open Source Ecology: Civilization Starter Kit v.0.01
Fabrication ManualTractor
Part Illustration
Base Cylinder
Mount
Loader Arm Cylinder Mount
Part Illustration
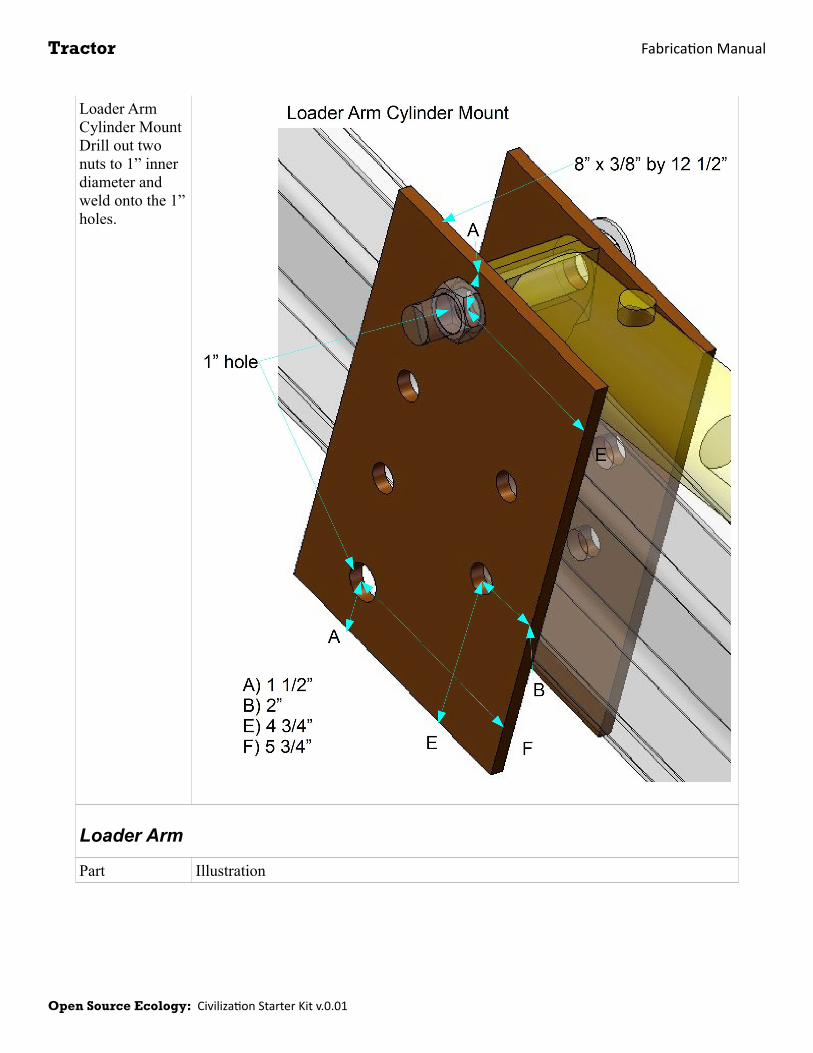
Open Source Ecology: Civilization Starter Kit v.0.01
Fabrication ManualTractor
Loader Arm
Cylinder Mount
Drill out two
nuts to 1” inner
diameter and
weld onto the 1”
holes.
Loader Arm
Part Illustration

Open Source Ecology: Civilization Starter Kit v.0.01
Fabrication ManualTractor
Loader Arm
The big hole
should be 2 3/8”.
Use a cutting
torch. The plug
weld holes
should overlap
the lump when it
is inserted into
the end of the
arm. Weld
through the
holes to secure
the lump.
Loader Arm Crossbar
Part Illustration
Loader Arm
Crossbar
Loader Arm Insert
Part Illustration

Open Source Ecology: Civilization Starter Kit v.0.01
Fabrication ManualTractor
Loader Arm
Insert
Tractor Frame Insert
Part Illustration
Tractor Frame
Insert

Open Source Ecology: Civilization Starter Kit v.0.01
Fabrication ManualTractor
Loader Arm Lump
Part Illustration
Loader Arm
Lump
The top edges of
the lump can be
notched and
rounded to better
fit inside the
loader arm tube.
Loader Arm Shaft
Part Illustration
Loader Arm
Shaft
Wheel Shaft Mount
Part Illustration

Open Source Ecology: Civilization Starter Kit v.0.01
Fabrication ManualTractor
Wheel Shaft
Mount
The position and
diameter of the
four bearing
mounting holes
depends on the
bearing block
you end up
using. Pictured
is an example.
Use a cutting
torch for the 2”
shaft hole.
Motor Mount
Part Illustration

Open Source Ecology: Civilization Starter Kit v.0.01
Fabrication ManualTractor
Motor Mount
Use a cutting
torch to make
the large shaft
hole. The motor
mounting holes
will depend on
the particular
hardware you
end up using.
This picture is
just an example.
Motor Interface
Part Illustration

Open Source Ecology: Civilization Starter Kit v.0.01
Fabrication ManualTractor
Motor Interface
Use a cutting
torch to make
the large shaft
hole. The motor
mounting holes,
if used, will
depend on the
particular
hardware you
end up using.
The motor will
probably be
welded to this
plate. This
picture is just an
example.
Wheel Hub
Part Illustration

Open Source Ecology: Civilization Starter Kit v.0.01
Fabrication ManualTractor
Wheel Hub
Use a cutting
torch to make
the shaft hole in
the middle of the
disc. The layout
of the tire rim
mounting holes
will depend on
the hardware
you end up
using. Pictured
is just an
example.
Gussets should
be as close to
90* apart as
possible.
Wheel Axle
Part Illustration
Wheel Axle
Using a lathe,
drill into the end
of the axle shaft.
Cut two slits on
either side of the
hole. Insert the
smaller splined
shaft and weld
in place. Use the
wheel hub to
locate and drill a
bolt hole
through the
other end of the
shaft.

Open Source Ecology: Civilization Starter Kit v.0.01
Fabrication ManualTractor
Quick Attach Plate
Part Illustration
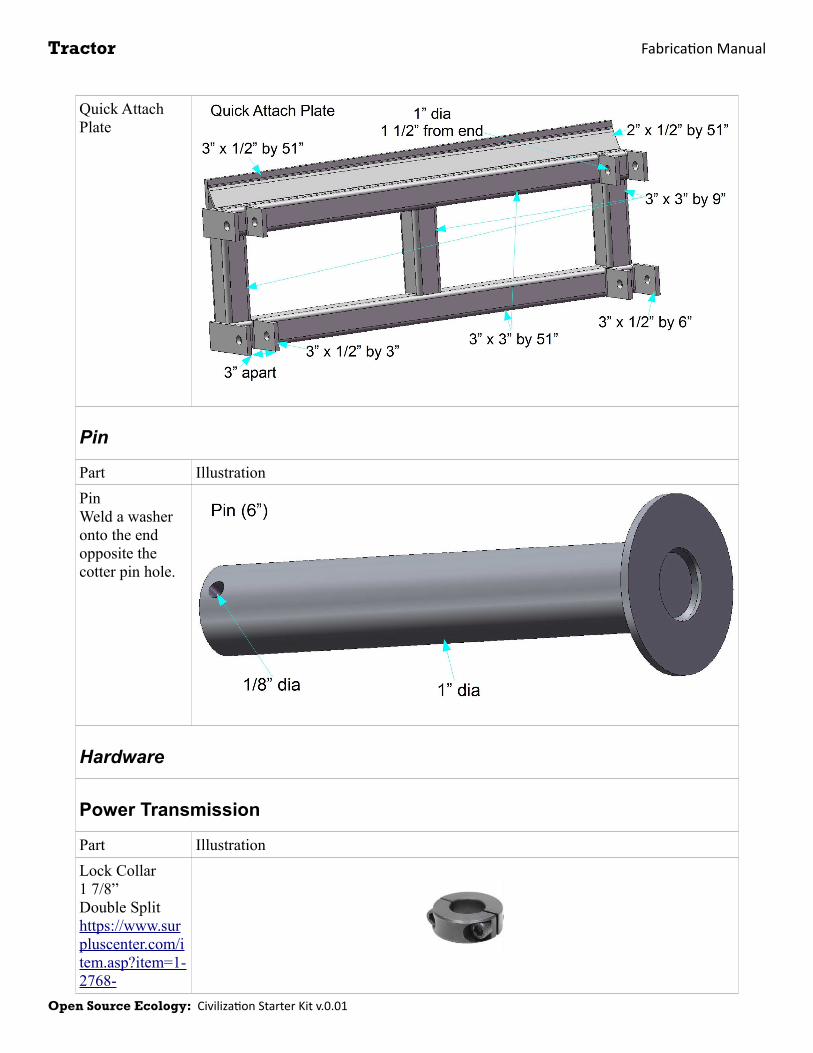
Open Source Ecology: Civilization Starter Kit v.0.01
Fabrication ManualTractor
Quick Attach
Plate
Pin
Part Illustration
Pin
Weld a washer
onto the end
opposite the
cotter pin hole.
Hardware
Power Transmission
Part Illustration
Lock Collar
1 7/8”
Double Split
https://www.sur
pluscenter.com/i
tem.asp?item=1-
2768-

Open Source Ecology: Civilization Starter Kit v.0.01
Fabrication ManualTractor
187&catname=p
owerTrans
Flange Bearing
1 7/8”
9/16” bolt holes
https://www.sur
pluscenter.com/i
tem.asp?item=1-
210-30-
4&catname=po
werTrans
Shaft Coupler
1 1/4” bore
5/16” keyway
https://www.sur
pluscenter.com/i
tem.asp?item=1-
1563-
J&catname=
Splined Shaft
1 3/8”
6 teeth
https://www.sur
pluscenter.com/i
tem.asp?item=1-
2938-
6&catname=
Female Splined
Coupling
1 3/8”
6 teeth
https://www.sur
pluscenter.com/i
tem.asp?item=1-
1562&catname=
Hydraulics
Valves

Open Source Ecology: Civilization Starter Kit v.0.01
Fabrication ManualTractor
Power Cube Delivery
Part Illustration
Power Cube
Delivery
Wrap all threads
with teflon tape.
Power Cube Return
Part Illustration
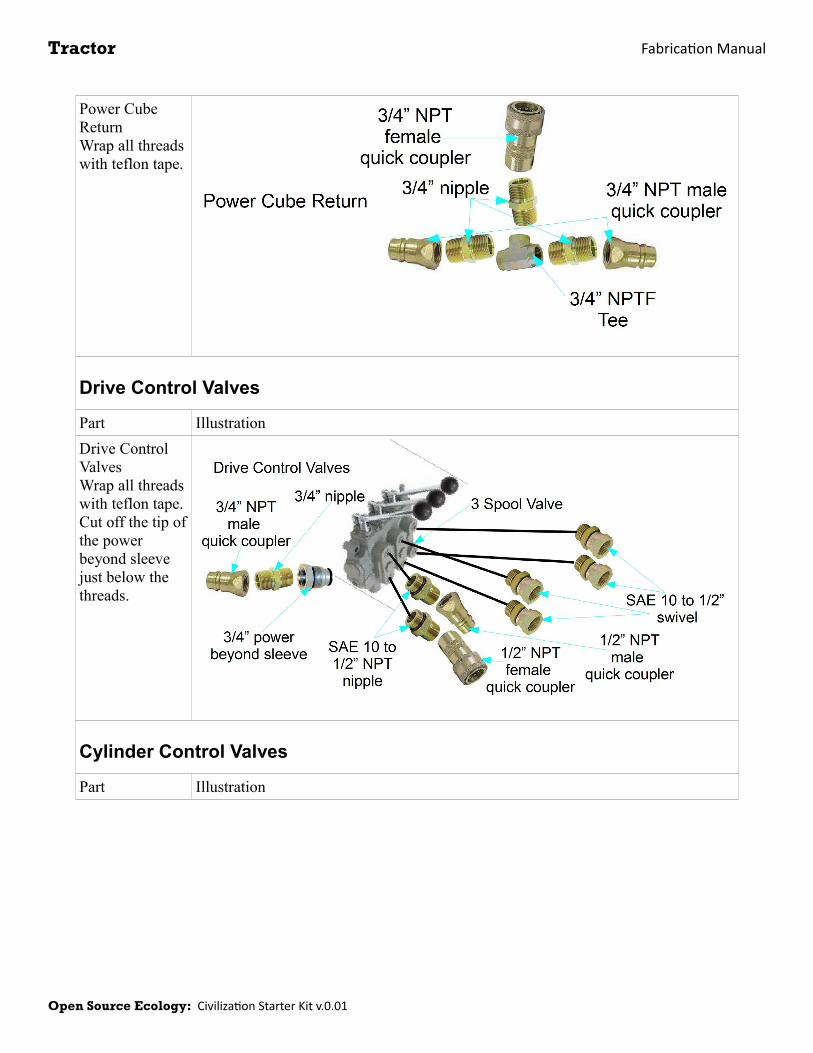
Open Source Ecology: Civilization Starter Kit v.0.01
Fabrication ManualTractor
Power Cube
Return
Wrap all threads
with teflon tape.
Drive Control Valves
Part Illustration
Drive Control
Valves
Wrap all threads
with teflon tape.
Cut off the tip of
the power
beyond sleeve
just below the
threads.
Cylinder Control Valves
Part Illustration

Open Source Ecology: Civilization Starter Kit v.0.01
Fabrication ManualTractor
Cylinder Control
Valves
Wrap all threads
with teflon tape.
Hoses
Part Illustration
1/4”, 1/2” and
3/4” NPTM
Drive Power Hose
Part Illustration
Drive Power
Hose
Wrap all threads
with teflon tape.
Drive Return Hose
Part Illustration

Open Source Ecology: Civilization Starter Kit v.0.01
Fabrication ManualTractor
Drive Return
Hose
Wrap all threads
with teflon tape.
Motor Drain Hose
Part Illustration
Motor Drain
Hose
Wrap all threads
with teflon tape.
Power Cube Connection Hoses
Part Illustration

Open Source Ecology: Civilization Starter Kit v.0.01
Fabrication ManualTractor
Power Cube
Connection
Hoses
Wrap all threads
with teflon tape.
Loader Cylinder Hoses
Part Illustration
Loader Cylinder
Hoses
Wrap all threads
with teflon tape.
QA Plate Cylinder Hoses
Part Illustration

Open Source Ecology: Civilization Starter Kit v.0.01
Fabrication ManualTractor
QA Plate
Cylinder Hoses
Wrap all threads
with teflon tape.

Open Source Ecology: Civilization Starter Kit v.0.01
Fabrication ManualTractor
Cylinders
Part Illustration
Loader Cylinder
2.5X36X1.5”
double acting
3/8” NPT ports
https://www.sur
pluscenter.com/i
tem.asp?item=9-
6775&catname=
hydraulic
QA Plate
Cylinder
2.5X30X1.25”
double acting
3/8” NPT ports
https://www.sur
pluscenter.com/i
tem.asp?item=9-
7619-
30&catname=hy
draulic
Cylinder Fittings
Part Illustration
Cylinder Fittings
Motor
Part Illustration

Open Source Ecology: Civilization Starter Kit v.0.01
Fabrication ManualTractor
Wheel Motor
31.88 cubic inch
SAE 10 ports
SAE 4 case
drain
https://www.sur
pluscenter.com/i
tem.asp?item=9-
7469&catname=
Motor Fittings
Part Illustration
Motor
Connections
Wrap all threads
with teflon tape.
Valves
Part Illustration
3-spool
spring centered
3/4” NPT ports
1/2” NPT ports
https://www.sur
pluscenter.com/i
tem.asp?
catname=hydrau
lic&qty=1&item
=9-6761
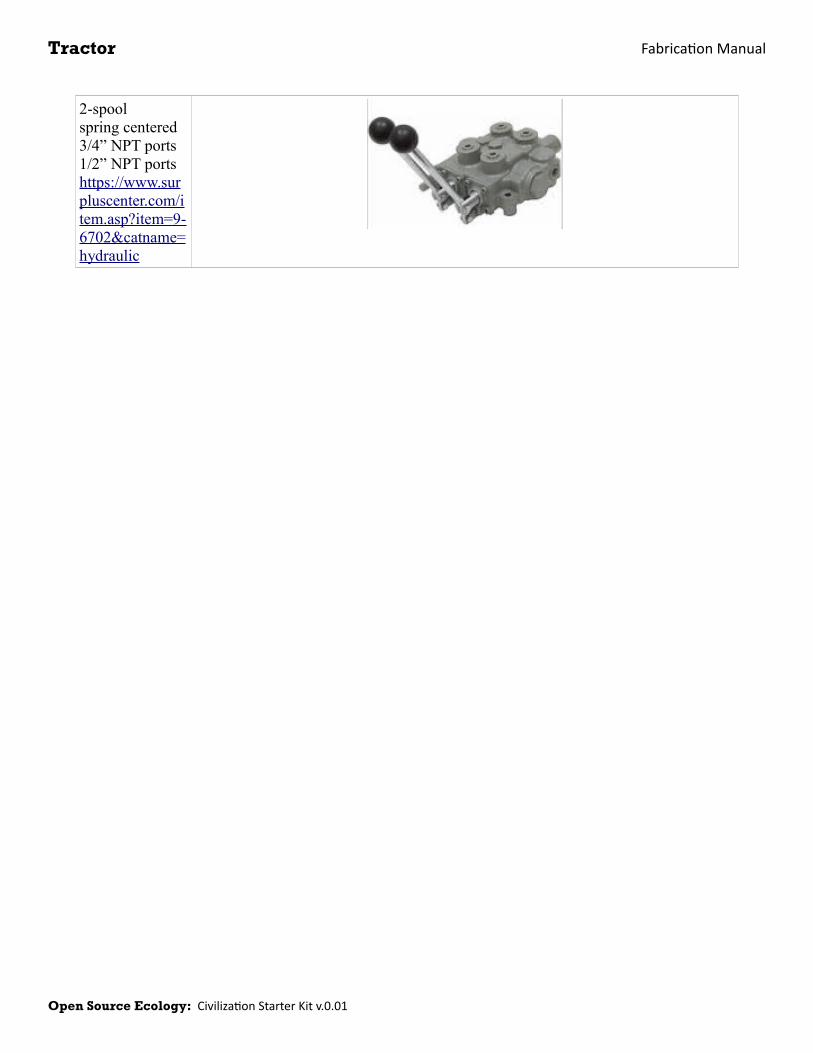
Open Source Ecology: Civilization Starter Kit v.0.01
Fabrication ManualTractor
2-spool
spring centered
3/4” NPT ports
1/2” NPT ports
https://www.sur
pluscenter.com/i
tem.asp?item=9-
6702&catname=
hydraulic

Open Source Ecology: Civilization Starter Kit v.0.01
Fabrication ManualTractor
Cushion Valve
1/2” NPT
https://www.sur
pluscenter.com/i
tem.asp?item=9-
4019-50-
H&catname=hy
draulic
3/4” NPT check
valve
Fittings
Part Illustration
SAE 10M to
1/2” NPT nipple
SAE 10M to
1/2” NPTM
swivel coupler
3/4” NPT nipple
3/4” NPTM 90
degree elbow

Open Source Ecology: Civilization Starter Kit v.0.01
Fabrication ManualTractor
3/4” NPTF tee

Open Source Ecology: Civilization Starter Kit v.0.01
Fabrication ManualTractor
3/4” female
quick coupler
1/2” NPT quick
coupler
Male and
Female in one
package
3/4” NPT power
beyond sleeve
Cut off the tip of
the sleeve just
below the
threads.
SAE 4M to 1/4”
NPTM nipple
1/4” NPTM
quick coupler
Male and female
in one package.
1/2” NPT nipple
1/2” NPTF Tee
1/2” NPT swivel

Open Source Ecology: Civilization Starter Kit v.0.01
Fabrication ManualTractor
1/2” NPT 90
elbow swivel
3/8” NPTM to
1/2” NPTF
swivel
3/8” NPTM to
1/2” NPTF 90
swivel
1/4” NPT nipple
1/4” NPTF Tee
1/4” NPTF 90
elbow
3/4” to 1/4”
NPT bushing

Open Source Ecology: Civilization Starter Kit v.0.01
Fabrication ManualTractor
Project Steps
Cut Stock Material
Jig
Frame Hole Jig: Cut To Length
Frame Hole Jig: Drill Holes
Bar
Loader Arm Shaft: Cut To Length
Wheel Axle: Cut To Length x4
Wheel Axle: Drill Holes x4
Wheel Axle Splined Shaft: Cut To Length x4
Pin: Cut To Length x10
Pin: Drill Hole x10
Tube
Frame
Outer Base: Cut To Length x2
Outer Base: Drill Holes x2
Inner Base: Cut To Length x2
Inner Base: Drill Holes x2
Bottom Crossbar: Cut To Length x3
Bottom Crossbar: Drill Holes x3
A-pillar: Cut To Length x2
A-pillar: Drill Holes x2
B-pillar: Cut To Length x2
B-pillar: Drill Holes x2
C-pillar: Cut To Length x2
C-pillar: Drill Holes x2
Top Crossbar: Cut To Length x3
Top Crossbar: Drill Holes x3
Cant Rail: Cut To Length x2
Cant Rail: Drill Holes x2
Cant Rail: Torch Holes x2

Open Source Ecology: Civilization Starter Kit v.0.01
Fabrication ManualTractor
Loader Arm
Loader Arm: Cut To Length x2
Loader Arm: Drill Holes x2
Loader Arm: Torch Holes x2
Loader Arm Crossbar: Cut To Length
Loader Arm Crossbar: Drill Holes
Loader Arm Insert: Cut To Length x2
Tractor Frame Insert: Cut To Length x2
Wheel Hub
Wheel Hub Tube: Cut To Length x4
Wheel Hub Tube: Drill Holes x4
Quick Attach Plate
Quick Attach Plate Horizontal: Cut To Length x2
Quick Attach Plate Vertical: Cut To Length x3
Flat
Cylinder Mounts
Base Cylinder Mount: Cut To Length x2
Base Cylinder Mount: Drill Holes x2
Loader Arm Cylinder Mount: Cut To Length x4
Loader Arm Cylinder Mount: Drill Holes x4
Power Cube Mount
Power Cube Mount Ramp: Cut To Length
Power Cube Mount Point: Cut To Length
Power Cube Mount Point: Drill Hole
Loader Arm Lump
Loader Arm Lump: Cut To Length x2
Loader Arm Lump: Drill Hole x2
Wheel Mount
Wheel Shaft Mount: Cut To Length x8
Wheel Shaft Mount: Drill Holes x8
Wheel Shaft Mount: Torch Hole x8

Open Source Ecology: Civilization Starter Kit v.0.01
Fabrication ManualTractor
Motor Mount
Motor Mount: Cut To Length x4
Motor Mount: Drill Holes x4
Motor Mount: Torch Hole x4
Motor Interface: Cut To Length x4
Motor Interface: Drill Holes x4
Motor Interface: Torch Hole x4
Wheel Hub
Wheel Hub Disc: Cut To Diameter x4
Wheel Hub Disc: Drill Holes x4
Wheel Hub Disc: Torch Hole x4
Wheel Hub Gusset: Cut To Triangle x16
Quick Attach Plate
Quick Attach Plate Ramp Face: Cut To Length
Quick Attach Plate Ramp Slope: Cut To Length
Quick Attach Plate Small Hinge: Cut To Length x4
Quick Attach Plate Small Hinge: Drill Hole x4
Quick Attach Plate Large Hinge: Cut To Length x4
Quick Attach Plate Large Hinge: Drill Hole x4
Seat Mount
Seat Mount: Cut To Length
Seat Mount: Drill Holes
Angle
Loader Arm Crossbar Support: Cut To Length x4
Loader Arm Crossbar Support: Drill Holes x4
Power Cube Mount: Cut To Length x2
Power Cube Mount: Drill Holes x2
Hydraulic Valve Mount: Cut To Length
Hydraulic Valve Mount: Drill Holes
Build Components
Hardware
Position Bottom Crossbars

Open Source Ecology: Civilization Starter Kit v.0.01
Fabrication ManualTractor
Attach Inner and Outer Base
Attach Pillars to Inner Base and Bottom Crossbars
Attach front two Top Crossbars to A & B Pillars

Open Source Ecology: Civilization Starter Kit v.0.01
Fabrication ManualTractor

Open Source Ecology: Civilization Starter Kit v.0.01
Fabrication ManualTractor
Attach Cant Rail to Pillars and Top Crossbars
Attach last Top Crossbar to Cant Rail and C-pillars
Tighten All Frame Bolts
Get them as tight as possible without deforming the square tubes.
Weld Base Cylinder Mounts
Use a jig, magnet or clamp to hold all the pieces in place. Insert a pin
through the pin holes to maintain alignment.
Weld Loader Arm Cylinder Mounts
Weld Motor Interfaces

Open Source Ecology: Civilization Starter Kit v.0.01
Fabrication ManualTractor
Weld Axle Shafts
After the 3” hole is drilled into the end of the shaft, torch or cut two
channels on either side. When the splined shaft is inserted into the
hole, it should be visible through the two channels. Plug weld through
the channels to permanently attach the splined shaft.
Weld Pins
Stand the 1” bar upright and weld a washer with roughly a 2” outer
diameter on the end.
Weld Quick Attach Plate
Use a bar or a bolt to keep the hinges aligned while welding.

Open Source Ecology: Civilization Starter Kit v.0.01
Fabrication ManualTractor
Weld Power Cube Mount
Attach Flange Bearings to Wheel Shaft Mounts
Weld Together Wheel Hubs

Open Source Ecology: Civilization Starter Kit v.0.01
Fabrication ManualTractor
Attach Wheel Hubs to Wheels
Plug Weld Lumps into Loader Arms
Run a piece of bar, or a bolt, through one or more holes in the loader
arm to maintain alignment. Use a similar method on the lumps. Insert
the lumps and weld through the plug weld holes to permanently attach
the lumps to the loader arm.

Open Source Ecology: Civilization Starter Kit v.0.01
Fabrication ManualTractor
Hydraulics
Remember to keep the open ends of hydraulic components covered up.
Use plastic caps, or rags, or tape. Be particularly careful around
grinding/welding operations. The inside of the hydraulic components
must remain free of contamination.
Assemble Power Cube Delivery
Assemble Power Cube Return
Assemble Drive Control Valves
Assemble Cylinder Control Valves
Assemble Drive Power Hose x2
Assemble Drive Return Hose x2
Assemble Motor Drain Hose
Assemble Power Cube Connection Hose x4
Assemble Loader Cylinder Hoses
Assemble Quick Attach Plate Cylinder Hoses
Assemble Loader Cylinder x2
Assemble Quick Attach Plate Cylinder x2
Assemble Motor x4
Assemble Tractor
Prepare Loader Arm
Position Frame Inserts and Loader Arm Shaft
The insert goes into the 2 3/8” holes in the Cant Rails. The shaft goes
through the two inserts, aligning them.
Weld Frame Inserts
Weld the aligned inserts to the Cant Rail. Grind the outside smooth.

Open Source Ecology: Civilization Starter Kit v.0.01
Fabrication ManualTractor
Position Loader Arm Inserts and Arms on Shaft
The inserts go into the 2 3/8” holes in the Loader Arms. Then the
Loader Arms go on the shaft sticking out of the Cant Rails. It helps to
use one or two bolts to attach the Loader Arm Crossbrace, or use pins
and the Quick Attach plate to align the Loader Arms.
Weld Loader Arm Inserts
Attach Loader Arm Cylinder Mount to Loader Arm
Remove the Crossbrace or Quick Attach Plate. Take the Loader Arms
off the tractor and attach the Cylinder Mounts.
Mount Loader Arm
Position Loader Arms on Shaft
Put a large washer on the shaft before the Loader Arm. This will keep
the Arm from rubbing against the Cant Rail. Then put a lock collar on
after the Loader Arm. This will keep the Arm from moving sideways.
Attach Loader Arm Crossbar
Tighten and Grease Lock Collars
Attach Base Cylinder Mounts to Base
Attach Quick Attach Plate to Loader Arm
Attach Cylinders to Loader Arm
Mount Wheels
Attach Wheel Shaft Mounts and Motor Mounts to Frame
Attach Motors to Motor Mounts
Insert Axle Shafts
After the shaft is through the outer bearing, but before it goes through
the inner bearing, put a large washer, two lock collars, and another
large washer on the shaft. Continue pushing it through the inner
bearing. Push the male splined shaft into the female coupler so there is
no more than 1/8” gap.
Weld Motor Mounts to Pillars
This is important to keep the Motor Mounts from shifting. Don't spare
the welding.
Tack Weld Wheel Shaft Mounts to Base
Just a dab along the top. Keep it small so it can be easily removed with
a grinder.
Tighten and Grease Lock Collars
Attach Wheel Hubs to Axles
Attach Power Cube and Valve Mounts
Install Hydraulic System

Open Source Ecology: Civilization Starter Kit v.0.01
Fabrication ManualTractor
Attach Power Cube Delivery to Drive Control Valves
Attach Power Cube Return to Cylinder Control Valves
Attach Drive & Cylinder Control Valves
Either mount the Valves directly to the Valve Mount in the middle of
the tractor, or use custom interface plates.
Attach Cylinder Hoses
Attach Drive Hoses
Attach Motor Drain Hose
Attach Power Cube Connection Hoses

User Manual

Soil Pulverizer

Design Rationale
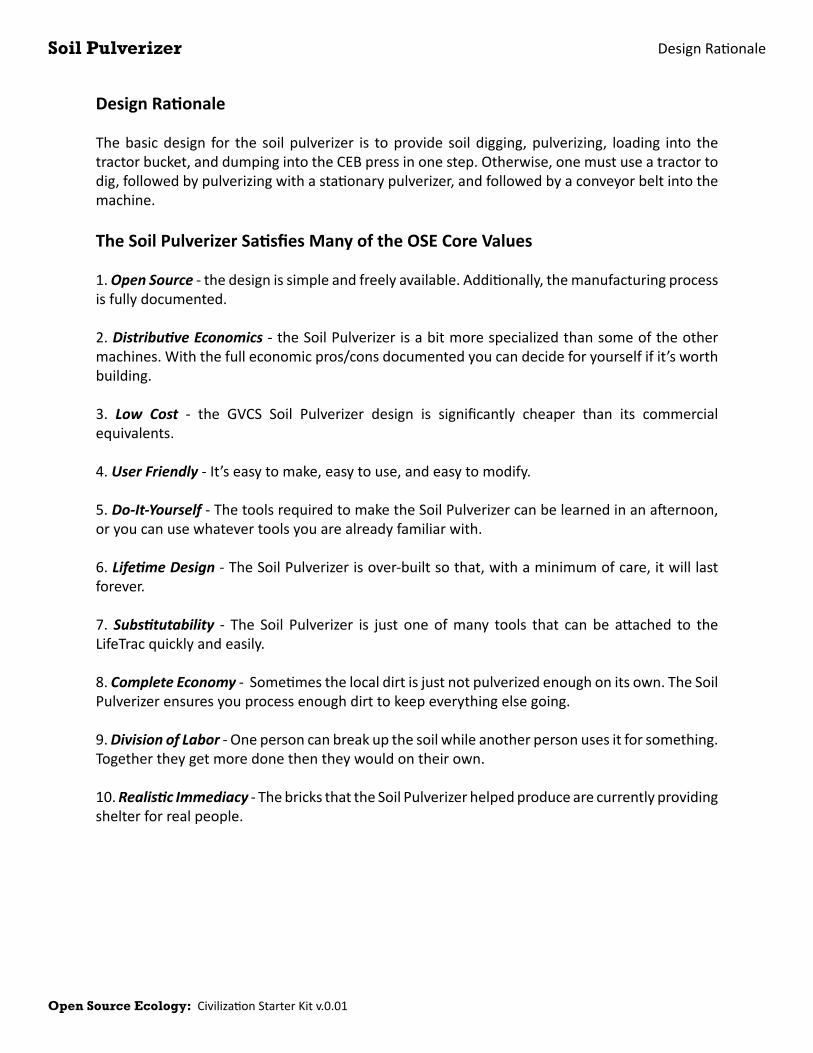
DesignRationale
Open Source Ecology:CivilizationStarterKitv.0.01
Soil Pulverizer
Design Rationale
Thebasicdesign for the soil pulverizer is toprovide soil digging,pulverizing, loading into thetractorbucket,anddumpingintotheCEBpressinonestep.Otherwise,onemustuseatractortodig,followedbypulverizingwithastationarypulverizer,andfollowedbyaconveyorbeltintothemachine.
The Soil Pulverizer Satisfies Many of the OSE Core Values
1.Open Source-thedesignissimpleandfreelyavailable.Additionally,themanufacturingprocessisfullydocumented.
2.Distributive Economics-theSoilPulverizerisabitmorespecializedthansomeoftheothermachines.Withthefulleconomicpros/consdocumentedyoucandecideforyourselfifit’sworthbuilding.
3. Low Cost - the GVCS Soil Pulverizer design is significantly cheaper than its commercialequivalents.
4.User Friendly-It’seasytomake,easytouse,andeasytomodify.
5.Do-It-Yourself-ThetoolsrequiredtomaketheSoilPulverizercanbelearnedinanafternoon,oryoucanusewhatevertoolsyouarealreadyfamiliarwith.
6.Lifetime Design-TheSoilPulverizerisover-builtsothat,withaminimumofcare,itwilllastforever.
7.Substitutability - The Soil Pulverizer is just oneofmany tools that can be attached to theLifeTracquicklyandeasily.
8.Complete Economy-Sometimesthelocaldirtisjustnotpulverizedenoughonitsown.TheSoilPulverizerensuresyouprocessenoughdirttokeepeverythingelsegoing.
9.Division of Labor-Onepersoncanbreakupthesoilwhileanotherpersonusesitforsomething.Togethertheygetmoredonethentheywouldontheirown.
10.Realistic Immediacy-ThebricksthattheSoilPulverizerhelpedproducearecurrentlyprovidingshelterforrealpeople.

Fabrication Drawings

Fabrication Manual

Open Source Ecology: Civilization Starter Kit v.0.01
Fabrication ManualSoil Pulverizer
Soil Pulverizer
Complete Fabrication Instructions, 2011 Open Source Ecology

Open Source Ecology: Civilization Starter Kit v.0.01
Fabrication ManualSoil Pulverizer
Introduction
The purpose of this guide is to provide all information to make the 2011 version Soil Pulverizer from stock steel and parts. More information and a constantly updated procedure can be found on the OSE wiki Soil Pulverizer Manufacturing Page.
This guide is broken into 2 main fabrication steps: Parts Fabrication, and
Parts Assembly. After these two have been completed, the machine can be painted. After it’s painted, the remaining hydraulics must be installed. After that, it should be ready to go! See the User Manual for how to adjust the height of the tines to your soil cutting needs.
Parts fabrication begins with the cutting of all stock steel as listed in the cut
list. It focuses on cutting, drilling, punching, bolting and welding the steel into parts pieces and then assembling the parts pieces into individual parts. Each part (IE Bucket, Arm Rest…) listed in this section is independent of all others, therefore the parts can be fabricated in any order.
Parts assembly joins all of the parts into the whole machine. It mostly
involves bolting, but some parts must still be welded upon assembly.

Open Source Ecology:CivilizationStarterKitv.0.01
Fabrication Manual - Bill of MaterialsSoil Pulverizer
Bill of Materials Steel
Type Stock Size (Inches) Length (inches)
Sheet 0.125 X 48 40 Plate 0.25 X 16 29 0.25 X 24 48 0.25 x 16 48 Beveled Flat
0.5 X 6 49
Flat 0.25 X 2 5.5 0.25 X 2.5 48.5 0.25 X 5.5 48.5 0.375 X 3 324 0.5 X 2 16.5 0.5 X 3 39 0.5 X 4 12 0.5 X 6 8 0.5 X 8 36 0.75 X 2 6 0.75 X 4 35.75 Pipe 2" SCH 80 Pipe 44.5 2” SCH 40 Pipe 1 Round Tubing
0.5ID X 0.75OD 16
Round 0.5 58 1.875 52 Square Tubing
0.1875 X 2.5X2.5 36
0.25 X 2X2 75 0.25 X 2X4 56
Hardware
Type Size (Inches) QTY Nut, Hex 0.375"-16 1 Nut, Hex 0.5"-13 2 Nut, Hex 0.5625-11 8 Nut, Hex, Steel 0.75"x10 18 Nut, Hex, Galv. 0.75”x10 4 Nut, Nylon Lock 1"-8 2 Bolt, Hex 0.3750-16x3x3 1 Bolt, Hex 0.5000-13x2.5x2.5 2 Bolt, Hex 0.5625-11x2x2 8 Bolt, Hex 0.7500-10x1.25x1.25 14 Bolt, Hex 0.75"-10x1.5"x1.5" 4 Bolt, Hex 0.75"-10x2"x2" 2 Bolt, Hex 0.75"-10x5.5"x1.75" 2 Bolt, Hex 1.0"-8x3"x2.25" 2 Washer, Wide 0.5625" 8 Washer, Wide 0.5" 2 Washer, Wide 0.75" 6 Washer, Wide 1.0" 4
Misc. COUPLER, 1-3/8" 6T SPLINED 1
Misc. BEARING WITH LOCK COLLAR, FS210, 1-7/8" 2
Misc. COTTER PIN, 1/8” X 2 ½” 6

Open Source Ecology:CivilizationStarterKitv.0.01
FabricationManual-BillofMaterialsSoil Pulverizer
Hydraulics Description Quantity Source
Hydraulic Motor 1 https://www.surpluscenter.com/item.asp?item=9-7368-125&catname=hydraulic
SAE 10 to 1/2 NPT swivel 2 https://www.surpluscenter.com/item.asp?item=9-6900-10-
8&catname=hydraulic
SAE 4 to 1/4 NPT swivel 1 https://www.surpluscenter.com/item.asp?item=9-6900-4-4&catname=hydraulic
1/2 NPTM x 12' Hose 2 https://www.surpluscenter.com/item.asp?item=905-12144&catname=hydraulic
1/4 NPTM x 12' Hose 1 https://www.surpluscenter.com/item.asp?item=916-14144&catname=hydraulic
30 gpm Quick Coupler set, Body Size: 1/2, Thread Size: 3/4-14 NPT
3 Dalton Hydraulics
¼” Quick Coupler Set 1 https://www.surpluscenter.com/item.asp?item=9-6314&catname=hydraulic
¼” Male Quick Coupler 1 https://www.surpluscenter.com/item.asp?item=9-5924&catname=hydraulic

Open Source Ecology: Civilization Starter Kit v.0.01
Fabrication ManualSoil Pulverizer
Cut List Type Stock Size (Inches) Length
(inches) QTY Primary Part Name Secondary Part Name
Sheet 0.125 X 48 40 1 PIECE PARTS TOP PLATE
Plate 0.25 X 16 29 1 BUCKET SIDE PLATES
0.25 X 24 48 1 BUCKET BOTTOM PLATE
0.25 x 16 48 1 BUCKET BACK PLATE
Beveled Flat 0.5 X 6 49 1 BUCKET BLADE
Flat 0.25 X 2 5.5 1 BUCKET TRIANGLE PLATE
0.25 X 2.5 48.5 1 BUCKET CROSS SUPPORT PLATE
0.25 X 5.5 48.5 1 BUCKET CROSS SUPPORT PLATE LOWER
0.375 X 3 48 1 BUCKET REAR MOUNTING PLATE
0.375 X 3 11.5 24 TINE TINE
0.5 X 2 4.25 2 FRONT FRAME END PLATE, CROSS TUBE
0.5 X 2 4 2 ARM REST PLATE, ARM REST
0.5 X 3 19.5 2 BUCKET SKID PLATE
0.5 X 4 6 2 BUCKET BOTTOM MOUNTING PLATES
0.5 X 6 8 1 PIECE PARTS PLATE, MOTOR MOUNT
0.5 X 8 12 1 FRONT FRAME PLATE, MOTOR END
0.5 X 8 12 2 FRONT FRAME PLATE, BEARING
0.75 X 2 3 2 BUCKET HARD STOP PLATE
0.75 X 4 23.75 1 BUCKET SIDE BRACE PLATE
0.75 X 4 6 2 PIVOT JOINT PLATE
Pipe 2" SCH 80 2.5 1 COUPLER COUPLER, SHAFT SIDE
2" SCH 80 3.5 12 TINE TUBE, TINE
2” SCH 40 1 1 COUPLER SLEEVE
Round Tubing 0.5ID X 0.75OD 2 8 PIECE PARTS HINGE PIPE
Round 0.5 50 1 PIECE PARTS ROD, HINGE
0.5 4 2 PIECE PARTS ROD, PIN
1.875 52 1 PIECE PARTS SHAFT
Square Tubing 0.1875 X 2.5X2.5 6 2 BUCKET LARGE TUBE, ANGLED
0.1875 X 2.5X2.5 12 2 PIVOT LARGE TUBE
0.25 X 2X2 24 2 PIECE PARTS SMALL TUBE
0.25 X 2X2 13.5 2 ARM REST SMALL TUBE, ARM
0.25 X 2X4 56 1 FRONT FRAME CROSS TUBE
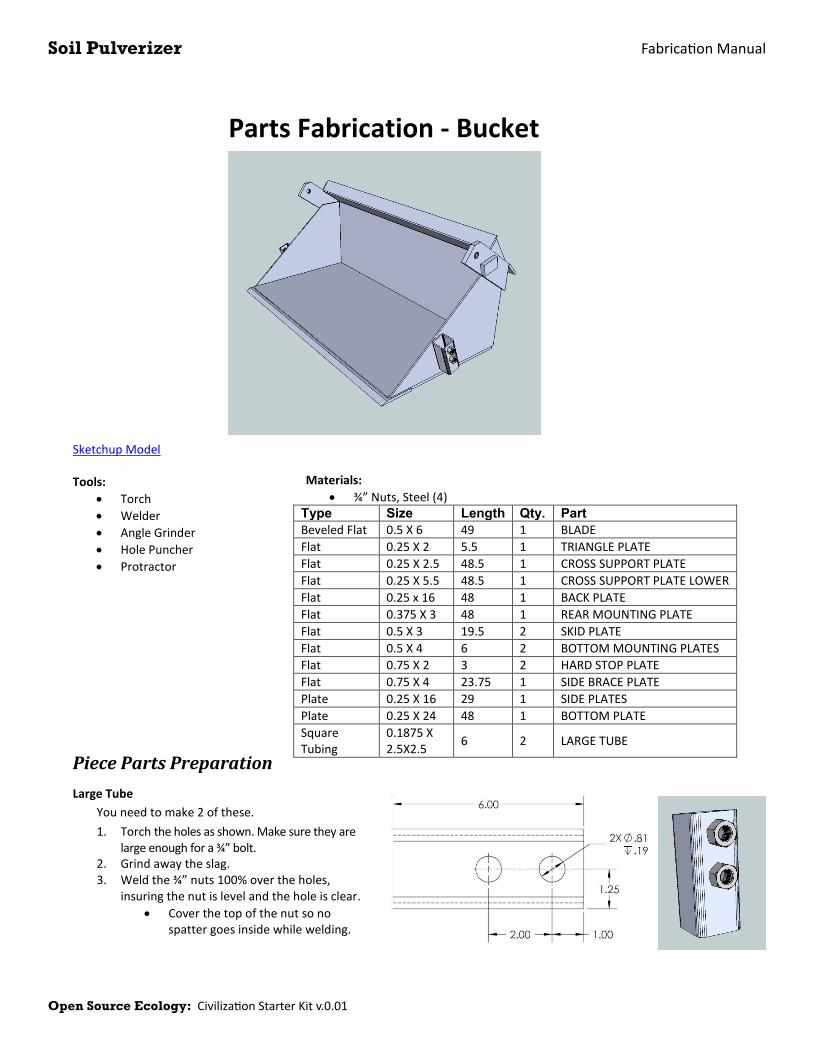
Open Source Ecology: Civilization Starter Kit v.0.01
Fabrication ManualSoil Pulverizer
Parts Fabrication - Bucket
Sketchup Model Tools:
Torch Welder Angle Grinder Hole Puncher Protractor
Piece Parts Preparation Large Tube
You need to make 2 of these. 1. Torch the holes as shown. Make sure they are
large enough for a ¾” bolt. 2. Grind away the slag. 3. Weld the ¾” nuts 100% over the holes,
insuring the nut is level and the hole is clear. Cover the top of the nut so no
spatter goes inside while welding.
Materials: ¾” Nuts, Steel (4)
Type Size Length Qty. PartBeveled Flat 0.5 X 6 49 1 BLADE Flat 0.25 X 2 5.5 1 TRIANGLE PLATE Flat 0.25 X 2.5 48.5 1 CROSS SUPPORT PLATE Flat 0.25 X 5.5 48.5 1 CROSS SUPPORT PLATE LOWER Flat 0.25 x 16 48 1 BACK PLATE Flat 0.375 X 3 48 1 REAR MOUNTING PLATE Flat 0.5 X 3 19.5 2 SKID PLATE Flat 0.5 X 4 6 2 BOTTOM MOUNTING PLATES Flat 0.75 X 2 3 2 HARD STOP PLATE Flat 0.75 X 4 23.75 1 SIDE BRACE PLATE Plate 0.25 X 16 29 1 SIDE PLATES Plate 0.25 X 24 48 1 BOTTOM PLATE Square Tubing
0.1875 X 2.5X2.5 6 2 LARGE TUBE

Open Source Ecology: Civilization Starter Kit v.0.01
Fabrication ManualSoil Pulverizer
Triangle Plates Torch or shear the flatbar into two pieces as shown.
Side Brace Plates You need 2 of these which are mirror images of eachother. 1. Torch or shear the flatbar into two pieces as
shown.
2. Punch the hole as shown. 3. Torch away the corner as shown.
4. Weld the Hard Stop Plate to them as shown.

Open Source Ecology: Civilization Starter Kit v.0.01
Fabrication ManualSoil Pulverizer
Bottom Mounting Plates You need to make 2 of these. 1. Punch the hole as shown. 2. Torch or shear away the corner as shown.
Piece Parts Assembly Side Plates You need 2 of these which are mirror images of eachother.
1. Torch or shear the plate as shown (right). 2. Weld the Side Brace Plates and Large Tubes as shown (below).
Back Plate Fully weld the bottom mounting
plates to the back plate as shown. Insure they are square and do not
warp while welding.

Open Source Ecology: Civilization Starter Kit v.0.01
Fabrication ManualSoil Pulverizer
Bottom Plate
Fully weld skid plates and blade to the bottom plate as shown.
o Only weld them from the bottom side, NOT the top or sides yet.
o Insure you get the right spacing on them by looking at the lower diagram.
o The blade will stick out ½” on each side, and the skid plates will stick out 1/4” on each side.
Cross Supports
Weld the Cross Support Plate, Cross Support Plate Lower, and Triangle Plates together as shown, with one Triangle Plate at each end of the supports.
o Fully weld all seams except the one shown.

Open Source Ecology: Civilization Starter Kit v.0.01
Fabrication ManualSoil Pulverizer
Parts Assembly 1. Weld Bucket Plates Fully weld the side pates, bottom plate, and back plate together at all joints as shown below.
2. Weld Cross Supports Weld Cross Supports as shown.
o Fully weld all seams except the one marked not to.
3. Weld Rear Mounting Plate Weld it in place, from all angles, as
shown, at a 45® angle with the back plate.

Open Source Ecology: Civilization Starter Kit v.0.01
Fabrication ManualSoil Pulverizer
Parts Fabrication - Frame Pivot Hinge
Tools:
Torch Welder Angle Grinder Hole Puncher
Procedure Joint Plate You need 2 of these.
1. Punch the hole as shown. 2. Torch away the corners as shown.
Large Tube You need 2 of these.
1. Torch the holes as shown. Insure a .75” bolt can
go thru the big hole. Insure the ½” rod can
go all the way thru the tubing through the smaller holes.
2. Grind away the slag.
Materials: .75”x4” Flat- 6” (2) – Joint Plate 2.5”x2.5”x3/16” Square Tubing-
12” (2) – Large Tube .75” Nut, Steel (2)

Open Source Ecology: Civilization Starter Kit v.0.01
Fabrication ManualSoil Pulverizer
3. Fully weld the nut and Joint Plate to the Large Tube as shown.
The two will be mirror images of eachother. When welding the nut, cover the top of the
nut so no spatter goes inside, and insure the hole is clear and the nut level.

Open Source Ecology: Civilization Starter Kit v.0.01
Fabrication ManualSoil Pulverizer
Parts Fabrication - Arm Rest
Tools: Welder
Steps: You need two of these.
Fully weld the plate to the tubing as shown.
Materials: 2”x2”x1/4” Square Tubing- 13.5”
(2) ½”x2 Flat- 4” (2)

Open Source Ecology: Civilization Starter Kit v.0.01
Fabrication ManualSoil Pulverizer
Parts Fabrication - Shaft and Motor Frame
Tools: Torch Welder Hole Puncher Angle Grinder
Parts Preparation Motor Plate You need 1 of these.
1. Punch the smaller holes. 2. Torch the larger hole. 3. Grind it smooth.
Bearing Plate You need 2 of these.
1. Punch the smaller holes. 2. Torch the larger hole. 3. Grind it smooth.
Materials: 1/2”x2” Flat- 4.25” (2) – End
Plates ½”x8” Flat- 12” (3) – Bearing and
Motor Plates 2”x4”x1/4” Rectangular Tubing-
56” (1) - Cross Tube

Open Source Ecology: Civilization Starter Kit v.0.01
Fabrication ManualSoil PulverizerCross Tube
1. Torch the holes shown. Insure .75” bolts will go all the way through the tube.
2. Grind away the slag.
Parts Assembly 1. Fully weld the end plates centered to each side of the
cross tube.
2. Fully weld the motor and bearing plates to the cross tube. It is crucial that these all be square in every direction! Double check it, and weld it slowly so it
doesn’t warp. Note that the motor plate is welded to the end plate.

Open Source Ecology: Civilization Starter Kit v.0.01
Fabrication ManualSoil Pulverizer
Tines
1 Note: Tines will not have bent tips until a later step.
Tools: Torch Welder Hole Puncher Angle Grinder
You need to make 12 of these total.
Procedure Prepare the tines:
1. Torch a hole in the center of each flat as shown. Check that the pipe will go through it.
2. Torch approximately 1” slits at each side of flat as shown. 3. Grind away any slag.
Materials: .375”x3” Flat- 11.5” (24) 2” Sch. 80 Pipe- 3.5” (12) .75” Nut, Steel – (12)

Open Source Ecology: Civilization Starter Kit v.0.01
Fabrication ManualSoil Pulverizer
Prepare the Pipe: 1. Torch a hole in the pipe as shown.
Insure a .75” bolt will go through. 2. Grind it smooth. 3. Weld a nut over the hole, insuring the hole remains
clear. Protect the threads while welding.
Weld the tines to the Pipe:
1. Weld the tines onto the pipe as shown. They should be perpendicular to eachother. The one closest to the end should be .25” away from the edge of
the pipe. Fully weld all joints. Make sure no spatter enters the nut

Open Source Ecology: Civilization Starter Kit v.0.01
Fabrication ManualSoil Pulverizer
Parts Fabrication - Coupler
Tools:
Bandsaw Welder Drill Press with 3/8” bit.
Procedure Note: if you have access to a lathe, you can simply lathe out about 1/8” long section of the splined coupler so it fits directly into the Sch 80 pipe. This ensures concentricity. You could do away with the sleeve and weld these two directly together.
1. Cut down the splined coupler so it is 1.25” long.
2. Tack it to the sleeve as shown.
If there’s any play, get the coupler as centered as possible in the sleeve.
3. Tack the pipe and coupler with sleeve together as shown. Insure that the sleeve and the pipe are concentric!! This is a critical
part. It would help to set the two on the welding table and tack from the
top, then twist until they’re perfect. 4. Tack them in many dimensions to insure nothing warps. 5. Weld it fully, with at least 3 layers of weld.
Materials: Coupler, 1-3/8" 6T Splined 2” Sch. 80 Pipe- 2.5” (1) – Shaft
side coupler 2” Sch. 40 Pipe- 1” (1) - Sleeve 1.875” Round – 52” (1) – Shaft 3/8”x3” bolt

Open Source Ecology: Civilization Starter Kit v.0.01
Fabrication ManualSoil Pulverizer
6. Mark and center punch where the hole in the pipe will be.
7. Insert the shaft fully into the coupler. 8. Drill through the coupler and the shaft. 9. Insure the 3/8” bolt goes through both the coupler and the shaft. If
not, re-drill with a slightly larger bit.

Open Source Ecology: Civilization Starter Kit v.0.01
Fabrication ManualSoil Pulverizer
Parts Fabrication - Additional Piece Parts Tools:
Torch Angle Grinder Welder Hole Puncher Drill Press
Small Tube Materials:
2”x2”x.25” Square tubing- 24” (2) You need to make 2 of these. Steps:
1. Torch all holes as shown. Insure the proper size bolt or
rod can go through each hole.
2. Grind away all slag.
Motor Mount Plate Materials:
½”x6” Flat- 8” (1) Steps:
1. Punch the smaller holes as shown. 2. Torch the center hole. 3. Grind away the slag.
Hinge Rod Materials:
.5” Round- 50” (1) Steps:
1. Drill a hole as shown at each end of the rod.

Open Source Ecology: Civilization Starter Kit v.0.01
Fabrication ManualSoil Pulverizer
Hinge Pin Materials:
.5” Round- 4” (2) You need 2 of these. Steps:
1. Drill the holes as shown.

Open Source Ecology: Civilization Starter Kit v.0.01
Fabrication ManualSoil Pulverizer
Assembly- Front Frame
An assembly video is also available. Note that not all steps will be the same, as some parts still need to be welded or bent. Follow the written instructions. Tools:
Various Wrenches
Procedure 1. Insert the Arm Rests into the Arm Rest Slots in
the side of the Bucket as shown. Make sure the arm rests have the
correct orientation. See the illustration.
2. Insert and tighten both ¾”x1.5” bolts on each side to hold them in place.
The arm rests should both be sticking up about 8” from the slots.
Materials: Assembled Parts:
o Bucket o Arm Rests o Frame Pivot Hinges o Shaft and Motor Frame
1 7/8” Bearings (2) 1/8” x 2.5” Cotter Pins
Fasteners o 1”x3”x2.25” Bolts (2) o 1” Washers (4) o 1” Nuts (2) o ¾”x5.5”x1.75” Bolts (2) o ¾”x1.25” Bolts (2) o ¾”x1.5” Bolts (4) o ¾” Nuts, Galvanized (2) o 9/16”x2” Bolts (8) o 9/16” Nuts (8) o 9/16” Washers (8)

Open Source Ecology: Civilization Starter Kit v.0.01
Fabrication ManualSoil Pulverizer
3. Bolt the Frame Pivot Hinges to the top side of the bucket so it rests on the arm rests.
Make sure they both have the right orientation by looking at the image.
Use the 1” bolts and nuts with a washer on each side. Tighten the bolt, but leave a little space so the Pivot
Hinges are free to rotate.
4. Insert the Small Tubes into the pivot hinge, as shown, so that the ¾” holes are on the outside of the bucket.
5. Put the hinge pin through both sets of tubing as shown on each side. Which holes you put it through are not crucial, as this can be
adjusted later. However, insure both small tubes are adjusted the same..
Put the cotter pins though each side of the pin. 6. Tighten a ¾”x1.25” bolt into the nut welded to each pivot hinge.
7. Bolt the Shaft and Motor Frame to the Small Tubes as shown.
Use the long ¾” bolts. You need washers on each side of the bolts.
8. Loosely bolt the bearings to the shaft and motor frame as shown.
You will tighten the bolts in a later step. Use the 9/16” bolts, with a washer near the
nut.

Open Source Ecology: Civilization Starter Kit v.0.01
Fabrication ManualSoil Pulverizer
Assembly- Bend the Tines Tools:
Pipe wrench Mallet
Procedure 1. Hammer the shaft through one bearing as
shown, so the hole for the coupler is positioned as shown.
Angle it to the side to allow room for the tines to slide on.
2. Slide all tines on the shaft so they are all oriented in the same direction, as shown.
3. Use a pipe wrench to bend each of the tines as shown. If it is too difficult, you can use a torch to heat them up.
Their shape doesn’t need to be precise. Make sure you bend each piece as in the lower image.
Materials: Assembled Parts:
o Tines o Bucket/Front Frame o Shaft

Open Source Ecology: Civilization Starter Kit v.0.01
Fabrication ManualSoil Pulverizer
Assembly- Install the Shaft and Motor
Tools: Mallet Various wrenches Ratchet/ socket set Socket extension Allen Wrench Loctite
Procedure 1. Place the lock collars on the shaft as shown.
Be sure they are in the right orientation to lock onto the bearings.
Don’t lock them yet, you’ll do this later.
2. Angle the shaft properly, and hammer it though the other bearing until it’s poking through the bearing mount plate about 1”.
Materials: Assembled Parts:
o Bucket/Front Frame o Motor Mount Plate
Motor Lock Collars for Bearings ¾”x1.25” Bolts (12) ¾”x2” Bolts ¾” Nuts, Galvanized (2) ¾” Washers (2)
½”x2.5” Bolts (2) ½” Nuts (2) ½” Washers (2) 3/8”x3” Bolt (1) 3/8” nut (1)

Open Source Ecology: Civilization Starter Kit v.0.01
Fabrication ManualSoil Pulverizer
3. Install the coupler onto the shaft. Insert the coupler onto the shaft. Once the coupler is on, hammer the shaft through
until it is fully inserted in the coupler and it is positioned as in the photo on the right.
Rotate the coupler so that the holes in the coupler and the shaft line up.
Insert the 3/8” bolt through the hole and tighten the nut onto it. Use loctite on the bolt.
4. Loosely bolt the motor mount plate to the frame, using the ¾”x2” Bolts.
Use a washer the side of the nut.
5. Slide the motor through the mount and into the coupler.
Make sure the motor is oriented so that you will be able to bolt it to the frame.
You may need to rotate the motor shaft, or the shaft with the tines on it to get the motor shaft to fit into the coupler.
Don’t insert it all the way yet, just get it started.
6. Loosely bolt the motor to the frame, with the ½”x2.5” bolts, with a washer on the side of the nut.
7. Lightly hammer the motor until it is flush with the motor mount plate.
8. Tighten the bolts on the motor and the motor plate. 9. Tighten the set screw on the coupler and the bearing lock
collars. 10. Tighten ¾”x1.25” bolts into each tine, using a socket with an
extension.

Open Source Ecology: Civilization Starter Kit v.0.01
Fabrication ManualSoil Pulverizer
Assembly – Install the Top Plate Tools:
Welder Mallet
Procedure 1. Lay the top plate onto the frame as
shown. 2. Insert the pipe onto the Hinge Rod as
shown, and position pipe and rod as shown.
Space the pipes approximately as shown, so they are in 4 sets of 2, evenly spaced.
3. Position the top plate and rod/pipes approximately as shown on the right.
4. Weld one pipe from each set to the cross support piece, and one to the top piece.
Protect the shaft so that no welding spatter sticks to it.
Weld the highlighted ones in the photo above to the top piece, and all others to the cross support piece.
5. Insert the cotter pins into the holes at each end of the rod.
Materials: Assembled Parts:
o Bucket/Front Frame o Hinge Rod
.5 ID x .75 OD Round Tubing- 2” (8)
1/8” Sheet- 40”x48” – Top Plate 1/8”x2” Cotter Pins (2)

Open Source Ecology: Civilization Starter Kit v.0.01
Fabrication ManualSoil Pulverizer
Assembly- Paint
Procedure 1. Check all external surfaces for sharp edges and smooth with angle grinder. 2. Remove any surface rust with wire brush and / or sandpaper. 3. Apply a thorough coating of paint to all steel surfaces.
You will need to prop up the top piece while painting, so you can paint everything. Do not paint the motor.
4. Allow 24 hours to dry before handling.

Open Source Ecology: Civilization Starter Kit v.0.01
Fabrication ManualSoil Pulverizer
Assembly – Hydraulics Tools:
Rags Jar Various Wrenches Thread Tape
Procedure Prepare the hoses
To each hose, attach a male quick coupler at one end and a female at the other. Use thread tape between each connection.
Assemble motor hydraulics
1. Remove the plugs in the motor. Have rags and a jar ready in case there
is fluid in the motor. 2. Install the swivels into the ports as shown in the
photo. Do not use thread tape on the swivel
fittings.
3. Install the quick couplers as shown on the right, using thread tape for each connection.
Materials: SAE 10 to 1/2 NPT swivel (2) SAE 4 to 1/4 NPT swivel (1) 30 gpm Quick Coupler set, Body
Size: 1/2, Thread Size: 3/4-14 NPT (3)
¼” Quick Coupler set (1) ¼” Male quick coupler (1) 1/4 NPTM x 12' Hose (1) 1/2 NPTM x 12' Hose (2)

Open Source Ecology: Civilization Starter Kit v.0.01
Fabrication ManualSoil Pulverizer
4. Attach the hoses to the quick couplers in preparation for attaching to a hydraulic power source.

User Manual

Open Source Ecology:CivilizationStarterKitv.0.01
Safety
Whenpulverizerisinoperation,donotgonearthespinningshaftandtines.Beveryawareofwhereothersarewhenoperatingthepulverizer.Debriscanandwillbeejectedtothesidesofthepulverizerbucket.Keepbystanderswellawayandensureeveryoneiswearingsafetyglassestopreventeyeinjury.
Troubleshooting
See Appendix: Hydraulics System Troubleshooting
User Agreement
TheUsertakesonthefullresponsibilityofusingtheplanstobuildaSoilPulverizer,byensuringthattheUserfollowsallSoilPulverizerbuild,safety,maintenance,andoperationprocedures.ItisthedutyoftheUsertoacceptthataccidentsandunforeseencircumstancesmayoccurbyusing,andthatsuchhappeningsmayplacetheUserindangerofinjuryorevendeath.TheUseragreestonotholdOSEliableforanyaccidentsordeaths,andtheUseragreestonotpursueanylegalactionagainstOSEandhisorheragentsandcollaboratorsinthecaseofharm,injury,ordeathresultingfromuseoftheMachine,regardlessofthecauseorreasonfortheaccident.ItisthedutyoftheUserandhis/hercollaboratorsorworkcrewtoreadandunderstandtheAssembly,SetupandTestingProcedure,MachineAdjustment,Troubleshooting,andalloftheabovesafety,maintenance,andoperationprocedures.Furthermore,theUseragreestonotsolicittheservicesofanyagents,assigns,orotherthirdpartiestopursuelegalactionagainsttheProducerinthecaseofaccidentsordeathrelatedtouseoftheMachine.IftheUserallowsanyotherpersonorgrouptousethemachineorparticipateinbrickproduction,theUserlikewiseagreestotakeonthefullresponsibilityandliabilityassociatedwithanyharmorinjurythatmayhappentoanyoneinvolvedinusingtheMachine,andshallholdtheProducerinindemnity.
Therefore,theUserherebyagreestoreleaseandforeverdischargeOSEfromanyandallliability,claims,anddemandsofwhateverkindeitherinlaworinequity,whichariseormayhereafterarisefromthebuildingoruseoftheMachineby:(1),theUser,(2),othersinvolvedwiththeUserinthebuildoruseoftheMachine,and(3),otherstowhomtheUsergrantsuseoftheMachine.TheUserfurthermoreagreesandunderstandsthatthiscontractdischargesOSEfromanyliabilityor claim that theUsermayhaveagainstOSEwith respect tobodily injury,personal injury,orpropertydamages thatmay result fromtheUser’sandBeneficiary’sproductionoruseof themachine,wherevertheMachinemaybeused.TheUseralsounderstandsthattheProducerdoesnotassumeanyresponsibilityfororobligationstoprovidefinancialorotherassistance,includingbutnotlimitedtomedical,health,ordisabilityinsuranceintheeventofinjuryorloss–unlessOSEagreestohelptheUserorBeneficiaryoutofvoluntary,goodfaithandhonor.
UserManualSoil Pulverizer

Power CubeModular Hydraulic Power Unit

Design Rationale

DesignRationale
Open Source Ecology:CivilizationStarterKitv.0.01
Design Rationale
ThePowerCubeisaninterchangeablepowersource.ThisdesignapproachsatisfiesanumberoftheOSECoreValues:
1.Modular-PowerCubesareeasilytradedoutandthedesigniseasilyaltered.Atthesametime,thereisanoveralllogictothedesignthatencouragesinteroperability.
2.User-Friendly-ThePowerCubecanbetransportedwithoutspecialequipmentandswappedoutwithonlyafewminutestraining.
3.Do-It-Yourself-Buildityourself.Useityourself.Repairityourself.NothingaboutaPowerCuberequiresspecialtoolsorproprietaryinformation.
4.Resilience-PowerCubesworkforyou,notagainstyou.Ifonebreaks,youcanswapitoutinthefieldandgetbacktowork.
5. Systems Design - The Power Cube does not maximize the performance of any particularmachine.Rather,itmaximizestheperformanceoftheentireGVCSsystemofsystems.
6.Substitutability -AnyGVCSmachinedesignedtoacceptaPowerCubecan justaseasilybepoweredbyacommercialequivalentorbymanualactivity.Additionally,PowerCubescanreplacecommercialandmanualequivalentsinnon-GVCSapplications.
7.Scalability-Theconceptofthepowercubeautomaticallylendsitselftosmallerversions,largerversionsandversionswithdifferentpowerin/outputs.
8.Simplicity-EachPowerCubeiscomposedofthebareminimumcomponentsnecessaryforgo-anywherepowerproduction.
9.Sufficiency-ThePowerCubeis“goodenough”butcouldbeaugmentedtoachieveanyspecifiedlevelofperformance.
10.Realistic Immediacy-PowerCubesaredoingrealworkrightnowandthedesignisalreadyinitsfourthversion.
Definition
ThePowerCubeisauniversalpowerunit,anditisamodulethatcanbeattachedtotheLifeTrac,Microtrac,Bulldozer,andOpenSourceCar(OSCar)platforms.Assuch,anyoftheseplatformscanbeusedaspowersourcesforotherdevices,suchasworkshoptools,powergenerators,ironworkermachines,oranyotherdeviceswhichrequireapowersource.Thekeytothisflexibility istheself-containednatureofthePowerCube,wherequick-connecthosesandquick-connectphysicalmountingallowthePowerCubetobecoupledtousewithotherdevices.Ithasframe-integratedfuelandhydraulic reservoirs. It currentlycontainsan18or27hpgasolineengine,coupled to
Modular Hydraulic Power Unit

Open Source Ecology:CivilizationStarterKitv.0.01
ahydraulicpump,andproducesfluidflowupto15gallonsperminuteandupto3000poundspersquareinch(PSI)pressure.Itconnectstootherdevicesviaquickcouplersandquick-connecthydraulichoses.Amodernsteamenginewillberetrofittedassoonasit isdevelopedtoallowcompletefuelflexibility.
Problem Statement and Solution
Powermachineryandequipmenttypicallyusesdedicatedengineunits,suchthatalargenumberofdifferentenginesisrequiredtopoweralargenumberofpoweredequipment.Theengineunitistheheartofanypowereddevice.
Solution
Bydecouplingthepowerunitfromapowereddeviceviaquick-attachcoupling–itispossibletoturnadedicatedpowerunitintoaflexiblepowermodule.Wehaveshownproofofconcept–inthatpowerunitscanbesharedbetweendifferentmachines.Thisallowsfordrasticcostreductionintheoverallcostofmechanicalinfrastructures.
Product Ecology
The current iterationof thepower cube is an off-the-shelf gasoline engine, but thedesign isintendedtobeaspowersourceagnosticaspossiblesothatthepowerproductioncanbereadilychanged.Therewill likelybemanyvariationsonthepowercubedesign,butallfittinginsideasimilarsizeprofilesothataGVCSmachinecanreadilyswapoutonePowerCubeforanother.
DesignRationaleModular Hydraulic Power Unit

Fabrication Drawings

Fabrication Manual

Open Source Ecology:CivilizationStarterKitv.0.01
FabricationManualModular Hydraulic Power Unit
1
Power Cube
Version 4

Open Source Ecology:CivilizationStarterKitv.0.01
Fabrication Manual - Bill of MaterialsModular Hydraulic Power Unit
Bill Of Materials
Discrete parts
Name Qty Dimensions Manufacturer /
RetailerPart No.
Engine 1 28 HP Briggs & Stratton 49M777 Series
Solid Shaft Coupling 1 1 1/8” x 5/8” Sweiger Shop Custom
Hydraulic Pump 1 0.976 cu in SurplusCenter.com 9-1766-B
SAE 10M x 3/4” NPTF Adapter 1 3/4” NPTM SurplusCenter.com 9-6405-10-12
3/4" NPTF Return Filter & Head 1 20 GPM SurplusCenter.com 9-059
14 GPM Hydraulic Tank Strainer 1 1 1/2” F x 1” M SurplusCenter.com 9-7290-100
3/4" NPTM TO 3/4" NPTM 90
Elbow1 ¾” SurplusCenter.com 9-5500-10-12
JIC 12M x 3/4 NPTM 90 ELBOW 1 12M x 3/4” SurplusCenter.com 9-2501-12-12
3/4" Quick Coupler S40-6 F/F 1 3/4” SurplusCenter.com 928-C
1/4" NPT Quick Coupler S40-2 1 1/4” SurplusCenter.com 9-6314
1/4 NPTM TO 3/4 NPTF
ADAPTER1 1/4” x 3/4” NPT SurplusCenter.com 9-5405-12
NPT Weld-In Tank Flange 1 1 1/2” SurplusCenter.com 9-7843-24
NPT Weld-In Tank Flange 2 3/4” SurplusCenter.com 9-7843-12
NPT Weld-In Tank Flange 1 ¼” SurplusCenter.com 9-7843-4
Hose barb 1 ¼" NPTM x 1/4" SurplusCenter.com 455-AA
1" Hose Barb to SAE 12M
Adapter1
1” Hose x SAE
12MSurplusCenter.com 9-4604-16-12
1" Hose Barb to 1" NPTM
Adapter1 1” x 1” NPTM SurplusCenter.com 9-4404-16-16
Hydraulic Suction Hose 1 3' SurplusCenter.com 9-1279
Hydraulic Oil Cooler 1 Approx 12” x 15” SweigerShop.com Custom
JIC 12F X JIC 12F 3000 PSI
HYD HOSE1 3/4” x 12” SurplusCenter.com 951-2212
3/4" NPT PLASTIC TANK
BREATHER1 3/4” SurplusCenter.com 9-7957-12
3/4" X 3/4" X 3/4" NPTF TEE 1 3/4" x 3/4" x 3/4" SurplusCenter.com 9-5605-12-12-12
3/4" NPT HEX NIPPLE 4 3/4” SurplusCenter.com 9-5404-12-12
JIC 12M x 3/4" NPTM 90 Elbow 1 3/4” SurplusCenter.com 9-2501-12-12

Open Source Ecology:CivilizationStarterKitv.0.01
FabricationManualModular Hydraulic Power Unit
Name Qty Dimensions Manufacturer /
RetailerPart No.
JIC 12M x JIC 12M UNION 1 JIM 12M SurplusCenter.com 9-2404-12-12
Solenoid 1 SurplusCenter.com 11-1108
12 Volt radiator fan 1 12” - 14” Auto Part
Rubber Fuel Line 1 24” Auto Part
Battery 1 5" x 7.5" x 7.5" Walmart UIP-7
Galvanized Nipple 4 1” Home Depot 64310
Galvanized Elbow 2 1” Home Depot 510-003HN
Galvanized Washer 4 2 ½” ?? ??
Galvanized Round 2 2” ?? ??
Teflon Tape 1 roll ½” wide Home Depot ??
1 Gauge Wire 30” 1 gauge Auto Part ??
1 gauge ring connector
- or -
Copper tubing
6
- or -
9”
1 gauge
- or -
3/8”
Auto Part ??
Ignition Switch 1
12 V Fan Switch 1
Bolt (Angle iron attach) 4 ½” x 2” x 12 TPI
Nut (Angle iron attach) 4 ½” x 12 TPI
Washer flat 8 ½”
Bolt (Engine mount) 4 ¼” x 2” 16 TPI
Nut (Engine mount) 4 ¼” x 16 TPI
Bolt (Hydraulic motor mount) 4 ¾” x 3.5” x 12 TPI
Nut (Hydraulic motor mount) 8 ¾” 12 TPI
Lock washer (Hydraulic motor mount) 4 ¾”
Nut (Fan mount) 4
Bolt (Fan mount) 4
Bolt (Solenoid mount) 2
Tractor Enamel: Glossy Black 1 pint
Steel
Type Thickness Width Total Length (rounded up)
Angle ¼" 2" x 2” 408" (34 ft)
Angle 1/8” 2” x 2” 6”
Plate ¼" 8" 38" (4ft)

Open Source Ecology:CivilizationStarterKitv.0.01
Modular Hydraulic Power Unit
Plate ¼” 2” 120” (10 ft)
Plate ¼" 6" 24" (2 ft)
Plate 3/8” 4” 54” (5 ft)
Tube ¼” 4” x 8” 14 ½” (2 ft)
Tube ¼” 6” x 12” 27 ½” (Hydraulic reservoir)
Tube 1/8” 4” 2” (black pipe)
Tube 1/8” 1 9/16” 12” (Galvanized Muffler Pipe)
Tube 1/8” 6 cm 14” (Galvanized Muffler Pipe)
Expanded Steel 13 gauge 12” 22” (Oil cooler grill)
FabricationManual-BillofMaterials

Open Source Ecology: Civilization Starter Kit v.0.01
Fabrication ManualModular Hydraulic Power Unit
Subassembly Fabrication
Many of the items listed in the Bill Of Materials require preparation before use in assembly of the
Power Cube. This includes drilling and cutting steel up to 3/8” in thickness. These are the parts for
assembling a Power Cube. Parts without special detail are not illustrated.
1. Engine and Hydraulic Pump mounts
a) ¼” x 8” x 12” Plate
b) ¼” x 8” x 9” Plate
c) ¼” x 2” x 2” x 8” Angle
d) ¼” x 2” x 2” x 29” Angle
e) ¼” x 8” x 8” Plate
2. Quick attach mounts
a) [2] 3/8” x 4” x 27” Plates

Open Source Ecology: Civilization Starter Kit v.0.01
Fabrication ManualModular Hydraulic Power Unit
3. Fuel tank
a) [2] ¼” x 4” x 8” Plates
b) 4” x 8” x 14 ½” Tube
c) ¼” x 2” x 24” Plate
d) All welds assembling the tank must be quality welds, as they must not leak. Be careful not
to “over weld” the tank to the mount.
e) Clean the inside of the ¼” x 4” x 8” tube and the two ¼” x 4” x 8” plates – anything left on
these surfaces will end up in the gasoline and could clog the engine when started. Tack and
weld the plates on each end of the tube, taking care to orient the top plate with the filler hole
as shown in the diagram below.
f) Weld the 1/4” tank flange to the hole in the side of the tank tube.

Open Source Ecology: Civilization Starter Kit v.0.01
Fabrication ManualModular Hydraulic Power Unit

Open Source Ecology: Civilization Starter Kit v.0.01
Fabrication ManualModular Hydraulic Power Unit
4. Oil Cooler Mount
a) [2] ¼” x 2” x 24” Plates
b) [2] ¼” x 2” x 1” Plates
c) [2] ¼” x 2” x 22” Plates (Note: the holes in these plates may need adjustment based on oil
cooler mounting holes)
5. Key Switches and Choke Brackets
a) [3] 1/8” x 2” x 2” x 2” Angle

Open Source Ecology: Civilization Starter Kit v.0.01
Fabrication ManualModular Hydraulic Power Unit
6. Electrical cables
a) The connectors can be purchased from an auto parts store – be aware that they usually
require a crimper to attach to the cables. Alternatively, 3/8” copper tubing can be used in 1
½” long pieces instead. Strip 1 ½” insulation from the cable, fully insert fully into 1 ½”
copper tube, flatten end with a hammer and drill hole.
b) [2] 1 gauge cables: 11” (verify length first!)
c) 1 gauge cable: 8 ½” (verify length first!)

Open Source Ecology: Civilization Starter Kit v.0.01
Fabrication ManualModular Hydraulic Power Unit
7. Battery Mounts
a) [2] ¼” x 2” x 2” x 4 3/4” Angle
b) [2] ¼” x 2” x 5/8” Plate
8. Oil filter Assembly
a) Assemble as shown, using teflon tape on all threaded components.
b) The parts for this are (from left to right):
1” nipple
Oil filter and header
1” to ¾” reducer

Open Source Ecology: Civilization Starter Kit v.0.01
Fabrication ManualModular Hydraulic Power Unit
¾” nipple
¾” T adapter
¾” to 3/8” recucer
¼” quick connect
¾” T adapter
¾” quick connect
9. Hydraulic reservoir
a) [2] ¼” x 6” x 12” Plates
b) ¼” x 6” x 12” x 27 ½” Tube
c) All welds assembling the reservoir must be quality welds that do not leak. Be careful not to
“over weld” the reservoir.
d) Clean the inside of the tube and the two end plates – anything on these surfaces will end up
in the hydraulic oil and could damage the pump or cylinders.
e) Tack and weld the 6” x 12” plates to both ends of the 6” x 12” tube. Pay attention to the
orientation of the plate with the filler hole and the side of the tube with other holes – see the
diagram below.
f) Tack and weld the strainer extension tube to the tank, centered around the strainer hole.
g) Insert the strainer into the flange and insert it into the strainer extension tube – verify that it
slides without binding or bottoming and that the flange is flush with the end of the tube.
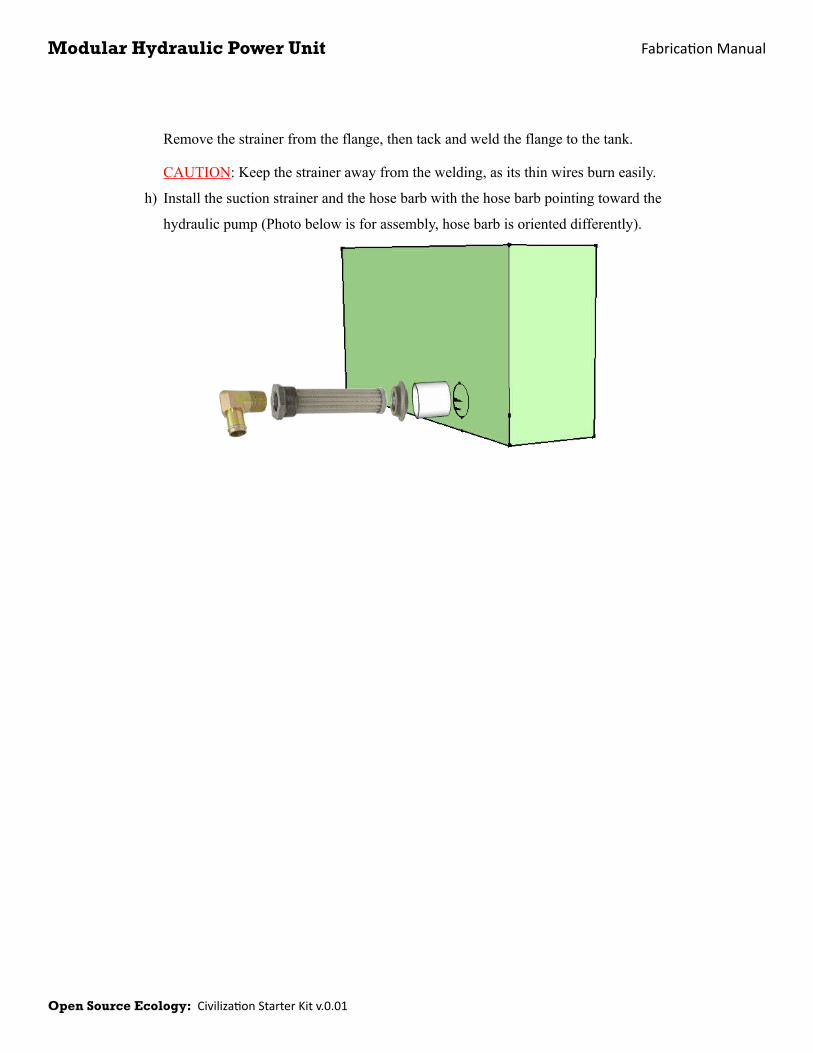
Open Source Ecology: Civilization Starter Kit v.0.01
Fabrication ManualModular Hydraulic Power Unit
Remove the strainer from the flange, then tack and weld the flange to the tank.
CAUTION: Keep the strainer away from the welding, as its thin wires burn easily.
h) Install the suction strainer and the hose barb with the hose barb pointing toward the
hydraulic pump (Photo below is for assembly, hose barb is oriented differently).

Open Source Ecology: Civilization Starter Kit v.0.01
Fabrication ManualModular Hydraulic Power Unit
Assembly
Power Cube assembly requires all the parts listed in the Bill Of Materials to be available and prepared
as detailed in the “Fabrication” section (above). Assembly requires a welder (electric or torch) capable
of welding metal 3/8” thick.
An optional jig can be used to aid in assembly. See Appendix 1 for details.
1. Frame
a) Top / Bottom Rectangles
Position two ¼” x 2” x 2” x 29” pieces angle iron on top of two 27” angle pieces as shown
below. Check that all joints are square, then tack and weld joints.
b) With one welded rectangle on the bottom, position two 24” pieces outside corner joints as
shown below. Check that the angles are square, then tack and weld. Note: The optional jig
makes this much easier and accurate. Repeat the prior procedure and this one for another
half of the frame assembly.

Open Source Ecology: Civilization Starter Kit v.0.01
Fabrication ManualModular Hydraulic Power Unit
c) Position the second rectangle as shown below, then tack and weld. Inspect all corners to
verify secure welds.

Open Source Ecology: Civilization Starter Kit v.0.01
Fabrication ManualModular Hydraulic Power Unit
2. Gas tank
a) Screw the 1/4" hose barb into the 1/4 NPT flange welded into the gas tank.
b) Perform a “soap bubble” test on the tank. Securely cover the larger hole (use something like
strong tape), pressurize the tank using the smaller hole and cover the tank surface with
soapy water. Look closely for new bubbles, mark any leaks and re-weld securely. Repeat
soap bubble test if re-welded.
c) Tack and weld the gas tank mount (¼” x 2” x 24” plate) to the frame. Position it so the gas
tank is 1" from the nearest vertical angle iron support.
d) Tack and weld the gas tank to the gas tank mount as shown below.
3. Hydraulic reservoir

Open Source Ecology: Civilization Starter Kit v.0.01
Fabrication ManualModular Hydraulic Power Unit
The reservoir should already be pre-assembled and ready for installation.
a) Perform a “soap bubble” test on the tank by securely covering the larger hole (use
something like strong tape), pressurizing the tank using the smaller hole and cover the tank
surface with soapy water. Mark any leaks and re-weld securely. Repeat soap bubble test if
re-welded.
b) Secure the hydraulic tank to the frame with clamps, then weld it with 4 x 1” welds. The
tank is ¼” and it can be easily damaged by over-heating. Spacers may be needed on the
sides near the top to keep everything snug.

Open Source Ecology: Civilization Starter Kit v.0.01
Fabrication ManualModular Hydraulic Power Unit
4. Engine Mounts and Hydraulic Pump Mount
a) Bolt the ¼” x 2” x 2” x 8” plate to the ¼” x 2” x 2” x 29” angle as shown using 1/2” x 2”
bolts:
b) Bolt the ¼” x 8” x 12” plate to the 8" angle as shown using 1/2” x 2” bolts:

Open Source Ecology: Civilization Starter Kit v.0.01
Fabrication ManualModular Hydraulic Power Unit
c) Align the plate edges and secure at 90 degree angle and weld. We use welding magnets to
hold the plates at 90 degrees:
d) Mount the engine to the engine plate using [4] 5/16” x 2” bolts. The method for mounting
may depend on your engine. See the following video for details:
http://youtu.be/DO6wbwOjWNA
e) Examine the engine shaft – it should be 2” long. If longer, cut the shaft to extend no more
than 2” from the case. This length is necessary for the coupling. Put the larger keystock in
the engine shaft and slide the shaft coupling on the engine shaft and tighten the allen screws
to hold it in place.

Open Source Ecology: Civilization Starter Kit v.0.01
Fabrication ManualModular Hydraulic Power Unit
f) Assemble the 8” x 8” pump plate as shown with [4] ¾” x 3.5” bolts and [8] 3/4” nuts, [8]
washers and [4] lockwashers. Tighten the nuts to hold the plate firmly:
g) Mount the pump to the pump plate using [2] 7/16 bolts, nuts and washers:

Open Source Ecology: Civilization Starter Kit v.0.01
Fabrication ManualModular Hydraulic Power Unit
h) Make sure the key is in the pump shaft and slide the pump shaft into the bottom of the shaft
coupling and tighten its allen screws. The bolt heads should just be touching the bottom of
the engine plate. Tack and weld the bolt heads to the engine plate.
i) Lower the engine/pump assembly into the frame. Adjust it so the engine plate is parallel
with the frame and weld the 8” angle iron to the reservoir and the 29” angle iron to the
frame.

Open Source Ecology: Civilization Starter Kit v.0.01
Fabrication ManualModular Hydraulic Power Unit
5. Battery mount
a) Weld the ¼” x 2” x 5/8” plates to the ends of the ¼” x 2” x 2” x 4 3/4” plates as shown
below.
b) Weld the two mounts to the angle iron and tank to form a rectangle for the battery as shown
below.

Open Source Ecology: Civilization Starter Kit v.0.01
Fabrication ManualModular Hydraulic Power Unit
c) After the mount has cooled, lower the battery into the rectangle to verify a proper fit.
6. Oil cooler and fan mounts
a) Position the two ¼” x 2” x 22” plates to the outside of the frame, adjust so the oil cooler
mounting bolts match the holes in the plates and is positioned as in the diagram below. Tack
and weld the mounts in to the frame. Verify that the oil cooler bolts match the holes in the
mounts.
b) Use the mounting holes in the fan shroud and the oil cooler width for positioning the

Open Source Ecology: Civilization Starter Kit v.0.01
Fabrication ManualModular Hydraulic Power Unit
mounting plates as shown in the diagram below. Position the four ¼” x 2” x 1” plates, then
tack and weld. Position the two ¼” x 2” x 24” plates against the 1” plates, then tack and
weld. Place the fan on the supports and mark the mounts with bolt hole positions. Place the
bolt heads against the fan mounting plate and weld in place. Verify that the bolts match the
holes in the fan. Inside the frame, adjust the fan position to position fan shroud ¼” from oil
cooler fins. Be careful with radiator as the delicate fins are easily bent and damaged.
c) Place the 9 gauge x 12” x 22” expanded steel grill in front of the oil cooler mounting plates,
positioned to cover the entire oil cooler and check if any holes are necessary to secure with
oil cooler mounting bolts.
7. Screw the filter assembly into the flange on the side of the hydraulic reservoir.

Open Source Ecology: Civilization Starter Kit v.0.01
Fabrication ManualModular Hydraulic Power Unit
8. Connect the 1” suction hose between the strainer and the pump intake.
9. Connect a male ¾” quick connect hydraulic coupler to the pump output.
10. Connect a female ¾” to ¾” elbow to the cooler port nearest the battery cage.
11. Connect one end of the ¾” x 1' hydraulic hose to the second cooler port, then connect the other
end of the ¾” x 1' hydraulic hose to filter assembly.

Open Source Ecology: Civilization Starter Kit v.0.01
Fabrication ManualModular Hydraulic Power Unit

Open Source Ecology: Civilization Starter Kit v.0.01
Fabrication ManualModular Hydraulic Power Unit
12. Weld the 1/8” x 2” x2” x 2” angle brackets to the frame in the positions shown below. Pay
special attention to the hole sizes, as the bracket for the choke has a smaller hole.
<image>
13. Weld the solenoid mounting bolts to the hydraulic reservoir as shown below.
<image>
14. Wire the switches.
15. Fix the throttle control, connect to throttle plate.

Open Source Ecology: Civilization Starter Kit v.0.01
Fabrication ManualModular Hydraulic Power Unit
User Guide
This section is intended for the end user of the Power Cube.
1. Caution
a) Weight
b) Hydraulic hazards
c) Ventilation
2. Mounting
a) Quick attach connector
3. Initial startup and testing
a) Initial Setup
Gasoline
Hydraulic Fluid
Battery Connection
b) Startup
c) Hydraulic Test
4. Routine use
5. Maintenance
a) Engine Oil
b) Hydraulic Fluid
6. Troubleshooting
a) Engine won't start
b) Loud noise
c) No hydraulic power

Open Source Ecology: Civilization Starter Kit v.0.01
Fabrication ManualModular Hydraulic Power Unit
Appendix
Frame Assembly Jig
The welding “jig” in the image below is helpful to insure square angles while assembling the Power
Cube. It is very useful if building multiple Power Cubes.
Note the corner holes that provide access for welding:
Materials List
• ¼” x 2” x 2” Angle Iron: 14'

Open Source Ecology: Civilization Starter Kit v.0.01
Fabrication ManualModular Hydraulic Power Unit
• ½" Rebar: 7' 2”
Cut List
Type Length Dimensions Quantity Color
Angle 22" ¼” x 2 x 2" 2 (red)
Angle 26" ¼” x 2” x 2” 2 (yellow)
Angle 29" ¼” x 2" x 2 2 (green)
Rebar 30.5" ½" 1
Rebar 27" ½" 2

User Manual

Open Source Ecology:CivilizationStarterKitv.0.01
Warnings
• Neverforceahydraulicconnectionthatdoesn’tseemtofit.• Useonlyfastenersofthepropersize.• Bewareofcorroded,looseormissingfasteners.• Donotoperatehydraulicsbelowminimumratedflow.• Donotopenventordrainvalveswhilesystemispressurized.• Lockoutpowerbeforeworkingonsystem.• Useproperliftingandsupportequipmenttoavoidinjury.• Properlydecontaminateskin,clothingandtools.
Hydraulic System Maintenance
Safety & Cleanliness
WearyourPersonalProtectiveEquipment.
Hydraulicsystemsoperateunderveryhighpressures.Shutthesystemdownandrelievesystempressurebeforeopeninganypartofthesystemthatisunderpressure.Donotallowsprayfromanyhighpressureleaktocontactanypartofthebody,asseriousinjectioninjuriesmayresult.Pumps,valvesandmotormaybecomehot;becautiousofincidentalcontactbetweenbareskinandhotsurfaces.Keephandsandclothingawayfrommovingpartsofthesystem.
Nogrindingorweldingoperationsshouldbedoneintheareawherehydrauliccomponentsarebeinginstalled.
Allcylinder,valve,pumpandhoseconnectionsshouldbesealedand/orcappeduntiljustpriortouse.
Wheninstallingpumpsormotors,alwaysaligncouplinghalvesascloselyaspossible,within0.007inch.
Generic
• Anyinterventionmustbecarriedoutwithpressureandtensionreleased.• Checkforvisibleleaks(particularlyatconnections).Tightenorsealifnecessary.• Checkstateofhydraulicfluid.Completelyreplaceifdeteriorating(sunkcolor,odor,milky
aspect).• Checkhydraulicfluidlevel.Refillwithsameviscosityandtosamelineifnecessary.• Ifsystemistobeshutdownforalongtime,leavehydraulicoilinthecircuit.• Replacehydraulicfluid:every24monthsofuse• Replacehydraulicfluidfilters:every12months• Inspecthosesfordamage,blisters,leaksorfraying.Replaceifnecessary.• Ensurepressurereliefvalveisnotheldpartiallyopenbycontamination.• Checkforcorrodedorloosefasteners.
UserManualModular Hydraulic Power Unit

Open Source Ecology:CivilizationStarterKitv.0.01
Pump/Motor Maintenance
Performanceparameters:
• suctionpressure(Ps)• discharge pressure (Pd)• flow(Q)• pump speed (Nr)• pumpageproperties• power
Measurepowerwithacliponampmeter.It’snotallthataccurate,butit’sgoodforabaselinecomparison.
Locatesuctionanddischargegaugestodetermine(Ps)and(Pd).
normal(perpendicular)tothepipewalloncenterlineofpipeinastraightsectionofpipenotinthebottomortop(avoidairandsolids)
Measureflow.It’sdifficultifapermanentflowmeterisn’tinstalled.
insert a pitot tube into the pipeuseadopplerortransitimedevice(non-intrusive)eachmeasuringdevicemustbecalibrated(don’tunderestimatetheimportanceofthis)
Measure Vibration
• Thereisnoabsolutevibrationreadingthatindicatesaproblem.• Sinceeachinstallationisunique,thebestthingtodoistakemeasurementsatfirstpower-on
andatregularintervalstoestablishabaselineandtrending.• Whenpossible,measurevibrationamplitudeattheselocations:
• motoroutboard&inboardbearinghousingsinvertical&horizontaldirection• motoraxialdirection• pumpoutboard&inboardbearinghousingsinvertical&horizontaldirection• pumpaxialdirection
• Alsorecordoperatingmodeofwhateverisbeingmeasured.Thevibrationwillincreaseasthepump/motorworksoutsideofitsBestEfficiencyPoint(BEP;thatisnormal.
• Vibration frequency will indicate what is causing the problem while amplitude indicateshowbadtheproblemis.Bearingmanufacturerswillpublish informationonbearingdefectfrequencyasafunctionofbearingspeed.
Measure Temperature
UserManualModular Hydraulic Power Unit

Open Source Ecology:CivilizationStarterKitv.0.01
• Fluid(oilandwater)mustremainwithincertaintemperatureboundaries.• Bearingsmustnotexceedacertaintemperature.
Measure Shaft Play
Useadial indicator,mountedsolidly tosomething thatdoesn’tmove in relation to theshaft,tomeasurehowfaroutofperfectroundtheshaftis.Anythingmorethan2mil/in(0.002in)isunacceptableatanyspeed.1mil/inisacceptableuptoabout4,000RPM.
Fluid Maintenance
Control the Temperature
• Excessivetemperatureswilloxidizetheoilandcanleadtovarnishandsludgedeposits.• Runningthetemperaturetoolowwillallowcondensationinthereservoirandincreasethe
likelihoodofpumpcavitation.• Typicalindustrialhydraulicsystemtemperaturesoftenrangebetween110to150ºF.• Keepsystemswhichoperateonawaterbasedfluidbelow140ºFtopreventthewaterfrom
evaporating.• Toallowheat to radiate fromthesystem,keeptheoutsideof the reservoircleanand the
surroundingareaclearofobstructions.• Keepair-cooledradiatorsfreeofdirt.• Normaltemperaturedropformostoilcoolersis5to10ºF.• Reservoirsshouldbefilledtotheproperleveltoallowenoughtimefortheheattodissipate.
Keep the Area Clean
Evennewsystemsmaybecontaminatedandshouldbecleanedbeforeuse.Preventcontaminantssuch as dirt, water, cutting fluids, and metal particles from entering the system around thereservoircover,openingsforsuctionanddrainlines,throughbreatherfillopenings,pastpistonrodpacking,andthroughleaksinpumpsuctionlines.
Keep the Fluid Clean
• Reservoirsshouldbefilledtotheproperleveltoallowtimetoshedwateranddirt• Deposits caused by oil degradation can plug valves and suction screens and cause high-
toleranceservovalvestoseizeand/oroperatesluggishly• Topreventcontaminationbeforeuse,storenewfluidinaprotectedareaanddispenseitin
clean,DEDICATEDcontainers.• Cleanthefillcapbeforeremovingittoaddhydraulicfluid.• Inspectfluidfiltersfrequentlyandchangeorcleanthembeforetheygointobypassmode.
Follow an Oil Analysis Program
UserManualModular Hydraulic Power Unit

Open Source Ecology:CivilizationStarterKitv.0.01
• Contaminantsactasacatalystforwear.Thisgeneratedweardebrisfurtheractsasacatalystforadditionalcomponentwear.
• Withaneffectiveoilanalysisprogram,youcansafely increasethestandard1yearintervalwhile at the same time provide yourself with an “early warning” of possible mechanicalproblems.
• Atminimum,checkyourcriticalandlargevolumehydraulicsystemsatleastannuallybyoilanalysis.
• Semi-annual or even quarterly sampling intervals may be required for extremely criticalmachines.
Inmodern equipment using servo valves, oil degradation can be evenmore damaging. Highpressure(upto4000psi),hightemperatures,andsmallreservoirsstressthefluid.Withminimalresidencetimeandhighpressures,entrainedairbubblescancauseextremelocalizedheatingofthehydraulicfluid.Thisresultsinnitrogenfixationthat,whencombinedwithoiloxidation,canformdepositswhichwillplugoilfiltersandcauseservovalvestostick.
OncriticalNCsystems,usequickdisconnecthosesandfilteralloiladdedtothereservoirthrougha5micronfilter.
Portablefilterswill supplementpermanently installedfiltersandshouldbeconstantly rotatedfromsystemtosystemregardlessifyouthinkthesystemrequiresfilteringornot.Systemsshouldbefilteredlongenoughtopassthetotalvolumeofoilthroughthefilteratleast10times.Portablefilters should be usedwhen transferring new oil from drums or storage tank to a system—especiallyforNCmachines.
10 Point Check
Performweekly
1. Checkfluidlevels.Addoil(ifneeded)viaportablefiltration(ifavailable).DONOTMIXOILS!Usethesameoilbrandandviscositygradethatisbeingusedinthesystem.
2. Inspectbreathercaps,breatherfiltersandfillscreens—DONOTpunchholesinscreensinordertoexpediteaddingoil.
3. Checkfilterindicatorsand/orpressuredifferentialgages.4. Visuallyinspectallsystemhoses,pipes,pipeconnectionsforleaksandfrays.Hydraulicfluid
leakageisacommonproblemforindustrialsystems.Excessiveleakageisanenvironmentalandsafetyhazard,increaseswastestreamsandoilconsumption,and,ifignored,canreducethesystemcapacityenoughtooverheatthesystem.
5. Checksystemtemperatureviabuilt-inthermometersorhand-heldinfrareddetectors.Normaltemperature range for most systems is110-140ºF. If temperatures are high, check cooleroperationandreliefvalvesettings.
6. Visually inspect the inside of the reservoir for signs of aeration (via the fill hole using aflashlight).Aeration isacondition inwhichdiscretebubblesofairarecarriedalong inthestreamofoil as it enters thepump.Visual signsof aeration in the reservoir aregenerallyfoamingand/orlittlewhirlpoolstakingsmallgulpsofairintothesuctionstrainer.Causesof
UserManualModular Hydraulic Power Unit

Open Source Ecology:CivilizationStarterKitv.0.01
aeration include: lowfluid levels; airleaks in the suction line; lowfluid temperature; fluidistooviscoustoreleaseairormaintainsuctionatthepump;orfaultyshaftseals.Whenairleaksaresuspectedonthesuctionline,smotheringthesepointswithoilwillusuallypinpointthe leaksbycreatingamarkedchange inpumpnoise.Apump ingestingair soundsas if itweregarglingmarbles.
7. Listentothepumpforthesignsofcavitation.Cavitation isslightlymorecomplicatedthanaeration,butbaressomesimilarities.Cavitationoccurswhenairisreleasedfromthehydraulicoilduringmomentarydepressurizationatthepumpsuctionandthenimplodedontometalsurfaces upon discharge.These implosions are extremely destructive to pump surfaces. Acavitatingpumpwillemitahigh-pitchedwhineorscream.Causesofcavitationarethesameasthoseofaerationwiththeexceptionofsuctionsideairleaks.Howdoyoudiscernaerationfromcavitation?Onewayistoinstallavacuumgageonthesuctionsideandmakesurethepressureisequaltooorgreaterthanthatprescribedbythepumpmanufacturer.Foaminginthereservoirisusuallythetelltalesignofaeration.
8. Inspectasmallsampleoffluidforcolor,signsofcontaminationandodor.Keepinmindthatvisualinspectionislimitedinthatitwillonlydetectsignsofexcesscontamination.
9. Scanelectricallycontrolledservovalveswithaninfraredthermometer.Highvalveandsolenoidtemperatures(over150ºF)usuallyindicatethevalveissticking.
10.Scantheelectricdrivemotorwithforhousinghotspotsandrotorbearingtemperaturesusinganinfraredthermometer.
Change The Fluid
• Drainthesystemwhilethefluidishottokeepcontaminantsinsuspension.• Emptyfluidfromcylinders,accumulatorsandlinesthatmightnotdrainproperly.• Mop,siphon,orpumpoutoilleftinthereservoir.• Wipereservoircleanwithlintfreeragsandremoverustandfreepaint.• Replaceorcleanfilterelementsandstrainersandcleanfilterhousings.• Refillthesystemwithnewfluidmakingsuretoventhighpoints.• Restartandchecksystemforproperoperation.
Oil Analysis
Identify“MissionCritical”Equipment It’snotnecessarytoperformoilanalysisoneverysinglelubricatedsystem.Identifycriticalapplicationsthatwouldseriouslyjeopardizeproductioniftheyweretoshutdownunexpectedly.
RegisterYourEquipmentItisimportanttohaveyourequipmentproperlyregisteredwithalab.Thissupportsroutinetrendingandplaysakeyroleinearlydetectionoflubricantorequipmentproblems.There’snoneedforyoutodecidewhichtestsareappropriateforaparticularapplicationbecausethelabhasalreadyestablishedtestslatesforspecificapplications.
EstablishBestPracticesEstablishaconsistent“how-to”practicefortakingoilsamplesfromyourequipmentandtrainyourmaintenancepersonneltousethispractice.Correctsamplingpracticesarecriticaltothevaluereceivedfromtheanalysisdata.Thisextremelyimportantsteprarelygets
UserManualModular Hydraulic Power Unit

Open Source Ecology:CivilizationStarterKitv.0.01
theattentionitneeds.
SampleRetrievesamplesinaccordancewithyourbestpracticeandsendthemtothelabassoonaspossible.Samplesthataresetasidemaydeteriorateandgivenon-representativeresults.AnalyzeAthoroughanalysis,keyedontrends,helpsdetermineyoursystems’conditions.InterpretReviewingtheresultsanddeterminingwhat,ifany,actionisrequiredcanmakeorbreakasuccessfulprogram.It’simportanttorememberthatanalertsampledoesnotnecessarilymeanimminent failure. Seek consultation on alert samples and re-sample to confirm present databeforetakingmassivecorrectiveaction.
Take Corrective Action and Document, Document, Document!!! As always, documentation isthekey toknowingwhereyou’vebeenandwhereyou’regoing.Documentcorrectiveactionsresultingfromoilanalysis.
Mechanical System Maintenance
Engine Maintenance
• Checkoillevel:every5hours• Changeoilandoilfilter:afterfirstfivehours• Changeoil:every50hoursoreveryseason(moreoftenifdirtyconditions)• Changeoilfilter:every100hoursoreveryseason• Replacefoamaircleaner:every25hoursoreveryseason• Replacepaperairfilter:every25hoursoreveryseason• Replacepaperairfilterw/foamaircleaner:every100hoursoreveryseason• Replacesparkplugs:every100hoursoreveryseason• Replacefuelfilter:every100hoursoreveryseason
UserManualModular Hydraulic Power Unit

Hydraulic Pump Failure Modes & Troubleshooting

Open Source Ecology:CivilizationStarterKitv.0.01
hydraulicfailuremechanicalfailure
Causepum
p does not deliver liquid
pump does not
deliver sufficient
capacity
pump does not
deliver sufficient
pressure
pump
delivers flow
intermittently
bearings run hot and/or fail on a
regular basis
high rate of m
echanical seal failure
packing has short life
pump vibrates
at higher-than-norm
al levelspum
p is drawing
too much pow
er
wear of internal
wetted parts is accelerated
pump not prim
ed or prime lost
XX
XX
suctionand/ordischargevalvesclosedorcloggedX
XX
X
suctionpipingincorrectX
XX
insufficientNPSHavailable*
XX
XX
XX
excessiveairentrappedinliquidX
XX
X
RPMtoolow
*X
XX
incorrectrotationX
X
brokenimpellerorbentvanes
XX
XX
incorrect impeller or im
peller diameter
XX
system head too high
X
instrumetnsgiveerroneousreadings
XX
airleaksinsuctionlineX
excessiveshaftmisalignm
entX
XX
inadequatelubricationX
lubricantcontamination
X
inadequatelubricantcoolingX
axialthrustorradialloadshigherthanbearingratingX
impropercouplinglubrication
XX
suctionpressuretoohighX
X
bearing incorrectly installedX
XX
impelleroutofbalance
XX
X
overheatingofsealfacesX
excessiveshaftdeflectionX
XX
lackofsealflushatsealfacesX
incorrectsealinstallationX
pump is run dry
X
pumpisrunoffdesignpoint
XX
XX
X
shaft/shaftsleeveworn
XX
packingglandnotproperlyadjustedX
X
packingnotproperlyinstalledX
impeller clogged
XX
couplingoutofbalanceX
XX
baseplate not installed properlyX
XX
pumpoperatingspeedtooclosetosystem
’snaturalfrequencyX
bearingfailureX
XX
piping not properly anchoredX
XX
pumpand/ordrivernotsecuredtobaseplate
XX
X
specificgravityhigherthanspecifiedX
XX
viscosityhigherthanspecifiedX
XX
internalclearancestootightX
X
chemicalsinliquidotherthanspecified
X
pump assem
bled incorrectlyX
XX
XX
X
highersolidsconcentrationthanspecifiedX
NPSH=NetPositiveSuctionHead;differencebetweenliquid
pressureandvaporpressureatacertaintemperature.Toolittleof
itmeansyourliquidisboiling.
RPM=RevolutionsPerM
inute;speedatwhichsom
ethingturns.Toolittleofitm
eansnotspinningfastenough.
HydraulicPumpFailureModesModular Hydraulic Power Unit

HydraulicPumpTroubleshooting
Open Source Ecology:CivilizationStarterKitv.0.01
problemprobable cause
remedy
no liquid deliveredpum
p not primed
reprime pum
p, check that pump and suction line are full
of liquidsuction line clogged
remove obstructions
impeller clogged w
ith foreign material
back flush pump to clean im
pellerw
rong direction of rotationchange rotation to concur w
ith direction indicated by arrow
on bearing housing or pump casing
foot valve or suction pipe opening not submerged
enoughconsult factory for proper depth. U
se baffler to eliminate
vorticessuction lift too high
shorten suction pipepum
p not producing rated flow or head
air leak through gasketreplace gasket
air leak through stuffing boxreplace or readjust packing/m
echanical sealim
peller partly cloggedback flush pum
p to clean impeller
worn suction sideplate or w
ear ringsreplace defective part as required
insufficient suction headensure that suction line shutoff valve is fully open and line is unobstructed
worn or broken im
pellerinspect and replace if necessary
pump starts then stops pum
pingim
properly primed pum
preprim
e pump, check that pum
p and suction line are full of liquid
air or vapor pockets in suction linerearrange piping to elim
inate air pocketsair leak in suction line
repair (plug) leakbearings run hot
improper alignm
entrealign pum
p and driveim
proper lubricationcheck lubricate for suitability and level
lube coolingcheck cooling system
pump is noisy or vibrates
improper pum
p/driver alignment
align shaftspartly clogged im
peller causing imbalance
back flush pump to clean im
pellerbroken or bent im
peller or shaftreplace as required
foundation not rigidtighten hold dow
n bolts of pump and m
otor or adjust stiltsw
orn bearingsreplace as required
suction or discharge piping not anchored or properly supported
anchor per Hydraulic Institute S
tandards Manual
recomm
endationpum
p is cavitatingsystem
problemexcessive leakage from
stuffing box/seal cham
berpacking gland im
properly adjustedtighten gland nuts
stuffing box improperly packed
check packing and repack boxw
orn mechanical seal parts
replace worn parts
overheating mechanical seal
check lubrication and cooling linesshaft sleeve scored
remachine or replace as required
motor requires excessive pow
erhead low
er than rating, pumps too m
uch liquidconsult factory. Install throttle valve, trim
impeller
diameter
liquid heavier than expectedcheck specific gravity and viscosity
stuffing packing too tightreadjust packing. R
eplace if worn
rotating parts bindcheck internal w
earing parts for proper clearances
Modular Hydraulic Power Unit

AppendixCivilization Starter Kit

Civilization Starter Kit v.0.01 Credits

CivilizationStarterKitv.0.01Credits
Open Source Ecology:CivilizationStarterKitv.0.01
Appendix
Civilization Starter Kit Credits
ThefollowingisacomprehensivelistofindividualswhocontributedtotheCivilizationStarterKitDVDv0.01.
Machines and CAD
1.BriannaKufa-CEBmachinefabricationprocedurelead2.TomGriffing-PowerCubefabricationprocedurelead,2DandSketchupmodifications3.JamesSlade-buildofbentloaderarms;firstCEBreplication;machinedisassemblyinstructionals4. Mike Apostol - full CAD drawings of tractor, CEB press, Pulverizer; Pulverizer fabricationprocedure5.MarcinJakubowski-OSEParadigmpage,others6.YoonseoKang-electrohydraulicintegrationtomechanicalpartofCEB;videosandinstructions7.JamesWise-OSECEBControllerboarddevelopment8.WilliamCleaver-LifeTracIIICAD9.DanielWorth-PowerCubefabricationdrawings10.MikeDoty-FullFabricationdrawings,CEBmechanical11.ChrisFornof-PowerCubeframeinstructionalsinSketchup12.RobBeddingfield-CEBdrawerandshakerFabricationDrawings13.HardiMeybaum-GrabCADchallengeontractor
Video
1.IsaiahSaxon-GVCSin2Minutesvideo,KickstarterVideo2.IanMidgley-majorvideocontribution,suchasPracticalPostScarcityVideo,disassemblyofmachines,others3.RebeccaRoger-constructionupdatevideo4.SeanChurch-machineoperationvideos,constructionreview
Construction
1.FloydHagerman-constructiondetail,shallowinsulatedfoundation2.PawelSroczynski-model40sqmeterCEB/Strawmicrohouse3.LarryDobson-gasifierhotwaterstoveplans4.KenMorton-beginningofergonomicanalysisofconstruction
Editing/Publishing DVD
1.Matt_Maier-organizationofTableofContents,backgroundinfoonhydraulicsystems2.SimonWalter-Hansen-DVDpublishing
Other
1.MarkNorton-ProductEcologyDiagrams

Open Source Ecology:CivilizationStarterKitv.0.01
2.AaronMakaruk-OSEEnterprisePlanVideo/CivilizationStarterKitv.0.01-PDF
Kickstarter Supporters
SpecialthanksgotoTrueFansandtheKickstarterSupporterswhofundedTheLastMileontheconstructiontoolkit.Hereisthelistofatotalof1384KickstarterSupporters.
CivilizationStarterKitv.0.01CreditsAppendix

Fabrication Drawings

Open Source Ecology License for Distributive Economics

Open Source Ecology:CivilizationStarterKitv.0.01
OSE License for Distributive Economics
OSELicenseforDistributiveEconomicsisessentiallytheCreativeCommons01.0UniversalPublicDomainDedicationplusethicaladherencetotheOpenSourceEcologyParadigm.
TheethicaltermsoftheOSELicenseincludeexplicitintentofcreatingDistributiveEnterprise.Wearetakingthisstandmakeitexplicitthatourcontentisintendedtohaveeconomicsignificanceforatransitiontotheopensourceeconomy.Thisisintendedtoraiseawarenessofdistributiveenterpriseasafoundationforaneconomicsystembeyondartificialmaterialscarcity-andforenvironmentalregenerationandsocialjustice.
Weencourage attribution and sharing of derivativework,without requiring people to do so.Webelievefirmlyinnon-coercion,asthatyieldsthemostpositive,long-termresultsonhumanrelations.
Creative Commons License
Statement of Purpose
The laws ofmost jurisdictions throughout theworld automatically confer exclusive CopyrightandRelatedRights(definedbelow)uponthecreatorandsubsequentowner(s)(eachandall,an“owner”)ofanoriginalworkofauthorshipand/oradatabase(each,a“Work”).
Certain owners wish to permanently relinquish those rights to a Work for the purpose ofcontributingtoacommonsofcreative,culturalandscientificworks(“Commons”)thatthepubliccanreliablyandwithoutfearoflaterclaimsofinfringementbuildupon,modify,incorporateinotherworks, reuseand redistributeas freelyaspossible in any formwhatsoeverand for anypurposes,includingwithoutlimitationcommercialpurposes.TheseownersmaycontributetotheCommonstopromotetheidealofafreecultureandthefurtherproductionofcreative,culturalandscientificworks,ortogainreputationorgreaterdistributionfortheirWorkinpartthroughtheuseandeffortsofothers.
For these and/or other purposes andmotivations, andwithout any expectationof additionalconsiderationorcompensation,thepersonassociatingCC0withaWork(the“Affirmer”),totheextentthatheorsheisanownerofCopyrightandRelatedRightsintheWork,voluntarilyelectstoapplyCC0totheWorkandpubliclydistributetheWorkunderitsterms,withknowledgeofhisorherCopyrightandRelatedRightsintheWorkandthemeaningandintendedlegaleffectofCC0onthoserights.
1.Copyright and Related Rights.AWorkmadeavailableunderCC0maybeprotectedbycopyrightandrelatedorneighboringrights(“CopyrightandRelatedRights”).CopyrightandRelatedRightsinclude,butarenotlimitedto,thefollowing:
therighttoreproduce,adapt,distribute,perform,display,communicate,andtranslateaWork;
OSELicenseforDistributiveEconomicsAppendix

Open Source Ecology:CivilizationStarterKitv.0.01
moralrightsretainedbytheoriginalauthor(s)and/orperformer(s);
publicityandprivacyrightspertainingtoaperson’simageorlikenessdepictedinaWork;
rightsprotectingagainstunfaircompetition in regards toaWork, subject to the limitations inparagraph4(a),below;
rightsprotectingtheextraction,dissemination,useandreuseofdatainaWork;
databaserights(suchasthosearisingunderDirective96/9/ECoftheEuropeanParliamentandoftheCouncilof11March1996onthelegalprotectionofdatabases,andunderanynationalimplementationthereof,includinganyamendedorsuccessorversionofsuchdirective);
andothersimilar,equivalentorcorrespondingrightsthroughouttheworldbasedonapplicablelawortreaty,andanynationalimplementationsthereof.
2. Waiver. To the greatest extent permitted by, but not in contravention of, applicable law,Affirmerherebyovertly, fully,permanently, irrevocablyandunconditionallywaives,abandons,andsurrendersallofAffirmer’sCopyrightandRelatedRightsandassociatedclaimsandcausesofaction,whethernowknownorunknown(includingexistingaswellasfutureclaimsandcausesofaction),intheWork(i)inallterritoriesworldwide,(ii)forthemaximumdurationprovidedbyapplicablelawortreaty(includingfuturetimeextensions),(iii)inanycurrentorfuturemediumandforanynumberofcopies,and(iv)foranypurposewhatsoever,includingwithoutlimitationcommercial, advertising or promotional purposes (the “Waiver”). Affirmermakes theWaiverforthebenefitofeachmemberofthepublicat largeandtothedetrimentofAffirmer’sheirsandsuccessors, fully intendingthatsuchWaivershallnotbesubject torevocation,rescission,cancellation,termination,oranyotherlegalorequitableactiontodisruptthequietenjoymentoftheWorkbythepublicascontemplatedbyAffirmer’sexpressStatementofPurpose.
3.Public License Fallback.ShouldanypartoftheWaiverforanyreasonbejudgedlegallyinvalidorineffectiveunderapplicablelaw,thentheWaivershallbepreservedtothemaximumextentpermitted taking into account Affirmer’s express Statement of Purpose. In addition, to theextenttheWaiverissojudgedAffirmerherebygrantstoeachaffectedpersonaroyalty-free,nontransferable,nonsublicensable,nonexclusive,irrevocableandunconditionallicensetoexerciseAffirmer’sCopyrightandRelatedRights in theWork (i) inall territoriesworldwide, (ii) for themaximumdurationprovidedbyapplicablelawortreaty(includingfuturetimeextensions),(iii)inanycurrentorfuturemediumandforanynumberofcopies,and(iv)foranypurposewhatsoever,includingwithoutlimitationcommercial,advertisingorpromotionalpurposes(the“License”).TheLicenseshallbedeemedeffectiveasofthedateCC0wasappliedbyAffirmertotheWork.ShouldanypartoftheLicenseforanyreasonbejudgedlegallyinvalidorineffectiveunderapplicablelaw,suchpartialinvalidityorineffectivenessshallnotinvalidatetheremainderoftheLicense,andinsuchcaseAffirmerherebyaffirmsthatheorshewillnot(i)exerciseanyofhisorherremainingCopyrightandRelatedRightsintheWorkor(ii)assertanyassociatedclaimsandcausesofactionwithrespecttotheWork,ineithercasecontrarytoAffirmer’sexpressStatementofPurpose.
OSELicenseforDistributiveEconomicsAppendix

Open Source Ecology:CivilizationStarterKitv.0.01
4.Limitations and Disclaimers.
NotrademarkorpatentrightsheldbyAffirmerarewaived,abandoned,surrendered,licensedorotherwiseaffectedbythisdocument.
AffirmerofferstheWorkas-isandmakesnorepresentationsorwarrantiesofanykindconcerningtheWork, express, implied, statutoryorotherwise, includingwithout limitationwarrantiesoftitle,merchantability,fitnessforaparticularpurpose,noninfringement,ortheabsenceoflatentorotherdefects,accuracy,orthepresentorabsenceoferrors,whetherornotdiscoverable,alltothegreatestextentpermissibleunderapplicablelaw.
AffirmerdisclaimsresponsibilityforclearingrightsofotherpersonsthatmayapplytotheWorkoranyusethereof,includingwithoutlimitationanyperson’sCopyrightandRelatedRightsintheWork.Further,Affirmerdisclaimsresponsibilityforobtaininganynecessaryconsents,permissionsorotherrightsrequiredforanyuseoftheWork.
AffirmerunderstandsandacknowledgesthatCreativeCommonsisnotapartytothisdocumentandhasnodutyorobligationwithrespecttothisCC0oruseoftheWork.
OSELicenseforDistributiveEconomicsAppendix

Open Source Ecology Specifications

Open Source Ecology:CivilizationStarterKitv.0.01
Introduction
OSESpecificationsareametricforassessingqualitiesthatcontributetothecreationofre-localizedeconomicproduction,asabasisforcommunityprosperityinaninterconnectedworld.
TheOSESpecificationsareastandardaimedatdefiningandevaluatingthecriteriaofproducts,services,andtheirproduction-whichservetopromotethecreationofabundanceeconomies,andtherefore,thecreationofresilientcommunities.Abundanceexistswhereacommunityusesitsresourcebaseinsuchawaythathumanneedsanddesiresareprovidedabundantly-withsignificantsurplustofuelculturalandscientificprogress.
GVCS Specifications/Core Values
ThesearethevaluesofOSEthatinformthedevelopmentoftheGVCSwhicharetobeembodiedinthedevelopmentprocess,intherecruitmentofvolunteers,initscorporatestructure,andinalloperations,publicandprivate:
1.Open Source-wefreelypublishour3ddesigns,schematics,instructionalvideos,budgets,andproductmanualsonouropensourcewiki.Westrivetoharnessopencollaborationwithaglobally-distributedteamof technicalcontributors.Wevaluetransparencyofouroperations,businessmodel,strategicdevelopment,“code”(blueprintsanddesigns),management information,andany other aspects that can lead to distributive economics. Commentary:Ourmain goal is tocontributetothecreationofopenculture,wheresharingandcollaborativedevelopmentisvaluedovergreedandexclusiveness.Thistypeofculturepromoteslifeandgrowth,asopposedtofear-basedaggressiveness.Opensourcecultureincludespublishing‘earlyandoften’toexposeerrorsanddeadends–whererapidgrowthoccursbyadjustingtofailure.Failingearlyallowssolutionstobe foundearly. Failureanddeadendsareabundant in life– and themarkof a successfulindividualistheirabilitytorespondtofailureinamannerthatleadstogrowthandtranscendence.
2.Distributive Economics–Wepublishourbusinessmodelsopenlysothatotherscanreplicateany enterprise. “Everything we know, you know.” This is intended to generate truly freeenterpriseandlife-givingcompetition,asopposedtomonopolycapitalismormilitarism.Inoneword-distributiveeconomicsarecalledsharing.Inthepoliticalsense,thisphenomenonmaybedescribedasdecentralizationengineering. Itshouldbenotedthat informationshouldbefree,becausethecostofdistributinginformationisnegligible.However,atomsorphysicalobjectsarenot‘free’inthesamesense,assignificanthumanenergyisrequiredtoproduceanddistributephysicalgoods.
3.Low-Cost-Thecostofbuyingormakingourmachinesare,onaverage,5-10xcheaperthanbuyingfromanindustrialmanufacturer-includinganaveragelaborcostof$25hourforaGVCSfabricator.
4.Modular – Components of the GVCS function as interchangeablemodules.Motors, parts,assemblies,andpowerunitscaninterchange,whereunitscangroupedtogethertodiversifythefunctionalitythatisachievablefromasmallsetofunits.Toseehowthedifferentpartsfittogether.
OSESpecificationsAppendix

Open Source Ecology:CivilizationStarterKitv.0.01
5. User Friendliness – Design-for-disassembly, simplicity, transparency, and open sourcedocumentation allows theuser to comprehend, take apart,modify, service,maintain, andfixtoolsreadilywithouttheneedtorelyonexpensiverepairmen.
6.DIY - Theusergains controlofdesigning,producing,andmodifying theGVCS tool set.DIYis intended to promote themaker, doer, creator, non-consumer culture – in peoplewho areinterested in creating their own custom environment as opposed to accepting massively-standardized options. DIY, however, does not imply substandard or economically-insignificantproduction-astheproductstillcouldandshouldhaveindustrialefficiencyandhighperformance.HighperformanceisnotinconsistentwithDIYculture,aslongastheenablingtoolsandtechniquesareaccessible.ThereisnolimittothetoolingavailableintheDIYcontext-aslongasthetoolsareappropriate,opensource,anduser-centered.
7.Closed-Loop Manufacturing and Material Cycles–Anyproductshouldneverbeawaste,butafeedstockforanotherprocess.Ourprojectreliesonrecyclingmetal intovirginfeedstockforproducingfurtherGVCStechnologies-therebyallowingforcradle-to-cradlemanufacturingcycles.
8. High Performance - Performance standards must match or exceed those of industrialcounterpartsfortheGVCStoprovideacomparableorbetterstandardofliving.NotethatthisisnotinconsistentwithDIYculture.
9. Industrial Efficiency - In order to provide a viable choice for a resilient lifestyle, theGVCSplatformmatchesorexceedsproductivitystandardsofindustrialcounterparts.10. Ecological Design -Our products promote a harmonious co-existence between natureandhumans.Theentireprocessandtechnologymustfitthecriteriaforbeingenvironmentallyfriendlyandregenerative.
11.Resilience -Thesystemsthatwearedesigningaredesignedtobeadaptable.Thisarisesfromtheabilitytomodify,scaleandreplicatethecomponentsandsystemstomeetrequirementofconstantlychangingconditions.
12.Systems Design–Ourdesignsconsiderthewholesystemoflifesupport,intermsofhowthedifferentmachines and services interfacewithone another.Differentmachines can functionsasmodules in awide arrayof integrated systems.Wedonot choose technologieswithpeakpointperformance,butwithpeaksystemsperformanceas theyfit intoa resilientcommunityintegratedwithitsnaturallifesupportsystems.Partofthesystemsdesignissynergy–inthattheGVCSisintendedtoattainitsmaximumpotentialwhenallofitscomponentsareworkingwithoneanother.
13.Lifetime Design –Ourproductsaredesigned fora lifetimeofuse–via soliddesign,userserviceability,opensource,DIYdesign.
14.Substitutability –Our products tend to the substitutability of common resources for lesscommonorstrategicresources.
OSESpecificationsAppendix

Open Source Ecology:CivilizationStarterKitv.0.01
15.Robustness–Applicationsofourworkrangefromthe1sttothe4thworlds,fromthecitytothecountry,fromhightechnologytolowtechnologyapplications,atdifferentscalesofoperation.
16.Multipurpose Flexibility–Ourtoolsaretypicallynotdedicateddevices,butonesthatcanbeusedflexiblyinawiderangeofapplications.
17.Best Practice–wefocusonoptimizationofourproductstoachievethebestpossibledesignandfunctionality.
18.Simplicity-Wedesignforabsolutesimplicitywithoutsacrificingperformancestandards.
19.Complete Economy–TheworkofOSEisintendedtobeaworkableblueprintforacompleteeconomy.Ourdesignsaregearedforamakerlifestyleonthepartofcommunitymembers.Thisisalsoknownasaneo-subsistencelifestyle–wherecommunitiescanprovidealltherequirementsofacompleteeconomy,suchthattradeisonlyanoption,notanecessity.
20.Freedom from Material Constraints–TheGVCSisintendedtoprovideallthematerialneedsofacommunityinanefficientway.Thisallowspeopletohavefreetime,whichallowspeopletochoosetheirpursuitsfreely,beyondconstraintsofmaterialscarcity.ThisisalsoknownasHigh-TechSelf-Providing.
21.Division of Labor–Ourdesignsfocusontheneedsofamodernvillageenjoyingahighqualityoflife,asopposedtoindividualutilization.Allofthetechnologiesmaybeadaptedtoanindividual’suse,butdivisionoflaborismoredesirableforachievingacompleteeconomyinacommunity.
22.Scalability and Fractality–TheGVCStoolsaredesignedtobescalabletodifferentsizesofoperations,fromindividualhouseholdstoagglomerationsofvillages(cities).Thedesignshouldbefractal,inthateachunitofoperationshouldbeself-contained(complete)andresilient.
23.Village Scale–TheGVCSisintendedtobeoptimizedforavillagescaleofabout200people,orDunbar’snumber–asthenumberofpeoplewhocanmaintainface-to-faceinteraction.
24.Nonviolence–TheGVCS isdesignedtoprovide forall theneedsofacommunitywithoutkillingorstealingfromothers.
25.Amicable Social Contract–TheGVCStoolsetisdesignedtopromoteajust,equitable,andlife-givingsocialcontractforavillagecommunitylivingwiththeGVCS.ThequalitiesoftheGVCSareintendedtopromotegoodrelationshipsbetweenavillage-scalegroupofpeople.Thesocialcontract isbasedoncollaborativedivisionof labor,whereproductivityof individualmemberscontributestothewell-beingofthewholecommunity.Thebasicrequirementislifelonglearningandregenerativestewardshipoflandandresources,alongwithnon-violence.
26.Community and Family–OSEpromotesthereconnectionofpeopletooneanotherasaresultofincreasedfreedomfrommaterialconstraints.Thisreconnectionalsoincludesreconnectionto
OSESpecificationsAppendix

Open Source Ecology:CivilizationStarterKitv.0.01
one’strueneeds,toone’sfamily,andtotheglobalfamilyofalllivingcreatures.
27.Proven Techniques–Wefocusontime-provenconcepts,techniques,andtechnologies.Allareprinciplesaregenerallyregardedascommon,historicalknowledgeorwisdomlearnedthrougheonsofcivilization.
28. Cross-Disciplinary Integration – We provide cutting edge practice in so far as they areintegrations of knowledge frommany fields and disciplines.We value unabashed boundary-crossing and cross-fertilization, drawing from asmany cultures, regions, and time periods aspossible.
29.Sufficiency–Ourdesignfocusesonsufficiency–i.e.,weunderstandthatweneedtoreachacertainlevelofperformance,andthatissufficient.Thisisdistinctfromcontinuousadditionoffrivolousbellsandwhistles.
30.New Economics–OneaspectofOSE is that itallowsforthecreationofaresourcebasedeconomy,wheretruewealthisbasedonthevalueofnatural,primarilylocalresources,wherewealthiscreatedfromaddingvaluetonaturalresourcesbytransformingthemtohuman-usableform.
31.Flexible Fabrication–This isamodeofproductiondistinct fromspecialization. Inflexiblefabrication,generalpurposemachineryisusedbyhighlyskilledworkerstoproduceawidearrayofproducts–asopposedtospecializedmachines,operatedbyhighlydeskilledworkers,producingonlyasingleitem.Ourmeanstoflexiblefabricationistheopensourcefablab.
32. Technological Recursion – The flexible fabrication technology also allows producers toproducemorecomplexmachinesandparts.Thisallowsalocalcommunityto,eventually,attainthecapacitytoproduceanytechnologyknowntohumankind.
33. Industry 2.0 – This is a concept thatflexible fabrication, combinedwitha collaboratively-developed, global repository of down-loadable product design has the potential to becomethe new engine of production. This is particularly useful towards relocalization of productiveeconomiesandtowardsdistributiveeconomics.Industry2.0isadirectgoalofOSE.
34.Permafacture-ecologicalfabricationwithlifetimedesign.
35.Local Resources–TheGVCSisfueledbylocalresources,suchaswater,sunlight,rockandsoil,viatechnologicalrecursion.
36.Replicability –OSEwork is intended tobe replicable, self-replicating, and viral. Theopensourcenature,low-cost,andsimplicityofourdesignsarekeytothis.
37.Meaning–Technology,whenusedappropriately,isintendedtoreconnectonetomeaning,andtonaturalecosystems.Reconnectiontonaturecanoccurfromconstantinterplaybetweenhumansandnature,asnatural resourcesarestewardedresponsiblytomeethumanneedsby
OSESpecificationsAppendix

Open Source Ecology:CivilizationStarterKitv.0.01
benignprocesses.
38.Appropriate Automation –We favor automation of production or other tasks wheneverrepetitive,difficult,dangerous,orotherwiseunrewardingtaskscanbecarriedoutwithcomputerassistanceinsteadofhumanlabor.Wefavorthisifthistrulyincreasesqualityoflifeandreducestoil,withoutlossofmeaning,violence,orothernegativesystemsconsequences.
39.Long Term Approach –OSE is seeking long-termsolutionson the100year scale into thefuture,notBand-Aidsonsuperficialissues.Wearelookingatissuesforthelonghaul,withlastingpeaceandstabilityforhumanityasthegoal.
40.Network–OSEisinterestedincreatinganetworkoflike-mindedcommunitiesthatfollowOSEvalues,suchthatculturalexchangecanhappenbetweendifferentcommunities.Thisreferstothe1000GlobalVillagesconcept-whichservesasmodelcommunitiesthatinfluencetherestoftheworldinapositiveway.Thisbringsinanelementofmobilityintothecommunitysocialfabric.
41.Model Community -TheOSEVillagewiththeGVCSareintendedtoprovideapositive,best-practice example of integrated, meaningful lifestyles along the principles of abundance andprosperity-asashiningpointoflighttoinspirepeopleinmanywalksoflife.
42.Land and Resource Stewardship–EachOSEfacilityfunctionsasalandsteward.Landisnotforsale,butispreservedforeverasapermanentsiteofhumanheritageandculturalgrowth.Resources are stewarded so that they improve inqualitywithtime, asopposed tobecomingdepleted.
43. Iconoclastic Innovation and Transformation – OSE favors iconoclastic approaches whichaddress issues at the root, not symptoms – towards addressing pressing world issues (war,poverty,corruption,distributionofwealth,disease,etc.).Wearenot looking formass-culturecompromisesswayedbypoliticalorspecialinterests,butforauthenticsolutionsbasedonvirtuescommontoallhumankind.
44.Absolute Creative Approaches-Wedonotpromotedestroyinganything,justcreatingabettersolutionthatmakestheoldparadigmobsolete.Wedonothateanygrouporpolitic,becauseweareallinthistogether.Webelieveinpositivepsychology,inspiration,andbringingoutthevirtuesinpeople–byappealingtotheirabsolutecreativity.
Methods and Strategic Approaches
1. Open – Open Source Ecology endorses open source culture of sharing and collaborativedevelopmentthroughout,towardstheendofdistributiveeconomics.Thisappliesatthelevelofourprocess,organizationalstructure,businessandproducts.Ontheprocesslevel,weencourageothers to collaborateopenly, yet respectfullyof otherdevelopers’ needs. To this end,weareaimingtocreatecollaborationstructuresandplatformsthatallowotherstocollaboratefreely,andtopublishmeaningfulresultsopenly.Weseektodesignallofouroperationstobeconsistentwiththisprinciple.Weencourageeverybodyonthedevelopmentteamtobetransparentabout
OSESpecificationsAppendix

Open Source Ecology:CivilizationStarterKitv.0.01
their work, and to ask openly for collaborative assistance.We encourage everybody to giveinformationawayforfree–asthecostofsharinginformationiszero.
2.Distributive Economics-Werecognizethechallengesofsharinginformationopenly–inthatsomeoneelsecan‘steal’anideaandcapitalizeonit.Weaddressthisissuebyencouragingpeopletopublishopenly,sothatpriorartmakes informationaccessibletoall,andtherefore,makinginformationun-patentableandtherefore incapableofbeingappropriated. Inorder tocapturevalue,weencouragehumanstoorganizearoundinformationresourcecommons,whilebuildinginaphysical,productiveinfrastructuretoconvertinformationintothesubstanceofmodern-daylivingviabenign,industrialprocesses
3.Notes on Patents-Thesemakesenseonlyinaworldbasedonscarcity.Weencourageeachcommunity thatadoptsOSEprinciples tobuildcomplete,opensource,economicproductivity–where truewealth canbe generatedeasily. In this case,what is theneed for patents? If acommunitycanprovideallofitsneeds-thenweenterintotheconceptofsufficiency.State-of-artpointtechnologiesthatoptimizeonefeatureofperformancearenotnecessarilyusefulforanecologicaltoolset.Weareinterestedmoreinoverall,orecological,performance-asopposedtopointperformance.
4.Creative Approach-Thereisanumberofmovementsthatcatertofearsregardingtheendoftheworldorothercomprehensivecollapsescenarios.Ourapproachisintendedtoempowerpeoplefromaperspectiveofwhatisa-priorifavorableandbenign-whetherornotanycataclysmis on the horizon. IT is important to underscore that we focus on positive psychology andtranscendence,whichwefavoroveranapproachbasedonfear,becausefear-basedresponseisnotaslikelytocreatelong-lastingsolutions.
5.Modular/Lifetime Design–Thecoreoflifetimedesignisdesign-for-disassemblyandmodularity.Design-for-disassembly is synonymouswith user ability to ‘look under the hood’ of a certaindevice.Modulesareinterchangeableunitsoffunctionality.
6.Closed Loop Manufacturing–OSEendorsesclosedloopeco-industry,wherewastedoesnotexistasthewasteisturnedintofeedstockforotherprocesses.
Components of OSE Specifications
OSESpecificationscoveranumberofaspectsofeconomically-significantproduction,coveringthedevelopmentandproductionaspects:
• Economicsignificance• Opendocumentation• Distributiveeconomicnature• Transformativenatureofenterprise• Systems design• Transparencyandparticipatorynatureofproductionmodelanddevelopmentprocess• Creationofpost-scarcitylevelsofproduction
OSESpecificationsAppendix

Open Source Ecology:CivilizationStarterKitv.0.01
• Simplicityandlowcost• Lifetime,modulardesign;design-for-disassembly;design-for-scalability• Localizationofmaterialsourcingandofproduction• Ecologicalqualities• EconomicFeasibilityandReplicability• Minimizationofwaste,overhead,andbureaucracy• ProductEvolution• FabricationFacilities• OpenFranchisingorOpenBusinessModel• StartupAssistance
Economic Significance
Economicsignificancereferstotheoveralleconomicimportanceofagivenproductorservice.Theassumptionherethateconomicsignificanceisdefinedonthebasisofrelevanceformeetingthematerialneedsofhumans.Forexample,fuelsandtractorsconstitutemultibilliondollarglobalmarkets,andare thuseconomically significant.On theotherhand,plaindiscussionmayhavelittleeconomicsignificance,ifisnotmorethanhotair.
Open Documentation
Open Content
Webeginwith open content as a foundation – content that is free of restrictions on use ordissemination.Theoptimallicenseforcontentthatwepromoteisthepublicdomain.Thiskeepsitsimplefromthepracticalandlegalperspective.Wehaveaphilosophythattheusersshoulddecideforthemselvesastohowtousetheinformation.Wesupportopenlicensing.Wearenotinterestedinpolicing.
Webelievethattoclaimsomethingas‘one’sown’isarrogant,asitdoesnotaddressthefactthatanysingle‘invention’issimplyasmalladditionaltoalargepoolofexistingknowledgethatmadethe‘invention’possible.Webelievethatthereisnopointintryingtopolicethepatentingofforks,asaresimply somanydifferent forksordevelopmentpaths thatcouldbe takennonetheless:creativityisunlimited.Webelievethatthemorewecontributetothecommons,themorenewcontentwillbegenerated.
Readilyaccessibleordownloadabledocumentationanddesign
Distributedinformationinthecomputerageismademostreadilyaccessibleifitisavailableforimmediatedownloadfromthe internet. Ifmaterial isavailable inelectronic format, itmaybemanipulatedorutilizedreadilywithsoftwaretools.Forexample,digitaldesignsmaybeeditedorusedimmediatelyinCADorCAM.IfCAMformatsareavailable,thendataatonepointinspacecanbereadilytransformedintoaphysicalobjectatanotherpointinspace,inthepresenceofdigitalfabricationcapacities.
OSESpecificationsAppendix

Open Source Ecology:CivilizationStarterKitv.0.01
Design Drawings
Thisisastarttowardsreplicability.
Bill of Materials (BOM)
Nexttodesigndrawing,theBOMisthesecondmost importanttowardsreplicability.This isadetailedlistingofallpartsused,sourcing,andprices.AvailabilityoftheBOMsavesthepotentialbuilder countless hours of searching for part availability and for reasonable pricing. RelevantcommentsshouldbemadealongsidetheBOM,suchas,qualityorreliabilityofcertainvendors,theirqualityofservice,andanyotherusefulcomments.TheonlydifficultywithaBOMmaybethatiftheaudienceisglobal,sourcingmaynotbereadilyavailableorshippingmaybeprohibitive,solocalsubstitutionofpartsmustbemade.IfaBOMisavailable,thenthebuildingofaspecificproduct can commence immediately: there is no guessingwhich partswouldwork, orwhichsupplierisreliable.
At best, the process for one-off individual production can be as follows:
1.anindividualdecidesthattheyneedacertainproduct2.theylookthatproductuponanonlinerepositoryofopensourceproducts,downloadfabricationprocedures and parts lists3.purchaseparts locallyallonthesamedayiftheyarelocatedinanurbanareawheremanysuppliersareavailable4.andstartbuildingacertainproject.
AllthesestepscanpotentiallybecompletedinonedaywhentheBOMisavailable.Opendesigndrawingsandplansareonlyoneaspect,butthecriticalpointtoenablingimmediateproductionistheavailabilityofBOMs,asthelaststeppriortoactualfabrication.
Underthisscenario,arealisticpossibilityemergesthatalargenumberofindividualsdiscontinuepurchasing slave goods fromwho-knows-where, and begins to fabricate them locally. This isfeasibleontheindividuallevelforanyoneequippedwitharobustFabLab,orwhensmallgroups(a few to a dozenpeople) get together to purchase low-cost, open source, digital fabricationequipment.Thesepeoplecouldoperateoutofbackyardgarages,rentedworkshopspaces,co-workingfacilities,orothercommunitysupportedmanufacturingoperations.Thetypesofproductsthatyieldthemselvesparticularlytothistypeofproductionarethoseitemsthatfallbeyondtheclassofdisposablegoods,andaremoreorlesslong-useitems.Theseitemsincludeelectronics,mechanizedtools,semi-heavymachinery,greenvehicles,andrenewableenergysystems,amongothers.
Tools
CADbyMarianoAlviraandSKDBaretwodifferenttoolsthatcanimproveandautomatedifferentaspectsofhandlingaBOM.
OSESpecificationsAppendix

Open Source Ecology:CivilizationStarterKitv.0.01
Free information
Ifinformationisfree,itismosteasilyaccessible.
Distributive Economics
Distributive economics refer to economicmodels that tend to distribute economic power asopposedtomonopolizingthispower.
Transformative Nature of Enterprise
We are interested in transformative economics, or those economics which tend towardscommunity and global resilience, while having qualities that, proactively, move the worldawayfrom:concentrationofsocietalpower;perennialwarfare; lossofmeaning;bureaucracy;globalizationofeconomicactivity;newspeak;lossoffreedom;andsoforth.
Systems Design
Systemsdesignreferstodesignofeconomicparadigmswhichconsiderthewholehumanandnatural ecosystem, and the relationships involved, not just an isolated part of that system.Forexample,non-systemsthinkingmayleadonetoconcludethatamodernsteamenginefortransportationisabadideacomparedtobiodieselorfuelalcoholbecausethethermodynamicefficiencyofasteamengineistwotimeslowerthanthatofdieselenginesorgasolineengines.Thesystemsdesignperspectivewillclaimthatthesteamengineisagreatidea,becausebiomasspelletscanbeusedasfuel,andtheyieldofcellulosicbiomassperacreisabout10timeshigherthantheyieldofoiloralcohol.Thesystemsthinkerwillcontinue,bystatingthat if thewholesystemisconsidered,biomasspelletproductionismuchsimplertoaccomplish,andthatbiomass-growingareascanbeintegratedwithotherusessuchasorchardingorlivestockraising,andthesystemsthinkerwillcontinuetomakeotherclaimsthatsuchanenergysourceallowsforabsolutedecentralizationofproductionandresilienceofcommunitiesusingthesimplestmeanspossible.Thepointtobemadeisthatthesystemsthinkercancontinuetomakealargenumberofclaimsonhowaparticularactivityisdesirablebasedonanumberofsystemsconnections,whichthenon-systemsthinkerdismissesassimplynotbeingpartofthequestion.
Webelievethatdestructivenon-systemsthinkingissopervasiveinoursociety,thatingeneral,individual and societal decision-making is completely partisan, thin on logic, and downrightretarded.WeareincludingametricforsystemsdesignintheOSESpecificationstoraiseawarenessofthisissue,withahope,whicheveniffutile,attemptstobringaglimmeroflighttothesituation.
Transparency of Production Model and Development Process
Thedevelopmentprocessforproducts,andtheirproductionmodel,shouldbetransparenttoanyinterestedobserver.Thisallowsforstudyof,inputinto,andimprovementofthetopicofinterest.Transparencyallowsfeedbackloopstobecomeactive,andempowersthosewhoareinterestedinlearningmoreaboutatopic.Transparencyisoneofseveralqualitiesofadistributive,economic
OSESpecificationsAppendix

Open Source Ecology:CivilizationStarterKitv.0.01
process.
Transparencyofsomeprogramimpliesthattheprogramisopentosuggestions,correction,orreplicationofitself,stemmingfromanethicalfoundationofthegivenprogram.Therefore,toolssuchasnon-disclosureagreements,patents,tradesecrets,andothermeansofprotectionismareinconsistentwiththecreationoftransparency.
Development Process
1.Participationinthedevelopmentprocessisentirelyvoluntary.Nocompensationforalienationis necessary. As a result, the best designs are produced from the commitment of passionatestakeholders.2.Anyonemayjoinorleavethedevelopmentgroupatanytime3.Collaborativedevelopmentprocessutilizestheinputofdiversestakeholders4.Stepsandresultsofthedevelopmentprocessaredocumented
Creation of Post-Scarcity Levels of Production
Post-scarcitylevelsofproductionimplytheavailabilityofeffectivetoolsofproduction,includingbothhardwareandtechniques-whichallowfortheamplemeetingofhumanneeds.Post-scarcitylevels of production also imply that local, nonstrategic resources can be utilized effectively,reliably,andwiththecapacitytoproducesignificantsurplus.Thegoalofattainingpost-scarcitylevelsofproductionofsomethingarethussynonymouswithaparticularcommunitybeingabletotranscendphysicalsurvivalasabasisforevolvingtopursuitsbeyondmeresurvival.
Simplicity and Low Cost
Thedesignandimplementationofanyproductorserviceshouldbethesimplestfromboththefabricationandcostperspective,suchthatit isthemostreadilyreplicable.Attainingsimplicityisindeedthemostdifficultdesignchallenge.Mostpeopleconfusehighperformancewithextrafeatures, because they externalize the hidden liabilities that accompany the extra features.Simplicityissynonymouswithefficientresourceuse.Simplicityshouldalsoapplytothefabricationprocedureofanobject.Assuch,simplicityisalsosynonymouswithlowcost.ThebasicdesignphilosophyofOSEisto includesimplicity indesignandfabrication- i.e.,design-for-fabricationshouldbeapplied.
Lifetime,ModularDesign;Design-for-Disassembly;Design-for-Scalability(DfS)(Note:Formainstreamreferenceonlifetimedesign,seetheworkofSaulGriffith)
Simplicity of design promotes the features of lifetime, modular, and scalable design-for-disassembly(DfD).
Lifetimedesignimpliesthatthevalueofaproductdoesnotdepreciateovertime.Thisimpliesfreedomfromlaborrequiredtoreplaceacertainproduct,whichhasdirectimplicationforone’saccesstofreetime.
OSESpecificationsAppendix

Open Source Ecology:CivilizationStarterKitv.0.01
Modulardesignisadesignwhichallowsdifferentmodulestobeusedandinterchanged,givingtheusercontroloverandflexibilitywiththeobjectofuse.
DfDmeansthatpartsofmodulesmaybereplacedreadily,bytakingthemoduleapart.Thishasprofoundimplicationstolifetimedesign.
DfSismorethanadesignthatcanbescaled.Itistheprincipleofdesigningthingswitheaseofscalabilityasoneofthefeatures-i.e.,designthatcanbescaledeasily.Thisisaslightimprovementoverdesignthatcanbescaled,inthatDfSincludesexplicitfeaturesthatmakescalabilityeasy.
Scalabilitymeansthatabasicbuildingblockcanbeusedtomakelargerorsmallerversions.Thiscontributestolowcostandefficiency.
Multipurpose Modular Design
Objectsshouldbedesignedsothattheyaremadeasbuildingblocks,ormodules,ofotherorlargerobjects.Thisway,objectscanbemodified.Insteadofawholeobjecthavingtobereplacedtoaddnewfunctionality,amodulemaybeadded.Thisgivesproductsaflexibilitythatisbuiltintotheirverynature,suchthattheuserhasadditionalcontrolwithminimumexpense.Modularitymaysometimesbesynonymouswithinter-operability,andmaysometimesbesynonymouswithscalability. Itmaycontributeto lifetimedesign ifanobject is100%modularandeachmodulemaybereplaced.Modularityalsomeansthatanobjectmayfunctionasabuildingblockofotherobjects. In all cases,modularity implies that an objectmay bemodified. The combinationofflexibility,adaptability,scalability,interoperabilityisdesirable.Thesefeaturesexpandtherangeofapplications,increaselifetime,reducecost,aswellasprovideandretainhighvalue.Inamaterialworld, these are features that contribute towealth and prosperity. In a nutshell,modularityprovideslargevalueandhaslowassociatedcosts.Thesearegoodimplicationsforindividualandcommunitywell-being.
Ifmodulardesignisfollowed,thenthetypeofinteroperabilityofusingbuildingblocksleadsustoaPatternLanguageoftechnology.Inthispatternlanguage,themodulesorbuildingblocksserveasthesentencesofalargerlanguage,ortechnologyinfrastructure.
Scalability
Productsshouldbedesignedsothattheycanbescaledupordown-suchasbyadditionofnewmodules,orusingmultiplesofapartinparallel.Forexample,asolarconcentratorsystemdesignedaccordingtotheprincipleofscalabilityshouldbealineardesign(seeSolarPowerGenerator),sothatitcouldbeenlargedeitherbylengtheningorwideningthearray.
Localization of Material Sourcing and of Production
Forcommunityresilience,abilitytouselocalresourcesiskey.Whileitisimportantthatacommunityhavethisabilityforessentialneeds,itisoptional,thoughdesirable,forothernonessentialitems.
OSESpecificationsAppendix

Open Source Ecology:CivilizationStarterKitv.0.01
Using local resourcesmay necessitate that a given community have additional technology toproduceacertainitem.Forexample,ifagivencommunitydoesnothavetheconditionstogrowacertaincropeasily,itmaywanttoinvestintheadditionaltechnologyrequiredtogrowthatcropsuccessfully.Or,ifacertaincommunitydoesnothaveadequatewater,itshouldinvestinwell-drillingorroof-catchmenttechnology,insteadofimportingwaterfromunsecuredsources.
A community should thus, in general, strive to increase its technologybase to accommodatetheprovisionofallessentials,andnotsettleonitsabilitytotradetoprocuretheseessentials,as trade may be vulnerable to disruption. Trade is quite acceptable for non-essential items,suchasmusicalinstruments,sincedisruptionofsuchsupplydoesnotthreatenthesurvivalofacommunity.Theleveloftechnologyinwhichacommunityisautonomousshouldbedeterminedonpracticalgrounds.
Moreover, intoday’sworld,wealreadyhearabout‘producedlocally.’Weshouldadd‘sourcedlocally’toourvocabulary-asresilienceimpliesnotonlylocalproduction,butalsolocalsourcing.Localsourcingtypicallyrequiresthatacommunityhaveadditionaltechnological infrastructureandknowhowforprovidingthenecessaryfeedstocks.
Localization Levels
Level1-productionislocalLevel2-sourcingofmaterialsusedinproductionislocalLevel3-rawmaterialproductionislocalLevel4-productionmachineryusedintheproductionprocessaboveisopensourceandlocallyfabricated.
Localization applies to the creation of natural economies, or those economies based on thesubstanceoftheirown,naturalresources,freeofsupplychaindisruptions.
AnexampleofLevel3isthatlocalaluminumismadebySmeltingaluminumfromlocalclays.
If localization is taken to all the 4 levels, for all necessities of sustaining its population - thatmeansthataregionisautonomous,andassuch,hasnobuilt-intendencytowagewarforothers’resources.Thisisthecriticalpointoflocalization-itsbenigneffectonglobalgeopoliticalstruggle.Insimplewords,peopledon’tkillandsteal.
Ecological Qualities
Theproductofinterestmustbegoodfortheenvironment.
Economic Feasibility and Replicability
MinimizationofWaste,Overhead,andBureaucracy
Thekeypointtothecompetitivenessofagile,opensourceenterpriseisitsleanstructurewith
OSESpecificationsAppendix
Open Source Ecology:CivilizationStarterKitv.0.01
minimaloverhead.Minimizationofwasteoccursbycollaborativedevelopment,suchthatR&Dcostsaresharedbyanumberofstakeholders.Competitivewasteiseliminatedbyopenenterprisegiving services away rather than competing formarket share,which is the ethicalmarketingstrategyforopenenterprise.
Otherstrategiesforkeepingoverheadlowarecrowd-fundingtheproductionfacility,suchasinFactoreFarm’scase.Wealsoproposepaperworkreductionbyoperatingasanun-incorporatedentity, with contractually-based fiscal fiduciaries and liability management, operation in theRepublicviaprivatecontract,andbyin-houselegalliteracy.
Product Evolution
Aprocess shouldbe inplace for continuedmaintenanceanddevelopmentof aproduct. Thiscouldbeasupportcommunity,foundation,orusers.
Fabrication Facilities
ConcreteFlexibleFabricationmechanismexistsforotherstopurchasetheproductatreasonablecost.Thisisameanstoassuringthatadiversityofsuppliersexists,suchthatmonopolyisavoided.
Open Franchising or Open Business Model
This point defines how easily one can obtain access to replicable enterprise design. See ourmotivationwithrespecttoOpenBusinessModels,asdescribedundertheOSELicense.
Thereareanumberofdetailsthatgoesintoenterprisereplications.Theseareallthestandarddetails found in aBusinessPlan, plus the actual technical details that go into thatplan, suchasdesignsandCAD,fabricationprocedures,BOMandsourcinginformation,economicanalysis,ergonomicanalysis,andsoforth.
Ifyouareinterestedinreplicatinganenterprise,thenpleaseinquirewithusregardingpracticalconsiderations.Forthoseinterestedinreplication,wearelookingforlong-termcommitmenttoprovidethenecessaryduediligenceofbusinessmodeldocumentation.
Startup Assistance
Producertrainingisthekeytoassistingotherstostartupenterprise.Dedicatedworkshopsshouldbeavailableforotherstolearnthetrade.Weplanonofferinga2yearimmersionprogram,whichincludesnotonlyworkshopskills,butagriculture,aswellastheoreticalandorganizationalaspects.
Calculation of a Metric Score
SeeOSESpecificationsMetricScore
Summary
OSESpecificationsAppendix

Open Source Ecology:CivilizationStarterKitv.0.01
Insummary,weaimtoraisethestandardsembodiedinopensourceproductdevelopmenteffortsbyarticulatingthepossibilities.OSESpecificationdescribesallthedesirablefeaturesthatcanbeembodiedinopeneconomicdevelopment,undertheassumptionthatmaximumadvancementofdistributiveproductionisthebestroutetohumanprosperity.
OSESpecifications,asappliedtotechnology-implyliberatorytechnology-definedastechnologywhichservesthetrueneedsofpeopleandliberatestimeforotherpursuitsbeyondsurvival.Thisisdistinctfromtechnologywhichcontrolspeople-whereintoday’sworld-withever-advancingtechnology,peopleenjoylessfreetime.
ApplicationofOSESpecificationstoAssessingtheLiberatoryPotentialofTechnologies
OSE Specifications, when applied to production of physical products, allow for transparentassessment of the overall openness or accessibility of so-called open source products. Thisspecification is intended tohelppeople assess distributiveproduction aspects of projects, bydistinguishingbetweenthevariousdegreesof‘opensource-ness’embodiedinprojects.Thisisbecausesomeprojectscallthemselves‘opensource’whenonlyasmallportionofthehardware,orevennophysicalportion,isopensource.
Forexample,inthecaseoftheOSGreenVehicle,theonlyopensourcecomponentisanapparentdesignprocess,buttheoutputofthedesignprocessisproprietary.Asquotedfromthewebsite,‘Yourrightstouse,modifyandre-distributeanydatafromthiswebsitearelimited.’Moreover,thecomponentsusedinthecarareproprietary.Therefore,theOSGreenVehiclehasalowOSESpecificationsmetricscore.
Accessreferstouseforbothprivateormarketpurposes.Thespecificationisnotneutralinitsgoals,justasnotechnologiesareeverneutral.Theintentgoessofarastopointoutthenuancesthatcontributetoaparticulardirectionof:(1),promotingecologicalintegrity,(2),contributingtothehighestpossiblequalityoflife,and(3),creatingthewidestpossibledistributionofwealth.Becausetheopensourcemethodofproductdevelopmenthasimmensepotentialintransformingtheeconomicsystem,theOSESpecificationaimstoaddresstheevaluationofpositivechangeendorsedbyvariousopensourceprojects.
ThescopeofOSESpecificationsisfar-reaching:itconsidersallthestepsnecessaryforaproducttobeuser-accessible.Thisincludesopenaccesstorelevantinformationandaffordableaccesstophysicalproducts.Thegoalisdistributiveeconomics.
OSESpecificationstipulatesaccesstophysicalproductionfacilitiesthatcanbuildwealth inre-localized communities.ButOSE Specificationsgoeven further: replicationandviral spreadofwealth - or distributive production. OSE Specifications address themeans for replicating theproductionprocessitself.Thisincludesnotonlyself-replicatingmachinesandsystems,butthedevelopmentofopenbusinessmodels,trainingmaterials,andapprenticeshipsforentrepreneurs.As the final step, we consider the availability of capitalization assistance within the metric.Thecapitalizationassistancemaybepartofanewentrepreneur’sapprenticeship-where, for
OSESpecificationsAppendix

Open Source Ecology:CivilizationStarterKitv.0.01
example-realproductscanbemadeandsoldwithintheapprenticeship.Weredefinethe‘capital’in‘capitalizationassistance’from‘money’to‘theabilitytoproducejustaboutanythingrequiredforbusinessstartupatlowcost.’
Suchlevelofcommitmenttothesuccessofreplicationmayimplyahiddenagendabehindthisprogram. Indeed there is: thegreatestpossibleempowermentofpeopleandcommunities tobe themastersof theirdestinies,byunleashedhumanproductivity fueledbyopenaccess toinformationandenablinghardware.
OSESpecaddressesaccesstobothproducersandusers-bothontheindividualandcommunityscale.Productioncouldoccurbydo-it-yourselfmeansontheindividualscaleinflexiblefabricationfacilities.Thecommunityscalepromotesdivisionoflabor,andthereforeahighstandardofliving.TheOSESpecaddressestheavailabilityofblueprintsordigitaldesigns,whichcanbeusedreadilyinmanualorautomated,computer-controlledfabricationfacilities.
OSESpecificationsAppendix

Tractor Scaling Calculations and CAE Analysis
Open Source Ecology:CivilizationStarterKitv.0.01
Scaling Calculations
ScalingcalculationsarebestdonewithCAEanalysis.Wecandeterminethelifetimeandweight-bearingstrengthoftheexistingdesign,andwealsoknowthatwecanbuildasmallermicrotractor.However,tobuildalargertractorsuchasabulldozer-withatleast20,000lb.weight,weshouldperformCAEanalysisbasedonthespecificgeometryinquestion.Thiswilldeterminetheshaftsizing,coupling,andgearreductionsallowableinthesystembasedona100yeardesignlifetime.Fromback-of-envelopecalculations,2.5”shafts,duallyortruallywheelsontheexactsamedrivesystemasnow,withjackshaftgearreduction,couldyieldapproximately15,000poundsoftractionpowerbysimplyusing16”trucktireswith4wheeldrive.Thisisbasedonthe5000lbtractionlimitofanF250truck-assuming4wheeldriveandsingletires.
Traction
The15,000InchPoundMotorsofLifeTracPrototypeIVproduceapproximately1000lb.offorceatthe15”radiusofthewheels,combiningtoatotalof4000poundsoftractionforcein4wheeldriveoperation.Assuming1asthecoefficientoffrictionfora5000lb.grossweighttractor,thistranslatestotractioncomparabletoanF250truck.
Themotorshaftis1.5”tapered,andthewheelshaftis1-7/8”,oranapproximategoodmatchfordirecttransferoftorquefromwheelmotortoshaft.
Traction CAE Analysis
These tests are useful:
1.Determining theshear limitofa3/4”grade8boltsholding thewheel inplace.Thiswouldinvolve3pointsof failure: the shearingof thebolt (simplepin-throughwithmetal locknut);rippingofthe3/4”boltholethroughthecold-rolledsteelshaft;rippingofthereinforcedcollarholding thewheel.Test formaximumsafe torquewithasafety factor resulting in30yearsofcontinuousoperation(equivalentto8hoursperdayfor100years).
2.Determiningthewheelmountingstrategy(multiplebolts,key,orsplinethatwouldachievetheabovelifetime).Ifpracticalconsiderationsrequirereplacementastheonlylifetimedesignoption,thatmaybetheoutcome.
Load Tests
1.Testformaximumweightbearingcapacityof1-7/8”shaftbasedonwheelgeometryofQuickAttachWheel.
2.TestofweightbearingcapacityofQuickAttachWheelssystem.
3.Weightholdingcapacityofframeassumingpointloadon2upperhorizontallongmembersfor
TractorScalingCalculationsandCAEAnalysisAppendix

Open Source Ecology:CivilizationStarterKitv.0.01
adeflectionof1/2”oruntilboltfailure,whicheverisearlier.
4.ShockabsorbingcapacityofframeusingGrade2boltspriortoboltshearing,andsamewithGrade5and8bolts.ThisisusedtodetermineifGrade2boltsaresatisfactoryforlifetimedesign.
5.Scalingframe2xtodetermineweightbearingcapacityoftractorwithalargerframe.Thisisusedtodeterminewhetherthetractorcanbeweigheddownwithconcreteorotherweights,heightbeingscaledtoabout10x16feet -orthesizerequiredforabulldozerof20,000 lb.minimumweight.
6.Using2.5”bearings,determiningthemaximumweightbearingcapacityforajack-shaftdrivesystem,4wheeldrive,forabulldozer-usingall-steelwheelslikeinoldsteamtractionenginesfromabout100yearsago.
TractorScalingCalculationsandCAEAnalysisAppendix

Hydraulic System Troubleshooting

Open Source Ecology:CivilizationStarterKitv.0.01
ProblemM
ore SpecificallyPossible Cause
Fix Actionsexcessivenoise
pump noisy
cavitationfluidm
aybetoocold;alsosee“A”airinfluid
see“B”coupling m
isalignedalignunitandcheckconditionofseals,bearingsandcoupling
pumpw
orn/damaged
overhaulorreplacem
otor noisycoupling m
isalignedalignunitandcheckconditionofseals,bearingsandcoupling
motor/couplingw
orn/damaged
see“B”reliefvalvenoisy
settingtoolow
ortooclosetoanothervalvesetti
nginstall pressure gauge and adjust to correct pressure
wornpoppetandseat
overhaulorreplace
HydraulicSystemTroubleshootingAppendix
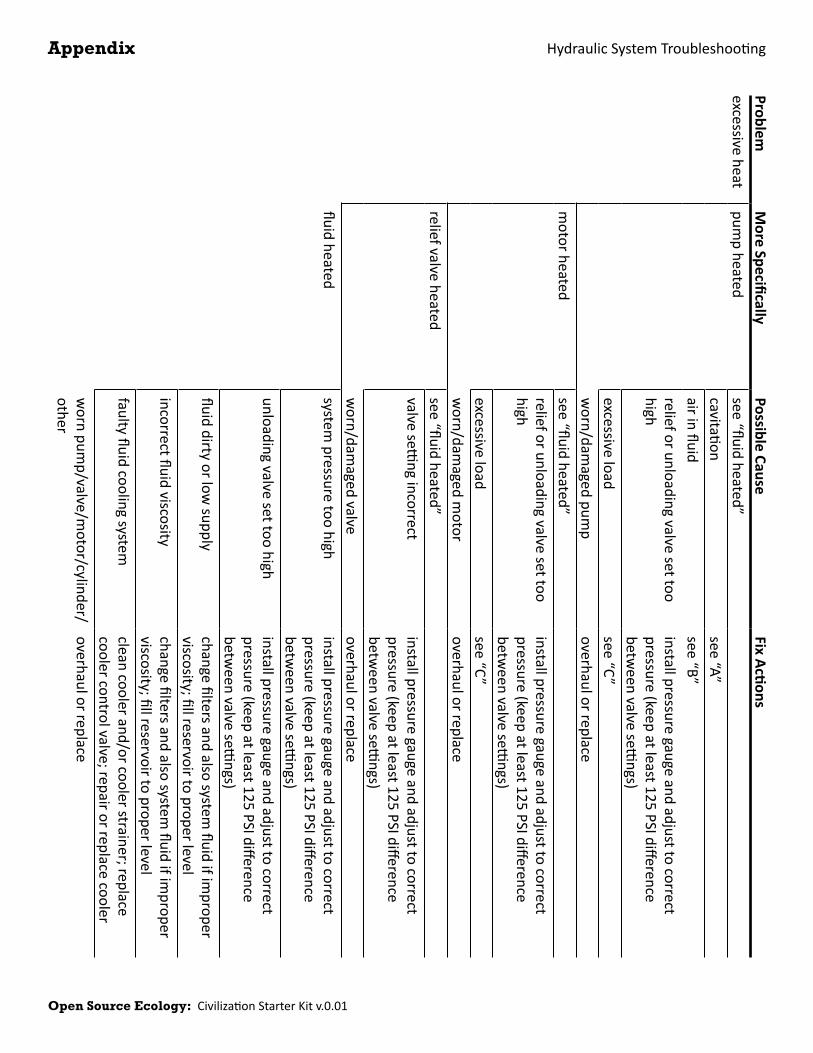
Open Source Ecology:CivilizationStarterKitv.0.01
ProblemM
ore SpecificallyPossible Cause
Fix Actionsexcessiveheat
pump heated
see“fluidheated”cavitation
see“A”airinfluid
see“B”relieforunloadingvalvesettoohigh
install pressure gauge and adjust to correct pressure(keepatleast125PSIdifferencebetw
eenvalvesettings)
excessiveloadsee“C”
worn/dam
agedpump
overhaulorreplacem
otor heatedsee“fluidheated”relieforunloadingvalvesettoohigh
install pressure gauge and adjust to correct pressure(keepatleast125PSIdifferencebetw
eenvalvesettings)
excessiveloadsee“C”
worn/dam
agedmotor
overhaulorreplacereliefvalveheated
see“fluidheated”valvesetti
ngincorrectinstall pressure gauge and adjust to correct pressure(keepatleast125PSIdifferencebetw
eenvalvesettings)
worn/dam
agedvalveoverhaulorreplace
fluidheatedsystem
pressure too highinstall pressure gauge and adjust to correct pressure(keepatleast125PSIdifferencebetw
eenvalvesettings)
unloadingvalvesettoohighinstall pressure gauge and adjust to correct pressure(keepatleast125PSIdifferencebetw
eenvalvesettings)
fluiddirtyorlowsupply
changefiltersandalsosystemfluidifim
properviscosity;fillreservoirtoproperlevel
incorrectfluidviscositychangefiltersandalsosystem
fluidifimproper
viscosity;fillreservoirtoproperlevelfaultyfluidcoolingsystem
cleancoolerand/orcoolerstrainer;replacecoolercontrolvalve;repairorreplacecooler
wornpum
p/valve/motor/cylinder/
otheroverhaulorreplace
HydraulicSystemTroubleshootingAppendix

Open Source Ecology:CivilizationStarterKitv.0.01
ProblemMoreSpecifically
Possible CauseFixActions
incorrectflownoflow
pumpnotreceivingfluid
fillreservoirtoproperleveland/orsee“A”pum
pdrivemotornotoperating
overhaulorreplacepum
ptodrivecouplingshearedcheckfordam
agedpumporpum
pdrive;replace and align coupling
pumpdrivem
otorturninginwrongdirection
reverserotationdirectionalcontrolsetinw
rongpositioncheckpositionofm
anuallyoperatedcontrols;checkelectricalcircuitonsolenoidoperatedcontrols;repairorreplacepilotpressurepum
pentireflow
passingoverreliefvalveadjust
damaged pum
pcheckfordam
agedpumporpum
pdrive;replace and align coupling
improperly assem
bled pump
overhaulorreplacelow
flowflow
controlsettoolowadjust
relieforunloadingvalvesettoolowadjust
flowby-passingthrupartiallyopenvalve
overhaulorreplaceor:checkpositionofmanuallyoperatedcontrols;checkelectrical
circuitonsolenoidoperatedcontrols;repairorreplace pilot pressure pum
pexternalleakinsystem
tightenleakingconnections(fillreservoirtoproperlevelandbleedairfrom
system)
yokeactuatingdeviceinoperative(variabledisplacem
ent pumps)
overhaulorreplace
RPMofpum
pdrivemotorincorrect
replacewithcorrectunit
wornpum
p/valve/motor/cylinder/other
overhaulorreplaceexcessiveflow
flowcontrolsettoohigh
adjustyokeactuatingdeviceinoperative(variabledisplacem
ent pumps)
overhaulorreplace
RPMofpum
pdrivemotorincorrect
replacewithcorrectunit
impropersizepum
pusedforreplacement
replacewithcorrectunit
HydraulicSystemTroubleshootingAppendix
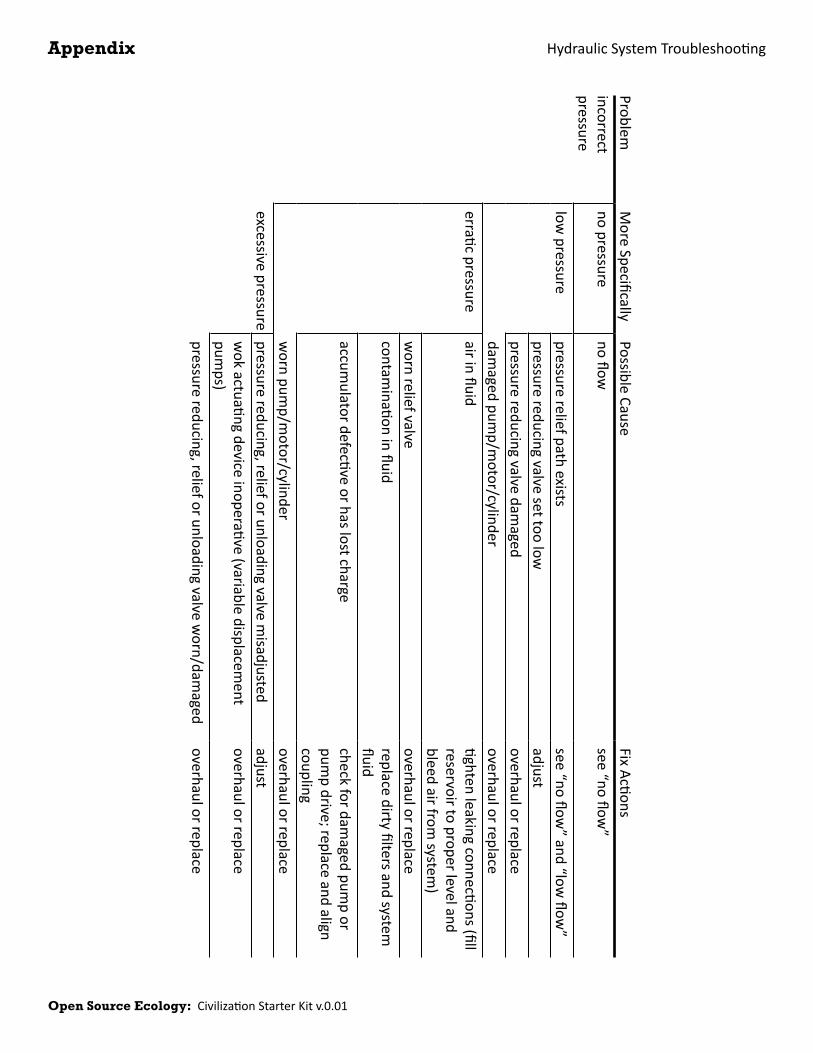
Open Source Ecology:CivilizationStarterKitv.0.01
ProblemMoreSpecifically
Possible CauseFixActions
incorrect pressure
no pressurenoflow
see“noflow”
lowpressure
pressurereliefpathexistssee“noflow
”and“lowflow
”pressurereducingvalvesettoolow
adjustpressurereducingvalvedam
agedoverhaulorreplace
damagedpum
p/motor/cylinder
overhaulorreplaceerraticpressure
airinfluidtightenleakingconnections(fillreservoirtoproperlevelandbleedairfrom
system)
wornreliefvalve
overhaulorreplacecontam
inationinfluidreplacedirtyfiltersandsystem
fluid
accumulatordefectiveorhaslostcharge
checkfordamagedpum
porpum
pdrive;replaceandaligncoupling
wornpum
p/motor/cylinder
overhaulorreplaceexcessivepressure
pressurereducing,relieforunloadingvalvemisadjusted
adjustwokactuatingdeviceinoperative(variabledisplacem
entpum
ps)overhaulorreplace
pressurereducing,relieforunloadingvalveworn/dam
agedoverhaulorreplace
HydraulicSystemTroubleshootingAppendix

Open Source Ecology:CivilizationStarterKitv.0.01
ProblemMoreSpecifically
Possible CauseFixActions
faultyoperationnom
ovement
nofloworpressure
see“noflow”or“nopressure”
limitorsequencedevice(m
ech/elec/hydro)inoperativeorm
isadjustedoverhaulorreplace
mechanical bind
locate bind and repairnocom
mandsignaltoservoam
plifierrepaircom
mandconsoleorinterconnectingw
iresinoperativeorm
isadjustedservoamplifier
adjust,repairorreplaceinoperativeservovalve
adjust,repairorreplaceworn/dam
agedcylinder/motor
overhaulorreplaceslow
movem
entlow
flowsee“low
flow”
fluidviscositytoohighfluidm
aybetoocoldorshouldbechangedtocleanfluidofcorrectviscosity
insufficientcontrolpressureforvalves
see“lowornopressure”
nolubricationofmachinew
aysorlinkagelubricate
misadjustedorm
alfunctioningservoamplifier
adjust,repairorreplacestickingservovalve
adjust,repairorreplaceworn/dam
agedcylinder/motor
overhaulorreplaceerraticm
ovement
erraticpressuresee“erraticpressure”
airinfluidsee“airinfluid”
nolubricationofmachinew
aysorlinkagesee“erraticpressure”
erraticcommandsignal
repaircommandconsoleorinterconnectingw
iresmisadjustedorm
alfunctioningservoamplifier
adjust,repairorreplacemalfunctioningfeedbacktransducer
overhaulorreplacestickingservovalve
cleanandadjustorreplace;checkconditionofsystem
fluidandfiltersworn/dam
agedcylinder/motor
overhaulorreplaceexcessivespeed/movem
entexcessiveflow
see“excessiveflow”
feedbacktransducermalfunctioning
overhaulorreplacemisadjustedorm
alfunctioningservoamplifier
adjust,repairorreplaceOver-ridingw
orkloadadjust,repairorreplacecounterbalancevalve
HydraulicSystemTroubleshootingAppendix

Open Source Ecology:CivilizationStarterKitv.0.01
A:anyorallofthefollowing
replacedirtyfilterswashstrainersinsolventcom
patiblewithsystem
fluidclean clogged inlet linecleanorreplacereservoirbreatherventchangesystem
fluidchangetoproperpum
pdrivemotorspeed
overhaulorreplacesuperchargepump
B:anyorallofthefollowing
tightenleakingconnectionsfillreservoirtoproperlevel(w
ithrareexceptionsallreturnlinesshouldbebelowfluidlevel)
bleedairfromsystem
replacepumpshaftseal(andshaftifw
ornatsealjournal)
C:anyorallofthefollowing
alignunitandcheckconditionofseals,bearingsandcouplinglocate and correct m
echanical bindingcheckforw
orkloadinexcessofcircuitdesign
HydraulicSystemTroubleshootingAppendix