classic composition mount | qmsc - quick mount pv · i an re reference and tips additional tips and...
TRANSCRIPT

Jan-2017, Rev 8BI 7.2.3-7
Sources: American Wood Council, NDS 2005, Table 11.2 A, 11.3.2 A
Notes: 1) Thread must be embedded in a rafter or other structural roof member. 2) See NDS Table 11.5.1C for required edge distances.
Lag pull-out (withdrawal) capacities (lbs) in typical lumber:
Lag Bolt Specifications
Specific Gravity 5/16" shaft per 3" thread depth 5/16" shaft per 1" thread depth
Douglas Fir, Larch .50 798 266
Douglas Fir, South .46 705 235
Engelmann Spruce, Lodgepole Pine (MSR 1650 f & higher) .46 705 235
Hem, Fir .43 636 212
Hem, Fir (North) .46 705 235
Southern Pine .55 921 307
Spruce, Pine, Fir .42 615 205
Spruce, Pine, Fir (E of 2 million psi and higher grades of MSR and MEL) .50 798 266
Classic Composition Mount | QMSC Elevated Water Seal Technology®
SCALE 1 : 3
8
7
6
5
4
1
3
2
5
RACKING COMPONENTSNOT INCLUDED
12.00
12.00
6.00
3.00
1.500
2.500 THIS EDGE TOWARDSROOF RIDGE
1.30
3.00
AVAILABLE IN MILL, CLEAR ANODIZED, AND BRONZE ANODIZED FINISHES.
ITEM NO. DESCRIPTION QTY.
1 FLASHING, 12" X 12" X .050", 5052, MILL 1
2 QBLOCK, CLASSIC, A360 CAST AL, MILL 1
3 HANGER BOLT, PLAIN CENTER, 5/16" x 6", 18-8 SS 1
4 WASHER, SEALING, 5/16" ID X 3/4" OD, EPDM BONDED SS 1
5 NUT, HEX, 5/16-18, UNC-2B, 18-8 SS 2
6 WASHER, FLAT, 19/64" ID x 7/8" OD x 1/8" EPDM 1
7 WASHER, FENDER, 5/16" ID X 1" OD, 18-8 SS 1
8 WASHER, SPLIT-LOCK, 5/16" ID, 18-8 SS 1
7DO NOT SCALE DRAWING
SHEET 1 OF 1
RAD
SCALE: 1:4 WEIGHT:
REV
ASIZE
TITLE:
DATE:
DRAWN BY:DIMENSIONS ARE IN INCHESTOLERANCES:FRACTIONAL 1/8TWO PLACE DECIMAL .18THREE PLACE DECIMAL .125
PROPRIETARY AND CONFIDENTIALTHE INFORMATION CONTAINED IN THIS DRAWING IS THE SOLE PROPERTY OF QUICK MOUNT PV. ANY REPRODUCTION IN PART OR AS A WHOLE WITHOUT THE WRITTEN PERMISSION OF QUICK MOUNT PV IS PROHIBITED.
5 4 3 2 1
UNLESS OTHERWISE SPECIFIED:
1.19
QMSC: CLASSIC COMPOSITION MOUNT
11/9/2015

Jan-2017, Rev 8BI 7.2.3-7 BI 7.2.3-7
You are now ready for the rack of your choice. Follow all the directions of the rack manufacturer as well as the module manufacturer.
All roofi ng manufacturers’ written instructions must also be followed by anyone modifying a roof system. Please consult the roof manufacturer's specs and instructions prior to touching the roof.
Using drill with 7/32" bit, drill pilot hole into roof and rafter, taking care to drill square to the roof. Do not use mount as a drill guide. Drill should be ‘long style bit' aka ‘aircraft extension bit’ to drill a 3" deep hole into rafter.
Clean off any sawdust, and fi ll hole with sealant compatible with roofi ng materials.
Slide fl ashing into position. Prepare hanger bolt with hex nut and sealing washer. Insert into hole and drive hanger bolt until QBlock stops rotating easily. Do NOT over torque.
Insert EPDM rubber washer over hanger bolt into block.
2 3
54 6
87
1
Classic Composition Mounting InstructionsInstallation Tools Required: tape measure, roofi ng bar, chalk line, stud fi nder, caulking gun, sealant compatible with roofi ng materials, drill with 7/32" long-style bit, drill or impact gun with 1/2" deep socket.
Locate, choose, and mark centers of rafters to be mounted. Select the courses of shingles where mounts will be placed.
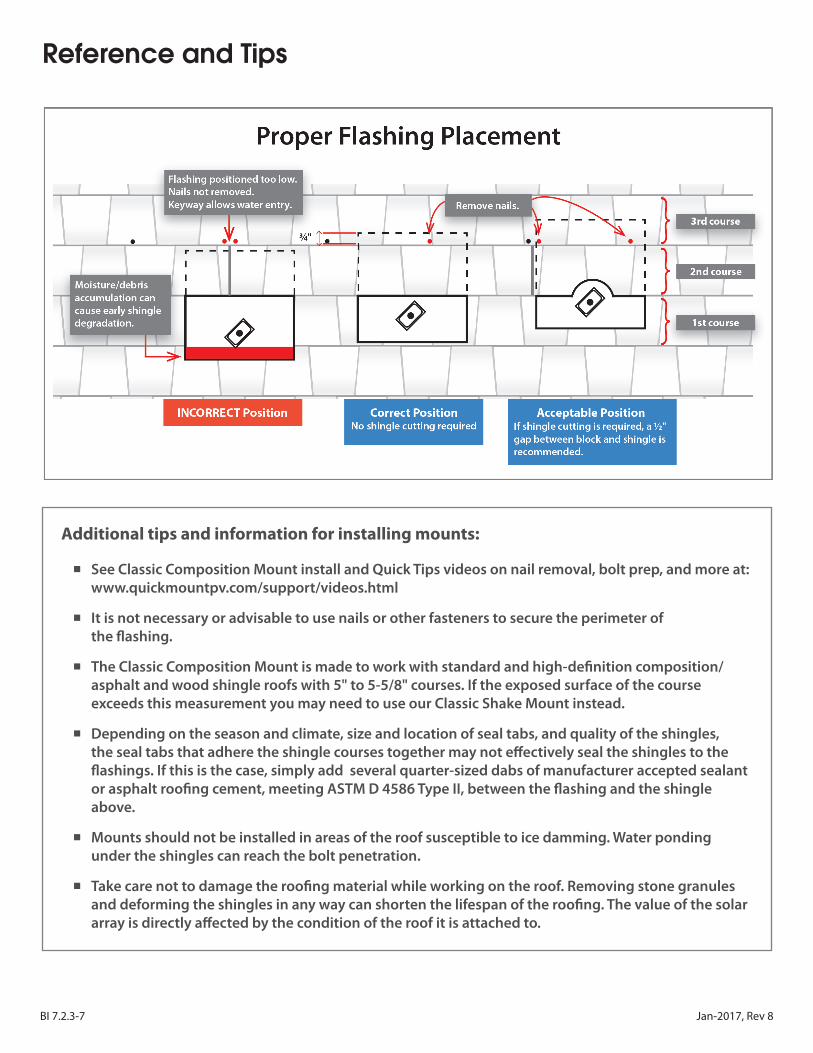
Carefully lift composition roof shingle with roofi ng bar, just above placement of mount. Remove nails as required. See "Proper Flashing Placement" on next page.
Insert fl ashing between 1st and 2nd course. Slide up so top edge of fl ashing is at least 3/4" higher than the drip edge of the 3rd course and lower fl ashing edge is above the drip edge of 1st course. Mark center for drilling.
Using the rack kit hardware, secure the racking (L-foot) to the mount using torque specs from racking manufacturer. If racking manufacturer does not specify torque setting, tighten to 13 ft.-lbs.
WARNING: Quick Mount PV products are NOT designed for and should NOT be used to anchor fall protection equipment.
3rd course
1st course
3rd course
2nd course
Jan-2017, Rev 8BI 7.2.3-7
Reference and Tips
Additional tips and information for installing mounts:
n See Classic Composition Mount install and Quick Tips videos on nail removal, bolt prep, and more at: www.quickmountpv.com/support/videos.html
n It is not necessary or advisable to use nails or other fasteners to secure the perimeter of the flashing.
n The Classic Composition Mount is made to work with standard and high-definition composition/asphalt and wood shingle roofs with 5" to 5-5/8" courses. If the exposed surface of the course exceeds this measurement you may need to use our Classic Shake Mount instead.
n Depending on the season and climate, size and location of seal tabs, and quality of the shingles, the seal tabs that adhere the shingle courses together may not effectively seal the shingles to the flashings. If this is the case, simply add several quarter-sized dabs of manufacturer accepted sealant or asphalt roofing cement, meeting ASTM D 4586 Type II, between the flashing and the shingle above.
n Mounts should not be installed in areas of the roof susceptible to ice damming. Water ponding under the shingles can reach the bolt penetration.
n Take care not to damage the roofing material while working on the roof. Removing stone granules and deforming the shingles in any way can shorten the lifespan of the roofing. The value of the solar array is directly affected by the condition of the roof it is attached to.

© 2016 by Quick Mount PV. All rights reserved.
925-478-8269 | www.quickmountpv.com | [email protected] Mitchell Dr., Bldg 2 | Walnut Creek, CA 94598