clearwell e-discovery platform v6.6 user guide tools 97 managing redactions 104 saving redactions...
TRANSCRIPT
Clearwell E-Discovery Platform V6.6User GuideRevision: May 9, 2011
PAGE: 2
Clearwell Systems, Inc.
Clearwell E-Discovery Platform V6.6 User Guide Revision: May 9, 2011 Last updated: April 27, 2011 3:22 pm
© 2011 Clearwell Systems, Inc. All rights reserved.Clearwell and Clearwell E-Discovery Platform are registered trademarks of Clearwell Systems, Inc.
The Clearwell E-Discovery Platform software ("Software") and related documentation are provided under a license agreement between you and Clearwell ("License Agreement"), which contains restrictions on your use of the Software and the documentation. The Software is provided in object code format only and only for your internal use. The Software and documentation are protected by United States and international intellectual property laws, including without limitation United States Patent Numbers 7657603, 7593995, 7743051, and 7899871.
The Software is provided in object code format only and only for your internal use. Except as expressly permitted in your License Agreement, you may not use, copy, reproduce, translate, broadcast, modify, license, transmit, distribute, exhibit, perform, publish, or display any part, in any form, or by any means. Reverse engineering, disassembly, or decompilation of the software is expressly prohibited. You may not disclose, transfer, or sublicense the Software or documentation, or any part thereof, except as expressly permitted in writing by Clearwell. The information contained herein is subject to change without notice and is not warranted to be error-free.
U.S. GOVERNMENT RIGHTS Programs, software, databases, and related documentation and technical data delivered to U.S. Government customers are "commercial computer software" or "commercial technical data" pursuant to the applicable Federal Acquisition Regulation and agency-specific supplemental regulations. As such, the use, duplication, disclosure, modification, and adaptation shall be subject to the restrictions and license terms set forth in the applicable Government contract, and, to the extent applicable by the terms of the Government contract, the additional rights set forth in FAR 52.227-19, Commercial Computer Software License (December 2007).
© 2004-2011 Clearwell Systems, Inc.Proprietary & Confidential
Rev. 050911
PAGE: 3
© 2004-2011 Clearwell Systems, Inc.
ContentsAbout This Guide 5Revision History 5Obtaining More Product Information 6
Documentation Comments/Feedback? 6Technical Support 6
Getting Started 7
Logging In and Out of the Clearwell Application 7Changing Your Account Preferences and Password 8Understanding the Clearwell User Interface 9
Navigating the Clearwell User Interface 10
Search 11
Performing Searches 11
Overview of Search Options 11Basic Searches 15About Advanced Searches 15Standard Advanced Searches 16Concept Searches 31Freeform Searches 36Tag History Searches 37
Working with Previous and Saved Searches 38
Saving Searches 40Managing Saved Searches and Search Folders 40
Setting Up Search Jobs 42
Viewing Search Results 42
Using the Documents Page 42Understanding Search Results Counts 49Changing your Search Results View 50Nested Email Attachments in Search Results 52
Filtering Search Results 54
Using the Search Reports Page 57
Analyze 61
Using the Discussions Page 61
Using the Topics Page 66
Using the Files Page 69
Using the Participants Page 71
Participant Analysis 72
Proprietary & ConfidentialRev. 050911
PAGE: 4
© 2004-2011 Clearwell Systems, Inc.Proprietary & Confidential
Rev. 050911
Organize and Track with Tags 75
Tagging Documents 75
Using the Tag History Page 79
Using Review Sets 81
Review Set Management 81
Begin Review 81Stop or Complete Review 82Edit or Delete a Review Set 83Assign a Review Set to Another Reviewer 83Creating and Organizing Folders 83Run a Production (on a Productions Folder) 85
Review and Redact 87
Review and Redaction Reference Card 87
About the Review Mode Native Viewer 87
Accelerating Review with Caching 90
Reviewing Documents 92
Using the Document Review Page 92Linear Review Tools in Review Mode 94
Redacting Documents 96
Understanding the Redaction Interface 96Redact a Document 96Redaction Tools 97
Managing Redactions 104
Saving Redactions 104Editing Redacted Documents 104Deleting Redactions 104Viewing Redaction History Information 104Verifying Redactions 105Verifying Image Text 105Using Redaction Colors 105Enabling and Disabling Reason Codes 105Redaction Display Options 106
Tracking Redaction Changes 107
Printing 109
Export and Production Tasks 109
Printing Documents and Logs 109
Using the Dashboard 119
Accessing the Dashboard 119
Glossary Terms 125
User Guide PAGE: 5
User GuideUser GuideWelcome to the Clearwell E-Discovery Platform User Guide. The Clearwell User Guide provides in-depth procedures for the Clearwell E-Discovery Platform Search and Review module. This guide describes how to perform basic and advanced searches, view search results, and manage messages and other documents using folders and tagging.
This section contains the following sections:
• “About This Guide” in the next section
• “Revision History” on page 5
• “Obtaining More Product Information” on page 6
• “Technical Support” on page 6
About This GuideThis guide is intended for end users, system administrators, decision makers, and anyone who is interested in understanding how the Clearwell E-Discovery Platform works. For information about administering the system, refer to the System Administration Guide.
Revision History
The following table lists the information that has been revised or added since the initial release of this document. The table also lists the revision date for these changes.
Revision Date New Information
05/02/2011 • Concept Search functionality
• Compare differences in document selected from Related Items in Review Mode
02/25/2011 • Scalable Folder Management and user interface enhancements
• Search, export, and production enhancements:
– Search for multiple production numbers at once
– Search for documents processed with OCR
– Export filter for failed documuments
– Production premediation report
12/13/2010 • Find Similar Feature enhancements:
– View Histogram/Set Threshold
– Show Primary document (on which similar items are based)
• Participant Search Feature - Search by participant, email, domain
• (Minor revisions and graphics enhancements throughout)
© 2004-2011 Clearwell Systems, Inc.Proprietary & Confidential
Rev. 050911

User Guide PAGE: 6
Obtaining More Product InformationTo obtain more information, refer to:
• Clearwell Systems web site — Go to http://www.clearwellsystems.com
• Documentation link — To obtain the most current online and PDF versions of the documentation, click the Documentation link at the bottom of any page in the Clearwell E-Discovery Platform.
• Online help — Click in the Clearwell user interface to access online help.
Documentation Comments/Feedback?
Got questions or comments on this guide, or other user documentation? We appreciate your feedback! Feel free to contact us at [email protected].
Technical SupportFor technical support, use any of the following methods:
• Clearwell Systems Support Portal — Go to http://www.clearwellsystems.com/support-portal.php to search the Clearwell knowledge base, view and create cases, and submit and vote on product enhancements.
• Email — Send email to [email protected]
• Phone — Contact us:
– Direct: 650-526-0600 (Option 2)
– US Toll-Free: 877-727-9909 (Option 2)
© 2004-2011 Clearwell Systems, Inc.Proprietary & Confidential
Rev. 050911

Getting Started: Logging In and Out of the Clearwell Application PAGE: 7
User’s GuideGetting StartedThis chapter describes the Clearwell Systems Software and the basic user tasks that you can perform. Refer to the following topics:
• “Logging In and Out of the Clearwell Application” in the next section
• “Changing Your Account Preferences and Password” in the next section
• “Understanding the Clearwell User Interface” on page 9
Logging In and Out of the Clearwell ApplicationTo log in:
1. Enter the name or IP address of a Clearwell E-Discovery Platform in your browser (Internet Explorer version 7 or 8 is required.)
http://<ClearwellServerName> or http://<IP address>
The login page opens.
Note: You can access Clearwell from any Windows-based PC using Microsoft Internet Explorer version 7 or 8. Other browsers, including Firefox, Safari, and Chrome, are not currently supported, and Clearwell cannot be accessed from Apple Macintosh computers. The 64-bit version of Internet Explorer is not fully supported due to the current lack of availability of the Flash plug-in for 64-bit browsers.
2. Enter your user name and password and click Login. Your administrator emails this information to you.
3. If you have access to multiple cases you will be prompted to select a case immediately after logging in. Select a case.
Note: If your preferences are set to save your session when you log out, when you log back in you might be prompted to resume your last session. You will not be prompted if you chose to always automatically resume the previous session.
To open another browser window, start a new browser session and log in. Do not use Ctrl+N to open multiple windows for the same Clearwell E-Discovery Platform.
To log out:
• To log out, click Logout at the top of the page.
When you log out of Clearwell while viewing search results or reviewing documents in the Search and Analysis tab, you have the option to save your place. The next time you log in, you have the option to return where you left off or to log in to the default screen.
© 2004-2011 Clearwell Systems, Inc.Proprietary & Confidential
Rev. 050911

Getting Started: Changing Your Account Preferences and Password PAGE: 8
Note: Inactive users are logged out automatically after a configurable amount of time (default is 30 minutes). If your session times out, you will be returned to your current state if you have previously logged out and (1) specified that you want your search state to be saved and (2) that you don’t want to be prompted to save state again.
Changing Your Account Preferences and PasswordYou can update your account preferences and password any time you are logged in to the Clearwell user interface.
Note: You can change your password through the account preferences interface or through the Change password interface.
To update account preferences:
1. Click your user name at the top of the page.
A drop-down menu displays
2. Click Preferences...
3. Update any of the following information:
– Email address
– Show InfoBubbles
– Display Microsoft Office documents
– Resume search state on login enabled
4. To change your password, click the Change Password... button.
The Change Your Password dialog box displays. Type the old and new passwords in the fields provided, and click Save.
5. Click Save.
To change your password:
1. Click your user name at the top of the page.
A drop-down menu displays.
2. Click Change password...
The Change Your Password dialog box displays.
3. Type the requested information.
4. Click Save.
© 2004-2011 Clearwell Systems, Inc.Proprietary & Confidential
Rev. 050911
Getting Started: Understanding the Clearwell User Interface PAGE: 9
Understanding the Clearwell User InterfaceWhen you log in to the Clearwell Systems Software, if you have been access to more than one case, you are asked to select the case on which you would like to work. After you select your case, the following tabs may be displayed (depending on your user role):
• Search and Analysis— Provides a broad set of tools to analyze documents and quickly drill down to the most relevant information. The Search and Analysis tab includes views of discussions, topics, files (email attachments and loose files), and tagging events.
• Dashboard —Provides a visual summary of case and tag status. Also provides access to reports that can be exported.
• Case Management— Provides access to management tasks, such as identifying Exchange servers and monitoring the application.
The top of the page shows your login name and the Pickup, Help, and Logout links. It also includes a link to change your case. When you export documents or print them to Portable Document Format (PDF) files, an icon displayed next to the Pickup link indicates that the files are ready to be downloaded.
Your access privileges depend on the “role” associated with your account. For example, users who have an administrative role see only the Case Management tab, while users who have an unrestricted role see all the tabs. For more information about user roles, refer to "Managing User Accounts" in the System Administration Guide.
© 2004-2011 Clearwell Systems, Inc.Proprietary & Confidential
Rev. 050911

Getting Started: Understanding the Clearwell User Interface PAGE: 10
Navigating the Clearwell User InterfaceThe Clearwell Systems Software provides the following navigational aids:
• Use the tabs and links at the top of the window to access the appropriate pages.
• Use the side panel to filter search results, view previous searches, shared saved searches and private saved searches, and save searches.
Figure 4-1 Using the Clearwell Application
© 2004-2011 Clearwell Systems, Inc.Proprietary & Confidential
Rev. 050911

Search: Performing Searches PAGE: 11
User GuideSearch This chapter describes the Clearwell Systems Software and the basic user tasks that you can perform. Refer to the following topics:
Running Searches
• “Performing Searches” on page 11
– “Overview of Search Options” on page 11
– “Basic Searches” on page 15
– “About Advanced Searches” on page 15
• “Working with Previous and Saved Searches” on page 38
• “Setting Up Search Jobs” on page 42
Viewing Search Results
• “Viewing Search Results” on page 42
– “Using the Documents Page” on page 42
– “Understanding Search Results Counts” on page 49
– “Changing your Search Results View” on page 50
– “Nested Email Attachments in Search Results” on page 52
• “Filtering Search Results” on page 54
Reporting Search Results
• “Using the Search Reports Page” on page 57
Performing SearchesFor more information about performing searches, refer to the following topics:
• “Overview of Search Options” in the next section
• “Basic Searches” on page 15
• “About Advanced Searches” on page 15
Overview of Search Options
There are two types of searches in Clearwell:
• Basic search — A basic search returns all documents (messages, attachments, and other files) that contain any of the words entered in the Search field. Basic searches search the following fields: Senders, Recipients, Email subject line, Email contents, Attachment names, and Attachments.
© 2004-2010 Clearwell Systems, Inc.Proprietary & Confidential
Rev. 5911

Search: Performing Searches PAGE: 12
• Advanced search — An advanced search allows you to search for specific phrases, dates, header information (such as sender or subject), identification information (such as Custodians and Document identifier), and specific tag values. You can also use an advanced search to find email attachments or other files, search for comments added with the tagging feature, or enter freeform queries to do more complicated searches.
Search Entry Guidelines
Search text consists of alphanumeric characters. Most punctuation and special characters are ignored. Searches are not case sensitive. All common languages are supported. Basic searches are stemmed and thus the results of basic searches include text variations, such as singular and plural instances of the specified nouns. Use an advanced search to run a literal search that will not find text variations.
The following table lists the search matching options and examples that are supported in Basic search. These searches are also supported in the Any of these words field in Advanced search.
Table 5-1 Search Matching Options and Examples
Option Example Results
Alphanumeric string energy policy A match occurs on “energy” or “policy.”
Logic Operations energy AND policy
A match occurs on documents containing both energy and policy. Clearwell also sup-ports the use of OR, NOT, + and - opera-tors and grouping using parenthesis in Basic search. Refer to the Freeform Search Guide for more details on Logic Operators and Grouping.
Note: All logic operations, such as AND, must be capitalized. A search containing “and” will search for the term “and.” When performing searches, Clearwell treats messages and attachments as separate documents. With an AND search, a match occurs for a message only if all of the words are in the message or in an attachment. A match does not occur if the words are split between the message and an attachment.
© 2004-2010 Clearwell Systems, Inc.Proprietary & Confidential
Rev. 5911

Search: Performing Searches PAGE: 13
Language Support
Clearwell supports searches in all common languages.
When performing searches with languages that use characters, such as Chinese, Japanese and Korean, note the following:
• If you enter characters with no spaces, such as (Beijing China), Clearwell will interpret this as a phrase search and will find documents containing these characters in the exact order you specify.
Phrase “energy policy” A match occurs only on “energy policy.”
Note: Phrase or proximity searches entered in Basic search will be run as stemmed searches and thus will match “energy policies” as well as “energy policy.” To perform a literal search that will only find “energy policy,” enter this query in the Any of the words field in Advanced search and do not check “Search all variations of key words.”
Proximity “energy policy”~5
energy w/5 policy
A match occurs when there are five or fewer intervening terms between “energy” and “policy” irrespective of whether “energy” appears before “policy” or “policy” appears before “energy.”Using NOT or “-” excludes the term or phrase that follows.Proximity searches are run on all search fields (e.g. Body, Subject, Quoted Text, Attachments). Note: Proximity searches do not span multiple search fields. All terms must be contained within the same field.
Nested Proximity “energy policy” w/5 (“alternative energy” w/10 “solar power”)
Nested proximity searches function in the same manner as proximity searches. Nested search terms are grouped with parentheses.
Wildcard polic* A match occurs on all terms that begin with “polic.” Clearwell supports both * and ? wildcard characters. Refer to the Freeform or Keyword Search Guides for more details on how to run wildcard searches.
Table 5-1 Search Matching Options and Examples (Continued)
Option Example Results
© 2004-2010 Clearwell Systems, Inc.Proprietary & Confidential
Rev. 5911
Search: Performing Searches PAGE: 14
• To search for documents containing ANY of these characters, enter the characters with spaces or using explicit OR operators. For example, or OR will search for Beijing OR China.
• To search for documents containing ALL of these characters but in no particular order, enter the characters using explicit AND operators. For example, AND will search for Beijing AND China.
Note: Prior to version 4.5, searches ignored common words, such as “and” and “the.” Cases created using pre-release 4.5 software will continue to ignore these stop words. Cases created using version 4.5 and later allow you to search for these words. (Treatment of punctuation characters was also updated in Release 4.5.)
© 2004-2010 Clearwell Systems, Inc.Proprietary & Confidential
Rev. 5911
Search: Performing Searches PAGE: 15
Basic Searches
To perform a basic search:
1. Enter a search term in the Search box shown at the top of any page.
2. Select from the menu next to the Search box to restrict the search by documents, folders, or both.
By default, All Documents is selected, and if your administrator has defined one or more folders, you can select any individual folder or Any Folder.
If you have access to all folders, you can also select No Folder to search only documents that have no associated folder.
Note: Leave the Search box blank to retrieve all documents within the selected context (All Documents, No Folder, individual selected folder, or Any Folder).
3. Click Submit.
The search results are displayed on the Documents page or on the page under the Search and Analysis tab where you enter the search.
For information about viewing search results, refer to “Viewing Search Results” on page 42. To view just the emails or loose files in the search results, or to filter the search results by folder, tag categories, sender names, or other criteria, refer to “Filtering Search Results” on page 54.
Note: By default, all content and metadata fields of emails and files are searched.
About Advanced Searches
You can perform any of the following types of advanced searches:
• Advanced Search — Search on documents, keywords, concepts, identifiers, participants (file, email or domain properties by sender and/or recipient), email properties, file properties, or tags.
• Freeform Search — Search for document content using text queries. This choice also includes all the standard advanced search options except keyword search. Refer to “Concept Searches” on page 31.
• Tag History Search — Search for tagging events and comments on bulk tagging events. Refer to “Tag History Searches” on page 37.
The following guidelines apply specifically to standard advanced searches:
© 2004-2010 Clearwell Systems, Inc.Proprietary & Confidential
Rev. 5911
Search: Performing Searches PAGE: 16
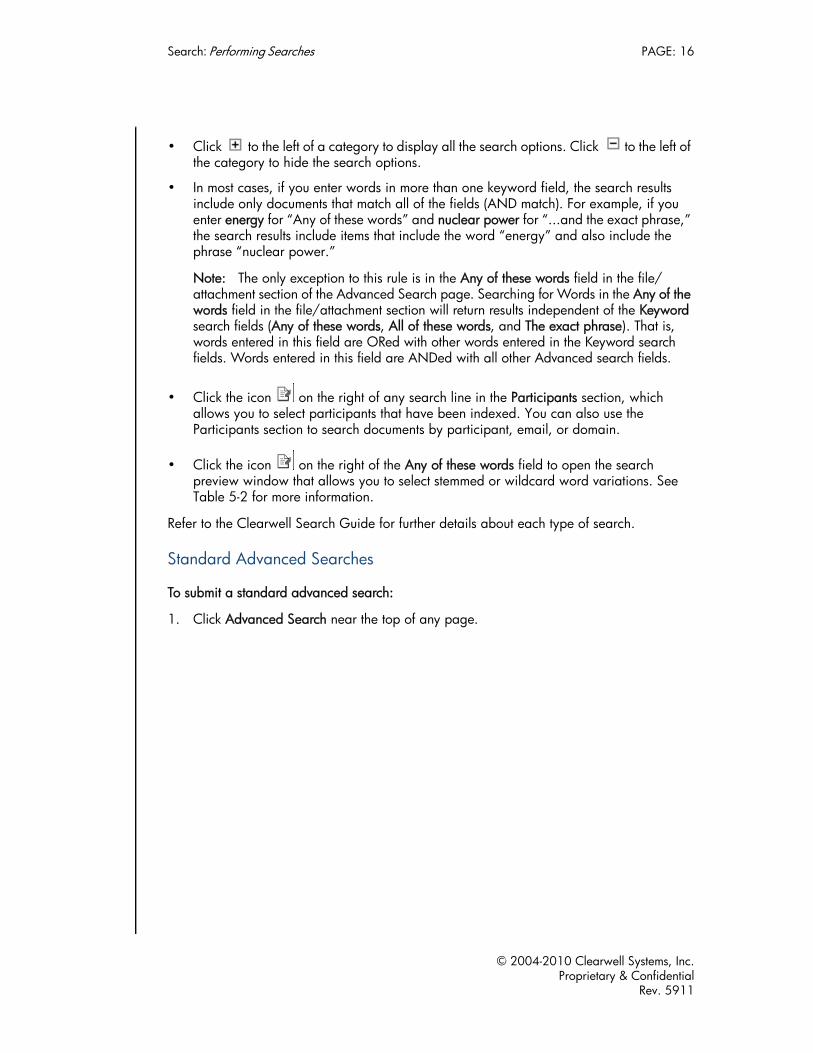
• Click to the left of a category to display all the search options. Click to the left of the category to hide the search options.
• In most cases, if you enter words in more than one keyword field, the search results include only documents that match all of the fields (AND match). For example, if you enter energy for “Any of these words” and nuclear power for “...and the exact phrase,” the search results include items that include the word “energy” and also include the phrase “nuclear power.”
Note: The only exception to this rule is in the Any of these words field in the file/attachment section of the Advanced Search page. Searching for Words in the Any of the words field in the file/attachment section will return results independent of the Keyword search fields (Any of these words, All of these words, and The exact phrase). That is, words entered in this field are ORed with other words entered in the Keyword search fields. Words entered in this field are ANDed with all other Advanced search fields.
• Click the icon on the right of any search line in the Participants section, which allows you to select participants that have been indexed. You can also use the Participants section to search documents by participant, email, or domain.
• Click the icon on the right of the Any of these words field to open the search preview window that allows you to select stemmed or wildcard word variations. See Table 5-2 for more information.
Refer to the Clearwell Search Guide for further details about each type of search.
Standard Advanced Searches
To submit a standard advanced search:
1. Click Advanced Search near the top of any page.
© 2004-2010 Clearwell Systems, Inc.Proprietary & Confidential
Rev. 5911

Search: Performing Searches PAGE: 17
Figure 5-1 Advanced Search Page
© 2004-2010 Clearwell Systems, Inc.Proprietary & Confidential
Rev. 5911

Search: Performing Searches PAGE: 18
2. To perform a standard advanced search, choose options in one or more of the available search categories, as described in the following table. For guidelines, refer to “Search Entry Guidelines” on page 12.
Table 5-2 Advanced Document Search Criteria
Criteria Effect on Search
Scope
Document Type Select check boxes to include email and/or loose files in the search.
Find documents... Choose one of the following options:•Find all documents—Find all documents, regardless of the folder.•Find all documents in any folder—Find all documents that are in a
folder.•Find all documents not in any folder—Find all documents that are
not in a folder.•Find all documents which meet the following folder criteria—Select
check boxes for the Any, All, or None options. You can select check boxes for multiple options.
© 2004-2010 Clearwell Systems, Inc.Proprietary & Confidential
Rev. 5911
Search: Performing Searches PAGE: 19
KeywordsNote: You can also perform a keyword search using concept terms. See the “Concept” entry in this table for details.
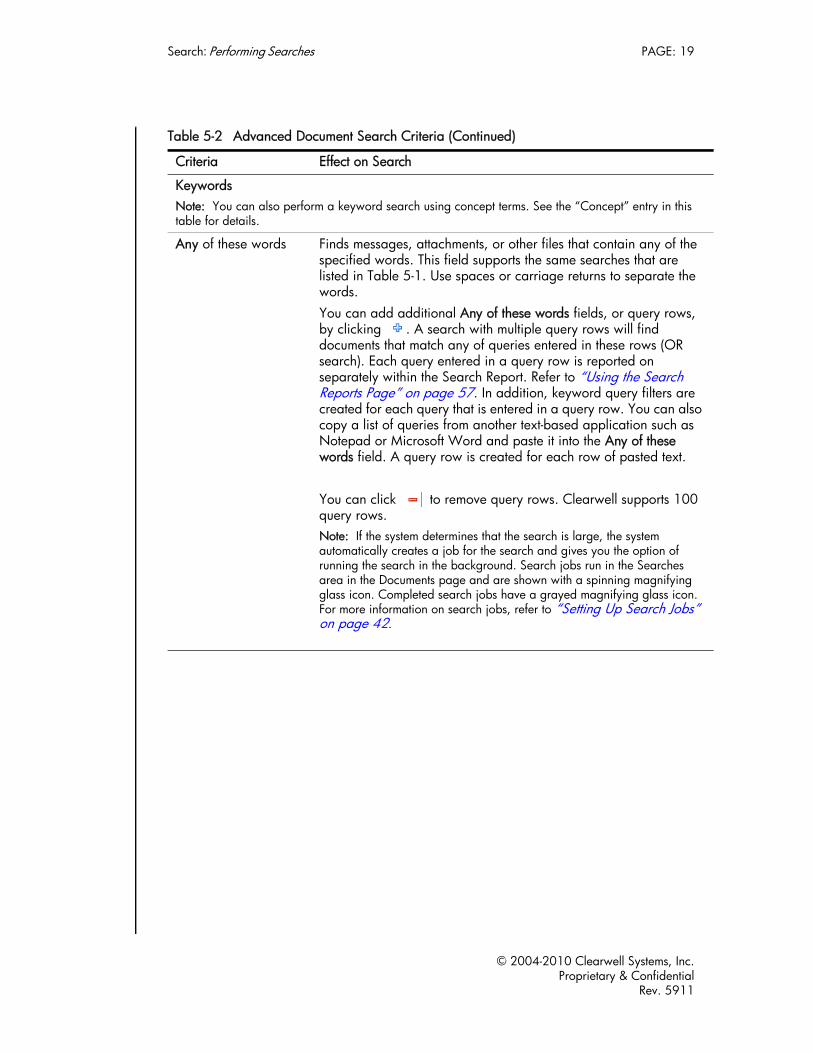
Any of these words Finds messages, attachments, or other files that contain any of the specified words. This field supports the same searches that are listed in Table 5-1. Use spaces or carriage returns to separate the words. You can add additional Any of these words fields, or query rows, by clicking . A search with multiple query rows will find documents that match any of queries entered in these rows (OR search). Each query entered in a query row is reported on separately within the Search Report. Refer to “Using the Search Reports Page” on page 57. In addition, keyword query filters are created for each query that is entered in a query row. You can also copy a list of queries from another text-based application such as Notepad or Microsoft Word and paste it into the Any of these words field. A query row is created for each row of pasted text.
You can click to remove query rows. Clearwell supports 100 query rows.Note: If the system determines that the search is large, the system automatically creates a job for the search and gives you the option of running the search in the background. Search jobs run in the Searches area in the Documents page and are shown with a spinning magnifying glass icon. Completed search jobs have a grayed magnifying glass icon. For more information on search jobs, refer to “Setting Up Search Jobs” on page 42.
Table 5-2 Advanced Document Search Criteria (Continued)
Criteria Effect on Search
© 2004-2010 Clearwell Systems, Inc.Proprietary & Confidential
Rev. 5911

Search: Performing Searches PAGE: 20
Any of these words (continued)
To use the Search Preview feature to search on variations of an entered keyword, click to open the Select Variations window. The Select Variations window will display the variations for each keyword within a query row that contains a wildcard or is stemmed. When the Search all variations of the keyword terms (stemmed search) option is checked, the window will show variations for every keyword in the query. When this option is not checked, variations will be shown only for terms containing wildcards (* or ?). You can access the variations of each term using the Select variations for drop-down list. Variations are listed in alphabetical order. The window also shows the number of matching emails and matching unique files that contain the keyword.
Select the check boxes or row for the variations that you want to include, and click OK. To display the selected or unselected variations, choose from the Show drop-down list. To copy the list to your clipboard, click Copy Shown Variations. Note: The number of matching emails and matching unique files are not constrained by any criteria within the Advanced Search page. They will always reflect the numbers for the entire case corpus.
Table 5-2 Advanced Document Search Criteria (Continued)
Criteria Effect on Search
© 2004-2010 Clearwell Systems, Inc.Proprietary & Confidential
Rev. 5911

Search: Performing Searches PAGE: 21
All of the words Finds messages, attachments, or other files that contain all of the specified words, in any order. Because Clearwell treats messages and attachments as separate documents when searching, a match occurs for a message only if all of the words are in the message or in an attachment. A match does not occur if the words are split between the message and an attachment.
The exact phrase Finds messages, attachments, or other files that contain an exact match of the specified phrase, including common words such as “the” (any punctuation included will be ignored). This field has the same effect as a basic search where the phrase is enclosed in quotation marks.
None of the words Excludes documents that contain any of the specified words. By contrast with NOT searches, messages are excluded if the body or attachments include the specified words.
Fields to search Determines the elements to search in documents, including subject, body, attachments, sender, and recipients.
Search all variations of the keyword terms (stemmed search)
If the check box is selected, performs stemmed searches on keywords or phrases (words in quotes). Stemmed searches find variations of words such as plurals or alternative verb forms. Clearwell can support stemmed searches in English and more than 10 additional languages, including Czech, Dutch, French, German, Greek, Hungarian, Italian, Polish, Portuguese, and Russian. Your case administrator determines which of these are enabled for your case.If the check box is cleared, the search includes only literal text matches on the specified keywords. Use the search preview feature to view the stemmed word variations.Note: To reduce the likelihood of false positives, Clearwell does not perform stemming on the To, From, CC, BCC and Attachment/File name fields in documents.
Limit filter and count generation for improved search speed
If selected, Sender, Recipient and Keyword filter information will not be generated. In addition, the Participants page will not be available and the Search Report will not display keywords or counts. To see this information, you may re-run the search at any time without this option selected.
Normal filter and count generation
If selected, a filter is created for each search term entered, however, it does not create a filter for the expanded, wildcard matches of the search terms.
Table 5-2 Advanced Document Search Criteria (Continued)
Criteria Effect on Search
© 2004-2010 Clearwell Systems, Inc.Proprietary & Confidential
Rev. 5911

Search: Performing Searches PAGE: 22
Generate keyword details for filters and report
If this check box is selected, additional search processing will occur when the search is run to provide filters and found document counts for each of the variations that are selected within the Select Variations window. See “Using the Search Reports Page” on page 57 for further details. Note: This additional processing may take a long time, depending on the number of terms within each query row and the number of query rows.
Concept
Find common terms and documents related to a concept
Enter one or more terms, phrases, or paragraphs. Click the edit icon to refine your search in the Concept Builder window. Choose from pre-selected terms in Search Preview pane based on these concepts to build your search in the Search Explorer (graphical) view.Note: Click any term surrounding your original concept to build another branch of concepts stemming from the new term. As you build your concept search, by selecting (or de-selecting) terms, click the Refresh link to update your document count. To adjust the number of documents, use the play buttons above the Explorer view to move forward or back through your actions as you refine terms, and refreshing after each change. When finished, save your search or start over to build on a new concept. Optionally, after saving your concept, you can click Save as Keywords. This allows you to run a Keyword search using the same concept terms you selected, already pre-populated in the Keywords section of the Advanced Search screen.
See “Concept Searches” on page 31 for further details.
Table 5-2 Advanced Document Search Criteria (Continued)
Criteria Effect on Search
© 2004-2010 Clearwell Systems, Inc.Proprietary & Confidential
Rev. 5911

Search: Performing Searches PAGE: 23
Identifiers
Document IDs Finds documents according to identifier. Document identifiers are automatically assigned during indexing.
Source Name and Location
Finds documents based on the specified source or folder location.Note: You can search only for one contiguous part of a locator path (for example, *.pst or “Inbox” but not “*.pst Inbox”). Wildcards are allowed within a single path element (if there are no slashes in your locator string).
Examples:•Searching for Inbox will find Inbox.•Searching for user will find PST files with user in the name
(because user.pst is a filename, its components are independently searchable without a wildcard).
•Searching for my* will find locations that start with my.•Searching for c: will find locations containing c:.•Searching for *.pst will find container files with a pst extension.Note: Any string with slashes, either \ or / will break the search, and sub-location searches are not supported.
Custodians Finds documents that the administrator has assigned to the specified custodians.
Any of these processing batches
Finds documents that are in any of the specified processing batches or none of the specified processing batches. A processing batch is a label that is associated with all of the documents that were processed by Clearwell at one time. Processing batches and their associated labels are defined by your administrator. See the Clearwell E-Discovery Platform Administration Guide for more information on processing batches.
Match documents that have never been exported
Finds documents that have never been exported.
Match...these export batches
Finds documents which match any or none of the specified export batches.
Match documents that have never been printed
Finds documents that have never been printed.
Table 5-2 Advanced Document Search Criteria (Continued)
Criteria Effect on Search
© 2004-2010 Clearwell Systems, Inc.Proprietary & Confidential
Rev. 5911

Search: Performing Searches PAGE: 24
Match...these print batches
Finds documents which match any or none of the specified print batches.Note: Export and print batches are tracked at the custodian level to facilitate rolling productions of native documents out of Clearwell. In such situations, you may have performed an export for one custodian (“Joe”), but still have data coming in for another custodian (“Jim”) and want to be able to do a search at a later time to find only those documents that have not been exported for Jim even if some (duplicate) documents may already have been exported for Joe. To do this, specify Jim in the custodian picker and Match any documents that have never been exported in the export batch selector.
Production Number Finds documents for the specified production criteria:• Ignore—Do not use production criteria.•Not Produced—Finds only documents that have not been pro-
duced.•Not Produced in—Finds only documents that are not part of this
production.•Exact Number—Finds documents with the specified production
number.•Number Between—Finds documents with a production number
between the specified values.•Slipsheets for Prefix—Finds the slipsheets for a production. Slip-
sheets are generated when issues are encountered during image generation for a document in production. Searching for slipsheets allows you to identify the documents that may require re-produc-tion or special attention during the production.
Flags
File Processing FlagsMessage Processing Flags
Finds documents that have any, all, or none of the selected file warnings and message warnings. Note: This option is visible only for users with the “Allow searching and filtering by processing flags” permission.
Table 5-2 Advanced Document Search Criteria (Continued)
Criteria Effect on Search
© 2004-2010 Clearwell Systems, Inc.Proprietary & Confidential
Rev. 5911

Search: Performing Searches PAGE: 25
Participant
Any/and any/or any/not any
Finds documents that have the specified participant names, email addresses, or domains in the From field. Note the following guidelines:•Multiple names, email addresses, or domains must be separated
by semicolons. •To search for an alias, enter alias(<aliasname>).• If you enter a name, the name order is not critical. For example,
enter john smith or smith john to find all documents sent or owned by John Smith.
• If you enter a partial domain, specify the right-most portion of the name, and include the full text between the period delimiters. For example, to match all emails in “us.example.com”, you can enter “example.com” but not “us” or “com.”
•Selecting any in the first row specifies that within a single text-entry box, only one of the criteria must match in a document for the entire row to be considered a match.
•Adding an additional line allows you to choose other operators for that line: – and any specifies the criteria in that row is required for the
search.– or any indicates that the criteria in that row is optional.
(However, one row must be required if all other are optional.)– not any indicates that the criteria in that row should be
excluded. (If documents are found which contain any partici-pants in this row, those documents do not appear in the results.)
(All)/(Recipients)/From/To/Cc/Bcc
Finds documents that have the specified names, email addresses, or domains according to the following rules:• (All) searches all fields: From, To, Cc, or Bcc fields (these fields
are blank on loose files). • (Recipients) finds documents in the To, Cc, or Bcc fields. •To search any single sender or recipient field, select From, To,
Cc, or Bcc. These fields represent the specified individual and searches all documents from all of that individual’s email addresses.)
• If the “Search in contained senders and/or recipients” option is selected, the equivalent contained fields are also searched.
See the guidelines for Participants/E-mail address/Domain in the next field to specify participant names/email/domains.
Table 5-2 Advanced Document Search Criteria (Continued)
Criteria Effect on Search
© 2004-2010 Clearwell Systems, Inc.Proprietary & Confidential
Rev. 5911
Search: Performing Searches PAGE: 26
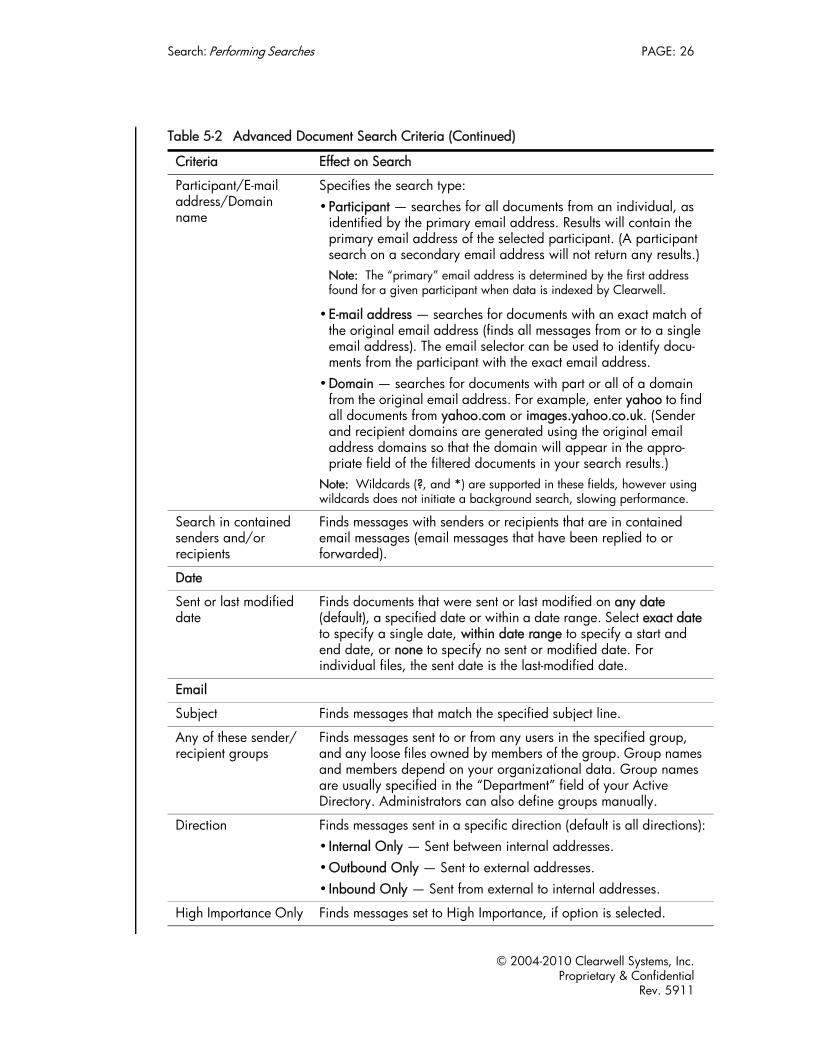
Participant/E-mail address/Domain name
Specifies the search type:•Participant — searches for all documents from an individual, as
identified by the primary email address. Results will contain the primary email address of the selected participant. (A participant search on a secondary email address will not return any results.)Note: The “primary” email address is determined by the first address found for a given participant when data is indexed by Clearwell.
•E-mail address — searches for documents with an exact match of the original email address (finds all messages from or to a single email address). The email selector can be used to identify docu-ments from the participant with the exact email address.
•Domain — searches for documents with part or all of a domain from the original email address. For example, enter yahoo to find all documents from yahoo.com or images.yahoo.co.uk. (Sender and recipient domains are generated using the original email address domains so that the domain will appear in the appro-priate field of the filtered documents in your search results.)
Note: Wildcards (?, and *) are supported in these fields, however using wildcards does not initiate a background search, slowing performance.
Search in contained senders and/or recipients
Finds messages with senders or recipients that are in contained email messages (email messages that have been replied to or forwarded).
Date
Sent or last modified date
Finds documents that were sent or last modified on any date (default), a specified date or within a date range. Select exact date to specify a single date, within date range to specify a start and end date, or none to specify no sent or modified date. For individual files, the sent date is the last-modified date.
Subject Finds messages that match the specified subject line.
Any of these sender/recipient groups
Finds messages sent to or from any users in the specified group, and any loose files owned by members of the group. Group names and members depend on your organizational data. Group names are usually specified in the “Department” field of your Active Directory. Administrators can also define groups manually.
Direction Finds messages sent in a specific direction (default is all directions):• Internal Only — Sent between internal addresses.•Outbound Only — Sent to external addresses.• Inbound Only — Sent from external to internal addresses.
High Importance Only Finds messages set to High Importance, if option is selected.
Table 5-2 Advanced Document Search Criteria (Continued)
Criteria Effect on Search
© 2004-2010 Clearwell Systems, Inc.Proprietary & Confidential
Rev. 5911
Search: Performing Searches PAGE: 27
File
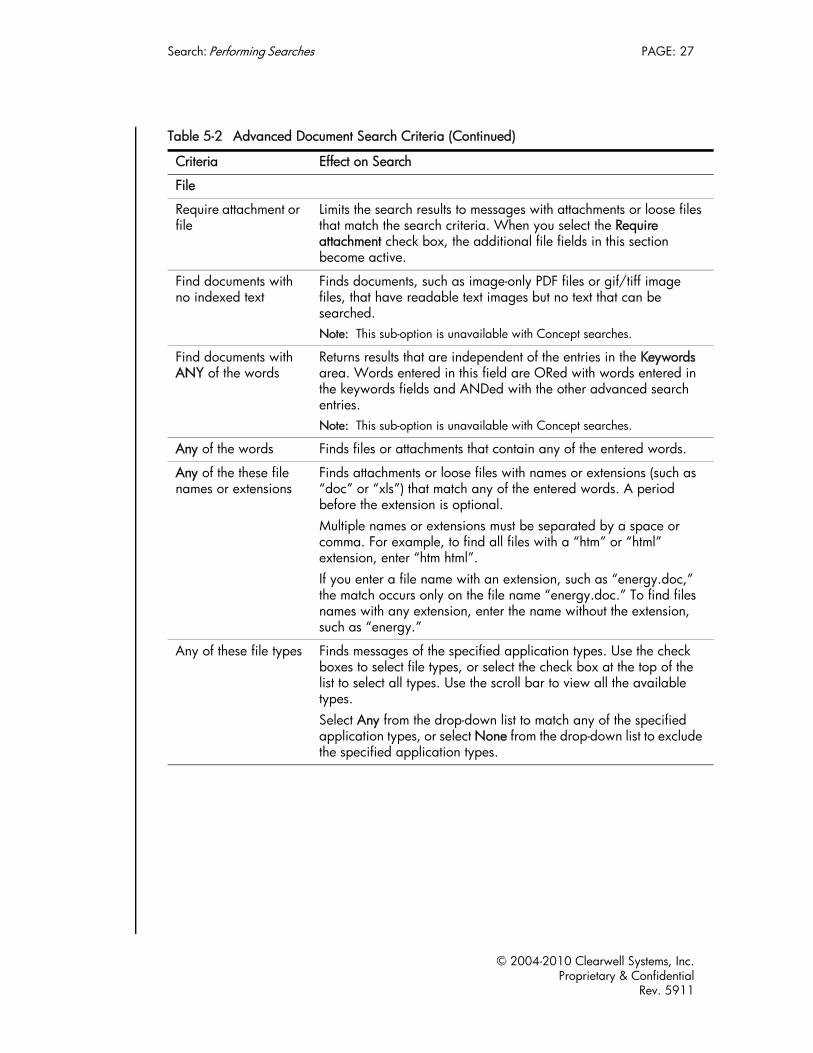
Require attachment or file
Limits the search results to messages with attachments or loose files that match the search criteria. When you select the Require attachment check box, the additional file fields in this section become active.
Find documents with no indexed text
Finds documents, such as image-only PDF files or gif/tiff image files, that have readable text images but no text that can be searched.Note: This sub-option is unavailable with Concept searches.
Find documents with ANY of the words
Returns results that are independent of the entries in the Keywords area. Words entered in this field are ORed with words entered in the keywords fields and ANDed with the other advanced search entries.Note: This sub-option is unavailable with Concept searches.
Any of the words Finds files or attachments that contain any of the entered words.
Any of the these file names or extensions
Finds attachments or loose files with names or extensions (such as “doc” or “xls”) that match any of the entered words. A period before the extension is optional. Multiple names or extensions must be separated by a space or comma. For example, to find all files with a “htm” or “html” extension, enter “htm html”.If you enter a file name with an extension, such as “energy.doc,” the match occurs only on the file name “energy.doc.” To find files names with any extension, enter the name without the extension, such as “energy.”
Any of these file types Finds messages of the specified application types. Use the check boxes to select file types, or select the check box at the top of the list to select all types. Use the scroll bar to view all the available types.Select Any from the drop-down list to match any of the specified application types, or select None from the drop-down list to exclude the specified application types.
Table 5-2 Advanced Document Search Criteria (Continued)
Criteria Effect on Search
© 2004-2010 Clearwell Systems, Inc.Proprietary & Confidential
Rev. 5911
Search: Performing Searches PAGE: 28
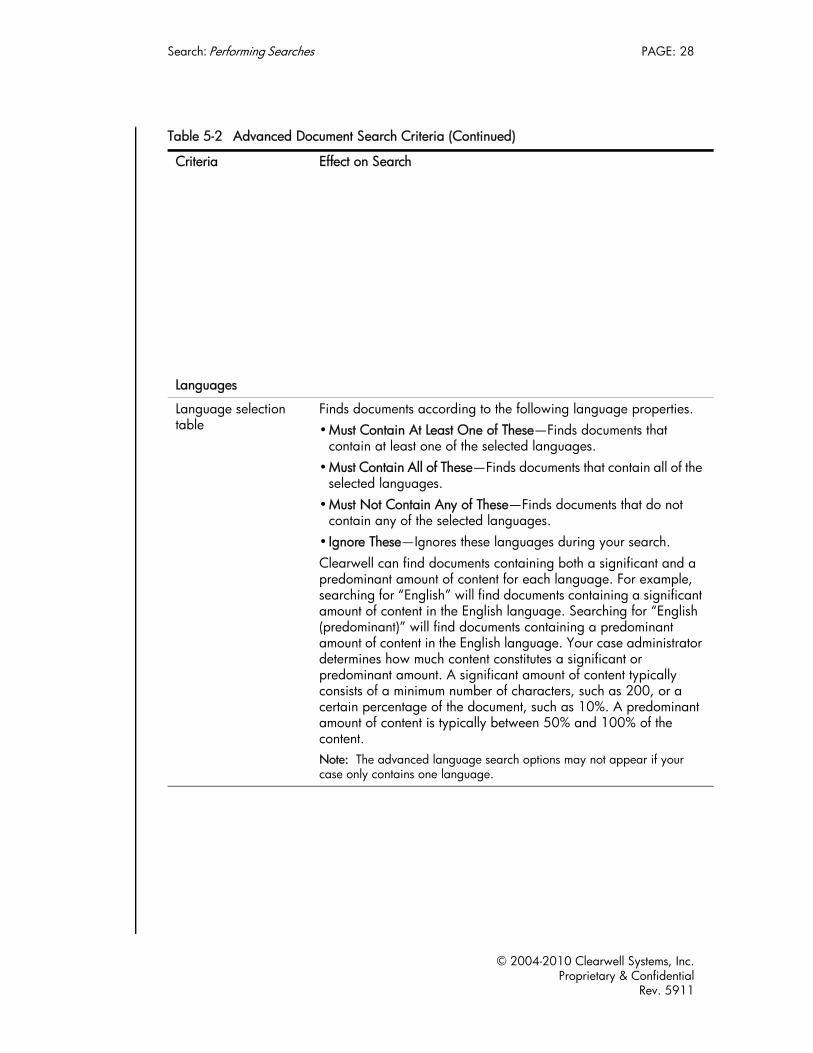
Languages
Language selection table
Finds documents according to the following language properties. •Must Contain At Least One of These—Finds documents that
contain at least one of the selected languages.•Must Contain All of These—Finds documents that contain all of the
selected languages.•Must Not Contain Any of These—Finds documents that do not
contain any of the selected languages.• Ignore These—Ignores these languages during your search.Clearwell can find documents containing both a significant and a predominant amount of content for each language. For example, searching for “English” will find documents containing a significant amount of content in the English language. Searching for “English (predominant)” will find documents containing a predominant amount of content in the English language. Your case administrator determines how much content constitutes a significant or predominant amount. A significant amount of content typically consists of a minimum number of characters, such as 200, or a certain percentage of the document, such as 10%. A predominant amount of content is typically between 50% and 100% of the content. Note: The advanced language search options may not appear if your case only contains one language.
Table 5-2 Advanced Document Search Criteria (Continued)
Criteria Effect on Search
© 2004-2010 Clearwell Systems, Inc.Proprietary & Confidential
Rev. 5911

Search: Performing Searches PAGE: 29
Tags
Find documents that are not tagged
Finds documents that are not tagged.
Find documents with all/any/none of the following tags
Finds all documents that match all of the selected values. The options in the area are activated when you select this button. The available options depend upon settings that your case administrator has configured.
– To find documents that have one or more of the selected tags, from the Any of these tags section, select the tags you want returned.
– To find documents that have all the selected tags, from the All of these tags section, select the tags that must be returned.
– To find documents that have none of the selected tags, from the None of these tags section, select the tags that you don’t want returned in your search.
To select the tags that you wish to search for, choose the tags from the available drop-down lists and check boxes. For check box values, you can choose whether to match one or more of the tag values (any) or none of the tag values (None).
Find documents with current tag-specific comments containing
The tag-specific comment search will search for documents that are currently tagged with matching comments. This search will not search for previous values.Comment search supports the use of wildcards (* or ?), logical operators (AND, OR, NOT), and phrase searches (“quick brown fox”). Wildcards are not supported within phrase searches. Note: This will not search document notes or tag event comments.
The results of a comment search are displayed on the Tag Events page (see “Tag History Page - Search Results Columns” on page 80).
Find documents by document note
Finds the current value of the document notes field. Select one of the options.
– Documents with no current document note– Find documents with document notes containing the specified
text string.
Table 5-2 Advanced Document Search Criteria (Continued)
Criteria Effect on Search
© 2004-2010 Clearwell Systems, Inc.Proprietary & Confidential
Rev. 5911

Search: Performing Searches PAGE: 30
3. Click Run Search at the bottom of the page to view the search results.
4. Click Save to save your search.
Actions
Any of these actions Finds documents that are associated with the specified actions. Select one or more actions, or select Any of these actions to match any of the listed actions.
Any of these users Finds documents with actions that are associated with the specified users. Select one or more users, or select Any of these users to match any of the listed users.
Date of tag or folder event
Finds documents with actions that occurred on the specified dates. Select Exact Date to specify a single date or Dates Between to specify a start and end date.
Find documents by tag event comments containing
Searches the tag event history log to find comments containing a specific value.The comment search supports the use of wildcards (* and ?), logical operators (AND, OR, NOT), and phrase searches (such as “quick brown fox”). Wildcards are not supported within phrase searches.Note: This will not search tag-specific comments. To search tag-specific comments, use the search field in the “Tags” section.
Find documents by historical tag values
To search for documents that have ever been tagged with a particular value, combine this option with the Find documents with current tag-specific comments containing field.Note: Historical tag values are not available in upgraded cases.
Table 5-2 Advanced Document Search Criteria (Continued)
Criteria Effect on Search
© 2004-2010 Clearwell Systems, Inc.Proprietary & Confidential
Rev. 5911

Search: Performing Searches PAGE: 31
Concept Searches
To perform an advanced search using concept terms:
1. Click Advanced Search at the top of the Search & Analysis page to display the advanced search options, and then click the Concept search option.
2. In the text box in the Concept area, enter one or more concept terms, sentences, or paragraphs to find common terms or documents related to a concept.
Note: While there is no maximum character limit for the Concept field, there is an overall limit of 2 MB for input submitted in any search query—applicable to the number of characters in the entire Advanced Search page.
3. Click the icon to begin refining terms.
The Concept Builder window opens, showing the concept you entered.
Figure 5-2 Concept Search: Concept Builder window
In the Search Preview pane (left), there are two types of co-occurring terms. In this example, they are terms that are:
– Found near “diamond”
– Synonyms of, and those strongly associated with “diamond”
In this scenario, Diamond Investment Group could be referred to in documents differently (as “Diamond” or “DIG”). Using a statistical co-occurrence algorithm, Clearwell may conclude that these two words are conceptually the same, and treat them as synonyms based on the concept. As a result, terms occurring near “DIG” are also included in the Search Preview pane for the concept “diamond”.
© 2004-2010 Clearwell Systems, Inc.Proprietary & Confidential
Rev. 5911
Search: Performing Searches PAGE: 32
© 2004-2010 Clearwell Systems, Inc.
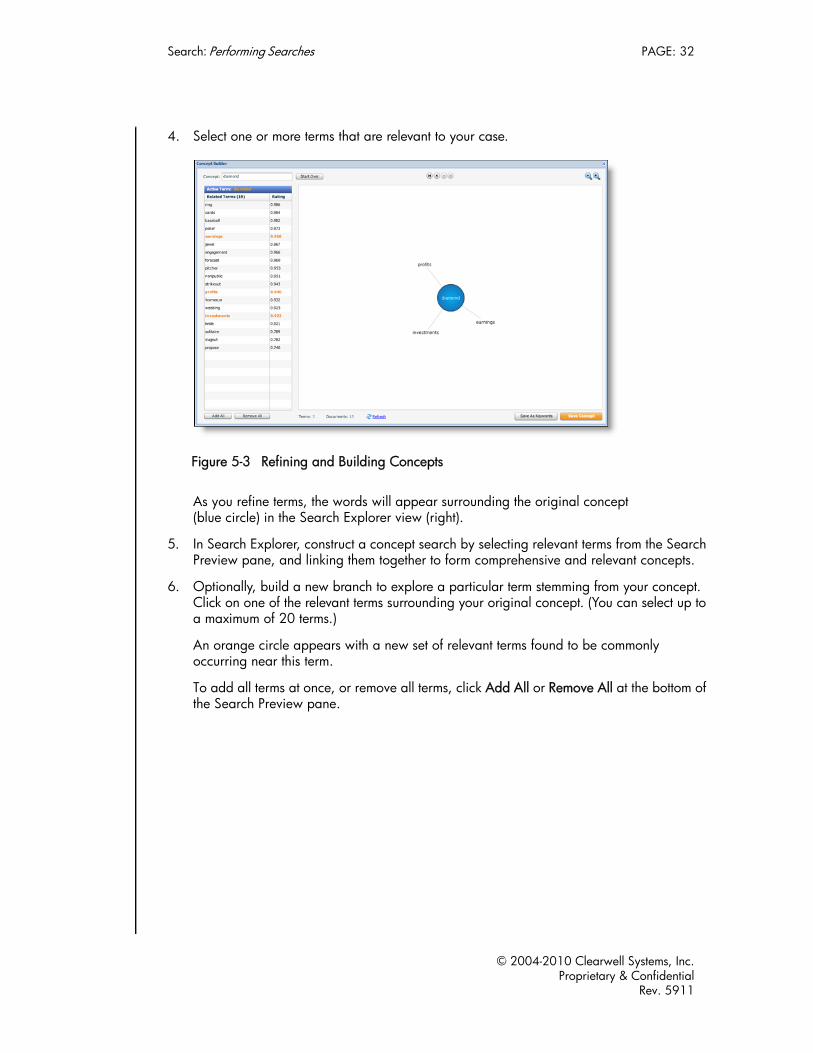
4. Select one or more terms that are relevant to your case.
Figure 5-3 Refining and Building Concepts
As you refine terms, the words will appear surrounding the original concept (blue circle) in the Search Explorer view (right).
5. In Search Explorer, construct a concept search by selecting relevant terms from the Search Preview pane, and linking them together to form comprehensive and relevant concepts.
6. Optionally, build a new branch to explore a particular term stemming from your concept. Click on one of the relevant terms surrounding your original concept. (You can select up to a maximum of 20 terms.)
An orange circle appears with a new set of relevant terms found to be commonly occurring near this term.
To add all terms at once, or remove all terms, click Add All or Remove All at the bottom of the Search Preview pane.
Proprietary & ConfidentialRev. 5911

Search: Performing Searches PAGE: 33
Figure 5-4 Exploring New Concepts
The Search Preview pane refreshes and displays words co-occurring with the active term (in this example “earnings”).
As you refine a concept, you can click the Refresh link at the bottom of the window to see how many documents your refined concept will yield.
This helps to understand the total number of matching documents before actually running the search, and whether or not you need to reduce or increase your result.
7. When finished refining terms, click Save Concept.
The Advanced Search screen re-opens.
8. From the Advanced Search screen, click Run Search.
When you run the search, Clearwell internally creates a holistic concept representing your terms, and finds documents that are conceptually similar to the holistic concept.
Your results appear, with your terms listed in the Common Concept Terms box.
© 2004-2010 Clearwell Systems, Inc.Proprietary & Confidential
Rev. 5911
Search: Performing Searches PAGE: 34
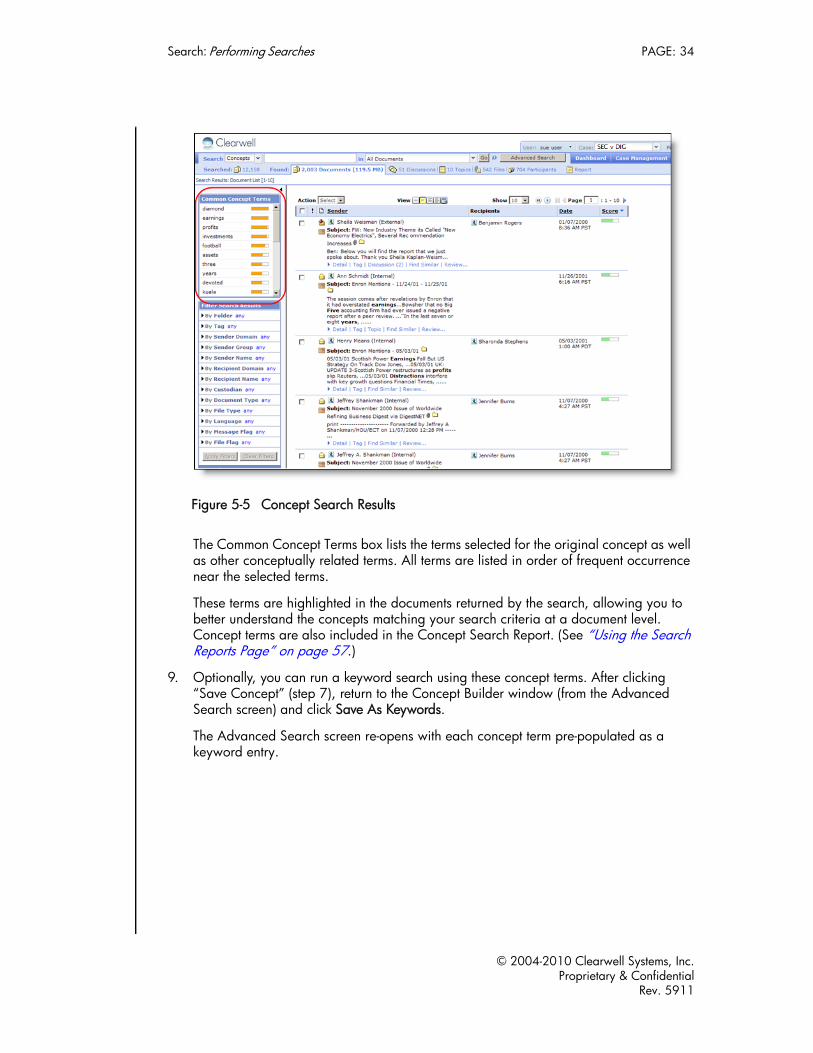
Figure 5-5 Concept Search Results
The Common Concept Terms box lists the terms selected for the original concept as well as other conceptually related terms. All terms are listed in order of frequent occurrence near the selected terms.
These terms are highlighted in the documents returned by the search, allowing you to better understand the concepts matching your search criteria at a document level. Concept terms are also included in the Concept Search Report. (See “Using the Search Reports Page” on page 57.)
9. Optionally, you can run a keyword search using these concept terms. After clicking “Save Concept” (step 7), return to the Concept Builder window (from the Advanced Search screen) and click Save As Keywords.
The Advanced Search screen re-opens with each concept term pre-populated as a keyword entry.
© 2004-2010 Clearwell Systems, Inc.Proprietary & Confidential
Rev. 5911

Search: Performing Searches PAGE: 35
Figure 5-6 Running a Keyword Search from Saved Concept Terms
Click Run Search to run your keyword search with your concept terms.
Note: Concept searches can also be combined with Tag, Folder, Participant and other selections in an Advanced Search. Refer to the Clearwell Search Guide for more information and additional details.
© 2004-2010 Clearwell Systems, Inc.Proprietary & Confidential
Rev. 5911

Search: Performing Searches PAGE: 36
Freeform Searches
To perform an advanced search using queries:
1. Click Advanced near the top of any page to display the advanced search options, and then click the Freeform Search option.
2. In the Queries area, enter any combination of the criteria listed in the following table.
Table 5-3 Freeform Search Criteria
Criteria Effect on Search
Apply this message query
Finds messages that match the specified query. For example:•To find documents where there are 10 or fewer intervening words
between “budget” and “issues,” use the search:budget w/10 issues
•To find “contract” in the Subject field and “energy” in the message body:+(u_subject:contract u_body:energy u_quotedTextN:energy)
•To find “contract” in the Subject field, except when “concluded” is also in the Subject field:+(u_subject:contract)-(u_subject:concluded)
•Search for a participant’s first and last name in the To, Cc, or Bcc fields (excludes the middle name):+((toListIndexed:”Phillip Allen”~1) (ccListIndexed:”Phillip Allen”~1) (bccListIndexed:”Phillip Allen”~1) )
•Search for messages between the Sales department and the Analysis department:(+(sendersDept:”sales”) +(recipientsDept:analysis)) (+(sendersDept:analysis) +(recipientsDept:”sales”))
...and apply this file query
Finds message attachments and other files that match the specified query.
© 2004-2010 Clearwell Systems, Inc.Proprietary & Confidential
Rev. 5911
Search: Performing Searches PAGE: 37
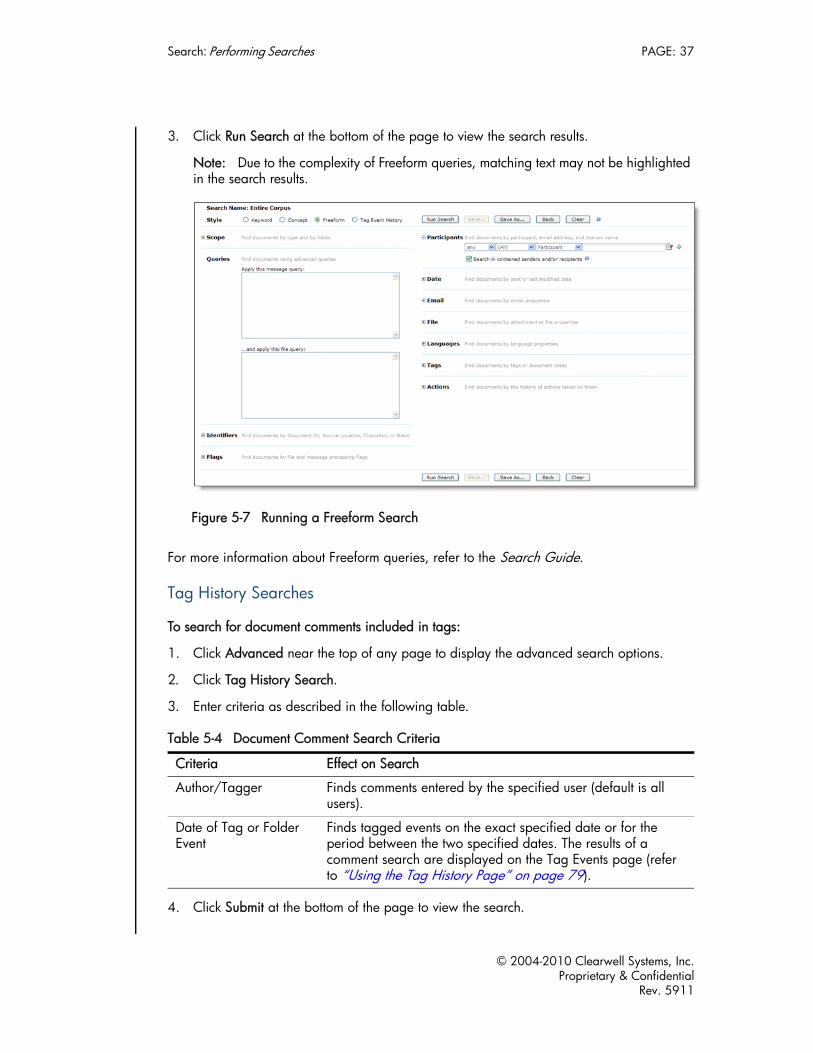
3. Click Run Search at the bottom of the page to view the search results.
Note: Due to the complexity of Freeform queries, matching text may not be highlighted in the search results.
Figure 5-7 Running a Freeform Search
For more information about Freeform queries, refer to the Search Guide.
Tag History Searches
To search for document comments included in tags:
1. Click Advanced near the top of any page to display the advanced search options.
2. Click Tag History Search.
3. Enter criteria as described in the following table.
4. Click Submit at the bottom of the page to view the search.
Table 5-4 Document Comment Search Criteria
Criteria Effect on Search
Author/Tagger Finds comments entered by the specified user (default is all users).
Date of Tag or Folder Event
Finds tagged events on the exact specified date or for the period between the two specified dates. The results of a comment search are displayed on the Tag Events page (refer to “Using the Tag History Page” on page 79).
© 2004-2010 Clearwell Systems, Inc.Proprietary & Confidential
Rev. 5911

Search: Working with Previous and Saved Searches PAGE: 38
To undo a tag operation:
1. Select a tagging event to display the impacted documents.
2. Using the Tag interface, bulk tag the impacted documents to update them. (Note that this bulk change could override the tagging operations of other reviewers.)
Working with Previous and Saved SearchesThe Searches section of the Filter Search Results area allows you to run, save, edit, or delete searches. The area is divided into the following sections:
• Previous—Previously run searches. These are searches that have not been explicitly saved, but are kept by the system. Only the last 50 previous searches will be listed. Older previous searches are deleted.
• Shared—Saved searches that are accessible by multiple users.
• Private—Saved searches that are accessible only by the user who saved the search.
Note: Only the original creator of a shared saved search or a case administrator can edit or delete shared saved searches. Only the original creator of a private saved search may edit or delete that saved search.
The Searches area (below the filters) includes options to run and edit previous or saved searches.
To refine searches using the Searches options:
1. On any page under the Search tab, click the arrow, to display filter search options.
2. Click the arrow for one of the Searches categories to display a list of check box options.
– To modify a search, click the edit link for a search variation to open the Advanced Search page.
– A Refresh link is shown for any search that has been run as a job. Clicking the link updates the results that were saved with the search. Search results may become outdated if new documents have been processed, or if new tags have been applied and the search contains tag search criteria. See “Setting Up Search Jobs” on page 42.
© 2004-2010 Clearwell Systems, Inc.Proprietary & Confidential
Rev. 5911

Search: Working with Previous and Saved Searches PAGE: 39
– To delete one or more searches, select the check box for the search name and then choose Actions > Delete selected.
– To edit the names of different folders, choose Actions > Edit folders.
3. To highlight the search string or strings in bold in the search results, choose Actions > Highlight terms. The search items are also highlighted in the Previous or Saved search area.
4. Clearwell enables you to associate a unique highlight color with saved searches. By default, all searches are given a highlight color of yellow. However, if you would like to be able to view different search hits in different colors (for example, to distinguish between responsive and privilege terms during review), select the desired color from the Highlight Color drop-down list when creating your saved search.
© 2004-2010 Clearwell Systems, Inc.Proprietary & Confidential
Rev. 5911

Search: Working with Previous and Saved Searches PAGE: 40
Saving Searches
Note: The search query for a saved search should only contain search terms. Including additional search constraints such as document identifiers, tags, or languages can cause search term highlighting to render incorrectly.
Since reviewers often use hit highlighting as a prompt to open attachments, ensure that saved searches only contain search terms.
To save a completed search:
1. Click Save Current Search on any search results page.
2. Enter the following information and click Save.
You can also save searches on the Advanced Search page. Click Save or Save as and enter the same information listed in the previous table.
Managing Saved Searches and Search FoldersOnly the original creator of a shared saved search or a case administrator can edit or delete shared saved searches. Only the original creator of a private saved search may edit or delete that saved search.
To edit an individual saved search:
1. Click the Edit link for the search in the Searches area.
The Advanced Search page opens.
Table 5-5 Saved Search Information
Field Description
Name of Saved Search
Enter the search name to be listed in the control panel (up to 20 characters).
Parent Folder,Name of New Folder
Select an existing private or shared folder used for saved searches, or select <New Shared Folder> or <New Private Folder> and enter the name of the new folder.
Search Notes Enter an optional description of the search.
© 2004-2010 Clearwell Systems, Inc.Proprietary & Confidential
Rev. 5911
Search: Working with Previous and Saved Searches PAGE: 41
2. Modify the search parameters as desired.
3. Choose one of the following actions:
– Click Run Search to run the modified search.
– Click Save to save the modified search.
– Click Save As to save the modified search under a new name.
– Click Back to return to the search results page.
– Click Clear to clear the entries on the page.
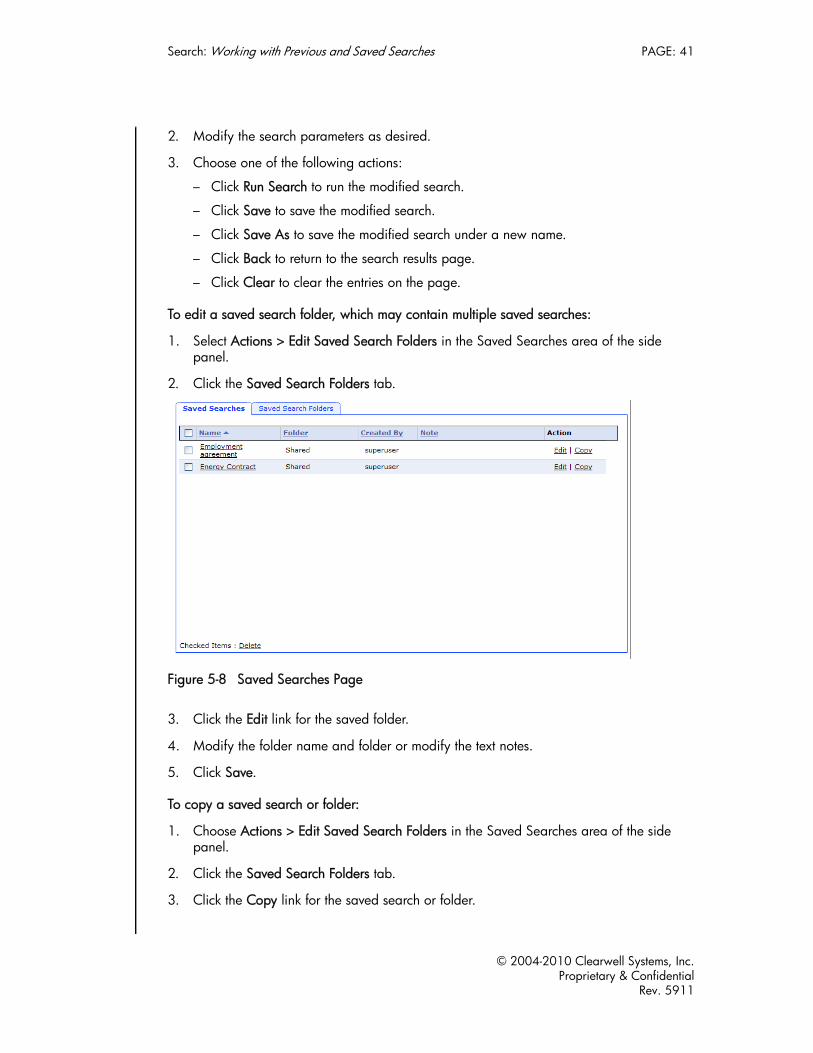
To edit a saved search folder, which may contain multiple saved searches:
1. Select Actions > Edit Saved Search Folders in the Saved Searches area of the side panel.
2. Click the Saved Search Folders tab.
Figure 5-8 Saved Searches Page
3. Click the Edit link for the saved folder.
4. Modify the folder name and folder or modify the text notes.
5. Click Save.
To copy a saved search or folder:
1. Choose Actions > Edit Saved Search Folders in the Saved Searches area of the side panel.
2. Click the Saved Search Folders tab.
3. Click the Copy link for the saved search or folder.
© 2004-2010 Clearwell Systems, Inc.Proprietary & Confidential
Rev. 5911

Search: Setting Up Search Jobs PAGE: 42
4. Enter a new name, make any additional changes, and click Save.
To delete saved searches or saved search folders:
1. Choose Actions > Edit Saved Search Folders in the Saved Searches area of the side panel.
2. Click the Saved Searches or Saved Search Folders tab.
3. Select the searches or folders you want to delete and click Delete.
Setting Up Search JobsIf the system determines that the search is large, it automatically creates a job for the search. When a search runs as a job, the results of the search are calculated and saved with the search. This allows fast access for the results of large searches.
Search jobs run in the Searches area in the Documents page are shown with a spinning magnifying glass icon, and completed search jobs have a grayed magnifying glass icon. You can access the results of a completed search job by clicking on the search name.
The system saves the results of up to 50 search jobs. If there are more than 50 search jobs, the system deletes the results associated with job, but does not delete the query. To access the result of such a search, you must rerun the search.
Note: If additional documents are processed, changes are made to custodians or export batches and the search contains custodian or export batch criteria, or additional tags are made and the search contains tagging search criteria, then the results of the search may become out-of-date. To refresh the results associated with the search job, click Refresh or rerun the search.
Viewing Search ResultsWhen you submit a search, you can view the results organized by documents, discussions, topics, files, or tag events by clicking the corresponding links under the Search and Analysis tab.
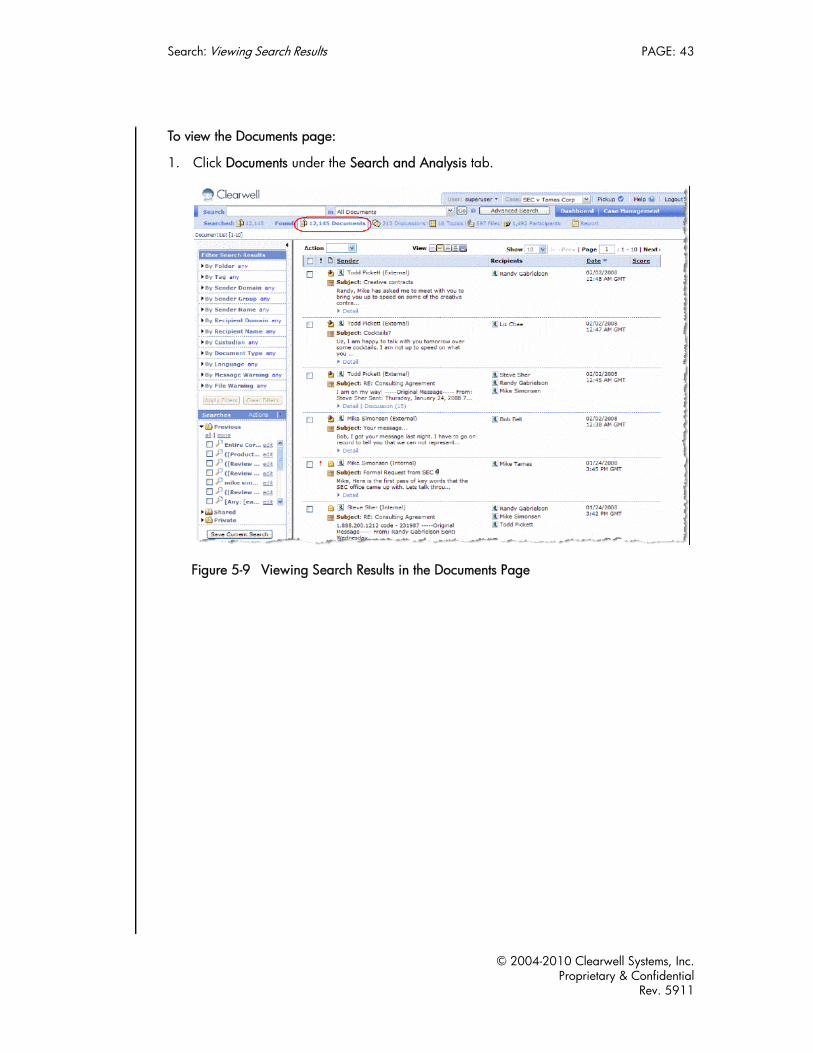
Using the Documents Page
The Documents page lists the messages and loose files retrieved from the search results sorted in descending order of relevance score (or by sent date, if no keywords are used). The top of the page shows the number of documents searched and found, and the number of discussions, topics, individuals, and files associated with the found documents.
By default, the Sender column includes selection of the most relevant excerpt from the message body or the name of the file. You can view the details of each document, add tags and document notes or comments, export documents, or print documents to PDF files. You can also open the Discussion Analysis page to view all messages related to the same discussion.
© 2004-2010 Clearwell Systems, Inc.Proprietary & Confidential
Rev. 5911
Search: Viewing Search Results PAGE: 43
To view the Documents page:
1. Click Documents under the Search and Analysis tab.
Figure 5-9 Viewing Search Results in the Documents Page
© 2004-2010 Clearwell Systems, Inc.Proprietary & Confidential
Rev. 5911

Search: Viewing Search Results PAGE: 44
2. Refer to the following table to perform tasks on this page.
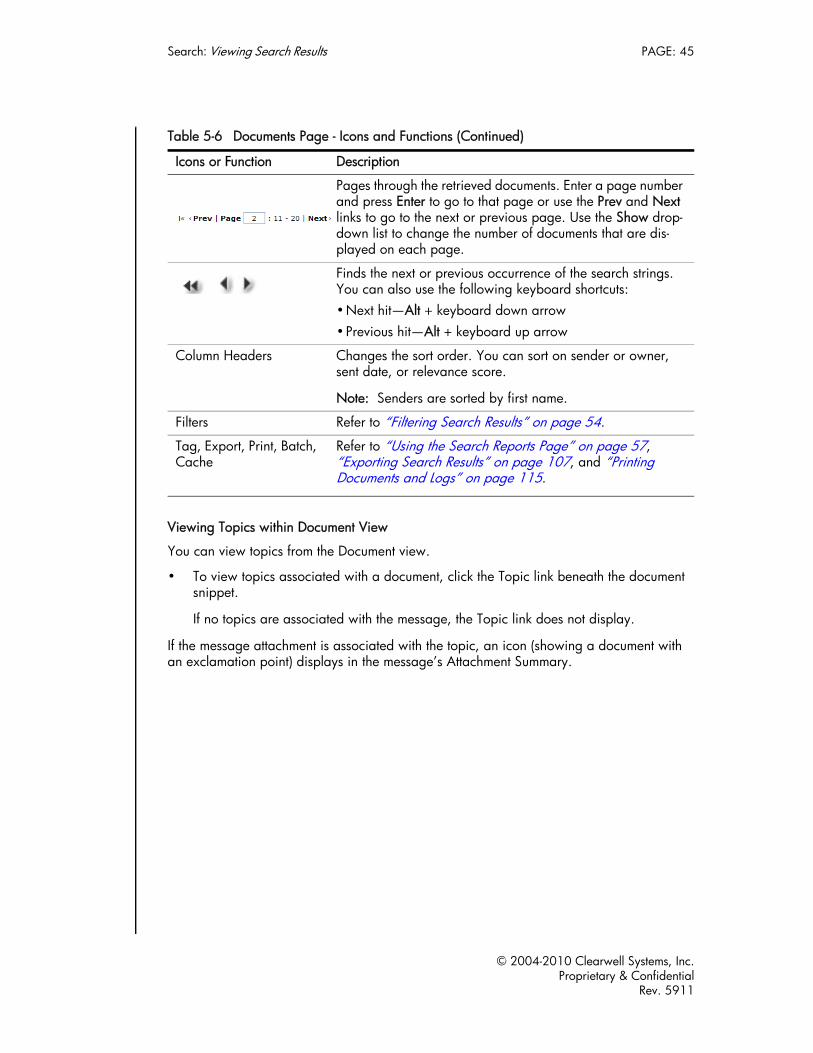
Table 5-6 Documents Page - Icons and Functions
Icons or Function Description
Displays the document sources, including server or path, mailbox or file, folder, and custodian). From left to right, the icons refer to the following message types:•Redacted email•Outbound email• Inbound email• Internal email• Loose file•Redacted fileMove the cursor over the icon or click the icon to view the document source information, which shows every custodian and location where this document was found, as in this example:
Displays or hides the message contents.
Opens a tag assignment area, allowing you to tag the document. Refer to “Using the Search Reports Page” on page 57.
Displays information about batch processing jobs that include this item when you move the cursor over the icon, as in this example:
Determines how many records are displayed on a page.
© 2004-2010 Clearwell Systems, Inc.Proprietary & Confidential
Rev. 5911
Search: Viewing Search Results PAGE: 45
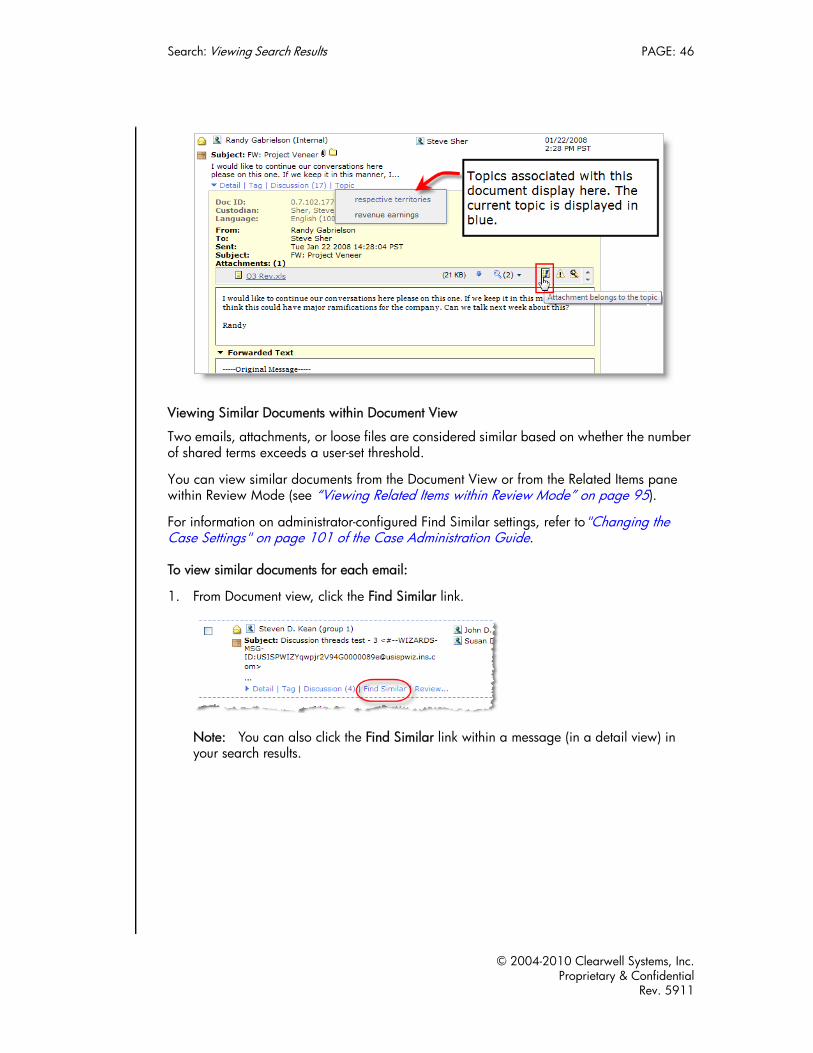
Viewing Topics within Document View
You can view topics from the Document view.
• To view topics associated with a document, click the Topic link beneath the document snippet.
If no topics are associated with the message, the Topic link does not display.
If the message attachment is associated with the topic, an icon (showing a document with an exclamation point) displays in the message’s Attachment Summary.
Pages through the retrieved documents. Enter a page number and press Enter to go to that page or use the Prev and Next links to go to the next or previous page. Use the Show drop-down list to change the number of documents that are dis-played on each page.
Finds the next or previous occurrence of the search strings. You can also use the following keyboard shortcuts:•Next hit—Alt + keyboard down arrow•Previous hit—Alt + keyboard up arrow
Column Headers Changes the sort order. You can sort on sender or owner, sent date, or relevance score.
Note: Senders are sorted by first name.
Filters Refer to “Filtering Search Results” on page 54.
Tag, Export, Print, Batch, Cache
Refer to “Using the Search Reports Page” on page 57, “Exporting Search Results” on page 107, and “Printing Documents and Logs” on page 115.
Table 5-6 Documents Page - Icons and Functions (Continued)
Icons or Function Description
© 2004-2010 Clearwell Systems, Inc.Proprietary & Confidential
Rev. 5911
Search: Viewing Search Results PAGE: 46
Viewing Similar Documents within Document View
Two emails, attachments, or loose files are considered similar based on whether the number of shared terms exceeds a user-set threshold.
You can view similar documents from the Document View or from the Related Items pane within Review Mode (see “Viewing Related Items within Review Mode” on page 95).
For information on administrator-configured Find Similar settings, refer to"Changing the Case Settings" on page 101 of the Case Administration Guide.
To view similar documents for each email:
1. From Document view, click the Find Similar link.
Note: You can also click the Find Similar link within a message (in a detail view) in your search results.
© 2004-2010 Clearwell Systems, Inc.Proprietary & Confidential
Rev. 5911

Search: Viewing Search Results PAGE: 47
Upon opening, the Minimum Rating shown reflects the value configured by the Case administrator. (The maximum number possible is 1, by default.)
2. Click and drag the blue slider bar left or right depending on how loosely or tightly similar (respectively) the documents you want to analyze should be. Note that the value in the Minimum Rating box changes as you move the slider. The higher your rating, the more closely similar the documents are to one another. (You can also enter a value from 1-100.)
3. When you are ready to view the results, click Analyze.
The Similar Item Analysis page appears, showing Messages, Discussions, and Attachment tabs.
The first message is shown in a shaded area (outlined in grey) to indicate that this is the primary document (the document on which all similar items are based.) The primary document will always appear first.
– Messages tab. Displays the similar items, the terms that the two items shared.
© 2004-2010 Clearwell Systems, Inc.Proprietary & Confidential
Rev. 5911
Search: Viewing Search Results PAGE: 48
Note: Since Find Similar is a superset of Near Duplicate technology, not all items on the analysis page are necessarily similar to each other. Use Find Similar for the documents on this page if you want to explore various documents of interest.
– Discussions tab. Displays the discussions that include the similar messages.
– Attachment tab. Displays attachments that are similar to the primary document.
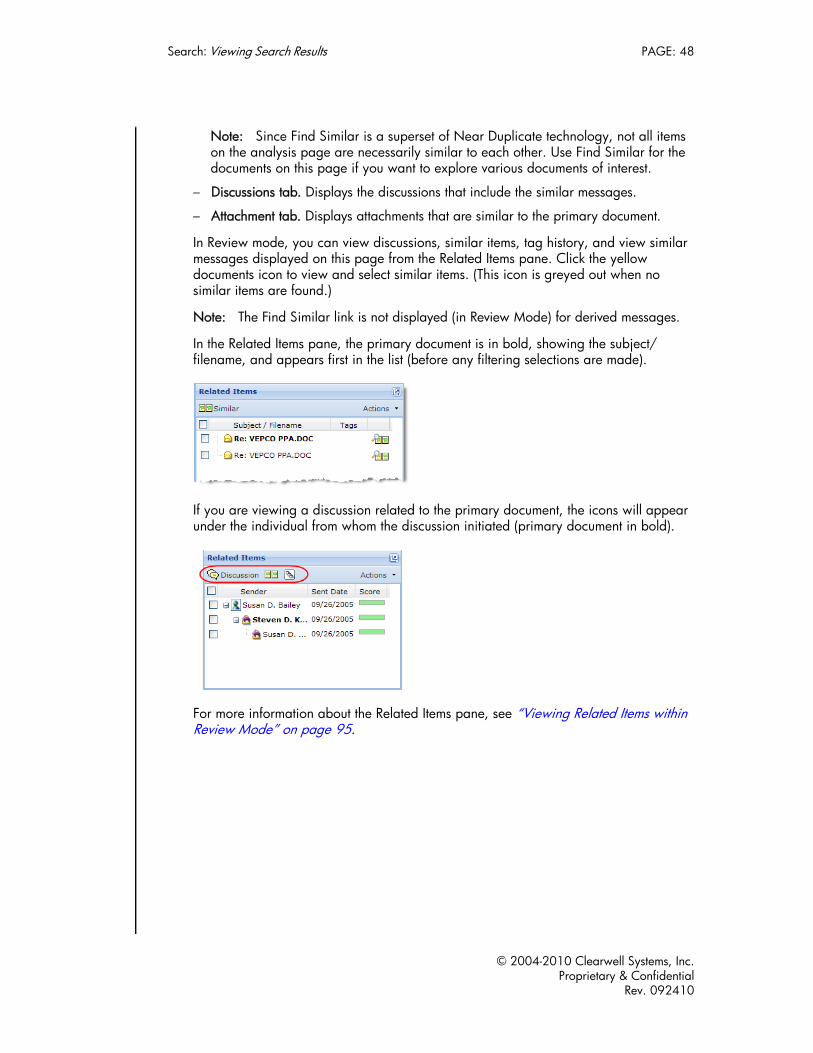
In Review mode, you can view discussions, similar items, tag history, and view similar messages displayed on this page from the Related Items pane. Click the yellow documents icon to view and select similar items. (This icon is greyed out when no similar items are found.)
Note: The Find Similar link is not displayed (in Review Mode) for derived messages.
In the Related Items pane, the primary document is in bold, showing the subject/filename, and appears first in the list (before any filtering selections are made).
If you are viewing a discussion related to the primary document, the icons will appear under the individual from whom the discussion initiated (primary document in bold).
For more information about the Related Items pane, see “Viewing Related Items within Review Mode” on page 95.
© 2004-2010 Clearwell Systems, Inc.Proprietary & Confidential
Rev. 092410
Search: Viewing Search Results PAGE: 49
.
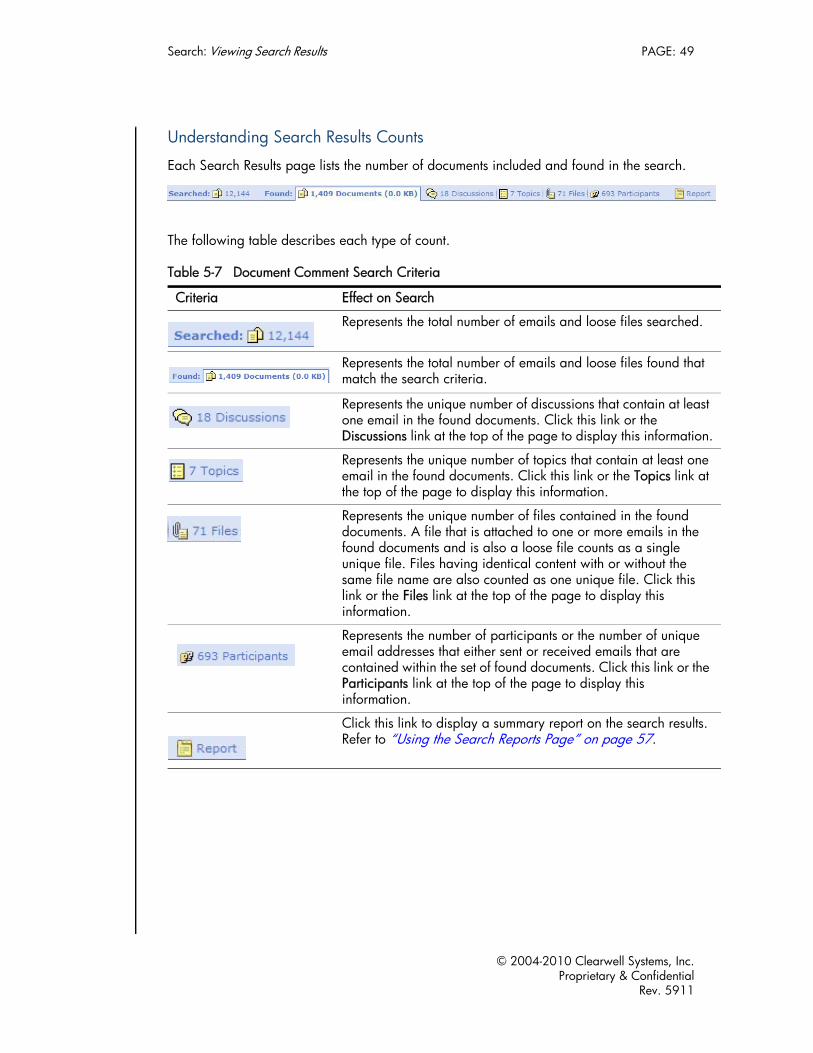
Understanding Search Results Counts
Each Search Results page lists the number of documents included and found in the search.
The following table describes each type of count.
Table 5-7 Document Comment Search Criteria
Criteria Effect on Search
Represents the total number of emails and loose files searched.
Represents the total number of emails and loose files found that match the search criteria.
Represents the unique number of discussions that contain at leastone email in the found documents. Click this link or the Discussions link at the top of the page to display this information
Represents the unique number of topics that contain at least oneemail in the found documents. Click this link or the Topics link atthe top of the page to display this information.
Represents the unique number of files contained in the found documents. A file that is attached to one or more emails in the found documents and is also a loose file counts as a single unique file. Files having identical content with or without the same file name are also counted as one unique file. Click this link or the Files link at the top of the page to display this information.
Represents the number of participants or the number of unique email addresses that either sent or received emails that are contained within the set of found documents. Click this link or theParticipants link at the top of the page to display this information.
Click this link to display a summary report on the search results.Refer to “Using the Search Reports Page” on page 57.
© 2004-2010 Clearwell Systems, Inc.Proprietary & Confidential
Rev. 5911

Search: Viewing Search Results PAGE: 50
Changing your Search Results View
Each Search Results page contains icons that correspond to different viewing options for the documents listed in the search results.
From left to right:
• Basic—Displays only the subject and other header information.
• Snippets—Displays the most relevant excerpt from the document. This is the default view.
• Simple Detail—Displays the full body of the message.
© 2004-2010 Clearwell Systems, Inc.Proprietary & Confidential
Rev. 092410

Search: Viewing Search Results PAGE: 51
• Full Detail—Displays the full body of the message, including any forwarded text.
• Review Mode—Opens the Document Review page. Refer to “Using the Document Review Page” on page 92.
The message header that is displayed in Simple Detail, Full Detail, and Review Mode includes the document ID and language percentages in the message, in addition to standard email header information.
To view additional information on individuals, move the cursor over the name of a discussion participant or in the To, From, cc, or bcc fields of an email message. The information includes all of the individual’s email addresses and display names.
© 2004-2010 Clearwell Systems, Inc.Proprietary & Confidential
Rev. 5911

Search: Viewing Search Results PAGE: 52
For more information about the Search Results pages and options, refer to the remaining sections in this chapter.
Nested Email Attachments in Search Results
After processing, all nested email attachments are displayed in a full hierarchy so that contained files are displayed nested within their containers, and attachments are nested within their parent emails.
Email attachments are searchable as loose file attachments. Their full text is indexed, but they are not searchable by way of their email metadata and are not included in discussion threads. (This is consistent with loose file attachments, which, beyond full text, are only searchable by their filename.)
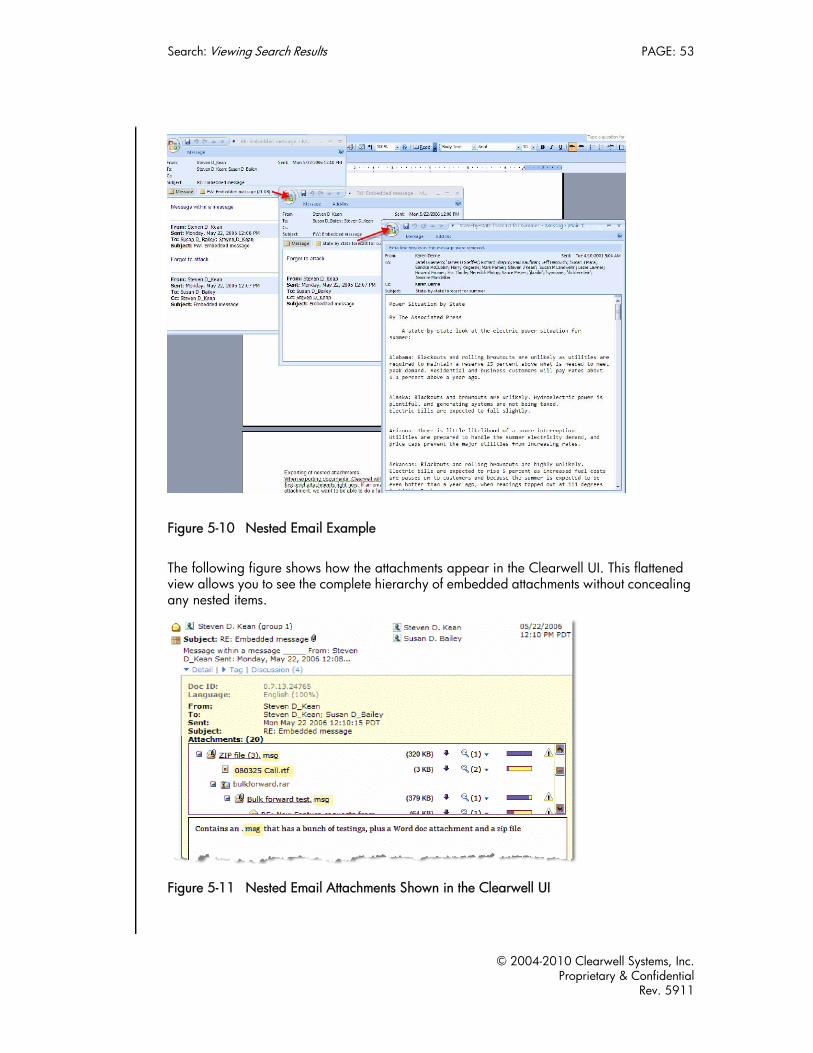
For example, the email shown in the following figure has two nested attachments (“FW: Embedded message” and “State-by-state forecast for summer”).
© 2004-2010 Clearwell Systems, Inc.Proprietary & Confidential
Rev. 092410
Search: Viewing Search Results PAGE: 53
Figure 5-10 Nested Email Example
The following figure shows how the attachments appear in the Clearwell UI. This flattened view allows you to see the complete hierarchy of embedded attachments without concealing any nested items.
Figure 5-11 Nested Email Attachments Shown in the Clearwell UI
© 2004-2010 Clearwell Systems, Inc.Proprietary & Confidential
Rev. 5911
Search: Filtering Search Results PAGE: 54
Filtering Search ResultsAfter you submit a search, if filters are enabled, you can apply filters to limit the search results to just the emails or loose files, folders, tags, sender domains, or names. You can also exclude the derived messages. The available filters depend on the search results. For example, the Folder filter is displayed only if one or more retrieved documents have been assigned to folders.
To enable filters:
From the Advanced Search window, ensure that the Filter and Count Generation options are set to either Normal filter and count generation or Generate keyword details for filters and report.
For more information, see how“To submit a standard advanced search:” on page 16.
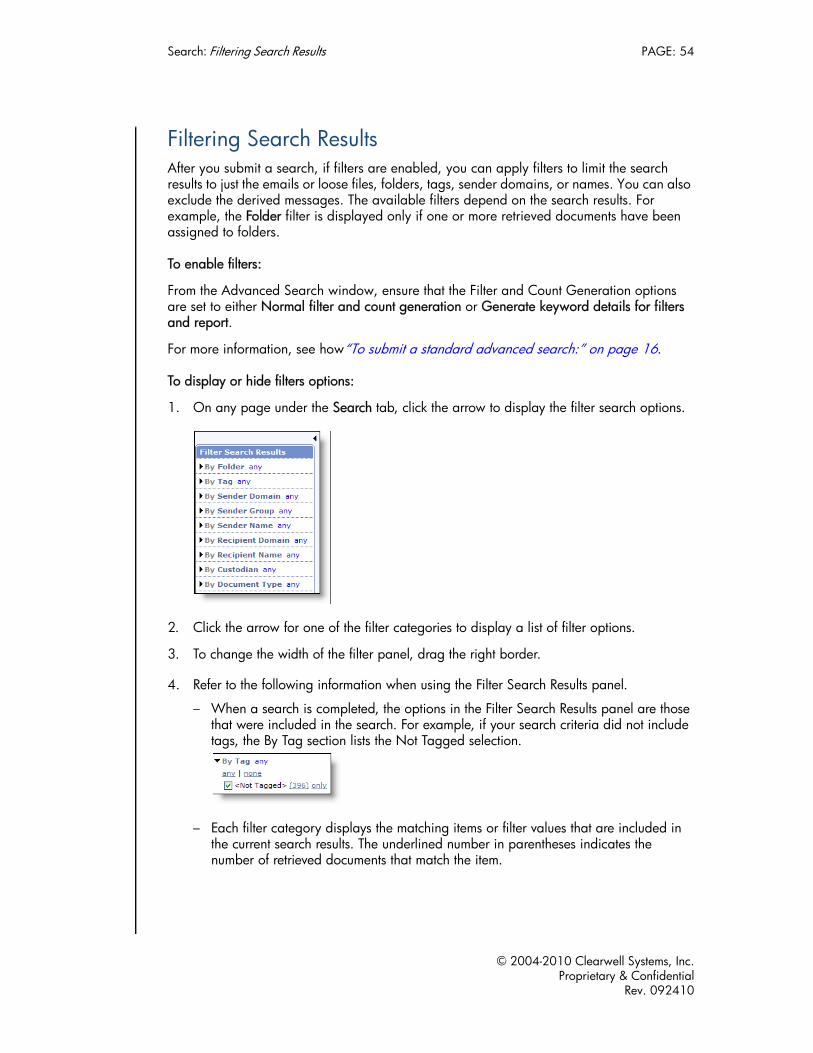
To display or hide filters options:
1. On any page under the Search tab, click the arrow to display the filter search options.
2. Click the arrow for one of the filter categories to display a list of filter options.
3. To change the width of the filter panel, drag the right border.
4. Refer to the following information when using the Filter Search Results panel.
– When a search is completed, the options in the Filter Search Results panel are those that were included in the search. For example, if your search criteria did not include tags, the By Tag section lists the Not Tagged selection.
– Each filter category displays the matching items or filter values that are included in the current search results. The underlined number in parentheses indicates the number of retrieved documents that match the item.
© 2004-2010 Clearwell Systems, Inc.Proprietary & Confidential
Rev. 092410

Search: Filtering Search Results PAGE: 55
– Click an underlined number to quickly refine the search to include only that item in that category. For example in the next figure, clicking the underlined numeric link for Benjamin Rogers immediately filters the current search results to include only the messages that have the sender name Benjamin Rogers.
– You can sort filters by count, by clicking the hash icon, or alphabetically, by clicking the letter A.
Note: Folder and Tag filters cannot be sorted by count or alphabetically. These filters are organized in a tree hierarchy.
– All folders are displayed in the filters. (Only tags currently applied are displayed.) Folder and Tag values only display in the hierarchy if a document has been assigned that value.
– Click any to include any of the values in this category in the search, or click none to include none of the values in this category.
Note: Every category must have at least one value set. Otherwise, no documents will be returned.
– When you select multiple filters, they match if any one of the filters matches (OR match).
– A scroll bar is available if the number of filters is too large to fit.
– To select the check box for only one item in a filter category, click the only link for that item.
© 2004-2010 Clearwell Systems, Inc.Proprietary & Confidential
Rev. 5911

Search: Filtering Search Results PAGE: 56
5. Click Apply Filters to refine the search based on any modifications that you have made.
Note: You do not need to click Apply Filters if you click a numeric link for a filter item. The search is performed immediately when you click the link.
You can rerun your search to show only those results that match the selected filtering options. Note the following guidelines:
– The Folder filter includes the selected folders. This option is available only if folders have been defined by your administrator, and you do not limit the search to a specific folder. The folder count is updated automatically after any actions are taken.
– The Tag filter includes documents your choice of tagged or not tagged documents. This option is available only if tags are defined. The tag count is updated automatically after any tagging action is completed.
– The Sender Domain filter includes the Internet domain names of message senders along with the count of the number of messages sent from each domain. The filter may include an Unknown domain if any of the messages in the search results had domains that could not be interpreted.
– The Sender Group filter includes an External group for all external senders, and an Internal group for all internal senders that do not belong to any other groups. If your administrator has run an Active Directory crawl, then this filter will also contain group information from your organization's directory.
– The Sender Name filter includes names of message senders along with the number of messages sent by each sender.
– The Recipient Domain filter includes the Internet domain names of message recipients along with a count of the number of messages sent to each domain.
– The Recipient Name filter includes the names of message recipients along with the number of messages sent to each recipient.
– The Custodian filter includes the names of document custodians along with the number of messages assigned to each custodian.
– The Keyword Search Query filter includes the specified queries contained within each query row of the search. To list additional expanded keyword queries based on the selected variations, select the Generate keyword details for filters and report check box within Advanced search.
– The Document Type filter includes the document types (email or file).
– The File Type filter allows you to filter your search results by the “strong type” (the actual content, not the file extension) of loose files and attachments. Clearwell will display any file types (such as Microsoft Excel) that exist in your search result set and allow you to select the desired file types to hone your search.
– The Languages filter includes the identified languages. A document is included in the language filter if the minimum threshold for that language is reached. Refer to Table 5-2 for details. If a document contains more than one language, it is included in more than one language filter. Language filters may not appear if your case contains only one language.
© 2004-2010 Clearwell Systems, Inc.Proprietary & Confidential
Rev. 092410

Search: Using the Search Reports Page PAGE: 57
– The Message Flag filter includes documents with message warnings that were identified during processing, such as a missing sent time in email messages or errors in processing attachments.
Note: You may notice a difference in exception counts between your search results and those listed on the Exceptions page. This is because the search filter accounts for every message containing a file (applied with a particular warning) only once, while the Exceptions page displays every occurrence of a file with a warning, as the same file could be contained in multiple messages. For example, the counts are incrementally counted following these general rules: › If a message has two attachments, and both attachments have the same warning,
the count is still incremented only once.
› If a message has two attachments, but each contains a different warning, the filter for each warning is incremented once.
› If there are two messages, each of which contain the same attachment, and that attachment has a warning, the filter for that warning is incremented once for each of those messages.
– The File Flag filter includes documents with file-related issues that were identified during processing, such as empty or corrupt files, hidden content, or embedded content.
– For loose files, if the administrator has defined file owners, then the sender name is the file owner.
– If you select both folder and tag category filters, documents that belong to multiple folders are displayed if they match the folder filter and ANY of the folders have the selected tag categories.
– Aliases are listed in both sender and recipient name filters. Senders and recipients that are part of aliases are listed in addition to the aliases.
6. To clear the current filters, click Clear Filters.
Using the Search Reports PageThe Search Report provides information on the specified search criteria and results of a search and includes the following sections:
• Search Report—Lists information related to the case and search query including all of the specified search criteria. By default, the keywords used in a search are shown and all other search criteria are hidden. Click Show search detail to show all of the specified search criteria.
• Results—The results section provides the following counts:
– Documents—Total number of emails and loose files.
– Emails—Total number of Emails and their attachments (note that an email with 2 attachments counts as a single email).
– Loose files—Total number of files that are not attached to emails.
© 2004-2010 Clearwell Systems, Inc.Proprietary & Confidential
Rev. 5911
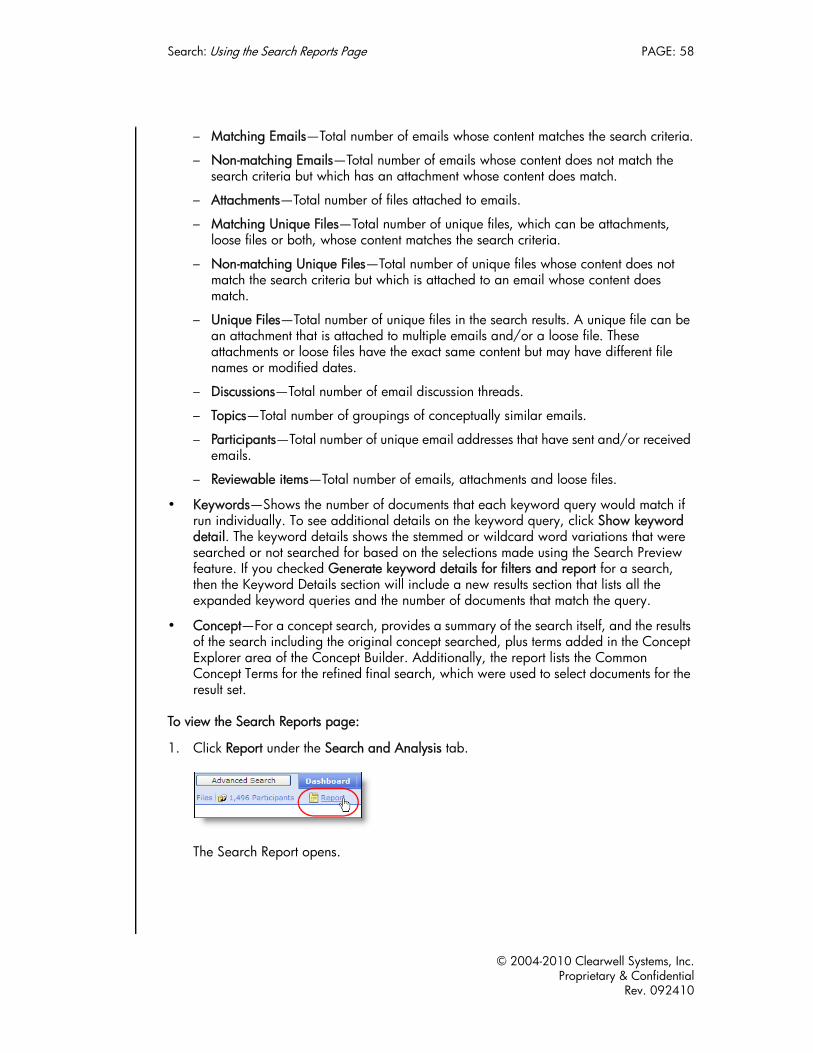
Search: Using the Search Reports Page PAGE: 58
– Matching Emails—Total number of emails whose content matches the search criteria.
– Non-matching Emails—Total number of emails whose content does not match the search criteria but which has an attachment whose content does match.
– Attachments—Total number of files attached to emails.
– Matching Unique Files—Total number of unique files, which can be attachments, loose files or both, whose content matches the search criteria.
– Non-matching Unique Files—Total number of unique files whose content does not match the search criteria but which is attached to an email whose content does match.
– Unique Files—Total number of unique files in the search results. A unique file can be an attachment that is attached to multiple emails and/or a loose file. These attachments or loose files have the exact same content but may have different file names or modified dates.
– Discussions—Total number of email discussion threads.
– Topics—Total number of groupings of conceptually similar emails.
– Participants—Total number of unique email addresses that have sent and/or received emails.
– Reviewable items—Total number of emails, attachments and loose files.
• Keywords—Shows the number of documents that each keyword query would match if run individually. To see additional details on the keyword query, click Show keyword detail. The keyword details shows the stemmed or wildcard word variations that were searched or not searched for based on the selections made using the Search Preview feature. If you checked Generate keyword details for filters and report for a search, then the Keyword Details section will include a new results section that lists all the expanded keyword queries and the number of documents that match the query.
• Concept—For a concept search, provides a summary of the search itself, and the results of the search including the original concept searched, plus terms added in the Concept Explorer area of the Concept Builder. Additionally, the report lists the Common Concept Terms for the refined final search, which were used to select documents for the result set.
To view the Search Reports page:
1. Click Report under the Search and Analysis tab.
The Search Report opens.
© 2004-2010 Clearwell Systems, Inc.Proprietary & Confidential
Rev. 092410
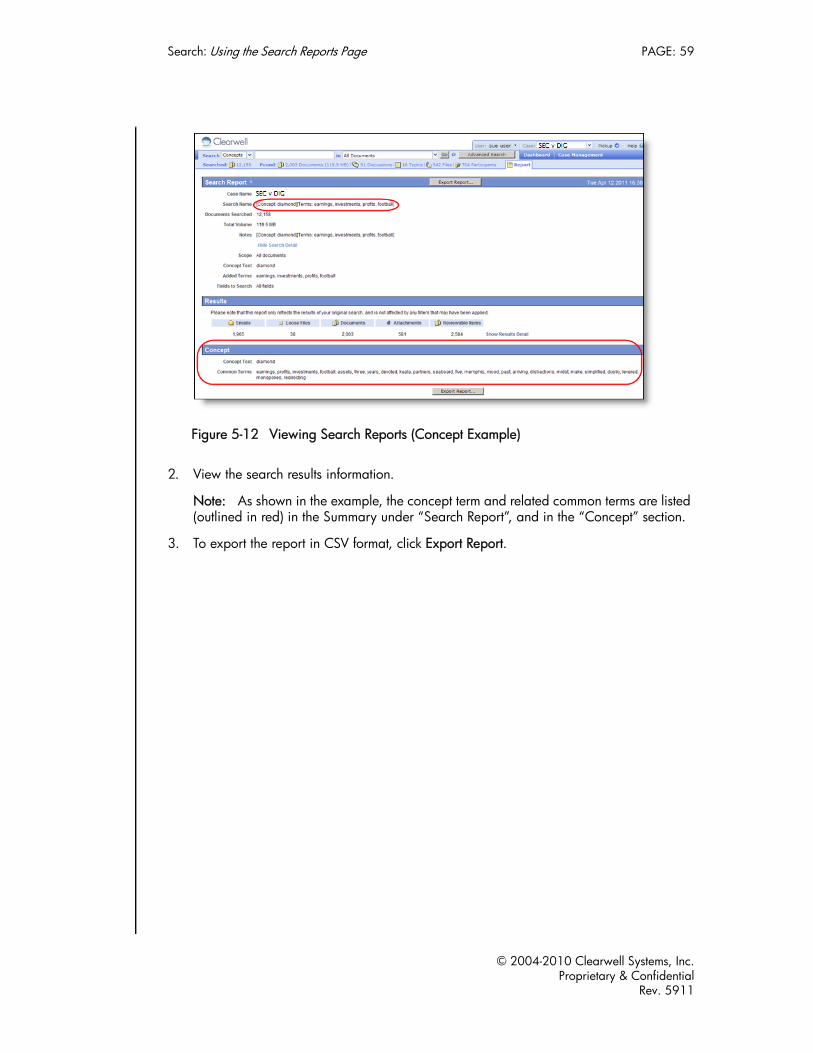
Search: Using the Search Reports Page PAGE: 59
Figure 5-12 Viewing Search Reports (Concept Example)
2. View the search results information.
Note: As shown in the example, the concept term and related common terms are listed (outlined in red) in the Summary under “Search Report”, and in the “Concept” section.
3. To export the report in CSV format, click Export Report.
© 2004-2010 Clearwell Systems, Inc.Proprietary & Confidential
Rev. 5911

Search: Using the Search Reports Page PAGE: 60
© 2004-2010 Clearwell Systems, Inc.Proprietary & Confidential
Rev. 092410

Analyze: Using the Discussions Page PAGE: 61
User GuideAnalyze This section describes the Clearwell Systems Software and the basic user tasks that you can perform. Refer to the following topics:
• “Using the Discussions Page” on page 61
• “Using the Topics Page” on page 66
• “Using the Files Page” on page 69
• “Using the Participants Page” on page 71
Using the Discussions PageEach message retrieved by a search may be part of a discussion—a sequence of send-reply or forward messages that have the same subject. The Discussions page lists all the discussions that have one or more messages in the retrieved results, sorted in descending order by relevance score. The originator, start date, and number of messages are shown for each discussion. You can tag a discussion thread from this page by clicking Tag. Note that the discussion may include messages that do not otherwise match search criteria.
To view the Discussions page:
1. Click Discussions under the Search and Analysis tab.
Figure 6-1 Viewing Search Results in the Discussions Page
© 2004-2011 Clearwell Systems, Inc.Proprietary & Confidential
Rev. 050911

Analyze: Using the Discussions Page PAGE: 62
2. Refer to the following table to perform tasks on this page.
Discussion Analysis
For each discussion, you can view the message sequence (thread), the key terms, the messages sent by each contributor and between each pair of contributors, and all the associated attachments. You can also save or print a discussion thread summary and all (or selected) messages in a thread.
The Discussion Analysis pages provide access to all of these details. The discussion name is the subject of all the messages in the discussion.
Table 6-1 Discussion Page - Icons and Functions
Icons or Function Description
Determines how many records are displayed on a page.
Pages through the retrieved documents. Enter a page number and press Enter to go to that page or use the Prev and Next links to go to the next or previous page. Use the Show drop-down list to change the number of documents that are dis-played on each page.
Column Headers Changes the sort order. You can sort on messages or relevance score.
Filters Refer to “Filtering Search Results” on page 54.
Refer to “Tagging Documents” on page 75.
Underlined title links Click to open the Discussion Analysis pages, as described in “Discussion Analysis” in the next section.
© 2004-2011 Clearwell Systems, Inc.Proprietary & Confidential
Rev. 050911
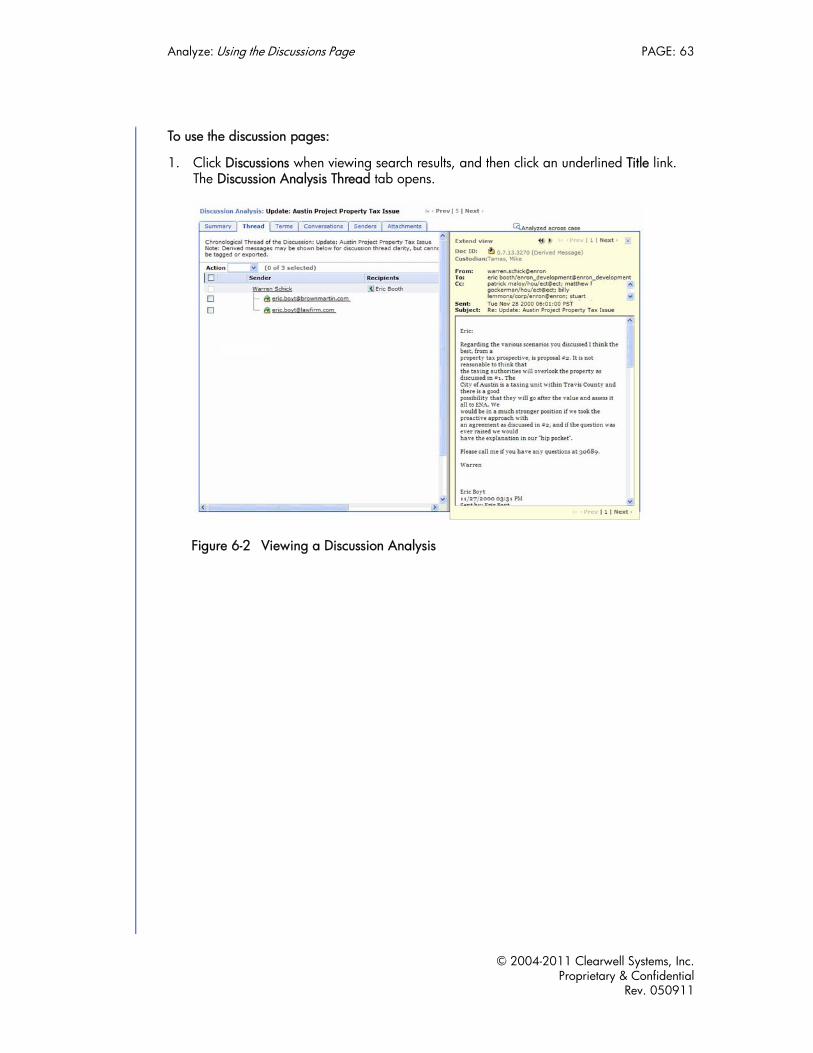
Analyze: Using the Discussions Page PAGE: 63
To use the discussion pages:
1. Click Discussions when viewing search results, and then click an underlined Title link. The Discussion Analysis Thread tab opens.
Figure 6-2 Viewing a Discussion Analysis
© 2004-2011 Clearwell Systems, Inc.Proprietary & Confidential
Rev. 050911

Analyze: Using the Discussions Page PAGE: 64
2. Click one of the tabs in the Discussion Analysis page to view the discussion details, as described in the following table.
Table 6-2 Discussion Analysis Tabs
Tab Description
Summary Provides a summary of the discussion, including the originator, senders, recipients, number of messages, discussion duration, number of attachments, and five terms that occur most frequently during the discussion.
Thread Provides a tree-like structure that shows the sequence of messages in the discussion. Perform these functions on this tab:•Click the sender name to view the contents of the message. The
search keywords are highlighted in yellow. Click Header to show or hide the header information.
•Move the cursor over a sender or recipients name to display relevant details.
•Click the X in the upper-right corner of a message window to close the window. – Click Next or Prev on the message window to move to the next or
previous message in the thread.– Click Next or Prev above “Analyzed across case” to go to the next
or previous thread in your search results.
Note: The derived message shown next to the message header indicates the message was not found individually, but was identified from the text included in another message. Derived messages cannot be selected for export or tagging. For example, if a message is sent from internal user A to external user B, and is then forwarded to external user C, who replies to A and B. The message from B to C is not received internally, but is derived from the forwarded text in the message from C.
Terms Lists the most commonly occurring words or noun phrases that occur in the discussion, sorted by relevance score. The number of occurrences is shown for each term. Click a term to view snippets of the messages where the term occurs.
Conversations Lists the pairs of individuals who have sent messages to each other during the discussion, sorted by relevance score. Click a pair to view the messages between the two contributors.
© 2004-2011 Clearwell Systems, Inc.Proprietary & Confidential
Rev. 050911
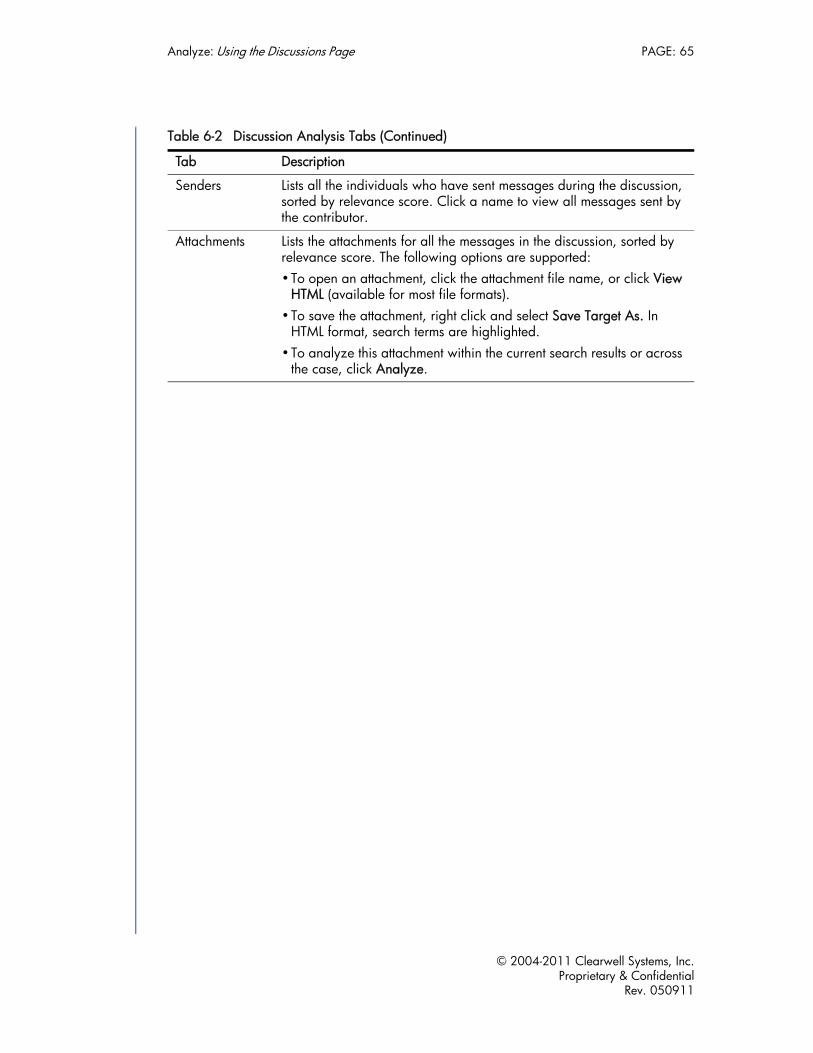
Analyze: Using the Discussions Page PAGE: 65
Senders Lists all the individuals who have sent messages during the discussion, sorted by relevance score. Click a name to view all messages sent by the contributor.
Attachments Lists the attachments for all the messages in the discussion, sorted by relevance score. The following options are supported:•To open an attachment, click the attachment file name, or click View
HTML (available for most file formats). •To save the attachment, right click and select Save Target As. In
HTML format, search terms are highlighted.•To analyze this attachment within the current search results or across
the case, click Analyze.
Table 6-2 Discussion Analysis Tabs (Continued)
Tab Description
© 2004-2011 Clearwell Systems, Inc.Proprietary & Confidential
Rev. 050911

Analyze: Using the Topics Page PAGE: 66
Using the Topics Page Each message is associated with one or more topics based on a statistical and linguistic analysis. The Topics page lists the topics included in the retrieved messages, sorted in descending order by relevance score. The number of individuals, discussions, and messages associated with each topic is also shown for the search results.
For each topic, you can view the relevant terms, contributors (those who sent the most messages), discussions, documents, and files in the retrieved search results. You can also view the same topic information across all messages.
Topics are identified automatically, but an administrator can edit the topic definitions and define new topics.
How Topics are Assigned
Only one topic can be associated per item. An item can be a message, document, file, or attachment.
Although each item could contain multiple topics, only the most relevant topic is assigned to the item. Topic relevance is determined by the keywords contained within the item.
Note: Messages can display multiple topics. These topics are associated with attachments or files contained within the message.
To view all topics related to a search:
1. From the Search and Analysis tab, view your result set.
You can either run a new search or select and load a review folder.
2. Click Topics.A summary of all topics related to the result set display.
© 2004-2011 Clearwell Systems, Inc.Proprietary & Confidential
Rev. 050911

Analyze: Using the Topics Page PAGE: 67
3. For instructions on how to use the navigation and display tools, refer to the following table.
To view the details of a topic:
1. From the topic list, click the topic name to open the Topic Analysis Summary tab.
The Summary tab displays with an overview of the topic.
2. For additional information about the topic, click one of tabs.
Note: In the upper-right corner, you can choose to view topics across all documents in the case or within the current search.
Table 6-3 Topics Page - Icons and Functions
Icons or Function Description
Determines how many records are displayed on a page.
Pages through the retrieved documents. Enter a page number and press Enter to go to that page or use the Prev and Next links to go to the next or previous page. Use the Show drop-down list to change the number of documents that are dis-played on each page.
Underlined title links Click to open the Topic Analysis pages, as described in “To view the details of a topic:” on page 67.
Table 6-4 Topic Analysis Tabs
Tab Description
Summary Provides a summary of the topic, including the experts on the topic, the number of contributors, discussions, documents, and files related to the topic.
Terms Lists all terms associated with the topic.
© 2004-2011 Clearwell Systems, Inc.Proprietary & Confidential
Rev. 050911
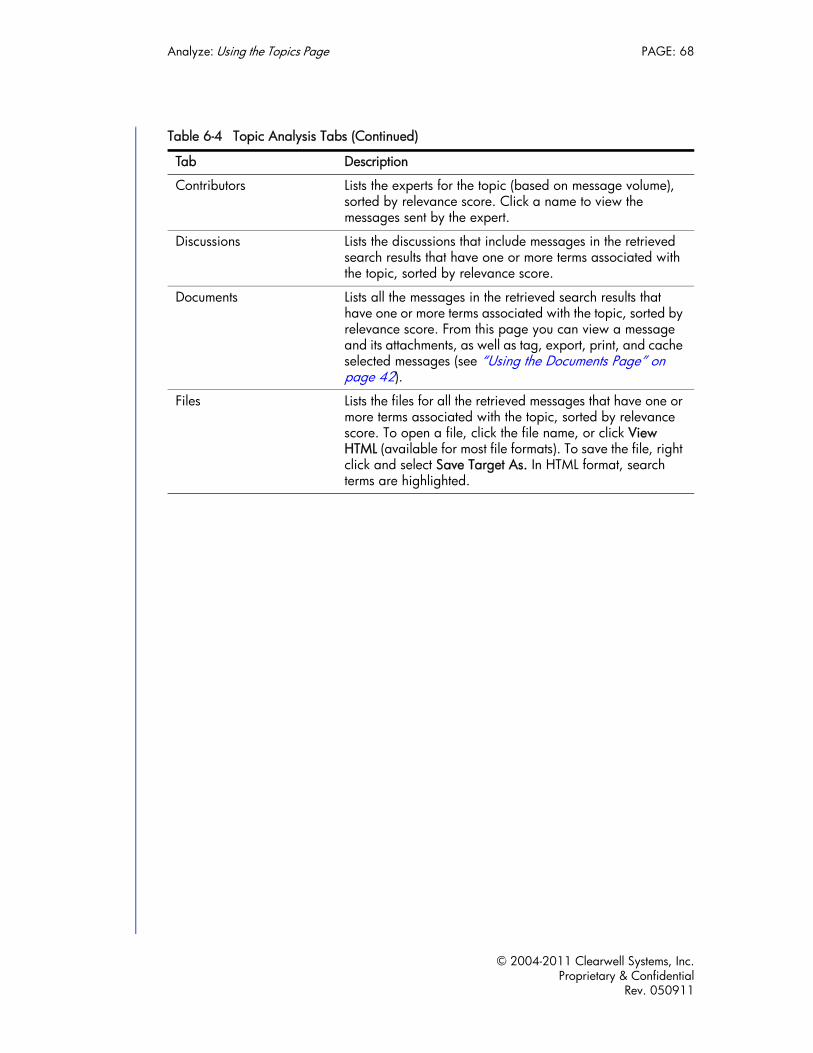
Analyze: Using the Topics Page PAGE: 68
Contributors Lists the experts for the topic (based on message volume), sorted by relevance score. Click a name to view the messages sent by the expert.
Discussions Lists the discussions that include messages in the retrieved search results that have one or more terms associated with the topic, sorted by relevance score.
Documents Lists all the messages in the retrieved search results that have one or more terms associated with the topic, sorted by relevance score. From this page you can view a message and its attachments, as well as tag, export, print, and cache selected messages (see “Using the Documents Page” on page 42).
Files Lists the files for all the retrieved messages that have one or more terms associated with the topic, sorted by relevance score. To open a file, click the file name, or click View HTML (available for most file formats). To save the file, right click and select Save Target As. In HTML format, search terms are highlighted.
Table 6-4 Topic Analysis Tabs (Continued)
Tab Description
© 2004-2011 Clearwell Systems, Inc.Proprietary & Confidential
Rev. 050911

Analyze: Using the Files Page PAGE: 69
Using the Files PageThe Files page lists all the attachments and loose (unattached) files in the search results, sorted in descending order by relevance score. The file owner or the originator of the first message that includes the attachment is shown, along with the number of times each file occurs in the retrieved search results. Identical files with different names are counted as occurrences of the same file. (Ultimately, Clearwell determines one or more files are identical by comparing the files’ binary signatures.) Each file can be viewed and saved in its native format. Many file types can also be viewed in HTML format, where search terms are highlighted in yellow.
To view the Files page:
1. From the Search and Analysis tab, click Files.
Figure 6-3 Viewing Search Results in the Files Page
2. For instructions on how to use this page, refer to the following table.\
Table 6-5 Files Page - Icons and Functions
Icons or Function Description
Determines how many records are displayed on a page.
© 2004-2011 Clearwell Systems, Inc.Proprietary & Confidential
Rev. 050911

Analyze: Using the Files Page PAGE: 70
3. Click the Analyze link for a file to view the documents and discussions related to the file:
– Summary—Lists general information about the documents and discussions associated with the file, including other names, numbers of documents and discussions, originators, senders, recipients, and custodians.
– Documents — Lists all occurrences of the file in the search results, sorted by relevance score. The same file may occur under different names. From this page you can use all the view options for messages, attachments, and loose files, and you can tag, export, and print selected documents (see “Using the Documents Page” on page 42).
– Discussions — Lists the discussions that include the messages that have the selected attachment, sorted by relevance score. Click a discussion to view the Discussion Analysis page for the discussion (see “Using the Discussions Page” on page 61).
Pages through the retrieved documents. Enter a page number and press Enter to go to that page or use the Prev and Next links to go to the next or previous page. Use the Show drop-down list to change the number of documents that are displayed on each page.
Column Headers Changes the sort order. You can sort on occurrences or rel-evance score.
Filters Refer to “Filtering Search Results” on page 54.
Underlined title links Open or save the selected file.
HTML link Displays the file in HTML format in a new window.
Analysis links Open File Analysis pages:•Choose Analyze within search to view the information for
the current search.•Choose Analyze across cases to view the information
across all the documents in the case.
Table 6-5 Files Page - Icons and Functions (Continued)
Icons or Function Description
© 2004-2011 Clearwell Systems, Inc.Proprietary & Confidential
Rev. 050911
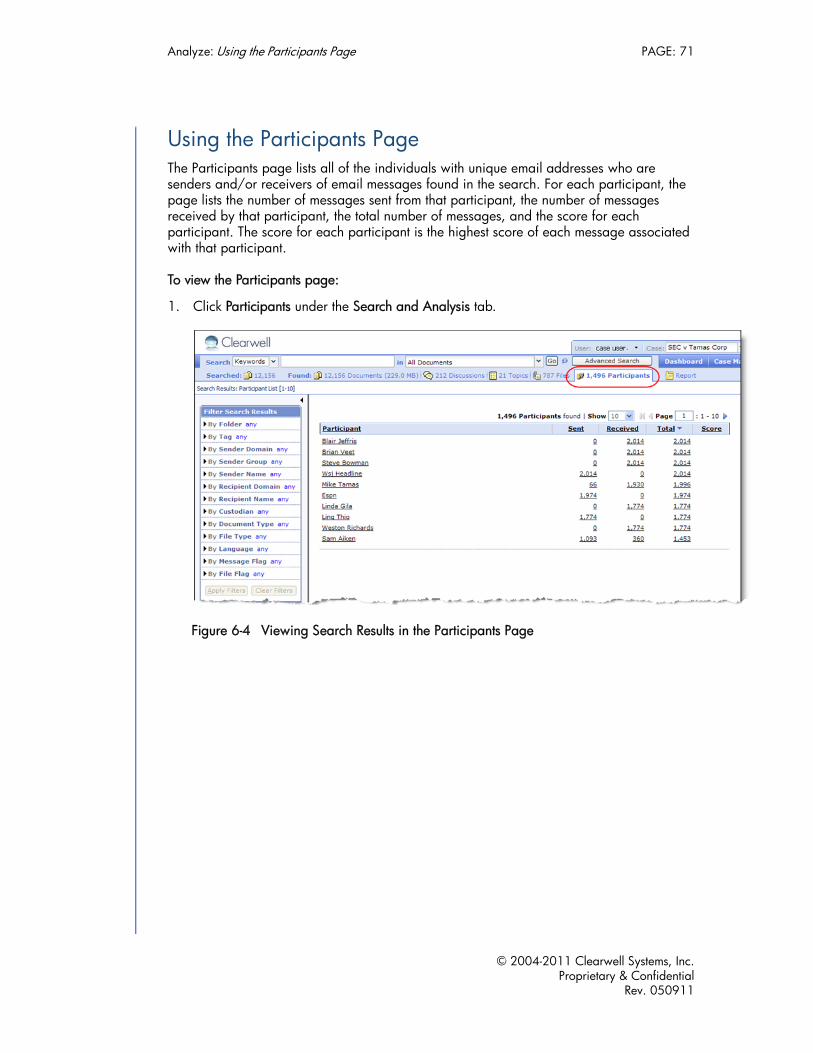
Analyze: Using the Participants Page PAGE: 71
Using the Participants PageThe Participants page lists all of the individuals with unique email addresses who are senders and/or receivers of email messages found in the search. For each participant, the page lists the number of messages sent from that participant, the number of messages received by that participant, the total number of messages, and the score for each participant. The score for each participant is the highest score of each message associated with that participant.
To view the Participants page:
1. Click Participants under the Search and Analysis tab.
Figure 6-4 Viewing Search Results in the Participants Page
© 2004-2011 Clearwell Systems, Inc.Proprietary & Confidential
Rev. 050911

Analyze: Using the Participants Page PAGE: 72
2. For instructions on how to use this page, refer to the following table.
Participant Analysis
The Participant Analysis pages present details about the topics in the search results.
To view the Participant Analysis pages:
1. Click the participant name to open the Participant Analysis Interactions tab.
Figure 6-5 Participant Analysis - Summary Tab
Table 6-6 Participants Page - Icons and Functions
Icons or Function Description
Determines how many records are displayed on a page.
Pages through the retrieved documents. Enter a page number and press Enter to go to that page or use the Prev and Next links to go to the next or previous page. Use the Show drop-down list to change the number of documents that are displayed on each page.
Column Headers Changes the sort order. You can sort on occurrences or rel-evance score.
Filters Refer to “Filtering Search Results” on page 54.
Underlined participant links
Refer to “Participant Analysis” in the next section.
HTML link Displays the file in HTML format in a new window.
Analysis links Open File Analysis pages:•Choose Analyze within search to view the information for
the current search.•Choose Analyze across cases to view the information
across all the documents in the case.
© 2004-2011 Clearwell Systems, Inc.Proprietary & Confidential
Rev. 050911
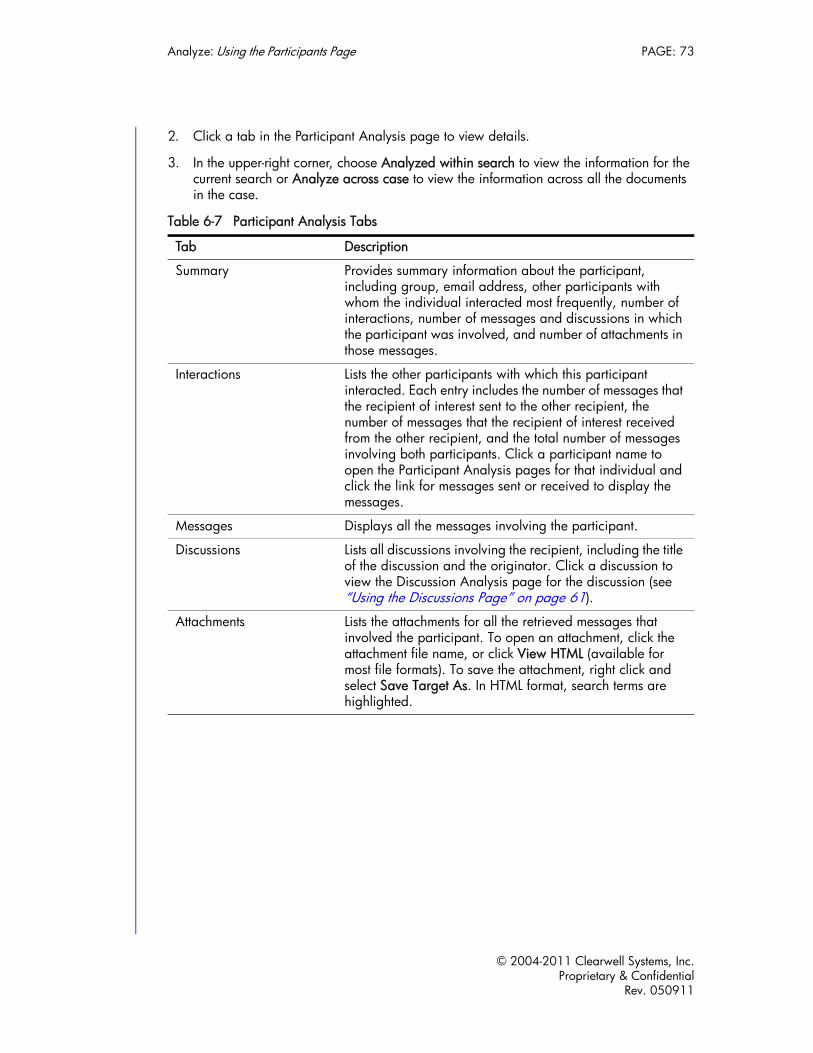
Analyze: Using the Participants Page PAGE: 73
2. Click a tab in the Participant Analysis page to view details.
3. In the upper-right corner, choose Analyzed within search to view the information for the current search or Analyze across case to view the information across all the documents in the case.
Table 6-7 Participant Analysis Tabs
Tab Description
Summary Provides summary information about the participant, including group, email address, other participants with whom the individual interacted most frequently, number of interactions, number of messages and discussions in which the participant was involved, and number of attachments in those messages.
Interactions Lists the other participants with which this participant interacted. Each entry includes the number of messages that the recipient of interest sent to the other recipient, the number of messages that the recipient of interest received from the other recipient, and the total number of messages involving both participants. Click a participant name to open the Participant Analysis pages for that individual and click the link for messages sent or received to display the messages.
Messages Displays all the messages involving the participant.
Discussions Lists all discussions involving the recipient, including the title of the discussion and the originator. Click a discussion to view the Discussion Analysis page for the discussion (see “Using the Discussions Page” on page 61).
Attachments Lists the attachments for all the retrieved messages that involved the participant. To open an attachment, click the attachment file name, or click View HTML (available for most file formats). To save the attachment, right click and select Save Target As. In HTML format, search terms are highlighted.
© 2004-2011 Clearwell Systems, Inc.Proprietary & Confidential
Rev. 050911

Analyze: Using the Participants Page PAGE: 74
© 2004-2011 Clearwell Systems, Inc.Proprietary & Confidential
Rev. 050911
Organize and Track with Tags: Tagging Documents PAGE: 75
User GuideOrganize and Track with TagsThis chapter describes the Clearwell Systems Software and the basic user tasks that you can perform. Refer to the following topics:
• “Tagging Documents” on page 75
• “Using the Tag History Page” on page 79
Tagging DocumentsTagging allows you to manage large sets of documents by assigning them to folders and by flagging them with predefined values in the categories that matter to you, such as relevance, privileged, and status. For example, you can organize related documents into folders for further analysis by a team of reviewers, who can then retrieve the documents assigned to them, tag the documents, and enter notes. In addition to assigning to folders and applying tags, reviewers can add text notes to documents.
Your system administrator must define all folders and tag category names, and the values that can be selected for each tag category. For example, a “Responsive” or “Privileged” category can be added as a check box, or a “Reason code” category can be defined as a drop-down with a list of reason codes.
You may be able to perform any of the following tagging operations, depending on how your system administrator has configured tagging:
• Assign documents to a specific folder (folders are configured by your administrator).
• Apply tag values (tag check boxes and drop-down lists are configured by your administrator).
• Add a document note.
© 2004-2011 Clearwell Systems, Inc.Proprietary & Confidential
Rev. 050911

Organize and Track with Tags: Tagging Documents PAGE: 76
You can tag documents directly from the search results or in Review mode. The following procedure describes how to tag documents from the search results and describes the tag settings. Refer to “Using the Document Review Page” on page 92 for instructions on accessing the tag settings in Review mode.
To tag documents:
1. Submit a search (see “Performing Searches” on page 11).
2. Use check boxes to select the documents that you want to tag.
3. Above the Sender column, click Actions > Tag.
Figure 7-1 Tagging Documents
© 2004-2011 Clearwell Systems, Inc.Proprietary & Confidential
Rev. 050911
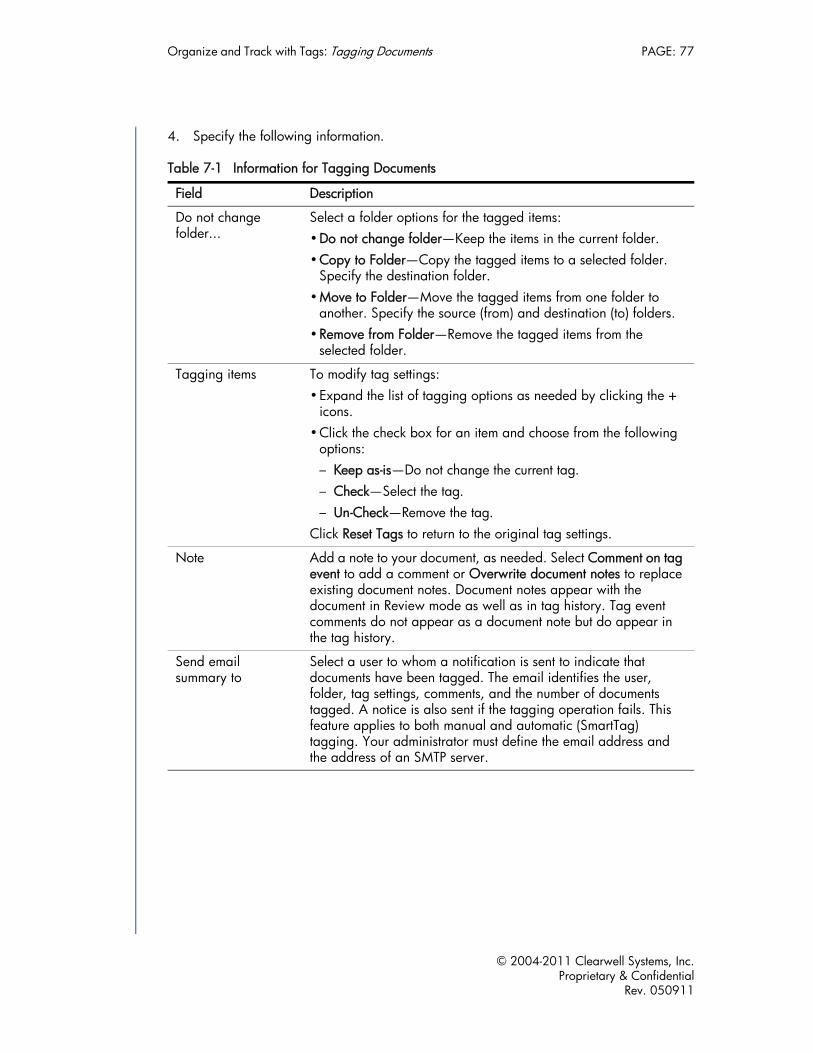
Organize and Track with Tags: Tagging Documents PAGE: 77
4. Specify the following information.
Table 7-1 Information for Tagging Documents
Field Description
Do not change folder...
Select a folder options for the tagged items:•Do not change folder—Keep the items in the current folder.•Copy to Folder—Copy the tagged items to a selected folder.
Specify the destination folder.•Move to Folder—Move the tagged items from one folder to
another. Specify the source (from) and destination (to) folders.•Remove from Folder—Remove the tagged items from the
selected folder.
Tagging items To modify tag settings:•Expand the list of tagging options as needed by clicking the +
icons.•Click the check box for an item and choose from the following
options:– Keep as-is—Do not change the current tag.– Check—Select the tag.– Un-Check—Remove the tag.
Click Reset Tags to return to the original tag settings.
Note Add a note to your document, as needed. Select Comment on tag event to add a comment or Overwrite document notes to replace existing document notes. Document notes appear with the document in Review mode as well as in tag history. Tag event comments do not appear as a document note but do appear in the tag history.
Send email summary to
Select a user to whom a notification is sent to indicate that documents have been tagged. The email identifies the user, folder, tag settings, comments, and the number of documents tagged. A notice is also sent if the tagging operation fails. This feature applies to both manual and automatic (SmartTag) tagging. Your administrator must define the email address and the address of an SMTP server.
© 2004-2011 Clearwell Systems, Inc.Proprietary & Confidential
Rev. 050911

Organize and Track with Tags: Tagging Documents PAGE: 78
5. After selecting your tagging settings, click Apply.
6. At the prompt, to start the tagging operation, click Tag.
7. The task may take some time to complete, depending on the number of documents. Click Pickup at the top of the page to view the status of the task. To cancel the task, click the red icon next to the task in the Pickup window.
If an error occurs during tagging, a is shown next to the Pickup link. Click Pickup for more information.
Apply tag to... If you selected Tag above the Sender column, select one of the following options:•Only selected documents. Applies the changes to one or more
documents on the current page. Check the box next to the appropriate document(s) or click the check box in the column heading to select all documents on the page.
•_% of documents. Applies the changes to a percentage of all current and/or future documents. Enter a percentage and select one or both of the following options. If you specify less than 100 percent, documents are tagged to meet the specified per-centage.
•_documents. Applies the changes to the specified number of current and/or future documents. Enter a number and select one or both of the following options.
•choose documents randomly—Tags a random sample of the search results. The number of documents specified determines the sample size.
• include documents in current search results. Applies to all docu-ments in the search results (filter settings are ignored).
• include future documents matching search criteria (SmartTag). Applies to all future documents that match the current search cri-teria. Enter a name for the SmartTag (up to 20 characters) in the SmartTag field.
Note: The SmartTag operation is run daily only on newly-indexed data.
Tag all documents in related discussion threads
Automatically tag documents that are part of discussion threads including this document. For example, if a document selected for tagging is part of a discussion thread containing 10 documents, then this option tags all 10 documents. If you use this option, the number of documents tagged will likely be greater than the number you specified in “Apply tag to...”
Table 7-1 Information for Tagging Documents (Continued)
Field Description
© 2004-2011 Clearwell Systems, Inc.Proprietary & Confidential
Rev. 050911

Organize and Track with Tags: Using the Tag History Page PAGE: 79
Using the Tag History PageWhen you submit an advanced tag history search (see “Tag History Searches” on page 37), the Tag History page lists all the tag events in the tag history search results. If you search for specific comment text, the results are sorted by relevance score. Each tag event includes the author, the date and time of the tag event, the associated folder (if any), and the number of documents that were tagged with the comment. Note that the Searched and Found counts indicate the number of tag events, not the number of documents.
To view the Tag History page:
1. Click Advanced Search at the top of any page, click Tag Event History, specify the search criteria, and click Run Search to view the retrieved search results on the Tag History page.
Figure 7-2 Viewing Search Results in the Tag History Page
2. For instructions on how to use this page, refer to the following tables.
Table 7-2 Tag History Page - Icons and Functions
Icons or Function Description
Determines how many records are displayed on a page.
Pages through the retrieved documents. Enter a page number and press Enter to go to that page or use the Prev and Next links to go to the next or previous page. Use the Show drop-down list to change the number of documents that are displayed on each page.
Underlined document links Displays all the documents that have this tag assigned and allows you to add additional tags and comments.
© 2004-2011 Clearwell Systems, Inc.Proprietary & Confidential
Rev. 050911

Organize and Track with Tags: Using the Tag History Page PAGE: 80
The following table describes the columns in the Tag History Search results.
Table 7-3 Tag History Page - Search Results Columns
Column Description
Author User who assigned the tag.
Date Date that the tag was assigned.
Folder Changes Changes to the folder assignment
Tag Changes Changes to the tag selections
Notes & Comments Notes or comments added to the tag.
Documents Number of documents tagged.
Score Relevance score.
© 2004-2011 Clearwell Systems, Inc.Proprietary & Confidential
Rev. 050911
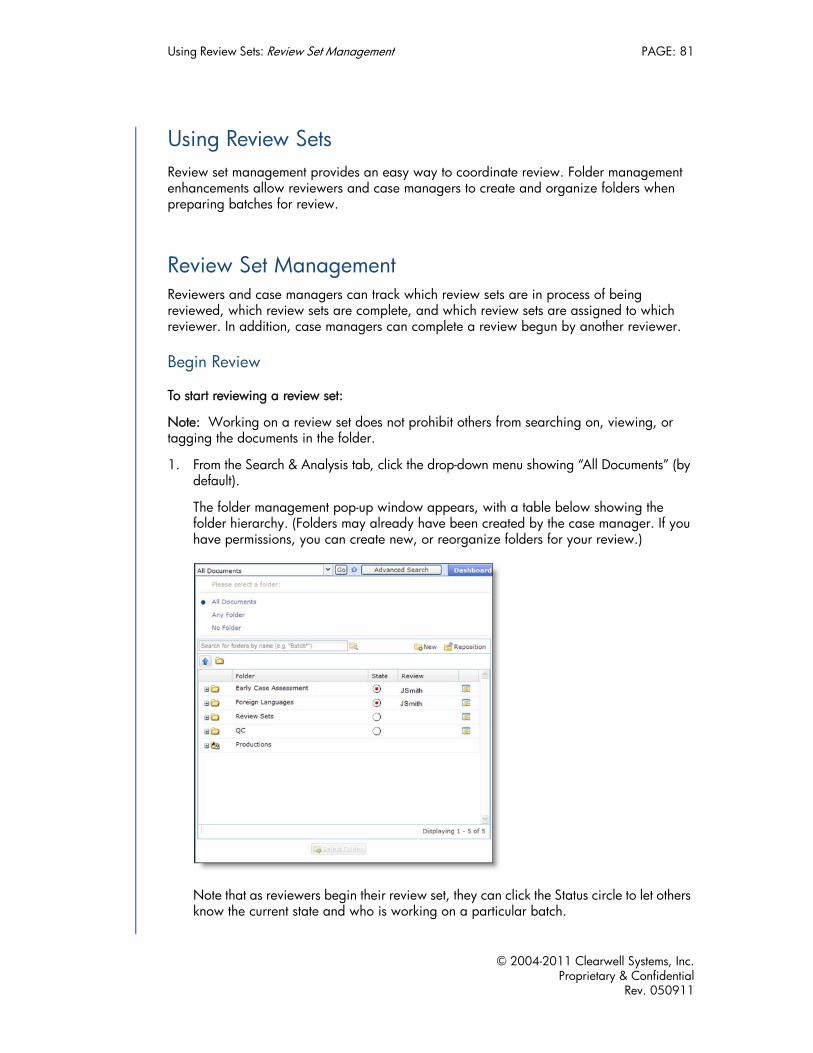
Using Review Sets: Review Set Management PAGE: 81
User GuideUsing Review SetsReview set management provides an easy way to coordinate review. Folder management enhancements allow reviewers and case managers to create and organize folders when preparing batches for review.
Review Set ManagementReviewers and case managers can track which review sets are in process of being reviewed, which review sets are complete, and which review sets are assigned to which reviewer. In addition, case managers can complete a review begun by another reviewer.
Begin Review
To start reviewing a review set:
Note: Working on a review set does not prohibit others from searching on, viewing, or tagging the documents in the folder.
1. From the Search & Analysis tab, click the drop-down menu showing “All Documents” (by default).
The folder management pop-up window appears, with a table below showing the folder hierarchy. (Folders may already have been created by the case manager. If you have permissions, you can create new, or reorganize folders for your review.)
Note that as reviewers begin their review set, they can click the Status circle to let others know the current state and who is working on a particular batch.
© 2004-2011 Clearwell Systems, Inc.Proprietary & Confidential
Rev. 050911
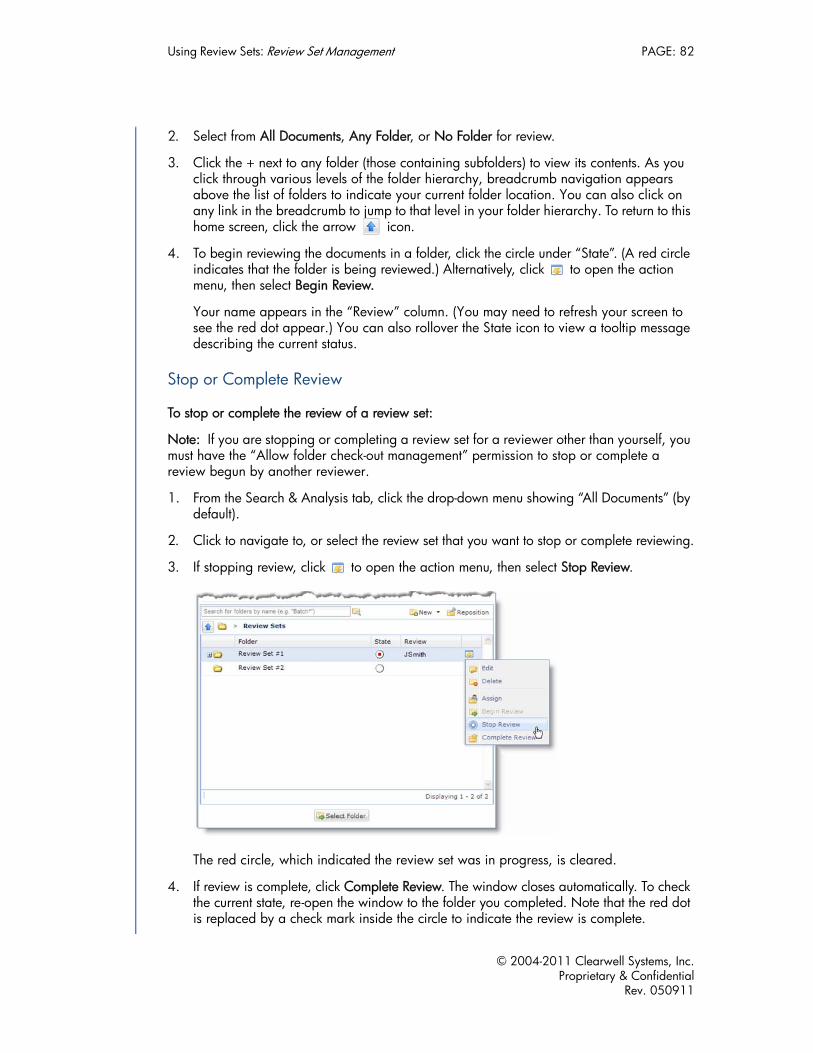
Using Review Sets: Review Set Management PAGE: 82
2. Select from All Documents, Any Folder, or No Folder for review.
3. Click the + next to any folder (those containing subfolders) to view its contents. As you click through various levels of the folder hierarchy, breadcrumb navigation appears above the list of folders to indicate your current folder location. You can also click on any link in the breadcrumb to jump to that level in your folder hierarchy. To return to this home screen, click the arrow icon.
4. To begin reviewing the documents in a folder, click the circle under “State”. (A red circle indicates that the folder is being reviewed.) Alternatively, click to open the action menu, then select Begin Review.
Your name appears in the “Review” column. (You may need to refresh your screen to see the red dot appear.) You can also rollover the State icon to view a tooltip message describing the current status.
Stop or Complete Review
To stop or complete the review of a review set:
Note: If you are stopping or completing a review set for a reviewer other than yourself, you must have the “Allow folder check-out management” permission to stop or complete a review begun by another reviewer.
1. From the Search & Analysis tab, click the drop-down menu showing “All Documents” (by default).
2. Click to navigate to, or select the review set that you want to stop or complete reviewing.
3. If stopping review, click to open the action menu, then select Stop Review.
The red circle, which indicated the review set was in progress, is cleared.
4. If review is complete, click Complete Review. The window closes automatically. To check the current state, re-open the window to the folder you completed. Note that the red dot is replaced by a check mark inside the circle to indicate the review is complete.
© 2004-2011 Clearwell Systems, Inc.Proprietary & Confidential
Rev. 050911

Using Review Sets: Review Set Management PAGE: 83
Edit or Delete a Review Set
To edit or delete folders:
1. From the Search & Analysis tab, click the drop-down menu showing “All Documents” (by default).
2. Click to navigate to, or select the review set that you want to edit or delete.
3. If editing a review folder:
A. Click next to the folder you want to edit (change the name or description), then from the Action menu select Edit.
B. On the Edit Folder window, change the name of the folder and/or description.
C. Click OK.
4. If deleting a review folder:
A. Click next to the folder you want to delete, then from the Action menu select Delete.
B. On the confirmation dialog, click OK to continue deleting the folder. (Folder contents will not be deleted, but will remain in the “All Documents” collection.
Assign a Review Set to Another Reviewer
To assign review access to another reviewer:
Note: You must have the “Allow folder check-out management” permission to enable users to access review set folders.Check with your Case Administrator for further details.
1. From the Search & Analysis tab, click the drop-down menu showing “All Documents” (by default).
2. Click next to the folder you want to assign, then from the Action menu select Assign.
3. On the Assign Review Access window, click and drag user names from the left “Available Case Users” box to the right to designate them as “Assigned Case Users”.
4. When finished, click OK.
Creating and Organizing Folders
To create a new review set folder and rearrange folders:
1. From the Search & Analysis tab, click the drop-down menu showing “All Documents” (by default).
2. Create a new top-level review folder, or click to select a parent folder to create a review set under, then click New. (Later, you can reposition the order on this folder level.)
3. On the New Folder window, type a name and description (optional) for the new review folder, then click OK.
© 2004-2011 Clearwell Systems, Inc.Proprietary & Confidential
Rev. 050911

Using Review Sets: Review Set Management PAGE: 84
Your new folder is shown in the Folder table.
4. To change the position of the folder, click Reposition.
The Repositioning Folders window appears.
Similar to the main folder management window, you can navigate to any subfolder and breadcrumbs will show your current location. (Click the arrow icon anytime you want to return to the home screen in this window.)
5. (Optional) Select the Allow Folder Relocation option to allow relocating folders between levels. When selected, a second pane appears.
This allows you to drag and drop source folders from the left pane to its new folder location on the right. In this example, you can now move “Review Set #3” from the main level (left), to the “Review Sets” folder on the right.
6. Reposition folders either by using clicking the arrows, or by entering a new numerical position. Click + next to any folder to reposition the its subfolders.
© 2004-2011 Clearwell Systems, Inc.Proprietary & Confidential
Rev. 050911

Using Review Sets: Review Set Management PAGE: 85
7. When finished, click Close.
Run a Production (on a Productions Folder)
If you want to run a production job, click the next to the Productions folder then from the Action menu select Lock/Produce. For more information, refer to the section "Running a Production" in the Case Administration Guide.
© 2004-2011 Clearwell Systems, Inc.Proprietary & Confidential
Rev. 050911

Using Review Sets: Review Set Management PAGE: 86
© 2004-2011 Clearwell Systems, Inc.Proprietary & Confidential
Rev. 050911

Review and Redact: Review and Redaction Reference Card PAGE: 87
User GuideReview and RedactThis section describes Reviewing and Redacting documents within Clearwell.
Note: The information in this section applies if you have licensed the Review, Redaction, and Production module.
Clearwell's Review and Redaction module provides the following capabilities:
1. Native Viewing Provides the ability to view documents in their native format without requiring each application to be loaded on a reviewer's workstation. Both text search and hit highlighting are available within the Native Viewer, increasing reviewer productivity.
2. Redaction Enables reviewers to quickly and easily redact documents in multiple colors, apply reason codes, and verify redactions prior to production. Reviewers can redact specific text, pages, or areas within a document.
3. Redaction VerificationEnables reviewers to rapidly navigate through each redaction within a document as part of the quality control process. Reviewers can leverage reason codes and color filters to quickly perform checks and verify the accuracy of all redactions.
4. Auto-RedactionAccelerates redaction by automatically finding and redacting keywords, phrases, and personal information, such as names, Social Security numbers, credit card numbers, and email addresses.
5. Persistent Hit HighlightingHighlights search terms in messages, attachments, and files within the Native Viewer, allowing reviewers to simultaneously view highlighted search terms from any number of previously performed searches (e.g., terms from previously executed privilege and responsive searches).
Note: The maximum number of names on which you can automatically redact is 32,000.
Review and Redaction Reference CardFor a 2-page overview of the review and redaction features, see the Review and Redaction Reference Card.
About the Review Mode Native ViewerNative Viewing of Documents
Clearwell's Viewer displays over 400 different file types (including Outlook, Notes, and Microsoft Office documents) that is equivalent to the view generated when printing that document using the native application. Clearwell's Viewer does not require any installation
© 2004-2011 Clearwell Systems, Inc.Proprietary & Confidential
Rev. 050911
Review and Redact: About the Review Mode Native Viewer PAGE: 88
of native applications on the user's computer. Native viewing of a document enhances document review, especially for documents (such as Excel and PowerPoint) where graphs and charts are important to understand the meaning of the document.
Viewer: Term Highlighting
Clearwell's Viewer supports hit highlighting of search terms, which are automatically highlighted within documents returned by a search query. Additional terms can also be highlighted using a new, persistent hit-highlighting feature available since v5.0. Term highlighting greatly aids review by drawing attention to terms relevant to the issues within the case. Term highlighting can also significantly improve the speed and accuracy of redaction by drawing attention to parts of the document that might require redaction and reducing the chance that they are missed.
Viewer: Magnification Options
Clearwell's Viewer supports a wide range of magnification options including: fit, fit width, zoom, zoom window, zoom in/out, and magnifier. These options make it easy to view the document in the most efficient way for review even in cases where a document may contain small text or images.
Viewer: Display Options
Clearwell allows you to change the way an image is displayed, including rotating an image, changing the background color, or displaying in monochrome mode. Clearwell also enables page level navigation via a paging drop-down, paging arrows, and Page Up/Down keys.
Viewer: Print
It is possible to print any document in the Viewer, Redaction, or Production views. When printing, users have access to typical print options, such as print range and scale. In addition, users can print regions in addition to whole pages or documents, and can choose whether to include redaction reason codes on the printed document. Printing is useful when users want to print a hardcopy for review during times they might not have access to the Clearwell application.
Viewer: Image Verification
The Viewer Task Pane Image Verification feature enables rapid identification and navigation to images contained within a file. This can be used to identify images that look like they contain text which may not be hit highlighted or automatically redacted.
Viewer: Thumbnail Task Pane
Image thumbnails, available via the Clearwell Viewer Task Pane, allow a user to view and navigate to each page within a document. Thumbnails of pages containing redactions and “mark-ups” are highlighted and separately navigable allowing for rapid navigation to, and quality control (QC) of, redactions.
© 2004-2011 Clearwell Systems, Inc.Proprietary & Confidential
Rev. 050911

Review and Redact: About the Review Mode Native Viewer PAGE: 89
Viewer: Document Search
Clearwell's Review and Redaction views support term and phrase searches within an open document making it easy to find and navigate to key terms or sections of a document.
© 2004-2011 Clearwell Systems, Inc.Proprietary & Confidential
Rev. 050911
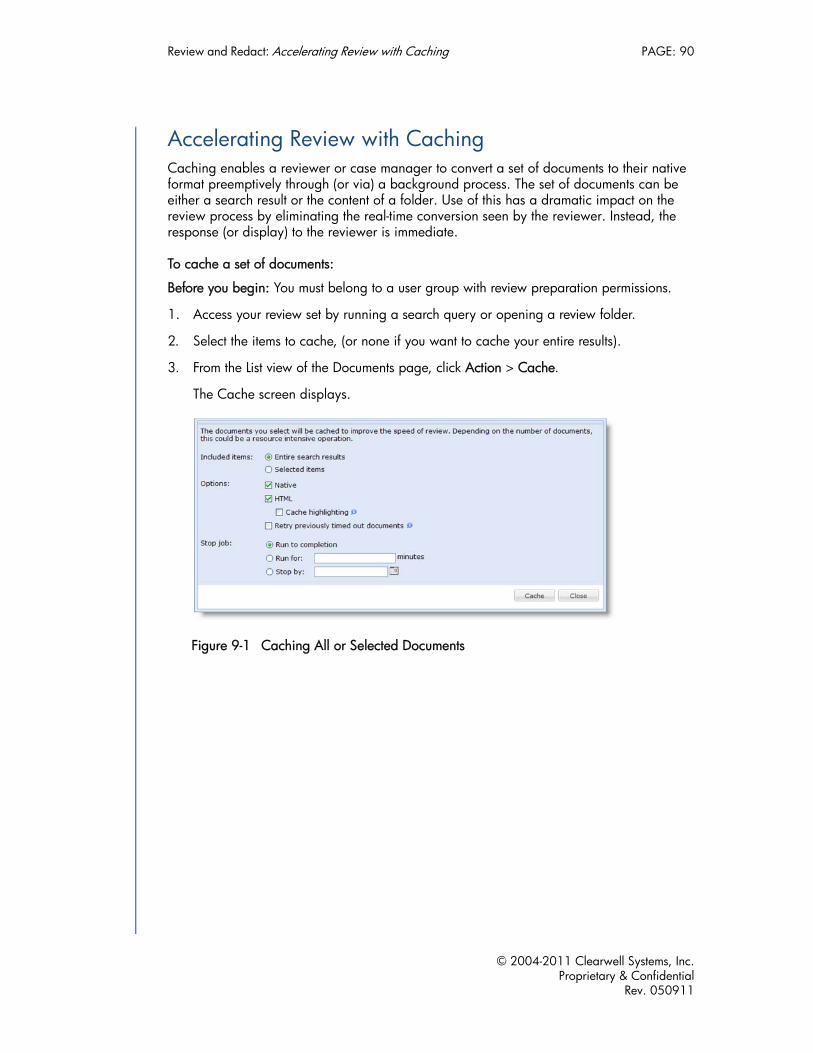
Review and Redact: Accelerating Review with Caching PAGE: 90
Accelerating Review with CachingCaching enables a reviewer or case manager to convert a set of documents to their native format preemptively through (or via) a background process. The set of documents can be either a search result or the content of a folder. Use of this has a dramatic impact on the review process by eliminating the real-time conversion seen by the reviewer. Instead, the response (or display) to the reviewer is immediate.
To cache a set of documents:
Before you begin: You must belong to a user group with review preparation permissions.
1. Access your review set by running a search query or opening a review folder.
2. Select the items to cache, (or none if you want to cache your entire results).
3. From the List view of the Documents page, click Action > Cache.
The Cache screen displays.
Figure 9-1 Caching All or Selected Documents
© 2004-2011 Clearwell Systems, Inc.Proprietary & Confidential
Rev. 050911
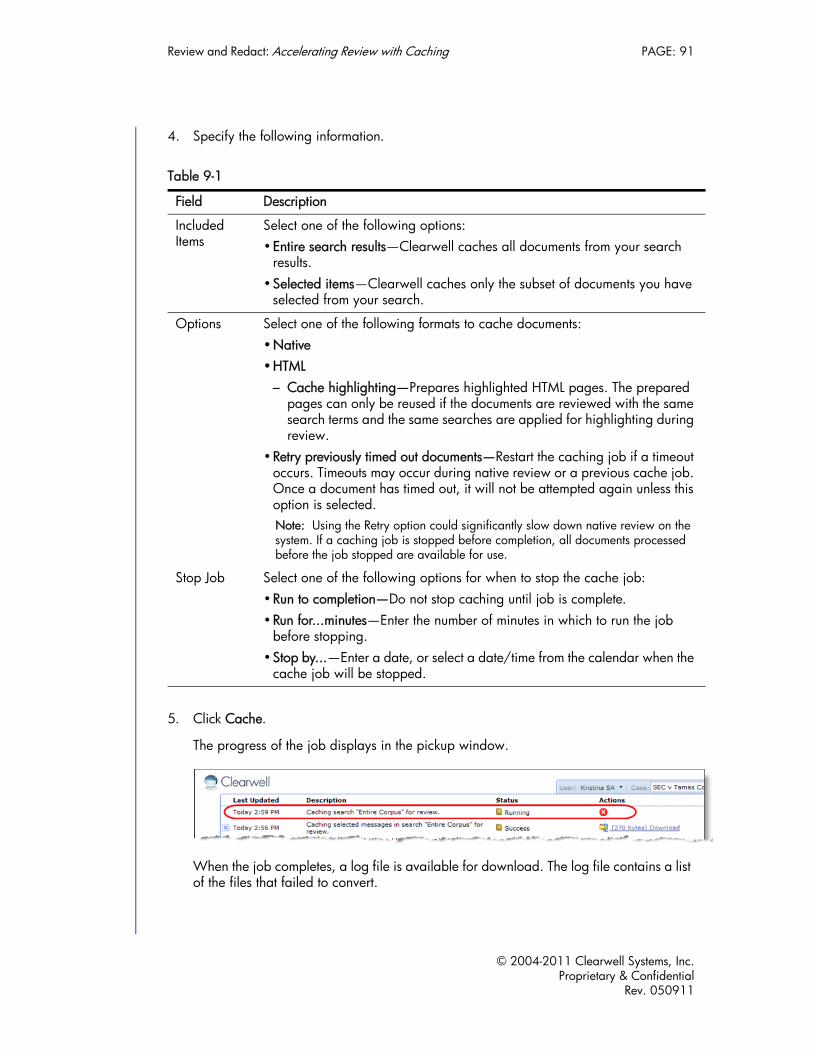
Review and Redact: Accelerating Review with Caching PAGE: 91
4. Specify the following information.
5. Click Cache.
The progress of the job displays in the pickup window.
When the job completes, a log file is available for download. The log file contains a list of the files that failed to convert.
Table 9-1
Field Description
Included Items
Select one of the following options:•Entire search results—Clearwell caches all documents from your search
results.•Selected items—Clearwell caches only the subset of documents you have
selected from your search.
Options Select one of the following formats to cache documents:•Native•HTML
– Cache highlighting—Prepares highlighted HTML pages. The prepared pages can only be reused if the documents are reviewed with the same search terms and the same searches are applied for highlighting during review.
•Retry previously timed out documents—Restart the caching job if a timeout occurs. Timeouts may occur during native review or a previous cache job. Once a document has timed out, it will not be attempted again unless this option is selected. Note: Using the Retry option could significantly slow down native review on the system. If a caching job is stopped before completion, all documents processed before the job stopped are available for use.
Stop Job Select one of the following options for when to stop the cache job:•Run to completion—Do not stop caching until job is complete. •Run for...minutes—Enter the number of minutes in which to run the job
before stopping.•Stop by...—Enter a date, or select a date/time from the calendar when the
cache job will be stopped.
© 2004-2011 Clearwell Systems, Inc.Proprietary & Confidential
Rev. 050911

Review and Redact: Reviewing Documents PAGE: 92
Reviewing DocumentsNote: The information in this section applies if you have licensed the Review, Redaction, and Production module.
The Clearwell Review Mode allows for faster review by optimizing screen real estate, enabling user customizations, and reducing number of clicks to tag a document. Activate Review Mode by clicking on the right-most icon in View options on the Documents screen.
Using the Document Review Page
The Document Review page allows you to view the document contents, tag, and add review notes. Refer to “Filtering Search Results” on page 54 for more information on the redaction and production options that are available in Review mode.
To view the Document Review page:
1. Select a document and click the Review icon.
The review mode displays.
2. Refer to the following table to perform tasks on this page.
Table 9-2 Document Review Page - Icons and Functions
Icons or Function Description
Change the viewing mode and access redaction and production controls. Click the arrow and choose one of the following:•Text—View document in default text mode.•Viewer—View the document in native format.•Redaction—Display redaction controls using the selected redac-
tion set (usually Default). Refer to “Filtering Search Results” on page 54.
•Production—Refer to “Filtering Search Results” on page 54.
Action menu. Select the destination folder, and click Copy.
Action menu. Select the source and destination folders, and click Move.
Action menu. Select the folder, and click Remove.
Action menu. Refer to “Exporting Search Results” on page 107.
Action menu. Refer to “Printing Documents and Logs” on page 115.
Action menu. Refer to “Redacting Documents” on page 96.
Action menu. Refer to “Redacting Documents” on page 96.
Action menu. Refer to “Redacting Documents” on page 96.
Opens the Related Discussion page, Thread tab. Refer to “Using the Discussions Page” on page 61.
© 2004-2011 Clearwell Systems, Inc.Proprietary & Confidential
Rev. 050911
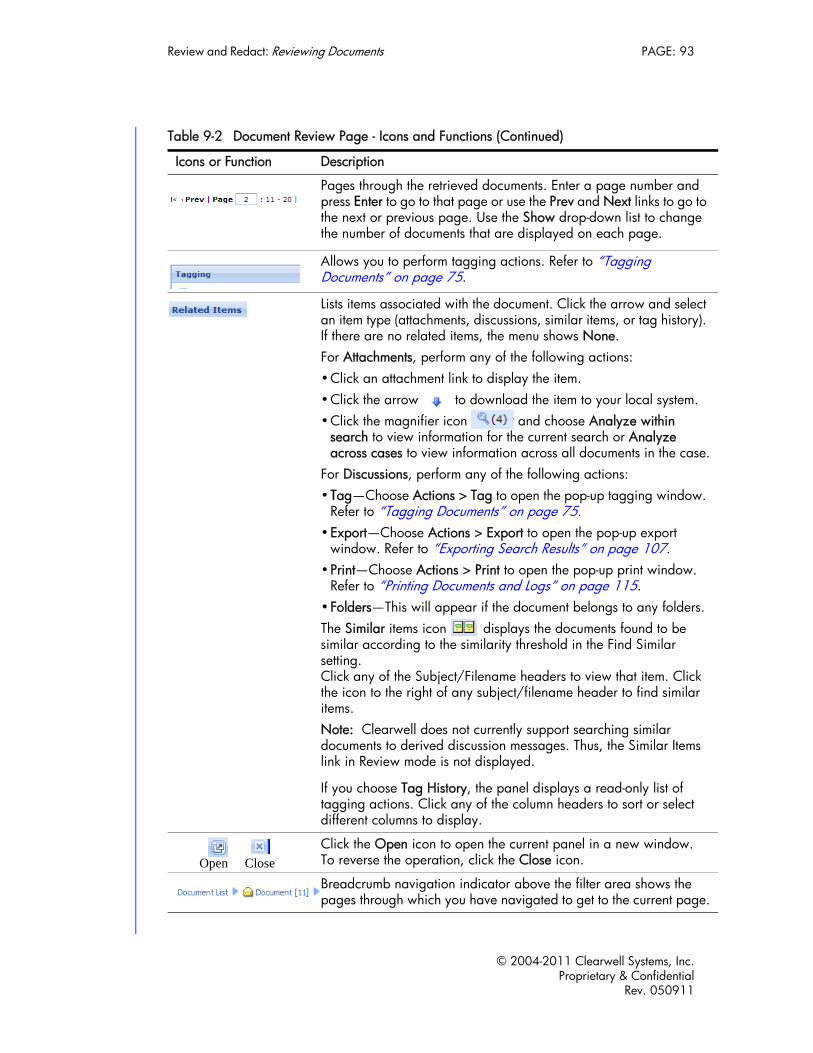
Review and Redact: Reviewing Documents PAGE: 93
Pages through the retrieved documents. Enter a page number and press Enter to go to that page or use the Prev and Next links to go tothe next or previous page. Use the Show drop-down list to change the number of documents that are displayed on each page.
Allows you to perform tagging actions. Refer to “Tagging Documents” on page 75.
Lists items associated with the document. Click the arrow and selectan item type (attachments, discussions, similar items, or tag history).If there are no related items, the menu shows None. For Attachments, perform any of the following actions:•Click an attachment link to display the item. •Click the arrow to download the item to your local system.•Click the magnifier icon and choose Analyze within
search to view information for the current search or Analyze across cases to view information across all documents in the case.
For Discussions, perform any of the following actions:•Tag—Choose Actions > Tag to open the pop-up tagging window.
Refer to “Tagging Documents” on page 75.•Export—Choose Actions > Export to open the pop-up export
window. Refer to “Exporting Search Results” on page 107.•Print—Choose Actions > Print to open the pop-up print window.
Refer to “Printing Documents and Logs” on page 115.•Folders—This will appear if the document belongs to any folders.The Similar items icon displays the documents found to be similar according to the similarity threshold in the Find Similar setting. Click any of the Subject/Filename headers to view that item. Click the icon to the right of any subject/filename header to find similar items.Note: Clearwell does not currently support searching similar documents to derived discussion messages. Thus, the Similar Items link in Review mode is not displayed.
If you choose Tag History, the panel displays a read-only list of tagging actions. Click any of the column headers to sort or select different columns to display.
Click the Open icon to open the current panel in a new window. To reverse the operation, click the Close icon.
Breadcrumb navigation indicator above the filter area shows the pages through which you have navigated to get to the current page.
Table 9-2 Document Review Page - Icons and Functions (Continued)
Icons or Function Description
Open Close
© 2004-2011 Clearwell Systems, Inc.Proprietary & Confidential
Rev. 050911

Review and Redact: Reviewing Documents PAGE: 94
Linear Review Tools in Review Mode
Tagging Pane
The tagging pane enables you to manage large sets of documents using various tagging tools. Manage your set of documents by assigning tags to folders and flagging them with predefined tags in the tag categories that matter to you, such as relevance, privileged, and status. For example, you can organize related documents into folders for further analysis by a team of reviewers, who can then retrieve the documents assigned to them, tag the documents, and enter notes. In addition to assigning to folders and applying tags, reviewers can add text notes to documents.
Note: Documents that are redacted are automatically tagged with the Redacted tag under the RedactionTagSet tag set.
Tagging Pane Views
Use the tagging pane options to change views depending on your preference.
Note: Use the “Configure all visible tag sets” option to view only the documents with the tags you select from all your tag sets.
Tagging Options
• Tag. The Tag button applies the selected tag(s) to the document
• Tag and Next. The Tag and Next button applies the selected tag(s) to the document and immediately moves to the next document
• Auto Advance. When the Auto Advance feature is selected, clicking a tag check box automatically tags the document and immediately moves to the next document without the need to click Tag and Next
Keyboard Shortcuts
Previous Document - Alt-p
Next Document - Alt-n
Tag - Alt-t
Tag and Next - Alt-g
© 2004-2011 Clearwell Systems, Inc.Proprietary & Confidential
Rev. 050911
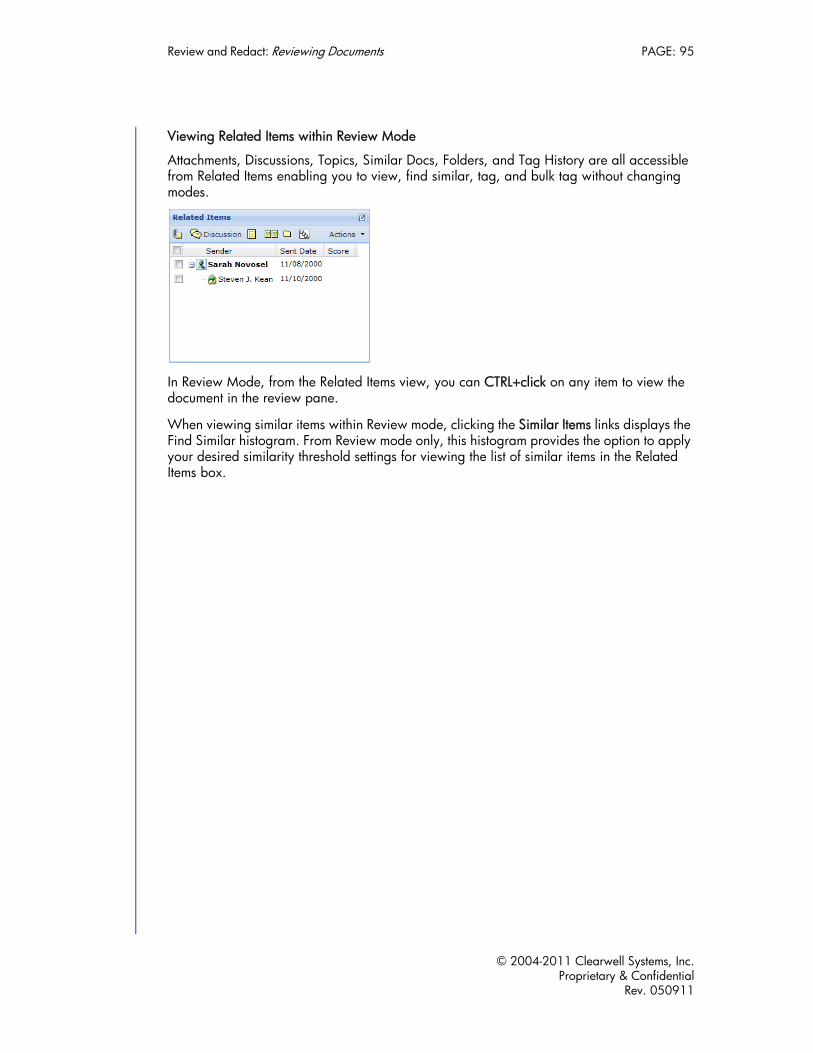
Review and Redact: Reviewing Documents PAGE: 95
Viewing Related Items within Review Mode
Attachments, Discussions, Topics, Similar Docs, Folders, and Tag History are all accessible from Related Items enabling you to view, find similar, tag, and bulk tag without changing modes.
In Review Mode, from the Related Items view, you can CTRL+click on any item to view the document in the review pane.
When viewing similar items within Review mode, clicking the Similar Items links displays the Find Similar histogram. From Review mode only, this histogram provides the option to apply your desired similarity threshold settings for viewing the list of similar items in the Related Items box.
© 2004-2011 Clearwell Systems, Inc.Proprietary & Confidential
Rev. 050911

Review and Redact: Redacting Documents PAGE: 96
Redacting DocumentsNote: The information in this section applies if you have licensed the Review, Redaction, and Production module.
Understanding the Redaction Interface
Redaction Mode provides the tools to redact case documents, verify your redactions, and customize how documents are displayed. The following diagram illustrates key functionality within Redaction Mode.
1. Edit Color. Select the color to use for redaction
2. Redaction Tools. Apply various redaction options to the document.
3. Viewer Display Options. Select display options such as background color, monochrome, rotate, etc.
4. Viewer Magnification Options. Control viewer options such as zooming, etc.
5. Document Viewing Tabs. Click to view thumbnails redaction verification options.
6. Navigation Arrows. Click to jump to the next redacted page.
7. Redaction Indicator. Exclamation mark indicates this page was redacted.
8. Expansion toggle. Click to hide or display the thumbnail pane.
Redact a Document
The redaction feature allows you to select specific portions of a document to be concealed when the document is produced. You can use redaction to protect sources or limit information on a need-to-know basis.
© 2004-2011 Clearwell Systems, Inc.Proprietary & Confidential
Rev. 050911
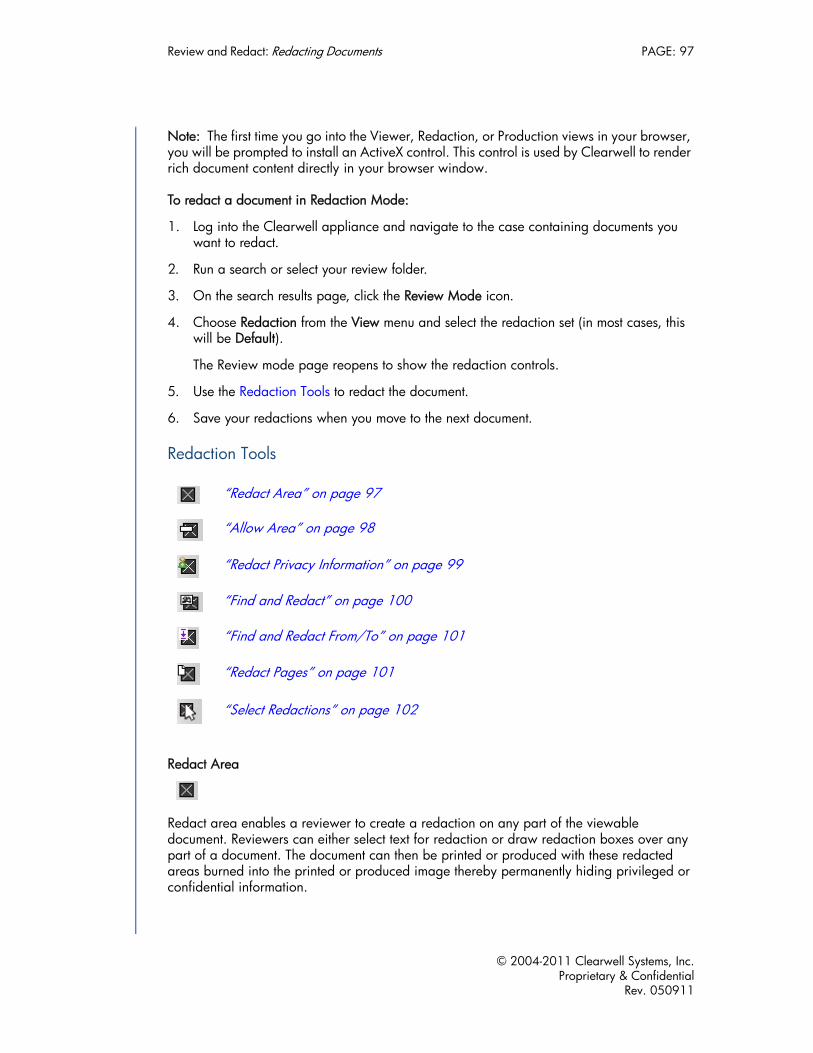
Review and Redact: Redacting Documents PAGE: 97
Note: The first time you go into the Viewer, Redaction, or Production views in your browser, you will be prompted to install an ActiveX control. This control is used by Clearwell to render rich document content directly in your browser window.
To redact a document in Redaction Mode:
1. Log into the Clearwell appliance and navigate to the case containing documents you want to redact.
2. Run a search or select your review folder.
3. On the search results page, click the Review Mode icon.
4. Choose Redaction from the View menu and select the redaction set (in most cases, this will be Default).
The Review mode page reopens to show the redaction controls.
5. Use the Redaction Tools to redact the document.
6. Save your redactions when you move to the next document.
Redaction Tools
Redact Area
Redact area enables a reviewer to create a redaction on any part of the viewable document. Reviewers can either select text for redaction or draw redaction boxes over any part of a document. The document can then be printed or produced with these redacted areas burned into the printed or produced image thereby permanently hiding privileged or confidential information.
“Redact Area” on page 97
“Allow Area” on page 98
“Redact Privacy Information” on page 99
“Find and Redact” on page 100
“Find and Redact From/To” on page 101
“Redact Pages” on page 101
“Select Redactions” on page 102
© 2004-2011 Clearwell Systems, Inc.Proprietary & Confidential
Rev. 050911

Review and Redact: Redacting Documents PAGE: 98
To redact an area:
Click the icon and then hold down your mouse and drag to select an area to redact. Type a reason in the pop-up window, if prompted to do so, and click OK. The reason is displayed in the redacted area.
Allow Area
Allow area allows a portion of a redacted area to be revealed (i.e. un-redacted). This provides efficiency when all but a small area of the document needs to be redacted.
© 2004-2011 Clearwell Systems, Inc.Proprietary & Confidential
Rev. 050911
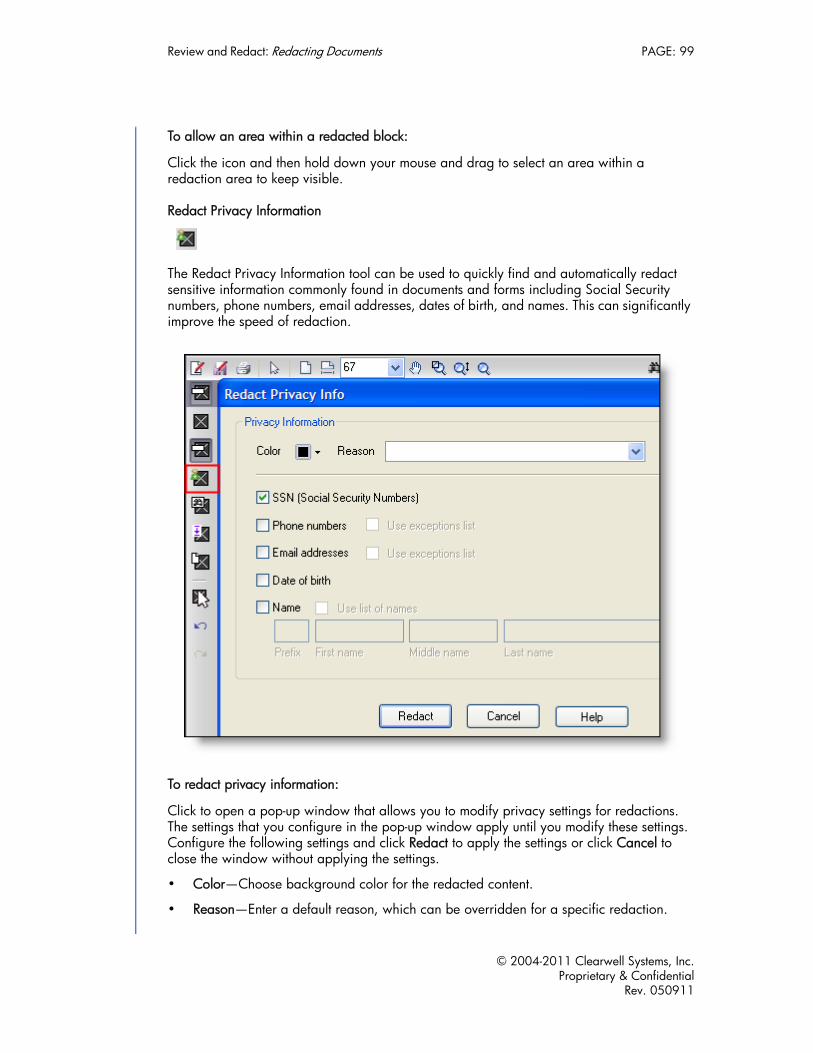
Review and Redact: Redacting Documents PAGE: 99
To allow an area within a redacted block:
Click the icon and then hold down your mouse and drag to select an area within a redaction area to keep visible.
Redact Privacy Information
The Redact Privacy Information tool can be used to quickly find and automatically redact sensitive information commonly found in documents and forms including Social Security numbers, phone numbers, email addresses, dates of birth, and names. This can significantly improve the speed of redaction.
To redact privacy information:
Click to open a pop-up window that allows you to modify privacy settings for redactions. The settings that you configure in the pop-up window apply until you modify these settings. Configure the following settings and click Redact to apply the settings or click Cancel to close the window without applying the settings.
• Color—Choose background color for the redacted content.
• Reason—Enter a default reason, which can be overridden for a specific redaction.
© 2004-2011 Clearwell Systems, Inc.Proprietary & Confidential
Rev. 050911

Review and Redact: Redacting Documents PAGE: 100
• SSN (Social Security Number)—Select to automatically redact any social security numbers found in the documents.
• Phone numbers—Select to automatically redact any phone numbers found in the documents. To exclude specific phone numbers from redaction, click Use Exceptions and specify the following:
– Enter a phone number and click Add. Add additional phone numbers as needed.
– Click Edit to modify a phone number.
– Click Open to add a CSV file that contains phone numbers.
– Click Save to save the phone number list.
– Click Delete to remove a phone number.
– Click Clear All to remove all phone numbers from the list.
– Click OK to save the phone numbers and close the window.
– Click Cancel to close the window without saving.
Find and Redact
This tool lets you find and mark for redaction multiple instances of a common word or phrase within the Redaction view of an open document. Reason codes and colors can also be applied. Find and Redact can help reduce the time required to redact a document by automatically redacting key phrases or confidential information.
© 2004-2011 Clearwell Systems, Inc.Proprietary & Confidential
Rev. 050911
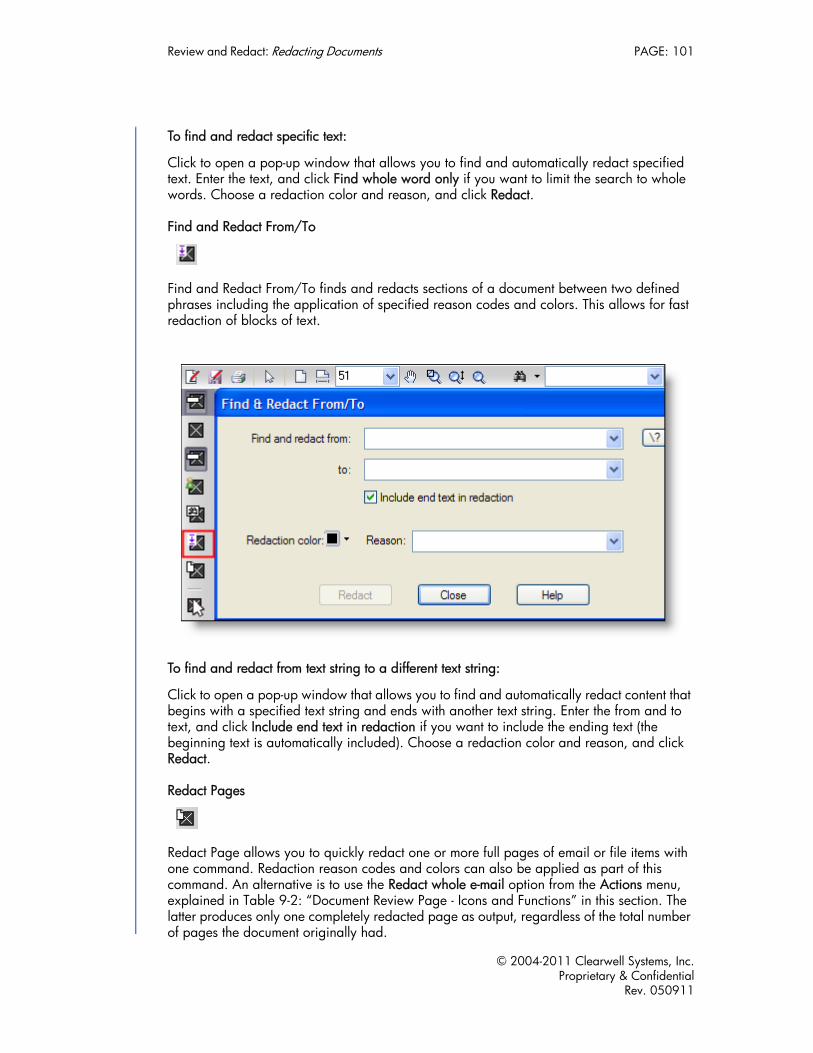
Review and Redact: Redacting Documents PAGE: 101
To find and redact specific text:
Click to open a pop-up window that allows you to find and automatically redact specified text. Enter the text, and click Find whole word only if you want to limit the search to whole words. Choose a redaction color and reason, and click Redact.
Find and Redact From/To
Find and Redact From/To finds and redacts sections of a document between two defined phrases including the application of specified reason codes and colors. This allows for fast redaction of blocks of text.
To find and redact from text string to a different text string:
Click to open a pop-up window that allows you to find and automatically redact content that begins with a specified text string and ends with another text string. Enter the from and to text, and click Include end text in redaction if you want to include the ending text (the beginning text is automatically included). Choose a redaction color and reason, and click Redact.
Redact Pages
Redact Page allows you to quickly redact one or more full pages of email or file items with one command. Redaction reason codes and colors can also be applied as part of this command. An alternative is to use the Redact whole e-mail option from the Actions menu, explained in Table 9-2: “Document Review Page - Icons and Functions” in this section. The latter produces only one completely redacted page as output, regardless of the total number of pages the document originally had.
© 2004-2011 Clearwell Systems, Inc.Proprietary & Confidential
Rev. 050911

Review and Redact: Redacting Documents PAGE: 102
To redact an entire page:
Click to open a pop-up window that allows you to find and automatically redact specified pages. You can choose to redact all pages, the current page, or a page range. Choose a redaction color and reason, and click Redact.
In production, all pages print with black redaction fields.
Note: To redact an entire document, select Redact Whole E-mail from the Actions menu. The production, the document is replaced with a single slipsheet.
Select Redactions
Select and modify redactions. This includes changing the selected shape or area, modifying redaction reasons, or deleting the redaction altogether.
To edit a redaction:
Select the Select Redactions tool, then press the SHIFT key and click the redaction to edit.
The redaction is selected and the redaction reason displays in the document header.
© 2004-2011 Clearwell Systems, Inc.Proprietary & Confidential
Rev. 050911
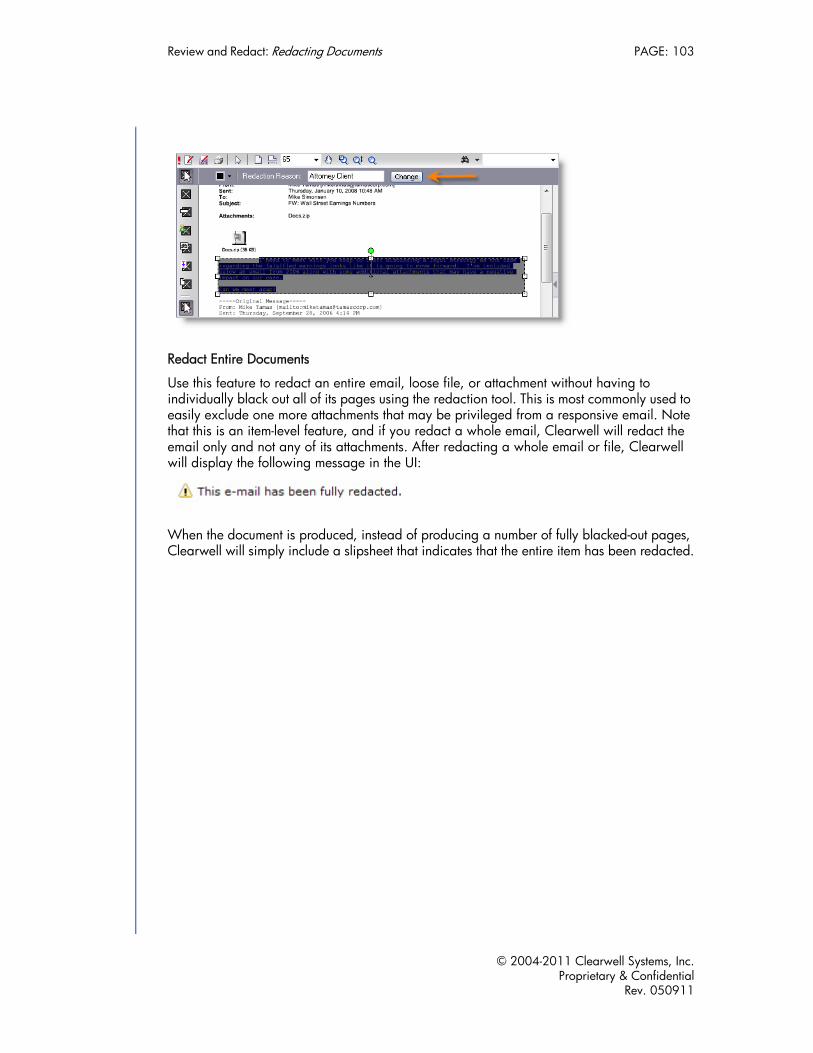
Review and Redact: Redacting Documents PAGE: 103
Redact Entire Documents
Use this feature to redact an entire email, loose file, or attachment without having to individually black out all of its pages using the redaction tool. This is most commonly used to easily exclude one more attachments that may be privileged from a responsive email. Note that this is an item-level feature, and if you redact a whole email, Clearwell will redact the email only and not any of its attachments. After redacting a whole email or file, Clearwell will display the following message in the UI:
When the document is produced, instead of producing a number of fully blacked-out pages, Clearwell will simply include a slipsheet that indicates that the entire item has been redacted.
© 2004-2011 Clearwell Systems, Inc.Proprietary & Confidential
Rev. 050911
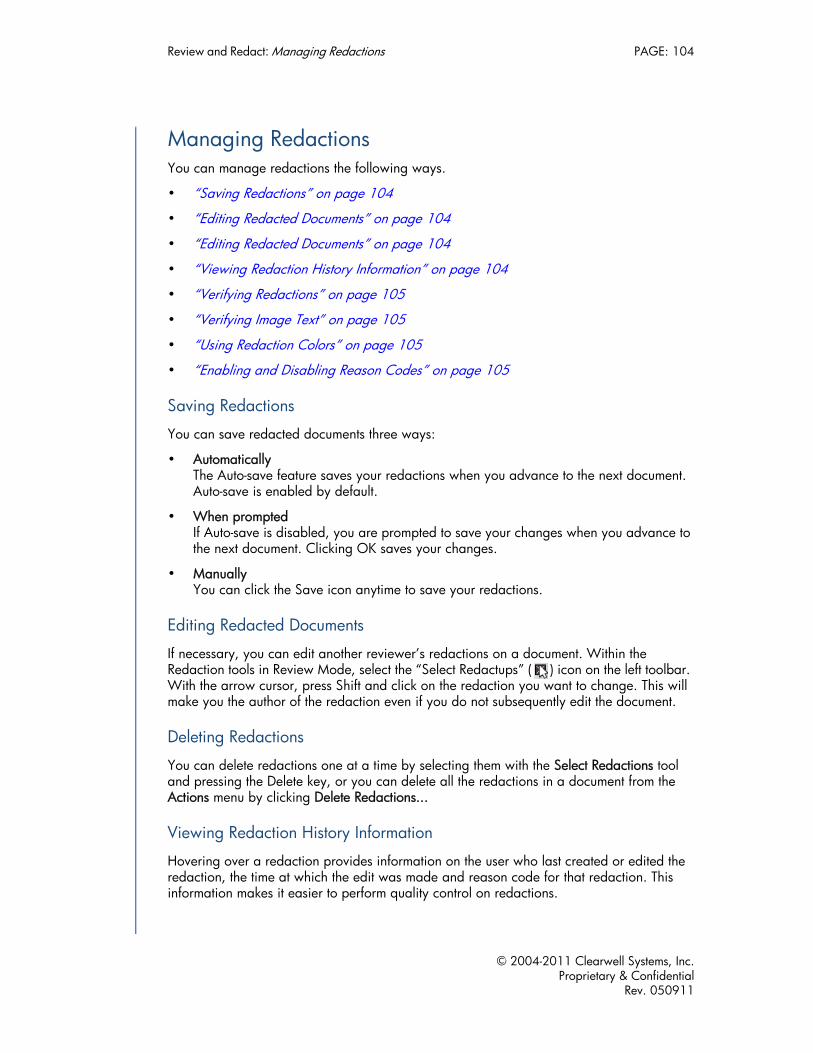
Review and Redact: Managing Redactions PAGE: 104
Managing RedactionsYou can manage redactions the following ways.
• “Saving Redactions” on page 104
• “Editing Redacted Documents” on page 104
• “Editing Redacted Documents” on page 104
• “Viewing Redaction History Information” on page 104
• “Verifying Redactions” on page 105
• “Verifying Image Text” on page 105
• “Using Redaction Colors” on page 105
• “Enabling and Disabling Reason Codes” on page 105
Saving Redactions
You can save redacted documents three ways:
• AutomaticallyThe Auto-save feature saves your redactions when you advance to the next document. Auto-save is enabled by default.
• When promptedIf Auto-save is disabled, you are prompted to save your changes when you advance to the next document. Clicking OK saves your changes.
• ManuallyYou can click the Save icon anytime to save your redactions.
Editing Redacted Documents
If necessary, you can edit another reviewer’s redactions on a document. Within the Redaction tools in Review Mode, select the “Select Redactups” ( ) icon on the left toolbar. With the arrow cursor, press Shift and click on the redaction you want to change. This will make you the author of the redaction even if you do not subsequently edit the document.
Deleting Redactions
You can delete redactions one at a time by selecting them with the Select Redactions tool and pressing the Delete key, or you can delete all the redactions in a document from the Actions menu by clicking Delete Redactions...
Viewing Redaction History Information
Hovering over a redaction provides information on the user who last created or edited the redaction, the time at which the edit was made and reason code for that redaction. This information makes it easier to perform quality control on redactions.
© 2004-2011 Clearwell Systems, Inc.Proprietary & Confidential
Rev. 050911

Review and Redact: Managing Redactions PAGE: 105
Verifying Redactions
Redaction Verification, available via the Clearwell Viewer Task Pane, allows you to rapidly navigate through each redaction within a document as part of a QC process. Leveraging reason codes and color filters, redaction verification also allows you to check that all redactions have had the appropriate reason or color assigned.
Verifying Image Text
Image verification hides all text within a document in order to make it possible to visually review all non-searchable or non-text highlightable images (such as image text). This feature makes it easier to find images within documents that could contain text that won't be found by keyword searches or can't be automatically redacted.
Using Redaction Colors
You can select the color of your redactions. Different colors can be valuable to easily distinguish redactions such as by reason codes or other criteria.
Enabling and Disabling Reason Codes
Administrators can turn off the prompt to enter reason codes for redactions, by editing the user access profiles. If you need the reason code prompt enabled or disabled, contact your case administrator.
© 2004-2011 Clearwell Systems, Inc.Proprietary & Confidential
Rev. 050911

Review and Redact: Managing Redactions PAGE: 106
Redaction Display Options
Viewer Display Options
Viewer Magnification Options
Display Controls
Rotate 90 Rotate the document 90 degrees clockwise.
Display Monochrome/Display Color
Click to display the document in monochrome or color.
Change Background Color
Click to change the background color to black, white, gray, or default.
Paging Controls Click the arrows to page through the document.
Markup, Print, and Page Controls
Markup Click to select specific text for redaction. Highlight the text. Enter a reason in the pop-up window, if prompted to do so, and click OK.
Markup Save Click to save markups.
Print Click to print the document with the specified redactions.
Select Click and then use your mouse to select text.
Fit All Click to display the whole page.
Fit Width Click to display size the page to display the full width.
Page Percent Choose a page size percentage to display the document.
Pan/Zoom Click to clear the zoom and magnifier settings.
Zoom Window
Click and then use your mouse to select an area. A zoomed version of the area is displayed. To return to the original size, using the page percent controls.
Zoom In/Out Click and then move your mouse back and forth to change the zoom level.
Magnifier Click and then click an area of the document to zoom in or that section.
Find Find specified text in the document.
© 2004-2011 Clearwell Systems, Inc.Proprietary & Confidential
Rev. 050911

Review and Redact: Tracking Redaction Changes PAGE: 107
Tracking Redaction ChangesAny time you redact a document or delete a document’s redaction, the action and its reason code are tracked in the Tag Event History using a standardized description in the Notes & Comments field.
This standardized event description enables you to quickly search all case documents for specific changes. You can search on whether a redaction was added or deleted. You can also specify the reason code provided by the reviewer.
To search for redaction changes:
1. From the Advanced Search screen, set the search Style to Advanced.
2. Expand the Actions menu.
3. In the Find Documents With Notes/Comments Containing field, type one of the following search strings.
A. “redactions added”
B. “redactions deleted”
C. “reason_code”
Note: Use quotation marks to ensure relevant results.
4. Click Run Search.
© 2004-2011 Clearwell Systems, Inc.Proprietary & Confidential
Rev. 050911

Review and Redact: Tracking Redaction Changes PAGE: 108
© 2004-2011 Clearwell Systems, Inc.Proprietary & Confidential
Rev. 050911

Printing: Printing Documents and Logs PAGE: 109
PrintingThis section describes how to use the printing function.
Export and Production Tasks
If you have been granted administrator-level rights to export and/or produce search results, refer to the Clearwell E-Discovery Platform Export and Production Guide.
Note: To open and print files, the Adobe Acrobat Reader must be installed on your system.
Printing Documents and LogsOn any Search Results page that displays a list of documents, you can print the documents in your search results to Portable Document Format (PDF) files and download the files to your computer. You can also print document logs.
To print documents:
1. Submit a search to find the documents you want to print (see “Performing Searches” on page 11).
2. Check the box next to the appropriate document or click the check box in the column heading to select all documents on the page.
3. Above the Sender column, click Action then select Print.
The printing options are displayed.
Figure 10-1 Printing Documents
4. Specify the following information.
© 2004-2011 Clearwell Systems, Inc.Proprietary & Confidential
Rev. 050911
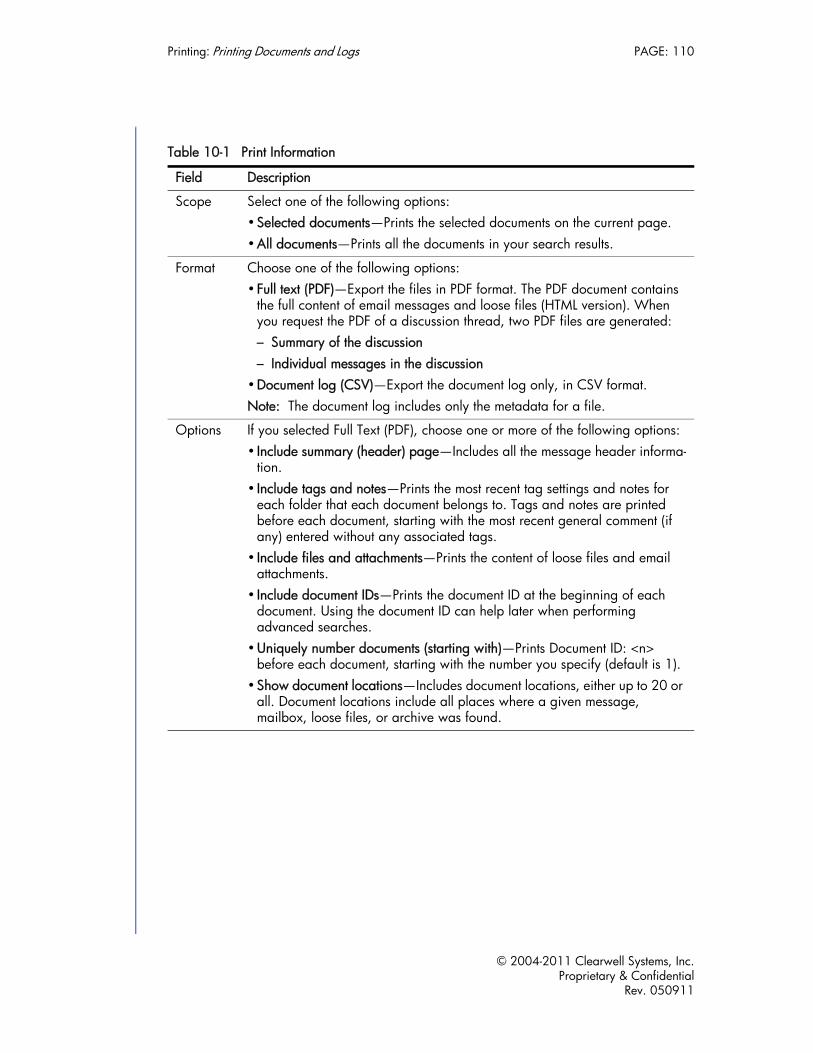
Printing: Printing Documents and Logs PAGE: 110
Table 10-1 Print Information
Field Description
Scope Select one of the following options:•Selected documents—Prints the selected documents on the current page. •All documents—Prints all the documents in your search results.
Format Choose one of the following options:•Full text (PDF)—Export the files in PDF format. The PDF document contains
the full content of email messages and loose files (HTML version). When you request the PDF of a discussion thread, two PDF files are generated: – Summary of the discussion – Individual messages in the discussion
•Document log (CSV)—Export the document log only, in CSV format. Note: The document log includes only the metadata for a file.
Options If you selected Full Text (PDF), choose one or more of the following options:• Include summary (header) page—Includes all the message header informa-
tion.• Include tags and notes—Prints the most recent tag settings and notes for
each folder that each document belongs to. Tags and notes are printed before each document, starting with the most recent general comment (if any) entered without any associated tags.
• Include files and attachments—Prints the content of loose files and email attachments.
• Include document IDs—Prints the document ID at the beginning of each document. Using the document ID can help later when performing advanced searches.
•Uniquely number documents (starting with)—Prints Document ID: <n> before each document, starting with the number you specify (default is 1).
•Show document locations—Includes document locations, either up to 20 or all. Document locations include all places where a given message, mailbox, loose files, or archive was found.
© 2004-2011 Clearwell Systems, Inc.Proprietary & Confidential
Rev. 050911

Printing: Printing Documents and Logs PAGE: 111
5. Click Print. To download the PDF file:
A. Click Pickup at the top of the page to view the status of the task. A check mark is displayed next to the Pickup link to indicate the processing status and when the file is ready. If an error occurs during printing, a warning indicator is shown next to the Pickup link.
B. When the task is complete, click Download in the Pickup window to open or save the PDF, CSV, or ZIP file. If a print job fails, you can select Retry in the Pickup window.
C. To delete a completed task, click for the task. To cancel a running task, click Stop in the Actions column. To close the Pickup window, click Pickup.
Output Select one of the following options:•Create downloadable file—Creates a zip file that you can download by
clicking Pickup on the top of the page.•Access only from appliance—Creates a file that is accessible only from the
Clearwell E-Discovery Platform. Move your cursor over the symbol to view the information needed to identify the file. Your Clearwell adminis-trator can use the job ID to download the files from the directory <esa_root>\data\filemanager\<username>\jobRun-<jobid>.
Table 10-1 Print Information (Continued)
Field Description
© 2004-2011 Clearwell Systems, Inc.Proprietary & Confidential
Rev. 050911

Printing: Printing Documents and Logs PAGE: 112
© 2004-2011 Clearwell Systems, Inc.Proprietary & Confidential
Rev. 050911

Printing: Printing Documents and Logs PAGE: 113
© 2004-2011 Clearwell Systems, Inc.Proprietary & Confidential
Rev. 050911

Printing: Printing Documents and Logs PAGE: 114
© 2004-2011 Clearwell Systems, Inc.
Proprietary & ConfidentialRev. 050911

Printing: Printing Documents and Logs PAGE: 115
© 2004-2011 Clearwell Systems, Inc.Proprietary & Confidential
Rev. 050911

Printing: Printing Documents and Logs PAGE: 116
© 2004-2011 Clearwell Systems, Inc.Proprietary & Confidential
Rev. 050911

Printing: Printing Documents and Logs PAGE: 117
© 2004-2011 Clearwell Systems, Inc.Proprietary & Confidential
Rev. 050911

Printing: Printing Documents and Logs PAGE: 118
© 2004-2011 Clearwell Systems, Inc.Proprietary & Confidential
Rev. 050911

Using the Dashboard: PAGE: 119
User GuideUsing the DashboardThe Dashboard provides a convenient, at-a-glance summary of case status. Reviewers and Case Managers can get live status of document and tag status and assignments. Case Managers can view the overall progress of a case and reviewer progress.
Refer to the following topics:
• “Accessing the Dashboard” in the next section
– “To use the Dashboard:” on page 119
– “To view the progress of a case:” on page 120
– “To track reviewer progress:” on page 121
– “To view folder status:” on page 122
– “To view tag status:” on page 122
– “To export dashboard reports to a CSV or Excel (XLS) file:” on page 123
Accessing the Dashboard
All information displayed on the dashboard is case-specific. When accessing the Dashboard, you are prompted to select a case if one is not already selected.
To use the Dashboard:
1. Click the Dashboard tab.
The Chart Options menu displays on the left and the generated charts display on the right.
2. Select the report you want to view.
By default, the information displays in chart form.
3. To display the dashboard information in table form, click the Table tab.
Note: You can export reports in the Table tab.
4. To search for the documents represented by a pie segment, a bar chart segment, or a number listed in the Table tab, click on the segment area or number.
The search is performed, and the Search Results page opens to show the documents that match. For information on the Search Results page, see “Viewing Search Results” on page 42.
© 2004-2011 Clearwell Systems, Inc.Proprietary & Confidential
Rev. 050911

Using the Dashboard: PAGE: 120
To view the progress of a case:The Case Review Progress report provides a view of how the documents or items within a case are progressing through the case lifecycle. A typical graph will show a steady progression of files or documents moving through the case. You can use this progression to help predict an end date for the review.
Before you begin: You must have the permission, “Allow access to management charts”, to view the Case Review Progress report.
1. From the Dashboard tab, click Analysis: Case Review Progress.
2. Specify the set of criteria to be used to generate the report.
– All documents, all folders, or a subset of folders
– All tags, a specific tag set, or a specific tag
– All users or a specified subset of users
– Documents or items
– Date range
– Time unit desired: daily, weekly, or monthly
3. Click Chart.
4. To export the report, select the Table view and click the Export drop-down menu. Select whether you want a CSV file or an XLS file, and then Open or Save the file.
© 2004-2011 Clearwell Systems, Inc.Proprietary & Confidential
Rev. 050911

Using the Dashboard: PAGE: 121
To track reviewer progress:The Reviewer Progress report shows how many documents your reviewers have tagged. In order to easily compare reviewer productivity, you can choose to report on how many documents were reviewed per time segment (hour, day, week, or month) or how many documents were reviewed in the date range you are interested in.
Before you begin: You must have the permission, “Allow access to management charts”, to view the Reviewer Progress report.
1. From the Dashboard tab, click Analysis: Reviewer Progress.
2. Specify the set of criteria to be used to generate the report.
– All documents, all folders, or a subset of folders
– All tags, a specific tag set, or a specific tag
– All users or a specified subset of users
– Documents or items
– Time unit desired: hourly, daily, weekly, or monthly
– Date (between, on or before, or on or after) range
– Show all columns, or columns with data
Note: Hourly productivity statistics are generated by determining the number of documents reviewed while a reviewer is logged in. If the reviewer is logged in and performing non-review tasks (or forgets to log out), that reviewer’s hourly productivity statistics can be skewed.
3. Click Chart.
4. To view the displayed information in table form, select the Table view.
5. To export the report, select the Table view and click the Export drop-down menu. Select whether you want a CSV file or an XLS file, and then Open or Save the file.
© 2004-2011 Clearwell Systems, Inc.Proprietary & Confidential
Rev. 050911

Using the Dashboard: PAGE: 122
To view folder status:To view the number of tagged or untagged documents within a folder, use the Folder Status report.
Tip: You can also use the Folder Status report as a way to resume your review of a specific review set folder. To do this run the report and click the Not Tagged chart segment to search for the remaining untagged documents.
Before you begin: You must have the permission, “Allow analysis tags dashboard access”, to view Folder Status reports.
1. From the Dashboard tab, click Analysis: Folder Status.
2. From the Folders menu, select all documents, all folders, or a specific folder.
The “All documents” option displays a pie chart. Charts displaying multiple folders, display bar charts.
3. Select whether you want unused columns to display in the chart.
4. Click Chart.
A chart showing the numbers of documents that are assigned to folders, not assigned to folders, tagged, and not tagged.
5. To view the displayed information in table form, select the Table view.
6. To export the report, select the Table view and click the Export drop-down menu. Select whether you want a CSV file or an XLS file, and then Open or Save the file.
To view tag status:
Before you begin: You must have the permission, “Allow analysis tags dashboard access”, to view Folder Status reports.
1. From the Dashboard tab, click Analysis: Tag Status.
2. From the Folders menu, select all documents, all folders, or a specific folder. The “All documents” option displays a pie chart with.
© 2004-2011 Clearwell Systems, Inc.Proprietary & Confidential
Rev. 050911

Using the Dashboard: PAGE: 123
The “All Folders” or “Selected Folders..” options display bar charts.
3. From the Tags menu, select all tags or a specific tag set.
4. Select whether you want unused columns to display in the chart.
5. Click Chart.
A bar chart displays the number of documents marked with each tag.
6. To view the displayed information in table form, select the Table view.
7. To export the report, select the Table view and click the Export drop-down menu. Select whether you want a CSV file or an XLS file, and then Open or Save the file.
To export dashboard reports to a CSV or Excel (XLS) file:
1. Display the report you want to export.
2. Export the report.
– To export a single report,
A. Open the Export drop-down menu by clicking the down arrow.
B. Select whether you want a CSV file or an XLS file.
C. Open or Save the file.
– To export the data from all of the reports into a single CSV file, click Export Tags/Folders. Then Open or Save the file.
© 2004-2011 Clearwell Systems, Inc.Proprietary & Confidential
Rev. 050911

Using the Dashboard: PAGE: 124
© 2004-2011 Clearwell Systems, Inc.Proprietary & Confidential
Rev. 050911
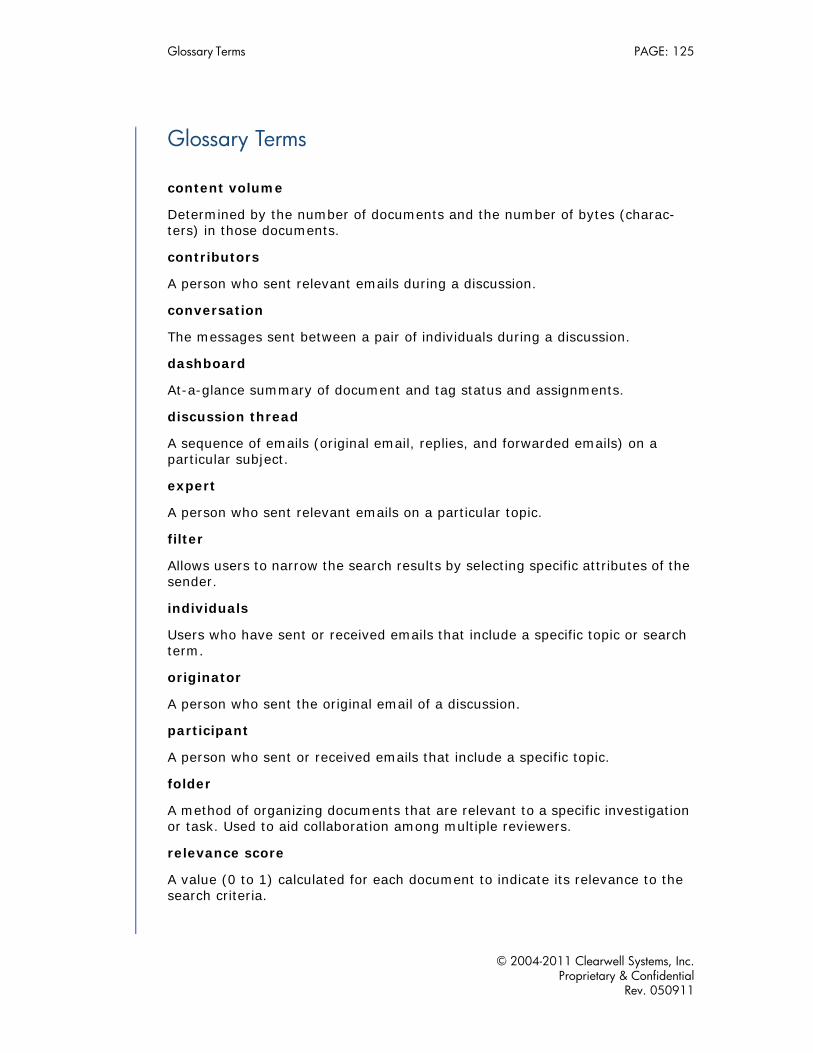
Glossary Terms PAGE: 125
Glossary Terms
content volume
Determined by the number of documents and the number of bytes (charac-ters) in those documents.
contributors
A person who sent relevant emails during a discussion.
conversation
The messages sent between a pair of individuals during a discussion.
dashboard
At-a-glance summary of document and tag status and assignments.
discussion thread
A sequence of emails (original email, replies, and forwarded emails) on a particular subject.
expert
A person who sent relevant emails on a particular topic.
filter
Allows users to narrow the search results by selecting specific attributes of the sender.
individuals
Users who have sent or received emails that include a specific topic or search term.
originator
A person who sent the original email of a discussion.
participant
A person who sent or received emails that include a specific topic.
folder
A method of organizing documents that are relevant to a specific investigation or task. Used to aid collaboration among multiple reviewers.
relevance score
A value (0 to 1) calculated for each document to indicate its relevance to the search criteria.
© 2004-2011 Clearwell Systems, Inc.Proprietary & Confidential
Rev. 050911

Glossary Terms PAGE: 126
role
Specifies a set of access permissions that can be assigned to user accounts.
stemmed search
A search that automatically finds documents that contain common variations of a word that is entered as part of a query.
tag categories
Customized identifiers with predefined values that can be used to indicate the review status (or other information) of a document associated with a folder.
tag values
The set of values available for a tag category. For example, the “Assigned To” tag category might have a list of user names. For a given folder, each document can have only one current tag value for each tag category.
terms
The words and phrases associated with a topic.
topic
A subject area identified by a set of associated terms. A document includes a topic if it contains any of the terms associated with the topic. Topics are iden-tified automatically, but an administrator can edit any topic and define new topics.
© 2004-2011 Clearwell Systems, Inc.Proprietary & Confidential
Rev. 050911