client data system version 4.3 - installation guide for ... guides/client data... · well as the...
TRANSCRIPT
Client Data System®
Installation Guide Version 4.3 (Network Version - Servers)
Client Data System version 4.3 - Installation Guide for Servers Revised: 1/4/2005

Copyright 1998-2004, E-Z Data, Inc. All Rights Reserved. No part of this documentation may be copied, reproduced, or translated in any form without the prior written consent of E-Z Data, Inc. All product names are trademarks of their respective manufacturers or organizations.
918 E. Green Street Pasadena, CA 91106 Web: http://www.ez-data.com
Telephone: (626) 585-3505 Fax: (626) 440-9097 U.S. toll-free fax: (800) 779-3123 Revised: 10/08/04
Client Data System version 4.3 - Installation Guide for Servers Revised: 1/4/2005
i
Table of Contents
Introduction ................................................................................................................... 1 Network Installation................................................................................................... 2 Network Protocols ..................................................................................................... 2 Network Expertise ..................................................................................................... 2
Hardware and Software System Requirements ......................................................... 3 Minimum/Recommended hardware for the Server.................................................... 3 Minimum/Recommended hardware for client workstations....................................... 3
Using the Adaptive Server Anywhere 7.0 DBMS........................................................ 4 Other Programs Using Adaptive Server Anywhere 7.0 ............................................. 4 About Changing Servers After Installation ................................................................ 4 Updates and Patches From Sybase ......................................................................... 4
Windows Server Installation ........................................................................................ 5 Regarding Windows 98/2000/XP/2003 Server Use .................................................. 5 Windows 98 Users Only............................................................................................ 5
Installation ........................................................................................................... 5 Windows Adaptive Server Anywhere 7.0 Startup .................................................... 10
Windows 98....................................................................................................... 10 Windows 2000................................................................................................... 10 Sybase Engine Startup as a Windows 2000/XP Service .................................. 10 Windows XP...................................................................................................... 11
After the Server Installation Process....................................................................... 11 NetWare Servers ......................................................................................................... 12
Server Installation ................................................................................................... 12 Novell NetWare 3.x, 4.xx, or 5.x Adaptive Server Anywhere Startup...................... 20 After the Server Installation Process....................................................................... 20
Appendix A – Configuring the Database Cache....................................................... 21 Appendix B - Glossary of Terms ............................................................................... 22
Client Data System version 4.3 - Installation Guide for Servers Revised: 1/4/2005


Introduction E-Z Data, Inc.’s Client Data System (CDS) is a modular front office system designed to increase the marketing, sales, and customer servicing capabilities of insurance agents, investment advisors, and the companies they represent. This document contains instructions for installing version 4.3 of the application. E-Z Data employs the most resourceful tools available to achieve CDS’s high performance. The program uses the most powerful and effective development language (Microsoft Visual C++) as well as the most robust database management system available—Sybase Adaptive Server Anywhere 7.0. More than fifteen years of leadership in client management software has resulted in innovative functionality that cannot be found in other programs. The unique SmartPad™, Letter Log, Sets, and valuable Dynamic Reports are industry-specific tools that will increase the effectiveness of your office. CDS makes accessing information, entering data and navigating through the system smooth and efficient. For more information on the system, please visit the E-Z Data, Inc. web site, www.ez-data.com.
Client Data System version 4.3 - Installation Guide for Servers Page 1

PLEASE READ THIS PAGE BEFORE CONTINUING
Network Installation
The installation of a CDS Workstation on a Network is not complicated but does require some technical knowledge and attention to detail. The first part of the process is to follow the procedures in this guide to install Sybase Adaptive Server Anywhere 7.0 and the CDS program on the server.
The second part of the process is to follow the platform-specific procedures in the Installation Guide for Servers to install the client software each workstation.
For peer-to-peer networks, where there is a non-dedicated server (i.e., the server computer is also used as a workstation), the server will have a directory for the Network installation of CDS and a different directory for the Client installation of CDS.
Network Protocols E-Z Data, Inc. strongly recommends using either the TCP/IP protocol or IPX/SPX compatible protocol (with NetBIOS enabled over IPX/SPX) when using a Windows-based network. Internal testing and extensive polling of past CDS customers have shown superior DBMS performance when using either of these protocols.
Network Expertise The Installation requires as much as two hours’ time to set up the server and the first workstation. The individual responsible for this installation should be competent in the following areas: • Each Windows operating system supported by CDS, that will be used (Windows 98,
Windows 2000, or Windows XP) • Network protocols • All of the configuration details for the computers that will be used on the CDS network If an individual with this experience is not available, consider hiring a consultant to handle the installation. This is not a procedure for novices. E-Z Data personnel can provide telephone-consultation regarding network issues at the standard rate of $75 per hour. Please contact the E-Z Data Sales department for details or to arrange for a consultation appointment.
Network Type This guide explains the procedure for installing the Sybase Adaptive Server Anywhere 7.0 software and the master copy of CDS on the server. Each type of network server (Windows and Novell NetWare) has its own installation chapter. After installing the software on the server, use the companion workstation installation guide to install and run CDS on each workstation.
Typing Command Lines While the setup wizard guides users through most of the installation process, some command lines will need to be typed in by hand.
Adaptive Server Anywhere 7.0 commands are case sensitive. When a server name EZDATA is listed in uppercase letters, ensure that it is typed in that way. When a switch, such as -gd, is listed in lowercase letters, ensure that it is typed in that way.
Client Data System version 4.3 - Installation Guide for Servers Page 2
Hardware and Software System Requirements
Minimum/Recommended hardware for the Server 400 MHz Pentium-class processor (1 GHz or higher recommended)
128 MB of RAM (512 MB or higher recommended)
2 GB of free hard disk drive space for initial installation (6 GB recommended). In addition, plan to maintain additional free hard disk space of approximately four times the size of the CDSWIN directory, including all subdirectories, for program upgrades and database rebuilds. This additional space is still required on the C: drive even if the CDSWIN.SVR directory is maintained on a different drive.
Microsoft® Windows® 98, 2000, or XP operating system
Netware 3.x/4.x/5.x (6.x is not currently supported by the program)
CDS runs across Microsoft compatible LANs (Local Area Networks) with the following protocols:
• IPX/SPX compatible protocol (with NetBIOS enabled over IPX/SPX) • TCP/IP (must be selected during Server installation)
Please note that CDS v4.3 does not support E-Z Conduit. E-Z Data strongly encourages CDS users who use E-Z Conduit to upgrade to the superior quality and features found in E-Z Mobile.
Minimum/Recommended hardware for client workstations • 266 MHz Pentium-class processor (500 MHz or higher recommended)
• 64 MB of RAM (256 MB or higher recommended)
• 100 MB of free hard disk space. Workstations that are used for database maintenance procedures should have three times the size of the largest CDS database as free hard disk space on the drive.
• Full access to the network server directory containing CDS program and data files • Microsoft® Word 97, or a later version, is required to use Word as the default word
processor in CDS. Earlier versions of Word can be used independently of CDS on the same computer.
• Microsoft® Outlook 2000 or Lotus Notes R6, or a later version, is required to use the E-Z Mail interface. Please note that the program does not support Microsoft® Outlook Express.
Client Data System version 4.3 - Installation Guide for Servers Page 3

Notes regarding CDS client/server requirements for 2000/XP networks • The user performing the installation must have Administrator rights to the server where CDS
will be installed. • CDS users must be granted full access rights to the server directory containing CDS program
and data files. • Each client workstation must be mapped to the server. E-Z Data, Inc. recommends mapping
the same drive letter to the server on all workstations to avoid confusion. • CDS users must have full administration rights to local workstations.
Notes regarding CDS client/server requirements for Novell networks • The user performing the installation must have Supervisor or Administrator rights to the
Novell server. • CDS users must be granted full access rights to the server directory containing CDS program
and data files • Each client workstation must be mapped to the server. E-Z Data, Inc. recommends mapping
the same drive letter to the server on all workstations to avoid confusion. • Each workstation should be operating with the most current Novell Client software (refer to
Novell’s web site at www.novell.com). • NetWare 4.x users must use the TCP/IP protocol to install Client Data System 4.3 using
Adaptive Server Anywhere 7.0. • CDS supports NetWare versions up to and including 5.0. For information on future
compatibility with NetWare 6.0, please contact E-Z Data Technical Support.
Using the Adaptive Server Anywhere 7.0 DBMS
Other Programs Using Adaptive Server Anywhere 7.0 If Sybase Adaptive Server Anywhere 7.0 is already installed, the name of the database server is needed to complete the installation. This name is available from the console window of the database server. During the installation of CDS, the user is prompted to enter the default Database Server Name, EZDATA. If Sybase Adaptive Server Anywhere is being used with another application, use the existing name of the Database Server. Please note that the database server name is case sensitive.
About Changing Servers After Installation The Adaptive Server Anywhere 7.0 software is specific to each operating system. For example, the Windows 2000 Adaptive Server Anywhere server software is different than the Adaptive Server Anywhere software for a Windows 98 server or a Novell NetWare server. Please note that any change in the operating system of the network server must be accompanied by a change in the Adaptive Server Anywhere software version.
Updates and Patches From Sybase Do not install updates and patches for the Sybase Adaptive Server Anywhere software without instructions from E-Z Data's Technical Support department. E-Z Data is not responsible for system problems that may occur after installing incompatible versions or patches.
Client Data System version 4.3 - Installation Guide for Servers Page 4

Windows Server Installation
Regarding Windows 98/2000/XP/2003 Server Use Installing the CDS and Sybase software using the default settings for a Windows 98/2000/XP/2003 server works well and is appropriate in most cases. However, managing the initial installation of CDS, as well as future maintenance procedures, will be more efficient if the CDS and Sybase software is installed in a common directory on the server (e.g., c:\apps\cdswin.svr, c:\apps\sqlany~1). This installation can be performed from any workstation connected with the server.
Windows 98 Users Only
Norton AntiVirus Users: Disable Norton AntiVirus Auto-Protect before installing CDS. 1. From the desktop, select Start, Programs, Norton AntiVirus, and then click Norton
AntiVirus. 2. Select Options and click the Auto-Protect tab. 3. Clear the checkmark next to the Load Auto-Protect at Startup option and click the OK
button. 4. Click the Yes button when prompted to unload Auto-Protect. 5. Exit Norton AntiVirus. Installation This procedure installs the Sybase Adaptive Server Anywhere and the CDS software on a Windows 98/2000/XP/2003 server. 1. Close any Windows applications that are currently running, including any suite products. To
open the Task List, press the CTRL+ALT+DEL keys. Select and then click the End Task button for each task except Explorer and Systray.
2. Insert the Client Data System CD into the CD-ROM drive. The E-Z Data Setup program should start automatically. If it does not start, continue with the next step. Otherwise, skip to Step 5 to proceed with the installation.
3. From the Taskbar, click the Start button and then select Run. 4. Click the Browse button to open the Browse dialog box. From the Look in: field, select the
CD-ROM drive from the drop-down menu. 5. Click the CDS button and then click the Install button to proceed with the installation. 6. After reading the Welcome message, click the Next button to continue.
Note: If Adaptive Server Anywhere has already been installed on the workstation, Steps 9-10 will be omitted.
7. A message box will indicate that Adaptive Server Anywhere 7.0 needs to be installed before running the CDS installation. Click the Yes button to continue.
8. Click the Next button to accept the default directories where Adaptive Server Anywhere 7.0 components will be installed.
9. In the Choose Client Data System Directory dialog box, click the Next button to accept the default Destination Directory (C:\Program Files\CDSWin.svr).
10. In the Select Program Folder dialog box, click the Next button to accept the default Program Folder (Client Data System).
11. Select the Windows 98/2000/XP Server (typical) option and click the Next button.
Client Data System version 4.3 - Installation Guide for Servers Page 5
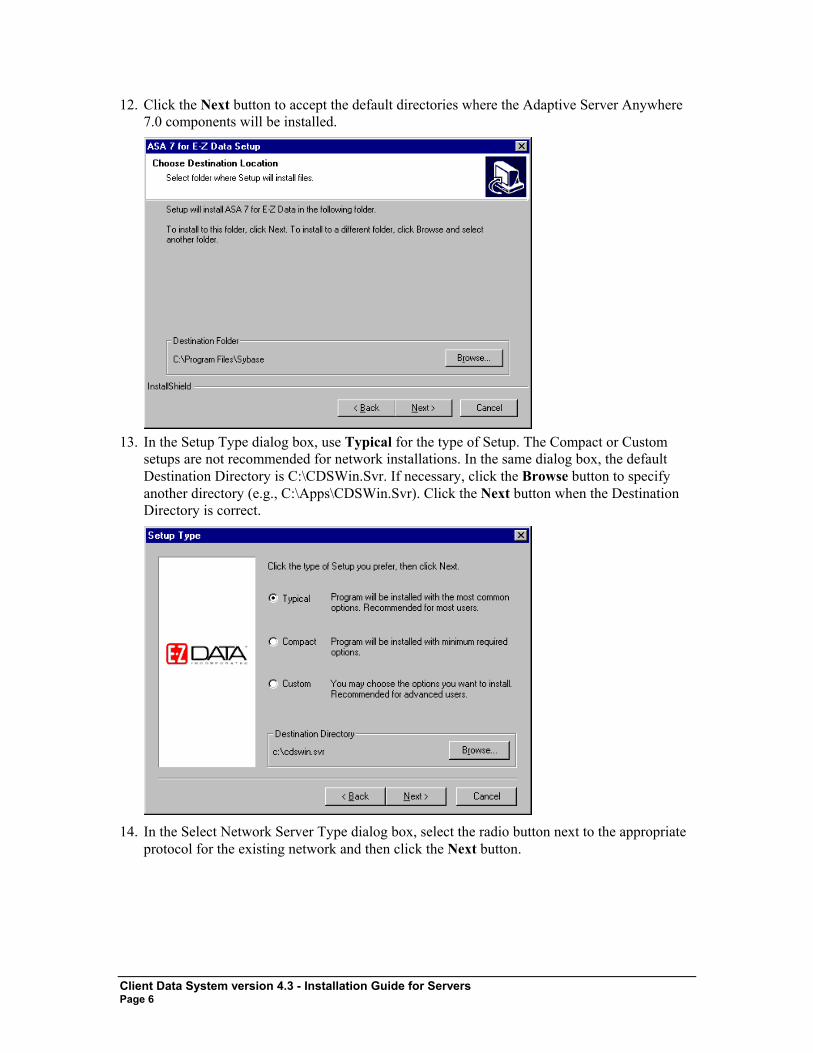
12. Click the Next button to accept the default directories where the Adaptive Server Anywhere 7.0 components will be installed.
13. In the Setup Type dialog box, use Typical for the type of Setup. The Compact or Custom
setups are not recommended for network installations. In the same dialog box, the default Destination Directory is C:\CDSWin.Svr. If necessary, click the Browse button to specify another directory (e.g., C:\Apps\CDSWin.Svr). Click the Next button when the Destination Directory is correct.
14. In the Select Network Server Type dialog box, select the radio button next to the appropriate
protocol for the existing network and then click the Next button.
Client Data System version 4.3 - Installation Guide for Servers Page 6

15. In the Database Information dialog box, use EZDATA as the Database Server Name and C:
for the Database Location (these are the default settings). Change these settings if necessary and then click the Next button to continue.
Note: If Sybase Adaptive Server Anywhere 7.0 is being used for another software application, use the name of that database server. The name is available from the task list of the database server. Please note that this name is case sensitive.
16. In the Start Copying Files dialog box, review the list of Current Settings. If a changed is
required, click the Back button. Otherwise, click the Next button to begin. A progress bar will track the status of the files being copied.
Client Data System version 4.3 - Installation Guide for Servers Page 7

17. When the progress bar is at 97%, a prompt to insert the Control File diskette into drive A
opens. Insert the diskette (or type C:\ in the dialog box if the file was copied to the hard disk) and then click the OK button to continue with the installation. A folder containing the new icons may open and obscure the dialog box. If this occurs, minimize the open folder to display the dialog box to continue.
18. When the Server Setup is complete, click the Finish button to close the Setup program. If a Control File diskette is still in drive A, remove it before continuing.
Windows 98 Users Only Norton AntiVirus Users: Re-enable Auto-Protect as explained below. 1. From the Desktop, select Start, Programs, Norton AntiVirus, and then click Norton
AntiVirus. 2. Select Options and click the Auto-Protect tab. 3. Check the Load Auto-Protect at Startup option and click the OK button.
Client Data System version 4.3 - Installation Guide for Servers Page 8

4. Click the Yes button when prompted to load Auto-Protect. 5. Exit Norton AntiVirus. Program icons for CDS are not created during the software installation for the server. Icons are created during the installation of each workstation. The CDS server installation is complete. Refer to the next section for information on running the server software.
Client Data System version 4.3 - Installation Guide for Servers Page 9
Windows Adaptive Server Anywhere 7.0 Startup Windows 98 1. From the Windows desktop, click the Start button, point to Settings, and then select
Taskbar & Start Menu. 2. Click the Start Menu Programs tab, and select Add button. 3. Type the path to the dbsrv7 file in the Command line field and then click the Next button.
Example: C:\Progra~1\Sybase\sqlany~1\win32\dbsrv7 -n EZDATA -gd all -gp 4096
(Refer to Appendix A for details about setting up the database cache) 4. In the Select Program Folder dialog box, select Startup and then click the Next button. 5. Name the shortcut SQL Server and then click the Finish button. 6. Reboot the computer to start Adaptive Server Anywhere 7.0. Windows 2000 1. From the Windows desktop, click the Start button, point to Settings, and then select
Taskbar and Start Menu. 2. Click the Advanced tab, and select Add button 3. Type the path to the dbsrv7 file in the Command line field and then click the Next button.
Example: C:\Progra~1\Sybase\sqlany~1\win32\dbsrv7 -n EZDATA -gd all-gp 4096
(Refer to Appendix A for details about setting up the database cache) 4. In the Select Program Folder dialog box, select Startup and then click the Next button. 5. Name the shortcut SQL Server and then click the Finish button. 6. Click the OK button on the Taskbar and Start Menu Properties dialog box. 7. Reboot the computer to start Adaptive Server Anywhere 7.0. Sybase Engine Startup as a Windows 2000/XP Service The Sybase Adaptive Server Anywhere 7.0 DBSVC command can be used to start the Sybase engine as a Windows 2000 service. To run the server engine as a service: 1. From the Windows desktop, click the Start button and then select Run to open the Run
dialog box. 2. Type the following command line and the complete path to the dbsrv7 file in the Open field
and then click the OK button. Example: dbsvc.exe -i -as -t network -s automatic -w EZDATA C:\Progra~1\Sybase\SQLAny~1\win32\dbsrv7.exe -n EZDATA -gd all -gp 4096 -tl 0 -ti 0
(Refer to Appendix A for details about setting up the database cache) 3. From the Windows desktop, click the Start button, point to Settings, select Control Panel,
and then point to Administrative Tools and click Services. 4. From the Services folder, right-click the Adaptive Server Anywhere Service listing and,
from the context menu, select Start to start the service.
Client Data System version 4.3 - Installation Guide for Servers Page 10

Windows XP 1. From the Windows desktop, double-click My Computer and browse to the Startup folder
(e.g., C:\Documents and Settings\All Users\Start Menu\Programs\Startup.) 2. Right-click in the Startup window, point to New and then select Shortcut. 3. In the Create Shortcut dialog box, type the complete path to the dbsrv7 file in the Command
line field and then click the Next button. Example: C:\Progra~1\Sybase\sqlany~1\win32\dbsrv7 -n EZDATA -gd all-gp 4096
(Refer to Appendix A for details about setting up the database cache) 4. Name the shortcut SQL Server and then click the Finish button. 5. Reboot the computer to start Adaptive Server Anywhere 7.0.
After the Server Installation Process
Once the server has been set up, install CDS on each workstation on the related network. For information on this installation, refer to the CDS Installation Guide (Workstations).
Client Data System version 4.3 - Installation Guide for Servers Page 11

NetWare Servers
Server Installation This procedure installs Adaptive Server Anywhere and CDS software on a Novell server. 1. Login to the Novell server with Administrator or Supervisor rights from a workstation with a
CD-ROM drive. 2. Close any Windows applications that are currently running, including any suite products. To
open the Task List, press the CTRL+ALT+DEL keys. Select and then click the End Task button for each task except Explorer and Systray.
3. Insert the Client Data System CD into the CD-ROM drive. The E-Z Data Setup program should start automatically. If it does not start, continue with the next step. Otherwise, skip to Step 7 to proceed with the installation.
4. From the Taskbar, click the Start button and then select Run to open the Run dialog box. 5. Click the Browse button to open the Browse dialog box. From the Look in: field, select the
CD-ROM drive from the drop-down menu. 6. Double-click the EZSetup icon and then click the OK button in the Run dialog box to start
the Setup program. 7. Click the CDS button and then click the Install button to proceed with the installation. 8. After reading the Welcome message, click the Next button to continue. 9. After reading the Software License Agreement, click the Yes button to accept the terms of the
license and continue with the installation. 10. In the Installation Type dialog box, select the CDS Installation/Upgrade option and click
the Next button. 11. In the Select Components dialog box, click the Server button. 12. A dialog box will indicate that Adaptive Server Anywhere 7.0 needs to be installed before
running the CDS installation. Click the Yes button to continue. 13. Select the Novell NetWare Server option and then click Next Note: If Adaptive Server Anywhere 7.0 has already been installed, steps 14-26 will be omitted 14. In the Adaptive Server Anywhere 7.0 for NetWare Welcome dialog box, click the Next
button to open the Choose Destination Location dialog box. 15. Sybase uses S: as the default drive letter for component installation. Browse to the letter
currently mapped to the Novell server and specify the System folder. After changing the drive letter and destination folder as needed, click the Next button to accept the directories where Sybase Adaptive Server Anywhere components will be installed.
Client Data System version 4.3 - Installation Guide for Servers Page 12

16. Select Adaptive Server Anywhere in the Select Components dialog box and then click the Next button.
Note for NetWare 3.1x users: Select the NetWare 3.1x System NLMs component, as well as the Adaptive Server Anywhere component.
17. In the Start Copying Files dialog box, review the list of Current Settings. If a changed is required, click the Back button. Otherwise, click the Next button to begin. A progress bar will track the status of the files being copied.
Client Data System version 4.3 - Installation Guide for Servers Page 13

18. In the Server License dialog box, enter the relevant Name and Company information. 19. In the Licensed Seats field, type: 999.
20. In the License Type section, select the Networked Seat (per seat) model option and click the OK button.
21. In the Setup Complete dialog box, click the Finish button to complete Adaptive Server Anywhere Setup and open the Adaptive Server Anywhere 7.0 for NetWare (EBF) installation wizard.
Client Data System version 4.3 - Installation Guide for Servers Page 14

22. In the Current Location of ASA for NetWare dialog box, click the Browse button to locate and select the system folder. Click the Next button to proceed with the installation.
23. In the Welcome dialog box, click the Next button to open the Select Components dialog box. 24. Select Adaptive Server Anywhere in the Select Components dialog box and click the Next
button.
Client Data System version 4.3 - Installation Guide for Servers Page 15

25. In the Start Copying Files dialog box, review the list of Current Settings. If a changed is required, click the Back button. Otherwise, click the Next button to begin. A progress bar will track the status of the files being copied.
26. In the Setup Complete dialog box, click the Finish button to complete the Adaptive Server Anywhere 7.0 (EBF) Setup.
Client Data System version 4.3 - Installation Guide for Servers Page 16

27. Click the OK button in the information dialog box to continue. 28. In the Setup Type dialog box, use Typical for the type of Setup. The Compact or Custom
setups are not recommended for network installations. In the same dialog box, the default Destination Directory is C:\CDSWin.Svr. If necessary, click the Browse button to specify another directory (e.g., C:\Apps\CDSWin.Svr). Click the Next button when the Destination Directory is correct. Note: NetWare 4.x users must use the TCP/IP protocol to install Client Data System 4.3 using Adaptive Server Anywhere 7.0.
29. In the Select Network Server Type dialog box, select the radio button next to the appropriate protocol for the existing network and then click the Next button.
Client Data System version 4.3 - Installation Guide for Servers Page 17

30. In the Database Information dialog box, use EZDATA as the Database Server Name and C: for the Database Location (these are the default settings). Change these settings if necessary and then click the Next button to continue.
Note: If Sybase Adaptive Server Anywhere 7.0 is being used for another software application, use the name of that database server. The name is available from the task list of the database server. Please note that this name is case sensitive.
31. In the Start Copying Files dialog box, review the list of Current Settings. If a changed is required, click the Back button. Otherwise, click the Next button to begin. A progress bar will track the status of the files being copied. The copying process may take up to 15 minutes.
Client Data System version 4.3 - Installation Guide for Servers Page 18

32. When the progress bar is at 97%, a prompt to insert the Control File diskette into drive A opens. Insert the diskette (or type C:\ in the dialog box if the file was copied to the hard disk) and then click the OK button to continue with the installation. A folder containing the new icons may open and obscure the dialog box. If this occurs, minimize the open folder to display the dialog box to continue.
33. When the Server Setup is complete, click the Finish button to close the Setup program. If a Control File disk is still in drive A:, remove it before continuing.
Program icons for CDS are not created during the software installation for the server. Icons are created during the installation of each workstation. The CDS server installation is complete. Refer to the next section for information on running the server software.
Client Data System version 4.3 - Installation Guide for Servers Page 19

Novell NetWare 3.x, 4.xx, or 5.x Adaptive Server Anywhere Startup Start Adaptive Server Anywhere at the file-server console. This action may require an Administrator or Supervisor password to access the console. 1. At the server console command prompt, type:
load sys:\system\dbsrv7 -n EZDATA -gd all –gp 4096 (Refer to Appendix A for details about setting up the database cache)
2. Click the Enter button to start Adaptive Server Anywhere. Note: This procedure must be performed to start Adaptive Server Anywhere each time the server is powered down and started again. This procedure can be automated by adding the command in Step 1 to the AUTOEXEC.NCF file. Contact the network administrator to discuss automation of this startup. 3. When Adaptive Server Anywhere has been started, press ALT-ESC to switch between the
system console, the Adaptive Server Anywhere console window, or other services.
After the Server Installation Process
Once the server has been set up, install CDS on each workstation on the related network. For information on this installation, refer to the CDS Installation Guide (Workstations).
Client Data System version 4.3 - Installation Guide for Servers Page 20

Appendix A – Configuring the Database Cache By default, Sybase Adaptive Server Anywhere uses two megabytes of memory for caching. This default cache size is adequate for databases that are less than 20 MB in size. For very large databases, increasing the memory that is allocated to the server cache improves performance. Accessing database pages that have been cached in memory is much faster than reading the information directly from the server’s hard disk. Allocating too much memory, however, will limit the available resources that other server-based programs may need to operate efficiently.
Generally, 10% of the total size of the database(s) is used to calculate the amount of memory to use for caching that will provide optimum performance. In the first example below, a 32-MB database and a 28-MB database produce a total database size of 60 MB. Using the general rule, 10% of the total database size, 6 MB of memory (60 MB x .10 = 6 MB) would be the optimum cache size.
The Sybase parameter -c cache-size is used to specify the amount of memory to be used for caching. Among other methods, the cache size can be specified with nM (number of Megabytes) as in the following examples.
Example 1: This is the typical Sybase Adaptive Server Anywhere startup command for a Windows 98 Server. The cache parameter in this example will allocate 6 Megabytes of memory for database caching.
\sqlanywhere7\win32\dbsrv7.exe -n EZDATA -gd all -gp 4096 -c 6M
Example 2: This is the typical Sybase Server startup command for a NetWare Server. The cache parameter in this example will allocate 8 Megabytes of memory for database caching.
load sys:\system\dbsrv7 -n EZDATA -gd all -gp 4096 -c 8M
Example 3: The following Sybase Server parameters are typically used to create a new service on a Windows 2000/XP Server. The cache parameter in this example will allocate 15 Megabytes of memory for database caching.
Client Data System version 4.3 - Installation Guide for Servers Page 21

Appendix B - Glossary of Terms
Adaptive Server Anywhere 7.0 A product of Sybase, Inc. and the database management system that CDS uses.
CDS Client Data System®, a registered trademark.
Client/Server Client/Server technology is the basis for the design of software and hardware architectures that support shared processing between a server and a workstation. Shared processing results in increased system speed and performance over traditional methods where the workstation is burdened with all of the processing. The client/server architecture of Sybase Adaptive Server Anywhere 7.0 exemplifies the principles of this technology and provides superior performance as a DBMS.
With traditional network databases, individual workstation resources are used to locate and retrieve data from the server. The Client/Server architecture allows the workstation to retain most of its resources by just sending requests for information to the server. The server then uses its own resources to process the request and return the requested data to the workstation. This also improves system and program performance by cutting down on network traffic.
Default A setting or choice that will be used unless it is changed. For example, CDS workstation files are installed, by default, in the C:\ProgramFiles\CDSWin directory.
CDS Desktop The CDS desktop is the first window that appears after logging in to the CDS program and the starting point for access to all other areas of the program.
Path Name The route to locate a file on disk. For example, c:\data\client1.bmp identifies the location of the "client1.bmp" file as the "data" directory on the "C" drive.
Peer-to-peer Peer-to-peer is a term that describes a network of two or more computers where each computer acts as a server to other computers on the same network. The computer where a server-based program is installed in this type of network is often referred to as a non-dedicated server.
User Profile The User Profile contains the privileges and preferences assigned to a CDS user (i.e., Database name, linked Contact or Agent record, customization details, etc.)
Client Data System version 4.3 - Installation Guide for Servers Page 22