client micro edition - ibmfile/... · workplace client technology, micro edition wctme enterprise...
TRANSCRIPT

Workplace Client Technology, Micro Edition
WCTME Enterprise Offering Application Developer’s Guide
���

Note
Before using this information and the product it supports, read the information in “Notices,” on page 79.
First Edition (September 2004)
This edition applies to version _5.8.1_, and to all subsequent releases and modifications until otherwise indicated in
new editions.
© Copyright International Business Machines Corporation 2004. All rights reserved.
US Government Users Restricted Rights – Use, duplication or disclosure restricted by GSA ADP Schedule Contract
with IBM Corp.
Contents
Quickstart . . . . . . . . . . . . . . 1
Introduction . . . . . . . . . . . . . 3
Concepts . . . . . . . . . . . . . . . 4
Enterprise Offering platform . . . . . . . . 4
Plug-ins and bundles . . . . . . . . . . 5
Fragments . . . . . . . . . . . . . . 6
Features . . . . . . . . . . . . . . . 6
Tools . . . . . . . . . . . . . . . . 7
Applications . . . . . . . . . . . . . . 8
Considerations . . . . . . . . . . . . . 8
Design . . . . . . . . . . . . . . . 10
Capabilities . . . . . . . . . . . . . 11
Next steps . . . . . . . . . . . . . . . 13
For more information . . . . . . . . . . . 13
Setting up WebSphere Studio . . . . . 15
Installing WebSphere Studio Site Developer or
WebSphere Studio Application Developer . . . . 15
Installing WebSphere Studio Device Developer . . 16
Installing WebSphere Studio Device Developer
Optional Features . . . . . . . . . . . . 16
Installing WebSphere Studio Site or Application
Developer Optional Features . . . . . . . . 16
Installing Additional Development Tools for
WebSphere Studio . . . . . . . . . . . . 17
Setting up the Eclipse SDK . . . . . . 19
If you do not have the Eclipse 3.0.1 SDK installed 19
If you already have Eclipse 3.0.1 SDK installed . . 19
Installing Additional Development Tools for Eclipse
3.0.1 SDK . . . . . . . . . . . . . . . 20
Setting up the target workspace . . . . . . . 21
Developing WCTME Enterprise Offering
applications . . . . . . . . . . . . 23
Creating plug-ins . . . . . . . . . . . . 23
Creating a plug-in project . . . . . . . . . 23
Creating a fragment project . . . . . . . . 23
Creating a web application project . . . . . . 23
Creating a bundle (plug-in) project . . . . . 24
Using Web Services . . . . . . . . . . . 25
Creating help for the application . . . . . . 26
Creating preference pages . . . . . . . . . 26
Preference options . . . . . . . . . . . 26
Using logging and tracing . . . . . . . . . 27
Eclipse logging . . . . . . . . . . . . 28
Eclipse tracing . . . . . . . . . . . . 28
OSGi logging . . . . . . . . . . . . . 29
WCTME Enterprise Offering logging . . . . . 29
Enabling your plug-in for startup . . . . . . . 29
Launching the Enterprise Offering platform . . . 31
Starting from the command line . . . . . . 31
Starting via launch configuration . . . . . . 31
Deploying plug-ins . . . . . . . . . . . . 34
Using plug-ins from your workspace . . . . . 35
Exporting plug-ins from the PDE . . . . . . 35
Exporting bundles from WebSphere Studio . . . 35
Debugging applications . . . . . . . . . . 38
Local Debugging of the Enterprise Offering
platform . . . . . . . . . . . . . . 38
Remote Debugging of the Enterprise Offering
Platform . . . . . . . . . . . . . . 39
Creating installation packages . . . . 41
Methods of installation . . . . . . . . . . 41
Local installation . . . . . . . . . . . 41
Enterprise installation . . . . . . . . . . 41
Install artifacts . . . . . . . . . . . . . 42
Installer/Uninstaller . . . . . . . . . . 42
Update site . . . . . . . . . . . . . 42
Features . . . . . . . . . . . . . . 42
Plug-ins . . . . . . . . . . . . . . 43
Native libraries . . . . . . . . . . . . 43
Configuration file updates . . . . . . . . 44
Installation instructions . . . . . . . . . 45
Enterprise distribution instructions . . . . . 45
Reference information . . . . . . . . 47
Windows registry entries . . . . . . . . . . 47
Plug-in extension points . . . . . . . . . . 47
Applications . . . . . . . . . . . . . 47
Web applications . . . . . . . . . . . 48
Configuration properties . . . . . . . . . . 49
Workbench properties . . . . . . . . . . 49
WebContainer properties . . . . . . . . . 51
Using the WCTME EO developer applications . . . 53
Using the Platform Manager . . . . . . . . 53
Sample Applications . . . . . . . . . 57
Rich client application . . . . . . . . . . . 58
Creating the projects . . . . . . . . . . 59
Importing the source . . . . . . . . . . 59
Running the client application . . . . . . . 59
Running the server application . . . . . . . 60
Creating installation artifacts for distribution . . 61
Install the features from your update site . . . 61
Web application . . . . . . . . . . . . . 62
Installing the projects . . . . . . . . . . 62
Exporting the bundles . . . . . . . . . . 63
Running the application . . . . . . . . . 64
Starting the server . . . . . . . . . . . 64
Administrator Tasks . . . . . . . . . 65
Silent installation and uninstallation of WCTME
Enterprise Offering . . . . . . . . . . . . 65
Installation . . . . . . . . . . . . . 65
Uninstallation . . . . . . . . . . . . 65
© Copyright IBM Corp. 2004 iii

Using Tivoli Device Manager with the Enterprise
Management Agent . . . . . . . . . . . . 65
Installing Tivoli Device Manager . . . . . . 65
Upgrading Tivoli Device Manager . . . . . . 65
Using the Tivoli Device Manager . . . . . . 67
Configuring the Enterprise Management Agent 67
Changing the Enterprise Management Agent
properties . . . . . . . . . . . . . . 68
Disabling the Enterprise Management Agent . . 69
Using the NativeAppBundle Tool . . . . . . 69
Installing the Order Entry Sample using Tivoli
Device Manager . . . . . . . . . . . . 71
Managing update policy settings for the client
platform . . . . . . . . . . . . . . . 74
Tips, tricks, and troubleshooting . . . 75
Appendix. Notices . . . . . . . . . . 79
Trademarks . . . . . . . . . . . . . . 81
iv Workplace Client Technology, Micro Edition: WCTME Enterprise Offering Application Developer’s Guide
Quickstart
The following quickstart guide lists the locations of procedures for the most
common initial tasks with WCTME Enterprise Offering.
Learning about WCTME Enterprise Offering (EO)...
Review “Introduction” on page 3.
Setting up your tools...
v Read “Tools” on page 7 to understand your tool choices
v Read and follow the instructions in “Setting up WebSphere Studio” on page 15 if
you will be using WebSphere Studio
v Read and follow the instructions in “Setting up the Eclipse SDK” on page 19 if
you will be using the Eclipse 3.0 Plug-in Development Feature
Running sample code...
Review the EO User’s Guide for instructions on installing EO platform and
installing the platform samples.
Reviewing sample code...
v Set up your tools
v Review “Sample Applications” on page 57
Developing, running, and debugging applications...
v Set up your tools
v Review “Developing WCTME Enterprise Offering applications” on page 23
Learning about creating installation packages...
Review “Creating installation packages” on page 41.
© Copyright IBM Corp. 2004 1

2 Workplace Client Technology, Micro Edition: WCTME Enterprise Offering Application Developer’s Guide

Introduction
The following terms will be used throughout this document and are defined as
follows:
Workplace Client Technology, Micro Edition 5.7.1 (WCTME)
A platform for developing, deploying, and maintaining server managed
client software.
WebSphere® Studio Device Developer 5.7.1 (WSDD)
An integrated development environment for the creation and testing of
applications that will be deployed on handsets and other small devices.
WCTME Enterprise Offering 5.8.1
Provides an application platform for both end users and ISV’s on Linux
and Windows® desktops, laptops, and tablets. The Offering is designed to
be used by end users, system administrators, and ISV’s.
Eclipse 3.0.1 Software Development Kit (SDK)
An open-source development framework (workbench) and set of widgets
(SWT - standard widget toolkit) for tool writers to leverage code reuse, a
consistent user interface, and a Plug-in architecture for developing new
tools.1
Eclipse 3.0 Plug-in Development Environment (PDE)
A development environment for creating, running, debugging, and
installing Eclipse plug-ins.
Eclipse 3.0 Rich Client Platform (RCP)
A client platform for applications based on the same infrastructure as the
Eclipse tools.
IBM® JDK 1.4.2 with J9 technology
A Java™ Virtual Machine (JVM) providing support for the Java 2 Standard
Edition (J2SE) 2.4.2 class libraries, that has been enhanced with IBM
technology.
WCTME Enterprise Offering 5.8.1 Workbench
The desktop runtime environment for WCTME Enterprise Offering.
WCTME Enterprise Offering 5.8.1 Features
On disk, the WCTME Enterprise Offering is structured as a collection of
plug-ins, which contain the code that provides the product’s functionality.
The code and other files for a plug-in are installed on the local computer,
and are activated automatically. These plug-ins are grouped together into
features. Features are the smallest unit of separately downloadable and
installable functionality.
WebSphere Studio Site Developer 5.1.X (WSSD)
An integrated development environment for the creation and testing of
applications that will be deployed on handsets and other small devices.
WebSphere Studio Application Developer 5.1.X (WSAD)
A comprehensive, integrated development environment for visually
1. WCTME EO includes Eclipse Technology. Eclipse is an award-winning, open source framework for the construction of powerful
software development tools and rich desktop applications.
© Copyright IBM Corp. 2004 3

designing, constructing, testing and deploying Web services, portals and
Java 2 Enterprise Edition (J2EE) applications.
In this document whenever the term Enterprise Offering (EO) is used it should be
considered to be the following: WCTME Enterprise Offering 5.8.1 Workbench based
on the Eclipse 3.0 Rich Client Platform (RCP) and running on the IBM JDK 1.4.2
with J9 technology.
In this document whenever the term WebSphere Studio is used it should be
considered to be a general reference to the following: WebSphere Studio Device
Developer 5.7.1 (WSDD), and WebSphere Studio Site Developer 5.1.X (WSSD) or
WebSphere Studio Application Developer 5.1.X (WSAD).
In this document whenever the term web application development environment
is used it should be considered to be a general reference to the following:
WebSphere Studio Device Developer 5.7.1 (WSDD) with SMF Bundle Development
Toolkit 5.7.1 and Extension Services for WebSphere Everyplace 5.7.1 installed,
linked into either WebSphere Studio Site Developer 5.1.X (WSSD) or WebSphere
Studio Application Developer 5.1.X (WSAD), with Application Tools for Extension
Services 5.7.1 installed.
In this document whenever the term Bundle Development Environment (BDE) is
used it should be considered to be a general reference to the following: WebSphere
Studio Device Developer 5.7.1 (WSDD) with SMF Bundle Development Toolkit
5.7.1 and Extension Services for WebSphere Everyplace 5.7.1 installed.
In this document whenever the term web services development environment is
used it should be considered to be a general reference to the following: WebSphere
Studio Device Developer 5.7.1 (WSDD) with SMF Bundle Development Toolkit
5.7.1 and Extension Services for WebSphere Everyplace 5.7.1 installed.
Note: For both BDE and web services development environment WSSD or WSAD
could be used if WSDD was linked to them during its install.
In this document whenever the term Plug-in Development Environment (PDE) is
used it should be considered to be the following: Eclipse 3.0 Plug-in Development
Environment (PDE) running inside of the Eclipse 3.0.1 Software Development Kit
(SDK).
Throughout the document, references to the term ECLIPSE_SDK, when used in path
references, refer to the installation directory for the Eclipse 3.0.1 SDK.
References to the term WCTME_EO_RUNTIME, when used in path references, refer to
the installation directory for the WCTME Enterprise Offering platform.
Concepts
Enterprise Offering platform
The Enterprise Offering (EO) provides a way to plug in and manage multiple
applications, and provide windows in which the applications are able to control
the available display mechanisms.
The EO platform is based upon the Eclipse 3.0 Rich Client Platform (RCP)
framework. For application developers familiar with the Eclipse Integrated
Development Environment, or WebSphere Studio tools, it is the same core platform
4 Workplace Client Technology, Micro Edition: WCTME Enterprise Offering Application Developer’s Guide

with the application development tools removed, leaving a basic container for
features and plug-ins, and a window management and layout environment. Core
features from Eclipse such as the Help facility and the Update Manager have also
been retained and are available for application use.
The EO platform has been supplemented with additional plug-ins (bundles)
available for application use. Services provided in the core platform include the
following:
v Java 2 Standard Edition 1.4.2 based JVM
v Relational database services through DB2 Everyplace, and synchronization
support via DB2 Everyplace Sync Client APIs
v Transactional, assured messaging services through MQ Everyplace
v Web application support through integrated browser controls and an integrated
web application container
v Web Services client and hosting capabilities
v Standards based programming interfaces including XML parsing, JDBC, and
Java Message Service (JMS)
v Implementations of OSGi services such as Configuration Admin, Log Service,
User Admin, and more
Plug-ins and bundles
The Eclipse framework, and therefore the EO platform, is organized around a
plug-in and extension point model. The framework provides a core, limited set of
services. Additional components, or plug-ins, are provided in a directory or JAR
file organized in a specific structure, and implement instantiations of the various
extension points. The framework reads the component declarative information, and
incorporates the components into the correct locations in the framework user
interface.
A plug-in is the level at which components are declared to the framework. A
plug-in can be used to provide user interface extensions, such as perspectives,
views, editors, and wizards. It can also be used to provide business logic or core
services to other plug-ins, but contribute no extensions to the user interface.
The term ’bundle’ is used by OSGi. A bundle is comprised of Java classes and
other resources, and provides various functions. The Eclipse framework used by
the EO platform is based upon an OSGi framework. Therefore, all plug-ins are also
OSGi bundles. The terms ’plug-ins’ and ’bundles’ can be used interchangeably
when referring to the Eclipse SDK or EO platform. However, the term ’plug-in’
generally indicates definition/implementation of extension points through a
plugin.xml, while the term ’bundles’ generally indicate usage of only the
MANIFEST. MF to provide packages and services.
For a plug-in or bundle to be recognized by the Eclipse PDE and EO platform, it
must have a unique name and version.
A plug-in/bundle can generally be organized in one of three ways:
v A directory containing at least a plugin.xml file. The directory may also contain
a MANIFEST.MF file located in the META-INF directory, additional files, as well as
Java code contained within JAR files.
A plugin.xml file is required if the component is intending to define or
implement extension points provided by other plug-ins.
Introduction 5
v A directory containing at least a MANIFEST.MF file in the META-INF directory. The
directory will also contain Java code contained in JAR files. The MANIFEST.MF will
refer to the JARs by referencing them via the Bundle-Classpath attribute.
Components that provide only business logic or OSGi services and do not
intend to provide or implement any extension points can use this format.
Components without plugin.xml files that need to be available when building
other components or when launching the EO platform using the Eclipse Plug-in
Development Environment (PDE) must be organized in this format.
v A single JAR file containing at least a META-INF\MANIFEST.MF or a plugin.xml file.
Components may be provided for use in the EO platform by collecting all of the
component artifacts into a single JAR file. While this organization will run
successfully, this organization is not compatible with the Eclipse PDE.
Fragments
A plug-in or a bundle may not always provide a complete implementation for a
component. In some cases, fragments may be used to complete or extend a
bundle/plug-in implementation.
For example, the primary bundle may provide an implementation that contains
translatable text in a default language. Fragments are then used to provide
translations for additional languages.
A second case where fragments are often used is to provide platform
(processor/operating system) specific implementations.
Fragments contain either a fragment.xml (similar to a plugin.xml), or a
MANIFEST.MF, or both. A fragment is associated with, or dependent upon, a specific
primary plug-in, but still maintains a unique identity. Querying a list of plug-ins or
bundles will return fragments as well, so that they can be individually started and
stopped.
Fragments generally add classes or resources to the classpath normally used by the
primary bundle. Fragments do not contain Bundle-Activator classes. Since
fragments are only extensions to a plug-in or bundle, they cannot be required or
imported by another plug-in or bundle.
Features
On disk, an Eclipse based product is structured as a collection of plug-ins and
fragments. Each plug-in or fragment contains the code that provides some of the
product’s functionality. The code and other files for a plug-in or fragment are
installed on the local computer, and get activated automatically as required. A
product’s plug-ins are grouped together into features. A feature is the smallest unit
of separately downloadable and installable functionality
The fundamentally modular nature of the Eclipse platform makes it easy to install
additional features and plug-ins into an Eclipse based product, and to update the
product’s existing features and plug-ins. You can do this either by using traditional
native installers running separately from Eclipse, or by using the Eclipse platform’s
own update manager. The Eclipse update manager can be used to discover,
download, and install updated features and plug-ins from special web based
Eclipse update sites.
The basic underlying mechanism of the update manager is simple: the files for a
feature or plug-in are always stored in a sub-directory whose name includes a
6 Workplace Client Technology, Micro Edition: WCTME Enterprise Offering Application Developer’s Guide
version identifier (e.g., ″2.0.0″). Different versions of a feature or plug-in are always
given different version identifiers, thereby ensuring that multiple versions of the
same feature or plug-in can co-exist on disk. This means that installing or updating
features and plug-ins requires adding more files, but never requires deleting or
overwriting existing files. Once the files are installed on the local computer, the
new feature and plug-in versions are available to be configured. The same installed
base of files is therefore capable of supporting many different configurations
simultaneously; installing and upgrading an existing product is reduced to
formulating a configuration that is incrementally newer than the current one.
Important configurations can be saved and restored to active service in the event
of an unsuccessful upgrade.
Large Eclipse based products can organize their features into trees starting from
the root feature that represents the entire product. This root feature then includes
smaller units of functionality all the way down to leaf features that list one or
more plug-ins and fragments. The capability to group feature hierarchically allows
products to be stacked using a ’Russian doll’ approach - a large product can build
on top of a smaller one by including it and adding more features.
Some included features may be useful add-ons but not vital to the proper
functioning of the overall product. Feature providers can elect to mark them as
optional. When installing optional features, users are provided with a choice of
whether they want them or not. If not installed right away, optional features can be
added at a later date.
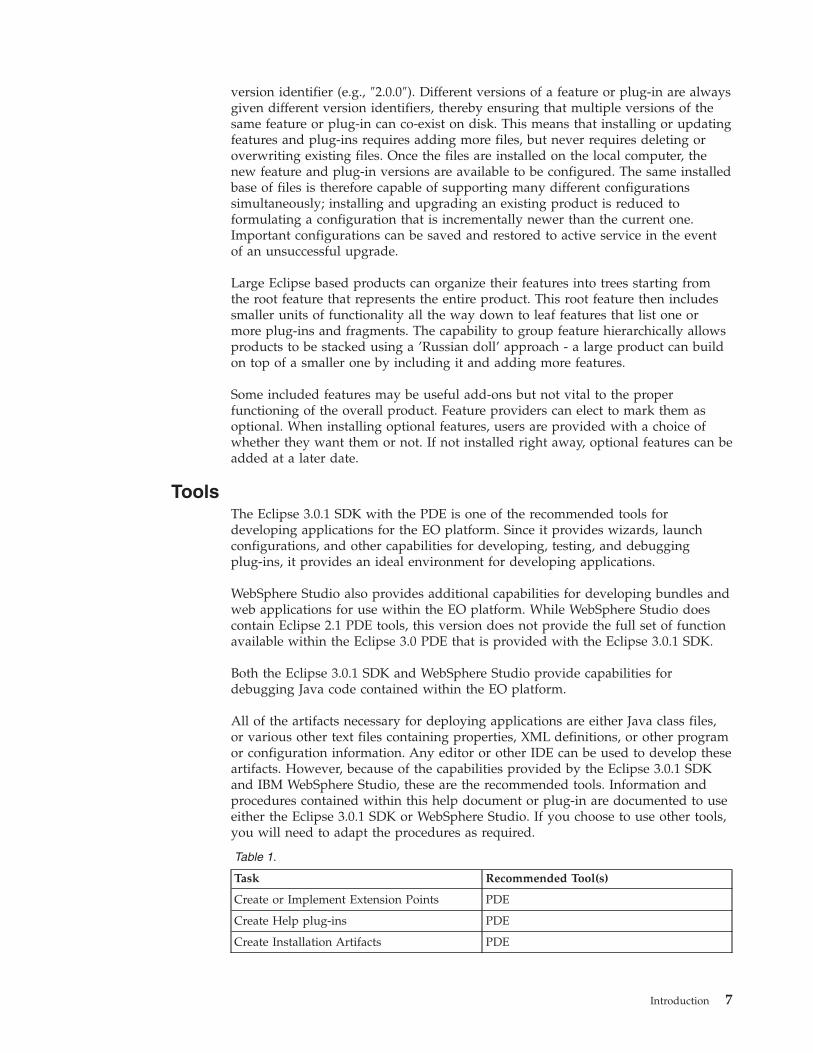
Tools
The Eclipse 3.0.1 SDK with the PDE is one of the recommended tools for
developing applications for the EO platform. Since it provides wizards, launch
configurations, and other capabilities for developing, testing, and debugging
plug-ins, it provides an ideal environment for developing applications.
WebSphere Studio also provides additional capabilities for developing bundles and
web applications for use within the EO platform. While WebSphere Studio does
contain Eclipse 2.1 PDE tools, this version does not provide the full set of function
available within the Eclipse 3.0 PDE that is provided with the Eclipse 3.0.1 SDK.
Both the Eclipse 3.0.1 SDK and WebSphere Studio provide capabilities for
debugging Java code contained within the EO platform.
All of the artifacts necessary for deploying applications are either Java class files,
or various other text files containing properties, XML definitions, or other program
or configuration information. Any editor or other IDE can be used to develop these
artifacts. However, because of the capabilities provided by the Eclipse 3.0.1 SDK
and IBM WebSphere Studio, these are the recommended tools. Information and
procedures contained within this help document or plug-in are documented to use
either the Eclipse 3.0.1 SDK or WebSphere Studio. If you choose to use other tools,
you will need to adapt the procedures as required.
Table 1.
Task Recommended Tool(s)
Create or Implement Extension Points PDE
Create Help plug-ins PDE
Create Installation Artifacts PDE
Introduction 7

Table 1. (continued)
Task Recommended Tool(s)
Create bundles (plug-ins with only
MANIFEST.MF files), for business logic
WSDD or PDE
Create Web Applications WebSphere Studio
Connect and use Web Services WSDD
Create Applications that consist of Web
Applications, Bundles for business logic,
Extension Point implementations
PDE and WebSphere Studio
Applications
Considerations
WCTME Enterprise Offering (EO) applications are designed in much the same way
as standard enterprise applications. However, the EO platform in which these
applications will execute has different capabilities than one might expect of
applications running on a single node in an enterprise system. The following are
considerations unique to applications enabled by WCTME. This is not necessarily
an exhaustive list, and comprehensive of all possible decision points, but it
provides some items that may need to be considered when developing client
applications.
Topology
The EO components are intended to enable the construction of distributed
applications. Each node (device) in the application can have unique characteristics.
These characteristics include display resolution and input capabilities, available
resources (processor speed, available memory, limited/removable storage), and
network capabilities (always, occasionally, or rarely connected, reliable or
unreliable connections, transfer rates, cost of the connections, etc.).
As an example, consider the typical web page. While suitable for an 800 x 600
display, it may not be suitable for a 320 x 200 display. Keyboards may be
acceptable input devices on laptops or desktops, but pointing devices or voice
capabilities may be better suited for devices with tiny, or pointing device activated
keyboards. Large image download may be acceptable for Wi-Fi or fixed LAN
connectivity over broadband devices since it is generally a reliable connection with
a monthly flat pricing model, but if one is paying per byte over a cell phone
modem, it may be very costly and time consuming to make that transfer.
Business logic
When building distributed applications, one must consider where business logic is
distributed. If always connected over a reliable network, a browser accessing a web
application may be sufficient. However, if the user may not always be able to
connect to the server, whether traveling via airplane, or in areas without acceptable
wireless coverage, being able to locate business logic on the client is crucial. The
amount of business logic that is distributed must be sufficient to perform all the
work that is required, but needs to be balanced with the requirements of how often
it must be updated.
Applications may provide multiple levels of capability, reserving some capability
for when a reliable connection exists, and disabling that capability if the server is
unavailable.
8 Workplace Client Technology, Micro Edition: WCTME Enterprise Offering Application Developer’s Guide

Persistence
Most applications manipulate data. This can take the form of read-only access of
databases to retrieve catalog items, or of database updates for creation of orders
that need to be processed. Data can take the form of files distributed on disk, or
relational database capability. When dealing with databases, one can choose to use
databases only as a local data repository, or as a repository that actively
synchronizes with another node in the topology. In either case, if data needs to be
distributed to a database, considerations of how much data needs to be distributed
and when (once only at initialization, one way from one node to another only on
an infrequent basis, frequent exchange between nodes), need to be balanced with
storage capabilities at each node in question, and the networking requirements that
would permit the exchange to take place. In addition, if synchronization is used,
applications should consider database organization, filtering, and conflict
resolution policies. Synchronization is useful for exchanging the current state of
data between nodes, where transaction boundaries or the order of state changes are
not important.
Messaging
Messaging can take various forms, whether a plain socket-based application, web
services, or a more sophisticated store and forward capability that allows for
connected as well as disconnected usage. Messaging provides a convenient
mechanism for defining, or identifying, transaction boundaries when performing
such actions as creating or updating orders, particularly if the transaction requires
updates across multiple resources.
Note: Certain nodes in the end-to-end system may not be able to manage or
commit transactions since they may not have transaction coordination, and
they do not have the master copy of all of the data.
Management
Management covers a wide range of activities, from initial device provisioning, to
application management. When considering management, one must also consider
network capabilities, and whether one should download a full new copy of the
application, or whether the application has been componentized sufficiently to only
distribute a few components. Also important for consideration is how data present
on any given node is affected -- if one updates the application, will it continue to
process existing data, does one need to update data formats, or database schemas
to conform to the new application level.
Serviceability
Distributed applications pose additional issues of serviceability as compared to
applications running on a single node. Logging and problem resolution may be
difficult if the application is running on one node, and a node only occasionally
connects to a central logging repository. How does one transfer logging
information from the node in question to the node hosting the central logging
repository, to track user usage, or help in problem resolution?
Interaction
When constructing an application, one needs to decide what type of user interface,
if any, will be used. Is there an existing web application that needs to be
duplicated on another node because of connectivity? If so, then moving the same
web-based application to that node can reduce training and maintenance costs.
Other considerations that may affect user interface are the device characteristics,
many of which were discussed in the section on Topology.
Introduction 9
Design
The EO workbench provides an Application Selection Action that opens a
particular perspective. Each application is presented individually in its own
perspective on the workbench.
There are two application user interface patterns that are recommended for use in
the EO platform. The first pattern is the browser user interface pattern. Web
applications present their user interface through the use of generated scripting
language such as HTML, which is rendered for display via use of the browser.
Each web application is selectable as a perspective in the Application Selection
Action, and will open to a unique perspective for each application.
The second pattern is to build user interfaces using graphical user interface APIs,
to aggregate display components into views, and views into perspectives.
Applications will be defined using extension points to define the actions, views,
and perspectives that provide the user interface.
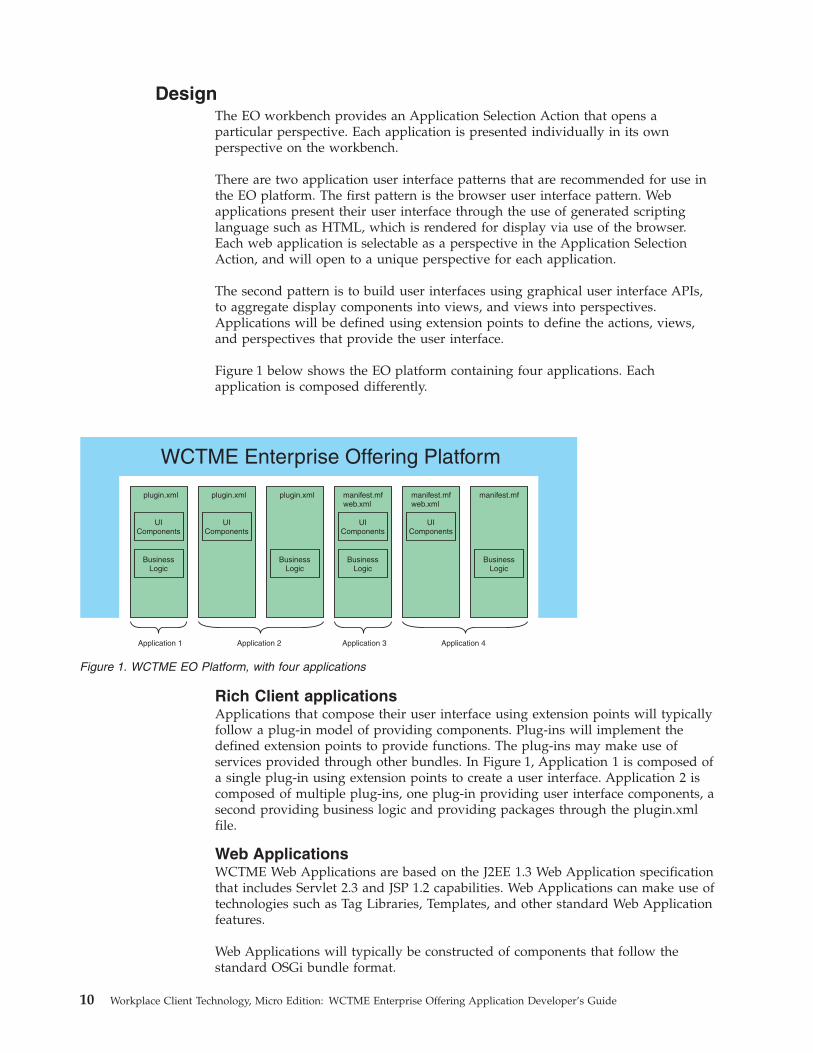
Figure 1 below shows the EO platform containing four applications. Each
application is composed differently.
Rich Client applications
Applications that compose their user interface using extension points will typically
follow a plug-in model of providing components. Plug-ins will implement the
defined extension points to provide functions. The plug-ins may make use of
services provided through other bundles. In Figure 1, Application 1 is composed of
a single plug-in using extension points to create a user interface. Application 2 is
composed of multiple plug-ins, one plug-in providing user interface components, a
second providing business logic and providing packages through the plugin.xml
file.
Web Applications
WCTME Web Applications are based on the J2EE 1.3 Web Application specification
that includes Servlet 2.3 and JSP 1.2 capabilities. Web Applications can make use of
technologies such as Tag Libraries, Templates, and other standard Web Application
features.
Web Applications will typically be constructed of components that follow the
standard OSGi bundle format.
WCTME Enterprise Offering Platform
plugin.xml manifest.mfmanifest.mfweb.xml
UIComponents
UIComponents
UIComponents
BusinessLogic
BusinessLogic
Application 1
plugin.xmlplugin.xml manifest.mfweb.xml
UIComponents
BusinessLogic
BusinessLogic
Application 2 Application 3 Application 4
Figure 1. WCTME EO Platform, with four applications
10 Workplace Client Technology, Micro Edition: WCTME Enterprise Offering Application Developer’s Guide
In Figure 1 on page 10 above, Application 3 is a web application contained in a
single bundle (with only the MANIFEST.MF file), while Application 4 separates the
business logic and user interface components into two bundles (containing only
MANIFEST.MF files).
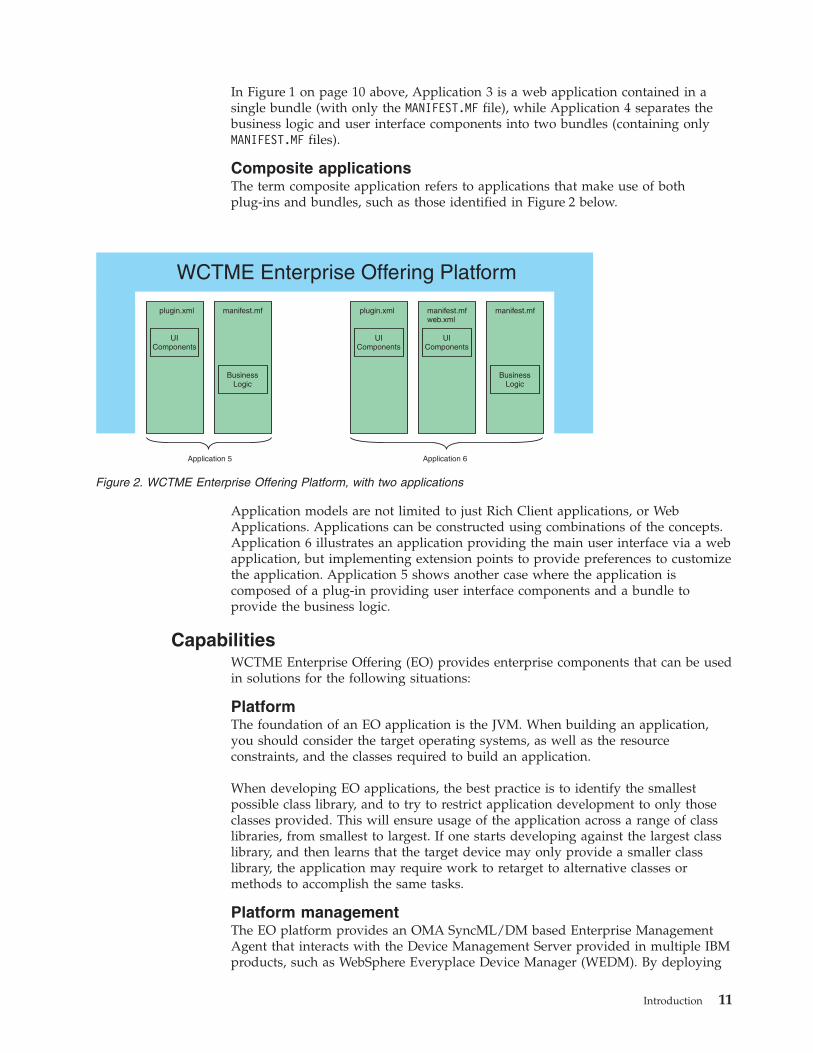
Composite applications
The term composite application refers to applications that make use of both
plug-ins and bundles, such as those identified in Figure 2 below.
Application models are not limited to just Rich Client applications, or Web
Applications. Applications can be constructed using combinations of the concepts.
Application 6 illustrates an application providing the main user interface via a web
application, but implementing extension points to provide preferences to customize
the application. Application 5 shows another case where the application is
composed of a plug-in providing user interface components and a bundle to
provide the business logic.
Capabilities
WCTME Enterprise Offering (EO) provides enterprise components that can be used
in solutions for the following situations:
Platform
The foundation of an EO application is the JVM. When building an application,
you should consider the target operating systems, as well as the resource
constraints, and the classes required to build an application.
When developing EO applications, the best practice is to identify the smallest
possible class library, and to try to restrict application development to only those
classes provided. This will ensure usage of the application across a range of class
libraries, from smallest to largest. If one starts developing against the largest class
library, and then learns that the target device may only provide a smaller class
library, the application may require work to retarget to alternative classes or
methods to accomplish the same tasks.
Platform management
The EO platform provides an OMA SyncML/DM based Enterprise Management
Agent that interacts with the Device Management Server provided in multiple IBM
products, such as WebSphere Everyplace Device Manager (WEDM). By deploying
WCTME Enterprise Offering Platform
plugin.xml manifest.mf manifest.mfmanifest.mfweb.xml
plugin.xml
UIComponents
UIComponents
UIComponents
BusinessLogic
BusinessLogic
Application 5 Application 6
Figure 2. WCTME Enterprise Offering Platform, with two applications
Introduction 11
the agent built into the platform, the agent can check for jobs to execute, such as
inventory control, configuration, software distribution, and others. The agent
provides the base capabilities, but it also provides service interfaces that permit
application developers to interact with the agent to initiate jobs.
Data
The EO platform provides DB2 Everyplace, a relational database accessible via
JDBC interfaces. DB2 Everyplace is an extremely small footprint relational
database. It is especially suitable for embedded devices, where large databases and
sophisticated queries are not normally required, but can also be used on larger
devices. DB2 Everyplace provides transaction support covering updates to multiple
tables within a single transaction, encrypted tables, and zero client administration.
Databases can be created by code running on the node in question, or the initial
database schemas can be distributed along with applications from some other
node. Both databases can be used in a read-only mode, so that databases
distributed upon read-only media can be used as well. Another option for database
creation, and for continual update, is to use database synchronization facilities.
DB2 Everyplace is capable of synchronizing with the DB2 Everyplace Sync Server,
using IBM’s ISync technology provided with the EO platform. The initial
synchronization activity will create the local database schema, as well as populate
the initial set of data. As data is updated on the node, synchronization will transfer
that data to other nodes as configured to receive it. Updates made to the data on
the remote nodes will be synchronized back to the local node. Database
administrators set up the necessary subscriptions for synchronization, and can set
up filtering of data to limit the amount of data distributed between nodes.
Database synchronization is based on row-level updates synchronized to and from
the remote nodes. Database synchronization captures only the current state of data
and synchronizes that data between nodes. If intermediate data updates or data
ordering is required, application developers may need to develop their own history
model, or use other technologies such as messaging to capture intermediate data.
The EO platform also includes an implementation of the OMA SyncML/DM and
/DS protocols as part of the SyncML4J bundle. This library provides the core
SyncML protocol, allowing application developers to create sync adapters on both
local and remote nodes to synchronize data objects between them.
Messaging
The EO platform provides support for the Java Message Service (JMS). MQ
Everyplace is the messaging provider for JMS, and includes support for
point-to-point messaging. MQ Everyplace is suitable for small devices, and can
provide the assured, once-only delivery capabilities consistent with the WebSphere
MQ family. MQ Everyplace operates in many topologies, from peer-to-peer, to
client to server via the MQ Everyplace gateway technology. MQ Everyplace
supports features such as synchronous and asynchronous messaging, encryption,
Internet tunneling, connection aware policies to support low-bandwidth and fragile
networking. JMS usage of MQ Everyplace will need to be bootstrapped using the
supplied connection factory, but from then on, full JMS APIs can be used. MQ
Everyplace APIs can also be used directly (without JMS).
Messaging is useful for transactional updates, or where intermediate data updates
or data ordering is required. Messages containing the complete update can be sent
to a server, where transaction managers can coordinate the update of multiple
resources. Messaging can be paired with synchronization technology, such that
transactions are sent via messages, and the resulting database updates distributed
12 Workplace Client Technology, Micro Edition: WCTME Enterprise Offering Application Developer’s Guide

back to the client via synchronization. Messaging can also be used effectively in a
disconnected environment, setting up a local queue manager to contain messages
until a connection to the server infrastructure is available.
Web Services provides an alternative request-response messaging in a fully
connected environment. The web services implementation provides for both client
connectivity to server hosted web services and the hosting of local web services.
The implementation is based on the Web Services for J2ME specifications, and
provides support for document literal encoded streams exchanging well-typed data
objects. In addition, the Web Services implementation provides a web services
hosting environment. Application developers can develop an OSGi service, and
during registration of the service, indicate that it should also be available as a web
service.
Next steps
For any application that you will create, you will need to build, debug, and run
the application. Depending upon the style of application, and the components that
are required, the tools, components and steps used to construct the applications
will differ. Consider the following scenarios:
Will your application implement Extension Points (Perspectives, Views, etc.)?
Read and follow the instructions in “Setting up the Eclipse SDK” on page 19.
Will you be constructing Help plug-ins for your application?
v Read and follow the instructions in “Setting up the Eclipse SDK” on page 19
v Read and follow instructions in “Creating help for the application” on page 26
Will you be building installation packages?
v Read and follow the instructions in “Setting up the Eclipse SDK” on page 19
v Read and follow instructions in “Creating installation packages” on page 41
Will your application use bundles (plug-ins with only MANIFEST.MF files), for
business logic, or web applications?
Read and follow the instructions in “Setting up WebSphere Studio” on page 15.
Will your application connect and use Web Services (even if you don’t intend on
using bundles)?
Read and follow the instructions in “Setting up WebSphere Studio” on page 15.
For more information
Additional information on tools, applications, and standards is available at these
locations:
v www.eclipse.org
v www.osgi.org
v www.ibm.com/pvc
Introduction 13

14 Workplace Client Technology, Micro Edition: WCTME Enterprise Offering Application Developer’s Guide

Setting up WebSphere Studio
This chapter describes how to set up WebSphere Studio, within the following two
scenarios:
If you will be developing Web Applications for WCTME, refer to...
v “Installing WebSphere Studio Site Developer or WebSphere Studio Application
Developer”
v “Installing WebSphere Studio Device Developer” on page 16
v “Installing WebSphere Studio Device Developer Optional Features” on page 16
v “Installing WebSphere Studio Site or Application Developer Optional Features”
on page 16
v “Installing Additional Development Tools for WebSphere Studio” on page 17
If you will you be developing only business logic or service bundles, or need to
use the Mobile Web Services Client wizards, refer to...
v “Installing WebSphere Studio Device Developer” on page 16
v “Installing WebSphere Studio Device Developer Optional Features” on page 16
v “Installing Additional Development Tools for WebSphere Studio” on page 17
Installing WebSphere Studio Site Developer or WebSphere Studio
Application Developer
WebSphere Studio Site Developer and WebSphere Studio Application Developer
provide an integrated development environment for building and maintaining
dynamic Web applications, Web services and Java applications. The web
application development component of Site Developer and Application Developer
is a core component of the WCTME embedded web application tooling,
Application Tools for Extension Services which is provided with WCTME 5.7. This
feature provides tooling which targets standard J2EE web applications to the
WCTME Enterprise Offering (EO) platform.
Either of these tools can be used to develop embedded web applications for the EO
platform. To find out more about these tools, or to purchase them, visit
www.ibm.com/websphere, then follow the links for Products to find WebSphere
Studio.
Once you have obtained a copy of WebSphere Studio Site or Application
Developer, please follow the standard installation steps for either of these products.
Notes:
1. The WCTME embedded web application tooling also requires several
features from WebSphere Studio Device Developer making this a
required product install as well, please see the section on Installing
WebSphere Studio Device Developer for more information.
2. The installation directory must not contain double byte or other special
characters (e.g. ’$’).
© Copyright IBM Corp. 2004 15

Installing WebSphere Studio Device Developer
The WebSphere Studio Device Developer (WSDD) component of IBM Workplace
Client Technology, Micro Edition (WCTME) 5.7 provides an integrated
development environment that helps developers build, test, and deploy J2ME
applications that run on server-managed clients and other pervasive devices. The
Web Services for Extension Services feature, an optional feature of WSDD, enables
Web Services for J2ME development for the WCTME Enterprise Offering platform.
To find out more about WCTME 5.7 and WSDD, including purchasing information,
visit www.ibm.com/embedded.
Once you have obtained a copy of WCTME 5.7, please follow the standard
installation instructions provided to install WSDD.
Note: The installation directory must not contain double byte or other special
characters (e.g. ’$’).
If you have previously installed WebSphere Studio Site or Application Developer,
when prompted as to whether to link, or plug, WebSphere Studio Device
Developer into either Site or Application Developer, select Yes.
Installing WebSphere Studio Device Developer Optional Features
Perform the following procedure to install WebSphere Studio Device Developer
Optional Features:
1. Start WebSphere Studio Device Developer
2. If the Install/Update perspective does not show on the left bar, select Help >
Software Updates > Update Manager.
In order to install the WSDD Optional Features listed below you will be using
the feature updates panel in the bottom left hand corned of the Update
perspective. With the WCTME 5.7.1 CD inserted you will go to My Computer
> Compact Disk > toolkit > Extension Services for WebSphere Everyplace.
3. In the Feature Updates view, install the following feature from the My
Computer > Compact Disk > toolkit > Extension Services for WebSphere
Everyplace site:
SMF Bundle Developer Kit 5.7.1
4. In the Feature Updates view, install the following feature from the My
Computer > Compact Disk > toolkit > Extension Services for WebSphere
Everyplace site:
Extension Services 5.7.1
5. Close WebSphere Studio Device Developer.
Installing WebSphere Studio Site or Application Developer Optional
Features
Perform the following procedure to install WebSphere Studio Site or Application
Developer Optional Features:
1. Start WebSphere Studio. Upon opening WebSphere Studio, you should be
prompted that you have updates available. Select the updates that are
presented and then confirm to restart WebSphere Studio.
2. Go to the Update Manager perspective in WebSphere Studio.
16 Workplace Client Technology, Micro Edition: WCTME Enterprise Offering Application Developer’s Guide

3. In the Feature Updates view, install the following feature from the My
Computer > Compact Disk > toolkit > Extension Services for WebSphere
Everyplace site:
Application Tools for Extension Services 5.7.1
4. Once all the Application Tools for Extension Services feature has been installed
and WebSphere Studio is restarted, launch the Install/Update perspective.
5. In the Feature Updates view, install the following feature from the My
Computer > Compact Disk > toolkit > Extension Services for WebSphere
Everyplace site:
Extension Services Samples 5.7.1
6. Once all the features have been installed and WebSphere Studio is restarted,
launch the Install/Update perspective again.
Installing Additional Development Tools for WebSphere Studio
An Update Site provided in the installation package contains an additional feature
for use with WebSphere Studio. The additional feature provides this document as a
Help plug-in, and provides an additional Platform Profile for use with Extension
Services Bundle and Web Application projects.
To install this additional feature, follow these steps:
1. Start WebSphere Studio.
2. Select Help > Software Updates > Update Manager.
3. In the Feature Updates view, expand My Computer to locate the installation
media.
4. Expand the updates directory.
5. Expand the developer site.
6. Expand Application Development Tools.
7. Select WebSphere Studio Tools 5.8.1.
8. In the Preview view, select Install Now to begin installation of the feature.
9. Select Next.
10. After carefully reading the license, if you accept the license, select I accept the
terms in the license agreements, then click Next.
11. Select Finish.
Setting up WebSphere Studio 17

18 Workplace Client Technology, Micro Edition: WCTME Enterprise Offering Application Developer’s Guide
Setting up the Eclipse SDK
This chapter describes how to set up Eclipse and WCTME Enterprise Offering (EO)
features.
If you do not have the Eclipse 3.0.1 SDK installed
You will need to install the Eclipse 3.0.1 SDK. This will enable you to develop
plug-ins using the Plug-in Development Environment (PDE) provided with the
SDK.
Note: The installation directory must not contain double byte or other special
characters (e.g. ’$’).
1. Install the EO platform following the instructions in the WCTME Enterprise
Offering User’s Guide. This installation includes the JVM that you will require
to run the PDE.
2. Download the Eclipse 3.0.1 SDK:
a. Go to www.eclipse.org.
b. Select downloads from the navigation bar.
c. Select the Main Eclipse Download Site for North America, or one of the
other Eclipse mirror sites.
d. Select the 3.0 release.
e. Locate your target platform (Windows or Linux), and select HTTP or FTP
to begin your download.
f. Unzip the Eclipse SDK into an appropriate location on your hard drive. 3. Create a Command Prompt or Terminal Window.
4. Change to the directory in which you unzipped the Eclipse SDK.
5. Launch the Eclipse SDK using the command:
eclipse -vm WCTME_EO_RUNTIME\eclipse\jre\bin\java.exe -vmargs -Xj9
6. Once the Eclipse SDK starts, you will need to finish setting up the JRE for use.
Select Windows > Preferences, then expand Java.
7. Select Installed JREs.
8. Select the one defined JRE, and then select Edit...
9. Add -Xj9 in the Default VM Arguments field, then click OK.
10. You may now begin using your Eclipse SDK.
If you already have Eclipse 3.0.1 SDK installed
If you have already installed the latest Eclipse 3.0.1 SDK, you do not need to install
another copy. For each Eclipse workspace that you will use to build plug-ins for
the EO platform, you do need to set up an Installed JRE. The IBM JDK 1.4.2 with
J9 technology provided with the WCTME Enterprise Offering is required for
application development.
Note: The installation directory must not contain double byte or other special
characters (e.g. ’$’).
1. Start Eclipse.
2. Click Window > Preferences, then expand Java.
© Copyright IBM Corp. 2004 19

3. Select Installed JREs.
4. Select Add to create another JRE.
5. Select Standard VM as the JRE Type.
6. Enter a JRE name to identify the JRE. This name will show up in other
dialogs, such as the Launch Configuration Dialogs. IBM JDK 1.4.2 with J9
technology was used in the example above.
7. Enter the JRE Location. This will be the WCTME_EO_RUNTIME\eclipse\
8. Enter -Xj9 in Default VM Arguments.
9. Click OK.
10. From the Installed Java Runtime Environments page, make sure that the JRE
that you just created has a check mark next to it to designate the default,
workspace JRE.
11. Click OK.
Installing Additional Development Tools for Eclipse 3.0.1 SDK
An Update Site provided in the Enterprise Offering installation package contains
an additional feature for use with the Eclipse 3.0.1 SDK. The additional feature
provides this document as a Help plug-in, and provides source for the Order Entry
sample application.
To install this additional feature, follow these steps:
1. Start the Eclipse 3.0.1 SDK.
2. Select Help > Software Updates > Find and Install...
3. Select Search for new features to install, then click Next.
4. Select New Local Site...
20 Workplace Client Technology, Micro Edition: WCTME Enterprise Offering Application Developer’s Guide

5. Browse to your installation media or unzip directory, then locate and select the
updates/developer directory, then click OK.
6. Put a check mark next to the site that you just created, then click Next.
7. Select Eclipse 3.0 SDK Tools, then Next.
8. After carefully reading the license, if you accept the license, select I accept the
terms in the license agreements, then click Next.
9. Select Finish.
Setting up the target workspace
The PDE enables you to develop plug-ins for the EO platform. To enable the
plug-ins provided with the EO platform to be used in the PDE, you will need to
re-target your workspace to use the EO platform. Because of this requirement, it is
recommended that you create a new workspace for use in developing plug-ins for
the EO platform.
You can create a new workspace by specifying another directory location in the
Workspace Launcher pop-up displayed when Eclipse starts. If this pop-up no
longer appears and you are immediately taken to an existing workspace, start the
Eclipse 3.0.1 SDK platform, and then go to Windows > Preferences, expand
Workbench and select Startup and Shutdown. Check the Prompt for workspace
on startup option. Stop Eclipse and restart to select a different workspace.
Once you have opened your intended workspace, go to Windows > Preferences,
expand Plug-in Development, then select Target Platform. In the Location field,
enter or Browse to the WCTME_EO_RUNTIME/eclipse directory.
Setting up the Eclipse SDK 21

Note: After installing any new applications or plug-ins into the EO platform, you
should return to this location, and select the Reload option to refresh the list
of plug-ins and fragments that are available in your target workspace.
22 Workplace Client Technology, Micro Edition: WCTME Enterprise Offering Application Developer’s Guide
Developing WCTME Enterprise Offering applications
Creating plug-ins
Depending upon the type of plug-in that you are intending to create, WebSphere
Studio or the Eclipse PDE may be the preferred development environment.
Creating a plug-in project
The Eclipse PDE is the recommended development environment for creating
plug-ins that will extend or implement extension points. To create a project, launch
the Eclipse 3.0.1 SDK, then select File > New > Project, then select Plug-in Project.
Follow the wizards to finish creating the project.
When creating a standard plug-in project, there will typically be a class that
extends the Plugin class. This class has start() and stop() methods that provide
access to the BundleContext parameter. This permits plug-ins access to the Bundle
Environment such that they can then access services defined at the OSGi service
layer.
To make use of the available EO platform capabilities such as relational databases,
or messaging, you will need to add the plug-ins that provide these capabilities as
required plug-ins. Open the plugin.xml file, and select the Dependencies tab.
Select the Add... button next to the Required plug-ins list. Select the plug-ins that
you require. The plug-ins selected here will be added to the build path for your
project.
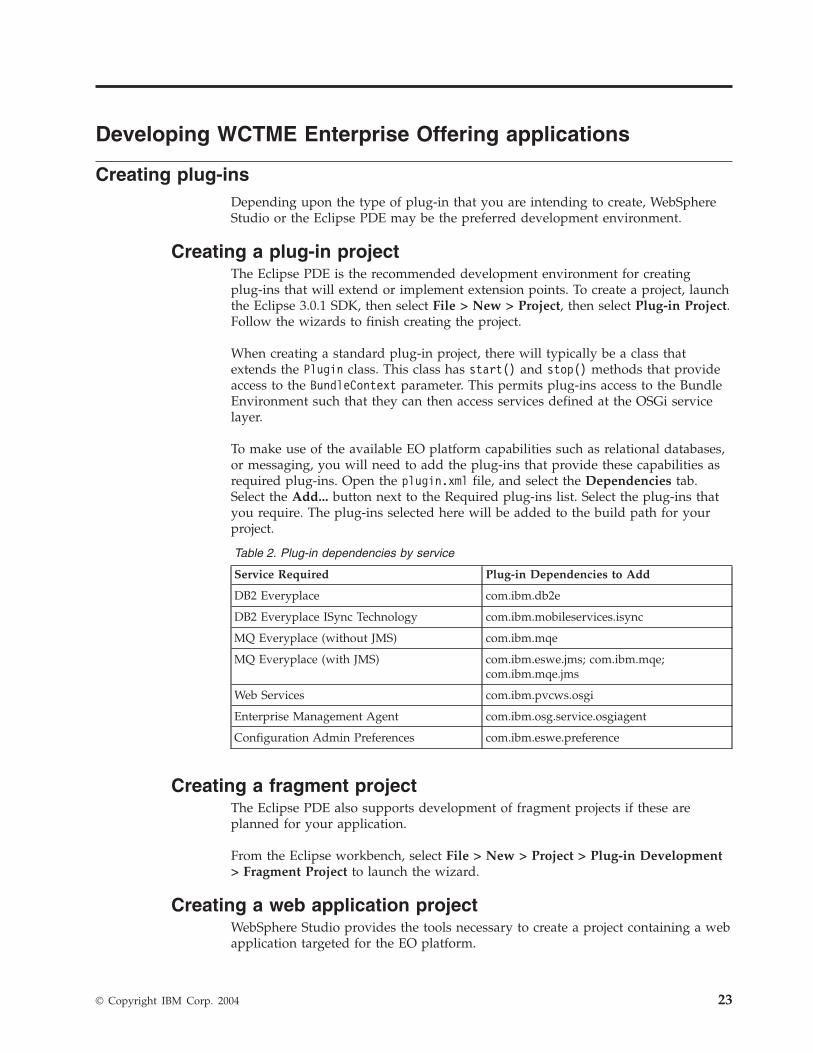
Table 2. Plug-in dependencies by service
Service Required Plug-in Dependencies to Add
DB2 Everyplace com.ibm.db2e
DB2 Everyplace ISync Technology com.ibm.mobileservices.isync
MQ Everyplace (without JMS) com.ibm.mqe
MQ Everyplace (with JMS) com.ibm.eswe.jms; com.ibm.mqe;
com.ibm.mqe.jms
Web Services com.ibm.pvcws.osgi
Enterprise Management Agent com.ibm.osg.service.osgiagent
Configuration Admin Preferences com.ibm.eswe.preference
Creating a fragment project
The Eclipse PDE also supports development of fragment projects if these are
planned for your application.
From the Eclipse workbench, select File > New > Project > Plug-in Development
> Fragment Project to launch the wizard.
Creating a web application project
WebSphere Studio provides the tools necessary to create a project containing a web
application targeted for the EO platform.
© Copyright IBM Corp. 2004 23

You can create a web application project for the EO platform in two ways:
v Creating a new Extension Services Web project
v Converting an existing WebSphere Web Application project into an Extension
Services Web project
Both of these actions are accessed by selecting File > New > Other > Extension
Services, and selecting the appropriate wizard inside of WebSphere Studio.
When creating or converting the project, you will be prompted to select a platform
profile. The platform profile helps to define the classpath used by the project and
to manage the contents of the MANIFEST.MF file.
When creating applications targeted at the EO platform, select the platform profile
named Enterprise Offering. This platform profile defines the core set of services
available in the EO platform. Select the set of application services that you require.
If you later need to add additional services to your project, select the project, right
click, select Properties. Select the Extension Services item in the displayed
properties dialog. You can now add or remove services from this project.
Bundles in the EO platform are uniquely identified with a combination of the
Bundle-SymbolicName and Bundle-Version attributes present in the MANIFEST.MF file.
After creating the Web Application project, edit the Extension Services
Content/META-INF/MANIFEST.MF file, in the following way:
1. Expand the User Defined Manifest Items, and click the Add... button to add a
new attribute.
2. Enter Bundle-SymbolicName in the left entry field.
3. Add a unique identifier as the value for the attribute.
The Java package naming convention, using the reverse of the internet address,
is the recommended naming convention. For example, if your internet address
is ibm.com, your packages should start with com.ibm.
4. Enter a value for the Bundle-Version.
5. Save the file.
Creating a bundle (plug-in) project
To create a project that contains Java code, but will run within the EO platform,
use the Extension Services Bundle project.
You can create an Extension Services Bundle project in two ways:
v Creating a new Extension Services Bundle project
v Converting an existing Java project into an Extension Services Bundle project
Both of these actions are accessed by selecting File > New > Other > Extension
Services, and selecting the appropriate wizard.
When creating or converting the project, you will be prompted to select a platform
profile. The platform profile helps to define the classpath used by the project and
to manage the contents of the MANIFEST.MF file.
When creating applications targeted at the EO platform, select the platform profile
named Enterprise Offering. This platform profile defines the core set of services
available in the EO platform. Select the set of application services that you require.
If you later need to add additional services to your project, select the project, right
24 Workplace Client Technology, Micro Edition: WCTME Enterprise Offering Application Developer’s Guide
click, select Properties. Select the Extension Services item in the displayed
properties dialog. You can now add or remove services from this project.
Bundles in the EO platform are uniquely identified with a combination of the
Bundle-SymbolicName and Bundle-Version attributes present in the MANIFEST.MF file.
After creating the Extension Services bundle project, edit the Extension Services
Content/META-INF/MANIFEST.MF file:
1. Expand the User Defined Manifest Items, and click the Add... button to add a
new attribute.
2. Enter Bundle-SymbolicName in the left entry field.
3. Add a unique identifier as the value for the attribute.
The Java package naming conventions, using the reverse of the internet
address, is the recommended naming convention. For example, if your internet
address is ibm.com, your packages should start with com.ibm.
4. Enter a value for the Bundle-Version.
5. Save the file.
Using Web Services
The Web Services support provided with the EO platform is based upon the Web
Services for J2ME specification. This support provides for document literal encoded
Web Services using strongly typed objects. Use of this web services support
requires that stubs and the associated complex type classes be generated using the
Mobile Web Services Client wizards provided within WebSphere Studio.
You must use WebSphere Studio to execute the wizards, and you can continue to
use WebSphere Studio to more fully develop the code, or you can copy the
generated code to another project managed within the Eclipse PDE.
If you do not already have a project existing in WebSphere Studio, then create a
project within WebSphere Studio:
1. Launch WebSphere Studio, select File > New > Project, then Extension
Services > Extension Services Bundle Project or Extension Services Web
project.
2. Enter a project name, then click Next.
3. Select the Enterprise Offering platform profile, and select the Web Services
using Proxy Services service, then Next.
4. Add a new source folder (such as src) to the project, then select Finish.
Answer yes to the displayed popup.
5. Select Finish.
If you already have an Extension Services Bundle project or an Extension Services
Web project within WebSphere Studio, then you do not need to create a new
project. Select the project, right click, and select Properties. Select the Extension
Services tab, then select the Web Services using Proxy Services service from the
Application Services list.
In order to execute the Mobile Web Services Client wizards, you will need to have
the WSDL for the Web Service that you intend to use.
Select File > New > Other > Mobile Web Services Client > Mobile Web Services
Client, then Next. Enter, or select, the destination folder for the generated classes.
Enter the WSDL location for your web service, then select Next.
Developing WCTME Enterprise Offering applications 25

Several classes will be generated as the wizard executes. You can continue using
WebSphere Studio for this project as you would any other project. If you are using
Eclipse PDE as your primary development environment, you will need to import
the generated classes into your Eclipse plug-in project. Within Eclipse, you can use
the Import > Import from File System wizard to select the Java source files from
the Extension Services project. You will also need to add the Web Services plug-in
as a required plug-in for your Eclipse plug-in project.
If you are using the PDE and you intend to use dynamic web services stubs from a
plug-in, you will need to add a MANIFEST.MF to your project. Edit the MANIFEST.MF
and add an Export-Package attribute to export the package(s) containing the web
services interface class and data object class(es).
Creating help for the application
If you are creating a set of Help information for your application, and you intend
on using the built-in WCTME Enterprise Offering (EO) help plug-ins, you should
use the Eclipse PDE to create a help plug-in. The Help Plug-in provides for XML
configuration of the Table of Contents, and content specified as HTML.
For more information on creating a help plug-in, refer to the section Plug-in Help
in the Platform Plug-in Developer’s Guide located in the Eclipse Help system.
Creating preference pages
The references to Preferences in this section cover a wide range of information,
from user choices on how to display information, to configuration options needed
to connect to enterprises. The EO platform framework provides built-in capabilities
to help manage preferences. You may choose to use one or both of these options,
or to construct your own mechanisms.
Preference options
Eclipse preferences
The Eclipse framework provides an extensible preference store that permits
preference information to be stored at various levels. Preference information is
stored as key value pairs. Preference pages are generally provided to set or update
the preference information stored within the system. Information stored within the
Eclipse preference framework will usually be related to display or operating
characteristics that the user may change to suit his choices. Eclipse-based
preferences are not connected to the enterprise management system.
Refer to the Platform Plug-in Developer’s Guide for more information on using
Eclipse preferences.
Configuration Admin
The OSGi core framework also provides a configuration management capability
known as Configuration Admin. Configuration Admin provides capabilities to
store preference or configuration information based on key value pairs.
Applications that use Configuration Admin to store information will need to
implement the ManagedService interface. By implementing this interface, the
application will be notified when configuration information changes.
Applications that use Configuration Admin to store configuration and preference
information can also use the Metatype service to provide a metadata description of
26 Workplace Client Technology, Micro Edition: WCTME Enterprise Offering Application Developer’s Guide

the information. The metadata can describe the parameter types, default values,
and validation logic to be applied for each parameter.
If Configuration Admin is used to store configuration information, system
administrators can query and update configuration values via the Enterprise
Management Agent.
Configuration information stored using Configuration Admin is common to all
instances (workspaces) of the Enterprise Offering platform using the same
installation directory (this is equivalent to the Eclipse ConfigurationScope
preferences). Since Configuration Admin values are common to all instances, it is
not recommended that user-specific configuration information be stored using
Configuration Admin. Applications requiring persistence of user specific
configuration information and preferences should use the Eclipse preferences
model. Configuration information stored using Configuration Admin can not be
imported or exported using the Import... or Export... buttons on the Manage >
Preferences dialog.
If configuration information is stored using Configuration Admin, preference pages
can be used to provide a user interface to view and modify preferences. The
Enterprise Offering platform provides classes to assist in using preference pages to
interact with Configuration Admin.
The com.ibm.eswe.preferences.ConfigAdminPreferencePage has subclassed the
org.eclipse.jface.preference.FieldEditorPreferencePage to provide preference
pages for configuration information stored within Configuration Admin. The
ConfigAdminPreferencePage creates a ConfigAdminPreferenceStore, that uses
Configuration Admin and Metatype services to obtain the required data to
automatically build the preference page.
To use the ConfigAdminPreferencePage, you will need to create your own subclass
of the ConfigAdminPreferencePage, and supply the Bundle and Persistent ID for
the properties that you intend to display. Within your subclass, you can also affect
the set of properties displayed, as well as add your own validation logic to the
page. You will also need to define a preference page via the standard Eclipse
extension point for preference pages, and supply the appropriate metadata files
(i.e. METADATA.XML, METADATA.properties) as described in the Service Management
Framework Runtime User’s Guide. The METADATA.XML and METADATA.properties
files are loaded as if they are classes on the classloader within the bundle. In
Eclipse PDE projects, they will need to be placed within the META-INF directory
located within a source directory in the plug-in project.
The ConfigAdminPreferencePage supports only scalar metatype definitions for
non-factory PIDs. Integer, String, and Boolean fields are handled by default. You
will need to provide implementations for FieldEditors for types such as Byte, Char,
Long, Float, Double, BigDecimal and BigInteger.
Refer to the Javadoc for the com.ibm.eswe.preference package for more
information.
Using logging and tracing
The WCTME Enterprise Offering provides two methods for logging and tracing
messages for developers - via the Eclipse provided logging interfaces, or the OSGi
LogService interface.
Developing WCTME Enterprise Offering applications 27

Eclipse logging
For plug-in developers the Eclipse logging and tracing mechanism consists of just a
few objects and methods. The following code provides a simple example of
logging from a plug-in:
import org.eclipse.core.runtime IStatus;
import org.eclipse.core.runtime Status;
import org.eclipse.core.runtime Platform
IStatus status= new Status (IStatus.ERROR,
"Test",
0,
"Testing Eclipse Error Logging",
(Throwable) null);
getDefault().getLog().log(status);
In order to send a message to the Eclipse logging system, a Status object must be
constructed and populated with all required data. Once the Status object is
instantiated it is then passed to the Eclipse logger via the log() method. The
handle to the Eclipse log is located via the getLog() method of the Plugin class
(the Plugin class is accessed via the getDefault() method here).
All messages logged via the Eclipse logging mechanism are stored in the
<workspace>/.metadata/.log file.
Note: If you are running your target platform out of the PDE, then the workspace
that is being used can be determined by reviewing the launch configuration
for the Run-time Workbench. On the first panel of the configuration screen
the location can be found on the Arguments tab, in the Workspace Data
section, in the Location field.
Eclipse tracing
Eclipse’s tracing mechanism is based on methods from the Platform class,
inDebugMode() and getDebugOption(String) and one tracing configuration file
called ″.options″ located in the plugin directory. Details on Eclipse tracing can be
found in the online help at Running with Tracing in the PDE Guide > Getting
Started > Basic Plug-in Tutorial > Running a plugin >Running with tracing.
Once the trace files have been setup appropriately for the plug-in and tracing has
been enabled via the workbench configuration screens, the following code shows
an example of how the tracing setup is used by the developer:
if ( Platform.inDebugMode() ) {
if ("true".equalsIgnoreCase (Platform.getDebugOption("T2")) {
IStatus status= new Status(IStatus.INFO,
"Test",
0,
"Testing Eclipse Error Logging",
(Throwable)null);
getDefault().getLog().log(status);
}
}
The above example begins by checking to see if debugging has been enabled for
this plug-in, if it has been enabled, then the example confirms that trace level ″T2″
is set to ″true″, if and only if these two checks are true will the Status object be
created and logged to the Eclipse logger.
While the above example illustrates the trace check and a log entry created to the
Eclipse logger, plug-in developers often use System.out or System.err to write out
28 Workplace Client Technology, Micro Edition: WCTME Enterprise Offering Application Developer’s Guide

trace information. The Eclipse log file is typically reserved for Error or Warning
conditions that occur during application execution.
OSGi logging
OSGi provides a service based interface for logging for OSGi applications. By
obtaining a LogService object from the Framework service registry, a bundle can
start logging messages to the Log Service object by calling on the LogService
methods. A Log Service object can log any message, but it is primarily intended for
reporting events and error conditions.
The following example demonstrates the use of a log method to write a message
into the log:
logService.log(LogService.LOG_INFO, "Test");
There are four levels of messages deferred by the OSGi LogService interface:
ERROR(1), WARNING(2), INFO(3) and DEBUG(4). The number in parenthesis is
the integer value for each of the levels.
For more detailed information on the OSGi LogService interface please refer to the
Platform Plugin Developer’s Guide > Reference > OSGi API Reference in
Eclipse 3.0 or Service Management Framework > Service Management
Framework Runtime User’s Guide in WebSphere Studio.
WCTME Enterprise Offering logging
In order to centralize the output of these two logging systems for the WCTME
Enterprise Offering, a LogRedirector has been provided for the OSGi LogService
that will relay all LogService Messages, of the appropriate level, to the eclipse
logger to be stored in the standard .log file in the current workspace/.metadata
directory. This allows users and developers to locate all log/debug or even trace
messages in one central log.
The default level for the LogRedirector is LOG_WARNING and lower (includes
LOG_ERROR) based on the constant values, so messages logged to the LogService as
LOG_INFO or LOG_DEBUG will not be relayed to the Eclipse logger. To modify the
default level of the LogRedirector set the system property:
com.ibm.eswe.workbench.LogRedirector.level=<level>
This can be specified in any way that a Java system property is specified, whether
programmatically through a System.setproperty call, by specifying as a system
property on startup, or by specifying in the eclipse\configuration\config.ini.
Replace<level> with an integer from 1-4 as listed above in the OSGi Logging
section. This value can also be updated within Configuration Admin. If a value has
been set using Configuration Admin, the Configuration Admin setting will take
precedence.
Enabling your plug-in for startup
Plug-ins in the Eclipse framework generally take on one of the following status:
v INSTALLED - The plug-in has been recognized, but either has not been
requested to start, or is incapable of starting because of missing pre-requisites
v RESOLVED - all of the pre-requisites exist and the plug-in is ready to start
v ACTIVE - The plug-in has been started and its capabilities are available to the
workbench.
Developing WCTME Enterprise Offering applications 29
The framework uses settings known as Start Levels to organize the startup of the
plug-ins. The framework exists at a specified level and the plug-ins are assigned to
start at a specific level. The framework begins at level 0 with no plug-ins started.
Next, the Framework will move to start level 1. All bundles assigned to start level
1 will then be started in some order. The framework will progress through each of
the levels until it reaches the designated framework start level.
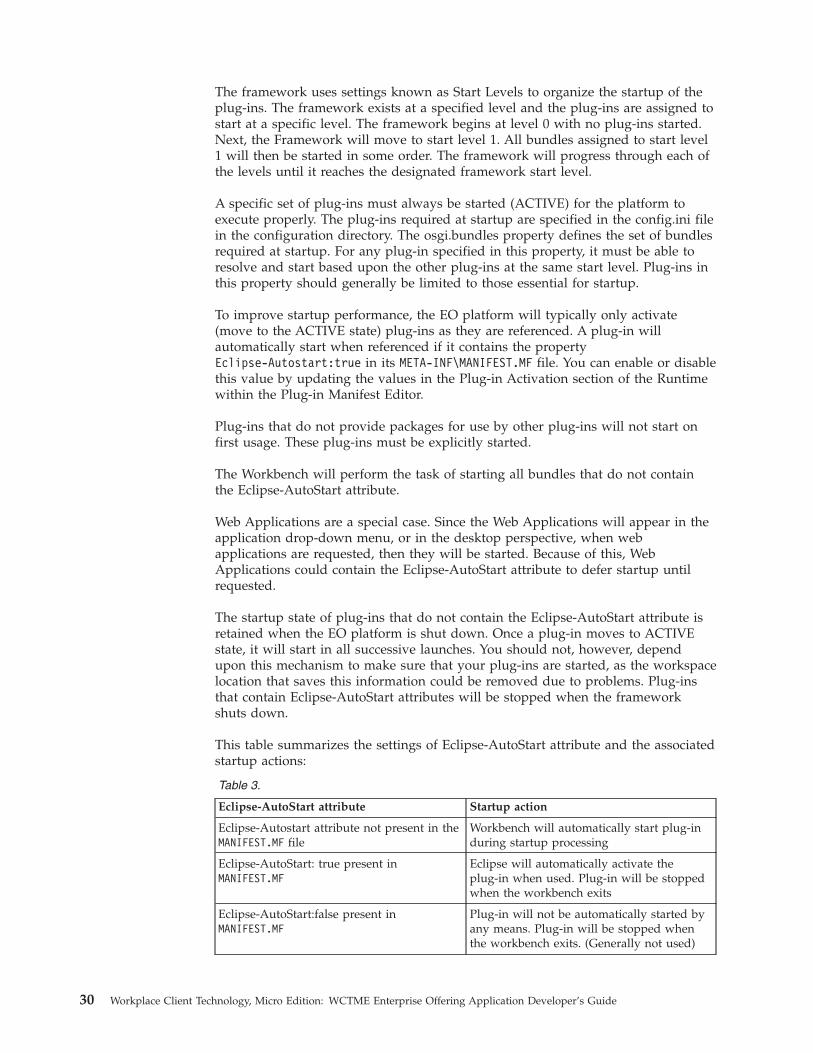
A specific set of plug-ins must always be started (ACTIVE) for the platform to
execute properly. The plug-ins required at startup are specified in the config.ini file
in the configuration directory. The osgi.bundles property defines the set of bundles
required at startup. For any plug-in specified in this property, it must be able to
resolve and start based upon the other plug-ins at the same start level. Plug-ins in
this property should generally be limited to those essential for startup.
To improve startup performance, the EO platform will typically only activate
(move to the ACTIVE state) plug-ins as they are referenced. A plug-in will
automatically start when referenced if it contains the property
Eclipse-Autostart:true in its META-INF\MANIFEST.MF file. You can enable or disable
this value by updating the values in the Plug-in Activation section of the Runtime
within the Plug-in Manifest Editor.
Plug-ins that do not provide packages for use by other plug-ins will not start on
first usage. These plug-ins must be explicitly started.
The Workbench will perform the task of starting all bundles that do not contain
the Eclipse-AutoStart attribute.
Web Applications are a special case. Since the Web Applications will appear in the
application drop-down menu, or in the desktop perspective, when web
applications are requested, then they will be started. Because of this, Web
Applications could contain the Eclipse-AutoStart attribute to defer startup until
requested.
The startup state of plug-ins that do not contain the Eclipse-AutoStart attribute is
retained when the EO platform is shut down. Once a plug-in moves to ACTIVE
state, it will start in all successive launches. You should not, however, depend
upon this mechanism to make sure that your plug-ins are started, as the workspace
location that saves this information could be removed due to problems. Plug-ins
that contain Eclipse-AutoStart attributes will be stopped when the framework
shuts down.
This table summarizes the settings of Eclipse-AutoStart attribute and the associated
startup actions:
Table 3.
Eclipse-AutoStart attribute Startup action
Eclipse-Autostart attribute not present in the
MANIFEST.MF file
Workbench will automatically start plug-in
during startup processing
Eclipse-AutoStart: true present in
MANIFEST.MF
Eclipse will automatically activate the
plug-in when used. Plug-in will be stopped
when the workbench exits
Eclipse-AutoStart:false present in
MANIFEST.MF
Plug-in will not be automatically started by
any means. Plug-in will be stopped when
the workbench exits. (Generally not used)
30 Workplace Client Technology, Micro Edition: WCTME Enterprise Offering Application Developer’s Guide

This table summarizes the various plug-in types and the recommended settings for
the Eclipse-AutoStart attribute:
Table 4.
Plug-in type Recommended Eclipse-Autostart Settings
Plug-in implementing extension points Eclipse-AutoStart:true
Plug-in providing services for use by other
bundles
Do not set Eclipse-AutoStart attribute
Plug-in providing packages for other
plug-ins to use
Do not set Eclipse-AutoStart attribute
Web Application appearing in the
application list
Eclipse-AutoStart:false (The workbench will
automatically start the web application when
requested)
Web Application not appearing in the
application list, but referred to from other
web applications
Do not set Eclipse-AutoStart attribute
The cases where a plug-in would not be started automatically by one of the rules
would include the plug-in that contains Eclipse-AutoStart:false, or it contains
Eclipse-AutoStart:true, but does not provide any packages. In these cases,
applications will be responsible for explicitly starting the required plug-ins. This
can be done by using the org.eclipse.core.runtime.Platform object to locate a
bundle by its symbolic name, and issuing methods such as startup against the
resultant Bundle object.
It is not recommended that the osgi.bundles property be updated to include
application specific bundles.
Launching the Enterprise Offering platform
Starting from the command line
To start the EO platform from command line, switch to the WCTME_EO_RUNTIME
directory, and run the startup.bat file on Windows, or the startup file on Linux.
You can add additional parameters following the file name, such as
startup -console -consoleLog
to start the platform with a console window, and the Eclipse log entries written to
the console. If you need to supply any Java virtual machine specific arguments,
such as when specifying debug options, use the -vmargs parameter. The -vmargs,
followed by any virtual machine specific arguments, must be the last parameter on
the command line. Application specific arguments must not follow the -vmargs
parameter on the command line.
Starting via launch configuration
Ensure that you have followed the instructions found in“Setting up the target
workspace” on page 21 before attempting to start via a launch configuration. In
addition, be sure that you are in the Plug-in Development perspective before
proceeding.
When developing applications using the Eclipse Plug-in Development Environment
(PDE), you can set up a Launch Configuration to enable debug or non-debug
execution of the WCTME runtime. This section will highlight the specific settings
Developing WCTME Enterprise Offering applications 31

that are used for running the workbench. You can locate full details on the
Run-time Workbench Launch Configuration in the Eclipse Help Contents.
1. Select Run > Run... > Run-time Workbench, then New to create a new
Launch Configuration.
2. Enter a name in the Name field to help you identify the configuration.
3. Enter a location in the Location field to use for the configuration workspace.
4. The Application Name should be
com.ibm.eswe.workbench.WctWorkbenchApplication.
5. In the program arguments, you can optionally add the switches -console,
-consoleLog, and -debug to gain access to a console, and to print out debug
information.
6. Switch to the Plug-ins tab.
7. Leave the default setting of Launch with all workspace and enabled external
plug-ins.
Note that you can customize the set of plug-ins that you start with by
selecting Choose plug-ins and fragments to launch from the list. The list
shows the plug-ins present in the workspace, and those that are available
externally. The list of external plug-ins is obtained based upon the Target
Workspace setting as prepared in “Setting up the target workspace” on page
21.
32 Workplace Client Technology, Micro Edition: WCTME Enterprise Offering Application Developer’s Guide
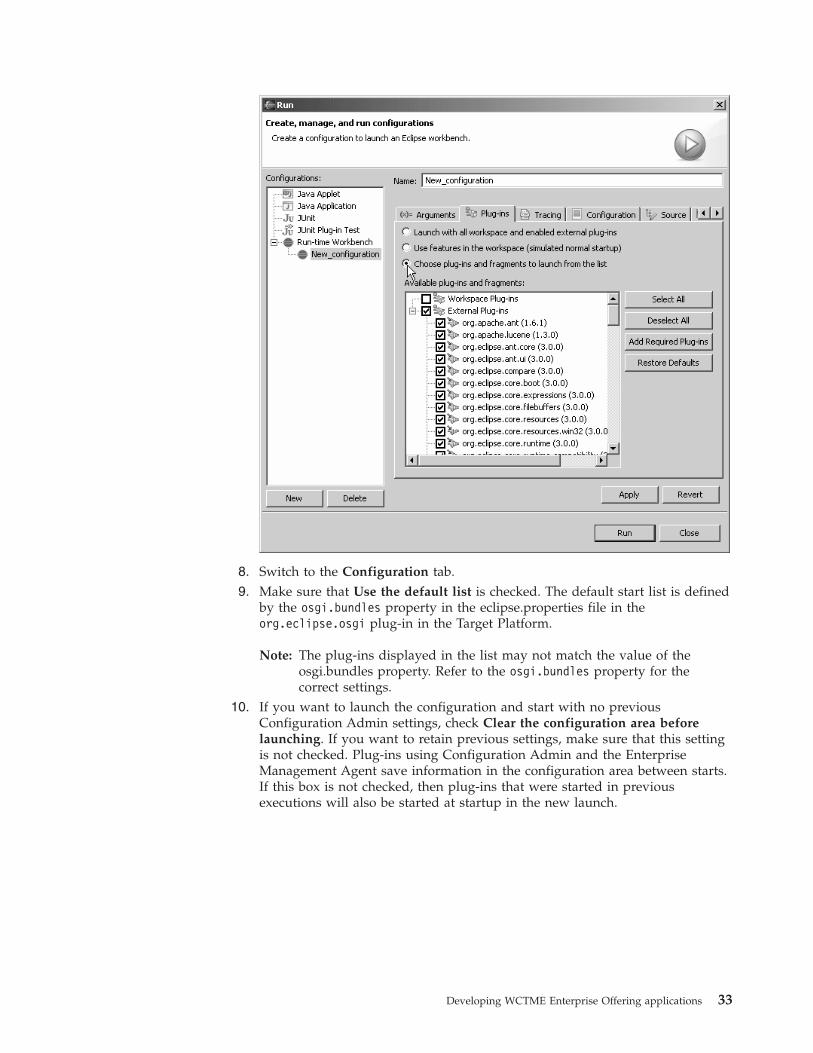
8. Switch to the Configuration tab.
9. Make sure that Use the default list is checked. The default start list is defined
by the osgi.bundles property in the eclipse.properties file in the
org.eclipse.osgi plug-in in the Target Platform.
Note: The plug-ins displayed in the list may not match the value of the
osgi.bundles property. Refer to the osgi.bundles property for the
correct settings.
10. If you want to launch the configuration and start with no previous
Configuration Admin settings, check Clear the configuration area before
launching. If you want to retain previous settings, make sure that this setting
is not checked. Plug-ins using Configuration Admin and the Enterprise
Management Agent save information in the configuration area between starts.
If this box is not checked, then plug-ins that were started in previous
executions will also be started at startup in the new launch.
Developing WCTME Enterprise Offering applications 33
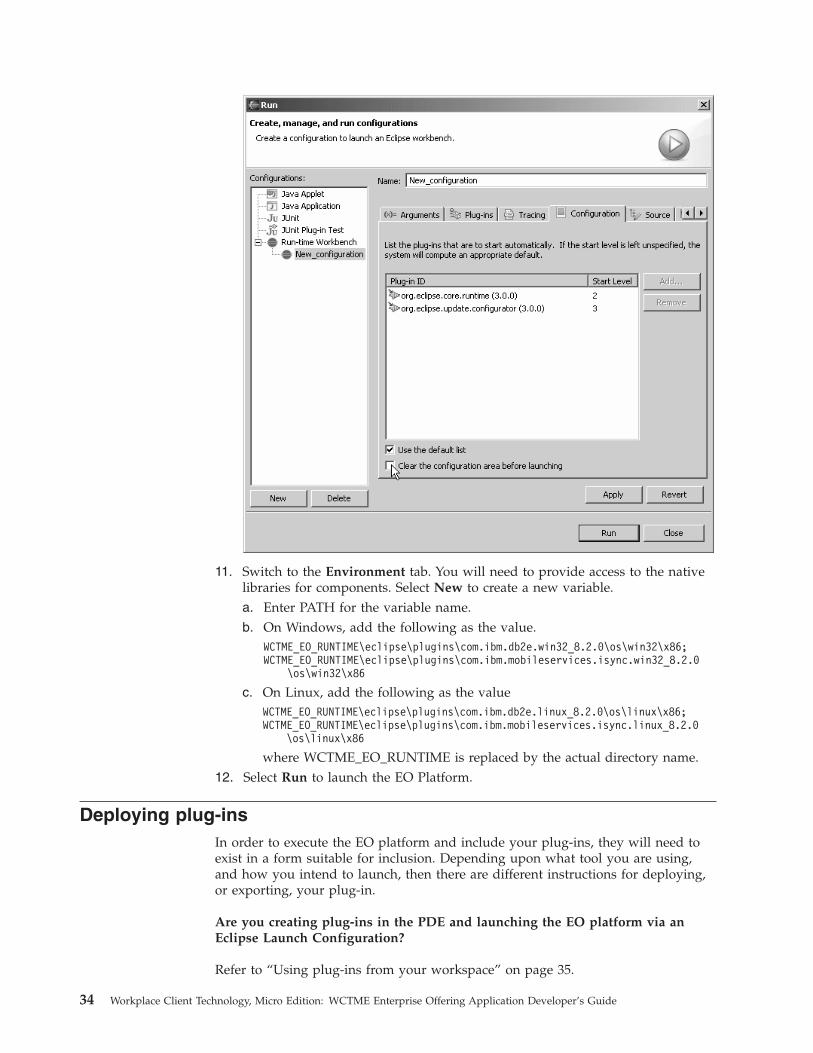
11. Switch to the Environment tab. You will need to provide access to the native
libraries for components. Select New to create a new variable.
a. Enter PATH for the variable name.
b. On Windows, add the following as the value.
WCTME_EO_RUNTIME\eclipse\plugins\com.ibm.db2e.win32_8.2.0\os\win32\x86;
WCTME_EO_RUNTIME\eclipse\plugins\com.ibm.mobileservices.isync.win32_8.2.0
\os\win32\x86
c. On Linux, add the following as the value
WCTME_EO_RUNTIME\eclipse\plugins\com.ibm.db2e.linux_8.2.0\os\linux\x86;
WCTME_EO_RUNTIME\eclipse\plugins\com.ibm.mobileservices.isync.linux_8.2.0
\os\linux\x86
where WCTME_EO_RUNTIME is replaced by the actual directory name.12. Select Run to launch the EO Platform.
Deploying plug-ins
In order to execute the EO platform and include your plug-ins, they will need to
exist in a form suitable for inclusion. Depending upon what tool you are using,
and how you intend to launch, then there are different instructions for deploying,
or exporting, your plug-in.
Are you creating plug-ins in the PDE and launching the EO platform via an
Eclipse Launch Configuration?
Refer to “Using plug-ins from your workspace” on page 35.
34 Workplace Client Technology, Micro Edition: WCTME Enterprise Offering Application Developer’s Guide

Are you creating plug-ins in the PDE and launching the EO platform outside of
the PDE?
Refer to “Exporting plug-ins from the PDE.”
Are you creating Web Application, Web Service, or OSGi bundles in WebSphere
Studio?
Refer to “Exporting bundles from WebSphere Studio.”
Using plug-ins from your workspace
If you are using the PDE, this is the simplest method for running and testing your
plug-ins. By setting up a Launch Configuration and launching the EO platform
directly from the PDE, you can incorporate your plug-ins under development
directly into the launch.
In your Launch Configuration, on the Plug-ins tab, make sure that either the
Launch with all workspace and enabled external plug-ins is selected, or that
Choose plug-ins and fragments from the list is selected, and your target plug-ins,
and any of its pre-requisites are selected.
Exporting plug-ins from the PDE
The PDE provides an Export wizard that will allow you to export a plug-in to a
format for deployment.
Select File > Export > Deployable Plug-ins and fragments. This wizard will allow
you to select multiple plug-ins for deployment. You will also be able to select
different output formats, such as a single ZIP file containing all plug-ins,
individual JARs for each plug-in for use on an update site, or a directory structure
which will be understood by both the EO platform and the PDE.
Notes:
1. While your plug-in may build successfully in the workspace, the Export
mechanism runs a separate compilation of your plug-in. If you have
added entries to the Java build path for your plug-in, you should also
make sure that the build.properties file in your plug-in project contains
any required extra JAR files in the jars.extra.classpath property. The
build.properties file can be updated either through the Build Properties
Editor or the Plug-in Manifest Editor.
2. If you will be debugging these plug-ins from another IDE (such as
WebSphere Studio), then you should make sure that you check the
Include source code option in the Export Wizard, and that the Compile
source with debug information option is selected in the Build Options
available in the Export Wizard.
Exporting bundles from WebSphere Studio
While SMF Bundles and Web Application Bundles can be exported as JAR files and
can run directly within the EO platform, the PDE will not recognize them in this
format. If you intend on providing bundles to other developers or customers for
them to program against using the PDE, then you will need to export them in an
appropriate organization. The acceptable format for a Bundle to be recognized by
the PDE (and by the EO platform) is the following:
WCTME_EO_RUNTIME\eclipse\plugins\<plug-in id>\META-INF\MANIFEST.MF
Developing WCTME Enterprise Offering applications 35
WCTME_EO_RUNTIME\eclipse\plugins\<plug-in id>\<jar file>
Where the MANIFEST.MF file is the same MANIFEST.MF as would normally be
contained in the bundle. However, you must add or edit the Bundle-Classpath
attribute to refer to the jar file.
If the Bundle-Classpath already specifies jar files that are contained within the
plug-in, these jar files also need to be exported to the file system, and the entries
retained on the Bundle-Classpath.
Note: Other files are allowed to be present in the directories.
Exporting Extension Services bundle projects
Bundles must contain the Bundle-SymbolicName and Bundle-Version attributes in
their MANIFEST.MF files. These attributes must exist before beginning the following
steps. Refer to “Creating a bundle (plug-in) project” on page 24 for steps to update
the manifest file.
To create the initial bundle JAR file, use the SMF Bundle Developer tools. For each
of the Extension Services projects (but not Extension Services Web projects) that
you intend to export:
1. Create a directory in the WCTME_EO_RUNTIME\eclipse\plugins directory. The
typical Eclipse plug-in directory name is <BundleSymbolicName>_<Bundle-Version>. For example, for a Bundle-SymbolicName of com.ibm.widget.label
and a Bundle-Version of 3.0.2, the directory name would be
com.ibm.widget.label_3.0.2.
2. Select the project(s), right click, select SMF + Submit Bundle ...
3. In the Target Submission window:
a. Select the Submit JAR option.
b. Select an existing Export Target directory, or add a new Export Target,
specifying the directory created in Step1 above.
c. Select Replace Bundles if you have already exported to this directory
before, and you want to replace the previously exported bundle.
d. Select Finish.4. For each of the projects, select the META-INF directory in the Extension
Services Content directory, or the project root, right click, then click Export >
File System, then select Next. Select the same directory created in Step1 above,
then select Finish
5. Edit the exported META-INF\MANIFEST.MF file using a text editor, and add or
update the Bundle-Classpath attribute to refer to the Bundle JAR exported in
step 3.
6. Restart your EO Platform.
Notes:
1. The name of the exported file will be named, by default,
Bundle-Name+Bundle-Version.jar. If you prefer to use a different
naming mechanism, you can change the naming mechanism. Go to
Windows > Preferences > SMF > Submission to specify a different
naming mechanism.
2. You can generate an ANT script on the Target Submission window, to
repeat this process. Note that the naming convention used for the jar
36 Workplace Client Technology, Micro Edition: WCTME Enterprise Offering Application Developer’s Guide

will be same as specified in your workspace. If the ANT script is run in
a different workspace that has a different defined naming convention,
the results may be different.
3. If you update the Bundle-Classpath attribute in your project, the Tasks
window and the project will indicate errors because the JARs referenced
in the Bundle-Classpath do not exist.
Exporting Extension Services web projects
Bundles must contain the Bundle-SymbolicName and Bundle-Version attributes in
their MANIFEST.MF files. These attributes must exist before beginning the following
steps. Refer to “Creating a bundle (plug-in) project” on page 24 for steps to update
the manifest file.
To create the initial bundle JAR file, use the Export wizard. For each of the
Extension Services Web projects that you intend to export, perform the following
procedure:
1. Create a directory in the plugins directory. The typical Eclipse plug-in directory
name is<BundleSymbolicName>_<Bundle-Version>. For example, for a
Bundle-SymbolicName of com.ibm.widget.label and a Bundle-Version of 3.0.2,
the directory name would be com.ibm.widget.label_3.0.2.
2. Select the project(s), right click, then select Export...
3. Select WAB file as the Export destination, then click Next.
4. Specify the destination of the file, then click Finish.
The destination contains an absolute path. The directory component must
specify the directory created in Step 1. The file name will typically end in .wab
or .jar.
5. Select the META-INF directory in the Extension Services Content directory, or
the project root, right click, then click Export > File System, then click Next.
Enter the name of the directory created in Step 1 above, then click Finish.
6. Edit the exported META-INF\MANIFEST.MF file using a text editor, and add or
update the Bundle-Classpath attribute to refer to the file exported in step 3
above.
Note: If you update the Bundle-Classpath attribute in your project’s manifest
file, the Tasks window and the project will indicate errors, because the
JARs referenced in the Bundle-Classpath do not exist.
7. To enable you to launch your web application by displaying an entry in either
the Desktop window or in the Application > Open list, declare your
application by providing a plugin.xml file.
a. Right click your web application project, then select New > File.
b. Leave the project selected as the parent folder, and enter plugin.xml as the
file name, then click Finish.
c. If the plugin.xml is opened in an editor view, close this editor.
d. Right click plugin.xml, and select Open With > Default Text Editor.
e. Add the declarative information for your web application.
The following is a sample declaration. Refer to “Web applications” on page
48 for more information).
<?xml version="1.0" encoding="UTF-8"?>
<?eclipse version="3.0"?>
<plugin>
<extension point="com.ibm.eswe.workbench.WctWebApplication">
<DisplayName>My Web Application</DisplayName>
<Local>true</Local>
Developing WCTME Enterprise Offering applications 37

<Location>/MyWeb/index.jsp</Location>
<Icon></Icon>
<Description>This is my web application</Description>
<Version>1.0.0</Version>
</extension>
</plugin>
If you need to declare other entry points for your application to show up in
the application list, you can declare all of them in the same plugin.xml file.
Repeat the extension element definition as many times as required.
f. Select plugin.xml, right click, then select Export > File System, then Next.
Enter the name of the directory that was created in Step 1 on page 37, then
click Finish.
g. Restart your EO platform.
Debugging applications
You can use either WebSphere Studio or the PDE to debug applications. Typically,
the IDE that you have used to develop most of the plug-ins will be the easiest to
use for debugging plug-ins.
Regardless of the IDE used for debugging, the critical requirements for successful
debugging are access to the source for your applications, and Java class files that
contain debugging information.
Local Debugging of the Enterprise Offering platform
Local debugging of PDE projects
If you are developing plug-ins using the PDE, the recommended approach is to
use the debug environment provided with the Eclipse 3.0.1 SDK. You should be
familiar with setting up an Eclipse Launch Configuration. Rather than using Run...
to launch the EO platform, you will need to use the Debug... option to select the
same Launch Configuration but execute it in Debug mode. You will be able to set
breakpoints in your plug-in to cause the debugger to interrupt execution.
Local Debugging of WebSphere Studio projects
When using WebSphere Studio, you can use the WebSphere Studio capabilities to
debug the code that you have written. However, you will not be able to directly
launch your code into a running version of the EO runtime.
You can either export your bundles and code so that you can debug using the
PDE, or you can use the remote debugging steps described in the next section.
The following information provides information on how to export your bundles
and source code so that you can successfully debug within the PDE.
To export executable code to the Eclipse target platform directory, follow the steps
in “Exporting bundles from WebSphere Studio” on page 35.
You will need to ensure that the source for the bundles is available to the Eclipse
PDE. To make the source available, you will either need to refer to the source
folders in the projects in the WebSphere Studio workspaces, or you will need to
export the source to another directory, such as the directory containing the plug-in
executable code.
38 Workplace Client Technology, Micro Edition: WCTME Enterprise Offering Application Developer’s Guide

To add the source location, within PDE, go to the Launch Configuration created for
the EO platform, and select the Source tab. Then select Add to add a location that
contains source.
Note: When you export an Extension Services Web project as a WAB file, you are
given the option to export source as well. If you select this option, then you
can refer to the exported WAB file object for the source location.
Use the Debug... action to select the Launch Configuration and execute it in Debug
mode.
Remote Debugging of the Enterprise Offering Platform
Remote Debugging using the PDE
The PDE provides capabilities to debug code executing within the Enterprise
Offering (EO) platform. You can use remote debugging if you need to connect to
an instance of the Enterprise Offering that is already installed on your local
system, or on another system.
Launch the EO platform for debugging using the command line. Add the
parameters
-vmargs -Xdebug -Xnoagent -Xrunjdwp:transport=dt_socket,server=y,address=zzzz
to the command line, where zzzz is an available port on your system. Refer to
“Starting via launch configuration” on page 31 for more information on launching
via the command line.
In the PDE, select Run > Debug..., then create a new Remote Java Application
launch configuration. Enter the name of any project, and select a Connection Type
of Standard (Socket Attach). For the Connection Properties, you can use localhost
as the host (or supply the IP address or host name for a remote system), and
specify the same port number as you specified when launching the EO platform.
Remote debugging using WebSphere Studio
WebSphere Studio also provides capabilities to debug code executing within the
Enterprise Offering (EO) platform. Using WebSphere Studio is effective if you have
created Extension Services Bundle projects, or Extension Services Web Projects and
will need to debug these projects.
In order to debug the EO platform, you will need to launch the EO platform using
specific debug options. You can launch using either a Launch Configuration from
the PDE, or by using the command line.
To launch an EO platform using a Launch Configuration in the PDE, create a
Launch Configuration as described in “Starting via launch configuration” on page
31. In the VM Arguments field on the Arguments tab, enter the arguments:
-Xdebug -Xnoagent -Xrunjdwp:transport=dt_socket,server=y,address=zzzz
Where zzzz is an available port on your system.
You can also launch the EO platform for debugging using the command line. Add
the parameters
-vmargs -Xdebug -Xnoagent
-Xrunjdwp:transport=dt_socket,server=y,address=zzzz
Developing WCTME Enterprise Offering applications 39

to the command line, where zzzz is an available port on your system. Refer to
“Starting from the command line” on page 31 for more information on launching
via the command line.
In WebSphere Studio, select Debug..., then create a new Remote Java Application
launch configuration. Enter the name of any project, and select a Connection Type
of Standard (Socket Attach). For the Connection Properties, you can use localhost
as the host (or supply the IP address or host name for a remote system), and
specify the same port number as you specified when launching the EO platform.
40 Workplace Client Technology, Micro Edition: WCTME Enterprise Offering Application Developer’s Guide
Creating installation packages
Updates to the Enterprise Offering (EO) platform are provided in the form of
features. Features may contain other features, or a set of related plug-ins. The
Update Manager component of the EO platform handles the installation of the
features, and a user interface is provided to manage the installed features.
Features may be provided to the Update Manager by connecting to an update site,
or by the included Enterprise Management agent. Update sites organize features
for installation. The Update Manager typically connects to an update site to
determine the features that are available for installation.
The Enterprise Management agent enables the EO platform to be managed
remotely. Administrators create software distribution jobs that define the artifacts
to be installed, and the Enterprise Management agent handles the installation
tasks.
Methods of installation
There are two mechanisms to install applications via features. The application can
either be installed from each system by using the Update Manager, or by using an
enterprise distribution system.
Local installation
To enable local installation, you will need to provide an update site configuration
to the platform. If you provide an installation program, in addition to any other
tasks that you perform, you should provide an update site for the users to use to
install your application. The update site could be provided on the distribution
media, or could be created on the hard drive of the system on which you execute
the installation program.
The customers will need to start their EO platform, and use the Update Manager
to connect to the site, and install the application.
Enterprise installation
In addition to a local installation process, you should also consider providing an
installation process to enable enterprise distribution. To enable the enterprise
installation, you should clearly identify each file that should be installed, and the
appropriate installation location.
The Enterprise Offering platform provides an Enterprise Management Agent that
connects to Tivoli Device Manager provided by WebSphere Everyplace Device
Manager.
Tivoli Device Manager provides for software distribution as well as configuration
jobs to be applied to the Enterprise Offering platform. Tivoli Device Manager uses
bundles as the distribution artifacts for the Enterprise Management Agent.
While the Enterprise Management Agent is capable of accepting a distribution at a
plug-in or bundle level, it is strongly recommended that Eclipse update sites
© Copyright IBM Corp. 2004 41

packaged as a bundle using the NativeAppBundle tool be used as the distribution
artifact. Refer to “Administrator Tasks” on page 65 for more information regarding
update site distribution.
The update site provided to an administrator for distribution is the same update
site that is built for local installation. Therefore, developers can create the same
artifacts for enterprise installation as they would create for local installation.
Install artifacts
For any successful application installation, you need to provide the appropriate set
of installation artifacts from the following:
Installer/Uninstaller
A program to handle installation (and uninstallation of your application) may be
needed if you need to do anything more than provide an update site to allow
installation of your application.
Update site
An Update Site is the key mechanism to enable local installation of the application.
The Eclipse PDE provides templates for creating Update Sites. To create an Update
Site, select File > New > Project > Plug-in Development > Update Site Project.
Once the project is created, you can edit the empty site.xml file to add features to
the update site.
Features
A feature is the only level of installable unit that exists. You cannot choose to
install only certain plug-ins from a feature. The Eclipse PDE provides wizards for
creating Features. To create a feature, select File > New Project > Plug-in
Development > Feature Project. You can use the wizard to fill in the required
fields for a feature, and select the plug-ins that will be part of the feature.
Once the feature project is created, you can make additional updates to the feature
definition by editing the feature.xml file.
Additionally, if a feature has already been created, you can import the feature as a
binary project into your workspace. Select File > Import > External Features to
launch the wizard. Enter the name of an update site to browse, and you can select
the features to import.
Importing External Features is useful if you are attempting to create an Update
Site, and someone else has already created the features that need to be installed.
To enable WCTME EO users to use the Scan for Updates action within the
Application Management dialog, you must add an update URL to the feature.xml
file. Using the Feature Manifest Editor, on the Overview tab, right click on the
Update URLs entry in the Feature URLs section, then select New > Update URL.
You can then enter the appropriate update site information in the Properties view
that is displayed.
If no update URLs are provided in the feature.xml file, the Scan for Updates
action will still be displayed as an available action, but will not return any update
information.
42 Workplace Client Technology, Micro Edition: WCTME Enterprise Offering Application Developer’s Guide

The WCTME EO reserves the use of the eclipse directory within the WCTME EO
installation root for its own features and plug-ins. The apps directory is provided
as an Eclipse extension, and the default installation location for new features.
When new versions of features are provided, they will be installed into the same
directory as the previous version. The installation directory for a feature upgrade
cannot be changed.
Versions for features are specified using major.minor.service.qualifier. For
example, a version of 4.0.1 has a major version of 4, a minor version of 0, and a
service version of 1. An equivalent version is a version that differs first at the
service level. A compatible version is a version that differs first at the minor level.
For example, using our version 4.0.1 above, a version of 4.0.2 would be an
equivalent version, since the service value is the first value that changed. A version
of 4.1.2 would be a compatible version, since the minor value is the first value that
changed.
The Scan for Updates capability provided as part of the Application Management
dialog enables updates of only equivalent or compatible versions, according to the
preferences selected in the Manage > Preferences > Install/Update dialog. The
default value is for Equivalent feature updates.
A feature version that changes at the major level, for example, a version 5.0.0 that
would replace our version 4.0.1, must be installed through the Application > Install
mechanism. Scan for Updates will not show this feature as being available.
For additional information on versioning, refer to the Feature manifest section of
the Platform Plug-in Developer’s Guide.
Plug-ins
Plug-ins provide the core logic capability for the application, but they must be
grouped into features in order to be installed via the Update Manager.
If you choose to use a Feature project, or an Update Site project within your
workspace, you will need to provide the plug-ins within the workspace as well.
These plug-ins can either be in source form - if you are responsible for developing
the plug-ins - or they can be in binary form - if another person will be providing
these artifacts to you. If another person is providing the artifacts, then you can
import these artifacts as binary plug-ins so that you can use the Feature and
Update Site project capabilities. Select File > Import > External Plug-ins and
Fragments to launch the Import Wizard. Once plug-ins exist in projects within the
workspace, you can use the Feature Manifest Editor to add plug-ins to the Feature,
and the Site Manifest Editor to add features to the Update Site.
Native libraries
Plug-ins may use the Java Native Interface (JNI) to access native library code.
Native libraries are by convention placed in a fragment specific to an operating
system or architecture to the plug-in providing the Java classes (native libraries can
all be placed within a single plug-in). The organization of the fragment is the
following:
directory\fragment.xml
directory\os\<osgi.os>\<osgi.arch>\*.dll or *.so
Where directory is typically <fragment_name>_<fragment_version>
Creating installation packages 43

The value of the osgi.os value above is the value corresponding to the value of
the Java System property, osgi.os. The value of the osgi.arch corresponds to the
value of the Java System property, osgi.arch.
The osgi.os value is generally based on the os.name property value, although the
value of osgi.os may alias a set of values for os.name. For example, the osgi.os
value of win32 is used to represent an os.name value of Windows 2000.
The osgi.arch value is generally based on the os.arch property value.
For the runtime environment, since it is targeting Windows 2000, Windows XP, and
Linux, the values of osgi.os would be either win32 or linux.
The value for arch will be x86.
As an example, the DB2 Everyplace component requires native libraries. The
plug-in id is com.ibm.db2e and the version is 8.2.0. The native libraries required for
Windows reside in a fragment for this plug-in, com.ibm.db2e.win32_8.2.0. Within
this fragment, the directory os\win32\x86 contains the DLLs required by DB2
Everyplace.
If there is a single native library required by the plug-in, and it is loaded via the
System.loadLibrary() method, then packaging the fragment or plug-in in this
organization is sufficient.
If there are multiple native libraries required by the plug-in, and each one is
individually loaded by the System.loadLibrary() method, and the DLLs do not
depend on each other or statically or dynamically load each other, this
organization is sufficient.
If there are multiple native libraries required by the plug-in, and there are
dependencies between the libraries such that a System.loadLibrary() method call
loads one of the libraries, but that library statically or dynamically loads the other
libraries, then an additional step is required. Because these directories are not
provided on the System PATH or LIBPATH, the operating system is unable to handle
the loading of the shared library. To cause these directories to be added to the
system PATH or LIBPATH so that the operating system can load these libraries, add
the plug-in or fragment directory name to the
WCTME_EO_RUNTIME\startup.properties file.
As an example, there are multiple native libraries required for DB2 Everyplace.
Because these libraries have dependencies between them, they must be present on
the system PATH or LIBPATH. Therefore, the fragment directory,
com.ibm.db2e.win32_8.2.0, has been added to the startup.properties file.
Code that behaves differently between operating systems that are aliased to win32,
such as Windows 2000 or Windows XP, should be handled within the native
libraries, and should not be placed into separate plug-ins/fragments, or separate
osgi.os directories, since changing the operating system name for the runtime
environment will prevent proper loading of components such as DB2 Everyplace
or SWT.
Configuration file updates
Most of the changes required when installing an application can be accomplished
by providing the appropriate plug-ins. However, some of the configuration files
44 Workplace Client Technology, Micro Edition: WCTME Enterprise Offering Application Developer’s Guide

used by the EO platform may need to be updated. Changes to these files can be
made either by installation programs, or by using an Install Handler associated
with the application Feature being installed. An Install Handler is invoked at
certain checkpoints within the installation process. During the applicable
checkpoints, code provided within the Install Handler can make the required
changes to the configuration files.
Installation instructions
You should make sure that any installation instructions for your application are
clearly provided to your customers. Your customers will need to know, for
example, the location of the update site from which to install the application, any
preferences that may need to be updated, how to start your application, and so on.
Enterprise distribution instructions
You should also consider the needs of enterprises to use an enterprise distribution
mechanism to install the application. Any artifacts that must be installed should be
clearly identified. This will allow the administrator to easily define the necessary
steps to distribute your application. You should supply Eclipse update sites to the
enterprise administrator to allow for distribution of your application.
Creating installation packages 45

46 Workplace Client Technology, Micro Edition: WCTME Enterprise Offering Application Developer’s Guide
Reference information
Windows registry entries
The following key is defined within the Windows Registry.
HKEY_LOCAL_MACHINE\SOFTWARE\IBM\WCTME
The following String values are associated with this key:
InstallLocation
The root installation location of the WCTME Enterprise Offering.
Version
The version of the WCTME Enterprise Offering that has been installed.
Plug-in extension points
This section describes the extension points WCTME Enterprise Offering provides
for application development. Currently, there are two extension points -
Applications and Web Applications - provided by WCTME Enterprise Offering.
Applications
com.ibm.eswe.workbench.WctApplication
This extension point provides for the definition of an application to be launched.
Since: WCTME Enterprise Offering 5.8.0
Configuration markup:
<!ELEMENT extension EMPTY>
<!ATTLIST extension
point CDATA #REQUIRED
id CDATA #IMPLIED
name CDATA #IMPLIED>
v point - Fully qualified identifier of the target extension point
v id - Optional ID identifying this instance of the extension point.
v name - Optional name associated with the extension point
<!ELEMENT DisplayName (#CDATA)>
DisplayName - Display Name to use for the application in the Application > Open
menu, or on the Desktop perspective. Required.
<!ELEMENT PerspectiveId (#CDATA)>
PerspectiveId - ID for the perspective to be launched when the application is
selected. Required.
<!ELEMENT Description (#CDATA)>
Description - Description of the application. Optional.
<!ELEMENT Icon (#CDATA)>
© Copyright IBM Corp. 2004 47
Icon - Icon to be used in the Desktop perspective Icon view. Optional.
<!ELEMENT Version (#CDATA)>
Version - Version of the application. Optional.
Examples:
<extension point="com.ibm.eswe.workbench.WctApplication">
<DisplayName>Order Entry</DisplayName>
<PerspectiveId>com.ibm.eswe.orderentry.OrderEntryPerspective
</PerspectiveId>
</extension>
Supplied Implementation:The Enterprise Offering runtime will use this extension
point to display the menu items that appear in the Application > Open menu, and
to display the applications within the Desktop view.
Web applications
com.ibm.eswe.workbench.WctWebApplication
This extension point provides the definition of a web application to be launched.
Since: WCTME Enterprise Offering 5.8.0
Configuration markup:
<!ELEMENT extension EMPTY>
<!ATTLIST extension
point CDATA #REQUIRED
id CDATA #IMPLIED
name CDATA #IMPLIED>
v point - Fully qualified identifier of the target extension point
v id - Optional ID identifying this instance of the extension point.
v name - Optional name associated with the extension point
<!ELEMENT DisplayName (#CDATA)>
DisplayName - Display Name to use for the application in the Application > Open
menu, or on the Desktop perspective. Required.
<!ELEMENT Local (#CDATA)>
Local - Indicates whether the web application being defined is local to the
Enterprise Offering runtime, or is a web application running on another server. Set
the value true if this is local, or false if this is remote. Required.
<!ELEMENT Location (#CDATA)>
Location - Specify the URL to access the web application. If Local is set to true,
then specify only the part of the URL following the server and port. If Local is set
to false, then specify the full URL including protocol, host, port, and path to access
the web application. Required.
<!ELEMENT Description (#CDATA)>
Description - Description of the application. Optional.
48 Workplace Client Technology, Micro Edition: WCTME Enterprise Offering Application Developer’s Guide

<!ELEMENT Icon (#CDATA)>
Icon - Icon to be used in the Desktop perspective Icon view. Optional.
<!ELEMENT Version (#CDATA)>
Version - Version of the application. Optional.
Examples:
The following example shows a web application that is local to the Enterprise
Offering runtime. The Location element defines only the portion of the URL after
the host and port:
<extension point="com.ibm.eswe.workbench.WctWebApplication">
<DisplayName>Order Entry Web Application</DisplayName>
<Local>true</Local>
<Location>/OrderEntry</Location>
</extension>
The following example shows a web application that is running on a remote
server:
<extension point="com.ibm.eswe.workbench.WctWebApplication">
<DisplayName>IBM</DisplayName>
<Local>false</Local>
<Location>http://www.ibm.com</Location>
</extension>
Supplied implementation: The Enterprise Offering runtime will use this extension
point to display the menu items that appear in the Application > Open menu, and
to display the web applications within the Desktop view.
Configuration properties
There are numerous configuration properties that can be used to customize the
operation of the workbench. These may be specified in the
WCTME_EO_RUNTIME\eclips\configuration\config.ini. Many of these are
documented in the Runtime options section of the Platform Plug-in Developer’s
Guide available via Help > Help Contents in the Eclipse 3.0.1 SDK.
In addition to those properties defined in the Platform Plug-in Developer’s Guide,
additional configuration options are provided. In the property descriptions in the
following sections, the Current Setting refers to the value as provided by the
default Enterprise Offering runtime. The Default Setting refers to the default value
if the property is not defined.
Workbench properties
osgi.framework.systemPackages
A comma separated list of packages that exist within the Java boot classpath used
to start the workbench, and that will be exported to satisfy bundle dependencies.
Current Setting:javax.xml.parsers, org.w3c.dom, org.xml.sax,
org.xml.sax.helpers, org.xml.sax.ext, java.sql, javax.sql, javax.net,
javax.net.ssl, java.rmi, javax.rmi, org.w3c.dom.html, org.w3c.dom.events,
org.w3c.dom.traversal, org.w3c.dom.ranges
Default Setting: <none>
Reference information 49
eclipse.exitOnError
Indicates whether the workbench should exit immediately if it receives a
Framework ERROR event.
Current Setting: false
Default Setting: true
com.ibm.eswe.workbench.WctWorkbenchManager.logStartupErrors
Indicates whether exceptions and errors encountered when the runtime attempts to
start a bundle should be logged to the Eclipse Platform log.
Current Setting: <not set>
Default Setting: false
com.ibm.eswe.workbench.LogRedirector.level
Defines the severity level of OSGi Log Service entries that will be redirected to the
Eclipse Platform log. All entries with a severity less than or equal to the value will
be written to the log. The values accepted are based on the
org.osgi.service.log.LogService defined constants for LOG_ERROR (1),
LOG_WARNING (2), LOG_INFO (3) and LOG_DEBUG (4)
Current Setting: <not set>
Default Setting: 2
eclipse.product
Sets the identifier of the product being run, which identifies the branding
information associated with the workbench.
Current Setting: com.ibm.eswe.workbench
Default Setting: <none>
eclipse.application
Sets the identifier of the application to run. This overrides the application defined
by the product identifier.
Current Setting: com.ibm.eswe.workbench.WctWorkbenchApplication
Default Setting: <none>
osgi.splashPath
The comma separated list of URLs to search for the file named splash.bmp.
Current Setting: platform:/base/plugins/com.ibm.eswe.workbench
Default Setting: <none>
osgi.frameworkClassPath
A comma separated list of classpath entries that define the OSGi framework
implementation.
Current Setting: core.jar, console.jar, osgi.jar, resolver.jar,
defaultAdaptor.jar, eclipseAdaptor.jar.
50 Workplace Client Technology, Micro Edition: WCTME Enterprise Offering Application Developer’s Guide
Default Setting: <none>
osgi.bundles
A comma separated list of bundles that will be installed and optionally started
once the system is up and running. For more information on the syntax for this
property, refer to the Platform Plug-in Developer’s Guide.
Current Setting: org.eclipse.core.runtime@2:start,
org.eclipse.update.configurator@3:start
Default Setting: <none>
osgi.bundles.defaultStartLevel
Assigns the default start level to any bundles that do not explicitly have a start
level assigned.
Current Setting: 4
Default Setting: 4
osgi.startLevel
Sets the framework start level.
Current Setting: not set
Default Setting: 8
com.ibm.osg.service.deviceagent.nativeinstall.default
Defines the target update site used by the Enterprise Management Agent when
installing updates created by the NativeAppBundle tool with a -Eclipse=default
parameter. The first configured site that ends with this value will be the target
installation site for the distributed features. This value is case sensitive, and must
end with a slash.
Current Setting: /apps/eclipse/
Default Setting: <none>
WebContainer properties
com.ibm.osg.service.http.defaultports
If this property exists, and no Http Service port configuration exists in
Configuration Admin, then Http Service will listen on the default port specified by
org.osgi.service.http.port.
If this property does not exist and no Http Service port configurations exist in
Configuration Admin, then Http Service will not listen on any ports.
Current Setting: defined
Default Setting: undefined
org.osgi.service.http.port
Defines the port used by the Http Service listener to listen for request.
Current Setting: 8777
Reference information 51
Default Setting: 80
com.ibm.osg.webcontainer.defaultports
If this property exists, and no Web Container configurations exist in Configuration
Admin, then the Web Container will listen on the http port specified through the
com.ibm.osg.webcontainer.port property.
If this property does not exist and no Web Container port configurations exist in
Configuration Admin, then the Web Container will not listen to any ports.
Current Setting: defined
Default Setting: undefined
com.ibm.osg.webcontainer.port
Defines the port on which the Web Container will listen for requests.
Current Setting: 8777
Default Setting: 80
com.ibm.osg.webcontainer.crosscontext
If set to true will allow Web Applications access to other Web Applications
ServletContext from the method ServletContext.getContext(String context)
method. Applications that need to forward request to other Web Applications will
need to set this property to true.
Current Setting: false
Default Setting: false
com.ibm.osg.webcontainer.http.timeout
Defines the value used for socket time-outs on the default ports (see
com.ibm.osg.webcontainer.defaultports).
Current Setting: not set
Default Setting: 60
com.ibm.osg.webcontainer.http.address
Defines the host address for the default ports that the Web Container listens on. If
this property is defined then the Web Container will only listen for requests that
come through this IP address.
The special value ALL indicates all available IP addresses on the device will be
used.
The value of this property may be a resolved name or IP address (e.g.
www.ibm.com, 192.168.0.101, localhost).
Current Setting: localhost
Default Setting: ALL
52 Workplace Client Technology, Micro Edition: WCTME Enterprise Offering Application Developer’s Guide

com.ibm.osg.webcontainer.singlesignon
If set to true, will enable the single sign on feature. Single sign on enables the Web
Container to recognize an authenticated user the first time that he or she tries to
access a protected area in any web application, and then recognize that
authenticated user across other web applications in the same environment without
requiring the user to log in again.
Current Setting: not set
Default Setting: false
com.ibm.osg.webcontainer.converter
If this property is set to true the WebContainer will attempt to map an encoding
according to the language specified in the http request header. This encoding will
be used to read string data passed in the http request.
Current Setting: not set
Default Setting: false
com.ibm.osg.webcontainer.converter.properties
If com.ibm.osg.webcontainer.converter is set to ″true″ and
com.ibm.osg.webcontainer.converter.properties is set to a file name, then the file
name specified is used to override the automatic mappings the Web Container uses
according to the language specified in the http request header. The
converter.properties file must contain key=value pairs where the key is the
encoding you want to override and the value is the encoding you want to use
instead.
Current Setting: none
Default Setting: converter.properties
Using the WCTME EO developer applications
Using the Platform Manager
The Platform Manager tool is a troubleshooting tool which can be used to view the
applications and features installed on the WCTME EO runtime. In case a particular
application or feature does not function as desired the user can use the tool to
view the status of application/feature dependencies (plug-ins) and start or stop
them as desired.
The Platform Manager provides a single view which lists the installed applications,
web applications, features and runtime plug-ins.
Installing the Platform Manager
The Platform Manager tool is available on the update site provided with the
installation media. Perform the following procedure to install the Platform
Manager troubleshooting tool:
1. Select Application > Open > Platform Manager.
2. Start WCTME EO.
3. Select Application > Install.
4. If you have been provided a CD, or network attached drive, then select New
Local Site.
Reference information 53

a. Browse to the updates\developer directory.
b. Click OK. 5. If you do not have the media or a network attached drive, you will need to
obtain the Update Site address from your IT personnel.
a. Select New Remote Site.
b. Add a name to identify the site, and enter the URL that you were
provided.
c. Click OK. 6. In the Sites to include in search list, select only the site that you just added,
then click Next.
7. From the list presented, select the Target Platform Tools feature, then click
Next.
8. Read the license terms provided, and if acceptable, then click Next.
9. Select the appropriate installation site (this will default to WCTME_EO_RUNTIME
\apps\eclipse).
10. Click Finish.
11. When prompted to install features that are unsigned, click Install.
12. When prompted to restart your workbench, save your work and select Yes.
Configuration view
The Configuration view provides the user with the list of plug-ins installed on the
runtime. For each plug-in the following information is provided - the plug-in ID,
status of the plug-in, the plug-in name and the location where the plug-in was
installed. After you have installed the Platform Manager tool, starting and
stopping any plug-in is easy:
1. Select Plugins.
2. Select the plug-in to start or stop.
3. To start a plug-in, click the Start button.
If the plug-in is in the Resolved state it will be started and the status of the
plug-in will be updated to Active to reflect the change. If an error occurs during
plug-in activation the Platform Manager tool will display an error message to
inform the user and log the error to the platform log.
4. To stop a plug-in, click the Stop button.
If the plug-in is in the Active state it will be stopped and the status of the
plug-in will be updated to Resolved to reflect the change. If an error occurs
during plug-in de-activation the Platform Manager tool will display an error
message to inform the user and log the error to the platform log.
Note: There are certain plugins which, if stopped, will cause the WCTME EO
runtime to not function correctly. It is recommended that users not stop the
following set of plug-ins:
v org.eclipse.core.runtime ″Core Runtime″
v org.eclipse.core.resources ″Core Resource Management″
v org.eclipse.osgi ″OSGi System Bundle″
v org.eclipse.osgi.services ″OSGi Release 3 Services″
v org.eclipse.osgi.util ″OSGi R3 Utility Classes″
v org.eclipse.ui ″Eclipse UI″
v org.eclipse.ui.forms ″Eclipse Forms″
v org.eclipse.ui.workbench ″Workbench″
54 Workplace Client Technology, Micro Edition: WCTME Enterprise Offering Application Developer’s Guide
v org.eclipse.jface ″JFace″
v org.eclipse.swt ″Standard Widget Toolkit″
v org.eclipse.update.core ″Install/Update Core″
v org.eclipse.update.ui ″Install/Update UI″
v org.eclipse.update.configurator ″Install/Update Configurator″
The Configuration view also provides the user with the list of applications, web
applications and features installed on the runtime. For each application or feature
installed the tool will also list the plug-in dependencies and allow the user to start
or stop plugins as desired. Viewing the list of plug-in dependencies for an installed
application, web application or feature is easy:
1. Select Applications (for non-web applications), Web Applications (for web
applications) or Features (for features)
2. Expand the tree to view the list of applications and web applications. For
features, the Platform Manager tool will list the plugins provided by the
feature.
3. Select the application or feature plug-in to view the list of application/feature
dependencies.
4. To start a plug-in, click the Start button.
If the plug-in is in the Resolved state it will be started and the status of the
plug-in will be updated to Active to reflect the change. If an error occurs during
plug-in activation the Platform Manager tool will display an error message to
inform the user and log the error to the platform log. The platform log is
located into the WCTME_EO_RUNTIME\workspace\.metadatadirectory.
5. To stop a plug-in, click the Stop button.
If the plug-in is in the Active state it will be stopped and the status of the
plug-in will be updated to Resolved to reflect that. If an error occurs during
plug-in de-activation the Platform Manager tool will display an error message
to inform the user and log the error to the platform log.
Reference information 55

56 Workplace Client Technology, Micro Edition: WCTME Enterprise Offering Application Developer’s Guide

Sample Applications
Order Entry is a sample three-tier application that demonstrates some of the
components and capabilities of the Enterprise Offering platform. This sample uses
the Web Container, Servlet 2.3, Configuration Admin, MQ Everyplace, JDBC, DB2
Everyplace, Rich Client views, and Preference Pages.
Sample applications including source are provided on the Enterprise Offering (EO)
platform distribution. The User Update Site is provided to allow installation of a
Feature that includes the binaries for the Order Entry application. The Developer
Update Site provides source for the version of the application that provides for a
user interface implemented using perspectives and views. The source for the web
application version is provided with the IBM WebSphere Studio suite.
The Order Entry application has a server component to simulate the server
infrastructure of an enterprise. The server component is provided with both the
WebSphere Studio and Eclipse 3.0.1 SDK sample versions. However, the server
component is not provided as a prepackaged bundle for use within the EO
platform
This sample program illustrates the following scenario. A delivery employee drives
a soda truck to three different customers: SpeedyMarket, Marine Mart, and Quick
Stop. As he travels to each of these locations to offload his stock, he determines
how many bottles and cans of soda to order for the next week and enters that
information into his device. The order is stored within the local DB2 Everyplace
database, and also queued for transmission to the server using MQ Everyplace.
The order will be transmitted to the server only when a network connection exists
and the server is ready to receive, otherwise it will be held on the device. Once the
order is sent from the device to the backend server, it is then confirmed with a
message back to the employee’s device.
© Copyright IBM Corp. 2004 57
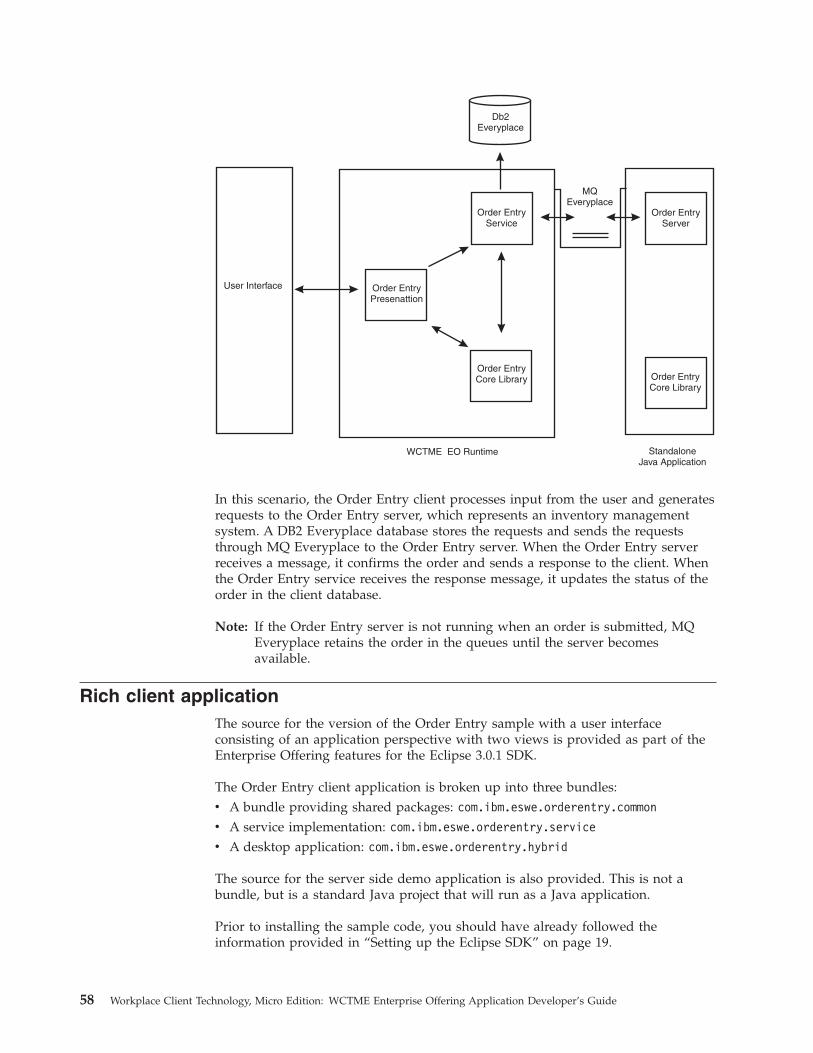
User Interface
WCTME EO Runtime
Order EntryPresenattion
Order EntryService
Order EntryCore Library
Order EntryServer
Order EntryCore Library
Db2Everyplace
StandaloneJava Application
MQEveryplace
In this scenario, the Order Entry client processes input from the user and generates
requests to the Order Entry server, which represents an inventory management
system. A DB2 Everyplace database stores the requests and sends the requests
through MQ Everyplace to the Order Entry server. When the Order Entry server
receives a message, it confirms the order and sends a response to the client. When
the Order Entry service receives the response message, it updates the status of the
order in the client database.
Note: If the Order Entry server is not running when an order is submitted, MQ
Everyplace retains the order in the queues until the server becomes
available.
Rich client application
The source for the version of the Order Entry sample with a user interface
consisting of an application perspective with two views is provided as part of the
Enterprise Offering features for the Eclipse 3.0.1 SDK.
The Order Entry client application is broken up into three bundles:
v A bundle providing shared packages: com.ibm.eswe.orderentry.common
v A service implementation: com.ibm.eswe.orderentry.service
v A desktop application: com.ibm.eswe.orderentry.hybrid
The source for the server side demo application is also provided. This is not a
bundle, but is a standard Java project that will run as a Java application.
Prior to installing the sample code, you should have already followed the
information provided in “Setting up the Eclipse SDK” on page 19.
58 Workplace Client Technology, Micro Edition: WCTME Enterprise Offering Application Developer’s Guide
Creating the projects
The sample source is provided within ZIP files residing in a plug-in. In order to
view and run the provided source code, you will need to create projects to import
the source code. Even though you will be creating bundles and a plug-in that
would be deployed, for purposes of importing the Java source, you will use a Java
project since it will not create excess files that will need to be replaced.
1. Select File > New > Project > Java Project.
2. Enter a project name com.ibm.eswe.orderentry.common.
3. Select the options Create project in workspace and Use project folder as root
for sources and class files.
4. Select Finish to complete the project creation.
Repeat steps 1 through 4 for the Java projects:
v com.ibm.eswe.orderentry.service
v com.ibm.eswe.orderentry.hybrid
v com.ibm.eswe.orderentry.server
Importing the source
To import the source, perform the following procedure:
1. Select the project com.ibm.eswe.orderentry.common.
2. Select File > Import..., then Zip File, then click Next.
3. Browse to your installation directory for the Eclipse 3.0.1 SDK, then select
plugins\com.ibm.eswe.orderentry.src_5.8.1\com.ibm.eswe.orderentry.common.src.zip.
a. Select the option Overwrite existing resources without warning.
b. Select Finish. 4. Select the project com.ibm.eswe.orderentry.service.
5. Select File > Import..., then Zip File.
6. Browse to your installation directory for the Eclipse 3.0.1 SDK, then select
plugins\com.ibm.eswe.orderentry.src_5.8.1\com.ibm.eswe.orderentry.service.src.zip.
a. Select the option Overwrite existing resources without warning.
b. Select Finish. 7. Select the project com.ibm.eswe.orderentry.hybrid.
8. Select File > Import..., then Zip File.
9. Browse to your installation directory for the Eclipse 3.0.1 SDK, then select
plugins\com.ibm.eswe.orderentry.src_5.8.1\com.ibm.eswe.orderentry.hybrid.src.zip.
a. Select the option Overwrite existing resources without warning.
b. Select Finish.10. Select the project com.ibm.eswe.orderentry.server.
11. Select File > Import..., then Zip File.
12. Browse to your installation directory for the Eclipse 3.0.1 SDK, then select
plugins\com.ibm.eswe.orderentry.src_5.8.1\com.ibm.eswe.orderentry.server.src.zip.
a. Select the option Overwrite existing resources without warning.
b. Select Finish.
Running the client application
In order to run the client application, you will first set up a Run-time Workbench
configuration:
Sample Applications 59
1. Select Run > Run...
2. Select Run-time Workbench, then New.
3. Enter a name for your configuration, such as Order Entry.
4. Select the Plug-ins tab.
5. Select Choose plug-ins and fragments to launch from the list
6. Verify that your projects, com.ibm.eswe.orderentry.common,
com.ibm.eswe.orderentry.service, and com.ibm.eswe.orderentry.hybrid are
selected.
7. Switch to the Environment tab. You will need to provide access to the native
libraries for components. Select New to create a new variable.
a. Enter PATH for the variable name.
b. On Windows, add the following as the value:
WCTME_EO_RUNTIME\eclipse\plugins\com.ibm.db2e.win32_8.2.0\os\win32\x86;
WCTME_EO_RUNTIME\eclipse\plugins\com.ibm.mobileservices.isync.win32_8.2.0
\os\win32\x86
c. On Linux, add the following as the value:
WCTME_EO_RUNTIME\eclipse\plugins\com.ibm.db2e.linux_8.2.0\os\linux\x86;
WCTME_EO_RUNTIME\eclipse\plugins\com.ibm.mobileservices.isync.linux_8.2.0
\os\linux\x86
Where WCTME_EO_RUNTIME is replaced by the actual directory name.8. Select Run to launch the workbench.
Once your workbench has started, select Application > Open > Order Entry Rich
Client Application to open the application perspective. Create orders in the
Submit Order view, and view the order status in the Order Status view.
Running the server application
The server application will cause the order status to be changed from Queued to
Confirmed in the Order Status view. While your workbench is running, perform
the following steps:
1. Select Run > Run...
2. Select Java Application, then New.
3. Enter a name for the configuration, such as Order Entry Server.
4. Select Browse to identify the Project. Select com.ibm.eswe.orderentry.server
from the list.
5. Select Search... to identify the Main Class.
6. Select Server from the displayed list to select
com.ibm.eswe.sample.orderentry.server.Server as the class containing the main
method.
7. Select Run to start the application.
The Order Entry server application will take a few seconds to start, and prepare to
begin processing messages. Once you see the message:
DEBUG -- BaseMQeTransport: Transport thread started
the Server application is ready to begin handling messages. If you have already
created Orders, you will see the messages in the Server application console:
DEBUG -- PROCESS ORDER
60 Workplace Client Technology, Micro Edition: WCTME Enterprise Offering Application Developer’s Guide

Return to the workbench showing the Order Status views. Select the Refresh
button to update the order status. You will see the following messages in the
Run-time workbench console:
DEBUG -- RESPONSE RECEIVED
as response messages are received from the Server application.
Creating installation artifacts for distribution
You have imported the application source, and created plug-ins for use within the
runtime environment, and have launched that environment from the workspace
using the PDE launch configuration.
The following steps will create a feature, and an update site, that would provide
the mechanism for installing the application into an existing client runtime.
Creating a feature containing the application plug-ins
In the workspace in which you have already creating the application plug-ins,
perform the following procedure:
1. Select File > New > Project > Plug-in Development > Feature Project.
2. Enter the Project name com.ibm.eswe.orderentry, then click Next.
3. Using the Feature Properties panel:
a. Replace the Feature Name using the value Order Entry.
b. Add a Feature Provider, using the value IBM.
c. Select Next.4. Using the Referenced Plug-ins and Fragments panel:
a. Select the plug-ins:
v com.ibm.eswe.orderentry.common
v com.ibm.eswe.orderentry.service
v com.ibm.eswe.orderentry.hybrid
b. Select Finish.
Creating an update site
To create an update site, perform the following procedure:
1. Select File > New > Project > Plug-in Development > Update Site Project.
2. Enter a Project Name, such as Sample, then click Finish.
3. If not opened automatically, open the site.xml file within the Sample project.
4. Click the Add... button to add a feature.
5. Select the com.ibm.eswe.orderentry feature, then click Finish.
6. Drag the com.ibm.eswe.orderentry feature from Features to Build (on the left)
to Features to Publish (on the right).
7. Save the file.
8. Select Build All.
Install the features from your update site
To install the features from your update site, perform the following procedure:
1. Start the WCTME EO Runtime.
2. Select Application > Install.
3. Select New Local Location...
Sample Applications 61
4. Browse to your workspace directory, and then the Sample directory
(corresponding to the Update Site Project that you just created), then click OK.
5. Select the site that you just created.
6. Select Next.
7. Select the Order Entry feature, then click Next.
8. Select I accept the terms in the license agreements, then click Next.
9. Select Finish.
At this point, you have created plug-ins, features, and an update site, and have
installed the feature into the runtime. During creation of the feature and update
site projects, the default values were used. When creating your own plug-in,
feature and update site values, you should change the values, adding the necessary
values for copyright, licensing, and separating translatable text to facilitate
translation.
Web application
The Web Application version of the Order Entry sample is provided with the
WebSphere Studio features. If you have not already installed WebSphere Studio
and the samples, follow the information in “Setting up WebSphere Studio” on page
15. The instructions contained in the following sections refer to WebSphere Studio.
This sample contains two projects with four components. The first project, Order
Entry Service Sample, contains a core library bundle, a service bundle, and the
server-side application. The second project, Order Entry Web Application, contains
the presentation Web application.
Installing the projects
Perform the following procedure to create the Order Entry Service and Order Entry
Web Application projects:
1. Select File > New > Example... > Extension Services > Order Entry Web
Application. Click Next.
2. Click Finish.
Note: If prompted to switch to the SMF perspective, click OK.
In order to prepare the bundles for use within the EO platform, you will need to
update the bundles MANIFEST.MF files to include a Bundle-SymbolicName.
Note: In the following steps, when editing the MANIFEST.MF files, you must use the
Bundle Manifest Editor. If the file opens with the JAR Dependency Editor,
close the editor, then select the file, right click, then select Open With >
Bundle Manifest Editor.
1. Edit the Order Entry Service\common\META-INF\MANIFEST.MF file. Expand the
User Defined Manifest Items section, then select Add... to add a new property.
2. Enter Bundle-SymbolicName in the left entry field, and a value of
com.ibm.eswe.orderentry.common in the right entry field.
3. Edit the Order Entry Service\service\META-INF\MANIFEST.MF file. Expand the
User Defined Manifest Items section, then select Add... to add a new property.
4. Enter Bundle-SymbolicName in the left entry field, and a value of
com.ibm.eswe.orderentry.service in the right entry field.
62 Workplace Client Technology, Micro Edition: WCTME Enterprise Offering Application Developer’s Guide

5. Edit the Order Entry Web Application\Extension Services
Content\META-INF\MANIFEST.MF file. Expand the User Defined Manifest Items
section, then select Add... to add a new property.
6. Enter Bundle-SymbolicName in the left entry field, and a value of
com.ibm.eswe.orderentry.webapp in the right entry field.
Exporting the bundles
For the purposes of this example, we will create the plug-ins directly within the
plugins directory. In a typical installation, an update site will be created, and the
Update Manager capabilities from the EO platform will be used to install the
plug-ins.
1. Create the directories:
v com.ibm.eswe.orderentry.common_5.7.0
v com.ibm.eswe.orderentry.service_5.7.0
v and com.ibm.eswe.orderentry.webapp_5.7.0 in the
WCTME_EO_RUNTIME/plugins directory 2. Create the plug-in jars from the Order Entry Service project. elect the Order
Entry Service project, right click, then select SMF > Submit Bundle...
a. Select JARs.
b. Click the Add... button to create a new Export Target.
c. Add the directory WCTME_EO_RUNTIME/plugins.
d. Click OK.
e. Select the WCTME_EO_RUNTIME/plugins directory in the Export Target List.
f. Click OK.
g. Move OrderEntryCommon+5_7_0.jar from the plugins directory to the
plugins/com.ibm.eswe.orderentry.common_5.7.0 directory.
h. Move OrderEntryService+5_7_0.jar from the plugins directory to the
plugins/com.ibm.eswe.orderentry.service_5.7.0 directory. 3. From WebSphere Studio, locate the Order Entry Service\common\META-INF
directory. Right click, select Export... > File System. Enter the directory
WCTME_EO_RUNTIME\eclipse\plugins\com.ibm.eswe.orderentry.common_5.7.0.
4. Edit the MANIFEST.MF file that now exists in the
com.ibm.eswe.orderentry.common_5.7.0\META-INF directory, and add the line:
Bundle-Classpath: OrderEntryCommon+5_7_0.jar.
5. From WebSphere Studio, locate the Order Entry Service\service\META-INF
directory. Right click, select Export... > File System. Enter the directory
WCTME_EO_RUNTIME\eclipse\plugins\com.ibm.eswe.order.entry.service_5.7.0.
6. Edit the MANIFEST.MF file that now exists in the
com.ibm.eswe.orderentry.service_5.7.0\META-INF directory, and add the line:
Bundle-Classpath: OrderEntryService+5_7_0.jar.
7. From WebSphere Studio, locate the Order Entry Web Application project.
Select the project, right click, select Export ... > WAB file, then enter the
location:
WCTME_EO_RUNTIME\eclipse\plugins\com.ibm.eswe.orderentry.webapp_5.7.0
\OrderEntryWebApp.jar
.
8. Locate the Order Entry Web Application\Extension Services
Content\META-INF directory. Right click, then select Export ... > File System,
Sample Applications 63

and provide the location
WCTME_EO_RUNTIME\eclipse\plugins\com.ibm.eswe.orderentry.webapp_5.7.0.
9. Edit the MANIFEST.MF file that now exists in the
com.ibm.eswe.orderentry.webapp_5.7.0\META-INF directory, and add the line:
Bundle-Classpath: OrderEntryWebApp.jar.
10. Create the file plugin.xml in the directory
com.ibm.eswe.orderentry.webapp_5.7.0containing the following contents:
<?xml version="1.0" encoding="UTF-8"?>
<?eclipse version="3.0"?>
<plugin>
<extension
point="com.ibm.eswe.workbench.WctWebApplication">
<DisplayName>Order Entry Web Application</DisplayName>
<Local>true</Local>
<Location>/OrderEntry</Location>
</extension>
</plugin>
Running the application
The contents of the plugin.xml that you created provide information to the
desktop perspective containing the launch information for the Order Entry Web
Application.
From the Desktop perspective, locate the Order Entry Web Application, and select
the entry. A browser perspective will open and display the first page of the Order
Entry Web Application.
Starting the server
The Order Entry server is a standalone Java application. Complete the following
steps to set up a launch configuration for the program that starts the Order Entry
server:
1. In the SMF perspective, select Run > Run... to display the Launch
Configurations window.
2. Select Java Application. Click New. Provide a name for the application.
3. If the Project field is empty, select Browse and choose Order Entry Service
Project.
4. Click Search next to the Main class field.
5. In the Choose Main Type window, select Server and click OK.
6. Select the JRE tab.
7. Select an applicable J9 JVM to run this application. Choose either J9 2.2.0 or
Extension Services Generated JRE (JCL Foundation).
8. Click Run.
Notes:
1. A J9 console window might display after you click Finish. If a J9
console window is displayed, minimize the window and return to
WebSphere Studio. If you close the window, the server terminates and
the sample application will not function correctly.
2. If an Error panel displays with the message ″Library JCL Foundation 1.0
[j2me/2.2.0/foundation10] is not available on VM vmname″, then a J9
JVM is not being used to run the application. Return to the Launch
Configuration window for this application and select a J9 JVM.
64 Workplace Client Technology, Micro Edition: WCTME Enterprise Offering Application Developer’s Guide

Administrator Tasks
Silent installation and uninstallation of WCTME Enterprise Offering
Installation
To run a silent, unattended installation, first copy the install options file
(install.template) from the install directory on the installation media to your
system and modify the properties contained in the file. Then execute the setup
executable:
For Windows: setupwctmewin32.exe -options optionsfile -silent
For Linux: setupwctmelinux.bin -options optionsfile -silent
Uninstallation
To run a silent, unattended uninstallation, first copy the uninstall options file
(uninstall.template) from the install directory on the installation media to your
system and modify the properties contained in the file. Then execute the setup
executable:
For Windows: WCTME_EO_RUNTIME/_uninst/uninstaller.exe -options optionsfile
-silent
For Linux: WCTME_EO_RUNTIME/_uninst/uninstaller.bin -options optionsfile
-silent
Using Tivoli Device Manager with the Enterprise Management Agent
There are a set of steps that are required to allow the Enterprise Management
Agent provided by the Enterprise Offering to connect to WebSphere Everyplace
Device Manager (version 5.0 or later). They include:
v Install one of the products containing Tivoli Device Manager
v Upgrade the Enterprise Management Agent plug-in used by the Tivoli Device
Manager
v Configure the Enterprise Management Agent on the client platforms
Installing Tivoli Device Manager
Obtain an installation package for either of the referenced products, and follow the
documented installation procedures.
Upgrading Tivoli Device Manager
Using the Enterprise Management Agent provided with the Enterprise Offering
platform requires updates to the Tivoli Device Manager. Two updates are provided.
The first update provides support for the Enterprise Management Agent included
as part of the Enterprise Offering platform. The second update provides updates to
the NativeAppBundle tool.
The required updates reside in the wedm directory on the installation CD or
downloaded zip file.
© Copyright IBM Corp. 2004 65

Follow these instructions on your Tivoli Device Manager system with the new
software.
1. Start a Command Prompt.
2. Stop the IBM WebSphere Application Server instance that is running DMS.
From the WebSphere Application Server bin dir ( A typical installation directory
on Windows may be c:\Program Files\WebSphere\AppServer\bin) run the
following command:
stopserver DMS_AppServer -username <username>
-password <password>
3. Navigate to the directory for WEDM (the default installation directory on
Windows is typically C:\Program Files\TivDMS15).
4. Change to the bin directory.
5. Run the following command to install the updated plug-in:
compinstall -file d:\wedm\SimpleOSGiPluginComponent.jar
Notes:
a. d: refers to the CD drive. If you have downloaded and extracted a
zip file, d: refers to the beginning path of extracted files.
b. The WebSphere Application Server instance that is running DMS
will be restarted as part of the compinstall process.Output from running compinstall on a Windows system:
Note: WEDM was installed in the d:\programs\TivDMS15 directory, and the
WebSphere Application Server was installed in
d:\websphere_v5\appserver directory.d:\programs\TivDMS15\bin>compinstall -file d:\wedm\SimpleOSGiPluginComponent.jar
Updated trace mask to: TYPE_ERROR_EXC TYPE_LEVEL1
Deploying component SimpleOSGiPluginComponent 1.5
DYM4231I Device class -register command completed successfully
DYM4303I -register command completed successfully.
DYM4303I -register command completed successfully.
DYM4303I -register command completed successfully.
DYM4032I Job class -register command completed successfully
DYM4032I Job class -register command completed successfully
DYM4032I Job class -register command completed successfully
DYM4032I Job class -register command completed successfully
DYM4032I Job class -register command completed successfully
DYM4032I Job class -register command completed successfully
DYM4032I Job class -register command completed successfully
DYM4032I Job class -register command completed successfully
DYM4032I Job class -register command completed successfully
DYM4303I -register command completed successfully.
DYM4159I Software Type -register command completed successfully
DYM4159I Software Type -register command completed successfully
DYM4159I Software Type -register command completed successfully
DYM4159I Software Type -register command completed successfully
Component SimpleOSGiPluginComponent 1.5 installed successfully.
ADMU0116I: Tool information is being logged in file
d:\websphere_v5\appserver\logs\DMS_AppServer\startServer.log
ADMU3100I: Reading configuration for server: DMS_AppServer
ADMU3200I: Server launched. Waiting for initialization status.
ADMU3000I: Server DMS_AppServer open for e-business; process id is 3700
IBM WebSphere Application Server, Release 5.0
WebSphere Plugin Configuration Generator
Copyright IBM Corp., 1997-2002
66 Workplace Client Technology, Micro Edition: WCTME Enterprise Offering Application Developer’s Guide

PLGC0013I: Generating server plugin configuration file for all of the
servers in cell MyCell.
PLGC0005I: Plugin Configuration file = d:\websphere_v5\appserver\config
\cells\plugin-cfg.xml
6. Stop the IBM WebSphere Application Server instance that is running the
DMS_AppServer enterprise application. See step 2 on page 66 above.
7. Run the following command to install the updated plug-in:
compinstall -file d:\wedm\WCTME_EO_Updates.jar
Using the Tivoli Device Manager
The following sections make use of the Tivoli Device Manager console and
NativeAppBundle tools. The steps explain the specific steps to achieve these tasks.
For more information on using these tools, refer to the Tivoli Device Manager
InfoCenter.
Configuring the Enterprise Management Agent
The Enterprise Management Agent is provided with the Enterprise Offering that
enables the platform to be managed remotely using a Tivoli Device Manager.
The Enterprise Management Agent uses the Sample Account to connect to the
server. Configuration parameters allow for specification of the Device User Name
and Device User Password to be used to connect to the server. An optional server
password may also be specified. The Device User Name and Device User
Password will be authenticated using the security mechanisms configured in the
WebSphere Application Server.
Note: WCTME EO does not support multiple accounts. The WEDM server
provides functionality to allow a user to change the default account id using
a Custom Command. If it is changed using this command, it will cause the
Enterprise Management Agent to malfunction.
The address of the server providing the device management capabilities is
configurable on the client. Connection to the Tivoli Device Manager is through the
http protocol only using Basic Authentication. Agents will connect to the server
using the servlet /dmserver/SyncMLDMServletAuthRequired.
To enable the Enterprise Management Agent on client systems to connect to the
Tivoli Device Manager, the agent requires configuration. Configuration can be
accomplished using the Manage > Preferences > Enterprise Management Agent
dialog.
Although Import... and Export... buttons are provided on the Preferences dialog,
changes to the Agent configuration cannot be imported or exported using these
buttons.
Once configured, agent configuration information, including the Device ID, can be
viewed using Help > About WCTME Enterprise Offering > Configuration
Details.
Once the Enterprise Management Agent is configured, the Application > Install
and Manage > Application Management dialogs are disabled.
Administrator Tasks 67
Changing the Enterprise Management Agent properties
Once the Enterprise Management Agent has been successfully configured and has
connected to the Tivoli Device Manager, users are prevented from modifying the
properties associated with the agent. You can change the agent properties using
custom jobs. These steps are performed at the Tivoli Device Manager system using
the DM Console application.
Guided method
The following steps describe how to change properties for the agent, making use of
multiple jobs to perform this task. Because there are multiple jobs, these steps may
take longer, but more information is pre-populated in the dialogs. These steps also
make changes only to a single device. To apply changes to multiple devices
simultaneously, use the Advanced Method listed below. These steps illustrate
changing the ./OSGiAgent/PollingInterval value.
1. Select Devices.
2. Select Use New Query and Return anything as your search criteria.
3. Select OK.
4. The DM console will show a list of enrolled devices.
5. Select your device, right click and select Submit Job.
6. Select Next.
7. Select the Job Type as Node Discovery (Use default settings for all the other
job attributes).
8. Select Next.
9. Select Add Group.
10. Enter ./OSGiAgent as the Target URI.
11. Enter a Search depth of 5.
12. Select Next.
13. Select OK.
14. The job has been submitted. Select Close.
15. You will need to wait for the job to complete (this will depend upon the
configured polling interval). Once the job has completed, select the device,
then click View Inventory...
16. Then select Management Tree.
17. Select the entry with the URI: ./OSGiAgent/PollingInterval.
18. Select Submit Job.
19. Select Next.
20. Leave the defaults as supplied in the panel, then select Next.
21. Enter 1 for the Command Number Field.
22. Set the Data value to 00:02.
23. Select Next.
24. Select OK.
25. Select Close.
26. Select Close.
27. Wait for the job to complete.
Advanced method
The following steps describe how to change properties for the agent, but allow you
to change the properties for multiple devices. Less information is pre-populated in
the dialogs.
68 Workplace Client Technology, Micro Edition: WCTME Enterprise Offering Application Developer’s Guide

These steps illustrate changing the ./OSGiAgent/PollingInterval value.
1. Select File > Submit Job... > All New...
2. Select OSGi as the device class.
3. Select Currently Enrolled for the status of the target devices, since you are
configuring agent specific properties.
4. Select Next.
5. Select the Job Type as Custom Command (use default settings for all other job
attributes).
6. Select Next.
7. Select Replace Command, then click Add Group.
8. Enter 1 as the Command Number.
9. Enter ./OSGiAgent/PollingInterval as the Target URI.
10. Enter 00:02 as the Data.
11. Select Next.
12. Select OK.
13. Select Close.
Disabling the Enterprise Management Agent
Once the Enterprise Management Agent has been successfully configured and has
connected to the Device Manager, the Application > Install and Manage >
Application Management dialogs will be disabled. If you need to disable the agent
from running, you will need to change the agent properties. Follow the steps
described in “Changing the Enterprise Management Agent properties” on page 68
to complete this task.
Change the value for the property name ./OSGiAgent/PollingEnabled to false.
If you are unable to successfully establish communications with a device to disable
the agent, but still wish to do so, delete the following files on the client system:
v WCTME_EO_RUNTIME\eclipse\configuration\OSGiAgentTree.bin
v
WCTME_EO_RUNTIME\workspace\.metadata\.plugins\com.ibm.eswe.osgiagentextension\
_OSGisyncSuccessOnce
All agent properties will be removed if these files are deleted.
Using the NativeAppBundle Tool
The NativeAppBundle tool is provided as part of Tivoli Device Manager
distribution. Since the Tivoli Device Manager distributes only bundles when using
the Enterprise Management Agent, the NativeAppBundle tool provides the
capability to provide a bundle wrapper for a set of files that are to be installed on
the target device.
To distribute software to the Enterprise Offering platform, we recommend using
the NativeAppBundle tool to wrap an Eclipse update site. When the created
bundle is received on the client by the agent and installed, it invokes the Update
Manager to install the features defined in the update site. Since the distributed
bundle contains target file names, you will need to create separate distribution
bundles for Win32 and Linux targets.
The following steps are required to create and distribute an update site:
Administrator Tasks 69

1. Create an Update Site in a directory on your system (a developer or software
vendor should provide this for you).
2. Run the NativeAppBundle tool to create the bundle.
3. Register the bundle with the Tivoli Device Manager.
4. Create software distribution jobs to distribute the bundle.
The section “Installing the Order Entry Sample using Tivoli Device Manager” on
page 71 provides step-by-step instructions to illustrate these steps.
Note: Each bundle that you define using the NativeAppBundle tool should use a
unique bundle name. For example, if you have created a distribution bundle
with a BundleName of MyApp, containing version 1.0.0 of your application, you
should use a different BundleName (for example, MyApp_v2) when creating a
distribution bundle containing version 2.0.0. This refers only to the
BundleName specified as parameters to the NativeAppBundle program, not to
the features or plugins contained in the update site.
The following information contains specific and recommended settings for using
the NativeAppBundle tool to distribute software to the Enterprise Offering
platform.
NativeAppBundle -BundleName=bundle_name
-InputDirectory=update_site_directory
-InstallDirectory=temporary_ install_directory
-BuildDirectory=target_output_directory
-Eclipse=target_extension_directory
-JarName=jarfilename
-BundleVersion=bundleVersion
-CleanupAfterInstall=yes
-RemoveOnUninstall=no
Notes:
1. bundle_name is a name for the bundle that you define. The bundle name
may not contain spaces.
2. update_site_directory is the update site directory.
3. temporary_install_directory is the name of a directory that will be
used on the client, and is operating system specific. This value may
contain a variable reference that will be replaced on the client during
bundle installation. The manifest file generated for this bundle uses % as
the delimiter surrounding the variable name. The search order for the
variable value is the operating system environment, followed by Java
System properties.
Note that if you use the Windows command line to specify a variable
name (with % delimiters), you will need to add escape characters. For
example, to use the value of the environment variable MY_TEMP_DIR on
the client system, you would need to specify
-InstallDirectory=^%^%MY_TEMP_DIR^%^%. If you use the -Parameters
option to specify a text file containing the options, you do not need to
escape the % character (you would specify only
-InstallDirectory=%MY_TEMP_DIR%).
4. target_extension_directory is the name of the Eclipse extension
directory into which the features will be installed. The special value
default will select the directory specified by the client configuration
property com.ibm.osg.service.deviceagent.nativeinstall.default. For
example, to use the default apps directory in WCTME EO, you would
70 Workplace Client Technology, Micro Edition: WCTME Enterprise Offering Application Developer’s Guide

specify c:\Program Files\IBM\WCTME_EO\apps. This directory is
operating system specific and case sensitive.
5. target_output_directory is the location where the created JAR should
be written.
6. jarfilename is a file name to be used for the Jar (optional, default is the
bundle_name will be used for the JAR.
7. bundleVersion is the version for the JAR (optional, default is 1.0.0).
If -Eclipse is used, the target bundle is targeted specifically for installation into an
Eclipse extension framework. Usage of Install and Uninstall Programs is not
supported for Eclipse targets.
Installing the Order Entry Sample using Tivoli Device Manager
The steps in the sections below provide an example of distributing software to the
EO platform using the Tivoli Device Manager. Prior to beginning the steps, you
will need to ensure that you have satisfied the following pre-requisites:
v You have installed the Tivoli Device Manager server using one of the available
product installations.
v You have applied the updates as described in section Upgrading the Tivoli
Device Manager server.
v You have an HTTP (or FTP) Server available on which you can put and get files.
v You have created a user identity that can be used by the agent to enroll with the
Tivoli Device Manager server.
v You can start the Device Manager Console program.
v You have an EO platform installed on a system that you are able to use for
testing.
v You have the installation media that provides the WCTME EO platform. The
distribution task will reuse the JARs provided on the update site.
The following tasks guide you through the distribution of the Order Entry Sample
application using the Tivoli Device Manager:
1. “Enrolling your WCTME EO device with the Tivoli Device Manager”
2. “Registering Order Entry for distribution via the NativeAppBundle tool” on
page 73
3. “Creating the Software Distribution job for the Order Entry feature” on page 73
4. “Running the Order Entry sample applications” on page 74
Note: There are two users that are identified in the subsequent instructions. The
first user identity is referred to as client01 with a password client01. This is
the identity that the Enterprise Management Agent will use to connect to the
Tivoli Device Manager.
The second user identity is referred to as dmadmin with a password
dmadmin. This is the identity that an administrator would use to access the
DM Console.
In both cases, replace the userid and password with a userid and password
appropriate to your environment.
Enrolling your WCTME EO device with the Tivoli Device Manager
This section discusses enrolling your WCTME EO device with Tivoli Device
Manager from client side and then server side.
Administrator Tasks 71

Client side:
1. Start the EO platform.
2. Select Manage > Preferences > Enterprise Management Agent.
3. Select the Enable Enterprise Management Agent checkbox.
4. A dialog box will be pop up asking you to confirm that you want to enable the
Enterprise Management Agent. Select OK.
5. Enter the following parameter settings:
a. Device User Name: client01
b. Device User Password: client01
c. Re-enter Device User Password: client01
d. Server IP Address: <DMS server hostname>
e. Polling Interval: 1 minute
By setting the polling interval to this time frame, the platform will
repeatedly attempt to access the Device Manager to check for jobs to do.
This will minimize the wait time as you follow these steps. However, in a
production environment, you will need to establish appropriate polling
parameters for your clients.
The Enterprise Management Agent contacts the WEDM server based on a
start and stop polling window. When the Enterprise Management Agent is
enabled for the first time it will attempt to contact the WEDM server
regardless of the polling window settings. Each subsequent restart, the
agent will not contact WEDM if it is outside the polling window.6. Click OK.
The platform will begin the process of connecting to the Device Manager and
enrolling the agent/platform with the server.
Once the agent has successfully enrolled with the server, the Enterprise
Management Agent preferences panel will no longer be editable. A message will
also be added to the EO log file:
Connection to the DMS server was successful. Please contact the DMS administrator
if you wish to disable Enterprise Management Agent.
Server side: Once the agent has successfully enrolled, the device will appear in
the Device Manager.
1. Start the DM console.
2. Login into the DM console using the following set of parameters:
a. User ID: dmadmin
b. Password: dmadmin
c. Device Manager Server: <DM server hostname>
3. Select Devices.
4. Select Use New Query and select Return anything as your search criteria. Click
OK.
5. The DM console will show a list of enrolled devices.
6. Confirm that the device ID of the WCTME EO client is listed in the DM
Console. On the EO platform, you can view the device ID in the Help > About
WCTME Enterprise Offering > Configuration Details.
72 Workplace Client Technology, Micro Edition: WCTME Enterprise Offering Application Developer’s Guide

Registering Order Entry for distribution via the NativeAppBundle
tool
Follow these steps on the Tivoli Device Manager system to create the software
bundle.
1. Change to the <WEDM install directory>\bin directory.
2. Run the command to create your software bundle.
NativeAppBundle -BundleName=Order_Entry_Feature
-InputDirectory=d:\updates\runtime
-InstallDirectory=c:\Program Files\IBM\WCTME_EO\temp
-BuildDirectory=c:\IBM_HTTP_Server\htdocs
\en_US\bundles
-Eclipse=default
-JarName=OrderEntryFeature
-BundleVersion=5.8.1
-CleanupAfterInstall=yes
-RemoveOnUninstall=no
Notes:
a. d: is a reference to the installation media.
b. c:\IBM_HTTP_Server\htdocs\en_US\bundles is assumed to be a
directory that is served by an HTTP server and from which the file
can later be accessed.
c. c:\Program Files\IBM\WCTME_EO is assumed to be the install
directory for WCTME EO.3. Start the Device Manager(DM) console.
4. Login into the DM console using the following set of parameters:
a. User ID: dmadmin
b. Password: dmadmin
c. Device Manager Server: <DM server hostname>
5. Add the OrderEntryFeature bundle to the DMS software inventory:
a. Right click on Software and select New Software.
b. Select OSGi bundle as the software type.
c. Specify the location (http:// or ftp:/ URL) of the
OrderEntryFeature+5_8_1.jar.
Assuming that the HTTP Server document root is set to
c:\IBM_HTTP_Server\htdocs\en_US, then the URL would be
http://<servername>/bundles/OrderEntryFeature+5_8_1.jar.
d. Select Fetch.
e. Select Next.
f. Select all of the operations for the Device Class = OSGi, then click OK.
g. The bundle will be added to the DM server software inventory.
Creating the Software Distribution job for the Order Entry feature
Follow these steps on the Tivoli Device Manager system to create the Software
Distribution job for the Order Entry feature.
1. Select Devices.
2. Select Use New Query and Return anything as your search criteria.
3. Select OK.
4. The DM console will show a list of enrolled devices.
5. Right click your device, and select Submit Job.
6. Select Next.
Administrator Tasks 73

7. Select the Job Type as Software Distribution (use default settings for all the
other job attributes).
8. Select Next.
9. Select Add Group.
10. Select Order_Entry_Feature from the list of Available Software.
11. Set Auto start to true.
12. Select Next.
13. Select OK.
14. The job has been submitted. Select Close.
15. Check the status of the Job at the DM Console.
Running the Order Entry sample applications
Once the distribution job has completed, the features provided in the update site
have been installed onto the file system on the client. Run the Order Entry sample
applications by performing the following procedure on the client side:
1. Stop and restart the the Enterprise Offering. The installed features will not
appear until you do so.
2. Once you have stopped and restarted, the Order Entry Web Application and
Order Entry Rich Client Application will be added to Application > Open
menu.
3. Launch one of the two applications, and use the Order Entry application as
described in the section, Using the Sample Order Entry Applications, in
Chapter two of the WCTME Enterprise Offering User’s Guide.
Removing the Order Entry Sample
To remove the Order Entry sample, perform the following procedure:
1. Select the Device.
2. Right click, then select Submit Job...
3. Select Next.
4. Select Bundle Control as the Job Type.
5. Select Next.
6. Select Add Step.
7. Select Uninstall for the Job Type.
8. Select Order_Entry_Feature from either the ’OSGi Bundles from Inventory
field’ or the ’OSGi bundles from repository not listed in inventory’ selection
list.
9. Select Next.
10. Select OK.
11. Select Close.
The feature will be installed when the job is received at the client. The client
should be stopped and restarted once the feature has been uninstalled.
Managing update policy settings for the client platform
The Install/Update preferences panel provides a configuration option for the
Update Policy. For more information, refer to the Eclipse 3.0.1 SDK documentation.
Specifically, see the Update policy section in the Workbench User Guide.
74 Workplace Client Technology, Micro Edition: WCTME Enterprise Offering Application Developer’s Guide
Tips, tricks, and troubleshooting
Q: I installed new applications, and need to develop against them, but why are
they not showing up when I try to select plug-ins?
A: You need to reload the target workspace.
Go to Windows > Preferences > Plug-in Development > Target Platform. Select
the Reload button to refresh the list of available plug-ins and fragments.
Q: I’ve reloaded the target workspace, but some of the plug-ins still do not show
up in my Target Platform list.
A: If the PDE cannot satisfy all of the plug-ins dependencies, then it will not make
the plug-in available in the target platform. Certain Import-Package dependencies
are not resolved by other plug-ins, but are resolved by packages exported from the
base class library through the specification of the osgi.framework.systemPackages
property. While these bundles will resolve correctly at runtime, the PDE is unable
to resolve these bundles using the available plug-ins. Check the
META-INF\MANIFEST.MF for the plug-ins that are not appearing to see if the plug-in
is importing packages such as java.sql, or org.w3c.dom, or any of the packages
listed in for the osgi.framework.systemPackages property in the
WCTME_EO_RUNTIME\eclipse\configuration\config.ini file.
Q: I print messages out using System.err or System.out. How can I view these
messages?
A: Start the Enterprise Offering from command line by specifying the -console
option. You can also have Eclipse log messages displayed on the console by
specifying the -consoleLog option (e.g. startup -console -consoleLog).
Q: How can I use ANT scripts to export bundles in a format acceptable to the
PDE?
A: The sample script below could be used to export bundles to a plug-in directory.
In the line marked [1] below, set the path to the correct path for your system. In
the line marked [2] below, set the name of the jar file that you would like to use.
<?xml version="1.0"?>
<project name="ad" default="All Bundles" basedir=".">
<target name="initTargets">
[1] <filedir id="submit.target.0" path="WCTME_EO_RUNTIME/eclipse/plugins
/<plug-in id>"/>
[2] <property name="bundle.filename" value="filename.jar"/>
</target>
<target name="ad jar" depends="initTargets">
<smfbd.submitJarBundle bundlepath="/ad" replace="true"
bundlefilename="${bundle.filename}" >
<filedir refId="submit.target.0"/>
</smfbd.submitJarBundle>
<property name="primary_destination" refId="submit.target.0"/>
<copy file="META-INF/MANIFEST.MF" overwrite="true" tofile="${primary_destination}
/META-INF/MANIFEST.MF" verbose="true"/>
© Copyright IBM Corp. 2004 75

<manifest mode="update" file="${primary_destination}/META-INF/MANIFEST.MF">
<attribute name="Bundle-Classpath" value="${bundle.filename}"/>
</manifest>
<echo message="Done"/>
</target>
<target name="All Bundles" depends="ad jar">
</target>
</project>
Q: I have updated the MANIFEST.MF file, so why don’t the changes I made
work?
A: The PDE requires that the MANIFEST.MF file have proper line terminators on the
last line in the file. Add an extra blank line at the end of the MANIFEST.MF file.
Q: I updated the plugin.xml information for bundle id, name, provider, and
required bundles, but why do they not have any effect?
A: If your project contains both a plugin.xml and a MANIFEST.MF, then the values
contained in the MANIFEST.MF will take precedence over the values in the
plugin.xml.
Q: I’ve installed my plug-in into the WCTME_EO_RUNTIME\eclipse\plugins
directory, and it ran the first time. Why, after making changes to the plug-in,
does it no longer have any effect?
A: If your changes were related to the contents of the plugin.xml that are
duplicated in a MANIFEST.MF file (plug-in id, name, required libraries, etc.) then you
will need to completely ’uninstall’ your plug-in before reinstalling it. The core
runtime will convert the plugin.xml from the plug-in into a MANIFEST.MF and cache
this information. As long as the MANIFEST.MFfile remains, the plugin.xml file
changes will not be reapplied.
To eliminate these problems, we recommend that you always create a MANIFEST.MF
file for your plug-in. The Plug-in Manifest Editor will keep both files up-to-date.
Q: I’ve tried uninstalling and reinstalling the bundle, but I’m convinced that it
is not picking up all of the changes. Is there anything more that I can do?
A: Try starting the Enterprise Offering using the command line, specifying the
-clean option (e.g. startup -clean). If this fails, then remove the org.eclipse.osgi
directory contained in the WCTME_EO_RUNTIME\eclipse\configuration directory. The
configuration engine will re-run the next time that you start the workbench. Note
that any data stored via Configuration Admin will also be removed.
Q: I’ve made changes to my plug-in files (plugin.xml, or MANIFEST.MF) after it
didn’t work the first time I started the Enterprise Offering platform. I think the
files are correct now, but the changes don’t seem to be taking effect.
A: Try starting the Enterprise Offering using the command line, specifying the
-clean option (e.g. startup -clean). If this fails, then remove the org.eclipse.osgi
directory contained in the WCTME_EO_RUNTIME\eclipse\configuration directory. The
configuration engine will re-run the next time that you start the workbench. Note
that any data stored via Configuration Admin will also be removed.
76 Workplace Client Technology, Micro Edition: WCTME Enterprise Offering Application Developer’s Guide

Q: I made changes to the MANIFEST.MF in my PDE project. Why do they not seem
to be taking effect?
A: If your plug-in has both a plugin.xml and a MANIFEST.MF file, make sure that
both files are being exported during the build process. Check the build.properties
file in your project to verify that the META-INF directory is selected. Creating a
MANIFEST.MFfile from the Plug-in Manifest Editor Runtime does not automatically
select the META-INF directory in the build.properties file.
Tips, tricks, and troubleshooting 77

78 Workplace Client Technology, Micro Edition: WCTME Enterprise Offering Application Developer’s Guide
Appendix. Notices
This information was developed for products and services offered in the U.S.A.
IBM may not offer the products, services, or features discussed in this document in
other countries. Consult your local IBM representative for information on the
products and services currently available in your area. Any reference to an IBM
product, program, or service is not intended to state or imply that only that IBM
product, program, or service may be used. Any functionally equivalent product,
program, or service that does not infringe any IBM intellectual property right may
be used instead. However, it is the user’s responsibility to evaluate and verify the
operation of any non-IBM product, program, or service.
IBM may have patents or pending patent applications covering subject matter
described in this document. The furnishing of this document does not give you
any license to these patents. You can send license inquiries, in writing, to:
IBM Director of Licensing
IBM Corporation
North Castle Drive
Armonk, NY 10504-1785
U.S.A.
For license inquiries regarding double-byte (DBCS) information, contact the IBM
Intellectual Property Department in your country or send inquiries, in writing, to:
IBM World Trade Asia Corporation
Licensing
2-31 Roppongi 3-chome, Minato-ku
Tokyo 106-0032, Japan
The following paragraph does not apply to the United Kingdom or any other
country where such provisions are inconsistent with local law:
INTERNATIONAL BUSINESS MACHINES CORPORATION PROVIDES THIS
PUBLICATION “AS IS” WITHOUT WARRANTY OF ANY KIND, EITHER
EXPRESS OR IMPLIED, INCLUDING, BUT NOT LIMITED TO, THE IMPLIED
WARRANTIES OF NON-INFRINGEMENT, MERCHANTABILITY OR FITNESS
FOR A PARTICULAR PURPOSE. Some states do not allow disclaimer of express or
implied warranties in certain transactions, therefore, this statement may not apply
to you.
This information could include technical inaccuracies or typographical errors.
Changes are periodically made to the information herein; these changes will be
incorporated in new editions of the publication. IBM may make improvements
and/or changes in the product(s) and/or the program(s) described in this
publication at any time without notice.
Any references in this information to non-IBM Web sites are provided for
convenience only and do not in any manner serve as an endorsement of those Web
sites. The materials at those Web sites are not part of the materials for this IBM
product and use of those Web sites is at your own risk.
IBM may use or distribute any of the information you supply in any way it
believes appropriate without incurring any obligation to you.
© Copyright IBM Corp. 2004 79

Licensees of this program who wish to have information about it for the purpose
of enabling: (i) the exchange of information between independently created
programs and other programs (including this one) and (ii) the mutual use of the
information which has been exchanged, should contact:
IBM Corporation
Department TLB3
3039 Cornwallis Road
Research Triangle Park, NC 27709-2195
U.S.A.
Such information may be available, subject to appropriate terms and conditions,
including in some cases, payment of a fee.
The licensed program described in this information and all licensed material
available for it are provided by IBM under terms of the IBM Customer Agreement,
IBM International Program License Agreement, or any equivalent agreement
between us.
Any performance data contained herein was determined in a controlled
environment. Therefore, the results obtained in other operating environments may
vary significantly. Some measurements may have been made on development-level
systems and there is no guarantee that these measurements will be the same on
generally available systems. Furthermore, some measurements may have been
estimated through extrapolation. Actual results may vary. Users of this document
should verify the applicable data for their specific environment.
Information concerning non-IBM products was obtained from the suppliers of
those products, their published announcements or other publicly available sources.
IBM has not tested those products and cannot confirm the accuracy of
performance, compatibility or any other claims related to non-IBM products.
Questions on the capabilities of non-IBM products should be addressed to the
suppliers of those products.
All statements regarding IBM’s future direction or intent are subject to change or
withdrawal without notice, and represent goals and objectives only.
This information contains examples of data and reports used in daily business
operations. To illustrate them as completely as possible, the examples include the
names of individuals, companies, brands, and products. All of these names are
fictitious and any similarity to the names and addresses used by an actual business
enterprise is entirely coincidental.
COPYRIGHT LICENSE:
This information contains sample application programs in source language, which
illustrate programming techniques on various operating platforms. You may copy,
modify, and distribute these sample programs in any form without payment to
IBM, for the purposes of developing, using, marketing or distributing application
programs conforming to the application programming interface for the operating
platform for which the sample programs are written. These examples have not
been thoroughly tested under all conditions. IBM, therefore, cannot guarantee or
imply reliability, serviceability, or function of these programs. You may copy,
modify, and distribute these sample programs in any form without payment to
IBM for the purposes of developing, using, marketing, or distributing application
programs conforming to IBM’s application programming interfaces.
80 Workplace Client Technology, Micro Edition: WCTME Enterprise Offering Application Developer’s Guide

Each copy or any portion of these sample programs or any derivative work, must
include a copyright notice as follows:
© (your company name) (year). Portions of this code are derived from IBM Corp.
Sample Programs. © Copyright IBM Corp. 2004. All rights reserved.
If you are viewing this information softcopy, the photographs and color
illustrations may not appear.
Trademarks
The following terms are trademarks or registered trademarks of International
Business Machines Corporation in the United States, or other countries, or both:
IBM
Java and all Java-based trademarks are trademarks of Sun Microsystems, Inc. in the
United States, other countries, or both.
Other company, product or service names may be trademarks or service marks of
others.
Appendix. Notices 81