clip analyzer user manual
TRANSCRIPT

i
Clip Analyzer User ManualINSTRUCTIONS FOR USEFor Use Under Emergency Use Authorization (EUA) OnlyFor Use with Nasal Swab Specimens

ASSISTANCEIf you have any questions regarding the use of this product or if you want to report a test system problem, please contact Luminostics Technical Support at [email protected].
Test system problems may also be reported to the FDA through the MedWatch medical products reporting program:
Phone: 800.FDA.1088 Fax: 800.FDA.0178 Web: http://www.fda.gov/medwatch
© 2021 Luminostics, Inc. All rights reserved.
INSIDE THIS MANUALIntended Use 1
Product Description 1
System Components 1
Warnings and Precautions 2
System Installation, Setup, and Operation 3
Storage and Operating Conditions 3
Test Procedure for the Clip COVID Rapid Antigen Test 4
Results Interpretation 10
Limitations 11
Conditions of Authorization for the Laboratory 12
Battery Power 14
Maintenance 14
Cleaning and Disinfecting the Clip Analyzer 15
Potential Biohazard 15
Menu Structure 16
Troubleshooting 18
Technical Specifications 20
1
INTENDED USEThe Clip Analyzer is an analyzer intended to be used for objective readout of Cartridge-based immunoluminescent in vitro diagnostic assays manufactured by Luminostics. The Clip Analyzer is intended for professional and laboratory use. The first in vitro diagnostic test made available for use on the Clip Analyzer is the Clip COVID Rapid Antigen Test under FDA emergency use authorization (EUA).
PRODUCT DESCRIPTIONThe Clip Analyzer comprises an Apple® iPhone® SE (2020), an Adapter (pre-assembled onto the iPhone), and the Clip COVID iOS app. The iPhone has been delivered to you in single-app mode, i.e., it is only capable of running the Clip COVID app.
SYSTEM COMPONENTSThe following system components are supplied with the Clip Analyzer:
• Analyzer• Charging Cord and Power Adapter• User Manual
Consumable test kits, including Cartridges and External Quality Control materials, are supplied separately. Contact Luminostics Technical Support for additional supplies at [email protected].

2
WARNINGS AND PRECAUTIONS• For in vitro diagnostic use.• For prescription use only• This product has not been FDA cleared or approved,
but has been authorized for emergency use by FDA under an Emergency Use Authorization (EUA) for use by laboratories certified under the CLIA, 42 U.S.C. §263a, that meet the requirements to perform high, moderate or waived complexity tests.
• This product has been authorized only for the detection of proteins from SARS-CoV-2, not for any other viruses or pathogens.
• The emergency use of this product is only authorized for the duration of the declaration that circumstances exist justifying the authorization of emergency use of in vitro diagnostic tests for detection and/or diagnosis of COVID-19 under Section 564(b)(1) of the Federal Food, Drug, and Cosmetic Act, 21 U.S.C. § 360bbb-3(b)(1), unless the declaration is terminated or authorization is revoked sooner.
• Use of Nitrile, Latex (or equivalent) gloves is recommended when handling patient samples. Change gloves between patients.
• Always operate the Clip Analyzer and use other components of the Clip COVID Rapid Antigen Test on a surface that is level, dry, and not in direct sunlight. Failure to do so may cause false positive, false negative, or invalid results. Leave room around the Analyzer for sample processing.
• Do not move or adjust the Clip Analyzer or remove the Cartridge while there is a test in progress. Doing so may cause an invalid result.
• Use only the power adapter that was provided with the Analyzer.
• Do not drop the Analyzer, as it could damage the unit.• To avoid damaging the Analyzer, do not place objects
on top of it.• Dispose of containers and unused contents in accordance
with Federal, State, and Local regulatory requirements. The used nasal swab, cartridge, extraction tube, and dropper tip are considered biohazardous waste and should be disposed of in a manner consistent with local biohazard waste disposal regulations.
• Do not spray disinfectant directly onto the analyzer.

3
• The product has not been tested for EMI compatibility with implantable cardioverter-defibrillators (ICDs) or pacemakers. Do not use the Clip Analyzer if you have an ICD or pacemaker.
• Do not open the foil pouch of the Cartridge and expose it to the ambient environment until the Cartridge is ready for immediate use. Premature exposure to ambient conditions may cause false positive, false negative, or invalid results
SYSTEM INSTALLATION, SETUP, AND OPERATIONAnalyzer SetupPlace Clip Analyzer on a level surface like a table or bench top. The unit is portable and can be moved to a suitable location for testing, ideally near an electrical outlet for charging. Ensure the counter top is stable, level, dry and free of obstructions. Avoid direct sunlight. Ensure the bench provides adequate space for Clip Analyzer. There must be space to insert the Cartridge into the Analyzer. Plug the Charging Cord into the iPhone’s charging port on the bottom of the Analyzer. Then plug the Charging Cord into the Power Adapter and the Power Adapter into an available electrical outlet.
Power UpTurn on the iPhone sub-component of the Analyzer by depressing the button on the right side of the bezel. Upon insertion of the Cartridge, the Analyzer will turn on.
Run TestFollow the assay-specific Package Insert to run a test using the Clip Analyzer.
Patient Test ResultWhen the test is complete, the results for the patient specimen will be displayed on the Analyzer screen.
ShutdownTurn off the unit by removing the cartridge and holding the power switch on the right side of the unit. Shutdown is complete when the screen goes dark.
STORAGE AND OPERATING CONDITIONSStore and operate the Clip Analyzer at room temperature, 59°F to 78°F (15°C to 26°C), out of direct sunlight, between 20%-85% humidity (non-condensing).

4
TEST PROCEDURE FOR CLIP COVID RAPID ANTIGEN TEST
Step 1
Place the Clip Analyzer on a table or counter top and power it on by holding down the power button on the right side of the iPhone.
The Analyzer is portable and can be moved to a suitable location for testing. Ensure the surface is stable, level, dry and free of obstructions. Ensure the bench provides adequate space for the Clip Analyzer.
Step 2
Touch Begin Test on the home screen of the Clip COVID app on the Analyzer.
Touch here to begin test.
There must be space to access the Clip Analyzer port for insertion of the Cartridge.
We recommend that you keep the Analyzer plugged in to a power outlet using the provided charging cord during operation/testing.

5
Step 3
The screen will prompt you to enter the Test Kit Lot ID number either by scanning the Barcode on the Test Kit pouch or typing in the Lot ID number manually.
To scan, face code on the pouch towards the front camera of the iPhone, using the screen to help line up the image.
Touch ‘Type Barcode’ to switch to manual entry of the Lot ID number.
Step 4
Remove a Cartridge from its foil pouch after using the tear notch to open the pouch.
Scan Barcode using iPhone camera. Or, type in the Lot ID number.

6
TEST PROCEDURE CONTINUED
Step 5
Load the Cartridge into the Analyzer by pushing the Cartridge into the Cartridge port until you hear a click.
If you don’t hear a click, continue pushing the Cartridge until you can’t push it further.
The cartridge can be handled with bare hands. However, we recommend wearing gloves during the entirety of the test procedure including this step.
Push the Cartridge into the Cartridge port until you hear a click.
“Click”

7
Step 6
The screen will prompt you to enter the Test Sample barcode either by scanning the Barcode on the nasal swab tube or typing in the Sample ID number manually.
To scan, face code on the tube towards the front camera of the iPhone, using the screen to help line up the image.
Alternatively, user may choose to type in custom Sample ID text.
Touch ‘Enter Barcode’ to switch to manual entry of the Sample ID number.
Scan Barcode using iPhone camera. Or, type in the Sample ID number.

8
TEST PROCEDURE CONTINUED
Step 7
Insert the anterior nasal swab collected from the patient all the way into the Extraction Tube and rotate the swab at least 3 times against the bottom of the tube. Additional rotations of the swab are not expected to negatively affect performance.
Leave the swab in the buffer in the Extraction Tube for 60 seconds.
Optionally, use the tube holder at the bottom of the Analyzer to hold the Extraction Tube.
Squeeze center of the Extraction Tube and remove the swab while keeping the center of the tube squeezed. Dispose of swab in a biohazard waste stream.
Cap the Extraction Tube using the Dropper Tip.
Rotate swab 3 full times
against bottom of the tube.
Keep swab immersed for 60 seconds. Squeeze
center of tube while removing
swab.
Cap tube with dropper tip.

9
Step 8
Dispense the entirety of the contents of the Extraction Tube into the sample well of the Cartridge by turning it upside down and squeezing it. Holding the tube vertically directly above the sample port will minimize spillage.
The Analyzer will automatically begin analysis 30-45 seconds after sample addition, transitioning to the ‘Analysis in Progress’ screen. A “positive”, “negative”, or “invalid” result will display in 30 minutes.
Movement of or removal of the Cartridge while analysis is in progress will result in invalid result.
Analysis in Progress screen.
Do not touch or remove the Cartridge or disturb the Analyzer until a result is displayed.

10
When the test is complete, the result will be displayed on the Analyzer screen. The result of the lateral flow test cannot be seen with the naked eye. The Analyzer screen will display results, individually providing a positive or negative result for SARS-CoV-2. If the result is Invalid, retest with a new patient sample and a new Cartridge.
Negative ResultThis display shows a valid negative result for SARS-CoV-2.
Invalid ResultThis display shows an invalid result
Positive ResultThis display shows a valid positive result for SARS-CoV-2.
RESULTS INTERPRETATION

11
LIMITATIONS• This product is currently authorized to only be used for
the qualitative detection of SARS-CoV-2 antigens from an anterior nasal swab.
• The Clip COVID Rapid Antigen Test detects both viable (live) and non-viable SARS-CoV-2. Test performance depends on the amount of virus (antigen) in the sample and may or may not correlate with viral culture results performed on the same sample.
• A negative test result may occur if the level of antigen in a sample is below the detection limit of the test or if the sample was collected improperly.
• Failure to follow the Test Procedure may adversely affect test performance and/or invalidate the test result by causing false positive or false negative results.
• Test results must be evaluated in conjunction with other clinical data available to the physician.
• Positive test results do not rule out co-infections with other pathogens.
• Positive test results do not differentiate between SARS-CoV and SARS-CoV-2.
• Negative test results are not intended to rule in other non-SARS viral or bacterial infections.
• Negative results, from patients with symptom onset beyond five days, should be treated as presumptive and confirmation with an FDA authorized molecular assay, if necessary, may be performed for clinical management.
• If the differentiation of specific SARS viruses and strains is needed, additional testing, in consultation with state or local public health departments, is required.
• Modifications to the assay procedure may result in false positive or false negative results.
• False negative results may occur if a specimen is improperly collected, transported or handled.
• The test has not been validated for use with viral transport media (VTM) or universal transport media (UTM). Usage of the test with samples prepared using VTM or UTM may cause false positive, false negative, or invalid results.
• The test has been validated for use in temperatures ranging from 15°C-26°C. The test has not been validated for use in temperature ranges outside of these conditions and usage outside of the validated range of conditions may result in false positive results or false negative results.

12
The Clip COVID Rapid Antigen Test Letter of Authorization1, along with the authorized Fact Sheet for Healthcare Providers, the authorized Fact Sheet for Patients, and authorized labeling are available on the FDA website:
https://www.fda.gov/medical-devices/emergency-situations-medical-devices/emergency-use- authorizations#covid19ivd
However, to assist clinical laboratories using the Clip COVID Rapid Antigen Test (“your product” in the conditions below), the relevant Conditions of Authorization are listed below:
• Authorized laboratories using your product will include with test result reports, all authorized Fact Sheets. Under exigent circumstances, other appropriate methods for disseminating these Fact Sheets may be used, which may include mass media.
• Authorized laboratories using your product will use your product as outlined in the authorized labeling, e.g., “Clip COVID Rapid Antigen Test Package Insert (Instructions for Use” and “User Manual-Clip Analyzer.” Deviations from the authorized procedures, including the authorized instruments, authorized clinical specimen types, authorized control materials, authorized other ancillary reagents and authorized materials required to use your product are not permitted.
• Authorized laboratories that receive your product will notify the relevant public health authorities of their intent to run your product prior to initiating testing.
CONDITIONS OF AUTHORIZATION FOR THE LABORATORY
1 The letter of authorization refers to, “Laboratories certified under the Clinical Laboratory Improvement Amendments of 1988 (CLIA), 42 U.S.C. §263a, that meet the requirements to perform high, moderate, or waived complexity tests. This test is authorized for use at the Point of Care (POC), i.e., in patient care settings operating under a CLIA Certificate of Waiver, Certificate of Compliance, or Certificate of Accreditation.” as “authorized laboratories.”

13
• Authorized laboratories using your product will have a process in place for reporting test results to healthcare providers and relevant public health authorities, as appropriate.
• Authorized laboratories will collect information on the performance of your product and report to DMD/OHT7-OIR/OPEQ/CDRH (via email: [email protected]) and Luminostics, Inc. (via email: [email protected], any suspected occurrence of false positive or false negative results and significant deviations from the established performance characteristics of your product of which they become aware.
• All operators using your product must be appropriately trained in performing and interpreting the results of your product, use appropriate personal protective equipment when handling this kit, and use your product in accordance with the authorized labeling.
• Luminostics, Inc., authorized distributors, and authorized laboratories and patient care settings using your product will ensure that any records associated with this EUA are maintained until otherwise notified by FDA. Such records will be made available to FDA for inspection upon request.

14
BATTERY POWERBattery Intended UseClip Analyzer includes 2 disposable AA batteries to power the Adapter and the iPhone SE(2020)’s rechargeable battery that is recharged when connected to AC power.
Battery ReplacementThe iPhone sub-component of the Clip Analyzer is shipped with an internal LiPo rechargeable battery with an expected life of approximately three years. Two disposable AA batteries with an expected life of 450 tests are used to power the non-iPhone sub-component of the Analyzer.
The disposable AA batteries are user-replaceable. The internal rechargeable battery is not user replaceable.
Prior to replacing the disposable AA batteries, ensure that there is no cartridge in the Analyzer. Remove the battery cover on the rear of the Analyzer. Carefully remove the used batteries and insert the new ones.
Replace the battery cover. Recycle or dispose of the batteries in accordance with all Federal, State and Local laws. To avoid fire and explosion hazard, do not burn or incinerate the batteries.
MAINTENANCEThe Clip Analyzer must be sent to Luminostics if maintenance is required. The user should not attempt any maintenance except for changing the batteries and cleaning the external surfaces. Contact Luminostics Technical Support via email at [email protected] for maintenance, return, or disposal of Clip Analyzer.
ASSISTANCEIf you have any questions regarding the use of this product or if you want to report a test system problem, please contact Luminostics Technical Support at [email protected].
Test system problems may also be reported to the FDA through the MedWatch medical products reporting program:
Phone: 800.FDA.1088 Fax: 800.FDA.0178 Web: http://www.fda.gov/medwatch

15
POTENTIAL BIOHAZARDDispose of used specimens in accordance with Federal, State, and Local requirements for biohazard waste.
Treat specimens and patient samples as potentially biohazardous material.
Ensure the Analyzer is cleaned per the Cleaning Guidelines.
Seek specific training or guidance if you are not experienced with specimen collection and handling procedures.
Please read the entirety of this user manual and the package insert prior to executing a test.
Use of Nitrile, Latex, or other gloves is recommended when handling patient samples. Change gloves between patients.
CLEANING AND DISINFECTING THE CLIP ANALYZER Do not disassemble the Analyzer. The Analyzer contains no user-serviceable components.
Possible electrical shock: turn off and unplugthe Analyzer prior to cleaning. Do not clean the port on the side of the instrument.
The Clip Analyzer can be gently wiped down with typical lab disinfectants (e.g., paper towel sprayed with 70% alcohol or Clorox/Lysol wipes) for cleaning if your protocols call for it. Do not spray disinfectant directly onto the Analyzer or immerse the Analyzer in liquid. Luminostics recommends disinfecting the Analyzer at least once per day.

16
Sample Set-UpScan the QR code or type in the current sample ID and Lot number to begin the test.
Insert CartridgeRemove cartridge from package and insert.
See pages 6-7 for information on entering QR Codes and Barcodes.
Checking CartridgeThe device will begin checking the validity of the cartridge.
MENU STRUCTURE
Testing MenuTouch “Begin test.”

17
Adapter FoundIf the adapter is found, it will indicate with a checkmark. Click “confirm” or “retry” to move forward.
Awaiting SampleApply the sample and wait approximately 30 seconds for analysis to begin.
Analysis in ProgressA clock will run to show progress.
Do not disconnect the cartridge until the analysis is complete.
Cancellation PopupIf a cancellation window appears, hit “cancel” or “accept” to move forward.
A new cartridge is required to start a new test.
18
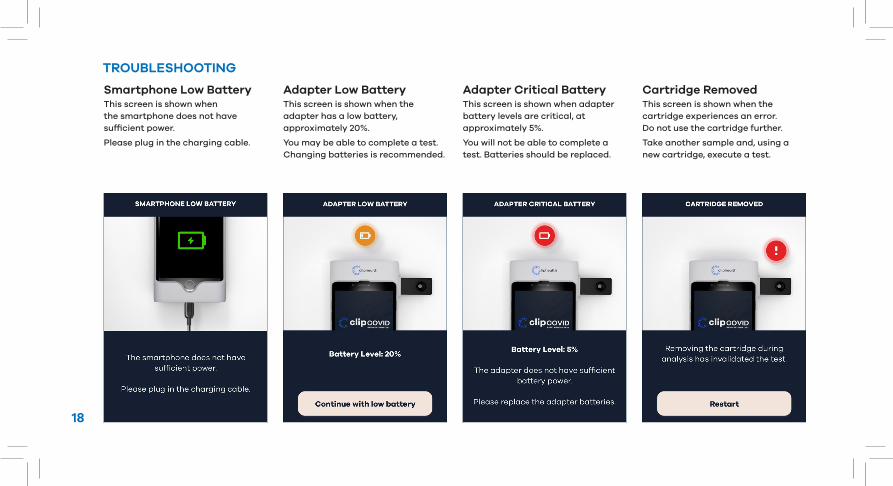
Smartphone Low BatteryThis screen is shown when the smartphone does not have sufficient power.
Please plug in the charging cable.
TROUBLESHOOTING
Adapter Critical BatteryThis screen is shown when adapter battery levels are critical, at approximately 5%.
You will not be able to complete a test. Batteries should be replaced.
Cartridge RemovedThis screen is shown when the cartridge experiences an error. Do not use the cartridge further.
Take another sample and, using a new cartridge, execute a test.
Adapter Low BatteryThis screen is shown when the adapter has a low battery, approximately 20%.
You may be able to complete a test. Changing batteries is recommended.

19
Cartridge ErrorThis screen is shown when the cartridge experiences an error. Do not use the cartridge further.
Take another sample and, using a new cartridge, execute a test.
Adapter Not FoundThe Adapter is not sensed by the smartphone.
Please check the Adapter batteries, confirming that the Adapter has power and a cartridge is inserted
Adapter DisconnectedThe Adapter is not sensed by the smartphone. Please check Adapter batteries, confirming the Adapter has power and a cartridge is inserted.
The current test run and cartridge are invalid. Take another sample and, using a new cartridge, execute a test.
Motion DetectedThe Analyzer has sensed motion.
Please secure the device in a stable location. The test should automatically resume.

20
TECHNICAL SPECIFICATIONSPower Supply 1.9-3.5V DC, Max. 0.14A from 2 AA batteries Dimensions 77 x 37 x 155mmWeight 336 gDisplay iPhone SE (2020), 5.45 x 2.65 inOperational Temperature 15°C to 26°COperational Humidity 20%-85% non-condensing
The Clip Analyzer will be tested to UL 60601-1 3rd Edition.
Apple and iPhone are trademarks of Apple Inc., registered in the US and other countries.
Invalid BarcodeThis screen is shown when the cartridge barcode entered does not match a released lot. Please check the information and try again. If you continue to get this error, reach out to support for additional assistance.
TROUBLESHOOTING CONTINUED

iii
SYMBOLS
Manufacturer Consult instructions for use
Catalogue number
Prescription only
For in-vitro diagnostic use only
Serial number
Keep dry
Biohazard
Caution
Luminostics, Inc.446 South Hillview Drive, Milpitas, CA 95035 USA

iv
LUMINOSTICS, INC.446 South Hillview Drive, Milpitas, CA 95035 USAwww.luminostics.com
PD085 Rev C