cloudera manager installation guide - · pdf fileoracle database ... and cdh 5. cloudera...
TRANSCRIPT
Cloudera ManagerInstallation Guide
Important Notice
(c) 2010-2015 Cloudera, Inc. All rights reserved.
Cloudera, the Cloudera logo, Cloudera Impala, and any other product or servicenames or slogans contained in this document are trademarks of Cloudera and itssuppliers or licensors, and may not be copied, imitated or used, in whole or in part,without the prior written permission of Cloudera or the applicable trademark holder.
Hadoop and the Hadoop elephant logo are trademarks of the Apache SoftwareFoundation. All other trademarks, registered trademarks, product names andcompany names or logos mentioned in this document are the property of theirrespective owners. Reference to any products, services, processes or otherinformation, by trade name, trademark, manufacturer, supplier or otherwise doesnot constitute or imply endorsement, sponsorship or recommendation thereof byus.
Complying with all applicable copyright laws is the responsibility of the user. Withoutlimiting the rights under copyright, no part of this document may be reproduced,stored in or introduced into a retrieval system, or transmitted in any form or by anymeans (electronic, mechanical, photocopying, recording, or otherwise), or for anypurpose, without the express written permission of Cloudera.
Cloudera may have patents, patent applications, trademarks, copyrights, or otherintellectual property rights covering subject matter in this document. Except asexpressly provided in any written license agreement from Cloudera, the furnishingof this document does not give you any license to these patents, trademarkscopyrights, or other intellectual property. For information about patents coveringCloudera products, see http://tiny.cloudera.com/patents.
The information in this document is subject to change without notice. Clouderashall not be liable for any damages resulting from technical errors or omissionswhich may be present in this document, or from use of this document.
Cloudera, Inc.1001 Page Mill Road Bldg 2Palo Alto, CA [email protected]: 1-888-789-1488Intl: 1-650-362-0488www.cloudera.com
Release Information
Version: 5.1.xDate: September 8, 2015
Table of Contents
About this Guide.........................................................................................................9
Introduction to Cloudera Manager Installation....................................................11About the Cloudera Manager Installation Program...............................................................................11Installing Cloudera Manager for the First Time ....................................................................................11About the Cloudera Manager "First Run" Wizard...................................................................................12Installation Phases and Paths for Cloudera Manager, CDH, and Managed Services.........................12
Cloudera Manager Requirements..........................................................................15Supported Operating Systems.................................................................................................................15Supported JDK Versions............................................................................................................................15Supported Browsers..................................................................................................................................16Supported Databases................................................................................................................................16Supported CDH and Managed Service Versions.....................................................................................16Resource Requirements ..........................................................................................................................17Networking and Security Requirements.................................................................................................17Permission Requirements........................................................................................................................19
Cloudera Manager and Managed Service Databases..........................................21What Databases Must Be Installed.........................................................................................................21Setting up the Cloudera Manager Server Database..............................................................................22
Installing and Starting the Cloudera Manager Server Embedded Database...................................................22Preparing an Cloudera Manager Server External Database..............................................................................22
External Databases for Activity Monitor, Reports Manager, Hive Metastore, Sentry Server, andCloudera Navigator Audit Server.........................................................................................................25
External Databases for Hue, and Oozie...................................................................................................25Embedded PostgreSQL Database............................................................................................................25External PostgreSQL Database................................................................................................................27
Installing the External PostgreSQL Server...........................................................................................................27Configuring and Starting the PostgreSQL Server................................................................................................27Creating Databases for Activity Monitor, Reports Manager, Hive Metastore, Sentry Server, and Cloudera
Navigator Audit Server.....................................................................................................................................29MySQL Database.......................................................................................................................................30
Installing the MySQL Server..................................................................................................................................30
Configuring and Starting the MySQL Server........................................................................................................30Installing the MySQL JDBC Connector .................................................................................................................33Creating Databases for Activity Monitor, Reports Manager, Hive Metastore, Sentry Server, and Cloudera
Navigator Audit Server.....................................................................................................................................33Backing Up MySQL Databases..............................................................................................................................34
Oracle Database.........................................................................................................................................35Collecting Oracle Database Information..............................................................................................................35Configuring the Oracle Server................................................................................................................................35Installing the Oracle JDBC Connector ..................................................................................................................36Creating Databases for Activity Monitor, Reports Manager, Hive Metastore, Sentry Server, and Cloudera
Navigator Audit Server.....................................................................................................................................36Backing up Databases...............................................................................................................................37
Backing Up PostgreSQL Databases .....................................................................................................................37Backing Up MySQL Databases..............................................................................................................................38Backing Up Oracle Databases...............................................................................................................................38
Data Storage for Monitoring Data...........................................................................................................38Monitoring Data Migration During Cloudera Manager Upgrade.......................................................................38Configuring Service Monitor Storage....................................................................................................................38Configuring Host Monitor Storage........................................................................................................................39Viewing Host and Service Monitor Data Storage................................................................................................39Data Granularity and Time-Series Metric Data...................................................................................................39Moving Monitoring Data on an Active Cluster....................................................................................................40Host Monitor and Service Monitor Memory Configuration................................................................................40
Installing Cloudera Manager, CDH, and Managed Services.................................43Installation Path A - Automated Installation by Cloudera Manager...................................................44
Before You Begin....................................................................................................................................................44Download and Run the Cloudera Manager Server Installer ..............................................................................44Start the Cloudera Manager Admin Console ......................................................................................................45Use the Cloudera Manager Wizard for Software Installation and Configuration ...........................................45Configure Cluster CDH Version for Package Installs...........................................................................................50Change the Default Administrator Password ....................................................................................................50Test the Installation ..............................................................................................................................................50
Installation Path B - Manual Installation Using Cloudera Manager Packages..................................50Before You Begin ...................................................................................................................................................51Establish Your Cloudera Manager Repository Strategy ....................................................................................51Install the Oracle JDK .............................................................................................................................................52Install the Cloudera Manager Server Packages..................................................................................................52Set up a Database for the Cloudera Manager Server.........................................................................................52(Optional) Install Cloudera Manager Agent, CDH, and Managed Service Software.........................................53Start the Cloudera Manager Server......................................................................................................................59(Optional) Start the Cloudera Manager Agents ..................................................................................................60Start the Cloudera Manager Admin Console ......................................................................................................60Choose Cloudera Manager Edition and Hosts.....................................................................................................60
Choose Software Installation Method and Install Software..............................................................................61Add Services............................................................................................................................................................63Configure Cluster CDH Version for Package Installs...........................................................................................64Change the Default Administrator Password ....................................................................................................64Test the Installation ..............................................................................................................................................65
Installation Path C - Manual Installation Using Cloudera Manager Tarballs ....................................65Before You Begin ...................................................................................................................................................65Install the Cloudera Manager Server and Agents...............................................................................................65Configure a Database for the Cloudera Manager Server....................................................................................67Create a Parcel Repository Directory....................................................................................................................67Start the Cloudera Manager Server .....................................................................................................................68Start the Cloudera Manager Agents.....................................................................................................................69Start the Cloudera Manager Admin Console ......................................................................................................69Choose Cloudera Manager Edition and Hosts.....................................................................................................70Choose Software Installation Method and Install Software..............................................................................70Add Services............................................................................................................................................................71(Optional) Change the Cloudera Manager User ..................................................................................................72Change the Default Administrator Password ....................................................................................................73Test the Installation ..............................................................................................................................................73
Installing Impala........................................................................................................................................73Installing Search........................................................................................................................................73Installing Spark..........................................................................................................................................74Installing GPL Extras.................................................................................................................................74
Managing Software Distribution............................................................................77Parcels........................................................................................................................................................77
Advantages of Parcels...........................................................................................................................................77Parcel Life Cycle......................................................................................................................................................78Parcel Locations......................................................................................................................................................80Managing Parcels...................................................................................................................................................80Viewing Parcel Usage.............................................................................................................................................82Parcel Configuration Settings...............................................................................................................................84
Migrating from Packages to Parcels.......................................................................................................85Migrating from Parcels to Packages.......................................................................................................87
Install Packages......................................................................................................................................................87Deactivate Parcels..................................................................................................................................................93Restart the Cluster.................................................................................................................................................93Remove and Delete Parcels...................................................................................................................................94
Understanding Custom Installation Solutions.....................................................95Understanding Parcels..............................................................................................................................95Understanding Package Management...................................................................................................95
Package Management Tools.................................................................................................................................95Package Repositories.............................................................................................................................................96
Creating and Using a Parcel Repository..................................................................................................97Install a Web Server...............................................................................................................................................97Download Parcel and Publish Files......................................................................................................................97Configure the Cloudera Manager Server to Use the Parcel URL.......................................................................98
Creating and Using a Package Repository..............................................................................................98Install a Web Server...............................................................................................................................................98Download Tarball and Publish Repository Files..................................................................................................99Modify Clients to Find Repository.........................................................................................................................99
Installing Cloudera Manager and CDH on EC2 ....................................................................................100Step 1: Set up an AWS EC2 instance for the Cloudera Manager Server.........................................................100Step 2: Use the Cloud Wizard to provision cloud instances and install Cloudera Manager and CDH.........101Terminating EC2 Instances .................................................................................................................................103
Using Whirr to Launch Cloudera Manager............................................................................................103Step 1: Set your AWS credentials as environment variables...........................................................................103Step 2: Install Whirr..............................................................................................................................................103Step 3: Create a password-less SSH Key Pair...................................................................................................103Step 4: Get your Whirr-Cloudera-Manager Configuration...............................................................................103Step 5: Launch a Cloudera Manager Cluster......................................................................................................104Using the Cluster..................................................................................................................................................104
Configuring a Custom Java Home Location..........................................................................................105Installing Older Versions of Cloudera Manager 5................................................................................105
Before You Begin..................................................................................................................................................105Establish Your Cloudera Manager Repository Strategy...................................................................................106Install the Oracle JDK ..........................................................................................................................................106Install the Cloudera Manager Server Packages................................................................................................106Set up a Database for the Cloudera Manager Server.......................................................................................107(Optional) Install Cloudera Manager Agent, CDH, and Managed Service Software.......................................107Start the Cloudera Manager Server....................................................................................................................114(Optional) Start the Cloudera Manager Agents ................................................................................................114Start the Cloudera Manager Admin Console ....................................................................................................114Choose Cloudera Manager Edition and Hosts...................................................................................................114Choose Software Installation Method and Install Software............................................................................116Add Services..........................................................................................................................................................117Change the Default Administrator Password ..................................................................................................119Test the Installation ............................................................................................................................................119
Deploying Clients...................................................................................................121
Testing the Installation.........................................................................................123Checking Host Heartbeats......................................................................................................................123
Running a MapReduce Job.....................................................................................................................124Testing with Hue......................................................................................................................................124
Uninstalling Cloudera Manager and Managed Software..................................125Reverting an Incomplete Installation....................................................................................................125Uninstalling Cloudera Manager and Managed Software....................................................................125
Record User Data Paths.......................................................................................................................................125Stop all Services....................................................................................................................................................125Deactivate and Remove Parcels.........................................................................................................................125Uninstall the Cloudera Manager Server.............................................................................................................126Uninstall Cloudera Manager Agent and Managed Software...........................................................................126Remove Cloudera Manager and User Data.......................................................................................................128
Troubleshooting Installation and Upgrade Problems.......................................131
Appendix A: Configuring Ports for Cloudera Manager.......................................135Ports Used by Cloudera Manager..........................................................................................................135Ports Used by Components of CDH 5....................................................................................................138Ports Used by Components of CDH 4....................................................................................................142Ports Used by Cloudera Impala..............................................................................................................146Ports Used by Cloudera Search..............................................................................................................147Ports Used by Third-Party Components...............................................................................................148


About this Guide
This guide explains how to install Cloudera Manager and CDH. Cloudera Manager 5 supports managing CDH 4and CDH 5.
Cloudera Manager Installation Guide | 9
About this Guide

Introduction to Cloudera Manager Installation
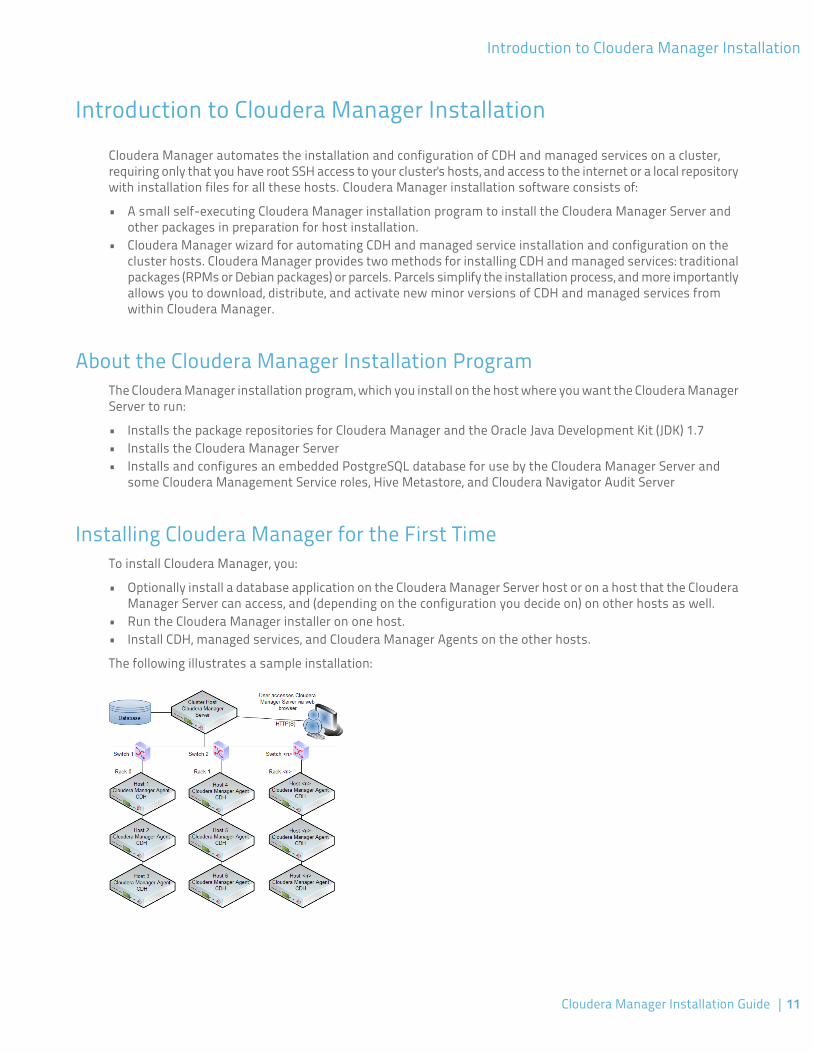
Cloudera Manager automates the installation and configuration of CDH and managed services on a cluster,requiring only that you have root SSH access to your cluster's hosts, and access to the internet or a local repositorywith installation files for all these hosts. Cloudera Manager installation software consists of:
• A small self-executing Cloudera Manager installation program to install the Cloudera Manager Server andother packages in preparation for host installation.
• Cloudera Manager wizard for automating CDH and managed service installation and configuration on thecluster hosts. Cloudera Manager provides two methods for installing CDH and managed services: traditionalpackages (RPMs or Debian packages) or parcels. Parcels simplify the installation process, and more importantlyallows you to download, distribute, and activate new minor versions of CDH and managed services fromwithin Cloudera Manager.
About the Cloudera Manager Installation ProgramThe Cloudera Manager installation program, which you install on the host where you want the Cloudera ManagerServer to run:
• Installs the package repositories for Cloudera Manager and the Oracle Java Development Kit (JDK) 1.7• Installs the Cloudera Manager Server• Installs and configures an embedded PostgreSQL database for use by the Cloudera Manager Server and
some Cloudera Management Service roles, Hive Metastore, and Cloudera Navigator Audit Server
Installing Cloudera Manager for the First TimeTo install Cloudera Manager, you:
• Optionally install a database application on the Cloudera Manager Server host or on a host that the ClouderaManager Server can access, and (depending on the configuration you decide on) on other hosts as well.
• Run the Cloudera Manager installer on one host.• Install CDH, managed services, and Cloudera Manager Agents on the other hosts.
The following illustrates a sample installation:
Cloudera Manager Installation Guide | 11
Introduction to Cloudera Manager Installation

About the Cloudera Manager "First Run" WizardAfter you install Cloudera Manager and you connect to the Cloudera Manager Admin Console for the first time,you use the Cloudera Manager "first run" wizard to do the following:
• Discover cluster hosts• Optionally install the Oracle JDK• Optionally install CDH, managed service, and Cloudera Manager Agent software on the hosts• Select which services to run• Specify the mapping of service roles to hosts• Confirm service configurations and start the services
You can choose to abort the software installation process and the Cloudera Manager wizard automaticallyreverts and completely rolls back the installation process for any uninstalled components. (Installation that hascompleted successfully on a given host is not rolled back on that host.)
Installation Phases and Paths for Cloudera Manager, CDH, and ManagedServices
The following diagram illustrates the phases required to install Cloudera Manager, CDH, and managed services.Every phase is required, but there are multiple ways to accomplish each phase, depending on your organization'spolicies and requirements.
12 | Cloudera Manager Installation Guide
Introduction to Cloudera Manager Installation
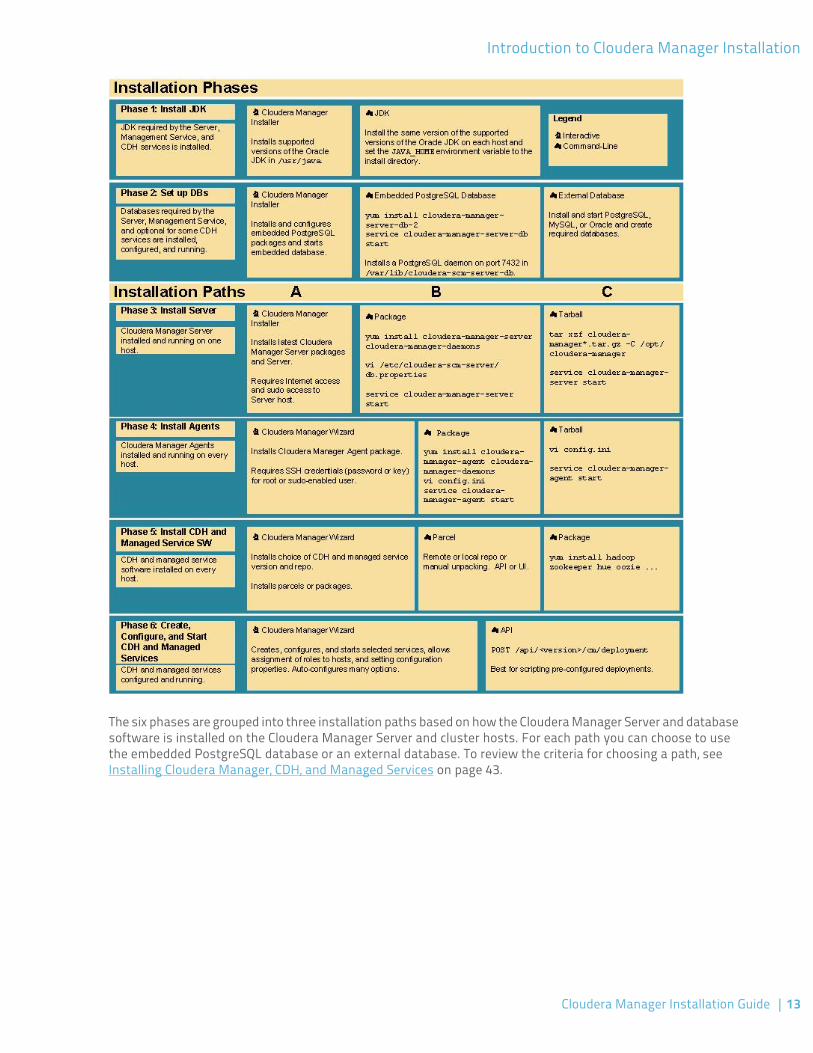
The six phases are grouped into three installation paths based on how the Cloudera Manager Server and databasesoftware is installed on the Cloudera Manager Server and cluster hosts. For each path you can choose to usethe embedded PostgreSQL database or an external database. To review the criteria for choosing a path, seeInstalling Cloudera Manager, CDH, and Managed Services on page 43.
Cloudera Manager Installation Guide | 13
Introduction to Cloudera Manager Installation

Cloudera Manager Requirements
Cloudera Manager interacts with a diversity of entities such as operating systems, databases, and browsers.This topic provides information about which major release version and minor release version of each entity issupported. In some cases, such as some browsers, a minor version may not be provided. After installing eachentity, upgrade to the latest patch version and apply any other appropriate updates. The available updates maybe specific to the operating system on which it is installed. For example, you might be using CentOS in yourenvironment. You could choose 6 as the major version and 4 as the minor version. These choices would meanyou would be using CentOS 6.4. After installing this operating system, apply any and all relevant CentOS 6.4upgrades and patches.
The following sections describe various requirements for Cloudera Manager.
Supported Operating SystemsCloudera Manager supports the following operating systems:
• RHEL-compatible systems
– Red Hat Enterprise Linux and CentOS 5.7, 64-bit– Red Hat Enterprise Linux and CentOS 6.4, 64-bit– Red Hat Enterprise Linux and CentOS 6.4 in SE Linux Mode– Red Hat Enterprise Linux and CentOS 6.5, 64-bit– Oracle Enterprise Linux 5.6 (UEK R2), 64-bit– Oracle Enterprise Linux 6.4 (UEK R2), 64-bit– Oracle Enterprise Linux 6.5 (UEK R2, UEK R3), 64-bit
• SLES - SUSE Linux Enterprise Server 11, 64-bit. Service Pack 2 or later is required for CDH 5 and Service Pack1 or later is required for CDH 4. To use the embedded PostgreSQL database that is installed when you followInstallation Path A - Automated Installation by Cloudera Manager, the Updates repository must be active.The SUSE Linux Enterprise Software Development Kit 11 SP1 is required on hosts running the ClouderaManager Agents.
• Debian - Debian 7.0 and 7.1, 6.0 (deprecated), 64-bit• Ubuntu - Ubuntu 12.04, 10.04 (deprecated), 64-bit
Note:
• Debian 6.0 and Ubuntu 10.04 are supported only for CDH 4.• Using the same version of the same operating system on all cluster hosts is strongly recommended.
Supported JDK VersionsCloudera Manager supports Oracle JDK 1.7.0_55 when it's managing CDH 5.x and Oracle JDK 1.6.0_31 and 1.7.0_55when it's managing CDH 4.x. Cloudera Manager supports Oracle JDK 1.7.0_55 when it's managing both CDH 4.xand CDH 5.x clusters. Oracle JDK 1.6.0_31 and 1.7.0_55 can be installed during the installation and upgrade. Forfurther information, see Java Development Kit Installation.
Cloudera Manager Installation Guide | 15
Cloudera Manager Requirements

Supported BrowsersThe Cloudera Manager Admin Console, which you use to install, configure, manage, and monitor services, supportsthe following browsers:
• Firefox 24 or 31• Google Chrome• Internet Explorer 9 or later• Safari 5 or later
Supported DatabasesCloudera Manager requires several databases. The Cloudera Manager Server stores information about configuredservices, role assignments, configuration history, commands, users, and running processes in a database of itsown. You must also specify a database for the Activity Monitor and Reports Manager management services.
The database you choose to use must be configured to support UTF8 character set encoding. The embeddedPostgreSQL database that is installed when you follow Installation Path A - Automated Installation by ClouderaManager on page 44 automatically provides UTF8 encoding. If you install a custom database, you may need toenable UTF8 encoding. The commands for enabling UTF8 encoding are described in each database's sectionunder Cloudera Manager and Managed Service Databases on page 21.
After installing a database, upgrade to the latest patch version and apply any other appropriate updates. Theavailable updates may be specific to the operating system on which it is installed.
Cloudera Manager and its supporting services can use the following databases:
• MySQL - 5.0, 5.1, 5.5, and 5.6• Oracle 11gR2• PostgreSQL - 8.4, 9.1, and 9.2
For information about the databases supported by CDH, see CDH 4 Supported Databases and CDH 5 SupportedDatabases.
Supported CDH and Managed Service VersionsThe following versions of CDH and managed services are supported:
Warning: Cloudera Manager 5 does not support CDH 3 and you cannot upgrade Cloudera Manager 4to Cloudera Manager 5 if you have a cluster running CDH 3. Therefore, to upgrade CDH 3 clusters toCDH 4 using Cloudera Manager you must use Cloudera Manager 4.
• CDH 4 and CDH 5. The latest released versions of CDH 4 and CDH 5 are strongly recommended. For informationon CDH 4 requirements, see CDH 4 Requirements and Supported Versions. For information on CDH 5requirements, see CDH 5 Requirements and Supported Versions.
• Cloudera Impala - Cloudera Impala is included with CDH 5. Cloudera Impala 1.2.1 with CDH 4.1.0 or later. Forfurther information on Cloudera Impala requirements with CDH 4, see Cloudera Impala Requirements.
• Cloudera Search - Cloudera Search is included with CDH 5. Cloudera Search 1.2.0 with CDH 4.6.0. For furtherinformation on Cloudera Search requirements with CDH 4, see Cloudera Search Requirements.
• Apache Spark - 0.90 or later with CDH 4.4.0 or later.• Apache Accumulo - 1.4.3 with CDH 4.3.0, 1.4.4 with CDH 4.5.0, and 1.6.0 with CDH 4.6.0.
For more information, see the Cloudera Product Compatibility Matrix.
16 | Cloudera Manager Installation Guide
Cloudera Manager Requirements
Resource RequirementsCloudera Manager requires resources of the following types:
• Disk Space
– Cloudera Manager Server
– 5 GB on the partition hosting /var.– 500 MB on the partition hosting /usr.– For parcels, the space required depends on the number of parcels you download to the Cloudera
Manager Server and distribute to Agent hosts. You can download multiple parcels of the same product,of different versions and builds. If you are managing multiple clusters, there will be only one parcel ofa given product/version/build/distribution downloaded on the Cloudera Manager Server—not oneper cluster. In the local parcel repository on the Cloudera Manager Server the approximate sizes ofthe various parcels are as follows:
– CDH 4.6 - ~700 MB per parcel, CDH 5 - ~1 GB per parcel– Impala - ~200 MB per parcel– Solr - ~ 400 MB per parcel
– Cloudera Management Service - The Host Monitor and Service Monitor databases are stored on thepartition hosting /var. Ensure that you have at least 20 GB available on this partition. For furtherinformation, see Data Storage for Monitoring Data on page 38.
– Agents - On Agent hosts each unpacked parcel requires about three times the space of the downloadedparcel on the Cloudera Manager Server. By default unpacked parcels are located in/opt/cloudera/parcels.
• RAM - 4 GB is appropriate for most cases, and is required when using Oracle databases. 2 GB may be sufficientfor non-Oracle deployments involving fewer than 100 hosts. However, if you want to run the Cloudera ManagerServer on a machine with 2 GB of RAM, you must tune down its maximum heap size (by modifying -Xmx in/etc/default/cloudera-scm-server). Otherwise the kernel may kill the Server for consuming too muchRAM.
• Python - Cloudera Manager uses Python. All supported operating systems contain a Python version 2.4 orhigher. Cloudera Manager and CDH 4 require at least Python 2.4, but Hue in CDH 5 requires Python 2.6 or2.7.
Networking and Security Requirements• Cluster hosts must have a working network name resolution system and correctly formatted /etc/hosts
file. All cluster hosts must have properly configured forward and reverse host resolution through DNS. The/etc/hosts files must contain consistent information about host names and addresses across all hosts. Aproperly formatted /etc/hosts should be similar to the following example:
127.0.0.1 localhost.localdomain localhost192.168.1.1 cluster-01.example.com cluster-01192.168.1.2 cluster-02.example.com cluster-02192.168.1.3 cluster-03.example.com cluster-03
The /etc/hosts file must not have duplicate IP addresses.• In most cases, the Cloudera Manager Server must have SSH access to the cluster hosts when you run the
installation or upgrade wizard. You must log in using a root account or an account that has password-lesssudo permission. For authentication during the installation and upgrade procedures, you must either enterthe password or upload a public and private key pair for the root or sudo user account. If you want to use apublic and private key pair, the public key must be installed on the cluster hosts before you use ClouderaManager.
Cloudera Manager Installation Guide | 17
Cloudera Manager Requirements
Cloudera Manager uses SSH only during the initial install or upgrade. Once your cluster is set up, you candisable root SSH access or change the root password. Cloudera Manager does not save SSH credentials andall credential information is discarded once the installation is complete. For further information, see PermissionRequirements on page 19.
• The Cloudera Manager Agent runs as root so that it can make sure the required directories are created andthat processes and files are owned by the appropriate user (for example, the hdfs and mapred users).
• No blocking by Security-Enhanced Linux (SELinux).• Disable Ipv6 on all hosts.• No blocking by iptables or firewalls; make sure port 7180 is open because it is the port used to access Cloudera
Manager after installation. Cloudera Manager communicates using specific ports, which must be open. SeeConfiguring Ports for Cloudera Manager on page 135.
• For RedHat and CentOS, make sure the/etc/sysconfig/network file on each system contains the hostnameyou have just set (or verified) for that system.
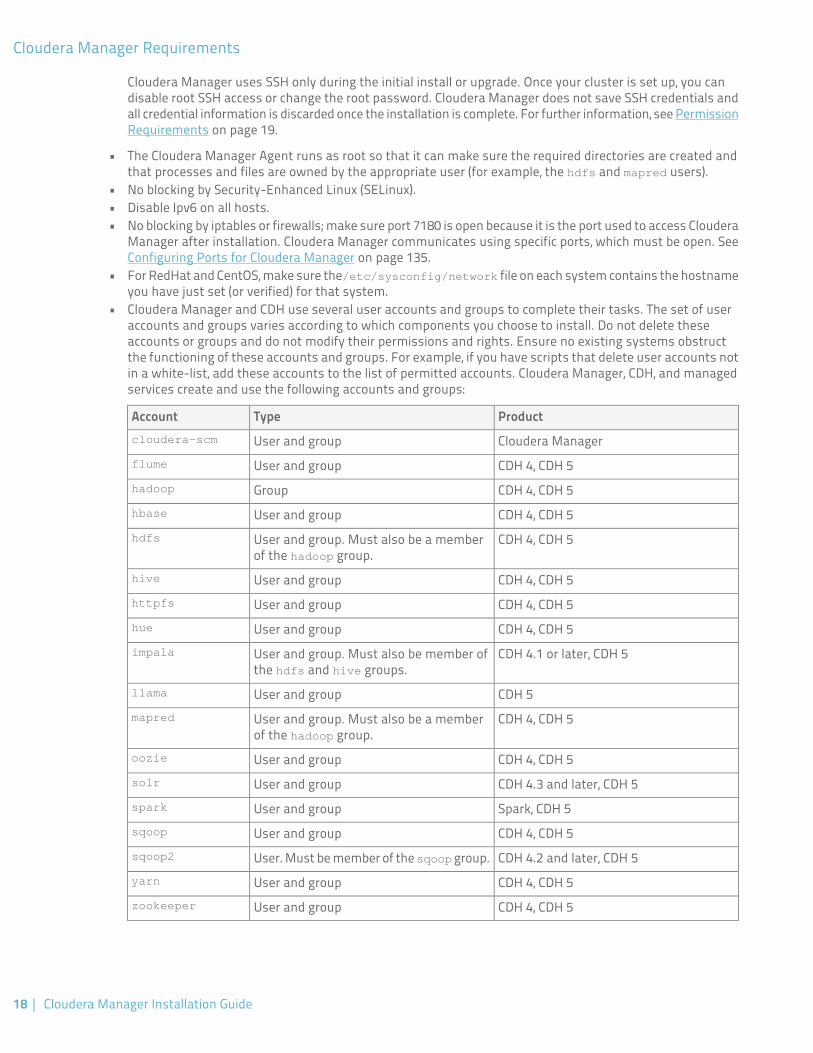
• Cloudera Manager and CDH use several user accounts and groups to complete their tasks. The set of useraccounts and groups varies according to which components you choose to install. Do not delete theseaccounts or groups and do not modify their permissions and rights. Ensure no existing systems obstructthe functioning of these accounts and groups. For example, if you have scripts that delete user accounts notin a white-list, add these accounts to the list of permitted accounts. Cloudera Manager, CDH, and managedservices create and use the following accounts and groups:
ProductTypeAccount
Cloudera ManagerUser and groupcloudera-scm
CDH 4, CDH 5User and groupflume
CDH 4, CDH 5Grouphadoop
CDH 4, CDH 5User and grouphbase
CDH 4, CDH 5User and group. Must also be a memberof the hadoop group.
hdfs
CDH 4, CDH 5User and grouphive
CDH 4, CDH 5User and grouphttpfs
CDH 4, CDH 5User and grouphue
CDH 4.1 or later, CDH 5User and group. Must also be member ofthe hdfs and hive groups.
impala
CDH 5User and groupllama
CDH 4, CDH 5User and group. Must also be a memberof the hadoop group.
mapred
CDH 4, CDH 5User and groupoozie
CDH 4.3 and later, CDH 5User and groupsolr
Spark, CDH 5User and groupspark
CDH 4, CDH 5User and groupsqoop
CDH 4.2 and later, CDH 5User. Must be member of the sqoop group.sqoop2
CDH 4, CDH 5User and groupyarn
CDH 4, CDH 5User and groupzookeeper
18 | Cloudera Manager Installation Guide
Cloudera Manager Requirements
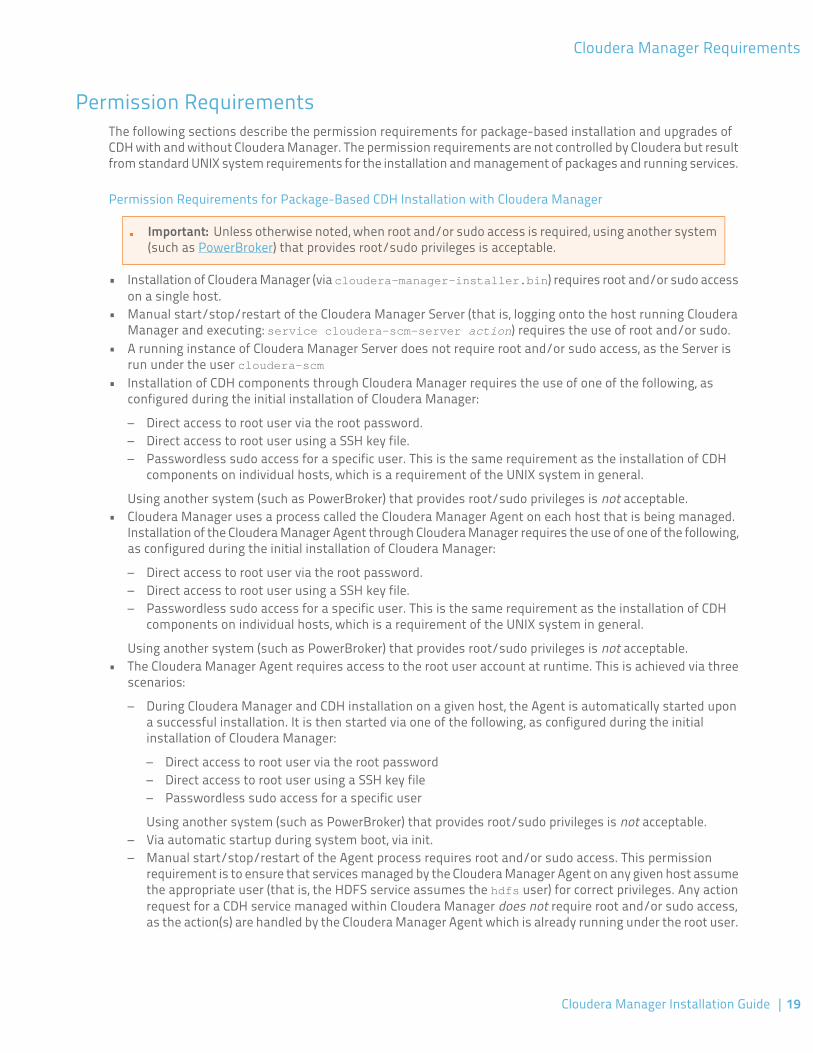
Permission RequirementsThe following sections describe the permission requirements for package-based installation and upgrades ofCDH with and without Cloudera Manager. The permission requirements are not controlled by Cloudera but resultfrom standard UNIX system requirements for the installation and management of packages and running services.
Permission Requirements for Package-Based CDH Installation with Cloudera Manager
Important: Unless otherwise noted, when root and/or sudo access is required, using another system(such as PowerBroker) that provides root/sudo privileges is acceptable.
• Installation of Cloudera Manager (via cloudera-manager-installer.bin) requires root and/or sudo accesson a single host.
• Manual start/stop/restart of the Cloudera Manager Server (that is, logging onto the host running ClouderaManager and executing: service cloudera-scm-server action) requires the use of root and/or sudo.
• A running instance of Cloudera Manager Server does not require root and/or sudo access, as the Server isrun under the user cloudera-scm
• Installation of CDH components through Cloudera Manager requires the use of one of the following, asconfigured during the initial installation of Cloudera Manager:
– Direct access to root user via the root password.– Direct access to root user using a SSH key file.– Passwordless sudo access for a specific user. This is the same requirement as the installation of CDH
components on individual hosts, which is a requirement of the UNIX system in general.
Using another system (such as PowerBroker) that provides root/sudo privileges is not acceptable.• Cloudera Manager uses a process called the Cloudera Manager Agent on each host that is being managed.
Installation of the Cloudera Manager Agent through Cloudera Manager requires the use of one of the following,as configured during the initial installation of Cloudera Manager:
– Direct access to root user via the root password.– Direct access to root user using a SSH key file.– Passwordless sudo access for a specific user. This is the same requirement as the installation of CDH
components on individual hosts, which is a requirement of the UNIX system in general.
Using another system (such as PowerBroker) that provides root/sudo privileges is not acceptable.• The Cloudera Manager Agent requires access to the root user account at runtime. This is achieved via three
scenarios:
– During Cloudera Manager and CDH installation on a given host, the Agent is automatically started upona successful installation. It is then started via one of the following, as configured during the initialinstallation of Cloudera Manager:
– Direct access to root user via the root password– Direct access to root user using a SSH key file– Passwordless sudo access for a specific user
Using another system (such as PowerBroker) that provides root/sudo privileges is not acceptable.– Via automatic startup during system boot, via init.– Manual start/stop/restart of the Agent process requires root and/or sudo access. This permission
requirement is to ensure that services managed by the Cloudera Manager Agent on any given host assumethe appropriate user (that is, the HDFS service assumes the hdfs user) for correct privileges. Any actionrequest for a CDH service managed within Cloudera Manager does not require root and/or sudo access,as the action(s) are handled by the Cloudera Manager Agent which is already running under the root user.
Cloudera Manager Installation Guide | 19
Cloudera Manager Requirements
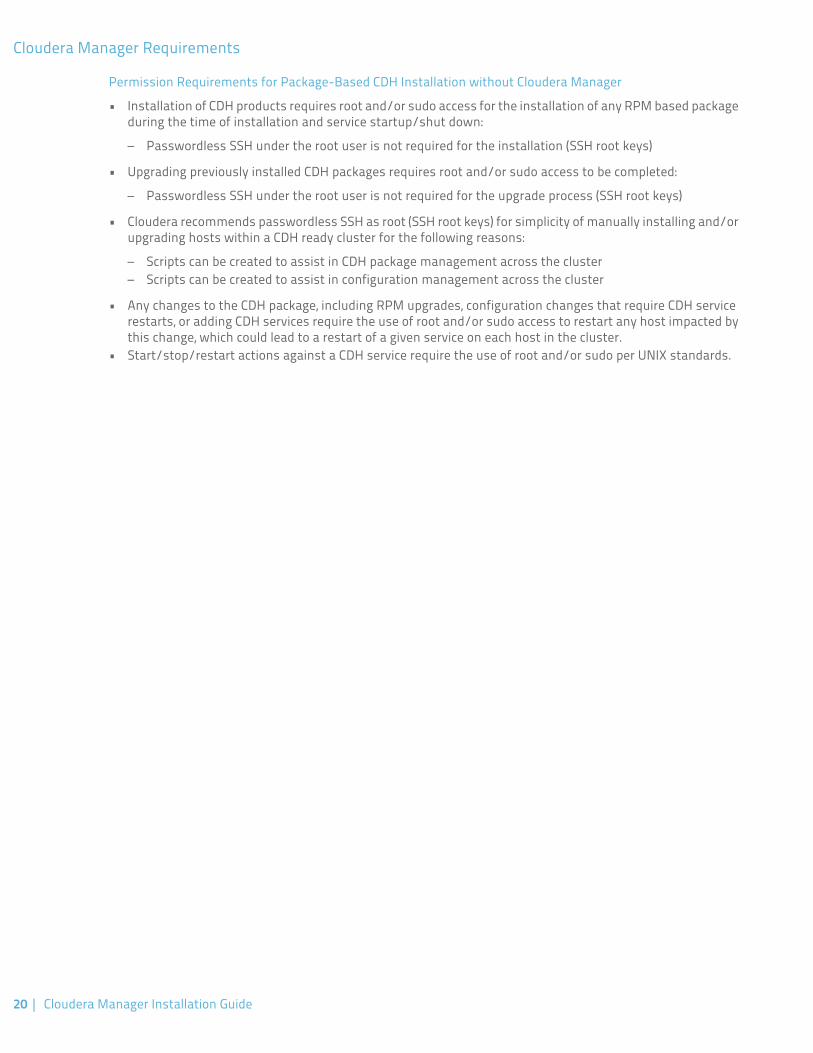
Permission Requirements for Package-Based CDH Installation without Cloudera Manager
• Installation of CDH products requires root and/or sudo access for the installation of any RPM based packageduring the time of installation and service startup/shut down:
– Passwordless SSH under the root user is not required for the installation (SSH root keys)
• Upgrading previously installed CDH packages requires root and/or sudo access to be completed:
– Passwordless SSH under the root user is not required for the upgrade process (SSH root keys)
• Cloudera recommends passwordless SSH as root (SSH root keys) for simplicity of manually installing and/orupgrading hosts within a CDH ready cluster for the following reasons:
– Scripts can be created to assist in CDH package management across the cluster– Scripts can be created to assist in configuration management across the cluster
• Any changes to the CDH package, including RPM upgrades, configuration changes that require CDH servicerestarts, or adding CDH services require the use of root and/or sudo access to restart any host impacted bythis change, which could lead to a restart of a given service on each host in the cluster.
• Start/stop/restart actions against a CDH service require the use of root and/or sudo per UNIX standards.
20 | Cloudera Manager Installation Guide
Cloudera Manager Requirements
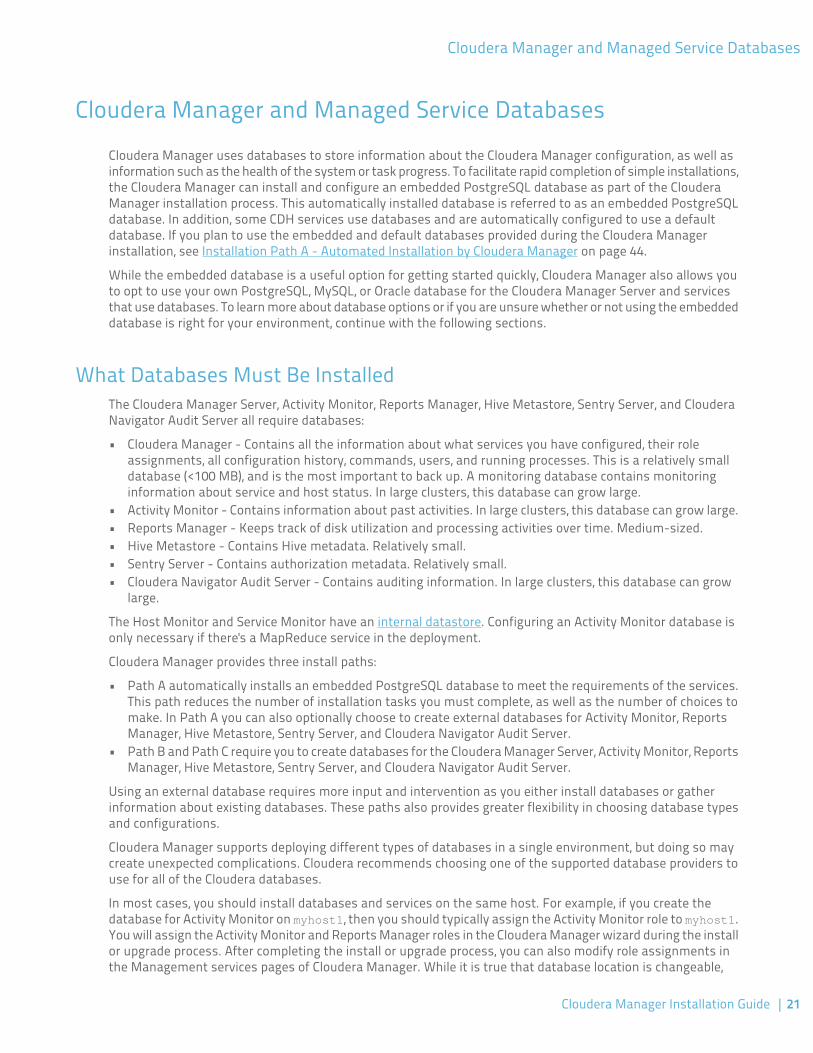
Cloudera Manager and Managed Service Databases
Cloudera Manager uses databases to store information about the Cloudera Manager configuration, as well asinformation such as the health of the system or task progress. To facilitate rapid completion of simple installations,the Cloudera Manager can install and configure an embedded PostgreSQL database as part of the ClouderaManager installation process. This automatically installed database is referred to as an embedded PostgreSQLdatabase. In addition, some CDH services use databases and are automatically configured to use a defaultdatabase. If you plan to use the embedded and default databases provided during the Cloudera Managerinstallation, see Installation Path A - Automated Installation by Cloudera Manager on page 44.
While the embedded database is a useful option for getting started quickly, Cloudera Manager also allows youto opt to use your own PostgreSQL, MySQL, or Oracle database for the Cloudera Manager Server and servicesthat use databases. To learn more about database options or if you are unsure whether or not using the embeddeddatabase is right for your environment, continue with the following sections.
What Databases Must Be InstalledThe Cloudera Manager Server, Activity Monitor, Reports Manager, Hive Metastore, Sentry Server, and ClouderaNavigator Audit Server all require databases:
• Cloudera Manager - Contains all the information about what services you have configured, their roleassignments, all configuration history, commands, users, and running processes. This is a relatively smalldatabase (<100 MB), and is the most important to back up. A monitoring database contains monitoringinformation about service and host status. In large clusters, this database can grow large.
• Activity Monitor - Contains information about past activities. In large clusters, this database can grow large.• Reports Manager - Keeps track of disk utilization and processing activities over time. Medium-sized.• Hive Metastore - Contains Hive metadata. Relatively small.• Sentry Server - Contains authorization metadata. Relatively small.• Cloudera Navigator Audit Server - Contains auditing information. In large clusters, this database can grow
large.
The Host Monitor and Service Monitor have an internal datastore. Configuring an Activity Monitor database isonly necessary if there's a MapReduce service in the deployment.
Cloudera Manager provides three install paths:
• Path A automatically installs an embedded PostgreSQL database to meet the requirements of the services.This path reduces the number of installation tasks you must complete, as well as the number of choices tomake. In Path A you can also optionally choose to create external databases for Activity Monitor, ReportsManager, Hive Metastore, Sentry Server, and Cloudera Navigator Audit Server.
• Path B and Path C require you to create databases for the Cloudera Manager Server, Activity Monitor, ReportsManager, Hive Metastore, Sentry Server, and Cloudera Navigator Audit Server.
Using an external database requires more input and intervention as you either install databases or gatherinformation about existing databases. These paths also provides greater flexibility in choosing database typesand configurations.
Cloudera Manager supports deploying different types of databases in a single environment, but doing so maycreate unexpected complications. Cloudera recommends choosing one of the supported database providers touse for all of the Cloudera databases.
In most cases, you should install databases and services on the same host. For example, if you create thedatabase for Activity Monitor on myhost1, then you should typically assign the Activity Monitor role to myhost1.You will assign the Activity Monitor and Reports Manager roles in the Cloudera Manager wizard during the installor upgrade process. After completing the install or upgrade process, you can also modify role assignments inthe Management services pages of Cloudera Manager. While it is true that database location is changeable,
Cloudera Manager Installation Guide | 21
Cloudera Manager and Managed Service Databases
before beginning an installation or upgrade, you should decide which hosts you will use. The JDBC connector foryour database must be installed on the hosts where you assign the Activity Monitor and Reports Manager roles.
It is possible to install the database and services on different hosts. Separating databases from services is morelikely to occur in larger deployments and in cases where more sophisticated database administrators activelychoose to establish such a configuration. For example, databases and services might be separated if yourenvironment includes Oracle databases that will be separately managed by Oracle database administrators.
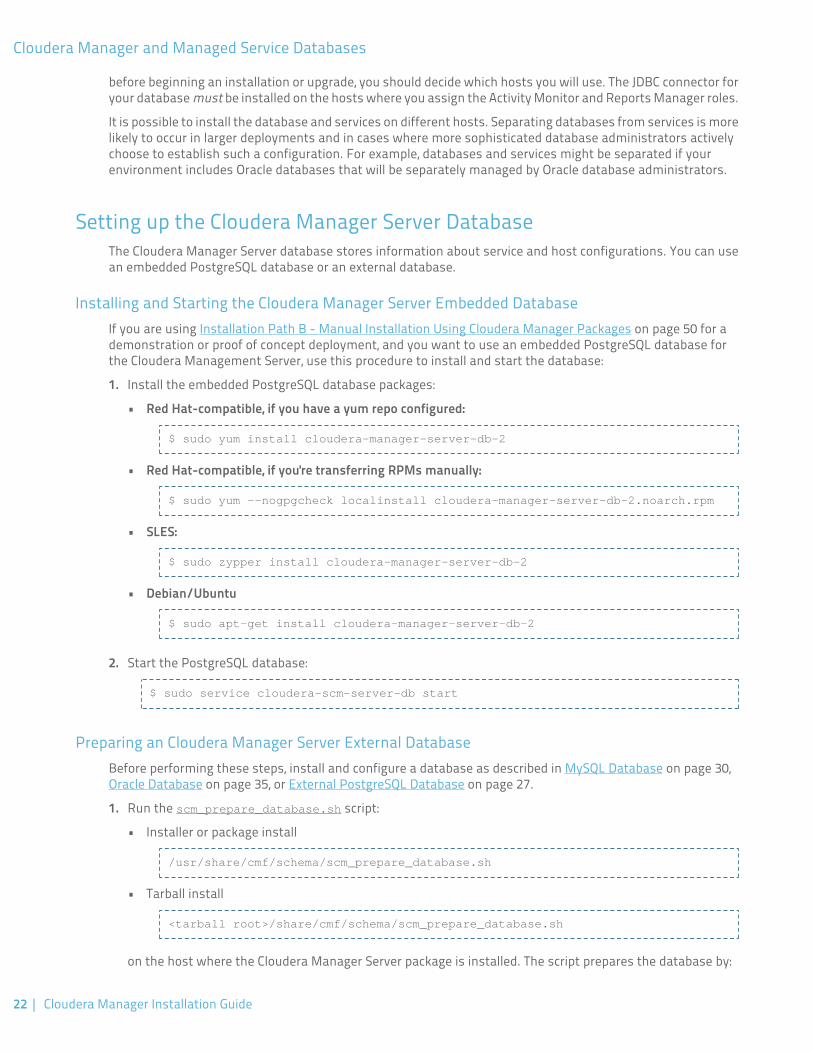
Setting up the Cloudera Manager Server DatabaseThe Cloudera Manager Server database stores information about service and host configurations. You can usean embedded PostgreSQL database or an external database.
Installing and Starting the Cloudera Manager Server Embedded DatabaseIf you are using Installation Path B - Manual Installation Using Cloudera Manager Packages on page 50 for ademonstration or proof of concept deployment, and you want to use an embedded PostgreSQL database forthe Cloudera Management Server, use this procedure to install and start the database:
1. Install the embedded PostgreSQL database packages:
• Red Hat-compatible, if you have a yum repo configured:
$ sudo yum install cloudera-manager-server-db-2
• Red Hat-compatible, if you're transferring RPMs manually:
$ sudo yum --nogpgcheck localinstall cloudera-manager-server-db-2.noarch.rpm
• SLES:
$ sudo zypper install cloudera-manager-server-db-2
• Debian/Ubuntu
$ sudo apt-get install cloudera-manager-server-db-2
2. Start the PostgreSQL database:
$ sudo service cloudera-scm-server-db start
Preparing an Cloudera Manager Server External DatabaseBefore performing these steps, install and configure a database as described in MySQL Database on page 30,Oracle Database on page 35, or External PostgreSQL Database on page 27.
1. Run the scm_prepare_database.sh script:
• Installer or package install
/usr/share/cmf/schema/scm_prepare_database.sh
• Tarball install
<tarball root>/share/cmf/schema/scm_prepare_database.sh
on the host where the Cloudera Manager Server package is installed. The script prepares the database by:
22 | Cloudera Manager Installation Guide
Cloudera Manager and Managed Service Databases
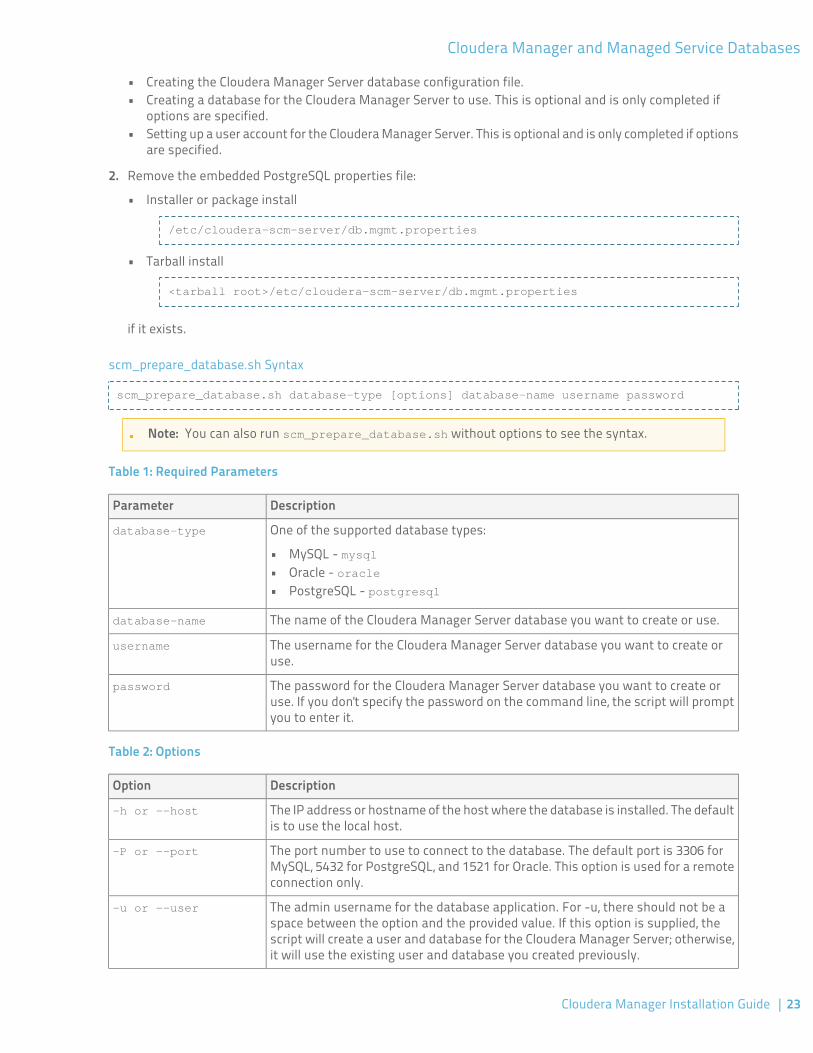
• Creating the Cloudera Manager Server database configuration file.• Creating a database for the Cloudera Manager Server to use. This is optional and is only completed if
options are specified.• Setting up a user account for the Cloudera Manager Server. This is optional and is only completed if options
are specified.
2. Remove the embedded PostgreSQL properties file:
• Installer or package install
/etc/cloudera-scm-server/db.mgmt.properties
• Tarball install
<tarball root>/etc/cloudera-scm-server/db.mgmt.properties
if it exists.
scm_prepare_database.sh Syntax
scm_prepare_database.sh database-type [options] database-name username password
Note: You can also run scm_prepare_database.sh without options to see the syntax.
Table 1: Required Parameters
DescriptionParameter
One of the supported database types:database-type
• MySQL - mysql• Oracle - oracle• PostgreSQL - postgresql
The name of the Cloudera Manager Server database you want to create or use.database-name
The username for the Cloudera Manager Server database you want to create oruse.
username
The password for the Cloudera Manager Server database you want to create oruse. If you don't specify the password on the command line, the script will promptyou to enter it.
password
Table 2: Options
DescriptionOption
The IP address or hostname of the host where the database is installed. The defaultis to use the local host.
-h or --host
The port number to use to connect to the database. The default port is 3306 forMySQL, 5432 for PostgreSQL, and 1521 for Oracle. This option is used for a remoteconnection only.
-P or --port
The admin username for the database application. For -u, there should not be aspace between the option and the provided value. If this option is supplied, the
-u or --user
script will create a user and database for the Cloudera Manager Server; otherwise,it will use the existing user and database you created previously.
Cloudera Manager Installation Guide | 23
Cloudera Manager and Managed Service Databases
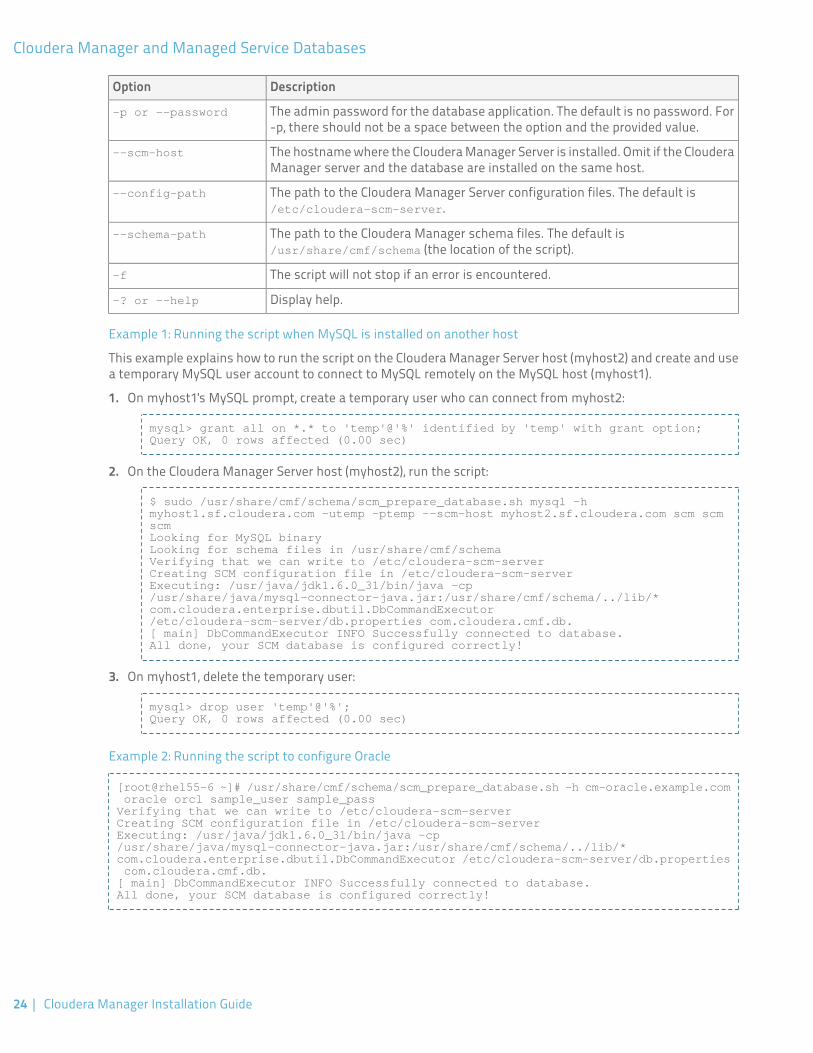
DescriptionOption
The admin password for the database application. The default is no password. For-p, there should not be a space between the option and the provided value.
-p or --password
The hostname where the Cloudera Manager Server is installed. Omit if the ClouderaManager server and the database are installed on the same host.
--scm-host
The path to the Cloudera Manager Server configuration files. The default is/etc/cloudera-scm-server.
--config-path
The path to the Cloudera Manager schema files. The default is/usr/share/cmf/schema (the location of the script).
--schema-path
The script will not stop if an error is encountered.-f
Display help.-? or --help
Example 1: Running the script when MySQL is installed on another host
This example explains how to run the script on the Cloudera Manager Server host (myhost2) and create and usea temporary MySQL user account to connect to MySQL remotely on the MySQL host (myhost1).
1. On myhost1's MySQL prompt, create a temporary user who can connect from myhost2:
mysql> grant all on *.* to 'temp'@'%' identified by 'temp' with grant option;Query OK, 0 rows affected (0.00 sec)
2. On the Cloudera Manager Server host (myhost2), run the script:
$ sudo /usr/share/cmf/schema/scm_prepare_database.sh mysql -h myhost1.sf.cloudera.com -utemp -ptemp --scm-host myhost2.sf.cloudera.com scm scm scmLooking for MySQL binaryLooking for schema files in /usr/share/cmf/schemaVerifying that we can write to /etc/cloudera-scm-serverCreating SCM configuration file in /etc/cloudera-scm-serverExecuting: /usr/java/jdk1.6.0_31/bin/java -cp /usr/share/java/mysql-connector-java.jar:/usr/share/cmf/schema/../lib/* com.cloudera.enterprise.dbutil.DbCommandExecutor /etc/cloudera-scm-server/db.properties com.cloudera.cmf.db.[ main] DbCommandExecutor INFO Successfully connected to database.All done, your SCM database is configured correctly!
3. On myhost1, delete the temporary user:
mysql> drop user 'temp'@'%';Query OK, 0 rows affected (0.00 sec)
Example 2: Running the script to configure Oracle
[root@rhel55-6 ~]# /usr/share/cmf/schema/scm_prepare_database.sh -h cm-oracle.example.com oracle orcl sample_user sample_passVerifying that we can write to /etc/cloudera-scm-serverCreating SCM configuration file in /etc/cloudera-scm-serverExecuting: /usr/java/jdk1.6.0_31/bin/java -cp /usr/share/java/mysql-connector-java.jar:/usr/share/cmf/schema/../lib/* com.cloudera.enterprise.dbutil.DbCommandExecutor /etc/cloudera-scm-server/db.properties com.cloudera.cmf.db.[ main] DbCommandExecutor INFO Successfully connected to database.All done, your SCM database is configured correctly!
24 | Cloudera Manager Installation Guide
Cloudera Manager and Managed Service Databases
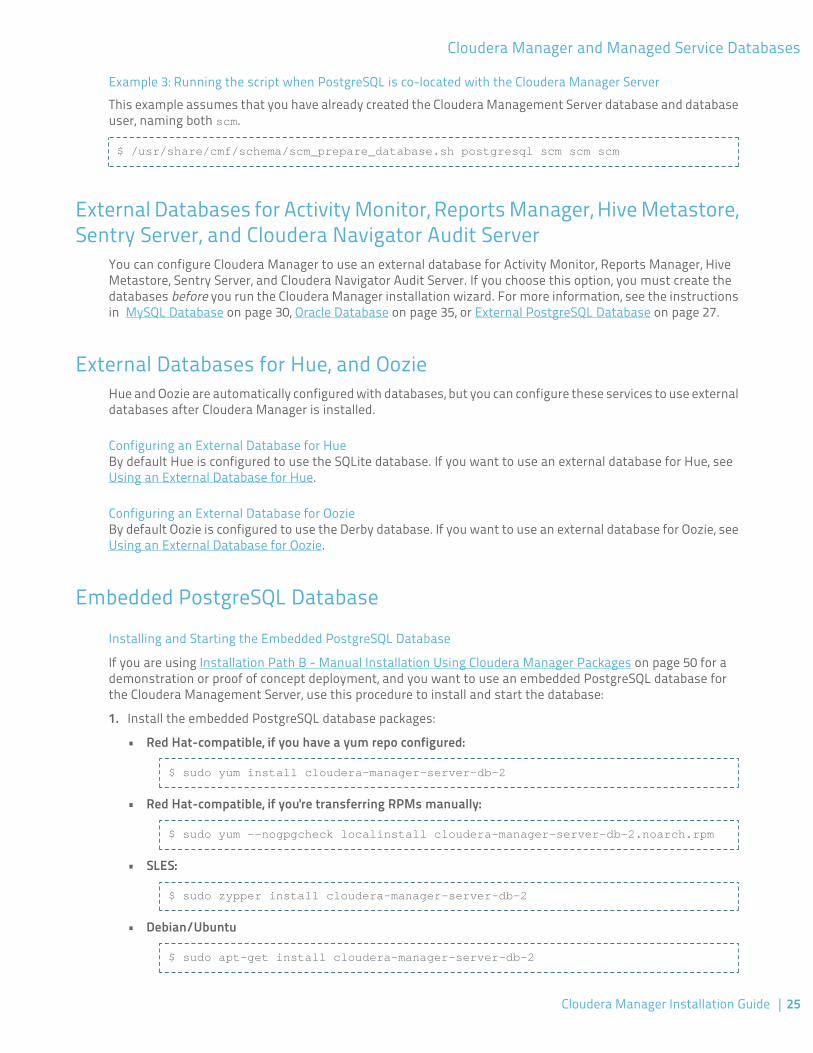
Example 3: Running the script when PostgreSQL is co-located with the Cloudera Manager ServerThis example assumes that you have already created the Cloudera Management Server database and databaseuser, naming both scm.
$ /usr/share/cmf/schema/scm_prepare_database.sh postgresql scm scm scm
External Databases for Activity Monitor, Reports Manager, Hive Metastore,Sentry Server, and Cloudera Navigator Audit Server
You can configure Cloudera Manager to use an external database for Activity Monitor, Reports Manager, HiveMetastore, Sentry Server, and Cloudera Navigator Audit Server. If you choose this option, you must create thedatabases before you run the Cloudera Manager installation wizard. For more information, see the instructionsin MySQL Database on page 30, Oracle Database on page 35, or External PostgreSQL Database on page 27.
External Databases for Hue, and OozieHue and Oozie are automatically configured with databases, but you can configure these services to use externaldatabases after Cloudera Manager is installed.
Configuring an External Database for HueBy default Hue is configured to use the SQLite database. If you want to use an external database for Hue, seeUsing an External Database for Hue.
Configuring an External Database for OozieBy default Oozie is configured to use the Derby database. If you want to use an external database for Oozie, seeUsing an External Database for Oozie.
Embedded PostgreSQL Database
Installing and Starting the Embedded PostgreSQL Database
If you are using Installation Path B - Manual Installation Using Cloudera Manager Packages on page 50 for ademonstration or proof of concept deployment, and you want to use an embedded PostgreSQL database forthe Cloudera Management Server, use this procedure to install and start the database:
1. Install the embedded PostgreSQL database packages:
• Red Hat-compatible, if you have a yum repo configured:
$ sudo yum install cloudera-manager-server-db-2
• Red Hat-compatible, if you're transferring RPMs manually:
$ sudo yum --nogpgcheck localinstall cloudera-manager-server-db-2.noarch.rpm
• SLES:
$ sudo zypper install cloudera-manager-server-db-2
• Debian/Ubuntu
$ sudo apt-get install cloudera-manager-server-db-2
Cloudera Manager Installation Guide | 25
Cloudera Manager and Managed Service Databases
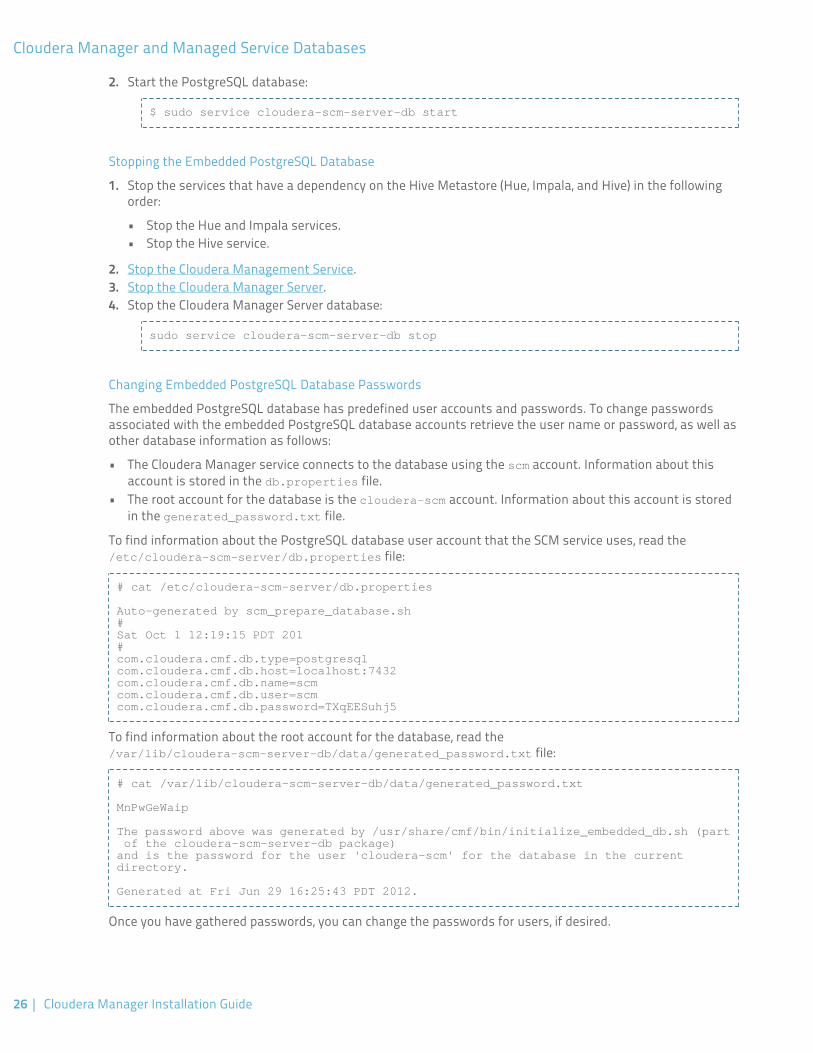
2. Start the PostgreSQL database:
$ sudo service cloudera-scm-server-db start
Stopping the Embedded PostgreSQL Database
1. Stop the services that have a dependency on the Hive Metastore (Hue, Impala, and Hive) in the followingorder:
• Stop the Hue and Impala services.• Stop the Hive service.
2. Stop the Cloudera Management Service.3. Stop the Cloudera Manager Server.4. Stop the Cloudera Manager Server database:
sudo service cloudera-scm-server-db stop
Changing Embedded PostgreSQL Database Passwords
The embedded PostgreSQL database has predefined user accounts and passwords. To change passwordsassociated with the embedded PostgreSQL database accounts retrieve the user name or password, as well asother database information as follows:
• The Cloudera Manager service connects to the database using the scm account. Information about thisaccount is stored in the db.properties file.
• The root account for the database is the cloudera-scm account. Information about this account is storedin the generated_password.txt file.
To find information about the PostgreSQL database user account that the SCM service uses, read the/etc/cloudera-scm-server/db.properties file:
# cat /etc/cloudera-scm-server/db.properties
Auto-generated by scm_prepare_database.sh#Sat Oct 1 12:19:15 PDT 201#com.cloudera.cmf.db.type=postgresqlcom.cloudera.cmf.db.host=localhost:7432com.cloudera.cmf.db.name=scmcom.cloudera.cmf.db.user=scmcom.cloudera.cmf.db.password=TXqEESuhj5
To find information about the root account for the database, read the/var/lib/cloudera-scm-server-db/data/generated_password.txt file:
# cat /var/lib/cloudera-scm-server-db/data/generated_password.txt
MnPwGeWaip
The password above was generated by /usr/share/cmf/bin/initialize_embedded_db.sh (part of the cloudera-scm-server-db package)and is the password for the user 'cloudera-scm' for the database in the current directory.
Generated at Fri Jun 29 16:25:43 PDT 2012.
Once you have gathered passwords, you can change the passwords for users, if desired.
26 | Cloudera Manager Installation Guide
Cloudera Manager and Managed Service Databases
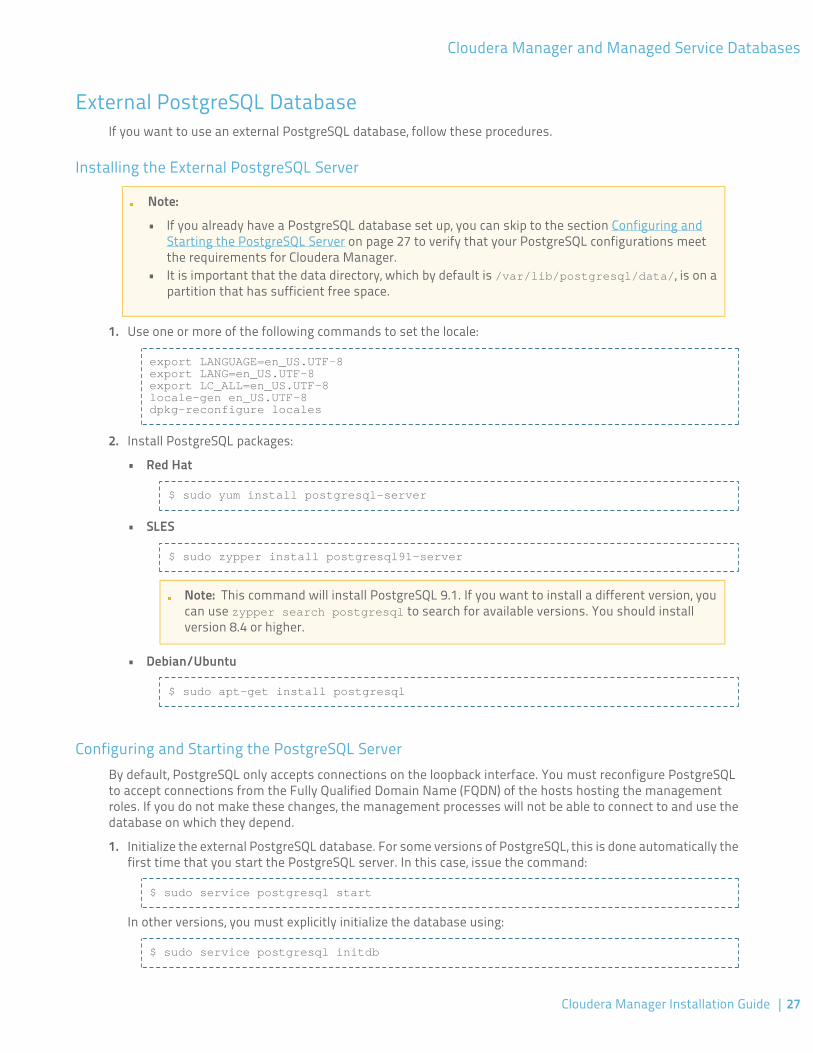
External PostgreSQL DatabaseIf you want to use an external PostgreSQL database, follow these procedures.
Installing the External PostgreSQL Server
Note:
• If you already have a PostgreSQL database set up, you can skip to the section Configuring andStarting the PostgreSQL Server on page 27 to verify that your PostgreSQL configurations meetthe requirements for Cloudera Manager.
• It is important that the data directory, which by default is /var/lib/postgresql/data/, is on apartition that has sufficient free space.
1. Use one or more of the following commands to set the locale:
export LANGUAGE=en_US.UTF-8export LANG=en_US.UTF-8export LC_ALL=en_US.UTF-8locale-gen en_US.UTF-8dpkg-reconfigure locales
2. Install PostgreSQL packages:
• Red Hat
$ sudo yum install postgresql-server
• SLES
$ sudo zypper install postgresql91-server
Note: This command will install PostgreSQL 9.1. If you want to install a different version, youcan use zypper search postgresql to search for available versions. You should installversion 8.4 or higher.
• Debian/Ubuntu
$ sudo apt-get install postgresql
Configuring and Starting the PostgreSQL ServerBy default, PostgreSQL only accepts connections on the loopback interface. You must reconfigure PostgreSQLto accept connections from the Fully Qualified Domain Name (FQDN) of the hosts hosting the managementroles. If you do not make these changes, the management processes will not be able to connect to and use thedatabase on which they depend.
1. Initialize the external PostgreSQL database. For some versions of PostgreSQL, this is done automatically thefirst time that you start the PostgreSQL server. In this case, issue the command:
$ sudo service postgresql start
In other versions, you must explicitly initialize the database using:
$ sudo service postgresql initdb
Cloudera Manager Installation Guide | 27
Cloudera Manager and Managed Service Databases

See the PostgreSQL documentation for more details.2. Enable MD5 authentication. Edit pg_hba.conf, which is usually found in /var/lib/pgsql/data or
/etc/postgresql/8.4/main. Add the following line:
host all all 127.0.0.1/32 md5
If the default pg_hba.conf file contains the following line:
host all all 127.0.0.1/32 ident
then the host line specifying md5 authentication shown above must be inserted before this ident line.Failure to do so may cause an authentication error when running the scm_prepare_database.sh script.You can modify the contents of the md5 line shown above to support different configurations. For example,if you want to access PostgreSQL from a different host, replace 127.0.0.1 with your IP address and updatepostgresql.conf, which is typically found in the same place as pg_hba.conf to include:
listen_addresses = '*'
3. Configure settings to ensure your system performs as expected. Update these settings in the/var/lib/pgsql/data/postgresql.conf or /var/lib/postgresql/data/postgresql.conf file. Settingsvary based on cluster size and resources.
• Small clusters - For small to mid-sized clusters, consider the following suggestions as a starting pointfor settings. If resources are especially limited, consider reducing the buffer sizes and checkpoint segmentsfurther. Ongoing tuning may be required based on each host's resource utilization. For example, if ClouderaManager is running on the same host as other roles, the following values may be acceptable:
– shared_buffers - 256MB– wal_buffers - 8MB– checkpoint_segments - 16– checkpoint_completion_target - 0.9
• Large clusters - may contain up to 1000 hosts. For large clusters consider the following suggestions asa starting point for settings.
– max_connection - For large clusters, each database is typically hosted on a different host. The generalrule is to allow each database on a host 100 maximum connections and then add 50 extra connections.As a result, in the normal case for large clusters, configure each of the five hosts that hosts a singledatabase for 150 connections. You may have to increase the system resources available to PostgreSQL,as described at Connection Settings.
– shared_buffers - 1024MB. This requires that the operating system can allocate sufficient sharedmemory. See PostgreSQL information on Managing Kernel Resources for more information on settingkernel resources.
– wal_buffers - 16MB. This value is derived from the shared_buffers value. Setting wal_buffersto be approximately 3% of shared_buffers up to a maximum of approximately 16MB works well inmost case.
– checkpoint_segments - 128. The PostgreSQL Tuning Guide recommends values between 32 and 256for write-intensive systems, such as this one.
– checkpoint_completion_target - 0.9. This setting is only available in PostgreSQL 8.3 and later.These versions are highly recommended.
4. Configure the PostgreSQL server to start at boot.
• Red Hat
$ sudo /sbin/chkconfig postgresql on$ sudo /sbin/chkconfig --list postgresqlpostgresql 0:off 1:off 2:on 3:on 4:on 5:on 6:off
28 | Cloudera Manager Installation Guide
Cloudera Manager and Managed Service Databases
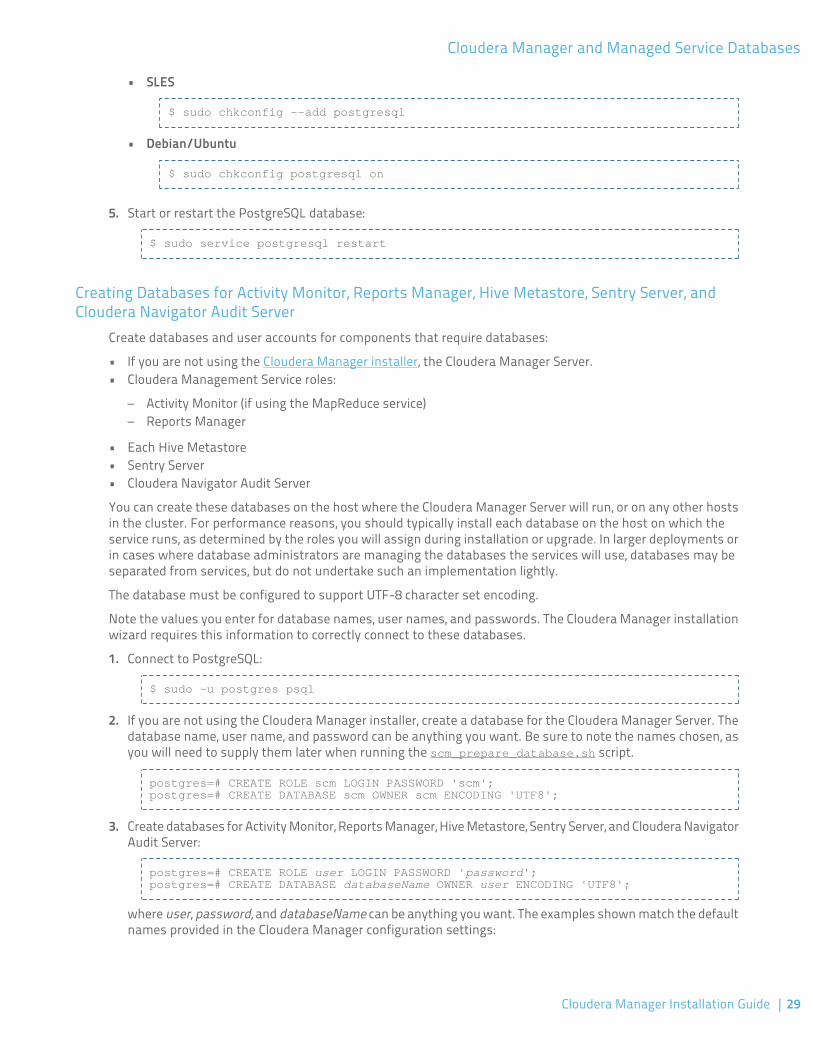
• SLES
$ sudo chkconfig --add postgresql
• Debian/Ubuntu
$ sudo chkconfig postgresql on
5. Start or restart the PostgreSQL database:
$ sudo service postgresql restart
Creating Databases for Activity Monitor, Reports Manager, Hive Metastore, Sentry Server, andCloudera Navigator Audit Server
Create databases and user accounts for components that require databases:
• If you are not using the Cloudera Manager installer, the Cloudera Manager Server.• Cloudera Management Service roles:
– Activity Monitor (if using the MapReduce service)– Reports Manager
• Each Hive Metastore• Sentry Server• Cloudera Navigator Audit Server
You can create these databases on the host where the Cloudera Manager Server will run, or on any other hostsin the cluster. For performance reasons, you should typically install each database on the host on which theservice runs, as determined by the roles you will assign during installation or upgrade. In larger deployments orin cases where database administrators are managing the databases the services will use, databases may beseparated from services, but do not undertake such an implementation lightly.
The database must be configured to support UTF-8 character set encoding.
Note the values you enter for database names, user names, and passwords. The Cloudera Manager installationwizard requires this information to correctly connect to these databases.
1. Connect to PostgreSQL:
$ sudo -u postgres psql
2. If you are not using the Cloudera Manager installer, create a database for the Cloudera Manager Server. Thedatabase name, user name, and password can be anything you want. Be sure to note the names chosen, asyou will need to supply them later when running the scm_prepare_database.sh script.
postgres=# CREATE ROLE scm LOGIN PASSWORD 'scm';postgres=# CREATE DATABASE scm OWNER scm ENCODING 'UTF8';
3. Create databases for Activity Monitor, Reports Manager, Hive Metastore, Sentry Server, and Cloudera NavigatorAudit Server:
postgres=# CREATE ROLE user LOGIN PASSWORD 'password';postgres=# CREATE DATABASE databaseName OWNER user ENCODING 'UTF8';
where user, password, and databaseName can be anything you want. The examples shown match the defaultnames provided in the Cloudera Manager configuration settings:
Cloudera Manager Installation Guide | 29
Cloudera Manager and Managed Service Databases
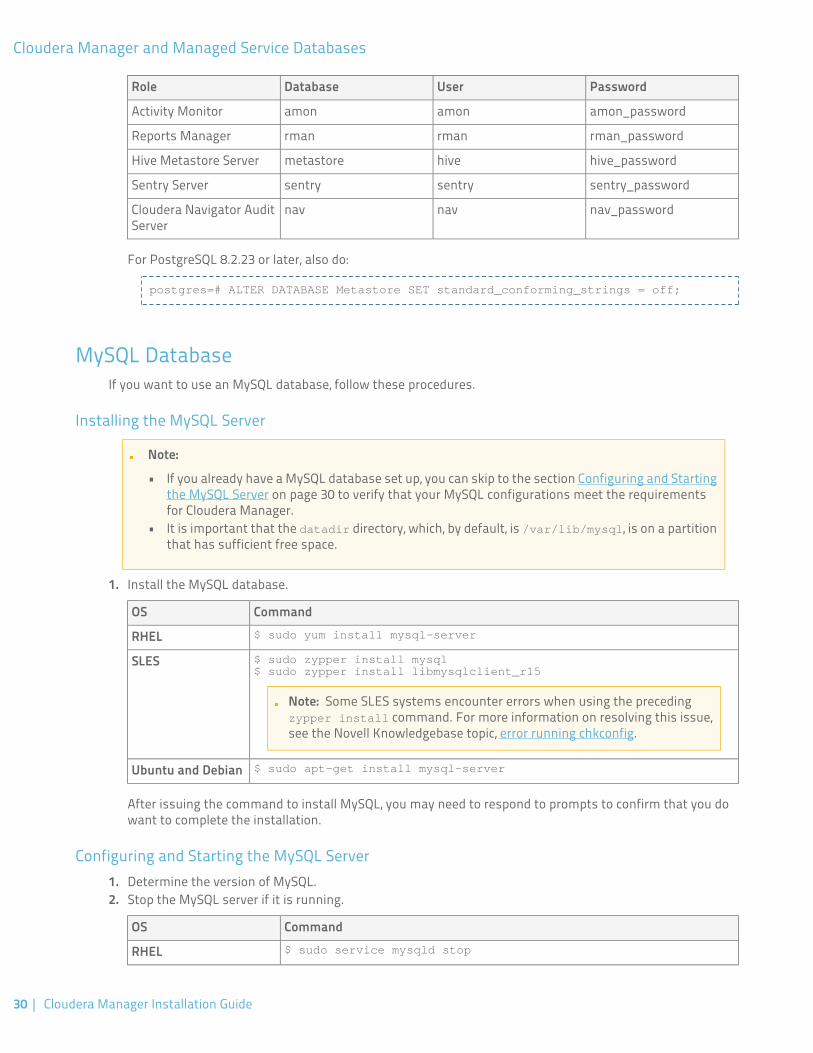
PasswordUserDatabaseRole
amon_passwordamonamonActivity Monitor
rman_passwordrmanrmanReports Manager
hive_passwordhivemetastoreHive Metastore Server
sentry_passwordsentrysentrySentry Server
nav_passwordnavnavCloudera Navigator AuditServer
For PostgreSQL 8.2.23 or later, also do:
postgres=# ALTER DATABASE Metastore SET standard_conforming_strings = off;
MySQL DatabaseIf you want to use an MySQL database, follow these procedures.
Installing the MySQL Server
Note:
• If you already have a MySQL database set up, you can skip to the section Configuring and Startingthe MySQL Server on page 30 to verify that your MySQL configurations meet the requirementsfor Cloudera Manager.
• It is important that the datadir directory, which, by default, is /var/lib/mysql, is on a partitionthat has sufficient free space.
1. Install the MySQL database.
CommandOS$ sudo yum install mysql-serverRHEL$ sudo zypper install mysql$ sudo zypper install libmysqlclient_r15
SLES
Note: Some SLES systems encounter errors when using the precedingzypper install command. For more information on resolving this issue,see the Novell Knowledgebase topic, error running chkconfig.
$ sudo apt-get install mysql-serverUbuntu and Debian
After issuing the command to install MySQL, you may need to respond to prompts to confirm that you dowant to complete the installation.
Configuring and Starting the MySQL Server1. Determine the version of MySQL.2. Stop the MySQL server if it is running.
CommandOS$ sudo service mysqld stopRHEL
30 | Cloudera Manager Installation Guide
Cloudera Manager and Managed Service Databases
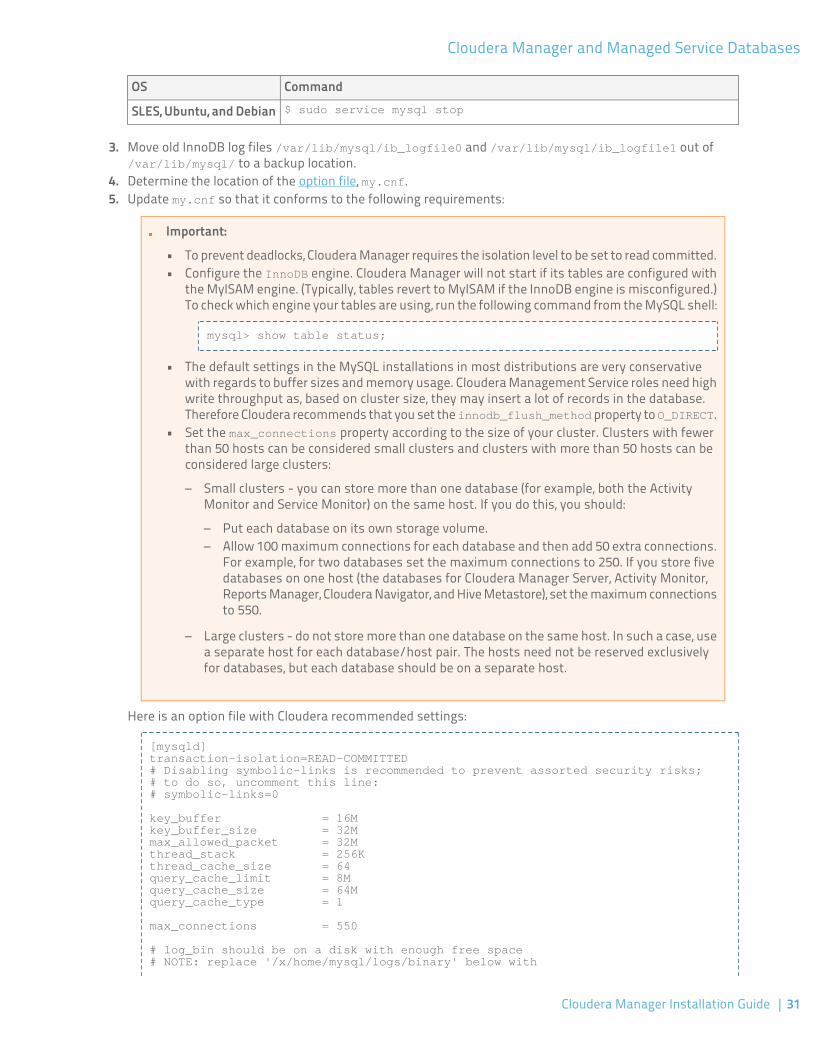
CommandOS$ sudo service mysql stopSLES, Ubuntu, and Debian
3. Move old InnoDB log files /var/lib/mysql/ib_logfile0 and /var/lib/mysql/ib_logfile1 out of/var/lib/mysql/ to a backup location.
4. Determine the location of the option file, my.cnf.5. Update my.cnf so that it conforms to the following requirements:
Important:
• To prevent deadlocks, Cloudera Manager requires the isolation level to be set to read committed.• Configure the InnoDB engine. Cloudera Manager will not start if its tables are configured with
the MyISAM engine. (Typically, tables revert to MyISAM if the InnoDB engine is misconfigured.)To check which engine your tables are using, run the following command from the MySQL shell:
mysql> show table status;
• The default settings in the MySQL installations in most distributions are very conservativewith regards to buffer sizes and memory usage. Cloudera Management Service roles need highwrite throughput as, based on cluster size, they may insert a lot of records in the database.Therefore Cloudera recommends that you set the innodb_flush_method property to O_DIRECT.
• Set the max_connections property according to the size of your cluster. Clusters with fewerthan 50 hosts can be considered small clusters and clusters with more than 50 hosts can beconsidered large clusters:
– Small clusters - you can store more than one database (for example, both the ActivityMonitor and Service Monitor) on the same host. If you do this, you should:
– Put each database on its own storage volume.– Allow 100 maximum connections for each database and then add 50 extra connections.
For example, for two databases set the maximum connections to 250. If you store fivedatabases on one host (the databases for Cloudera Manager Server, Activity Monitor,Reports Manager, Cloudera Navigator, and Hive Metastore), set the maximum connectionsto 550.
– Large clusters - do not store more than one database on the same host. In such a case, usea separate host for each database/host pair. The hosts need not be reserved exclusivelyfor databases, but each database should be on a separate host.
Here is an option file with Cloudera recommended settings:
[mysqld]transaction-isolation=READ-COMMITTED# Disabling symbolic-links is recommended to prevent assorted security risks;# to do so, uncomment this line:# symbolic-links=0
key_buffer = 16Mkey_buffer_size = 32Mmax_allowed_packet = 32Mthread_stack = 256Kthread_cache_size = 64query_cache_limit = 8Mquery_cache_size = 64Mquery_cache_type = 1
max_connections = 550
# log_bin should be on a disk with enough free space# NOTE: replace '/x/home/mysql/logs/binary' below with
Cloudera Manager Installation Guide | 31
Cloudera Manager and Managed Service Databases
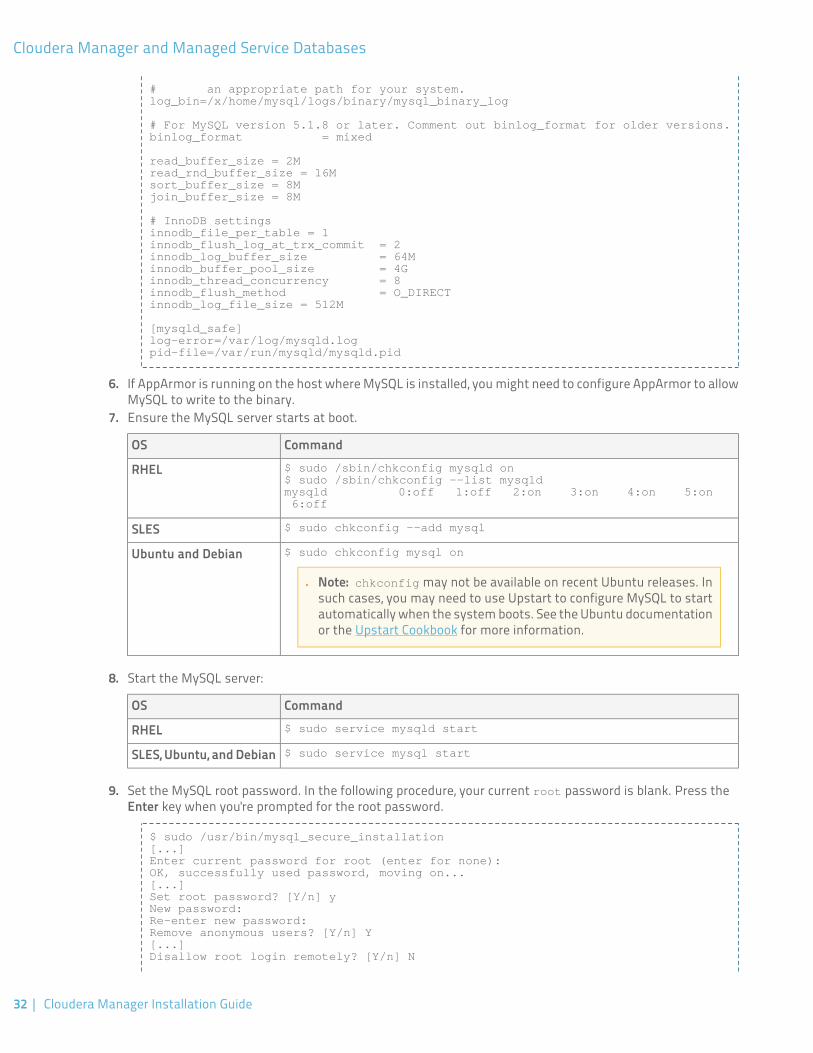
# an appropriate path for your system.log_bin=/x/home/mysql/logs/binary/mysql_binary_log
# For MySQL version 5.1.8 or later. Comment out binlog_format for older versions.binlog_format = mixed
read_buffer_size = 2Mread_rnd_buffer_size = 16Msort_buffer_size = 8Mjoin_buffer_size = 8M
# InnoDB settingsinnodb_file_per_table = 1innodb_flush_log_at_trx_commit = 2innodb_log_buffer_size = 64Minnodb_buffer_pool_size = 4Ginnodb_thread_concurrency = 8innodb_flush_method = O_DIRECTinnodb_log_file_size = 512M
[mysqld_safe]log-error=/var/log/mysqld.logpid-file=/var/run/mysqld/mysqld.pid
6. If AppArmor is running on the host where MySQL is installed, you might need to configure AppArmor to allowMySQL to write to the binary.
7. Ensure the MySQL server starts at boot.
CommandOS$ sudo /sbin/chkconfig mysqld on$ sudo /sbin/chkconfig --list mysqld
RHELmysqld 0:off 1:off 2:on 3:on 4:on 5:on 6:off
$ sudo chkconfig --add mysqlSLES$ sudo chkconfig mysql onUbuntu and Debian
Note: chkconfig may not be available on recent Ubuntu releases. Insuch cases, you may need to use Upstart to configure MySQL to startautomatically when the system boots. See the Ubuntu documentationor the Upstart Cookbook for more information.
8. Start the MySQL server:
CommandOS$ sudo service mysqld startRHEL$ sudo service mysql startSLES, Ubuntu, and Debian
9. Set the MySQL root password. In the following procedure, your current root password is blank. Press theEnter key when you're prompted for the root password.
$ sudo /usr/bin/mysql_secure_installation[...]Enter current password for root (enter for none):OK, successfully used password, moving on...[...]Set root password? [Y/n] yNew password:Re-enter new password:Remove anonymous users? [Y/n] Y[...]Disallow root login remotely? [Y/n] N
32 | Cloudera Manager Installation Guide
Cloudera Manager and Managed Service Databases
[...]Remove test database and access to it [Y/n] Y[...]Reload privilege tables now? [Y/n] YAll done!
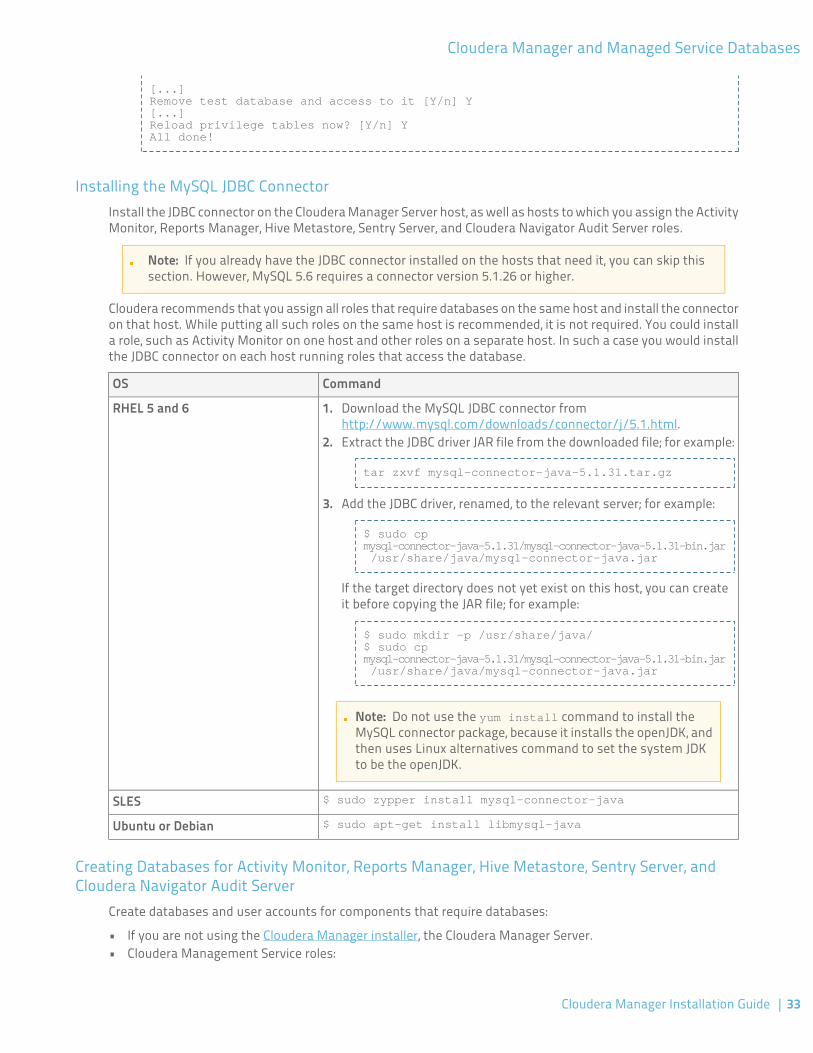
Installing the MySQL JDBC ConnectorInstall the JDBC connector on the Cloudera Manager Server host, as well as hosts to which you assign the ActivityMonitor, Reports Manager, Hive Metastore, Sentry Server, and Cloudera Navigator Audit Server roles.
Note: If you already have the JDBC connector installed on the hosts that need it, you can skip thissection. However, MySQL 5.6 requires a connector version 5.1.26 or higher.
Cloudera recommends that you assign all roles that require databases on the same host and install the connectoron that host. While putting all such roles on the same host is recommended, it is not required. You could installa role, such as Activity Monitor on one host and other roles on a separate host. In such a case you would installthe JDBC connector on each host running roles that access the database.
CommandOS
RHEL 5 and 6 1. Download the MySQL JDBC connector fromhttp://www.mysql.com/downloads/connector/j/5.1.html.
2. Extract the JDBC driver JAR file from the downloaded file; for example:
tar zxvf mysql-connector-java-5.1.31.tar.gz
3. Add the JDBC driver, renamed, to the relevant server; for example:
$ sudo cp mysql-connector-java-5.1.31/mysql-connector-java-5.1.31-bin.jar /usr/share/java/mysql-connector-java.jar
If the target directory does not yet exist on this host, you can createit before copying the JAR file; for example:
$ sudo mkdir -p /usr/share/java/$ sudo cp mysql-connector-java-5.1.31/mysql-connector-java-5.1.31-bin.jar /usr/share/java/mysql-connector-java.jar
Note: Do not use the yum install command to install theMySQL connector package, because it installs the openJDK, andthen uses Linux alternatives command to set the system JDKto be the openJDK.
$ sudo zypper install mysql-connector-javaSLES$ sudo apt-get install libmysql-javaUbuntu or Debian
Creating Databases for Activity Monitor, Reports Manager, Hive Metastore, Sentry Server, andCloudera Navigator Audit Server
Create databases and user accounts for components that require databases:
• If you are not using the Cloudera Manager installer, the Cloudera Manager Server.• Cloudera Management Service roles:
Cloudera Manager Installation Guide | 33
Cloudera Manager and Managed Service Databases
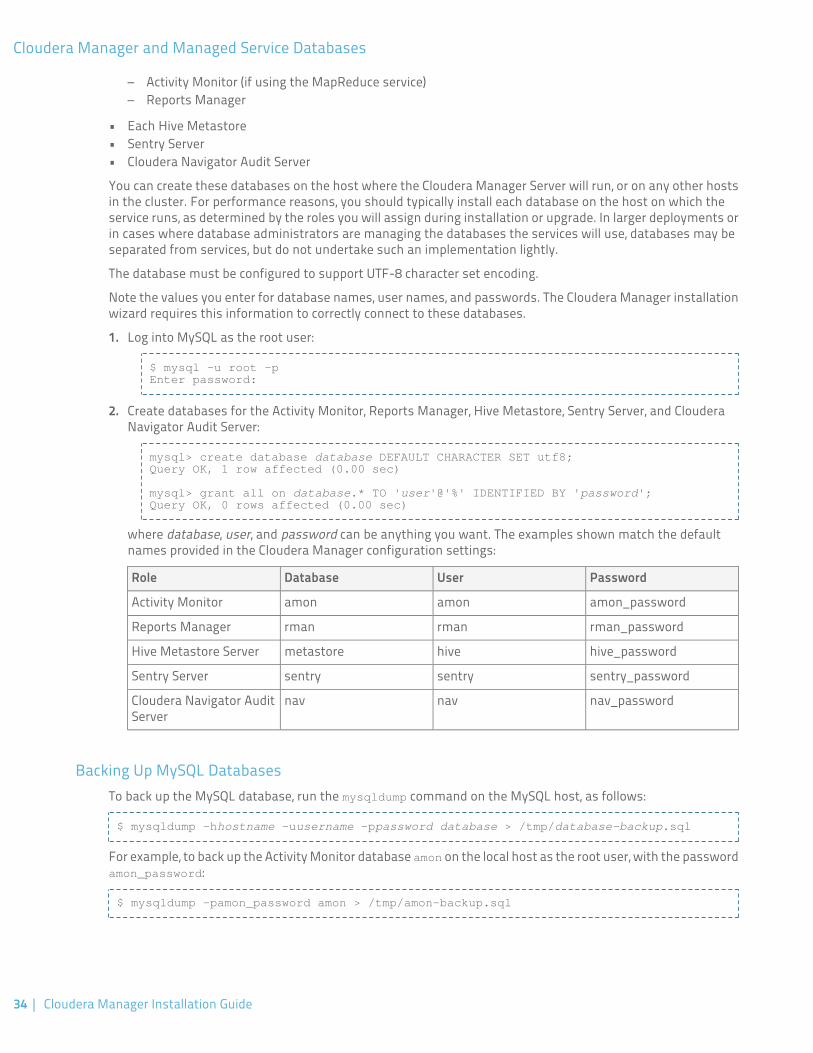
Activity Monitor (if using the MapReduce service)–– Reports Manager
• Each Hive Metastore• Sentry Server• Cloudera Navigator Audit Server
You can create these databases on the host where the Cloudera Manager Server will run, or on any other hostsin the cluster. For performance reasons, you should typically install each database on the host on which theservice runs, as determined by the roles you will assign during installation or upgrade. In larger deployments orin cases where database administrators are managing the databases the services will use, databases may beseparated from services, but do not undertake such an implementation lightly.
The database must be configured to support UTF-8 character set encoding.
Note the values you enter for database names, user names, and passwords. The Cloudera Manager installationwizard requires this information to correctly connect to these databases.
1. Log into MySQL as the root user:
$ mysql -u root -pEnter password:
2. Create databases for the Activity Monitor, Reports Manager, Hive Metastore, Sentry Server, and ClouderaNavigator Audit Server:
mysql> create database database DEFAULT CHARACTER SET utf8;Query OK, 1 row affected (0.00 sec)
mysql> grant all on database.* TO 'user'@'%' IDENTIFIED BY 'password';Query OK, 0 rows affected (0.00 sec)
where database, user, and password can be anything you want. The examples shown match the defaultnames provided in the Cloudera Manager configuration settings:
PasswordUserDatabaseRole
amon_passwordamonamonActivity Monitor
rman_passwordrmanrmanReports Manager
hive_passwordhivemetastoreHive Metastore Server
sentry_passwordsentrysentrySentry Server
nav_passwordnavnavCloudera Navigator AuditServer
Backing Up MySQL DatabasesTo back up the MySQL database, run the mysqldump command on the MySQL host, as follows:
$ mysqldump -hhostname -uusername -ppassword database > /tmp/database-backup.sql
For example, to back up the Activity Monitor database amon on the local host as the root user, with the passwordamon_password:
$ mysqldump -pamon_password amon > /tmp/amon-backup.sql
34 | Cloudera Manager Installation Guide
Cloudera Manager and Managed Service Databases
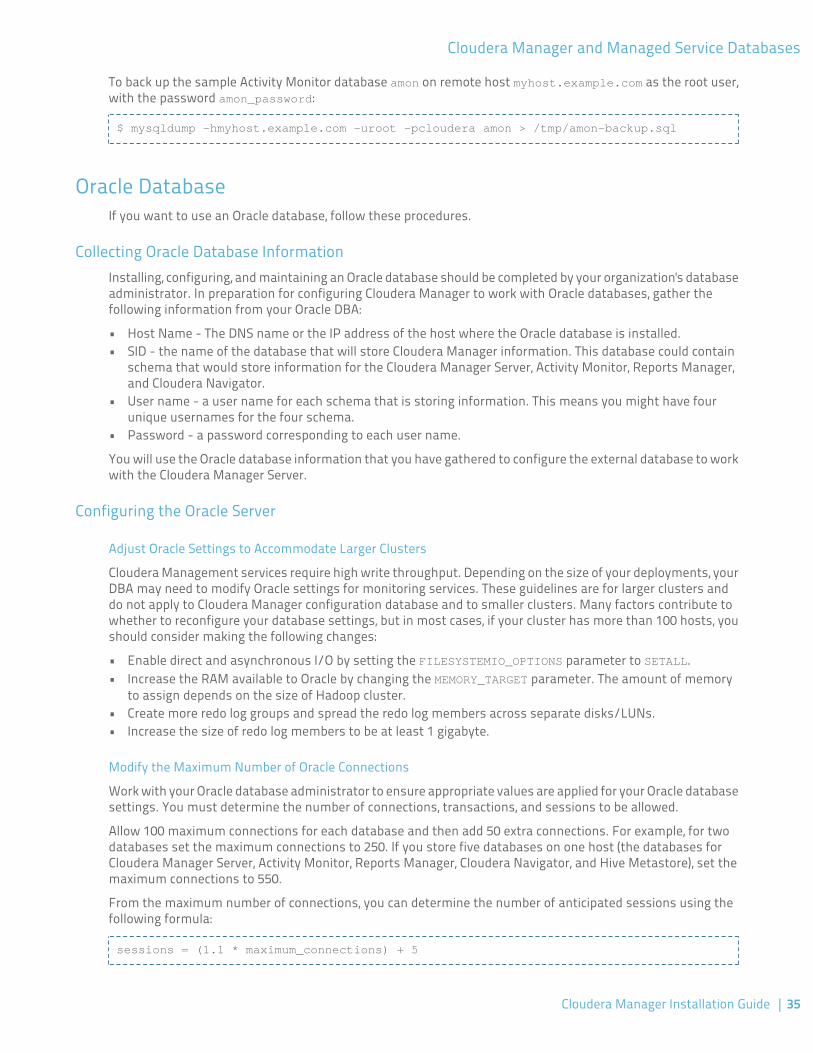
To back up the sample Activity Monitor database amon on remote host myhost.example.com as the root user,with the password amon_password:
$ mysqldump -hmyhost.example.com -uroot -pcloudera amon > /tmp/amon-backup.sql
Oracle DatabaseIf you want to use an Oracle database, follow these procedures.
Collecting Oracle Database InformationInstalling, configuring, and maintaining an Oracle database should be completed by your organization's databaseadministrator. In preparation for configuring Cloudera Manager to work with Oracle databases, gather thefollowing information from your Oracle DBA:
• Host Name - The DNS name or the IP address of the host where the Oracle database is installed.• SID - the name of the database that will store Cloudera Manager information. This database could contain
schema that would store information for the Cloudera Manager Server, Activity Monitor, Reports Manager,and Cloudera Navigator.
• User name - a user name for each schema that is storing information. This means you might have fourunique usernames for the four schema.
• Password - a password corresponding to each user name.
You will use the Oracle database information that you have gathered to configure the external database to workwith the Cloudera Manager Server.
Configuring the Oracle Server
Adjust Oracle Settings to Accommodate Larger Clusters
Cloudera Management services require high write throughput. Depending on the size of your deployments, yourDBA may need to modify Oracle settings for monitoring services. These guidelines are for larger clusters anddo not apply to Cloudera Manager configuration database and to smaller clusters. Many factors contribute towhether to reconfigure your database settings, but in most cases, if your cluster has more than 100 hosts, youshould consider making the following changes:
• Enable direct and asynchronous I/O by setting the FILESYSTEMIO_OPTIONS parameter to SETALL.• Increase the RAM available to Oracle by changing the MEMORY_TARGET parameter. The amount of memory
to assign depends on the size of Hadoop cluster.• Create more redo log groups and spread the redo log members across separate disks/LUNs.• Increase the size of redo log members to be at least 1 gigabyte.
Modify the Maximum Number of Oracle Connections
Work with your Oracle database administrator to ensure appropriate values are applied for your Oracle databasesettings. You must determine the number of connections, transactions, and sessions to be allowed.
Allow 100 maximum connections for each database and then add 50 extra connections. For example, for twodatabases set the maximum connections to 250. If you store five databases on one host (the databases forCloudera Manager Server, Activity Monitor, Reports Manager, Cloudera Navigator, and Hive Metastore), set themaximum connections to 550.
From the maximum number of connections, you can determine the number of anticipated sessions using thefollowing formula:
sessions = (1.1 * maximum_connections) + 5
Cloudera Manager Installation Guide | 35
Cloudera Manager and Managed Service Databases
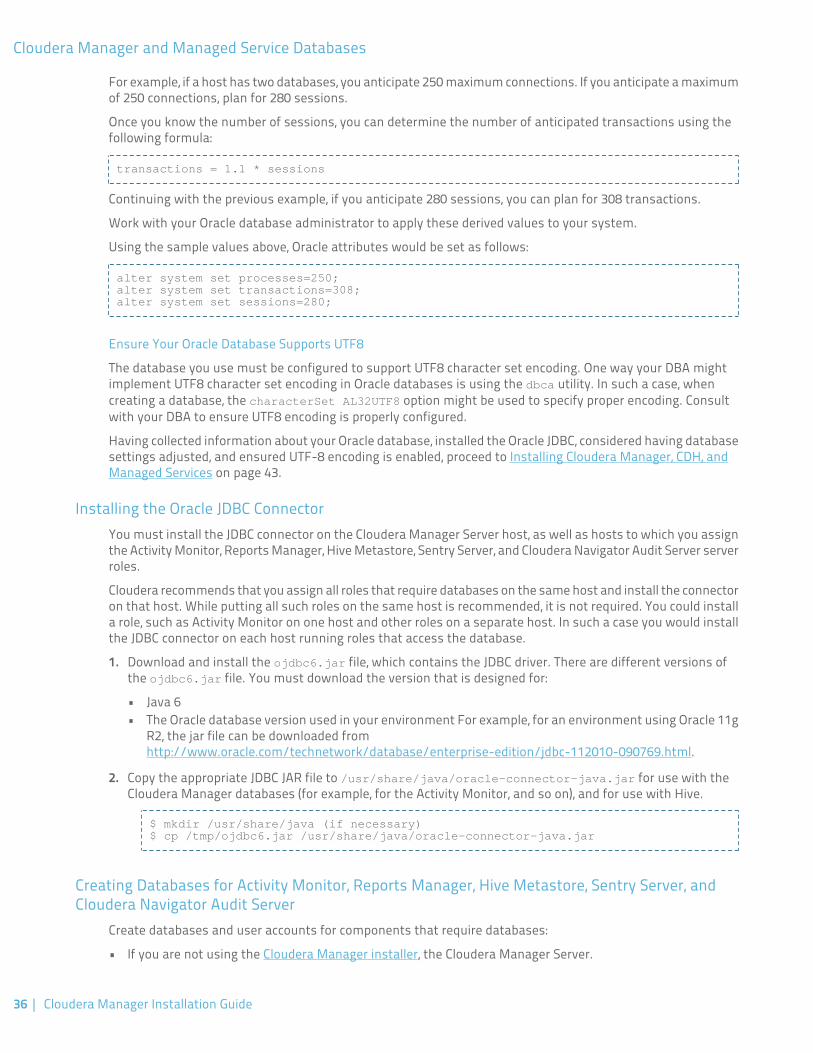
For example, if a host has two databases, you anticipate 250 maximum connections. If you anticipate a maximumof 250 connections, plan for 280 sessions.
Once you know the number of sessions, you can determine the number of anticipated transactions using thefollowing formula:
transactions = 1.1 * sessions
Continuing with the previous example, if you anticipate 280 sessions, you can plan for 308 transactions.
Work with your Oracle database administrator to apply these derived values to your system.
Using the sample values above, Oracle attributes would be set as follows:
alter system set processes=250;alter system set transactions=308;alter system set sessions=280;
Ensure Your Oracle Database Supports UTF8
The database you use must be configured to support UTF8 character set encoding. One way your DBA mightimplement UTF8 character set encoding in Oracle databases is using the dbca utility. In such a case, whencreating a database, the characterSet AL32UTF8 option might be used to specify proper encoding. Consultwith your DBA to ensure UTF8 encoding is properly configured.
Having collected information about your Oracle database, installed the Oracle JDBC, considered having databasesettings adjusted, and ensured UTF-8 encoding is enabled, proceed to Installing Cloudera Manager, CDH, andManaged Services on page 43.
Installing the Oracle JDBC ConnectorYou must install the JDBC connector on the Cloudera Manager Server host, as well as hosts to which you assignthe Activity Monitor, Reports Manager, Hive Metastore, Sentry Server, and Cloudera Navigator Audit Server serverroles.
Cloudera recommends that you assign all roles that require databases on the same host and install the connectoron that host. While putting all such roles on the same host is recommended, it is not required. You could installa role, such as Activity Monitor on one host and other roles on a separate host. In such a case you would installthe JDBC connector on each host running roles that access the database.
1. Download and install the ojdbc6.jar file, which contains the JDBC driver. There are different versions ofthe ojdbc6.jar file. You must download the version that is designed for:
• Java 6• The Oracle database version used in your environment For example, for an environment using Oracle 11g
R2, the jar file can be downloaded fromhttp://www.oracle.com/technetwork/database/enterprise-edition/jdbc-112010-090769.html.
2. Copy the appropriate JDBC JAR file to /usr/share/java/oracle-connector-java.jar for use with theCloudera Manager databases (for example, for the Activity Monitor, and so on), and for use with Hive.
$ mkdir /usr/share/java (if necessary)$ cp /tmp/ojdbc6.jar /usr/share/java/oracle-connector-java.jar
Creating Databases for Activity Monitor, Reports Manager, Hive Metastore, Sentry Server, andCloudera Navigator Audit Server
Create databases and user accounts for components that require databases:
• If you are not using the Cloudera Manager installer, the Cloudera Manager Server.
36 | Cloudera Manager Installation Guide
Cloudera Manager and Managed Service Databases
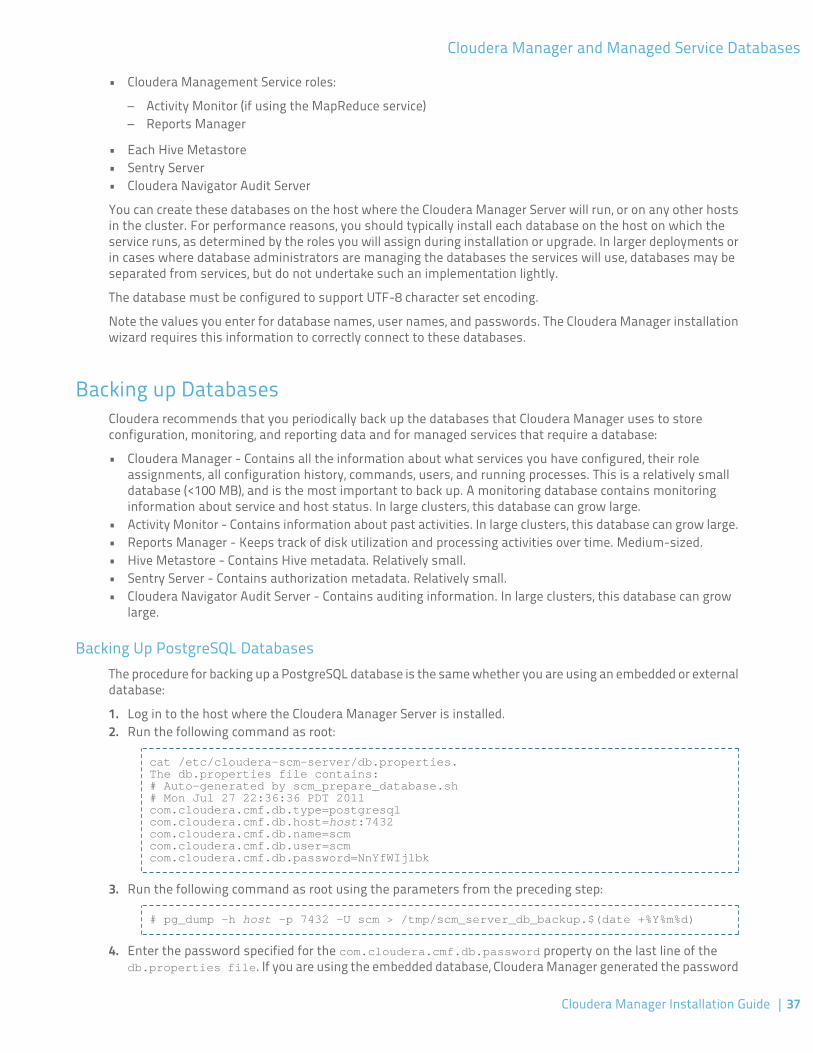
• Cloudera Management Service roles:
– Activity Monitor (if using the MapReduce service)– Reports Manager
• Each Hive Metastore• Sentry Server• Cloudera Navigator Audit Server
You can create these databases on the host where the Cloudera Manager Server will run, or on any other hostsin the cluster. For performance reasons, you should typically install each database on the host on which theservice runs, as determined by the roles you will assign during installation or upgrade. In larger deployments orin cases where database administrators are managing the databases the services will use, databases may beseparated from services, but do not undertake such an implementation lightly.
The database must be configured to support UTF-8 character set encoding.
Note the values you enter for database names, user names, and passwords. The Cloudera Manager installationwizard requires this information to correctly connect to these databases.
Backing up DatabasesCloudera recommends that you periodically back up the databases that Cloudera Manager uses to storeconfiguration, monitoring, and reporting data and for managed services that require a database:
• Cloudera Manager - Contains all the information about what services you have configured, their roleassignments, all configuration history, commands, users, and running processes. This is a relatively smalldatabase (<100 MB), and is the most important to back up. A monitoring database contains monitoringinformation about service and host status. In large clusters, this database can grow large.
• Activity Monitor - Contains information about past activities. In large clusters, this database can grow large.• Reports Manager - Keeps track of disk utilization and processing activities over time. Medium-sized.• Hive Metastore - Contains Hive metadata. Relatively small.• Sentry Server - Contains authorization metadata. Relatively small.• Cloudera Navigator Audit Server - Contains auditing information. In large clusters, this database can grow
large.
Backing Up PostgreSQL DatabasesThe procedure for backing up a PostgreSQL database is the same whether you are using an embedded or externaldatabase:
1. Log in to the host where the Cloudera Manager Server is installed.2. Run the following command as root:
cat /etc/cloudera-scm-server/db.properties.The db.properties file contains:# Auto-generated by scm_prepare_database.sh# Mon Jul 27 22:36:36 PDT 2011com.cloudera.cmf.db.type=postgresqlcom.cloudera.cmf.db.host=host:7432com.cloudera.cmf.db.name=scmcom.cloudera.cmf.db.user=scmcom.cloudera.cmf.db.password=NnYfWIjlbk
3. Run the following command as root using the parameters from the preceding step:
# pg_dump -h host -p 7432 -U scm > /tmp/scm_server_db_backup.$(date +%Y%m%d)
4. Enter the password specified for the com.cloudera.cmf.db.password property on the last line of thedb.properties file. If you are using the embedded database, Cloudera Manager generated the password
Cloudera Manager Installation Guide | 37
Cloudera Manager and Managed Service Databases
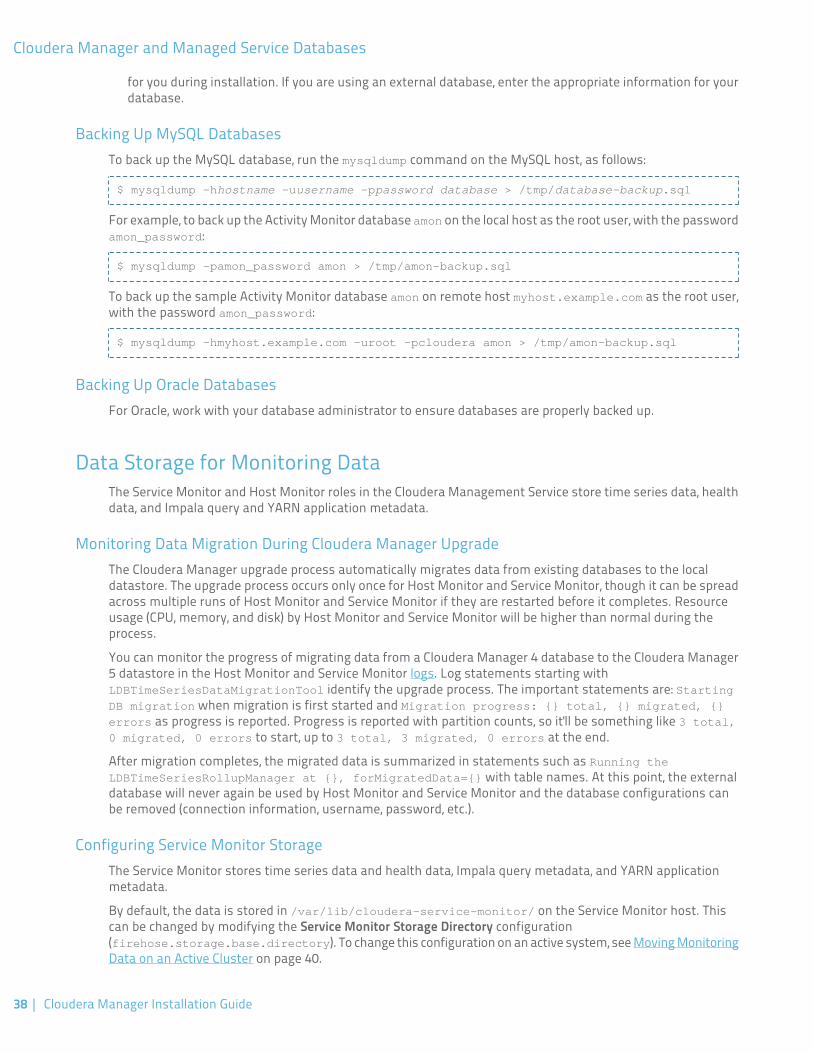
for you during installation. If you are using an external database, enter the appropriate information for yourdatabase.
Backing Up MySQL DatabasesTo back up the MySQL database, run the mysqldump command on the MySQL host, as follows:
$ mysqldump -hhostname -uusername -ppassword database > /tmp/database-backup.sql
For example, to back up the Activity Monitor database amon on the local host as the root user, with the passwordamon_password:
$ mysqldump -pamon_password amon > /tmp/amon-backup.sql
To back up the sample Activity Monitor database amon on remote host myhost.example.com as the root user,with the password amon_password:
$ mysqldump -hmyhost.example.com -uroot -pcloudera amon > /tmp/amon-backup.sql
Backing Up Oracle DatabasesFor Oracle, work with your database administrator to ensure databases are properly backed up.
Data Storage for Monitoring DataThe Service Monitor and Host Monitor roles in the Cloudera Management Service store time series data, healthdata, and Impala query and YARN application metadata.
Monitoring Data Migration During Cloudera Manager UpgradeThe Cloudera Manager upgrade process automatically migrates data from existing databases to the localdatastore. The upgrade process occurs only once for Host Monitor and Service Monitor, though it can be spreadacross multiple runs of Host Monitor and Service Monitor if they are restarted before it completes. Resourceusage (CPU, memory, and disk) by Host Monitor and Service Monitor will be higher than normal during theprocess.
You can monitor the progress of migrating data from a Cloudera Manager 4 database to the Cloudera Manager5 datastore in the Host Monitor and Service Monitor logs. Log statements starting withLDBTimeSeriesDataMigrationTool identify the upgrade process. The important statements are: StartingDB migration when migration is first started and Migration progress: {} total, {} migrated, {}errors as progress is reported. Progress is reported with partition counts, so it'll be something like 3 total,0 migrated, 0 errors to start, up to 3 total, 3 migrated, 0 errors at the end.
After migration completes, the migrated data is summarized in statements such as Running theLDBTimeSeriesRollupManager at {}, forMigratedData={} with table names. At this point, the externaldatabase will never again be used by Host Monitor and Service Monitor and the database configurations canbe removed (connection information, username, password, etc.).
Configuring Service Monitor StorageThe Service Monitor stores time series data and health data, Impala query metadata, and YARN applicationmetadata.
By default, the data is stored in /var/lib/cloudera-service-monitor/ on the Service Monitor host. Thiscan be changed by modifying the Service Monitor Storage Directory configuration(firehose.storage.base.directory). To change this configuration on an active system, see Moving MonitoringData on an Active Cluster on page 40.
38 | Cloudera Manager Installation Guide
Cloudera Manager and Managed Service Databases
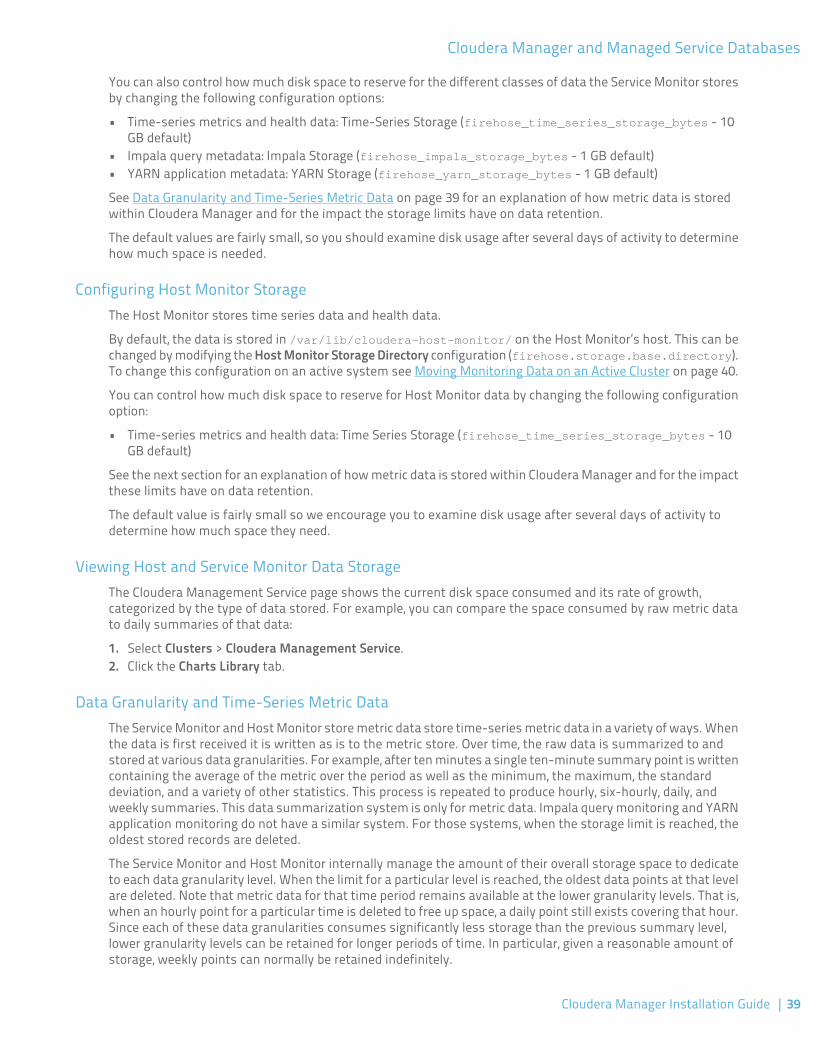
You can also control how much disk space to reserve for the different classes of data the Service Monitor storesby changing the following configuration options:
• Time-series metrics and health data: Time-Series Storage (firehose_time_series_storage_bytes - 10GB default)
• Impala query metadata: Impala Storage (firehose_impala_storage_bytes - 1 GB default)• YARN application metadata: YARN Storage (firehose_yarn_storage_bytes - 1 GB default)
See Data Granularity and Time-Series Metric Data on page 39 for an explanation of how metric data is storedwithin Cloudera Manager and for the impact the storage limits have on data retention.
The default values are fairly small, so you should examine disk usage after several days of activity to determinehow much space is needed.
Configuring Host Monitor StorageThe Host Monitor stores time series data and health data.
By default, the data is stored in /var/lib/cloudera-host-monitor/ on the Host Monitor’s host. This can bechanged by modifying the Host Monitor Storage Directory configuration (firehose.storage.base.directory).To change this configuration on an active system see Moving Monitoring Data on an Active Cluster on page 40.
You can control how much disk space to reserve for Host Monitor data by changing the following configurationoption:
• Time-series metrics and health data: Time Series Storage (firehose_time_series_storage_bytes - 10GB default)
See the next section for an explanation of how metric data is stored within Cloudera Manager and for the impactthese limits have on data retention.
The default value is fairly small so we encourage you to examine disk usage after several days of activity todetermine how much space they need.
Viewing Host and Service Monitor Data StorageThe Cloudera Management Service page shows the current disk space consumed and its rate of growth,categorized by the type of data stored. For example, you can compare the space consumed by raw metric datato daily summaries of that data:
1. Select Clusters > Cloudera Management Service.2. Click the Charts Library tab.
Data Granularity and Time-Series Metric DataThe Service Monitor and Host Monitor store metric data store time-series metric data in a variety of ways. Whenthe data is first received it is written as is to the metric store. Over time, the raw data is summarized to andstored at various data granularities. For example, after ten minutes a single ten-minute summary point is writtencontaining the average of the metric over the period as well as the minimum, the maximum, the standarddeviation, and a variety of other statistics. This process is repeated to produce hourly, six-hourly, daily, andweekly summaries. This data summarization system is only for metric data. Impala query monitoring and YARNapplication monitoring do not have a similar system. For those systems, when the storage limit is reached, theoldest stored records are deleted.
The Service Monitor and Host Monitor internally manage the amount of their overall storage space to dedicateto each data granularity level. When the limit for a particular level is reached, the oldest data points at that levelare deleted. Note that metric data for that time period remains available at the lower granularity levels. That is,when an hourly point for a particular time is deleted to free up space, a daily point still exists covering that hour.Since each of these data granularities consumes significantly less storage than the previous summary level,lower granularity levels can be retained for longer periods of time. In particular, given a reasonable amount ofstorage, weekly points can normally be retained indefinitely.
Cloudera Manager Installation Guide | 39
Cloudera Manager and Managed Service Databases
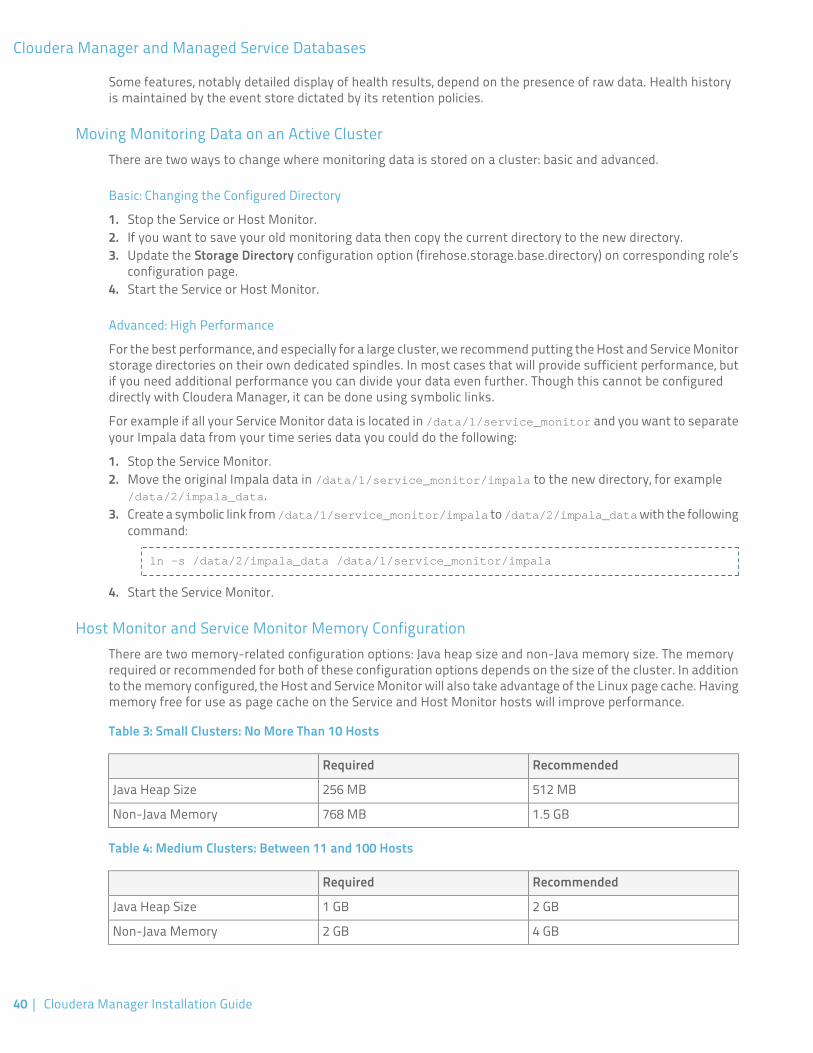
Some features, notably detailed display of health results, depend on the presence of raw data. Health historyis maintained by the event store dictated by its retention policies.
Moving Monitoring Data on an Active ClusterThere are two ways to change where monitoring data is stored on a cluster: basic and advanced.
Basic: Changing the Configured Directory
1. Stop the Service or Host Monitor.2. If you want to save your old monitoring data then copy the current directory to the new directory.3. Update the Storage Directory configuration option (firehose.storage.base.directory) on corresponding role’s
configuration page.4. Start the Service or Host Monitor.
Advanced: High Performance
For the best performance, and especially for a large cluster, we recommend putting the Host and Service Monitorstorage directories on their own dedicated spindles. In most cases that will provide sufficient performance, butif you need additional performance you can divide your data even further. Though this cannot be configureddirectly with Cloudera Manager, it can be done using symbolic links.
For example if all your Service Monitor data is located in /data/1/service_monitor and you want to separateyour Impala data from your time series data you could do the following:
1. Stop the Service Monitor.2. Move the original Impala data in /data/1/service_monitor/impala to the new directory, for example
/data/2/impala_data.3. Create a symbolic link from /data/1/service_monitor/impala to /data/2/impala_data with the following
command:
ln -s /data/2/impala_data /data/1/service_monitor/impala
4. Start the Service Monitor.
Host Monitor and Service Monitor Memory ConfigurationThere are two memory-related configuration options: Java heap size and non-Java memory size. The memoryrequired or recommended for both of these configuration options depends on the size of the cluster. In additionto the memory configured, the Host and Service Monitor will also take advantage of the Linux page cache. Havingmemory free for use as page cache on the Service and Host Monitor hosts will improve performance.
Table 3: Small Clusters: No More Than 10 Hosts
RecommendedRequired
512 MB256 MBJava Heap Size
1.5 GB768 MBNon-Java Memory
Table 4: Medium Clusters: Between 11 and 100 Hosts
RecommendedRequired
2 GB1 GBJava Heap Size
4 GB2 GBNon-Java Memory
40 | Cloudera Manager Installation Guide
Cloudera Manager and Managed Service Databases
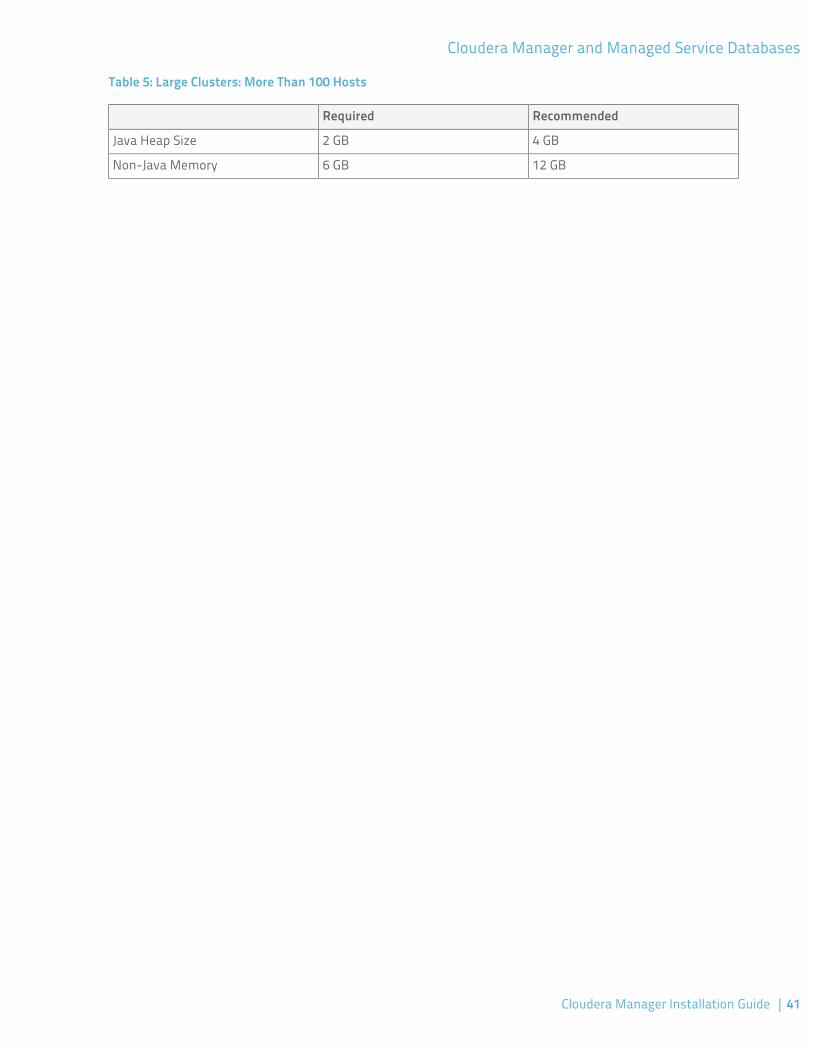
Table 5: Large Clusters: More Than 100 Hosts
RecommendedRequired
4 GB2 GBJava Heap Size
12 GB6 GBNon-Java Memory
Cloudera Manager Installation Guide | 41
Cloudera Manager and Managed Service Databases


Installing Cloudera Manager, CDH, and Managed Services
A Cloudera Manager deployment consists of many software components: Cloudera Manager Server and Agentsoftware, supporting database software, and CDH and managed service software. This section describes thethree main paths for creating a new Cloudera Manager deployment and the criteria for choosing an installationpath. If your cluster already has an installation of a previous version of Cloudera Manager, follow the instructionsin Upgrading Cloudera Manager.
Choosing an Installation PathThe Cloudera Manager installation paths share some common phases, but the variant aspects of each pathsupport different user and cluster host requirements:
• Demonstration and proof of concept deployments - There are two installation options:
– Installation Path A - Automated Installation by Cloudera Manager on page 44 - Cloudera Managerautomates the installation of the Oracle JDK, Cloudera Manager Server, embedded PostgreSQL database,and Cloudera Manager Agent packages, and configures databases for the Cloudera Manager Server andHive Metastore and optionally for Cloudera Management Service roles. This path is recommended fordemonstration and proof of concept deployments, but is not recommended for production deploymentsbecause its not intended to scale and may require database migration as your cluster grows. To use thismethod, server and cluster hosts must satisfy the following requirements:
– Provide the ability to log in to the Cloudera Manager Server host using a root account or an accountthat has password-less sudo permission.
– Allow the Cloudera Manager Server host to have uniform SSH access on the same port to all hosts.See Networking and Security Requirements on page 17 for further information.
– All hosts must have access to standard package repositories and either archive.cloudera.com ora local repository with the necessary installation files.
– Installation Path B - Manual Installation Using Cloudera Manager Packages on page 50 - you install theOracle JDK and Cloudera Manager Server, and embedded PostgreSQL database packages on the ClouderaManager Server host. You have two options for installing Oracle JDK, Cloudera Manager Agent, CDH, andmanaged service software on cluster hosts: manually install it yourself or use Cloudera Manager toautomate installation. However, in order for Cloudera Manager to automate installation of ClouderaManager Agent packages or CDH and managed service packages, cluster hosts must satisfy the followingrequirements:
– Allow the Cloudera Manager Server host to have uniform SSH access on the same port to all hosts.See Networking and Security Requirements on page 17 for further information.
– All hosts must have access to standard package repositories and either archive.cloudera.com ora local repository with the necessary installation files.
• Production deployments - require you to first manually install and configure a production database for theCloudera Manager Server and Hive Metastore. There are two installation options:
– Installation Path B - Manual Installation Using Cloudera Manager Packages on page 50 - you install theOracle JDK and Cloudera Manager Server packages on the Cloudera Manager Server host. You have twooptions for installing Oracle JDK, Cloudera Manager Agent, CDH, and managed service software on clusterhosts: manually install it yourself or use Cloudera Manager to automate installation. However, in orderfor Cloudera Manager to automate installation of Cloudera Manager Agent packages or CDH and managedservice packages, cluster hosts must satisfy the following requirements:
– Allow the Cloudera Manager Server host to have uniform SSH access on the same port to all hosts.See Networking and Security Requirements on page 17 for further information.
– All hosts must have access to standard package repositories and either archive.cloudera.com ora local repository with the necessary installation files.
Cloudera Manager Installation Guide | 43
Installing Cloudera Manager, CDH, and Managed Services
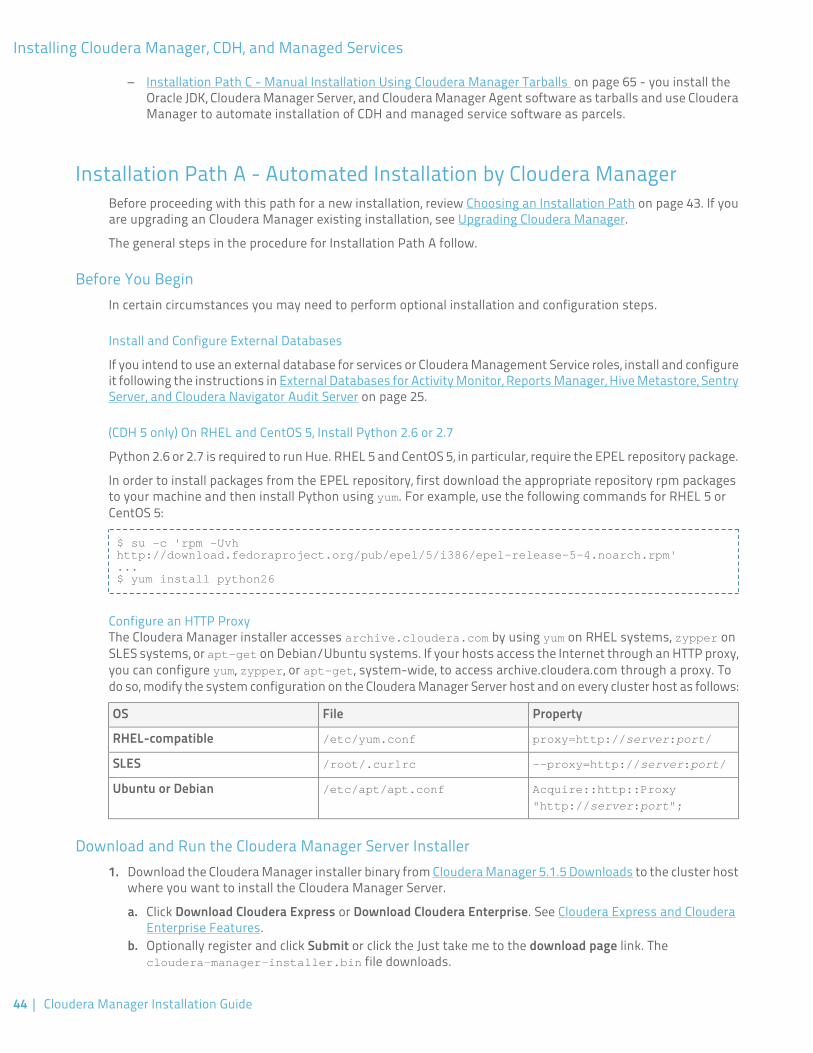
– Installation Path C - Manual Installation Using Cloudera Manager Tarballs on page 65 - you install theOracle JDK, Cloudera Manager Server, and Cloudera Manager Agent software as tarballs and use ClouderaManager to automate installation of CDH and managed service software as parcels.
Installation Path A - Automated Installation by Cloudera ManagerBefore proceeding with this path for a new installation, review Choosing an Installation Path on page 43. If youare upgrading an Cloudera Manager existing installation, see Upgrading Cloudera Manager.
The general steps in the procedure for Installation Path A follow.
Before You BeginIn certain circumstances you may need to perform optional installation and configuration steps.
Install and Configure External Databases
If you intend to use an external database for services or Cloudera Management Service roles, install and configureit following the instructions in External Databases for Activity Monitor, Reports Manager, Hive Metastore, SentryServer, and Cloudera Navigator Audit Server on page 25.
(CDH 5 only) On RHEL and CentOS 5, Install Python 2.6 or 2.7
Python 2.6 or 2.7 is required to run Hue. RHEL 5 and CentOS 5, in particular, require the EPEL repository package.
In order to install packages from the EPEL repository, first download the appropriate repository rpm packagesto your machine and then install Python using yum. For example, use the following commands for RHEL 5 orCentOS 5:
$ su -c 'rpm -Uvh http://download.fedoraproject.org/pub/epel/5/i386/epel-release-5-4.noarch.rpm'...$ yum install python26
Configure an HTTP ProxyThe Cloudera Manager installer accesses archive.cloudera.com by using yum on RHEL systems, zypper onSLES systems, or apt-get on Debian/Ubuntu systems. If your hosts access the Internet through an HTTP proxy,you can configure yum, zypper, or apt-get, system-wide, to access archive.cloudera.com through a proxy. Todo so, modify the system configuration on the Cloudera Manager Server host and on every cluster host as follows:
PropertyFileOS
proxy=http://server:port//etc/yum.confRHEL-compatible
--proxy=http://server:port//root/.curlrcSLES
Acquire::http::Proxy
"http://server:port";
/etc/apt/apt.confUbuntu or Debian
Download and Run the Cloudera Manager Server Installer1. Download the Cloudera Manager installer binary from Cloudera Manager 5.1.5 Downloads to the cluster host
where you want to install the Cloudera Manager Server.
a. Click Download Cloudera Express or Download Cloudera Enterprise. See Cloudera Express and ClouderaEnterprise Features.
b. Optionally register and click Submit or click the Just take me to the download page link. Thecloudera-manager-installer.bin file downloads.
44 | Cloudera Manager Installation Guide
Installing Cloudera Manager, CDH, and Managed Services
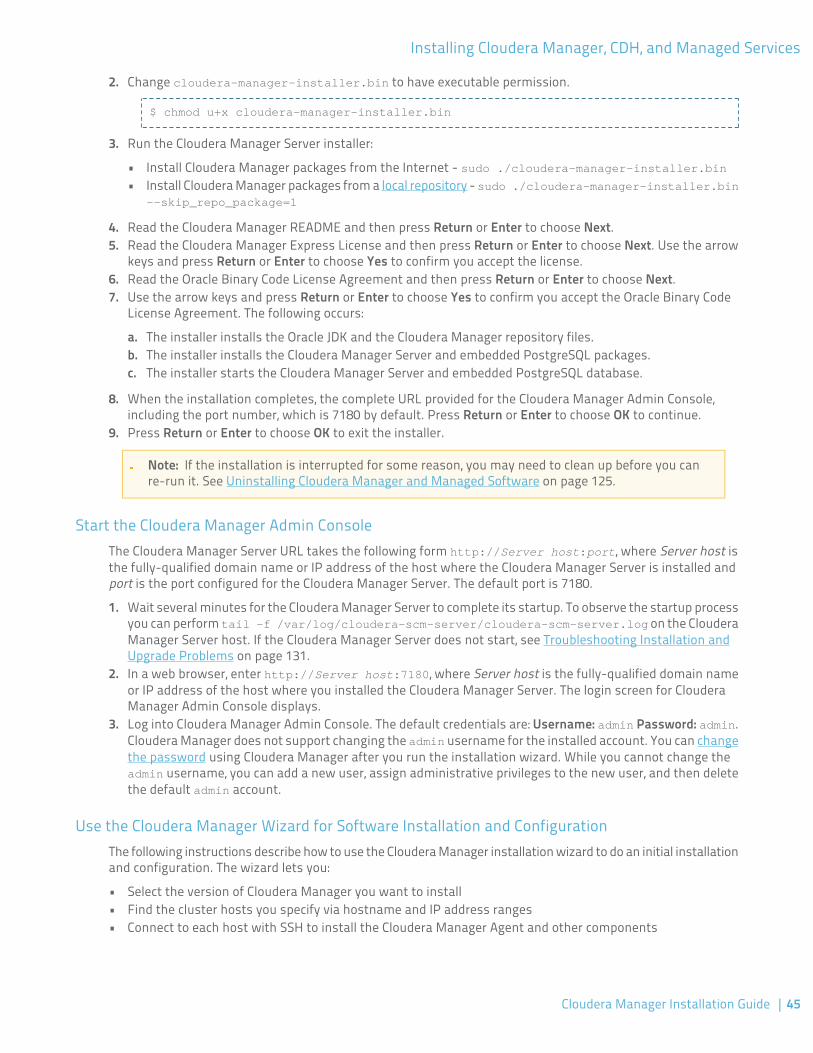
2. Change cloudera-manager-installer.bin to have executable permission.
$ chmod u+x cloudera-manager-installer.bin
3. Run the Cloudera Manager Server installer:
• Install Cloudera Manager packages from the Internet - sudo ./cloudera-manager-installer.bin• Install Cloudera Manager packages from a local repository - sudo ./cloudera-manager-installer.bin
--skip_repo_package=1
4. Read the Cloudera Manager README and then press Return or Enter to choose Next.5. Read the Cloudera Manager Express License and then press Return or Enter to choose Next. Use the arrow
keys and press Return or Enter to choose Yes to confirm you accept the license.6. Read the Oracle Binary Code License Agreement and then press Return or Enter to choose Next.7. Use the arrow keys and press Return or Enter to choose Yes to confirm you accept the Oracle Binary Code
License Agreement. The following occurs:
a. The installer installs the Oracle JDK and the Cloudera Manager repository files.b. The installer installs the Cloudera Manager Server and embedded PostgreSQL packages.c. The installer starts the Cloudera Manager Server and embedded PostgreSQL database.
8. When the installation completes, the complete URL provided for the Cloudera Manager Admin Console,including the port number, which is 7180 by default. Press Return or Enter to choose OK to continue.
9. Press Return or Enter to choose OK to exit the installer.
Note: If the installation is interrupted for some reason, you may need to clean up before you canre-run it. See Uninstalling Cloudera Manager and Managed Software on page 125.
Start the Cloudera Manager Admin ConsoleThe Cloudera Manager Server URL takes the following form http://Server host:port, where Server host isthe fully-qualified domain name or IP address of the host where the Cloudera Manager Server is installed andport is the port configured for the Cloudera Manager Server. The default port is 7180.
1. Wait several minutes for the Cloudera Manager Server to complete its startup. To observe the startup processyou can perform tail -f /var/log/cloudera-scm-server/cloudera-scm-server.log on the ClouderaManager Server host. If the Cloudera Manager Server does not start, see Troubleshooting Installation andUpgrade Problems on page 131.
2. In a web browser, enter http://Server host:7180, where Server host is the fully-qualified domain nameor IP address of the host where you installed the Cloudera Manager Server. The login screen for ClouderaManager Admin Console displays.
3. Log into Cloudera Manager Admin Console. The default credentials are: Username: admin Password: admin.Cloudera Manager does not support changing the admin username for the installed account. You can changethe password using Cloudera Manager after you run the installation wizard. While you cannot change theadmin username, you can add a new user, assign administrative privileges to the new user, and then deletethe default admin account.
Use the Cloudera Manager Wizard for Software Installation and ConfigurationThe following instructions describe how to use the Cloudera Manager installation wizard to do an initial installationand configuration. The wizard lets you:
• Select the version of Cloudera Manager you want to install• Find the cluster hosts you specify via hostname and IP address ranges• Connect to each host with SSH to install the Cloudera Manager Agent and other components
Cloudera Manager Installation Guide | 45
Installing Cloudera Manager, CDH, and Managed Services
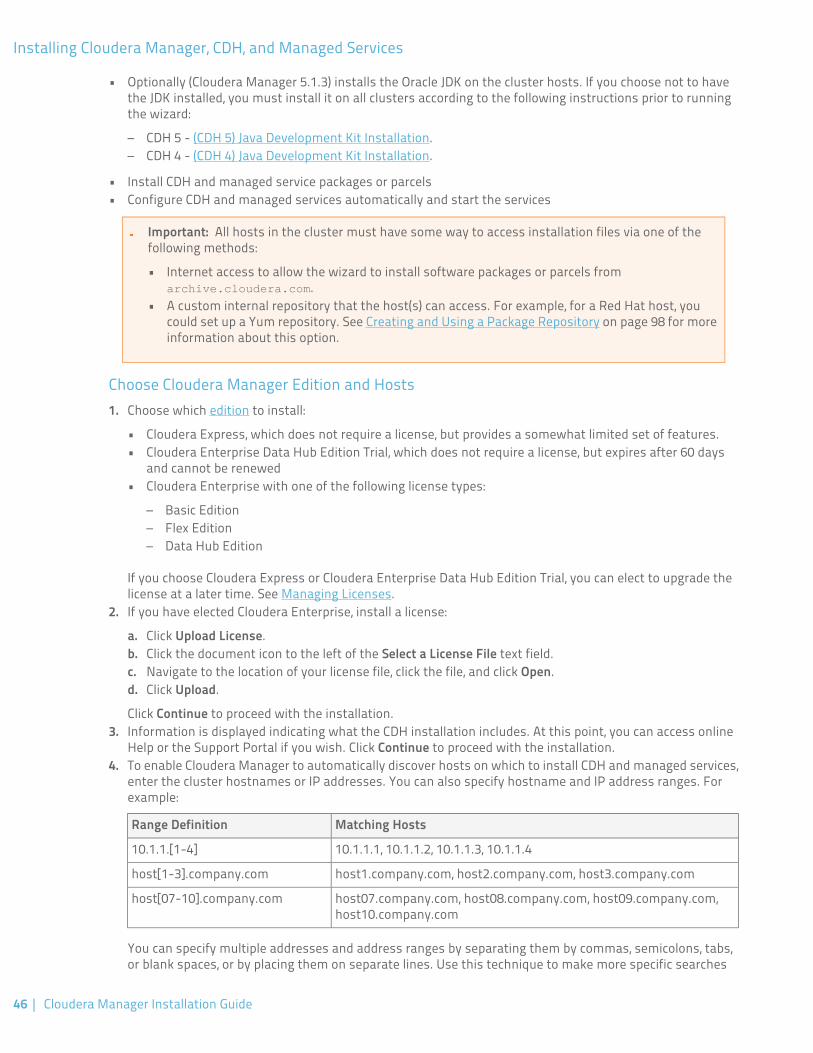
• Optionally (Cloudera Manager 5.1.3) installs the Oracle JDK on the cluster hosts. If you choose not to havethe JDK installed, you must install it on all clusters according to the following instructions prior to runningthe wizard:
– CDH 5 - (CDH 5) Java Development Kit Installation.– CDH 4 - (CDH 4) Java Development Kit Installation.
• Install CDH and managed service packages or parcels• Configure CDH and managed services automatically and start the services
Important: All hosts in the cluster must have some way to access installation files via one of thefollowing methods:
• Internet access to allow the wizard to install software packages or parcels fromarchive.cloudera.com.
• A custom internal repository that the host(s) can access. For example, for a Red Hat host, youcould set up a Yum repository. See Creating and Using a Package Repository on page 98 for moreinformation about this option.
Choose Cloudera Manager Edition and Hosts1. Choose which edition to install:
• Cloudera Express, which does not require a license, but provides a somewhat limited set of features.• Cloudera Enterprise Data Hub Edition Trial, which does not require a license, but expires after 60 days
and cannot be renewed• Cloudera Enterprise with one of the following license types:
– Basic Edition– Flex Edition– Data Hub Edition
If you choose Cloudera Express or Cloudera Enterprise Data Hub Edition Trial, you can elect to upgrade thelicense at a later time. See Managing Licenses.
2. If you have elected Cloudera Enterprise, install a license:
a. Click Upload License.b. Click the document icon to the left of the Select a License File text field.c. Navigate to the location of your license file, click the file, and click Open.d. Click Upload.
Click Continue to proceed with the installation.3. Information is displayed indicating what the CDH installation includes. At this point, you can access online
Help or the Support Portal if you wish. Click Continue to proceed with the installation.4. To enable Cloudera Manager to automatically discover hosts on which to install CDH and managed services,
enter the cluster hostnames or IP addresses. You can also specify hostname and IP address ranges. Forexample:
Matching HostsRange Definition
10.1.1.1, 10.1.1.2, 10.1.1.3, 10.1.1.410.1.1.[1-4]
host1.company.com, host2.company.com, host3.company.comhost[1-3].company.com
host07.company.com, host08.company.com, host09.company.com,host10.company.com
host[07-10].company.com
You can specify multiple addresses and address ranges by separating them by commas, semicolons, tabs,or blank spaces, or by placing them on separate lines. Use this technique to make more specific searches
46 | Cloudera Manager Installation Guide
Installing Cloudera Manager, CDH, and Managed Services
instead of searching overly wide ranges. The scan results will include all addresses scanned, but only scansthat reach hosts running SSH will be selected for inclusion in your cluster by default. If you don't know theIP addresses of all of the hosts, you can enter an address range that spans over unused addresses and thendeselect the hosts that do not exist (and are not discovered) later in this procedure. However, keep in mindthat wider ranges will require more time to scan.
5. Click Search. Cloudera Manager identifies the hosts on your cluster to allow you to configure them for services.If there are a large number of hosts on your cluster, wait a few moments to allow them to be discovered andshown in the wizard. If the search is taking too long, you can stop the scan by clicking Abort Scan. To findadditional hosts, click New Search, add the host names or IP addresses and click Search again. ClouderaManager scans hosts by checking for network connectivity. If there are some hosts where you want to installservices that are not shown in the list, make sure you have network connectivity between the ClouderaManager Server host and those hosts. Common causes of loss of connectivity are firewalls and interferencefrom SELinux.
6. Verify that the number of hosts shown matches the number of hosts where you want to install services.Deselect host entries that do not exist and deselect the hosts where you do not want to install services. ClickContinue. The Select Repository page displays.
Choose Software Installation Method and Install Software1. Select the repository type to use for the installation: parcels or packages.
• Use Parcels:
1. Choose the parcels to install. The choices you see depend on the repositories you have chosen – arepository may contain multiple parcels. Only the parcels for the latest supported service versions areconfigured by default.
You can add additional parcels for previous versions by specifying custom repositories. For example,you can find the locations of the previous CDH 4 parcels athttp://archive.cloudera.com/cdh4/parcels/. Or, if you are installing CDH 4.3 and want to useSentry for Policy File-Based Hive Authorization, you can add the Sentry parcel using this mechanism.
1. To specify the parcel directory, local parcel repository, add a parcel repository, or specify theproperties of a proxy server through which parcels are downloaded, click the More Options buttonand do one or more of the following:
• Parcel Directory and Local Parcel Repository Path - Specify the location of parcels on clusterhosts and the Cloudera Manager Server host.
• Parcel Repository - In the Remote Parcel Repository URLs field, click the button and enterthe URL of the repository. The URL you specify is added to the list of repositories listed in theConfiguring Server Parcel Settings on page 84 page and a parcel is added to the list of parcelson the Select Repository page. If you have multiple repositories configured, you will see all theunique parcels contained in all your repositories.
• Proxy Server - Specify the properties of a proxy server.
2. Click OK.
• Use Packages:
1. Select the major release of CDH to install.2. Select the specific release of CDH to install.3. Select the specific releases of Impala and Solr to install, assuming you have selected an appropriate
CDH version. You can choose either the latest version or use a custom repository. Choose None if youdo not want to install that service.
2. Select the release of Cloudera Manager Agent to install. You can choose either the version that matches theCloudera Manager Server you are currently using or specify a version in a custom repository.
Cloudera Manager Installation Guide | 47
Installing Cloudera Manager, CDH, and Managed Services
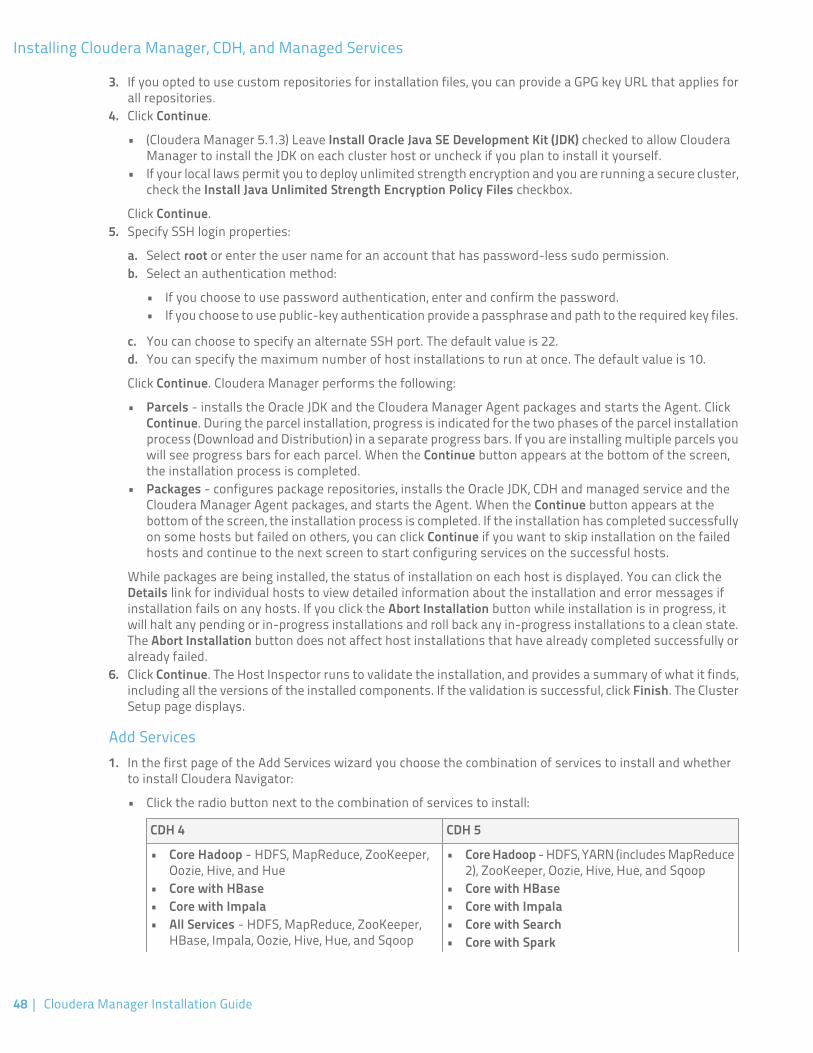
3. If you opted to use custom repositories for installation files, you can provide a GPG key URL that applies forall repositories.
4. Click Continue.
• (Cloudera Manager 5.1.3) Leave Install Oracle Java SE Development Kit (JDK) checked to allow ClouderaManager to install the JDK on each cluster host or uncheck if you plan to install it yourself.
• If your local laws permit you to deploy unlimited strength encryption and you are running a secure cluster,check the Install Java Unlimited Strength Encryption Policy Files checkbox.
Click Continue.5. Specify SSH login properties:
a. Select root or enter the user name for an account that has password-less sudo permission.b. Select an authentication method:
• If you choose to use password authentication, enter and confirm the password.• If you choose to use public-key authentication provide a passphrase and path to the required key files.
c. You can choose to specify an alternate SSH port. The default value is 22.d. You can specify the maximum number of host installations to run at once. The default value is 10.
Click Continue. Cloudera Manager performs the following:
• Parcels - installs the Oracle JDK and the Cloudera Manager Agent packages and starts the Agent. ClickContinue. During the parcel installation, progress is indicated for the two phases of the parcel installationprocess (Download and Distribution) in a separate progress bars. If you are installing multiple parcels youwill see progress bars for each parcel. When the Continue button appears at the bottom of the screen,the installation process is completed.
• Packages - configures package repositories, installs the Oracle JDK, CDH and managed service and theCloudera Manager Agent packages, and starts the Agent. When the Continue button appears at thebottom of the screen, the installation process is completed. If the installation has completed successfullyon some hosts but failed on others, you can click Continue if you want to skip installation on the failedhosts and continue to the next screen to start configuring services on the successful hosts.
While packages are being installed, the status of installation on each host is displayed. You can click theDetails link for individual hosts to view detailed information about the installation and error messages ifinstallation fails on any hosts. If you click the Abort Installation button while installation is in progress, itwill halt any pending or in-progress installations and roll back any in-progress installations to a clean state.The Abort Installation button does not affect host installations that have already completed successfully oralready failed.
6. Click Continue. The Host Inspector runs to validate the installation, and provides a summary of what it finds,including all the versions of the installed components. If the validation is successful, click Finish. The ClusterSetup page displays.
Add Services1. In the first page of the Add Services wizard you choose the combination of services to install and whether
to install Cloudera Navigator:
• Click the radio button next to the combination of services to install:
CDH 5CDH 4
• Core Hadoop - HDFS, YARN (includes MapReduce2), ZooKeeper, Oozie, Hive, Hue, and Sqoop
• Core Hadoop - HDFS, MapReduce, ZooKeeper,Oozie, Hive, and Hue
• Core with HBase • Core with HBase• Core with Impala• Core with Impala
• All Services - HDFS, MapReduce, ZooKeeper,HBase, Impala, Oozie, Hive, Hue, and Sqoop
• Core with Search• Core with Spark
48 | Cloudera Manager Installation Guide
Installing Cloudera Manager, CDH, and Managed Services
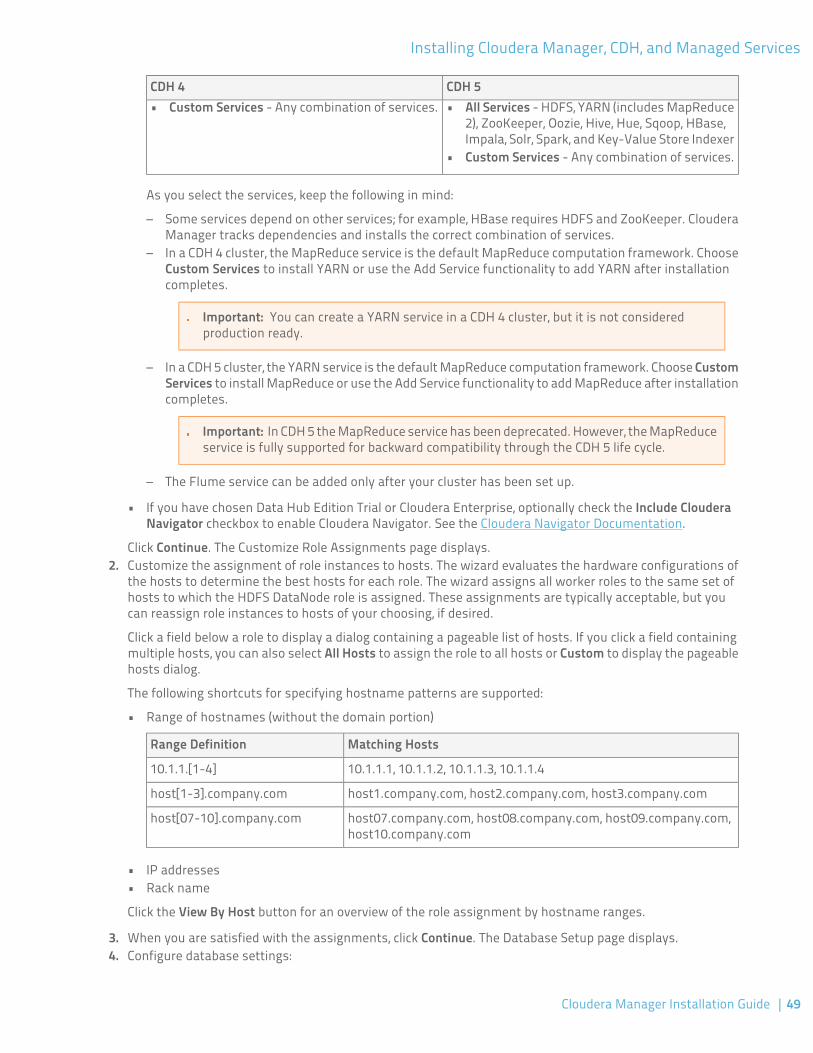
CDH 5CDH 4• Custom Services - Any combination of services. • All Services - HDFS, YARN (includes MapReduce
2), ZooKeeper, Oozie, Hive, Hue, Sqoop, HBase,Impala, Solr, Spark, and Key-Value Store Indexer
• Custom Services - Any combination of services.
As you select the services, keep the following in mind:
– Some services depend on other services; for example, HBase requires HDFS and ZooKeeper. ClouderaManager tracks dependencies and installs the correct combination of services.
– In a CDH 4 cluster, the MapReduce service is the default MapReduce computation framework. ChooseCustom Services to install YARN or use the Add Service functionality to add YARN after installationcompletes.
Important: You can create a YARN service in a CDH 4 cluster, but it is not consideredproduction ready.
– In a CDH 5 cluster, the YARN service is the default MapReduce computation framework. Choose CustomServices to install MapReduce or use the Add Service functionality to add MapReduce after installationcompletes.
Important: In CDH 5 the MapReduce service has been deprecated. However, the MapReduceservice is fully supported for backward compatibility through the CDH 5 life cycle.
– The Flume service can be added only after your cluster has been set up.
• If you have chosen Data Hub Edition Trial or Cloudera Enterprise, optionally check the Include ClouderaNavigator checkbox to enable Cloudera Navigator. See the Cloudera Navigator Documentation.
Click Continue. The Customize Role Assignments page displays.2. Customize the assignment of role instances to hosts. The wizard evaluates the hardware configurations of
the hosts to determine the best hosts for each role. The wizard assigns all worker roles to the same set ofhosts to which the HDFS DataNode role is assigned. These assignments are typically acceptable, but youcan reassign role instances to hosts of your choosing, if desired.
Click a field below a role to display a dialog containing a pageable list of hosts. If you click a field containingmultiple hosts, you can also select All Hosts to assign the role to all hosts or Custom to display the pageablehosts dialog.
The following shortcuts for specifying hostname patterns are supported:
• Range of hostnames (without the domain portion)
Matching HostsRange Definition
10.1.1.1, 10.1.1.2, 10.1.1.3, 10.1.1.410.1.1.[1-4]
host1.company.com, host2.company.com, host3.company.comhost[1-3].company.com
host07.company.com, host08.company.com, host09.company.com,host10.company.com
host[07-10].company.com
• IP addresses• Rack name
Click the View By Host button for an overview of the role assignment by hostname ranges.
3. When you are satisfied with the assignments, click Continue. The Database Setup page displays.4. Configure database settings:
Cloudera Manager Installation Guide | 49
Installing Cloudera Manager, CDH, and Managed Services
Choose the database type:a.
• Leave the default setting of Use Embedded Database to have Cloudera Manager create and configurerequired databases. Make a note of the auto-generated passwords.
• Select Use Custom Databases to specify external databases.
1. Enter the database host, database type, database name, username, and password for the databasethat you created when you set up the database.
b. Click Test Connection to confirm that Cloudera Manager can communicate with the database using theinformation you have supplied. If the test succeeds in all cases, click Continue; otherwise check and correctthe information you have provided for the database and then try the test again. (For some servers, if youare using the embedded database, you will see a message saying the database will be created at a laterstep in the installation process.) The Review Changes page displays.
5. Review the configuration changes to be applied. Confirm the settings entered for file system paths. The filepaths required vary based on the services to be installed.
Warning: DataNode data directories should not be placed on NAS devices.
Click Continue. The wizard starts the services.6. When all of the services are started, click Continue. You will see a success message indicating that your
cluster has been successfully started.7. Click Finish to proceed to the Home Page.
Configure Cluster CDH Version for Package InstallsIf you have installed CDH as a package, after an install or upgrade make sure that the cluster CDH versionmatches the package CDH version, using the procedure in Configuring the CDH Version for a Cluster in ManagingClusters with Cloudera Manager. If the cluster CDH version does not match the package CDH version, ClouderaManager will incorrectly enable and disable service features based on the cluster's configured CDH version.
Change the Default Administrator PasswordAs soon as possible after running the wizard and beginning to use Cloudera Manager, change the defaultadministrator password:
1. Right-click the logged-in username at the far right of the top navigation bar and select Change Password.2. Enter the current password, and a new password twice and then click Update.
Test the InstallationYou can test the installation following the instructions in Testing the Installation on page 123.
Installation Path B - Manual Installation Using Cloudera Manager PackagesBefore proceeding with this path for a new installation, review Choosing an Installation Path on page 43. If youare upgrading an Cloudera Manager existing installation, see Upgrading Cloudera Manager.
To install the Cloudera Manager Server using packages, follow the instructions in this section. You can also usePuppet or Chef to install the packages. The general steps in the procedure for Installation Path B follow.
50 | Cloudera Manager Installation Guide
Installing Cloudera Manager, CDH, and Managed Services
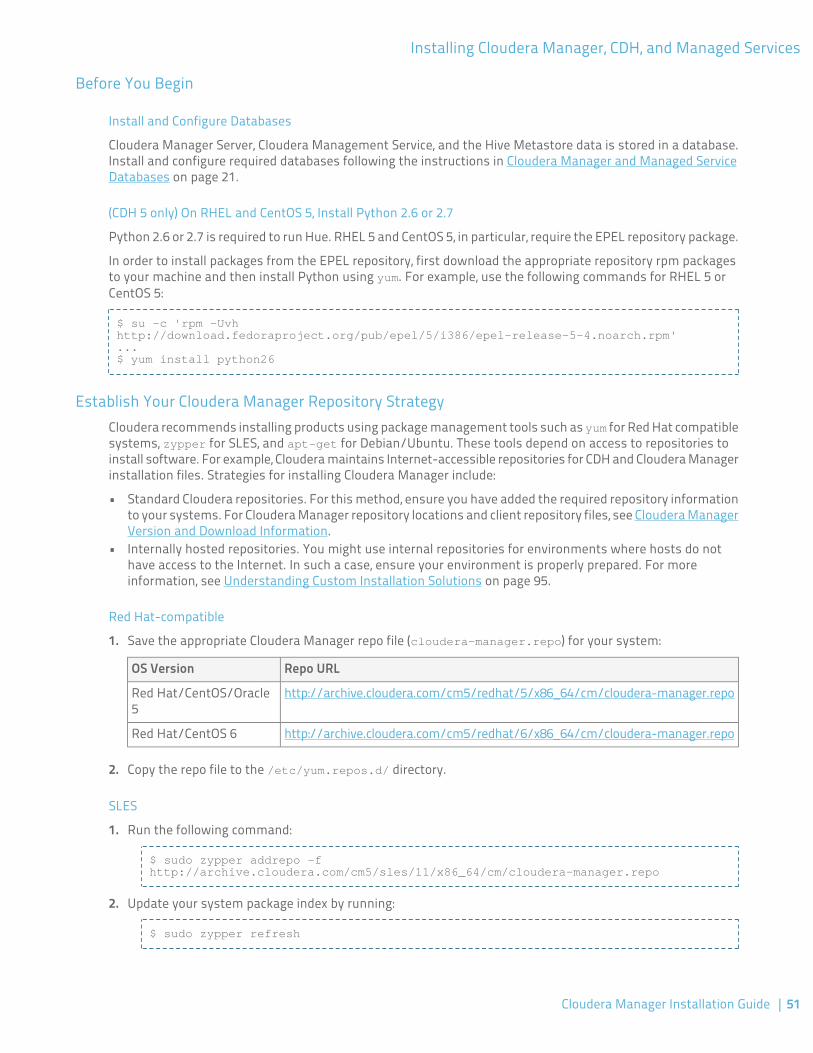
Before You Begin
Install and Configure Databases
Cloudera Manager Server, Cloudera Management Service, and the Hive Metastore data is stored in a database.Install and configure required databases following the instructions in Cloudera Manager and Managed ServiceDatabases on page 21.
(CDH 5 only) On RHEL and CentOS 5, Install Python 2.6 or 2.7
Python 2.6 or 2.7 is required to run Hue. RHEL 5 and CentOS 5, in particular, require the EPEL repository package.
In order to install packages from the EPEL repository, first download the appropriate repository rpm packagesto your machine and then install Python using yum. For example, use the following commands for RHEL 5 orCentOS 5:
$ su -c 'rpm -Uvh http://download.fedoraproject.org/pub/epel/5/i386/epel-release-5-4.noarch.rpm'...$ yum install python26
Establish Your Cloudera Manager Repository StrategyCloudera recommends installing products using package management tools such as yum for Red Hat compatiblesystems, zypper for SLES, and apt-get for Debian/Ubuntu. These tools depend on access to repositories toinstall software. For example, Cloudera maintains Internet-accessible repositories for CDH and Cloudera Managerinstallation files. Strategies for installing Cloudera Manager include:
• Standard Cloudera repositories. For this method, ensure you have added the required repository informationto your systems. For Cloudera Manager repository locations and client repository files, see Cloudera ManagerVersion and Download Information.
• Internally hosted repositories. You might use internal repositories for environments where hosts do nothave access to the Internet. In such a case, ensure your environment is properly prepared. For moreinformation, see Understanding Custom Installation Solutions on page 95.
Red Hat-compatible
1. Save the appropriate Cloudera Manager repo file (cloudera-manager.repo) for your system:
Repo URLOS Version
http://archive.cloudera.com/cm5/redhat/5/x86_64/cm/cloudera-manager.repoRed Hat/CentOS/Oracle5
http://archive.cloudera.com/cm5/redhat/6/x86_64/cm/cloudera-manager.repoRed Hat/CentOS 6
2. Copy the repo file to the /etc/yum.repos.d/ directory.
SLES
1. Run the following command:
$ sudo zypper addrepo -f http://archive.cloudera.com/cm5/sles/11/x86_64/cm/cloudera-manager.repo
2. Update your system package index by running:
$ sudo zypper refresh
Cloudera Manager Installation Guide | 51
Installing Cloudera Manager, CDH, and Managed Services
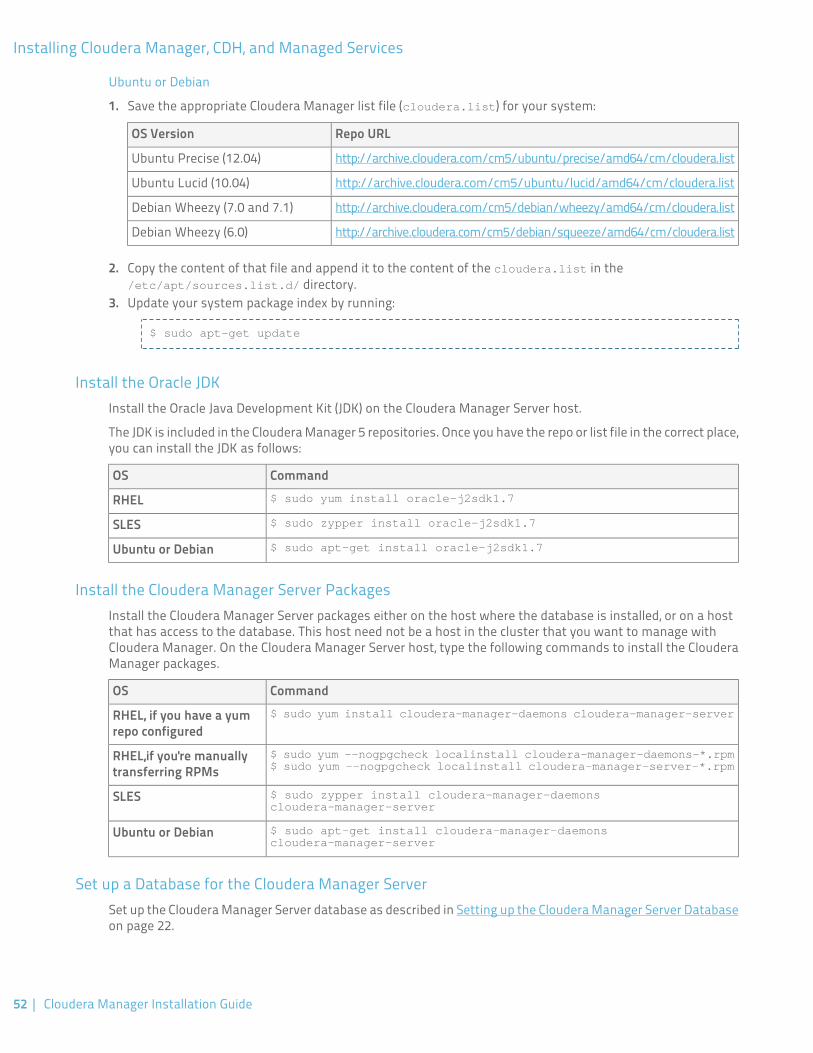
Ubuntu or Debian
1. Save the appropriate Cloudera Manager list file (cloudera.list) for your system:
Repo URLOS Version
http://archive.cloudera.com/cm5/ubuntu/precise/amd64/cm/cloudera.listUbuntu Precise (12.04)
http://archive.cloudera.com/cm5/ubuntu/lucid/amd64/cm/cloudera.listUbuntu Lucid (10.04)
http://archive.cloudera.com/cm5/debian/wheezy/amd64/cm/cloudera.listDebian Wheezy (7.0 and 7.1)
http://archive.cloudera.com/cm5/debian/squeeze/amd64/cm/cloudera.listDebian Wheezy (6.0)
2. Copy the content of that file and append it to the content of the cloudera.list in the/etc/apt/sources.list.d/ directory.
3. Update your system package index by running:
$ sudo apt-get update
Install the Oracle JDKInstall the Oracle Java Development Kit (JDK) on the Cloudera Manager Server host.
The JDK is included in the Cloudera Manager 5 repositories. Once you have the repo or list file in the correct place,you can install the JDK as follows:
CommandOS$ sudo yum install oracle-j2sdk1.7RHEL$ sudo zypper install oracle-j2sdk1.7SLES$ sudo apt-get install oracle-j2sdk1.7Ubuntu or Debian
Install the Cloudera Manager Server PackagesInstall the Cloudera Manager Server packages either on the host where the database is installed, or on a hostthat has access to the database. This host need not be a host in the cluster that you want to manage withCloudera Manager. On the Cloudera Manager Server host, type the following commands to install the ClouderaManager packages.
CommandOS$ sudo yum install cloudera-manager-daemons cloudera-manager-serverRHEL, if you have a yum
repo configured$ sudo yum --nogpgcheck localinstall cloudera-manager-daemons-*.rpm$ sudo yum --nogpgcheck localinstall cloudera-manager-server-*.rpm
RHEL,if you're manuallytransferring RPMs
$ sudo zypper install cloudera-manager-daemons cloudera-manager-server
SLES
$ sudo apt-get install cloudera-manager-daemons cloudera-manager-server
Ubuntu or Debian
Set up a Database for the Cloudera Manager ServerSet up the Cloudera Manager Server database as described in Setting up the Cloudera Manager Server Databaseon page 22.
52 | Cloudera Manager Installation Guide
Installing Cloudera Manager, CDH, and Managed Services
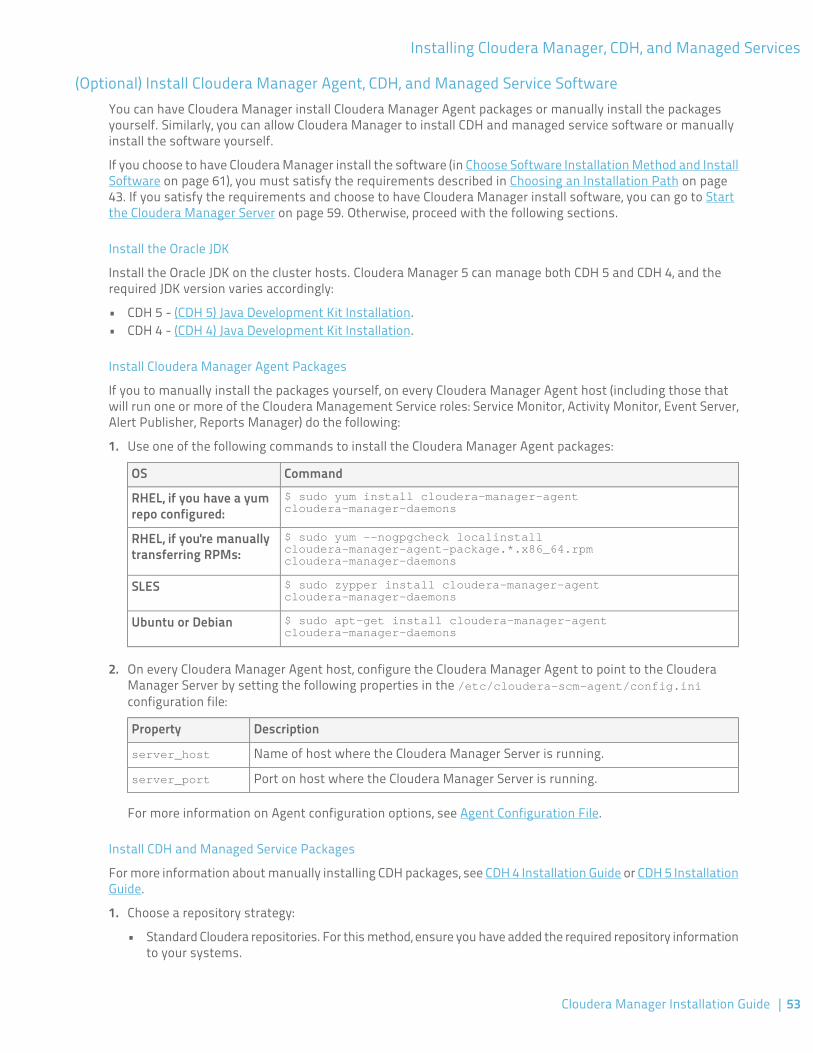
(Optional) Install Cloudera Manager Agent, CDH, and Managed Service SoftwareYou can have Cloudera Manager install Cloudera Manager Agent packages or manually install the packagesyourself. Similarly, you can allow Cloudera Manager to install CDH and managed service software or manuallyinstall the software yourself.
If you choose to have Cloudera Manager install the software (in Choose Software Installation Method and InstallSoftware on page 61), you must satisfy the requirements described in Choosing an Installation Path on page43. If you satisfy the requirements and choose to have Cloudera Manager install software, you can go to Startthe Cloudera Manager Server on page 59. Otherwise, proceed with the following sections.
Install the Oracle JDK
Install the Oracle JDK on the cluster hosts. Cloudera Manager 5 can manage both CDH 5 and CDH 4, and therequired JDK version varies accordingly:
• CDH 5 - (CDH 5) Java Development Kit Installation.• CDH 4 - (CDH 4) Java Development Kit Installation.
Install Cloudera Manager Agent Packages
If you to manually install the packages yourself, on every Cloudera Manager Agent host (including those thatwill run one or more of the Cloudera Management Service roles: Service Monitor, Activity Monitor, Event Server,Alert Publisher, Reports Manager) do the following:
1. Use one of the following commands to install the Cloudera Manager Agent packages:
CommandOS$ sudo yum install cloudera-manager-agent cloudera-manager-daemons
RHEL, if you have a yumrepo configured:
$ sudo yum --nogpgcheck localinstall cloudera-manager-agent-package.*.x86_64.rpm cloudera-manager-daemons
RHEL, if you're manuallytransferring RPMs:
$ sudo zypper install cloudera-manager-agent cloudera-manager-daemons
SLES
$ sudo apt-get install cloudera-manager-agent cloudera-manager-daemons
Ubuntu or Debian
2. On every Cloudera Manager Agent host, configure the Cloudera Manager Agent to point to the ClouderaManager Server by setting the following properties in the /etc/cloudera-scm-agent/config.iniconfiguration file:
DescriptionProperty
Name of host where the Cloudera Manager Server is running.server_host
Port on host where the Cloudera Manager Server is running.server_port
For more information on Agent configuration options, see Agent Configuration File.
Install CDH and Managed Service Packages
For more information about manually installing CDH packages, see CDH 4 Installation Guide or CDH 5 InstallationGuide.
1. Choose a repository strategy:
• Standard Cloudera repositories. For this method, ensure you have added the required repository informationto your systems.
Cloudera Manager Installation Guide | 53
Installing Cloudera Manager, CDH, and Managed Services
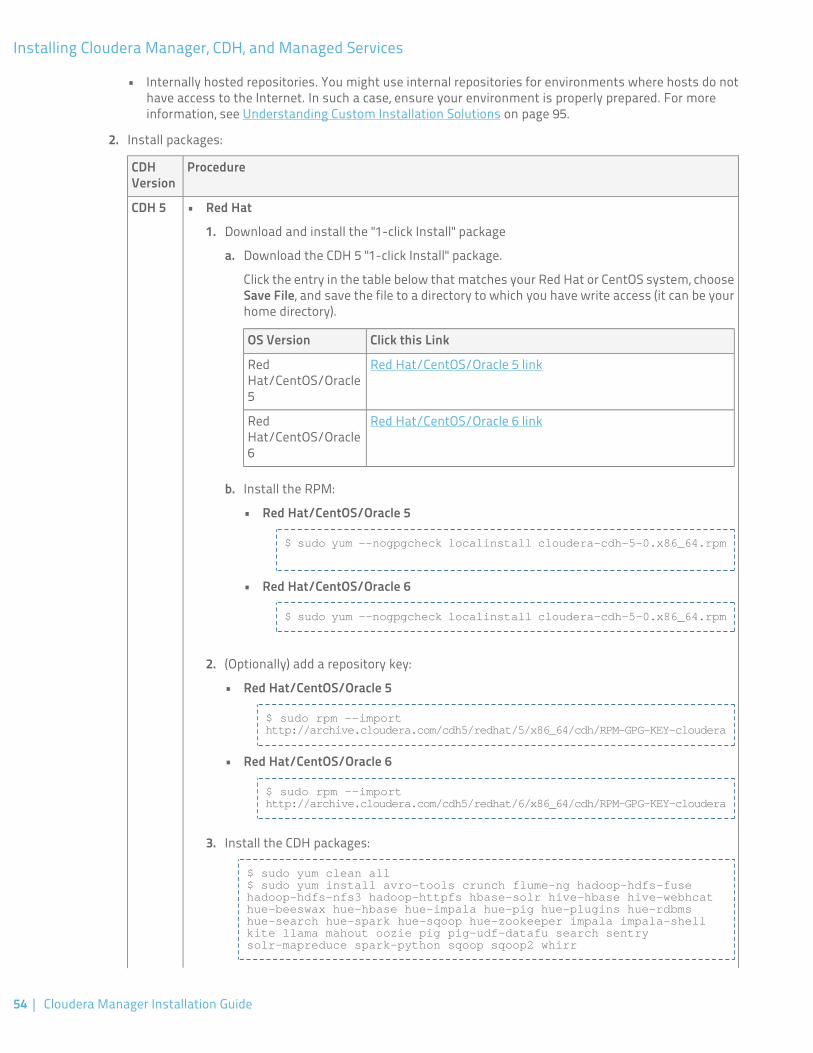
• Internally hosted repositories. You might use internal repositories for environments where hosts do nothave access to the Internet. In such a case, ensure your environment is properly prepared. For moreinformation, see Understanding Custom Installation Solutions on page 95.
2. Install packages:
ProcedureCDHVersion
CDH 5 • Red Hat
1. Download and install the "1-click Install" package
a. Download the CDH 5 "1-click Install" package.
Click the entry in the table below that matches your Red Hat or CentOS system, chooseSave File, and save the file to a directory to which you have write access (it can be yourhome directory).
Click this LinkOS Version
Red Hat/CentOS/Oracle 5 linkRedHat/CentOS/Oracle5
Red Hat/CentOS/Oracle 6 linkRedHat/CentOS/Oracle6
b. Install the RPM:
• Red Hat/CentOS/Oracle 5
$ sudo yum --nogpgcheck localinstall cloudera-cdh-5-0.x86_64.rpm
• Red Hat/CentOS/Oracle 6
$ sudo yum --nogpgcheck localinstall cloudera-cdh-5-0.x86_64.rpm
2. (Optionally) add a repository key:
• Red Hat/CentOS/Oracle 5
$ sudo rpm --import http://archive.cloudera.com/cdh5/redhat/5/x86_64/cdh/RPM-GPG-KEY-cloudera
• Red Hat/CentOS/Oracle 6
$ sudo rpm --import http://archive.cloudera.com/cdh5/redhat/6/x86_64/cdh/RPM-GPG-KEY-cloudera
3. Install the CDH packages:
$ sudo yum clean all$ sudo yum install avro-tools crunch flume-ng hadoop-hdfs-fuse hadoop-hdfs-nfs3 hadoop-httpfs hbase-solr hive-hbase hive-webhcat hue-beeswax hue-hbase hue-impala hue-pig hue-plugins hue-rdbms hue-search hue-spark hue-sqoop hue-zookeeper impala impala-shell kite llama mahout oozie pig pig-udf-datafu search sentry solr-mapreduce spark-python sqoop sqoop2 whirr
54 | Cloudera Manager Installation Guide
Installing Cloudera Manager, CDH, and Managed Services

ProcedureCDHVersion
Note: Installing these packages will also install all the other CDH packages thatare needed for a full CDH 5 installation.
• SLES
1. Download and install the "1-click Install" package.
a. Download the CDH 5 "1-click Install" package.
Click this link, choose Save File, and save it to a directory to which you have write access(it can be your home directory).
b. Install the RPM:
$ sudo rpm -i cloudera-cdh-5-0.x86_64.rpm
c. Update your system package index by running:
$ sudo zypper refresh
2. (Optionally) add a repository key:
$ sudo rpm --import http://archive.cloudera.com/cdh5/sles/11/x86_64/cdh/RPM-GPG-KEY-cloudera
3. Install the CDH packages:
$ sudo zypper clean --all$ sudo zypper install avro-tools crunch flume-ng hadoop-hdfs-fuse hadoop-hdfs-nfs3 hadoop-httpfs hbase-solr hive-hbase hive-webhcat hue-beeswax hue-hbase hue-impala hue-pig hue-plugins hue-rdbms hue-search hue-spark hue-sqoop hue-zookeeper impala impala-shell kite llama mahout oozie pig pig-udf-datafu search sentry solr-mapreduce spark-python sqoop sqoop2 whirr
Note: Installing these packages will also install all the other CDH packages thatare needed for a full CDH 5 installation.
• Ubuntu and Debian
1. Download and install the "1-click Install" package
a. Download the CDH 5 "1-click Install" package:
Click this LinkOS Version
Wheezy linkWheezy
Precise linkPrecise
b. Install the package. Do one of the following:
• Choose Open with in the download window to use the package manager.• Choose Save File, save the package to a directory to which you have write access (it
can be your home directory) and install it from the command line, for example:
sudo dpkg -i cdh5-repository_1.0_all.deb
Cloudera Manager Installation Guide | 55
Installing Cloudera Manager, CDH, and Managed Services
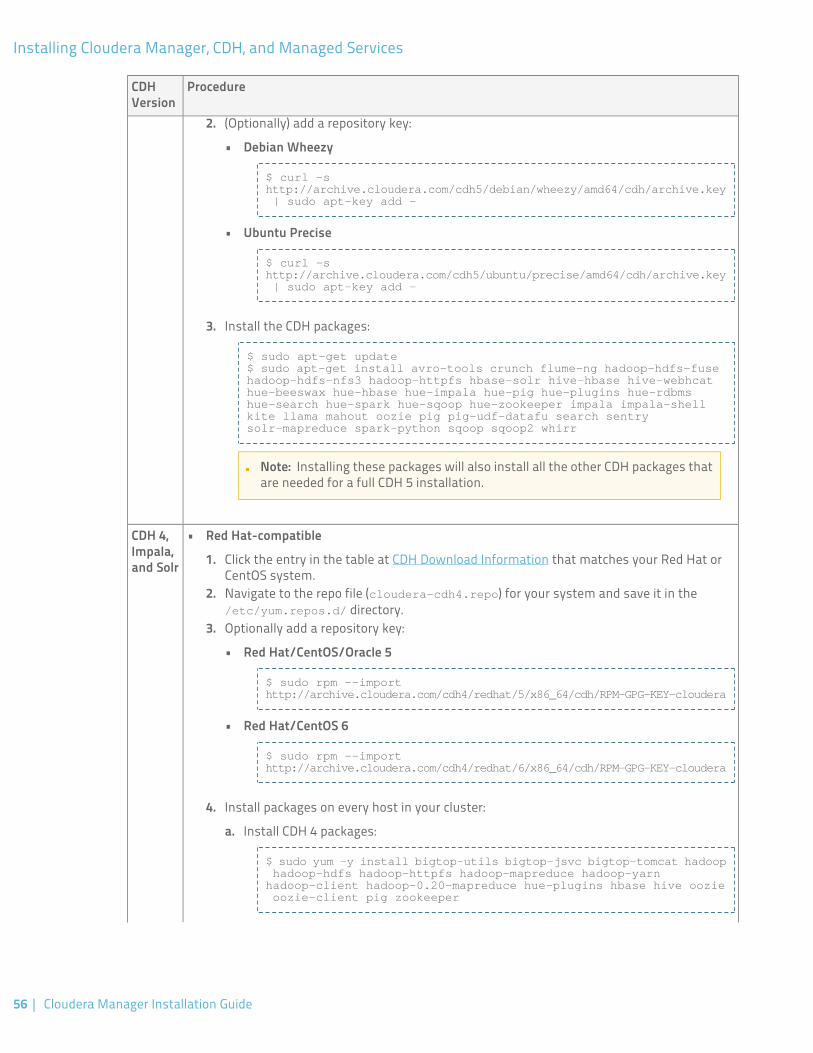
ProcedureCDHVersion
2. (Optionally) add a repository key:
• Debian Wheezy
$ curl -s http://archive.cloudera.com/cdh5/debian/wheezy/amd64/cdh/archive.key | sudo apt-key add -
• Ubuntu Precise
$ curl -s http://archive.cloudera.com/cdh5/ubuntu/precise/amd64/cdh/archive.key | sudo apt-key add -
3. Install the CDH packages:
$ sudo apt-get update$ sudo apt-get install avro-tools crunch flume-ng hadoop-hdfs-fuse hadoop-hdfs-nfs3 hadoop-httpfs hbase-solr hive-hbase hive-webhcat hue-beeswax hue-hbase hue-impala hue-pig hue-plugins hue-rdbms hue-search hue-spark hue-sqoop hue-zookeeper impala impala-shell kite llama mahout oozie pig pig-udf-datafu search sentry solr-mapreduce spark-python sqoop sqoop2 whirr
Note: Installing these packages will also install all the other CDH packages thatare needed for a full CDH 5 installation.
CDH 4,Impala,and Solr
• Red Hat-compatible
1. Click the entry in the table at CDH Download Information that matches your Red Hat orCentOS system.
2. Navigate to the repo file (cloudera-cdh4.repo) for your system and save it in the/etc/yum.repos.d/ directory.
3. Optionally add a repository key:
• Red Hat/CentOS/Oracle 5
$ sudo rpm --import http://archive.cloudera.com/cdh4/redhat/5/x86_64/cdh/RPM-GPG-KEY-cloudera
• Red Hat/CentOS 6
$ sudo rpm --import http://archive.cloudera.com/cdh4/redhat/6/x86_64/cdh/RPM-GPG-KEY-cloudera
4. Install packages on every host in your cluster:
a. Install CDH 4 packages:
$ sudo yum -y install bigtop-utils bigtop-jsvc bigtop-tomcat hadoop hadoop-hdfs hadoop-httpfs hadoop-mapreduce hadoop-yarn hadoop-client hadoop-0.20-mapreduce hue-plugins hbase hive oozie oozie-client pig zookeeper
56 | Cloudera Manager Installation Guide
Installing Cloudera Manager, CDH, and Managed Services

ProcedureCDHVersion
b. To install the hue-common package and all Hue applications on the Hue host, install thehue meta-package:
$ sudo yum install hue
5. (Requires CDH 4.2 or later) Install Impala
a. Click the entry in the table at Cloudera Impala Version and Download Information thatmatches your Red Hat or CentOS system.
b. Navigate to the repo file for your system and save it in the /etc/yum.repos.d/directory.
c. Install Impala and the Impala Shell on Impala machines:
$ sudo yum -y install impala impala-shell
6. (Requires CDH 4.3 or later) Install Search
a. Click the entry in the table at Cloudera Search Version and Download Information thatmatches your Red Hat or CentOS system.
b. Navigate to the repo file for your system and save it in the /etc/yum.repos.d/directory.
c. Install the Solr Server on machines where you want Cloudera Search.
$ sudo yum -y install solr-server
• SLES
1. Run the following command:
$ sudo zypper addrepo -f http://archive.cloudera.com/cdh4/sles/11/x86_64/cdh/cloudera-cdh4.repo
2. Update your system package index by running:
$ sudo zypper refresh
3. Optionally add a repository key:
$ sudo rpm --import http://archive.cloudera.com/cdh4/sles/11/x86_64/cdh/RPM-GPG-KEY-cloudera
4. Install packages on every host in your cluster:
a. Install CDH 4 packages:
$ sudo zypper install bigtop-utils bigtop-jsvc bigtop-tomcat hadoop hadoop-hdfs hadoop-httpfs hadoop-mapreduce hadoop-yarn hadoop-client hadoop-0.20-mapreduce hue-plugins hbase hive oozie oozie-client pig zookeeper
b. To install the hue-common package and all Hue applications on the Hue host, install thehue meta-package:
$ sudo zypper install hue
Cloudera Manager Installation Guide | 57
Installing Cloudera Manager, CDH, and Managed Services
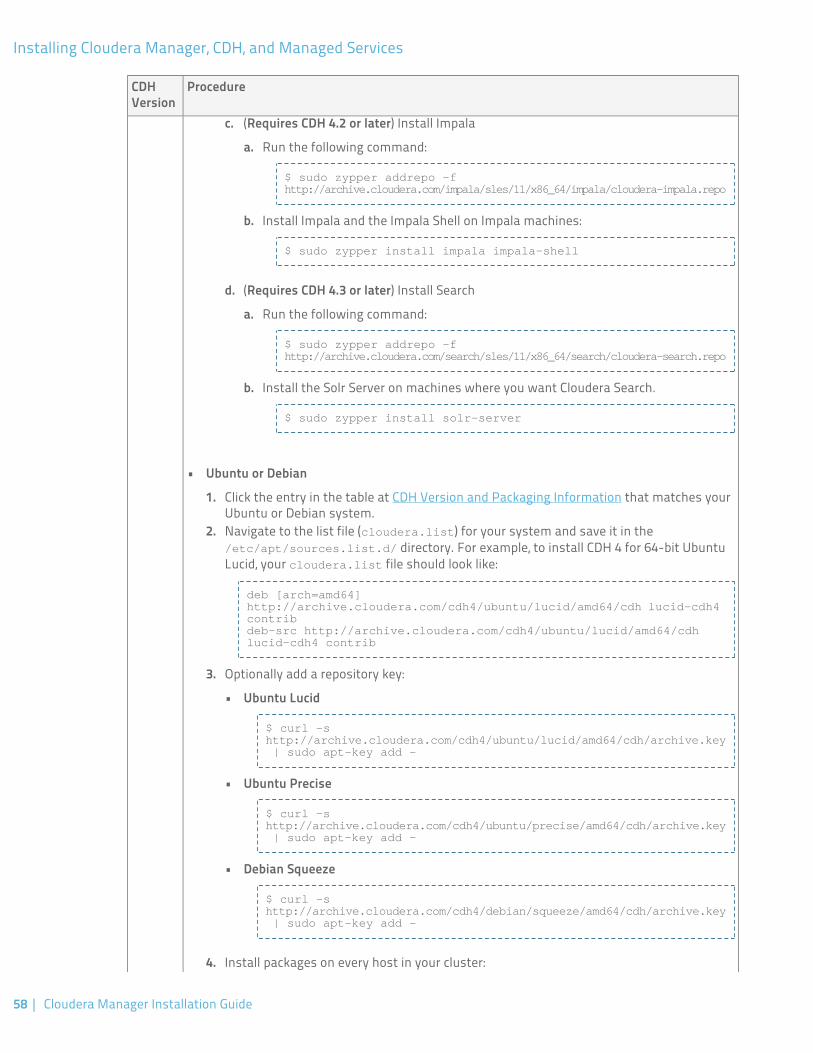
ProcedureCDHVersion
c. (Requires CDH 4.2 or later) Install Impala
a. Run the following command:
$ sudo zypper addrepo -f http://archive.cloudera.com/impala/sles/11/x86_64/impala/cloudera-impala.repo
b. Install Impala and the Impala Shell on Impala machines:
$ sudo zypper install impala impala-shell
d. (Requires CDH 4.3 or later) Install Search
a. Run the following command:
$ sudo zypper addrepo -f http://archive.cloudera.com/search/sles/11/x86_64/search/cloudera-search.repo
b. Install the Solr Server on machines where you want Cloudera Search.
$ sudo zypper install solr-server
• Ubuntu or Debian
1. Click the entry in the table at CDH Version and Packaging Information that matches yourUbuntu or Debian system.
2. Navigate to the list file (cloudera.list) for your system and save it in the/etc/apt/sources.list.d/ directory. For example, to install CDH 4 for 64-bit UbuntuLucid, your cloudera.list file should look like:
deb [arch=amd64] http://archive.cloudera.com/cdh4/ubuntu/lucid/amd64/cdh lucid-cdh4 contribdeb-src http://archive.cloudera.com/cdh4/ubuntu/lucid/amd64/cdh lucid-cdh4 contrib
3. Optionally add a repository key:
• Ubuntu Lucid
$ curl -s http://archive.cloudera.com/cdh4/ubuntu/lucid/amd64/cdh/archive.key | sudo apt-key add -
• Ubuntu Precise
$ curl -s http://archive.cloudera.com/cdh4/ubuntu/precise/amd64/cdh/archive.key | sudo apt-key add -
• Debian Squeeze
$ curl -s http://archive.cloudera.com/cdh4/debian/squeeze/amd64/cdh/archive.key | sudo apt-key add -
4. Install packages on every host in your cluster:
58 | Cloudera Manager Installation Guide
Installing Cloudera Manager, CDH, and Managed Services
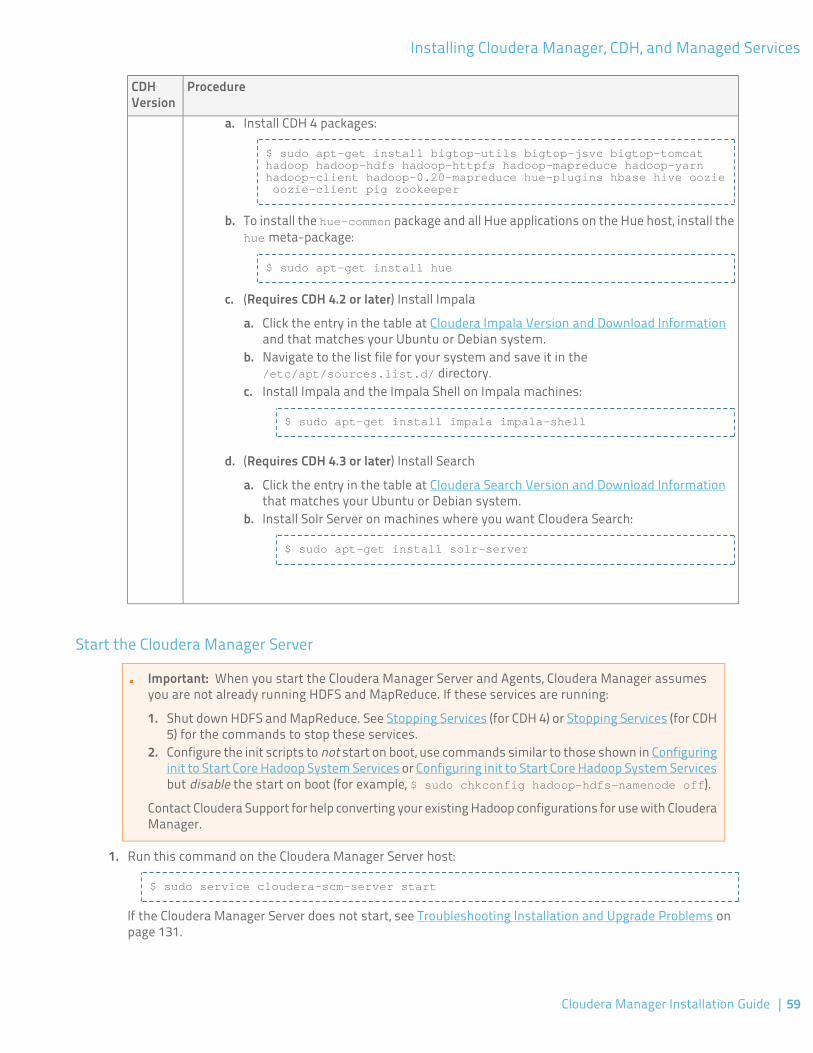
ProcedureCDHVersion
a. Install CDH 4 packages:
$ sudo apt-get install bigtop-utils bigtop-jsvc bigtop-tomcat hadoop hadoop-hdfs hadoop-httpfs hadoop-mapreduce hadoop-yarn hadoop-client hadoop-0.20-mapreduce hue-plugins hbase hive oozie oozie-client pig zookeeper
b. To install the hue-common package and all Hue applications on the Hue host, install thehue meta-package:
$ sudo apt-get install hue
c. (Requires CDH 4.2 or later) Install Impala
a. Click the entry in the table at Cloudera Impala Version and Download Informationand that matches your Ubuntu or Debian system.
b. Navigate to the list file for your system and save it in the/etc/apt/sources.list.d/ directory.
c. Install Impala and the Impala Shell on Impala machines:
$ sudo apt-get install impala impala-shell
d. (Requires CDH 4.3 or later) Install Search
a. Click the entry in the table at Cloudera Search Version and Download Informationthat matches your Ubuntu or Debian system.
b. Install Solr Server on machines where you want Cloudera Search:
$ sudo apt-get install solr-server
Start the Cloudera Manager Server
Important: When you start the Cloudera Manager Server and Agents, Cloudera Manager assumesyou are not already running HDFS and MapReduce. If these services are running:
1. Shut down HDFS and MapReduce. See Stopping Services (for CDH 4) or Stopping Services (for CDH5) for the commands to stop these services.
2. Configure the init scripts to not start on boot, use commands similar to those shown in Configuringinit to Start Core Hadoop System Services or Configuring init to Start Core Hadoop System Servicesbut disable the start on boot (for example, $ sudo chkconfig hadoop-hdfs-namenode off).
Contact Cloudera Support for help converting your existing Hadoop configurations for use with ClouderaManager.
1. Run this command on the Cloudera Manager Server host:
$ sudo service cloudera-scm-server start
If the Cloudera Manager Server does not start, see Troubleshooting Installation and Upgrade Problems onpage 131.
Cloudera Manager Installation Guide | 59
Installing Cloudera Manager, CDH, and Managed Services
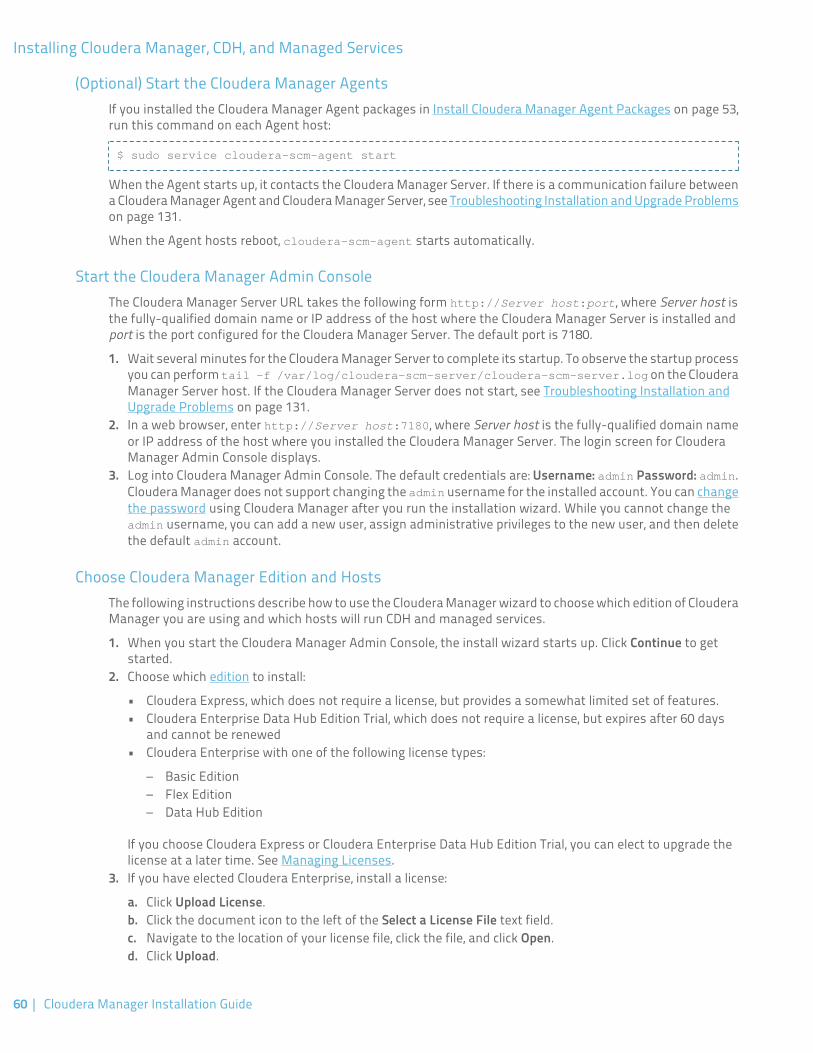
(Optional) Start the Cloudera Manager AgentsIf you installed the Cloudera Manager Agent packages in Install Cloudera Manager Agent Packages on page 53,run this command on each Agent host:
$ sudo service cloudera-scm-agent start
When the Agent starts up, it contacts the Cloudera Manager Server. If there is a communication failure betweena Cloudera Manager Agent and Cloudera Manager Server, see Troubleshooting Installation and Upgrade Problemson page 131.
When the Agent hosts reboot, cloudera-scm-agent starts automatically.
Start the Cloudera Manager Admin ConsoleThe Cloudera Manager Server URL takes the following form http://Server host:port, where Server host isthe fully-qualified domain name or IP address of the host where the Cloudera Manager Server is installed andport is the port configured for the Cloudera Manager Server. The default port is 7180.
1. Wait several minutes for the Cloudera Manager Server to complete its startup. To observe the startup processyou can perform tail -f /var/log/cloudera-scm-server/cloudera-scm-server.log on the ClouderaManager Server host. If the Cloudera Manager Server does not start, see Troubleshooting Installation andUpgrade Problems on page 131.
2. In a web browser, enter http://Server host:7180, where Server host is the fully-qualified domain nameor IP address of the host where you installed the Cloudera Manager Server. The login screen for ClouderaManager Admin Console displays.
3. Log into Cloudera Manager Admin Console. The default credentials are: Username: admin Password: admin.Cloudera Manager does not support changing the admin username for the installed account. You can changethe password using Cloudera Manager after you run the installation wizard. While you cannot change theadmin username, you can add a new user, assign administrative privileges to the new user, and then deletethe default admin account.
Choose Cloudera Manager Edition and HostsThe following instructions describe how to use the Cloudera Manager wizard to choose which edition of ClouderaManager you are using and which hosts will run CDH and managed services.
1. When you start the Cloudera Manager Admin Console, the install wizard starts up. Click Continue to getstarted.
2. Choose which edition to install:
• Cloudera Express, which does not require a license, but provides a somewhat limited set of features.• Cloudera Enterprise Data Hub Edition Trial, which does not require a license, but expires after 60 days
and cannot be renewed• Cloudera Enterprise with one of the following license types:
– Basic Edition– Flex Edition– Data Hub Edition
If you choose Cloudera Express or Cloudera Enterprise Data Hub Edition Trial, you can elect to upgrade thelicense at a later time. See Managing Licenses.
3. If you have elected Cloudera Enterprise, install a license:
a. Click Upload License.b. Click the document icon to the left of the Select a License File text field.c. Navigate to the location of your license file, click the file, and click Open.d. Click Upload.
60 | Cloudera Manager Installation Guide
Installing Cloudera Manager, CDH, and Managed Services
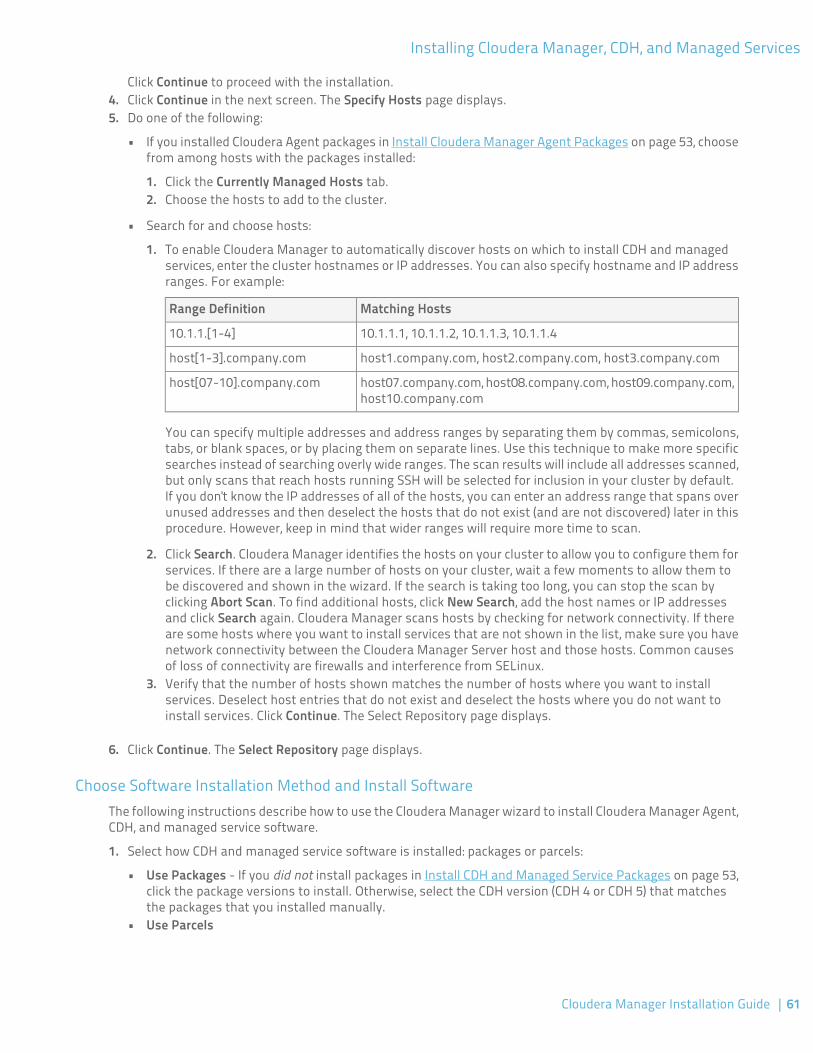
Click Continue to proceed with the installation.4. Click Continue in the next screen. The Specify Hosts page displays.5. Do one of the following:
• If you installed Cloudera Agent packages in Install Cloudera Manager Agent Packages on page 53, choosefrom among hosts with the packages installed:
1. Click the Currently Managed Hosts tab.2. Choose the hosts to add to the cluster.
• Search for and choose hosts:
1. To enable Cloudera Manager to automatically discover hosts on which to install CDH and managedservices, enter the cluster hostnames or IP addresses. You can also specify hostname and IP addressranges. For example:
Matching HostsRange Definition
10.1.1.1, 10.1.1.2, 10.1.1.3, 10.1.1.410.1.1.[1-4]
host1.company.com, host2.company.com, host3.company.comhost[1-3].company.com
host07.company.com, host08.company.com, host09.company.com,host10.company.com
host[07-10].company.com
You can specify multiple addresses and address ranges by separating them by commas, semicolons,tabs, or blank spaces, or by placing them on separate lines. Use this technique to make more specificsearches instead of searching overly wide ranges. The scan results will include all addresses scanned,but only scans that reach hosts running SSH will be selected for inclusion in your cluster by default.If you don't know the IP addresses of all of the hosts, you can enter an address range that spans overunused addresses and then deselect the hosts that do not exist (and are not discovered) later in thisprocedure. However, keep in mind that wider ranges will require more time to scan.
2. Click Search. Cloudera Manager identifies the hosts on your cluster to allow you to configure them forservices. If there are a large number of hosts on your cluster, wait a few moments to allow them tobe discovered and shown in the wizard. If the search is taking too long, you can stop the scan byclicking Abort Scan. To find additional hosts, click New Search, add the host names or IP addressesand click Search again. Cloudera Manager scans hosts by checking for network connectivity. If thereare some hosts where you want to install services that are not shown in the list, make sure you havenetwork connectivity between the Cloudera Manager Server host and those hosts. Common causesof loss of connectivity are firewalls and interference from SELinux.
3. Verify that the number of hosts shown matches the number of hosts where you want to installservices. Deselect host entries that do not exist and deselect the hosts where you do not want toinstall services. Click Continue. The Select Repository page displays.
6. Click Continue. The Select Repository page displays.
Choose Software Installation Method and Install SoftwareThe following instructions describe how to use the Cloudera Manager wizard to install Cloudera Manager Agent,CDH, and managed service software.
1. Select how CDH and managed service software is installed: packages or parcels:
• Use Packages - If you did not install packages in Install CDH and Managed Service Packages on page 53,click the package versions to install. Otherwise, select the CDH version (CDH 4 or CDH 5) that matchesthe packages that you installed manually.
• Use Parcels
Cloudera Manager Installation Guide | 61
Installing Cloudera Manager, CDH, and Managed Services
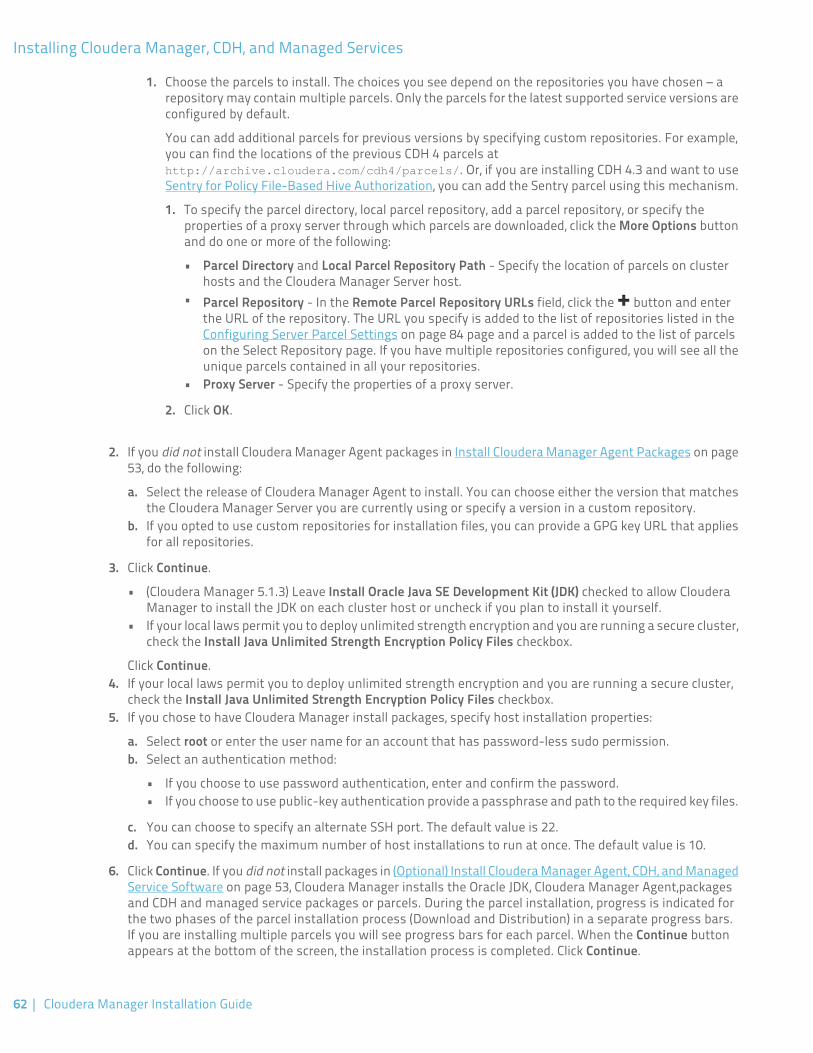
1. Choose the parcels to install. The choices you see depend on the repositories you have chosen – arepository may contain multiple parcels. Only the parcels for the latest supported service versions areconfigured by default.
You can add additional parcels for previous versions by specifying custom repositories. For example,you can find the locations of the previous CDH 4 parcels athttp://archive.cloudera.com/cdh4/parcels/. Or, if you are installing CDH 4.3 and want to useSentry for Policy File-Based Hive Authorization, you can add the Sentry parcel using this mechanism.
1. To specify the parcel directory, local parcel repository, add a parcel repository, or specify theproperties of a proxy server through which parcels are downloaded, click the More Options buttonand do one or more of the following:
• Parcel Directory and Local Parcel Repository Path - Specify the location of parcels on clusterhosts and the Cloudera Manager Server host.
• Parcel Repository - In the Remote Parcel Repository URLs field, click the button and enterthe URL of the repository. The URL you specify is added to the list of repositories listed in theConfiguring Server Parcel Settings on page 84 page and a parcel is added to the list of parcelson the Select Repository page. If you have multiple repositories configured, you will see all theunique parcels contained in all your repositories.
• Proxy Server - Specify the properties of a proxy server.
2. Click OK.
2. If you did not install Cloudera Manager Agent packages in Install Cloudera Manager Agent Packages on page53, do the following:
a. Select the release of Cloudera Manager Agent to install. You can choose either the version that matchesthe Cloudera Manager Server you are currently using or specify a version in a custom repository.
b. If you opted to use custom repositories for installation files, you can provide a GPG key URL that appliesfor all repositories.
3. Click Continue.
• (Cloudera Manager 5.1.3) Leave Install Oracle Java SE Development Kit (JDK) checked to allow ClouderaManager to install the JDK on each cluster host or uncheck if you plan to install it yourself.
• If your local laws permit you to deploy unlimited strength encryption and you are running a secure cluster,check the Install Java Unlimited Strength Encryption Policy Files checkbox.
Click Continue.4. If your local laws permit you to deploy unlimited strength encryption and you are running a secure cluster,
check the Install Java Unlimited Strength Encryption Policy Files checkbox.5. If you chose to have Cloudera Manager install packages, specify host installation properties:
a. Select root or enter the user name for an account that has password-less sudo permission.b. Select an authentication method:
• If you choose to use password authentication, enter and confirm the password.• If you choose to use public-key authentication provide a passphrase and path to the required key files.
c. You can choose to specify an alternate SSH port. The default value is 22.d. You can specify the maximum number of host installations to run at once. The default value is 10.
6. Click Continue. If you did not install packages in (Optional) Install Cloudera Manager Agent, CDH, and ManagedService Software on page 53, Cloudera Manager installs the Oracle JDK, Cloudera Manager Agent,packagesand CDH and managed service packages or parcels. During the parcel installation, progress is indicated forthe two phases of the parcel installation process (Download and Distribution) in a separate progress bars.If you are installing multiple parcels you will see progress bars for each parcel. When the Continue buttonappears at the bottom of the screen, the installation process is completed. Click Continue.
62 | Cloudera Manager Installation Guide
Installing Cloudera Manager, CDH, and Managed Services
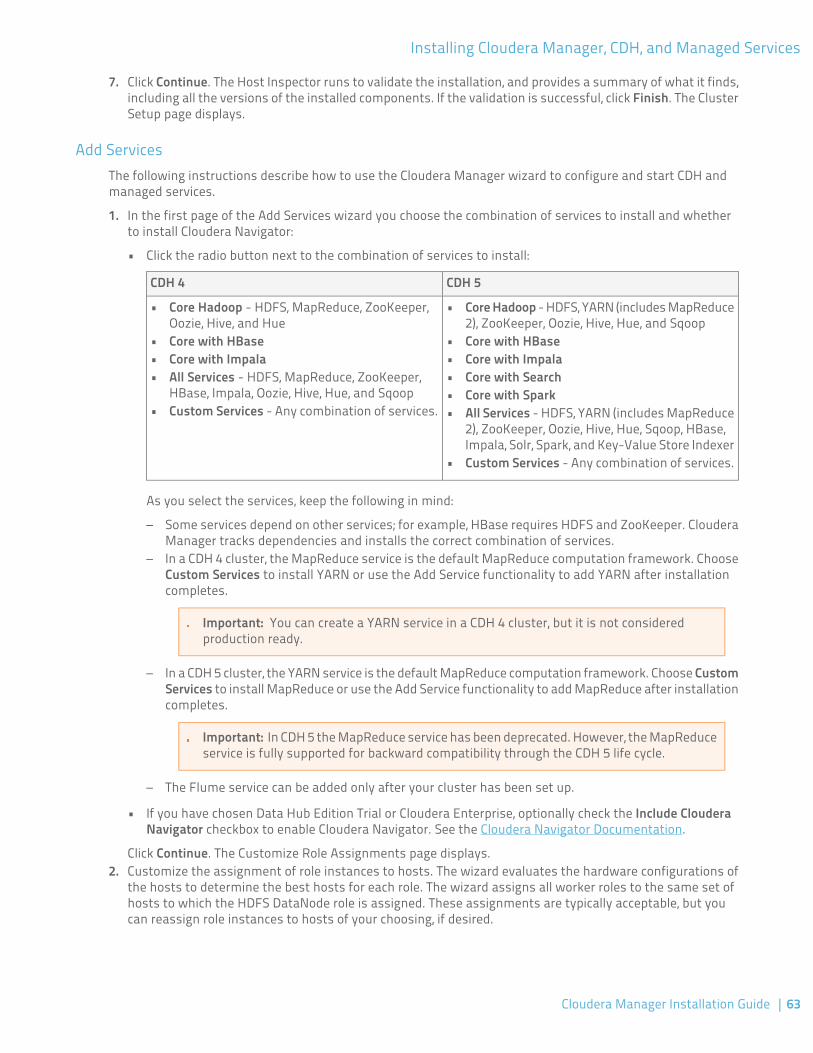
7. Click Continue. The Host Inspector runs to validate the installation, and provides a summary of what it finds,including all the versions of the installed components. If the validation is successful, click Finish. The ClusterSetup page displays.
Add ServicesThe following instructions describe how to use the Cloudera Manager wizard to configure and start CDH andmanaged services.
1. In the first page of the Add Services wizard you choose the combination of services to install and whetherto install Cloudera Navigator:
• Click the radio button next to the combination of services to install:
CDH 5CDH 4
• Core Hadoop - HDFS, YARN (includes MapReduce2), ZooKeeper, Oozie, Hive, Hue, and Sqoop
• Core Hadoop - HDFS, MapReduce, ZooKeeper,Oozie, Hive, and Hue
• Core with HBase • Core with HBase• Core with Impala• Core with Impala
• All Services - HDFS, MapReduce, ZooKeeper,HBase, Impala, Oozie, Hive, Hue, and Sqoop
• Core with Search• Core with Spark
• Custom Services - Any combination of services. • All Services - HDFS, YARN (includes MapReduce2), ZooKeeper, Oozie, Hive, Hue, Sqoop, HBase,Impala, Solr, Spark, and Key-Value Store Indexer
• Custom Services - Any combination of services.
As you select the services, keep the following in mind:
– Some services depend on other services; for example, HBase requires HDFS and ZooKeeper. ClouderaManager tracks dependencies and installs the correct combination of services.
– In a CDH 4 cluster, the MapReduce service is the default MapReduce computation framework. ChooseCustom Services to install YARN or use the Add Service functionality to add YARN after installationcompletes.
Important: You can create a YARN service in a CDH 4 cluster, but it is not consideredproduction ready.
– In a CDH 5 cluster, the YARN service is the default MapReduce computation framework. Choose CustomServices to install MapReduce or use the Add Service functionality to add MapReduce after installationcompletes.
Important: In CDH 5 the MapReduce service has been deprecated. However, the MapReduceservice is fully supported for backward compatibility through the CDH 5 life cycle.
– The Flume service can be added only after your cluster has been set up.
• If you have chosen Data Hub Edition Trial or Cloudera Enterprise, optionally check the Include ClouderaNavigator checkbox to enable Cloudera Navigator. See the Cloudera Navigator Documentation.
Click Continue. The Customize Role Assignments page displays.2. Customize the assignment of role instances to hosts. The wizard evaluates the hardware configurations of
the hosts to determine the best hosts for each role. The wizard assigns all worker roles to the same set ofhosts to which the HDFS DataNode role is assigned. These assignments are typically acceptable, but youcan reassign role instances to hosts of your choosing, if desired.
Cloudera Manager Installation Guide | 63
Installing Cloudera Manager, CDH, and Managed Services
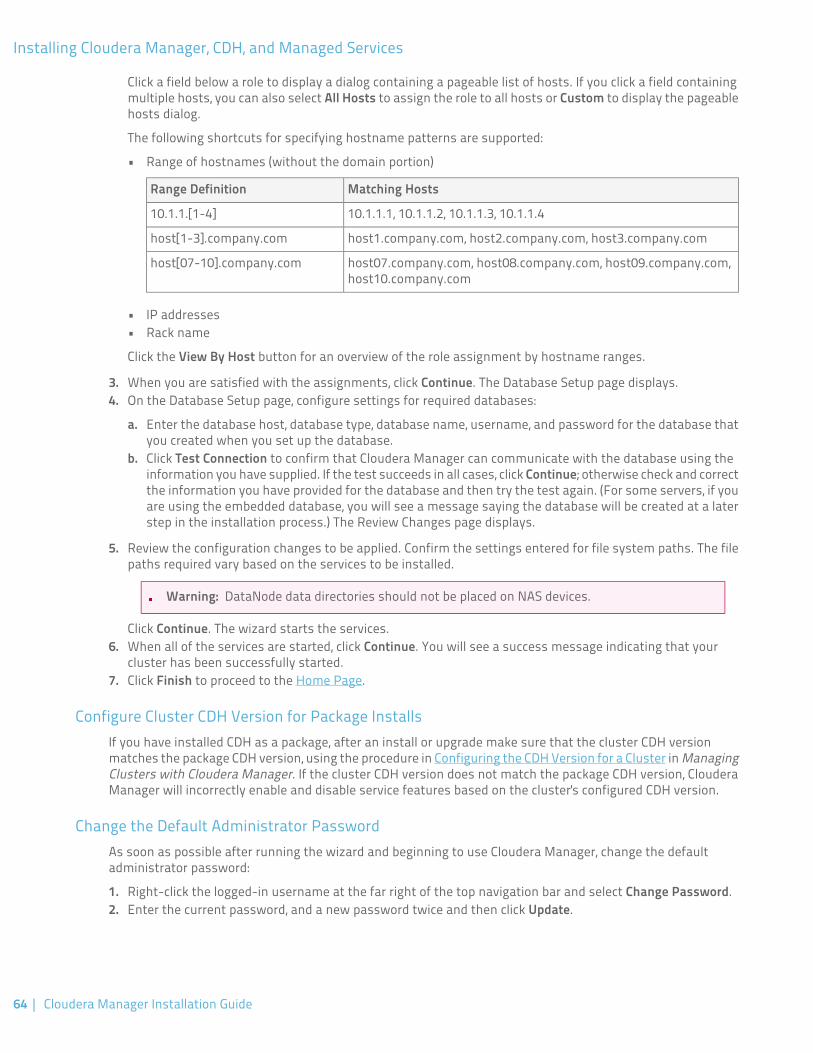
Click a field below a role to display a dialog containing a pageable list of hosts. If you click a field containingmultiple hosts, you can also select All Hosts to assign the role to all hosts or Custom to display the pageablehosts dialog.
The following shortcuts for specifying hostname patterns are supported:
• Range of hostnames (without the domain portion)
Matching HostsRange Definition
10.1.1.1, 10.1.1.2, 10.1.1.3, 10.1.1.410.1.1.[1-4]
host1.company.com, host2.company.com, host3.company.comhost[1-3].company.com
host07.company.com, host08.company.com, host09.company.com,host10.company.com
host[07-10].company.com
• IP addresses• Rack name
Click the View By Host button for an overview of the role assignment by hostname ranges.
3. When you are satisfied with the assignments, click Continue. The Database Setup page displays.4. On the Database Setup page, configure settings for required databases:
a. Enter the database host, database type, database name, username, and password for the database thatyou created when you set up the database.
b. Click Test Connection to confirm that Cloudera Manager can communicate with the database using theinformation you have supplied. If the test succeeds in all cases, click Continue; otherwise check and correctthe information you have provided for the database and then try the test again. (For some servers, if youare using the embedded database, you will see a message saying the database will be created at a laterstep in the installation process.) The Review Changes page displays.
5. Review the configuration changes to be applied. Confirm the settings entered for file system paths. The filepaths required vary based on the services to be installed.
Warning: DataNode data directories should not be placed on NAS devices.
Click Continue. The wizard starts the services.6. When all of the services are started, click Continue. You will see a success message indicating that your
cluster has been successfully started.7. Click Finish to proceed to the Home Page.
Configure Cluster CDH Version for Package InstallsIf you have installed CDH as a package, after an install or upgrade make sure that the cluster CDH versionmatches the package CDH version, using the procedure in Configuring the CDH Version for a Cluster in ManagingClusters with Cloudera Manager. If the cluster CDH version does not match the package CDH version, ClouderaManager will incorrectly enable and disable service features based on the cluster's configured CDH version.
Change the Default Administrator PasswordAs soon as possible after running the wizard and beginning to use Cloudera Manager, change the defaultadministrator password:
1. Right-click the logged-in username at the far right of the top navigation bar and select Change Password.2. Enter the current password, and a new password twice and then click Update.
64 | Cloudera Manager Installation Guide
Installing Cloudera Manager, CDH, and Managed Services
Test the InstallationYou can test the installation following the instructions in Testing the Installation on page 123.
Installation Path C - Manual Installation Using Cloudera Manager TarballsBefore proceeding with this path for a new installation, review Choosing an Installation Path on page 43. If youare upgrading an Cloudera Manager existing installation, see Upgrading Cloudera Manager.
To avoid using system packages, and to use tarballs and parcels instead, follow the instructions in this section.
Note: When installing with tarballs and parcels, some services may require additional dependencieswhich are not provided by Cloudera. To determine these dependencies, check the logs if a service failsto start or has errors. The logs should specify whether there are missing dependencies, which youthen must install manually.
Before You Begin
Install and Configure Databases
Cloudera Manager Server, Cloudera Management Service, and the Hive Metastore data is stored in a database.Install and configure required databases following the instructions in Cloudera Manager and Managed ServiceDatabases on page 21.
(CDH 5 only) On RHEL and CentOS 5, Install Python 2.6 or 2.7
Python 2.6 or 2.7 is required to run Hue. RHEL 5 and CentOS 5, in particular, require the EPEL repository package.
In order to install packages from the EPEL repository, first download the appropriate repository rpm packagesto your machine and then install Python using yum. For example, use the following commands for RHEL 5 orCentOS 5:
$ su -c 'rpm -Uvh http://download.fedoraproject.org/pub/epel/5/i386/epel-release-5-4.noarch.rpm'...$ yum install python26
Install the Cloudera Manager Server and AgentsTarballs contain both the Cloudera Manager Server and Cloudera Manager Agent in a single file. Downloadtarballs from the locations listed in Cloudera Manager Version and Download Information. Copy the tarballs andunpack them on all hosts on which you intend to install Cloudera Manager Server and Cloudera Manager Agentsin a location of your choosing. If necessary, create a new directory to accommodate the files you extract fromthe tarball. For instance if /opt/cloudera-manager does not exist, create that using a command similar to:
$ sudo mkdir /opt/cloudera-manager
When you have a location to which to extract the contents of the tarball, extract the contents. For example, tocopy a tar file to your home directory and extract the contents of all tar files to the /opt/ directory, you mightuse a command similar to the following:
$ sudo tar xzf cloudera-manager*.tar.gz -C /opt/cloudera-manager
The files are extracted to a subdirectory named according to the Cloudera Manager version being extracted. Forexample, files could extract to /opt/cloudera-manager/cm-5.0/. This full path is needed later and is referredto as tarball_root directory.
Cloudera Manager Installation Guide | 65
Installing Cloudera Manager, CDH, and Managed Services
Create Users
The Cloudera Manager Server and managed services need a user account to complete tasks. When installingCloudera Manager from tarballs, you much create this user account on all hosts manually. Because ClouderaManager Server and managed services are configured to use the user account cloudera-scm by default, creatinga user with this name is the simplest approach. After creating such a user, it is automatically used after installationis complete.
To create a user cloudera-scm, use a command such as the following:
$ sudo useradd --system --home=/opt/cloudera-manager/cm-5.0/run/cloudera-scm-server --no-create-home --shell=/bin/false --comment "Cloudera SCM User" cloudera-scm
For the preceding useradd command, ensure the --home argument path matches your environment. Thisargument varies according to where you place the tarball and the version number varies among releases. Forexample, the --home location could be /opt/cm-5.0/run/cloudera-scm-server.
Configure Cloudera Manager AgentsOn every Cloudera Manager Agent host, configure the Cloudera Manager Agent to point to the Cloudera ManagerServer by setting the following properties in the tarball_root/etc/cloudera-scm-agent/config.iniconfiguration file:
DescriptionProperty
Name of host where the Cloudera Manager Server is running.server_host
Port on host where the Cloudera Manager Server is running.server_port
Custom Cloudera Manager Users and Directories
Cloudera Manager is built to use a default set of directories and user accounts. You can use the default locationsand accounts, but there is also the option to change these settings. In some cases, changing these settings isrequired. For most installations, you can skip ahead to Configure a Database for the Cloudera Manager Serveron page 67. By default, Cloudera Manager services creates directories in /var/log and /var/lib. The directoriesthe Cloudera Manager installer attempts to create are:
• /var/log/cloudera-scm-headlamp
• /var/log/cloudera-scm-firehose
• /var/log/cloudera-scm-alertpublisher
• /var/log/cloudera-scm-eventserver
• /var/lib/cloudera-scm-headlamp
• /var/lib/cloudera-scm-firehose
• /var/lib/cloudera-scm-alertpublisher
• /var/lib/cloudera-scm-eventserver
If you are using a custom user and directory for Cloudera Manager, you must create these directories on theCloudera Manager Server host and assign ownership of these directories to your user manually. Issues mightarise if any of these directories already exist. The Cloudera Manager installer makes no changes to existingdirectories. In such a case, Cloudera Manager is unable to write to any existing directories for which it does nothave proper permissions and services may not perform as expected.
Two ways to resolve such situations are: Changing the ownership of existing directories or specifying alternatedirectories for agents. You do not need to complete both procedures.
To change ownership for existing directories:
66 | Cloudera Manager Installation Guide
Installing Cloudera Manager, CDH, and Managed Services
1. Change the directory owner to the Cloudera Manager user. If the Cloudera Manager user and group arecloudera-scm and you needed to take ownership of the headlamp log directory, you would issue a commandsimilar to the following:
$ sudo chown -R cloudera-scm:cloudera-scm /var/log/cloudera-scm-headlamp
2. Repeat the process of using chown to change ownership for all existing directories to the Cloudera Manageruser.
To use alternate directories for services:
1. If the directories you plan to use do not exist, create them now. For example to create/var/cm_logs/cloudera-scm-headlamp for use by the cloudera-scm user, you might use the followingcommands:
sudo mkdir /var/cm_logs/cloudera-scm-headlampsudo chown cloudera-scm /var/cm_logs/cloudera-scm-headlamp
2. Connect to the Cloudera Manager Admin Console.3. Under the Cloudera Managed Services, click the name of the service.4. In the service status page, click Configuration.5. In the settings page, enter a term in the Search field to find the settings to be change. For example, you might
enter "/var" or "directory".6. Update each value with the new locations for Cloudera Manager to use.7. Click Save Changes.
Configure a Database for the Cloudera Manager ServerSet up the Cloudera Manager Server database as described in Setting up the Cloudera Manager Server Databaseon page 22.
Create a Parcel Repository Directory1. Create a parcel repository directory:
$ sudo mkdir -p /opt/cloudera/parcel-repo
2. Change the directory ownership to be the username you are using to run Cloudera Manager:
$ sudo chown username:groupname /opt/cloudera/parcel-repo
where username and groupname are the user and group names (respectively) you are using to run ClouderaManager. For example, if you use the default username cloudera-scm, you would give the command:
$ sudo chown cloudera-scm:cloudera-scm /opt/cloudera/parcel-repo
Cloudera Manager Installation Guide | 67
Installing Cloudera Manager, CDH, and Managed Services
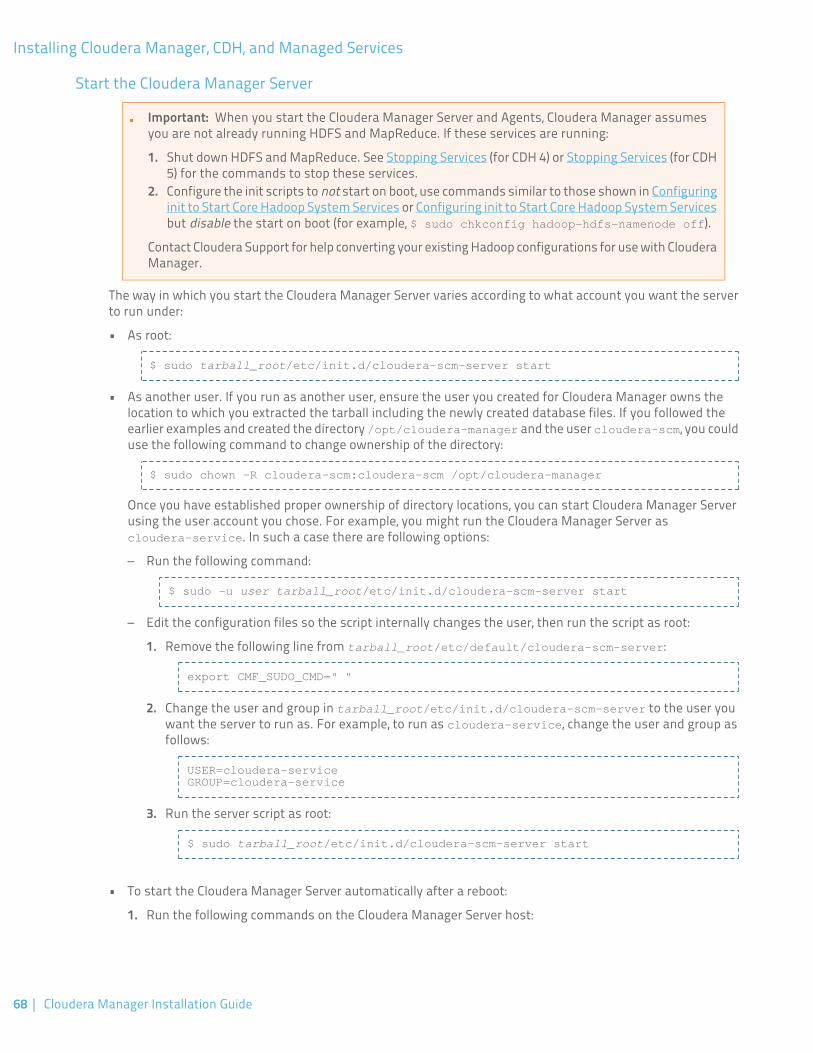
Start the Cloudera Manager Server
Important: When you start the Cloudera Manager Server and Agents, Cloudera Manager assumesyou are not already running HDFS and MapReduce. If these services are running:
1. Shut down HDFS and MapReduce. See Stopping Services (for CDH 4) or Stopping Services (for CDH5) for the commands to stop these services.
2. Configure the init scripts to not start on boot, use commands similar to those shown in Configuringinit to Start Core Hadoop System Services or Configuring init to Start Core Hadoop System Servicesbut disable the start on boot (for example, $ sudo chkconfig hadoop-hdfs-namenode off).
Contact Cloudera Support for help converting your existing Hadoop configurations for use with ClouderaManager.
The way in which you start the Cloudera Manager Server varies according to what account you want the serverto run under:
• As root:
$ sudo tarball_root/etc/init.d/cloudera-scm-server start
• As another user. If you run as another user, ensure the user you created for Cloudera Manager owns thelocation to which you extracted the tarball including the newly created database files. If you followed theearlier examples and created the directory /opt/cloudera-manager and the user cloudera-scm, you coulduse the following command to change ownership of the directory:
$ sudo chown -R cloudera-scm:cloudera-scm /opt/cloudera-manager
Once you have established proper ownership of directory locations, you can start Cloudera Manager Serverusing the user account you chose. For example, you might run the Cloudera Manager Server ascloudera-service. In such a case there are following options:
– Run the following command:
$ sudo -u user tarball_root/etc/init.d/cloudera-scm-server start
– Edit the configuration files so the script internally changes the user, then run the script as root:
1. Remove the following line from tarball_root/etc/default/cloudera-scm-server:
export CMF_SUDO_CMD=" "
2. Change the user and group in tarball_root/etc/init.d/cloudera-scm-server to the user youwant the server to run as. For example, to run as cloudera-service, change the user and group asfollows:
USER=cloudera-serviceGROUP=cloudera-service
3. Run the server script as root:
$ sudo tarball_root/etc/init.d/cloudera-scm-server start
• To start the Cloudera Manager Server automatically after a reboot:
1. Run the following commands on the Cloudera Manager Server host:
68 | Cloudera Manager Installation Guide
Installing Cloudera Manager, CDH, and Managed Services
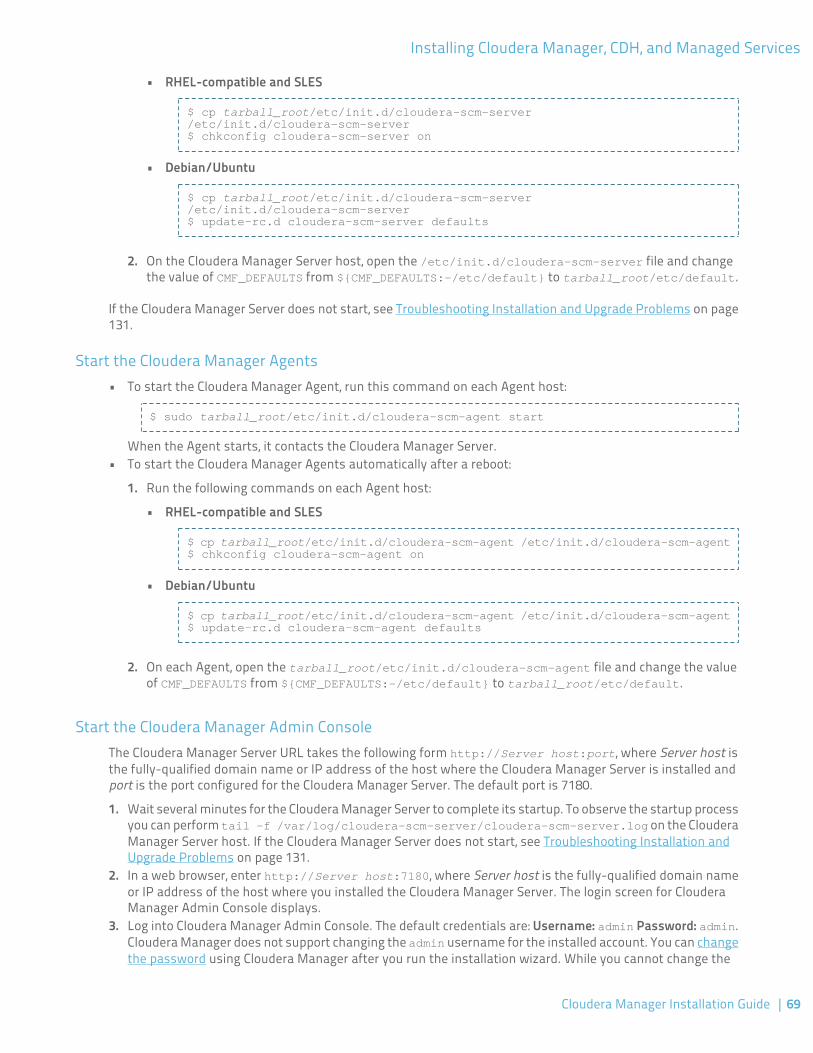
RHEL-compatible and SLES
$ cp tarball_root/etc/init.d/cloudera-scm-server /etc/init.d/cloudera-scm-server$ chkconfig cloudera-scm-server on
•
• Debian/Ubuntu
$ cp tarball_root/etc/init.d/cloudera-scm-server /etc/init.d/cloudera-scm-server$ update-rc.d cloudera-scm-server defaults
2. On the Cloudera Manager Server host, open the /etc/init.d/cloudera-scm-server file and changethe value of CMF_DEFAULTS from ${CMF_DEFAULTS:-/etc/default} to tarball_root/etc/default.
If the Cloudera Manager Server does not start, see Troubleshooting Installation and Upgrade Problems on page131.
Start the Cloudera Manager Agents• To start the Cloudera Manager Agent, run this command on each Agent host:
$ sudo tarball_root/etc/init.d/cloudera-scm-agent start
When the Agent starts, it contacts the Cloudera Manager Server.• To start the Cloudera Manager Agents automatically after a reboot:
1. Run the following commands on each Agent host:
• RHEL-compatible and SLES
$ cp tarball_root/etc/init.d/cloudera-scm-agent /etc/init.d/cloudera-scm-agent$ chkconfig cloudera-scm-agent on
• Debian/Ubuntu
$ cp tarball_root/etc/init.d/cloudera-scm-agent /etc/init.d/cloudera-scm-agent$ update-rc.d cloudera-scm-agent defaults
2. On each Agent, open the tarball_root/etc/init.d/cloudera-scm-agent file and change the valueof CMF_DEFAULTS from ${CMF_DEFAULTS:-/etc/default} to tarball_root/etc/default.
Start the Cloudera Manager Admin ConsoleThe Cloudera Manager Server URL takes the following form http://Server host:port, where Server host isthe fully-qualified domain name or IP address of the host where the Cloudera Manager Server is installed andport is the port configured for the Cloudera Manager Server. The default port is 7180.
1. Wait several minutes for the Cloudera Manager Server to complete its startup. To observe the startup processyou can perform tail -f /var/log/cloudera-scm-server/cloudera-scm-server.log on the ClouderaManager Server host. If the Cloudera Manager Server does not start, see Troubleshooting Installation andUpgrade Problems on page 131.
2. In a web browser, enter http://Server host:7180, where Server host is the fully-qualified domain nameor IP address of the host where you installed the Cloudera Manager Server. The login screen for ClouderaManager Admin Console displays.
3. Log into Cloudera Manager Admin Console. The default credentials are: Username: admin Password: admin.Cloudera Manager does not support changing the admin username for the installed account. You can changethe password using Cloudera Manager after you run the installation wizard. While you cannot change the
Cloudera Manager Installation Guide | 69
Installing Cloudera Manager, CDH, and Managed Services
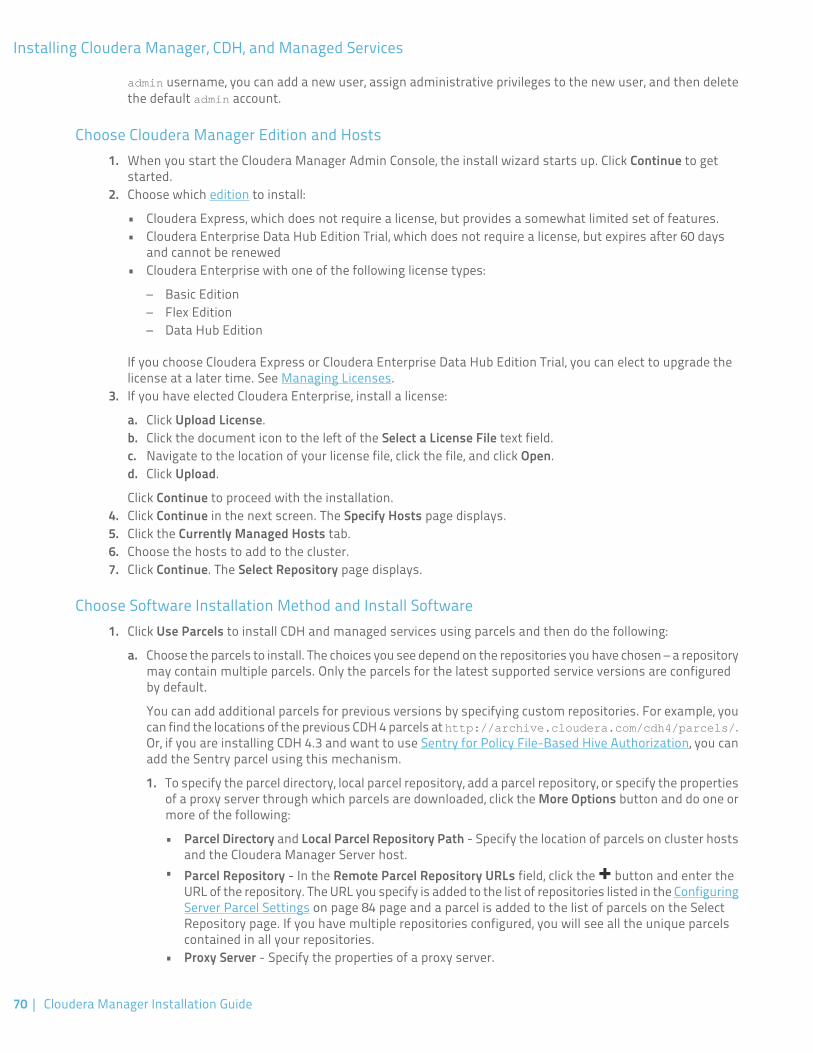
admin username, you can add a new user, assign administrative privileges to the new user, and then deletethe default admin account.
Choose Cloudera Manager Edition and Hosts1. When you start the Cloudera Manager Admin Console, the install wizard starts up. Click Continue to get
started.2. Choose which edition to install:
• Cloudera Express, which does not require a license, but provides a somewhat limited set of features.• Cloudera Enterprise Data Hub Edition Trial, which does not require a license, but expires after 60 days
and cannot be renewed• Cloudera Enterprise with one of the following license types:
– Basic Edition– Flex Edition– Data Hub Edition
If you choose Cloudera Express or Cloudera Enterprise Data Hub Edition Trial, you can elect to upgrade thelicense at a later time. See Managing Licenses.
3. If you have elected Cloudera Enterprise, install a license:
a. Click Upload License.b. Click the document icon to the left of the Select a License File text field.c. Navigate to the location of your license file, click the file, and click Open.d. Click Upload.
Click Continue to proceed with the installation.4. Click Continue in the next screen. The Specify Hosts page displays.5. Click the Currently Managed Hosts tab.6. Choose the hosts to add to the cluster.7. Click Continue. The Select Repository page displays.
Choose Software Installation Method and Install Software1. Click Use Parcels to install CDH and managed services using parcels and then do the following:
a. Choose the parcels to install. The choices you see depend on the repositories you have chosen – a repositorymay contain multiple parcels. Only the parcels for the latest supported service versions are configuredby default.
You can add additional parcels for previous versions by specifying custom repositories. For example, youcan find the locations of the previous CDH 4 parcels at http://archive.cloudera.com/cdh4/parcels/.Or, if you are installing CDH 4.3 and want to use Sentry for Policy File-Based Hive Authorization, you canadd the Sentry parcel using this mechanism.
1. To specify the parcel directory, local parcel repository, add a parcel repository, or specify the propertiesof a proxy server through which parcels are downloaded, click the More Options button and do one ormore of the following:
• Parcel Directory and Local Parcel Repository Path - Specify the location of parcels on cluster hostsand the Cloudera Manager Server host.
• Parcel Repository - In the Remote Parcel Repository URLs field, click the button and enter theURL of the repository. The URL you specify is added to the list of repositories listed in the ConfiguringServer Parcel Settings on page 84 page and a parcel is added to the list of parcels on the SelectRepository page. If you have multiple repositories configured, you will see all the unique parcelscontained in all your repositories.
• Proxy Server - Specify the properties of a proxy server.
70 | Cloudera Manager Installation Guide
Installing Cloudera Manager, CDH, and Managed Services
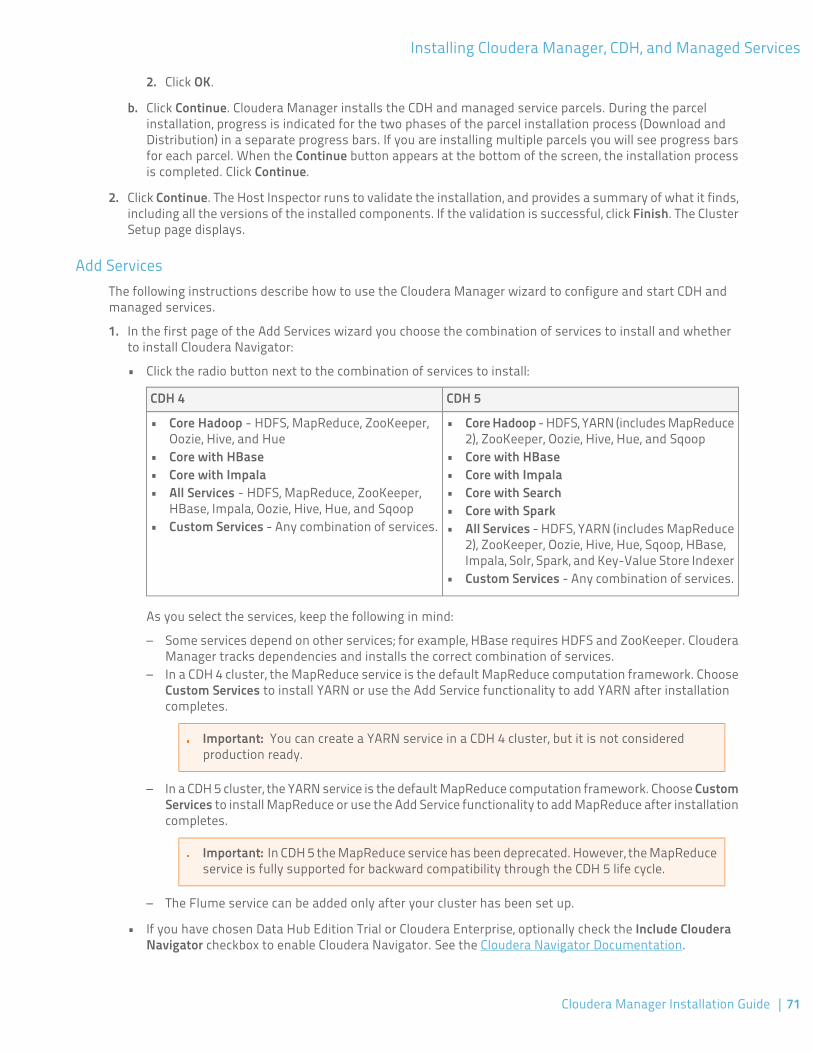
2. Click OK.
b. Click Continue. Cloudera Manager installs the CDH and managed service parcels. During the parcelinstallation, progress is indicated for the two phases of the parcel installation process (Download andDistribution) in a separate progress bars. If you are installing multiple parcels you will see progress barsfor each parcel. When the Continue button appears at the bottom of the screen, the installation processis completed. Click Continue.
2. Click Continue. The Host Inspector runs to validate the installation, and provides a summary of what it finds,including all the versions of the installed components. If the validation is successful, click Finish. The ClusterSetup page displays.
Add ServicesThe following instructions describe how to use the Cloudera Manager wizard to configure and start CDH andmanaged services.
1. In the first page of the Add Services wizard you choose the combination of services to install and whetherto install Cloudera Navigator:
• Click the radio button next to the combination of services to install:
CDH 5CDH 4
• Core Hadoop - HDFS, YARN (includes MapReduce2), ZooKeeper, Oozie, Hive, Hue, and Sqoop
• Core Hadoop - HDFS, MapReduce, ZooKeeper,Oozie, Hive, and Hue
• Core with HBase • Core with HBase• Core with Impala• Core with Impala
• All Services - HDFS, MapReduce, ZooKeeper,HBase, Impala, Oozie, Hive, Hue, and Sqoop
• Core with Search• Core with Spark
• Custom Services - Any combination of services. • All Services - HDFS, YARN (includes MapReduce2), ZooKeeper, Oozie, Hive, Hue, Sqoop, HBase,Impala, Solr, Spark, and Key-Value Store Indexer
• Custom Services - Any combination of services.
As you select the services, keep the following in mind:
– Some services depend on other services; for example, HBase requires HDFS and ZooKeeper. ClouderaManager tracks dependencies and installs the correct combination of services.
– In a CDH 4 cluster, the MapReduce service is the default MapReduce computation framework. ChooseCustom Services to install YARN or use the Add Service functionality to add YARN after installationcompletes.
Important: You can create a YARN service in a CDH 4 cluster, but it is not consideredproduction ready.
– In a CDH 5 cluster, the YARN service is the default MapReduce computation framework. Choose CustomServices to install MapReduce or use the Add Service functionality to add MapReduce after installationcompletes.
Important: In CDH 5 the MapReduce service has been deprecated. However, the MapReduceservice is fully supported for backward compatibility through the CDH 5 life cycle.
– The Flume service can be added only after your cluster has been set up.
• If you have chosen Data Hub Edition Trial or Cloudera Enterprise, optionally check the Include ClouderaNavigator checkbox to enable Cloudera Navigator. See the Cloudera Navigator Documentation.
Cloudera Manager Installation Guide | 71
Installing Cloudera Manager, CDH, and Managed Services
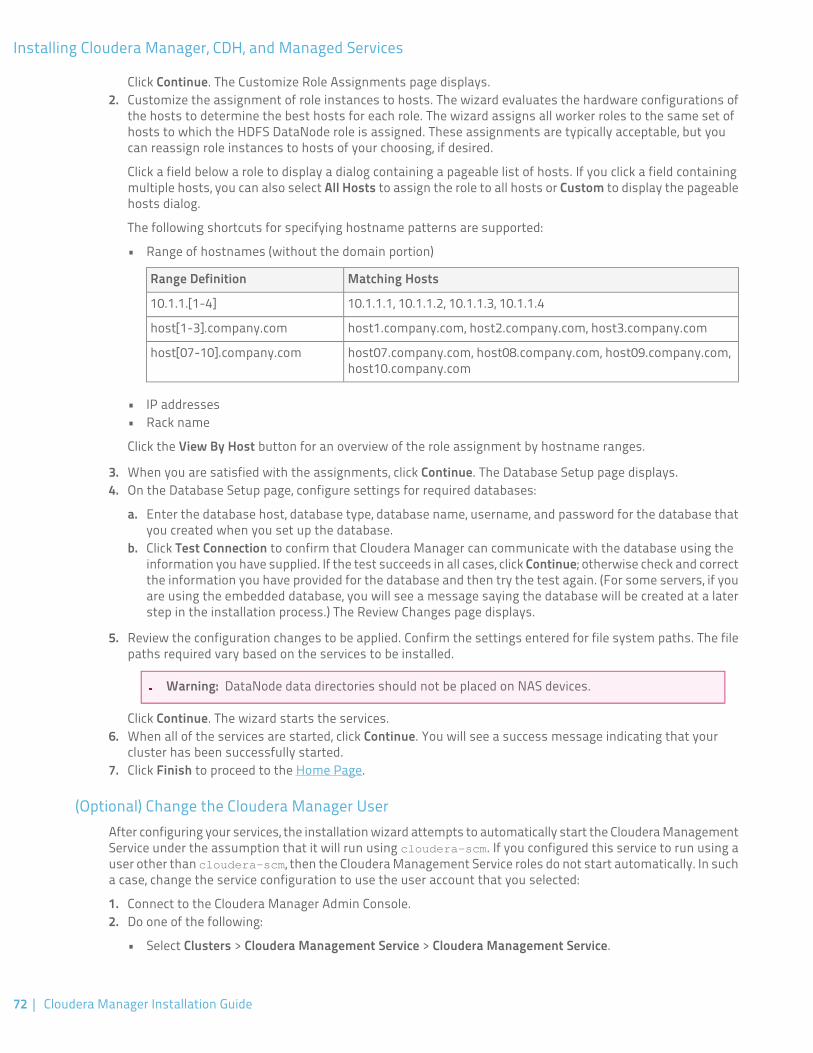
Click Continue. The Customize Role Assignments page displays.2. Customize the assignment of role instances to hosts. The wizard evaluates the hardware configurations of
the hosts to determine the best hosts for each role. The wizard assigns all worker roles to the same set ofhosts to which the HDFS DataNode role is assigned. These assignments are typically acceptable, but youcan reassign role instances to hosts of your choosing, if desired.
Click a field below a role to display a dialog containing a pageable list of hosts. If you click a field containingmultiple hosts, you can also select All Hosts to assign the role to all hosts or Custom to display the pageablehosts dialog.
The following shortcuts for specifying hostname patterns are supported:
• Range of hostnames (without the domain portion)
Matching HostsRange Definition
10.1.1.1, 10.1.1.2, 10.1.1.3, 10.1.1.410.1.1.[1-4]
host1.company.com, host2.company.com, host3.company.comhost[1-3].company.com
host07.company.com, host08.company.com, host09.company.com,host10.company.com
host[07-10].company.com
• IP addresses• Rack name
Click the View By Host button for an overview of the role assignment by hostname ranges.
3. When you are satisfied with the assignments, click Continue. The Database Setup page displays.4. On the Database Setup page, configure settings for required databases:
a. Enter the database host, database type, database name, username, and password for the database thatyou created when you set up the database.
b. Click Test Connection to confirm that Cloudera Manager can communicate with the database using theinformation you have supplied. If the test succeeds in all cases, click Continue; otherwise check and correctthe information you have provided for the database and then try the test again. (For some servers, if youare using the embedded database, you will see a message saying the database will be created at a laterstep in the installation process.) The Review Changes page displays.
5. Review the configuration changes to be applied. Confirm the settings entered for file system paths. The filepaths required vary based on the services to be installed.
Warning: DataNode data directories should not be placed on NAS devices.
Click Continue. The wizard starts the services.6. When all of the services are started, click Continue. You will see a success message indicating that your
cluster has been successfully started.7. Click Finish to proceed to the Home Page.
(Optional) Change the Cloudera Manager UserAfter configuring your services, the installation wizard attempts to automatically start the Cloudera ManagementService under the assumption that it will run using cloudera-scm. If you configured this service to run using auser other than cloudera-scm, then the Cloudera Management Service roles do not start automatically. In sucha case, change the service configuration to use the user account that you selected:
1. Connect to the Cloudera Manager Admin Console.2. Do one of the following:
• Select Clusters > Cloudera Management Service > Cloudera Management Service.
72 | Cloudera Manager Installation Guide
Installing Cloudera Manager, CDH, and Managed Services
• On the Status tab of the Home page, in Cloudera Management Service table, click the Cloudera ManagementService link.
3. Click the Configuration tab.4. Use the search box to find the property to be changed. For example, you might enter "system" to find the
System User and System Group properties.5. Make any changes required to the System User and System Group to ensure Cloudera Manager uses the
proper user accounts.6. Click Save Changes.
After making this configuration change, manually start the Cloudera Management Service roles.
Change the Default Administrator PasswordAs soon as possible after running the wizard and beginning to use Cloudera Manager, change the defaultadministrator password:
1. Right-click the logged-in username at the far right of the top navigation bar and select Change Password.2. Enter the current password, and a new password twice and then click Update.
Test the InstallationYou can test the installation following the instructions in Testing the Installation on page 123.
Installing ImpalaCloudera Impala is included with CDH 5. To use Cloudera Impala with CDH 4, you must install both CDH andImpala on the hosts that will run Impala.
Note:
• See Supported CDH and Managed Service Versions on page 16 for supported versions.• Before proceeding, review the installation options described in Choosing an Installation Path on
page 43.
Installing Impala after Upgrading Cloudera Manager
If you have just upgraded Cloudera Manager from a version that did not support Impala, the Impala software isnot installed automatically. (Upgrading Cloudera Manager does not automatically upgrade CDH or other managedservices). You can add Impala using parcels; go to the Hosts tab, and select the Parcels tab. You should see atleast one Impala parcel available for download. See Parcels on page 77 for detailed instructions on using parcelsto install or upgrade Impala. If you do not see any Impala parcels available, click the Edit Settings button on theParcels page to go to the Parcel configuration settings and verify that the Impala parcel repo URL(http://archive.cloudera.com/impala/parcels/latest/) has been configured in the Parcels configuration page.See Parcel Configuration Settings on page 84 for more details.
Post Installation ConfigurationSee The Impala Service in Managing Clusters with Cloudera Manager for instructions on configuring the Impalaservice.
Installing SearchCloudera Search is provided by the Solr service. The Solr service is included with CDH 5. To use Cloudera Searchwith CDH 4, you must install both CDH and Search on the hosts that will run Search.
Cloudera Manager Installation Guide | 73
Installing Cloudera Manager, CDH, and Managed Services

Note:
• See Supported CDH and Managed Service Versions on page 16 for supported versions.• Before proceeding, review the installation options described in Choosing an Installation Path on
page 43.
Installing Search after Upgrading Cloudera Manager
If you have just upgraded Cloudera Manager from a version that did not support Search, the Search software isnot installed automatically. (Upgrading Cloudera Manager does not automatically upgrade CDH or other managedservices). You can add Search using parcels; go to the Hosts tab, and select the Parcels tab. You should see atleast one Solr parcel available for download. See Parcels on page 77 for detailed instructions on using parcelsto install or upgrade Solr. If you do not see any Solr parcels available, click the Edit Settings button on the Parcelspage to go to the Parcel configuration settings and verify that the Search parcel repo URL(http://archive.cloudera.com/search/parcels/latest/) has been configured in the Parcels configuration page.See Parcel Configuration Settings on page 84 for more details.
Post Installation ConfigurationSee The Solr Service in Managing Clusters with Cloudera Manager for instructions on configuring Cloudera Search.
Installing SparkApache Spark is included with CDH 5. To use Apache Spark with CDH 4, you must install both CDH and Spark onthe hosts that will run Spark.
Note:
• See Supported CDH and Managed Service Versions on page 16 for supported versions.• Before proceeding, review the installation options described in Choosing an Installation Path on
page 43.
Installing Spark after Upgrading Cloudera Manager
If you have just upgraded Cloudera Manager from a version that did not support Spark, the Spark software isnot installed automatically. (Upgrading Cloudera Manager does not automatically upgrade CDH or other managedservices).
You can add Spark using parcels; go to the Hosts tab, and select the Parcels tab. You should see at least oneSpark parcel available for download. See Parcels on page 77 for detailed instructions on using parcels to installor upgrade Spark. If you do not see any Spark parcels available, click the Edit Settings button on the Parcelspage to go to the Parcel configuration settings and verify that the Spark parcel repo URL(http://archive.cloudera.com/spark/parcels/latest/) has been configured in the Parcels configuration page.See Parcel Configuration Settings on page 84 for more details.
Post Installation ConfigurationSee The Spark Service in Managing Clusters with Cloudera Manager for instructions on adding the Spark service.
Installing GPL ExtrasGPL Extras contains LZO functionality.
To install the GPL Extras parcel:
74 | Cloudera Manager Installation Guide
Installing Cloudera Manager, CDH, and Managed Services
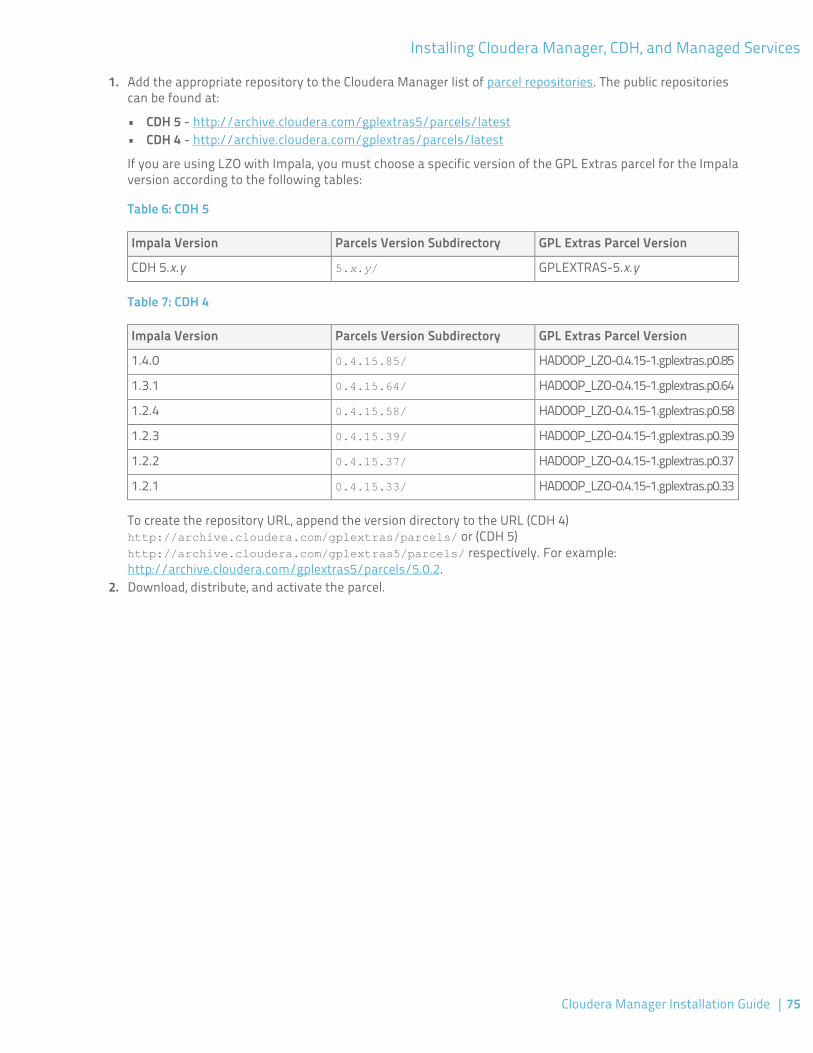
1. Add the appropriate repository to the Cloudera Manager list of parcel repositories. The public repositoriescan be found at:
• CDH 5 - http://archive.cloudera.com/gplextras5/parcels/latest• CDH 4 - http://archive.cloudera.com/gplextras/parcels/latest
If you are using LZO with Impala, you must choose a specific version of the GPL Extras parcel for the Impalaversion according to the following tables:
Table 6: CDH 5
GPL Extras Parcel VersionParcels Version SubdirectoryImpala Version
GPLEXTRAS-5.x.y5.x.y/CDH 5.x.y
Table 7: CDH 4
GPL Extras Parcel VersionParcels Version SubdirectoryImpala Version
HADOOP_LZO-0.4.15-1.gplextras.p0.850.4.15.85/1.4.0
HADOOP_LZO-0.4.15-1.gplextras.p0.640.4.15.64/1.3.1
HADOOP_LZO-0.4.15-1.gplextras.p0.580.4.15.58/1.2.4
HADOOP_LZO-0.4.15-1.gplextras.p0.390.4.15.39/1.2.3
HADOOP_LZO-0.4.15-1.gplextras.p0.370.4.15.37/1.2.2
HADOOP_LZO-0.4.15-1.gplextras.p0.330.4.15.33/1.2.1
To create the repository URL, append the version directory to the URL (CDH 4)http://archive.cloudera.com/gplextras/parcels/ or (CDH 5)http://archive.cloudera.com/gplextras5/parcels/ respectively. For example:http://archive.cloudera.com/gplextras5/parcels/5.0.2.
2. Download, distribute, and activate the parcel.
Cloudera Manager Installation Guide | 75
Installing Cloudera Manager, CDH, and Managed Services

Managing Software Distribution
A major function of Cloudera Manager is to distribute and activate software in your cluster. Cloudera Managersupports two software distribution formats: packages and parcels.
A package is a binary distribution format that contains compiled code and meta-information such as a packagedescription, version, and dependencies. Package management systems evaluate this meta-information to allowpackage searches, perform upgrades to a newer version, and ensure that all dependencies of a package arefulfilled. Cloudera Manager uses the native "system package manager" for each supported OS.
A parcel is a binary distribution format containing the program files, along with additional metadata used byCloudera Manager. There are a few notable differences between parcels and packages:
• Parcels are self-contained and installed in a versioned directory. This means that multiple versions of a givenparcel can be installed side-by-side. You can then designate one of these installed versions as the activeone. With traditional packages, only one package can be installed at a time so there's no distinction betweenwhat's installed and what's active.
• Parcels can be installed at any location in the filesystem. By default, parcels are installed in/opt/cloudera/parcels.
ParcelsRequired Role:
A parcel is a binary distribution format containing the program files, along with additional metadata used byCloudera Manager. There are a few notable differences between parcels and packages:
• Parcels are self-contained and installed in a versioned directory. This means that multiple versions of a givenparcel can be installed side-by-side. You can then designate one of these installed versions as the activeone. With traditional packages, only one package can be installed at a time so there's no distinction betweenwhat's installed and what's active.
• Parcels can be installed at any location in the filesystem. By default, parcels are installed in/opt/cloudera/parcels.
Parcels are available for CDH 4.1.3 or later, and for Impala, Search, Spark, and Accumulo.
Advantages of ParcelsAs a consequence of their unique properties, parcels offer a number of advantages over packages:
• CDH is distributed as a single object - In contrast to having a separate package for each part of CDH, whenusing parcels there is just a single object to install. This is especially useful when managing a cluster thatisn't connected to the Internet.
• Internal consistency - All CDH components are matched so there isn't a danger of different parts comingfrom different versions of CDH.
• Installation outside of /usr - In some environments, Hadoop administrators do not have privileges to installsystem packages. In the past, these administrators had to fall back to CDH tarballs, which deprived them ofa lot of infrastructure that packages provide. With parcels, administrators can install to /opt or anywhereelse without having to step through all the additional manual steps of regular tarballs.
Note: With parcel software distribution, the path to the CDH libraries is/opt/cloudera/parcels/CDH/lib instead of the usual /usr/lib. You should not link /usr/lib/elements to parcel deployed paths, as such links may confuse scripts that distinguish betweenthe two paths.
Cloudera Manager Installation Guide | 77
Managing Software Distribution
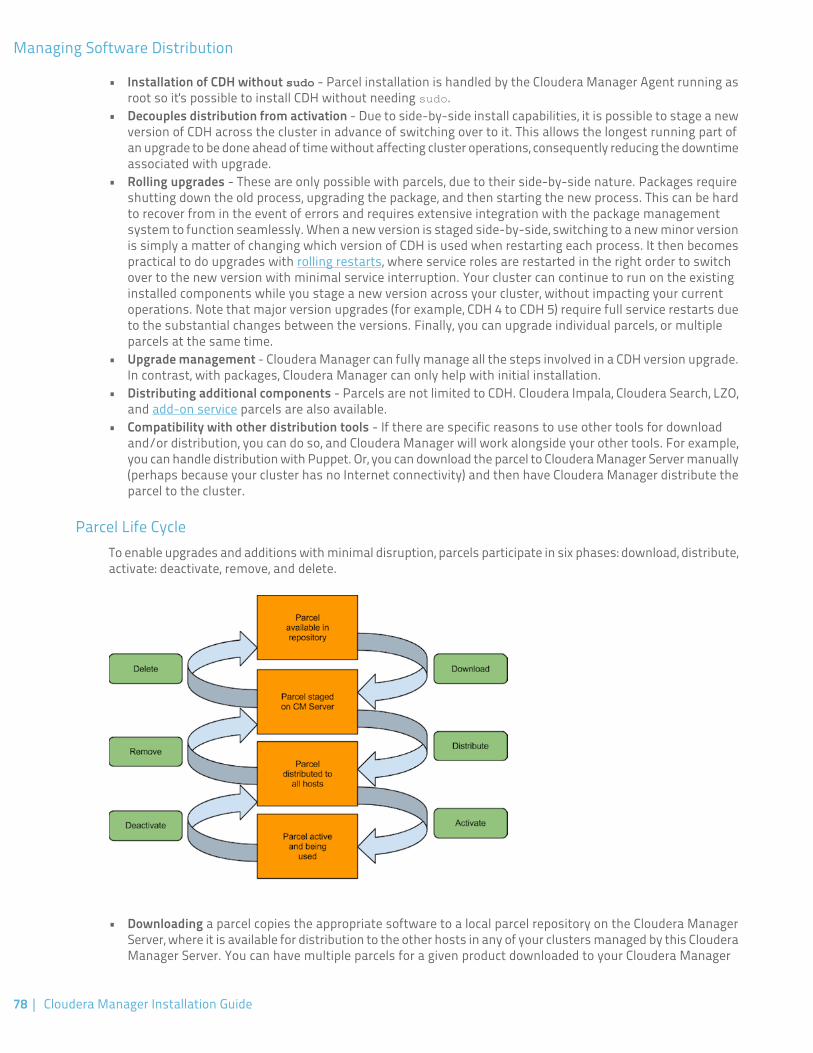
• Installation of CDH without sudo - Parcel installation is handled by the Cloudera Manager Agent running asroot so it's possible to install CDH without needing sudo.
• Decouples distribution from activation - Due to side-by-side install capabilities, it is possible to stage a newversion of CDH across the cluster in advance of switching over to it. This allows the longest running part ofan upgrade to be done ahead of time without affecting cluster operations, consequently reducing the downtimeassociated with upgrade.
• Rolling upgrades - These are only possible with parcels, due to their side-by-side nature. Packages requireshutting down the old process, upgrading the package, and then starting the new process. This can be hardto recover from in the event of errors and requires extensive integration with the package managementsystem to function seamlessly. When a new version is staged side-by-side, switching to a new minor versionis simply a matter of changing which version of CDH is used when restarting each process. It then becomespractical to do upgrades with rolling restarts, where service roles are restarted in the right order to switchover to the new version with minimal service interruption. Your cluster can continue to run on the existinginstalled components while you stage a new version across your cluster, without impacting your currentoperations. Note that major version upgrades (for example, CDH 4 to CDH 5) require full service restarts dueto the substantial changes between the versions. Finally, you can upgrade individual parcels, or multipleparcels at the same time.
• Upgrade management - Cloudera Manager can fully manage all the steps involved in a CDH version upgrade.In contrast, with packages, Cloudera Manager can only help with initial installation.
• Distributing additional components - Parcels are not limited to CDH. Cloudera Impala, Cloudera Search, LZO,and add-on service parcels are also available.
• Compatibility with other distribution tools - If there are specific reasons to use other tools for downloadand/or distribution, you can do so, and Cloudera Manager will work alongside your other tools. For example,you can handle distribution with Puppet. Or, you can download the parcel to Cloudera Manager Server manually(perhaps because your cluster has no Internet connectivity) and then have Cloudera Manager distribute theparcel to the cluster.
Parcel Life CycleTo enable upgrades and additions with minimal disruption, parcels participate in six phases: download, distribute,activate: deactivate, remove, and delete.
• Downloading a parcel copies the appropriate software to a local parcel repository on the Cloudera ManagerServer, where it is available for distribution to the other hosts in any of your clusters managed by this ClouderaManager Server. You can have multiple parcels for a given product downloaded to your Cloudera Manager
78 | Cloudera Manager Installation Guide
Managing Software Distribution
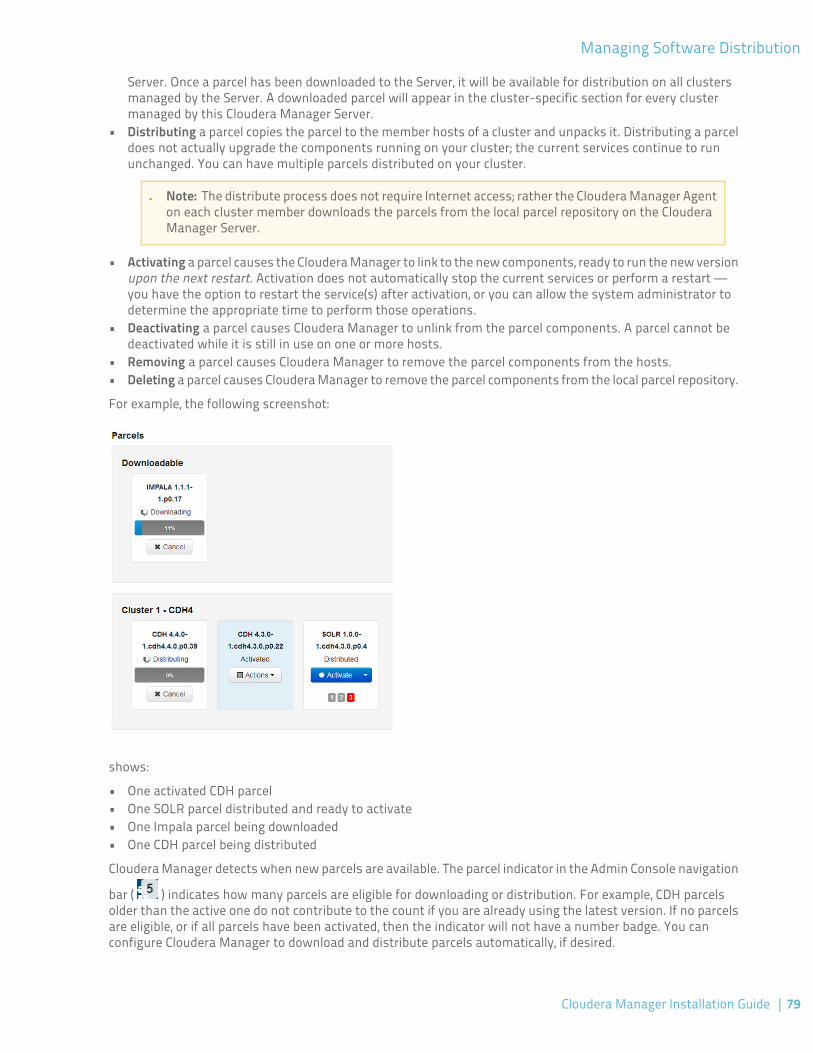
Server. Once a parcel has been downloaded to the Server, it will be available for distribution on all clustersmanaged by the Server. A downloaded parcel will appear in the cluster-specific section for every clustermanaged by this Cloudera Manager Server.
• Distributing a parcel copies the parcel to the member hosts of a cluster and unpacks it. Distributing a parceldoes not actually upgrade the components running on your cluster; the current services continue to rununchanged. You can have multiple parcels distributed on your cluster.
Note: The distribute process does not require Internet access; rather the Cloudera Manager Agenton each cluster member downloads the parcels from the local parcel repository on the ClouderaManager Server.
• Activating a parcel causes the Cloudera Manager to link to the new components, ready to run the new versionupon the next restart. Activation does not automatically stop the current services or perform a restart —you have the option to restart the service(s) after activation, or you can allow the system administrator todetermine the appropriate time to perform those operations.
• Deactivating a parcel causes Cloudera Manager to unlink from the parcel components. A parcel cannot bedeactivated while it is still in use on one or more hosts.
• Removing a parcel causes Cloudera Manager to remove the parcel components from the hosts.• Deleting a parcel causes Cloudera Manager to remove the parcel components from the local parcel repository.
For example, the following screenshot:
shows:
• One activated CDH parcel• One SOLR parcel distributed and ready to activate• One Impala parcel being downloaded• One CDH parcel being distributed
Cloudera Manager detects when new parcels are available. The parcel indicator in the Admin Console navigation
bar ( ) indicates how many parcels are eligible for downloading or distribution. For example, CDH parcelsolder than the active one do not contribute to the count if you are already using the latest version. If no parcelsare eligible, or if all parcels have been activated, then the indicator will not have a number badge. You canconfigure Cloudera Manager to download and distribute parcels automatically, if desired.
Cloudera Manager Installation Guide | 79
Managing Software Distribution
Important: If you plan to upgrade CDH you should follow the instructions in Upgrading CDH andManaged Services. There are additional steps that must be performed in order to successfully upgrade.
Parcel LocationsThe default location for the local parcel directory on the Cloudera Manager Server host is/opt/cloudera/parcel-repo. To change this location, follow the instructions in Configuring Server ParcelSettings on page 84.
The default location for the distributed parcels on the managed hosts is /opt/cloudera/parcels. To changethis location, set the parcel_dir property in /etc/cloudera-scm-agent/config.ini file of the ClouderaManager Agent and restart the Cloudera Manager Agent or by following the instructions in Configuring the HostParcel Directory on page 85.
Note: With parcel software distribution, the path to the CDH libraries is/opt/cloudera/parcels/CDH/lib instead of the usual /usr/lib. You should not link /usr/lib/elements to parcel deployed paths, as such links may confuse scripts that distinguish between thetwo paths.
Managing ParcelsThrough the Parcels interface in Cloudera Manager, you can determine what software versions are runningacross your clusters. You access the Parcels page by doing one of the following:
• Clicking the parcel indicator in the Admin Console navigation bar ( )• Clicking the Hosts in the top navigation bar, then the Parcels tab.
The Parcels page is divided into several sections. The top section, labeled Downloadable, shows you all theparcels that are available for download from the configured parcel repositories.
Below the Downloadable section, each cluster managed by this Cloudera Manager Server has a section thatshows the parcels that have been downloaded, distributed, or activated on that cluster.
When you download a parcel, it appears under every cluster, if you are managing more than one. However, thisjust indicates that the parcel is available for distribution on those clusters — in fact there is only one copy ofthe downloaded parcel, residing on the Cloudera Manager Server. Only after you distribute the parcel to a clusterwill copies of it be placed on the hosts in that cluster.
Downloading a Parcel
1. Click the parcel indicator in the top navigation bar. This takes you to the Hosts page, Parcels tab. By default,any parcels available for download are shown in the Available Remotely section of the Parcels page. Parcelsavailable for download will display a Download button.
If the parcel you want is not shown here — for example, you want to upgrade to version of CDH that is notthe most current version — you can make additional remote parcel repositories available through theAdministration Settings page. You can also configure the location of the local parcel repository and othersettings. See Parcel Configuration Settings on page 84.
2. Click Download to initiate the download of the parcel from the remote parcel repository to your local repository.
When the parcel has been downloaded, the button label changes to Distribute.
Note: The parcel download is done at the Cloudera Manager Server, so with multiple clusters, thedownloaded parcels are shown as available to all clusters managed by the Cloudera Manager Server.However, distribution (to a specific cluster's member hosts) must be selected on a cluster-by-clusterbasis.
80 | Cloudera Manager Installation Guide
Managing Software Distribution
Distributing a Parcel
Parcels that have been downloaded can be distributed to the hosts in your cluster, available for activation.
From the Parcels tab, click the Distribute button for the parcel you want to distribute. This starts the distributionprocess to the hosts in the cluster.
Distribution does not require Internet access; rather the Cloudera Manager Agent on each cluster memberdownloads the parcel from the local parcel repository hosted on the Cloudera Manager Server.
If you have a large number of hosts to which the parcels should be distributed, you can control how manyconcurrent uploads Cloudera Manager will perform. You can configure this setting on the Administration page,Properties tab under the Parcels section.
You can delete a parcel that is ready to be distributed; click the triangle at the right end of the Distribute buttonto access the Delete command. This will delete the downloaded parcel from the local parcel repository.
Distributing parcels to the hosts in the cluster does not affect the current running services.
Activating a Parcel
Parcels that have been distributed to the hosts in a cluster are ready to be activated.
1. From the Parcels tab, click the Activate button for the parcel you want to activate. This will update ClouderaManager to point to the new software, ready to be run the next time a service is restarted.
2. A pop-up warns you that your currently running process will not be affected until you restart, and gives youthe option to perform a restart. If you do not want to restart at this time, click Close.
If you elect not to restart services as part of the Activation process, you can instead go to the Clusters tab andrestart your services at a later time. Until you restart services, the current software will continue to run. Thisallows you to restart your services at a time that is convenient based on your maintenance schedules or otherconsiderations.
Activating a new parcel also deactivates the previously active parcel (if any) for the product you've just upgraded.However, until you restart the services, the previously active parcel will have the link Still in use and you will notbe able to remove the parcel until it is no longer being used.
Note: Under some situations, such as doing a major release upgrade (for example, CDH 4 to CDH 5)additional upgrade steps may be necessary. In this case, instead of Activate, the button may insteadsay Upgrade. This indicates that there may be additional steps involved in the upgrade.
Deactivating a Parcel
You can deactivate an active parcel; this will update Cloudera Manager to point to the previous software version,ready to be run the next time a service is restarted. To deactivate a parcel, click Actions on an activated parceland select Deactivate.
To use the previous version of the software, go to the Clusters tab and restart your services.
Note: If you did your original installation from parcels, and there is only one version of your softwareinstalled (that is, no packages, and no previous parcels have been activated and started) then whenyou attempt to restart after deactivating the current version, your roles will be stopped but will notbe able to restart.
Removing a Parcel
To remove a parcel, click the down arrow to the right of an Activate button and select Remove from Hosts.
Deleting a Parcel
To delete a parcel, click the down arrow to the right of a Distribute button and select Delete.
Cloudera Manager Installation Guide | 81
Managing Software Distribution
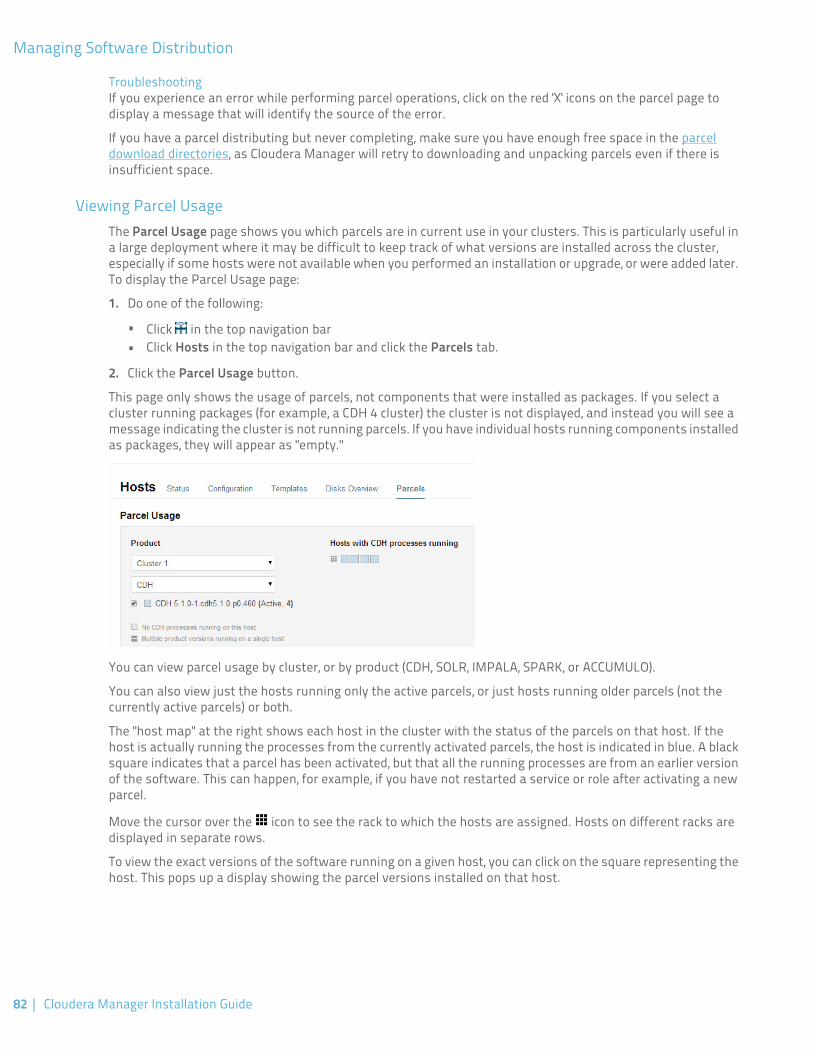
TroubleshootingIf you experience an error while performing parcel operations, click on the red 'X' icons on the parcel page todisplay a message that will identify the source of the error.
If you have a parcel distributing but never completing, make sure you have enough free space in the parceldownload directories, as Cloudera Manager will retry to downloading and unpacking parcels even if there isinsufficient space.
Viewing Parcel UsageThe Parcel Usage page shows you which parcels are in current use in your clusters. This is particularly useful ina large deployment where it may be difficult to keep track of what versions are installed across the cluster,especially if some hosts were not available when you performed an installation or upgrade, or were added later.To display the Parcel Usage page:
1. Do one of the following:
• Click in the top navigation bar• Click Hosts in the top navigation bar and click the Parcels tab.
2. Click the Parcel Usage button.
This page only shows the usage of parcels, not components that were installed as packages. If you select acluster running packages (for example, a CDH 4 cluster) the cluster is not displayed, and instead you will see amessage indicating the cluster is not running parcels. If you have individual hosts running components installedas packages, they will appear as "empty."
You can view parcel usage by cluster, or by product (CDH, SOLR, IMPALA, SPARK, or ACCUMULO).
You can also view just the hosts running only the active parcels, or just hosts running older parcels (not thecurrently active parcels) or both.
The "host map" at the right shows each host in the cluster with the status of the parcels on that host. If thehost is actually running the processes from the currently activated parcels, the host is indicated in blue. A blacksquare indicates that a parcel has been activated, but that all the running processes are from an earlier versionof the software. This can happen, for example, if you have not restarted a service or role after activating a newparcel.
Move the cursor over the icon to see the rack to which the hosts are assigned. Hosts on different racks aredisplayed in separate rows.
To view the exact versions of the software running on a given host, you can click on the square representing thehost. This pops up a display showing the parcel versions installed on that host.
82 | Cloudera Manager Installation Guide
Managing Software Distribution
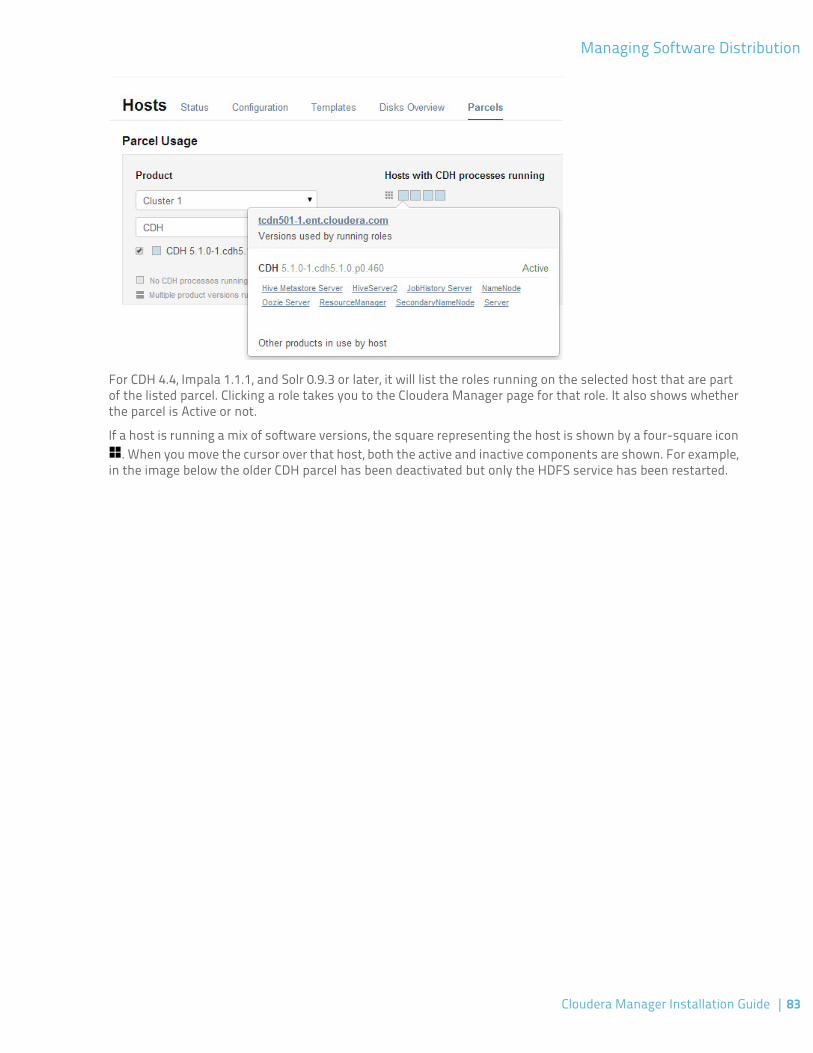
For CDH 4.4, Impala 1.1.1, and Solr 0.9.3 or later, it will list the roles running on the selected host that are partof the listed parcel. Clicking a role takes you to the Cloudera Manager page for that role. It also shows whetherthe parcel is Active or not.
If a host is running a mix of software versions, the square representing the host is shown by a four-square icon. When you move the cursor over that host, both the active and inactive components are shown. For example,
in the image below the older CDH parcel has been deactivated but only the HDFS service has been restarted.
Cloudera Manager Installation Guide | 83
Managing Software Distribution
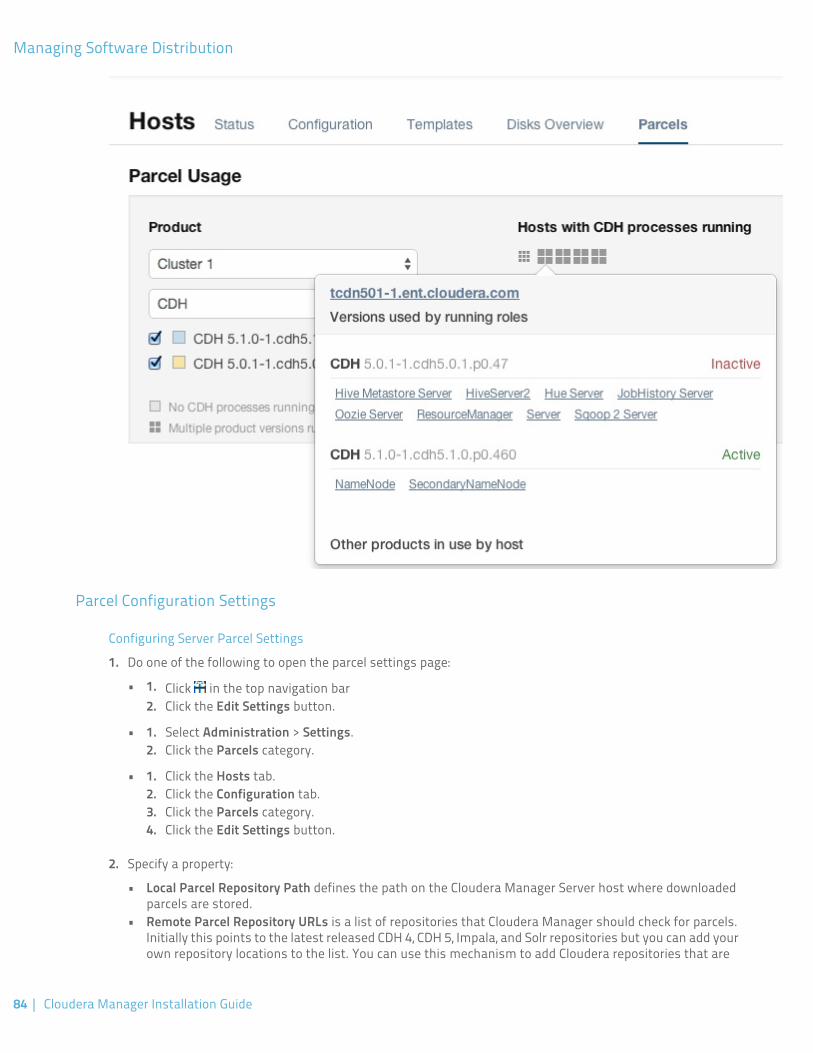
Parcel Configuration Settings
Configuring Server Parcel Settings
1. Do one of the following to open the parcel settings page:
• Click in the top navigation bar1.2. Click the Edit Settings button.
• Select Administration > Settings.1.2. Click the Parcels category.
• 1. Click the Hosts tab.2. Click the Configuration tab.3. Click the Parcels category.4. Click the Edit Settings button.
2. Specify a property:
• Local Parcel Repository Path defines the path on the Cloudera Manager Server host where downloadedparcels are stored.
• Remote Parcel Repository URLs is a list of repositories that Cloudera Manager should check for parcels.Initially this points to the latest released CDH 4, CDH 5, Impala, and Solr repositories but you can add yourown repository locations to the list. You can use this mechanism to add Cloudera repositories that are
84 | Cloudera Manager Installation Guide
Managing Software Distribution
not listed by default, such as older versions of CDH, or the Sentry parcel for CDH 4.3. You can also use thisto add your own custom repositories. The locations of the Cloudera parcel repositories arehttp://archive.cloudera.com/product/parcels/version, where product is cdh4, cdh5, gplextras5,impala, search, and sentry, and version is a specific product version or latest.
To add a parcel repository:
1. In the Remote Parcel Repository URLs list, click to open an additional row.2. Enter the path to the repository.
3. Click Save Changes.
You can also:
• Set the frequency with which Cloudera Manager will check for new parcels.• Configure a proxy to access to the remote repositories.• Configure whether downloads and distribution of parcels should occur automatically whenever new ones
are detected. If automatic downloading/distribution are not enabled (the default), you must go to the Parcelspage to initiate these actions.
• Control which products can be downloaded if automatic downloading is enabled.• Control whether to retain downloaded parcels.• Control whether to retain old parcel version and how many parcel versions to retain
You can configure the bandwidth limits and the number of concurrent uploads, to tune the load that parceldistribution puts on your network. The defaults are up to 50 concurrent parcel uploads and 50 MiB/s aggregatebandwidth.
• The concurrent upload count (Maximum Parcel Uploads) doesn't matter, theoretically, if all hosts have thesame speed Ethernet. In general, 50 concurrent uploads is an acceptable setting in most cases. However, ina scenario where the server has more bandwidth (say 10Gbe while the normal hosts are using 1Gbe), thenthe count is important to maximize bandwidth, and would need to be at least the difference in speeds (10xin this case).
• The bandwidth limit (Parcel Distribution Rate Limit) should be your Ethernet speed (in MiB/seconds) dividedby approximately 16. You can use a higher limit if you have QoS set up to prevent starving other services, orif you are willing accept a higher risk of higher bandwidth load.
Configuring a Proxy Server
To configure a proxy server through which parcels are downloaded, follow the instructions in Configuring NetworkSettings.
Configuring the Host Parcel Directory
To configure the location of distributed parcels:
1. Click Hosts in the top navigation bar.2. Click the Configuration tab.3. Configure the value of the Parcel Directory property. The setting of the parcel_dir property in the Cloudera
Manager Agent configuration file overrides this setting.4. Click Save Changes to commit the changes.
Migrating from Packages to ParcelsRequired Role:
Cloudera Manager Installation Guide | 85
Managing Software Distribution
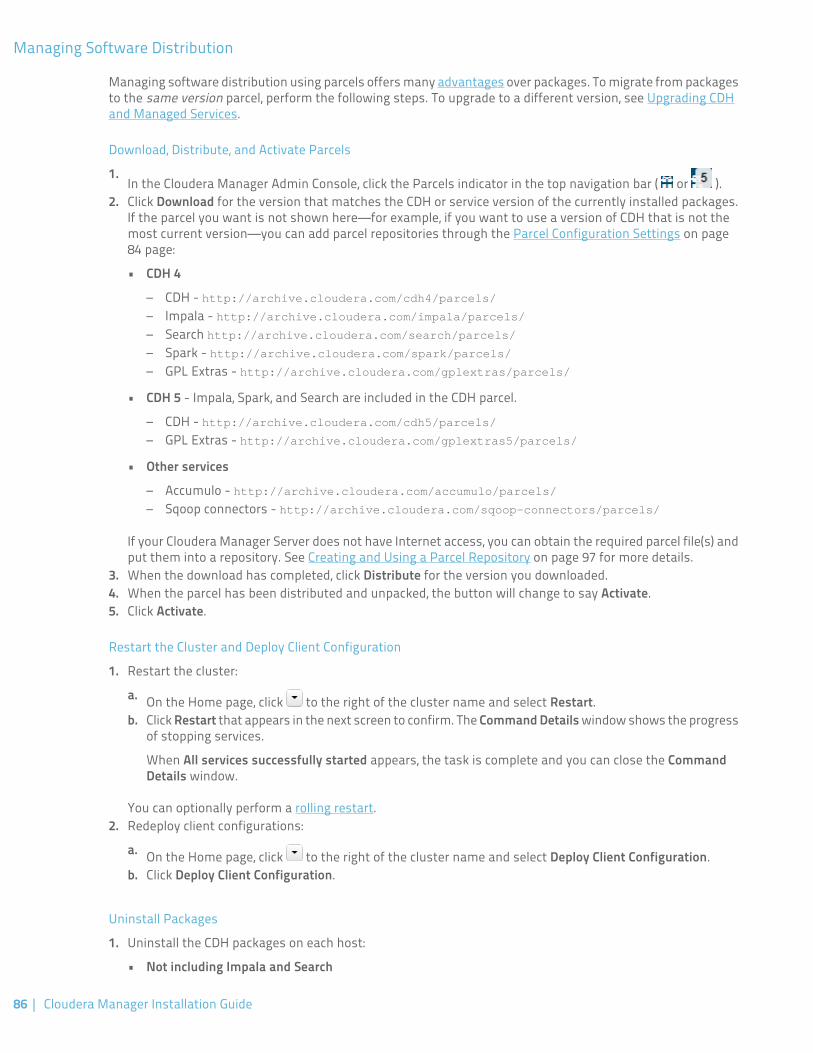
Managing software distribution using parcels offers many advantages over packages. To migrate from packagesto the same version parcel, perform the following steps. To upgrade to a different version, see Upgrading CDHand Managed Services.
Download, Distribute, and Activate Parcels
1.In the Cloudera Manager Admin Console, click the Parcels indicator in the top navigation bar ( or ).
2. Click Download for the version that matches the CDH or service version of the currently installed packages.If the parcel you want is not shown here—for example, if you want to use a version of CDH that is not themost current version—you can add parcel repositories through the Parcel Configuration Settings on page84 page:
• CDH 4
– CDH - http://archive.cloudera.com/cdh4/parcels/– Impala - http://archive.cloudera.com/impala/parcels/– Search http://archive.cloudera.com/search/parcels/– Spark - http://archive.cloudera.com/spark/parcels/– GPL Extras - http://archive.cloudera.com/gplextras/parcels/
• CDH 5 - Impala, Spark, and Search are included in the CDH parcel.
– CDH - http://archive.cloudera.com/cdh5/parcels/– GPL Extras - http://archive.cloudera.com/gplextras5/parcels/
• Other services
– Accumulo - http://archive.cloudera.com/accumulo/parcels/– Sqoop connectors - http://archive.cloudera.com/sqoop-connectors/parcels/
If your Cloudera Manager Server does not have Internet access, you can obtain the required parcel file(s) andput them into a repository. See Creating and Using a Parcel Repository on page 97 for more details.
3. When the download has completed, click Distribute for the version you downloaded.4. When the parcel has been distributed and unpacked, the button will change to say Activate.5. Click Activate.
Restart the Cluster and Deploy Client Configuration
1. Restart the cluster:
a. On the Home page, click to the right of the cluster name and select Restart.b. Click Restart that appears in the next screen to confirm. The Command Details window shows the progress
of stopping services.
When All services successfully started appears, the task is complete and you can close the CommandDetails window.
You can optionally perform a rolling restart.2. Redeploy client configurations:
a. On the Home page, click to the right of the cluster name and select Deploy Client Configuration.b. Click Deploy Client Configuration.
Uninstall Packages
1. Uninstall the CDH packages on each host:
• Not including Impala and Search
86 | Cloudera Manager Installation Guide
Managing Software Distribution
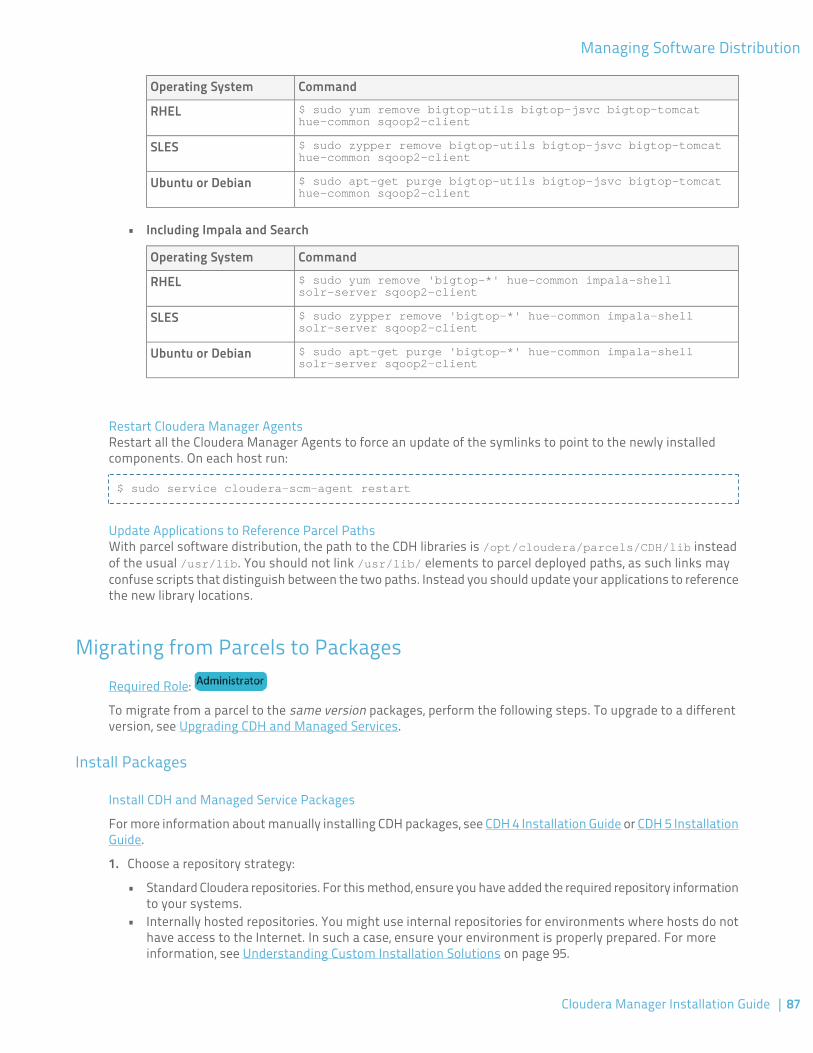
CommandOperating System$ sudo yum remove bigtop-utils bigtop-jsvc bigtop-tomcat hue-common sqoop2-client
RHEL
$ sudo zypper remove bigtop-utils bigtop-jsvc bigtop-tomcat hue-common sqoop2-client
SLES
$ sudo apt-get purge bigtop-utils bigtop-jsvc bigtop-tomcat hue-common sqoop2-client
Ubuntu or Debian
• Including Impala and Search
CommandOperating System$ sudo yum remove 'bigtop-*' hue-common impala-shell solr-server sqoop2-client
RHEL
$ sudo zypper remove 'bigtop-*' hue-common impala-shell solr-server sqoop2-client
SLES
$ sudo apt-get purge 'bigtop-*' hue-common impala-shell solr-server sqoop2-client
Ubuntu or Debian
Restart Cloudera Manager AgentsRestart all the Cloudera Manager Agents to force an update of the symlinks to point to the newly installedcomponents. On each host run:
$ sudo service cloudera-scm-agent restart
Update Applications to Reference Parcel PathsWith parcel software distribution, the path to the CDH libraries is /opt/cloudera/parcels/CDH/lib insteadof the usual /usr/lib. You should not link /usr/lib/ elements to parcel deployed paths, as such links mayconfuse scripts that distinguish between the two paths. Instead you should update your applications to referencethe new library locations.
Migrating from Parcels to PackagesRequired Role:
To migrate from a parcel to the same version packages, perform the following steps. To upgrade to a differentversion, see Upgrading CDH and Managed Services.
Install Packages
Install CDH and Managed Service Packages
For more information about manually installing CDH packages, see CDH 4 Installation Guide or CDH 5 InstallationGuide.
1. Choose a repository strategy:
• Standard Cloudera repositories. For this method, ensure you have added the required repository informationto your systems.
• Internally hosted repositories. You might use internal repositories for environments where hosts do nothave access to the Internet. In such a case, ensure your environment is properly prepared. For moreinformation, see Understanding Custom Installation Solutions on page 95.
Cloudera Manager Installation Guide | 87
Managing Software Distribution
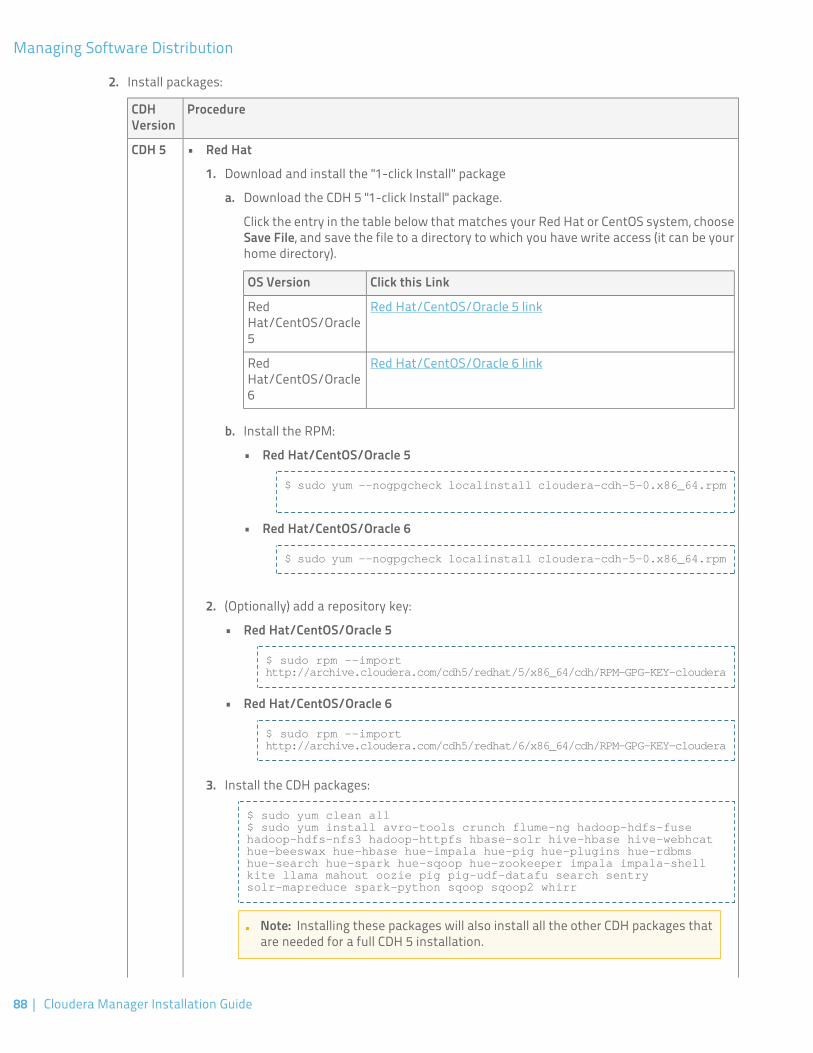
2. Install packages:
ProcedureCDHVersion
CDH 5 • Red Hat
1. Download and install the "1-click Install" package
a. Download the CDH 5 "1-click Install" package.
Click the entry in the table below that matches your Red Hat or CentOS system, chooseSave File, and save the file to a directory to which you have write access (it can be yourhome directory).
Click this LinkOS Version
Red Hat/CentOS/Oracle 5 linkRedHat/CentOS/Oracle5
Red Hat/CentOS/Oracle 6 linkRedHat/CentOS/Oracle6
b. Install the RPM:
• Red Hat/CentOS/Oracle 5
$ sudo yum --nogpgcheck localinstall cloudera-cdh-5-0.x86_64.rpm
• Red Hat/CentOS/Oracle 6
$ sudo yum --nogpgcheck localinstall cloudera-cdh-5-0.x86_64.rpm
2. (Optionally) add a repository key:
• Red Hat/CentOS/Oracle 5
$ sudo rpm --import http://archive.cloudera.com/cdh5/redhat/5/x86_64/cdh/RPM-GPG-KEY-cloudera
• Red Hat/CentOS/Oracle 6
$ sudo rpm --import http://archive.cloudera.com/cdh5/redhat/6/x86_64/cdh/RPM-GPG-KEY-cloudera
3. Install the CDH packages:
$ sudo yum clean all$ sudo yum install avro-tools crunch flume-ng hadoop-hdfs-fuse hadoop-hdfs-nfs3 hadoop-httpfs hbase-solr hive-hbase hive-webhcat hue-beeswax hue-hbase hue-impala hue-pig hue-plugins hue-rdbms hue-search hue-spark hue-sqoop hue-zookeeper impala impala-shell kite llama mahout oozie pig pig-udf-datafu search sentry solr-mapreduce spark-python sqoop sqoop2 whirr
Note: Installing these packages will also install all the other CDH packages thatare needed for a full CDH 5 installation.
88 | Cloudera Manager Installation Guide
Managing Software Distribution
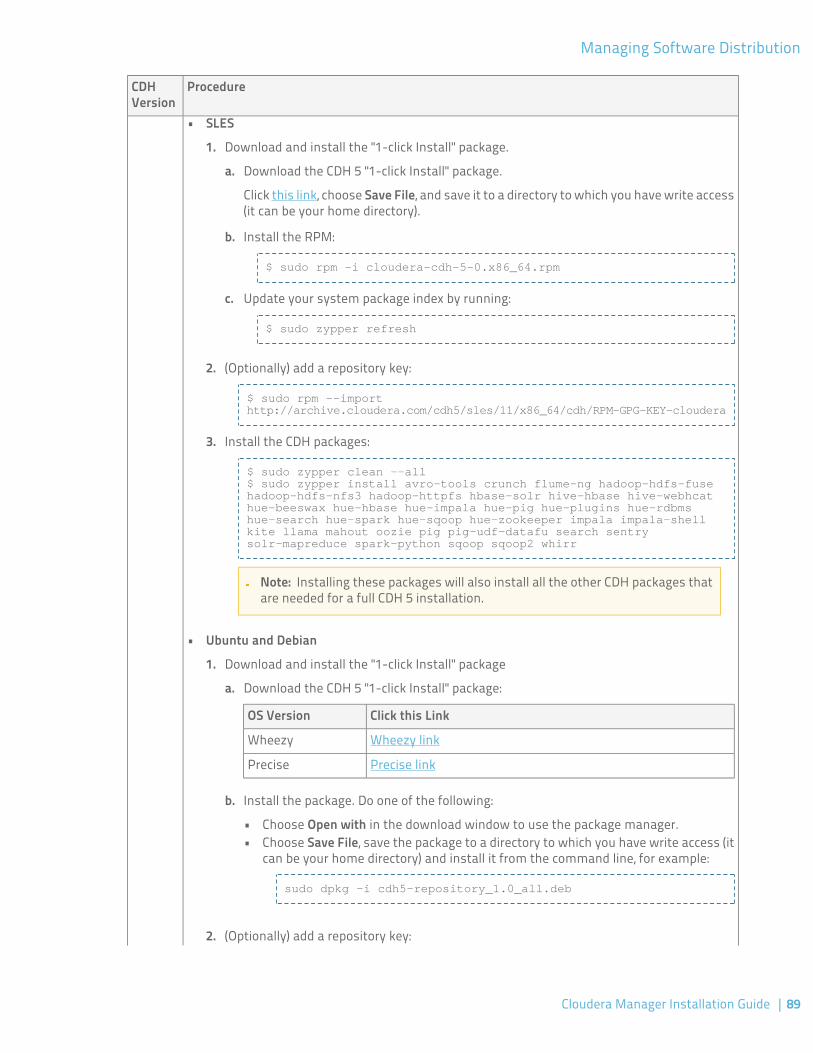
ProcedureCDHVersion
• SLES
1. Download and install the "1-click Install" package.
a. Download the CDH 5 "1-click Install" package.
Click this link, choose Save File, and save it to a directory to which you have write access(it can be your home directory).
b. Install the RPM:
$ sudo rpm -i cloudera-cdh-5-0.x86_64.rpm
c. Update your system package index by running:
$ sudo zypper refresh
2. (Optionally) add a repository key:
$ sudo rpm --import http://archive.cloudera.com/cdh5/sles/11/x86_64/cdh/RPM-GPG-KEY-cloudera
3. Install the CDH packages:
$ sudo zypper clean --all$ sudo zypper install avro-tools crunch flume-ng hadoop-hdfs-fuse hadoop-hdfs-nfs3 hadoop-httpfs hbase-solr hive-hbase hive-webhcat hue-beeswax hue-hbase hue-impala hue-pig hue-plugins hue-rdbms hue-search hue-spark hue-sqoop hue-zookeeper impala impala-shell kite llama mahout oozie pig pig-udf-datafu search sentry solr-mapreduce spark-python sqoop sqoop2 whirr
Note: Installing these packages will also install all the other CDH packages thatare needed for a full CDH 5 installation.
• Ubuntu and Debian
1. Download and install the "1-click Install" package
a. Download the CDH 5 "1-click Install" package:
Click this LinkOS Version
Wheezy linkWheezy
Precise linkPrecise
b. Install the package. Do one of the following:
• Choose Open with in the download window to use the package manager.• Choose Save File, save the package to a directory to which you have write access (it
can be your home directory) and install it from the command line, for example:
sudo dpkg -i cdh5-repository_1.0_all.deb
2. (Optionally) add a repository key:
Cloudera Manager Installation Guide | 89
Managing Software Distribution
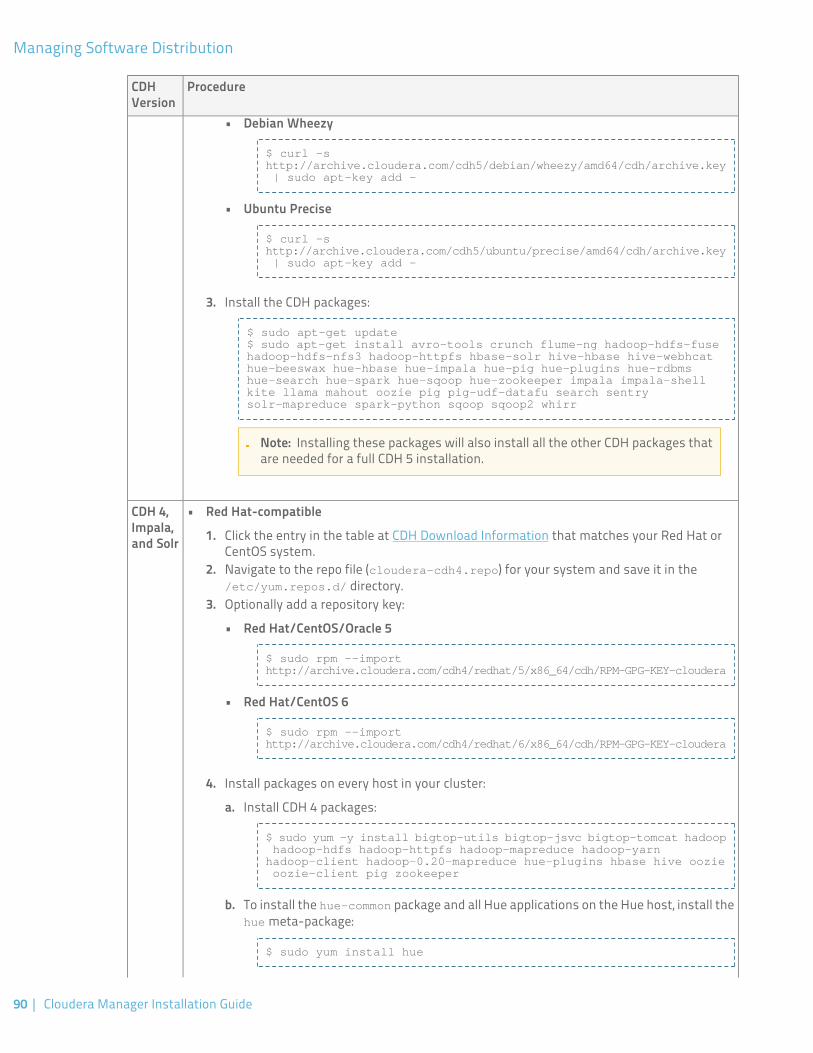
ProcedureCDHVersion
Debian Wheezy
$ curl -s http://archive.cloudera.com/cdh5/debian/wheezy/amd64/cdh/archive.key | sudo apt-key add -
•
• Ubuntu Precise
$ curl -s http://archive.cloudera.com/cdh5/ubuntu/precise/amd64/cdh/archive.key | sudo apt-key add -
3. Install the CDH packages:
$ sudo apt-get update$ sudo apt-get install avro-tools crunch flume-ng hadoop-hdfs-fuse hadoop-hdfs-nfs3 hadoop-httpfs hbase-solr hive-hbase hive-webhcat hue-beeswax hue-hbase hue-impala hue-pig hue-plugins hue-rdbms hue-search hue-spark hue-sqoop hue-zookeeper impala impala-shell kite llama mahout oozie pig pig-udf-datafu search sentry solr-mapreduce spark-python sqoop sqoop2 whirr
Note: Installing these packages will also install all the other CDH packages thatare needed for a full CDH 5 installation.
CDH 4,Impala,and Solr
• Red Hat-compatible
1. Click the entry in the table at CDH Download Information that matches your Red Hat orCentOS system.
2. Navigate to the repo file (cloudera-cdh4.repo) for your system and save it in the/etc/yum.repos.d/ directory.
3. Optionally add a repository key:
• Red Hat/CentOS/Oracle 5
$ sudo rpm --import http://archive.cloudera.com/cdh4/redhat/5/x86_64/cdh/RPM-GPG-KEY-cloudera
• Red Hat/CentOS 6
$ sudo rpm --import http://archive.cloudera.com/cdh4/redhat/6/x86_64/cdh/RPM-GPG-KEY-cloudera
4. Install packages on every host in your cluster:
a. Install CDH 4 packages:
$ sudo yum -y install bigtop-utils bigtop-jsvc bigtop-tomcat hadoop hadoop-hdfs hadoop-httpfs hadoop-mapreduce hadoop-yarn hadoop-client hadoop-0.20-mapreduce hue-plugins hbase hive oozie oozie-client pig zookeeper
b. To install the hue-common package and all Hue applications on the Hue host, install thehue meta-package:
$ sudo yum install hue
90 | Cloudera Manager Installation Guide
Managing Software Distribution
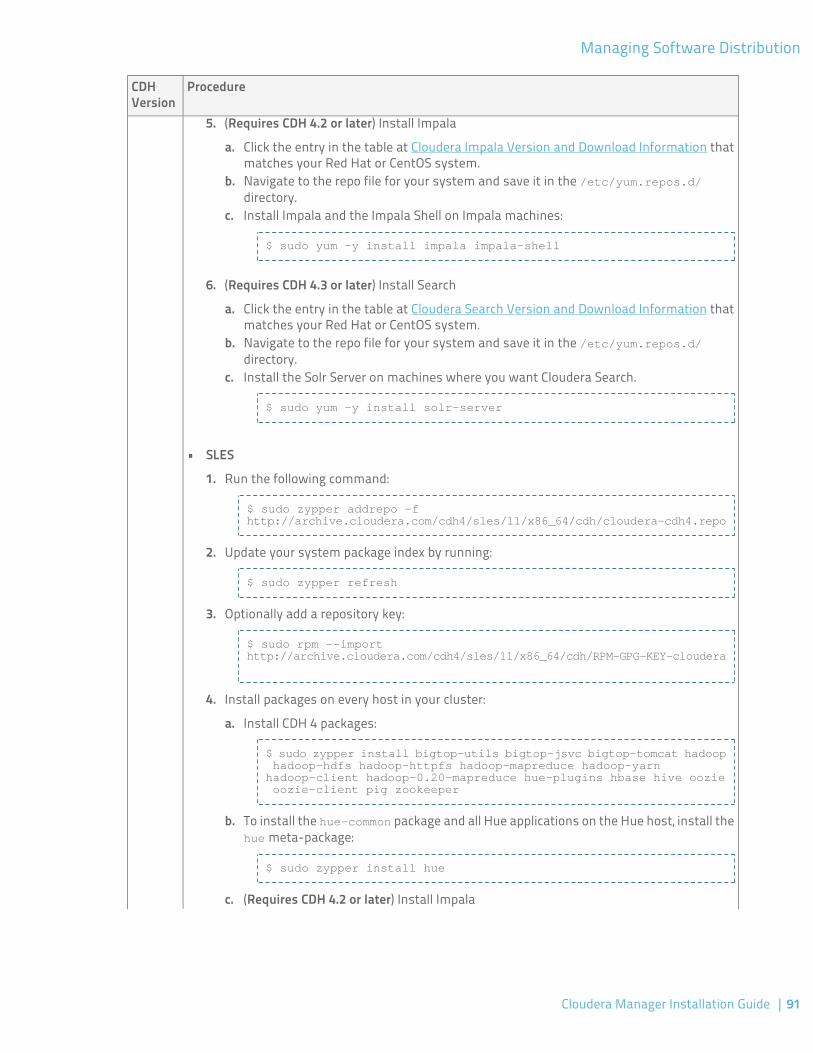
ProcedureCDHVersion
5. (Requires CDH 4.2 or later) Install Impala
a. Click the entry in the table at Cloudera Impala Version and Download Information thatmatches your Red Hat or CentOS system.
b. Navigate to the repo file for your system and save it in the /etc/yum.repos.d/directory.
c. Install Impala and the Impala Shell on Impala machines:
$ sudo yum -y install impala impala-shell
6. (Requires CDH 4.3 or later) Install Search
a. Click the entry in the table at Cloudera Search Version and Download Information thatmatches your Red Hat or CentOS system.
b. Navigate to the repo file for your system and save it in the /etc/yum.repos.d/directory.
c. Install the Solr Server on machines where you want Cloudera Search.
$ sudo yum -y install solr-server
• SLES
1. Run the following command:
$ sudo zypper addrepo -f http://archive.cloudera.com/cdh4/sles/11/x86_64/cdh/cloudera-cdh4.repo
2. Update your system package index by running:
$ sudo zypper refresh
3. Optionally add a repository key:
$ sudo rpm --import http://archive.cloudera.com/cdh4/sles/11/x86_64/cdh/RPM-GPG-KEY-cloudera
4. Install packages on every host in your cluster:
a. Install CDH 4 packages:
$ sudo zypper install bigtop-utils bigtop-jsvc bigtop-tomcat hadoop hadoop-hdfs hadoop-httpfs hadoop-mapreduce hadoop-yarn hadoop-client hadoop-0.20-mapreduce hue-plugins hbase hive oozie oozie-client pig zookeeper
b. To install the hue-common package and all Hue applications on the Hue host, install thehue meta-package:
$ sudo zypper install hue
c. (Requires CDH 4.2 or later) Install Impala
Cloudera Manager Installation Guide | 91
Managing Software Distribution
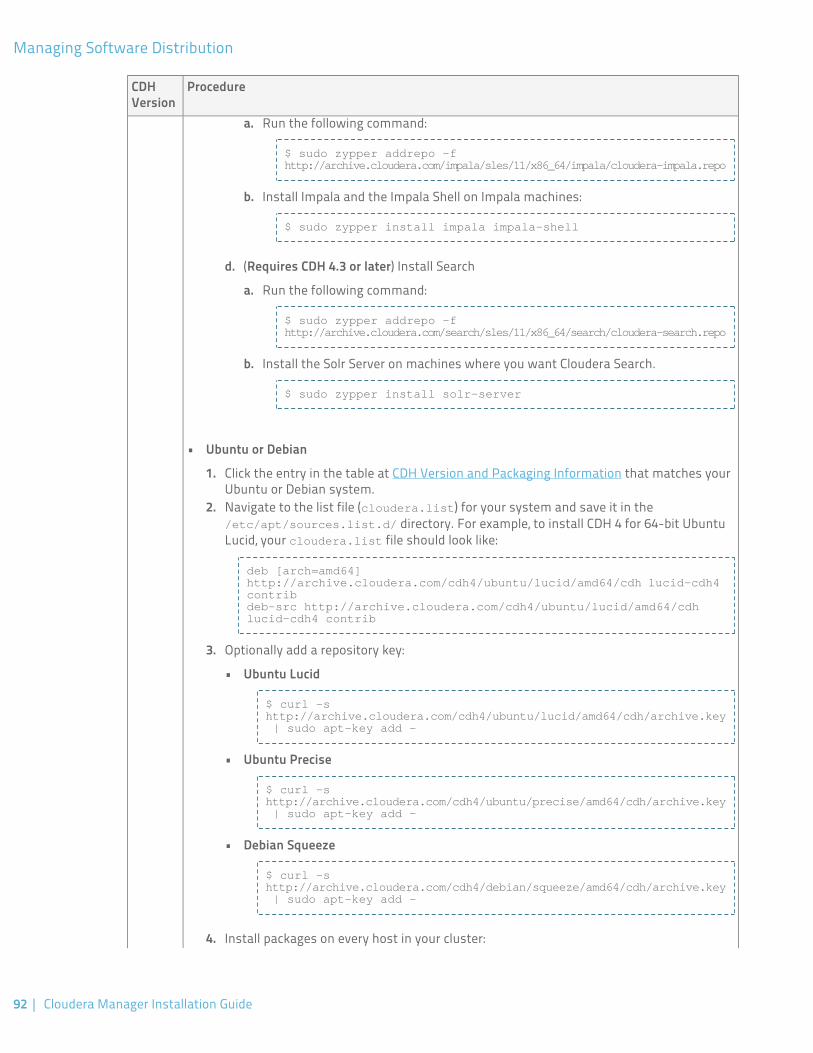
ProcedureCDHVersion
Run the following command:
$ sudo zypper addrepo -f http://archive.cloudera.com/impala/sles/11/x86_64/impala/cloudera-impala.repo
a.
b. Install Impala and the Impala Shell on Impala machines:
$ sudo zypper install impala impala-shell
d. (Requires CDH 4.3 or later) Install Search
a. Run the following command:
$ sudo zypper addrepo -f http://archive.cloudera.com/search/sles/11/x86_64/search/cloudera-search.repo
b. Install the Solr Server on machines where you want Cloudera Search.
$ sudo zypper install solr-server
• Ubuntu or Debian
1. Click the entry in the table at CDH Version and Packaging Information that matches yourUbuntu or Debian system.
2. Navigate to the list file (cloudera.list) for your system and save it in the/etc/apt/sources.list.d/ directory. For example, to install CDH 4 for 64-bit UbuntuLucid, your cloudera.list file should look like:
deb [arch=amd64] http://archive.cloudera.com/cdh4/ubuntu/lucid/amd64/cdh lucid-cdh4 contribdeb-src http://archive.cloudera.com/cdh4/ubuntu/lucid/amd64/cdh lucid-cdh4 contrib
3. Optionally add a repository key:
• Ubuntu Lucid
$ curl -s http://archive.cloudera.com/cdh4/ubuntu/lucid/amd64/cdh/archive.key | sudo apt-key add -
• Ubuntu Precise
$ curl -s http://archive.cloudera.com/cdh4/ubuntu/precise/amd64/cdh/archive.key | sudo apt-key add -
• Debian Squeeze
$ curl -s http://archive.cloudera.com/cdh4/debian/squeeze/amd64/cdh/archive.key | sudo apt-key add -
4. Install packages on every host in your cluster:
92 | Cloudera Manager Installation Guide
Managing Software Distribution
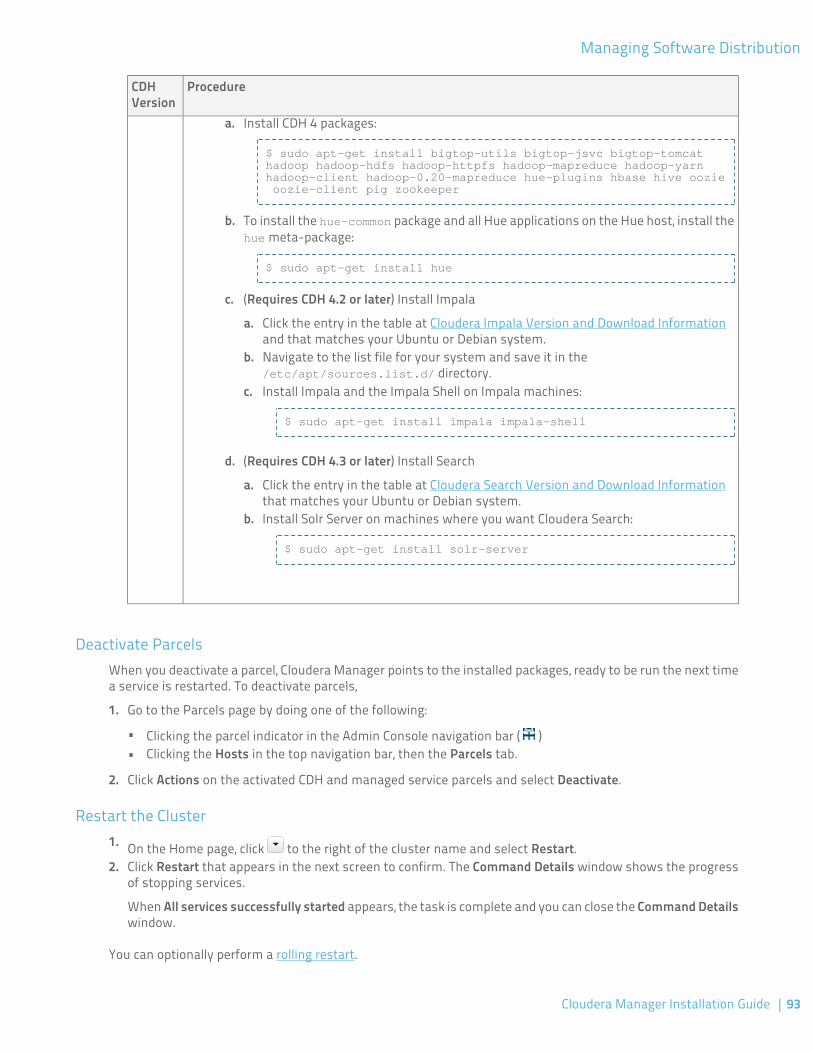
ProcedureCDHVersion
a. Install CDH 4 packages:
$ sudo apt-get install bigtop-utils bigtop-jsvc bigtop-tomcat hadoop hadoop-hdfs hadoop-httpfs hadoop-mapreduce hadoop-yarn hadoop-client hadoop-0.20-mapreduce hue-plugins hbase hive oozie oozie-client pig zookeeper
b. To install the hue-common package and all Hue applications on the Hue host, install thehue meta-package:
$ sudo apt-get install hue
c. (Requires CDH 4.2 or later) Install Impala
a. Click the entry in the table at Cloudera Impala Version and Download Informationand that matches your Ubuntu or Debian system.
b. Navigate to the list file for your system and save it in the/etc/apt/sources.list.d/ directory.
c. Install Impala and the Impala Shell on Impala machines:
$ sudo apt-get install impala impala-shell
d. (Requires CDH 4.3 or later) Install Search
a. Click the entry in the table at Cloudera Search Version and Download Informationthat matches your Ubuntu or Debian system.
b. Install Solr Server on machines where you want Cloudera Search:
$ sudo apt-get install solr-server
Deactivate ParcelsWhen you deactivate a parcel, Cloudera Manager points to the installed packages, ready to be run the next timea service is restarted. To deactivate parcels,
1. Go to the Parcels page by doing one of the following:
• Clicking the parcel indicator in the Admin Console navigation bar ( )• Clicking the Hosts in the top navigation bar, then the Parcels tab.
2. Click Actions on the activated CDH and managed service parcels and select Deactivate.
Restart the Cluster1. On the Home page, click to the right of the cluster name and select Restart.2. Click Restart that appears in the next screen to confirm. The Command Details window shows the progress
of stopping services.
When All services successfully started appears, the task is complete and you can close the Command Detailswindow.
You can optionally perform a rolling restart.
Cloudera Manager Installation Guide | 93
Managing Software Distribution

Remove and Delete Parcels
Removing a Parcel
To remove a parcel, click the down arrow to the right of an Activate button and select Remove from Hosts.
Deleting a Parcel
To delete a parcel, click the down arrow to the right of a Distribute button and select Delete.
94 | Cloudera Manager Installation Guide
Managing Software Distribution
Understanding Custom Installation Solutions
Cloudera hosts two types of software repositories that you can use to install products such as Cloudera Manageror CDH—parcel repositories and RHEL and SLES RPM and Debian/Ubuntu package repositories.
These repositories are effective solutions in most cases, but custom installation solutions are sometimesrequired. Using the software repositories requires client access over the Internet and results in the installationof the latest version of products. An alternate solution is required if:
• You need to install older product versions. For example, in a CDH cluster, all hosts must run the same CDHversion. After completing an initial installation, you may want to add hosts. This could be to increase the sizeof your cluster to handle larger tasks or to replace older hardware.
• The hosts on which you want to install Cloudera products are not connected to the Internet, so they areunable to reach the Cloudera repository. (For a parcel installation, only the Cloudera Manager Server needsInternet access, but for a package installation, all cluster members need access to the Cloudera repository).Some organizations choose to partition parts of their network from outside access. Isolating segments of anetwork can provide greater assurance that valuable data is not compromised by individuals out ofmaliciousness or for personal gain. In such a case, the isolated computers are unable to access Clouderarepositories for new installations or upgrades.
In both of these cases, using a custom repository solution allows you to meet the needs of your organization,whether that means installing older versions of Cloudera software or installing any version of Cloudera softwareon hosts that are disconnected from the Internet.
Understanding ParcelsParcels are a packaging format that facilitate upgrading software from within Cloudera Manager. You candownload, distribute, and activate a new software version all from within Cloudera Manager. Cloudera Managerdownloads a parcel to a local directory. Once the parcel is downloaded to the Cloudera Manager Server host, anInternet connection is no longer needed to deploy the parcel. Parcels are available for CDH 4.1.3 and onwards.For detailed information about parcels, see Parcels on page 77.
If your Cloudera Manager Server does not have Internet access, you can obtain the required parcel files and putthem into a parcel repository. See Creating and Using a Parcel Repository on page 97.
Understanding Package ManagementBefore getting into the details of how to configure a custom package management solution in your environment,it can be useful to have more information about:
• Package management tools• Package repositories
Package Management ToolsPackages (rpm or deb files) help ensure that installations complete successfully by encoding each package'sdependencies. That means that if you request the installation of a solution, all required elements can be installedat the same time. For example, hadoop-0.20-hive depends on hadoop-0.20. Package management tools,such as yum (RHEL), zypper (SLES), and apt-get (Debian/Ubuntu) are tools that can find and install any requiredpackages. For example, for RHEL, you might enter yum install hadoop-0.20-hive. yum would inform youthat the hive package requires hadoop-0.20 and offers to complete that installation for you. zypper andapt-get provide similar functionality.
Cloudera Manager Installation Guide | 95
Understanding Custom Installation Solutions
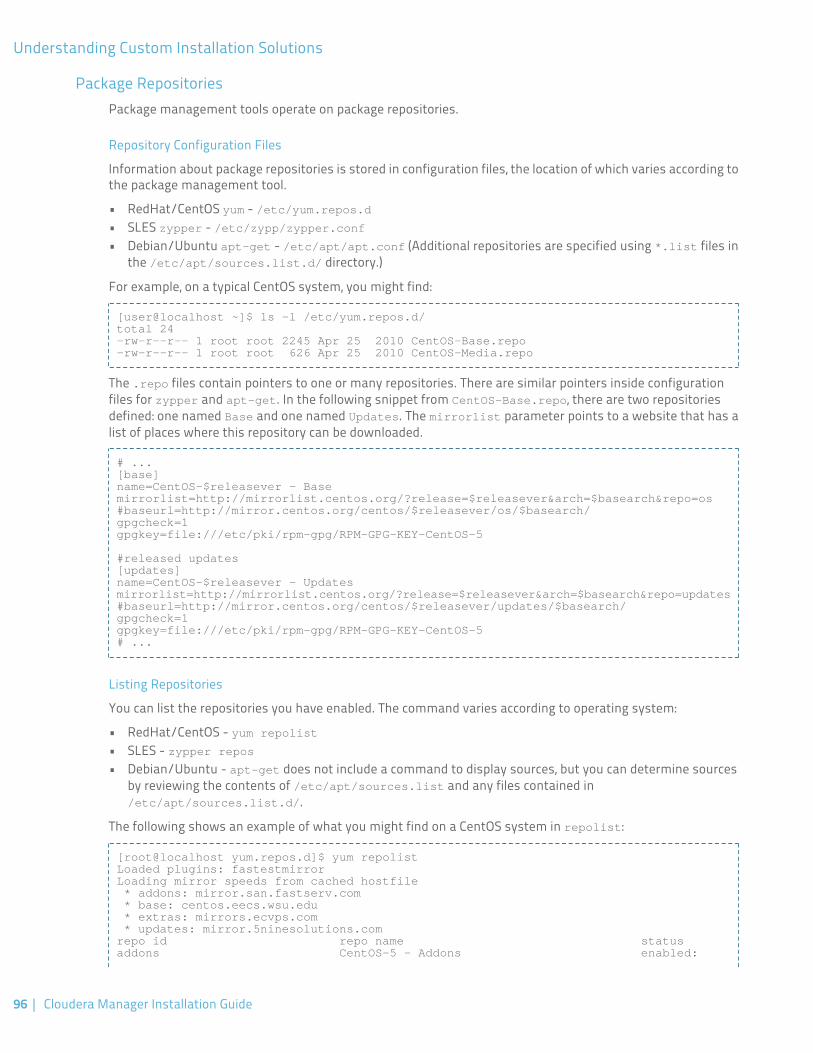
Package RepositoriesPackage management tools operate on package repositories.
Repository Configuration Files
Information about package repositories is stored in configuration files, the location of which varies according tothe package management tool.
• RedHat/CentOS yum - /etc/yum.repos.d• SLES zypper - /etc/zypp/zypper.conf• Debian/Ubuntu apt-get - /etc/apt/apt.conf (Additional repositories are specified using *.list files in
the /etc/apt/sources.list.d/ directory.)
For example, on a typical CentOS system, you might find:
[user@localhost ~]$ ls -l /etc/yum.repos.d/total 24-rw-r--r-- 1 root root 2245 Apr 25 2010 CentOS-Base.repo-rw-r--r-- 1 root root 626 Apr 25 2010 CentOS-Media.repo
The .repo files contain pointers to one or many repositories. There are similar pointers inside configurationfiles for zypper and apt-get. In the following snippet from CentOS-Base.repo, there are two repositoriesdefined: one named Base and one named Updates. The mirrorlist parameter points to a website that has alist of places where this repository can be downloaded.
# ...[base]name=CentOS-$releasever - Basemirrorlist=http://mirrorlist.centos.org/?release=$releasever&arch=$basearch&repo=os#baseurl=http://mirror.centos.org/centos/$releasever/os/$basearch/gpgcheck=1gpgkey=file:///etc/pki/rpm-gpg/RPM-GPG-KEY-CentOS-5
#released updates[updates]name=CentOS-$releasever - Updatesmirrorlist=http://mirrorlist.centos.org/?release=$releasever&arch=$basearch&repo=updates#baseurl=http://mirror.centos.org/centos/$releasever/updates/$basearch/gpgcheck=1gpgkey=file:///etc/pki/rpm-gpg/RPM-GPG-KEY-CentOS-5# ...
Listing Repositories
You can list the repositories you have enabled. The command varies according to operating system:
• RedHat/CentOS - yum repolist• SLES - zypper repos• Debian/Ubuntu - apt-get does not include a command to display sources, but you can determine sources
by reviewing the contents of /etc/apt/sources.list and any files contained in/etc/apt/sources.list.d/.
The following shows an example of what you might find on a CentOS system in repolist:
[root@localhost yum.repos.d]$ yum repolistLoaded plugins: fastestmirrorLoading mirror speeds from cached hostfile * addons: mirror.san.fastserv.com * base: centos.eecs.wsu.edu * extras: mirrors.ecvps.com * updates: mirror.5ninesolutions.comrepo id repo name statusaddons CentOS-5 - Addons enabled:
96 | Cloudera Manager Installation Guide
Understanding Custom Installation Solutions
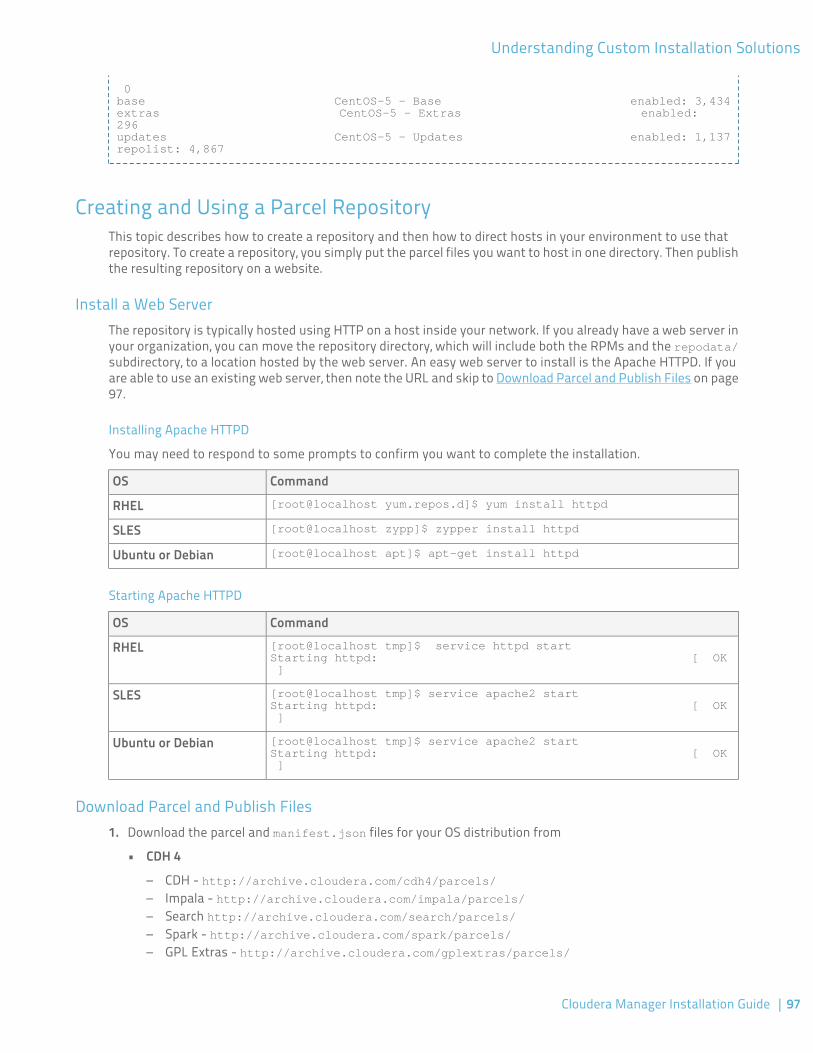
0base CentOS-5 - Base enabled: 3,434extras CentOS-5 - Extras enabled: 296updates CentOS-5 - Updates enabled: 1,137repolist: 4,867
Creating and Using a Parcel RepositoryThis topic describes how to create a repository and then how to direct hosts in your environment to use thatrepository. To create a repository, you simply put the parcel files you want to host in one directory. Then publishthe resulting repository on a website.
Install a Web ServerThe repository is typically hosted using HTTP on a host inside your network. If you already have a web server inyour organization, you can move the repository directory, which will include both the RPMs and the repodata/subdirectory, to a location hosted by the web server. An easy web server to install is the Apache HTTPD. If youare able to use an existing web server, then note the URL and skip to Download Parcel and Publish Files on page97.
Installing Apache HTTPD
You may need to respond to some prompts to confirm you want to complete the installation.
CommandOS[root@localhost yum.repos.d]$ yum install httpdRHEL[root@localhost zypp]$ zypper install httpdSLES[root@localhost apt]$ apt-get install httpdUbuntu or Debian
Starting Apache HTTPD
CommandOS[root@localhost tmp]$ service httpd startStarting httpd: [ OK ]
RHEL
[root@localhost tmp]$ service apache2 startStarting httpd: [ OK ]
SLES
[root@localhost tmp]$ service apache2 startStarting httpd: [ OK ]
Ubuntu or Debian
Download Parcel and Publish Files1. Download the parcel and manifest.json files for your OS distribution from
• CDH 4
– CDH - http://archive.cloudera.com/cdh4/parcels/– Impala - http://archive.cloudera.com/impala/parcels/– Search http://archive.cloudera.com/search/parcels/– Spark - http://archive.cloudera.com/spark/parcels/– GPL Extras - http://archive.cloudera.com/gplextras/parcels/
Cloudera Manager Installation Guide | 97
Understanding Custom Installation Solutions
• CDH 5 - Impala, Spark, and Search are included in the CDH parcel.
– CDH - http://archive.cloudera.com/cdh5/parcels/– GPL Extras - http://archive.cloudera.com/gplextras5/parcels/
• Other services
– Accumulo - http://archive.cloudera.com/accumulo/parcels/– Sqoop connectors - http://archive.cloudera.com/sqoop-connectors/parcels/
2. Move the parcel and manifest.json files to the web server directory, and modify file permissions. Forexample, you might use the following commands:
[root@localhost tmp]$ mkdir /var/www/html/cdh4.6[root@localhost tmp]$ mv CDH-4.6.0-1.cdh4.6.0.p0.26-lucid.parcel /var/www/html/cdh4.6[root@localhost tmp]$ mv manifest.json /var/www/html/cdh4.6[root@localhost tmp]$ chmod -R ugo+rX /var/www/html/cdh4.6
After moving the files and changing permissions, visit http://hostname:80/cdh4.6/ to verify that youcan access the parcel. Apache may have been configured to not show indexes, which is also acceptable.
Configure the Cloudera Manager Server to Use the Parcel URL1. Do one of the following to open the parcel settings page:
• Click in the top navigation bar1.2. Click the Edit Settings button.
• Select Administration > Settings.1.2. Click the Parcels category.
• 1. Click the Hosts tab.2. Click the Configuration tab.3. Click the Parcels category.4. Click the Edit Settings button.
2. In the Remote Parcel Repository URLs list, click to open an additional row.3. Enter the path to the parcel. For example, http://hostname:80/cdh4.6/.4. Click Save Changes to commit the changes.
Creating and Using a Package RepositoryThis topic describes how to create a package repository and then how to direct hosts in your environment touse that repository. To create a repository, you simply put the repo files you want to host in one directory. Thenpublish the resulting repository on a website.
Install a Web ServerThe repository is typically hosted using HTTP on a host inside your network. If you already have a web server inyour organization, you can move the repository directory, which will include both the RPMs and the repodata/subdirectory, to some a location hosted by the web server. An easy web server to install is the Apache HTTPD.If you are able to use an existing web server, then note the URL and skip to Download Tarball and PublishRepository Files on page 99.
Installing Apache HTTPD
You may need to respond to some prompts to confirm you want to complete the installation.
98 | Cloudera Manager Installation Guide
Understanding Custom Installation Solutions
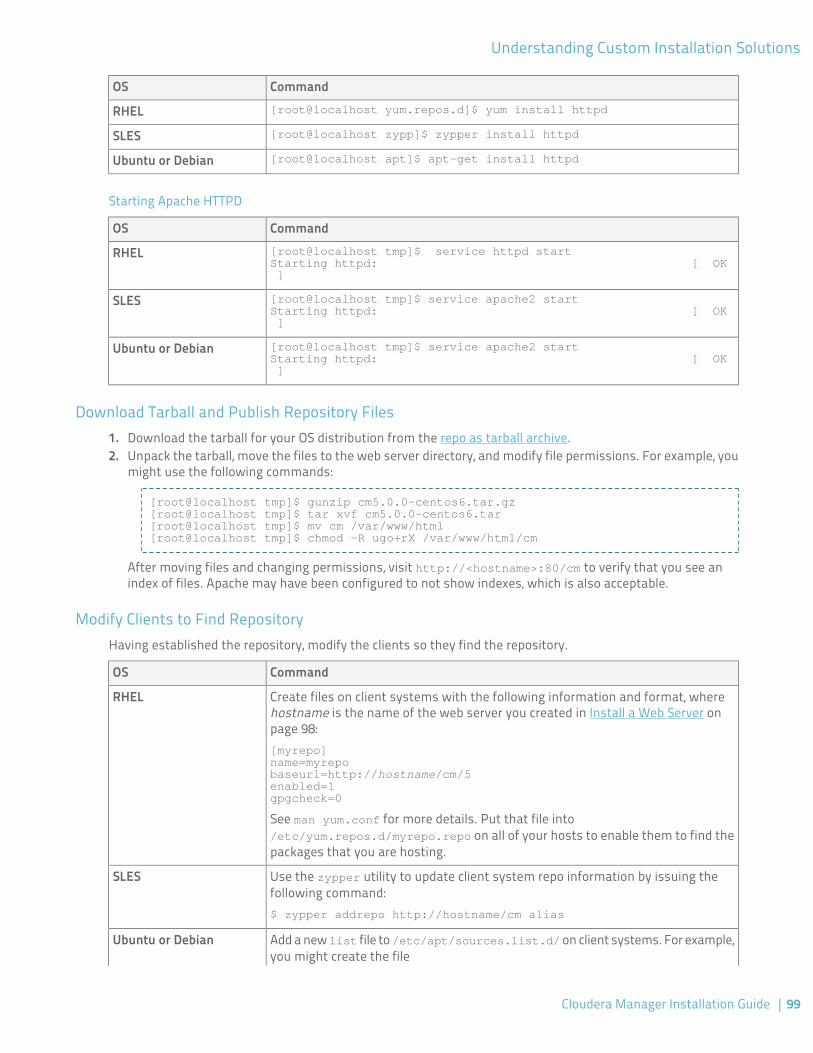
CommandOS[root@localhost yum.repos.d]$ yum install httpdRHEL[root@localhost zypp]$ zypper install httpdSLES[root@localhost apt]$ apt-get install httpdUbuntu or Debian
Starting Apache HTTPD
CommandOS[root@localhost tmp]$ service httpd startStarting httpd: [ OK ]
RHEL
[root@localhost tmp]$ service apache2 startStarting httpd: [ OK ]
SLES
[root@localhost tmp]$ service apache2 startStarting httpd: [ OK ]
Ubuntu or Debian
Download Tarball and Publish Repository Files1. Download the tarball for your OS distribution from the repo as tarball archive.2. Unpack the tarball, move the files to the web server directory, and modify file permissions. For example, you
might use the following commands:
[root@localhost tmp]$ gunzip cm5.0.0-centos6.tar.gz[root@localhost tmp]$ tar xvf cm5.0.0-centos6.tar[root@localhost tmp]$ mv cm /var/www/html[root@localhost tmp]$ chmod -R ugo+rX /var/www/html/cm
After moving files and changing permissions, visit http://<hostname>:80/cm to verify that you see anindex of files. Apache may have been configured to not show indexes, which is also acceptable.
Modify Clients to Find RepositoryHaving established the repository, modify the clients so they find the repository.
CommandOS
Create files on client systems with the following information and format, wherehostname is the name of the web server you created in Install a Web Server onpage 98:[myrepo]name=myrepo
RHEL
baseurl=http://hostname/cm/5enabled=1gpgcheck=0
See man yum.conf for more details. Put that file into/etc/yum.repos.d/myrepo.repo on all of your hosts to enable them to find thepackages that you are hosting.
Use the zypper utility to update client system repo information by issuing thefollowing command:$ zypper addrepo http://hostname/cm alias
SLES
Add a new list file to /etc/apt/sources.list.d/ on client systems. For example,you might create the file
Ubuntu or Debian
Cloudera Manager Installation Guide | 99
Understanding Custom Installation Solutions
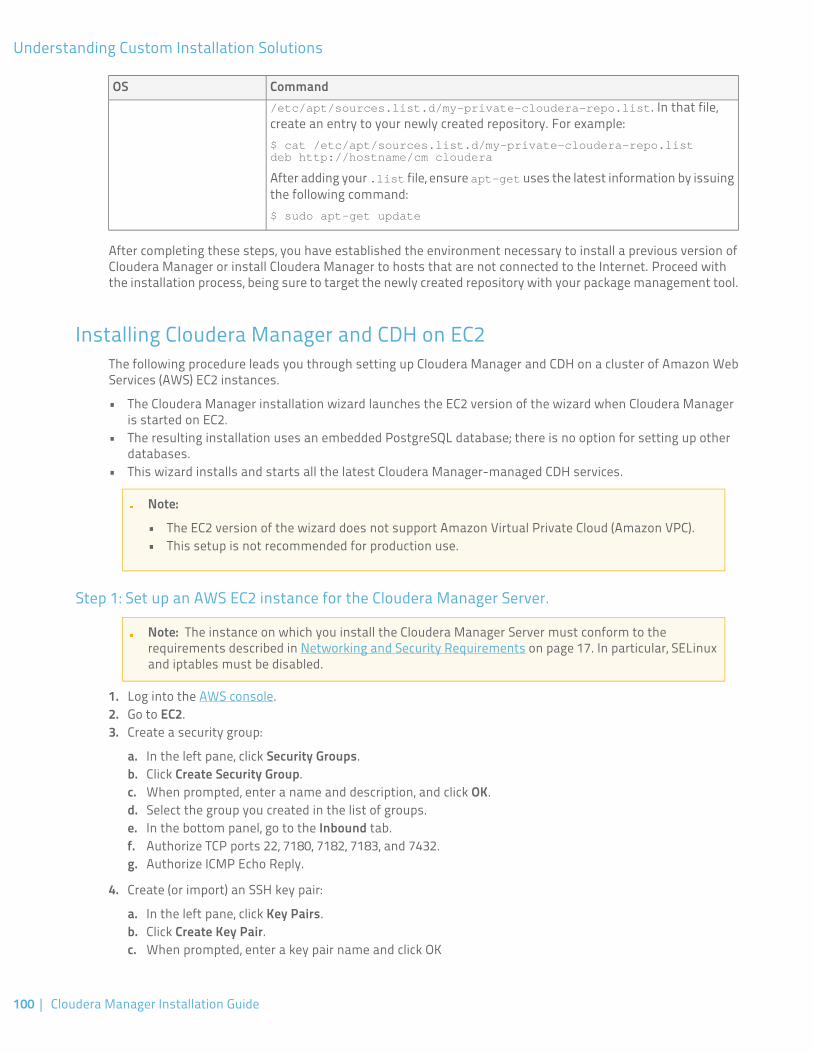
CommandOS/etc/apt/sources.list.d/my-private-cloudera-repo.list. In that file,create an entry to your newly created repository. For example:$ cat /etc/apt/sources.list.d/my-private-cloudera-repo.listdeb http://hostname/cm cloudera
After adding your .list file, ensure apt-get uses the latest information by issuingthe following command:$ sudo apt-get update
After completing these steps, you have established the environment necessary to install a previous version ofCloudera Manager or install Cloudera Manager to hosts that are not connected to the Internet. Proceed withthe installation process, being sure to target the newly created repository with your package management tool.
Installing Cloudera Manager and CDH on EC2The following procedure leads you through setting up Cloudera Manager and CDH on a cluster of Amazon WebServices (AWS) EC2 instances.
• The Cloudera Manager installation wizard launches the EC2 version of the wizard when Cloudera Manageris started on EC2.
• The resulting installation uses an embedded PostgreSQL database; there is no option for setting up otherdatabases.
• This wizard installs and starts all the latest Cloudera Manager-managed CDH services.
Note:
• The EC2 version of the wizard does not support Amazon Virtual Private Cloud (Amazon VPC).• This setup is not recommended for production use.
Step 1: Set up an AWS EC2 instance for the Cloudera Manager Server.
Note: The instance on which you install the Cloudera Manager Server must conform to therequirements described in Networking and Security Requirements on page 17. In particular, SELinuxand iptables must be disabled.
1. Log into the AWS console.2. Go to EC2.3. Create a security group:
a. In the left pane, click Security Groups.b. Click Create Security Group.c. When prompted, enter a name and description, and click OK.d. Select the group you created in the list of groups.e. In the bottom panel, go to the Inbound tab.f. Authorize TCP ports 22, 7180, 7182, 7183, and 7432.g. Authorize ICMP Echo Reply.
4. Create (or import) an SSH key pair:
a. In the left pane, click Key Pairs.b. Click Create Key Pair.c. When prompted, enter a key pair name and click OK
100 | Cloudera Manager Installation Guide
Understanding Custom Installation Solutions
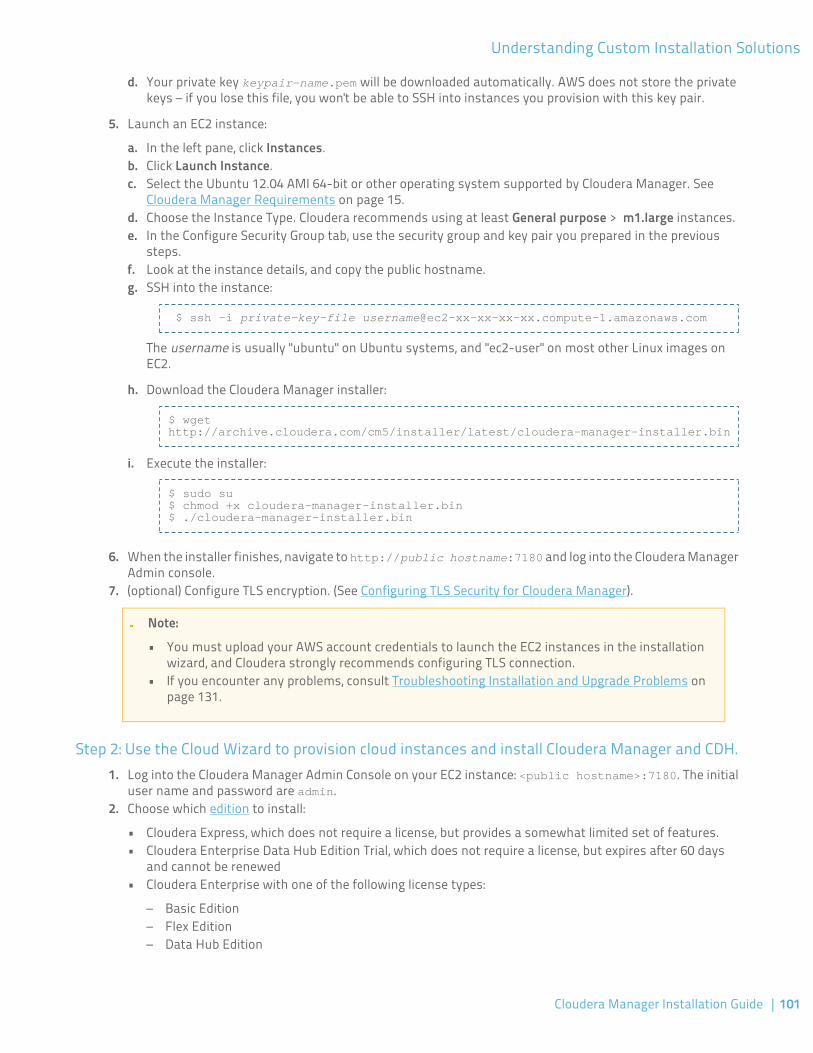
d. Your private key keypair-name.pem will be downloaded automatically. AWS does not store the privatekeys – if you lose this file, you won't be able to SSH into instances you provision with this key pair.
5. Launch an EC2 instance:
a. In the left pane, click Instances.b. Click Launch Instance.c. Select the Ubuntu 12.04 AMI 64-bit or other operating system supported by Cloudera Manager. See
Cloudera Manager Requirements on page 15.d. Choose the Instance Type. Cloudera recommends using at least General purpose > m1.large instances.e. In the Configure Security Group tab, use the security group and key pair you prepared in the previous
steps.f. Look at the instance details, and copy the public hostname.g. SSH into the instance:
$ ssh -i private-key-file [email protected]
The username is usually "ubuntu" on Ubuntu systems, and "ec2-user" on most other Linux images onEC2.
h. Download the Cloudera Manager installer:
$ wget http://archive.cloudera.com/cm5/installer/latest/cloudera-manager-installer.bin
i. Execute the installer:
$ sudo su$ chmod +x cloudera-manager-installer.bin$ ./cloudera-manager-installer.bin
6. When the installer finishes, navigate to http://public hostname:7180 and log into the Cloudera ManagerAdmin console.
7. (optional) Configure TLS encryption. (See Configuring TLS Security for Cloudera Manager).
Note:
• You must upload your AWS account credentials to launch the EC2 instances in the installationwizard, and Cloudera strongly recommends configuring TLS connection.
• If you encounter any problems, consult Troubleshooting Installation and Upgrade Problems onpage 131.
Step 2: Use the Cloud Wizard to provision cloud instances and install Cloudera Manager and CDH.1. Log into the Cloudera Manager Admin Console on your EC2 instance: <public hostname>:7180. The initial
user name and password are admin.2. Choose which edition to install:
• Cloudera Express, which does not require a license, but provides a somewhat limited set of features.• Cloudera Enterprise Data Hub Edition Trial, which does not require a license, but expires after 60 days
and cannot be renewed• Cloudera Enterprise with one of the following license types:
– Basic Edition– Flex Edition– Data Hub Edition
Cloudera Manager Installation Guide | 101
Understanding Custom Installation Solutions
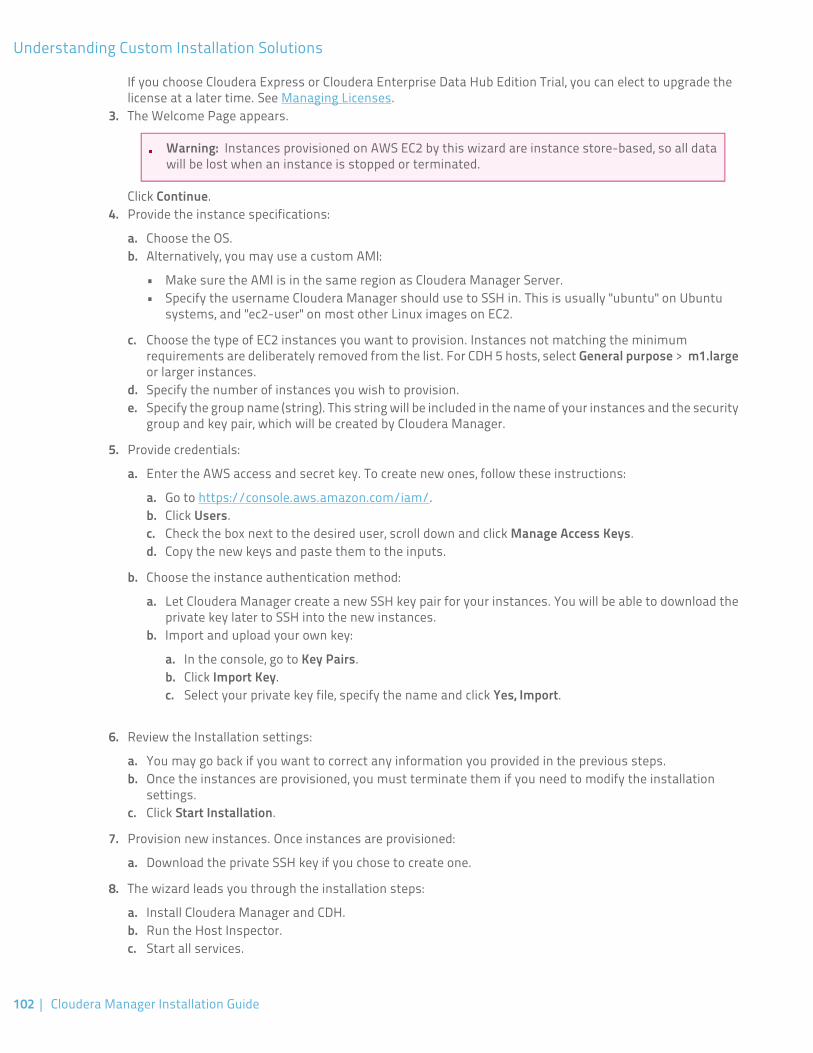
If you choose Cloudera Express or Cloudera Enterprise Data Hub Edition Trial, you can elect to upgrade thelicense at a later time. See Managing Licenses.
3. The Welcome Page appears.
Warning: Instances provisioned on AWS EC2 by this wizard are instance store-based, so all datawill be lost when an instance is stopped or terminated.
Click Continue.4. Provide the instance specifications:
a. Choose the OS.b. Alternatively, you may use a custom AMI:
• Make sure the AMI is in the same region as Cloudera Manager Server.• Specify the username Cloudera Manager should use to SSH in. This is usually "ubuntu" on Ubuntu
systems, and "ec2-user" on most other Linux images on EC2.
c. Choose the type of EC2 instances you want to provision. Instances not matching the minimumrequirements are deliberately removed from the list. For CDH 5 hosts, select General purpose > m1.largeor larger instances.
d. Specify the number of instances you wish to provision.e. Specify the group name (string). This string will be included in the name of your instances and the security
group and key pair, which will be created by Cloudera Manager.
5. Provide credentials:
a. Enter the AWS access and secret key. To create new ones, follow these instructions:
a. Go to https://console.aws.amazon.com/iam/.b. Click Users.c. Check the box next to the desired user, scroll down and click Manage Access Keys.d. Copy the new keys and paste them to the inputs.
b. Choose the instance authentication method:
a. Let Cloudera Manager create a new SSH key pair for your instances. You will be able to download theprivate key later to SSH into the new instances.
b. Import and upload your own key:
a. In the console, go to Key Pairs.b. Click Import Key.c. Select your private key file, specify the name and click Yes, Import.
6. Review the Installation settings:
a. You may go back if you want to correct any information you provided in the previous steps.b. Once the instances are provisioned, you must terminate them if you need to modify the installation
settings.c. Click Start Installation.
7. Provision new instances. Once instances are provisioned:
a. Download the private SSH key if you chose to create one.
8. The wizard leads you through the installation steps:
a. Install Cloudera Manager and CDH.b. Run the Host Inspector.c. Start all services.
102 | Cloudera Manager Installation Guide
Understanding Custom Installation Solutions
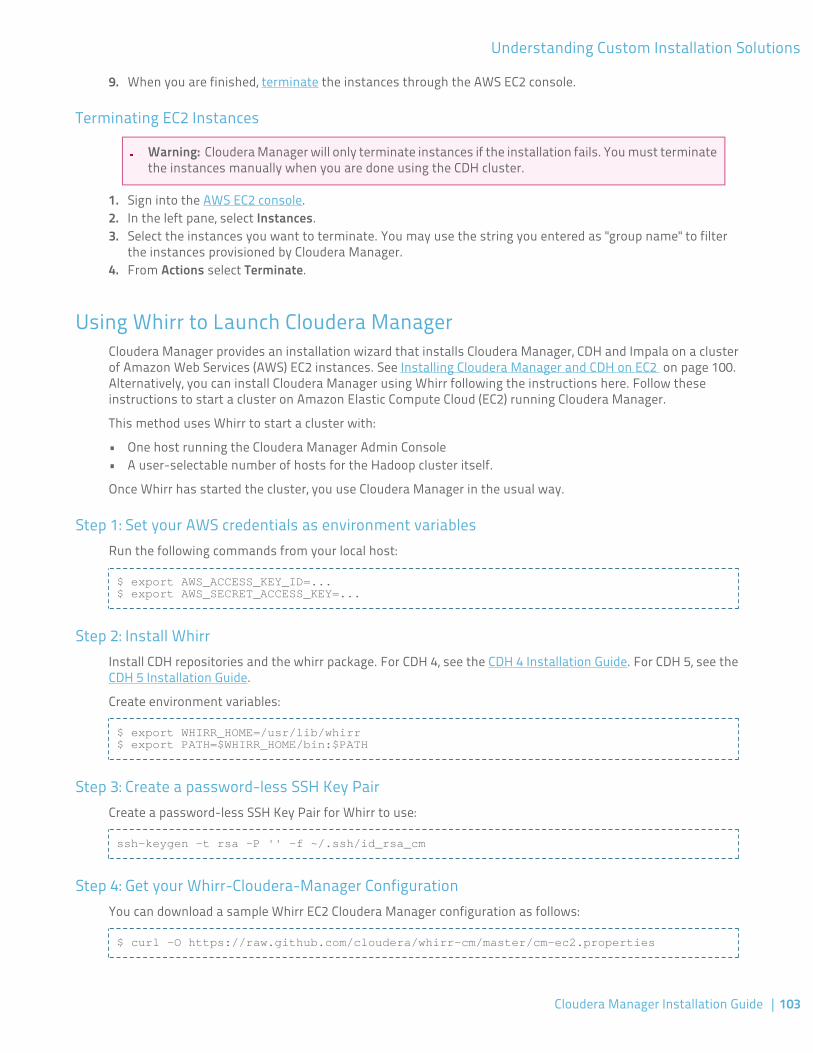
9. When you are finished, terminate the instances through the AWS EC2 console.
Terminating EC2 Instances
Warning: Cloudera Manager will only terminate instances if the installation fails. You must terminatethe instances manually when you are done using the CDH cluster.
1. Sign into the AWS EC2 console.2. In the left pane, select Instances.3. Select the instances you want to terminate. You may use the string you entered as "group name" to filter
the instances provisioned by Cloudera Manager.4. From Actions select Terminate.
Using Whirr to Launch Cloudera ManagerCloudera Manager provides an installation wizard that installs Cloudera Manager, CDH and Impala on a clusterof Amazon Web Services (AWS) EC2 instances. See Installing Cloudera Manager and CDH on EC2 on page 100.Alternatively, you can install Cloudera Manager using Whirr following the instructions here. Follow theseinstructions to start a cluster on Amazon Elastic Compute Cloud (EC2) running Cloudera Manager.
This method uses Whirr to start a cluster with:
• One host running the Cloudera Manager Admin Console• A user-selectable number of hosts for the Hadoop cluster itself.
Once Whirr has started the cluster, you use Cloudera Manager in the usual way.
Step 1: Set your AWS credentials as environment variablesRun the following commands from your local host:
$ export AWS_ACCESS_KEY_ID=...$ export AWS_SECRET_ACCESS_KEY=...
Step 2: Install WhirrInstall CDH repositories and the whirr package. For CDH 4, see the CDH 4 Installation Guide. For CDH 5, see theCDH 5 Installation Guide.
Create environment variables:
$ export WHIRR_HOME=/usr/lib/whirr$ export PATH=$WHIRR_HOME/bin:$PATH
Step 3: Create a password-less SSH Key PairCreate a password-less SSH Key Pair for Whirr to use:
ssh-keygen -t rsa -P '' -f ~/.ssh/id_rsa_cm
Step 4: Get your Whirr-Cloudera-Manager ConfigurationYou can download a sample Whirr EC2 Cloudera Manager configuration as follows:
$ curl -O https://raw.github.com/cloudera/whirr-cm/master/cm-ec2.properties
Cloudera Manager Installation Guide | 103
Understanding Custom Installation Solutions
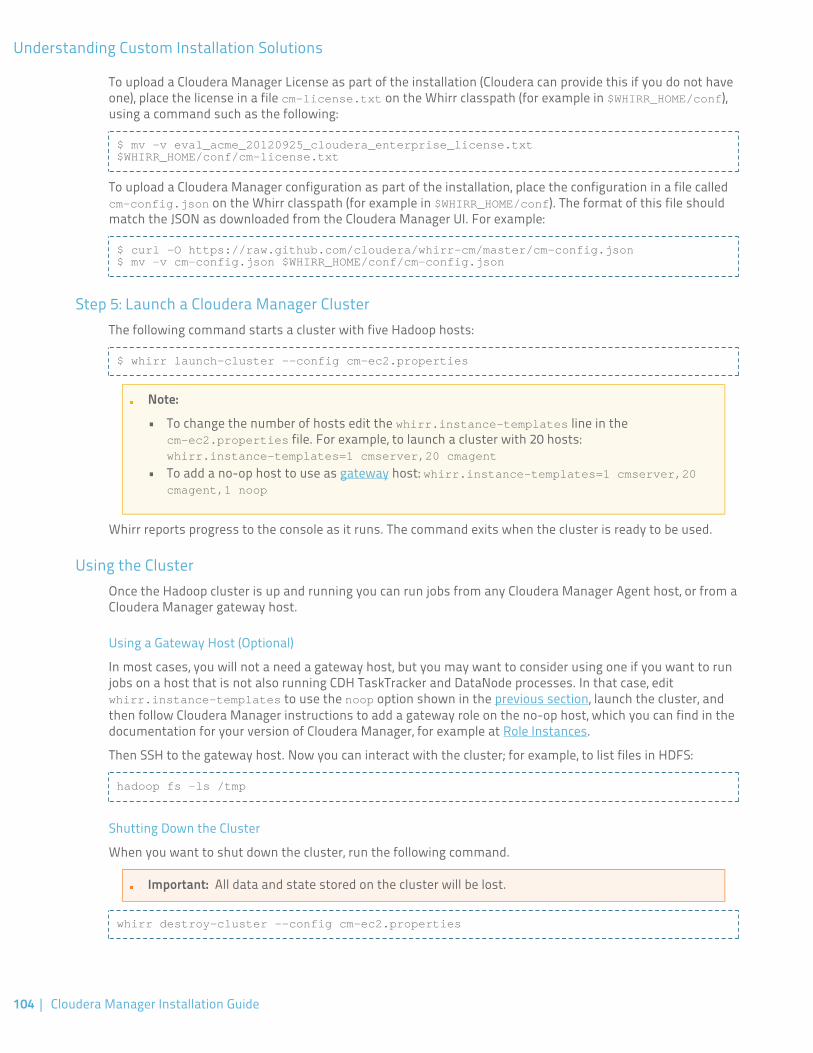
To upload a Cloudera Manager License as part of the installation (Cloudera can provide this if you do not haveone), place the license in a file cm-license.txt on the Whirr classpath (for example in $WHIRR_HOME/conf),using a command such as the following:
$ mv -v eval_acme_20120925_cloudera_enterprise_license.txt $WHIRR_HOME/conf/cm-license.txt
To upload a Cloudera Manager configuration as part of the installation, place the configuration in a file calledcm-config.json on the Whirr classpath (for example in $WHIRR_HOME/conf). The format of this file shouldmatch the JSON as downloaded from the Cloudera Manager UI. For example:
$ curl -O https://raw.github.com/cloudera/whirr-cm/master/cm-config.json$ mv -v cm-config.json $WHIRR_HOME/conf/cm-config.json
Step 5: Launch a Cloudera Manager ClusterThe following command starts a cluster with five Hadoop hosts:
$ whirr launch-cluster --config cm-ec2.properties
Note:
• To change the number of hosts edit the whirr.instance-templates line in thecm-ec2.properties file. For example, to launch a cluster with 20 hosts:whirr.instance-templates=1 cmserver,20 cmagent
• To add a no-op host to use as gateway host: whirr.instance-templates=1 cmserver,20cmagent,1 noop
Whirr reports progress to the console as it runs. The command exits when the cluster is ready to be used.
Using the ClusterOnce the Hadoop cluster is up and running you can run jobs from any Cloudera Manager Agent host, or from aCloudera Manager gateway host.
Using a Gateway Host (Optional)
In most cases, you will not a need a gateway host, but you may want to consider using one if you want to runjobs on a host that is not also running CDH TaskTracker and DataNode processes. In that case, editwhirr.instance-templates to use the noop option shown in the previous section, launch the cluster, andthen follow Cloudera Manager instructions to add a gateway role on the no-op host, which you can find in thedocumentation for your version of Cloudera Manager, for example at Role Instances.
Then SSH to the gateway host. Now you can interact with the cluster; for example, to list files in HDFS:
hadoop fs -ls /tmp
Shutting Down the Cluster
When you want to shut down the cluster, run the following command.
Important: All data and state stored on the cluster will be lost.
whirr destroy-cluster --config cm-ec2.properties
104 | Cloudera Manager Installation Guide
Understanding Custom Installation Solutions
Configuring a Custom Java Home LocationJava, which Cloudera services require, may be installed at a custom location. Follow the installation instructionsin:
• CDH 5 - (CDH 5) Java Development Kit Installation.• CDH 4 - (CDH 4) Java Development Kit Installation.
If you choose to use a custom Java location, modify the host configuration to ensure the JDK can be found:
1. Open the Cloudera Manager Admin Console.2. In the main navigation bar, click the Hosts tab and optionally click a specific host link.3. Click the Configuration tab.4. In the Advanced category, click the Java Home Directory property.5. Set the property to the custom location.6. Click Save Changes.7. Restart all services.
If you don't update the configuration, Cloudera services will be unable to find this resource and will not start.
Installing Older Versions of Cloudera Manager 5The Cloudera Manager installation solutions, such as the installer downloadable from the Cloudera Downloadswebsite, install the most recent version of Cloudera Manager. This ensures that you install the latest featuresand bug fixes. While having the latest version of Cloudera Manager is valuable, in some cases it may be necessaryto install previous versions.
The most common reason to install a previous version is when you want to expand an existing cluster. In thiscase, follow the instructions in Adding a Host to the Cluster.
You can also add a cluster to be managed by the same instance of Cloudera Manager – you do this using theAdd Cluster feature from the Services page in the Cloudera Manager Admin Console. In this case, follow theinstructions in Adding a Cluster.
You may also want to install a previous version of the Cloudera Manager server on a new cluster if, for example,you have validated a specific version and want to deploy that version on additional clusters. Installing an olderversion of Cloudera Manager requires several manual steps to install and configure the database and the correctversion of the Cloudera Manager Server. Once these are done, you can run the Express wizard to complete theinstallation of Cloudera Manager and CDH.
Before You Begin
Install and Configure Databases
Cloudera Manager Server, Cloudera Management Service, and the Hive Metastore data is stored in a database.Install and configure required databases following the instructions in Cloudera Manager and Managed ServiceDatabases on page 21.
(CDH 5 only) On RHEL and CentOS 5, Install Python 2.6 or 2.7
Python 2.6 or 2.7 is required to run Hue. RHEL 5 and CentOS 5, in particular, require the EPEL repository package.
Cloudera Manager Installation Guide | 105
Understanding Custom Installation Solutions
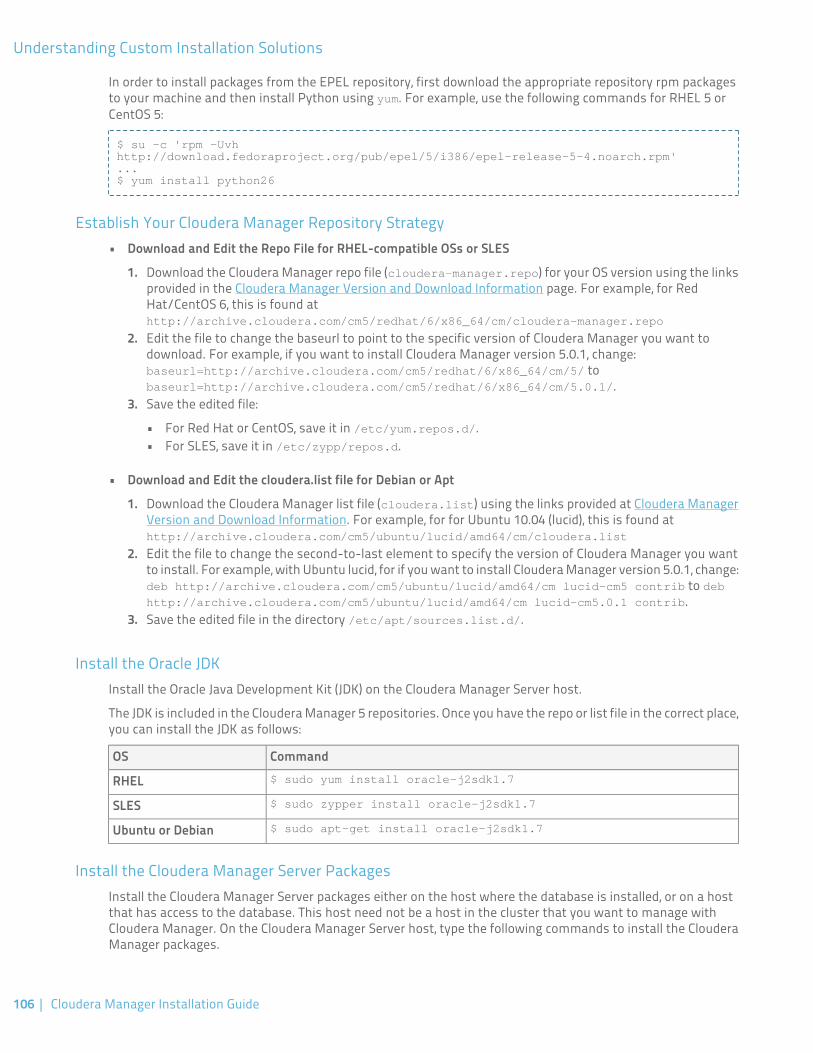
In order to install packages from the EPEL repository, first download the appropriate repository rpm packagesto your machine and then install Python using yum. For example, use the following commands for RHEL 5 orCentOS 5:
$ su -c 'rpm -Uvh http://download.fedoraproject.org/pub/epel/5/i386/epel-release-5-4.noarch.rpm'...$ yum install python26
Establish Your Cloudera Manager Repository Strategy• Download and Edit the Repo File for RHEL-compatible OSs or SLES
1. Download the Cloudera Manager repo file (cloudera-manager.repo) for your OS version using the linksprovided in the Cloudera Manager Version and Download Information page. For example, for RedHat/CentOS 6, this is found athttp://archive.cloudera.com/cm5/redhat/6/x86_64/cm/cloudera-manager.repo
2. Edit the file to change the baseurl to point to the specific version of Cloudera Manager you want todownload. For example, if you want to install Cloudera Manager version 5.0.1, change:baseurl=http://archive.cloudera.com/cm5/redhat/6/x86_64/cm/5/ tobaseurl=http://archive.cloudera.com/cm5/redhat/6/x86_64/cm/5.0.1/.
3. Save the edited file:
• For Red Hat or CentOS, save it in /etc/yum.repos.d/.• For SLES, save it in /etc/zypp/repos.d.
• Download and Edit the cloudera.list file for Debian or Apt
1. Download the Cloudera Manager list file (cloudera.list) using the links provided at Cloudera ManagerVersion and Download Information. For example, for for Ubuntu 10.04 (lucid), this is found athttp://archive.cloudera.com/cm5/ubuntu/lucid/amd64/cm/cloudera.list
2. Edit the file to change the second-to-last element to specify the version of Cloudera Manager you wantto install. For example, with Ubuntu lucid, for if you want to install Cloudera Manager version 5.0.1, change:deb http://archive.cloudera.com/cm5/ubuntu/lucid/amd64/cm lucid-cm5 contrib to debhttp://archive.cloudera.com/cm5/ubuntu/lucid/amd64/cm lucid-cm5.0.1 contrib.
3. Save the edited file in the directory /etc/apt/sources.list.d/.
Install the Oracle JDKInstall the Oracle Java Development Kit (JDK) on the Cloudera Manager Server host.
The JDK is included in the Cloudera Manager 5 repositories. Once you have the repo or list file in the correct place,you can install the JDK as follows:
CommandOS$ sudo yum install oracle-j2sdk1.7RHEL$ sudo zypper install oracle-j2sdk1.7SLES$ sudo apt-get install oracle-j2sdk1.7Ubuntu or Debian
Install the Cloudera Manager Server PackagesInstall the Cloudera Manager Server packages either on the host where the database is installed, or on a hostthat has access to the database. This host need not be a host in the cluster that you want to manage withCloudera Manager. On the Cloudera Manager Server host, type the following commands to install the ClouderaManager packages.
106 | Cloudera Manager Installation Guide
Understanding Custom Installation Solutions
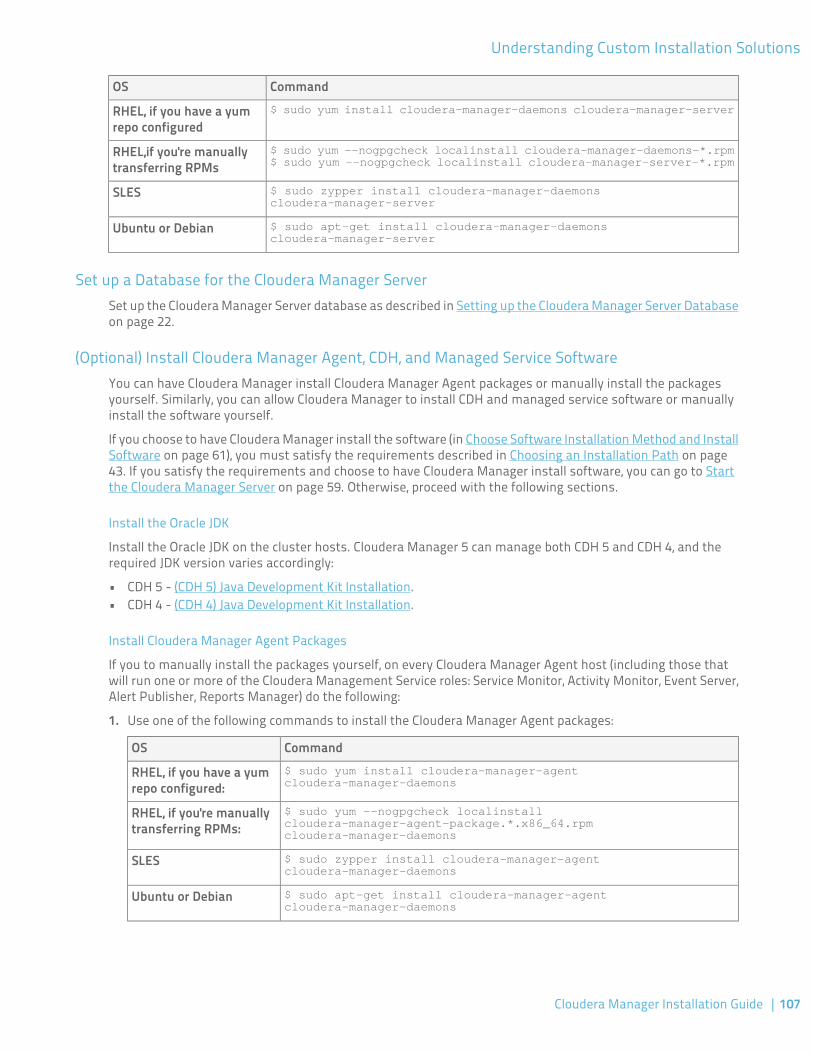
CommandOS$ sudo yum install cloudera-manager-daemons cloudera-manager-serverRHEL, if you have a yum
repo configured$ sudo yum --nogpgcheck localinstall cloudera-manager-daemons-*.rpm$ sudo yum --nogpgcheck localinstall cloudera-manager-server-*.rpm
RHEL,if you're manuallytransferring RPMs
$ sudo zypper install cloudera-manager-daemons cloudera-manager-server
SLES
$ sudo apt-get install cloudera-manager-daemons cloudera-manager-server
Ubuntu or Debian
Set up a Database for the Cloudera Manager ServerSet up the Cloudera Manager Server database as described in Setting up the Cloudera Manager Server Databaseon page 22.
(Optional) Install Cloudera Manager Agent, CDH, and Managed Service SoftwareYou can have Cloudera Manager install Cloudera Manager Agent packages or manually install the packagesyourself. Similarly, you can allow Cloudera Manager to install CDH and managed service software or manuallyinstall the software yourself.
If you choose to have Cloudera Manager install the software (in Choose Software Installation Method and InstallSoftware on page 61), you must satisfy the requirements described in Choosing an Installation Path on page43. If you satisfy the requirements and choose to have Cloudera Manager install software, you can go to Startthe Cloudera Manager Server on page 59. Otherwise, proceed with the following sections.
Install the Oracle JDK
Install the Oracle JDK on the cluster hosts. Cloudera Manager 5 can manage both CDH 5 and CDH 4, and therequired JDK version varies accordingly:
• CDH 5 - (CDH 5) Java Development Kit Installation.• CDH 4 - (CDH 4) Java Development Kit Installation.
Install Cloudera Manager Agent Packages
If you to manually install the packages yourself, on every Cloudera Manager Agent host (including those thatwill run one or more of the Cloudera Management Service roles: Service Monitor, Activity Monitor, Event Server,Alert Publisher, Reports Manager) do the following:
1. Use one of the following commands to install the Cloudera Manager Agent packages:
CommandOS$ sudo yum install cloudera-manager-agent cloudera-manager-daemons
RHEL, if you have a yumrepo configured:
$ sudo yum --nogpgcheck localinstall cloudera-manager-agent-package.*.x86_64.rpm cloudera-manager-daemons
RHEL, if you're manuallytransferring RPMs:
$ sudo zypper install cloudera-manager-agent cloudera-manager-daemons
SLES
$ sudo apt-get install cloudera-manager-agent cloudera-manager-daemons
Ubuntu or Debian
Cloudera Manager Installation Guide | 107
Understanding Custom Installation Solutions
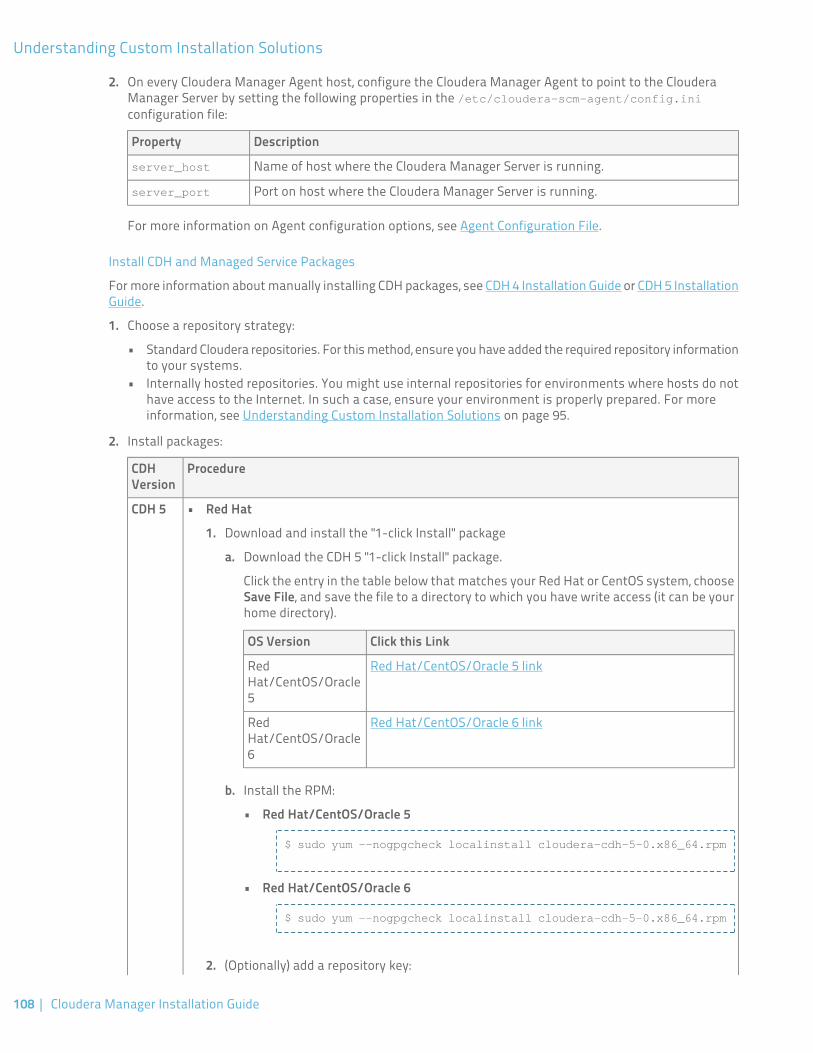
2. On every Cloudera Manager Agent host, configure the Cloudera Manager Agent to point to the ClouderaManager Server by setting the following properties in the /etc/cloudera-scm-agent/config.iniconfiguration file:
DescriptionProperty
Name of host where the Cloudera Manager Server is running.server_host
Port on host where the Cloudera Manager Server is running.server_port
For more information on Agent configuration options, see Agent Configuration File.
Install CDH and Managed Service Packages
For more information about manually installing CDH packages, see CDH 4 Installation Guide or CDH 5 InstallationGuide.
1. Choose a repository strategy:
• Standard Cloudera repositories. For this method, ensure you have added the required repository informationto your systems.
• Internally hosted repositories. You might use internal repositories for environments where hosts do nothave access to the Internet. In such a case, ensure your environment is properly prepared. For moreinformation, see Understanding Custom Installation Solutions on page 95.
2. Install packages:
ProcedureCDHVersion
CDH 5 • Red Hat
1. Download and install the "1-click Install" package
a. Download the CDH 5 "1-click Install" package.
Click the entry in the table below that matches your Red Hat or CentOS system, chooseSave File, and save the file to a directory to which you have write access (it can be yourhome directory).
Click this LinkOS Version
Red Hat/CentOS/Oracle 5 linkRedHat/CentOS/Oracle5
Red Hat/CentOS/Oracle 6 linkRedHat/CentOS/Oracle6
b. Install the RPM:
• Red Hat/CentOS/Oracle 5
$ sudo yum --nogpgcheck localinstall cloudera-cdh-5-0.x86_64.rpm
• Red Hat/CentOS/Oracle 6
$ sudo yum --nogpgcheck localinstall cloudera-cdh-5-0.x86_64.rpm
2. (Optionally) add a repository key:
108 | Cloudera Manager Installation Guide
Understanding Custom Installation Solutions

ProcedureCDHVersion
Red Hat/CentOS/Oracle 5
$ sudo rpm --import http://archive.cloudera.com/cdh5/redhat/5/x86_64/cdh/RPM-GPG-KEY-cloudera
•
• Red Hat/CentOS/Oracle 6
$ sudo rpm --import http://archive.cloudera.com/cdh5/redhat/6/x86_64/cdh/RPM-GPG-KEY-cloudera
3. Install the CDH packages:
$ sudo yum clean all$ sudo yum install avro-tools crunch flume-ng hadoop-hdfs-fuse hadoop-hdfs-nfs3 hadoop-httpfs hbase-solr hive-hbase hive-webhcat hue-beeswax hue-hbase hue-impala hue-pig hue-plugins hue-rdbms hue-search hue-spark hue-sqoop hue-zookeeper impala impala-shell kite llama mahout oozie pig pig-udf-datafu search sentry solr-mapreduce spark-python sqoop sqoop2 whirr
Note: Installing these packages will also install all the other CDH packages thatare needed for a full CDH 5 installation.
• SLES
1. Download and install the "1-click Install" package.
a. Download the CDH 5 "1-click Install" package.
Click this link, choose Save File, and save it to a directory to which you have write access(it can be your home directory).
b. Install the RPM:
$ sudo rpm -i cloudera-cdh-5-0.x86_64.rpm
c. Update your system package index by running:
$ sudo zypper refresh
2. (Optionally) add a repository key:
$ sudo rpm --import http://archive.cloudera.com/cdh5/sles/11/x86_64/cdh/RPM-GPG-KEY-cloudera
3. Install the CDH packages:
$ sudo zypper clean --all$ sudo zypper install avro-tools crunch flume-ng hadoop-hdfs-fuse hadoop-hdfs-nfs3 hadoop-httpfs hbase-solr hive-hbase hive-webhcat hue-beeswax hue-hbase hue-impala hue-pig hue-plugins hue-rdbms hue-search hue-spark hue-sqoop hue-zookeeper impala impala-shell kite llama mahout oozie pig pig-udf-datafu search sentry solr-mapreduce spark-python sqoop sqoop2 whirr
Note: Installing these packages will also install all the other CDH packages thatare needed for a full CDH 5 installation.
Cloudera Manager Installation Guide | 109
Understanding Custom Installation Solutions
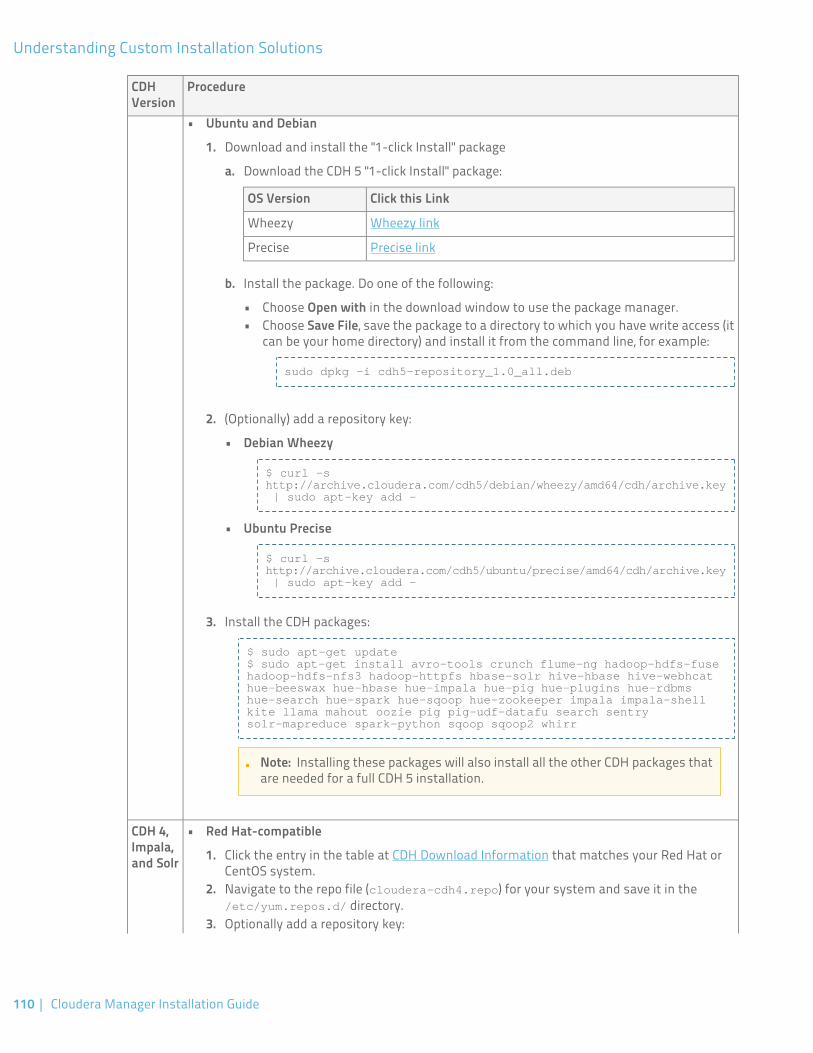
ProcedureCDHVersion
• Ubuntu and Debian
1. Download and install the "1-click Install" package
a. Download the CDH 5 "1-click Install" package:
Click this LinkOS Version
Wheezy linkWheezy
Precise linkPrecise
b. Install the package. Do one of the following:
• Choose Open with in the download window to use the package manager.• Choose Save File, save the package to a directory to which you have write access (it
can be your home directory) and install it from the command line, for example:
sudo dpkg -i cdh5-repository_1.0_all.deb
2. (Optionally) add a repository key:
• Debian Wheezy
$ curl -s http://archive.cloudera.com/cdh5/debian/wheezy/amd64/cdh/archive.key | sudo apt-key add -
• Ubuntu Precise
$ curl -s http://archive.cloudera.com/cdh5/ubuntu/precise/amd64/cdh/archive.key | sudo apt-key add -
3. Install the CDH packages:
$ sudo apt-get update$ sudo apt-get install avro-tools crunch flume-ng hadoop-hdfs-fuse hadoop-hdfs-nfs3 hadoop-httpfs hbase-solr hive-hbase hive-webhcat hue-beeswax hue-hbase hue-impala hue-pig hue-plugins hue-rdbms hue-search hue-spark hue-sqoop hue-zookeeper impala impala-shell kite llama mahout oozie pig pig-udf-datafu search sentry solr-mapreduce spark-python sqoop sqoop2 whirr
Note: Installing these packages will also install all the other CDH packages thatare needed for a full CDH 5 installation.
CDH 4,Impala,and Solr
• Red Hat-compatible
1. Click the entry in the table at CDH Download Information that matches your Red Hat orCentOS system.
2. Navigate to the repo file (cloudera-cdh4.repo) for your system and save it in the/etc/yum.repos.d/ directory.
3. Optionally add a repository key:
110 | Cloudera Manager Installation Guide
Understanding Custom Installation Solutions
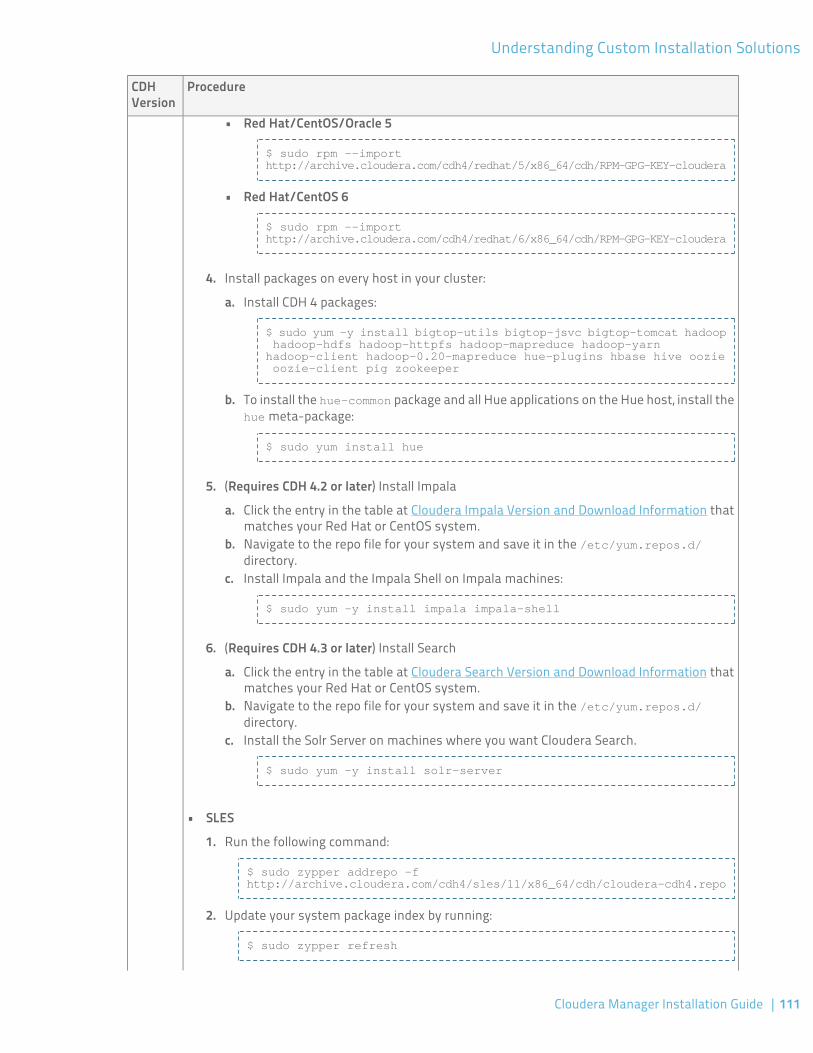
ProcedureCDHVersion
Red Hat/CentOS/Oracle 5
$ sudo rpm --import http://archive.cloudera.com/cdh4/redhat/5/x86_64/cdh/RPM-GPG-KEY-cloudera
•
• Red Hat/CentOS 6
$ sudo rpm --import http://archive.cloudera.com/cdh4/redhat/6/x86_64/cdh/RPM-GPG-KEY-cloudera
4. Install packages on every host in your cluster:
a. Install CDH 4 packages:
$ sudo yum -y install bigtop-utils bigtop-jsvc bigtop-tomcat hadoop hadoop-hdfs hadoop-httpfs hadoop-mapreduce hadoop-yarn hadoop-client hadoop-0.20-mapreduce hue-plugins hbase hive oozie oozie-client pig zookeeper
b. To install the hue-common package and all Hue applications on the Hue host, install thehue meta-package:
$ sudo yum install hue
5. (Requires CDH 4.2 or later) Install Impala
a. Click the entry in the table at Cloudera Impala Version and Download Information thatmatches your Red Hat or CentOS system.
b. Navigate to the repo file for your system and save it in the /etc/yum.repos.d/directory.
c. Install Impala and the Impala Shell on Impala machines:
$ sudo yum -y install impala impala-shell
6. (Requires CDH 4.3 or later) Install Search
a. Click the entry in the table at Cloudera Search Version and Download Information thatmatches your Red Hat or CentOS system.
b. Navigate to the repo file for your system and save it in the /etc/yum.repos.d/directory.
c. Install the Solr Server on machines where you want Cloudera Search.
$ sudo yum -y install solr-server
• SLES
1. Run the following command:
$ sudo zypper addrepo -f http://archive.cloudera.com/cdh4/sles/11/x86_64/cdh/cloudera-cdh4.repo
2. Update your system package index by running:
$ sudo zypper refresh
Cloudera Manager Installation Guide | 111
Understanding Custom Installation Solutions
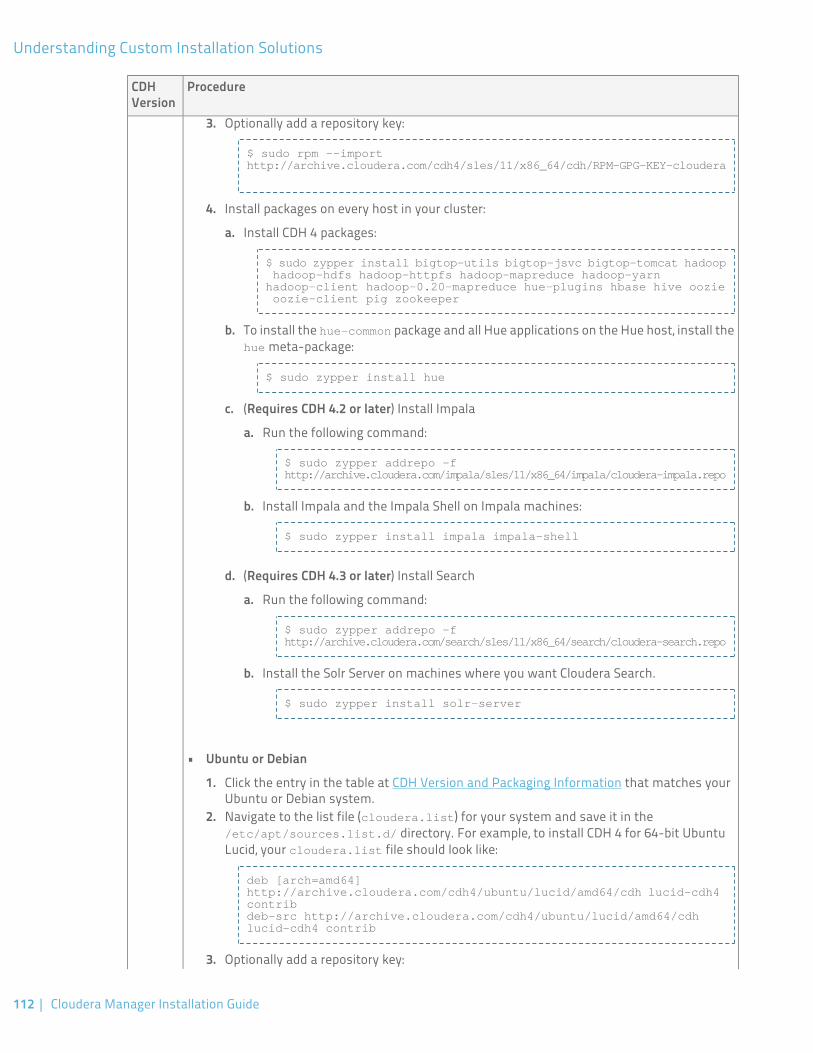
ProcedureCDHVersion
3. Optionally add a repository key:
$ sudo rpm --import http://archive.cloudera.com/cdh4/sles/11/x86_64/cdh/RPM-GPG-KEY-cloudera
4. Install packages on every host in your cluster:
a. Install CDH 4 packages:
$ sudo zypper install bigtop-utils bigtop-jsvc bigtop-tomcat hadoop hadoop-hdfs hadoop-httpfs hadoop-mapreduce hadoop-yarn hadoop-client hadoop-0.20-mapreduce hue-plugins hbase hive oozie oozie-client pig zookeeper
b. To install the hue-common package and all Hue applications on the Hue host, install thehue meta-package:
$ sudo zypper install hue
c. (Requires CDH 4.2 or later) Install Impala
a. Run the following command:
$ sudo zypper addrepo -f http://archive.cloudera.com/impala/sles/11/x86_64/impala/cloudera-impala.repo
b. Install Impala and the Impala Shell on Impala machines:
$ sudo zypper install impala impala-shell
d. (Requires CDH 4.3 or later) Install Search
a. Run the following command:
$ sudo zypper addrepo -f http://archive.cloudera.com/search/sles/11/x86_64/search/cloudera-search.repo
b. Install the Solr Server on machines where you want Cloudera Search.
$ sudo zypper install solr-server
• Ubuntu or Debian
1. Click the entry in the table at CDH Version and Packaging Information that matches yourUbuntu or Debian system.
2. Navigate to the list file (cloudera.list) for your system and save it in the/etc/apt/sources.list.d/ directory. For example, to install CDH 4 for 64-bit UbuntuLucid, your cloudera.list file should look like:
deb [arch=amd64] http://archive.cloudera.com/cdh4/ubuntu/lucid/amd64/cdh lucid-cdh4 contribdeb-src http://archive.cloudera.com/cdh4/ubuntu/lucid/amd64/cdh lucid-cdh4 contrib
3. Optionally add a repository key:
112 | Cloudera Manager Installation Guide
Understanding Custom Installation Solutions
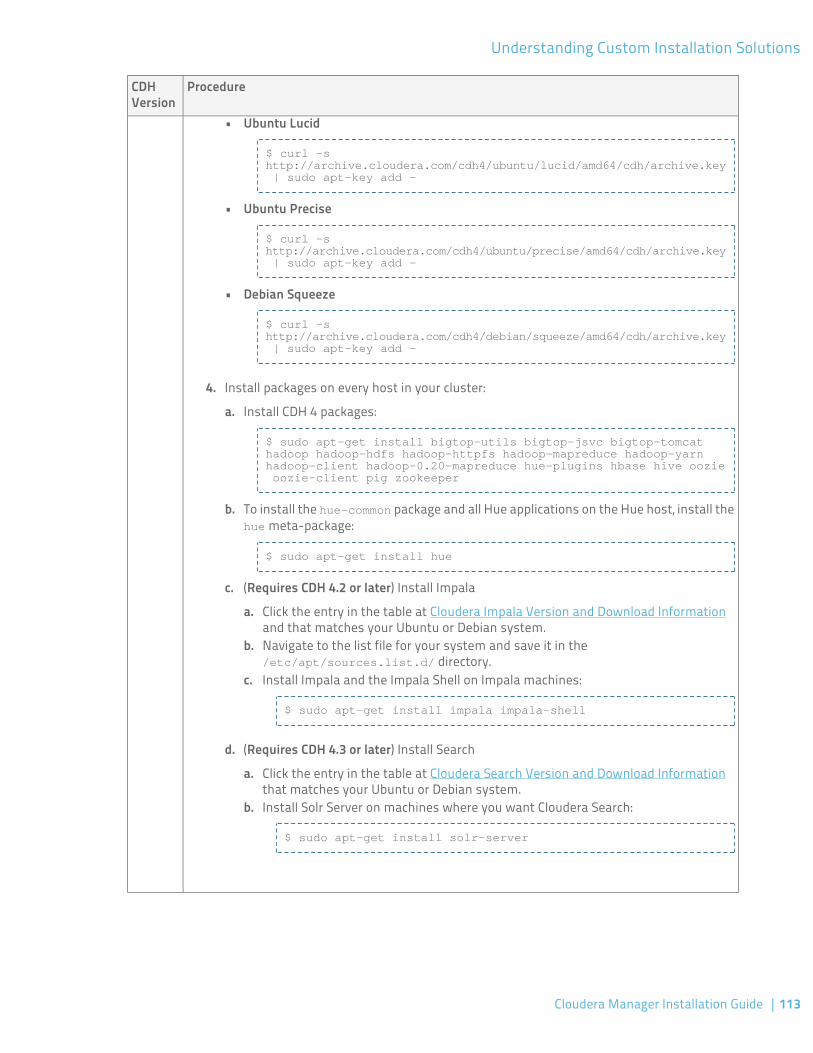
ProcedureCDHVersion
Ubuntu Lucid
$ curl -s http://archive.cloudera.com/cdh4/ubuntu/lucid/amd64/cdh/archive.key | sudo apt-key add -
•
• Ubuntu Precise
$ curl -s http://archive.cloudera.com/cdh4/ubuntu/precise/amd64/cdh/archive.key | sudo apt-key add -
• Debian Squeeze
$ curl -s http://archive.cloudera.com/cdh4/debian/squeeze/amd64/cdh/archive.key | sudo apt-key add -
4. Install packages on every host in your cluster:
a. Install CDH 4 packages:
$ sudo apt-get install bigtop-utils bigtop-jsvc bigtop-tomcat hadoop hadoop-hdfs hadoop-httpfs hadoop-mapreduce hadoop-yarn hadoop-client hadoop-0.20-mapreduce hue-plugins hbase hive oozie oozie-client pig zookeeper
b. To install the hue-common package and all Hue applications on the Hue host, install thehue meta-package:
$ sudo apt-get install hue
c. (Requires CDH 4.2 or later) Install Impala
a. Click the entry in the table at Cloudera Impala Version and Download Informationand that matches your Ubuntu or Debian system.
b. Navigate to the list file for your system and save it in the/etc/apt/sources.list.d/ directory.
c. Install Impala and the Impala Shell on Impala machines:
$ sudo apt-get install impala impala-shell
d. (Requires CDH 4.3 or later) Install Search
a. Click the entry in the table at Cloudera Search Version and Download Informationthat matches your Ubuntu or Debian system.
b. Install Solr Server on machines where you want Cloudera Search:
$ sudo apt-get install solr-server
Cloudera Manager Installation Guide | 113
Understanding Custom Installation Solutions
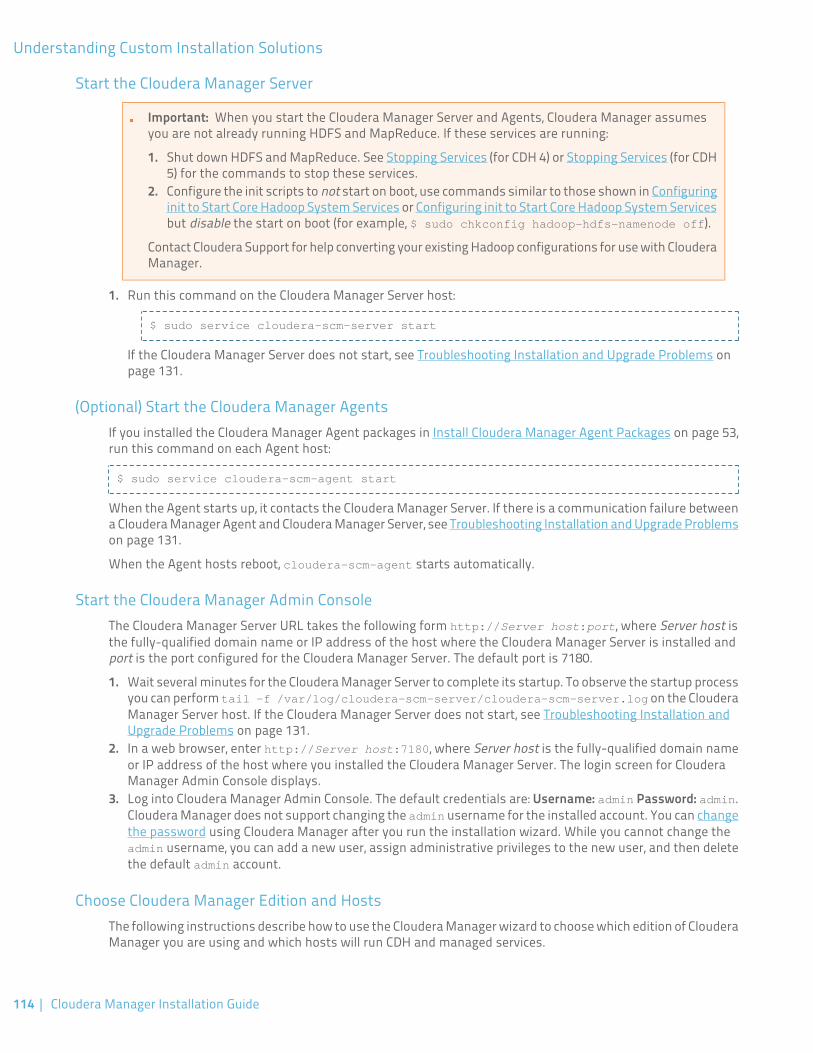
Start the Cloudera Manager Server
Important: When you start the Cloudera Manager Server and Agents, Cloudera Manager assumesyou are not already running HDFS and MapReduce. If these services are running:
1. Shut down HDFS and MapReduce. See Stopping Services (for CDH 4) or Stopping Services (for CDH5) for the commands to stop these services.
2. Configure the init scripts to not start on boot, use commands similar to those shown in Configuringinit to Start Core Hadoop System Services or Configuring init to Start Core Hadoop System Servicesbut disable the start on boot (for example, $ sudo chkconfig hadoop-hdfs-namenode off).
Contact Cloudera Support for help converting your existing Hadoop configurations for use with ClouderaManager.
1. Run this command on the Cloudera Manager Server host:
$ sudo service cloudera-scm-server start
If the Cloudera Manager Server does not start, see Troubleshooting Installation and Upgrade Problems onpage 131.
(Optional) Start the Cloudera Manager AgentsIf you installed the Cloudera Manager Agent packages in Install Cloudera Manager Agent Packages on page 53,run this command on each Agent host:
$ sudo service cloudera-scm-agent start
When the Agent starts up, it contacts the Cloudera Manager Server. If there is a communication failure betweena Cloudera Manager Agent and Cloudera Manager Server, see Troubleshooting Installation and Upgrade Problemson page 131.
When the Agent hosts reboot, cloudera-scm-agent starts automatically.
Start the Cloudera Manager Admin ConsoleThe Cloudera Manager Server URL takes the following form http://Server host:port, where Server host isthe fully-qualified domain name or IP address of the host where the Cloudera Manager Server is installed andport is the port configured for the Cloudera Manager Server. The default port is 7180.
1. Wait several minutes for the Cloudera Manager Server to complete its startup. To observe the startup processyou can perform tail -f /var/log/cloudera-scm-server/cloudera-scm-server.log on the ClouderaManager Server host. If the Cloudera Manager Server does not start, see Troubleshooting Installation andUpgrade Problems on page 131.
2. In a web browser, enter http://Server host:7180, where Server host is the fully-qualified domain nameor IP address of the host where you installed the Cloudera Manager Server. The login screen for ClouderaManager Admin Console displays.
3. Log into Cloudera Manager Admin Console. The default credentials are: Username: admin Password: admin.Cloudera Manager does not support changing the admin username for the installed account. You can changethe password using Cloudera Manager after you run the installation wizard. While you cannot change theadmin username, you can add a new user, assign administrative privileges to the new user, and then deletethe default admin account.
Choose Cloudera Manager Edition and HostsThe following instructions describe how to use the Cloudera Manager wizard to choose which edition of ClouderaManager you are using and which hosts will run CDH and managed services.
114 | Cloudera Manager Installation Guide
Understanding Custom Installation Solutions
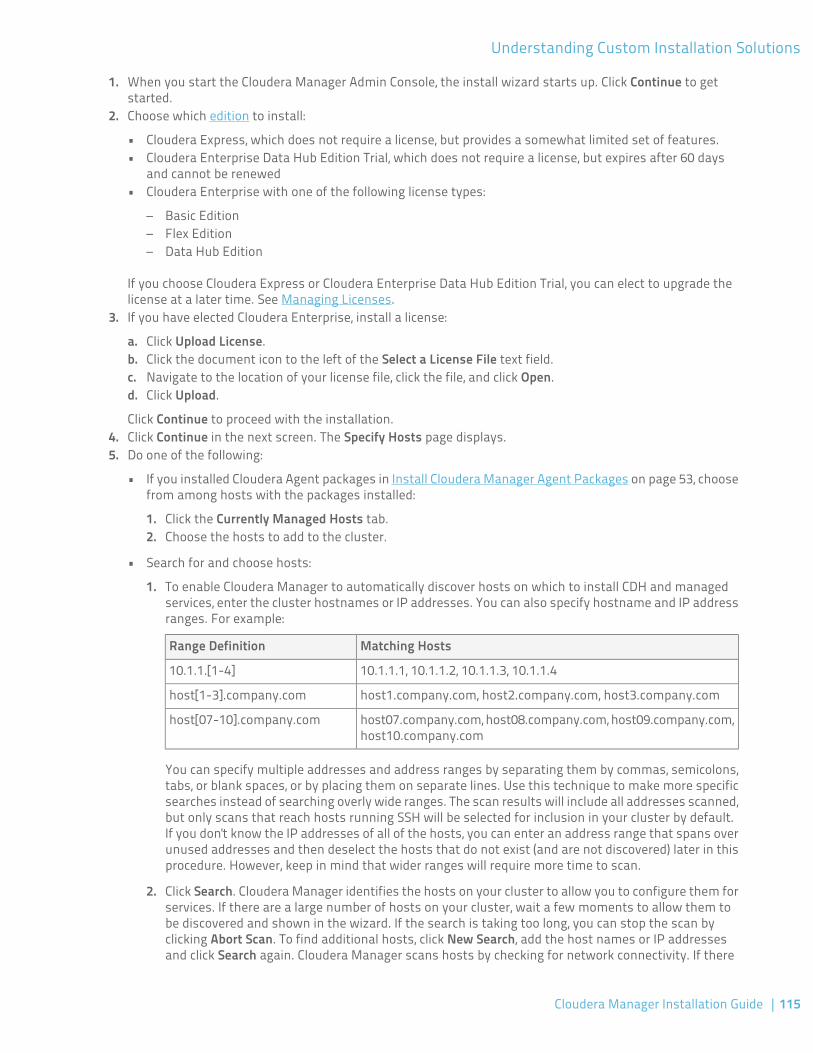
1. When you start the Cloudera Manager Admin Console, the install wizard starts up. Click Continue to getstarted.
2. Choose which edition to install:
• Cloudera Express, which does not require a license, but provides a somewhat limited set of features.• Cloudera Enterprise Data Hub Edition Trial, which does not require a license, but expires after 60 days
and cannot be renewed• Cloudera Enterprise with one of the following license types:
– Basic Edition– Flex Edition– Data Hub Edition
If you choose Cloudera Express or Cloudera Enterprise Data Hub Edition Trial, you can elect to upgrade thelicense at a later time. See Managing Licenses.
3. If you have elected Cloudera Enterprise, install a license:
a. Click Upload License.b. Click the document icon to the left of the Select a License File text field.c. Navigate to the location of your license file, click the file, and click Open.d. Click Upload.
Click Continue to proceed with the installation.4. Click Continue in the next screen. The Specify Hosts page displays.5. Do one of the following:
• If you installed Cloudera Agent packages in Install Cloudera Manager Agent Packages on page 53, choosefrom among hosts with the packages installed:
1. Click the Currently Managed Hosts tab.2. Choose the hosts to add to the cluster.
• Search for and choose hosts:
1. To enable Cloudera Manager to automatically discover hosts on which to install CDH and managedservices, enter the cluster hostnames or IP addresses. You can also specify hostname and IP addressranges. For example:
Matching HostsRange Definition
10.1.1.1, 10.1.1.2, 10.1.1.3, 10.1.1.410.1.1.[1-4]
host1.company.com, host2.company.com, host3.company.comhost[1-3].company.com
host07.company.com, host08.company.com, host09.company.com,host10.company.com
host[07-10].company.com
You can specify multiple addresses and address ranges by separating them by commas, semicolons,tabs, or blank spaces, or by placing them on separate lines. Use this technique to make more specificsearches instead of searching overly wide ranges. The scan results will include all addresses scanned,but only scans that reach hosts running SSH will be selected for inclusion in your cluster by default.If you don't know the IP addresses of all of the hosts, you can enter an address range that spans overunused addresses and then deselect the hosts that do not exist (and are not discovered) later in thisprocedure. However, keep in mind that wider ranges will require more time to scan.
2. Click Search. Cloudera Manager identifies the hosts on your cluster to allow you to configure them forservices. If there are a large number of hosts on your cluster, wait a few moments to allow them tobe discovered and shown in the wizard. If the search is taking too long, you can stop the scan byclicking Abort Scan. To find additional hosts, click New Search, add the host names or IP addressesand click Search again. Cloudera Manager scans hosts by checking for network connectivity. If there
Cloudera Manager Installation Guide | 115
Understanding Custom Installation Solutions
are some hosts where you want to install services that are not shown in the list, make sure you havenetwork connectivity between the Cloudera Manager Server host and those hosts. Common causesof loss of connectivity are firewalls and interference from SELinux.
3. Verify that the number of hosts shown matches the number of hosts where you want to installservices. Deselect host entries that do not exist and deselect the hosts where you do not want toinstall services. Click Continue. The Select Repository page displays.
6. Click Continue. The Select Repository page displays.
Choose Software Installation Method and Install SoftwareThe following instructions describe how to use the Cloudera Manager wizard to install Cloudera Manager Agent,CDH, and managed service software.
1. Select how CDH and managed service software is installed: packages or parcels:
• Use Packages - If you did not install packages in Install CDH and Managed Service Packages on page 53,click the package versions to install. Otherwise, select the CDH version (CDH 4 or CDH 5) that matchesthe packages that you installed manually.
• Use Parcels
1. Choose the parcels to install. The choices you see depend on the repositories you have chosen – arepository may contain multiple parcels. Only the parcels for the latest supported service versions areconfigured by default.
You can add additional parcels for previous versions by specifying custom repositories. For example,you can find the locations of the previous CDH 4 parcels athttp://archive.cloudera.com/cdh4/parcels/. Or, if you are installing CDH 4.3 and want to useSentry for Policy File-Based Hive Authorization, you can add the Sentry parcel using this mechanism.
1. To specify the parcel directory, local parcel repository, add a parcel repository, or specify theproperties of a proxy server through which parcels are downloaded, click the More Options buttonand do one or more of the following:
• Parcel Directory and Local Parcel Repository Path - Specify the location of parcels on clusterhosts and the Cloudera Manager Server host.
• Parcel Repository - In the Remote Parcel Repository URLs field, click the button and enterthe URL of the repository. The URL you specify is added to the list of repositories listed in theConfiguring Server Parcel Settings on page 84 page and a parcel is added to the list of parcelson the Select Repository page. If you have multiple repositories configured, you will see all theunique parcels contained in all your repositories.
• Proxy Server - Specify the properties of a proxy server.
2. Click OK.
2. If you did not install Cloudera Manager Agent packages in Install Cloudera Manager Agent Packages on page53, do the following:
a. Select the release of Cloudera Manager Agent to install. You can choose either the version that matchesthe Cloudera Manager Server you are currently using or specify a version in a custom repository.
b. If you opted to use custom repositories for installation files, you can provide a GPG key URL that appliesfor all repositories.
3. Click Continue.
• (Cloudera Manager 5.1.3) Leave Install Oracle Java SE Development Kit (JDK) checked to allow ClouderaManager to install the JDK on each cluster host or uncheck if you plan to install it yourself.
• If your local laws permit you to deploy unlimited strength encryption and you are running a secure cluster,check the Install Java Unlimited Strength Encryption Policy Files checkbox.
116 | Cloudera Manager Installation Guide
Understanding Custom Installation Solutions
Click Continue.4. If your local laws permit you to deploy unlimited strength encryption and you are running a secure cluster,
check the Install Java Unlimited Strength Encryption Policy Files checkbox.5. If you chose to have Cloudera Manager install packages, specify host installation properties:
a. Select root or enter the user name for an account that has password-less sudo permission.b. Select an authentication method:
• If you choose to use password authentication, enter and confirm the password.• If you choose to use public-key authentication provide a passphrase and path to the required key files.
c. You can choose to specify an alternate SSH port. The default value is 22.d. You can specify the maximum number of host installations to run at once. The default value is 10.
6. Click Continue. If you did not install packages in (Optional) Install Cloudera Manager Agent, CDH, and ManagedService Software on page 53, Cloudera Manager installs the Oracle JDK, Cloudera Manager Agent,packagesand CDH and managed service packages or parcels. During the parcel installation, progress is indicated forthe two phases of the parcel installation process (Download and Distribution) in a separate progress bars.If you are installing multiple parcels you will see progress bars for each parcel. When the Continue buttonappears at the bottom of the screen, the installation process is completed. Click Continue.
7. Click Continue. The Host Inspector runs to validate the installation, and provides a summary of what it finds,including all the versions of the installed components. If the validation is successful, click Finish. The ClusterSetup page displays.
Add ServicesThe following instructions describe how to use the Cloudera Manager wizard to configure and start CDH andmanaged services.
1. In the first page of the Add Services wizard you choose the combination of services to install and whetherto install Cloudera Navigator:
• Click the radio button next to the combination of services to install:
CDH 5CDH 4
• Core Hadoop - HDFS, YARN (includes MapReduce2), ZooKeeper, Oozie, Hive, Hue, and Sqoop
• Core Hadoop - HDFS, MapReduce, ZooKeeper,Oozie, Hive, and Hue
• Core with HBase • Core with HBase• Core with Impala• Core with Impala
• All Services - HDFS, MapReduce, ZooKeeper,HBase, Impala, Oozie, Hive, Hue, and Sqoop
• Core with Search• Core with Spark
• Custom Services - Any combination of services. • All Services - HDFS, YARN (includes MapReduce2), ZooKeeper, Oozie, Hive, Hue, Sqoop, HBase,Impala, Solr, Spark, and Key-Value Store Indexer
• Custom Services - Any combination of services.
As you select the services, keep the following in mind:
– Some services depend on other services; for example, HBase requires HDFS and ZooKeeper. ClouderaManager tracks dependencies and installs the correct combination of services.
– In a CDH 4 cluster, the MapReduce service is the default MapReduce computation framework. ChooseCustom Services to install YARN or use the Add Service functionality to add YARN after installationcompletes.
Important: You can create a YARN service in a CDH 4 cluster, but it is not consideredproduction ready.
Cloudera Manager Installation Guide | 117
Understanding Custom Installation Solutions
– In a CDH 5 cluster, the YARN service is the default MapReduce computation framework. Choose CustomServices to install MapReduce or use the Add Service functionality to add MapReduce after installationcompletes.
Important: In CDH 5 the MapReduce service has been deprecated. However, the MapReduceservice is fully supported for backward compatibility through the CDH 5 life cycle.
– The Flume service can be added only after your cluster has been set up.
• If you have chosen Data Hub Edition Trial or Cloudera Enterprise, optionally check the Include ClouderaNavigator checkbox to enable Cloudera Navigator. See the Cloudera Navigator Documentation.
Click Continue. The Customize Role Assignments page displays.2. Customize the assignment of role instances to hosts. The wizard evaluates the hardware configurations of
the hosts to determine the best hosts for each role. The wizard assigns all worker roles to the same set ofhosts to which the HDFS DataNode role is assigned. These assignments are typically acceptable, but youcan reassign role instances to hosts of your choosing, if desired.
Click a field below a role to display a dialog containing a pageable list of hosts. If you click a field containingmultiple hosts, you can also select All Hosts to assign the role to all hosts or Custom to display the pageablehosts dialog.
The following shortcuts for specifying hostname patterns are supported:
• Range of hostnames (without the domain portion)
Matching HostsRange Definition
10.1.1.1, 10.1.1.2, 10.1.1.3, 10.1.1.410.1.1.[1-4]
host1.company.com, host2.company.com, host3.company.comhost[1-3].company.com
host07.company.com, host08.company.com, host09.company.com,host10.company.com
host[07-10].company.com
• IP addresses• Rack name
Click the View By Host button for an overview of the role assignment by hostname ranges.
3. When you are satisfied with the assignments, click Continue. The Database Setup page displays.4. On the Database Setup page, configure settings for required databases:
a. Enter the database host, database type, database name, username, and password for the database thatyou created when you set up the database.
b. Click Test Connection to confirm that Cloudera Manager can communicate with the database using theinformation you have supplied. If the test succeeds in all cases, click Continue; otherwise check and correctthe information you have provided for the database and then try the test again. (For some servers, if youare using the embedded database, you will see a message saying the database will be created at a laterstep in the installation process.) The Review Changes page displays.
5. Review the configuration changes to be applied. Confirm the settings entered for file system paths. The filepaths required vary based on the services to be installed.
Warning: DataNode data directories should not be placed on NAS devices.
Click Continue. The wizard starts the services.6. When all of the services are started, click Continue. You will see a success message indicating that your
cluster has been successfully started.7. Click Finish to proceed to the Home Page.
118 | Cloudera Manager Installation Guide
Understanding Custom Installation Solutions
Change the Default Administrator PasswordAs soon as possible after running the wizard and beginning to use Cloudera Manager, change the defaultadministrator password:
1. Right-click the logged-in username at the far right of the top navigation bar and select Change Password.2. Enter the current password, and a new password twice and then click Update.
Test the InstallationYou can test the installation following the instructions in Testing the Installation on page 123.
Cloudera Manager Installation Guide | 119
Understanding Custom Installation Solutions

Deploying Clients
Client configuration files are generated automatically by Cloudera Manager based on the services you install.
Cloudera Manager deploys these configurations automatically at the end of the installation workflow. You canalso download the client configuration files to deploy them manually.
If you modify the configuration of your cluster, you may need to redeploy the client configuration files. If a service'sstatus is "Client configuration redeployment required," you need to redeploy those files.
See Client Configuration Files for information on downloading client configuration files, or redeploying themthrough Cloudera Manager.
Cloudera Manager Installation Guide | 121
Deploying Clients

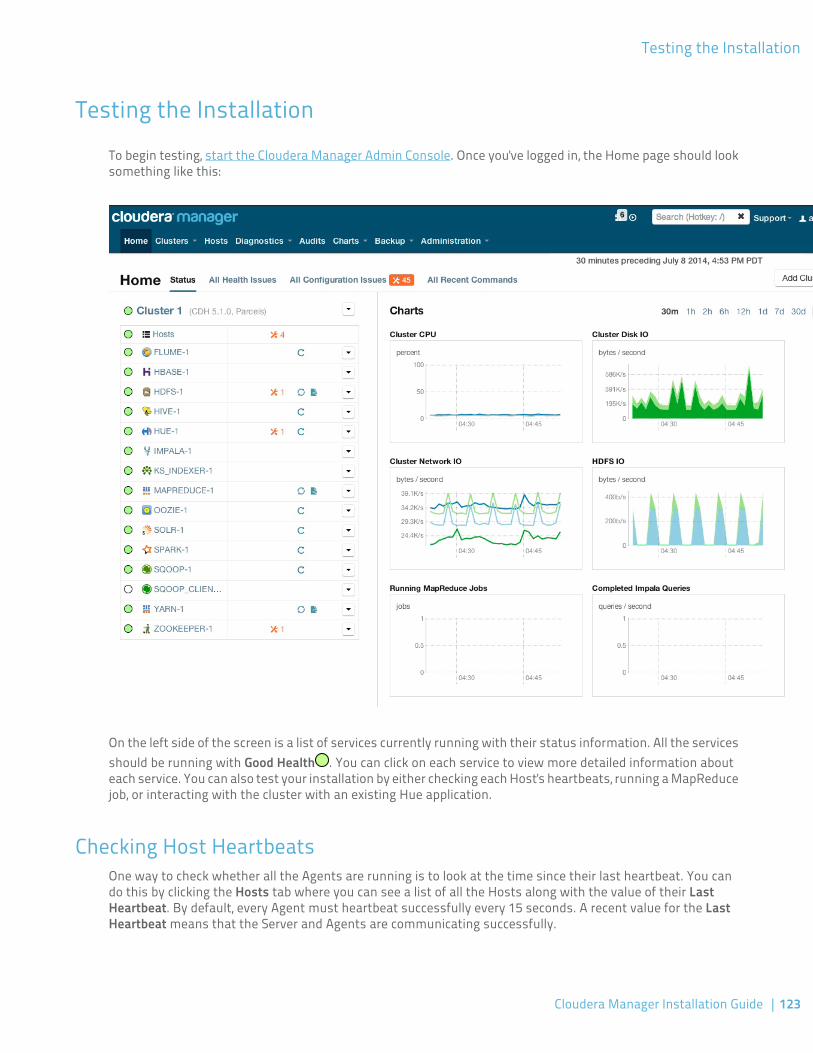
Testing the Installation
To begin testing, start the Cloudera Manager Admin Console. Once you've logged in, the Home page should looksomething like this:
On the left side of the screen is a list of services currently running with their status information. All the servicesshould be running with Good Health . You can click on each service to view more detailed information abouteach service. You can also test your installation by either checking each Host's heartbeats, running a MapReducejob, or interacting with the cluster with an existing Hue application.
Checking Host HeartbeatsOne way to check whether all the Agents are running is to look at the time since their last heartbeat. You cando this by clicking the Hosts tab where you can see a list of all the Hosts along with the value of their LastHeartbeat. By default, every Agent must heartbeat successfully every 15 seconds. A recent value for the LastHeartbeat means that the Server and Agents are communicating successfully.
Cloudera Manager Installation Guide | 123
Testing the Installation
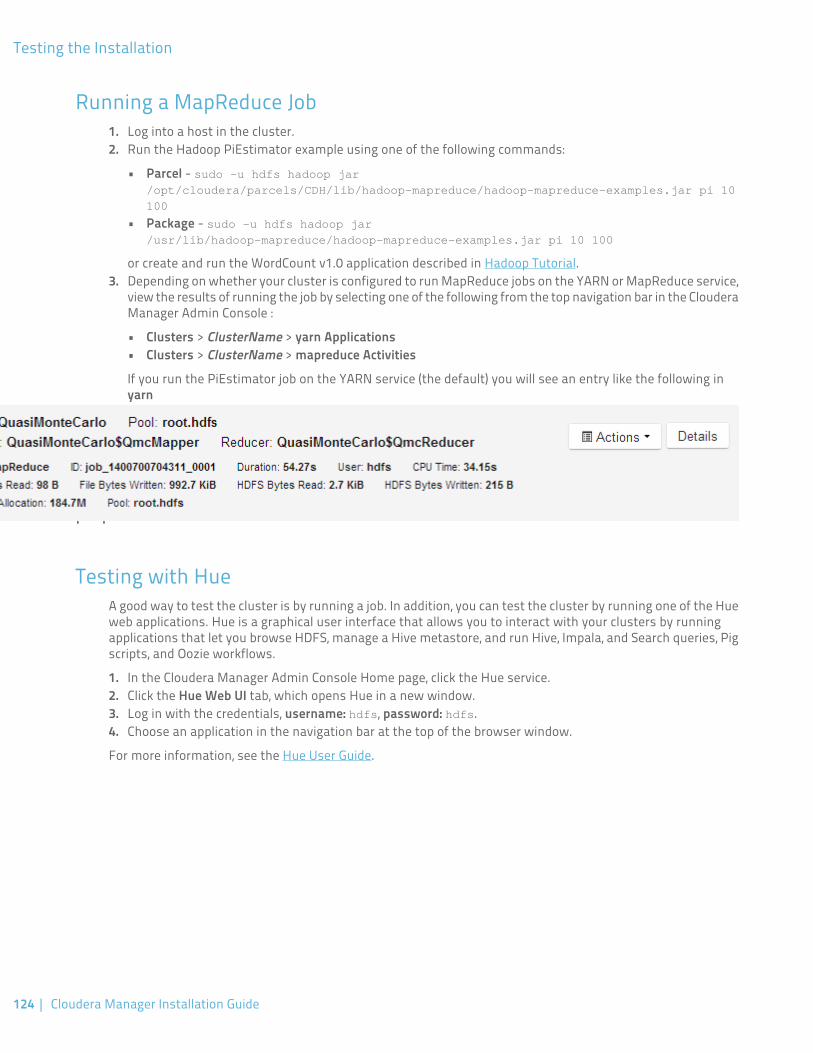
Running a MapReduce Job1. Log into a host in the cluster.2. Run the Hadoop PiEstimator example using one of the following commands:
• Parcel - sudo -u hdfs hadoop jar/opt/cloudera/parcels/CDH/lib/hadoop-mapreduce/hadoop-mapreduce-examples.jar pi 10
100
• Package - sudo -u hdfs hadoop jar/usr/lib/hadoop-mapreduce/hadoop-mapreduce-examples.jar pi 10 100
or create and run the WordCount v1.0 application described in Hadoop Tutorial.3. Depending on whether your cluster is configured to run MapReduce jobs on the YARN or MapReduce service,
view the results of running the job by selecting one of the following from the top navigation bar in the ClouderaManager Admin Console :
• Clusters > ClusterName > yarn Applications• Clusters > ClusterName > mapreduce Activities
If you run the PiEstimator job on the YARN service (the default) you will see an entry like the following inyarn
Applications:
Testing with HueA good way to test the cluster is by running a job. In addition, you can test the cluster by running one of the Hueweb applications. Hue is a graphical user interface that allows you to interact with your clusters by runningapplications that let you browse HDFS, manage a Hive metastore, and run Hive, Impala, and Search queries, Pigscripts, and Oozie workflows.
1. In the Cloudera Manager Admin Console Home page, click the Hue service.2. Click the Hue Web UI tab, which opens Hue in a new window.3. Log in with the credentials, username: hdfs, password: hdfs.4. Choose an application in the navigation bar at the top of the browser window.
For more information, see the Hue User Guide.
124 | Cloudera Manager Installation Guide
Testing the Installation
Uninstalling Cloudera Manager and Managed Software
Use the following instructions to uninstall the Cloudera Manager Server, Agents, managed software, anddatabases.
Reverting an Incomplete InstallationIf you have come to this page because your installation did not complete (for example, if it was interrupted bya virtual machine timeout), and you want to proceed with the installation, do the following before reinstalling:
1. Remove files and directories:
$ sudo rm -Rf /usr/share/cmf /var/lib/cloudera* /var/cache/yum/cloudera*
Uninstalling Cloudera Manager and Managed SoftwareFollow the steps in this section to remove software and data.
Record User Data PathsThe user data paths listed Remove User Data on page 129, /var/lib/flume-ng /var/lib/hadoop*/var/lib/hue /var/lib/navigator /var/lib/oozie /var/lib/solr /var/lib/sqoop*
/var/lib/zookeeper /dfs /mapred /yarn, are the default settings. However, at some point they may havebeen reconfigured in Cloudera Manager. If you want to remove all user data from the cluster and have changedthe paths, either when you installed CDH and managed services or at some later time, note the location of thepaths by checking the configuration in each service.
Stop all Services1. For each cluster managed by Cloudera Manager:
a. On the Home page, click to the right of the cluster name and select Stop.b. Click Stop in the confirmation screen. The Command Details window shows the progress of stopping
services. When All services successfully stopped appears, the task is complete and you can close theCommand Details window.
c. On the Home page, click to the right of the Cloudera Management Service entry and select Stop. TheCommand Details window shows the progress of stopping services. When All services successfullystopped appears, the task is complete and you can close the Command Details window.
2. Stop the Cloudera Management Service.
Deactivate and Remove ParcelsIf you installed using packages, skip this step and go to Uninstall the Cloudera Manager Server on page 126; youwill remove packages in Uninstall Cloudera Manager Agent and Managed Software on page 126. If you installedusing parcels remove them as follows:
1. Click the parcel indicator in the main navigation bar.2. For each activated parcel, select Actions > Deactivate. When this action has completed, the parcel button
changes to Activate.
Cloudera Manager Installation Guide | 125
Uninstalling Cloudera Manager and Managed Software
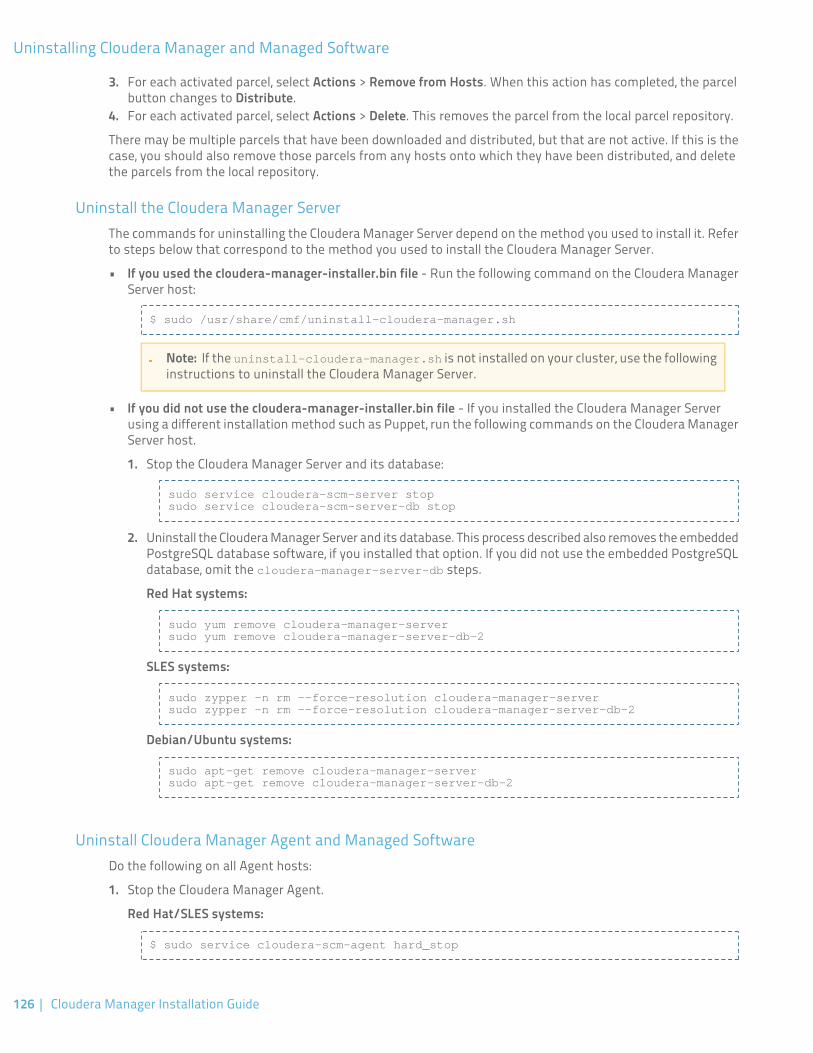
3. For each activated parcel, select Actions > Remove from Hosts. When this action has completed, the parcelbutton changes to Distribute.
4. For each activated parcel, select Actions > Delete. This removes the parcel from the local parcel repository.
There may be multiple parcels that have been downloaded and distributed, but that are not active. If this is thecase, you should also remove those parcels from any hosts onto which they have been distributed, and deletethe parcels from the local repository.
Uninstall the Cloudera Manager ServerThe commands for uninstalling the Cloudera Manager Server depend on the method you used to install it. Referto steps below that correspond to the method you used to install the Cloudera Manager Server.
• If you used the cloudera-manager-installer.bin file - Run the following command on the Cloudera ManagerServer host:
$ sudo /usr/share/cmf/uninstall-cloudera-manager.sh
Note: If the uninstall-cloudera-manager.sh is not installed on your cluster, use the followinginstructions to uninstall the Cloudera Manager Server.
• If you did not use the cloudera-manager-installer.bin file - If you installed the Cloudera Manager Serverusing a different installation method such as Puppet, run the following commands on the Cloudera ManagerServer host.
1. Stop the Cloudera Manager Server and its database:
sudo service cloudera-scm-server stopsudo service cloudera-scm-server-db stop
2. Uninstall the Cloudera Manager Server and its database. This process described also removes the embeddedPostgreSQL database software, if you installed that option. If you did not use the embedded PostgreSQLdatabase, omit the cloudera-manager-server-db steps.
Red Hat systems:
sudo yum remove cloudera-manager-serversudo yum remove cloudera-manager-server-db-2
SLES systems:
sudo zypper -n rm --force-resolution cloudera-manager-serversudo zypper -n rm --force-resolution cloudera-manager-server-db-2
Debian/Ubuntu systems:
sudo apt-get remove cloudera-manager-serversudo apt-get remove cloudera-manager-server-db-2
Uninstall Cloudera Manager Agent and Managed SoftwareDo the following on all Agent hosts:
1. Stop the Cloudera Manager Agent.
Red Hat/SLES systems:
$ sudo service cloudera-scm-agent hard_stop
126 | Cloudera Manager Installation Guide
Uninstalling Cloudera Manager and Managed Software
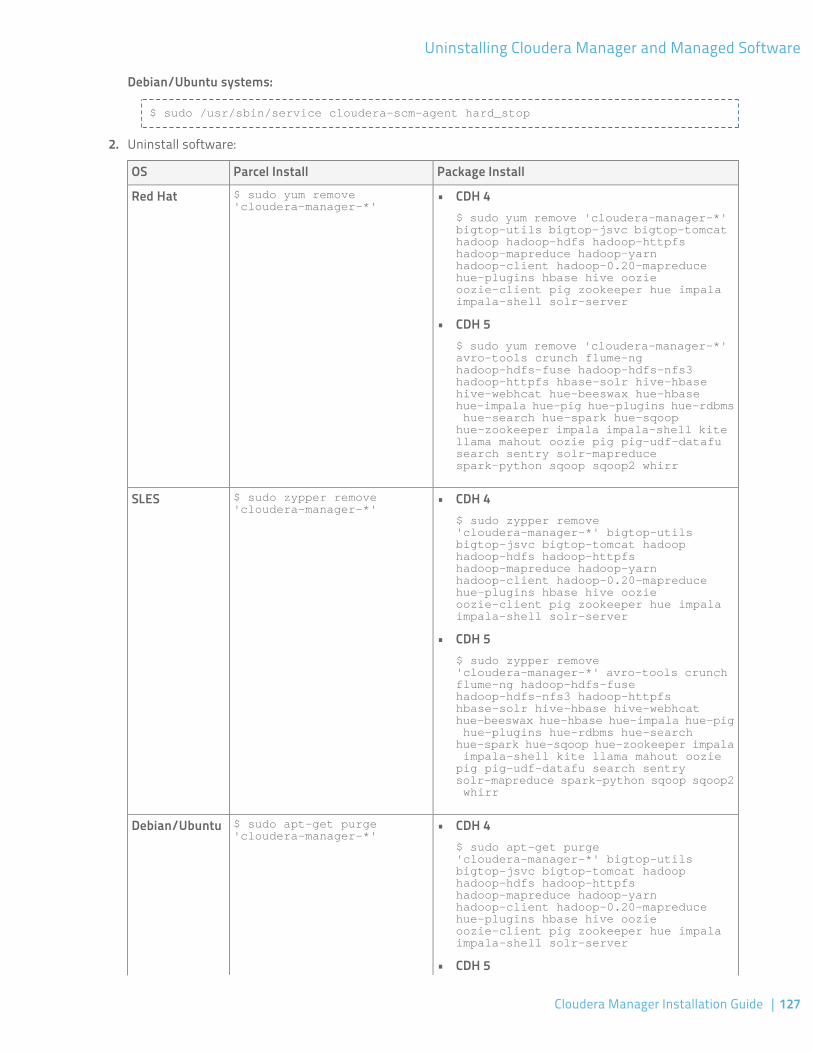
Debian/Ubuntu systems:
$ sudo /usr/sbin/service cloudera-scm-agent hard_stop
2. Uninstall software:
Package InstallParcel InstallOS$ sudo yum remove 'cloudera-manager-*'
Red Hat • CDH 4$ sudo yum remove 'cloudera-manager-*' bigtop-utils bigtop-jsvc bigtop-tomcat hadoop hadoop-hdfs hadoop-httpfs hadoop-mapreduce hadoop-yarn hadoop-client hadoop-0.20-mapreduce hue-plugins hbase hive oozie oozie-client pig zookeeper hue impala impala-shell solr-server
• CDH 5$ sudo yum remove 'cloudera-manager-*' avro-tools crunch flume-ng hadoop-hdfs-fuse hadoop-hdfs-nfs3 hadoop-httpfs hbase-solr hive-hbase hive-webhcat hue-beeswax hue-hbase hue-impala hue-pig hue-plugins hue-rdbms hue-search hue-spark hue-sqoop hue-zookeeper impala impala-shell kite llama mahout oozie pig pig-udf-datafu search sentry solr-mapreduce spark-python sqoop sqoop2 whirr
$ sudo zypper remove 'cloudera-manager-*'
SLES • CDH 4$ sudo zypper remove 'cloudera-manager-*' bigtop-utils bigtop-jsvc bigtop-tomcat hadoop hadoop-hdfs hadoop-httpfs hadoop-mapreduce hadoop-yarn hadoop-client hadoop-0.20-mapreduce hue-plugins hbase hive oozie oozie-client pig zookeeper hue impala impala-shell solr-server
• CDH 5$ sudo zypper remove 'cloudera-manager-*' avro-tools crunch flume-ng hadoop-hdfs-fuse hadoop-hdfs-nfs3 hadoop-httpfs hbase-solr hive-hbase hive-webhcat hue-beeswax hue-hbase hue-impala hue-pig hue-plugins hue-rdbms hue-search hue-spark hue-sqoop hue-zookeeper impala impala-shell kite llama mahout oozie pig pig-udf-datafu search sentry solr-mapreduce spark-python sqoop sqoop2 whirr
$ sudo apt-get purge 'cloudera-manager-*'
Debian/Ubuntu • CDH 4$ sudo apt-get purge 'cloudera-manager-*' bigtop-utils bigtop-jsvc bigtop-tomcat hadoop hadoop-hdfs hadoop-httpfs hadoop-mapreduce hadoop-yarn hadoop-client hadoop-0.20-mapreduce hue-plugins hbase hive oozie oozie-client pig zookeeper hue impala impala-shell solr-server
• CDH 5
Cloudera Manager Installation Guide | 127
Uninstalling Cloudera Manager and Managed Software
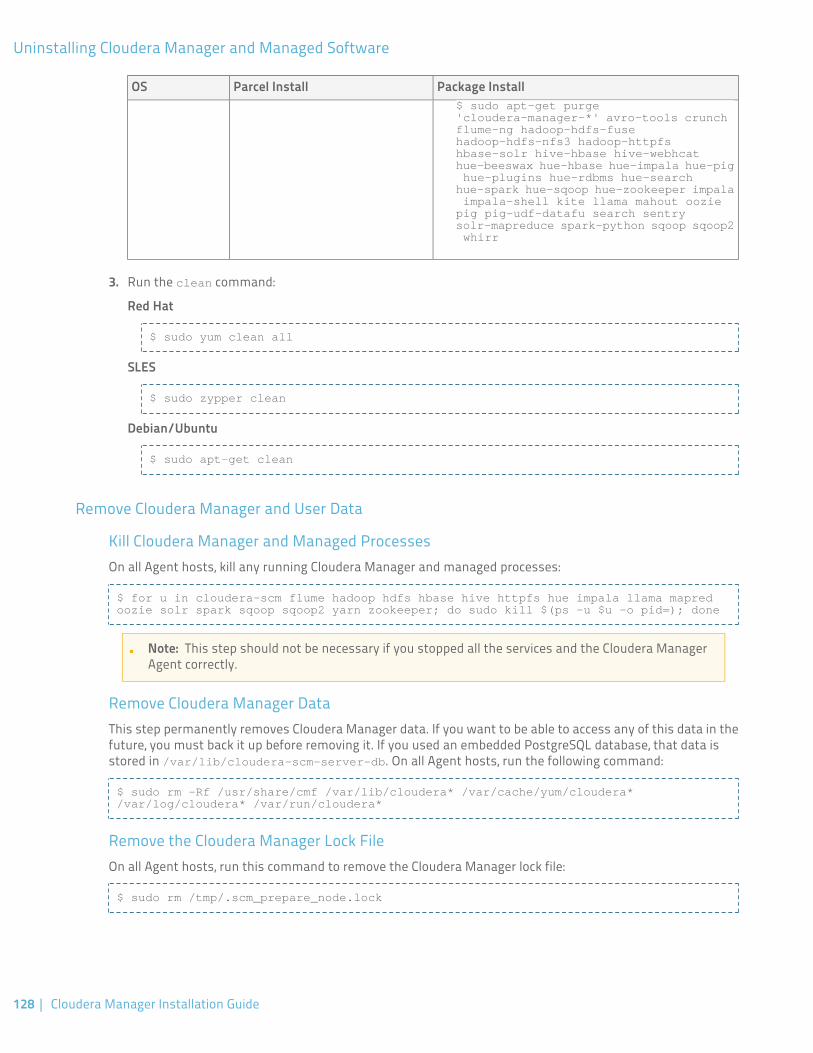
Package InstallParcel InstallOS$ sudo apt-get purge 'cloudera-manager-*' avro-tools crunch flume-ng hadoop-hdfs-fuse hadoop-hdfs-nfs3 hadoop-httpfs hbase-solr hive-hbase hive-webhcat hue-beeswax hue-hbase hue-impala hue-pig hue-plugins hue-rdbms hue-search hue-spark hue-sqoop hue-zookeeper impala impala-shell kite llama mahout oozie pig pig-udf-datafu search sentry solr-mapreduce spark-python sqoop sqoop2 whirr
3. Run the clean command:
Red Hat
$ sudo yum clean all
SLES
$ sudo zypper clean
Debian/Ubuntu
$ sudo apt-get clean
Remove Cloudera Manager and User Data
Kill Cloudera Manager and Managed ProcessesOn all Agent hosts, kill any running Cloudera Manager and managed processes:
$ for u in cloudera-scm flume hadoop hdfs hbase hive httpfs hue impala llama mapred oozie solr spark sqoop sqoop2 yarn zookeeper; do sudo kill $(ps -u $u -o pid=); done
Note: This step should not be necessary if you stopped all the services and the Cloudera ManagerAgent correctly.
Remove Cloudera Manager DataThis step permanently removes Cloudera Manager data. If you want to be able to access any of this data in thefuture, you must back it up before removing it. If you used an embedded PostgreSQL database, that data isstored in /var/lib/cloudera-scm-server-db. On all Agent hosts, run the following command:
$ sudo rm -Rf /usr/share/cmf /var/lib/cloudera* /var/cache/yum/cloudera* /var/log/cloudera* /var/run/cloudera*
Remove the Cloudera Manager Lock FileOn all Agent hosts, run this command to remove the Cloudera Manager lock file:
$ sudo rm /tmp/.scm_prepare_node.lock
128 | Cloudera Manager Installation Guide
Uninstalling Cloudera Manager and Managed Software
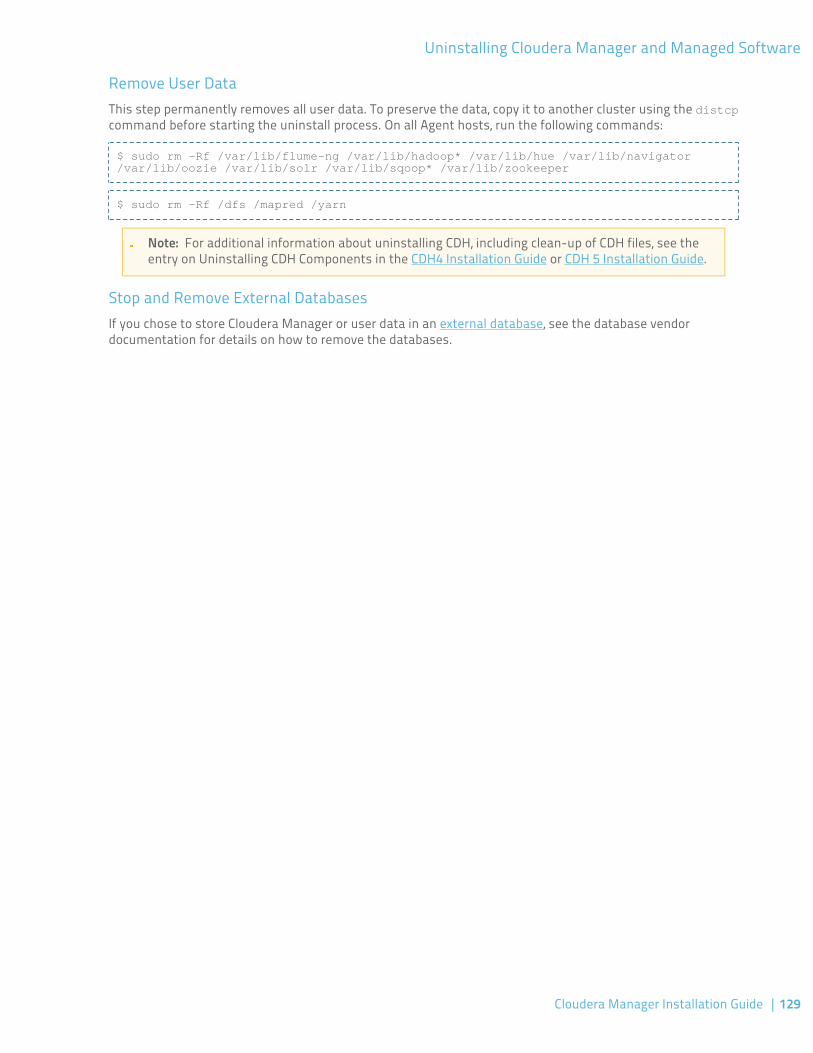
Remove User DataThis step permanently removes all user data. To preserve the data, copy it to another cluster using the distcpcommand before starting the uninstall process. On all Agent hosts, run the following commands:
$ sudo rm -Rf /var/lib/flume-ng /var/lib/hadoop* /var/lib/hue /var/lib/navigator /var/lib/oozie /var/lib/solr /var/lib/sqoop* /var/lib/zookeeper
$ sudo rm -Rf /dfs /mapred /yarn
Note: For additional information about uninstalling CDH, including clean-up of CDH files, see theentry on Uninstalling CDH Components in the CDH4 Installation Guide or CDH 5 Installation Guide.
Stop and Remove External DatabasesIf you chose to store Cloudera Manager or user data in an external database, see the database vendordocumentation for details on how to remove the databases.
Cloudera Manager Installation Guide | 129
Uninstalling Cloudera Manager and Managed Software


Troubleshooting Installation and Upgrade Problems
For information on known issues, seehttp://www.cloudera.com/content/cloudera-content/cloudera-docs/CM5/latest/Cloudera-Manager-Release-Notes/cm5rn_known_issues.html.
SolutionReasonSymptom
Disable SELinux by running sudosetenforce 0 on the Cloudera
You may have SELinux enabled."Failed to start server" reported bycloudera-manager-installer.bin.
Manager Server host. To disable it/var/log/cloudera-scm-server/cloudera-scm-server.log
permanently, edit/etc/selinux/config.
contains a message beginningCaused by:
java.lang.ClassNotFoundException:
com.mysql.jdbc.Driver...
See Uninstalling Cloudera Managerand Managed Software on page 125.
You need to do some manualcleanup.
Installation interrupted and installerwon't restart.
Make sure that the InnoDB engineis configured, not the MyISAM
Tables may be configured with theISAM engine. The Server will not
Cloudera Manager Server fails tostart and the Server is configured to
engine. To check what engine yourstart if its tables are configured withuse a MySQL database to storetables are using, run the followingthe MyISAM engine, and an errorinformation about service
configuration. command from the MySQL shell:mysql> show table status;
For more information, see MySQLDatabase on page 30.
such as the following will appear inthe log file:Tables ... have unsupported engine type ... . InnoDB is required.
Check/var/log/cloudera-scm-server/cloudera-scm-server.log
You may have SELinux or iptablesenabled.
Agents fail to connect to server.Error 113 ('No route to host') in/var/log/cloudera-scm-agent/cloudera-scm-agent.log. on the Server host and
/var/log/cloudera-scm-agent/cloudera-scm-agent.log
on the Agent hosts. Disable SELinuxand iptables.
You may have network connectivityproblems.
Some cluster hosts do not appearwhen you click Find Hosts in installor update wizard.
• Make sure all cluster hosts haveSSH port 22 open.
• Check other common causes ofloss of connectivity such asfirewalls and interference fromSELinux.
Hostname mapping or permissionsare incorrectly set up.
"Access denied" in install or updatewizard during databaseconfiguration for Activity Monitor orReports Manager.
• For hostname configuration, seeConfiguring Network Names (forCDH 5) or Configuring NetworkNames (for CDH 4).
• For permissions, make sure thevalues you enter into the wizardmatch those you used when youconfigured the databases. Thevalue you enter into the wizardas the database hostname mustmatch the value you entered forthe hostname (if any) when youconfigured the database.
Cloudera Manager Installation Guide | 131
Troubleshooting Installation and Upgrade Problems
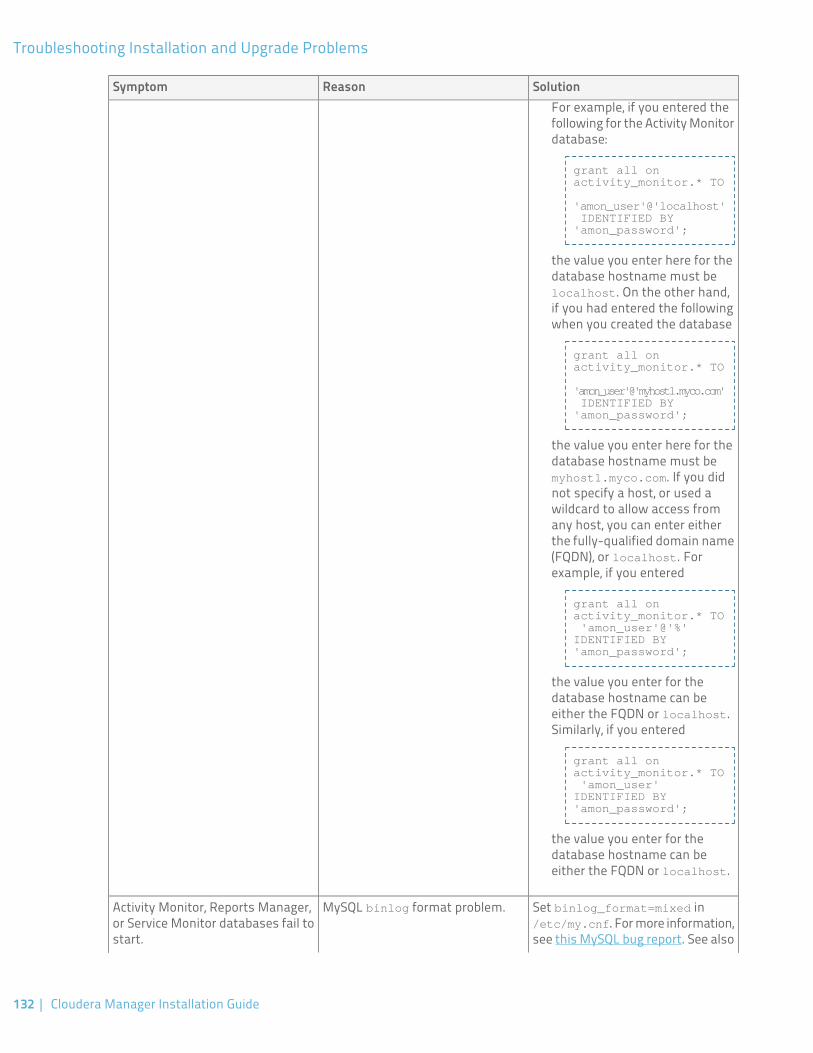
SolutionReasonSymptomFor example, if you entered thefollowing for the Activity Monitordatabase:
grant all on activity_monitor.* TO
'amon_user'@'localhost' IDENTIFIED BY 'amon_password';
the value you enter here for thedatabase hostname must belocalhost. On the other hand,if you had entered the followingwhen you created the database
grant all on activity_monitor.* TO
'amon_user'@'myhost1.myco.com' IDENTIFIED BY 'amon_password';
the value you enter here for thedatabase hostname must bemyhost1.myco.com. If you didnot specify a host, or used awildcard to allow access fromany host, you can enter eitherthe fully-qualified domain name(FQDN), or localhost. Forexample, if you entered
grant all on activity_monitor.* TO 'amon_user'@'%' IDENTIFIED BY 'amon_password';
the value you enter for thedatabase hostname can beeither the FQDN or localhost.Similarly, if you entered
grant all on activity_monitor.* TO 'amon_user' IDENTIFIED BY 'amon_password';
the value you enter for thedatabase hostname can beeither the FQDN or localhost.
Set binlog_format=mixed in/etc/my.cnf. For more information,
MySQL binlog format problem.Activity Monitor, Reports Manager,or Service Monitor databases fail tostart. see this MySQL bug report. See also
132 | Cloudera Manager Installation Guide
Troubleshooting Installation and Upgrade Problems
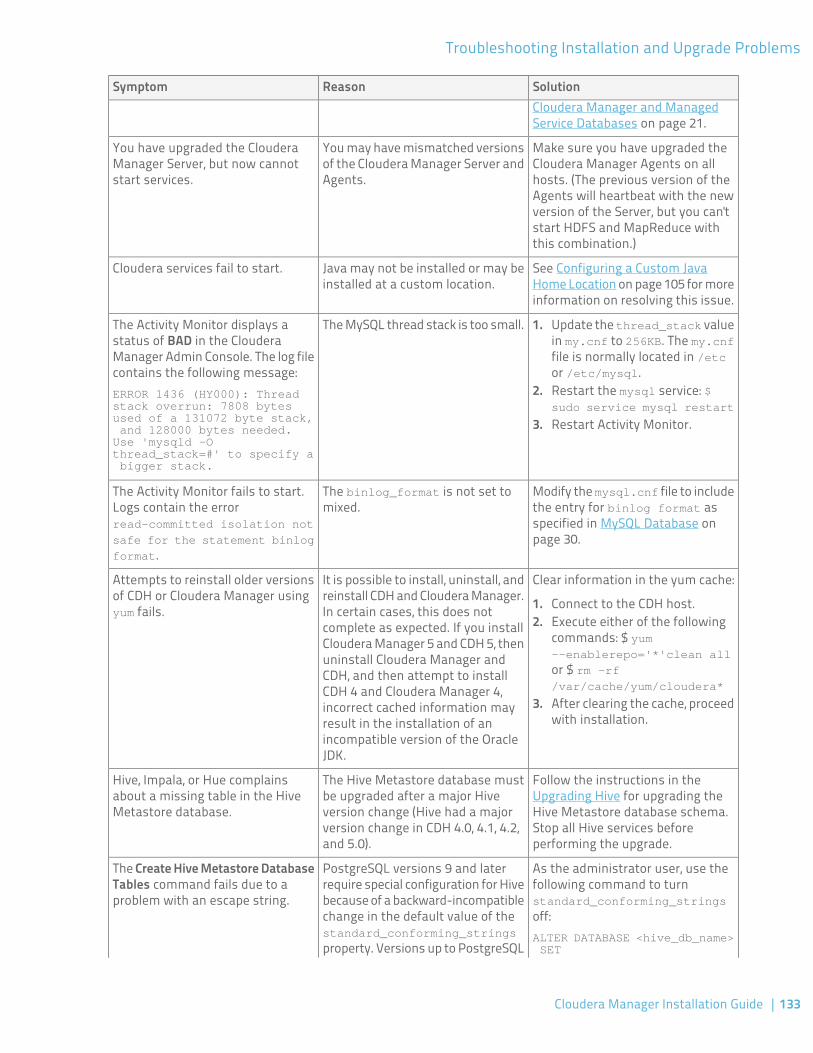
SolutionReasonSymptomCloudera Manager and ManagedService Databases on page 21.
Make sure you have upgraded theCloudera Manager Agents on all
You may have mismatched versionsof the Cloudera Manager Server andAgents.
You have upgraded the ClouderaManager Server, but now cannotstart services. hosts. (The previous version of the
Agents will heartbeat with the newversion of the Server, but you can'tstart HDFS and MapReduce withthis combination.)
See Configuring a Custom JavaHome Location on page 105 for moreinformation on resolving this issue.
Java may not be installed or may beinstalled at a custom location.
Cloudera services fail to start.
The MySQL thread stack is too small.The Activity Monitor displays astatus of BAD in the Cloudera
1. Update the thread_stack valuein my.cnf to 256KB. The my.cnf
Manager Admin Console. The log filecontains the following message:ERROR 1436 (HY000): Thread stack overrun: 7808 bytes
file is normally located in /etcor /etc/mysql.
2. Restart the mysql service: $sudo service mysql restart
used of a 131072 byte stack, 3. Restart Activity Monitor. and 128000 bytes needed.Use 'mysqld -O thread_stack=#' to specify a bigger stack.
Modify the mysql.cnf file to includethe entry for binlog format as
The binlog_format is not set tomixed.
The Activity Monitor fails to start.Logs contain the errorread-committed isolation not specified in MySQL Database on
page 30.safe for the statement binlog
format.
Clear information in the yum cache:It is possible to install, uninstall, andreinstall CDH and Cloudera Manager.
Attempts to reinstall older versionsof CDH or Cloudera Manager usingyum fails. 1. Connect to the CDH host.In certain cases, this does not
complete as expected. If you install 2. Execute either of the followingcommands: $ yumCloudera Manager 5 and CDH 5, then--enablerepo='*'clean alluninstall Cloudera Manager andor $ rm -rf/var/cache/yum/cloudera*
CDH, and then attempt to installCDH 4 and Cloudera Manager 4,
3. After clearing the cache, proceedwith installation.
incorrect cached information mayresult in the installation of anincompatible version of the OracleJDK.
Follow the instructions in theUpgrading Hive for upgrading the
The Hive Metastore database mustbe upgraded after a major Hive
Hive, Impala, or Hue complainsabout a missing table in the HiveMetastore database. Hive Metastore database schema.
Stop all Hive services beforeperforming the upgrade.
version change (Hive had a majorversion change in CDH 4.0, 4.1, 4.2,and 5.0).
As the administrator user, use thefollowing command to turn
PostgreSQL versions 9 and laterrequire special configuration for Hive
The Create Hive Metastore DatabaseTables command fails due to aproblem with an escape string. standard_conforming_strings
off:ALTER DATABASE <hive_db_name> SET
because of a backward-incompatiblechange in the default value of thestandard_conforming_strings
property. Versions up to PostgreSQL
Cloudera Manager Installation Guide | 133
Troubleshooting Installation and Upgrade Problems
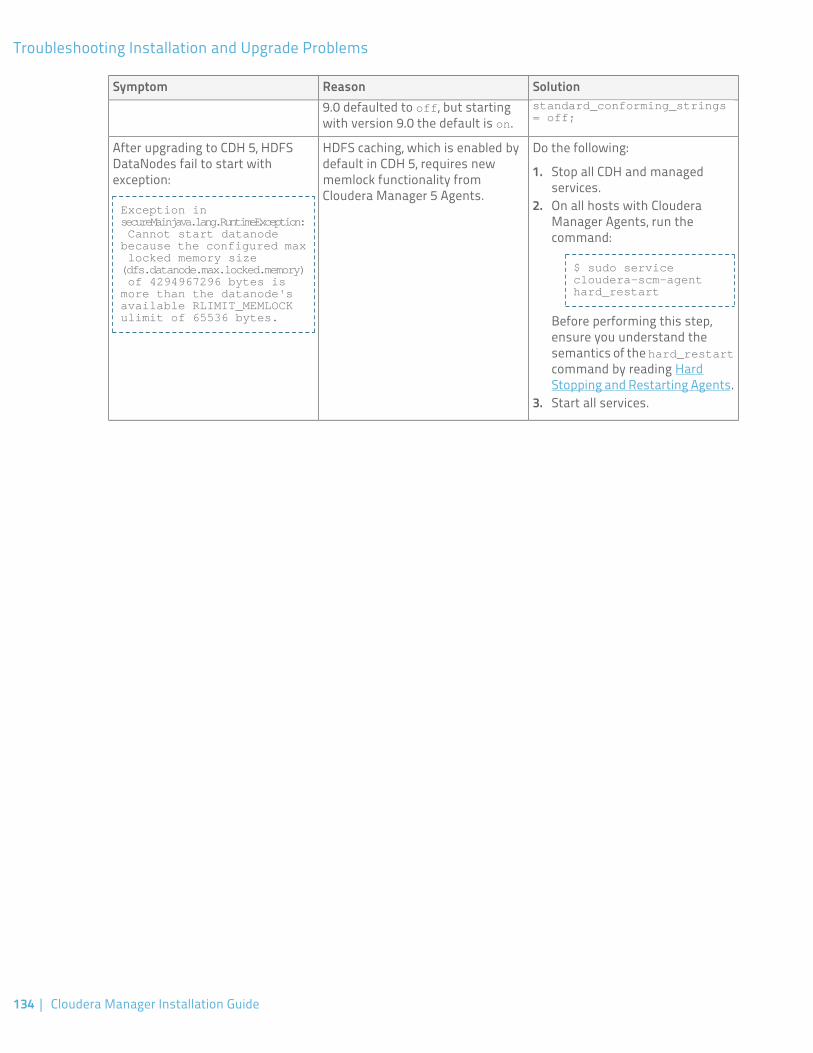
SolutionReasonSymptom9.0 defaulted to off, but startingwith version 9.0 the default is on.
standard_conforming_strings = off;
Do the following:HDFS caching, which is enabled bydefault in CDH 5, requires new
After upgrading to CDH 5, HDFSDataNodes fail to start withexception:
Exception in secureMainjava.lang.RuntimeException:
1. Stop all CDH and managedservices.memlock functionality from
Cloudera Manager 5 Agents.2. On all hosts with Cloudera
Manager Agents, run thecommand:
$ sudo service cloudera-scm-agent hard_restart
Cannot start datanode because the configured max locked memory size (dfs.datanode.max.locked.memory) of 4294967296 bytes is more than the datanode's available RLIMIT_MEMLOCK ulimit of 65536 bytes. Before performing this step,
ensure you understand thesemantics of the hard_restartcommand by reading HardStopping and Restarting Agents.
3. Start all services.
134 | Cloudera Manager Installation Guide
Troubleshooting Installation and Upgrade Problems
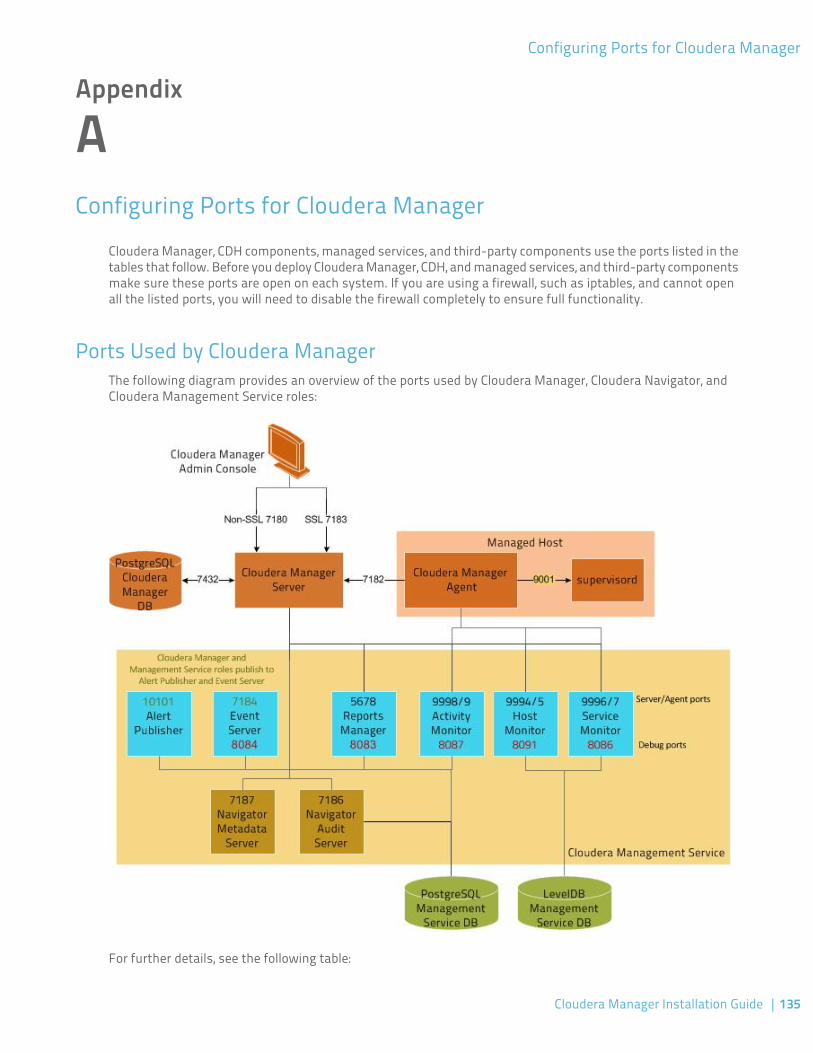
Appendix
AConfiguring Ports for Cloudera Manager
Cloudera Manager, CDH components, managed services, and third-party components use the ports listed in thetables that follow. Before you deploy Cloudera Manager, CDH, and managed services, and third-party componentsmake sure these ports are open on each system. If you are using a firewall, such as iptables, and cannot openall the listed ports, you will need to disable the firewall completely to ensure full functionality.
Ports Used by Cloudera ManagerThe following diagram provides an overview of the ports used by Cloudera Manager, Cloudera Navigator, andCloudera Management Service roles:
For further details, see the following table:
Cloudera Manager Installation Guide | 135
Configuring Ports for Cloudera Manager
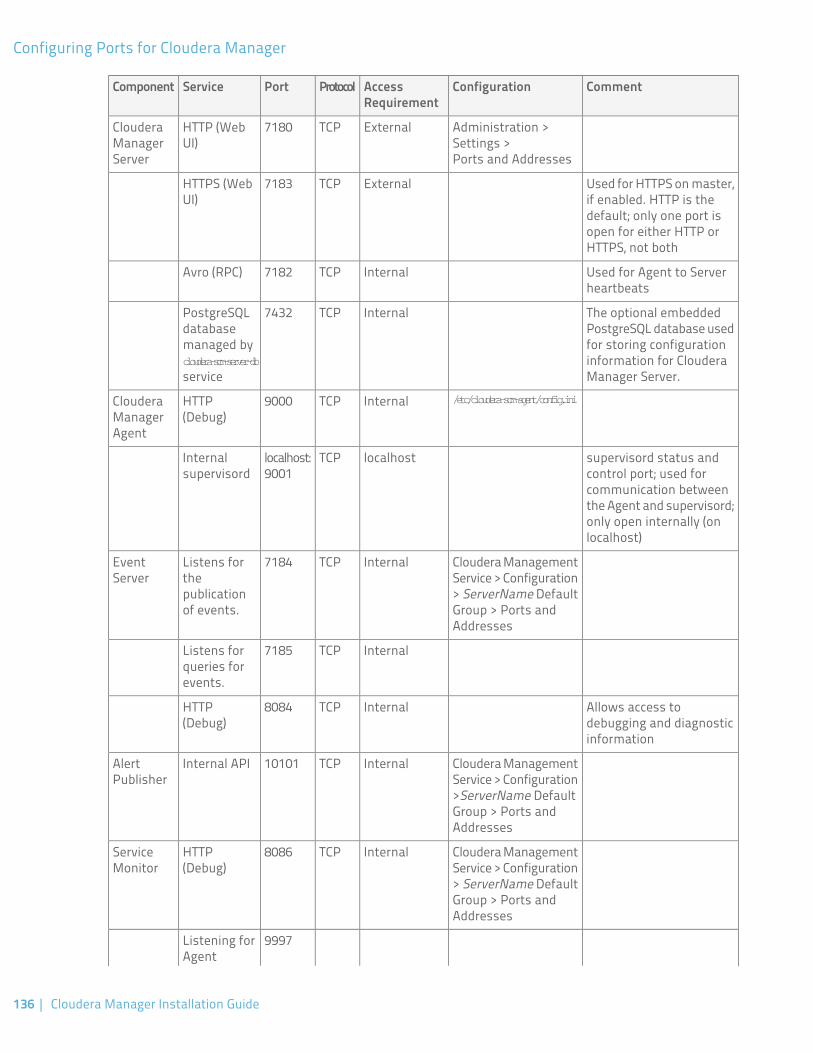
CommentConfigurationAccessRequirement
ProtocolPortServiceComponent
Administration >Settings >Ports and Addresses
ExternalTCP7180HTTP (WebUI)
ClouderaManagerServer
Used for HTTPS on master,if enabled. HTTP is the
ExternalTCP7183HTTPS (WebUI)
default; only one port isopen for either HTTP orHTTPS, not both
Used for Agent to Serverheartbeats
InternalTCP7182Avro (RPC)
The optional embeddedPostgreSQL database used
InternalTCP7432PostgreSQL database
for storing configurationmanaged byinformation for ClouderaManager Server.
cloudera-scm-server-db
service/etc/cloudera-scm-agent/config.iniInternalTCP9000HTTP
(Debug)Cloudera ManagerAgent
supervisord status andcontrol port; used for
localhostTCPlocalhost:9001
Internalsupervisord
communication betweenthe Agent and supervisord;only open internally (onlocalhost)
Cloudera ManagementService > Configuration
InternalTCP7184Listens forthe
EventServer
> ServerName Defaultpublicationof events. Group > Ports and
Addresses
InternalTCP7185Listens forqueries forevents.
Allows access todebugging and diagnosticinformation
InternalTCP8084HTTP(Debug)
Cloudera ManagementService > Configuration
InternalTCP10101Internal APIAlertPublisher
>ServerName DefaultGroup > Ports andAddresses
Cloudera ManagementService > Configuration
InternalTCP8086HTTP(Debug)
ServiceMonitor
> ServerName DefaultGroup > Ports andAddresses
9997Listening forAgent
136 | Cloudera Manager Installation Guide
Configuring Ports for Cloudera Manager
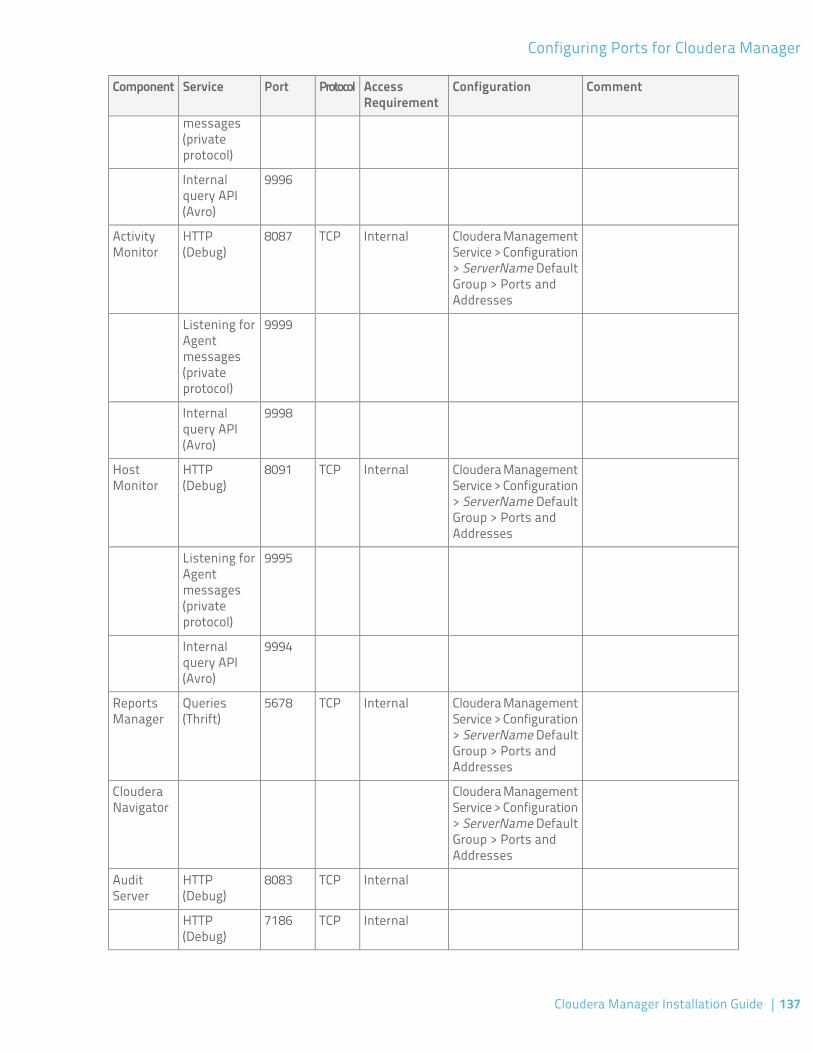
CommentConfigurationAccessRequirement
ProtocolPortServiceComponent
messages(privateprotocol)
9996Internalquery API(Avro)
Cloudera ManagementService > Configuration
InternalTCP8087HTTP(Debug)
ActivityMonitor
> ServerName DefaultGroup > Ports andAddresses
9999Listening forAgentmessages(privateprotocol)
9998Internalquery API(Avro)
Cloudera ManagementService > Configuration
InternalTCP8091HTTP(Debug)
HostMonitor
> ServerName DefaultGroup > Ports andAddresses
9995Listening forAgentmessages(privateprotocol)
9994Internalquery API(Avro)
Cloudera ManagementService > Configuration
InternalTCP5678Queries(Thrift)
ReportsManager
> ServerName DefaultGroup > Ports andAddresses
Cloudera ManagementService > Configuration
ClouderaNavigator
> ServerName DefaultGroup > Ports andAddresses
InternalTCP8083HTTP(Debug)
AuditServer
InternalTCP7186HTTP(Debug)
Cloudera Manager Installation Guide | 137
Configuring Ports for Cloudera Manager
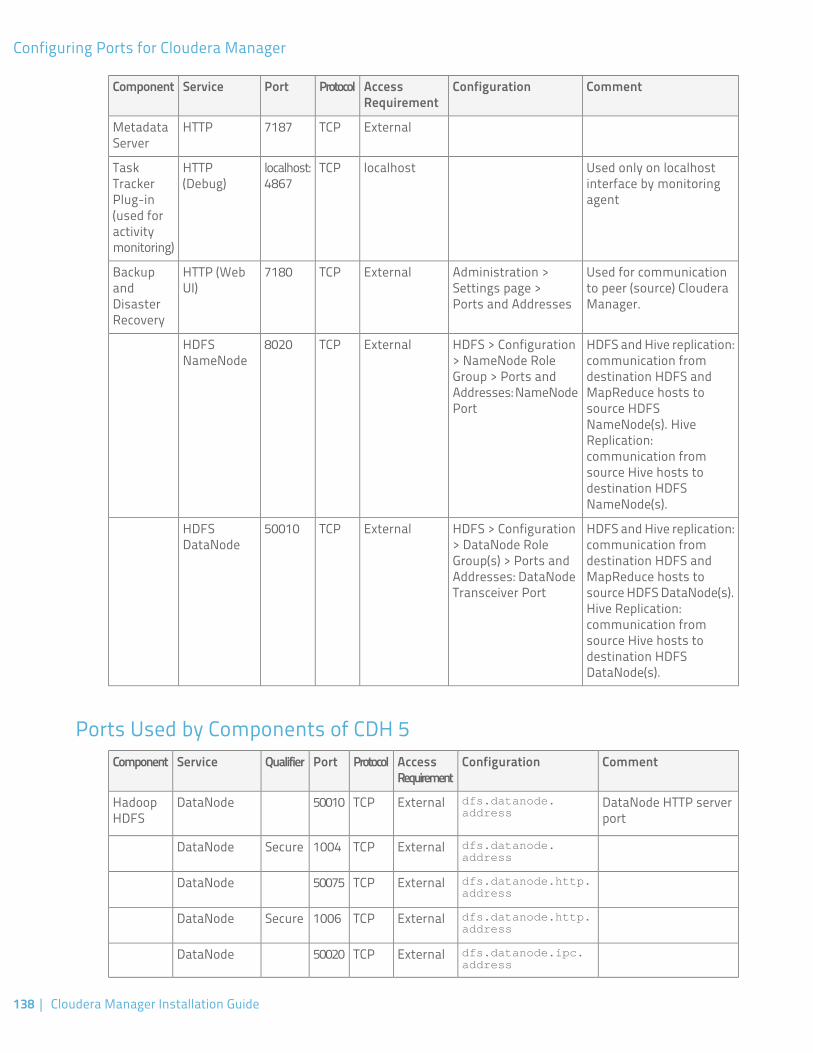
CommentConfigurationAccessRequirement
ProtocolPortServiceComponent
ExternalTCP7187HTTPMetadataServer
Used only on localhostinterface by monitoringagent
localhostTCPlocalhost:4867
HTTP(Debug)
TaskTrackerPlug-in(used foractivitymonitoring)
Used for communicationto peer (source) ClouderaManager.
Administration >Settings page >Ports and Addresses
ExternalTCP7180HTTP (WebUI)
BackupandDisasterRecovery
HDFS and Hive replication:communication from
HDFS > Configuration> NameNode Role
ExternalTCP8020HDFSNameNode
destination HDFS andGroup > Ports andMapReduce hosts toAddresses: NameNode
Port source HDFSNameNode(s). HiveReplication:communication fromsource Hive hosts todestination HDFSNameNode(s).
HDFS and Hive replication:communication from
HDFS > Configuration> DataNode Role
ExternalTCP50010HDFSDataNode
destination HDFS andGroup(s) > Ports andMapReduce hosts toAddresses: DataNode
Transceiver Port source HDFS DataNode(s).Hive Replication:communication fromsource Hive hosts todestination HDFSDataNode(s).
Ports Used by Components of CDH 5CommentConfigurationAccess
RequirementProtocolPortQualifierServiceComponent
DataNode HTTP serverport
dfs.datanode.address
ExternalTCP50010DataNodeHadoopHDFS
dfs.datanode.address
ExternalTCP1004SecureDataNode
dfs.datanode.http.address
ExternalTCP50075DataNode
dfs.datanode.http.address
ExternalTCP1006SecureDataNode
dfs.datanode.ipc.address
ExternalTCP50020DataNode
138 | Cloudera Manager Installation Guide
Configuring Ports for Cloudera Manager
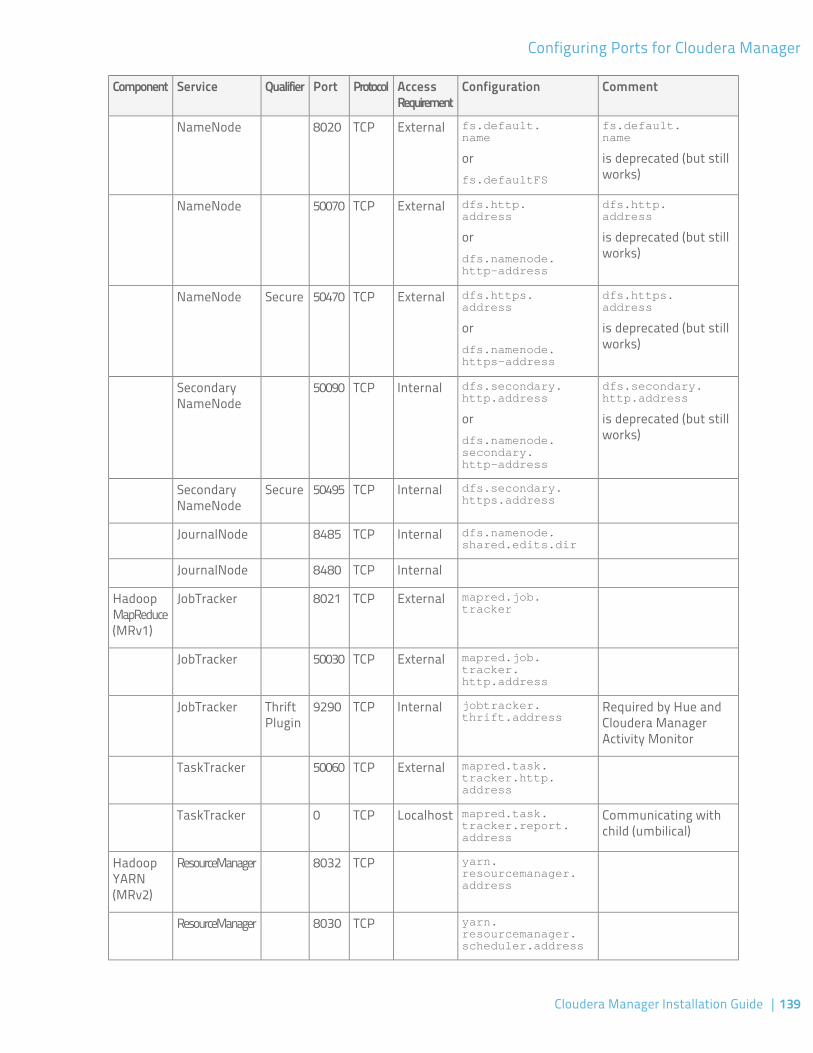
CommentConfigurationAccessRequirement
ProtocolPortQualifierServiceComponent
fs.default.name
fs.default.name
ExternalTCP8020NameNode
is deprecated (but stillworks)
orfs.defaultFS
dfs.http.address
dfs.http.address
ExternalTCP50070NameNode
is deprecated (but stillworks)
ordfs.namenode.http-address
dfs.https.address
dfs.https.address
ExternalTCP50470SecureNameNode
is deprecated (but stillworks)
ordfs.namenode.https-address
dfs.secondary.http.address
dfs.secondary.http.address
InternalTCP50090SecondaryNameNode
is deprecated (but stillworks)
ordfs.namenode.secondary.http-address
dfs.secondary.https.address
InternalTCP50495SecureSecondaryNameNode
dfs.namenode.shared.edits.dir
InternalTCP8485JournalNode
InternalTCP8480JournalNode
mapred.job.tracker
ExternalTCP8021JobTrackerHadoopMapReduce(MRv1)
mapred.job.tracker.http.address
ExternalTCP50030JobTracker
Required by Hue andCloudera ManagerActivity Monitor
jobtracker.thrift.address
InternalTCP9290ThriftPlugin
JobTracker
mapred.task.tracker.http.address
ExternalTCP50060TaskTracker
Communicating withchild (umbilical)
mapred.task.tracker.report.address
LocalhostTCP0TaskTracker
yarn.resourcemanager.address
TCP8032ResourceManagerHadoopYARN(MRv2)
yarn.resourcemanager.scheduler.address
TCP8030ResourceManager
Cloudera Manager Installation Guide | 139
Configuring Ports for Cloudera Manager
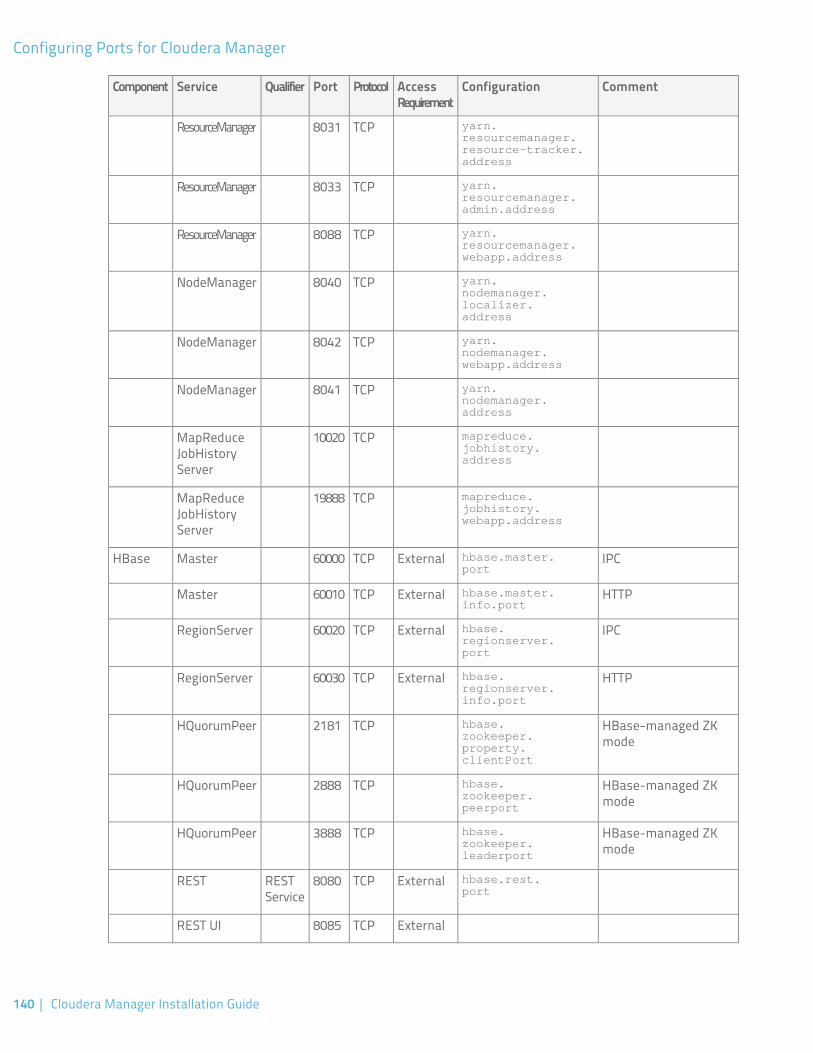
CommentConfigurationAccessRequirement
ProtocolPortQualifierServiceComponent
yarn.resourcemanager.
TCP8031ResourceManagerresource-tracker.address
yarn.resourcemanager.admin.address
TCP8033ResourceManager
yarn.resourcemanager.webapp.address
TCP8088ResourceManager
yarn.nodemanager.
TCP8040NodeManagerlocalizer.address
yarn.nodemanager.webapp.address
TCP8042NodeManager
yarn.nodemanager.address
TCP8041NodeManager
mapreduce.jobhistory.address
TCP10020MapReduceJobHistoryServer
mapreduce.jobhistory.webapp.address
TCP19888MapReduceJobHistoryServer
IPChbase.master.port
ExternalTCP60000MasterHBase
HTTPhbase.master.info.port
ExternalTCP60010Master
IPChbase.regionserver.port
ExternalTCP60020RegionServer
HTTPhbase.regionserver.info.port
ExternalTCP60030RegionServer
HBase-managed ZKmode
hbase.zookeeper.property.clientPort
TCP2181HQuorumPeer
HBase-managed ZKmode
hbase.zookeeper.peerport
TCP2888HQuorumPeer
HBase-managed ZKmode
hbase.zookeeper.leaderport
TCP3888HQuorumPeer
hbase.rest.port
ExternalTCP8080RESTService
REST
ExternalTCP8085REST UI
140 | Cloudera Manager Installation Guide
Configuring Ports for Cloudera Manager

CommentConfigurationAccessRequirement
ProtocolPortQualifierServiceComponent
Pass -p <port> on CLIExternalTCP9090ThriftServer
ThriftServer
ExternalTCP9095ThriftServer
Pass --port <port>
on CLIExternalTCP9090Avro
server
ExternalTCP9083MetastoreHive
hive.server2.thrift.port
ExternalTCP10000HiveServer2
sqoop.metastore.server.port
ExternalTCP16000MetastoreSqoop
ExternalTCP12000Sqoop 2server
Sqoop 2
Admin portExternalTCP12001Sqoop 2
Client portclientPortExternalTCP2181Server (withCDH 5 and/or
ZooKeeper
ClouderaManager 5)
PeerX in server.N=host:X:Y
InternalTCP2888Server (withCDH 5 only)
PeerX in server.N=host:X:Y
InternalTCP3888Server (withCDH 5 only)
PeerX in server.N=host:X:Y
InternalTCP3181Server (withCDH 5 andClouderaManager 5)
PeerX in server.N=host:X:Y
InternalTCP4181Server (withCDH 5 andClouderaManager 5)
Used for HAInternalTCP8019ZooKeeperFailoverController(ZKFC)
ZooKeeper will also useanother randomly
InternalTCP9010ZooKeeperJMX port
selected port for RMI. Inorder for ClouderaManager to monitorZooKeeper, you mustopen up all ports whenthe connection
Cloudera Manager Installation Guide | 141
Configuring Ports for Cloudera Manager
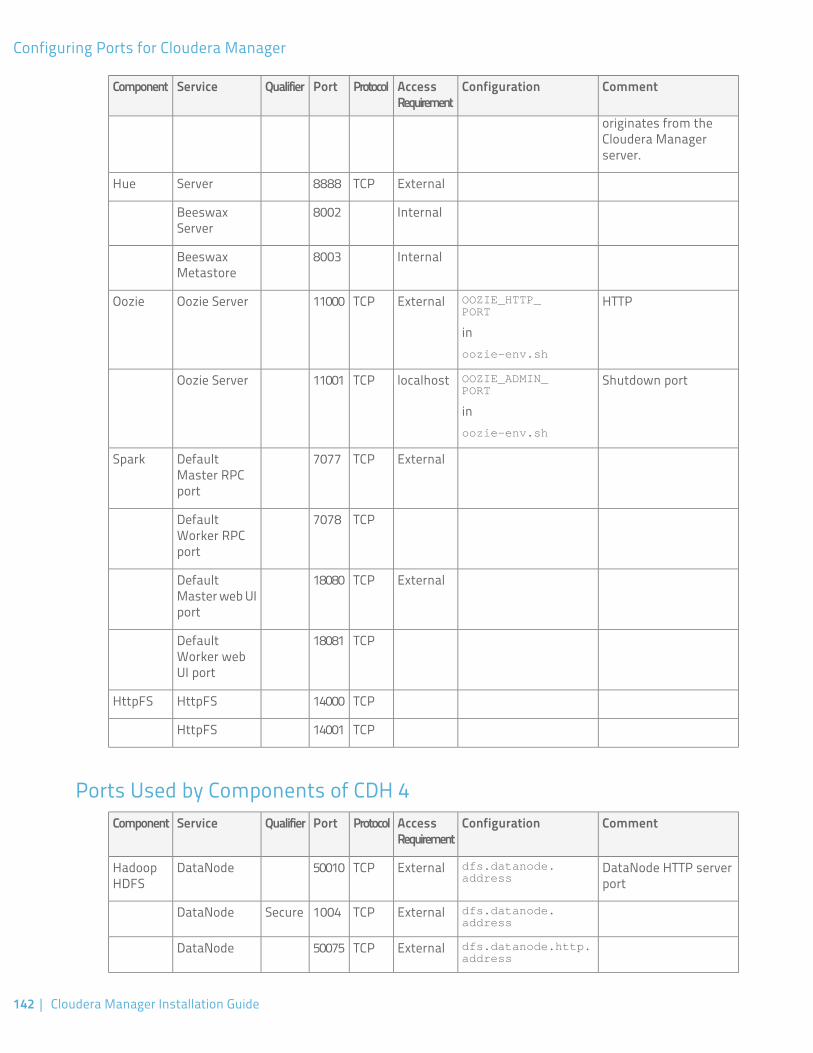
CommentConfigurationAccessRequirement
ProtocolPortQualifierServiceComponent
originates from theCloudera Managerserver.
ExternalTCP8888ServerHue
Internal8002BeeswaxServer
Internal8003BeeswaxMetastore
HTTPOOZIE_HTTP_PORT
ExternalTCP11000Oozie ServerOozie
inoozie-env.sh
Shutdown portOOZIE_ADMIN_PORT
localhostTCP11001Oozie Server
inoozie-env.sh
ExternalTCP7077DefaultMaster RPCport
Spark
TCP7078DefaultWorker RPCport
ExternalTCP18080DefaultMaster web UIport
TCP18081DefaultWorker webUI port
TCP14000HttpFSHttpFS
TCP14001HttpFS
Ports Used by Components of CDH 4CommentConfigurationAccess
RequirementProtocolPortQualifierServiceComponent
DataNode HTTP serverport
dfs.datanode.address
ExternalTCP50010DataNodeHadoopHDFS
dfs.datanode.address
ExternalTCP1004SecureDataNode
dfs.datanode.http.address
ExternalTCP50075DataNode
142 | Cloudera Manager Installation Guide
Configuring Ports for Cloudera Manager
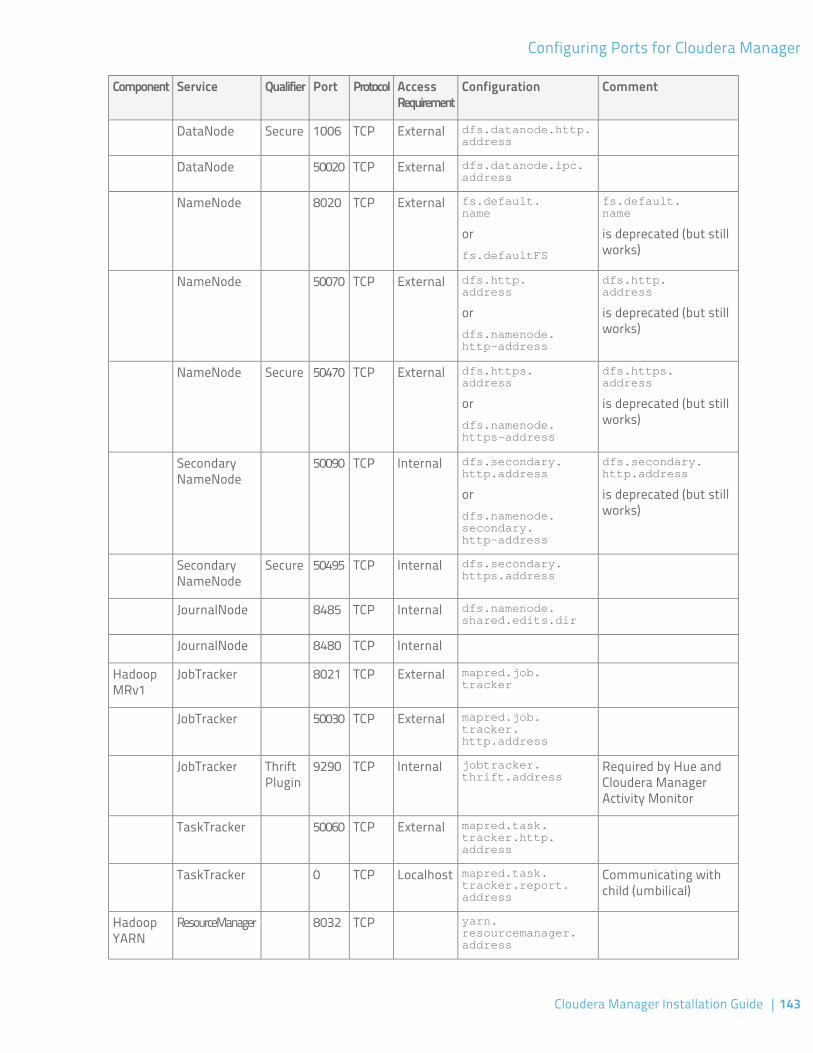
CommentConfigurationAccessRequirement
ProtocolPortQualifierServiceComponent
dfs.datanode.http.address
ExternalTCP1006SecureDataNode
dfs.datanode.ipc.address
ExternalTCP50020DataNode
fs.default.name
fs.default.name
ExternalTCP8020NameNode
is deprecated (but stillworks)
orfs.defaultFS
dfs.http.address
dfs.http.address
ExternalTCP50070NameNode
is deprecated (but stillworks)
ordfs.namenode.http-address
dfs.https.address
dfs.https.address
ExternalTCP50470SecureNameNode
is deprecated (but stillworks)
ordfs.namenode.https-address
dfs.secondary.http.address
dfs.secondary.http.address
InternalTCP50090SecondaryNameNode
is deprecated (but stillworks)
ordfs.namenode.secondary.http-address
dfs.secondary.https.address
InternalTCP50495SecureSecondaryNameNode
dfs.namenode.shared.edits.dir
InternalTCP8485JournalNode
InternalTCP8480JournalNode
mapred.job.tracker
ExternalTCP8021JobTrackerHadoopMRv1
mapred.job.tracker.http.address
ExternalTCP50030JobTracker
Required by Hue andCloudera ManagerActivity Monitor
jobtracker.thrift.address
InternalTCP9290ThriftPlugin
JobTracker
mapred.task.tracker.http.address
ExternalTCP50060TaskTracker
Communicating withchild (umbilical)
mapred.task.tracker.report.address
LocalhostTCP0TaskTracker
yarn.resourcemanager.address
TCP8032ResourceManagerHadoopYARN
Cloudera Manager Installation Guide | 143
Configuring Ports for Cloudera Manager
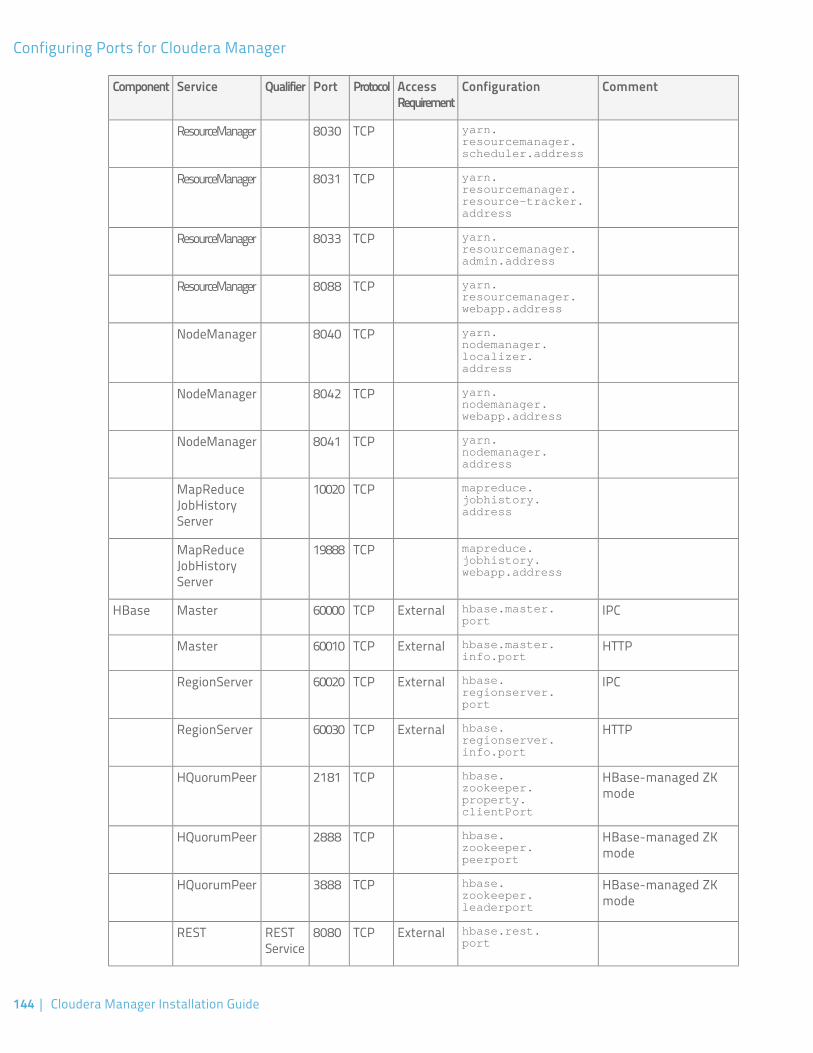
CommentConfigurationAccessRequirement
ProtocolPortQualifierServiceComponent
yarn.resourcemanager.scheduler.address
TCP8030ResourceManager
yarn.resourcemanager.
TCP8031ResourceManagerresource-tracker.address
yarn.resourcemanager.admin.address
TCP8033ResourceManager
yarn.resourcemanager.webapp.address
TCP8088ResourceManager
yarn.nodemanager.
TCP8040NodeManagerlocalizer.address
yarn.nodemanager.webapp.address
TCP8042NodeManager
yarn.nodemanager.address
TCP8041NodeManager
mapreduce.jobhistory.address
TCP10020MapReduceJobHistoryServer
mapreduce.jobhistory.webapp.address
TCP19888MapReduceJobHistoryServer
IPChbase.master.port
ExternalTCP60000MasterHBase
HTTPhbase.master.info.port
ExternalTCP60010Master
IPChbase.regionserver.port
ExternalTCP60020RegionServer
HTTPhbase.regionserver.info.port
ExternalTCP60030RegionServer
HBase-managed ZKmode
hbase.zookeeper.property.clientPort
TCP2181HQuorumPeer
HBase-managed ZKmode
hbase.zookeeper.peerport
TCP2888HQuorumPeer
HBase-managed ZKmode
hbase.zookeeper.leaderport
TCP3888HQuorumPeer
hbase.rest.port
ExternalTCP8080RESTService
REST
144 | Cloudera Manager Installation Guide
Configuring Ports for Cloudera Manager
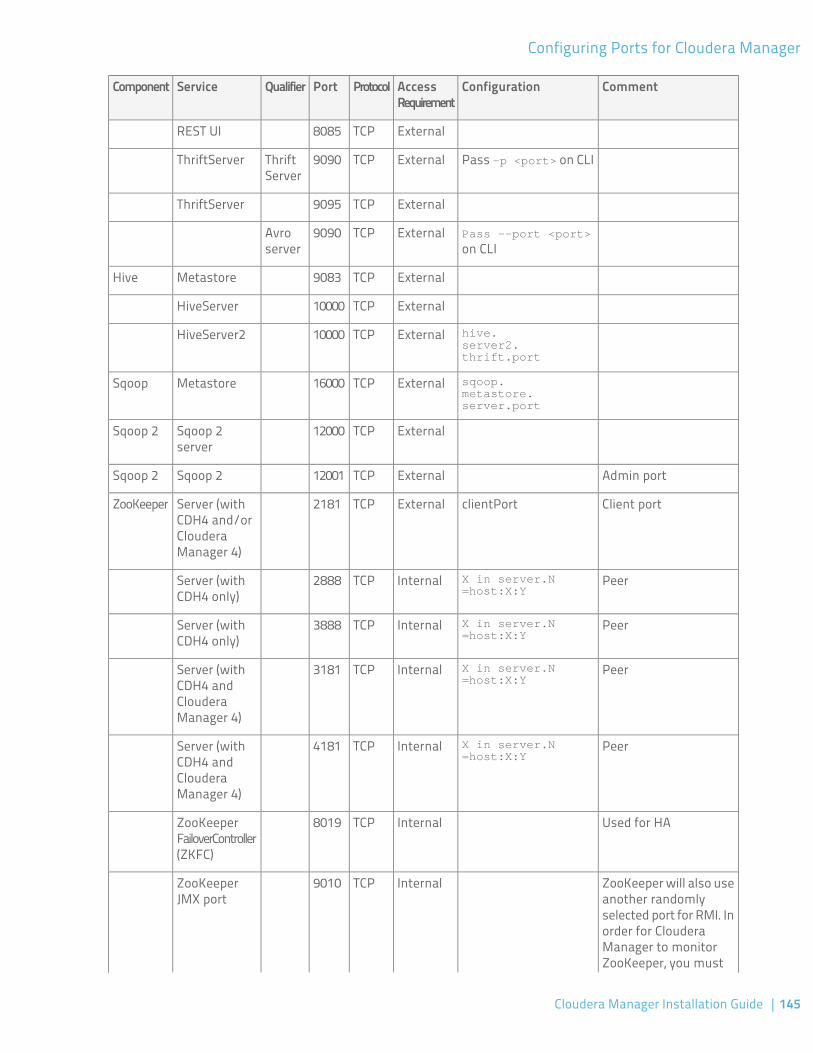
CommentConfigurationAccessRequirement
ProtocolPortQualifierServiceComponent
ExternalTCP8085REST UI
Pass -p <port> on CLIExternalTCP9090ThriftServer
ThriftServer
ExternalTCP9095ThriftServer
Pass --port <port>
on CLIExternalTCP9090Avro
server
ExternalTCP9083MetastoreHive
ExternalTCP10000HiveServer
hive.server2.thrift.port
ExternalTCP10000HiveServer2
sqoop.metastore.server.port
ExternalTCP16000MetastoreSqoop
ExternalTCP12000Sqoop 2server
Sqoop 2
Admin portExternalTCP12001Sqoop 2Sqoop 2
Client portclientPortExternalTCP2181Server (withCDH4 and/or
ZooKeeper
ClouderaManager 4)
PeerX in server.N=host:X:Y
InternalTCP2888Server (withCDH4 only)
PeerX in server.N=host:X:Y
InternalTCP3888Server (withCDH4 only)
PeerX in server.N=host:X:Y
InternalTCP3181Server (withCDH4 andClouderaManager 4)
PeerX in server.N=host:X:Y
InternalTCP4181Server (withCDH4 andClouderaManager 4)
Used for HAInternalTCP8019ZooKeeperFailoverController(ZKFC)
ZooKeeper will also useanother randomly
InternalTCP9010ZooKeeperJMX port
selected port for RMI. Inorder for ClouderaManager to monitorZooKeeper, you must
Cloudera Manager Installation Guide | 145
Configuring Ports for Cloudera Manager
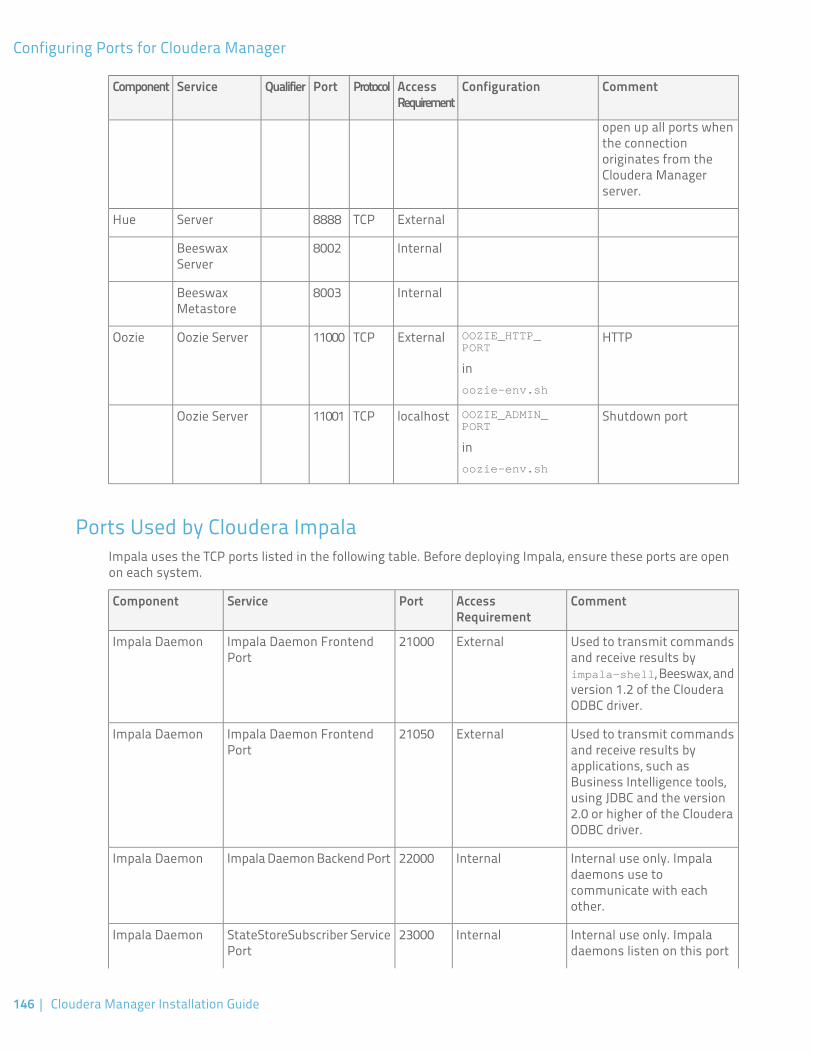
CommentConfigurationAccessRequirement
ProtocolPortQualifierServiceComponent
open up all ports whenthe connectionoriginates from theCloudera Managerserver.
ExternalTCP8888ServerHue
Internal8002BeeswaxServer
Internal8003BeeswaxMetastore
HTTPOOZIE_HTTP_PORT
ExternalTCP11000Oozie ServerOozie
inoozie-env.sh
Shutdown portOOZIE_ADMIN_PORT
localhostTCP11001Oozie Server
inoozie-env.sh
Ports Used by Cloudera ImpalaImpala uses the TCP ports listed in the following table. Before deploying Impala, ensure these ports are openon each system.
CommentAccessRequirement
PortServiceComponent
Used to transmit commandsand receive results by
External21000Impala Daemon FrontendPort
Impala Daemon
impala-shell, Beeswax, andversion 1.2 of the ClouderaODBC driver.
Used to transmit commandsand receive results by
External21050Impala Daemon FrontendPort
Impala Daemon
applications, such asBusiness Intelligence tools,using JDBC and the version2.0 or higher of the ClouderaODBC driver.
Internal use only. Impaladaemons use to
Internal22000Impala Daemon Backend PortImpala Daemon
communicate with eachother.
Internal use only. Impaladaemons listen on this port
Internal23000StateStoreSubscriber ServicePort
Impala Daemon
146 | Cloudera Manager Installation Guide
Configuring Ports for Cloudera Manager
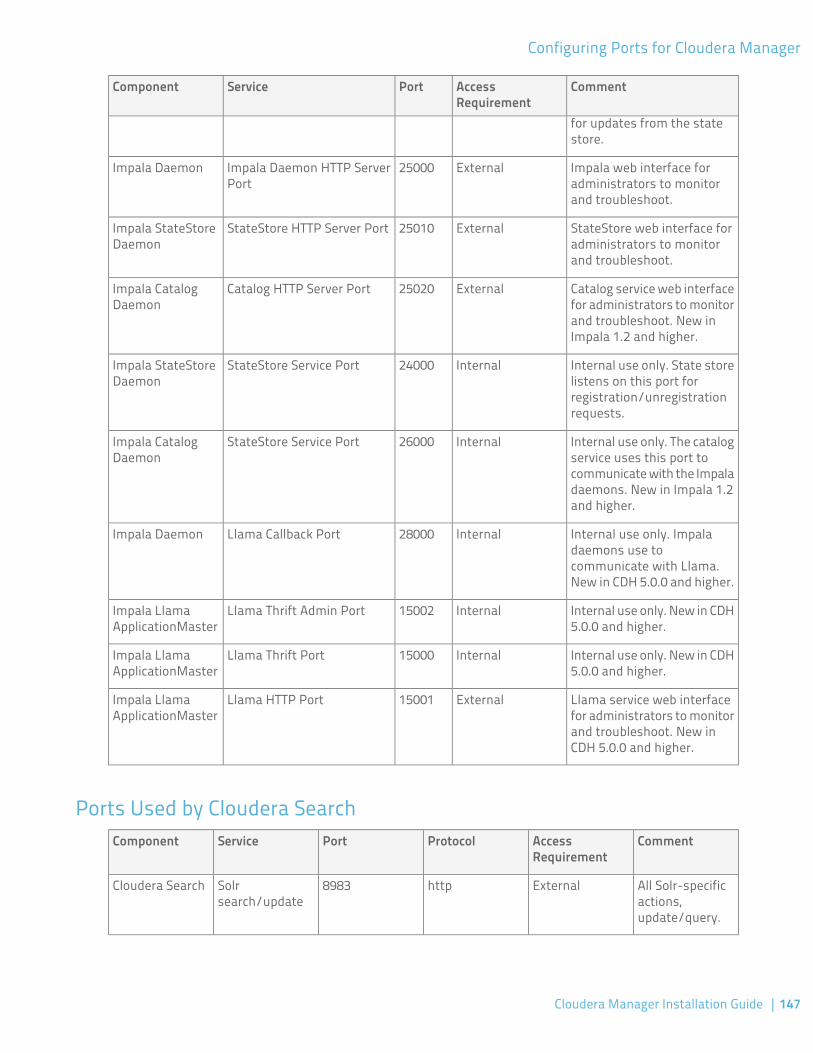
CommentAccessRequirement
PortServiceComponent
for updates from the statestore.
Impala web interface foradministrators to monitorand troubleshoot.
External25000Impala Daemon HTTP ServerPort
Impala Daemon
StateStore web interface foradministrators to monitorand troubleshoot.
External25010StateStore HTTP Server PortImpala StateStoreDaemon
Catalog service web interfacefor administrators to monitor
External25020Catalog HTTP Server PortImpala CatalogDaemon
and troubleshoot. New inImpala 1.2 and higher.
Internal use only. State storelistens on this port for
Internal24000StateStore Service PortImpala StateStoreDaemon
registration/unregistrationrequests.
Internal use only. The catalogservice uses this port to
Internal26000StateStore Service PortImpala CatalogDaemon
communicate with the Impaladaemons. New in Impala 1.2and higher.
Internal use only. Impaladaemons use to
Internal28000Llama Callback PortImpala Daemon
communicate with Llama.New in CDH 5.0.0 and higher.
Internal use only. New in CDH5.0.0 and higher.
Internal15002Llama Thrift Admin PortImpala LlamaApplicationMaster
Internal use only. New in CDH5.0.0 and higher.
Internal15000Llama Thrift PortImpala LlamaApplicationMaster
Llama service web interfacefor administrators to monitor
External15001Llama HTTP PortImpala LlamaApplicationMaster
and troubleshoot. New inCDH 5.0.0 and higher.
Ports Used by Cloudera SearchCommentAccess
RequirementProtocolPortServiceComponent
All Solr-specificactions,update/query.
Externalhttp8983Solrsearch/update
Cloudera Search
Cloudera Manager Installation Guide | 147
Configuring Ports for Cloudera Manager
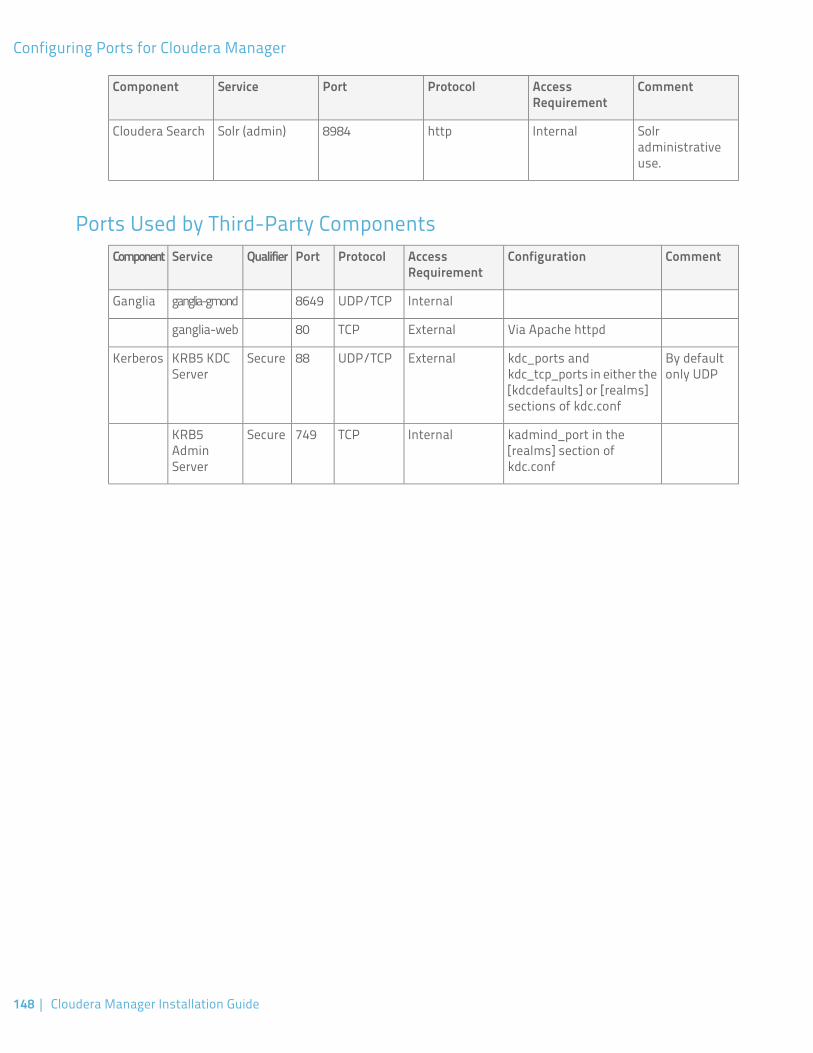
CommentAccessRequirement
ProtocolPortServiceComponent
Solradministrativeuse.
Internalhttp8984Solr (admin)Cloudera Search
Ports Used by Third-Party ComponentsCommentConfigurationAccess
RequirementProtocolPortQualifierServiceComponent
InternalUDP/TCP8649ganglia-gmondGanglia
Via Apache httpdExternalTCP80ganglia-web
By defaultonly UDP
kdc_ports andkdc_tcp_ports in either the[kdcdefaults] or [realms]sections of kdc.conf
ExternalUDP/TCP88SecureKRB5 KDCServer
Kerberos
kadmind_port in the[realms] section ofkdc.conf
InternalTCP749SecureKRB5AdminServer
148 | Cloudera Manager Installation Guide
Configuring Ports for Cloudera Manager