cloudstack documentation - read the docs · chapter 1 introduction if you are new to cloudstack,...
TRANSCRIPT

CloudStack DocumentationRelease 4.11.0
Apache CloudStack
Apr 24, 2018


Contents
1 Introduction 31.1 Concepts and Terminology . . . . . . . . . . . . . . . . . . . . . . . . . . . . . . . . . . . . . . . . 3
2 Navigating the docs 15
3 Integration Guides 173.1 The Cloudian Connector Plugin . . . . . . . . . . . . . . . . . . . . . . . . . . . . . . . . . . . . . 17
4 Advanced Networking Guides 274.1 The Nicira NVP Plugin . . . . . . . . . . . . . . . . . . . . . . . . . . . . . . . . . . . . . . . . . 274.2 The Nuage VSP Plugin . . . . . . . . . . . . . . . . . . . . . . . . . . . . . . . . . . . . . . . . . . 344.3 The VXLAN Plugin . . . . . . . . . . . . . . . . . . . . . . . . . . . . . . . . . . . . . . . . . . . 504.4 The OVS Plugin . . . . . . . . . . . . . . . . . . . . . . . . . . . . . . . . . . . . . . . . . . . . . 604.5 IPv6 Support in CloudStack . . . . . . . . . . . . . . . . . . . . . . . . . . . . . . . . . . . . . . . 654.6 Configuring AutoScale without using NetScaler . . . . . . . . . . . . . . . . . . . . . . . . . . . . 68
5 Developers Guide 735.1 CloudStack Installation from GIT repo for Developers . . . . . . . . . . . . . . . . . . . . . . . . . 735.2 Programmer Guide . . . . . . . . . . . . . . . . . . . . . . . . . . . . . . . . . . . . . . . . . . . . 825.3 Plugins . . . . . . . . . . . . . . . . . . . . . . . . . . . . . . . . . . . . . . . . . . . . . . . . . . 985.4 Allocators . . . . . . . . . . . . . . . . . . . . . . . . . . . . . . . . . . . . . . . . . . . . . . . . 1105.5 Deploying CloudStack with Ansible . . . . . . . . . . . . . . . . . . . . . . . . . . . . . . . . . . . 1145.6 Getting Help . . . . . . . . . . . . . . . . . . . . . . . . . . . . . . . . . . . . . . . . . . . . . . . 120
i

ii

CloudStack Documentation, Release 4.11.0
Contents 1

CloudStack Documentation, Release 4.11.0
2 Contents

CHAPTER 1
Introduction
If you are new to CloudStack, you should go through this short introduction on concepts and terminology beforeproceeding to the installation or administration guides.
1.1 Concepts and Terminology
Primary storage is associated with a cluster
1.1.1 What is Apache CloudStack?
Apache CloudStack is an open source Infrastructure-as-a-Service platform that manages and orchestrates pools ofstorage, network, and computer resources to build a public or private IaaS compute cloud.
With CloudStack you can:
• Set up an on-demand elastic cloud computing service.
• Allow end-users to provision resources
1.1.2 What can Apache CloudStack do?
Multiple Hypervisor Support
CloudStack works with a variety of hypervisors and hypervisor-like technologies. A single cloud can contain multiplehypervisor implementations. As of the current release CloudStack supports:
• BareMetal (via IPMI)
• Hyper-V
• KVM
• LXC
3

CloudStack Documentation, Release 4.11.0
• vSphere (via vCenter)
• Xenserver
• Xen Project
Massively Scalable Infrastructure Management
CloudStack can manage tens of thousands of physical servers installed in geographically distributed datacenters. Themanagement server scales near-linearly eliminating the need for cluster-level management servers. Maintenance orother outages of the management server can occur without affecting the virtual machines running in the cloud.
Automatic Cloud Configuration Management
CloudStack automatically configures the network and storage settings for each virtual machine deployment. Internally,a pool of virtual appliances support the operation of configuration of the cloud itself. These appliances offer servicessuch as firewalling, routing, DHCP, VPN, console proxy, storage access, and storage replication. The extensive use ofhorizontally scalable virtual machines simplifies the installation and ongoing operation of a cloud.
Graphical User Interface
CloudStack offers an administrators web interface used for provisioning and managing the cloud, as well as an end-user’s Web interface, used for running VMs and managing VM templates. The UI can be customized to reflect thedesired service provider or enterprise look and feel.
API
CloudStack provides a REST-like API for the operation, management and use of the cloud.
AWS EC2 API Support
CloudStack provides an EC2 API translation layer to permit the common EC2 tools to be used in the use of a Cloud-Stack cloud.
High Availability
CloudStack has a number of features to increase the availability of the system. The Management Server itself maybe deployed in a multi-node installation where the servers are load balanced. MySQL may be configured to usereplication to provide for failover in the event of database loss. For the hosts, CloudStack supports NIC bonding andthe use of separate networks for storage as well as iSCSI Multipath.
1.1.3 Deployment Architecture Overview
Generally speaking, most CloudStack deployments consist of the management server and the resources to be managed.During deployment you inform the management server of the resources to be managed, such as IP address blocks,storage devices, hypervisors, and VLANs.
The minimum installation consists of one machine running the CloudStack Management Server and another machineto act as the cloud infrastructure (in this case, a very simple infrastructure consisting of one host running hypervisor
4 Chapter 1. Introduction

CloudStack Documentation, Release 4.11.0
software). In its smallest deployment, a single machine can act as both the Management Server and the hypervisorhost (using the KVM hypervisor).
A more full-featured installation consists of a highly-available multi-node Management Server installation and up totens of thousands of hosts using any of several networking technologies.
Management Server Overview
The management server orchestrates and allocates the resources in your cloud deployment.
The management server typically runs on a dedicated machine or as a virtual machine. It controls allocation of virtualmachines to hosts and assigns storage and IP addresses to the virtual machine instances. The Management Server runsin an Apache Tomcat container and requires a MySQL database for persistence.
The management server:
• Provides the web interface for both the adminstrator and end user.
• Provides the API interfaces for both the CloudStack API as well as the EC2 interface.
• Manages the assignment of guest VMs to a specific compute resource
• Manages the assignment of public and private IP addresses.
• Allocates storage during the VM instantiation process.
• Manages snapshots, disk images (templates), and ISO images.
• Provides a single point of configuration for your cloud.
Cloud Infrastructure Overview
Resources within the cloud are managed as follows:
• Regions: A collection of one or more geographically proximate zones managed by one or more managementservers.
• Zones: Typically, a zone is equivalent to a single datacenter. A zone consists of one or more pods and secondarystorage.
• Pods: A pod is usually a rack, or row of racks that includes a layer-2 switch and one or more clusters.
• Clusters: A cluster consists of one or more homogenous hosts and primary storage.
1.1. Concepts and Terminology 5

CloudStack Documentation, Release 4.11.0
• Host: A single compute node within a cluster; often a hypervisor.
• Primary Storage: A storage resource typically provided to a single cluster for the actual running of instance diskimages. (Zone-wide primary storage is an option, though not typically used.)
• Secondary Storage: A zone-wide resource which stores disk templates, ISO images, and snapshots.
Networking Overview
CloudStack offers many types of networking, but they typically fall into one of two scenarios:
• Basic: Most analogous to AWS-classic style networking. Provides a single flat layer-2 network where guestisolation is provided at layer-3 by the hypervisors bridge device.
• Advanced: This typically uses layer-2 isolation such as VLANs, though this category also includes SDN tech-nologies such as Nicira NVP.
1.1.4 CloudStack Terminology
About Regions
To increase reliability of the cloud, you can optionally group resources into multiple geographic regions. A region is thelargest available organizational unit within a CloudStack deployment. A region is made up of several availability zones,where each zone is roughly equivalent to a datacenter. Each region is controlled by its own cluster of ManagementServers, running in one of the zones. The zones in a region are typically located in close geographical proximity.Regions are a useful technique for providing fault tolerance and disaster recovery.
By grouping zones into regions, the cloud can achieve higher availability and scalability. User accounts can spanregions, so that users can deploy VMs in multiple, widely-dispersed regions. Even if one of the regions becomesunavailable, the services are still available to the end-user through VMs deployed in another region. And by groupingcommunities of zones under their own nearby Management Servers, the latency of communications within the cloudis reduced compared to managing widely-dispersed zones from a single central Management Server.
Usage records can also be consolidated and tracked at the region level, creating reports or invoices for each geographicregion.
6 Chapter 1. Introduction

CloudStack Documentation, Release 4.11.0
Regions are visible to the end user. When a user starts a guest VM on a particular CloudStack Management Server,the user is implicitly selecting that region for their guest. Users might also be required to copy their private templatesto additional regions to enable creation of guest VMs using their templates in those regions.
About Zones
A zone is the second largest organizational unit within a CloudStack deployment. A zone typically correspondsto a single datacenter, although it is permissible to have multiple zones in a datacenter. The benefit of organizinginfrastructure into zones is to provide physical isolation and redundancy. For example, each zone can have its ownpower supply and network uplink, and the zones can be widely separated geographically (though this is not required).
A zone consists of:
• One or more pods. Each pod contains one or more clusters of hosts and one or more primary storage servers.
• A zone may contain one or more primary storage servers, which are shared by all the pods in the zone.
• Secondary storage, which is shared by all the pods in the zone.
1.1. Concepts and Terminology 7

CloudStack Documentation, Release 4.11.0
Zones are visible to the end user. When a user starts a guest VM, the user must select a zone for their guest. Usersmight also be required to copy their private templates to additional zones to enable creation of guest VMs using theirtemplates in those zones.
Zones can be public or private. Public zones are visible to all users. This means that any user may create a guest inthat zone. Private zones are reserved for a specific domain. Only users in that domain or its subdomains may createguests in that zone.
Hosts in the same zone are directly accessible to each other without having to go through a firewall. Hosts in differentzones can access each other through statically configured VPN tunnels.
For each zone, the administrator must decide the following.
• How many pods to place in each zone.
• How many clusters to place in each pod.
• How many hosts to place in each cluster.
• (Optional) How many primary storage servers to place in each zone and total capacity for these storage servers.
• How many primary storage servers to place in each cluster and total capacity for these storage servers.
• How much secondary storage to deploy in a zone.
When you add a new zone using the CloudStack UI, you will be prompted to configure the zone’s physical networkand add the first pod, cluster, host, primary storage, and secondary storage.
In order to support zone-wide functions for VMware, CloudStack is aware of VMware Datacenters and can map eachDatacenter to a CloudStack zone. To enable features like storage live migration and zone-wide primary storage forVMware hosts, CloudStack has to make sure that a zone contains only a single VMware Datacenter. Therefore, when
8 Chapter 1. Introduction

CloudStack Documentation, Release 4.11.0
you are creating a new CloudStack zone, you can select a VMware Datacenter for the zone. If you are provisioningmultiple VMware Datacenters, each one will be set up as a single zone in CloudStack.
Note: If you are upgrading from a previous CloudStack version, and your existing deployment contains a zone withclusters from multiple VMware Datacenters, that zone will not be forcibly migrated to the new model. It will continueto function as before. However, any new zone-wide operations, such as zone-wide primary storage and live storagemigration, will not be available in that zone.
About Pods
A pod often represents a single rack. Hosts in the same pod are in the same subnet. A pod is the third-largestorganizational unit within a CloudStack deployment. Pods are contained within zones. Each zone can contain one ormore pods. A pod consists of one or more clusters of hosts and one or more primary storage servers. Pods are notvisible to the end user.
About Clusters
A cluster provides a way to group hosts. To be precise, a cluster is a XenServer server pool, a set of KVM servers,, or a VMware cluster preconfigured in vCenter. The hosts in a cluster all have identical hardware, run the samehypervisor, are on the same subnet, and access the same shared primary storage. Virtual machine instances (VMs) canbe live-migrated from one host to another within the same cluster, without interrupting service to the user.
A cluster is the fourth-largest organizational unit within a CloudStack deployment. Clusters are contained withinpods, and pods are contained within zones. Size of the cluster is limited by the underlying hypervisor, although theCloudStack recommends less in most cases; see Best Practices.
A cluster consists of one or more hosts and one or more primary storage servers.
1.1. Concepts and Terminology 9

CloudStack Documentation, Release 4.11.0
CloudStack allows multiple clusters in a cloud deployment.
Even when local storage is used exclusively, clusters are still required organizationally, even if there is just one hostper cluster.
When VMware is used, every VMware cluster is managed by a vCenter server. An Administrator must register thevCenter server with CloudStack. There may be multiple vCenter servers per zone. Each vCenter server may managemultiple VMware clusters.
About Hosts
A host is a single computer. Hosts provide the computing resources that run guest virtual machines. Each host hashypervisor software installed on it to manage the guest VMs. For example, a host can be a Citrix XenServer server, aLinux KVM-enabled server, an ESXi server, or a Windows Hyper-V server.
The host is the smallest organizational unit within a CloudStack deployment. Hosts are contained within clusters,clusters are contained within pods, pods are contained within zones, and zones can be contained within regions.
Hosts in a CloudStack deployment:
• Provide the CPU, memory, storage, and networking resources needed to host the virtual machines
• Interconnect using a high bandwidth TCP/IP network and connect to the Internet
• May reside in multiple data centers across different geographic locations
• May have different capacities (different CPU speeds, different amounts of RAM, etc.), although the hosts withina cluster must all be homogeneous
Additional hosts can be added at any time to provide more capacity for guest VMs.
CloudStack automatically detects the amount of CPU and memory resources provided by the hosts.
Hosts are not visible to the end user. An end user cannot determine which host their guest has been assigned to.
For a host to function in CloudStack, you must do the following:
• Install hypervisor software on the host
• Assign an IP address to the host
• Ensure the host is connected to the CloudStack Management Server.
10 Chapter 1. Introduction

CloudStack Documentation, Release 4.11.0
About Primary Storage
Primary storage is associated with a cluster, and it stores virtual disks for all the VMs running on hosts in that cluster.On KVM and VMware, you can provision primary storage on a per-zone basis.
You can add multiple primary storage servers to a cluster or zone. At least one is required. It is typically located closeto the hosts for increased performance. CloudStack manages the allocation of guest virtual disks to particular primarystorage devices.
It is useful to set up zone-wide primary storage when you want to avoid extra data copy operations. With cluster-basedprimary storage, data in the primary storage is directly available only to VMs within that cluster. If a VM in a differentcluster needs some of the data, it must be copied from one cluster to another, using the zone’s secondary storage as anintermediate step. This operation can be unnecessarily time-consuming.
For Hyper-V, SMB/CIFS storage is supported. Note that Zone-wide Primary Storage is not supported in Hyper-V.
Ceph/RBD storage is only supported by the KVM hypervisor. It can be used as Zone-wide Primary Storage.
CloudStack is designed to work with all standards-compliant iSCSI and NFS servers that are supported by the under-lying hypervisor, including, for example:
• SolidFire for iSCSI
• Dell EqualLogic™ for iSCSI
• Network Appliances filers for NFS and iSCSI
• Scale Computing for NFS
If you intend to use only local disk for your installation, you can skip adding separate primary storage.
About Secondary Storage
Secondary storage stores the following:
• Templates — OS images that can be used to boot VMs and can include additional configuration information,such as installed applications
• ISO images — disc images containing data or bootable media for operating systems
• Disk volume snapshots — saved copies of VM data which can be used for data recovery or to create newtemplates
The items in secondary storage are available to all hosts in the scope of the secondary storage, which may be definedas per zone or per region.
To make items in secondary storage available to all hosts throughout the cloud, you can add object storage in additionto the zone-based NFS Secondary Staging Store. It is not necessary to copy templates and snapshots from one zone toanother, as would be required when using zone NFS alone. Everything is available everywhere.
For Hyper-V hosts, SMB/CIFS storage is supported.
CloudStack provides plugins that enable both OpenStack Object Storage (Swift, swift.openstack.org) and AmazonSimple Storage Service (S3) object storage. When using one of these storage plugins, you configure Swift or S3storage for the entire CloudStack, then set up the NFS Secondary Staging Store for each zone. The NFS storagein each zone acts as a staging area through which all templates and other secondary storage data pass before beingforwarded to Swift or S3. The backing object storage acts as a cloud-wide resource, making templates and other dataavailable to any zone in the cloud.
1.1. Concepts and Terminology 11

CloudStack Documentation, Release 4.11.0
Warning: Heterogeneous Secondary Storage is not supported in Regions. For example, you cannot set up multiplezones, one using NFS secondary and the other using S3 or Swift secondary.
About Physical Networks
Part of adding a zone is setting up the physical network. One or (in an advanced zone) more physical networks canbe associated with each zone. The network corresponds to a NIC on the hypervisor host. Each physical network cancarry one or more types of network traffic. The choices of traffic type for each network vary depending on whetheryou are creating a zone with basic networking or advanced networking.
A physical network is the actual network hardware and wiring in a zone. A zone can have multiple physical networks.An administrator can:
• Add/Remove/Update physical networks in a zone
• Configure VLANs on the physical network
• Configure a name so the network can be recognized by hypervisors
• Configure the service providers (firewalls, load balancers, etc.) available on a physical network
• Configure the IP addresses trunked to a physical network
• Specify what type of traffic is carried on the physical network, as well as other properties like network speed
Basic Zone Network Traffic Types
When basic networking is used, there can be only one physical network in the zone. That physical network carries thefollowing traffic types:
• Guest. When end users run VMs, they generate guest traffic. The guest VMs communicate with each other overa network that can be referred to as the guest network. Each pod in a basic zone is a broadcast domain, andtherefore each pod has a different IP range for the guest network. The administrator must configure the IP rangefor each pod.
• Management. When CloudStack’s internal resources communicate with each other, they generate managementtraffic. This includes communication between hosts, system VMs (VMs used by CloudStack to perform varioustasks in the cloud), and any other component that communicates directly with the CloudStack ManagementServer. You must configure the IP range for the system VMs to use.
Note: We strongly recommend the use of separate NICs for management traffic and guest traffic.
• Public. Public traffic is generated when VMs in the cloud access the Internet. Publicly accessible IPs must beallocated for this purpose. End users can use the CloudStack UI to acquire these IPs to implement NAT betweentheir guest network and the public network, as described in Acquiring a New IP Address.
• Storage. While labeled “storage” this is specifically about secondary storage, and doesn’t affect traffic forprimary storage. This includes traffic such as VM templates and snapshots, which is sent between the secondarystorage VM and secondary storage servers. CloudStack uses a separate Network Interface Controller (NIC)named storage NIC for storage network traffic. Use of a storage NIC that always operates on a high bandwidthnetwork allows fast template and snapshot copying. You must configure the IP range to use for the storagenetwork.
In a basic network, configuring the physical network is fairly straightforward. In most cases, you only need to configureone guest network to carry traffic that is generated by guest VMs. If you use a NetScaler load balancer and enable its
12 Chapter 1. Introduction

CloudStack Documentation, Release 4.11.0
elastic IP and elastic load balancing (EIP and ELB) features, you must also configure a network to carry public traffic.CloudStack takes care of presenting the necessary network configuration steps to you in the UI when you add a newzone.
Basic Zone Guest IP Addresses
When basic networking is used, CloudStack will assign IP addresses in the CIDR of the pod to the guests in that pod.The administrator must add a Direct IP range on the pod for this purpose. These IPs are in the same VLAN as thehosts.
Advanced Zone Network Traffic Types
When advanced networking is used, there can be multiple physical networks in the zone. Each physical network cancarry one or more traffic types, and you need to let CloudStack know which type of network traffic you want eachnetwork to carry. The traffic types in an advanced zone are:
• Guest. When end users run VMs, they generate guest traffic. The guest VMs communicate with each other over anetwork that can be referred to as the guest network. This network can be isolated or shared. In an isolated guestnetwork, the administrator needs to reserve VLAN ranges to provide isolation for each CloudStack account’snetwork (potentially a large number of VLANs). In a shared guest network, all guest VMs share a singlenetwork.
• Management. When CloudStack’s internal resources communicate with each other, they generate managementtraffic. This includes communication between hosts, system VMs (VMs used by CloudStack to perform varioustasks in the cloud), and any other component that communicates directly with the CloudStack ManagementServer. You must configure the IP range for the system VMs to use.
• Public. Public traffic is generated when VMs in the cloud access the Internet. Publicly accessible IPs must beallocated for this purpose. End users can use the CloudStack UI to acquire these IPs to implement NAT betweentheir guest network and the public network, as described in “Acquiring a New IP Address” in the AdministrationGuide.
• Storage. While labeled “storage” this is specifically about secondary storage, and doesn’t affect traffic forprimary storage. This includes traffic such as VM templates and snapshots, which is sent between the secondarystorage VM and secondary storage servers. CloudStack uses a separate Network Interface Controller (NIC)named storage NIC for storage network traffic. Use of a storage NIC that always operates on a high bandwidthnetwork allows fast template and snapshot copying. You must configure the IP range to use for the storagenetwork.
These traffic types can each be on a separate physical network, or they can be combined with certain restrictions.When you use the Add Zone wizard in the UI to create a new zone, you are guided into making only valid choices.
Advanced Zone Guest IP Addresses
When advanced networking is used, the administrator can create additional networks for use by the guests. Thesenetworks can span the zone and be available to all accounts, or they can be scoped to a single account, in which caseonly the named account may create guests that attach to these networks. The networks are defined by a VLAN ID,IP range, and gateway. The administrator may provision thousands of these networks if desired. Additionally, theadministrator can reserve a part of the IP address space for non-CloudStack VMs and servers.
1.1. Concepts and Terminology 13
CloudStack Documentation, Release 4.11.0
Advanced Zone Public IP Addresses
When advanced networking is used, the administrator can create additional networks for use by the guests. Thesenetworks can span the zone and be available to all accounts, or they can be scoped to a single account, in which caseonly the named account may create guests that attach to these networks. The networks are defined by a VLAN ID, IPrange, and gateway. The administrator may provision thousands of these networks if desired.
System Reserved IP Addresses
In each zone, you need to configure a range of reserved IP addresses for the management network. This networkcarries communication between the CloudStack Management Server and various system VMs, such as SecondaryStorage VMs, Console Proxy VMs, and DHCP.
The reserved IP addresses must be unique across the cloud. You cannot, for example, have a host in one zone whichhas the same private IP address as a host in another zone.
The hosts in a pod are assigned private IP addresses. These are typically RFC1918 addresses. The Console Proxy andSecondary Storage system VMs are also allocated private IP addresses in the CIDR of the pod that they are created in.
Make sure computing servers and Management Servers use IP addresses outside of the System Reserved IP range. Forexample, suppose the System Reserved IP range starts at 192.168.154.2 and ends at 192.168.154.7. CloudStack canuse .2 to .7 for System VMs. This leaves the rest of the pod CIDR, from .8 to .254, for the Management Server andhypervisor hosts.
In all zones:
Provide private IPs for the system in each pod and provision them in CloudStack.
For KVM and XenServer, the recommended number of private IPs per pod is one per host. If you expect a pod togrow, add enough private IPs now to accommodate the growth.
In a zone that uses advanced networking:
For zones with advanced networking, we recommend provisioning enough private IPs for your total number of cus-tomers, plus enough for the required CloudStack System VMs. Typically, about 10 additional IPs are required forthe System VMs. For more information about System VMs, see the section on working with SystemVMs in theAdministrator’s Guide.
When advanced networking is being used, the number of private IP addresses available in each pod varies dependingon which hypervisor is running on the nodes in that pod. Citrix XenServer and KVM use link-local addresses, which intheory provide more than 65,000 private IP addresses within the address block. As the pod grows over time, this shouldbe more than enough for any reasonable number of hosts as well as IP addresses for guest virtual routers. VMWareESXi, by contrast uses any administrator-specified subnetting scheme, and the typical administrator provides only 255IPs per pod. Since these are shared by physical machines, the guest virtual router, and other entities, it is possible torun out of private IPs when scaling up a pod whose nodes are running ESXi.
To ensure adequate headroom to scale private IP space in an ESXi pod that uses advanced networking, use one or bothof the following techniques:
• Specify a larger CIDR block for the subnet. A subnet mask with a /20 suffix will provide more than 4,000 IPaddresses.
• Create multiple pods, each with its own subnet. For example, if you create 10 pods and each pod has 255 IPs,this will provide 2,550 IP addresses.
14 Chapter 1. Introduction

CHAPTER 2
Navigating the docs
Now that you have gone over the basic concepts of CloudStack you are ready to dive into installation and operationdocumentation.
• Installation Guide
• Administration Guide
• Release Notes
Below you will find very specific documentation on advanced networking which you can skip if you are just gettingstarted. Developers will also find below a short developers guide.
15

CloudStack Documentation, Release 4.11.0
16 Chapter 2. Navigating the docs

CHAPTER 3
Integration Guides
3.1 The Cloudian Connector Plugin
3.1.1 Introduction to the Cloudian Connector Plugin
The Cloudian (HyperStore) Connector is a native CloudStack plugin that allow integration between Apache Cloud-Stack and Cloudian Management Console (CMC). The Connector integrates Cloudian S3 Storage into the CloudStackManagement GUI and allows administrators to easily give their CloudStack users access to and manage their own S3storage areas.
Compatibilty
The following table shows the compatiblity of Cloudian Connector with CloudStack.
Connector Version CloudStack version Cloudian Compatibility4.9_6.2-1 4.9 Version 6.2 and onwards4.11+ 4.11+ Version 6.2 and onwards
Table: Support Matrix
Note: Starting CloudStack 4.11, the Connector will be part of the CloudStack release and will not need to beexternally installed.
17

CloudStack Documentation, Release 4.11.0
3.1.2 Connector Overview
Single-Sign-On Integration
The connector plugin adds a Cloudian Storage button to the CloudStack UI. This button is available for all users onthe bottom left of the menu.
When a user clicks this button, a new window or tab (depending on the web browser preferences) is opened for theHyperStore CMC GUI. The CloudStack user is automatically logged in to CMC as the correctly mapped HyperStoreuser using Single-Sign-On (SSO).
With the connector enabled, when the user clicks ‘Log Out’ in the CloudStack UI this first logs the user out ofCloudStack and then redirects the page to log out any logged-in Cloudian user out of CMC GUI and finally redirectsthe page to the CloudStack login page.
Single-Sign-On is a technique where CloudStack and HyperStore are configured to trust each other. This is achievedby configuring both HyperStore and the CloudStack connector with the same SSO Shared Key. The CloudStackconnector creates a special login URL for CMC which it signs using this shared key. Upon receiving the specialsigned login URL, CMC validates the request by comparing the signature to its own copy of the shared key and theuser is automatically logged in.
User Mapping and Provisioning/De-provisioning
CloudStack domains are mapped to Cloudian Groups. CloudStack accounts within those domains are mapped toCloudian users. The Cloudian user and group are created on demand if it doesn’t already exist when the CloudStackuser accesses CMC through the Cloudian Storage button. When accounts and domains are created or removed inCloudStack, they automatically create or remove users or groups in CMC.
CloudStack Entity Equivalent Cloudian EntityAccount UserDomain Group
Table: Mapping Between Cloudian and CloudStack
Note: Adding groups or users directly through Cloudian does not add corresponding CloudStack Domains or Ac-counts. The integration is driven completely from the CloudStack side.
Special Admin User Mapping
The special CloudStack admin is are mapped to a special HyperStore Admin user account which defaults to the userid admin. As the admin user on HyperStore is configurable, there is a configuration option to control this mapping.
18 Chapter 3. Integration Guides

CloudStack Documentation, Release 4.11.0
This mapping dictates which HyperStore user is automatically logged in using SSO when the CloudStack admin userclicks “Cloudian Storage”.
Note: The Cloudian Admin user default is called admin. Older versions of Cloudian used to use [email protected].
DNS Resolution Requirements
The CloudStack Management Server will need to be access the Cloudian admin service. The Cloudian admin service iscommonly run on the same nodes as your Cloudian S3 servers. The admin service is used to provision and deprovisionCloudian users and groups automatically by CloudStack.
Additionally, your CloudStack users will need to be able to resolve your CMC server hostname on their desktops sothat they can access CMC.
Example domain names that should resolve:
Resolvable Name Required By Descriptionmgmt.abc-cloud.com User’s browser CloudStack Management Servercmc.abc-cloud.com User’s browser Cloudian CMCadmin.abc-cloud.com Management Server Cloudian Admin Server
Table: DNS Name Resolution Example
3.1.3 Configuring the Cloudian Connector
Prerequisites
Cloudian ships with SSO disabled by default. You will need to enable it on each CMC server. Additionally, you willneed to choose a unique SSO shared key that you will also configure in the CloudStack connector further below.
Edit Puppet config to enable SSO on all CMC servers:
# vi /etc/cloudian-[version]-puppet/modules/cmc/templates/mts-ui.properties.→˓erbsso.enabled=truesso.shared.key=YourSecretKeyHere
Note: Once configured in Puppet, you should roll out out to each CMC server and restart CMC services. Please referto the HyperStore documentation for how to do this.
Connector Configuration
The main way to configure, enable and disable the connector is using the CloudStack global setting. The global settingsprovide an easy way to configure the connector and synchronize setting across multiple management server(s). Thefollowing global setting can be accessed and changed using the CloudStack UI:
3.1. The Cloudian Connector Plugin 19

CloudStack Documentation, Release 4.11.0
Global Setting Descriptioncloudian.connector.enabled Setting to enable/disable the plugincloudian.admin.host The Cloudian admin server hostcloudian.admin.port The Cloudian admin server port, usually 19443 (https) or 18081 (http)cloudian.admin.protocol The Cloudian admin server protocol, http/httpscloudian.validate.ssl Whether to validate SSL certificate of Cloudian admin service while making API
callscloudian.admin.user Basic auth user name for Cloudian admin servercloudian.admin.password Basic auth password for Cloudian admin servercloudian.api.request.timeout The admin API request timeout in secondscloudian.cmc.admin.user The user id of the CMC admin that maps to CloudStack admin usercloudian.cmc.host The Cloudian Management Console hostnamecloudian.cmc.port The Cloudian Management Console portcloudian.cmc.protocol The Cloudian Management Console protocolcloudian.sso.key The shared secret as configured in Cloudian CMC
Table: Cloudian Connector Global Settings
Note: Change in only ‘cloudian.connector.enabled’ setting requires restarting of all the CloudStack managementserver(s), rest of the setting can be changed dynamically without requiring to restart the CloudStack managementserver(s).
Enabling the Cloudian Connector
The Cloudian Connector comes disabled by default, enabling the connector is the last step. You should have al-ready configured the Cloudian Connector global settings. To enable the connector, ensure that the global setting“cloudian.connector.enabled” is set to true. Finally, restart each of the management server(s) to reload and enable theconnector.
For example, here is how you can restart the CloudStack management server installed on CentOS7:
# systemctl restart cloudstack-management
Troubleshooting
Most of the trouble you may run into will be configuration related.
There are a few things which can go wrong for SSO. Here are the most common problems and things to check:
• Does the global settings cloudian.cmc.admin.user point to the correct Cloudian (admin) user?
• Is SSO configured and enabled on Cloudian HyperStore CMC?
• Check for errors in the CMC log file.
• Are both CloudStack and HyperStore CMC configured with the same cloudian.sso.key?
• Check the /var/log/cloudstack/management/management-server.log file and search for errors relating to SSO.
• Try access the CMC host directly from the problem users host using the configured cloudian.cmc.host,cloudian.cmc.port and cloudian.cmc.protocol configured in the CloudStack global settings.
• If you log out of the management server and log in again, does the Cloudian Storage button work?
20 Chapter 3. Integration Guides

CloudStack Documentation, Release 4.11.0
Adding/Deleting Domains or Accounts fails: These operations use the Cloudian Admin Server. It’s likely that some-thing has changed with the connection or the admin server is down. Check list:
• Is the admin server alive and listening?
• Try access the admin server host directly from the problem users host using the configured cloudian.admin.host,cloudian.admin.port and cloudian.admin.protocol configured in the CloudStack global settings. Check the con-figured auth settings cloudian.admin.user and cloudian.admin.password.
• If you’re experiencing timeout issues, trying changing the API timeout value defined incloudian.api.request.timeout global setting.
• Look for errors in the admin log file /var/log/cloudian/cloudian-admin.log.
3.1.4 Cloudian as CloudStack Secondary Storage
This section is a supplementary guide for CloudStack and describes how to configure CloudStack to use CloudianHyperStore as Secondary Storage. Please also review CloudStack’s documentation (Getting Started Guide) for con-figuring and using S3 as Secondary Storage.
CloudStack, as of version 4.2.1, can utilize Cloudian HyperStore as S3 Secondary Storage out of the box. There is noneed for any modifications or to install any connectors. Secondary Storage is used to store ISOs, Templates, Snapshotsand Volumes.
Note: CloudStack still requires an NFS Secondary Storage Staging Server with is mentioned in the requirementsbelow.
Requirements:
• CloudStack 4.5+ (installed/configured and running)
• Cloudian HyperStore 5.0 or greater (installed/configured and running)
NFS Secondary Storage Staging Server Requirement
The use of S3 as Secondary Storage for CloudStack also requires an NFS server. The NFS server is required becausethe various hypervisors cannot yet talk directly to S3 but instead talk through the standard file system API. As such,CloudStack requires an NFS staging server which the Hypervisors use to read and write data from/to. The NFS storagerequirements for the staging server are small however as space is only required while objects are staged (moving)between the S3 server and the VMs.
DNS Name Resolution Requirement
All CloudStack Management Servers, system VMs and customer VMs (if required) must be able to resolve yourS3 bucket names. Usually, if you already have Cloudian installed and running in your environment, this is alreadyworking. At a minimum the following names should resolve to the correct IP addresses using the DNS server thatyour Management Server and System VMs are using.
Example Name DNS Name Typess3.mycloud.com Cloudian S3 Endpointsec.s3.mycloud.com Bucket for Secondary Storages3-admin.mycloud.com Cloudian Admin Server
3.1. The Cloudian Connector Plugin 21

CloudStack Documentation, Release 4.11.0
Table: Example Domain Names that should Resolve on CloudStack Servers
3.1.5 Adding Cloudian as CloudStack Secondary Storage
Setup a Cloudian User and Bucket for Secondary Storage
S3 Secondary Storage stores the CloudStack templates, snapshots etc in a dedicated S3 Bucket. To properly configureCloudStack you will need to know the S3 Bucket name and how to access your S3 Server (the S3 endpoint, access keyand secret key).
Below, we will create a dedicated Cloudian user and a dedicated bucket which we will assign for use as SecondaryStorage.
Create a dedicated user/group:
• Login to the Cloudian Management Console (CMC) as the Cloudian admin user.
• Create a new group called cloudstack. Any group name is ok.
• Create a new user called cloudstack in the cloudstack group. Any user name is ok.
Create a dedicated bucket:
• Login to CMC as the cloudstack user created above.
• Create a bucket called secondary. Any bucket name will do.
• On the top menu bar on the right hand side, use the drop down menu under your user name to select SecurityCredentials and copy and paste your Access and Secret Keys to a note for later use. CloudStack will need thesewhen you attach Cloudian as Secondary Storage in a later step below.
Open Up Access to your S3 Network from Secondary Storage
If your S3 server is on a different network to your Secondary Storage VM, you will need to open up access to the S3network. This also allows users to download templates from their S3 object store areas.
Note: Editing the Global Settings requires you to restart the management server(s).
Add an NFS Secondary Storage Staging Server
As mentioned previously, S3 Secondary Storage currently requires the use of an NFS Secondary Staging Server. AddNFS Secondary Storage Staging Server:
• Login to CloudStack Management Server as the admin user.
• Navigate to Infrastructure → Secondary Storage.
• Click Select View and select Secondary Staging Store.
22 Chapter 3. Integration Guides

CloudStack Documentation, Release 4.11.0
• Click Add Secondary Staging Store.
• Configure the zone, server and path for your desired secondary staging store. For example nfs.mycloud.comand /export/staging.
Attach Cloudian as Secondary Storage
CloudStack supports using either S3 or NFS as Secondary Storage but not both. The below instructions assume youare not using Secondary Storage on NFS and that you can delete it to add the S3 storage.
Note: Already using NFS for Secondary Storage with CloudStack? You need to migrate your Secondary Storage.Refer to CloudStack’s instructions for migrating existing NFS Secondary Storage to an S3 object storage. CloudStack4.5 onwards supports migrating data via special commands which are described in the Getting Started Guide in asection titled Upgrading from NFS to Object Storage.
Adding S3 Secondary Storage:
• Login to CloudStack Management Server as the admin user.
• Navigate to Infrastructure → Secondary Storage.
• If it exists, select and delete any existing NFS Secondary Storage server setting. NOTE: Do not do this if youwant to migrate existing NFS secondary storage to S3. Instead, see warning above.
• Click the Add Secondary Storage button. This will open up a pop-up form which you can fill out similarly tobelow.
Note: CloudStack doesn’t currently allow you to re-edit the S3 configuration so take time to double check what youenter. If you make a mistake the only options currently are either a) delete and recreate the storage or b) directly editthe entry in the database.
When you have finished adding Cloudian as Secondary Storage in the previous steps, CloudStack will populate thenew secondary storage with the system and default templates. This can take some time do download as the templatesare quite big.
Note: You can check if the system template and the default template have properly downloaded to the new secondarystorage by navigating to Templates, selecting a template, clicking on the Zones tab and checking its Status is Ready
3.1. The Cloudian Connector Plugin 23

CloudStack Documentation, Release 4.11.0
24 Chapter 3. Integration Guides
CloudStack Documentation, Release 4.11.0
100% Downloaded.
Note: Should you continue to have problems, sometimes it is necessary to restart the Secondary Storage VM. Youcan do this by navigating to Infrastructure, System VMs, selecting and rebooting the Secondary Storage VM.
CloudStack should now ready to use Cloudian HyperStore for S3 Secondary Storage.
3.1.6 Revision History
• Fri Oct 6 2017 Rohit Yadav [email protected] Documentation created for 4.11.0 version of theCloudian Connector Plugin
3.1. The Cloudian Connector Plugin 25

CloudStack Documentation, Release 4.11.0
26 Chapter 3. Integration Guides

CHAPTER 4
Advanced Networking Guides
4.1 The Nicira NVP Plugin
4.1.1 Introduction to the Nicira NVP Plugin
The Nicira NVP plugin adds Nicira NVP as one of the available SDN implementations in CloudStack. With theplugin an exisiting Nicira NVP setup can be used by CloudStack to implement isolated guest networks and to provideadditional services like routing and NAT.
Features of the Nicira NVP Plugin
The following table lists the CloudStack network services provided by the Nicira NVP Plugin.
Network Service CloudStack version NVP versionVirtual Networking >= 4.0 >= 2.2.1Source NAT >= 4.1 >= 3.0.1Static NAT >= 4.1 >= 3.0.1Port Forwarding >= 4.1 >= 3.0.1
Table: Supported Services
Note: The Virtual Networking service was originally called ‘Connectivity’ in CloudStack 4.0
The following hypervisors are supported by the Nicira NVP Plugin.
Hypervisor CloudStack versionXenServer >= 4.0KVM >= 4.1
27

CloudStack Documentation, Release 4.11.0
Table: Supported Hypervisors
Note: Please refer to the Nicira NVP configuration guide on how to prepare the hypervisors for Nicira NVP integra-tion.
4.1.2 Configuring the Nicira NVP Plugin
Prerequisites
Before enabling the Nicira NVP plugin the NVP Controller needs to be configured. Please review the NVP User Guideon how to do that.
Make sure you have the following information ready:
• The IP address of the NVP Controller
• The username to access the API
• The password to access the API
• The UUID of the Transport Zone that contains the hypervisors in this Zone
• The UUID of the Gateway Service used to provide router and NAT services.
Note: The gateway service uuid is optional and is used for Layer 3 services only (SourceNat, StaticNat and PortFor-warding)
Zone Configuration
CloudStack needs to have at least one physical network with the isolation method set to “STT”. This network shouldbe enabled for the Guest traffic type.
Note: The Guest traffic type should be configured with the traffic label that matches the name of the IntegrationBridge on the hypervisor. See the Nicira NVP User Guide for more details on how to set this up in XenServer orKVM.
Enabling the service provider
The Nicira NVP provider is disabled by default. Navigate to the “Network Service Providers” configuration of thephysical network with the STT isolation type. Navigate to the Nicira NVP provider and press the “Enable Provider”button.
Note: CloudStack 4.0 does not have the UI interface to configure the Nicira NVP plugin. Configuration needs to bedone using the API directly.
28 Chapter 4. Advanced Networking Guides

CloudStack Documentation, Release 4.11.0
4.1. The Nicira NVP Plugin 29

CloudStack Documentation, Release 4.11.0
Device Management
In CloudStack a Nicira NVP setup is considered a “device” that can be added and removed from a physical network.To complete the configuration of the Nicira NVP plugin a device needs to be added to the physical network. Press the“Add NVP Controller” button on the provider panel and enter the configuration details.
Network Offerings
Using the Nicira NVP plugin requires a network offering with Virtual Networking enabled and configured to use theNiciraNvp element. Typical use cases combine services from the Virtual Router appliance and the Nicira NVP plugin.
Service ProviderVPN VirtualRouterDHCP VirtualRouterDNS VirtualRouterFirewall VirtualRouterLoad Balancer VirtualRouterUser Data VirtualRouterSource NAT VirtualRouterStatic NAT VirtualRouterPost Forwarding VirtualRouterVirtual Networking NiciraNVP
Table: Isolated network offering with regular services from the Virtual Router.
Note: The tag in the network offering should be set to the name of the physical network with the NVP provider.
Isolated network with network services. The virtual router is still required to provide network services like dns anddhcp.
30 Chapter 4. Advanced Networking Guides

CloudStack Documentation, Release 4.11.0
Service ProviderDHCP VirtualRouterDNS VirtualRouterUser Data VirtualRouterSource NAT NiciraNVPStatic NAT NiciraNVPPost Forwarding NiciraNVPVirtual Networking NiciraNVP
Table: Isolated network offering with network services
4.1.3 Using the Nicira NVP plugin with VPC
Supported VPC features
The Nicira NVP plugin supports CloudStack VPC to a certain extent. Starting with CloudStack version 4.1 VPCs canbe deployed using NVP isolated networks.
It is not possible to use a Nicira NVP Logical Router for as a VPC Router
It is not possible to connect a private gateway using a Nicira NVP Logical Switch
VPC Offering with Nicira NVP
To allow a VPC to use the Nicira NVP plugin to provision networks, a new VPC offering needs to be created whichallows the Virtual Networking service to be implemented by NiciraNVP.
This is not currently possible with the UI. The API does provide the proper calls to create a VPC offering withVirtual Networking enabled. However due to a limitation in the 4.1 API it is not possible to select the providerfor this network service. To configure the VPC offering with the NiciraNVP provider edit the database table‘vpc_offering_service_map’ and change the provider to NiciraNvp for the service ‘Connectivity’
It is also possible to update the default VPC offering by adding a row to the ‘vpc_offering_service_map’ with service‘Connectivity’ and provider ‘NiciraNvp’
4.1. The Nicira NVP Plugin 31

CloudStack Documentation, Release 4.11.0
Note: When creating a new VPC offering please note that the UI does not allow you to select a VPC offering yet.The VPC needs to be created using the API with the offering UUID.
VPC Network Offerings
The VPC needs specific network offerings with the VPC flag enabled. Otherwise these network offerings are identicalto regular network offerings. To allow VPC networks with a Nicira NVP isolated network the offerings need to supportthe Virtual Networking service with the NiciraNVP provider.
In a typical configuration two network offerings need to be created. One with the loadbalancing service enabled andone without loadbalancing.
Service ProviderVPN VpcVirtualRouterDHCP VpcVirtualRouterDNS VpcVirtualRouterLoad Balancer VpcVirtualRouterUser Data VpcVirtualRouterSource NAT VpcVirtualRouterStatic NAT VpcVirtualRouterPost Forwarding VpcVirtualRouterNetworkACL VpcVirtualRouterVirtual Networking NiciraNVP
Table: VPC Network Offering with Loadbalancing
4.1.4 Troubleshooting the Nicira NVP Plugin
UUID References
The plugin maintains several references in the CloudStack database to items created on the NVP Controller.
32 Chapter 4. Advanced Networking Guides

CloudStack Documentation, Release 4.11.0
Every guest network that is created will have its broadcast type set to Lswitch and if the network is in state “Imple-mented”, the broadcast URI will have the UUID of the Logical Switch that was created for this network on the NVPController.
The Nics that are connected to one of the Logical Switches will have their Logical Switch Port UUID listed in thenicira_nvp_nic_map table
Note: All devices created on the NVP Controller will have a tag set to domain-account of the owner of the network,this string can be used to search for items in the NVP Controller.
Database tables
The following tables are added to the cloud database for the Nicira NVP Plugin
id auto incrementing idlogicalswitch uuid of the logical switch this port is connected tologicalswitchport uuid of the logical switch port for this nicnic the CloudStack uuid for this nic, reference to the nics table
Table: nicira_nvp_nic_map
id auto incrementing iduuid UUID identifying this devicephysical_network_id the physical network this device is configured onprovider_name NiciraNVPdevice_name display name for this devicehost_id reference to the host table with the device configuration
Table: external_nicira_nvp_devices
id auto incrementing idlogicalrouter_uuid uuid of the logical routernetwork_id id of the network this router is linked to
Table: nicira_nvp_router_map
Note: nicira_nvp_router_map is only available in CloudStack 4.1 and above
4.1.5 Revision History
0-0 Wed Oct 03 2012 Hugo Trippaers [email protected] Documentation created for 4.0.0-incubating version of theNVP Plugin 1-0 Wed May 22 2013 Hugo Trippaers [email protected] Documentation updated for CloudStack 4.1.0
4.1. The Nicira NVP Plugin 33

CloudStack Documentation, Release 4.11.0
4.2 The Nuage VSP Plugin
4.2.1 Introduction
The Nuage VSP Plugin is the Nuage Networks SDN implementation in CloudStack, which integrates with NuageNetworks Virtualized Services Platform (VSP). The plugin can be used by CloudStack to leverage the scalability andrich features of advanced SDN being provided by the Nuage VSP SDN Platform and to implement:
• Isolated Guest Networks
• Virtual Private Clouds (VPC)
• Shared Networks
For more information about Nuage Networks, visit www.nuagenetworks.net.
Supported Features
The following table lists the supported Network services in a CloudStack deployment with NuageVsp being the Con-nectivity/Virtual Networking provider, with their providers and supported CloudStack versions.
Network Service Isolated Networks VPCs Shared NetworksVirtual Networking NuageVsp (>=4.5) NuageVsp (>=4.5) NuageVsp (>=4.10)Dhcp NuageVsp (>=4.5) NuageVsp (>=4.5) NuageVsp (>=4.10)SourceNat NuageVsp (>=4.10) NuageVsp (>=4.10) N/AStaticNat NuageVsp (>=4.5) NuageVsp (>=4.5) N/AFirewall NuageVsp (>=4.5) N/A N/ANetworkACL N/A NuageVsp (>=4.5) N/AUserData VirtualRouter (>=4.5) VpcVirtualRouter (>=4.5) VirtualRouter (>=4.10)Dns VirtualRouter (>=4.10) VpcVirtualRouter (>=4.10) N/AInternal Lb N/A InternalLbVm (>=4.9) N/A
Table: Supported Network Services
Note: The Virtual Networking service was originally called ‘Connectivity’ in CloudStack 4.0
Supported Hypervisors
The following hypervisors are supported by the Nuage VSP Plugin, with their supported CloudStack versions.
Hypervisor CloudStack versionKVM 7.x >= 4.5VMware ESXi 5.5 >= 4.5VMware ESXi 6.0 >= 4.9
Table: Supported Hypervisors
34 Chapter 4. Advanced Networking Guides

CloudStack Documentation, Release 4.11.0
Supported Nuage VSP SDN Platform Versions
The following Nuage VSP SDN Platform versions are supported by the Nuage VSP Plugin, with their supportedCloudStack versions.
Nuage VSP version CloudStack versionNuage VSP v3.2 >= 4.5Nuage VSP v4.0 >= 4.10
Table: Supported Nuage VSP SDN Platform Versions
4.2.2 Configuring The Nuage VSP Plugin
Prerequisites
Before enabling and using the Nuage VSP Plugin with CloudStack.
1. Verify that the CloudStack deployment (hypervisors) and Nuage VSP SDN Platform version you intend to useis being supported.
Note: Only the release notes for Nuage VSP contain the most up-to-date information on different supported versions.Please check them to verify that the information in this document is up-to-date.
2. Prepare and configure the hypervisors for CloudStack integration with Nuage VSP SDN Platform.
Note: Please refer to the Nuage VSP Install Guide on how to prepare the hypervisors for Nuage VSP SDN Platformintegration.
Required Nuage VSD Configuration
When configuring Nuage VSP as the network service provider in a CloudStack Zone, a CSP user must be added inNuage VSD, and this user must be added to the CMS group. See Enable Nuage VSP Network Service Provider.
Note: Nuage VSD is the programmable policy and analytics engine of the Nuage VSP SDN Platform with which theNuage VSP Plugin interacts.
Zone Configuration
Select VSP Isolation Method
The Nuage VSP solution is NOT supported in Basic zone provisioning mode.
1. When adding a zone, the CloudStack administrator should select Advanced mode in the zone wizard.
2. When laying out the physical network configuration during zone provisioning, the Guest network traffic shouldbe put in a separate physical network of its own.
3. This physical network carrying the Guest traffic should have VSP as the Isolation Method.
4.2. The Nuage VSP Plugin 35

CloudStack Documentation, Release 4.11.0
Fig. 1: Setting Isolation Method to VSP
36 Chapter 4. Advanced Networking Guides

CloudStack Documentation, Release 4.11.0
Update Traffic Labels
Guest Traffic Type
Select Edit on the Guest traffic type panel and update the Traffic Label:
• For KVM, use alubr0 as the KVM Traffic Label.
Fig. 2: Specifying the Traffic Type in KVM
• For VMware ESXi, use the switch name used by dVRS for guest networking as the vSwitch Name, leave theVLAN ID field blank, and select VMware vNetwork Distributed Switch in the vSwitch Type drop downfield.
Enable Nuage VSP Network Service Provider
Nuage VSP must be added and enabled as a Network Service Provider in the CloudStack Zone before it can be used.
Step 1 Select Infrastructure > Zone > [zone name] > Physical Network 2 > Configure Network Ser-vice Providers > Nuage Vsp > +, which brings up the Add Nuage Virtualized Services Directory(VSD) panel.
Step 2 Enter the Nuage VSD Host Name, Username and Password that was previously created.
Step 3 Specify the Nuage VSD API version by entering the API version in the appropriate field (format:v4_0).
Step 4 EITHER Add Nuage VSD by clicking the OK button,
OR use Nuage VSP API calls to configure Nuage VSP as a Network Service Provider in the Cloud-Stack Zone; see Configure Nuage VSP API in the Appendix of this document.
Step 5 Go to Infrastructure > Zones > [zone name] > Physical Network 2 > Network ServiceProviders > Nuage Vsp > Devices > Details tab as shown in the figure “Enabling Nuage VSPNetwork Service Provider” below. This indicates the state of Nuage VSP Network Service Provider.Enable Nuage VSP Network Service Provider by clicking Enable.
4.2. The Nuage VSP Plugin 37

CloudStack Documentation, Release 4.11.0
Fig. 3: Specifying the Traffic Type in VMware ESXi
38 Chapter 4. Advanced Networking Guides

CloudStack Documentation, Release 4.11.0
Fig. 4: Adding Nuage VSD as the Network Service Provider
4.2. The Nuage VSP Plugin 39

CloudStack Documentation, Release 4.11.0
Fig. 5: Enabling Nuage VSP Network Service Provider
40 Chapter 4. Advanced Networking Guides

CloudStack Documentation, Release 4.11.0
Step 6 (Optional) View the Nuage VSP Network Service Provider status on the list of Network ServiceProviders on the Infrastructure > Zones > [zone name] > Physical Network 2 > Network ServiceProviders page;
Fig. 6: Viewing Network Service Providers Status
4.2.3 Using The Nuage VSP Plugin
Network Offerings
There are three types of Network Offerings that can be created:
• If Isolated Networks are required, then create a Isolated guest type network offering for use with IsolatedNetworks.
• If VPC deployments are required, then create a new Isolated guest type network offering for such deployments.
• If Shared Networks are required, then create a new Shared guest type network offering for use with SharedNetworks.
Note: Per Zone MUST always be selected as the Supported Source NAT type when Source NAT service is beingprovided by NuageVsp.
Create and Enable Isolated Network Offering
1. Select Service Offerings > Select Offering: Network Offerings > Add network offering, which brings upthe Add network offering.
4.2. The Nuage VSP Plugin 41

CloudStack Documentation, Release 4.11.0
2. In the Add network offering panel, add a Name and a Description to the network offering. Select Isolated asthe Guest Type. In the Supported Services field select services and providers that are supported by the NuageVSP Plugin for Isolated Networks, see Supported Features at the beginning of this document.
Fig. 7: Creating Isolated Network Offering
3. Click the OK button to create the network offering.
4. After the network offering has been successfully created, enable it from the Service Offerings - NetworkOfferings list.
Create and Enable VPC Network Offering
1. Select Service Offerings > Select Offering: Network Offerings > Add network offering, which brings upthe Add network offering.
2. In the Add network offering panel, add a Name and a Description to the network offering. Select Isolated asthe Guest Type. Select the VPC field. In the Supported Services field select services and providers that aresupported by the Nuage VSP Plugin for VPCs, see Supported Features at the beginning of this document.
3. Click the OK button to create the network offering.
4. After the network offering has been successfully created, enable it from the Service Offerings - NetworkOfferings list.
Create and Enable Shared Network Offering
1. Select Service Offerings > Select Offering: Network Offerings > Add network offering, which brings upthe Add network offering.
2. In the Add network offering panel, add a Name and a Description to the network offering. Select Shared asthe Guest Type. In the Supported Services field select services and providers that are supported by the NuageVSP Plugin for Shared Networks, see Supported Features at the beginning of this document.
42 Chapter 4. Advanced Networking Guides

CloudStack Documentation, Release 4.11.0
Fig. 8: Creating VPC Network Offering
Fig. 9: Creating Shared Network Offering
4.2. The Nuage VSP Plugin 43

CloudStack Documentation, Release 4.11.0
Note: Selecting the Supporting Public Access field in the Shared Network offering enables Public/Internet accessto the VMs in the Shared Network.
3. Click the OK button to create the network offering.
4. After the network offering has been successfully created, enable it from the Service Offerings - NetworkOfferings list.
VPC Offerings
Pre-created and Enabled Nuage VSP VPC Offering
A VPC offering by the name Nuage VSP VPC Offering is pre-created and enabled in the list of Service Offerings- VPC Offerings (Select Service Offerings > Select Offering: VPC Offerings) which contains all the services andproviders that are supported by the Nuage VSP Plugin for VPCs.
Fig. 10: Pre-created and Enabled Nuage VSP VPC Offering
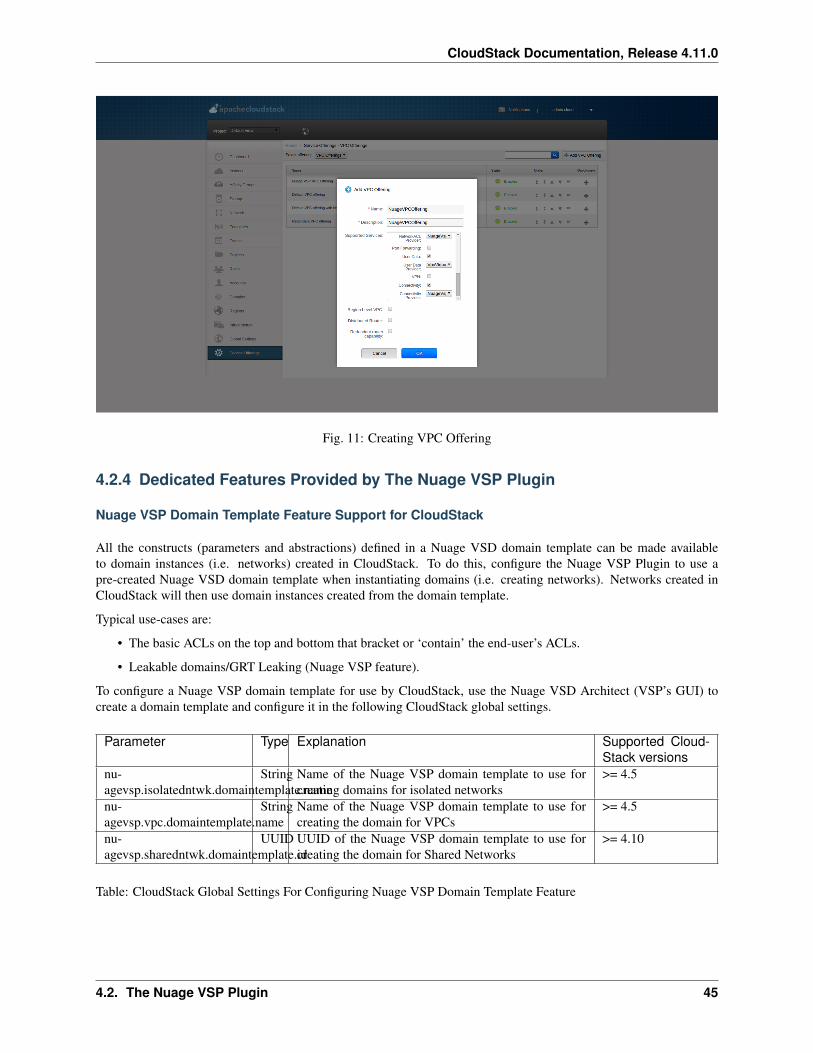
(Optional) Create and Enable VPC Offering
1. Select Service Offerings > Select Offering: VPC Offerings > Add VPC Offering, which brings up the AddVPC Offering.
2. In the Add VPC Offering panel, add a Name and a Description to the network offering. In the SupportedServices field select services and providers that are supported by the Nuage VSP Plugin for VPCs, see SupportedFeatures at the beginning of this document.
3. Click the OK button to create the VPC Offering.
4. After the VPC Offering has been successfully created, enable it from the Service Offerings - VPC Offeringslist.
44 Chapter 4. Advanced Networking Guides
CloudStack Documentation, Release 4.11.0
Fig. 11: Creating VPC Offering
4.2.4 Dedicated Features Provided by The Nuage VSP Plugin
Nuage VSP Domain Template Feature Support for CloudStack
All the constructs (parameters and abstractions) defined in a Nuage VSD domain template can be made availableto domain instances (i.e. networks) created in CloudStack. To do this, configure the Nuage VSP Plugin to use apre-created Nuage VSD domain template when instantiating domains (i.e. creating networks). Networks created inCloudStack will then use domain instances created from the domain template.
Typical use-cases are:
• The basic ACLs on the top and bottom that bracket or ‘contain’ the end-user’s ACLs.
• Leakable domains/GRT Leaking (Nuage VSP feature).
To configure a Nuage VSP domain template for use by CloudStack, use the Nuage VSD Architect (VSP’s GUI) tocreate a domain template and configure it in the following CloudStack global settings.
Parameter Type Explanation Supported Cloud-Stack versions
nu-agevsp.isolatedntwk.domaintemplate.name
String Name of the Nuage VSP domain template to use forcreating domains for isolated networks
>= 4.5
nu-agevsp.vpc.domaintemplate.name
String Name of the Nuage VSP domain template to use forcreating the domain for VPCs
>= 4.5
nu-agevsp.sharedntwk.domaintemplate.id
UUID UUID of the Nuage VSP domain template to use forcreating the domain for Shared Networks
>= 4.10
Table: CloudStack Global Settings For Configuring Nuage VSP Domain Template Feature
4.2. The Nuage VSP Plugin 45

CloudStack Documentation, Release 4.11.0
Nuage VSP Source NAT via the Underlay Feature Support For CloudStack
Supported CloudStack versions: >= 4.10
CloudStack provides Source NAT service to enable guest VMs to send traffic out to the Internet without requiring aStatic NAT IP (public IP) assigned to the VM. The Source NAT service must be enabled as part of the network offeringused for creating the guest network. When a network is created using this network offering, the first public IP fromthe assigned public IP range is automatically acquired as the Source NAT IP for the network. All VMs attached to thisnetwork then use that Source NAT IP to send traffic to the Internet.
The Nuage VSP Plugin for CloudStack supports CloudStack’s native Source NAT service and enhances it by restrictingto a minimum the number of public IP addresses assigned to any given tenant. This is achieved by not allocating aSource NAT IP for every network that is created.
The Source NAT service that Nuage VSP calls the Port Address Translation (PAT) feature uses the hypervisor IP asthe Source NAT IP address for all VMs in the hypervisor that need to send traffic out to the Internet. Configure thisduring Nuage VSP installation using the instructions given in the Nuage VSP Install Guide.
This feature is supported for both VPCs and Isolated Networks. In the case of VPCs, Source NAT is applied at theNuage VSP domain level, therefore there is no customization on the individual VPC network (tier) level.
All VPCs and Isolated networks that are created from a Nuage VSP Source NAT-enabled network offering have thisfeature enabled automatically. An example Nuage VSP Source NAT-enabled network offering is shown in the figure“Nuage VSP Source NAT-enabled Network Offering” below.
Fig. 12: Nuage VSP Source NAT-enabled Network Offering
46 Chapter 4. Advanced Networking Guides

CloudStack Documentation, Release 4.11.0
Nuage VSP Static NAT via the Underlay Feature Support For CloudStack
Supported CloudStack versions: >= 4.10
Static NAT is supported in Nuage VSP as FIP (Floating IP). Prior to Nuage VSP v3.2, FIP in Nuage VSP required aVXLAN GW/PE to be present in the data center. In Nuage VSP v3.2 and above FIP is supported via the underlay,which removes the requirement for a GW/PE in the DC.
For the Static NAT without GW/PE feature to be operational in the CloudStack plugin, FIP in Nuage VSP must beconfigured to use the underlay. This operation takes place during Nuage VSP installation; instructions can be found inthe Nuage VSP Install Guide.
A new API called nuageunderlayvlaniprange has been introduced to enable/disable Static NAT via the Un-derlay feature support for CloudStack public IP ranges being used for Static NAT service. This API specifies whetherthe FIP to underlay support is required for the corresponding FIP subnet in Nuage VSD since there is no GW/PEin the data center. When the nuageunderlayvlaniprange API has been enabled/disabled for a public IPrange and Static NAT is enabled on at-least one of its Public IPs, the plugin creates the corresponding shared FIPsubnet in Nuage VSD using the sharednetworkresources API with the underlay flag set accordingly. Thenuageunderlayvlaniprange API usage is shown in the figure “nuageunderlayvlaniprange API Usage” below.
Fig. 13: nuageunderlayvlaniprange API Usage
By default, the Nuage VSP Plugin creates the corresponding shared FIP subnet in Nuage VSD with the underlay flagset to false (disabled). There is no support for the nuageunderlayvlaniprange API from the CloudStack UI.
Note: Enabling/disabling the nuageunderlayvlaniprange API for CloudStack public IP ranges is supportedonly before the Nuage VSP plugin creates the corresponding shared FIP subnet in Nuage VSD. After a shared FIPsubnet is created in Nuage VSD, its underlay flag cannot be changed. To change the underlay flag for a given sharedFIP subnet, delete the Public vLanIPRange, recreate it and enable/disable the nuageunderlayvlaniprange APIfor it.
4.2. The Nuage VSP Plugin 47
CloudStack Documentation, Release 4.11.0
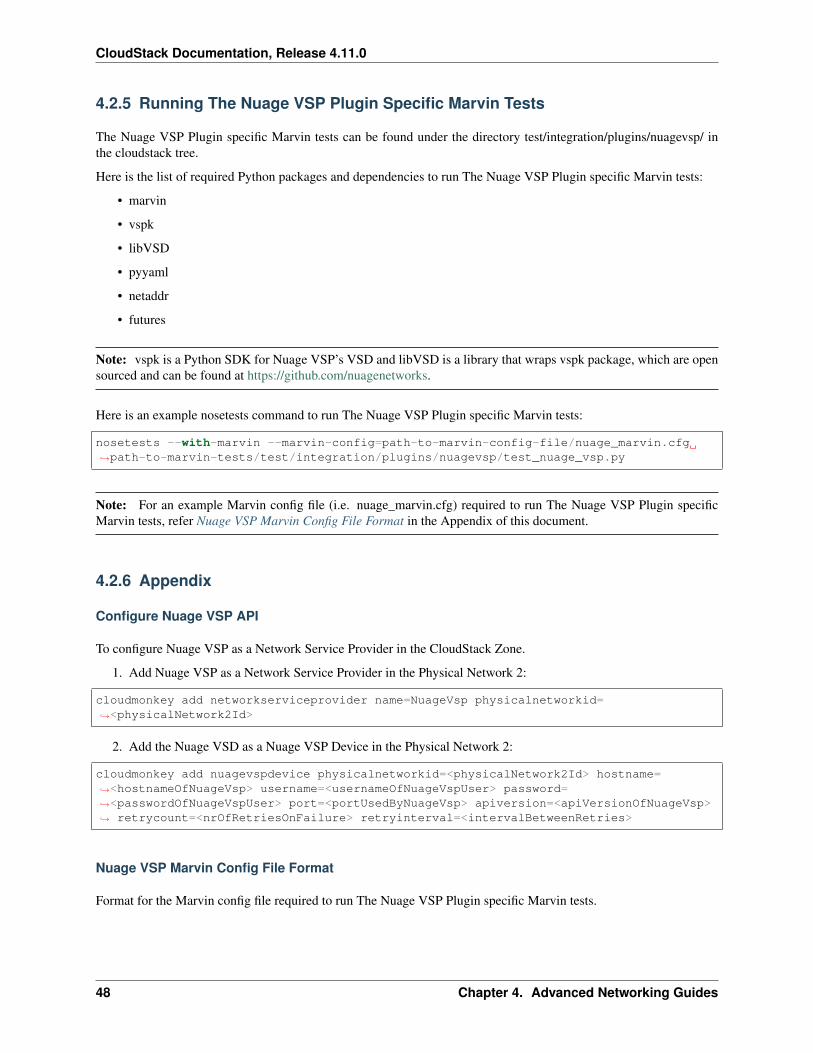
4.2.5 Running The Nuage VSP Plugin Specific Marvin Tests
The Nuage VSP Plugin specific Marvin tests can be found under the directory test/integration/plugins/nuagevsp/ inthe cloudstack tree.
Here is the list of required Python packages and dependencies to run The Nuage VSP Plugin specific Marvin tests:
• marvin
• vspk
• libVSD
• pyyaml
• netaddr
• futures
Note: vspk is a Python SDK for Nuage VSP’s VSD and libVSD is a library that wraps vspk package, which are opensourced and can be found at https://github.com/nuagenetworks.
Here is an example nosetests command to run The Nuage VSP Plugin specific Marvin tests:
nosetests --with-marvin --marvin-config=path-to-marvin-config-file/nuage_marvin.cfg→˓path-to-marvin-tests/test/integration/plugins/nuagevsp/test_nuage_vsp.py
Note: For an example Marvin config file (i.e. nuage_marvin.cfg) required to run The Nuage VSP Plugin specificMarvin tests, refer Nuage VSP Marvin Config File Format in the Appendix of this document.
4.2.6 Appendix
Configure Nuage VSP API
To configure Nuage VSP as a Network Service Provider in the CloudStack Zone.
1. Add Nuage VSP as a Network Service Provider in the Physical Network 2:
cloudmonkey add networkserviceprovider name=NuageVsp physicalnetworkid=→˓<physicalNetwork2Id>
2. Add the Nuage VSD as a Nuage VSP Device in the Physical Network 2:
cloudmonkey add nuagevspdevice physicalnetworkid=<physicalNetwork2Id> hostname=→˓<hostnameOfNuageVsp> username=<usernameOfNuageVspUser> password=→˓<passwordOfNuageVspUser> port=<portUsedByNuageVsp> apiversion=<apiVersionOfNuageVsp>→˓ retrycount=<nrOfRetriesOnFailure> retryinterval=<intervalBetweenRetries>
Nuage VSP Marvin Config File Format
Format for the Marvin config file required to run The Nuage VSP Plugin specific Marvin tests.
48 Chapter 4. Advanced Networking Guides

CloudStack Documentation, Release 4.11.0
{"zones": [
{"name": "ZONE1NAME","physical_networks": [
{"name": "Physical Network 1","isolationmethods": [
"VLAN"]
},{
"name": "Physical Network 2","isolationmethods": [
"VSP"],"providers": [
{"name": "NuageVsp","devices": [
{"username": "VSDUSERNAME","retryinterval": "60","hostname": "VSDSERVER","apiversion": "VSDVERSION","retrycount": "4","password": "VSDUSERPASSWORD","port": VSDPORT
}]
}]
}],"dcInternetConnectivityInfo" : {
"available": "INTERNETAVAILABLE","httpProxy": "HTTPPROXY","httpsProxy": "HTTPSPROXY"
}},{
"name": "ZONE2NAME","physical_networks": [
{"name": "Physical Network 1","isolationmethods": [
"VLAN"]
},{
"name": "Physical Network 2","isolationmethods": [
"VSP"],"providers": [
{"name": "NuageVsp",
(continues on next page)
4.2. The Nuage VSP Plugin 49

CloudStack Documentation, Release 4.11.0
(continued from previous page)
"devices": [{
"username": "VSDUSERNAME","retryinterval": "60","hostname": "VSDSERVER","apiversion": "VSDVERSION","retrycount": "4","password": "VSDUSERPASSWORD","port": VSDPORT
}]
}]
}],"dcInternetConnectivityInfo" : {
"available": "INTERNETAVAILABLE","httpProxy": "HTTPPROXY","httpsProxy": "HTTPSPROXY"
}}
],"dbSvr": {
"dbSvr": "DBSERVER","passwd": "DBPASSWORD","db": "cloud","port": 3306,"user": "DBUSERNAME"
},"logger":
{"LogFolderPath": "/tmp/LOGFOLDERNAME"
},"mgtSvr": [
{"mgtSvrIp": "MGNTSERVERIP","port": 8096,"user": "MGNTUSERNAME","passwd": "MGNTPASSWORD"
}]}
4.3 The VXLAN Plugin
4.3.1 System Requirements for VXLAN
In PRODUCT 4.X.0, this plugin only supports the KVM hypervisor with the standard linux bridge.
The following table lists the requirements for the hypervisor.
50 Chapter 4. Advanced Networking Guides

CloudStack Documentation, Release 4.11.0
Item Requirement NoteHyper-visor
KVM OvsVifDriver is not supported by this plugin in PRODUCT 4.X, useBridgeVifDriver (default).
Linuxkernel
version >= 3.7, VXLAN ker-nel module enabled
It is recommended to use kernel >=3.9, since Linux kernel categorizesthe VXLAN driver as experimental <3.9.
iproute2 matches kernel version
Table: Hypervisor Requirement for VXLAN
4.3.2 Linux Distributions that meet the requirements
The following table lists distributions which meet requirements.
Distribu-tion
Release Ver-sion
Kernel Version (Date con-firmed)
Note
Ubuntu 13.04 3.8.0 (2013/07/23)Fedora >= 17 3.9.10 (2013/07/23) Latest kernel packages are available in “update”
repository.CentOS >= 6.5 2.6.32-431.3.1.el6.x86_64
(2014/01/21)
Table: List of Linux distributions which meet the hypervisor requirements
Check the capability of your system
To check the capability of your system, execute the following commands.
$ sudo modprobe vxlan && echo $?# Confirm the output is "0".# If it's non-0 value or error message, your kernel doesn't have VXLAN kernel module.
$ ip link add type vxlan help# Confirm the output is usage of the command and that it's for VXLAN.# If it's not, your iproute2 utility doesn't support VXLAN.
Important note on MTU size
When new vxlan interfaces are created, kernel will obtain current MTU size of the physical interface (ethX or thebridge) and then create vxlan interface/bridge that are exactly 50 bytes smaller than the MTU on physical inter-face/bridge. This means that in order to support default MTU size of 1500 bytes inside VM, your vxlan interface/bridgemust also have MTU of 1500 bytes, meaning that your physical interface/bridge must have MTU of at least 1550 bytes.In order to configure “jumbo frames” you can i.e. make physical interface/bridge with 9000 bytes MTU, then all thevxlan interfaces will be created with MTU of 8950 bytes, and then MTU size inside VM can be set to 8950 bytes.
Important note on max number of multicast groups (and thus VXLAN intefaces)
Default value of “net.ipv4.igmp_max_memberships” (cat /proc/sys/net/ipv4/igmp_max_memberships) is “20”, whichmeans that host can be joined to max 20 multicast groups (attach max 20 multicast IPs on the host). Since all VXLAN(VTEP) interfaces provisioned on host are multicast-based (belong to certain multicast group, and thus has it’s ownmulticast IP that is used as VTEP), this means that you can not provision more than 20 (working) VXLAN interfaces
4.3. The VXLAN Plugin 51

CloudStack Documentation, Release 4.11.0
per host. On Linux kernel 3.x you actually can provision more than 20, but ARP request will silently fail and causeclient’s networking problems On Linux kernel 4.x you can NOT provision (start) more than 20 VXLAN interfacesand error message “No buffer space available” can be observed in Cloudstack Agent logs after provisioning requiredbridges and VXLAN interfaces. Increase needed parameter to sane value (i.e. 100 or 200) as required. If you need tooperate more than 20 VMs from different client’s network, this change above is required.
Advanced: Build kernel and iproute2
Even if your system doesn’t support VXLAN, you can compile the kernel and iproute2 by yourself. The followingprocedure is an example for CentOS 6.4.
Build kernel
$ sudo yum groupinstall "Development Tools"$ sudo yum install ncurses-devel hmaccalc zlib-devel binutils-devel elfutils-libelf-→˓devel bc
$ KERNEL_VERSION=3.10.4# Declare the kernel version you want to build.
$ wget https://www.kernel.org/pub/linux/kernel/v3.x/linux-${KERNEL_VERSION}.tar.xz$ tar xvf linux-${KERNEL_VERSION}.tar.xz$ cd linux-${KERNEL_VERSION}$ cp /boot/config-`uname -r` .config$ make oldconfig# You may keep hitting enter and choose the default.
$ make menuconfig# Dig into "Device Drivers" -> "Network device support",# then select "Virtual eXtensible Local Area Network (VXLAN)" and hit space.# Make sure it indicates "<M>" (build as module), then Save and Exit.
# You may also want to check "IPv4 NAT" and its child nodes in "IP: Netfilter→˓Configuration"# and "IPv6 NAT" and its child nodes in "IPv6: Netfilter Configuration".# In 3.10.4, you can find the options in# "Networking support" -> "Networking options"# -> "Network packet filtering framework (Netfilter)".
$ make # -j N# You may use -j N option to make the build process parallel and faster,# generally N = 1 + (cores your machine have).
$ sudo make modules_install$ sudo make install# You would get an error like "ERROR: modinfo: could not find module XXXX" here.# This happens mainly due to config structure changes between kernel versions.# You can ignore this error, until you find you need the kernel module.# If you feel uneasy, you can go back to make menuconfig,# find module XXXX by using '/' key, enable the module, build and install the kernel→˓again.
$ sudo vi /etc/grub.conf# Make sure the new kernel isn't set as the default and the timeout is long enough,# so you can select the new kernel during boot process.
(continues on next page)
52 Chapter 4. Advanced Networking Guides

CloudStack Documentation, Release 4.11.0
(continued from previous page)
# It's not a good idea to set the new kernel as the default until you confirm the→˓kernel works fine.
$ sudo reboot# Select the new kernel during the boot process.
Build iproute2
$ sudo yum install db4-devel
$ git clone git://git.kernel.org/pub/scm/linux/kernel/git/shemminger/iproute2.git$ cd iproute2$ git tag# Find the version that matches the kernel.# If you built kernel 3.10.4 as above, it would be v3.10.0.
$ git checkout v3.10.0$ ./configure$ make # -j N$ sudo make install
Note: Please use rebuild kernel and tools at your own risk.
4.3.3 Configure PRODUCT to use VXLAN Plugin
Configure hypervisor
Configure hypervisor: KVM
In addition to “KVM Hypervisor Host Installation” in “PRODUCT Installation Guide”, you have to configure thefollowing item on the host.
Create bridge interface with IPv4 address
This plugin requires an IPv4 address on the KVM host to terminate and originate VXLAN traffic. The address shouldbe assinged to a physical interface or a bridge interface bound to a physical interface. Both a private address or apublic address are fine for the purpose. It is not required to be in the same subnet for all hypervisors in a zone, but theyshould be able to reach each other via IP multicast with UDP/8472 port. A name of a physical interface or a name ofa bridge interface bound to a physical interface can be used as a traffic label. Physical interface name fits for almostall cases, but if physical interface name differs per host, you may use a bridge to set a same name. If you would liketo use a bridge name as a traffic label, you may create a bridge in this way.
Let cloudbr1 be the bridge interface for the instances’ private network.
Configure in RHEL or CentOS
When you configured the cloudbr1 interface as below,
4.3. The VXLAN Plugin 53

CloudStack Documentation, Release 4.11.0
$ sudo vi /etc/sysconfig/network-scripts/ifcfg-cloudbr1
DEVICE=cloudbr1TYPE=BridgeONBOOT=yesBOOTPROTO=noneIPV6INIT=noIPV6_AUTOCONF=noDELAY=5STP=yes
you would change the configuration similar to below.
DEVICE=cloudbr1TYPE=BridgeONBOOT=yesBOOTPROTO=staticIPADDR=192.0.2.XNETMASK=255.255.255.0IPV6INIT=noIPV6_AUTOCONF=noDELAY=5STP=yes
Configure in Ubuntu
When you configured cloudbr1 as below,
$ sudo vi /etc/network/interfaces
auto loiface lo inet loopback
# The primary network interfaceauto eth0.100iface eth0.100 inet static
address 192.168.42.11netmask 255.255.255.240gateway 192.168.42.1dns-nameservers 8.8.8.8 8.8.4.4dns-domain lab.example.org
# Public networkauto cloudbr0iface cloudbr0 inet manual
bridge_ports eth0.200bridge_fd 5bridge_stp offbridge_maxwait 1
# Private networkauto cloudbr1iface cloudbr1 inet manual
bridge_ports eth0.300bridge_fd 5
(continues on next page)
54 Chapter 4. Advanced Networking Guides

CloudStack Documentation, Release 4.11.0
(continued from previous page)
bridge_stp offbridge_maxwait 1
you would change the configuration similar to below.
auto loiface lo inet loopback
# The primary network interfaceauto eth0.100iface eth0.100 inet static
address 192.168.42.11netmask 255.255.255.240gateway 192.168.42.1dns-nameservers 8.8.8.8 8.8.4.4dns-domain lab.example.org
# Public networkauto cloudbr0iface cloudbr0 inet manual
bridge_ports eth0.200bridge_fd 5bridge_stp offbridge_maxwait 1
# Private networkauto cloudbr1iface cloudbr1 inet static
addres 192.0.2.Xnetmask 255.255.255.0bridge_ports eth0.300bridge_fd 5bridge_stp offbridge_maxwait 1
Configure iptables to pass XVLAN packets
Since VXLAN uses UDP packet to forward encapsulated the L2 frames, UDP/8472 port must be opened.
Configure in RHEL or CentOS
RHEL and CentOS use iptables for firewalling the system, you can open extra ports by executing the following iptablecommands:
$ sudo iptables -I INPUT -p udp -m udp --dport 8472 -j ACCEPT
These iptable settings are not persistent accross reboots, we have to save them first.
$ sudo iptables-save > /etc/sysconfig/iptables
With this configuration you should be able to restart the network, although a reboot is recommended to see if everythingworks properly.
4.3. The VXLAN Plugin 55

CloudStack Documentation, Release 4.11.0
$ sudo service network restart$ sudo reboot
Warning: Make sure you have an alternative way like IPMI or ILO to reach the machine in case you made aconfiguration error and the network stops functioning!
Configure in Ubuntu
The default firewall under Ubuntu is UFW (Uncomplicated FireWall), which is a Python wrapper around iptables.
To open the required ports, execute the following commands:
$ sudo ufw allow proto udp from any to any port 8472
Note: By default UFW is not enabled on Ubuntu. Executing these commands with the firewall disabled does notenable the firewall.
With this configuration you should be able to restart the network, although a reboot is recommended to see if everythingworks properly.
$ sudo service networking restart$ sudo reboot
Warning: Make sure you have an alternative way like IPMI or ILO to reach the machine in case you made aconfiguration error and the network stops functioning!
Setup zone using VXLAN
In almost all parts of zone setup, you can just follow the advanced zone setup istruction in “PRODUCT InstallationGuide” to use this plugin. It is not required to add a network element nor to reconfigure the network offering. The onlything you have to do is configure the physical network to use VXLAN as the isolation method for Guest Network.
Configure the physical network
CloudStack needs to have one physical network for Guest Traffic with the isolation method set to “VXLAN”.
Guest Network traffic label should be the name of the physical interface or the name of the bridge interface and thebridge interface and they should have an IPv4 address. See ? for details.
Configure the guest traffic
Specify a range of VNIs you would like to use for carrying guest network traffic.
Warning: VNI must be unique per zone and no duplicate VNIs can exist in the zone. Exercise care whendesigning your VNI allocation policy.
56 Chapter 4. Advanced Networking Guides

CloudStack Documentation, Release 4.11.0
4.3. The VXLAN Plugin 57

CloudStack Documentation, Release 4.11.0
58 Chapter 4. Advanced Networking Guides

CloudStack Documentation, Release 4.11.0
4.3. The VXLAN Plugin 59

CloudStack Documentation, Release 4.11.0
4.4 The OVS Plugin
4.4.1 Introduction to the OVS Plugin
The OVS plugin is the native SDN implementations in CloudStack, using GRE isolation method. The plugin can beused by CloudStack to implement isolated guest networks and to provide additional services like NAT, port forwardingand load balancing.
Features of the OVS Plugin
The following table lists the CloudStack network services provided by the OVS Plugin.
Network Service CloudStack versionVirtual Networking >= 4.0Static NAT >= 4.3Port Forwarding >= 4.3Load Balancing >= 4.3
Table: Supported Services
Note: The Virtual Networking service was originally called ‘Connectivity’ in CloudStack 4.0
The following hypervisors are supported by the OVS Plugin.
Hypervisor CloudStack versionXenServer >= 4.0KVM >= 4.3
Table: Supported Hypervisors
4.4.2 Configuring the OVS Plugin
Prerequisites
Before enabling the OVS plugin the hypervisor needs to be install OpenvSwitch. Default, XenServer has alreadyinstalled OpenvSwitch. However, you must install OpenvSwitch manually on KVM. CentOS 6.4 and OpenvSwitch1.10 are recommended.
KVM hypervisor:
• CentOS 6.4 is recommended.
• To make sure that the native bridge module will not interfere with openvSwitch the bridge module should beadded to the blacklist. See the modprobe documentation for your distribution on where to find the blacklist.Make sure the module is not loaded either by rebooting or executing rmmod bridge before executing next steps.
60 Chapter 4. Advanced Networking Guides
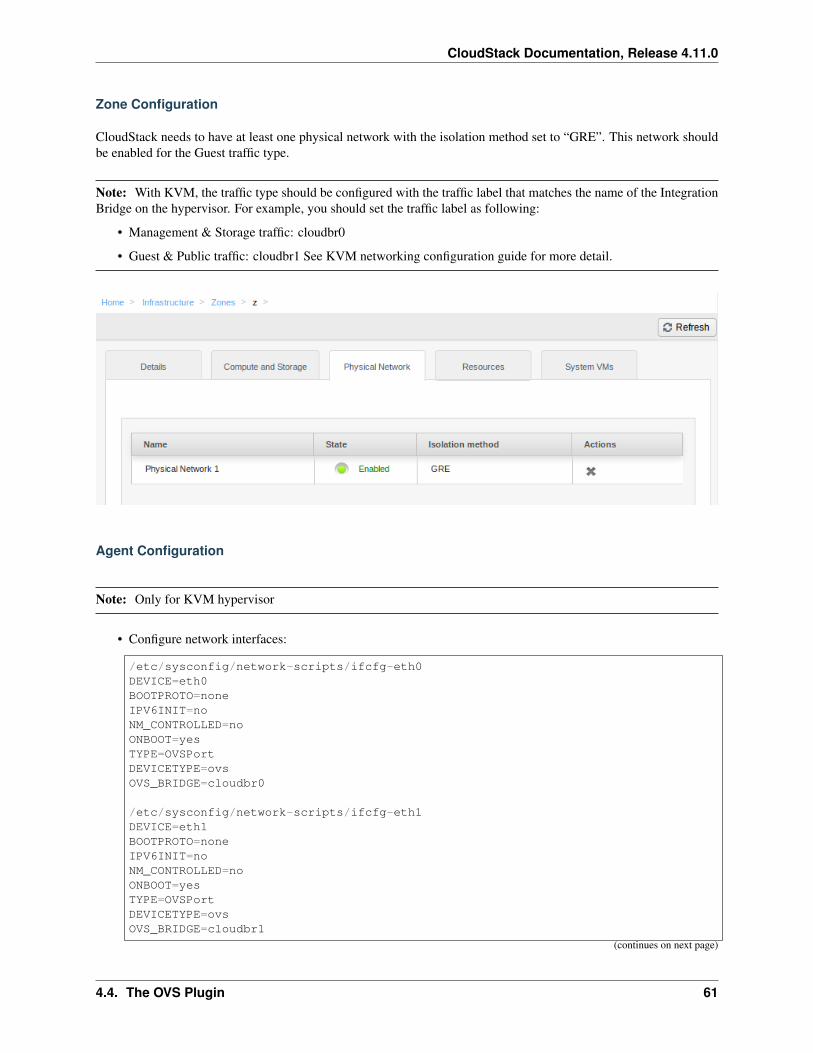
CloudStack Documentation, Release 4.11.0
Zone Configuration
CloudStack needs to have at least one physical network with the isolation method set to “GRE”. This network shouldbe enabled for the Guest traffic type.
Note: With KVM, the traffic type should be configured with the traffic label that matches the name of the IntegrationBridge on the hypervisor. For example, you should set the traffic label as following:
• Management & Storage traffic: cloudbr0
• Guest & Public traffic: cloudbr1 See KVM networking configuration guide for more detail.
Agent Configuration
Note: Only for KVM hypervisor
• Configure network interfaces:
/etc/sysconfig/network-scripts/ifcfg-eth0DEVICE=eth0BOOTPROTO=noneIPV6INIT=noNM_CONTROLLED=noONBOOT=yesTYPE=OVSPortDEVICETYPE=ovsOVS_BRIDGE=cloudbr0
/etc/sysconfig/network-scripts/ifcfg-eth1DEVICE=eth1BOOTPROTO=noneIPV6INIT=noNM_CONTROLLED=noONBOOT=yesTYPE=OVSPortDEVICETYPE=ovsOVS_BRIDGE=cloudbr1
(continues on next page)
4.4. The OVS Plugin 61

CloudStack Documentation, Release 4.11.0
(continued from previous page)
/etc/sysconfig/network-scripts/ifcfg-cloudbr0DEVICE=cloudbr0ONBOOT=yesDEVICETYPE=ovsTYPE=OVSBridgeBOOTPROTO=staticIPADDR=172.16.10.10GATEWAY=172.16.10.1NETMASK=255.255.255.0HOTPLUG=no
/etc/sysconfig/network-scripts/ifcfg-cloudbr1DEVICE=cloudbr1ONBOOT=yesDEVICETYPE=ovsTYPE=OVSBridgeBOOTPROTO=noneHOTPLUG=no
/etc/sysconfig/networkNETWORKING=yesHOSTNAME=testkvm1GATEWAY=172.10.10.1
• Edit /etc/cloudstack/agent/agent.properties
network.bridge.type=openvswitchlibvirt.vif.driver=com.cloud.hypervisor.kvm.resource.OvsVifDriver
Enabling the service provider
The OVS provider is disabled by default. Navigate to the “Network Service Providers” configuration of the physicalnetwork with the GRE isolation type. Navigate to the OVS provider and press the “Enable Provider” button.
Network Offerings
Using the OVS plugin requires a network offering with Virtual Networking enabled and configured to use the OVSelement. Typical use cases combine services from the Virtual Router appliance and the OVS plugin.
Service ProviderVPN VirtualRouterDHCP VirtualRouterDNS VirtualRouterFirewall VirtualRouterLoad Balancer OVSUser Data VirtualRouterSource NAT VirtualRouterStatic NAT OVSPost Forwarding OVSVirtual Networking OVS
Table: Isolated network offering with regular services from the Virtual Router.
62 Chapter 4. Advanced Networking Guides

CloudStack Documentation, Release 4.11.0
4.4. The OVS Plugin 63

CloudStack Documentation, Release 4.11.0
64 Chapter 4. Advanced Networking Guides

CloudStack Documentation, Release 4.11.0
Note: The tag in the network offering should be set to the name of the physical network with the OVS provider.
Isolated network with network services. The virtual router is still required to provide network services like dns anddhcp.
Service ProviderDHCP VirtualRouterDNS VirtualRouterUser Data VirtualRouterSource NAT VirtualRouterStatic NAT OVSPost Forwarding OVSLoad Balancing OVSVirtual Networking OVS
Table: Isolated network offering with network services
4.4.3 Using the OVS plugin with VPC
OVS plugin does not work with VPC at that time
4.4.4 Revision History
0-0 Mon Dec 2 2013 Nguyen Anh Tu [email protected] Documentation created for 4.3.0 version of the OVS Plugin
4.5 IPv6 Support in CloudStack
CloudStack supports Internet Protocol version 6 (IPv6), the recent version of the Internet Protocol (IP) that definesrouting the network traffic. IPv6 uses a 128-bit address that exponentially expands the current address space thatis available to the users. IPv6 addresses consist of eight groups of four hexadecimal digits separated by colons, forexample, 5001:0dt8:83a3:1012:1000:8s2e:0870:7454. CloudStack supports IPv6 for public IPs in shared networks.With IPv6 support, VMs in shared networks can obtain both IPv4 and IPv6 addresses from the DHCP server. You candeploy VMs either in a IPv6 or IPv4 network, or in a dual network environment. If IPv6 network is used, the VMgenerates a link-local IPv6 address by itself, and receives a stateful IPv6 address from the DHCPv6 server.
IPv6 is supported only on KVM and XenServer hypervisors. The IPv6 support is only an experimental feature.
Here’s the sequence of events when IPv6 is used:
1. The administrator creates an IPv6 shared network in an advanced zone.
2. The user deploys a VM in an IPv6 shared network.
3. The user VM generates an IPv6 link local address by itself, and gets an IPv6 global or site local address throughDHCPv6.
4.5.1 Prerequisites and Guidelines
Consider the following:
4.5. IPv6 Support in CloudStack 65

CloudStack Documentation, Release 4.11.0
• CIDR size must be 64 for IPv6 networks.
• The DHCP client of the guest VMs should support generating DUID based on Link-layer Address (DUID- LL).DUID-LL derives from the MAC address of guest VMs, and therefore the user VM can be identified by usingDUID. See Dynamic Host Configuration Protocol for IPv6for more information.
• The gateway of the guest network generates Router Advisement and Response messages to Router Solicitation.The M (Managed Address Configuration) flag of Router Advisement should enable stateful IP address configu-ration. Set the M flag to where the end nodes receive their IPv6 addresses from the DHCPv6 server as opposedto the router or switch.
Note: The M flag is the 1-bit Managed Address Configuration flag for Router Advisement. When set, DynamicHost Configuration Protocol (DHCPv6) is available for address configuration in addition to any IPs set by usingstateless address auto-configuration.
• Use the System VM template exclusively designed to support IPv6. Download the System VM template fromhttp://cloudstack.apt-get.eu/systemvm/.
• The concept of Default Network applies to IPv6 networks. However, unlike IPv4 CloudStack does not controlthe routing information of IPv6 in shared network; the choice of Default Network will not affect the routing inthe user VM.
• In a multiple shared network, the default route is set by the rack router, rather than the DHCP server, which isout of CloudStack control. Therefore, in order for the user VM to get only the default route from the defaultNIC, modify the configuration of the user VM, and set non-default NIC’s accept_ra to 0 explicitly. Theaccept_ra parameter accepts Router Advertisements and auto-configure /proc/sys/net/ipv6/conf/interface with received data.
4.5.2 Limitations of IPv6 in CloudStack
The following are not yet supported:
1. Security groups
2. Userdata and metadata
3. Passwords
4.5.3 Guest VM Configuration for DHCPv6
For the guest VMs to get IPv6 address, run dhclient command manually on each of the VMs. Use DUID-LL to set updhclient.
Note: The IPv6 address is lost when a VM is stopped and started. Therefore, use the same procedure to get an IPv6address when a VM is stopped and started.
1. Set up dhclient by using DUID-LL.
Perform the following for DHCP Client 4.2 and above:
(a) Run the following command on the selected VM to get the dhcpv6 offer from VR:
dhclient -6 -D LL <dev>
Perform the following for DHCP Client 4.1:
66 Chapter 4. Advanced Networking Guides

CloudStack Documentation, Release 4.11.0
(a) Open the following to the dhclient configuration file:
vi /etc/dhcp/dhclient.conf
(b) Add the following to the dhclient configuration file:
send dhcp6.client-id = concat(00:03:00, hardware);
2. Get IPv6 address from DHCP server as part of the system or network restart.
Based on the operating systems, perform the following:
On CentOS 6.2:
(a) Open the Ethernet interface configuration file:
vi /etc/sysconfig/network-scripts/ifcfg-eth0
The ifcfg-eth0 file controls the first NIC in a system.
(b) Make the necessary configuration changes, as given below:
DEVICE=eth0HWADDR=06:A0:F0:00:00:38NM_CONTROLLED=noONBOOT=yesBOOTPROTO=dhcp6TYPE=EthernetUSERCTL=noPEERDNS=yesIPV6INIT=yesDHCPV6C=yes
(c) Open the following:
vi /etc/sysconfig/network
(d) Make the necessary configuration changes, as given below:
NETWORKING=yesHOSTNAME=centos62mgmt.lab.vmops.comNETWORKING_IPV6=yesIPV6_AUTOCONF=no
On Ubuntu 12.10
(a) Open the following:
etc/network/interfaces:
(b) Make the necessary configuration changes, as given below:
iface eth0 inet6 dhcpautoconf 0accept_ra 1
4.5. IPv6 Support in CloudStack 67

CloudStack Documentation, Release 4.11.0
4.6 Configuring AutoScale without using NetScaler
Warning: This feature is currently only available on the master branch and will be released in the 4.4 release.
4.6.1 What is AutoScaling?
AutoScaling allows you to scale your back-end services or application VMs up or down seamlessly and automaticallyaccording to the conditions you define. With AutoScaling enabled, you can ensure that the number of VMs you areusing seamlessly scale up when demand increases, and automatically decreases when demand subsides. Thus it helpsyou save compute costs by terminating underused VMs automatically and launching new VMs when you need them,without the need for manual intervention.
4.6.2 Hypervisor support
At that time, AutoScaling without NetScaler only supports for Xenserver. We are working to support KVM also.
4.6.3 Prerequisites
Before you configure an AutoScale rule, consider the following:
• Ensure that the necessary template is prepared before configuring AutoScale. Firstly you must install the PV-driver, which helps Xenserver collect performance parameters (CPU and memory) into VMs. Beside, When aVM is deployed by using a template and when it comes up, the application should be up and running.
4.6.4 Configuration
Specify the following:
68 Chapter 4. Advanced Networking Guides

CloudStack Documentation, Release 4.11.0
• Template: A template consists of a base OS image and application. A template is used to provision the newinstance of an application on a scaleup action. When a VM is deployed from a template, the VM can start takingthe traffic from the load balancer without any admin intervention. For example, if the VM is deployed for a Webservice, it should have the Web server running, the database connected, and so on.
• Compute offering: A predefined set of virtual hardware attributes, including CPU speed, number of CPUs, andRAM size, that the user can select when creating a new virtual machine instance. Choose one of the computeofferings to be used while provisioning a VM instance as part of scaleup action.
• Min Instance: The minimum number of active VM instances that is assigned to a load balancing rule. The activeVM instances are the application instances that are up and serving the traffic, and are being load balanced. Thisparameter ensures that a load balancing rule has at least the configured number of active VM instances areavailable to serve the traffic.
• Max Instance: Maximum number of active VM instances that should be assigned to a load balancing rule. Thisparameter defines the upper limit of active VM instances that can be assigned to a load balancing rule.
Specifying a large value for the maximum instance parameter might result in provisioning large number of VMinstances, which in turn leads to a single load balancing rule exhausting the VM instances limit specified at theaccount or domain level.
Specify the following scale-up and scale-down policies:
4.6. Configuring AutoScale without using NetScaler 69

CloudStack Documentation, Release 4.11.0
• Duration: The duration, in seconds, for which the conditions you specify must be true to trigger a scaleupaction. The conditions defined should hold true for the entire duration you specify for an AutoScale action to beinvoked.
• Counter: The performance counters expose the state of the monitored instances. We added two new counter towork with that feature:
– Linux User CPU [native] - percentage
– Linux User RAM [native] - percentage
Remember to choose one of them. If you choose anything else, the autoscaling will not work.
• Operator: The following five relational operators are supported in AutoScale feature: Greater than, Less than,Less than or equal to, Greater than or equal to, and Equal to.
• Threshold: Threshold value to be used for the counter. Once the counter defined above breaches the thresholdvalue, the AutoScale feature initiates a scaleup or scaledown action.
• Add: Click Add to add the condition.
Additionally, if you want to configure the advanced settings, click Show advanced settings, and specify thefollowing:
• Polling interval: Frequency in which the conditions, combination of counter, operator and threshold, are to beevaluated before taking a scale up or down action. The default polling interval is 30 seconds.
• Quiet Time: This is the cool down period after an AutoScale action is initiated. The time includes the time takento complete provisioning a VM instance from its template and the time taken by an application to be ready toserve traffic. This quiet time allows the fleet to come up to a stable state before any action can take place. Thedefault is 300 seconds.
• Destroy VM Grace Period: The duration in seconds, after a scaledown action is initiated, to wait before the VMis destroyed as part of scaledown action. This is to ensure graceful close of any pending sessions or transactionsbeing served by the VM marked for destroy. The default is 120 seconds.
• Apply: Click Apply to create the AutoScale configuration.
4.6.5 Disabling and Enabling an AutoScale Configuration
If you want to perform any maintenance operation on the AutoScale VM instances, disable the AutoScale configura-tion. When the AutoScale configuration is disabled, no scaleup or scaledown action is performed. You can use thisdowntime for the maintenance activities. To disable the AutoScale configuration, click the Disable AutoScale button.
The button toggles between enable and disable, depending on whether AutoScale is currently enabled or not. After themaintenance operations are done, you can enable the AutoScale configuration back. To enable, open the AutoScaleconfiguration page again, then click the Enable AutoScale button.
4.6.6 Updating an AutoScale Configuration
You can update the various parameters and add or delete the conditions in a scaleup or scaledown rule. Before youupdate an AutoScale configuration, ensure that you disable the AutoScale load balancer rule by clicking the DisableAutoScale button.
After you modify the required AutoScale parameters, click Apply. To apply the new AutoScale policies, open theAutoScale configuration page again, then click the Enable AutoScale button.
70 Chapter 4. Advanced Networking Guides

CloudStack Documentation, Release 4.11.0
4.6.7 Runtime Considerations
An administrator should not assign a VM to a load balancing rule which is configured for AutoScale.
Making API calls outside the context of AutoScale, such as destroyVM, on an autoscaled VM leaves the load balancingconfiguration in an inconsistent state. Though VM is destroyed from the load balancer rule, it continues be showed asa service assigned to a rule inside the context of AutoScale.
4.6. Configuring AutoScale without using NetScaler 71

CloudStack Documentation, Release 4.11.0
72 Chapter 4. Advanced Networking Guides

CHAPTER 5
Developers Guide
5.1 CloudStack Installation from GIT repo for Developers
This book is aimed at CloudStack developers who need to build the code. These instructions are valid on a Ubuntu12.04 and CentOS 6.4 systems and were tested with the 4.2 release of Apache CloudStack, please adapt them if you areon a different operating system or using a newer/older version of CloudStack. This book is composed of the followingsections:
1. Installation of the prerequisites
2. Compiling and installation from source
3. Using the CloudStack simulator
4. Installation with DevCloud the CloudStack sandbox
5. Building your own packages
6. The CloudStack API
7. Testing the AWS API interface
5.1.1 Prerequisites
In this section we’ll look at installing the dependencies you’ll need for Apache CloudStack development.
On Ubuntu 12.04
First update and upgrade your system:
apt-get updateapt-get upgrade
NTP might already be installed, check it with service ntp status. If it’s not then install NTP to synchronizethe clocks:
73

CloudStack Documentation, Release 4.11.0
apt-get install openntpd
Install openjdk. As we’re using Linux, OpenJDK is our first choice.
apt-get install openjdk-7-jdk
Install tomcat6, note that the new version of tomcat on Ubuntu is the 6.0.35 version.
apt-get install tomcat6
Next, we’ll install MySQL if it’s not already present on the system.
apt-get install mysql-server
Remember to set the correct mysql password in the CloudStack properties file. Mysql should be running but you cancheck it’s status with:
service mysql status
Developers wanting to build CloudStack from source will want to install the following additional packages. If youdont’ want to build from source just jump to the next section.
Install git to later clone the CloudStack source code:
apt-get install git
Install Maven to later build CloudStack
apt-get install maven
This should have installed Maven 3.0, check the version number with mvn --version
A little bit of Python can be used (e.g simulator), install the Python package management tools:
apt-get install python-pip python-setuptools
Finally install mkisofs with:
apt-get install genisoimage
On CentOS 6.4
First update and upgrade your system:
yum -y updateyum -y upgrade
If not already installed, install NTP for clock synchornization
yum -y install ntp
Install openjdk. As we’re using Linux, OpenJDK is our first choice.
yum -y install java-1.7.0-openjdk-devel
Install tomcat6, note that the version of tomcat6 in the default CentOS 6.4 repo is 6.0.24, so we will grab the 6.0.35version. The 6.0.24 version will be installed anyway as a dependency to cloudstack.
74 Chapter 5. Developers Guide

CloudStack Documentation, Release 4.11.0
wget https://archive.apache.org/dist/tomcat/tomcat-6/v6.0.35/bin/apache-tomcat-6.0.35.→˓tar.gztar xzvf apache-tomcat-6.0.35.tar.gz -C /usr/local
Setup tomcat6 system wide by creating a file /etc/profile.d/tomcat.sh with the following content:
export CATALINA_BASE=/usr/local/apache-tomcat-6.0.35export CATALINA_HOME=/usr/local/apache-tomcat-6.0.35
Next, we’ll install MySQL if it’s not already present on the system.
yum -y install mysql mysql-server
Remember to set the correct mysql password in the CloudStack properties file. Mysql should be running but you cancheck it’s status with:
service mysqld status
Install git to later clone the CloudStack source code:
yum -y install git
Install Maven to later build CloudStack. Grab the 3.0.5 release from the Maven website
wget http://mirror.cc.columbia.edu/pub/software/apache/maven/maven-3/3.0.5/binaries/→˓apache-maven-3.0.5-bin.tar.gztar xzf apache-maven-3.0.5-bin.tar.gz -C /usr/localcd /usr/localln -s apache-maven-3.0.5 maven
Setup Maven system wide by creating a /etc/profile.d/maven.sh file with the following content:
export M2_HOME=/usr/local/mavenexport PATH=${M2_HOME}/bin:${PATH}
Log out and log in again and you will have maven in your PATH:
mvn --version
This should have installed Maven 3.0, check the version number with mvn --version
A little bit of Python can be used (e.g simulator), install the Python package management tools:
yum -y install python-setuptools
To install python-pip you might want to setup the Extra Packages for Enterprise Linux (EPEL) repo
cd /tmpwget http://mirror-fpt-telecom.fpt.net/fedora/epel/6/i386/epel-release-6-8.noarch.rpmrpm -ivh epel-release-6-8.noarch.rpm
Then update you repository cache yum update and install pip yum -y install python-pip
Finally install mkisofs with:
yum -y install genisoimage
5.1. CloudStack Installation from GIT repo for Developers 75

CloudStack Documentation, Release 4.11.0
5.1.2 Installing from Source
CloudStack uses git for source version control, if you know little about git is a good start. Once you have git setup onyour machine, pull the source with:
git clone https://git-wip-us.apache.org/repos/asf/cloudstack.git
To build the latest stable release:
git checkout 4.8
To compile Apache CloudStack, go to the cloudstack source folder and run:
mvn -Pdeveloper,systemvm clean install
If you want to skip the tests add -DskipTests to the command above. Do NOT use -Dmaven.test.skip=true because that will break the build.
You will have made sure to set the proper db password in utils/conf/db.properties
Deploy the database next:
mvn -P developer -pl developer -Ddeploydb
Run Apache CloudStack with jetty for testing. Note that tomcat maybe be running on port 8080, stop it before youuse jetty
mvn -pl :cloud-client-ui jetty:run
Log Into Apache CloudStack:
Open your Web browser and use this URL to connect to CloudStack:
http://localhost:8080/client/
Replace localhost with the IP of your management server if need be.
Note: If you have iptables enabled, you may have to open the ports used by CloudStack. Specifically, ports 8080,8250, and 9090.
You can now start configuring a Zone, playing with the API. Of course we did not setup any infrastructure, there is nostorage, no hypervisors. . . etc. However you can run tests using the simulator. The following section shows you howto use the simulator so that you don’t have to setup a physical infrastructure.
5.1.3 Using the Simulator
CloudStack comes with a simulator based on Python bindings called Marvin. Marvin is available in the CloudStacksource code or on Pypi. With Marvin you can simulate your data center infrastructure by providing CloudStack with aconfiguration file that defines the number of zones/pods/clusters/hosts, types of storage etc. You can then develop andtest the CloudStack management server as if it was managing your production infrastructure.
Do a clean build:
mvn -Pdeveloper -Dsimulator -DskipTests clean install
Deploy the database:
76 Chapter 5. Developers Guide

CloudStack Documentation, Release 4.11.0
mvn -Pdeveloper -pl developer -Ddeploydbmvn -Pdeveloper -pl developer -Ddeploydb-simulator
Install marvin. Note that you will need to have installed pip properly in the prerequisites step.
pip install tools/marvin/dist/Marvin-0.1.0.tar.gz
Stop jetty (from any previous runs)
mvn -pl :cloud-client-ui jetty:stop
Start jetty
mvn -pl client jetty:run
Setup a basic zone with Marvin. In a separate shell://
mvn -Pdeveloper,marvin.setup -Dmarvin.config=setup/dev/basic.cfg -pl :cloud-marvin→˓integration-test
At this stage log in the CloudStack management server at http://localhost:8080/client with the credentials ad-min/password, you should see a fully configured basic zone infrastructure. To simulate an advanced zone replacebasic.cfg with advanced.cfg.
You can now run integration tests, use the API etc. . .
5.1.4 Using DevCloud
The Installing from source section will only get you to the point of runnign the management server, it does not getyou any hypervisors. The simulator section gets you a simulated datacenter for testing. With DevCloud you can runat least one hypervisor and add it to your management server the way you would a real physical machine.
DevCloud is the CloudStack sandbox, the standard version is a VirtualBox based image. There is also a KVM basedimage for it. Here we only show steps with the VirtualBox image. For KVM see the wiki.
** DevCloud Pre-requisites
1. Install VirtualBox on your machine
2. Run VirtualBox and under >Preferences create a host-only interface on which you disable the DHCP server
3. Download the DevCloud image
4. In VirtualBox, under File > Import Appliance import the DevCloud image.
5. Verify the settings under > Settings and check the enable PAE option in the processor menu
6. Once the VM has booted try to ssh to it with credentials: root/password
Adding DevCloud as an Hypervisor
Picking up from a clean build:
mvn -Pdeveloper,systemvm clean installmvn -P developer -pl developer,tools/devcloud -Ddeploydb
At this stage install marvin similarly than with the simulator:
5.1. CloudStack Installation from GIT repo for Developers 77

CloudStack Documentation, Release 4.11.0
pip install tools/marvin/dist/Marvin-0.1.0.tar.gz
Start the management server
mvn -pl client jetty:run
Then you are going to configure CloudStack to use the running DevCloud instance:
cd tools/devcloudpython ../marvin/marvin/deployDataCenter.py -i devcloud.cfg
If you are curious, check the devcloud.cfg file and see how the data center is defined: 1 Zone, 1 Pod, 1 Cluster, 1Host, 1 primary Storage, 1 Seondary Storage, all provided by Devcloud.
You can now log in the management server at http://localhost:8080/client and start experimenting withthe UI or the API.
Do note that the management server is running in your local machine and that DevCloud is used only as a n Hyper-visor. You could potentially run the management server within DevCloud as well, or memory granted, run multipleDevClouds.
5.1.5 Building Packages
Working from source is necessary when developing CloudStack. As mentioned earlier this is not primarily intendedfor users. However some may want to modify the code for their own use and specific infrastructure. The may alsoneed to build their own packages for security reasons and due to network connectivity constraints. This section showsyou the gist of how to build packages. We assume that the reader will know how to create a repository to serve thispackages. The complete documentation is available on the website
To build debian packages you will need couple extra packages that we did not need to install for source compilation:
apt-get install python-mysqldbapt-get install debhelper
Then build the packages with:
dpkg-buildpackage -uc -us
One directory up from the CloudStack root dir you will find:
cloudstack_4.8.0_amd64.changescloudstack_4.8.0.dsccloudstack_4.8.0.tar.gzcloudstack-agent_4.8.0_all.debcloudstack-awsapi_4.8.0_all.debcloudstack-cli_4.8.0_all.debcloudstack-common_4.8.0_all.debcloudstack-docs_4.8.0_all.debcloudstack-management_4.8.0_all.debcloudstack-usage_4.8.0_all.deb
Of course the community provides a repository for these packages and you can use it instead of building your ownpackages and putting them in your own repo. Instructions on how to use this community repository are available inthe installation book.
78 Chapter 5. Developers Guide

CloudStack Documentation, Release 4.11.0
5.1.6 The CloudStack API
The CloudStack API is a query based API using http that return results in XML or JSON. It is used to implementthe default web UI. This API is not a standard like OGF OCCI or DMTF CIMI but is easy to learn. Mapping existsbetween the AWS API and the CloudStack API as will be seen in the next section. Recently a Google Compute Engineinterface was also developed that maps the GCE REST API to the CloudStack API described here. The API docs area good start to learn the extent of the API. Multiple clients exist on github to use this API, you should be able to findone in your favorite language. The reference documentation for the API and changes that might occur from version toversion is availble on-line. This short section is aimed at providing a quick summary to give you a base understandingof how to use this API. As a quick start, a good way to explore the API is to navigate the dashboard with a firebugconsole (or similar developer console) to study the queries.
In a succint statement, the CloudStack query API can be used via http GET requests made against your cloud endpoint(e.g http://localhost:8080/client/api). The API name is passed using the command key and the various parameters forthis API call are passed as key value pairs. The request is signed using the access key and secret key of the user makingthe call. Some calls are synchronous while some are asynchronous, this is documented in the API docs. Asynchronouscalls return a jobid, the status and result of a job can be queried with the queryAsyncJobResult call. Let’s getstarted and give an example of calling the listUsers API in Python.
First you will need to generate keys to make requests. Going through the dashboard, go under Accounts select theappropriate account then click on Show Users select the intended users and generate keys using the GenerateKeys icon. You will see an API Key and Secret Key field being generated. The keys will be of the form:
API Key : XzAz0uC0t888gOzPs3HchY72qwDc7pUPIO8LxC-VkIHo4C3fvbEBY_Ccj8fo3mBapN5qRDg_0_→˓EbGdbxi8oy1ASecret Key: zmBOXAXPlfb-LIygOxUVblAbz7E47eukDS_0JYUxP3JAmknOYo56T0R-→˓AcM7rK7SMyo11Y6XW22gyuXzOdiybQ
Open a Python shell and import the basic modules necessary to make the request. Do note that this request could bemade many different ways, this is just a low level example. The urllib* modules are used to make the http requestand do url encoding. The hashlib module gives us the sha1 hash function. It used to geenrate the hmac (KeyedHashing for Message Authentication) using the secretkey. The result is encoded using the base64 module.
$pythonPython 2.7.3 (default, Nov 17 2012, 19:54:34)[GCC 4.2.1 Compatible Apple Clang 4.1 ((tags/Apple/clang-421.11.66))] on darwinType "help", "copyright", "credits" or "license" for more information.>>> import urllib2>>> import urllib>>> import hashlib>>> import hmac>>> import base64
Define the endpoint of the Cloud, the command that you want to execute, the type of the response (i.e XML or JSON)and the keys of the user. Note that we do not put the secretkey in our request dictionary because it is only used tocompute the hmac.
>>> baseurl='http://localhost:8080/client/api?'>>> request={}>>> request['command']='listUsers'>>> request['response']='json'>>> request['apikey']='plgWJfZK4gyS3mOMTVmjUVg-X-jlWlnfaUJ9GAbBbf9EdM-→˓kAYMmAiLqzzq1ElZLYq_u38zCm0bewzGUdP66mg'>>> secretkey='VDaACYb0LV9eNjTetIOElcVQkvJck_J_QljX_→˓FcHRj87ZKiy0z0ty0ZsYBkoXkY9b7eq1EhwJaw7FF3akA3KBQ'
Build the base request string, the combination of all the key/pairs of the request, url encoded and joined with amper-
5.1. CloudStack Installation from GIT repo for Developers 79

CloudStack Documentation, Release 4.11.0
sand.
>>> request_str='&'.join(['='.join([k,urllib.quote_plus(request[k])]) for k in→˓request.keys()])>>> request_str'apikey=plgWJfZK4gyS3mOMTVmjUVg-X-jlWlnfaUJ9GAbBbf9EdM-kAYMmAiLqzzq1ElZLYq_→˓u38zCm0bewzGUdP66mg&command=listUsers&response=json'
Compute the signature with hmac, do a 64 bit encoding and a url encoding, the string used for the signature is similarto the base request string shown above but the keys/values are lower cased and joined in a sorted order
>>> sig_str='&'.join(['='.join([k.lower(),urllib.quote_plus(request[k].lower().→˓replace('+','%20'))])for k in sorted(request.iterkeys())])>>> sig_str'apikey=plgwjfzk4gys3momtvmjuvg-x-jlwlnfauj9gabbbf9edm-kaymmailqzzq1elzlyq_→˓u38zcm0bewzgudp66mg&command=listusers&response=json'>>> sig=hmac.new(secretkey,sig_str,hashlib.sha1).digest()>>> sig'M:]\x0e\xaf\xfb\x8f\xf2y\xf1p\x91\x1e\x89\x8a\xa1\x05\xc4A\xdb'>>> sig=base64.encodestring(hmac.new(secretkey,sig_str,hashlib.sha1).digest())>>> sig'TTpdDq/7j/J58XCRHomKoQXEQds=\n'>>> sig=base64.encodestring(hmac.new(secretkey,sig_str,hashlib.sha1).digest()).strip()>>> sig'TTpdDq/7j/J58XCRHomKoQXEQds='>>> sig=urllib.quote_plus(base64.encodestring(hmac.new(secretkey,sig_str,hashlib.→˓sha1).digest()).strip())
Finally, build the entire string by joining the baseurl, the request str and the signature. Then do an http GET:
>>> req=baseurl+request_str+'&signature='+sig>>> req'http://localhost:8080/client/api?apikey=plgWJfZK4gyS3mOMTVmjUVg-X-→˓jlWlnfaUJ9GAbBbf9EdM-kAYMmAiLqzzq1ElZLYq_u38zCm0bewzGUdP66mg&command=listUsers&→˓response=json&signature=TTpdDq%2F7j%2FJ58XCRHomKoQXEQds%3D'>>> res=urllib2.urlopen(req)>>> res.read(){
"listusersresponse" : {"count":1 ,"user" : [
{"id":"7ed6d5da-93b2-4545-a502-23d20b48ef2a","username":"admin","firstname":"admin","lastname":"cloud","created":"2012-07-05T12:18:27-0700","state":"enabled","account":"admin","accounttype":1,"domainid":"8a111e58-e155-4482-93ce-84efff3c7c77","domain":"ROOT","apikey":"plgWJfZK4gyS3mOMTVmjUVg-X-jlWlnfaUJ9GAbBbf9EdM-
→˓kAYMmAiLqzzq1ElZLYq_u38zCm0bewzGUdP66mg","secretkey":"VDaACYb0LV9eNjTetIOElcVQkvJck_J_QljX_
→˓FcHRj87ZKiy0z0ty0ZsYBkoXkY9b7eq1EhwJaw7FF3akA3KBQ","accountid":"7548ac03-af1d-4c1c-9064-2f3e2c0eda0d"
}
(continues on next page)
80 Chapter 5. Developers Guide

CloudStack Documentation, Release 4.11.0
(continued from previous page)
]}
}
All the clients that you will find on github will implement this signature technique, you should not have to do it byhand. Now that you have explored the API through the UI and that you understand how to make low level calls,pick your favorite client of use CloudMonkey. CloudMonkey is a sub-project of Apache CloudStack and gives oper-ators/developers the ability to use any of the API methods. It has nice auto-completion and help feature as well as anAPI discovery mechanism since 4.2.
5.1.7 Testing the AWS API interface
While the native CloudStack API is not a standard, CloudStack provides a AWS EC2 compatible interface. It has thegreat advantage that existing tools written with EC2 libraries can be re-used against a CloudStack based cloud. In theinstallation books we described how to run this interface from installing packages. In this section we show you howto compile the interface with maven and test it with Python boto module.
Starting from a running management server (with DevCloud for instance), start the AWS API interface in a separateshell with:
mvn -Pawsapi -pl :cloud-awsapi jetty:run
Log into the CloudStack UI http://localhost:8080/client, go to Service Offerings and edit one of thecompute offerings to have the name m1.small or any of the other AWS EC2 instance types.
With access and secret keys generated for a user you should now be able to use Python Boto module:
import botoimport boto.ec2
accesskey="2IUSA5xylbsPSnBQFoWXKg3RvjHgsufcKhC1SeiCbeEc0obKwUlwJamB_→˓gFmMJkFHYHTIafpUx0pHcfLvt-dzw"secretkey=→˓"oxV5Dhhk5ufNowey7OVHgWxCBVS4deTl9qL0EqMthfPBuy3ScHPo2fifDxw1aXeL5cyH10hnLOKjyKphcXGeDA→˓"
region = boto.ec2.regioninfo.RegionInfo(name="ROOT", endpoint="localhost")conn = boto.connect_ec2(aws_access_key_id=accesskey, aws_secret_access_key=secretkey,→˓is_secure=False, region=region, port=7080, path="/awsapi", api_version="2012-08-15")
images=conn.get_all_images()print images
res = images[0].run(instance_type='m1.small',security_groups=['default'])
Note the new api_version number in the connection object and also note that there was no user registration tomake like in previous CloudStack releases.
5.1.8 Conclusions
CloudStack is a mostly Java application running with Tomcat and Mysql. It consists of a management server anddepending on the hypervisors being used, an agent installed on the hypervisor farm. To complete a Cloud infrastructurehowever you will also need some Zone wide storage a.k.a Secondary Storage and some Cluster wide storage a.k.a
5.1. CloudStack Installation from GIT repo for Developers 81

CloudStack Documentation, Release 4.11.0
Primary storage. The choice of hypervisor, storage solution and type of Zone (i.e Basic vs. Advanced) will dictatehow complex your installation can be. As a quick start, you might want to consider KVM+NFS and a Basic Zone.
If you’ve run into any problems with this, please ask on the cloudstack-dev mailing list.
5.2 Programmer Guide
This guide shows how to develop CloudStack, use the API for operation and integration, access the usage data and useCloudStack specific tools to ease development, testing and integration.
5.2.1 The CloudStack API
Getting Started
To get started using the CloudStack API, you should have the following:
• URL of the CloudStack server you wish to integrate with.
• Both the API Key and Secret Key for an account. This should have been generated by the administrator of thecloud instance and given to you.
• Familiarity with HTTP GET/POST and query strings.
• Knowledge of either XML or JSON.
• Knowledge of a programming language that can generate HTTP requests; for example, Java or PHP.
Roles
The CloudStack API supports three access roles:
1. Root Admin. Access to all features of the cloud, including both virtual and physical resource management.
2. Domain Admin. Access to only the virtual resources of the clouds that belong to the administrator’s domain.
3. User. Access to only the features that allow management of the user’s virtual instances, storage, and network.
API Reference Documentation
You can find all the API reference documentation at the below site:
http://cloudstack.apache.org/docs/api/
Making API Requests
All CloudStack API requests are submitted in the form of a HTTP GET/POST with an associated command and anyparameters. A request is composed of the following whether in HTTP or HTTPS:
• CloudStack API URL: This is the web services API entry point(for example, http://www.example.com:8080/client/api)
• Command: The web services command you wish to execute, such as start a virtual machine or create a diskvolume
• Parameters: Any additional required or optional parameters for the command
82 Chapter 5. Developers Guide

CloudStack Documentation, Release 4.11.0
A sample API GET request looks like the following:
http://localhost:8080/client/api?command=deployVirtualMachine&serviceOfferingId=1&→˓diskOfferingId=1&templateId=2&zoneId=4&apiKey=miVr6X7u6bN_sdahOBpjNejPgEsT35eXq-→˓jB8CG20YI3yaxXcgpyuaIRmFI_EJTVwZ0nUkkJbPmY3y2bciKwFQ&signature=Lxx1DM40AjcXU→˓%2FcaiK8RAP0O1hU%3D
Or in a more readable format:
1. http://localhost:8080/client/api2. ?command=deployVirtualMachine3. &serviceOfferingId=14. &diskOfferingId=15. &templateId=26. &zoneId=47. &apiKey=miVr6X7u6bN_sdahOBpjNejPgEsT35eXqjB8CG20YI3yaxXcgpyuaIRmFI_→˓EJTVwZ0nUkkJbPmY3y2bciKwFQ8. &signature=Lxx1DM40AjcXU%2FcaiK8RAP0O1hU%3D
The first line is the CloudStack API URL. This is the Cloud instance you wish to interact with.
The second line refers to the command you wish to execute. In our example, we are attempting to deploy a fresh newvirtual machine. It is preceded by a (?) to separate itself from the CloudStack API URL.
Lines 3-6 are the parameters for this given command. To see the command and its request parameters, please referto the appropriate section in the CloudStack API documentation. Each parameter field-value pair (field=value) ispreceded by an ampersand character (&).
Line 7 is the user API Key that uniquely identifies the account. See Signing API Requests on page 7.
Line 8 is the signature hash created to authenticate the user account executing the API command.
Signing API Requests
Whether you access the CloudStack API with HTTP or HTTPS, it must still be signed so that CloudStack can verifythe caller has been authenticated and authorized to execute the command. Make sure that you have both the API Keyand Secret Key provided by the CloudStack administrator for your account before proceeding with the signing process.
To show how to sign a request, we will re-use the previous example.
http://http://localhost:8080/client/api?command=deployVirtualMachine&→˓serviceOfferingId=1&diskOfferingId=1&templateId=2&zoneId=4&apiKey=miVr6X7u6bN_→˓sdahOBpjNejPgEsT35eXq-jB8CG20YI3yaxXcgpyuaIRmFI_EJTVwZ0nUkkJbPmY3y2bciKwFQ&→˓signature=Lxx1DM40AjcXU%2FcaiK8RAP0O1hU%3D
Breaking this down, we have several distinct parts to this URL.
• Base URL: This is the base URL to the CloudStack Management Server.
http://localhost:8080
• API Path: This is the path to the API Servlet that processes the incoming requests.
/client/api?
• Command String: This part of the query string comprises of the command, its parameters, and the API Key thatidentifies the account.
5.2. Programmer Guide 83

CloudStack Documentation, Release 4.11.0
Note: As with all query string parameters of field-value pairs, the “field” component is case insensitive whileall “value” values are case sensitive.
• Signature: This is the signature of the command string that is generated using a combination of the user’s SecretKey and the HMAC SHA-1 hashing algorithm.
&signature=Lxx1DM40AjcXU%2FcaiK8RAP0O1hU%3D
Every API request has the format Base URL+API Path+Command String+Signature.
To generate the signature.
1. For each field-value pair (as separated by a ‘&’) in the Command String, URL encode each value so that it canbe safely sent via HTTP GET.
Note: Make sure all spaces are encoded as “%20” rather than “+”.
2. Lower case the entire Command String and sort it alphabetically via the field for each field-value pair. The resultof this step would look like the following.
apikey=mivr6x7u6bn_sdahobpjnejpgest35exq-jb8cg20yi3yaxxcgpyuairmfi_→˓ejtvwz0nukkjbpmy3y2bcikwfq&command=deployvirtualmachine&diskofferingid=1&→˓serviceofferingid=1&templateid=2&zoneid=4
3. Take the sorted Command String and run it through the HMAC SHA-1 hashing algorithm (most programminglanguages offer a utility method to do this) with the user’s Secret Key. Base64 encode the resulting byte arrayin UTF-8 so that it can be safely transmitted via HTTP. The final string produced after Base64 encoding shouldbe “Lxx1DM40AjcXU%2FcaiK8RAP0O1hU%3D”.
By reconstructing the final URL in the format Base URL+API Path+Command String+Signature, the final URLshould look like:
http://localhost:8080/client/api?command=deployVirtualMachine&serviceOfferingId=1&→˓diskOfferingId=1&templateId=2&zoneId=4&apiKey=miVr6X7u6bN_sdahOBpjNejPgEsT35eXq-→˓jB8CG20YI3yaxXcgpyuaIRmFI_EJTVwZ0nUkkJbPmY3y2bciKwFQ&signature=Lxx1DM40AjcXU→˓%2FcaiK8RAP0O1hU%3D
How to sign an API call with Python
To illustrate the procedure used to sign API calls we present a step by step interactive session using Python.
First import the required modules:
$pythonPython 2.7.3 (default, Nov 17 2012, 19:54:34)[GCC 4.2.1 Compatible Apple Clang 4.1 ((tags/Apple/clang-421.11.66))] on darwinType "help", "copyright", "credits" or "license" for more information.>>> import urllib2>>> import urllib>>> import hashlib>>> import hmac>>> import base64
Define the endpoint of the Cloud, the command that you want to execute and the keys of the user.
84 Chapter 5. Developers Guide
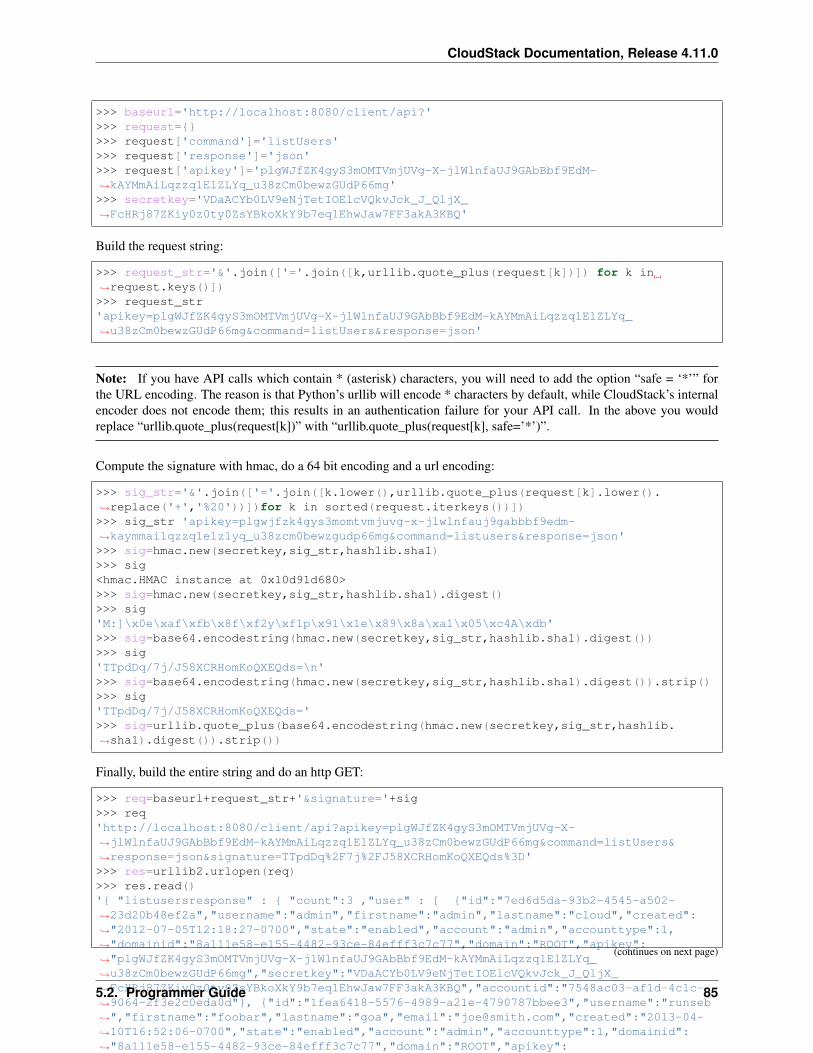
CloudStack Documentation, Release 4.11.0
>>> baseurl='http://localhost:8080/client/api?'>>> request={}>>> request['command']='listUsers'>>> request['response']='json'>>> request['apikey']='plgWJfZK4gyS3mOMTVmjUVg-X-jlWlnfaUJ9GAbBbf9EdM-→˓kAYMmAiLqzzq1ElZLYq_u38zCm0bewzGUdP66mg'>>> secretkey='VDaACYb0LV9eNjTetIOElcVQkvJck_J_QljX_→˓FcHRj87ZKiy0z0ty0ZsYBkoXkY9b7eq1EhwJaw7FF3akA3KBQ'
Build the request string:
>>> request_str='&'.join(['='.join([k,urllib.quote_plus(request[k])]) for k in→˓request.keys()])>>> request_str'apikey=plgWJfZK4gyS3mOMTVmjUVg-X-jlWlnfaUJ9GAbBbf9EdM-kAYMmAiLqzzq1ElZLYq_→˓u38zCm0bewzGUdP66mg&command=listUsers&response=json'
Note: If you have API calls which contain * (asterisk) characters, you will need to add the option “safe = ‘*’” forthe URL encoding. The reason is that Python’s urllib will encode * characters by default, while CloudStack’s internalencoder does not encode them; this results in an authentication failure for your API call. In the above you wouldreplace “urllib.quote_plus(request[k])” with “urllib.quote_plus(request[k], safe=’*’)”.
Compute the signature with hmac, do a 64 bit encoding and a url encoding:
>>> sig_str='&'.join(['='.join([k.lower(),urllib.quote_plus(request[k].lower().→˓replace('+','%20'))])for k in sorted(request.iterkeys())])>>> sig_str 'apikey=plgwjfzk4gys3momtvmjuvg-x-jlwlnfauj9gabbbf9edm-→˓kaymmailqzzq1elzlyq_u38zcm0bewzgudp66mg&command=listusers&response=json'>>> sig=hmac.new(secretkey,sig_str,hashlib.sha1)>>> sig<hmac.HMAC instance at 0x10d91d680>>>> sig=hmac.new(secretkey,sig_str,hashlib.sha1).digest()>>> sig'M:]\x0e\xaf\xfb\x8f\xf2y\xf1p\x91\x1e\x89\x8a\xa1\x05\xc4A\xdb'>>> sig=base64.encodestring(hmac.new(secretkey,sig_str,hashlib.sha1).digest())>>> sig'TTpdDq/7j/J58XCRHomKoQXEQds=\n'>>> sig=base64.encodestring(hmac.new(secretkey,sig_str,hashlib.sha1).digest()).strip()>>> sig'TTpdDq/7j/J58XCRHomKoQXEQds='>>> sig=urllib.quote_plus(base64.encodestring(hmac.new(secretkey,sig_str,hashlib.→˓sha1).digest()).strip())
Finally, build the entire string and do an http GET:
>>> req=baseurl+request_str+'&signature='+sig>>> req'http://localhost:8080/client/api?apikey=plgWJfZK4gyS3mOMTVmjUVg-X-→˓jlWlnfaUJ9GAbBbf9EdM-kAYMmAiLqzzq1ElZLYq_u38zCm0bewzGUdP66mg&command=listUsers&→˓response=json&signature=TTpdDq%2F7j%2FJ58XCRHomKoQXEQds%3D'>>> res=urllib2.urlopen(req)>>> res.read()'{ "listusersresponse" : { "count":3 ,"user" : [ {"id":"7ed6d5da-93b2-4545-a502-→˓23d20b48ef2a","username":"admin","firstname":"admin","lastname":"cloud","created":→˓"2012-07-05T12:18:27-0700","state":"enabled","account":"admin","accounttype":1,→˓"domainid":"8a111e58-e155-4482-93ce-84efff3c7c77","domain":"ROOT","apikey":→˓"plgWJfZK4gyS3mOMTVmjUVg-X-jlWlnfaUJ9GAbBbf9EdM-kAYMmAiLqzzq1ElZLYq_→˓u38zCm0bewzGUdP66mg","secretkey":"VDaACYb0LV9eNjTetIOElcVQkvJck_J_QljX_→˓FcHRj87ZKiy0z0ty0ZsYBkoXkY9b7eq1EhwJaw7FF3akA3KBQ","accountid":"7548ac03-af1d-4c1c-→˓9064-2f3e2c0eda0d"}, {"id":"1fea6418-5576-4989-a21e-4790787bbee3","username":"runseb→˓","firstname":"foobar","lastname":"goa","email":"[email protected]","created":"2013-04-→˓10T16:52:06-0700","state":"enabled","account":"admin","accounttype":1,"domainid":→˓"8a111e58-e155-4482-93ce-84efff3c7c77","domain":"ROOT","apikey":→˓"Xhsb3MewjJQaXXMszRcLvQI9_NPy_→˓UcbDj1QXikkVbDC9MDSPwWdtZ1bUY1H7JBEYTtDDLY3yuchCeW778GkBA","secretkey":→˓"gIsgmi8C5YwxMHjX5o51pSe0kqs6JnKriw0jJBLceY5bgnfzKjL4aM6ctJX-→˓i1ddQIHJLbLJDK9MRzsKk6xZ_w","accountid":"7548ac03-af1d-4c1c-9064-2f3e2c0eda0d"}, {→˓"id":"52f65396-183c-4473-883f-a37e7bb93967","username":"toto","firstname":"john",→˓"lastname":"smith","email":"[email protected]","created":"2013-04-23T04:27:22-0700",→˓"state":"enabled","account":"admin","accounttype":1,"domainid":"8a111e58-e155-4482-→˓93ce-84efff3c7c77","domain":"ROOT","apikey":"THaA6fFWS_OmvU8od201omxFC8yKNL_→˓Hc5ZCS77LFCJsRzSx48JyZucbUul6XYbEg-ZyXMl_wuEpECzK-wKnow","secretkey":→˓"O5ywpqJorAsEBKR_5jEvrtGHfWL1Y_j1E4Z_→˓iCr8OKCYcsPIOdVcfzjJQ8YqK0a5EzSpoRrjOFiLsG0hQrYnDA","accountid":"7548ac03-af1d-4c1c-→˓9064-2f3e2c0eda0d"} ] } }'
(continues on next page)
5.2. Programmer Guide 85

CloudStack Documentation, Release 4.11.0
(continued from previous page)
Enabling API Call Expiration
You can set an expiry timestamp on API calls to prevent replay attacks over non-secure channels, such as HTTP. Theserver tracks the expiry timestamp you have specified and rejects all the subsequent API requests that come in afterthis validity period.
To enable this feature, add the following parameters to the API request:
• signatureVersion=3: If the signatureVersion parameter is missing or is not equal to 3, the expires parameter isignored in the API request.
• expires=YYYY-MM-DDThh:mm:ssZ: Specifies the date and time at which the signature included in the requestis expired. The timestamp is expressed in the YYYY-MM-DDThh:mm:ssZ format, as specified in the ISO 8601standard.
For example:
expires=2011-10-10T12:00:00+0530
A sample API request with expiration is given below:
http://<IPAddress>:8080/client/api?command=listZones&signatureVersion=3&expires=2011-→˓10-10T12:00:00+0530&apiKey=miVr6X7u6bN_sdahOBpjNejPgEsT35eXq-→˓jB8CG20YI3yaxXcgpyuaIRmFI_EJTVwZ0nUkkJbPmY3y2bciKwFQ&signature=Lxx1DM40AjcXU→˓%2FcaiK8RAP0O1hU%3D
Limiting the Rate of API Requests
You can limit the rate at which API requests can be placed for each account. This is useful to avoid malicious attackson the Management Server, prevent performance degradation, and provide fairness to all accounts.
If the number of API calls exceeds the threshold, an error message is returned for any additional API calls. The callerwill have to retry these API calls at another time.
Configuring the API Request Rate
To control the API request rate, use the following global configuration settings:
• api.throttling.enabled - Enable/Disable API throttling. By default, this setting is false, so API throttling is notenabled.
• api.throttling.interval (in seconds) - Time interval during which the number of API requests is to be counted.When the interval has passed, the API count is reset to 0.
• api.throttling.max - Maximum number of APIs that can be placed within the api.throttling.interval period.
• api.throttling.cachesize - Cache size for storing API counters. Use a value higher than the total number ofaccounts managed by the cloud. One cache entry is needed for each account, to store the running API total forthat account.
86 Chapter 5. Developers Guide

CloudStack Documentation, Release 4.11.0
Limitations on API Throttling
The following limitations exist in the current implementation of this feature.
Note: Even with these limitations, CloudStack is still able to effectively use API throttling to avoid malicious attackscausing denial of service.
• In a deployment with multiple Management Servers, the cache is not synchronized across them. In this case,CloudStack might not be able to ensure that only the exact desired number of API requests are allowed.In the worst case, the number of API calls that might be allowed is (number of Management Servers) *(api.throttling.max).
• The API commands resetApiLimit and getApiLimit are limited to the Management Server where the API isinvoked.
API Responses
Response Formats: XML and JSON
CloudStack supports two formats as the response to an API call. The default response is XML. If you would like theresponse to be in JSON, add &response=json to the Command String.
The two response formats differ in how they handle blank fields. In JSON, if there is no value for a response field, itwill not appear in the response. If all the fields were empty, there might be no response at all. In XML, even if thereis no value to be returned, an empty field will be returned as a placeholder XML element.
Sample XML Response:
<listipaddressesresponse><allocatedipaddress><ipaddress>192.168.10.141</ipaddress><allocated>2009-09-18T13:16:10-0700</allocated><zoneid>4</zoneid>
<zonename>WC</zonename><issourcenat>true</issourcenat>
</allocatedipaddress></listipaddressesresponse>
Sample JSON Response:
{ "listipaddressesresponse" :{ "allocatedipaddress" :[
{"ipaddress" : "192.168.10.141","allocated" : "2009-09-18T13:16:10-0700","zoneid" : "4","zonename" : "WC","issourcenat" : "true"
}]
}}
5.2. Programmer Guide 87

CloudStack Documentation, Release 4.11.0
Maximum Result Pages Returned
For each cloud, there is a default upper limit on the number of results that any API command will return in a singlepage. This is to help prevent overloading the cloud servers and prevent DOS attacks. For example, if the page sizelimit is 500 and a command returns 10,000 results, the command will return 20 pages.
The default page size limit can be different for each cloud. It is set in the global configuration parameter de-fault.page.size. If your cloud has many users with lots of VMs, you might need to increase the value of this parameter.At the same time, be careful not to set it so high that your site can be taken down by an enormous return from an APIcall. For more information about how to set global configuration parameters, see “Describe Your Deployment” in theInstallation Guide.
To decrease the page size limit for an individual API command, override the global setting with the page and pagesizeparameters, which are available in any list* command (listCapabilities, listDiskOfferings, etc.).
• Both parameters must be specified together.
• The value of the pagesize parameter must be smaller than the value of default.page.size. That is, you can notincrease the number of possible items in a result page, only decrease it.
For syntax information on the list* commands, see the API Reference.
Error Handling
If an error occurs while processing an API request, the appropriate response in the format specified is returned. Eacherror response consists of an error code and an error text describing what possibly can go wrong. Below is a list ofpossible error codes:
You can now find the CloudStack-specific error code in the exception response for each type of exception. Thefollowing list of error codes is added to the new class named CSExceptionErrorCode.
4250 : “com.cloud.utils.exception.CloudRuntimeException”
4255 : “com.cloud.utils.exception.ExceptionUtil”
4260 : “com.cloud.utils.exception.ExecutionException”
4265 : “com.cloud.utils.exception.HypervisorVersionChangedException”
4270 : “com.cloud.utils.exception.RuntimeCloudException”
4275 : “com.cloud.exception.CloudException”
4280 : “com.cloud.exception.AccountLimitException”
4285 : “com.cloud.exception.AgentUnavailableException”
4290 : “com.cloud.exception.CloudAuthenticationException”
4295 : “com.cloud.exception.CloudExecutionException”
4300 : “com.cloud.exception.ConcurrentOperationException”
4305 : “com.cloud.exception.ConflictingNetworkSettingsException”
4310 : “com.cloud.exception.DiscoveredWithErrorException”
4315 : “com.cloud.exception.HAStateException”
4320 : “com.cloud.exception.InsufficientAddressCapacityException”
4325 : “com.cloud.exception.InsufficientCapacityException”
4330 : “com.cloud.exception.InsufficientNetworkCapacityException”
88 Chapter 5. Developers Guide

CloudStack Documentation, Release 4.11.0
4335 : “com.cloud.exception.InsufficientServerCapacityException”
4340 : “com.cloud.exception.InsufficientStorageCapacityException”
4345 : “com.cloud.exception.InternalErrorException”
4350 : “com.cloud.exception.InvalidParameterValueException”
4355 : “com.cloud.exception.ManagementServerException”
4360 : “com.cloud.exception.NetworkRuleConflictException”
4365 : “com.cloud.exception.PermissionDeniedException”
4370 : “com.cloud.exception.ResourceAllocationException”
4375 : “com.cloud.exception.ResourceInUseException”
4380 : “com.cloud.exception.ResourceUnavailableException”
4385 : “com.cloud.exception.StorageUnavailableException”
4390 : “com.cloud.exception.UnsupportedServiceException”
4395 : “com.cloud.exception.VirtualMachineMigrationException”
4400 : “com.cloud.exception.AccountLimitException”
4405 : “com.cloud.exception.AgentUnavailableException”
4410 : “com.cloud.exception.CloudAuthenticationException”
4415 : “com.cloud.exception.CloudException”
4420 : “com.cloud.exception.CloudExecutionException”
4425 : “com.cloud.exception.ConcurrentOperationException”
4430 : “com.cloud.exception.ConflictingNetworkSettingsException”
4435 : “com.cloud.exception.ConnectionException”
4440 : “com.cloud.exception.DiscoveredWithErrorException”
4445 : “com.cloud.exception.DiscoveryException”
4450 : “com.cloud.exception.HAStateException”
4455 : “com.cloud.exception.InsufficientAddressCapacityException”
4460 : “com.cloud.exception.InsufficientCapacityException”
4465 : “com.cloud.exception.InsufficientNetworkCapacityException”
4470 : “com.cloud.exception.InsufficientServerCapacityException”
4475 : “com.cloud.exception.InsufficientStorageCapacityException”
4480 : “com.cloud.exception.InsufficientVirtualNetworkCapcityException”
4485 : “com.cloud.exception.InternalErrorException”
4490 : “com.cloud.exception.InvalidParameterValueException”
4495 : “com.cloud.exception.ManagementServerException”
4500 : “com.cloud.exception.NetworkRuleConflictException”
4505 : “com.cloud.exception.PermissionDeniedException”
4510 : “com.cloud.exception.ResourceAllocationException”
5.2. Programmer Guide 89

CloudStack Documentation, Release 4.11.0
4515 : “com.cloud.exception.ResourceInUseException”
4520 : “com.cloud.exception.ResourceUnavailableException”
4525 : “com.cloud.exception.StorageUnavailableException”
4530 : “com.cloud.exception.UnsupportedServiceException”
4535 : “com.cloud.exception.VirtualMachineMigrationException”
9999 : “org.apache.cloudstack.api.ServerApiException”
An HTTP error code of 401 is always returned if API request was rejected due to bad signatures, missing API Keys,or the user simply did not have the permissions to execute the command.
Asynchronous Commands
Asynchronous commands were introduced in CloudStack 2.x. Commands are designated as asynchronous when theycan potentially take a long period of time to complete such as creating a snapshot or disk volume. They differ fromsynchronous commands by the following:
• They are identified in the API Reference by an (A).
• They will immediately return a job ID to refer to the job that will be responsible in processing the command.
• If executed as a “create” resource command, it will return the resource ID as well as the job ID.
You can periodically check the status of the job by making a simple API call to the command, queryAsyncJo-bResult and passing in the job ID.
Job Status
The key to using an asynchronous command is the job ID that is returned immediately once the command has been ex-ecuted. With the job ID, you can periodically check the job status by making calls to queryAsyncJobResult command.The command will return three possible job status integer values:
• 0 - Job is still in progress. Continue to periodically poll for any status changes.
• 1 - Job has successfully completed. The job will return any successful response values associated with commandthat was originally executed.
• 2 - Job has failed to complete. Please check the “jobresultcode” tag for failure reason code and “jobresult” forthe failure reason.
Example
The following shows an example of using an asynchronous command. Assume the API command:
command=deployVirtualMachine&zoneId=1&serviceOfferingId=1&diskOfferingId=1&→˓templateId=1
CloudStack will immediately return a job ID and any other additional data.
<deployvirtualmachineresponse><jobid>1</jobid><id>100</id>
</deployvirtualmachineresponse>
Using the job ID, you can periodically poll for the results by using the queryAsyncJobResult command.
90 Chapter 5. Developers Guide

CloudStack Documentation, Release 4.11.0
command=queryAsyncJobResult&jobId=1
Three possible results could come from this query.
Job is still pending:
<queryasyncjobresult><jobid>1</jobid><jobstatus>0</jobstatus><jobprocstatus>1</jobprocstatus>
</queryasyncjobresult>
Job has succeeded:
<queryasyncjobresultresponse cloud-stack-version="3.0.1.6"><jobid>1</jobid><jobstatus>1</jobstatus><jobprocstatus>0</jobprocstatus><jobresultcode>0</jobresultcode><jobresulttype>object</jobresulttype><jobresult>
<virtualmachine><id>450</id><name>i-2-450-VM</name><displayname>i-2-450-VM</displayname><account>admin</account><domainid>1</domainid><domain>ROOT</domain><created>2011-03-10T18:20:25-0800</created><state>Running</state><haenable>false</haenable><zoneid>1</zoneid><zonename>San Jose 1</zonename><hostid>2</hostid><hostname>905-13.sjc.lab.vmops.com</hostname><templateid>1</templateid><templatename>CentOS 5.3 64bit LAMP</templatename><templatedisplaytext>CentOS 5.3 64bit LAMP</templatedisplaytext><passwordenabled>false</passwordenabled><serviceofferingid>1</serviceofferingid><serviceofferingname>Small Instance</serviceofferingname><cpunumber>1</cpunumber><cpuspeed>500</cpuspeed><memory>512</memory><guestosid>12</guestosid><rootdeviceid>0</rootdeviceid><rootdevicetype>NetworkFilesystem</rootdevicetype><nic>
<id>561</id><networkid>205</networkid><netmask>255.255.255.0</netmask><gateway>10.1.1.1</gateway><ipaddress>10.1.1.225</ipaddress><isolationuri>vlan://295</isolationuri><broadcasturi>vlan://295</broadcasturi><traffictype>Guest</traffictype><type>Virtual</type><isdefault>true</isdefault>
(continues on next page)
5.2. Programmer Guide 91

CloudStack Documentation, Release 4.11.0
(continued from previous page)
</nic><hypervisor>XenServer</hypervisor>
</virtualmachine></jobresult>
</queryasyncjobresultresponse>
Job has failed:
<queryasyncjobresult><jobid>1</jobid><jobstatus>2</jobstatus><jobprocstatus>0</jobprocstatus><jobresultcode>551</jobresultcode><jobresulttype>text</jobresulttype><jobresult>Unable to deploy virtual machine id = 100 due to not enough capacity</
→˓jobresult></queryasyncjobresult>
5.2.2 Event Types
Types EventsVM VM.CREATE
VM.DESTROYVM.STARTVM.STOPVM.REBOOTVM.UPDATEVM.UPGRADEVM.DYNAMIC.SCALEVM.RESETPASSWORDVM.RESETSSHKEYVM.MIGRATEVM.MOVEVM.RESTORE
Domain Router ROUTER.CREATEROUTER.DESTROYROUTER.STARTROUTER.STOPROUTER.REBOOTROUTER.HAROUTER.UPGRADE
Console proxy PROXY.CREATEPROXY.DESTROYPROXY.STARTPROXY.STOPPROXY.REBOOTPROXY.HA
VNC Console Events VNC.CONNECTVNC.DISCONNECT
Continued on next page
92 Chapter 5. Developers Guide

CloudStack Documentation, Release 4.11.0
Table 1 – continued from previous pageTypes EventsNetwork Events NET.IPASSIGN
NET.IPRELEASEPORTABLE.IPASSIGNPORTABLE.IPRELEASENET.RULEADDNET.RULEDELETENET.RULEMODIFYNETWORK.CREATENETWORK.DELETENETWORK.UPDATEFIREWALL.OPENFIREWALL.CLOSE
NIC Events NIC.CREATENIC.DELETENIC.UPDATENIC.DETAIL.ADDNIC.DETAIL.UPDATENIC.DETAIL.REMOVE
Load Balancers LB.ASSIGN.TO.RULELB.REMOVE.FROM.RULELB.CREATELB.DELETELB.STICKINESSPOLICY.CREATELB.STICKINESSPOLICY.DELETELB.HEALTHCHECKPOLICY.CREATELB.HEALTHCHECKPOLICY.DELETELB.UPDATE
Global Load Balancer rules GLOBAL.LB.ASSIGNGLOBAL.LB.REMOVEGLOBAL.LB.CREATEGLOBAL.LB.DELETEGLOBAL.LB.UPDATE
Account events ACCOUNT.ENABLEACCOUNT.DISABLEACCOUNT.CREATEACCOUNT.DELETEACCOUNT.UPDATEACCOUNT.MARK.DEFAULT.ZONE
UserVO Events USER.LOGINUSER.LOGOUTUSER.CREATEUSER.DELETEUSER.DISABLEUSER.UPDATEUSER.ENABLEUSER.LOCK
Registering SSH keypair events REGISTER.SSH.KEYPAIRRegister for user API and secret keys REGISTER.USER.KEY
Continued on next page
5.2. Programmer Guide 93

CloudStack Documentation, Release 4.11.0
Table 1 – continued from previous pageTypes EventsTemplate Events TEMPLATE.CREATE
TEMPLATE.DELETETEMPLATE.UPDATETEMPLATE.DOWNLOAD.STARTTEMPLATE.DOWNLOAD.SUCCESSTEMPLATE.DOWNLOAD.FAILEDTEMPLATE.COPYTEMPLATE.EXTRACTTEMPLATE.UPLOADTEMPLATE.CLEANUP
Volume Events VOLUME.CREATEVOLUME.DELETEVOLUME.ATTACHVOLUME.DETACHVOLUME.EXTRACTVOLUME.UPLOADVOLUME.MIGRATEVOLUME.RESIZEVOLUME.DETAIL.UPDATEVOLUME.DETAIL.ADDVOLUME.DETAIL.REMOVE
Domains DOMAIN.CREATEDOMAIN.DELETEDOMAIN.UPDATE
Snapshots SNAPSHOT.CREATESNAPSHOT.DELETESNAPSHOTPOLICY.CREATESNAPSHOTPOLICY.UPDATESNAPSHOTPOLICY.DELETE
ISO ISO.CREATEISO.DELETEISO.COPYISO.ATTACHISO.DETACHISO.EXTRACTISO.UPLOAD
SSVM SSVM.CREATESSVM.DESTROYSSVM.STARTSSVM.STOPSSVM.REBOOTSSVM.HA
Service Offerings SERVICE.OFFERING.CREATESERVICE.OFFERING.EDITSERVICE.OFFERING.DELETE
Disk Offerings DISK.OFFERING.CREATEDISK.OFFERING.EDITDISK.OFFERING.DELETE
Continued on next page
94 Chapter 5. Developers Guide

CloudStack Documentation, Release 4.11.0
Table 1 – continued from previous pageTypes EventsNetwork offerings NETWORK.OFFERING.CREATE
NETWORK.OFFERING.ASSIGNNETWORK.OFFERING.EDITNETWORK.OFFERING.REMOVENETWORK.OFFERING.DELETE
Pods POD.CREATEPOD.EDITPOD.DELETE
Zones ZONE.CREATEZONE.EDITZONE.DELETE
VLANs/IP ranges VLAN.IP.RANGE.CREATEVLAN.IP.RANGE.DELETEVLAN.IP.RANGE.DEDICATEVLAN.IP.RANGE.RELEASESTORAGE.IP.RANGE.CREATESTORAGE.IP.RANGE.DELETESTORAGE.IP.RANGE.UPDATE
Configuration Table CONFIGURATION.VALUE.EDITSecurity Groups SG.AUTH.INGRESS
SG.REVOKE.INGRESSSG.AUTH.EGRESSSG.REVOKE.EGRESSSG.CREATESG.DELETESG.ASSIGNSG.REMOVE
Host HOST.RECONNECTMaintenance MAINT.CANCEL
MAINT.CANCEL.PSMAINT.PREPAREMAINT.PREPARE.PS
VPN VPN.REMOTE.ACCESS.CREATEVPN.REMOTE.ACCESS.DESTROYVPN.USER.ADDVPN.USER.REMOVEVPN.S2S.VPN.GATEWAY.CREATEVPN.S2S.VPN.GATEWAY.DELETEVPN.S2S.CUSTOMER.GATEWAY.CREATEVPN.S2S.CUSTOMER.GATEWAY.DELETEVPN.S2S.CUSTOMER.GATEWAY.UPDATEVPN.S2S.CONNECTION.CREATEVPN.S2S.CONNECTION.DELETEVPN.S2S.CONNECTION.RESET
Network NETWORK.RESTARTCustom certificates UPLOAD.CUSTOM.CERTIFICATEOneToOnenat STATICNAT.ENABLE
STATICNAT.DISABLEZONE.VLAN.ASSIGNZONE.VLAN.RELEASE
Continued on next page
5.2. Programmer Guide 95

CloudStack Documentation, Release 4.11.0
Table 1 – continued from previous pageTypes EventsProjects PROJECT.CREATE
PROJECT.UPDATEPROJECT.DELETEPROJECT.ACTIVATEPROJECT.SUSPENDPROJECT.ACCOUNT.ADDPROJECT.INVITATION.UPDATEPROJECT.INVITATION.REMOVEPROJECT.ACCOUNT.REMOVE
Network as a Service NETWORK.ELEMENT.CONFIGUREPhysical Network Events PHYSICAL.NETWORK.CREATE
PHYSICAL.NETWORK.DELETEPHYSICAL.NETWORK.UPDATE
Physical Network Service Provider Events SERVICE.PROVIDER.CREATESERVICE.PROVIDER.DELETESERVICE.PROVIDER.UPDATE
Physical Network Traffic Type Events TRAFFIC.TYPE.CREATETRAFFIC.TYPE.DELETETRAFFIC.TYPE.UPDATE
External network device events PHYSICAL.LOADBALANCER.ADDPHYSICAL.LOADBALANCER.DELETEPHYSICAL.LOADBALANCER.CONFIGURE
External switch management device eventsFor example: Cisco Nexus 1000v Virtual SupervisorModule.
SWITCH.MGMT.ADDSWITCH.MGMT.DELETESWITCH.MGMT.CONFIGURESWITCH.MGMT.ENABLESWITCH.MGMT.DISABLEPHYSICAL.FIREWALL.ADDPHYSICAL.FIREWALL.DELETEPHYSICAL.FIREWALL.CONFIGURE
VPC VPC.CREATEVPC.UPDATEVPC.DELETEVPC.RESTART
Network ACL NETWORK.ACL.CREATENETWORK.ACL.DELETENETWORK.ACL.REPLACENETWORK.ACL.ITEM.CREATENETWORK.ACL.ITEM.UPDATENETWORK.ACL.ITEM.DELETE
VPC offerings VPC.OFFERING.CREATEVPC.OFFERING.UPDATEVPC.OFFERING.DELETE
Private gateway PRIVATE.GATEWAY.CREATEPRIVATE.GATEWAY.DELETE
Static routes STATIC.ROUTE.CREATESTATIC.ROUTE.DELETE
Tag-related events CREATE_TAGSDELETE_TAGS
Continued on next page
96 Chapter 5. Developers Guide
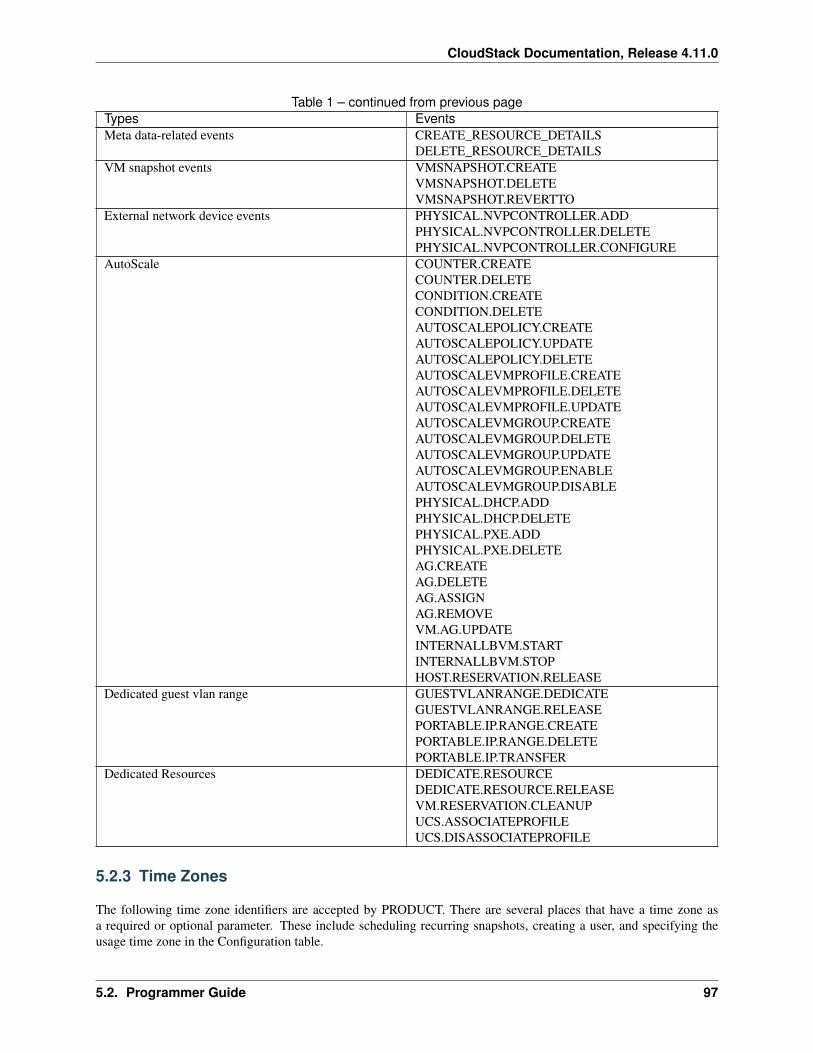
CloudStack Documentation, Release 4.11.0
Table 1 – continued from previous pageTypes EventsMeta data-related events CREATE_RESOURCE_DETAILS
DELETE_RESOURCE_DETAILSVM snapshot events VMSNAPSHOT.CREATE
VMSNAPSHOT.DELETEVMSNAPSHOT.REVERTTO
External network device events PHYSICAL.NVPCONTROLLER.ADDPHYSICAL.NVPCONTROLLER.DELETEPHYSICAL.NVPCONTROLLER.CONFIGURE
AutoScale COUNTER.CREATECOUNTER.DELETECONDITION.CREATECONDITION.DELETEAUTOSCALEPOLICY.CREATEAUTOSCALEPOLICY.UPDATEAUTOSCALEPOLICY.DELETEAUTOSCALEVMPROFILE.CREATEAUTOSCALEVMPROFILE.DELETEAUTOSCALEVMPROFILE.UPDATEAUTOSCALEVMGROUP.CREATEAUTOSCALEVMGROUP.DELETEAUTOSCALEVMGROUP.UPDATEAUTOSCALEVMGROUP.ENABLEAUTOSCALEVMGROUP.DISABLEPHYSICAL.DHCP.ADDPHYSICAL.DHCP.DELETEPHYSICAL.PXE.ADDPHYSICAL.PXE.DELETEAG.CREATEAG.DELETEAG.ASSIGNAG.REMOVEVM.AG.UPDATEINTERNALLBVM.STARTINTERNALLBVM.STOPHOST.RESERVATION.RELEASE
Dedicated guest vlan range GUESTVLANRANGE.DEDICATEGUESTVLANRANGE.RELEASEPORTABLE.IP.RANGE.CREATEPORTABLE.IP.RANGE.DELETEPORTABLE.IP.TRANSFER
Dedicated Resources DEDICATE.RESOURCEDEDICATE.RESOURCE.RELEASEVM.RESERVATION.CLEANUPUCS.ASSOCIATEPROFILEUCS.DISASSOCIATEPROFILE
5.2.3 Time Zones
The following time zone identifiers are accepted by PRODUCT. There are several places that have a time zone asa required or optional parameter. These include scheduling recurring snapshots, creating a user, and specifying theusage time zone in the Configuration table.
5.2. Programmer Guide 97

CloudStack Documentation, Release 4.11.0
Etc/GMT+12 Etc/GMT+11 Pacific/SamoaPacific/Honolulu US/Alaska America/Los_AngelesMexico/BajaNorte US/Arizona US/MountainAmerica/Chihuahua America/Chicago America/Costa_RicaAmerica/Mexico_City Canada/Saskatchewan America/BogotaAmerica/New_York America/Caracas America/AsuncionAmerica/Cuiaba America/Halifax America/La_PazAmerica/Santiago America/St_Johns America/AraguainaAmerica/Argentina/Buenos_Aires America/Cayenne America/GodthabAmerica/Montevideo Etc/GMT+2 Atlantic/AzoresAtlantic/Cape_Verde Africa/Casablanca Etc/UTCAtlantic/Reykjavik Europe/London CETEurope/Bucharest Africa/Johannesburg Asia/BeirutAfrica/Cairo Asia/Jerusalem Europe/MinskEurope/Moscow Africa/Nairobi Asia/KarachiAsia/Kolkata Asia/Bangkok Asia/ShanghaiAsia/Kuala_Lumpur Australia/Perth Asia/TaipeiAsia/Tokyo Asia/Seoul Australia/AdelaideAustralia/Darwin Australia/Brisbane Australia/CanberraPacific/Guam Pacific/Auckland
5.3 Plugins
5.3.1 Storage Plugins
This section gives an outline of how to implement a plugin to integrate a third-party storage provider. For details andan example, you will need to read the code.
Note: Example code is available at: plugins/storage/volume/sample
Third party storage providers can integrate with CloudStack to provide either primary storage or secondary storage.For example, CloudStack provides plugins for Amazon Simple Storage Service (S3) or OpenStack Object Storage(Swift). The S3 plugin can be used for any object storage that supports the Amazon S3 interface.
Additional third party object storages that do not support the S3 interface can be integrated with CloudStack by writingplugin software that uses the object storage plugin framework. Several new interfaces are available so that storageproviders can develop vendor-specific plugins based on well-defined contracts that can be seamlessly managed byCloudStack.
Artifacts such as templates, ISOs and snapshots are kept in storage which CloudStack refers to as secondary storage.To improve scalability and performance, as when a number of hosts access secondary storage concurrently, objectstorage can be used for secondary storage. Object storage can also provide built-in high availability capability. Whenusing object storage, access to secondary storage data can be made available across multiple zones in a region. Thisis a huge benefit, as it is no longer necessary to copy templates, snapshots etc. across zones as would be needed in anenvironment using only zone-based NFS storage.
The user enables a storage plugin through the UI. A new dialog box choice is offered to select the storage provider.Depending on which provider is selected, additional input fields may appear so that the user can provide the additionaldetails required by that provider, such as a user name and password for a third-party storage account.
98 Chapter 5. Developers Guide

CloudStack Documentation, Release 4.11.0
Overview of How to Write a Storage Plugin
To add a third-party storage option to CloudStack, follow these general steps (explained in more detail later in thissection):
1. Implement the following interfaces in Java:
• DataStoreDriver
• DataStoreLifecycle
• DataStoreProvider
• VMSnapshotStrategy (if you want to customize the VM snapshot functionality)
2. Hardcode your plugin’s required additional input fields into the code for the Add Secondary Storage or AddPrimary Storage dialog box.
3. Place your .jar file in plugins/storage/volume/ or plugins/storage/image/.
4. Edit /client/tomcatconf/componentContext.xml.in.
5. Edit client/pom.xml.
Implementing DataStoreDriver
DataStoreDriver contains the code that CloudStack will use to provision the object store, when needed.
You must implement the following methods:
• getTO()
• getStoreTO()
• createAsync()
• deleteAsync()
The following methods are optional:
• resize()
• canCopy() is optional. If you set it to true, then you must implement copyAsync().
Implementing DataStoreLifecycle
DataStoreLifecycle contains the code to manage the storage operations for ongoing use of the storage. Several opera-tions are needed, like create, maintenance mode, delete, etc.
You must implement the following methods:
• initialize()
• maintain()
• cancelMaintain()
• deleteDataStore()
• Implement one of the attach*() methods depending on what scope you want the storage to have: attachHost(),attachCluster(), or attachZone().
5.3. Plugins 99

CloudStack Documentation, Release 4.11.0
Implementing DataStoreProvider
DataStoreProvider contains the main code of the data store.
You must implement the following methods:
• getDatastoreLifeCycle()
• getDataStoreDriver()
• getTypes(). Returns one or more types of storage for which this data store provider can be used. For secondaryobject storage, return IMAGE, and for a Secondary Staging Store, return ImageCache.
• configure(). First initialize the lifecycle implementation and the driver implementation, then call registerDriver()to register the new object store provider instance with CloudStack.
• getName(). Returns the unique name of your provider; for example, this can be used to get the name to displayin the UI.
The following methods are optional:
• getHostListener() is optional; it’s for monitoring the status of the host.
Implementing VMSnapshotStrategy
VMSnapshotStrategy has the following methods:
• takeVMSnapshot()
• deleteVMSnapshot()
• revertVMSnapshot()
• canHandle(). For a given VM snapshot, tells whether this implementation of VMSnapshotStrategy can handleit.
Place the .jar File in the Right Directory
For a secondary storage plugin, place your .jar file here:
plugins/storage/image/
For a primary storage plugin, place your .jar file here:
plugins/storage/volume/
Edit Configuration Files
First, edit the following file tell CloudStack to include your .jar file. Add a line to this file to tell the CloudStackManagement Server that it now has a dependency on your code:
client/pom.xml
Place some facts about your code in the following file so CloudStack can run it:
/client/tomcatconf/componentContext.xml.in
In the section “Deployment configurations of various adapters,” add this:
100 Chapter 5. Developers Guide

CloudStack Documentation, Release 4.11.0
<bean>id=”some unique ID” class=”package name of your implementation of→˓DataStoreProvider”</bean>
In the section “Storage Providers,” add this:
<property name=”providers”><ref local=”same ID from the bean tag's id attribute”>
</property>
Minimum Required Interfaces
The classes, interfaces, and methods used by CloudStack from the Amazon Web Services (AWS) Java SDK are listedin this section. An object storage that supports the S3 interface is minimally required to support the below in order tobe compatible with CloudStack.
Interface AmazonS3
http://docs.aws.amazon.com/AWSJavaSDK/latest/javadoc/com/amazonaws/services/s3/AmazonS3.html
5.3. Plugins 101

CloudStack Documentation, Release 4.11.0
ModifierandType
Method and Description
Bucket createBucket(String bucketName)Creates a new Amazon S3 bucket with the specified name in the default (US) region, Re-gion.US_Standard.
void deleteObject(String bucketName, String key)Deletes the specified object in the specified bucket.
Object-Metadata
getObject(GetObjectRequest getObjectRequest, File destinationFile)Gets the object metadata for the object stored in Amazon S3 under the specified bucket and key, andsaves the object contents to the specified file.
S3Object getObject(String bucketName, String key)Gets the object stored in Amazon S3 under the specified bucket and key.
URL generatePresignedUrl(String bucketName, String key, Date expiration, HttpMethod method)Returns a pre-signed URL for accessing an Amazon S3 resource.
void deleteBucket(String bucketName)Deletes the specified bucket.
List<Bucket>listBuckets()Returns a list of all Amazon S3 buckets that the authenticated sender of the request owns.
Ob-jectList-ing
listObjects(String bucketName, String prefix)Returns a list of summary information about the objects in the specified bucket.
PutOb-jectRe-sult
putObject(PutObjectRequest putObjectRequest)Uploads a new object to the specified Amazon S3 bucket.
PutOb-jectRe-sult
putObject(String bucketName, String key, File file)Uploads the specified file to Amazon S3 under the specified bucket and key name.
PutOb-jectRe-sult
putObject(String bucketName, String key, InputStream input, ObjectMetadata metadata)Uploads the specified input stream and object metadata to Amazon S3 under the specified bucket andkey name.
void setEndpoint(String endpoint)Overrides the default endpoint for this client.
void setObjectAcl(String bucketName, String key, CannedAccessControlList acl)Sets the CannedAccessControlList for the specified object in Amazon S3 using one of the pre-configured CannedAccessControlLists.
Class TransferManager
http://docs.aws.amazon.com/AWSJavaSDK/latest/javadoc/com/amazonaws/services/s3/transfer/TransferManager.html
Modifier andType
Method and Description
Upload upload(PutObjectRequest putObjectRequest)Schedules a new transfer to upload data to Amazon S3.
Class PutObjectRequest
http://docs.aws.amazon.com/AWSJavaSDK/latest/javadoc/com/amazonaws/services/s3/model/PutObjectRequest.html
102 Chapter 5. Developers Guide

CloudStack Documentation, Release 4.11.0
Modifier andType
Method and Description
Upload upload(PutObjectRequest putObjectRequest)Schedules a new transfer to upload data to Amazon S3.
5.3.2 Third Party UI Plugins
Using the new third-party plugin framework, you can write and install extensions to CloudStack. The installed andenabled plugins will appear in the UI alongside the other features. The code for the plugin is simply placed in a specialdirectory within CloudStack’s installed code at any time after CloudStack installation. The new plugin appears onlywhen it is enabled by the cloud administrator.
The left navigation bar of the CloudStack UI has a new Plugins button to help you work with UI plugins.
How to Write a Plugin: Overview
The basic procedure for writing a plugin is:
1. Write the code and create the other files needed. You will need the plugin code itself (in Javascript), a thumbnailimage, the plugin listing, and a CSS file.
All UI plugins have the following set of files:
+-- cloudstack/+-- ui/
+-- plugins/+-- csMyFirstPlugin/+-- config.js --> Plugin metadata (title, author, vendor URL,
→˓etc.)+-- icon.png --> Icon, shown on side nav bar and plugin
→˓listing(should be square, and ~50x50px)
+-- csMyFirstPlugin.css --> CSS file, loaded automatically when plugin→˓loads
+-- csMyFirstPlugin.js --> Main JS file, containing plugin code
The same files must also be present at /tomcat/webapps/client/plugins.
2. The CloudStack administrator adds the folder containing your plugin code under the CloudStack PLUGINSfolder.
3. The administrator also adds the name of your plugin to the plugin.js file in the PLUGINS folder.
4. The next time the user refreshes the UI in the browser, your plugin will appear in the left navigation bar.
How to Write a Plugin: Implementation Details
This section requires an understanding of JavaScript and the CloudStack API. You don’t need knowledge of specificframeworks for this tutorial (jQuery, etc.), since the CloudStack UI handles the front-end rendering for you.
5.3. Plugins 103
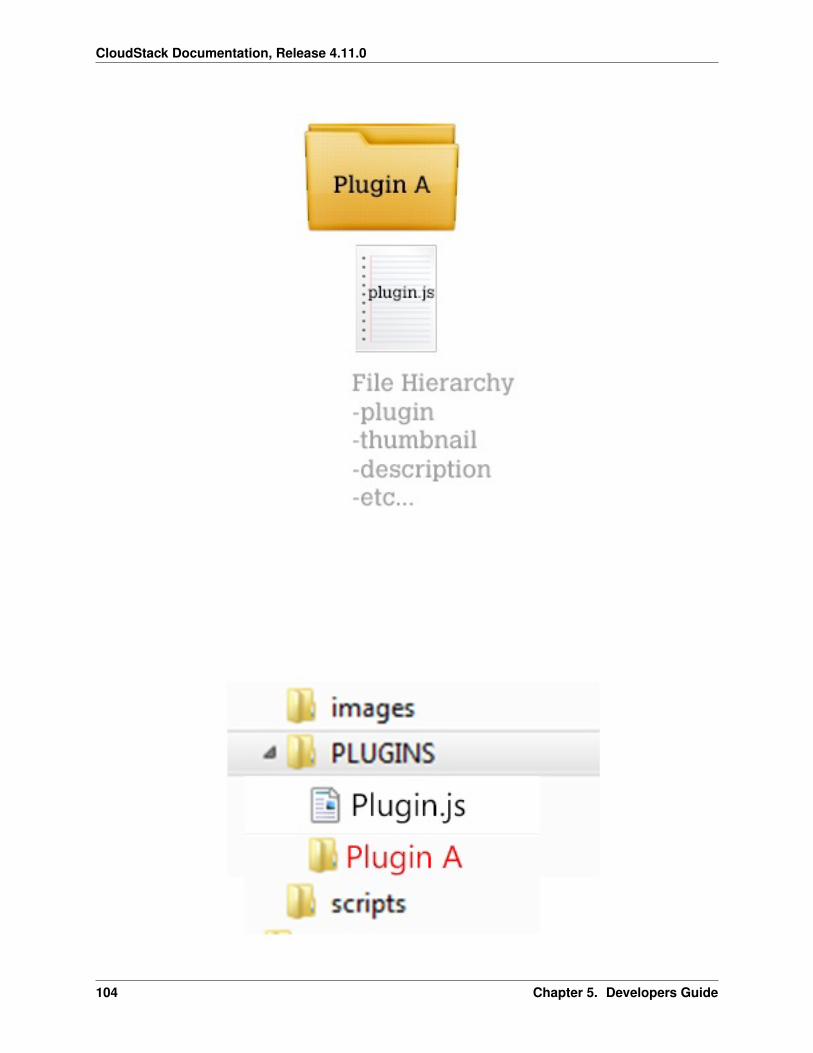
CloudStack Documentation, Release 4.11.0
104 Chapter 5. Developers Guide

CloudStack Documentation, Release 4.11.0
5.3. Plugins 105
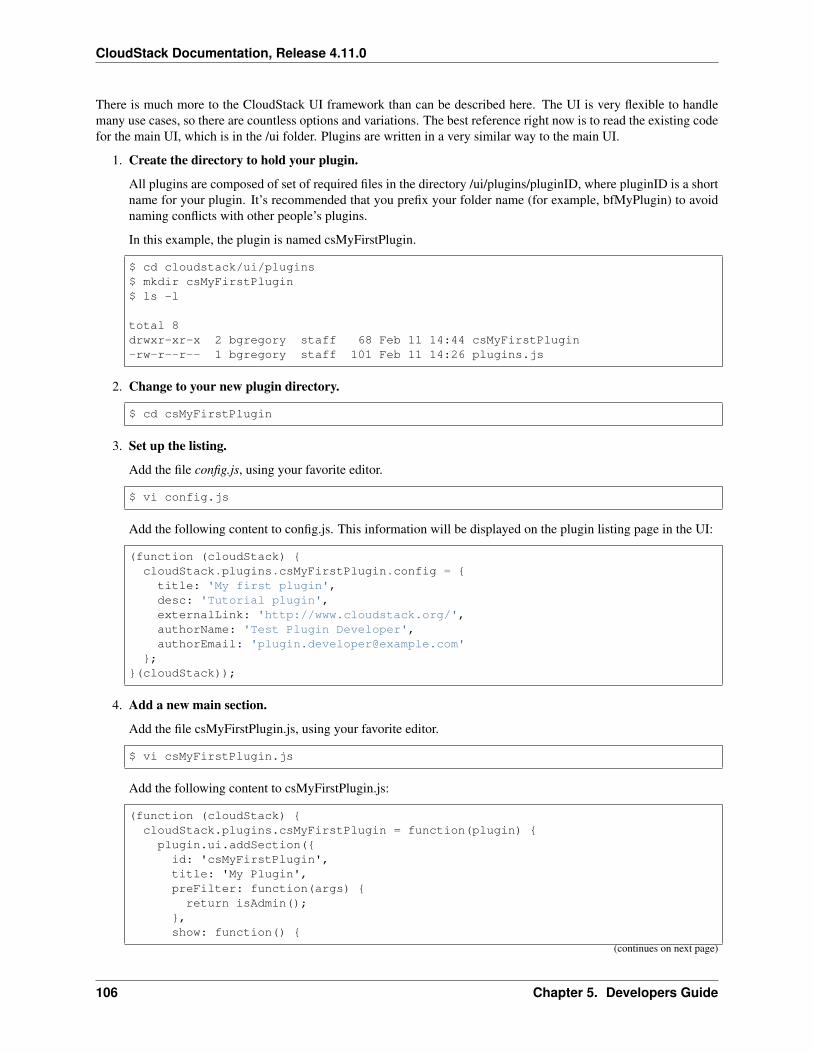
CloudStack Documentation, Release 4.11.0
There is much more to the CloudStack UI framework than can be described here. The UI is very flexible to handlemany use cases, so there are countless options and variations. The best reference right now is to read the existing codefor the main UI, which is in the /ui folder. Plugins are written in a very similar way to the main UI.
1. Create the directory to hold your plugin.
All plugins are composed of set of required files in the directory /ui/plugins/pluginID, where pluginID is a shortname for your plugin. It’s recommended that you prefix your folder name (for example, bfMyPlugin) to avoidnaming conflicts with other people’s plugins.
In this example, the plugin is named csMyFirstPlugin.
$ cd cloudstack/ui/plugins$ mkdir csMyFirstPlugin$ ls -l
total 8drwxr-xr-x 2 bgregory staff 68 Feb 11 14:44 csMyFirstPlugin-rw-r--r-- 1 bgregory staff 101 Feb 11 14:26 plugins.js
2. Change to your new plugin directory.
$ cd csMyFirstPlugin
3. Set up the listing.
Add the file config.js, using your favorite editor.
$ vi config.js
Add the following content to config.js. This information will be displayed on the plugin listing page in the UI:
(function (cloudStack) {cloudStack.plugins.csMyFirstPlugin.config = {
title: 'My first plugin',desc: 'Tutorial plugin',externalLink: 'http://www.cloudstack.org/',authorName: 'Test Plugin Developer',authorEmail: '[email protected]'
};}(cloudStack));
4. Add a new main section.
Add the file csMyFirstPlugin.js, using your favorite editor.
$ vi csMyFirstPlugin.js
Add the following content to csMyFirstPlugin.js:
(function (cloudStack) {cloudStack.plugins.csMyFirstPlugin = function(plugin) {
plugin.ui.addSection({id: 'csMyFirstPlugin',title: 'My Plugin',preFilter: function(args) {return isAdmin();
},show: function() {
(continues on next page)
106 Chapter 5. Developers Guide

CloudStack Documentation, Release 4.11.0
(continued from previous page)
return $('<div>').html('Content will go here');}
});};
}(cloudStack));
5. Register the plugin.
You now have the minimal content needed to run the plugin, so you can activate the plugin in the UI by addingit to plugins.js. First, edit the file:
$ cd cloudstack/ui/plugins$ vi plugins.js
Now add the following to plugins.js:
(function($, cloudStack) {cloudStack.plugins = [
'csMyFirstPlugin'];
}(jQuery, cloudStack));
6. Check the plugin in the UI.
First, copy all the plugin code that you have created so far to /tomcat/webapps/client/plugins. Then refresh thebrowser and click Plugins in the side navigation bar. You should see your new plugin.
7. Make the plugin do something.
Right now, you just have placeholder content in the new plugin. It’s time to add real code. In this example, youwill write a basic list view, which renders data from an API call. You will list all virtual machines owned by thelogged-in user. To do this, replace the ‘show’ function in the plugin code with a ‘listView’ block, containing therequired syntax for a list view. To get the data, use the listVirtualMachines API call. Without any parameters, itwill return VMs only for your active user. Use the provided ‘apiCall’ helper method to handle the server call. Ofcourse, you are free to use any other method for making the AJAX call (for example, jQuery’s $.ajax method).
First, open your plugin’s JavaScript source file in your favorite editor:
$ cd csMyFirstPlugin$ vi csMyFirstPlugin.js
Add the following code in csMyFirstPlugin.js:
(function (cloudStack) {cloudStack.plugins.csMyFirstPlugin = function(plugin) {
plugin.ui.addSection({id: 'csMyFirstPlugin',title: 'My Plugin',preFilter: function(args) {return isAdmin();
},
// Render page as a list viewlistView: {id: 'testPluginInstances',fields: {name: { label: 'label.name' },instancename: { label: 'label.internal.name' },
(continues on next page)
5.3. Plugins 107

CloudStack Documentation, Release 4.11.0
(continued from previous page)
displayname: { label: 'label.display.name' },zonename: { label: 'label.zone.name' }
},dataProvider: function(args) {// API calls go here, to retrive the data asynchronously//// On successful retrieval, call// args.response.success({ data: [data array] });plugin.ui.apiCall('listVirtualMachines', {success: function(json) {var vms = json.listvirtualmachinesresponse.virtualmachine;
args.response.success({ data: vms });},error: function(errorMessage) {args.response.error(errorMessage)
}});
}}
});};
}(cloudStack));
8. Test the plugin.
First, copy all the plugin code that you have created so far to /tomcat/webapps/client/plugins. Then refresh thebrowser. You can see that your placeholder content was replaced with a list table, containing 4 columns ofvirtual machine data.
9. Add an action button.
Let’s add an action button to the list view, which will reboot the VM. To do this, add an actions block underlistView. After specifying the correct format, the actions will appear automatically to the right of each row ofdata.
$ vi csMyFirstPlugin.js
Now add the following new code in csMyFirstPlugin.js. (The dots . . . show where we have omitted someexisting code for the sake of space. Don’t actually cut and paste that part):
...listView: {
id: 'testPluginInstances',...
actions: {// The key/ID you specify here will determine what icon is// shown in the UI for this action,// and will be added as a CSS class to the action's element// (i.e., '.action.restart')//// -- here, 'restart' is a predefined name in CloudStack that will// automatically show a 'reboot' arrow as an icon;// this can be changed in csMyFirstPlugin.cssrestart: {label: 'Restart VM',
(continues on next page)
108 Chapter 5. Developers Guide

CloudStack Documentation, Release 4.11.0
(continued from previous page)
messages: {confirm: function() { return 'Are you sure you want to restart this VM?
→˓' },notification: function() { return 'Rebooted VM' }
},action: function(args) {// Get the instance object of the selected row from context//// -- all currently loaded state is stored in 'context' as objects,// such as the selected list view row,// the selected section, and active user//// -- for list view actions, the object's key will be the same as// listView.id, specified above;// always make sure you specify an 'id' for the listView,// or else it will be 'undefined!'var instance = args.context.testPluginInstances[0];
plugin.ui.apiCall('rebootVirtualMachine', {// These will be appended to the API request//// i.e., rebootVirtualMachine&id=...data: {id: instance.id
},success: function(json) {args.response.success({// This is an async job, so success here only indicates// that the job was initiated.//// To pass the job ID to the notification UI// (for checking to see when action is completed),// '_custom: { jobID: ... }' needs to always be passed on
→˓success,// in the same format as below_custom: { jobId: json.rebootvirtualmachineresponse.jobid }
});},
error: function(errorMessage) {args.response.error(errorMessage); // Cancel action, show error
→˓message returned}
});},
// Because rebootVirtualMachine is an async job, we need to add// a poll function, which will perodically check// the management server to see if the job is ready// (via pollAsyncJobResult API call)//// The plugin API provides a helper function, 'plugin.ui.pollAsyncJob',/ which will work for most jobs// in CloudStacknotification: {poll: plugin.ui.pollAsyncJob
(continues on next page)
5.3. Plugins 109

CloudStack Documentation, Release 4.11.0
(continued from previous page)
}}
},
dataProvider: function(args) {...
...
10. Add the thumbnail icon.
Create an icon file; it should be square, about 50x50 pixels, and named icon.png. Copy it into the same directorywith your plugin code: cloudstack/ui/plugins/csMyFirstPlugin/icon.png.
11. Add the stylesheet.
Create a CSS file, with the same name as your .js file. Copy it into the same directory with your plugin code:cloudstack/ui/plugins/csMyFirstPlugin/csMyFirstPlugin.css.
5.4 Allocators
CloudStack enables administrators to write custom allocators that will choose the Host to place a new guest and thestorage host from which to allocate guest virtual disk images.
These are following categories of allocators currently supported:
• HostAllocators - Allows you to create custom rules to determine which physical host to allocate the guest virtualmachines on.
• StoragePoolAllocators - Allows you to create custom rules to determine which storage pool to allocate the guestvirtual machines on.
5.4.1 Implementing a custom HostAllocator
HostAllocators are written by extending com.cloud.agent.manager.allocator.HostAllocator interface.
HostAllocator Interface
The interface defines the following two methods.
/*** Checks if the VM can be upgraded to the specified ServiceOffering
* @param UserVm vm
* @param ServiceOffering offering
* @return boolean true if the VM can be upgraded
**/
publicboolean isVirtualMachineUpgradable(final UserVm vm, final ServiceOffering→˓offering);
/*** Determines which physical hosts are suitable to allocate the guest virtual
→˓machines on
** @paramVirtualMachineProfile vmProfile
(continues on next page)
110 Chapter 5. Developers Guide

CloudStack Documentation, Release 4.11.0
(continued from previous page)
* @paramDeploymentPlan plan
* @paramType type
* @paramExcludeList avoid
* @paramint returnUpTo
* @returnList<Host>List of hosts that are suitable for VM allocation
**/
publicList<Host> allocateTo( VirtualMachineProfile<?extendsVirtualMachine> vmProfile,→˓ DeploymentPlan plan, Type type, ExcludeList avoid, intreturnUpTo);
A custom HostAllocator can be written by implementing the ‘allocateTo’ method
Input Parameters for the method ‘HostAllocator :: allocateTo’
com.cloud.vm.VirtualMachineProfile vmProfile
VirtualMachineProfile describes one virtual machine. This allows the adapters like Allocators to process the informa-tion in the virtual machine and make determinations on what the virtual machine profile should look like before it isactually started on the hypervisor.
HostAllocators can make use of the following information present in the VirtualMachineProfile:
• The ServiceOffering that specifies configuration like requested CPU speed, RAM etc necessary for the guestVM.
• The VirtualMachineTemplate, the template to be used to start the VM.
com.cloud.deploy.DeploymentPlan plan
DeploymentPlan should specify:
• dataCenterId: The data center the VM should deploy in
• podId: The pod the Vm should deploy in; null if no preference
• clusterId: The cluster the VM should deploy in; null if no preference
• poolId: The storage pool the VM should be created in; null if no preference
com.cloud.host.Host.Type type
Type of the Host needed for this guest VM. Currently com.cloud.host.Host.Type interface defines the following Hosttypes:
• Storage
• Routing
• SecondaryStorage
• ConsoleProxy
• ExternalFirewall
• ExternalLoadBalancer
com.cloud.deploy.DeploymentPlanner.ExcludeList avoid
The ExcludeList specifies what datacenters, pods, clusters, hosts, storagePools should not be considered for allocatingthis guest VM. HostAllocators should avoid the hosts that are mentioned in ExcludeList.hostIds.
• Set Long dcIds;
5.4. Allocators 111

CloudStack Documentation, Release 4.11.0
• Set Long podIds;
• Set Long clusterIds;
• Set Long hostIds;
• Set Long poolIds;
int returnUpTo
This specifies return up to that many available hosts for this guest VM.
To get all possible hosts, set this value to -1.
Reference HostAllocator implementation
Refer com.cloud.agent.manager.allocator.impl.FirstFitAllocator that implements the HostAllocator interface. This al-locator checks available hosts in the specified datacenter, Pod, Cluster and considering the given ServiceOfferingrequirements.
If returnUpTo = 1, this allocator would return the first Host that fits the requirements of the guest VM.
Loading a custom HostAllocator
1. Write a custom HostAllocator class, implementing the interface described above.
2. Package the code into a JAR file and make the JAR available in the classpath of the Management Server/tomcat.
3. Modify the components.xml and components-premium.xml files found in /client/ tomcatconf as follows.
4. Search for ‘HostAllocator’ in these files.
<adapters key="com.cloud.agent.manager.allocator.HostAllocator"><adapter name="FirstFit" class="com.cloud.agent.manager.allocator.impl.
→˓FirstFitAllocator"/></adapters>
5. Replace the FirstFitAllocator with your class name. Optionally, you can change the name of the adapter as well.
6. Restart the Management Server.
5.4.2 Implementing a custom StoragePoolAllocator
StoragePoolAllocators are written by extending com.cloud.storage.allocator. StoragePoolAllocator interface.
StoragePoolAllocator Interface
A custom StoragePoolAllocator can be written by implementing the ‘allocateTo’ method.
/*** Determines which storage pools are suitable for the guest virtual machine
* @param DiskProfile dskCh
* @param VirtualMachineProfile vmProfile
* @param DeploymentPlan plan
* @param ExcludeList avoid
* @param int returnUpTo
(continues on next page)
112 Chapter 5. Developers Guide

CloudStack Documentation, Release 4.11.0
(continued from previous page)
* @return List<StoragePool> List of storage pools that are suitable for the VM
**/
public List<StoragePool> allocateToPool(DiskProfile dskCh, VirtualMachineProfile<?→˓extends VirtualMachine> vm, DeploymentPlan plan, ExcludeList avoid, int returnUpTo);
This interface also contains some other methods to support some legacy code. However your custom allocator canextend the existing com.cloud.storage.allocator. AbstractStoragePoolAllocator. This class provides default implemen-tation for all the other interface methods.
Input Parameters for the method ‘StoragePoolAllocator :: allocateTo’
com.cloud.vm.DiskProfile dskCh
DiskCharacteristics describes a disk and what functionality is required from it. It specifies the storage pool tags if anyto be used while searching for a storage pool.
com.cloud.vm.VirtualMachineProfile vmProfile
VirtualMachineProfile describes one virtual machine. This allows the adapters like Allocators to process the informa-tion in the virtual machine and make determinations on what the virtual machine profile should look like before it isactually started on the hypervisor.
StoragePoolAllocators can make use of the following information present in the VirtualMachineProfile:
• The VirtualMachine instance that specifies properties of the guest VM.
• The VirtualMachineTemplate, the template to be used to start the VM.
com.cloud.deploy.DeploymentPlan plan
DeploymentPlan should specify:
• dataCenterId: The data center the VM should deploy in
• podId: The pod the VM should deploy in; null if no preference
• clusterId: The cluster the VM should deploy in; null if no preference
• poolId: The storage pool the VM should be created in; null if no preference
com.cloud.deploy.DeploymentPlanner.ExcludeList avoid
The ExcludeList specifies what datacenters, pods, clusters, hosts, storagePools should not be considered for allocatingthis guest VM. StoragePoolAllocators should avoid the pools that are mentioned in ExcludeList.poolIds
• Set Long dcIds;
• Set Long podIds;
• Set Long clusterIds;
• Set Long hostIds;
• Set Long poolIds;
int returnUpTo
This specifies return up to that many available pools for this guest VM
To get all possible pools, set this value to -1
5.4. Allocators 113

CloudStack Documentation, Release 4.11.0
Reference StoragePoolAllocator implementation
Refer com.cloud.storage.allocator.FirstFitStoragePoolAllocator that implements the StoragePoolAllocator interface.This allocator checks available pools in the specified datacenter, Pod, Cluster and considering the given DiskProfilecharacteristics.
If returnUpTo = 1, this allocator would return the first Storage Pool that fits the requirements of the guest VM.
Loading a custom StoragePoolAllocator
1. Write a custom StoragePoolAllocator class, implementing the interface described above.
2. Package the code into a JAR file and make the JAR available in the classpath of the Management Server/tomcat.
3. Modify the components.xml and components-premium.xml files found in /client/ tomcatconf as follows.
4. Search for ‘StoragePoolAllocator’ in these files.
<adapters key="com.cloud.storage.allocator.StoragePoolAllocator"><adapter name="Storage" class="com.cloud.storage.allocator.
→˓FirstFitStoragePoolAllocator"/></adapters>
5. Replace the FirstFitStoragePoolAllocator with your class name. Optionally, you can change the name of theadapter as well.
6. Restart the Management Server.
5.5 Deploying CloudStack with Ansible
In this article, Paul Angus Cloud Architect at ShapeBlue takes a look at using Ansible to Deploy an Apache CloudStackcloud.
5.5.1 What is Ansible
Ansible is a deployment and configuration management tool similar in intent to Chef and Puppet. It allows (usually)DevOps teams to orchestrate the deployment and configuration of their environments without having to re-write customscripts to make changes.
Like Chef and Puppet, Ansible is designed to be idempotent. This means that you determine the state you want a hostto be in and Ansible will decide if it needs to act in order to achieve that state.
5.5.2 There’s already Chef and Puppet, so what’s the fuss about Ansible?
Let’s take it as a given that configuration management makes life much easier (and is quite cool), Ansible only needsan SSH connection to the hosts that you’re going to manage to get started. While Ansible requires Python 2.4 orgreater on the host you’re going to manage in order to leverage the vast majority of its functionality, it is able toconnect to hosts which don’t have Python installed in order to then install Python, so it’s not really a problem. Thisgreatly simplifies the deployment procedure for hosts, avoiding the need to pre-install agents onto the clients beforethe configuration management can take over.
Ansible will allow you to connect as any user to a managed host (with that user’s privileges) or by using public/privatekeys – allowing fully automated management.
114 Chapter 5. Developers Guide

CloudStack Documentation, Release 4.11.0
There also doesn’t need to be a central server to run everything, as long as your playbooks and inventories are in-syncyou can create as many Ansible servers as you need (generally a bit of Git pushing and pulling will do the trick).
Finally – its structure and language is pretty simple and clean. I’ve found it a bit tricky to get the syntax correct forvariables in some circumstances, but otherwise I’ve found it one of the easier tools to get my head around.
5.5.3 So let’s see something
For this example we’re going to create an Ansible server which will then deploy a CloudStack server. Both of theseservers will be CentOS 6.4 virtual machines.
5.5.4 Installing Ansible
Installing Ansible is blessedly easy. We generally prefer to use CentOS so to install Ansible you run the followingcommands on the Ansible server.
# rpm -ivh http://www.mirrorservice.org/sites/dl.fedoraproject.org/pub/epel/6/i386/→˓epel-release-6-8.noarch.rpm# yum install -y ansible
And that’s it.
(There is a commercial version which has more features such as callback to request configurations and a RESTful APIand also support. The installation of this is different)
By default Ansible uses /etc/ansible to store your playbooks, I tend to move it, but there’s no real problem with usingthe default location. Create yourself a little directory structure to get started with. The documentation recommendssomething like this:
5.5.5 Playbooks
Ansible uses playbooks to specify the state in which you wish the target host to be in to be able to accomplish its role.Ansible playbooks are written in YAML format.
5.5.6 Modules
To get Ansible to do things you specify the hosts a playbook will act upon and then call modules and supply argumentswhich determine what Ansible will do to those hosts.
To keep things simple, this example is a cut-down version of a full deployment. This example creates a single manage-ment server with a local MySQL server and assumes you have your secondary storage already provisioned somewhere.For this example I’m also not going to include securing the MySQL server, configuring NTP or using Ansible to con-figure the networking on the hosts either. Although normally we’d use Ansible to do exactly that.
The pre-requisites to this CloudStack build are:
• A CentOS 6.4 host to install CloudStack on
• An IP address already assigned on the ACS management host
• The ACS management host should have a resolvable FQDN (either through DNS or the host file on the ACSmanagement host)
• Internet connectivity on the ACS management host
5.5. Deploying CloudStack with Ansible 115

CloudStack Documentation, Release 4.11.0
5.5.7 Planning
The first step I use is to list all of the tasks I think I’ll need and group them or split them into logical blocks. So forthis deployment of CloudStack I’d start with:
• Configure selinux
• (libselinux-python required for Ansible to work with selinux enabled hosts)
• Install and configure MySQL
• (Python MySQL-DB required for Ansible MySQL module)
• Install cloud-client
• Seed secondary storage
Ansible is built around the idea of hosts having roles, so generally you would group or manage your hosts by theirroles. So now to create some roles for these tasks
I’ve created:
• cloudstack-manager
• mysql
First up we need to tell Ansible where to find our CloudStack management host. In the root Ansible directory there isa file called ‘hosts’ (/etc/Ansible/hosts) add a section like this:
[acs-manager]xxx.xxx.xxx.xxx
where xxx.xxx.xxx.xxx is the ip address of your ACS management host.
5.5.8 MySQL
So let’s start with the MySQL server. We’ll need to create a task within the mysql role directory called main.yml. The‘task’ in this case to have MySQL running and configured on the target host. The contents of the file will look likethis:
-name: Ensure mysql server is installed
yum: name=mysql-server state=present
- name: Ensure mysql python is installed
yum: name=MySQL-python state=present
- name: Ensure selinux python bindings are installed
yum: name=libselinux-python state=present
- name: Ensure cloudstack specfic my.cnf lines are present
lineinfile: dest=/etc/my.cnf regexp=’$item’ insertafter=”symbolic-links=0 line=’$item’
with\_items:
- skip-name-resolve
(continues on next page)
116 Chapter 5. Developers Guide

CloudStack Documentation, Release 4.11.0
(continued from previous page)
- default-time-zone=’+00:00
- innodb\_rollback\_on\_timeout=1
- innodb\_lock\_wait\_timeout=600
- max\_connections=350
- log-bin=mysql-bin
- binlog-format = ‘ROW’
- name: Ensure MySQL service is started
service: name=mysqld state=started
- name: Ensure MySQL service is enabled at boot
service: name=mysqld enabled=yes
- name: Ensure root password is set
mysql\_user: user=root password=$mysql\_root\_password host=localhost
ignore\_errors: true
- name: Ensure root has sufficient privileges
mysql\_user: login\_user=root login\_password=$mysql\_root\_password user=root host=%→˓password=$mysql\_root\_password priv=\*.\*:GRANT,ALL state=present
This needs to be saved as /etc/ansible/roles/mysql/tasks/main.yml
As explained earlier, this playbook in fact describes the state of the host rather than setting out commands to be run.For instance, we specify certain lines which must be in the my.cnf file and allow Ansible to decide whether or not itneeds to add them.
Most of the modules are self-explanatory once you see them, but to run through them briefly;
The ‘yum’ module is used to specify which packages are required, the ‘service’ module controls the running of ser-vices, while the ‘mysql_user’ module controls mysql user configuration. The ‘lineinfile’ module controls the contentsin a file.
We have a couple of variables which need declaring. You could do that within this playbook or its ‘parent’ playbook,or as a higher level variable. I’m going to declare them in a higher level playbook. More on this later.
That’s enough to provision a MySQL server. Now for the management server.
5.5.9 CloudStack Management server service
For the management server role we create a main.yml task like this:
5.5. Deploying CloudStack with Ansible 117

CloudStack Documentation, Release 4.11.0
- name: Ensure selinux python bindings are installed
yum: name=libselinux-python state=present
- name: Ensure the Apache Cloudstack Repo file exists as per template
template: src=cloudstack.repo.j2 dest=/etc/yum.repos.d/cloudstack.repo
- name: Ensure selinux is in permissive mode
command: setenforce permissive
- name: Ensure selinux is set permanently
selinux: policy=targeted state=permissive
-name: Ensure CloudStack packages are installed
yum: name=cloud-client state=present
- name: Ensure vhdutil is in correct location
get\_url: url=https://download.cloudstack.org/tools/vhd-util dest=/usr/share/→˓cloudstack-common/scripts/vm/hypervisor/xenserver/vhd-util mode=0755
Save this as /etc/ansible/roles/cloudstack-management/tasks/main.yml
Now we have some new elements to deal with. The Ansible template module uses Jinja2 based templating. As we’redoing a simplified example here, the Jinja template for the cloudstack.repo won’t have any variables in it, so it wouldsimply look like this:
[cloudstack]name=cloudstackbaseurl=http://cloudstack.apt-get.eu/rhel/4.2/enabled=1gpgcheck=0
This is saved in /etc/ansible/roles/cloudstack-manager/templates/cloudstack.repo.j2
That gives us the packages installed, we need to set up the database. To do this I’ve created a separate task calledsetupdb.yml
- name: cloudstack-setup-databasescommand: /usr/bin/cloudstack-setup-databases cloud:{{mysql\_cloud\_password }}→˓@localhost -deploy-as=root:{{mysql\_root\_password }}
- name: Setup CloudStack managercommand: /usr/bin/cloudstack-setup-management
Save this as: /etc/ansible/roles/cloudstack-management/tasks/setupdb.yml
As there isn’t (as yet) a CloudStack module, Ansible doesn’t inherently know whether or not the databases havealready been provisioned, therefore this step is not currently idempotent and will overwrite any previously provisioneddatabases.
118 Chapter 5. Developers Guide

CloudStack Documentation, Release 4.11.0
There are some more variables here for us to declare later.
5.5.10 System VM Templates:
Finally we would want to seed the system VM templates into the secondary storage. The playbook for this wouldlook as follows:
- name: Ensure secondary storage mount existsfile: path={{ tmp\_nfs\_path }} state=directory
- name: Ensure NFS storage is mountedmount: name={{ tmp\_nfs\_path }} src={{ sec\_nfs\_ip }}:{{sec\_nfs\_path }}
→˓fstype=nfs state=mounted opts=nolock
- name: Seed secondary storagecommand:
/usr/share/cloudstack-common/scripts/storage/secondary/cloud-install-sys-tmplt -m {{→˓tmp\_nfs\_path }} -u https://download.cloudstack.org/templates/4.2/systemvmtemplate-→˓2013-06-12-master-kvm.qcow2.bz2 -h kvm -F
command:/usr/share/cloudstack-common/scripts/storage/secondary/cloud-install-sys-tmplt -m {{→˓tmp\_nfs\_path }} -u https://download.cloudstack.org/templates/4.2/systemvmtemplate-→˓2013-07-12-master-xen.vhd.bz2 -h xenserver -F
command:/usr/share/cloudstack-common/scripts/storage/secondary/cloud-install-sys-tmplt -m {{→˓tmp\_nfs\_path }} -u https://download.cloudstack.org/templates/4.2/systemvmtemplate-→˓4.2-vh7.ov -h vmware -F
Save this as /etc/ansible/roles/cloudstack-manager/tasks/seedstorage.yml
Again, there isn’t a CloudStack module so Ansible will always run this even if the secondary storage already has thetemplates in it.
5.5.11 Bringing it all together
Ansible can use playbooks which run other playbooks, this allows us to group these playbooks together and declarevariables across all of the individual playbooks. So in the Ansible playbook directory create a file called deploy-cloudstack.yml, which would look like this:
-hosts: acs-manager
vars:
mysql\_root\_password: Cl0ud5tackmysql\_cloud\_password: Cl0ud5tacktmp\_nfs\_path: /mnt/secondarysec\_nfs\_ip: IP\_OF\_YOUR\_SECONDARY\_STORAGEsec\_nfs\_path: PATH\_TO\_YOUR\_SECONDARY\_STORAGE\_MOUNT
roles:
(continues on next page)
5.5. Deploying CloudStack with Ansible 119

CloudStack Documentation, Release 4.11.0
(continued from previous page)
- mysql- cloudstack-manager
tasks:
- include: /etc/ansible/roles/cloudstack-manager/tasks/setupdb.yml- include: /etc/ansible/roles/cloudstack-manager/tasks/seedstorage.yml
Save this as /etc/ansible/deploy-cloudstack.yml inserting the IP address and path for your secondary storage andchanging the passwords if you wish to.
To run this go to the Ansible directory (cd /etc/ansible ) and run:
# ansible-playbook deploy-cloudstack.yml -k
‘-k’ tells Ansible to ask you for the root password to connect to the remote host.
Now log in to the CloudStack UI on the new management server.
5.5.12 How is this example different from a production deployment?
In a production deployment, the Ansible playbooks would configure multiple management servers connected to mas-ter/slave replicating MySQL databases along with any other infrastructure components required and deploy and con-figure the hypervisor hosts. We would also have a dedicated file describing the hosts in the environment and a dedicatedfile containing variables which describe the environment.
The advantage of using a configuration management tool such as Ansible is that we can specify components like theMySQL database VIP once and use it multiple times when configuring the MySQL server itself and other componentswhich need to use that information.
5.5.13 Acknowledgements
Thanks to Shanker Balan for introducing me to Ansible and a load of handy hints along the way.
5.6 Getting Help
Need some help getting started? Feel free to ask on the mailing list:
• users@: This list is for users of CloudStack to seek and provide support. This is a moderately high volume list.
• dev@: Where discussions about development and the project itself happen. This is a high volume list.
Or on one of the following IRC channels on irc.freenode.net:
• #cloudstack - General Apache CloudStack conversation and end user support
• #cloudstack-dev - Development discussions
• #cloudstack-meeting - Weekly and ad-hoc meeting room for the Apache CloudStack community
120 Chapter 5. Developers Guide

CloudStack Documentation, Release 4.11.0
5.6.1 Documentation Available
The following guides are available:
• CloudStack Installation Guide - Covers initial installation of CloudStack. It aims to cover in full detail all thesteps and requirements to obtain a functioning cloud deployment. At times, this guide mentions additional topicsin the context of installation tasks, but does not give full details on every topic. Additional details on many ofthese topics can be found in the Administration Guide. For example, security groups, firewall and load balancingrules, IP address allocation, and virtual routers are covered in more detail in the Administration Guide.
• CloudStack Administrator’s Guide - Discusses how to set up services for the end users of your cloud. Alsocovers ongoing runtime management and maintenance. This guide discusses topics like domains, accounts, ser-vice offerings, projects, guest networks, administrator alerts, virtual machines, storage, and measuring resourceusage.
• Developer’s Guide - How to use the API to interact with CloudStack programmatically. Includes links to thecomplete API Reference.
• CloudStack Apidocs - API documentation reference.
• Release Notes - release specific documentation, including upgrade instructions from prior releases, new featuresadded to CloudStack, API changes, and fixed issues.
5.6.2 Books
5.6. Getting Help 121

CloudStack Documentation, Release 4.11.0
5.6.3 Commercial support
Some companies offer commercial support for Apache CloudStack or their own product based on CloudStack.
122 Chapter 5. Developers Guide