cms 1.108 capacity management system booking modules · capacity management system — booking...
TRANSCRIPT
CMS 1.108
Capacity Management System
—
Booking Modules
User Guide for Customers

Contents
CMS V1.108—BOOKING MODULES 1 USER GUIDE FOR CUSTOMERS
Contents
I. Introduction ........................................................................................................... 4
Hard & Software Requirements ..................................................................................................................... 6
Documentation & Application conventions ................................................................................................ 6
Documentation conventions ............................................................................................................................. 6
Symbols and conventions ...................................................................................................................... 6
Terminology ............................................................................................................................................... 6
Application conventions ...................................................................................................................................... 7
Defaults ............................................................................................................................................................. 7
Session Time-out ...................................................................................................................................... 7
In progress indicator ............................................................................................................................... 7
Warning messages ........................................................................................................................ 7
Textboxes .......................................................................................................................................................... 8
Common Buttons & Icons ........................................................................................................................... 9
Buttons ............................................................................................................................................ 9
Icons ................................................................................................................................................ 10
Results lists....................................................................................................................................................... 11
Navigation bar ................................................................................................................................................ 12
II. Accessing CMS ..................................................................................................... 13
Accessing CMS ................................................................................................................................................... 14
Customer Login Request ............................................................................................................................ 15
How to log on to CMS ...................................................................................................................................... 16
III. CMS Menus ......................................................................................................... 18
Home Menu ........................................................................................................................................................ 19
User Management ............................................................................................................................................... 19
Logout ..................................................................................................................................................................... 19
Booking Menu ................................................................................................................................................... 20
New Booking ........................................................................................................................................................ 20
Basic Information .......................................................................................................................................... 21 DHL Routes .................................................................................................................................................... 26
HAWBs ............................................................................................................................................................ 29
Shipper & Consignee tabs ....................................................................................................... 31
Customs Info ................................................................................................................................................. 32
Customs Information ............................................................................................................... 32
Firms Code* ............................................................................................................................................. 32
Agent Code* ............................................................................................................................................ 32
Contents
CMS V1.108—BOOKING MODULES 2 USER GUIDE FOR CUSTOMERS
SLAC* ........................................................................................................................................................ 32
RUC Number ........................................................................................................................................... 32
MRN ........................................................................................................................................................... 32
Notify party EORI .................................................................................................................................. 32
MRN (Movement Reference Number) ................................................................................ 33
EORI (Economic Operator Registration and Indentification) and Notify party EORI .............................................................................................................................................. 34
BA/M-Form .................................................................................................................................. 34
PPW Notification ....................................................................................................................... 34
Special Handling Codes .............................................................................................................................. 35
Restricted Commodities ............................................................................................................................. 35
Dangerous Goods ...................................................................................................................... 36
UN Numbers ............................................................................................................................... 37
Special Loads ............................................................................................................................... 38
Booking History ............................................................................................................................................ 39
Rate/Yield ........................................................................................................................................................ 39
Booking command buttons ....................................................................................................................... 42
Saving a Booking ....................................................................................................................... 42
Cancelling a Booking ................................................................................................................ 42
Scheduled automatic cancel booking job (nonDeliveredShipmentCancellationJob)43
Returning to Search Booking results list ........................................................................... 43
Printing Booking Details ......................................................................................................... 44
Sending Booking Information ................................................................................................ 45
Copying a Booking .................................................................................................................... 45
Search Route ........................................................................................................................................................ 46
Search Booking .................................................................................................................................................... 47
How to view booking details? ............................................................................................... 48
How to edit a booking? ........................................................................................................... 49
How to cancel a booking? ....................................................................................................... 51 How to send Booking Information ....................................................................................... 52
How to print labels for this particular booking? ............................................................ 53
How can I print Booking Details? ........................................................................................ 55
How can I copy a Booking ...................................................................................................... 55
How to print a Mawb? ............................................................................................................ 56
Allocations Menu .............................................................................................................................................. 57
Search Allocations .............................................................................................................................................. 57
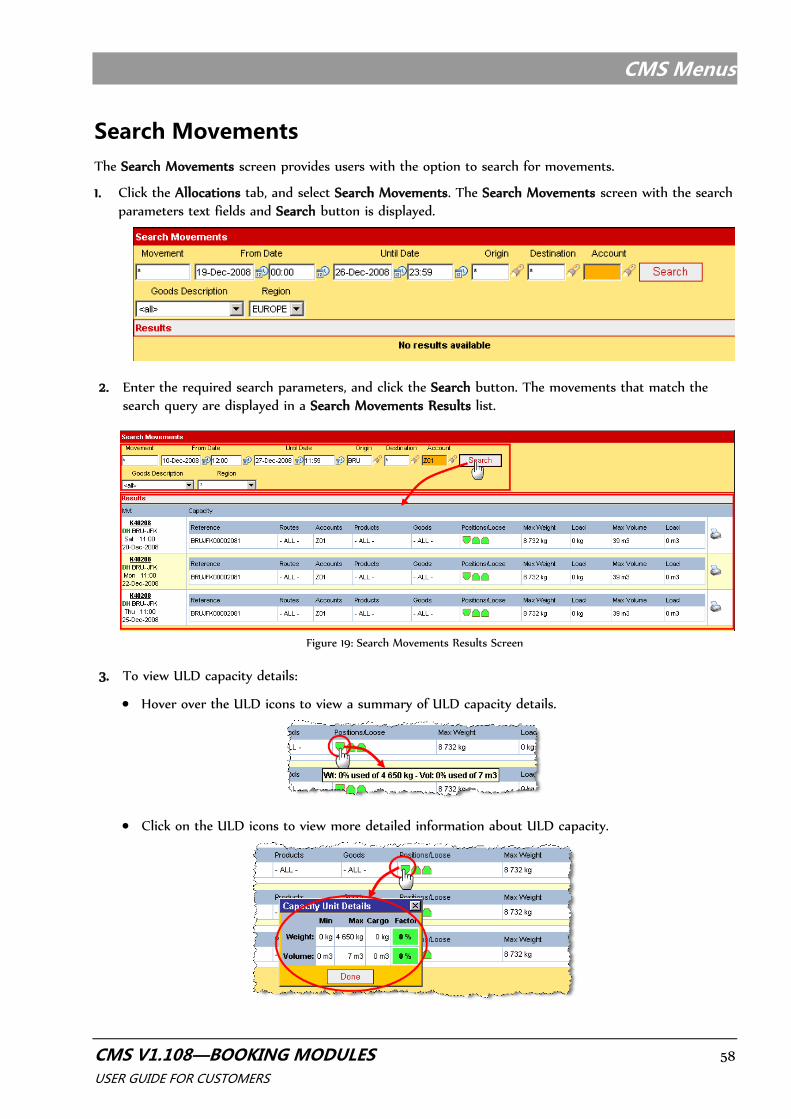
Search Movements ............................................................................................................................................. 58
List of Figures
CMS V1.108—BOOKING MODULES 3 USER GUIDE FOR CUSTOMERS
Table of Figures
Figure 1: CMS Login Page ........................................................................................................ 14
Figure 2: User Management Menu .......................................................................................... 19
Figure 3: New Booking/Basic Information Screen ..................................................................... 21
Figure 4: DHL Routes Screen .................................................................................................. 26
Figure 5: DHL Routes/Search Routings Results Screen ............................................................ 28
Figure 6: HAWBs Screen ......................................................................................................... 29
Figure 7: Customs Info Screen ................................................................................................ 32
Figure 8: Special Handling Codes Screen ................................................................................. 35
Figure 9: Restricted Commodities Screen ................................................................................ 35
Figure 10: Restricted Commodities/Special Load Screen ........................................................... 38
Figure 11: Booking Hisory Screen .............................................................................................. 39
Figure 12: Rate/Yield Screen ..................................................................................................... 39
Figure 13: Search Booking Results List with Saved New Booking .............................................. 40
Figure 14: Booking Screen Bottom Command Buttons ............................................................. 42
Figure 15: Search Route Results Screen .................................................................................... 46
Figure 16: Search Booking Results Screen ................................................................................ 47
Figure 17: Print labels .............................................................................................................. 53
Figure 18: Search Allocation Results Screen ............................................................................. 57
Figure 19: Search Movements Results Screen ........................................................................... 58
Introduction
CMS V1.108—BOOKING MODULES 4 USER GUIDE FOR CUSTOMERS
I. Introduction
This chapter describes the following:
About CMS, its Purpose & Advantages, and an Overview of CMS menus
Hard & Software Requirements
Documentation & Application conventions
Introduction
CMS V1.108—BOOKING MODULES 5 USER GUIDE FOR CUSTOMERS
About CMS
CMS (Capacity Management System) has been developed to timely and efficiently manage bookings versus capacity. The system enables ACS (Air Capacity Sales) to create ACS allocations on scheduled flights, and to collect booking information entered by DHL staff, GSAs/customers (Available on
http://aviationcargo.dhl.com), or through IATA messaging. The CMS allocation and booking process guided by ACS forecast availabilities, and the risk and opportunity reporting feature, greatly reduce the potential of under-allocation (and unexploited capacity), and the risk of over-booking.
CMS facilitates regional administrators to allocate capacity on high-profile routes for specific customers and/or commodities based on experience, recent ACS availability and forecasting information.
Booking requests that have a specific allocation and for which space exists (Auto Allocate), and bookings without a specific allocation that are below a defined weight and volume threshold (Auto Confirm), are automatically accepted. Bookings that cannot be automatically accepted are raised for manual review.
CMS includes a reply messaging facility to automatically or manually mail booking and capacity information to relevant users and customers.
Purpose & Advantages
The CMS allocation and booking processes reduce the time and administration workload, and enhance the efficiency of allocating capacity and booking of freight. CMS ensures that DHL facilities and personnel are
used to their full potential, delivering increased customer satisfaction, reduced operation cost, a lowering of
business risks, and increased sales revenue.
About this manual
This manual was specifically developed to guide GSA/customers who use the booking modules of CMS to
enter and manage bookings.
Overview of CMS menus for customers and GSA users
Customer and GSA users have access to the following menus and screens of CMS:
Home Menu (User Management & Log Out screens)
Booking Menu (New Booking, Search Routes, and Search Bookings screen)
Allocations Menu (Search Allocations, and Search Movements screens)

Introduction
CMS V1.108—BOOKING MODULES 6 USER GUIDE FOR CUSTOMERS
Hard & Software Requirements
CMS requires:
A PC running any operating system.
A DHL Intranet connection or a high bandwidth Internet connection.
Internet Explorer 6 (or higher).
A user name and password to have logon to CMS.
A PDF reader application, such as Adobe Acrobat or Adobe Reader (optional).
A printer (optional).
Documentation & Application conventions
Documentation conventions
Symbols and conventions
Symbols and conventions used in this manual include:
Elements of the GUI (Graphical User Interface) such as the names of the screens, fields, and buttons are
formatted in bold fonts and capitalized.
A reference used to direct a reader elsewhere for additional information is written in blue font. A mouse click on such a title will re-direct the user to the additional information.
Note: Text on a grey background and introduced by Note: in bold font provides the user with
important additional or summary information.
Text in a red border and proceeded by a red warning hand gives important information the user
must be aware of—e.g., warnings about commands that need to be executed, etc.
Terminology
Allocation: A virtual reservation of capacity on a flight for ACS bookings. Allocations can be made for a
particular customer, commodity, or on a free basis. Allocations are made for a particular date range with possibly different volume and weight assignments for different days of the week.
In CMS, Bookings can be made up to the allocation limit without the need for manual review.
Introduction
CMS V1.108—BOOKING MODULES 7 USER GUIDE FOR CUSTOMERS
Booking: In CMS, a booking is made with a MAWB for a particular shipment by a particular customer/commodity. The booking is automatically accepted if space exists on a dedicated
allocation with a customer or commodity code, or if there is space available on a free allocation. If no allocations can be found, the booking has to be manually reviewed before it is accepted. Many bookings can be made to fill a single allocation and visa versa up to the allocated limit.
ULD: A ULD (Unit Loading Device) is a container that can be loaded with shipment material before
being placed in a position on an aircraft. ULDs are generally aircraft, deck and position specific and their availability for loading into an aircraft when required is essential for the smooth operation of the DHL cargo network.
Application conventions
Defaults
Session Time-out
To avoid illegal access and unnecessary server connection, CMS shall automatically time-out when not used
for 30 minutes. The user shall be returned to the login page when using the application again after it has timed out.
In progress indicator
CMS shall display a clockwise turning circle of dots in the bottom right corner of the screen
while the system is executing a command, such as retrieving data, sorting information, etc.
Display of weight & volume measurement
CMS always display weight and volume in the unit (metric or imperial) set up at registration of the user.
Hover over the value to display the weight in the other measurement unit.
Warning messages
CMS generates three kinds of warning messages:
1. Confirmation message: CMS will often generate a confirmation message (on a green background) when a command was successfully performed.
2. Error message: CMS generates an error message (on a red background) when a command was not successfully performed.
Introduction
CMS V1.108—BOOKING MODULES 8 USER GUIDE FOR CUSTOMERS
3. Warning message: CMS generates a warning message (on an orange background) when CMS automatically updates data to suit new conditions (as a result of new entries.)
4. Error icon & error message: When no or wrong information is entered, CMS shall display an icon at the location of the error. Hover over the icon to get information about the error.
Textboxes
CMS screens include three types of textboxes:
Mandatory textboxes (dark yellow color) that MUST be completed for a command to be executable.
Optional textboxes (white color) that the user MAY complete to add additional information.

Introduction
CMS V1.108—BOOKING MODULES 9 USER GUIDE FOR CUSTOMERS
Common Buttons & Icons
Buttons
Click a button to execute a command—e.g., call up a popup screen, start a search, save newly entered information, etc.
Clear entries button: Click the Clear entries button to clear recent (not saved) entries and text fields
Find & Enter Data button: Click to have the system search and enter available data.
Flashlight button: Click the Flashlight button located next to a textbox, to call up a pop-up screen or dropdown
list from which to select a desired entry for a textbox.
1. Click the required entry to enter it in the text field and close the popup dialogue box.
2. Enter a required code in the search text box and click the Search button. When CMS has found (an
highlighted) the required entry, click the OK button to enter it in the text field and close the popup dialogue
box.
List button: Click the List button located next to a textbox, to call up a list from which to select a desired entry
for a textbox. Depending on the required data, the list box may also provide textboxes in which to create a new
entry for the textbox.
or
Pencil button: Click the Pencil button in a row of a results list to call up a screen with editable text fields, drop
down lists and/or buttons about the subject of the row.
Save buttons ( in screens, in result lists): Click to store new data or configurations in the
database, or update the database with the latest changes to stored data or configurations.
Trash button: Click to remove an entry from the database.
Verify button: Click to have the system verify that the entry is correct.
Web button: Click to open the Track & Trace application in a new window.
See also, Table 2: Bookings Buttons & Icons.
Introduction
CMS V1.108—BOOKING MODULES 10 USER GUIDE FOR CUSTOMERS
Icons
Icons are graphical presentations of certain information. Hover over an icon to see more details.
Deck icons ( Upper Deck icon, Lower Deck icon): Hover over a Deck icon to view capacity details.
Click on a Deck icon to call up the View Allocation Position popup screen with more details o the position. Click
the Done button to close the screen.
Filtered List icon: Indicates that the items in the corresponding list are filtered—e.g., items that are a results of a
particular search.
Not Filtered List icon: Indicates that the items in the corresponding list are not filtered—e.g., items that are a results
of a manual selection process.
Bulk/Loose Load icon: Indicates that the shipment is bulk/loose load.
ULD icon: Indicates that the shipment is a ULD.
ULD load indicators: upper deck ULD, lower deck icon. ULD is empty, ULD is partially loaded, ULD is
fully loaded.Hover over a ULD load indicator to view available capacity.
Click on a ULD load indicator to call up the Capacity Unit Details popup screen. Click the Done button to close the
screen.
How to select an option in a dropdown box?
Click the arrow in a drop-down box ( ) and select from the list ( ).
Use the scroll bar to move up/ down through a long dropdown list ( ).
How to select & enter a date or a time in a text field?
To enter a date or a time in a search field, click the Calendar button ( ) located on the right of the textbox to call up a calendar popup screen, or a time dropdown list, to select date or time.
Note: You can also type in the date or time. Date format: dd-mm-yyyy — Time format: mm:hh
Introduction
CMS V1.108—BOOKING MODULES 11 USER GUIDE FOR CUSTOMERS
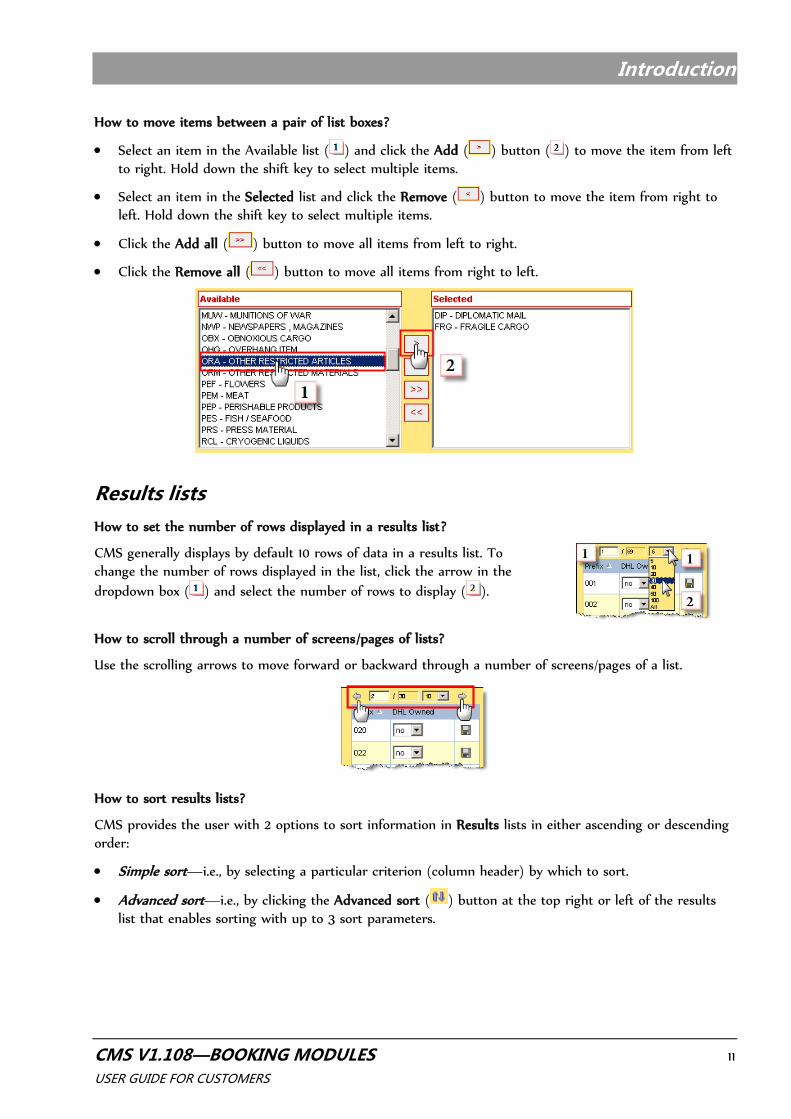
How to move items between a pair of list boxes?
Select an item in the Available list ( ) and click the Add ( ) button ( ) to move the item from left
to right. Hold down the shift key to select multiple items.
Select an item in the Selected list and click the Remove ( ) button to move the item from right to left. Hold down the shift key to select multiple items.
Click the Add all ( ) button to move all items from left to right.
Click the Remove all ( ) button to move all items from right to left.
Results lists
How to set the number of rows displayed in a results list?
CMS generally displays by default 10 rows of data in a results list. To change the number of rows displayed in the list, click the arrow in the
dropdown box ( ) and select the number of rows to display ( ).
How to scroll through a number of screens/pages of lists?
Use the scrolling arrows to move forward or backward through a number of screens/pages of a list.
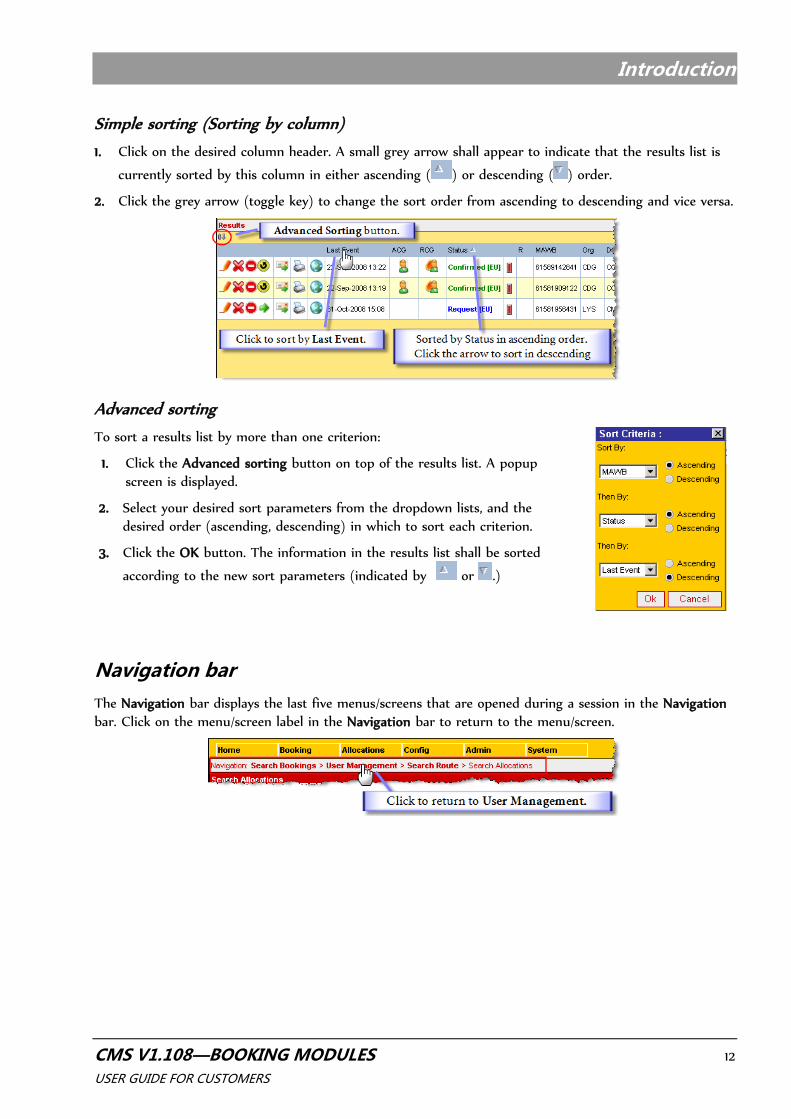
How to sort results lists?
CMS provides the user with 2 options to sort information in Results lists in either ascending or descending order:
Simple sort—i.e., by selecting a particular criterion (column header) by which to sort.
Advanced sort—i.e., by clicking the Advanced sort ( ) button at the top right or left of the results list that enables sorting with up to 3 sort parameters.
Introduction
CMS V1.108—BOOKING MODULES 12 USER GUIDE FOR CUSTOMERS
Simple sorting (Sorting by column)
1. Click on the desired column header. A small grey arrow shall appear to indicate that the results list is
currently sorted by this column in either ascending ( ) or descending ( ) order.
2. Click the grey arrow (toggle key) to change the sort order from ascending to descending and vice versa.
Advanced sorting
To sort a results list by more than one criterion:
1. Click the Advanced sorting button on top of the results list. A popup
screen is displayed.
2. Select your desired sort parameters from the dropdown lists, and the
desired order (ascending, descending) in which to sort each criterion.
3. Click the OK button. The information in the results list shall be sorted
according to the new sort parameters (indicated by or .)
Navigation bar
The Navigation bar displays the last five menus/screens that are opened during a session in the Navigation
bar. Click on the menu/screen label in the Navigation bar to return to the menu/screen.

Accessing CMS
CMS V1.108—BOOKING MODULES 13 USER GUIDE FOR CUSTOMERS
II. Accessing CMS
This chapter covers the following topics:
How to access CMS?
How to request a user name and password?
How to log on to CMS?
What to do when you have forgotten your password?
What to do when your access is disabled?
How to log off from CMS?
Accessing CMS
CMS V1.108—BOOKING MODULES 14 USER GUIDE FOR CUSTOMERS
Accessing CMS
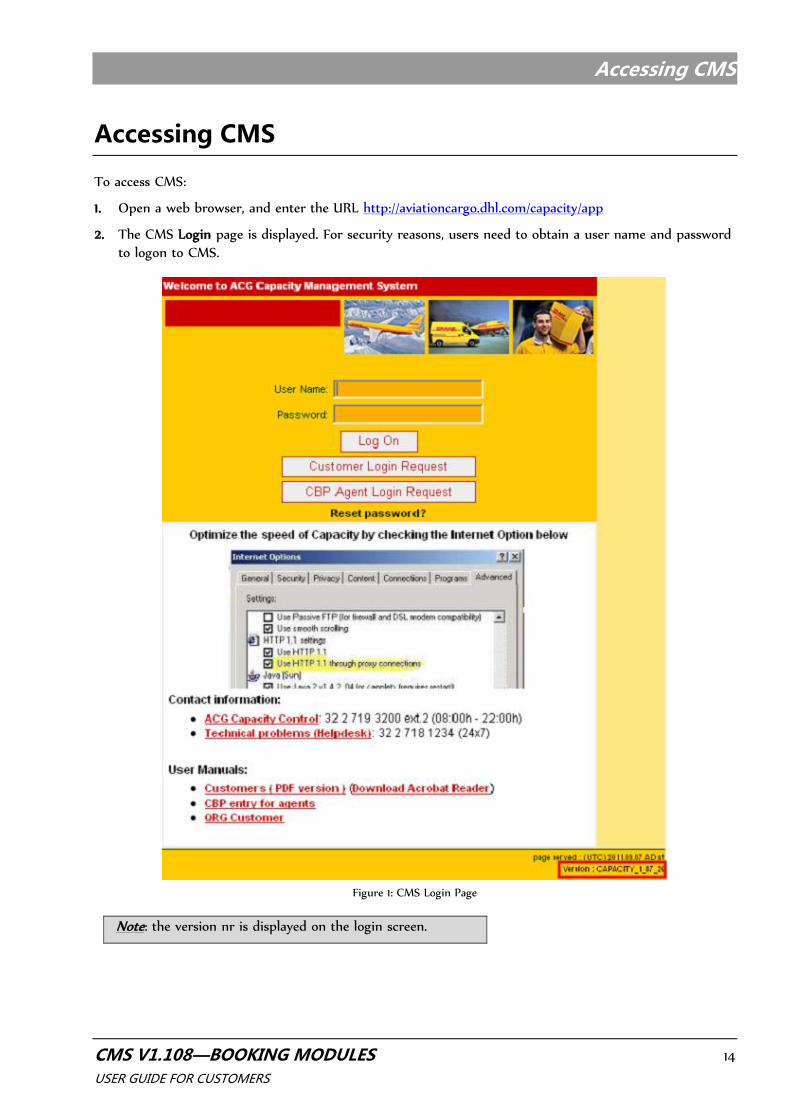
To access CMS:
1. Open a web browser, and enter the URL http://aviationcargo.dhl.com/capacity/app
2. The CMS Login page is displayed. For security reasons, users need to obtain a user name and password
to logon to CMS.
Figure 1: CMS Login Page
Note: the version nr is displayed on the login screen.
Accessing CMS
CMS V1.108—BOOKING MODULES 15 USER GUIDE FOR CUSTOMERS
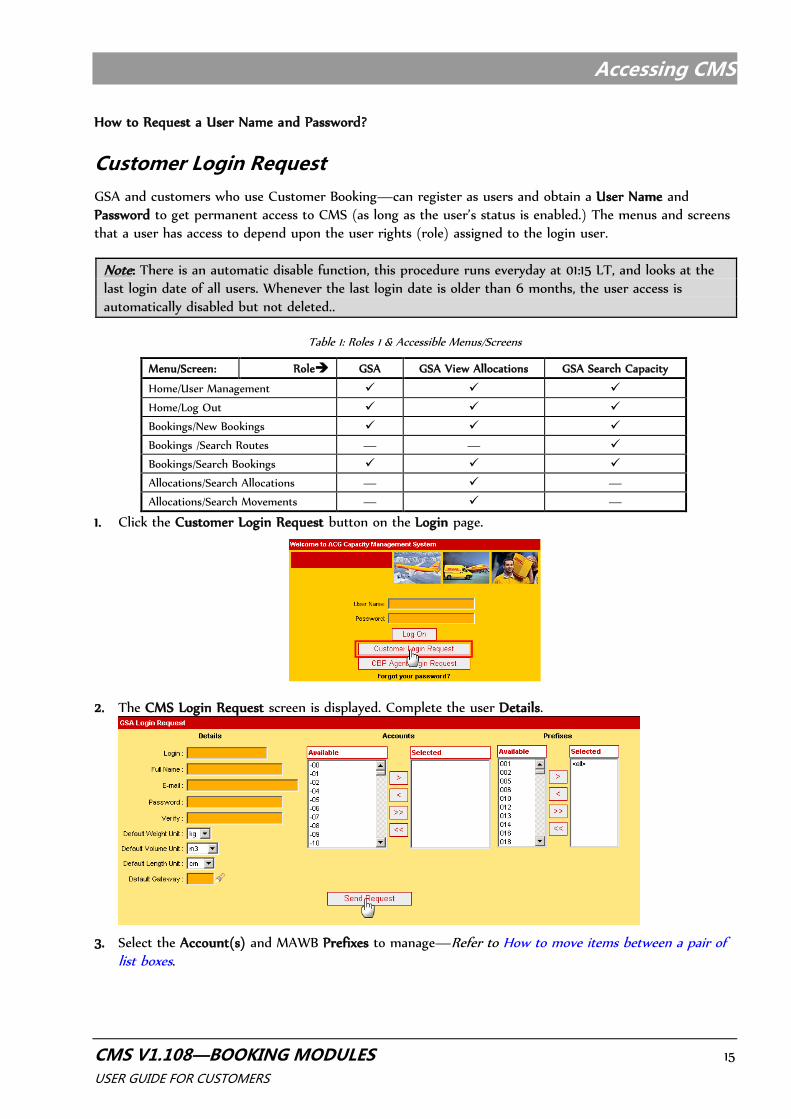
How to Request a User Name and Password?
Customer Login Request
GSA and customers who use Customer Booking—can register as users and obtain a User Name and
Password to get permanent access to CMS (as long as the user’s status is enabled.) The menus and screens that a user has access to depend upon the user rights (role) assigned to the login user.
Note: There is an automatic disable function, this procedure runs everyday at 01:15 LT, and looks at the
last login date of all users. Whenever the last login date is older than 6 months, the user access is
automatically disabled but not deleted..
Table 1: Roles 1 & Accessible Menus/Screens
Menu/Screen: Role GSA GSA View Allocations GSA Search Capacity
Home/User Management
Home/Log Out
Bookings/New Bookings
Bookings /Search Routes — —
Bookings/Search Bookings
Allocations/Search Allocations — —
Allocations/Search Movements — —
1. Click the Customer Login Request button on the Login page.
2. The CMS Login Request screen is displayed. Complete the user Details.
3. Select the Account(s) and MAWB Prefixes to manage—Refer to How to move items between a pair of list boxes.
Accessing CMS
CMS V1.108—BOOKING MODULES 16 USER GUIDE FOR CUSTOMERS
4. Click the Send Request button. An administrator shall review the login request, and when approved, send an Email with a user name and password to the requestor.
How to log on to CMS
To log on to CMS:
1. Open a web browser, and enter the URL http://aviationcargo.dhl.com/capacity/app.
2. The CMS Login page is displayed. Enter the User Name and Password, and click the Log On button.
3. The Search Bookings screen is displayed.
Note: When a wrong User Name or Password is entered, the ‘The system could not log you on!’ screen is displayed.
Click Try again to return to the Logon page.
Click the Forgot Your password link to open the screen and request your password by Email —Refer to What to do when you have forgotten your password?
What to do when you have forgotten your password?
A user who has forgotten his/her password can request the system to email the password. To have a password sent:
1. On the Login page, click the Forgot your password? link. The Forgot Your Password? screen is displayed.
2. Enter the User Name in the User Name textbox.
3. Click the Mail Password button. CMS will send the user the password to the email address entered in the system at the time of registration.

Accessing CMS
CMS V1.108—BOOKING MODULES 17 USER GUIDE FOR CUSTOMERS
What to do when your access is disabled?
When your user access is disabled, you will receive an email.
If you want to re-enable your access, you can contact capacity by sending a mail to [email protected]
How to log off from CMS?
—Refer to Logout.
CMS Menus
CMS V1.108—BOOKING MODULES 18 USER GUIDE FOR CUSTOMERS
III. CMS Menus
This chapter covers the following topics:
The Home Menu’s User Management screen to configure personal details, and the Log Out screen to log off from CMS.
The Booking Menu’s New Booking screens to enter new or edit existing bookings, the
Search Routes screen, and the Search Bookings screen.
The Allocations Menu’s Search Allocations, and Search Movements screens.
CMS Menus
CMS V1.108—BOOKING MODULES 19 USER GUIDE FOR CUSTOMERS
Home Menu
User Management
The User Management menu provides users with the option to edit certain properties of their personal user details.
To edit the personal user properties:
1. Click the Home tab, and select User Management.
2. The User Management/Edit User(s) screen with the current properties of the logged in user are
displayed.
Figure 2: User Management Menu
3. Edit current/add or correct your user details, and click the Save button.
Logout
To logout from CMS:
1. Click the Home tab, and select Logout. The Close the Application screen is displayed.
2. Click the Close the Application button to logout.
CMS Menus
CMS V1.108—BOOKING MODULES 20 USER GUIDE FOR CUSTOMERS
Booking Menu
New Booking
The New Booking menu provides users with the option to enter and manage a new booking in CMS. The menu includes various screens to:
Enter Basic Booking Information, define booking items, and manage booking pieces and positions.
Enter and edit preferred routings (DHL Routes).
Enter and edit HAWBs.
Enter and edit Customs Info.
Assign Special Handling Codes.
Define Restricted Commodities.
View Booking History.
Assign rate/yield.
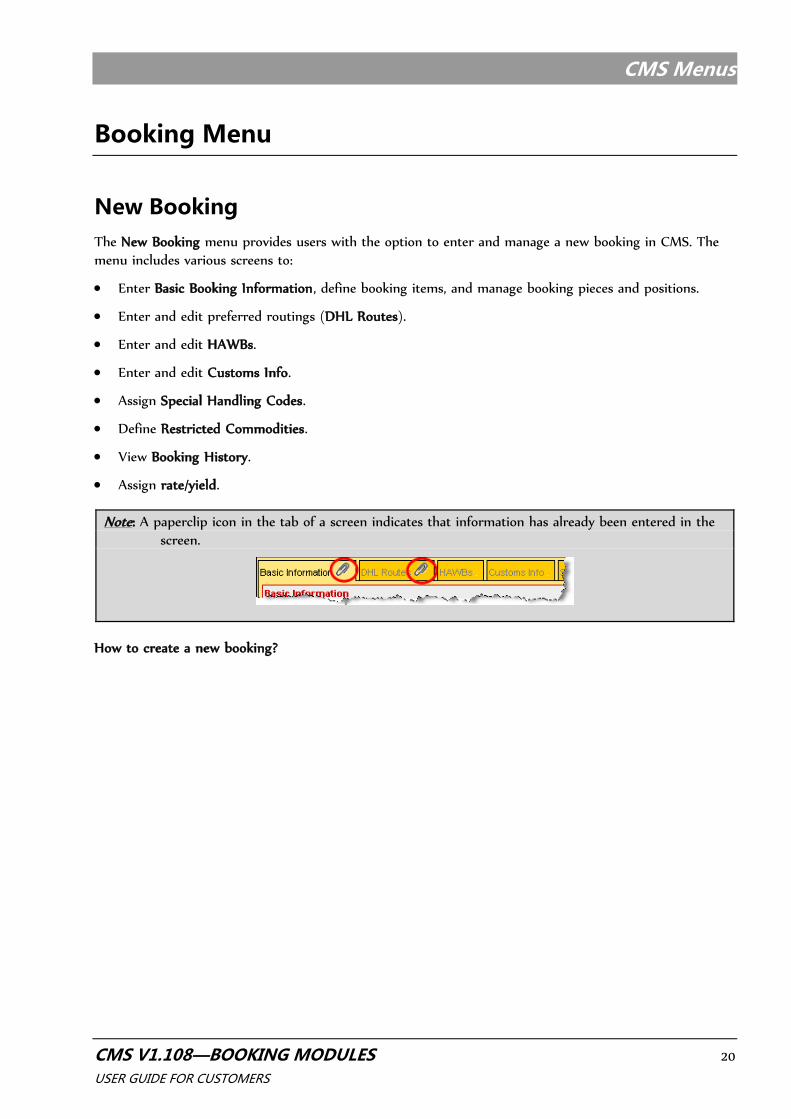
Note: A paperclip icon in the tab of a screen indicates that information has already been entered in the
screen.
How to create a new booking?
CMS Menus
CMS V1.108—BOOKING MODULES 21 USER GUIDE FOR CUSTOMERS
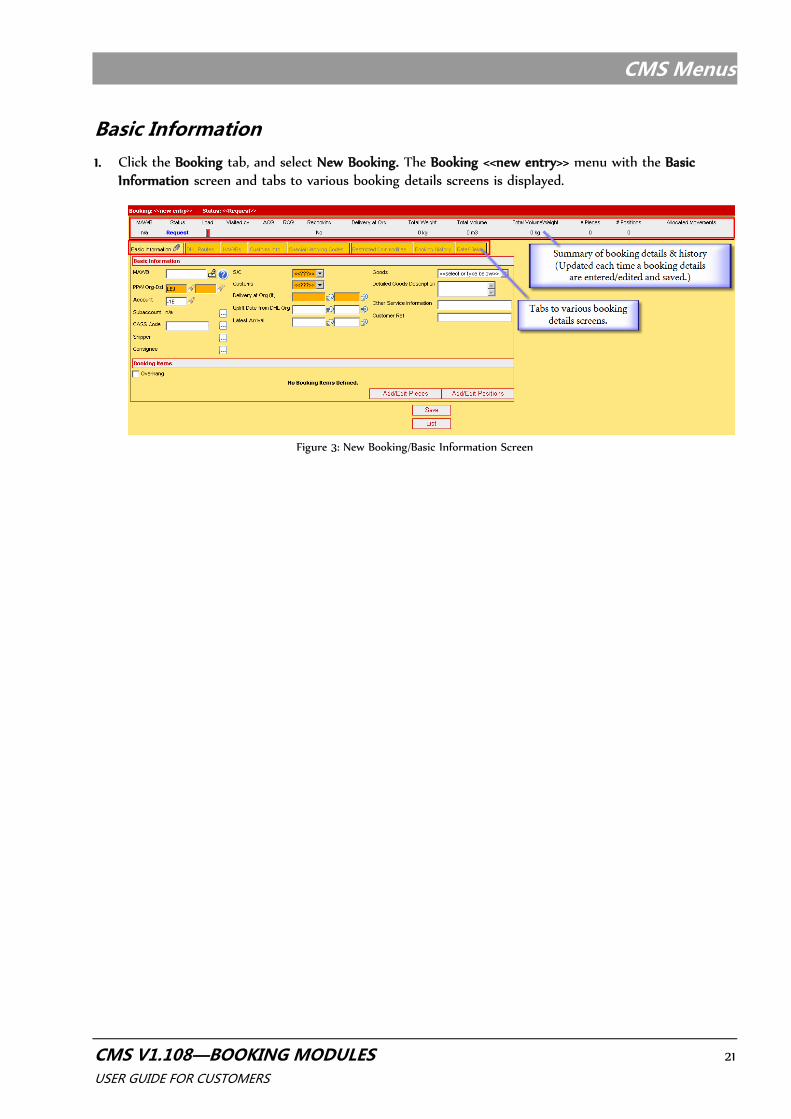
Basic Information
1. Click the Booking tab, and select New Booking. The Booking <<new entry>> menu with the Basic Information screen and tabs to various booking details screens is displayed.
Figure 3: New Booking/Basic Information Screen
CMS Menus
CMS V1.108—BOOKING MODULES 22 USER GUIDE FOR CUSTOMERS
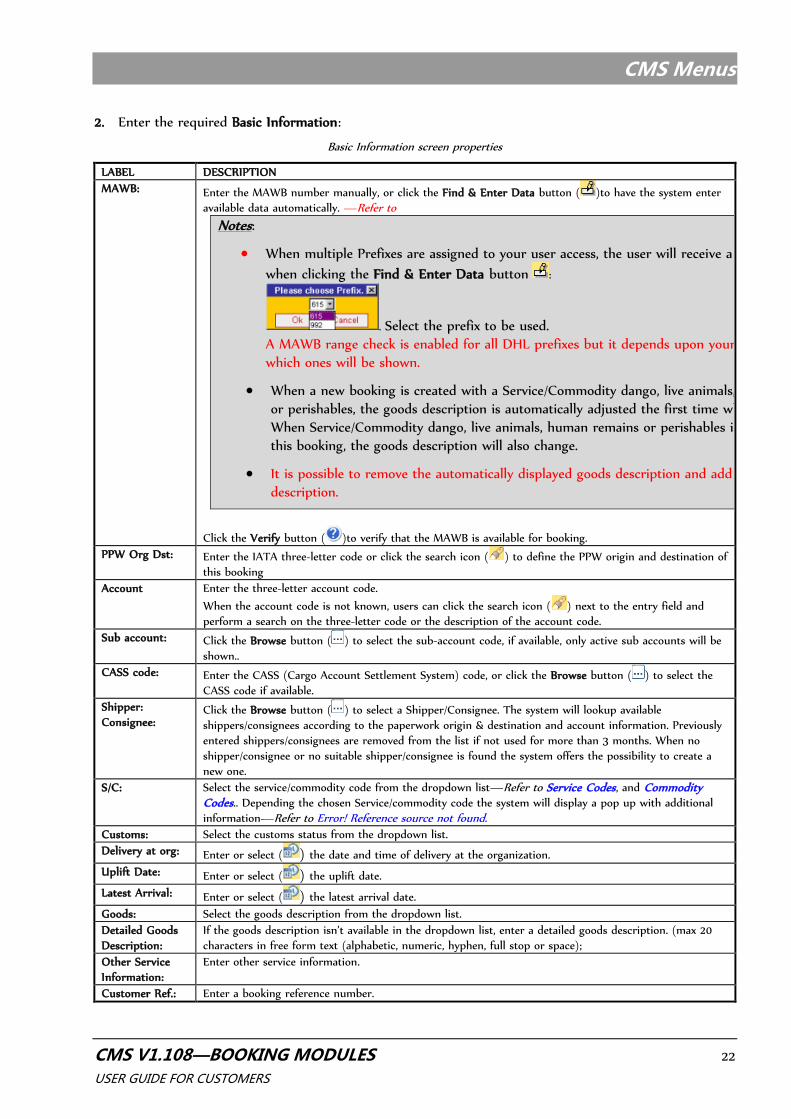
2. Enter the required Basic Information:
Basic Information screen properties
LABEL DESCRIPTION
MAWB: Enter the MAWB number manually, or click the Find & Enter Data button ( )to have the system enter
available data automatically. —Refer to Notes:
When multiple Prefixes are assigned to your user access, the user will receive a popup window
when clicking the Find & Enter Data button :
. Select the prefix to be used. A MAWB range check is enabled for all DHL prefixes but it depends upon your assigned prefixes which ones will be shown.
When a new booking is created with a Service/Commodity dango, live animals, human remains or perishables, the goods description is automatically adjusted the first time when selected.
When Service/Commodity dango, live animals, human remains or perishables is changed within this booking, the goods description will also change.
It is possible to remove the automatically displayed goods description and add a detailed goods description.
Click the Verify button ( )to verify that the MAWB is available for booking.
PPW Org Dst: Enter the IATA three-letter code or click the search icon ( ) to define the PPW origin and destination of
this booking
Account Enter the three-letter account code.
When the account code is not known, users can click the search icon ( ) next to the entry field and
perform a search on the three-letter code or the description of the account code.
Sub account: Click the Browse button ( ) to select the sub-account code, if available, only active sub accounts will be
shown..
CASS code: Enter the CASS (Cargo Account Settlement System) code, or click the Browse button ( ) to select the
CASS code if available.
Shipper:
Consignee: Click the Browse button ( ) to select a Shipper/Consignee. The system will lookup available
shippers/consignees according to the paperwork origin & destination and account information. Previously
entered shippers/consignees are removed from the list if not used for more than 3 months. When no
shipper/consignee or no suitable shipper/consignee is found the system offers the possibility to create a
new one.
S/C: Select the service/commodity code from the dropdown list—Refer to Service Codes, and Commodity Codes.. Depending the chosen Service/commodity code the system will display a pop up with additional
information—Refer to Error! Reference source not found.
Customs: Select the customs status from the dropdown list.
Delivery at org: Enter or select ( ) the date and time of delivery at the organization.
Uplift Date: Enter or select ( ) the uplift date.
Latest Arrival: Enter or select ( ) the latest arrival date.
Goods: Select the goods description from the dropdown list.
Detailed Goods
Description:
If the goods description isn’t available in the dropdown list, enter a detailed goods description. (max 20
characters in free form text (alphabetic, numeric, hyphen, full stop or space);
Other Service
Information:
Enter other service information.
Customer Ref.: Enter a booking reference number.
CMS Menus
CMS V1.108—BOOKING MODULES 23 USER GUIDE FOR CUSTOMERS
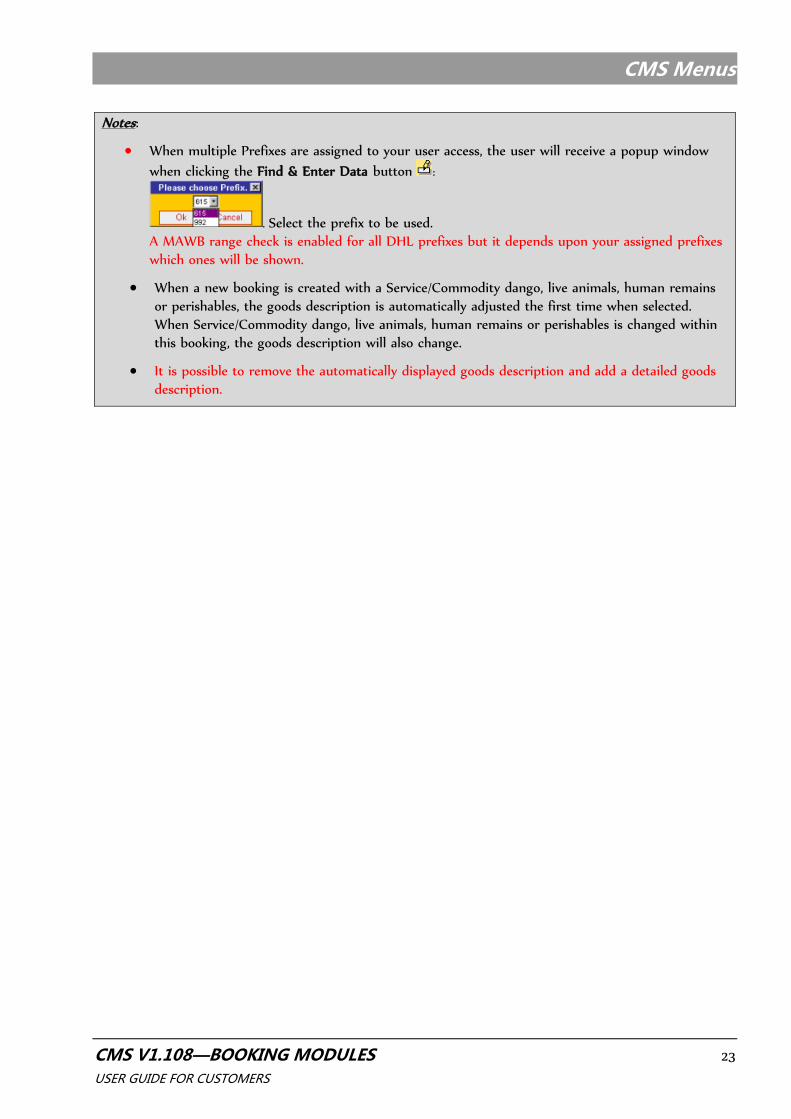
Notes:
When multiple Prefixes are assigned to your user access, the user will receive a popup window
when clicking the Find & Enter Data button :
. Select the prefix to be used. A MAWB range check is enabled for all DHL prefixes but it depends upon your assigned prefixes which ones will be shown.
When a new booking is created with a Service/Commodity dango, live animals, human remains
or perishables, the goods description is automatically adjusted the first time when selected. When Service/Commodity dango, live animals, human remains or perishables is changed within this booking, the goods description will also change.
It is possible to remove the automatically displayed goods description and add a detailed goods
description.
CMS Menus
CMS V1.108—BOOKING MODULES 24 USER GUIDE FOR CUSTOMERS
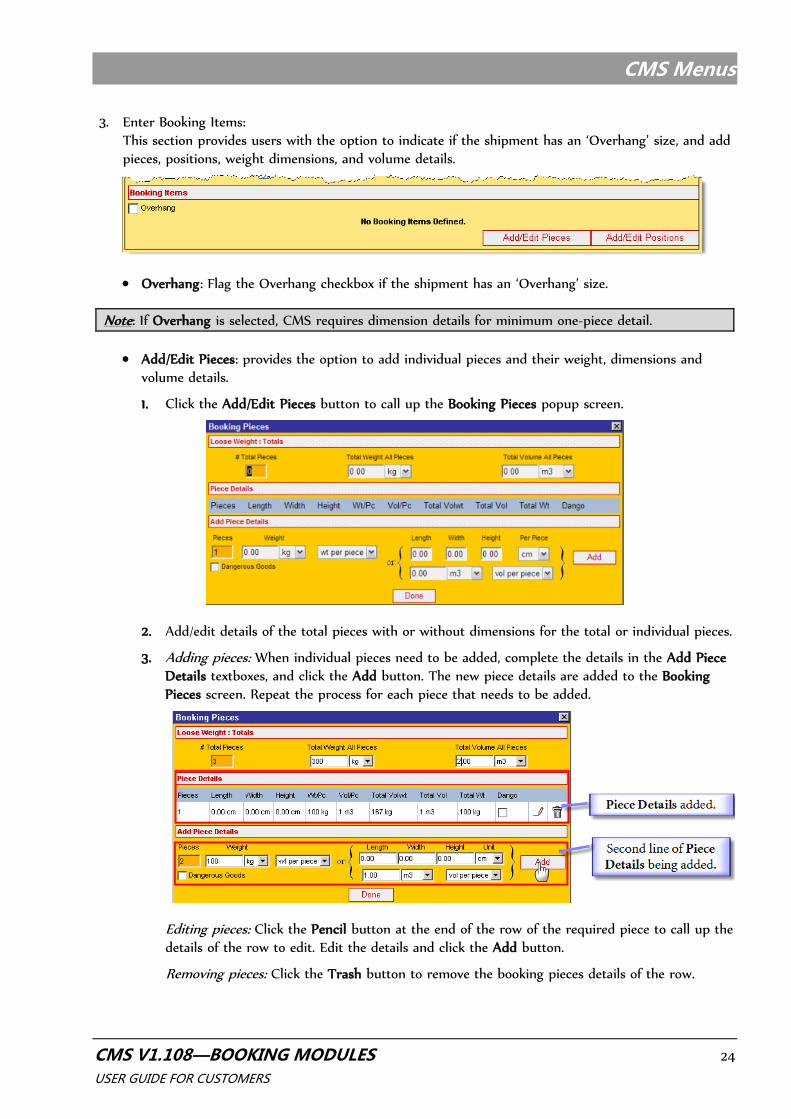
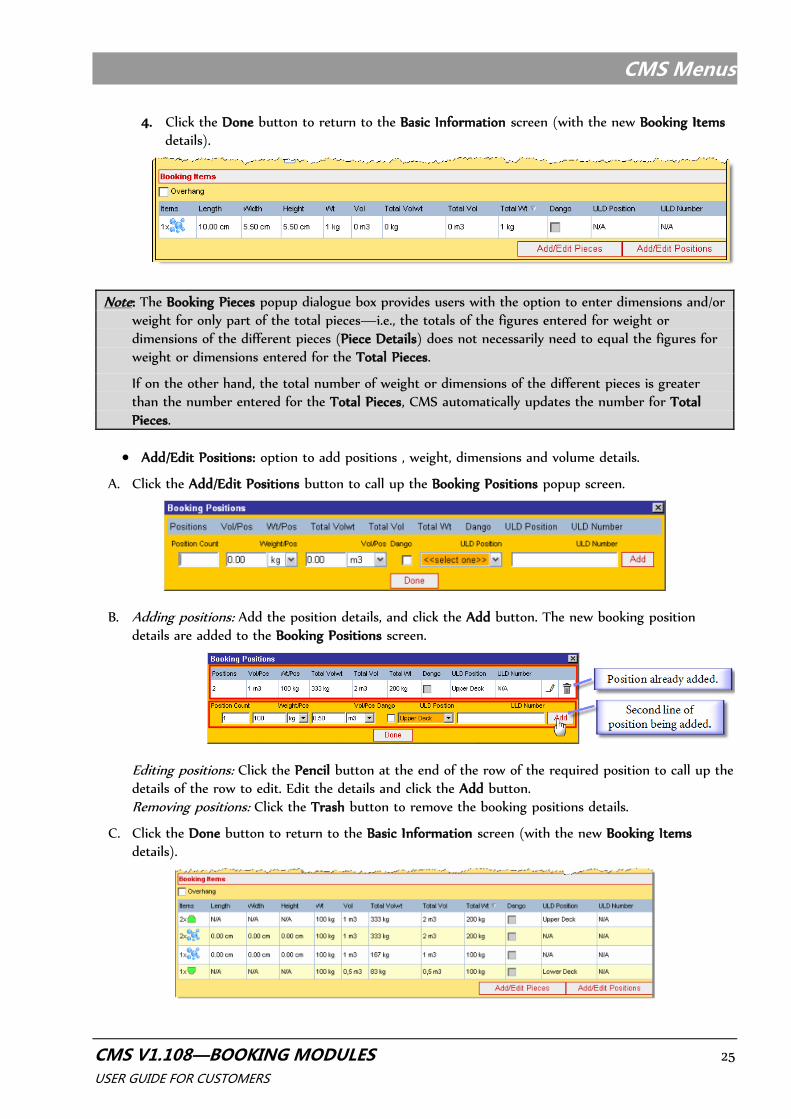
3. Enter Booking Items: This section provides users with the option to indicate if the shipment has an ‘Overhang’ size, and add
pieces, positions, weight dimensions, and volume details.
Overhang: Flag the Overhang checkbox if the shipment has an ‘Overhang’ size.
Note: If Overhang is selected, CMS requires dimension details for minimum one-piece detail.
Add/Edit Pieces: provides the option to add individual pieces and their weight, dimensions and
volume details.
1. Click the Add/Edit Pieces button to call up the Booking Pieces popup screen.
2. Add/edit details of the total pieces with or without dimensions for the total or individual pieces.
3. Adding pieces: When individual pieces need to be added, complete the details in the Add Piece Details textboxes, and click the Add button. The new piece details are added to the Booking Pieces screen. Repeat the process for each piece that needs to be added.
Editing pieces: Click the Pencil button at the end of the row of the required piece to call up the details of the row to edit. Edit the details and click the Add button.
Removing pieces: Click the Trash button to remove the booking pieces details of the row.
CMS Menus
CMS V1.108—BOOKING MODULES 25 USER GUIDE FOR CUSTOMERS
4. Click the Done button to return to the Basic Information screen (with the new Booking Items details).
Note: The Booking Pieces popup dialogue box provides users with the option to enter dimensions and/or
weight for only part of the total pieces—i.e., the totals of the figures entered for weight or dimensions of the different pieces (Piece Details) does not necessarily need to equal the figures for weight or dimensions entered for the Total Pieces.
If on the other hand, the total number of weight or dimensions of the different pieces is greater than the number entered for the Total Pieces, CMS automatically updates the number for Total Pieces.
Add/Edit Positions: option to add positions , weight, dimensions and volume details.
A. Click the Add/Edit Positions button to call up the Booking Positions popup screen.
B. Adding positions: Add the position details, and click the Add button. The new booking position details are added to the Booking Positions screen.
Editing positions: Click the Pencil button at the end of the row of the required position to call up the
details of the row to edit. Edit the details and click the Add button. Removing positions: Click the Trash button to remove the booking positions details.
C. Click the Done button to return to the Basic Information screen (with the new Booking Items
details).
CMS Menus
CMS V1.108—BOOKING MODULES 26 USER GUIDE FOR CUSTOMERS
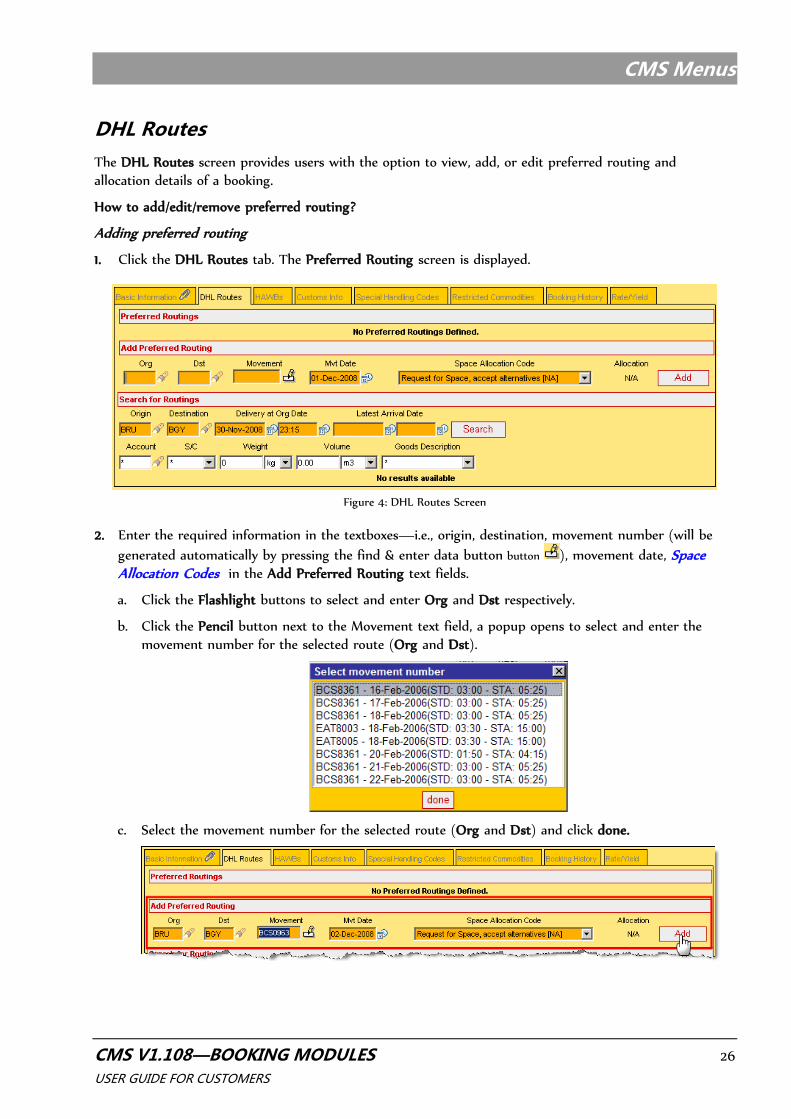
DHL Routes
The DHL Routes screen provides users with the option to view, add, or edit preferred routing and allocation details of a booking.
How to add/edit/remove preferred routing?
Adding preferred routing
1. Click the DHL Routes tab. The Preferred Routing screen is displayed.
Figure 4: DHL Routes Screen
2. Enter the required information in the textboxes—i.e., origin, destination, movement number (will be
generated automatically by pressing the find & enter data button button ), movement date, Space Allocation Codes in the Add Preferred Routing text fields.
a. Click the Flashlight buttons to select and enter Org and Dst respectively.
b. Click the Pencil button next to the Movement text field, a popup opens to select and enter the movement number for the selected route (Org and Dst).
c. Select the movement number for the selected route (Org and Dst) and click done.
CMS Menus
CMS V1.108—BOOKING MODULES 27 USER GUIDE FOR CUSTOMERS
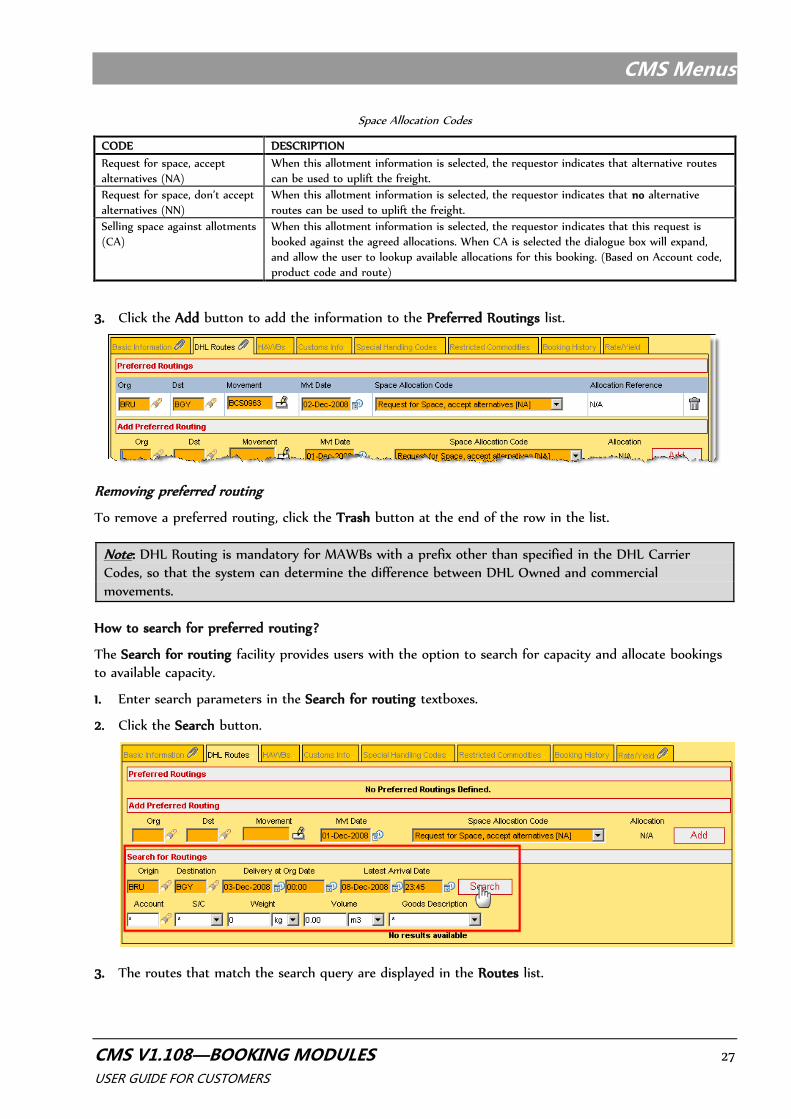
Space Allocation Codes
CODE DESCRIPTION
Request for space, accept
alternatives (NA)
When this allotment information is selected, the requestor indicates that alternative routes
can be used to uplift the freight.
Request for space, don’t accept
alternatives (NN)
When this allotment information is selected, the requestor indicates that no alternative
routes can be used to uplift the freight.
Selling space against allotments
(CA)
When this allotment information is selected, the requestor indicates that this request is
booked against the agreed allocations. When CA is selected the dialogue box will expand,
and allow the user to lookup available allocations for this booking. (Based on Account code,
product code and route)
3. Click the Add button to add the information to the Preferred Routings list.
Removing preferred routing
To remove a preferred routing, click the Trash button at the end of the row in the list.
Note: DHL Routing is mandatory for MAWBs with a prefix other than specified in the DHL Carrier Codes, so that the system can determine the difference between DHL Owned and commercial
movements.
How to search for preferred routing?
The Search for routing facility provides users with the option to search for capacity and allocate bookings
to available capacity.
1. Enter search parameters in the Search for routing textboxes.
2. Click the Search button.
3. The routes that match the search query are displayed in the Routes list.
CMS Menus
CMS V1.108—BOOKING MODULES 28 USER GUIDE FOR CUSTOMERS
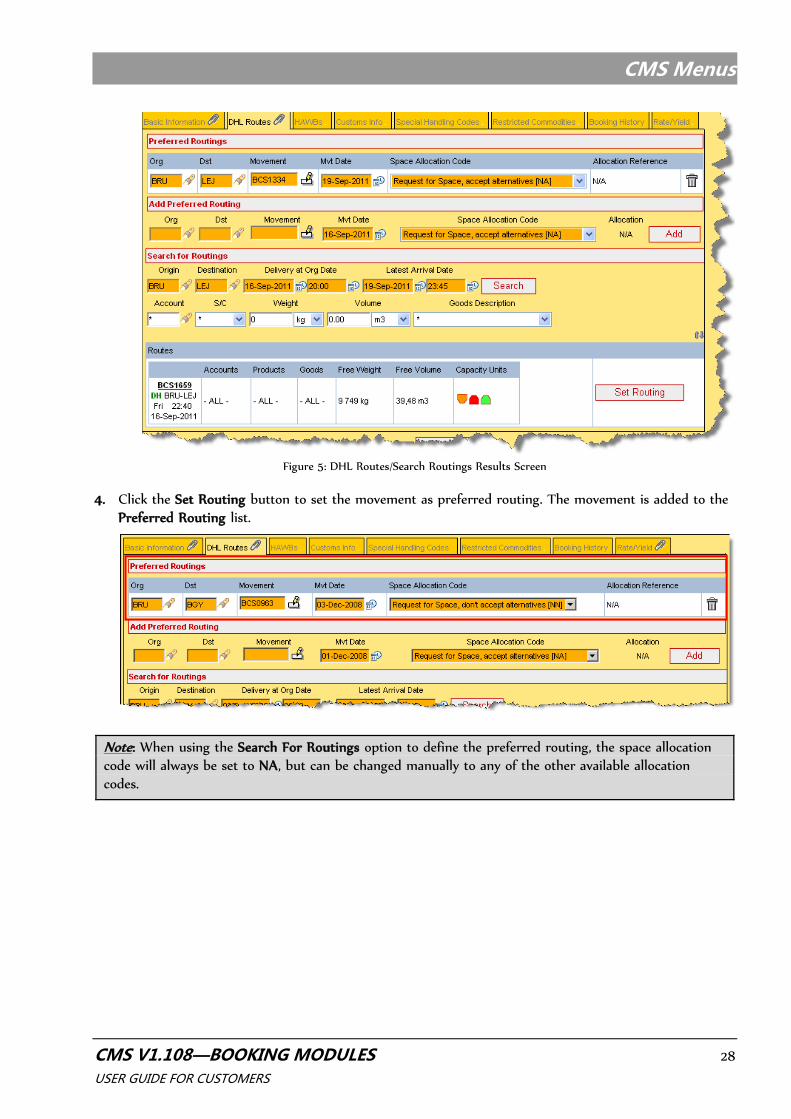
Figure 5: DHL Routes/Search Routings Results Screen
4. Click the Set Routing button to set the movement as preferred routing. The movement is added to the
Preferred Routing list.
Note: When using the Search For Routings option to define the preferred routing, the space allocation code will always be set to NA, but can be changed manually to any of the other available allocation
codes.

CMS Menus
CMS V1.108—BOOKING MODULES 29 USER GUIDE FOR CUSTOMERS
HAWBs
The HAWBs screen provides users with the option to add or edit HAWB details of a booking, or indicate that the booking has no HAWB details (US Import).
Figure 6: HAWBs Screen
How to indicate a booking has no HAWB details (US Import)?
Flag the Import Into US Without HAWB Information checkbox to identify that the booking can be
imported into the US without HAWBs.
Once the flag is set, you will not be able to add hawbs anymore, unless you remove the flag.
How to add HAWB details?
1. Enter the HAWB details in the textboxes.

CMS Menus
CMS V1.108—BOOKING MODULES 30 USER GUIDE FOR CUSTOMERS
HAWBs Screen Properties
LABEL DESCRIPTION
HAWB nr: Enter the HAWB number (max 12 digits).
Pieces: Enter the number of pieces.
SLAC: Enter the Shippers Load And Count —i.e., the actual number of pieces in the ULD, box or wooden
pallet.
Origin: Enter the HAWB 3 letter code of origin.
Destination: Enter the HAWB 3 letter code of destination.
Weight: Enter the weight of the HAWB shipment.
Weight unit: Enter the weight unit for the HAWB.
Volume: Enter the volume for the HAWB.
Volume unit: Enter the volume unit for the HAWB.
Goods Description: Enter the nature of the goods for the HAWB.
Notify party EORI Enter the EORI Notify party (17 alphanumeric characters, not mandatory)
Shipper/Consignee: Click the buttons to add a shipper and consignee —See also Shipper & Consignee,..
MRN Enter the Movement Reference Number regarding the export validation (not mandatory).
IMPORTANT Note MRN (Movement Reference Number).
2. Click the Add button. The new HAWB details shall be added to the House Airway Bills list.
Note: HAWB details can be added to any booking unless the booking status is rejected, cancelled, or operational. When the first HAWB is added the checkbox ‘Import MAWB without HAWB information’ is hidden to avoid contradictions.
How to edit HAWB details?
To edit a HAWB information, click the Pencil button at the end of the row of the HAWB to call up the details of the row to edit. Edit the details and click the Add button.
Note: Only the HAWB number is not editable! When an incorrect HAWB number is added the only solution to solve this is to delete the incorrect one prior to add the correct.
How to remove HAWB details?
To remove HAWB information, click the Trash button at the end of the row in the House Airway Bills list.
Note: The HAWB information in TGV is updated with the edited or removed HAWB information when
the changes is saved (Save button) in CMS.
CMS Menus
CMS V1.108—BOOKING MODULES 31 USER GUIDE FOR CUSTOMERS
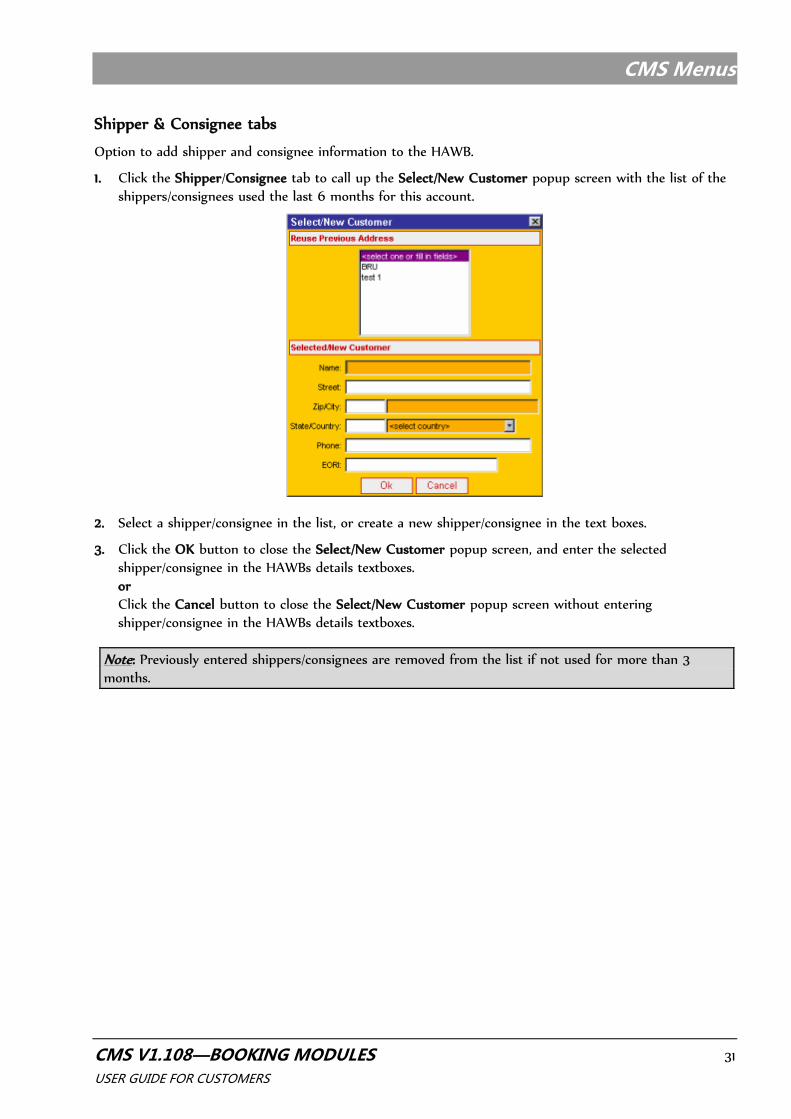
Shipper & Consignee tabs
Option to add shipper and consignee information to the HAWB.
1. Click the Shipper/Consignee tab to call up the Select/New Customer popup screen with the list of the shippers/consignees used the last 6 months for this account.
2. Select a shipper/consignee in the list, or create a new shipper/consignee in the text boxes.
3. Click the OK button to close the Select/New Customer popup screen, and enter the selected shipper/consignee in the HAWBs details textboxes.
or Click the Cancel button to close the Select/New Customer popup screen without entering shipper/consignee in the HAWBs details textboxes.
Note: Previously entered shippers/consignees are removed from the list if not used for more than 3
months.
CMS Menus
CMS V1.108—BOOKING MODULES 32 USER GUIDE FOR CUSTOMERS
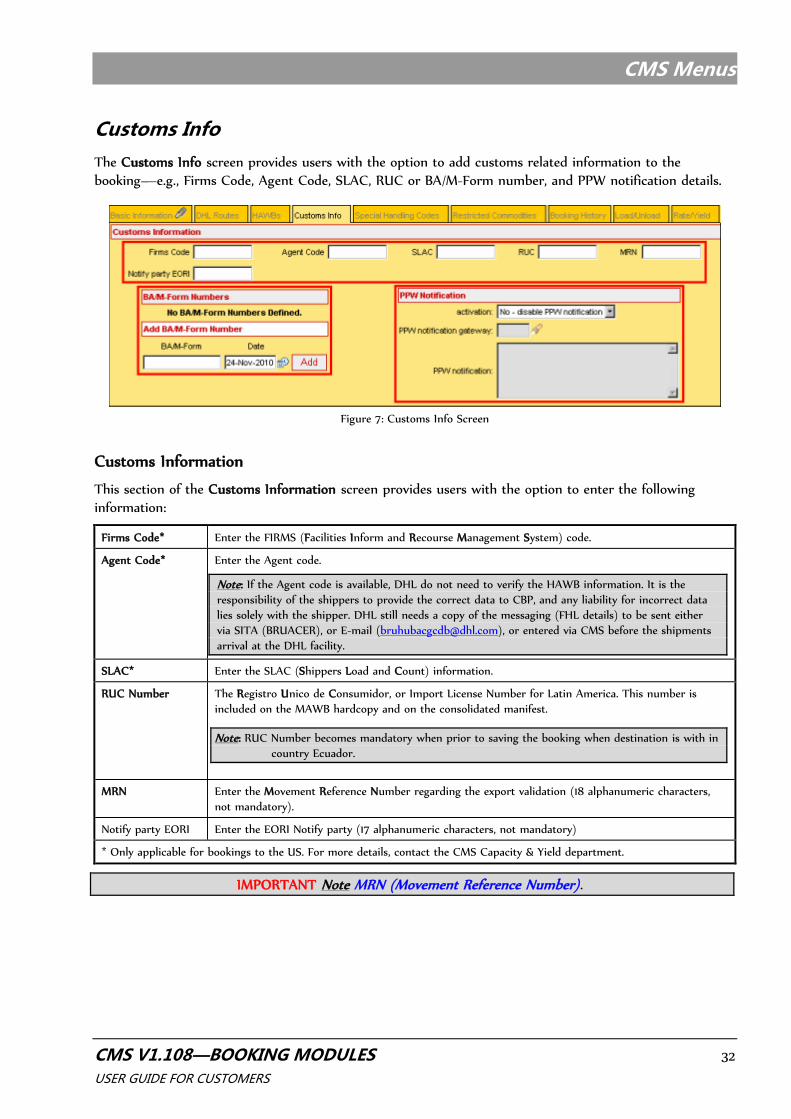
Customs Info
The Customs Info screen provides users with the option to add customs related information to the booking—e.g., Firms Code, Agent Code, SLAC, RUC or BA/M-Form number, and PPW notification details.
Figure 7: Customs Info Screen
Customs Information
This section of the Customs Information screen provides users with the option to enter the following
information:
Firms Code* Enter the FIRMS (Facilities Inform and Recourse Management System) code.
Agent Code* Enter the Agent code.
Note: If the Agent code is available, DHL do not need to verify the HAWB information. It is the
responsibility of the shippers to provide the correct data to CBP, and any liability for incorrect data
lies solely with the shipper. DHL still needs a copy of the messaging (FHL details) to be sent either
via SITA (BRUACER), or E-mail ([email protected]), or entered via CMS before the shipments
arrival at the DHL facility.
SLAC* Enter the SLAC (Shippers Load and Count) information.
RUC Number The Registro Unico de Consumidor, or Import License Number for Latin America. This number is
included on the MAWB hardcopy and on the consolidated manifest.
Note: RUC Number becomes mandatory when prior to saving the booking when destination is with in
country Ecuador.
MRN Enter the Movement Reference Number regarding the export validation (18 alphanumeric characters,
not mandatory).
Notify party EORI Enter the EORI Notify party (17 alphanumeric characters, not mandatory)
* Only applicable for bookings to the US. For more details, contact the CMS Capacity & Yield department.
IMPORTANT Note MRN (Movement Reference Number).

CMS Menus
CMS V1.108—BOOKING MODULES 33 USER GUIDE FOR CUSTOMERS
MRN (Movement Reference Number)
The objective is to meet the ECS (Export Control System) legislative requirements for all declarable shipments prior to the departure of consignments from the EU within the required timeframes.
The required MRN data/reference should be available to the declaring gateway within the required timeframes, in the event that they need the MRN(s) to make arrival notification.
Ensure that declarable shipments leaving the EU are compliant to the Safety and Security validation.
The MRN field allows an entry of 18 alphanumeric characters, and input is not mandatory.
Adding or updating an MRN is possible on MAWB or HAWB level when inserting a new booking or when
editing an existing booking.
How to add or update MRN on HAWB level?
In the HAWBs tab the MRN can be added, when available.
When the MRN is already added on MAWB level, the HAWBs tab displays following message:
How to add or update MRN on MAWB level?
In the Customs Info tab the MRN can be added, when available.
When the MRN is already added on HAWB level, the Customs Info tab displays following message:
It is not possible to insert or add an MRN on both levels (a MAWB and its containing HAWBs).
To avoid this, following restriction is built in:
Adding a MRN on MAWB level (Customs Info) when one or more containing HAWBs already have a MRN, or vice versa, and the user presses Save or Confirm, CMS will display a warning message :
CMS Menus
CMS V1.108—BOOKING MODULES 34 USER GUIDE FOR CUSTOMERS
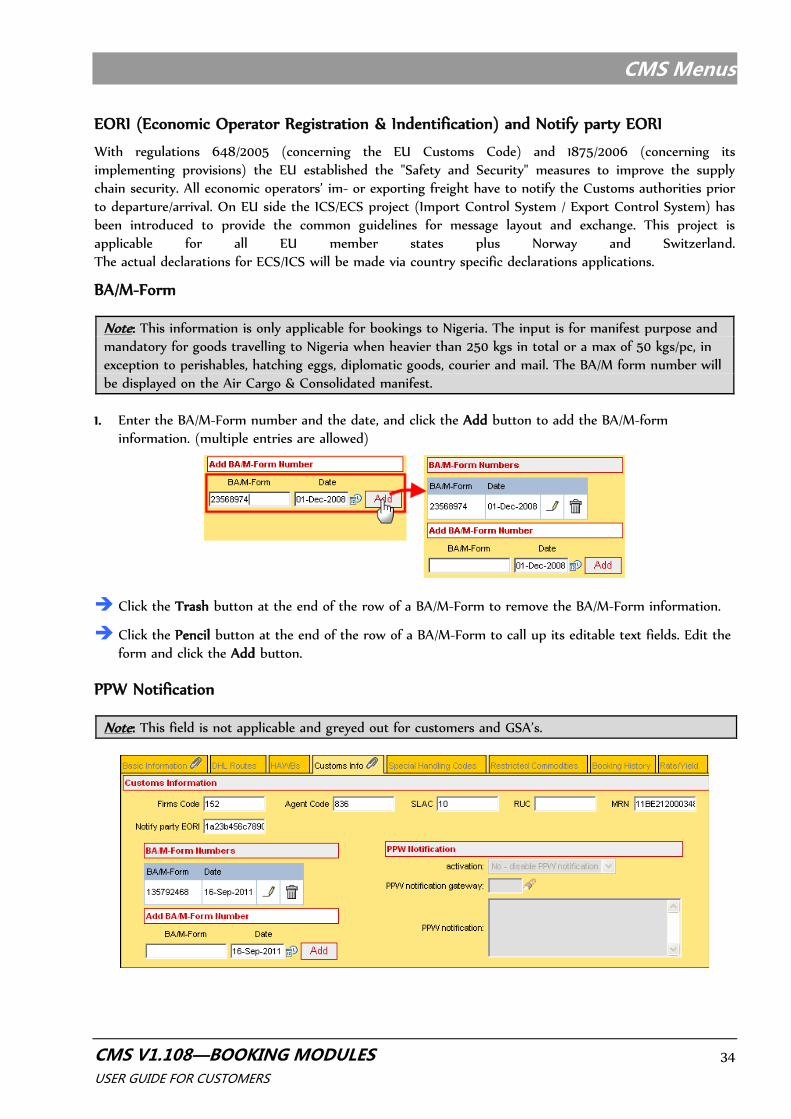
EORI (Economic Operator Registration & Indentification) and Notify party EORI
With regulations 648/2005 (concerning the EU Customs Code) and 1875/2006 (concerning its implementing provisions) the EU established the "Safety and Security" measures to improve the supply chain security. All economic operators’ im- or exporting freight have to notify the Customs authorities prior
to departure/arrival. On EU side the ICS/ECS project (Import Control System / Export Control System) has been introduced to provide the common guidelines for message layout and exchange. This project is applicable for all EU member states plus Norway and Switzerland. The actual declarations for ECS/ICS will be made via country specific declarations applications.
BA/M-Form
Note: This information is only applicable for bookings to Nigeria. The input is for manifest purpose and mandatory for goods travelling to Nigeria when heavier than 250 kgs in total or a max of 50 kgs/pc, in exception to perishables, hatching eggs, diplomatic goods, courier and mail. The BA/M form number will
be displayed on the Air Cargo & Consolidated manifest.
1. Enter the BA/M-Form number and the date, and click the Add button to add the BA/M-form information. (multiple entries are allowed)
Click the Trash button at the end of the row of a BA/M-Form to remove the BA/M-Form information.
Click the Pencil button at the end of the row of a BA/M-Form to call up its editable text fields. Edit the form and click the Add button.
PPW Notification
Note: This field is not applicable and greyed out for customers and GSA’s.

CMS Menus
CMS V1.108—BOOKING MODULES 35 USER GUIDE FOR CUSTOMERS
Special Handling Codes
1. To add Special Handling Codes, move codes from the Available to the Selected list box. The selected codes are added to the Special Handling Codes list.
2. To remove Special Handling Codes, move codes from the Selected to the Available list box. The removed codes are deleted to the Special Handling Codes list.
—Refer to How to move items between a pair of list boxes.
Figure 8: Special Handling Codes Screen
Restricted Commodities
The Restricted Commodities screen provides users with the option to add Dangerous Goods related information to the booking.
Figure 9: Restricted Commodities Screen
CMS Menus
CMS V1.108—BOOKING MODULES 36 USER GUIDE FOR CUSTOMERS
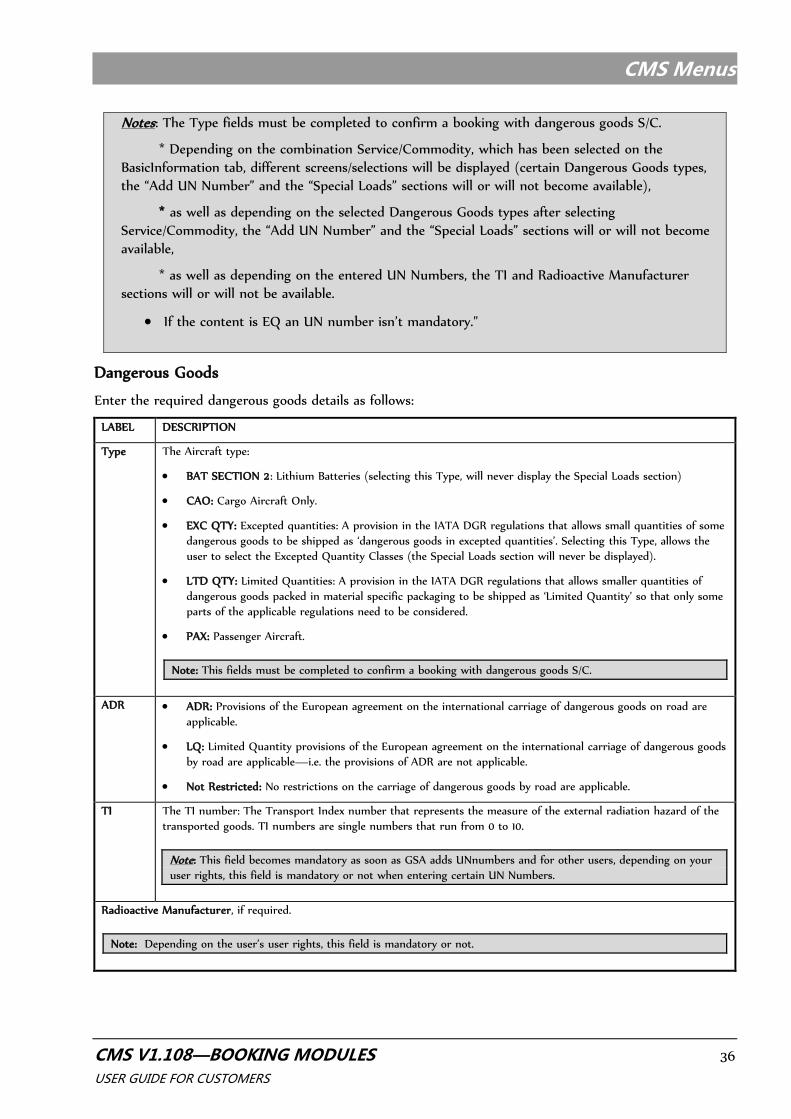
Notes: The Type fields must be completed to confirm a booking with dangerous goods S/C.
* Depending on the combination Service/Commodity, which has been selected on the BasicInformation tab, different screens/selections will be displayed (certain Dangerous Goods types, the “Add UN Number” and the “Special Loads” sections will or will not become available),
* as well as depending on the selected Dangerous Goods types after selecting Service/Commodity, the “Add UN Number” and the “Special Loads” sections will or will not become
available,
* as well as depending on the entered UN Numbers, the TI and Radioactive Manufacturer sections will or will not be available.
If the content is EQ an UN number isn’t mandatory."
Dangerous Goods
Enter the required dangerous goods details as follows:
LABEL DESCRIPTION
Type The Aircraft type:
BAT SECTION 2: Lithium Batteries (selecting this Type, will never display the Special Loads section)
CAO: Cargo Aircraft Only.
EXC QTY: Excepted quantities: A provision in the IATA DGR regulations that allows small quantities of some
dangerous goods to be shipped as ‘dangerous goods in excepted quantities’. Selecting this Type, allows the
user to select the Excepted Quantity Classes (the Special Loads section will never be displayed).
LTD QTY: Limited Quantities: A provision in the IATA DGR regulations that allows smaller quantities of
dangerous goods packed in material specific packaging to be shipped as ‘Limited Quantity’ so that only some
parts of the applicable regulations need to be considered.
PAX: Passenger Aircraft.
Note: This fields must be completed to confirm a booking with dangerous goods S/C.
ADR ADR: Provisions of the European agreement on the international carriage of dangerous goods on road are
applicable.
LQ: Limited Quantity provisions of the European agreement on the international carriage of dangerous goods
by road are applicable—i.e. the provisions of ADR are not applicable.
Not Restricted: No restrictions on the carriage of dangerous goods by road are applicable.
TI The TI number: The Transport Index number that represents the measure of the external radiation hazard of the
transported goods. TI numbers are single numbers that run from 0 to 10.
Note: This field becomes mandatory as soon as GSA adds UNnumbers and for other users, depending on your
user rights, this field is mandatory or not when entering certain UN Numbers.
Radioactive Manufacturer, if required.
Note: Depending on the user’s user rights, this field is mandatory or not.
CMS Menus
CMS V1.108—BOOKING MODULES 37 USER GUIDE FOR CUSTOMERS
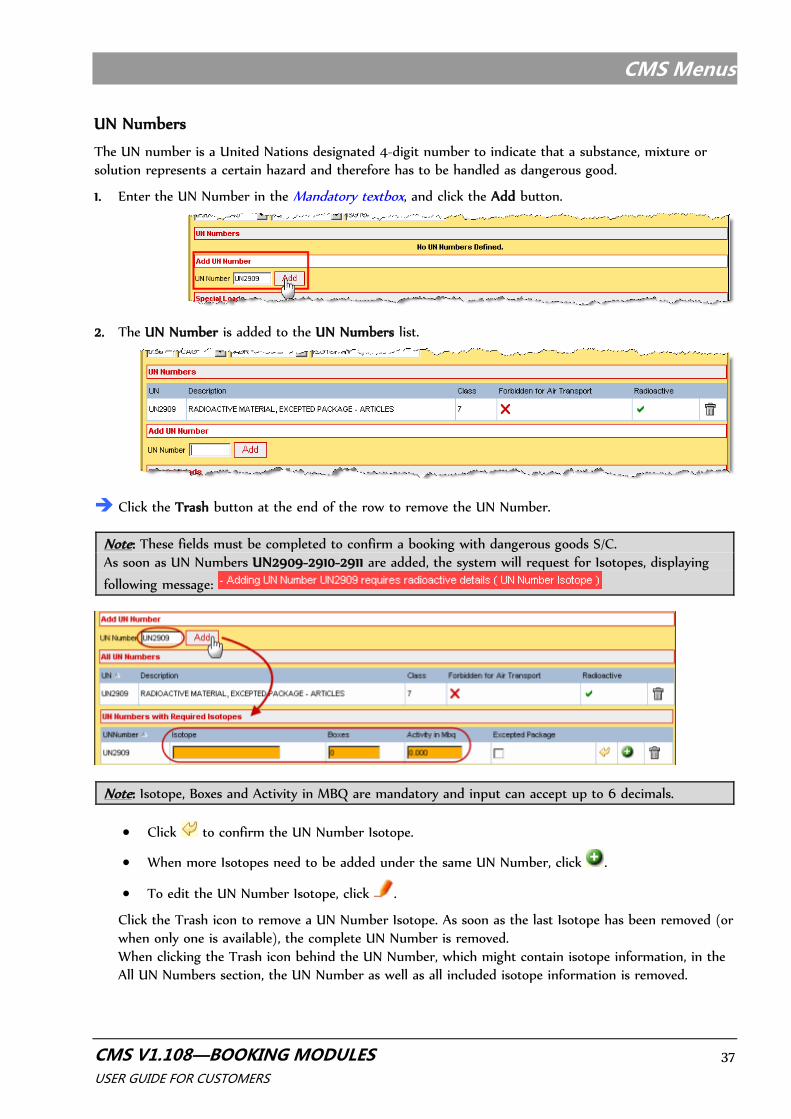
UN Numbers
The UN number is a United Nations designated 4-digit number to indicate that a substance, mixture or solution represents a certain hazard and therefore has to be handled as dangerous good.
1. Enter the UN Number in the Mandatory textbox, and click the Add button.
2. The UN Number is added to the UN Numbers list.
Click the Trash button at the end of the row to remove the UN Number.
Note: These fields must be completed to confirm a booking with dangerous goods S/C. As soon as UN Numbers UN2909-2910-2911 are added, the system will request for Isotopes, displaying
following message:
Note: Isotope, Boxes and Activity in MBQ are mandatory and input can accept up to 6 decimals.
Click to confirm the UN Number Isotope.
When more Isotopes need to be added under the same UN Number, click .
To edit the UN Number Isotope, click .
Click the Trash icon to remove a UN Number Isotope. As soon as the last Isotope has been removed (or
when only one is available), the complete UN Number is removed.
When clicking the Trash icon behind the UN Number, which might contain isotope information, in the All UN Numbers section, the UN Number as well as all included isotope information is removed.
CMS Menus
CMS V1.108—BOOKING MODULES 38 USER GUIDE FOR CUSTOMERS
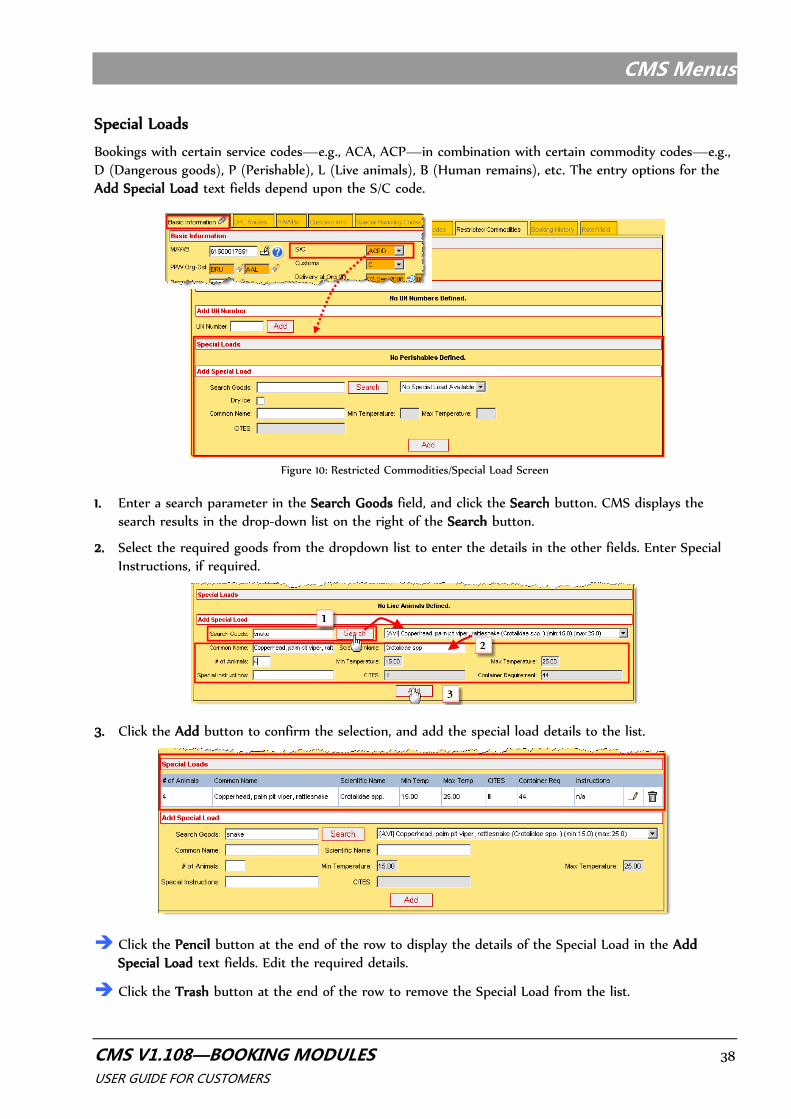
Special Loads
Bookings with certain service codes—e.g., ACA, ACP—in combination with certain commodity codes—e.g., D (Dangerous goods), P (Perishable), L (Live animals), B (Human remains), etc. The entry options for the Add Special Load text fields depend upon the S/C code.
Figure 10: Restricted Commodities/Special Load Screen
1. Enter a search parameter in the Search Goods field, and click the Search button. CMS displays the
search results in the drop-down list on the right of the Search button.
2. Select the required goods from the dropdown list to enter the details in the other fields. Enter Special
Instructions, if required.
3. Click the Add button to confirm the selection, and add the special load details to the list.
Click the Pencil button at the end of the row to display the details of the Special Load in the Add Special Load text fields. Edit the required details.
Click the Trash button at the end of the row to remove the Special Load from the list.
CMS Menus
CMS V1.108—BOOKING MODULES 39 USER GUIDE FOR CUSTOMERS
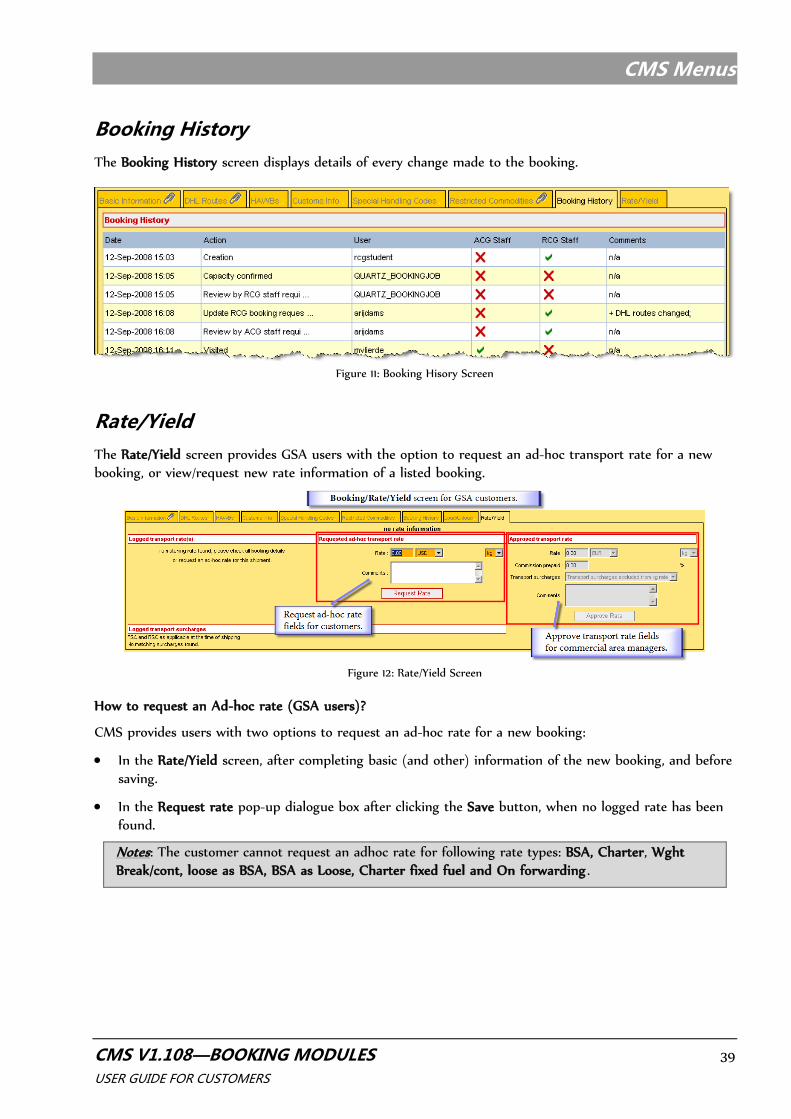
Booking History
The Booking History screen displays details of every change made to the booking.
Figure 11: Booking Hisory Screen
Rate/Yield
The Rate/Yield screen provides GSA users with the option to request an ad-hoc transport rate for a new
booking, or view/request new rate information of a listed booking.
Figure 12: Rate/Yield Screen
How to request an Ad-hoc rate (GSA users)?
CMS provides users with two options to request an ad-hoc rate for a new booking:
In the Rate/Yield screen, after completing basic (and other) information of the new booking, and before saving.
In the Request rate pop-up dialogue box after clicking the Save button, when no logged rate has been found.
Notes: The customer cannot request an adhoc rate for following rate types: BSA, Charter, Wght Break/cont, loose as BSA, BSA as Loose, Charter fixed fuel and On forwarding .
CMS Menus
CMS V1.108—BOOKING MODULES 40 USER GUIDE FOR CUSTOMERS
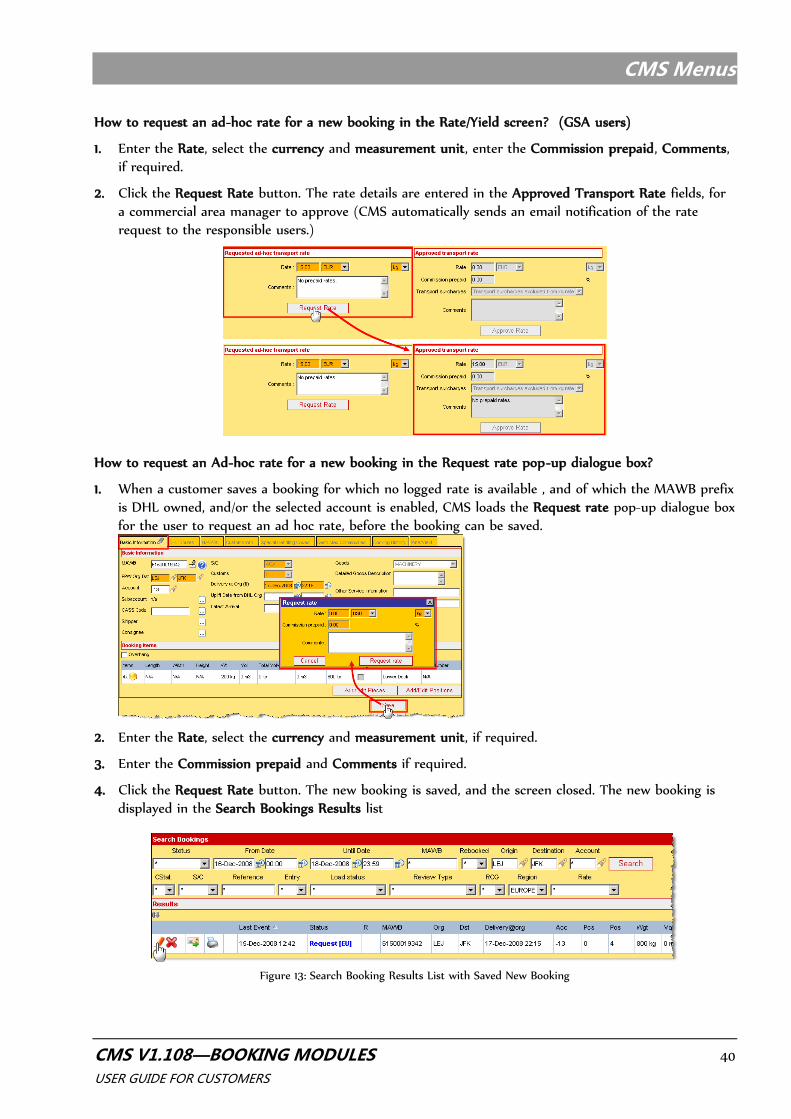
How to request an ad-hoc rate for a new booking in the Rate/Yield screen? (GSA users)
1. Enter the Rate, select the currency and measurement unit, enter the Commission prepaid, Comments,
if required.
2. Click the Request Rate button. The rate details are entered in the Approved Transport Rate fields, for a commercial area manager to approve (CMS automatically sends an email notification of the rate request to the responsible users.)
How to request an Ad-hoc rate for a new booking in the Request rate pop-up dialogue box?
1. When a customer saves a booking for which no logged rate is available , and of which the MAWB prefix is DHL owned, and/or the selected account is enabled, CMS loads the Request rate pop-up dialogue box
for the user to request an ad hoc rate, before the booking can be saved.
2. Enter the Rate, select the currency and measurement unit, if required.
3. Enter the Commission prepaid and Comments if required.
4. Click the Request Rate button. The new booking is saved, and the screen closed. The new booking is
displayed in the Search Bookings Results list
Figure 13: Search Booking Results List with Saved New Booking

CMS Menus
CMS V1.108—BOOKING MODULES 41 USER GUIDE FOR CUSTOMERS
How to request a new rate for a listed booking? (GSA users)
1. In the Search Bookings Results list, click the Pencil button of the booking of which to edit the rate. The
Booking details screens are displayed.
2. Click the Rate/Yield tab to display the Rate/Yield screen.
3. Edit the Rate details, if required, and click the Request Rate button. The new rate is entered in the Approved Transport rate fields, for a commercial area manager to approve. (CMS automatically sends
an email notification of the rate request to the responsible users.)
Note: Ad-hoc rates can only be approved by Commercial Area Managers. When a rate is approved, CMS sends the booking and rate details to the creator of the booking.
CMS Menus
CMS V1.108—BOOKING MODULES 42 USER GUIDE FOR CUSTOMERS
Booking command buttons
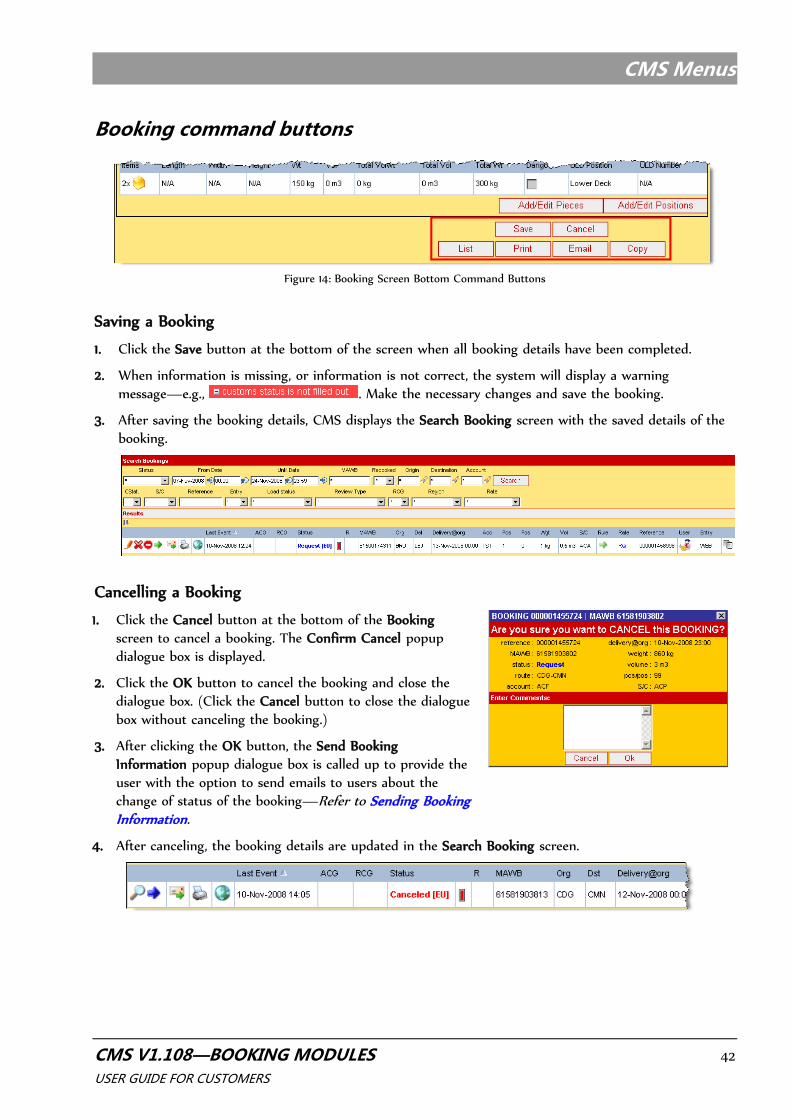
Figure 14: Booking Screen Bottom Command Buttons
Saving a Booking
1. Click the Save button at the bottom of the screen when all booking details have been completed.
2. When information is missing, or information is not correct, the system will display a warning message—e.g., . Make the necessary changes and save the booking.
3. After saving the booking details, CMS displays the Search Booking screen with the saved details of the booking.
Cancelling a Booking
1. Click the Cancel button at the bottom of the Booking screen to cancel a booking. The Confirm Cancel popup dialogue box is displayed.
2. Click the OK button to cancel the booking and close the dialogue box. (Click the Cancel button to close the dialogue
box without canceling the booking.)
3. After clicking the OK button, the Send Booking
Information popup dialogue box is called up to provide the user with the option to send emails to users about the change of status of the booking—Refer to Sending Booking Information.
4. After canceling, the booking details are updated in the Search Booking screen.

CMS Menus
CMS V1.108—BOOKING MODULES 43 USER GUIDE FOR CUSTOMERS
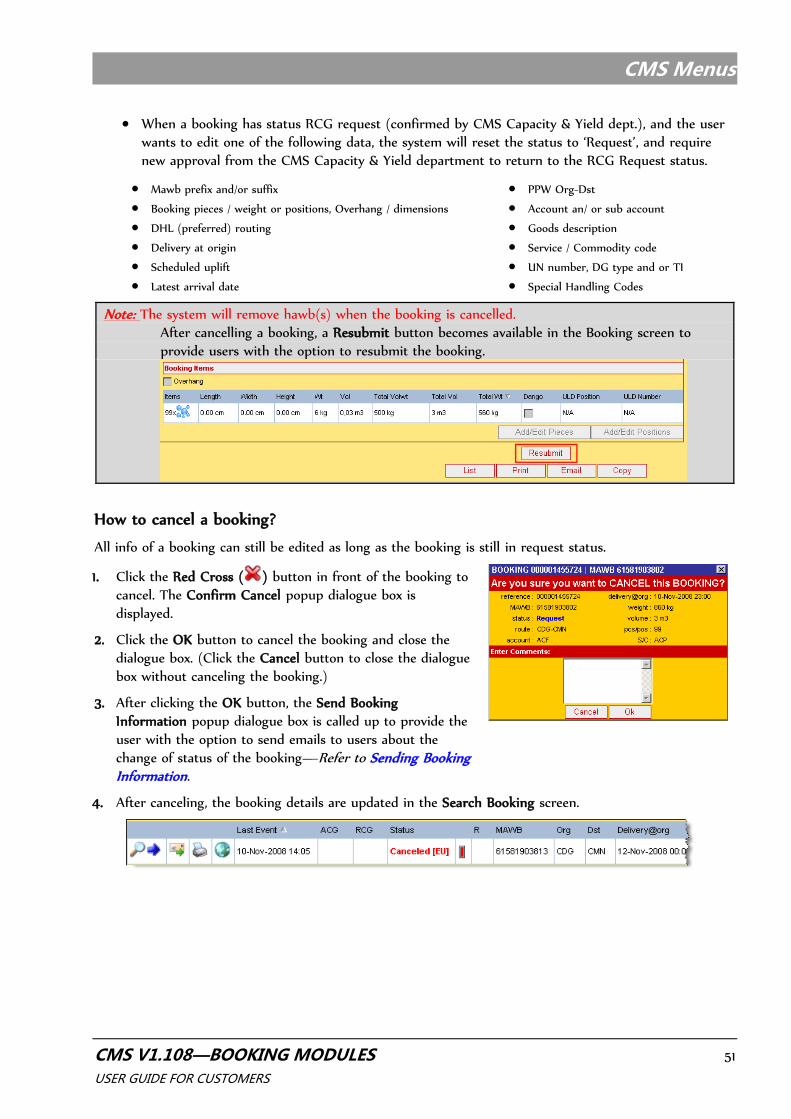
Notes: The system will remove hawb(s) when the booking is cancelled. After cancelling a booking, a Resubmit button becomes available in the Booking screen to provide users with the option to resubmit the booking.
Scheduled automatic cancel booking job (nonDeliveredShipmentCancellationJob)
A new scheduled job is in place to automatic cancel bookings. This job runs daily at every hour. Purpose is; default all bookings that were not delivered to DHL by the forwarder will be included in the auto cancel job.
Which bookings will automatically be cancelled?
The job will automatically cancel bookings that meet the criteria set up by the system administrator:
Note: After cancelling, the booking details are updated in the Search Booking screen, and details about
auto cancellation are listed in the Booking History .
Returning to Search Booking results list
Click the List button at the bottom of the Booking screen to return to the last Search Booking results list.
CMS Menus
CMS V1.108—BOOKING MODULES 44 USER GUIDE FOR CUSTOMERS
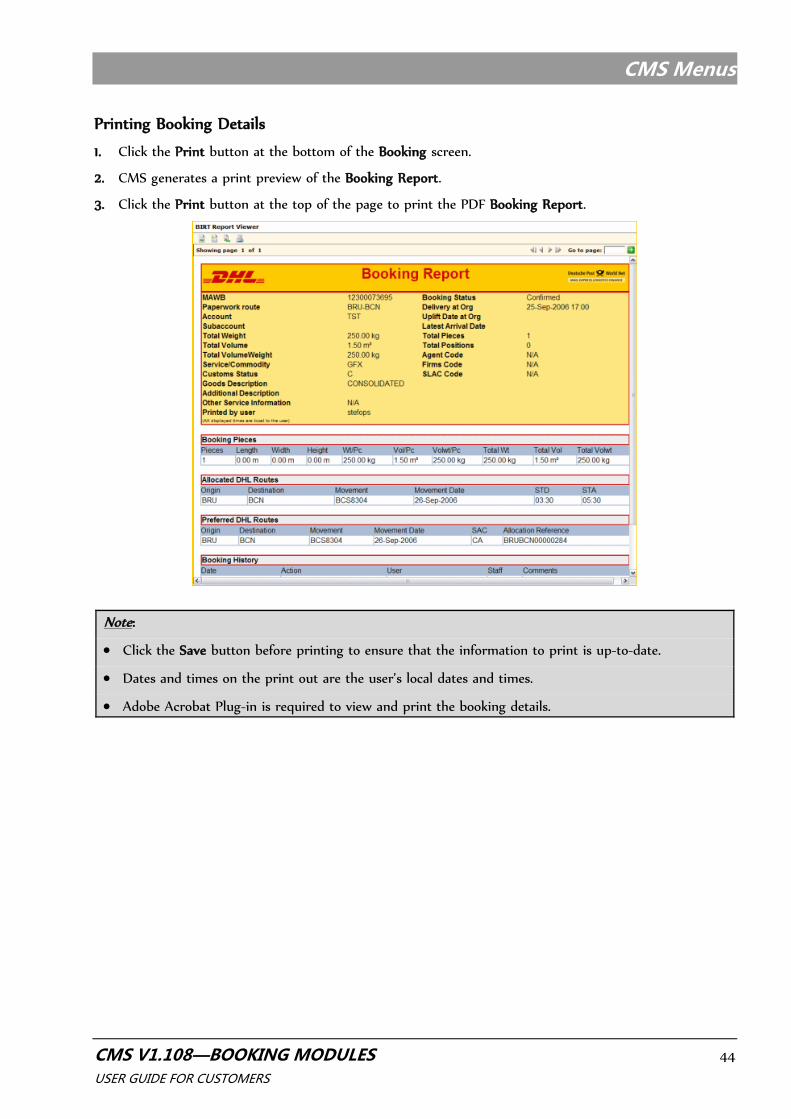
Printing Booking Details
1. Click the Print button at the bottom of the Booking screen.
2. CMS generates a print preview of the Booking Report.
3. Click the Print button at the top of the page to print the PDF Booking Report.
Note:
Click the Save button before printing to ensure that the information to print is up-to-date.
Dates and times on the print out are the user’s local dates and times.
Adobe Acrobat Plug-in is required to view and print the booking details.

CMS Menus
CMS V1.108—BOOKING MODULES 45 USER GUIDE FOR CUSTOMERS
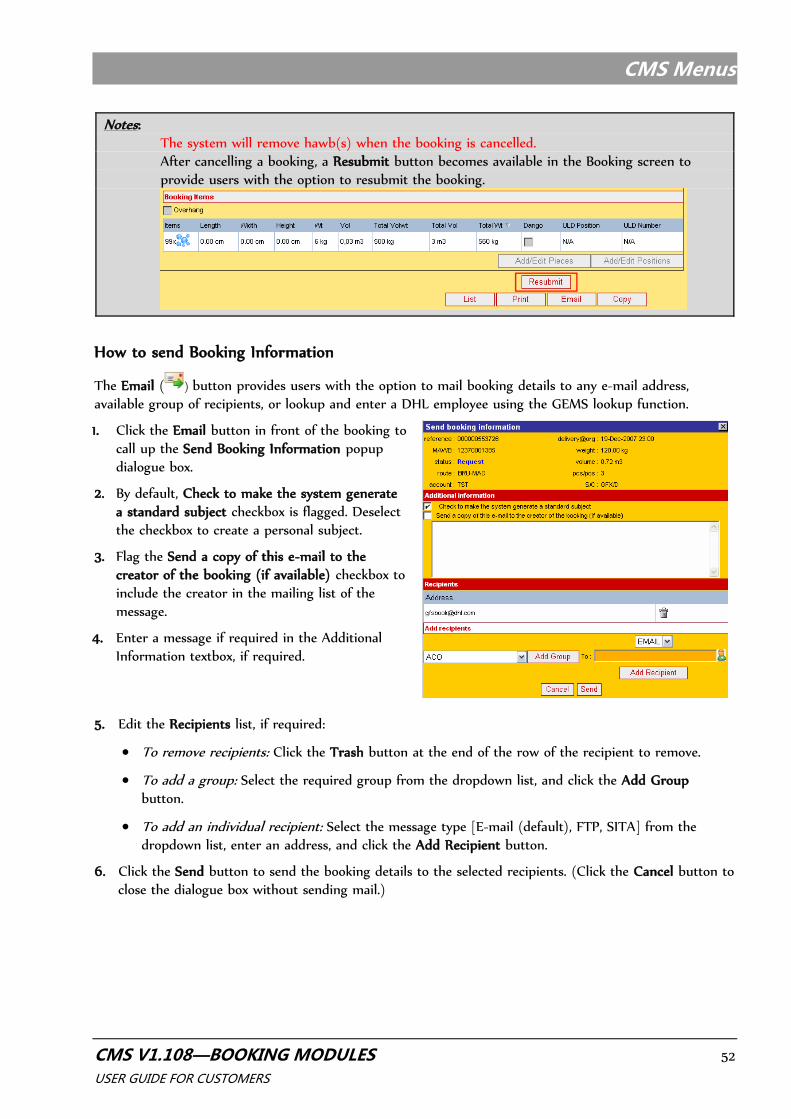
Sending Booking Information
The Email button provides users with the option to mail booking details to any e-mail address, available group of recipients, or lookup and enter a DHL employee using the GEMS lookup function.
1. Click the Email button at the bottom of the
Booking screen to call up the Send Booking Information popup dialogue box.
2. By default, Check to make the system generate a standard subject checkbox is flagged. Deselect the checkbox to create a personal subject.
3. Flag the Send a copy of this e-mail to the creator of the booking (if available) checkbox to include the creator in the mailing list of the
message.
4. Enter a message if required in the Additional Information textbox, if required.
5. Edit the Recipients list, if required:
To remove recipients: Click the Trash button at the end of the row of the recipient to remove.
To add a group: Select the required group from the dropdown list, and click the Add Group button.
To add an individual recipient: Select the message type [E-mail (default), FTP, SITA] from the
dropdown list, enter an address, and click the Add Recipient button.
6. Click the Send button to send the booking details to the selected recipients. (Click the Cancel button to
close the dialogue box without sending mail.)
Copying a Booking
The Copy button provides users with the option to copy booking details from an existing booking, but without MAWB number, Hawb details, Load and Rate details.
1. Click the Copy button to call up the booking details of the selected booking.
2. Enter a new MAWB number, and edit details if required.
3. Click the Save button to save the new booking.
Note: identical rules concerning rate look up, the possibility to request an adhoc rate or using an active sub-account are applicable when copying a booking.

CMS Menus
CMS V1.108—BOOKING MODULES 46 USER GUIDE FOR CUSTOMERS
Search Route
Available to: GSA Search Capacity users
The Search Route screen provides users with the option to search for capacity on particular routes.
1. Click the Booking tab, and select Search Route. The Search Route screen is displayed. Note that the default account of the logged in user is automatically entered.
2. Enter the required search parameters (* = all, but only available in the Optional textboxes), and click
the Search button. CMS generates the list with routes that match the search query. From the Results list of the Search Route screen, users have the options to:
View capacity on the movement(s) of the routes that match the search query: Hover over the ULD
load indicators to view capacity details, or click the ULD load indicators to see more details about
capacity.
Call up the New Booking screens to book a new booking on the selected route—Refer to the various New Booking screens for more information about entering booking details.
Figure 15: Search Route Results Screen
CMS Menus
CMS V1.108—BOOKING MODULES 47 USER GUIDE FOR CUSTOMERS
Search Booking
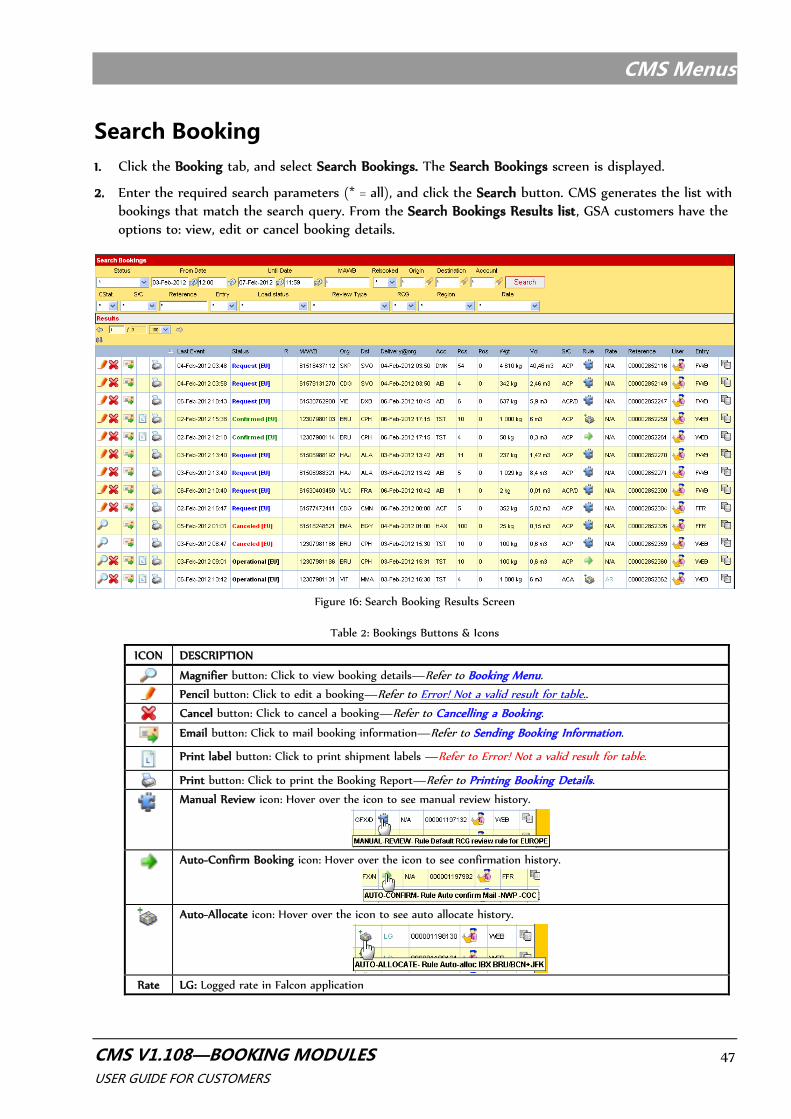
1. Click the Booking tab, and select Search Bookings. The Search Bookings screen is displayed.
2. Enter the required search parameters (* = all), and click the Search button. CMS generates the list with bookings that match the search query. From the Search Bookings Results list, GSA customers have the options to: view, edit or cancel booking details.
Figure 16: Search Booking Results Screen
Table 2: Bookings Buttons & Icons
ICON DESCRIPTION
Magnifier button: Click to view booking details—Refer to Booking Menu.
Pencil button: Click to edit a booking—Refer to Error! Not a valid result for table..
Cancel button: Click to cancel a booking—Refer to Cancelling a Booking.
Email button: Click to mail booking information—Refer to Sending Booking Information.
Print label button: Click to print shipment labels —Refer to Error! Not a valid result for table.
Print button: Click to print the Booking Report—Refer to Printing Booking Details.
Manual Review icon: Hover over the icon to see manual review history.
Auto-Confirm Booking icon: Hover over the icon to see confirmation history.
Auto-Allocate icon: Hover over the icon to see auto allocate history.
Rate LG: Logged rate in Falcon application
CMS Menus
CMS V1.108—BOOKING MODULES 48 USER GUIDE FOR CUSTOMERS
RQ: Requested rate, is not yet approved
AR: Approved rate, the requested rate was approved by a commercial manager
User icon: Hover over the icon to see the name of the creator of the booking.
Entry FFR: SITA message - AWB space allocation request message
FWB: SITA message – Air Waybill data message
Web: manual booking entry
Copy button: Click to copy the details of the booking without MAWB number, to create a new booking—
Refer to Copying a Booking.
Print MAWB (front) button: Click to print the front pages of the MAWB.
Print MAWB (back) button: Click to print the back pages of the MAWB.
—Refer to How to print a Mawb?.
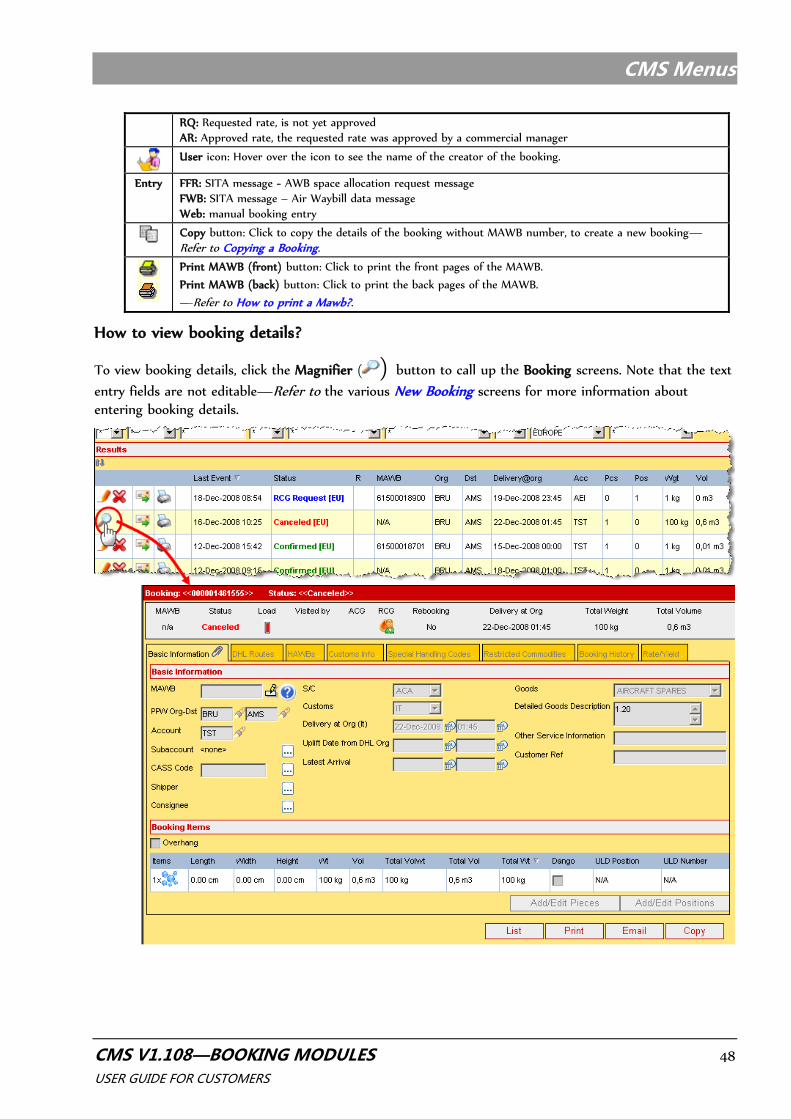
How to view booking details?
To view booking details, click the Magnifier ( ) button to call up the Booking screens. Note that the text
entry fields are not editable—Refer to the various New Booking screens for more information about entering booking details.

CMS Menus
CMS V1.108—BOOKING MODULES 49 USER GUIDE FOR CUSTOMERS
How to edit a booking?
All info of a booking can still be edited as long as the booking is still in request status.
1. In the Search Bookings Results list, click the Pencil ( ) button of the booking to edit.
2. CMS loads the booking details of the selected booking and the text entry fields are editable.
3. Edit the booking details as required—Refer to the various New Booking screens for more information about entering booking details.
Rules for editing a booking:
All info of a booking can still be edited as long as the booking is still in request status.
When an operational event (such as a PPW entry, check-in, on hold, volumetric entry, reload, pod
or billed) has been performed, the system will not allow the user to make any changes to a booking or hawb(s), except to re-submit it. Pressing the edit button will perform a check for operational events in TGV and will change status to “operational” if operational events are found.
CMS Menus
CMS V1.108—BOOKING MODULES 50 USER GUIDE FOR CUSTOMERS
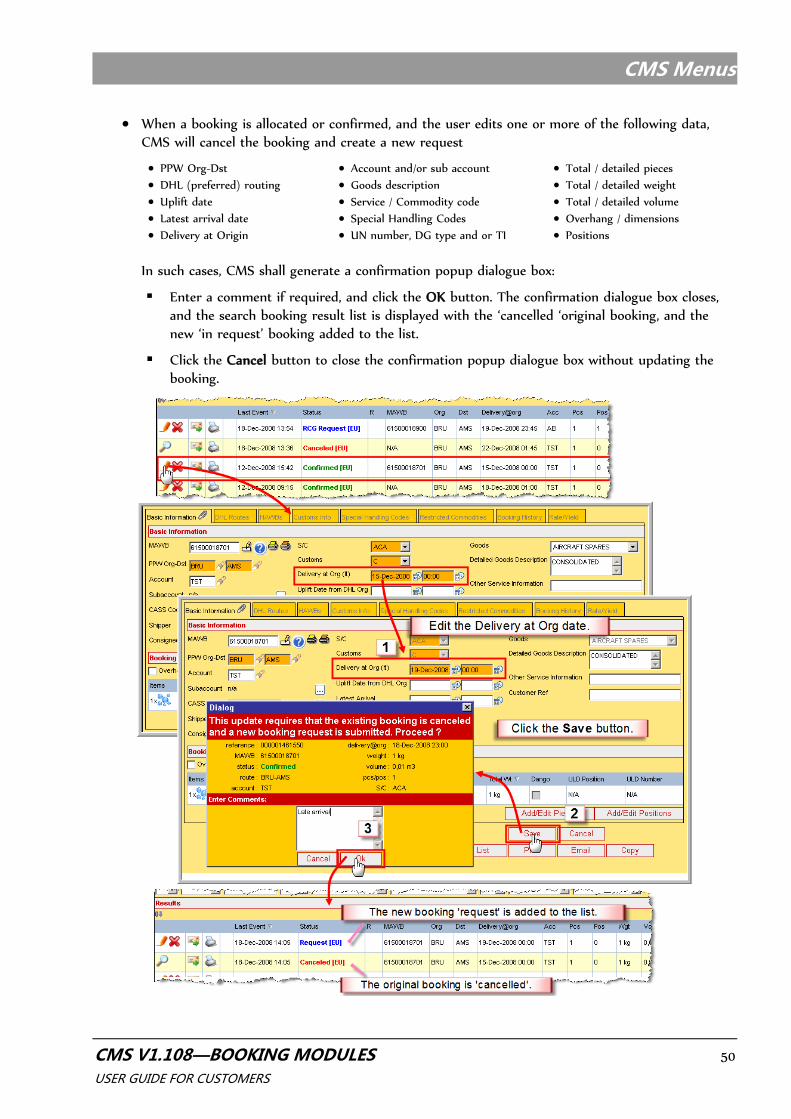
When a booking is allocated or confirmed, and the user edits one or more of the following data, CMS will cancel the booking and create a new request
PPW Org-Dst Account and/or sub account Total / detailed pieces
DHL (preferred) routing Goods description Total / detailed weight
Uplift date Service / Commodity code Total / detailed volume
Latest arrival date Special Handling Codes Overhang / dimensions
Delivery at Origin UN number, DG type and or TI Positions
In such cases, CMS shall generate a confirmation popup dialogue box:
Enter a comment if required, and click the OK button. The confirmation dialogue box closes,
and the search booking result list is displayed with the ‘cancelled ‘original booking, and the new ‘in request’ booking added to the list.
Click the Cancel button to close the confirmation popup dialogue box without updating the booking.
CMS Menus
CMS V1.108—BOOKING MODULES 51 USER GUIDE FOR CUSTOMERS
When a booking has status RCG request (confirmed by CMS Capacity & Yield dept.), and the user wants to edit one of the following data, the system will reset the status to ‘Request’, and require new approval from the CMS Capacity & Yield department to return to the RCG Request status.
Mawb prefix and/or suffix PPW Org-Dst
Booking pieces / weight or positions, Overhang / dimensions Account an/ or sub account
DHL (preferred) routing Goods description
Delivery at origin Service / Commodity code
Scheduled uplift UN number, DG type and or TI
Latest arrival date Special Handling Codes
Note: The system will remove hawb(s) when the booking is cancelled. After cancelling a booking, a Resubmit button becomes available in the Booking screen to provide users with the option to resubmit the booking.
How to cancel a booking?
All info of a booking can still be edited as long as the booking is still in request status.
1. Click the Red Cross ( ) button in front of the booking to
cancel. The Confirm Cancel popup dialogue box is displayed.
2. Click the OK button to cancel the booking and close the dialogue box. (Click the Cancel button to close the dialogue box without canceling the booking.)
3. After clicking the OK button, the Send Booking
Information popup dialogue box is called up to provide the
user with the option to send emails to users about the change of status of the booking—Refer to Sending Booking Information.
4. After canceling, the booking details are updated in the Search Booking screen.
CMS Menus
CMS V1.108—BOOKING MODULES 52 USER GUIDE FOR CUSTOMERS
Notes: The system will remove hawb(s) when the booking is cancelled. After cancelling a booking, a Resubmit button becomes available in the Booking screen to provide users with the option to resubmit the booking.
How to send Booking Information
The Email ( ) button provides users with the option to mail booking details to any e-mail address, available group of recipients, or lookup and enter a DHL employee using the GEMS lookup function.
1. Click the Email button in front of the booking to
call up the Send Booking Information popup dialogue box.
2. By default, Check to make the system generate
a standard subject checkbox is flagged. Deselect
the checkbox to create a personal subject.
3. Flag the Send a copy of this e-mail to the creator of the booking (if available) checkbox to
include the creator in the mailing list of the message.
4. Enter a message if required in the Additional Information textbox, if required.
5. Edit the Recipients list, if required:
To remove recipients: Click the Trash button at the end of the row of the recipient to remove.
To add a group: Select the required group from the dropdown list, and click the Add Group button.
To add an individual recipient: Select the message type [E-mail (default), FTP, SITA] from the dropdown list, enter an address, and click the Add Recipient button.
6. Click the Send button to send the booking details to the selected recipients. (Click the Cancel button to close the dialogue box without sending mail.)

CMS Menus
CMS V1.108—BOOKING MODULES 53 USER GUIDE FOR CUSTOMERS
How to print labels for this particular booking?
Note: The print label icon ( ) is only available when the booking is confirmed or operational.
1. In the Search Bookings Results list, click the Print label button ( ).
Figure 17: Print labels
2. CMS will generate a popup screen with known information of the MAWB based on the booking.
Select Avery label type 3483, or type 5168 in the USA where another paper size is used.
MAWB Nr: The MAWB number is from the respective booking.
Ignore modulo 7 check: Modulo 7 check verifies the IATA code, when the MAWB is non
IATA, an error message will be displayed. Check if the correct MAWB is used. If the non
IATA MAWB is correct, flag the option to continue printing.
Pieces: reflects the number of pieces of the shipment as per booking info. The user can
enter a different number if required—i.e., if some labels have already been printed.
Show pieces: numbers the pieces individually on the labels.
Origin: the origin is from the respective booking.
Destination: the destination is from the respective booking.
Airline: the airline code is based upon the booking.
S/C: the service/commodity code is from the respective booking.

CMS Menus
CMS V1.108—BOOKING MODULES 54 USER GUIDE FOR CUSTOMERS
First Page Layout: select how many labels are to be used for printing on the first page. This option is useful when printing labels on an incomplete labels sheet. For example, when the previously 7 labels were printed, there will be only 1 blank label left on the first page of
the label sheet.
3. Click the label blocks on the First Page Layout print to deselect the missing blank labels.
4. Click the OK button to print.
CMS Menus
CMS V1.108—BOOKING MODULES 55 USER GUIDE FOR CUSTOMERS
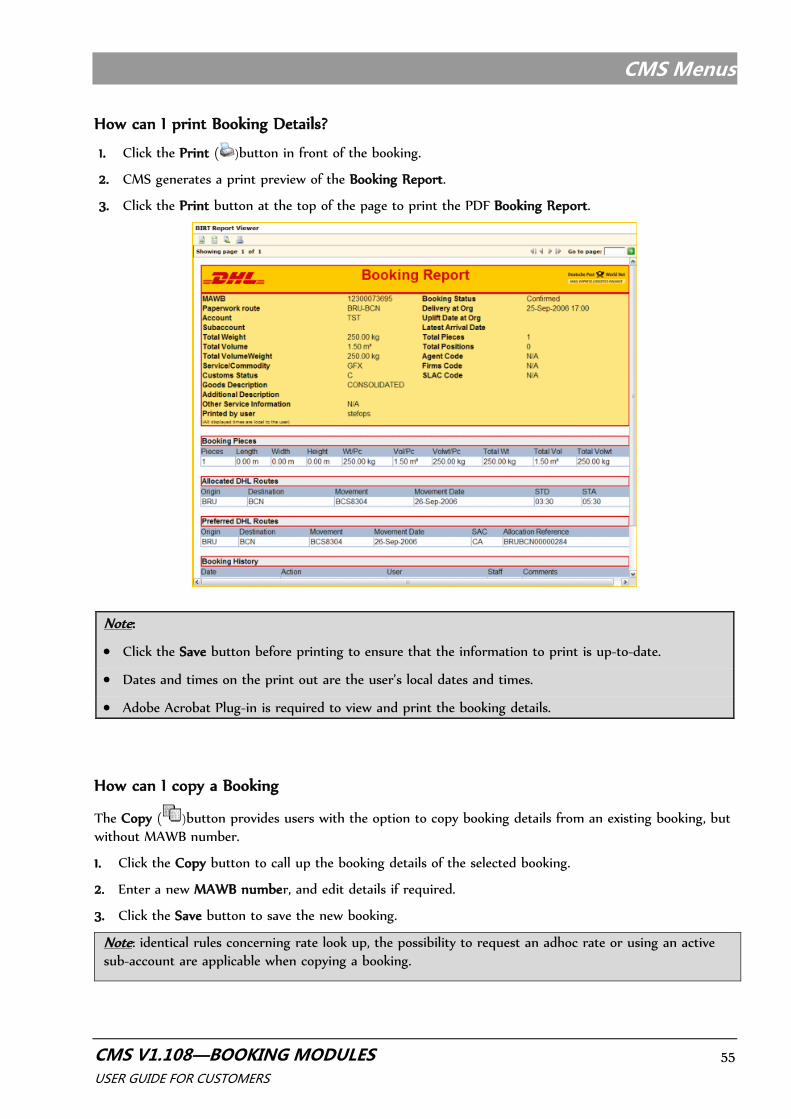
How can I print Booking Details?
1. Click the Print ( )button in front of the booking.
2. CMS generates a print preview of the Booking Report.
3. Click the Print button at the top of the page to print the PDF Booking Report.
Note:
Click the Save button before printing to ensure that the information to print is up-to-date.
Dates and times on the print out are the user’s local dates and times.
Adobe Acrobat Plug-in is required to view and print the booking details.
How can I copy a Booking
The Copy ( )button provides users with the option to copy booking details from an existing booking, but without MAWB number.
1. Click the Copy button to call up the booking details of the selected booking.
2. Enter a new MAWB number, and edit details if required.
3. Click the Save button to save the new booking.
Note: identical rules concerning rate look up, the possibility to request an adhoc rate or using an active sub-account are applicable when copying a booking.

CMS Menus
CMS V1.108—BOOKING MODULES 56 USER GUIDE FOR CUSTOMERS
How to print a Mawb?
The printing MAWBs facility provides users with the option to print paper copies of MAWBs of confirmed bookings for all concerned users (shipper, agent, issuing carrier, consignee, etc.), provided shipper and consignee details are entered in the booking.
1. Click the Print MAWB (front) button ( )to print all the front pages with the shipment data of the MAWB.
2. Click the Print MAWB (back) button ( ) to print all the back pages with the regulatory data of the MAWB.
3. The PDF version of the MAWB opens in a new window. Use the Print utility of your PDF application to print the MAWB.

CMS Menus
CMS V1.108—BOOKING MODULES 57 USER GUIDE FOR CUSTOMERS
Allocations Menu
Available to: GSA View Allocations users.
Search Allocations
The Search Allocations screen provides users with the option to search for available allocations on movements and only for accounts linked to the login of the user.
1. Click the Allocations tab, and select Search Allocations. The Search Allocations screen is displayed.
2. Enter the required parameters, and click the Search button. CMS generates the list with allocations
that match the search query.
3. Hover over a ULD( ) icon to view capacity details, if required.
Figure 18: Search Allocation Results Screen
CMS Menus
CMS V1.108—BOOKING MODULES 58 USER GUIDE FOR CUSTOMERS
Search Movements
The Search Movements screen provides users with the option to search for movements.
1. Click the Allocations tab, and select Search Movements. The Search Movements screen with the search parameters text fields and Search button is displayed.
2. Enter the required search parameters, and click the Search button. The movements that match the search query are displayed in a Search Movements Results list.
Figure 19: Search Movements Results Screen
3. To view ULD capacity details:
Hover over the ULD icons to view a summary of ULD capacity details.
Click on the ULD icons to view more detailed information about ULD capacity.

APPENDIX
CMS V1.108—BOOKING MODULES 59 USER GUIDE FOR CUSTOMERS
Glossary
Service Codes
CODE DESCRIPTION CODE DESCRIPTION CODE DESCRIPTION
ACA Air Cargo Advantage ACP Air Cargo Priority CHA Chartered
ACE Air Cargo Economic BSA Block Space Agreement GFH TPH only, not on DHL
Commodity Codes
CODE DESCRIPTION CODE DESCRIPTION
No commodity (general cargo) L Live animals
A Automotive (auto parts) L1 Live animals (1 horse)
AU Automotives L2 Live animals (2 horses)
B Human remains (body) L3 Live animals (3 horses)
CH Chickens L4 Live animals (4 horses/4 pos)
CM Computer micro chips priority connection L5 Live animals (5 horses/5 pos)
CP Computer chips LA Live animals
D Dangerous goods LB Lithium Batteries section II
DA Domestic animals M Magazines
DC Dry cargo MC Miscellaneous 2
DG Dangerous goods MM Mail
DT DGR cargo transferred to us, in transit with a special rate MS Miscellaneous
FL Flowers N Newspapers
FS Sea Products II P Perishable
FT Sea Products I PE Perishables
GC General cargo (also valid for regular general public rates) PH Pharmaceuticals
GX General express cargo (also valid for regular public rates) RE Reptiles
HE Hatching eggs VE Vegetables
HR Human remains VU Vulnerable cargo
W Intra West Africa Traders
WE Weapons, guns