color correction in final cut studio -...
TRANSCRIPT
Color Correction in Final Cut StudioIntroduction to Color
Part 1: Getting Started with Color
Part 2: Managing and Applying Grades
uPart 3: Using the Scopes and Auto Balanceo
Part 4: Copying from One Clip to Another
Part 5: Secondary Corrections and Color FX
Copyright © 2010. Used with permission of Pearson Education, Inc. and Peachpit Press.
2
Part 3
NOTE P This is the third part in a series of tutorials that build upon each other.
Before beginning this part, make sure you’ve completed the exercises in Parts 1 and 2.
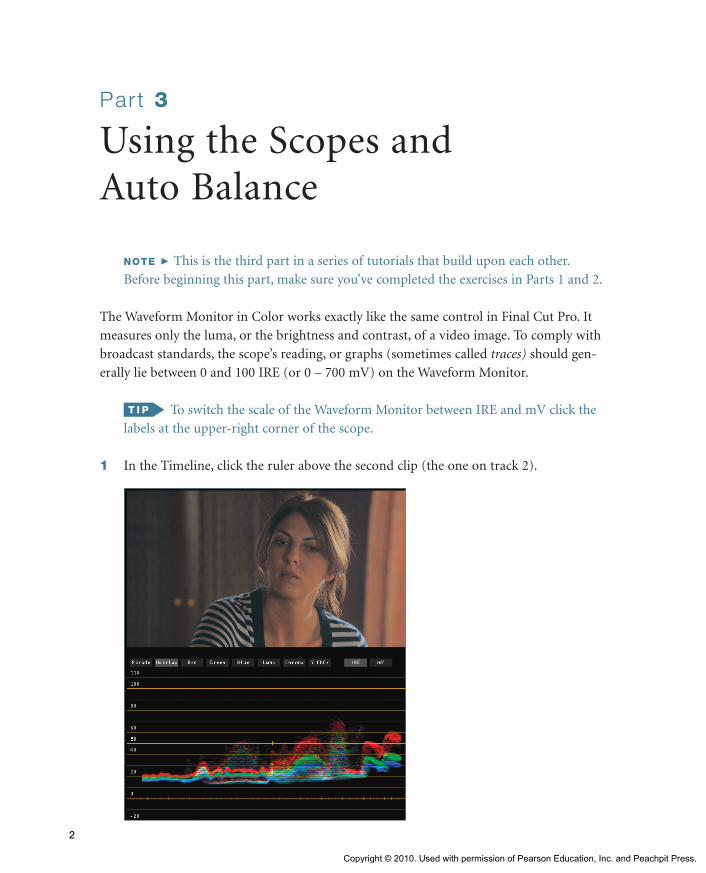
The Waveform Monitor in Color works exactly like the same control in Final Cut Pro. It
measures only the luma, or the brightness and contrast, of a video image. To comply with
broadcast standards, the scope’s reading, or graphs (sometimes called traces) should gen-
erally lie between 0 and 100 IRE (or 0 – 700 mV) on the Waveform Monitor.
To switch the scale of the Waveform Monitor between IRE and mV click the
labels at the upper-right corner of the scope.
1 In the Timeline, click the ruler above the second clip (the one on track 2).
Using the Scopes and Auto Balance
Copyright © 2010. Used with permission of Pearson Education, Inc. and Peachpit Press.
Part 3: Using the Scopes and Auto Balance 3
The Primary In room updates to show the settings for this clip. Even though this clip
also had a 3-way Color Corrector filter applied in Final Cut Pro, you disabled the fil-
ter, so the settings here are all at their defaults.
As you learned in Lesson 1, the Waveform Monitor illustrates that this shot has a
narrow tonal range with no true blacks and no bright highlights. Changes made
to the contrast sliders (shadow, midtone, or highlight) will be clearly visible in the
Waveform Monitor.
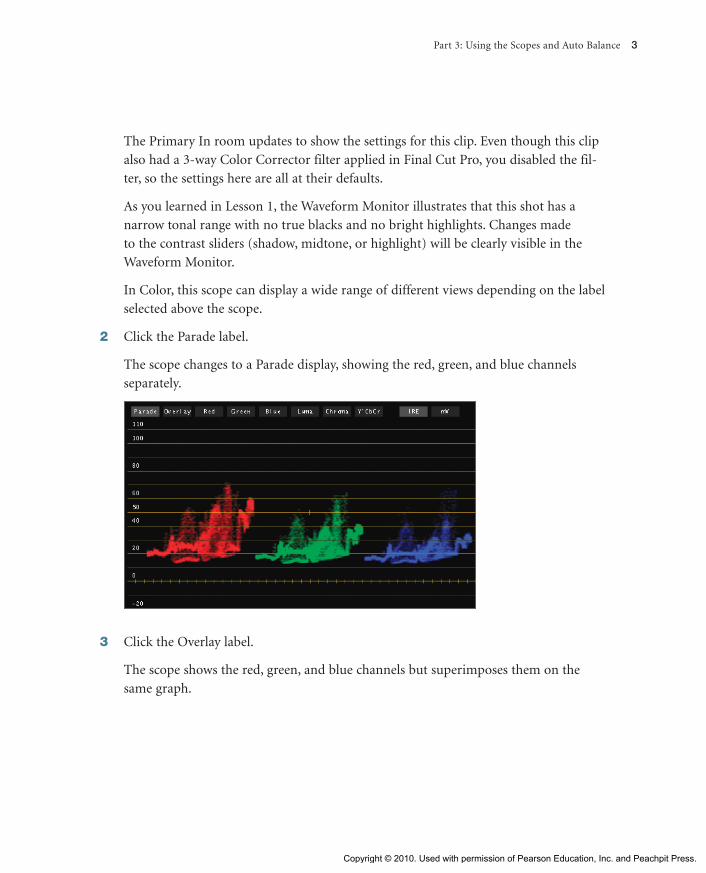
In Color, this scope can display a wide range of different views depending on the label
selected above the scope.
2 Click the Parade label.
The scope changes to a Parade display, showing the red, green, and blue channels
separately.
3 Click the Overlay label.
The scope shows the red, green, and blue channels but superimposes them on the
same graph.
Copyright © 2010. Used with permission of Pearson Education, Inc. and Peachpit Press.

4 Color Correction in Final Cut Studio
4 Click the Luma label.
This screen shows just the luma values and is most similar to the default Waveform
Monitor scope in Final Cut Pro.
5 Drag the Shadow, Highlight, and Midtone contrast sliders and observe the impact
they make on the Waveform Monitor.
The Shadow contrast slider primarily affects the darkest areas at the bottom of the
trace, the Highlight contrast slider primarily affects the brightest areas at the top of
the trace, and the Midtone contrast slider adjusts the entire image.
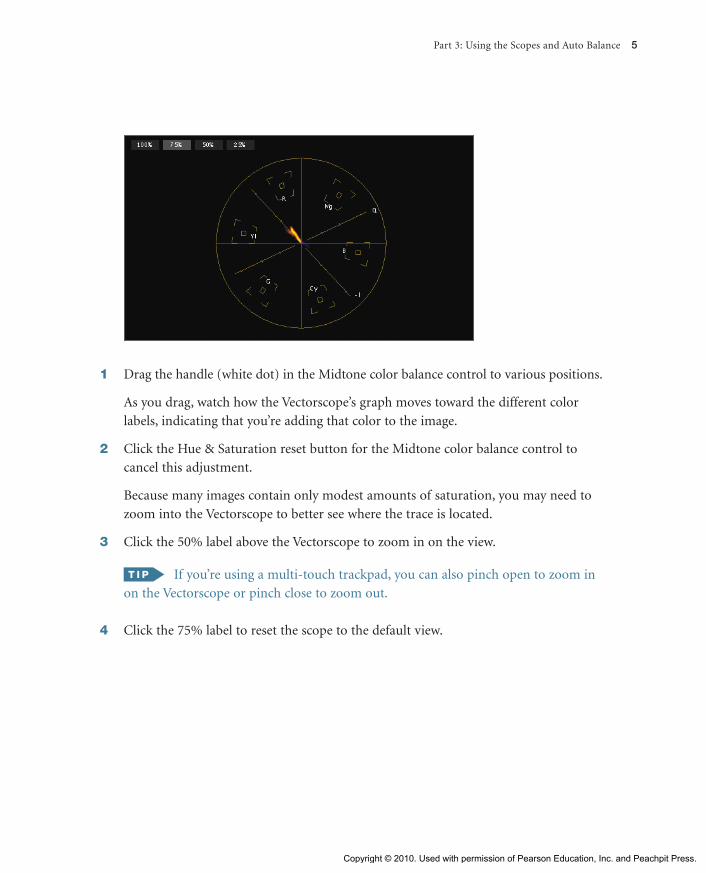
Using the VectorscopeJust like in Final Cut Pro, the Vectorscope measures the chrominance, or hue and satura-
tion, of a video image. The Vectorscope’s overlay includes labels for the primary and sec-
ondary colors of light: red, magenta, blue, cyan, green, and yellow. When the graphs in the
Vectorscope extend toward one of these labels, it indicates the presence of that color in the
image. The saturation of that color is represented by the distance that the graph extends
from the scope’s center.
Copyright © 2010. Used with permission of Pearson Education, Inc. and Peachpit Press.
Part 3: Using the Scopes and Auto Balance 5
1 Drag the handle (white dot) in the Midtone color balance control to various positions.
As you drag, watch how the Vectorscope’s graph moves toward the different color
labels, indicating that you’re adding that color to the image.
2 Click the Hue & Saturation reset button for the Midtone color balance control to
cancel this adjustment.
Because many images contain only modest amounts of saturation, you may need to
zoom into the Vectorscope to better see where the trace is located.
3 Click the 50% label above the Vectorscope to zoom in on the view.
If you’re using a multi-touch trackpad, you can also pinch open to zoom in
on the Vectorscope or pinch close to zoom out.
4 Click the 75% label to reset the scope to the default view.
Copyright © 2010. Used with permission of Pearson Education, Inc. and Peachpit Press.
6 Color Correction in Final Cut Studio
P Trust Your Scopes
Our eyes are easily tricked and easily fatigued. You may think that an image seems
overly dark or skewed toward a certain color, but that perception is often just in
comparison to another shot, or in comparison to the way the shot looked before
you began adjusting it.
The reason Color provides so many scopes and so many ways to view them is to
give you something to trust in addition to your own eyes. Although it may take you
additional time to grow comfortable reading the scopes, they offer an objective view
of the exact mathematical values of the pixels in your image. No matter how accu-
rate your grading reference monitor or computer display is, scopes will always be an
essential tool in balancing shots, especially after a long day. Put your trust in them,
though ultimately, there is no mechanical substitute for your own eyes.
Color includes two other scopes to aid you in your work, the Histogram and the
3D Color Space Scope.
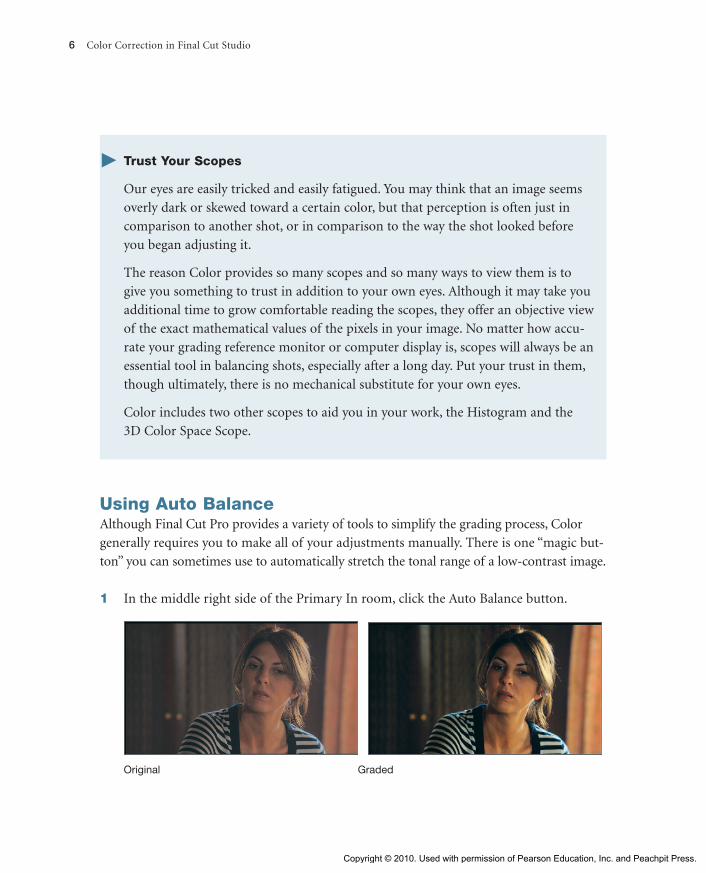
Using Auto BalanceAlthough Final Cut Pro provides a variety of tools to simplify the grading process, Color
generally requires you to make all of your adjustments manually. There is one “magic but-
ton” you can sometimes use to automatically stretch the tonal range of a low-contrast image.
1 In the middle right side of the Primary In room, click the Auto Balance button.
Original Graded
Copyright © 2010. Used with permission of Pearson Education, Inc. and Peachpit Press.
Part 3: Using the Scopes and Auto Balance 7
The image is adjusted so the darkest pixels are set to black and the brightest pixels are
set to white. In Color, this is done on a channel-by-channel basis and any adjustments
you made to the contrast sliders are automatically reset.
Copyright © 2010. Used with permission of Pearson Education, Inc. and Peachpit Press.