combat gymnastics - crossfitlibrary.crossfit.com/free/pdf/39_05_combat_gymnastics.pdf · combat...
TRANSCRIPT

® CrossFit is a registered trademark of CrossFit, Inc.
© 2008 All rights reserved.
Subscription info at http://store.crossf it.com
Feedback to feedback@crossf it.com
CrossFit Journal Article Reprint. First Published in CrossFit Journal Issue 39 - November 2005
Combat GymnasticsJT Williams, Wade Rutland, and Trip Lewis
1 of 11
The profession of soldiering requires a high level of physical fitness. Deficiencies in the physical domain could lead to loss of limb or death on operations, or to the death of a buddy or subordinate. The notion of combat fitness, however, can be difficult to define. Clearly, a soldier requires a wide variety of physical competencies such as strength, power, and endurance, but the vital domain of body control is often overlooked, even though soldiers must be capable of moving their bodies through high-skill tasks while weighted down with equipment and weapons, usually dehydrated, frequently fatigued, and always under stress.
SOLDIER BODY CONTROL DEMANDS
Pulling
Soldiers require the capacity to pull themselves up or statically hold themselves in a hanging position with the added challenge of wearing gear. To make pulling demands even more difficult, the type of grip available in the field will usually be uneven, slippery, or unstable. Specific examples include pulling on parachute slips; climbing ropes, ladders, and rocks; and mounting armored vehicles. Soldiers conducting operations in urban terrain require such strength and coordination in pulling that they must be able not only to pull themselves up, but to pull so forcefully that they actually propel themselves onto or over an object. Examples of this include the soldier pulling himself into a window, onto a balcony, or over a wall or fence.
Pressing
Soldiers also need the ability to press themselves up while carrying an extra load, often for repeated
efforts far exceeding what would normally occur in a gym setting. This could include pressing up from a prone position, or pressing dip-style, with the body vertical. Pressing in the field encompasses both dynamic and static movements, although static pressing is encountered primarily in the artificial push-up holds that

® CrossFit is a registered trademark of CrossFit, Inc.
© 2008 All rights reserved.
Subscription info at http://store.crossf it.com
Feedback to feedback@crossf it.com
2 of 11
Combat Gymnastics (continued...)
occur at the behest of a superior. Specific functional examples include pressing or lowering the body to the ground while moving to contact, or getting in and out of a vehicle turret. Note that while exiting the turret, a soldier has no choice but to go beyond the ninety-degree angle in the upper arm that is normally considered “safe” by most mainstream fitness publications.
Core Strength
There may be no profession that demands more core strength and stability then soldiering. There are no isolation movements in the field; every movement the soldier performs requires either active core movement or a high degree of stabilization. A lack of core strength leads not just to decreased performance but possibly to back injury from lifting too much or from simply carrying extra gear on the back for prolonged periods. The photos below tell the story. Transporting an injured soldier in a fireman’s carry requires powerful core stabilization. If the core gives out in this situation, one or both of the soldiers will surely be injured.
Spatial Awareness
Combat is unpredictable, and the types of body positions a soldier finds himself in may be far outside anything he has specifically trained for. When one is taken off the feet, everything feels different; the ability to function while in an unpredictable spatial orientation could be the difference between injury and mission accomplishment. Soldiers could find themselves completely upside
down when crossing an obstacle, when flipped due to a vehicle accident or hang-up on a rappel descent, or when crawling around the tight spaces inside armored vehicles. Soldiers who have been upside down in training are more likely to find themselves landing on their feet instead of on their necks and shoulders in a similar situation.
MASTERS OF BODY CONTROL
There currently exists a kind of athlete who can perform the above physical tasks with ease. The athlete that demonstrates the highest degree of strength, stamina,
coordination, agility, and balance while handling his own body weight is the gymnast. This is undeniable; if you don’t believe it, go to your garage, hang up a couple of ropes with loops at the bottom, and perform an iron cross by extending your arms straight out to the sides until parallel with the ground. Now that you have failed miserably at a “B”-level gymnastics skill that every competitive teenage boy gymnast can do, read on. To put this into context, “A” is considered an easy movement in gymnastics terminology, and “E” a difficult one.

® CrossFit is a registered trademark of CrossFit, Inc.
© 2008 All rights reserved.
Subscription info at http://store.crossf it.com
Feedback to feedback@crossf it.com
3 of 11
Combat Gymnastics (continued...)
If gymnasts possess the highest degree of physical skills necessary for accomplishing the four soldier physical demands described earlier (pulling, pressing, core strength, and spatial awareness), why is this powerful training methodology not being utilized in military physical training? We think it’s largely the result of a complex of misperceptions:
The perception that gymnastics is a “female” event. Ask someone to name a famous gymnast and probably all they will come up with is Mary Lou Retton.The perception that the men who do participate in gymnastics are “sissies” (a.k.a. the white stirrup pants PR problem).The perception that a lot of specialized, expensive equipment is necessary to practice gymnastics.The perception that supervising gymnastics training requires an extensive coaching background.The perception that you need to be some kind of physical “freak” to perform gymnastics movements like those seen on television during the Olympics.
This article aims to put these perceptions to rest and to get soldiers performing the most beneficial body control training available—period.
GYMNASTICS FOR SOLDIERS
In order to get soldiers practicing safe, effective gymnastics training, the program we describe was developed with the following principles in mind:
The movements use only equipment readily available on a military base or commercial gym, or inexpensive homemade gymnastics equipment.The movements describe series of skill progressions. The beginner versions will be challenging for most; it will likely take months to years to accomplish the advanced version.The program lends itself to group physical training (PT) sessions. It has been created so a large group can be broken into circuit stations, and the circuit
•
•
•
•
•
•
•
•
can be finished within the one hour normally allotted for military PT sessions (including warm-up and cool down).
Before we explain the movements and the circuit, some safety points require emphasis:
Always confirm that the equipment to be used is serviceable. The time to realize that the straps holding your rings are about to give out is NOT when a trainee is in an inverted position on them.Use a spotter. One is required to accomplish the majority of these movements anyway. Ensure that the spotter is paying attention to the trainee and not goofing off.The movements have been put in a progression from beginner to advanced. Don’t be in a hurry to move to the advanced version of the movement. Let the body adapt before progressing in difficulty.
THE MOVEMENTS
1. Boat Rock
Boat rocks develop core stability in the trainee, as well as coordination and awareness of core functioning. These are far more effective than something like Swiss ball crunches.
Beginner – Rock and hold
Lie on your back with your arms stretched overhead and your legs straight. Then lift your feet and hands approximately a foot off the ground and press your lower back into the ground. A spotter can assist here by attempting to place a hand underneath the lower back of the trainee; if the hand can get under, the lower back is not pressed firmly enough into the ground. Then rock back and forth on the buttocks and lower back, holding a rigid body position. After five repetitions, hold the starting position for five seconds. Repeat the sequence. Work up to performing the progression eight times (that’s 40 boat rocks interspersed with 40 seconds of holding).
•
•
•
® CrossFit is a registered trademark of CrossFit, Inc.
© 2008 All rights reserved.
Subscription info at http://store.crossf it.com
Feedback to feedback@crossf it.com
4 of 11
Combat Gymnastics (continued...)
Intermediate – Rock with V-snaps
Perform the boat rocks as described above. After five reps, however, instead of holding, perform five V-snaps by raising your upper body and hands simultaneously so that your feet and hands meet approximately above your navel. A common error is to lift the feet only—be sure to lift your upper body and legs at the same time. Once you can perform the progression eight times (that’s 40 boat rocks interspersed with 40 V-snaps), you are ready to move on to the advanced move.
Advanced – Rock/V-snap/hold
This time, do five boat rocks; hold for five seconds; perform five V snaps; repeat. If you can perform this progression eight times you will never be troubled again by a sadistic superior ordering, “Leg lifts! Begin! One two three ONE!”
2. Pullover
The pullover progression will develop tremendous pulling and core strength, as well as spatial awareness. It is also a method of surmounting an obstacle.
Beginner – L pull-up
Grasp a pull-up bar with palms facing away from you (pronated). With straight arms and legs, lift your legs until they are extended straight out in front of you in an L position. Then perform a pull-up, maintaining the L position. If your legs drop, you will still get tremendous benefit out of this movement. If maintaining even an approximation of an L position is clearly impossible for you, a spotter can assist by holding your feet up, or you can bend your legs and hold your thighs up, parallel to the ground. Once you can perform ten strict L pull-ups with no assistance, you are ready to move on to the next progression.
Intermediate – Hips to bar
Perform an L pull-up as described above. At the top position, maintain the L, keep your arms straight, and pull your hips up and back to the bar. Lower your hips and legs back down into the L-hang position and repeat. A spotter may be necessary to push your hips toward the bar at first. Once you can perform five of these with no assistance, you are ready to move on.
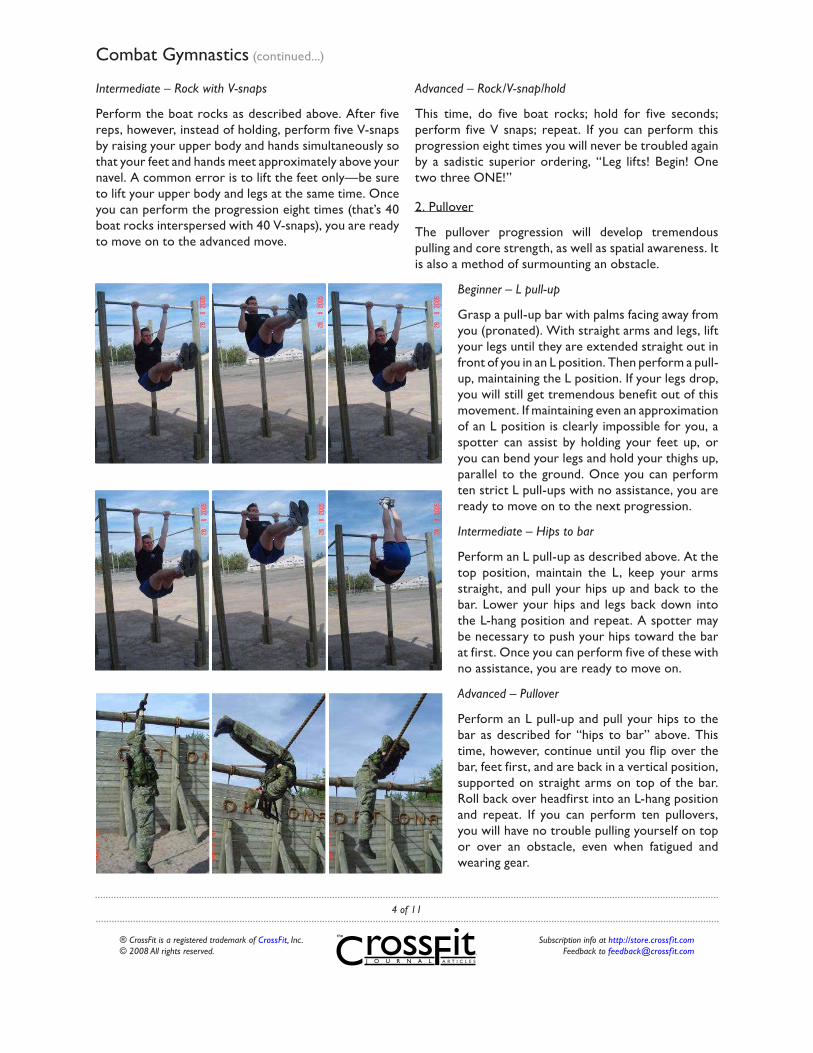
Advanced – Pullover
Perform an L pull-up and pull your hips to the bar as described for “hips to bar” above. This time, however, continue until you flip over the bar, feet first, and are back in a vertical position, supported on straight arms on top of the bar. Roll back over headfirst into an L-hang position and repeat. If you can perform ten pullovers, you will have no trouble pulling yourself on top or over an obstacle, even when fatigued and wearing gear.
® CrossFit is a registered trademark of CrossFit, Inc.
© 2008 All rights reserved.
Subscription info at http://store.crossf it.com
Feedback to feedback@crossf it.com
5 of 11
Combat Gymnastics (continued...)
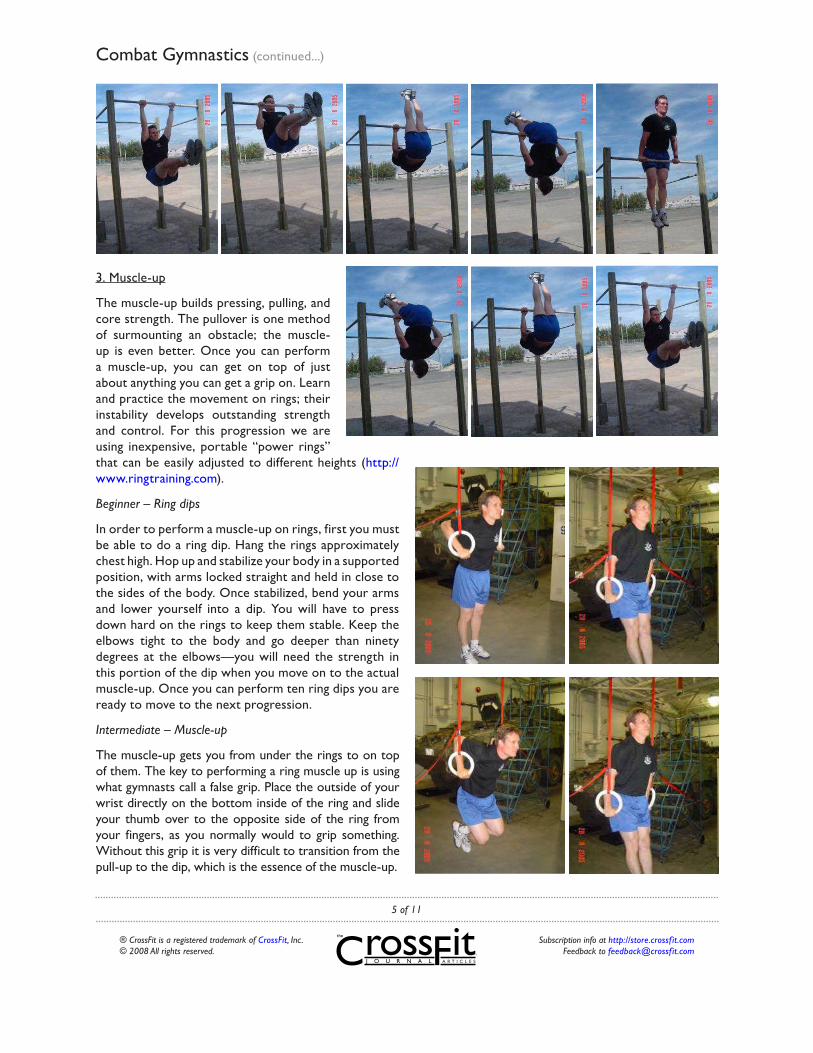
3. Muscle-up
The muscle-up builds pressing, pulling, and core strength. The pullover is one method of surmounting an obstacle; the muscle-up is even better. Once you can perform a muscle-up, you can get on top of just about anything you can get a grip on. Learn and practice the movement on rings; their instability develops outstanding strength and control. For this progression we are using inexpensive, portable “power rings” that can be easily adjusted to different heights (http://www.ringtraining.com).
Beginner – Ring dips
In order to perform a muscle-up on rings, first you must be able to do a ring dip. Hang the rings approximately chest high. Hop up and stabilize your body in a supported position, with arms locked straight and held in close to the sides of the body. Once stabilized, bend your arms and lower yourself into a dip. You will have to press down hard on the rings to keep them stable. Keep the elbows tight to the body and go deeper than ninety degrees at the elbows—you will need the strength in this portion of the dip when you move on to the actual muscle-up. Once you can perform ten ring dips you are ready to move to the next progression.
Intermediate – Muscle-up
The muscle-up gets you from under the rings to on top of them. The key to performing a ring muscle up is using what gymnasts call a false grip. Place the outside of your wrist directly on the bottom inside of the ring and slide your thumb over to the opposite side of the ring from your fingers, as you normally would to grip something. Without this grip it is very difficult to transition from the pull-up to the dip, which is the essence of the muscle-up.

® CrossFit is a registered trademark of CrossFit, Inc.
© 2008 All rights reserved.
Subscription info at http://store.crossf it.com
Feedback to feedback@crossf it.com
6 of 11
Combat Gymnastics (continued...)
Once you have the false grip, hang from the rings with your arms just slightly flexed (to help maintain the false grip) and then pull yourself up. Once at the top of your pull-up, throw your face forward and your elbows back, and perform a dip. This is easier said than done; you will have to pull yourself up powerfully to get into the dip starting position. Keep the rings tight to the sides of your body the entire time or you will inadvertently end up in a pseudo-iron cross. This pull-up to dip transition takes considerable skill. To learn the mechanics, you can perform the pull-up with a small jump or spot assist to get into the dip. However, the only legitimate muscle-up is the hanging type. Once you can perform five consecutive muscle-ups you are ready to move on to the next progression. Note how the muscle-up duplicates the motion required by the soldier pulling himself into a window or over a wall.
Advanced – Muscle-up to L-sit
Perform a muscle-up as described above. Then lift your legs until you are in the L position. Attempt to push your hips forward so they are even with the hands, not behind them. Hold for five seconds, lower your legs, and return to the hanging position. If you can perform five of these, no window, balcony, or wall will be able to keep you from your objective.
4. Rope Climb
Climbing a rope builds strength in the pulling muscles and core. A side benefit to climbing a rope is the iron grip you develop through repetition. This is a military basic exercise; if you are a soldier and unable to climb a rope, go hang your head in shame. Then start working on this progression.
Beginner – Rope climb with leg
assist
There are several ways to use the legs to help grip the rope, but this is the most effective. Wrap the rope completely around your right leg so it is resting on your right instep, then step on the rope with your left foot. Now pull yourself up the rope using your arms to
pull while pushing with your feet and legs. You will know if you have the foot placement correct if you can stop and rest halfway up while dangling one arm. After you can climb the rope with ease in this manner, you are ready to move on. Note how this exercise is exactly the same as that used by a soldier to…climb a rope!

® CrossFit is a registered trademark of CrossFit, Inc.
© 2008 All rights reserved.
Subscription info at http://store.crossf it.com
Feedback to feedback@crossf it.com
7 of 11
Combat Gymnastics (continued...)
Intermediate – Rope climb, arms only
This one is self-explanatory. Grab the rope and pull yourself up it with feet not touching the rope (it helps to get a little momentum going). This one will really tax
your grip. If you are a real stud and have a double rope setup you can climb in a two-at-a-time fashion as shown in the photos below.
Advanced – Rope climb in straddle L-sit
Start by sitting on the ground with legs spread (straddled). Pull yourself up the rope while maintaining your legs in this position. If this hurts everywhere, you are probably performing it correctly. Once you can climb the rope in this fashion, no climbing obstacle will stand in your way.
5. Leg lift
This progression builds strength in the core and pulling muscles. Hit especially hard are the hip flexors, which are the prime movers in running, squatting, and sitting up.
Beginner – Leg lift
Grasp a pull-up bar with your palms facing away from you. Maintaining straight arms and legs, and keeping your legs together, lift your legs as high as you can. The goal is to touch your insteps on the bar. If you have to bend your arms, keep working until you can perform the movement with straight arms. Once you can perform ten of these you are ready to move on.
Intermediate - Jackknife
Perform the leg lift movement and hold your insteps on the bar. Now push your insteps six inches from the bar and bring them back, then repeat. Keep your feet up at the bar between reps. Maintain straight arms while you are performing these. Work up to ten consecutive reps before moving on to the advanced version.

® CrossFit is a registered trademark of CrossFit, Inc.
© 2008 All rights reserved.
Subscription info at http://store.crossf it.com
Feedback to feedback@crossf it.com
8 of 11
Combat Gymnastics (continued...)
Advanced – Lateral leg lift
Perform the leg lift movement, but this time bring the legs up in an arc to the left or right of the body. On the next repetition, lift the legs to the other side. Once you can perform ten of these, you will likely set a battalion sit-up record on your next PT test.
6. Parallette L-sit/planche
This progression builds strength in the pressing and core musculature. We are using homemade parallettes (low, freestanding parallel bars) for this progression; they cost approximately thirty dollars to build using ABS or PVC
pipe, a hacksaw, and ABS/PVC glue. (For instructions on building homemade parallettes, see CrossFit Journal 13, September 2003).
Beginner – Tuck sit to tuck hip lift
Support your body weight with straight arms on the parallettes with your knees tucked into your chest. Attempt to push your hips forward so that they are in line with or in front of your hands. Hold for several seconds. Then lift your hips up and back so that your feet rest on the bars. You will have to lean forward slightly, which puts load on the chest and deltoids. Really concentrate on lifting your hips up and back in a controlled fashion (no swinging). From this position, move
back to the tuck sit position and repeat. When you can do this ten times you are ready to move on.
Intermediate – L-sit to tuck planche
Support your body weight on the parallettes as with the tuck sit, but this time hold your legs straight out in front of your hips, making your body into an L shape. This is substantially more difficult than the tuck sit because of the longer levers (legs) in front. Hold this position for five seconds. Then lift your hips up and back while tucking in your knees, but do not place your feet on the parallettes as in the first progression. This is position is termed a tuck planche; you will feel it just about everywhere. Do not be alarmed if you can’t lift your hips very high at first; as long as you are actively trying to lift your hips, you will garner the core strength benefits of this movement. Hold this position for five seconds. Move back into the L-sit for four seconds, then back to the tuck planche
for four, then for three, two, one. Keep working on this progression until you can get your hips at the same height as your shoulders with no rounding of your back for all five time cycles.
® CrossFit is a registered trademark of CrossFit, Inc.
© 2008 All rights reserved.
Subscription info at http://store.crossf it.com
Feedback to feedback@crossf it.com
9 of 11
Combat Gymnastics (continued...)
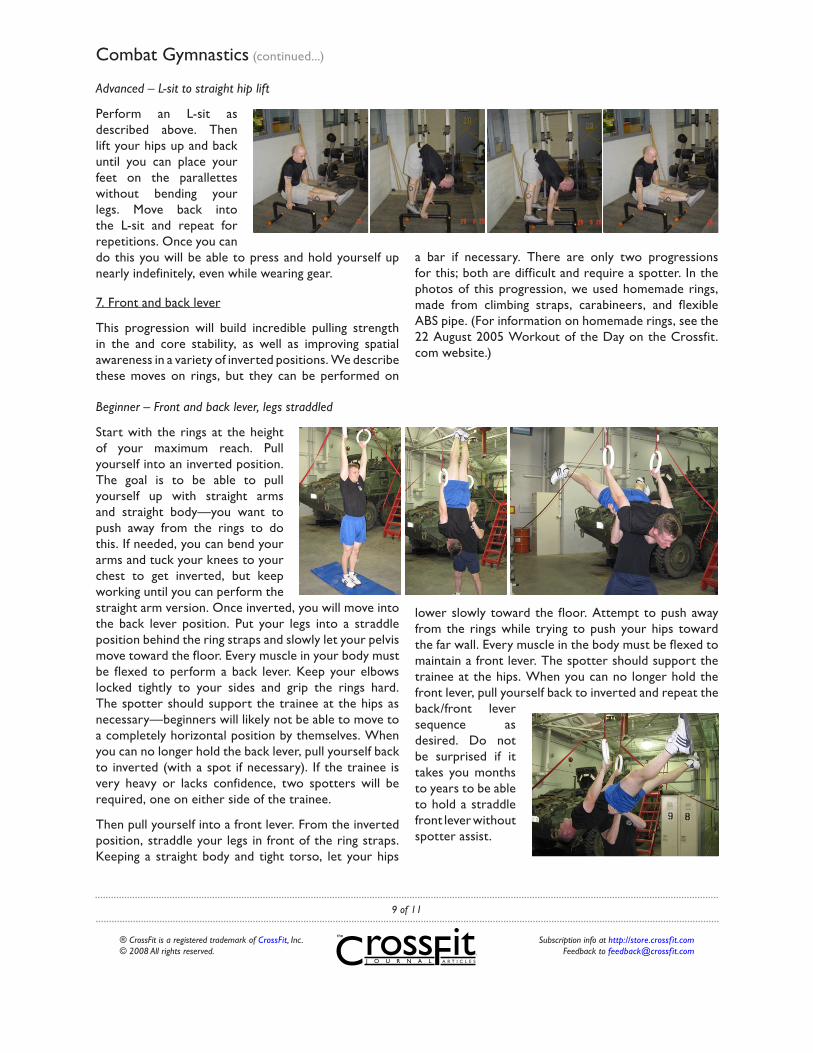
Advanced – L-sit to straight hip lift
Perform an L-sit as described above. Then lift your hips up and back until you can place your feet on the parallettes without bending your legs. Move back into the L-sit and repeat for repetitions. Once you can do this you will be able to press and hold yourself up nearly indefinitely, even while wearing gear.
7. Front and back lever
This progression will build incredible pulling strength in the and core stability, as well as improving spatial awareness in a variety of inverted positions. We describe these moves on rings, but they can be performed on
a bar if necessary. There are only two progressions for this; both are difficult and require a spotter. In the photos of this progression, we used homemade rings, made from climbing straps, carabineers, and flexible ABS pipe. (For information on homemade rings, see the 22 August 2005 Workout of the Day on the Crossfit. com website.)
Beginner – Front and back lever, legs straddled
Start with the rings at the height of your maximum reach. Pull yourself into an inverted position. The goal is to be able to pull yourself up with straight arms and straight body—you want to push away from the rings to do this. If needed, you can bend your arms and tuck your knees to your chest to get inverted, but keep working until you can perform the straight arm version. Once inverted, you will move into the back lever position. Put your legs into a straddle position behind the ring straps and slowly let your pelvis move toward the floor. Every muscle in your body must be flexed to perform a back lever. Keep your elbows locked tightly to your sides and grip the rings hard. The spotter should support the trainee at the hips as necessary—beginners will likely not be able to move to a completely horizontal position by themselves. When you can no longer hold the back lever, pull yourself back to inverted (with a spot if necessary). If the trainee is very heavy or lacks confidence, two spotters will be required, one on either side of the trainee.
Then pull yourself into a front lever. From the inverted position, straddle your legs in front of the ring straps. Keeping a straight body and tight torso, let your hips
lower slowly toward the floor. Attempt to push away from the rings while trying to push your hips toward the far wall. Every muscle in the body must be flexed to maintain a front lever. The spotter should support the trainee at the hips. When you can no longer hold the front lever, pull yourself back to inverted and repeat the back/front lever sequence as desired. Do not be surprised if it takes you months to years to be able to hold a straddle front lever without spotter assist.

® CrossFit is a registered trademark of CrossFit, Inc.
© 2008 All rights reserved.
Subscription info at http://store.crossf it.com
Feedback to feedback@crossf it.com
10 of 11
Combat Gymnastics (continued...)
Advanced – Front and back lever, legs
together
This sequence is the same as for the straddle levers, except that you keep your legs together. This amplifies the difficulty by lengthening the lever and creating a larger moment around the core. Spotting is the same. If you can complete a front lever in this fashion, you have mastered a gymnastics B-level move. Although you will probably not ever perform a front lever on operations unless you happen to be ordered to negotiate an anti-personnel, multi-variation alternating optical pulsing laser field,
the strength, stability, and spatial awareness it requires you to develop will serve you well in plenty of other situations.
8. Handstand
Working handstands improves pressing ability, core strength, and spatial awareness, as well as increasing shoulder stability and flexibility.
Beginner – Back to the wall handstand
Face a wall and place your hands shoulder-width apart on the ground in front of you. Lock your arms straight, raise your hips high, and kick off with the leg you jump with; the other leg will swing up and over toward the wall. You will have to kick hard, but don’t worry, you won’t knock over the wall. A spotter can help the trainee get his hips aligned over his shoulders and lift the legs into position, if needed. Press your hands down hard against the floor and shrug your shoulders toward your ears (“active” shoulders). You want to have your hands as close to the wall as possible, and have your entire body flat against the wall (you should be able to look up at your feet). Avoid arching your back, which creates habits that will keep you from being able perform a handstand with no support. Once you can hold this handstand on the wall for thirty seconds you are ready to move on.
Intermediate – Front to the wall handstand
Stand directly in front of a wall, with your back to it, and place your hands on the ground in front of you. Walk up the wall by moving your feet one at a time backward up the wall and your hands toward the wall. It is a good idea to have a spotter for this at first. Get your hands as close as possible to the wall, attempting to have the front of your body completely against the wall. You have two choices to get out of this position: either walk your hands back out and your feet down the wall or tuck your head and roll out on your back, if you know how to do it. Once you can hold this handstand for thirty seconds, you are ready to move on.

® CrossFit is a registered trademark of CrossFit, Inc.
© 2008 All rights reserved.
Subscription info at http://store.crossf it.com
Feedback to feedback@crossf it.com
11 of 11
Combat Gymnastics (continued...)
Advanced – Partner assist handstand
Move away from the wall with a partner. This time when you kick into the handstand your spotter will catch your feet and help you stabilize yourself. When your partner feels that you are holding the handstand yourself, he will move his hands slightly away from your feet, keeping one hand in front and one in back, ready to stabilize you if you lose balance. You can control your forward and backward movement in the handstand by using pressure from your palms and fingertips. If you are a real hero, you can now try performing some handstand push-ups by bending your arms, lowering your head toward the floor, and then pressing back up into a straight-arm handstand position.
CIRCUIT TRAINING
These movements were chosen to accommodate as large a group as necessary. It will take several days, at least, of learning and practicing the movements before you are able to make this into a circuit-style workout. Do not give into temptation and skip this teaching component; you are asking for injuries or sub-standard performance if you do. Once your trainees have a good grasp of the beginner progressions, you can have them perform those movements in a conditioning circuit workout:
Set up stations for the eight movement progressions. Each station can accommodate groups of two to three; therefore, you can run a group of 24 through a circuit using one set of equipment for each station. Any more than this and you will have to double the equipment at each station.Perform a ten-minute warm up.Break the group into twos or threes depending on equipment and send them to their stations.Give each group five minutes at each station. While one trainee works, the other one or two act as spotters, and then they switch. Have them perform as many sets as possible within the five-minute period. If your soldiers are working hard and not goofing off, they should be able to get in three sets per station. Rotate to the next station after five minutes. As the leader you may have to forego your own workout and spend your time correcting form and coaching instead. This is technical PT, and supervision is necessary. You can arrive early or do your circuit at lunch so your soldiers don’t think you’re a shirker.Once everyone has been to all eight stations, have then perform a ten-minute cool-down.
•
••
•
•
You now possess the tools to bring the body control abilities of your soldiers to a much higher level. You may choose to ignore this information because you can’t scrounge thirty dollars to make some parallettes or because you are afraid of looking silly by trying something new in front of the other platoon commanders. Ignore this information at your peril, however, as gymnastics training is by far the best physical training that soldiers can perform to increase their body control ability—a skill that may save their lives.