commitment on the part of native instruments gmbh. … · bit reduction effects are used to distort...
TRANSCRIPT
MANUAL
The information in this document is subject to change without notice and does not represent acommitment on the part of Native Instruments GmbH. The software described by this docu-ment is subject to a License Agreement and may not be copied to other media. No part of thispublication may be copied, reproduced or otherwise transmitted or recorded, for any purpose,without prior written permission by Native Instruments GmbH, hereinafter referred to as NativeInstruments.
“Native Instruments”, “NI” and associated logos are (registered) trademarks of Native Instru-ments GmbH.
Mac, Mac OS, GarageBand, Logic, iTunes and iPod are registered trademarks of Apple Inc.,registered in the U.S. and other countries.Windows, Windows Vista and DirectSound are registered trademarks of Microsoft Corporationin the United States and/or other countries.All other trademarks are the property of their respective owners and use of them does not implyany affiliation with or endorsement by them.
Document authored by: David Gover, Jan Ola Korte
Software version: 1.0 (06/2018)
Disclaimer

NATIVE INSTRUMENTS GmbHSchlesische Str. 29-30D-10997 BerlinGermanywww.native-instruments.de
NATIVE INSTRUMENTS North America, Inc.6725 Sunset Boulevard5th FloorLos Angeles, CA 90028USAwww.native-instruments.com
NATIVE INSTRUMENTS K.K.YO Building 3FJingumae 6-7-15, Shibuya-ku,Tokyo 150-0001Japanwww.native-instruments.co.jp
NATIVE INSTRUMENTS UK Limited18 Phipp StreetLondon EC2A 4NUUKwww.native-instruments.co.uk
NATIVE INSTRUMENTS FRANCE SARL113 Rue Saint-Maur75011 ParisFrance
www.native-instruments.com
SHENZHEN NATIVE INSTRUMENTS COMPANY Limited203B & 201B, Nanshan E-Commerce Base OfInnovative Services
Shi Yun Road, Shekou, Nanshan, ShenzhenChina
www.native-instruments.com
© NATIVE INSTRUMENTS GmbH, 2018. All rights reserved.
Contact
Table of Contents1 Welcome to CRUSH PACK ..........................................................................................5
2 Document Conventions ..............................................................................................6
3 Controls in the User Interface ....................................................................................7
4 BITE .........................................................................................................................10
4.1 About Bit and Sample Reduction Effects .................................................................................... 10
4.2 Overview of BITE ......................................................................................................................... 10
5 DIRT .........................................................................................................................14
5.1 About Distortion Effects .............................................................................................................. 14
5.2 Overview of DIRT ......................................................................................................................... 14
6 FREAK .......................................................................................................................17
6.1 About Ring Modulator and Frequency Shifter Effects .................................................................. 17
6.2 Overview of FREAK ...................................................................................................................... 17
6.3 Modulation Types ........................................................................................................................ 20
6.4 Radio Mode ................................................................................................................................. 21
6.5 Oscillator Mode ........................................................................................................................... 22
6.6 Sidechain Mode .......................................................................................................................... 23
7 Header and Presets ...................................................................................................25
7.1 Loading Presets .......................................................................................................................... 26
7.2 Saving Presets ............................................................................................................................ 28
7.3 Comparing Parameter Settings .................................................................................................. 29
8 Troubleshooting ........................................................................................................30
Table of Contents
CRUSH PACK - MANUAL - 4

1 Welcome to CRUSH PACK
CRUSH PACK is part of Native Instruments’ KOMPLETE Instruments & Effects series. It con-sists of three plug-ins that are designed for use in your host, offering new takes on classic dis-tortion effects:
▪ BITE: A bit and sample rate reduction effect that can be used to emulate early digital devi-ces, roughen up sound and add more character to any audio signal. For more information,refer to ↑4, BITE.
▪ DIRT: A comprehensive distortion device with destructive capability that can be used tosimulate warm, overdriven tube sounds and also generate drastic distortions. For more in-formation, refer to ↑5, DIRT.
▪ FREAK: A ring modulation and frequency shifting effect that can be used to transform, addmovement, roughen up, and convert the harmonics of signals. For more information, referto ↑6, FREAK.
The CRUSH PACK: BITE, DIRT, FREAK
Welcome to CRUSH PACK
CRUSH PACK - MANUAL - 5

2 Document Conventions
This document uses particular formatting to point out special facts and to warn you of poten-tial issues. The icons introducing the following notes let you see what kind of information canbe expected:
The speech bubble icon indicates a useful tip that may often help you to solve a task more effi-ciently.
The exclamation mark icon highlights important information that is essential for the given context.
The red cross icon warns you of serious issues and potential risks that require your full attention.
Furthermore, the following formatting is used:
▪ Text appearing in (drop-down) menus (such as Open…, Save as… etc.) in the software andpaths to locations on your hard disk or other storage devices is printed in italics.
▪ Text appearing elsewhere (labels of buttons, controls, text next to checkboxes etc.) in thesoftware is printed in blue. Whenever you see this formatting applied, you will find thesame text appearing somewhere on the screen.
▪ Important names and concepts are printed in bold.
▪ References to keys on your computer’s keyboard you’ll find put in square brackets (e.g.,“Press [Shift] + [Enter]”).
► Single instructions are introduced by this play button type arrow.
→ Results of actions are introduced by this smaller arrow.
Document Conventions
CRUSH PACK - MANUAL - 6
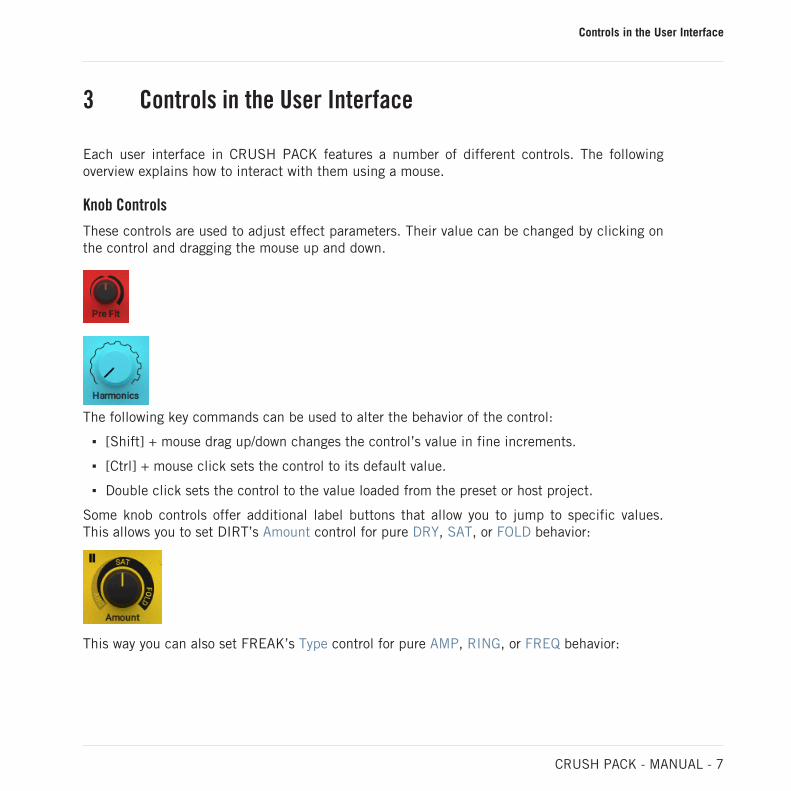
3 Controls in the User Interface
Each user interface in CRUSH PACK features a number of different controls. The followingoverview explains how to interact with them using a mouse.
Knob Controls
These controls are used to adjust effect parameters. Their value can be changed by clicking onthe control and dragging the mouse up and down.
The following key commands can be used to alter the behavior of the control:
▪ [Shift] + mouse drag up/down changes the control’s value in fine increments.
▪ [Ctrl] + mouse click sets the control to its default value.
▪ Double click sets the control to the value loaded from the preset or host project.
Some knob controls offer additional label buttons that allow you to jump to specific values.This allows you to set DIRT’s Amount control for pure DRY, SAT, or FOLD behavior:
This way you can also set FREAK’s Type control for pure AMP, RING, or FREQ behavior:
Controls in the User Interface
CRUSH PACK - MANUAL - 7

Numeric Controls
These controls are used to adjust effect parameters. Their value can be changed by clicking onthe control and dragging the mouse up and down.
The following key commands can be used to alter the behavior of the control:
▪ [Shift] + mouse drag up/down changes the control’s value in fine increments.
▪ [Ctrl] + mouse click sets the control to its default value.
▪ Double click sets the control to the value loaded from the preset or host project.
Button Controls
These controls are used to switch functions on or off. Their value can be changed by clickingon the control.
Controls in the User Interface
CRUSH PACK - MANUAL - 8
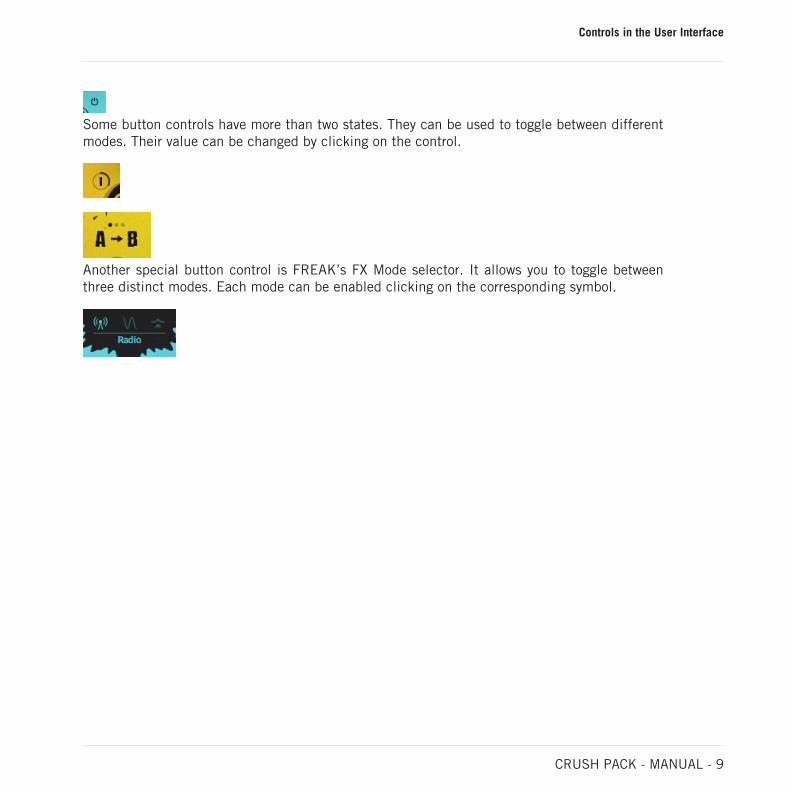
Some button controls have more than two states. They can be used to toggle between differentmodes. Their value can be changed by clicking on the control.
Another special button control is FREAK’s FX Mode selector. It allows you to toggle betweenthree distinct modes. Each mode can be enabled clicking on the corresponding symbol.
Controls in the User Interface
CRUSH PACK - MANUAL - 9
4 BITE
In this chapter you can learn about BITE. It includes a general note about bit and sample ratereduction effects and an overview of the BITE plug-in.
4.1 About Bit and Sample Reduction Effects
Bit reduction effects are used to distort sound by resampling digital audio signals at a lower bitrate and therefore lowering their resolution. This degrades the audio signal and gives it a quali-ty resembling pulse wave signals. At low settings, bit crushing produces harsh distortion, whilehigher settings simulate the “vintage” sound of older drum machines and samplers.
Sample rate reduction effects (also called down-sampling) convert the digital audio signal to alower sample rate, adding distortion and aliasing to the sound. This can be used to achievelow-fi effects that emulate vintage studio equipment or to simply add grittiness to the sound.Extreme reductions completely break the integrity of the signal beyond recognition.
Bit and sample rate reduction effects can intentionally be used to not only reduce the resolu-tion and bandwidth of the signal but also attenuate the high frequencies, or add noise with acertain “bite” to the sound. BITE combines the two techniques in a single plug-in, making itpossible to add complex textures to the signal or completely deteriorate the sound in many dif-ferent ways.
4.2 Overview of BITE
BITE is an anti-aliased sample rate and bit reduction effect that can be used to create distor-tion effects that sound like vintage studio equipment, or inherently lo-fi sound sources, like oldvideo games. It simulates the audio being sampled and replayed using a low-quality samplerwith limited sample rate and bit depth.
BITE is divided into two sections that control the resampling frequency (kHz) and the bit depth(Bits). As a special feature, the Crunch control adjusts the level going into the bit reductionalgorithm, providing a smooth way to control the resolution without stepping effects.
BITE
About Bit and Sample Reduction Effects
CRUSH PACK - MANUAL - 10

The resampling algorithm also includes stereo clock jittering (Jitter), and the bit reduction al-gorithm provides stereo dither noise (Dither), allowing you to create a wide stereo image fromany source. The additional controls for filtering and saturation allow you to fine-tune the be-havior of the effect.
1
2
3
4
5
8
9
10
11
13
12
6 7Overview of BITE
(1) Header: Provides global functions related to preset management and plug-in behavior. Formore information, refer to ↑7, Header and Presets.
(2) kHz (resampling frequency): Adjusts the sampling frequency at which the input signal is re-sampled in a range of 100 Hz to 44100 Hz.
(3) Jitter: Adjusts the amount of clock jitter. This adds fluctuations to the sampling rate of theresampling algorithm, effectively making the signal noisier. The jitter is added to the left andright stereo channels independently, resulting in a wide stereo image for the noise component.
BITE
Overview of BITE
CRUSH PACK - MANUAL - 11
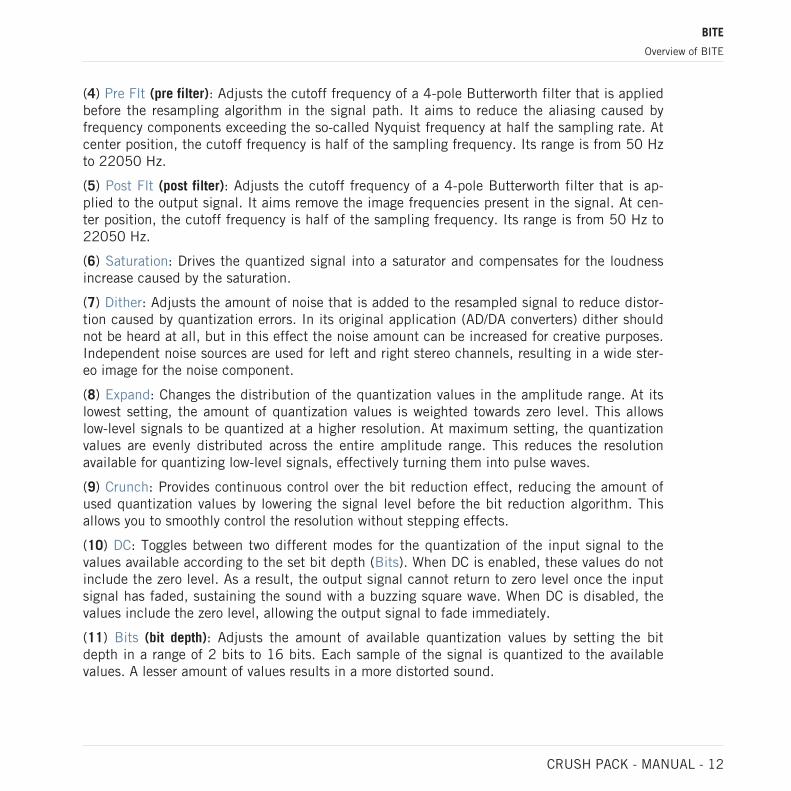
(4) Pre Flt (pre filter): Adjusts the cutoff frequency of a 4-pole Butterworth filter that is appliedbefore the resampling algorithm in the signal path. It aims to reduce the aliasing caused byfrequency components exceeding the so-called Nyquist frequency at half the sampling rate. Atcenter position, the cutoff frequency is half of the sampling frequency. Its range is from 50 Hzto 22050 Hz.
(5) Post Flt (post filter): Adjusts the cutoff frequency of a 4-pole Butterworth filter that is ap-plied to the output signal. It aims remove the image frequencies present in the signal. At cen-ter position, the cutoff frequency is half of the sampling frequency. Its range is from 50 Hz to22050 Hz.
(6) Saturation: Drives the quantized signal into a saturator and compensates for the loudnessincrease caused by the saturation.
(7) Dither: Adjusts the amount of noise that is added to the resampled signal to reduce distor-tion caused by quantization errors. In its original application (AD/DA converters) dither shouldnot be heard at all, but in this effect the noise amount can be increased for creative purposes.Independent noise sources are used for left and right stereo channels, resulting in a wide ster-eo image for the noise component.
(8) Expand: Changes the distribution of the quantization values in the amplitude range. At itslowest setting, the amount of quantization values is weighted towards zero level. This allowslow-level signals to be quantized at a higher resolution. At maximum setting, the quantizationvalues are evenly distributed across the entire amplitude range. This reduces the resolutionavailable for quantizing low-level signals, effectively turning them into pulse waves.
(9) Crunch: Provides continuous control over the bit reduction effect, reducing the amount ofused quantization values by lowering the signal level before the bit reduction algorithm. Thisallows you to smoothly control the resolution without stepping effects.
(10) DC: Toggles between two different modes for the quantization of the input signal to thevalues available according to the set bit depth (Bits). When DC is enabled, these values do notinclude the zero level. As a result, the output signal cannot return to zero level once the inputsignal has faded, sustaining the sound with a buzzing square wave. When DC is disabled, thevalues include the zero level, allowing the output signal to fade immediately.
(11) Bits (bit depth): Adjusts the amount of available quantization values by setting the bitdepth in a range of 2 bits to 16 bits. Each sample of the signal is quantized to the availablevalues. A lesser amount of values results in a more distorted sound.
BITE
Overview of BITE
CRUSH PACK - MANUAL - 12
(12) Mix: Blends between the dry signal and the wet signal by means of an equal-power cross-fade.
(13) HP: Adjusts the cutoff frequency of a 1-pole high-pass filter that is applied to the outputsignal. It aims remove low-frequency and DC components from the signal. It provides threecutoffs 5 Hz, 100 Hz and 200 Hz.
BITE
Overview of BITE
CRUSH PACK - MANUAL - 13

5 DIRT
In this chapter you can learn about DIRT. It includes a general note about distortion effectsand an overview of the DIRT plug-in.
5.1 About Distortion Effects
Distortion effects simulate the distortion created by analog circuits, which can be based onvacuum tubes or transistors. They add harmonic overtones to audio signals, usually by increas-ing their gain and clipping their contour, to produce a fuzzy, growling, or gritty sound.
Although they are often associated for use with electric guitar, they can also be used on otherinstruments or any audio signal to intentionally add warmth or distortion to a sound. Distortionadds harmonic or enharmonic overtones, which sound pleasing in small amounts (often calledsaturation), but can overtake sounds for intense or unnatural effects.
Distortion effects include controls for gain, which let you control how much the distortion al-ters the signal, and for tone, which let you shape the way the distortion alters the signal (byfiltering). DIRT combines two distortion units, which additionally offer control over the type ofclipping behavior.
5.2 Overview of DIRT
DIRT carefully provides more sophisticated and extreme sounds than possible with commondistortion pedals, while staying true to the ease of use associated with these effects.
It consists of two circuit-modeled diode clipping stages (A, B) that can be configured in seriesor parallel using the Routing control. There are three modes of distortion (I, II, III) which canbe used independently on each stage of the effect to set the type of clipping behavior. Thisallows you to explore different distortion characteristics and tonal qualities from subtle to moreextreme.
DIRT
About Distortion Effects
CRUSH PACK - MANUAL - 14
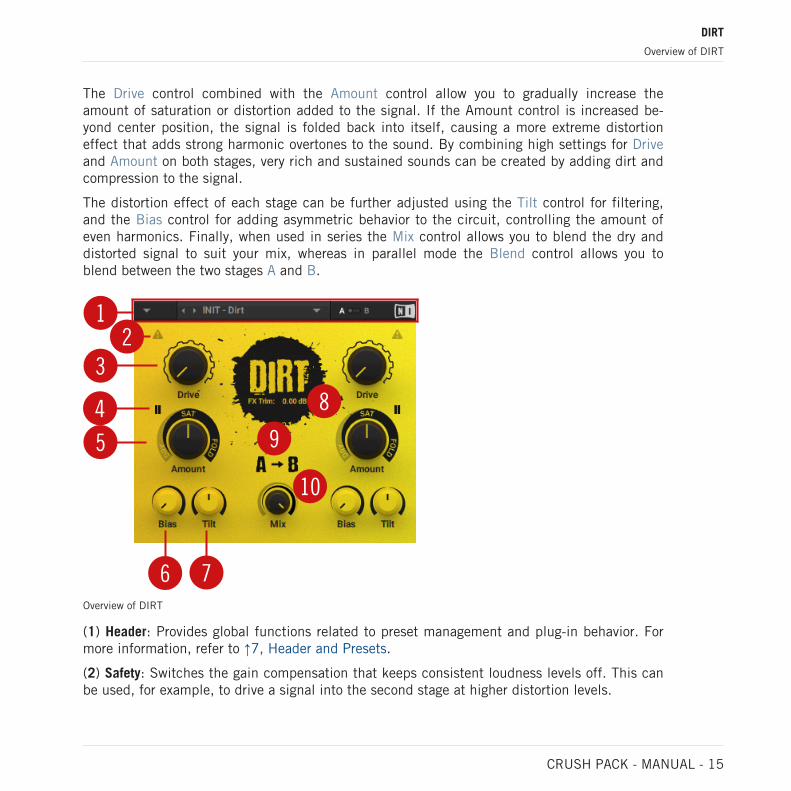
The Drive control combined with the Amount control allow you to gradually increase theamount of saturation or distortion added to the signal. If the Amount control is increased be-yond center position, the signal is folded back into itself, causing a more extreme distortioneffect that adds strong harmonic overtones to the sound. By combining high settings for Driveand Amount on both stages, very rich and sustained sounds can be created by adding dirt andcompression to the signal.
The distortion effect of each stage can be further adjusted using the Tilt control for filtering,and the Bias control for adding asymmetric behavior to the circuit, controlling the amount ofeven harmonics. Finally, when used in series the Mix control allows you to blend the dry anddistorted signal to suit your mix, whereas in parallel mode the Blend control allows you toblend between the two stages A and B.
12
3
4
6
8
7
9
10
5
Overview of DIRT
(1) Header: Provides global functions related to preset management and plug-in behavior. Formore information, refer to ↑7, Header and Presets.
(2) Safety: Switches the gain compensation that keeps consistent loudness levels off. This canbe used, for example, to drive a signal into the second stage at higher distortion levels.
DIRT
Overview of DIRT
CRUSH PACK - MANUAL - 15
(3) Drive: Controls the amount of input gain, increasing the intensity of the distortion.
(4) Mode: Selects one of three distortion modes to be used independently on stage A and stageB:
▪ I is the most subtle mode and adds the least amount of coloring to the audio signal.
▪ II is the default mode and is a well-balanced type of distortion with the brightest tone.
▪ III is the most extreme mode which adds a crushed type of distortion with a dark tone.
(5) Amount: Adjusts the amount of distortion by introducing saturation in the first half of itsrange and wave folding in the second half. Instead of clipping the signal, wave folding foldsthe waveform of the signal back into itself.
(6) Bias: Introduces asymmetry into the signal by adding asymmetric behavior to the circuit,which produces even harmonics. This prevents the distorted audio from sounding hollow.
(7) Tilt: Applies filtering to the distorted signal. When turned clockwise, low-frequency contentis attenuated and high-frequency content is boosted. When turned counterclockwise, low-fre-quency content is boosted and high-frequency content is attenuated.
(8) FX Trim: Adjusts the output level of the wet signal in a range of -18 dB to +6 dB. This canbe used to compensate for loudness differences between presets.
(9) Routing: Determines how the signal is routed between stage A and stage B of the effect:
▪ A > B serial routing configuration: The signal is fed into stage A, then into stage B.
▪ A < B serial routing configuration: The signal is fed into stage B, then into stage A.
▪ A + B parallel routing configuration: The signal is split into both stage A and stage B beforebeing mixed with the Blend control (10).
(10) Mix: Blends between the dry signal and the wet signal by means of an equal-power cross-fade. In A + B parallel routing configuration (9) Mix is replaced with the Blend control, allow-ing you to blend between the output signals of stage A and stage B.
DIRT
Overview of DIRT
CRUSH PACK - MANUAL - 16
6 FREAK
In this chapter you can learn about FREAK. It includes a general note about ring modulationand frequency shifter effects and an overview of the FREAK plug-in.
6.1 About Ring Modulator and Frequency Shifter Effects
Ring modulators and frequency shifters are used to distort sound by warping the harmonic con-tent of signals. They are based on amplitude modulation, which can create a wide range of ef-fects depending on the specific implementation and the used modulation source.
Amplitude modulation changes the level of a carrier signal according to the contour of a modu-lation signal. If the modulation signal is evolving slowly, the changes in level can be heard as ifturning a volume control. If the modulation signal is an audio signal, the changes in level be-come too rapid to be discernable. Instead, new frequencies are created, called sidebands.
Ring modulators and frequency shifters use this effect to apply harmonic transformations to asound that add and shift frequencies, resulting in metallic and bell-like tones. FREAK com-bines the different techniques in a single plug-in, making it possible to smoothly morph be-tween them. Its three modes completely change the character of the plug-in and facilitate theuse of different types of modulation sources.
6.2 Overview of FREAK
FREAK combines different amplitude modulation techniques and is based on a model of ananalog diode ring circuit that produces rich harmonic overtones and textures. In addition to awide range of harmonic transformations, its three FX Modes facilitate special applications likeAM radio simulation (Radio mode), tremolo and distortion (Oscillator mode), as well as gating(Sidechain mode).
In all three FX Modes the Type control smoothly morphs between basic amplitude modulation(AMP), ring modulation (RING), and frequency shifting (FREQ), while Harmonics and Feed-back allow you to control the intensity of the effect. The controls on the left side are specific toeach individual mode, making it possible to fully control its behavior.
FREAK
About Ring Modulator and Frequency Shifter Effects
CRUSH PACK - MANUAL - 17

1
2
3
4
5
7
8
9
6Overview of FREAK
(1) Header: Provides global functions related to preset management and plug-in behavior. Formore information, refer to ↑7, Header and Presets.
(2) Mode control 1: This control is specific to the selected FX Mode (9).
(3) Mode control 2: This control is specific to the selected FX Mode (9).
(4) Mode control 3: This control is specific to the selected FX Mode (9).
(5) Type: Morphs between three different amplitude modulation techniques: AMP (basic ampli-tude modulation, RING (ring modulation), and FREQ (frequency shifting). For more informa-tion, refer to ↑6.3, Modulation Types.
(6) Feedback: Adjusts the level of the feedback signal from the effect’s output to its input.This increases the amount of frequencies, or sidebands, created by the amplitude modulation.When the FX Mode (9) is set to Radio, Feedback additionally controls the amount of noise add-ed to the signal. Feedback can also be used to adjust the strength of the phasing effect pro-duced by applying frequency shifting (Type set to FREQ) at very low modulation rates (Freqcontrol).
FREAK
Overview of FREAK
CRUSH PACK - MANUAL - 18
(7) Harmonics: Adjusts the amount of harmonic overtones produced by the model of an analogdiode ring circuit used to implement the different amplitude modulation techniques in FREAK.
(8) Mix: Blends between the dry signal and the wet signal by means of an equal-power cross-fade.
(9) FX Mode: Switches between FREAK’s three basic modes of operation:
▪ Radio: AM radio emulation. For more information, refer to ↑6.4, Radio Mode.
▪ Oscillator: Pure sine wave modulation. For more information, refer to ↑6.5, OscillatorMode.
▪ Sidechain: External modulation. For more information, refer to ↑6.6, Sidechain Mode.
FREAK
Overview of FREAK
CRUSH PACK - MANUAL - 19
6.3 Modulation Types
In all three FX Modes the Type control smoothly morphs between three different amplitudemodulation techniques:
▪ AMP: Basic amplitude modulation. At modulation rates below the audio spectrum (<20 Hz), the level of the input signal, or carrier signal, changes slowly. This can be used fortremolo effects. At modulation rates in the audio spectrum (> 20 Hz), new frequencies areadded to the carrier signal, called sidebands. The sidebands are the sum and the differ-ence of the frequencies contained in the carrier and modulation signals. This way you canadd inharmonic content to the sound while maintaining its basic character.
▪ RING: Ring modulation, also called balanced modulation. At modulation rates below theaudio spectrum (< 20 Hz), the level of the input signal, or carrier signal, changes slowlywhile also periodically inverting its phase. This can be used for subtle phasing and distor-tion effects. At modulation rates in the audio spectrum (> 20 Hz), the carrier signal’s fre-quency content is replaced by new frequencies, called sidebands. The sidebands are thesum and the difference of the frequencies contained in the modulation signal and the in-put signal. This breaks up the harmonic structure of the sound and gives it a metallicsounding character.
▪ FREQ: Frequency shifting. This complex amplitude modulation technique shifts the inputsignal’s frequency content in the frequency spectrum by an amount that equals the modu-lation rate. For example, when setting a modulation rate of 100 Hz with the Freq control inOscillator mode, all frequencies contained in the input signal will be shifted up in the fre-quency spectrum by 100 Hz. This breaks up the harmonic structure of the sound and givesit a metallic sounding yet distinctly tonal character.
Frequency shifting can also be used to create strong phasing effects that appear to move endlesslyin the frequency spectrum (the so-called barber-pole effect). To achieve this, set Freq in a range ofroughly 0 Hz to 5 Hz and increase the amount of Feedback.
FREAK
Modulation Types
CRUSH PACK - MANUAL - 20
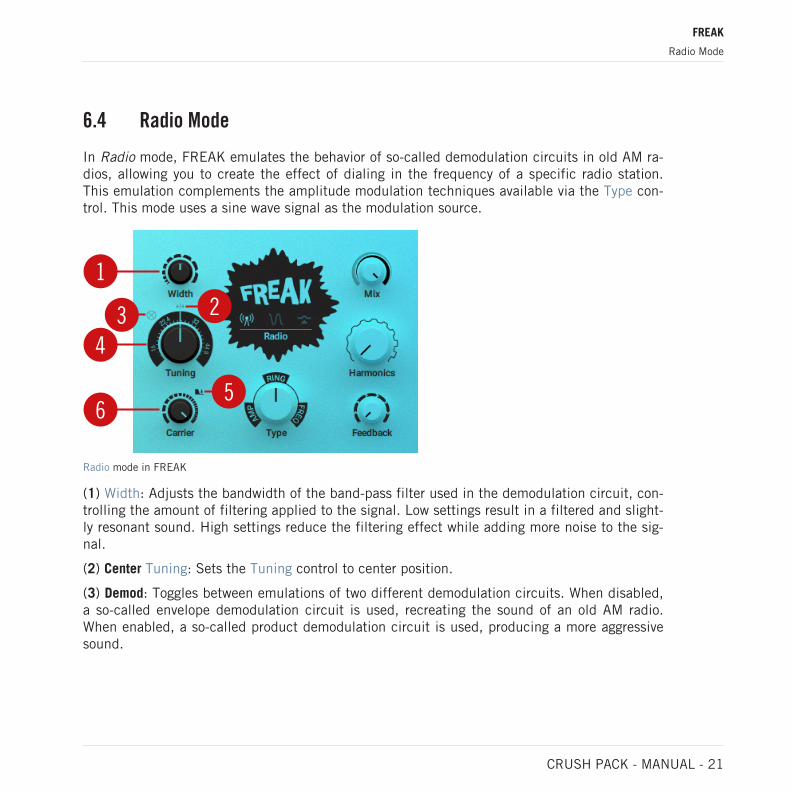
6.4 Radio Mode
In Radio mode, FREAK emulates the behavior of so-called demodulation circuits in old AM ra-dios, allowing you to create the effect of dialing in the frequency of a specific radio station.This emulation complements the amplitude modulation techniques available via the Type con-trol. This mode uses a sine wave signal as the modulation source.
1
4
6
3
5
2
Radio mode in FREAK
(1) Width: Adjusts the bandwidth of the band-pass filter used in the demodulation circuit, con-trolling the amount of filtering applied to the signal. Low settings result in a filtered and slight-ly resonant sound. High settings reduce the filtering effect while adding more noise to the sig-nal.
(2) Center Tuning: Sets the Tuning control to center position.
(3) Demod: Toggles between emulations of two different demodulation circuits. When disabled,a so-called envelope demodulation circuit is used, recreating the sound of an old AM radio.When enabled, a so-called product demodulation circuit is used, producing a more aggressivesound.
FREAK
Radio Mode
CRUSH PACK - MANUAL - 21

(4) Tuning: Emulates the effect of tuning an old AM radio, as if you were dialing in the fre-quency of a specific radio station. In center position, the best possible tuning is achieved. Asyou move the control away from center position, the amount of radio interference increases.
(5) Gate: Switches the noise gate on or off. When enabled, the noise added to the demodula-tion circuit is only passed through to the output if an input signal is present. When disabled,the noise is constantly passed through to the output, allowing you to use FREAK as a flexiblenoise source. The amount of noise can be adjusted with the Feedback control.
(6) Carrier: Adjusts the frequency of the carrier used in the demodulation circuit, controllingthe quality of the radio transmission. The quality improves as you increase the frequency.
6.5 Oscillator Mode
In Oscillator mode, you can explore the pure sound of the three different amplitude modulationtechniques available via the Type control. This modes uses a sine wave signal as the modula-tion source.
1
4
5
3 2
Oscillator mode in FREAK
(1) Stereo: Creates a wide stereo image by adding a phase offset to the modulation applied tothe left and right stereo channels.
(2) Center Freq: Sets the Freq control to center position.
FREAK
Oscillator Mode
CRUSH PACK - MANUAL - 22
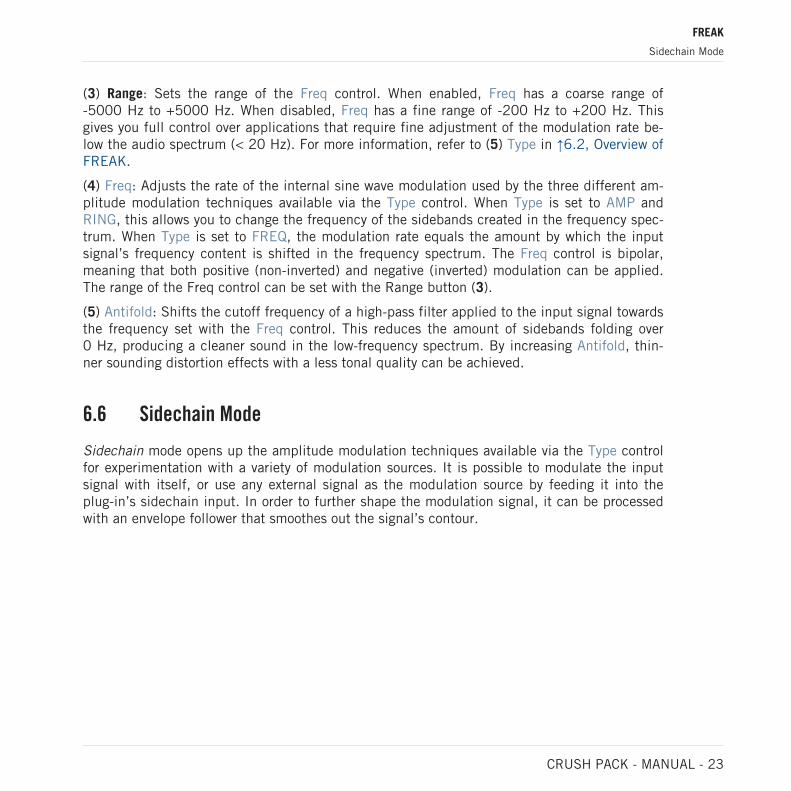
(3) Range: Sets the range of the Freq control. When enabled, Freq has a coarse range of-5000 Hz to +5000 Hz. When disabled, Freq has a fine range of -200 Hz to +200 Hz. Thisgives you full control over applications that require fine adjustment of the modulation rate be-low the audio spectrum (< 20 Hz). For more information, refer to (5) Type in ↑6.2, Overview ofFREAK.
(4) Freq: Adjusts the rate of the internal sine wave modulation used by the three different am-plitude modulation techniques available via the Type control. When Type is set to AMP andRING, this allows you to change the frequency of the sidebands created in the frequency spec-trum. When Type is set to FREQ, the modulation rate equals the amount by which the inputsignal’s frequency content is shifted in the frequency spectrum. The Freq control is bipolar,meaning that both positive (non-inverted) and negative (inverted) modulation can be applied.The range of the Freq control can be set with the Range button (3).
(5) Antifold: Shifts the cutoff frequency of a high-pass filter applied to the input signal towardsthe frequency set with the Freq control. This reduces the amount of sidebands folding over0 Hz, producing a cleaner sound in the low-frequency spectrum. By increasing Antifold, thin-ner sounding distortion effects with a less tonal quality can be achieved.
6.6 Sidechain Mode
Sidechain mode opens up the amplitude modulation techniques available via the Type controlfor experimentation with a variety of modulation sources. It is possible to modulate the inputsignal with itself, or use any external signal as the modulation source by feeding it into theplug-in’s sidechain input. In order to further shape the modulation signal, it can be processedwith an envelope follower that smoothes out the signal’s contour.
FREAK
Sidechain Mode
CRUSH PACK - MANUAL - 23
1
3
5
2
4
Sidechain mode in FREAK
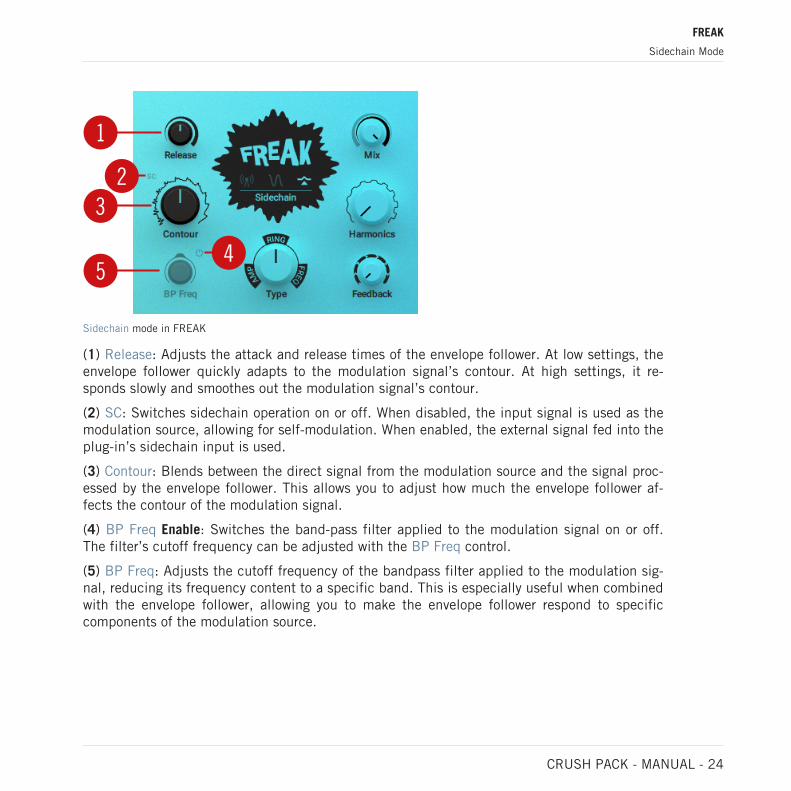
(1) Release: Adjusts the attack and release times of the envelope follower. At low settings, theenvelope follower quickly adapts to the modulation signal’s contour. At high settings, it re-sponds slowly and smoothes out the modulation signal’s contour.
(2) SC: Switches sidechain operation on or off. When disabled, the input signal is used as themodulation source, allowing for self-modulation. When enabled, the external signal fed into theplug-in’s sidechain input is used.
(3) Contour: Blends between the direct signal from the modulation source and the signal proc-essed by the envelope follower. This allows you to adjust how much the envelope follower af-fects the contour of the modulation signal.
(4) BP Freq Enable: Switches the band-pass filter applied to the modulation signal on or off.The filter’s cutoff frequency can be adjusted with the BP Freq control.
(5) BP Freq: Adjusts the cutoff frequency of the bandpass filter applied to the modulation sig-nal, reducing its frequency content to a specific band. This is especially useful when combinedwith the envelope follower, allowing you to make the envelope follower respond to specificcomponents of the modulation source.
FREAK
Sidechain Mode
CRUSH PACK - MANUAL - 24

7 Header and Presets
The Header can be found in BITE, DIRT, and FREAK. It provides global functions related topreset management and plug-in behavior.
The following sections show BITE as an example, however the functionality provided in the Headeris the same in all three plug-ins.
1 2 3 4
Preset functions in the Header
(1) Main menu: Allows you to save and delete user presets, as well as copy settings of the A/BComparison switch (see below). From here, you can also access the User Preset Folder. Formore information, refer to section ↑7.2, Saving Presets.The following additional entries are also available:
▪ Learn more about Bite/Dirt/Freak…: Opens the Native Instruments website where you candownload the CRUSH PACK Manual.
Header and Presets
CRUSH PACK - MANUAL - 25
▪ Touchscreen Mode: Enables compatibility with touch screens and pen tablets.
▪ View Size: Allows you to choose from five different sizes for the plug-in and save the cur-rent size as default value.
▪ Usage Data Tracking: Here you can learn more about Usage Data Tracking and choose toenable or disable it.
(2) Preset menu: Provides access to all factory and user presets. For more information, refer tosection ↑7.1, Loading Presets.
(3) A/B Comparison switch: Allows you to compare two sets of settings A and B. For more infor-mation, refer to section ↑7.3, Comparing Parameter Settings.
(4) NI logo: Opens the About screen, which shows the version number of the software.
7.1 Loading Presets
Each CRUSH PACK plug-in is provided with a wide range of factory presets that make full useof its sonic capabilities. You can put them to use with your music right away, or explore theirsound and settings to make yourself familiar with the plug-in.
All presets can be loaded directly from the user interface by using the Preset menu, includingyour own user presets.
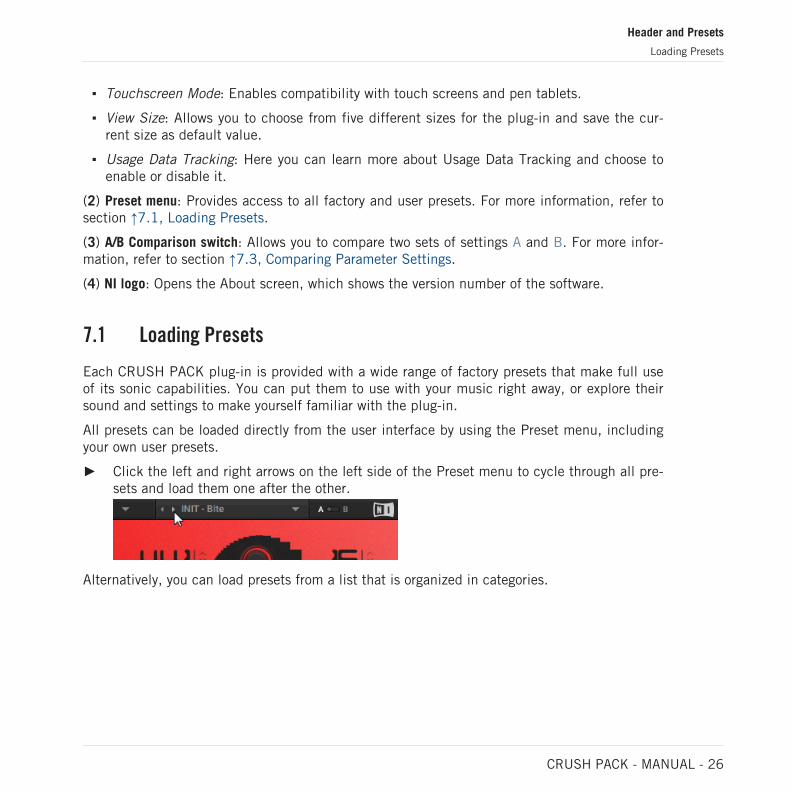
► Click the left and right arrows on the left side of the Preset menu to cycle through all pre-sets and load them one after the other.
Alternatively, you can load presets from a list that is organized in categories.
Header and Presets
Loading Presets
CRUSH PACK - MANUAL - 26
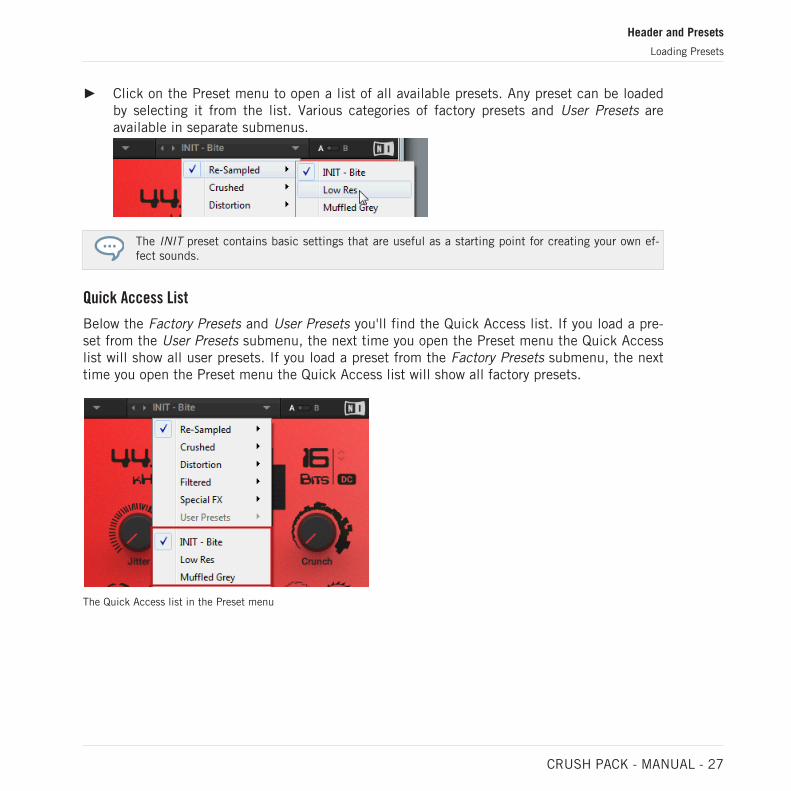
► Click on the Preset menu to open a list of all available presets. Any preset can be loadedby selecting it from the list. Various categories of factory presets and User Presets areavailable in separate submenus.
The INIT preset contains basic settings that are useful as a starting point for creating your own ef-fect sounds.
Quick Access List
Below the Factory Presets and User Presets you'll find the Quick Access list. If you load a pre-set from the User Presets submenu, the next time you open the Preset menu the Quick Accesslist will show all user presets. If you load a preset from the Factory Presets submenu, the nexttime you open the Preset menu the Quick Access list will show all factory presets.
The Quick Access list in the Preset menu
Header and Presets
Loading Presets
CRUSH PACK - MANUAL - 27

7.2 Saving Presets
If you have created an effect sound you want to keep for later use, you can save it to the UserPreset Folder. All presets in the User Preset Folder are available under User Presets in the Pre-set menu. This way you can always access your personal library of effect sounds directly fromthe user interface.
To save a user preset:
1. Open the Main menu by clicking on the arrow symbol in the left corner of the Header andselect Save as….
2. Enter a new name for your preset in the Save New Preset dialog box.
3. Click Ok to finish the process and close the dialog box.
→ Your user preset is saved in the user preset folder.
You can delete any of your user presets by loading the preset and then selecting Delete from theMain menu. Note that you cannot delete the factory presets.
User Preset Folder
The User Preset Folder contains all of your saved user presets. You can copy, delete or changethe name of user presets directly in the folder on your hard drive.
The plug-in needs to be reloaded in order to reflect any changes made in the User Preset Folder.
► To show the User Preset Folder on your hard drive, open the Main menu by clicking onthe arrow symbol in the left corner of the Header and select Show User Preset Folder.
→ A new system window opens showing the User Preset Folder on your hard drive.
Header and Presets
Saving Presets
CRUSH PACK - MANUAL - 28

7.3 Comparing Parameter Settings
The A/B Comparison switch can help you to fine-tune your settings. It is located to the right ofthe Preset menu in the Header.
The A/B Comparison switch in the Header
It provides two temporary memory slots A and B which allow you to quickly switch between dif-ferent states of your parameter settings. This makes it easy to compare settings and find theones you like.
To use the A/B Comparison switch:
1. Create an effect sound you like. All parameter settings are automatically saved to slot A.
2. Click on B to switch to the second slot. When you switch to slot B for the first time, itautomatically takes over all the settings from slot A.
3. Adjust parameters to create an alternative effect sound. All settings are automaticallystored in slot B.
4. Click A and B to switch between the two variations of your effect sound.
→ If you have found an effect sound you like, you can save the settings from the currentlyselected memory slot of the A/B Comparison switch as a preset.
If you want to overwrite the settings saved in the other slot with the settings saved in the currentlyselected slot, open the Main menu by clicking on the arrow symbol in the left corner of the Headerand select Copy A to B or Copy B to A, respectively.
Header and Presets
Comparing Parameter Settings
CRUSH PACK - MANUAL - 29
8 Troubleshooting
If you are experiencing problems related to your product that the supplied documentation doesnot cover, you can get further help in the Support section of the Native Instruments website:
https://support.native-instruments.com/hc
The Support section allows you to search both the Knowledge Base and the Support Communi-ty for content related to your issue. The Knowledge Base and the Support Community gatheruseful information about your Native Instruments product and can be of great help to solvepossible issues you may encounter.
▪ The Knowledge Base is an ever-growing database of help articles by Native Instruments,providing solutions to common issues and answering frequently asked questions.
▪ The Support Community allows users to help users, and makes all the information and dis-cussion publicly available.
► Enter your query into the search field at the top of the Support section’s landing page inorder to find related entries from the Knowledge Base and the Support Community.
Before getting help please make sure you have downloaded the latest software for your product fromNative Access.
Support
If no entry from the Knowledge Base and the Support Community matches your problem, or ifthe matching entry does not solve the problem, you can contact the Native Instruments Sup-port team. You will find Contact Support buttons in the Support section of our website afterlooking for related content in the Knowledge Base and the Support Community.
When communicating with the Native Instruments Support team, keep in mind that the moredetails you can provide about your hardware, your operating system, the version of the softwareyou are running, and the problem you are experiencing, the better they will be able to help you.
In your description, you should mention:
▪ How to reproduce the problem
▪ What you have already tried to fix the problem
Troubleshooting
CRUSH PACK - MANUAL - 30
▪ A description of your setup, including all hardware and the version of your software
▪ The brand and specifications of your computer
When installing new software or software updates, a Readme file is included that contains latebreaking news and new information that was not yet included in the documentation. Please openand read this Readme file before contacting Technical Support.
User Forum
In the Native Instruments User Forum, you can discuss product features directly with otherusers and with experts moderating the forum. You can reach the User Forum via: http://www.native-instruments.com/forum.
Troubleshooting
CRUSH PACK - MANUAL - 31