compass documents x.xx user guide - … · our compass software product suite is created solely to...
TRANSCRIPT

®
User Guide
5.13
Compass® Documents


Copyright © 2014 Northwoods Consulting Partners, Inc. All rights reserved. Page i
ABOUT NORTHWOODS CONSULTING PARTNERSNorthwoods Consulting Partners, Inc., founded in 1999, is a privately‐held software development and
services company headquartered in Dublin, Ohio. Our Compass Software product suite is created solely to serve the needs of human services agencies nationwide.
With proven technology, and a focus on industry knowledge and our clients, we create business solutions that provide proper application of products and services with tangible and measurable results.
COPYRIGHT AND TRADEMARKS NOTICE
Copyright © 2014 Northwoods Consulting Partners, Inc. All rights reserved.
Northwoods, the Northwoods Bear Logo, “Revolutionizing the Delivery of Human Services,” and Compass are all registered trademarks and service marks of Northwoods Consulting Partners, Inc. Rather than repeat the trademark and service mark attributions throughout this document, Northwoods hereby asserts its rights for all of its products and services.
iPad is a registered trademark of Apple, Inc. All other trademarks and service marks are the property of their respective owners. Unless stated to the contrary, no association with any other company or product is intended nor inferred.
DISCLAIMER
Northwoods Consulting Partners has made reasonable effort to ensure the accuracy of this manual. Information in this document is subject to change. If you should discover any discrepancies, please notify us immediately.
CONTACT INFORMATION
Northwoods Consulting Partners
Address:5815 Wall StreetDublin, Ohio 43017
Phone:(614) 781-7800
Web:teamnorthwoods.com
Northwoods Support Center
Phone:(614) 545-0999
Email:[email protected]


Copyright © 2014 Northwoods Consulting Partners, Inc. All rights reserved. Page iii
Compass Pilot . . . . . . . . . . . . . . . . . . . . . . . . . . . . . . . . . . . . . . . . . . . . . . . . . . . . . . . . . . . . . . . . . 1
Launching Compass Pilot . . . . . . . . . . . . . . . . . . . . . . . . . . . . . . . . . . . . . . . . . . . . . . . . . . . . . . 1
Navigating the Compass Pilot Interface . . . . . . . . . . . . . . . . . . . . . . . . . . . . . . . . . . . . . . . . . . 2
Opening, Detaching, and Reattaching a Module . . . . . . . . . . . . . . . . . . . . . . . . . . . . . . . . . . . 6To open a module in the stage . . . . . . . . . . . . . . . . . . . . . . . . . . . . . . . . . . . . . . . . . . . . . 6To open a module in a detached window . . . . . . . . . . . . . . . . . . . . . . . . . . . . . . . . . . . . 6To reattach a module to the stage. . . . . . . . . . . . . . . . . . . . . . . . . . . . . . . . . . . . . . . . . . 6
Using the File Menu . . . . . . . . . . . . . . . . . . . . . . . . . . . . . . . . . . . . . . . . . . . . . . . . . . . . . . . . . . 6To log out of Compass Pilot . . . . . . . . . . . . . . . . . . . . . . . . . . . . . . . . . . . . . . . . . . . . . . . 6To exit Compass Pilot . . . . . . . . . . . . . . . . . . . . . . . . . . . . . . . . . . . . . . . . . . . . . . . . . . . . 6
Using the Tools Menu. . . . . . . . . . . . . . . . . . . . . . . . . . . . . . . . . . . . . . . . . . . . . . . . . . . . . . . . . 7Managing Your Usernames and Passwords. . . . . . . . . . . . . . . . . . . . . . . . . . . . . . . . . . . 7
To change credentials . . . . . . . . . . . . . . . . . . . . . . . . . . . . . . . . . . . . . . . . . . . . . . . 7Managing Your Recipient Pools . . . . . . . . . . . . . . . . . . . . . . . . . . . . . . . . . . . . . . . . . . . . 7
To edit recipient pool tick lists . . . . . . . . . . . . . . . . . . . . . . . . . . . . . . . . . . . . . . . . 8To add members to the tick list . . . . . . . . . . . . . . . . . . . . . . . . . . . . . . . . . . . 8To order the members in the tick list . . . . . . . . . . . . . . . . . . . . . . . . . . . . . . 9To remove members from the tick list . . . . . . . . . . . . . . . . . . . . . . . . . . . . . 9
To view assignment history . . . . . . . . . . . . . . . . . . . . . . . . . . . . . . . . . . . . . . . . . . . 9To export assignment history . . . . . . . . . . . . . . . . . . . . . . . . . . . . . . . . . . . . . . . . 10
Managing Your Settings . . . . . . . . . . . . . . . . . . . . . . . . . . . . . . . . . . . . . . . . . . . . . . . . . 10To add task types to My Selected Tasks. . . . . . . . . . . . . . . . . . . . . . . . . . . . . . . . 12To order task types in My Selected Tasks . . . . . . . . . . . . . . . . . . . . . . . . . . . . . . 12To remove task types from My Selected Tasks . . . . . . . . . . . . . . . . . . . . . . . . . . 12
Managing Your Theme . . . . . . . . . . . . . . . . . . . . . . . . . . . . . . . . . . . . . . . . . . . . . . . . . . 12To manage your theme . . . . . . . . . . . . . . . . . . . . . . . . . . . . . . . . . . . . . . . . . . . . . 12
Taking a Screen Capture . . . . . . . . . . . . . . . . . . . . . . . . . . . . . . . . . . . . . . . . . . . . . . . . . 12To take a screen capture . . . . . . . . . . . . . . . . . . . . . . . . . . . . . . . . . . . . . . . . . . . . 12
Using Administration Options . . . . . . . . . . . . . . . . . . . . . . . . . . . . . . . . . . . . . . . . . . . . 13
Using the Help Menu . . . . . . . . . . . . . . . . . . . . . . . . . . . . . . . . . . . . . . . . . . . . . . . . . . . . . . . . 13Viewing Information About Your Pilot Installation . . . . . . . . . . . . . . . . . . . . . . . . . . . . 13Accessing Online Help . . . . . . . . . . . . . . . . . . . . . . . . . . . . . . . . . . . . . . . . . . . . . . . . . . . 13
Using Smart Search . . . . . . . . . . . . . . . . . . . . . . . . . . . . . . . . . . . . . . . . . . . . . . . . . . . . . . . . . . 13To perform a smart search using the attached panel. . . . . . . . . . . . . . . . . . . . . . . . . . 14To perform a smart search using the detached window . . . . . . . . . . . . . . . . . . . . . . . 14
Compass Documents . . . . . . . . . . . . . . . . . . . . . . . . . . . . . . . . . . . . . . . . . . . . . . . . . . . . . . . . . . . 15
Searching for Documents . . . . . . . . . . . . . . . . . . . . . . . . . . . . . . . . . . . . . . . . . . . . . . . . . . . . . 15To search for client and case documents . . . . . . . . . . . . . . . . . . . . . . . . . . . . . . . . . . . 15To filter search results by client . . . . . . . . . . . . . . . . . . . . . . . . . . . . . . . . . . . . . . . . . . . 16To filter search results by document type group . . . . . . . . . . . . . . . . . . . . . . . . . . . . . 16To filter search results by program type . . . . . . . . . . . . . . . . . . . . . . . . . . . . . . . . . . . . 17To find related documents . . . . . . . . . . . . . . . . . . . . . . . . . . . . . . . . . . . . . . . . . . . . . . . 17
Working with Saved Queries . . . . . . . . . . . . . . . . . . . . . . . . . . . . . . . . . . . . . . . . . . . . . . . . . . 18

Copyright © 2014 Northwoods Consulting Partners, Inc. All rights reserved. Page iv
To save a query . . . . . . . . . . . . . . . . . . . . . . . . . . . . . . . . . . . . . . . . . . . . . . . . . . . . . . . . 18To view saved queries . . . . . . . . . . . . . . . . . . . . . . . . . . . . . . . . . . . . . . . . . . . . . . . . . . . 19To edit a saved query . . . . . . . . . . . . . . . . . . . . . . . . . . . . . . . . . . . . . . . . . . . . . . . . . . . 20To delete a saved query . . . . . . . . . . . . . . . . . . . . . . . . . . . . . . . . . . . . . . . . . . . . . . . . . 20
Adding Clients to My People . . . . . . . . . . . . . . . . . . . . . . . . . . . . . . . . . . . . . . . . . . . . . . . . . . 20
Viewing the Document List . . . . . . . . . . . . . . . . . . . . . . . . . . . . . . . . . . . . . . . . . . . . . . . . . . . 21To change the results view . . . . . . . . . . . . . . . . . . . . . . . . . . . . . . . . . . . . . . . . . . . . . . . 21
Accessing Documents . . . . . . . . . . . . . . . . . . . . . . . . . . . . . . . . . . . . . . . . . . . . . . . . . . . . . . . . 22To access document images . . . . . . . . . . . . . . . . . . . . . . . . . . . . . . . . . . . . . . . . . . . . . . 22To access non‐image documents and audio files . . . . . . . . . . . . . . . . . . . . . . . . . . . . . 23
Editing Document Content. . . . . . . . . . . . . . . . . . . . . . . . . . . . . . . . . . . . . . . . . . . . . . . . . . . . 23Editing Document Images . . . . . . . . . . . . . . . . . . . . . . . . . . . . . . . . . . . . . . . . . . . . . . . . 23Editing Non‐Image Documents. . . . . . . . . . . . . . . . . . . . . . . . . . . . . . . . . . . . . . . . . . . . 23
To edit a non‐image file . . . . . . . . . . . . . . . . . . . . . . . . . . . . . . . . . . . . . . . . . . . . . 23Editing Audio Files . . . . . . . . . . . . . . . . . . . . . . . . . . . . . . . . . . . . . . . . . . . . . . . . . . . . . . 24
Using Sticky Notes. . . . . . . . . . . . . . . . . . . . . . . . . . . . . . . . . . . . . . . . . . . . . . . . . . . . . . . . . . . 24To create a new sticky note . . . . . . . . . . . . . . . . . . . . . . . . . . . . . . . . . . . . . . . . . . . . . . 24To view a sticky note . . . . . . . . . . . . . . . . . . . . . . . . . . . . . . . . . . . . . . . . . . . . . . . . . . . . 25To edit a sticky note . . . . . . . . . . . . . . . . . . . . . . . . . . . . . . . . . . . . . . . . . . . . . . . . . . . . 25To delete a sticky note . . . . . . . . . . . . . . . . . . . . . . . . . . . . . . . . . . . . . . . . . . . . . . . . . . 26
Editing Document Keywords and Document Types . . . . . . . . . . . . . . . . . . . . . . . . . . . . . . . . 26To edit document keywords . . . . . . . . . . . . . . . . . . . . . . . . . . . . . . . . . . . . . . . . . . . . . . 26
To re‐index the document for a different client . . . . . . . . . . . . . . . . . . . . . . . . . 27To add an additional client . . . . . . . . . . . . . . . . . . . . . . . . . . . . . . . . . . . . . . . . . . 27To copy existing information to a new tab . . . . . . . . . . . . . . . . . . . . . . . . . . . . . 28To copy a field’s content to all tabs . . . . . . . . . . . . . . . . . . . . . . . . . . . . . . . . . . . 29
To select a new document type for a document . . . . . . . . . . . . . . . . . . . . . . . . . . . . . 29
Reorienting an Image . . . . . . . . . . . . . . . . . . . . . . . . . . . . . . . . . . . . . . . . . . . . . . . . . . . . . . . . 30
Hiding and Unhiding an Overlay Image. . . . . . . . . . . . . . . . . . . . . . . . . . . . . . . . . . . . . . . . . . 30To hide an overlay image . . . . . . . . . . . . . . . . . . . . . . . . . . . . . . . . . . . . . . . . . . . . . . . . 30To unhide an overlay image . . . . . . . . . . . . . . . . . . . . . . . . . . . . . . . . . . . . . . . . . . . . . . 31
Closing Documents . . . . . . . . . . . . . . . . . . . . . . . . . . . . . . . . . . . . . . . . . . . . . . . . . . . . . . . . . . 31To close all open documents . . . . . . . . . . . . . . . . . . . . . . . . . . . . . . . . . . . . . . . . . . . . . 31To close selected documents . . . . . . . . . . . . . . . . . . . . . . . . . . . . . . . . . . . . . . . . . . . . . 31
Selecting Multiple Documents . . . . . . . . . . . . . . . . . . . . . . . . . . . . . . . . . . . . . . . . . . . . . . . . . 31To select multiple documents using the keyboard . . . . . . . . . . . . . . . . . . . . . . . . . . . . 31To select all using the Select All option . . . . . . . . . . . . . . . . . . . . . . . . . . . . . . . . . . . . . 32
Selecting a Profile . . . . . . . . . . . . . . . . . . . . . . . . . . . . . . . . . . . . . . . . . . . . . . . . . . . . . . . . . . . 32To select a profile . . . . . . . . . . . . . . . . . . . . . . . . . . . . . . . . . . . . . . . . . . . . . . . . . . . . . . 32
Selecting an Autofill Source . . . . . . . . . . . . . . . . . . . . . . . . . . . . . . . . . . . . . . . . . . . . . . . . . . . 32To select an autofill source . . . . . . . . . . . . . . . . . . . . . . . . . . . . . . . . . . . . . . . . . . . . . . . 32
Working with Tasks. . . . . . . . . . . . . . . . . . . . . . . . . . . . . . . . . . . . . . . . . . . . . . . . . . . . . . . . . . 33

Copyright © 2014 Northwoods Consulting Partners, Inc. All rights reserved. Page v
To assign a task to a recipient. . . . . . . . . . . . . . . . . . . . . . . . . . . . . . . . . . . . . . . . . . . . . 33To add specific recipients . . . . . . . . . . . . . . . . . . . . . . . . . . . . . . . . . . . . . . . . . . . 33To add the next recipient in the rotation. . . . . . . . . . . . . . . . . . . . . . . . . . . . . . . 33
To create a follow‐up task for a document . . . . . . . . . . . . . . . . . . . . . . . . . . . . . . . . . . 34To create a new task . . . . . . . . . . . . . . . . . . . . . . . . . . . . . . . . . . . . . . . . . . . . . . . . . . . . 35To view document assignments . . . . . . . . . . . . . . . . . . . . . . . . . . . . . . . . . . . . . . . . . . . 35
Cutting and Copying Document Pages . . . . . . . . . . . . . . . . . . . . . . . . . . . . . . . . . . . . . . . . . . 36To copy pages from a document to create a new document . . . . . . . . . . . . . . . . . . . 36
Selecting a Document Type. . . . . . . . . . . . . . . . . . . . . . . . . . . . . . . . . . . . . . . . . . 38To select a new document type. . . . . . . . . . . . . . . . . . . . . . . . . . . . . . . . . . 39
Select Index Values . . . . . . . . . . . . . . . . . . . . . . . . . . . . . . . . . . . . . . . . . . . . . . . . 39To select new index values . . . . . . . . . . . . . . . . . . . . . . . . . . . . . . . . . . . . . 39
Selecting a Routing Preference . . . . . . . . . . . . . . . . . . . . . . . . . . . . . . . . . . . . . . . 39To select a recipient . . . . . . . . . . . . . . . . . . . . . . . . . . . . . . . . . . . . . . . . . . . 39
Selecting a Task Type . . . . . . . . . . . . . . . . . . . . . . . . . . . . . . . . . . . . . . . . . . . . . . . 40Setting a Due Date for a Task . . . . . . . . . . . . . . . . . . . . . . . . . . . . . . . . . . . . . . . . 40
To set a due date for a task . . . . . . . . . . . . . . . . . . . . . . . . . . . . . . . . . . . . . 40To move pages from one document to create a new document . . . . . . . . . . . . . . . . 40To delete pages from a document . . . . . . . . . . . . . . . . . . . . . . . . . . . . . . . . . . . . . . . . . 41
Importing Documents. . . . . . . . . . . . . . . . . . . . . . . . . . . . . . . . . . . . . . . . . . . . . . . . . . . . . . . . 41To import documents . . . . . . . . . . . . . . . . . . . . . . . . . . . . . . . . . . . . . . . . . . . . . . . . . . . 41
Exporting Documents . . . . . . . . . . . . . . . . . . . . . . . . . . . . . . . . . . . . . . . . . . . . . . . . . . . . . . . . 42To export documents . . . . . . . . . . . . . . . . . . . . . . . . . . . . . . . . . . . . . . . . . . . . . . . . . . . 43
Printing Documents . . . . . . . . . . . . . . . . . . . . . . . . . . . . . . . . . . . . . . . . . . . . . . . . . . . . . . . . . 44To print documents . . . . . . . . . . . . . . . . . . . . . . . . . . . . . . . . . . . . . . . . . . . . . . . . . . . . . 44
Pushing Documents to Compass Forms . . . . . . . . . . . . . . . . . . . . . . . . . . . . . . . . . . . . . . . . . 44To push documents to Compass Forms. . . . . . . . . . . . . . . . . . . . . . . . . . . . . . . . . . . . . 45
Working with Documents in Laserfiche . . . . . . . . . . . . . . . . . . . . . . . . . . . . . . . . . . . . . . . . . 46To launch documents in Laserfiche . . . . . . . . . . . . . . . . . . . . . . . . . . . . . . . . . . . . . . . . 46Using the Laserfiche Toolbar . . . . . . . . . . . . . . . . . . . . . . . . . . . . . . . . . . . . . . . . . . . . . 47


Copyright © 2014 Northwoods Consulting Partners, Inc. All rights reserved. Page 1
Compass Pilot
COMPASS PILOT
Compass Pilot increases agency‐wide productivity by automating routine agency tasks from a single application.
With Compass Pilot installed on the desktop, case and client data that is collected at any point in the system is immediately available to all workers and processes that need it. For the agency, this results in dramatic increases in productivity and service levels throughout the organization. For agency workers, it means that all of the time and energy they used to spend on paperwork can now be directed toward the most important aspect of their jobs—their clients.
Launching Compass Pilot1. Double click the Pilot icon on your desktop.
The Compass Pilot Login window appears.
2. Type your username and password.
OR
2. To log in using Windows authentication, ensure the Use Windows® Authentication box is selected. Installations with Windows authentication use your Windows username and password to log you in to Pilot. This option must be enabled by your system administrator.
3. Click OK.
Compass Pilot opens.

Copyright © 2014 Northwoods Consulting Partners, Inc. All rights reserved. Page 2
Compass Pilot
Navigating the Compass Pilot InterfaceThe following image is a sample of the Pilot interface with Compass Documents loaded.
Fig. 1 Compass Pilot interface (Compass Documents loaded)
The interface is divided into the following components: driver panel, stage, auxiliary panel, menu bar and toolbar, status bar, and collapsible splitters.

Copyright © 2014 Northwoods Consulting Partners, Inc. All rights reserved. Page 3
Compass Pilot
• Driver panel ‐ The driver panel contains the main navigation in Pilot. It allows you to load modules and navigate while inside each module.
Fig. 2 Driver panel
• Stage ‐ The stage is the main section of Pilot and is the main work area for all modules.
Fig. 3 Stage

Copyright © 2014 Northwoods Consulting Partners, Inc. All rights reserved. Page 4
Compass Pilot
• Auxiliary panel ‐ The auxiliary panel contains additional information, such as image previews. It is collapsed by default in some modules.
Fig. 4 Auxiliary panel
• Menu bar and toolbar ‐ The menu bar and toolbar are located at the top of the screen.
• The menu bar consists of the File, Tools, and Help menus, as well as additional menus that vary with each module. Additionally, options in the File menu can vary by module.
• The toolbar contains the smart search feature as well as module‐specific icons. For more information on smart search, see “Using Smart Search” on page 13. For more information on the module‐specific toolbar icons that are available within each module, see the respective user guide.
Fig. 5 Menu Bar and Toolbar

Copyright © 2014 Northwoods Consulting Partners, Inc. All rights reserved. Page 5
Compass Pilot
• Status bar ‐ The status bar displays the current profile in use in Capture, Forms, and Documents. Additionally, a form’s loading status (such as “Loading form...” or “Done”) is displayed next to the profile. This bar also displays an envelope icon at the bottom right if there are unread tasks that takes you to the list of unread tasks when clicked.
Fig. 6 Status bar
• Collapsible splitters ‐ Collapsible splitters are located in various places on the Pilot interface, allowing you to collapse and resize panels as desired.
Fig. 7 Collapsible splitters

Copyright © 2014 Northwoods Consulting Partners, Inc. All rights reserved. Page 6
Compass Pilot
Opening, Detaching, and Reattaching a ModuleModules opened from the driver panel can appear in the stage or be detached and opened as a separate window. Detaching a module allows you to open and work in more than one module concurrently.
To open a module in the stageOpening a module in the stage allows you to use a single module at a time. Opening a different module loads that module in the stage but does not clear search results or content from the first module; all information is still available when you return to the first module.
1. In the driver panel, click the desired module.
The module opens in the stage.
To open a module in a detached windowOpening a module in a separate window allows you to use multiple modules concurrently.
1. In the driver panel, right click the desired module.
2. Click Detach <module>.
The selected module opens in a new window.
To reattach a module to the stageReattaching a module loads it in the stage. No content will be cleared when reattaching the window.
1. Click the X in the top right corner of the detached window.
The module is reattached to the stage. Any module already open in the stage is replaced by the reattached module; content is not cleared from the first module and will be available when you return to that module.
Using the File MenuThe File menu allows you to log out of Pilot and exit Pilot. Additional options may be available depending on the active module.
To log out of Compass Pilot1. Click File.
2. Click Log Out.
The Confirmation message appears
3. Click Yes.
You are logged out of Pilot and returned to the Compass Pilot Login window.
To exit Compass Pilot1. Click File.
2. Click Exit.
The Confirmation message appears

Copyright © 2014 Northwoods Consulting Partners, Inc. All rights reserved. Page 7
Compass Pilot
3. Click Yes.
You are logged out of Pilot and Pilot closes.
Using the Tools MenuThe Tools menu contains the following items. Depending on permissions, you may not have access to all of these items.
• Manage My Usernames/Passwords
• Manage My Recipient Pools
• My Settings
• Themes
• Screen Capture
• Administration
Managing Your Usernames and PasswordsThe Manage My Usernames/Passwords menu item (located in the Tools menu) allows you to manage your Pilot, CoPilot, and Box passwords. With appropriate permissions, you will also be able to edit your Autofill Web Service and DMS passwords.
You cannot edit your Pilot, Box, or CoPilot usernames.
To change credentialsTo change Box credentials, see the Connect for iPad® via Box user guide.
1. Click Tools.
2. Click Manage My Usernames/Passwords.
The Authentication Manager window opens.
3. In the Select a credential type list, select the desired credential type.
4. Optional ‐ In the Username field, enter the desired username.
5. Click Change Password.
The Password field is enabled.
6. In the Password field, enter the desired password.
7. Repeat steps 1‐4 as desired.
8. When finished, click Save.
Managing Your Recipient PoolsThe Manage My Recipient Pools menu item (located in the Tools menu) allows you to manage pools of which you are a manager. This option is only visible to users designated as recipient pool managers.
Recipient pools are not available to users with FileNet or in implementation where FileNet workflow is set as the tasking engine.

Copyright © 2014 Northwoods Consulting Partners, Inc. All rights reserved. Page 8
Compass Pilot
To edit recipient pool tick listsThe Manage Recipient Pool window displays all members of a pool and the pool’s tick list order. In the Tick List Order section, a green arrow points to the member who is the next to be selected at the time the list was opened for editing. The Refresh button allows you to view who will be selected next as agency operations continue. This opens another window that displays the same list that was saved when you began editing the tick list; the green arrow will be displayed next to the person who will be selected next at the time this window was opened.
Pools are locked when they are being edited to ensure they cannot be changed or deleted by another user.
1. Click Tools.
2. Click Manage My Recipient Pools.
The Recipient Pool Management window opens.
3. In the Recipient Pool Name list, select the desired recipient pool.
4. Click Edit.
The Manage Recipient Pool window opens, allowing you to edit the pool’s tick list. To add members to the tick list, see “To add members to the tick list” on page 8. To set order of members in the tick list, see “To order the members in the tick list” on page 9. To remove members from the tick list, see “To remove members from the tick list” on page 9.
Fig. 8 Manage Recipient Pool
To add members to the tick listYou can add a member to the Tick List Order list multiple times to increase the frequency of their assignment in the rotation.
1. In the Recipient Pool Members list, select the members you want to add to the tick list.

Copyright © 2014 Northwoods Consulting Partners, Inc. All rights reserved. Page 9
Compass Pilot
2. Drag and drop the members in the Tick List Order list.
The selected members appear in the list.
3. Click Save.
The Select Next Suggestion window opens. This window allows you to select the next person to be suggested by the pool. It displays the name of the caseworker last assigned and the time of the last assignment, which is updated every 15 seconds.
4. Select the user who you want the pool to suggest next.
5. Click Save and Close.
To order the members in the tick listThe order of members in this list controls the order in which users are recommended by the pool.
1. In the Tick List Order list, select the member you want to move.
2. Drag and drop the member’s name to position the member in the list rotation.
3. Click Save.
The Select Next Suggestion window opens. This window allows you to select the next person to be suggested by the pool. It displays the name of the caseworker last assigned and the time of the last assignment, which is updated every 15 seconds.
4. Select the user who you want the pool to suggest next.
5. Click Save and Close.
To remove members from the tick list1. In the Tick List Order list, select the members you want to remove from the tick list.
2. Drag and drop the members in the Recipient Pool Members list.
The selected members are removed from the Tick List Order list.
3. Click Save.
The Select Next Suggestion window opens. This window allows you to select the next person to be suggested by the pool. It displays the name of the caseworker last assigned and the time of the last assignment, which is updated every 15 seconds.
4. Select the user who you want the pool to suggest next.
5. Click Save and Close.
To view assignment historyThe Recipient Pool Assignment History window displays assignment history for the selected pool.
1. Click Tools.
2. Click Manage My Recipient Pools.
The Recipient Pool Management window opens.
3. In the Recipient Pool Name list, select the desired recipient pool.
4. Click Edit.
The Manage Recipient Pool window opens.
5. Click Show Assignment History.
The Recipient Pool Assignment History window opens and displays the assignment history for that pool.

Copyright © 2014 Northwoods Consulting Partners, Inc. All rights reserved. Page 10
Compass Pilot
6. Optional ‐ Change the date range in the Assignment Range section to alter the range of the information displayed.
To export assignment historyThe assignment history of a recipient pool can be exported to a .csv file saved outside of Pilot.
1. Click Tools.
2. Click Manage My Recipient Pools.
The Recipient Pool Management window opens.
3. In the Recipient Pool Name list, select the desired recipient pool.
4. Click Edit.
The Manage Recipient Pool window opens.
5. Click Show Assignment History.
The Recipient Pool Assignment History window opens and displays the assignment history for that pool.
6. Optional ‐ Change the date range in the Assignment Range section to alter the range of information displayed.
7. Click Export To CSV File.
The Save As window opens.
8. Navigate to the desired location and click Save.
The File Saved confirmation message appears.
9. Click OK.
Managing Your SettingsThe My Settings menu item (located in the Tools menu) allows you to select which modules load automatically when you sign in to Pilot, the printer that is used to print labels, which task types appear at the top of your task type lists, and which task types generate notifications for you.

Copyright © 2014 Northwoods Consulting Partners, Inc. All rights reserved. Page 11
Compass Pilot
Fig. 9 My Settings window
• General tab
• Automatically Launch these Modules on Pilot Start ‐ This section allows you to select which modules you want to automatically load when you log in to Pilot. Selected modules are loaded in the stage and must be manually detached, if desired.
• Label Printer ‐ This drop‐down list allows you to select which printer will be used when printing labels from Pilot.
• Task Favorites ‐ This section allows you to select which task types you want to be displayed at the top of tasks type lists and the order you’d like those task types displayed. This affects any place in Pilot where you can select a task type. For information on how to work with this list, see “To add task types to My Selected Tasks” on page 12, “To order task types in My Selected Tasks” on page 12, and “To remove task types from My Selected Tasks” on page 12.
• Notifications tab
• Task Notifications ‐ This section allows you to select the task types for which you will receive a notification. Balloon or toast messages will only appear for the task types you’ve selected on this tab.
Notifications are not supported in installations with FileNet.
Copyright © 2014 Northwoods Consulting Partners, Inc. All rights reserved. Page 12
Compass Pilot
To add task types to My Selected Tasks1. In the AvailableTaskTypes list, select the task types you want to add to your selected tasks list.
2. Click the right‐facing arrow.
The selected task types are moved to the My Selected Tasks list.
3. Click Save.
To order task types in My Selected TasksThe order of task types in this list controls the order in which task types are displayed at the top of task type selection lists.
1. In the My Selected Tasks list, select the task types you want to move.
2. Use the up and down arrows to position the task types in the list.
3. Click Save.
To remove task types from My Selected Tasks1. In the My Selected Tasks list, select the task types you want to remove from your selected tasks
list.
2. Click the left‐facing arrow.
The selected task types are moved to the AvailableTaskTypes list.
3. Click Save.
Managing Your ThemeThe Themes menu item (located in the Tools menu) allows you to change the color of Compass Pilot. Currently, two colors—Emerald and Sky Blue—are supported.
To manage your theme1. Click Tools.
2. Hover over Theme.
3. Click the desired color.
Taking a Screen CaptureThe Screen Capture menu item (located in the Tools menu) allows you to take an image of your screen. The image can then be pasted into an application such as Word or Paint.
To take a screen capture1. Click Tools.
2. Hover over Screen Capture.
3. Click Take Screenshot.
The image is saved to your computer’s clipboard and can be pasted into an application such as Word or Paint.

Copyright © 2014 Northwoods Consulting Partners, Inc. All rights reserved. Page 13
Compass Pilot
Using Administration OptionsYour system administrator has access to the options in the Administration menu (located in the Tools menu.) Depending on your permissions, you may have the ability to access to some or none of these menu items. For more information, contact your system administrator or see the Compass Pilot administrator guide.
Using the Help MenuThe Help menu contains information about your installation of Pilot as well as a link to the product documentation.
Viewing Information About Your Pilot InstallationThe About menu item (located in the Help menu) allows you to view information about your installation of Compass Pilot.
• The About tab of the About window displays the version numbers of all installed Pilot modules.
• The Advanced tab of the About window displays the statuses of the Windows Communication Foundation (WCF) services that deliver documents and information to users’ machines. This tab is permission‐based and may not be available to all users.
Accessing Online HelpThe Online Help menu item (located in the Help menu) allows you to view documentation about the product. Clicking this link launches a website that contains the documentation for your version of Pilot.
Using Smart SearchThe smart search feature allows you to search for members and documents from anywhere in Pilot.
The panel is attached by default but can be detached by clicking the green arrow, shown in Fig. 10.
Fig. 10 Attached smart search
To reattach the window, click the red X, shown in Fig. 11.
Fig. 11 Detached smart search

Copyright © 2014 Northwoods Consulting Partners, Inc. All rights reserved. Page 14
Compass Pilot
To perform a smart search using the attached panel1. To attach the detached smart search window, click the red X at the top right corner.
2. In the drop‐down list next to the Enter search criteria... field, select either People or Documents to search for members or documents, respectively.
3. In the Enter search criteria... field, type the text on which you want to search.
4. On the keyboard, press Enter.
The search results are loaded in the corresponding module.
To perform a smart search using the detached window1. To detach the attached smart search pane, click the green arrow to the right of the Enter search
criteria... field.
2. Optional ‐ To change the opacity of the window, slide the blue slider to the left to decrease the opacity or to the right to increase the opacity.
3. Select either the Documents icon or the People icon to search the desired module.
4. In the text field, type the text on which you want to search.
5. On the keyboard, press Enter.
The search results are loaded in their corresponding module.
Copyright © 2014 Northwoods Consulting Partners, Inc. All rights reserved. Page 15
Compass Documents
COMPASS DOCUMENTS
Compass® Documents provides nearly instantaneous access to electronic documents through the Compass Pilot interface. With Documents™, users will no longer lose documents or experience delays caused by trying to physically locate the client’s case file in a file room. Instead of storing files in a physical filing cabinet, Documents works with each agency’s document management system to securely store all documents in a client’s case folder.
Searching for DocumentsDocuments allows you to search for client documents in the Pilot system and filter the results as necessary.
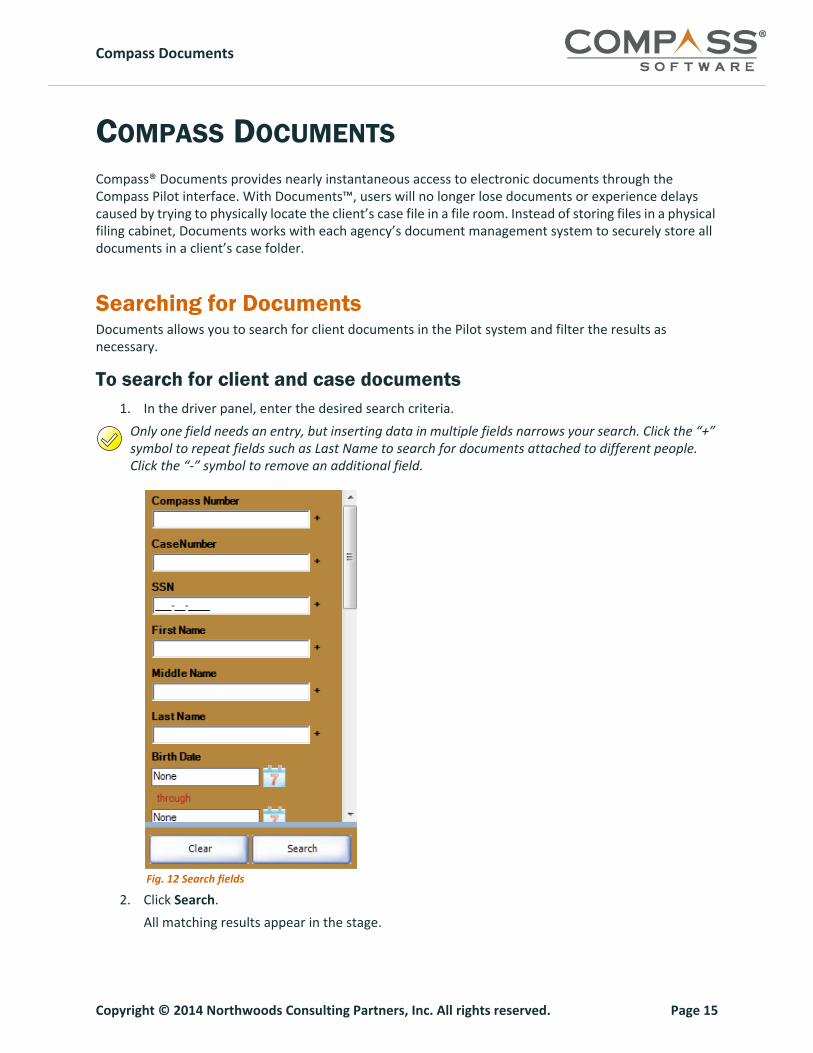
To search for client and case documents1. In the driver panel, enter the desired search criteria.
Only one field needs an entry, but inserting data in multiple fields narrows your search. Click the “+” symbol to repeat fields such as Last Name to search for documents attached to different people. Click the “‐” symbol to remove an additional field.
Fig. 12 Search fields
2. Click Search.
All matching results appear in the stage.

Copyright © 2014 Northwoods Consulting Partners, Inc. All rights reserved. Page 16
Compass Documents
To filter search results by clientIf a large number of results are returned—such as documents associated to clients that are related to the client you searched for—you may further filter the results by selecting a specific client.
The tabs at the top of the stage pertain to clients. The All tab is automatically selected if more than one client’s documents are returned. Depending on the width of the window, a limited number of tabs may be shown. The arrow to the right of the tabs, when clicked, displays all clients whose documents have been returned, even those shown on the tabs.
Fig. 13 Client tabs
1. Select the desired client from the tabs at the top of the stage.
Documents for the selected client appear in the stage.
OR
1. Click the arrow show below to display available clients.
Fig. 14 Drop‐down with client matches
2. Optional ‐ Enter the first name, last name, or SSN to filter the list. The list is filtered as you type.
3. From the list of clients, select the desired client.
Documents for the selected client appear in the stage.
To filter search results by document type groupThe document type group tabs on the right side of the stage pertain to document type groups. You can choose to show all document types or documents specific to only one of the document type groups. Depending on the height of the window, a limited number of tabs may be shown. The arrows at the bottom of the tabs can be used to reveal more tabs.
1. Select the desired document type group from the tabs at the right side of the stage.

Copyright © 2014 Northwoods Consulting Partners, Inc. All rights reserved. Page 17
Compass Documents
Fig. 15 Document type group tabs (rotated)
Documents with types within the selected group appear in the stage.
To filter search results by program typeThe Program Filters button in the toolbar allows you to select one or more program types to display.
When you log out of Pilot, your program choices made using the Program Filters button are retained. If filters are applied, the Program Filters button in the toolbar is orange. If no filters are selected, all documents pertaining to all program types will be displayed.
1. In the toolbar, click Program Filters.
Fig. 16 Program Filters button
The Select Program Filters window opens.
2. Select the desired program types. Only documents pertaining to the selected program types will be displayed.
3. Click OK.
Documents within the selected program type appear in the stage.
To find related documentsThe Find Related... option in the Actions and right‐click menus allows you to search for related documents by searching for cases containing clients with similar data (such as last name).
1. In the stage, select the desired document.
2. In the toolbar, select Actions.
3. Select Find Related...
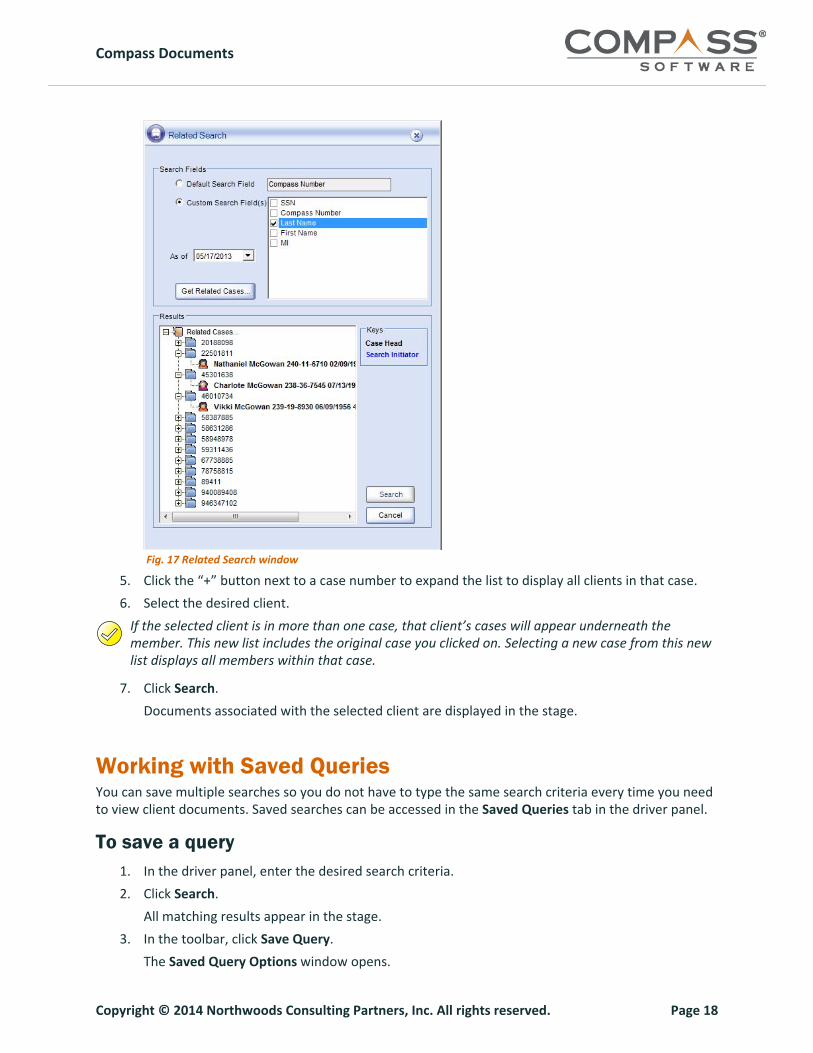
The Related Search window opens.
3. Optional ‐ To change the search criteria from the default, select the Custom Search Field(s) radio button and select the desired criteria. (For example, selecting Last Name searches for all clients in the system with a last name matching the last name of the client associated with the selected document.)
4. Click Get Related Cases…
The cases display in the Results section.
Copyright © 2014 Northwoods Consulting Partners, Inc. All rights reserved. Page 18
Compass Documents
Fig. 17 Related Search window
5. Click the “+” button next to a case number to expand the list to display all clients in that case.
6. Select the desired client.
If the selected client is in more than one case, that client’s cases will appear underneath the member. This new list includes the original case you clicked on. Selecting a new case from this new list displays all members within that case.
7. Click Search.
Documents associated with the selected client are displayed in the stage.
Working with Saved QueriesYou can save multiple searches so you do not have to type the same search criteria every time you need to view client documents. Saved searches can be accessed in the Saved Queries tab in the driver panel.
To save a query1. In the driver panel, enter the desired search criteria.
2. Click Search.
All matching results appear in the stage.
3. In the toolbar, click Save Query.
The Saved Query Options window opens.

Copyright © 2014 Northwoods Consulting Partners, Inc. All rights reserved. Page 19
Compass Documents
Fig. 18 Saved Query Options window
4. In the Description field, enter a title (for example, the client’s name).
5. Optional ‐ In the Notes field, add a note.
6. Set the expiration date in one of the following ways:
• Select the expiration date by using the calendar.
• Select the expiration date by using the <#> day(s) until expiration option.
• Select the No Expiration Date checkbox if there is no expiration date.
7. Click Save.
To view saved queries1. In the driver panel, click the Saved Queries tab.

Copyright © 2014 Northwoods Consulting Partners, Inc. All rights reserved. Page 20
Compass Documents
Fig. 19 Saved Queries tab
2. Select the desired query.
The results are displayed in the stage.
To edit a saved query1. In the driver panel, click the Saved Queries tab.
2. Right click the desired query.
3. Select Properties.
The Saved Query Options window opens.
4. Make any desired changes.
5. Click Save.
To delete a saved queryYou will not be prompted to verify your decision to delete a query.
1. In the driver panel, click the Saved Queries tab.
2. Right click the desired query.
3. Select Delete Saved Query.
The query is removed from the Saved Queries tab.
Adding Clients to My PeopleThe Add Keyword Values To My People option in the Actions and right‐click menus adds the client associated with the document to My People in Compass People.

Copyright © 2014 Northwoods Consulting Partners, Inc. All rights reserved. Page 21
Compass Documents
1. In the stage, select the desired documents.
2. In the toolbar, click Actions.
3. Click Add Keyword Values To My People.
The clients associated to the selected documents are added to My People in Compass People.
Viewing the Document ListDocuments can be displayed in a single sortable grid or in groups of documents types.
• Grid View ‐ Grid View displays the documents in one large list. Each column is sortable, and information will remain sorted between sessions.
Fig. 20 Grid View
• Smart Views ‐ Smart Views display documents in a list organized by document types. There are two types of Smart Views: the Default Smart View and Custom Smart Views. The default view includes all document types. Custom views are tied to profiles and only include the configured document types. If no custom views have been configured for a profile, only Grid View and Default Smart View will be selectable.
Fig. 21 Smart View
To change the results view1. In the toolbar, click Result Type.
Fig. 22 Result Type button
2. Select Grid View, Default Smart View, or a Custom Smart View (if configured).

Copyright © 2014 Northwoods Consulting Partners, Inc. All rights reserved. Page 22
Compass Documents
Accessing DocumentsCompass Documents allows you to store three different types of files in the DMS:
• Document images ‐ These are flat images stored in the DMS. Documents scanned using Compass Capture and documents submitted to the DMS using Compass Forms are examples of document images. Once submitted to the DMS, they are uneditable. Images of the following types will launch in Compass Documents:
• TIFF (.tiff)
• JPG (.jpg; .jpeg)
• GIF (.gif)
• PNG (.png)
• Bitmap (.bmp)
• Non‐image documents ‐ These are documents (such as Word documents) that are imported into Compass Documents and submitted to the DMS without being flattened into an image. As they are not images, they can be edited. After editing, a new version is saved in the DMS, preserving the original. When opened, they launch in their native application. Third party documents of the following types can be saved to the DMS, accessed through Compass Pilot, and launched in their respective native applications:
• Microsoft Word files (.doc; .docx)
• Microsoft Excel files (.xls; .xlsx)
• Microsoft PowerPoint files (.ppt; .pptx)
• Portable Document Format files (.pdf)
• Audio files ‐ These are audio files stored in the DMS. When opened, the default media player launches and plays the audio file. Audio files of the following types will be launched in your default media player:
• WAV (.wav)
• MP3 (.mp3)
• AAC (.aac)
• WMA (.wma)
• 3GP (.3gp)
• M4A (.m4a)
Users with Laserfiche have the ability to launch documents in Laserfiche and modify those documents by highlighting, rotating, and adding sticky notes and stamps. See “Working with Documents in Laserfiche” on page 46 for more information.
To access document imagesUse one of the following options to view document images in Compass Documents.
1. In the stage, select the desired document.
The first page of the selected document appears in the auxiliary panel. Additional pages are shown as thumbnails below.
Selecting another document replaces the previously selected image in the auxiliary panel.

Copyright © 2014 Northwoods Consulting Partners, Inc. All rights reserved. Page 23
Compass Documents
OR
1. In the auxiliary panel, click Detach, located at the top of the panel.
The auxiliary panel is detached and opens as the Detached Documents Panel window.
Selecting another document replaces the previously selected image in the Detached Documents Panel window.
OR
1. In the stage, double click the desired document.
The document opens in a separate window.
This option allows you to open multiple documents at once. Documents opened in this manner will remain open until you close them.
To access non-image documents and audio filesSelecting a non‐image document or an audio file displays an icon in place of the document preview seen with document images.
1. In the stage, double click the document.
If the document is a non‐image document, it launches in its native application and can be edited. (For more information on editing non‐image documents, see “Editing Non‐Image Documents” on page 23.)
If the document is an audio file, it launches in your computer’s default media player.
Editing Document ContentFor security reasons, there are restrictions in place to ensure original documents are not compromised.
Editing Document ImagesDocument images are flat images stored in the DMS. Once submitted to the DMS, the content is uneditable.
Additional information can be added to a document image by pushing it to Compass Forms. See “Pushing Documents to Compass Forms” on page 44 for more information.
While content cannot be changed, pages can be removed from a document and deleted, removed and saved as a new document, or copied and saved as a new document. See “Cutting and Copying Document Pages” on page 36 for more information.
Editing Non-Image DocumentsThese are documents (such as Word documents) imported into Compass Documents and submitted to the DMS. They are not images and can be edited. After editing, a new version is saved in the DMS, preserving the original. When opened, they launch in their native application.
To edit a non-image fileYou can edit non‐image files (such as Word documents) by opening the file through Compass Documents. When the edited file is saved, a new version is added to Documents. The original version in Documents will not be altered.

Copyright © 2014 Northwoods Consulting Partners, Inc. All rights reserved. Page 24
Compass Documents
1. In the stage, select the desired non‐image file.
A preview of the non‐image file displays in the auxiliary panel. The preview image represents the file’s native application (for example, Word, PDF, PowerPoint, or Excel).
2. Double click the entry in the stage to edit the file in its native application.
3. Make the necessary changes to the file.
4. Save and close the file.
The Import Document window opens in Pilot.
Fig. 23 Import Document
5. Select Save as a new document.
The Save Successful window opens.
6. Click OK.
A new instance of this file is now in Documents.
Editing Audio FilesAudio files stored in the DMS cannot be edited.
Using Sticky NotesSticky notes are notes added to a document after it has been submitted to the DMS. They are used differently depending on your DMS:
• FileNet ‐ Users with FileNet are able to add, edit, and delete sticky notes from Compass Documents.
• Laserfiche and OnBase ‐ Users with either Laserfiche or OnBase can view sticky notes in Compass Documents. They must be added, edited, and deleted using the Laserfiche or OnBase client.
To create a new sticky noteThe Create a new sticky note icon allows users with the FileNet DMS to add sticky notes to a document.
If the document contains an image overlay, it must be turned off before a sticky note can be added. For information on hiding and unhiding overlay images, see “Hiding and Unhiding an Overlay Image” on page 30.
1. In the auxiliary panel, click the Create a new sticky note icon.

Copyright © 2014 Northwoods Consulting Partners, Inc. All rights reserved. Page 25
Compass Documents
Fig. 24 Create a new sticky note icon
2. On the document preview, click the location to place the sticky note. The top left corner of the note is placed where you released your mouse button.
The Sticky Note window opens.
3. Enter the desired note text.
4. Click Save.
The note is saved and a yellow box representing the note is placed on the document.
To view a sticky noteThe Sticky Notes icon opens the Sticky Note List window which allows you to view all sticky note text and the page number for each note.
This icon only appears if there is at least one sticky note on the document.
1. In the auxiliary panel, click the Sticky Notes icon.
Fig. 25 Sticky Notes icon
The Sticky Note List window opens, displaying the text and page number for all sticky notes attached to the current document.
To edit a sticky noteThe Edit Sticky Note icon allows users with the FileNet DMS to edit sticky notes attached to a document. Users with a different DMS can edit sticky notes using the DMS client.
1. In the auxiliary panel, click the Sticky Notes icon.
Fig. 26 Sticky Notes icon
The Sticky Note icon only appears if there is at least one sticky note on the document.
The Sticky Note List window opens.
2. Select the note you want to edit.
3. Click the Edit Sticky Note icon.
Fig. 27 Edit Sticky Note icon
The Sticky Note window opens.
4. Edit the note.
5. Click Save.
The windows close and you are returned to the document image.

Copyright © 2014 Northwoods Consulting Partners, Inc. All rights reserved. Page 26
Compass Documents
To delete a sticky noteThe Delete Sticky Note icon allows users with the FileNet DMS to delete sticky notes attached to a document. Users with a different DMS can delete sticky notes using the DMS client.
1. In the auxiliary panel, click the Sticky Notes icon.
Fig. 28 Sticky Notes icon
The Sticky Note icon only appears if there is at least one sticky note on the document.
2. In the Sticky Note List window, select the note you want to delete.
3. Click the Remove Sticky Note icon.
Fig. 29 Remove Sticky Note icon
The windows close and you are returned to the document image.
Editing Document Keywords and Document TypesDocument keywords (also referred to as index values) associate a document with a specific client. Additionally, a caseworker can be included in the index values, associating that caseworker to the client for that particular document. To edit a document’s keywords, see “To edit document keywords” on page 26.
Document types are set separately and categorize documents in Documents and the DMS. To edit a document’s type, see “To select a new document type for a document” on page 29.
To edit document keywordsThe Edit Document Keywords option in the Actions and right‐click menus allows you to verify, change, and/or re‐index the existing index values of the document, such as the client associated to the document.
1. In the stage, select the desired document.
2. In the toolbar, click Actions.
3. Click Edit Document Keywords.
The Verify Index Values window opens with the Indexes tab displayed.
4. Click the Default Member tab.

Copyright © 2014 Northwoods Consulting Partners, Inc. All rights reserved. Page 27
Compass Documents
Fig. 30 Verify Index Values, Default Member tab
5. See one or more of the sections listed below and follow the directions to alter the document indexes:
• To re‐index the document for a different client, see “To re‐index the document for a different client” on page 27.
• To add an additional client to the document, see “To add an additional client” on page 27.
• To copy existing index information to a new tab, see “To copy existing information to a new tab” on page 28.
• To add the contents of a single field to all other tabs, see “To copy a field’s content to all tabs” on page 29.
6. Click OK.
The changes are saved.
To re-index the document for a different client1. Click in a field (for example, SSN) and change the data to match the desired client.
2. On the keyboard, press either Ctrl+S or Ctrl+F to search.
The Autofill Search Results window opens.
3. Select the desired client.
4. Click OK.
The fields are filled in with the client’s information.
To add an additional client1. Click the Add a new tab of indexes button.

Copyright © 2014 Northwoods Consulting Partners, Inc. All rights reserved. Page 28
Compass Documents
Fig. 31 Add a new tab of indexes button
A new tab appears.
2. Click in a field (for example, SSN) and change the data to match the desired client.
3. On the keyboard, press either Ctrl+S or Ctrl+F to search.
The Autofill Search Results window opens.
4. Select the desired client.
5. Click OK.
The fields are filled in with the client’s information.
To copy existing information to a new tab1. Click the Copy this set of indexes to a new tab button.

Copyright © 2014 Northwoods Consulting Partners, Inc. All rights reserved. Page 29
Compass Documents
Fig. 32 Copy this set of indexes to a new tab button
A new tab appears with all fields completed on the original tab filled in.
2. Make any desired changes. To search for a new client, see “To re‐index the document for a different client” on page 27.
To copy a field’s content to all tabs1. Click the arrow at the right side of the field whose contents you want to copy to all tabs.
The field’s content will be copied to all open tabs.
To select a new document type for a documentThe Select New Document Type option in the Actions and right‐click menus allows you to change the document type associated with a document.
Generally, rights to permanently delete a document from the system will be at the administrative level. To mark a document for deletion, change the document type to the document type that denotes deletion in your agency (for example, “ZZ – To Be Deleted”).
1. In the stage, select the desired document.
2. In the toolbar, click Actions.
3. Click Select New Document Type.
The Please select a document type... window opens.
4. Optional ‐ In the Filter field, enter the name of the desired document type. The results will update automatically as you type.
5. Select the desired document type.
6. Click OK.

Copyright © 2014 Northwoods Consulting Partners, Inc. All rights reserved. Page 30
Compass Documents
Reorienting an ImageThe following options are available in the auxiliary panel to reorient an image for easier viewing.
Changes to an image’s orientation are not saved. After navigating away from a document, the document’s original orientation is returned.
Hiding and Unhiding an Overlay ImageImage overlays display on document types as a reminder of agency policy (for example, to safeguard federal tax information). Your system administrator configures the appropriate document types for image overlays.
The Hide overlay image icon hides the overlay; once hidden, the icon becomes the Show overlay image icon and allows you to display the hidden overlay image. Hiding the overlay does not permanently remove it from the document. This icon only appears if there is an overlay image on the document.
If adding a sticky note in Compass Documents (for users with FileNet only), you must first hide the overlay image.
To hide an overlay image1. In the auxiliary panel, click the Hide overlay image icon.
Fig. 33 Hide overlay image icon
The image is hidden. If you are viewing the document in the attached or detached auxiliary panel, the overlay will remain hidden until you select a different document or click the Show overlay image icon. If you double clicked the document to open it in another window, the overlay will remain hidden until you click the Show overlay image icon.
TABLE 1: IMAGE ORIENTATION OPTIONS
Icon Option Description
Magnifying Glass This option enlarges parts of the document. Click and hold the mouse button to enlarge a section of the document.
Zoom To This option zooms in on parts of the document. Use your mouse to drag a box around the area you want to enlarge.
Center At Point This option centers the document at a selected point. Click on the document to center it around the selected point.
Fit To Width This option fits the document to the width of the auxiliary panel or the Detached Documents Panel window.
Rotate This option rotates the document.
Fit This option resizes the selected document page so the entire page is displayed in the auxiliary panel or the Detached Documents Panel.
Move Image (Pan) This option allows you to drag the image. (This is similar to scrolling.) Click and drag your mouse to move around within the document.

Copyright © 2014 Northwoods Consulting Partners, Inc. All rights reserved. Page 31
Compass Documents
To unhide an overlay imageThe Show overlay image icon is only available if the overlay image has been hidden.
1. In the auxiliary panel, click the Show overlay image icon.
Fig. 34 Show overlay image icon
The image is unhidden.
Closing DocumentsThe Close Document(s) button appears as a toolbar icon located at the top right side of the stage. This button gives you two options:
• Close All ‐ This option closes all open documents.
• Close Selected ‐ This option opens a window displaying all open document titles with checkboxes for your individual selection.
If there are no open documents, the Close Document(s) button is grayed out.
To close all open documents1. In the toolbar, click Close Document(s).
2. Click Close All.
All open documents close.
To close selected documents1. In the toolbar, click Close Document(s).
2. Click Close Selected.
The Close Selected Documents window opens.
3. Select the checkbox next to the documents you want to close.
OR
3. Click Select All to select all open documents.
4. Click OK.
The selected documents close.
Selecting Multiple DocumentsYou can select multiple documents at once by using the Ctrl key on the keyboard or by using the Select All option in the right‐click menu or Actions menu.
To select multiple documents using the keyboard1. On the keyboard, hold Ctrl.

Copyright © 2014 Northwoods Consulting Partners, Inc. All rights reserved. Page 32
Compass Documents
2. Click each desired document. Documents do not need to be contiguous.
OR
1. On the keyboard, hold Shift.
2. Click the first and last documents in the desired range. All documents in that range will be selected.
To select all using the Select All optionThe Select All option in the Actions and right‐click menus highlights all of the documents in the stage, allowing you to apply a single action to all documents shown at once.
1. In the toolbar, click Actions.
2. Click Select All.
Selecting a ProfileProfiles control the available search keywords, the document types to which you have access, the columns that display on the stage, and the Smart Views to which you have access.
If you do not have a profile saved for Documents, you will be prompted and required to select one before the module will function properly.
If you do not have any profiles configured, you will receive a message informing you that there are no valid profiles configured and that you should contact your system administrator.
To select a profile1. In the toolbar, click Change Profile.
Fig. 35 Change Profile button
The Select a Profile... window opens.
2. Select the profile you want from the list displayed.
Selecting an Autofill SourceYou must select an autofill source. The autofill settings have been configured by your Northwoods solution architect based on your role within the agency.
To select an autofill sourceThe Select Autofill Source option in the Actions and right‐click menus allows you to select the correct autofill source (a collection of client data).
1. In the toolbar, click Actions.
2. Click Select Autofill Source.
The Autofill Selection window opens.
3. Select the desired autofill.

Copyright © 2014 Northwoods Consulting Partners, Inc. All rights reserved. Page 33
Compass Documents
4. Click OK.
Working with TasksYou can assign a document as a task to one or more users.
To assign a task to a recipientThe Assign To A Recipient option in the Actions and right‐click menus allows you to assign a document to one or more users and create a task in Compass Tasks.
1. In the stage, select the desired document.
2. In the toolbar, click Actions.
3. Click Assign To A Recipient.
The Select a recipient... window opens.
4. Click Add Recipient(s).
The Select recipients window opens.
5. Based on your agency’s practices, either add specific recipients or add the next recipient in the rotation. (See “To add specific recipients” on page 33 or “To add the next recipient in the rotation” on page 33 for more information.)
6. Optional – To manually add a description, deselect the Default Description checkbox and enter a description in the Description field.
7. Optional – To add a note, click in the Note area. There is a limit of 500 characters.
8. Click OK.
To add specific recipients1. Select the Standard tab.
2. Optional – To view a filtered list of recipients, choose a Group and/or Department under Additional Filters…
3. In the Recipients pane, select one or more recipients.
4. Click OK.
To add the next recipient in the rotationYou will not see the Pool tab unless your role has the Can Assign Recipient Pools privilege.
1. Select the Pool tab.
2. From the Recipient Pool drop‐down list, select a pool.
3. Click Get Next Suggestion.
The Select Recipient window opens.
4. Optional ‐ To stop the Select Recipient window from appearing again, click the checkbox next to Don’t show this message again.
5. Click Yes.
The next available person on the tick list is selected, and a green checkmark displays next to that member’s name.

Copyright © 2014 Northwoods Consulting Partners, Inc. All rights reserved. Page 34
Compass Documents
6. Optional – To add a note, click in the Notes area. There is a limit of 500 characters.
7. Optional – To display a bar graph of worker assignments within a date range, click Show Assignment History.
8. Click OK.
To create a follow-up task for a documentThe Assign Follow Up Date option in the Actions and right‐click menus allows you to assign a follow up task to yourself for a document.
1. In the stage, select the desired document.
2. In the toolbar, click Actions.
3. Click Assign Follow Up Date.
The Select a follow up date and time... window opens.
Fig. 36 Select a follow up date and time... window
4. Using the calendar, select the desired follow up date and proceed to step 6.
OR
4. Click By Number of Days.

Copyright © 2014 Northwoods Consulting Partners, Inc. All rights reserved. Page 35
Compass Documents
5. Select the desired number of business days. The due date changes as the number is changed.
6. Optional – Set the time. If no time is set, time defaults to midnight.
7. Optional – To manually add a description, deselect the Default Description checkbox and enter a description in the Description field.
8. Optional – To add a note, click in the Note area. There is a limit of 500 characters.
9. Click OK.
To create a new taskThe Create New Task option in the Actions and right‐click menus allows you to create a new task with the desired document associated to that task.
1. In the stage, select the desired document.
2. In the toolbar, click Actions.
3. Click Create New Task.
The Create new task window opens.
4. In the Task Type drop‐down list, choose a task type.
5. In the Description field, enter a description.
6. In the Due Date section, select the desired due date and time.
7. In the Priority drop‐down list, select the priority level.
8. Optional – To add a note, click in the Note area. There is a limit of 500 characters.
9. To select one or more recipients, click Add Recipient(s).
The Select recipients window opens.
10. Based on your agency’s practices, either add specific recipients or add the next recipient in the rotation. (See “To add specific recipients” on page 33 or “To add the next recipient in the rotation” on page 33 for more information.)
11. Click Save.
Depending on your agency’s configuration, you may be prompted to select a task origin. Select one from the Select Task Origin drop‐down list and click OK.
To view document assignmentsThe View Document Assignments option in the Actions and right‐click menus allows you to see the current assignment and history of a document.

Copyright © 2014 Northwoods Consulting Partners, Inc. All rights reserved. Page 36
Compass Documents
Fig. 37 History
Cutting and Copying Document PagesThe Cut / Copy Pages option in the Actions and right‐click menus allows you to perform the following actions:
• Copy ‐ This option copies pages in a document and duplicates them in a new document. The original document remains unchanged.
• Move ‐ This option removes a page or pages from the original document and creates a new document using those pages.
• Cut (Discard) ‐ This option removes pages from the original document and deletes them. No additional document is created.
To copy pages from a document to create a new document1. In the stage, select the desired document.
2. In the toolbar, click Actions.
3. Click Cut / Copy Pages.
The Cut / Copy Pages window opens.
4. Click the Copy radio button.

Copyright © 2014 Northwoods Consulting Partners, Inc. All rights reserved. Page 37
Compass Documents
Fig. 38 Cut/Copy Pages
5. Drag the appropriate pages from the Original document pages section to the New pages section. Click Save.
The Permanent change confirmation message appears.
6. Click OK to confirm the changes.
The Assign Document Indexes window opens, set by default to keep the document type and index values of the original document.

Copyright © 2014 Northwoods Consulting Partners, Inc. All rights reserved. Page 38
Compass Documents
Fig. 39 Assign Document Indexes
7. Select the desired index options from the following:
• To select a document type, see “Selecting a Document Type” on page 38.
• To select index values, see “Select Index Values” on page 39.
• To select a recipient, see “Selecting a Routing Preference” on page 39.
You will only be able to send a task to a recipient if Send to recipient(s) is selected in the Send Document section.
• To select a task type, see “Selecting a Task Type” on page 40.
You will only be able to select a task type if Send to recipient(s) or To Me are selected in the Send Document section.
• To set a due date for the task, see “Setting a Due Date for a Task” on page 40.
You will only be able to select a due date if Send to recipient(s) or To Me are selected in the Send Document section.
8. Click OK.
The new document is created.
Selecting a Document TypeThere are two options that allow you to set the document type for the new document.
• Keep Existing ‐ This option keeps the original document’s type and attaches it to the new document.
• Choose New ‐ This option allows you to select a new document type.

Copyright © 2014 Northwoods Consulting Partners, Inc. All rights reserved. Page 39
Compass Documents
To select a new document type1. Click the ellipsis button next to the Choose New option.
The Please select a document type... window opens.
2. Optional ‐ In the Filter field, enter the name of the desired document type. The results will update automatically as you type.
3. Select the desired document type.
4. Click OK.
Select Index ValuesThere are two options which allow you to set index values for the new document.
• Keep Existing ‐ This option keeps the original document’s index values and attaches them to the new document.
• Choose New ‐ This option allows you to select new index values.
To select new index values1. Click the ellipsis button next to the Choose New option.
The Verify Index Values window opens with the Indexes tab displayed.
2. Click the Default Member tab.
3. See one or more of the sections listed below and follow the directions to alter the document indexes:
• To re‐index the document for a different client, see “To re‐index the document for a different client” on page 27.
• To add an additional client to the document, see “To add an additional client” on page 27.
• To copy existing index information to a new tab, see “To copy existing information to a new tab” on page 28.
• To add the contents of a single field to all other tabs, see “To copy a field’s content to all tabs” on page 29.
4. Click OK.
Selecting a Routing PreferenceThe following options determine how the document is routed.
• Save to DMS, do not send to worker ‐ This option saves the document to the DMS but does not create a task for a worker.
• Send to recipient(s) ‐ This option saves the document to the DMS and creates a task for the selected recipients.
• To Me ‐ This option saves the document to the DMS and creates a task for you.
To select a recipient1. Click Select...
The Select recipients window opens.
2. Based on your agency’s practices, either add specific recipients or add the next recipient in the rotation. (See “To add specific recipients” on page 33 or “To add the next recipient in the rotation” on page 33 for more information.)

Copyright © 2014 Northwoods Consulting Partners, Inc. All rights reserved. Page 40
Compass Documents
3. Optional ‐ To include yourself as a recipient and generate a task for yourself, select the Include Me checkbox in the Assign Document Indexes window.
Selecting a Task TypeThe following options determine the type of the task you are creating:
• New Mail ‐ This option sets the task as the Document New Mail type.
• Follow Ups ‐ This option sets the task as the Document Followup type.
• Other ‐ This drop‐down list allows you to select from any configured task type (including the two listed above).
Setting a Due Date for a TaskA due date may automatically be set based on the selected task type. You have the option to select a different date, if desired.
To set a due date for a task1. Click the button displaying the current due date.
The Select a follow up date and time... window opens.
2. Using the calendar, select the desired follow up date. Proceed to step 4.
OR
2. Click By Number of Days.
3. Select the desired number of business days. The due date changes as the number is changed.
4. Optional – Set the time. If no time is set, time defaults to midnight.
5. Optional – To add a note, click in the Note area. There is a limit of 500 characters.
6. Click OK.
To move pages from one document to create a new document1. In the stage, select the desired document.
2. In the toolbar, click Actions.
3. Click Cut / Copy Pages.
The Cut / Copy Pages window opens.
4. Select the Move radio button.
5. Drag the appropriate pages from the Original document pages section to the New pages section.
6. Click Save.
The Permanent change confirmation message appears.
7. Click OK to confirm the changes.
The Assign Document Indexes window opens, set by default to keep the document type and index values of the original document.
8. Select the desired index options from the following:
• To select a document type, see “Selecting a Document Type” on page 38.
• To select index values, see “Select Index Values” on page 39.
• To select a recipient, see “Selecting a Routing Preference” on page 39.

Copyright © 2014 Northwoods Consulting Partners, Inc. All rights reserved. Page 41
Compass Documents
You will only be able to send a task to a recipient if Send to recipient(s) is selected in the Send Document section.
• To select a task type, see “Selecting a Task Type” on page 40.
You will only be able to select a task type if Send to recipient(s) or To Me are selected in the Send Document section.
• To set a due date for the task, see “Setting a Due Date for a Task” on page 40.
You will only be able to select a due date if Send to recipient(s) or To Me are selected in the Send Document section.
9. Click OK.
The original document is altered, and the new document is created.
To delete pages from a document1. In the stage, select the desired document.
2. In the toolbar, click Actions.
3. Click Cut / Copy Pages.
The Cut / Copy Pages window opens.
4. Drag the appropriate page(s) from the Original document pages section to the Discarded pages section.
5. Click Save.
The Permanent change confirmation message appears.
6. Click OK to confirm the changes.
The discarded pages are removed from the document.
Importing DocumentsThe Import Document in the Actions, right‐click, and File menus allows you to import non‐image files (such as Word, PDF, PowerPoint, and Excel files) into Documents. Once imported, you can edit the non‐image file in its native application. Typically, this functionality is used for documents that require modification during the work flow process (for example, preparing, signing, and presenting recommendations for a court judge).
Images and audio files can also be imported using the Import Document feature. However, images and audio files cannot be edited.
To import documents1. In the toolbar, click Actions.
2. Click Import Document.
The Select File to Import window opens.
3. Locate and select the file you want to import.
4. Click Open.
The Please select a document type... window opens.

Copyright © 2014 Northwoods Consulting Partners, Inc. All rights reserved. Page 42
Compass Documents
5. Optional ‐ In the Filter field, enter the name of the desired document type. The results will update automatically as you type.
6. Choose a document type.
7. Click OK.
The Verify Index Values window opens.
8. Click the Default Member tab.
9. In the Required Indexes section, enter client information, (such as Last Name or SSN) for the client that this document should be attached to.
10. On the keyboard, press either Ctrl+S or Ctrl+F to search for clients matching the entered information.
The Autofill Search Results window opens.
11. Select the desired client.
12. Click OK.
The client information is autofilled.
13. See one or more of the sections listed below and follow the directions to alter the document indexes:
• To re‐index the document for a different client, see “To re‐index the document for a different client” on page 27.
• To add an additional client to the document, see “To add an additional client” on page 27.
• To copy existing index information to a new tab, see “To copy existing information to a new tab” on page 28.
• To add the contents of a single field to all other tabs, see “To copy a field’s content to all tabs” on page 29.
14. To select a recipient, see “Selecting a Routing Preference” on page 39.
You will only be able to send a task to a recipient if Send to recipient(s) is selected in the Send Document section.
15. To select a task type, see “Selecting a Task Type” on page 40.
You will only be able to select a task type if Send to recipient(s) or To Me are selected in the Send Document section.
16. To set a due date for the task, see “Setting a Due Date for a Task” on page 40.
You will only be able to select a due date if Send to recipient(s) or To Me are selected in the Send Document section.
17. Click OK.
The non‐image or audio file is imported into Documents.
Exporting DocumentsThe Export Document(s) option in the Actions and right‐click menus allows you to copy documents to another location. It doesn’t delete them from Pilot. Exported documents are grouped in separate folders by document type.

Copyright © 2014 Northwoods Consulting Partners, Inc. All rights reserved. Page 43
Compass Documents
To export documents1. In the stage, select the desired documents. For instructions on selecting multiple documents, see
“Selecting Multiple Documents” on page 31.
2. In the toolbar, click Actions.
3. Click Export Document(s).
The Export Documents window opens.
Fig. 40 Export Documents window ‐ Document Selection
4. Check the box each document you want to export.
5. Click Next.
6. Click the ellipses next to the Export Output Path field.
The Browse For Folder window opens.
7. Navigate to the folder where you want to export the files.
8. Optional ‐ Click Make New Folder to create a new folder in the target location.
9. Click OK.
10. In the Package Name field, enter the desired folder name. This folder will be created inside the folder selected in the Export Output Path field.
11. Click Next.
12. To complete the export process, click Finish.
The Export Successful window appears.
13. Click OK.

Copyright © 2014 Northwoods Consulting Partners, Inc. All rights reserved. Page 44
Compass Documents
A separate folder is created for each document type exported. For sorting purposes, a folder containing Excel spreadsheets and an HTML file are also included.
Fig. 41 Exported Files
Printing DocumentsYou can select documents to be printed to a local printer.
To print documents1. In the stage, select the desired document.
2. In the auxiliary panel, click the Print icon.
Fig. 42 Print icon
A print window opens.
3. Select the desired printer and print options.
4. Click OK.
Pushing Documents to Compass FormsYou can add information to an existing document by pushing it from Documents to Forms. No existing information can be changed.
You can use the following options to add additional information to a pushed form:
• Text Box ‐ This option allows you to add new text to a document. Use the cursor to draw the desired side of box. Double click to type inside the box.
• Stamp ‐ This option allows you add and resize checkmarks, x’s, circles, lines, and redactions.
Redactions are most often used for documents with sensitive information (such as income tax data) that needs to be hidden.
• Caseworker Sign ‐ This option adds the worker’s saved signature to the form. If no signature has been saved, this option opens the Please sign the signature tablet... window, allowing a worker to add his or her signature to the form.
• Client Sign ‐ This option opens the Please sign the signature tablet... window, allowing clients to add their signature to the form.
The original document will not be altered; when the new form is submitted to the DMS, a new document will be created.

Copyright © 2014 Northwoods Consulting Partners, Inc. All rights reserved. Page 45
Compass Documents
To push documents to Compass Forms1. In the stage, select the desired document.
2. In the auxiliary panel, click the Push to Forms icon.
Fig. 43 Push to Forms icon
The document opens in Compass Forms as a form.
3. Add one or more form items to the form.
4. When finished, click the Finish icon.
The Assign Document Indexes window opens.
Fig. 44 Assign Document Indexes
5. Select the desired index options from the following:
• To select a document type, see “Selecting a Document Type” on page 38.
• To select index values, see “Select Index Values” on page 39.
• To select a recipient, see “Selecting a Routing Preference” on page 39.
You will only be able to send a task to a recipient if Send to recipient(s) is selected in the Send Document section.
• To select a task type, see “Selecting a Task Type” on page 40.
You will only be able to select a task type if Send to recipient(s) or To Me are selected in the Send Document section.
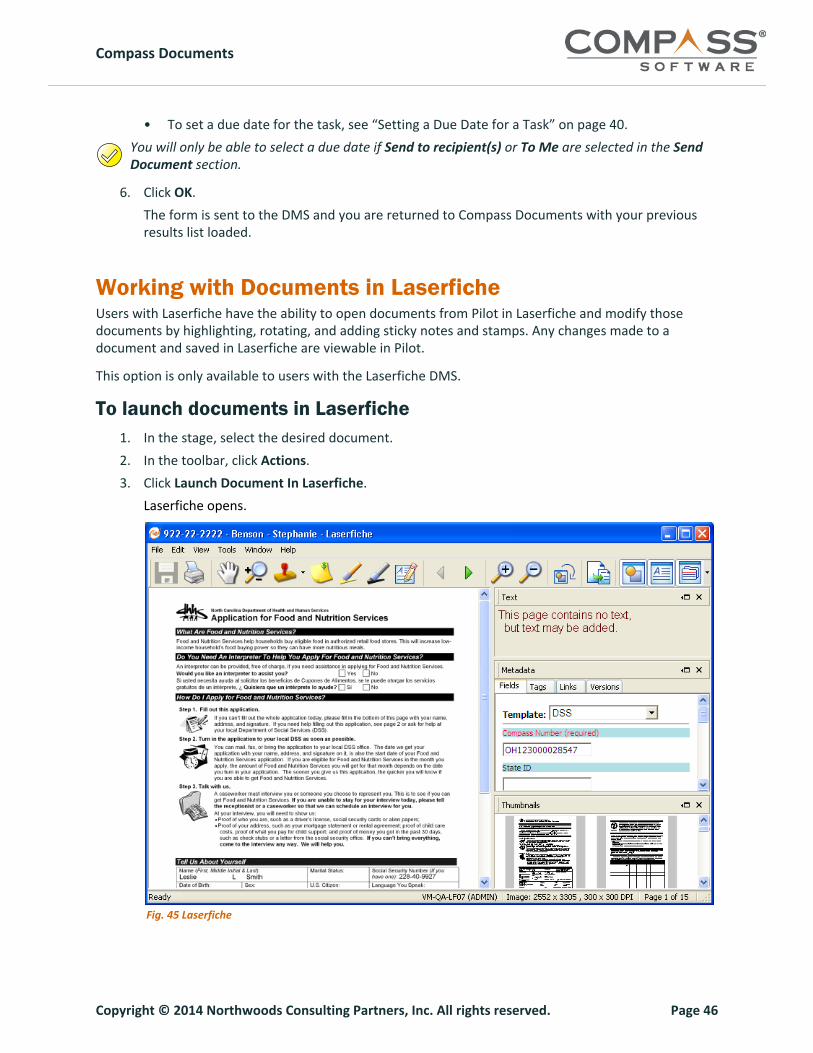
Copyright © 2014 Northwoods Consulting Partners, Inc. All rights reserved. Page 46
Compass Documents
• To set a due date for the task, see “Setting a Due Date for a Task” on page 40.
You will only be able to select a due date if Send to recipient(s) or To Me are selected in the Send Document section.
6. Click OK.
The form is sent to the DMS and you are returned to Compass Documents with your previous results list loaded.
Working with Documents in LaserficheUsers with Laserfiche have the ability to open documents from Pilot in Laserfiche and modify those documents by highlighting, rotating, and adding sticky notes and stamps. Any changes made to a document and saved in Laserfiche are viewable in Pilot.
This option is only available to users with the Laserfiche DMS.
To launch documents in Laserfiche1. In the stage, select the desired document.
2. In the toolbar, click Actions.
3. Click Launch Document In Laserfiche.
Laserfiche opens.
Fig. 45 Laserfiche

Copyright © 2014 Northwoods Consulting Partners, Inc. All rights reserved. Page 47
Compass Documents
Using the Laserfiche ToolbarYou can modify different parts of the document while in Laserfiche using the options on the toolbar.
Fig. 46 Laserfiche Toolbar
The following table details the available options.
TABLE 2: TOOLBAR OPTIONS
Icon Option Description
Save This option saves the document.
Print This option prints the document.
Panning This option allows you click, drag, and pull the window around the viewing area of Laserfiche.
Zoom This option allows you to drag a box over a location of the document, thereby zooming in on the area selected.
Stamp This option allows you to place a stamp on the document (for example, “Approved”).
Sticky Note This option allows you to add a sticky note to the document.
Highlighter This option allows you to highlight parts of the document.
Redaction This option allows you to edit an image or text by adding a black or white region.
Edit Text This option activates the text field and allows you to change text that has been associated with the current page of the opened document.
Navigation This option allows you to navigate to different pages of the document.
Zoom In / Zoom Out This option allows you to zoom in and out on the document.
Rotate This option allows you to rotate the document.