compendiumld tutorial 1 - open...
TRANSCRIPT

CompendiumLD Tutorial 1
By Simon Cross This is the first of five tutorials introducing CompendiumLD. Each tutorial is divided in to a number of Parts, most of which contain activities to work through. This tutorial covers the following:
Installing CompendiumLD
Starting CompendiumLD for the first time
Getting Orientated
The Editing Area
The Tab Panel, Tool Bar and Menu Bar
Finding the tutorial examples
Navigating between maps
Part 1: Installing CompendiumLD Before getting started with CompendiumLD you need to install it on your computer. To do this you need to download the installer software from the CompendiumLD website.
Already have CompendiumLD installed? If you have recently installed CompendiumLD go to Part 2. If it’s been a while since you installed there may be a new version out so check the website. If you are upgrading from a previous release of CompendiumLD we recommend that you copy your previous installation to another folder (e.g. CompendiumLD‐backup) before proceeding with the installation of this upgrade)
Windows 7 or Vista user? To ensure the installer is run with the necessary privileges in Windows Vista or 7 you should right‐click on the installer and select 'Run as administrator'.
How to install CompendiumLD
Go to this webpage and fill‐in the short form:
http://compendiumld.open.ac.uk/download.cfm
1

On submitting this form, a second page will load. On this page there will be a link to the installer. Download the installer by left or right clicking on the ‘Download Compendium…’ link. The version of CompendiumLD you download will always be the most recent (and therefore may differ from the version given in the example below)
If you get a security warning, such as the one below, just click ‘yes’
A file download box will open and you will be asked if you want to run or save the file. If installing on the machine you are currently using select ‘run’. If you want to install it on a different machine select ‘save’ and then copy this file (using a USB stick for example) to the new machine and then double click the file to run it.
If you get a security warning, such as the one below, just click ‘run’ or ‘ok’
2

Now you are ready to install the software. You should see a ‘Welcome’ window like the one below. This is the first page of several that will guide you through the setup and install.
Follow the on screen instructions:
1. On the Welcome page click ‘Next’
2. On the agreement page select the ‘I agree’ box and click next
3. On the third page (‘Important information’) read the text and click ‘Next’
4. You now have the choice of where to install CompendiumLD, by default it will install in the Program Files folder. If this is ok, click ‘Next’ if not navigate to a different folder and click ‘Next’ (Note: If you are installing a second or a newer version of CompendiumLD on the same machine you will get a warning box (see below). To overwrite the original version click yes. However, we would suggest installing to a new folder – to differentiate this folder from the original, name it CompendiumLD and then add the version number at the end)
3

5. Next you will be asked if you want a shortcut in the start up menu. This is recommended so click ‘Next’.
6. You will next be asked if you want a desktop icon. Again this is a good idea to have so leave the box ticked and click ‘Next’.
7. Finally you will be shown a summary of the install. Click ‘Install’ to install.
8. Once the programme has installed a new box will appear with some ‘Notes on Java’ in it. CompendiumLD uses a common computer code called Java. However, some computers may not have an up‐to‐date version installed so you need to install a current version. Click ‘Next’ in this box.
9. The next screen gives you the option of installing Java. It is recommended that you leave the box checked and click ‘Finish’. Don’t worry if your computer already has the latest version of Java, the software will detect this and a new box will pop‐up asking you if you want to re‐install it ‐ if this happens click ‘No’.
CompendiumLD should now be installed on your machine. Part 2 of this tutorial (on the next page) takes you through starting CompendiumLD for the first time.
4

Part 2: Starting CompendiumLD for the first time
Let’s start by creating and opening a new project in CompendiumLD.
ACTIVITY 1
Open the CompendiumLD software by double clicking the icon on the desktop or opening it from the Start menu. Everything you do in CompendiumLD must be done within a project. A project is a little like a portfolio in which you create and store sets of visual maps/ diagrams/ representations.
The first time you use CompendiumLD you will be prompted to ‘Create a New Project’. Fill in the fields and click ‘Create’. If you can’t think of anything better, name the project ‘Tutorial 1’. You have to have an Author Name, Login Name and password for each project but if you keep the ‘Make the user below the default user’ box ticked you will not have to enter this information again; it is used to identify the author if you share maps with other Compendium users. You can use something easy and obvious for the login name and password (e.g. the project name or your initials) and make a note of it somewhere too!
5

ACTIVITY 2
Once you have created a project, you will need to open it. If you have just created a project, you will be automatically prompted to ‘Login to a Project’. If you are returning to CompendiumLD or have just closed a project chose the ‘Open’ command from the ‘File’ menu.
In the login box, click the name of the project you want to open (projects are listed in alphabetical order). The illustration on the left below shows I have just one project – named ‘a’. The illustration on the right shows three projects have been created and you can choose which to open. If you’re new to CompendiumLD, you will just have just one project listed (the one you setup in Activity 1). Your login name and password should be automatically entered by the software, if not enter them remembering these are case sensitive. Click ‘Open’. Your project should now open. You will know it is open once a large white box has appeared labelled ‘home window’.
You can only have one project open at a time, so if you ever want to open or create a new project, you first need to close this project. Let’s do this now: chose the ‘Close’ command from the ‘File’ menu. Once the project has closed, go back to the ‘File’ menu and chose the ‘Open’ command. In the pop‐up, select the project you just created and open it (see Step 2).
6

PART 3: Getting Orientated Now you are familiar with opening and closing projects let’s take a look at the general layout of CompendiumLD. When you first open a project, you will see:
• A large area mostly filled with a window labelled ‘Home map’ (a white box with a couple of unconnected labelled icons in it). This area is the ‘Editing Area’ and the window open is called a ‘Map’. Maps are the canvas on which you will create your designs.
• Above the Editing Area is a ‘Toolbar’ and above this the ‘Menu’ bar. • On the left there is another toolbar/window which we call the ‘Tab Panel’
The layout of the screen may remind you of an image‐editing or desk‐top publishing package.
Let’s explore each of these areas in turn
PART 4: The Editing Area The Editing Area is where you open and edit ‘Maps’. You can have several Map windows open at once and (just like the windows in any other application), the top‐most one may partially or completely hide others underneath. When a new project loads up you will be shown the ‘Home’ Map window. This will initially contain a couple of nodes. A node is the standard type of object you will use in Compendium. Maps are built from nodes and the links you draw between the nodes. All nodes that you will use in CompendiumLD are composed of two main parts: an image (such as an icon, symbol or picture) and a label (the text underneath the image).
7

In the course of these tutorials I may occasionally refer to a node as an object and the image used for a node as an ‘icon’. This may seem to be complicating things unduly but these terms are often used interchangeably by practitioners so it is important to be aware of and practice this. Nodes are the basic building blocks of any design, diagram or visualisation you create in CompendiumLD.
ACTIVITY 3
Open a project (see Section 1.2). To familiarise yourself with the Map windows try moving the window around the screen. Now use the minimise button (top‐right of the Map window) to minimise the map to a small box at the bottom of the Editing Area’. Now use the restore button to restore it to its original size.
In the home window you will see a node titled ‘How do I get started…’ This is a special type of node called a ‘map’ node. Each map node ‘contains’ a further map window in which you can add more nodes and links. You can see this window by simply double clicking on the node. In CompendiumLD there are two map nodes:
a. Standard Compendium map
b. Learning activity map So double clicking on any ‘Map’ node will open its Map in a new window. Let’s try that now: double‐click on the ‘Welcome’ link node. A new Map window will open and you should see that the window contains a map of nodes showing you four possible paths for getting started with CompendiumLD. Some of the nodes on this map link to resources which are stored outside of CompendiumLD, such as web pages or PDF files. Double‐ clicking these nodes will open your web browser or PDF reader and load the relevant document or page. We will return to this Welcome map in Tutorial 2.
8
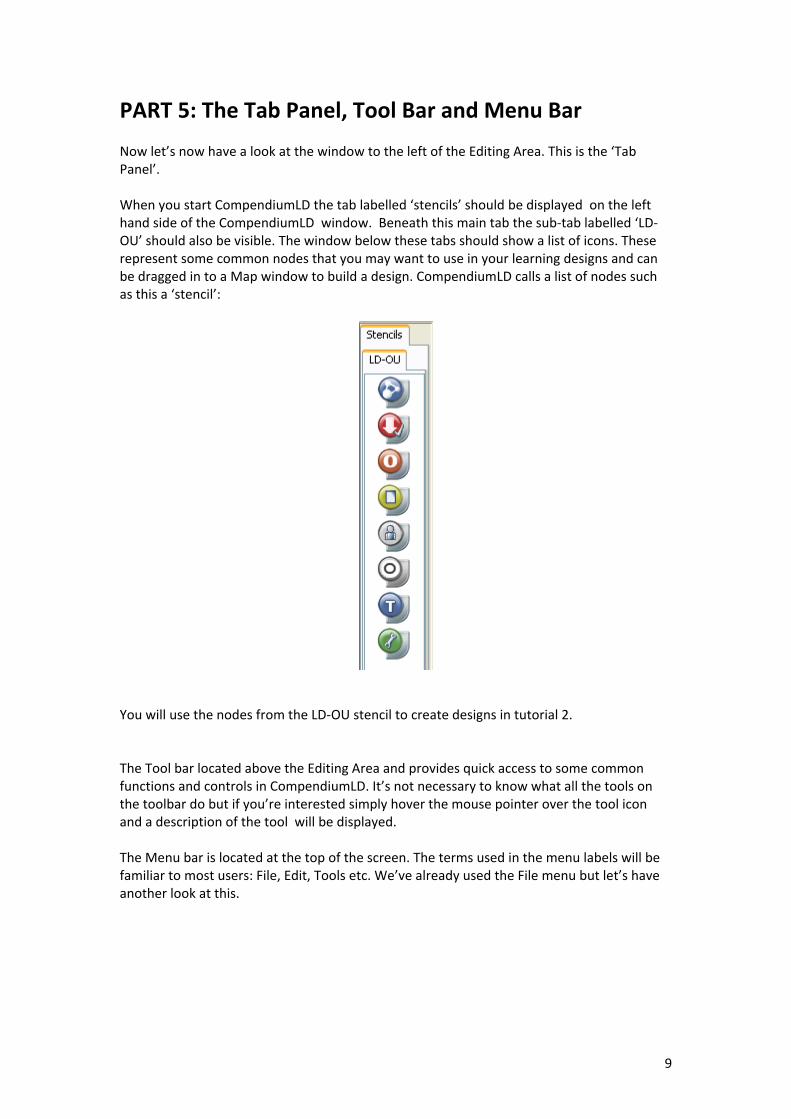
PART 5: The Tab Panel, Tool Bar and Menu Bar Now let’s now have a look at the window to the left of the Editing Area. This is the ‘Tab Panel’. When you start CompendiumLD the tab labelled ‘stencils’ should be displayed on the left hand side of the CompendiumLD window. Beneath this main tab the sub‐tab labelled ‘LD‐OU’ should also be visible. The window below these tabs should show a list of icons. These represent some common nodes that you may want to use in your learning designs and can be dragged in to a Map window to build a design. CompendiumLD calls a list of nodes such as this a ‘stencil’:
You will use the nodes from the LD‐OU stencil to create designs in tutorial 2. The Tool bar located above the Editing Area and provides quick access to some common functions and controls in CompendiumLD. It’s not necessary to know what all the tools on the toolbar do but if you’re interested simply hover the mouse pointer over the tool icon and a description of the tool will be displayed. The Menu bar is located at the top of the screen. The terms used in the menu labels will be familiar to most users: File, Edit, Tools etc. We’ve already used the File menu but let’s have another look at this.
9

ACTIVITY 4
Look at the list of option in the File menu. If necessary click on the downward facing arrow to see all the options in this menu. What option is often found in the File menu but is missing here?
You should have found that there is no ‘Save’ option in the File menu ‐ instead, CompendiumLD continually auto‐saves your work to the program folder. For example, if you have installed CompendiumLD on your C: Drive, this is where it will save your project to. This means that to share your design with others, or transfer it to another machine, you will use the ‘Export’ option (see a later Tutorial).
Part 6: Finding the tutorial examples We have created some CompendiumLD maps for you to use in conjunction with these Tutorials. These can be found from the Welcome map. The following activity shows you how.
ACTIVITY 5
Load CompendiumLD and then open (or create) a project. If you are uncertain how to do this, refer back to Part 2.
In the Editing Area (see Part 4) you should see a map titled ‘Home’. This is your Home Map – this effectively becomes the project’s home map and should be seen as sitting at the top of any hierarchy of linked maps you create. In this map there will be a map node labelled ‘How do I get started’. Double click this map node.
10

A new map will open titled ‘Welcome: how to get started…’ (see below). You will notice that this new window almost completely hides the ‘Home’ map (underneath).
STEP 4: Double click the image icon in Welcome map labelled ‘Examples and information…’ This links to the CompendiumLD website where example maps are stored. Follow the links on the site to Tutorial examples. Now you can save these files to your computer and import them (we cover importing in Tutorial 2).
Part 7: Navigating between maps In the last activity, you will have ended up with three map windows open: the Home map window, the Welcome map window and the Tutorial 2 map window. Having to move amongst and manage maps – both ones we’ve prepared and ones you will later create ‐ may appear a daunting prospect, however, there are several methods to make this faster and easier. Two familiar methods to Windows users wills be: navigating between maps by dragging windows around the screen, thereby clearing space so you can see the windows underneath, and minimising maps (click the button at the top right of each map window) so the window shrinks in to a small box at the bottom of the Editing Area. You can also:
11

• Use the blue browse button in the toolbar. These work in a similar way to an internet browser, allowing you to move back or forward through the maps you’ve looked at:
• Use the ‘Window’ command in the Menu Bar to find and display maps you know you have opened. If you were to click on the ‘Window’ command after Step 4 in Activity 6 above you would see:
What next?
This is the end of Tutorial 1. Please now move on to Tutorial 2 which will introduce you to CompendiumLD maps by talking you through a pre‐designed map First published in February 2010 by the Open University Learning Design Initiative. With thanks to Andrew Brasher and Anna Page for their comments and contributions.
12