comping and mixing - via lab home page 5 - comping and mixing.pdf · comping creating a...
TRANSCRIPT

Comping and Mixing

• Clean-up and organization • Comping • Arranging • Additional tracking • Equalization • Panning • Level adjustment • Compression • Reverb • Automation • Mastering
Much of the material in this lecture comes from the following sources: Sound On Sound
• http://www.soundonsound.com/sos/aug01/articles/usingeq.asp • http://www.soundonsound.com/sos/sep09/articles/compressionmadeeasy.htm
Mixing Secrets for the Small Studio, Mike Senior, Focal Press (2013)
Mixing
Post-Tracking Overview
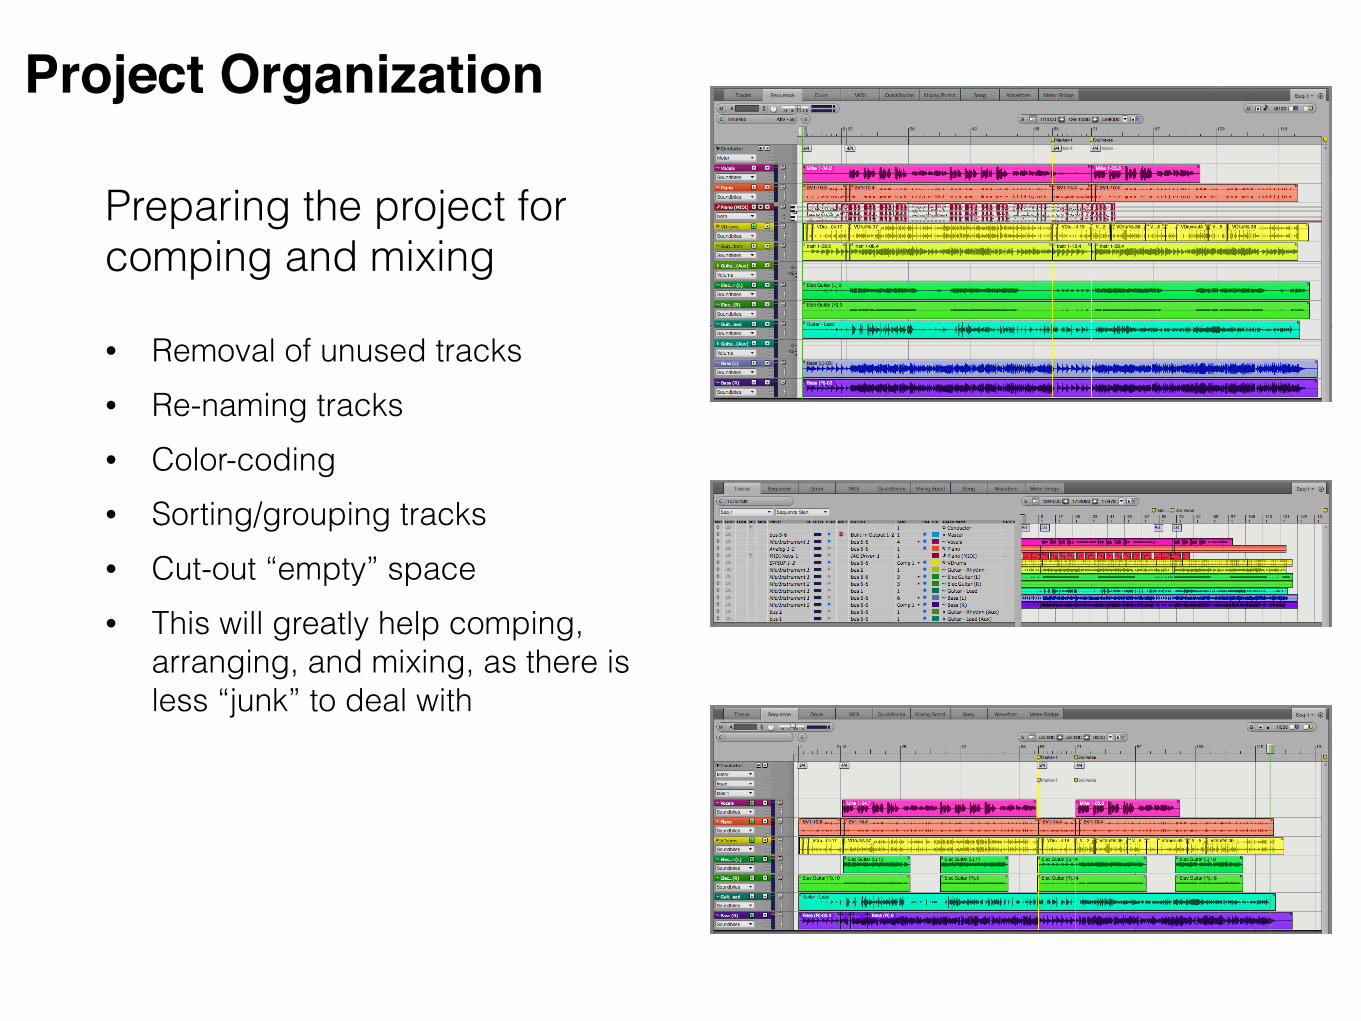
Preparing the project for comping and mixing
• Removal of unused tracks • Re-naming tracks • Color-coding • Sorting/grouping tracks • Cut-out “empty” space • This will greatly help comping,
arranging, and mixing, as there is less “junk” to deal with
Project Organization

Comping
Creating a “composite” take from a set of takes
• Listen through all takes • Create a comp sheet, where the best parts from each take are noted • Select the best sections of the individual takes to create the composite take • Use crossfades to mask transitions
Arranging
Arranging individual tracks/parts into a complete song
• Sometimes less is more - people can usually only attend to ~3 sources at any given time. Adding additional parts beyond this risk being lost
• Keep parts from clashing by making sure they do not occupy the same register. If you notice two parts are competing with one another, consider transposing one up/down.
• Using a dynamic arrangement can add depth. Dropping instruments for different parts of an arrangement can add complexity to a piece (e.g., the “drop chorus”).
Comping vs Arranging

• Generally, this starts from a collection of takes
• Isolate the track you wish to work on
• From the mini drop-down menu for a track, select Take > Show Takes. A new “comp” take will be created
• Use the solo button to listen to the individual takes
• The comping tool can be used to define section boundaries and select which take is to be used for each region
• When finished, select Take > Hide Takes to hide individual takes
Comping in Digital Performer
• The comping process involves splicing together multiple tracks
• Once this is complete, it may be necessary to perform detailed edits on a track
• These can involve cutting out undesired sounds (e.g., breathing), fixing timing issues, or masking comping transitions
• This can be an involved process, and may cause/reveal other timing issues if timing edits are performed on certain rhythm tracks
Comping: Editing
• Generally consists of adding equalization (EQ), panning, setting levels, adding compression and reverb in order to bring a “set of tracks” to a “song”.
• This can be a long process, and requires careful listening
• Having a set of reference tracks can be a good place to start. When choosing reference material, it is important to select songs in which the mix is good, not necessarily your favorite track on an album.
• Mixing often involves alternating between monitoring environments. Typically, this will consist of (a) a set of good near-field monitors, (b) a cheap stereo, and (c) a set of “cheap” in-ear headphones.
• It is important to take brakes while mixing
Mixing Overview

• Boosting or cutting various frequencies. In generally, it is a better idea to cut rather than boost. If a boost is needed, be conservative.
• First step: remove unused frequencies for the instrument. This can prevent the mix from becoming too “boomy”, as any frequency components below the lowest fundamental frequency of the instrument are likely noise or undesired resonances.
• Set the EQ for individual instruments to get their sounds as desired.
• When setting levels, the EQ may have to be re-adjusted to fix issues where different instruments interfere with one another (e.g., the bass and the drums, which occupy the same range and can result in the loss of one or the other).
Equalization

Note: Does NOT include harmonics!
Equalization

• Vocals: plosives (100 Hz), nasality (1 - 3 kHz), presence (4 - 5 kHz), sibilance/breath noise (7 - 12 kHz), crispness (16 - 18 kHz)
• Acoustic Guitar: low-end weight (80 - 120 Hz, 200 - 300 Hz), strumming (2 - 5 kHz), nasality (1 - 1.5 kHz), jangle/sparkle (5 - 10 kHz)
• Electric Guitar: only hum/noise below the lowest fundamental (typically around 80 Hz), warmth (125 - 250 Hz), most speaker cabs have little power above 4 kHz, so boosting 3 - 5 kHz can add crispness/attack
• Bass: weight (80 - 100 Hz), warmth (100 - 300 Hz), attack/boxiness (500 Hz - 1.5 kHz), string noise (> 2 kHz)
• Strings: fullness (200 - 300 Hz), bow/string noise (7.5 - 10 kHz) • Brass: warmth (200 - 400 Hz), honky (1 - 3.5 kHz), rasp (6 - 8 kHz), shrillness (8 -
12 kHz) • Trumpet/Sax: warmth (200 - 400 Hz), nasality (1 - 3 kHz), brightness (6 - 8 kHz),
shrillness (8 - 11 kHz) • Drums
- Bass drum: 80 - 100 Hz - Snare drum: 120 - 400 Hz - Toms (floor): 100 Hz - Toms (rack): 100 - 300 Hz - Cymbals: stick (100 - 300 Hz), ringing (1 - 6 kHz), sizzle (8 - 12 kHz)
Equalization: Tips for Various Instruments

• Options for HP, LF, LMF, MF, HMF, HF, LP filters
• Settings: - Freq - center of filter - Gain - amount of boost/cut - Q - band width of filter - (I - IV) - controls the range of the
Q control • Real-time visualization of the frequency
spectrum using the FFT button. This can be useful in the identification of specific ranges which need to be cut.
DP: Masterworks EQ

Compression • Dynamic gain variation - makes quiet signals louder, and loud signals
quieter • In mixing, this is commonly used when you have a frequent urge to
change the fader level • Ratio: amount of compression • Makeup Gain: post-compression gain to correct for volume loss • Attack Time: how quickly the compression kicks in • Release Time: how quickly the gain reduction resets • Compressors with very high-ratio compression are often referred to as
Limiters • Also used in mastering (the “loudness wars”)
Panning • Use to create “space” in a mix • Dead-center: bass (uses both speakers to produce the largest possible
bass response), snare, vocals • Must balance the desired stereo effect with the loss of parts on mono
systems
Reverb • Effectively delayed copies of a signal, used to simulate natural acoustic
reflections • Classic example of natural reverb: “When the levee breaks”, Led Zeppelin • Listen to reverb at 100% (the “wet” signal) to get an idea for the sound • Usually many presets - try them out to get an idea for how they affect the
sound • Length/Decay Time/Reverb Time: determines how quickly the echoes die
out • To blend tracks, send to the same bus, add reverb to the “merged” track
(can use the send in the mixing board)
DP: Mixing Plugins
Allows for the automatic control of various parameters in Digital Performer.
Potential applications: • Fader level • Pan • Plugins (EQ, compression, effects)
Can write in automation data by hand using the “pencil” tool in the sequence window, or record it in real-time during playback
Automation

Busses
Sending all the tracks of a similar type (e.g., drums, guitars) to an auxiliary track can allows the overall level of the tracks to be controlled using a single fader. This is also a better place to add global effects and automation.
Side Chains
For effects such as reverb, the “send” output from different channels can be sent to an auxiliary track (via a bus). In this way, the same instance of the plug-in is used to process all of channels. This can ensure that the same settings are used for all instruments, as well as (specifically in the case of reverb) allow the reverb to blend across the different instruments more organically.
Other Tips