compromise a perfectly good jig for its original tissue ... · tissue box cover introduction ......
TRANSCRIPT

Tissue Box Cover
Introduction
I first thought of the Back Up Plate as a device to make essentially two dimensional objects
such as a Notebook Cover. And it does serve wonderfully for that. However with a little post
turning assembly and perhaps some preparatory
work, it can also be used to make three dimension objects with a bold design and a
substantial “how did he do that?” component. A
20” Back Up Plate is required to make the Tissue Box Cover. See the Spring 2007 issue of
Woodturning Design, or my web site
(www.DavidReedSmith.com/articles/backupplate/backupplate.htm) for instructions on making a
Back Up Plate. If your lathe doesn’t have at least a 20” swing you won’t be able to make a
full size Tissue Box Cover, however you could
adapt the method to make a smaller box for any purpose you like—as long as it has a square top.
Whatever design elements you choose will wrap around the sides of the box in graceful
connected arcs. The box is joined together with
simple miter joints which are cut before any turning is done while the stock is still whole and
flat and easy to handle. A simple jig to cut the
miters in an accurate and non-scary fashion will be described. The stock pieces are then fastened
temporarily to the Back Up and easily turned
with no “air turning” even though they are hardly round. The precut pieces are then
removed from the Back Up Plate and glued
together. After a little touch up work and finishing you’ll have an unusual hand made
item you (or your recipient) can display without
taking up any extra room in the house—you’ve got tissue boxes sitting out already.
Miter Cutting Jig
While it might seem like a bit of work to just
make a Tissue Box Cover or two, I really suggest you take the time to make a sled that
will cut 45° miters. I tried doing it with just a rip
fence and miter gauge the first time and it was not particularly accurate. It also didn’t feel safe.
Besides, the sled doesn’t take long to make if it
is miter gauge based. If you plan on making Tissue Box Covers for everyone in your family,
or a lot of other work requiring 45° miters, you
should consider making a miter gauge slot based jig instead, as it will be slightly more robust and
accurate. You could consider adapting an
existing sled for 45° work, but that might
compromise a perfectly good jig for its original
intended use.
I intended the Miter Cutting Jig to be quick and
dirty so I used construction lumber and sheet
goods (I still have fair amount of melamine from the Shelving Incident). Plan on making a
sled about 18” to 24” long and about 8” wide.
Select a reasonably straight piece of 2x4 construction lumber for the Sled Back and use
your planer and jointer and/or table saw to make
it straight, flat, and with square corners. Cross-cut the processed 2x4 to the length you want to
make the jig (you want it long enough for the
Tissue Box Cover pieces plus an accurate stop block, but not so long that the miter gauge can’t
support it adequately).
Now cut a rectangle of sheet goods that is the
length of your intended sled and about 8” wide. All sides should be straight and all corners
should be square. Lay the sled base on your
table saw so that it’s more or less centered on the angled blade. Mark where it overlies the
right hand miter gauge slot. Then mark a “no
screw” zone a couple of inches on both sides of the blade. Drill body holes for screws along the
back edge of the sled base. Flip the base over
and countersink the holes so that the screw heads won’t protrude below the base.
Spread a little glue on the Sled Back and clamp it to the Sled Base so that the back of the Sled
Base is flush with the Sled Base (or you can run
it though the jointer when you’re done). Drill pilot holes for mounting screws and then screw
the Sled together. Remove the clamps, place the
Sled on your table saw so that the no-screw zone is over the blade and test fasten the Sled to
your miter gauge. Check to make sure that
fastening to the miter gauge doesn’t pull it away from being flat on the saw (use your jointer or
hand plane to correct if necessary). Also check
to be sure that no screws are near where the blade will be.
Make a fence/stop block from a piece of 2x6 construction lumber. Cut a piece 4” x 6” making
sure all sides are straight and that all corners are
square. Drill a 1/1/4” hole (or whatever size will accept a clamp you have) centered about a 1-
1/4” back from the front edge of the fence/stop
block. The fence/stop block will just be clamped to the Sled Back. Fig01 shows the Miter Cutting
Jig from the back with the stop block in place.
Fig02 shows the jig from the front with the stop block removed and standing on end.
Fig01: The 45° Miter Jig from the back with
Fence/Stop Block in place.
Fig02: The 45° Miter Jig from the front with Fence/Stop Block standing behind the Jig to
show the hole the clamp fits down into.
Prep Work
Cutting Pieces
Once you have the Miter Sled completed you
can start cutting the pieces for the Tissue Box Cover. You can use any wood that you like,
although I suggest picking a fairly plain looking
species so that wild figure doesn’t compete with graphic design elements. I used some clear pine
from my local big box store. You’ll need a piece
a little more than 6” wide by 3’ long. You’ll also need about the same amount and size of a
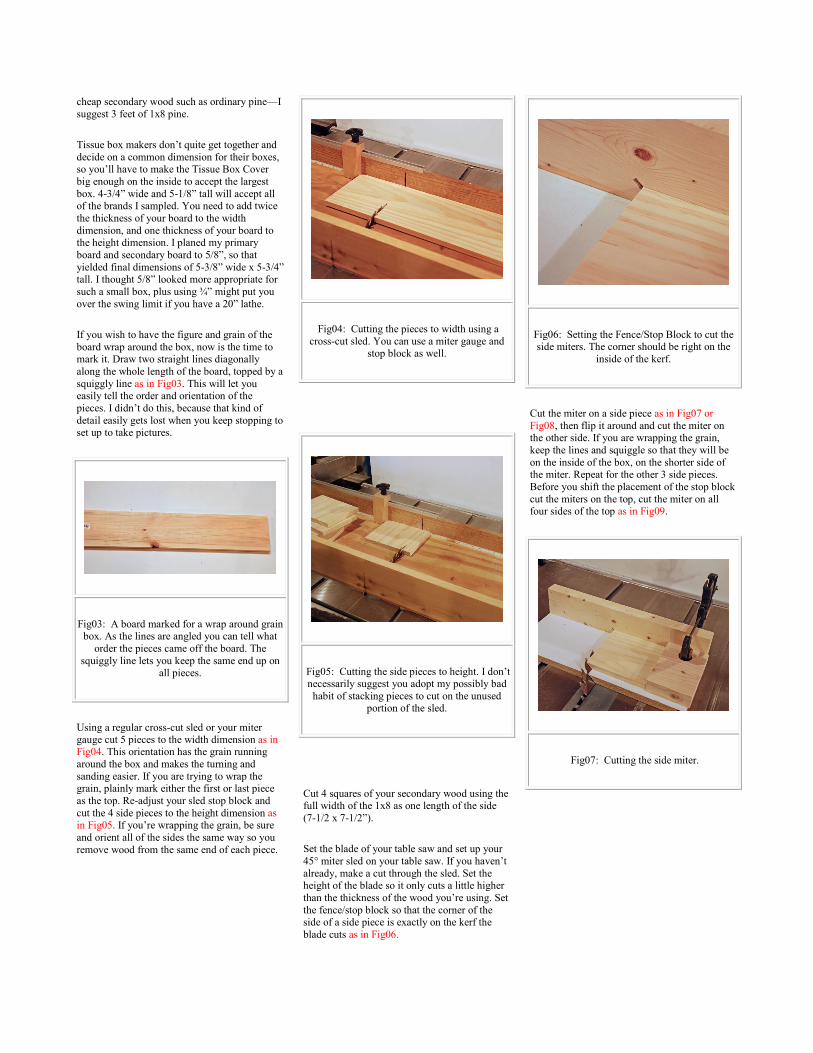
cheap secondary wood such as ordinary pine—I
suggest 3 feet of 1x8 pine.
Tissue box makers don’t quite get together and
decide on a common dimension for their boxes, so you’ll have to make the Tissue Box Cover
big enough on the inside to accept the largest
box. 4-3/4” wide and 5-1/8” tall will accept all of the brands I sampled. You need to add twice
the thickness of your board to the width
dimension, and one thickness of your board to the height dimension. I planed my primary
board and secondary board to 5/8”, so that
yielded final dimensions of 5-3/8” wide x 5-3/4” tall. I thought 5/8” looked more appropriate for
such a small box, plus using ¾” might put you
over the swing limit if you have a 20” lathe.
If you wish to have the figure and grain of the
board wrap around the box, now is the time to mark it. Draw two straight lines diagonally
along the whole length of the board, topped by a
squiggly line as in Fig03. This will let you easily tell the order and orientation of the
pieces. I didn’t do this, because that kind of
detail easily gets lost when you keep stopping to set up to take pictures.
Fig03: A board marked for a wrap around grain box. As the lines are angled you can tell what
order the pieces came off the board. The
squiggly line lets you keep the same end up on all pieces.
Using a regular cross-cut sled or your miter gauge cut 5 pieces to the width dimension as in Fig04. This orientation has the grain running
around the box and makes the turning and
sanding easier. If you are trying to wrap the grain, plainly mark either the first or last piece
as the top. Re-adjust your sled stop block and
cut the 4 side pieces to the height dimension as in Fig05. If you’re wrapping the grain, be sure
and orient all of the sides the same way so you
remove wood from the same end of each piece.
Fig04: Cutting the pieces to width using a
cross-cut sled. You can use a miter gauge and stop block as well.
Fig05: Cutting the side pieces to height. I don’t necessarily suggest you adopt my possibly bad
habit of stacking pieces to cut on the unused portion of the sled.
Cut 4 squares of your secondary wood using the full width of the 1x8 as one length of the side
(7-1/2 x 7-1/2”).
Set the blade of your table saw and set up your
45° miter sled on your table saw. If you haven’t
already, make a cut through the sled. Set the height of the blade so it only cuts a little higher
than the thickness of the wood you’re using. Set
the fence/stop block so that the corner of the side of a side piece is exactly on the kerf the
blade cuts as in Fig06.
Fig06: Setting the Fence/Stop Block to cut the side miters. The corner should be right on the
inside of the kerf.
Cut the miter on a side piece as in Fig07 or
Fig08, then flip it around and cut the miter on the other side. If you are wrapping the grain,
keep the lines and squiggle so that they will be
on the inside of the box, on the shorter side of the miter. Repeat for the other 3 side pieces.
Before you shift the placement of the stop block
cut the miters on the top, cut the miter on all four sides of the top as in Fig09.
Fig07: Cutting the side miter.

Fig08: Cutting the side miter.
Fig09: Cutting the height miter on a side piece.
Now move the stop block to cut the top miters
on the sides. Adjust the stop so that the top corner of the side lines up exactly with the kerf
of the blade in the fence. If you are wrapping
the grain, be sure to miter the same end of each of the sides. Cut the top miter on all four side
pieces as in Fig10. The completed blanks are
shown in Fig11.
Fig10: Cutting all four miters on the top.
Fig11: The 5 pieces for the Tissue Box Cover
cut for eventual joining.
Now reset the stop block in the same manner to miter the squares of secondary wood you cut
earlier. Cut a miter on two adjacent sides of each secondary square.
Gluing to Back Up Plate
Heat up your hot melt glue gun and set some
extra glue sticks nearby. If your Back Up Plate doesn’t have a clearly marked center, mount it
on your lathe and mark the center with the lathe
running. Tape over, or preferably fill any void in the center if necessary so that you can
accurately mark the center. Mount your Back
Up Plate in a workbench vise or hold it stationary in some other fashion. Draw a straight
line all the way across the Back Up Plate
through the center point. Next layout and draw a line through the center point that is at a 90°
angle to the first line as in Fig12. Set the top
piece of the Tissue Box Cover on the Back Up Plate with the bevels up and position it so that
all four corners lie on the layout lines as in
Fig13. Trace around the top piece. Fig14 shows
the completed layout.
Fig12: Right angle lines drawn through the center of the Back Up Plate.
Fig13: The top piece on the Back Up Plate for tracing. Note that each corner is on one of the
right angle lines. The miters are UP so that the
sides can be accurately traced.

Figure #14. The completed layout of the Back Up Plate.
The pieces will be glued to the Back Up Plate
with their bevels down, so you won’t be able to
visually line up the top with the traced lines you just made. Instead, clamp some straight edged
scrap pieces that are thicker than your Tissue
Box Cover pieces along two adjacent traced sides as in Fig15. Run a bead of hot-melt glue in
a circle inside the traced square (don’t put glue
in the middle as you want the center to pop out when you turn that part away) and quickly set
the top piece in place, using the clamped scrap
pieces as a guide Fig16. Fig17 shows what my workbench really looked like at this step.
Remove the clamped scrap pieces.
Figure #15. Two random scraps clamped to the
Back Up Plate with straight edges along two of the traced top piece sides.
Figure #16. The top after gluing on to the Back Up Plate. Note that the miters are DOWN.
Figure #17. This is what my work bench really looked like in Fig 16.
If you are wrapping the grain around the box, pre-assemble the pieces so that they are in the
correct position. Then lie them down in that order on the Back Up Plate. They will be
fastened to the Back Up Plate with the side
bevels down, and the top bevel butted against a side edge of the top piece. Apply a bead of hot
melt glue to a side piece and quickly press it
into location as in Fig18. Repeat for the other 3 side pieces Fig19.
Figure #18. After gluing on the first side piece. The miters are down and the top miter is against
the top piece.
Figure #19. After gluing all of the side pieces to the Back Up Plate.
Now take one of the filler pieces and place it,
bevel side up, into a corner formed by two side
pieces. If it won’t go in all the way you may have some glue squeeze out in the way. You can
just cut away some of the beveled edge on the
filler to make it fit better as in Fig20. Once it fits in well, use a ruler placed along the adjacent
side pieces to extend the lines along the bottoms
of the side pieces Fig21. Then use a pencil and trace the outside of the Back Up Plate on the
under side of the filler piece as in Fig22.

Figure #20. A filler piece has been modified to dodge a squeezed out glue blob.
Figure #21. Extending the line defined by the
bottom edge of a side piece on to the filler piece.
Figure #22. Tracing the circumference of the Back Up Plate on to the filler piece.
Take the filler piece out and cut along the lines
you just made with a band saw. Then spread a
bead of hot-melt glue on the filler piece and quickly slide it into place Fig23. Now rotate the
Back Up Plate so you can get underside access
to another corner, and repeat this process with the other 3 filler pieces.
Figure #23. After gluing on the filler piece. Be
sure to get it tucked underneath the miters on the side pieces.
Last use some of the small off-cuts to fill in the flats out near the rim of the Back Up Plate. You
can use more than one piece per flat. Trace from below the Back Up Plate with a pencil Fig24,
cut on the penciled line, then glue in place.
Figure #24. Tracing the circumference of the Back Up Plate on to a small filler piece.
Turning
Mount the Back Up Plate on your lathe Fig25.
Give it a spin by hand to make sure nothing hits
the bed if you’ve got a 20” lathe. Position your
tool rest across the face of the Back Up Plate and turn the lathe on at a moderate speed. Use a
bowl gouge to make a leveling cut across the
whole face Fig26. Cutting from the inside out is probably less likely to produce a catch out near
the rim.
Figure #25. The Back Up Plate mounted on the lathe after all the pieces are glued on.
Figure #26. After turning the face level.
Once the face is turned flat, then lay out your
design. The area between the middle of the sides of the top and the corners of the top can be
turned down, but must be flat. Do not put any
design elements in this area Fig27. Lay out a

circle in the middle to indicate the opening. You
can use any size you like within reason for the opening. The tissues will come thru a 1” hole
just about as well as a 2-1/2” hole. Then lay out
the rest of your design. I favor a few strong elements rather than a busy filling of the whole
area. Try to layout the design so that the corners
of the sides at top and bottom will be flat for easy clamping. I used on medium bead and one
fat bead. Then I added two small coves, one in
the top and one in the middle of the fat bead Fig28.
Figure #27. The area where the top joins the sides must be flat and free of design elements
because they won’t cross over correctly. Mark it out if you like.
Figure #28. After laying out the design.
Using a small bowl gouge begin turning a
central hole for the tissues as in Fig29. Continue until you’ve cut all the way through Fig30.
After the center pops out (or you pry it out if
you got glue under it) under cut the hole Fig31.
Fig 29. After starting to cut the center hole.
Figure #30. The hole after removing the center.
Figure #31. After undercutting the center hole. I used a pyramid point tool.

Next use the small bowl gouge to delineate the
beads by cutting V-grooves on either side of them as in Fig32. Then round over the area
around the central hole (making a mound)
changing to a flat area that continues to the first bead Fig33. Cut gently when cutting around the
edges of the top to avoid breaking off the edge
(but if you do, plan on rounding over the top more after assembly). Then flatten the area in
between the beads and beyond the outer bead
and the rim Fig34. Use the bowl gouge to start rounding over the beads—you don’t need to
completely shape the beads with the gouge, but
just remove the bulk of the wood that needs to be removed Fig35.
Figure #32. After setting off the beads with a small bowl gouge.
Figure #33. After creating a dome around the center hole and flattening the area between the
dome and the first bead. Cut gently at the
intersection of the top and sides.
Figure #34. After cutting all the background flat.
Figure #35. The bulk of rounding over the beads has been done with a small bowl gouge.
Use a mini-cove tool (see the Fall 2005 issue of Woodturning Design or my web site to learn
how to make one) to cut the two coves Fig36.
Then use a pyramid point tool to finish shaping the beads Fig37. Smooth the remainder of the
work with a shear scraper Fig37. Check the
flatness of the area around the sides of the top. One way to do this is with a straight edge held
against one side as in Fig39. Make any
corrections required. Fig40 shows the work ready for sanding.
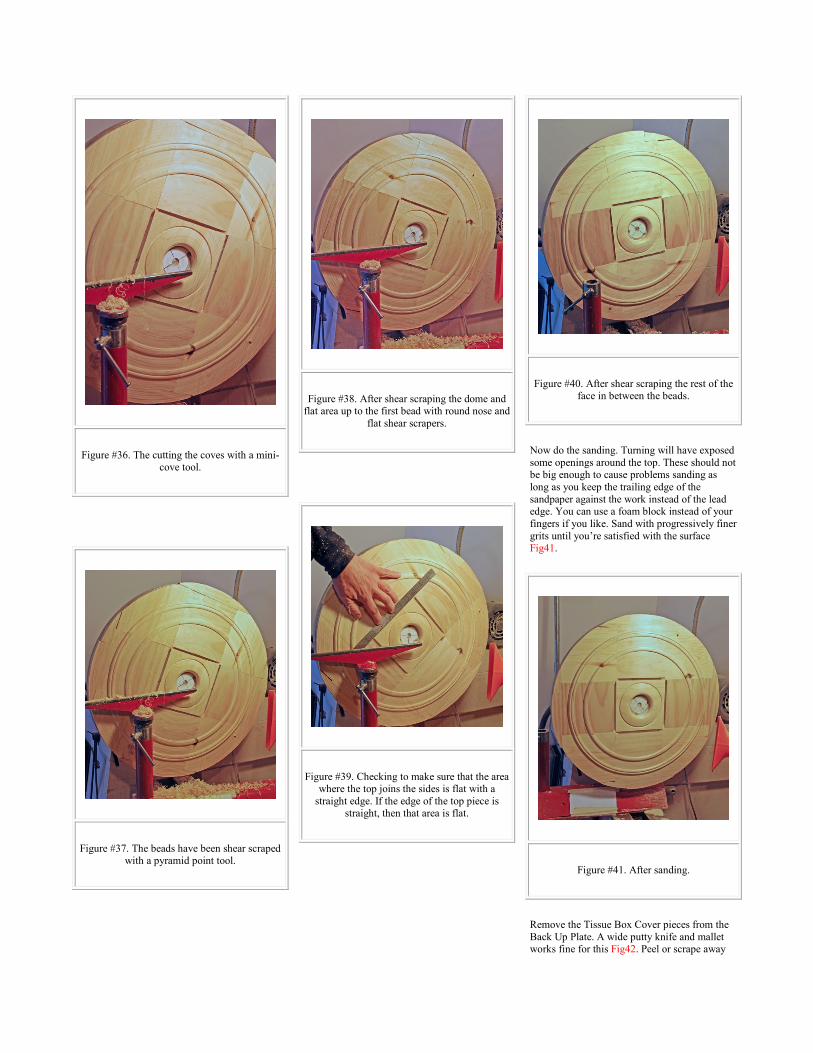
Figure #36. The cutting the coves with a mini-cove tool.
Figure #37. The beads have been shear scraped with a pyramid point tool.
Figure #38. After shear scraping the dome and flat area up to the first bead with round nose and
flat shear scrapers.
Figure #39. Checking to make sure that the area where the top joins the sides is flat with a
straight edge. If the edge of the top piece is straight, then that area is flat.
Figure #40. After shear scraping the rest of the face in between the beads.
Now do the sanding. Turning will have exposed
some openings around the top. These should not be big enough to cause problems sanding as
long as you keep the trailing edge of the
sandpaper against the work instead of the lead edge. You can use a foam block instead of your
fingers if you like. Sand with progressively finer
grits until you’re satisfied with the surface Fig41.
Figure #41. After sanding.
Remove the Tissue Box Cover pieces from the
Back Up Plate. A wide putty knife and mallet works fine for this Fig42. Peel or scrape away

any glue clinging to the backs of the Tissue Box
Cover pieces.
Figure #42. Removing the pieces from the Back Up Plate with a broad putty knife and mallet.
Assembly
Glue Sides
Begin by dry clamping the box together as in Fig43. This will make you adjust your clamps
properly and give you a feel for the assembly and any potential problems without the pressure
of setting glue. You want prioritize getting the
design elements to line up rather than the top and bottom. You can adjust the top and bottom
relatively invisibly.
Figure #43. Dry clamping not only makes sure that everything will work, but forces you to pre-
adjust your clamps so it goes quicker when the glue is wet.
I’ve tried several strategies for glue-up
adjustments. I first tried putting on the clamps and trying to tap things around before the glue
set. Then I tried leaving 3 joints dry, only trying
to adjust one join, then moving to the next. But putting glue on all joints and taping them with
masking tape before applying the clamps
seemed to work best. You can’t apply tape, then glue, then roll it up as the beads get in the way.
Take one joint at a time. Apply some glue, line it up, and apply masking tape to hold the joint in
place. Then apply glue to the next joint, line up,
and apply tape. Then do the same for the last two joints. Last apply clamps. The four sides are
shown clamped together with masking tape
holding alignment in Fig44. Some sort of corner clamping scheme is helpful—I got some frame
clamps at a dimly remembered woodworking
show in an earlier life.
Figure #44. Masking tape holds the beads
aligned while you apply the clamps
Top and bottom Corrections
Once the glue has thoroughly cured, remove the clamps and tape. If you had to take a
misalignment in the top and bottom for the sake of the design (like in Fig45), then clean that up
now. Clamp the box in a workbench vise
(padding with cardboard would be a good idea) and even things out on top with a chisel Fig46.
Then flip it over and do the same thing on the
bottom.
Figure #45. There is no free lunch. If you
prioritize bead alignment, you may sacrifice edge and miter alignment.
Figure #46. Fixing mis-alignment with a chisel.
Glue Top
Try the top dry to make sure it fits reasonably. Then figure out how to glue it on. If your
clamps will reach to the dome around the hole,
you can clamp there. If not, use some small scraps along the edge. If needed make some
more corrections to the top miters. Spread some glue on the top miters and clamp the top in place
Fig47. Give the glue time to cure and then
remove the clamps.

Figure #47. Clamping the top. Two ways are shown, reaching over to the dome and using a
scrap block.
Touch up
Even trying to even the design elements out, there will probably be some small errors. A
handy tool for fixing these glitches is a
sandpaper file. I have a commercial one somewhere that takes loops of abrasive. But it
was quicker to make one from some of the miter
cut scrap then it would have been to find the commercial one—plus the narrow edge let me
get into corners better. I just rounded over a
couple of inches with a utility knife to make it easier to hold. Then I used spray adhesive to
attach some 180 grit sandpaper Fig48.
Figure #48. A homemade sanding file to touch
up the miters at the beads.
Use the sandpaper file, or hand held sandpaper
to touch up where the design elements meet. Break the sharpness of the side corners with
hand held abrasive. Round over the top corners
a bit more aggressively—I used a pneumatic cushion drum sander for this, but use what you
have.
Once everything looks okay, sand the edges and
corners with progressively finer abrasive Fig49.
Then apply your favorite finish Fig50.
Figure #49. After sanding the corners and touching up the beads.
Figure #50. The completed Tissue Box Cover
Smaller or Other Boxes
I took three of the filler pieces from a Tissue Box Cover effort and quickly glued them
together as in Fig51. Looks interesting—now if I turned an incised design, flipped them over on
the Back Up Plate and turned the beads…
Figure #51. Three of the filler pieces quickly
glued together. There are some interesting possibilities.
For smaller boxes, or boxes with a removable top I suggest you eliminate the top miters. Add a
groove on the bottom inside of the box sides for a box bottom. Allow extra for alignment—you
can tighten up the bottom with shims or glue
blocks. Cut a rebate on the bottom of the sides of the top. Consider using a filler piece inside of
the sides when turning them, and turn the top
separately mounted off-center.

Figure #52. This box is about a 3” cube. It was made on a 10” Back Up Plate.
Tools & Materials Prime wood about 6” x 3’
Filler wood about 7-1/2” x 3’ 20” Back Up Plate
Table Saw
Bandsaw
Figure #53. A Visual Tool List. From left to
right: Glue gun, 3/8” bowl gouge, ¼” bowl gouge, straight shear scraper, domed shear
scraper, pyramid point tool, sanding file,
masking tape, frame clamps.
Author
David Reed Smith turns and tinkers in his very cluttered basement in Hampstead, Maryland .
He welcomes comments, questions, and suggestions via email at