comptia a+ part essentials i - john wiley &...
TRANSCRIPT

CompTIA A+ Essentials
Chapter 1n Hardware
Chapter 2n Troubleshooting, Repair, and Maintenance
Chapter 3n Operating Systems and Software
Chapter 4n Networking
Chapter 5n Security
Chapter 6n Operational Procedure
Part
I
86504c01.indd 1 7/25/09 6:03:55 PM
COPYRIG
HTED M
ATERIAL

86504c01.indd 2 7/25/09 6:03:56 PM
Chapter
1Hardware
CompTIA A+ EssEnTIAls ExAm objECTIvEs CovErEd In THIs CHApTEr:
1.1 Categorize storage devices and backup mediaÛÛ
FDDÛN
HDDÛN
Solid state vs. magneticÛN
Optical drivesÛN
CD / DVD/ RW / Blu-RayÛN
Removable storageÛN
Tape driveÛN
Solid state (e.g. thumb drive, flash, SD cards, USB)ÛN
External CD-RW and hard driveÛN
Hot swappable devices and non-hot swappable devicesÛN
1.2 explain motherboard components, types and featuresÛÛ
Form Factor ÛN
ATX / BTXÛN
micro ATXÛN
NLXÛN
I/O interfacesÛN
SoundÛN
VideoÛN
USB 1.1 and 2.0ÛN
SerialÛN
IEEE 1394 / FirewireÛN
ParallelÛN
NICÛN
86504c01.indd 3 7/25/09 6:03:56 PM
ModemÛN
PS/2ÛN
Memory slotsÛN
RIMMÛN
DIMMÛN
SODIMMÛN
SIMMÛN
Processor socketsÛN
Bus architectureÛN
Bus slotsÛN
PCIÛN
AGPÛN
PCIeÛN
AMRÛN
CNRÛN
PCMCIAÛN
PATAÛN
IDEÛN
EIDEÛN
SATA, eSATAÛN
Contrast RAID (levels 0,1,5)ÛN
ChipsetsÛN
BIOS/ CMOS / FirmwareÛN
POSTÛN
CMOS batteryÛN
Riser card / daughterboardÛN
1.3 Classify power supplies types and characteristicsÛÛ
AC adapterÛN
ATX proprietaryÛN
Voltage, wattage, and capacityÛN
86504c01.indd 4 7/25/09 6:03:57 PM
Voltage selector switchÛN
Pins (20,24)ÛN
1.4 explain the purpose and characteristics of CpUs and ÛÛtheir features
Identify CPU typesÛN
AMDÛN
IntelÛN
HyperthreadingÛN
Multi coreÛN
Dual coreÛN
Triple coreÛN
Quad coreÛN
Onchip cacheÛN
L1ÛN
L2ÛN
Speed (real vs. actual)ÛN
32 bit vs. 64bitÛN
1.5 explain cooling methods and devicesÛÛ
Heat sinksÛN
CPU and case fansÛN
Liquid cooling systemsÛN
Thermal compoundÛN
1.6 Compare and contrast memory types, characteristics ÛÛand their purpose
TypesÛN
DRAMÛN
SRAMÛN
SDRAMÛN
DDR / DDR2 / DDR3ÛN
RAMBUSÛN
86504c01.indd 5 7/25/09 6:03:58 PM

Parity vs. non-parityÛN
ECC vs. non-ECCÛN
Single sided vs. double sidedÛN
Single channel vs. dual channelÛN
SpeedÛN
PC100ÛN
PC133ÛN
PC2700ÛN
PC3200ÛN
DDR3-1600ÛN
DDR2-667ÛN
1.7 Distinguish between the different display devices ÛÛand their characteristics
Projectors, CRT and LCDÛN
LCD technologiesÛN
Resolution (e.g. XGA, SXGA+, UXGA, WUXGA)ÛN
Contrast ratioÛN
Native resolutionÛN
Connector typesÛN
VGAÛN
HDMiÛN
S-VideoÛN
Component / RGBÛN
DVI pin compatibilityÛN
SettingsÛN
Refresh rateÛN
ResolutionÛN
Multi-monitorÛN
DegaussÛN
86504c01.indd 6 7/25/09 6:03:59 PM

1.8 Install and configure peripherals and input devicesÛÛ
MouseÛN
KeyboardÛN
Bar code readerÛN
Multimedia (e.g. web and digital cameras, MIDI, micro-ÛN
phones)
Biometric devicesÛN
Touch screenÛN
KVM switchÛN
1.9 Summarize the function and types of adapter cardsÛÛ
VideoÛN
PCIÛN
PCIe ÛN
AGPÛN
MultimediaÛN
Sound cardÛN
TV tuner cardsÛN
Capture cardsÛN
I/O ÛN
SCSIÛN
SerialÛN
USBÛN
ParallelÛN
CommunicationsÛN
NICÛN
ModemÛN
1.10 Install, configure and optimize laptop components ÛÛand features
Expansion devicesÛN
PCMCIA cardsÛN
Express busÛN
Docking stationÛN
86504c01.indd 7 7/25/09 6:04:00 PM

Communications connectionsÛN
BluetoothÛN
InfraredÛN
Cellular WANÛN
Ethernet ÛN
ModemÛN
Power and electrical input devicesÛN
Auto-switchingÛN
Fixed input power suppliesÛN
BatteriesÛN
Input devicesÛN
Stylus / digitizerÛN
Function keysÛN
Point devices (e.g. touch pad, point stick / track point)ÛN
1.11 Install and configure printersÛÛ
Differentiate between printer typesÛN
LaserÛN
InkjetÛN
ThermalÛN
ImpactÛN
Local vs. network printersÛN
Printer drivers (compatibility)ÛN
ConsumablesÛN
86504c01.indd 8 7/25/09 6:04:00 PM
This chapter covers a lot of material—in fact, it could easily be a book in and of itself. One of the things that CompTIA is notorious for is having overlap between domains and exams,
and the A+ is no exception. This domain is weighted at 27 percent (the highest of any) of the Essentials exam, and a great deal of the material covered here also appears in other domains (not to mention in the Practical Application exam).
Because of this, you’ll want to make sure you’re comfortable with the information pre-sented in this chapter before moving on to other chapters. As a doctor must be intimately acquainted with human anatomy, so a computer technician must understand the physical and functional structure of a personal computer.
Identify Principles of Personal Computer StorageAny PC is a complex machine. It could be described as a melting pot of various technologies and products, manufactured by a host of companies in many different countries. This diversity is a great advantage because it gives the PC its versatility. However, these components don’t always “melt” together into a unified whole without the help of a technician. The different products—whether they’re hard disks, network cards, sound cards, or memory boards—must share one processor and one motherboard and therefore must be designed to work in harmony. For this reason, configuration of the computer components is especially emphasized on the A+ Essentials exam, and nearly one-third of the exam’s question pool pertains to the objectives reviewed in this chapter.
Before sitting for the exam, you’ll need to have a working knowledge of the components that make up a computer, and their function within the system as a whole. The exam will test your knowledge of the types of components and their functions. The objective of this chapter is to review and identify the main components and their functions.
To pass the exam, you must be able to recognize these components and understand their relationship to one another.
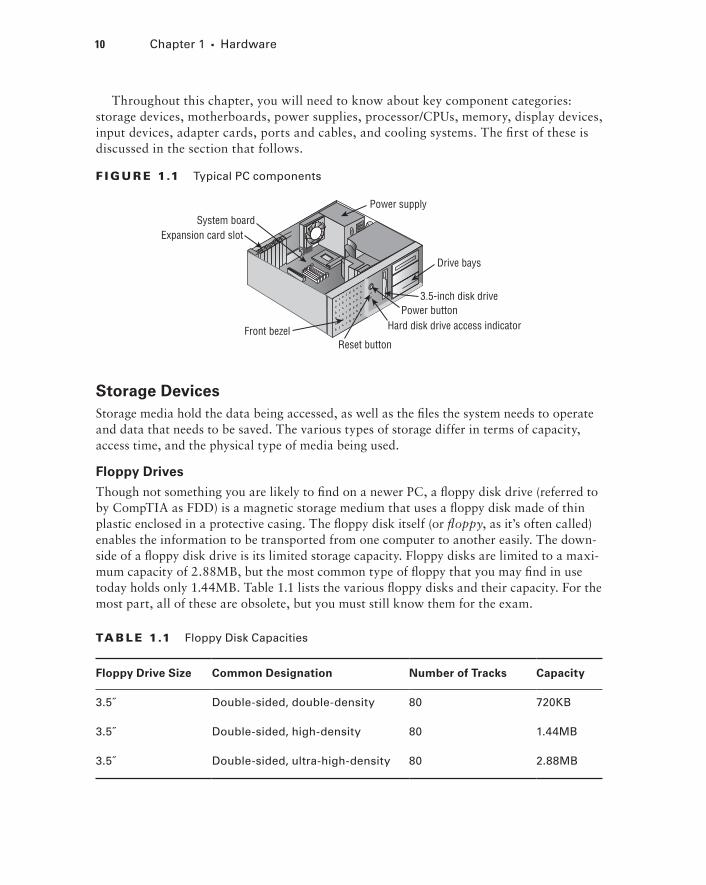
Critical InformationThis first objective is on storage devices, but to put it in perspective, you must blend together many diverse topic areas as they relate to PCs. Figure 1.1 shows a typical PC, its components, and their locations.
86504c01.indd 9 7/25/09 6:04:00 PM
10 Chapter 1 N Hardware
Throughout this chapter, you will need to know about key component categories: storage devices, motherboards, power supplies, processor/CPUs, memory, display devices, input devices, adapter cards, ports and cables, and cooling systems. The first of these is discussed in the section that follows.
F I gu r E 1.1 Typical PC components
Power supply
Drive bays
3.5-inch disk drivePower button
Hard disk drive access indicator
Reset buttonFront bezel
Expansion card slotSystem board
Storage DevicesStorage media hold the data being accessed, as well as the files the system needs to operate and data that needs to be saved. The various types of storage differ in terms of capacity, access time, and the physical type of media being used.
Floppy Drives
Though not something you are likely to find on a newer PC, a floppy disk drive (referred to by CompTIA as FDD) is a magnetic storage medium that uses a floppy disk made of thin plastic enclosed in a protective casing. The floppy disk itself (or floppy, as it’s often called) enables the information to be transported from one computer to another easily. The down-side of a floppy disk drive is its limited storage capacity. Floppy disks are limited to a maxi-mum capacity of 2.88MB, but the most common type of floppy that you may find in use today holds only 1.44MB. Table 1.1 lists the various floppy disks and their capacity. For the most part, all of these are obsolete, but you must still know them for the exam.
TA b lE 1.1 Floppy Disk Capacities
Floppy Drive Size Common Designation Number of tracks Capacity
3.5˝ Double-sided, double-density 80 720KB
3.5˝ Double-sided, high-density 80 1.44MB
3.5˝ Double-sided, ultra-high-density 80 2.88MB
86504c01.indd 10 7/25/09 6:04:02 PM
Identify Principles of Personal Computer Storage 11
Prior to 31⁄2˝ disks, the most popular were 5¼ ,̋ but these went the way of the dodo bird.
hard Disk Systems
Hard disks reside inside the computer (usually) and can hold more information than other forms of storage. The hard disk system contains three critical components:
The controllerÛN
The hard diskÛN
The host adapterÛN
The controller controls the drive, the hard disk provides a physical medium to store the data, and the host adapter is the translator.
CompTIA favors the acronym HDD for hard disk drive.
Optical Drives
Optical drives work by using a laser rather than magnetism to change the characteristics of the storage medium. This is true for CD-ROM drives, DVD drives, and Blu-ray, all of which are discussed in the following sections.
Cd-rom drIvEs
CD-ROM stands for Compact Disc Read-Only Memory. The CD-ROM is used for long-term storage of data. CD-ROMs are read-only, meaning that once information is written to a CD, it can’t be erased or changed. Access time for CD-ROMs is considerably slower than for a hard drive. CDs normally hold 650–700MB of data and use the ISO 9660 standard, which allows them to be used in multiple platforms.
dvd-rom drIvEs
Because DVD-ROMs use slightly different technology than CD-ROMs, they can store up to 1.6GB of data. This makes them a better choice for distributing large software bundles. Many software packages today are so huge that they require multiple CDs to hold all the installation and reference files. A single DVD, in a double-sided, double-layered configuration, can hold as much as 17GB (as much as 26 regular CDs).
blu-rAy drIvEs
Blu-ray recorders have been available since 2003, and have the ability to record more infor-mation than a standard DVD using similar optical technology. In recent years, Blu-ray has been more synonymous with recording television and movie files than data, but the Blu-ray specification (1.0) includes two data formats: BD-R for recoding PC data, and BD-RW for
86504c01.indd 11 7/25/09 6:04:03 PM
12 Chapter 1 N Hardware
rewritable media. Bonus View, the minimum required standard since 2007, is also known as Profile 1.1. BD-Live, which is basically 1.1 with an Internet connection, is called Profile 2.0.
In the official specification, as noted on the Blu-ray Disc Association web-site (http://us.blu-raydisc.com/), the “r” is lowercase. CompTIA favors the uppercase “R.”
The current capacity a Blu-ray disc can hold is 50GB with 400GB on the horizon, and an aim for 1TB by 2013. As a final note, there was a long-running (but finally complete) battle between Blu-ray and HD DVD to be the format of the future, and Blu-ray won out.
removable Storage
Removable storage is any that you can eject or quickly take with you. Within this broad category, the types that CompTIA wants you to know are tape drive, solid state (e.g., thumb drive, flash, SD cards, USB), external CD-RW and hard drive, and hot-swappable and non-hot-swappable devices.
TApE drIvEs
Another form of storage device is the tape backup. Tape backup devices can be installed internally or externally and use a magnetic tape medium instead of disks for storage. They hold much more data than any other medium but are also much slower. They’re primarily used for archival storage.
solId sTATE drIvEs
Flash drives have been growing in popularity for years and replacing floppy disks due to their capacity and small size. Flash is ideally suited for use not only with computers, but also with many other things—digital cameras, MP3 players, and so on.
Although the CompTIA objective lists flash and SecureDigital (SD) cards separately, in reality SD cards are just one type of flash; there are many others. The maximum capac-ity of a standard SD card is 4GB, while there are two other standards that go beyond this: SDHC can go to 32GB, and SDXC to 2TB. Figure 1.2 shows a CompactFlash card (the larger of the two) and an SD card (the smaller of the two) along with an 8-in-1 card reader/writer. The reader shown connects to the USB port and then interacts with CompactFlash, CompactFlash II, Memory Stick, Memory Stick PRO, SmartMedia, xD-Picture Cards, SD, and MultiMediaCards.
You can find flash cards in any of these formats available in a variety of sizes (16MB, 128MB, 256MB, and so on). The size of the flash card does place some limitation on the max-imum capacity of the media, but most cards on the market are well below that maximum.
Thumb drives are USB flash drives that have become extremely popular for transporting files. Figure 1.3 shows three thumb drives (also known as keychain drives) next to a pack of gum for size comparison.
As with other flash drives, you can find these in a number of different size capacities. Many models include a write-protect switch to keep you from accidentally overwriting files stored on the drive. All include an LED to show when they’re connected to the USB port. Other names for thumb drives include travel drives, flash drives, jump drives, and a host of others.
86504c01.indd 12 7/25/09 6:04:03 PM

Identify Principles of Personal Computer Storage 13
F I gu r E 1. 2 CompactFlash and SD cards together with a reader
F I gu r E 1. 3 Three thumb drives shown with a pack of gum
ExTErnAl drIvEs
A number of vendors are now making external hard drives. These often connect to the computer through the USB port, but can also connect through the network (and be shared by other users) or other connections. While some are intended for expansion, many are marketed for the purpose of “mirroring” data on the internal drive(s) and often incorporate a push-button switch that starts a backup.
86504c01.indd 13 7/25/09 6:04:03 PM

14 Chapter 1 N Hardware
While not as common as they once were, Iomega’s Zip and Jaz drives are detachable, external hard disks that are used to store a large volume (around 100MB for the Zip, 1GB and 2GB for the Jaz) of data on a single, thick floppy-sized disk. The drives connect to either a parallel port or a special interface card. The major use of Zip and Jaz drives is to transport large amounts of data from place to place. This used to be accomplished with several floppies.
HoT swAppAblEs
The term “hot swappable” is used to refer to any media that can be changed without the system being brought down. In RAID arrays (discussed later in this chapter), if a failed hard drive can be replaced with a new hard drive without needing to bring the system down, then it is said to be hot swappable.
Floppy and Other removable Disk Drive problems
Most floppy drive problems result from bad media. Your first troubleshooting technique with floppy drive issues should be to try a new disk.
One of the most common problems that develops with floppy drives is misaligned read/write heads. The symptoms are fairly easy to recognize—you can read and write to a floppy on one machine but not on any others. This is normally caused by the mechanical arm in the floppy drive becoming misaligned. When the disk was formatted, it wasn’t properly positioned on the drive, thus preventing other floppy drives from reading it.
Numerous commercial tools are available to realign floppy drive read/write heads. They use a floppy drive that has been preformatted to reposition the mechanical arm. In most cases, though, this fix is temporary—the arm will move out of place again fairly soon. Given the inexpensive nature of the problem, the best solution is to spend a few dollars and replace the drive or upgrade and get rid of it altogether.
Another problem you may encounter is a phantom directory listing. For example, suppose you display the contents of a floppy disk, and then you swap to another floppy disk but the listing stays the same. This is almost always a result of a faulty ribbon cable; a particular wire in the ribbon cable signals when a disk swap has taken place, and when that wire breaks, this error occurs.
CD-rOM/DVD/Blu-ray Issues
CD-ROM, DVD, and Blu-ray problems are normally media-related. Although compact disc technology is much more reliable than floppy disks, it’s not perfect. Another factor to consider is the cleanliness of the disc. On many occasions, if a disc is unreadable cleaning it with an approved cleaner and a lint-free cleaning towel will fix the problem.
If the operating system doesn’t see the drive, start troubleshooting by determining whether the drive is receiving power. If the tray will eject, you can assume there is power to it. Next, check BIOS Setup (for IDE drives) to make sure the drive has been detected. If not, check the master/slave jumper on the drive, and make sure the IDE adapter is set to Auto, CD-ROM, or ATAPI in BIOS Setup.
86504c01.indd 14 7/25/09 6:04:04 PM

Identifying Motherboards 15
In order to play movies, a DVD drive must have MPEG-decoding capability. This is usually accomplished via an expansion board, but it may be built into the video card or sound card, or it may be a software decoder. If DVD data discs will play but movies won’t, suspect a problem with the MPEG decoding.
If a CD-RW, DVD, or Blu-ray drive works normally as a regular CD-ROM drive but doesn’t perform its special capability (doesn’t read DVD discs, or doesn’t write to blank CDs), perhaps software needs to be installed to work with it. For example, with CD-RW drives, unless you’re using an operating system such as Windows XP that supports CD writing, you must install CD-writing software in order to write to CDs.
There are also a few quick fixes you can try: cleaning the disc and examining it for scratches are the easiest. If there are scratches, you can occasionally repair them using scratch repair that is available at most office supply sites. You should also clean the drive regularly using a commercial cleaning disc, available as well at most office supply stores.
exam essential
Know the various types of storage devices. Even though it is difficult to locate a PC today with a floppy drive, you must still be familiar with their capabilities and limitations as you prepare for this exam. You must also know the basics of hard drives, optical drives, and removable storage.
Identifying MotherboardsThis objective is a complex one, for it requires you to not only know the various types of motherboards, but also be able to recognize their features. Therefore, this objective requires a great deal of memorization for you to pass the exam.
Critical InformationThis second objective is focused on motherboards, and requires you to know that the mother board is the backbone of a computer. The components of the motherboard provide basic services needed for the machine to operate and provide a platform for devices such as the processor, memory, disk drives, and expansion devices. For this objective, you should study the types of motherboards, their ports and memory, the types of CPU sockets, and the types of expansion slots. The spine of the computer is the system board, or mother-board. This component is made of green or brown fiberglass and is placed in the bottom or side of the case. It’s the most important component in the computer because it connects all the other components of a PC together. Figure 1.4 shows a typical PC system board, as seen from above. On the system board you’ll find the CPU, underlying circuitry, expansion slots, video components, RAM slots, and a variety of other chips.
86504c01.indd 15 7/25/09 6:04:04 PM

16 Chapter 1 N Hardware
F I gu r E 1. 4 A typical system board
RAM
CPU
Ports Expansion slots
Integrated ComponentsSome motherboards have some of the peripheral devices built in, such as video, sound, and/or networking. These are referred to as integrated system boards. Such boards are cost-effective because they don’t require a separate video card, sound card, and so on. The built-in components can be disabled through BIOS Setup if they should ever malfunction or need to be replaced by newer models.
System Board ComponentsMotherboards include components that provide basic functionality to the computer. The following components are found on a typical motherboard:
Expansion slots (AGP, PCI, etc.)ÛN
Memory (RAM) slots ÛN
CPU slot or socket ÛN
Power connector ÛN
Floppy and IDE drive connectors ÛN
Keyboard and mouse connectorsÛN
Peripheral port connectors (COM, LPT, USB)ÛN
BIOS chipÛN
Battery ÛN
Figure 1.5 illustrates many of the components found on a typical motherboard. Many of these components are discussed elsewhere in this chapter as they relate to other objectives. Next let’s look at those that are important to focus on.
86504c01.indd 16 7/25/09 6:04:05 PM

Identifying Motherboards 17
F I gu r E 1.5 Components on a motherboard
CPU
USB ports
IDE connectors
AGP slot
Battery
ISA slot
BIOS chipCOM andLPT ports
Keyboard andmouse ports
Power supplyconnector
Floppyconnector PCI slots
RAM
Memory Slots
Memory, or RAM, slots contain the memory chips. There are many and varied types of memory for PCs today. We’ll further discuss memory later in this chapter. PCs use memory chips arranged on a small circuit board. These circuit boards are called single inline mem-ory modules (SIMMs) or dual inline memory modules (DIMMs). DIMMs utilize memory chips on both sides of the circuit board, whereas SIMMs utilize memory chips on a single side. There is also a high-speed type of RAM called Rambus dynamic RAM (RDRAM), which comes on circuit boards called RIMMs (Rambus inline memory module).
Along with chip placement, memory modules also differ in the number of conductors, or pins, that the particular module uses. The number of pins used directly affects the overall size of the memory slot. Slot sizes include 30-pin, 72-pin, 168-pin, and 184-pin. Laptop memory comes in smaller form factors known as small outline DIMMs (SoDIMMs). Figure 1.6 shows the form factors for the most popular memory chips. Notice that they basically look the same, but the memory module sizes are different.
Memory slots are easy to identify on a motherboard. They’re usually white and placed very close together. The number of memory slots varies from motherboard to motherboard, but the appearance of the different slots is similar. Metal pins in the bottom make contact with the soldered tabs on each memory module. Small metal or plastic tabs on each side of the slot keep the memory module securely in its slot.
Central processing Unit (CpU) and processor Slots
The CPU slot permits the attachment of the CPU to the motherboard, allowing the CPU to use the other components of the system. There are many different types of processors, which means many types of CPU connectors.
86504c01.indd 17 7/25/09 6:04:07 PM

18 Chapter 1 N Hardware
F I gu r E 1.6 Various memory module form factors
30-pin SIMM (3.5 x .75") 72-pin SIMM (4.25 x 1")
168-pin DIMM (5.375 x 1")
144-pin SoDIMM (2.625 x 1") 72-pin SoDIMM (2.375 x 1")
The CPU slot can take on several different forms. In the past, the CPU slot was a rect-angular box called a PGA socket, with many small holes to accommodate the pins on the bottom of the chip. With the release of new and more-powerful chips, additional holes were added, changing the configuration of the slot and its designator or number. Figure 1.7 shows a typical PGA-type CPU socket.
With the release of the Pentium II, the architecture of the slot went from a rectangle to more of an expansion-slot style of interface called an SECC. This style of CPU slot includes Slot 1 and Slot 2 for Intel CPUs, and Slot A for Athlon (AMD) CPUs. This type of slot looks much like an expansion slot, but it’s located in a different place on the motherboard than the other expansion slots.
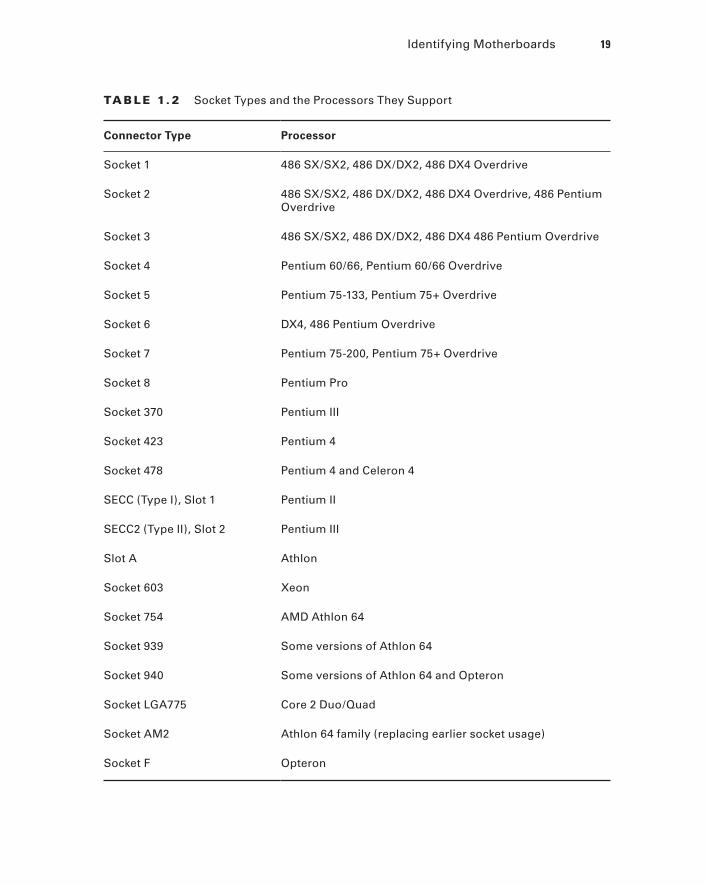
To see which socket type is used for which processors, examine Table 1.2.
F I gu r E 1.7 A PGA CPU socket
86504c01.indd 18 7/25/09 6:04:07 PM
Identifying Motherboards 19
TA b lE 1. 2 Socket Types and the Processors They Support
Connector type processor
Socket 1 486 SX/SX2, 486 DX/DX2, 486 DX4 Overdrive
Socket 2 486 SX/SX2, 486 DX/DX2, 486 DX4 Overdrive, 486 Pentium Overdrive
Socket 3 486 SX/SX2, 486 DX/DX2, 486 DX4 486 Pentium Overdrive
Socket 4 Pentium 60/66, Pentium 60/66 Overdrive
Socket 5 Pentium 75-133, Pentium 75+ Overdrive
Socket 6 DX4, 486 Pentium Overdrive
Socket 7 Pentium 75-200, Pentium 75+ Overdrive
Socket 8 Pentium Pro
Socket 370 Pentium III
Socket 423 Pentium 4
Socket 478 Pentium 4 and Celeron 4
SECC (Type I), Slot 1 Pentium II
SECC2 (Type II), Slot 2 Pentium III
Slot A Athlon
Socket 603 Xeon
Socket 754 AMD Athlon 64
Socket 939 Some versions of Athlon 64
Socket 940 Some versions of Athlon 64 and Opteron
Socket LGA775 Core 2 Duo/Quad
Socket AM2 Athlon 64 family (replacing earlier socket usage)
Socket F Opteron
86504c01.indd 19 7/25/09 6:04:08 PM

20 Chapter 1 N Hardware
power Connectors
A power connector allows the motherboard to be connected to the power supply. On an ATX, there is a single power connector consisting of a block of 20 holes (in two rows). On an AT, there is a block consisting of 12 pins sticking up; these pins are covered by two con-nectors with six holes each.
Figure 1.8 shows a very versatile motherboard that happens to have both kinds, so you can compare. The upper connector is for ATX, and the lower one is for AT.
F I gu r E 1. 8 Power connectors on a motherboard
ATX
AT
On-Board Floppy and IDe Connectors
With the exception of diskless workstations, every PC made today uses some type of disk drive to store data and programs until they’re needed. Disk drives need a connection to the motherboard in order for the computer to utilize the disk drive. These connections are known as drive interfaces. There are two primary types: floppy drive interfaces and IDE interfaces. Floppy drive interfaces allow floppy disk drives to be connected to the moth-erboard, and, similarly, IDE interfaces do the same for hard disks, CD drives, and other IDE-based drives. When you see them on the motherboard, these interfaces are said to be on board, as opposed to being on an expansion card, known as off board. The interfaces consist of circuitry and a port. A few motherboards also have SCSI interfaces that can be used for connecting drives.
Battery
Your PC has to keep certain settings when it’s turned off and its power cord is unplugged. These settings include the date, time, hard drive configuration, and some basic settings in memory.
86504c01.indd 20 7/25/09 6:04:08 PM
Identifying Motherboards 21
Your PC stores the settings in a special memory chip called the CMOS chip. To retain these settings, the CMOS chip requires power constantly. To prevent the CMOS chip from losing its charge, a small battery is located on the motherboard. The CMOS chip holds the BIOS.
System Board Form FactorsForm factor refers to the size and shape of a component. Most system boards today use the ATX form factor. Some of its key features are its orientation of the expansion slots parallel to the narrow edge of the board, a one-piece power connector from the power supply, the built-in I/O ports on the side, and the orientation of the CPU in such a position that the power-supply fan helps to cool it.
An older, alternative form factor for a system board is the baby AT style. This type uses a two-piece power supply connector, uses ribbon cables to connect ports to the board, and orients the expansion slots parallel to the wide edge of the board.
A case is generally designed to hold one or the other of these motherboard form factors, and a power supply is designed to work with one or the other; therefore, those three com-ponents must be chosen as a group.
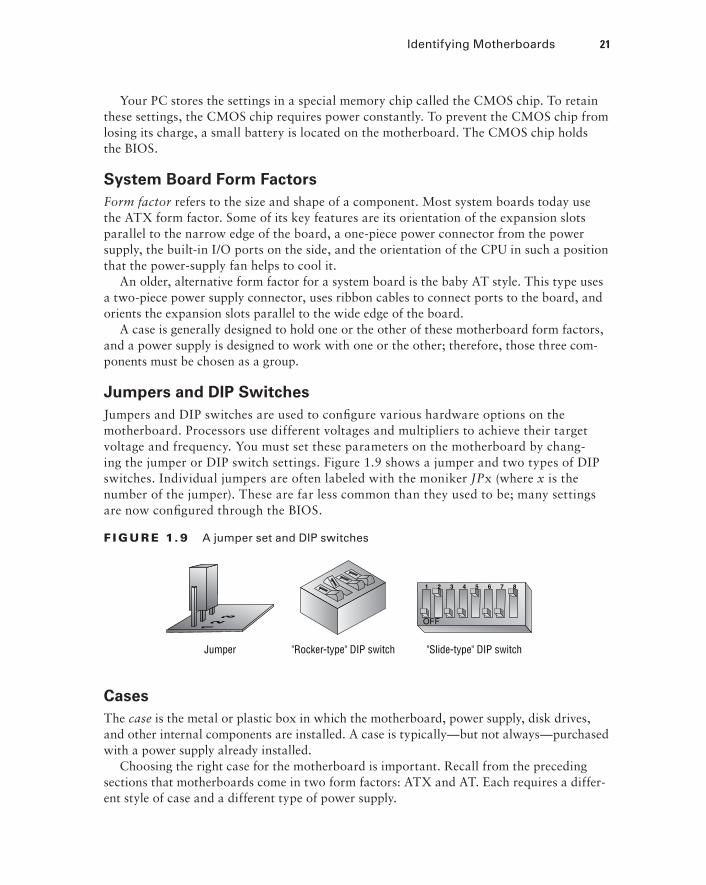
Jumpers and DIp SwitchesJumpers and DIP switches are used to configure various hardware options on the motherboard. Processors use different voltages and multipliers to achieve their target voltage and frequency. You must set these parameters on the motherboard by chang-ing the jumper or DIP switch settings. Figure 1.9 shows a jumper and two types of DIP switches. Individual jumpers are often labeled with the moniker JPx (where x is the number of the jumper). These are far less common than they used to be; many settings are now configured through the BIOS.
F I gu r E 1. 9 A jumper set and DIP switches
Jumper "Rocker-type" DIP switch "Slide-type" DIP switch
CasesThe case is the metal or plastic box in which the motherboard, power supply, disk drives, and other internal components are installed. A case is typically—but not always—purchased with a power supply already installed.
Choosing the right case for the motherboard is important. Recall from the preceding sections that motherboards come in two form factors: ATX and AT. Each requires a differ-ent style of case and a different type of power supply.
86504c01.indd 21 7/25/09 6:04:09 PM

22 Chapter 1 N Hardware
One case may also be distinguished from another in terms of its orientation. A desktop case lies with its widest side flat on the desk; a tower case stands up on end.
Finally, one case differs from another in terms of the number of drive bays it has. For example, within the broad category of tower cases are mini-towers (typically with two large and two small drive bays), mid-towers, and full towers (typically with four large and three small drive bays). However, there is little standardization of the number of drive bays that constitute a particular size; one manufacturer’s full tower may have more or fewer bays than another’s.
Although it isn’t common, you may occasionally encounter a slim-line case, which is a desktop-orientation case that is shorter and thinner than a normal one—so short that normal expansion boards won’t fit perpendicular to the motherboard. In such cases a riser card is installed, which sits perpendicular to the motherboard and contains expansion slots. The expansion cards can then be oriented parallel to the motherboard when installed.
ShapesForm factor refers to the size and shape of a component. There are five popular mother-board form factors for desktop PCs:
AT AT (Advanced Technology) is an older style of motherboard. A slightly more modern variant of it is the baby AT, which is similar but smaller. Its key features are a two-piece power-supply connector, ribbon cables that connect the I/O ports to the board, and an AT-style keyboard connector. The expansion slots are parallel to the wide edge of the board. See Figure 1.10.
F I gu r E 1.10 An AT-style motherboard
CPU
Expansion slotsparallel to wide edge
Power supplyconnector
AT-stylekeyboard
plug
COM and LPTports (requireribbon cables)
86504c01.indd 22 7/25/09 6:04:11 PM

Identifying Motherboards 23
ATX Most system boards today use the ATX (Advanced Technology Extended) form factor. It provides many design improvements over the AT, including I/O ports built directly into the side of the motherboard, the CPU positioned so that the power-supply fan helps cool it, and the ability for the PC to be turned on and off via software. It uses a PS/2-style connector for the keyboard. The expansion slots are parallel to the narrow edge of the board. See Figure 1.11.
F I gu r E 1.11 An ATX-style motherboard
CPU
Expansion slotsparallel to narrowedgePower supply
connector
Built-in ports
BTX The Balanced Technology Extended (BTX) motherboard was designed by Intel to deal with issues surrounding ATX (heat, power consumption, and so on). The BTX mother board is larger than ATX, so there is more room for integrated components; there is also an optimized airflow path and a low-profile option.
Micro ATX The micro ATX (most commonly written as microATX) was released in 1997 for smaller—and typically cheaper—systems. It has become popular in recent years in low-cost PCs. The maximum size of a micro ATX motherboard is 244mm square, com-pared to 305mm×244mm for a standard ATX motherboard. The micro ATX is backward compatible with the ATX.
NLX An acronym for New, Low profile eXtended, this form factor is used in low-profile case types. It incorporates expansion slots that are placed on a riser board to accommodate the reduction in case size. However, this design adds another component to troubleshoot.
I/O InterfacesWhile there are many types of I/O (input/output) interfaces available, the key ones to know for this portion of the exam are USB and IEEE 1394/FireWire, as the others are discussed in other places in this chapter and inclusion here would be repetitive.
USB USB is a newer expansion bus type that is used almost exclusively for external devices. All motherboards today have at least two USB ports. Some of the advantages of USB include hot-plugging and the capability for up to 127 USB devices to share a single set
86504c01.indd 23 7/25/09 6:04:12 PM

24 Chapter 1 N Hardware
of system resources. USB 1.1 runs at 12Mbps, and USB 2.0 runs at 480Mbps. Because USB is a serial interface, its width is 1 bit.
IEEE 1394/FireWire Some newer motherboards have a built-in IEEE 1394/FireWire port, although this port is more typically found on a PCI expansion board. It transfers data at 400Mbps and supports up to 63 chained devices on a single set of resources. It’s hot-pluggable, like USB. Figure 1.12 shows the connections on a FireWire card.
F I gu r E 1.12 FireWire connections
troubleshooting I/O ports and CablesI/O ports include USB, FireWire, and legacy parallel and serial ports, all of which are used to connect external peripherals to the motherboard. When a port doesn’t appear to be func-tioning, check the following:
Cables are snugly connected.ÛN
The port has not been disabled in BIOS Setup.ÛN
The port has not been disabled in Device Manager in Windows.ÛN
No pins are broken or bent on the male end of the port or of the cable being plugged ÛN
into it.
If you suspect that the cable, rather than the port, may be the problem, swap out the cable with a known good one. If you don’t have an extra cable, you can test the existing cable with a multimeter by setting it to ohms and checking the resistance between one end of the cable and the other.
Use a pin-out diagram, if available, to determine which pin matches up to which at the other end. There is often—but not always—an inverse relationship between the ends. In other words, at one end pin 1 is at the left, and at the other end it’s at the right on the same row of pins.
MemoryTo pass the A+ exam and be a productive computer technician, you must be familiar with memory. Not only will you be tested on this subject, but one of the most common upgrades performed on a PC is adding memory. Adding memory is a simple task, but before you can add memory you must have the correct type. When I say memory, we are most often refer-ring to random access memory (RAM). However, there are other types of memory. We’ll discuss them all in this section. Be familiar with the various types and their usage.
86504c01.indd 24 7/25/09 6:04:12 PM

Identifying Motherboards 25
physical MemoryPhysically, memory or RAM is a collection of integrated circuits that store data and pro-gram information as patterns of 1s and 0s (on and off states) in the chip. Most memory chips require constant power (also called a constant refresh) to maintain those patterns of 1s and 0s. If power is lost, all those tiny switches revert back to the off position, effectively erasing the data from memory. Some memory types, however, don’t require a refresh.
There are many types of RAM. Let’s examine each type in detail.
SraM
Static RAM (SRAM) stores whatever is placed in it until it’s changed and it is used as cache memory (discussed later). Unlike dynamic RAM (DRAM), it doesn’t require constant elec-trical refreshing. Another name for it is nonvolatile RAM (NVRAM). It’s expensive, so it isn’t typically used for the main memory in a system.
DraM
Dynamic RAM (DRAM) is an improvement over SRAM. DRAM uses a different approach to storing the 1s and 0s. Instead of using transistors, DRAM stores information as charges in very small capacitors. If a charge exists in a capacitor, it’s interpreted as a 1. The absence of a charge is interpreted as a 0.
Because DRAM uses capacitors instead of switches, it needs to use a constant refresh signal to keep the information in memory. DRAM requires more power than SRAM for refresh signals and, therefore, is mostly found in desktop computers.
DRAM technology allows several memory units, called cells, to be packed to a high density. Therefore, these chips can hold very large amounts of information. Most PCs today use DRAM of one type or another.
Let’s take a brief look at some of the different types of DRAM:
Fast Page Mode (FPM) An older type of RAM (almost always 72-pin SIMM packaging) that isn’t synchronized in speed with the motherboard. It’s rated in nanoseconds of delay, with lower numbers being better (for example, 60ns). FPM is now obsolete.
Extended Data Out (EDO) Like FPM, an older type of RAM, usually in 72-pin SIMM form. It performs a bit better than normal FPM RAM because it needs to be refreshed less frequently. Like FPM, it’s now obsolete.
Synchronous DRAM (SDRAM) Synchronized to the speed of the motherboard’s system bus. Synchronizing the speed of the systems prevents the address bus from having to wait for the memory because of different clock speeds. A 100MHz clock signal produces 800Mbps, and such memory modules are referred to as PC100. PC133, which replaced PC100, used a 133MHz clock to produce 1067Mbps of throughput.
The relationship between clock speed and throughput is always roughly 1:8 and thus PC2700 modules are designed specifically for a motherboard with a speed of 333MHz, and PC3200 modules are designed for a motherboard with a speed of 400MHz.
SDRAM typically comes in the form of 168-pin DIMMs or 184-pin RIMMs.
86504c01.indd 25 7/25/09 6:04:12 PM

26 Chapter 1 N Hardware
Double Data Rate (DDR) SDRAM/DDR2 Essentially, clock-doubled SDRAM. The mem-ory chip can perform reads and writes on both sides of any clock cycle (the up, or start, and the down, or ending), thus doubling the effective memory executions per second. So, if you’re using DDR SDRAM with a 100MHz memory bus, the memory will execute reads and writes at 200MHz and transfer the data to the processor at 100MHz. The advantage of DDR over regular SDRAM is increased throughput and thus increased overall system speed.
The next generation of DDR SDRAM is DDR2 (Double Data Rate 2). This allows for two accesses per clock cycle and effectively doubles the speed of the memory. DDR2-667 chips work with speeds of 667MHz and PC2-5300 modules, while DDR3-1600 chips support a 12800Mbps throughput.
RAMBUS A relatively new and extremely fast (up to 800MHz) technology that uses, for the most part, a new methodology in memory system design. RAMBUS (also known as direct Rambus) is a memory bus that transfers data at 800MHz, and is named after the company that designed it. RAMBUS memory models (often called Rambus inline memory modules [RIMMs]), like DDR SDRAM, can transfer data on both the rising and falling edges of a clock cycle. That feature, combined with the 16-bit bus for efficient transfer of data, results in the ultra-high memory transfer rate (800MHz) and the high bandwidth of up to 1.6GBps.
Memory Chip package typesMemory chips come in many different types of packages. Let’s look at the ones most frequently encountered.
Dual Inline package (DIp)
Dual inline package (DIP) memory is so named because the individual RAM chips use the DIP-style package for the memory module. Older computers, such as the IBM AT, arranged these small chips like rows of caskets in a small memory “graveyard.” This type of memory has long been obsolete.
SIMMs
Single inline memory modules (SIMMs) were developed because DIPs took up too much real estate on the logic board. Someone got the idea to put several DIP chips on a small circuit board and then make that board easily removable.
Each of these RAM circuit boards is a stick of RAM. There are two sizes of SIMMs: 30-pin and 72-pin. The 30-pin are older, 8-bit sticks. The 72-pin are 32-bit sticks. Figure 1.13 shows one of each. SIMMs are called single because they’re single-sided. When you count the number of pins (the metal tabs) along the bottom, there are 30 or 72 of them. In contrast, DIMMs (dual inline memory modules) are double-sided; for example, a 168-pin DIMM has 84 pins on each side.
DIMMs and rIMMs
DIMMs (dual inline memory modules) are double-sided memory chips used in modern sys-tems (Pentium and higher). They typically have 168 pins and are 64 bits in width. Figure 1.14 shows a DIMM.
86504c01.indd 26 7/25/09 6:04:12 PM

Identifying Motherboards 27
F I gu r E 1.13 Single inline memory modules (SIMMs)
30-pin SIMM
72-pin SIMM
F I gu r E 1.14 Dual inline memory module (DIMM)
A RIMM (Rambus inline memory module) is just like a DIMM, except it’s a Rambus DRAM stick, has 184 pins, and is slightly longer in size.
SoDIMMs and MicroDIMMs
Portable computers (notebooks and subnotebooks) require smaller sticks of RAM because of their smaller size. Two types are small outline DIMM (SoDIMM), which can have 72, 144, or 200 pins, and MicroDIMM, which has either 172 or 214 pins.
parity and Nonparity raMSome sticks of RAM have a parity bit on them for error detection. The parity bit works by adding up the number of 1s in a particular row of data in RAM (for example, 32-bit RAM has 32 individual binary digits). It then adds either 1 or 0 to that total to make it come out even. When retrieving the data from RAM, it re-adds the 1s again, and if the parity bit doesn’t come out the same, it knows an error has occurred.
You can identify a parity SIMM by counting the number of chips on the stick. If there are nine, it’s parity RAM. If there are eight, it’s nonparity.
When do you choose parity RAM? Usually the motherboard requires either parity or nonparity; a few motherboards will accept either. Nowadays parity RAM is rarely needed because advances in RAM technology have created reliable RAM that seldom makes errors.
One type of parity RAM is error correction code (ECC). This is a now-obsolete type of parity RAM. Most RAM today is non-ECC.
86504c01.indd 27 7/25/09 6:04:15 PM

28 Chapter 1 N Hardware
raM Banks and Bit WidthAs explained earlier, 30-pin SIMMs are 8-bit, 72-pin SIMMs are 32-bit, and DIMMs are 64-bit. The motherboard has an address bus that carries data from the RAM to the CPU and chipset. It has a certain width. On Pentium and higher systems, it’s 64-bit; on earlier systems, it’s 32-bit (386 and 486) or less (286 and below). A bank of RAM is a single stick or a group of sticks where the collective bit width adds up to the width of the address bus.
For example, on a Pentium motherboard, a single bank consists of a single 64-bit DIMM or a pair of two 32-bit SIMMs. For a 486 motherboard, a single bank is a single 32-bit SIMM or four 8-bit SIMMs.
Video raMVideo memory (also called video RAM [VRAM]) is used to store image data for pro-cessing by the video adapter. The more video memory an adapter has, the better the quality of image that it can display. Also, more VRAM allows the adapter to display a higher resolution of image.
processor SocketsThe processor socket is the interface for the CPU. Table 1.2 listed the various CPU slots and sockets you may find in a motherboard and explained which CPUs will fit into them. The central processing unit (CPU) is a processor chip consisting of an array of millions of integrated circuits. Its purpose is to accept, perform calculations on, and eject numeric data. It’s considered the “brain” of the computer because it’s the part that performs the mathematical operations required for all other activity.
There are two form factors for CPU chips: pin grid array (PGA) and single edge contact cartridge (SECC). The PGA style is a flat square or rectangular ceramic chip with an array of pins in the bottom. The actual CPU is a tiny silicon wafer embedded inside that ceramic chip. The SECC style is a circuit board with the silicon wafer mounted on it. The circuit board is then surrounded by a plastic cartridge for protection; the circuit board sticks out of the cartridge along one edge. This edge fits into a slot in the motherboard.
All CPUs today require cooling because they generate heat as they operate. The cooling can be either active or passive. A passive heat sink is a block of heat-conductive material that sits close to the CPU and wicks away the heat into the air. An active heat sink contains a fan that pulls the hot air away from the CPU.
One way to determine which CPU your computer is using is to open the case and view the numbers stamped on the CPU. However, some passive heat sinks are glued to the CPU, so the numbers may not be visible without removing it. Another way to determine a computer’s CPU is to save your work, exit any open programs, and restart the computer. Watch closely as the computer returns to its normal state. You should see a notation that tells you what chip you’re using. The General tab of the System Properties in Windows may also report the CPU speed. Later versions of Windows will also report the CPU speed in the System Information tool.
86504c01.indd 28 7/25/09 6:04:16 PM

Identifying Motherboards 29
external Speed (Clock Speed)
The clock speed, or external speed, is the speed at which the motherboard communicates with the CPU. It’s determined by the motherboard, and its cadence is set by a quartz crystal (the system crystal) that generates regular electrical pulses.
Internal Speed
The internal speed is the maximum speed at which the CPU can perform its internal opera-tions. This may be the same as the motherboard’s speed (the external speed), but it’s more likely to be a multiple of it. For example, a CPU may have an internal speed of 1.3GHz but an external speed of 133MHz. That means for every tick of the system crystal’s clock, the CPU has 10 internal ticks of its own clock.
Cache Memory
A cache is an area of extremely fast memory used to store data that is waiting to enter or exit the CPU. The Level 1 cache, also known as the L1 or front-side cache, holds data that is waiting to enter the CPU. On modern systems, the L1 cache is built into the CPU. The Level 2 cache, also known as the L2 or back-side cache, holds data that is exiting the CPU and is waiting to return to RAM. On modern systems, the L2 cache is in the same packaging as the CPU but on a separate chip. On older systems, the L2 cache was on a separate circuit board installed in the motherboard, and was sometimes called cache on a stick (COAST).
On some CPUs, the L2 cache operates at the same speed as the CPU; on others, the cache speed is only half the CPU speed. Chips with full-speed L2 caches have better performance.
Some newer systems also have an L3 cache, which is external to the CPU. It sits between the CPU and RAM to optimize data transfer between them.
the Bus
The processor’s ability to communicate with the rest of the system’s components relies on the supporting circuitry. The system board’s underlying circuitry is called the bus. The computer’s bus moves information into and out of the processor and other devices. A bus allows all devices to communicate with one another. The motherboard has several buses. The external data bus carries information to and from the CPU and is the fastest bus on the system. The address bus typically runs at the same speed as the external data bus and carries data to and from RAM. The PCI, AGP, and ISA interfaces also have their own buses with their own widths and speeds. With newer architectures, the System or Front Side Bus (FSB) connects the CPU to northbridge (or memory) hub. The back side bus con-nects CPU with Level 2 (L2) cache, aka secondary or external cache and the memory bus connects northbridge (or memory) hub to RAM.
The CPU must be compatible with the motherboard in the following ways:
Physical Connectivity The CPU must be in the right kind of package to fit into the motherboard.
Speed The motherboard’s chipset dictates its external data bus speed; the CPU must be capable of operating at that external speed.
86504c01.indd 29 7/25/09 6:04:16 PM
30 Chapter 1 N Hardware
Instruction Set The motherboard’s chipset contains an instruction set for communicating with the CPU; the CPU must understand the commands in that set. For example, a mother-board designed for an AMD Athlon CPU can’t accept an Intel Pentium CPU, because the instruction set is different.
Voltage The CPU requires that a certain voltage of power be supplied to it via the mother-board’s interface. This can be anywhere from +5V for a very old CPU down to around +2.1V for a modern one. The wrong voltage can ruin the CPU. One reason a given mother-board can’t support many different CPUs is that it must provide the correct voltage. To get around this issue, some motherboards have voltage regulator modules (VRMs) that are able to change the voltage based on the CPU.
There are several ways of differentiating one CPU from another. The following sections explain specifications according to type, speed, voltage, and cache memory.
CpU Speed
The CPU’s speed is the frequency at which it executes instructions. This frequency is measured in millions of cycles per second, or megahertz (MHz); or billions of cycles per second, or gigahertz (GHz).
The CPU has an internal and an external speed. The external speed corresponds with the motherboard’s speed, based on its system crystal. The system crystal pulses, generating a cadence at which operations occur on the motherboard. Each pulse is called a clock tick. The CPU’s internal speed is usually a multiple of that, so that multiple operations occur internally per clock tick. A CPU’s speed as described in its specifications is its internal speed.
CpU Manufacturers
The market leader in the manufacture of chips is Intel Corporation, with Advanced Micro Devices (AMD) gaining market share in the home PC market. Other competitors include Motorola and IBM.
InTEl proCEssors
The first commercially successful Intel CPU was the 8086, developed in the late 1970s. It was used in the IBM XT, one of the early home and business personal computers. Other early Intel CPUs included the 80286, 80386, and 80486. You may find it useful to learn about the specifications of these CPUs for your own knowledge, but they aren’t covered on the current A+ exam.
pEnTIum
Intel introduced the Pentium processor in 1993. This processor has 3.1 million transistors using a 64-bit data path, a 32-bit address bus, and a 16KB on-chip cache, and it comes in speeds from 60MHz to 200MHz. With the release of the Pentium chips, dual pipelining was introduced (also called superscalar architecture), allowing the chip to process two operations at once.
The term Pentium refers to three separate CPUs: first-generation, second-generation, and MMX. First-generation Pentiums were 273-pin PGA CPUs (Socket 4) drawing +5V. They ran at 60MHz or 66MHz. The second-generation Pentiums were 296-pin models (Socket 5 or Socket 7) drawing +3.3V. They ran at between 75Mhz and 200MHz.
86504c01.indd 30 7/25/09 6:04:16 PM

Identifying Motherboards 31
Third-generation (MMX) Pentiums, released in 1997, added multimedia extensions (MMX) to help the CPU work with graphic-intensive games. They used Socket 7 sockets, drew +2.8V, and ran at 166MHz to 233MHz. Due to the voltage difference between the Pentium MMX CPU and other Socket 7 CPUs, the MMX CPU required a motherboard that either was specifically for that CPU or had a VRM that could take the voltage down to that level.
pEnTIum pro
The Pentium Pro, released in 1995, came between the second- and third-generation Pentiums. Physically, the Pentium Pro was a PGA-style, rectangular chip with 387 pins, using a Socket 8 socket drawing +3V. It was designed primarily for server usage, and was optimized for 32-bit operating systems. On a 16-bit OS like Windows 3.1, the Pentium Pro ran more slowly than a Pentium, so it failed to gain widespread consumer support.
The Pentium Pro included quad pipelining, which processed four operations at once. It was also the first CPU to include an on-chip L2 cache. Another advantage of the Pentium Pro was dynamic processing, which allowed it to run instructions out of order whenever it was waiting for something else to happen.
Throttling is a term CompTIA expects you to know for the exam. With throt-tling, you artificially reduce the amount of resources available. Although commonly used with bandwidth to prevent one user from absorbing all the resources on a network, it can also be applied to processors and applica-tions. In many senses, throttling in this manner is the opposite of over-clocking—where you attempt to get the processor to run at a speed higher than it’s marked by using a faster bus speed or some other trick.
pEnTIum II
Intel next released the Pentium II. This chip’s speeds ranged from 233MHz to over 400MHz. It was introduced in 1997 and was designed to be a multimedia chip with special on-chip multimedia instructions and high-speed cache memory. It has 32KB of L1 cache, dynamic execution, and MMX technology. The Pentium II uses an SECC to attach to the motherboard instead of the standard PGA package used with the earlier processor types.
When released, the Pentium II was designed for single-processor-only applications. Intel also released a separate processor, known as the Pentium II Xeon, to fill the need for multi-processor applications such as servers. The Xeon’s primary advantage is a huge L2 cache (up to 2MB) that runs at the same speed as the CPU. The Xeon uses a special size of SECC-style slot called Slot 2.
Different voltages have been used for the Pentium II over its lifespan, ranging from +2.8V to +2.0V. When you’re using a Pentium II, it’s important that the motherboard pro-vide the correct voltage to it. This can be achieved with a VRM on the motherboard that detects the CPU’s needs and adjusts the voltage provided.
CElEron
To offer a less-costly alternative and to keep its large market share, Intel released the Cel-eron. In some cases, the Celeron was priced as low as half the retail price of the Pentium II. Because it was developed after the Pentium II, it benefited from some advancements and in
86504c01.indd 31 7/25/09 6:04:16 PM

32 Chapter 1 N Hardware
certain aspects outperformed its more expensive counterpart. Intel has also named its low-budget Pentium III CPUs Celeron.
The Celeron CPU has come in several package types, including a 370-pin PGA socket (Socket 370) and an SECC variant called single-edge processor (SEP) that is similar to the circuit board inside an SECC cartridge but without the plastic outer shell.
pEnTIum III
The Pentium III was released in 1999 and uses the same SECC connector as its predeces-sor, the Pentium II. It included 70 new instructions and a processor serial number (PSN), a unique number electronically encoded into the processor. This number can be used to uniquely identify a system during Internet transactions.
The Pentium III has two styles: an SECC-style cartridge called SECC2, and a PGA-style chip with 370 pins. The Pentium III PGA chip has the CPU chip mounted on the top rather than the bottom of the ceramic square; it’s called a flip chip (FC), or FC-PGA.
Like the Pentium II, the Pentium III has a multiprocessor Xeon version as well.
pEnTIum 4
The Pentium 4 was released in 2002. It runs on a motherboard with a fast system bus (between 400MHz and 800MHz) and provides some incremental improvements over the Pentium III. It’s a PGA-style CPU.
One of the improvements the Pentium 4 offers is hyperthreading technology. This feature enables the computer to multitask more efficiently between CPU-demanding applications.
Dual-core processors, available from Intel as well as AMD, essentially com-bine two processors into one chip. Instead of adding two processors to a machine (making it a multiprocessor system), you have one chip splitting operations and essentially performing as if it’s two processors in order to get better performance. The Centrino processor, for example, was released in 2003 and combines Wi-Fi capability with a multicore processor. A multicore architecture simply has multiple completely separate processor dies in the same package, whether its dual core, triple core, or quad core. The operating system and applications see multiple processors in the same way that they see multiple processors in separate sockets. Both dual-core and quad-core processors are common specific cases for the multicore technology. Most multicore processors from Intel come in even numbers, while AMD’s Phe-nom series can contain odd numbers (such as the triple-core processor).
summAry oF InTEl proCEssors
Table 1.3 provides a summary of the history of the Intel processors. Table 1.4 shows the physical characteristics of Pentium-class (and higher-class) processors.
86504c01.indd 32 7/25/09 6:04:17 PM

Identifying Motherboards 33
Processors were also created for the server market, but you are not required to know of them for this exam. The Itanium chip is one of the most notable: it came out in 2001 and was geared toward high-end servers.
TA b lE 1. 3 The Intel Family of Processors
Chip Year addedData Bus Width (in Bits)
address Bus Width (in Bits) Speed (in Mhz)
8080 1974 8 8 2
8086 1978 16 20 5–10
8088 1979 8 20 4.77
80286 1982 16 24 8–12
386DX 1985 32 32 16–33
386SX 1988 32 24 16–20
486DX 1989 32 32 25–50
486SX 1991 32 32 16–33
487SX 1991 32 32 16–33
486DX2 1991 32 32 33–66
486DX4 1992 32 32 75–100
Pentium 1993 32 32 60–166
Pentium Pro 1995 64 32 150–200
Pentium II 1997 64 64 233–300
Pentium II Xeon 1998 64 64 400–600
Celeron 1999 64 64 400–600
Pentium III 1999 64 64 350–1000
Pentium III Xeon 1999 64 64 350–1000
Pentium 4 2002 64 64 1000–3000
86504c01.indd 33 7/25/09 6:04:17 PM
34 Chapter 1 N Hardware
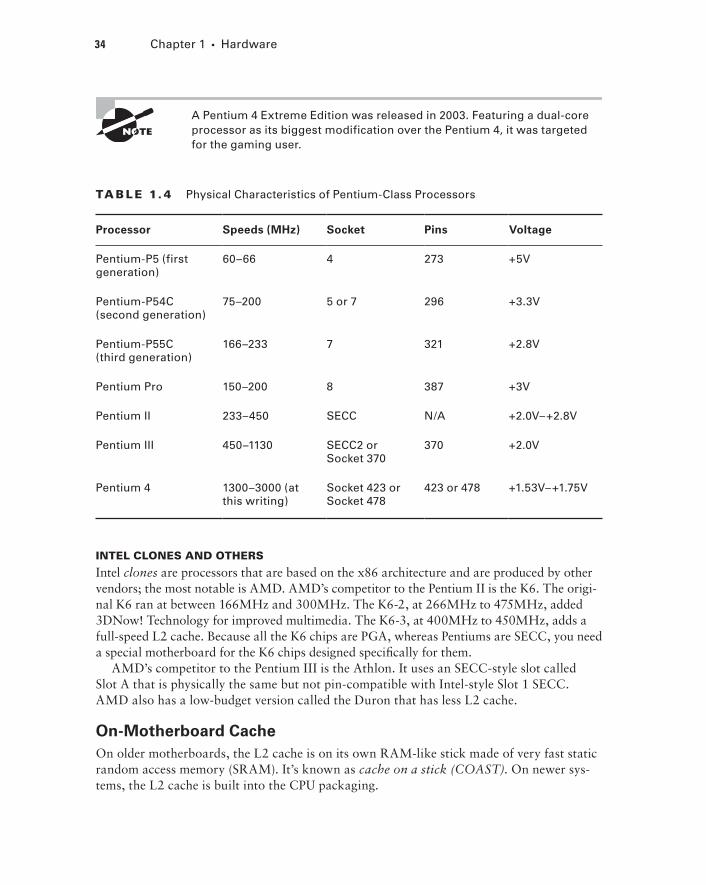
A Pentium 4 Extreme Edition was released in 2003. Featuring a dual-core processor as its biggest modification over the Pentium 4, it was targeted for the gaming user.
TA b lE 1. 4 Physical Characteristics of Pentium-Class Processors
processor Speeds (Mhz) Socket pins Voltage
Pentium-P5 (first generation)
60–66 4 273 +5V
Pentium-P54C (second generation)
75–200 5 or 7 296 +3.3V
Pentium-P55C (third generation)
166–233 7 321 +2.8V
Pentium Pro 150–200 8 387 +3V
Pentium II 233–450 SECC N/A +2.0V–+2.8V
Pentium III 450–1130 SECC2 or Socket 370
370 +2.0V
Pentium 4 1300–3000 (at this writing)
Socket 423 or Socket 478
423 or 478 +1.53V–+1.75V
InTEl ClonEs And oTHErs
Intel clones are processors that are based on the x86 architecture and are produced by other vendors; the most notable is AMD. AMD’s competitor to the Pentium II is the K6. The origi-nal K6 ran at between 166MHz and 300MHz. The K6-2, at 266MHz to 475MHz, added 3DNow! Technology for improved multimedia. The K6-3, at 400MHz to 450MHz, adds a full-speed L2 cache. Because all the K6 chips are PGA, whereas Pentiums are SECC, you need a special motherboard for the K6 chips designed specifically for them.
AMD’s competitor to the Pentium III is the Athlon. It uses an SECC-style slot called Slot A that is physically the same but not pin-compatible with Intel-style Slot 1 SECC. AMD also has a low-budget version called the Duron that has less L2 cache.
On-Motherboard CacheOn older motherboards, the L2 cache is on its own RAM-like stick made of very fast static random access memory (SRAM). It’s known as cache on a stick (COAST). On newer sys-tems, the L2 cache is built into the CPU packaging.
86504c01.indd 34 7/25/09 6:04:17 PM
Identifying Motherboards 35
Some newer systems also have an L3 cache, which is an external cache on the mother-board that sits between the CPU and RAM.
IDe and SCSI On-Motherboard InterfacesMost motherboards include two integrated drive electronics (IDE) channels but don’t include built-in Small Computer System Interface (SCSI). A consideration when choosing a mother-board for IDE is that it needs to support the desired level of UltraDMA to match the capabili-ties of the hard drive you want to use.
ChipsetsThe chipset is the set of controller chips that monitors and directs the traffic on the mother-board between the buses. It usually consists of two or more chips. Motherboards use two basic chipset designs: the north/south bridge chipset and the hub chipset.
North/south bridge is the older of the two. The north bridge connects the system bus to the other relatively fast buses (AGP and PCI). The south bridge connects ISA, IDE, and USB. A third chip, SuperIO, connects the legacy parallel and serial ports.
The hub chipset includes a memory controller hub (equivalent to the north bridge), an I/O controller hub (equivalent to the south bridge), and a SuperIO chip.
troubleshooting Dislodged Chips and CardsThe inside of a computer is a harsh environment. The temperature inside the case of some Pentium computers is well over 100° F! When you turn on your computer, it heats up. Turn it off, and it cools down. After several hundred such cycles, some components can’t handle the stress and begin to move out of their sockets. This phenomenon is known as chip creep, and it can be really frustrating.
Chip creep can affect any socketed device, including ICs, RAM chips, and expansion cards. The solution to chip creep is simple: open the case, and reseat the devices. It’s sur-prising how often this is the solution to phantom problems of all sorts.
Another important item worth mentioning is an unresponsive but freshly unboxed PC. With the introduction of the Type II and Type II-style processors, the number of dead boxes increased dramatically. In fact, at that time I was leading a 2,000-unit migration for a large financial institution. As with any large migration, time and labor were in short supply. The average dead PC ratio was about 1 out of every 20. When about 10 DOAs had stacked up, I stayed after work one night to assess the problem. After checking the power supply, RAM, and cables on these integrated systems, an examination of the chip provided me with the fix. These large, top-heavy processors can become dislodged during shipment. Shortly thereafter, manufacturers began using a heavier attachment point for the slot style of processor, which has helped tremendously.
CMOSYou can adjust a computer’s base-level settings through a Basic Input/Output System (BIOS) Setup program, which you access by pressing a certain key at startup, such as F1 or Delete
86504c01.indd 35 7/25/09 6:04:17 PM
36 Chapter 1 N Hardware
(depending on the system). Another name for this setup program is CMOS Setup. The most common settings to adjust in CMOS include port settings (parallel, serial, USB), drive types, boot sequence, date and time, and virus/security protections.
accessing CMOS Setup
Your PC keeps these settings in a special memory chip called the Complementary Metallic Oxide Semiconductor (CMOS) chip. The CMOS chip must have a constant source of power to keep its settings. To prevent the loss of data, motherboard manufacturers include a small battery to power the CMOS memory. On modern systems, this is a coin-style battery, about the same diameter of a dime and about ¼ inch thick.
You can press a certain key or group of keys to access the setup program during the power-on self-test (POST). This utility allows you to change the configuration through a group of menus. There are many different CMOS Setup programs, depending on the BIOS make and manufacturer, so it’s impossible to provide specifics here; instead, we’ll look at capabilities.
Load Setup Defaults
The purpose of this setting is to configure the PC back to the default settings set by the factory. If you make changes to your settings and the machine becomes disabled, in most cases selecting this menu item returns the machine to a usable state. You may then try dif-ferent settings until you achieve your desired configuration. This is an important setting to know about before making any other changes.
Date and time
One of the most basic things you can change in CMOS Setup is the system date and time. You can also change this from within the operating system.
CpU Settings
In most modern systems, the BIOS detects the CPU’s type and speed automatically, so any CPU setting in CMOS Setup is likely to be read-only.
Memory Speed/parity
Most systems today detect the RAM amount and speed automatically. Some motherboards can use different types of RAM, such as parity and nonparity, or different speeds, and the CMOS Setup program may provide the opportunity to change those settings. Increasingly, however, RAM is becoming a read-only part of CMOS Setup programs.
power Management
The Power Management settings determine the way the PC will act after it has been idle for certain time periods. For example, you may have choices like Minimum, Maximum, and User Defined. The Minimum and Maximum settings control the HDD Off After, Doze Mode, Standby Mode, and Suspend Mode settings with predefined parameters. If you select User Defined, you must manually configure these settings to your personal preferences.
86504c01.indd 36 7/25/09 6:04:18 PM

Identifying Motherboards 37
ports and peripherals
In CMOS Setup, you can enable or disable integrated components, such as built-in video cards, sound cards, or network cards. You may disable them in order to replace them with different models on expansion boards, for example.
You can also disable the on-board I/O ports for the motherboard, including parallel, serial, and USB. Depending on the utility, there may also be settings that enable or disable USB keyboard usage, Wake on LAN, or other special features.
In addition to enabling or disabling legacy parallel ports, you can assign an operational mode to the port. Table 1.5 lists the common modes for a parallel port. When you’re trouble shooting parallel port problems, sometimes trying a different mode will help.
TA b lE 1.5 Parallel Port Settings
Setting Description Use
EPP (enhanced parallel port)
Supports bidirectional communication and high transfer rates
Newer ink-jet and laser printers that can utilize bidirectional communi-cation and scanners
ECP (enhanced capabilities port)
Supports bidirectional communication and high transfer rates
Newer ink-jet and laser printers that can utilize bidirectional communi-cation, connectivity devices, and scanners
SPP (standard parallel port)
Supports bidirectional communication
Older ink-jet and laser printers and slower scanners
passwords
In most CMOS Setup programs, you can set a supervisor password. Doing so requires a password to be entered in order to use the CMOS Setup program, effectively locking out users from making changes to it. You may also be able to set a user password, which restricts the PC from booting unless the password is entered.
To reset a forgotten password, you can remove the CMOS battery to reset everything. There also may be a Reset jumper on the motherboard.
Virus protection
Some CMOS Setup programs have a rudimentary virus-protection mechanism that pre-vents applications from writing to the boot sector of a disk without your permission. If this setting is turned on and you install a new operating system, a confirmation box may appear at some point, warning you that the operating system’s Setup program is trying to write to the boot sector. Let it.
86504c01.indd 37 7/25/09 6:04:18 PM
38 Chapter 1 N Hardware
hDD auto Detection
Some CMOS Setup programs have a feature that polls the IDE channels and provides infor-mation about the IDE devices attached to them. You can use this feature to gather the set-tings for a hard disk. However, most hard disks these days are fully Plug and Play, so they automatically report themselves to the CMOS Setup.
Drive Configuration
You can specify how many floppy drives are installed and what types they are. Floppy drives aren’t automatically detected. The settings needed for a floppy drive are size (31⁄2-inch or 5¼-inch) and density (double-density or high-density). You can also set each floppy drive to be enabled or disabled from being bootable. Almost all floppy drives today are high-density 31⁄2-inch.
Hard drives, on the other hand, can be autodetected by most systems if the IDE setting is set to Auto. The settings detected may include the drive’s capacity; its geometry (cylinders, heads, and sectors); and its preferred PIO (Programmed Input/Output), direct memory access (DMA), or UltraDMA operating mode. You can also configure a hard drive by entering its CHS values manually, but doing so is almost never necessary anymore.
CHS stands for cylinders, heads, and sectors. This is also called the drive geometry, because together these three numbers determine how much data the disk can hold. Most CMOS Setup programs are able to automati-cally detect the CHS values.
Boot Sequence
Each system has a default boot order, which is the order in which it checks the drives for a valid operating system to boot. Usually, this order is set for floppy first, then hard disk, and finally CD-ROM, but these components can be placed in any boot order. For example, you might set CD-ROM first to boot from a Windows XP Setup disk on a system that already contained an operating system.
exiting CMOS Setup
The CMOS Setup program includes an Exit command, with options that include Save Changes and Discard Changes. In most programs, Esc is a shortcut for exiting and dis-carding changes, and F10 is a common shortcut for exiting and saving changes.
BIOS IssuesComputer BIOSs don’t go bad; they just become out-of-date. This isn’t necessarily a critical issue—they will continue to support the hardware that came with the box. It does, however, become an issue when the BIOS doesn’t support some component that you would like to install—a larger hard drive, for instance.
Most of today’s BIOSs are written to an EEPROM and can be updated through the use of software. Each manufacturer has its own method for accomplishing this. Check out the documentation for complete details.
86504c01.indd 38 7/25/09 6:04:18 PM

Identifying Motherboards 39
If you make a mistake in the upgrade process, the computer can become unbootable. If this happens, your only option may be to ship the box to a manufacturer-approved service center. Be careful!
post routinesEvery computer has a diagnostic program built into its BIOS called the power-on self-test (POST). When you turn on the computer, it executes this set of diagnostics. Many steps are involved the POST, but they happen very quickly, they’re invisible to the user, and they vary among BIOS versions. The steps include checking the CPU, checking the RAM, check-ing for the presence of a video card, and so on. The main reason to be aware of the POST’s existence is that if it encounters a problem, the boot process stops. Being able to determine at what point the problem occurred can help you troubleshoot.
One way to determine the source of a problem is to listen for a beep code. This is a series of beeps from the computer’s speaker. The number, duration, and pattern of the beeps can some-times tell you what component is causing the problem. However, the beeps differ depending on the BIOS manufacturer and version, so you must look up the beep code in a chart for your particular BIOS. Different BIOS manufacturers use the beeping differently. AMI BIOS, for example, relies on a raw number of beeps, and uses patterns of short and long beeps.
Another way to determine a problem during the POST routine is to use a POST card. This is a circuit board that fits into an ISA or PCI expansion slot in the motherboard and reports numeric codes as the boot process progresses. Each of those codes corresponds to a particular component being checked. If the POST card stops at a certain number, you can look up that number in the manual that came with the card to determine the problem.
BIOS Central is a website containing charts detailing the beep codes and POST error codes for many different BIOS manufacturers: www.iterasi .net/openviewer.aspx?sqrlitid=px8b_zkg9eiiv-n5ilfowq.
Bus architecture and SlotsA bus is a set of signal pathways that allows information and signals to travel between components inside or outside a computer. A motherboard has several buses, each with its own speed and width.
The external data bus, also called the system bus, connects the CPU to the chipset. On modern systems, it’s 64-bit. The address bus connects the RAM to the CPU. On modern systems, it’s 64-bit.
The expansion bus connects the I/O ports and expansion slots to the chipset. There are usually several different expansion buses on a motherboard. Expansion buses can be broken into two broad categories: internal and external. Internal expansion buses include Industry Standard Architecture (ISA), Peripheral Component Interconnect (PCI), and
86504c01.indd 39 7/25/09 6:04:18 PM

40 Chapter 1 N Hardware
Accelerated Graphics Port (AGP); they’re for circuit boards. External expansion buses include serial, parallel, Universal Serial Bus (USB), FireWire, and infrared. The following sections explain some of the most common buses.
There are many obsolete bus types, including Video Electronics Standards Association Local Bus (VESA local bus, or VL-Bus), Microchannel Architec-ture (MCA), and enhanced ISA (EISA). These were not on the last iteration of the A+ test and should not appear on this one either.
ISa (Industry Standard architecture)This is a 16-bit bus (originally 8-bit on the oldest computers) that operates at 8MHz. Its slots are usually black. New motherboards will not have this type of slot, because the ISA bus is old technology and has been phased out.
Besides the slow speed and narrow width, another drawback of the ISA bus is that each ISA device requires separate system resources, including separate interrupt requests (IRQs). In a heavily loaded system, this can cause an IRQ shortage. (PCI slots, in contrast, can share some resources.)
pCI (peripheral Component Interconnect)The PCI bus is a fast (33MHz), wide (32-bit or 64-bit) expansion bus that is the modern standard in motherboards today for general-purpose expansion devices. Its slots are typi-cally white. PCI devices can share IRQs and other system resources with one another in some cases. All modern motherboards have at least three PCI slots. Figure 1.15 shows some PCI slots.
F I gu r E 1.15 PCI bus connectors
86504c01.indd 40 7/25/09 6:04:19 PM
Identifying Motherboards 41
aGp (accelerated Graphics port)As systems got faster, PC game players wanted games that had better graphics, more real-ism, and more speed. However, as the computers got faster, the video technology couldn’t seem to keep up, even with the PCI bus. The AGP bus was developed to meet this need.
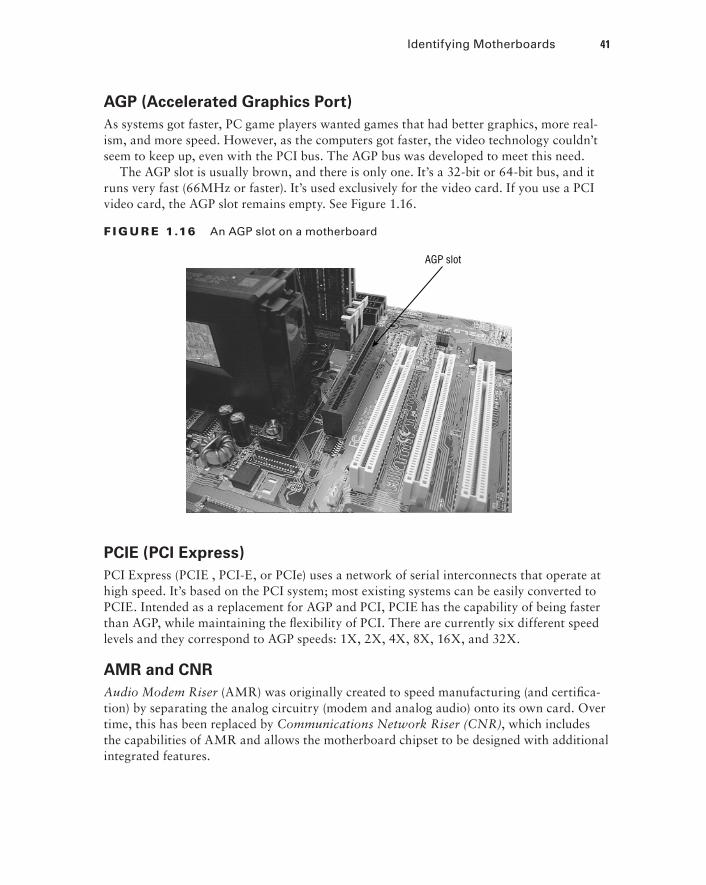
The AGP slot is usually brown, and there is only one. It’s a 32-bit or 64-bit bus, and it runs very fast (66MHz or faster). It’s used exclusively for the video card. If you use a PCI video card, the AGP slot remains empty. See Figure 1.16.
F I gu r E 1.16 An AGP slot on a motherboard
AGP slot
pCIe (pCI express)PCI Express (PCIE , PCI-E, or PCIe) uses a network of serial interconnects that operate at high speed. It’s based on the PCI system; most existing systems can be easily converted to PCIE. Intended as a replacement for AGP and PCI, PCIE has the capability of being faster than AGP, while maintaining the flexibility of PCI. There are currently six different speed levels and they correspond to AGP speeds: 1X, 2X, 4X, 8X, 16X, and 32X.
aMr and CNrAudio Modem Riser (AMR) was originally created to speed manufacturing (and certifica-tion) by separating the analog circuitry (modem and analog audio) onto its own card. Over time, this has been replaced by Communications Network Riser (CNR), which includes the capabilities of AMR and allows the motherboard chipset to be designed with additional integrated features.
86504c01.indd 41 7/25/09 6:04:20 PM

42 Chapter 1 N Hardware
pCMCIa (personal Computer Memory Card International association)The PCMCIA standard defines the PC Card (formerly known as the PCMCIA Card), an interface designed for laptop computers. This standard is discussed in more detail later in this chapter.
Legacy parallel and SerialThese buses are called legacy because they’re old technology and are being phased out. The legacy serial port, also called an RS-232 port, is a 9-pin or 25-pin male connector. It sends data one bit at a time and is usually limited to about 115Kbps in speed.
The legacy parallel port transfers data 8 bits at a time. It’s a 25-pin female connector. A system typically has only one parallel port, but because many printers are now coming with USB interfaces, this is no longer the inconvenience that it used to be.
pata/IDe/eIDe Devices IDE drives are the most common type of hard drive found in computers. But IDE is much more than a hard drive interface; it’s also a popular interface for many other drive types, including CD-ROM, DVD, and Zip. IDE drives are the most prevalent in the industry today. IDE drives are easy to install and configure, and they provide acceptable performance for most applications. Their ease of use relates to their most identifiable feature—the controller is located on the drive itself.
IDe technologiesThe design of the IDE is simple: put the controller right on the drive, and use a relatively short ribbon cable to connect the drive/controller to the IDE interface. This offers the benefits of decreasing signal loss (thus increasing reliability) and making the drive easier to install. The IDE interface can be an expansion board, or it can be built into the mother-board, as is the case on almost all systems today.
IDE generically refers to any drive that has a built-in controller. The IDE we know today is more properly called AT IDE; two previous types of IDE (MCA IDE and XT IDE) are obsolete and incompatible with it.
There have been many revisions of the IDE standard over the years, and each one is designated with a certain AT attachment (ATA) number—ATA-1 through ATA-8. Drives that support ATA-2 and higher are generically referred to as enhanced IDE (EIDE).
With ATA-3, a technology called ATA Packet Interface (ATAPI) was introduced to help deal with IDE devices other than hard disks. ATAPI enables the BIOS to recognize an IDE CD-ROM drive, for example, or a tape backup or Zip drive.
Starting with ATA-4, a new technology was introduced called UltraDMA, supporting transfer modes of up to 33Mbps.
ATA-5 supports UltraDMA/66, with transfer modes of up to 66Mbps. To achieve this high rate, the drive must have a special 80-wire ribbon cable, and the motherboard or IDE controller card must support ATA-5.
86504c01.indd 42 7/25/09 6:04:20 PM

Identifying Motherboards 43
ATA-6 supports UltraDMA/100, with transfer modes of up to 100Mbps.
If an ATA-5 or ATA-6 drive is used with a normal 40-wire cable or is used on a system that doesn’t support the higher modes, it reverts to the ATA-4 performance level.
ATA-7 supports UltraDMA/133, with transfer modes of up to 150Mbps and serial ATA (discussed later).
ATA-8 made only minor revisions to ATA-7 and also supports UltraDMA/133, with transfer modes of up to 150Mbps and serial ATA.
IDe pros and ConsThe primary benefit of IDE is that it’s nearly universally supported. Almost every mother-board has IDE connectors. In addition, IDE devices are typically the cheapest and most read-ily available type.
A typical motherboard has two IDE connectors, and each connector can support up to two drives on the same cable. That means you’re limited to four IDE devices per system unless you add an expansion board containing another IDE interface. In contrast, with SCSI you can have up to seven drives per interface (or even more on some types of SCSI).
Performance also may suffer when IDE devices share an interface. When you’re burning CDs, for example, if the reading and writing CD drives are both on the same cable, errors may occur. SCSI drives are much more efficient with this type of transfer.
Installation and ConfigurationTo install an IDE drive, do the following:
1. Set the master/slave jumper on the drive.
2. Install the drive in the drive bay.
3. Connect the power-supply cable.
4. Connect the ribbon cable to the drive and to the motherboard or IDE expansion board.
5. Configure the drive in BIOS Setup if it isn’t automatically detected.
6. Partition and format the drive using the operating system.
Each IDE interface can have only one master drive on it. If there are two drives on a single cable, one of them must be the slave drive. This setting is accomplished via a jumper on the drive. Some drives have a separate setting for Single (that is, master with no slave) and Master (that is, master with a slave); others use the Master setting generi-cally to refer to either case. Figure 1.17 shows a typical master/slave jumper scenario, but different drives may have different jumper positions to represent each state. Today, the need for jumper settings has decreased as many drives can autodetect the master/slave relationship.
86504c01.indd 43 7/25/09 6:04:20 PM
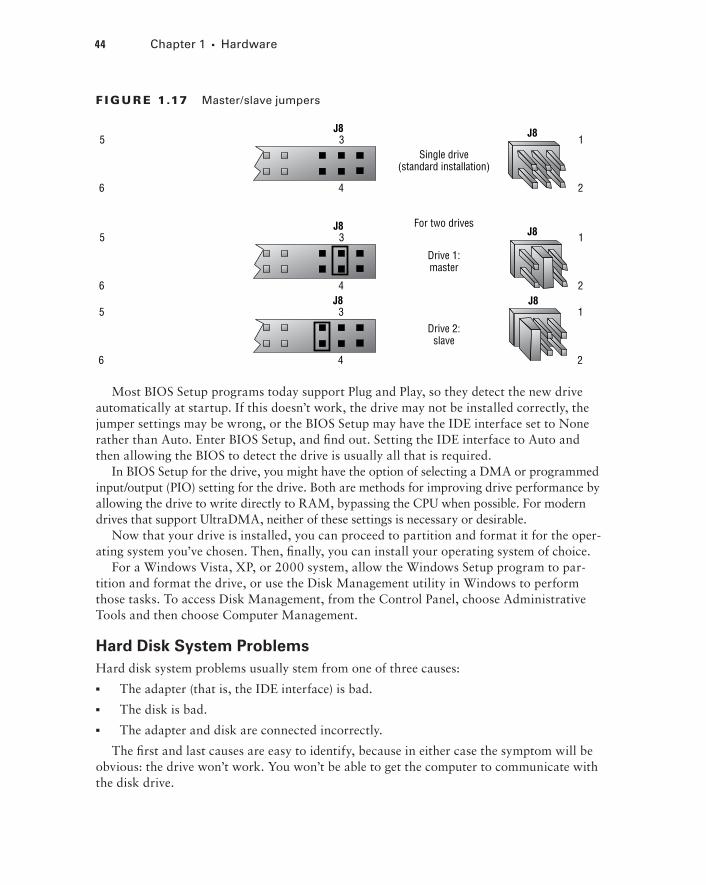
44 Chapter 1 N Hardware
F I gu r E 1.17 Master/slave jumpers
Single drive(standard installation)
For two drives
Drive 1:master
Drive 2:slave
J85 3 1
6 4 2
J85 3 1
6 4 2J8
5 3 1
6 4 2
J8
J8
J8
Most BIOS Setup programs today support Plug and Play, so they detect the new drive automatically at startup. If this doesn’t work, the drive may not be installed correctly, the jumper settings may be wrong, or the BIOS Setup may have the IDE interface set to None rather than Auto. Enter BIOS Setup, and find out. Setting the IDE interface to Auto and then allowing the BIOS to detect the drive is usually all that is required.
In BIOS Setup for the drive, you might have the option of selecting a DMA or programmed input/output (PIO) setting for the drive. Both are methods for improving drive performance by allowing the drive to write directly to RAM, bypassing the CPU when possible. For modern drives that support UltraDMA, neither of these settings is necessary or desirable.
Now that your drive is installed, you can proceed to partition and format it for the oper-ating system you’ve chosen. Then, finally, you can install your operating system of choice.
For a Windows Vista, XP, or 2000 system, allow the Windows Setup program to par-tition and format the drive, or use the Disk Management utility in Windows to perform those tasks. To access Disk Management, from the Control Panel, choose Administrative Tools and then choose Computer Management.
hard Disk System problemsHard disk system problems usually stem from one of three causes:
The adapter (that is, the IDE interface) is bad.ÛN
The disk is bad.ÛN
The adapter and disk are connected incorrectly.ÛN
The first and last causes are easy to identify, because in either case the symptom will be obvious: the drive won’t work. You won’t be able to get the computer to communicate with the disk drive.
86504c01.indd 44 7/25/09 6:04:21 PM

Identifying Motherboards 45
However, if the problem is a bad disk drive, the symptoms aren’t as obvious. As long as the BIOS POST routines can communicate with the disk drive, they’re usually satisfied. But the POST routines may not uncover problems related to storing information. Even with healthy POST results, you may find that you’re permitted to save information to a bad disk, but when you try to read it back, you get errors. Or the computer may not boot as quickly as it used to, because the disk drive can’t read the boot information successfully every time.
In some cases, reformatting the drive can solve the problems described in the preceding paragraph. In other cases, reformatting brings the drive back to life only for a short while. The bottom line is that read and write problems usually indicate that the drive is malfunc-tioning and should be replaced soon.
Never low-level-format IDE drives! They’re low-level-formatted from the factory, and you may cause problems by using low-level utilities on these types of drives.
Sata and eSataSerial ATA (SATA) came out as a standard recently and was first adopted in desktops and then laptops. Whereas ATA had always been an interface that sends 16 bits at a time, SATA sends only one bit at a time. The benefit is that the cable used can be much smaller, and faster cycling can actually increase performance.
External SATA (eSATA) is a variant of SATA that was standardized in 2004 for external devices. As such, it competes with FireWire and USB, but differs from them in that it requires its own power connector. The advantage it has over the other technologies is speed—it is approximately three times faster at data transfer than either FireWire or USB 2.0.
raIDRAID stands for Redundant Array of Independent Disks. It’s a way of combining the storage power of more than one hard disk for a special purpose such as increased performance or fault tolerance. RAID is more commonly done with SCSI drives, but it can be done with IDE drives.
There are several types of RAID, of which you need to know the following three for the exam:
RAID 0 Also known as disk striping. This is technically not RAID, because it doesn’t pro-vide fault tolerance. Data is written across multiple drives, so one drive can be reading or writing while the next drive’s read-write head is moving. This makes for faster data access. However, if any one of the drives fails, all content is lost.
RAID 1 Also known as disk mirroring. This is a method of producing fault tolerance by writing all data simultaneously to two separate drives. If one drive fails, the other contains all the data and can be switched to. However, disk mirroring doesn’t help access speed, and the cost is double that of a single drive.
86504c01.indd 45 7/25/09 6:04:21 PM

46 Chapter 1 N Hardware
RAID 5 Combines the benefits of both RAID 0 and RAID 1, and is known as Striping with Parity. It uses a parity block distributed across all the drives in the array, in addition to striping the data across them. That way, if one drive fails, the parity information can be used to recover what was on the failed drive. A minimum of three drives is required.
FirmwareAny software that is built into a hardware device is called firmware. Firmware is typically in flash ROM and can be updated as newer versions become available. An example of firm-ware is the software in a laser printer that controls it and allows you to interact with it at the console (usually through a limited menu of options).
DaughterboardsAny boards added to the motherboard to expand its capabilities are known as daughter-boards (“daughters” of the “mother”). A common use is to insert one daughterboard (also called daughter boards) into the motherboard and allow expansion cards to then be inserted into it sideways, thus saving space.
Motherboard and CpU problemsMost motherboard and CPU problems manifest themselves by the system appearing com-pletely dead. However, “completely dead” can be a symptom of a wide variety of problems, not only with the CPU or motherboard but also with the RAM or the power supply. So, a POST card (described in the preceding section) may be helpful in narrowing down the exact component that is faulty.
When a motherboard fails, it’s usually because it has been damaged. Most technicians can’t repair motherboard damage; the motherboard must be replaced. Motherboards can become damaged due to physical trauma, exposure to electrostatic discharge (ESD), or short-circuiting. To minimize the risk of these damages, observe the following rules:
Handle a motherboard as little as possible, and keep it in an antistatic bag whenever ÛN
it’s removed from the PC case.
Keep all liquids well away from the motherboard, because water can cause a short circuit.ÛN
Wear an antistatic wrist strap when handling or touching a motherboard.ÛN
When installing a motherboard in a case, make sure you use brass stand-offs with ÛN
paper washers to prevent any stray solder around the screw holes from causing a short circuit with the metal of the screw.
A CPU may fail because of physical trauma or short-circuiting, but the most common cause for a CPU not to work is failure to install it properly. With a PGA-style CPU, ensure that the CPU is oriented correctly in the socket. With an SECC-style CPU, make sure the CPU is completely inserted into its slot.
86504c01.indd 46 7/25/09 6:04:21 PM

Identifying Motherboards 47
exam essentials
Know what the BIOS does. This is a ROM chip on the motherboard. It contains the BIOS software that tells the processor how to interact with the hardware in the computer. The BIOS chip tells the motherboard how to start up, check itself and its components, and pass off control to the operating system.
Know the different types of memory. DRAM is dynamic random access memory. SRAM is static random access memory. ROM stands for read-only memory, and it’s normally used to store the computer’s BIOS. CMOS is a special kind of memory that holds the BIOS con-figuration settings.
Understand the differences between PCI, PCIe, and AGP. Know the bus widths and speeds, and be able to select the best bus type for a given device.
Know what factors go into making memory compatible with a PC. These factors can include physical size, capacity, technology, speed, and compatibility with existing RAM in the system.
Understand the processor’s job. The processor is the brain of the PC. Most actions per-formed by the PC require use of the processor to accomplish their task.
Understand the differences between the classes of Pentium chips. The Intel Pentium has gone through several changes since its release. You’ll need to understand the differ-ences between the various classes in terms of their physical packaging, speeds, voltages, and caches.
Know the differences between RAM types. Make sure you can differentiate between all the acronyms, such as SRAM, DRAM, SDRAM, DDR/DDR2/DDR3 and RAMBUS.
Understand the different RAM packaging. Be able to differentiate between SIMMs and DIMMs, including the number of pins each has and their bit widths.
Know the purpose of parity in RAM. Understand how a parity bit is used for error correction.
Know the motherboard form factors. Understand the differences between BTX, ATX, micro ATX, and NLX.
Know what the CMOS Setup utility does. The CMOS Setup utility allows you to configure the characteristics of certain portions of the PC.
Understand RAID levels. Know that RAID 0 is performance enhancement with no fault tolerance, RAID 1 is fault tolerance with no performance enhancement, and RAID 5 offers fault tolerance and enhances performance.
86504c01.indd 47 7/25/09 6:04:21 PM
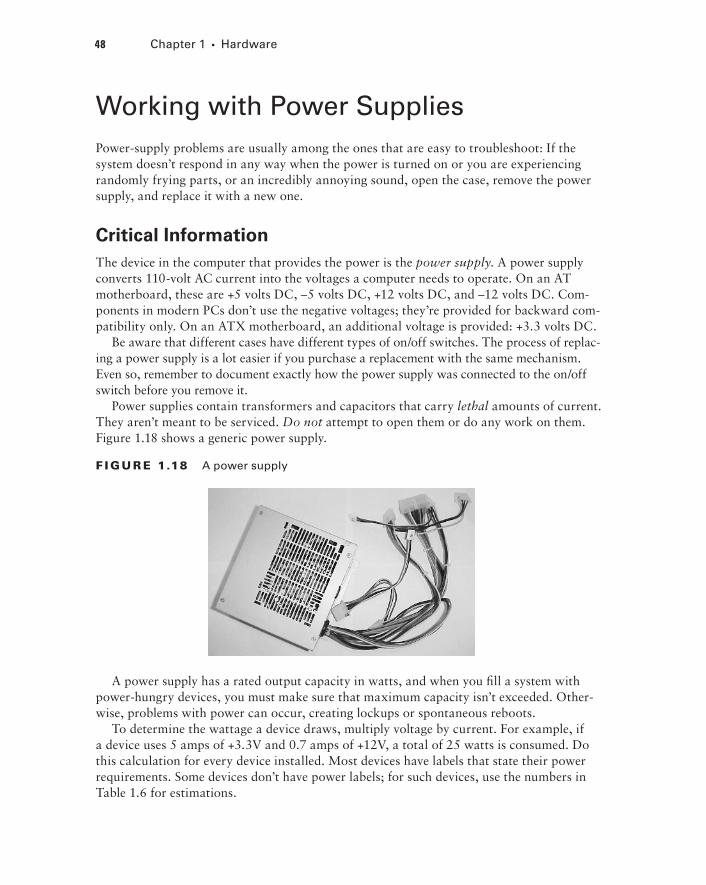
48 Chapter 1 N Hardware
Working with Power SuppliesPower-supply problems are usually among the ones that are easy to troubleshoot: If the system doesn’t respond in any way when the power is turned on or you are experiencing randomly frying parts, or an incredibly annoying sound, open the case, remove the power supply, and replace it with a new one.
Critical InformationThe device in the computer that provides the power is the power supply. A power supply converts 110-volt AC current into the voltages a computer needs to operate. On an AT motherboard, these are +5 volts DC, –5 volts DC, +12 volts DC, and –12 volts DC. Com-ponents in modern PCs don’t use the negative voltages; they’re provided for backward com-patibility only. On an ATX motherboard, an additional voltage is provided: +3.3 volts DC.
Be aware that different cases have different types of on/off switches. The process of replac-ing a power supply is a lot easier if you purchase a replacement with the same mechanism. Even so, remember to document exactly how the power supply was connected to the on/off switch before you remove it.
Power supplies contain transformers and capacitors that carry lethal amounts of current. They aren’t meant to be serviced. Do not attempt to open them or do any work on them. Figure 1.18 shows a generic power supply.
F I gu r E 1.18 A power supply
A power supply has a rated output capacity in watts, and when you fill a system with power-hungry devices, you must make sure that maximum capacity isn’t exceeded. Other-wise, problems with power can occur, creating lockups or spontaneous reboots.
To determine the wattage a device draws, multiply voltage by current. For example, if a device uses 5 amps of +3.3V and 0.7 amps of +12V, a total of 25 watts is consumed. Do this calculation for every device installed. Most devices have labels that state their power requirements. Some devices don’t have power labels; for such devices, use the numbers in Table 1.6 for estimations.
86504c01.indd 48 7/25/09 6:04:21 PM
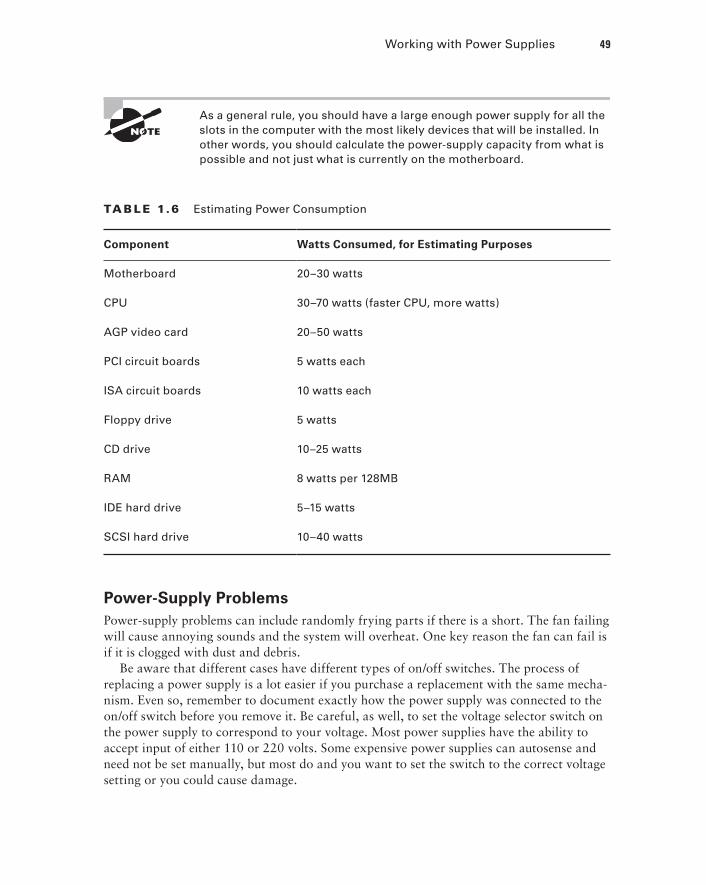
Working with Power Supplies 49
As a general rule, you should have a large enough power supply for all the slots in the computer with the most likely devices that will be installed. In other words, you should calculate the power-supply capacity from what is possible and not just what is currently on the motherboard.
TA b lE 1.6 Estimating Power Consumption
Component Watts Consumed, for estimating purposes
Motherboard 20–30 watts
CPU 30–70 watts (faster CPU, more watts)
AGP video card 20–50 watts
PCI circuit boards 5 watts each
ISA circuit boards 10 watts each
Floppy drive 5 watts
CD drive 10–25 watts
RAM 8 watts per 128MB
IDE hard drive 5–15 watts
SCSI hard drive 10–40 watts
power-Supply problemsPower-supply problems can include randomly frying parts if there is a short. The fan failing will cause annoying sounds and the system will overheat. One key reason the fan can fail is if it is clogged with dust and debris.
Be aware that different cases have different types of on/off switches. The process of replacing a power supply is a lot easier if you purchase a replacement with the same mecha-nism. Even so, remember to document exactly how the power supply was connected to the on/off switch before you remove it. Be careful, as well, to set the voltage selector switch on the power supply to correspond to your voltage. Most power supplies have the ability to accept input of either 110 or 220 volts. Some expensive power supplies can autosense and need not be set manually, but most do and you want to set the switch to the correct voltage setting or you could cause damage.
86504c01.indd 49 7/25/09 6:04:22 PM

50 Chapter 1 N Hardware
A 20-pin main connector from the power supply to the motherboard is standard for all ATX power supplies. In addition to this connector, many will include an auxiliary power connector of either 4 or 6 pins to provide additional power.
In 2004, the ATX12V 2.0 standard was passed, changing the main connector from 20 pins to 24. The additional pins provide +3.3V, +5V, and +12V (the fourth pin is a ground) for use by PCIE cards. When a 24-pin connector is used, there is no need for the optional 4- or 6-pin auxiliary power connectors.
exam essentials
Learn to troubleshoot power supplies. Be able to think through common power supply problems and know that when you replace one you should check the voltage selector switch and set it properly.
Recognize power-supply problems. Become familiar with the symptoms of a dead, failing, or overloaded power supply.
Cooling MethodsThe cooling system consists of the fan in the power supply, the fan or heat sink on the CPU, and any additional heat sinks or fans in the case. If a system is inadequately cooled, lockups and spontaneous reboots may occur.
Critical InformationAir cooling is the most common cooling method used in PCs. CPUs typically have active heat sinks, which are heat sinks that include an electric fan that constantly channels heat away. A CPU that is running too hot may benefit from a better cooling fan. The heat sink portion is a block of spikes that channel heat away from the CPU.
Most passive heat sinks (that is, heat sinks that don’t include a fan) are attached to the CPU using a glue-like thermal compound. This makes the connection between the heat sink and the CPU more seamless and direct. Thermal compound can be used on active heat sinks too, but generally it isn’t because of the possibility that the fan may stop working and need to be replaced. Thermal compound improves thermal transfer by eliminating tiny air pockets between the heat sink and CPU (or other device like a northbridge or video chipset). Thermal glue provides both improved thermal transfer and adds bonding for heat sinks when there are no mounting holes to clamp the heat sink to the device to be cooled. Clamps or screws are commonly used to attach heat sinks to CPUs; therefore thermal compound is used more often than thermal glue for CPU active or passive heatsinks.
In addition to the main fan in the power supply, you can install additional cooling fans in a case to help circulate air through the case.
Liquid-cooled cases are available that use circulating water rather than fans to keep components cool. These cases are typically more expensive than standard ones and may
86504c01.indd 50 7/25/09 6:04:22 PM

Cooling Methods 51
be more difficult for an untrained technician to work on, but they result in an almost completely silent system.
Cooling IssuesA PC that works for a few minutes and then locks up is probably experiencing overheating due to a heat sink or fan not functioning properly. To troubleshoot overheating, first check all fans inside the PC to ensure they’re operating, and make sure any heat sinks are firmly attached to their chips.
In a properly designed, properly assembled PC case, air flows in a specific path from the power-supply fan through the vent holes. Cases are designed to cool by making the air flow in a certain way. Therefore, operating a PC with the cover removed can make a PC more susceptible to overheating, even though it’s “getting more air.”
Similarly, operating a PC with empty expansion-slot backplates removed can inhibit a PC’s ability to cool itself properly because the extra holes change the airflow pattern from what was intended by its design.
Although CPUs are the most common component to overheat, occasionally chips on other devices, particularly video cards, may also overheat. Extra heat sinks or fans may be installed to cool these chips.
Issues with liquid cooled machines can include problems with hoses or fittings, the pump, or the coolant. A failure of the pump can keep the liquid from flowing and cause the system to overheat. A liquid cooled system should also be checked every so often for leaks or corrosion on the hoses and fittings, and the reservoir should be examined to make sure it is full and does not contain contaminants.
environmental problemsComputers are like human beings. They have similar tolerances to heat and cold. In general, anything comfortable to us is comfortable to computers. They need lots of clean, moving air to keep them functioning.
Dirt, grime, paint, smoke, and other airborne particles can become caked on the inside of the components. This is most common in automotive and manufacturing environments. The contaminants create a film that coats the components, causing them to overheat and/or conduct electricity on their surface. Blowing out these exposed systems with a can of con-densed air from time to time can prevent damage to the components. While you’re cleaning the components, be sure to clean any cooling fans in the power supply or on the heat sink.
To clean the power-supply fan, blow the air from the inside of the case. When you do this, the fan will blow the contaminants out the cooling vents. If you spray from the vents toward the inside of the box, you’ll be blowing the dust and grime inside the case or back into the fan motor.
One way to ensure that the environment has the least possible effect on your computer is to always leave the blanks in the empty slots on the back of your box. These pieces of metal are designed to keep dirt, dust, and other foreign matter from the inside of the computer. They also maintain proper airflow within the case to ensure that the computer doesn’t overheat.
86504c01.indd 51 7/25/09 6:04:22 PM

52 Chapter 1 N Hardware
exam essentials
Learn to troubleshoot overheating issues. When overheating occurs, you need to be able to isolate the source quickly and respond before the problem affects internal system components.
Identify problems that can result from overheating. Overheating can cause spontaneous rebooting or shutdown. Overheating is often caused by nonfunctioning cooling fans or improper airflow through the PC.
Display DevicesSeveral types of computer displays are used today, including the TV. All of them use either the same cathode ray tube (CRT) technology found in television sets or the liquid crystal display (LCD) technology found on all laptop, notebook, and palmtop computers.
Critical InformationThere are two ways of measuring a monitor’s image quality: dot pitch and refresh (scan) rate. A monitor’s dot pitch is the distance between two dots of the same color on the monitor. Usu-ally given in fractions of a millimeter (mm), it tells how sharp the picture is. The lower the number, the closer together the pixels are, and thus the sharper the image. An average dot pitch is 0.28mm.
A monitor’s refresh rate specifies how many times in one second the scanning beam of electrons redraws the screen. The phosphors stay bright for only a fraction of a second, so they must constantly be hit with electrons to stay lit. Given in draws per second, or hertz (Hz), the refresh rate specifies how much energy is being put into keeping the screen lit. Most people notice a flicker in the display at refresh rates of 75Hz or lower because the phosphors begin to decay to black before they’re revived; increasing the refresh rate can help reduce eyestrain by reducing the flickering.
The resolution of a monitor is the number of horizontal and vertical pixels that are dis-played. Most monitors allow for two or more resolutions, and you can pick the one to use in the desktop settings of the operating system. The vertical hold (V-hold) settings can be tweaked to make the image appear properly in the monitor. Connectors commonly used to connect the display device include the following:
VGA This is the traditional connector, which is shaped like a D and has three rows of five pins each, for a total of 15 pins. This is also often called the DB-15 connector.
A 9-pin VGA connector does exist, but it’s very uncommon.
86504c01.indd 52 7/25/09 6:04:22 PM

Display Devices 53
Digital Video Interface (DVI) There are several types of DVI pin configurations, but all connectors are D-shaped. The wiring differs based on whether the connector is single-linked or dual-linked (extra pins are used for the dual link). DVI differs from everything else in that it includes both digital and analog signals at the same time, which makes it popular for LCD and plasma TVs. Figure 1.19 shows a DVI connector.
F I gu r E 1.19 One of several possible DVI connectors
High Definition Multimedia Interface (HDMi) These connectors are used to connect compatible digital items (DVD players, for example). The Type A connector has 19 pins and is backward compatible with DVI. Type B connectors have 29 pins and aren’t back-ward compatible with DVI, but they support greater resolutions.
S-Video The S-Video connector looks much like a PS/2 connector, except that it has four conductors. These are also known as Y/C connectors; they break the signal into two com-ponents (luminance and chrominance) instead of carrying them in a single signal.
Component/RGB Component connectors are similar to what you use to connect video recorders and other items to televisions. They have RCA jacks and use red, green, and blue signals.
Liquid Crystal DisplaysTwo major types of LCDs are used in laptops today: active matrix screens and passive matrix screens. Their main differences lie in the quality of the image. Both types use some kind of lighting behind the LCD panel to make the screen easier to view.
Passive Matrix A passive matrix screen uses a row of transistors across the top of the screen and a column of them down the side. It sends pulses to each pixel at the intersections of each row and column combination, telling it what to display.
Passive matrix displays are becoming obsolete because they’re less bright and have poorer refresh rates and image quality than active matrix displays. However, they use less power than active matrix displays do.
Active Matrix An active matrix screen uses a separate transistor for each individual pixel in the display, resulting in higher refresh rates and brighter display quality. These screens use more power, however, because of the increased number of transistors that must be powered. Almost all notebook PCs today use active matrix. A variant called thin-film transistor (TFT) uses multiple transistors per pixel, resulting in even better dis-play quality.
86504c01.indd 53 7/25/09 6:04:23 PM
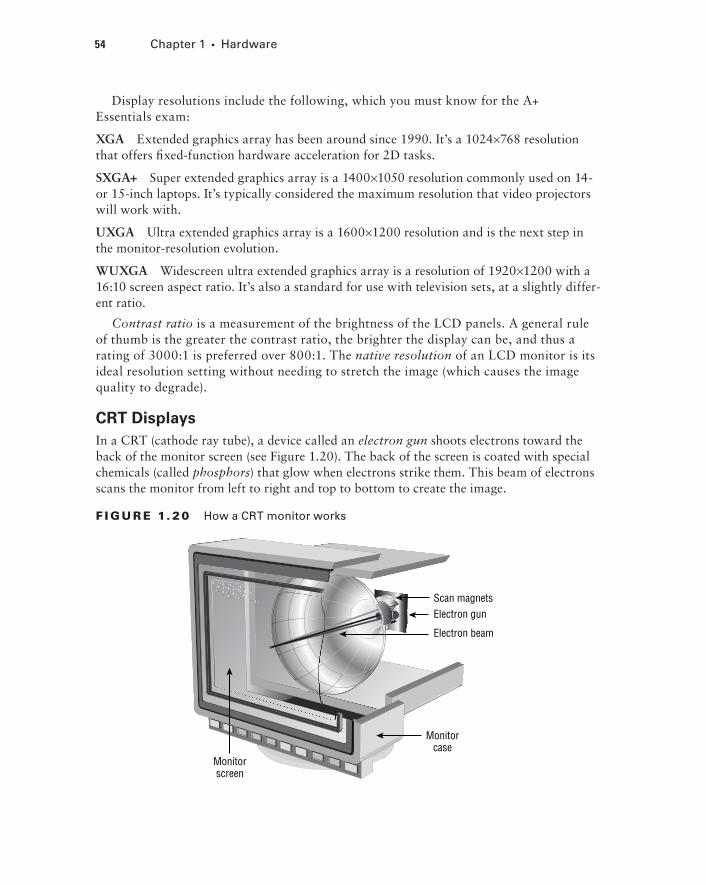
54 Chapter 1 N Hardware
Display resolutions include the following, which you must know for the A+ Essentials exam:
XGA Extended graphics array has been around since 1990. It’s a 1024×768 resolution that offers fixed-function hardware acceleration for 2D tasks.
SXGA+ Super extended graphics array is a 1400×1050 resolution commonly used on 14- or 15-inch laptops. It’s typically considered the maximum resolution that video projectors will work with.
UXGA Ultra extended graphics array is a 1600×1200 resolution and is the next step in the monitor-resolution evolution.
WUXGA Widescreen ultra extended graphics array is a resolution of 1920×1200 with a 16:10 screen aspect ratio. It’s also a standard for use with television sets, at a slightly differ-ent ratio.
Contrast ratio is a measurement of the brightness of the LCD panels. A general rule of thumb is the greater the contrast ratio, the brighter the display can be, and thus a rating of 3000:1 is preferred over 800:1. The native resolution of an LCD monitor is its ideal resolution setting without needing to stretch the image (which causes the image quality to degrade).
Crt DisplaysIn a CRT (cathode ray tube), a device called an electron gun shoots electrons toward the back of the monitor screen (see Figure 1.20). The back of the screen is coated with special chemicals (called phosphors) that glow when electrons strike them. This beam of electrons scans the monitor from left to right and top to bottom to create the image.
F I gu r E 1. 20 How a CRT monitor works
Scan magnetsElectron gun
Electron beam
Monitorcase
Monitorscreen
86504c01.indd 54 7/25/09 6:04:24 PM
Display Devices 55
The creation of the image is known as a raster. Rasterizing an image, thus, is creating the image in such a way that it can be displayed in a rectangular ray.
Display System problemsThere are two types of video problems: no video and bad video. No video means no image appears on the screen when the computer is powered up. Bad video means the quality is substandard for the type of display system being used.
No Video
Any number of things can cause a blank screen. These three are the most common: the power is off, the monitor’s cable is unplugged, or the contrast or brightness is turned down.
If you’ve checked the power as well as the brightness and contrast settings, then the problem could be a bad video card or a bad monitor. Most monitors these days display a Working message briefly when you turn them on, so you can ascertain that the monitor is working and that an amber light appears on the front. When the PC starts up, the light on the front of the monitor changes from amber to green, indicating that the monitor is receiv-ing a signal.
If the monitor is working but not receiving a signal from the PC, the video card may be bad. However, no video can also mean a problem with the motherboard, RAM, or CPU, so it isn’t a given that the video card is at fault when no video appears.
Malfunctioning monitors are usually not worth fixing, because the cost of the labor involved exceeds the cost of a brand-new monitor. In addition, it may be difficult to find a technician to work on a monitor, because it isn’t part of most standard PC technician training programs (due to the risk of electric shock from the high-voltage capacitor inside the monitor).
Bad Video
A monitor that doesn’t display one of the three basic colors (red, green, or blue) probably has a bad cable, a bent or broken pin, or a loose connection at either the PC or the monitor. This is the case because different pins on the connectors—and wires in the cable—control different colors.
Color problems may also result from the monitor being out of adjustment. With most new monitors, this is an easy problem to fix. Old monitors had to be partially disassem-bled to change these settings; new monitors have push-button control panels for changing these settings.
Exposure to a magnetic field can cause swirls and fuzziness even in high-quality monitors. The earth generates magnetic fields, as do unshielded speakers and power surges. Most moni-tors have metal shields that can protect against magnetic fields. But eventually these shields can become polluted by taking on the same magnetic field as the earth, so they become useless. To solve this problem, these monitors have a built-in feature known as Degauss; it removes the effects of the magnetic field by creating a stronger magnetic field with opposite polarity that gradually fades to a field of zero. A special Degauss button or feature in the monitor’s onscreen software activates it. You need only press it when the picture starts to deteriorate. The image will shake momentarily during the Degauss cycle and then return to normal.
86504c01.indd 55 7/25/09 6:04:24 PM

56 Chapter 1 N Hardware
Upgrading Display DevicesBefore connecting or disconnecting a monitor, ensure that the power to both the PC and the monitor is off. Then, connect a VGA (DB-15) cable from the monitor to the PC’s video card, and connect the monitor’s power cord to an AC outlet.
Other than the power supply, one of the most dangerous components to try to repair is the monitor, or CRT monitor. I recommend that you not try to repair monitors. To avoid the extremely hazardous environment contained inside the monitor—it can retain a high-voltage charge for hours after it’s been turned off—take it to a certified monitor technician or television repair shop. The repair shop or certified technician will know and understand the proper procedures to discharge the monitor, which involves attaching a resistor to the flyback transformer’s charging capacitor to release the high-voltage electrical charge that builds up during use. They will also be able to determine whether the monitor can be repaired or needs to be replaced. Remember, the monitor works in its own extremely pro-tective environment (the monitor case) and may not respond well to your desire to try to open it. The CRT is vacuum-sealed. Be extremely careful when handling it—if you break the glass, the CRT will implode, which can send glass in any direction.
Even though I recommend not repairing monitors, the A+ exam does test your knowledge of the safety practices to use when you need to do so. If you have to open a monitor, you must first discharge the high-voltage charge on it using a high-voltage probe. This probe has a very large needle, a gauge that indicates volts, and a wire with an alligator clip. Attach the alliga-tor clip to a ground (usually the round pin on the power cord). Slip the probe needle under the high-voltage cup on the monitor. You’ll see the gauge spike to around 15,000 volts and slowly reduce to zero. When it reaches zero, you may remove the high-voltage probe and service the high-voltage components of the monitor.
If you have a monitor that shows bad distortion, and changing the settings or Degaussing has no effect, then look for magnetic interference caused by nearby florescent lights or large power sources.
Using MultimonitorMultimonitor, also known as multidisplay, is simply using more than one display device for a single PC. Most PCs allow you to use multiple monitors as long as there is a display card installed for each. While this can be useful for running a window for each monitor, one of the most common uses is the Presenter View in Microsoft PowerPoint. When chosen, this allows a different view of the slideshow to be shown on the main monitor (typically a pro-jector) than what is shown on the secondary monitor (such as presenter notes, the next slide that is set to appear, etc.).
exam essentials
Know how to deal with display problems. Know that before you begin to work on a dis-play system, you must take safety precautions because of the power that is stored within.
86504c01.indd 56 7/25/09 6:04:24 PM

Input and Peripheral Devices 57
Be able to determine the cause of display system problems. The most common display problems relate to power, brightness, or contrast. Adjusting the monitor controls should be your first step when troubleshooting.
Input and Peripheral DevicesA virtually unlimited number of types of input devices can be connected to a PC. In addition to the standard keyboard and mouse, there are bar-code readers, digital cameras, micro-phones, biometric devices, touch screens, and a plethora of others. Many today connect through the USB or FireWire port, using instructions from the vendor. However, you must know about other types of connections for the A+ exam.
Critical InformationKeyboard connectors allow for the direct connection of the keyboard to the motherboard. There are essentially three types of keyboard connectors: AT, PS/2, and USB.
AT connectors are round, about 11⁄2˝ in diameter, and have five sockets in the DIN-5 con-figuration. They’re found on AT motherboards. The second style, PS/2 connectors, are smaller and look just like a PS/2 mouse connector; these are found on ATX motherboards. USB key-boards are rapidly growing in popularity and allow you to connect to any available USB port (front, back, side, etc.).
A mouse connector is a PS/2-style connector; on an ATX it’s built into the side of the motherboard, and on an AT a small ribbon cable connects a back-mountable port to the motherboard.
troubleshooting Keyboard and Mouse problemsUsually, keyboard problems are environmental. Keyboards get dirty, and the keys start to stick.
If a keyboard is malfunctioning (for example, sending the wrong characters to the display), it’s most cost-effective to replace it rather than spend hours attempting to fix it, because keyboards are fairly inexpensive.
One way to clean a keyboard is with the keyboard cleaner sold by electronics supply stores. This cleaner foams up quickly and doesn’t leave a residue behind. Spray it liberally on the keyboard and keys. Work the cleaner in between the keys with a stiff toothbrush. Blow away the excess with a strong blast of compressed air. Repeat until the keyboard functions properly. If you have to clean a keyboard that’s had a soft drink spilled on it, remove the key caps before you perform the cleaning procedure; doing so makes it easier to reach the sticky plungers.
86504c01.indd 57 7/25/09 6:04:25 PM

58 Chapter 1 N Hardware
Remember that most of the dollars spent on systems are for labor. If you spend an hour cleaning a $12.00 keyboard, then you have probably just cost your company $20.00. Knowing how to fix certain things doesn’t nec-essarily mean that you should fix them. Always evaluate your workload, the cost of replacement, and the estimated cost of the repair before decid-ing on a course of action.
Similarly, most mouse problems, such as the pointer failing to move in one direction or the other, or the pointer jumping around onscreen, are due to dirt building up inside the mouse. To clean a standard mouse, remove the plate on the bottom of the mouse that holds the ball in place; then remove the ball, and clean the inside chamber with an alcohol-dipped cotton swab. Clean the ball itself with mild soap and water. Don’t use alcohol on the ball, because it tends to dry out the rubber.
Rather than being ball-driven, many mice today are optical. This simplifies cleaning, in that the only thing you need to do is wipe dust away from the optical sensor.
peripheral ports and ConnectorsIn order for a PC to be useful, there of course must be a way to get the data into and out of the computer. To accomplish this, several ports are available. The four most common types of ports are the serial, parallel, USB, and game ports. Figure 1.21 shows some typical ports built into an ATX motherboard.
F I gu r E 1. 21 Built-in ports on a motherboard
These ports are connected to the motherboard using small ribbon cables on an AT system, or they’re built directly into the side of the motherboard on an ATX system.
adapter CardsAdapter cards are also known by many other names, including circuit boards/cards and expansion boards/cards. In all cases, adapter cards are circuit boards that fit into expansion slots in the motherboard. They can include modems, network interface cards, sound cards, and many other types of devices.
86504c01.indd 58 7/25/09 6:04:25 PM

Input and Peripheral Devices 59
Adapter cards are purchased to match an available expansion slot in the motherboard. PCI is the most common type of expansion slot for an adapter card in today’s PCs. ISA slots are nearly obsolete, and AGP slots are used only for video cards.
Expansion slots are used to install various devices in the computer to expand its capa-bilities. Some expansion devices that may be installed in these slots include video, network, sound, and disk interface cards.
Expansion slots come in three main types: ISA, PCI, and AGP. Each type is different in appearance and function, as you’ll learn in future chapters. You should be able to visually identify the different expansion slots on the motherboard:
ISA Expansion Slots If you’re repairing a computer made before 1997, chances are the motherboard in your computer has a few ISA slots. These slots are usually brown and are separated into two unequal lengths. Computers made after 1997 generally include a few ISA slots for backward compatibility with old expansion cards.
PCI Expansion Slots Most computers made today contain primarily PCI slots. They’re easily recognizable, because they’re short (around 3 inches long) and are usually white. PCI slots can usually be found in any computer that has a Pentium-class processor or higher.
AGP Expansion Slots AGP slots are very popular today. In the past, if you wanted to use a high-speed, accelerated 3D graphics video card, you had to install the card into an existing PCI or ISA slot. AGP slots were designed to be a direct connection between the video circuitry and the PC’s memory. They’re also easily recognizable because they’re usually brown and located right next to the PCI slots on the motherboard. Figure 1.22 shows an example of an AGP slot, along with a PCI slot for comparison.
PCIE Expansion Slots PCIE combines the functionality of PCI with AGP and was dis-cussed earlier in this chapter.
F I gu r E 1. 22 An AGP slot compared to a PCI slot
PCI slotAGP slot
86504c01.indd 59 7/25/09 6:04:26 PM

60 Chapter 1 N Hardware
Sound-Card problems
Sound cards are traditionally one of the most problem-ridden components in a PC. They demand a lot of PC resources and are notorious for being inflexible in their configuration. The most common problems related to sound cards involve resource conflicts (IRQ, DMA, or I/O address). The problem is much less pronounced on PCI than on ISA cards.
Luckily, most sound-card vendors are aware of the problems and ship very good diagnostic utilities to help resolve them. Use your PC troubleshooting skills to determine the conflict, and then reconfigure until you find an acceptable set of resources that aren’t in use.
Some legacy sound cards aren’t completely Plug and Play–compatible. Windows may detect that new hardware has been installed but be unable to identify the new hardware as a working sound card. To fix this problem, run the Setup software that came with the sound card.
Network Interface Card problems
In general, network interface cards (NICs) are added to a PC via an expansion slot, but may also be added through a USB or PCMCIA slot. The most common issue that prevents network connectivity is a bad or unplugged patch cable.
Cleaning crews and the rollers on the bottoms of chairs are the most common threats to a patch cable. In most cases, wall jacks are placed 4 to 10 feet away from the desktop. The patch cables are normally lying exposed under the user’s desk, and from time to time dam-age is done to the cable, or it’s inadvertently snagged and unplugged. When you trouble-shoot a network adapter, start with the most rudimentary explanations first. Make sure the patch cable is tightly plugged in, and then look at the card and see if any lights are on. If there are lights on, use the NIC’s documentation to help troubleshoot. More often than not, shutting down the machine, unplugging the patch and power cables for a moment, and then reattaching them and rebooting the PC will fix an unresponsive NIC.
Although this isn’t on the test, it’s useful information: Wake on LAN cards have more problems than standard network cards. In my opinion, this is because they’re always on. In some cases, you’ll be unable to get the card working again unless you unplug the PC’s power supply and reset the card.
ports and CablesA computer’s peripheral ports are the physical connectors found outside the computer. Cables of various types are designed to plug into these ports and create a connection between the PC and the external devices that may be attached to it. A successful IT technician should have an in-depth knowledge of ports and cables.
Because the peripheral components need to be upgraded frequently, either to keep pace with technological change or to replace broken devices, the test requires a well-rounded familiarity with the ports and their associated cabling.
Unless a peripheral device connects directly to the motherboard, it must use a port. Ports can be distinguished from one another by three factors:
86504c01.indd 60 7/25/09 6:04:26 PM

Input and Peripheral Devices 61
Bits of Data Simultaneously Conveyed A serial cable carries only one bit at a time. A parallel cable carries multiple bits at a time (usually eight).
Data Transmission Speed This is expressed in kilobits or megabits per second and refers to the overall data throughput.
Type of Connector A wide variety of connectors are used in PCs today, including the DB style (as with legacy parallel and serial ports and VGA monitors), Centronics style (as with printers and some SCSI devices), and USB.
parallel vs. Serial
A cable (and its port) can be either parallel or serial, and it isn’t always immediately obvious from looking which is which. For example, both parallel and serial cables can use the DB-25 style of connector.
Both parallel and serial cables have multiple wires inside them, but they use them for dif-ferent purposes. A parallel cable uses eight wires to carry bits of data in each direction, plus extra wires for signaling and traffic control. A serial cable uses only one wire to carry data in each direction; all the rest of its wires are for signaling and traffic control.
transmission Speed
Neither parallel nor serial is intrinsically faster than the other. There are both fast and slow parallel and serial connections. For example, a legacy serial port such as for an external modem carries data fairly slowly (about 115Kbps), but a USB cable (also serial) carries data very quickly (up to 12Mbps for USB 1.1, and even faster for USB 2.0—480Mbps).
Connector types
The following are common connector types:
DB A D-shaped connector with a metal ring around a set of pins. Named for the number of pins/holes used: DB-25, DB-9, DB-15, and so on. Can be either parallel or serial. Common uses: VGA video, legacy serial devices such as external modems, and parallel printer cables (the connector on the PC only; the printer end uses Centronics).
RJ Registered jack; a plastic plug with small metal tabs, like a telephone cord plug. Num-bering is used in the naming: RJ-11 has two metal tabs, and RJ-14 has four. Both are used for telephone systems. RJ-45 has eight tabs and is used for Ethernet 10BaseT/100BaseT networking. Always serial.
BNC Stands for Bayonet-Neill Connector or British Naval Connector. A metal wire surrounded by shielding, like a cable television connector. Used for 10Base2 Ethernet networking. Always serial.
Centronics A plastic block with metal tabs flat against it, surrounded by a D-shaped metal ring. Used to connect a parallel printer cable to the printer, and also for some SCSI devices. Always parallel.
Ribbon Connector A rectangular block consisting of a set of square holes that connect to pins on a circuit board. Used to connect floppy drives, IDE drives, and some SCSI devices to their controllers. Always parallel.
86504c01.indd 61 7/25/09 6:04:26 PM

62 Chapter 1 N Hardware
PS/2 (Mini-DIN) A round connector with six small pins inside, commonly used to connect keyboards on ATX motherboards or PS/2 style mice.
DIN A larger round connector with five rather large pins inside, used for connecting the keyboard on an AT motherboard.
USB A flat rectangular connector, used with USB interfaces.
CablingCables are used to connect two or more entities together. They’re usually constructed of several wires encased in a rubberized outer coating. The wires are soldered to modular connectors at both ends. These connectors allow the cables to be quickly attached to the devices they connect.
Cables may be either shielded or unshielded. This refers to shielding against electromag-netic interference (EMI); it has nothing to do with whether the cable is shielded against dirt or water.
A list of common cable types used in PCs, their descriptions, their maximum effective lengths, and their most common uses is given in Table 1.7. The F or M in a connector’s designation is for female (holes) or male (pins).
TA b lE 1.7 Common PC Cable Descriptions
application 1st Connector 2nd Connector Max. Length
Null modem DB-9F DB-9F 25 feet
Null modem DB-25F DB-25F 25 feet
RS-232 (modem cable) DB-9F DB-25M 25 feet
RS-232 (modem cable) DB-25F DB-25M 25 feet
Parallel printer DB-25M Centronics 36M 10 feet
External SCSI cable Centronics 50M Centronics 50M 10 feet (total SCSI bus length)
VGA extension cable DB-15M DB-15M 3 feet
UTP Ethernet cable RJ-45M RJ-45M 100 meters
Thinnet Ethernet cable BNC-M BNC-M 100 meters
Telephone wall cable RJ-11M or RJ-14M RJ-11M or RJ-14M N/A
86504c01.indd 62 7/25/09 6:04:26 PM
Input and Peripheral Devices 63
One cable that deserves special mention is the null modem cable. It allows two comput-ers to communicate with each other without using a modem. This cable has its transmit and receive wires crossed at both ends, so when one entity transmits on its TD line, the other entity receives it on its RD line.
Unshielded twisted pair (UTP) is the most common type of cable used for network cabling. There are various categories of network cabling; the category required for 10BaseT/100BaseT networking is Category 5, often shortened to Cat 5. There is also a Cat 5e cable type, which is used for higher-speed Ethernet such as Gigabit Ethernet.
Miscellaneous peripheralsThere is almost no limit to the number, or type, of peripherals and input devices that can be connected to a computer. CompTIA wants you to know that the day when only the keyboard and mouse were connected have gone by the wayside.
Among the many devices that can be connected today are the following:
Bar code reader, used for scanning barcodes.ÛN
Biometric devices, used for authentication purposes; among the most common are ÛN
thumb readers included with a number of laptops.
Capture cards, used for capturing video, typically using RCA connectors.ÛN
KVM switches, which allow you to use one keyboard, video, and mouse set with a ÛN
number of PCs.
Multimedia (such as web and digital cameras, MIDI, microphones); used to input video ÛN
and audio, and commonly use USB or FireWire connections.
Touch screen, available for desktops and laptops; this adapter allows you to interact ÛN
with the software by touching the screen.
TV tuner cards, used to receive television signals on the computer; most include a ÛN
capture card built in.
exam essentials
Know what RJ-45 connectors are used for. You’re likely to be asked what type of connec-tor would be used to attach a network connector to a wall jack.
Know what PS2/mini-DIN connectors are used for. You’re likely to be asked what type of connector would be used to connect a keyboard or mouse to the back of a PC.
Know what RJ-11 connectors are used for. You’re likely to be asked what type of connec-tor would be used to connect a modem to a telephone jack.
86504c01.indd 63 7/25/09 6:04:27 PM

64 Chapter 1 N Hardware
Principles of Laptops and Portable DevicesWhether you choose to call them laptops, portable devices, or something different is mostly a matter of semantics. This objective tests your knowledge of some of the basic operations of laptops. In many cases, the components are the same as in a desktop computer, and they were discussed already. We’ll focus now on those that are different.
Critical InformationA portable computer must provide all the functionality of a desktop counterpart yet be able to withstand travel, run in the absence of AC power, and be much smaller and more com-pact. When you get right down to it, there is not a great deal of difference between laptop and desktop computers, with the exception that laptops are more difficult to disassemble and form factors on items such as motherboards, memory, and hard drives become impor-tant. While they perform the same functions, size is critical.
Laptop-specific elements are discussed in this section.
Docking StationsSome notebook PCs have optional accessories called docking stations or port replicators. These let you quickly connect/disconnect with external peripherals and may also provide extra ports that the notebook PC doesn’t normally have.
A docking station essentially allows a laptop computer to be converted to a desktop computer. When plugged into a docking station, the laptop has access to things it doesn’t have as a stand-alone—the network, a workgroup printer, and so on. The cheapest form of docking station (if it can be called that) is a port replicator. Typically, you slide a laptop into the port replicator, and the laptop can then use a full-sized monitor, keyboard (versus the standard 84 keys on a laptop), mouse, and so on. Extended, or enhanced, replicators add other ports not found on the laptop, such as PC slots, sound, and more. The most com-mon division between port replicators and docking stations is whether the peripheral pro-vides network access and expands the laptop’s capabilities.
Laptops can support Plug and Play at three different levels, depending on how dynami-cally they’re able to adapt to changes:
Cold Docking The laptop must be turned off and back on for the change to be recognized.
Warm Docking The laptop must be put in and out of suspended mode for the change to be recognized.
Hot Docking The change can be made and is recognized while running normal operations.
Each docking station works a little differently, but there is usually a button you can press to undock the notebook from the unit. There may also be a manual release lever in case you need to undock when the button is unresponsive.
86504c01.indd 64 7/25/09 6:04:27 PM

Principles of Laptops and Portable Devices 65
Because different hardware is available in docked versus undocked configurations, you may want to set up hardware profiles in Windows to account for the differences.
autoswitching and Fixed InputAutoswitching power supplies allow you to use the same supply for more than one voltage. Most autoswitching power supplies can operate on voltages from 100 to 240, allowing them to be used in countries almost anywhere in the world. Fixed-input power supplies, on the other hand, regulate the voltage coming in to make certain it stays consistent.
Notebook BatteriesWhen you’re shopping for notebook batteries, be aware not only of the physical size and shape (which vary depending on the notebook manufacturer’s specifications) but also of the battery technology:
Nickel-Cadmium (NiCad) The least preferable. Must be recharged every 3 to 4 hours. A full recharge can take as long as 12 hours. These batteries tend to lose their ability to hold a charge unless they’re fully discharged each time before being recharged. Leaving the notebook PC plugged in all the time and using the battery only occasionally for short periods can eventually ruin the battery.
NiCad batteries are not likely to be on any new device these days.
Nickel-Metal Hydride (NiMH) Better than NiCad because they don’t use heavy metals with great toxicity. They can also store up to 50 percent more power and don’t suffer loss of functionality from partial draining and recharging.
Lithium Ion (Li-ion) Lightweight and have a long life, plus they aren’t subject to problems with partial draining and recharging. They tend to be more expensive than NiCad or NiMH, however.
Fuel Cell Casio has announced plans to produce a hydrogen fuel cell battery for notebook computers that promises to last 20 hours or more on a single charge. By the time you read this, it may be available, offering greatly increased performance but at a much higher price than normal notebook batteries.
When dealing with batteries, you must be careful not to dispose of them in the normal way, for they may harm the environment; whenever possible, recycling them is recom-mended. Here are some rules from the back of a typical battery:
Don’t put in fire or mutilate; may burst or release toxic materialsÛN
Don’t crush, puncture, incinerate, or short external circuitsÛN
Don’t short-circuit; may cause burnsÛN
86504c01.indd 65 7/25/09 6:04:27 PM
66 Chapter 1 N Hardware
Depending on the notebook model, the battery may be anywhere, but it’s usually under the keyboard. On some models, you can slide the battery out the side by removing a panel or cover; on other models, you must lift the keyboard.
Pull out the battery, and insert a fresh battery in the same slot, pressing it firmly into place. Then, replace the cover over the battery’s bay.
While manufacturers recommend a shutdown, in reality batteries are hot-pluggable/swappable, so you don’t have to shut down in order to remove one. However, unless you have a second battery or are connected to AC power, you’ll lose power and the PC will shut off when you remove the battery.
For purposes of exam study, hot-swappable and hot-pluggable are inter-changeable terms.
pCMCIa CardsPCMCIA cards (named after the Personal Computer Memory Card International Association) are the expansion cards for notebook PCs. Most notebook PCs have a PCMCIA bay that can accept one Type III device or two Type I or Type II devices:
Type I Up to 3.3mm thick. Used mostly for memory. These are very rarely used in today’s systems, since the new laptops have other means of increasing memory, such as SoDIMMs.
Type II The most common type. Up to 5.5mm thick. Used for devices that would typically be expansion boards in a desktop PC, such as network interface cards.
Type III Up to 10.5mm thick. Used for drives. Not common.
In addition to these types based on thickness, there are other types based on technology. The PCMCIA (PC Card) standard has been updated to a new standard called CardBus; look for CardBus in the specification when you’re buying PC Card devices. CardBus devices are backward compatible with older PCMCIA slots. Even newer is the Peripheral Component Interconnect (PCI) Express (PCIe) bus—a serial bus addition that uses low-voltage differen-tial signaling (LVDS), allowing you to attach several devices at the same time (using serial communication instead of the parallel communication standard with most PC buses).
ports and Communication ConnectionsMany laptops now include a Mini PCI slot for use with wireless adapters. Mini PCI slots are also common on docking stations. Mini PCI is a 32-bit bus that operates at 32MHz. It operates at only 3.3 volts and has three card configurations: Type I, Type II, and Type III. Whereas Types I and III provide support for an RJ-45 connector, Type II cards have an RJ-45 connector mounted on them.
Other connections/connectors common on laptops include Bluetooth, infrared, cellular WAN, WiFi, and Ethernet. All of these are discussed elsewhere in this book as they apply to networking.
86504c01.indd 66 7/25/09 6:04:27 PM
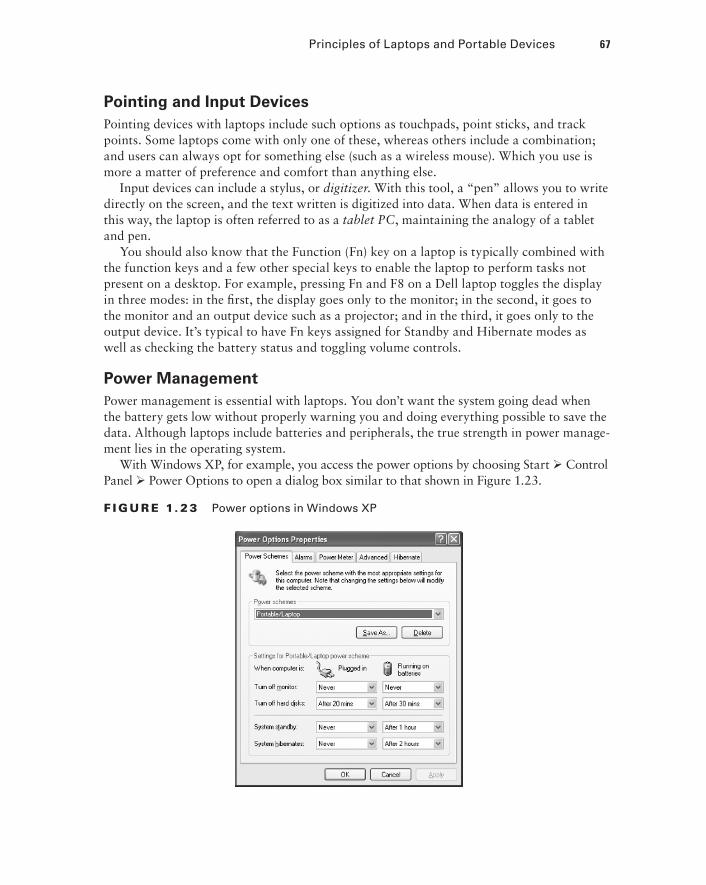
Principles of Laptops and Portable Devices 67
pointing and Input DevicesPointing devices with laptops include such options as touchpads, point sticks, and track points. Some laptops come with only one of these, whereas others include a combination; and users can always opt for something else (such as a wireless mouse). Which you use is more a matter of preference and comfort than anything else.
Input devices can include a stylus, or digitizer. With this tool, a “pen” allows you to write directly on the screen, and the text written is digitized into data. When data is entered in this way, the laptop is often referred to as a tablet PC, maintaining the analogy of a tablet and pen.
You should also know that the Function (Fn) key on a laptop is typically combined with the function keys and a few other special keys to enable the laptop to perform tasks not present on a desktop. For example, pressing Fn and F8 on a Dell laptop toggles the display in three modes: in the first, the display goes only to the monitor; in the second, it goes to the monitor and an output device such as a projector; and in the third, it goes only to the output device. It’s typical to have Fn keys assigned for Standby and Hibernate modes as well as checking the battery status and toggling volume controls.
power ManagementPower management is essential with laptops. You don’t want the system going dead when the battery gets low without properly warning you and doing everything possible to save the data. Although laptops include batteries and peripherals, the true strength in power manage-ment lies in the operating system.
With Windows XP, for example, you access the power options by choosing Start Control Panel Power Options to open a dialog box similar to that shown in Figure 1.23.
F I gu r E 1. 23 Power options in Windows XP
86504c01.indd 67 7/25/09 6:04:27 PM

68 Chapter 1 N Hardware
At least 10 power schemes are possible, including Home/Office Desk (which doesn’t use power management), Portable/Laptop (the default on a laptop PC), Always On, Max Battery, and so on. From the Advanced tab, you can choose what happens when you close the lid, when you press the power button, and when you press the sleep button.
If you select “Always show icon on the taskbar,” you can change power schemes by clicking that icon without having to access the power properties of the system.
By default, the alarms are set to notify you when only 10 percent of the battery life is left and to put the system in hibernation when only 3 percent of the battery life is left. You can change all these options to fit individual circumstances.
power ConfigurationThe Advanced Configuration Power Interface (ACPI) must be supported by the system BIOS in order to work properly. With ACPI, it is the BIOS that provides the operating system with the necessary methods for controlling the hardware. This is in contrast to APM (Advanced Power Management), which only gave a limited amount of power to the operating system and let the BIOS do all the real work. Because of this, it is not uncommon to find legacy systems that can support APM but not ACPI.
There are three main states of power management common in most operating systems:
Hibernate This state saves all the contents of memory to the hard drive and preserves all data and application information exactly where they are. When the system comes out of hibernation, it returns the system to its previous state.
Standby This state leaves memory active but saves everything else to disk.
Suspend In most operating systems, this term is used interchangeably with Hibernate. In Windows XP, Hibernate is used instead of Suspend.
adding and removing pC Card DevicesPC Card devices are designed to be easily removed and installed. They’re approximately the size and shape of a thick credit card, and they fit into PC Card (PCMCIA) slots in the side of the notebook PC. PC Card devices can include modems, network interface cards (NICs), SCSI adapters, USB adapters, FireWire adapters, and wireless Ethernet cards.
To eject a PC Card device, press the eject button next to its slot. To insert a PC Card device, press the device into the slot. You can do this while the computer is running. (That’s called hot-plugging or hot-swapping.) However, in Windows, it’s a good idea to stop the PC Card device before ejecting it, to ensure that all operations involving it complete normally. To do so, double-click the Safely Remove Hardware icon in the system tray, click the device, and then click Stop.
86504c01.indd 68 7/25/09 6:04:28 PM

Principles of Laptops and Portable Devices 69
Disassembling a Notebook pCThere are many designs of notebook PC cases, and each one disassembles a little differ-ently. The best way to determine the proper disassembly method is to consult the documen-tation from the manufacturer.
Some models of notebook PCs require a special T-8 Torx screwdriver. Most PC toolkits come with a T-8 bit for a screwdriver with interchangeable bits, but you may find that the T-8 screws are countersunk in deep holes so that you can’t fit the screwdriver into them. In such cases, you need to buy a separate T-8 screwdriver, available at most hardware stores or auto-parts stores.
Prepare a clean, well-lit, flat work surface, assemble your tools and manuals, and ensure that you have the correct parts. Shut down the PC, unplug it, and detach any external devices such as an external keyboard, mouse, or monitor.
Many laptop manufacturers will consider a warranty void if an unauthorized person opens a laptop case and attempts to repair a laptop.
removing and replacing Disk DrivesAccessing the hard disk drive usually involves lifting the keyboard or removing it entirely. The hard disk typically has a ribbon cable made of thin plastic; be very careful when detach-ing it so you don’t bend or break it. The hard disk also usually has a power connector that is smaller than that of a typical hard disk in a desktop PC. After you disconnect the hard disk, remove the screws holding it in place and lift it out.
The procedure for removing the floppy disk and/or CD drive varies widely depending on the model. Some notebook PCs are fully modular, so that the floppy disk and CD drives pop out easily without any tools. On other models, you may need to completely disassemble the PC to access them. Consult the documentation from the manufacturer.
After you remove the old drive, insert the new one in the same spot and secure it with screws. Then attach the power cable and ribbon cable, and reassemble the PC.
adding MemoryMost notebook PCs have a certain amount of memory hard-wired into them that you can’t remove. They also typically have a memory expansion slot into which you can insert a single circuit board containing additional RAM.
If such an additional memory module has been installed, you can remove it if desired (perhaps to replace it with one that has larger capacity). Most notebook PCs have a panel on the bottom held in place by screws. Remove this panel to expose the memory expan-sion slot. Then gently pull out the existing RAM module, if necessary, and insert the new RAM module.
86504c01.indd 69 7/25/09 6:04:28 PM
70 Chapter 1 N Hardware
exam essentials
Know the different types of PCMCIA cards. PCMCIA cards are the expansion cards for notebook PCs. Most notebook PCs have a PCMCIA bay that can accept one Type III device or two Type I or Type II devices.
Know the different monitor resolutions. The exam expects you to know four different types: XGA, SXGA+, UXGA, and WUXGA. Know the resolution for each of them.
Know the purpose of the Fn key. You should know that the Function (Fn) key on a lap-top is typically combined with the function keys and a few other special keys to enable the laptop to perform tasks not present on a desktop.
Know the peripherals discussed. You should be familiar with docking stations and under-stand the principle reasons for their use.
Know about autoswitching and fixed-input power supplies. You should understand that autoswitching allows the power supply to be used in other countries without making manual adjustments.
Know what hot-swappable means. PC Card devices are hot-swappable, meaning you can remove and insert them while the computer is running. So are USB and FireWire devices. However, if you need to remove a drive, add or remove RAM, or connect or disconnect a monitor or a parallel or serial device, you must shut down the laptop.
Know where to look for the battery and for RAM expansion slots. Batteries are usually accessed either from the sides of a laptop or from under the keyboard. RAM is usually accessed on the bottom of the laptop. There will also be some RAM built into the mother-board that can’t be removed.
Installation and Configuration of PrintersThis objective tests your knowledge of how printers work and how they connect to computers. Although the A+ exam has traditionally focused heavily on laser printers, you may also see questions about other printer types. Scanners have also been added to this iteration of the exam, and you should know their basic characteristics as well.
Critical InformationThe three major areas of study for this objective are printer technologies, printer interfaces, and scanners. The printer technologies include laser, ink-jet (sometimes called ink disper-sion), dot matrix, solid ink, thermal, and dye sublimation. The printer interfaces include parallel, network, and Universal Serial Bus (USB), among others.
With regard to scanners, you’re expected to know the different types of connections, which are—for the most part—identical to those for printers. Therefore, most of the focus here will be on printers.
86504c01.indd 70 7/25/09 6:04:28 PM
Installation and Configuration of Printers 71
This section provides details about various technologies of printers. These printers may be differentiated from one another in several ways, including the following:
Impact vs. Nonimpact Impact printers physically strike an inked ribbon and therefore can print multipart forms; nonimpact printers deliver ink onto the page without striking it. Dot matrix is impact; everything else is nonimpact.
Continuous Feed vs. Sheet Fed Continuous-feed paper feeds through the printer using a system of sprockets and tractors. Sheet-fed printers accept plain paper in a paper tray. Dot matrix is continuous feed; everything else is sheet fed.
Line vs. Page Line printers print one line at a time; page printers compose the entire page in memory and then place it all on the paper at once. Dot matrix and ink-jet are line printers; laser is a page printer.
printer ComponentsIn addition to the physical body of the printer, components and consumables are associated with it. Components include the following:
Memory As a general rule, the more memory the printer has, the better. The memory is used to hold the print jobs in the printer queue; the more users, and the larger the print jobs, the more memory you’ll want.
Drivers These are the software components of the printer (or scanner)—allowing the device to communicate with the operating system. It’s important to always have the correct and most current drivers, for the greatest efficiency.
Firmware Although drivers can be updated, firmware rarely is. Firmware is installed on the printer/scanner and can be thought of as the operating system for that device.
Consumables for printers are those items you must change as you use the printer—the variable items that get consumed and must be replenished. These include toner (or ink, depending on the type of printer you’re using) and paper.
Be sure to always order and use the consumables that are recommended for your machine.
Dot-Matrix printersA dot-matrix printer is an impact printer; it prints by physically striking an inked ribbon, much like a typewriter. It’s an impact, continuous-feed line printer.
The printhead on a dot-matrix printer consists of a block of metal pins that extend and retract. These pins are triggered to extend in patterns that form letters and num-bers as the printhead moves across the paper. Early models, known as near letter quality (NLQ), printed using only nine pins. Later models used 21 pins and produced much bet-ter letter-quality (LQ) output.
The main advantage of dot matrix is its impact (physical striking of the paper). Because it strikes the paper, you can use it to print on multipart forms. Nonimpact printers can’t do that. Dot-matrix printers aren’t commonly found in most offices these days because of their disadvantages, including noise, slow speed, and poor print quality.
86504c01.indd 71 7/25/09 6:04:28 PM

72 Chapter 1 N Hardware
Dot-matrix printers are still found in many warehouses, and other businesses, where multipart forms are used.
Ink-Jet printersInk-jet printers are one of the most popular types in use today. This type of printer sprays ink on the page to print text or graphics. It’s a nonimpact, sheet-fed line printer.
Figure 1.24 shows an ink cartridge. Some cartridges, like this one, contain the print-head for that color of ink; you get a new printhead each time you replace the cartridge. On other printer models, the ink cartridge is just an ink reservoir, and the heads don’t need replacing.
F I gu r E 1. 24 A typical ink cartridge (size: approximately 3×1½ inches)
There are two kinds of ink-jet printers: thermal and piezoelectric. These terms refer to the way the ink is sprayed onto the paper. A thermal ink-jet printer heats the ink to about 400° F, creating vapor bubbles that force the ink out of the cartridge. Thermal ink-jets are also sometimes called bubble-jets. A piezoelectric printer does the same thing but with elec-tricity instead of heat.
Ink-jet printers are popular because they can print in color and are inexpensive. How-ever, their print quality isn’t quite as good as that of a laser printer, and the per-page cost of ink is much higher than for a laser printer. Therefore, most businesses prefer laser printers for their main printing needs, perhaps keeping one or two ink-jet printers around for situa-tions requiring color printing.
Laser printersLaser printers are referred to as page printers because they receive their print job instruc-tions one page at a time. They’re sheet-fed, nonimpact printers. Another name for a laser printer is an electrophotographic (EP) printer.
LED printers are much like laser printers except they use light-emitting diodes (LEDs) instead of lasers. Their process is similar to that of laser printers. They’re covered in more detail later in this chapter.
86504c01.indd 72 7/25/09 6:04:28 PM
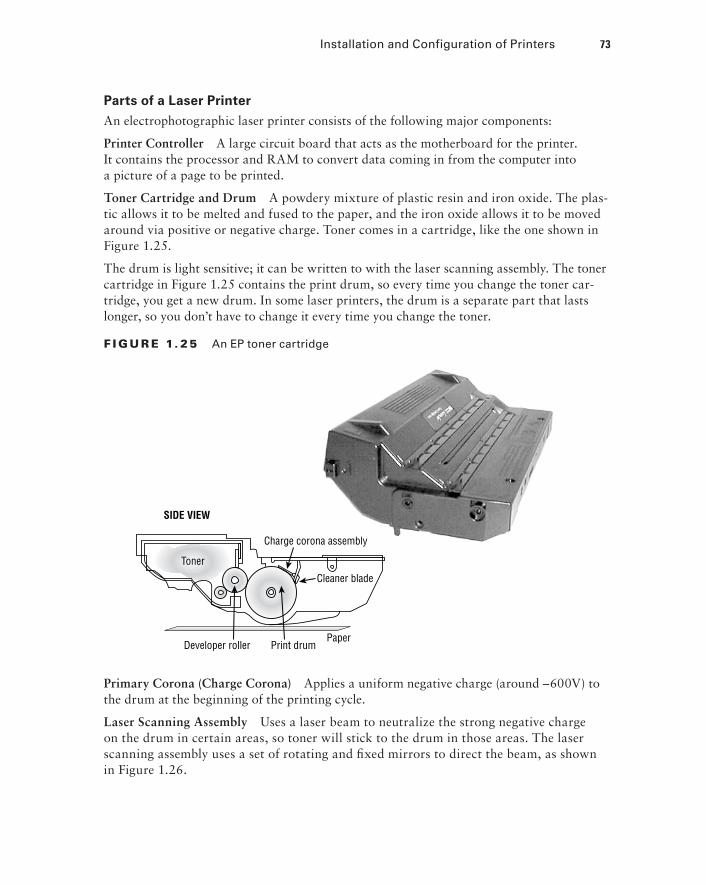
Installation and Configuration of Printers 73
parts of a Laser printer
An electrophotographic laser printer consists of the following major components:
Printer Controller A large circuit board that acts as the motherboard for the printer. It contains the processor and RAM to convert data coming in from the computer into a picture of a page to be printed.
Toner Cartridge and Drum A powdery mixture of plastic resin and iron oxide. The plas-tic allows it to be melted and fused to the paper, and the iron oxide allows it to be moved around via positive or negative charge. Toner comes in a cartridge, like the one shown in Figure 1.25.
The drum is light sensitive; it can be written to with the laser scanning assembly. The toner cartridge in Figure 1.25 contains the print drum, so every time you change the toner car-tridge, you get a new drum. In some laser printers, the drum is a separate part that lasts longer, so you don’t have to change it every time you change the toner.
F I gu r E 1. 25 An EP toner cartridge
SIDE VIEW
Charge corona assembly
Cleaner blade
PaperPrint drumDeveloper roller
Toner
Primary Corona (Charge Corona) Applies a uniform negative charge (around –600V) to the drum at the beginning of the printing cycle.
Laser Scanning Assembly Uses a laser beam to neutralize the strong negative charge on the drum in certain areas, so toner will stick to the drum in those areas. The laser scanning assembly uses a set of rotating and fixed mirrors to direct the beam, as shown in Figure 1.26.
86504c01.indd 73 7/25/09 6:04:29 PM

74 Chapter 1 N Hardware
F I gu r E 1. 26 The EP laser scanning assembly (side view and simplified top view)
MirrorLaser beam
Laserassembly
EP drum
Rotating mirror
Direction ofrotation
Laser scanningassembly
Laserbeam
Fixedmirror
SIDE VIEW
Paper Transport Assembly Moves the paper through the printer. The paper transport assembly consists of a motor and several rubberized rollers. These rollers are operated by an electronic stepper motor. See Figure 1.27 for an example.
F I gu r E 1. 27 Paper transport rollers
Feed rollerExit rollers
Fuser rollers
Registration rollers
Transfer Corona Applies a uniform positive charge (about +600V) to the paper. When the paper rotates past the drum, the toner jumps off the drum and onto the paper. Then the paper passes through a static eliminator that removes the positive charge from it. (See Fig-ure 1.28.) Some printers use a transfer corona wire; others use a transfer corona roller.
High-Voltage Power Supply (HVPS) Delivers the high voltages needed to make the print-ing process happen. It converts ordinary 120V household AC current into high-DC voltages used to energize the primary and transfer corona wires (discussed later).
86504c01.indd 74 7/25/09 6:04:30 PM
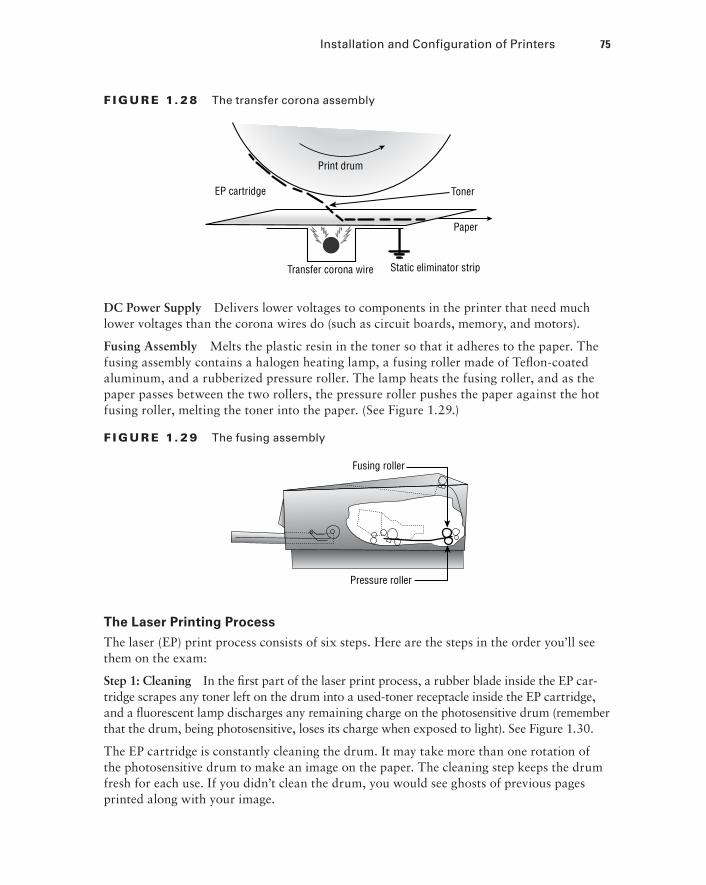
Installation and Configuration of Printers 75
F I gu r E 1. 28 The transfer corona assembly
Print drum
Toner
Paper
Static eliminator stripTransfer corona wire
EP cartridge
DC Power Supply Delivers lower voltages to components in the printer that need much lower voltages than the corona wires do (such as circuit boards, memory, and motors).
Fusing Assembly Melts the plastic resin in the toner so that it adheres to the paper. The fusing assembly contains a halogen heating lamp, a fusing roller made of Teflon-coated aluminum, and a rubberized pressure roller. The lamp heats the fusing roller, and as the paper passes between the two rollers, the pressure roller pushes the paper against the hot fusing roller, melting the toner into the paper. (See Figure 1.29.)
F I gu r E 1. 29 The fusing assembly
Fusing roller
Pressure roller
the Laser printing process
The laser (EP) print process consists of six steps. Here are the steps in the order you’ll see them on the exam:
Step 1: Cleaning In the first part of the laser print process, a rubber blade inside the EP car-tridge scrapes any toner left on the drum into a used-toner receptacle inside the EP cartridge, and a fluorescent lamp discharges any remaining charge on the photosensitive drum (remember that the drum, being photosensitive, loses its charge when exposed to light). See Figure 1.30.
The EP cartridge is constantly cleaning the drum. It may take more than one rotation of the photosensitive drum to make an image on the paper. The cleaning step keeps the drum fresh for each use. If you didn’t clean the drum, you would see ghosts of previous pages printed along with your image.
86504c01.indd 75 7/25/09 6:04:31 PM
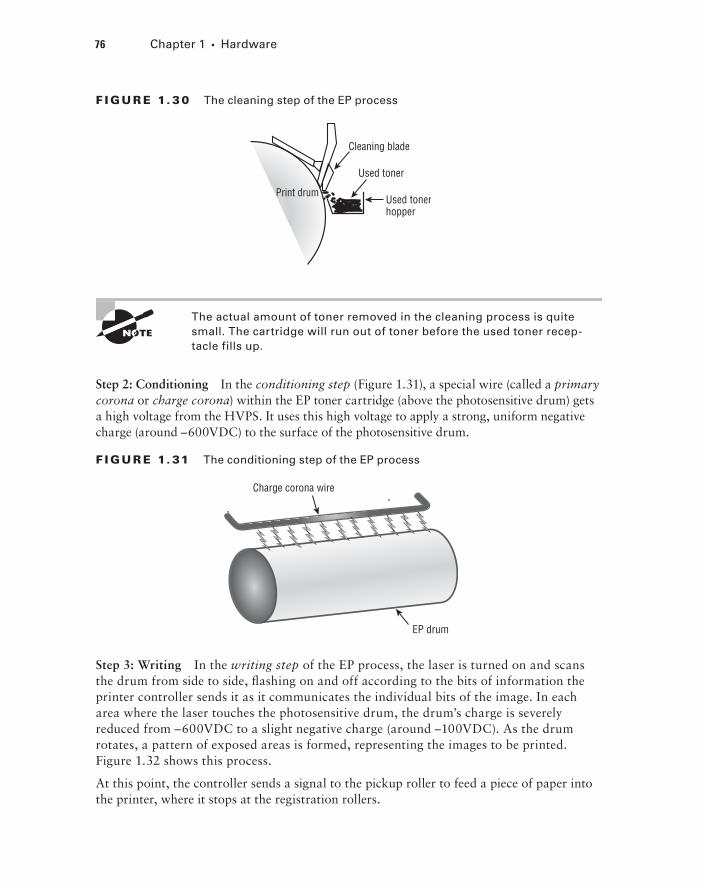
76 Chapter 1 N Hardware
F I gu r E 1. 3 0 The cleaning step of the EP process
Cleaning blade
Used toner
Used tonerhopper
Print drum
The actual amount of toner removed in the cleaning process is quite small. The cartridge will run out of toner before the used toner recep-tacle fills up.
Step 2: Conditioning In the conditioning step (Figure 1.31), a special wire (called a primary corona or charge corona) within the EP toner cartridge (above the photosensitive drum) gets a high voltage from the HVPS. It uses this high voltage to apply a strong, uniform negative charge (around –600VDC) to the surface of the photosensitive drum.
F I gu r E 1. 31 The conditioning step of the EP process
Charge corona wire
EP drum
Step 3: Writing In the writing step of the EP process, the laser is turned on and scans the drum from side to side, flashing on and off according to the bits of information the printer controller sends it as it communicates the individual bits of the image. In each area where the laser touches the photosensitive drum, the drum’s charge is severely reduced from –600VDC to a slight negative charge (around –100VDC). As the drum rotates, a pattern of exposed areas is formed, representing the images to be printed. Figure 1.32 shows this process.
At this point, the controller sends a signal to the pickup roller to feed a piece of paper into the printer, where it stops at the registration rollers.
86504c01.indd 76 7/25/09 6:04:31 PM

Installation and Configuration of Printers 77
F I gu r E 1. 32 The writing step of the EP process
EP drum
Rotating mirror
Direction ofrotation
Laser scanningassembly
Laserbeam
Fixedmirror
Step 4: Developing Now that the surface of the drum holds an electrical representation of the image being printed, its discrete electrical charges need to be converted into something that can be transferred to a piece of paper. The EP process’s developing step accomplishes this (Figure 1.33). In this step, toner is transferred to the areas that were exposed in the writing step.
F I gu r E 1. 3 3 The developing step of the EP process
TonerBlade
Reservoir
EP drumDeveloping
cylinder EP drum
Toner fog
Nonexposed areas
Nonexposed areas
Exposed areas
A metallic developing roller or cylinder inside an EP cartridge acquires a –600VDC charge (called a bias voltage) from the HVPS. The toner sticks to this roller because there is a mag-net located inside the roller and because of the electrostatic charges between the toner and the developing roller. While the developing roller rotates toward the photosensitive drum, the toner acquires the charge of the roller (–600VDC). When the toner comes between the devel-oping roller and the photosensitive drum, the toner is attracted to the areas that have been exposed by the laser (because these areas have a lesser charge, of –100VDC). The toner also is repelled from the unexposed areas (because they’re at the same –600VDC charge, and like charges repel). This toner transfer creates a fog of toner between the EP drum and the devel-oping roller.
86504c01.indd 77 7/25/09 6:04:32 PM

78 Chapter 1 N Hardware
The photosensitive drum now has toner stuck to it where the laser has written. The photo-sensitive drum continues to rotate until the developed image is ready to be transferred to paper in the next step.
Step 5: Transferring At this point in the EP process, the developed image is rotating into position. The controller notifies the registration rollers that the paper should be fed through. The registration rollers move the paper underneath the photosensitive drum, and the process of transferring the image can begin, with the transferring step.
The controller sends a signal to the corona wire or corona roller (depending on which one the printer has) and tells it to turn on. The corona wire/roller then acquires a strong positive charge (+600VDC) and applies that charge to the paper. The paper, thus charged, pulls the toner from the photosensitive drum at the line of contact between the roller and the paper, because the paper and toner have opposite charges. Once the registration rollers move the paper past the corona wire, the static-eliminator strip removes all charge from that line of the paper. Figure 1.34 details this step. If the strip didn’t bleed this charge away, the paper would attract itself to the toner cartridge and cause a paper jam.
F I gu r E 1. 3 4 The transferring step of the EP process
Print drum
Toner
Paper
Static-eliminator stripTransfer corona wire
EP cartridge
The toner is now held in place by weak electrostatic charges and gravity. It won’t stay there, however, unless it’s made permanent, which is the reason for the fusing step.
Step 6: Fusing In the final step, the fusing step, the toner image is made permanent. The registration rollers push the paper toward the fuser rollers. Once the fuser grabs the paper, the registration rollers push for only a short time more. The fuser is now in control of mov-ing the paper.
As the paper passes through the fuser, the fuser roller melts the polyester resin of the toner, and the rubberized pressure roller presses it permanently into the paper (Figure 1.35). The paper continues on through the fuser and eventually exits the printer.
Once the paper completely exits the fuser, it trips a sensor that tells the printer to finish the EP process with the cleaning step. At this point, the printer can print another page, and the EP process can begin again.
86504c01.indd 78 7/25/09 6:04:33 PM
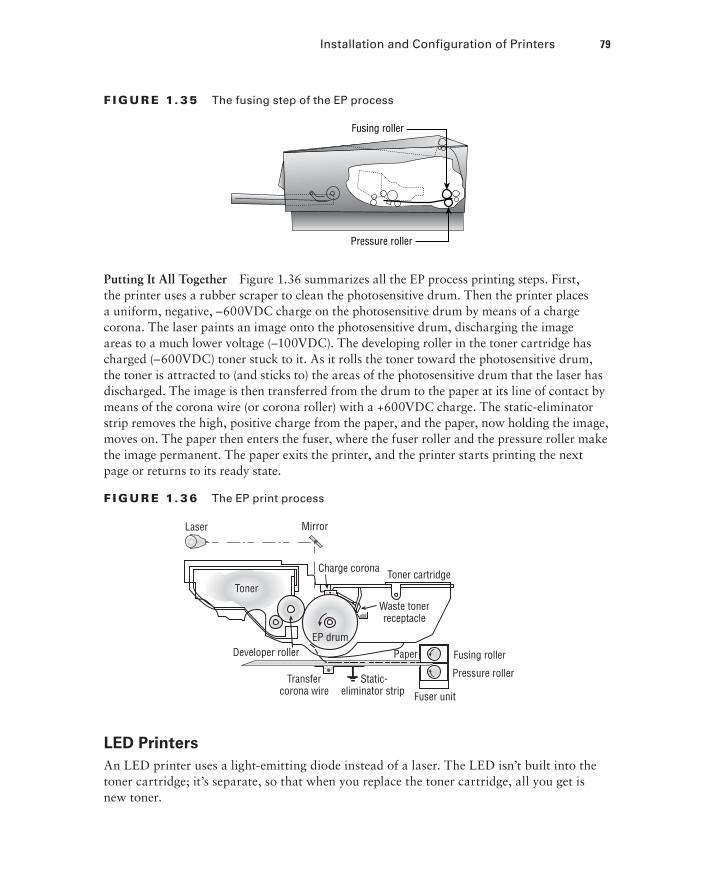
Installation and Configuration of Printers 79
F I gu r E 1. 3 5 The fusing step of the EP process
Fusing roller
Pressure roller
Putting It All Together Figure 1.36 summarizes all the EP process printing steps. First, the printer uses a rubber scraper to clean the photosensitive drum. Then the printer places a uniform, negative, –600VDC charge on the photosensitive drum by means of a charge corona. The laser paints an image onto the photosensitive drum, discharging the image areas to a much lower voltage (–100VDC). The developing roller in the toner cartridge has charged (–600VDC) toner stuck to it. As it rolls the toner toward the photosensitive drum, the toner is attracted to (and sticks to) the areas of the photosensitive drum that the laser has discharged. The image is then transferred from the drum to the paper at its line of contact by means of the corona wire (or corona roller) with a +600VDC charge. The static-eliminator strip removes the high, positive charge from the paper, and the paper, now holding the image, moves on. The paper then enters the fuser, where the fuser roller and the pressure roller make the image permanent. The paper exits the printer, and the printer starts printing the next page or returns to its ready state.
F I gu r E 1. 36 The EP print process
Laser Mirror
Charge coronaToner cartridge
Toner
Developer roller
Transfercorona wire
Static-eliminator strip Fuser unit
Paper
EP drum
Waste tonerreceptacle
Fusing roller
Pressure roller
LeD printersAn LED printer uses a light-emitting diode instead of a laser. The LED isn’t built into the toner cartridge; it’s separate, so that when you replace the toner cartridge, all you get is new toner.
86504c01.indd 79 7/25/09 6:04:34 PM
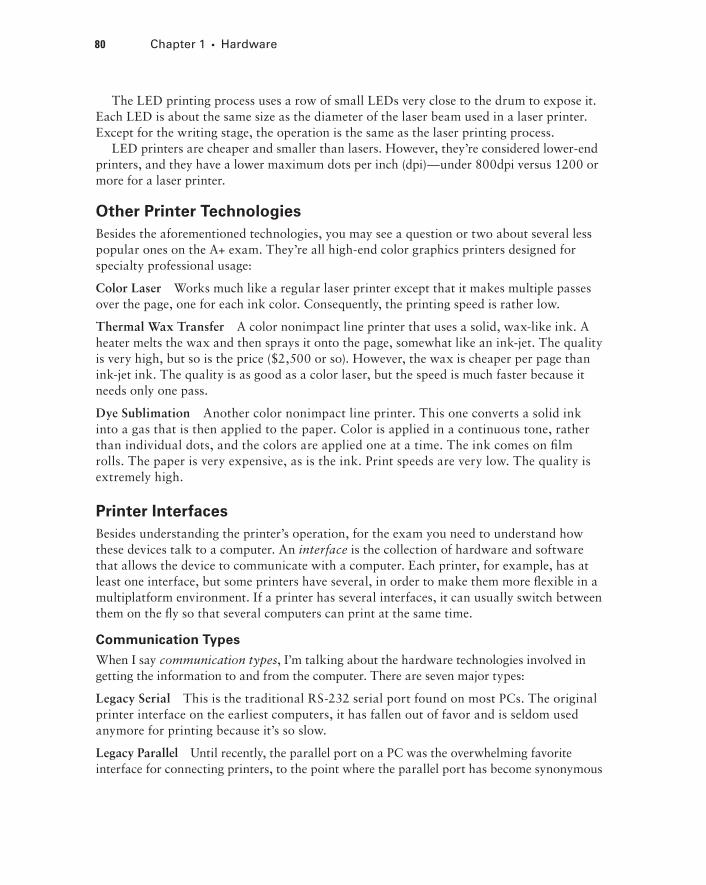
80 Chapter 1 N Hardware
The LED printing process uses a row of small LEDs very close to the drum to expose it. Each LED is about the same size as the diameter of the laser beam used in a laser printer. Except for the writing stage, the operation is the same as the laser printing process.
LED printers are cheaper and smaller than lasers. However, they’re considered lower-end printers, and they have a lower maximum dots per inch (dpi)—under 800dpi versus 1200 or more for a laser printer.
Other printer technologiesBesides the aforementioned technologies, you may see a question or two about several less popular ones on the A+ exam. They’re all high-end color graphics printers designed for specialty professional usage:
Color Laser Works much like a regular laser printer except that it makes multiple passes over the page, one for each ink color. Consequently, the printing speed is rather low.
Thermal Wax Transfer A color nonimpact line printer that uses a solid, wax-like ink. A heater melts the wax and then sprays it onto the page, somewhat like an ink-jet. The quality is very high, but so is the price ($2,500 or so). However, the wax is cheaper per page than ink-jet ink. The quality is as good as a color laser, but the speed is much faster because it needs only one pass.
Dye Sublimation Another color nonimpact line printer. This one converts a solid ink into a gas that is then applied to the paper. Color is applied in a continuous tone, rather than individual dots, and the colors are applied one at a time. The ink comes on film rolls. The paper is very expensive, as is the ink. Print speeds are very low. The quality is extremely high.
printer InterfacesBesides understanding the printer’s operation, for the exam you need to understand how these devices talk to a computer. An interface is the collection of hardware and software that allows the device to communicate with a computer. Each printer, for example, has at least one interface, but some printers have several, in order to make them more flexible in a multiplatform environment. If a printer has several interfaces, it can usually switch between them on the fly so that several computers can print at the same time.
Communication types
When I say communication types, I’m talking about the hardware technologies involved in getting the information to and from the computer. There are seven major types:
Legacy Serial This is the traditional RS-232 serial port found on most PCs. The original printer interface on the earliest computers, it has fallen out of favor and is seldom used anymore for printing because it’s so slow.
Legacy Parallel Until recently, the parallel port on a PC was the overwhelming favorite interface for connecting printers, to the point where the parallel port has become synonymous
86504c01.indd 80 7/25/09 6:04:34 PM
Installation and Configuration of Printers 81
with printer port. It sends data 8 bits at a time (in parallel) and uses a cable with a male DB-25 connector at the computer and a 36-bin Centronics male connector at the printer. Its main drawback is its cable length, which must be less than 10 feet.
Universal Serial Bus (USB) The most popular type of printer interface as this book is being written is the USB. It’s the most popular interface for just about every peripheral. The benefit for printers is that it has a higher transfer rate than either serial or parallel and it automati-cally recognizes new devices. USB is also fully Plug and Play, and it allows several printers to be connected at once without adding ports or using up additional system resources.
Network Most large-environment printers (primarily laser and LED printers) have a special interface that allows them to be hooked directly to a network. These printers have a network interface card (NIC) and ROM-based software that let them communicate with networks, servers, and workstations.
The type of network interface used on the printer depends on the type of network the printer is being attached to. For example, if you’re using a Token Ring network, the printer should have a Token Ring interface.
IEEE 1394/FireWire This is a high-speed serial alternative to USB. It’s less commonly used for printers than USB is, but FireWire printer interfaces do exist.
Radio Wave Bluetooth is an infrared technology that can connect a printer to a computer at a range of about 35 feet, provided there is an unblocked line of sight.
Wireless A network-enabled printer that has a wireless adapter can participate in a wireless Ethernet (IEEE 802.11b, a, or g) network, just as it would as a wired network client.
Firmware UpdatesPrinters resemble computers in many ways. Like a computers, they can have their own motherboard, memory, and CPU. They also have firmware—that is, software permanently stored on a chip. If you’re using an old computer with a new operating system, an update may be available for the printer’s or scanner’s firmware. You can find out that information at the printer or scanner manufacturer’s website and download the update from there along with a utility program for performing the update.
printer ConfigurationTo add a printer, whether it’s local or networked, you start the Add Printer Wizard found in Windows by accessing Start Printers and Faxes (or Start Printers) and then choosing Add a Printer. Once the printer is installed, you can right-click its icon at any time beneath this dialog box and choose Properties from the context menu. From here, you can print a test page and configure such items as sharing, ports, device settings (including tray selection), and so on. Figure 1.37 shows the spooling options and the settings that allow you to configure the printer to be available only at certain times, and Figure 1.38 shows the tray settings.
86504c01.indd 81 7/25/09 6:04:34 PM

82 Chapter 1 N Hardware
F I gu r E 1. 37 Configure the advanced options.
F I gu r E 1. 3 8 Configure the tray and other settings.
86504c01.indd 82 7/25/09 6:04:34 PM

Exam Essentials 83
Exam Essentials
Know the common types of printers. Know and understand the types of printers, such as impact printers, ink-jet printers, and laser printers (page printers), as well as their interfaces and print media.
Know the fundamentals of scanners. Whereas printers are output devices, scanners can be thought of as input devices.
Understand the process of printing for each type of printer. Each type of printer puts images or text on paper. Understand the process that each type of printer uses to accom-plish this task.
Know the specific components of each type of printer. Each type of printer uses similar components to print. Know the different components that make up each type of printer, and their jobs.
Understand the print process of a laser printer. You’ll most likely be asked questions about certain processes of a laser printer. Know and understand the different steps that make up the print process of a laser printer.
Be familiar with the possible interfaces that can be used for printing. The seven types are legacy parallel, legacy serial, USB, network, IEEE 1394/FireWire, radio wave, and wireless.
Know how to install printers and scanners. The manufacturer is the best source of information about installing printers and scanners. You should, however, know about the wizards available in Windows as well.
Know to keep firmware up-to-date. Firmware updates can be found at the manufacturer’s website and installed according to the instructions accompanying them.
86504c01.indd 83 7/25/09 6:04:34 PM

84 Chapter 1 N Hardware
Review Questions
1. What two types of expansion slots are found on all modern motherboards? What is a third, older type that might or might not also be present?
2. Name three features that distinguish an ATX motherboard from an AT motherboard.
3. What are PGA and SECC? Which of those types is the Socket 423 used with the Pentium 4?
4. What voltages does a typical power supply provide to the motherboard?
5. On modern systems, what is the relationship between a CPU’s internal and external speeds?
6. Which cache is also known as the back-side cache?
7. What is the purpose of a VRM on a motherboard?
8. What is the purpose of a parity bit on a SIMM?
9. Would the POST test identify a problem with RAM?
10. If a legacy serial port is physically fine but does not show up in Windows’ Device Manager, how might you enable it?
86504c01.indd 84 7/25/09 6:04:34 PM

Answers to Review Questions 85
Answers to Review Questions
1. PCI and AGP. The third type is ISA.
2. Possible answers include: (1) position of CPU, (2) expansion slot orientation, (3) built-in ports on the side, (4) one-piece power supply connector, (5) physical size and shape of the motherboard, and (6) type of keyboard connector.
3. They are the two types of slots/sockets for CPUs in motherboards. PGA is the type with a grid of holes into which pins fit on a flat chip. SECC is the type that accepts a circuit board surrounded by a cartridge. Whenever you see socket in the name, it’s always a PGA type. SECC types have slot in the name.
4. +5V, –5V, +12V, and –12V for all power supplies, plus +3.3V for an ATX power supply.
5. The internal speed is a multiple of the external speed.
6. The L2 cache.
7. To provide different voltages for different CPUs.
8. Error detection.
9. Yes. One of the components the POST checks is the RAM.
10. It may be disabled in BIOS Setup; try enabling it there.
86504c01.indd 85 7/25/09 6:04:35 PM

86504c01.indd 86 7/25/09 6:04:35 PM