computer-skill.yolasite.comcomputer-skill.yolasite.com/resources/windows 8 han… · web...
TRANSCRIPT

PRINCESS NOURA BINT ABDUL RAHMAN UNIVERSITY
PREPARATORY YEAR
FIRST SEMESTER (2013 – 2014 / 1434 – 1435)
Computer skills (CMP-001)
CMP 001 1 1st Semester (2013-2014)

Topics:1- Introduction 2- Interface Changes
(Start screen - Live tiles - Hot corners - Charms bar)3- Other Windows 8 Features
(Simplified Desktop for increased speed - No Start button - Improved security)
4- To Sign In to Windows 85- Navigating Windows 8
(Using Hot Corners)6- Navigating on a Tablet
(Using Keyboard Shortcuts to Navigate - The Charms Bar - Coping Without the Start Menu - To Open the Control Panel - To Shut Down Your Computer)
7- Working with Start Screen Apps(To Open an App - To Close an App - Viewing Two Apps Side-By-Side)
8- Using the Search Feature9- Personalizing Your Start Screen
(To Change Your Lock Screen Picture - To Change Your Start Screen Background- To Change Your Account Picture)
10- Customizing Your Start Screen Apps(To Move an App - To Turn a Live Tile Off)
11-Pinning/unpinning Apps to the Start Screen12-Creating App Groups / To Name an App Group 13-Getting Started with the Desktop14-Working with Files
(To Open File Explorer - Deleting Files)15-Working with Desktop Apps
(Open - To Pin Apps to the Taskbar)16-Using Desktop Effects
(Snap – Peek – Shake – Flip)17-Taskbar Features
(To Show the Desktop - To Access a Jump List)18-Managing Your Files and Folders
(File Explorer - To Change the Content View - To Sort Files - Searching with File Explorer)19-Personalizing Your Desktop
(Desktop background – color – screen saver – display)
CMP 001 2 1st Semester (2013-2014)

How is Windows 8 Different from Earlier Versions?There are many new features and changes in Windows 8, both small and large. These changes include a redesigned interface, online features, improved security, and more.
Interface ChangesThe first thing that you'll notice about Windows 8 is that it looks totally different from previous versions of Windows. The all-new interface includes features like the Start screen, live tiles, and hot corners.
Start screen: The main screen that you'll use is called the Start screen, and it displays all of your apps as tiles. You can personalize your Start screen by changing the color scheme, choosing a background image, and rearranging your tiles.
Apps on the Start screen
CMP 001 3 1st Semester (2013-2014)

Live tiles: Some apps use live tiles, which let you see information without even clicking on the app. For example, the Weather app displays the current weather on its tile, and you can click on it to see more details.
Live tiles
Hot corners: You'll navigate through Windows 8 by using hot corners. To use a hot corner, just hover the mouse in the corner of the screen, and it will open a toolbar or tile that you can click. For example, to switch to another open app, you can hover the mouse in the top-left corner and then click. If you're using a tablet, you'll swipe from the left or right instead of using hot corners.
Hot corners
CMP 001 4 1st Semester (2013-2014)

Charms bar: Many of your computer's settings are now found in a toolbar called the Charms bar. You can access it by hovering in the top-right or bottom-right corner of the screen. If you're using a tablet, you can swipe from the right to open the Charms bar.
The Charms bar
CMP 001 5 1st Semester (2013-2014)

Other Windows 8 Features Simplified Desktop for increased speed: Microsoft hasn't removed the Desktop, and you can still
use it to manage your files or open many of your existing programs. However, it has removed some of the transparency effects that often caused Windows 7 and Vista to run slowly. The new Desktop should run more smoothly on most computers.
The Desktop
No Start button: The biggest change to the Desktop is that there is no Start button. In previous versions, the Start button was a very common place to go to launch apps, access settings, or search the computer. Although these features are now accessible from the Start screen, many people may find it disorienting to use Windows without the Start button.
The Desktop no longer has a Start button
CMP 001 6 1st Semester (2013-2014)

Improved security: Windows 8 has a built-in antivirus program called Windows Defender, which can also protect you from other types of malware such as spyware. The built-in Windows Store also helps to keep you and your computer safe by showing you what information each app will have access to. For example, some apps have access to your location, so if you're uncomfortable sharing your location you can decide not to download those apps.
An app that has access to your location and internet connection
To Sign In to Windows 8:When you're setting up Windows 8, it will require you to create an account name and password that you will use to sign in. You can also create additional accounts, and you'll have the option of associating each one with a Microsoft account.
1. Click anywhere on the lock screen to unlock the computer.
Clicking the lock screen
CMP 001 7 1st Semester (2013-2014)

2. Your user account name and picture will appear. Type your password and then press Enter to sign in. Alternatively, you can press the back arrow to select a different user.
The sign-in screen
3. The Start screen will appear.
The Start screen
CMP 001 8 1st Semester (2013-2014)

Navigating Windows 8There are several ways to navigate through Windows 8, including hot corners, keyboard shortcuts, and gestures if you're using a tablet.
Using Hot CornersWhether you're in the Start screen or the Desktop, you can navigate through Windows 8 by using hot corners. To use a hot corner, just hover the mouse in the corner of the screen, and it will open a toolbar or tile that you can click. Each corner performs a different task:
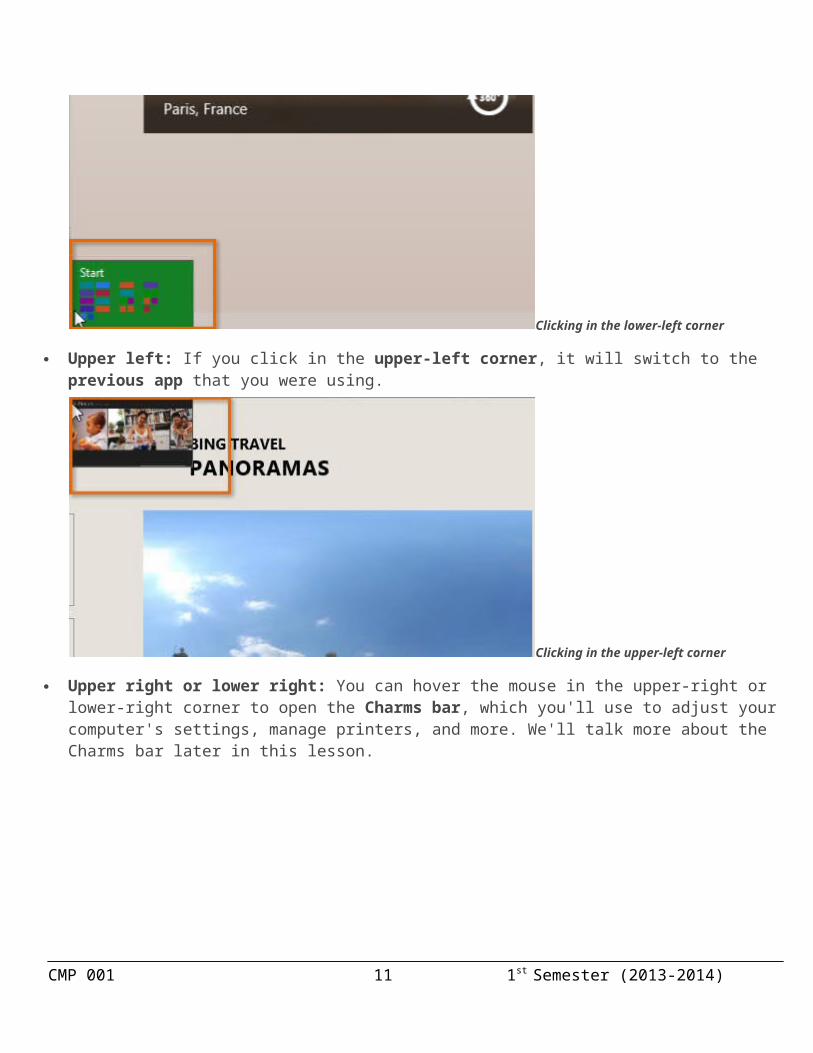
Lower left: When you're using an app, you can click in the lower-left corner to switch back to the Start screen.
Clicking in the lower-left corner
Upper left: If you click in the upper-left corner, it will switch to the previous app that you were using.
Clicking in the upper-left corner
CMP 001 9 1st Semester (2013-2014)

Upper right or lower right: You can hover the mouse in the upper-right or lower-right corner to open the Charms bar, which you'll use to adjust your computer's settings, manage printers, and more. We'll talk more about the Charms bar later in this lesson.
Hovering in the lower-right corner
If you have several apps open, you can switch between them by hovering the mouse in the upper-left corner and then moving the mouse down. This displays a list of all of your open apps, and you can click the desired app to switch to it.
CMP 001 10 1st Semester (2013-2014)
Switching to a different app
Navigating on a TabletIf you have a Windows 8 tablet, you can navigate by using swipe gestures instead of hot corners:
Swipe in from left edge lets you switch to a different open app.
Swipe in from right edge opens the Charms bar.
Using Keyboard Shortcuts to NavigateWindows 8 has several keyboard shortcuts that you can use to navigate more easily:
Alt+Tab: You can hold down the Alt key and then press Tab one or more times to switch between your open apps. This feature is called Flip, and it works in both Desktop view and the Start screen.
CMP 001 11 1st Semester (2013-2014)

Alt+Tab
Windows: When you have an app open, you can press the Windows key to switch to the Start screen. This shortcut also lets you switch back to the Start screen when you are in Desktop view.
Windows key
CMP 001 12 1st Semester (2013-2014)

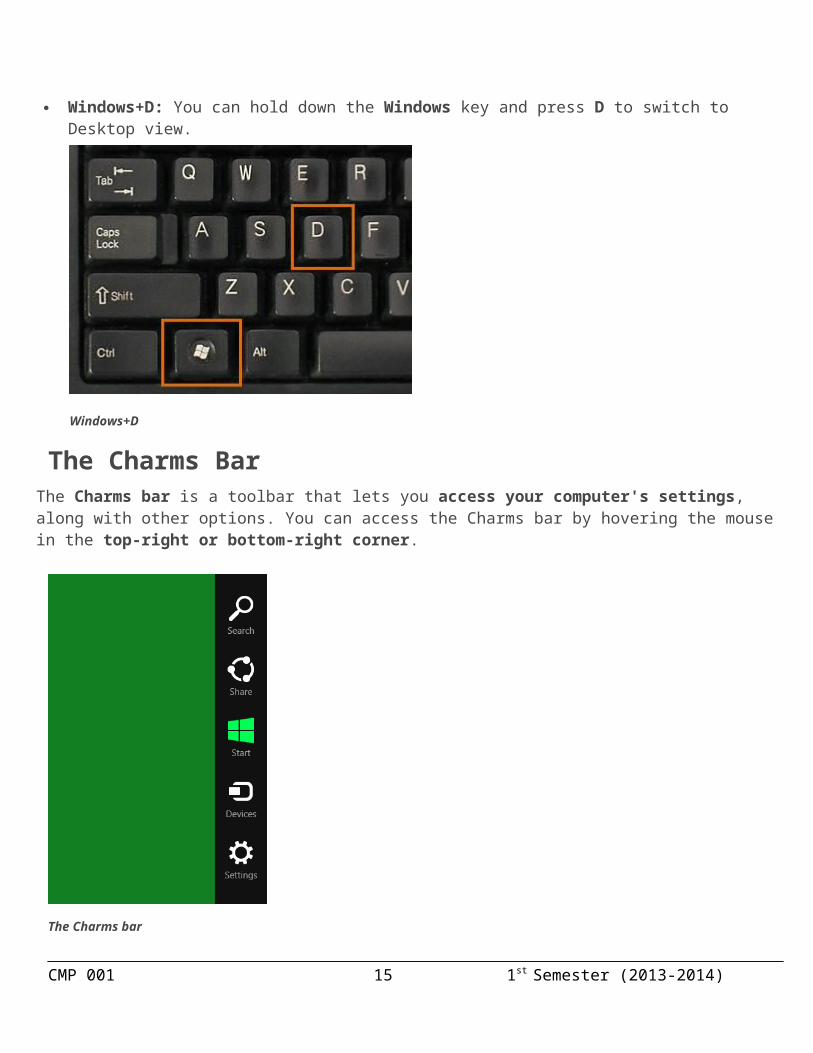
Windows+D: You can hold down the Windows key and press D to switch to Desktop view.
Windows+D
The Charms BarThe Charms bar is a toolbar that lets you access your computer's settings, along with other options. You can access the Charms bar by hovering the mouse in the top-right or bottom-right corner.
The Charms bar
CMP 001 13 1st Semester (2013-2014)

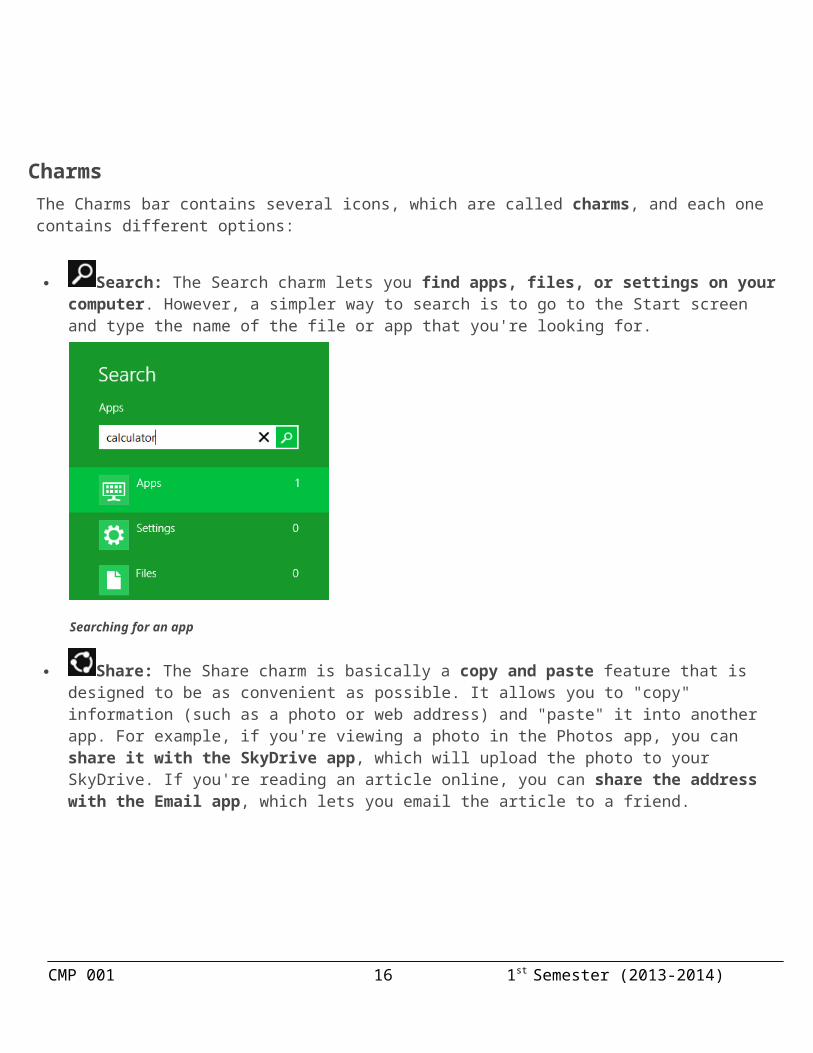
CharmsThe Charms bar contains several icons, which are called charms, and each one contains different options:
Search: The Search charm lets you find apps, files, or settings on your computer. However, a simpler way to search is to go to the Start screen and type the name of the file or app that you're looking for.
Searching for an app
Share: The Share charm is basically a copy and paste feature that is designed to be as convenient as possible. It allows you to "copy" information (such as a photo or web address) and "paste" it into another app. For example, if you're viewing a photo in the Photos app, you can share it with the SkyDrive app, which will upload the photo to your SkyDrive. If you're reading an article online, you can share the address with the Email app, which lets you email the article to a friend.
Using the Share charm to upload a photo to SkyDrive
CMP 001 14 1st Semester (2013-2014)
Start: This switches to the Start screen. If you're already on the Start screen, it will open the most recent app.
The Start screen
Devices: This shows any hardware devices that are connected to your computer, such as printers or monitors.
Settings: This lets you access general settings for your computer, as well as settings for the app you're currently viewing. For example, if you're in Internet Explorer, you can go to the Settings charm to access your Internet Options.
Viewing settings in Internet Explorer
CMP 001 15 1st Semester (2013-2014)
CMP 001 16 1st Semester (2013-2014)

Coping Without the Start MenuOne of the biggest complaints about Windows 8 is that it doesn't have a Start menu. The Start menu was a very important feature in previous versions of Windows, as it was used to launch apps, search for files, open the Control Panel, and shut down the computer. You can still do all of these things in Windows 8, but they're now found in different places.
To Launch an App:There are several ways to open an app in Windows 8:
Click the app icon on the taskbar.
Opening an app from the taskbar
Double-click the app shortcut on the Desktop.
Opening an app from a shortcut
Click the app tile in the Start screen.
Opening an app from the Start screen
CMP 001 17 1st Semester (2013-2014)

To view all of your apps, right-click the Start screen background and select All apps.
Clicking the All apps button
To Open the Control Panel:1. From the Desktop view, hover the mouse in the lower-right corner to access the Charms bar, then
select Settings.
The Settings charm
CMP 001 18 1st Semester (2013-2014)

2. Locate and select Control Panel from the Settings Pane.
Clicking Control Panel
3. The Control Panel will appear. You can then select the desired setting to change it.
The Control Panel
CMP 001 19 1st Semester (2013-2014)

To Shut Down Your Computer:1. Hover the mouse in the lower-right corner to access the Charms bar, then select Settings.
The Settings charm
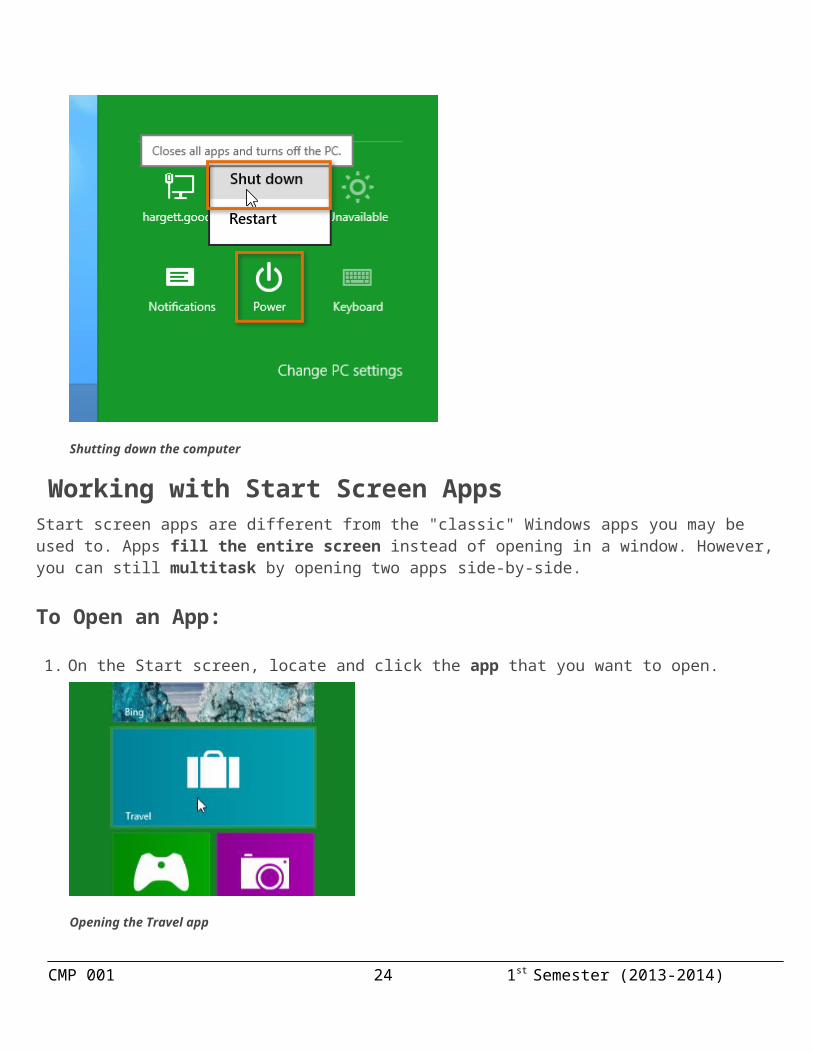
2. Click Power and select Shut down.
Shutting down the computer
Working with Start Screen AppsStart screen apps are different from the "classic" Windows apps you may be used to. Apps fill the entire screen instead of opening in a window. However, you can still multitask by opening two apps side-by-side.
CMP 001 20 1st Semester (2013-2014)

To Open an App:
1. On the Start screen, locate and click the app that you want to open.
Opening the Travel app
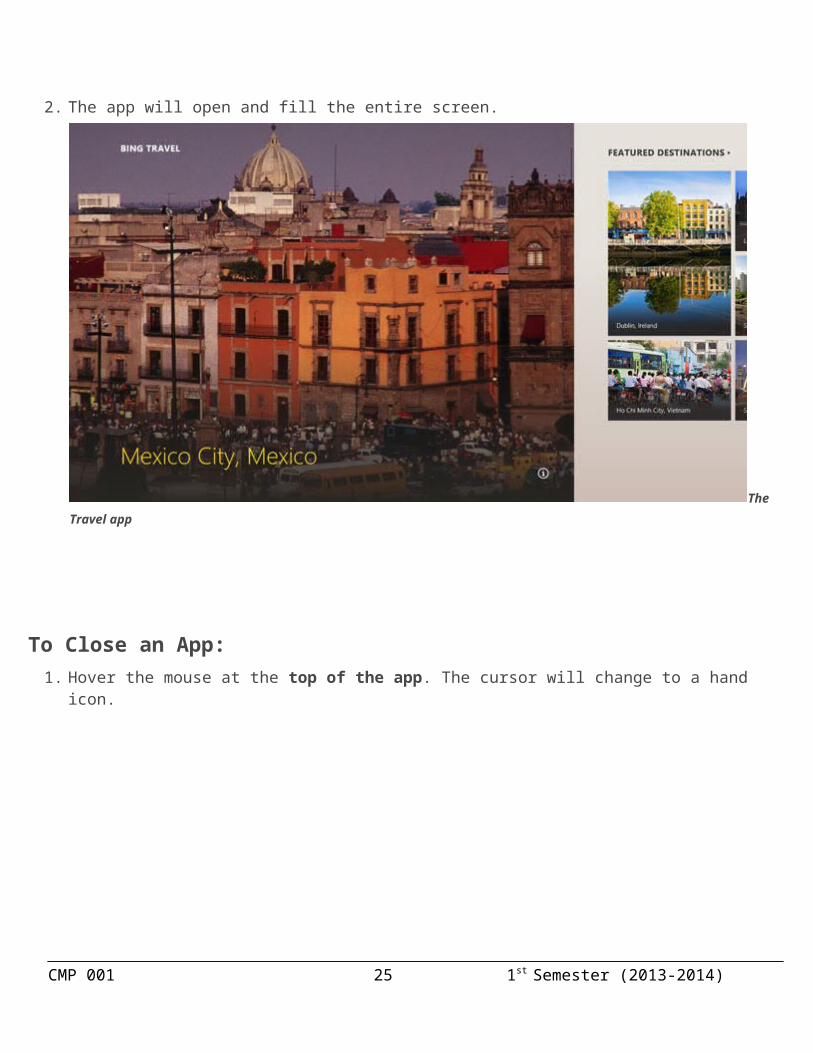
2. The app will open and fill the entire screen.
The Travel app
CMP 001 21 1st Semester (2013-2014)

To Close an App:1. Hover the mouse at the top of the app. The cursor will change to a hand icon.
The hand icon
2. Click, hold, and drag the top of the app all the way down to the bottom of the screen and then release. The app will close, and you'll return to the Start screen.
Closing an app
When dragging the app down, it may look like it's "stuck." However, just keep moving the mouse down until the cursor gets to the bottom of the screen, and the app will then close
CMP 001 22 1st Semester (2013-2014)

Viewing Two Apps Side-By-SideAlthough apps usually fill up the entire screen, Windows 8 lets you snap an app to the left or right side and then open a second app. For example, you might want to keep your calendar visible while you're using another app.
To View Two Apps Side-By-Side:1. From the Start screen, click on the first app to open it.
Opening the Calendar app
2. Click, hold, and drag the top of the app all the way to the right or left side of the screen.
Snapping to the right side of the screen
CMP 001 23 1st Semester (2013-2014)
3. Release the mouse, and the app will snap to the side of the screen. You cannot change the size of the snapped app.
The snapped app
4. Click anywhere in the empty part of the screen to return to the Start screen.
Clicking in the empty part of the screen
CMP 001 24 1st Semester (2013-2014)
5. Click the second app to open it
Opening the People app
6. Both apps will now appear side-by-side.
Two apps side-by-side
Snapping is designed to work with wide-screen monitors. You will need a screen resolution of at least 1366x768 pixels to use this feature.
CMP 001 25 1st Semester (2013-2014)

Using the Search FeatureOnce you've used Windows 8 for a while, you'll start to have more and more files, such as music, photos, and documents. It may sometimes be difficult to find the exact file that you want. You may even have trouble finding a specific app, since Windows 8 has moved everything around. Luckily, there is a built-in search feature, which can help you find files, apps, or almost anything else on your computer.
To Search From the Start Screen: From the Start screen, type what you're looking for. Your search results will instantly appear on the
left side of the screen, and search options will appear on the right.
Searching for the Calculator app
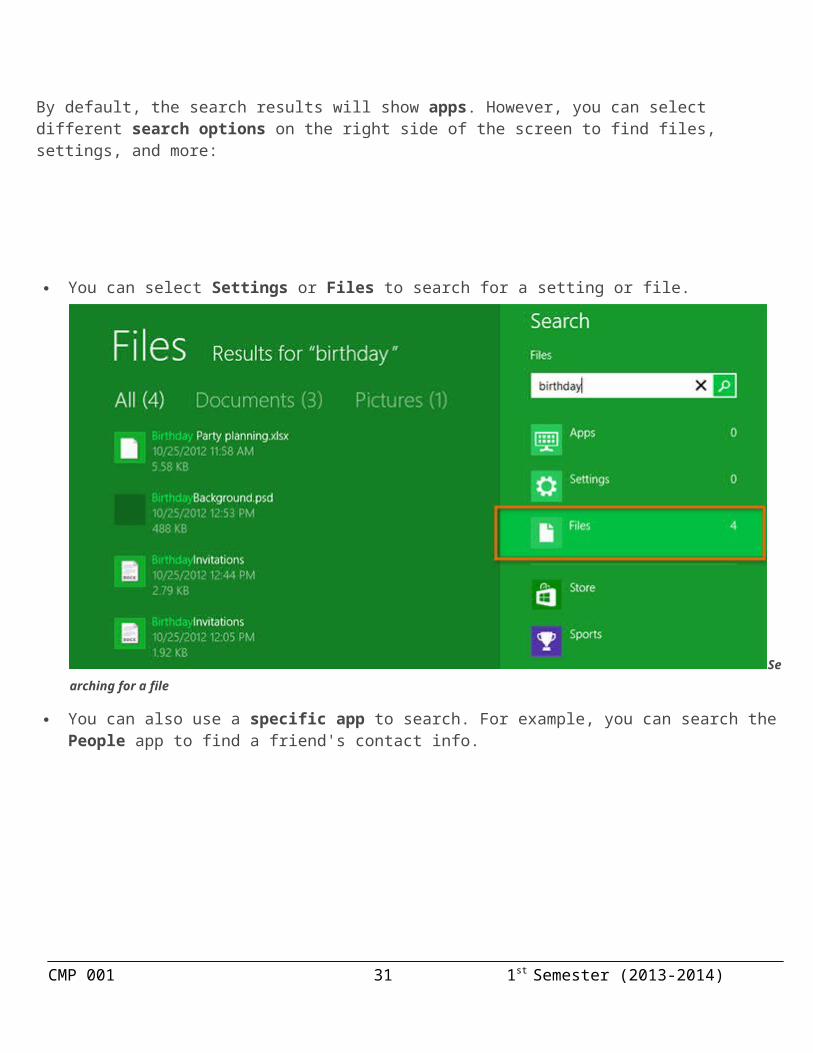
Using Different Search OptionsBy default, the search results will show apps. However, you can select different search options on the right side of the screen to find files, settings, and more:
CMP 001 26 1st Semester (2013-2014)

You can select Settings or Files to search for a setting or file.
Searching for a file
You can also use a specific app to search. For example, you can search the People app to find a friend's contact info.
Searching the People app
CMP 001 27 1st Semester (2013-2014)

Searching From the DesktopIf you're on the Desktop, you will first need to press the Windows key to switch to the Start screen, and then type what you're looking for.
Windows key
Searching on a TabletIf you're using a tablet without an attached keyboard, you can search by swiping in from the right, and then selecting the Search charm. You can then type what you're looking for.
The Search charm
CMP 001 28 1st Semester (2013-2014)

Personalizing Your Start Screen
Personalizing the Start screen
You'll probably spend a lot of time on your Start screen, so you may want to personalize it so that it suits your taste. In this lesson, we'll show you several different ways to personalize it, including changing the background image and color, rearranging apps, pinning apps, and creating app groups.
To View Your Personalization Settings:1. Hover the mouse in the lower-right corner to open the Charms bar, and then select the Settings
charm.
Selecting the Settings charm
CMP 001 29 1st Semester (2013-2014)

2. Click Change PC settings.
Clicking Change PC settings
3. Make sure Personalize is selected on the left side of the screen. Your settings will appear on the right side of the screen.
Personalization settings
CMP 001 30 1st Semester (2013-2014)
To Change Your Lock Screen Picture:1. From your personalization settings, select Lock screen at the top of the screen.
2. Select the desired picture from the list of thumbnails. Alternatively, you can click Browse to select one of your own pictures.
Selecting a lock screen picture
The lock screen will appear whenever your computer is locked, which happens automatically after a few minutes of inactivity. You can also lock your computer by clicking your account name and selecting Lock.
CMP 001 31 1st Semester (2013-2014)

Locking the computer
CMP 001 32 1st Semester (2013-2014)

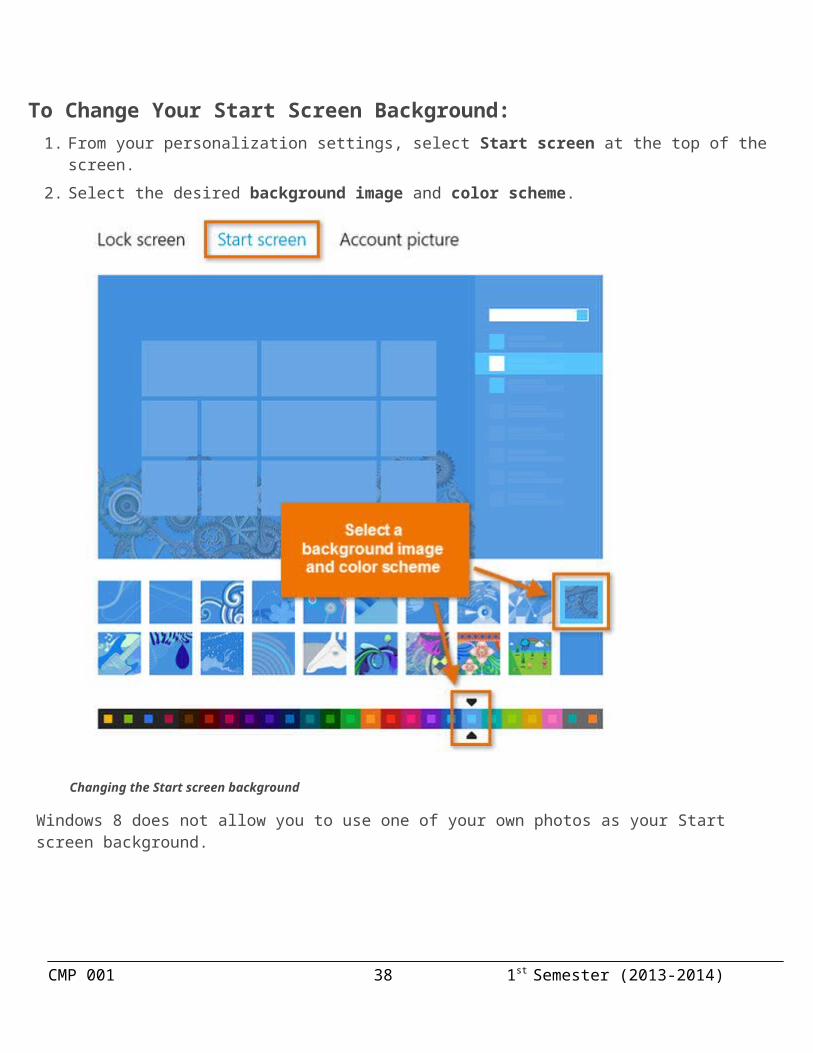
To Change Your Start Screen Background:1. From your personalization settings, select Start screen at the top of the screen.
2. Select the desired background image and color scheme.
Changing the Start screen background
Windows 8 does not allow you to use one of your own photos as your Start screen background.
CMP 001 33 1st Semester (2013-2014)

To Change Your Account Picture:1. From your personalization settings, select Account picture at the top of the screen.
2. Click Browse.
Changing the account picture
CMP 001 34 1st Semester (2013-2014)

Customizing Your Start Screen AppsIf you don't like the way your apps are arranged on the Start screen, you can rearrange them by moving them wherever you want. You may also find that the animated live tiles are too distracting, and you can easily turn them off so that they will display a plain background with no animations.
To Move an App:1. Click, hold and drag the app to the desired location.
Moving an app
CMP 001 35 1st Semester (2013-2014)

2. Release the mouse. The app will move to the new location.
The app in its new location
To Turn a Live Tile Off:1. Right-click the app you want to change.
Right-clicking a live tile
CMP 001 36 1st Semester (2013-2014)

2. A toolbar will appear at the bottom of the screen. Click Turn live tile off, and the tile will change to a plain background.
Turning a live tile off
Pinning Apps to the Start ScreenBy default, the Start screen doesn't show all of the apps on your computer. However, it's easy to pin your favorite apps to the Start screen so that you can open them quickly.
To Pin an App to the Start Screen:1. Right-click anywhere on the Start screen background.
Right-clicking the Start screen background
CMP 001 37 1st Semester (2013-2014)
2. A menu will appear at the bottom of the screen. Click All apps to view all of the apps installed on your computer.
Clicking the All apps button
3. Locate and right-click the desired app.
Right-clicking an app
4. At the bottom of the screen, click Pin to Start.
Pinning an app to the Start screen
CMP 001 38 1st Semester (2013-2014)

5. Click the lower-left corner to return to the Start screen. Your app will now appear on the Start screen.
The pinned app
To Unpin an App from the Start Screen:1. From the Start screen, right-click the desired app.
Right-clicking an app
2. At the bottom of the screen, click Unpin from Start. The app will disappear from the Start screen.
Unpinning an app from the Start screen
CMP 001 39 1st Semester (2013-2014)

Creating App GroupsTo further organize your apps, you can put related apps into groups. You can also name your groups, and each group will display its name at the top.
To Create a New App Group:1. Click, hold and drag an app to the right, until it is on an empty area of the Start screen.
Moving an app
CMP 001 40 1st Semester (2013-2014)

2. Release the mouse. The app will now be in its own app group, and you should see a space between the new group and the other groups. This space helps to visually separate the different groups.
The new app group
3. You can now move more apps into the new app group.
Adding apps to the new group
CMP 001 41 1st Semester (2013-2014)

To Name an App Group:1. Click the lower-right corner of the screen to zoom out.
Zooming out
2. All of your Start screen apps will appear as small icons organized into groups. Right-click the desired group.
Right-clicking a group
3. At the bottom of the screen, select Name group.
Clicking the Name group button
CMP 001 42 1st Semester (2013-2014)

4. Type the desired name. Shorter names usually work best, so try to use a single word if possible. When you're done, click Name.
Typing a name for the group
5. Click anywhere on the Start screen to return to the normal view. The new name will appear above the app group.
The new group name
CMP 001 43 1st Semester (2013-2014)

Getting Started with the DesktopAlthough Windows 8 uses the Start screen for launching apps and other tasks, the Desktop view is still an important feature that you'll need to know how to use. In this lesson, we'll show you the basics of using the Desktop, including how to navigate with File Explorer, pin apps to the taskbar, and manage open windows with the built-in desktop effects.
To Switch to the Desktop: Click the Desktop tile on the Start screen.
Switching to the Desktop
CMP 001 44 1st Semester (2013-2014)

Working with FilesTo work with the files and folders on your computer, you'll use the File Explorer app. In File Explorer, you can navigate to different folders, open files, delete files, and more.
To Open File Explorer: Click the File Explorer icon on the taskbar, or double-click any folder on your desktop. A File
Explorer window will open.
Opening File Explorer
CMP 001 45 1st Semester (2013-2014)

Basic Navigation:If you see the file that you want, you can double-click it. Otherwise, you can use the Navigation pane on the left side of the window to select a different location.
Navigating File Explorer
Deleting FilesWindows 8 uses a Recycle Bin to prevent you from accidentally deleting files. When you delete a file, it is simply moved to the Recycle Bin. If you change your mind, you can move the file back to its original location. If you're sure you want to permanently delete the file, you will need to empty the Recycle Bin.
CMP 001 46 1st Semester (2013-2014)

To Delete a File:1. Click, hold and drag the file onto the Recycle Bin icon on the Desktop. Alternatively, you can select
the file and then press the Delete key.
Dragging a file to the Recycle Bin
2. Right-click the Recycle Bin icon and select Empty Recycle Bin. All files in the Recycle Bin will be permanently deleted.
Emptying the Recycle Bin
CMP 001 47 1st Semester (2013-2014)

Working with Desktop AppsWhile many applications run exclusively in the Start screen, you'll also need to know how to open apps from the Desktop view. If you've used previous versions of Windows before, this should feel more familiar.
To Open an App on the Desktop:There are two ways to open an app in Desktop view:
Click the app icon on the taskbar.
Opening an app from the taskbar
Double-click the app shortcut on the Desktop.
Opening an app from a shortcut
CMP 001 48 1st Semester (2013-2014)

To Pin Apps to the Taskbar:By default, only a few apps will have icons on the taskbar. You can pin your favorite apps to the taskbar, which will create a convenient shortcut to the app from the Desktop view.
1. Right-click anywhere on the Start screen and a menu will appear at the bottom. Click the All apps button.
Clicking All apps
2. A list of apps will appear. Locate and right-click the desired app.
Right-clicking the desired app
CMP 001 49 1st Semester (2013-2014)

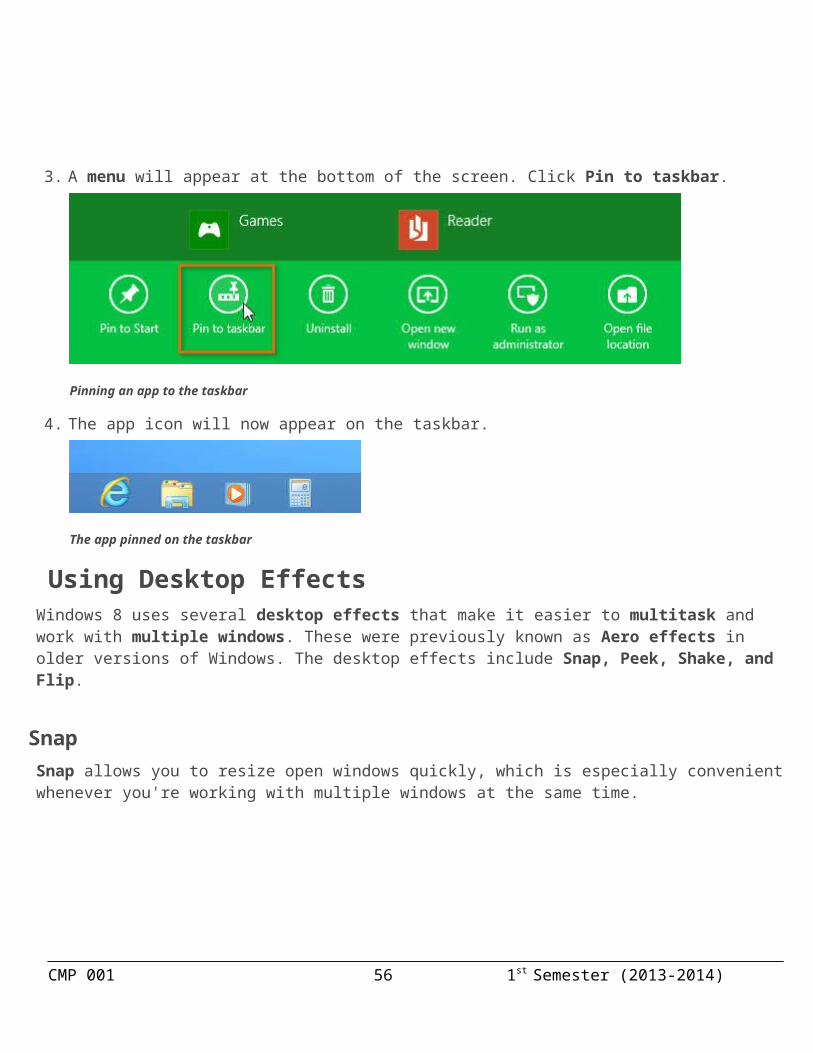
3. A menu will appear at the bottom of the screen. Click Pin to taskbar.
Pinning an app to the taskbar
4. The app icon will now appear on the taskbar.
The app pinned on the taskbar
Using Desktop EffectsWindows 8 uses several desktop effects that make it easier to multitask and work with multiple windows. These were previously known as Aero effects in older versions of Windows. The desktop effects include Snap, Peek, Shake, and Flip.
SnapSnap allows you to resize open windows quickly, which is especially convenient whenever you're working with multiple windows at the same time.
Overlapping windows
CMP 001 50 1st Semester (2013-2014)

Side-by-side Snap view
1. Click, hold and drag the desired window to the left or right until the cursor reaches the edge of the screen.
2. Release the mouse. The window will snap into place.
3. To unsnap a window, click and drag the window down, then release the mouse.
Snapping a window to one side of the screen
CMP 001 51 1st Semester (2013-2014)

You can also use Snap to maximize a window. Simply click and drag the window until the cursor reaches the top of the screen, then release the mouse.
PeekYou can view your open windows on the taskbar by using Peek. Simply hover the mouse over an icon in the taskbar and a thumbnail preview of open windows will appear.
Viewing a thumbail preview with Peek
1. Hover the mouse over the window in the thumbnail preview. A full-sized version of the window will appear.
2. Select the thumbnail preview to open the window or click the X to close the window from Peek view.
Previewing a full-sized window from Peek view
CMP 001 52 1st Semester (2013-2014)

ShakeWhen your desktop is cluttered with open windows, you can use Shake to select a single window and minimize the rest.
Multiple windows cluttering the desktop
Shaking to view a single window
1. Locate and select the window you wish to focus on.
2. Gently shake the window back and forth. All other windows will be minimized.
3. Shake the window again and the minimized windows will reappear.
FlipYou can use Flip to scroll through a preview of your open windows. Any apps open on the Start screen will also appear in the Flip preview. While Snap, Peek, and Shake are designed to work exclusively in the Desktop view, Flip works the same way in both the Start screen and Desktop views.
CMP 001 53 1st Semester (2013-2014)

1. Press and hold the Alt key and then press Tab. The Flip preview will appear.
2. While holding the Alt key, scroll through the open windows by pressing Tab.
3. Stop on the window or app you wish to select. The chosen window or app will appear.
Flipping through open apps
Taskbar FeaturesThe taskbar includes several features that make it easier to view and manage desktop apps.
To Show the Desktop:If you want to see the desktop, you can click the lower-right corner of the screen to minimize all open windows.
CMP 001 54 1st Semester (2013-2014)

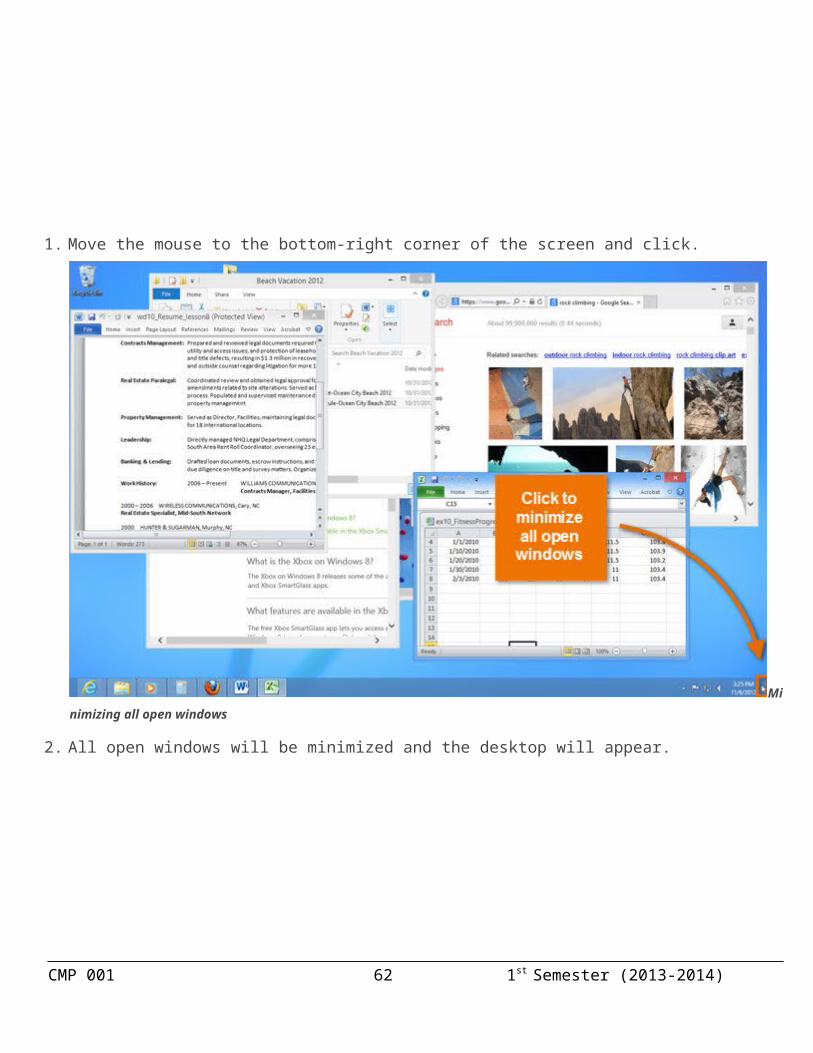
1. Move the mouse to the bottom-right corner of the screen and click.
Minimizing all open windows
2. All open windows will be minimized and the desktop will appear.
The Desktop with all open windows minimized
CMP 001 55 1st Semester (2013-2014)
3. Click the bottom-right corner again to restore the minimized windows.
To Access a Jump List:A Jump List is like a mini-menu that you can open from the taskbar. It allows quick access to recent files, frequently viewed items, performance tasks, and more. For example, you might open frequently used websites with just a few clicks from the Internet Explorer Jump List.
Right-click an app icon in the taskbar to open a Jump List.
The Jump List for Internet Explorer
CMP 001 56 1st Semester (2013-2014)

Managing Your Files and FoldersYou can easily manage your files and folders using File Explorer in the Desktop view. In this lesson, you’ll learn how to view, organize, and search for files with File Explorer
File ExplorerFile Explorer (previously known as Windows Explorer) allows you to open, access, and rearrange your files and folders in Desktop view. If you've used prior versions of Windows before, File Explorer should feel like a familiar way to manage and organize your files.
Click the folder icon on the taskbar in Desktop view to open File Explorer.
Opening File Explorer
CMP 001 57 1st Semester (2013-2014)

To Change the Content View:The View tab makes it easy to change the way files are displayed within a folder. For example, you may prefer to see your files as a list when viewing documents and as large icons when viewing pictures.
Select the View tab and then choose your preference from the Layout group.
Changing the content view from the View tab
CMP 001 58 1st Semester (2013-2014)

To Sort Files:Depending on the folder, you may also want to sort your files. For example, you can sort files by size, name, date created, date modified, file type, and much more.
Select the View tab, click the Sort by button and then choose your preference from the drop-down menu.
Sorting files by size
Searching with File ExplorerIn addition to the Search feature found on the Charms bar, you can also search for files directly from File Explorer using the Search bar. File Explorer also offers more advanced search options, which can be especially helpful if you're having trouble finding a specific file.
CMP 001 59 1st Semester (2013-2014)

To Use the Search Bar:1. Locate and select the Search bar in File Explorer.2. Enter a file name or keyword. Your search results will appear as you type.
Searching for a file
CMP 001 60 1st Semester (2013-2014)

The Search Tools TabWhenever you enter a term into the search bar, the Search Tools tab will open automatically on the Ribbon. This tab gives you access to advanced search options, which allow you to limit your search by file type, size and date modified, view your recent searches, and more.
The
Search Tools tab
CMP 001 61 1st Semester (2013-2014)
Personalizing Your DesktopWindows 8 makes it easy to customize the look and feel of the Desktop view. In this lesson, you'll learn how to access the Personalization pane, which allows you to customize the theme, background image, and color of your Desktop. You'll also learn how to adjust your font size and text display.
Any changes you make to the appearance of the Desktop will not affect the Start screen.
To access the Personalization pane, right-click anywhere on the Desktop and then select Personalize from the drop-down menu. The Personalization pane will appear.
Accessing the Personalization pane
CMP 001 62 1st Semester (2013-2014)

CMP 001 63 1st Semester (2013-2014)