configure ms exchange integration with penelope for … · athena software last updated: february...
TRANSCRIPT

ATHENA SOFTWARE Last updated: February 10, 2015
penelope CONFIGURE MS EXCHANGE INTEGRATION WITH PENELOPE FOR OFFICE 365 (SELF-HOSTED)
enabling the ms exchange feature in penelope THE BASICS The MS Exchange feature allows you to push calendar information from Penelope to your agency’s Office 365. If you enable this feature, calendar information will appear in the Microsoft Outlook calendars of your staff.
COMPATIBILITY MS Exchange integration for Office 365 is compatible with Penelope versions 4.1.2.2 and later. If you are interested in enabling the MS Exchange feature in Penelope and you are running a version older than 4.1.2.2, please submit a ticket to our support team to request the upgrade.
process flow: enabling the ms exchange feature in penelope If your Penelope database is installed on your own server, please complete the following steps: 1. Set up the Penelope server
a) Run PSQL scripts b) Install the security certificate c) Update the Resin.xml file d) Restart the Resin service
2. Set up an impersonation account in Office 365 3. Set up MS Exchange in Penelope
a) Configure your MS Exchange settings b) Update worker profiles c) Push events to MS Exchange calendar

run psql scripts

STEP 1 From the Start menu, browse to All Programs > Postgresql 9.2 > SQL Shell (psql)!
run psql scripts
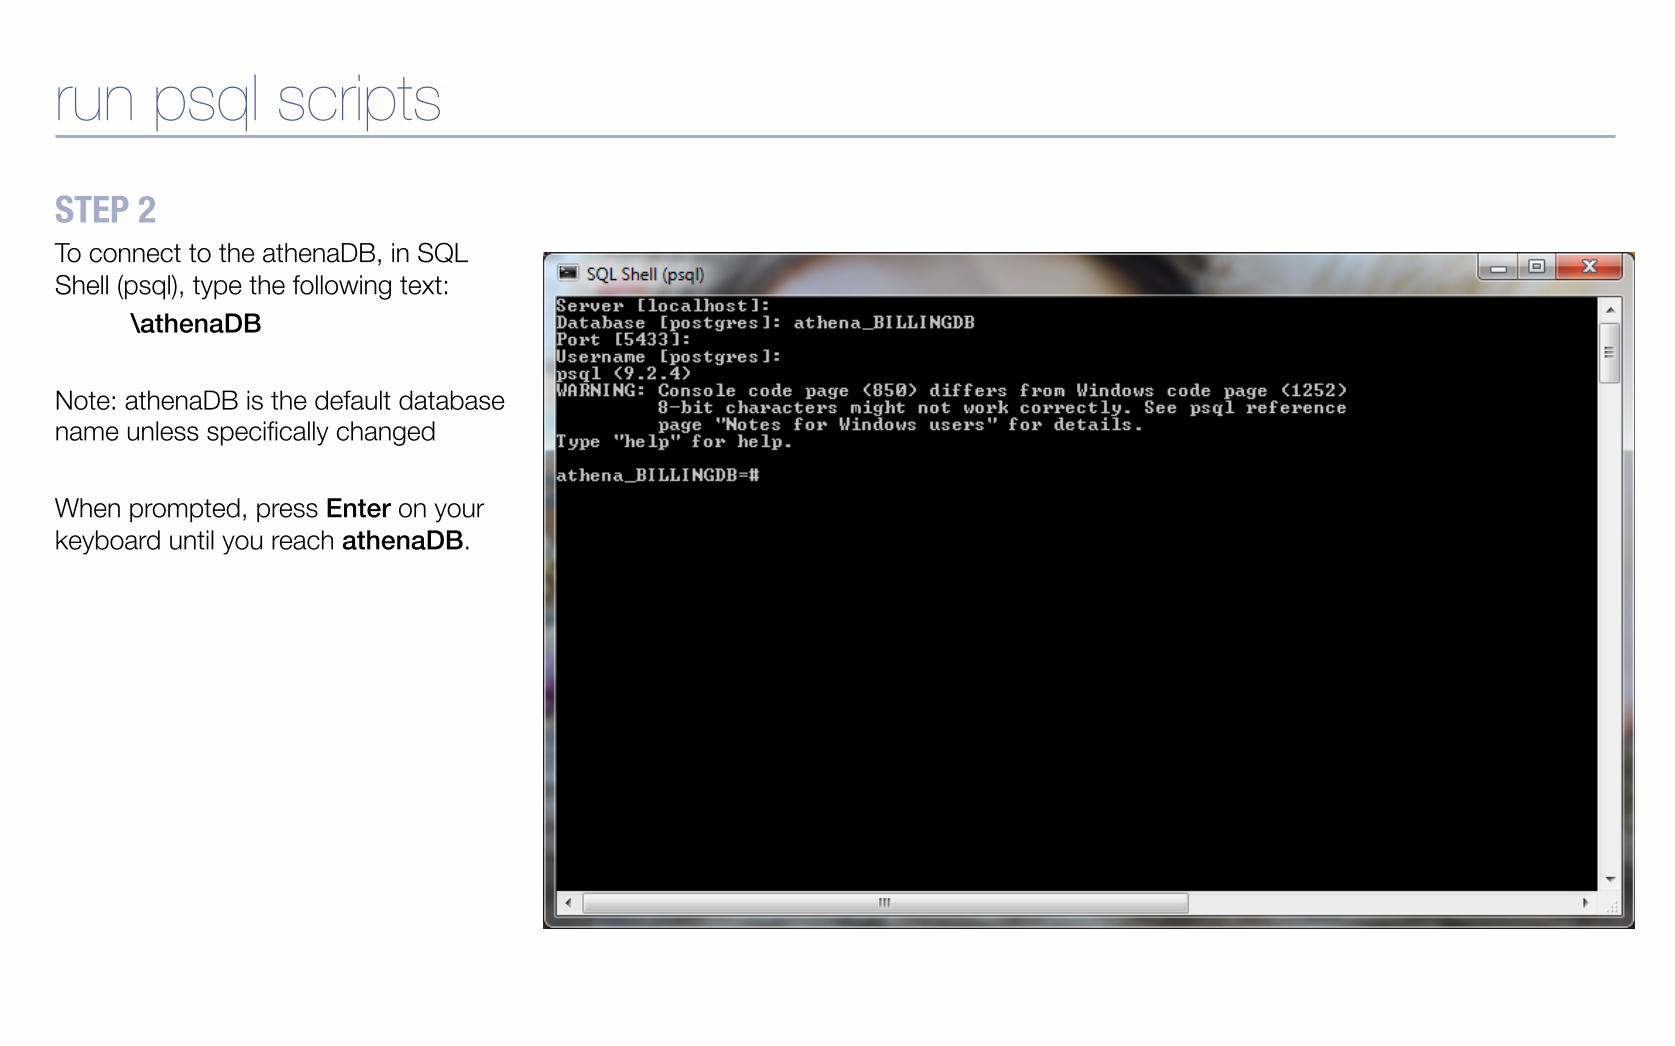
STEP 2 To connect to the athenaDB, in SQL Shell (psql), type the following text:
\athenaDB! Note: athenaDB is the default database name unless specifically changed When prompted, press Enter on your keyboard until you reach athenaDB.
run psql scripts

run psql scripts STEP 3 Type the following text: !update sssystematt set saemail = '51ghzuohvdf8@@';! Click Enter.!
STEP 5 Type the following text: !\q! Click Enter.!
STEP 4 Type the following text: !update sssystemconf set value = ’t’ where name = ‘acm.msexchange.switch’;! Click Enter.!

install the security certificate

install the security certificate STEP 1 To access the Office 365 Exchange Portal, in a web browser, browse to portal.office.com !
STEP 2 In the address bar, click the lock icon.!

install the security certificate STEP 3 Click More Information.!
STEP 4 In the Page Info window, on the Security tab, click View Certificate.!
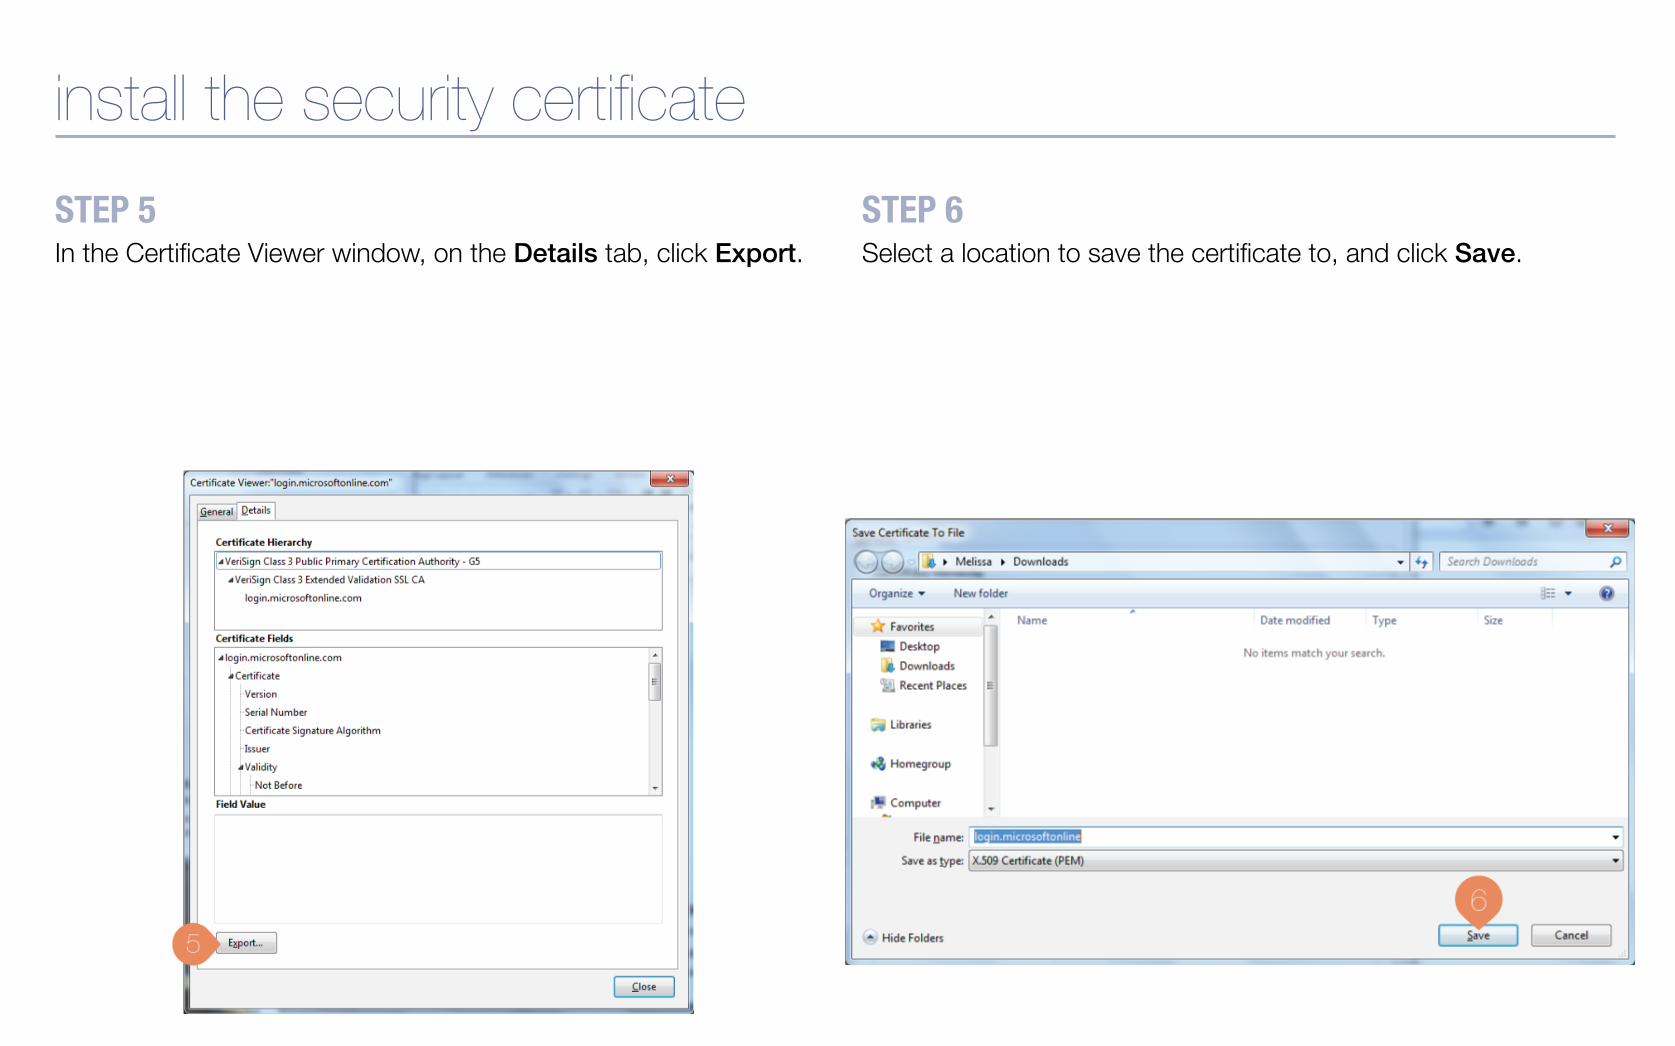
install the security certificate STEP 5 In the Certificate Viewer window, on the Details tab, click Export.!
STEP 6 Select a location to save the certificate to, and click Save.

STEP 7 Browse to Control Panel > Administrative Tools > Services.!
install the security certificate
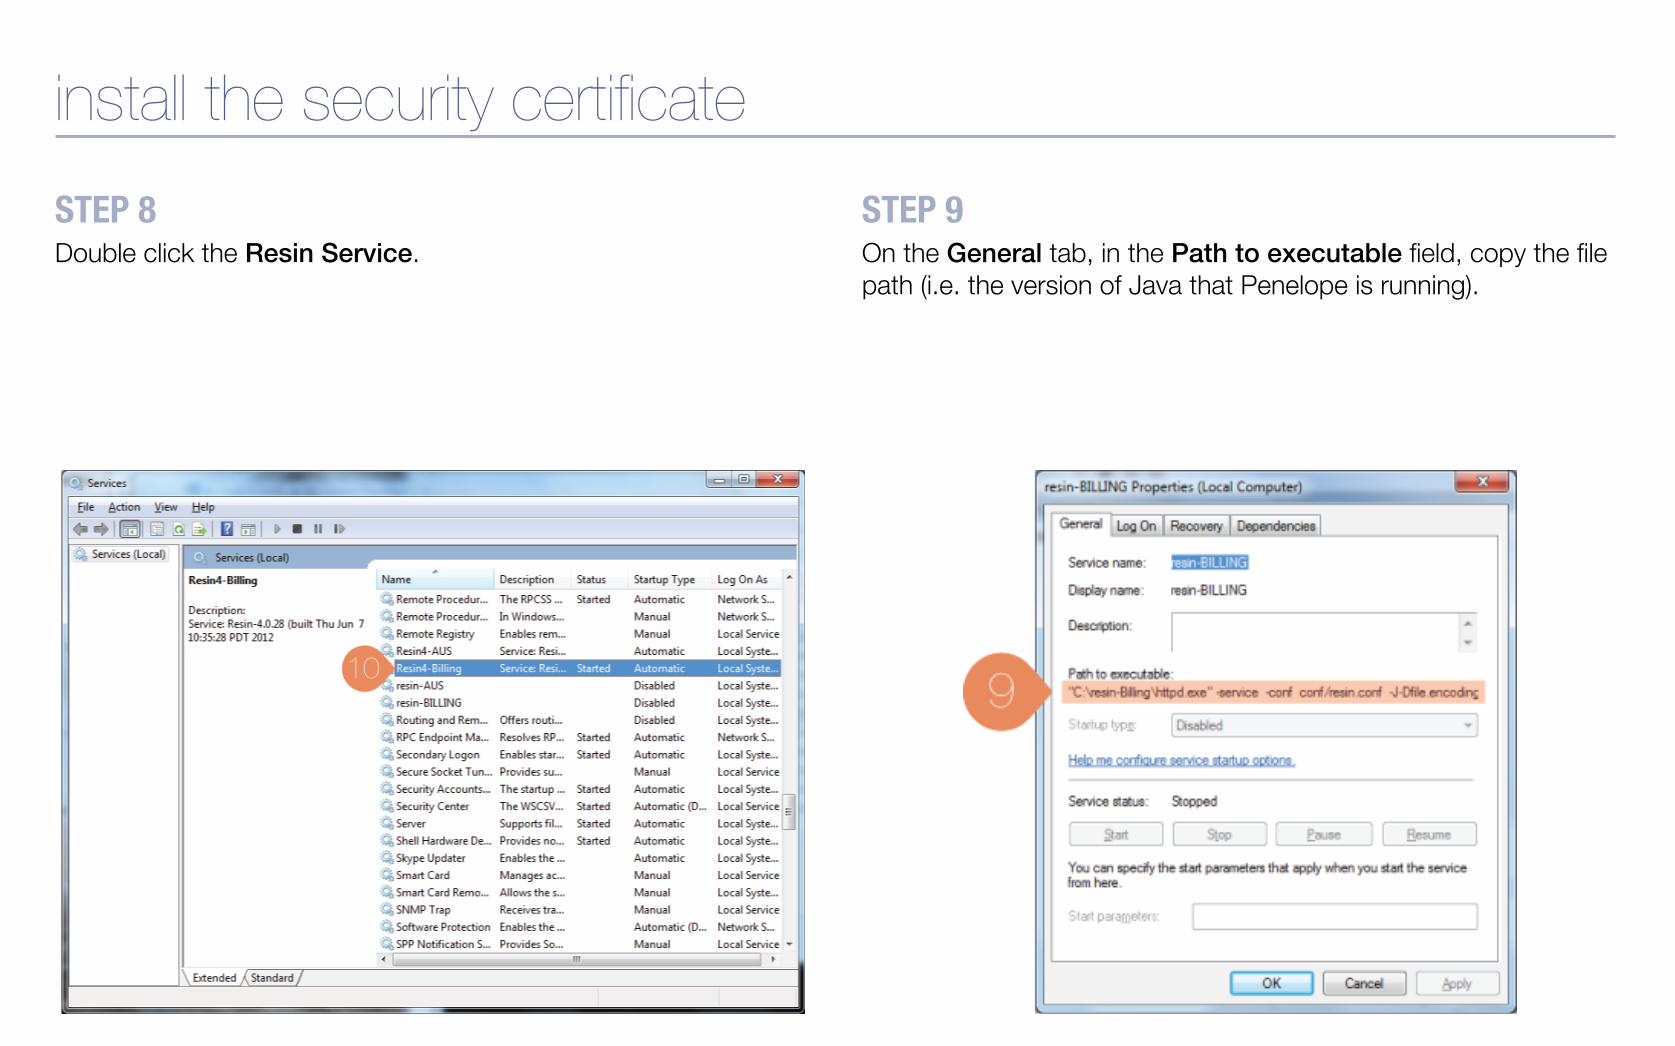
install the security certificate STEP 8 Double click the Resin Service.
STEP 9 On the General tab, in the Path to executable field, copy the file path (i.e. the version of Java that Penelope is running).

STEP 10 From the Start menu, browse to Accessories > Command Prompt.!
install the security certificate
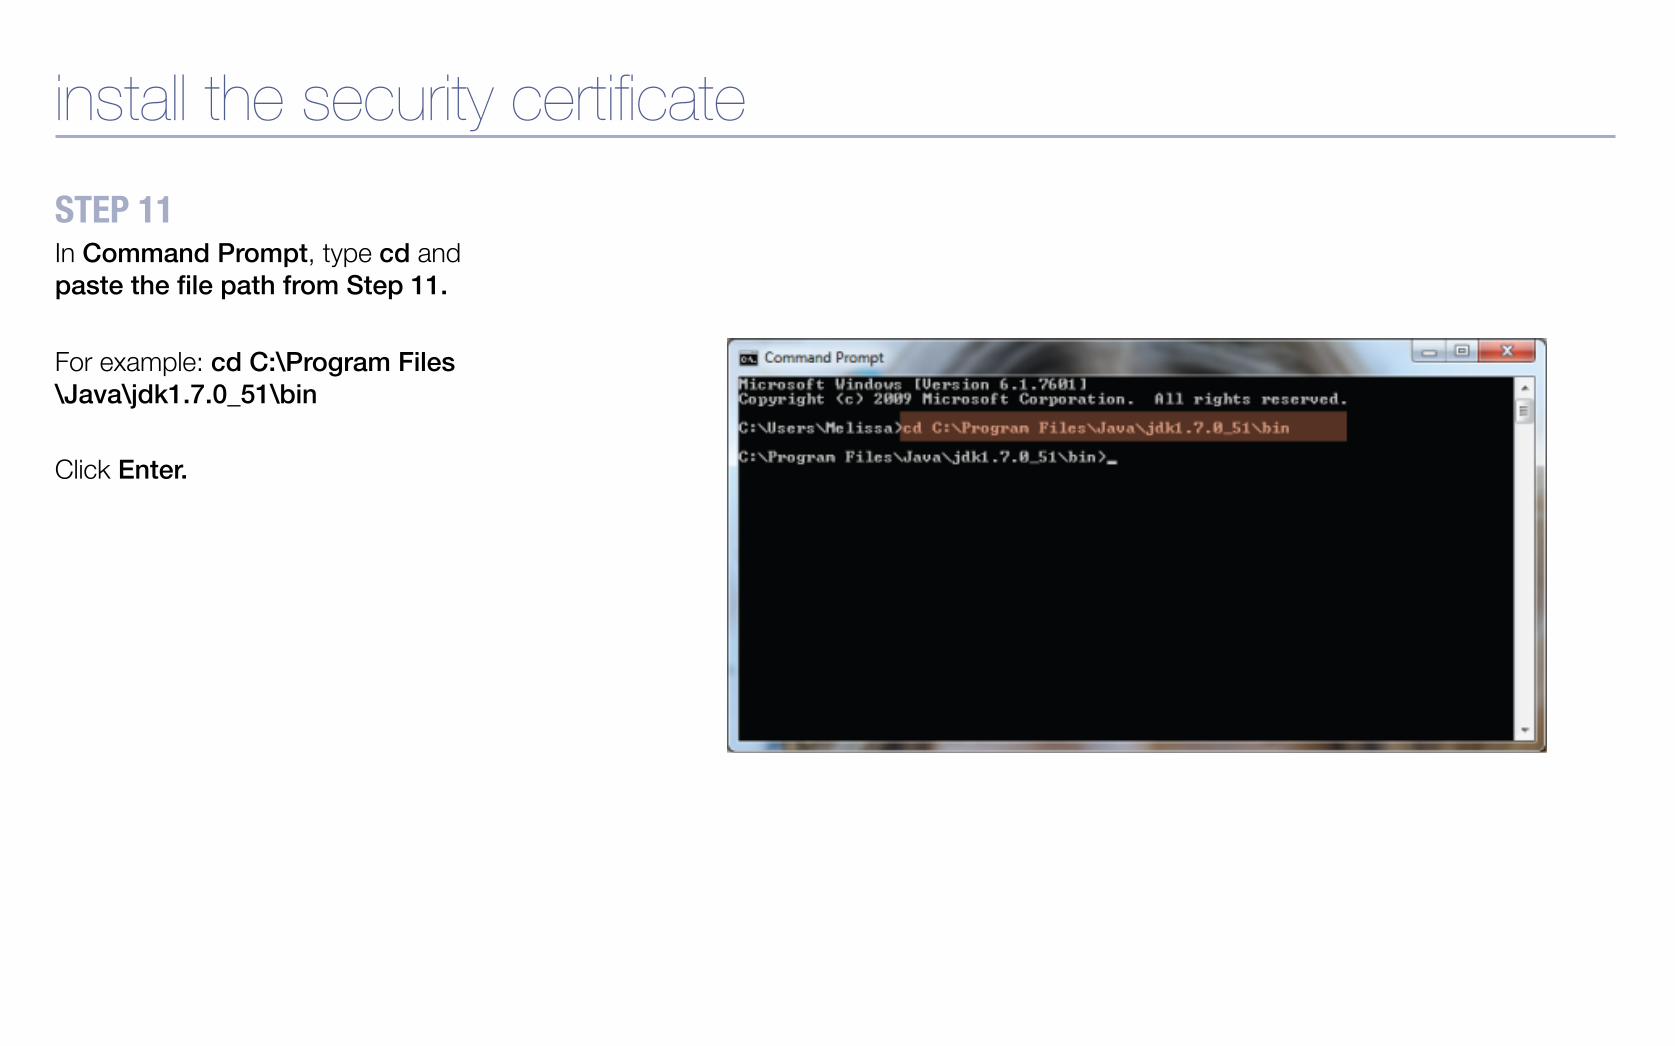
STEP 11 In Command Prompt, type cd and paste the file path from Step 11.!!For example: cd C:\Program Files\Java\jdk1.7.0_51\bin !Click Enter.!
install the security certificate
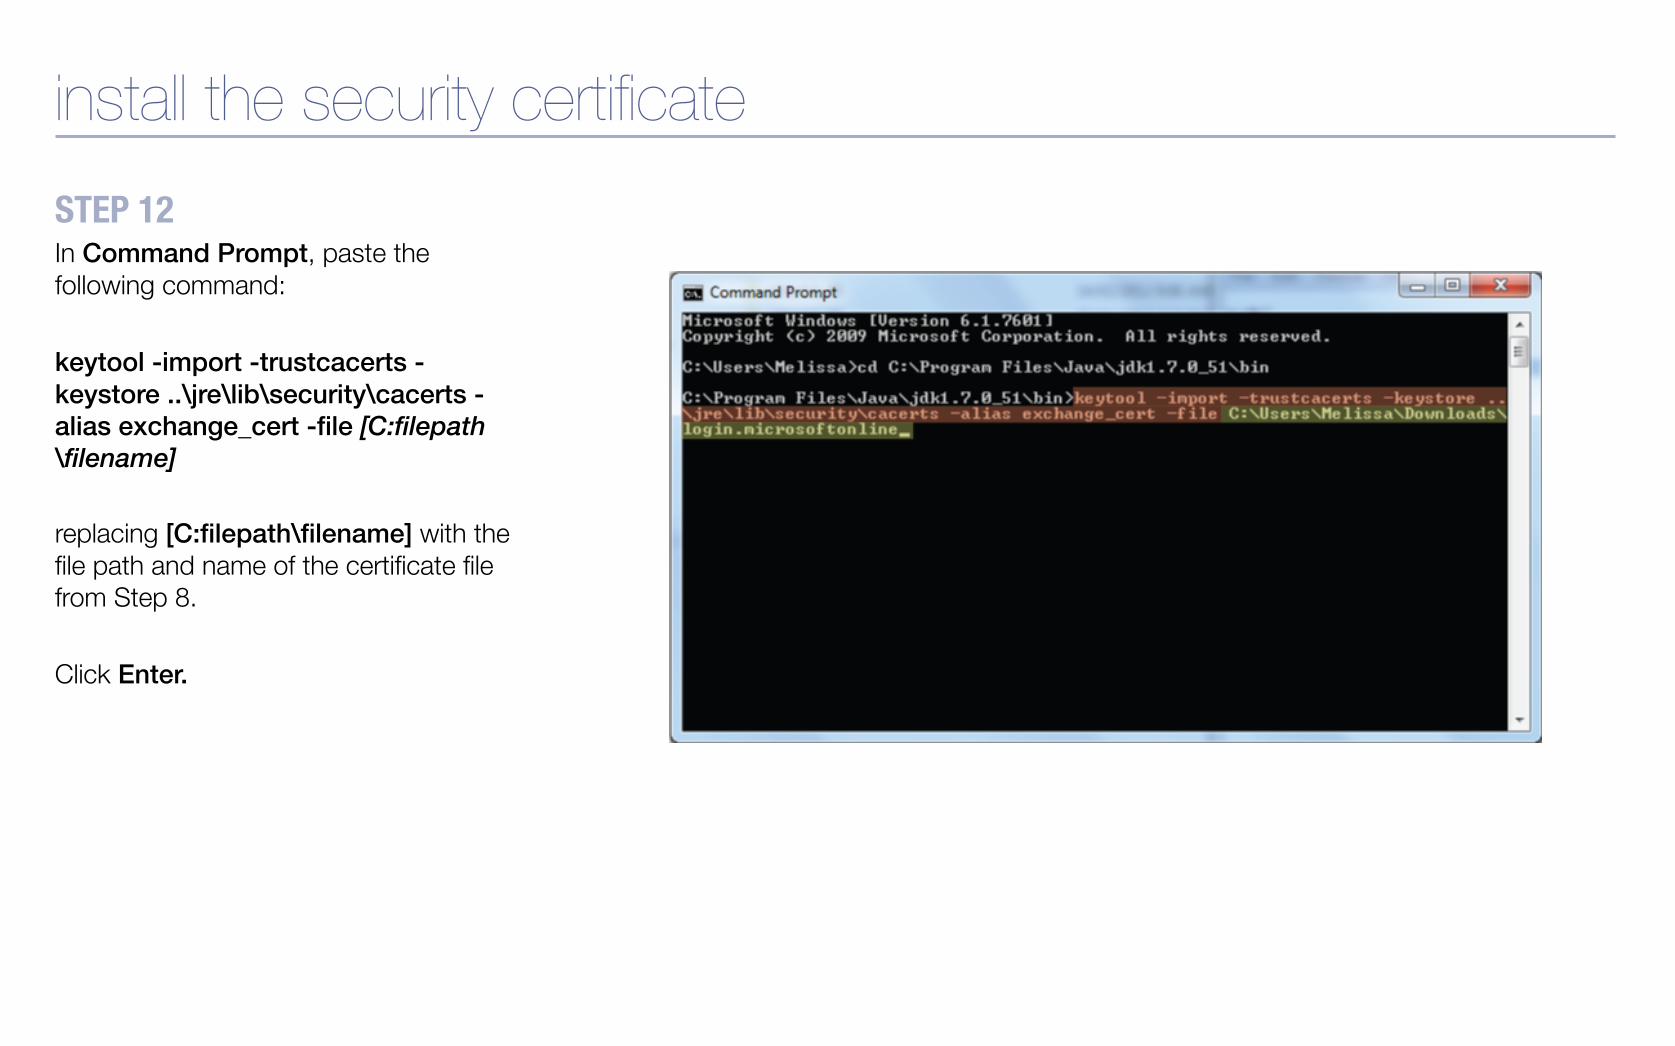
STEP 12 In Command Prompt, paste the following command: keytool -import -trustcacerts -keystore ..\jre\lib\security\cacerts -alias exchange_cert -file [C:filepath\filename] replacing [C:filepath\filename] with the file path and name of the certificate file from Step 8. Click Enter.!
install the security certificate
install the security certificate STEP 13 If prompted for a password, type your password. Note: The default password is changeit. If you changed the password after the installation of Java, type your password.

enable time synchronization

enable time synchronization STEP 1 On your server, browse to Resin > conf.
STEP 2 Open the resin.xml file.
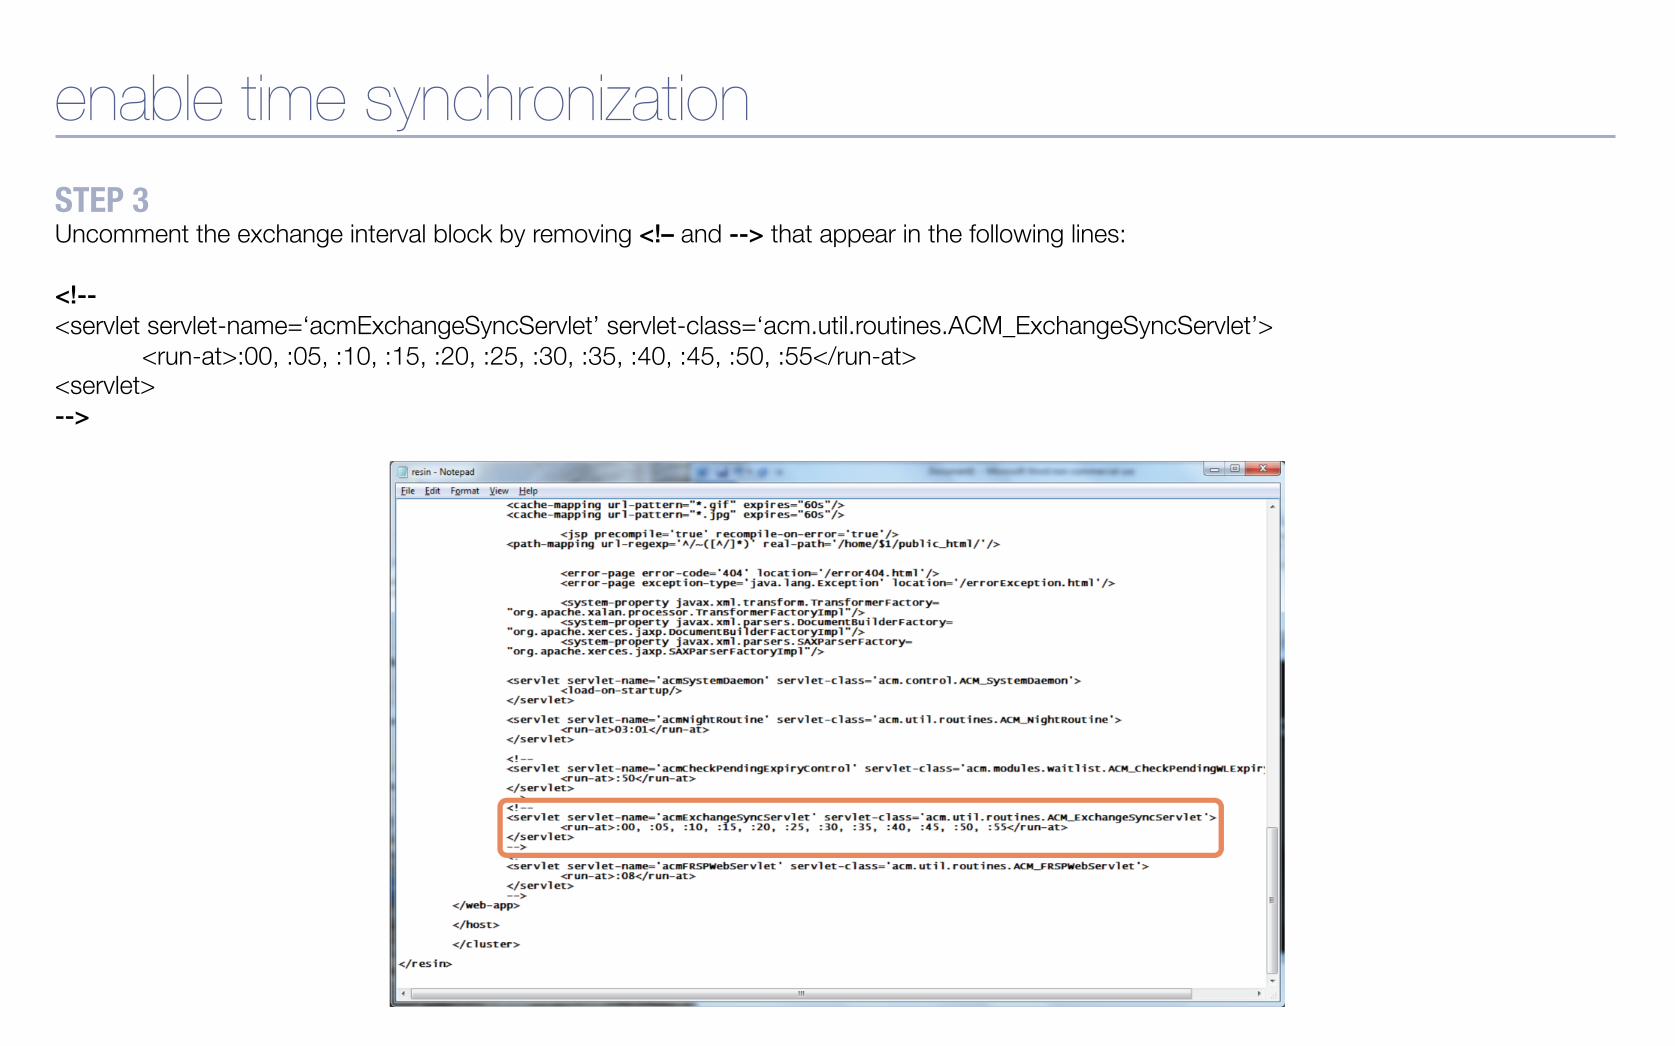
enable time synchronization STEP 3 Uncomment the exchange interval block by removing <!– and --> that appear in the following lines: <!--!<servlet servlet-name=‘acmExchangeSyncServlet’ servlet-class=‘acm.util.routines.ACM_ExchangeSyncServlet’>
<run-at>:00, :05, :10, :15, :20, :25, :30, :35, :40, :45, :50, :55</run-at> <servlet> -->!

enable time synchronization STEP 4 Save your changes to the resin.xml file.!

restart resin

STEP 1 Browse to Control Panel > Administrative Tools > Services.!
restart resin
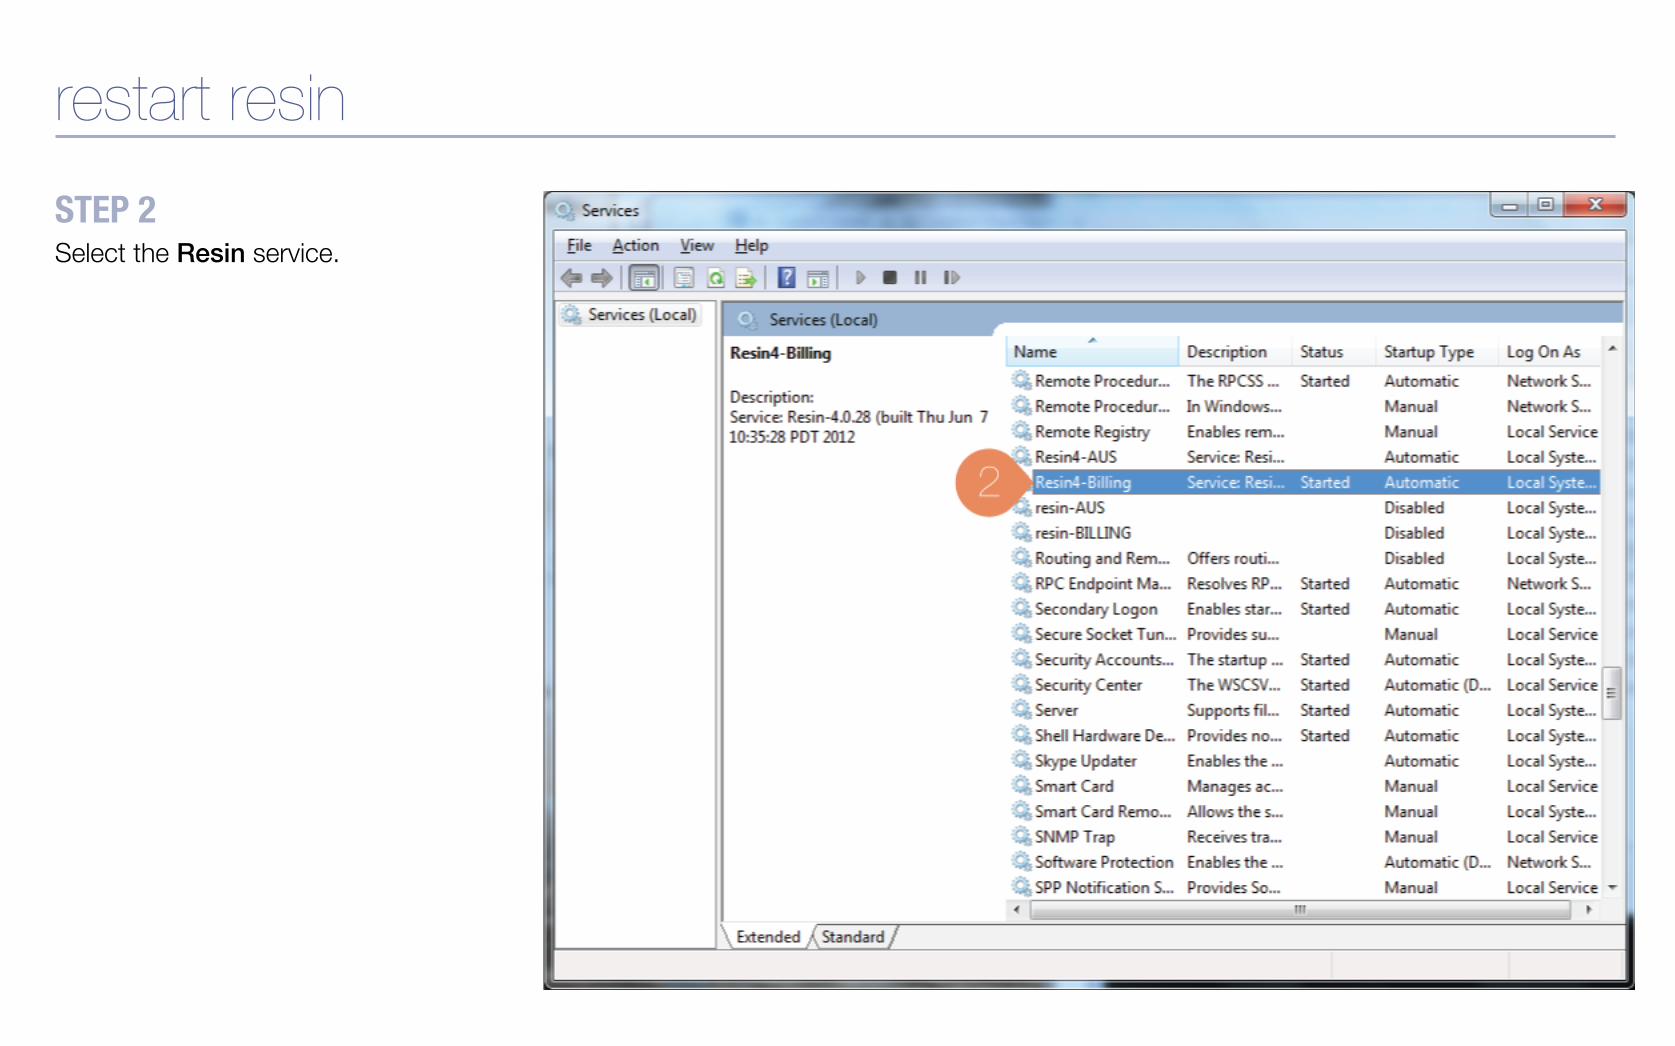
STEP 2 Select the Resin service.
restart resin

restart resin STEP 3 To stop Resin, click Stop.
STEP 4 To restart Resin, click Start.
set up an impersonation account in office 365
set up an impersonation account THE BASICS An impersonation account is a special type of account in MS Exchange that has read (view all) and write (add, delete and modify) privileges for other accounts in Exchange. When Penelope pushes scheduling data to Office 365, the impersonation account takes that information and impersonates each worker in Office 365 in order to push the information to their calendars. It is very important that you guard the credentials for your impersonation account.
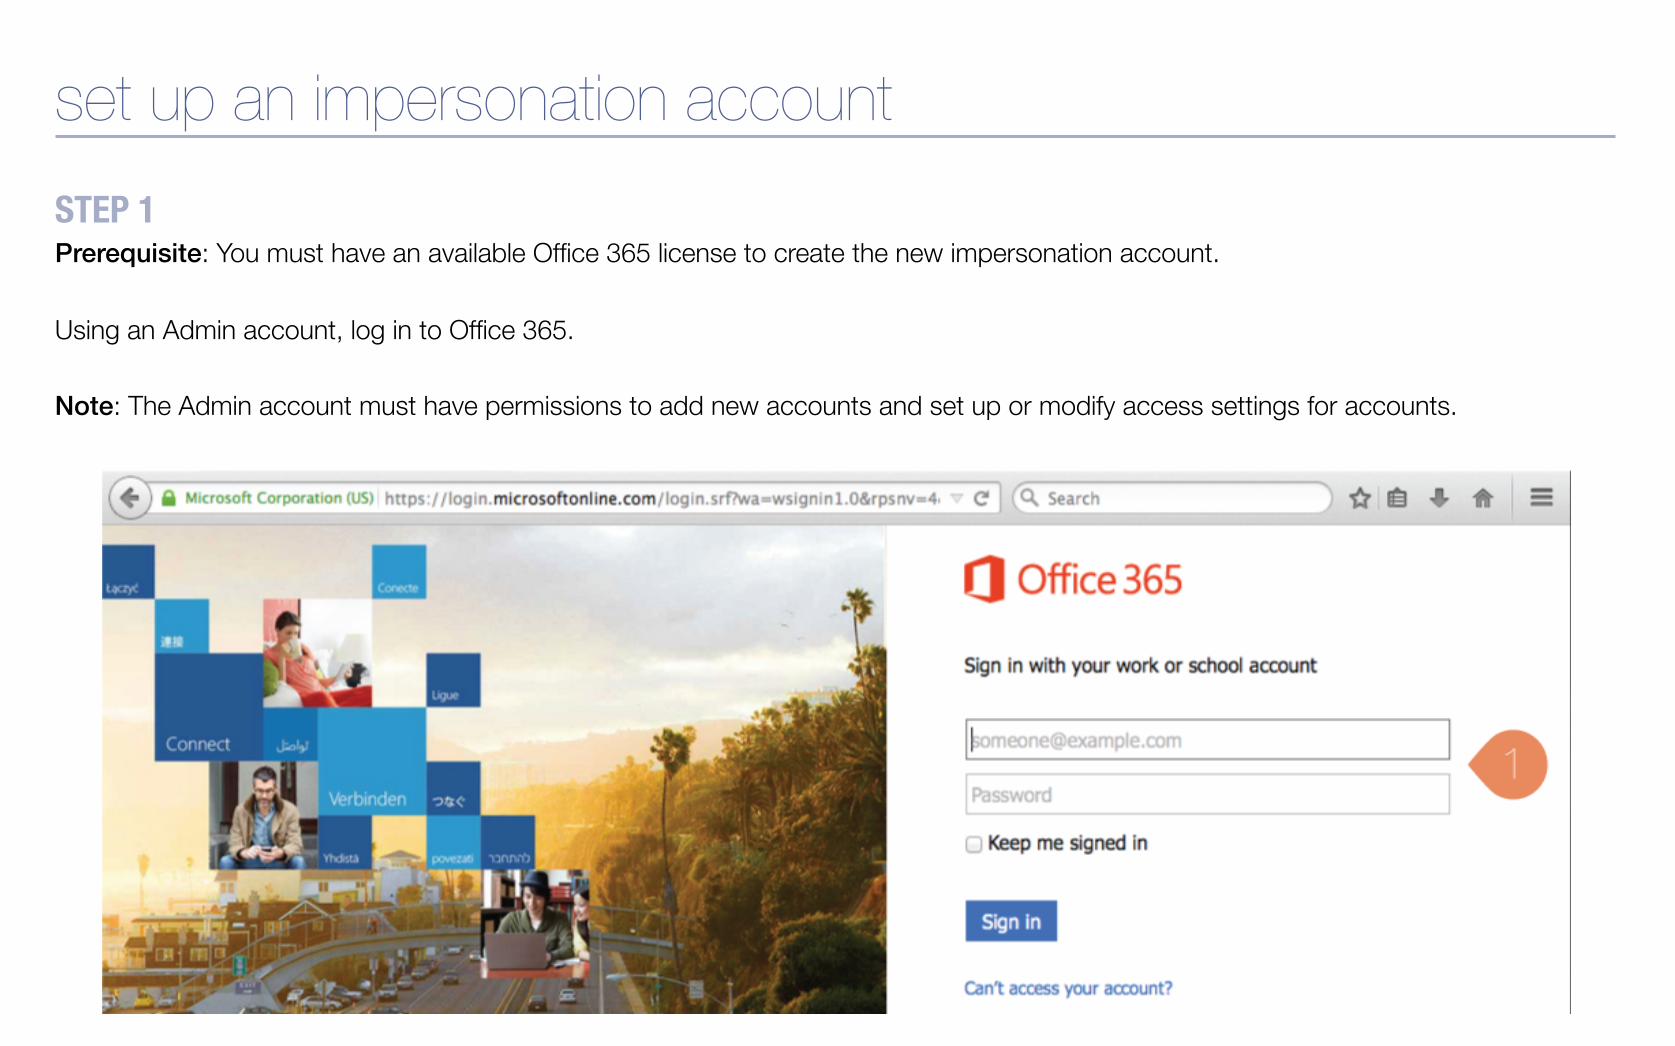
set up an impersonation account STEP 1 Prerequisite: You must have an available Office 365 license to create the new impersonation account. Using an Admin account, log in to Office 365. Note: The Admin account must have permissions to add new accounts and set up or modify access settings for accounts.

STEP 2 In the users and groups section, click Add new users.
set up an impersonation account
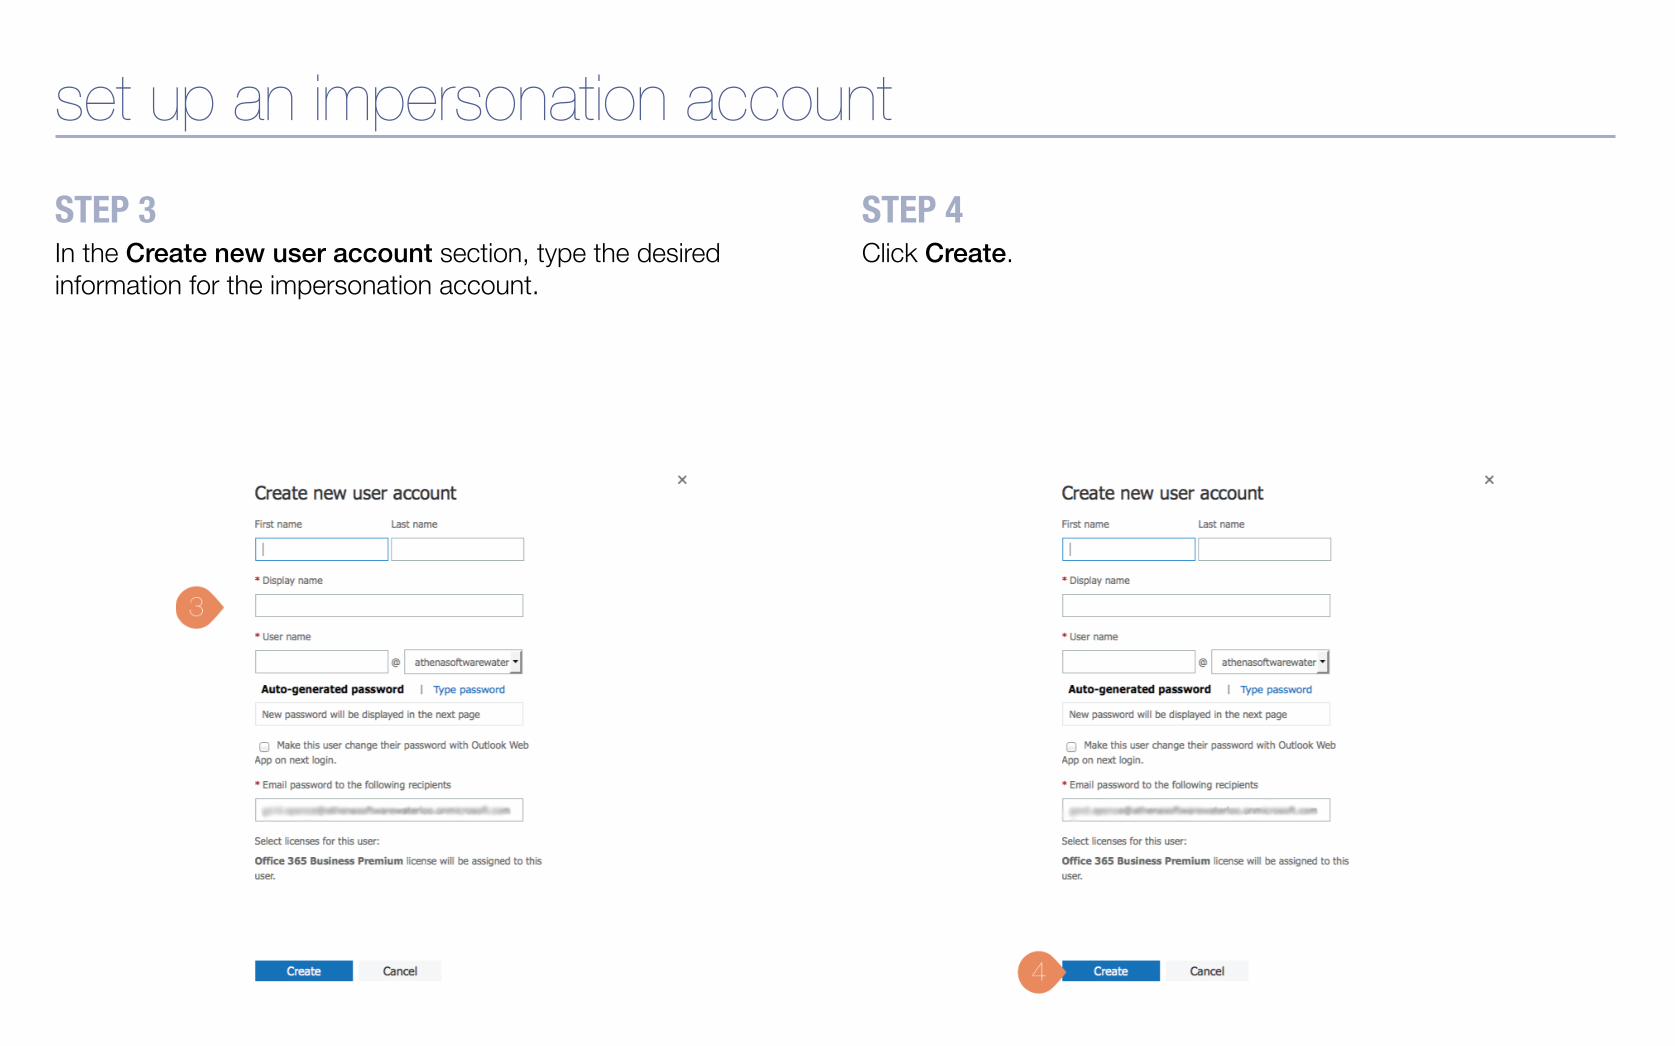
set up an impersonation account STEP 3 In the Create new user account section, type the desired information for the impersonation account.
STEP 4 Click Create.
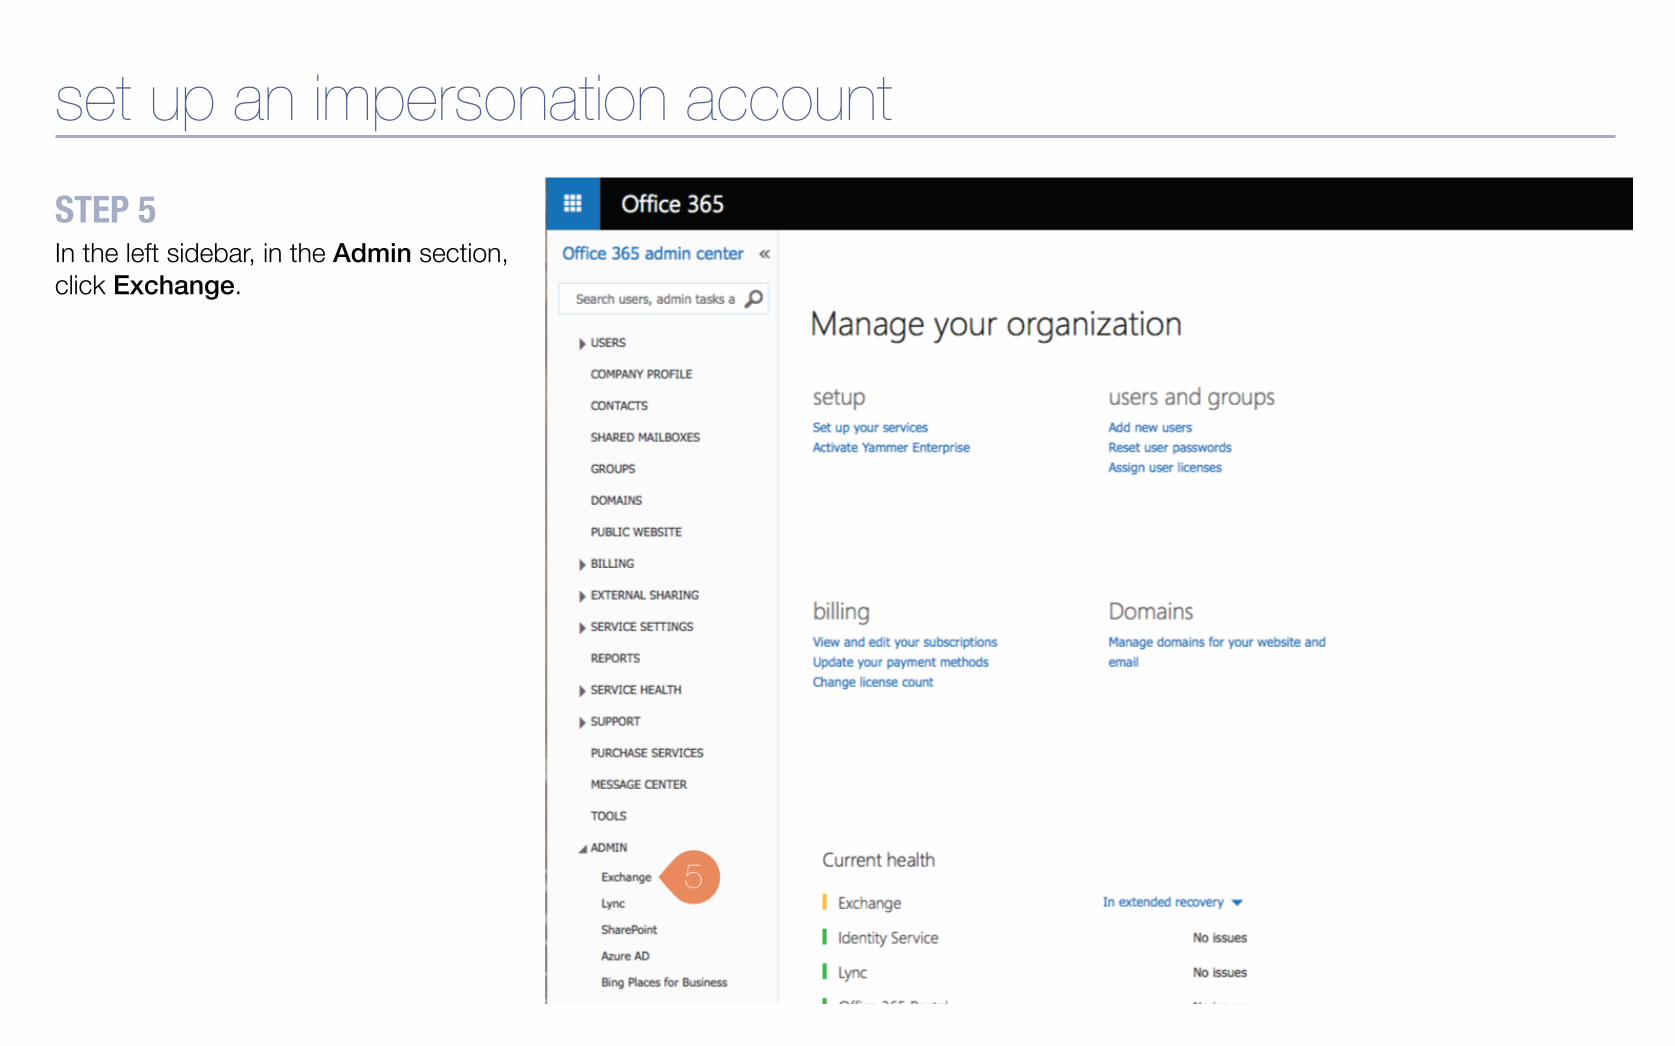
STEP 5 In the left sidebar, in the Admin section, click Exchange.
set up an impersonation account
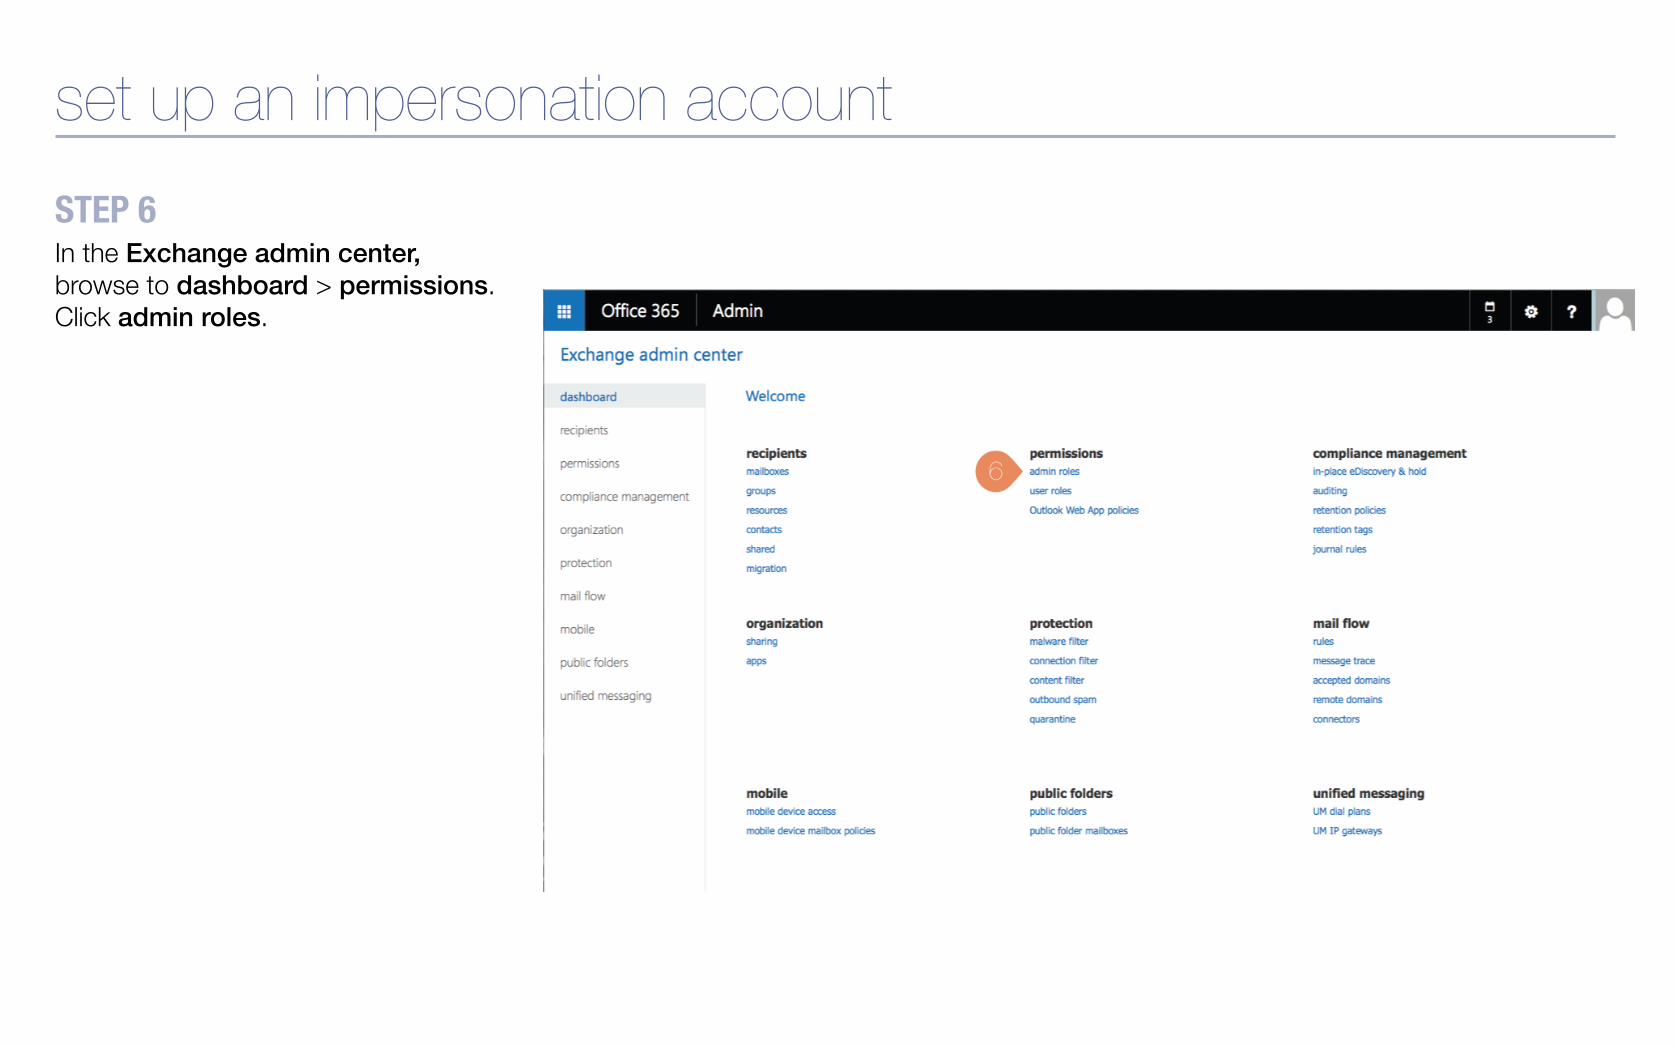
STEP 6 In the Exchange admin center, browse to dashboard > permissions. Click admin roles.
set up an impersonation account
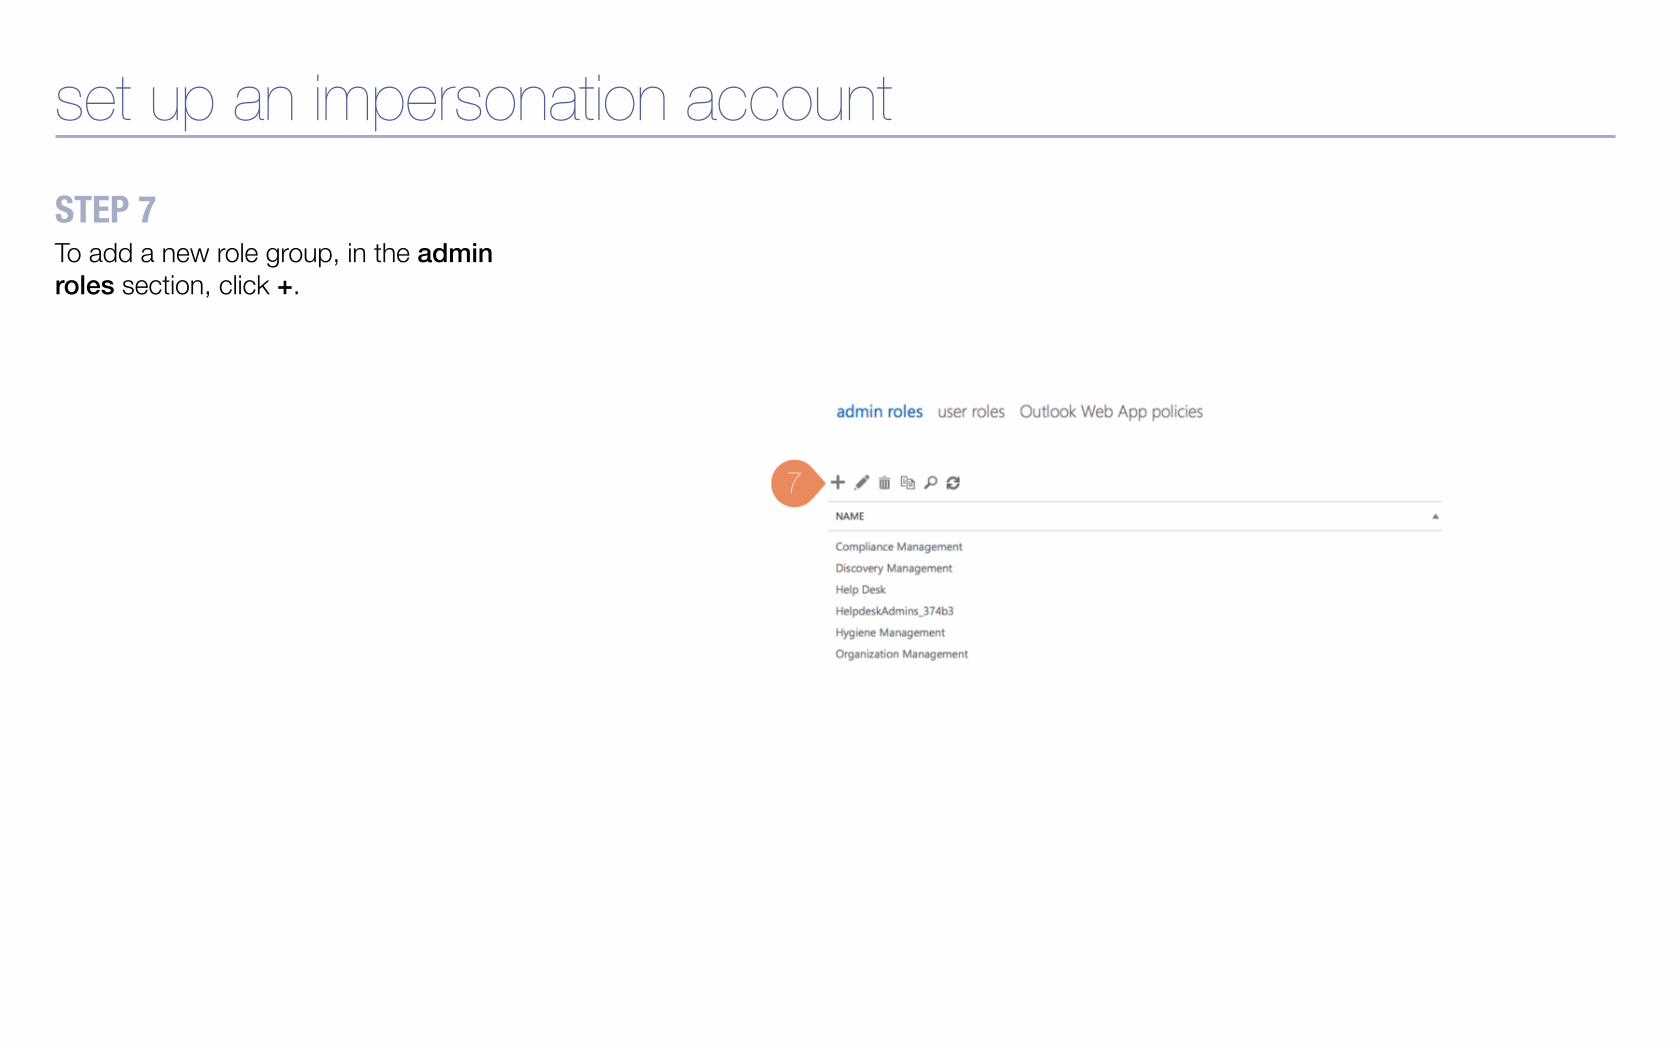
STEP 7 To add a new role group, in the admin roles section, click +.
set up an impersonation account

STEP 8 To give the impersonation account the ApplicationImpersonation role, type the following information:
a) In the Name field, type what you would like the role group name to be. For example, Penelope Impersonation.
b) Unless desired, leave the Description field blank.
c) From the Write scope drop-down list, select Default.
d) In the Roles section, click + and select ApplicationImpersonation.!
e) In the Members section, click + and select the impersonation account that you just set up.
STEP 9 Click Save.
set up an impersonation account
set up an impersonation account STEP 10 Ensure the credentials that you set up are working by logging out of the admin account and logging back into Office 365 using the impersonation account. You will require the impersonation account credentials to configure the MS Exchange feature in Penelope.

set up ms exchange in penelope
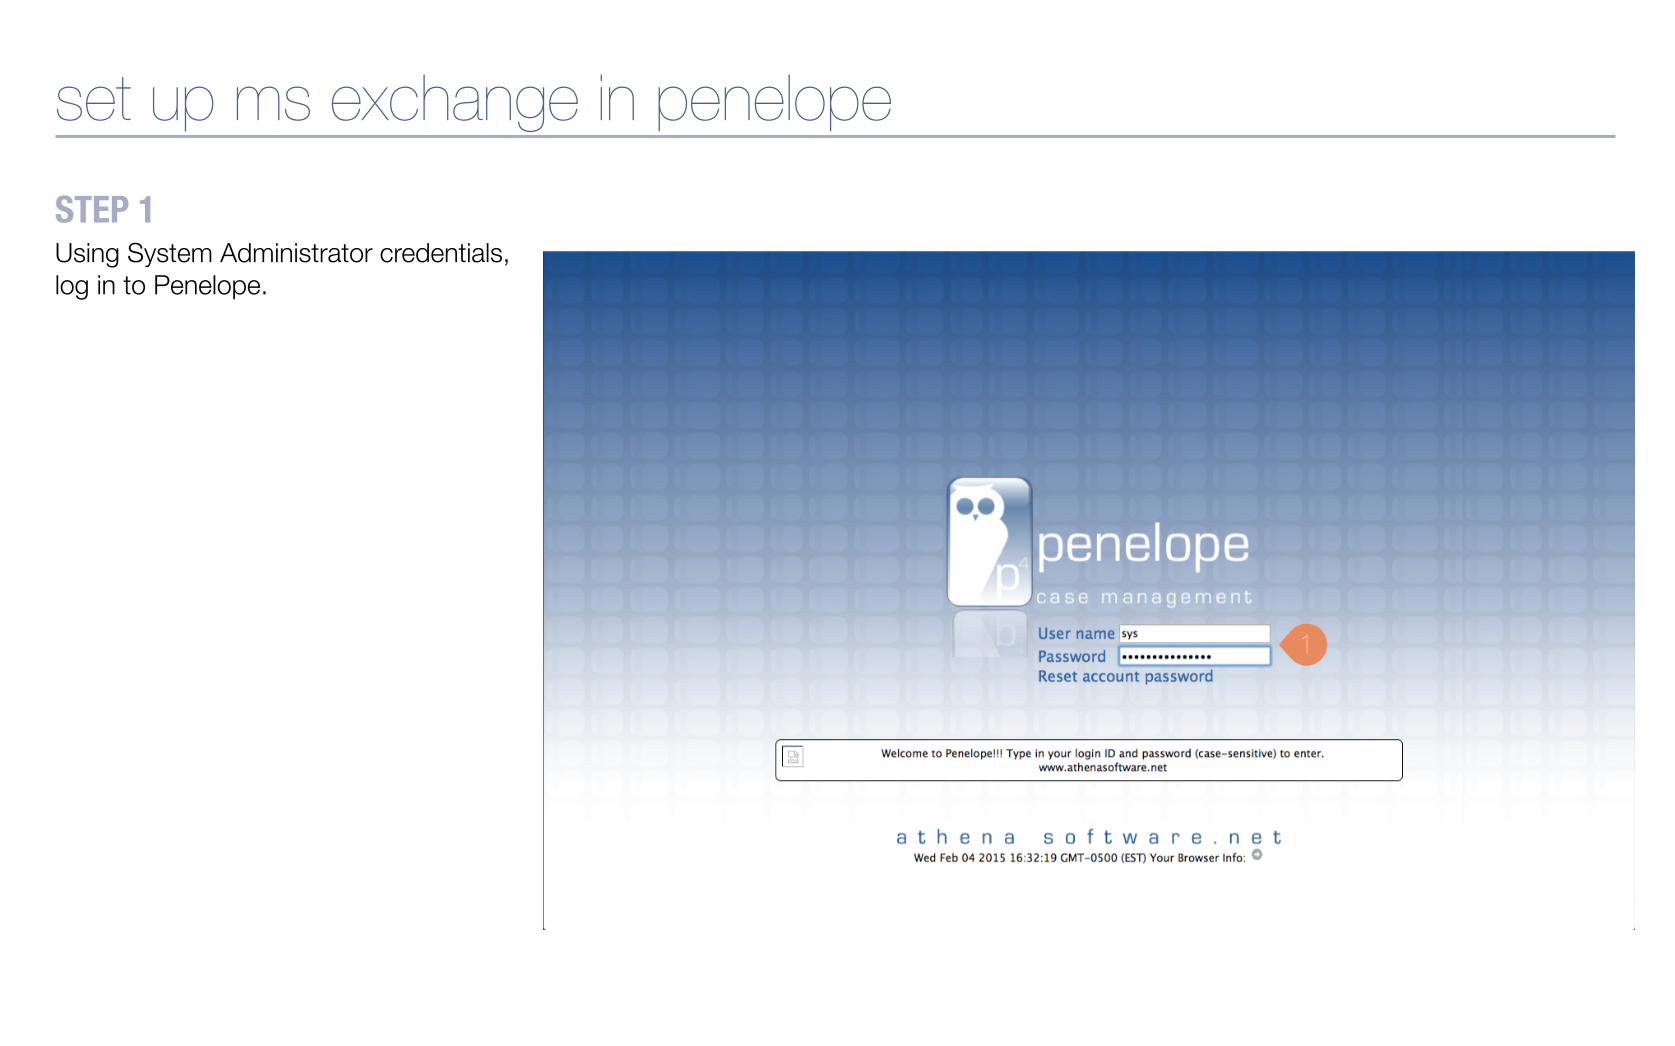
STEP 1 Using System Administrator credentials, log in to Penelope.
set up ms exchange in penelope
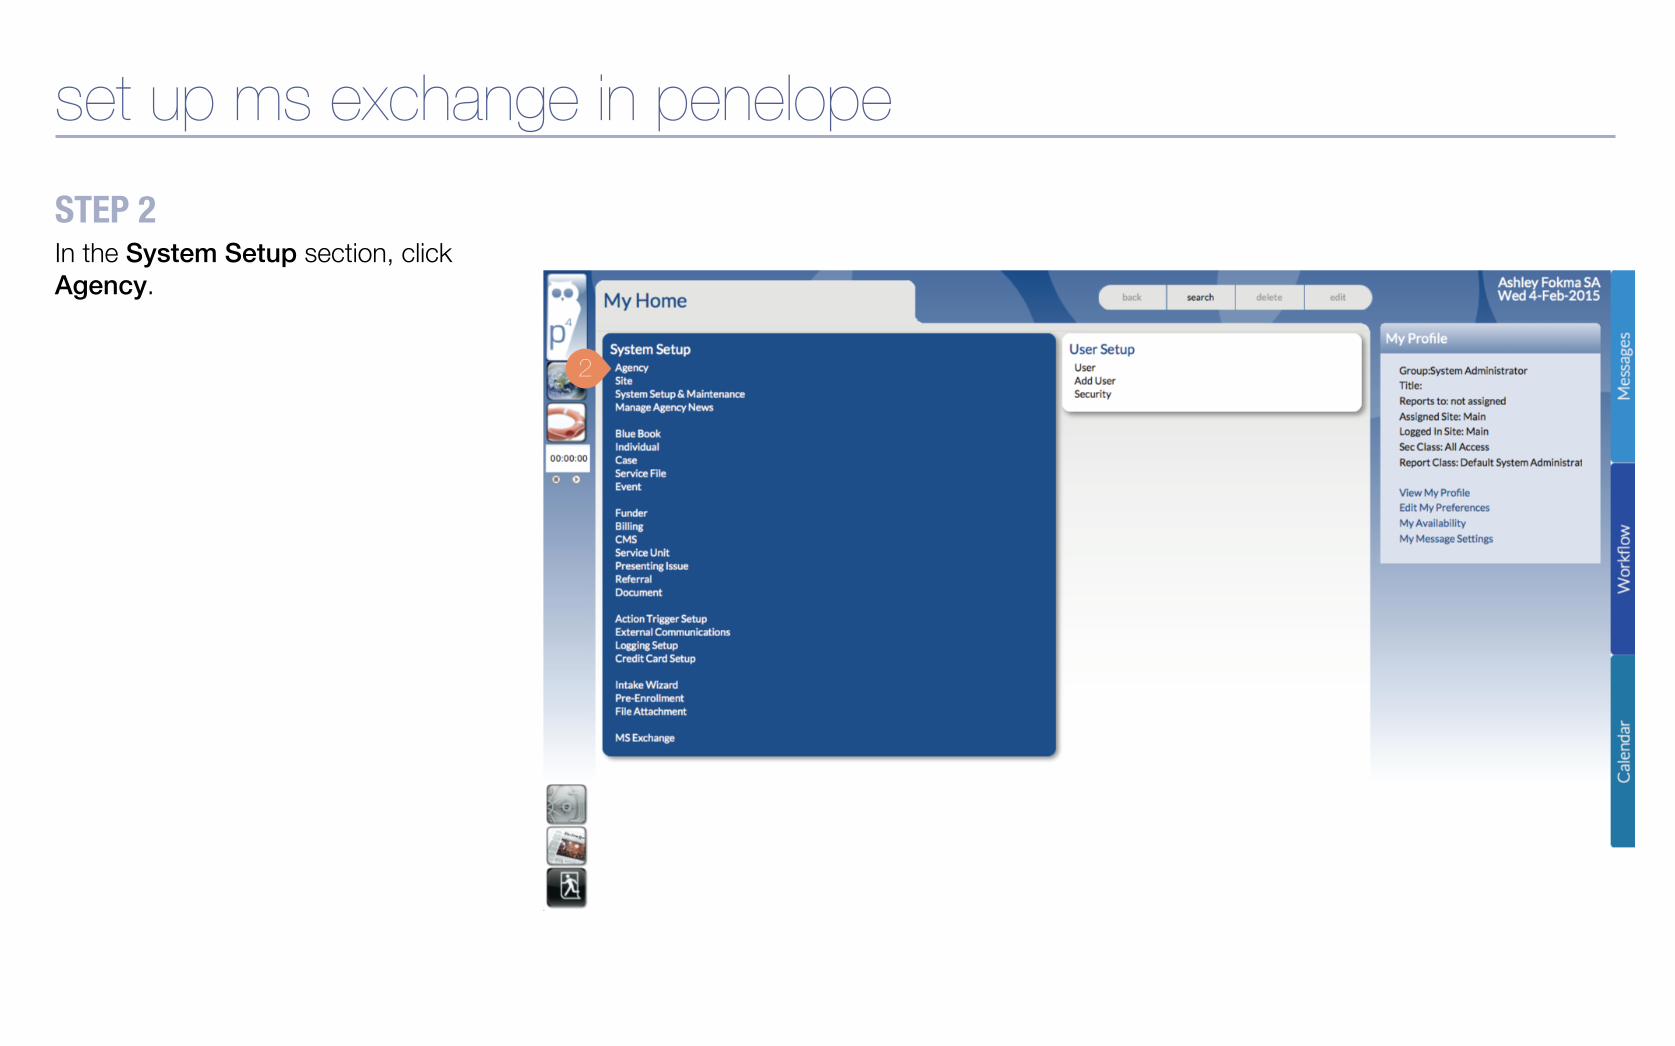
STEP 2 In the System Setup section, click Agency.
set up ms exchange in penelope
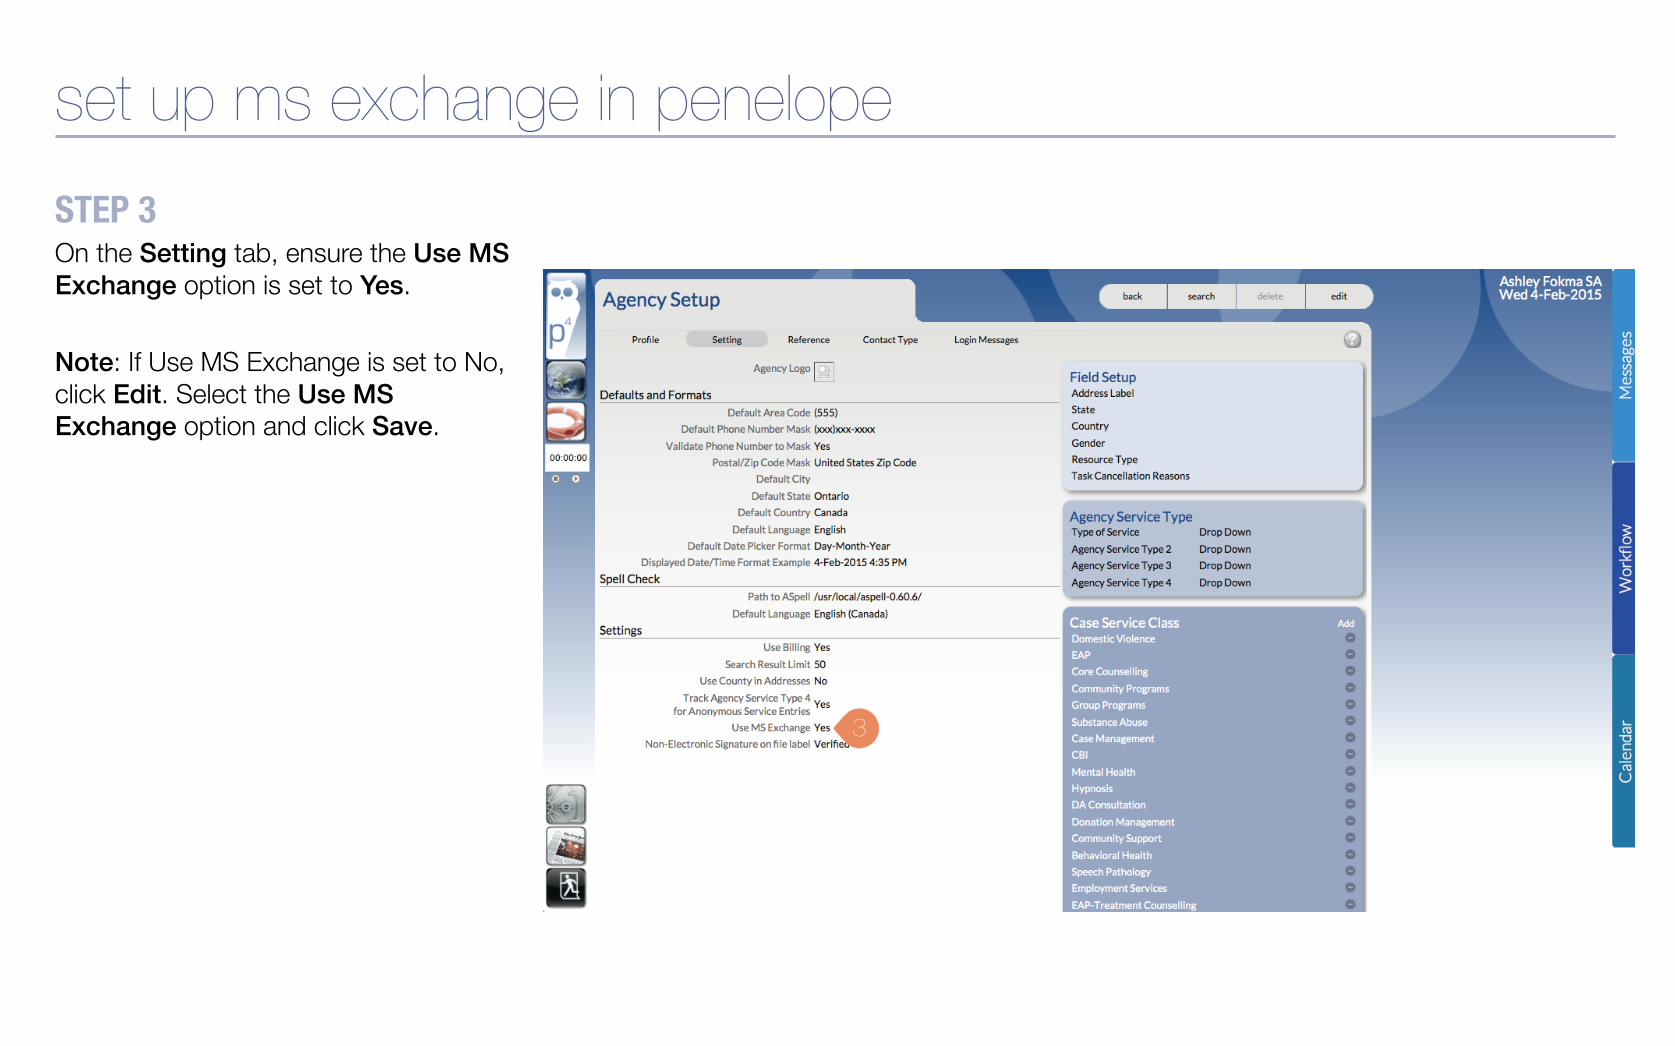
STEP 3 On the Setting tab, ensure the Use MS Exchange option is set to Yes. !Note: If Use MS Exchange is set to No, click Edit. Select the Use MS Exchange option and click Save.
set up ms exchange in penelope

STEP 4 On the homepage, click MS Exchange.
set up ms exchange in penelope

STEP 5 Click Edit.
set up ms exchange in penelope
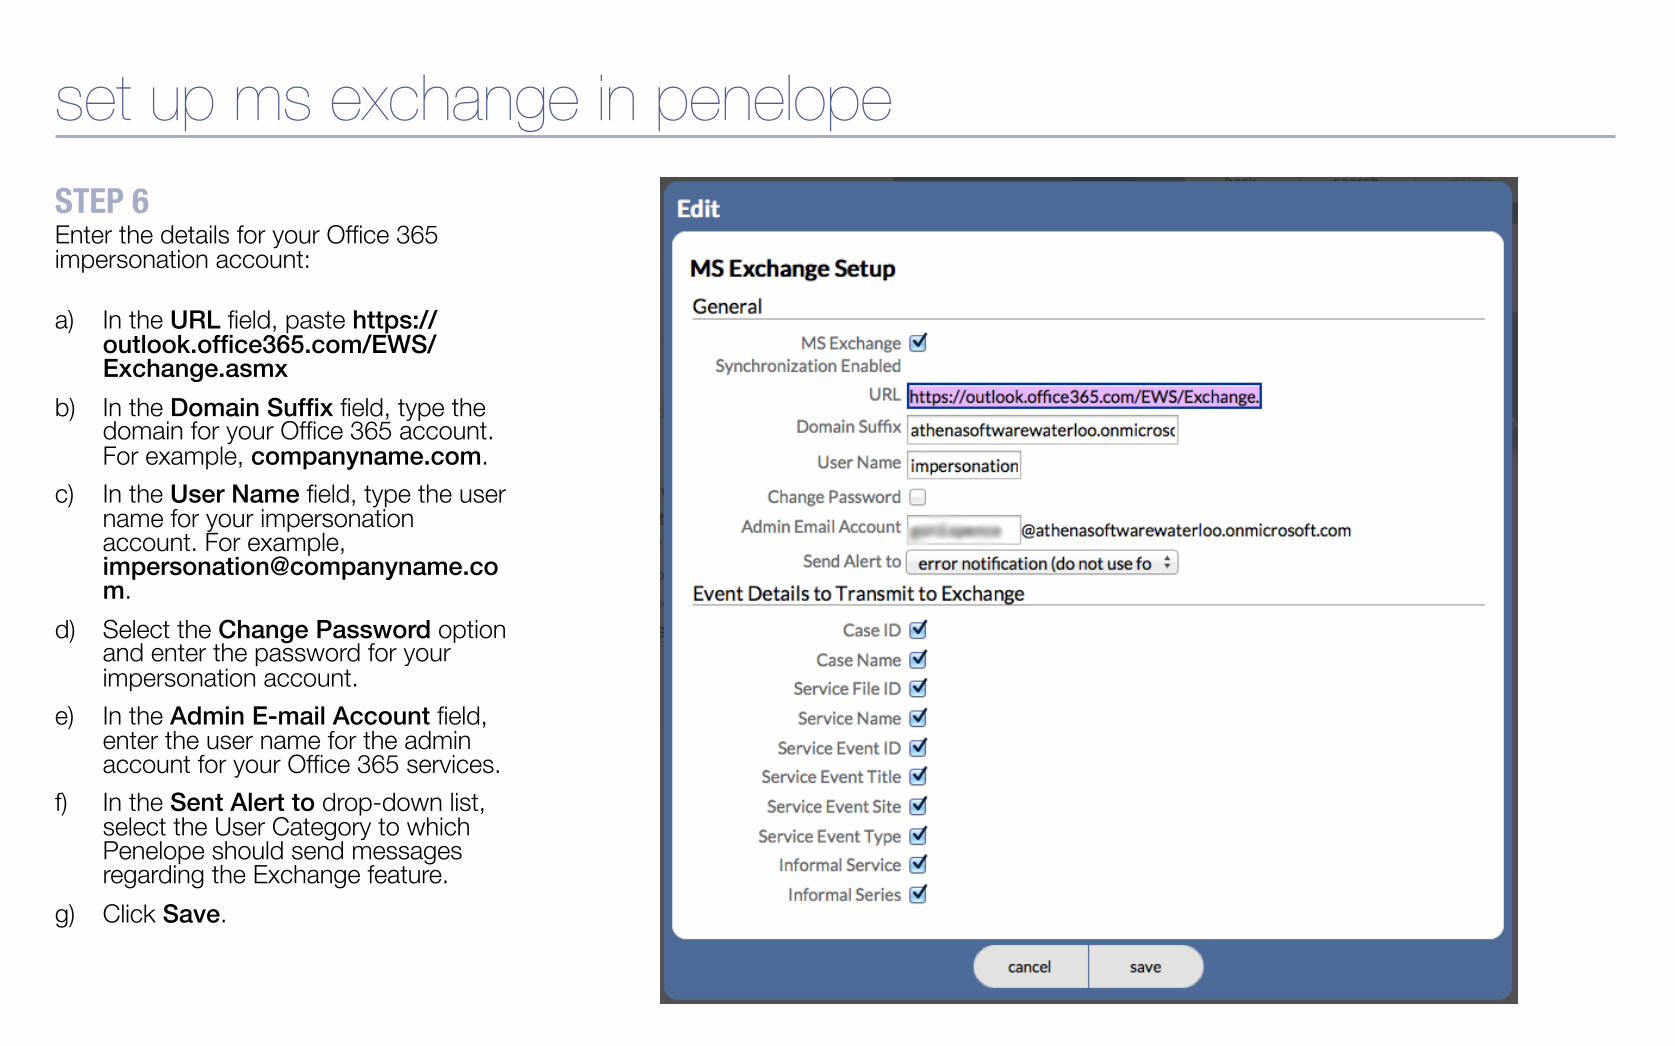
STEP 6 Enter the details for your Office 365 impersonation account: a) In the URL field, paste https://
outlook.office365.com/EWS/Exchange.asmx
b) In the Domain Suffix field, type the domain for your Office 365 account. For example, companyname.com.!
c) In the User Name field, type the user name for your impersonation account. For example, [email protected].
d) Select the Change Password option and enter the password for your impersonation account.
e) In the Admin E-mail Account field, enter the user name for the admin account for your Office 365 services.
f) In the Sent Alert to drop-down list, select the User Category to which Penelope should send messages regarding the Exchange feature.
g) Click Save.
set up ms exchange in penelope
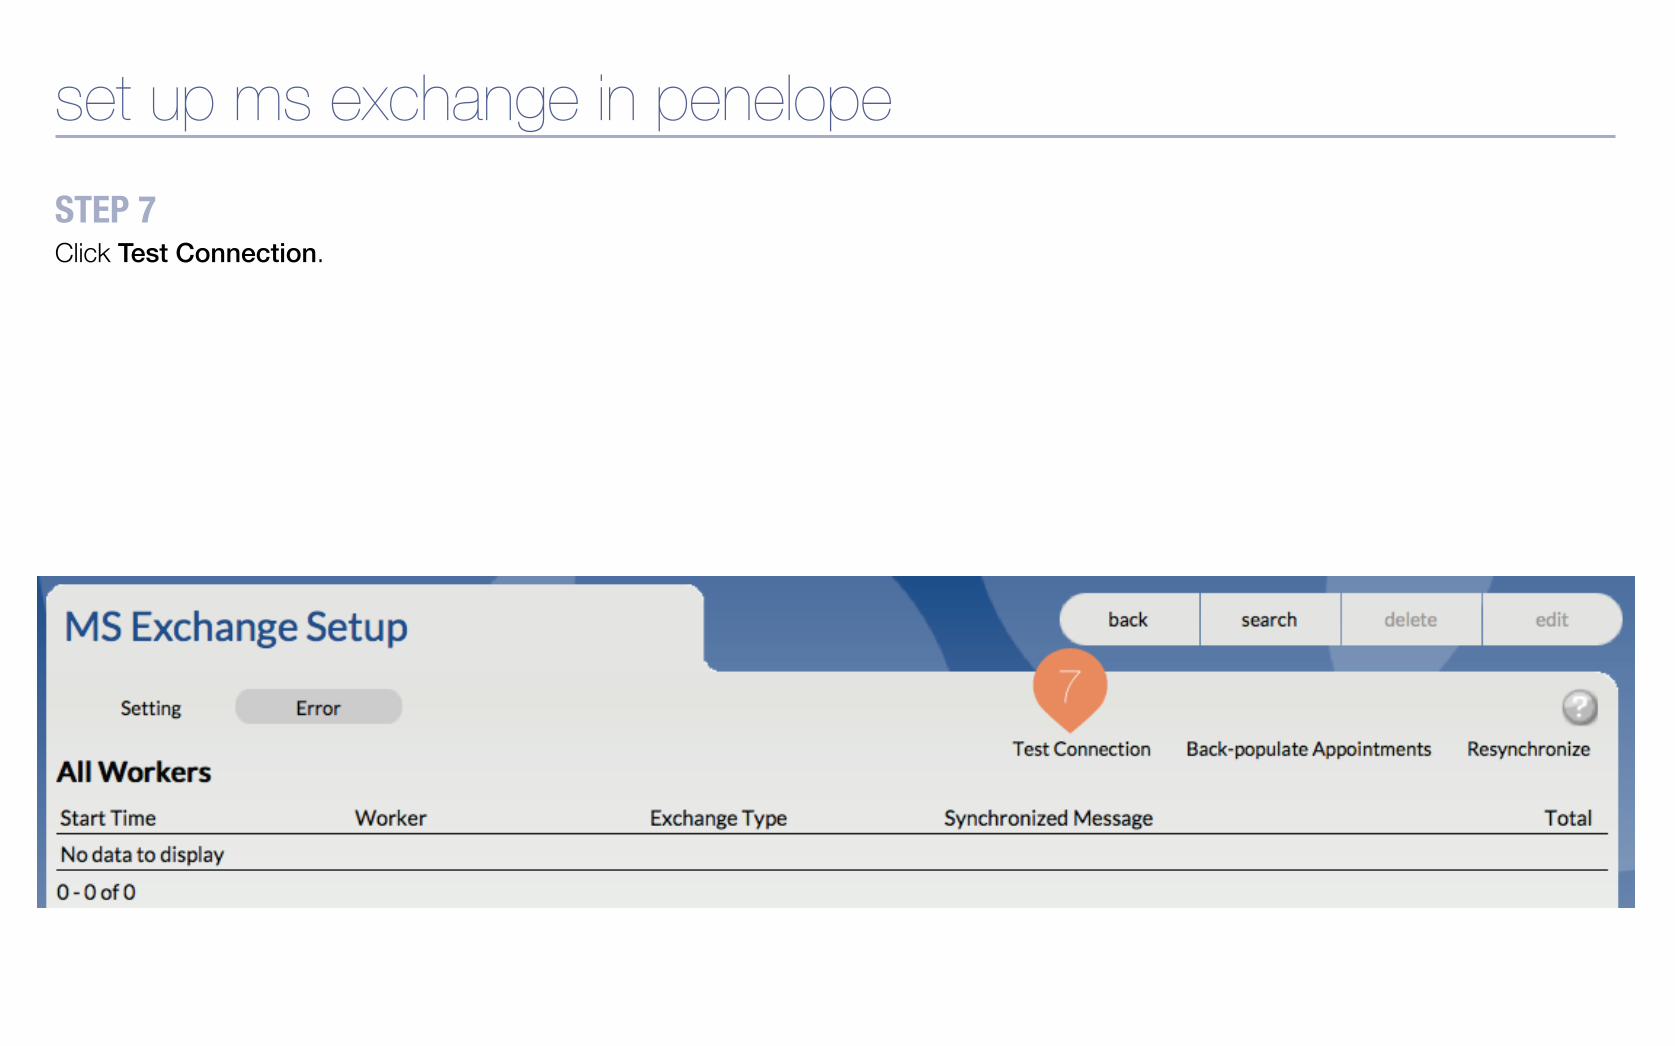
set up ms exchange in penelope STEP 7 Click Test Connection.
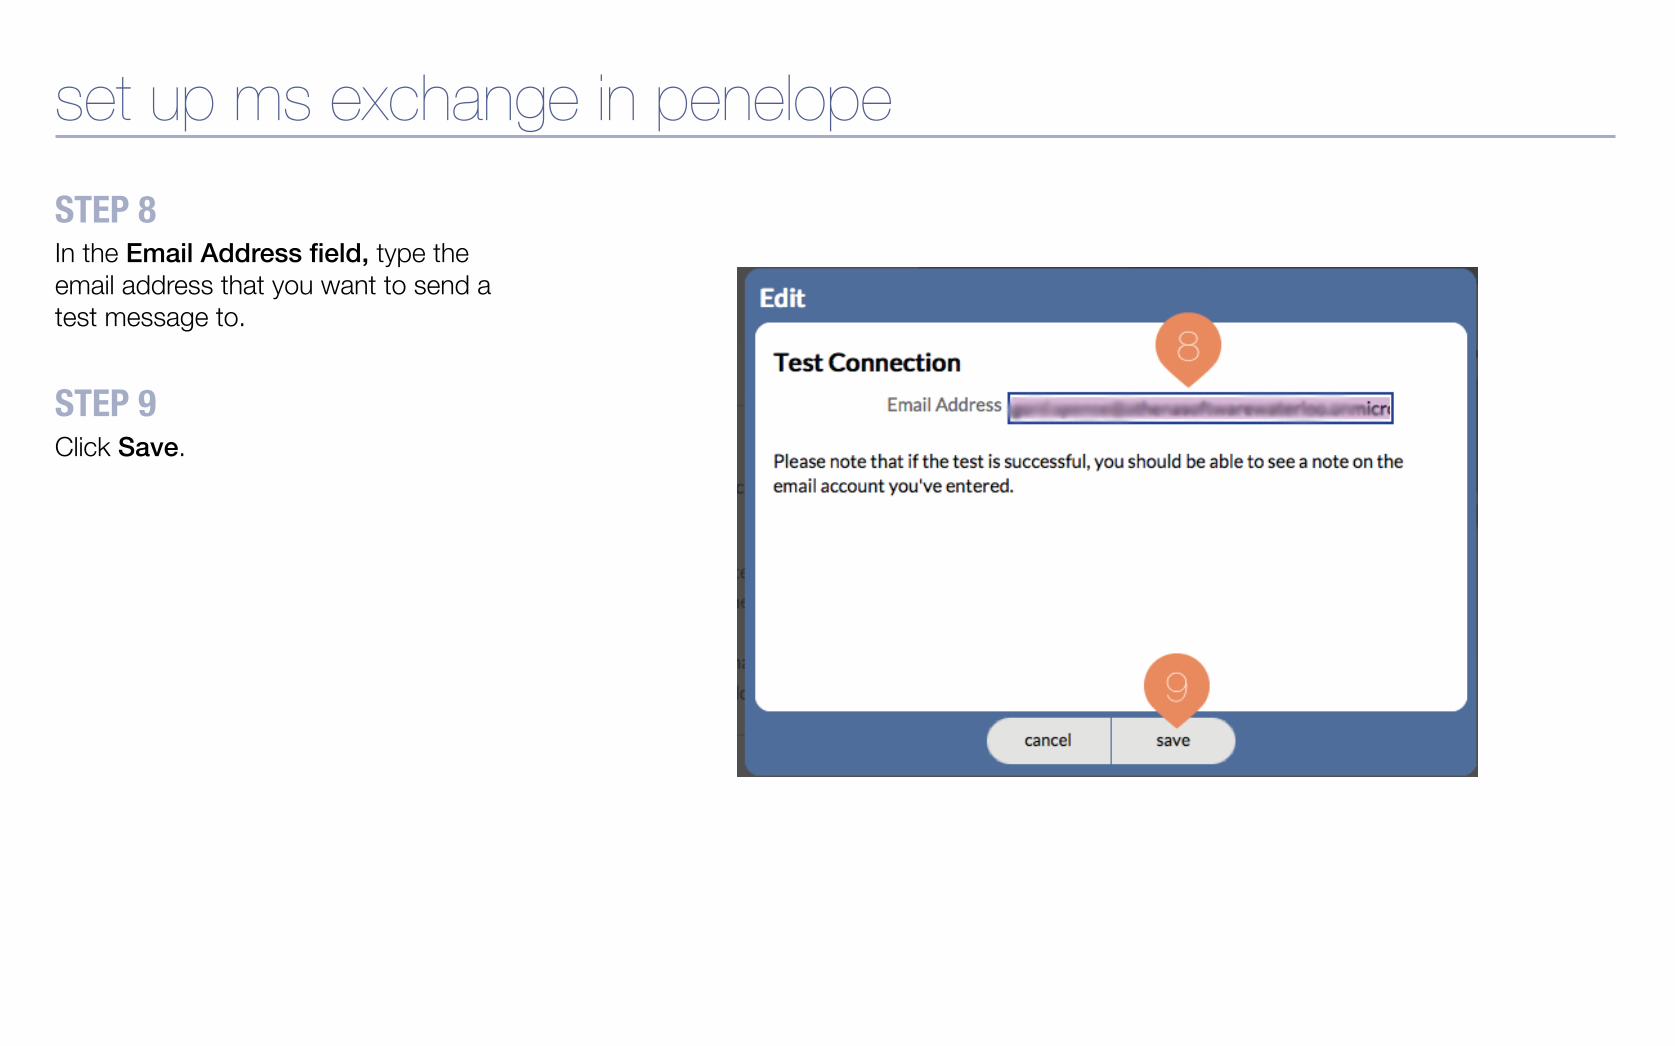
STEP 8 In the Email Address field, type the email address that you want to send a test message to.
STEP 9 Click Save.
set up ms exchange in penelope
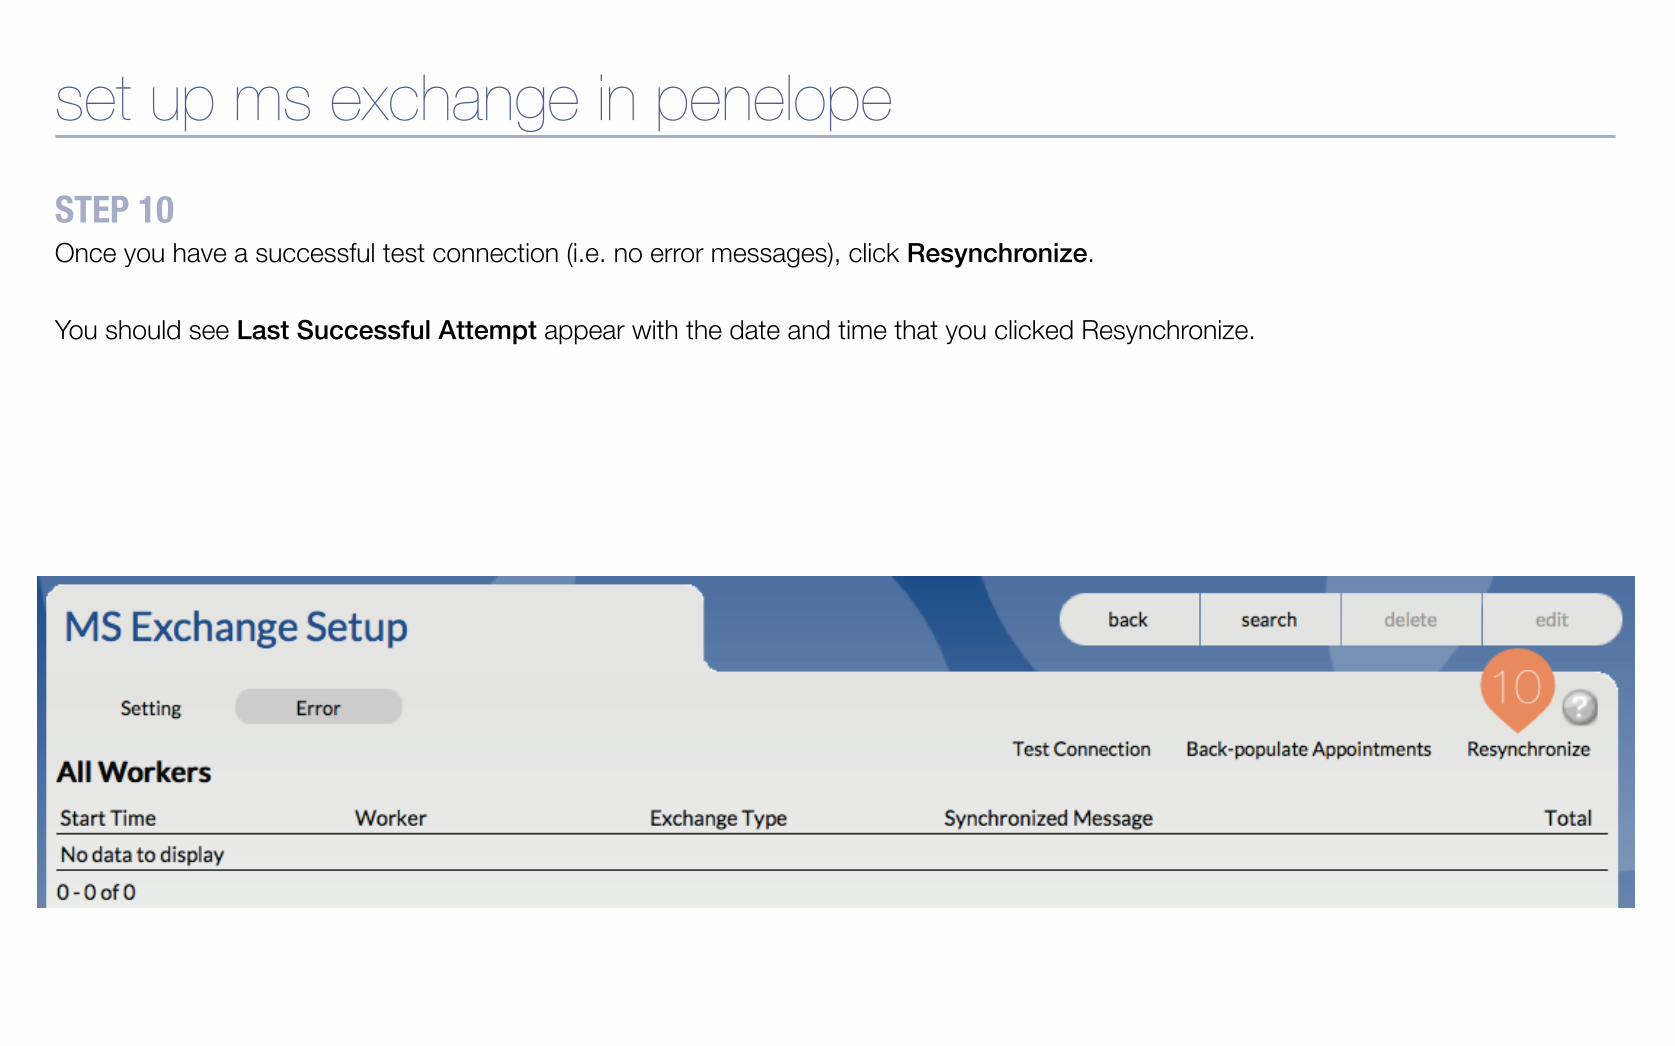
set up ms exchange in penelope STEP 10 Once you have a successful test connection (i.e. no error messages), click Resynchronize. You should see Last Successful Attempt appear with the date and time that you clicked Resynchronize.

update worker profiles

STEP 1 To update each worker’s profile with their email settings, click Search.
update worker profiles

update worker profiles STEP 2 Click Go.
STEP 3 In the Results section, click a worker’s name.
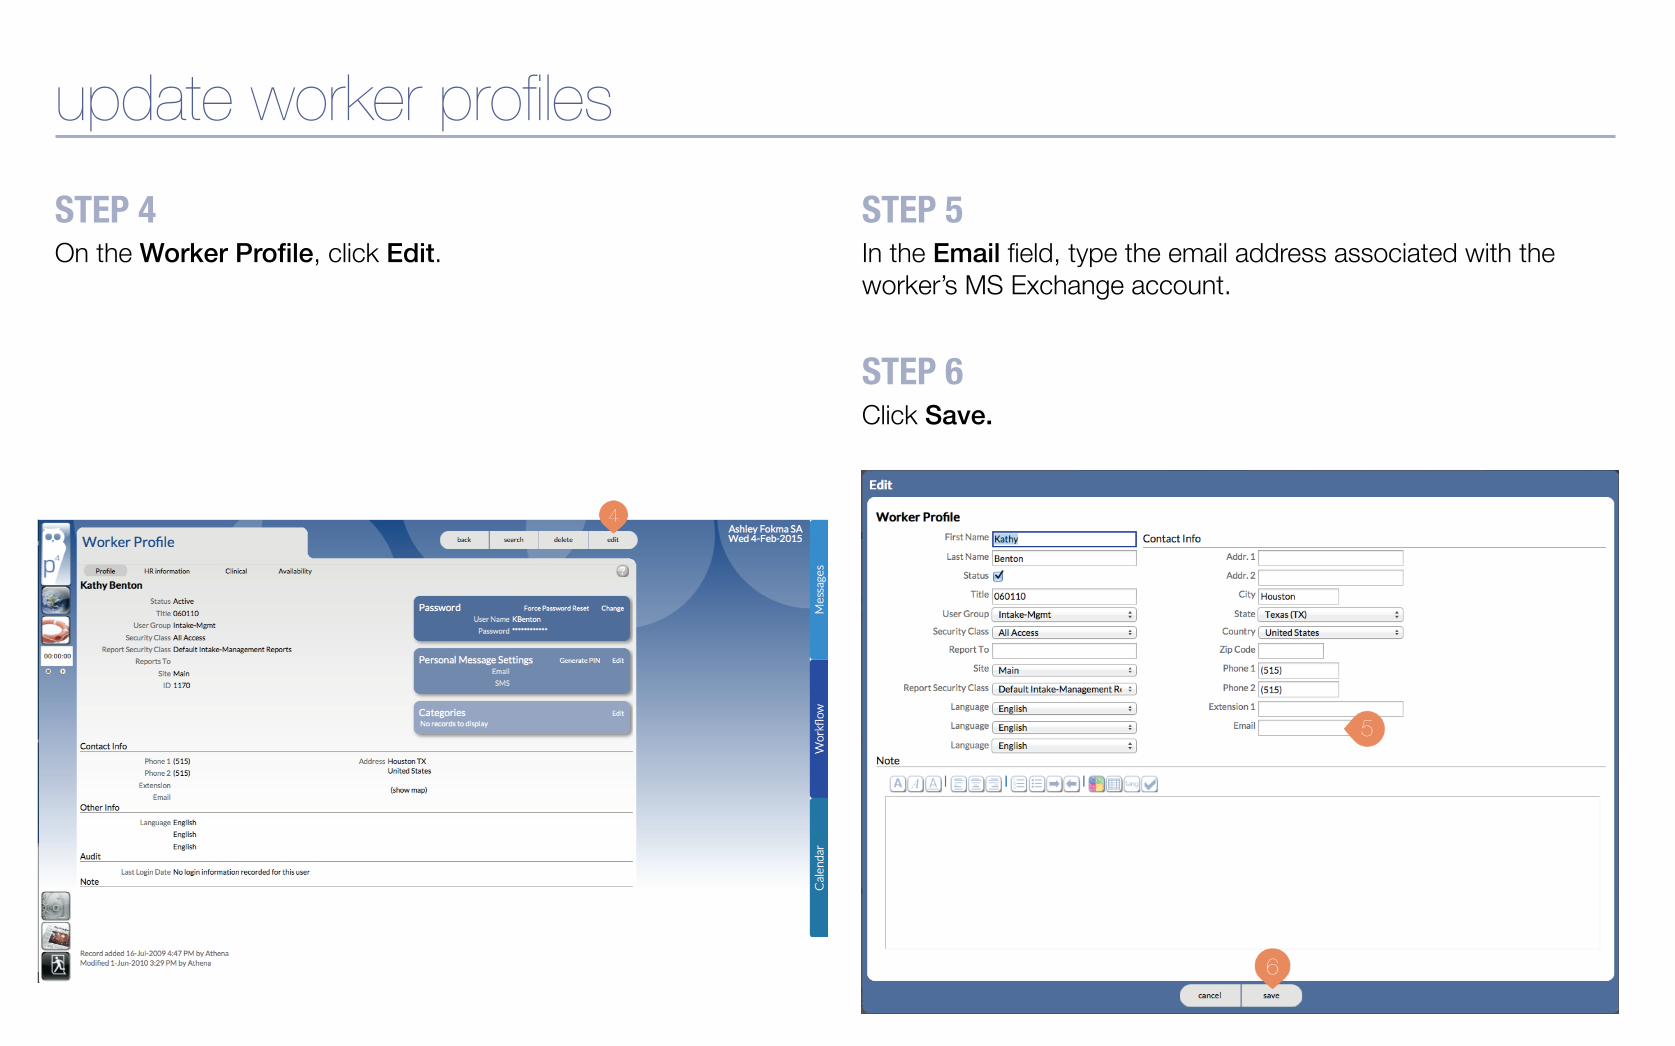
update worker profiles STEP 4 On the Worker Profile, click Edit.
STEP 5 In the Email field, type the email address associated with the worker’s MS Exchange account.!
STEP 6!Click Save.

push events to ms exchange calendar
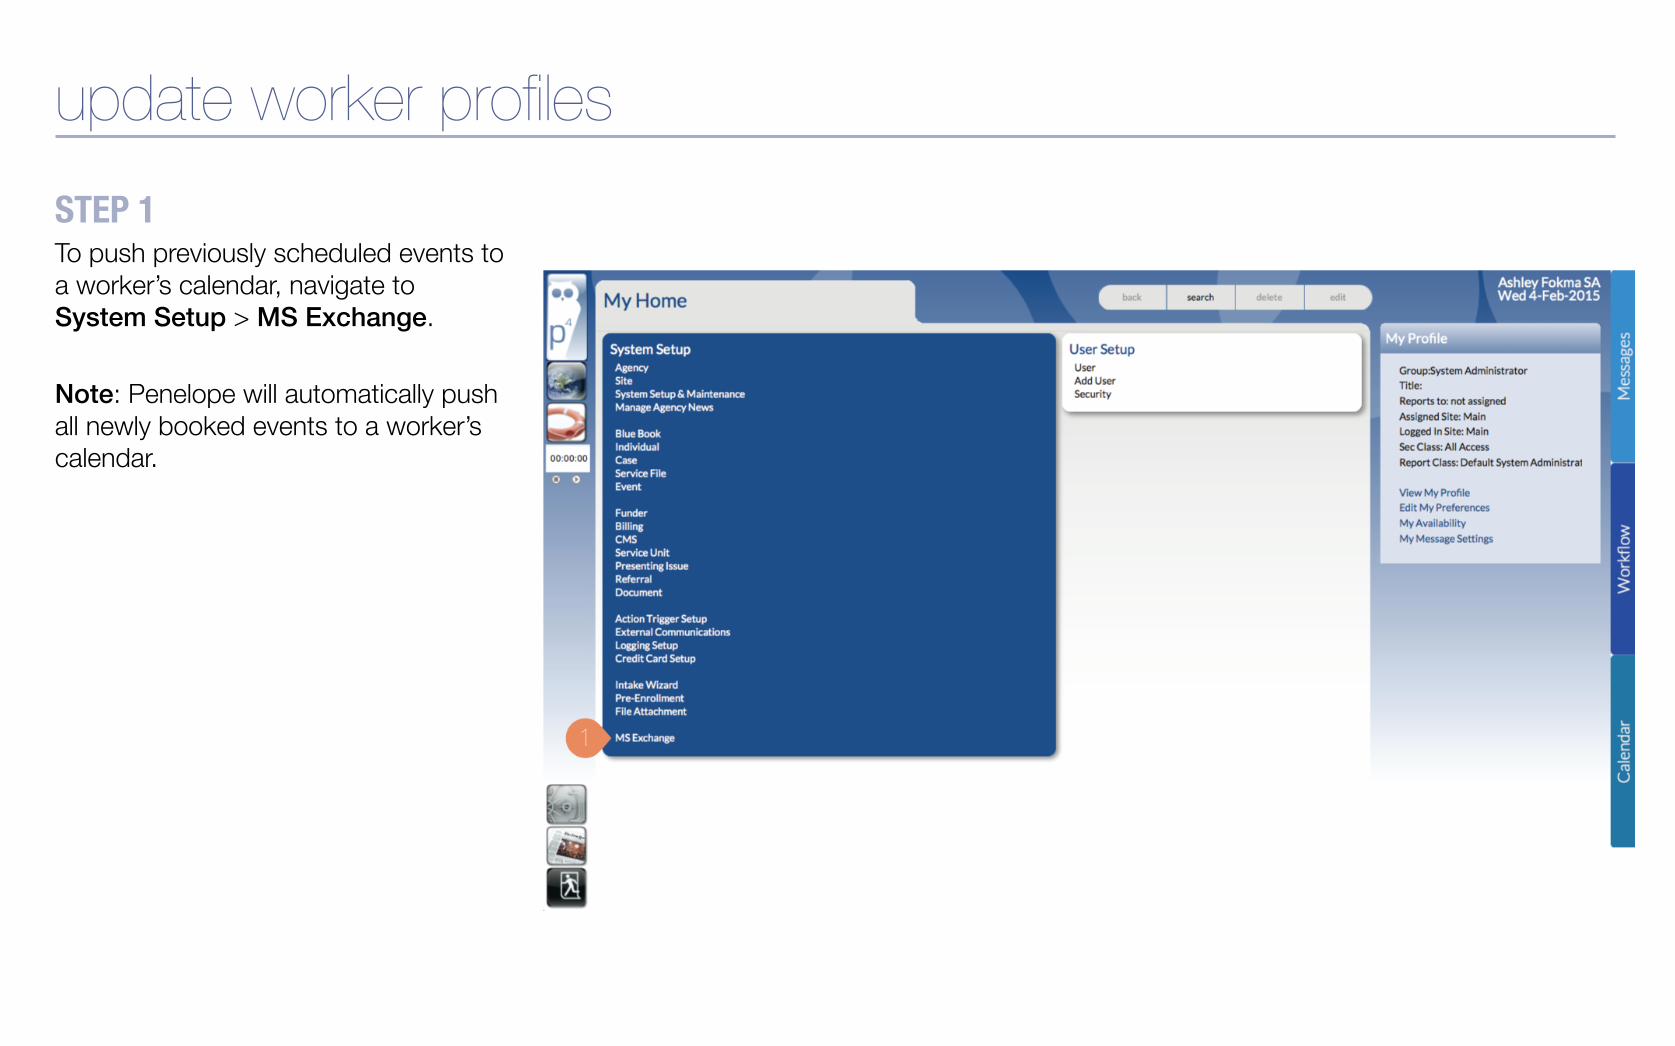
STEP 1 To push previously scheduled events to a worker’s calendar, navigate to System Setup > MS Exchange. Note: Penelope will automatically push all newly booked events to a worker’s calendar.
update worker profiles

update worker profiles STEP 2 Click Back-populate Appointments. Note: A confirmation message will appear asking you to confirm that you want to back-populate previously added appointments to Exchange. Click okay to continue having the previously scheduled events populated.
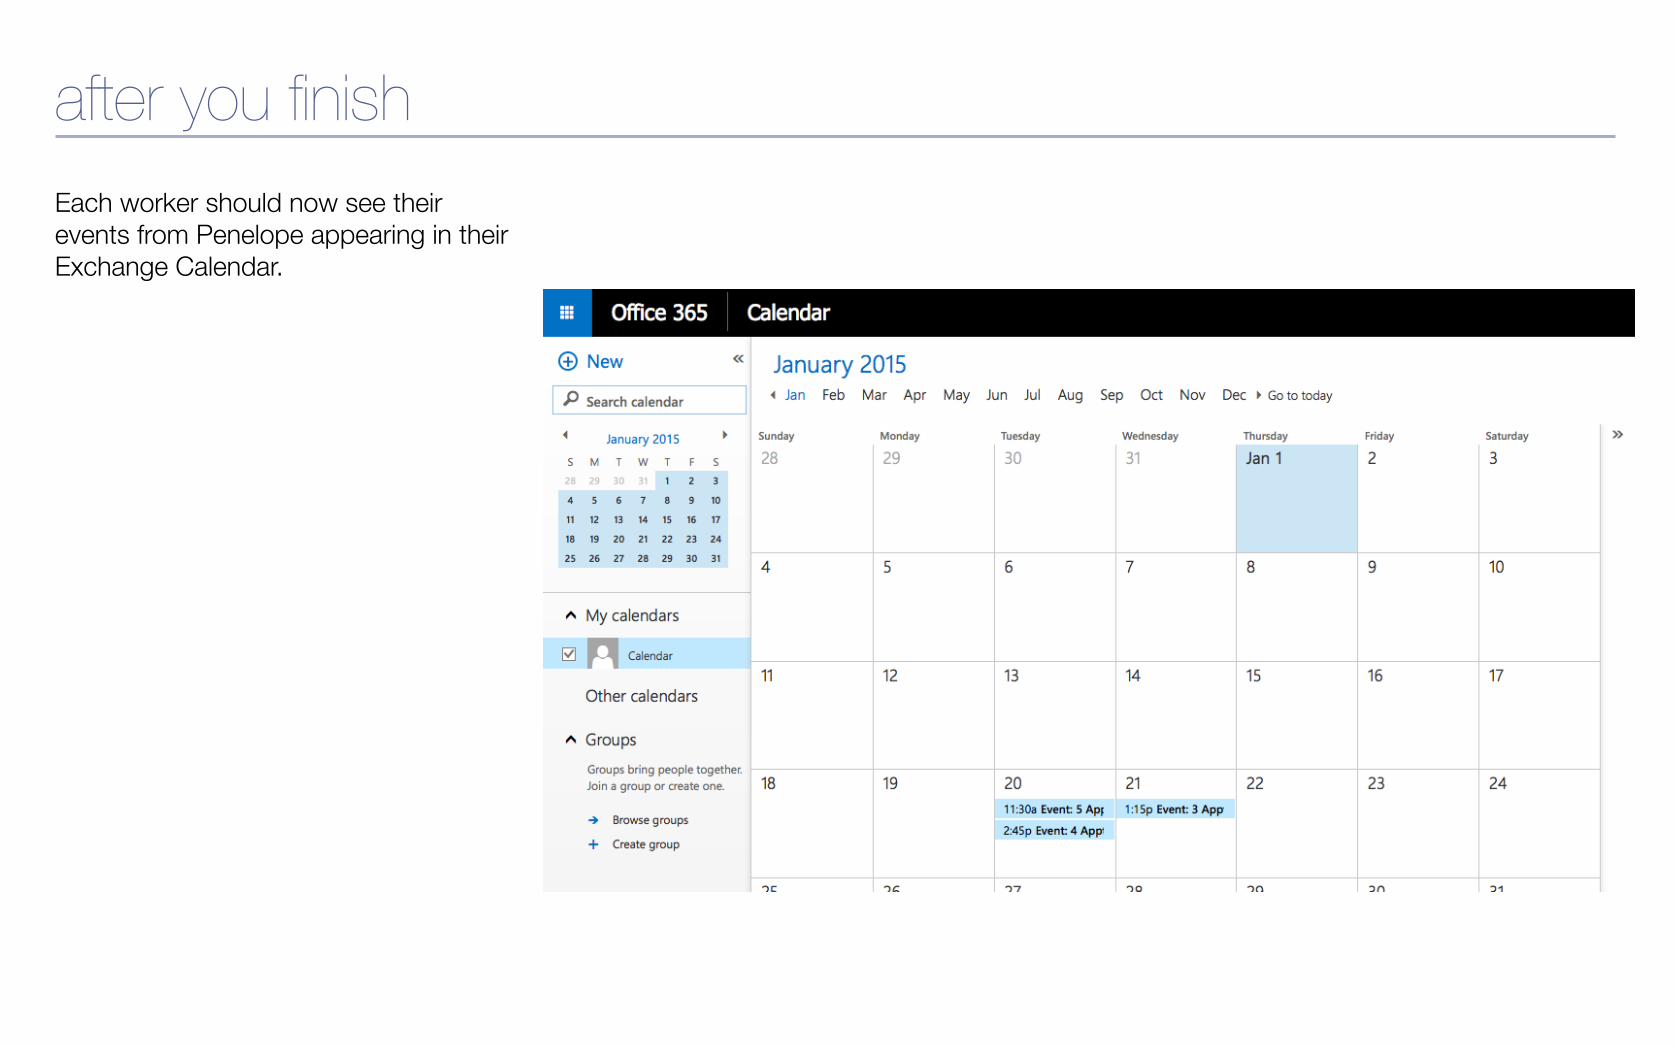
Each worker should now see their events from Penelope appearing in their Exchange Calendar.
after you finish

to view more tutorials, visit www.penelopehelp.com