configuring a centos 7 “minimal” virtualbox vm on...
TRANSCRIPT
Configuring a CentOS 7 “Minimal” VirtualBox VM on Windows 10David J. Walling, March 6th, 2017Email: [email protected]
This “how to” describes a process to configure a CentOS 7 “Minimal” virtual machine on a Windows 10 host. We'll be using Oracle VirtualBox 5.1.14 as our hypervisor. This “how to” is part of a series and continues from the point where the CentOS 7 virtual machine has been installed and started.
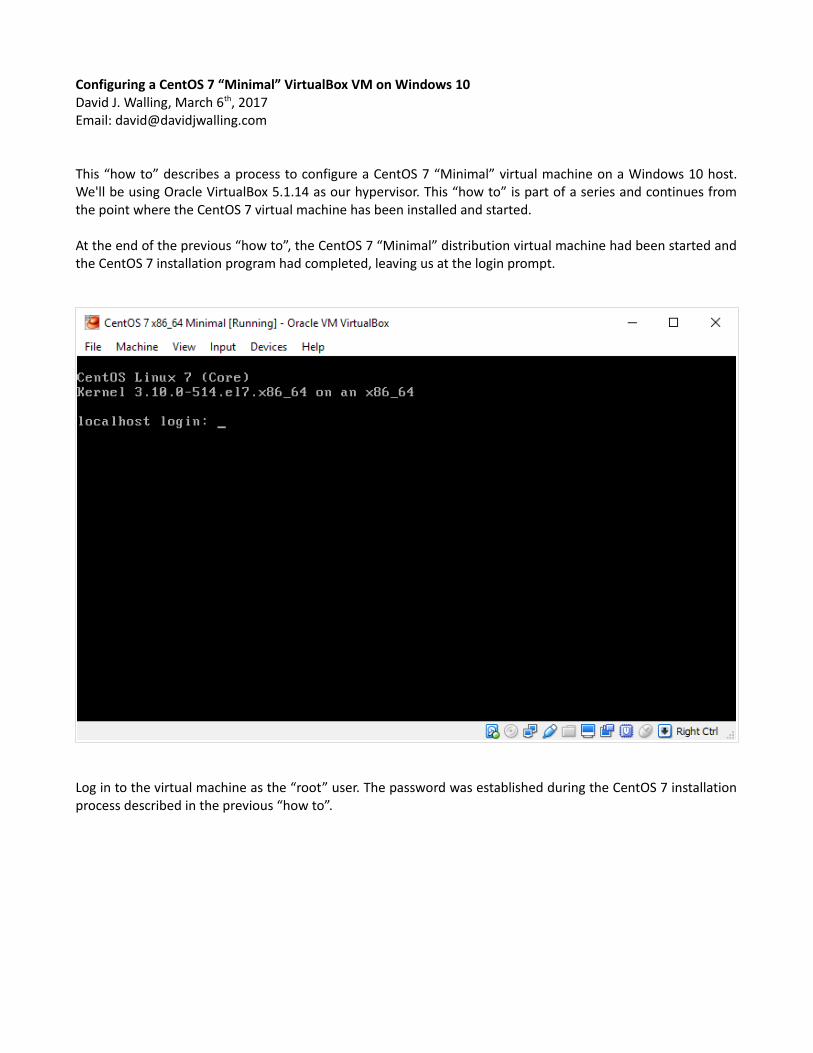
At the end of the previous “how to”, the CentOS 7 “Minimal” distribution virtual machine had been started and the CentOS 7 installation program had completed, leaving us at the login prompt.
Log in to the virtual machine as the “root” user. The password was established during the CentOS 7 installation process described in the previous “how to”.
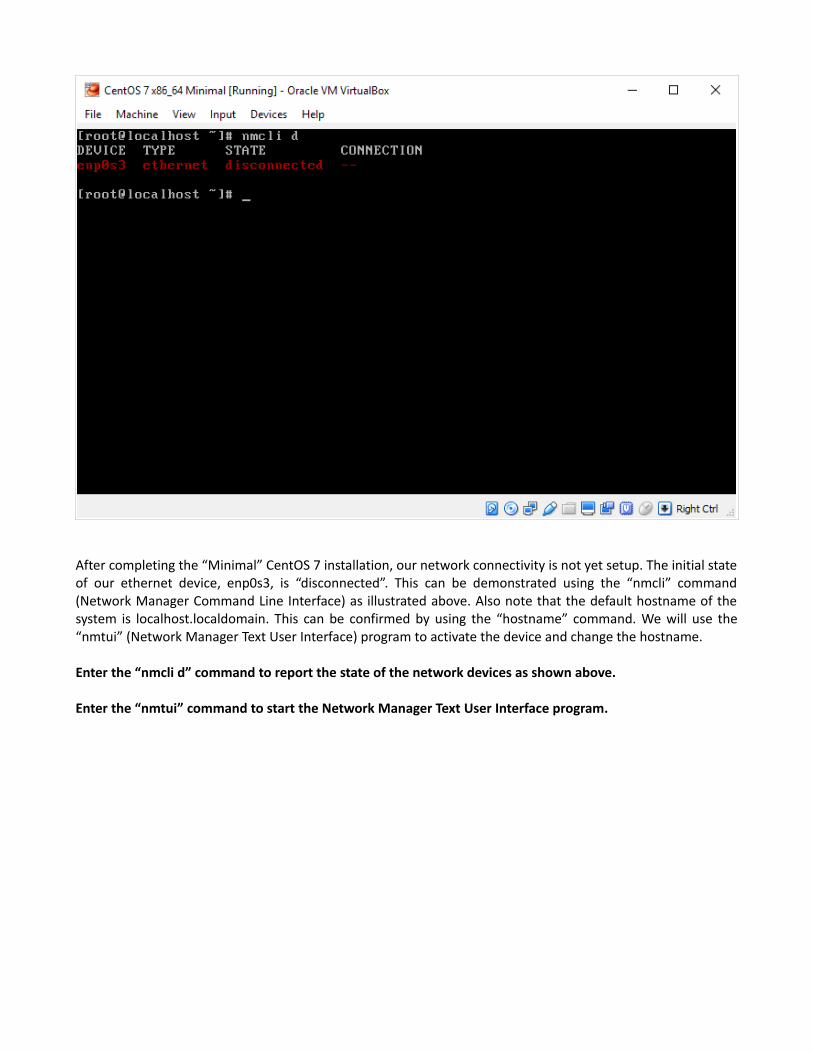
After completing the “Minimal” CentOS 7 installation, our network connectivity is not yet setup. The initial state of our ethernet device, enp0s3, is “disconnected”. This can be demonstrated using the “nmcli” command (Network Manager Command Line Interface) as illustrated above. Also note that the default hostname of the system is localhost.localdomain. This can be confirmed by using the “hostname” command. We will use the “nmtui” (Network Manager Text User Interface) program to activate the device and change the hostname.
Enter the “nmcli d” command to report the state of the network devices as shown above.
Enter the “nmtui” command to start the Network Manager Text User Interface program.

Use the up and down arrow keys and the tab key to navigate the nmtui menu. Use the Enter key to invoke a menu selection. We can activate the ethernet device using either the “Edit a connection” or the “Activate a connection” menu items. The “Edit a connection” item illustrates more information about the system, so we'll use that method.
Press the Enter key to open the “Edit a connection” dialog.

We have only one Ethernet device. Clicking Enter at this point will open the dialog to edit the device's settings.
Click Enter to open the device settings dialog.

The “Edit Connection” dialog provides descriptive information about the Ethernet device and allows for configuration of the device's behavior relating to both the IPv4 and IPv6 protocols. The only thing we need to do now is check the “Automatically connect” check-box and then select the “OK” button.
Tab to the “Automatically connect” check-box and use the space bar to check the box.

With the “Automatically connect” check-box checked, we can return to the previous menu using the “OK” buttton.
Tab to the “OK” button and press Enter to apply the change and close the “Edit Connection” dialog.

Closing the “Edit Connection” dialog returns us to the Ethernet device list. From here we can return again to the nmtui main menu.
Use the Tab key to navigate to the “Back” button and press Enter to close the Ethernet device list.
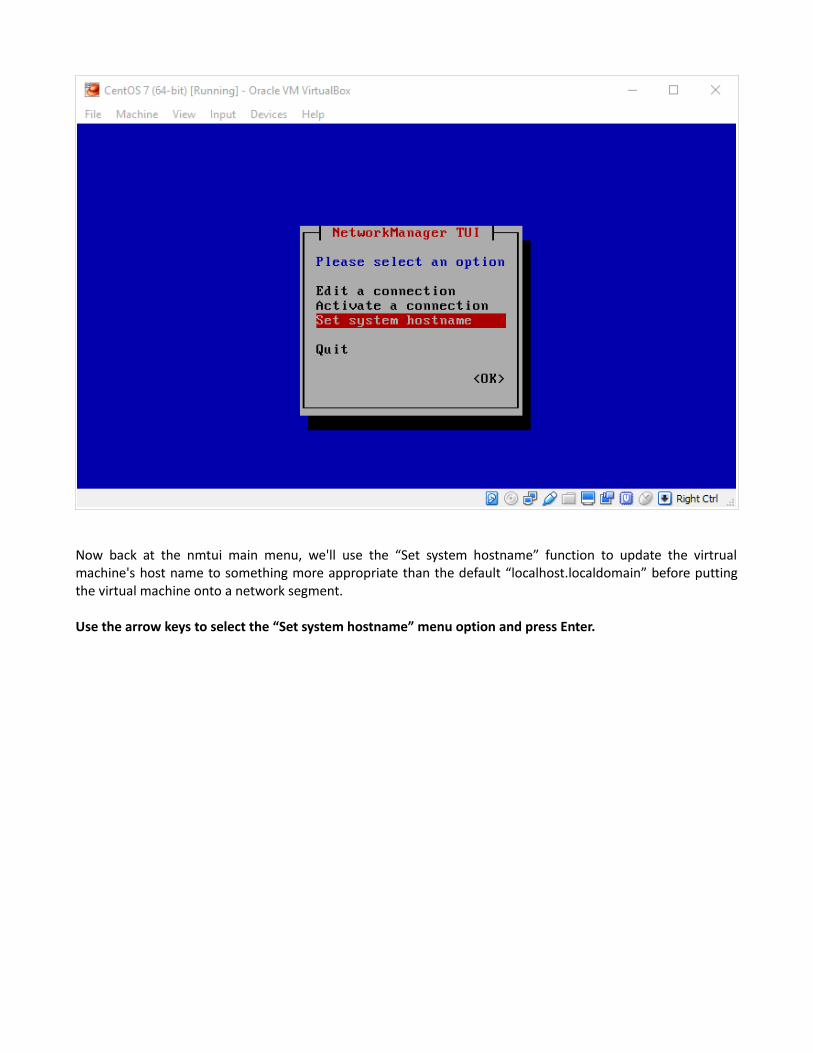
Now back at the nmtui main menu, we'll use the “Set system hostname” function to update the virtrual machine's host name to something more appropriate than the default “localhost.localdomain” before putting the virtual machine onto a network segment.
Use the arrow keys to select the “Set system hostname” menu option and press Enter.

The “Set Hostname” dialog contains a simple edit-text field. Use the Backspace key to remove the current value and enter an appropriate Hostname for the Virtual Machine.
Edit the Hostname, then tab to the “OK” button and press Enter to save changes.

After closing the “Set Hostname” dialog, nmtui asks you to confirm the change to the hostname.
Press the Enter key to confim the change.

Now, again at the nmtui main menu, use the “Quit” menu option to exit nmtui.
Use the arrow keys to select the “Quit” menu option and press the Enter key to exit nmtui.

Having exited nmtui, we can confirm our changes and our network connection. Here, we use the “hostname” command to confirm that our hostname is now “CentOS7”. Next we use the “nmcli” command with the “d” argument to display the state of our Ethernet device. It now indicates that enp0s3 is connected to the network. Finally, we use the “ping” command to test whether we can reach a known external host using the ICMP protocol. This test, if successful, also confirms that our network configuration can successfully resolve a network name, “google.com” in this case, to an IP address. Everything looks good!
Now we can download some updates to our CentOS packages. We'll use the “yum” (Yellowdog Updater, Modified) utility for this. The “update” argument will update our package lists. The “upgrade” argument will download and install available package updates. Note the “&&” operator concatenating two “yum” commands. Remember that when using “&&”, the subsequent command will only execute if the preceding command is successful.
Enter the “hostname” command to confirm our host name set with nmtui.
Enter the “nmcli d” command again to confirm that our ethernet device is now connected.
Test network connectivity (ICMP) by entering the “ping -c2 google.com” command.
Run the “yum update && yum upgrade” command.
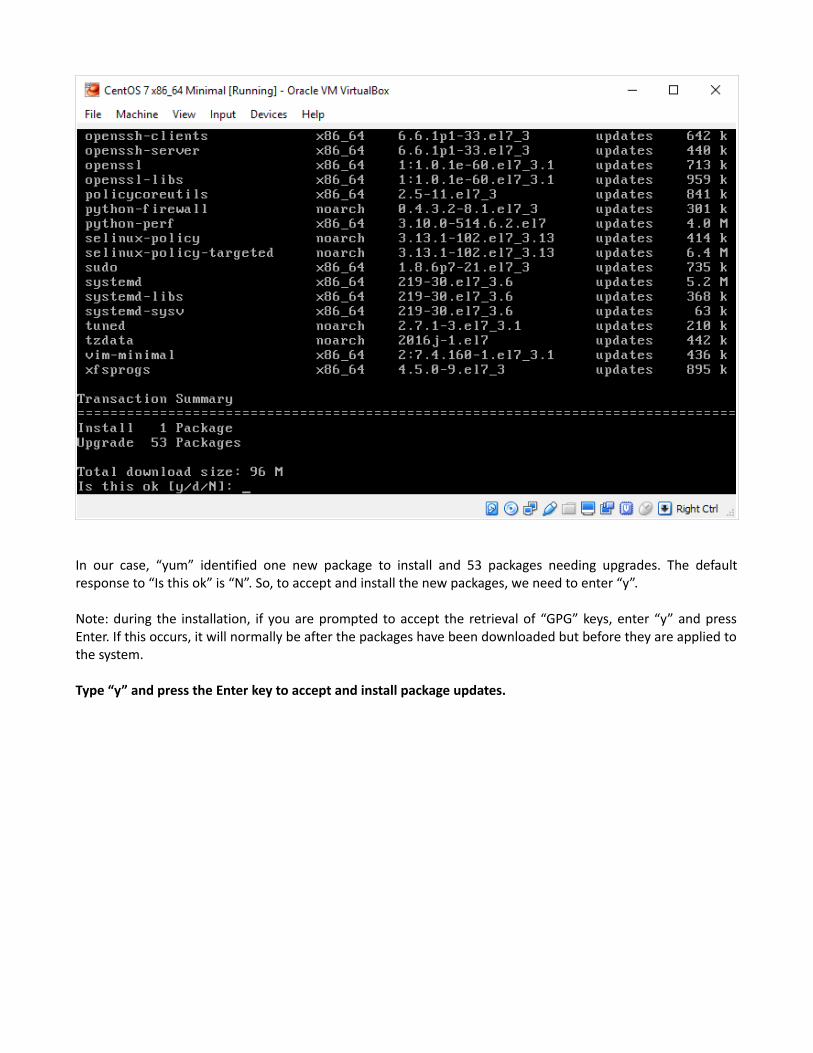
In our case, “yum” identified one new package to install and 53 packages needing upgrades. The default response to “Is this ok” is “N”. So, to accept and install the new packages, we need to enter “y”.
Note: during the installation, if you are prompted to accept the retrieval of “GPG” keys, enter “y” and press Enter. If this occurs, it will normally be after the packages have been downloaded but before they are applied to the system.
Type “y” and press the Enter key to accept and install package updates.
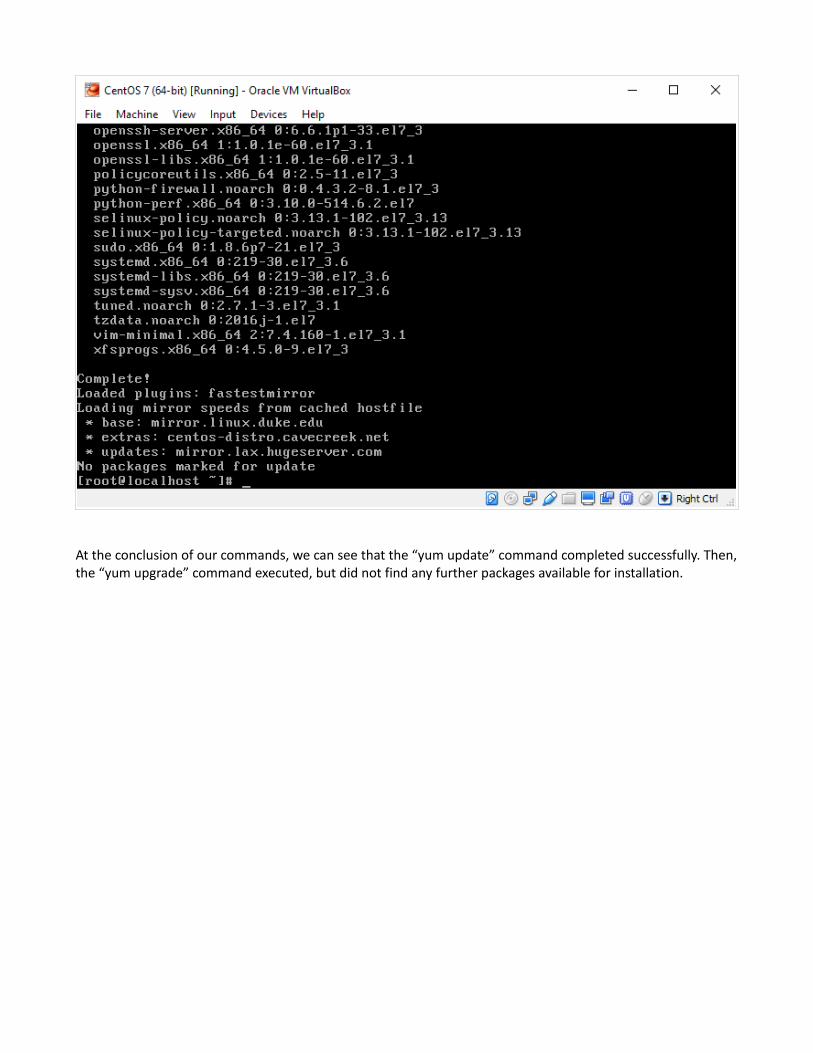
At the conclusion of our commands, we can see that the “yum update” command completed successfully. Then, the “yum upgrade” command executed, but did not find any further packages available for installation.

After updating the packages included in the “MInimal” CentOS distribution, we will install additional packages as we need them. At this stage, we will want to setup our Virual Machine to accept secure incoming connections to upload archive files from our host. We also will use some standard networking tools, such as ifconfig, netstat and lsof to give us some greater flexibility and convenience when querying our network configuration. By default, CentOS 7 is configured to listen on some IP ports that we may choose to not use. In such cases, these ports need to be closed or, if possible, the services using them removed or disabled.
The net-tools package includes both ifconfig and netstat (and other things). The policycoreutils-python package includes “semanage”, which enables SELinux configuration. The “lsof” utility is installed separately here. Multiple packages can be installed by yum by listing the package names separated by spaces.
Type the “yum install net-tools policycoreutils-python lsof” command and press Enter.
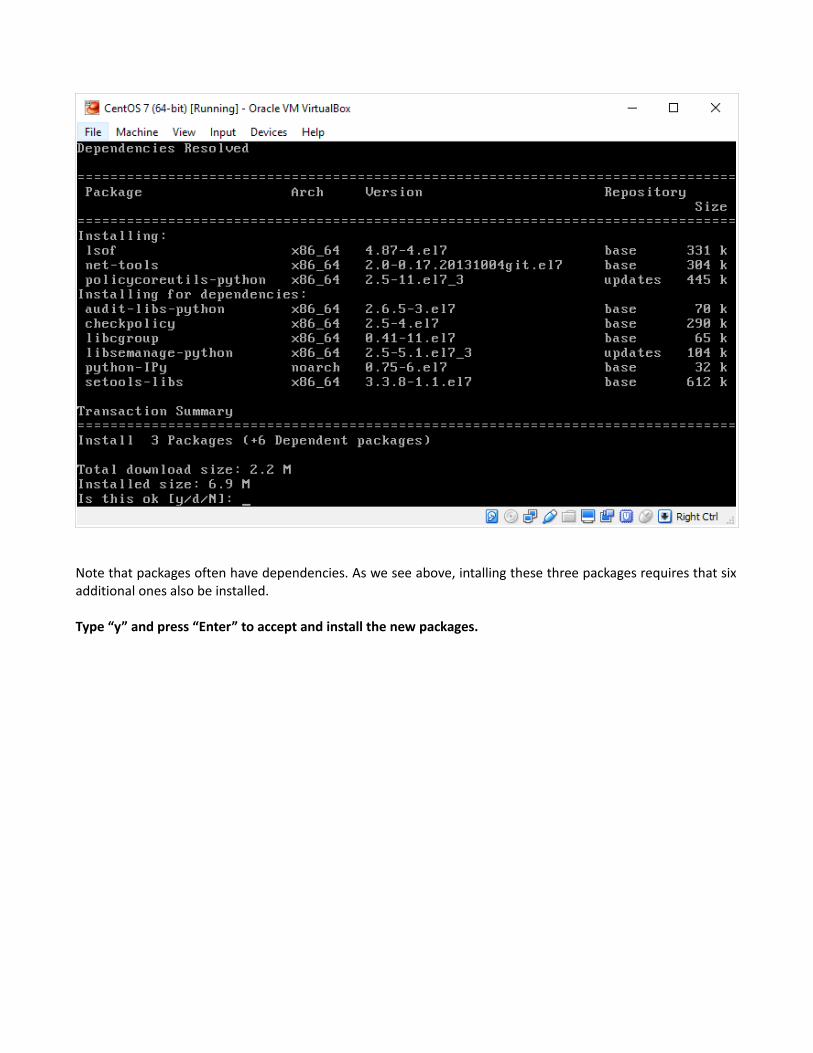
Note that packages often have dependencies. As we see above, intalling these three packages requires that six additional ones also be installed.
Type “y” and press “Enter” to accept and install the new packages.

After “yum” finished installing, the dependencies that were also installed are listed separately.
Now that we have some networking tools installed, let's use them.
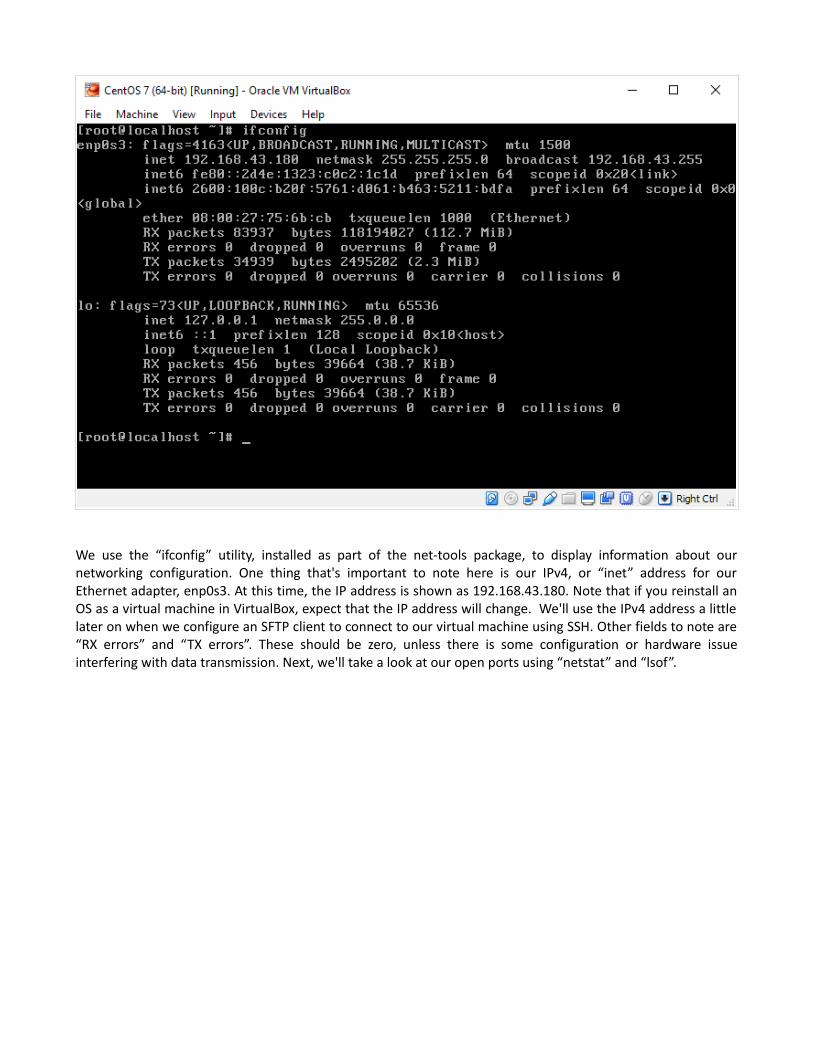
We use the “ifconfig” utility, installed as part of the net-tools package, to display information about our networking configuration. One thing that's important to note here is our IPv4, or “inet” address for our Ethernet adapter, enp0s3. At this time, the IP address is shown as 192.168.43.180. Note that if you reinstall an OS as a virtual machine in VirtualBox, expect that the IP address will change. We'll use the IPv4 address a little later on when we configure an SFTP client to connect to our virtual machine using SSH. Other fields to note are “RX errors” and “TX errors”. These should be zero, unless there is some configuration or hardware issue interfering with data transmission. Next, we'll take a look at our open ports using “netstat” and “lsof”.

The “netstat” program displays network status information. The “-an” arguments instruct netstat to report active connections in numeric-address format. We “pipe” ( | ) the results of this command into the “grep” utility which filters the output to only lines containing the value “LISTEN “. This has the effect of showing us only those IP ports that are actively listening for incoming connections. Here we see that two ports, 22 and 25, are actively listening for tcp segments over both IPv4 and IPv6 protocols. Port 25 (SMTP) is listening on the loopback interface. Port 22 (SSH) is listening on all interfaces.
Now using the “lsof -i -P” command, we can associate the open, listening ports to actual processes running on CentOS. We can see that port 22 is hosted by the sshd service. Port 25 is hosted by a command called “master”, but, with a little research, we can determine that it is the postfix service that is providing SMTP services.
We don't plan to use SMTP, so we will go ahead and remove the postfix package using “yum remove”. As for port 25, we do want to accept incoming SSH connections. But, we will apply some security restrictions around that access.

We'll use “yum” here to remove postfix, the default CentOS SMTP service.
Type the command “yum remove postfix” and press Enter. Press “y” and Enter to confirm.

Yum reports the removal of packages similarly to how it reports the installation of packages. Now let's check our listening ports again.

Here we can see that removing the postfix package has stopped the active listening on port 25. What remains is our SSH service listening on both IPv4 and IPv6 protocols. We are not planning to really use IPv6 much. While it is possible to disable IPv6 across the entire system, that can have unintended consequences. So instead, we will remove the IPv6 listener for SSH as part of our customization of the SSH configuration, which we'll do next.
By the way, if your curious as to which version of SSH is running, use the “ssh -V” command as shown above.
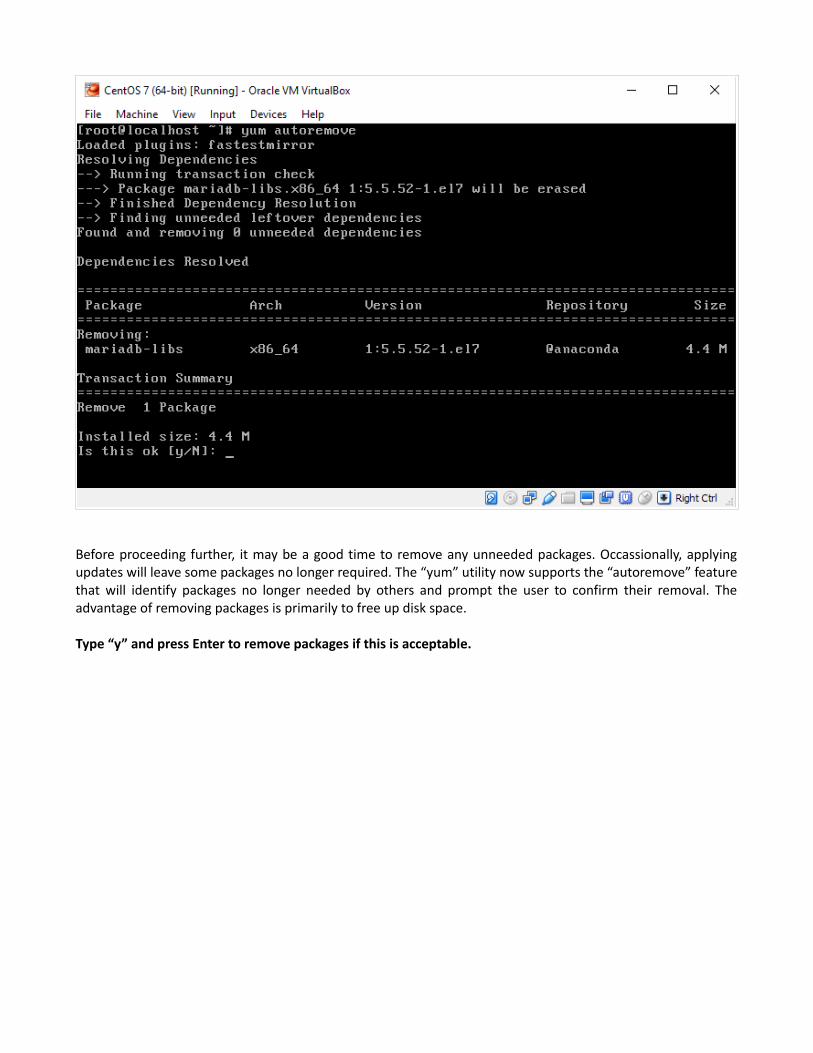
Before proceeding further, it may be a good time to remove any unneeded packages. Occassionally, applying updates will leave some packages no longer required. The “yum” utility now supports the “autoremove” feature that will identify packages no longer needed by others and prompt the user to confirm their removal. The advantage of removing packages is primarily to free up disk space.
Type “y” and press Enter to remove packages if this is acceptable.

The removal of our unused package is complete.
We are going to move to our host OS for the next step to create SSH keys for use by connections to our CentOS virtual machine. So, in the mean time, we'll log out of CentOS. We can use this log out step to further validate the change to our host name. Up to know, the prompt being displayed has continued to show “[root@localhost ~]. In reality, localhost is no longer our host. We should see “CentOS7”.
Log out of the CentOS session by typing “exit” and pressing the Enter key.
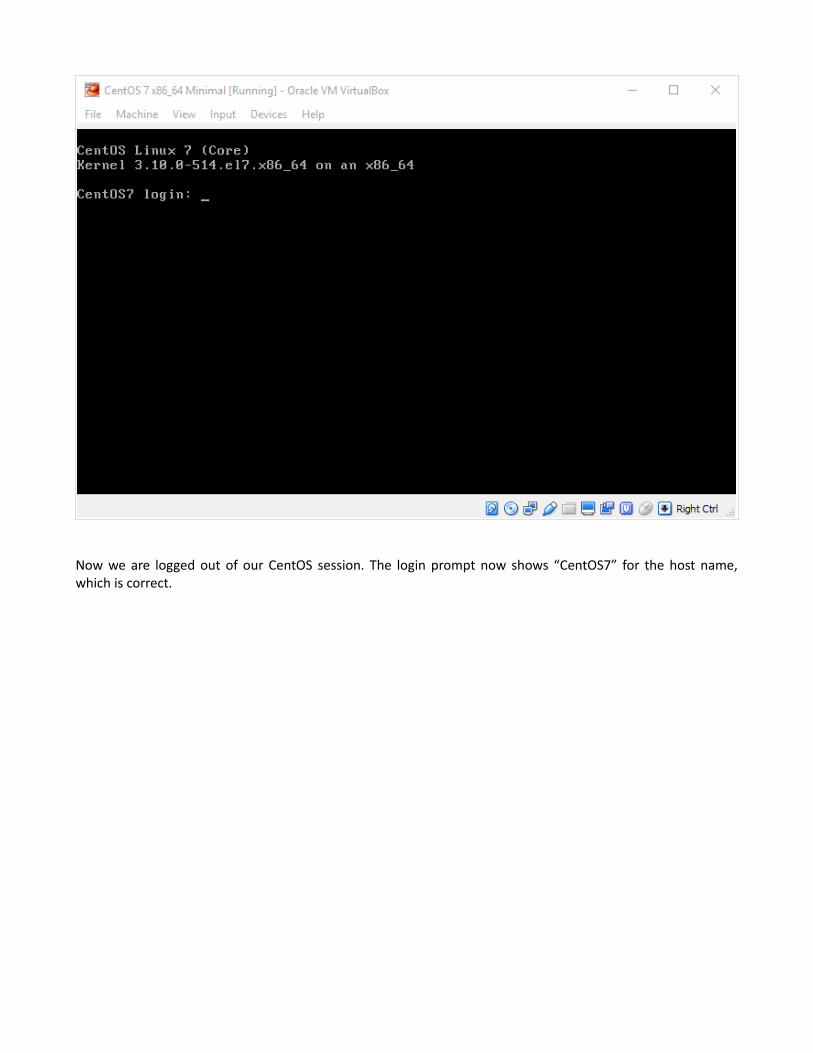
Now we are logged out of our CentOS session. The login prompt now shows “CentOS7” for the host name, which is correct.
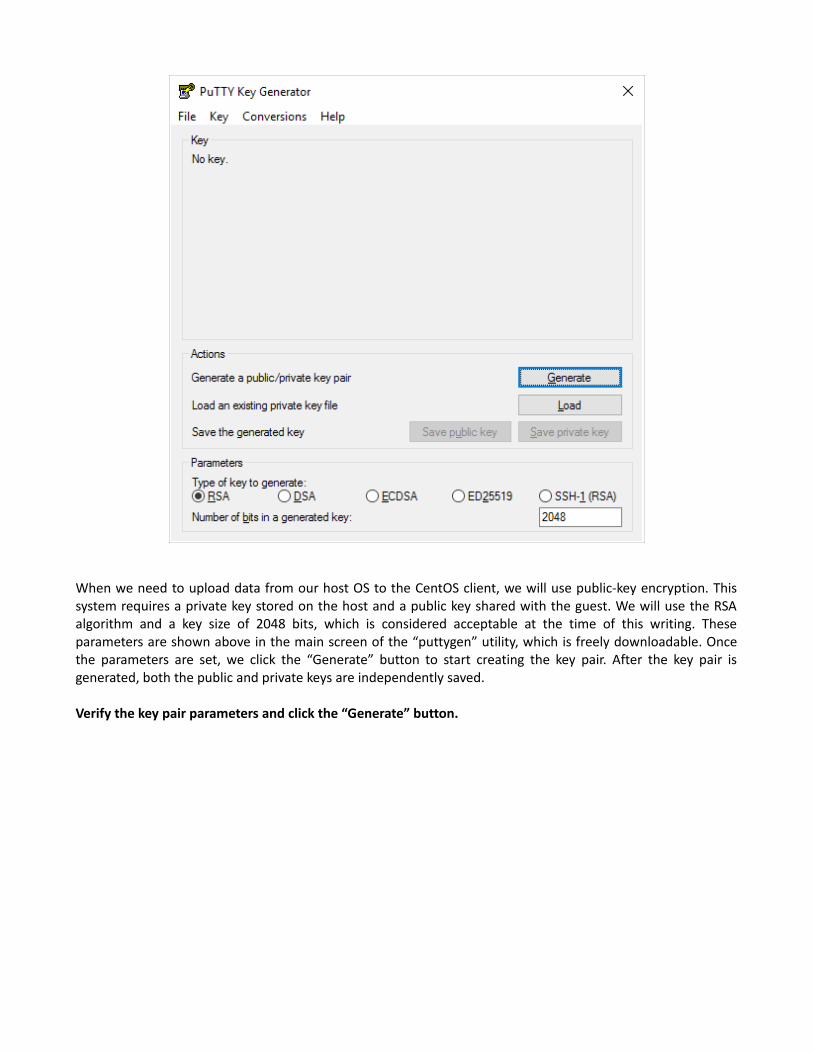
When we need to upload data from our host OS to the CentOS client, we will use public-key encryption. This system requires a private key stored on the host and a public key shared with the guest. We will use the RSA algorithm and a key size of 2048 bits, which is considered acceptable at the time of this writing. These parameters are shown above in the main screen of the “puttygen” utility, which is freely downloadable. Once the parameters are set, we click the “Generate” button to start creating the key pair. After the key pair is generated, both the public and private keys are independently saved.
Verify the key pair parameters and click the “Generate” button.
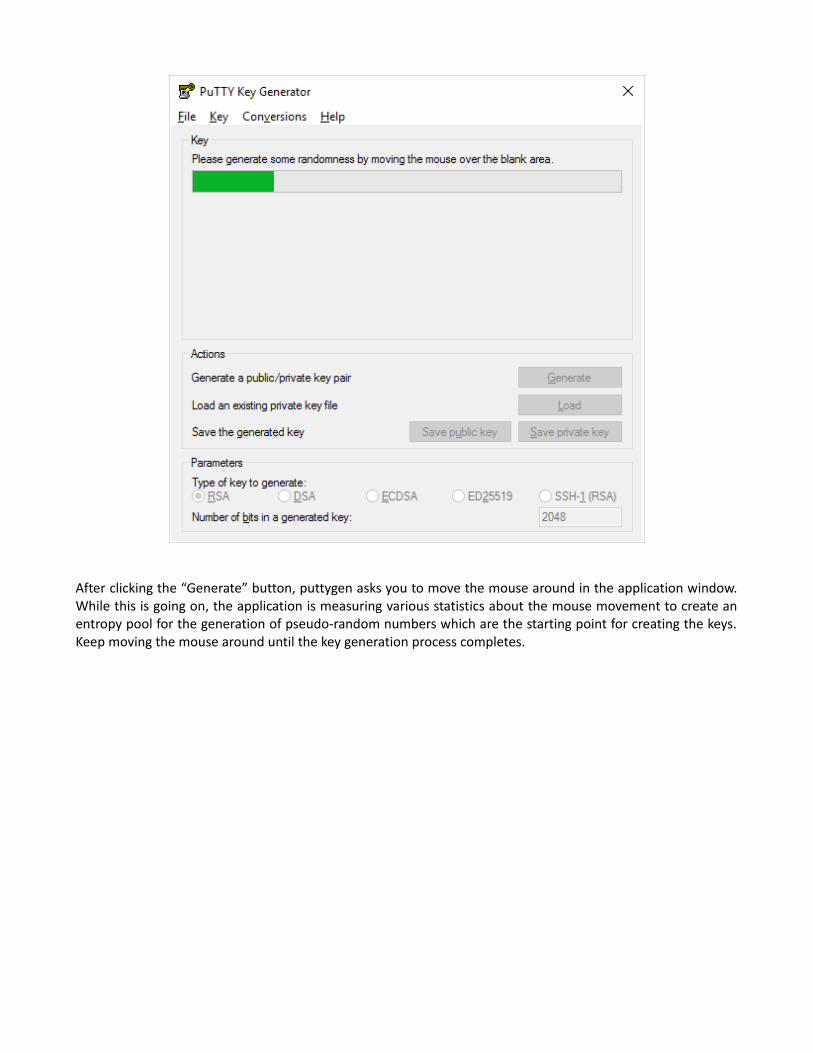
After clicking the “Generate” button, puttygen asks you to move the mouse around in the application window. While this is going on, the application is measuring various statistics about the mouse movement to create an entropy pool for the generation of pseudo-random numbers which are the starting point for creating the keys. Keep moving the mouse around until the key generation process completes.
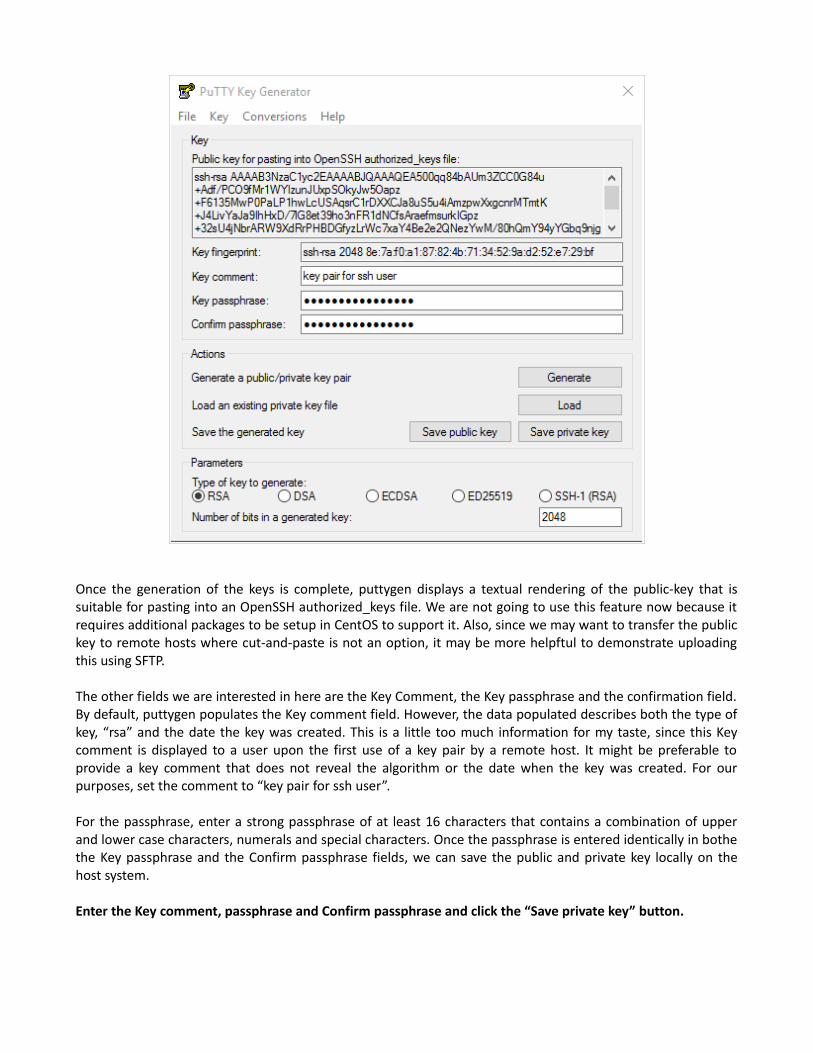
Once the generation of the keys is complete, puttygen displays a textual rendering of the public-key that is suitable for pasting into an OpenSSH authorized_keys file. We are not going to use this feature now because it requires additional packages to be setup in CentOS to support it. Also, since we may want to transfer the public key to remote hosts where cut-and-paste is not an option, it may be more helpftul to demonstrate uploading this using SFTP.
The other fields we are interested in here are the Key Comment, the Key passphrase and the confirmation field. By default, puttygen populates the Key comment field. However, the data populated describes both the type of key, “rsa” and the date the key was created. This is a little too much information for my taste, since this Key comment is displayed to a user upon the first use of a key pair by a remote host. It might be preferable to provide a key comment that does not reveal the algorithm or the date when the key was created. For our purposes, set the comment to “key pair for ssh user”.
For the passphrase, enter a strong passphrase of at least 16 characters that contains a combination of upper and lower case characters, numerals and special characters. Once the passphrase is entered identically in bothe the Key passphrase and the Confirm passphrase fields, we can save the public and private key locally on the host system.
Enter the Key comment, passphrase and Confirm passphrase and click the “Save private key” button.

Since we may setup several RSA key-pairs, we'll name the private key in a way that we'll recognize its use. Remember that this private key must be kept only on the host computer and never shared.
Enter a memorable name for the private key and click “Save”.
Now at the puttygen screen again, we'll save the public key.
Click the “Save public key” button.
Enter a similar name for the public-key so that you can easily, visibly associate the private and the public key together. By convention, puttygen private keys end in a .ppk extension. Public key files, by convention, end in a .pub extension.
With our key files saved, we are finished using the puttygen program.
Select the File menu and the Exit menu item to exit puttygen.
Next we will upload the public key to our CentOS guest.
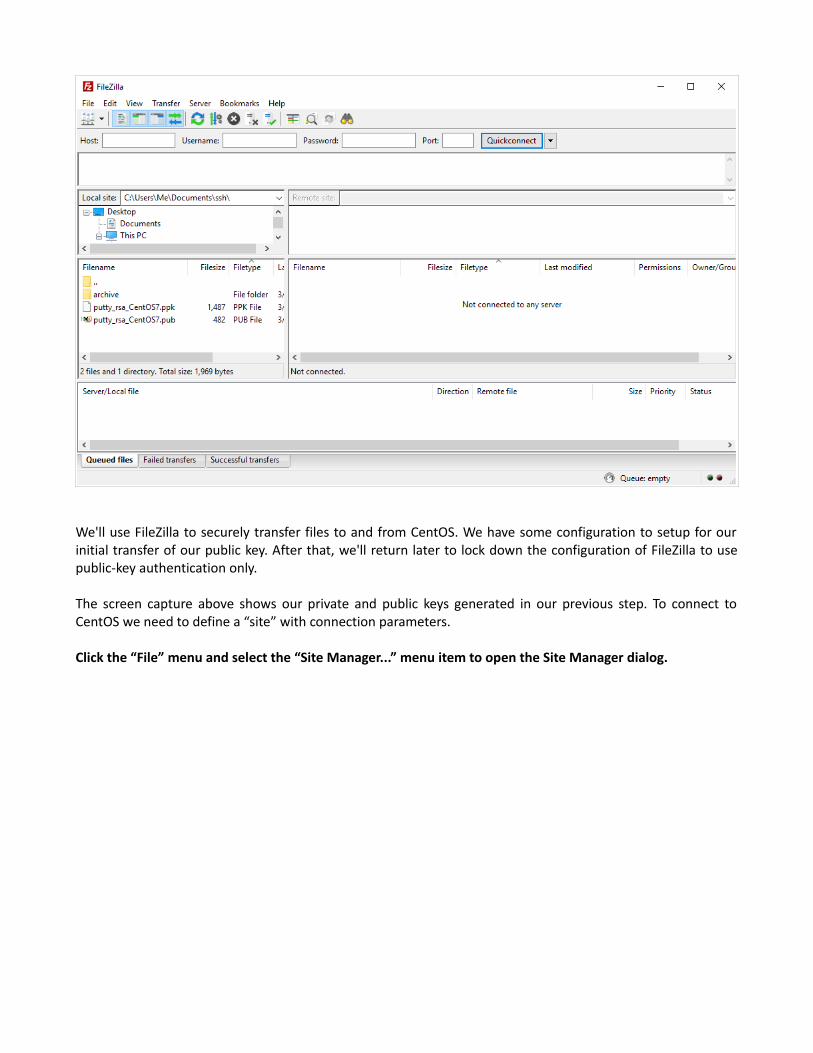
We'll use FileZilla to securely transfer files to and from CentOS. We have some configuration to setup for our initial transfer of our public key. After that, we'll return later to lock down the configuration of FileZilla to use public-key authentication only.
The screen capture above shows our private and public keys generated in our previous step. To connect to CentOS we need to define a “site” with connection parameters.
Click the “File” menu and select the “Site Manager...” menu item to open the Site Manager dialog.

In the “Site Manager” dialog, click the “New Site” button and enter “CentOS7” as the site name. Next, enter the IPv4 address for the CentOS7 Ethernet interface. We recorded this IP address above when we ran the “ifconfig” utility. Select the “SFTP - SSH File Transfer Protocol”. We saw above that CentOS7 is using the default SSH port, 22. For “Logon Type”, select “Normal”. Enter the name of the administrative user we created and the user's password. Then click on the “OK” button to save the site configuration.
Now to test our configuration, we can return to the “Site Manager” dialog as before and either double-click on the “CentOS7” site, or select the site and click “Connect”
Define the “CentOS7” site, save it, and click “Connect” to connect to the CentOS7 guest.
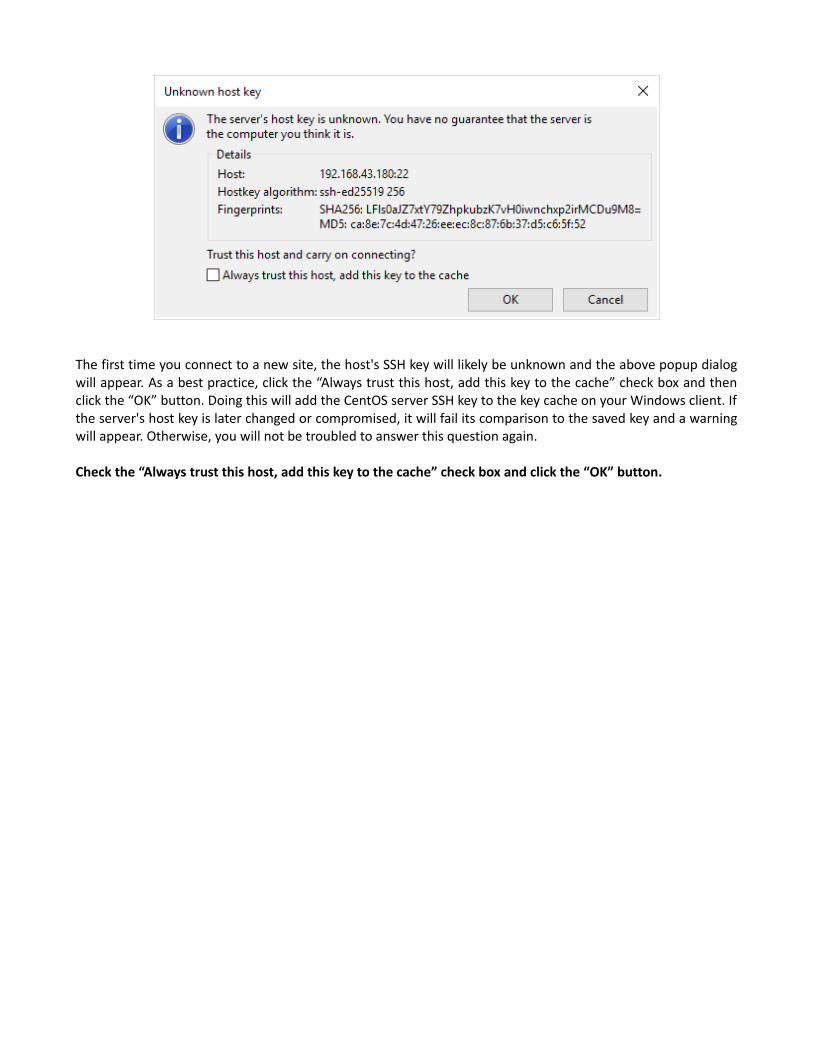
The first time you connect to a new site, the host's SSH key will likely be unknown and the above popup dialog will appear. As a best practice, click the “Always trust this host, add this key to the cache” check box and then click the “OK” button. Doing this will add the CentOS server SSH key to the key cache on your Windows client. If the server's host key is later changed or compromised, it will fail its comparison to the saved key and a warning will appear. Otherwise, you will not be troubled to answer this question again.
Check the “Always trust this host, add this key to the cache” check box and click the “OK” button.
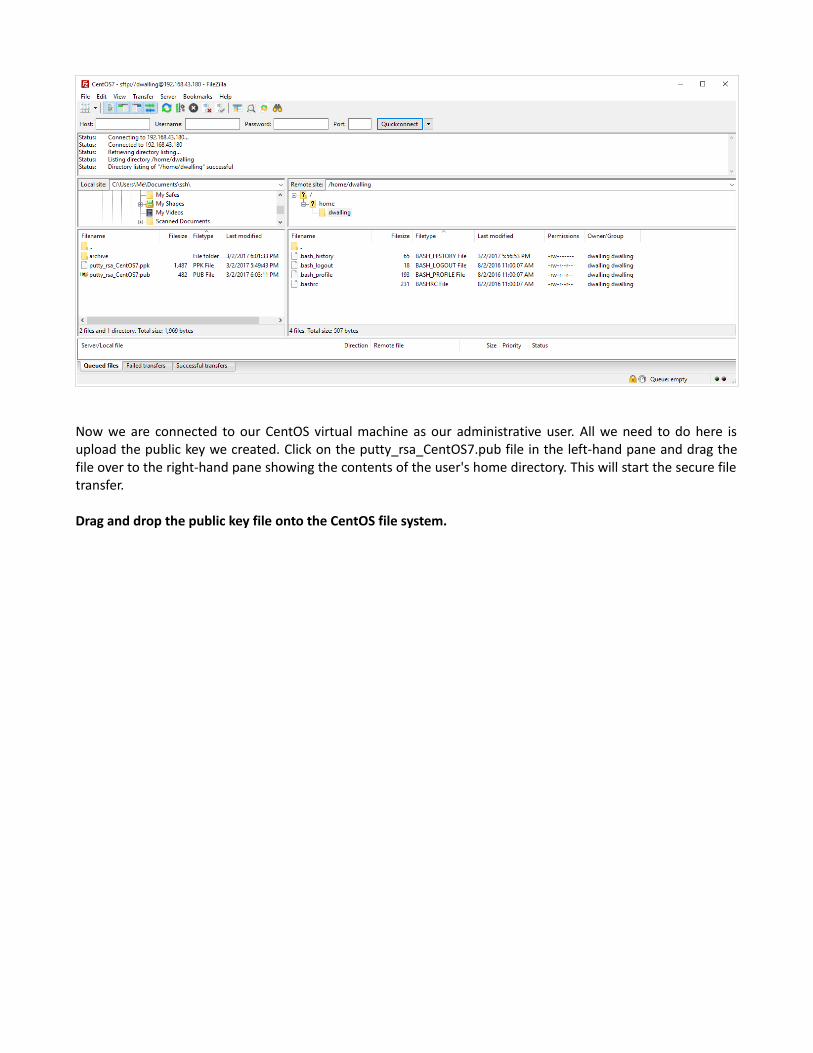
Now we are connected to our CentOS virtual machine as our administrative user. All we need to do here is upload the public key we created. Click on the putty_rsa_CentOS7.pub file in the left-hand pane and drag the file over to the right-hand pane showing the contents of the user's home directory. This will start the secure file transfer.
Drag and drop the public key file onto the CentOS file system.

Now the public key file has been uploaded to our CentOS virtual machine. We'll return now to CentOS to properly install this public key and update our SSH configuration to make it more secure.
Log in to our CentOS virtual machine as our administrative user.
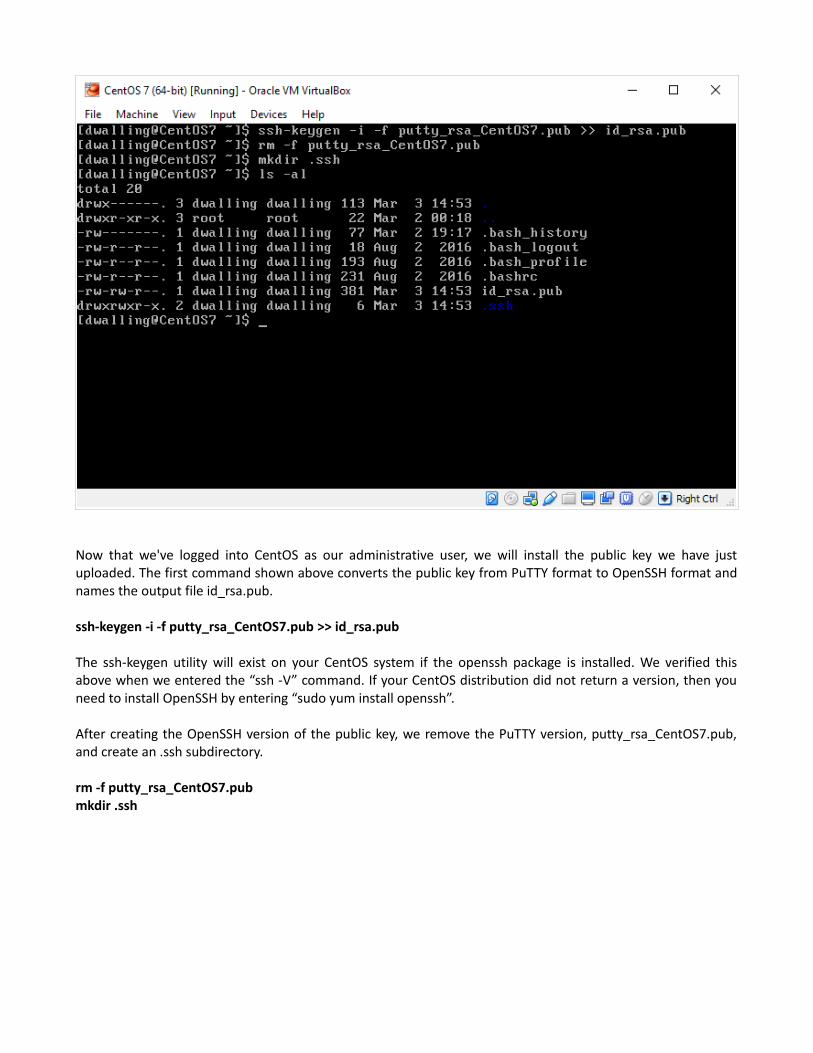
Now that we've logged into CentOS as our administrative user, we will install the public key we have just uploaded. The first command shown above converts the public key from PuTTY format to OpenSSH format and names the output file id_rsa.pub.
ssh-keygen -i -f putty_rsa_CentOS7.pub >> id_rsa.pub
The ssh-keygen utility will exist on your CentOS system if the openssh package is installed. We verified this above when we entered the “ssh -V” command. If your CentOS distribution did not return a version, then you need to install OpenSSH by entering “sudo yum install openssh”.
After creating the OpenSSH version of the public key, we remove the PuTTY version, putty_rsa_CentOS7.pub, and create an .ssh subdirectory.
rm -f putty_rsa_CentOS7.pubmkdir .ssh
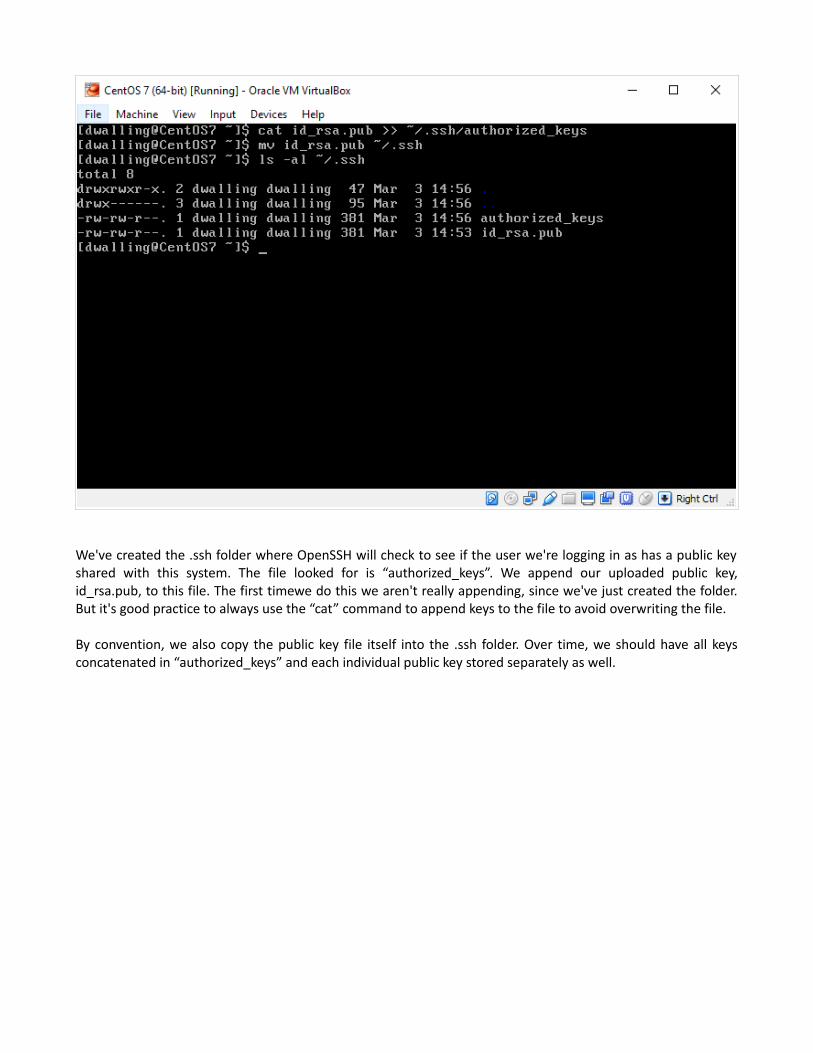
We've created the .ssh folder where OpenSSH will check to see if the user we're logging in as has a public key shared with this system. The file looked for is “authorized_keys”. We append our uploaded public key, id_rsa.pub, to this file. The first timewe do this we aren't really appending, since we've just created the folder. But it's good practice to always use the “cat” command to append keys to the file to avoid overwriting the file.
By convention, we also copy the public key file itself into the .ssh folder. Over time, we should have all keys concatenated in “authorized_keys” and each individual public key stored separately as well.

Now we update permissions on some folders to prohibit unauthorized access. The .ssh folder needn't be accessed by anyone other than the user. CentOS will still be able to reach authorized_keys, however, even with these settings.
What we'll want to do next is update the SSH configuration so that making secure connections into CentOS isn't quite so easy.

Our first step to step-up security is to update the “issue.net” file. This file, located in /etc is displayed when a user logs in using SSH. It's intent is to clearly present the acceptable use policy for the server and put clients on official notice that their activity may be monitored. This services to meet certain legal requirements and also as a deterrent to some. What text you put into issue.net is up to you. The above is merely an example.
To edit /etc/issue.net, issue the command:
sudo cp /etc/issue.net /etc/issue.net.originalsudo vi /etc/issue.net
Remember, we are logged in now as our administrative user, not as “root”. So we will need to “ask permission”, so to speak, before editing system files. The “sudo” command asks CentOS to allow us to issue a command as though we were the “super user”. CentOS will prompt us for our administrative user password and check to see if the we are allowed to issue the command. Remember too that when we setup our administrative user at the beginning of our CentOS installation process, the user was added to the “wheel” group. Now we can see the signicance of that. The group “wheel” is listed in the file /etc/sudoers as being allowed to issue all commands, once authenticated by “sudo”.
As a best practice, the first time we edit a system file, let's copy the original file first to a reserved name so we can revert back to it later if our changes are unsuccessful.

Next, we are going to update the /etc/ssh/sshd_config file. The parameters in this file control the behavior of OpenSSH when we connect to CentOS from a remote client. These are the server-side parameters. There is also an /etc/ssh/ssh_config file, which includes client-side parameters. We are not going to change anything in that file. Open the /etc/ssh/sshd_config file for editing by entering:
sudo cp /etc/ssh/sshd_config /etc/ssh/sshd_config.originalsudo vi /etc/ssh/sshd_config
Edit the file to set the following parameter values. As you make changes to the file. It is a good practice to leave the original line as a comment and follow the original line with a new line defining the new parameter value.
AllowUsers dwalling # White-list allowed usersBanner /etc/issue.net # Display security policy on loginChallengeResponseAuthentication no # Use only public key authenticationClientAliveCountMax 0 # No warning before session timeoutClientAliveInterval 900 # Timeout session after 15 minutesGSSAPI Authentication no # Use only public key authenticationListenAddress 192.168.43.180 # Use only this Ethernet interfaceLoginGraceTime 30 # Timeout login prompt after 30 secondsPasswordAuthentication no # Use only public key authenticationPermitEmptyPasswords no # No empty passwordsPermitRootLogin no # SSH users must sudoPort 8642 # Use an alternate portProtocol 2 # Require SSH version 2PubkeyAuthentication yes # Use public key authentication onlySyslogFacility AUTHPRIV # Restrict access to log filesX11Forwarding no # No graphical UI access
Some of these settings may be controversial. For example, setting the “ListenAddress” setting to a fixed IP will cause some inconvenience if the host system roams or is regularly transported and uses DHCP-assigned intetnet addressing itself. An alternative is to set ListenAddress to “0.0.0.0” to allow all interfaces to accept SSH connections. This is a choice between security and convenience. Choose wisely.
After saving these changes to /etc/ssh/sshd_config, you will be tempted to restart the sshd service. Not so fast! If you do, you're likely to get a big fat error. This is because the “Minimal” CentOS 7 distirbution ISO includes the “Security Enhanced Linux” (SELinux) kernel security module. This module will prevent the sshd service from actively listening on a port that is not explicitely defined to SELinux. So before we stop and start sshd, we need to define our alternate port. Enter the following command:
sudo semange port -a -t ssh_port_t -p tcp 8642
This command defines port 8642 as a valid TCP port for SSH connections. Now we can restart sshd.
sudo systemctl restart sshd.service
Now we can connect from a client, right? Well, not quite yet. We have identified port 8642 to SELinux, but to the CentOS firewall. To open the port on the firewall, enter these commands. Note the double-dashes!
sudo firewall-cmd --permanent --add-port=8642/tcpsudo firewall-cmd --reload

Now that we've gotten our SELinux and firewall into shape, let's revisit the “netstat” command. As shown above, we now have only our custom port 8642 in an actively listening state on TCP. If we inspect the netstat filter more closely, without filtering for active listeners, we'll still see some UDP activity on other ports. But for now, this is what we want to see from netstat.
We're not really done with our firewall configuration though. If we dig deeper, we'll see, for example, that we are allowing incoming connections on port 8642 from anywhere. This is not ideal. We should be allowing SSH connections from our administrative user only from source addresses that correspond to locations where we expect that user to be. We'll look at how to improve our firewall configuration using both firewall-cmd and iptables later on.

Having configured SSH the way we want it, we can now setup our host to connect to CentOS using SSH-2 and public key authentication. We are going to setup two applications to do this. One is FileZilla, which we've seen before. The second is the PuTTY terminal client.
The FileZilla site configuration for CentOS7 is updated as shown above. We change the Port number to our custom port, in our case, 8642. We also change the “Login Type” to “Key file”. This changes the password field to a “Key file” field. Here, we use the “Browse” button to locate the private key file we created earlier. Select the private key file to populate the field.
Now we can save this configuration by clicking “OK” and reopen or double-click the site to connect to CentOS using public key authentication.
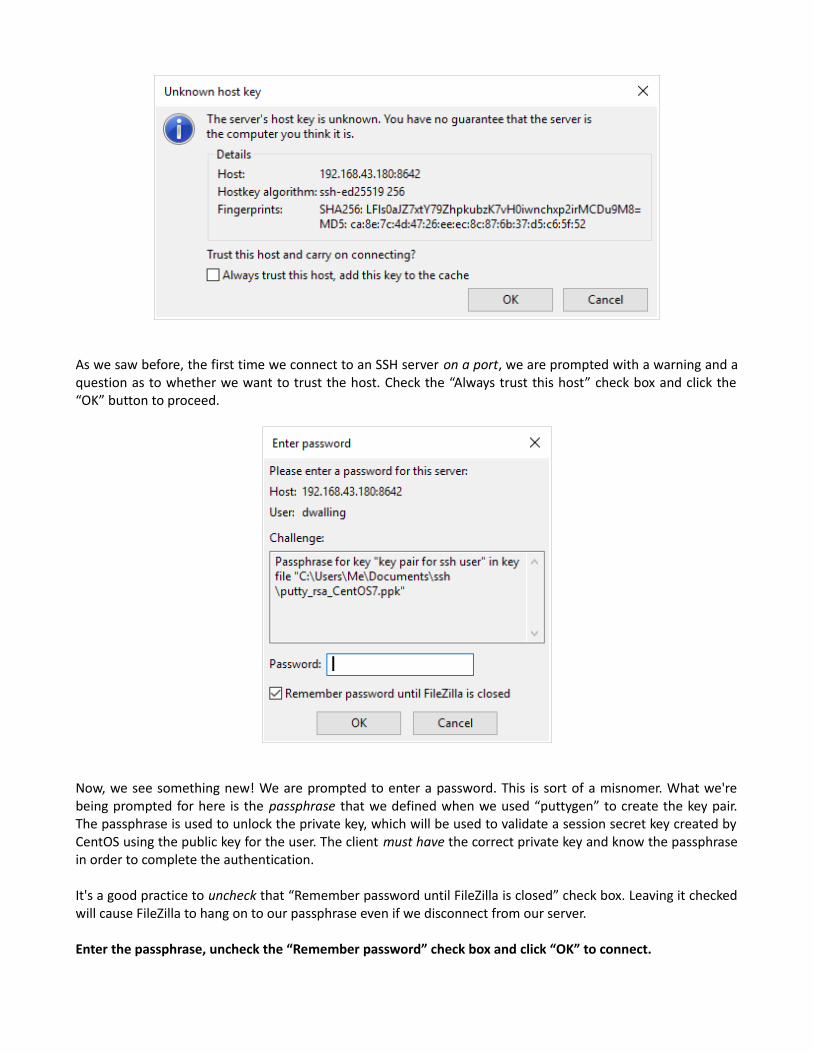
As we saw before, the first time we connect to an SSH server on a port, we are prompted with a warning and a question as to whether we want to trust the host. Check the “Always trust this host” check box and click the “OK” button to proceed.
Now, we see something new! We are prompted to enter a password. This is sort of a misnomer. What we're being prompted for here is the passphrase that we defined when we used “puttygen” to create the key pair. The passphrase is used to unlock the private key, which will be used to validate a session secret key created by CentOS using the public key for the user. The client must have the correct private key and know the passphrase in order to complete the authentication.
It's a good practice to uncheck that “Remember password until FileZilla is closed” check box. Leaving it checked will cause FileZilla to hang on to our passphrase even if we disconnect from our server.
Enter the passphrase, uncheck the “Remember password” check box and click “OK” to connect.

Once we have connected successfully to CentOS7 using public key authentication, all other behavior in FileZilla looks pretty much the same. Now we are going to configure the PuTTY client to connect to CentOS7 using SSH to establish a remote terminal session.
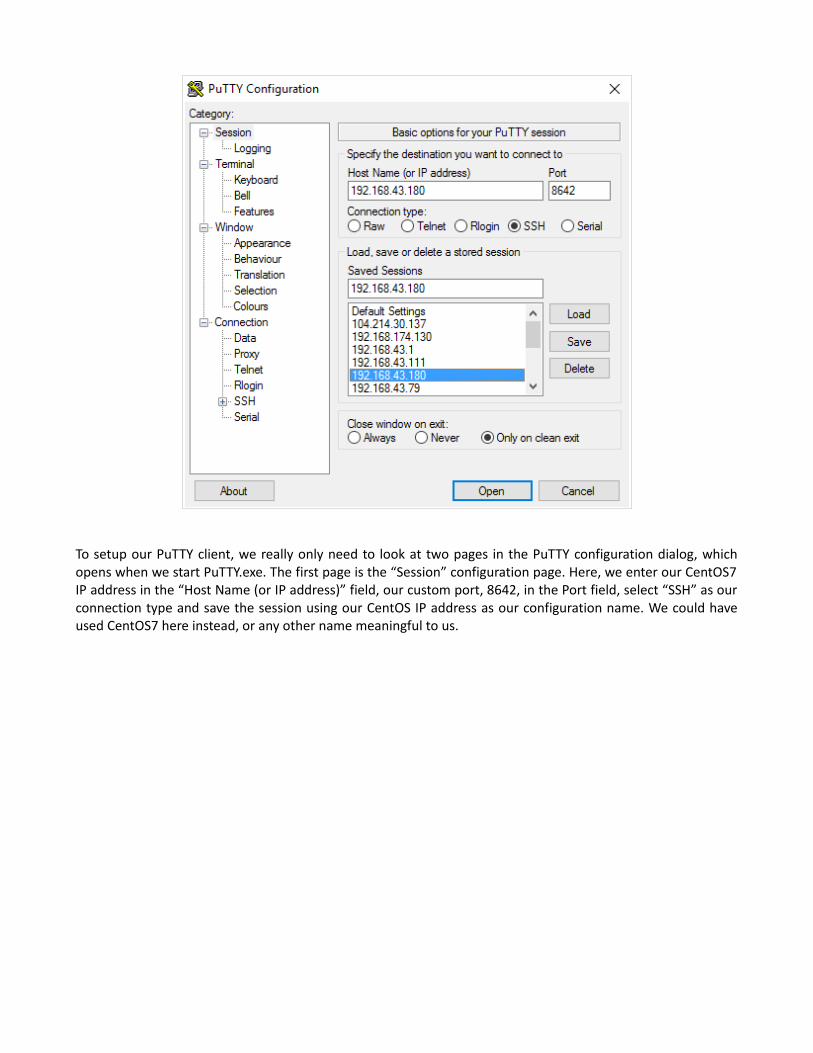
To setup our PuTTY client, we really only need to look at two pages in the PuTTY configuration dialog, which opens when we start PuTTY.exe. The first page is the “Session” configuration page. Here, we enter our CentOS7 IP address in the “Host Name (or IP address)” field, our custom port, 8642, in the Port field, select “SSH” as our connection type and save the session using our CentOS IP address as our configuration name. We could have used CentOS7 here instead, or any other name meaningful to us.
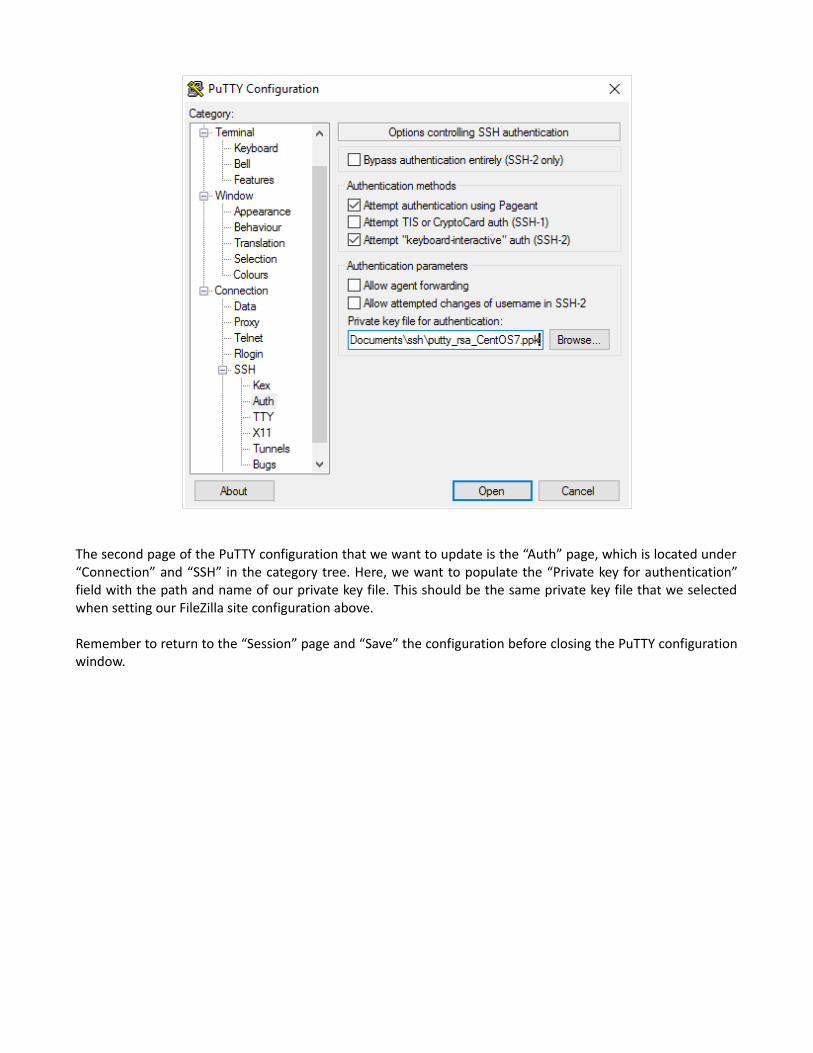
The second page of the PuTTY configuration that we want to update is the “Auth” page, which is located under “Connection” and “SSH” in the category tree. Here, we want to populate the “Private key for authentication” field with the path and name of our private key file. This should be the same private key file that we selected when setting our FileZilla site configuration above.
Remember to return to the “Session” page and “Save” the configuration before closing the PuTTY configuration window.
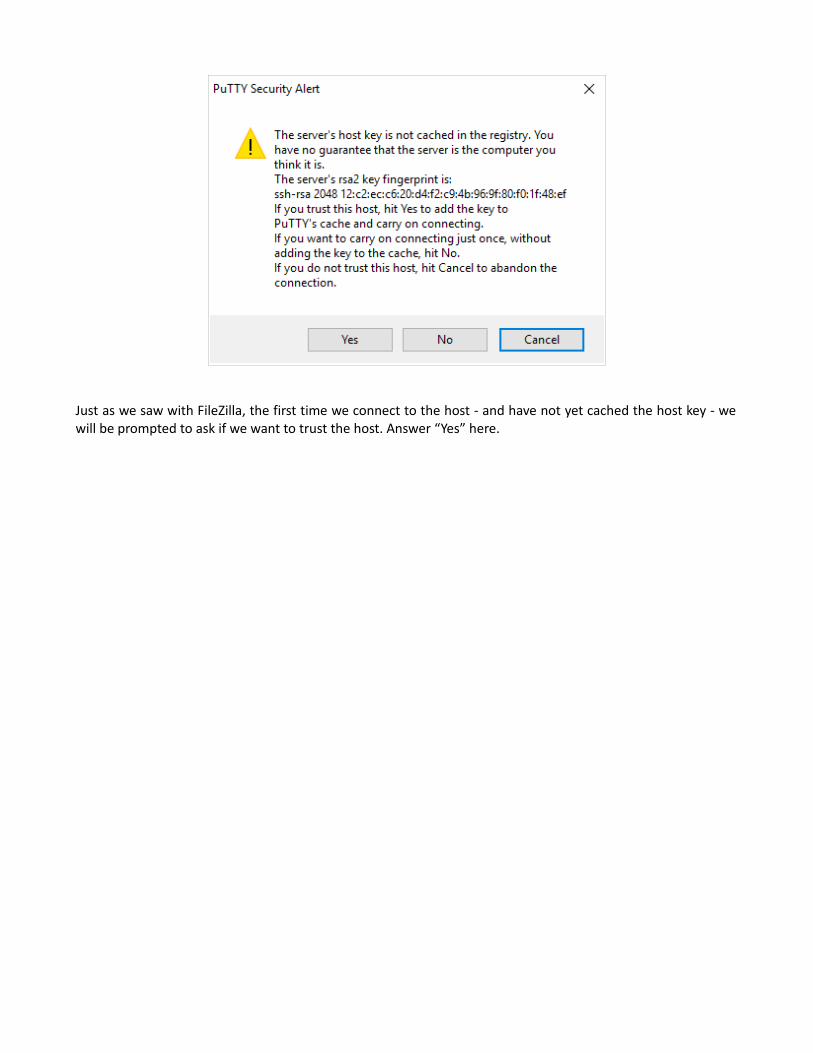
Just as we saw with FileZilla, the first time we connect to the host - and have not yet cached the host key - we will be prompted to ask if we want to trust the host. Answer “Yes” here.

When the PuTTY client starts, a window is created that prompts us for our user name. This is a little different than FileZilla, which asked us to define the user name as part of the site configuration. After we type the user name and press Enter, CentOS checks our /etc/ssh/sshd_config file to see if the user name entered is listed as one of the allowed users. Remember that we defined our administrative user as the only allowed user.
If the user name is found as one of the allowed users, our banner (the /etc/issue.net) file is displayed, giving the user fair notice of our acceptable use policies for the CentOS server. Below the banner, the sshd service notifies us that we are authenticating with a public key that it has found in the .ssh/authorized_keys file for the administrative user. The name of the public key is simply “key pair for ssh user”. Remember that we changed this from the default value when we created the key pair because the default value revealed both the assymetric encryption algorithm, rsa, and the date on which the key was created. Too much information!
The sshd service then prompts us for the passphrase that was used to lock the private key. I say “lock” and not “encrypt” here, because the key that encrypts the private key is not actually the passphrase itself, but is generated using the passphrase.
When we enter the correct passphrase, control is passed to the normal login process, which displays our last login date and time. Finally we are left at the prompt for our shell.

Having access to CentOS using the PuTTY client gives us several advantages, including having a terminal window we can freely resize and being able to have multiple concurrent sessions on our desktop. Of course, these and other advantages could be accomplished by installing a graphical user interface on our server. We'll get to that in a little while.

Now that we have terminal and SFTP (FileZilla) access into CentOS, it may not always be necessary to start our CentOS7 virtual machine and have it create a foreground window. In fact, sometimes it may be preferable to have the virtual machine start “in the background”, as it were. Starting the virtual machine without a foreground window is called, in Oracle VirtualBox parlance, a “headless start”. To demonstrate what this looks like, first return to the CentOS7 virtual machine window and power off the virtual machine. To do this, enter the “/sbin/shutdown -h now” command while logged on as root.
Once the virtual machine powers off, the foreground window will close, returning you to the VIrtualBox manager window. From here, as shown above, we can choose the “Headless Start” option from the drop-down menu associated with the toolbar “Start” button.
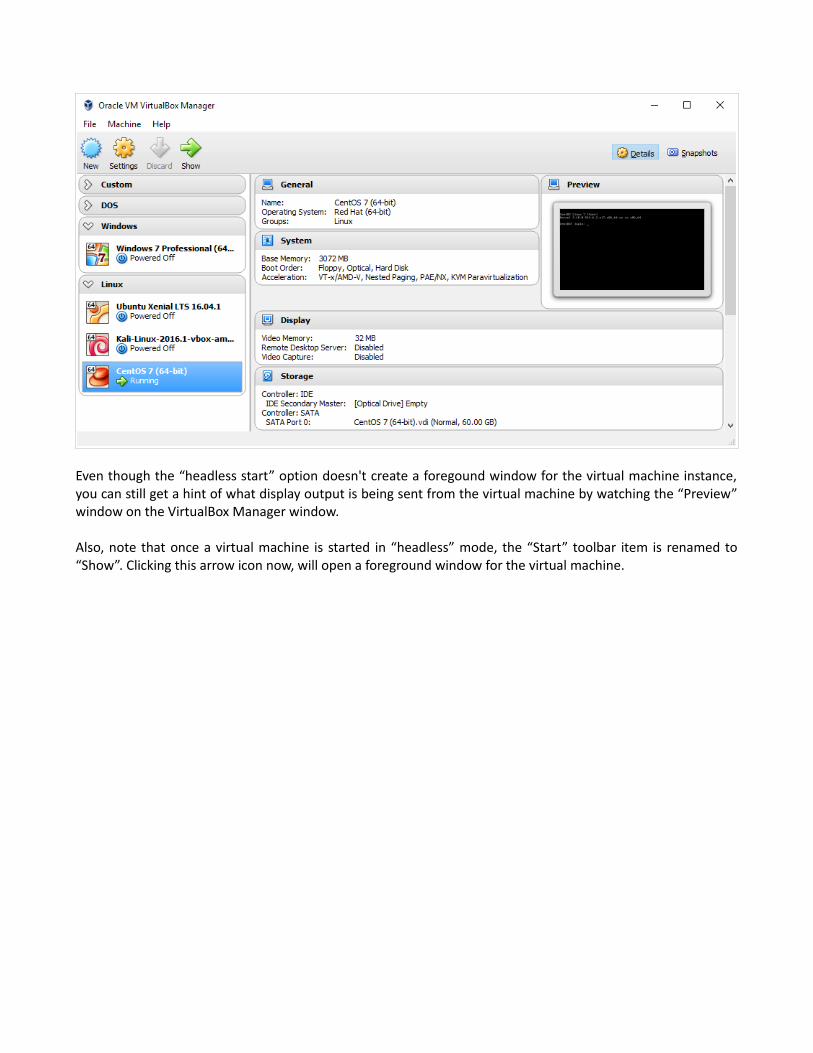
Even though the “headless start” option doesn't create a foregound window for the virtual machine instance, you can still get a hint of what display output is being sent from the virtual machine by watching the “Preview” window on the VirtualBox Manager window.
Also, note that once a virtual machine is started in “headless” mode, the “Start” toolbar item is renamed to “Show”. Clicking this arrow icon now, will open a foreground window for the virtual machine.
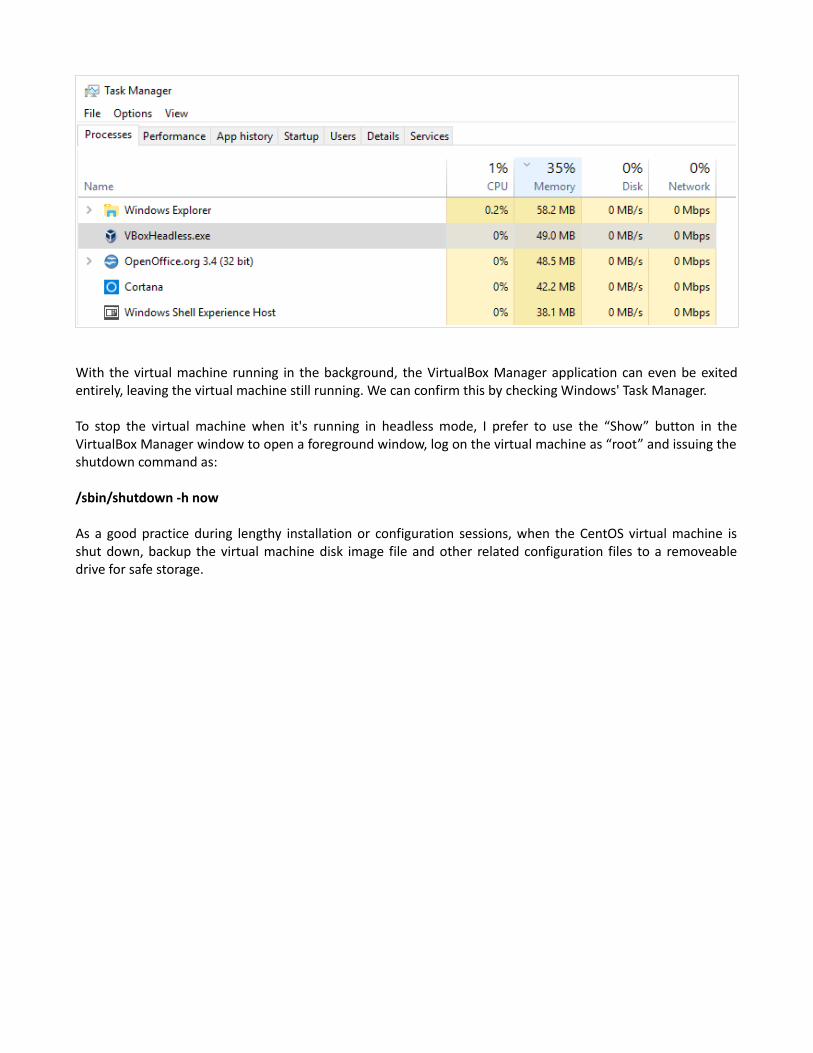
With the virtual machine running in the background, the VirtualBox Manager application can even be exited entirely, leaving the virtual machine still running. We can confirm this by checking Windows' Task Manager.
To stop the virtual machine when it's running in headless mode, I prefer to use the “Show” button in the VirtualBox Manager window to open a foreground window, log on the virtual machine as “root” and issuing the shutdown command as:
/sbin/shutdown -h now
As a good practice during lengthy installation or configuration sessions, when the CentOS virtual machine is shut down, backup the virtual machine disk image file and other related configuration files to a removeable drive for safe storage.