configuring ehealth to monitor snmpv3 elements€¦ · configuring ehealth to monitor snmpv3...
TRANSCRIPT

Focus on Setup
Configuring eHealth to Monitor SNMPv3Elements
In eHealth Release 5.7 Service Pack 5 or later, you can configure eHealth to discover and poll elements using theSNMPv3 protocol, allowing you to take advantage of the authentication and encryption features of SNMPv3 witheHealth. eHealth can monitor SNMPv3 devices along with SNMPv1 and v2 devices, automatically using theappropriate protocol to discover and poll each element.
eHealth works with Distributed SNMP Security Pack™ software (available from SNMP Research International) toprovide encrypted SNMPv3 credentials for authentication and privacy to SNMPv3 agents. Using DCI, you specifycredentials for each SNMPv3 agent, including its IP address, the security level you want to use, and the algorithmsused for authentication and encryption. These credentials are then encrypted and stored in the eHealth database.
During discovery, eHealth looks for SNMPv3 key information in the database. If such information exists for anelement, eHealth performs an SNMPv3 discovery using the specified credentials. If no such information exists,eHealth performs a standard SNMPv1 or v2 discovery. Similarly, eHealth looks for SNMPv3 key information duringpolling, and automatically uses the appropriate protocol for each element.
NOTE: Polling SNMPv3 agents adds additional load to the eHealth system due to the overhead associated withencryption and authentication. If you are polling SNMPv3 agents, you can poll up to 40,000 elements every5 minutes. Polling a larger number of elements can cause missed polls and a corresponding loss of datagranularity.
Overview of this DocumentThis document describes how to configure eHealth to discover and poll SNMPv3 elements. It contains the followingsections:
Installing and Configuring the Distributed SNMP Security Pack Software
Setting the NH_SNMP_PROXY_ADDRESS Environment Variable
Creating the SNMPv3 Key Information DCI File
Importing SNMPv3 Key Configuration Information
Exporting and Modifying SNMPv3 Key Configuration Information
Troubleshooting

Configuring eHealth to Monitor SNMPv3 Elements
Installing and Configuring theDistributed SNMP Security Pack SoftwareBefore you can configure eHealth to discover SNMPv3 elements, you must install and configure Distributed SNMPSecurity Pack, Release 16.1.0.62 or later on your eHealth system. The Distributed SNMP Security Pack software isavailable from SNMP Research International Inc. www.snmp.com
To install and configure the Distributed SNMP Security Pack software:
1. Install the Distributed SNMP Security Pack software on your eHealth system, as described in theSNMP Security Pack Quick Start Guide provided by SNMP Research.
2. During the installation process, you are prompted for what network management software “Are youinstalling SP to be used with.” Select Some other manager application.
3. After installing the Distributed SNMP Security Pack software, set the SNMP Security Pack environmentvariable SR_TRAP_TEST_PORT to an unused port (such as 4750). Do NOT set it to port 162 (the default).Setting this variable to port 162 will cause problems for eHealth receiving traps. For more information, referto the SNMP Security Pack User Documentation provided by SNMP Research.
Setting the NH_SNMP_PROXY_ADDRESSEnvironment VariableOnce you have installed and configured the Distributed SNMP Security Pack software, you must set the eHealthenvironment variable NH_SNMP_PROXY_ADDRESS to specify the IP address and port number of the
BRASS server used as the SNMPv3 proxy. The BRASS server is installed as part of the DSSP software.
NOTE: You should specify a value of 127.0.0.1:4747 for this variable unless you specified another port for the BRASSserver during installation.
Setting the Variable on UNIX SystemsUse the following procedure to define the NH_SNMP_PROXY_ADDRESS environment variable on UNIX systems.
To set the environment variable on a UNIX system:1. Using any text editor, open the nethealthrc.sh.usr file in the eHealth installation directory.
2. Define the variable as follows:NH_SNMP_PROXY_ADDRESS=”VALUE”; export NH_SNMP_PROXY_ADDRESS
*Where VALUE is the IP address and port number of the BRASS server installed as part of the SNMP SecurityPack™ software. You should specify a value of 127.0.0.1:4747 for this variable unless you specified anotherport for the BRASS server during installation. For example:NH_SNMP_PROXY_ADDRESS="127.0.0.1:4747"; export NH_SNMP_PROXY_ADDRESS
3. Save and close the nethealthrc.sh.usr file.
CAUTION: Before you stop the eHealth server, check the console and the console messages to determinewhether any eHealth processes or scheduled jobs are running. If jobs are running, wait until they finish.
4. Stop and restart the eHealth server to apply your changes

Configuring eHealth to Monitor SNMPv3 Elements
Setting the Variable on Windows SystemsOn a Windows system, eHealth sets environment variables as system variables.
To set the environment variable on a Windows system:1. Select Start > Settings > Control Panel. The Control Panel dialog box appears.2. Double-click System. The System Properties dialog box appears.
3. Click the Advanced tab.4. Click Environment Variables. The Environment Variables dialog box appears.
5. Under System variables, click New. The New System Variable dialog box appears.
6. In the New System Variable dialog box, enter the following:
Variable Name – NH_SNMP_PROXY_ADDRESS
Variable Value – 127.0.0.1:4747
NOTE: Specify 127.0.0.1:4747 for the Variable Value unless you specified another port for the BRASSserver during installation.
7. Click OK to close the New System Variable dialog box.
8. Click OK to close the Environment Variables dialog box.
9. Click OK to close the System Properties dialog box.
10. In the Control Panel dialog box, double-click Administrative Tools.The Administrative Tools dialog box appears.
11. Double-click Services. The Services dialog box appears.
12. In the list of services, select eHealth.
CAUTION: Before you stop the eHealth service, check the console and the console messages to determinewhether any eHealth processes or scheduled jobs are running. If jobs are running, wait until they finish.
13. Right-click the eHealth service, then select Restart. The new variable is applied when eHealth restarts.
14. Close the Services dialog box.
NOTE: For more information on setting environment variables, refer to the “Commands and EnvironmentVariables” section of the eHealth Web Help (for eHealth Release 6.0 and later) or the eHealth AdministrationReference (for eHealth Release 5.7 and later).
3

Configuring eHealth to Monitor SNMPv3 Elements
Creating the SNMPv3 Key Information DCI FileTo import SNMPv3 key configuration information, you need to create a DCI file. An SNMPv3 key informationDCI file contains SNMPv3 agent and key management information that allows eHealth to discover and pollelements using the SNMPv3 protocol. For more information on using DCI files, see the eHealth Integration Guide.
You can create this file in two ways:
1. Create a new file using the standard header.
2. Export the existing SNMPv3 key configuration information, and modify it.
Creating a New File Using the Standard HeaderThe first time you import SNMPv3 key configuration into the database, you need to create a new DCI file. To createthis file, you start with the eHealth standard header file for SNMPv3 key information, and add information to it.The standard header file for SNMPv3 is the stdHdrSnmpKeyInfo.dci file, located in the ehealth/sys directory, inwhich ehealth represents the eHealth home directory.
To create a new file:
Copy the standard header file stdHdrSnmpKeyInfo.dci from the ehealth/sys directory to a new location. Open the file with a text editor.
Add the appropriate information to the file as described in the next section, ”SNMP Key Information DCIFile Sections and Format.
Save the file.
NOTE: When eHealth is installed, a sample SNMPv3 DCI file complete with header information is created:
$NH_HOME/sampleFiles/dciFiles/snmpv3KeyInfo.dci
Exporting the Existing Information
For information on exporting and modifying existing SNMPv3 key configuration information, refer to “Exportingand Modifying SNMPv3 Key Configuration Information” later in this document.

Configuring eHealth to Monitor SNMPv3 Elements
SNMP Key Information DCI File Sections and FormatAn SNMP key information DCI file includes SNMPv3 agent and key management information, which you add tospecific sections in the DCI file. An SNMP key information DCI file contains the following sections:
Standard Header
SnmpKeyInfo
Operations
SNMP Key Information Standard Header File.
Each DCI file requires a header section that is specific to the type of DCI file that you want to create. To importSNMPv3 key configuration information, you use the stdHdrSnmpKeyInfo.dci file located in the ehealth/sys directory.
Figure 1 shows the SNMP key information DCI header file. The header file defines the field type (FT) records andfield name (FN) records for the DCI file sections.# SnmpKeyInfo DCI header must be placed at the top of each KeyInfo DCI file.
IR, 1, "SnmpKeyInfo Configuration", 1, <date>, <time>, <dbName>
FT, SnmpKeyInfo, symbol, ipAddr, integer, symbol, \symbol, symbol, symbol, \symbol, symbol, string, string \
FN, SnmpKeyInfo, objId, agentIpAddress, agentPort, userName, \contextEngineId, contextName, securityLevel, \authAlgorithm, encryptAlgorithm, authKey, privKey
# CAUTION: Format of this section is duplicated in# stdHeader.dci
FT, Operations, symbol, symbol, symbol, symbol
Figure 1. Standard Header Section
NOTE: Specify the date and time in the DCI header as MM/DD/YYYY, HH:MM:SS, (24-hour format).
SnmpKeyInfo Section of the DCI File. The SnmpKeyInfo section specifies the SNMPv3 agent configurationand key management information for the SNMPv3 elements you want to monitor with eHealth. The SnmpKeyInfosection has the following format:
DS,,SnmpKeyInfo,
Agent1Agent2Agent3...DE
Each record in the data set defines an SNMPv3 agent. Each agent definition consists of the following series ofcomma-separated fields (described in Table 1):
objId, agentIpAddress, agentPort, userName, \contextEngineId, contextName, securityLevel, \authAlgorithm, encryptAlgorithm, authKey, privKey

Configuring eHealth to Monitor SNMPv3 Elements
Table 1 describes the fields in an SNMPv3 agent definition.
Table 1. SnmpKeyInfo Section Fields
Field Name Type Description
objId symbol Assigns a unique identifier to the SNMPv3 agent in this file.Eachdefinition in the DCI file must begin with a unique object ID (withoutspaces). The objId value is for eHealth internal use only. It is used in thisfile only, and does not appear in eHealth (Required).
agentIpAddress ipAddr Specifies the Internet Protocol (IP) address of the SNMPv3agent(Required).
agentPort integer Specifies the port on which eHealth addresses the agent(Required). Thedefault is 161.
userName symbol Specifies the user name of an authorized user of the agent(Required).
contextEngineId symbol Specifies the SNMP engine ID of the agent (Optional).
contextName symbol Specifies the context name under which the user is grantedaccess to theagent (Optional).
securityLevel symbol Specifies the security level for authentication and encryption(Required):
noAuthNoPriv
authNoPriv
authPriv
authAlgorithm symbol Specifies the authentication algorithm used by the agent:MD5 (default)
SHA
encryptAlgorithm symbol Specifies the encryption algorithm used by the agent:DES (default)
3DES
AES
authKey string Specifies the authentication key for the agent.
privKey string Specifies the privacy key for the agent.

Figure 2 shows an example of an SnmpKeyInfo DCI section:DS,,SnmpKeyInfo,1,123.245.78.1,161,eHuser,,,authNoPriv,MD5,,”Authkey”,””,2,123.245.78.2,161,eHuser,,,authNoPriv,SHA,,”Authkey”,””,3,123.245.78.3,161,eHuser,,,noAuthNoPriv,,,””,””,4,123.245.78.4,161,eHuser,,,authPriv,SHA, AES,”Authkey”,”Privkey”,5,123.245.78.5,161,eHuser,,,authPriv,MD5, DES,”Authkey”,”Privkey”,DE
Figure 2. SNMPKeyInfo DCI Section
NOTE: Insert a comma for empty data fields that occur between specified information; you can omit trailing commasat the end of the record.
Operations Section of SNMP Key DCI File.
An operation is an add, modify, merge, mergeWithDelete, or delete process performed by eHealth on an objectthat you have defined in your DCI file and specified in the Operations section. The Operations section specifies theoperations that eHealth performs when it processes the DCI file.
Operations are processed sequentially on the data defined in the DCI sections as specified in the Operations section.eHealth can perform two types of operations on objects:
Operations on individual objects (add, delete, modify)
Merge operations on multiple objects (merge, mergeWithDelete)
The Operations section is a data set record that has one of the formats shown below, and described in Table 2.
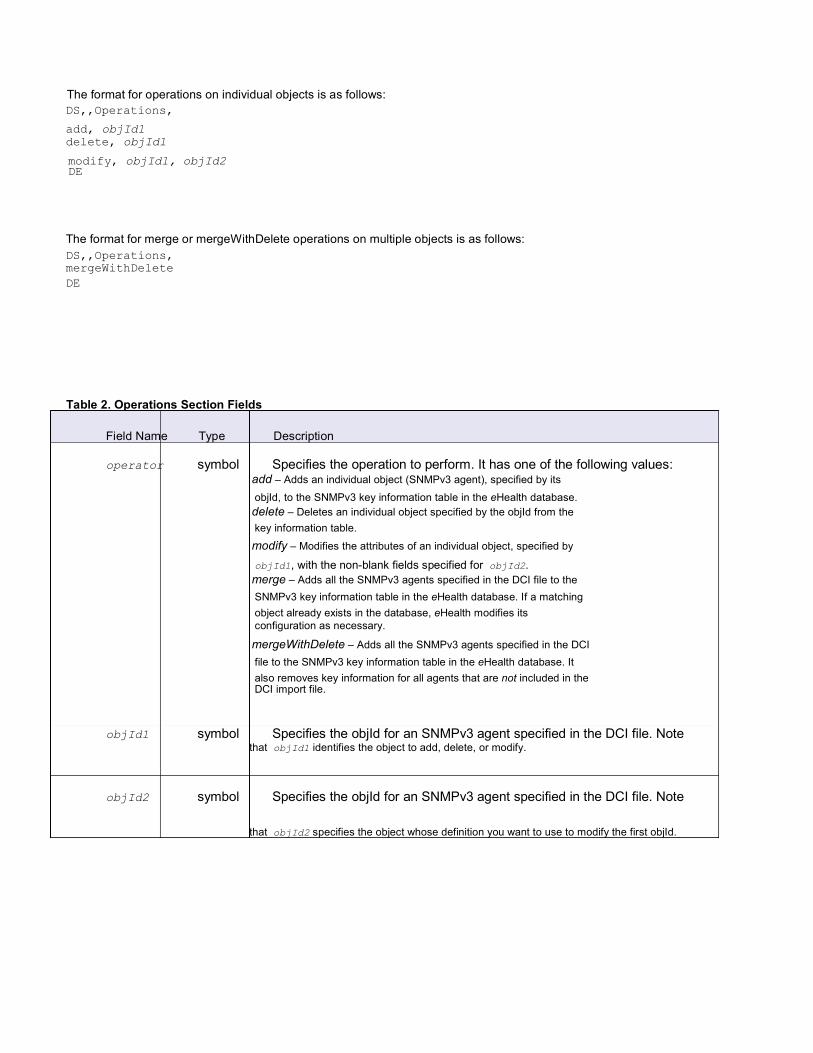
The format for operations on individual objects is as follows:DS,,Operations,
add, objId1delete, objId1
modify, objId1, objId2DE
The format for merge or mergeWithDelete operations on multiple objects is as follows:DS,,Operations,mergeWithDeleteDE
Table 2. Operations Section Fields
Field Name Type Description
operator symbol Specifies the operation to perform. It has one of the following values:add – Adds an individual object (SNMPv3 agent), specified by its
objId, to the SNMPv3 key information table in the eHealth database.delete – Deletes an individual object specified by the objId from thekey information table.
modify – Modifies the attributes of an individual object, specified by
objId1, with the non-blank fields specified for objId2.merge – Adds all the SNMPv3 agents specified in the DCI file to theSNMPv3 key information table in the eHealth database. If a matchingobject already exists in the database, eHealth modifies itsconfiguration as necessary.
mergeWithDelete – Adds all the SNMPv3 agents specified in the DCIfile to the SNMPv3 key information table in the eHealth database. Italso removes key information for all agents that are not included in theDCI import file.
objId1 symbol Specifies the objId for an SNMPv3 agent specified in the DCI file. Notethat objId1 identifies the object to add, delete, or modify.
objId2 symbol Specifies the objId for an SNMPv3 agent specified in the DCI file. Note
that objId2 specifies the object whose definition you want to use to modify the first objId.7
Configuring eHealth to Monitor SNMPv3 Elements
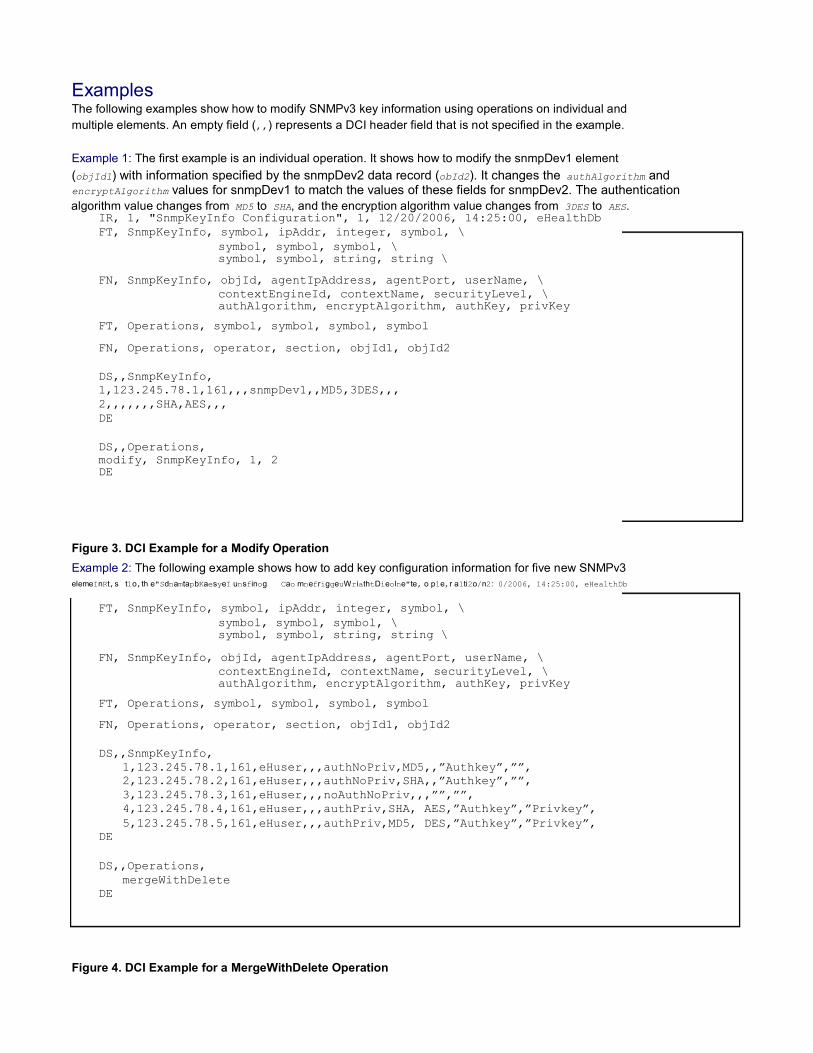
ExamplesThe following examples show how to modify SNMPv3 key information using operations on individual andmultiple elements. An empty field (,,) represents a DCI header field that is not specified in the example.
Example 1: The first example is an individual operation. It shows how to modify the snmpDev1 element(objId1) with information specified by the snmpDev2 data record (obId2). It changes the authAlgorithm andencryptAlgorithm values for snmpDev1 to match the values of these fields for snmpDev2. The authenticationalgorithm value changes from MD5 to SHA, and the encryption algorithm value changes from 3DES to AES.
IR, 1, "SnmpKeyInfo Configuration", 1, 12/20/2006, 14:25:00, eHealthDbFT, SnmpKeyInfo, symbol, ipAddr, integer, symbol, \
symbol, symbol, symbol, \symbol, symbol, string, string \
FN, SnmpKeyInfo, objId, agentIpAddress, agentPort, userName, \contextEngineId, contextName, securityLevel, \authAlgorithm, encryptAlgorithm, authKey, privKey
FT, Operations, symbol, symbol, symbol, symbol
FN, Operations, operator, section, objId1, objId2
DS,,SnmpKeyInfo,1,123.245.78.1,161,,,snmpDev1,,MD5,3DES,,,2,,,,,,,SHA,AES,,,DE
DS,,Operations,modify, SnmpKeyInfo, 1, 2DE
Figure 3. DCI Example for a Modify OperationExample 2: The following example shows how to add key configuration information for five new SNMPv3elemeInRt,s t1o,th e"SdnamtapbKaesyeI unsfinog Cao mnefriggeuWriathtDieolne"te, o p1e,r a1ti2o/n2: 0/2006, 14:25:00, eHealthDb
FT, SnmpKeyInfo, symbol, ipAddr, integer, symbol, \symbol, symbol, symbol, \symbol, symbol, string, string \
FN, SnmpKeyInfo, objId, agentIpAddress, agentPort, userName, \contextEngineId, contextName, securityLevel, \authAlgorithm, encryptAlgorithm, authKey, privKey
FT, Operations, symbol, symbol, symbol, symbol
FN, Operations, operator, section, objId1, objId2
DS,,SnmpKeyInfo,1,123.245.78.1,161,eHuser,,,authNoPriv,MD5,,”Authkey”,””,2,123.245.78.2,161,eHuser,,,authNoPriv,SHA,,”Authkey”,””,3,123.245.78.3,161,eHuser,,,noAuthNoPriv,,,””,””,4,123.245.78.4,161,eHuser,,,authPriv,SHA, AES,”Authkey”,”Privkey”,5,123.245.78.5,161,eHuser,,,authPriv,MD5, DES,”Authkey”,”Privkey”,
DE
DS,,Operations,mergeWithDelete
DE
Figure 4. DCI Example for a MergeWithDelete Operation8

Configuring eHealth to Monitor SNMPv3 Elements
Importing SNMPv3 Key ConfigurationInformationAfter you create a DCI file, you use the nhImportSnmpKeyInfo command to import the key configurationinformation in the DCI file into the eHealth database. The command adds SNMPv3 agent and key configurationinformation to the key information table in the eHealth database.
Using the nhImportSnmpKeyInfo CommandYou use the nhImportSnmpKeyInfo command to import SNMPv3 agent and key configuration information from aDCI file into the eHealth database. eHealth can then discover and poll your elements using the SNMPv3 protocol.You can run the command as often as required to update your SNMPv3 agent and key configuration information.
You can use this command on a Distributed eHealth System; however, it is not supported on a Distributed eHealthConsole.
The nhImportSnmpKeyInfo command has the following syntax, as described in Table 3:
nhImportSnmpKeyInfo -dciIn dciInputFile [-h] [-rev]
Table 3. nhImportSnmpKeyInfo Command SyntaxArguments Description
-dciIn dciInputFile Specifies the name of the DCI file to import.
-h Displays the syntax of the nhImportSnmpKeyInfo command.
-rev Displays the product version.
nhImportSnmpKeyInfo ExampleThe following example imports SNMPv3 key information from a DCI file named snmpV3Import.dci.nhImportSnmpKeyInfo -dciIn snmpV3Import.dci

Configuring eHealth to Monitor SNMPv3 Elements
Exporting and Modifying SNMPv3 KeyConfiguration InformationWhen you need to modify SNMPv3 key configuration information in the eHealth database, you can export theinformation to a DCI file, modify the information, then import the new information to the eHealth database.
This section describes how to export configuration information from the eHealth database and then modify it in aDCI file. It includes the following:
An overview of the export procedure
The procedure for exporting information from eHealth
The procedure for modifying the information in the exported file
Overview of the Configuration Export and Modification ProcessThe process of modifying SNMP key configuration information and updating your database requires the followingsteps:
1. Export the key configuration information from eHealth to a DCI file using the nhExportSnmpKeyInfocommand.
2. Modify the key configuration information in the DCI file, either manually or by using scripts or otherapplications.
3. Import the modified DCI file.
Exporting Configuration InformationTo export SNMPv3 key configuration information, you use the nhExportSnmpKeyInfo command. The commandexports the entire SNMPv3 key information table from the database to a DCI file. You cannot export keyconfiguration information for a single SNMPv3 element.
Using the nhExportSnmpKeyInfo Command.The nhExportSnmpKeyInfo command exports SNMPv3 agent and key configuration information from theeHealth database to a DCI file. You can then modify the information and reimport it into the database. Use thiscommand as needed. You can use this command on a Distributed eHealth System; however, it is not supportedon a Distributed eHealth Console. For more information about this command, refer to the eHealth Integration Guide.
CAUTION:The eHealth server must be running when you use the nhExportSnmpKeyInfo command. If it is notrunning or if it stops during the configuration export process, the command exits and displays an errormessage.
NOTE: The nhExportSnmpKeyInfo command does not export configuration information for any eHealth elements.
10
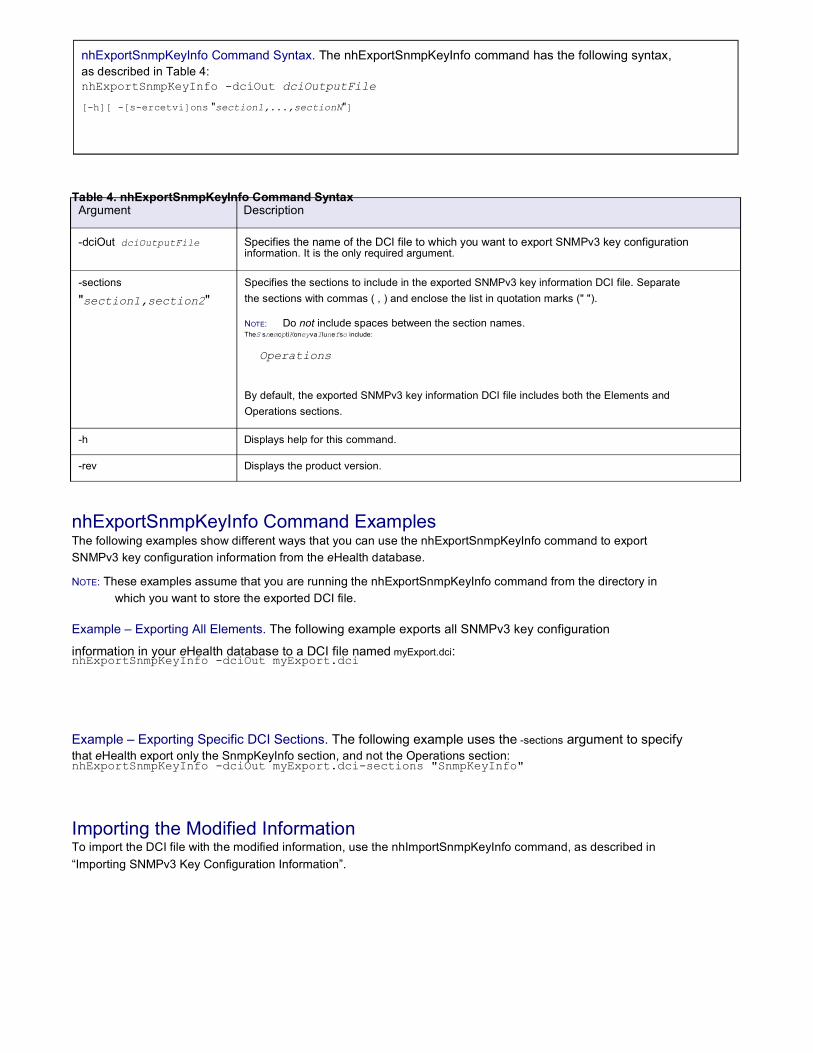
Table 4. nhExportSnmpKeyInfo Command SyntaxArgument Description
-dciOut dciOutputFile Specifies the name of the DCI file to which you want to export SNMPv3 key configurationinformation. It is the only required argument.
-sections
"section1,section2"Specifies the sections to include in the exported SNMPv3 key information DCI file. Separatethe sections with commas ( , ) and enclose the list in quotation marks (" ").
nhExportSnmpKeyInfo Command Syntax. The nhExportSnmpKeyInfo command has the following syntax,as described in Table 4:nhExportSnmpKeyInfo -dciOut dciOutputFile
[-h][ -[s-ercetvi]ons "section1,...,sectionN"]
NOTE: Do not include spaces between the section names.TheS snemcptiKoneyvaIlunefso include:
Operations
By default, the exported SNMPv3 key information DCI file includes both the Elements andOperations sections.
-h Displays help for this command.
-rev Displays the product version.
nhExportSnmpKeyInfo Command ExamplesThe following examples show different ways that you can use the nhExportSnmpKeyInfo command to exportSNMPv3 key configuration information from the eHealth database.
NOTE: These examples assume that you are running the nhExportSnmpKeyInfo command from the directory inwhich you want to store the exported DCI file.
Example – Exporting All Elements. The following example exports all SNMPv3 key configuration
information in your eHealth database to a DCI file named myExport.dci:nhExportSnmpKeyInfo -dciOut myExport.dci
Example – Exporting Specific DCI Sections. The following example uses the -sections argument to specifythat eHealth export only the SnmpKeyInfo section, and not the Operations section:nhExportSnmpKeyInfo -dciOut myExport.dci-sections "SnmpKeyInfo"
Importing the Modified InformationTo import the DCI file with the modified information, use the nhImportSnmpKeyInfo command, as described in“Importing SNMPv3 Key Configuration Information”.

Configuring eHealth to Monitor SNMPv3 Elements
Discovering SNMPv3 ElementsAfter you import key configuration information, you must rediscover your elements to ensure that they are polledusing SNMPv3. During discovery, eHealth automatically looks SNMPv3 key configuration information. If suchinformation exists for an element, eHealth performs an SNMPv3 discovery using the specified credentials. If nosuch information exists, eHealth performs a standard SNMPv1 or v2 discovery.
Rediscovering Existing Elements Using SNMPv3If you add SNMPv3 key configuration information for elements that were previously discovered using the SNMPv1or SNMPv2 protocols, these elements will be automatically discovered and polled with SNMPv3 protocols after yourediscover them. Similarly, if you delete key configuration information for a device, that device will be automaticallyrediscovered and polled using SNMP V1 or SNMP V2 as appropriate.
To rediscover existing elements using SNMPv3:1. In eHealth OneClick, select Element Configuration -> Resource discovery -> Discover2. Select the Discover Policy you wish to use for discovery.
3. Select Current Configuration.4. Click Discover. eHealth rediscovers the elements for which you imported key configuration information
using SNMPv3. During this process, the Discovering dialog displays details about the discovery.
Discovering New Elements Using SNMPv3When eHealth discovers new elements, it looks for SNMPv3 key configuration information in the database, andautomatically performs SNMPv3 discovery for those elements that have this information.
To discover new elements using SNMPv3:1. In eHealth OneClick, select Element Configuration -> Resource discovery -> Discover2. Select the Discover Policy you wish to use for discovery.
3. Enter the IP Address(es) or list of IPs to aim discovery at using the following formats:
An inclusive range with a dash (-) separating the first and last number of the range.For example, enter 128.12.10-12.87 to search the following IP addresses: 128.12.10.87, 128.12.11.87, and128.12.12.87.
A list of specific numbers separated by a comma (,).For example, enter 128.12.5,19,22.87 to search the following IP addresses: 128.12.5.87, 128.12.19.87, and128.12.22.87.
A combination of dashes and commas.For example, enter 192.12.15-17.5,8 to search the following IP addresses: 192.12.15.5, 192.12.16.5,192.12.17.5, 192.12.15.8, 192.12.16.8, 192.12.17.8.
4. Click Discover. eHealth discovers the elements for which you imported key configuration information usingSNMPv3.
*Note: Simply enter 'public' in the community string field. eHealth will not use the string you put in here butrather will refer to the v3 information you imported for your devices such as userName, securityLevel, etc.

Completing a DiscoverWhen you complete the discover process, eHealth displays the number of new elements and saves these messages inthe discoverResults.log file. After you review the discover log, you can discard the changes, save them, or edit thepoller configuration before saving them.
Discarding All Changes. If you do not want to retain the discovered data, click Don’t Save in the DiscoverResults dialog box. eHealth discards the new elements and saves the log file as
discoverInteractive.date.time.unsaved.log.
Saving Changes without Editing the Poller Configuration. If you want to monitor all the elements thatdiscover found, click Save in the Discover Results dialog box. eHealth creates an entry in the poller configurationfor each new element and saves the results in the pollerAudit.date.time.log file in the /ehealth/log directory. Afteryou save the results, eHealth immediately starts to poll the elements.
Editing the Poller Configuration before Saving. Before saving your discover results, you may want toremove elements that you do not want to monitor, or change certain attributes which include: Disable Polling, EnablePolling, Disable LE Monitoring, Enable LE Monitoring, Disable Record Detail Data or Enable Record Detail Data.Click Edit Before Saving in the Discover Results dialog box, change the elements as necessary and then click Save Results
to ensure that eHealth saves the edited results of the discover process. If you click Cancel, it discards any newlydiscovered elements and updates.
13
Configuring eHealth to Monitor SNMPv3 Elements
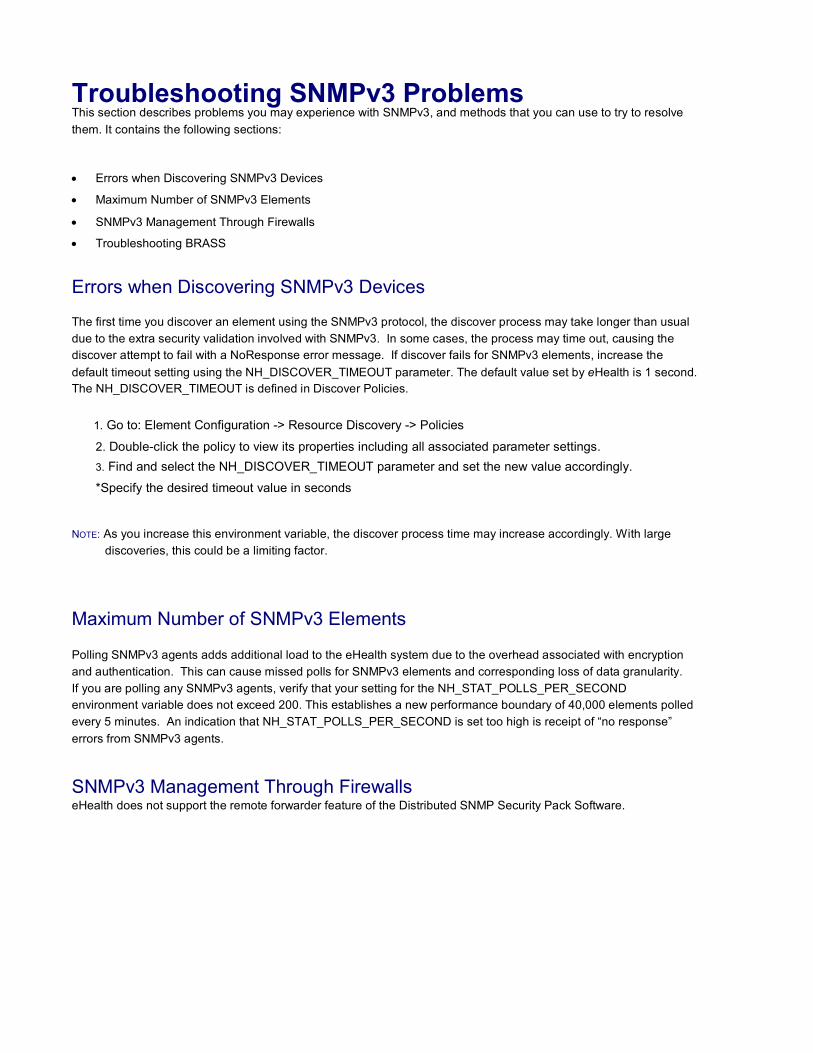
Troubleshooting SNMPv3 ProblemsThis section describes problems you may experience with SNMPv3, and methods that you can use to try to resolvethem. It contains the following sections:
Errors when Discovering SNMPv3 Devices
Maximum Number of SNMPv3 Elements
SNMPv3 Management Through Firewalls
Troubleshooting BRASS
Errors when Discovering SNMPv3 Devices
The first time you discover an element using the SNMPv3 protocol, the discover process may take longer than usualdue to the extra security validation involved with SNMPv3. In some cases, the process may time out, causing thediscover attempt to fail with a NoResponse error message. If discover fails for SNMPv3 elements, increase thedefault timeout setting using the NH_DISCOVER_TIMEOUT parameter. The default value set by eHealth is 1 second.The NH_DISCOVER_TIMEOUT is defined in Discover Policies.
1. Go to: Element Configuration -> Resource Discovery -> Policies
2. Double-click the policy to view its properties including all associated parameter settings.3. Find and select the NH_DISCOVER_TIMEOUT parameter and set the new value accordingly.
*Specify the desired timeout value in seconds
NOTE: As you increase this environment variable, the discover process time may increase accordingly. With largediscoveries, this could be a limiting factor.
Configuring eHealth to Monitor SNMPv3 Elements
Maximum Number of SNMPv3 Elements
Polling SNMPv3 agents adds additional load to the eHealth system due to the overhead associated with encryptionand authentication. This can cause missed polls for SNMPv3 elements and corresponding loss of data granularity.If you are polling any SNMPv3 agents, verify that your setting for the NH_STAT_POLLS_PER_SECONDenvironment variable does not exceed 200. This establishes a new performance boundary of 40,000 elements polledevery 5 minutes. An indication that NH_STAT_POLLS_PER_SECOND is set too high is receipt of “no response”errors from SNMPv3 agents.
SNMPv3 Management Through FirewallseHealth does not support the remote forwarder feature of the Distributed SNMP Security Pack Software.

Troubleshooting BRASS
The startup parameters for brassd should be as follows:
brassd -secpack -wbufnum 4096 -sndsocksize 32768 -rcvsocksize 174760
*Note: There can be problems with the DSSP-eHealth integration if not using these brassd startup parameters.
Testing connection to the target SNMP agent
1. Test connection directly to the device agent.
In this example, the target address is: 1.2.3.4
Auth/privilegeusername: v3userauth password: authpasswordPrivacy password: privpassword
From a Bourne or ksh cmd shell perform the following : (to enter a shell on a Windows command prompt,simply enter: sh)
a. SR_SNMP_TEST_PORT=161; export SR_SNMP_TEST_PORT
b. cd /opt/Snmpri/SecurityPack/emanate/bin/
*Replace the path above with the SecurityPack pathing on your eHealth server. Different versions ofthe DSSP will install into different default locations.
*NOTE: Make sure you use the getone utility in the ".../emanate/bin". There will be more than one getoneutility under different directories. Be sure to use the one under ".../emanate/bin".
c. getone -v3 1.2.3.4 v3user sysDescr.0
Enter Authentication password : authpassword (SUBSTITUTE your user passwd)Enter Privacy password: privpassword (SUBSTITUTE your privacy passwd)
*You should see output like the below example:
sysDescr.0 = Cisco IOS Software, 7200 Software (C7200-JK9S-M), Version12.3(14)T6, RELEASE SOFTWARE (fc2)Technical Support: http://www.cisco.com/techsupportCopyright (c) 1986-2006 by Cisco Systems, Inc.
Compiled Thu 05-Jan-06 05:36 by dchiheH
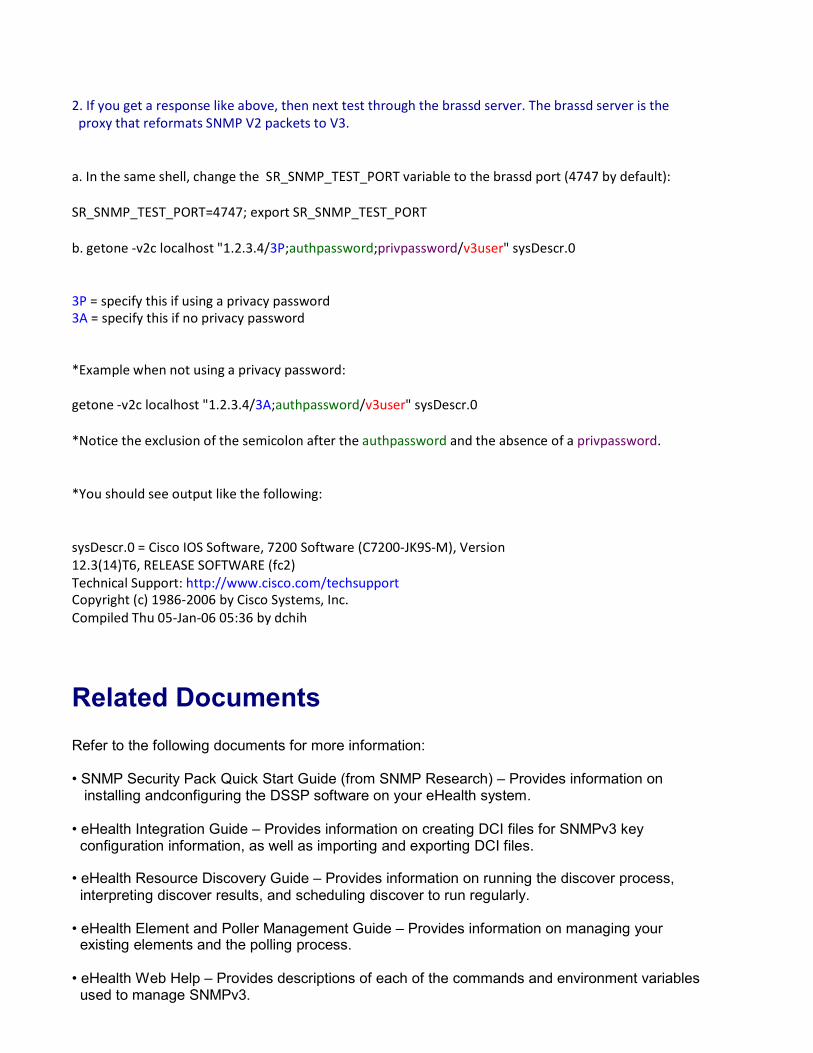
2. If you get a response like above, then next test through the brassd server. The brassd server is theproxy that reformats SNMP V2 packets to V3.
a. In the same shell, change the SR_SNMP_TEST_PORT variable to the brassd port (4747 by default):
SR_SNMP_TEST_PORT=4747; export SR_SNMP_TEST_PORT
b. getone -v2c localhost "1.2.3.4/3P;authpassword;privpassword/v3user" sysDescr.0
3P = specify this if using a privacy password3A = specify this if no privacy password
*Example when not using a privacy password:
getone -v2c localhost "1.2.3.4/3A;authpassword/v3user" sysDescr.0
*Notice the exclusion of the semicolon after the authpassword and the absence of a privpassword.
*You should see output like the following:
sysDescr.0 = Cisco IOS Software, 7200 Software (C7200-JK9S-M), Version12.3(14)T6, RELEASE SOFTWARE (fc2)Technical Support: http://www.cisco.com/techsupportCopyright (c) 1986-2006 by Cisco Systems, Inc.Compiled Thu 05-Jan-06 05:36 by dchih
Related DocumentsRefer to the following documents for more information:
• SNMP Security Pack Quick Start Guide (from SNMP Research) – Provides information oninstalling andconfiguring the DSSP software on your eHealth system.
• eHealth Integration Guide – Provides information on creating DCI files for SNMPv3 keyconfiguration information, as well as importing and exporting DCI files.
• eHealth Resource Discovery Guide – Provides information on running the discover process,interpreting discover results, and scheduling discover to run regularly.
• eHealth Element and Poller Management Guide – Provides information on managing yourexisting elements and the polling process.
• eHealth Web Help – Provides descriptions of each of the commands and environment variables used to manage SNMPv3.