configuring internet explorer for carelogic...
TRANSCRIPT
1 | P a g e
Configuring Internet Explorer for CareLogic Use July 30, 2013

2 | P a g e
Table of Contents
Configuring Internet Explorer for CareLogic Use .............................................................................................................. 3
Configuring Internet Explorer Security Settings ........................................................................................................... 4
Internet Explorer Favorites ......................................................................................................................................... 10
Clearing the Cache .................................................................................................................................................. 10
Configuring Internet Explorer E-Prescription Settings ................................................................................................ 15
Configuration Settings for Internet Explorer 8 or 9 .................................................................................................... 17
Uninstall Internet Explorer 10 ..................................................................................................................................... 19
Uninstall Google Chrome Frame Add-On ................................................................................................................... 21
Disabling Pop-up Blockers ........................................................................................................................................... 23

3 | P a g e
Configuring Internet Explorer for CareLogic Use
This document describes recommended settings for all customers (including those accessing the Patient Portal) who
are running CareLogic in Internet Explorer version 7, 8, or 9. If your computer has Internet Explorer 10 installed, it
will not be compatible with CareLogic. A step-by-step guide to uninstalling IE 10 is included in this guide.
In an effort to improve security, Microsoft has added new functionality to Internet Explorer. While the security
enhancements are necessary to protect your network while browsing the Internet, they can impact the performance
of a secure Web application, such as CareLogic. Because Qualifacts Systems is a trusted site, it is safe for you to set it
to a low security level so the application is free to deliver dynamic content.
When you are running CareLogic, you want to ensure that you are receiving the latest content each time you access
a page.

4 | P a g e
Configuring Internet Explorer Security Settings
This task describes the recommended security settings that should be configured for Internet Explorer by all
customers who are running CareLogic on Windows XP, Vista, or 7.
Note: CareLogic has been certified on Windows XP, Vista, and 7 operating systems.
To configure Internet Explorer settings:
Launch Internet Explorer.
Navigate to Tools>Internet Options.
The Internet Options window appears. The General tab is displayed.
In the Browsing History section, click Settings.

5 | P a g e
The Temporary Internet Files and History Settings window appears.
In the Check for newer versions of stored pages section, select the Every time I visit the webpage radio
button.
Click OK.
The General tab reappears.
Click the Security tab.

6 | P a g e
The Security tab appears.
In the Select a zone to view or change security settings section, click Trusted sites.

7 | P a g e
The Trusted sites section appears.
In the Trusted sites section, click Sites.
The Trusted sites window appears.
De-select the Require server verification (https:) for all sites in this zone checkbox.
To add a website, enter the address (URL) in the Add this website to the zone field.

8 | P a g e
Click Add.
The address is moved to the Websites section, which indicates it has been successfully added.
Add the following websites to this zone:
https://*.drfirst.com
https://*.qualifacts.com
http://*.qualifacts.com
https://*.qualifacts.org
http://*.qualifacts.org
http://code.jquery.com
Note: The website http://code.jquery.com is only for those that use the Support Portal.
Click Close.
The Trusted sites window closes.
In the Security level for this zone section, click Custom level.
The Security Settings - Trusted Sites Zone window appears.
Find the following settings and ensure they are set to Enable:

9 | P a g e
File download
Font download
Allow script-initiated windows without size or position constraints
Automatic prompting for the file downloads – this option is not available in Internet Explorer 9
Display Mixed Content (This only needs to be set-up for those that use the Support Portal.)
Find the Enable XSS filter setting and set the value to Disable.
In the Reset custom settings section, select Low from the Reset to drop-down.
Click Reset.
A warning message appears.
Click Yes.
The Reset button is disabled.
Click OK.
The Security Settings - Trusted Sites Zone window closes, and the security settings are saved.
If you are finished updating the Internet Explorer settings, close all Internet Explorer instances; you do not
have to restart your computer. If you are not finished updating Internet Explorer settings, skip this step.
The next time you launch Internet Explorer, the settings will be applied.

10 | P a g e
Internet Explorer Favorites
When using CareLogic, if you create a Favorite in Internet Explorer after logging in to CareLogic, the Favorite will
access a cached, and therefore, out of date page.
For example, if you bookmark the Schedule screen after logging in to CareLogic, the next time you access the page
using the favorite, it will not reflect the current information.
To correct this problem, any time you create a Favorite in Internet Explorer, please create it before logging in to
CareLogic. In other words, the only favorite you can create in CareLogic is at the login screen.
Remember: Do not create a favorite for any other page except for your CareLogic login page.
Clearing the Cache
1. Close all instances of Internet Explorer.
2. Navigate to Start > Control Panel.

11 | P a g e
The Control Panel screen appears.
3. Click Network and Internet.
The Network and Internet screen appears.
4. Click Internet Options.

12 | P a g e
The Internet Properties screen appears.
5. Click Delete.

13 | P a g e
The Delete Browsing History screen appears.
6. Make sure the following checkboxes are marked:
Preserve Favorites website data – keeps your favorites
Temporary Internet files – removes these temporary files
7. Unmark the Cookies and History checkboxes to preserve these items.
8. Click Delete.
The Delete Browsing History screen closes, and the selected files are deleted.
9. In the Internet Properties screen, click Settings in the Browsing history section.
14 | P a g e
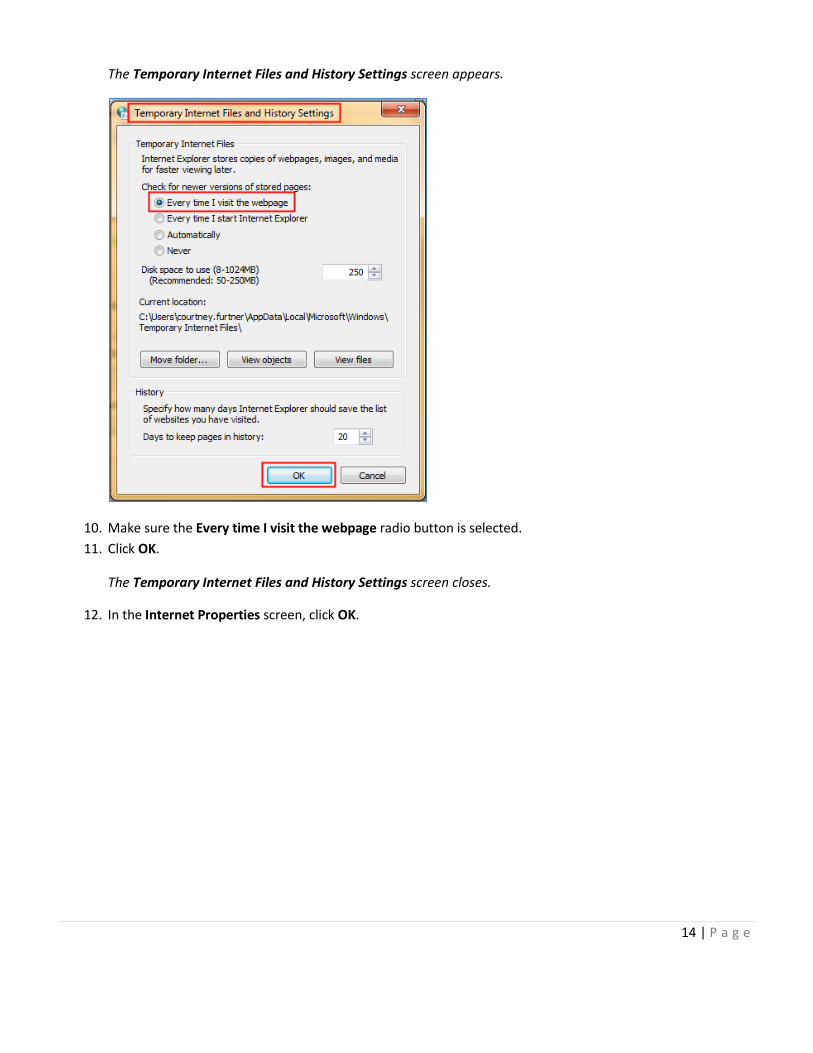
The Temporary Internet Files and History Settings screen appears.
10. Make sure the Every time I visit the webpage radio button is selected.
11. Click OK.
The Temporary Internet Files and History Settings screen closes.
12. In the Internet Properties screen, click OK.

15 | P a g e
Configuring Internet Explorer E-Prescription Settings
If your system is configured to use e-prescription, complete the following tasks.
In the Internet Options window, click the Privacy tab.
The Privacy tab appears.
Click Sites.
16 | P a g e
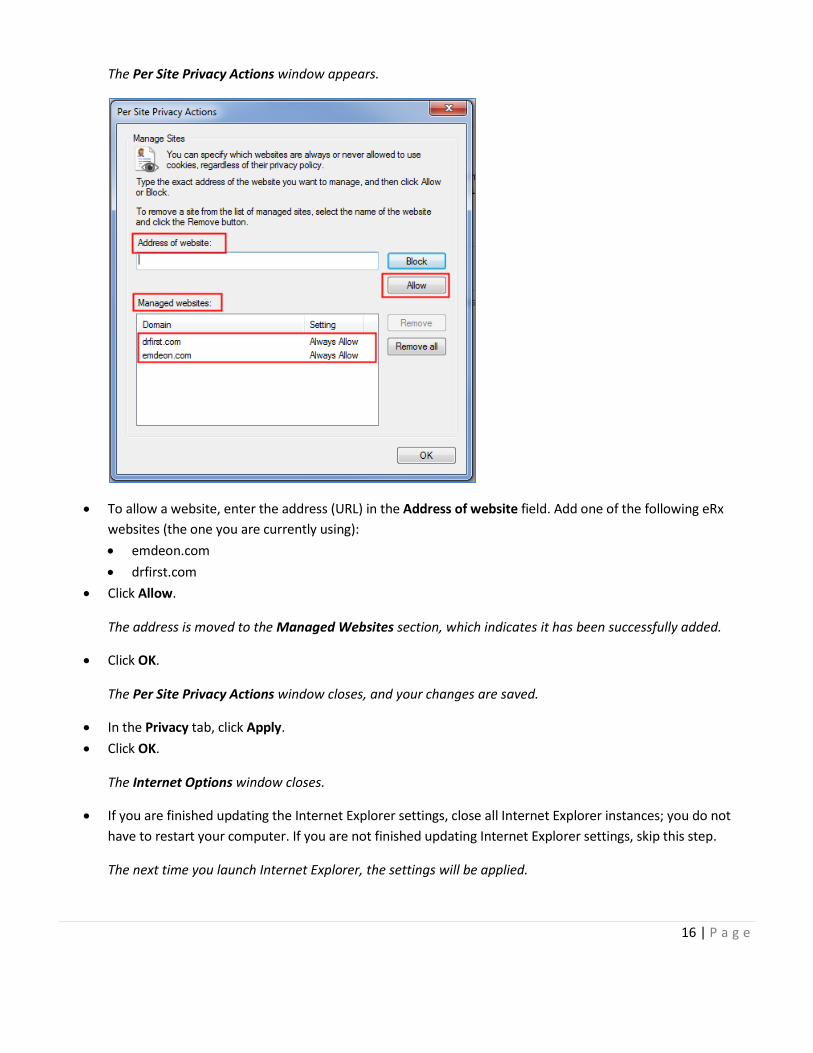
The Per Site Privacy Actions window appears.
To allow a website, enter the address (URL) in the Address of website field. Add one of the following eRx
websites (the one you are currently using):
emdeon.com
drfirst.com
Click Allow.
The address is moved to the Managed Websites section, which indicates it has been successfully added.
Click OK.
The Per Site Privacy Actions window closes, and your changes are saved.
In the Privacy tab, click Apply.
Click OK.
The Internet Options window closes.
If you are finished updating the Internet Explorer settings, close all Internet Explorer instances; you do not
have to restart your computer. If you are not finished updating Internet Explorer settings, skip this step.
The next time you launch Internet Explorer, the settings will be applied.

17 | P a g e
Configuration Settings for Internet Explorer 8 or 9
To add CareLogic websites to the list of compatibility view sites, perform the following.
Navigate to Tools > Compatibility View Settings.
The Compatibility View Settings window appears.
To add a website, enter the address (URL) in the Add this website field. Add the following websites:
http://*.qualifacts.com
https://*.qualifacts.com
http://*.qualifacts.org
https://*.qualifacts.org
http://*.drfirst.com
https://*.drfirst.com
http://*.emdeon.com
https://*.emdeon.com
Note: In Internet Explorer 8, enter the websites as follows:
o qualifacts.com
o qualifacts.org
Click Add.

18 | P a g e
The address is moved to the Websites you’ve added to Compatibility View section, which indicates it has
been successfully added.
Click Close.
The Compatibility View Settings window closes, and your changes are saved.
Close all Internet Explorer instances; you do not have to restart your computer.
The next time you launch Internet Explorer, the settings will be applied.

19 | P a g e
Uninstall Internet Explorer 10
Many computers now have Internet Explorer 10 automatically installed; however, CareLogic is not compatible.
Therefore, IE 10 must be uninstalled for CareLogic to work properly.
1. To get started, click Start and type the command appwiz.cpl.

20 | P a g e
2. Next, select View installed updates to show all updates to Windows 7.
3. Next, select Windows Internet Explorer 10 and select Uninstall.
4. Restart your computer.

21 | P a g e
Uninstall Google Chrome Frame Add-On
Users, who use Google Chrome, may also have a plug-in called Chrome Frame. This may cause problems with the
Front Desk module, amongst other places within CareLogic, which will result in an XML error.
To determine if your computer has Google Chrome Frame, complete the following steps:
Launch Internet Explorer.
Navigate to Tools > Manage add-ons.
The Manage Add-ons screen appears.
1. Go to the Google Inc. section.
If Chrome Frame is installed you will see two entries:
o Chrome Frame
o Chrome Frame BHO
Uninstall Chrome Frame by performing the following:
1. Navigate to Start > Control Panel > Programs and Features.

22 | P a g e
The Programs and Features screen appears.
2. Right click Google Chrome to Uninstall.
3. Once Google Chrome Frame is uninstalled, close Internet Explorer.
4. Launch Internet Explorer.
23 | P a g e
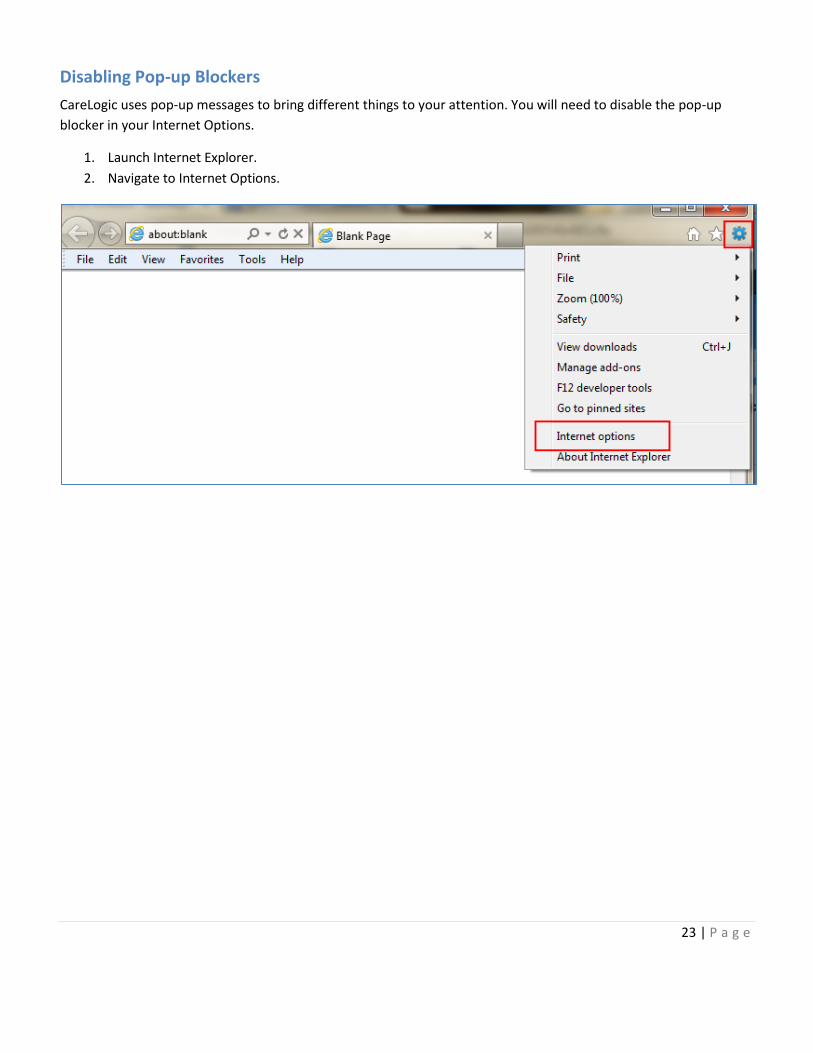
Disabling Pop-up Blockers
CareLogic uses pop-up messages to bring different things to your attention. You will need to disable the pop-up
blocker in your Internet Options.
1. Launch Internet Explorer.
2. Navigate to Internet Options.

24 | P a g e
3. Select the Privacy tab.
4. In Pop-up Blocker section, uncheck the box.
5. Click OK.
6. Close Internet Explorer.
7. Launch Internet Explorer.