configuring veritas netbackup version 4.5 for ndmp · after netbackup is installed on a server as...
TRANSCRIPT

Configuring Veritas NetBackup Version 4.5 for NDMP
Overview of the Setup ProcessTo configure Veritas NetBackup version 4.5 for Mirapoint NDMP backup, you work in both the Mirapoint appliance command-line and in Veritas NetBackup's command-line and Administration Console GUI. You do the following:
1. Connect the tape drive or library to a network-connected server. (see Connecting Tape Drives or Libraries on page 1)
2. Complete the Mirapoint system software configuration and setup. (see Completing the Mirapoint System Software Configuration and Setup on page 2)
3. Complete the Veritas NetBackup server and data management application (DMA) software configuration and setup. (see Completing the NetBackup Server and DMA Configuration on page 4)
4. Test your NDMP backup configuration (see Testing Your NDMP Backup Configuration on page 20)
Connecting Tape Drives or LibrariesYour tape drive or library (media changer) should come with instructions on how to connect your equipment to other systems. While these instructions are not specific to the Mirapoint appliance, they should provide enough information to allow you to complete the connections correctly.
To back up the Mirapoint appliance to a SCSI tape drive or library operating in random-access mode, that device must be attached to a network connected appliance or server.
There are two ways to connect a tape drive or library:
◆ Locally attached to the Mirapoint appliance (direct attached)
For information on SCSI tape drives and tape libraries that Mirapoint approves for attachment, see Approved Local Tape and Library Devices within the Mirapoint Support Knowledge Base.
◆ Third-party attached to some other network-attached server
When using a tape drive or library that is connected to a third-party system or server that is not a Mirapoint appliance, you must have a working knowledge
Copyright © 2009 support.mirapoint.com. All Rights Reserved. 1

Configuring Veritas NetBackup Version 4.5 for NDMP
of the setup and installation of those devices to complete the NetBackup software setup portion of the process.
To use the media in a library after adding it, the library must first be inventoried. Otherwise, the DMA will not know it is available for use.
For more information on configuring tape drives to work with the Mirapoint appliance, see Tape Device Configurations for NDMP DMAs within the Mirapoint Support Knowlege Base.
Completing the Mirapoint System Software Configuration and Setup
To complete the software configuration and setup on the Mirapoint appliance, you must enable and start the NDMP service, identify the changer or tape drive device address, and designate the DMA type you plan to use (for example, Veritas).
In this section, tape drives and libraries (changers or robots) are referred to as devices.
Do the following:
1. (This step is required only if the device is directly attached to the Mirapoint appliance.) Open a telnet window and log into the CLI as an administrator.
2. Verify the tape device you plan to use is recognized by the appliance.
If the device is a tape library, follow the instructions detailed below:
a. Verify your tape library's address. Enter the following commands:
Diag Get Changeraddress
The Mirapoint system returns an output string that includes the device name, SCSI controller ID, target number, and logical unit number; for example:
Controller 1, Target 1, LUN 0, Device /dev/ch0
OK Completed
b. Make note of the device name (/dev/ch0) provided in the output string; this is used later in the NetBackup DMA setup process. The controller, target, and LUN information is no longer required to complete the process, so these values can be ignored.
c. Next enter the following command:
Diag Changer Inquiry "" "" ""
The Mirapoint system returns information on the manufacturer, model number, firmware version, and serial number of the device.
"EXABYTE " "Exabyte 17D " "E113" "THX1138"
OK Completed
If no information is returned for either command, then the device (tape drive or library) is either not attached, not attached correctly, or was attached while the system was live and is not recognized until the Mirapoint appliance is rebooted, or in the case of some media changers (robots), it is in sequential mode.
2 Copyright © 2009 support.mirapoint.com. All Rights Reserved.

Completing the Mirapoint System Software
If you are certain the device is correctly installed on a network connected server, , see Troubleshooting a Tape Drive or Media Changer Connection in the Mirapoint Support Knowledge Base.
If the device is a tape drive, follow the instructions detailed below:
a. Verify a tape drive address, enter the following commands:
Diag Get Tapeaddress
The Mirapoint appliance returns an output string that includes the device name, SCSI controller ID, target number, and logical unit number; for example:
Controller 1, Target 2, LUN 0, Device /dev/nrsa0
OK Completed
b. Make note of the device name (/dev/nrsa0) provided in the output string; this is used later in the NetBackup DMA setup process. The controller, target, and LUN information is not required to complete the process, so these values can be ignored.
c. Next enter the following command:
Diag Tape Inquiry "" "" ""
The Mirapoint appliance returns information on the manufacturer, model number, firmware version, and serial number of the device.
"HP " "Ultrium 1-SCSI " "E12V" "THX1138"
OK Completed
3. Enable and start NDMP service. Enter the following commands:
Service Enable Ndmp
Service Start Ndmp
To verify that NDMP service has been enabled and started, enter the following command:
Service Started Ndmp
4. Set the NDMP DMA type using the following CLI command:
Ndmp Set Dma Veritas
To verify your NDMP DMA setting, use the Ndmp Get Dma command.
5. Log out of the CLI, and close the telnet window.
If you are certain your locally attached tape drive or media changer is correctly installed, but it is not recognized by the Mirapoint appliance, see Troubleshooting a Tape Drive or Media Changer Connection in the Mirapoint Support Knowledge Base for instructions on how to use the CLI Diag commands to resolve the problem.
Steps 3 and 4 are required when the device either locally attached, or if it is connected as a third-party attached device to some other network attached server.
Copyright © 2009 support.mirapoint.com. All Rights Reserved. 3
Configuring Veritas NetBackup Version 4.5 for NDMP
Completing the NetBackup Server and DMA Configuration
After NetBackup is installed on a server as described in the documentation provided by Veritas, complete the data management application (DMA) setup.
Use the command-line to do the following:
◆ Authorize the data management application (DMA) to allow access for the Mirapoint appliance to the NetBackup server (see Authorizing Access to the NDMP Server on page 5)
◆ Configure the tape drive or library that will be used for NDMP backup (see Configuring NDMP Storage Devices on page 6)
Use the NetBackup Administration Console (GUI) to do the following:
◆ Add a robot and tape drive (see Adding a Robot (Tape Library) on page 8 and Adding a Tape Device to the Tape Library on page 10)
◆ Create a storage unit (see Creating the Storage Unit on page 12)
◆ Create a policy (see Creating a Class or Policy on page 14)
◆ Define a file in the new policy (see Adding File Directives on page 15)
◆ Define a schedule for the new policy (see Defining a Schedule on page 18)
◆ Add a client name to the newly created policy (see Adding a Client Name on page 19)
After completing each of these items, you test your settings to verify the DMA is properly configured (see Testing Your NDMP Backup Configuration on page 20).
NetBackup for NDMP has been tested on Solaris hosts. NetBackup runs on other platforms, but those have not been tested by Mirapoint. This procedure documents using a Solaris Unix workstation to complete the setup process.
Required Information
The following information is required:
Veritas may change their DMA at any time, rendering these instructions obsolete.
4 Copyright © 2009 support.mirapoint.com. All Rights Reserved.

Completing the NetBackup Server and DMA
◆ The device name for the tape drive you plan to use (see Configuring NDMP Storage Devices on page 6).
◆ The device name for the tape library or media changer (robot) if you plan to use one (see Configuring NDMP Storage Devices on page 6).
◆ The host name of the Mirapoint appliance to be backed up. The Mirapoint appliance provides the NDMP mover, data, tape, and SCSI services (in case of direct-attached).
◆ The host name of the Veritas NetBackup server.
◆ The host name of the server or system where the tape drive or library is attached. This can be the same Mirapoint appliance, a second Mirapoint appliance, or some other third-party network connected system or server.
◆ Determine the Mirapoint user login and password to be used by the NetBackup server (administrator is recommended, but this can be someone with administrator privileges) for authentication.
Authorizing Access to the NDMP Server
Before you can use Veritas NetBackup to perform an NDMP backup of a Mirapoint appliance you must first authorize the NetBackup server to access the Mirapoint appliance. You must also setup NDMP authentication for the NetBackup media server.
From the Solaris command-line do the following:
1. Change from the root directory to the volmgr/bin directory, by entering the following:
cd /usr/openv/volmgr/bin
This assumes the root or install directory is /usr/openv/.
2. Add the host name for the NDMP server to be backed up, and a user login name and password for authentication. Enter the following commands:
set_ndmp_attr -auth ndmpserverhost username
password: secret
Re-enter password: secret
where:
❖ ndmpserverhost is the host name of the Mirapoint appliance to be backed up.
❖ username is the user name under which NetBackup accesses the NDMP host (your Mirapoint appliance in most cases). This user must have
Veritas limits the password to a maximum of eight characters.
Copyright © 2009 support.mirapoint.com. All Rights Reserved. 5

Configuring Veritas NetBackup Version 4.5 for NDMP
permission to execute the NDMP commands, so use Administrator, or a user with administrator privileges.
❖ secret is the password selected for the login. Because of limitations in the NetBackup product, passwords entered via set_ndmp_attr are limited to a maximum of eight characters.
3. (Optional) For three-way configurations, if the tape drive or library is locally attached to an NDMP server and controlled by a different NDMP service other than the Mirapoint appliance to be backed up, then enter the host name of that server, and a user login name and password to be used for authentication. Enter the following commands:
set_ndmp_attr -auth ndmp3wayhost username
password: secret
Re-enter password: secret
where:
❖ ndmp3wayhost is the host name of the network connected server or system with the locally attached tape device; this can be another Mirapoint appliance, or a third-party network connected server or system.
❖ username is the name under which NetBackup accesses the NDMP host. This user must have permission to execute the NDMP commands, so use Administrator.
❖ secret is the password selected for the login.
Configuring NDMP Storage Devices
Storage devices (tape drives and libraries) are configured first using the command-line on the NetBackup server, and then in the NetBackup Administration Console (the DMA user interface).
From the Solaris command-line, do the following:
1. Configure a robot (tape library) by entering the following command:
set_ndmp_attr -robot ndmpserverhost device 0 0 0
where:
❖ ndmpserverhost is the name of the system or server where the device is attached.
❖ device is the address of the library or media changer (see Configuring NDMP Storage Devices on page 6)
Mirapoint does not make use of the controller, target, or LUN information, so these should be entered as zero.
If you use set_ndmp_attr to configure a robot, then later remove the robot, you must delete references to it from the NetBackup server. If you do not remove the references, NetBackup continues to ping the non-existent device, and produce error messages. Enter the set_ndmp_attr_help with no arguments for details of the syntax to use.
6 Copyright © 2009 support.mirapoint.com. All Rights Reserved.
Completing the NetBackup Server and DMA
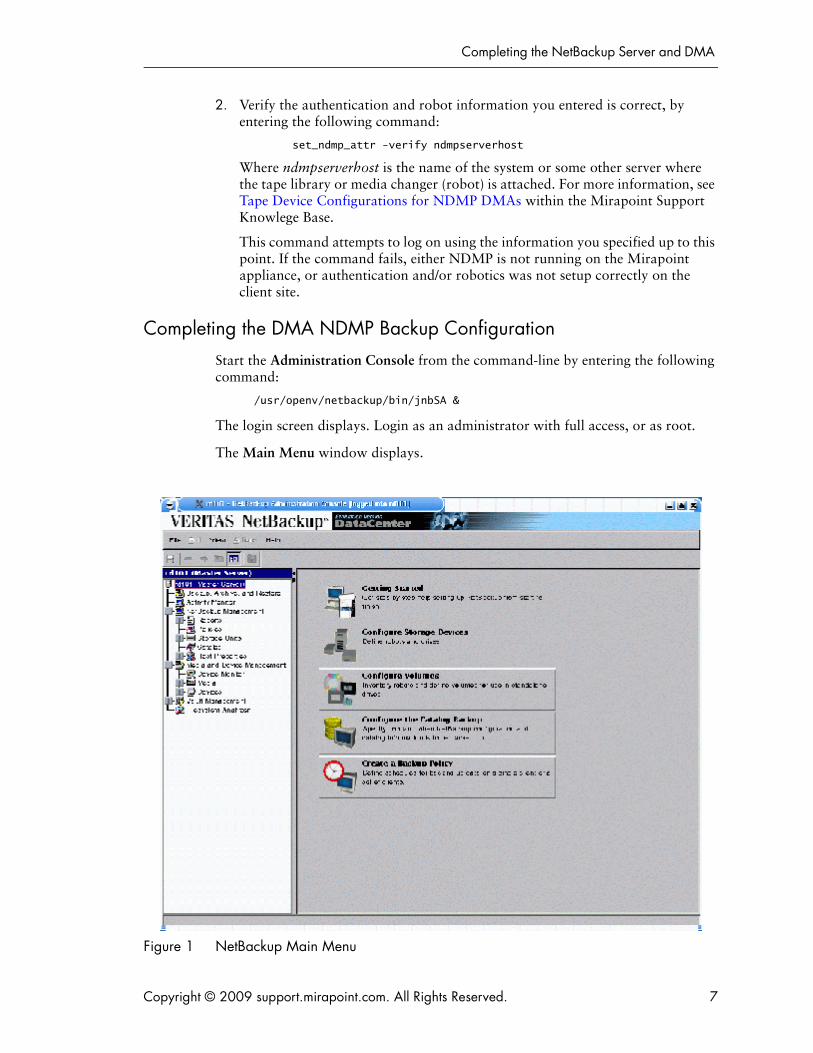
2. Verify the authentication and robot information you entered is correct, by entering the following command:
set_ndmp_attr -verify ndmpserverhost
Where ndmpserverhost is the name of the system or some other server where the tape library or media changer (robot) is attached. For more information, see Tape Device Configurations for NDMP DMAs within the Mirapoint Support Knowlege Base.
This command attempts to log on using the information you specified up to this point. If the command fails, either NDMP is not running on the Mirapoint appliance, or authentication and/or robotics was not setup correctly on the client site.
Completing the DMA NDMP Backup Configuration
Start the Administration Console from the command-line by entering the following command:
/usr/openv/netbackup/bin/jnbSA &
The login screen displays. Login as an administrator with full access, or as root.
The Main Menu window displays.
Figure 1 NetBackup Main Menu
Copyright © 2009 support.mirapoint.com. All Rights Reserved. 7

Configuring Veritas NetBackup Version 4.5 for NDMP
Adding a Robot (Tape Library)
From the main menu, select and expand Media and Device Management > Devices, then do the following:
1. Highlight and right-click on Robots, then select New Robot from the drop-down menu.
Figure 2 Robots Drop-Down Menu
The Add a New Robot pop-up window displays.
8 Copyright © 2009 support.mirapoint.com. All Rights Reserved.
Completing the NetBackup Server and DMA
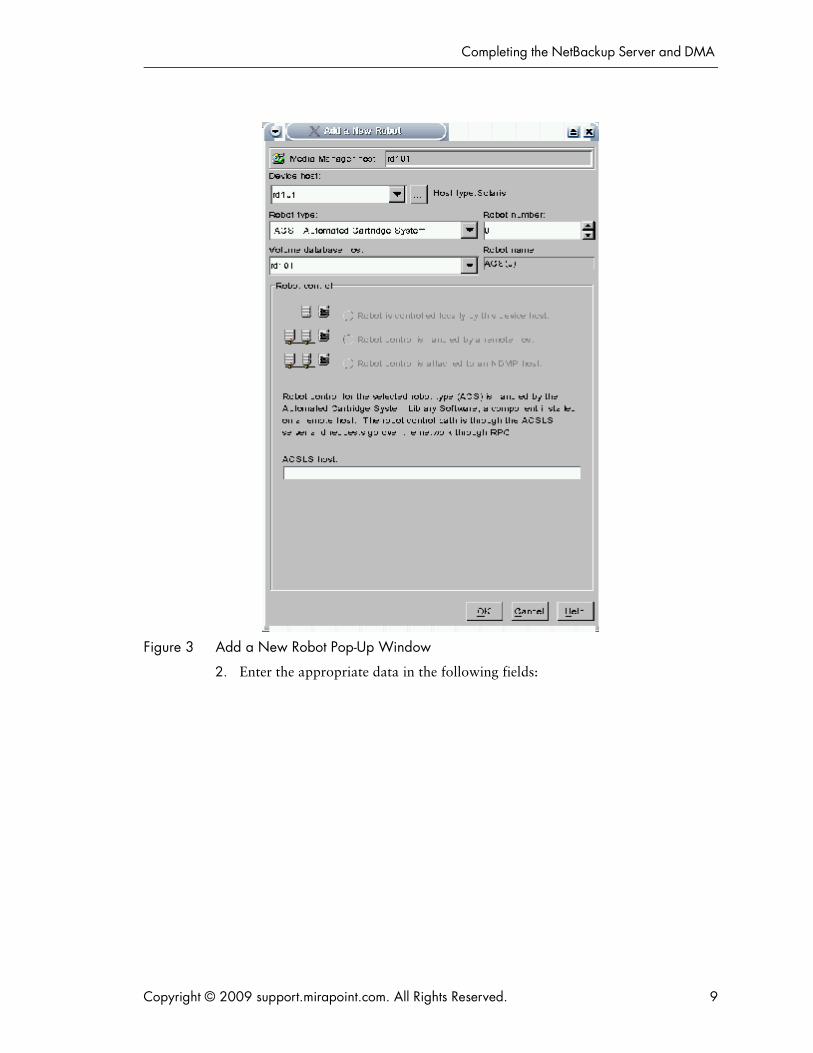
Figure 3 Add a New Robot Pop-Up Window
2. Enter the appropriate data in the following fields:
Copyright © 2009 support.mirapoint.com. All Rights Reserved. 9
Configuring Veritas NetBackup Version 4.5 for NDMP
❖ Robot Type: Select the information for the robot you plan to use for backup storage from the drop-down menu.
❖ Device Host: Enter the host name of NetBackup system or server (this is not the Mirapoint appliance's host name). This should already be filled in by default.
❖ Volume Database Host: Enter the name of the NetBackup host that controls the volume database (this is not the Mirapoint appliance). This should already be filled in by default.
❖ Robot Number: Enter a number that you assign to this device, which does not conflict with a robot already created on the client.
❖ Robot Control: Select Robot control is attached to an NDMP host.
3. Locate and click on the button immediately adjacent to the Robot Device text box.
a. Enter the address of the robot in the Robotic Device File field (for example /dev/ch0).
b. Click OK.c. Enter the host name of the server or system where the robot is attached in
the NDMP Host Name field. The NDMP host name must match the name entered when setting up authentication (see Authorizing Access to the NDMP Server on page 5).
4. Click OK.
Adding a Tape Device to the Tape Library
Next you add a tape device to the tape library you created in Adding a Robot (Tape Library) on page 8.
From the Device > Robots window, highlight the robot created previously, then do the following:
If the Administration Console displays an error message, the Robot Number may need to be changed.
10 Copyright © 2009 support.mirapoint.com. All Rights Reserved.

Completing the NetBackup Server and DMA
Figure 4 Adding a New Drive Using the Top Tool Bar
1. Select Actions > New > Drive from the top menu bar. The Add a New Drive window displays.
Figure 5 Add a New Device Pop-Up Window
2. Enter the appropriate data in the following fields:
Copyright © 2009 support.mirapoint.com. All Rights Reserved. 11

Configuring Veritas NetBackup Version 4.5 for NDMP
❖ Device Host: Type the host name of the NetBackup server you are working with.
❖ Drive Name: Type an informative name of your choosing, for example dlt7000.
❖ No Rewind Device: Type the host name for the server where the tape device is attached, followed by a colon, and the name of the tape device. The host name is the same host name entered when you set up authentication (see Authorizing Access to the NDMP Server on page 5). For example: hostname:/dev/nrsa0.
❖ Drive Type: Select the appropriate drive type from the drop-down menu.
3. Click Drive is in a Robotic Library.
4. Click OK.
Creating the Storage Unit
After adding the tape library (robot) and the tape devices to that robot, you create the storage unit.
A storage unit is the set of drives in a robot, or consists of one or more single tape drives that connects to the same host.
From the Main Menu, under NetBackup Management, highlight and right-click on Storage Units, then do the following:
Figure 6 Adding a New Storage Unit Using the Navigation Menu
12 Copyright © 2009 support.mirapoint.com. All Rights Reserved.
Completing the NetBackup Server and DMA
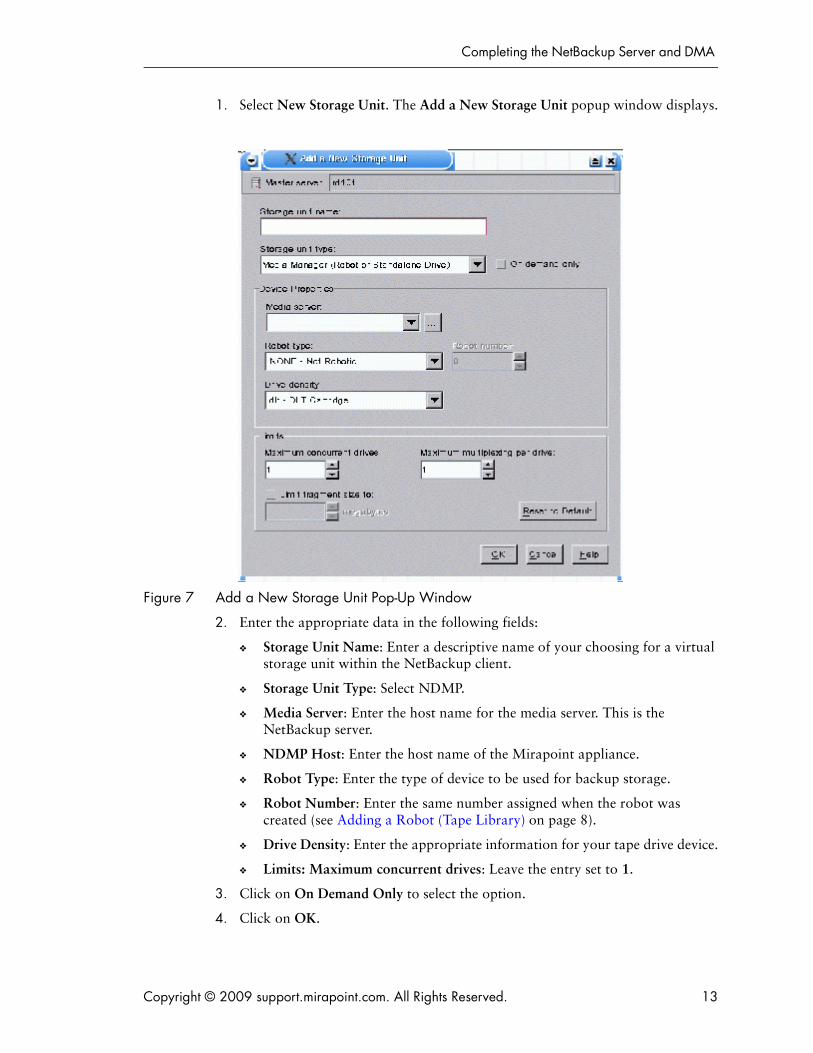
1. Select New Storage Unit. The Add a New Storage Unit popup window displays.
Figure 7 Add a New Storage Unit Pop-Up Window
2. Enter the appropriate data in the following fields:
❖ Storage Unit Name: Enter a descriptive name of your choosing for a virtual storage unit within the NetBackup client.
❖ Storage Unit Type: Select NDMP.
❖ Media Server: Enter the host name for the media server. This is the NetBackup server.
❖ NDMP Host: Enter the host name of the Mirapoint appliance.
❖ Robot Type: Enter the type of device to be used for backup storage.
❖ Robot Number: Enter the same number assigned when the robot was created (see Adding a Robot (Tape Library) on page 8).
❖ Drive Density: Enter the appropriate information for your tape drive device.
❖ Limits: Maximum concurrent drives: Leave the entry set to 1.
3. Click on On Demand Only to select the option.
4. Click on OK.
Copyright © 2009 support.mirapoint.com. All Rights Reserved. 13

Configuring Veritas NetBackup Version 4.5 for NDMP
Creating a Class or Policy
A policy defines the backup characteristics for a group of one or more clients that have similar backup requirements.
From the Main Menu under the NetBackup Management, select Policies > Edit > New.
The Add a New Policy popup window displays.
Do the following:
1. Type the policy name of your choosing in the dialog box.
Figure 8 Add a New Policy Pop-Up Window
2. Click OK. The Change Policy pop-up window displays for the new policy you just created. Do the following:
14 Copyright © 2009 support.mirapoint.com. All Rights Reserved.
Completing the NetBackup Server and DMA
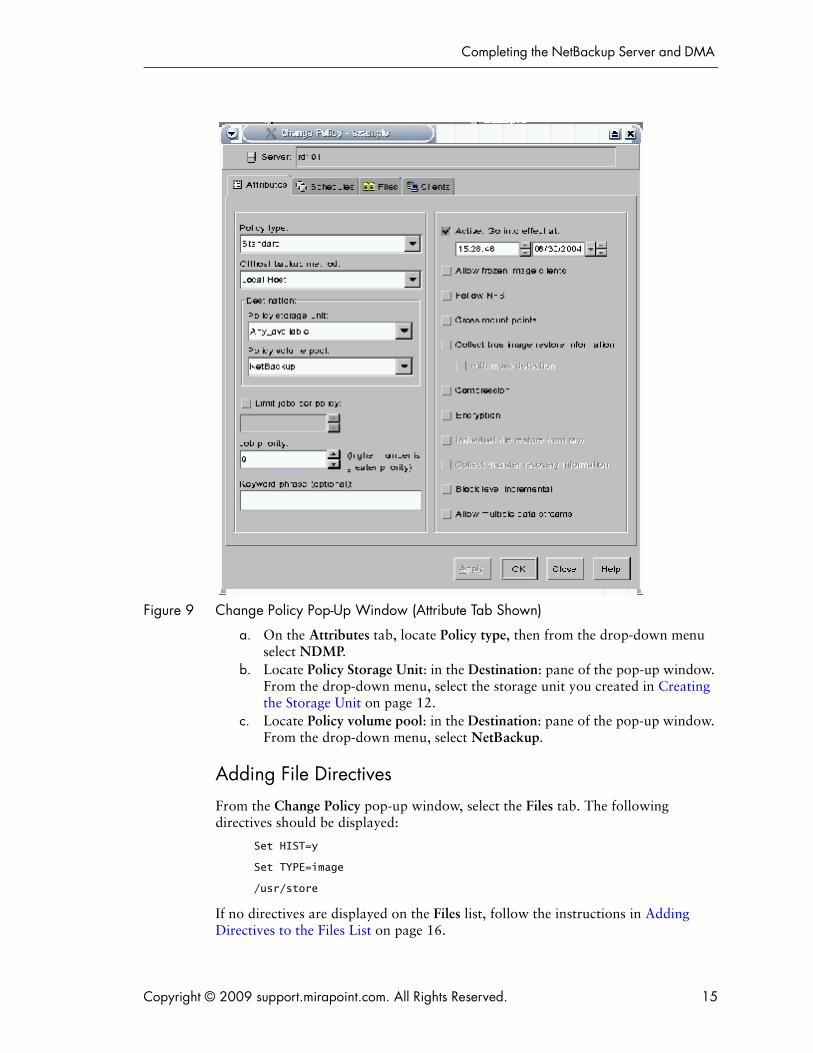
Figure 9 Change Policy Pop-Up Window (Attribute Tab Shown)
a. On the Attributes tab, locate Policy type, then from the drop-down menu select NDMP.
b. Locate Policy Storage Unit: in the Destination: pane of the pop-up window. From the drop-down menu, select the storage unit you created in Creating the Storage Unit on page 12.
c. Locate Policy volume pool: in the Destination: pane of the pop-up window. From the drop-down menu, select NetBackup.
Adding File Directives
From the Change Policy pop-up window, select the Files tab. The following directives should be displayed:
Set HIST=y
Set TYPE=image
/usr/store
If no directives are displayed on the Files list, follow the instructions in Adding Directives to the Files List on page 16.
Copyright © 2009 support.mirapoint.com. All Rights Reserved. 15
Configuring Veritas NetBackup Version 4.5 for NDMP
If only the /usr/store entry is on the list, follow the instructions in Inserting Directives in Existing Policy Files List on page 17 to add the other required directives.
If any of the specified directives or pathname appear on the list, but have values other than those specified, follow the instructions in Changing a Directive or Pathname on page 17.
Adding Directives to the Files List
All directives for a given pathname must appear before that pathname on the list if they are to be correctly applied. Therefore, the set HIST= and TYPE= directives must appear on the list before the /usr/store pathname. The set HIST= directive must precede the set TYPE= directive.
To add directives or the pathname, do the following:
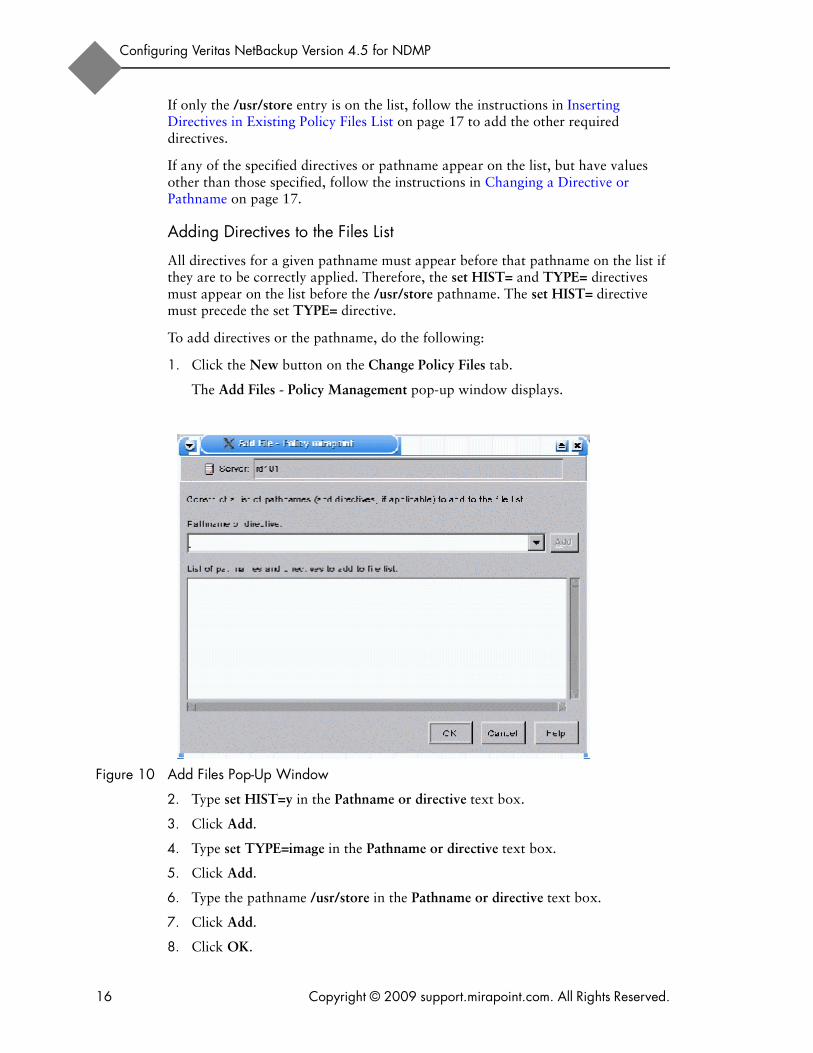
1. Click the New button on the Change Policy Files tab.
The Add Files - Policy Management pop-up window displays.
Figure 10 Add Files Pop-Up Window
2. Type set HIST=y in the Pathname or directive text box.
3. Click Add.
4. Type set TYPE=image in the Pathname or directive text box.
5. Click Add.
6. Type the pathname /usr/store in the Pathname or directive text box.
7. Click Add.
8. Click OK.
16 Copyright © 2009 support.mirapoint.com. All Rights Reserved.

Completing the NetBackup Server and DMA
The Add Backup Selection pop-up window closes, and the Change Policy Backup Selections tab should now displays the policy directives in the correct order.
Inserting Directives in Existing Policy Files List
If your policy file settings includes the TYPE= directive and the /usr/store pathname, but not the HIST= directive, you must add it to the list.
Remember, all directives for a given pathname must appear before that pathname on the list if they are to be correctly applied. Therefore, the set HIST= and TYPE= directives must appear on the list before the /usr/store pathname.
From the Change Policy Directory Selections tab, do the following:
1. Highlight the TYPE= entry on the Directory Selection List.
2. Click the Insert button. The Insert File pop-up window displays.
Figure 11 Insert Files Pop-Up Window
3. Type set HIST=y in the Pathname or directive text box.
4. Click Add.
5. Click OK.
The pop-up window closes, and the display reflects the changes.
Changing a Directive or Pathname
If the history directive appear on the Pathname or Directive List, but has values other than what is specified in this document, you must change it.
Do the following:
Copyright © 2009 support.mirapoint.com. All Rights Reserved. 17
Configuring Veritas NetBackup Version 4.5 for NDMP
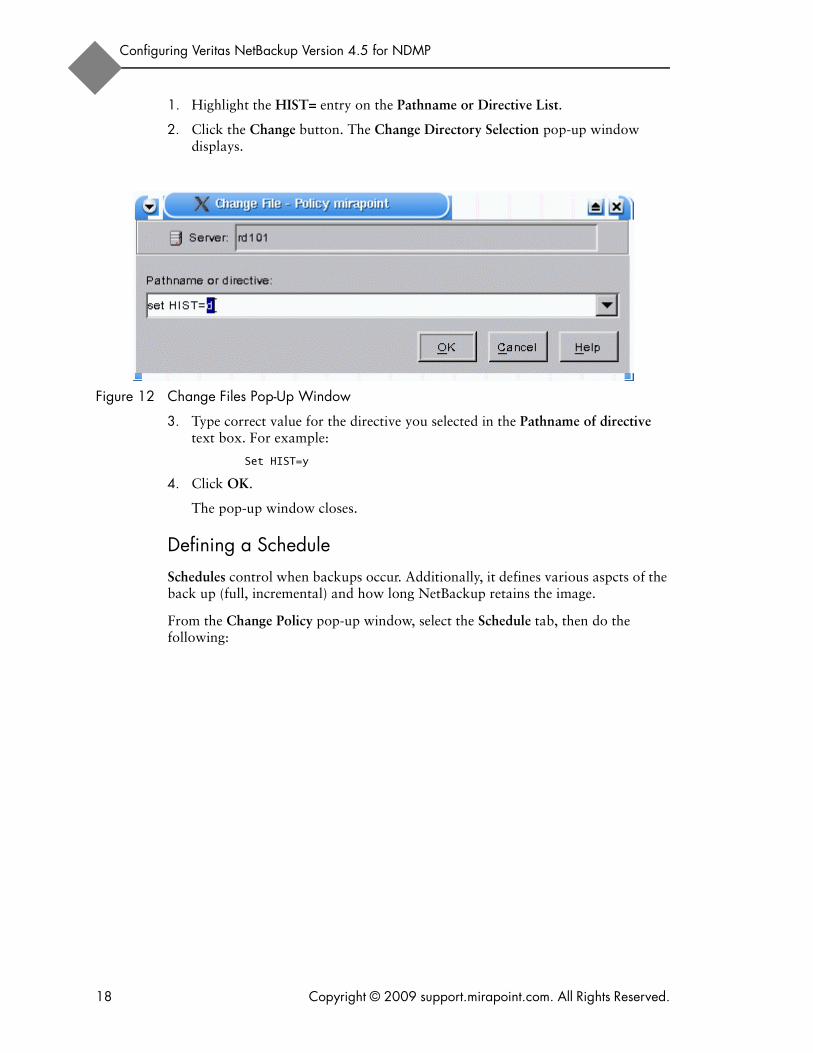
1. Highlight the HIST= entry on the Pathname or Directive List.
2. Click the Change button. The Change Directory Selection pop-up window displays.
Figure 12 Change Files Pop-Up Window
3. Type correct value for the directive you selected in the Pathname of directive text box. For example:
Set HIST=y
4. Click OK.
The pop-up window closes.
Defining a Schedule
Schedules control when backups occur. Additionally, it defines various aspcts of the back up (full, incremental) and how long NetBackup retains the image.
From the Change Policy pop-up window, select the Schedule tab, then do the following:
18 Copyright © 2009 support.mirapoint.com. All Rights Reserved.

Completing the NetBackup Server and DMA
1. Click New. The Add Schedule pop-up window displays. On the Attributes tab, do the following:
Figure 13 Add Schedule Pop-Up Window
a. Type a name for the new schedule in the Name text box.b. Use the Type of backup drop-down menu to specify the backupc. Define any remaining attributes desired for this schedule.
2. Select the Start Window tab, and define the start and end times for this schedule.
3. Select the Exclude Dates tab, and define any dates to exclude that match your requirements for this schedule.
Adding a Client Name
A client is the system or appliance with the files to be backed up, archived, or restored.
From the Change Policy pop-up window, select the Clients tab, then do the following:
Copyright © 2009 support.mirapoint.com. All Rights Reserved. 19
Configuring Veritas NetBackup Version 4.5 for NDMP
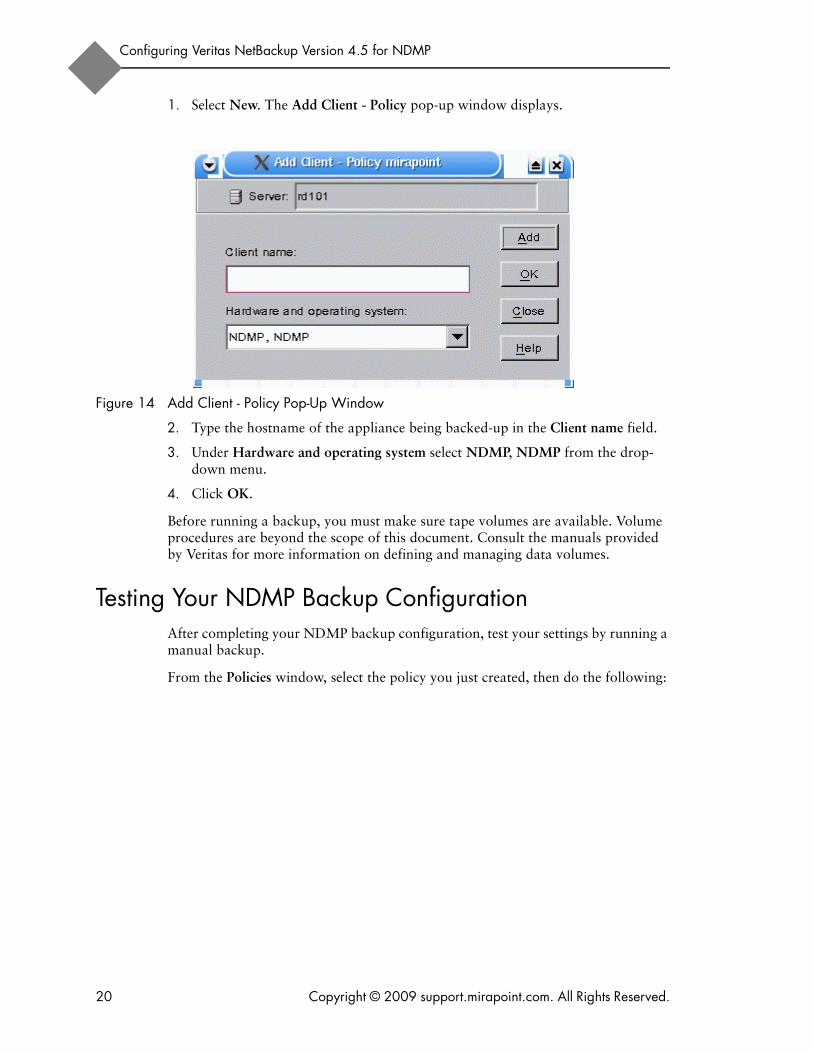
1. Select New. The Add Client - Policy pop-up window displays.
Figure 14 Add Client - Policy Pop-Up Window
2. Type the hostname of the appliance being backed-up in the Client name field.
3. Under Hardware and operating system select NDMP, NDMP from the drop-down menu.
4. Click OK.
Before running a backup, you must make sure tape volumes are available. Volume procedures are beyond the scope of this document. Consult the manuals provided by Veritas for more information on defining and managing data volumes.
Testing Your NDMP Backup ConfigurationAfter completing your NDMP backup configuration, test your settings by running a manual backup.
From the Policies window, select the policy you just created, then do the following:
20 Copyright © 2009 support.mirapoint.com. All Rights Reserved.

Testing Your NDMP Backup Configuration
Figure 15 Using the Top Tool Bar to Start a Manual Backup
1. Select Actions > Manual Backup from the top tool bar. The Manual Backup pop-up window displays.
You can also right-click on the desired policy, then select Manual Backup. The Manual Backup pop-up window displays.
Copyright © 2009 support.mirapoint.com. All Rights Reserved. 21

Configuring Veritas NetBackup Version 4.5 for NDMP
Figure 16 Manual Backup Pop-Up Window
2. Verify the settings in the Manual Backup pop-up window. The Policy Name text box should be the name of policy you selected at the beginning of this procedure. If not, click Cancel to return to the Policies screen, then select the appropriate policy.
If the policy name in the Policy Name text box is correct, but either the Schedules or Clients fields are incorrect, then you did not complete your configuration correctly. Return to Completing the DMA NDMP Backup Configuration on page 7 and make the necessary corrections.
3. Select the Mirapoint appliance you want to manually backup from the Clients list.
4. Select a schedule. If multiple schedules are on the Schedules list, select any you want to use for this manual backup. If you opt to not highlight a schedule, the backup will reflect all.
5. Click OK to start the manual backup.
If all values in the pop-up window are correct, then click OK to start the manual backup.
22 Copyright © 2009 support.mirapoint.com. All Rights Reserved.