connect for sharepoint user guide · pdf filemetalogix connect for sharepoint user guide...
TRANSCRIPT

Connect for
SharePoint User
Guide
Version 2.2
Publication Date: January 23, 2014
Copyright © Metalogix International GmbH 2008-2014 . All Rights Reserved.
This software is protected by copyright law and international treaties. Unauthorized reproduction or
distribution of this software, or any portion of it, may result in severe civil and/or criminal penalties
and will be prosecuted to the maximum extent possible under the law.

Page 2 Metalogix Connect for SharePoint User Guide Introduction
© Copyright Metalogix International GmbH 2008-2014 .
Copyright
© Copyright Metalogix International GmbH 2008-2014 .
All rights reserved. No part or section of the contents of this material may be reproduced
or transmitted in any form or by any means without the written permission of Metalogix
International GmbH 2008-2014 .
Metalogix International GmbH 2008-2014 ™ and Replicator™ are trademarks of
Metalogix International GmbH 2008-2014 .
Windows SharePoint Services is either a registered trademark or a trademark of
Microsoft Corporation in the United States and/or other countries. Other product and
company names mentioned herein may be the trademarks of their respective owners.
Technical Support
For information about Metalogix Technical Support, please visit
http://metalogix.com/support.
Technical support specialists can be reached by email at [email protected] or by
phone at 1.202.609.9100.
We want to hear from you. Please send any comments regarding this document to
The level of technical support provided depends upon the support package that you
have purchased. Contact us to discuss your support requirements.

Metalogix Connect for SharePoint User Guide Page 3 Introduction
© Copyright Metalogix International GmbH 2008-2014 .
Table of Contents
Introduction .....................................................................................................................................4
Starting Metalogix Connect ...........................................................................................................5
Managing your SharePoint Farms ................................................................................................6
Managing Connections ................................................................................................................6
Adding Connections .................................................................................................................6
Editing Connection Settings .....................................................................................................7
Specifying the Preferred Connection .......................................................................................7
Refreshing Connections ...........................................................................................................8
Removing Connections ............................................................................................................8
Exploring Connections .................................................................................................................8
Viewing Web Applications ........................................................................................................9
Using Explore Tree Shortcuts ............................................................................................... 10
Moving and Copying List Items ............................................................................................. 13
Using Snapshots ................................................................................................................... 14
Comparing Web Applications ................................................................................................ 15
Visualizing your SharePoint Network ........................................................................................ 18
Creating a Connection Diagram ............................................................................................ 19
Saving Diagrams as Images ................................................................................................. 20
Reporting on SharePoint ............................................................................................................ 21
Generating Reports ................................................................................................................... 21
Viewing Reports ........................................................................................................................ 21
Snapshot Reports...................................................................................................................... 21
Enabling Connect for Replicator ................................................................................................ 23

Page 4 Metalogix Connect for SharePoint User Guide Introduction
© Copyright Metalogix International GmbH 2008-2014 .
Introduction
Metalogix Connect for SharePoint gives SharePoint administrators tools they can use to
monitor and visualize their SharePoint environment. Using these tools, administrators
can:
Visualize their SharePoint environment.
Compare the structure and content of SharePoint web applications, site
collections, web sites, and lists.
Cut, copy, and paste list items to reorganize structure within a web application.
Generate detailed reports about their SharePoint and replication environments.

Metalogix Connect for SharePoint User Guide Page 5 Starting Metalogix Connect
© Copyright Metalogix International GmbH 2008-2014 .
Starting Metalogix Connect
To start Metalogix Connect, open the Windows Start menu and select Connect. If
Connect does not appear directly under the Start menu, then open All Programs,
Metalogix, Connect, and select Connect.
The first time you start Connect after installing it, a configuration wizard will open. For
information on completing this wizard and other tasks you must perform the first time you
use Connect, see the Metalogix Connect Installation Guide.

Page 6 Metalogix Connect for SharePoint User Guide Managing your SharePoint Farms
© Copyright Metalogix International GmbH 2008-2014 .
Managing your SharePoint Farms
The SharePoint farm management tools are listed under Connection Network in the
Connect navigation pane. Using these tools you can:
Add, refresh, and remove connections.
Explore and compare your SharePoint farms.
Managing Connections
You can add connections to any SharePoint web application that has deployed the
Connect solution. For information on deploying this solution to your SharePoint farms,
see the Metalogix Connect Installation Guide.
Adding Connections
To add a connection to a SharePoint web application:
1. In Connect, under the Home tab, click Connection Network.
2. From the Connection Network menu, select Connection Manager.
3. Click Add Connection in the ribbon. This opens the Add Connection dialog.
4. Enter the connection details for a web application and click Add. The account
you specify must be in the Central Administration Farm Administrators group.

Metalogix Connect for SharePoint User Guide Page 7 Managing your SharePoint Farms
© Copyright Metalogix International GmbH 2008-2014 .
The web application is now in the Connection Manager table. If you chose to discover
other web applications, then you will also see all of the web applications in this farm
where the Connect Solution is deployed.
Editing Connection Settings
To edit details for a connection:
1. Select the connection in the Connection Manager table.
2. In the right-hand pane, edit the settings for this connection under Farm Details
and Connection Credentials. Changes made under Farm Details will affect all
connections in that farm.
3. Click Save to save your changes.
Specifying the Preferred Connection
If you are connecting to a web application that has been extended in SharePoint with
alternate access maps, then you can specify the preferred URL for Connect to use. This
indicates the first URL Connect will use to retrieve information about the web application.
If you are connecting to a web application that uses forms-based authentication, then
you must specify a preferred URL that uses Windows authentication.
To specify a preferred URL:

Page 8 Metalogix Connect for SharePoint User Guide Managing your SharePoint Farms
© Copyright Metalogix International GmbH 2008-2014 .
1. Select the connection in the Connection Manager table.
2. In the bottom-right corner of the window, select the preferred map from the list of alternate access maps.
3. Click Save to save your changes.
Refreshing Connections
After changing your web applications in Central Administration or enabling new Connect
products, you must refresh your Connect connections. This includes changing
Replication Groups, Replication Connections, and Replication Map Families.
To refresh a connection:
1. Select the connection in the Connection Manager table.
2. Click Refresh Connection in the ribbon.
Removing Connections
To remove a connection from Connect:
1. Select the connection in the Connection Manager table.
2. Click Remove Connection in the ribbon.
The connection will be removed from Connect. This has no effect on web applications
and Replication Connections in your Replication Network. This action only removes the
web application from being monitored in Connect.
Exploring Connections
From the Connection Explorer page, you can view the structure and content of any web
application you have a connection for.

Metalogix Connect for SharePoint User Guide Page 9 Managing your SharePoint Farms
© Copyright Metalogix International GmbH 2008-2014 .
Viewing Web Applications
To view the structure and content of a web application:
1. In Connect, under the Home tab, click Connection Network.
2. From the Connection Network menu, select Connection Explorer.
3. Below the ribbon, in the Connection list, select the web application you want to
view. This opens a tree view of the web application.
4. Expand the tree. You can select items in the tree and view their properties in the
table below the tree.

Page 10 Metalogix Connect for SharePoint User Guide Managing your SharePoint Farms
© Copyright Metalogix International GmbH 2008-2014 .
Using Explore Tree Shortcuts
While exploring your connections in Connect there are several shortcuts available. These shortcuts can be accessed when you right-click in the explorer tree. They allow you to alter certain components of your SharePoint directly through Connect, without having to access the SharePoint site.
Add List
This function allows you to add a list, such as a task list or document library, to a SharePoint site via Connect for SharePoint.
1. In Connect, under the Home tab, click Connection Network.
2. Right-click a web site, select Add List.
3. The Add List wizard will pop up, follow the instructions.
4. The Add List Wizard opens. In the List Details window, configure the new list and
click create list.

Metalogix Connect for SharePoint User Guide Page 11 Managing your SharePoint Farms
© Copyright Metalogix International GmbH 2008-2014 .
5. Refresh your tree and check to see if the list was created.
Add Web
This function allows you to add a web site, such as a team site or blank site, to a SharePoint web application via Connect for SharePoint.
1. In Connect, under the Home tab, click Connection Network.
2. Right-click a web collection and select Add Web.

Page 12 Metalogix Connect for SharePoint User Guide Managing your SharePoint Farms
© Copyright Metalogix International GmbH 2008-2014 .
3. The Add Web Wizard opens. In the Add Web window, configure the new list and click create list.
4. Refresh your tree and check to see if the web site was created.
Navigate To
This function navigates you directly to the website view of the list within your SharePoint
environment.
1. In Connect, under the Home tab, click Connection Network
2. Right Click a list, website or site collection, select Navigate To.
3. This opens a browser window showing the selected content.

Metalogix Connect for SharePoint User Guide Page 13 Managing your SharePoint Farms
© Copyright Metalogix International GmbH 2008-2014 .
Moving and Copying List Items
This function allows you to replicate content within a tree between multiple lists quickly and efficiently, without having to re-enter the information multiple times within multiple lists. This is done by Cutting or Copying the list item, and pasting it into another list of the same kind within the same tree.
1. This function is performed in Connect, under the Home tab, in Connection Network, Connection Explorer under the web application of your choice.
2. Expand the list of your choice and select the list item you wish to Copy or Cut.
3. Click Copy if you wish to copy the item and have it remain in the current list as well. Click Cut if you wish to remove the item from its current list and place it into a different list.
4. Select the List you wish to Paste your item in, and click Paste.
5. Click Refresh Trees to see the pasted item.

Page 14 Metalogix Connect for SharePoint User Guide Managing your SharePoint Farms
© Copyright Metalogix International GmbH 2008-2014 .
Using Snapshots
Snapshots create an image of your web applications and store them in the Connect
database. You can use these snapshots to compare changes in your web application
over time and also in some reports.
Creating Snapshots
To create a snapshot of a web application do the following:
1. On the Connection Explorer page, click to the right of the snapshot list. This
opens the Create Snapshot dialog.
2. In the dialog, enter a name for the snapshot and select what you want to include
in the snapshot. Select what to include in the snapshot based on how you intend
to use the snapshot. The more information you include in a snapshot, the longer
it will take Connect to retrieve that information from SharePoint. Click Start to
begin creating the snapshot.
Connect creates the snapshot in the background and you will be able to continue
working with Connect as the snapshot is being created.
Note: It is important to note that the amount of time that it takes a snapshot to complete
is directly related to the size and complexity of your environment. Taking a snapshot of
the structure first can help you see the size and complexity of your environment.
Creating a full snapshot including content can take at least ten times longer than
creating a snapshot with only structure, for a local SharePoint farm. Remote farms can
take longer as network bandwidth will also be a factor.
Metalogix Connect for SharePoint User Guide Page 15 Managing your SharePoint Farms
© Copyright Metalogix International GmbH 2008-2014 .
Viewing Snapshots
To view an existing snapshot, on the Connection Explorer page, select the connection
and then the snapshot from the snapshot list.
Reporting on Snapshot Data
Connect includes a variety of built-in reports that can be run on snapshots. These
reports can help SharePoint administrators better understand the structure, features, and
usage of various SharePoint web applications across their global network. For more
information, see "Reporting on SharePoint" on page 21.
Note: Reports rely upon the data from snapshots. Snapshots that contain only structure
or data that was previously loaded into Connect can only report on information included
in the snapshot.
Removing Snapshots
To remove an existing snapshot:
1. Select the snapshot from the snapshot list.
2. Click to the right of the snapshot's name.
This removes the snapshot from the Connect database.
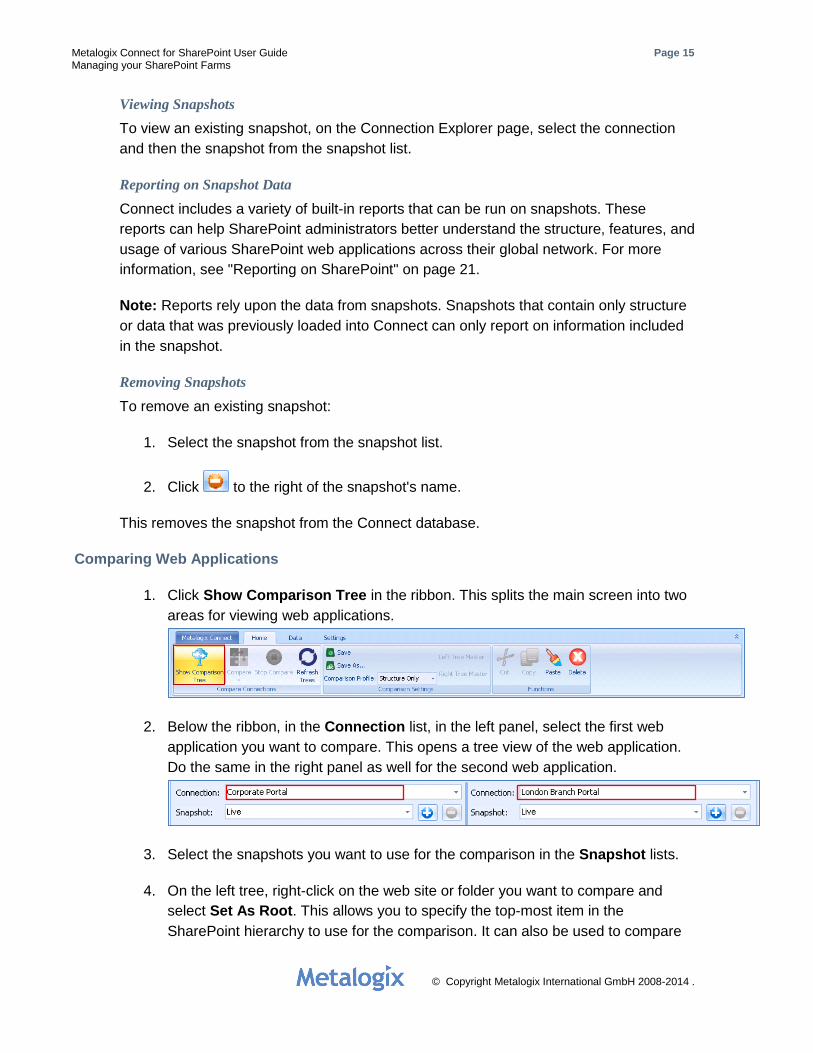
Comparing Web Applications
1. Click Show Comparison Tree in the ribbon. This splits the main screen into two
areas for viewing web applications.
2. Below the ribbon, in the Connection list, in the left panel, select the first web
application you want to compare. This opens a tree view of the web application.
Do the same in the right panel as well for the second web application.
3. Select the snapshots you want to use for the comparison in the Snapshot lists.
4. On the left tree, right-click on the web site or folder you want to compare and
select Set As Root. This allows you to specify the top-most item in the
SharePoint hierarchy to use for the comparison. It can also be used to compare

Page 16 Metalogix Connect for SharePoint User Guide Managing your SharePoint Farms
© Copyright Metalogix International GmbH 2008-2014 .
items at different levels of the SharePoint hierarchy, such as comparing a root
web site to a sub-site.
5. On the right tree, right-click the web site or folder you want to compare and select
Set As Root.
6. On the left hand side of the tree, select the Comparison Settings tab. It will
expand into a pane with comparison options, which you can select to specify
what you would like to compare.
7. Click outside the Comparison Settings pane to hide the list.
8. If one web application is authoritative, then click Left Tree Master or Right Tree
Master to indicate the authoritative web application. Doing this changes how the
comparison results are shown, but does not affect the comparison.

Metalogix Connect for SharePoint User Guide Page 17 Managing your SharePoint Farms
© Copyright Metalogix International GmbH 2008-2014 .
9. In the ribbon, click Compare to start comparing the sites.
Connect will start to compare the contents of both trees. Depending on the amount of
content in each tree, this can take a while. As Connect finishes comparing branches in
the trees, it displays the comparison results. The results are shaded as follows:
Yellow: Content under this folder is different.
Orange: This content does not exist on the other tree.
Red: Properties for this item are different. Select the item to see its properties.
Gray: This content does not exist on the master tree.
Viewing Only the Differences
This feature provides you with an easier view of differences in your tree comparisons by hiding the items that are the same.
1. After you have compared two trees, right click the root you have compared or one of its children.

Page 18 Metalogix Connect for SharePoint User Guide Managing your SharePoint Farms
© Copyright Metalogix International GmbH 2008-2014 .
2. Select Show Differences Only.
3. This can be selected on one or both trees as per your comparison preferences.
Visualizing your SharePoint Network
The Connection Diagram page allows you to visualize your SharePoint farms.

Metalogix Connect for SharePoint User Guide Page 19 Managing your SharePoint Farms
© Copyright Metalogix International GmbH 2008-2014 .
Creating a Connection Diagram
To create a connection diagram:
1. In Connect, under the Home tab, click Connection Network.
2. From the Connection Network menu, select Connection Diagram.
3. If you want to add a background image, or later change your background image,
then right-click on the main area and select Add Background Image. Select a
background image to use for the diagram. For your convenience, several images
are included in <ConnectFolder>\Images, where <ConnectFolder> is where you
installed Connect.
4. Drag each farm to move them in the diagram.
5. Right-click each farm to change how that farm appears in the diagram.
6. Use the Show/Hide and Diagram Zoom controls in the ribbon to customize the
diagram.
7. Click Save Layout in the ribbon to save this diagram. After saving the layout, this
will be the default connection diagram the next time you open the page.

Page 20 Metalogix Connect for SharePoint User Guide Managing your SharePoint Farms
© Copyright Metalogix International GmbH 2008-2014 .
Saving Diagrams as Images
Connect can save the current connection diagram as an image file. To do this:
1. On the Connection Diagram page, click Save Diagram As in the ribbon.
2. Select the image type that you want to save the diagram as.
3. Select the location where you want to save the image and enter a file name.
4. Click Save to save the image.

Metalogix Connect for SharePoint User Guide Page 21 Reporting on SharePoint
© Copyright Metalogix International GmbH 2008-2014 .
Reporting on SharePoint
Connect includes several built-in reports that summarize your SharePoint environment.
Generating Reports
1. In Connect, under the Home tab, click Reports.
2. From the Reports menu, select the report you want to view.
Viewing Reports
There are various ways in which to sort and filter your reports.
Sort reports by clicking on the column heading you want to sort by.
Filter reports by clicking the filter icon in the top-right corner of any column heading.
Filter rows dynamically by right-clicking the heading row and selecting Show
Auto Filter Row. This adds a row between the report and the column headings
where you can enter filter criteria for each column.
Search for values in the report by right-clicking the heading row and selecting
Show Find Panel. In the panel, enter the phrase to search for.
Snapshot Reports
The SharePoint Snapshot reports show information about your SharePoint environment
that is useful to SharePoint administrators looking for a high-level summary of how
SharePoint is being used. These reports are generated based on existing snapshots
taken in Connect and are not based on the current, live, state of SharePoint. See "Using
Snapshots" on page 14 for more information.
Snapshot reports include the following kinds of reports:
Report Name Contents
SharePoint Snapshot Summary Provides an overview of your SharePoint
environment. Including number of site
collections, websites, lists, folders.
Features by Farm Provides an overview of your SharePoint

Page 22 Metalogix Connect for SharePoint User Guide Reporting on SharePoint
© Copyright Metalogix International GmbH 2008-2014 .
Report Name Contents
features activated by farm. You can
search your scope according to web
application, site collection, or web site.
Site Collection by Farm Provides an overview of your site
collection by farm. This report details the
owner of the site collection, and content
database information for the site
collection.
Websites by Farm Provides an overview of the website
located within a farm. This includes the
website author, list item file sizes, and url
details.
Lists by Farm Provides an overview of all lists within a
farm. This includes lists by site, items
checked out by list/site, the number of lists
over a variable amount of items, and
document library item count and size by
site.
Content Databases by Farm Provides an overview of content
databases on a farm. This includes the
statuses of content databases and site
collection counts.
When reading snapshot reports, note that:
Snapshot reports only show values for data that is included in the snapshot. If
you create a snapshot using only structure, then you will not be able to see list
item details, such as the number of checked out items in a list or the total size of
library items.
Some snapshot reports show an approximate size of SharePoint web sites and
lists. These are calculated using individual list items in the snapshot and do not
include recycled items or older versions of library items. The calculated sizes
may not exactly match the size of content stored in the SharePoint database.
Snapshots taken with earlier releases of Connect may not display information for
all of the values in a report.
Metalogix Connect for SharePoint User Guide Page 23 Enabling Connect for Replicator
© Copyright Metalogix International GmbH 2008-2014 .
Enabling Connect for Replicator
Metalogix Connect for SharePoint allows you to enable Connect for Replicator. This
product requires that you install some edition of Metalogix Replicator on your SharePoint
farms.
If you decide to evaluate or purchase this product, then you can activate it on the About
Connect page. To do this:
1. In Connect, under the Metalogix Connect tab, click About.
2. In the Connect for Replicator row, check the box in the Enabled column.
3. Refresh any existing connections using the steps described in "Refreshing
Connections" section.
After enabling the product, you will see new options under the Home tab. For more
information on using this product, see its respective user guide.