connecting to citrix using vpn · web viewafter a few seconds, you will see a prompt at the bottom...
TRANSCRIPT

Nov 2017
Instructions for Connecting to Citrix using VPN
ContentsPrerequisites for connecting to the HRSA network using VPN....................................................................1
Connecting to Citrix using VPN....................................................................................................................2
Disconnecting the HRSA VPN client.............................................................................................................4
Frequently Asked Questions........................................................................................................................5
Appendix A: VPN Client Installation.............................................................................................................6
Appendix B: Installing the Citrix client.......................................................................................................12
Appendix C: ActiveClient Installation.........................................................................................................13
Appendix D: Adding Trusted Sites to Internet Explorer.............................................................................14
Prerequisites for connecting to the HRSA network using VPN
1. A computer with internet access (does not have to be Government Furnished Equipment)2. A supported smartcard reader3. A HRSA issued PIV card and PIN4. An active HRSA account in good standing5. Windows 7 with SP1 or Windows 8/8.1 or Windows 106. A supported antivirus with active scanning enabled and up to date definitions
Supported Antivirus Products (definitions must be within 5 days) Windows Defender Symantec Endpoint Protection McAfee Heat (formerly Lumension) Eset Endpoint Antivirus
7. Cisco AnyConnect VPN client [Refer to Appendix A for instructions]8. Citrix client [Refer to Appendix B for instructions]9. ActiveClient Software & patches [Refer to Appendix C for instructions]10. Add Trusted Sites list in Internet Explorer [Refer to Appendix D for instructions]

Reference Guide
Connecting to Citrix using VPNStep 1. Insert your PIV card into the PIV card reader.
Step 2. Connect to a reliable Internet source via a LAN connection or a wireless connection.
Step 3. Locate the Cisco AnyConnect icon in the system tray (typically found in the lower right hand
corner of your screen). You may have to select the up arrow to “Show hidden icons”.
Step 4. Right click the Cisco AnyConnect icon and click Connect to launch the VPN client.
Step 5. A new window displays as shown below. Enter vpn.hrsa.gov if it is not already in the drop down.
Click Connect.
Step 6: Enter your PIN number and click OK.
Connecting to Citrix using VPN 2

Reference Guide
Note: Your PIV card and PIN are required every time you need to access the VPN.
Step 7. Read the banner agreement and click Accept to accept the terms of the disclaimer.
After a few seconds, you will see a prompt at the bottom right hand-side of your screen informing you that you are connected to the HRSA network using VPN. The Cisco AnyConnect icon also displays a gold lock when you are connected.
Connecting to Citrix using VPN 3

Reference Guide
Step 8. Open a browser window and type https://telework.hrsa.gov/ to get to the Telework portal. Click on the Citrix button to access Citrix as used previously.
Disconnecting the HRSA VPN clientIt is important to always disconnect your VPN client after you finish your work and/or when remote access is no longer needed.
To disconnect:
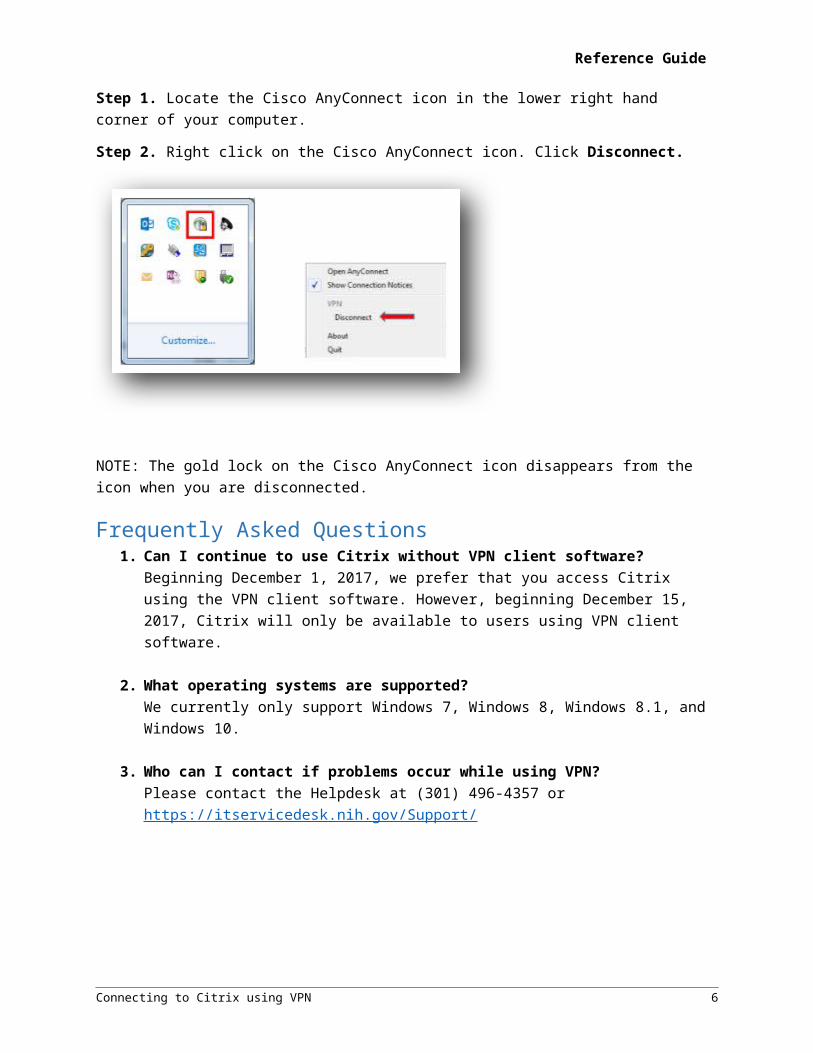
Step 1. Locate the Cisco AnyConnect icon in the lower right hand corner of your computer.
Step 2. Right click on the Cisco AnyConnect icon. Click Disconnect.
NOTE: The gold lock on the Cisco AnyConnect icon disappears from the icon when you are disconnected.
Connecting to Citrix using VPN 4

Reference Guide
Frequently Asked Questions1. Can I continue to use Citrix without VPN client software?
Beginning December 1, 2017, we prefer that you access Citrix using the VPN client software. However, beginning December 15, 2017, Citrix will only be available to users using VPN client software.
2. What operating systems are supported? We currently only support Windows 7, Windows 8, Windows 8.1, and Windows 10.
3. Who can I contact if problems occur while using VPN? Please contact the Helpdesk at (301) 496-4357 or https://itservicedesk.nih.gov/Support/
Connecting to Citrix using VPN 5
Reference Guide
Appendix A: VPN Client Installation Step 1. Connect your computer to the internet and go to https://telework.hrsa.gov/
Step 2. Click the Downloads tab.
Step 3. Scroll down and locate “Cisco AnyConnect Client Software”.
Connecting to Citrix using VPN 6

Reference Guide
Step 4. Right-Click on the Download button and choose “Save Target As…”
Connecting to Citrix using VPN 7

Reference Guide
Step 5. Save to your Desktop. This makes it easier to find.
Step 6. Right-click the folder on your desktop for the AnyConnect files and then click on Extract All… and extract to a folder on your desktop
Connecting to Citrix using VPN 8

Reference Guide
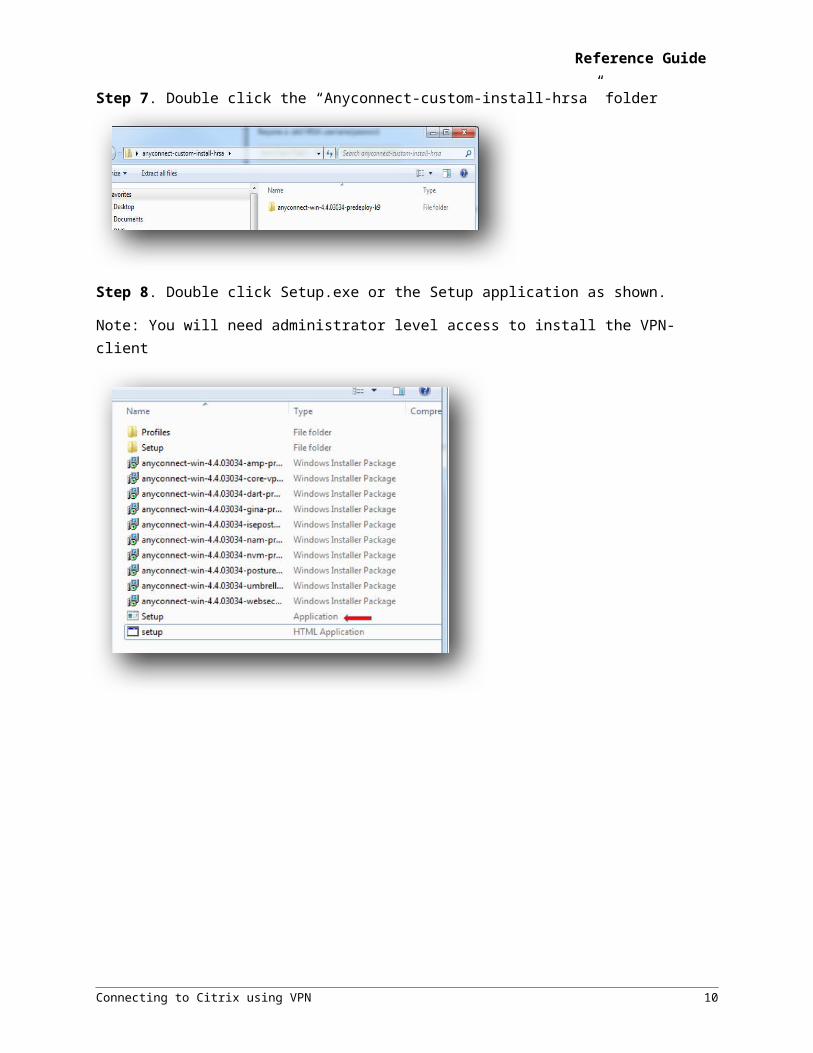
Step 7. Double click the “Anyconnect-custom-install-hrsa” folder
Step 8. Double click Setup.exe or the Setup application as shown.
Note: You will need administrator level access to install the VPN-client
Connecting to Citrix using VPN 9
Reference Guide
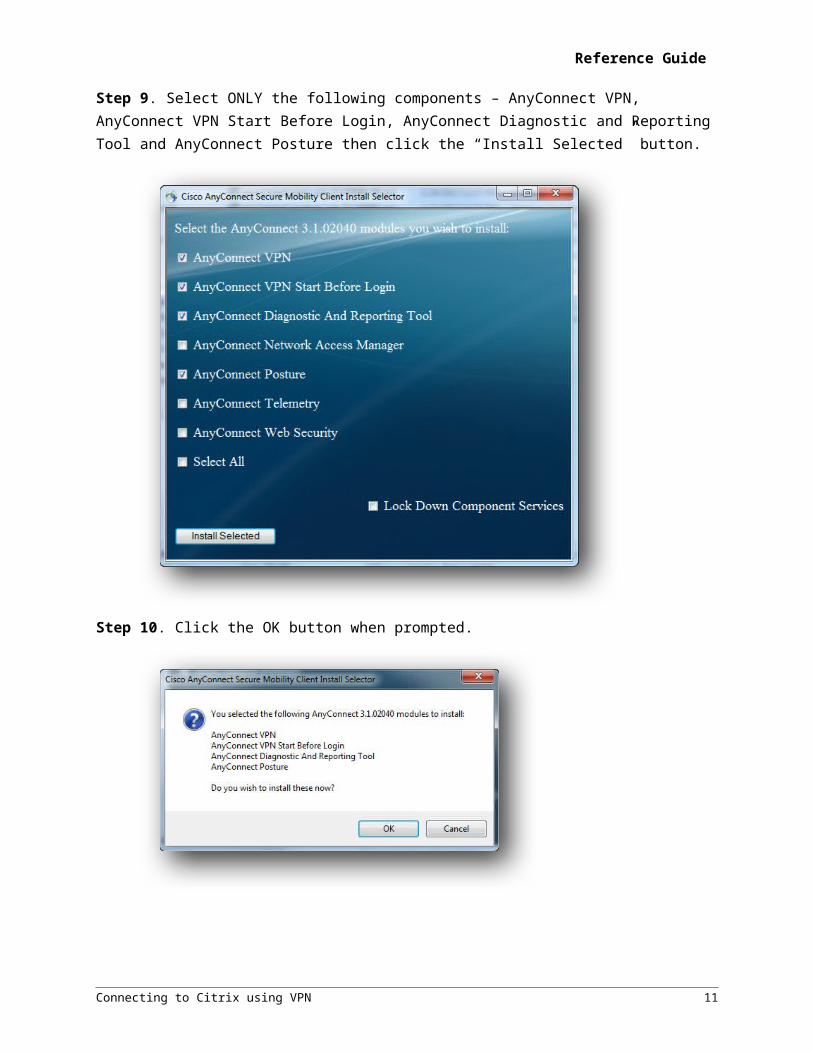
Step 9. Select ONLY the following components – AnyConnect VPN, AnyConnect VPN Start Before Login, AnyConnect Diagnostic and Reporting Tool and AnyConnect Posture then click the “Install Selected” button.
Step 10. Click the OK button when prompted.
Connecting to Citrix using VPN 10
Reference Guide
Step 11. Accept the licensing agreement.
Step 12. When Installation is complete, click the OK button and reboot your PC.
Connecting to Citrix using VPN 11

Reference Guide
Appendix B: Installing the Citrix client Step 1. Open Internet Explorer and browse to https://telework.hrsa.gov/
Step 2. Click the Downloads tab
Step 3. Scroll down to “Download Citrix Client Version 12.3” and click “Windows Client”.
Step 4. Click Run to run the program and install.
Step 5. Click OK after the installation to complete to exit the prompt box.
Connecting to Citrix using VPN 12

Reference Guide
Appendix C: ActiveClient Installation
Step 1. Open Internet Explorer and browse to https://telework.hrsa.gov/
Step 2. Click the Downloads tab
Step 3. Scroll down to ActivClient Card Reader Software and download the package applicable to your OS. (All downloads require a valid HRSA username/password).
Step 4. Reboot your computer after installation is complete.
Connecting to Citrix using VPN 13
Reference Guide
Appendix D: Adding Trusted Sites to Internet Explorer Step 1. Open Internet Explorer
Step 2. Click Tools in the top navigation ribbon.
Step 3. Click Internet Options
Step 4. Click the “Security” tab
Step 5. Click the “Trusted sites” icon.
Step 6. Click the Sites button.
Connecting to Citrix using VPN 14

Reference Guide
Step 7. Click in the trusted website box. Enter the following websites and click Add after each.
https://access.hrsa.gov
https://telework.hrsa.gov
Connecting to Citrix using VPN 15