connexx 7 tutorial. 5 connexx 7. tutorial. getting started. 1. selecting client list allows you to...
TRANSCRIPT

Life sounds brilliant.
www.siemens.com/connexx
Connexx 7 Tutorial.Designed for simplicity.

2
Content
Content .....................................................................
Module 01 – First Fit ..................................................
Getting started .....................................................
Entering new client data .......................................
Entering an audiogram ..........................................
The First Fit ..........................................................
Defining preferred default settings .........................
Module 02 – Basic Tuning ..........................................
2
4
5
6
8
12
14
16
18
21
23
24
26
26
27
28
29
29
Module 03 – Fine Tuning ...........................................
Frequency shaping ................................................
Compression ........................................................
Microphone/Audio ................................................
Module 04 – Program handling .................................
Program selection .................................................
Changing the program order .................................
Deleting a program ...............................................
Fitting different programs to different ears .............
Renaming a program .............................................
Content

3www.siemens.com/connexx
Connexx 7. Tutorial.
30
31
32
34
36
38
38
46
46
48
49
50
56
58
62
64
68
70
78
Module 05 – miGuide ................................................
Data Logging .......................................................
Sound Equalizer ...................................................
Learning ..............................................................
Acclimitization Manager ........................................
Module 06 – Frequency Compression .........................
Fine tuning frequency compression .......................
Module 07 – User Control Configuration ....................
Hearing instrument ...............................................
Volume control .....................................................
e2e wireless 2.0 ....................................................
Module 08 – InSituGram ............................................
Module 09 – Wireless Programming ............................
Module 10 – Configuring Remote Controls .................
Module 11 – Critical Gain Measurement for Follow-Up Fittings ...........................
Module 12 – Tinnitus Settings ...................................
Module 13 – Documentation Settings ........................
Module 14 – Preferences ...........................................
Module 15 – Real Ear Measurements.........................
Content
Module01
Module04
Module07
Module11
Module02
Module05
Module08
Module12
Module13
Module03
Module06
Module10
Module09
Module14
Module15

4
Module 01 – First Fit
The new Connexx™ 7 portal page provides the clinician with the flexibility to start a First Fit in a variety of ways depending on workflow
1 3 4
2

5www.siemens.com/connexx
Connexx 7. Tutorial.
Getting started.
1. Selecting Client List allows you to either search for an existing client that has already been entered into the Connexx database or to enter a brand new client profile.
2. If you have already loaded your client’s profile and audiometric data using an independent database, you can skip this step and proceed to the Hearing Instru-ments page.
Module 01 – First Fit
3. If you have already determined which hearing instru-ments to fit to your client, you can begin the session by detecting the attached hearing aids.
4. To determine your client’s individual hearing needs, go to the Connexx Counseling Suite.
This section gives an overview of how to perform the First Fit for a selected hearing instrument.
Module01
Module04
Module07
Module11
Module02
Module05
Module08
Module12
Module13
Module03
Module06
Module10
Module09
Module14
Content
Module15

6
Module 01 – First Fit
Entering new client data
When you select Client List, the window Client List and Data will open. You can select New Client to enter new client data, select an existing client from the list or use the search function to find a particular client.
To enter a new client, select New Client and then fill out the Client Details form. The new client will then be auto-matically highlighted in the Client List and Data window. Select Load Client and proceed to the audiogram page.

7www.siemens.com/connexx
Connexx 7. Tutorial.
If the client has already been entered into the database, simply highlight the client in the list and then select Load Client and proceed to the audiogram page.
To search for a previously registered client, enter the cli-ent’s name and select Search. The client’s file will be high-lighted when found. Simply select Load Client and pro-ceed to the audiogram page.
Module01
Module04
Module07
Module11
Module02
Module05
Module08
Module12
Module13
Module03
Module06
Module10
Module09
Module14
Content
Module15

8
Module 01 – First Fit
Entering an audiogram
In order to enter the audiometric data for the client, select Audiogram from the Connexx 7 portal page or from the tool bar above. Double click on each value across the fre-quencies for the right and left ear, then select save
Simulating Hearing Instruments
To determine the most suitable hearing instruments for your client’s needs, Connexx 7 offers several functions on the Hearing Instruments page. After you have selected hearing instruments, you will be able to see the fitting range based on a selection of acoustic coupling data rela-tive to your client’s audiogram data. This way, you can eas-ily check to see if the selected hearing aids are appropriate for your client’s hearing loss.
Note that Connexx 6 will launch automatically if the selected hearing instrument is not currently supported by Connexx 7 (i.e., not part of the micon family).
1. Check if the instrument’s fitting range suits your cli-ents’ hearing loss.
2. You can find a list of Benefits & Demos for the selected instrument.
3. A click on a play button will open a short demon-stration, which will help you explain its benefit to your client. Use the Details button to find technical details, information on accessories, demonstrate a 360° view of the selected Instrument as well as their color availability.

9www.siemens.com/connexx
Connexx 7. Tutorial.
5. It is possible to read out/detect attached hearing instruments from the Portal page, the Audiogram page and the Hearing Instruments page by clicking on the Detected connected hearing systems icon .
Module01
Module04
Module07
Module11
Module02
Module05
Module08
Module12
Module13
Module03
Module06
Module10
Module09
Module14
4. This way, you can show the instrument to your client without having to have it in stock. Use the Simulate selected hearing systems button to simulate a fitting.
1 23
4
5
Content
Module15

10
Module 01 – First Fit
Detect hearing instruments from the portal page. Detect hearing instruments from the audiogram page.

11www.siemens.com/connexx
Connexx 7. Tutorial.
Module01
Module04
Module07
Module11
Module02
Module05
Module08
Module12
Module13
Module03
Module06
Module10
Module09
Module14
Detect hearing instruments from the Hearing Instruments page.
Once you have decided on which hearing instruments to fit and have connected them to the computer, click on Detect connected hearing systems to proceed with the fitting.
Content
Module15

12
Module 01 – First Fit
The First Fit
In the dialogue box that appears after the hearing instru-ments are detected, you are given a choice of New fitting, Read out connected instruments or Use session data. Select New fitting and then click OK, which will take you to the Fitting Page.
Based on the client’s degree and configuration of hearing loss, as well as the selected hearing instruments, Connexx will automatically propose settings. An overview of these selections are included in each tab at the bottom of the page. For more details and to modify these settings or run the functions, click on each tab. On this screen, the arrow button can be used to expand the menu at any time.
Acoustical Parameters: It is possible to modify ear hook, ear coupling, and venting so that it suits the client’s needs prior to carrying out the First Fit.
Critical Gain: A measure to reduce the risk of feedback. To run it, ensure that the background noise is reduced and that the earmold/hearing aid fits securely in the client’s ear. Then instruct the client to remain still and quiet while they hear a short broadband noise. Click on Start and fol-low the prompts.

13www.siemens.com/connexx
Connexx 7. Tutorial.
Fitting Formula: A number of prescriptive targets are available by clicking on the drop down menu. Connexx will select the system default or the one that you have pre-defined in the Preferences settings (see Module 14).
Determine an InSituGram for the fitting: it is possible to use the hearing instrument to measure the client’s hearing thresholds and use these values for the First Fit.
Enter an individually measured RECD/REUG: if you would like to include the RECD or REUG measurements in the First Fit, select box Use measurement for First Fit.
Once you are sure that everything is set to the client’s needs, use to perform a First Fit. To show that a First Fit has been correctly performed, a will appear next to the First Fit button and on the First Fit section in the navigation column on the left side of the screen.
Module01
Module04
Module07
Module11
Module02
Module05
Module08
Module12
Module13
Module03
Module06
Module10
Module09
Module14
Content
Module15

14
Module 01 – First Fit
Defining preferred default settings.
Connexx 7 allows you to define your preferred default set-tings with the Edit user preferences symbol . You can also access the preferences settings on the toolbar by choosing Preferences.
1 7
8
3
2
4
5
6
For the First Fit you can set defaults for the following:
1. Fitting Formula:
a. System default for that hearing instrument
b. micon fit for micon products
c. NAL-NL1*
d. NAL-NL2
2. Experience Level: of the client and only if available for the selected fitting formula
3. Frequency Compression: can be activated or deacti-vated upon First Fit, if recommended, based on the client’s hearing loss

15www.siemens.com/connexx
Connexx 7. Tutorial.
Module01
Module04
Module07
Module11
Module02
Module05
Module08
Module12
Module13
Module03
Module06
Module10
Module09
Module14
The Workflow preferences allow you to define the page to which Connexx 7 automatically switches in case of a follow up fitting session.
4. Target Gain Level: set at 70, 80, 90, or 100%
5. Language Type of the client, either tonal or non-tonal
6. Acclimatization Level, system default or levels 1 through 4, depending on the selected fitting formula
7. Horn: can be selected to enable horns as acoustical parameters
8. Test results: measured RECD/REUG for the client can be automatically included in the First Fit, if provided.
Content
Module15

16
Module 02 – Basic Tuning
Master Gain, Loudness and Sound Quality can be easily modified to match the client’s sound impressions. Always check the gain curves to see how these changes affect the settings.
Module 02 – Basic TuningThis section shows how to do Basic Tuning for a selected hearing instrument. A variety of frequently used settings can be adjusted after the First Fit has been performed for a selected hearing instrument.
1
2
3
For the First Fit you can set defaults for the following:
1. To access Basic Tuning following a First Fit or at a follow-up fitting session, select Basic Tuning on the menu on the left hand side.

17www.siemens.com/connexx
Connexx 7. Tutorial.
Module01
Module04
Module07
Module11
Module02
Module05
Module08
Module12
Module13
Module03
Module06
Module10
Module09
Module14
2. Check if the binaural coupling of the hearing instru-ment is active or inactive by hovering over the icon with the mouse. If changes are desired for both hear-ing instruments simultaneously and to the same degree, ensure that binaural coupling is active. If it is preferable to adjust the hearing instruments indepen-dently, verify that the button is inactive.
3. Adjust Master Gain, Loudness and Sound Quality as needed. The following are descriptions of the controls:
4. Master Gain adjusts overall gain for soft, medium and loud inputs. By clicking on the icon, the overall gain will decrease. By selecting the icon, the over-all gain will increase.
5. The Loud Sounds buttons adjusts the output of 80 dB inputs. To decrease loud sounds, click the icon. To increase the perception of loud sounds, click on the icon.
6. The Soft Sounds buttons adjust the output of 50 dB inputs. To decrease soft sounds, click icon. To increase the loudness of soft sounds, click .
7. Medium Sounds (65 dB input) can be decreased with and increased with .
8. The Speech buttons will alter the output for medium and low level sounds between 400 Hz and 5 kHz, which represents the intensities and frequencies of speech. Selecting will decrease the loudness of speech. Selecting will increase the loudness of speech.
9. The Own Voice control will adjust the output of loud and medium input levels between 400 Hz and 5 kHz for open fittings and below 1 kHz for closed fittings. Select to reduce the loudness of the client’s own voice and click to increase the loudness of the cli-ent’s own voice.
10. Finally, Sound Quality can be adjusted using the Sharper and Softer buttons. Clicking the Softer but-ton decreases the output of sounds above 2 kHz and increases the output below this frequency. Selecting the Sharper button has the opposite effect.
Content
Module15

18
Module 03 – Fine Tuning
To access Fine Tuning after a First Fit or at a follow-up session, select Fine Tuning from the navigation column on the left side of the screen.
1. It is recommended that you check the binaural coupling status prior to making changes by selecting or de-selecting icon. To make changes to both hearing instru-ments simultaneously, couple the hearing instruments. To make changes to one hearing instru-ment at a time, ensure that the hearing instruments are decoupled.
Module 03 – Fine TuningThis section looks at the different ways to fine-tune hearing instruments. It may be necessary to do some fine tuning after a First Fit or at a follow-up fitting session.
1
2

19www.siemens.com/connexx
Connexx 7. Tutorial.
2. Selecting the Curve Display View Modes icon, allows you to decide what values you would like to temporarily view on the fitting screen, including gain or output, cou-pler type, stimulus type and target gain.
Module01
Module04
Module07
Module11
Module02
Module05
Module08
Module12
Module13
Module03
Module06
Module10
Module09
Module14
Gain or Output can be viewed on the curve display by selecting the drop down menu.
The following coupler types are available: Ear Simulator, 2cc Coupler, Simulated Aided Gain or Simulated Insertion Gain.
Several stimulus types are available, including Pure tone, White noise, Pink noise, Speech noise (IEC, AURINS, DSL), Real speech (DSL), Speech noise (LTASS Long-term average speech spectrum), and Short Time Speech. The display curves on the graph are based on whichever stimu-lus type is selected from the drop down menu.
Content
Module15

20
Module 03 – Fine Tuning
Finally, it is possible to select the targets that are shown on the curve display. It is important to note that the targets selected for this temporary view do not actually change the settings of the hearing instrument following the First Fit but rather are a means to compare the hearing instru-ment settings to the prescriptive targets used during the First Fit.
Selecting the Curve Display Settings icon takes you to a dialogue box where you can choose the values that you would like to view on the graphs:
1. Display input level curves (high/low): shows the gain/output for soft and loud input.
1
3
2
4
5
6

21www.siemens.com/connexx
Connexx 7. Tutorial.
Module01
Module04
Module07
Module11
Module02
Module05
Module08
Module12
Module13
Module03
Module06
Module10
Module09
Module14
1. It is also possible to reduce the number of handles from the maximum down to 1, depending on the level of technology. The number of handles selected is dependent on preference and requirements for fre-quency shaping.
2. Display target gain curves (high/low): shows the tar-get gain based on the prescriptive formula for high, low, and medium inputs (80, 50, and 65 dB inputs, respectively).
3. Display VC range: volume control range selected in the fitting is shown on the curve display as a grey shaded area.
4. Display critical gain: lightly shaded area on the curve display in gain view that shows the area where there is a potential for feedback.
5. Display HL & UCL: hearing thresholds and UCLs are shown on the curve display,
6. Display effective audibility is not a target formula but rather a guide that displays the predicted limit of output that will maximize sound quality and speech intelligibility for the client. Exceeding this ‘dotted’ line suggests the level at which sound quality may be com-promised without improving speech intelligibility. Out-put view must be open, and LTASS stimulus type must be selected, in order to see the effective audibility curve in a meaningful manner.
Frequency shaping
In the Frequency Shaping tab, master gain and MPO can be adjusted in 1 dB steps by using up to 20 channel handles.
1
2
Content
Module15

22
Module 03 – Fine Tuning
2. To adjust the gain for several channels at once, click and drag the cursor across the desired frequencies to be adjusted. This way, the gain in several channels can be modified at once.
1. Adjustments to the maximum power output (MPO) can be made in much the same way as those for gain. There is an option to select the number of handles. Similarly, adjusting output for several channels at once can be accomplished by clicking and dragging the cur-sor across the desired frequencies.
2. If you set the MPO to the Multichannel mode, you will limit the output signal in each channel.This means if you set all channels to -12, the output signal of each channel will be 12 dB below the hearing instrument’s
OSPL90 curve. Multichannel mode also allows different output values across the frequency range, i.e., in each channel.
3. However if you switch the view of MPO from Multi-channel with the output signal of each channel set at -12 to Broadband it shows a higher value. This is because the broadband MPO value represents the sum of all the channels, which is always higher than the val-ues in the multichannel mode. It is preferable to use the multichannel view rather than the broadband view because it’s more frequency specific. If there is little to no variation in UCLs across the frequency range, then the broadband view would be appropriate.
1
23

23www.siemens.com/connexx
Connexx 7. Tutorial.
Module01
Module04
Module07
Module11
Module02
Module05
Module08
Module12
Module13
Module03
Module06
Module10
Module09
Module14
Compression
Click on the Compression tab to independently adjust gain for different input levels. LI 50 (Level Input for 50 dB) refers to the output of soft level inputs. Similarly, LI65 (Level Input for 65 dB) represents the output of the aver-age level inputs. Finally, LI80 (Level Input for 80 dB) shows the output for loud inputs. This is the most effective and efficient way to adjust gain and compression. Connexx will automatically adjust the settings for compression ratios and kneepoints.
When fitting to traditional prescriptive formulas, it is also possible to go to the Compression (CK, CR, CM) tab in order to adjust compression kneepoints, compression ratios and compression methods separately in the individ-ual channels.
Content
Module15

24
Module 03 – Fine Tuning
Microphone/Audio
It is recommended that you check the binaural coupling status of the hearing instruments prior to making changes by selecting or de-selecting the icon. When changing the microphone settings for both ears, it might be useful to work with coupled hearing instruments.
1
34
5
2
1. If Automatic with TruEar is selected, the hearing instru-ment’s classifier decides which microphone system (TruEar or adaptive directional) is most suitable for a par-ticular acoustic environment. TruEar is designed to help mimic the natural directional effects of the pinna in order to enhance localization front to back. When the auto-matic microphone is activated, the hearing instrument user does not have to manually change listening pro-grams in order to change from spatial omnidirectional to directional mode. Automatic with TruEar is the preferred and default setting for the Universal listening program.
2. When Speech in noise only is selected, the classifier acti-vates the directional microphone only if both speech and noise are detected at the same time. Otherwise, direc-tional microphones would also be activated in noise-only situations.
3. SpeechFocus is another option under the Microphone/Audio tab, which continuously screens the environment and selects the microphone mode that ensures the best speech intelligibility. It can be selected to operate auto-matically in the Automatic with TruEar program and will

25www.siemens.com/connexx
Connexx 7. Tutorial.
Module01
Module04
Module07
Module11
Module02
Module05
Module08
Module12
Module13
Module03
Module06
Module10
Module09
Module14
Soft Level Directivity represents the level of envi-ronmental noise necessary to fully engage the direc-tional microphone. “Stan-dard” is the default setting after First Fit.
engage when the classifier detects that the user is in a car. When Speech Focus (Car) is selected within the automatic mode, directionality will follow the most prom-inent speech source in a car.
4. Alternatively, SpeechFocus can be activated as a micro-phone mode. In this case, directionality will always fol-low the most prominent speech source. Note, however, that this microphone mode is not recommended for the Universal program, but in a dedicated program for situa-tions where the wearer might not be able to always face the speech source. SpeechFocus works by operating simultaneously, an omnidirectional microphone, an adap-tive directional microphone, and a backward directional microphone. Unlike typical directional microphones that only attenuate sounds coming from the back, this back-ward directional microphone works like an acoustic rear-view mirror and focuses on speech that originates from the back while suppressing noise from the front. The sig-nals from the microphones are then analyzed for speech patterns. The microphone that picks up the most speech pattern is chosen as the appropriate microphone mode.
5. The new directional speech enhancement feature will help attenuate background noise in the directional micro-phone mode. This innovative algorithm is able to sup-press noises from the back, even if these are fluctuating or speech noises. The degree of attenuation can be modi-fied by using the slider. After First Fit, directional speech enhancement will be set to min in the Universal program. If you select a dedicated Noise program in Program Han-dling, then directional speech enhancement will be auto-matically set to max.
Content
Module15

26
Module 04 – Program Handling
Program selection
In addition to the Universal program (listening program 1), it is possible to add up to 5 more listening programs from the drop down menu. The fine tuning done previously for listening program 1 will be the starting point for any additional programs.
Module 04 – Program HandlingThis section looks at how to add and change additional listening programs. There is an option to add more programs after completing the fine tuning for the Universal program. This is accomplished via the Program Handling page.

27www.siemens.com/connexx
Connexx 7. Tutorial.
Module01
Module04
Module07
Module11
Module02
Module05
Module08
Module12
Module13
Module03
Module06
Module10
Module09
Module14
Changing the program order
To change the order of the programs, click your cursor on the program number that you want to move, then drag and drop it into the desired location amongst the other programs. The program number will automatically change.
To add a program, just click on the arrow for the drop down menu to select a program from the list or select the small white box next to the left of the program number. Repeat this sequence to select additional programs.
Content
Module15

28
Module 04 – Program Handling
Deleting a program
To delete a program, simply deactivate the check box next to it. This will automatically rearrange the order of the remaining programs. It is not necessary to delete programs from the bottom to the top.
Additionally, it is possible to copy the configuration of one program to another program by clicking your cursor on the red and blue box next to the left of the program name and dragging it on top of another program.

29www.siemens.com/connexx
Connexx 7. Tutorial.
Module01
Module04
Module07
Module11
Module02
Module05
Module08
Module12
Module13
Module03
Module06
Module10
Module09
Module14
Fitting different programs to different ears
It is possible to allocate different programs to the right and left ears. By De-couple hearing instruments , the view is separated. This is useful when fitting hearing instru-ments with a telecoil – the wearer may want a telecoil on one ear and privacy or microphone on the other ear. This separated view also allows the contents of a listening pro-gram to be copied between program slots as well as left and right ears with the help of drag and drop.
Renaming a program
With the exception of program 1, all listening programs can be renamed. Simply click in the text field for the desired listening program and change the name accord-ingly. The new name will also appear in the printed docu-mentation as well as in the connected remote controls, using a display, such as Tek™ Connect. Initial program names can be restored by using the respective program selection button. The initial name is also shown via a tooltip when using the mouse to hover over the renamed listening program.
Content
Module15

30
Module 05 – miGuide
To access miGuide, select it from the navigation column on the left hand side of the screen in the Fitting tab.
Module 05 – miGuideThis module looks at miGuide™, which combines several features such as Data Logging, Sound Equalizer, Learning and Acclimitization Manager.

31www.siemens.com/connexx
Connexx 7. Tutorial.
Module01
Module04
Module07
Module11
Module02
Module05
Module08
Module12
Module13
Module03
Module06
Module10
Module09
Module14
Data Logging
The Data Logging page contains information about how the hearing instruments have been used, which can help manage a wearer’s expectations and concerns, as well as improve counseling.
1. To access the Data Logging page, click on Data Logging from within miGuide
2. Data Logging shows information about the hearing instrument wear-ing time for each ear.
3. It also shows the percentage of time each program was used.
4. Additionally, acoustic environ-ments that have been detected by the hearing instruments are shown.
5. Lastly, this page provides informa-tion on the average number of times the wearer has made changes to volume and programs per day.
1
2
3
4
5
Content
Module15

32
Module 05 – miGuide
To view the acoustic situations that have been detected by the hearing instruments for each program separately, select the Programs tab. This section also contains infor-mation about the microphone mode as well as speech and noise management usage within the particular program.
Sound Equalizer
The Sound Equalizer differentiates between 6 different acoustic situations in program 1 (Universal), including Speech in Quiet, Speech in Noise, Noise, Music, Car, and Quiet. For each acoustic situation there is an optimized fre-quency response. The respective gain settings are defined as offsets against the general settings in program 1.
1. To access Sound Equalizer, select it from the navigation column under miGuide on the left hand side of the screen.
2. To activate the function, select the box next to Sound Equalizer.
3. The settings for the class Speech in Quiet are identi-cal to the general settings for program 1, which is why offsets are set to zero and cannot be changed.
4. If it is necessary to change the settings for Speech in Quiet, go to Basic Tuning or Fine Tuning in program 1 to modify the frequency response and/or compres-sion. For other situations, including Speech in Noise, Noise, Music, Car, and Quiet, Connexx uses different

33www.siemens.com/connexx
Connexx 7. Tutorial.
Module01
Module04
Module07
Module11
Module02
Module05
Module08
Module12
Module13
Module03
Module06
Module10
Module09
Module14
offsets which can be further optimized manually if desired. To modify a value, select the respective situa-tion and click the up or down arrow of the handle that requires modification, which will result in a change in gain in the specific channel.
5. In the curve view you will be able to see the gain curves you have defined for the selected situation.
1
3
23
64 4
5
Content
Module15

34
Module 05 – miGuide
Learning
1. This feature allows the wearer to personally train their hearing instruments to suit their listening preferences after fine tuning has been completed. Learning defaults are set to off following a First Fit.. To enable learning in all programs or just some of the programs, select Learn-ing from the navigation column on the left hand side of the screen under miGuide.
2. Then select Programs.
1
4
2
3
5 5
3. A learning range or limit has to be set to ensure that the wearer still receives the correct amplification. This defines how many dB the hearing instrument can be trained to deviate from the original settings. The learning range is accessed by clicking on the pull down menu for Maximum Up and Maximum Down. The minimum learning range is +3/-3 dB and the maxi-mum learning range is +/- 16 dB.
4. Once the range has been selected, click on Start Learning for each program where you would like learning to occur.
5. In the curve view, the initial as well as the trained set-tings are displayed for each program.

35www.siemens.com/connexx
Connexx 7. Tutorial.
Module01
Module04
Module07
Module11
Module02
Module05
Module08
Module12
Module13
Module03
Module06
Module10
Module09
Module14
At a follow-up fitting, the trained settings for each of the 6 situations can be gathered from the Situations tab.
Please note that learned settings only become available after the instrument has been used for a sufficient amount of time and that there have been enough interactions to show a training effect.
Content
Module15

36
Module 05 – miGuide
1. Acclimatization Manager can be accessed from the navi-gation column on the left side of the screen.
2. The hearing instrument can slowly increase gain towards a prescribed target, including micon fit Experienced, NAL-NL2 Experienced,
3. or one that can be defined by the fitter in up to 8 chan-nels by selecting Individual Target.
4. The time span in which the automatic acclimatization should be completed can also be pre-set as 1 week, 2 weeks, 4 weeks, 2 months, or 6 months.
1
4
2
3
Acclimatization Manager
The Acclimatization Manager automatically increases the gain of the hearing instruments to a prescriptive target or an Individual Target over a pre-determined period of time that is chosen by the fitter. This gradual increase allows wearers to become accustomed to an amplification which is optimal for their hearing loss, especially with regards to speech understanding. Therefore, automatic acclimatiza-tion allows for optimal spontaneous acceptance at the First Fit, and then optimal audibility over time without sacrificing sound comfort.
5

37www.siemens.com/connexx
Connexx 7. Tutorial.
Module01
Module04
Module07
Module11
Module02
Module05
Module08
Module12
Module13
Module03
Module06
Module10
Module09
Module14
1. After setting all the details, press start to begin acclimatization.
2. Use the stop button to restore the original settings before Acclimatization Manager is started.
5. Click on the pull down menu Duration under Acclimati-zation Period to select the time span. A selected duration of 2 months means that the target will be reached within 2 months, with an average wearing time of 10 hours per day. If the hearing instruments are worn for less than 10 hours a day, the acclimatization time will be automati-cally adjusted and it will take proportionally longer to reach the pre-set target. Before starting automatic acclimitization, click on Pre-listen to demonstrate the end result of this process to the client and to ensure that no feedback occurs.
1
2
Content
Module15

38
Module 06 – Frequency Compression
Connexx 7.0 employs a strategy for frequency compression in order to preserve natural sound quality of the input sig-nal as much as possible. When it is activated, it is set in a way that the wearer should still be able to differentiate between /s/ and /sh/. For asymmetric hearing losses, fre-quency compression is set to the better ear bilaterally. For open fittings, frequency compression is not recommended; there is an interaction between the altered tonality of the output and the direct sound because it is an open fitting, which could result in poorer sound quality.
Module 06 – Frequency CompressionFrequency compression is recommended for those individuals whose severity of hearing loss, especially in the higher frequencies, may prevent them from deriving benefit from traditional means of amplification.
Fine Tuning frequency compression
1. The settings for Frequency Compression can be adjusted in the Fine Tuning section.
2. It is possible to engage or disengage Frequency Com-pression by selecting or de-selecting the check box.
Frequency compression will default to ‘on’ if the appropriate audiometric criteria are met.
3. There are two controls, fmin and fmax, which are con-figurable. fmin represents the starting point of the fre-quency compression region. fmax is the maximal audible frequency after frequency compression.
4. CR describes the resulting compression ratio out of fmin and fmax. Relevant information from incoming frequen-cies above fmin will be compressed into the range between fmin and fmax.
Even though the fmin and fmax parameters are automati-cally set to match the wearer’s hearing loss, it is possible to modify these values by using the slider controls.
The curve view shows the range for which frequency com-pression applies.
5. The area above fmax is grayed out to indicate the lack of acoustic output in this frequency region.
6. All incoming sounds above fmin will be compressed into the frequency range between fmin and fmax so they become audible again for the individual wearer.

39www.siemens.com/connexx
Connexx 7. Tutorial.
Module01
Module04
Module07
Module11
Module02
Module05
Module08
Module12
Module13
Module03
Module06
Module10
Module09
Module14
Since frequency compression alters the tonality of the acoustic environ-ment, we recom-mend that the wearer should try to acclimatize to the First Fit settings of frequency compres-sion for a minimum of 2 weeks. If required, the fmin and fmax parame-ters, which are pre-selected after First Fit, can be changed according to the wearers’ needs and preferences.
1
4
6 5
2
3
Content
Module15

40
Module 06 – Frequency Compression
fmax is adjusted from 3.0 to 5.25, which decreases the area where no amplification is provided. To improve sound quality:
If the wearer has a small residual audi-ble band (fmin <= 2,5 kHz with fre-quency compression activated), raise fmax by clicking on the control and sliding it to the right. This action will widen the frequency compressed region and reduce the area where no amplification is provided. This will result in less frequency-compressed sound quality.

41www.siemens.com/connexx
Connexx 7. Tutorial.
Module01
Module04
Module07
Module11
Module02
Module05
Module08
Module12
Module13
Module03
Module06
Module10
Module09
Module14
fmin is adjusted from 3.0 to 4.5 so that less of the input signal is modified.If the wearer has a larger audible band
(fmin > 2,5 kHz with frequency com-pression activated) raise the fmin by clicking on the slider and moving it to the right so that more of the original input signal will remain unmodified.
Content
Module15

42
Module 06 – Frequency Compression
Decreasing fmax from 8.0 to 6.0 increases the area where no amplification is provided thus providing frequency compression to a greater area of the frequency response.
Audibility:
If the wearer needs more frequency compression to improve audibility, reduce fmax by clicking on the control and sliding it to the left. This will pro-vide more information in the wearer’s audible range.

43www.siemens.com/connexx
Connexx 7. Tutorial.
Module01
Module04
Module07
Module11
Module02
Module05
Module08
Module12
Module13
Module03
Module06
Module10
Module09
Module14
Decreasing fmin from 4 to 2.5 widens the area for compressed frequencies.If the wearer’s residual aid-able hearing
extends further out in the high frequency range, audibility may be improved by decreasing fmin.
Content
Module15

44
these cases, it can be deactivated under the First Fit section in the User Preferences. To access User Settings, go to Preferences on the toolbar or click on the icon .
Module 06 – Frequency Compression
The Frequency Compression option can be set as a default for those individuals who may not benefit from traditional means of amplification. If it is generally not desired to apply frequency compression after First Fit in

45www.siemens.com/connexx
Connexx 7. Tutorial.
Module01
Module04
Module07
Module11
Module02
Module05
Module08
Module12
Module13
Module03
Module06
Module10
Module09
Module14
Content
Module15

46
Module 07 – User Control Configuration
Module 07 – User Control ConfigurationThis module shows how to use the Configuration view to assign different functions to the hearing instrument’s controls.
Hearing instrument
1. To access this function, select Con-figuration from the navigation col-umn on the left hand side of the screen, under the Fitting tab. Then select Hearing Instrument.
Within the Hearing Instrument section, the desired functions for the instru-ment’s controls can be specified. The user control options for each side will be shown underneath the user controls. The selection will depend on the type of hearing instrument and the featured user controls (if any) that are being con-figured. Examples of configurable user control functions include volume, pro-gram change, volume and program change, tinnitus volume, and SoundBalance™.
1
2
3

47www.siemens.com/connexx
Connexx 7. Tutorial.
User Controls and Functionality:
2. Select the type of user control by clicking on the desired control. Available controls for the particular hearing instrument will be listed under User Control.
3. Then select the functionality of the chosen control from the drop down menu.
Different functions can be assigned to the selected user con-trols. For example, a rocker switch can be set to change the volume on one side and change the program on the other, providing e2e wireless™ 2.0 is enabled for volume and pro-gram (see below for further details on e2e wireless 2.0).
Program Change: wearer can adjust the programs set up by the hearing care professional.
Volume: wearer can adjust the volume of the hearing aid microphone.
Volume and Program Change: wearer can adjust the vol-ume as well as the hearing instrument programs; pressing the switch for one second up or down affects volume up or down, pressing the switch for two seconds changes the program and pressing the switch for five seconds turns the hearing instrument on/off. This function is only available with a rocker switch.
Tinnitus Control volume: wearer can adjust the volume of the therapy noise in their tinnitus program.
SoundBalance: wearer can adjust the volume above 1000 Hz.
Module01
Module04
Module07
Module11
Module02
Module05
Module08
Module12
Module13
Module03
Module06
Module10
Module09
Module14
The options will change according to the selected user con-trol. For example, the control may offer Program change, Volume, Volume and Program change, Tinnitus Control volume and SoundBalance.
Content
Module15

48
Module 07 – User Control Configuration
Volume control:
The range of the volume control is configurable by clicking the drop down menu under Volume Control/Range and selecting a value from 0 dB to 32 dB.
Power-On-Position represents the volume control level of the hearing instrument when it is switched on.
The same can be done for SoundBalance. SoundBalance is a volume control that only changes gain above 1000 Hz. The range for the SoundBalance control can be defined by clicking on the drop down menu and selecting a range from 0 to 32 dB.

49www.siemens.com/connexx
Connexx 7. Tutorial.
Module01
Module04
Module07
Module11
Module02
Module05
Module08
Module12
Module13
Module03
Module06
Module10
Module09
Module14
e2e wireless 2.0
If e2e wireless 2.0™ coupling is switched on, features such as the automatic microphone settings will be simulta-neously aligned in both hearing instruments.
If Volume Control and / or Program coupling are also acti-vated by having selected Enable program control cou-pling and Enable volume control coupling, any changes the wearer makes for one ear will be automatically applied to the other ear by means of a bilateral synchronization. For example, if the right hearing instrument’s control is programmed as a volume control and the left hearing instrument’s control is configured to program change, then when the wearer increases the volume by adjusting the control on the right hearing instrument, the volume on the left ear will increase simultaneously and by the same amount. This is especially beneficial since it improves left to right localization and is simpler for the wearer. The same would apply to program change.
Content
Module15

50
Module 08 – InSituGram
Module 08 – InSituGramThis section is a step-by-step guide on how to perform a First Fit using the InSituGram™ function. An InSituGram allows the wearer’s hearing thresh-olds to be verified directly via his hearing instruments.
To determine an in-situ audiogram, in addition to the tradi-tional pure tone audiogram for use in fitting, the wearer’s hearing instruments must first be connected to Connexx by clicking on the Detect connected hearing systems button.
Next, select New Fitting and hit OK.
The First Fit screen will appear. The InSituGram will be found in the expanded menu at the bottom of the screen. Once in the InSituGram page, the microphones of the hearing instru-ments will be disabled.

51www.siemens.com/connexx
Connexx 7. Tutorial.
2. To begin the measurement, click on the audiogram screen of the ear you would like to test.
Then use the arrow buttons on the keyboard to change vol-ume and frequency of the tones.
Press Space to present the tone to the wearer and select Enter to set the value in the audiogram.
1. Before performing the InSituGram, click on the info button to review the brief instructions .
Use the Talk to client button to talk to the wearer via the hearing instrument microphones. This will temporarily re-acti-vate the hearing instruments’ microphones and thereby inter-rupt the InSituGram procedure.
Talk to client
1
2
3
Module01
Module04
Module07
Module11
Module02
Module05
Module08
Module12
Module13
Module03
Module06
Module10
Module09
Module14
Content
Module15

52
Module 08 – InSituGram
3. Alternatively, the buttons in the user interface can be used. Select the up/down arrows to increase or decrease the tone. Use the left/right arrows to change the frequency. For both methods, the signal will be played as long as the button or key is pressed.
4. To use the InSituGram for the First Fit, values for at least 500 Hz, 2 kHz and a third frequency between 400 Hz and 5 kHz need to be included.
5. Additionally, the box next to Use InSituGram for First Fit must be check off.
6. The red writing on the InSituGram tab indicates that the InSituGram is used for the right ear. The same holds true for the left ear in blue.
More functions and settings of the InSituGram can be defined through the preferences window, including Limit of Output Level, Silent Mode, Butterfly Start, and the Number of Signal Repetitions.
6
4
5

53www.siemens.com/connexx
Connexx 7. Tutorial.
Module01
Module04
Module07
Module11
Module02
Module05
Module08
Module12
Module13
Module03
Module06
Module10
Module09
Module14
1. To access these settings, go to Preferences in the main menu or click on the icon in the toolbar, then go to Audiogram.
1
52
4 3
2. From InSituGram Specific Set-tings, it is possible to enable the security measure Restriction of Output Level. If Limit output level to 100 dB HL is checked, the hearing care professional is pre-vented from presenting pure tone signals above 100 dB HL through the hearing instrument.
3. To engage Silent Mode, check the box Activate Silent Mode in the InsituGram Specific Settings. In this mode, the test signal can be changed without the wearer hear-ing any mouse clicks or key strokes. To use Silent Mode, hover the mouse over the InSituGram controls and Connexx will auto-matically adjust the volume and frequency of the test signal.
Content
Module15

54
Module 08 – InSituGram
4. Automatic Butterfly mode will automatically select the standard frequencies of 250 Hz, 500 Hz, 1, 2, 4 and 8 kHz for the InSituGram if Butterfly (start: 1 kHz) is checked. The reference to start 1 kHz means that in this mode, the test will always begin at 1 kHz and then automatically jump to the next frequency. Once the higher frequency values are confirmed, the test will move to the lower frequency range.
5. Other frequencies can be selected by checking them off in the section Use Non- Standard Frequencies in Automatic Mode (Hz).
Signal Repetitions refers to the number of times the wearer has to respond to the pure tones before the value is entered into the InSituGram. This can be pre-set.

55www.siemens.com/connexx
Connexx 7. Tutorial.
It is also possible to choose the default dB per step for the InSituGram from the Audiogram and InSituGram Specific Settings. Simply select 1, 2, 5 dB step-ping so that the gain can only be increased by the selected dB at a time.
When all the preferences have been selected, save the changes by selecting OK. Before performing First Fit, check if all First Fit options are set to the wearer’s needs, including acoustical parameters, critical gain and fitting formula.
Module01
Module04
Module07
Module11
Module02
Module05
Module08
Module12
Module13
Module03
Module06
Module10
Module09
Module14
Content
Module15

56
Module 09 – Wireless Programming
Module 09 – Wireless ProgrammingThis section looks at how to apply wireless programming using ConnexxLink™. With this device, no programming cords are necessary.
Enter the User Preferences dialogue via the toolbar icon, or the menu entry Preferences. Here, different programming devices can be enabled.
1
2
1. Go to Devices.
2. Enable the desired programming devices and hit OK.
3. This has to be set up only once; from now on ConnexxLink can be in the top right corner of the menu bar.
4. Arrange the hearing instruments within the neck loop and then click on Detect Hearing Instruments.
5. If ConnexxLink is unable to detect the desired hearing instrument(s), check if the hearing instruments are switched on and are properly located within the range of the neck loop. It is also a good idea to check on the battery. Then click “Re-try” to repeat detection.
6. One instrument can be selected for the right (R) and left (L) ear using the radio button selection in the dia-log box.

57www.siemens.com/connexx
Connexx 7. Tutorial.
Module01
Module04
Module07
Module11
Module02
Module05
Module08
Module12
Module13
Module03
Module06
Module10
Module09
Module14
7. If more than one hearing instrument has been detected, or if the detected hearing instrument has not yet been assigned to the left or right ear, it is also possible to check the serial number of the instruments in the same section.
8. For a confirmation that the correct hearing instrument has been selected, a detection melody can be played in the instrument using the loudspeaker symbol.
After the correct hearing instruments have been assigned, select the Next Step (for example New Fitting or Follow-up fitting) and then click OK. The fitting workflow can now be continued as usual.
67
4
5
8
3
Content
Module15
58
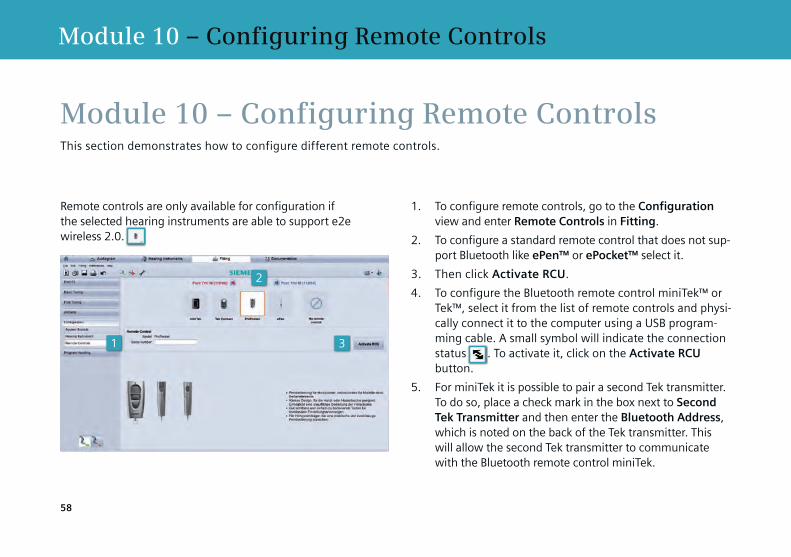
1. To configure remote controls, go to the Configuration view and enter Remote Controls in Fitting.
2. To configure a standard remote control that does not sup-port Bluetooth like ePen™ or ePocket™ select it.
3. Then click Activate RCU.
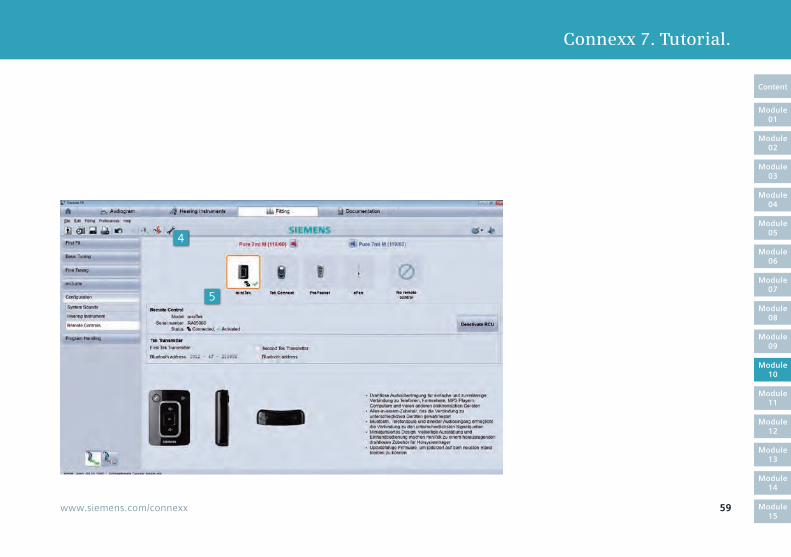
4. To configure the Bluetooth remote control miniTek™ or Tek™, select it from the list of remote controls and physi-cally connect it to the computer using a USB program-ming cable. A small symbol will indicate the connection status . To activate it, click on the Activate RCU button.
5. For miniTek it is possible to pair a second Tek transmitter. To do so, place a check mark in the box next to Second Tek Transmitter and then enter the Bluetooth Address, which is noted on the back of the Tek transmitter. This will allow the second Tek transmitter to communicate with the Bluetooth remote control miniTek.
Module 10 – Configuring Remote Controls
Module 10 – Configuring Remote ControlsThis section demonstrates how to configure different remote controls.
1
2
3
Remote controls are only available for configuration if the selected hearing instruments are able to support e2e wireless 2.0.
59www.siemens.com/connexx
Connexx 7. Tutorial.
Module01
Module04
Module07
Module11
Module02
Module05
Module08
Module12
Module13
Module03
Module06
Module10
Module09
Module14
5
4
Content
Module15

60
Module 10 – Configuring Remote Controls
6
For remote controls such as Tek Connect, it is possible to define, for example, a start-up text or to change program names, which can be separately trans-ferred to the remote control via a Trans-fer Text option. This means it is not nec-essary to repeat full programming of the remote.

61www.siemens.com/connexx
Connexx 7. Tutorial.
Module01
Module04
Module07
Module11
Module02
Module05
Module08
Module12
Module13
Module03
Module06
Module10
Module09
Module14
6. To include a start-up text, check the box next to Show individual start-up text and then type the desired text.
Content
Module15

62
Module 11 – Critical Gain Measurement for Follow-Up Fittings
Module 11 – Critical Gain Measurement for Follow-Up FittingsThis module looks at how to apply critical gain measurements for follow-up fittings.
If a wearer experiences feedback problems in a particular lis-tening situation, a critical gain measurement can be per-formed after First Fit has been carried out, even if a critical gain measure was run at First Fit. The critical gain measure-ment is a useful tool for troubleshooting feedback at follow-up fittings and is easily accessed via a toolbar button .
1
2 4 5
6
3

63www.siemens.com/connexx
Connexx 7. Tutorial.Module 11 – Critical Gain Measurement for Follow-Up Fittings
Module01
Module04
Module07
Module11
Module02
Module05
Module08
Module12
Module13
Module03
Module06
Module10
Module09
Module14
1. Prior to the critical gain measurement, click on the info button for instructions on how to perform the test.
2. Critical gain measurements are done separately for each ear. Click on Start Critical Gain Measurement to start the measurement for the desired ear.
3. The area of critical gain is displayed in the curve view as a shaded area, which represents the likelihood of feedback; the closer the shaded area is to the curves, the more likely feedback is to occur.
If required, the same measurement can be done for the left ear.
4. Next, select the listening program in which a feedback problem persists.
5. Click Optimize to apply the critical gain measurement result. Gain may be decreased in critical frequencies (i.e., shaded area on the curve view) to minimize feed-back and accommodate the results of the Critical Gain Measurement.
Click Okay to keep the optimization changes. To dis-card all the changes and measurement results, reset the instrument to its initial settings via Cancel.
Content
Module15

64
Module 12 – Tinnitus Settings
Module 12 – Tinnitus SettingsThis module explains how to set up a tinntius program and apply all required settings.
If the wearer needs a tinnitus noiser, go to Program Handling, activate the desired program for the tinnitus noiser and choose Tinnitus from the drop down menu. It is advisable to set up a dedi-cated tinnitus program beyond the Uni-versal listening program. The tinnitus function can be activated and configured separately for each listening program. Refer to Module 04 for details on how to set up additional programs.
1
2
4
3

65www.siemens.com/connexx
Connexx 7. Tutorial.Module 12 – Tinnitus Settings
3
Module01
Module04
Module07
Module11
Module02
Module05
Module08
Module12
Module13
Module03
Module06
Module10
Module09
Module14
1. Once the tinnitus program has been designated, click on Fine Tuning and then Tinnitus Function in the navigation column on the left hand side of the screen
2. To set up a program, first choose either Noise or Noise + Microphone. When Noise is enabled, the hearing instrument will not provide amplification for microphone signals. Only the designated tinnitus noiser will be audible. When Noise + Microphone is selected, both the hearing instrument microphone as well as the noiser will be engaged.
4. Pre-defined noises, called Noiser Preset can also be used, such as White Noise, Pink Noise, Speech Noise or High Tone Noise.
3. It is possible to shape the frequency response of the noiser in all available hearing instrument channels so that it suits the wearer’s needs and supports the method of tinnitus management. Simply click on the particular frequency and adjust up or down. Alterna-tively, left mouse click and drag the cursor to modify a group of frequencies at once.
Content
Module15

66
Module 12 – Tinnitus Settings
1
2
3
It may be desirable for the wearer to be able to adjust the volume of the noiser, depending on the type of tinnitus man-agement program.
1. In order for the wearer to manipu-late volume, switch to the Config-uration view and select Hearing Instrument.
3. By enabling e2e wireless 2.0 coupling, adjusting the control on one ear will modify volume on both ears.
2. Then select Tinntus Control volume from the drop down menu Functionality. This feature is only avail-able in products that offer a rocker switch.

67www.siemens.com/connexx
Connexx 7. Tutorial.Module 12 – Tinnitus Settings
Module01
Module04
Module07
Module11
Module02
Module05
Module08
Module12
Module13
Module03
Module06
Module10
Module09
Module14
It is very useful to note that if a Tek Connect remote control has been con-figured for use with the hearing instru-ment, the SoundBalance control will automatically act as volume control for the Tinnitus Noise.
SoundBalance Control
Content
Module15

68
Module 13 – Documentation Settings
Module 13 – Documentation SettingsThis section goes through the steps needed to configure the various documentation settings.
A new feature of Connexx 7 is a docu-mentation option that can be configured to suit individual preferences.
1
2
5
4 3
1. In the Documentation tab it is possible to select the information that you would like contained in the printout of the report, includ-ing Fitting Report, Client, Over-view, Hearing Instruments, Sound Signals, Accessories, Curve Details, Programs and Print Options.

69www.siemens.com/connexx
Connexx 7. Tutorial.Module 13 – Documentation Settings
Module01
Module04
Module07
Module11
Module02
Module05
Module08
Module12
Module13
Module03
Module06
Module10
Module09
Module14
2. Using the Print & Report preferences from within User Preferences, a personalized logo can be uploaded onto the printout.
3. Once the User Preferences have been set, a preview of all pages is given. To have a better look at the details, simply zoom in and out.
4. There is a type-ahead search included in the preview so that the content of the documentation can be checked for certain words or expressions. For example, to check the settings for program 2, simply type in program 2 and select enter. Connexx will take you directly to the page with information on program 2.
5. The report can then be printed as well as opened, stored or sent directly as a PDF file.
Content
Module15

70
Module 14 – PreferencesThis module focuses on the preference settings that are provided by Connexx7, including sections on General Settings, Audiogram, First Fit, Curve Display, Print & Report, Devices and Workflow.
To enter the User Preferences window click on Preferences > Edit User Pref-erences in the menu or alternatively click on the respective button in the toolbar .
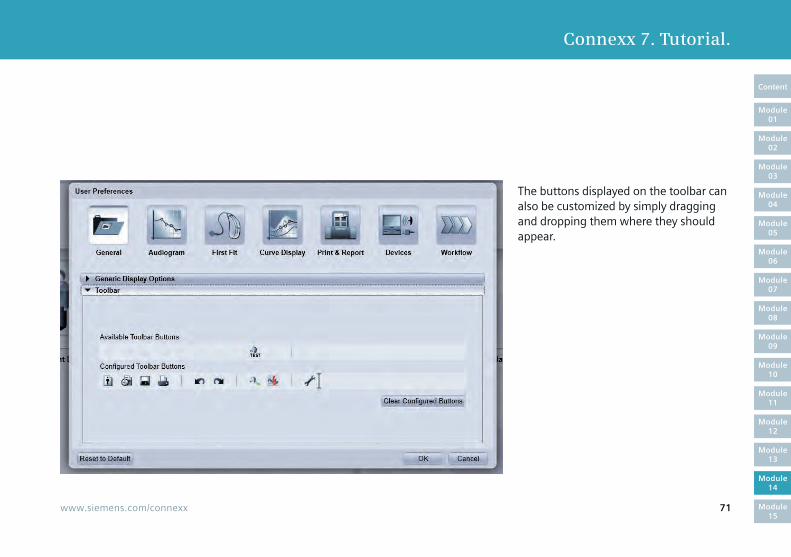
The Generic Display Options section provides access to Language and Toolbar.
Module 14 – Preferences
71www.siemens.com/connexx
Connexx 7. Tutorial.
The buttons displayed on the toolbar can also be customized by simply dragging and dropping them where they should appear.
Module 14 – Preferences
Module01
Module04
Module07
Module11
Module02
Module05
Module08
Module12
Module13
Module03
Module06
Module10
Module09
Module14
Content
Module15

72
Within the Audiogram page, it is possible to modify Audio-gram and InSituGram styles and settings for each test.
Go to Audiogram in User Preferences, and choose Audio-gram and InSituGram Styles to change the symbols and col-ors of the Audiogram and InSituGram page views.
Go to InsituGram Specific Settings to set up preferences for the InSituGram test.
Within First Fit it is possible to define the following default settings:
· Fitting Formula· Activation of Frequency Compression· Language Type· Experience Level of the wearer· Acclimatization Level and Step· Allow Horns as acoustical parameters and,· Use of measured RECD/REUG, if these are available
Module 14 – Preferences

73www.siemens.com/connexx
Connexx 7. Tutorial.
For each hearing instrument First Fit, the Fitting Defaults will be used. To access the default settings for the curve view, click on Curve Display Settings in User Preferences. Here you can select the measurements for the display, including input
levels, target gain, VC range, MPO, critical gain, HL and UCL, as well as effective audibility.
Module 14 – Preferences
Module01
Module04
Module07
Module11
Module02
Module05
Module08
Module12
Module13
Module03
Module06
Module10
Module09
Module14
Content
Module15

74
View Mode Settings provides options for the display mode (gain or output), View Type (Ear Simulator, 2cc Coupler, REIG, or REAG), as well as many other options and Target Formula.
Display Mode default options: Gain or Output.
View Type default options: Ear Simu-lator, 2cc Coupler, Simulated IG, Sim-ulated AG.
Module 14 – Preferences

75www.siemens.com/connexx
Connexx 7. Tutorial.
Stimulus Type default options: Pure tone, White Noise, Pink Noise, IEC Noise, Aurins Noise, DSL Speech Noise, DSL Real Speech, LTASS, and Short Time Speech.
The Print & Report defaults allow you to include your company logo on the report that prints from Connexx.
Content
Module 14 – Preferences
Module01
Module04
Module07
Module11
Module02
Module05
Module08
Module12
Module13
Module03
Module06
Module10
Module09
Module14
Content
Module15

76
Module 14 – Preferences
The default device for programming can be set by checking it off in Devices under User Preferences. Check the desired device.

77www.siemens.com/connexx
Connexx 7. Tutorial.Module 14 – Preferences
Module01
Module04
Module07
Module11
Module02
Module05
Module08
Module12
Module13
Module03
Module06
Module10
Module09
Module14
Finally, default options for the desired workflow can be set up in the Workflow section in User Preferences. In a follow-up fitting, it is possible for Connexx to bring the hearing care pro-fessional directly to Basic Tuning or to Fine Tuning.
Content
Module15

78
Module 15 – Real Ear Measurements
This section provides an overview of how to use the Test Settings feature and the Measurement Settings function.
Test Settings To access the Test Settings options, choose Test Settings from the Fitting menu or select the icon from the toolbar.
The following options appear: Full-on-gain setting, as well as Test settings for coupler and In-situ measurements (omnidirectional or directional). Note that this feature is only accessible when hearing instru-ments are connected. Furthermore, this feature only allows for a fixed set of measurement settings; further con-figuration of the settings is not possible in Test Settings mode.
Module 15 – Real Ear Measurements

79www.siemens.com/connexx
Connexx 7. Tutorial.Module 15 – Real Ear Measurements
Module01
Module04
Module07
Module11
Module02
Module05
Module08
Module12
Module13
Module03
Module06
Module10
Module09
Module14
Content
Module15
1. Choose Full-on-gain setting for testing the hearing instru-ment in a test box. The hearing instrument will be set to full-on gain and all adaptive parameters will be switched off so that you can easily measure the maximum gain curve without having to make the adjustments manually.
2. Activate Test settings for coupler and In-situ measure-ments (omnidirectional mode) to test the hearing instru-ment in the test box or perform real ear measurements. All adaptive features are turned off, gain and compression remain unchanged and the microphone is set to the dedi-cated omnidirectional mode.
3. Finally, activate Test settings for coupler and In-situ mea-surements (directional mode) to test the hearing instru-ment in the test box or perform real ear measurements. All adaptive features are turned off, gain and compression remain unchanged and the microphone is set to the dedi-cated directional mode.
Once the test is completed, selecting Close will prompt you to either keep the test settings by clicking on Yes or return the hearing instrument to its original settings by clicking on No.
3
2
1

80
Module 15 – Real Ear Measurements
Measurement SettingsMeasurement Settings is located within Fine Tuning on the left hand side of the screen. These settings are useful for verification (real-ear and/or coupler measures) in Program 1.
1
2

81www.siemens.com/connexx
Connexx 7. Tutorial.Module 15 – Real Ear Measurements
Module01
Module04
Module07
Module11
Module02
Module05
Module08
Module12
Module13
Module03
Module06
Module10
Module09
Module14
Content
Module15
1. Switch off all adaptive parameters/ Set microphone to omnidirectional mode will automatically adjust the following:
• Microphone mode – omnidirectional• Speech and noise management – OFF• SoundSmoothingTM – OFF• eWindscreenTM – OFF• Current setting for feedback cancellation – unaffected• Compression method for micon fit – unaffected• Compression method for traditional formulae – syllabic• Frequency compression – OFF (if activated)
Fine tuning of the frequency response is possible in Measure-ment Settings. IMPORTANT: If you have made changes to the adaptive parameters after First Fit, make sure to save your fitting first before clicking this button. Otherwise, your changes will be lost.
Now you will be able to use all the fine tuning options and perform the verification measurements as necessary.
2. Once the measurements and adjustments are completed, select the button Reset adaptive parameters and micro-phone mode. This will restore the adaptive parameters, compression settings and microphone mode to First Fit default settings.
Please note: Connexx will NOT warn you in case the adaptive parameters are still switched off and compression is still in syllabic when you leave the fitting session.

www.siemens.com/hearing
Order No. A91SAT-80012-99C1-7600 | Printed in Germany | CC 1204 AU 0313. | © 03.2013 Siemens AG
The information in this document contains general descriptions of the technical options available, which do not always have to be present in individual cases and are subject to change without prior notice.
Global Siemens Headquarters Siemens AG Wittelsbacherplatz 2 80333 Muenchen Germany
Global Siemens Healthcare HeadquartersSiemens AGHealthcare SectorHenkestrasse 12791052 ErlangenGermanyPhone: +49 9131 84-0www.siemens.com/healthcare
Legal ManufacturerSiemens Audiologische Technik GmbHGebbertstrasse 125DE-91058 ErlangenGermany
Global Business UnitSiemens Audiologische Technik GmbHGebbertstrasse 125DE-91058 ErlangenGermanyPhone: +49 9131 308-0
The required features should therefore be specified in each individual case at the time of conclusion of the respective contract.