contact information - amazon s3myofascial+trigger... · la1. hand and finger extensors 77 ......
TRANSCRIPT
™
2
© 2017 S&V Marketing Inc.
All Rights Reserved. No part of this publication may be reproduced, distributed, or transmitted in any form or by any means, including photocopying, recording, or other electronic or mechanical methods, without the prior written permission of the publisher, except in the case of brief quotations embodied in critical reviews and certain other noncommercial uses permitted by copyright law.
Contact information:
DISCLAIMERThis book is not intended to be a substitute for the medical advice of a licensed physician. The reader should consult with their doctor in any matters relating to his/her health.The exercises provided in this book are for educational and entertainment purposes only, and are not to be interpreted as a recommendation for a specific treatment plan or course of action. Exercise is not without its risks, and this or any other exercise program may result in injury. They include but are not limited to: risk of injury, aggravation of a pre-existing condition, or adverse effect of over-exertion such as muscle strain, abnormal blood pressure, fainting, disorders of heartbeat, and very rare instances of heart attack. To reduce the risk of injury, before beginning this or any exercise program, please consult a healthcare provider for appropriate exercise prescription and safety precautions. The exercise instruction and advice presented are in no way intended as a substitute for medical consultation. The authors of this book and sFeraFitness™ (and sferafitness.com) disclaims any liability from and in connection with this program. As with any exercise program, if at any point during your workout you begin to feel faint, dizzy, or have physical discomfort, you should stop immediately and consult a physician.
Contents
3
THE MISSING LINK 5
WHAT ARE TRIGGER POINTS? 6
WHAT CAUSES TRIGGER POINTS? 9NOTE ABOUT MYOFASCIAL RELEASE 9WHAT ABOUT DEEP TISSUE MASSAGE 10
BENEFITS OF MYOFASCIAL TRIGGER POINT RELEASE 11
TRIGGER POINT RELEASE TOOLS 14
TRIGGER POINT RELEASE TECHNIQUE 17
MISTAKES TO AVOID 18EXERCISE GUIDE 19
LL-LOWER LEG 20LL1. FOOT 21LL2. CALF AND SHIN 23
UL-UPPER LEG 26UL1. TENSOR FASCIAE LATAE 26UL2. QUADRICEPS AND SARTORIUS 29UL3. INNER THIGH MUSCLES 33UL4. HAMSTRINGS 35
BU-BUTTOCKS 37BU1. GLUTEALS AND PIRIFORMIS 38
BA-BACK MUSCLES 43BA1. QUADRATUS LUMBORUM 43BA2. SPINAL MUSCLES 45BA3. LATISSIMUS DORSI AND SERRATUS POSTERIOR INFERIOR 50BA4. RHOMBOIDS AND SERRATUS POSTERIOR SUPERIOR 54BA4. TRAPEZIUS AND LEVATOR SCAPULAE 59
HN-HEAD AND NECK 65SA-SHOULDER AND ARM 67
SA1. SUPRASPINATUS 67SA2. INFRASPINATUS AND TERES MINOR 69SA3. DELTOID 71SA4. BICEPS AND BRACHIALIS 73SA5. TRICEPS 75
LA-LOWER ARM 77LA1. HAND AND FINGER EXTENSORS 77LA2. HAND AND FINGER FLEXORS 81LA3. MUSCLES OF THE HAND 83
CH-CHEST 85CH1. PECTORALIS MAJOR AND MINOR 85CH2. SERRATUS ANTERIOR 89
QUICK START RELEASE GUIDES 91
YOUR PERSONAL PLAN 95
4
5
The Missing LinkEver since I can remember myself my back has always
given me trouble. When I was still in high school I used to
see a chiropractor to keep my back and neck from
hurting. I was exercising and did physical therapy to
correct postural imbalances. However, no matter what I
did my troubles still remained.
Doctors could not find anything wrong with me and they
said my back muscles were too weak and they could not
support my lifestyle. I became a fitness instructor and yet
my troubles remained.
Eventually I discovered Pilates as a way to strengthen my
core and to improve my posture. It was really a game
changer for me. I could sit for long hours behind the
computer without having this agonizing dull pain in my
back. I proceeded to become a Pilates instructor and
became vigilant about my personal workouts. Everything
was going great. I thought I was finally free from pain and
discomfort.
And then I became pregnant … with twins. Despite my
almost rock-solid core this pregnancy and later caring
for my young twins took a toll on me. I did not have as
much time for workouts (shocking, isn’t it?) and my back
pain came back with vengeance. Now by upper back was
giving me a fit and I literally felt that somebody was
stabbing me with a knife between the shoulder blades.
Sometimes I felt one of my arms go numb for several days
and I had no idea what was going on.
One of my Pilates clients was a massage therapist and she
offered to see me. The massage that she gave me was
very different from anything that I’ve had in the past.
Those were not gentle strokes and kneading that I have
experienced in the past. She would find a spot in the
muscle and apply direct pressure to it that at first almost
made me cry but after just a couple of seconds gave me a
huge release. After the session was over I felt that
somebody has just pressed a “restart” button in my body
and all the pains and aches were gone.
That was the first time that I have experienced and heard
about Myofascial Trigger Point Release.
6
After several sessions I have noticed that I did not just feel
better, I could actually perform a lot of the exercises
better because I had more power and greater range of
motion in my joints.
Amazing as it was, weekly massage sessions were
becoming quite pricey (and I was even getting a discount
because both of us were health professionals.) It was also
hard for me to find time every week to come in for my
massage (kids and work always kept my schedule booked
24x7.)
Based on my friend’s (massage therapist)
recommendation I ordered several books to learn more
about Trigger Points and how to perform self Trigger
Point release.
That was the beginning of my journey towards health and
wellness. I felt that I finally found the Missing Link that
has helped me and, since then, many of my Pilates clients
to get rid of the lifestyle-induced muscle pains, tightness
and muscular weakness. By combining self myofascial
Trigger Point release and Pilates I had all the tools to keep
my body strong and feeling great. I could focus on
spending time with my family and doing things that I
loved instead of being held hostage by my back pains.
This guide will show you locations of the most common
Trigger Points that tend to cause the most discomfort and
pain. Most of these trigger points are a result of our
modern lifestyle - hours spent behind the computer or in
the car, looking down at our mobile devices, wearing
uncomfortable shoes, or simply having too much daily
stress.
There are many different tools that can be used for self
Trigger Point Release and all of them have their pros and
cons. The tools that are featured in this guide are sFera
Pro Massage Therapy Balls. This set includes 4 balls that
are guaranteed to access most of the Trigger Points on
your body while also providing a calming and soothing
effect on the nervous system. The bonus section also
shows several ways to use sFera Massage Balls to
challenge you balance and strength.
7
What are Trigger Points?
There is a lot of confusion about what Trigger Points are
and are not. The main reason for that is that there is no
single body of medical specialization that focuses directly
on muscles. Most of the modern knowledge about Trigger
Points comes from the work of two doctors David Simons
and Janet Travell who published two texts two texts,
“Myofascial pain and dysfunction, The Trigger Point
Manual” in the 20th century. They were the first ones to
pay specific attention to “myo” (muscle) and “fascia” (a
thin sheath of fibrous spider-web-like tissue enclosing all
muscle and organs) and to compile all of the existing at
that time medical research and clinical case studies into
one body of knowledge.
In the past couple of decades Trigger Points and Fascia
have received more attention from researchers and
medical professionals. Some of those studies will be cited
in this guide as a reference material. However, there is
still a certain degree of uncertainty of why exactly Trigger
Points appear, why they create these “strange” pain
patterns and what the best ways to prevent them are. We
will stay within the scope of accepted facts and body of
knowledge about Trigger Points and will let researchers
and medical scientists keep exploring this subject to bring
us better understanding and explanation of the subject.
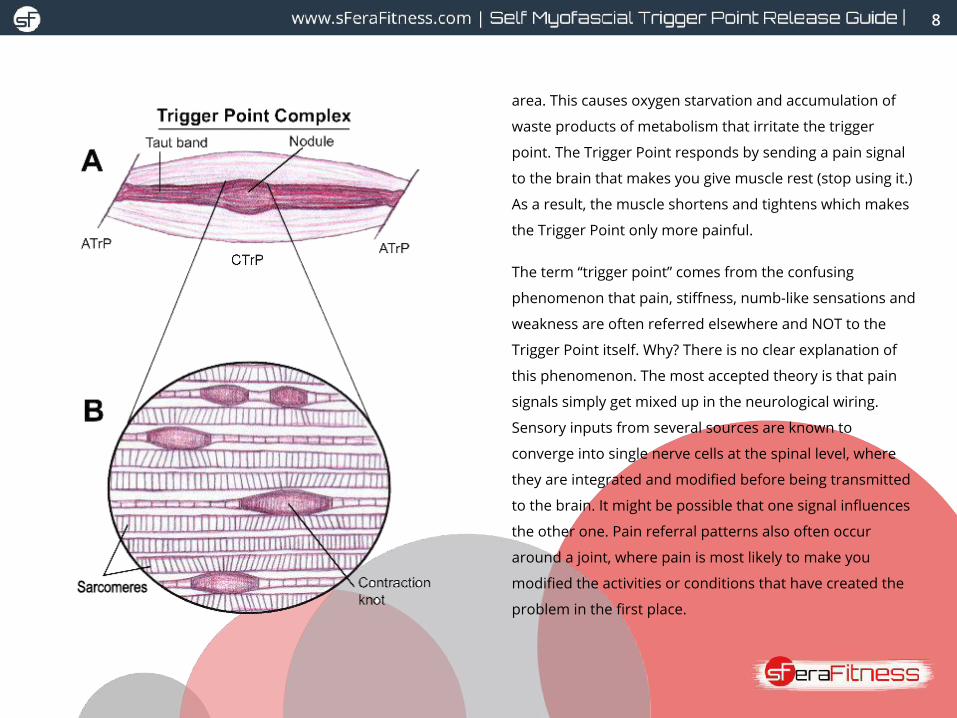
Myofascial Trigger Point is a hyperirritable spot in a
muscle taut band that is associated with tenderness and
referred pain symptoms. In a “normal” language it means
that Trigger Points are extremely sensitive to the touch. If
you press a Trigger Point you will immediately feel distinct
“Ouch!”
Trigger Points are a result of contractions that cannot
release in microscopic muscle units - sarcomeres.
Normally, sarcomeres work like tiny pumps, contracting
and releasing to circulate blood through the capillaries in
the muscle. When sarcomeres in a trigger point hold their
contraction, blood flow essentially stops in the immediate
8
“Ouch!” area. This causes oxygen starvation and accumulation of
waste products of metabolism that irritate the trigger
point. The Trigger Point responds by sending a pain signal
to the brain that makes you give muscle rest (stop using it.)
As a result, the muscle shortens and tightens which makes
the Trigger Point only more painful.
The term “trigger point” comes from the confusing
phenomenon that pain, stiffness, numb-like sensations and
weakness are often referred elsewhere and NOT to the
Trigger Point itself. Why? There is no clear explanation of
this phenomenon. The most accepted theory is that pain
signals simply get mixed up in the neurological wiring.
Sensory inputs from several sources are known to
converge into single nerve cells at the spinal level, where
they are integrated and modified before being transmitted
to the brain. It might be possible that one signal influences
the other one. Pain referral patterns also often occur
around a joint, where pain is most likely to make you
modified the activities or conditions that have created the
problem in the first place.
9
Regardless of why Trigger Points refer pain to different
areas, it is important to know that they do. Our job is to
use this knowledge in order to pinpoint locations of the
Trigger Points (the trouble-makers!) and to release them.
What causes Trigger Points?
A short answer to this question will be “living.” Here is
just a short overview of the causes of Trigger Points:
•Accidents and direct injuries,
•Overuse injuries,
•Repetitive movements,
•Lack of exercise and muscle deconditioning,
•Poor posture,
•Abnormal bone structure,
•Stress that results in shallow breathing andholding tension in the shoulders/neck,
•Vitamin and mineral deficiencies,
•Metabolic disorders (thyroid inadequacy, diabetes, hypoglycemia etc.)
•Sedentary lifestyle.
A Note about Myofascial Release
Trigger Point Release and Myofascial release are often
confused, misunderstood and simply thrown in
interchangeably.
Myofascial Release is a hands-on technique that
involves applying gentle sustained pressure into the
Myofascial connective tissue restrictions to eliminate
pain and restore motion (definition courtesy of
Myofascial Release Approach.) Myofascial release is
performed by a trained bodyworker using his/her
hands.
Self Myofascial Release is often performed with a foam
roller and it is believed to release fascial adhesions thus
releasing movement restrictions. In reality, friction
(‘shear’ force) created during foam rolling is not enough
to break up any of those adhesions and create true
“myofascial release” as performed by a trained
bodyworker.
10
Myo (muscle) and fascia (soft tissue white spider web
like stuff) are not separable. They are functioning as a
whole. So when treating muscle pain and dysfunction it
is best to view them as a whole as well (exactly as
doctors Travell and Simons did in their ground-breaking
manual “Myofascial pain and dysfunction, The Trigger
Point Manual.”)
The main goal of Self Myofascial or Trigger Point Release
is to hydrate the tissues, aid in metabolic waste removal
from the muscles and to increase blood circulation to
the area. The result of this work will be decreased pain,
greater range of motion, improved elasticity of the
arteries and better overall performance of the muscle.
What about Deep Tissue Massage?Most people are familiar with the term “deep tissue
massage” and it has even been featured in the title of
this guide.
The focus of Deep Tissue Massage is on the deepest
layers of the muscle. This type of massage uses deeper
pressure to realign muscles and connective tissue. The
movements in Deep Tissue Massage are typically slower,
and the pressure is deeper, concentrating on specific
areas of tension and pain. It breaks down adhesions to
relieve pain and restore normal movement.
Trigger Point Release is a variation of Deep Tissue
Massage as both of the techniques apply targeted
pressure into specific muscles spots focusing on deep
and precise penetration.
Myofacsial Release is more gentle and more
“superficial” as it focuses on stretching out fascia right
underneath the skin.
In this guide we will be using the term “Myofascial
Trigger Point Release “ to encompass all 3 types of self
massage: Deep Tissue Massage, Trigger Point Release
and Self-Myofascial Release.
Techniques described in this guide will be focused
mostly around Trigger Point Release as defined by
Travell and Simons. However, rolling and spiky ball
massage techniques will be used to achieve all of the
benefits of self myofascial release with a foam roller as
well as of self massage that will “wake up” muscle
sensation, hydrate the tissue and provide proprioceptive
feedback.

11
Benefits of Myofascial Trigger Point ReleaseIt would be nice if I could say that Myofascial Trigger Point
release is the magic method that will cure anything. No, it
certainly has its limitations. And before we even start
talking about the benefits of MTP it is important to point
out that consultation with a medical professional is the first
and most essential step. If you have any pains in the body
then you need to be checked out first by a doctor and get
exercise clearance from him/her. Use common sense and
critical thinking before you try to self-massage.
The benefits of self massage using trigger point release
techniques are pretty amazing. Take a look for yourself:
1. Decreased muscle pain - Trigger Points can cause a lot
of trouble in the body. As discussed in the previous
chapter, trigger points usually refer pain to a “remote”
location in the body and can mimic various conditions
like bursitis, tendonitis, even migraines and heart
attack.
With practice and help of this guide, you will learn to
locate these trigger points and release them.
Self-massage combined with a regular exercise
program have proven to provide the best pain
reduction results in people with myofascial pain
dysfunction syndrome1.
2. Fewer headaches - a lot of trigger points located in
the neck and upper back area are a cause of
headaches. Simple release techniques done on a
daily basis will help you eliminate these trigger
points from your muscles.
3. Improved range of motion - recent studies have
shown that Trigger Point and Self Myofascial
Release techniques are effective in improving range
of motion – 2, 3.
4. Injury prevention - For a long time static stretching
used to be recommended as an effective injury
prevention technique pre workout. Recent studies
show that pre-workout static stretching actually
inhibits muscle performance 4. )
12
Self Myofascial release is a more effective warm-up
routine especially if combined with dynamic stretching.
Your muscles have two major receptors. One is your
muscle spindle, which makes the muscle contract. The
other is called the Golgi tendon organ, which makes the
muscle relax. “They both should be in balance with one
another, which allows the tissue to work without getting
injured,” says Dr. Mike Clark, CEO of the National
Academy of Sports Medicine. If you have any muscular
imbalances, and all you do to warm up is dynamic or
static movements, your body will be continuously
compensating for your problem spots, Clark cautions.
“Stretching stimulates the muscle spindle and makes it
more overactive. Deep pressure stimulates the Golgi
tendon organ, which then overrides the muscle spindle,
which allows the tissue to relax, which prepares it for
stretching,” Clark says. Self Myofascial Release before
stretching and exercising is like taking the parking
brake off before you start driving your car.
5. Improved flexibility - Trigger Points by nature make
the muscle tight and weak. It loses its normal function
and every attempt to stretch it will result in pain. Things
change dramatically if we first release the trigger point
and then stretch the muscle - that’s how we can
improve flexibility in tight areas. Recent study focused
on the effect of self-myofascial release on hamstring
flexibility found significant evidence that SMR is
beneficial for increased ROM and flexibility - 5.
6. Better posture - self massage using Trigger Point
Release techniques will help you release tight muscles
that could have negatively affected your posture. Once
those TP’s are identified and taken care of you can use
an exercise program (like Pilates) to build your core
strength and improve your posture.
7. Reduced muscle soreness post workout. Release of
the trigger points aids in removal of metabolic waste
products from the muscle as well as overall
improvement of blood circulation. In a normal
language it means that you will be hurting less after
your next workout - 6.
13
8. Increased blood flow and tissue hydration.
When we apply pressure to the soft tissue (skin,
fascia, muscle) the water is squeezed out of the
tissues, and then is sucked back in when the
pressure moves on or is taken away. It’s like
squeezing a sponge over the sink and then letting it
fill again while doing the pots and pans. Recent
study suggests that this form of self massage
improves the elasticity of the arteries that results in
better blood circulation - 7.
Trigger Points create congestion spots in the
muscle (like traffic jams that keep oxygen and
nutrients from reaching their destination) and
when we release them we open up the “highways.”
Now our muscle cells can get all the nutrition that
they need to function and perform all their daily
tasks.
9. Calming effect on the nervous system. Most people
will agree that massage is a very relaxing experience. If
you’ve ever done Self Myofascial Release the wrong
way then you will have a very different opinion. Rolling
in a way that causes so much pain that you are
grinding your teeth and barely holding the tears back
is usually a bad sign. It causes muscle contraction and
cellular retraction that makes a tight spot only tighter.
Bruising and extreme pain are a sign of damage, not of
healing.
You know that you are doing your Trigger Point
Release right if you stay in the ‘hedonic point’ (poised
between pleasure and pain). The pain level should be
around 3-5 (where 0 is no pain at all and 10 is
intolerable pain.) After you finish your self massage
session you will feel refreshed and relaxed. You can
reduce the effects of daily stress by treating this
session as the time to slow down, focus on your
breathing and connect with your body.
14
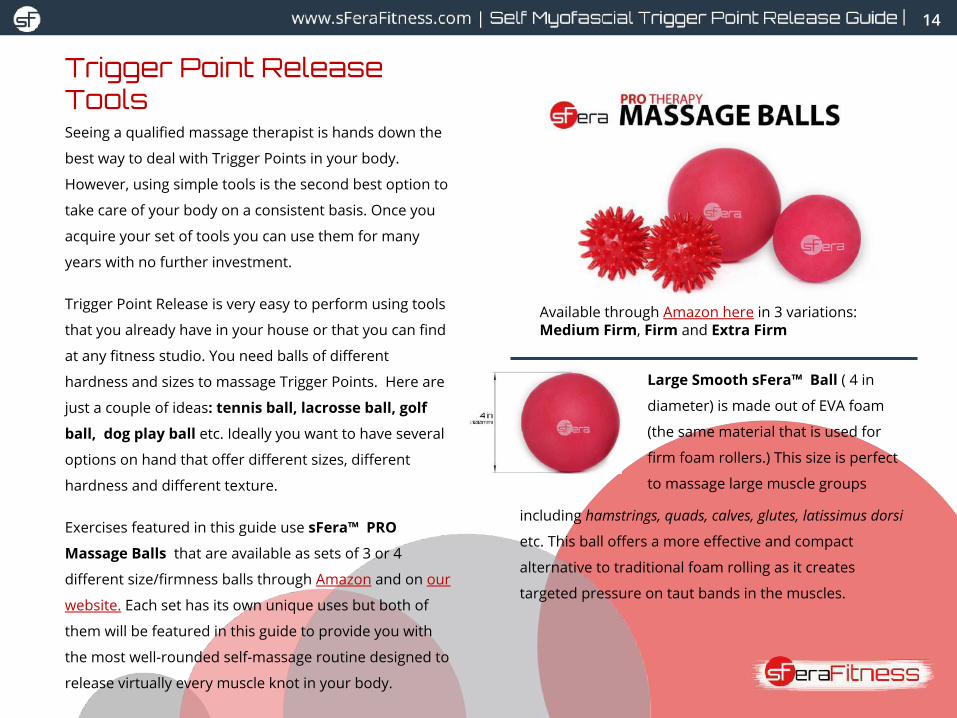
Trigger Point Release ToolsSeeing a qualified massage therapist is hands down the
best way to deal with Trigger Points in your body.
However, using simple tools is the second best option to
take care of your body on a consistent basis. Once you
acquire your set of tools you can use them for many
years with no further investment.
Trigger Point Release is very easy to perform using tools
that you already have in your house or that you can find
at any fitness studio. You need balls of different
hardness and sizes to massage Trigger Points. Here are
just a couple of ideas: tennis ball, lacrosse ball, golf
ball, dog play ball etc. Ideally you want to have several
options on hand that offer different sizes, different
hardness and different texture.
Exercises featured in this guide use sFera™ PRO
Massage Balls that are available as sets of 3 or 4
different size/firmness balls through Amazon and on our
website. Each set has its own unique uses but both of
them will be featured in this guide to provide you with
the most well-rounded self-massage routine designed to
release virtually every muscle knot in your body.
Large Smooth sFera™ Ball ( 4 in
diameter) is made out of EVA foam
(the same material that is used for
firm foam rollers.) This size is perfect
to massage large muscle groups
including hamstrings, quads, calves, glutes, latissimus dorsi
etc. This ball offers a more effective and compact
alternative to traditional foam rolling as it creates
targeted pressure on taut bands in the muscles.
Available through Amazon here in 3 variations: Medium Firm, Firm and Extra Firm

15
sFera™ Tote bag is more than just a
convenient carry case. Place one of the
balls in the tote bag and position the
ball exactly where you need it on your
back. Hard to reach places in your
upper and mid back become easily
accessible with this simple
modification. You can also place the
bag over the spiky balls to decrease the
pressure of the spikes during scalp
massage.
Spiky sFera™ Massage balls (2 in
diameter, 2 balls) are the smallest and
softest balls in the set that nevertheless
provide deep penetration into the
muscles. These balls are best used under
the feet to relieve plantar fasciitis, pain associated with
bunions, improve overall blood circulation in the feet.
These balls also provide a great warmup for the lower
and upper back if placed symmetrically along the spine.
Finally, scalp massage with the spiky balls can help
relieve tension headaches and neck pain.
There are still certain Trigger Points that cannot be reached
by any tool and hands are the only effective way to access
them (e.g. Trigger points in front of the neck, in the face,
abdominal area etc.) These Trigger Points will not be covered
in this guide and they should be addressed with caution. You
can use excellent Trigger Point Manuals (e.g. The Trigger
Point Therapy Workbook by Clair Davies) to learn all known
Trigger Points and available techniques to treat them.
Another great addition to any Trigger Point Release toolbox is
a TheraCane available from Amazon. This tool will not be
covered in this guide.
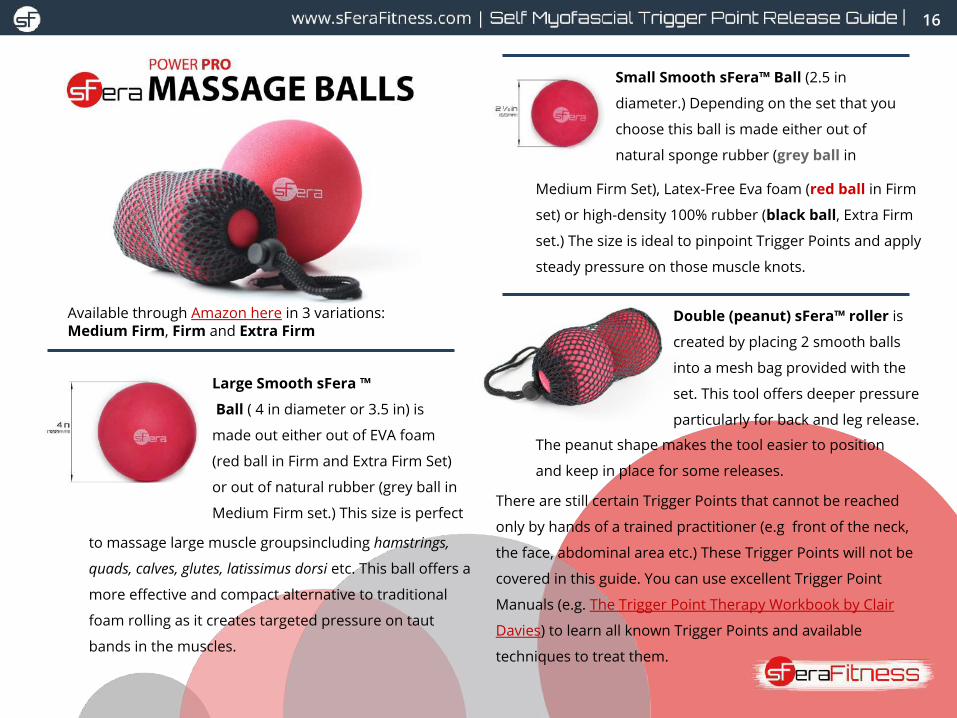
Small Smooth sFera™ Ball (2.5 in
diameter.) Depending on the set that you
choose this ball is made either out of
natural sponge rubber (grey ball in
Medium Firm Set), Latex-Free Eva foam (red ball in Firm
set) or high-density 100% rubber (black ball, Extra Firm
set.) The size is ideal to pinpoint Trigger Points and apply
steady pressure on those muscle knots.
16
There are still certain Trigger Points that cannot be reached
only by hands of a trained practitioner (e.g front of the neck,
the face, abdominal area etc.) These Trigger Points will not be
covered in this guide. You can use excellent Trigger Point
Manuals (e.g. The Trigger Point Therapy Workbook by Clair
Davies) to learn all known Trigger Points and available
techniques to treat them.
Available through Amazon here in 3 variations: Medium Firm, Firm and Extra Firm
Large Smooth sFera ™
Ball ( 4 in diameter or 3.5 in) is
made out either out of EVA foam
(red ball in Firm and Extra Firm Set)
or out of natural rubber (grey ball in
Medium Firm set.) This size is perfect
to massage large muscle groupsincluding hamstrings,
quads, calves, glutes, latissimus dorsi etc. This ball offers a
more effective and compact alternative to traditional
foam rolling as it creates targeted pressure on taut
bands in the muscles.
Small Smooth sFera™ Ball (2.5 in
diameter.) Depending on the set that you
choose this ball is made either out of
natural sponge rubber (grey ball in
Medium Firm Set), Latex-Free Eva foam (red ball in Firm
set) or high-density 100% rubber (black ball, Extra Firm
set.) The size is ideal to pinpoint Trigger Points and apply
steady pressure on those muscle knots.
Double (peanut) sFera™ roller is
created by placing 2 smooth balls
into a mesh bag provided with the
set. This tool offers deeper pressure
particularly for back and leg release.
The peanut shape makes the tool easier to position
and keep in place for some releases.
17
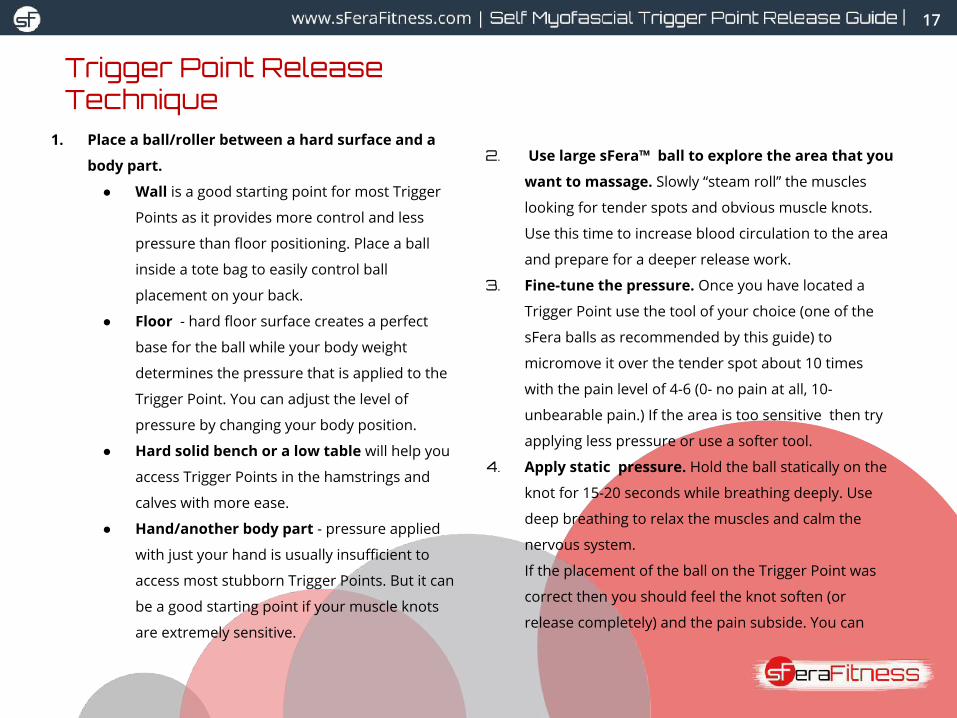
Trigger Point Release Technique
1. Place a ball/roller between a hard surface and a
body part.
● Wall is a good starting point for most Trigger
Points as it provides more control and less
pressure than floor positioning. Place a ball
inside a tote bag to easily control ball
placement on your back.
● Floor - hard floor surface creates a perfect
base for the ball while your body weight
determines the pressure that is applied to the
Trigger Point. You can adjust the level of
pressure by changing your body position.
● Hard solid bench or a low table will help you
access Trigger Points in the hamstrings and
calves with more ease.
● Hand/another body part - pressure applied
with just your hand is usually insufficient to
access most stubborn Trigger Points. But it can
be a good starting point if your muscle knots
are extremely sensitive.
2. Use large sFera™ ball to explore the area that you
want to massage. Slowly “steam roll” the muscles
looking for tender spots and obvious muscle knots.
Use this time to increase blood circulation to the area
and prepare for a deeper release work.
3. Fine-tune the pressure. Once you have located a
Trigger Point use the tool of your choice (one of the
sFera balls as recommended by this guide) to
micromove it over the tender spot about 10 times
with the pain level of 4-6 (0- no pain at all, 10-
unbearable pain.) If the area is too sensitive then try
applying less pressure or use a softer tool.
4. Apply static pressure. Hold the ball statically on the
knot for 15-20 seconds while breathing deeply. Use
deep breathing to relax the muscles and calm the
nervous system.
If the placement of the ball on the Trigger Point was
correct then you should feel the knot soften (or
release completely) and the pain subside. You can
1.
18
also experience warmth spreading from the Trigger
Point sight to the surrounding tissue.
If you do not experience immediate release then try to
find a nearby spot that will offer a more precise pressure
on the Trigger Point. Some Trigger Points are more
stubborn than others and you might have to come back
to this spot several times before you can finally feel the
release.
5. Stretch muscles worked.
6. Repeat your release 2-3 times a day for stubborn
Trigger Points or 2-3 times a week for
maintenance.
Mistakes to Avoid● Do not use the ball around prominent bony
landmarks.
● Do not place the ball directly on the joint.
● Avoid placing balls directly under the lower back
or under the neck.
● Move slowly.
● Avoid working through too much pain. Sharp pain
might be a sign of an injury and should be
examined by a medical professional. Applying too
much pressure on the Trigger Point can cause the
opposite reaction - the brain will send a signal to
the muscle to contract and avoid possible injury.
Work on the border of pleasure and pain.
● Do not stay in one spot for too long. If the Trigger
Point did not release within 30 sec - 1 minute then
you need to move to another spot or come back
later. You risk damaging soft tissues or bruising
your skin. More time or pain will not result in
release, more precise positioning of the tool (ball)
will.
19
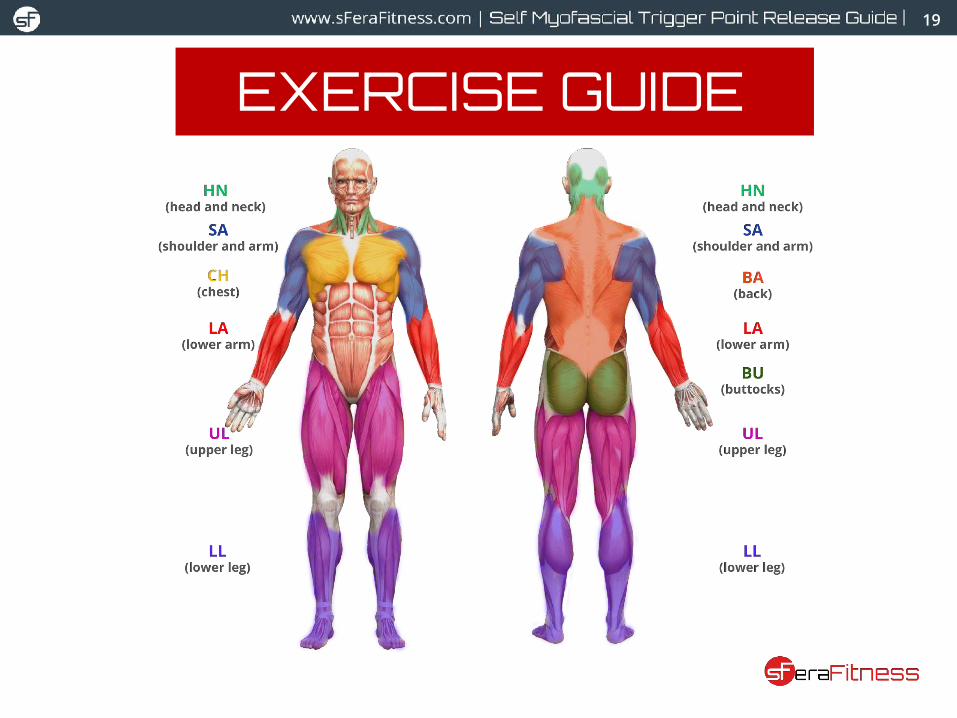
EXERCISE GUIDE
20
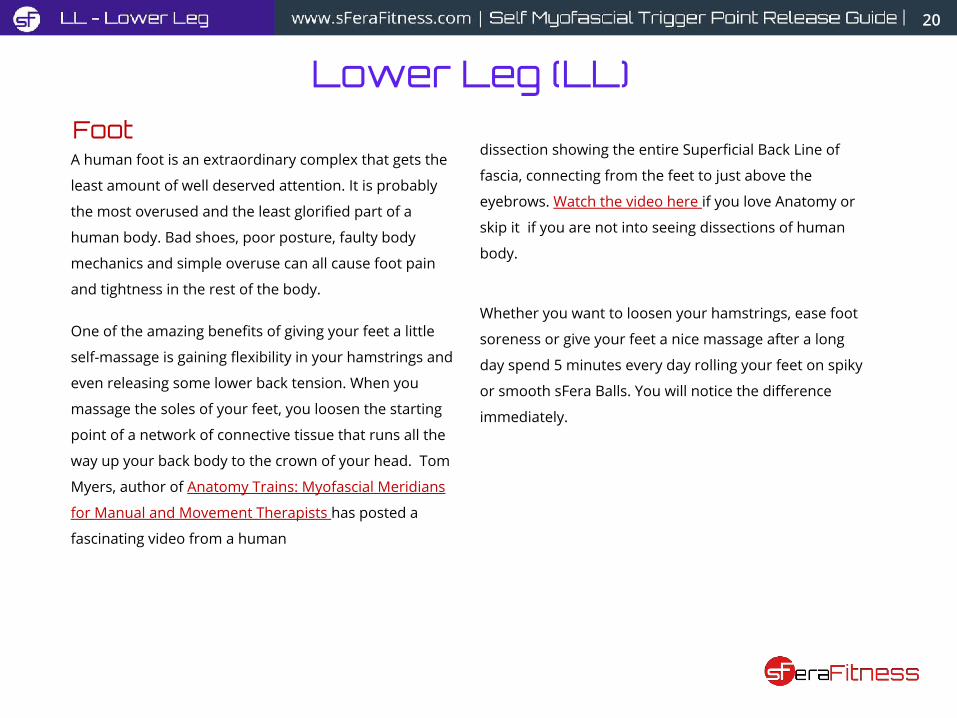
Lower Leg (LL)FootA human foot is an extraordinary complex that gets the
least amount of well deserved attention. It is probably
the most overused and the least glorified part of a
human body. Bad shoes, poor posture, faulty body
mechanics and simple overuse can all cause foot pain
and tightness in the rest of the body.
One of the amazing benefits of giving your feet a little
self-massage is gaining flexibility in your hamstrings and
even releasing some lower back tension. When you
massage the soles of your feet, you loosen the starting
point of a network of connective tissue that runs all the
way up your back body to the crown of your head. Tom
Myers, author of Anatomy Trains: Myofascial Meridians
for Manual and Movement Therapists has posted a
fascinating video from a human
dissection showing the entire Superficial Back Line of
fascia, connecting from the feet to just above the
eyebrows. Watch the video here if you love Anatomy or
skip it if you are not into seeing dissections of human
body.
Whether you want to loosen your hamstrings, ease foot
soreness or give your feet a nice massage after a long
day spend 5 minutes every day rolling your feet on spiky
or smooth sFera Balls. You will notice the difference
immediately.

21
LL1. Anatomy, Trigger Points and Referral Pain patterns in the foot
LL1. Benefits•decrease / eliminate foot pain associated with
Trigger Points
•Plantar fasciitis relief
•improved walking posture
•improve hamstring flexibility
•relieve sore feet
•improve standing posture and overall alignment
LL1. Tools
1 spiky sFera ™ ball or
1 small smooth sFera ™ Ball
double/peanut sFera ™ roller
22
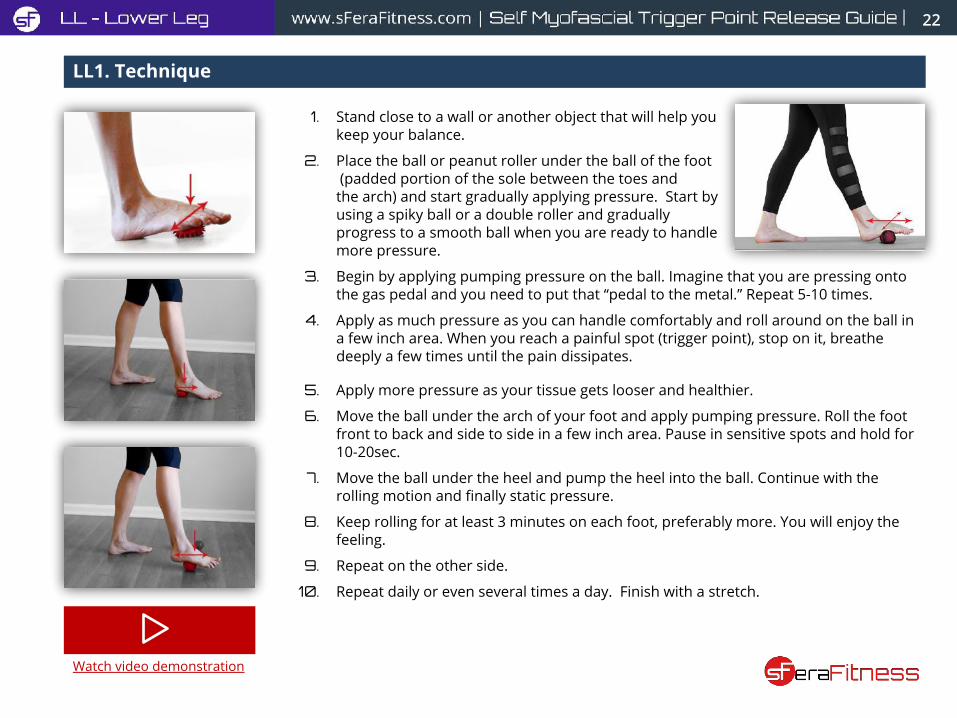
LL1. Technique
1. Stand close to a wall or another object that will help you keep your balance.
2. Place the ball or peanut roller under the ball of the foot (padded portion of the sole between the toes and the arch) and start gradually applying pressure. Start by using a spiky ball or a double roller and gradually progress to a smooth ball when you are ready to handle more pressure.
3. Begin by applying pumping pressure on the ball. Imagine that you are pressing onto the gas pedal and you need to put that “pedal to the metal.” Repeat 5-10 times.
4. Apply as much pressure as you can handle comfortably and roll around on the ball in a few inch area. When you reach a painful spot (trigger point), stop on it, breathe deeply a few times until the pain dissipates.
5. Apply more pressure as your tissue gets looser and healthier.
6. Move the ball under the arch of your foot and apply pumping pressure. Roll the foot front to back and side to side in a few inch area. Pause in sensitive spots and hold for 10-20sec.
7. Move the ball under the heel and pump the heel into the ball. Continue with the rolling motion and finally static pressure.
8. Keep rolling for at least 3 minutes on each foot, preferably more. You will enjoy the feeling.
9. Repeat on the other side.
10. Repeat daily or even several times a day. Finish with a stretch.
Watch video demonstration
23
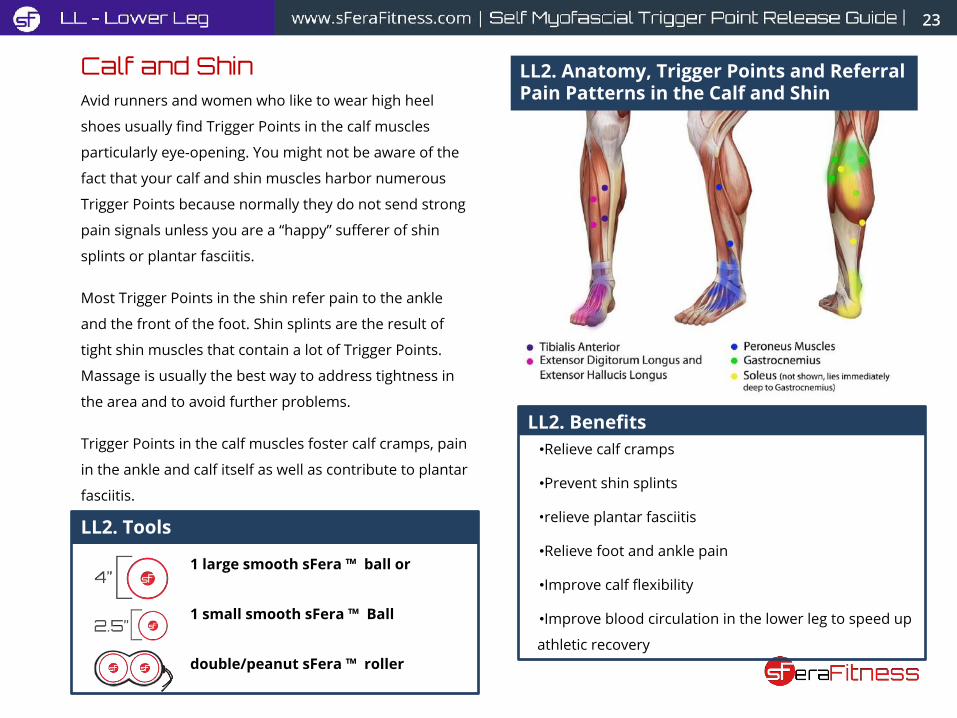
Avid runners and women who like to wear high heel
shoes usually find Trigger Points in the calf muscles
particularly eye-opening. You might not be aware of the
fact that your calf and shin muscles harbor numerous
Trigger Points because normally they do not send strong
pain signals unless you are a “happy” sufferer of shin
splints or plantar fasciitis.
Most Trigger Points in the shin refer pain to the ankle
and the front of the foot. Shin splints are the result of
tight shin muscles that contain a lot of Trigger Points.
Massage is usually the best way to address tightness in
the area and to avoid further problems.
Trigger Points in the calf muscles foster calf cramps, pain
in the ankle and calf itself as well as contribute to plantar
fasciitis.
Calf and Shin
LL2. Benefits•Relieve calf cramps
•Prevent shin splints
•relieve plantar fasciitis
•Relieve foot and ankle pain
•Improve calf flexibility
•Improve blood circulation in the lower leg to speed up
athletic recovery
LL2. Tools
1 large smooth sFera ™ ball or
1 small smooth sFera ™ Ball
double/peanut sFera ™ roller
LL2. Anatomy, Trigger Points and Referral Pain Patterns in the Calf and Shin
24
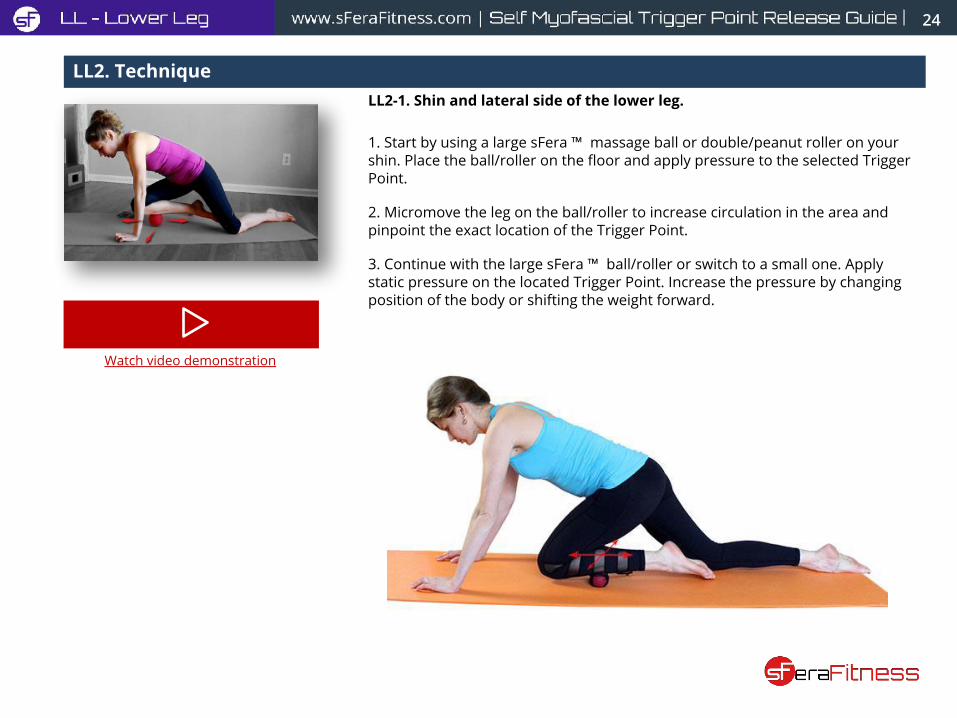
LL2. TechniqueLL2-1. Shin and lateral side of the lower leg.
1. Start by using a large sFera ™ massage ball or double/peanut roller on your shin. Place the ball/roller on the floor and apply pressure to the selected Trigger Point.
2. Micromove the leg on the ball/roller to increase circulation in the area and pinpoint the exact location of the Trigger Point.
3. Continue with the large sFera ™ ball/roller or switch to a small one. Apply static pressure on the located Trigger Point. Increase the pressure by changing position of the body or shifting the weight forward.
Watch video demonstration
25
LL2. Technique
Watch video demonstration
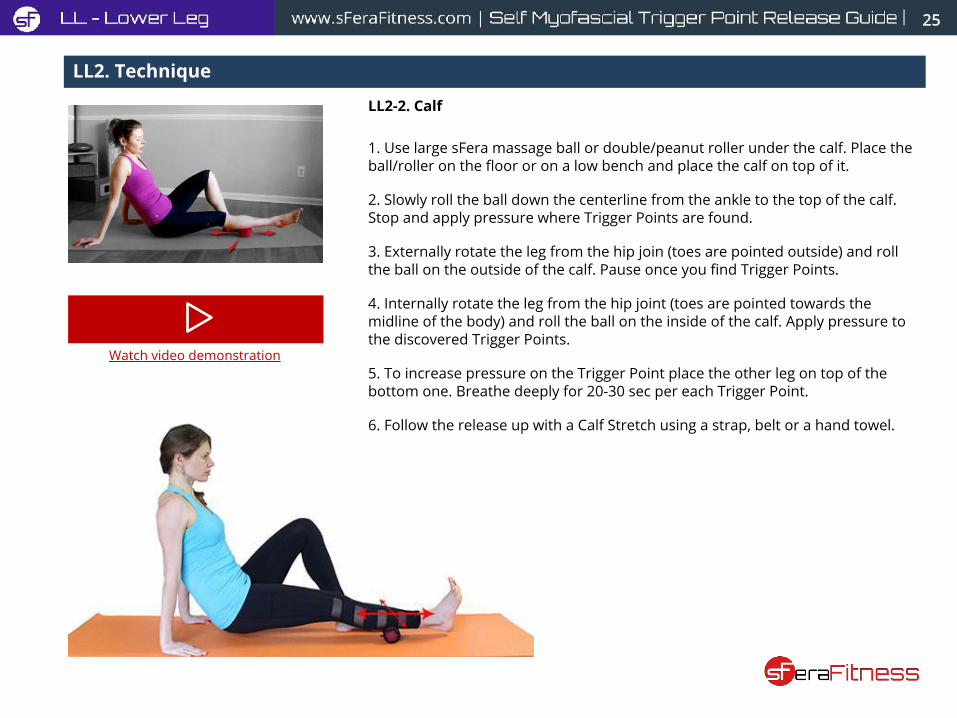
LL2-2. Calf
1. Use large sFera massage ball or double/peanut roller under the calf. Place the ball/roller on the floor or on a low bench and place the calf on top of it.
2. Slowly roll the ball down the centerline from the ankle to the top of the calf. Stop and apply pressure where Trigger Points are found.
3. Externally rotate the leg from the hip join (toes are pointed outside) and roll the ball on the outside of the calf. Pause once you find Trigger Points.
4. Internally rotate the leg from the hip joint (toes are pointed towards the midline of the body) and roll the ball on the inside of the calf. Apply pressure to the discovered Trigger Points.
5. To increase pressure on the Trigger Point place the other leg on top of the bottom one. Breathe deeply for 20-30 sec per each Trigger Point.
6. Follow the release up with a Calf Stretch using a strap, belt or a hand towel.
26
Upper Leg (UL)Hip and knee pain is a major source of disability
contributing to a diminished quality of life. When your
knees or hips hurt you give up sports and other forms of
exercise, avoid going on long walks, doing yard work etc. If
you are an avid athlete then knee or hip pain can put a
stop to your workout for many months.
Tensor Fasciae Latae It’s a long and a complicated name for a relatively small
muscle that plays a crucial role in walking, running, and
moving your leg in general. Tensor Fasciae Latae (TFL as
we will call for short) is a strong muscle that tightens a
sheet of fibrous tissue that includes Iliotibial Band (IT
Band) and assists the bending on the knee and hip.
Many people in gyms religiously roll their It Band out on a
foam roller hoping to release the outer thigh and knee
pain and “stretch” the IT Band. The IT Band (which is a very
large tendon) DOES NOT stretch and the pain that is felt
during foam rolling is a warning from your body that you
are about to damage soft tissues in the area.
Releasing Trigger Points in the TFL muscle can actually
help you release tension in the outer thigh and relieve
some of the hip pain. Trigger Points in the TFL muscle can
cause hip stiffness (particularly in the morning), alter body
alignment by tilting the pelvis forward (excess lower back
curve) or sideways (creating a “short leg” effect.) These
Trigger Points can get worse if you tend to sleep on your
side with the knees up (put a pillow between the knees) or
sit for long periods of time. Trigger Points in TFL are often
misdiagnosed as trochanteric bursitis.
Trigger Points in TFL are important to address for people
who had knee or replacements or are considering a
surgery (consult with a physician first!)
27
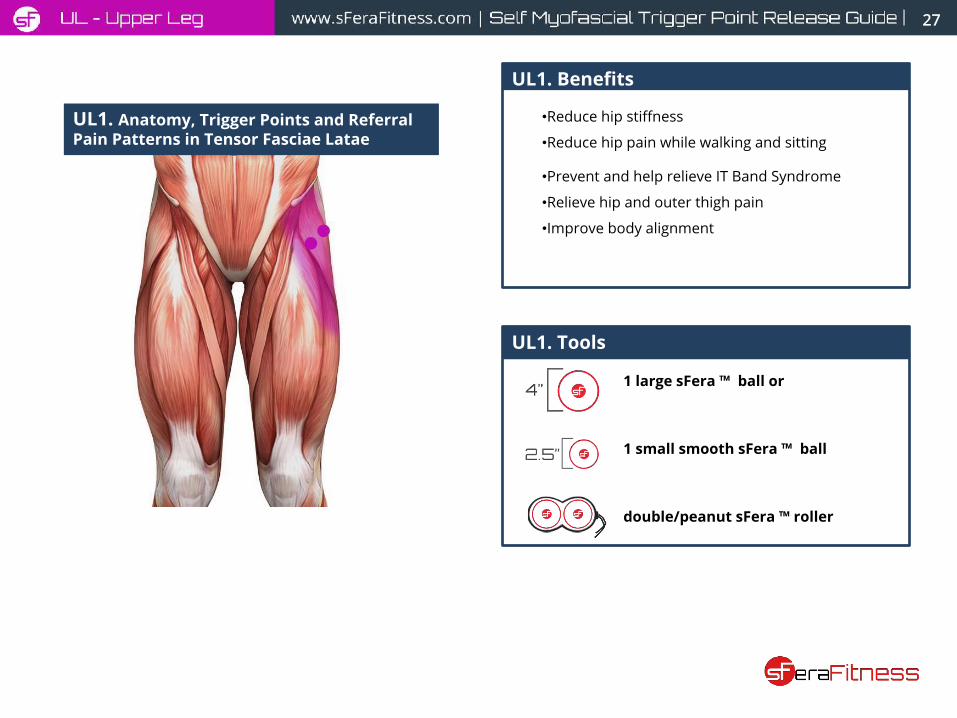
UL1. Anatomy, Trigger Points and Referral Pain Patterns in Tensor Fasciae Latae
UL1. Benefits
•Reduce hip stiffness
•Reduce hip pain while walking and sitting
•Prevent and help relieve IT Band Syndrome
•Relieve hip and outer thigh pain
•Improve body alignment
UL1. Tools
1 large sFera ™ ball or
1 small smooth sFera ™ ball
double/peanut sFera ™ roller
28
UL1. Technique
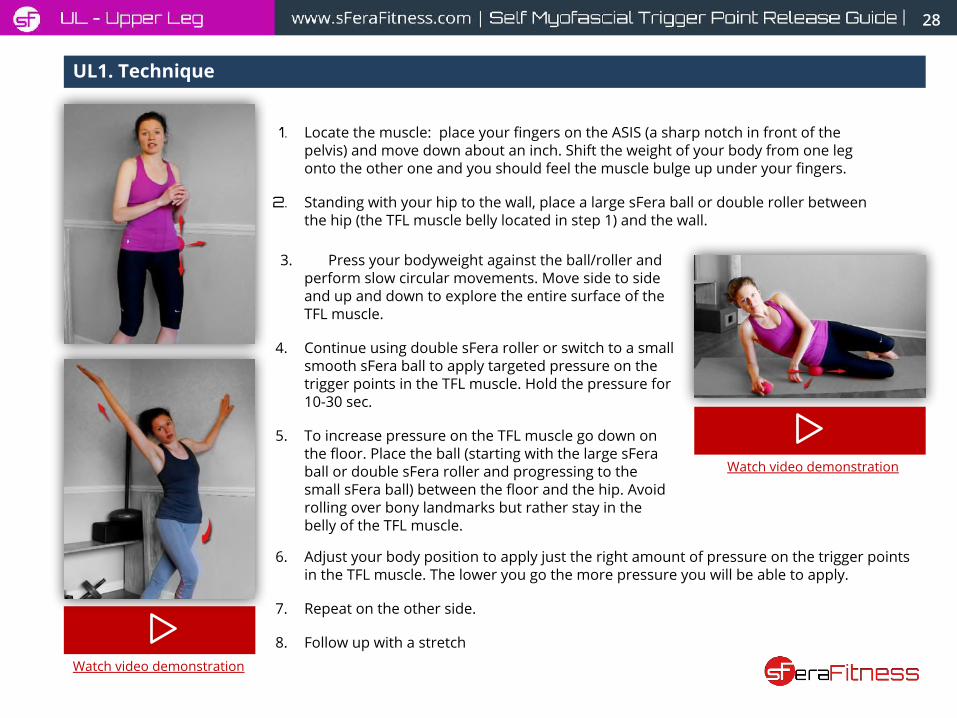
1. Locate the muscle: place your fingers on the ASIS (a sharp notch in front of the pelvis) and move down about an inch. Shift the weight of your body from one leg onto the other one and you should feel the muscle bulge up under your fingers.
2. Standing with your hip to the wall, place a large sFera ball or double roller between the hip (the TFL muscle belly located in step 1) and the wall.
Watch video demonstration
3. Press your bodyweight against the ball/roller and perform slow circular movements. Move side to side and up and down to explore the entire surface of the TFL muscle.
4. Continue using double sFera roller or switch to a small smooth sFera ball to apply targeted pressure on the trigger points in the TFL muscle. Hold the pressure for 10-30 sec.
5. To increase pressure on the TFL muscle go down on the floor. Place the ball (starting with the large sFera ball or double sFera roller and progressing to the small sFera ball) between the floor and the hip. Avoid rolling over bony landmarks but rather stay in the belly of the TFL muscle.
6. Adjust your body position to apply just the right amount of pressure on the trigger points in the TFL muscle. The lower you go the more pressure you will be able to apply.
7. Repeat on the other side.
8. Follow up with a stretch
Watch video demonstration
29
Quadriceps MusclesThe Quadriceps is a single muscle with 4 heads attaching
to the knee cap. It wraps around the front and the
outside of the leg and is the largest and most powerful
muscle in the body. It is used to flex the hip and
straighten the knee - the primary actions necessary in
everyday life and most of the sports activities.
Trigger Points in the Quadriceps are the primary source
of knee pain. Jumper’s or runner’s knee, restless leg
syndrome and many more conditions can be traced down
to Trigger Points in the Quadriceps.
The Quadriceps muscle is commonly abused by
overexercising or overexertion in sports, by carrying
heavy loads, walking in high heels, climbing, jumping,
running, kneeling and squatting. Sedentary lifestyle that
involves sitting for long periods of time promotes Trigger
Points in the Quadriceps that in turn weakens the muscle
in general.
Vastus Lateralis (the head of the Quadriceps that wraps
the outside of the leg and attaches to the kneecap and
tibia) deserves special attention when talking about
Trigger Points. This muscle lies underneath the IT Band
(mentioned in the TFL release chapter) and usually is the
real cause of knee and thigh pain. Instead of aggressively
rolling the IT Band with tears in eyes, we need to address
Trigger Points in Vastus Lateralis that are present in
virtually everyone.
Sartorius
The Sartorius is the longest muscle in the body. The
muscle attaches to the hip bone, descends down the
thigh crossing towards the inner thigh and attaches again
on the inner side of the knee. This arrangement allows
the Sartorius to participate in raising or the leg and
turning the knee outward.
Trigger Points in the Sartorius are often initiated by a
sudden fast twisting movement with the foot planted.
Sitting for long periods of time with legs crossed, kicks in
the martial arts and deep twisted Yoga poses can all
encourage development of active Trigger Points in this
muscle. Active Trigger Points cause burning or tingling
sensation just under the skin or on the inner side of the
knee.
30
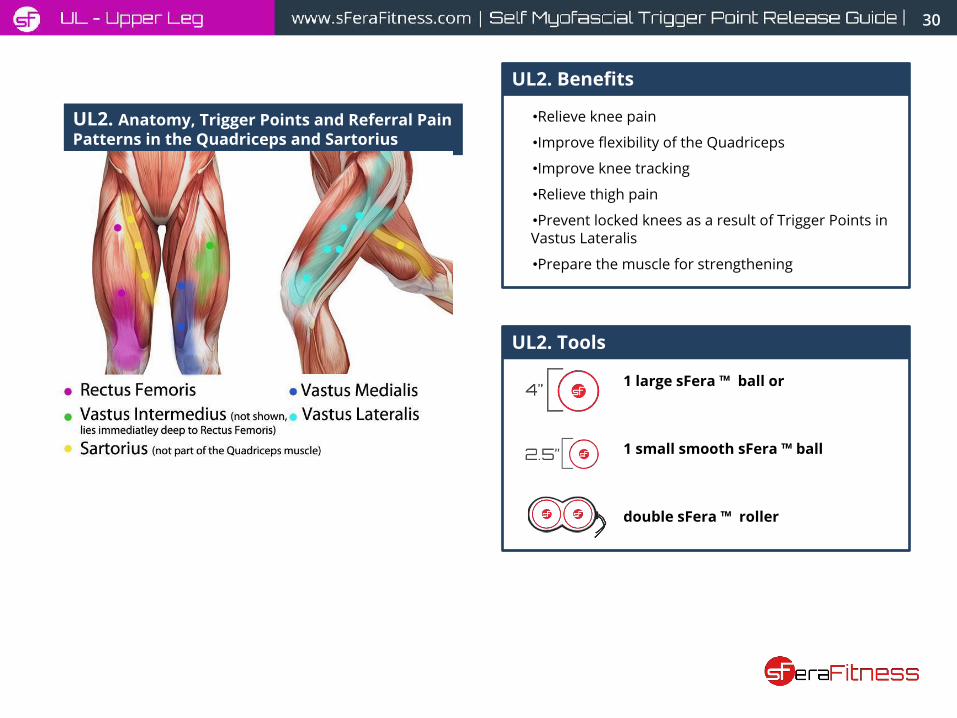
UL2. Anatomy, Trigger Points and Referral Pain Patterns in the Quadriceps and Sartorius
UL2. Benefits
•Relieve knee pain
•Improve flexibility of the Quadriceps
•Improve knee tracking
•Relieve thigh pain
•Prevent locked knees as a result of Trigger Points in Vastus Lateralis
•Prepare the muscle for strengthening
UL2. Tools
1 large sFera ™ ball or
1 small smooth sFera ™ ball
double sFera ™ roller
31
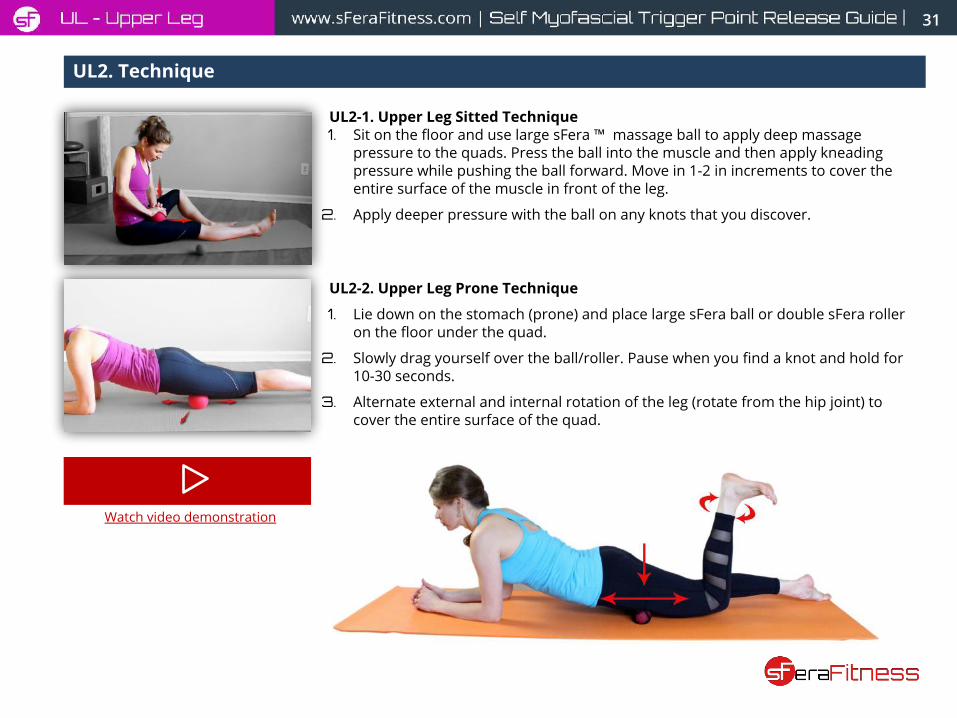
UL2. Technique
UL2-1. Upper Leg Sitted Technique 1. Sit on the floor and use large sFera ™ massage ball to apply deep massage
pressure to the quads. Press the ball into the muscle and then apply kneading pressure while pushing the ball forward. Move in 1-2 in increments to cover the entire surface of the muscle in front of the leg.
2. Apply deeper pressure with the ball on any knots that you discover.
Watch video demonstration
UL2-2. Upper Leg Prone Technique
1. Lie down on the stomach (prone) and place large sFera ball or double sFera roller on the floor under the quad.
2. Slowly drag yourself over the ball/roller. Pause when you find a knot and hold for 10-30 seconds.
3. Alternate external and internal rotation of the leg (rotate from the hip joint) to cover the entire surface of the quad.
32
UL2. Technique
Watch video demonstration
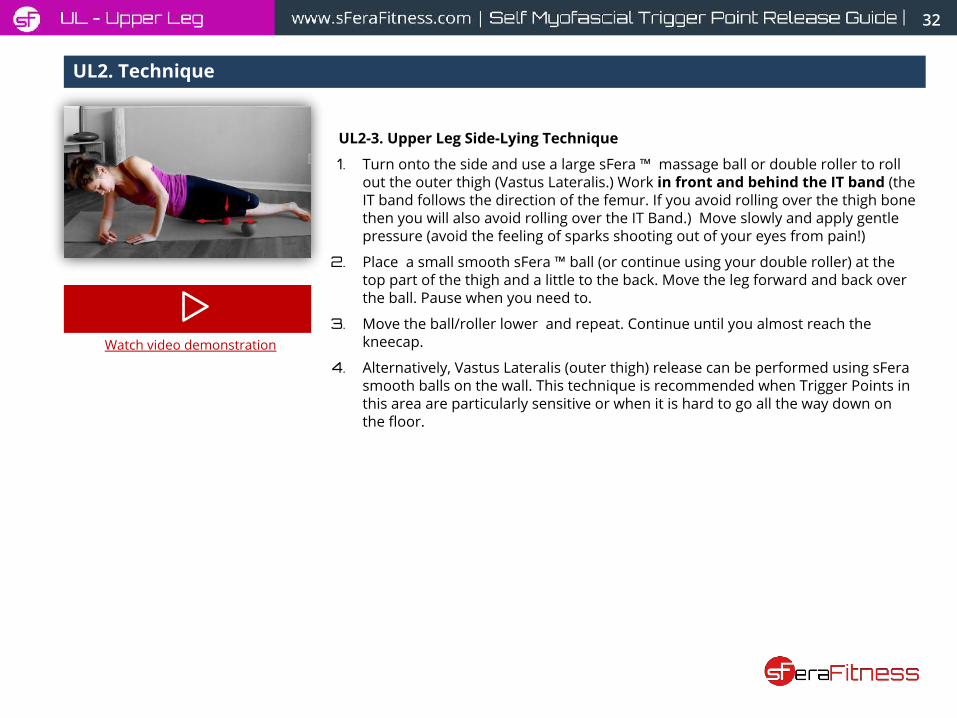
UL2-3. Upper Leg Side-Lying Technique
1. Turn onto the side and use a large sFera ™ massage ball or double roller to roll out the outer thigh (Vastus Lateralis.) Work in front and behind the IT band (the IT band follows the direction of the femur. If you avoid rolling over the thigh bone then you will also avoid rolling over the IT Band.) Move slowly and apply gentle pressure (avoid the feeling of sparks shooting out of your eyes from pain!)
2. Place a small smooth sFera ™ ball (or continue using your double roller) at the top part of the thigh and a little to the back. Move the leg forward and back over the ball. Pause when you need to.
3. Move the ball/roller lower and repeat. Continue until you almost reach the kneecap.
4. Alternatively, Vastus Lateralis (outer thigh) release can be performed using sFera smooth balls on the wall. This technique is recommended when Trigger Points in this area are particularly sensitive or when it is hard to go all the way down on the floor.
33
Inner Thigh MusclesInner thigh muscles (also known as the ADductors)
function primarily to move one leg towards the other and
to stabilize the hip during walking and running. Accessing
these muscles is hard because of their location and how
“private” they are.
It is very easy to injury inner thigh muscles by
overstretching and even by performing daily activities.
Trigger Points in this area can cause pain in the pelvic and
groin area, deep “groin pull” familiar to many athletes, hip
and knee pain.
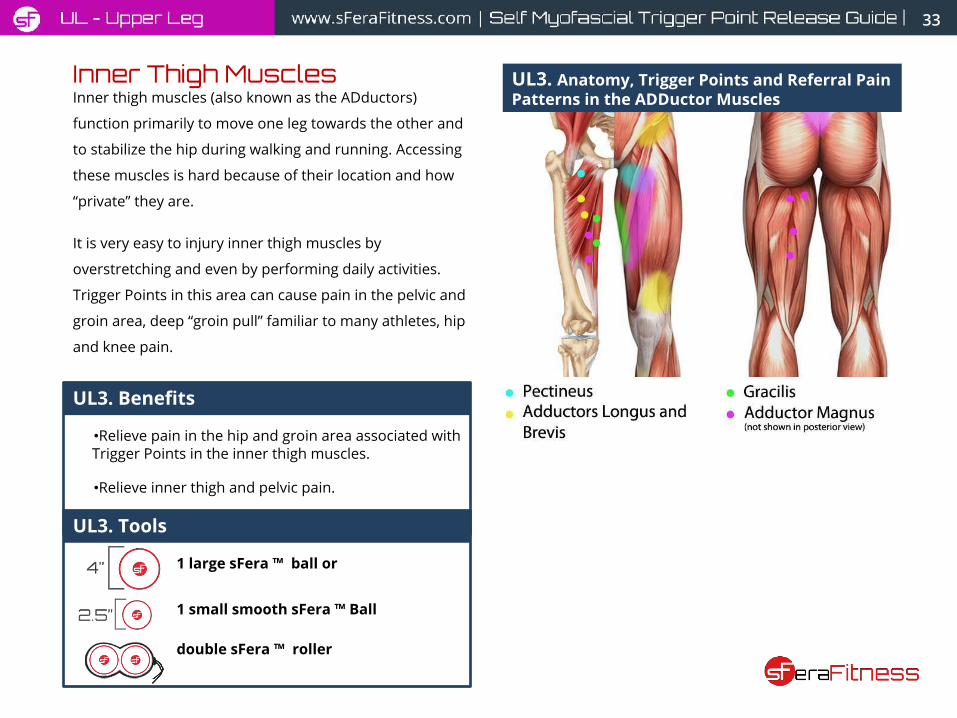
UL3. Anatomy, Trigger Points and Referral Pain Patterns in the ADDuctor Muscles
UL3. Benefits
•Relieve pain in the hip and groin area associated with Trigger Points in the inner thigh muscles.
•Relieve inner thigh and pelvic pain.
UL3. Tools
1 large sFera ™ ball or
1 small smooth sFera ™ Ball
double sFera ™ roller
34
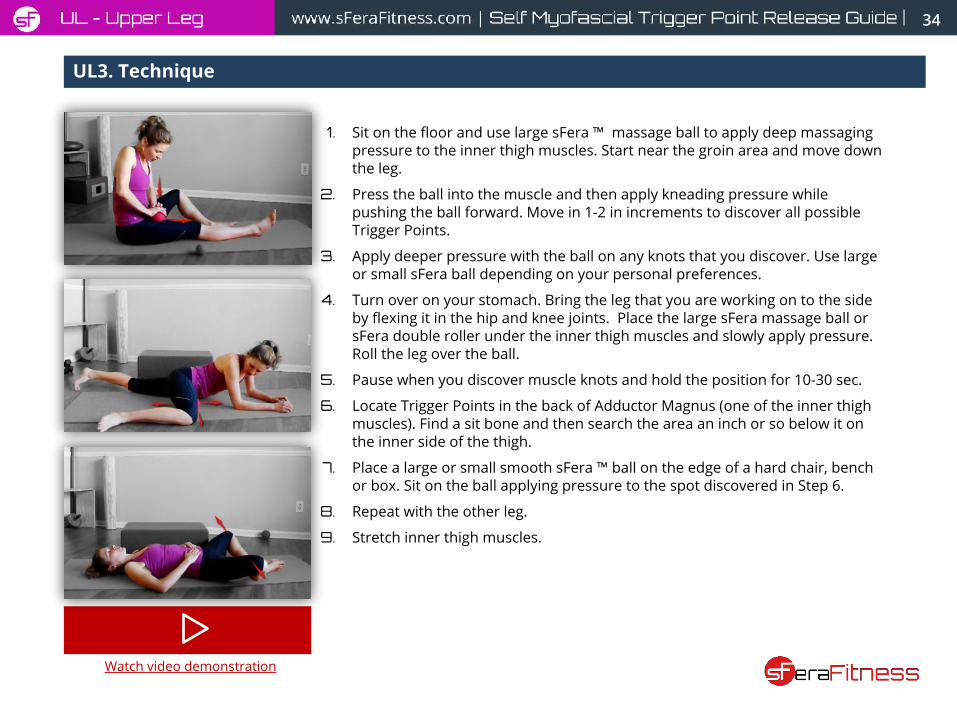
UL3. Technique
1. Sit on the floor and use large sFera ™ massage ball to apply deep massaging pressure to the inner thigh muscles. Start near the groin area and move down the leg.
2. Press the ball into the muscle and then apply kneading pressure while pushing the ball forward. Move in 1-2 in increments to discover all possible Trigger Points.
3. Apply deeper pressure with the ball on any knots that you discover. Use large or small sFera ball depending on your personal preferences.
4. Turn over on your stomach. Bring the leg that you are working on to the side by flexing it in the hip and knee joints. Place the large sFera massage ball or sFera double roller under the inner thigh muscles and slowly apply pressure. Roll the leg over the ball.
5. Pause when you discover muscle knots and hold the position for 10-30 sec.
6. Locate Trigger Points in the back of Adductor Magnus (one of the inner thigh muscles). Find a sit bone and then search the area an inch or so below it on the inner side of the thigh.
7. Place a large or small smooth sFera ™ ball on the edge of a hard chair, bench or box. Sit on the ball applying pressure to the spot discovered in Step 6.
8. Repeat with the other leg.
9. Stretch inner thigh muscles.
Watch video demonstration
35
HamstringsHamstrings are three exceptionally strong and slender muscles that cover the backs of the thighs. When talking about hamstrings people will most often refer to them in the following context “My hamstrings are so tight!”, “I pulled a hamstring while working out (or lifting something heavy).” Approximately 90% of the people will agree that they need more flexibility in the back of their legs (hamstring!)
While referral pain patterns from active Trigger Points in the hamstrings normally do not occur in the lower back area, these Trigger Points keep the Hamstrings group tight causing a tightening chain reaction in the hip and lower back muscles that eventually manifests itself in lower back pain. Pain behind the knee is another possible symptom of Trigger Points in this area.
The activities that can cause injury and set off Trigger Points in the hamstrings are numerous ranging from overuse injuries during athletic performance to long hours of sitting and sedentary lifestyle. Trigger Points weaken the muscles making any strengthening work ineffective.
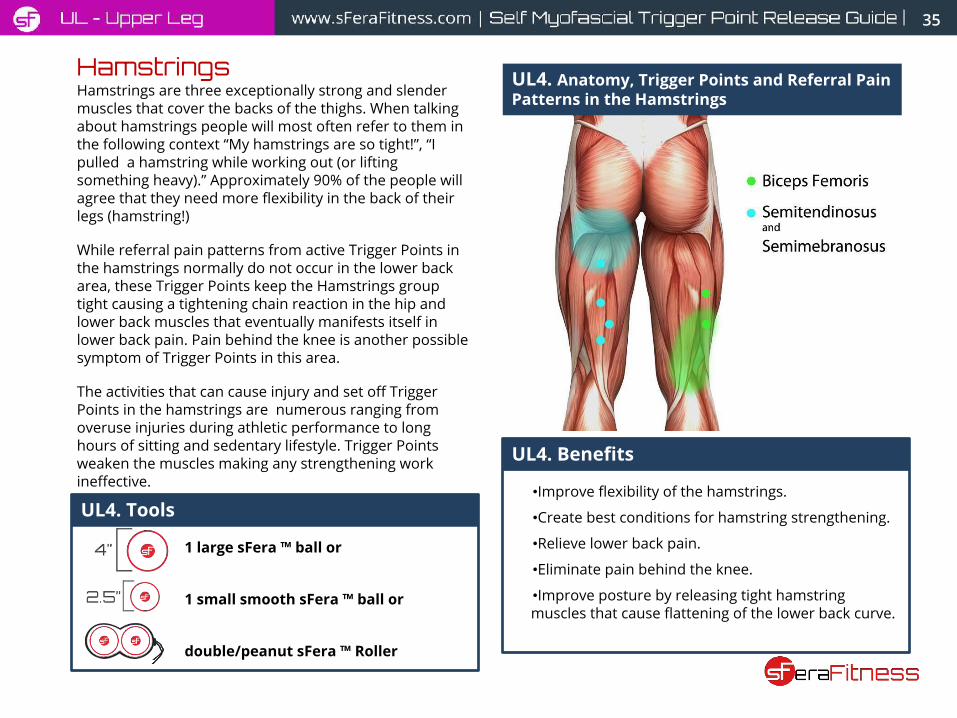
UL4. Anatomy, Trigger Points and Referral Pain Patterns in the Hamstrings
UL4. Benefits
•Improve flexibility of the hamstrings.
•Create best conditions for hamstring strengthening.
•Relieve lower back pain.
•Eliminate pain behind the knee.
•Improve posture by releasing tight hamstring muscles that cause flattening of the lower back curve.
UL4. Tools
1 large sFera ™ ball or
1 small smooth sFera ™ ball or
double/peanut sFera ™ Roller
36
UL4. Technique
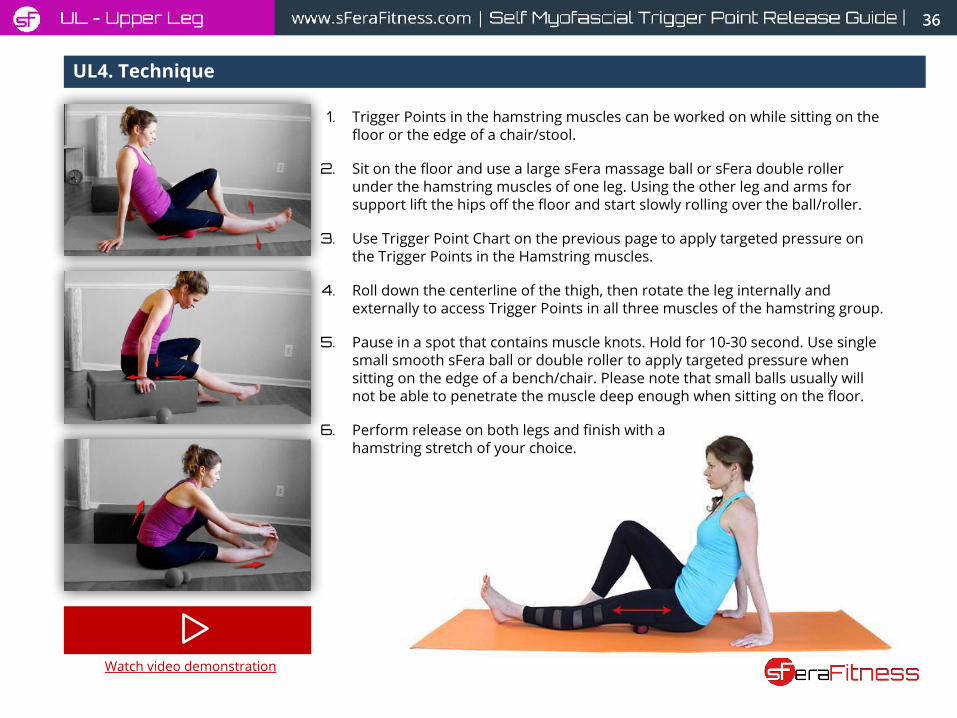
1. Trigger Points in the hamstring muscles can be worked on while sitting on the floor or the edge of a chair/stool.
2. Sit on the floor and use a large sFera massage ball or sFera double roller under the hamstring muscles of one leg. Using the other leg and arms for support lift the hips off the floor and start slowly rolling over the ball/roller.
3. Use Trigger Point Chart on the previous page to apply targeted pressure on the Trigger Points in the Hamstring muscles.
4. Roll down the centerline of the thigh, then rotate the leg internally and externally to access Trigger Points in all three muscles of the hamstring group.
5. Pause in a spot that contains muscle knots. Hold for 10-30 second. Use single small smooth sFera ball or double roller to apply targeted pressure when sitting on the edge of a bench/chair. Please note that small balls usually will not be able to penetrate the muscle deep enough when sitting on the floor.
6. Perform release on both legs and finish with a hamstring stretch of your choice.
Watch video demonstration
37
Buttocks (BU)The Glutes and Piriformis
Most of the people think of their Glutes as a soft cushion to
sit on or as a sexy booty to show off. Few people stop and
think about the enormous work that gluteal muscles
perform every day to help us stand, walk, run and jump.
Tightness in gluteal muscles is the most common cause
of low back pain. It also causes hip and leg pain that
radiates from the hip and down to the ankle.
Piriformis is another muscle that we will discuss in this
section because of its location and similar pain referral
patterns. Piriformis is the strongest of hip rotators and it
can cause incredible amounts of pain in the low back, hip
and down the leg. When this muscle is tight (afflicted by
many Trigger Points that cause constant contraction) it can
compress the sciatic nerve creating a Sciatica-like
symptoms. This pain demonstrates itself when sitting,
walking and even lying down. You are not able to find a
relief in any position and sitting for long periods of time
really aggravates Trigger Points in this muscle. This
condition is known as the Piriformis Syndrome and is often
misinterpreted as the inflammation of the sciatic nerve,
intervertebral disc protrusion or spinal root compression.
Trigger Points in Piriformis, Gluteus Maximus and Gluteus
Minimus can all be the cause of Sciatica-like pain.
Sedentary lifestyle, sports injuries, overuse injury during
running, jumping, climbing or squatting, excess weight (e.g.
during last months of pregnancy) as well as uneven
distribution of weight in the body all encourage the
development and activation of Trigger Points in the Gluteal
Muscles and the Piriformis. It is wise to start any workout
with a Trigger Point release of the Glutes and Piriformis to
prevent injuries and pain down the road.
38
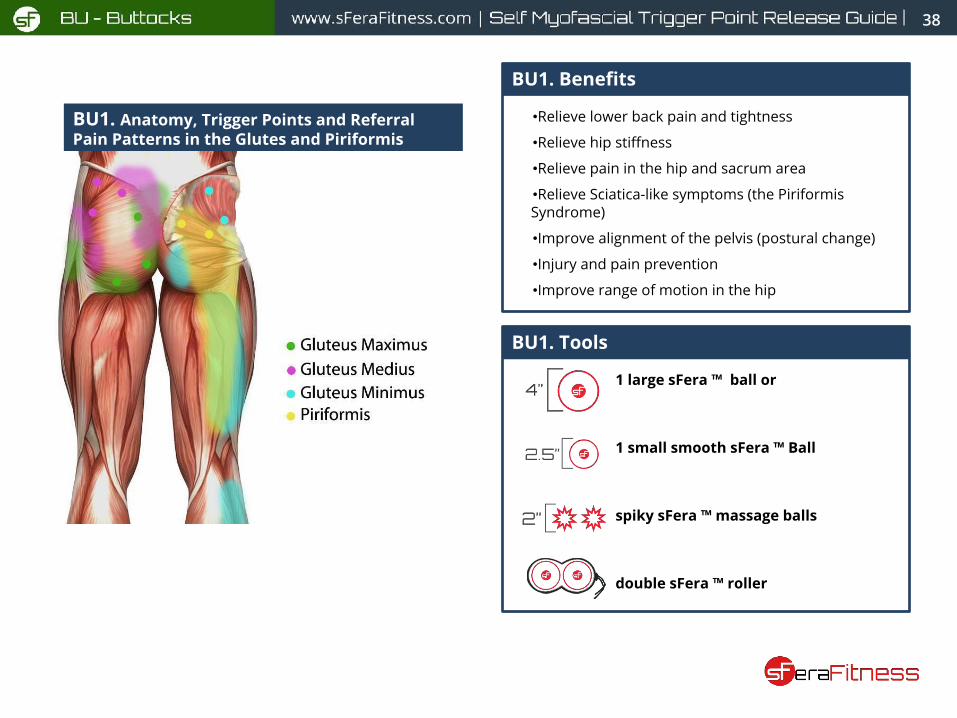
BU1. Anatomy, Trigger Points and Referral Pain Patterns in the Glutes and Piriformis
BU1. Benefits
•Relieve lower back pain and tightness
•Relieve hip stiffness
•Relieve pain in the hip and sacrum area
•Relieve Sciatica-like symptoms (the Piriformis Syndrome)
•Improve alignment of the pelvis (postural change)
•Injury and pain prevention
•Improve range of motion in the hip
BU1. Tools
1 large sFera ™ ball or
1 small smooth sFera ™ Ball
spiky sFera ™ massage balls
double sFera ™ roller
39
BU1. Technique
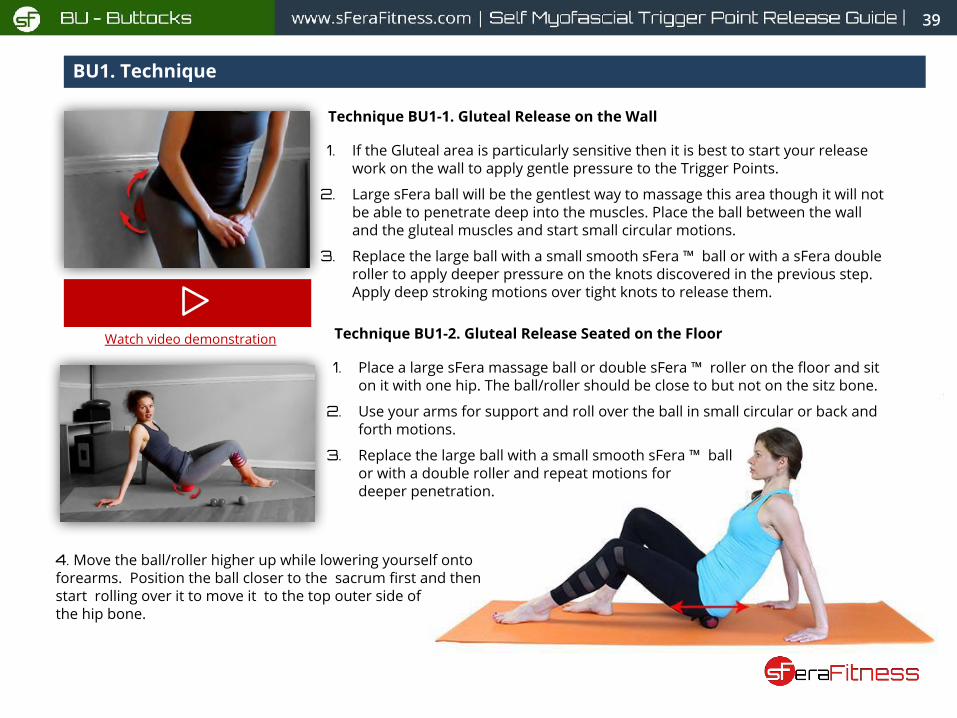
Technique BU1-1. Gluteal Release on the Wall
1. If the Gluteal area is particularly sensitive then it is best to start your release work on the wall to apply gentle pressure to the Trigger Points.
2. Large sFera ball will be the gentlest way to massage this area though it will not be able to penetrate deep into the muscles. Place the ball between the wall and the gluteal muscles and start small circular motions.
3. Replace the large ball with a small smooth sFera ™ ball or with a sFera double roller to apply deeper pressure on the knots discovered in the previous step. Apply deep stroking motions over tight knots to release them.
Watch video demonstration Technique BU1-2. Gluteal Release Seated on the Floor
1. Place a large sFera massage ball or double sFera ™ roller on the floor and sit on it with one hip. The ball/roller should be close to but not on the sitz bone.
2. Use your arms for support and roll over the ball in small circular or back and forth motions.
3. Replace the large ball with a small smooth sFera ™ ball or with a double roller and repeat motions for deeper penetration.
4. Move the ball/roller higher up while lowering yourself onto forearms. Position the ball closer to the sacrum first and then start rolling over it to move it to the top outer side of the hip bone.
40
BU1. Technique
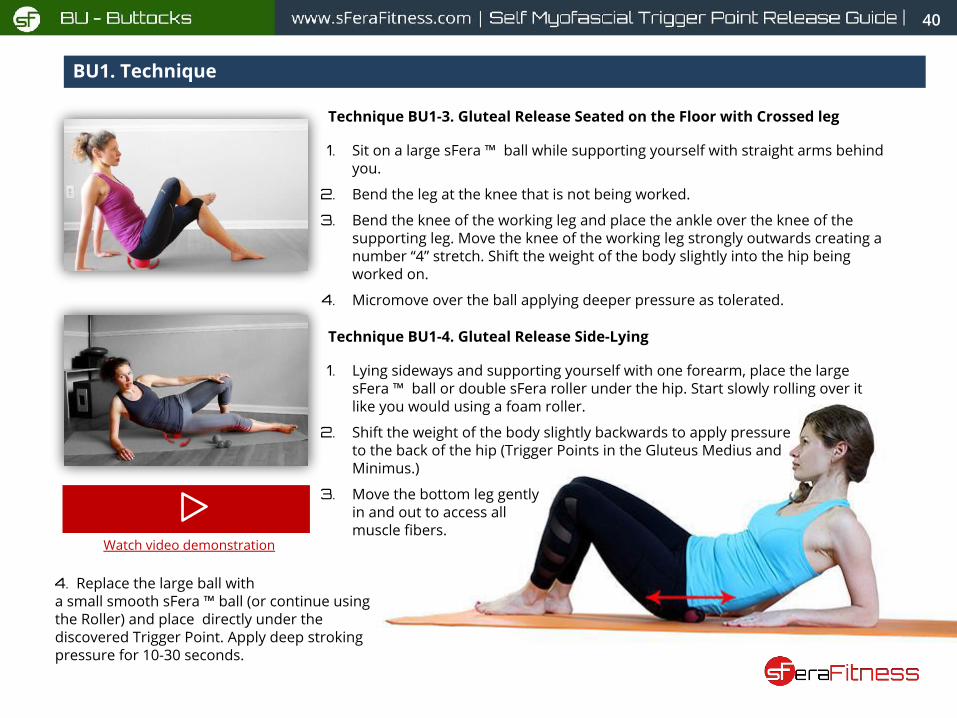
Technique BU1-3. Gluteal Release Seated on the Floor with Crossed leg
1. Sit on a large sFera ™ ball while supporting yourself with straight arms behind you.
2. Bend the leg at the knee that is not being worked.
3. Bend the knee of the working leg and place the ankle over the knee of the supporting leg. Move the knee of the working leg strongly outwards creating a number “4” stretch. Shift the weight of the body slightly into the hip being worked on.
4. Micromove over the ball applying deeper pressure as tolerated.
Technique BU1-4. Gluteal Release Side-Lying
1. Lying sideways and supporting yourself with one forearm, place the large sFera ™ ball or double sFera roller under the hip. Start slowly rolling over it like you would using a foam roller.
2. Shift the weight of the body slightly backwards to apply pressure to the back of the hip (Trigger Points in the Gluteus Medius and Minimus.)
3. Move the bottom leg gently in and out to access all muscle fibers.
Watch video demonstration
4. Replace the large ball with a small smooth sFera ™ ball (or continue using the Roller) and place directly under the discovered Trigger Point. Apply deep stroking pressure for 10-30 seconds.
41
BU1. Technique
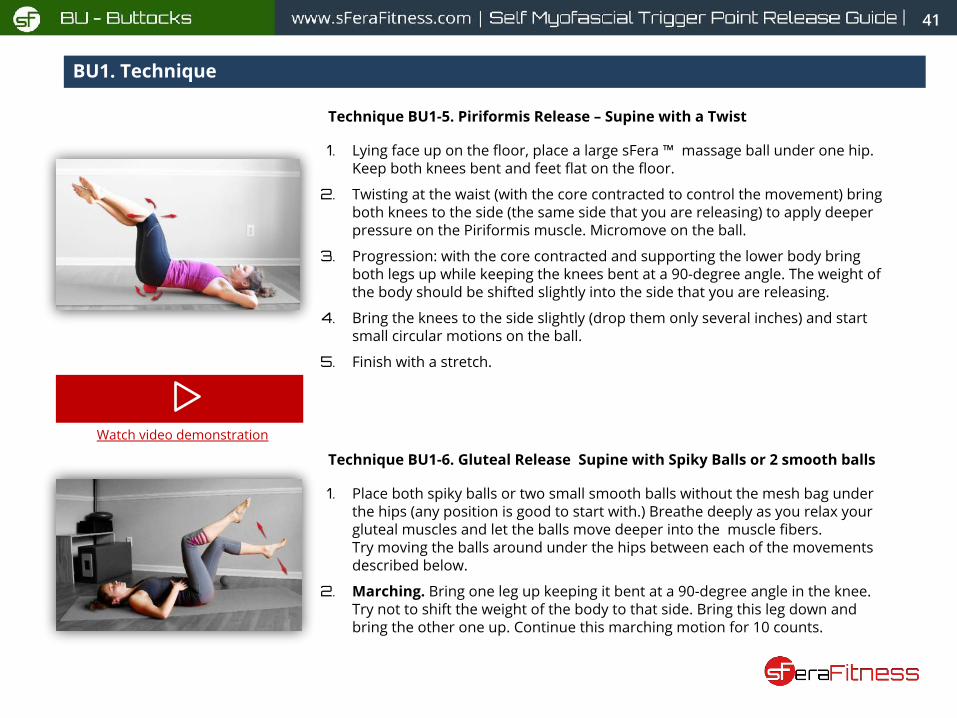
Technique BU1-5. Piriformis Release – Supine with a Twist
1. Lying face up on the floor, place a large sFera ™ massage ball under one hip. Keep both knees bent and feet flat on the floor.
2. Twisting at the waist (with the core contracted to control the movement) bring both knees to the side (the same side that you are releasing) to apply deeper pressure on the Piriformis muscle. Micromove on the ball.
3. Progression: with the core contracted and supporting the lower body bring both legs up while keeping the knees bent at a 90-degree angle. The weight of the body should be shifted slightly into the side that you are releasing.
4. Bring the knees to the side slightly (drop them only several inches) and start small circular motions on the ball.
5. Finish with a stretch.
Watch video demonstration
Technique BU1-6. Gluteal Release Supine with Spiky Balls or 2 smooth balls
1. Place both spiky balls or two small smooth balls without the mesh bag under the hips (any position is good to start with.) Breathe deeply as you relax your gluteal muscles and let the balls move deeper into the muscle fibers.Try moving the balls around under the hips between each of the movements described below.
2. Marching. Bring one leg up keeping it bent at a 90-degree angle in the knee. Try not to shift the weight of the body to that side. Bring this leg down and bring the other one up. Continue this marching motion for 10 counts.
42
BU1. Technique
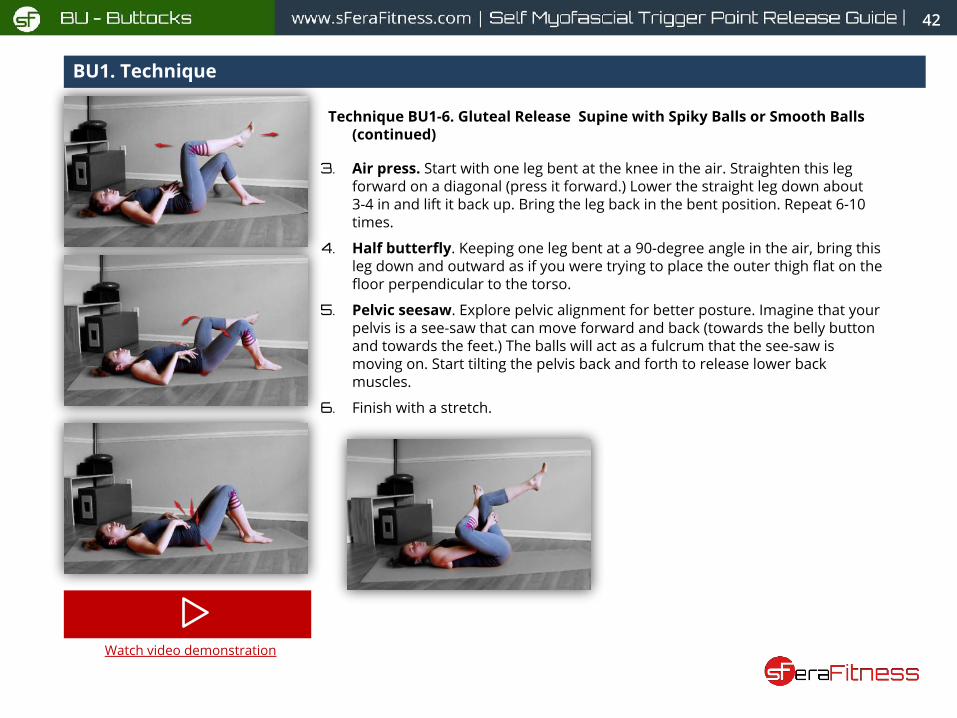
Technique BU1-6. Gluteal Release Supine with Spiky Balls or Smooth Balls (continued)
3. Air press. Start with one leg bent at the knee in the air. Straighten this leg forward on a diagonal (press it forward.) Lower the straight leg down about 3-4 in and lift it back up. Bring the leg back in the bent position. Repeat 6-10 times.
4. Half butterfly. Keeping one leg bent at a 90-degree angle in the air, bring this leg down and outward as if you were trying to place the outer thigh flat on the floor perpendicular to the torso.
5. Pelvic seesaw. Explore pelvic alignment for better posture. Imagine that your pelvis is a see-saw that can move forward and back (towards the belly button and towards the feet.) The balls will act as a fulcrum that the see-saw is moving on. Start tilting the pelvis back and forth to release lower back muscles.
6. Finish with a stretch.
Watch video demonstration
43
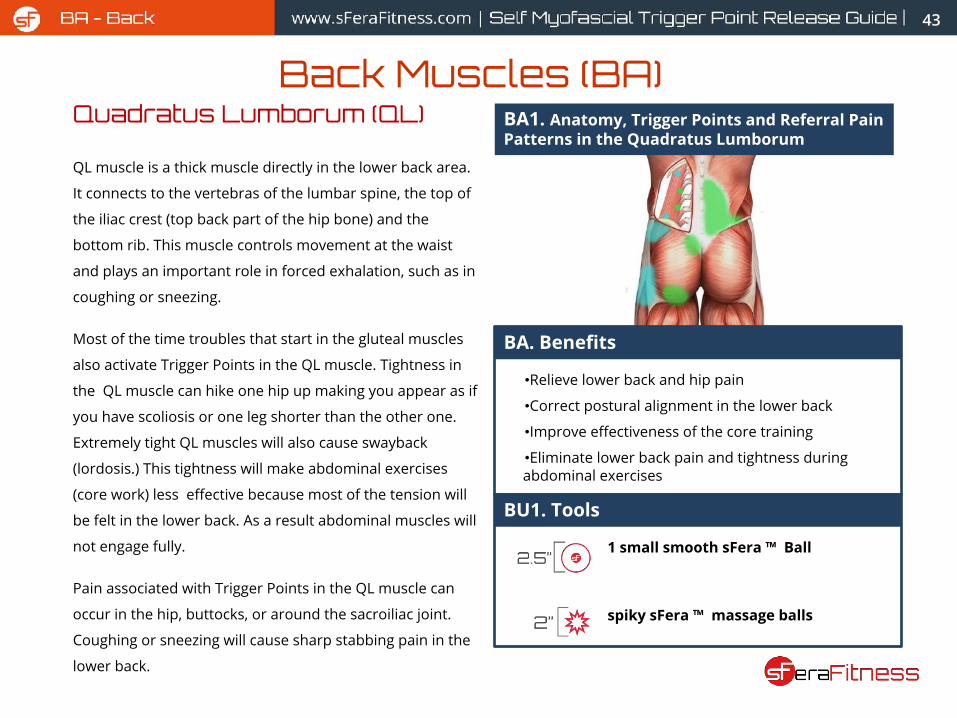
Quadratus Lumborum (QL)
QL muscle is a thick muscle directly in the lower back area.
It connects to the vertebras of the lumbar spine, the top of
the iliac crest (top back part of the hip bone) and the
bottom rib. This muscle controls movement at the waist
and plays an important role in forced exhalation, such as in
coughing or sneezing.
Most of the time troubles that start in the gluteal muscles
also activate Trigger Points in the QL muscle. Tightness in
the QL muscle can hike one hip up making you appear as if
you have scoliosis or one leg shorter than the other one.
Extremely tight QL muscles will also cause swayback
(lordosis.) This tightness will make abdominal exercises
(core work) less effective because most of the tension will
be felt in the lower back. As a result abdominal muscles will
not engage fully.
Pain associated with Trigger Points in the QL muscle can
occur in the hip, buttocks, or around the sacroiliac joint.
Coughing or sneezing will cause sharp stabbing pain in the
lower back.
Back Muscles (BA)
BA. Benefits
•Relieve lower back and hip pain
•Correct postural alignment in the lower back
•Improve effectiveness of the core training
•Eliminate lower back pain and tightness during abdominal exercises
BU1. Tools
1 small smooth sFera ™ Ball
spiky sFera ™ massage balls
BA1. Anatomy, Trigger Points and Referral Pain Patterns in the Quadratus Lumborum
44
BA1. Technique
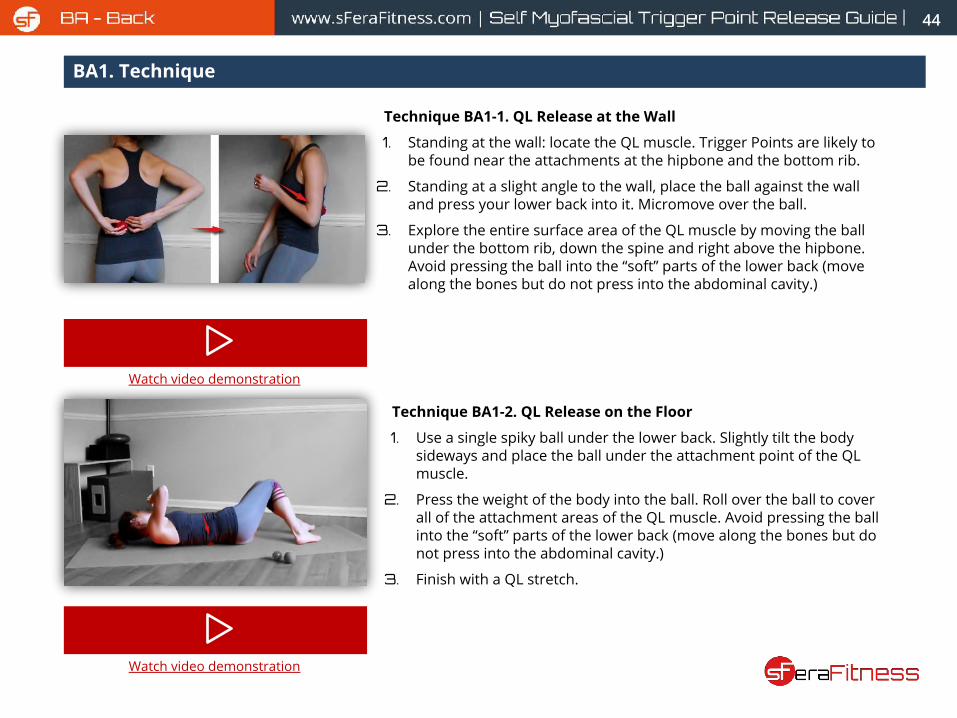
Technique BA1-1. QL Release at the Wall
1. Standing at the wall: locate the QL muscle. Trigger Points are likely to be found near the attachments at the hipbone and the bottom rib.
2. Standing at a slight angle to the wall, place the ball against the wall and press your lower back into it. Micromove over the ball.
3. Explore the entire surface area of the QL muscle by moving the ball under the bottom rib, down the spine and right above the hipbone. Avoid pressing the ball into the “soft” parts of the lower back (move along the bones but do not press into the abdominal cavity.)
Watch video demonstration
Technique BA1-2. QL Release on the Floor
1. Use a single spiky ball under the lower back. Slightly tilt the body sideways and place the ball under the attachment point of the QL muscle.
2. Press the weight of the body into the ball. Roll over the ball to cover all of the attachment areas of the QL muscle. Avoid pressing the ball into the “soft” parts of the lower back (move along the bones but do not press into the abdominal cavity.)
3. Finish with a QL stretch.
Watch video demonstration
45
Spinal Muscles
All of the muscles that run along the spine can be divided
into two groups - deep spinal muscles and superficial
muscles. Deep spinal muscles are very short muscles
oriented diagonally to the spine to gain leverage on
individual vertebrae. Superficial spinal muscles are long
muscles running parallel to the spine. It is obvious, that
jobs of all spinal muscles involve movement and
stabilization of the spine and we can hardly
underestimate their value.
It is impossible to work on Trigger Points in deep spinal
muscles without involving superficial ones and vice versa.
For this reason, we will address Trigger Points that occur
along the spine all together.
Pain associated with Trigger Points in the deep spinal
muscles is usually localized along the spine. Extreme
tension in deep spinal muscles can compress nerves
coming out of the spine and cause numbness in the
areas serves by those nerves. Chronic tension in these
muscles can alter spinal alignment by causing scoliosis.
Superficial spinal muscles often refer pain to the area 1-2
inches away from the spine. This pain can be felt in the
lower back, buttocks, at the lower ribs, and at the bottom
of the shoulder blade. Trigger Points in superficial spinal
muscles will also tighten the muscles and create a visible
bulge on the back.
All spinal muscles become extremely vulnerable if the
abdominal muscles are weak and deconditioned. Any
sudden movement, bad twist, heavy lifting (especially
with a bad technique) can cause an injury to these
muscles and create Trigger Points in them. Poor posture
(slouching, uneven weight distribution) are another
cause of Trigger Points and unexplained back pain.
Releasing Trigger Points in the spinal muscles is the first
step in correcting posture and eliminating back pain.
However, core training is the second most important step
in preventing those Trigger Points from flaring up again.
Pilates is one of the best forms of deep core training that
teaches you proper body mechanics that can be used in
any other activity that you are interested in.
46
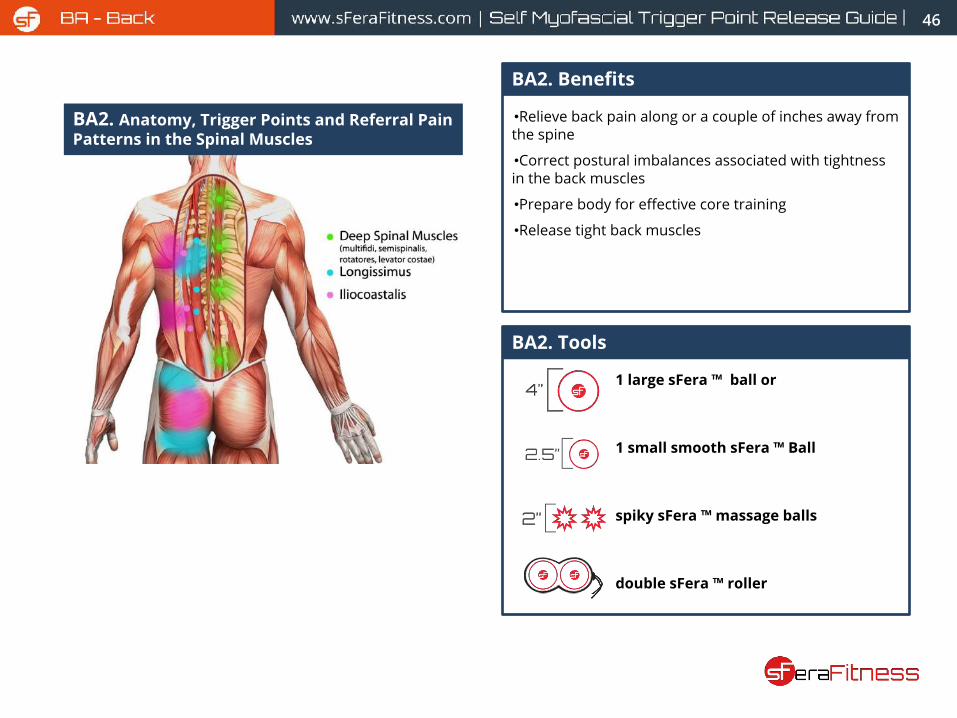
BA2. Anatomy, Trigger Points and Referral Pain Patterns in the Spinal Muscles
BA2. Benefits
•Relieve back pain along or a couple of inches away from the spine
•Correct postural imbalances associated with tightness in the back muscles
•Prepare body for effective core training
•Release tight back muscles
BA2. Tools
1 large sFera ™ ball or
1 small smooth sFera ™ Ball
spiky sFera ™ massage balls
double sFera ™ roller
47
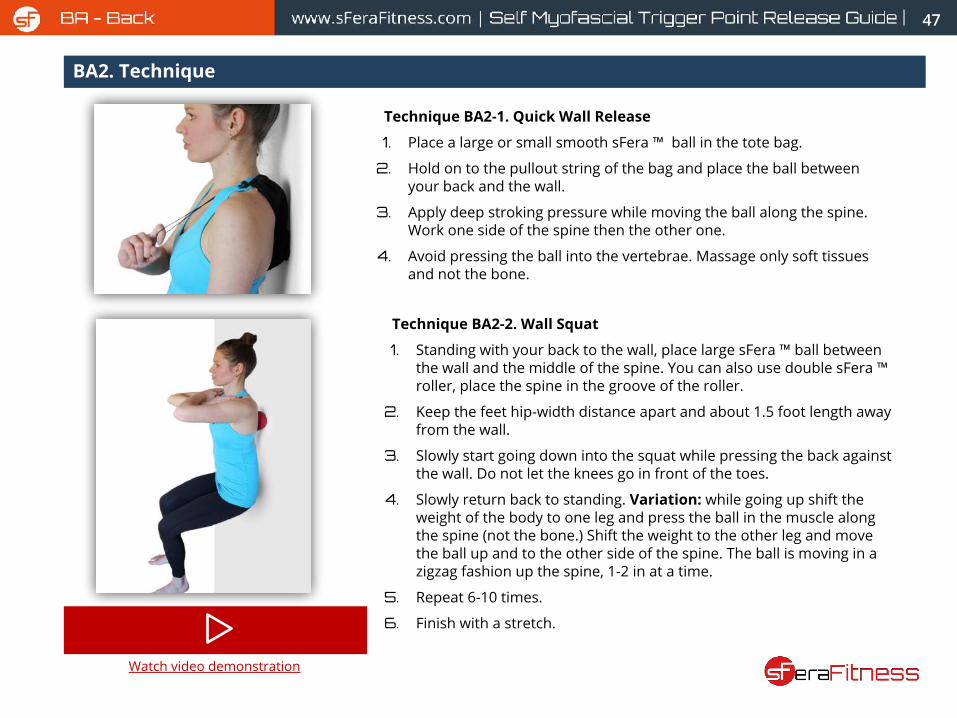
BA2. Technique
Technique BA2-1. Quick Wall Release
1. Place a large or small smooth sFera ™ ball in the tote bag.
2. Hold on to the pullout string of the bag and place the ball between your back and the wall.
3. Apply deep stroking pressure while moving the ball along the spine. Work one side of the spine then the other one.
4. Avoid pressing the ball into the vertebrae. Massage only soft tissues and not the bone.
Technique BA2-2. Wall Squat
1. Standing with your back to the wall, place large sFera ™ ball between the wall and the middle of the spine. You can also use double sFera ™ roller, place the spine in the groove of the roller.
2. Keep the feet hip-width distance apart and about 1.5 foot length away from the wall.
3. Slowly start going down into the squat while pressing the back against the wall. Do not let the knees go in front of the toes.
4. Slowly return back to standing. Variation: while going up shift the weight of the body to one leg and press the ball in the muscle along the spine (not the bone.) Shift the weight to the other leg and move the ball up and to the other side of the spine. The ball is moving in a zigzag fashion up the spine, 1-2 in at a time.
5. Repeat 6-10 times.
6. Finish with a stretch.
Watch video demonstration
48
BA2. Technique
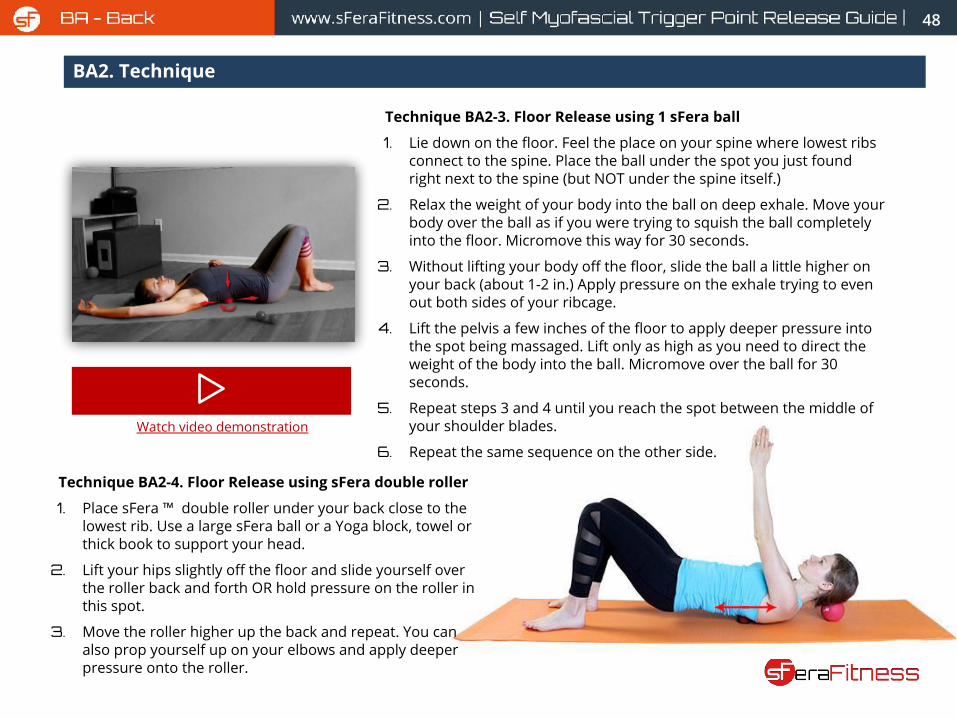
Technique BA2-3. Floor Release using 1 sFera ball
1. Lie down on the floor. Feel the place on your spine where lowest ribs connect to the spine. Place the ball under the spot you just found right next to the spine (but NOT under the spine itself.)
2. Relax the weight of your body into the ball on deep exhale. Move your body over the ball as if you were trying to squish the ball completely into the floor. Micromove this way for 30 seconds.
3. Without lifting your body off the floor, slide the ball a little higher on your back (about 1-2 in.) Apply pressure on the exhale trying to even out both sides of your ribcage.
4. Lift the pelvis a few inches of the floor to apply deeper pressure into the spot being massaged. Lift only as high as you need to direct the weight of the body into the ball. Micromove over the ball for 30 seconds.
5. Repeat steps 3 and 4 until you reach the spot between the middle of your shoulder blades.
6. Repeat the same sequence on the other side.
Watch video demonstration
Technique BA2-4. Floor Release using sFera double roller
1. Place sFera ™ double roller under your back close to the lowest rib. Use a large sFera ball or a Yoga block, towel or thick book to support your head.
2. Lift your hips slightly off the floor and slide yourself over the roller back and forth OR hold pressure on the roller in this spot.
3. Move the roller higher up the back and repeat. You can also prop yourself up on your elbows and apply deeper pressure onto the roller.
49
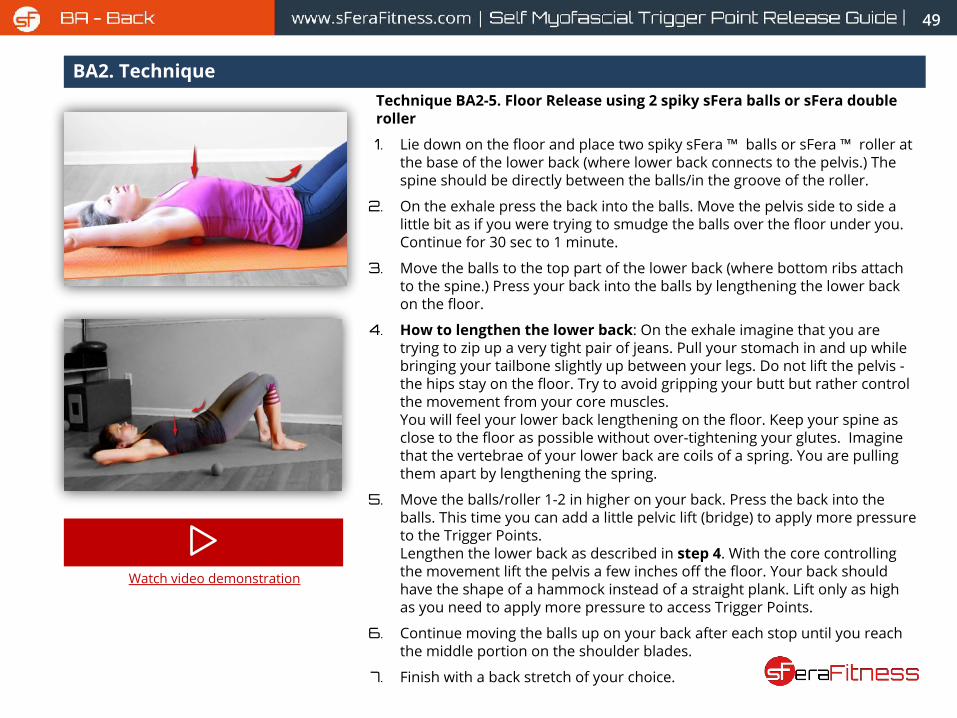
BA2. TechniqueTechnique BA2-5. Floor Release using 2 spiky sFera balls or sFera double roller
1. Lie down on the floor and place two spiky sFera ™ balls or sFera ™ roller at the base of the lower back (where lower back connects to the pelvis.) The spine should be directly between the balls/in the groove of the roller.
2. On the exhale press the back into the balls. Move the pelvis side to side a little bit as if you were trying to smudge the balls over the floor under you. Continue for 30 sec to 1 minute.
3. Move the balls to the top part of the lower back (where bottom ribs attach to the spine.) Press your back into the balls by lengthening the lower back on the floor.
4. How to lengthen the lower back: On the exhale imagine that you are trying to zip up a very tight pair of jeans. Pull your stomach in and up while bringing your tailbone slightly up between your legs. Do not lift the pelvis - the hips stay on the floor. Try to avoid gripping your butt but rather control the movement from your core muscles. You will feel your lower back lengthening on the floor. Keep your spine as close to the floor as possible without over-tightening your glutes. Imagine that the vertebrae of your lower back are coils of a spring. You are pulling them apart by lengthening the spring.
5. Move the balls/roller 1-2 in higher on your back. Press the back into the balls. This time you can add a little pelvic lift (bridge) to apply more pressure to the Trigger Points.Lengthen the lower back as described in step 4. With the core controlling the movement lift the pelvis a few inches off the floor. Your back should have the shape of a hammock instead of a straight plank. Lift only as high as you need to apply more pressure to access Trigger Points.
6. Continue moving the balls up on your back after each stop until you reach the middle portion on the shoulder blades.
7. Finish with a back stretch of your choice.
Watch video demonstration
50
Upper and Mid Back MusclesUpper and Mid back pain symptoms are second only to
lower back issues. Both athletes and sedentary people
can suffer from Trigger Points in this area. Our modern
lifestyle that involves driving, working at the computer
for many hours and looking at small screen (how often
do you check your email or pull up an app on your
phone or tablet?) aggravates Trigger Points in this area.
Poor posture that is associated with our screen-oriented
lifestyle is the main cause of Trigger Points in this area.
Many people also tend to hold a lot of their emotional
stress in the upper back area. Most of the muscles in
this area play a role in the movement of the shoulder or
breathing. Shallow breathing (associated with stress) as
well as the tendency to keep the shoulders up both
promote tension in the upper area and activation of the
Trigger Points.
Trigger Points in one muscles will usually set up a chain
reaction of Trigger Points in all of the neighboring areas.
Trigger Points in different muscles may overlap one
another (a superficial muscle will be covering Trigger
Points of a deeper muscle located underneath it.)
Latissimus Dorsi and Serratus
Posterior Inferior
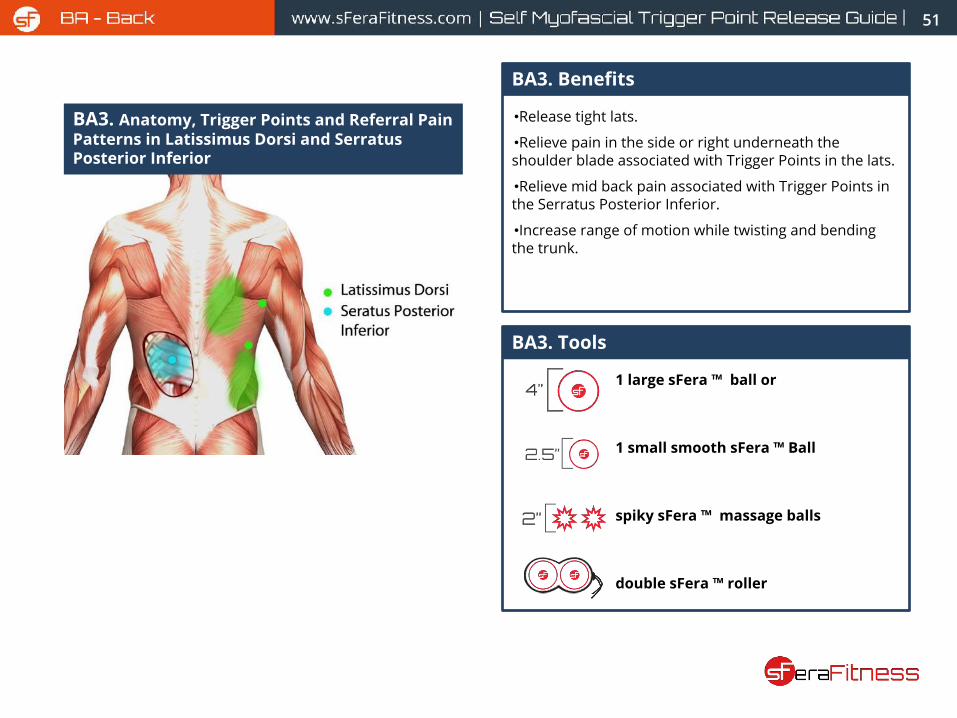
Latissimus Dorsi or lats is the widest muscle of the back.
When well developed it creates a beautiful V-shape of
the back. Even though the muscle covers most of the
lower and mid back its primary action is to move the
arm towards the chest (adduction), extend the arm back
and rotate it inwardly. The muscle also helps to
compress the thorax while coughing. Most of the athletic
activities that involve arm movement can set up Trigger
Points in the lats.
Serratus Posterior Inferior assists in rotation and
extension of the trunk as well as forceful exhalation.
Even though lats and Serratus Posterior Inferior have
completely different functions their location on the body
makes it convenient to massage both of them at the
same time.
Painful Trigger Points in the Serratus Posterior Inferior
can be caused by a sagging mattress or simply
overstretching the muscle while twisting or reaching
overhead.
51
BA3. Anatomy, Trigger Points and Referral Pain Patterns in Latissimus Dorsi and Serratus Posterior Inferior
BA3. Benefits
•Release tight lats.
•Relieve pain in the side or right underneath the shoulder blade associated with Trigger Points in the lats.
•Relieve mid back pain associated with Trigger Points in the Serratus Posterior Inferior.
•Increase range of motion while twisting and bending the trunk.
BA3. Tools
1 large sFera ™ ball or
1 small smooth sFera ™ Ball
spiky sFera ™ massage balls
double sFera ™ roller
52
BA3. Technique
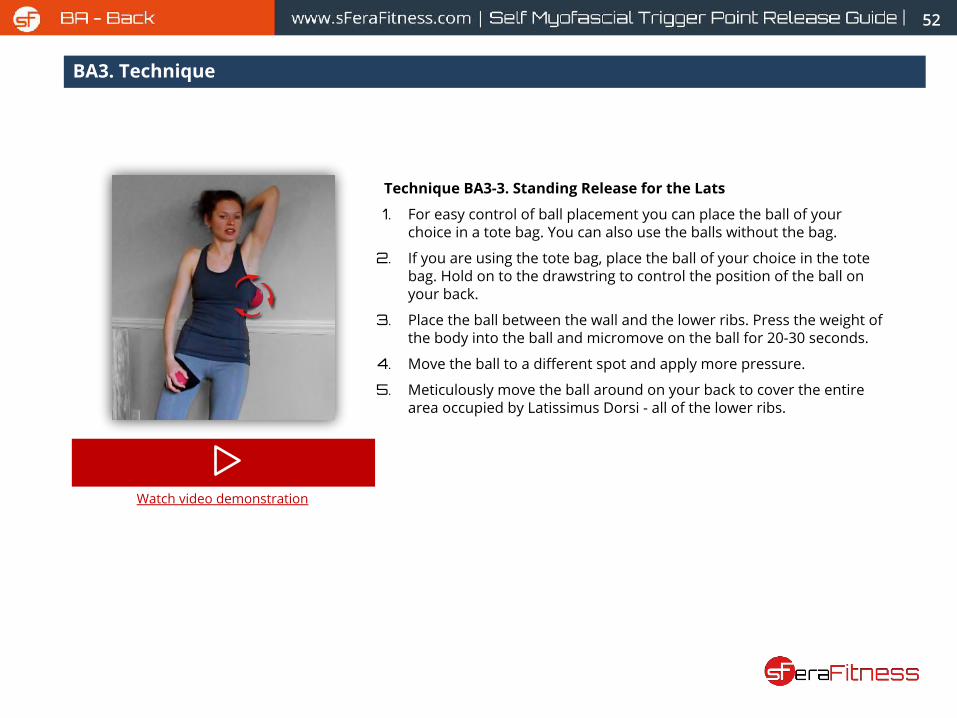
Technique BA3-3. Standing Release for the Lats
1. For easy control of ball placement you can place the ball of your choice in a tote bag. You can also use the balls without the bag.
2. If you are using the tote bag, place the ball of your choice in the tote bag. Hold on to the drawstring to control the position of the ball on your back.
3. Place the ball between the wall and the lower ribs. Press the weight of the body into the ball and micromove on the ball for 20-30 seconds.
4. Move the ball to a different spot and apply more pressure.
5. Meticulously move the ball around on your back to cover the entire area occupied by Latissimus Dorsi - all of the lower ribs.
Watch video demonstration
53
BA3. Technique
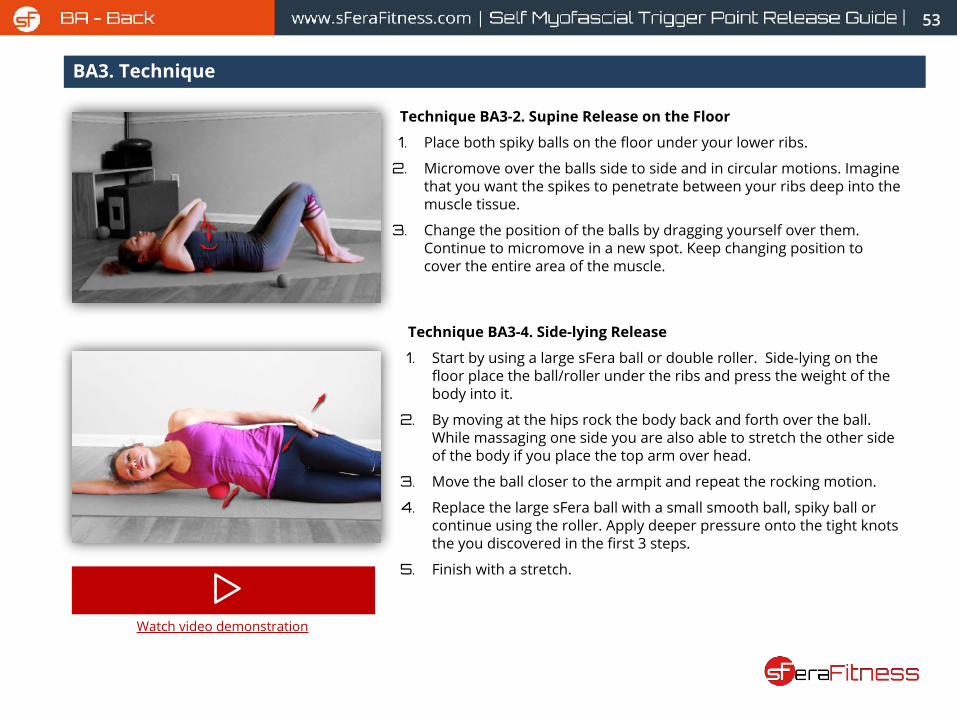
Technique BA3-4. Side-lying Release
1. Start by using a large sFera ball or double roller. Side-lying on the floor place the ball/roller under the ribs and press the weight of the body into it.
2. By moving at the hips rock the body back and forth over the ball. While massaging one side you are also able to stretch the other side of the body if you place the top arm over head.
3. Move the ball closer to the armpit and repeat the rocking motion.
4. Replace the large sFera ball with a small smooth ball, spiky ball or continue using the roller. Apply deeper pressure onto the tight knots the you discovered in the first 3 steps.
5. Finish with a stretch.
Technique BA3-2. Supine Release on the Floor
1. Place both spiky balls on the floor under your lower ribs.
2. Micromove over the balls side to side and in circular motions. Imagine that you want the spikes to penetrate between your ribs deep into the muscle tissue.
3. Change the position of the balls by dragging yourself over them. Continue to micromove in a new spot. Keep changing position to cover the entire area of the muscle.
Watch video demonstration
54
Rhomboids and Serratus Posterior
Superior
Rhomboids and Serratus Posterior Superior both attach to
several vertebrae of the upper back and run diagonally
towards the shoulder blade. Serratus Posterior Superior is
located underneath the Rhomboids and attaches to several
upper ribs. This muscle raises the ribs during inhalation and
it can get overworked during hyperventilation or habitual
chest breathing.
Rhomboids attach to the shoulder blade and play a crucial
role in stabilization and movement of the shoulder blade on
the back ribs.
Tight pectoral muscles that pull shoulders forward are a
very common cause of Trigger Points in the Rhomboids. In
this case the shoulder blades appear to stick out in the back.
Trigger Point release of the Rhomboids in this case has to be
preceded by the release of the Pectoral muscles.
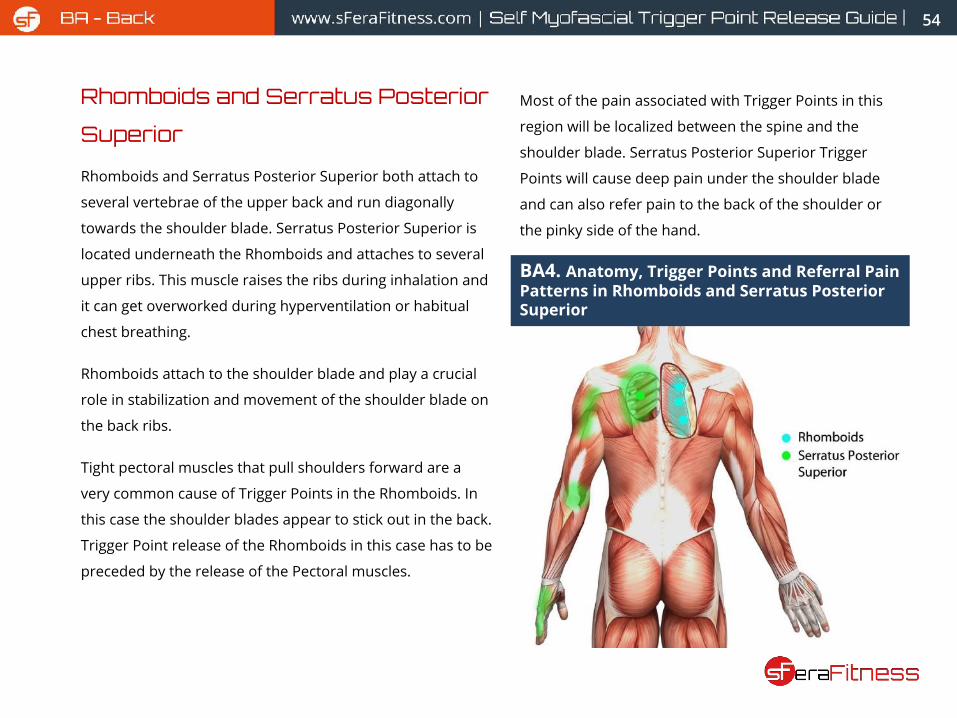
BA4. Anatomy, Trigger Points and Referral Pain Patterns in Rhomboids and Serratus Posterior Superior
Most of the pain associated with Trigger Points in this
region will be localized between the spine and the
shoulder blade. Serratus Posterior Superior Trigger
Points will cause deep pain under the shoulder blade
and can also refer pain to the back of the shoulder or
the pinky side of the hand.
55
BA4. Technique
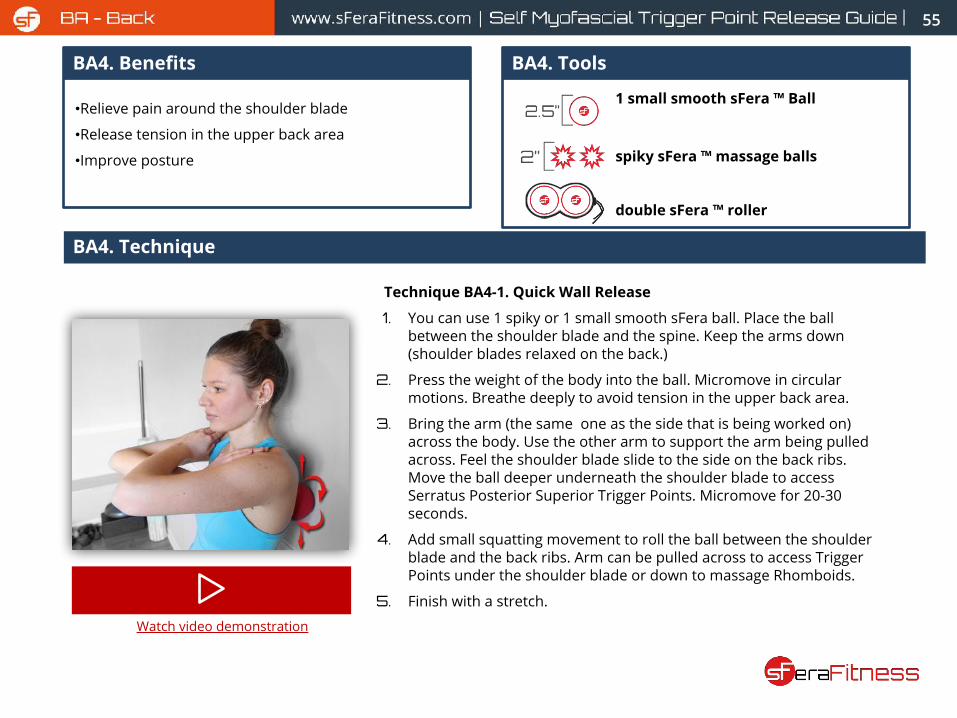
Technique BA4-1. Quick Wall Release
1. You can use 1 spiky or 1 small smooth sFera ball. Place the ball between the shoulder blade and the spine. Keep the arms down (shoulder blades relaxed on the back.)
2. Press the weight of the body into the ball. Micromove in circular motions. Breathe deeply to avoid tension in the upper back area.
3. Bring the arm (the same one as the side that is being worked on) across the body. Use the other arm to support the arm being pulled across. Feel the shoulder blade slide to the side on the back ribs. Move the ball deeper underneath the shoulder blade to access Serratus Posterior Superior Trigger Points. Micromove for 20-30 seconds.
4. Add small squatting movement to roll the ball between the shoulder blade and the back ribs. Arm can be pulled across to access Trigger Points under the shoulder blade or down to massage Rhomboids.
5. Finish with a stretch.
Watch video demonstration
BA4. Benefits
•Relieve pain around the shoulder blade
•Release tension in the upper back area
•Improve posture
BA4. Tools
1 small smooth sFera ™ Ball
spiky sFera ™ massage balls
double sFera ™ roller
56
BA4. Technique
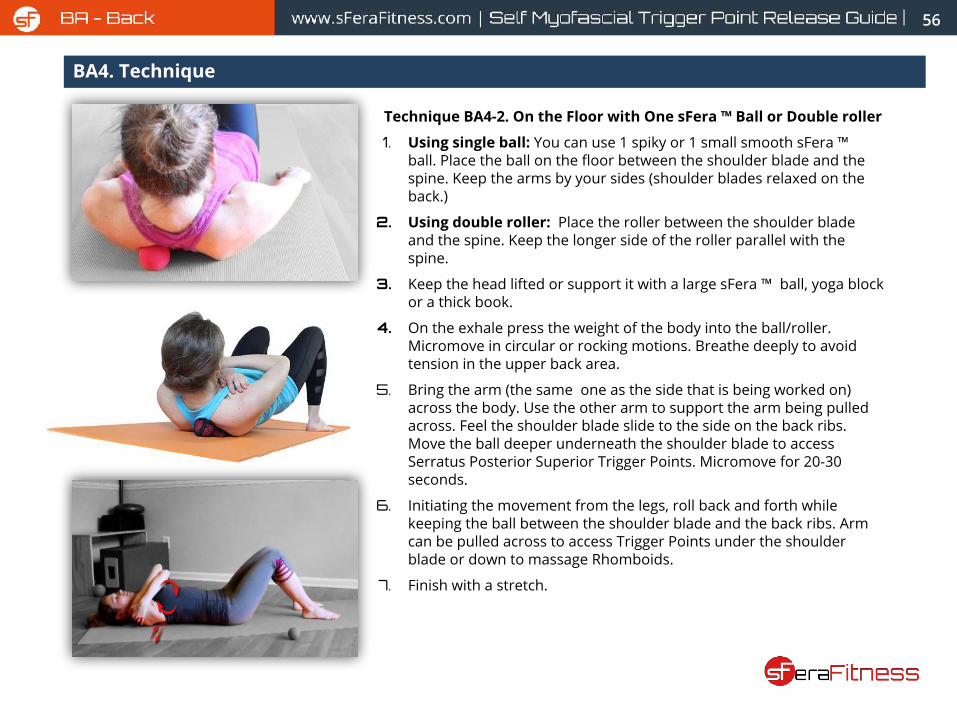
Technique BA4-2. On the Floor with One sFera ™ Ball or Double roller
1. Using single ball: You can use 1 spiky or 1 small smooth sFera ™ ball. Place the ball on the floor between the shoulder blade and the spine. Keep the arms by your sides (shoulder blades relaxed on the back.)
2. Using double roller: Place the roller between the shoulder blade and the spine. Keep the longer side of the roller parallel with the spine.
3. Keep the head lifted or support it with a large sFera ™ ball, yoga block or a thick book.
4. On the exhale press the weight of the body into the ball/roller. Micromove in circular or rocking motions. Breathe deeply to avoid tension in the upper back area.
5. Bring the arm (the same one as the side that is being worked on) across the body. Use the other arm to support the arm being pulled across. Feel the shoulder blade slide to the side on the back ribs. Move the ball deeper underneath the shoulder blade to access Serratus Posterior Superior Trigger Points. Micromove for 20-30 seconds.
6. Initiating the movement from the legs, roll back and forth while keeping the ball between the shoulder blade and the back ribs. Arm can be pulled across to access Trigger Points under the shoulder blade or down to massage Rhomboids.
7. Finish with a stretch.
57
BA4. Technique
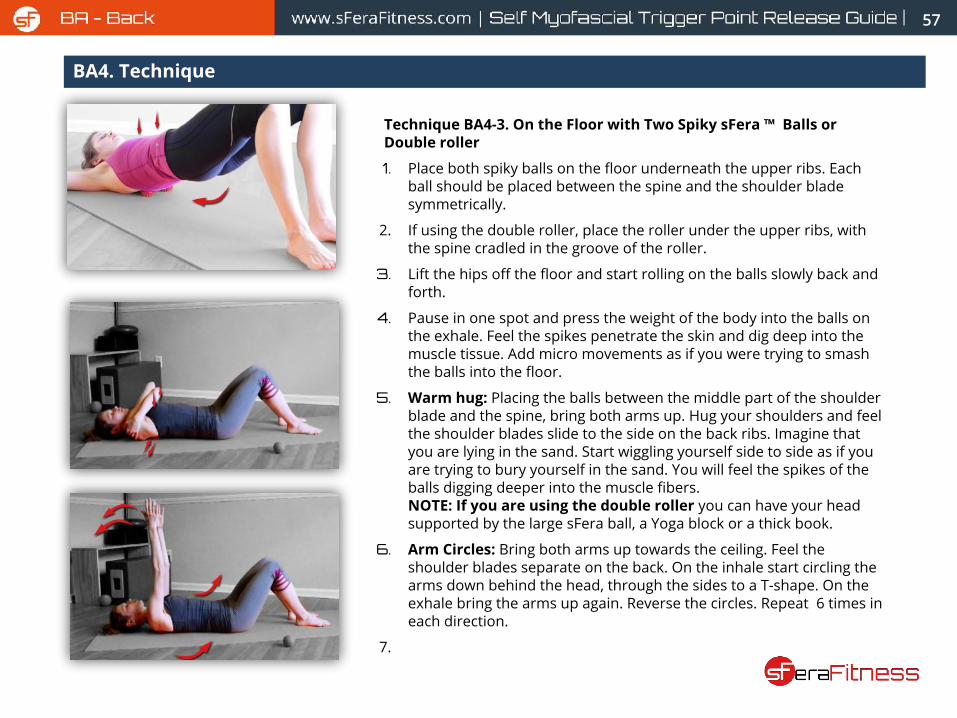
Technique BA4-3. On the Floor with Two Spiky sFera ™ Balls or Double roller
1. Place both spiky balls on the floor underneath the upper ribs. Each ball should be placed between the spine and the shoulder blade symmetrically.
2. If using the double roller, place the roller under the upper ribs, with the spine cradled in the groove of the roller.
3. Lift the hips off the floor and start rolling on the balls slowly back and forth.
4. Pause in one spot and press the weight of the body into the balls on the exhale. Feel the spikes penetrate the skin and dig deep into the muscle tissue. Add micro movements as if you were trying to smash the balls into the floor.
5. Warm hug: Placing the balls between the middle part of the shoulder blade and the spine, bring both arms up. Hug your shoulders and feel the shoulder blades slide to the side on the back ribs. Imagine that you are lying in the sand. Start wiggling yourself side to side as if you are trying to bury yourself in the sand. You will feel the spikes of the balls digging deeper into the muscle fibers. NOTE: If you are using the double roller you can have your head supported by the large sFera ball, a Yoga block or a thick book.
6. Arm Circles: Bring both arms up towards the ceiling. Feel the shoulder blades separate on the back. On the inhale start circling the arms down behind the head, through the sides to a T-shape. On the exhale bring the arms up again. Reverse the circles. Repeat 6 times in each direction.
7.
58
BA4. Technique
Watch video demonstration
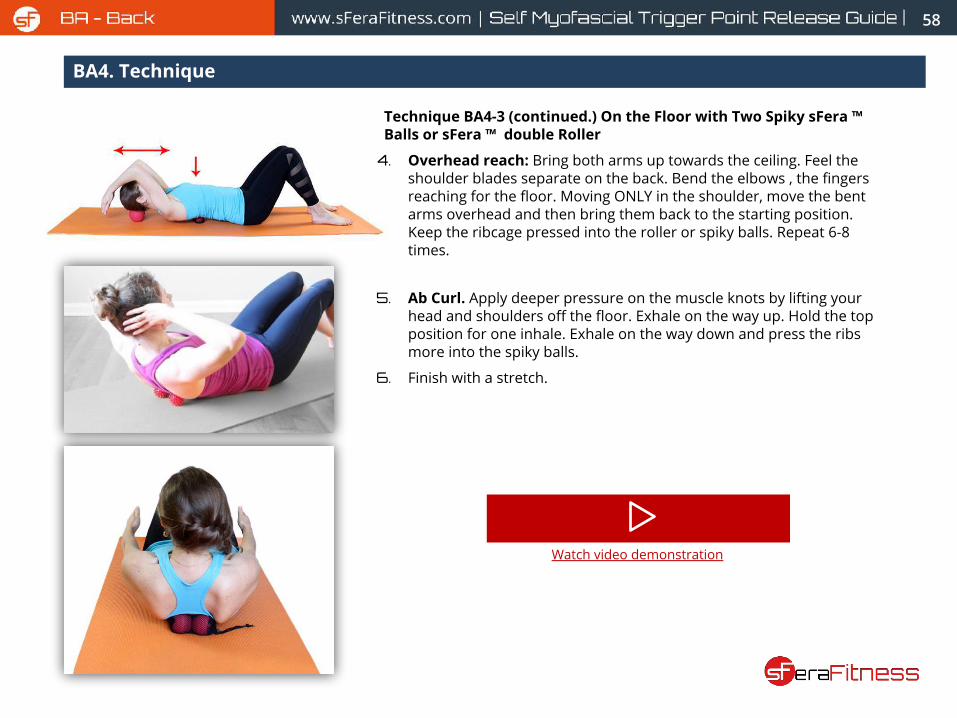
Technique BA4-3 (continued.) On the Floor with Two Spiky sFera ™ Balls or sFera ™ double Roller
4. Overhead reach: Bring both arms up towards the ceiling. Feel the shoulder blades separate on the back. Bend the elbows , the fingers reaching for the floor. Moving ONLY in the shoulder, move the bent arms overhead and then bring them back to the starting position. Keep the ribcage pressed into the roller or spiky balls. Repeat 6-8 times.
5. Ab Curl. Apply deeper pressure on the muscle knots by lifting your head and shoulders off the floor. Exhale on the way up. Hold the top position for one inhale. Exhale on the way down and press the ribs more into the spiky balls.
6. Finish with a stretch.
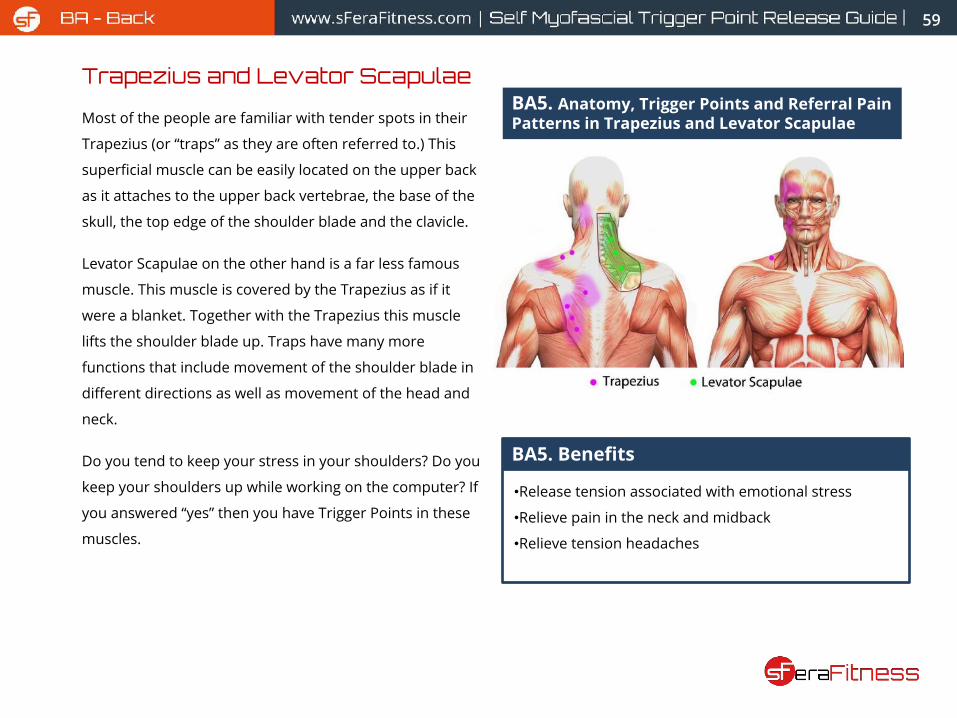
Trapezius and Levator Scapulae
Most of the people are familiar with tender spots in their
Trapezius (or “traps” as they are often referred to.) This
superficial muscle can be easily located on the upper back
as it attaches to the upper back vertebrae, the base of the
skull, the top edge of the shoulder blade and the clavicle.
Levator Scapulae on the other hand is a far less famous
muscle. This muscle is covered by the Trapezius as if it
were a blanket. Together with the Trapezius this muscle
lifts the shoulder blade up. Traps have many more
functions that include movement of the shoulder blade in
different directions as well as movement of the head and
neck.
Do you tend to keep your stress in your shoulders? Do you
keep your shoulders up while working on the computer? If
you answered “yes” then you have Trigger Points in these
muscles.
59
BA5. Anatomy, Trigger Points and Referral Pain Patterns in Trapezius and Levator Scapulae
BA5. Benefits
•Release tension associated with emotional stress
•Relieve pain in the neck and midback
•Relieve tension headaches
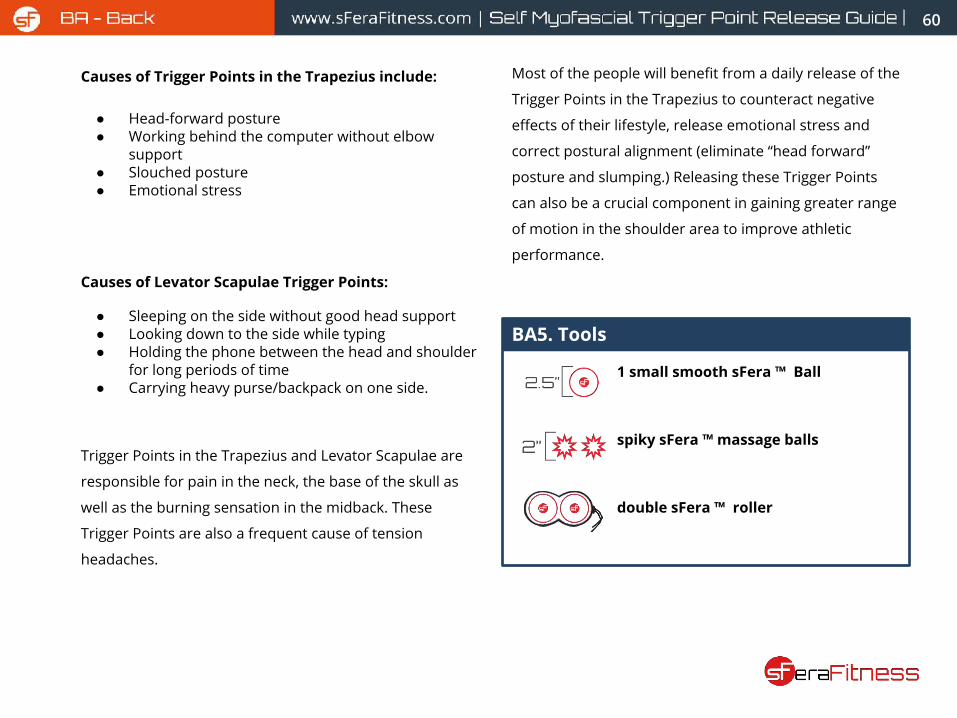
60
BA5. Tools
1 small smooth sFera ™ Ball
spiky sFera ™ massage balls
double sFera ™ roller
Causes of Trigger Points in the Trapezius include:
● Head-forward posture● Working behind the computer without elbow
support● Slouched posture● Emotional stress
Causes of Levator Scapulae Trigger Points:
● Sleeping on the side without good head support● Looking down to the side while typing● Holding the phone between the head and shoulder
for long periods of time● Carrying heavy purse/backpack on one side.
Trigger Points in the Trapezius and Levator Scapulae are
responsible for pain in the neck, the base of the skull as
well as the burning sensation in the midback. These
Trigger Points are also a frequent cause of tension
headaches.
Most of the people will benefit from a daily release of the
Trigger Points in the Trapezius to counteract negative
effects of their lifestyle, release emotional stress and
correct postural alignment (eliminate “head forward”
posture and slumping.) Releasing these Trigger Points
can also be a crucial component in gaining greater range
of motion in the shoulder area to improve athletic
performance.
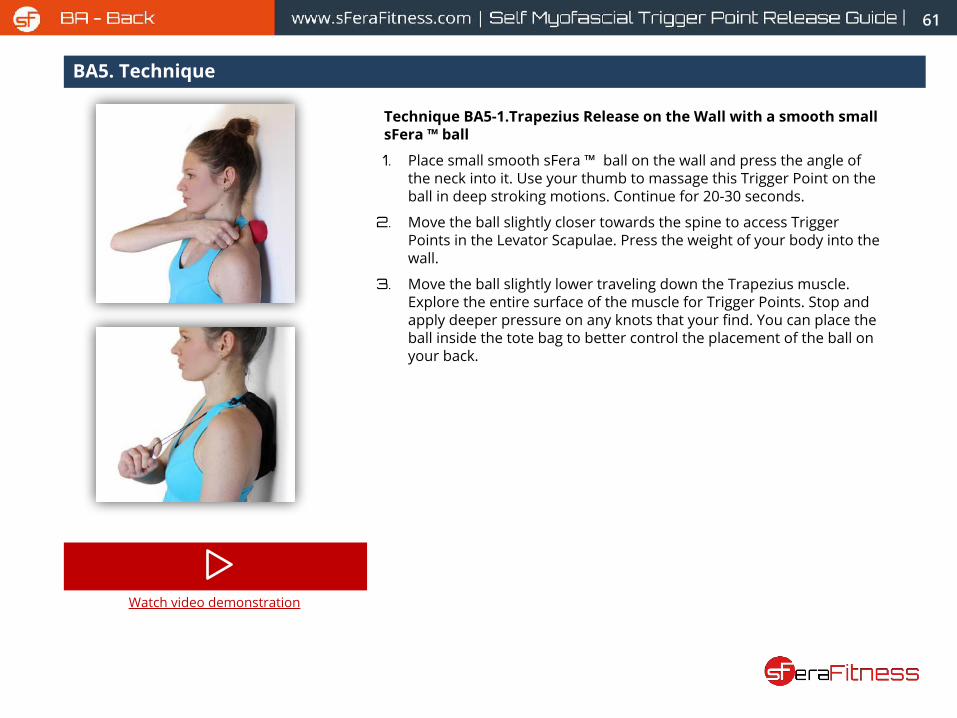
61
BA5. Technique
Technique BA5-1.Trapezius Release on the Wall with a smooth small sFera ™ ball
1. Place small smooth sFera ™ ball on the wall and press the angle of the neck into it. Use your thumb to massage this Trigger Point on the ball in deep stroking motions. Continue for 20-30 seconds.
2. Move the ball slightly closer towards the spine to access Trigger Points in the Levator Scapulae. Press the weight of your body into the wall.
3. Move the ball slightly lower traveling down the Trapezius muscle. Explore the entire surface of the muscle for Trigger Points. Stop and apply deeper pressure on any knots that your find. You can place the ball inside the tote bag to better control the placement of the ball on your back.
Watch video demonstration
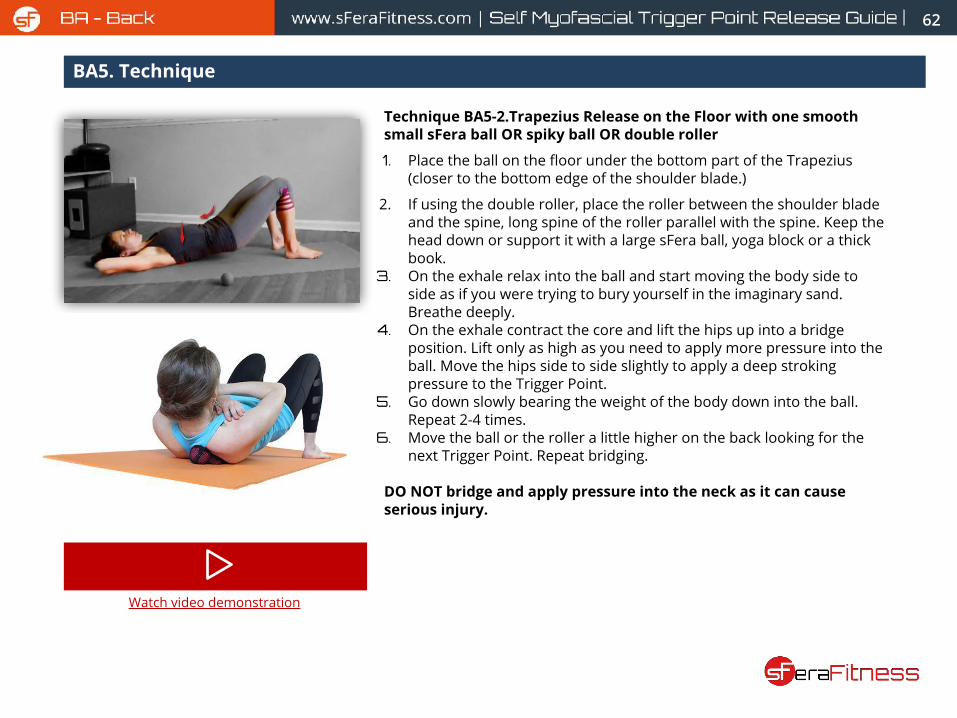
62
BA5. Technique
Technique BA5-2.Trapezius Release on the Floor with one smooth small sFera ball OR spiky ball OR double roller
1. Place the ball on the floor under the bottom part of the Trapezius (closer to the bottom edge of the shoulder blade.)
2. If using the double roller, place the roller between the shoulder blade and the spine, long spine of the roller parallel with the spine. Keep the head down or support it with a large sFera ball, yoga block or a thick book.
3. On the exhale relax into the ball and start moving the body side to side as if you were trying to bury yourself in the imaginary sand. Breathe deeply.
4. On the exhale contract the core and lift the hips up into a bridge position. Lift only as high as you need to apply more pressure into the ball. Move the hips side to side slightly to apply a deep stroking pressure to the Trigger Point.
5. Go down slowly bearing the weight of the body down into the ball. Repeat 2-4 times.
6. Move the ball or the roller a little higher on the back looking for the next Trigger Point. Repeat bridging.
DO NOT bridge and apply pressure into the neck as it can cause serious injury.
Watch video demonstration
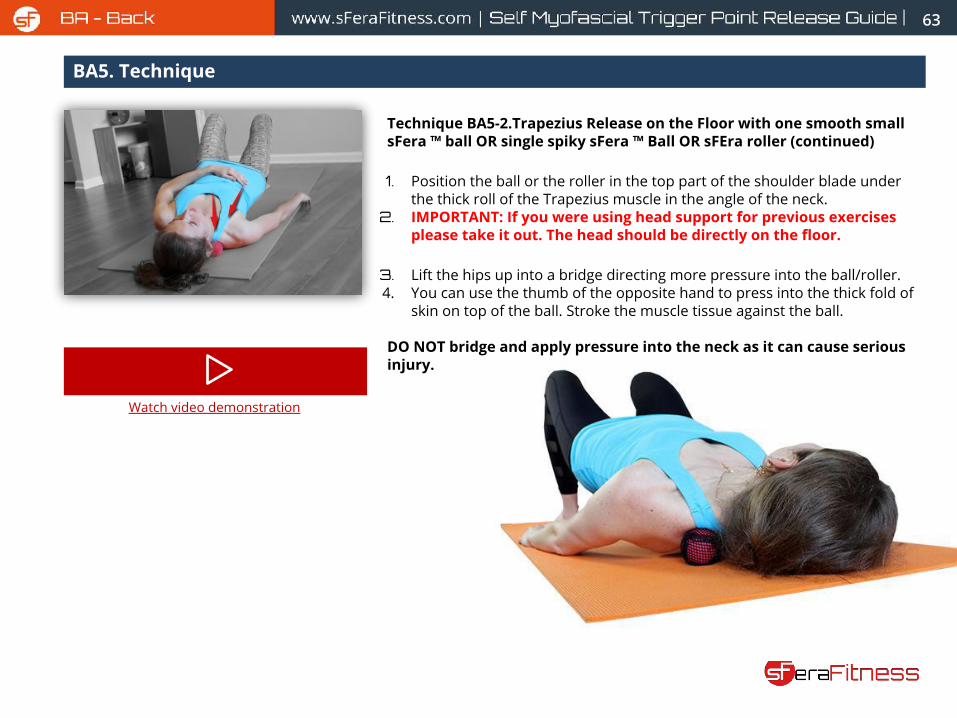
63
BA5. Technique
Technique BA5-2.Trapezius Release on the Floor with one smooth small sFera ™ ball OR single spiky sFera ™ Ball OR sFEra roller (continued)
1. Position the ball or the roller in the top part of the shoulder blade under the thick roll of the Trapezius muscle in the angle of the neck.
2. IMPORTANT: If you were using head support for previous exercises please take it out. The head should be directly on the floor.
3. Lift the hips up into a bridge directing more pressure into the ball/roller.4. You can use the thumb of the opposite hand to press into the thick fold of
skin on top of the ball. Stroke the muscle tissue against the ball.
DO NOT bridge and apply pressure into the neck as it can cause serious injury.
Watch video demonstration
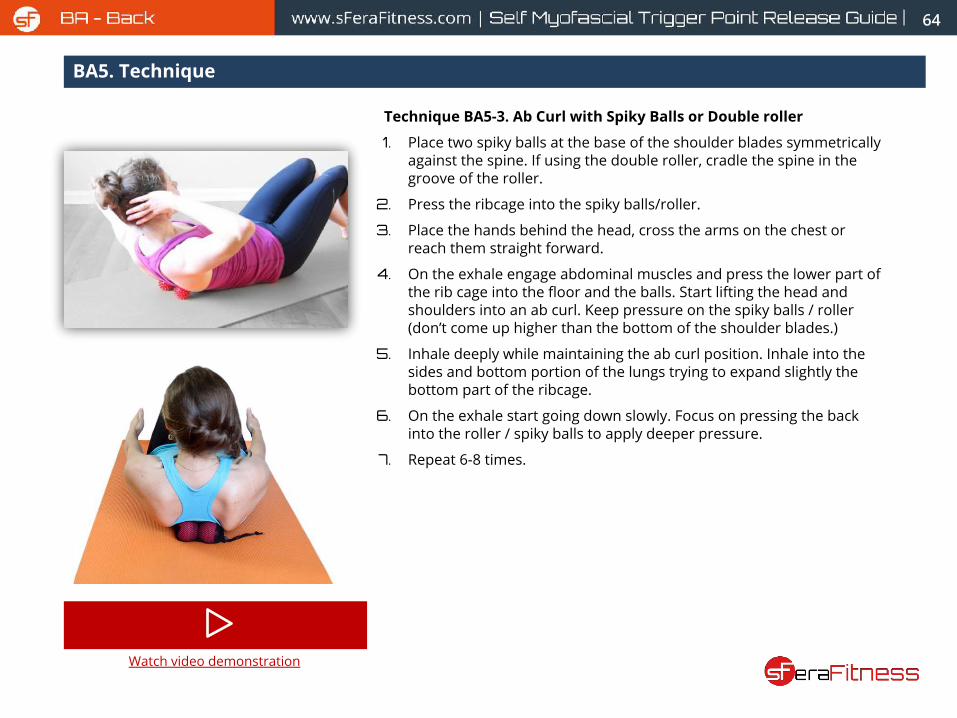
64
BA5. Technique
Technique BA5-3. Ab Curl with Spiky Balls or Double roller
1. Place two spiky balls at the base of the shoulder blades symmetrically against the spine. If using the double roller, cradle the spine in the groove of the roller.
2. Press the ribcage into the spiky balls/roller.
3. Place the hands behind the head, cross the arms on the chest or reach them straight forward.
4. On the exhale engage abdominal muscles and press the lower part of the rib cage into the floor and the balls. Start lifting the head and shoulders into an ab curl. Keep pressure on the spiky balls / roller (don’t come up higher than the bottom of the shoulder blades.)
5. Inhale deeply while maintaining the ab curl position. Inhale into the sides and bottom portion of the lungs trying to expand slightly the bottom part of the ribcage.
6. On the exhale start going down slowly. Focus on pressing the back into the roller / spiky balls to apply deeper pressure.
7. Repeat 6-8 times.
Watch video demonstration
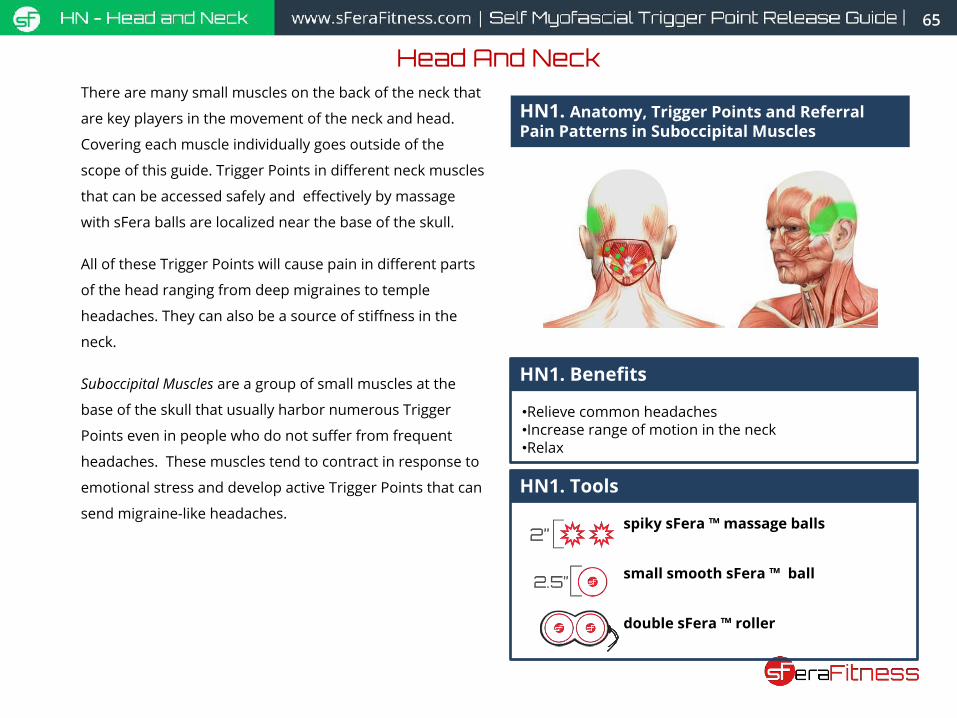
65
There are many small muscles on the back of the neck that
are key players in the movement of the neck and head.
Covering each muscle individually goes outside of the
scope of this guide. Trigger Points in different neck muscles
that can be accessed safely and effectively by massage
with sFera balls are localized near the base of the skull.
All of these Trigger Points will cause pain in different parts
of the head ranging from deep migraines to temple
headaches. They can also be a source of stiffness in the
neck.
Suboccipital Muscles are a group of small muscles at the
base of the skull that usually harbor numerous Trigger
Points even in people who do not suffer from frequent
headaches. These muscles tend to contract in response to
emotional stress and develop active Trigger Points that can
send migraine-like headaches.
Head And Neck
HN1. Anatomy, Trigger Points and Referral Pain Patterns in Suboccipital Muscles
HN1. Benefits
•Relieve common headaches•Increase range of motion in the neck•Relax
HN1. Tools
spiky sFera ™ massage balls
small smooth sFera ™ ball
double sFera ™ roller
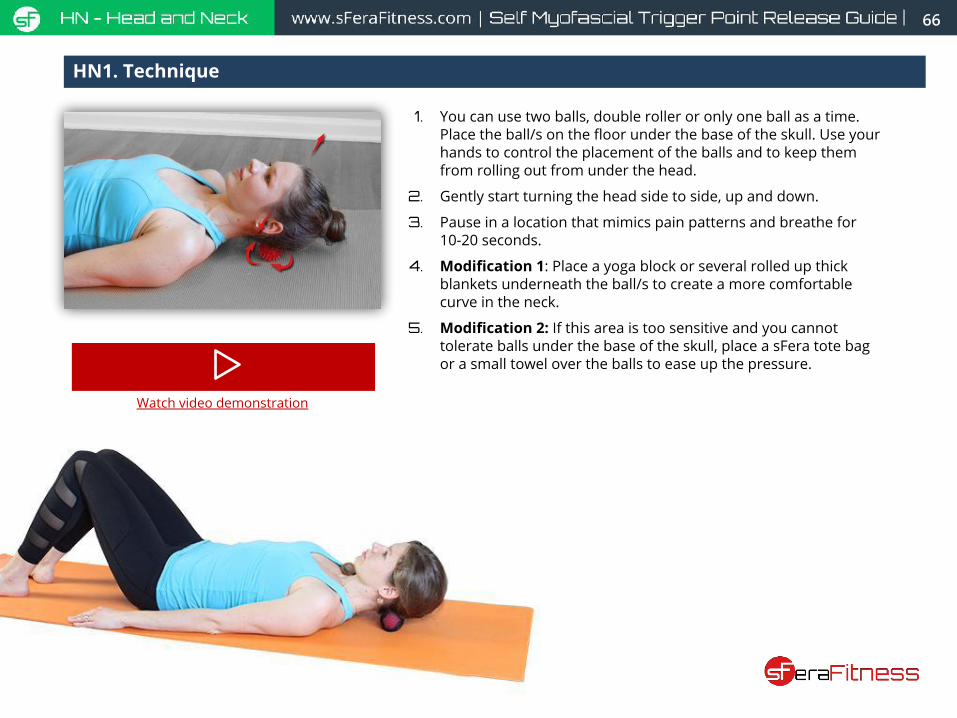
66
HN1. Technique
1. You can use two balls, double roller or only one ball as a time. Place the ball/s on the floor under the base of the skull. Use your hands to control the placement of the balls and to keep them from rolling out from under the head.
2. Gently start turning the head side to side, up and down.
3. Pause in a location that mimics pain patterns and breathe for 10-20 seconds.
4. Modification 1: Place a yoga block or several rolled up thick blankets underneath the ball/s to create a more comfortable curve in the neck.
5. Modification 2: If this area is too sensitive and you cannot tolerate balls under the base of the skull, place a sFera tote bag or a small towel over the balls to ease up the pressure.
Watch video demonstration
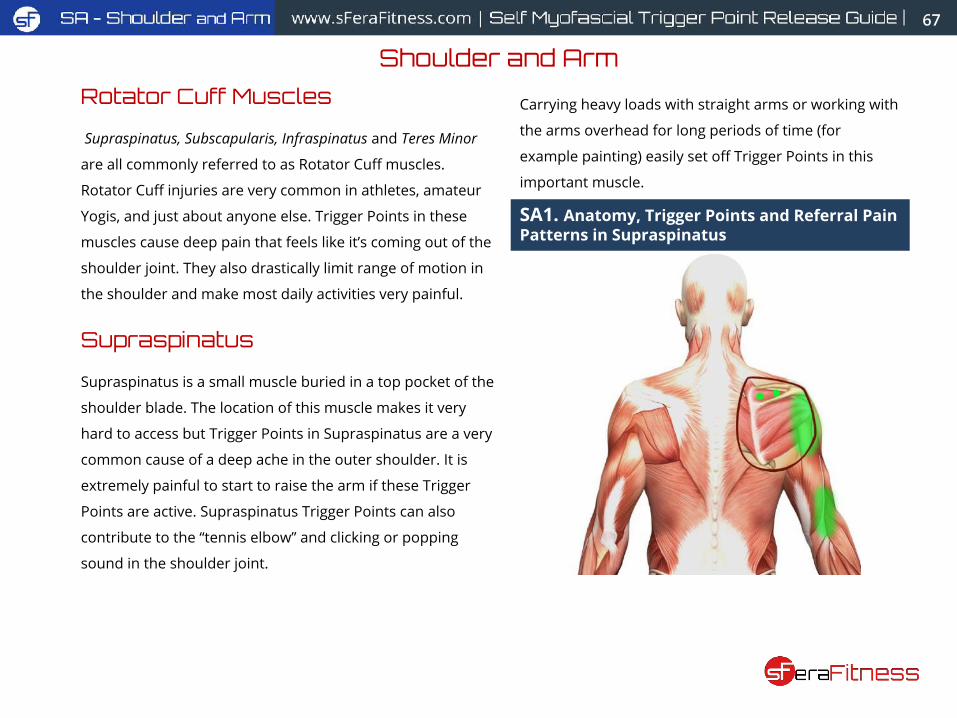
67
Rotator Cuff Muscles
Supraspinatus, Subscapularis, Infraspinatus and Teres Minor
are all commonly referred to as Rotator Cuff muscles.
Rotator Cuff injuries are very common in athletes, amateur
Yogis, and just about anyone else. Trigger Points in these
muscles cause deep pain that feels like it’s coming out of the
shoulder joint. They also drastically limit range of motion in
the shoulder and make most daily activities very painful.
Supraspinatus
Supraspinatus is a small muscle buried in a top pocket of the
shoulder blade. The location of this muscle makes it very
hard to access but Trigger Points in Supraspinatus are a very
common cause of a deep ache in the outer shoulder. It is
extremely painful to start to raise the arm if these Trigger
Points are active. Supraspinatus Trigger Points can also
contribute to the “tennis elbow” and clicking or popping
sound in the shoulder joint.
Shoulder and Arm
SA1. Anatomy, Trigger Points and Referral Pain Patterns in Supraspinatus
Carrying heavy loads with straight arms or working with
the arms overhead for long periods of time (for
example painting) easily set off Trigger Points in this
important muscle.
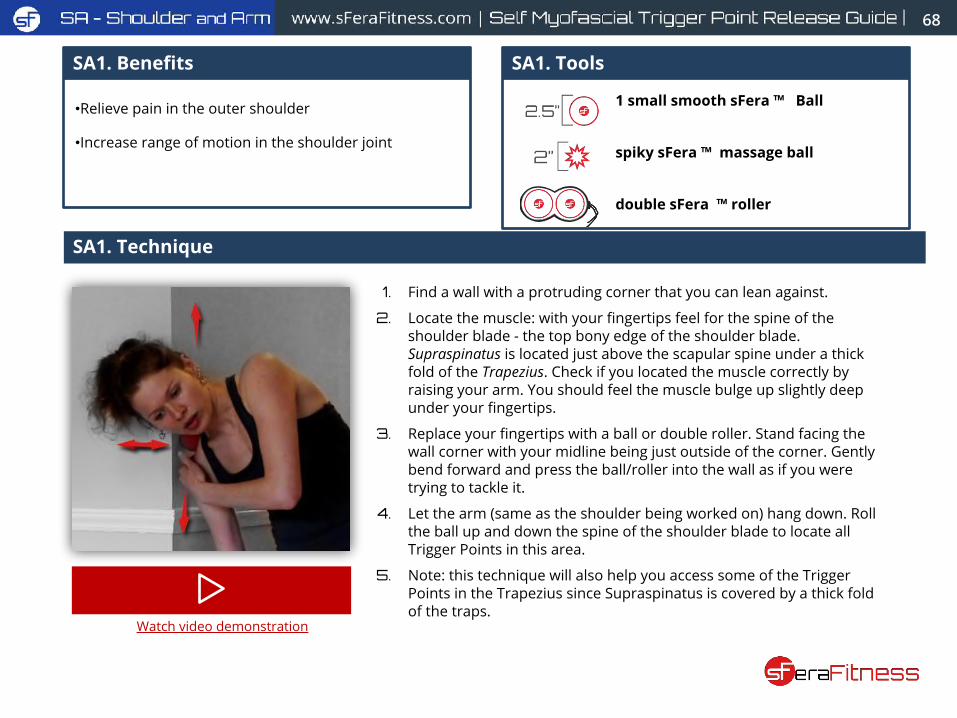
68
SA1. Technique
1. Find a wall with a protruding corner that you can lean against.
2. Locate the muscle: with your fingertips feel for the spine of the shoulder blade - the top bony edge of the shoulder blade. Supraspinatus is located just above the scapular spine under a thick fold of the Trapezius. Check if you located the muscle correctly by raising your arm. You should feel the muscle bulge up slightly deep under your fingertips.
3. Replace your fingertips with a ball or double roller. Stand facing the wall corner with your midline being just outside of the corner. Gently bend forward and press the ball/roller into the wall as if you were trying to tackle it.
4. Let the arm (same as the shoulder being worked on) hang down. Roll the ball up and down the spine of the shoulder blade to locate all Trigger Points in this area.
5. Note: this technique will also help you access some of the Trigger Points in the Trapezius since Supraspinatus is covered by a thick fold of the traps.
Watch video demonstration
SA1. Benefits
•Relieve pain in the outer shoulder
•Increase range of motion in the shoulder joint
SA1. Tools
1 small smooth sFera ™ Ball
spiky sFera ™ massage ball
double sFera ™ roller
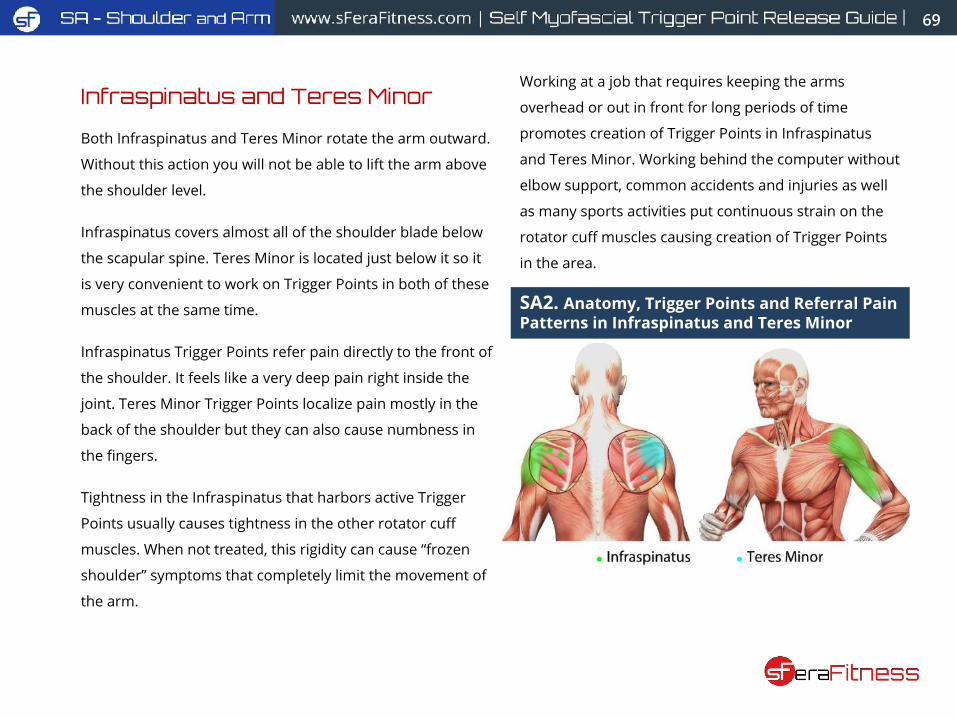
Infraspinatus and Teres Minor
Both Infraspinatus and Teres Minor rotate the arm outward.
Without this action you will not be able to lift the arm above
the shoulder level.
Infraspinatus covers almost all of the shoulder blade below
the scapular spine. Teres Minor is located just below it so it
is very convenient to work on Trigger Points in both of these
muscles at the same time.
Infraspinatus Trigger Points refer pain directly to the front of
the shoulder. It feels like a very deep pain right inside the
joint. Teres Minor Trigger Points localize pain mostly in the
back of the shoulder but they can also cause numbness in
the fingers.
Tightness in the Infraspinatus that harbors active Trigger
Points usually causes tightness in the other rotator cuff
muscles. When not treated, this rigidity can cause “frozen
shoulder” symptoms that completely limit the movement of
the arm.
69
SA2. Anatomy, Trigger Points and Referral Pain Patterns in Infraspinatus and Teres Minor
Working at a job that requires keeping the arms
overhead or out in front for long periods of time
promotes creation of Trigger Points in Infraspinatus
and Teres Minor. Working behind the computer without
elbow support, common accidents and injuries as well
as many sports activities put continuous strain on the
rotator cuff muscles causing creation of Trigger Points
in the area.

70
SA2. Technique
1. Locate Infraspinatus muscle: reach one hand behind the back and place the fingertips in the center of the shoulder blade. Rotate the arm being worked on outward and feel the Infraspinatus muscle bulge up under your fingertips.
2. Place the ball of your choice or double roller in the exact spot that you have just found. Get down side-lying on the floor pressing the ball/roller against the floor. Use a large sFera ball, a pillow or a Yoga block for a head support.
3. Initiating the movement from the hips, start rocking the body back and forth on the ball. Pause for 10-20 seconds in a spot that refers pain to the front of the shoulder or is particularly sensitive.
4. Move the ball/roller to a new position on the shoulder blade to explore the entire surface of the Infraspinatus muscle.
5. Move the ball/rolelr to the upper outer edge of the shoulder blade to locate Trigger Points in Teres Minor. Apply pressure and rocking motion for 10-20 seconds to release this Trigger Point.
6. Note: similar release can be performed on the wall however the pressure that can be applied to the Trigger Points will not be as deep. You can place the ball inside the tote bag to better control its placement.
7. Finish with a stretch.
Watch video demonstration
SA2. Benefits•Prevent and release “frozen shoulder” caused by muscle tightness
•Relieve deep pain in front or back of the shoulder
•Release tightness and rigidity in the shoulder
•Improve range of motion in the shoulder joint
SA2. Tools
1 small smooth sFera ™ Ball
1 spiky sFera ™ massage ball
double sFera ™ roller
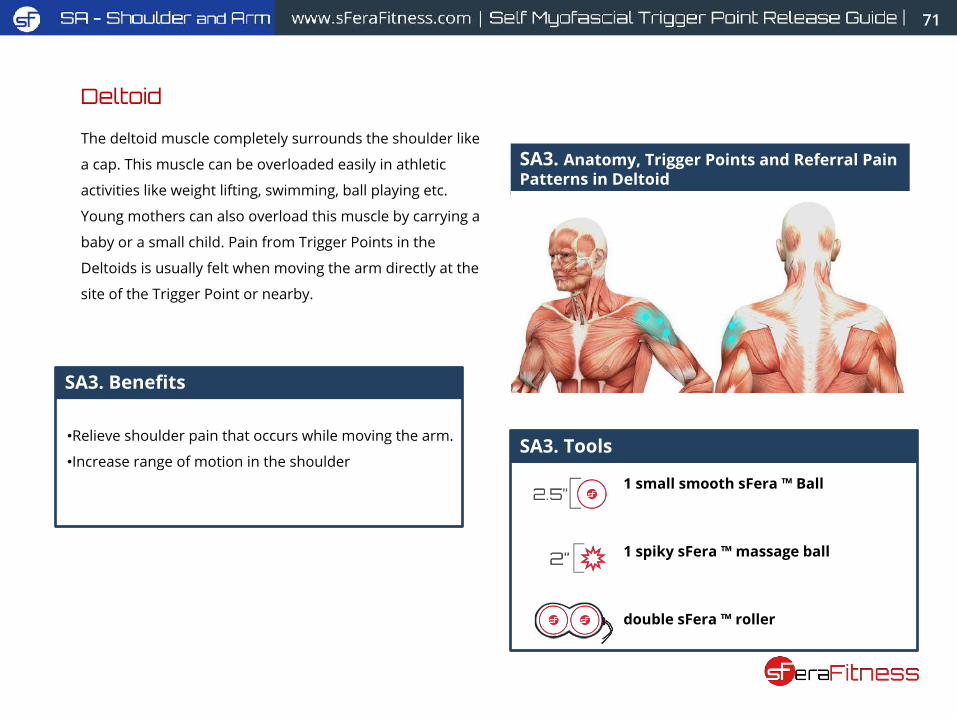
Deltoid
The deltoid muscle completely surrounds the shoulder like
a cap. This muscle can be overloaded easily in athletic
activities like weight lifting, swimming, ball playing etc.
Young mothers can also overload this muscle by carrying a
baby or a small child. Pain from Trigger Points in the
Deltoids is usually felt when moving the arm directly at the
site of the Trigger Point or nearby.
71
SA3. Anatomy, Trigger Points and Referral Pain Patterns in Deltoid
SA3. Benefits
•Relieve shoulder pain that occurs while moving the arm.
•Increase range of motion in the shoulderSA3. Tools
1 small smooth sFera ™ Ball
1 spiky sFera ™ massage ball
double sFera ™ roller
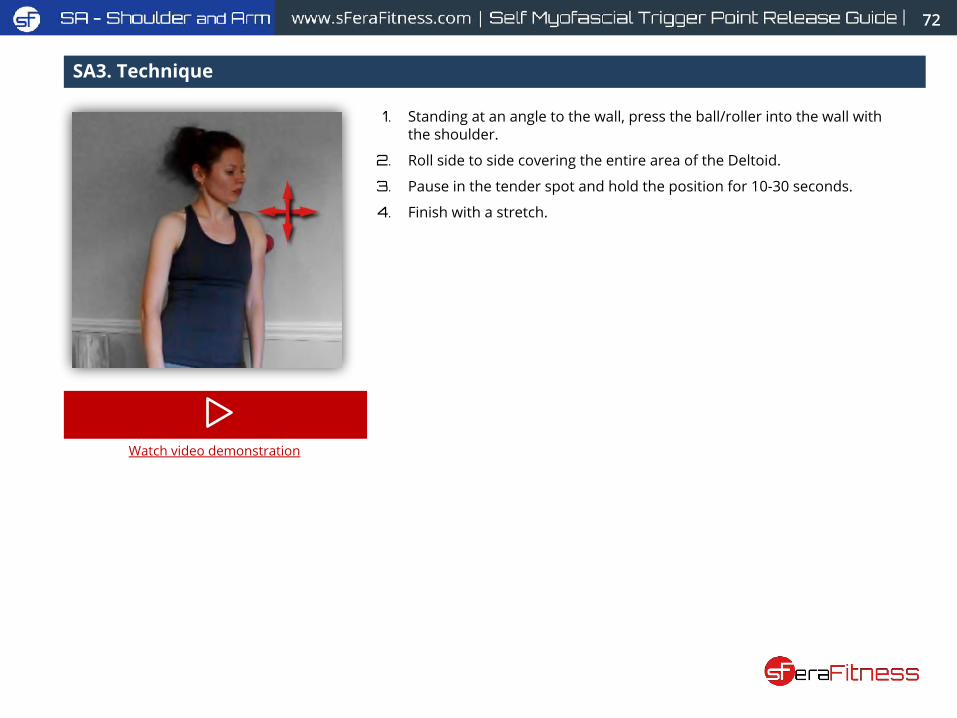
72
SA3. Technique
1. Standing at an angle to the wall, press the ball/roller into the wall with the shoulder.
2. Roll side to side covering the entire area of the Deltoid.
3. Pause in the tender spot and hold the position for 10-30 seconds.
4. Finish with a stretch.
Watch video demonstration
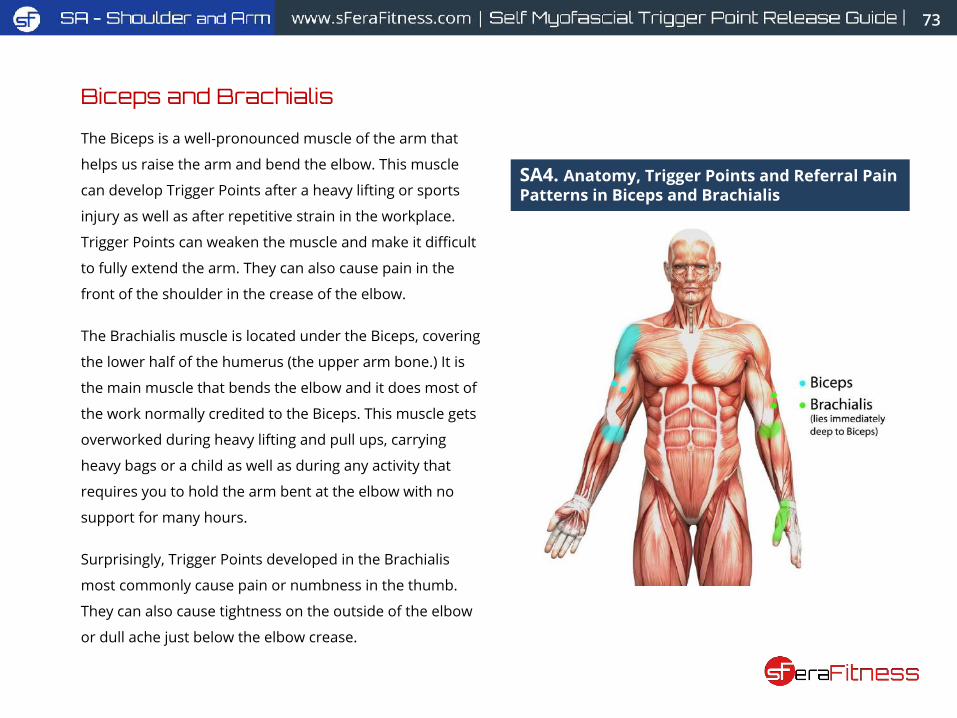
Biceps and Brachialis
The Biceps is a well-pronounced muscle of the arm that
helps us raise the arm and bend the elbow. This muscle
can develop Trigger Points after a heavy lifting or sports
injury as well as after repetitive strain in the workplace.
Trigger Points can weaken the muscle and make it difficult
to fully extend the arm. They can also cause pain in the
front of the shoulder in the crease of the elbow.
The Brachialis muscle is located under the Biceps, covering
the lower half of the humerus (the upper arm bone.) It is
the main muscle that bends the elbow and it does most of
the work normally credited to the Biceps. This muscle gets
overworked during heavy lifting and pull ups, carrying
heavy bags or a child as well as during any activity that
requires you to hold the arm bent at the elbow with no
support for many hours.
Surprisingly, Trigger Points developed in the Brachialis
most commonly cause pain or numbness in the thumb.
They can also cause tightness on the outside of the elbow
or dull ache just below the elbow crease.
73
SA4. Anatomy, Trigger Points and Referral Pain Patterns in Biceps and Brachialis
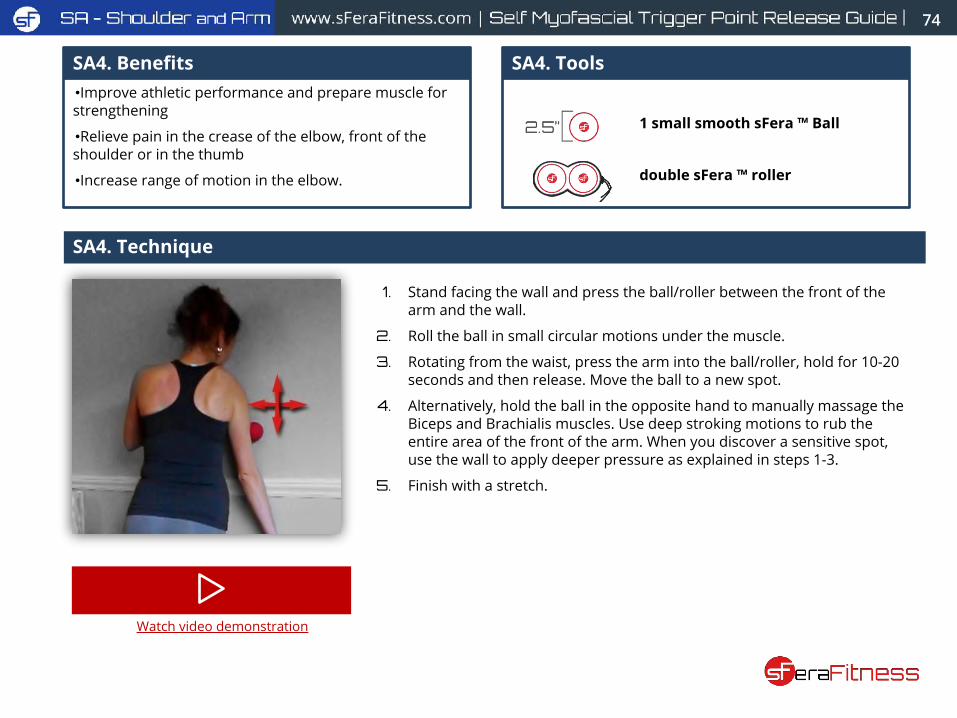
74
SA4. Technique
1. Stand facing the wall and press the ball/roller between the front of the arm and the wall.
2. Roll the ball in small circular motions under the muscle.
3. Rotating from the waist, press the arm into the ball/roller, hold for 10-20 seconds and then release. Move the ball to a new spot.
4. Alternatively, hold the ball in the opposite hand to manually massage the Biceps and Brachialis muscles. Use deep stroking motions to rub the entire area of the front of the arm. When you discover a sensitive spot, use the wall to apply deeper pressure as explained in steps 1-3.
5. Finish with a stretch.
Watch video demonstration
SA4. Benefits•Improve athletic performance and prepare muscle for strengthening
•Relieve pain in the crease of the elbow, front of the shoulder or in the thumb
•Increase range of motion in the elbow.
SA4. Tools
1 small smooth sFera ™ Ball
double sFera ™ roller
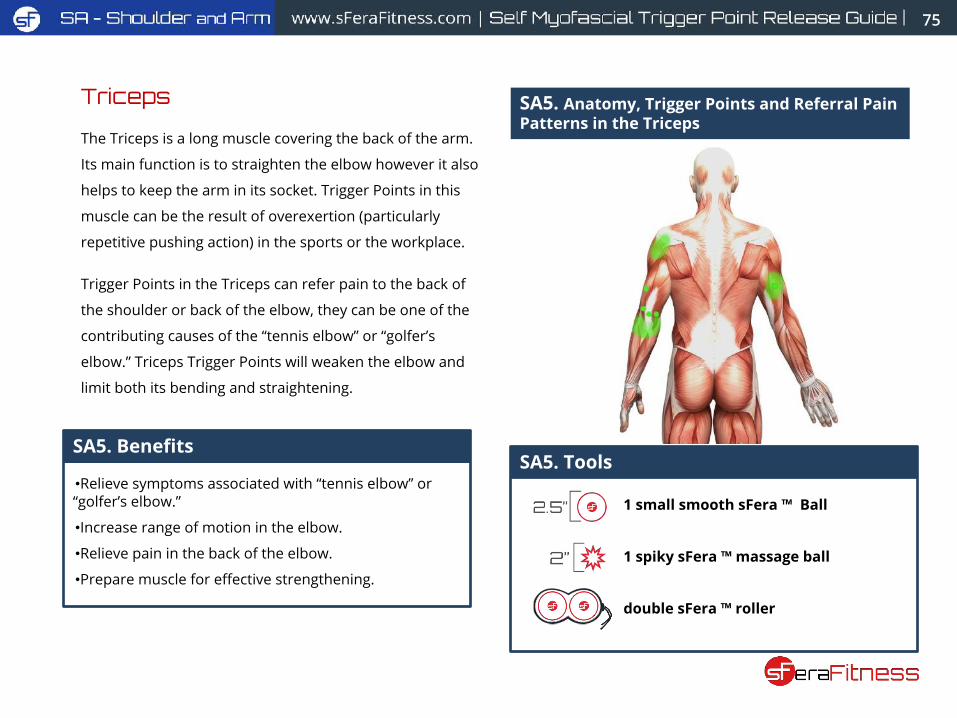
Triceps
The Triceps is a long muscle covering the back of the arm.
Its main function is to straighten the elbow however it also
helps to keep the arm in its socket. Trigger Points in this
muscle can be the result of overexertion (particularly
repetitive pushing action) in the sports or the workplace.
Trigger Points in the Triceps can refer pain to the back of
the shoulder or back of the elbow, they can be one of the
contributing causes of the “tennis elbow” or “golfer’s
elbow.” Triceps Trigger Points will weaken the elbow and
limit both its bending and straightening.
75
SA5. Anatomy, Trigger Points and Referral Pain Patterns in the Triceps
SA5. Benefits
•Relieve symptoms associated with “tennis elbow” or “golfer’s elbow.”
•Increase range of motion in the elbow.
•Relieve pain in the back of the elbow.
•Prepare muscle for effective strengthening.
SA5. Tools
1 small smooth sFera ™ Ball
1 spiky sFera ™ massage ball
double sFera ™ roller
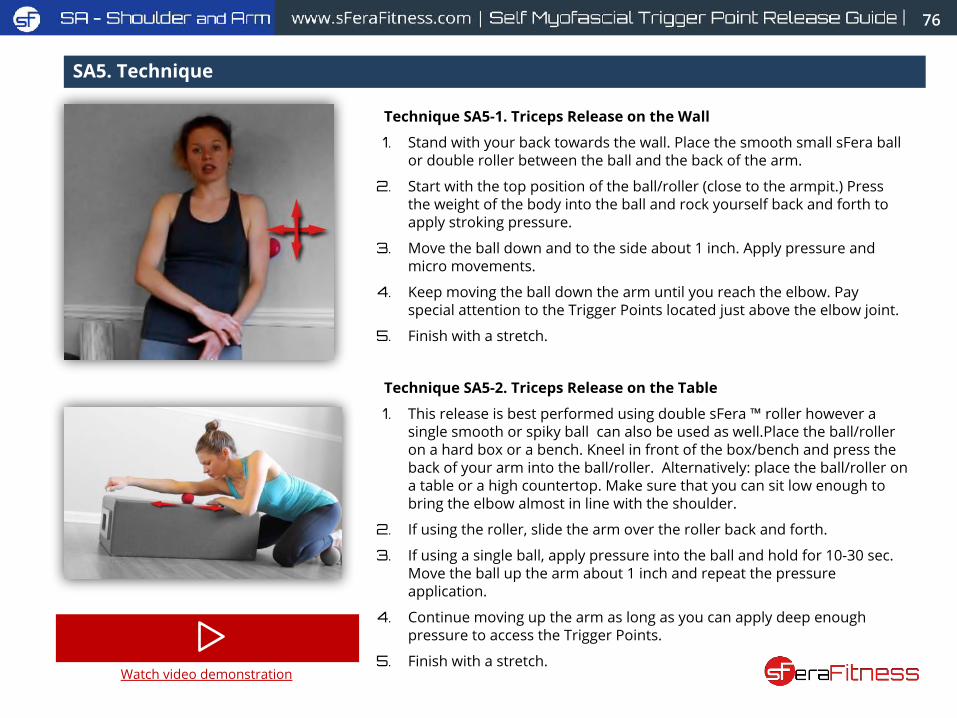
76
SA5. Technique
Technique SA5-1. Triceps Release on the Wall
1. Stand with your back towards the wall. Place the smooth small sFera ball or double roller between the ball and the back of the arm.
2. Start with the top position of the ball/roller (close to the armpit.) Press the weight of the body into the ball and rock yourself back and forth to apply stroking pressure.
3. Move the ball down and to the side about 1 inch. Apply pressure and micro movements.
4. Keep moving the ball down the arm until you reach the elbow. Pay special attention to the Trigger Points located just above the elbow joint.
5. Finish with a stretch.
Technique SA5-2. Triceps Release on the Table
1. This release is best performed using double sFera ™ roller however a single smooth or spiky ball can also be used as well.Place the ball/roller on a hard box or a bench. Kneel in front of the box/bench and press the back of your arm into the ball/roller. Alternatively: place the ball/roller on a table or a high countertop. Make sure that you can sit low enough to bring the elbow almost in line with the shoulder.
2. If using the roller, slide the arm over the roller back and forth.
3. If using a single ball, apply pressure into the ball and hold for 10-30 sec. Move the ball up the arm about 1 inch and repeat the pressure application.
4. Continue moving up the arm as long as you can apply deep enough pressure to access the Trigger Points.
5. Finish with a stretch.Watch video demonstration

77
Lower Arm
Of all the muscles that you have thoughts about
releasing forearms are probably the last ones. In fact,
many people are not aware of any tightness or muscle
knots in their forearms until they discover pain in the
elbow or wrist. Many people live many years with
occasional numbness or tingling in their fingers without
ever giving these symptoms any attention.
“Tennis elbow” and “carpal tunnel syndrome” are two
terms that get thrown around a lot if there is any pain in
the elbow or wrist. However, all of these symptoms can
be merely a sign of active Trigger Points in the forearm.
Trigger Points in the forearm are easily aggravated by
our modern lifestyle that involves long hours of typing,
writing with a pen (not so much these days) and any
sport activity that requires you to grip something for
long periods of time (yes, an occasional tennis match
can be the cause of all the pain.)
Hand and Finger Extensors
Finger Extensor muscles are located on the outer (hairy)
side of the forearm. Just as the name suggests, these
muscles extend the fingers. A couple of other muscles
including Brachioradialis and Supinator are located
underneath the extensor muscles on the outer
(“thumb”) side of the forearm. These muscles have
similar pain referral patterns and they will be worked on
together with the extensors.
Trigger Points in the Extensor muscles send the pain to
the top part of the hand and the outer (“thumb”) side of
the elbow.
These muscles get overworked by repetitive activities
involving the hands. Examples include but are not
limited to typing, tennis, golf, playing musical
instruments, stirring or kneading dough for long
periods of time etc.
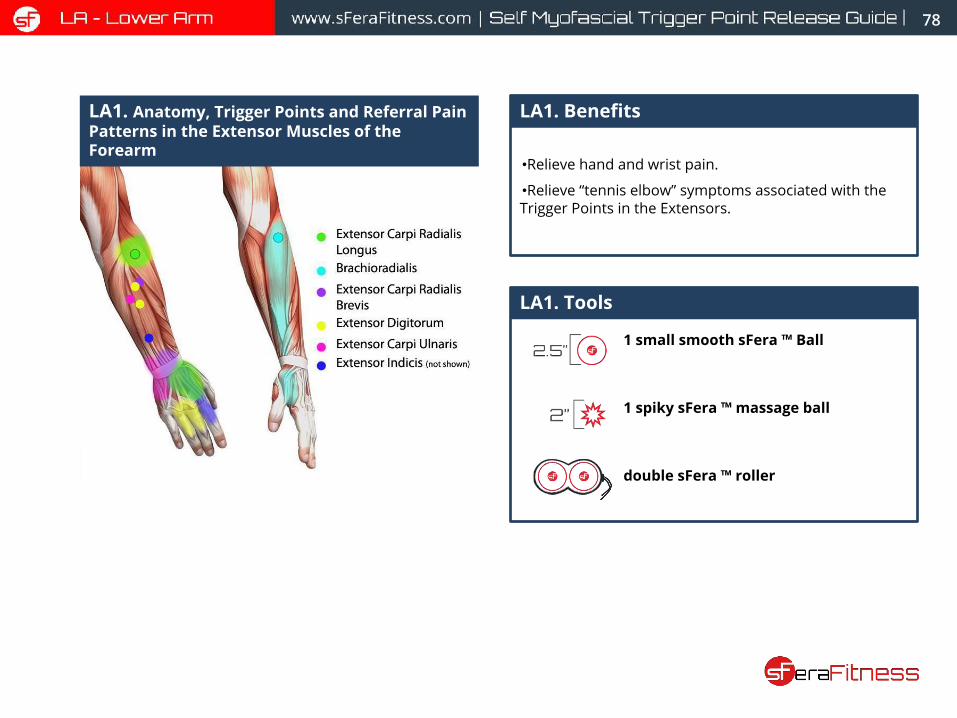
78
LA1. Anatomy, Trigger Points and Referral Pain Patterns in the Extensor Muscles of the Forearm
LA1. Benefits
•Relieve hand and wrist pain.
•Relieve “tennis elbow” symptoms associated with the Trigger Points in the Extensors.
LA1. Tools
1 small smooth sFera ™ Ball
1 spiky sFera ™ massage ball
double sFera ™ roller
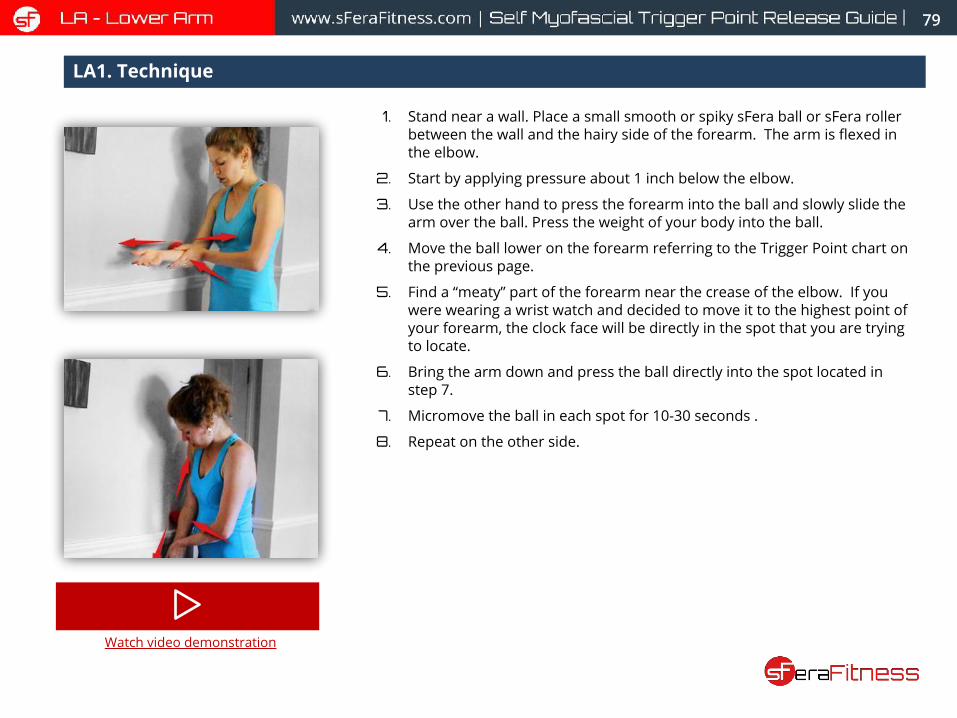
79
LA1. Technique
1. Stand near a wall. Place a small smooth or spiky sFera ball or sFera roller between the wall and the hairy side of the forearm. The arm is flexed in the elbow.
2. Start by applying pressure about 1 inch below the elbow.
3. Use the other hand to press the forearm into the ball and slowly slide the arm over the ball. Press the weight of your body into the ball.
4. Move the ball lower on the forearm referring to the Trigger Point chart on the previous page.
5. Find a “meaty” part of the forearm near the crease of the elbow. If you were wearing a wrist watch and decided to move it to the highest point of your forearm, the clock face will be directly in the spot that you are trying to locate.
6. Bring the arm down and press the ball directly into the spot located in step 7.
7. Micromove the ball in each spot for 10-30 seconds .
8. Repeat on the other side.
Watch video demonstration
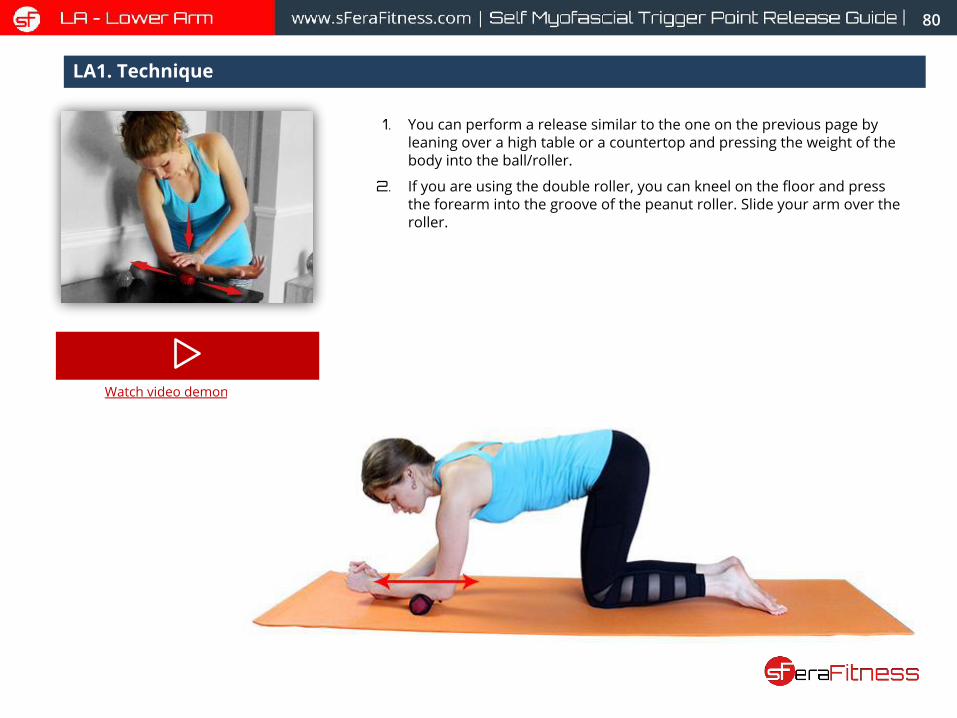
80
LA1. Technique
1. You can perform a release similar to the one on the previous page by leaning over a high table or a countertop and pressing the weight of the body into the ball/roller.
2. If you are using the double roller, you can kneel on the floor and press the forearm into the groove of the peanut roller. Slide your arm over the roller.
Watch video demonstration
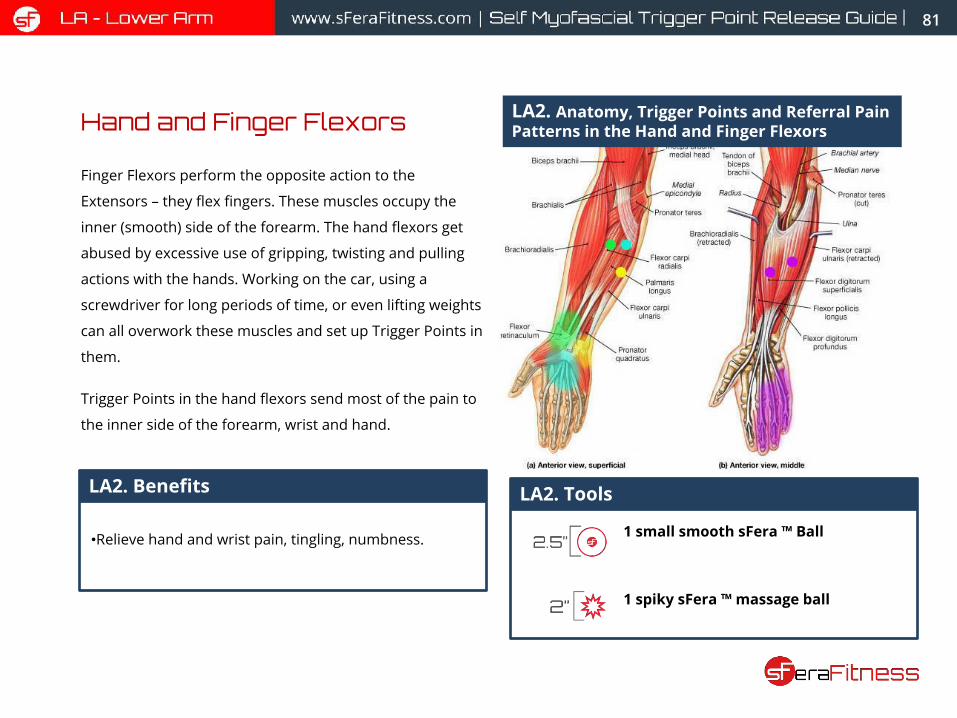
Hand and Finger Flexors
Finger Flexors perform the opposite action to the
Extensors – they flex fingers. These muscles occupy the
inner (smooth) side of the forearm. The hand flexors get
abused by excessive use of gripping, twisting and pulling
actions with the hands. Working on the car, using a
screwdriver for long periods of time, or even lifting weights
can all overwork these muscles and set up Trigger Points in
them.
Trigger Points in the hand flexors send most of the pain to
the inner side of the forearm, wrist and hand.
81
LA2. Anatomy, Trigger Points and Referral Pain Patterns in the Hand and Finger Flexors
LA2. Tools
1 small smooth sFera ™ Ball
1 spiky sFera ™ massage ball
LA2. Benefits
•Relieve hand and wrist pain, tingling, numbness.
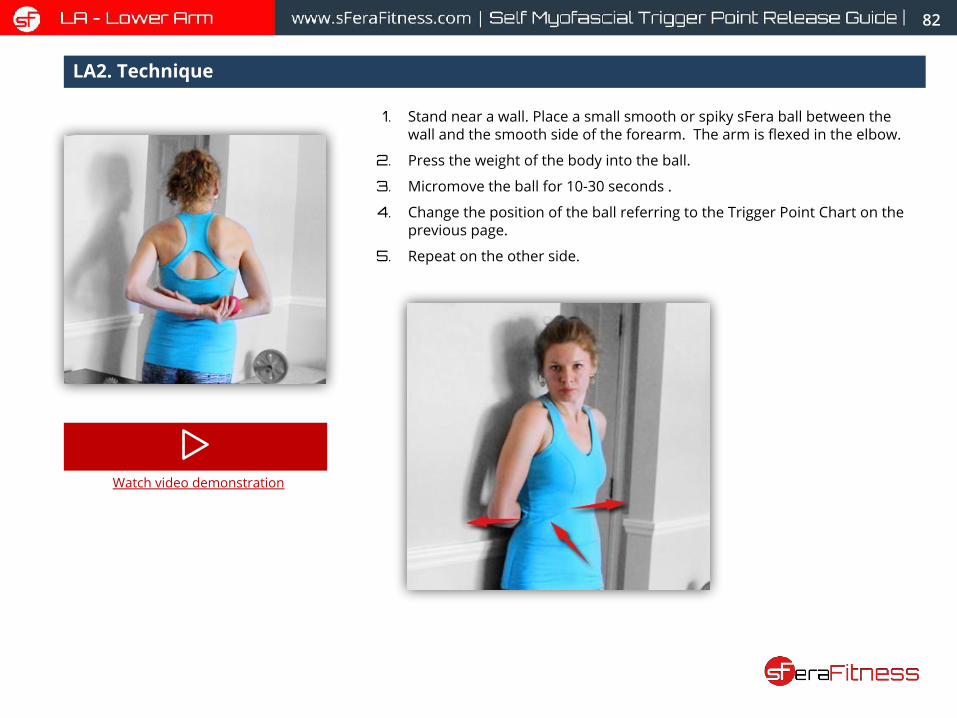
82
LA2. Technique
1. Stand near a wall. Place a small smooth or spiky sFera ball between the wall and the smooth side of the forearm. The arm is flexed in the elbow.
2. Press the weight of the body into the ball.
3. Micromove the ball for 10-30 seconds .
4. Change the position of the ball referring to the Trigger Point Chart on the previous page.
5. Repeat on the other side.
Watch video demonstration
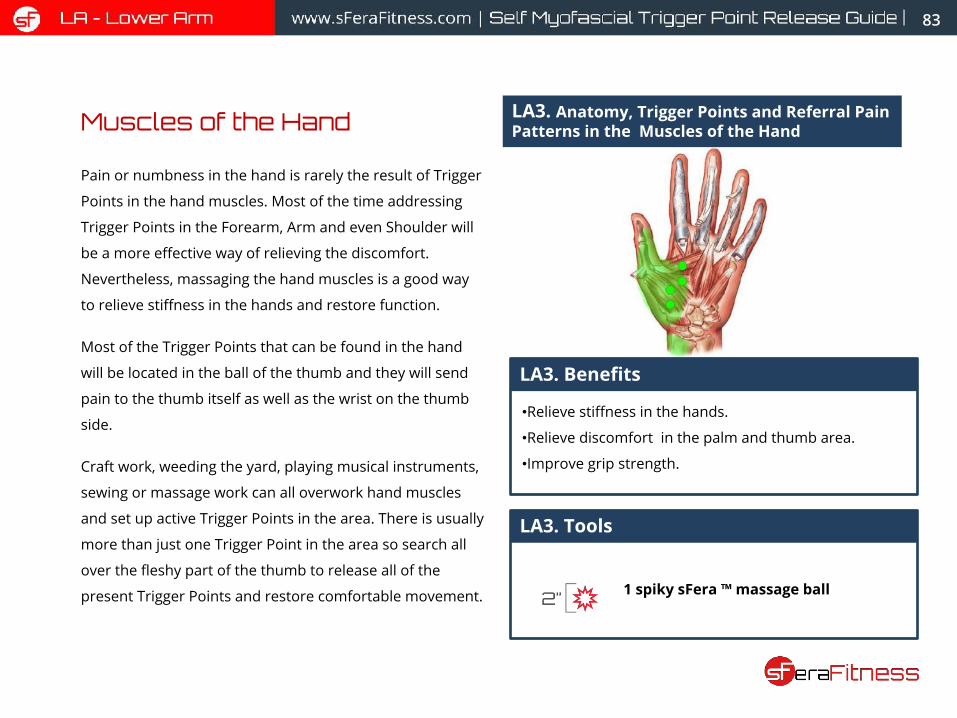
Muscles of the Hand
Pain or numbness in the hand is rarely the result of Trigger
Points in the hand muscles. Most of the time addressing
Trigger Points in the Forearm, Arm and even Shoulder will
be a more effective way of relieving the discomfort.
Nevertheless, massaging the hand muscles is a good way
to relieve stiffness in the hands and restore function.
Most of the Trigger Points that can be found in the hand
will be located in the ball of the thumb and they will send
pain to the thumb itself as well as the wrist on the thumb
side.
Craft work, weeding the yard, playing musical instruments,
sewing or massage work can all overwork hand muscles
and set up active Trigger Points in the area. There is usually
more than just one Trigger Point in the area so search all
over the fleshy part of the thumb to release all of the
present Trigger Points and restore comfortable movement.
83
LA3. Anatomy, Trigger Points and Referral Pain Patterns in the Muscles of the Hand
1 spiky sFera ™ massage ball
LA3. Tools
LA3. Benefits
•Relieve stiffness in the hands.
•Relieve discomfort in the palm and thumb area.
•Improve grip strength.
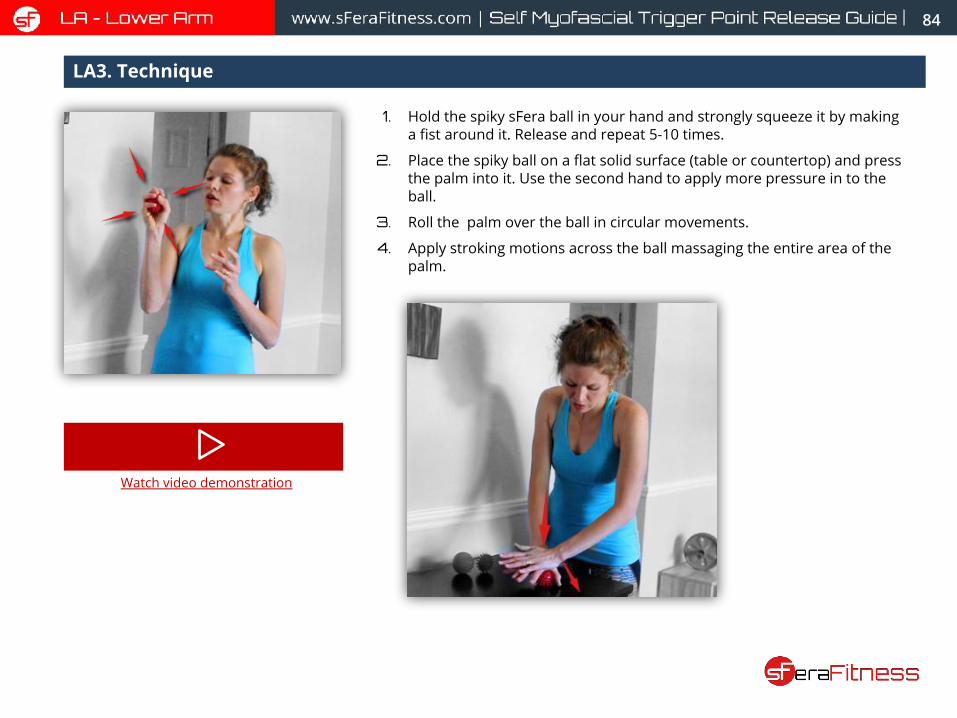
84
LA3. Technique
1. Hold the spiky sFera ball in your hand and strongly squeeze it by making a fist around it. Release and repeat 5-10 times.
2. Place the spiky ball on a flat solid surface (table or countertop) and press the palm into it. Use the second hand to apply more pressure in to the ball.
3. Roll the palm over the ball in circular movements.
4. Apply stroking motions across the ball massaging the entire area of the palm.
Watch video demonstration

85
ChestPectoralis Major and Minor
The Pectoralis Major muscles (commonly referred to as
the “pecs”) are a muscular part of the breasts in both men
and women. They are mostly responsible for movement
of the arm however they are also important for the action
of deep inhalation as they pull the ribcage apart to create
room for the expansion of the lungs.
The Pectoralis Minor muscles is completely covered by
the Pectoralis Major. It has a very different function by
“fixing” the shoulder blade in place during various
activities. Together with the Pectoralis Major it also moves
the ribcage to assist during deep inhalation. Since it is
impossible to access Trigger Points in the Pectoralis Minor
without also touching the Pectoralis Major, we will
overview both muscles together. Causes and pain
patterns associated with Trigger Points in the Pectoralis
Minor are very similar or completely identical to the ones
in the Pectoralis Major.
Trigger Points in the Pecs can cause very alarming
symptoms that mimic heart attack pain. People who have
had a heart attack can have multiple Trigger Points
developed in the pecs that will cause chest pain and
heaviness long after the heart attack itself. It is vitally
important that any chest pain should be first
examined and diagnosed by a physician to rule out
any possibility of heart failure.
A less alarming and more common manifestation of the
Trigger Points in the pecs is the slouched or
round-shouldered posture. The muscles afflicted by the
Trigger Points survive in a perpetually shortened (tight)
form and they pull the shoulders forward sponsoring
Trigger Points all over the upper back and shoulder
muscles.
It is needless to say that hours spent behind the
computer with bad posture (head forward, shoulders
rounded) are detrimental to the health of the Pectoralis
Major and Pectoralis Minor. Young mothers are also at
risk of developing Trigger Points in this area as they are
nursing and caring for the baby.
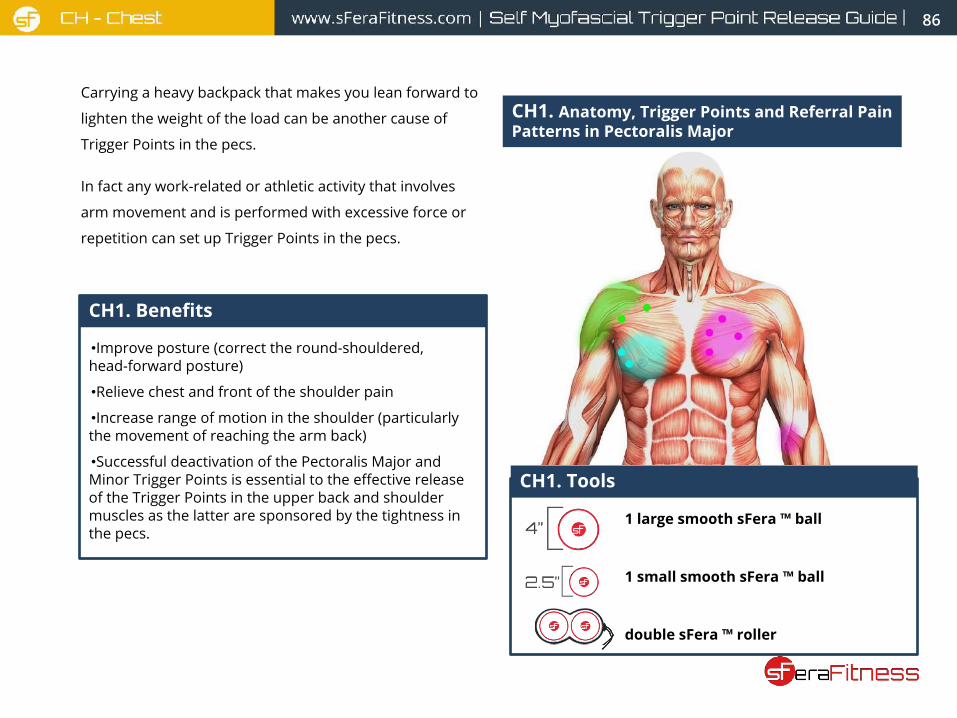
Carrying a heavy backpack that makes you lean forward to
lighten the weight of the load can be another cause of
Trigger Points in the pecs.
In fact any work-related or athletic activity that involves
arm movement and is performed with excessive force or
repetition can set up Trigger Points in the pecs.
86
CH1. Anatomy, Trigger Points and Referral Pain Patterns in Pectoralis Major
1 large smooth sFera ™ ball
1 small smooth sFera ™ ball
double sFera ™ roller
CH1. Tools
CH1. Benefits
•Improve posture (correct the round-shouldered, head-forward posture)
•Relieve chest and front of the shoulder pain
•Increase range of motion in the shoulder (particularly the movement of reaching the arm back)
•Successful deactivation of the Pectoralis Major and Minor Trigger Points is essential to the effective release of the Trigger Points in the upper back and shoulder muscles as the latter are sponsored by the tightness in the pecs.
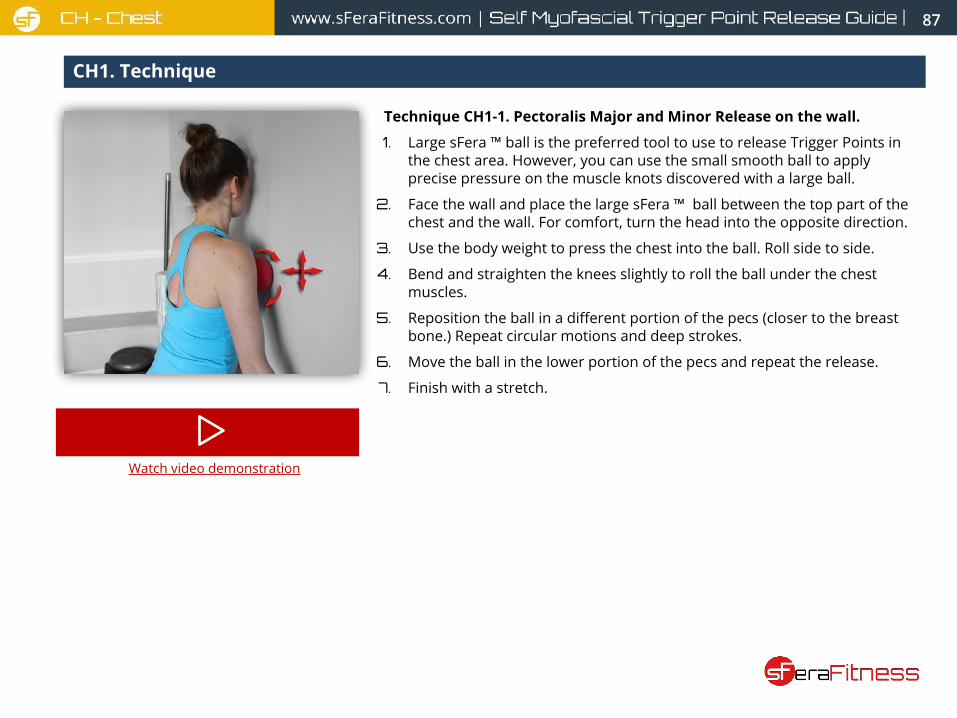
87
CH1. Technique
Technique CH1-1. Pectoralis Major and Minor Release on the wall.
1. Large sFera ™ ball is the preferred tool to use to release Trigger Points in the chest area. However, you can use the small smooth ball to apply precise pressure on the muscle knots discovered with a large ball.
2. Face the wall and place the large sFera ™ ball between the top part of the chest and the wall. For comfort, turn the head into the opposite direction.
3. Use the body weight to press the chest into the ball. Roll side to side.
4. Bend and straighten the knees slightly to roll the ball under the chest muscles.
5. Reposition the ball in a different portion of the pecs (closer to the breast bone.) Repeat circular motions and deep strokes.
6. Move the ball in the lower portion of the pecs and repeat the release.
7. Finish with a stretch.
Watch video demonstration
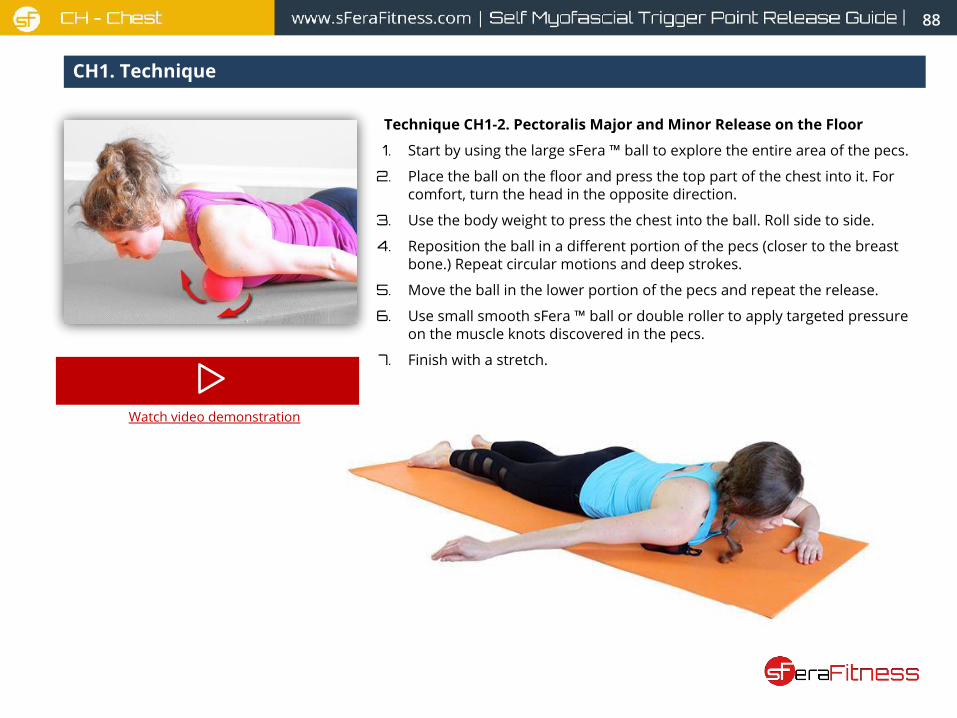
88
CH1. Technique
Technique CH1-2. Pectoralis Major and Minor Release on the Floor
1. Start by using the large sFera ™ ball to explore the entire area of the pecs.
2. Place the ball on the floor and press the top part of the chest into it. For comfort, turn the head in the opposite direction.
3. Use the body weight to press the chest into the ball. Roll side to side.
4. Reposition the ball in a different portion of the pecs (closer to the breast bone.) Repeat circular motions and deep strokes.
5. Move the ball in the lower portion of the pecs and repeat the release.
6. Use small smooth sFera ™ ball or double roller to apply targeted pressure on the muscle knots discovered in the pecs.
7. Finish with a stretch.
Watch video demonstration

Serratus Anterior
The Serratus Anterior is located under the arm and it helps to reposition the shoulder blade in order to allow the movement of raising the arm. Planks and arm balances would be impossible without strong Serratus Anterior muscles. This muscle also aids inhalation by expanding the ribcage.
Trigger Points in the Serratus Anterior are common in amateur athletes and weekend warriors who overexert themselves during a strenuous workout. Hyperventilation in this case will cause “stitch in the side” feeling. Athletic activities that require forceful movements of the arm (like swimming, tennis, gymnastics, pull-ups etc.) can activate Trigger Points in this muscle as well.
Most of the pain patterns associated with Trigger Points in the Serratus Anterior will be localized under the arm or behind the shoulder blade.
89
CH2. Anatomy, Trigger Points and Referral Pain Patterns in Serratus Anterior
1 large smooth sFera ™ ball
1 small smooth sFera ™ ball
1 spiky sFera ™ ball
CH1. ToolsCH1. Benefits
•Relieve pain in the side and behind the shoulder blade
•Increase range of motion in the shoulder especially for back bends and overhead reaches
•Improve deep breathing patterns by releasing tightness in the Serratus Anterior muscles.
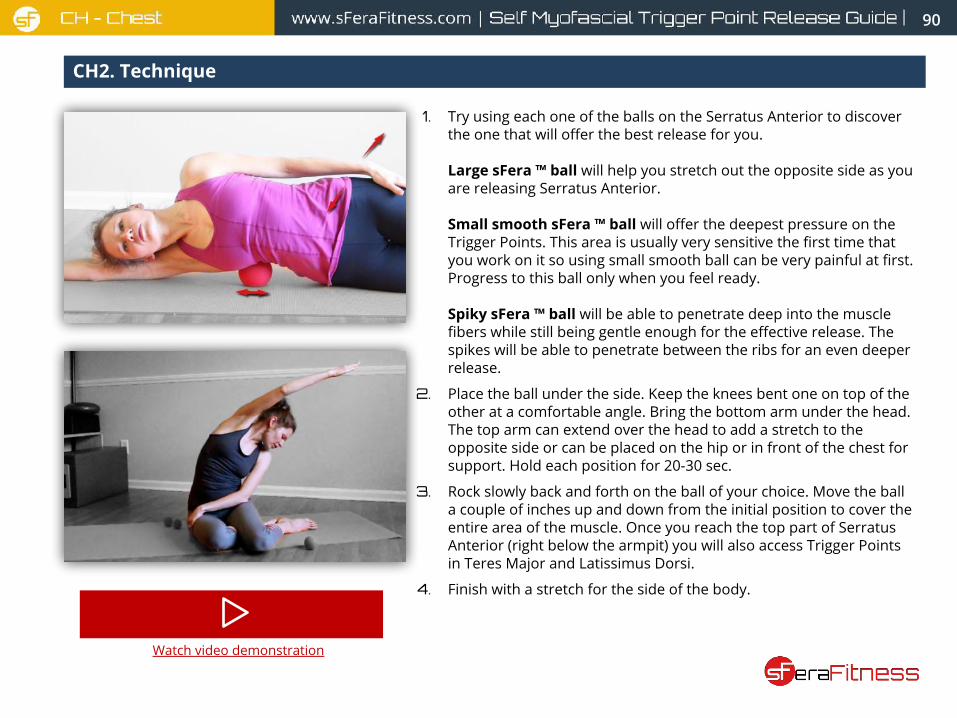
90
CH2. Technique
1. Try using each one of the balls on the Serratus Anterior to discover the one that will offer the best release for you.
Large sFera ™ ball will help you stretch out the opposite side as you are releasing Serratus Anterior.
Small smooth sFera ™ ball will offer the deepest pressure on the Trigger Points. This area is usually very sensitive the first time that you work on it so using small smooth ball can be very painful at first. Progress to this ball only when you feel ready.
Spiky sFera ™ ball will be able to penetrate deep into the muscle fibers while still being gentle enough for the effective release. The spikes will be able to penetrate between the ribs for an even deeper release.
2. Place the ball under the side. Keep the knees bent one on top of the other at a comfortable angle. Bring the bottom arm under the head. The top arm can extend over the head to add a stretch to the opposite side or can be placed on the hip or in front of the chest for support. Hold each position for 20-30 sec.
3. Rock slowly back and forth on the ball of your choice. Move the ball a couple of inches up and down from the initial position to cover the entire area of the muscle. Once you reach the top part of Serratus Anterior (right below the armpit) you will also access Trigger Points in Teres Major and Latissimus Dorsi.
4. Finish with a stretch for the side of the body.
Watch video demonstration
91
QUICK START RELEASE GUIDES
For quick start video guides please click here
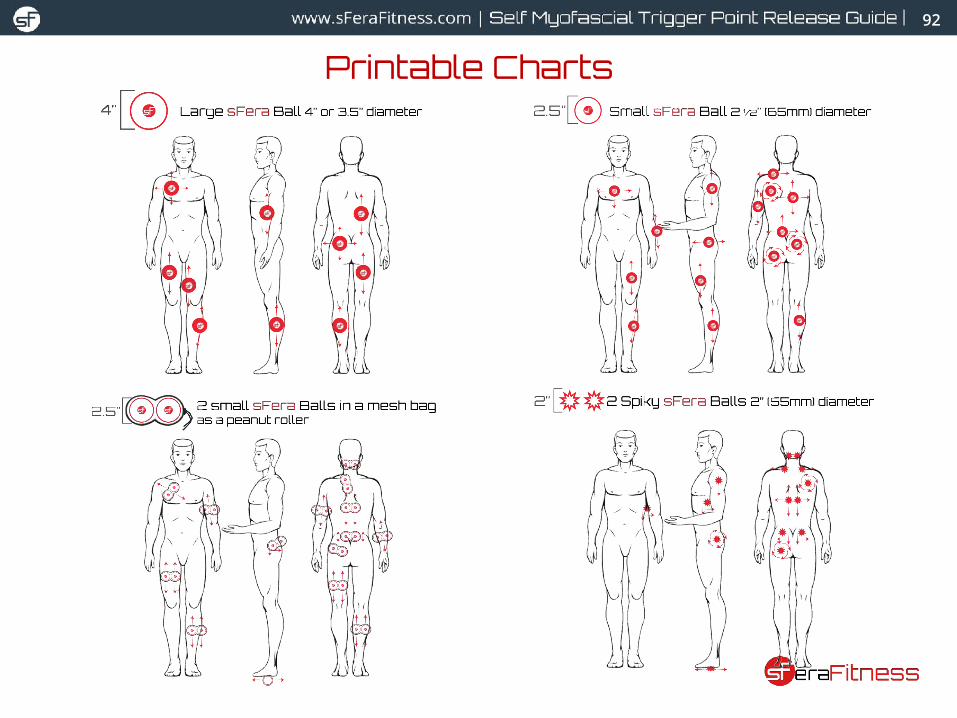
92
Printable Charts
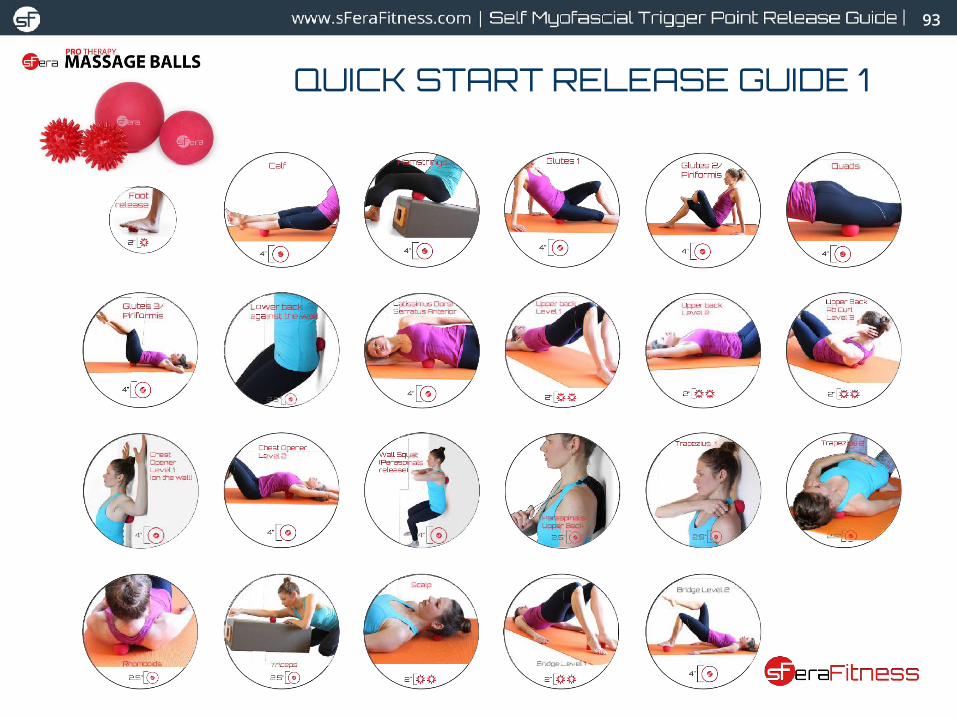
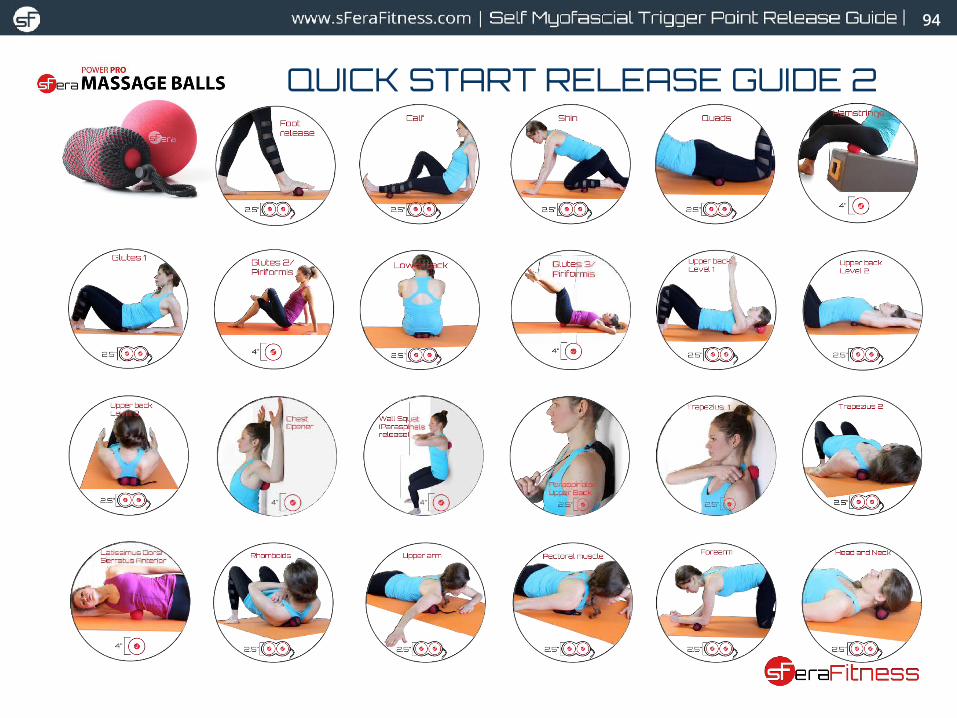
QUICK START RELEASE GUIDE 2
94
95
Your Personal Plan
Self-massage is one of the simplest self-care techniques
that will bring tremendous changes into your life. By
exploring your muscles you will gain better awareness
of your body that will change the way you work out and
perform your daily tasks. Beyond that, you will learn to
relax and take care of your body in the midst or after a
busy day.
Regardless of your background and the reasons why
you chose to explore Trigger Point Release the
exercises in this book will help you create a well
balanced self care routine that will help you stay pain
and injury free.
The more time you spend exploring your body using
sFera massage balls the more in tune you will become
with it. You will learn to pinpoint the exact location of
your Trigger Points and the source of tightness in your
muscles. You will know what muscles to release after a
strenuous workout or a stressful day at work.
But most importantly you will notice the difference in
the way you feel on a daily basis. You will feel more
open and loose. The rigidity of movement will
disappear and so will small pains and aches. You will
enjoy being active more because you will be in sync
with your body.
The last advice that I would like to give you at the end of
this book is
Stay consistent.
It is easy to get side-tracked by numerous daily
activities. But I challenge you to devote 10 minutes
every day to your health. Use some relaxing music or
spend time in total silence while you are exploring and
releasing your body. Switch areas that you target every
day so that you can work your entire body during the
week. If possible, keep a journal of the changes that
you notice in your body to track your personal
progress.
Enjoy the freedom of movement!
96
Do you have feedback or comments?We’d love to hear from you.
Contact us at
Find more EXERCISE VIDEOS at
www.sFeraFitness.com