contact samsung worldwide country customer care centre …
TRANSCRIPT
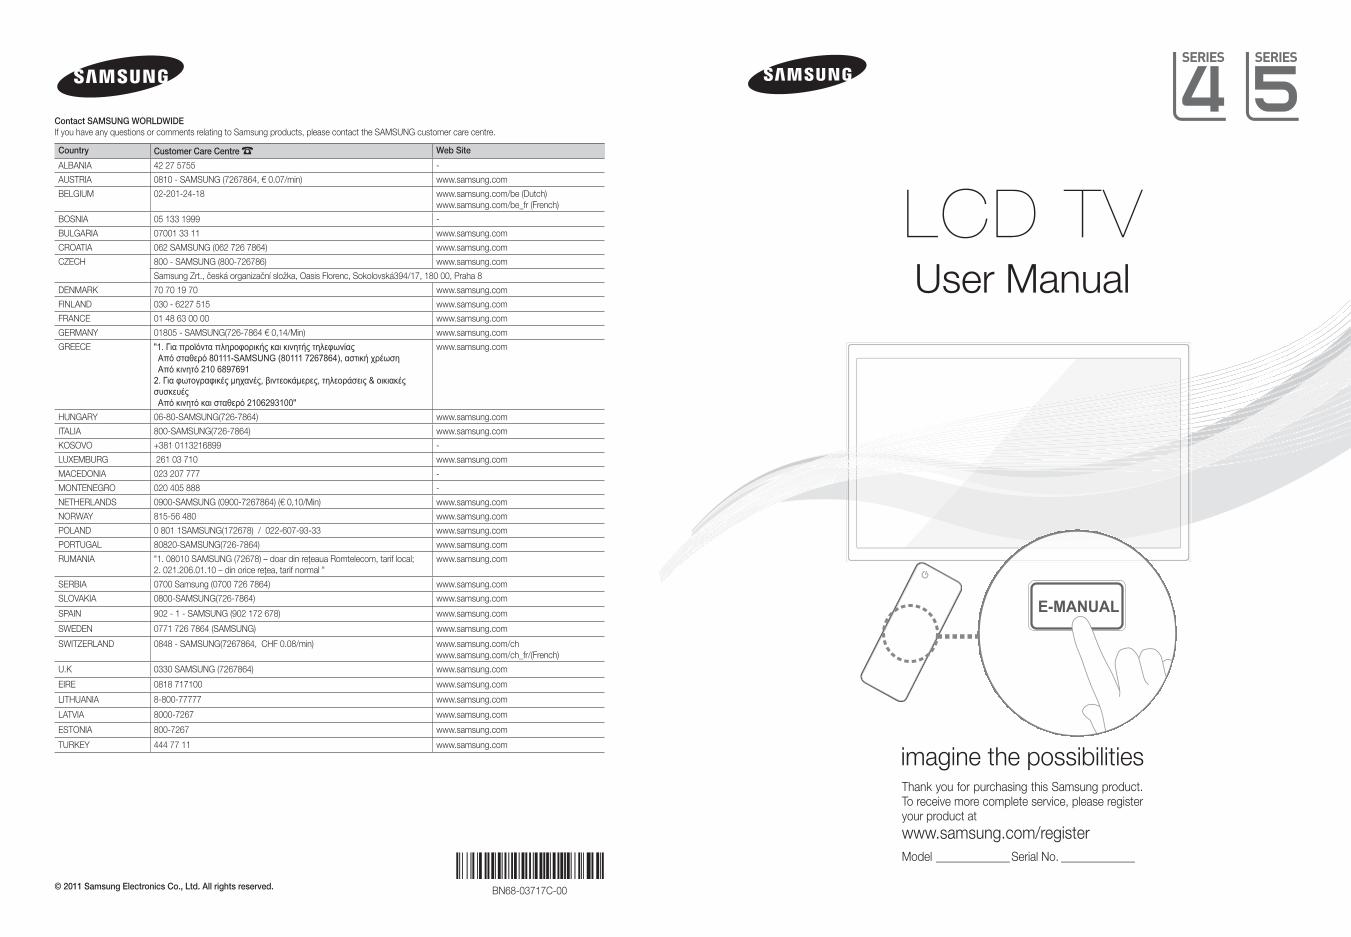
LCD TVUser Manual
imagine the possibilitiesThank you for purchasing this Samsung product. To receive more complete service, please register your product atwww.samsung.com/registerModel _____________Serial No. _____________
E-MANUAL
© 2011 Samsung Electronics Co., Ltd. All rights reserved.
Contact SAMSUNG WORLDWIDEIf you have any questions or comments relating to Samsung products, please contact the SAMSUNG customer care centre.
Country Customer Care Centre Web Site
ALBANIA 42 27 5755 -
AUSTRIA 0810 - SAMSUNG (7267864, € 0.07/min) www.samsung.com
BELGIUM 02-201-24-18 www.samsung.com/be (Dutch) www.samsung.com/be_fr (French)
BOSNIA 05 133 1999 -
BULGARIA 07001 33 11 www.samsung.com
CROATIA 062 SAMSUNG (062 726 7864) www.samsung.com
CZECH 800 - SAMSUNG (800-726786) www.samsung.com
Samsung Zrt., česká organizační složka, Oasis Florenc, Sokolovská394/17, 180 00, Praha 8
DENMARK 70 70 19 70 www.samsung.com
FINLAND 030 - 6227 515 www.samsung.com
FRANCE 01 48 63 00 00 www.samsung.com
GERMANY 01805 - SAMSUNG(726-7864 € 0,14/Min) www.samsung.com
GREECE "1. Για προϊόντα πληροφορικής και κινητής τηλεφωνίας Από σταθερό 80111-SAMSUNG (80111 7267864), αστική χρέωση Από κινητό 210 68976912. Για φωτογραφικές μηχανές, βιντεοκάμερες, τηλεοράσεις & οικιακές συσκευές Από κινητό και σταθερό 2106293100"
www.samsung.com
HUNGARY 06-80-SAMSUNG(726-7864) www.samsung.com
ITALIA 800-SAMSUNG(726-7864) www.samsung.com
KOSOVO +381 0113216899 -
LUXEMBURG 261 03 710 www.samsung.com
MACEDONIA 023 207 777 -
MONTENEGRO 020 405 888 -
NETHERLANDS 0900-SAMSUNG (0900-7267864) (€ 0,10/Min) www.samsung.com
NORWAY 815-56 480 www.samsung.com
POLAND 0 801 1SAMSUNG(172678) / 022-607-93-33 www.samsung.com
PORTUGAL 80820-SAMSUNG(726-7864) www.samsung.com
RUMANIA "1. 08010 SAMSUNG (72678) – doar din reţeaua Romtelecom, tarif local; 2. 021.206.01.10 – din orice reţea, tarif normal "
www.samsung.com
SERBIA 0700 Samsung (0700 726 7864) www.samsung.com
SLOVAKIA 0800-SAMSUNG(726-7864) www.samsung.com
SPAIN 902 - 1 - SAMSUNG (902 172 678) www.samsung.com
SWEDEN 0771 726 7864 (SAMSUNG) www.samsung.com
SWITZERLAND 0848 - SAMSUNG(7267864, CHF 0.08/min) www.samsung.com/ch www.samsung.com/ch_fr/(French)
U.K 0330 SAMSUNG (7267864) www.samsung.com
EIRE 0818 717100 www.samsung.com
LITHUANIA 8-800-77777 www.samsung.com
LATVIA 8000-7267 www.samsung.com
ESTONIA 800-7267 www.samsung.com
TURKEY 444 77 11 www.samsung.com
BN68-03717CBN68-03717C-00
[LCD-ZG ZT]BN68-03717C-L04.indb 1 2011-04-29 �� 10:12:35
English - 2
For more information on how to use the e-Manual (P.10)
Figures and illustrations in this User Manual are provided for reference only and may differ from actual product appearance. Product design and specifications may be changed without notice.
Important Warranty Information Regarding Television Format Viewing1. Functionalities related to Digital TV (DVB) are only available in countries/areas where DVB-T (MPEG2 and MPEG4 AVC) digital terrestrial
signals are broadcasted or where you are able to access to a compatible DVB-C (MPEG2 and MPEG4 AAC) cable-TV service. Please check with your local dealer the possibility to receive DVB-T or DVB-C signal.
2. DVB-T is the DVB European consortium standard for the broadcast transmission of digital terrestrial television and DVB-C is that for the broadcast transmission of digital TV over cable. However, some differentiated features like EPG (Electric Programme Guide), VOD (Video On Demand) and so on, are not included in this specification. So, they cannot be workable at this moment.
3. Although this TV set meets the latest DVB-T and DVB-C standards, as of [August, 2008], the compatibility with future DVB-T digital terrestrial and DVB-C digital cable broadcasts cannot be guaranteed.
4. Depending on the countries/areas where this TV set is used some cable-TV providers may charge an additional fee for such a service and you may be required to agree to terms and conditions of their business.
5. Some Digital TV functions might be unavailable in some countries or regions and DVB-C might not work correctly with some cable service providers.
6. For more information, please contact your local Samsung customer care centre.
✎ The reception quality of TV may be affected due to differences in broadcasting method between the countries. Please check the TV performance in the local SAMSUNG Authorized Dealer, or the Samsung Call Centre whether it can be improved by reconfiguring TV setting or not.
Still image warningAvoid displaying still images (like jpeg picture files) or still image element (like TV programme logo, panorama or 4:3 image format, stock or news bar at screen bottom etc.) on the screen. Constant displaying of still picture can cause ghosting of LCD screen, which will affect image quality. To reduce risk of this effect, please follow below recommendations:• Avoid displaying the same TV channel for long periods.• Always try do display any image on full screen, use TV set picture format menu for best possible match.• Reduce brightness and contrast values to minimum required to achieve desired picture quality, exceeded values may speed up the burnout
process.• Frequently use all TV features designed to reduce image retention and screen burnout, refer to proper user manual section for details.
Securing the Installation SpaceKeep the required distances between the product and other objects (e.g. walls) to ensure proper ventilation.Failing to do so may result in fire or a problem with the product due to an increase in the internal temperature of the product.
✎ When using a stand or wall-mount, use parts provided by Samsung Electronics only.• If you use parts provided by another manufacturer, it may result in a problem with the product or an injury due to the product falling.
✎ The appearance may differ depending on the product.
✎ Be careful when you contact the TV because some parts can be somewhat hot.
Installation with a stand. Installation with a wall-mount.
10 cm10 cm
10 cm
10 cm
10 cm
10 cm
10 cm
Correct Disposal of This Product (Waste Electrical & Electronic Equipment)(Applicable in the European Union and other European countries with separate collection systems)This marking on the product, accessories or literature indicates that the product and its electronic accessories (e.g. charger, headset, USB cable) should not be disposed of with other household waste at the end of their working life. To prevent possible harm to the environment or human health from uncontrolled waste disposal, please separate these items from other types of waste and recycle them responsibly to promote the sustainable reuse of material resources. Household users should contact either the retailer where they purchased this product, or their local government office, for details of where and how they can take these items for environmentally safe recycling. Business users should contact their supplier and check the terms and conditions of the purchase contract. This product and its electronic accessories should not be mixed with other commercial wastes for disposal.
Correct disposal of batteries in this product(Applicable in the European Union and other European countries with separate battery return systems)This marking on the battery, manual or packaging indicates that the batteries in this product should not be disposed of with other household waste at the end of their working life. Where marked, the chemical symbols Hg, Cd or Pb indicate that the battery contains mercury, cadmium or lead above the reference levels in EC Directive 2006/66. If batteries are not properly disposed of, these substances can cause harm to human health or the environment. To protect natural resources and to promote material reuse, please separate batteries from other types of waste and recycle them through your local, free battery return system.
[LCD-ZG ZT]BN68-03717C-L04.indb 2 2011-04-29 �� 10:12:36
English - 3
Accessories
✎ Please make sure the following items are included with your TV. If any items are missing, contact your dealer.
✎ The items’ colours and shapes may vary depending on the models.
y Remote Control & Batteries (AAA x 2) y Owner’s Instructions y Warranty Card / Safety Guide (Not available in some locations)
y Power Cord y Cleaning Cloth
✎ An administration fee may be charged if either(a) an engineer is called out at your request and there is no defect in the product(i.e. where you have failed to read this user manual)(b) you bring the unit to a repair centre and there is no defect in the product(i.e. where you have failed to read this user manual).
✎ The amount of such administration charge will be advised to you before any work or home visit is carried out.
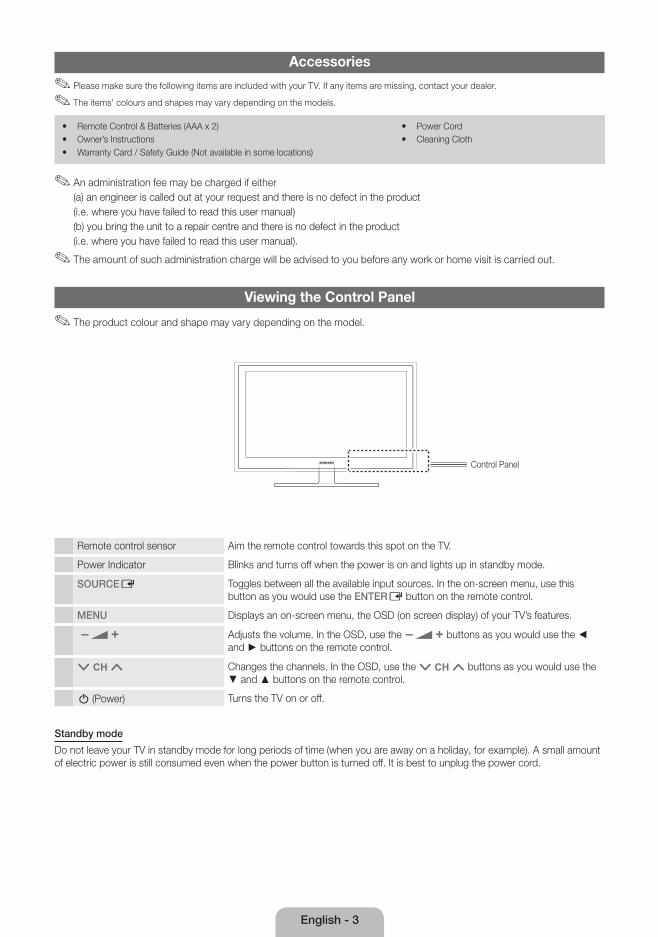
Viewing the Control Panel
✎ The product colour and shape may vary depending on the model.
Control Panel
Remote control sensor Aim the remote control towards this spot on the TV.
Power Indicator Blinks and turns off when the power is on and lights up in standby mode.
SOURCEE Toggles between all the available input sources. In the on-screen menu, use this button as you would use the ENTERE button on the remote control.
MENU Displays an on-screen menu, the OSD (on screen display) of your TV’s features.
Y Adjusts the volume. In the OSD, use the Y buttons as you would use the ◄ and ► buttons on the remote control.
z Changes the channels. In the OSD, use the z buttons as you would use the ▼ and ▲ buttons on the remote control.
P (Power) Turns the TV on or off.
Standby mode
Do not leave your TV in standby mode for long periods of time (when you are away on a holiday, for example). A small amount of electric power is still consumed even when the power button is turned off. It is best to unplug the power cord.
[LCD-ZG ZT]BN68-03717C-L04.indb 3 2011-04-29 �� 10:12:36
English - 4
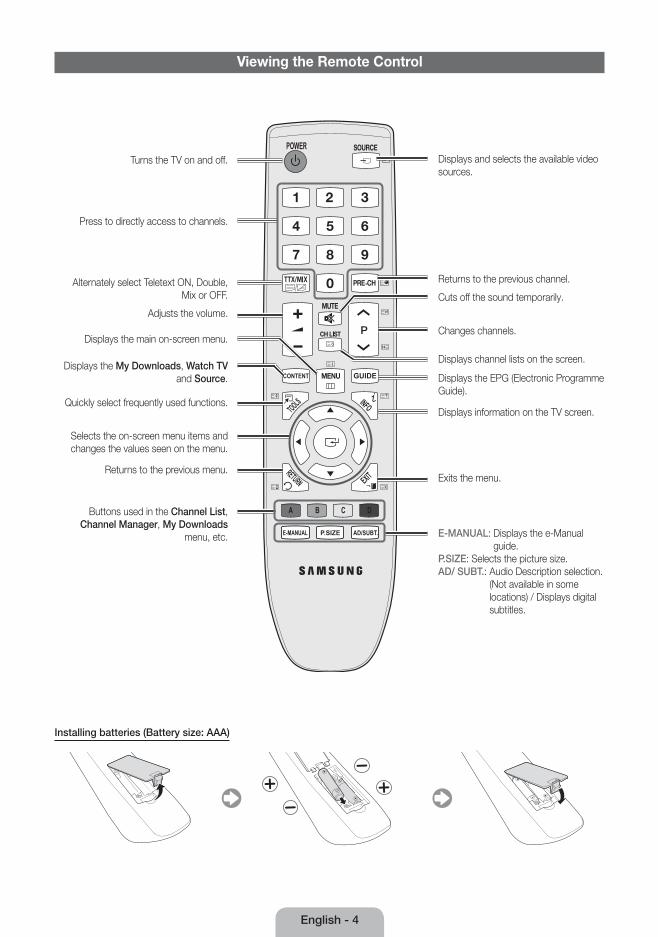
Viewing the Remote Control
A B C D
AD/SUBT.P.SIZEE-MANUAL
CONTENT
Turns the TV on and off.
Returns to the previous channel.
Cuts off the sound temporarily.
Changes channels.
Displays channel lists on the screen.
Displays the EPG (Electronic Programme Guide).
Displays information on the TV screen.
Exits the menu.
Press to directly access to channels.
Adjusts the volume.
Alternately select Teletext ON, Double, Mix or OFF.
Displays the main on-screen menu.
Quickly select frequently used functions.
Displays the My Downloads, Watch TV and Source.
Returns to the previous menu.
Selects the on-screen menu items and changes the values seen on the menu.
Buttons used in the Channel List, Channel Manager, My Downloads
menu, etc. E-MANUAL: Displays the e-Manual guide.
P.SIZE: Selects the picture size.AD/ SUBT.: Audio Description selection.
(Not available in some locations) / Displays digital subtitles.
Displays and selects the available video sources.
Installing batteries (Battery size: AAA)
[LCD-ZG ZT]BN68-03717C-L04.indb 4 2011-04-29 �� 10:12:37
English - 5
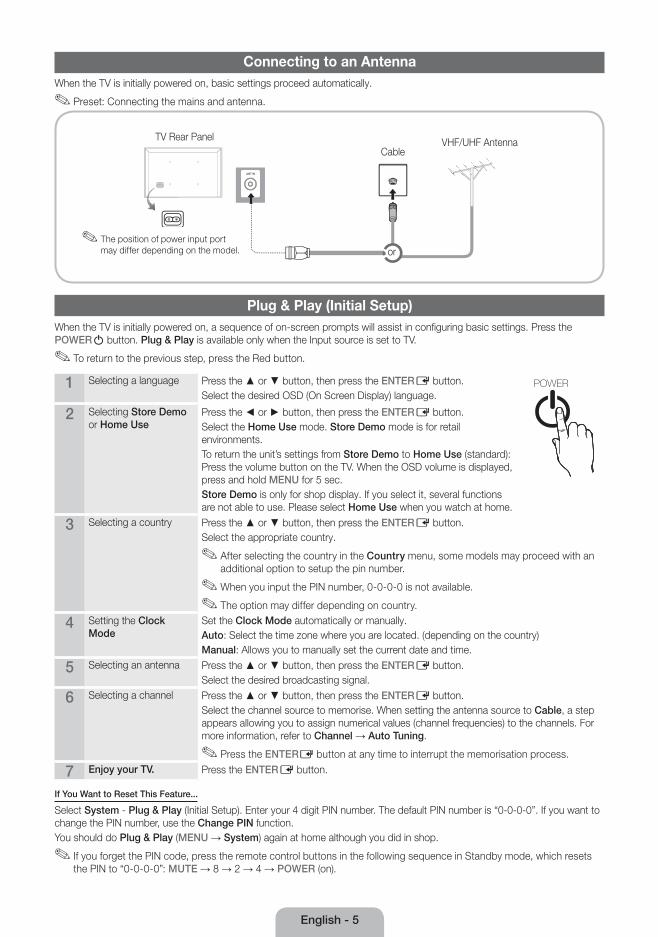
Connecting to an AntennaWhen the TV is initially powered on, basic settings proceed automatically.
✎ Preset: Connecting the mains and antenna.
Plug & Play (Initial Setup)When the TV is initially powered on, a sequence of on-screen prompts will assist in configuring basic settings. Press the POWERP button. Plug & Play is available only when the Input source is set to TV.
✎ To return to the previous step, press the Red button.
1 Selecting a language Press the ▲ or ▼ button, then press the ENTERE button. Select the desired OSD (On Screen Display) language. P
POWER
2 Selecting Store Demo or Home Use
Press the ◄ or ► button, then press the ENTERE button.Select the Home Use mode. Store Demo mode is for retail environments.To return the unit’s settings from Store Demo to Home Use (standard): Press the volume button on the TV. When the OSD volume is displayed, press and hold MENU for 5 sec.Store Demo is only for shop display. If you select it, several functions are not able to use. Please select Home Use when you watch at home.
3 Selecting a country Press the ▲ or ▼ button, then press the ENTERE button. Select the appropriate country.
✎ After selecting the country in the Country menu, some models may proceed with an additional option to setup the pin number.
✎ When you input the PIN number, 0-0-0-0 is not available.
✎ The option may differ depending on country.
4 Setting the Clock Mode
Set the Clock Mode automatically or manually.Auto: Select the time zone where you are located. (depending on the country)Manual: Allows you to manually set the current date and time.
5 Selecting an antenna Press the ▲ or ▼ button, then press the ENTERE button. Select the desired broadcasting signal.
6 Selecting a channel Press the ▲ or ▼ button, then press the ENTERE button. Select the channel source to memorise. When setting the antenna source to Cable, a step appears allowing you to assign numerical values (channel frequencies) to the channels. For more information, refer to Channel → Auto Tuning.
✎ Press the ENTERE button at any time to interrupt the memorisation process.
7 Enjoy your TV. Press the ENTERE button.
If You Want to Reset This Feature...
Select System - Plug & Play (Initial Setup). Enter your 4 digit PIN number. The default PIN number is “0-0-0-0”. If you want to change the PIN number, use the Change PIN function.You should do Plug & Play (MENU → System) again at home although you did in shop.
✎ If you forget the PIN code, press the remote control buttons in the following sequence in Standby mode, which resets the PIN to “0-0-0-0”: MUTE → 8 → 2 → 4 → POWER (on).
VHF/UHF AntennaCable
or
TV Rear Panel
✎ The position of power input port may differ depending on the model.
[LCD-ZG ZT]BN68-03717C-L04.indb 5 2011-04-29 �� 10:12:38

English - 6
Connecting to an AV devices
¦ Available devices: DVD, Blu-ray player, HD cable box, HD STB (Set-Top-Box) satellite receiver, VCR, Digital Audio System, Amplifier, DVD Home Theatre, PC
HDMI OUT
Using an HDMI cable (up to 1080p)
✎ HDMI IN 1(DVI), 2
x If an HDMI to DVI cable is connected to the HDMI IN 1(DVI) port, the audio does not work.
x The picture may not display normally (if at all) or the audio may not work if an external device that uses an older version of HDMI mode is connected to the TV. If such a problem occurs, ask the manufacturer of the external device about the HDMI version and, if out of date, request an upgrade.
x Be sure to purchase a certified HDMI cable. Otherwise, the picture may not display or a connection error may occur.
x A basic high-speed HDMI cable or one with ethernet is recommended. This product does not support the ethernet function via HDMI.
HDMI connection
TV Rear Panel
EXT
SCART connection
Using a Scart Cable
✎ In Ext. mode, DTV Out supports MPEG SD Video and Audio only.
TV Rear Panel
[LCD-ZG ZT]BN68-03717C-L04.indb 6 2011-04-29 �� 10:12:40

English - 7
Connecting to a PC and Audio device
¦ Available devices: Headphone
Headphones connection
Using an Headphone Connection
✎ Headphones H: You can connect your headphones to the headphones output on your set. While the headphones are connected, the sound from the built-in speakers will be disabled.
x Sound function may be restricted when connecting headphones to the TV.
x Headphone volume and TV volume are adjusted separately.
TV Rear Panel
¦ Using an HDMI cable or HDMI to DVI Cable
✎ Connecting through the HDMI cable may not be supported depending on the PC.
✎ An HDMI cable supports digital video and audio signals, and does not require an audio cable.
Display Modes (HDMI/DVI Input)
LE32D400 / LE32D403 : Optimal resolution is 1360 x 768 @ 60Hz.
Mode Resolution Horizontal Frequency (KHz) Vertical Frequency (Hz) Pixel Clock Frequency (MHz) Sync Polarity (H / V)
IBM640 x 350 31.469 70.086 25.175 + / -
720 x 400 31.469 70.087 28.322 - / +
MAC640 x 480 35.000 66.667 30.240 - / -
832 x 624 49.726 74.551 57.284 - / -
VESA DMT
640 x 480
31.469 59.940 25.175 - / -
37.861 72.809 31.500 - / -
37.500 75.000 31.500 - / -
800 x 600
37.879 60.317 40.000 + / +
48.077 72.188 50.000 + / +
46.875 75.000 49.500 + / +
1024 x 768
48.363 60.004 65.000 - / -
56.476 70.069 75.000 - / -
60.023 75.029 78.750 + / +
1360 x 768 47.712 60.015 85.500 + / +
AUDIO OUT
DVI OUT
HDMI OUT
PC connection
TV Rear Panel
[LCD-ZG ZT]BN68-03717C-L04.indb 7 2011-04-29 �� 10:12:43
English - 8
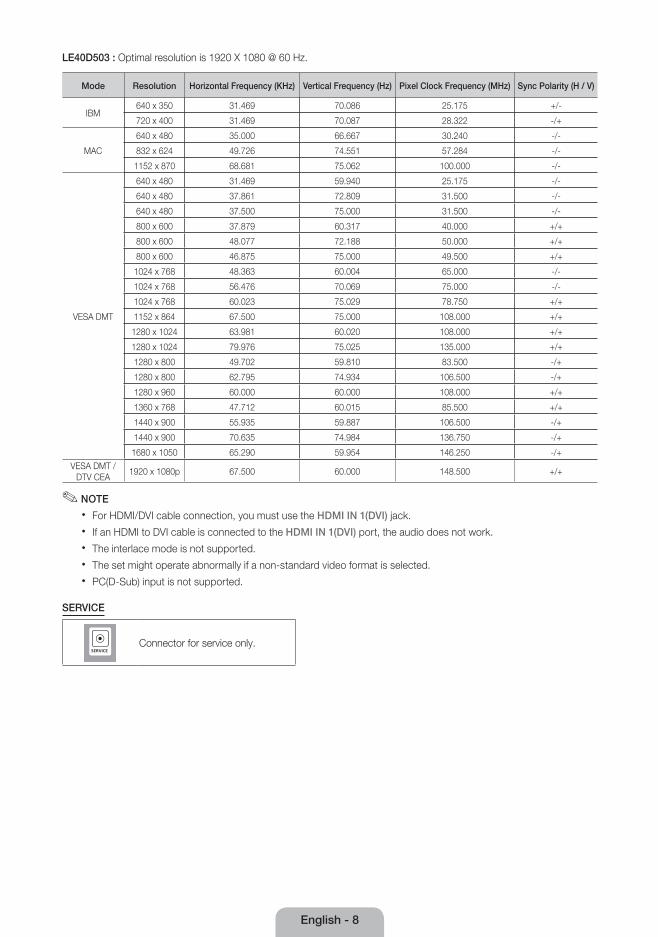
LE40D503 : Optimal resolution is 1920 X 1080 @ 60 Hz.
Mode Resolution Horizontal Frequency (KHz) Vertical Frequency (Hz) Pixel Clock Frequency (MHz) Sync Polarity (H / V)
IBM640 x 350 31.469 70.086 25.175 +/-
720 x 400 31.469 70.087 28.322 -/+
MAC
640 x 480 35.000 66.667 30.240 -/-
832 x 624 49.726 74.551 57.284 -/-
1152 x 870 68.681 75.062 100.000 -/-
VESA DMT
640 x 480 31.469 59.940 25.175 -/-
640 x 480 37.861 72.809 31.500 -/-
640 x 480 37.500 75.000 31.500 -/-
800 x 600 37.879 60.317 40.000 +/+
800 x 600 48.077 72.188 50.000 +/+
800 x 600 46.875 75.000 49.500 +/+
1024 x 768 48.363 60.004 65.000 -/-
1024 x 768 56.476 70.069 75.000 -/-
1024 x 768 60.023 75.029 78.750 +/+
1152 x 864 67.500 75.000 108.000 +/+
1280 x 1024 63.981 60.020 108.000 +/+
1280 x 1024 79.976 75.025 135.000 +/+
1280 x 800 49.702 59.810 83.500 -/+
1280 x 800 62.795 74.934 106.500 -/+
1280 x 960 60.000 60.000 108.000 +/+
1360 x 768 47.712 60.015 85.500 +/+
1440 x 900 55.935 59.887 106.500 -/+
1440 x 900 70.635 74.984 136.750 -/+
1680 x 1050 65.290 59.954 146.250 -/+VESA DMT /
DTV CEA1920 x 1080p 67.500 60.000 148.500 +/+
✎✎ NOTE
x For HDMI/DVI cable connection, you must use the HDMI IN 1(DVI) jack.
x If an HDMI to DVI cable is connected to the HDMI IN 1(DVI) port, the audio does not work.
x The interlace mode is not supported.
x The set might operate abnormally if a non-standard video format is selected.
x PC(D-Sub) input is not supported.
SERVICE
Connector for service only.
[LCD-ZG ZT]BN68-03717C-L04.indb 8 2011-04-29 �� 10:12:44
English - 9
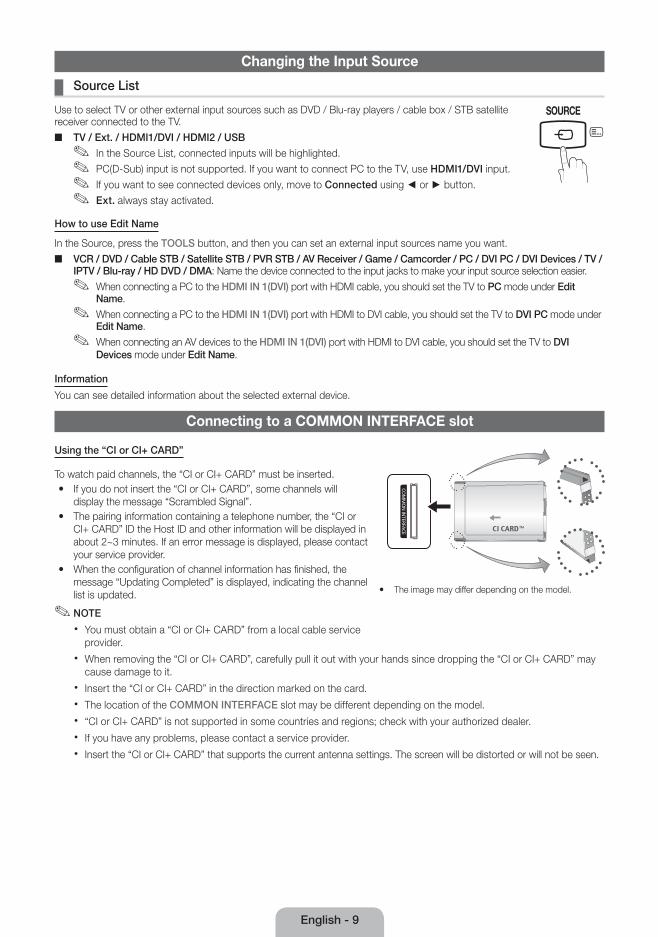
Changing the Input Source
¦ Source List
Use to select TV or other external input sources such as DVD / Blu-ray players / cable box / STB satellite receiver connected to the TV.
■ TV / Ext. / HDMI1/DVI / HDMI2 / USB
✎ In the Source List, connected inputs will be highlighted.
✎ PC(D-Sub) input is not supported. If you want to connect PC to the TV, use HDMI1/DVI input.
✎ If you want to see connected devices only, move to Connected using ◄ or ► button.
✎ Ext. always stay activated.
How to use Edit Name
In the Source, press the TOOLS button, and then you can set an external input sources name you want.
■ VCR / DVD / Cable STB / Satellite STB / PVR STB / AV Receiver / Game / Camcorder / PC / DVI PC / DVI Devices / TV / IPTV / Blu-ray / HD DVD / DMA: Name the device connected to the input jacks to make your input source selection easier.
✎ When connecting a PC to the HDMI IN 1(DVI) port with HDMI cable, you should set the TV to PC mode under Edit Name.
✎ When connecting a PC to the HDMI IN 1(DVI) port with HDMI to DVI cable, you should set the TV to DVI PC mode under Edit Name.
✎ When connecting an AV devices to the HDMI IN 1(DVI) port with HDMI to DVI cable, you should set the TV to DVI Devices mode under Edit Name.
Information
You can see detailed information about the selected external device.
Connecting to a COMMON INTERFACE slot
Using the “CI or CI+ CARD”
To watch paid channels, the “CI or CI+ CARD” must be inserted. y If you do not insert the “CI or CI+ CARD”, some channels will
display the message “Scrambled Signal”. y The pairing information containing a telephone number, the “CI or
CI+ CARD” ID the Host ID and other information will be displayed in about 2~3 minutes. If an error message is displayed, please contact your service provider.
y When the configuration of channel information has finished, the message “Updating Completed” is displayed, indicating the channel list is updated.
✎ NOTE
x You must obtain a “CI or CI+ CARD” from a local cable service provider.
x When removing the “CI or CI+ CARD”, carefully pull it out with your hands since dropping the “CI or CI+ CARD” may cause damage to it.
x Insert the “CI or CI+ CARD” in the direction marked on the card.
x The location of the COMMON INTERFACE slot may be different depending on the model.
x “CI or CI+ CARD” is not supported in some countries and regions; check with your authorized dealer.
x If you have any problems, please contact a service provider.
x Insert the “CI or CI+ CARD” that supports the current antenna settings. The screen will be distorted or will not be seen.
y The image may differ depending on the model.
[LCD-ZG ZT]BN68-03717C-L04.indb 9 2011-04-29 �� 10:12:45
English - 10
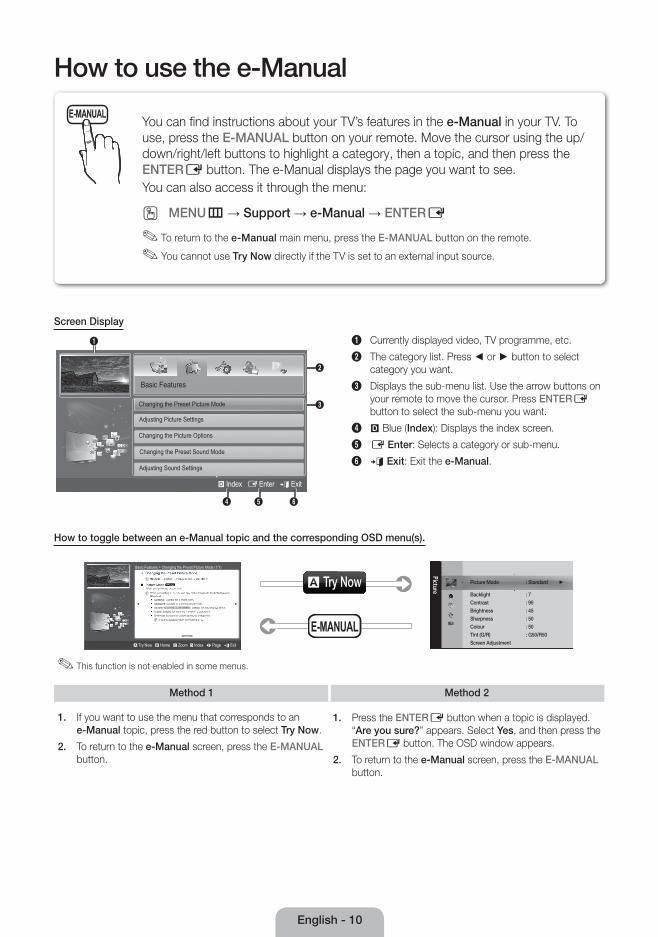
How to use the e-Manual
Screen Display
1
4 5 6
2
3
Basic Features
Changing the Preset Picture Mode
Changing the Picture Options
} Index E Enter e Exit
Changing the Preset Sound Mode
Adjusting Sound Settings
Adjusting Picture Settings
1 Currently displayed video, TV programme, etc.
2 The category list. Press ◄ or ► button to select category you want.
3 Displays the sub-menu list. Use the arrow buttons on your remote to move the cursor. Press ENTERE button to select the sub-menu you want.
4 } Blue (Index): Displays the index screen.
5 E Enter: Selects a category or sub-menu.
6 e Exit: Exit the e-Manual.
How to toggle between an e-Manual topic and the corresponding OSD menu(s).
Picture
Picture Mode : Standard ►
Backlight : 7
Contrast : 95
Brightness : 45
Sharpness : 50
Colour : 50
Tint (G/R) : G50/R50
Screen Adjustment
E-MANUAL
a Try NowBasic Features > Changing the Preset Picture Mode (1/1)
a Try Now b Home { Zoom } Index L Page e Exit
✎ This function is not enabled in some menus.
Method 1 Method 2
1. If you want to use the menu that corresponds to an e-Manual topic, press the red button to select Try Now.
2. To return to the e-Manual screen, press the E-MANUAL button.
1. Press the ENTERE button when a topic is displayed. “Are you sure?” appears. Select Yes, and then press the ENTERE button. The OSD window appears.
2. To return to the e-Manual screen, press the E-MANUAL button.
E-MANUALYou can fi nd instructions about your TV’s features in the e-Manual in your TV. To use, press the E-MANUAL button on your remote. Move the cursor using the up/down/right/left buttons to highlight a category, then a topic, and then press the ENTERE button. The e-Manual displays the page you want to see.You can also access it through the menu:
O MENUm → Support → e-Manual → ENTERE
✎ To return to the e-Manual main menu, press the E-MANUAL button on the remote.
✎ You cannot use Try Now directly if the TV is set to an external input source.
[LCD-ZG ZT]BN68-03717C-L04.indb 10 2011-04-29 �� 10:12:48

English - 11
Viewing the Contents
Basic Features > Changing the Preset Picture Mode (1/1)
2 3 4 5
a Try Now b Home { Zoom } Index L Page e Exit
1
1 Contents Area: Contains the topic contents, if you selected a sub-menu. To move previous or next page, press the ◄ / ► button.
2 Try Now: Displays the OSD menu that corresponds to the topic. To return to the e-Manual screen, press the E-MANUAL button.
3 Home: Moves to the e-Manual home screen.
4 Zoom: Magnifies a screen. You can scroll through the magnified screen by using ▲ / ▼ buttons.
5 L (Page): Moves to previous or next page.
Using the Zoom mode
U Move R Return
Select the Zoom, and then press ENTERE to magnify the screen. You can scroll through the magnified screen by using the ▲ or ▼ buttons.
✎ To return to the screen to normal size, press the RETURN button.
How to search for a topic on the index page
✎ This function may not be supported depending on the language.1. If you want to search a keyword, press the blue button to select Index.
2. Press the ◄ or ► button to select a character order you want.
3. Press the ▲ or ▼ button to select a keyword you want to see, and then press the ENTERE button.
4. You can view the corresponding e-Manual instruction screen.
✎ To close the Index screen, press the RETURN button.
[LCD-ZG ZT]BN68-03717C-L04.indb 11 2011-04-29 �� 10:12:50
English - 12
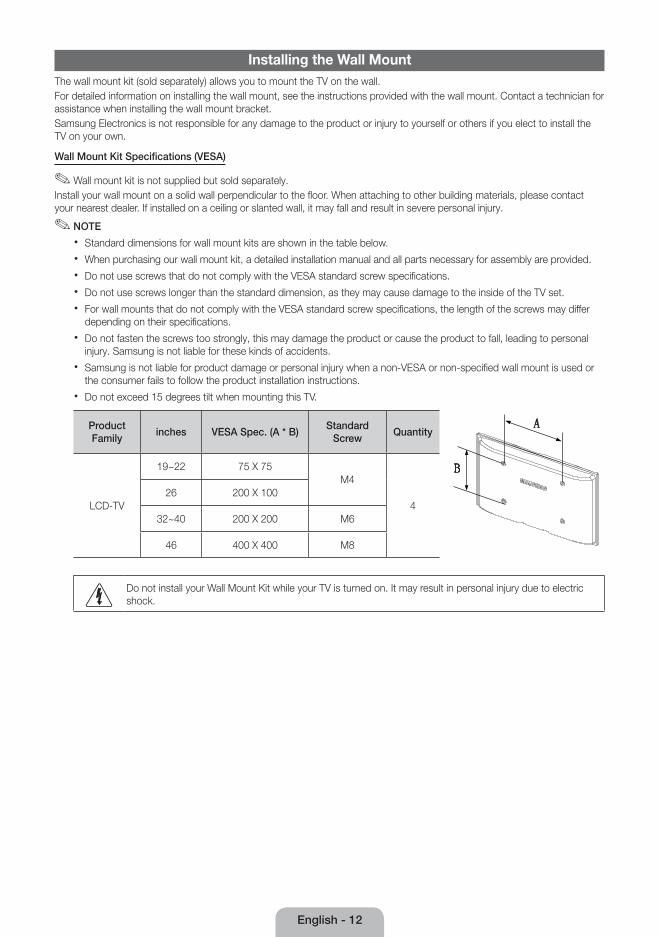
Installing the Wall MountThe wall mount kit (sold separately) allows you to mount the TV on the wall.For detailed information on installing the wall mount, see the instructions provided with the wall mount. Contact a technician for assistance when installing the wall mount bracket.Samsung Electronics is not responsible for any damage to the product or injury to yourself or others if you elect to install the TV on your own.
Wall Mount Kit Specifications (VESA)
✎ Wall mount kit is not supplied but sold separately.Install your wall mount on a solid wall perpendicular to the floor. When attaching to other building materials, please contact your nearest dealer. If installed on a ceiling or slanted wall, it may fall and result in severe personal injury.
✎ NOTE
x Standard dimensions for wall mount kits are shown in the table below.
x When purchasing our wall mount kit, a detailed installation manual and all parts necessary for assembly are provided.
x Do not use screws that do not comply with the VESA standard screw specifications.
x Do not use screws longer than the standard dimension, as they may cause damage to the inside of the TV set.
x For wall mounts that do not comply with the VESA standard screw specifications, the length of the screws may differ depending on their specifications.
x Do not fasten the screws too strongly, this may damage the product or cause the product to fall, leading to personal injury. Samsung is not liable for these kinds of accidents.
x Samsung is not liable for product damage or personal injury when a non-VESA or non-specified wall mount is used or the consumer fails to follow the product installation instructions.
x Do not exceed 15 degrees tilt when mounting this TV.
Product Family
inches VESA Spec. (A * B)Standard
ScrewQuantity
LCD-TV
19~22 75 X 75M4
426 200 X 100
32~40 200 X 200 M6
46 400 X 400 M8
Do not install your Wall Mount Kit while your TV is turned on. It may result in personal injury due to electric shock.
[LCD-ZG ZT]BN68-03717C-L04.indb 12 2011-04-29 �� 10:12:50
English - 13
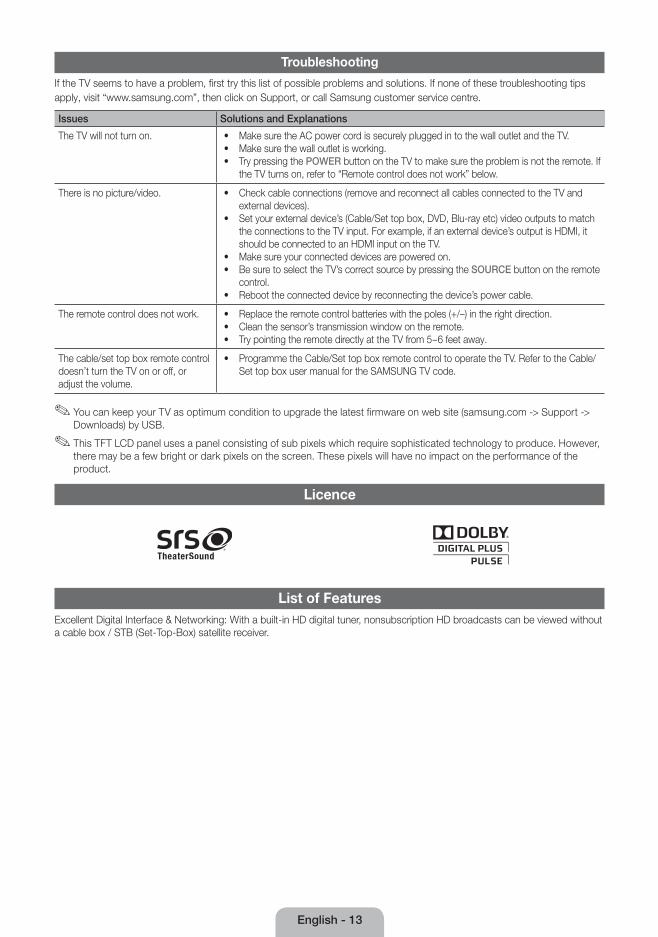
Troubleshooting
If the TV seems to have a problem, first try this list of possible problems and solutions. If none of these troubleshooting tips apply, visit “www.samsung.com”, then click on Support, or call Samsung customer service centre.
Issues Solutions and Explanations
The TV will not turn on. • Make sure the AC power cord is securely plugged in to the wall outlet and the TV. • Make sure the wall outlet is working. • Try pressing the POWER button on the TV to make sure the problem is not the remote. If
the TV turns on, refer to “Remote control does not work” below.
There is no picture/video. • Check cable connections (remove and reconnect all cables connected to the TV and external devices).
• Set your external device’s (Cable/Set top box, DVD, Blu-ray etc) video outputs to match the connections to the TV input. For example, if an external device’s output is HDMI, it should be connected to an HDMI input on the TV.
• Make sure your connected devices are powered on. • Be sure to select the TV’s correct source by pressing the SOURCE button on the remote
control. • Reboot the connected device by reconnecting the device’s power cable.
The remote control does not work. • Replace the remote control batteries with the poles (+/–) in the right direction. • Clean the sensor’s transmission window on the remote. • Try pointing the remote directly at the TV from 5~6 feet away.
The cable/set top box remote control doesn’t turn the TV on or off, or adjust the volume.
• Programme the Cable/Set top box remote control to operate the TV. Refer to the Cable/Set top box user manual for the SAMSUNG TV code.
✎ You can keep your TV as optimum condition to upgrade the latest firmware on web site (samsung.com -> Support -> Downloads) by USB.
✎ This TFT LCD panel uses a panel consisting of sub pixels which require sophisticated technology to produce. However, there may be a few bright or dark pixels on the screen. These pixels will have no impact on the performance of the product.
Licence
List of FeaturesExcellent Digital Interface & Networking: With a built-in HD digital tuner, nonsubscription HD broadcasts can be viewed without a cable box / STB (Set-Top-Box) satellite receiver.
[LCD-ZG ZT]BN68-03717C-L04.indb 13 2011-04-29 �� 10:12:51

English - 14
Securing the TV to the Wall
Caution: Pulling, pushing, or climbing onto the TV may cause the TV to fall. In particular, ensure that your children do not hang over or destabilize the TV; doing so may cause the TV to tip over, resulting in serious injuries or death. Follow all safety precautions provided on the included Safety Flyer. For added stability, install the anti-fall device for safety purposes, as follows.
To avoid the TV from falling
1. Put the screws into the clamps and firmly fasten them onto the wall. Confirm that the screws have been firmly installed onto the wall.
✎ You may need additional material such as an anchor depending on the type of wall.
✎ Since the necessary clamps, screws, and string are not supplied, please purchase these additionally.
2. Remove the screws from the centre back of the TV, put the screws into the clamps, and then fasten the screws onto the TV again.
✎ Screws may not be supplied with the product. In this case, please purchase the screws of the following specifications.
✎ Screw Specifications
x For a 32 ~ 40 inch TV: M6
3. Connect the clamps fixed onto the TV and the clamps fixed onto the wall with a strong string and then tie the string tightly.
✎ NOTE
x Install the TV near to the wall so that it does not fall backwards.
x It is safe to connect the string so that the clamps fixed on the wall are equal to or lower than the clamps fixed on the TV.
x Untie the string before moving the TV.
4. Verify all connections are properly secured. Periodically check connections for any sign of fatigue for failure. If you have any doubt about the security of your connections, contact a professional installer.
Storage and Maintenance
✎ If you remove the attached sticker on the TV screen, clean the residues and then watch TV.
Do not spray water or a cleaning agent directly onto the product. Any liquid that goes into the product may cause a failure, fire, or electric shock.
Clean the product with a soft cloth dapped in a small amount of water.
Wall
[LCD-ZG ZT]BN68-03717C-L04.indb 14 2011-04-29 �� 10:12:53
English - 15
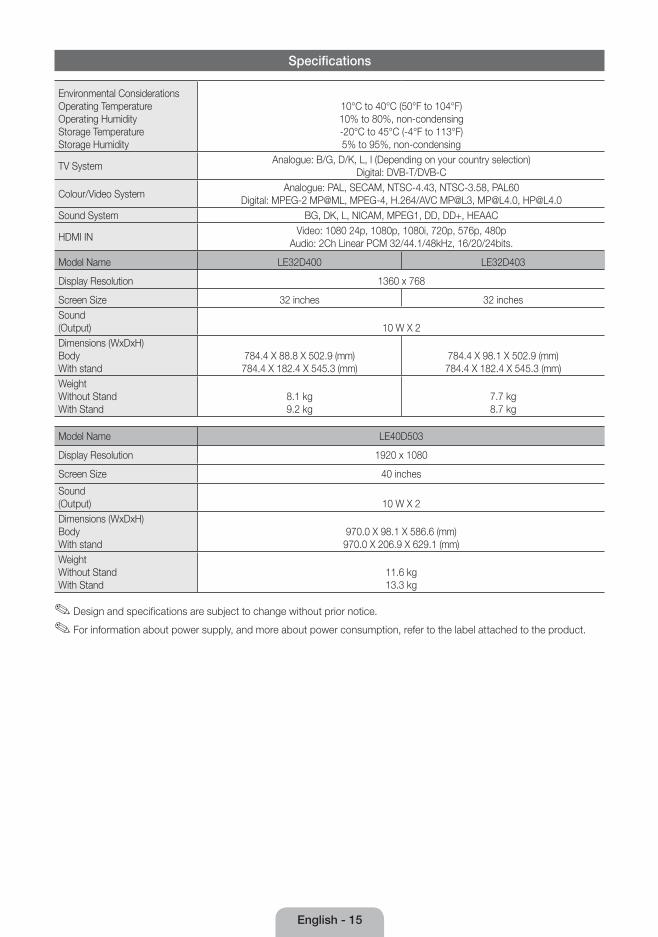
Specifications
Environmental Considerations Operating Temperature Operating HumidityStorage Temperature Storage Humidity
10°C to 40°C (50°F to 104°F) 10% to 80%, non-condensing -20°C to 45°C (-4°F to 113°F) 5% to 95%, non-condensing
TV System Analogue: B/G, D/K, L, I (Depending on your country selection)
Digital: DVB-T/DVB-C
Colour/Video SystemAnalogue: PAL, SECAM, NTSC-4.43, NTSC-3.58, PAL60
Digital: MPEG-2 MP@ML, MPEG-4, H.264/AVC MP@L3, [email protected], [email protected] System BG, DK, L, NICAM, MPEG1, DD, DD+, HEAAC
HDMI INVideo: 1080 24p, 1080p, 1080i, 720p, 576p, 480p
Audio: 2Ch Linear PCM 32/44.1/48kHz, 16/20/24bits.
Model Name LE32D400 LE32D403
Display Resolution 1360 x 768
Screen Size 32 inches 32 inchesSound (Output) 10 W X 2Dimensions (WxDxH) Body With stand
784.4 X 88.8 X 502.9 (mm)784.4 X 182.4 X 545.3 (mm)
784.4 X 98.1 X 502.9 (mm)784.4 X 182.4 X 545.3 (mm)
Weight Without Stand With Stand
8.1 kg9.2 kg
7.7 kg8.7 kg
Model Name LE40D503
Display Resolution 1920 x 1080
Screen Size 40 inches
Sound (Output) 10 W X 2Dimensions (WxDxH) Body With stand
970.0 X 98.1 X 586.6 (mm)970.0 X 206.9 X 629.1 (mm)
Weight Without Stand With Stand
11.6 kg13.3 kg
✎ Design and specifications are subject to change without prior notice.
✎ For information about power supply, and more about power consumption, refer to the label attached to the product.
[LCD-ZG ZT]BN68-03717C-L04.indb 15 2011-04-29 �� 10:12:53
Deutsch - 2
Weitere Informationen zur Verwendung des e-Manuals (S. 10)Die Abbildungen und Illustrationen in diesem Handbuch dienen nur zur Information und können vom tatsächlichen Aussehen des Geräts abweichen. Änderungen an Ausführung und technischen Daten vorbehalten.
Wichtige Garantieinformationen zum Bildschirmformat des Fernsehers1. Die Funktionalitäten für Digitalfernsehen (DVB) stehen nur in Ländern/Regionen zur Verfügung, in denen digitale terrestrische DVB-T-Signale (MPEG2 und MPEG4
AVC) gesendet werden oder in denen Sie Zugang zu einem kompatiblen Kabelfernsehdienst mit DVB-C (MPEG2 und MPEG4 AAC) haben können. Fragen Sie Ihren örtlichen Händler, wenn Sie Informationen über die Verfügbarkeit von DVB-T oder DVB-C in Ihrer Gegend benötigen.
2. DVB-T ist der Standard des europäischen DVB-Konsortiums für die terrestrische Versorgung mit digitalem terrestrischem Fernsehen, und DVB-C ist das Konsortium für die Versorgung mit digitalem Kabelfernsehen. Allerdings werden manche Unterscheidungsmerkmale wie EPG (elektrische Programmzeitschrift), VOD (Video on Demand) usw. in dieser Spezifikation nicht berücksichtigt. Deshalb können sie zum jetzigen Zeitpunkt noch nicht eingesetzt werden.
3. Zwar hält dieses Fernsehgerät die aktuellen Standards der DVB-T- und DVB-C-Spezifikationen [Version August 2008] ein, aber es kann nicht garantiert werden, dass die Kompatibilität mit zukünftigen digitalen terrestrischen DVB-T und DBV-C-Signalen gewahrt bleibt.
4. In Abhängigkeit von den Ländern/Regionen, in denen dieses Fernsehgerät eingesetzt wird, verlangen manche Kabelfernsehanbieter zusätzliche Gebühren für solch einen Dienst, und möglicherweise wird verlangt, dass Sie den Vertragsbedingungen des Unternehmens zustimmen.
5. Manche Digitalfernsehfunktionen sind in einigen Ländern oder Regionen möglicherweise nicht verfügbar, und DVB-C-Signale kann das Gerät bei manchen Kabelfernsehanbietern möglicherweise nicht fehlerfrei verarbeiten.
6. Für weitere Informationen setzen Sie sich bitte mit dem Samsung-Kundendienstzentrum in Verbindung.
✎ Die Empfangsqualität des Fernsehgeräts kann durch Unterschiede bei den Sendeverfahren in verschiedenen Ländern beeinträchtigt werden. Kontrollieren Sie die Leistung des Fernsehgeräts bei Ihrem örtlichen SAMSUNG-Händler oder wenden Sie sich an das Samsung-Callcenter um festzustellen, ob sich die Empfangsqualität durch Ändern der Fernseheinstellungen verbessern lässt.
Warnung bei StandbildernVermeiden Sie die Anzeige von Standbildern (wie z. B. JPEG-Bilddateien) oder Standbildelementen (wie z. B. Senderlogos, Panorama- oder 4:3-Bilder, Aktien- oder Laufschriften mit Nachrichten am unteren Bildschirmrand usw.) auf dem Bildschirm. Durch lang anhaltende Anzeige von Standbildern kann es zu Schattenbildern auf dem LCD-Bildschirm kommen, wodurch die Bildqualität beeinträchtigt wird. Um die Gefahr dieses Effekts zu vermindern, befolgen Sie bitte die nachfolgenden Empfehlungen: • Vermeiden Sie es, für lange Zeit denselben Fernsehsender anzuzeigen.• Versuchen Sie, Abbildungen immer als Vollbild anzuzeigen. Verwenden Sie das Bildformatmenü des Fernsehgeräts, um die beste Anzeigemöglichkeit zu finden.• Reduzieren Sie die Helligkeits- und Kontrastwerte soweit wie möglich, um immer noch die gewünschte Bildqualität zu erreichen. Zu hohe Werte können das
Ausbrennen beschleunigen.• Verwenden Sie regelmäßig alle Funktionen Ihres Fernsehgeräts, die dazu dienen, das Einbrennen von Bildern und das Ausbrennen des Bildschirms zu reduzieren.
Weitere Informationen hierzu finden Sie in den entsprechenden Abschnitten des Benutzerhandbuchs.
Absichern des AufstellbereichsHalten Sie die erforderlichen Abstände zwischen dem Gerät und anderen Objekten (z.B. Wänden) ein, um eine ausreichende Lüftung sicherzustellen.Wenn Sie dies nicht tun, besteht die Gefahr, dass aufgrund eines Anstiegs der Temperatur im Innern des Geräts ein Brand ausbricht oder andere Probleme mit dem Gerät auftreten.
✎ Wenn Sie einen Standfuß oder eine Wandhalterung einsetzen, verwenden Sie ausschließlich Teile von Samsung Electronics.• Wenn Sie Teile eines anderen Herstellers verwenden, kann es zu Problemen mit dem Gerät oder zu Verletzungen kommen, weil das Gerät herunterfällt.
✎ Das Aussehen kann sich je nach Gerät unterscheiden.
✎ Gehen Sie beim Anschließen des Fernsehgeräts vorsichtig vor, da einige Teile warm werden können.
Aufstellen des Geräts mit dem Standfuß Installation des Geräts mit der Wandhalterung
10 cm10 cm
10 cm
10 cm
10 cm
10 cm
10 cm
Ordnungsgemäße Entsorgung dieses Geräts (Elektro- und Elektronik-Altgeräte)
(Anwendbar in der Europäischen Union und anderen europäischen Staaten mit Systemen zur getrennten Sammlung von Wertstoffen)Diese Kennzeichnung auf dem Gerät, dem Zubehör oder der Dokumentation bedeutet, dass das Gerät sowie das elektronische Zubehör (z. B. Ladegerät, Headset, USB-Kabel) am Ende ihrer Lebensdauer nicht im normalen Hausmüll entsorgt werden dürfen. Entsorgen Sie diese Geräte bitte getrennt von anderen Abfällen, um der Umwelt bzw. der menschlichen Gesundheit nicht durch unkontrollierte Müllbeseitigung zu schaden. Recyceln Sie das Gerät, um die nachhaltige Wiederverwertung von stofflichen Ressourcen zu fördern. Private Nutzer sollten den Händler, bei dem das Produkt gekauft wurde, oder die zuständigen Behörden kontaktieren, um in Erfahrung zu bringen, wie sie das Gerät auf umweltfreundliche Weise recyceln können. Gewerbliche Benutzer wenden sich an ihren Lieferanten und überprüfen die Konditionen Ihres Kaufvertrags. Dieses Gerät und seine elektronischen Zubehörteile dürfen nicht zusammen mit anderem Gewerbemüll entsorgt werden.
Ordnungsgemäße Entsorgung der Batterien dieses Produkts(Anzuwenden in den Ländern der Europäischen Union und anderen europäischen Ländern mit einem separaten Sammelsystem für Batterien)Diese Kennzeichnung auf der Batterie, dem Handbuch oder der Verpackung bedeutet, dass die Batterie am Ende ihrer Lebensdauer nicht im normalen Hausmüll entsorgt werden darf. Die Kennzeichnung mit den chemischen Symbolen für Hg, Cd oder Pb bedeutet, dass die Batterie Quecksilber, Cadmium oder Blei in Mengen enthält, die die Grenzwerte der EU-Direktive 2006/66 übersteigen. Wenn Batterien nicht ordnungsgemäß entsorgt werden, können diese Substanzen die Gesundheit von Menschen oder die Umwelt gefährden. Zum Schutz der natürlichen Ressourcen und zur Förderung der Wiederverwertung von Materialien trennen Sie die Batterien von anderem Müll und führen Sie sie Ihrem örtlichen Recyclingsystem zu.
[LCD-ZG ZT]BN68-03717C-L04.indb 2 2011-04-29 �� 10:12:54
Deutsch - 3
Zubehör
✎ Vergewissern Sie sich, dass im Lieferumfang des Fernsehgeräts folgende Komponenten enthalten sind. Falls irgendwelche Teile fehlen sollten, setzen Sie sich bitte mit Ihrem Händler in Verbindung.
✎ Die Farbe und die Form der Teile können sich je nach Modell unterscheiden.
y Fernbedienung und 2 Batterien (Typ AAA) y Bedienungsanleitung y Garantiekarte / Sicherheitshinweise (nicht überall verfügbar)
y Netzkabel y Reinigungstuch
✎ Verwaltungskosten werden abgerechnet, wenn: (a) auf Ihren Wunsch ein Techniker gerufen wird und kein Defekt des Geräts vorliegt(d.h. wenn Sie dieses Benutzerhandbuch nicht gelesen haben).(b) Sie das Gerät in eine Reparaturwerkstatt bringen und kein Defekt des Geräts vorliegt(d.h. wenn Sie dieses Benutzerhandbuch nicht gelesen haben).
✎ Der abgerechnete Betrag wird Ihnen mitgeteilt, ehe irgendwelche Arbeiten oder Kundenbesuche ausgeführt werden.
Bedienfeld
✎ Form und Farbe des Geräts können sich je nach Modell unterscheiden.
Systemsteuerung
Fernbedienungssensor Richten Sie die Fernbedienung auf diesen Sensor am Fernsehgerät.
Netzanzeige Beim Einschalten des Fernsehgeräts blinkt die Netzleuchte kurz und erlischt anschließend. Im Standby-Modus leuchtet die Anzeige permanent.
SOURCEE Umschalten zwischen allen verfügbaren Signalquellen. Im Bildschirmmenü können Sie diese Schaltfläche genauso wie die ENTERE-Taste auf der Fernbedienung verwenden.
MENU Drücken Sie diese Taste, um die Funktionen des Fernsehgeräts in einem Bildschirmmenü anzuzeigen.
Y Einstellen der Lautstärke. Im Bildschirmmenü können Sie die Y-Schaltflächen wie die Tasten ◄ und ► auf der Fernbedienung verwenden.
z Wechseln des Senders. Im Bildschirmmenü können Sie die z-Schaltflächen wie die Tasten ▼ und ▲ auf der Fernbedienung verwenden.
P (Netz) Ein- oder Ausschalten des Fernsehgeräts.
Standby-Modus
Der Standby-Modus ist nicht für längere Phasen der Abwesenheit gedacht (z. B. wenn Sie verreist sind). Eine kleine Menge Strom wird auch dann noch verbraucht, wenn das Gerät mit dem Netzschalter ausgeschaltet wurde. Es ist am besten, das Netzkabel aus der Steckdose zu ziehen.
[LCD-ZG ZT]BN68-03717C-L04.indb 3 2011-04-29 �� 10:12:55
Deutsch - 4
Fernbedienung
A B C D
AD/SUBT.P.SIZEE-MANUAL
CONTENT
Ein- und Ausschalten des Fernsehgeräts.
Zurück zum vorherigen Sender.
Drücken Sie diese Taste, um den Ton vorübergehend auszuschalten.Wechseln des Senders.
Anzeigen der Senderlisten auf dem Bildschirm.Anzeigen des elektronischen Programmführers.
Anzeigen von Informationen auf dem Bildschirm
Schließen des Menüs.
Hiermit wechseln Sie direkt zu einem Kanal.
Einstellen der Lautstärke.
Alternativ wählen Sie „Videotext ein“, „Doppel“, „Mix“ oder „Aus“
Anzeigen des Bildschirmmenüs.
Hiermit können Sie häufig verwendete Funktionen schnell auswählen.
Anzeigen von Eigene Inhalte, Fernsehen und Quelle.
Zurück zum vorherigen Menü.
Auswählen von Optionen im Bildschirmmenü und Ändern von
Menüwerten.
Tasten, die in den Menüs Senderliste, Kanal-Manager, Eigene Inhalte usw.
E-MANUAL: Anzeigen des e-Manuals.P.SIZE: Hiermit wählen Sie das
Bildformat.AD/ SUBT.: Auswahl der Audio-
Beschreibung. (nicht überall verfügbar). / Digitale Untertitel anzeigen
Anzeigen und Auswählen der verfügbaren Videosignalquellen.
Einlegen von Batterien (Batteriegröße: AAA)
✎ Batterien und Akkus gehören nicht in den Hausmüll. Als Verbraucher sind Sie verpflichtet, alte Batterien und Akkus zur umweltschonenden Entsorgung zurückzugeben. Sie können alte Batterien und Akkus bei den öffentlichen Sammelstellen in Ihrer Gemeinde oder überall dort abgeben, wo Batterien und Akkus der betreffenden Art verkauft werden.
[LCD-ZG ZT]BN68-03717C-L04.indb 4 2011-04-29 �� 10:12:55
Deutsch - 5
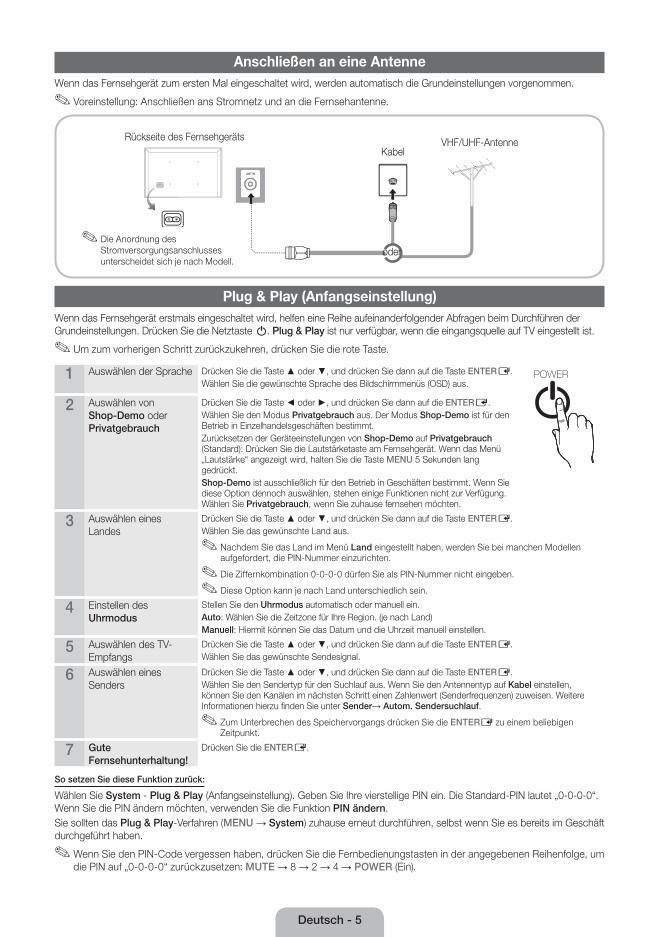
Anschließen an eine AntenneWenn das Fernsehgerät zum ersten Mal eingeschaltet wird, werden automatisch die Grundeinstellungen vorgenommen.
✎ Voreinstellung: Anschließen ans Stromnetz und an die Fernsehantenne.
Plug & Play (Anfangseinstellung)Wenn das Fernsehgerät erstmals eingeschaltet wird, helfen eine Reihe aufeinanderfolgender Abfragen beim Durchführen der Grundeinstellungen. Drücken Sie die Netztaste P. Plug & Play ist nur verfügbar, wenn die eingangsquelle auf TV eingestellt ist.
✎ Um zum vorherigen Schritt zurückzukehren, drücken Sie die rote Taste.
1 Auswählen der Sprache Drücken Sie die Taste ▲ oder ▼, und drücken Sie dann auf die Taste ENTERE. Wählen Sie die gewünschte Sprache des Bildschirmmenüs (OSD) aus. P
POWER
2 Auswählen von Shop-Demo oder Privatgebrauch
Drücken Sie die Taste ◄ oder ►, und drücken Sie dann auf die ENTERE.Wählen Sie den Modus Privatgebrauch aus. Der Modus Shop-Demo ist für den Betrieb in Einzelhandelsgeschäften bestimmt.Zurücksetzen der Geräteeinstellungen von Shop-Demo auf Privatgebrauch (Standard): Drücken Sie die Lautstärketaste am Fernsehgerät. Wenn das Menü „Lautstärke“ angezeigt wird, halten Sie die Taste MENU 5 Sekunden lang gedrückt.Shop-Demo ist ausschließlich für den Betrieb in Geschäften bestimmt. Wenn Sie diese Option dennoch auswählen, stehen einige Funktionen nicht zur Verfügung. Wählen Sie Privatgebrauch, wenn Sie zuhause fernsehen möchten.
3 Auswählen eines Landes
Drücken Sie die Taste ▲ oder ▼, und drücken Sie dann auf die Taste ENTERE. Wählen Sie das gewünschte Land aus.
✎ Nachdem Sie das Land im Menü Land eingestellt haben, werden Sie bei manchen Modellen aufgefordert, die PIN-Nummer einzurichten.
✎ Die Ziffernkombination 0-0-0-0 dürfen Sie als PIN-Nummer nicht eingeben.
✎ Diese Option kann je nach Land unterschiedlich sein.
4 Einstellen des Uhrmodus
Stellen Sie den Uhrmodus automatisch oder manuell ein. Auto: Wählen Sie die Zeitzone für Ihre Region. (je nach Land)Manuell: Hiermit können Sie das Datum und die Uhrzeit manuell einstellen.
5 Auswählen des TV-Empfangs
Drücken Sie die Taste ▲ oder ▼, und drücken Sie dann auf die Taste ENTERE. Wählen Sie das gewünschte Sendesignal.
6 Auswählen eines Senders
Drücken Sie die Taste ▲ oder ▼, und drücken Sie dann auf die Taste ENTERE. Wählen Sie den Sendertyp für den Suchlauf aus. Wenn Sie den Antennentyp auf Kabel einstellen, können Sie den Kanälen im nächsten Schritt einen Zahlenwert (Senderfrequenzen) zuweisen. Weitere Informationen hierzu finden Sie unter Sender→ Autom. Sendersuchlauf.
✎ Zum Unterbrechen des Speichervorgangs drücken Sie die ENTERE zu einem beliebigen Zeitpunkt.
7 Gute Fernsehunterhaltung!
Drücken Sie die ENTERE.
So setzen Sie diese Funktion zurück:
Wählen Sie System - Plug & Play (Anfangseinstellung). Geben Sie Ihre vierstellige PIN ein. Die Standard-PIN lautet „0-0-0-0“. Wenn Sie die PIN ändern möchten, verwenden Sie die Funktion PIN ändern.Sie sollten das Plug & Play-Verfahren (MENU → System) zuhause erneut durchführen, selbst wenn Sie es bereits im Geschäft durchgeführt haben.
✎ Wenn Sie den PIN-Code vergessen haben, drücken Sie die Fernbedienungstasten in der angegebenen Reihenfolge, um die PIN auf „0-0-0-0“ zurückzusetzen: MUTE → 8 → 2 → 4 → POWER (Ein).
VHF/UHF-AntenneKabel
oder
Rückseite des Fernsehgeräts
✎ Die Anordnung des Stromversorgungsanschlusses unterscheidet sich je nach Modell.
[LCD-ZG ZT]BN68-03717C-L04.indb 5 2011-04-29 �� 10:12:56
Deutsch - 6
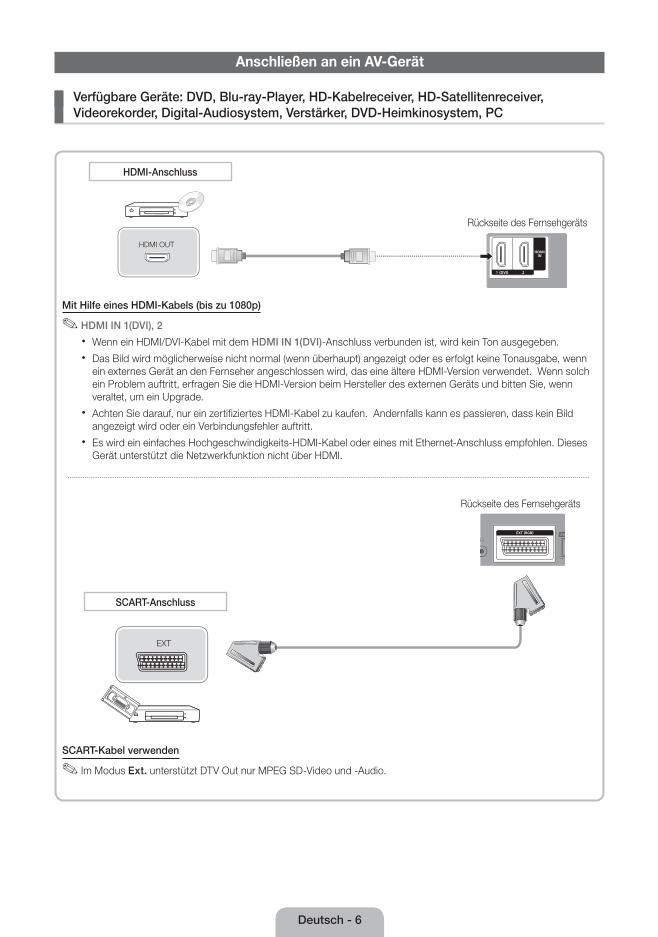
Anschließen an ein AV-Gerät
¦ Verfügbare Geräte: DVD, Blu-ray-Player, HD-Kabelreceiver, HD-Satellitenreceiver, Videorekorder, Digital-Audiosystem, Verstärker, DVD-Heimkinosystem, PC
HDMI OUT
Mit Hilfe eines HDMI-Kabels (bis zu 1080p)
✎ HDMI IN 1(DVI), 2
x Wenn ein HDMI/DVI-Kabel mit dem HDMI IN 1(DVI)-Anschluss verbunden ist, wird kein Ton ausgegeben.
x Das Bild wird möglicherweise nicht normal (wenn überhaupt) angezeigt oder es erfolgt keine Tonausgabe, wenn ein externes Gerät an den Fernseher angeschlossen wird, das eine ältere HDMI-Version verwendet. Wenn solch ein Problem auftritt, erfragen Sie die HDMI-Version beim Hersteller des externen Geräts und bitten Sie, wenn veraltet, um ein Upgrade.
x Achten Sie darauf, nur ein zertifiziertes HDMI-Kabel zu kaufen. Andernfalls kann es passieren, dass kein Bild angezeigt wird oder ein Verbindungsfehler auftritt.
x Es wird ein einfaches Hochgeschwindigkeits-HDMI-Kabel oder eines mit Ethernet-Anschluss empfohlen. Dieses Gerät unterstützt die Netzwerkfunktion nicht über HDMI.
HDMI-Anschluss
Rückseite des Fernsehgeräts
EXT
SCART-Anschluss
SCART-Kabel verwenden
✎ Im Modus Ext. unterstützt DTV Out nur MPEG SD-Video und -Audio.
Rückseite des Fernsehgeräts
[LCD-ZG ZT]BN68-03717C-L04.indb 6 2011-04-29 �� 10:12:57
Deutsch - 7
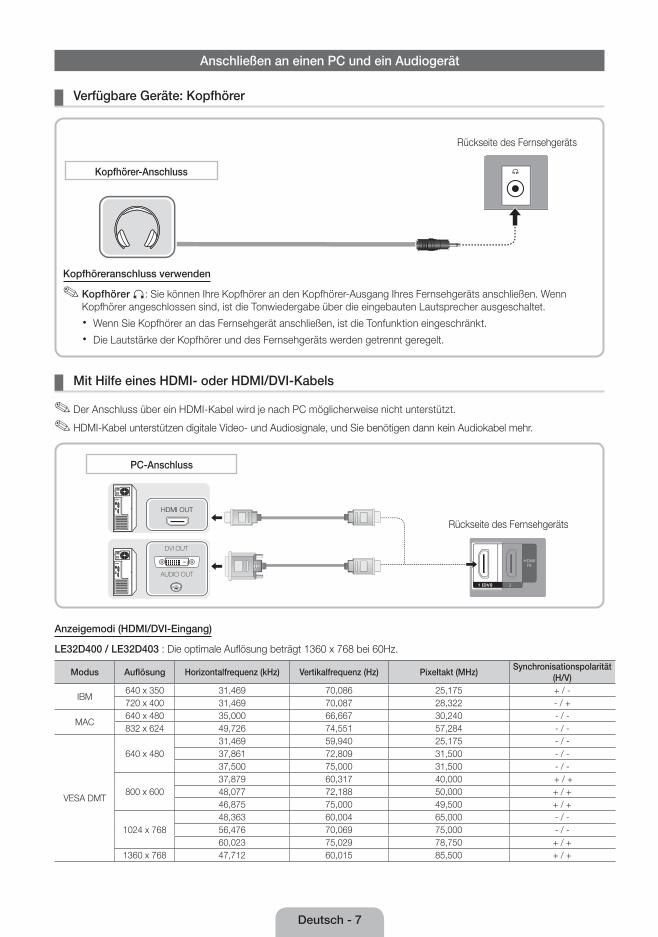
Anschließen an einen PC und ein Audiogerät
¦ Verfügbare Geräte: Kopfhörer
Kopfhörer-Anschluss
Kopfhöreranschluss verwenden
✎ Kopfhörer H: Sie können Ihre Kopfhörer an den Kopfhörer-Ausgang Ihres Fernsehgeräts anschließen. Wenn Kopfhörer angeschlossen sind, ist die Tonwiedergabe über die eingebauten Lautsprecher ausgeschaltet.
x Wenn Sie Kopfhörer an das Fernsehgerät anschließen, ist die Tonfunktion eingeschränkt.
x Die Lautstärke der Kopfhörer und des Fernsehgeräts werden getrennt geregelt.
Rückseite des Fernsehgeräts
¦ Mit Hilfe eines HDMI- oder HDMI/DVI-Kabels
✎ Der Anschluss über ein HDMI-Kabel wird je nach PC möglicherweise nicht unterstützt.
✎ HDMI-Kabel unterstützen digitale Video- und Audiosignale, und Sie benötigen dann kein Audiokabel mehr.
Anzeigemodi (HDMI/DVI-Eingang)
LE32D400 / LE32D403 : Die optimale Auflösung beträgt 1360 x 768 bei 60Hz.
Modus Auflösung Horizontalfrequenz (kHz) Vertikalfrequenz (Hz) Pixeltakt (MHz)Synchronisationspolarität
(H/V)
IBM640 x 350 31,469 70,086 25,175 + / -720 x 400 31,469 70,087 28,322 - / +
MAC640 x 480 35,000 66,667 30,240 - / -832 x 624 49,726 74,551 57,284 - / -
VESA DMT
640 x 48031,469 59,940 25,175 - / -37,861 72,809 31,500 - / -37,500 75,000 31,500 - / -
800 x 60037,879 60,317 40,000 + / +48,077 72,188 50,000 + / +46,875 75,000 49,500 + / +
1024 x 76848,363 60,004 65,000 - / -56,476 70,069 75,000 - / -60,023 75,029 78,750 + / +
1360 x 768 47,712 60,015 85,500 + / +
AUDIO OUT
DVI OUT
HDMI OUT
PC-Anschluss
Rückseite des Fernsehgeräts
[LCD-ZG ZT]BN68-03717C-L04.indb 7 2011-04-29 �� 10:13:00
Deutsch - 8
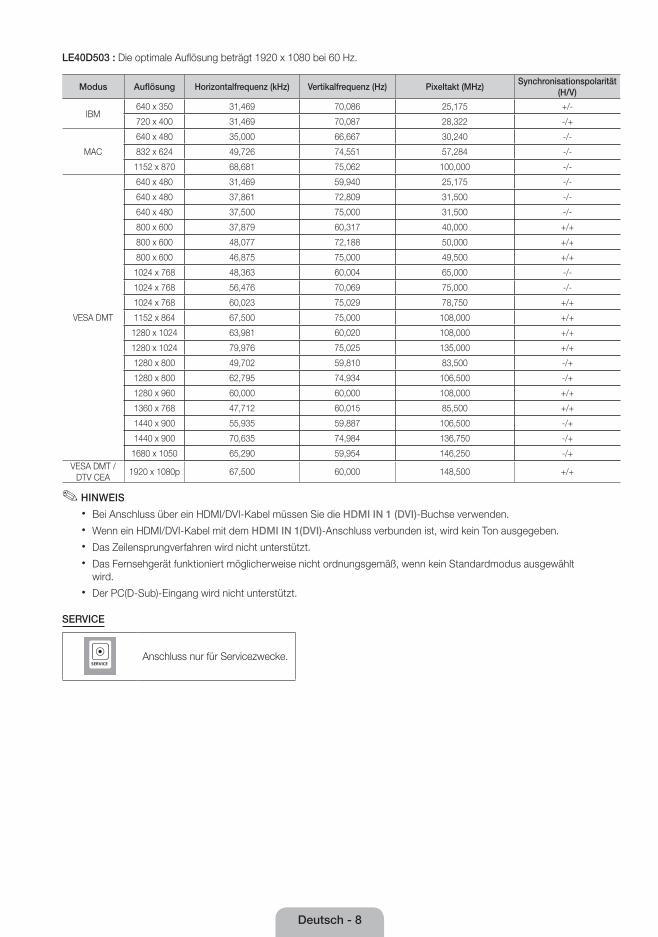
LE40D503 : Die optimale Auflösung beträgt 1920 x 1080 bei 60 Hz.
Modus Auflösung Horizontalfrequenz (kHz) Vertikalfrequenz (Hz) Pixeltakt (MHz)Synchronisationspolarität
(H/V)
IBM640 x 350 31,469 70,086 25,175 +/-
720 x 400 31,469 70,087 28,322 -/+
MAC
640 x 480 35,000 66,667 30,240 -/-
832 x 624 49,726 74,551 57,284 -/-
1152 x 870 68,681 75,062 100,000 -/-
VESA DMT
640 x 480 31,469 59,940 25,175 -/-
640 x 480 37,861 72,809 31,500 -/-
640 x 480 37,500 75,000 31,500 -/-
800 x 600 37,879 60,317 40,000 +/+
800 x 600 48,077 72,188 50,000 +/+
800 x 600 46,875 75,000 49,500 +/+
1024 x 768 48,363 60,004 65,000 -/-
1024 x 768 56,476 70,069 75,000 -/-
1024 x 768 60,023 75,029 78,750 +/+
1152 x 864 67,500 75,000 108,000 +/+
1280 x 1024 63,981 60,020 108,000 +/+
1280 x 1024 79,976 75,025 135,000 +/+
1280 x 800 49,702 59,810 83,500 -/+
1280 x 800 62,795 74,934 106,500 -/+
1280 x 960 60,000 60,000 108,000 +/+
1360 x 768 47,712 60,015 85,500 +/+
1440 x 900 55,935 59,887 106,500 -/+
1440 x 900 70,635 74,984 136,750 -/+
1680 x 1050 65,290 59,954 146,250 -/+VESA DMT /
DTV CEA1920 x 1080p 67,500 60,000 148,500 +/+
✎✎ HINWEIS
x Bei Anschluss über ein HDMI/DVI-Kabel müssen Sie die HDMI IN 1 (DVI)-Buchse verwenden.
x Wenn ein HDMI/DVI-Kabel mit dem HDMI IN 1(DVI)-Anschluss verbunden ist, wird kein Ton ausgegeben.
x Das Zeilensprungverfahren wird nicht unterstützt.
x Das Fernsehgerät funktioniert möglicherweise nicht ordnungsgemäß, wenn kein Standardmodus ausgewählt wird.
x Der PC(D-Sub)-Eingang wird nicht unterstützt.
SERVICE
Anschluss nur für Servicezwecke.
[LCD-ZG ZT]BN68-03717C-L04.indb 8 2011-04-29 �� 10:13:01

Deutsch - 9
Ändern der Eingangsquelle
¦ Quellen
Hiermit wählen Sie, ob das Fernsehgerät mit einem Fernsehsignal versorgt wird oder an andere externe Signaleingänge wie z. B. DVD- / Blu-Ray-Player / Kabelreceiver / Satellitenreceiver (Set-Top Box) angeschlossen ist.
■ TV / Ext. / HDMI1/DVI / HDMI2 / USB
✎ In der Liste der Quellen werden die angeschlossenen Signalquellen hervorgehoben.
✎ Der PC(D-Sub)-Eingang wird nicht unterstützt. Wenn Sie den PC an das Fernsehgerät anschließen möchten, verwenden Sie dafrü den HDMI1/DVI-Eingang.
✎ Wenn Sie nur die angeschlossenen Geräte anzeigen möchten, wechseln Sie mit der Taste ◄ oder ► zu Verbunden.
✎ Ext. bleibt immer aktiviert.
So verwenden Sie die Option „Name bearb.“
Drücken Sie im Fenster „Quelle“ die Taste TOOLS, um die gewünschten externen Eingangsquellen einzustellen.
■ VCR / DVD / Kabel-STB / Sat-STB / PVR-STB / AV-Receiver / Spiel / Camcorder / PC / DVI PC / DVI-Geräte / TV / IPTV / Blu-ray / HD DVD / DMA: Vergeben Sie Namen für die an die Eingangsbuchsen angeschlossenen Geräte, um die Auswahl der Signalquelle zu vereinfachen.
✎ Wenn Sie einen PC über ein HDMI-Kabel mit dem HDMI IN 1 (DVI)-Anschluss verbinden, müssen Sie unter Name bearb. den PC-Modus des Fernsehgeräts aktivieren.
✎ Wenn Sie einen PC über ein HDMI/DVI-Kabel mit dem HDMI IN 1 (DVI)-Anschluss verbinden, müssen Sie unter Name bearb. den DVI PC-Modus des Fernsehgeräts aktivieren.
✎ Wenn Sie ein AV-Gerät über ein HDMI/DVI-Kabel mit dem HDMI IN 1 (DVI)-Anschluss verbinden, müssen Sie unter Name bearb. den DVI-Geräte-Modus des Fernsehgeräts aktivieren.
Informationen
Sie können detaillierte Informationen zum gewälten externen Gerät anzeigen.
Anschließen an den COMMON INTERFACE-Steckplatz
Verwenden der „CI“- oder „CI+“-Karte
Um Bezahlsender zu sehen, müssen Sie eine „CI“ oder „CI+“-Karte einsetzen.
y Wenn Sie keine „CI“ oder „CI+“-Karte einsetzen, wird bei einigen Kanälen die Meldung „Gestörtes Signal“ angezeigt.
y Die Verbindungsinformationen mit Telefonnummer, Kennung der „CI“- oder „CI+“-Karten und Hostkennung sowie anderen Angaben werden nach ungefähr 2 bis 3 Minuten angezeigt. Wenn eine Fehlermeldung angezeigt wird, wenden Sie sich bitte an Ihren Dienstanbieter.
y Wenn das Konfigurieren der Kanalinformationen abgeschlossen ist, wird die Meldung „Udating Completed“ (Aktualisierung abgeschlossen) angezeigt. Dies bedeutet, dass die Kanalliste aktualisiert ist.
y Das Bild kann je nach Modell unterschiedlich sein.
✎ HINWEIS
x Sie können die „CI“ oder „CI+“-Karte bei einem der örtlichen Kabelnetzbetreiber erwerben.
x Ziehen Sie die „CI“ oder „CI+“-Karte vorsichtig mit den Händen heraus. Sie könnte beim Herunterfallen ansonsten beschädigt werden.
x Die Richtung, in der Sie die „CI“ oder „CI+“-Karte einsetzen müssen, ist auf der Karte markiert.
x Die Position des COMMON INTERFACE-Steckplatzes ist modellabhängig.
x „CI“ oder „CI+“-Karten werden in einigen Ländern und Regionen nicht unterstützt. Fragen Sie diesbezüglich Ihren offiziellen Händler.
x Wenden Sie sich bei Problemen an den Dienstanbieter.
x Setzen Sie eine „CI“ oder „CI+“-Karte ein, die für die aktuellen Antenneneinstellungen geeignet ist. Andernfalls ist das Bild gestört oder es fällt aus.
[LCD-ZG ZT]BN68-03717C-L04.indb 9 2011-04-29 �� 10:13:02
Deutsch - 10
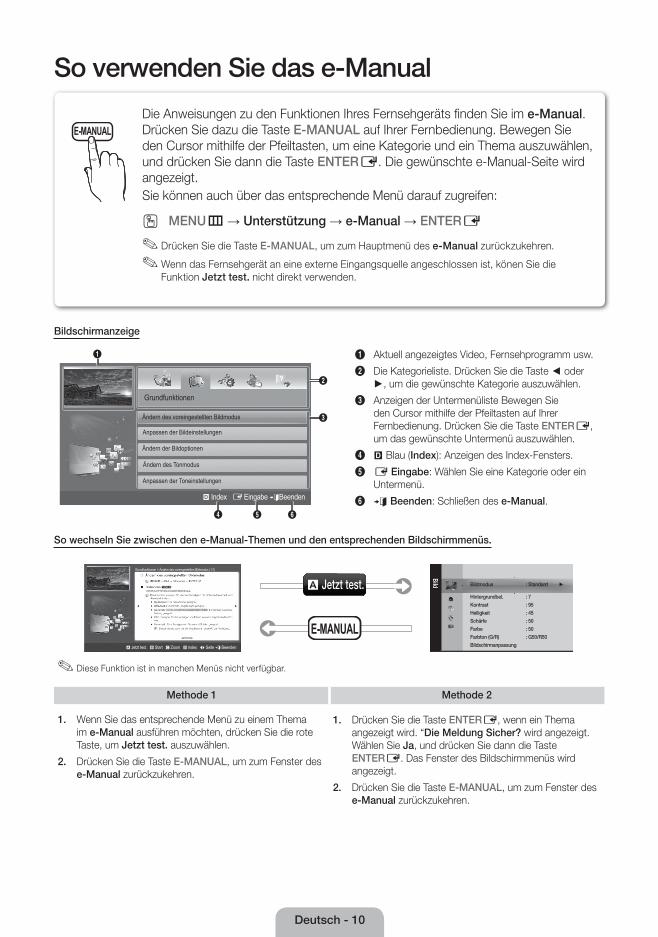
So verwenden Sie das e-Manual
Bildschirmanzeige
1
4 5 6
2
3
Grundfunktionen
Ändern des voreingestellten Bildmodus
Ändern der Bildoptionen
} Index E Eingabe eBeenden
Ändern des Tonmodus
Anpassen der Toneinstellungen
Anpassen der Bildeinstellungen
1 Aktuell angezeigtes Video, Fernsehprogramm usw.
2 Die Kategorieliste. Drücken Sie die Taste ◄ oder ►, um die gewünschte Kategorie auszuwählen.
3 Anzeigen der Untermenüliste Bewegen Sie den Cursor mithilfe der Pfeiltasten auf Ihrer Fernbedienung. Drücken Sie die Taste ENTERE, um das gewünschte Untermenü auszuwählen.
4 } Blau (Index): Anzeigen des Index-Fensters.
5 E Eingabe: Wählen Sie eine Kategorie oder ein Untermenü.
6 e Beenden: Schließen des e-Manual.
So wechseln Sie zwischen den e-Manual-Themen und den entsprechenden Bildschirmmenüs.
Bild Bildmodus : Standard ►
Hintergrundbel. : 7
Kontrast : 95
Helligkeit : 45
Schärfe : 50
Farbe : 50
Farbton (G/R) : G50/R50
Bildschirmanpassung
E-MANUAL
a Jetzt test.Grundfunktionen > Ändern des voreingestellten Bildmodus (1/1)
a Jetzt test. b Start { Zoom } Index L Seite e Beenden
✎ Diese Funktion ist in manchen Menüs nicht verfügbar.
Methode 1 Methode 2
1. Wenn Sie das entsprechende Menü zu einem Thema im e-Manual ausführen möchten, drücken Sie die rote Taste, um Jetzt test. auszuwählen.
2. Drücken Sie die Taste E-MANUAL, um zum Fenster des e-Manual zurückzukehren.
1. Drücken Sie die Taste ENTERE, wenn ein Thema angezeigt wird. “Die Meldung Sicher? wird angezeigt. Wählen Sie Ja, und drücken Sie dann die Taste ENTERE. Das Fenster des Bildschirmmenüs wird angezeigt.
2. Drücken Sie die Taste E-MANUAL, um zum Fenster des e-Manual zurückzukehren.
E-MANUALDie Anweisungen zu den Funktionen Ihres Fernsehgeräts fi nden Sie im e-Manual. Drücken Sie dazu die Taste E-MANUAL auf Ihrer Fernbedienung. Bewegen Sie den Cursor mithilfe der Pfeiltasten, um eine Kategorie und ein Thema auszuwählen, und drücken Sie dann die Taste ENTERE. Die gewünschte e-Manual-Seite wird angezeigt.Sie können auch über das entsprechende Menü darauf zugreifen:
O MENUm → Unterstützung → e-Manual → ENTERE
✎ Drücken Sie die Taste E-MANUAL, um zum Hauptmenü des e-Manual zurückzukehren.
✎ Wenn das Fernsehgerät an eine externe Eingangsquelle angeschlossen ist, könen Sie die Funktion Jetzt test. nicht direkt verwenden.
[LCD-ZG ZT]BN68-03717C-L04.indb 10 2011-04-29 �� 10:13:04
Deutsch - 11
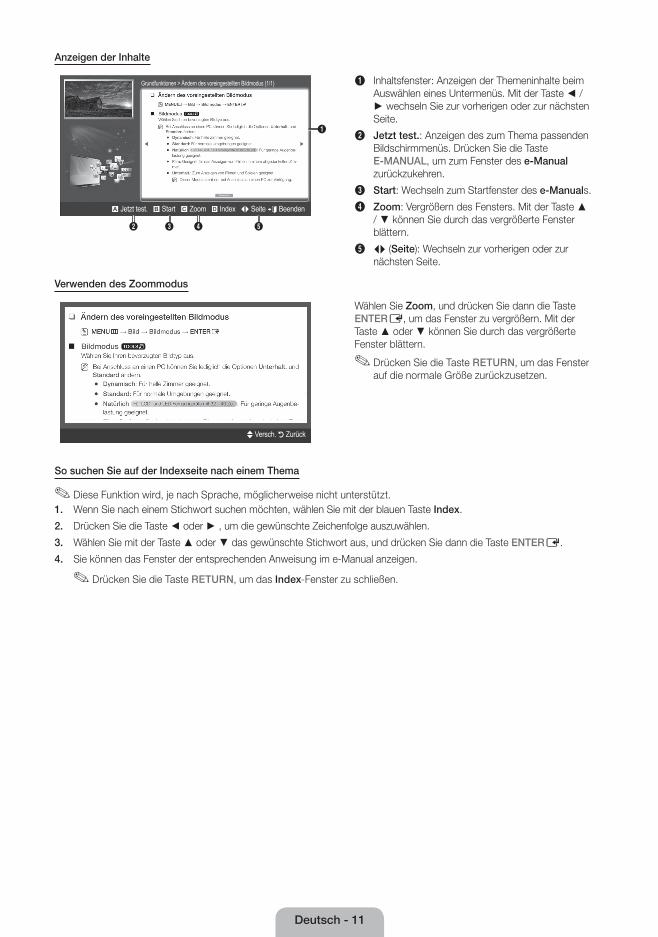
Anzeigen der Inhalte
Grundfunktionen > Ändern des voreingestellten Bildmodus (1/1)
2 3 4 5
a Jetzt test. b Start { Zoom } Index L Seite e Beenden
1
1 Inhaltsfenster: Anzeigen der Themeninhalte beim Auswählen eines Untermenüs. Mit der Taste ◄ / ► wechseln Sie zur vorherigen oder zur nächsten Seite.
2 Jetzt test.: Anzeigen des zum Thema passenden Bildschirmmenüs. Drücken Sie die Taste E-MANUAL, um zum Fenster des e-Manual zurückzukehren.
3 Start: Wechseln zum Startfenster des e-Manuals.
4 Zoom: Vergrößern des Fensters. Mit der Taste ▲ / ▼ können Sie durch das vergrößerte Fenster blättern.
5 L (Seite): Wechseln zur vorherigen oder zur nächsten Seite.
Verwenden des Zoommodus
U Versch. R Zurück
Wählen Sie Zoom, und drücken Sie dann die Taste ENTERE, um das Fenster zu vergrößern. Mit der Taste ▲ oder ▼ können Sie durch das vergrößerte Fenster blättern.
✎ Drücken Sie die Taste RETURN, um das Fenster auf die normale Größe zurückzusetzen.
So suchen Sie auf der Indexseite nach einem Thema
✎ Diese Funktion wird, je nach Sprache, möglicherweise nicht unterstützt.1. Wenn Sie nach einem Stichwort suchen möchten, wählen Sie mit der blauen Taste Index.
2. Drücken Sie die Taste ◄ oder ► , um die gewünschte Zeichenfolge auszuwählen.
3. Wählen Sie mit der Taste ▲ oder ▼ das gewünschte Stichwort aus, und drücken Sie dann die Taste ENTERE.
4. Sie können das Fenster der entsprechenden Anweisung im e-Manual anzeigen.
✎ Drücken Sie die Taste RETURN, um das Index-Fenster zu schließen.
[LCD-ZG ZT]BN68-03717C-L04.indb 11 2011-04-29 �� 10:13:06
Deutsch - 12
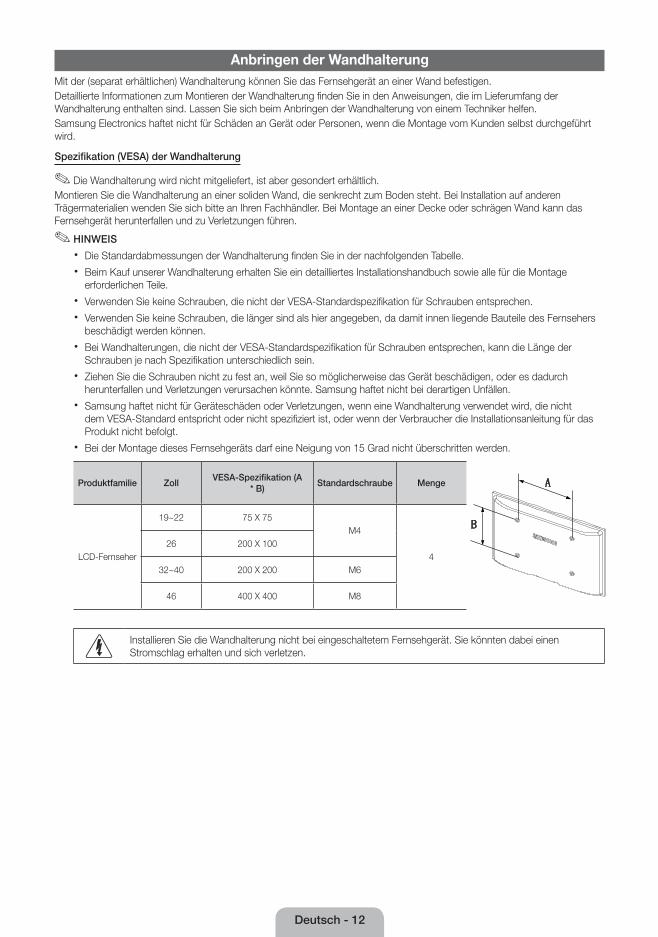
Anbringen der WandhalterungMit der (separat erhältlichen) Wandhalterung können Sie das Fernsehgerät an einer Wand befestigen.Detaillierte Informationen zum Montieren der Wandhalterung finden Sie in den Anweisungen, die im Lieferumfang der Wandhalterung enthalten sind. Lassen Sie sich beim Anbringen der Wandhalterung von einem Techniker helfen.Samsung Electronics haftet nicht für Schäden an Gerät oder Personen, wenn die Montage vom Kunden selbst durchgeführt wird.
Spezifikation (VESA) der Wandhalterung
✎ Die Wandhalterung wird nicht mitgeliefert, ist aber gesondert erhältlich.Montieren Sie die Wandhalterung an einer soliden Wand, die senkrecht zum Boden steht. Bei Installation auf anderen Trägermaterialien wenden Sie sich bitte an Ihren Fachhändler. Bei Montage an einer Decke oder schrägen Wand kann das Fernsehgerät herunterfallen und zu Verletzungen führen.
✎ HINWEIS
x Die Standardabmessungen der Wandhalterung finden Sie in der nachfolgenden Tabelle.
x Beim Kauf unserer Wandhalterung erhalten Sie ein detailliertes Installationshandbuch sowie alle für die Montage erforderlichen Teile.
x Verwenden Sie keine Schrauben, die nicht der VESA-Standardspezifikation für Schrauben entsprechen.
x Verwenden Sie keine Schrauben, die länger sind als hier angegeben, da damit innen liegende Bauteile des Fernsehers beschädigt werden können.
x Bei Wandhalterungen, die nicht der VESA-Standardspezifikation für Schrauben entsprechen, kann die Länge der Schrauben je nach Spezifikation unterschiedlich sein.
x Ziehen Sie die Schrauben nicht zu fest an, weil Sie so möglicherweise das Gerät beschädigen, oder es dadurch herunterfallen und Verletzungen verursachen könnte. Samsung haftet nicht bei derartigen Unfällen.
x Samsung haftet nicht für Geräteschäden oder Verletzungen, wenn eine Wandhalterung verwendet wird, die nicht dem VESA-Standard entspricht oder nicht spezifiziert ist, oder wenn der Verbraucher die Installationsanleitung für das Produkt nicht befolgt.
x Bei der Montage dieses Fernsehgeräts darf eine Neigung von 15 Grad nicht überschritten werden.
Produktfamilie ZollVESA-Spezifikation (A
* B)Standardschraube Menge
LCD-Fernseher
19~22 75 X 75M4
426 200 X 100
32~40 200 X 200 M6
46 400 X 400 M8
Installieren Sie die Wandhalterung nicht bei eingeschaltetem Fernsehgerät. Sie könnten dabei einen Stromschlag erhalten und sich verletzen.
[LCD-ZG ZT]BN68-03717C-L04.indb 12 2011-04-29 �� 10:13:06
Deutsch - 13
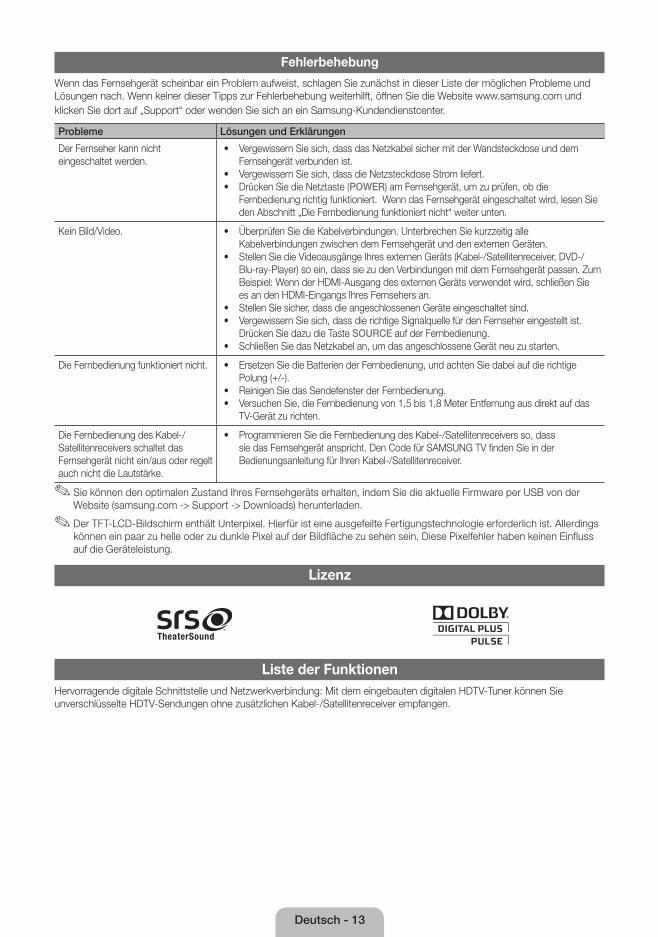
Fehlerbehebung
Wenn das Fernsehgerät scheinbar ein Problem aufweist, schlagen Sie zunächst in dieser Liste der möglichen Probleme und Lösungen nach. Wenn keiner dieser Tipps zur Fehlerbehebung weiterhilft, öffnen Sie die Website www.samsung.com und klicken Sie dort auf „Support“ oder wenden Sie sich an ein Samsung-Kundendienstcenter.
Probleme Lösungen und Erklärungen
Der Fernseher kann nicht eingeschaltet werden.
• Vergewissern Sie sich, dass das Netzkabel sicher mit der Wandsteckdose und dem Fernsehgerät verbunden ist.
• Vergewissern Sie sich, dass die Netzsteckdose Strom liefert. • Drücken Sie die Netztaste (POWER) am Fernsehgerät, um zu prüfen, ob die
Fernbedienung richtig funktioniert. Wenn das Fernsehgerät eingeschaltet wird, lesen Sie den Abschnitt „Die Fernbedienung funktioniert nicht“ weiter unten.
Kein Bild/Video. • Überprüfen Sie die Kabelverbindungen. Unterbrechen Sie kurzzeitig alle Kabelverbindungen zwischen dem Fernsehgerät und den externen Geräten.
• Stellen Sie die Videoausgänge Ihres externen Geräts (Kabel-/Satellitenreceiver, DVD-/Blu-ray-Player) so ein, dass sie zu den Verbindungen mit dem Fernsehgerät passen. Zum Beispiel: Wenn der HDMI-Ausgang des externen Geräts verwendet wird, schließen Sie es an den HDMI-Eingangs Ihres Fernsehers an.
• Stellen Sie sicher, dass die angeschlossenen Geräte eingeschaltet sind. • Vergewissern Sie sich, dass die richtige Signalquelle für den Fernseher eingestellt ist.
Drücken Sie dazu die Taste SOURCE auf der Fernbedienung. • Schließen Sie das Netzkabel an, um das angeschlossene Gerät neu zu starten.
Die Fernbedienung funktioniert nicht. • Ersetzen Sie die Batterien der Fernbedienung, und achten Sie dabei auf die richtige Polung (+/-).
• Reinigen Sie das Sendefenster der Fernbedienung. • Versuchen Sie, die Fernbedienung von 1,5 bis 1,8 Meter Entfernung aus direkt auf das
TV-Gerät zu richten.
Die Fernbedienung des Kabel-/Satellitenreceivers schaltet das Fernsehgerät nicht ein/aus oder regelt auch nicht die Lautstärke.
• Programmieren Sie die Fernbedienung des Kabel-/Satellitenreceivers so, dass sie das Fernsehgerät anspricht. Den Code für SAMSUNG TV finden Sie in der Bedienungsanleitung für Ihren Kabel-/Satellitenreceiver.
✎ Sie können den optimalen Zustand Ihres Fernsehgeräts erhalten, indem Sie die aktuelle Firmware per USB von der Website (samsung.com -> Support -> Downloads) herunterladen.
✎ Der TFT-LCD-Bildschirm enthält Unterpixel. Hierfür ist eine ausgefeilte Fertigungstechnologie erforderlich ist. Allerdings können ein paar zu helle oder zu dunkle Pixel auf der Bildfläche zu sehen sein. Diese Pixelfehler haben keinen Einfluss auf die Geräteleistung.
Lizenz
Liste der FunktionenHervorragende digitale Schnittstelle und Netzwerkverbindung: Mit dem eingebauten digitalen HDTV-Tuner können Sie unverschlüsselte HDTV-Sendungen ohne zusätzlichen Kabel-/Satellitenreceiver empfangen.
[LCD-ZG ZT]BN68-03717C-L04.indb 13 2011-04-29 �� 10:13:07

Deutsch - 14
Befestigen des Fernsehgeräts an der Wand
Achtung: Das Fernsehgerät kann hinfallen, wenn Sie daran ziehen, es schieben oder darauf klettern. Stellen Sie insbesondere sicher, dass sich keine Kinder an das Gerät hängen oder es aus dem Gleichgewicht bringen. Anderenfalls könnte das Gerät umkippen und zu schweren Verletzungen oder dem Tod führen. Beachten Sie alle Anweisungen der beigefügten Sicherheitshinweise. Noch mehr Stabilität erreichen Sie, wenn Sie den Kippschutz installieren. Gehen Sie hierzu folgendermaßen vor.
So verhindern Sie, dass das Fernsehgerät umkippt
1. Stecken Sie die Schrauben durch die Halterungen und befestigen Sie sie fest an der Wand. Vergewissern Sie sich, dass die Schrauben gut halten.
✎ Je nach Ausführung der Wand benötigen Sie zum Befestigen weiteres Material, wie z. B. Dübel.
✎ Da die benötigten Halterungen, Schrauben und das Band nicht zum Lieferumfang gehören, müssen Sie diese Teile gesondert erwerben.
2. Entfernen Sie die Schrauben in der Mitte der Geräterückseite. Setzen Sie die Schrauben in die Halterungen ein und befestigen Sie die Schrauben dann wieder am Fernsehgerät.
✎ Die Schrauben werden möglicherweise nicht zusammen mit dem Gerät geliefert. Kaufen Sie in diesem Fall Schrauben entsprechend den folgenden Angaben.
✎ Daten der Schrauben
x Für Fernseher von 32 bis 40 Zoll: M6
3. Verbinden Sie die Halterungen an der Wand und die Halterungen am Fernsehgerät mit einem festen Band und ziehen Sie das Band dann fest.
✎ HINWEIS
x Stellen Sie das Fernsehgerät in der Nähe der Wand auf, damit es nicht nach hinten kippen kann.
x Es ist noch sicherer, wenn die Halterungen an der Wand niedriger als die Halterungen am Fernsehgerät sind.
x Lösen Sie das Band, ehe Sie den Fernseher bewegen.
4. Kontrollieren Sie, ob alle Befestigungen ordnungsgemäß gesichert sind. Prüfen Sie regelmäßig die Verbindungen auf Zeichen von Ermüdung oder Versagen. Bei Zweifeln hinsichtlich der Sicherheit Ihrer Halterungen wenden Sie sich an einen professionellen Installationsbetrieb.
Lagerung und Wartung
✎ Wenn Sie den Aufkleber vom Bildschirm abnehmen, entfernen Sie die Kleberückstände, ehe Sie fernsehen.
Sprühen Sie kein Wasser oder Reinigungsmittel direkt auf das Gerät. Jede Flüssigkeit, die in das Gerät eindringt, kann zu einer Funktionsstörung, einem Brand oder einem Stromschlag führen.
Reinigen Sie das Gerät mit einem weichen Tuch, das Sie vorher mit einer kleinen Menge Wasser anfeuchten.
Wand
[LCD-ZG ZT]BN68-03717C-L04.indb 14 2011-04-29 �� 10:13:09
Deutsch - 15
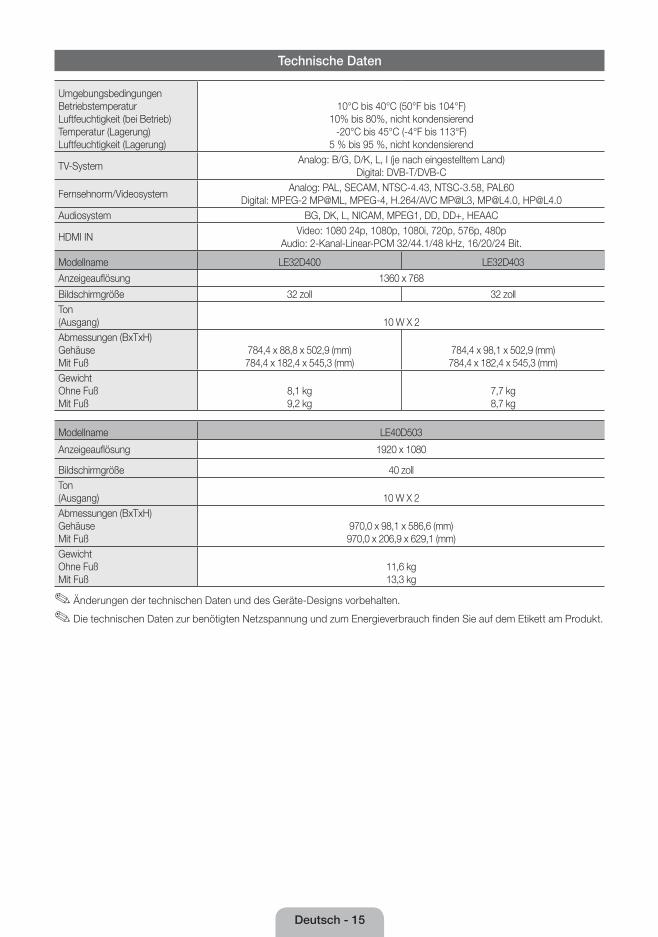
Technische Daten
Umgebungsbedingungen Betriebstemperatur Luftfeuchtigkeit (bei Betrieb)Temperatur (Lagerung) Luftfeuchtigkeit (Lagerung)
10°C bis 40°C (50°F bis 104°F) 10% bis 80%, nicht kondensierend
-20°C bis 45°C (-4°F bis 113°F) 5 % bis 95 %, nicht kondensierend
TV-System Analog: B/G, D/K, L, I (je nach eingestelltem Land)
Digital: DVB-T/DVB-C
Fernsehnorm/VideosystemAnalog: PAL, SECAM, NTSC-4.43, NTSC-3.58, PAL60
Digital: MPEG-2 MP@ML, MPEG-4, H.264/AVC MP@L3, [email protected], [email protected] BG, DK, L, NICAM, MPEG1, DD, DD+, HEAAC
HDMI INVideo: 1080 24p, 1080p, 1080i, 720p, 576p, 480p
Audio: 2-Kanal-Linear-PCM 32/44.1/48 kHz, 16/20/24 Bit.
Modellname LE32D400 LE32D403
Anzeigeauflösung 1360 x 768
Bildschirmgröße 32 zoll 32 zollTon (Ausgang) 10 W X 2Abmessungen (BxTxH) Gehäuse Mit Fuß
784,4 x 88,8 x 502,9 (mm)784,4 x 182,4 x 545,3 (mm)
784,4 x 98,1 x 502,9 (mm)784,4 x 182,4 x 545,3 (mm)
Gewicht Ohne Fuß Mit Fuß
8,1 kg9,2 kg
7,7 kg8,7 kg
Modellname LE40D503
Anzeigeauflösung 1920 x 1080
Bildschirmgröße 40 zollTon (Ausgang) 10 W X 2Abmessungen (BxTxH) Gehäuse Mit Fuß
970,0 x 98,1 x 586,6 (mm)970,0 x 206,9 x 629,1 (mm)
Gewicht Ohne Fuß Mit Fuß
11,6 kg13,3 kg
✎ Änderungen der technischen Daten und des Geräte-Designs vorbehalten.
✎ Die technischen Daten zur benötigten Netzspannung und zum Energieverbrauch finden Sie auf dem Etikett am Produkt.
[LCD-ZG ZT]BN68-03717C-L04.indb 15 2011-04-29 �� 10:13:10
Français - 2
Pour plus d’informations sur l’utilisation du manuel électronique (P.10)Les figures et illustrations contenues dans ce mode d’emploi sont fournies pour référence uniquement. Elles peuvent différer de l’aspect réel du produit. La conception et les spécifications du produit sont susceptibles d’être modifiées sans préavis.
Informations importantes relatives à la garantie de votre téléviseur (format d'affichage)1. Les fonctions relatives à la télévision numérique (DVB) ne sont disponibles que dans les pays ou régions où des signaux terrestres numériques de type DVB-T
(MPEG2 et MPEG4 AVC) sont diffusés ou dans lesquels vous avez accès à un service de télévision par câble compatible DVB-C (MPEG2 et MPEG4 AAC). Consultez votre distributeur local pour connaître les possibilités en matière de réception des signaux DVB-T ou DVB-C.
2. DVB-T est la norme du consortium européen DVB pour la diffusion de signaux terrestres de télévision numérique. La norme DVB-C est, quant à elle, prévue pour la diffusion des signaux de télévision numérique par câble. Certaines fonctions particulières, telles que le guide électronique des programmes (Electric Program Guide - EPG) ou encore la vidéo à la demande (Video On Demand - VOD), ne sont toutefois pas incluses dans cette spécification. Dès lors, elles ne seront pas traitées pour l’instant.
3. Bien que ce téléviseur soit conforme aux dernières normes DVB-T et DVB-C (août 2008), il n’est pas garanti qu’il soit compatible avec les futures diffusions de signaux numériques terrestres DVB-T et par câble DVB-C.
4. En fonction du pays ou de la région où vous vous trouvez, certains opérateurs de télévision par câble peuvent facturer des frais supplémentaires pour un tel service. Il se peut également que vous deviez accepter les termes et conditions de ces sociétés.
5. Il se peut que certaines fonctions de TV numérique ne soient pas disponibles dans certains pays ou certaines régions et que la réception des signaux DVB-C ne soit pas correcte avec tous les opérateurs.
6. Pour plus d’informations, contactez votre service client Samsung.
✎ Les différentes méthodes de diffusion adoptées en fonction des pays peuvent affecter la qualité de réception du téléviseur. Vérifiez le fonctionnement du téléviseur chez votre revendeur agréé SAMSUNG ou contactez le centre d’appel de Samsung pour savoir s’il est possible d’en améliorer les performances en reconfigurant les réglages.
Avertissement d’image fixeEvitez d'afficher sur l'écran des images fixes (telles que des photos au format JPEG) ou des éléments d'images fixes (tels que des logos de programmes TV, un format d'image 4:3 ou panoramique, des bandeaux d'actualités ou d'informations boursières au bas de l'écran, etc.). L'affichage permanent d'images fixes risque, en effet, d'entraîner l'apparition d'images fantôme à l'écran, ce qui peut se traduire par une dégradation de la qualité d'image. Pour atténuer les risques, suivez scrupuleusement les recommandations suivantes :• Evitez d’afficher le même canal de télévision pendant de longues périodes.• Essayez toujours d’afficher l’image en plein écran ; pour obtenir une correspondance optimale, utilisez le menu de format d’image du téléviseur.• Réduisez les valeurs de luminosité et de contraste sur le minimum requis pour obtenir la qualité d’image souhaitée. L’utilisation de valeurs trop élevées risque
d’accélérer le processus de brûlure.• Utilisez fréquemment toutes les fonctions du téléviseur conçues pour réduire le phénomène de rémanence et la brûlure d’écran. Pour plus d’informations à ce sujet,
consultez la section appropriée du mode d’emploi.
Sécurisation de l’espace d’installationMaintenez les distances requises entre le produit et les autres objets (par exemple, les murs) afin de garantir une ventilation adaptée.Le non-respect de ces distances peut provoquer un incendie ou un problème au produit en raison d’une augmentation de la température interne de celui-ci.
✎ Lors de l’utilisation d’un pied ou d’un support mural, utilisez uniquement les pièces fournies par Samsung Electronics.• L’utilisation de pièces fournies par un autre fabricant peut occasionner un problème au niveau du produit ou la chute de celui-ci, ce qui pourrait vous blesser.
✎ L’aspect peut varier en fonction du produit.
✎ Soyez prudent lorsque vous touchez le téléviseur, car certaines parties peuvent être brûlantes.
Installation avec un pied. Installation avec un support de montage mural.
10 cm10 cm
10 cm
10 cm
10 cm
10 cm
10 cm
Instructions de mise au rebut de ce produit (Déchets d'équipements électriques et électroniques) (Applicable dans les pays de l'Union Européenne et dans d'autres pays européens pratiquant la collecte sélective de déchets) Ce symbole sur le produit, ses accessoires ou sa documentation indique que ni le produit, ni ses accessoires électroniques usagés (chargeur, casque audio, câble USB, etc.) ne peuvent être jetés avec les autres déchets ménagers. La mise au rebut incontrôlée des déchets présentant des risques pour l'environnement et la santé publique, veuillez séparer vos produits et accessoires usagés des autres déchets. Vous favoriserez ainsi le recyclage de la matière qui les compose dans le cadre d'un développement durable. Les particuliers sont invités à contacter le magasin leur ayant vendu le produit ou à se renseigner auprès des autorités locales pour connaître les procédures et les points de collecte de ces produits en vue de leur recyclage. Les utilisateurs professionnels doivent contacter leur fournisseur et consulter les conditions générales du contrat d'achat. Ce produit et ses accessoires ne peuvent être jetés avec les autres déchets professionnels et commerciaux.
Élimination des batteries de ce produit (Applicable aux pays de l'Union européenne et aux autres pays européens dans lesquels des systèmes de collecte sélective sont mis en place.) Le symbole sur la pile, le manuel ou l'emballage indique que les batteries de ce produit ne doivent pas être éliminées en fin de vie avec les autres déchets ménagers. L'indication éventuelle des symboles chimiques Hg, Cd ou Pb signifie que la pile ou l'accumulateur contient des quantités de mercure, de cadmium ou de plomb supérieures aux niveaux de référence stipulés dans la directive CE 2006/66. Si les piles ne sont pas correctement éliminées, ces substances peuvent porter préjudice à la santé humaine ou à l'environnement. Afin de protéger les ressources naturelles et de favoriser la réutilisation du matériel, veillez à séparer les batteries des autres types de déchets et à les recycler via votre système local de collecte gratuite des piles et accumulateurs.
[LCD-ZG ZT]BN68-03717C-L04.indb 2 2011-04-29 �� 10:13:10
Français - 3
Accessories
✎ Vérifiez que les éléments suivants sont inclus avec votre téléviseur. S’il manque des éléments, contactez votre revendeur.
✎ La couleur et la forme des éléments peuvent varier en fonction du modèle.
y Télécommande et piles (AAA x 2) y Instructions d’utilisation y Carte de garantie / Manuel de sécurité (non disponible dans certains pays)
y Câble d’alimentation y Chiffon de nettoyage
✎ Des frais d'administration peuvent vous être facturés si :(a) un technicien intervient à votre demande et que le produit ne comporte aucun défaut(c.-à-d; si vous n'avez pas pris la peine de lire le présent manuel d'utilisation)(b) vous amenez le produit dans un centre de réparation alors qu'il ne comporte aucun défaut (c.-à-d; si vous n'avez pas pris la peine de lire le présent manuel d'utilisation)
✎ Le montant de ces frais d'administration vous sera signifié avant la réalisation de toute prestation ou visite à domicile.
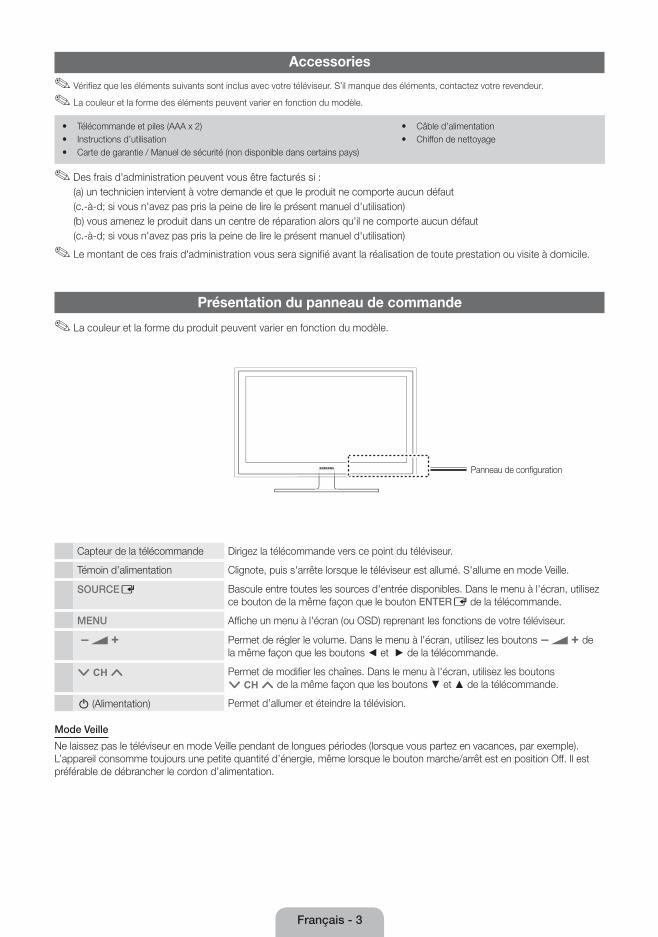
Présentation du panneau de commande
✎ La couleur et la forme du produit peuvent varier en fonction du modèle.
Panneau de configuration
Capteur de la télécommande Dirigez la télécommande vers ce point du téléviseur.
Témoin d’alimentation Clignote, puis s'arrête lorsque le téléviseur est allumé. S'allume en mode Veille.
SOURCEE Bascule entre toutes les sources d'entrée disponibles. Dans le menu à l'écran, utilisez ce bouton de la même façon que le bouton ENTERE de la télécommande.
MENU Affiche un menu à l'écran (ou OSD) reprenant les fonctions de votre téléviseur.
Y Permet de régler le volume. Dans le menu à l'écran, utilisez les boutons Y de la même façon que les boutons ◄ et ► de la télécommande.
z Permet de modifier les chaînes. Dans le menu à l'écran, utilisez les boutons z de la même façon que les boutons ▼ et ▲ de la télécommande.
P (Alimentation) Permet d’allumer et éteindre la télévision.
Mode Veille
Ne laissez pas le téléviseur en mode Veille pendant de longues périodes (lorsque vous partez en vacances, par exemple). L’appareil consomme toujours une petite quantité d’énergie, même lorsque le bouton marche/arrêt est en position Off. Il est préférable de débrancher le cordon d’alimentation.
[LCD-ZG ZT]BN68-03717C-L04.indb 3 2011-04-29 �� 10:13:11
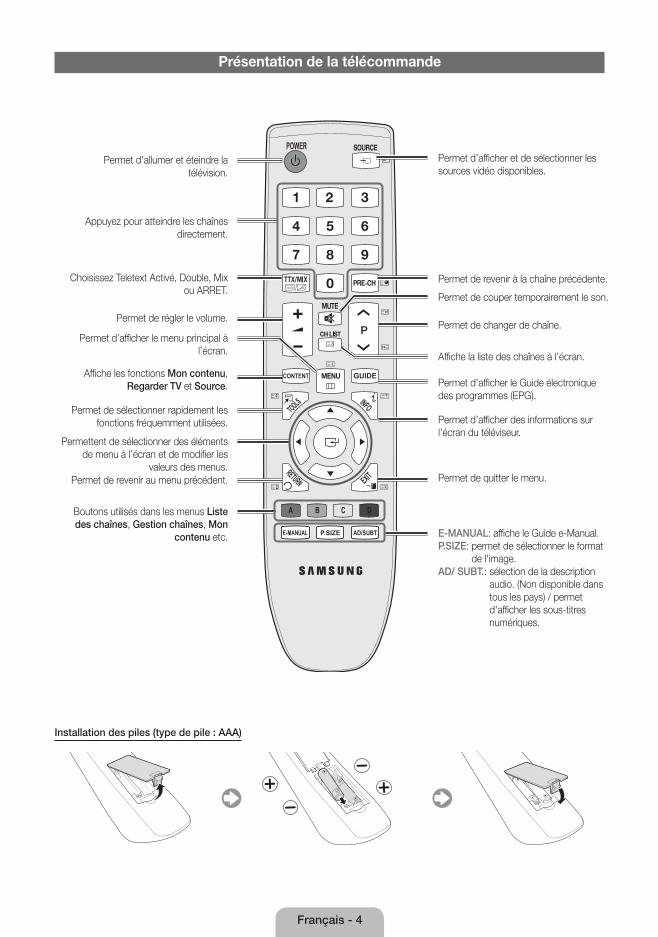
Français - 4
Présentation de la télécommande
A B C D
AD/SUBT.P.SIZEE-MANUAL
CONTENT
Permet d’allumer et éteindre la télévision.
Permet de revenir à la chaîne précédente.
Permet de couper temporairement le son.
Permet de changer de chaîne.
Affiche la liste des chaînes à l’écran.
Permet d’afficher le Guide électronique des programmes (EPG).
Permet d’afficher des informations sur l’écran du téléviseur.
Permet de quitter le menu.
Appuyez pour atteindre les chaînes directement.
Permet de régler le volume.
Choisissez Teletext Activé, Double, Mix ou ARRET.
Permet d’afficher le menu principal à l’écran.
Permet de sélectionner rapidement les fonctions fréquemment utilisées.
Affiche les fonctions Mon contenu, Regarder TV et Source.
Permet de revenir au menu précédent.
Permettent de sélectionner des éléments de menu à l’écran et de modifier les
valeurs des menus.
Boutons utilisés dans les menus Liste des chaînes, Gestion chaînes, Mon
contenu etc. E-MANUAL: affiche le Guide e-Manual.P.SIZE: permet de sélectionner le format
de l'image.AD/ SUBT.: sélection de la description
audio. (Non disponible dans tous les pays) / permet d'afficher les sous-titres numériques.
Permet d’afficher et de sélectionner les sources vidéo disponibles.
Installation des piles (type de pile : AAA)
[LCD-ZG ZT]BN68-03717C-L04.indb 4 2011-04-29 �� 10:13:11
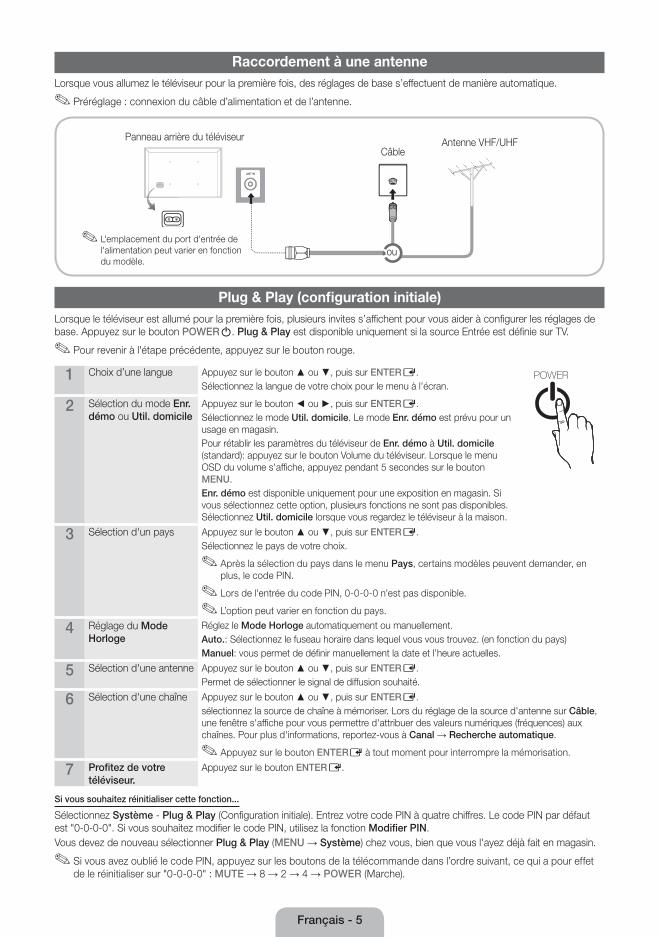
Français - 5
Permet de revenir à la chaîne précédente.
Permet de couper temporairement le son.
Raccordement à une antenneLorsque vous allumez le téléviseur pour la première fois, des réglages de base s’effectuent de manière automatique.
✎ Préréglage : connexion du câble d’alimentation et de l’antenne.
Plug & Play (configuration initiale)Lorsque le téléviseur est allumé pour la première fois, plusieurs invites s’affichent pour vous aider à configurer les réglages de base. Appuyez sur le bouton POWERP. Plug & Play est disponible uniquement si la source Entrée est définie sur TV.
✎ Pour revenir à l'étape précédente, appuyez sur le bouton rouge.
1 Choix d’une langue Appuyez sur le bouton ▲ ou ▼, puis sur ENTERE. Sélectionnez la langue de votre choix pour le menu à l'écran. P
POWER
2 Sélection du mode Enr. démo ou Util. domicile
Appuyez sur le bouton ◄ ou ►, puis sur ENTERE.Sélectionnez le mode Util. domicile. Le mode Enr. démo est prévu pour un usage en magasin.Pour rétablir les paramètres du téléviseur de Enr. démo à Util. domicile (standard): appuyez sur le bouton Volume du téléviseur. Lorsque le menu OSD du volume s'affiche, appuyez pendant 5 secondes sur le bouton MENU.Enr. démo est disponible uniquement pour une exposition en magasin. Si vous sélectionnez cette option, plusieurs fonctions ne sont pas disponibles. Sélectionnez Util. domicile lorsque vous regardez le téléviseur à la maison.
3 Sélection d'un pays Appuyez sur le bouton ▲ ou ▼, puis sur ENTERE. Sélectionnez le pays de votre choix.
✎ Après la sélection du pays dans le menu Pays, certains modèles peuvent demander, en plus, le code PIN.
✎ Lors de l'entrée du code PIN, 0-0-0-0 n'est pas disponible.
✎ L’option peut varier en fonction du pays.
4 Réglage du Mode Horloge
Réglez le Mode Horloge automatiquement ou manuellement.Auto.: Sélectionnez le fuseau horaire dans lequel vous vous trouvez. (en fonction du pays)Manuel: vous permet de définir manuellement la date et l’heure actuelles.
5 Sélection d'une antenne Appuyez sur le bouton ▲ ou ▼, puis sur ENTERE. Permet de sélectionner le signal de diffusion souhaité.
6 Sélection d'une chaîne Appuyez sur le bouton ▲ ou ▼, puis sur ENTERE. sélectionnez la source de chaîne à mémoriser. Lors du réglage de la source d'antenne sur Câble, une fenêtre s'affiche pour vous permettre d'attribuer des valeurs numériques (fréquences) aux chaînes. Pour plus d'informations, reportez-vous à Canal → Recherche automatique.
✎ Appuyez sur le bouton ENTERE à tout moment pour interrompre la mémorisation.
7 Profitez de votre téléviseur.
Appuyez sur le bouton ENTERE.
Si vous souhaitez réinitialiser cette fonction...
Sélectionnez Système - Plug & Play (Configuration initiale). Entrez votre code PIN à quatre chiffres. Le code PIN par défaut est "0-0-0-0". Si vous souhaitez modifier le code PIN, utilisez la fonction Modifier PIN.Vous devez de nouveau sélectionner Plug & Play (MENU → Système) chez vous, bien que vous l'ayez déjà fait en magasin.
✎ Si vous avez oublié le code PIN, appuyez sur les boutons de la télécommande dans l’ordre suivant, ce qui a pour effet de le réinitialiser sur "0-0-0-0" : MUTE → 8 → 2 → 4 → POWER (Marche).
Antenne VHF/UHFCâble
ou
Panneau arrière du téléviseur
✎ L'emplacement du port d'entrée de l'alimentation peut varier en fonction du modèle.
[LCD-ZG ZT]BN68-03717C-L04.indb 5 2011-04-29 �� 10:13:12
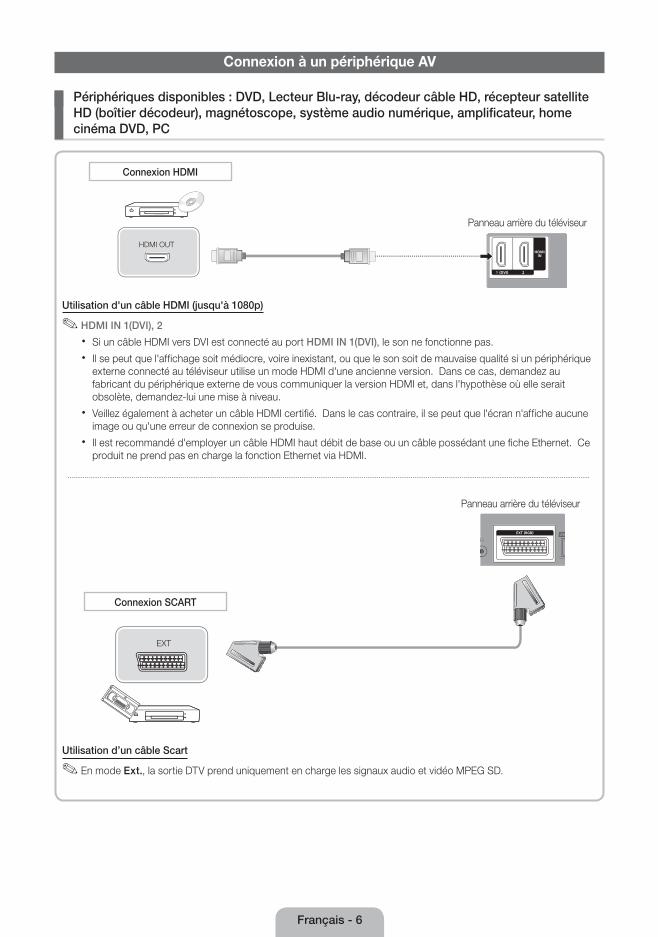
Français - 6
Connexion à un périphérique AV
¦ Périphériques disponibles : DVD, Lecteur Blu-ray, décodeur câble HD, récepteur satellite HD (boîtier décodeur), magnétoscope, système audio numérique, amplificateur, home cinéma DVD, PC
HDMI OUT
Utilisation d'un câble HDMI (jusqu'à 1080p)
✎ HDMI IN 1(DVI), 2
x Si un câble HDMI vers DVI est connecté au port HDMI IN 1(DVI), le son ne fonctionne pas.
x Il se peut que l'affichage soit médiocre, voire inexistant, ou que le son soit de mauvaise qualité si un périphérique externe connecté au téléviseur utilise un mode HDMI d'une ancienne version. Dans ce cas, demandez au fabricant du périphérique externe de vous communiquer la version HDMI et, dans l'hypothèse où elle serait obsolète, demandez-lui une mise à niveau.
x Veillez également à acheter un câble HDMI certifié. Dans le cas contraire, il se peut que l'écran n'affiche aucune image ou qu'une erreur de connexion se produise.
x Il est recommandé d'employer un câble HDMI haut débit de base ou un câble possédant une fiche Ethernet. Ce produit ne prend pas en charge la fonction Ethernet via HDMI.
Connexion HDMI
Panneau arrière du téléviseur
EXT
Connexion SCART
Utilisation d’un câble Scart
✎ En mode Ext., la sortie DTV prend uniquement en charge les signaux audio et vidéo MPEG SD.
Panneau arrière du téléviseur
[LCD-ZG ZT]BN68-03717C-L04.indb 6 2011-04-29 �� 10:13:13
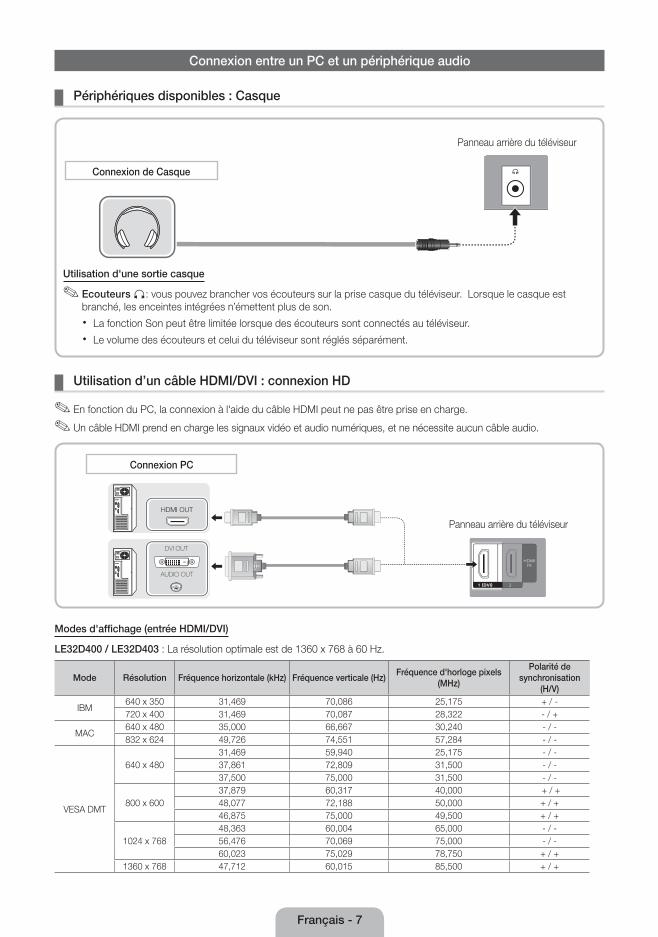
Français - 7
Connexion entre un PC et un périphérique audio
¦ Périphériques disponibles : Casque
Connexion de Casque
Utilisation d'une sortie casque
✎ Ecouteurs H: vous pouvez brancher vos écouteurs sur la prise casque du téléviseur. Lorsque le casque est branché, les enceintes intégrées n’émettent plus de son.
x La fonction Son peut être limitée lorsque des écouteurs sont connectés au téléviseur.
x Le volume des écouteurs et celui du téléviseur sont réglés séparément.
Panneau arrière du téléviseur
¦ Utilisation d’un câble HDMI/DVI : connexion HD
✎ En fonction du PC, la connexion à l'aide du câble HDMI peut ne pas être prise en charge.
✎ Un câble HDMI prend en charge les signaux vidéo et audio numériques, et ne nécessite aucun câble audio.
Modes d'affichage (entrée HDMI/DVI)
LE32D400 / LE32D403 : La résolution optimale est de 1360 x 768 à 60 Hz.
Mode Résolution Fréquence horizontale (kHz) Fréquence verticale (Hz)Fréquence d'horloge pixels
(MHz)
Polarité de synchronisation
(H/V)
IBM640 x 350 31,469 70,086 25,175 + / -720 x 400 31,469 70,087 28,322 - / +
MAC640 x 480 35,000 66,667 30,240 - / -832 x 624 49,726 74,551 57,284 - / -
VESA DMT
640 x 48031,469 59,940 25,175 - / -37,861 72,809 31,500 - / -37,500 75,000 31,500 - / -
800 x 60037,879 60,317 40,000 + / +48,077 72,188 50,000 + / +46,875 75,000 49,500 + / +
1024 x 76848,363 60,004 65,000 - / -56,476 70,069 75,000 - / -60,023 75,029 78,750 + / +
1360 x 768 47,712 60,015 85,500 + / +
AUDIO OUT
DVI OUT
HDMI OUT
Connexion PC
Panneau arrière du téléviseur
[LCD-ZG ZT]BN68-03717C-L04.indb 7 2011-04-29 �� 10:13:16
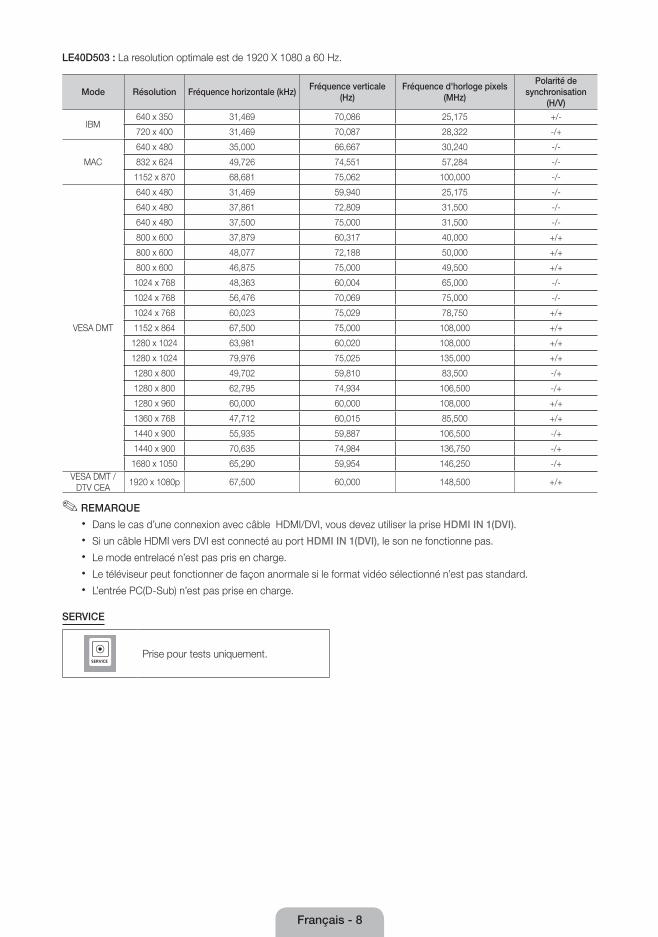
Français - 8
LE40D503 : La resolution optimale est de 1920 X 1080 a 60 Hz.
Mode Résolution Fréquence horizontale (kHz)Fréquence verticale
(Hz)Fréquence d'horloge pixels
(MHz)
Polarité de synchronisation
(H/V)
IBM640 x 350 31,469 70,086 25,175 +/-
720 x 400 31,469 70,087 28,322 -/+
MAC
640 x 480 35,000 66,667 30,240 -/-
832 x 624 49,726 74,551 57,284 -/-
1152 x 870 68,681 75,062 100,000 -/-
VESA DMT
640 x 480 31,469 59,940 25,175 -/-
640 x 480 37,861 72,809 31,500 -/-
640 x 480 37,500 75,000 31,500 -/-
800 x 600 37,879 60,317 40,000 +/+
800 x 600 48,077 72,188 50,000 +/+
800 x 600 46,875 75,000 49,500 +/+
1024 x 768 48,363 60,004 65,000 -/-
1024 x 768 56,476 70,069 75,000 -/-
1024 x 768 60,023 75,029 78,750 +/+
1152 x 864 67,500 75,000 108,000 +/+
1280 x 1024 63,981 60,020 108,000 +/+
1280 x 1024 79,976 75,025 135,000 +/+
1280 x 800 49,702 59,810 83,500 -/+
1280 x 800 62,795 74,934 106,500 -/+
1280 x 960 60,000 60,000 108,000 +/+
1360 x 768 47,712 60,015 85,500 +/+
1440 x 900 55,935 59,887 106,500 -/+
1440 x 900 70,635 74,984 136,750 -/+
1680 x 1050 65,290 59,954 146,250 -/+VESA DMT /
DTV CEA1920 x 1080p 67,500 60,000 148,500 +/+
✎✎ REMARQUE
x Dans le cas d’une connexion avec câble HDMI/DVI, vous devez utiliser la prise HDMI IN 1(DVI).
x Si un câble HDMI vers DVI est connecté au port HDMI IN 1(DVI), le son ne fonctionne pas.
x Le mode entrelacé n’est pas pris en charge.
x Le téléviseur peut fonctionner de façon anormale si le format vidéo sélectionné n’est pas standard.
x L’entrée PC(D-Sub) n’est pas prise en charge.
SERVICE
Prise pour tests uniquement.
[LCD-ZG ZT]BN68-03717C-L04.indb 8 2011-04-29 �� 10:13:17
Français - 9
Changement de la source d'entrée
¦ Liste Source
Permet de sélectionner le téléviseur ou d’autres sources d’entrée externes (telles qu’un lecteur DVD, un lecteur Blu-ray, un décodeur câble ou un récepteur décodeur) connectées au téléviseur.
■ TV / Ext. / HDMI1/DVI / HDMI2 / USB
✎ Les entrées connectées sont mises en surbrillance dans la Liste Source.
✎ L’entrée PC(D-Sub) n’est pas prise en charge. Pour connecter un PC au téléviseur, utilisez l’entrée HDMI1/DVI.
✎ Pour afficher les périphériques connectés uniquement, accédez à la fonction Connecté à l'aide du bouton ◄ ou ►.
✎ L’option Ext. reste activée en permanence.
Utilisation de la fonction Modif. Nom
Dans Source, appuyez sur le bouton TOOLS. Vous pouvez ensuite définir le nom de la source d'entrée externe de votre choix.
■ Magnétoscope / DVD / Décodeur Câble / Décodeur satellite / Décodeur PVR / Récepteur AV / Jeu / Caméscope / PC / DVI PC / Périph. DVI / TV / IPTV / Blu-ray / HD DVD / DMA: Nommez le périphérique connecté aux prises d’entrée pour faciliter la sélection de la source d’entrée.
✎ Lorsque vous connectez un PC au port HDMI IN 1(DVI) avec un câble HDMI, vous devez définir le téléviseur en mode PC sous Modif. Nom.
✎ Lorsque vous connectez un PC au port HDMI IN 1(DVI) avec un câble HDMI vers DVI, vous devez définir le téléviseur en mode DVI PC sous Modif. Nom.
✎ Lorsque vous connectez un périphérique AV au port HDMI IN 1(DVI) avec un câble HDMI vers DVI, vous devez définir le téléviseur en mode Périph. DVI sous Modif. Nom.
Informations
Vous pouvez afficher des informations détaillées sur le périphérique externe sélectionné.
Connexion à un port COMMON INTERFACE
Utilisation de la "CARTE CI ou CI+"
Pour regarder les chaînes payantes, la carte CI ou CI+ doit être insérée.
y Si vous ne l'insérez pas, certaines chaînes afficheront le message "Signal brouillé".
y Les informations de pairage contenant un numéro de téléphone, l'ID de la carte CI ou CI+, l'ID de l'hôte et d'autres informations s'afficheront après 2 ou 3 minutes. Si un message d'erreur s'affiche, contactez votre fournisseur de service.
y Lorsque la configuration des informations sur les canaux est terminée, le message "Mise à jour terminée" s'affiche, indiquant que la liste des chaînes est mise à jour.
y L'image peut varier en fonction du modèle.
✎ REMARQUE
x Vous devez vous procurer une "Carte CI ou CI+" auprès d’un câblo-opérateur local.
x Lorsque vous sortez la "Carte CI ou CI+", tirez-la délicatement avec vos doigts. Une chute pourrait l’endommager.
x Insérez la ''Carte CI ou CI+'' dans le sens indiqué sur celle-ci.
x L'emplacement de la fente COMMON INTERFACE peut varier en fonction du modèle.
x La "Carte CI ou CI+" n’est pas prise en charge dans certains pays et certaines régions ; vérifiez auprès de votre revendeur agréé.
x Si vous rencontrez des problèmes, contactez le prestataire de service.
x Insérez la carte d'interface commune (CI ou CI+ CARD), qui prend en charge les paramètres actuels de l'antenne. L'image sera déformée, voire invisible.
[LCD-ZG ZT]BN68-03717C-L04.indb 9 2011-04-29 �� 10:13:18

Français - 10
Utilisation du manuel électronique
Affi chage
1
4 5 6
2
3
Fonctions de base
Changement du mode Image prédéfi ni
Modifi cation des options d’image
} Index E Entrer e Quitter
Changement du mode Son prédéfi ni
Réglage des paramètres sonores
Réglages des paramètres de l’image
1 Vidéo, programme télévisé, etc actuellement affi ché.
2 Liste des catégories. Appuyez sur le bouton ◄ ou ► pour sélectionner la catégorie de votre choix.
3 Affi che la liste des sous-menus. Utilisez les touches fl échées de votre télécommande pour déplacer le curseur. Appuyez sur le bouton ENTERE pour sélectionner le sous-menu de votre choix.
4 } Bleu (Index) : affi che l'écran d'index.
5 E Entrer : sélectionne une catégorie ou un sous-menu.
6 e Quitter : permet de quitter le e-Manual.
Comment basculer entre une rubrique du manuel électronique et le(s) menu(s) correspondant(s) affi ché(s) à l'écran
Image Mode Image : Standard ►
Rétroéclairage : 7
Contraste : 95
Luminosité : 45
Netteté : 50
Couleur : 50
Teinte (V/R) : G50/R50
Réglage de l’écran
E-MANUAL
a Essayer Fonctions de base > Changement du mode Image prédéfi ni (1/1)
a Essayer b Accueil { Zoom } Index L Page e Quitter
✎ Cette fonction n'est pas disponible dans certains menus.
Méthode 1 Méthode 2
1. Si vous souhaitez utiliser le menu correspondant à une rubrique du e-Manual, appuyez sur le bouton rouge afi n de sélectionner l'option Essayer.
2. Pour revenir à l'écran du e-Manual, appuyez sur le bouton E-MANUAL.
1. Appuyez sur le bouton ENTERE lorsqu'une rubrique s'affi che. Le message "Exécuter?" s'affi che. Sélectionnez Oui, puis appuyez sur le bouton ENTERE. La fenêtre des menus à l'écran s'affi che.
2. Pour revenir à l'écran du e-Manual, appuyez sur le bouton E-MANUAL.
E-MANUAL
Vous trouverez des instructions sur les caractéristiques de votre téléviseur dans le e-Manual de ce dernier. Pour l'utiliser, appuyez sur le bouton E-MANUAL de votre télécommande. Déplacez le curseur à l'aide des boutons Haut/Bas/Gauche/Droite afi n de mettre en surbrillance une catégorie, puis une rubrique. Appuyez ensuite sur le bouton ENTERE. Le e-Manual affi che la page souhaitée.Vous pouvez également y accéder via le menu :
O MENUm → Assistance → e-Manual → ENTERE
✎ Pour revenir au menu principal du e-Manual, appuyez sur le bouton E-MANUAL de la télécommande.
✎ La fonction Essayer n'est pas directement disponible si le téléviseur est défini avec une source d'entrée externe.
[LCD-ZG ZT]BN68-03717C-L04.indb 10 2011-04-29 �� 10:13:20
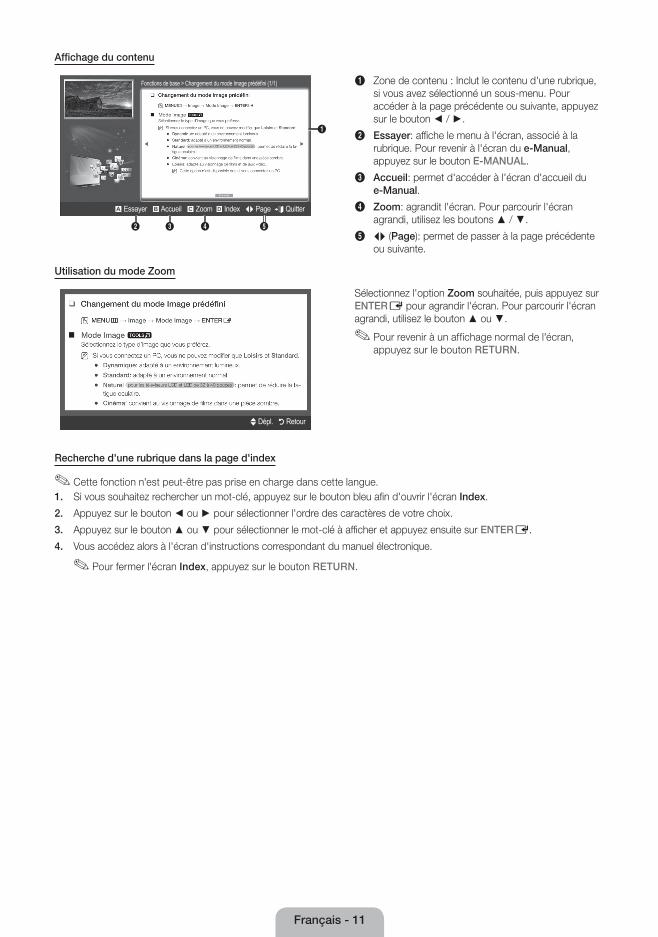
Français - 11
Affichage du contenu
Fonctions de base > Changement du mode Image prédéfini (1/1)
2 3 4 5
a Essayer b Accueil { Zoom } Index L Page e Quitter
1
1 Zone de contenu : Inclut le contenu d'une rubrique, si vous avez sélectionné un sous-menu. Pour accéder à la page précédente ou suivante, appuyez sur le bouton ◄ / ►.
2 Essayer: affiche le menu à l'écran, associé à la rubrique. Pour revenir à l'écran du e-Manual, appuyez sur le bouton E-MANUAL.
3 Accueil: permet d'accéder à l'écran d'accueil du e-Manual.
4 Zoom: agrandit l'écran. Pour parcourir l'écran agrandi, utilisez les boutons ▲ / ▼.
5 L (Page): permet de passer à la page précédente ou suivante.
Utilisation du mode Zoom
U Dépl. R Retour
Sélectionnez l'option Zoom souhaitée, puis appuyez sur ENTERE pour agrandir l'écran. Pour parcourir l'écran agrandi, utilisez le bouton ▲ ou ▼.
✎ Pour revenir à un affichage normal de l'écran, appuyez sur le bouton RETURN.
Recherche d'une rubrique dans la page d'index
✎ Cette fonction n'est peut-être pas prise en charge dans cette langue.1. Si vous souhaitez rechercher un mot-clé, appuyez sur le bouton bleu afin d'ouvrir l'écran Index.
2. Appuyez sur le bouton ◄ ou ► pour sélectionner l'ordre des caractères de votre choix.
3. Appuyez sur le bouton ▲ ou ▼ pour sélectionner le mot-clé à afficher et appuyez ensuite sur ENTERE.
4. Vous accédez alors à l'écran d'instructions correspondant du manuel électronique.
✎ Pour fermer l'écran Index, appuyez sur le bouton RETURN.
[LCD-ZG ZT]BN68-03717C-L04.indb 11 2011-04-29 �� 10:13:22
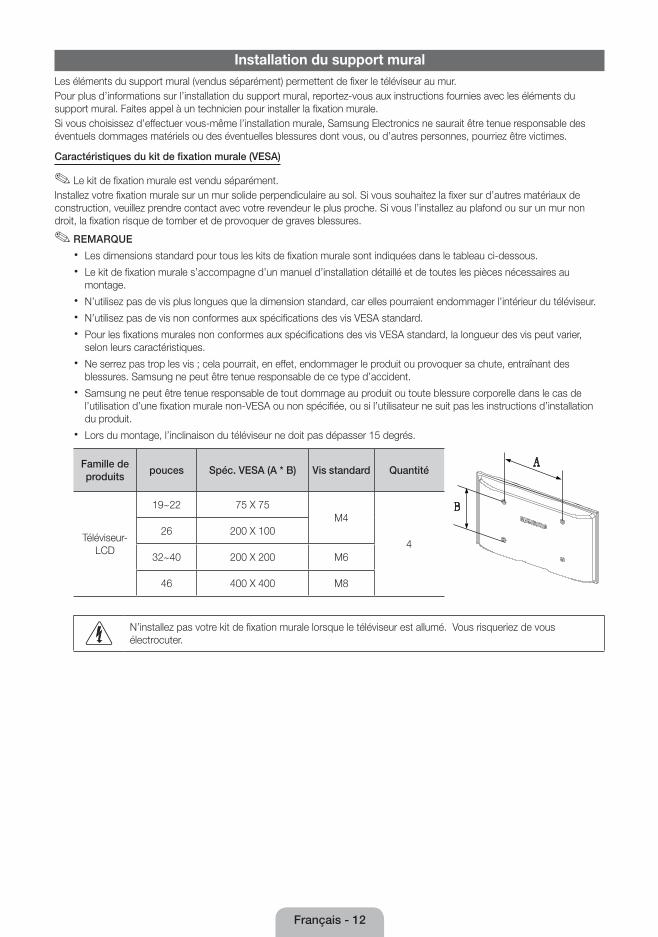
Français - 12
Installation du support muralLes éléments du support mural (vendus séparément) permettent de fixer le téléviseur au mur.Pour plus d’informations sur l’installation du support mural, reportez-vous aux instructions fournies avec les éléments du support mural. Faites appel à un technicien pour installer la fixation murale.Si vous choisissez d’effectuer vous-même l’installation murale, Samsung Electronics ne saurait être tenue responsable des éventuels dommages matériels ou des éventuelles blessures dont vous, ou d’autres personnes, pourriez être victimes.
Caractéristiques du kit de fixation murale (VESA)
✎ Le kit de fixation murale est vendu séparément.Installez votre fixation murale sur un mur solide perpendiculaire au sol. Si vous souhaitez la fixer sur d’autres matériaux de construction, veuillez prendre contact avec votre revendeur le plus proche. Si vous l’installez au plafond ou sur un mur non droit, la fixation risque de tomber et de provoquer de graves blessures.
✎ REMARQUE
x Les dimensions standard pour tous les kits de fixation murale sont indiquées dans le tableau ci-dessous.
x Le kit de fixation murale s’accompagne d’un manuel d’installation détaillé et de toutes les pièces nécessaires au montage.
x N’utilisez pas de vis plus longues que la dimension standard, car elles pourraient endommager l’intérieur du téléviseur.
x N’utilisez pas de vis non conformes aux spécifications des vis VESA standard.
x Pour les fixations murales non conformes aux spécifications des vis VESA standard, la longueur des vis peut varier, selon leurs caractéristiques.
x Ne serrez pas trop les vis ; cela pourrait, en effet, endommager le produit ou provoquer sa chute, entraînant des blessures. Samsung ne peut être tenue responsable de ce type d’accident.
x Samsung ne peut être tenue responsable de tout dommage au produit ou toute blessure corporelle dans le cas de l’utilisation d’une fixation murale non-VESA ou non spécifiée, ou si l’utilisateur ne suit pas les instructions d’installation du produit.
x Lors du montage, l’inclinaison du téléviseur ne doit pas dépasser 15 degrés.
Famille de produits
pouces Spéc. VESA (A * B) Vis standard Quantité
Téléviseur-LCD
19~22 75 X 75M4
426 200 X 100
32~40 200 X 200 M6
46 400 X 400 M8
N’installez pas votre kit de fixation murale lorsque le téléviseur est allumé. Vous risqueriez de vous électrocuter.
[LCD-ZG ZT]BN68-03717C-L04.indb 12 2011-04-29 �� 10:13:22
Français - 13
Résolution des problèmes
En cas de problème, consultez d’abord la liste des problèmes potentiels et des solutions. Si aucune de ces astuces de dépannage ne s’applique à votre problème, rendez-vous sur le site www.samsung.com, puis cliquez sur Assistance ou contactez le service clientèle de Samsung.
Problèmes Solutions et explications
Le téléviseur ne s'allume pas. • Vérifiez que le cordon d'alimentation secteur est branché correctement sur la prise murale et sur le téléviseur.
• Vérifiez que la prise murale est opérationnelle. • Essayez d'appuyer sur le bouton POWER du téléviseur pour vous assurer que le
problème n'est pas dû à la télécommande. Si le téléviseur s'allume, reportez-vous au problème "La télécommande ne fonctionne pas" ci-après.
Aucune image/vidéo n'est affichée. • Vérifiez le raccordement des câbles (retirez tous les câbles connectés au téléviseur et aux appareils externes, puis rebranchez-les).
• Réglez les sorties vidéo de votre périphérique externe (décodeur câble/boîtier décodeur, DVD, Blu-ray, etc.) pour faire correspondre les connexions à l'entrée du téléviseur. Par exemple, si la sortie d'un périphérique externe est HDMI, vous devez établir une connexion avec une entrée HDMI du téléviseur.
• Vérifiez que les appareils connectés sont sous tension. • Veillez à sélectionner la source appropriée du téléviseur en appuyant sur la touche
SOURCE de la télécommande. • Redémarrez le périphérique connecté en rebranchant le câble d'alimentation du
périphérique.
La télécommande ne fonctionne pas. • Vérifiez que la polarité (+/–) des piles de la télécommande est respectée. • Nettoyez la lentille de la télécommande. • Essayez de diriger directement la télécommande vers le téléviseur à une distance de 1,5
à 1,8 m.
La télécommande du décodeur câble /boîtier décodeur ne permet pas d'allumer ou d'éteindre le téléviseur, ni de régler le volume.
• Programmez la télécommande du décodeur câble/boîtier décodeur de telle sorte qu'elle puisse commander le téléviseur. Consultez le mode d'emploi du décodeur câble/boîtier décodeur pour obtenir le code du téléviseur SAMSUNG.
✎ Vous pouvez maintenir votre téléviseur dans des conditions optimales en le mettant à niveau avec le dernier micrologiciel (samsung.com -> Assistance -> Téléchargements) par le biais d'un périphérique USB.
✎ Ce téléviseur LCD TFT est équipé d'un écran constitué de sous-pixels dont la fabrication nécessite une technologie sophistiquée. Il se peut toutefois que quelques points clairs ou sombres apparaissent à l'écran. Ils n'ont aucune incidence sur la performance du produit.
License
Liste des fonctionsInterface numérique et réseau excellents : Avec un syntoniseur numérique HD intégré, le visionnage des émissions HD sans abonnement ne nécessite pas de décodeur câble/récepteur satellite (boîtier décodeur).
[LCD-ZG ZT]BN68-03717C-L04.indb 13 2011-04-29 �� 10:13:23
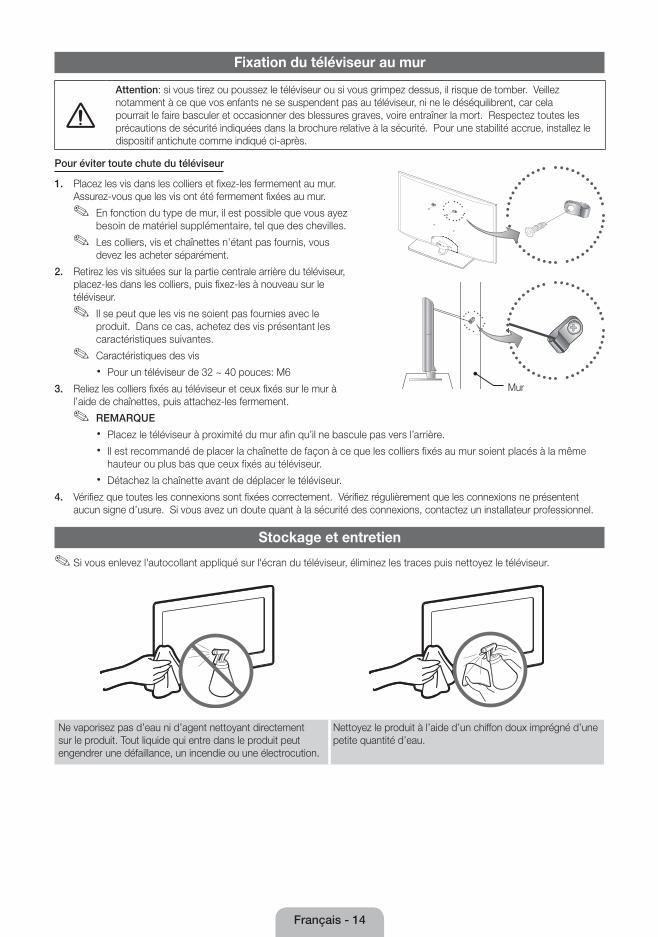
Français - 14
Fixation du téléviseur au mur
Attention: si vous tirez ou poussez le téléviseur ou si vous grimpez dessus, il risque de tomber. Veillez notamment à ce que vos enfants ne se suspendent pas au téléviseur, ni ne le déséquilibrent, car cela pourrait le faire basculer et occasionner des blessures graves, voire entraîner la mort. Respectez toutes les précautions de sécurité indiquées dans la brochure relative à la sécurité. Pour une stabilité accrue, installez le dispositif antichute comme indiqué ci-après.
Pour éviter toute chute du téléviseur
1. Placez les vis dans les colliers et fixez-les fermement au mur. Assurez-vous que les vis ont été fermement fixées au mur.
✎ En fonction du type de mur, il est possible que vous ayez besoin de matériel supplémentaire, tel que des chevilles.
✎ Les colliers, vis et chaînettes n’étant pas fournis, vous devez les acheter séparément.
2. Retirez les vis situées sur la partie centrale arrière du téléviseur, placez-les dans les colliers, puis fixez-les à nouveau sur le téléviseur.
✎ Il se peut que les vis ne soient pas fournies avec le produit. Dans ce cas, achetez des vis présentant les caractéristiques suivantes.
✎ Caractéristiques des vis
x Pour un téléviseur de 32 ~ 40 pouces: M6
3. Reliez les colliers fixés au téléviseur et ceux fixés sur le mur à l’aide de chaînettes, puis attachez-les fermement.
✎ REMARQUE
x Placez le téléviseur à proximité du mur afin qu’il ne bascule pas vers l’arrière.
x Il est recommandé de placer la chaînette de façon à ce que les colliers fixés au mur soient placés à la même hauteur ou plus bas que ceux fixés au téléviseur.
x Détachez la chaînette avant de déplacer le téléviseur.
4. Vérifiez que toutes les connexions sont fixées correctement. Vérifiez régulièrement que les connexions ne présentent aucun signe d’usure. Si vous avez un doute quant à la sécurité des connexions, contactez un installateur professionnel.
Stockage et entretien
✎ Si vous enlevez l'autocollant appliqué sur l'écran du téléviseur, éliminez les traces puis nettoyez le téléviseur.
Ne vaporisez pas d’eau ni d’agent nettoyant directement sur le produit. Tout liquide qui entre dans le produit peut engendrer une défaillance, un incendie ou une électrocution.
Nettoyez le produit à l’aide d’un chiffon doux imprégné d’une petite quantité d’eau.
Mur
[LCD-ZG ZT]BN68-03717C-L04.indb 14 2011-04-29 �� 10:13:25

Français - 15
Specifications
Conditions ambiantes Température en service Humidité en fonctionnement Température de stockage Humidité sur le lieu de stockage
10°C à 40°C (50°F à 104°F) 10% à 80%, sans condensation
-20°C à 45°C (-4°F à 113°F) 5% à 95%, sans condensation
Système TV Analogique : B/G, D/K, L, I (en fonction du pays sélectionné)
Numérique: DVB-T/DVB-C
Système de couleur/vidéoAnalogique : PAL, SECAM, NTSC-4.43, NTSC-3.58, PAL60
Numérique: MPEG-2 MP@ML, MPEG-4, H.264/AVC MP@L3, [email protected], [email protected]ème Sonore BG, DK, L, NICAM, MPEG1, DD, DD+, HEAAC
HDMI INVidéo: 1080 24p, 1080p, 1080i, 720p, 576p, 480p
Audio: PCM linéaire sur deux voies 32/44.1/48kHz, 16/20/24bits.
Nom du modèle LE32D400 LE32D403
Résolution de l’affichage 1360 x 768
Taille de l’écran 32 pouces 32 poucesSon (Sortie) 10 W X 2Dimensions (L x P x H) Corps Avec socle
784,4 X 88,8 X 502,9 (mm)784,4 X 182,4 X 545,3 (mm)
784,4 X 98,1 X 502,9 (mm)784,4 X 182,4 X 545,3 (mm)
Poids Sans socle Avec socle
8,1 kg9,2 kg
7,7 kg8,7 kg
Nom du modèle LE40D503
Résolution de l’affichage 1920 x 1080
Taille de l’écran 40 poucesSon (Sortie) 10 W X 2Dimensions (L x P x H) Corps Avec socle
970,0 X 98,1 X 586,6 (mm)970,0 X 206,9 X 629,1 (mm)
Poids Sans socle Avec socle
11,6 kg13,3 kg
✎ La conception et les spécifications peuvent être modifiées sans préavis.
✎ Pour plus d’informations sur les caractéristiques d’alimentation et de consommation électrique, reportez-vous à l’étiquette fixée au produit.
[LCD-ZG ZT]BN68-03717C-L04.indb 15 2011-04-29 �� 10:13:26
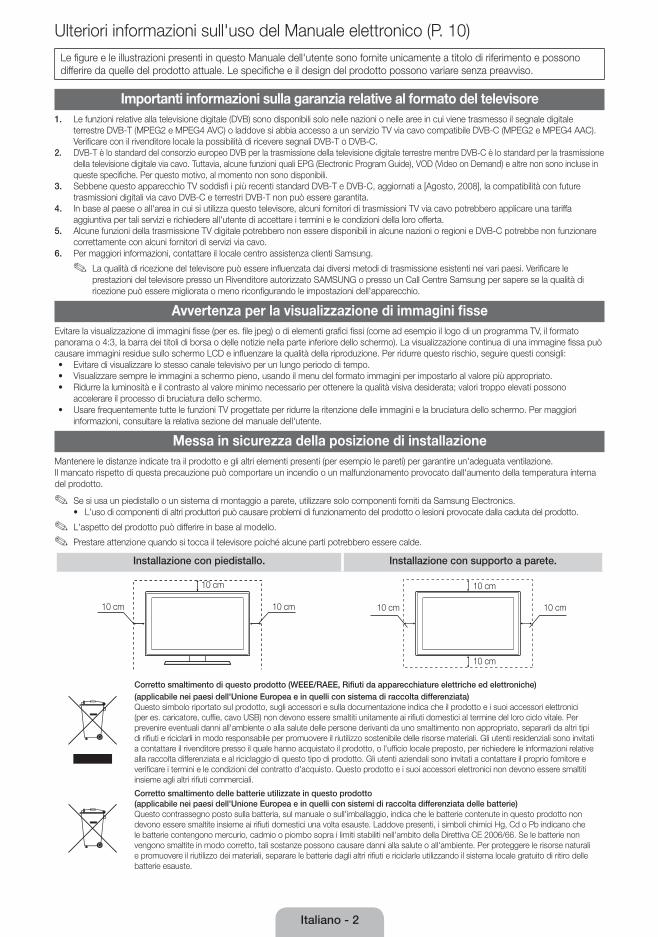
Italiano - 2
Ulteriori informazioni sull'uso del Manuale elettronico (P. 10)Le figure e le illustrazioni presenti in questo Manuale dell'utente sono fornite unicamente a titolo di riferimento e possono differire da quelle del prodotto attuale. Le specifiche e il design del prodotto possono variare senza preavviso.
Importanti informazioni sulla garanzia relative al formato del televisore1. Le funzioni relative alla televisione digitale (DVB) sono disponibili solo nelle nazioni o nelle aree in cui viene trasmesso il segnale digitale
terrestre DVB-T (MPEG2 e MPEG4 AVC) o laddove si abbia accesso a un servizio TV via cavo compatibile DVB-C (MPEG2 e MPEG4 AAC). Verificare con il rivenditore locale la possibilità di ricevere segnali DVB-T o DVB-C.
2. DVB-T è lo standard del consorzio europeo DVB per la trasmissione della televisione digitale terrestre mentre DVB-C è lo standard per la trasmissione della televisione digitale via cavo. Tuttavia, alcune funzioni quali EPG (Electronic Program Guide), VOD (Video on Demand) e altre non sono incluse in queste specifiche. Per questo motivo, al momento non sono disponibili.
3. Sebbene questo apparecchio TV soddisfi i più recenti standard DVB-T e DVB-C, aggiornati a [Agosto, 2008], la compatibilità con future trasmissioni digitali via cavo DVB-C e terrestri DVB-T non può essere garantita.
4. In base al paese o all'area in cui si utilizza questo televisore, alcuni fornitori di trasmissioni TV via cavo potrebbero applicare una tariffa aggiuntiva per tali servizi e richiedere all'utente di accettare i termini e le condizioni della loro offerta.
5. Alcune funzioni della trasmissione TV digitale potrebbero non essere disponibili in alcune nazioni o regioni e DVB-C potrebbe non funzionare correttamente con alcuni fornitori di servizi via cavo.
6. Per maggiori informazioni, contattare il locale centro assistenza clienti Samsung.
✎ La qualità di ricezione del televisore può essere influenzata dai diversi metodi di trasmissione esistenti nei vari paesi. Verificare le prestazioni del televisore presso un Rivenditore autorizzato SAMSUNG o presso un Call Centre Samsung per sapere se la qualità di ricezione può essere migliorata o meno riconfigurando le impostazioni dell'apparecchio.
Avvertenza per la visualizzazione di immagini fisseEvitare la visualizzazione di immagini fisse (per es. file jpeg) o di elementi grafici fissi (come ad esempio il logo di un programma TV, il formato panorama o 4:3, la barra dei titoli di borsa o delle notizie nella parte inferiore dello schermo). La visualizzazione continua di una immagine fissa può causare immagini residue sullo schermo LCD e influenzare la qualità della riproduzione. Per ridurre questo rischio, seguire questi consigli:• Evitare di visualizzare lo stesso canale televisivo per un lungo periodo di tempo.• Visualizzare sempre le immagini a schermo pieno, usando il menu del formato immagini per impostarlo al valore più appropriato.• Ridurre la luminosità e il contrasto al valore minimo necessario per ottenere la qualità visiva desiderata; valori troppo elevati possono
accelerare il processo di bruciatura dello schermo.• Usare frequentemente tutte le funzioni TV progettate per ridurre la ritenzione delle immagini e la bruciatura dello schermo. Per maggiori
informazioni, consultare la relativa sezione del manuale dell'utente.
Messa in sicurezza della posizione di installazioneMantenere le distanze indicate tra il prodotto e gli altri elementi presenti (per esempio le pareti) per garantire un'adeguata ventilazione.Il mancato rispetto di questa precauzione può comportare un incendio o un malfunzionamento provocato dall'aumento della temperatura interna del prodotto.
✎ Se si usa un piedistallo o un sistema di montaggio a parete, utilizzare solo componenti forniti da Samsung Electronics.• L'uso di componenti di altri produttori può causare problemi di funzionamento del prodotto o lesioni provocate dalla caduta del prodotto.
✎ L'aspetto del prodotto può differire in base al modello.
✎ Prestare attenzione quando si tocca il televisore poiché alcune parti potrebbero essere calde.
Installazione con piedistallo. Installazione con supporto a parete.
10 cm10 cm
10 cm
10 cm
10 cm
10 cm
10 cm
Corretto smaltimento di questo prodotto (WEEE/RAEE, Rifiuti da apparecchiature elettriche ed elettroniche)(applicabile nei paesi dell'Unione Europea e in quelli con sistema di raccolta differenziata)Questo simbolo riportato sul prodotto, sugli accessori e sulla documentazione indica che il prodotto e i suoi accessori elettronici (per es. caricatore, cuffie, cavo USB) non devono essere smaltiti unitamente ai rifiuti domestici al termine del loro ciclo vitale. Per prevenire eventuali danni all'ambiente o alla salute delle persone derivanti da uno smaltimento non appropriato, separarli da altri tipi di rifiuti e riciclarli in modo responsabile per promuovere il riutilizzo sostenibile delle risorse materiali. Gli utenti residenziali sono invitati a contattare il rivenditore presso il quale hanno acquistato il prodotto, o l'ufficio locale preposto, per richiedere le informazioni relative alla raccolta differenziata e al riciclaggio di questo tipo di prodotto. Gli utenti aziendali sono invitati a contattare il proprio fornitore e verificare i termini e le condizioni del contratto d'acquisto. Questo prodotto e i suoi accessori elettronici non devono essere smaltiti insieme agli altri rifiuti commerciali.
Corretto smaltimento delle batterie utilizzate in questo prodotto(applicabile nei paesi dell'Unione Europea e in quelli con sistemi di raccolta differenziata delle batterie)Questo contrassegno posto sulla batteria, sul manuale o sull'imballaggio, indica che le batterie contenute in questo prodotto non devono essere smaltite insieme ai rifiuti domestici una volta esauste. Laddove presenti, i simboli chimici Hg, Cd o Pb indicano che le batterie contengono mercurio, cadmio o piombo sopra i limiti stabiliti nell'ambito della Direttiva CE 2006/66. Se le batterie non vengono smaltite in modo corretto, tali sostanze possono causare danni alla salute o all'ambiente. Per proteggere le risorse naturali e promuovere il riutilizzo dei materiali, separare le batterie dagli altri rifiuti e riciclarle utilizzando il sistema locale gratuito di ritiro delle batterie esauste.
[LCD-ZG ZT]BN68-03717C-L04.indb 2 2011-04-29 �� 10:13:26
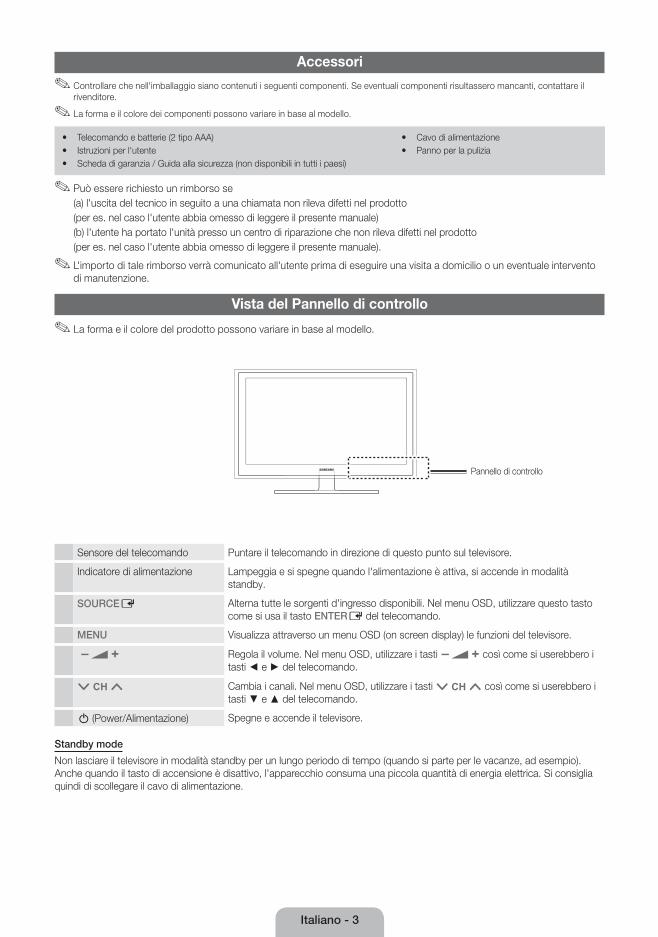
Italiano - 3
Accessori
✎ Controllare che nell'imballaggio siano contenuti i seguenti componenti. Se eventuali componenti risultassero mancanti, contattare il rivenditore.
✎ La forma e il colore dei componenti possono variare in base al modello.
y Telecomando e batterie (2 tipo AAA) y Istruzioni per l'utente y Scheda di garanzia / Guida alla sicurezza (non disponibili in tutti i paesi)
y Cavo di alimentazione y Panno per la pulizia
✎ Può essere richiesto un rimborso se(a) l'uscita del tecnico in seguito a una chiamata non rileva difetti nel prodotto(per es. nel caso l'utente abbia omesso di leggere il presente manuale)(b) l'utente ha portato l'unità presso un centro di riparazione che non rileva difetti nel prodotto(per es. nel caso l'utente abbia omesso di leggere il presente manuale).
✎ L'importo di tale rimborso verrà comunicato all'utente prima di eseguire una visita a domicilio o un eventuale intervento di manutenzione.
Vista del Pannello di controllo
✎ La forma e il colore del prodotto possono variare in base al modello.
Pannello di controllo
Sensore del telecomando Puntare il telecomando in direzione di questo punto sul televisore.
Indicatore di alimentazione Lampeggia e si spegne quando l'alimentazione è attiva, si accende in modalità standby.
SOURCEE Alterna tutte le sorgenti d'ingresso disponibili. Nel menu OSD, utilizzare questo tasto come si usa il tasto ENTERE del telecomando.
MENU Visualizza attraverso un menu OSD (on screen display) le funzioni del televisore.
Y Regola il volume. Nel menu OSD, utilizzare i tasti Y così come si userebbero i tasti ◄ e ► del telecomando.
z Cambia i canali. Nel menu OSD, utilizzare i tasti z così come si userebbero i tasti ▼ e ▲ del telecomando.
P (Power/Alimentazione) Spegne e accende il televisore.
Standby mode
Non lasciare il televisore in modalità standby per un lungo periodo di tempo (quando si parte per le vacanze, ad esempio). Anche quando il tasto di accensione è disattivo, l'apparecchio consuma una piccola quantità di energia elettrica. Si consiglia quindi di scollegare il cavo di alimentazione.
[LCD-ZG ZT]BN68-03717C-L04.indb 3 2011-04-29 �� 10:13:26
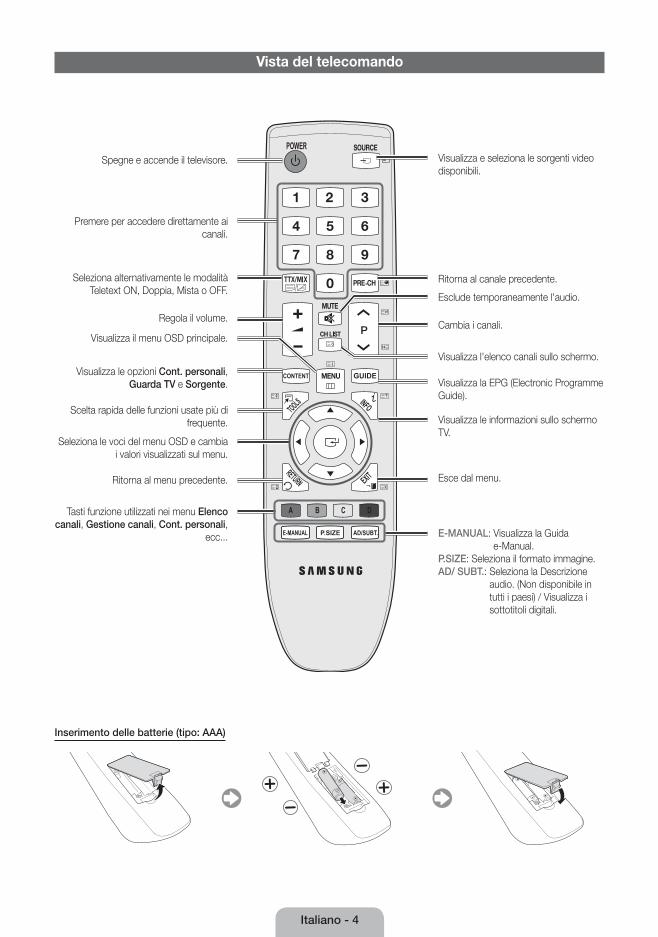
Italiano - 4
Vista del telecomando
A B C D
AD/SUBT.P.SIZEE-MANUAL
CONTENT
Spegne e accende il televisore.
Ritorna al canale precedente.
Esclude temporaneamente l'audio.
Cambia i canali.
Visualizza l'elenco canali sullo schermo.
Visualizza la EPG (Electronic Programme Guide).
Visualizza le informazioni sullo schermo TV.
Esce dal menu.
Premere per accedere direttamente ai canali.
Regola il volume.
Seleziona alternativamente le modalità Teletext ON, Doppia, Mista o OFF.
Visualizza il menu OSD principale.
Scelta rapida delle funzioni usate più di frequente.
Visualizza le opzioni Cont. personali, Guarda TV e Sorgente.
Ritorna al menu precedente.
Seleziona le voci del menu OSD e cambia i valori visualizzati sul menu.
Tasti funzione utilizzati nei menu Elenco canali, Gestione canali, Cont. personali,
ecc... E-MANUAL: Visualizza la Guida e-Manual.
P.SIZE: Seleziona il formato immagine.AD/ SUBT.: Seleziona la Descrizione
audio. (Non disponibile in tutti i paesi) / Visualizza i sottotitoli digitali.
Visualizza e seleziona le sorgenti video disponibili.
Inserimento delle batterie (tipo: AAA)
[LCD-ZG ZT]BN68-03717C-L04.indb 4 2011-04-29 �� 10:13:27
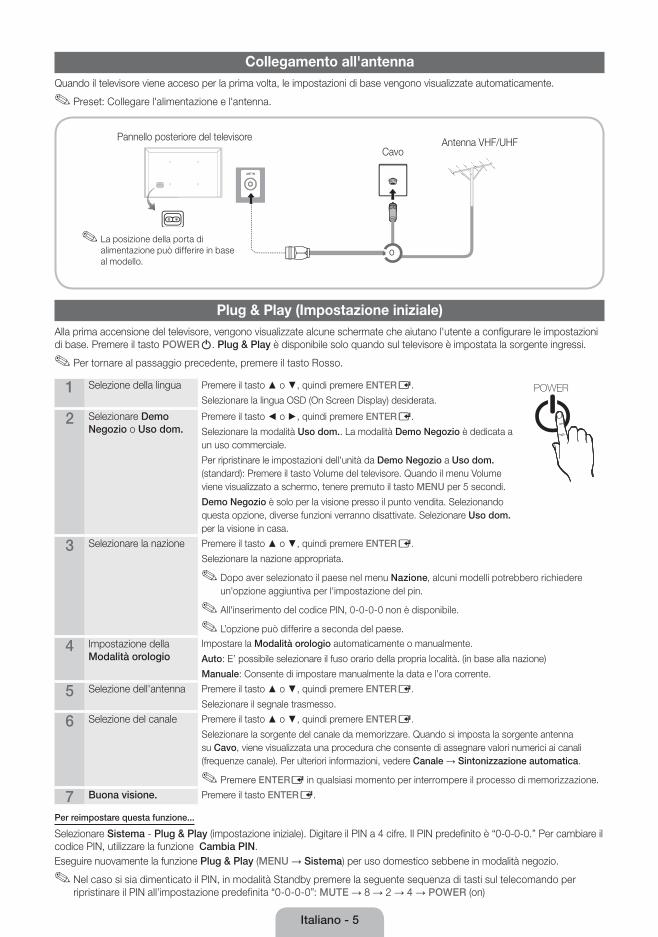
Italiano - 5
Collegamento all'antennaQuando il televisore viene acceso per la prima volta, le impostazioni di base vengono visualizzate automaticamente.
✎ Preset: Collegare l'alimentazione e l'antenna.
Plug & Play (Impostazione iniziale)Alla prima accensione del televisore, vengono visualizzate alcune schermate che aiutano l'utente a configurare le impostazioni di base. Premere il tasto POWERP. Plug & Play è disponibile solo quando sul televisore è impostata la sorgente ingressi.
✎ Per tornare al passaggio precedente, premere il tasto Rosso.
1 Selezione della lingua Premere il tasto ▲ o ▼, quindi premere ENTERE.
Selezionare la lingua OSD (On Screen Display) desiderata. PPOWER
2 Selezionare Demo Negozio o Uso dom.
Premere il tasto ◄ o ►, quindi premere ENTERE.
Selezionare la modalità Uso dom.. La modalità Demo Negozio è dedicata a un uso commerciale.
Per ripristinare le impostazioni dell'unità da Demo Negozio a Uso dom. (standard): Premere il tasto Volume del televisore. Quando il menu Volume viene visualizzato a schermo, tenere premuto il tasto MENU per 5 secondi.
Demo Negozio è solo per la visione presso il punto vendita. Selezionando questa opzione, diverse funzioni verranno disattivate. Selezionare Uso dom. per la visione in casa.
3 Selezionare la nazione Premere il tasto ▲ o ▼, quindi premere ENTERE.
Selezionare la nazione appropriata.
✎ Dopo aver selezionato il paese nel menu Nazione, alcuni modelli potrebbero richiedere un'opzione aggiuntiva per l'impostazione del pin.
✎ All'inserimento del codice PIN, 0-0-0-0 non è disponibile.
✎ L’opzione può differire a seconda del paese.
4 Impostazione della Modalità orologio
Impostare la Modalità orologio automaticamente o manualmente.
Auto: E’ possibile selezionare il fuso orario della propria località. (in base alla nazione)
Manuale: Consente di impostare manualmente la data e l’ora corrente.
5 Selezione dell'antenna Premere il tasto ▲ o ▼, quindi premere ENTERE.
Selezionare il segnale trasmesso.
6 Selezione del canale Premere il tasto ▲ o ▼, quindi premere ENTERE.
Selezionare la sorgente del canale da memorizzare. Quando si imposta la sorgente antenna su Cavo, viene visualizzata una procedura che consente di assegnare valori numerici ai canali (frequenze canale). Per ulteriori informazioni, vedere Canale → Sintonizzazione automatica.
✎ Premere ENTERE in qualsiasi momento per interrompere il processo di memorizzazione.
7 Buona visione. Premere il tasto ENTERE.
Per reimpostare questa funzione...
Selezionare Sistema - Plug & Play (impostazione iniziale). Digitare il PIN a 4 cifre. Il PIN predefinito è “0-0-0-0.” Per cambiare il codice PIN, utilizzare la funzione Cambia PIN.Eseguire nuovamente la funzione Plug & Play (MENU → Sistema) per uso domestico sebbene in modalità negozio.
✎ Nel caso si sia dimenticato il PIN, in modalità Standby premere la seguente sequenza di tasti sul telecomando per ripristinare il PIN all’impostazione predefinita “0-0-0-0”: MUTE → 8 → 2 → 4 → POWER (on)
Antenna VHF/UHFCavo
o
Pannello posteriore del televisore
✎ La posizione della porta di alimentazione può differire in base al modello.
[LCD-ZG ZT]BN68-03717C-L04.indb 5 2011-04-29 �� 10:13:27
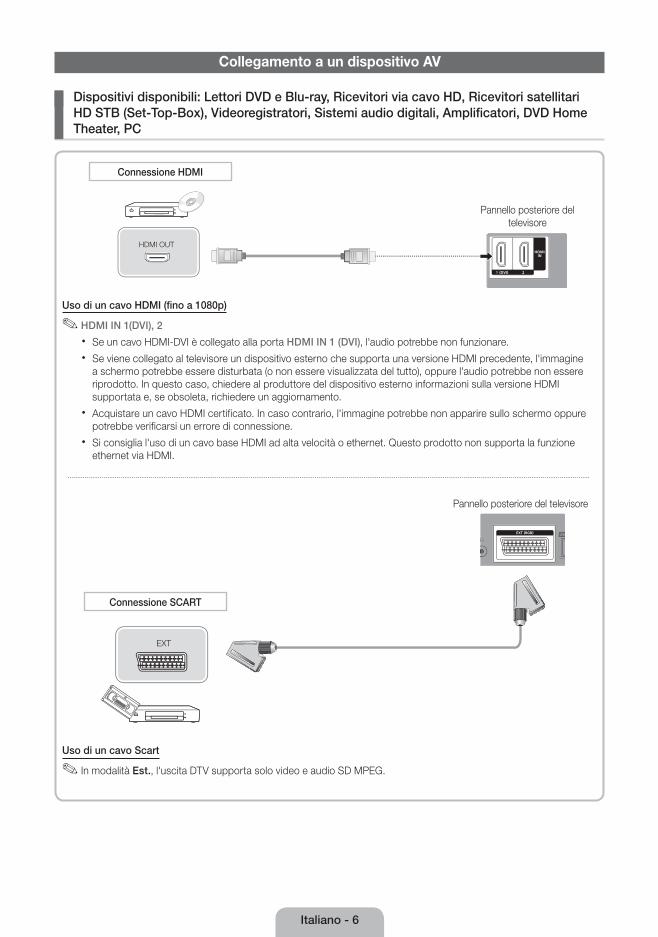
Italiano - 6
Collegamento a un dispositivo AV
¦ Dispositivi disponibili: Lettori DVD e Blu-ray, Ricevitori via cavo HD, Ricevitori satellitari HD STB (Set-Top-Box), Videoregistratori, Sistemi audio digitali, Amplificatori, DVD Home Theater, PC
HDMI OUT
Uso di un cavo HDMI (fino a 1080p)
✎ HDMI IN 1(DVI), 2
x Se un cavo HDMI-DVI è collegato alla porta HDMI IN 1 (DVI), l'audio potrebbe non funzionare.
x Se viene collegato al televisore un dispositivo esterno che supporta una versione HDMI precedente, l'immagine a schermo potrebbe essere disturbata (o non essere visualizzata del tutto), oppure l'audio potrebbe non essere riprodotto. In questo caso, chiedere al produttore del dispositivo esterno informazioni sulla versione HDMI supportata e, se obsoleta, richiedere un aggiornamento.
x Acquistare un cavo HDMI certificato. In caso contrario, l'immagine potrebbe non apparire sullo schermo oppure potrebbe verificarsi un errore di connessione.
x Si consiglia l'uso di un cavo base HDMI ad alta velocità o ethernet. Questo prodotto non supporta la funzione ethernet via HDMI.
Connessione HDMI
Pannello posteriore del televisore
EXT
Connessione SCART
Uso di un cavo Scart
✎ In modalità Est., l'uscita DTV supporta solo video e audio SD MPEG.
Pannello posteriore del televisore
[LCD-ZG ZT]BN68-03717C-L04.indb 6 2011-04-29 �� 10:13:28

Italiano - 7
Connessione a un PC e a un dispositivo audio
¦ Dispositivi disponibili: Cuffie
Connessione cuffie
Uso di una connessione cuffie
✎ Cuffie H: E' possibile collegare le cuffie all'uscita cuffie del televisore. Quando le cuffie sono collegate, l'audio proveniente dagli altoparlanti interni viene disabilitato.
x Collegando le cuffie al televisore, l'uso della funzione audio non è disponibile.
x E' possibile regolare in modo indipendente il volume delle cuffie e quello del televisore.
Pannello posteriore del televisore
¦ Uso di un cavo HDMI o HDMI-DVI
✎ La connessione mediante cavo HDMI potrebbe non essere supportata a seconda del modello di PC in uso.
✎ I cavi HDMI supportano i segnali video e audio e non richiedono un canale audio.
Modalità di visualizzazione (ingresso HDMI/DVI)
LE32D400 / LE32D403 : La risoluzione ottimale è 1360 X 768 a 60Hz.
Modalità Risoluzione Frequenza orizzontale (kHz) Frequenza verticale (Hz)Frequenza di clock dei pixel
(MHz)Polarità sync (O/V)
IBM640 x 350 31,469 70,086 25,175 + / -720 x 400 31,469 70,087 28,322 - / +
MAC640 x 480 35,000 66,667 30,240 - / -832 x 624 49,726 74,551 57,284 - / -
VESA DMT
640 x 48031,469 59,940 25,175 - / -37,861 72,809 31,500 - / -37,500 75,000 31,500 - / -
800 x 60037,879 60,317 40,000 + / +48,077 72,188 50,000 + / +46,875 75,000 49,500 + / +
1024 x 76848,363 60,004 65,000 - / -56,476 70,069 75,000 - / -60,023 75,029 78,750 + / +
1360 x 768 47,712 60,015 85,500 + / +
AUDIO OUT
DVI OUT
HDMI OUT
Connessione PC
Pannello posteriore del televisore
[LCD-ZG ZT]BN68-03717C-L04.indb 7 2011-04-29 �� 10:13:31
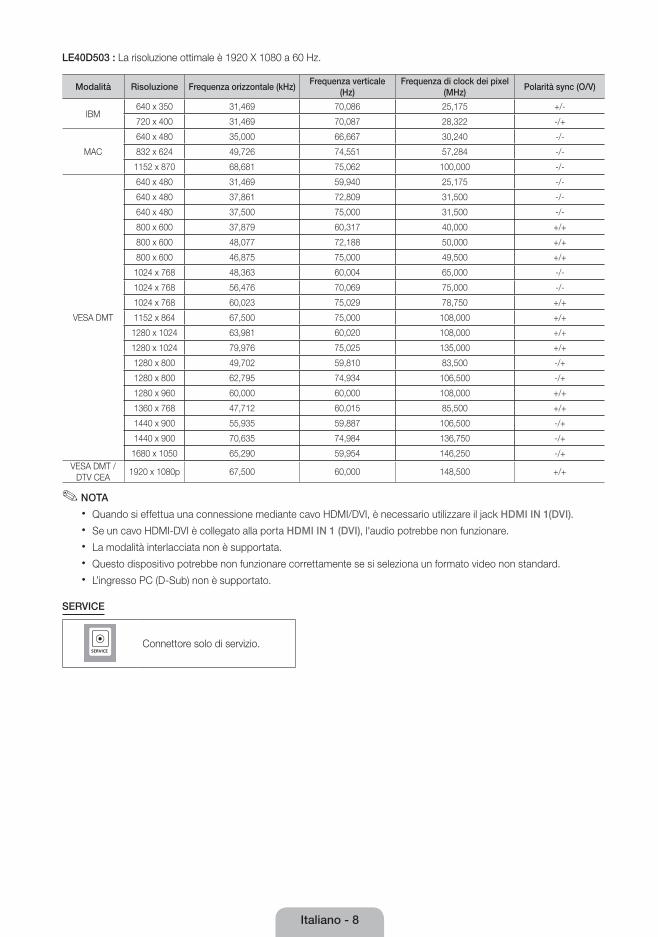
Italiano - 8
LE40D503 : La risoluzione ottimale è 1920 X 1080 a 60 Hz.
Modalità Risoluzione Frequenza orizzontale (kHz)Frequenza verticale
(Hz)Frequenza di clock dei pixel
(MHz)Polarità sync (O/V)
IBM640 x 350 31,469 70,086 25,175 +/-
720 x 400 31,469 70,087 28,322 -/+
MAC
640 x 480 35,000 66,667 30,240 -/-
832 x 624 49,726 74,551 57,284 -/-
1152 x 870 68,681 75,062 100,000 -/-
VESA DMT
640 x 480 31,469 59,940 25,175 -/-
640 x 480 37,861 72,809 31,500 -/-
640 x 480 37,500 75,000 31,500 -/-
800 x 600 37,879 60,317 40,000 +/+
800 x 600 48,077 72,188 50,000 +/+
800 x 600 46,875 75,000 49,500 +/+
1024 x 768 48,363 60,004 65,000 -/-
1024 x 768 56,476 70,069 75,000 -/-
1024 x 768 60,023 75,029 78,750 +/+
1152 x 864 67,500 75,000 108,000 +/+
1280 x 1024 63,981 60,020 108,000 +/+
1280 x 1024 79,976 75,025 135,000 +/+
1280 x 800 49,702 59,810 83,500 -/+
1280 x 800 62,795 74,934 106,500 -/+
1280 x 960 60,000 60,000 108,000 +/+
1360 x 768 47,712 60,015 85,500 +/+
1440 x 900 55,935 59,887 106,500 -/+
1440 x 900 70,635 74,984 136,750 -/+
1680 x 1050 65,290 59,954 146,250 -/+VESA DMT /
DTV CEA1920 x 1080p 67,500 60,000 148,500 +/+
✎✎ NOTA
x Quando si effettua una connessione mediante cavo HDMI/DVI, è necessario utilizzare il jack HDMI IN 1(DVI).
x Se un cavo HDMI-DVI è collegato alla porta HDMI IN 1 (DVI), l'audio potrebbe non funzionare.
x La modalità interlacciata non è supportata.
x Questo dispositivo potrebbe non funzionare correttamente se si seleziona un formato video non standard.
x L’ingresso PC (D-Sub) non è supportato.
SERVICE
Connettore solo di servizio.
[LCD-ZG ZT]BN68-03717C-L04.indb 8 2011-04-29 �� 10:13:31
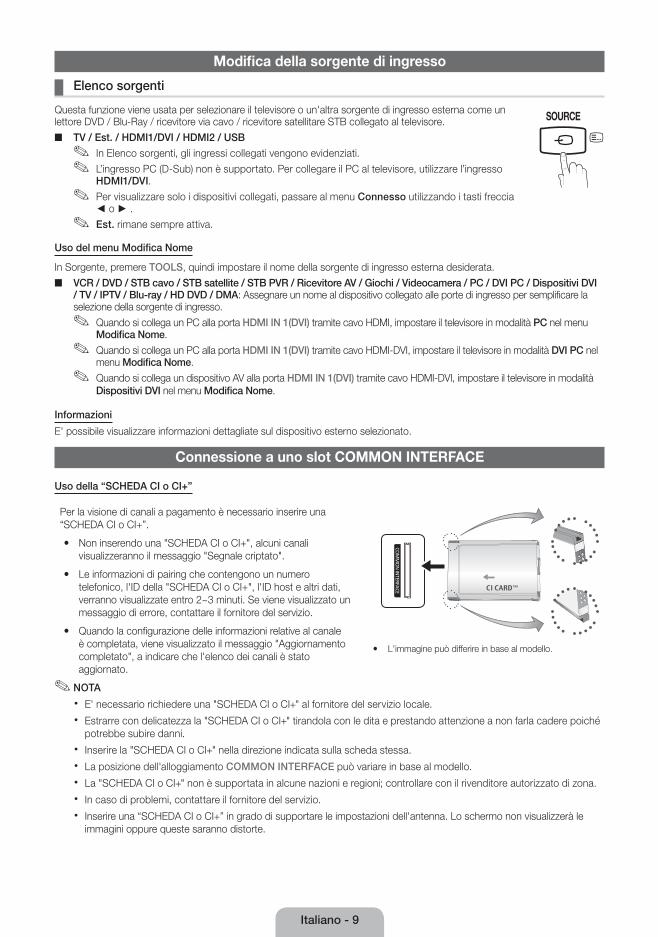
Italiano - 9
Modifica della sorgente di ingresso
¦ Elenco sorgenti
Questa funzione viene usata per selezionare il televisore o un'altra sorgente di ingresso esterna come un lettore DVD / Blu-Ray / ricevitore via cavo / ricevitore satellitare STB collegato al televisore.
■ TV / Est. / HDMI1/DVI / HDMI2 / USB
✎ In Elenco sorgenti, gli ingressi collegati vengono evidenziati.
✎ L’ingresso PC (D-Sub) non è supportato. Per collegare il PC al televisore, utilizzare l’ingresso HDMI1/DVI.
✎ Per visualizzare solo i dispositivi collegati, passare al menu Connesso utilizzando i tasti freccia ◄ o ► .
✎ Est. rimane sempre attiva.
Uso del menu Modifica Nome
In Sorgente, premere TOOLS, quindi impostare il nome della sorgente di ingresso esterna desiderata.
■ VCR / DVD / STB cavo / STB satellite / STB PVR / Ricevitore AV / Giochi / Videocamera / PC / DVI PC / Dispositivi DVI / TV / IPTV / Blu-ray / HD DVD / DMA: Assegnare un nome al dispositivo collegato alle porte di ingresso per semplificare la selezione della sorgente di ingresso.
✎ Quando si collega un PC alla porta HDMI IN 1(DVI) tramite cavo HDMI, impostare il televisore in modalità PC nel menu Modifica Nome.
✎ Quando si collega un PC alla porta HDMI IN 1(DVI) tramite cavo HDMI-DVI, impostare il televisore in modalità DVI PC nel menu Modifica Nome.
✎ Quando si collega un dispositivo AV alla porta HDMI IN 1(DVI) tramite cavo HDMI-DVI, impostare il televisore in modalità Dispositivi DVI nel menu Modifica Nome.
Informazioni
E' possibile visualizzare informazioni dettagliate sul dispositivo esterno selezionato.
Connessione a uno slot COMMON INTERFACE
Uso della “SCHEDA CI o CI+”
Per la visione di canali a pagamento è necessario inserire una “SCHEDA CI o CI+”.
y Non inserendo una "SCHEDA CI o CI+", alcuni canali visualizzeranno il messaggio "Segnale criptato".
y Le informazioni di pairing che contengono un numero telefonico, l'ID della "SCHEDA CI o CI+", l'ID host e altri dati, verranno visualizzate entro 2~3 minuti. Se viene visualizzato un messaggio di errore, contattare il fornitore del servizio.
y Quando la configurazione delle informazioni relative al canale è completata, viene visualizzato il messaggio "Aggiornamento completato", a indicare che l'elenco dei canali è stato aggiornato.
y L'immagine può differire in base al modello.
✎ NOTA
x E' necessario richiedere una "SCHEDA CI o CI+" al fornitore del servizio locale.
x Estrarre con delicatezza la "SCHEDA CI o CI+" tirandola con le dita e prestando attenzione a non farla cadere poiché potrebbe subire danni.
x Inserire la "SCHEDA CI o CI+" nella direzione indicata sulla scheda stessa.
x La posizione dell'alloggiamento COMMON INTERFACE può variare in base al modello.
x La "SCHEDA CI o CI+" non è supportata in alcune nazioni e regioni; controllare con il rivenditore autorizzato di zona.
x In caso di problemi, contattare il fornitore del servizio.
x Inserire una “SCHEDA CI o CI+” in grado di supportare le impostazioni dell'antenna. Lo schermo non visualizzerà le immagini oppure queste saranno distorte.
[LCD-ZG ZT]BN68-03717C-L04.indb 9 2011-04-29 �� 10:13:32
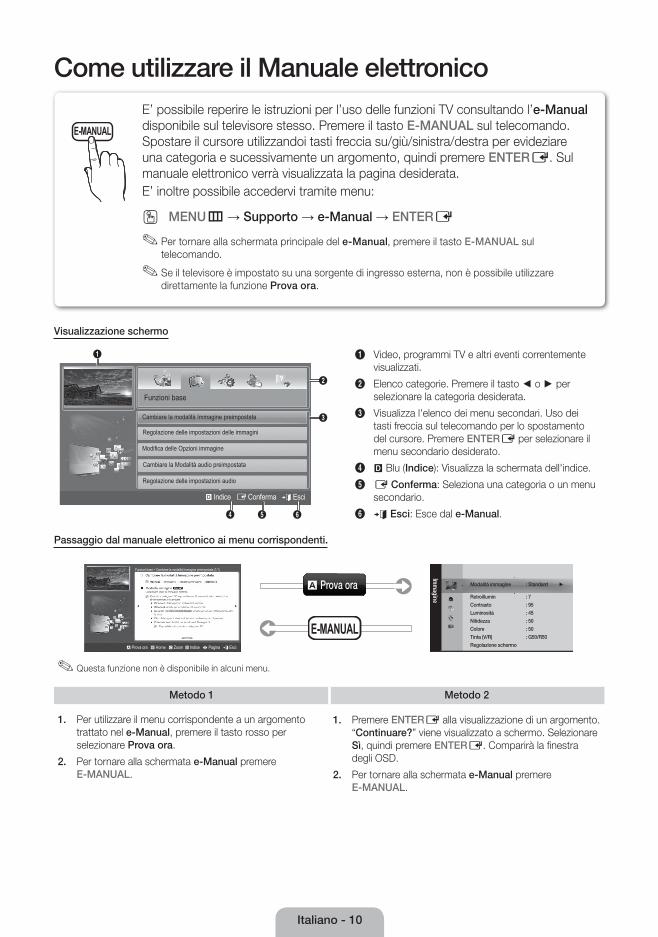
Italiano - 10
Come utilizzare il Manuale elettronico
Visualizzazione schermo
1
4 5 6
2
3
Funzioni base
Cambiare la modalità Immagine preimpostata
Modifi ca delle Opzioni immagine
} Indice E Conferma e Esci
Cambiare la Modalità audio preimpostata
Regolazione delle impostazioni audio
Regolazione delle impostazioni delle immagini
1 Video, programmi TV e altri eventi correntemente visualizzati.
2 Elenco categorie. Premere il tasto ◄ o ► per selezionare la categoria desiderata.
3 Visualizza l'elenco dei menu secondari. Uso dei tasti freccia sul telecomando per lo spostamento del cursore. Premere ENTERE per selezionare il menu secondario desiderato.
4 } Blu (Indice): Visualizza la schermata dell'indice.
5 E Conferma: Seleziona una categoria o un menu secondario.
6 e Esci: Esce dal e-Manual.
Passaggio dal manuale elettronico ai menu corrispondenti.
Immagine
Modalità immagine : Standard ►
Retroillumin : 7
Contrasto : 95
Luminosità : 45
Nitidezza : 50
Colore : 50
Tinta (V/R) : G50/R50
Regolazione schermo
E-MANUAL
a Prova ora
Funzioni base > Cambiare la modalità Immagine preimpostata (1/1)
a Prova ora b Home { Zoom } Indice L Pagina e Esci
✎ Questa funzione non è disponibile in alcuni menu.
Metodo 1 Metodo 2
1. Per utilizzare il menu corrispondente a un argomento trattato nel e-Manual, premere il tasto rosso per selezionare Prova ora.
2. Per tornare alla schermata e-Manual premere E-MANUAL.
1. Premere ENTERE alla visualizzazione di un argomento. “Continuare?” viene visualizzato a schermo. Selezionare Sì, quindi premere ENTERE. Comparirà la fi nestra degli OSD.
2. Per tornare alla schermata e-Manual premere E-MANUAL.
E-MANUAL
E’ possibile reperire le istruzioni per l’uso delle funzioni TV consultando l’e-Manual disponibile sul televisore stesso. Premere il tasto E-MANUAL sul telecomando. Spostare il cursore utilizzandoi tasti freccia su/giù/sinistra/destra per evideziare una categoria e sucessivamente un argomento, quindi premere ENTERE. Sul manuale elettronico verrà visualizzata la pagina desiderata.E’ inoltre possibile accedervi tramite menu:
O MENUm → Supporto → e-Manual → ENTERE
✎ Per tornare alla schermata principale del e-Manual, premere il tasto E-MANUAL sul telecomando.
✎ Se il televisore è impostato su una sorgente di ingresso esterna, non è possibile utilizzare direttamente la funzione Prova ora.
[LCD-ZG ZT]BN68-03717C-L04.indb 10 2011-04-29 �� 10:13:35

Italiano - 11
Visualizzazione dei contenuti
Funzioni base > Cambiare la modalità Immagine preimpostata (1/1)
2 3 4 5
a Prova ora b Home { Zoom } Indice L Pagina e Esci
1
1 Area contenuti: Se è stato selezionato un menu secondario, quest'area offre i contenuti degli argomenti. Per passare alla pagina precedente o successiva premere ◄ / ►.
2 Prova ora: Visualizza il menu OSD corrispondente all'argomento. Per tornare alla schermata del e-Manual premere E-MANUAL.
3 Home: Passa alla pagina home dell'e-Manual.
4 Zoom: Ingrandisce la schermata. E' possibile scorrere la pagina ingrandita utilizzando i tasti ▲ / ▼.
5 L (Pagina): Passa alla pagina precedente o successiva.
Uso della modalità Zoom
U Sposta R Ritorna
Selezionare Zoom, quindi premere ENTERE per ingrandire la pagina. E' possibile scorrere la pagina ingrandita utilizzando i tasti ▲ o ▼.
✎ Per tornare alle dimensioni normali della pagina, premere RETURN.
Ricerca di un argomento sulla pagina dell'Indice
✎ Questa funzione potrebbe non essere supportata a seconda della lingua selezionata.1. Per cercare una parola chiave, premere il tasto blu per selezionare Indice.
2. Premere il tasto ◄ o ► per selezionare l'ordine desiderato.
3. Premere ▲ o ▼ per selezionare una parola chiave da visualizzare, quindi premere ENTERE.
4. E' possibile visualizzare la schermata di istruzioni corrispondente del manuale elettronico.
✎ Per chiudere la schermata Indice, premere RETURN.
[LCD-ZG ZT]BN68-03717C-L04.indb 11 2011-04-29 �� 10:13:36
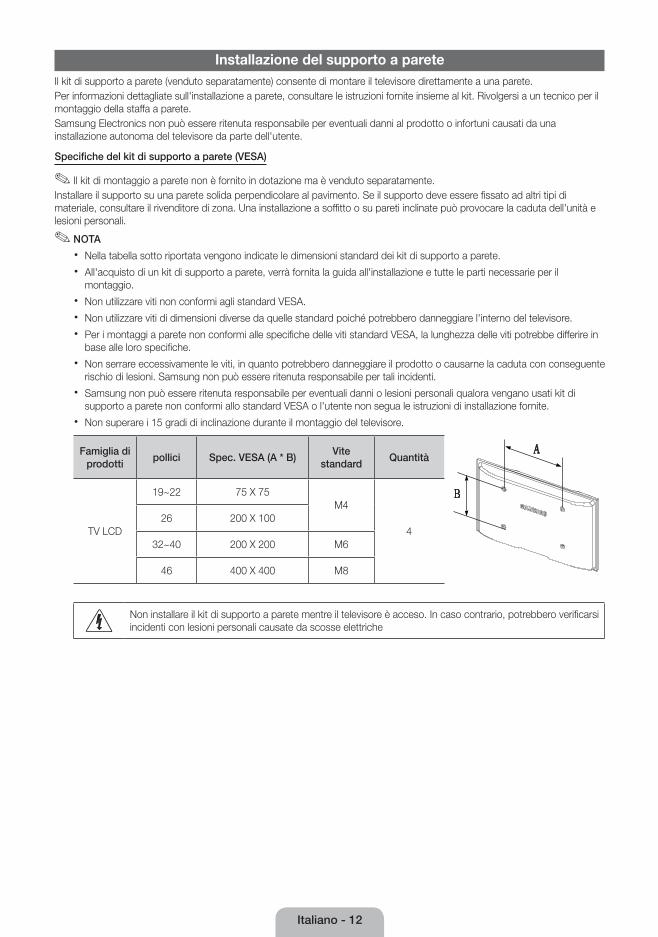
Italiano - 12
Installazione del supporto a pareteIl kit di supporto a parete (venduto separatamente) consente di montare il televisore direttamente a una parete.Per informazioni dettagliate sull'installazione a parete, consultare le istruzioni fornite insieme al kit. Rivolgersi a un tecnico per il montaggio della staffa a parete.Samsung Electronics non può essere ritenuta responsabile per eventuali danni al prodotto o infortuni causati da una installazione autonoma del televisore da parte dell'utente.
Specifiche del kit di supporto a parete (VESA)
✎ Il kit di montaggio a parete non è fornito in dotazione ma è venduto separatamente.Installare il supporto su una parete solida perpendicolare al pavimento. Se il supporto deve essere fissato ad altri tipi di materiale, consultare il rivenditore di zona. Una installazione a soffitto o su pareti inclinate può provocare la caduta dell'unità e lesioni personali.
✎ NOTA
x Nella tabella sotto riportata vengono indicate le dimensioni standard dei kit di supporto a parete.
x All'acquisto di un kit di supporto a parete, verrà fornita la guida all'installazione e tutte le parti necessarie per il montaggio.
x Non utilizzare viti non conformi agli standard VESA.
x Non utilizzare viti di dimensioni diverse da quelle standard poiché potrebbero danneggiare l'interno del televisore.
x Per i montaggi a parete non conformi alle specifiche delle viti standard VESA, la lunghezza delle viti potrebbe differire in base alle loro specifiche.
x Non serrare eccessivamente le viti, in quanto potrebbero danneggiare il prodotto o causarne la caduta con conseguente rischio di lesioni. Samsung non può essere ritenuta responsabile per tali incidenti.
x Samsung non può essere ritenuta responsabile per eventuali danni o lesioni personali qualora vengano usati kit di supporto a parete non conformi allo standard VESA o l'utente non segua le istruzioni di installazione fornite.
x Non superare i 15 gradi di inclinazione durante il montaggio del televisore.
Famiglia di prodotti
pollici Spec. VESA (A * B)Vite
standardQuantità
TV LCD
19~22 75 X 75M4
426 200 X 100
32~40 200 X 200 M6
46 400 X 400 M8
Non installare il kit di supporto a parete mentre il televisore è acceso. In caso contrario, potrebbero verificarsi incidenti con lesioni personali causate da scosse elettriche
[LCD-ZG ZT]BN68-03717C-L04.indb 12 2011-04-29 �� 10:13:37
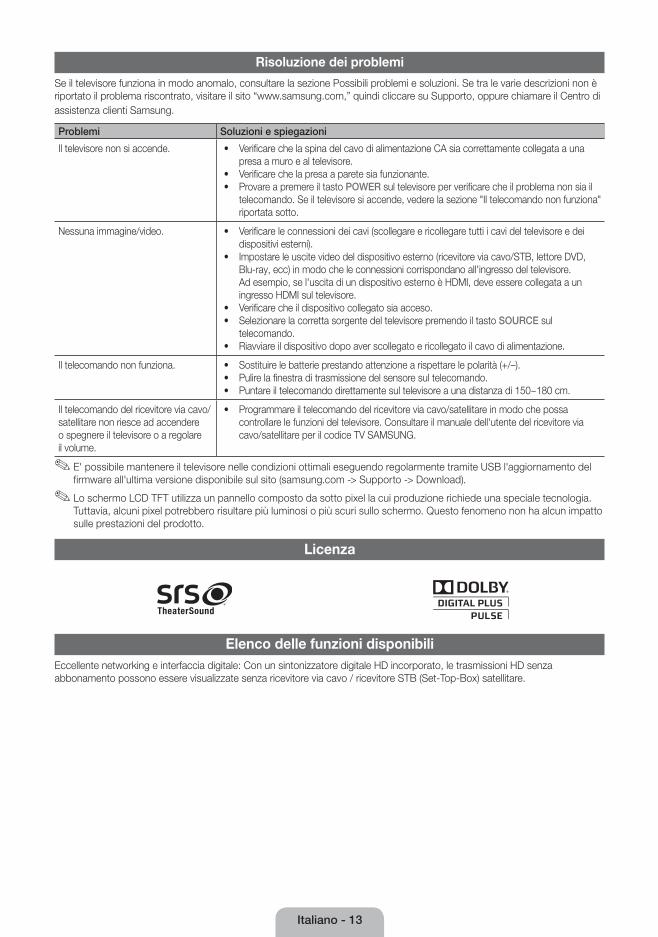
Italiano - 13
Risoluzione dei problemi
Se il televisore funziona in modo anomalo, consultare la sezione Possibili problemi e soluzioni. Se tra le varie descrizioni non è riportato il problema riscontrato, visitare il sito “www.samsung.com,” quindi cliccare su Supporto, oppure chiamare il Centro di assistenza clienti Samsung.
Problemi Soluzioni e spiegazioni
Il televisore non si accende. • Verificare che la spina del cavo di alimentazione CA sia correttamente collegata a una presa a muro e al televisore.
• Verificare che la presa a parete sia funzionante. • Provare a premere il tasto POWER sul televisore per verificare che il problema non sia il
telecomando. Se il televisore si accende, vedere la sezione "Il telecomando non funziona" riportata sotto.
Nessuna immagine/video. • Verificare le connessioni dei cavi (scollegare e ricollegare tutti i cavi del televisore e dei dispositivi esterni).
• Impostare le uscite video del dispositivo esterno (ricevitore via cavo/STB, lettore DVD, Blu-ray, ecc) in modo che le connessioni corrispondano all'ingresso del televisore. Ad esempio, se l'uscita di un dispositivo esterno è HDMI, deve essere collegata a un ingresso HDMI sul televisore.
• Verificare che il dispositivo collegato sia acceso. • Selezionare la corretta sorgente del televisore premendo il tasto SOURCE sul
telecomando. • Riavviare il dispositivo dopo aver scollegato e ricollegato il cavo di alimentazione.
Il telecomando non funziona. • Sostituire le batterie prestando attenzione a rispettare le polarità (+/–). • Pulire la finestra di trasmissione del sensore sul telecomando. • Puntare il telecomando direttamente sul televisore a una distanza di 150~180 cm.
Il telecomando del ricevitore via cavo/satellitare non riesce ad accendere o spegnere il televisore o a regolare il volume.
• Programmare il telecomando del ricevitore via cavo/satellitare in modo che possa controllare le funzioni del televisore. Consultare il manuale dell'utente del ricevitore via cavo/satellitare per il codice TV SAMSUNG.
✎ E' possibile mantenere il televisore nelle condizioni ottimali eseguendo regolarmente tramite USB l'aggiornamento del firmware all'ultima versione disponibile sul sito (samsung.com -> Supporto -> Download).
✎ Lo schermo LCD TFT utilizza un pannello composto da sotto pixel la cui produzione richiede una speciale tecnologia. Tuttavia, alcuni pixel potrebbero risultare più luminosi o più scuri sullo schermo. Questo fenomeno non ha alcun impatto sulle prestazioni del prodotto.
Licenza
Elenco delle funzioni disponibiliEccellente networking e interfaccia digitale: Con un sintonizzatore digitale HD incorporato, le trasmissioni HD senza abbonamento possono essere visualizzate senza ricevitore via cavo / ricevitore STB (Set-Top-Box) satellitare.
[LCD-ZG ZT]BN68-03717C-L04.indb 13 2011-04-29 �� 10:13:37
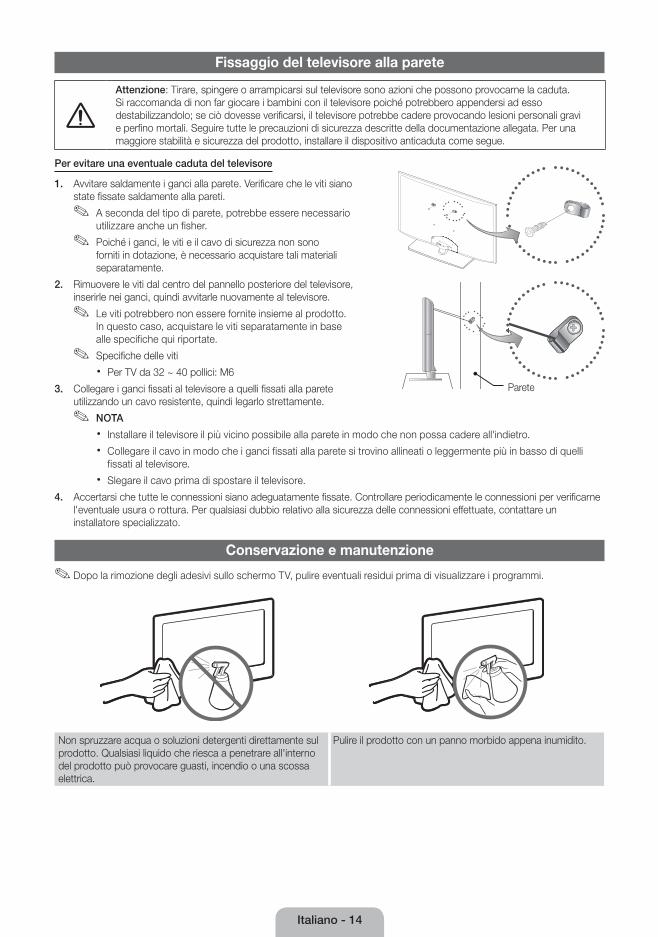
Italiano - 14
Fissaggio del televisore alla parete
Attenzione: Tirare, spingere o arrampicarsi sul televisore sono azioni che possono provocarne la caduta. Si raccomanda di non far giocare i bambini con il televisore poiché potrebbero appendersi ad esso destabilizzandolo; se ciò dovesse verificarsi, il televisore potrebbe cadere provocando lesioni personali gravi e perfino mortali. Seguire tutte le precauzioni di sicurezza descritte della documentazione allegata. Per una maggiore stabilità e sicurezza del prodotto, installare il dispositivo anticaduta come segue.
Per evitare una eventuale caduta del televisore
1. Avvitare saldamente i ganci alla parete. Verificare che le viti siano state fissate saldamente alla pareti.
✎ A seconda del tipo di parete, potrebbe essere necessario utilizzare anche un fisher.
✎ Poiché i ganci, le viti e il cavo di sicurezza non sono forniti in dotazione, è necessario acquistare tali materiali separatamente.
2. Rimuovere le viti dal centro del pannello posteriore del televisore, inserirle nei ganci, quindi avvitarle nuovamente al televisore.
✎ Le viti potrebbero non essere fornite insieme al prodotto. In questo caso, acquistare le viti separatamente in base alle specifiche qui riportate.
✎ Specifiche delle viti
x Per TV da 32 ~ 40 pollici: M6
3. Collegare i ganci fissati al televisore a quelli fissati alla parete utilizzando un cavo resistente, quindi legarlo strettamente.
✎ NOTA
x Installare il televisore il più vicino possibile alla parete in modo che non possa cadere all'indietro.
x Collegare il cavo in modo che i ganci fissati alla parete si trovino allineati o leggermente più in basso di quelli fissati al televisore.
x Slegare il cavo prima di spostare il televisore.
4. Accertarsi che tutte le connessioni siano adeguatamente fissate. Controllare periodicamente le connessioni per verificarne l'eventuale usura o rottura. Per qualsiasi dubbio relativo alla sicurezza delle connessioni effettuate, contattare un installatore specializzato.
Conservazione e manutenzione
✎ Dopo la rimozione degli adesivi sullo schermo TV, pulire eventuali residui prima di visualizzare i programmi.
Non spruzzare acqua o soluzioni detergenti direttamente sul prodotto. Qualsiasi liquido che riesca a penetrare all'interno del prodotto può provocare guasti, incendio o una scossa elettrica.
Pulire il prodotto con un panno morbido appena inumidito.
Parete
[LCD-ZG ZT]BN68-03717C-L04.indb 14 2011-04-29 �� 10:13:39
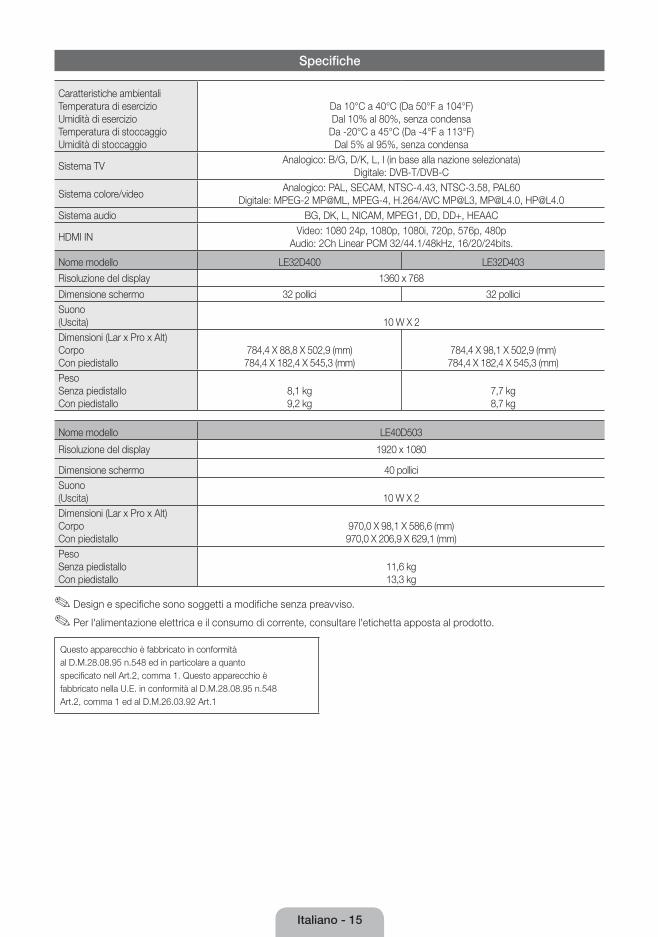
Italiano - 15
Specifiche
Caratteristiche ambientali Temperatura di esercizio Umidità di esercizioTemperatura di stoccaggio Umidità di stoccaggio
Da 10°C a 40°C (Da 50°F a 104°F) Dal 10% al 80%, senza condensa
Da -20°C a 45°C (Da -4°F a 113°F) Dal 5% al 95%, senza condensa
Sistema TV Analogico: B/G, D/K, L, I (in base alla nazione selezionata)
Digitale: DVB-T/DVB-C
Sistema colore/videoAnalogico: PAL, SECAM, NTSC-4.43, NTSC-3.58, PAL60
Digitale: MPEG-2 MP@ML, MPEG-4, H.264/AVC MP@L3, [email protected], [email protected] audio BG, DK, L, NICAM, MPEG1, DD, DD+, HEAAC
HDMI INVideo: 1080 24p, 1080p, 1080i, 720p, 576p, 480p
Audio: 2Ch Linear PCM 32/44.1/48kHz, 16/20/24bits.
Nome modello LE32D400 LE32D403
Risoluzione del display 1360 x 768
Dimensione schermo 32 pollici 32 polliciSuono (Uscita) 10 W X 2Dimensioni (Lar x Pro x Alt) Corpo Con piedistallo
784,4 X 88,8 X 502,9 (mm)784,4 X 182,4 X 545,3 (mm)
784,4 X 98,1 X 502,9 (mm)784,4 X 182,4 X 545,3 (mm)
Peso Senza piedistallo Con piedistallo
8,1 kg9,2 kg
7,7 kg8,7 kg
Nome modello LE40D503
Risoluzione del display 1920 x 1080
Dimensione schermo 40 polliciSuono (Uscita) 10 W X 2Dimensioni (Lar x Pro x Alt) Corpo Con piedistallo
970,0 X 98,1 X 586,6 (mm)970,0 X 206,9 X 629,1 (mm)
Peso Senza piedistallo Con piedistallo
11,6 kg13,3 kg
✎ Design e specifiche sono soggetti a modifiche senza preavviso.
✎ Per l'alimentazione elettrica e il consumo di corrente, consultare l'etichetta apposta al prodotto.
Questo apparecchio è fabbricato in conformitàal D.M.28.08.95 n.548 ed in particolare a quantospecificato nell Art.2, comma 1. Questo apparecchio èfabbricato nella U.E. in conformità al D.M.28.08.95 n.548Art.2, comma 1 ed al D.M.26.03.92 Art.1
[LCD-ZG ZT]BN68-03717C-L04.indb 15 2011-04-29 �� 10:13:40
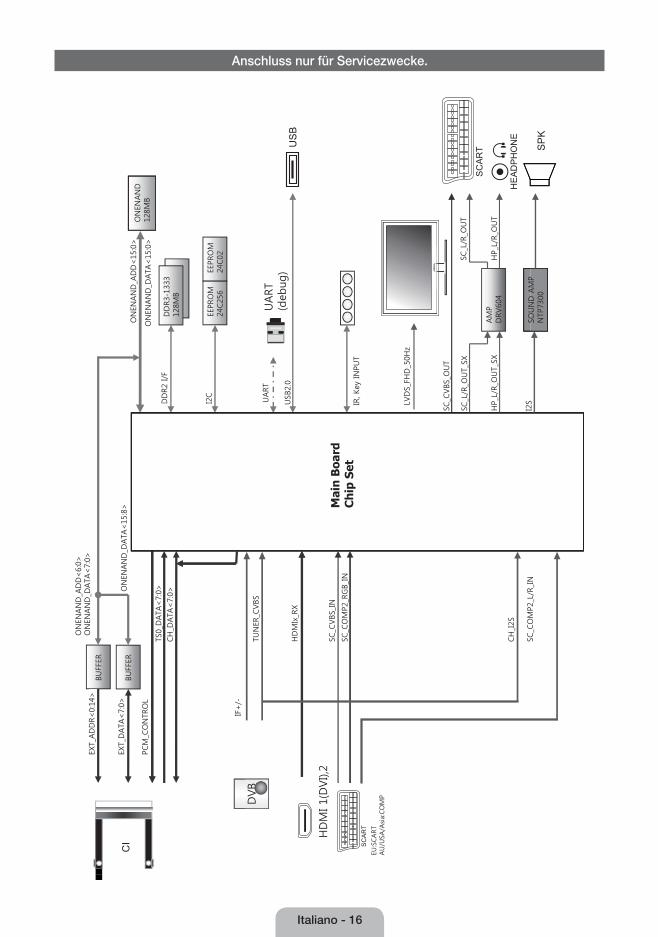
Italiano - 16
Anschluss nur für Servicezwecke.
Mai
n B
oard
Ch
ip S
et
BUFF
ER
ON
ENAN
D12
8MB
ON
ENAN
D_A
DD
<15
:0>
EXT_
DATA
<7:
0>
EXT_
AD
DR<0:
14>
ON
ENAN
D_D
ATA
<15
:8>
ON
ENAN
D_D
ATA
<7:
0>
ON
ENAN
D_D
ATA
<15
:0>
PCM
_CO
NTR
OL
BUFF
ER
ON
ENAN
D_A
DD
<6:
0>
TS0_
DATA
<7:
0>
CH
_DATA
<7:
0>D
DR2
I/F
EEPR
OM
24C25
6
DD
R3-
1333
128M
B
EEPR
OM
24C02
I2C
UART
(deb
ug)
DVB
IF+/-
USB
2.0
UART
TU
NER
_CVBS
HD
MIx
_RX
HD
MI 1(
DVI),
2
EU:S
CART
AU/U
SA/A
sia:
CO
MP
IR, K
ey IN
PUT
SC_C
VBS
_IN
SC_C
OM
P2_R
GB_
IN
LVD
S_FH
D_5
0Hz
SC_C
VBS
_OUT
SOUN
DAM
P
AM
PD
RV60
4
SC_L
/R_O
UT_
SX
CH
_I2S
SCCO
MP2
L/R
IN
SC_L
/R_O
UT T
UO_
R/L_PH
XS_TU
O_R/L_P
H
SOUN
D A
MP
NTP
7300
I2S
I2S
SC_C
OM
P2_L
/R_IN
CI
[LCD-ZG ZT]BN68-03717C-L04.indb 16 2011-04-29 �� 10:13:40