contents · 2016. 4. 22. · pendants sugar skulls pendants working with washers necklace confetti...
TRANSCRIPT

ContentsIntroduction: Play! 6
Basics 7Tools and MaterialsSafetyEnameling 101
Other Techniques 110
Acknowledgments 111& About the Author
Chapter 1: Beyond the Basics
Chapter 2: Fantastic Finishes
EmbeddedMetal Comic Book
Earrings
Scratch Art Pendants
Sugar Skulls Pendants
Working withWashers Necklace
Confetti Earrings
Sugar Coat It Necklace
H2Oh!Bracelet
Salted Enamel Bracelet
River Rock Bracelet
Ready to Raku Bracelet
20 24 27 30 33
38 41 44 47 50

Chapter 4: Manipulating Metal
Chapter 3: Working with Wire
Chapter 5: Creating Connections
Dimensional Designs Pendant
Bubble Earrings Path Less Traveled Necklace
Spellbound Pendant
Hearts on Fire Bracelet
Bouquet Garni Pendant
Connect the Dots Earrings
Cocoon Earrings DNA Pendant Enameled-Wire Words Pendants
Enameled Yo-Yo Earrings
Bullseye Ring Starburst Cuff Rainbow Fringe Brooch
Folding RulerPendant
76 80 83 86 89
56 60 64 67 70
94 97 101 104 107

6
It’s my favorite action verb, hands down.
It’s also how I’ve always approached arts
and crafts. I am grateful to have grown
up with parents and teachers who
encouraged me to have fun and play.
Well, most of the time. They must have
already known what I eventually figured out.
Play is about more than just fun. It’s also about
discovery, of yourself and the world around you.
Sadly, for adults, play doesn’t always make the
schedule in our “work, work, work” culture. We rarely allow ourselves
enough opportunities to have fun. So please think of this book as your
invitation.
I encourage you to discover all torch enameling can offer you as a
designer. The combination of color, shapes, and textures will yield
amazing and unlimited results. Play with these projects and make them
your own. Pick colors that speak to you, choose shapes that reflect
your personality—combine project techniques to produce something
never before seen. Go on—play!
Yes, there are a few rules. We are, after all, playing with fire, and we
all know how the old saying goes. So follow the techniques and take
precautions to play safely. But then “go wild.”
If you get stuck, don’t worry. That’s part of the fun. Take a break or try
a new approach. If you get REALLY stuck, just raise your hand. My day
job is teaching children, so I’ve heard it all. Seriously, email me with any
questions. I’m happy to help.
Finally, please keep in touch. Visit my website, macaroniandglitter.com.
I absolutely love seeing what my students make, so be sure to send me
photos of your amazing creations. My Instagram and Pinterest pages
aren’t going to fill themselves.
— Steven
Play!
Are you ready? It’s playtime!

20
Embedded Metal Comic Book Earrings
I’ve always been drawn to the bold colors and
larger-than-life imagery of the comic book
motif. These earrings are made even more fun
with the addition of enameled letters. Most
people would say earrings are supposed to
match, so to avoid an international incident, use
the same colors on both sides. But a different
word on each ear sounds way more fun to me!
• Copper letters (beaducation.com)
• 3x3 in. 22-gauge copper sheet
• 2–4 7mm jump rings
• Pair of earring wires
• Permanent marker
• Transparent enamel (Egg Yellow)
• Black counterenamel (I used 1995.)
• Opaque enamels (Titanium White and Darkest Blue)
• French shears
You’ll need
• Mesh screen
• Penny Brite, old toothbrush, and small towel
• Kiln brick, trivet, fine-point tweezers, torch, and titanium pick
• Sifter, dust mask, and magazine sheets
• Hole-punching pliers and metal file
• Bentnose pliers
• Small claw hammer and bench block

21
Prepare the Metal
I prefer to cut out my “star” design
directly from the copper sheet. The
thinner gauge makes it much easier
to use the French shears. First, draw
your design onto the copper sheet
with a permanent marker. (You can
trace it on a piece of cardstock.)
Next, use the shears to cut out the
individual pieces [1]. Cut one line at
a time, in one direction, and try to
always begin your cuts from an open
edge versus a tight angle. This will
result in cleaner cuts and help
minimize bending of the metal.
Repeat the process for the other star,
and then punch a hole near the top
edge of each star. Use a hammer and
bench block to flatten the star [2].
Prepare the stars as in “Cleaning
Your Copper,” p. 16. File down any
sharp points or burrs [3].
CounterenamelCounterenamel the backside of both
pieces [4]. Fire the counterenamel,
allow it to cool, and then clean the
front of each star. Set these two
pieces aside.
1
32
4
NOTEFor this project, I used a base coat
of Titanium White, Darkest Blue for
the letters, and a splash of
transparent Egg Yellow. You can
also try bright primary-colored
enamels, such as Orient Red,
Marigold Yellow, Ultramarine Blue,
and Hunter Green.

24
Scratch Art Pendants
This is my twist on the sgraffito (scratching)
technique. It was one of the first techniques I taught
to students. Do you remember those iconic sheets
of scratch art paper? They were covered in a black
wax and with just a few scratches here and there,
you could reveal a rainbow of colors. The beauty of
this project is you can create intricate designs or
simple freeform styles with random scratching.
• 5 25.4x6.4mm copper rectangles
• 18–20 in. (46–51cm) fancy chain
• 7 6mm jump rings
• Lobster claw clasp
• Black counterenamel (I used 1995; this is also the base for the front.)
• 4 or more opaque enamels in bright primary colors, such as Orient Red, Marigold Yellow, Ultramarine Blue, and Hunter Green
• Black enamel paint
You’ll need
• Small paintbrush
• Scratching tool with a sharp point
• Water for painting and cleaning
• Penny Brite, old toothbrush, and small towel
• Kiln brick, trivet, torch, bentnose pliers, tweezers, and titanium pick
• Sifter, dust mask, and magazine sheets
• Hole-punching pliers
25
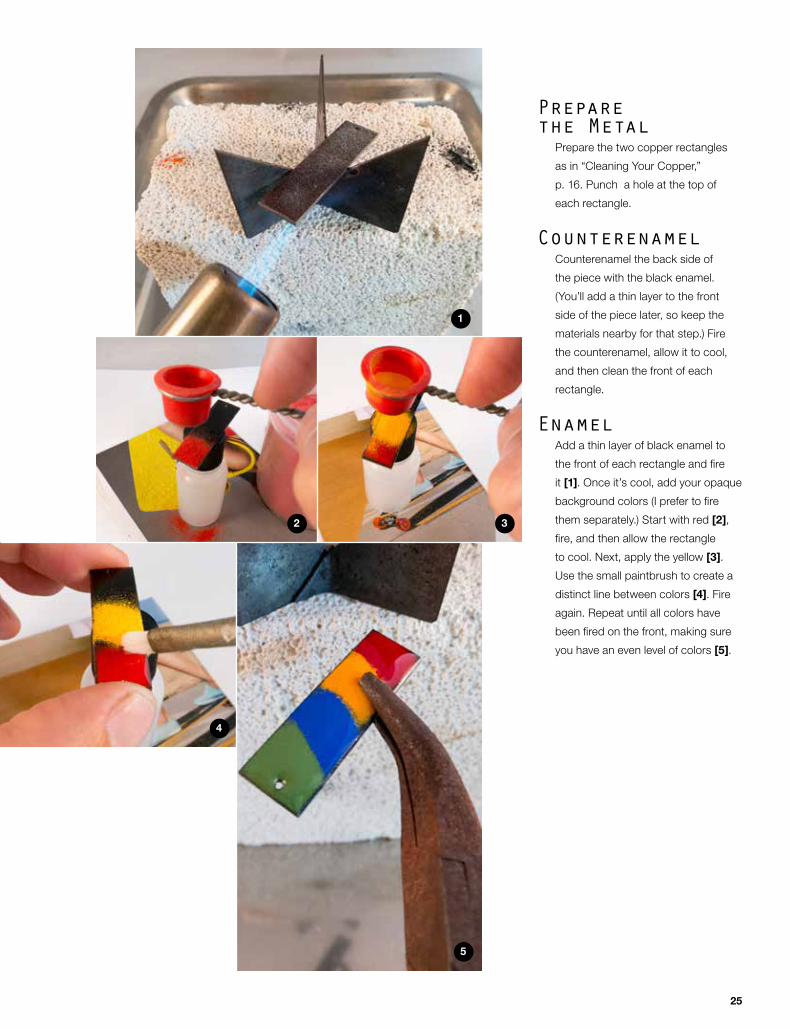
Prepare the Metal
Prepare the two copper rectangles
as in “Cleaning Your Copper,”
p. 16. Punch a hole at the top of
each rectangle.
CounterenamelCounterenamel the back side of
the piece with the black enamel.
(You’ll add a thin layer to the front
side of the piece later, so keep the
materials nearby for that step.) Fire
the counterenamel, allow it to cool,
and then clean the front of each
rectangle.
EnamelAdd a thin layer of black enamel to
the front of each rectangle and fire
it [1]. Once it’s cool, add your opaque
background colors (I prefer to fire
them separately.) Start with red [2],
fire, and then allow the rectangle
to cool. Next, apply the yellow [3].
Use the small paintbrush to create a
distinct line between colors [4]. Fire
again. Repeat until all colors have
been fired on the front, making sure
you have an even level of colors [5].
1
2 3
4
5

44
• 5 18-gauge copper blanks (I used 20.5mm rounded
squares and a 25x18mm oval.)
• 4 6mm round gemstone beads
• 2 5–6mm jump rings
• 8 in. (20cm) 20-gauge craft wire
• Lobster claw clasp
• Black counterenamel (I used 1020.)
• Background enamel color (I used Titanium White.)
• Enamel paints and containers
Salted Enamel Bracelet
If you’ve worked with watercolors before, you may remember the
trick of using salt to absorb and ultimately draw the watercolors to
a specific area of a painting. This technique incorporates that
concept, but when the project is fired with the salt, it leaves behind
an intriguing texture.
You’ll need
• Table salt
• Small paintbrush and water
• Penny Brite, old toothbrush, and small towel
• Kiln brick, trivet, torch, bentnose pliers, and fine-point
tweezers
• Sifter, dust mask, and magazine sheets
• 2mm hole-punching pliers
• Roundnose pliers and chainnose pliers
• Wire cutters
45
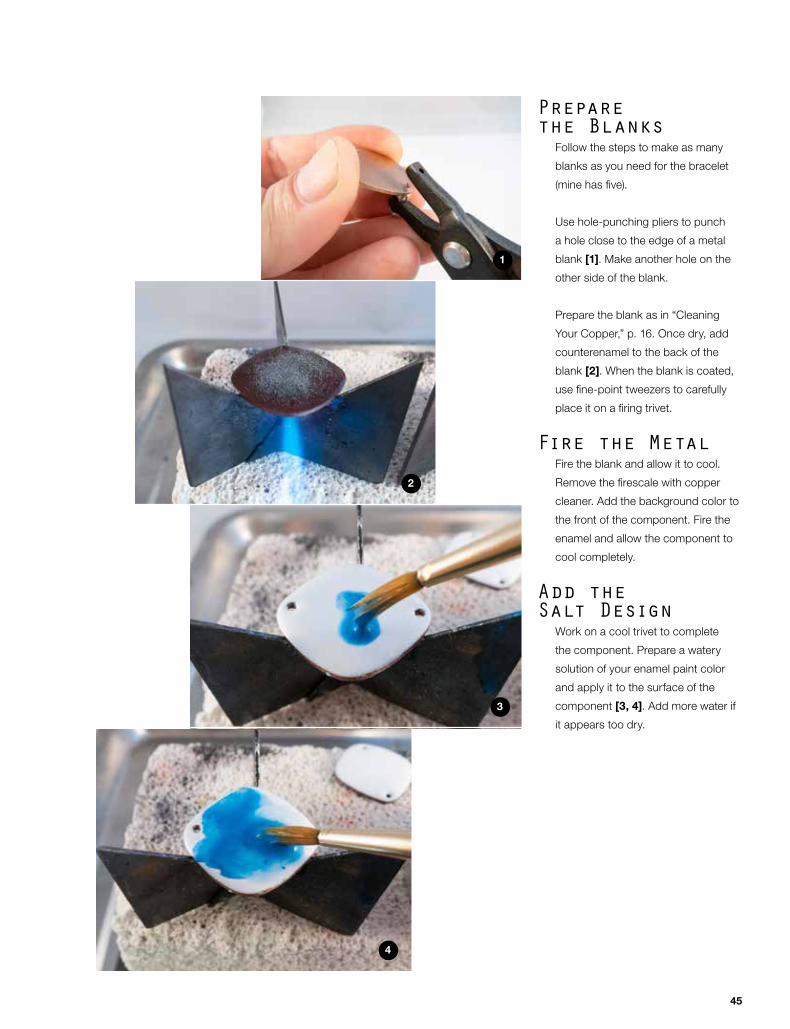
Prepare the Blanks
Follow the steps to make as many
blanks as you need for the bracelet
(mine has five).
Use hole-punching pliers to punch
a hole close to the edge of a metal
blank [1]. Make another hole on the
other side of the blank.
Prepare the blank as in “Cleaning
Your Copper,” p. 16. Once dry, add
counterenamel to the back of the
blank [2]. When the blank is coated,
use fine-point tweezers to carefully
place it on a firing trivet.
Fire the MetalFire the blank and allow it to cool.
Remove the firescale with copper
cleaner. Add the background color to
the front of the component. Fire the
enamel and allow the component to
cool completely.
Add the Salt Design
Work on a cool trivet to complete
the component. Prepare a watery
solution of your enamel paint color
and apply it to the surface of the
component [3, 4]. Add more water if
it appears too dry.
1
2
3
4

You’ll need
56
Bouquet GarniPendant
I created this project after a day of yardwork. I
used dried rosemary trimmings from my backyard
for raku enameling and was inspired to replicate
the look of rosemary with this project. I find blues
and greens are best suited for this project, but you
can also experiment with other colors. This is an
in-flame project, so you’ll need to position the wire
in a specific area of the flame to avoid over-firing
and discoloring the enamel—although I’ll be the
first to admit that some enamel colors look
fantastic when they have a little char on them.
• 20 2–3-in. (5–7.6mm) pieces of 20-gauge
copper wire
• 3 in. (7.6cm) 18-gauge copper wire
• Beading wire or leather cord necklace
• Opaque enamels (choose colors within the same
family for maximum effect)
• Kiln brick, trivet, torch, bentnose pliers, and
cross-locking tweezers
• Sifter, dust mask, and magazine sheets
• Shallow glass bowl or saucer to hold loose
enamel (1 for each color)
• Roundnose pliers and chainnose pliers
• Wire cutters
• Vermiculite in a container

57
Prepare the WireBefore beginning your project, you’ll
need to create one 3-in. stem as well
as about twenty 2–3-in. branches.
Leave the stem straight. To create a
branch, center a pair of roundnose
pliers on each wire and wrap the end
of each wire one full rotation around
the pliers’ jaws [1, 2, 3, 4]. Create
various lengths of the branches, as
the pieces will be stacked over each
other. If your wire has a tarnish-
resistant coating, pass the wire
through the torch flame to burn off
the coating (Make sure you’re in a
well-ventilated space!). Now, your
wires are ready to be enameled.
1
32
4
68
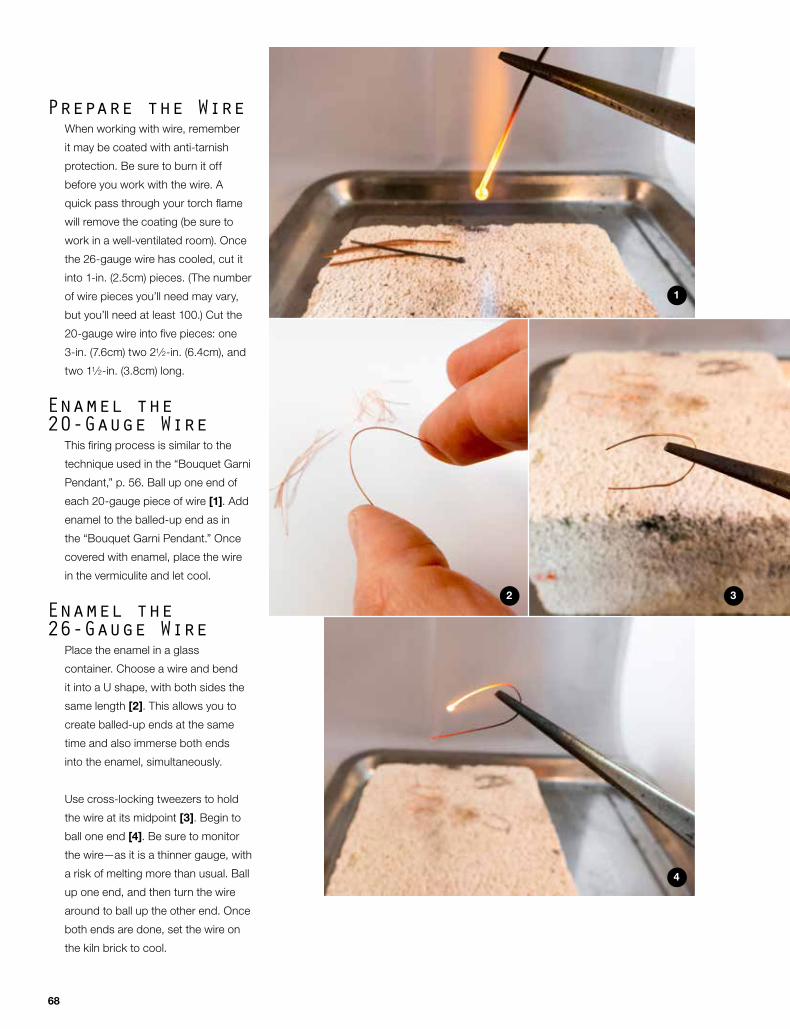
Prepare the WireWhen working with wire, remember
it may be coated with anti-tarnish
protection. Be sure to burn it off
before you work with the wire. A
quick pass through your torch flame
will remove the coating (be sure to
work in a well-ventilated room). Once
the 26-gauge wire has cooled, cut it
into 1-in. (2.5cm) pieces. (The number
of wire pieces you’ll need may vary,
but you’ll need at least 100.) Cut the
20-gauge wire into five pieces: one
3-in. (7.6cm) two 21⁄2-in. (6.4cm), and
two 11⁄2-in. (3.8cm) long.
Enamel the 20-Gauge Wire
This firing process is similar to the
technique used in the “Bouquet Garni
Pendant,” p. 56. Ball up one end of
each 20-gauge piece of wire [1]. Add
enamel to the balled-up end as in
the “Bouquet Garni Pendant.” Once
covered with enamel, place the wire
in the vermiculite and let cool.
Enamel the 26-Gauge Wire
Place the enamel in a glass
container. Choose a wire and bend
it into a U shape, with both sides the
same length [2]. This allows you to
create balled-up ends at the same
time and also immerse both ends
into the enamel, simultaneously.
Use cross-locking tweezers to hold
the wire at its midpoint [3]. Begin to
ball one end [4]. Be sure to monitor
the wire—as it is a thinner gauge, with
a risk of melting more than usual. Ball
up one end, and then turn the wire
around to ball up the other end. Once
both ends are done, set the wire on
the kiln brick to cool.
1
32
4

81
Prepare the Copper
Use the tube cutter to create two 1⁄2-in. (1.3cm) pipe cut-outs [1]. You’ll
also need six 1⁄4-in. (6mm) cut-outs
[2]. Each should be approximately 1⁄8 in. (3mm) high. Punch a hole in the
center of the largest ring [3]. Soak
the pieces in a citric acid bath. Allow
them to dry before adding
the enamel.
EnamelPlace a mica square on a stainless
steel trivet. Place a single piece of
tube on top of the mica square [4].
Carefully add enamel to the inside
of the tube (fill it about halfway)
using a line sifter or a folded piece of
magazine paper [5]. Avoid disturbing
the placement of the tube to ensure
the enamel will stay inside the tube.
Don’t worry about enamel falling
onto the front of the tube, as you can
remove this with a diamond file after
you’ve finished firing.
You’re now ready for the first firing.
Mica is able to withstand a tremen-
dous amount of heat, but the flame’s
first contact with the sheet will slightly
warp and discolor the mica. Slowly
introduce the flame into the project
area, directing it under the tube [6].
After about a minute, redirect the
flame to the side of the tube, keeping
in mind the flame should not enter
the inside of the tube [7]. Pay close
attention to the enamel, as it will
slowly fuse to the sides, and in most
cases, settle to the bottom of the
tube. Allow the tube to cool. Add a
second layer of enamel inside the
tube [8].
Do not overfill the tube or you’ll
likely burn the exposed enamel.
1 2
3
5
76
4