contractor tips - eversave · pdf filecontractor tips for the use of cadweld® products...
TRANSCRIPT

CONTRACTOR TIPSFOR THE USE OF CADWELD® PRODUCTS
E1172LT08NAEN:Layout 1 6/24/08 4:15 PM Page 1

2 www.erico.com
Welding ProcedureConductor and Surface Prep . . . . . . .P3General Welding Procedure . . . . . . .P4
Connection SimplificationSleeves and shim . . . . . . . . . . . . . . .Q1, P5Simplifying a GY or XB Connection .Q2, P6Fewer molds for the job . . . . . . . . .Q3, P7
Tips For Making ConnectionsWet or muddy conductors . . . . . . . .Q4, P9Holes in the connection . . . . . . . . .Q5, P9Pin holes in the connection . . . . . . .Q6, P9Heating mold with a torch . . . . . . .Q7, P9Heating mold without a torch . . . . .Q7, P9Cable “burned up” . . . . . . . . . . . .Q8, P10Leakage of welding material . . . . .Q9, P11Mold leakage . . . . . . . . . . . . . . .Q10, P11Clamp adjustment . . . . . . . . . . . .Q11, P12Connections to steel . . . . . . . . . .Q12, P12Steel surface clamps . . . . . . . . . .Q13, P13Ground rod driving sleeves . . . . .Q14, P14Ground rod splices . . . . . . . . . . .Q15, P14Mold Life . . . . . . . . . . . . . . . . . .Q16, P15 CADWELD® PLUS . . . . . . . . . . . .Q17, P16
Small tap wires . . . . . . . . . . . . . . . . .Q18, P16Cable sleeve . . . . . . . . . . . . . . . . . . . .Q19, P16Solid conductor . . . . . . . . . . . . . . . . .Q20, P17No flint ignitor . . . . . . . . . . . . . . . . . .Q21, P17Starting the reaction . . . . . . . . . . . . .Q21, P17Flint ignitors . . . . . . . . . . . . . . . . . . . .Q22, P17300 g, 400 g & 500 g CADWELD PLUS Q23, P17Welding to copper surface . . . . . . . . .Q24, P18Connection of large conductors . . . . .Q25, P18Indoor connections . . . . . . . . . . . . . .Q26, P19
General InformationPrice key . . . . . . . . . . . . . . . . . . . . . .Q27, P20Wear plates . . . . . . . . . . . . . . . . . . . .Q28, P20Split crucible . . . . . . . . . . . . . . . . . . .Q29, P20Heavy Duty . . . . . . . . . . . . . . . . . . . .Q30, P21Welding material alloys . . . . . . . . . . .Q31, P21Welding material sizes . . . . . . . . . . . .Q32, P22Ground rod connections . . . . . . . . . .Q33, P22Reinforcing bar connections . . . . . . . .Q34, P22Difference between connections . . . .Q35, P23Different manufacturers materials . . .Q36, P24Threaded and Plain ground rods . . . .Q37, P24Mold Clips . . . . . . . . . . . . . . . . . . . . .Q38, P24Handle Clamps & Frames . . . . . . . . . .Q39, P25Ground rod diameters . . . . . . . . . . . .Q40, P25
Index . . . . . . . . . . . . . . . . . . . . . . .P26 & P27
CONTRACTOR TIPSFOR THE USE OF CADWELD® PRODUCTS
TABLE OF CONTENTS
This manual contains a list of time-saving tips for contractors using CADWELD products. To usethis guide, just look up the question you may have in the Table of Contents or the Index and then reference the informational tips. Making a CADWELD connection is often easier and less expensivethan using crimp or bolted connections.
Every job needs:
Mold(s) (with instruction sheets), flint ignitor or Control Unit, welding material*, handle clamps, wire brush and torch.
In addition, some molds may need:Packing for rebar molds, CADWELD mold sealer, mold cleaning tool, cable clamps, surface clamps, ground rod support clamps, etc.
*If traditional welding material box is opened, check to be sure disks are still there.
CHECK LIST
TABLE OF CONTENTS
Question = QPage = P
E1172LT08NAEN:Layout 1 6/24/08 4:15 PM Page 2

3www.erico.com
CONNECTION SIMPLIFICATION
Conductor and Surface Preparation
1. Preparation of Cablea. Conductors should be clean, shiny and dry to help ensure a good weld.b. Corrosion must be cleaned from conductors with an ERICO® T313 card
cloth brush or a T314 cable cleaning brush. Keep tools clean to avoid contamination.
c. Oil and/or grease should be removed from conductors.d. Wet conductors must be dried with an ERICO T111 torch head (fits on all
standard 14 and 16 ounce propane bottles).e. Bent conductors (or conductors which have been “bird-caged”) can prevent
the mold from closing tightly, which can cause leaks. To prevent deformingof the cable ends, use a cable cutter whenever possible.
f. ERICO B265 cable clamps should be used for cables under tension. This keepsthe cable from springing the mold open or being pulled out during welding.
2. Preparation of Ground Rodsa. Ground rod ends that have been mushroomed by driving must be cut off
as they will hold the mold open and cause leakage during the welding procedure.
b. Ground rod must be clean, shiny and dry to help ensure a good weld.c. Corrosion must be removed as it may cause porosity in the weld.d. Ground rod splices require a B120 clamp.
3. Preparation of Steel Surfacesa. Welding surface must be cleaned bright and dried.b. Surface should be ground or filed using a course file or an ERICO T321 rasp.
Keep tool clean to avoid contamination.c. If a grinder is used, use only a wheel that is self-cleaning and organically
bonded, leaving no residue to contaminate the bonding surface.
4. Preparation of Rebara. Rebar welding surface should be clean, shiny and dry to help ensure a
good weld.b. If the rebar has surface corrosion protection (epoxy coating), it needs to be
removed before making the connections. c. Corrosion and mill scale must be removed prior to making a weld. Use a
course file or an ERICO T321 rasp. Keep tool clean to avoid contamination.d. Packing is required for most cable to rebar connections.e. Locking pliers are required to support mold for GR, GT, NC and ND
connections.
E1172LT08NAEN:Layout 1 6/24/08 4:15 PM Page 3

4 www.erico.com
CONNECTION SIMPLIFICATION
General Welding Procedure
1. Check the followinga. Mold is correct for the conductor size and application. Do not modify molds.b. Welding material indicated on mold tag is available. Use only CADWELD®
welding material with CADWELD molds.c. Handle clamp and/or frame is attached to the mold and properly adjusted.d. Flint ignitor or CADWELD® PLUS Control Unit is in working order.
2. Make sure mold is clean and dry and is in good condition. Dry the mold by heatingwith torch to about 250° F (120° C).
3. Position mold on conductor and/or against surface following appropriate instructionsheet provided with mold.
4. Close mold. Lock tightly with handle clamps / frame toggles.
5. Igniting Welding Materiala. Traditional CADWELD
i) Insert the steel disk into the crucible with concave side up to help ensurethe disk seats properly and completely covers the tap hole.
ii) Dump the welding material into the crucible being careful not to upsetthe disk.
iii) Tap the tube to loosen starting material. Place approximately 1/2 of thestarting material on top of the welding material, close the lid and placeremaining starting material into the opening on top of the mold cover.
iv) Aiming the flint ignitor from the side, ignite the starting material in themold cover opening in the top. Withdraw the ignitor quickly to preventfouling.
b. CADWELD PLUSi) Insert CADWELD PLUS package into the mold
ii) Attach the control unit termination clip to the ignition strip and makesure the termination clip is pushed all the way to the black mark on thestrip.
iii) Press and hold the Control Unit button and wait for ignition.
6. Allow approximately 30 seconds for completion of the reaction and solidification ofweld metal.
7. Open and remove the mold. Use care to prevent chipping the mold.
8. Remove expended CADWELD PLUS steel cup, if applicable, and clean mold usingERICO® T394 natural bristle brush or soft cloth.
E1172LT08NAEN:Layout 1 6/24/08 4:15 PM Page 4

5www.erico.com
--- #6 B1331L #4#6 --- B112 #2#4 #3 or #4 B1331V #2
#3 or #4 #2 B1331Y #1#2 #1 B1332C 1/0#1 1/0 B1332G 2/0
1/0 or #1 2/0 B1332L 3/02/0 or 3/0 3/0 B1332Q 4/0
CONCENTRICSTRAND
SOLID USE SLEEVEPART NO.
USE IN MOLDFOR
ADAPTOR SLEEVE SELECTION GUIDECABLE SIZE
ADAPTOR SLEEVES
4/0
2/0250
WRAP SLEEVES
CONNECTION SIMPLIFICATION
QUESTION 1: I have several 4/0molds in stock but now I have asmall job using 2/0. Can I shim thesmaller cable to fit the mold?
ANSWER 1a: You can often shim one or two cable sizesto fit a larger mold. Use a wrap sleeve, CADWELD® PartNo. B140A. Wrap the shim around each cable to build itup to a 4/0 size. Then use the 4/0 molds to make the connection. We recommend that you keep a package ofwrap sleeves handy.
ANSWER 1b: Use an adaptor sleeve which is sized forspecific cables to build up 2/0 to fit the 4/0 mold. Selectsleeve Part No. B1332Q for this example. Adaptor sleevescost more but they take less time.
E1172LT08NAEN:Layout 1 6/24/08 4:15 PM Page 5

6 www.erico.com
CONNECTION SIMPLIFICATION
QUESTION 2: The last time I had tomake a through connection to theside of a ground rod, the three-piecemold was difficult to use because ofits complex frames and toggles. Isthere a simpler approach?
ANSWER 2: For a through connection to the side of aground rod, try the 2-piece GY mold from ERICO®.This mold uses an L160 or L159 handle (the sameclamps used for the majority of connections). It is lessexpensive and a lot easier to use.
We have a similar solution for an X (cross) connection –instead of a complicated XBM or XBV mold – try the XBQ or XBZ mold. They make the same connection, are less expensiveand save time.
We will be happy to help you find the right solution and recommend a connection that would meet your needs
and potentially save you time and money.
Please see the answers to Question 3 for further information.
E1172LT08NAEN:Layout 1 6/24/08 4:15 PM Page 6

7www.erico.com
ANSWER 3a: Use Type PT molds on conductor sizes up to4/0. This one mold type can be used to make splices, “T’s”and “X’s”, in addition to parallels.
ANSWER 3b: When a splice is required, several differentmold types may be used. For instance, a splice can be madeusing the same mold as other connections like a Type TA.Just center the ends of the cable to be spliced under the taphole of the mold and use a short length of cable (about 3inches) in the tap cable hole. Be careful to center the cableends for the splice in the center of the mold.
ANSWER 3c: For ground rods, use Type GT through cable connections. When the cable dead-ends at the ground rod,just let it extend past the rod 2” (through the mold) whenmaking the connection.
ANSWER 3d: When a lot of “T’s” and a few “X’s” arerequired on a job, use two “T’s” about 2” apart to make the “X”.
QUESTION 3: ERICO® makes so manydifferent CADWELD® molds. Whichmolds are the most versatile?
SPLICE “T” PARALLEL “X”
DEAD-ENDOR THROUGHCONNECTION
USE 2 “T’s”FOR AN “X”
CONNECTION SIMPLIFICATION
E1172LT08NAEN:Layout 1 6/24/08 4:15 PM Page 7

8 www.erico.com
ANSWER 3e: When several cable-to-ground rod connectionsare shown on the print, use a Type GT mold to connect athrough cable (or two cables from opposite directions) to thetop of the rod. Then use a Type TA mold to connect the othercables to the first cable. Electrically, this is equivalent to thatshown on the print.
ANSWER 3f: When making connections of vertical cable to a vertical steel surface, a Type VV mold can be used for athrough cable, a dead-end cable from above or a dead-endcable from below.
ANSWER 3g: When making connections of horizontal cable to a vertical steel surface, a Type VG or VT mold can be used for a through cable or a dead-end cable.
ANSWER 3h: When making connections of horizontal cable toa horizontal steel surface, a Type HC or HT mold can be usedfor a through cable or a dead-end cable.
GROUND ROD CONNECTIONSWhen the construction print shows several cables to a ground rod,several methods can be utilized to achieve the required electrical path.
DEAD-ENDFROM BELOW
DEAD-ENDFROM ABOVE
THROUGH
THROUGH
DEAD-END
DEAD-ENDOR THROUGH
AS MADE IN FIELD
Shown on Construction
Print GT & GY
Two GY’s
GT & XA (or XB)
GT & PT
ND
GT & Two TA’s
QUESTION 3 (continued)
CONNECTION SIMPLIFICATION
E1172LT08NAEN:Layout 1 6/24/08 4:15 PM Page 8

9www.erico.com
ANSWER: When the conductor is wet and muddy, first heatthe conductor with a torch to dry all the moisture. Wiping theconductor with a cloth before heating helps to remove themud. Second, tap the conductor to knock out as much dirt aspossible. Finally, use a wire brush to clean the ends of the con-ductor and about 2 inches along the length of the conductor.
ANSWER 5a: Holes in the riser can be caused by contamination on the cables or the surface if welding to steel. If there is oil or another substance which burns, a black material can usually be seen in the holes and around the weld. Moisture can also cause holes in the finished connection. See question 10 for further discussion.
ANSWER 5b: Holes in the riser can also be caused by excessive galvanizing when welding to a galvanized surface. If this occurs, remove a little more galvanizing at the area ofthe weld before making the next weld. This can be done witha file or a scraper.
ANSWER: Heat the mold (to above the boiling point of water) before using it each day. It only takes a couple of minutes using a hand-held propane torch. The graphiteabsorbs moisture from the atmosphere overnight. Making the first connection without heating the mold causes themoisture to turn to steam, some of which becomes trapped in the welding material.
ANSWER: The moisture you are seeing coming out of themold is actually moisture from the torch flame condensing onthe cold mold (the product of combustion is water). You aretherefore adding moisture to the mold as you begin heating it.This can’t be prevented. It is therefore necessary to heat themold to a high enough temperature to drive all the moistureout. It is hot enough when a drop of water sizzles on themold. Having the mold this hot also provides another benefit -if there is moisture on the conductors, a hot mold will drysome of the moisture as the welding preparation takes place.
QUESTION 4: How do I clean theconductors when they are wet andmuddy?
QUESTION 5: Sometimes, I get holesin the riser even after I have beenusing the mold and it is hot. Whatcan I do?
QUESTION 6: I make good lookingCADWELD® connections most of thetime, but the first one I make eachmorning doesn’t look as good. It hassmall pin holes in the riser or is silverin color. What can I do to improve thatfirst mold connection?
QUESTION 7: I do heat the mold butstill have the holes on the first connection. I know there is moisturein the mold because I can see themoisture come out as I am heatingthe mold. I heat the mold until it isnice and warm. What’s wrong?
TIPS FOR MAKING CONNECTIONS
E1172LT08NAEN:Layout 1 6/24/08 4:15 PM Page 9

10 www.erico.com
ANSWER: What you experienced was not the cable being“burned up”. When a CADWELD® connection is being made, the molten metal from the reaction melts the cable in the weldcavity.
The resulting void in the connection can be the result of eitherof the following:
a. If molten metal leaks from the mold, not enough material remains in the mold to fill the weld cavity. If the mold wasproperly closed and it still leaked, it may be worn and inneed of replacement.
b. If there is tension on the cable, even slight tension, thecable is pulled apart. This creates a larger void than can befilled with the welding material. Use cable clamp B265 tohold the cables in place during the welding process.
c. It is also important to use a pair of locking pliers to supportthe mold on a ground rod connection during the connectionprocess. As the molten weld metal burns through the cable,the mold may slide down the rod without them.
QUESTION 8: The other day when Iopened the mold, the cable was“burned up”. Was the “shot” (welding material) too hot causing it to burn up the cable?
b. B265
a. LOW FILL
TIPS FOR MAKING CONNECTIONS
E1172LT08NAEN:Layout 1 6/24/08 4:15 PM Page 10

11www.erico.com
ANSWER: This is a common occurence, especially after themold has been used 15 to 20 times and the cable mold openings become worn. After the mold has been locked onthe cables, apply a ring of CADWELD® T403 Mold Sealeraround the cable where it enters the mold. Don’t force it intothe mold! If it gets in the weld cavity, the molten metal willcause it to burn and give off gases which can cause animproper weld or spattering of molten welding material.
ANSWER: NO! Neither mud nor anything else containingwater or oil should ever be used. CADWELD T403 Mold Sealerpacked around the conductors AFTER the mold handles havebeen closed and locked will usually stop the leakage. However,after the mold wears and the cable opening becomesenlarged, the difference between the mold opening and thecable diameter may be too great for the mold sealer to do itsjob. A new mold will then be required.
When applying Mold Sealer, never allow it to be forced intothe weld cavity. It will cause poor welds. See QUESTION 9.
QUESTION 9: Sometimes moltenmetal leaks out of the mold aroundthe cable strands, especially on 4/0, 7 strand cable. Is my mold defective?
QUESTION 10: The welding material leaks around the cablestrands, especially when I use 4/0 7strand cable. Can I pack mud to stopthe leakage?
TIPS FOR MAKING CONNECTIONS
E1172LT08NAEN:Layout 1 6/24/08 4:15 PM Page 11

12 www.erico.com
ANSWER 11a: The first thing to check is the adjustment of the handles, especially if the handles are new. Just in front of thegrips is the adjustment linkage. Remove the key and pin. Turn the linkage counterclockwise to tighten the locking action andclockwise to loosen the locking action. Test the locking actionand then replace the pin and key.
ANSWER 11b: Check the conductors at the mold cable opening to make sure that you are using the correct mold forthe cable. Too large a cable will hold the mold open.
ANSWER 11c: Check the mold parting line. Make sure some foreign object isn’t caught in the parting line.
ANSWER: There is no problem with the welding material. Thisissue is caused by one of the following:
a. The steel surface is not properly prepared. A file, rasp or grinder using an ERICO® approved wheel must be used to clean the steel surface to “bright metal”. Brushing the surface is not sufficient. If the surface is heavily galvanized,the galvanizing at the area of the weld must be removed.
b. The cable may not be positioned properly in the mold.When the cable dead-ends at the connection, the cable endmust be positioned as shown on the instructions suppliedwith each mold. Positioning the cable end too far into themold may restrict the flow of the molten welding materialresulting in an improper connection.
QUESTION 11: My mold doesn’t closetight enough even though the handles lock. What can I do?
QUESTION 12: When I try to make a connection to a steel surface sometimes it does not “stick” to thesteel or, if it does, a light tap with a hammer knocks it off. Is there a problem with the welding material?
TIPS FOR MAKING CONNECTIONS
Adjustment Linkage
E1172LT08NAEN:Layout 1 6/24/08 4:15 PM Page 12
13www.erico.com
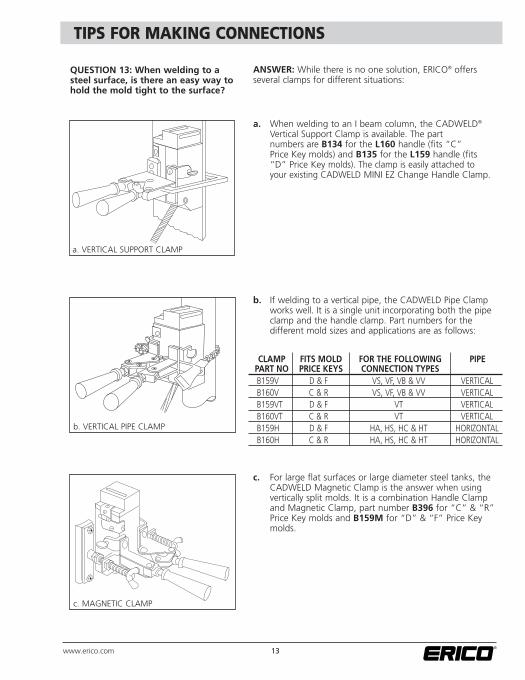
ANSWER: While there is no one solution, ERICO® offers several clamps for different situations:
a. When welding to an I beam column, the CADWELD®
Vertical Support Clamp is available. The part numbers are B134 for the L160 handle (fits “C” Price Key molds) and B135 for the L159 handle (fits “D” Price Key molds). The clamp is easily attached to your existing CADWELD MINI EZ Change Handle Clamp.
b. If welding to a vertical pipe, the CADWELD Pipe Clampworks well. It is a single unit incorporating both the pipeclamp and the handle clamp. Part numbers for the different mold sizes and applications are as follows:
c. For large flat surfaces or large diameter steel tanks, the CADWELD Magnetic Clamp is the answer when using vertically split molds. It is a combination Handle Clampand Magnetic Clamp, part number B396 for “C” & “R”Price Key molds and B159M for “D” & “F” Price Keymolds.
QUESTION 13: When welding to asteel surface, is there an easy way tohold the mold tight to the surface?
a. VERTICAL SUPPORT CLAMP
b. VERTICAL PIPE CLAMP
c. MAGNETIC CLAMP
B159V D & F VS, VF, VB & VV VERTICALB160V C & R VS, VF, VB & VV VERTICALB159VT D & F VT VERTICALB160VT C & R VT VERTICALB159H D & F HA, HS, HC & HT HORIZONTALB160H C & R HA, HS, HC & HT HORIZONTAL
CLAMPPART NO
FITS MOLDPRICE KEYS
FOR THE FOLLOWING CONNECTION TYPES
PIPE
TIPS FOR MAKING CONNECTIONS
E1172LT08NAEN:Layout 1 6/24/08 4:15 PM Page 13

14 www.erico.com
QUESTION 14: Every time I drive a ground rod, I have to cut off thetop of the rod before my mold will fit on. How can I save time on thisconnection?
QUESTION 15: When making Type GBground rod splices, I have a hardtime positioning the mold correctlyon the rods. Any suggestions?
1/2” COPPERCLAD OR STEEL B137-145/8” COPPERCLAD B137-16
5/8” STEEL B137-313/4” COPPERCLAD B137-18
3/4” STEEL B137-331” COPPERCLAD B137-22
1” STEEL B137-37
*FOR PLAIN (NOT THREADED) RODS ONLY
GROUND ROD SIZE PART NO.
GROUND ROD DRIVING SLEEVES*
ANSWER: Time savings is achieved when using a driving sleeveor ERITECH® ground rod driver. If using a threaded rod, use thescrew coupling and drive stud when driving the rod. For a plainrod, either steel or copperbonded, use the CADWELD® drivingsleeve listed below.
ANSWER: Use the CADWELD B120 clamp. This clamp not onlysupports the rod but also properly positions and supports the mold.This clamp is required for all ground rod splice connections.
B120 CLAMP
TIPS FOR MAKING CONNECTIONS
E1172LT08NAEN:Layout 1 6/24/08 4:15 PM Page 14

15www.erico.com
ANSWER: Mold life will vary to some extent with the type ofconnection being made. But, 50 connections or more are notunusual for a mold.
a. One reason for shorter mold life is cleaning the mold witha wire brush. The mold is made of graphite which is a soft material. The wire brush quickly erodes the graphite,resulting in short mold life.
b. The mold should be cleaned after each connection with a soft cloth, natural bristle brush, crumpled newspaper or a clean rag. Only the loose material must be removed. The mold should never be “scrubbed”.
c. For horizontally split molds (such as Type TA), theCADWELD mold cleaning tool (Part No. B136A for moldsusing welding material #65 & smaller, B136B for moldsusing welding material #90 and larger) works quite wellwithout damaging the graphite.
When using horizontally split molds, the tap hole must alsobe checked when cleaning the mold. If slag remains in the tap hole, push it out with the handle of the mold cleaning tool or with a rod.
d. The conductors must be aligned before the mold isclamped on. Any misalignment will cause the mold to actas a clamp causing excessive wear and chipping. The cableclamp, Part No. B265, helps to properly align the cables.
QUESTION 16: The CADWELD® catalogstates that the average mold life is50 connections. I can’t get anywherenear that many. What can I do toimprove my mold life?
c. B136
TIPS FOR MAKING CONNECTIONS
d. B265
E1172LT08NAEN:Layout 1 6/24/08 4:15 PM Page 15

16 www.erico.com
ANSWER: ERICO® has developed a patented system that initiatesthe CADWELD® reaction by delivering a specific amount of energy to the welding material using an ignition strip. The strip isconstructed of metals and insulation. It is not flammable andcannot spark unless the Control Unit is attached and operated.One of the unique features of this system is that it has the capability of providing a second spark to intiate the reaction ifnecessary.
There are a few other tips for using CADWELD® PLUS:
1. The welding material contained within the CADWELD PLUScup is basically a mixture of copper oxide and aluminum. It isnot a bad idea to shake or tap the side of the cup before placing it in the crucible in order to level the powdered material for optimal ignition.
2. Make sure the termination clip is fully engaged; the ignitorstrip should be fully inserted into the termination clip to theblack line printed on the strip.
3. Hold the operate button on the Control Until down for thefull charge / discharge cycle. Do not let go of the button untilthe LED is off and the reaction is initiated. Consult the ControlUnit Operation Instructions for further details.
ANSWER: Yes, it is necessary if you use a Type TA connection.An easier way is to use a Type PC connection in which the #6 isparallel to the 2/0. This gives you two advantages:
1. A sleeve is not required. 2. A vertically split mold is used rather than a horizontally split
mold which is easier to clean after each connection.
ANSWER: Ropelay cable (either welding cable or class G or Hropelay) is larger in diameter than concentric cable (7,19, 37 etc.strand) and therefore a different mold is required. Also, sleevesmust be used on the cable ends. The sleeves hold the strandstogether and give mechanical protection to the strands after theweld is made. Contact ERICO® or your local rep for the propermold and sleeves.
QUESTION 17: I know CADWELD® PLUSdoes not require the use of startingmaterial, but how is the exothermic reaction started?
QUESTION 18: I often have to maketaps of small wire from large runs. For instance, #6 tap from a 2/0 run.The Type TA requires that I use asleeve on the #6. Is this necessary?
QUESTION 19: I have a fine strandcable. It is too large to fit in the moldfor that size conductor. What should I do?
PC CONNECTION
CABLE SLEEVE
TIPS FOR MAKING CONNECTIONS
E1172LT08NAEN:Layout 1 6/24/08 4:15 PM Page 16

17www.erico.com
QUESTION 20: The last job I was onused #2 solid conductor. The mold Iordered was too big, even though Iordered it for #2. Why?
ANSWER: #2 solid is smaller in diameter than #2 stranded.A different mold part number must be ordered. ContactERICO® or your local rep for assistance.
ANSWER: Contact your local CADWELD® distributor to buyanother one.
Never use any other method including a match, torch, orother hand held flame to ignite starting material. It probablywill not start the reaction but if it does, YOU CAN BE BURNED!
NOTE: ERICO now offers a CADWELD system which uses electronic ignition to initiate the reaction. Contact ERICO or yout local representative for more information about CADWELD® PLUS.
ANSWER: First, make sure you place a small amount of starting material on the welding material in the mold crucible,then place the remaining starting material in the slot on top ofthe mold cover. The spark is aimed at the starting material inthe slot in the baffle to begin the reaction.
Second, stand to the side with the end of the flint ignitorjust back from the cover opening when you start the reaction.Now, the end of the flint ignitor is protected from the flame ofthe CADWELD reaction and should last much longer.
If the end of the flint ignitor becomes fouled, it can becleaned by soaking it overnight in household ammonia.
ANSWER: CADWELD PLUS is available in 300 g and 400 gsizes. The part numbers for the 300 gram size is 300PLUSF20and the part number for the 400 gram size is 400PLUSF20.
QUESTION 22: My flint ignitors do notlast very long. The end of the ignitorgets burned and fouled. How can Iavoid this problem?
QUESTION 23: With traditional CADWELD, I use (2) 150s for moldsthat require 300 grams of weldingmaterial and (2) 200s for molds thatrequire 400 grams of welding material.How is that going to be possible withthe new system?
QUESTION 21: I lost my flint ignitor.What else can I use to start the CADWELD® reaction?
TIPS FOR MAKING CONNECTIONS
E1172LT08NAEN:Layout 1 6/24/08 4:15 PM Page 17

18 www.erico.com
ANSWER: The mold you used was designed and tested forwelding to a steel surface. A copper surface is harder to weldto and takes a different mold, which in most cases takes a larger size welding material than steel. Whenever possible, whenwelding to copper, weld to the edge. Molds for these welds areshown in Section 5 of the CADWELD® E1A catalog.
ANSWER: The easiest way is to make two connections. First,make a TA (TAC3Q2Q) to the 500 using a short length of 4/0conductor. Then, make a GT (GTCl62Q) of the 4/0 to theground rod. The installed cost will usually be less than trying toweld the 500 directly to the rod. And electrically, it is just asgood.
QUESTION 24: Rather than buyinganother mold, I tried to use my TypeVS mold to weld a copper plate. Thefinished weld looked good but whenI gave it the hammer test, it cameright off. There was almost no penetration into the copper plate.Yet, when I follow the same procedure when welding to a steel surface, I can’t knock off the weld. Why?
QUESTION 25: My job calls for a 500 kcmil conductor to be welded to a 5/8” copperclad ground rod.Because the conductor is so large, it is difficult to properly position itover the ground rod. Is there an easier way?
TA
GR
TIPS FOR MAKING CONNECTIONS
E1172LT08NAEN:Layout 1 6/24/08 4:15 PM Page 18

19www.erico.com
ANSWER: To deal with such situations, ERICO® developed the CADWELD® EXOLON low-emission welding process. The CADWELD EXOLON system produces the same permanent,highly reliable welded bonds as the standard CADWELDprocess, but without the smoke usually associated with theexothermic welding process.
The low-emission CADWELD EXOLON system is ideal forexothermic welding in tunnels, vaults and trenches; and it can be used inside computer rooms, telecommunications centersand other electronic facilities where installers have been reluctant to make CADWELD connections before. That meansthat exothermic welding can now be used just about anywhere, indoors or out.
The metallurgy is exactly the same as that of the conventionalCADWELD connection system, which means the CADWELDEXOLON process still provides a superior connection whencompared to compression or bolted connections.
What’s different from the standard CADWELD process is thatthe CADWELD EXOLON system uses a unique, high-temperature dual filter on top of the mold. These filters trapvirtually all the smoke created by the welding process, whileallowing heated air to escape. In addition, the easy-to-use,battery starting system does away with flint ignitors and open flames.
Any connection listed in the E1A catalog and other catalogscan be supplied using the CADWELD EXOLON process.
QUESTION 26: I have many jobs thatrequire CADWELD® connections to bemade indoors near sensitive electronicequipment or outdoors in confinedspaces. What can I do to make theseconnections and not have to worryabout smoke created by the weldingprocess?
TIPS FOR MAKING CONNECTIONS
TWO-PIECEFILTER
GRAPHITEMOLD
WELDCAVITY
TAPHOLE
DISKSEAT
WELDINGMATERIAL
ROUNDCOVER
IGNITOR
“SMOKELESS” CADWELD® EXOLON
CONDUCTOR
CONDUCTOR
E1172LT08NAEN:Layout 1 6/24/08 4:15 PM Page 19

20 www.erico.com
ANSWER: In order to standardize mold sizes, ERICO® has giveneach of these standard sizes a letter (price key). For example, themost common molds used for grounding are Price Key “C”.
This Price Key is used to simplify pricing. Rather than individually pricing each and every mold, an average price isestablished for all molds of the same Price Key. In most cases,the third letter of the mold part number is the Price Key. Forexample, TAC2Q2Q and GTC162Q are both Price Key “C”. The exceptions to the third letter rule are CADWELD® EXOLONmolds, Heavy Duty (HD) molds and Cathodic (CA) molds.
ANSWER: These are called wear plates. They are available onmost of our molds. Their purpose is to support the cable at themetal plate instead of the soft graphite. This increases the moldlife. We have had some contractors tell us the mold life is doubled. You must still treat the mold carefully to get long moldlife. Wear plates are available for most CADWELD molds withcable openings from 1/0 thru 500 kcmil and ground rods 1/2”thru 1”. The wear plates can be ordered by adding a “W” suffixto the mold part number eg. TAC2Q2QW. Molds with wearplates are not stocked so delivery time will be longer.
ANSWER: This is called a “split crucible” feature and is availableon most horizontally split molds. To order, add an “L” suffix tothe mold part number. For example, TAC2Q2QL.
QUESTION 27: I keep hearing thewords “price key” in reference tomolds. What are they talking about?
QUESTION 28: I’ve seen some CADWELD® molds with copper platesaround the cable openings. What arethese for?
QUESTION 29: Some of the Type TAmolds I get have an extra hinge onthe crucible section. Opening thishelps in cleaning the mold. What isthis called and how do I order it?
GENERAL INFORMATION
E1172LT08NAEN:Layout 1 6/24/08 4:15 PM Page 20

21www.erico.com
ANSWER: Heavy Duty was originally developed by ERICO®
after World War II when copper was scarce and the powercompanies were reclaiming old cotton and tar insulatedcable. After burning off the insulation (before EPA restrictions), they found it difficult to properly clean the copper prior to making a connection. We found that by making a connection with two to three times larger sizewelding material than normally used, we could burn through the “dirt” and make a good connection. Since then, we havemodified the welding material size to about 2 sizes largerthan standard. Today, Heavy Duty Connections are often usedfor making connections to aged cable during grounding system expansion projects (for example, expanding the site ofa substation grounding grid). When field conditions areunusually bad, CADWELD Heavy Duty connections provide asolution.
ANSWER 31a: The different color caps on CADWELD weld-ing materials indicate different types of CADWELD welding material alloys. We have proven that one type or alloy ofwelding material is not suitable for all applications. To preventinferior connections, we have developed the following different types:
a. The standard welding material that you normally use will have a clear (or natural) cap. This is used for almost all grounding connections.
b. When welding to a cast iron or ductile iron surface, the CADWELD XF19 alloy is used. These have orange caps.
c. When making a grounding connection to a load bearing rail, the CADWELD F80 alloy is required. These have yellow caps.
d. On all cathodic protection jobs, the CADWELD F33 alloyis utilized. F33 alloy has green caps. The use of F33welding material is absolutely necessary on connectionsto pipe lines.
e. White caps are used for CADWELD® EXOLON weldingmaterial which does not contain starting material. See question 26 for more information on this product.
ANSWER 31b: CADWELD® PLUS utilizes the same color codeas traditional CADWELD, but in the form of a large “dot” onthe top of the unit. In addition to the different colors for different alloys, CADWELD PLUS also has a size identificationby color on the outer ring to help prevent misapplication ofsizes.
QUESTION 30: I’ve noticed in yourcatalog a separate listing for “HeavyDuty” CADWELD® Connections. WhyHeavy Duty?
QUESTION 31: Why are there different color caps on CADWELDwelding materials?
COLORCODEDCAPS
GENERAL INFORMATION
E1172LT08NAEN:Layout 1 6/24/08 4:15 PM Page 21

22 www.erico.com
ANSWER: The welding material size is embossed on each capof the individual welding material containers.
ANSWER: Several factors enter into the choice. But, no matterwhich style is used, you can expect the same high quality CADWELD connection you are used to. When connecting smallwire (#4 to #10 AWG) to ground rods, the CADWELD PLUS ONE SHOT and CADWELD MINI EZ styles are less expensive andeasier to use than the standard CADWELD. For example, a GTconnection of #6 to a 5/8” ground rod can be made with aCADWELD PLUS ONE SHOT at a 14 to 18% cost savings ascompared to the standard CADWELD. The main advantage ofthe CADWELD PLUS ONE SHOT is that it’s disposable. Whereonly a few connections are needed at a particular location, therequired number of CADWELD PLUS ONE SHOT’s can be takenalong with a CADWELD PLUS control unit. When finished, nothing has to be carried back and restocked except the controlunit. The CADWELD MINI EZ mold style can save up to 45%.However, as the conductor size increases, the savings decrease.
ANSWER: YES! It is necessary. The packing listed is a material that is placed around or over the rebar to prevent themolten metal from leaking around the rebar deformations. Insome cases, it is a copper shim that is wrapped around the barand in other cases, it is a ceramic batting material that eitherwraps around or is placed over the rebar, depending on theconnection being made. The instructions enclosed with themold must be consulted for proper usage of the packing material. Do not substitute any other material for the properpacking. It probably will not work and it may cause a dangerous situation.
QUESTION 32: I lost the label in thewelding material box.How can I tell whatsize welding material I have?
QUESTION 33: The CADWELD® cataloglists the standard connections of acable to ground rod, a CADWELD®
MINI EZ series and the CADWELD®
PLUS ONE SHOT connections. I’m confused as to which one I should use.
CADWELD® MINI EZ
STANDARD
CADWELD®
ONE SHOT
GENERAL INFORMATION
QUESTION 34: On connections toreinforcing bar (rebar), a listing for“packing” is noted in the catalog.What is this and do I really need it?
E1172LT08NAEN:Layout 1 6/24/08 4:15 PM Page 22

23www.erico.com
ANSWER: Let’s look at each of these separately.
a. Types HA and HS, Types HC and HT and Types VG and VT. The difference in these is that one type makes the weld with the cable on the surface of the steel and the other with the cable off the surface. For small conductors, the “on the surface” style is recommended in most cases since the mold is less prone to damage as compared to the “off the surface” mold. But, for conductors 1/0 and larger, the “off the surface” style has the advantage of not having an “open area” around the conductors next to the surface which can leak molten metal unless packed with mold sealer. However, with the “off the surface” style, the mold must be removed from the finished weld more cautiously to prevent the small area of graphite between the mold and the surface from breaking.
b. Comparing the Type HA to the HB, the HA is for steel surfaces and the HB is for cast iron or ductile iron surfaces.Each is designed differently and takes a different weldingmaterial alloy. They should never be mixed.
c. Comparing the VS to the VS Range and the HA to the HA Range, the “range” mold is used when connections must be made to more than one pipe size and those sizes fall with the range that the mold fits. Since the mold is made to fit several sizes, care must be exercised when positioning the mold to prevent leakage. When the connection is to be made to only one size pipe, it is better to order the mold for that particular pipe size.
d. Comparing the Type VS to the Type VB, the VS mold is stronger and will normally have a longer life than the VBmold because of the greater mass of graphite around the cable hole. However, some users like the VB betterbecause it can result in a neater installation. But, becauseof the smaller section of mold between the cable and the surface, care must be exercised when using the VB mold to prevent this small section from breaking.
e. Comparing the two types of lug termination molds available, Types GL and LA, the Type GL is usually moreeconomical. The welding material in most cases is smallerand the lug price is usually less. When comparing theshapes of the two types, it can be seen that the LA has twostyles of lugs, a straight lug and an offset lug. When bolting to the edge of a surface or another lug, thestraight lug can be used. But, when bolting further in fromthe edge, the weld will interfere with the bolting surface.Then the offset style must be used. The Type GL can beused in either situation.
f. Comparing the Type XA to Type XB, it is noted that theXA requires the tap (usually the smaller) cable to be cut.When using the XB, the cables are just lapped and do notrequire cutting and positioning in the mold. The XB moldusually costs more and a larger size welding material isrequired, but the extra material cost is easily offset by savings in labor.
Also note that when welding a small cable (e.g. #6) to another cable, the #6 requires sleeves. It must be cut to put on the sleeves. Therefore, the Type XA mold is the proper choice for this situation.
QUESTION 35: The CADWELD®
catalog, in several instances, liststwo types of connections for whatappears to be the same connection.What is the difference and whichshould I use?
CONDUCTOR OFF SURFACE
CONDUCTOR ON SURFACE
GENERAL INFORMATION
TYPE LA OFFSET LUG
TYPE LA STRAIGHT LUG
TYPE GL LUG
VB VS
E1172LT08NAEN:Layout 1 6/24/08 4:16 PM Page 23

24 www.erico.com
ANSWER: ERICO is correct! CADWELD molds are tested onlywith CADWELD welding material. There is a great differencebetween CADWELD welding material and the competitors’.Therefore, ERICO cannot guarantee results if competitors’welding material is used in CADWELD molds.
Mixing and matching ERICO welding materials or molds withthose of other manufacturers will void the UL® Listing for safety,and therefore violate NFPA® 70 National Electrical Code®, violatethe IEEE® 837 compliance and jeopardize the integrity of theconnection. Finally, if you use a competitors’ welding material ina CADWELD mold, who do you contact for service or support?Refer to the various welding materials we have for specializedCADWELD applications (See QUESTION 31). We have developedthese to provide you with an optimum connection for all yourapplications.
ANSWER: CADWELD molds used to connect cable to groundrods (GR, GT, NT and ND connections) are designed to work on both threaded and unthreaded ground rods. This is accomplished by adding a “thread clearance” to the weld cavitynear the ground rod entrance location of the mold. It is completely acceptable to have a layer of weld metal as a resultof the thread clearance below the ground rod sleeve. As this isnot part of the cable to rod connection, a void at this location is purely cosmetic and has no effect on the resultant weld orperformance of the connection. The disk has been integratedinto the CADWELD® PLUS weld metal cup. There is no need toadd a separate disk to cover the tap hole.
ANSWER: The purpose of these clips is to keep the mold halvestogether during shipping and handling. They are not designedto hold the mold together during the CADWELD connectionprocess. Molds that are shipped with these clips require a separate handle clamp (either an L160 or L159 depending onthe mold price key). See QUESTION 33 for more information onmolds, handle clamps, frames and handles.
QUESTION 36: The ERICO®
literature states that materials fromdifferent manufacturers should not bemixed to perform the CADWELD®
connection. But, CADWELD competitors state otherwise. Who is correct?
QUESTION 37: Do I need differentmolds for threaded and pointedground rods?
QUESTION 38: The small clip thatcomes with the mold isn’t strongenough to hold the mold togetherand the weld metal leaks when Imake the connection. How can I prevent this from happening?
GENERAL INFORMATION
E1172LT08NAEN:Layout 1 6/24/08 4:16 PM Page 24

25www.erico.com
ANSWER: For most CADWELD® connections of cable-to-cable,cable-to-lugs, cable-to-steel surfaces, cable-to-ground rods andsmall busbars, separate handle clamps are required. AlthoughERICO® has designed tens of thousands of different types ofconnections worldwide, the vast majority of these molds requirethe use of one of two different sizes of handle clamps.
These two sizes of handle clamps are:1. L160 for all molds having a C, E , Q or R price key2. L159 for all molds having a D, F, J or Z price key
ANSWER: No – the diameter of copperbonded and steel rodsare different. This difference in diameter requires that molds bedrilled for each specific type of rod.
Copperclad rods are actually noted as a nominal dimension.This measurement is actually less than the steel diameter. Forexample, the nominal dimension of a 3/4” copperbonded rod isactually 0.682” – or 0.068” less than its stated size. Steel rods(stainless and galvanized manufactured in accordance to theNEMA® standard) are actually full sized. Therefore, a 3/4” steelrod is actually 0.750” in diameter.
Please see the following chart for further information
QUESTION 39: There are many different molds and connections,how do I know what frames or handle clamps are required in orderto make a connection?
QUESTION 40: Are CADWELD Moldsfor cable-to-ground rods inter-changeable for steel and copperrods?
GENERAL INFORMATION
Nominal Marerial Type Thread Rod CADWELDSize Size Diameter Ground Rod
Code
Copperbonded Sectional 9/16” 0.505 141/2” Steel* Plain 0.500 14
Copperbonded Plain 0.475 15Copperbonded Sectional 1/2” 0.447 13Copperbonded Sectional 5/8” 0.563 16
5/8” Steel* Plain 0.625 31Copperbonded Plain 0.563 16Copperbonded Sectional 3/4” 0.682 18
3/4” Steel* Plain 0.750 33Copperbonded Plain 0.682 18Copperbonded Sectional 1” 0.914 22
1” Steel* Plain 1.000 37Copperbonded Plain 0.914 22
* Plain steel, stainless steel, stainless clad rods or galvanized steel rods manufacturedin accordance with NEMA GR-1.
E1172LT08NAEN:Layout 1 6/24/08 4:16 PM Page 25

26 www.erico.com
Adaptor Sleeve 1 5
CableBurned Up 9 11Clamp 9 11Concentric Strand 20 17Fine Strand 20 17Melting 9 11Position 13 13Ropelay 20 17
Caps, Color Coded 31 21
Clamp B120 15 14Cable 9 11Handle 11 12Magnetic 13 13Vertical Pipe 13 13Vertical Support 13 13
Conductor 12 12Cleaning 4 9Proper Position 25 18Solid 20 17Stranded 20 17
ConnectionConfined Spaces 26 19Copper 24 18CADWELD® EXOLON 26 19Grounding 33 22Heavy Duty 30 21Inside 26 19CADWELD® MINI EZ 33 22CADWELD® PLUS ONE SHOT 33 22Parallel 3 7Rebar 34 22Smokeless 26 19Standard 33 22Steel 24 18X 2,3 6,7
Contamination 5 9
Crucible, Split 29 20
Driving Sleeve 14 14
CADWELD EXOLON 26 19
File 12 12
QUESTION # PAGE # QUESTION # PAGE #
Flint Ignitor 21 17Burned 22 17Cleaning 22 17Fouled 22 17
Graphite 17 16
Grinder 12 12
Ground Rod 14 14Connections 3 7, 8Copperclad 25 18Position 15 14
Ground Rod SpliceType GB 15 14
Ground Rod DriverERITECH® 14 14
Handles 11 12
Heavy Duty Connection 30 21
Inventory, Reduce 3 7, 8
Lugs 18 16
CADWELD MINI EZ 33 22
Moisture 6, 7 9Conductors 7 9Remove From Mold 7 9
Mold Sealer 9, 10 11
Mold typeGB 16 15GL 10, 36 11, 24GT 3, 25 7, 18GY 2, 3 6, 9HA 36 24HB 36 24HC 3, 36 7, 24HS 36 24HT 3, 36 7, 24LA 18, 36 16, 24ND 3 7PC 19 16PT 3 7
INDEX
E1172LT08NAEN:Layout 1 6/24/08 4:16 PM Page 26

27www.erico.com
Mold type (cont.)TA 3, 17, 19, 25 7, 16, 18VB 36 24VG 3, 36 7, 24VS 24, 36 18, 24VT 3, 36 7, 24VV 2 6XA 3, 36 7, 24XB 3, 36 7, 24
MoldAttachment To Steel Surface 14 14Cleaning 17 16Cleaning Tool 17 16Close 12 12Extending Life 17, 28 16, 20Heating 8 10Horizontally Split 17, 29 16, 20Life 17 16Misalignment 17 16Off The Surface 36 24On The Surface 36 24Parting Line 12 12Standard Size 27 20Wear Plates 28 20With Copper Plates 28 20
Oil 5 9
CADWELD® PLUS ONE SHOT 34 22
Packing 35 23
Price Key, Explanation 27 20
Rasp 13 13
Reaction, CADWELD® 22 17
Rebar 35 23
Riser, Holes 5, 6 9
Shim 1, 35 5, 23
Sleeve 19, 20 16, 17
Splice Connections 3 7, 8
Steel Surface 13 13
QUESTION # PAGE # QUESTION # PAGE #
I beam 14 14Flat 14 14Galvanized 13 13Horizontal 3 7, 8Mold Attachment 14 14Preparation 13 13Vertical 3 7, 8Vertical Pipe 14 14
Surface, Galvanized 5 9
T Connections 3 7, 8
Taps, Small Wire 19 16
Torch, Alternative 8 10
Vertical Cable 3 7, 8
Welding MaterialDifferent Manufacturer 37 24Mixing 37 24
Welding Material 9 11CADWELD & CADWELD® EXOLON 31 21Color Coded Caps 31 21Correct Size 23 17F33 Alloy 31 21Leakage 9, 10 11Size 32 22Standard 31 21XF19 alloy 31 21
Wrap Sleeve 1 5
INDEX (Cont.)
E1172LT08NAEN:Layout 1 6/24/08 4:16 PM Page 27
Consult the following documents for further information:
CADWELD® Welded Electrical Connections CatalogCADWELD® Field Catalog
Installers & Inspectors Guide
Chile ph: 562-624-4004 fax: 562-624-4006Mexico ph: 525-260-5991 fax: 525-260-3310
USA/Canada ph: 1-800-677-9089 fax: 1-800-677-8131Brazil ph: 55-11-3621-4111 fax: 55-11-3621-7425www.erico.com
IEEE is a registered trademark of The Institute of Electrical and Electronics Engineers, Inc.NEC is a registered trademark of National Fire Protection Association, Inc.NEMA is a registered trademark of National Electrical Manufacturers Association.NFPA is a registered trademark of National Fire Protection Association.UL is a registered trademark of Underwriters Laboratories, Inc.
Copyright ©2006 ERICO International Corporation. All rights reserved.CADDY, CADWELD, CRITEC, ERICO, ERIFLEX, ERITECH, and LENTON are registered trademarks of ERICO International Corporation.
WARRANTYERICO products are warranted to be free from defects in material and workmanship at the time of shipment. NO OTHER WARRANTY, WHETHER EXPRESS OR IMPLIED (INCLUDING ANY WAR-RANTY OF MERCHANTABILITY OR FITNESS FOR A PARTICULAR PURPOSE), SHALL EXIST IN CONNECTION WITH THE SALE OR USE OF ANY ERICO PRODUCTS. Claims for errors, shortages, defectsor nonconformities ascertainable upon inspection must be made in writing within 5 days after Buyer's receipt of products. All other claims must be made in writing to ERICO within 6 monthsfrom the date of shipment or transport. Products claimed to be nonconforming or defective must, upon ERICO's prior written approval in accordance with its standard terms and proceduresgoverning returns, promptly be returned to ERICO for inspection. Claims not made as provided above and within the applicable time period will be barred. ERICO shall in no event be respon-sible if the products have not been stored or used in accordance with its specifications and recommended procedures. ERICO will, at its option, either repair or replace nonconforming ordefective products for which it is responsible or return the purchase price to the Buyer. THE FOREGOING STATES BUYER’S EXCLUSIVE REMEDY FOR ANY BREACH OF ERICO WARRANTY ANDFOR ANY CLAIM, WHETHER SOUNDING IN CONTRACT, TORT OR NEGLIGENCE, FOR LOSS OR INJURY CAUSED BY THE SALE OR USE OF ANY PRODUCT.
LIMITATION OF LIABILITYERICO excludes all liability except such liability that is directly attributable to the willful or gross negligence of ERICO's employees. Should ERICO be held liable its liability shall in no eventexceed the total purchase price under the contract. ERICO SHALL IN NO EVENT BE RESPONSIBLE FOR ANY LOSS OF BUSINESS OR PROFITS, DOWNTIME OR DELAY, LABOR, REPAIR OR MATERI-AL COSTS OR ANY SIMILAR OR DISSIMILAR CONSEQUENTIAL LOSS OR DAMAGE INCURRED BY BUYER.
WARNING:1. These products shall be used only as illustrated and recommended in product instruction sheets (instruction sheets are available at www.erico.com). Improper installation, misuse, or misapplication may result in possible
property damage or bodily injury.2. These products must be used only in the manner depicted in the illustrations that accompany them.3. Failure to observe these instructions may cause product malfunction, property damage, and bodily injury. ERICO products are warranted to conform, at the time of shipment, to any applicable written description furnished to
the Buyer by ERICO, and to be free from defects in material and workmanship. NO OTHER WARRANTY, WHETHER EXPRESS OR IMPLIED, (INCLUDING ANY WARRANTY OF MERCHANTABILITY, FITNESS FOR A PARTICULARPURPOSE, OR INFRINGEMENT), SHALL EXIST IN CONNECTION WITH THE SALE OR USE OF ANY ERICO PRODUCT.
4. All instructions must be completely followed to ensure proper and safe operation.
GENERAL AND SAFETY INSTRUCTIONS:A. Only ERICO manufactured equipment and materials should be used to make CADWELD/CADWELD PLUS connections.B. Do not connect items except as detailed in instruction sheets. Failure to comply with these instructions may result in improper and unsafe connections, damage to items being connected, bodily injury and
property damage.C. Do not use worn or broken equipment which could cause leakage.D. Do not alter equipment or material without ERICO authorization.E. When using CADWELD/CADWELD PLUS do not use welding material package if damaged or not fully intact. When using CADWELD PLUS, do not tamper with or disassemble the welding material unit.F. Make connections in conformance with CADWELD/CADWELD PLUS instructions and all governing codes.
1. Personnel should be properly trained in the use of this product and must wear safety glasses and gloves. 2. Avoid contact with hot materials.3. Advise nearby personnel of welding operations in the area.4. Remove or protect fire hazards in the immediate area.5. Provide adequate ventilation to the work area.6. Do not smoke when handling starting material7. Avoid direct eye contact with “flash” of light from ignition of starting material.
G. Welding material is an exothermic mixture and reacts to produce hot molten material with temperatures in excess of 1400˚C (2500˚F) and a localized release of smoke. These materials are not explosive. Ignition temperatures are in excess of 900˚C (1650˚F) for welding material.
H. Adhering to the CADWELD/CADWELD PLUS welding procedures will minimize risk of burns and fire caused by hot molten material spillage. In case of fire, use of water or CO2 will aid in control of burning containers.Large quantities of water will aid in controlling a fire should the exothermic materials become involved. Water should be applied from a distance.
1. Make sure there is proper mold fit and assembly of equipment.2. Avoid moisture and contaminants in mold and materials being welded. Contact between hot molten metal and moisture or contaminants may result in spewing of hot material.3. Base material thickness must be sufficient for the size and type of connection being made to prevent melt-through and leakage of hot molten metal.
I. Applications or conditions may exist which require special considerations. The following are examples, but are not intended to be a complete listing of applications/conditions.
CONNECTIONS TO PIPE/VESSELSFor use with cast iron pipe or heavy casting meeting ASTM A47-84, A48-83, A126-84, A278-85, or A377-89. DO NOT USE ON CAST IRON SOIL PIPE (ASTM A74-93). Evaluate possible effects of CADWELD/CADWELD PLUS con-nections to structural members and thin-wall materials; vessels/piping systems that are pressurized, closed or containing (or having contained) flammable / explosive / hazardous materials. Evaluation should be made prior to use,based on conditions of use and applicable codes, and should incorporate as a minimum, effects of melt-through of hot material; structural/metallurgical effects of CADWELD/CADWELD PLUS connections, pressure (temperature)build-up and fire/chemical decomposition hazards.
CONNECTIONS TO REBARApplication of the CADWELD/CADWELD PLUS connection may have an effect on the rebar’s structural integrity. The rebar’s chemistry and the location of the weld should be considered before making any welds to the rebar.For lapped rebar splices, it is recommended that the connections be made near the bar end at an area of minimum stress. If CADWELD/CADWELD PLUS Rebar Splices are used, the grounding connection can be made to thesplice sleeve with minimal effect on the structural characteristics of the splice.
SAFETY WARNING:SAFETY INSTRUCTIONS: All governing codes and regulations and those required by the job site must be observed. Always use appropriate safety equipment such as eye protection, hard hat, and gloves as appropriate to the application.
E9E E1172LT08NAEN 00710M8
E1172LT08NAEN:Layout 1 6/24/08 4:16 PM Page 28