control panels - bosch securityresource.boschsecurity.us/documents/bosch_bx512g_operation_man… ·...
TRANSCRIPT
Control PanelsB9512G/B8512G/B5512/B4512/B3512
en Owner's Manual


Table of contents
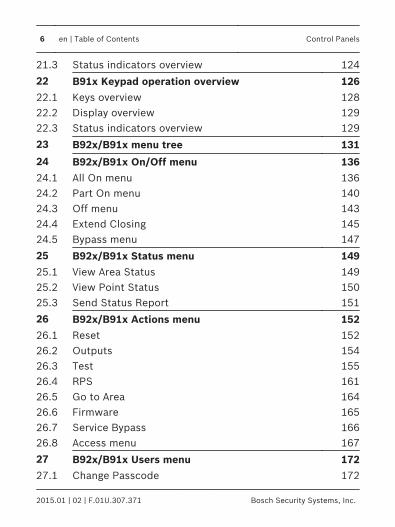
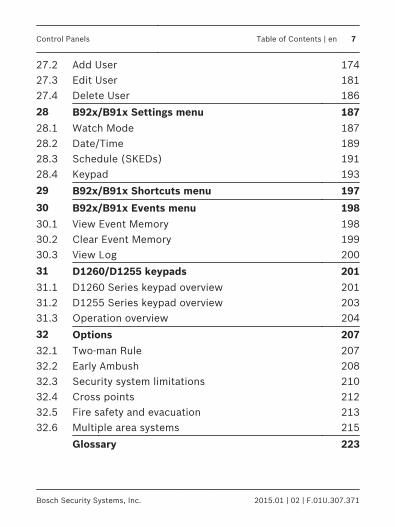
1 Introduction 81.1 About documentation 9
2 Keypads overview 112.1 Identify your keypad style 112.2 Keypad cleaning 13
3 Points 143.1 What is a point? 143.2 Controlled points 143.3 24-hour points 15
4 Areas 164.1 What is an area? 16
5 Warning displays and tones 175.1 Keypad quiets for keystrokes 175.2 Silence the alarm tone 175.3 Entry delay tone and display 175.4 Exit delay tone and display 185.5 Keypress tones 18
6 How the system reports events 20
7 Alarm events 227.1 Priority of events 227.2 Fire alarms 227.3 Gas alarms 247.4 User and burglary alarms 25
Control Panels Table of Contents | en 3
Bosch Security Systems, Inc. 2015.01 | 02 | F.01U.307.371

8 Trouble events 278.1 Fire trouble events 278.2 Gas trouble events 278.3 User and burglary trouble events 288.4 System trouble events 28
9 Cleared events are not lost 29
10 View faulted or bypassed points 30
11 B94x Keypad operation overview 3211.1 Main display area 3411.2 Ribbon bar overview 3811.3 Status indicators overview 3911.4 Feature key 41
12 B93x keypad operation overview 4212.1 Keys overview 4412.2 Display overview 4612.3 Status indicators overview 47
13 B94x/B93x menu tree and commands 49
14 B94x/B93x On/Off menu 5414.1 All On menu 5414.2 Part On menu 5814.3 Off menu 6114.4 Extend Closing 6414.5 Bypass 66
15 B94x/B93x Status menu 6815.1 View Area Status 6815.2 View Point Status 6915.3 Send Status Report 70
4 en | Table of Contents Control Panels
2015.01 | 02 | F.01U.307.371 Bosch Security Systems, Inc.

16 B94x/B93x Actions menu 7116.1 Reset 7116.2 Outputs 7316.3 Test 7416.4 RPS 7916.5 Go to area 8316.6 Firmware 8416.7 Service bypass 8516.8 Access menu 86
17 B94x/B93x Users menu 9117.1 Change Passcode 9117.2 Add User 9317.3 Edit User 9917.4 Delete User 103
18 B94x/B93x Settings menu 10418.1 Watch Mode 10418.2 Date/Time 10618.3 Schedule (SKEDs) 10718.4 Keypad 109
19 B94x/B93x Shortcuts menu 114
20 B94x/B93x Events menu 11520.1 View Event Memory 11520.2 Clear Event Memory 11620.3 View Log 117
21 B92x keypad operation overview 11821.1 Keys overview 12121.2 Display overview 123
Control Panels Table of Contents | en 5
Bosch Security Systems, Inc. 2015.01 | 02 | F.01U.307.371
21.3 Status indicators overview 124
22 B91x Keypad operation overview 12622.1 Keys overview 12822.2 Display overview 12922.3 Status indicators overview 129
23 B92x/B91x menu tree 131
24 B92x/B91x On/Off menu 13624.1 All On menu 13624.2 Part On menu 14024.3 Off menu 14324.4 Extend Closing 14524.5 Bypass menu 147
25 B92x/B91x Status menu 14925.1 View Area Status 14925.2 View Point Status 15025.3 Send Status Report 151
26 B92x/B91x Actions menu 15226.1 Reset 15226.2 Outputs 15426.3 Test 15526.4 RPS 16126.5 Go to Area 16426.6 Firmware 16526.7 Service Bypass 16626.8 Access menu 167
27 B92x/B91x Users menu 17227.1 Change Passcode 172
6 en | Table of Contents Control Panels
2015.01 | 02 | F.01U.307.371 Bosch Security Systems, Inc.
27.2 Add User 17427.3 Edit User 18127.4 Delete User 186
28 B92x/B91x Settings menu 18728.1 Watch Mode 18728.2 Date/Time 18928.3 Schedule (SKEDs) 19128.4 Keypad 193
29 B92x/B91x Shortcuts menu 197
30 B92x/B91x Events menu 19830.1 View Event Memory 19830.2 Clear Event Memory 19930.3 View Log 200
31 D1260/D1255 keypads 20131.1 D1260 Series keypad overview 20131.2 D1255 Series keypad overview 20331.3 Operation overview 204
32 Options 20732.1 Two-man Rule 20732.2 Early Ambush 20832.3 Security system limitations 21032.4 Cross points 21232.5 Fire safety and evacuation 21332.6 Multiple area systems 215
Glossary 223
Control Panels Table of Contents | en 7
Bosch Security Systems, Inc. 2015.01 | 02 | F.01U.307.371

1 Introduction
Security systems help to secure life, property, and investmentsagainst fire, theft, and bodily harm. The keypad is an advanceddigital device that offers a variety of features not available withother systems. Its highly visible, back-lit display and built-insounder alert you to a number of system events. Stylish designand ease-of-use make it ideal for property protection. Your security company can program the system to meet yourindividual needs. Your property is given its own English languagedescription that appears in the display. Contact your securitycompany should problems be encountered during testing of thesystem.
Your alarm company is: Call before test:______________________________________________________
8 en | Introduction Control Panels
2015.01 | 02 | F.01U.307.371 Bosch Security Systems, Inc.

1.1 About documentation
This owner’s manual covers basic and advanced functions. Thismanual is designed as an everyday reference for system users.The functions described in this manual are programmed by yoursecurity company. Your system might not include all of thefunctions described. Some functions require you to enter yourpersonal passcode.
Manual organization– Section 2. Helps you identify your keypad style.– Sections 3 through 10. Examines security system basics.– Sections 11 through 20. Covers how to use B94x/B93x
keypads.– Sections 21 through 30. Covers how to use B92x/B91x
keypads.– Section 31. Covers how to use D1260x/D1255x keypads
(B9512G/B8512G control panels only).– Section 32. Explains optional features and security system
recommendations and limitations.
Control Panels Introduction | en 9
Bosch Security Systems, Inc. 2015.01 | 02 | F.01U.307.371
Manual conventionsThroughout this manual, the # symbol refers to a variablenumerical quantity, such as the number of points to test or exitdelay time. Text that shows on the keypad’s display appears in this manual initalics. Text that appears in this manual in brackets [ ] instructsyou to press the corresponding icon/key on your keypad.
CopyrightThis document is the intellectual property of Bosch SecuritySystems, Inc. and is protected by copyright. All rights reserved.
TrademarksAll hardware and software product names used in this documentare likely to be registered trademarks and must be treatedaccordingly.
10 en | Introduction Control Panels
2015.01 | 02 | F.01U.307.371 Bosch Security Systems, Inc.

2 Keypads overview
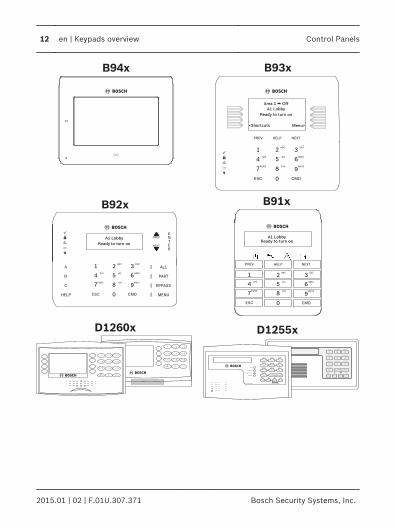
2.1 Identify your keypad style
Take note of which keypad you own so that you can read theappropriate instructions.
Control Panels Keypads overview | en 11
Bosch Security Systems, Inc. 2015.01 | 02 | F.01U.307.371
GAS
A1 Lobby
Ready to turn on
1
4
7
ESC
GHI
PQRS
0 CMD
9WXYZ
6MNO
3DEF
2
5JKL
8TUV
ABC
NEXTHELPPREV
Area 1 Off
A1 Lobby
Ready to turn on
<Shortcuts Menu>
GAS
1
4
7
ESC
GHI
PQRS
0 CMD
9WXYZ
6MNO
3DEF
2
5JKL
8TUV
ABC
A1 Lobby
1
4
7
ESC
GHI
PQRS
0 CMD
9WXYZ
6MNO
3DEF
2
5JKL
8TUV
ABC
NEXTHELPPREV
Ready to turn on
B94x B93x
B92x B91x
1 2 3
4 5 6
7 8 9
0 COMMAND
ESC PREV NEXT ENT
ALL INSTANT DELAY
RESET WATCH
SPECIAL PARTIAL POLICE
BYPASS
MENU YES
D1260x D1255x
12 en | Keypads overview Control Panels
2015.01 | 02 | F.01U.307.371 Bosch Security Systems, Inc.
2.2 Keypad cleaning
Use a soft cloth and non-abrasive cleaning solution to clean yourkeypad (for example, microfiber cloth and eyeglass cleaner).Spray the cleaner onto the cloth. Do not spray directly onto thekeypad.
Control Panels Keypads overview | en 13
Bosch Security Systems, Inc. 2015.01 | 02 | F.01U.307.371
3 Points
3.1 What is a point?
The term point refers to a detection device, or group of devicesconnected to your security system. Points show individually atthe keypad with their names. The point name can describe asingle door, motion sensor, smoke detector, or an area such asUpstairs or Garage. There are two basic types of points,controlled and 24-hour.
3.2 Controlled points
Controlled points respond to alarm conditions depending uponwhether the system is turned on (armed) or turned off(disarmed). Controlled points are programmed to respondinstantly to alarm conditions or to provide a delay for you toreach the keypad and turn your system off. There are two typesof controlled points, part points and interior points.
3.2.1 Part points
Part points often include the exterior doors and windows of thebuilding (the perimeter). When you turn your system Part On, youonly turn on (arm) the part points.
14 en | Points Control Panels
2015.01 | 02 | F.01U.307.371 Bosch Security Systems, Inc.
3.2.2 Interior points
These points often include interior forms of burglary detectiondevices, such as motion sensors or interior doors. When you turnyour system All On, you turn on (arm) both part points andinterior points.
3.3 24-hour points
24-hour points are always on (armed), even when your securitysystem is turned off (disarmed). There are two types of 24-hourpoints, fire points and non-fire points.
3.3.1 Fire points
Fire points exclusively monitor fire detection devices. They arealways on (armed) and cannot be turned off (disarmed). You canclearly distinguish fire points from other non-fire points at thekeypad.
3.3.2 Non-Fire points
Non-fire 24-hour points are always on (armed) and you cannotturn them off (disarm). Panic buttons, hold up buttons, lowtemperature sensors, and water sensors are examples of devicesthat are typically monitored by non-fire 24-hour points.
Control Panels Points | en 15
Bosch Security Systems, Inc. 2015.01 | 02 | F.01U.307.371

4 Areas
4.1 What is an area?
An area is a number of points that are grouped together so thatyou can control them together as one unit. For example, if asecurity system protected a building with three sections – anoffice, a laboratory, and a cafeteria – the points in each of thosesections could be grouped together as an area. With each sectionbeing its own area in your security system, you can turn them on(arm) and off (disarm) individually, in groups (office andlaboratory, for example), or all together.
16 en | Areas Control Panels
2015.01 | 02 | F.01U.307.371 Bosch Security Systems, Inc.

5 Warning displays and tones
The keypad emits several distinct tones and shows text to alertyou to system events. Additional bells or sirens may also beconnected to your system. Bells or sirens mounted on theexterior of the premises alert neighbors to emergencies andprovide an audible guide for police and fire fighters. The keypad has status icons that show the status of the system.For more information, refer to the status icons overview section.
5.1 Keypad quiets for keystrokes
Pressing any key on the keypad lights the keys and quiets anywarning tones. If you do not press another key within 20seconds, the keypad lights go out and the warning tones resume.
5.2 Silence the alarm tone
The audible alarm sounds for a specific period of time before itautomatically shuts off. To silence the alarm before the timeexpires, simply enter your personal passcode and press [ENTER].
5.3 Entry delay tone and display
When you enter a system that is on (armed) through a pointprogrammed for entry delay, the keypad emits the entry delaytone as a reminder to turn off the security system.
Control Panels Warning displays and tones | en 17
Bosch Security Systems, Inc. 2015.01 | 02 | F.01U.307.371

Failure to turn off your security system before the entry delaytime expires might sound the burglary tone and could result in analarm report being sent to your security company. Your security company programmed the entry delay times foryou: My entry delay time is: _______________________________
5.4 Exit delay tone and display
When you first turn on (arm) your system (using your keypad orkeyfob), the keypad emits the exit delay tone, shows Exit Now!,and counts down the exit delay time. The tone pulsing rateincreases during the last 10 sec of exit time. If you exit and re-enter before exit time expires, the exit delaytimer restarts the countdown. The restart only applies once. Your security company programmed the exit delay times for you: My exit delay time is: _______________________________
5.5 Keypress tones
The keypad sounds the keypress tone (a short beep) when youpress any key. Use the Settings menu to enable/disable thekeypress tone.
18 en | Warning displays and tones Control Panels
2015.01 | 02 | F.01U.307.371 Bosch Security Systems, Inc.

5.5.1 Invalid entry (error tone)
The invalid entry tone follows the keypress tone when thekeypress completes an invalid entry. Some entries require one keypress. Other entries require a seriesof two or more keypresses.
Control Panels Warning displays and tones | en 19
Bosch Security Systems, Inc. 2015.01 | 02 | F.01U.307.371
6 How the system reports events
Your security system makes repeated attempts to send reports toyour security company. In the event your security system fails tocommunicate, the keypad sounds the trouble tone and thekeypad shows a communication failed message. Notify yoursecurity company of the communications failure. If your telephone, internet, or cellular service is interrupted, yoursecurity system cannot send reports to the security companyunless an alternate means of transmitting the reports exists. For telephone communication, your security company canprogram your security system to automatically disconnect thetelephones when sending reports to the security company. Oncethe report finishes, the security system returns the telephones tonormal operation (check with your security company). Consult with your installer to determine if your security system isconfigured with a communicator delay. A communicator delayaborts reports to your security company if the control panel isdisarmed within 30 to 45 seconds after a burglary alarm istriggered. Note that fire-type alarms are always reported withouta delay.
20 en | How the system reports events Control Panels
2015.01 | 02 | F.01U.307.371 Bosch Security Systems, Inc.
Consult with your installer to determine if your security system isconfigured with a cancel feature. If you silence a non-fire alarmbefore the alarm sound timer expires, your security systemssends a cancel report to your security company. Consult with your installer to determine if your security system isconfigured with a swinger shutdown feature for non-fire alarmsand trouble events. After a programmable number of alarm ortrouble events, your security system automatically bypassespoints. If your telephone service includes the call waiting feature, yoursecurity company can configure your security system so that callwaiting does not interfere with alarm reporting. Be sure to notifyyour security company if you enable call waiting. A system that isconfigured for call waiting cannot report alarms correctly whencall waiting is disabled. If you disable call waiting after yoursystem has been configured for it, be sure to notify your securitycompany.
Control Panels How the system reports events | en 21
Bosch Security Systems, Inc. 2015.01 | 02 | F.01U.307.371

7 Alarm events
The system produces several types of events.
7.1 Priority of events
If more than one event occurs, the system sorts them into one ofsix groups. The groups are (highest priority first): Fire Alarms,Gas Alarms, User Alarms, Burglary Alarms, Fire Troubles, andNon-Fire Troubles. The group with the highest priority scrollsfirst. The descriptions and instructions that follow describe thetones and displays for each group, and explain how to silence thetones.
7.2 Fire alarms
Fire alarms are the highest priority events. When a fire pointactivates, the keypad emits a unique pulsating fire tone. Evacuate all occupants and investigate for smoke or fire. Ensurethat all occupants know the difference between the steadyburglary tone, the pulsating gas tone, and the pulsating fire tone.The tone sounds for the duration set by your security company. The display shows the point text of the first point that went into
fire alarm. Press /[NEXT] to manually show additional points(if any) that went into alarm. Events scroll from the oldest to thenewest.
22 en | Alarm events Control Panels
2015.01 | 02 | F.01U.307.371 Bosch Security Systems, Inc.
7.2.1 Silence fire alarms
Enter your passcode to silence fire alarms. If the system is on(armed), silencing the fire alarm also turns the system off. Thesystem now shows Alarm Silenced, and then the number of pointsin alarm, and the names of all the points in alarm, in the order ofoccurrence. Your security company can program your system so that userscannot silence some fire alarms until the fire event clears. Yoursecurity company can program the system so that users cannotsilence some fire alarms until the fire point has restored tonormal (trouble conditions are corrected). The Alarm Silencedmessage continues to scroll as a reminder that you can still viewthe points in alarm by using the View Event Memory menu option. If the fire point is still in alarm (faulted), the point goes to troubleafter silencing. Some fire points need to be reset. You cannotclear fire troubles from the display. When fire points return tonormal, the security system automatically clears the fire troublesfrom the display.
Control Panels Alarm events | en 23
Bosch Security Systems, Inc. 2015.01 | 02 | F.01U.307.371
7.3 Gas alarms
Gas alarms are the second highest priority events. When a gaspoint activates, the keypad emits a unique pulsating gas alarm. Evacuate all occupants and investigate for gas. Ensure that alloccupants know the difference between the burglary tone, thepulsating gas tone, and the pulsating fire tone. The tone soundsfor the duration set by your security company. The display shows the point text of the first point that went into
gas alarm. Press /[NEXT] to manually show additional points(if any) that went into alarm. Events scroll from the oldest to thenewest.
7.3.1 Silence gas alarms
Enter your passcode to silence gas alarms. If the system is on(armed), silencing the gas alarm also turns the security systemoff (disarms the system). The system now shows Alarm Silenced,and then the number of points in alarm, and the name of all thepoints in alarm in the order of occurrence. Your security company can program the system so that userscannot silence some gas alarms until the gas event clears. Enteryour passcode to clear the scrolling point text from the display.The Alarm Silenced message continues to scroll as a reminderthat you can still view the text of the points in alarm by using theView Event Memory menu option.
24 en | Alarm events Control Panels
2015.01 | 02 | F.01U.307.371 Bosch Security Systems, Inc.
If the gas point is still in alarm (faulted) then the point goes totrouble after silencing. Some gas points need to be reset. Youcannot clear gas troubles from the display. When gas pointsreturn to normal (trouble conditions are corrected), the securitysystem automatically clears the fire trouble from the display.
7.4 User and burglary alarms
User alarms have the third priority. User alarms are user initiatedalarms that include hold-up, panic, and medical alarms, forexample. Medical alarms are not available on UL listed systems. Asteady tone sounds for the time set by your security company. Burglary alarms are the forth priority. When a burglary pointactivates while the system is on (armed), the keypad emits asteady burglary tone. Ensure that all occupants know the difference between thesteady user or burglary tone, the pulsating gas tone, and thepulsating fire tone. The tone sounds for the time set by yoursecurity company.
7.4.1 Silence user and burglar alarms
The audible alarm sounds for a specific period of time before itautomatically shuts off. To silence user and burglary alarmsbefore the time expires, simply enter your personal passcode andpress [ENTER].
Control Panels Alarm events | en 25
Bosch Security Systems, Inc. 2015.01 | 02 | F.01U.307.371
Notice!For silent alarms, such as hold up alarms, no audiblealarm sounds.
26 en | Alarm events Control Panels
2015.01 | 02 | F.01U.307.371 Bosch Security Systems, Inc.
8 Trouble events
8.1 Fire trouble events
When a fire trouble occurs, the keypad emits the trouble tone(three tones followed by a pause repeated). The system showsthe number of fire points with troubles and the name for eachpoint in trouble.
8.1.1 Silence fire troubles
Press [ENTER] to silence the trouble tone.After you silence the trouble, the text of the fire point in trouble
continues to show on the display. Use /[NEXT] to scrollthrough the trouble text. Events scroll from oldest to newest. Youcannot clear fire troubles from the display until the troublecondition is cleared (the point is normal).
8.2 Gas trouble events
When a gas trouble occurs, the keypad emits the trouble tone(three tones followed by a pause repeated). The system showsthe number of gas points with troubles and the name for eachpoint in trouble.
8.2.1 Silence gas troubles
Press [ENTER] to silence the trouble tone.
Control Panels Trouble events | en 27
Bosch Security Systems, Inc. 2015.01 | 02 | F.01U.307.371

8.3 User and burglary trouble events
The security company can program a keypad to emit the troubletone (three tones followed by a pause repeated), when a user orburglary trouble event occurs. If the system is on, the display shows the number of points withtroubles and the name for each point.
8.3.1 Silence user and burglary trouble events
Press [ENTER] to silence the trouble tone.
8.3.2 View user and burglary trouble events
After a user enters a passcode, the name of the point in trouble
continues to scroll through the display. Use /[NEXT] to scrolltext manually. Events scroll from oldest to newest.
8.4 System trouble events
Examples of system trouble displays include Service AC Failureand Service Battery Low. These displays appear on all keypads inthe system. All system trouble displays begin with SERV orService. The Service text clears only after the faulted condition iscorrected.Press [ENTER] to silence the trouble tone.
28 en | Trouble events Control Panels
2015.01 | 02 | F.01U.307.371 Bosch Security Systems, Inc.
9 Cleared events are not lost
If you clear the alarms and troubles from the display, you can stillview all the events. Using the events menu you can:– Select the Event Memory menu to view the alarm and trouble
events that occurred since the last time the system wasturned on (armed). Turning the system on (arming) clearsevent memory.
– Select the View Log menu to view all events in your system’sevent log.
Control Panels Cleared events are not lost | en 29
Bosch Security Systems, Inc. 2015.01 | 02 | F.01U.307.371
10 View faulted or bypassed points
To turn on (arm) the system, all the doors and windows in thesystem must be in the normal (not faulted) condition. Viewingthe faulted points helps you find faulted points and correct themso arming is possible. The keypad offers two ways of displaying faulted and bypassedpoint information. The first causes the faulted or bypassed pointinformation to scroll automatically through the display. Thesecond allows you to manually scroll through each individualpoint description.
30 en | View faulted or bypassed points Control Panels
2015.01 | 02 | F.01U.307.371 Bosch Security Systems, Inc.
ᅳNotesᅳ
Control Panels View faulted or bypassed points | en 31
Bosch Security Systems, Inc. 2015.01 | 02 | F.01U.307.371

11 B94x Keypad operation overview
1 2 3 4
567
32 en | B94x Keypad operation overview Control Panels
2015.01 | 02 | F.01U.307.371 Bosch Security Systems, Inc.

Description of callouts for the keypad overview figure
Calloutnumber
Description
1 Power indicator LED
2 Feature key (refer to Feature key, page 41)
3 Status indicators (refer to Status indicators overview,page 39))
4 Main display area (refer to Main display area, page34)
5 Ribbon bar (refer to Ribbon bar overview, page 38)
6 Integrated proximity reader (for use with tokens andcards)
7 Presence sensor (lights a dim screen as youapproach)
Your security system provides quick access to functions throughthe keypad menus. My shortcuts are:___________________________ ______________________________________________________ ___________________________
Control Panels B94x Keypad operation overview | en 33
Bosch Security Systems, Inc. 2015.01 | 02 | F.01U.307.371

11.1 Main display area
The keypad main display area has several screens that showbased on the task performed at the keypad.
11.1.1 Idle screen
When the main display area shows the idle screen, it uses words,numbers, and symbols to show the status of the security system.When several events occur, the keypad shows each event inorder of priority.
The Main icon serves as both an indicator of the arming state andalarms, and as an icon to press to change the arming state. Thetext above the icon provides instructions.
34 en | B94x Keypad operation overview Control Panels
2015.01 | 02 | F.01U.307.371 Bosch Security Systems, Inc.

Ready to arm. Indicates that the system is ready to turnon (arm). Press the icon to turn on (arm) the securitysystem.
Not ready to arm. Indicates that the system is not readyto turn on (arm). Press the desired icon to resolve thefaults.
On (armed). Indicates that the system is on (armed).Press the icon and enter your passcode to turn off(disarm) the security system.
Part on (armed). Indicates that the system is part on(armed). Press the icon and enter your passcode to turnoff (disarm) the security system.
Alarm. The security system is in alarm. Press the iconand enter your passcode to silence any alarms.
Notice!When on the idle screen, the main display area showsicons to the right or left of the idle text icon when youmust press an icon to continue, or when you canchoose to perform additional tasks. For example, the[View Faulted] icon allows you to look at the list offaulted points.
Control Panels B94x Keypad operation overview | en 35
Bosch Security Systems, Inc. 2015.01 | 02 | F.01U.307.371
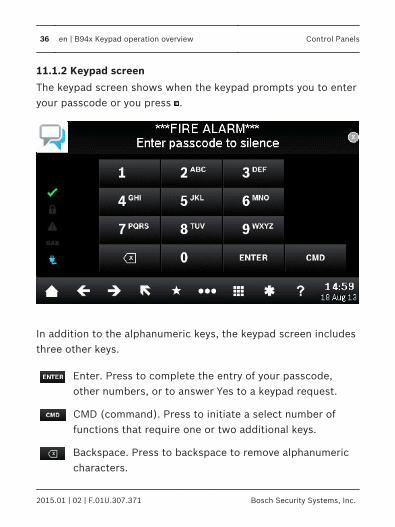
11.1.2 Keypad screen
The keypad screen shows when the keypad prompts you to enteryour passcode or you press .
In addition to the alphanumeric keys, the keypad screen includesthree other keys.
Enter. Press to complete the entry of your passcode,other numbers, or to answer Yes to a keypad request.
CMD (command). Press to initiate a select number offunctions that require one or two additional keys.
Backspace. Press to backspace to remove alphanumericcharacters.
36 en | B94x Keypad operation overview Control Panels
2015.01 | 02 | F.01U.307.371 Bosch Security Systems, Inc.
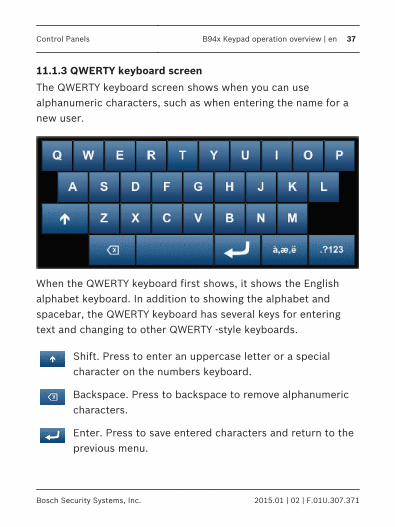
11.1.3 QWERTY keyboard screen
The QWERTY keyboard screen shows when you can usealphanumeric characters, such as when entering the name for anew user.
When the QWERTY keyboard first shows, it shows the Englishalphabet keyboard. In addition to showing the alphabet andspacebar, the QWERTY keyboard has several keys for enteringtext and changing to other QWERTY -style keyboards.
Shift. Press to enter an uppercase letter or a specialcharacter on the numbers keyboard.
Backspace. Press to backspace to remove alphanumericcharacters.
Enter. Press to save entered characters and return to theprevious menu.
Control Panels B94x Keypad operation overview | en 37
Bosch Security Systems, Inc. 2015.01 | 02 | F.01U.307.371

Extended Language keyboard. Press to show the non-English characters keyboard.
Number/special character keyboard. Press to show thenumbers and special characters keyboard.
ABC keyboard. Press to show the English alphabetkeyboard.
11.2 Ribbon bar overview
The Ribbon bar includes several icons and the date and time.Each icon lights only when available.
109
87
65
43
2
1
Callout
Number
Description
1 Home. Press to return to the home (main) display.
2 Previous. Press to return to the previous screen ormenu.
3 Next. Press to advance to the next screen or menu.
38 en | B94x Keypad operation overview Control Panels
2015.01 | 02 | F.01U.307.371 Bosch Security Systems, Inc.
Callout
Number
Description
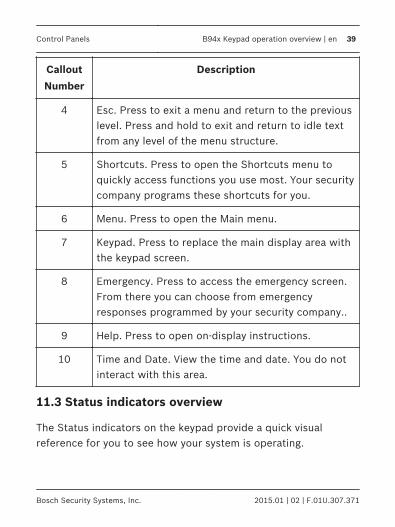
4 Esc. Press to exit a menu and return to the previouslevel. Press and hold to exit and return to idle textfrom any level of the menu structure.
5 Shortcuts. Press to open the Shortcuts menu toquickly access functions you use most. Your securitycompany programs these shortcuts for you.
6 Menu. Press to open the Main menu.
7 Keypad. Press to replace the main display area withthe keypad screen.
8 Emergency. Press to access the emergency screen.From there you can choose from emergencyresponses programmed by your security company..
9 Help. Press to open on-display instructions.
10 Time and Date. View the time and date. You do notinteract with this area.
11.3 Status indicators overview
The Status indicators on the keypad provide a quick visualreference for you to see how your system is operating.
Control Panels B94x Keypad operation overview | en 39
Bosch Security Systems, Inc. 2015.01 | 02 | F.01U.307.371

Ready to arm. The green checkmark indicates whetherthe system is ready to turn on (arm).
– ON Steady. All points are normal and the system isready to turn on.
– OFF. One or more points are faulted, and the systemis not ready to turn on.
On (armed). The red lock indicates whether the systemis on (armed).
– ON Steady. All areas are on with no alarms.
– Flashing. All areas are armed, and there is an activealarm.
– OFF. One or more areas are off.
Trouble. The yellow caution lights when a troublecondition exists.
– ON Steady. There is a system, device, or pointtrouble.
– OFF. There are no system, device, or point troubles.
GAS. The blue GAS indicates a gas alarm.
– Flashing. An area has a gas alarm. You should leavethe premises immediately when there is a gas alarm.
40 en | B94x Keypad operation overview Control Panels
2015.01 | 02 | F.01U.307.371 Bosch Security Systems, Inc.

– OFF. A gas alarm does not exist within the keypad’sscope.
Power. The blue power plug whether the control panelhas AC power.
– ON Steady. The AC (mains) power to the controlpanel is present.
– Flashing. AC (mains) power to the control panel isnot present and the control panel is operating fromthe battery.
– OFF. There is no power to the control panel.
11.4 Feature key
The Feature key performs a specific function programmed byyour security company.
Control Panels B94x Keypad operation overview | en 41
Bosch Security Systems, Inc. 2015.01 | 02 | F.01U.307.371

12 B93x keypad operation overview
1
4
7
ESC
GHI
PQRS
0 CMD
9WXYZ
6MNO
3DEF
2
5JKL
8TUV
ABC
NEXTHELPPREV
Area 1 Off
A1 Lobby
Ready to turn on
<Shortcuts Menu>
GAS
3
7
6 5
4
3
1 2
4
1
4
7
ESC
GHI
PQRS
0 CMD
9WXYZ
6MNO
3DEF
2
5JKL
8TUV
ABC
Callout
Number
Description
1 Alphanumeric display (refer to Display overview,page 46)
2 [HELP] key
3 Softkeys
42 en | B93x keypad operation overview Control Panels
2015.01 | 02 | F.01U.307.371 Bosch Security Systems, Inc.
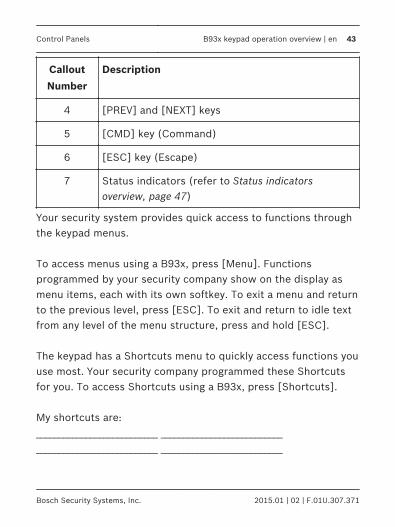
Callout
Number
Description
4 [PREV] and [NEXT] keys
5 [CMD] key (Command)
6 [ESC] key (Escape)
7 Status indicators (refer to Status indicatorsoverview, page 47)
Your security system provides quick access to functions throughthe keypad menus. To access menus using a B93x, press [Menu]. Functionsprogrammed by your security company show on the display asmenu items, each with its own softkey. To exit a menu and returnto the previous level, press [ESC]. To exit and return to idle textfrom any level of the menu structure, press and hold [ESC]. The keypad has a Shortcuts menu to quickly access functions youuse most. Your security company programmed these Shortcutsfor you. To access Shortcuts using a B93x, press [Shortcuts]. My shortcuts are:___________________________ ______________________________________________________ ___________________________
Control Panels B93x keypad operation overview | en 43
Bosch Security Systems, Inc. 2015.01 | 02 | F.01U.307.371
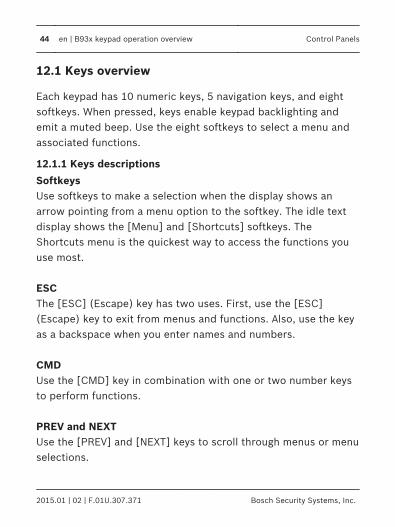
12.1 Keys overview
Each keypad has 10 numeric keys, 5 navigation keys, and eightsoftkeys. When pressed, keys enable keypad backlighting andemit a muted beep. Use the eight softkeys to select a menu andassociated functions.
12.1.1 Keys descriptions
SoftkeysUse softkeys to make a selection when the display shows anarrow pointing from a menu option to the softkey. The idle textdisplay shows the [Menu] and [Shortcuts] softkeys. TheShortcuts menu is the quickest way to access the functions youuse most. ESCThe [ESC] (Escape) key has two uses. First, use the [ESC](Escape) key to exit from menus and functions. Also, use the keyas a backspace when you enter names and numbers. CMDUse the [CMD] key in combination with one or two number keysto perform functions. PREV and NEXTUse the [PREV] and [NEXT] keys to scroll through menus or menuselections.
44 en | B93x keypad operation overview Control Panels
2015.01 | 02 | F.01U.307.371 Bosch Security Systems, Inc.

HELPThe [HELP] key has two uses. First, use the key to open thekeypad’s on-display Help. (Press [ESC] to exit Help whenfinished.) Also, press and hold the [HELP] key for 2 seconds tochange to the security system’s second language.
Control Panels B93x keypad operation overview | en 45
Bosch Security Systems, Inc. 2015.01 | 02 | F.01U.307.371
12.2 Display overview
The keypad uses words, numbers, and symbols to show thestatus of the security system. When several events occur, thekeypad shows each event in order of priority. The display showsfive lines, 21 characters per line. The keypad has a bright two-line by 20-character liquid crystaldisplay (LCD). When names are more than 18 characters, the textscrolls horizontally, similar to the way a stock ticker scrolls.
46 en | B93x keypad operation overview Control Panels
2015.01 | 02 | F.01U.307.371 Bosch Security Systems, Inc.
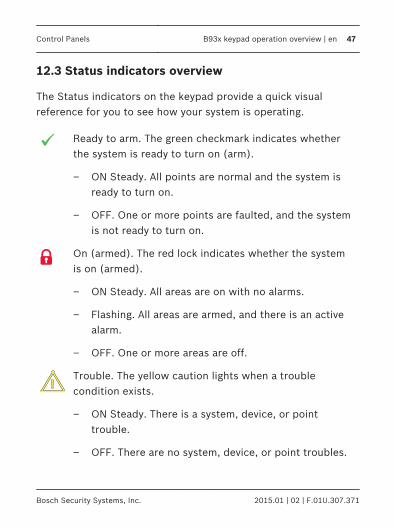
12.3 Status indicators overview
The Status indicators on the keypad provide a quick visualreference for you to see how your system is operating.
Ready to arm. The green checkmark indicates whetherthe system is ready to turn on (arm).
– ON Steady. All points are normal and the system isready to turn on.
– OFF. One or more points are faulted, and the systemis not ready to turn on.
On (armed). The red lock indicates whether the systemis on (armed).
– ON Steady. All areas are on with no alarms.
– Flashing. All areas are armed, and there is an activealarm.
– OFF. One or more areas are off.
Trouble. The yellow caution lights when a troublecondition exists.
– ON Steady. There is a system, device, or pointtrouble.
– OFF. There are no system, device, or point troubles.
Control Panels B93x keypad operation overview | en 47
Bosch Security Systems, Inc. 2015.01 | 02 | F.01U.307.371

GAS. The blue GAS indicates a gas alarm.
– Flashing. An area has a gas alarm. You should leavethe premises immediately when there is a gas alarm.
– OFF. A gas alarm does not exist within the keypad’sscope.
Power. The blue power plug whether the control panelhas AC power.
– ON Steady. The AC (mains) power to the controlpanel is present.
– Flashing. AC (mains) power to the control panel isnot present and the control panel is operating fromthe battery.
– OFF. There is no power to the control panel.
48 en | B93x keypad operation overview Control Panels
2015.01 | 02 | F.01U.307.371 Bosch Security Systems, Inc.

13 B94x/B93x menu tree and commands
The keypad offers an easy-to-use menu tree structure. To access
the menu tree, press the icon on a B94x or the [Menu]softkey on a B93x. The Main menu shows first. Each menuselection has its own icon or softkey. Press the icon or softkey tochoose that option. On a B93x, the menu options for each menu tree level areassociated with a number based upon the order in which themenu option is shown. You can type the number for the desiredmenu, if you know it. The menu tree figure on the next page shows the Menu structureand the numbers associated for each menu (B93x only).
Control Panels B94x/B93x menu tree and commands | en 49
Bosch Security Systems, Inc. 2015.01 | 02 | F.01U.307.371
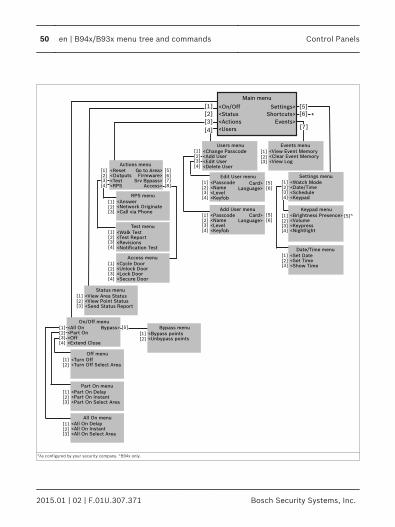
[1]
[2]
[3]
[4]
[5]
[6]
[7]
[4][3][2][1]
[4][3][2][1]
[4][3][2][1]
[3][2][1]
[3][2][1]
[4][3][2][1]
[3][2][1][5]
<Nightlight [4]
Users menu
<Delete User
<Add User<Change Passcode
<Edit User
Events menu
<Clear Event Memory<View Event Memory
<View Log
Main menu
<Users
<Status
<On/Off
<Actions
Settings>
Shortcuts>
Events>*
Edit User menu
<Keyfob
<Name<Passcode
<Level
Add User menu
<Keyfob
<Name<Passcode
<Level
Card>
Settings menu
<Keypad
<Date/Time<Watch Mode
<Schedule
Keypad menu
<Volume<Brightness
<Keypress
Date/Time menu
<Set Time<Set Date
<Show Time
*As configured by your security company. ^B94x only.
[5]^[6]Language>
Presence>
All On menu
<All On Instant<All On Delay
<All On Select Area
Status menu
<View Point Status<View Area Status
<Send Status Report
Off menu
<Turn Off Select Area<Turn Off
Part On menu
<Part On Instant<Part On Delay
<Part On Select Area
On/Off menu
<Extend Close
<Part On<All On
<Off
Bypass>
RPS menu
<Network Originate<Answer
<Call via Phone
Test menu
<Notification Test
<Test Report<Walk Test
<Revisions
Access menu
<Secure Door
<Unlock Door<Cycle Door
<Lock Door
Actions menu
<RPS
<Outputs<Reset
<Test
Go to Area>Firmware>
Srv Bypass>Access>[4]
[3][2][1]
[4][3][2][1]
[3][2][1]
[4][3][2][1]
[8][7][6][5]
[3][2][1]
[4][3][2][1]
[2][1]
[3][2][1]
[3][2][1]
[5] Bypass menu
<Unbypass points<Bypass points
[2][1]
[5]Card>[6]Language>
50 en | B94x/B93x menu tree and commands Control Panels
2015.01 | 02 | F.01U.307.371 Bosch Security Systems, Inc.

CommandsYou can initiate functions with the [CMD] key plus the one or twodigit command. If you know the command number, press the [CMD] key and thenthe one or two digit command.
Notice!
After you press [CMD], you can use /[PREV] or /[NEXT] to move through the list of commands, andpress [ENTER] when viewing the desired command.
Review the available commands in the following table.
Control Panels B94x/B93x menu tree and commands | en 51
Bosch Security Systems, Inc. 2015.01 | 02 | F.01U.307.371

Command Function
[CMD] 0 Bypass
[CMD] 0 0 Unbypass
[CMD] 1 All on (with delay)
[CMD] 1 1 All On, Instant
[CMD] 2 Part On, Instant
[CMD] 3 Part On (with delay)
[CMD] 4* Silence Trouble Sounders
[CMD] 4 0 See Alarms
[CMD] 4 1* Test Report
[CMD] 4 2* Status Report
[CMD] 4 3* RPS Answer
[CMD] 4 4* Intrusion Walk Test
[CMD] 4 5* Change Date and Time
[CMD] 4 6*# Door Control Menu
[CMD] 4 7 Reset Sensors
[CMD] 4 9* Change Display
[CMD] 5 0 Go to Area
52 en | B94x/B93x menu tree and commands Control Panels
2015.01 | 02 | F.01U.307.371 Bosch Security Systems, Inc.

Command Function
[CMD] 5 1 Extend Close
[CMD] 5 2* SKED Menu
[CMD] 5 3 Delete User
[CMD] 5 4* Output Change Menu
[CMD] 5 5 Change Passcode
[CMD] 5 6 Add User
[CMD] 5 8* Fire Walk Test
[CMD] 5 9 Show Revision
[CMD] 6 Watch Mode
[CMD] 7*~ Special Alert ___________________
[CMD] 8 Open Main menu
[CMD] 9*~ Special Alert ___________________
*Requires firmware v3.0x or higher. #B9512G/B8512G only. ~Asconfigured by your security company.
Control Panels B94x/B93x menu tree and commands | en 53
Bosch Security Systems, Inc. 2015.01 | 02 | F.01U.307.371
14 B94x/B93x On/Off menu
Use the On/Off menu to turn areas All or Part On, to turn areasoff, to extend closing time, or to bypass points. When you turn on (arm) your security system, there is an exitdelay that gives you time to leave the area without sounding theburglary tone. When you enter a security system that is turned on(armed), there is an entry delay that gives you time to turn off(disarm) the system.
14.1 All On menu
Use the On/Off menu to turn areas All or Part On, to turn areasoff, to extend closing time, or to bypass points. When you turn on (arm) your security system, there is an exitdelay that gives you time to leave the area without sounding theburglary tone. When you enter a security system that is turned on(armed), there is an entry delay that gives you time to turn off(disarm) the system.
14.1.1 All On
Turning an area All On turns on all points in the area and providesentry and exit delay. For example, you can turn on the area andleave through a door (within exit delay time) without creating analarm event. When you turn the area All On, the display showshow many seconds of exit delay time remain to exit the protectedarea. Leave before the exit delay time expires.
54 en | B94x/B93x On/Off menu Control Panels
2015.01 | 02 | F.01U.307.371 Bosch Security Systems, Inc.
Leaving after exit delay expires causes entry delay to start. It mayalso cause an alarm on an interior device. Enter your passcode toturn off the system.Turning areas All On:1. Open the Main menu.2. Press [On/Off] to open the menu.3. Press [All On] to open the menu.4. Press [All On Delay] to open the menu.5. Enter your passcode and press [ENTER]. The keypad shows
Exit Now! and sounds during the exit delay.6. Exit the area or enter your passcode again to stop the system
from turning on. If you turn your system All On and don't exit,the system automatically switches to Part On.
Control Panels B94x/B93x On/Off menu | en 55
Bosch Security Systems, Inc. 2015.01 | 02 | F.01U.307.371

14.1.2 All On Instant
Turning an area All On Instant turns on all points with no entry orexit delay. When areas are All On Instant, faulting any point(opening a door for example) creates an alarm eventimmediately. Turning areas All On Instant:1. Open the Main menu.2. Press [On/Off] to open the menu.3. Press [All On] to open the menu.4. Press to [All On Instant] open the menu.5. Enter your passcode and press [ENTER]. The keypad shows
All On.6. To turn off the security system, enter your passcode and
press [ENTER].
56 en | B94x/B93x On/Off menu Control Panels
2015.01 | 02 | F.01U.307.371 Bosch Security Systems, Inc.
14.1.3 Select Area
Use All On Select to choose individual areas to turn All On or AllOn Instant. You choose areas from a list of the areas in which youhave authority. Turning on a specific area:1. Open the Main menu.2. Press [On/Off] to open the menu.3. Press [All On] to open the menu.4. Press [All On Select Area] to open the menu.5. Enter your passcode and press [ENTER].6. Press either [On Delay] or [Instant]. The keypad responds
based upon your selection.
Control Panels B94x/B93x On/Off menu | en 57
Bosch Security Systems, Inc. 2015.01 | 02 | F.01U.307.371
14.2 Part On menu
Use the Part On menu to turn areas Part On. Turning an area PartOn means to turn on only some of the points, and thus part ofthe system. For example, your security company might configureyour system so that when you use the Part On function, only theexterior doors and windows turn on, whereas interior motionsensors do not turn on.
14.2.1 Part On
Turning an area Part On turns on some points, or part of thesystem, in the area and provides entry and exit delay. Forexample, you can turn on the area and leave through a door(within exit delay time) without creating an alarm event. Turning the perimeter on with an exit delay:1. Open the Main menu.2. Press [On/Off] to open the menu.3. Press [Part On] to open the menu.4. Press [Part On Delay] to open the menu.5. Enter your passcode and press [ENTER]. The keypad shows
Part On Delay.
58 en | B94x/B93x On/Off menu Control Panels
2015.01 | 02 | F.01U.307.371 Bosch Security Systems, Inc.

14.2.2 Part On Instant
Turning an area Part On turns on some points, or part of thesystem, in the area with no entry or exit delay. When the area isPart On Instant, faulting a Part On point (opening a door forexample) creates an alarm event immediately. Turning the system Part On without delay:1. Open the Main menu.2. Press [On/Off] to open the menu.3. Press [Part On] to open the menu.4. Press [Part On Instant] to open the menu.5. Enter your passcode and press [ENTER]. The keypad shows
Part On Instant.
Control Panels B94x/B93x On/Off menu | en 59
Bosch Security Systems, Inc. 2015.01 | 02 | F.01U.307.371
14.2.3 Select Area
Use Part On Select to choose individual areas to turn Part On orPart On Instant. You choose areas from a list of the areas inwhich you have authority. Turning individual areas Part On:1. Open the Main menu.2. Press [On/Off] to open the menu.3. Press [Part On] to open the menu.4. Press [Part On Select Area] to open the menu.5. Enter your passcode and press [ENTER].6. Press either [On Delay] or [Instant]. The keypad responds
based upon your selection.
60 en | B94x/B93x On/Off menu Control Panels
2015.01 | 02 | F.01U.307.371 Bosch Security Systems, Inc.
14.3 Off menu
You can turn areas off simply by entering your passcode or byusing the Off menu. With either option, you turn off all areas inwhich you have authority. You must enter your personal passcode and enter through adesignated entry door to prevent an instant alarm condition.Opening the door starts entry delay time and the keypad emits apulsing “beep” tone to remind you to turn the system off. Enteryour passcode before the entry delay time expires. If you enter through the wrong door or fail to turn off (disarm)before the entry delay time expires, an alarm occurs. If thishappens, silence the alarm (by entering your personal passcodeand pressing [ENTER]) and call your security company to notifythem that you do not have an emergency situation. Turning off the security system (disarm) with your passcode:1. Enter your personal passcode.2. Press [ENTER] within 8 sec of entering your passcode. The
display returns to idle text.
Control Panels B94x/B93x On/Off menu | en 61
Bosch Security Systems, Inc. 2015.01 | 02 | F.01U.307.371
14.3.1 Turn Off
You can use the Turn Off menu to turn off all areas in which youhave authority. Turning off areas:1. Open the Main menu.2. Press [On/Off] to open the menu.3. Press [Off] to open the menu.4. Press [Turn Off] to turn off.5. Enter your passcode and press [ENTER]. The display returns
to idle text.
62 en | B94x/B93x On/Off menu Control Panels
2015.01 | 02 | F.01U.307.371 Bosch Security Systems, Inc.

14.3.2 Turn Off Select
Use Turn Off Select to choose individual areas to turn off. Youchoose areas from a list of the areas in which you have authority. Turning off a specific area:1. Open the Main menu.2. Press [On/Off] to open the menu.3. Press [Off] to open the menu.4. Press [Turn Off Select Area] to open the menu.5. Enter your passcode and press [ENTER]. The display returns
to idle text.
Control Panels B94x/B93x On/Off menu | en 63
Bosch Security Systems, Inc. 2015.01 | 02 | F.01U.307.371

14.4 Extend Closing
Your security company might program your system to expect youto turn on (arm) within a closing window. A closing window is aduration of time programmed by your security company. Yoursecurity company sets a fixed length of time for the closingwindow. Additionally, your security company might program yoursystem to automatically turn on (arm) at the end of the window. Use the Extend Close Time option when you need to stay laterthan the scheduled close time. If you do not extend the CloseTime and do not turn the system on before the scheduled time,the system creates a Late to Close event. At the beginning of the closing window, the keypad beeps andshows Please Close Now to remind you to turn on (arm) yoursystem. It remains in the display until you turn on the system, theclose window ends, or you extend closing. Alarm or troublemessages replace this message in the event of an alarm ortrouble condition. If the alarm or trouble condition clears beforethe end of the close window Please Close Now returns to thekeypad display. Pressing [ESC] silences the beep and clears the message for 10minutes. If you have not turned your system on (armed) orextended closing, the Please Close Now message and beep
64 en | B94x/B93x On/Off menu Control Panels
2015.01 | 02 | F.01U.307.371 Bosch Security Systems, Inc.

reappear after 10 minutes. To extend the window, enter the newtime at which you would like the reminder tone to begin. Thistime is the new beginning of the closing window. When you hear the warning, you can:– Leave before the end of the closing window by pressing
[ESC] to silence the signal, turning on the system, andleaving.
– Stay past the scheduled end of the closing window, by usingthis function to extend the closing window.
To extend closing:1. Open the Main menu.2. Press [On/Off] to open the menu.3. Press [Extend Close] to open the menu.4. Enter your passcode and press [ENTER].
Notice!You cannot extend the window across the midnightboundary. The system cannot arm if points are off-normal.
Control Panels B94x/B93x On/Off menu | en 65
Bosch Security Systems, Inc. 2015.01 | 02 | F.01U.307.371
14.5 Bypass
Use the Bypass menu to temporarily take points out of thesecurity system, and enter them back into the system. Bypassedpoints do not create alarm or trouble events, do not detectintruders, and cannot send any reports. For example, to leave awindow open and turn the system on, you bypass the windowpoint and then turn the system on.
14.5.1 Bypass Points
You can bypass points when an area is turned off (disarmed).Points remain bypassed until you unbypass them or some pointsreturn when the area is turned off (disarmed). Use pointbypassing with discretion: bypassing a point reduces the level ofsecurity. Bypassing a point:1. Open the Main menu.2. Press [On/Off] to open the menu.3. Press [Bypass] to open the menu.4. Press [Bypass Points] to open the menu.5. Select a point to bypass.6. Escape from the menu.
66 en | B94x/B93x On/Off menu Control Panels
2015.01 | 02 | F.01U.307.371 Bosch Security Systems, Inc.
14.5.2 Unbypass Points
Unbypassing a point returns a bypassed point to the securitysystem so that it can once again respond to trouble and alarmconditions. Unbypassing a point:1. Open the Main menu.2. Press [On/Off] to open the menu.3. Press [Bypass] to open the menu.4. Press [Unbypass Points] to open the menu.5. Select a point to unbypass.6. Escape from the menu.
Control Panels B94x/B93x On/Off menu | en 67
Bosch Security Systems, Inc. 2015.01 | 02 | F.01U.307.371

15 B94x/B93x Status menu
Use the Status menu to see area or point status, or to send astatus report.
15.1 View Area Status
Area Status shows the on/off status for areas in which you haveauthority. Viewing area status:1. Open the Main menu.2. Press [Status] to open the menu.3. Press [View Area Status] to open the menu.4. Enter your passcode and press [ENTER]. The display shows
the status of each area. For example A-1: Off.5. Escape from the menu.
68 en | B94x/B93x Status menu Control Panels
2015.01 | 02 | F.01U.307.371 Bosch Security Systems, Inc.

15.2 View Point Status
The View Point Status feature shows the status (normal, open, orshort) for all points in the areas in which you have authority. Viewing point status:1. Open the Main menu.2. Press [Status] to open the menu.3. Press [View Area Status] to open the menu.4. Enter your passcode and press [ENTER].5. The display shows the number of points in the system. Use
/[PREV] or /[NEXT] to scroll through the list of pointsand each point’s status.
6. Escape from the menu.
Control Panels B94x/B93x Status menu | en 69
Bosch Security Systems, Inc. 2015.01 | 02 | F.01U.307.371
15.3 Send Status Report
The Send Status Report feature sends a complete system statusreport to your security monitoring company. Status reports canalert them to potential problems. Sending a status report:1. Open the Main menu.2. Press [Status] to open the menu.3. Press [Send Status Report] to open the menu.4. Enter your passcode and press [ENTER]. The control panel
sends a report to your security company.
70 en | B94x/B93x Status menu Control Panels
2015.01 | 02 | F.01U.307.371 Bosch Security Systems, Inc.

16 B94x/B93x Actions menu
Use the Actions menu to reset sensors, change outputs, see thetest menu, see the RPS menu, go to an area, update systemfirmware, or to view service bypassed points.
16.1 Reset
Detection devices, such as smoke detectors and shock sensors,might require a reset action before they return to normaloperation. This function momentarily removes power from thesedevices to reset them. Resetting sensors:1. Open the Main menu.2. Press [Actions] to open the menu.3. Press [Reset] to open the menu.4. Enter your passcode and press [ENTER]. The display shows
Sensors resetting for approximately 3 seconds and then goesblank before returning to idle disarmed text.
If you enter this function and the detector or sensor resetsmomentarily, but then returns to a faulted condition, theconditions causing the activation may still be present or thedetector may be faulty. Check to be certain that there is nosmoke, fire, or other danger present.
Control Panels B94x/B93x Actions menu | en 71
Bosch Security Systems, Inc. 2015.01 | 02 | F.01U.307.371
If you cannot reset the detector or sensor, contact your securitycompany.
72 en | B94x/B93x Actions menu Control Panels
2015.01 | 02 | F.01U.307.371 Bosch Security Systems, Inc.

16.2 Outputs
Your security company programs outputs for automatic controland/or keypad control of devices such as premises lighting orentry gates. An output is a device that is controlled by thesecurity system. Contact your security company for furtherinformation regarding the use of outputs in your security system. Use this function to select outputs to turn on or off. Outputs onyour security system can control other systems, lighting forexample. Security systems using B5512/B4512/B3512 control panels arenot UL investigated for access control. Turning outputs on and off:1. Open the Main menu.2. Press [Actions] to open the menu.3. Press [Outputs] to open the menu.4. Enter your passcode and press [ENTER].
5. Use /[NEXT] to select the desired output value, or use thenumber keys to enter the value.
6. Press [Turn On] or [Turn Off].7. Escape from the menu.
Control Panels B94x/B93x Actions menu | en 73
Bosch Security Systems, Inc. 2015.01 | 02 | F.01U.307.371

16.3 Test
Use the Test menu to walk test your system, send test reports, orto review system revision information on the keypad display.
16.3.1 Walk Test
A walk test allows you to test the sensors, keypads, sounders,and other devices in your system without creating alarm events.You can review untested points at the keypad to help pinpointany problems. You cannot turn on the security system while in the walk testmode. Also, the security system does not create alarm events forpoints included in the walk test. Points not included create alarmevents. For example, faulting a fire point during an intrusion walktest creates a fire alarm event. Beginning the walk test activates the burglary tone for 2 seconds.A battery test also begins. A successful battery test ends in fourminutes (the walk test continues). If the security systemdetermines there is a low battery, it generates a low batteryevent and continues the test. If the battery is determined to bevery low, the system creates a missing battery event and endsthe battery test immediately. To test individual detection devices, simply activate sensors andopen protected doors and windows one-at-a-time. As you faulteach detection device, the keypad from which you initiated the
74 en | B94x/B93x Actions menu Control Panels
2015.01 | 02 | F.01U.307.371 Bosch Security Systems, Inc.

test emits a brief tone, and for 60 seconds the display indicatesthat the point was tested. The tone and display verify that eachdetection device is working properly. Keypads within the area’sscope from which you did not initiate the walk test show Walktest in progress during the testing.
Notice!Fire walk test includes gasWhen you perform a Fire walk test, the security systemtests any 24-hour points that are not invisible, includinggas points.
Performing a walk test:1. Open the Main menu.2. Press [Actions] to open the menu.3. Press [Test] to open the menu.4. Press [Walk Test] to open the menu.5. Press [Fire], [Intrusion], [Service], or [Invisible] based upon
the type of walk test you wish to perform.6. The keypad shows the number of points remaining to test.
Press [View Untested Points].
7. Use /[NEXT] to go through your desired point and view thestatus of that point.
8. Escape from the menu.
Control Panels B94x/B93x Actions menu | en 75
Bosch Security Systems, Inc. 2015.01 | 02 | F.01U.307.371
Automatic terminationThe Walk Test automatically ends after 20 minutes of no testactivity. The keypad sounds during the last 5 minutes of the test.
76 en | B94x/B93x Actions menu Control Panels
2015.01 | 02 | F.01U.307.371 Bosch Security Systems, Inc.

16.3.2 Send Test Report
This function tests the communication link between your securitysystem and your security company. It is an important part ofmaintaining a high level of security for your property. Sending a test report:1. Open the Main menu.2. Press [Actions] to open the menu.3. Press [Test] to open the menu.4. Press [Send Test Report] to open the menu.5. Enter your passcode and press [ENTER]. The system sends a
test report.6. Escape from the menu.
Control Panels B94x/B93x Actions menu | en 77
Bosch Security Systems, Inc. 2015.01 | 02 | F.01U.307.371

16.3.3 Revisions
Use this function to view the current revision of your controlpanel firmware. Viewing the current revision of your system (control panel):1. Open the Main menu.2. Press [Actions] to open the menu.3. Press [Test] to open the menu.4. Press [Revisions] to open the menu.5. Enter your passcode and press [ENTER]. The current revision
information shows on the display.6. Escape from the menu.
78 en | B94x/B93x Actions menu Control Panels
2015.01 | 02 | F.01U.307.371 Bosch Security Systems, Inc.
16.3.4 Notification Test
Use this menu to test the security system’s ability to sendpersonal notification messages to the destination pathdesignated by your security company. Testing notifications:1. Open the Main menu.2. Press [Actions] to open the menu.3. Press [Test] to open the menu.4. Press [Notification Test] to open the menu.5. The keypad shows the first properly configured notification
path. Use /[NEXT] to go to the desired notification path,and then press [ENTER]. The control panel sends a testnotification, and then returns to idle text.
16.4 RPS
Use the RPS menu for connection to Remote ProgrammingSoftware (RPS). Your security company uses RPS to configureand service your security system. RPS is intended for use byprofessional or licensed installers only.
16.4.1 Answer
Use the Answer option to answer the phone (pick up the phoneline) to connect to RPS. Using the Answer menu option to answer an incoming call fromRPS:
Control Panels B94x/B93x Actions menu | en 79
Bosch Security Systems, Inc. 2015.01 | 02 | F.01U.307.371
1. Open the Main menu.2. Press [Actions] to open the menu.3. Press [RPS] to open the menu.4. Press [Answer] to open the menu.5. Enter your passcode and press [ENTER].The keypad shows RPS is connecting…. and then returns to idletext.
80 en | B94x/B93x Actions menu Control Panels
2015.01 | 02 | F.01U.307.371 Bosch Security Systems, Inc.
16.4.2 Network Originate
Use this function to originate an RPS session using an internetconnection. Connecting to RPS using an internet connection:1. Open the Main menu.2. Press [Actions] to open the menu.3. Press [RPS] to open the menu.4. Press [Network Originate] to open the menu.5. To use the programmed port number, press [Configured
Port]. The connection progress begins.6. If you wish to change the port number before connecting,
press [Change Port]. Press [ENTER]. The connection progressbegins.
Control Panels B94x/B93x Actions menu | en 81
Bosch Security Systems, Inc. 2015.01 | 02 | F.01U.307.371

16.4.3 Call Via Phone
Use this function to call RPS using the phone line. Connecting to RPS via the phone line:1. Open the Main menu.2. Press [Actions] to open the menu.3. Press [RPS] to open the menu.4. Press [Call via Phone] to open the menu.5. Enter your passcode, press [ENTER]. The connection
progress begins.
82 en | B94x/B93x Actions menu Control Panels
2015.01 | 02 | F.01U.307.371 Bosch Security Systems, Inc.
16.5 Go to area
With the Go to Area function you can perform tasks in an areaother than the one you’re in without having to physically go tothat area. For example, using the keypad in the office area, youcould 'go' to the loading area. You select the area from a list ofareas in which you have authority. Once you 'go’ to an area, you can perform tasks you haveauthority for in that area. To 'leave' an area press [ESC]. Using Go to Area:1. Open the Main menu.2. Press [Actions] to open the menu.3. Press [Got to Area] to open the menu.4. Enter your passcode and press [ENTER].
5. Use /[NEXT] to go to the area you wish to enter, and thenpress [Got to Area].
Control Panels B94x/B93x Actions menu | en 83
Bosch Security Systems, Inc. 2015.01 | 02 | F.01U.307.371
16.6 Firmware
Your security company might have configured your securitysystem to require your authorization before system firmware canbe updated. Use this action to provide authorization at therequest of your security company. Local authorization is requiredfor UL listed systems. Authorizing a firmware update:1. Open the Main menu.2. Press [Actions] to open the menu.3. Press [Firmware] to open the menu.4. Enter your passcode and press [ENTER].
84 en | B94x/B93x Actions menu Control Panels
2015.01 | 02 | F.01U.307.371 Bosch Security Systems, Inc.
16.7 Service bypass
To facilitate system maintenance for service personnel, yoursecurity system comes with a special point bypass option toremove any point from service. Bypassed points are notprotected. Use this menu to view bypassed points. Viewing points in Service Bypass:1. Open the Main menu.2. Press [Actions] to open the menu.3. Press [Srv Bypass] to open the menu. The keypad shows any
points in service bypass.
Control Panels B94x/B93x Actions menu | en 85
Bosch Security Systems, Inc. 2015.01 | 02 | F.01U.307.371
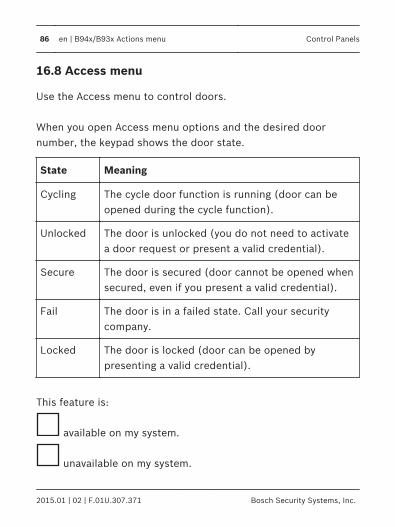
16.8 Access menu
Use the Access menu to control doors. When you open Access menu options and the desired doornumber, the keypad shows the door state.
State Meaning
Cycling The cycle door function is running (door can beopened during the cycle function).
Unlocked The door is unlocked (you do not need to activatea door request or present a valid credential).
Secure The door is secured (door cannot be opened whensecured, even if you present a valid credential).
Fail The door is in a failed state. Call your securitycompany.
Locked The door is locked (door can be opened bypresenting a valid credential).
This feature is:
available on my system.
unavailable on my system.
86 en | B94x/B93x Actions menu Control Panels
2015.01 | 02 | F.01U.307.371 Bosch Security Systems, Inc.
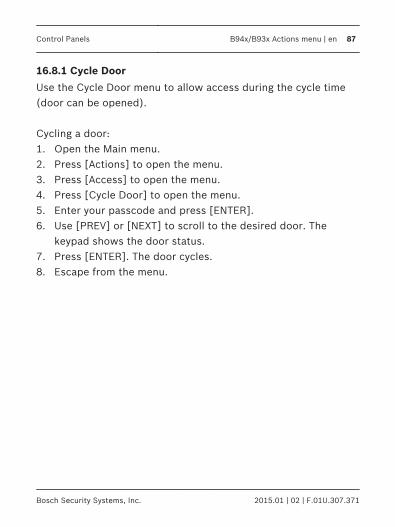
16.8.1 Cycle Door
Use the Cycle Door menu to allow access during the cycle time(door can be opened). Cycling a door:1. Open the Main menu.2. Press [Actions] to open the menu.3. Press [Access] to open the menu.4. Press [Cycle Door] to open the menu.5. Enter your passcode and press [ENTER].6. Use [PREV] or [NEXT] to scroll to the desired door. The
keypad shows the door status.7. Press [ENTER]. The door cycles.8. Escape from the menu.
Control Panels B94x/B93x Actions menu | en 87
Bosch Security Systems, Inc. 2015.01 | 02 | F.01U.307.371

16.8.2 Unlock Door
Use the Unlock Door menu to unlock a door to allow free access. Unlocking a door:1. Open the Main menu.2. Press [Actions] to open the menu.3. Press [Access] to open the menu.4. Press [Unlock Door] to open the menu.5. Enter your passcode and press [ENTER].6. Use [PREV] or [NEXT] to scroll to the desired door. The
keypad shows the door status.7. Press [ENTER]. The door unlocks.8. Escape from the menu.
88 en | B94x/B93x Actions menu Control Panels
2015.01 | 02 | F.01U.307.371 Bosch Security Systems, Inc.

16.8.3 Lock Door
Use the Lock Door menu to lock an unlocked door. Also use thismenu to lock doors that were automatically opened during a firealarm. Once a door is locked, a user must present a card toenter, or send an Unlock or a Cycle command from the keypad toallow the door to open. Locking a door:1. Open the Main menu.2. Press [Actions] to open the menu.3. Press [Access] to open the menu.4. Press [Lock Door] to open the menu.5. Enter your passcode and press [ENTER].6. Use [PREV] or [NEXT] to scroll to the desired door. The
keypad shows the door status.7. Press [ENTER]. The door locks.8. Escape from the menu.
Control Panels B94x/B93x Actions menu | en 89
Bosch Security Systems, Inc. 2015.01 | 02 | F.01U.307.371
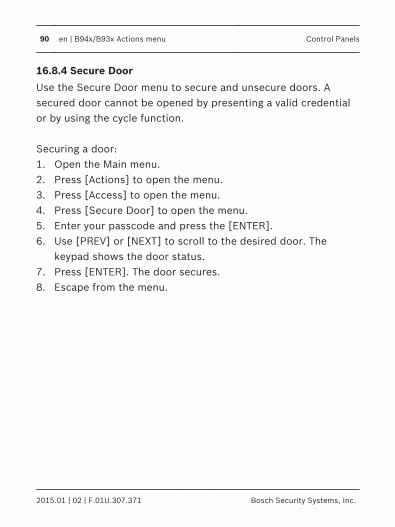
16.8.4 Secure Door
Use the Secure Door menu to secure and unsecure doors. Asecured door cannot be opened by presenting a valid credentialor by using the cycle function. Securing a door:1. Open the Main menu.2. Press [Actions] to open the menu.3. Press [Access] to open the menu.4. Press [Secure Door] to open the menu.5. Enter your passcode and press the [ENTER].6. Use [PREV] or [NEXT] to scroll to the desired door. The
keypad shows the door status.7. Press [ENTER]. The door secures.8. Escape from the menu.
90 en | B94x/B93x Actions menu Control Panels
2015.01 | 02 | F.01U.307.371 Bosch Security Systems, Inc.
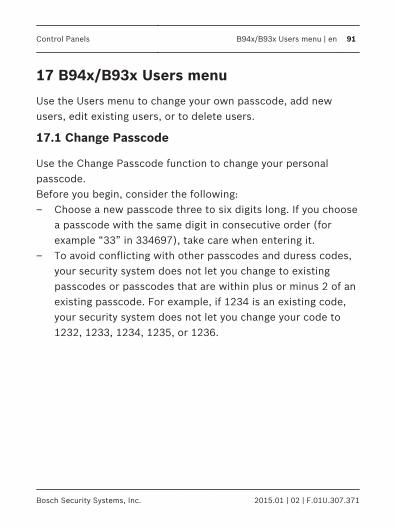
17 B94x/B93x Users menu
Use the Users menu to change your own passcode, add newusers, edit existing users, or to delete users.
17.1 Change Passcode
Use the Change Passcode function to change your personalpasscode.Before you begin, consider the following:– Choose a new passcode three to six digits long. If you choose
a passcode with the same digit in consecutive order (forexample “33” in 334697), take care when entering it.
– To avoid conflicting with other passcodes and duress codes,your security system does not let you change to existingpasscodes or passcodes that are within plus or minus 2 of anexisting passcode. For example, if 1234 is an existing code,your security system does not let you change your code to1232, 1233, 1234, 1235, or 1236.
Control Panels B94x/B93x Users menu | en 91
Bosch Security Systems, Inc. 2015.01 | 02 | F.01U.307.371

Changing your passcode:1. Open the Main menu.2. Press [Users]Press [Change Passcode] to open the menu.3. Enter your current passcode and press [ENTER].4. Enter your new passcode and press [ENTER].5. Enter your new passcode again and press [ENTER].6. Escape from the menu.
92 en | B94x/B93x Users menu Control Panels
2015.01 | 02 | F.01U.307.371 Bosch Security Systems, Inc.
17.2 Add User
Use the Add User function to add a passcode to your securitysystem. Before you add the user, you need to know which usernumbers are available, the authority level you want to assign tothe new passcode, and the areas in which it will be valid. The user numbers identify users in reports transmitted from yoursecurity system. The authority level determines what systemfunctions the passcode can access. The area number identifieswhich parts of your security system the passcode can access.Contact your security company if you don’t know what usernumbers, authority levels, or areas are available.
Control Panels B94x/B93x Users menu | en 93
Bosch Security Systems, Inc. 2015.01 | 02 | F.01U.307.371
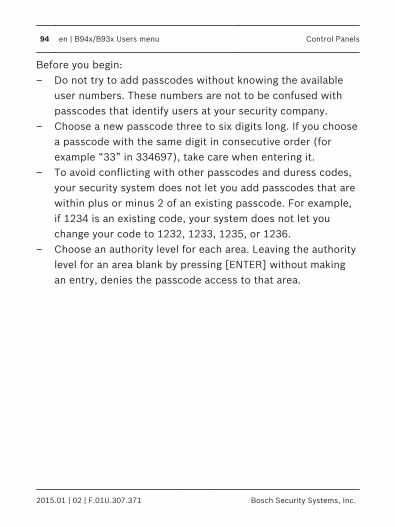
Before you begin:– Do not try to add passcodes without knowing the available
user numbers. These numbers are not to be confused withpasscodes that identify users at your security company.
– Choose a new passcode three to six digits long. If you choosea passcode with the same digit in consecutive order (forexample “33” in 334697), take care when entering it.
– To avoid conflicting with other passcodes and duress codes,your security system does not let you add passcodes that arewithin plus or minus 2 of an existing passcode. For example,if 1234 is an existing code, your system does not let youchange your code to 1232, 1233, 1235, or 1236.
– Choose an authority level for each area. Leaving the authoritylevel for an area blank by pressing [ENTER] without makingan entry, denies the passcode access to that area.
94 en | B94x/B93x Users menu Control Panels
2015.01 | 02 | F.01U.307.371 Bosch Security Systems, Inc.

Adding a user:1. Open the Main menu.2. Press [Users].3. Press [Add User] to open the menu.4. Enter your passcode and press [ENTER].5. Enter the number (1 – 50) for the user you wish to add, and
press [ENTER]. Configuring the user’s passcode:1. Press [Passcode] to set the passcode.2. Press [ENTER] to continue.3. Enter the user’s passcode and press [ENTER].4. Enter the passcode again and press [ENTER]. The keypad
shows Passcode changed and then returns to the previousmenu.
Configuring the user’s name:1. Press [Name] to configure the user’s name.2. The B94x offers a qwerty keyboard. For a B93x, press a
number key repeatedly to scroll through the number andletters shown on the key. To enter a space, press [0][0]. Tocapitalize a letter, press [CMD] before you enter the letter.For caps lock, press [CMD][CMD]. To remove caps lock,press [CMD][CMD][CMD].
3. Press [ENTER] to save the name. The keypad returns to theprevious menu.
Control Panels B94x/B93x Users menu | en 95
Bosch Security Systems, Inc. 2015.01 | 02 | F.01U.307.371
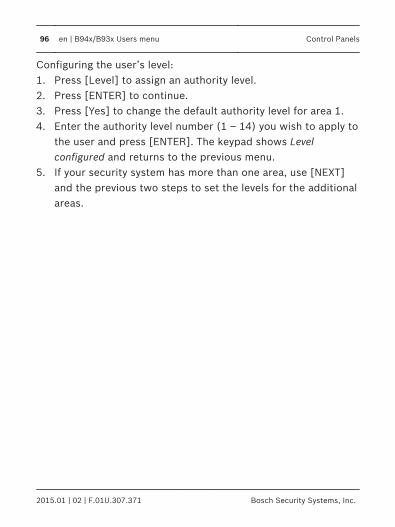
Configuring the user’s level:1. Press [Level] to assign an authority level.2. Press [ENTER] to continue.3. Press [Yes] to change the default authority level for area 1.4. Enter the authority level number (1 – 14) you wish to apply to
the user and press [ENTER]. The keypad shows Levelconfigured and returns to the previous menu.
5. If your security system has more than one area, use [NEXT]and the previous two steps to set the levels for the additionalareas.
96 en | B94x/B93x Users menu Control Panels
2015.01 | 02 | F.01U.307.371 Bosch Security Systems, Inc.
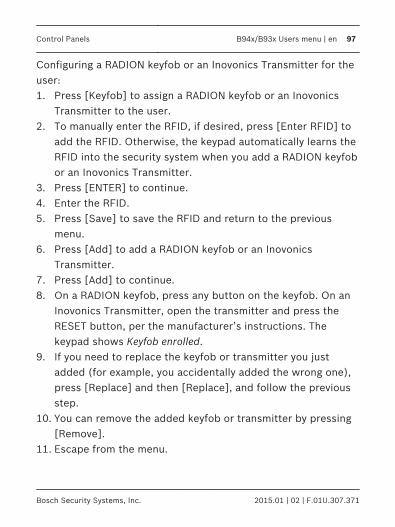
Configuring a RADION keyfob or an Inovonics Transmitter for theuser:1. Press [Keyfob] to assign a RADION keyfob or an Inovonics
Transmitter to the user.2. To manually enter the RFID, if desired, press [Enter RFID] to
add the RFID. Otherwise, the keypad automatically learns theRFID into the security system when you add a RADION keyfobor an Inovonics Transmitter.
3. Press [ENTER] to continue.4. Enter the RFID.5. Press [Save] to save the RFID and return to the previous
menu.6. Press [Add] to add a RADION keyfob or an Inovonics
Transmitter.7. Press [Add] to continue.8. On a RADION keyfob, press any button on the keyfob. On an
Inovonics Transmitter, open the transmitter and press theRESET button, per the manufacturer’s instructions. Thekeypad shows Keyfob enrolled.
9. If you need to replace the keyfob or transmitter you justadded (for example, you accidentally added the wrong one),press [Replace] and then [Replace], and follow the previousstep.
10. You can remove the added keyfob or transmitter by pressing[Remove].
11. Escape from the menu.
Control Panels B94x/B93x Users menu | en 97
Bosch Security Systems, Inc. 2015.01 | 02 | F.01U.307.371

This feature is:
available on my system.
unavailable on my system.Selecting a keypad display language for the user:1. Press [Language] to select the user’s language.2. Press [ENTER] to continue.3. Select the desired language. The keypad shows Language
configured, and then returns to the previous menu. This feature is:
available on my system.
unavailable on my system.Adding card to a user:1. Press [Card].2. Press [ENTER] to continue.3. Present the card at the card reader. The keypad shows
Present card.4. If the reader identifies the card correctly, the keypad shows
Card configured.5. Escape from the menu.
98 en | B94x/B93x Users menu Control Panels
2015.01 | 02 | F.01U.307.371 Bosch Security Systems, Inc.

17.3 Edit User
Use the Edit User function to edit a user of your security system.You need to know the user number for the user you want to edit. Editing an existing user:1. Open the Main menu.2. Press [Users] to open the menu.3. Press [Edit User] to open the menu.4. Enter your passcode and press [ENTER].5. Enter the number (1 – 50) for the user you wish to edit, and
press [ENTER].6. The keypad shows the name for the user number you entered.
Press [Continue]. Configuring the user’s passcode:1. Press [Passcode] to set the passcode.2. Press [ENTER] to continue.3. Enter the user’s passcode and press [ENTER].4. Enter the passcode again and press [ENTER]. The keypad
shows Passcode changed and then returns to the previousmenu.
Control Panels B94x/B93x Users menu | en 99
Bosch Security Systems, Inc. 2015.01 | 02 | F.01U.307.371
Configuring the user’s name:1. Press [Name] to configure the user’s name.2. The B94x offers a qwerty keyboard. For a B93x, press a
number key repeatedly to scroll through the number andletters shown on the key. To enter a space, press [0][0]. Tocapitalize a letter, press [CMD] before you enter the letter.For caps lock, press [CMD][CMD]. To remove caps lock,press [CMD][CMD][CMD].
3. Press [ENTER] to save the name. The keypad returns to theprevious menu.
Configuring the user’s level:1. Press [Level] to assign an authority level.2. Press [ENTER] to continue.3. Press [Yes] to change the default authority level for area 1.4. Enter the authority level number (1 – 14) you wish to apply to
the user and press [ENTER]. The keypad shows Levelconfigured and returns to the previous menu.
5. If your security system has more than one area, use [NEXT]and the previous two steps to set the levels for the additionalareas.
100 en | B94x/B93x Users menu Control Panels
2015.01 | 02 | F.01U.307.371 Bosch Security Systems, Inc.

Configuring a RADION keyfob or an Inovonics Transmitter for theuser:1. Press [Keyfob] to assign a RADION keyfob or an Inovonics
Transmitter to the user.2. To remove a previously added keyfob or transmitter, press
[Remove].3. To replace a previously added keyfob or transmitter, press
[Replace] and then [Replace], and follow the next step.4. On a RADION keyfob, press any button. On an Inovonics
Transmitter, open the transmitter and press the RESETbutton, per the manufacturer’s instructions. The keypadshows Keyfob enrolled.
5. To add a RADION keyfob or an Inovonics Transmitter, press[Add] to continue, and follow the previous step.
6. To manually enter the RFID, if desired, press [Enter RFID] toadd the RFID. Otherwise, the keypad automatically learns theRFID into the security system when you add a RADION keyfobor an Inovonics Transmitter.
7. Press [ENTER] to continue.8. Enter the RFID.9. Press [Save] to save the RFID and return to the previous
menu. Adding or replacing a card for the user:1. Press [Card].2. Press [ENTER] to continue.
Control Panels B94x/B93x Users menu | en 101
Bosch Security Systems, Inc. 2015.01 | 02 | F.01U.307.371
3. Present the card at the card reader. The keypad showsPresent card.
4. If the reader identifies the card correctly, the keypad showsCard configured.
5. Escape from the menu. Selecting a keypad display language for the user:1. Press [Language] to select the user’s language.2. Press [ENTER] to continue.3. Select the desired language. The keypad shows Language
configured, and then returns to the previous menu.
102 en | B94x/B93x Users menu Control Panels
2015.01 | 02 | F.01U.307.371 Bosch Security Systems, Inc.
17.4 Delete User
Use the Delete User function to delete a user. Use this function to remove users from the system. All user data(name, passcode, keyfob) is deleted and cannot be recovered.Use Edit User if you only wish to remove a user's authority(disable the user), but retain the user’s data. You need to knowthe user number for the passcode you want to delete. The usernumbers identify users in reports transmitted from your system. Deleting a user:1. Open the Main menu.2. Press [Users] to open the menu.3. Press [Delete User] to open the menu.4. Enter your passcode and press [ENTER].5. Enter the number (1 – 50) for the user you wish to delete,
and press [ENTER]. The keypad shows the name for the usernumber you entered.
6. Press [Continue].7. Press [Yes] to confirm you wish to delete the selected user.
The keypad shows User ## deleted, and then returns to theprevious menu.
8. Escape from the menu.
Control Panels B94x/B93x Users menu | en 103
Bosch Security Systems, Inc. 2015.01 | 02 | F.01U.307.371
18 B94x/B93x Settings menu
Use the Settings menu to turn Watch mode on or off, set thesystem date and time, view and change schedules, set keypadbrightness and volume, and show the time in the keypad display.
18.1 Watch Mode
You can use Watch Mode to monitor select points with thesecurity system turned off. Each time points are faulted (door orwindow is opened), the keypad chimes once and shows the pointtext for 60 seconds. The control panel does not generate alarmsin this mode except 24-hour alarms (fire, panic, etc.). Use this function in residential systems to monitor entries orexits in your home. In commercial systems it can serve as a doorchime to alert you when a customer or delivery person entersyour business.
104 en | B94x/B93x Settings menu Control Panels
2015.01 | 02 | F.01U.307.371 Bosch Security Systems, Inc.
Entering and exiting Watch Mode:1. Open the Main menu.2. Press [Settings] to open the menu.3. Press [Watch Mode] to open the menu.4. Enter your passcode and press [ENTER].5. Press [Turn On] or [Turn Off]. The keypad indicates that you
enabled or disabled Watch Mode successfully.6. Escape from the menu.
Control Panels B94x/B93x Settings menu | en 105
Bosch Security Systems, Inc. 2015.01 | 02 | F.01U.307.371

18.2 Date/Time
Your security system must have the correct time and date forscheduled events to occur at the correct times. Use the Date/Time function to set both the time and date. The security systemuses a 12-hour AM/PM format. If your security system is configured for automatic date/timeupdates, the update might overwrite your changes. Setting the date and time:1. Open the Main menu.2. Press [Settings] to open the menu.3. Press [Date/Time] to open the menu.4. Press [Set Date] to open the menu.5. Enter your passcode and press [ENTER].6. Enter the new date in MM/DD/YY format.7. Press [Save]/[ENTER] to save the change. The keypad shows
Date change complete and then returns to the previous menu.8. Press [Set Time] to open the menu.9. Press [Set].10. Enter the new time in HH:MM format.11. For B93x, press [AM] or [PM].12. Press [Save]/[ENTER] to save the change. The keypad shows
Time change complete and then returns to the previous menu.13. Escape from the menu.
106 en | B94x/B93x Settings menu Control Panels
2015.01 | 02 | F.01U.307.371 Bosch Security Systems, Inc.

18.3 Schedule (SKEDs)
A SKED is a function programmed to be performed automaticallyat a scheduled time by your security system. You can change thescheduled time for SKEDs, disable a SKED to prevent it fromautomatically happening, or restart a previously disabled SKED.Contact your security company to determine what SKEDs theyprogrammed for your system. Selecting a SKED to change:1. Open the Main menu.2. Press [Settings] to open the menu.3. Press [Schedule] to open the menu.4. Enter your passcode and press [ENTER].
5. Use /[PREV] or /[NEXT] to scroll through the list ofSKEDs. The keypad indicates whether a SKED is enabled,disabled, or not yet programmed.
6. Continue to Enabling a disabled SKED or Disabling a enabledSKED.
Control Panels B94x/B93x Settings menu | en 107
Bosch Security Systems, Inc. 2015.01 | 02 | F.01U.307.371
Enabling a disabled SKED:1. With the SKED you wish to enable showing, press [Enable the
sked].2. Press [Exclude holidays] or [Include holidays].3. Enter the new time in HH:MM format.4. Press [ENTER] to save the time and choose AM or PM.5. Press [AM] or [PM]. The keypad shows Schedule update
complete and then returns to the previous menu.6. Escape from the menu. Disabling an enabled SKED:1. With the SKED you wish to disable showing, press [Disable
the sked].2. Press [ENTER] to disable the SKED. The keypad display
indicates that the SKED is disabled.3. Escape from the menu.
108 en | B94x/B93x Settings menu Control Panels
2015.01 | 02 | F.01U.307.371 Bosch Security Systems, Inc.

18.4 Keypad
Use the Keypad menu to adjust the brightness of the keypaddisplay, the keypress volume, and enable or disable the keypresstone.
18.4.1 Brightness
Use the Brightness function to adjust the brightness level for thekeypad display. Adjusting the keypad display brightness:1. Open the Main menu.2. Press [Settings] to open the menu.3. Press [Keypad] to open the menu.4. Press [Brightness] to open the menu.
5. Use /[PREV] or /[NEXT] to adjust the brightness level.The changes apply immediately.
6. Escape from the menu.
Control Panels B94x/B93x Settings menu | en 109
Bosch Security Systems, Inc. 2015.01 | 02 | F.01U.307.371
18.4.2 Volume
Use the Volume function to adjust the keypress volume level forthe keypad. Adjusting the keypress volume:1. Open the Main menu.2. Press [Settings] to open the menu.3. Press [Keypad] to open the menu .4. Press [Volume] to open the menu.
5. Use /[PREV] or /[NEXT] to adjust the volume level. Thechanges apply immediately.
6. Escape from the menu.
110 en | B94x/B93x Settings menu Control Panels
2015.01 | 02 | F.01U.307.371 Bosch Security Systems, Inc.
18.4.3 Keypress
Use the Keypress function to activate or deactivate the keypresstone. Activating and deactivating the keypress tone:1. Open the Main menu.2. Press [Settings] to open the menu.3. Press [Keypad] to open the menu.4. Press [Keypress] to open the menu.5. Press [Turn On] or [Turn Off].6. Escape from the menu.
Control Panels B94x/B93x Settings menu | en 111
Bosch Security Systems, Inc. 2015.01 | 02 | F.01U.307.371

18.4.4 Nightlight
Use the Nightlight menu to turn the nightlight feature on or off.The nighlight feature dimly lights the display and keys when thekeypad is idle, making it easier to find the keypad in a dark room. Turning the nighlight feature on or off:1. Open the Main menu.2. Press [Settings] to open the menu.3. Press [Keypad] to open the menu.4. Press [Nightlight] to open the menu.5. Press [Turn On] or [Turn Off].6. Escape from the menu.
112 en | B94x/B93x Settings menu Control Panels
2015.01 | 02 | F.01U.307.371 Bosch Security Systems, Inc.

18.4.5 Presence (B94x only)
The keypad uses the presence sensor to brighten the display asyou approach. Turning the presence sensor on or off:1. Open the Main menu.2. Press [Settings] to open the menu.3. Press [Keypad] to open the menu.4. Press [Presence] to open the menu.5. Press [Turn On] or [Turn Off].6. Escape from the menu.
Control Panels B94x/B93x Settings menu | en 113
Bosch Security Systems, Inc. 2015.01 | 02 | F.01U.307.371

19 B94x/B93x Shortcuts menu
Use shortcuts to quickly access common functions. Using a shortcut:
1. From the Main menu, press [Shortcuts], or simply press /[Shortcuts]while viewing idle text.
2. Press the softkey for the desired Shortcut. If more than fourShortcuts are available, the [NEXT] key lights, and you canuse the key to view additional Shortcuts.
114 en | B94x/B93x Shortcuts menu Control Panels
2015.01 | 02 | F.01U.307.371 Bosch Security Systems, Inc.
20 B94x/B93x Events menu
Use the Events menu to view event memory, clear event memory,or view the event log.
20.1 View Event Memory
Your security system stores events that occurred since the lasttime memory was cleared. Use View Event Memory to view theevents not previously cleared. Each time you turn the securitysystem on, the event memory is erased. Viewing event memory:1. Open the Main menu.2. Press [Events] to open the menu.3. Press [View Event Memory] to open the menu.
Control Panels B94x/B93x Events menu | en 115
Bosch Security Systems, Inc. 2015.01 | 02 | F.01U.307.371
20.2 Clear Event Memory
Use the Clear Event Memory function to clear out event memorywithout turning your security system off and on again. Clearing event memory:1. Open the Main menu.2. Press [Events] to open the menu.3. Press [Clear Event Memory] to open the menu.
116 en | B94x/B93x Events menu Control Panels
2015.01 | 02 | F.01U.307.371 Bosch Security Systems, Inc.
20.3 View Log
Use the View Log function to review events stored in yoursecurity system. Reviewing past events might help you identifyproblems. Events are stored in the control panel’s memory inorder of occurrence, and tagged with the date and time. Viewing the log:1. Open the Main menu.2. Press [Events] to open the menu.3. Press [View Log] to open the menu. The keypad shows Enter
Start Date.To view part of the log, enter the date (MM/DD/YY) at whichyou wish to start the review. Press [ENTER].To view the entire log from the newest event, press [Go tolast event] without entering a start date. The date and time of
the newest event shows. Use /[PREV] or /[NEXT] tomove through the events.
4. Escape from the menu.
Control Panels B94x/B93x Events menu | en 117
Bosch Security Systems, Inc. 2015.01 | 02 | F.01U.307.371
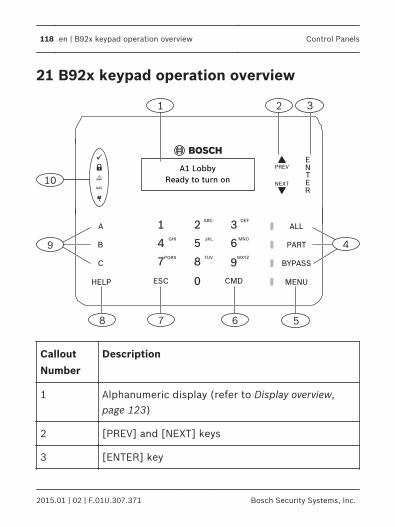
21 B92x keypad operation overview
GAS
A1 Lobby
Ready to turn on
8 7 6
9
5
10
1 2 3
4
Callout
Number
Description
1 Alphanumeric display (refer to Display overview,page 123)
2 [PREV] and [NEXT] keys
3 [ENTER] key
118 en | B92x keypad operation overview Control Panels
2015.01 | 02 | F.01U.307.371 Bosch Security Systems, Inc.
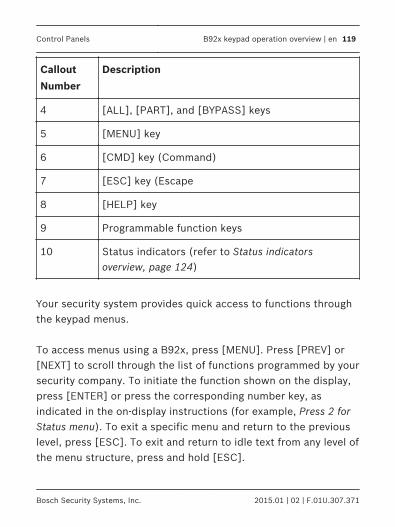
Callout
Number
Description
4 [ALL], [PART], and [BYPASS] keys
5 [MENU] key
6 [CMD] key (Command)
7 [ESC] key (Escape
8 [HELP] key
9 Programmable function keys
10 Status indicators (refer to Status indicatorsoverview, page 124)
Your security system provides quick access to functions throughthe keypad menus. To access menus using a B92x, press [MENU]. Press [PREV] or[NEXT] to scroll through the list of functions programmed by yoursecurity company. To initiate the function shown on the display,press [ENTER] or press the corresponding number key, asindicated in the on-display instructions (for example, Press 2 forStatus menu). To exit a specific menu and return to the previouslevel, press [ESC]. To exit and return to idle text from any level ofthe menu structure, press and hold [ESC].
Control Panels B92x keypad operation overview | en 119
Bosch Security Systems, Inc. 2015.01 | 02 | F.01U.307.371
The keypad has a Shortcuts menu to quickly access functions youuse most. Your security company programmed these Shortcutsfor you. To access Shortcuts, press [MENU], and then press [6]. My shortcuts are:___________________________ ______________________________________________________ ___________________________
120 en | B92x keypad operation overview Control Panels
2015.01 | 02 | F.01U.307.371 Bosch Security Systems, Inc.
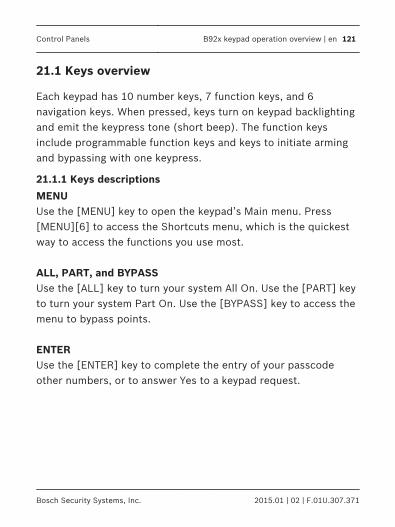
21.1 Keys overview
Each keypad has 10 number keys, 7 function keys, and 6navigation keys. When pressed, keys turn on keypad backlightingand emit the keypress tone (short beep). The function keysinclude programmable function keys and keys to initiate armingand bypassing with one keypress.
21.1.1 Keys descriptions
MENUUse the [MENU] key to open the keypad’s Main menu. Press[MENU][6] to access the Shortcuts menu, which is the quickestway to access the functions you use most. ALL, PART, and BYPASSUse the [ALL] key to turn your system All On. Use the [PART] keyto turn your system Part On. Use the [BYPASS] key to access themenu to bypass points. ENTERUse the [ENTER] key to complete the entry of your passcodeother numbers, or to answer Yes to a keypad request.
Control Panels B92x keypad operation overview | en 121
Bosch Security Systems, Inc. 2015.01 | 02 | F.01U.307.371
ESCThe [ESC] (Escape) key has two uses. First, use the [ESC](Escape) key to exit from menus and functions. Also, use the keyas a backspace when you enter names and numbers. CMDUse the [CMD] key in combination with one or two number keysto perform functions. PREV and NEXTUse the [PREV] and [NEXT] keys to scroll through menus or menuselections.
122 en | B92x keypad operation overview Control Panels
2015.01 | 02 | F.01U.307.371 Bosch Security Systems, Inc.

21.2 Display overview
The keypad uses words, numbers, and symbols to show thestatus of the security system. When several events occur, thekeypad shows each event in order of priority. The keypad has a bright two-line liquid crystal display (LCD).
Control Panels B92x keypad operation overview | en 123
Bosch Security Systems, Inc. 2015.01 | 02 | F.01U.307.371
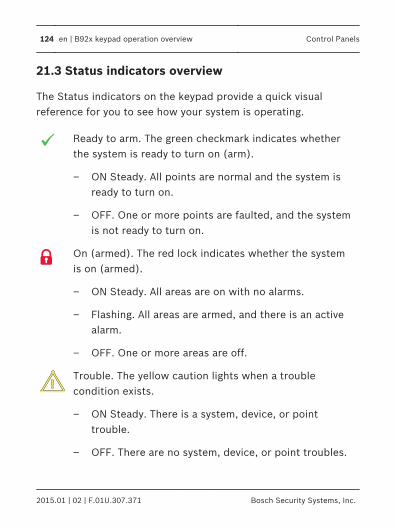
21.3 Status indicators overview
The Status indicators on the keypad provide a quick visualreference for you to see how your system is operating.
Ready to arm. The green checkmark indicates whetherthe system is ready to turn on (arm).
– ON Steady. All points are normal and the system isready to turn on.
– OFF. One or more points are faulted, and the systemis not ready to turn on.
On (armed). The red lock indicates whether the systemis on (armed).
– ON Steady. All areas are on with no alarms.
– Flashing. All areas are armed, and there is an activealarm.
– OFF. One or more areas are off.
Trouble. The yellow caution lights when a troublecondition exists.
– ON Steady. There is a system, device, or pointtrouble.
– OFF. There are no system, device, or point troubles.
124 en | B92x keypad operation overview Control Panels
2015.01 | 02 | F.01U.307.371 Bosch Security Systems, Inc.

GAS. The blue GAS indicates a gas alarm.
– Flashing. An area has a gas alarm. You should leavethe premises immediately when there is a gas alarm.
– OFF. A gas alarm does not exist within the keypad’sscope.
Power. The blue power plug whether the control panelhas AC power.
– ON Steady. The AC (mains) power to the controlpanel is present.
– Flashing. AC (mains) power to the control panel isnot present and the control panel is operating fromthe battery.
– OFF. There is no power to the control panel.
Control Panels B92x keypad operation overview | en 125
Bosch Security Systems, Inc. 2015.01 | 02 | F.01U.307.371
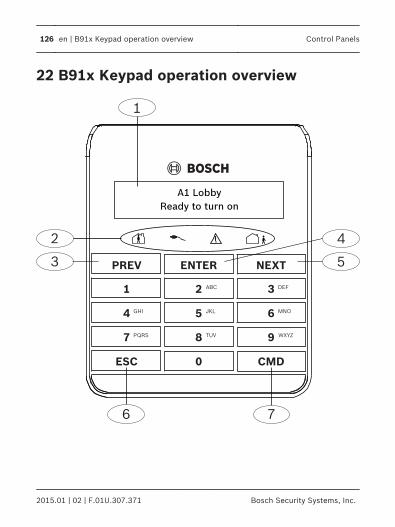
22 B91x Keypad operation overview
A1 Lobby
Ready to turn on
1
PREV
2
ENTER
3
NEXT
4
7
ESC CMD
8
0
9
5 6JKLGHI
PQRS
ABC DEF
MNO
WXYZTUV
76
5
4
3
2
1
126 en | B91x Keypad operation overview Control Panels
2015.01 | 02 | F.01U.307.371 Bosch Security Systems, Inc.
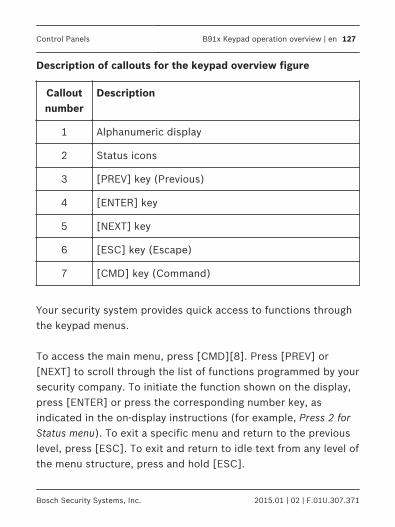
Description of callouts for the keypad overview figure
Calloutnumber
Description
1 Alphanumeric display
2 Status icons
3 [PREV] key (Previous)
4 [ENTER] key
5 [NEXT] key
6 [ESC] key (Escape)
7 [CMD] key (Command)
Your security system provides quick access to functions throughthe keypad menus. To access the main menu, press [CMD][8]. Press [PREV] or[NEXT] to scroll through the list of functions programmed by yoursecurity company. To initiate the function shown on the display,press [ENTER] or press the corresponding number key, asindicated in the on-display instructions (for example, Press 2 forStatus menu). To exit a specific menu and return to the previouslevel, press [ESC]. To exit and return to idle text from any level ofthe menu structure, press and hold [ESC].
Control Panels B91x Keypad operation overview | en 127
Bosch Security Systems, Inc. 2015.01 | 02 | F.01U.307.371
The keypad has a Shortcuts menu to quickly access functions youuse most. Your security company programmed these Shortcutsfor you. To access Shortcuts, press [CMD][8][6]. My shortcuts are:___________________________ ______________________________________________________ ___________________________
22.1 Keys overview
Each keypad has 10 number keys and five function keys: [ESC],[CMD], [PREV], [NEXT], and [ENTER]. When pressed, keys turnon keypad backlighting and emit the keypress tone (short beep).
22.1.1 Keys descriptions
ESCThe [ESC] (Escape) key has two uses. First, use the [ESC](Escape) key to exit from menus and functions. Also, use the keyas a backspace when you enter names and numbers. CMDUse the [CMD] key in combination with one or two number keysto perform functions. PREV and NEXTUse the [PREV] and [NEXT] keys to scroll through menus or menuselections. ENTER
128 en | B91x Keypad operation overview Control Panels
2015.01 | 02 | F.01U.307.371 Bosch Security Systems, Inc.
Use the [ENTER] key to complete the entry of your passcode, toselect a menu item, or to answer Yes to a keypad request.
22.2 Display overview
The keypad uses words, numbers, and symbols to show thestatus of the security system. When several events occur, thekeypad shows each event in order of priority.The keypad has a bright two-line liquid crystal display (LCD).
22.3 Status indicators overview
The Status indicators on keypads provide a quick visual referencefor you to see how your system is operating.
Control Panels B91x Keypad operation overview | en 129
Bosch Security Systems, Inc. 2015.01 | 02 | F.01U.307.371

Part On status.– Green. Ready to turn Part On.– Red. Part On (part armed).
Power. The blue power plug indicates whether thecontrol panel has AC power.– ON Steady. The AC (mains) power to the control
panel is present.– Flashing. AC (mains) power to the control panel
is not present and the control panel is operatingfrom the battery.
– OFF. There is no power to the control panel.
Trouble. The yellow caution lights when a troublecondition exists.– ON Steady. There is a system, device, or point
trouble.– OFF. There are no system, device, or point
troubles.
All On status.– Green. Ready to turn All On.– Red. All On (all armed).
130 en | B91x Keypad operation overview Control Panels
2015.01 | 02 | F.01U.307.371 Bosch Security Systems, Inc.
23 B92x/B91x menu tree
The keypad offers an easy-to-use menu tree structure. To accessthe menu tree, press [MENU] on a B92x or [CMD][8] on a B91x.Each menu option has a number. At each level, you can press the number for the desired menu, ifyou know it. Otherwise, use [PREV] or [NEXT] to review youroptions at that level, and then press [ENTER] when you see thedesired menu option. The menu tree figure on the next page shows the menu structureand the numbers associated for each menu option.
Control Panels B92x/B91x menu tree | en 131
Bosch Security Systems, Inc. 2015.01 | 02 | F.01U.307.371
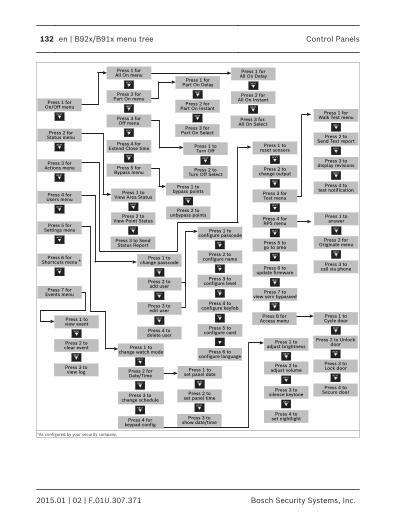
*As configured by your security company.
Press 1 forAll On menu
Press 2 for Part On menu
Press 3 for Off menu
Press 4 forExtend Close time
Press 5 for Bypass menu
Press 1 for All On Delay
Press 2 forAll On Instant
Press 3 for.All On Select
Press 1 forPart On Delay
Press 2 forPart On Instant
Press 3 for Part On Select
Press 1 toTurn Off
Press 2 toTurn Off Select
Press 1 toView Area Status
Press 2 to View Point Status
Press 3 to SendStatus Report
Press 1 to change passcode
Press 2 toadd user
Press 3 to edit user
Press 4 to delete user
Press 1 toset panel date
Press 2 to set panel time
Press 3 toshow date/time
Press 1 to change watch mode
Press 2 forDate/Time
Press 3 tochange schedule
Press 4 forkeypad config
Press 1 to view event
Press 2 to clear event
Press 3 to view log
Press 1 forOn/Off menu
Press 2 forStatus menu
Press 3 for Actions menu
Press 4 forUsers menu
Press 5 forSettings menu
Press 6 forShortcuts menu
Press 7 forEvents menu
Press 1 tobypass points
Press 2 tounbypass points Press 1 to
answer
Press 2 forOriginate menu
Press 3 to call via phone
Press 7 toview serv bypassed
Press 1 forWalk Test menu
Press 4 totest notification
Press 1 toconfigure passcode
Press 2 to configure name
Press 3 toconfigure level
Press 4 toconfigure keyfob
Press 5 toconfigure card
*
Press 3 forTest menu
Press 4 for RPS menu
Press 5 togo to area
Press 6 toupdate firmware
Press 1 toreset sensors
Press 2 tochange output
Press 2 to Send Test report
Press 3 todisplay revisions
Press 1 to adjust brightness
Press 2 toadjust volume
Press 3 tosilence keytone
Press 4 toset nightlight
Press 1 toCycle door
Press 2 to Unlock door
Press 4 toSecure door
Press 3 toLock door
Press 8 forAccess menu
Press 6 toconfigure language
132 en | B92x/B91x menu tree Control Panels
2015.01 | 02 | F.01U.307.371 Bosch Security Systems, Inc.
CommandsYou can initiate functions with the [CMD] key plus the one or twodigit command. If you know the command number, press the [CMD] key and thenthe one or two digit command.
Notice!
After you press [CMD], you can use /[PREV] or /[NEXT] to move through the list of commands, andpress [ENTER] when viewing the desired command.
Review the available commands in the following table.
Control Panels B92x/B91x menu tree | en 133
Bosch Security Systems, Inc. 2015.01 | 02 | F.01U.307.371
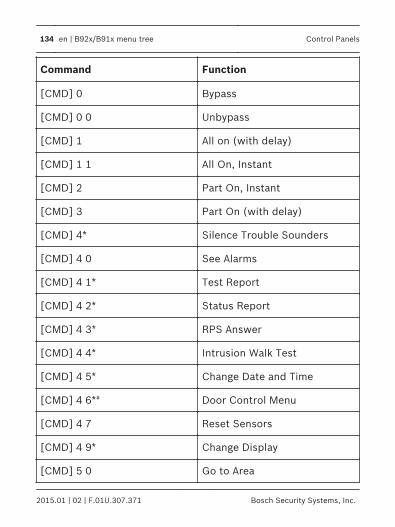
Command Function
[CMD] 0 Bypass
[CMD] 0 0 Unbypass
[CMD] 1 All on (with delay)
[CMD] 1 1 All On, Instant
[CMD] 2 Part On, Instant
[CMD] 3 Part On (with delay)
[CMD] 4* Silence Trouble Sounders
[CMD] 4 0 See Alarms
[CMD] 4 1* Test Report
[CMD] 4 2* Status Report
[CMD] 4 3* RPS Answer
[CMD] 4 4* Intrusion Walk Test
[CMD] 4 5* Change Date and Time
[CMD] 4 6*# Door Control Menu
[CMD] 4 7 Reset Sensors
[CMD] 4 9* Change Display
[CMD] 5 0 Go to Area
134 en | B92x/B91x menu tree Control Panels
2015.01 | 02 | F.01U.307.371 Bosch Security Systems, Inc.
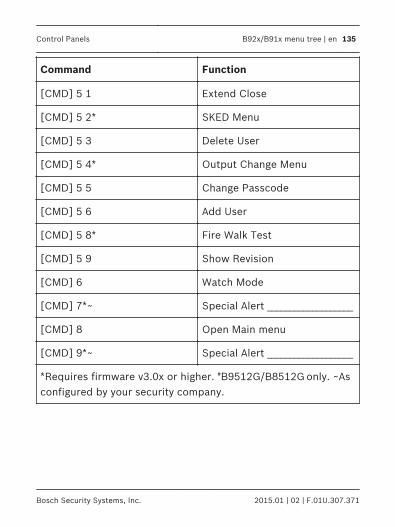
Command Function
[CMD] 5 1 Extend Close
[CMD] 5 2* SKED Menu
[CMD] 5 3 Delete User
[CMD] 5 4* Output Change Menu
[CMD] 5 5 Change Passcode
[CMD] 5 6 Add User
[CMD] 5 8* Fire Walk Test
[CMD] 5 9 Show Revision
[CMD] 6 Watch Mode
[CMD] 7*~ Special Alert ___________________
[CMD] 8 Open Main menu
[CMD] 9*~ Special Alert ___________________
*Requires firmware v3.0x or higher. #B9512G/B8512G only. ~Asconfigured by your security company.
Control Panels B92x/B91x menu tree | en 135
Bosch Security Systems, Inc. 2015.01 | 02 | F.01U.307.371
24 B92x/B91x On/Off menu
Use the On/Off menu to turn areas All or Part On, to turn areasoff, to extend closing time, or to bypass points. When you turn on (arm) your security system, there is an exitdelay that gives you time to leave the area without sounding theburglary tone. When you enter a security system that is turned on(armed), there is an entry delay that gives you time to turn off(disarm) the system.
24.1 All On menu
Use the All On menu to turn areas All On. Turning an area All Onmeans to turn on (arm) all the points in that area, for example, alldoors and all windows and all motion sensors.
136 en | B92x/B91x On/Off menu Control Panels
2015.01 | 02 | F.01U.307.371 Bosch Security Systems, Inc.

24.1.1 All On
Turning an area All On turns on all points in the area and providesentry and exit delay. For example, you can turn on the area andleave through a door (within exit delay time) without creating analarm event. When you turn the area All On, the display showshow many seconds of exit delay time remain to exit the protectedarea. Leave before the exit delay time expires. Leaving after exit delay expires causes entry delay to start. It mayalso cause an alarm on an interior device. Enter your passcode toturn off the system.Turning areas All On:1. Open the Main menu.2. Press [1] or [ENTER] to open the On/Off menu.3. Press [1] or [ENTER] to open the All On menu.4. Press [1] or [ENTER] to select All On Delay.5. Enter your passcode and press [ENTER]. The keypad shows
Exit Now! and sounds during the exit delay.6. Exit the area or enter your passcode to stop the system from
turning on. If you turn your system All On and don't exit, thesystem automatically switches to Part On.
Control Panels B92x/B91x On/Off menu | en 137
Bosch Security Systems, Inc. 2015.01 | 02 | F.01U.307.371
24.1.2 All On Instant
Turning an area All On Instant turns on all points with no entry orexit delay. When areas are All On Instant, faulting any point(opening a door for example) creates an alarm eventimmediately. Turning areas All On Instant:1. Open the Main menu.2. Press [1] or [ENTER] to open the On/Off menu.3. Press [1] or [ENTER] to open the All On menu.4. Use [NEXT] to go to the All On Instant option, and press
[ENTER], or simply press [2]. The keypad shows All On.5. To turn off the security system, enter your passcode and
press [ENTER].
138 en | B92x/B91x On/Off menu Control Panels
2015.01 | 02 | F.01U.307.371 Bosch Security Systems, Inc.

24.1.3 Select Area (All On menu)
Use All On Select to choose individual areas to turn All On or AllOn Instant. You choose areas from a list of the areas in which youhave authority. Turning on a specific area:1. Open the Main menu.2. Press [1] or [ENTER] to open the On/Off menu.3. Press [1] or [ENTER] to open the All On menu.4. Use [NEXT] to go to the All On Select menu, and press
[ENTER], or simply press [3].5. Use [NEXT] and [ENTER] to select either the On Instant or On
Delay option. The keypad responds based upon yourselection.
Control Panels B92x/B91x On/Off menu | en 139
Bosch Security Systems, Inc. 2015.01 | 02 | F.01U.307.371
24.2 Part On menu
Use the Part On menu to turn areas Part On. Turning an area PartOn means to turn on only some of the points, and thus part ofthe system. For example, your security company might configureyour system so that when you use the Part On function, only theexterior doors and windows turn on, whereas interior motionsensors do not turn on.
24.2.1 Part On
Turning an area Part On turns on some points, or part of thesystem, in the area and provides entry and exit delay. Forexample, you can turn on the area and leave through a door(within exit delay time) without creating an alarm event. Turning the perimeter on with an exit delay:1. Open the Main menu.2. Press [1] or [ENTER] to open the On/Off menu.3. Use [NEXT] to go to the Part On option, and press [ENTER],
or simply press [2].4. Press [1] or [ENTER] to open the Part On Delay option. The
keypad shows Part On Dly.5. To turn off the system, enter your passcode and press
[ENTER].
140 en | B92x/B91x On/Off menu Control Panels
2015.01 | 02 | F.01U.307.371 Bosch Security Systems, Inc.
24.2.2 Part On Instant
Turning an area Part On turns on some points, or part of thesystem, in the area with no entry or exit delay. When the area isPart On Instant, faulting a Part On point (opening a door forexample) creates an alarm event immediately. Turning the system Part On without delay:1. Open the Main menu.2. Press [1] or [ENTER] to open the On/Off menu.3. Use [NEXT] to go to the Part On option, and press [ENTER],
or simply press [2].4. Use [NEXT] to go to the Part On Instant option, and press
[ENTER], or press [2].5. Enter your passcode and press [ENTER]. The keypad shows
Part On Inst.6. To turn off the system, enter your passcode and press
[ENTER].
Control Panels B92x/B91x On/Off menu | en 141
Bosch Security Systems, Inc. 2015.01 | 02 | F.01U.307.371
24.2.3 Select Area (Part On menu)
Use Part On Select to choose individual areas to turn Part On orPart On Instant. You choose areas from a list of the areas inwhich you have authority. Turning individual areas Part On:1. Open the Main menu.2. Press [1] or [ENTER] to open the On/Off menu.3. Use [NEXT] to go to the Part On option, and press [ENTER],
or simply press [2].4. Use [NEXT] to go to the menu Part On Select menu, and
press [ENTER], or press [3].5. Use [NEXT] and [ENTER]to select either the On Instant or On
Delay option. The keypad responds based upon yourselection.
142 en | B92x/B91x On/Off menu Control Panels
2015.01 | 02 | F.01U.307.371 Bosch Security Systems, Inc.
24.3 Off menu
You can turn areas off simply by entering your passcode or byusing the Off menu. With either option, you turn off all areas inwhich you have authority. You must enter your personal passcode and enter through adesignated entry door to prevent an instant alarm condition.Opening the door starts entry delay time and the keypad emits apulsing “beep” tone to remind you to turn the system off. Enteryour passcode before the entry delay time expires. If you enter through the wrong door or fail to turn off (disarm)before the entry delay time expires, an alarm occurs. If thishappens, silence the alarm (by entering your personal passcodeand pressing [ENTER]) and call your security company to notifythem that you do not have an emergency situation. Turning off the security system (disarm) with your passcode:1. Enter your personal passcode.2. Press [ENTER] within 8 sec of entering your passcode. The
display returns to idle text.
24.3.1 Turn Off
You can use the Turn Off menu to turn off all areas in which youhave authority. Turning off areas:
Control Panels B92x/B91x On/Off menu | en 143
Bosch Security Systems, Inc. 2015.01 | 02 | F.01U.307.371

1. Open the Main menu.2. Press [1] or [ENTER] to open the On/Off menu.3. Use [NEXT] to go to the menu Off menu, and press [ENTER],
or simply press [3].4. Press [1] or [ENTER] to open the Off menu.5. Enter your passcode and press [ENTER]. The display returns
to idle text.
24.3.2 Turn Off Select
Use Turn Off Select to choose individual areas to turn off. Youchoose areas from a list of the areas in which you have authority. Turning off a specific area:1. Open the Main menu.2. Press [1] or [ENTER] to open the On/Off menu.3. Use [NEXT] to go to the menu Off menu, and press [ENTER],
or simply press [3].4. Use [NEXT] to go to the menu Turn Off Select menu, and
press [ENTER], or simply press [2].5. Use [NEXT] and [ENTER] to select an area.6. Press [ENTER] to turn off your selected area.
144 en | B92x/B91x On/Off menu Control Panels
2015.01 | 02 | F.01U.307.371 Bosch Security Systems, Inc.
24.4 Extend Closing
Your security company might program your system to expect youto turn on (arm) within a closing window. A closing window is aduration of time programmed by your security company. Yoursecurity company sets a fixed length of time for the closingwindow. Additionally, your security company might program yoursystem to automatically turn on (arm) at the end of the window. Use the Extend Close Time option when you need to stay laterthan the scheduled close time. If you do not extend the CloseTime and do not turn the system on before the scheduled time,the system creates a Late to Close event. At the beginning of the closing window, the keypad beeps andshows Please Close Now to remind you to turn on (arm) yoursystem. It remains in the display until you turn on the system, theclose window ends, or you extend closing. Alarm or troublemessages replace this message in the event of an alarm ortrouble condition. If the alarm or trouble condition clears beforethe end of the close window Please Close Now returns to thekeypad display. Pressing [ESC] silences the beep and clears the message for 10minutes. If you have not turned your system on (armed) orextended closing, the Please Close Now message and beep
Control Panels B92x/B91x On/Off menu | en 145
Bosch Security Systems, Inc. 2015.01 | 02 | F.01U.307.371
reappear after 10 minutes. To extend the window, enter the newtime at which you would like the reminder tone to begin. Thistime is the new beginning of the closing window. When you hear the warning, you can:– Leave before the end of the closing window by pressing
[ESC] to silence the signal, turning on the system, andleaving.
– Stay past the scheduled end of the closing window, by usingthis function to extend the closing window.
To extend closing:1. Open the Main menu.2. Press [1] or [ENTER] to open the On/Off menu.3. Use [NEXT] to go to the Extend Closing menu, and press
[ENTER], or simply press [4].4. Enter your passcode and press [ENTER].
Notice!You cannot extend the window across the midnightboundary. The system cannot arm if points are off-normal.
146 en | B92x/B91x On/Off menu Control Panels
2015.01 | 02 | F.01U.307.371 Bosch Security Systems, Inc.
24.5 Bypass menu
Use the Bypass menu to temporarily take points out of thesecurity system, and enter them back into the system. Bypassedpoints do not create alarm or trouble events, do not detectintruders, and cannot send any reports. For example, to leave awindow open and turn the system on, you bypass the windowpoint and then turn the system on.
24.5.1 Bypass
You can bypass points when an area is turned off (disarmed).Points remain bypassed until you unbypass them or some pointsreturn when the area is turned off (disarmed). Use pointbypassing with discretion: bypassing a point reduces the level ofsecurity. Bypassing a point:1. Open the Main menu.2. Press [1] or [ENTER] to open the On/Off menu.3. Use [NEXT] to go to the Bypass menu, and press [ENTER], or
simply press [5].4. Press [1] or [ENTER] to open the Bypass Points menu.5. Select a point to bypass.6. Press [ESC] to exit the menu.
Control Panels B92x/B91x On/Off menu | en 147
Bosch Security Systems, Inc. 2015.01 | 02 | F.01U.307.371
24.5.2 Unbypass
Unbypassing a point returns a bypassed point to the securitysystem so that it can once again respond to trouble and alarmconditions. Unbypassing a point:1. Open the Main menu.2. Press [1] or [ENTER] to open the On/Off menu.3. Use [NEXT] to go to the Bypass menu, and press [ENTER], or
simply press [5].4. Use [NEXT] to go to the Unbypass menu, and press [ENTER],
or simply press [2].5. Enter your passcode and press [ENTER].6. Select a point to bypass.7. Press [ESC] to exit the menu.
148 en | B92x/B91x On/Off menu Control Panels
2015.01 | 02 | F.01U.307.371 Bosch Security Systems, Inc.
25 B92x/B91x Status menu
Use the Status menu to see area or point status, or to send astatus report.
25.1 View Area Status
Area Status shows the on/off status for areas in which you haveauthority. Viewing area status:1. Open the Main menu.2. Use [NEXT] to go to the Status menu option, and press
[ENTER], or simply press [2].3. Press [1] or [ENTER] to open the View Area Status menu.4. Enter your passcode and press [ENTER]. The display shows
the status of each area. For example A1: Off.5. Press [ESC] to exit the menu.
Control Panels B92x/B91x Status menu | en 149
Bosch Security Systems, Inc. 2015.01 | 02 | F.01U.307.371
25.2 View Point Status
The View Point Status feature shows the status (normal, open, orshort) for all points in the areas in which you have authority. Viewing point status:1. Open the Main menu.2. Use [NEXT] to go to the Status menu option, and press
[ENTER], or simply press [2].3. Use [NEXT] to go to the View Point Status menu option, and
press [ENTER], or simply press [2].4. The display shows the number of points in the system. Use
[PREV] or [NEXT] to scroll through the list of points and eachpoint’s status.
5. Press [ESC] to exit the menu.
150 en | B92x/B91x Status menu Control Panels
2015.01 | 02 | F.01U.307.371 Bosch Security Systems, Inc.

25.3 Send Status Report
The Send Status Report feature sends a complete system statusreport to your security monitoring company. Status reports canalert them to potential problems. Sending a status report:1. Open the Main menu.2. Use [NEXT] to go to the Status menu option, and press
[ENTER], or simply press [2].3. Use [NEXT] to go to the Send Status Report menu option,
and press [ENTER], or simply press [3].4. Enter your passcode and press [ENTER]. The control panel
sends a status report to your security company.
Control Panels B92x/B91x Status menu | en 151
Bosch Security Systems, Inc. 2015.01 | 02 | F.01U.307.371
26 B92x/B91x Actions menu
Use the Actions menu to reset sensors, change outputs, see thetest menu, see the RPS menu, go to an area, update systemfirmware, or to view service bypassed points.
26.1 Reset
Detection devices, such as smoke detectors and shock sensors,might require a reset action before they return to normaloperation. This function momentarily removes power from thesedevices to reset them. Resetting sensors:1. Open the Main menu.2. Use [NEXT] to go to the Actions menu option, and press
[ENTER], or simply press [3].3. Press [1] or [ENTER] to reset the sensors with the Reset
option.4. Enter your passcode and press [ENTER]. The display shows
Sensors resetting for approximately 3 seconds and then goesblank before returning to idle disarmed text.
If you enter this function and the detector or sensor resetsmomentarily, but then returns to a faulted condition, theconditions causing the activation may still be present or thedetector may be faulty. Check to be certain that there is nosmoke, fire, or other danger present.
152 en | B92x/B91x Actions menu Control Panels
2015.01 | 02 | F.01U.307.371 Bosch Security Systems, Inc.

If you cannot reset the detector or sensor, contact your securitycompany.
Control Panels B92x/B91x Actions menu | en 153
Bosch Security Systems, Inc. 2015.01 | 02 | F.01U.307.371

26.2 Outputs
Your security company programs outputs for automatic controland/or keypad control of devices such as premises lighting orentry gates. An output is a device that is controlled by thesecurity system. Contact your security company for furtherinformation regarding the use of outputs in your security system. Use this function to select outputs to turn on or off. Outputs onyour security system can control other systems, lighting forexample. Security systems using B5512/B4512/B3512 control panels arenot UL investigated for access control. Turning outputs on and off:1. Open the Main menu.2. Use [NEXT] to go to the Actions menu option, and press
[ENTER], or simply press [3].3. Use [NEXT] to go to the Outputs menu option, and press
[ENTER], or simply press [2].4. Enter your passcode and press [ENTER].5. Use [NEXT] to select the desired output value, or use the
number keys to enter the value.6. Press [ENTER]. The current state of the output shows.7. Use [ENTER] to toggle between Off and On.8. Press [ESC] to exit the menu.
154 en | B92x/B91x Actions menu Control Panels
2015.01 | 02 | F.01U.307.371 Bosch Security Systems, Inc.
26.3 Test
Use the Test menu to walk test your system, send test reports, orto review system revision information on the keypad display.
26.3.1 Walk Test
A walk test allows you to test the sensors, keypads, sounders,and other devices in your system without creating alarm events.You can review untested points at the keypad to help pinpointany problems. You cannot turn on the security system while in the walk testmode. Also, the security system does not create alarm events forpoints included in the walk test. Points not included create alarmevents. For example, faulting a fire point during an intrusion walktest creates a fire alarm event. Beginning the walk test activates the burglary tone for 2 seconds.A battery test also begins. A successful battery test ends in fourminutes (the walk test continues). If the security systemdetermines there is a low battery, it generates a low batteryevent and continues the test. If the battery is determined to bevery low, the system creates a missing battery event and endsthe battery test immediately. To test individual detection devices, simply activate sensors andopen protected doors and windows one-at-a-time. As you faulteach detection device, the keypad from which you initiated the
Control Panels B92x/B91x Actions menu | en 155
Bosch Security Systems, Inc. 2015.01 | 02 | F.01U.307.371
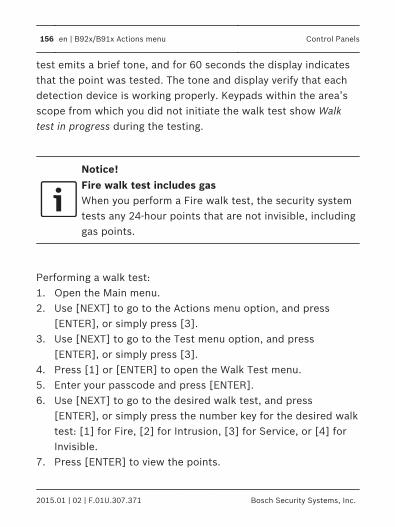
test emits a brief tone, and for 60 seconds the display indicatesthat the point was tested. The tone and display verify that eachdetection device is working properly. Keypads within the area’sscope from which you did not initiate the walk test show Walktest in progress during the testing.
Notice!Fire walk test includes gasWhen you perform a Fire walk test, the security systemtests any 24-hour points that are not invisible, includinggas points.
Performing a walk test:1. Open the Main menu.2. Use [NEXT] to go to the Actions menu option, and press
[ENTER], or simply press [3].3. Use [NEXT] to go to the Test menu option, and press
[ENTER], or simply press [3].4. Press [1] or [ENTER] to open the Walk Test menu.5. Enter your passcode and press [ENTER].6. Use [NEXT] to go to the desired walk test, and press
[ENTER], or simply press the number key for the desired walktest: [1] for Fire, [2] for Intrusion, [3] for Service, or [4] forInvisible.
7. Press [ENTER] to view the points.
156 en | B92x/B91x Actions menu Control Panels
2015.01 | 02 | F.01U.307.371 Bosch Security Systems, Inc.

8. Use [NEXT] to toggle through your desired point and view thestatus of that point.
9. Press [ESC] to exit the menu.
Automatic terminationThe Walk Test automatically ends after 20 minutes of no testactivity. The keypad sounds during the last 5 minutes of the test.
Control Panels B92x/B91x Actions menu | en 157
Bosch Security Systems, Inc. 2015.01 | 02 | F.01U.307.371
26.3.2 Send Test Report
This function tests the communication link between your securitysystem and your security company. It is an important part ofmaintaining a high level of security for your property. Sending a test report:1. Open the Main menu.2. Use [NEXT] to go to the Actions menu option, and press
[ENTER], or simply press [3].3. Use [NEXT] to go to the Test menu option, and press
[ENTER], or simply press [3].4. Use [NEXT] to go to the Send Test Report menu option, and
press [ENTER], or simply press [2].5. Enter your passcode and press [ENTER]. The system sends a
test report.6. Press [ESC] to exit the menu
158 en | B92x/B91x Actions menu Control Panels
2015.01 | 02 | F.01U.307.371 Bosch Security Systems, Inc.

26.3.3 Revisions
Use this function to view the current revision of your controlpanel firmware. Viewing the current revision of your system (control panel):1. Open the Main menu.2. Use [NEXT] to go to the Actions menu option, and press
[ENTER], or simply press [3].3. Use [NEXT] to go to the Test menu option, and press
[ENTER], or simply press [3].4. Use [NEXT] to go to the Revisions menu option, and press
[ENTER], or simply press [3]. The current control panelrevision information shows on the display.
5. Press [ESC] to exit the menu.
Control Panels B92x/B91x Actions menu | en 159
Bosch Security Systems, Inc. 2015.01 | 02 | F.01U.307.371
26.3.4 Notification Test
Use this menu to test the security system’s ability to sendpersonal notification messages to the destination pathdesignated by your security company. Testing notifications:1. Open the Main menu.2. Use [NEXT] to go to the Actions menu option, and press
[ENTER], or simply press [3].3. Use [NEXT] to go to the Test menu option, and [ENTER], or
simply press [3].4. Use [NEXT] to go to the Notification Test Report option, and
press [ENTER], or simply press [4]. The keypad shows thefirst destination.
5. Use [NEXT] to go to the desired destination, and then press[ENTER]. The control panel sends a test notification, and thenreturns to idle text.
160 en | B92x/B91x Actions menu Control Panels
2015.01 | 02 | F.01U.307.371 Bosch Security Systems, Inc.
26.4 RPS
Use the RPS menu for connection to Remote ProgrammingSoftware (RPS). Your security company uses RPS to configureand service your security system. RPS is intended for use byprofessional or licensed installers only.
26.4.1 Answer
Use the Answer option to answer the phone (pick up the phoneline) to connect to RPS. Using the Answer menu option to answer an incoming call fromRPS:1. Open the Main menu.2. Use [NEXT] to go to the Actions menu option, and press
[ENTER], or simply press [3].3. Use [NEXT] to go to the RPS menu option, and press
[ENTER], or simply press [4].4. Press [1] or [ENTER] to reset the sensors with the Answer
option.5. Enter your passcode and press [ENTER]. The keypad shows
RPS is connecting…. and then returns to idle text.
Control Panels B92x/B91x Actions menu | en 161
Bosch Security Systems, Inc. 2015.01 | 02 | F.01U.307.371

26.4.2 Network Originate
Use this function to originate an RPS session using an internetconnection. Connecting to RPS using an internet connection:1. Open the Main menu.2. Use [NEXT] to go to the Actions menu option, and press
[ENTER], or simply press [3].3. Use [NEXT] to go to the RPS menu option, and press
[ENTER], or simply press [4].4. Use [NEXT] to go to the Network Originate menu option, and
press [ENTER], or simply press [2].5. Enter your passcode and press [ENTER].6. To use the programmed port number, press [1] or press
[ENTER]. The connection progress begins.7. If you wish to change the port number before connecting,
press [NEXT] and then [ENTER], or simply press [2]. The[ESC] key acts as a backspace key. Press [ESC] to delete thecharacters, and then enter the new characters. Press[ENTER]. The connection process begins.
162 en | B92x/B91x Actions menu Control Panels
2015.01 | 02 | F.01U.307.371 Bosch Security Systems, Inc.
26.4.3 Call Via Phone
Use this function to call RPS using the phone line. Connecting to RPS via the phone line:1. Open the Main menu.2. Use [NEXT] to go to the Actions menu option, and press
[ENTER], or simply press [3].3. Use [NEXT] to go to the RPS menu option, and press
[ENTER], or simply press [4].4. Use [NEXT] to go to the Call Via Phone menu option, and
press [ENTER], or simply press [3].5. Enter your passcode and press [ENTER]. The connection
process begins.
Control Panels B92x/B91x Actions menu | en 163
Bosch Security Systems, Inc. 2015.01 | 02 | F.01U.307.371
26.5 Go to Area
With the Go to Area function you can perform tasks in an areaother than the one you’re in without having to physically go tothat area. For example, using the keypad in the office area, youcould 'go' to the loading area. You select the area from a list ofareas in which you have authority. Once you 'go’ to an area, you can perform tasks you haveauthority for in that area. To 'leave' an area press [ESC]. Using Go to Area:1. Open the Main menu.2. Use [NEXT] to go to the Actions menu option, and press
[ENTER], or simply press [3].3. Use [NEXT] to go to the Go to Area menu option, and press
[ENTER], or simply press [5].4. Enter your passcode and press [ENTER].5. Use [NEXT] to go to the area you wish to enter, and then
press [ENTER].
164 en | B92x/B91x Actions menu Control Panels
2015.01 | 02 | F.01U.307.371 Bosch Security Systems, Inc.

26.6 Firmware
Your security company might have configured your securitysystem to require your authorization before system firmware canbe updated. Use this action to provide authorization at therequest of your security company. Local authorization is requiredfor UL listed systems. Authorizing a firmware update:1. Open the Main menu.2. Use [NEXT] to go to the Actions menu option, and press
[ENTER], or simply press [3].3. Use [NEXT] to go to the Firmware menu option, and [ENTER],
or simply press [6].4. Enter your passcode and press [ENTER].
Control Panels B92x/B91x Actions menu | en 165
Bosch Security Systems, Inc. 2015.01 | 02 | F.01U.307.371
26.7 Service Bypass
To facilitate system maintenance for service personnel, yoursecurity system comes with a special point bypass option toremove any point from service. Bypassed points are notprotected. Use this menu to view bypassed points. Viewing points in Service Bypass:1. Open the Main menu.2. Use [NEXT] to go to the Actions menu option, and press
[ENTER], or simply press [3].3. Use [NEXT] to go to the Service Bypass menu option, and
press [ENTER], or simply press [6].4. Enter your passcode and press [ENTER]. The keypad shows
any points in service bypass.
166 en | B92x/B91x Actions menu Control Panels
2015.01 | 02 | F.01U.307.371 Bosch Security Systems, Inc.
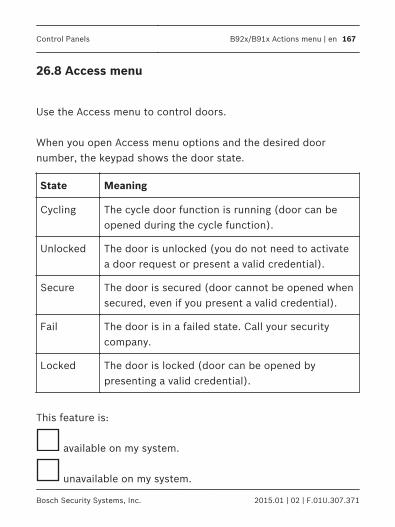
26.8 Access menu
Use the Access menu to control doors. When you open Access menu options and the desired doornumber, the keypad shows the door state.
State Meaning
Cycling The cycle door function is running (door can beopened during the cycle function).
Unlocked The door is unlocked (you do not need to activatea door request or present a valid credential).
Secure The door is secured (door cannot be opened whensecured, even if you present a valid credential).
Fail The door is in a failed state. Call your securitycompany.
Locked The door is locked (door can be opened bypresenting a valid credential).
This feature is:
available on my system.
unavailable on my system.
Control Panels B92x/B91x Actions menu | en 167
Bosch Security Systems, Inc. 2015.01 | 02 | F.01U.307.371

26.8.1 Cycle Door
Use the Cycle Door menu to allow access during the cycle time(door can be opened). Cycling a door:1. Open the Main menu.2. Use [NEXT] to go to the Actions menu option, and press
[ENTER] , or simply press [3].3. Use [NEXT] to go to the Access menu option, and press
[ENTER], or simply press [8].4. Press the [1] or [ENTER] to open the Cycle Door option.5. Enter your passcode and press the [ENTER] key.6. Use [PREV] or [NEXT] to scroll to the desired door. The
keypad shows the door status.7. To cycle the door, press [ENTER]. The door cycles.8. Escape from the menu.
168 en | B92x/B91x Actions menu Control Panels
2015.01 | 02 | F.01U.307.371 Bosch Security Systems, Inc.

26.8.2 Unlock Door
Use the Unlock Door menu to unlock a door to allow free access. Unlocking a door:1. Open the Main menu.2. Use [NEXT] to go to the Actions menu option, and press
[ENTER] , or simply press [3].3. Use [NEXT] to go to the Access menu option, and press
[ENTER], or simply press [8].4. Use [NEXT] to go to the Unlock menu option, and press
[ENTER], or simply press [2].5. Enter your passcode and press [ENTER].6. Use [PREV] or [NEXT] to scroll to the desired door. The
keypad shows the door status.7. Press [ENTER]. The door unlocks.8. Escape from the menu.
Control Panels B92x/B91x Actions menu | en 169
Bosch Security Systems, Inc. 2015.01 | 02 | F.01U.307.371
26.8.3 Lock Door
Use the Lock Door menu to lock an unlocked door. Also use thismenu to lock doors that were automatically opened during a firealarm. Once a door is locked, a user must present a card toenter, or send an Unlock or a Cycle command from the keypad toallow the door to open. Locking a door:1. Open the Main menu.2. Use [NEXT] to go to the Actions menu option, and press
[ENTER] , or simply press [3].3. Use the [NEXT] key to go to the Access menu option, and
press [ENTER], or simply press [8].4. Use [NEXT] to go to the Lock menu option, and press
[ENTER], or simply press [3].5. Enter your passcode and press [ENTER].6. Use [PREV] or [NEXT] to scroll to the desired door. The
keypad shows the door status.7. Press [ENTER]. The door locks.8. Escape from the menu.
170 en | B92x/B91x Actions menu Control Panels
2015.01 | 02 | F.01U.307.371 Bosch Security Systems, Inc.
26.8.4 Secure Door
Use the Secure Door menu to secure and unsecure doors. Asecured door cannot be opened by presenting a valid credentialor by using the cycle function. Securing a door:1. Open the Main menu.2. Use [NEXT] to go to the Actions menu option, and press
[ENTER] , or simply press [3].3. Use the [NEXT] key to go to the Access menu option, and
press [ENTER], or simply press [8].4. Use [NEXT] to go to the Secure menu option, and press
[ENTER], or simply press [4].5. Enter your passcode and press [ENTER].6. Use [PREV] or [NEXT] to scroll to the desired door. The
keypad shows the door status.7. Press [ENTER]. The door secures.8. Escape from the menu..
Control Panels B92x/B91x Actions menu | en 171
Bosch Security Systems, Inc. 2015.01 | 02 | F.01U.307.371

27 B92x/B91x Users menu
Use the Users menu to change your own passcode, add newusers, edit existing users, or to delete users.
27.1 Change Passcode
Use the Change Passcode function to change your personalpasscode.Before you begin, consider the following:– Choose a new passcode three to six digits long. If you choose
a passcode with the same digit in consecutive order (forexample “33” in 334697), take care when entering it.
– To avoid conflicting with other passcodes and duress codes,your security system does not let you change to existingpasscodes or passcodes that are within plus or minus 2 of anexisting passcode. For example, if 1234 is an existing code,your security system does not let you change your code to1232, 1233, 1234, 1235, or 1236.
172 en | B92x/B91x Users menu Control Panels
2015.01 | 02 | F.01U.307.371 Bosch Security Systems, Inc.

Changing your passcode:1. Open the Main menu.2. Use [NEXT] to go the Users menu option, and press [ENTER],
or simply press [4].3. Press [1] or [ENTER] to open the Change Passcode option.4. Enter your current passcode and press [ENTER].5. Enter your new passcode and press [ENTER].6. Enter your new passcode again and press [ENTER]. The
keypad shows Passcode changed and then returns to theChange Passcode option.
7. Press [ESC] to exit the menu.
Control Panels B92x/B91x Users menu | en 173
Bosch Security Systems, Inc. 2015.01 | 02 | F.01U.307.371
27.2 Add User
Use the Add User function to add a passcode to your securitysystem. Before you add the user, you need to know which usernumbers are available, the authority level you want to assign tothe new passcode, and the areas in which it will be valid. The user numbers identify users in reports transmitted from yoursecurity system. The authority level determines what systemfunctions the passcode can access. The area number identifieswhich parts of your security system the passcode can access.Contact your security company if you don’t know what usernumbers, authority levels, or areas are available.
174 en | B92x/B91x Users menu Control Panels
2015.01 | 02 | F.01U.307.371 Bosch Security Systems, Inc.
Before you begin:– Do not try to add passcodes without knowing the available
user numbers. These numbers are not to be confused withpasscodes that identify users at your security company.
– Choose a new passcode three to six digits long. If you choosea passcode with the same digit in consecutive order (forexample “33” in 334697), take care when entering it.
– To avoid conflicting with other passcodes and duress codes,your security system does not let you add passcodes that arewithin plus or minus 2 of an existing passcode. For example,if 1234 is an existing code, your system does not let youchange your code to 1232, 1233, 1235, or 1236.
– Choose an authority level for each area. Leaving the authoritylevel for an area blank by pressing [ENTER] without makingan entry, denies the passcode access to that area.
Control Panels B92x/B91x Users menu | en 175
Bosch Security Systems, Inc. 2015.01 | 02 | F.01U.307.371
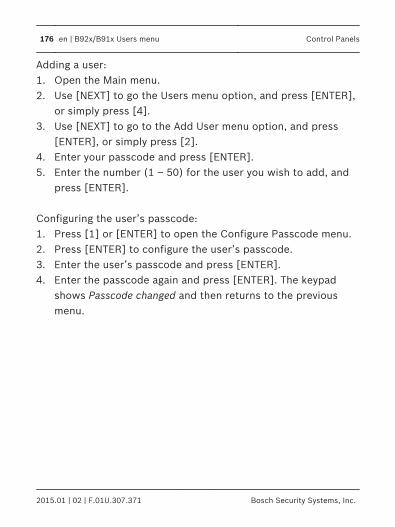
Adding a user:1. Open the Main menu.2. Use [NEXT] to go the Users menu option, and press [ENTER],
or simply press [4].3. Use [NEXT] to go to the Add User menu option, and press
[ENTER], or simply press [2].4. Enter your passcode and press [ENTER].5. Enter the number (1 – 50) for the user you wish to add, and
press [ENTER]. Configuring the user’s passcode:1. Press [1] or [ENTER] to open the Configure Passcode menu.2. Press [ENTER] to configure the user’s passcode.3. Enter the user’s passcode and press [ENTER].4. Enter the passcode again and press [ENTER]. The keypad
shows Passcode changed and then returns to the previousmenu.
176 en | B92x/B91x Users menu Control Panels
2015.01 | 02 | F.01U.307.371 Bosch Security Systems, Inc.
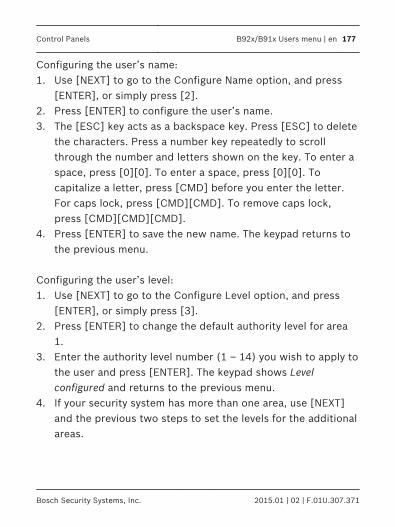
Configuring the user’s name:1. Use [NEXT] to go to the Configure Name option, and press
[ENTER], or simply press [2].2. Press [ENTER] to configure the user’s name.3. The [ESC] key acts as a backspace key. Press [ESC] to delete
the characters. Press a number key repeatedly to scrollthrough the number and letters shown on the key. To enter aspace, press [0][0]. To enter a space, press [0][0]. Tocapitalize a letter, press [CMD] before you enter the letter.For caps lock, press [CMD][CMD]. To remove caps lock,press [CMD][CMD][CMD].
4. Press [ENTER] to save the new name. The keypad returns tothe previous menu.
Configuring the user’s level:1. Use [NEXT] to go to the Configure Level option, and press
[ENTER], or simply press [3].2. Press [ENTER] to change the default authority level for area
1.3. Enter the authority level number (1 – 14) you wish to apply to
the user and press [ENTER]. The keypad shows Levelconfigured and returns to the previous menu.
4. If your security system has more than one area, use [NEXT]and the previous two steps to set the levels for the additionalareas.
Control Panels B92x/B91x Users menu | en 177
Bosch Security Systems, Inc. 2015.01 | 02 | F.01U.307.371
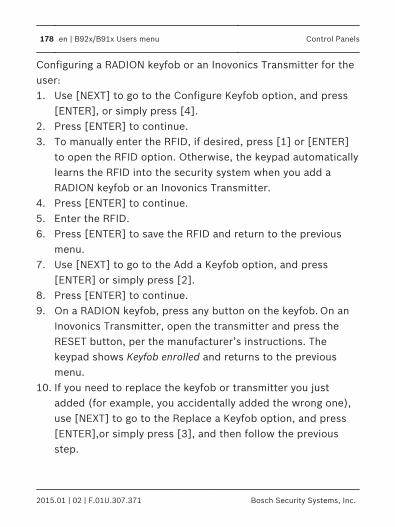
Configuring a RADION keyfob or an Inovonics Transmitter for theuser:1. Use [NEXT] to go to the Configure Keyfob option, and press
[ENTER], or simply press [4].2. Press [ENTER] to continue.3. To manually enter the RFID, if desired, press [1] or [ENTER]
to open the RFID option. Otherwise, the keypad automaticallylearns the RFID into the security system when you add aRADION keyfob or an Inovonics Transmitter.
4. Press [ENTER] to continue.5. Enter the RFID.6. Press [ENTER] to save the RFID and return to the previous
menu.7. Use [NEXT] to go to the Add a Keyfob option, and press
[ENTER] or simply press [2].8. Press [ENTER] to continue.9. On a RADION keyfob, press any button on the keyfob. On an
Inovonics Transmitter, open the transmitter and press theRESET button, per the manufacturer’s instructions. Thekeypad shows Keyfob enrolled and returns to the previousmenu.
10. If you need to replace the keyfob or transmitter you justadded (for example, you accidentally added the wrong one),use [NEXT] to go to the Replace a Keyfob option, and press[ENTER],or simply press [3], and then follow the previousstep.
178 en | B92x/B91x Users menu Control Panels
2015.01 | 02 | F.01U.307.371 Bosch Security Systems, Inc.
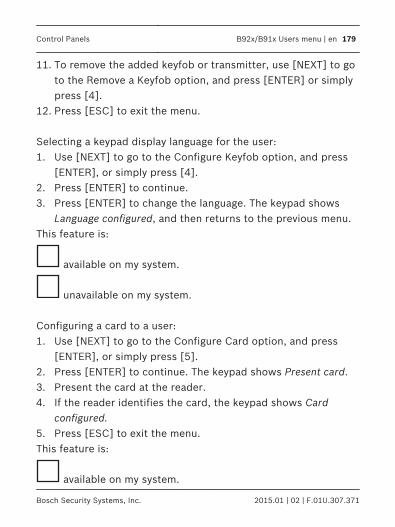
11. To remove the added keyfob or transmitter, use [NEXT] to goto the Remove a Keyfob option, and press [ENTER] or simplypress [4].
12. Press [ESC] to exit the menu. Selecting a keypad display language for the user:1. Use [NEXT] to go to the Configure Keyfob option, and press
[ENTER], or simply press [4].2. Press [ENTER] to continue.3. Press [ENTER] to change the language. The keypad shows
Language configured, and then returns to the previous menu.This feature is:
available on my system.
unavailable on my system. Configuring a card to a user:1. Use [NEXT] to go to the Configure Card option, and press
[ENTER], or simply press [5].2. Press [ENTER] to continue. The keypad shows Present card.3. Present the card at the reader.4. If the reader identifies the card, the keypad shows Card
configured.5. Press [ESC] to exit the menu.This feature is:
available on my system.
Control Panels B92x/B91x Users menu | en 179
Bosch Security Systems, Inc. 2015.01 | 02 | F.01U.307.371
unavailable on my system.
180 en | B92x/B91x Users menu Control Panels
2015.01 | 02 | F.01U.307.371 Bosch Security Systems, Inc.
27.3 Edit User
Use the Edit User function to edit a user of your security system.You need to know the user number for the user you want to edit. Editing an existing user:1. Open the Main menu.2. Use [NEXT] to go the Users menu option, and press [ENTER],
or simply press [4].3. Use [NEXT] to go to the Edit User menu option, and press
[ENTER], or simply press [3].4. Enter your passcode and press [ENTER].5. Enter the number (1 – 50) for the user you wish to edit, and
press [ENTER].6. The keypad shows the name for the user number you entered.
Press [ENTER]. Configuring the user’s passcode:1. Press [1] or [ENTER] to open the Configure Passcode menu.2. Press [ENTER] to configure the user’s passcode.3. Enter the user’s passcode and press [ENTER].4. Enter the passcode again and press [ENTER]. The keypad
shows Passcode changed and then returns to the previousmenu.
Configuring the user’s name:1. Use [NEXT] to go to the Configure Name option, and press
[ENTER], or simply press [2].
Control Panels B92x/B91x Users menu | en 181
Bosch Security Systems, Inc. 2015.01 | 02 | F.01U.307.371

2. Press [ENTER] to configure the user’s name.3. The [ESC] key acts as a backspace key. Press [ESC] to delete
the characters. Press a number key repeatedly to scrollthrough the number and letters shown on the key. To enter aspace, press [0][0]. To enter a space, press [0][0]. Tocapitalize a letter, press [CMD] before you enter the letter.For caps lock, press [CMD][CMD]. To remove caps lock,press [CMD][CMD][CMD].
4. Press [ENTER] to save the new name. The keypad returns tothe previous menu.
Configuring the user’s level:1. Use [NEXT] to go to the Configure Level option, and press
[ENTER], or simply press [3].2. Press [ENTER] to change the default authority level for area
1.3. Enter the authority level number (1 – 14) you wish to apply to
the user and press [ENTER]. The keypad shows Levelconfigured and returns to the previous menu.
4. If your security system has more than one area, use [NEXT]and the previous two steps to set the levels for the additionalareas.
182 en | B92x/B91x Users menu Control Panels
2015.01 | 02 | F.01U.307.371 Bosch Security Systems, Inc.
Configuring a RADION keyfob or an Inovonics Transmitter for theuser:1. Use [NEXT] to go to the Configure Keyfob option, and press
[ENTER], or simply press [4].2. Press [ENTER] to continue.3. To manually enter the RFID, if desired, press [1] or [ENTER]
to open the RFID option. Otherwise, the keypad automaticallylearns the RFID into the security system when you add aRADION keyfob or an Inovonics Transmitter.
4. Press [ENTER] to continue.5. Enter the RFID.6. Press [ENTER] to save the RFID and return to the previous
menu.7. Use [NEXT] to go to the Add a Keyfob option, and press
[ENTER] or simply press [2].8. Press [ENTER] to continue.9. On a RADION keyfob, press any button on the keyfob. On an
Inovonics Transmitter, open the transmitter and press theRESET button, per the manufacturer’s instructions. Thekeypad shows Keyfob enrolled and returns to the previousmenu.
10. If you need to replace the keyfob or transmitter you justadded (for example, you accidentally added the wrong one),use [NEXT] to go to the Replace a Keyfob option, and press[ENTER],or simply press [3], and then follow the previousstep.
Control Panels B92x/B91x Users menu | en 183
Bosch Security Systems, Inc. 2015.01 | 02 | F.01U.307.371
11. To remove the added keyfob or transmitter, use [NEXT] to goto the Remove a Keyfob option, and press [ENTER] or simplypress [4].
12. Press [ESC] to exit the menu. Selecting a keypad display language for the user:1. Use [NEXT] to go to the Configure Keyfob option, and press
[ENTER], or simply press [4].2. Press [ENTER] to continue.3. Press [ENTER] to change the language. The keypad shows
Language configured, and then returns to the previous menu.This feature is:
available on my system.
unavailable on my system. Adding or replacing a card for the user:1. Use [NEXT] to go to the Configure Card option, and press
[ENTER], or simply press [5].2. Press [ENTER] to continue. The keypad shows Present card.3. Present the card at the card reader.4. If the reader identifies the card, the keypad shows Card
configured.5. Press [ESC] to exit the menu.This feature is:
available on my system.
184 en | B92x/B91x Users menu Control Panels
2015.01 | 02 | F.01U.307.371 Bosch Security Systems, Inc.

unavailable on my system.
Control Panels B92x/B91x Users menu | en 185
Bosch Security Systems, Inc. 2015.01 | 02 | F.01U.307.371

27.4 Delete User
Use the Delete User function to delete a user. Use this function to remove users from the system. All user data(name, passcode, keyfob) is deleted and cannot be recovered.Use Edit User if you only wish to remove a user's authority(disable the user), but retain the user’s data. You need to knowthe user number for the passcode you want to delete. The usernumbers identify users in reports transmitted from your system. Deleting a user:1. Open the Main menu.2. Use [NEXT] to go the Users menu option, and press [ENTER],
or simply press [4].3. Use [NEXT] to go to the Delete User menu option, and press
[ENTER], or simply press [4].4. Enter your passcode and press [ENTER].5. Enter the number for the user you wish to delete, and press
[ENTER].6. Press [ENTER] to continue.7. Press [ENTER] to confirm you wish to delete the selected
user. The keypad shows User ## deleted, and then returns tothe previous menu.
8. Press [ESC] to exit the menu.
186 en | B92x/B91x Users menu Control Panels
2015.01 | 02 | F.01U.307.371 Bosch Security Systems, Inc.
28 B92x/B91x Settings menu
Use the Settings menu to turn Watch mode on or off, set thesystem date and time, view and change schedules, set keypadbrightness and volume, and show the time in the keypad display.
28.1 Watch Mode
You can use Watch Mode to monitor select points with thesecurity system turned off. Each time points are faulted (door orwindow is opened), the keypad chimes once and shows the pointtext for 60 seconds. The control panel does not generate alarmsin this mode except 24-hour alarms (fire, panic, etc.). Use this function in residential systems to monitor entries orexits in your home. In commercial systems it can serve as a doorchime to alert you when a customer or delivery person entersyour business.
Control Panels B92x/B91x Settings menu | en 187
Bosch Security Systems, Inc. 2015.01 | 02 | F.01U.307.371

Entering and exiting Watch Mode:1. Open the Main menu.2. Use [NEXT] to go to the Settings menu option, and press
[ENTER], or simply press [5].3. Press [1] or [ENTER] to open the Watch Mode option.4. Enter your passcode and press [ENTER].5. Press [ENTER] to turn Watch Mode on if it is off, or off if it is
on. The keypad display indicates that you enabled or disabledWatch Mode successfully.
6. Press [ESC] to exit the menu.
188 en | B92x/B91x Settings menu Control Panels
2015.01 | 02 | F.01U.307.371 Bosch Security Systems, Inc.

28.2 Date/Time
Your security system must have the correct time and date forscheduled events to occur at the correct times. Use the Date/Time function to set both the time and date. The security systemuses a 12-hour AM/PM format. If your security system is configured for automatic date/timeupdates, the update might overwrite your changes. Setting the date and time:1. Open the Main menu.2. Use [NEXT] to go to the Settings menu option, and press
[ENTER], or simply press [5].3. Use [NEXT] to go to the Date/Time menu option, and press
[ENTER], or simply press [2].4. Enter your passcode and press [ENTER].5. Press [1] or [ENTER] to set the control panel’s date.6. Enter the new date in MM/DD/YY format. If you make a
mistake, the [ESC] key acts as a backspace key. Press [ESC]to delete the characters and then enter the new numbers.
7. Press [ENTER]. The keypad shows Change complete and thenreturns to the previous menu.
8. Use [NEXT] to go to the option to change the time, and press[ENTER], or simply press [2].
9. Enter the new time in HH:MM format. If you make a mistake,the [ESC] key acts as a backspace key. Press [ESC] to deletethe characters and then enter the new numbers.
Control Panels B92x/B91x Settings menu | en 189
Bosch Security Systems, Inc. 2015.01 | 02 | F.01U.307.371
10. Press [ENTER] to save the time and to go to the AM or PMselection option.
11. Press [ENTER] to select AM, or press [NEXT] and then[ENTER] to select PM. The keypad shows Change completeand then returns to the previous menu.
12. Press [ESC] to exit the menu.
190 en | B92x/B91x Settings menu Control Panels
2015.01 | 02 | F.01U.307.371 Bosch Security Systems, Inc.
28.3 Schedule (SKEDs)
A SKED is a function programmed to be performed automaticallyat a scheduled time by your security system. You can change thescheduled time for SKEDs, disable a SKED to prevent it fromautomatically happening, or restart a previously disabled SKED.Contact your security company to determine what SKEDs theyprogrammed for your system. Selecting a SKED to change:1. Open the Main menu.2. Use [NEXT] to go to the Settings menu option, and press
[ENTER], or simply press [5].3. Use [NEXT] to go to the Schedule menu option, and [ENTER],
or simply press [3].4. Enter your passcode and press [ENTER].5. Use [PREV] or [NEXT] to scroll through the list of SKEDs. The
keypad indicates whether a SKED is enabled, disabled, or notyet programmed.
6. With the SKED you wish to enable showing, press [ENTER].7. Continue to Enabling a disabled SKED or Disabling a enabled
SKED.
Control Panels B92x/B91x Settings menu | en 191
Bosch Security Systems, Inc. 2015.01 | 02 | F.01U.307.371

Enabling a disabled SKED:1. With the SKED you wish to enable showing, press [ENTER].2. Press [ENTER] to continue.3. Enter the new time in HH:MM format. If you make a mistake
the [ESC] key acts as a backspace key. Press [ESC] to deletethe characters and then enter the new numbers.
4. Press [ENTER] to save the time and choose AM or PM.5. Press [ENTER] to select AM, or press [NEXT] and then
[ENTER] to select PM. The keypad shows Schedule updatecomplete and then returns to the previous menu.
6. Press [ESC] to exit the menu. Disabling an enabled SKED:1. With the SKED you wish to enable showing, press [ENTER].2. Press [ENTER].to continue disable it. The keypad display
indicates that the SKED is disabled.3. Press [ESC] to exit the menu.
192 en | B92x/B91x Settings menu Control Panels
2015.01 | 02 | F.01U.307.371 Bosch Security Systems, Inc.
28.4 Keypad
Use the Keypad menu to adjust the brightness of the keypaddisplay, the keypress volume, and enable or disable the keypresstone.
28.4.1 Brightness
Use the Brightness function to adjust the brightness level for thekeypad display. Adjusting the keypad display brightness:1. Open the Main menu.2. Use [NEXT] to go to the Settings menu option, and press
[ENTER], or simply press [5].3. Use [NEXT] to go to the Keypad menu option, and press
[ENTER], or simply press [4].4. Press [1] or [ENTER] to adjust the brightness.5. Press [PREV] or [NEXT] to adjust the brightness level. The
changes apply immediately.6. Press [ESC] to exit the menu.
Control Panels B92x/B91x Settings menu | en 193
Bosch Security Systems, Inc. 2015.01 | 02 | F.01U.307.371
28.4.2 Volume
Use the Volume function to adjust the keypress volume level forthe keypad. Adjusting the keypress volume:1. Open the Main menu.2. Use [NEXT] to go to the Settings menu option, and press
[ENTER], or simply press [5].3. Use [NEXT] to go to the Keypad menu option, and press
[ENTER], or simply press [4].4. Use [NEXT] to go to the Volume menu option, and press
[ENTER], or simply press [2].5. Press [PREV] or [NEXT] to adjust the volume level. The
changes apply immediately.6. Press [ESC] to exit the menu.
194 en | B92x/B91x Settings menu Control Panels
2015.01 | 02 | F.01U.307.371 Bosch Security Systems, Inc.
28.4.3 Keypress
Use the Keypress function to activate or deactivate the keypresstone. Activating and deactivating the keypress tone:1. Open the Main menu.2. Use [NEXT] to go to the Settings menu option, and press
[ENTER], or simply press [5].3. Use [NEXT] to go to the Keypad menu option, and press
[ENTER], or simply press [4].4. Use [NEXT] to go to the Keypress menu option, and press
[ENTER], or simply press [3].5. Press [ENTER] to toggle between the On and Off options.6. Press [ESC] to exit the menu.
28.4.4 Nightlight
Use the Nightlight menu to turn the nightlight feature on or off.The nighlight feature dimly lights the display and keys when thekeypad is idle, making it easier to find the keypad in a dark room. Turning the nighlight feature on or off:1. Open the Main menu.2. Use [NEXT] to go to the Press 5 for Settings Menu option, or
simply press [5].3. Use [NEXT] to go to the Press 4 for Keypad Config option, or
simply press [4].4. Use [NEXT] to go to the Press 4 to Set Nightlight option, or
simply press [4].
Control Panels B92x/B91x Settings menu | en 195
Bosch Security Systems, Inc. 2015.01 | 02 | F.01U.307.371
5. Use [PREV] or [NEXT] to toggle between the Yes and Nooptions.
6. Press [ENTER] while viewing the desired option to save theprogramming.
7. Press [ESC] to exit the menu.
196 en | B92x/B91x Settings menu Control Panels
2015.01 | 02 | F.01U.307.371 Bosch Security Systems, Inc.

29 B92x/B91x Shortcuts menu
Use shortcuts to quickly access common functions. Using a shortcut:1. Open the Main menu.2. Use [NEXT] to go to the Shortcuts menu option, and press
[ENTER], or simply press [6].3. Use [PREV] or [NEXT] to go to the Shortcut you wish to run,
and then press [ENTER]. The shortcut runs.
Control Panels B92x/B91x Shortcuts menu | en 197
Bosch Security Systems, Inc. 2015.01 | 02 | F.01U.307.371
30 B92x/B91x Events menu
Use the Events menu to view event memory, clear event memory,or view the event log.
30.1 View Event Memory
Your security system stores events that occurred since the lasttime memory was cleared. Use View Event Memory to view theevents not previously cleared. Each time you turn the securitysystem on, the event memory is erased. Viewing event memory:1. Open the Main menu.2. Use [NEXT] to go to the Events menu option, and press
[ENTER], or simply press [7].3. Press [1] or [ENTER] to open the view event memory.
198 en | B92x/B91x Events menu Control Panels
2015.01 | 02 | F.01U.307.371 Bosch Security Systems, Inc.

30.2 Clear Event Memory
Use the Clear Event Memory function to clear out event memorywithout turning your security system off and on again. Clearing event memory:1. Open the Main menu.2. Use [NEXT] to go to the Events menu option, and press
[ENTER], or simply press [7].3. Use [NEXT] to go to the Clear Event Memory menu option,
and press [ENTER], or simply press [2].
Control Panels B92x/B91x Events menu | en 199
Bosch Security Systems, Inc. 2015.01 | 02 | F.01U.307.371

30.3 View Log
Use the View Log function to review events stored in yoursecurity system. Reviewing past events might help you identifyproblems. Events are stored in the control panel’s memory inorder of occurrence, and tagged with the date and time. Viewing the log:1. Open the Main menu.2. Use [NEXT] to go to the Events menu option, and press
[ENTER], or simply press [7].3. Use [NEXT] to go to the View Log menu option, and press
[ENTER], or simply press [3]. The keypad shows Enter StartDate.To view part of the log, enter the date (MM/DD) at which youwish to start the review. Press [ENTER].To view the entire log from the newest event, press [ENTER]without entering a start date. The date and time of thenewest event shows. Use [PREV] or [NEXT] to move throughthe events. If an event description is longer than the display,the event description scrolls horizontally.
4. Press [ESC] to exit the menu.
200 en | B92x/B91x Events menu Control Panels
2015.01 | 02 | F.01U.307.371 Bosch Security Systems, Inc.
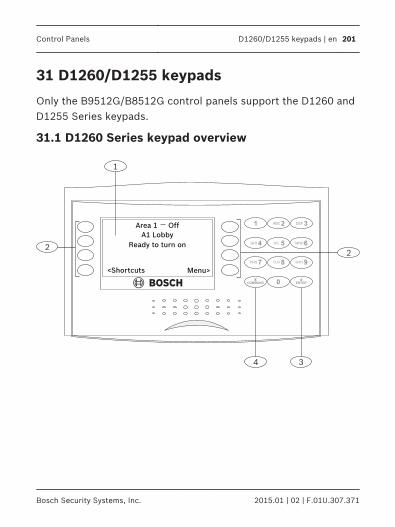
31 D1260/D1255 keypads
Only the B9512G/B8512G control panels support the D1260 andD1255 Series keypads.
31.1 D1260 Series keypad overview
1
34
22
Area 1 Off
A1 Lobby
Ready to turn on
<Shortcuts Menu>
Control Panels D1260/D1255 keypads | en 201
Bosch Security Systems, Inc. 2015.01 | 02 | F.01U.307.371

Callout
Number
Description
1 Alphanumeric display
2 Softkeys
3 [ENTER]
4 [CMD] key (Command)
202 en | D1260/D1255 keypads Control Panels
2015.01 | 02 | F.01U.307.371 Bosch Security Systems, Inc.
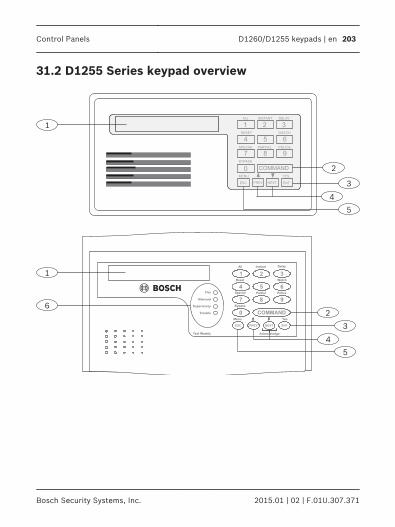
31.2 D1255 Series keypad overview
1 2 3
4 5 6
7 8 9
0 COMMAND
ESC PREV NEXT ENT
ALL INSTANT DELAY
RESET WATCH
SPECIAL PARTIAL POLICE
BYPASS
MENU YES
1
2
2
1
6
5
3
4
5
3
4
Control Panels D1260/D1255 keypads | en 203
Bosch Security Systems, Inc. 2015.01 | 02 | F.01U.307.371

Callout
Number
Description
1 Alphanumeric display)
2 [CMD] key (Command))
3 [ENTER] key
4 [PREV] and [NEXT] keys
5 [ESC] key (Escape)
6 System Status indicators (Fire keypads only)
31.3 Operation overview
Your security system provides quick access to functions throughthe keypad menus. You initiate functions and open menus with the [CMD] key plusthe one or two digit command. D1260 Series keypads, refer tothe menu tree in B94x/B93x menu tree and commands, page 49.For D1255 Series keypads, refer to the menu tree in B92x/B91xmenu tree, page 131.To enter a command, press the [CMD] key and then the one ortwo digit command.
204 en | D1260/D1255 keypads Control Panels
2015.01 | 02 | F.01U.307.371 Bosch Security Systems, Inc.

For instructions for using command-initiated menus, refer to thesection of this book as listed in the following table. The listedsections explain the steps leading up to and including openingthe menu you open by using the command. Follow theinstructions as they apply to the commands.
Command Function/
menu
D1260 Series
refer to
D1255 Series
refer to
[CMD] 0 Bypass Bypass, page 66 Bypass menu, page147
[CMD] 0 0 Unbypass
[CMD] 1 All on(withdelay)
All On menu, page54
All On menu, page136
[CMD] 1 1 All On,Instant
[CMD] 2 Part On,Instant
Part On menu,page 58
Part On menu,page 140
[CMD] 3 Part On(withdelay)
[CMD] 4 7 ResetSensors
Reset, page 71 Reset, page 152
Control Panels D1260/D1255 keypads | en 205
Bosch Security Systems, Inc. 2015.01 | 02 | F.01U.307.371
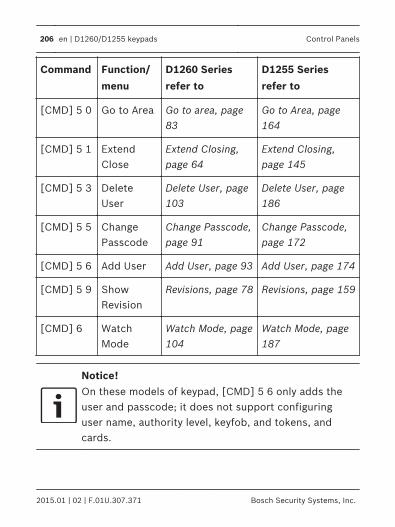
Command Function/
menu
D1260 Series
refer to
D1255 Series
refer to
[CMD] 5 0 Go to Area Go to area, page83
Go to Area, page164
[CMD] 5 1 ExtendClose
Extend Closing,page 64
Extend Closing,page 145
[CMD] 5 3 DeleteUser
Delete User, page103
Delete User, page186
[CMD] 5 5 ChangePasscode
Change Passcode,page 91
Change Passcode,page 172
[CMD] 5 6 Add User Add User, page 93 Add User, page 174
[CMD] 5 9 ShowRevision
Revisions, page 78 Revisions, page 159
[CMD] 6 WatchMode
Watch Mode, page104
Watch Mode, page187
Notice!On these models of keypad, [CMD] 5 6 only adds theuser and passcode; it does not support configuringuser name, authority level, keyfob, and tokens, andcards.
206 en | D1260/D1255 keypads Control Panels
2015.01 | 02 | F.01U.307.371 Bosch Security Systems, Inc.
32 Options
This section describes optional features that your securitycompany might have programmed for you.
32.1 Two-man Rule
The Two-man Rule adds an extra step to the process of turningoff your security system by requiring two unique passcodesentered on the same keypad to turn off an area. Two-man Rule isdisabled for SIA compliant systems. Two-man Rule is:
enabled on my system.
disabled on my system. Turning off with Two-man Rule enabled:1. Enter the first passcode and press [ENTER]. The keypad
shows a request for the second passcode.2. Enter a second passcode and press [ENTER]. The second
passcode must be different from the first passcode. The areaturns off.
Control Panels Options | en 207
Bosch Security Systems, Inc. 2015.01 | 02 | F.01U.307.371
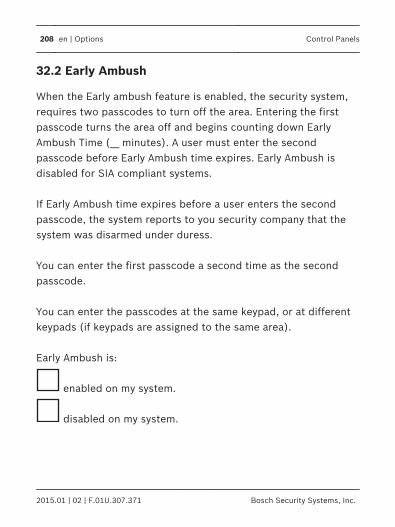
32.2 Early Ambush
When the Early ambush feature is enabled, the security system,requires two passcodes to turn off the area. Entering the firstpasscode turns the area off and begins counting down EarlyAmbush Time (__ minutes). A user must enter the secondpasscode before Early Ambush time expires. Early Ambush isdisabled for SIA compliant systems. If Early Ambush time expires before a user enters the secondpasscode, the system reports to you security company that thesystem was disarmed under duress. You can enter the first passcode a second time as the secondpasscode. You can enter the passcodes at the same keypad, or at differentkeypads (if keypads are assigned to the same area). Early Ambush is:
enabled on my system.
disabled on my system.
208 en | Options Control Panels
2015.01 | 02 | F.01U.307.371 Bosch Security Systems, Inc.
Turning off with Early Ambush enabled:1. Enter the first passcode and press [ENTER]. The keypad
shows the system is turned off. Early ambush time beginscounting down. The keypad does not indicate that earlyambush time is counting down.
2. You must enter the second passcode before the Early Ambushtime expires. Warning! Failure to cancel will result in alarmtransmission and law enforcement may be dispatched.
3. Enter a second passcode and press [ENTER]. The keypadshows Code 2 Validated to confirm that the security systemaccepted the second passcode and stopped the EarlyAmbush time countdown. The system does not create aduress event.
Control Panels Options | en 209
Bosch Security Systems, Inc. 2015.01 | 02 | F.01U.307.371
32.3 Security system limitations
Not even the most advanced security system can guaranteeprotection against burglary, fire, or environmental threats. Allsecurity systems are subject to possible compromise or failure-to-warn for a variety of reasons including, but not limited to, thefollowing:– Sirens or horns placed outside the hearing range of people in
remote areas of the building or in areas that are frequentlyclosed off do not provide the intended protection.
– If intruders gain access through unprotected points of entry,the security system does not detect the intruders.
– If intruders have the technical means of bypassing, jamming,or disconnecting all or part of the security system, thesecurity system cannot detect the intruders.
– If the AC power supply is OFF and the back-up battery iseither missing or dead, the security system does not detectintrusion.
– Smoke detectors cannot detect smoke in chimneys, walls, orroofs, or smoke blocked by a closed door. They might notdetect smoke or fire on a level of the building different fromthe one on which they are located. Smoke detectors mightnot be able to warn in time about fires started by explosions,improper storage of flammables, overloaded electricalcircuits, or other types of hazardous conditions.
210 en | Options Control Panels
2015.01 | 02 | F.01U.307.371 Bosch Security Systems, Inc.
– If your security system’s method of communication is down(phone line, cellular, or internet problems), reports from thesecurity system to the security company cannot send.Communication methods are vulnerable to compromise byseveral means.
Inadequate maintenance and failure to test are the most commoncauses of alarm failure. Testing the system once a week isstrongly recommended to ensure all system components areworking properly. Although having a security system might make you eligible forreduced insurance premiums, the security system is nosubstitute for insurance. Warning devices cannot compensateyou for loss of life or property.
Control Panels Options | en 211
Bosch Security Systems, Inc. 2015.01 | 02 | F.01U.307.371
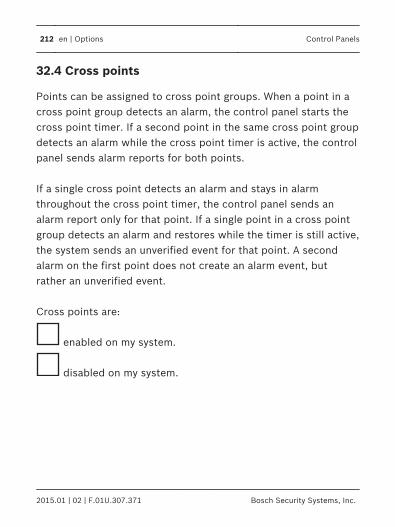
32.4 Cross points
Points can be assigned to cross point groups. When a point in across point group detects an alarm, the control panel starts thecross point timer. If a second point in the same cross point groupdetects an alarm while the cross point timer is active, the controlpanel sends alarm reports for both points. If a single cross point detects an alarm and stays in alarmthroughout the cross point timer, the control panel sends analarm report only for that point. If a single point in a cross pointgroup detects an alarm and restores while the timer is still active,the system sends an unverified event for that point. A secondalarm on the first point does not create an alarm event, butrather an unverified event. Cross points are:
enabled on my system.
disabled on my system.
212 en | Options Control Panels
2015.01 | 02 | F.01U.307.371 Bosch Security Systems, Inc.
32.5 Fire safety and evacuation
Residential fire is a leading cause of accidental death. Most firerelated deaths occur at night when occupants suffocate in theirsleep from smoke and toxic gases, rather than from burns. Tohelp reduce this risk, implement the following program:– Make a home escape plan. Draw a map of your home showing
all doors and windows. Discuss the plan with everyone inyour home.
– Know at least two ways out of every room, if possible. Makesure all doors and windows leading outside open easily.
– Have an outside meeting place (like a tree, light pole ormailbox), a safe distance from the home where everyoneshould meet.
– Practice your home fire drill at night and during the day witheveryone in your home, twice each year.
– Practice using different ways out.– Teach children how to escape on their own in case you can’t
help them.– Close doors behind you as you leave.
Control Panels Options | en 213
Bosch Security Systems, Inc. 2015.01 | 02 | F.01U.307.371

If the alarm sounds:– If the smoke alarm sounds, get out and stay out. Never go
back inside for people or pets.– If you have to escape through smoke, get low and go under
the smoke to your way out.– Call the fire department from outside your home.
Bedroom
Family RoomDining Room
Living Room
Kitchen Bedroom
Bedroom
Meeting Place
214 en | Options Control Panels
2015.01 | 02 | F.01U.307.371 Bosch Security Systems, Inc.

32.6 Multiple area systems
32.6.1 Keypad scope
Your security company can configure your security system so thatkeypads allow you view the status of and control only one area, agroup of areas, or all of the areas in your system. The areas youcan view and the area functions (actions) you can use at akeypad constitute the keypad’s scope.
32.6.2 Authority levels
Each of your security system users is assigned an authority level.An authority level determines how much control the user has forany function that requires a passcode (turning an area on, forexample). The authority level is set for each area in a multiplearea system so that a user can have different levels in each area,if desired.
32.6.3 Scope and authority levels combined
The functions you can use at a keypad (turning All On, forexample) are limited to the areas you have authority in, and theareas that are within a keypad’s scope.
ExampleYour security system protects a business configured for threeareas (the office, the warehouse, and shipping), and three users(1, 2, and 3).
Control Panels Options | en 215
Bosch Security Systems, Inc. 2015.01 | 02 | F.01U.307.371
Keypads details:– The keypad in the office area has scope for all areas. (Users
can view the status of all areas – office, warehouse, andshipping.)
– The keypad in the warehouse has scope for the warehouseonly.
– The keypad in shipping has scope for the warehouse andshipping.
Users details:– User 1 has authority to turn the office area on and off, but no
authority in the warehouse or shipping areas.– User 2 has authority in the warehouse and shipping.– User 3 has authority in all three areas. When a user enters his or her passcode into a keypad, thesecurity system allows the user to perform functions limited toboth the user’s authority level and the keypad’s scope. Whatdoes this mean for the three users in the example? Specifically,which areas turn on when the user turns the system All On fromeach keypad?
216 en | Options Control Panels
2015.01 | 02 | F.01U.307.371 Bosch Security Systems, Inc.

User 1 at the office keypad
Action Area affected Reason
View status? All three Keypad’s scope includes allthree areas
Performpasscode-protectedfunctions?
Office User’s authority is limited tothe office area
Result of turning the system All On? Only the office area turns on.
User 1 at the warehouse keypad
Action Area affected Reason
View status? Warehouse Keypad’s scope includesonly the warehouse area
Performpasscode-protectedfunctions?
None User’s authority is limited tothe office area, which is notwithin the warehousekeypad’s scope
Result of turning the system All On? No area turns on.
Control Panels Options | en 217
Bosch Security Systems, Inc. 2015.01 | 02 | F.01U.307.371
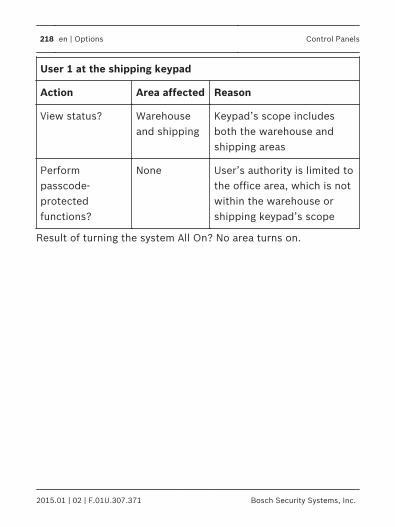
User 1 at the shipping keypad
Action Area affected Reason
View status? Warehouseand shipping
Keypad’s scope includesboth the warehouse andshipping areas
Performpasscode-protectedfunctions?
None User’s authority is limited tothe office area, which is notwithin the warehouse orshipping keypad’s scope
Result of turning the system All On? No area turns on.
218 en | Options Control Panels
2015.01 | 02 | F.01U.307.371 Bosch Security Systems, Inc.
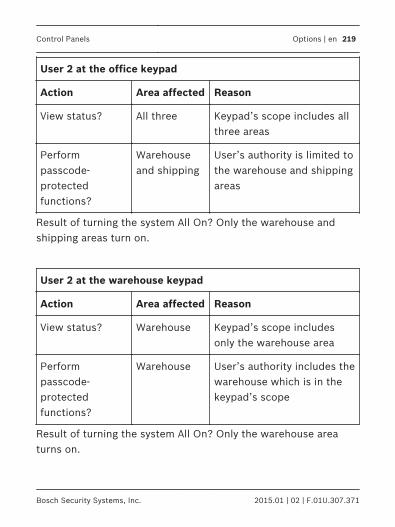
User 2 at the office keypad
Action Area affected Reason
View status? All three Keypad’s scope includes allthree areas
Performpasscode-protectedfunctions?
Warehouseand shipping
User’s authority is limited tothe warehouse and shippingareas
Result of turning the system All On? Only the warehouse andshipping areas turn on.
User 2 at the warehouse keypad
Action Area affected Reason
View status? Warehouse Keypad’s scope includesonly the warehouse area
Performpasscode-protectedfunctions?
Warehouse User’s authority includes thewarehouse which is in thekeypad’s scope
Result of turning the system All On? Only the warehouse areaturns on.
Control Panels Options | en 219
Bosch Security Systems, Inc. 2015.01 | 02 | F.01U.307.371

User 2 at the shipping keypad
Action Area affected Reason
View status? Warehouseand shipping
Keypad’s scope includesboth the warehouse andshipping areas
Performpasscode-protectedfunctions?
Warehouseand shipping
User’s authority level andthe keypad’s scope includeboth the warehouse andshipping
Result of turning the system All On? Only the warehouse andshipping areas turn on.
220 en | Options Control Panels
2015.01 | 02 | F.01U.307.371 Bosch Security Systems, Inc.

User 3 at the office keypad
Action Area affected Reason
View status? All three Keypad’s scope includes allthree areas
Performpasscode-protectedfunctions?
All three User’s authority includes allthree areas
Result of turning the system All On? All three areas turn on.
User 3 at the warehouse keypad
Action Area affected Reason
View status? Warehouse Keypad’s scope includesonly the warehouse area
Performpasscode-protectedfunctions?
Warehouse User’s authority includes thewarehouse which is in thekeypad’s scope
Result of turning the system All On? Only the warehouse areaturns on.
Control Panels Options | en 221
Bosch Security Systems, Inc. 2015.01 | 02 | F.01U.307.371
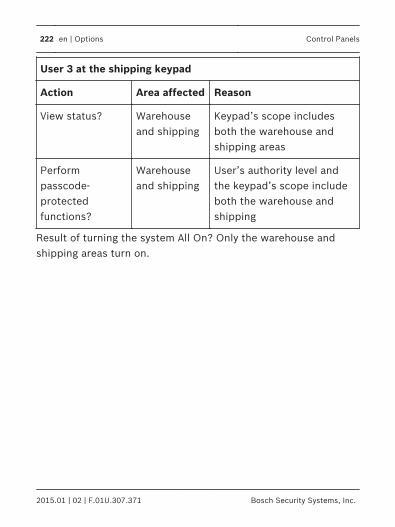
User 3 at the shipping keypad
Action Area affected Reason
View status? Warehouseand shipping
Keypad’s scope includesboth the warehouse andshipping areas
Performpasscode-protectedfunctions?
Warehouseand shipping
User’s authority level andthe keypad’s scope includeboth the warehouse andshipping
Result of turning the system All On? Only the warehouse andshipping areas turn on.
222 en | Options Control Panels
2015.01 | 02 | F.01U.307.371 Bosch Security Systems, Inc.

Glossary
All OnTo turn on (arm) bothinterior points andperimeter points.
bypassSelectively removepoints from the securitysystem. A point may bebypassed in order toarm the perimeter witha window open.
closing windowA duration of timeprogrammed by yoursecurity company. Yousecurity company canprogram the system toturn on at the end ofthe window.
entry delayA programmed delay ofsystem alarm responseallowing an individual toenter an armed area
through the correctpoint and disarm thearea. If not disarmedbefore the delay timeexpires, the systembegins an alarmresponse which mayinclude reports to thecentral station.
exit delayA programmed delay ofsystem alarm responseallowing exit afterarming an area. Failureto exit before the delaytime expires, causesentry delay to begin.The system must thenbe disarmed. If notdisarmed before thedelay time expires, thesystem begins an alarmresponse which mayinclude reports to thecentral station.
Control Panels Glossary | en 223
Bosch Security Systems, Inc. 2015.01 | 02 | F.01U.307.371

faulted pointA point that is notnormal (a door orwindow is open).
keypress toneThe beep you hear eachtime you press a key.
outputThe system may haveoutputs programmed toprovide control ofdevices such aspremises lighting orentry gates. Thesecurity companyprograms outputs forautomatic controland/or control from thekeypad.
Part OnAn arming commandthat arms only theperimeter points.
pointA detection device, orgroup of devicesconnected to thesecurity system. Pointsdisplay individually atthe commandcenterwith custom text.The text can describe asingle door, motionsensor, smoke detector,or an area such asUPSTAIRS or GARAGE.
troubleA service condition thatneeds to be corrected,such as a broken wire.
224 en | Glossary Control Panels
2015.01 | 02 | F.01U.307.371 Bosch Security Systems, Inc.


Bosch Security Systems, Inc.130 Perinton ParkwayFairport, NY 14450USAwww.boschsecurity.com© Bosch Security Systems, Inc., 2015
Bosch Sicherheitssysteme GmbHRobert-Bosch-Ring 585630 GrasbrunnGermany