controlling traffic using intrusion and file policies · 10-3 asa firepower module user guide...
TRANSCRIPT

C H A P T E R 10
Controlling Traffic Using Intrusion and File PoliciesIntrusion and file policies work together, as the last line of defense before traffic is allowed to its destination:
• Intrusion policies govern the system’s intrusion prevention capabilities; see Understanding Network Analysis and Intrusion Policies, page 11-1.
• File policies govern the system’s network-based file control and advanced malware protection (AMP) capabilities; see Understanding and Creating File Policies, page 24-4.
Security Intelligence-based traffic filtering (blacklisting) and traffic decoding and preprocessing occur before network traffic is examined for intrusions, prohibited files, and malware. Access control rules and the access control default action determine which traffic is inspected by intrusion and file policies.
By associating an intrusion or file policy with an access control rule, you are telling the system that before it passes traffic that matches the access control rule’s conditions, you first want to inspect the traffic with an intrusion policy, a file policy, or both.
Intrusion prevention and AMP require that you enable specific licensed capabilities as described in the following table.
For more information on inspecting traffic for intrusions, prohibited files, and malware, see:
• Inspecting Allowed Traffic For Intrusions and Malware, page 10-2
• Tuning Intrusion Prevention Performance, page 10-6
• Tuning File and Malware Inspection Performance and Storage, page 10-16
Table 10-1 License Requirements for Intrusion and File Inspection
Feature Description License
intrusion prevention detect and optionally block intrusions and exploits
Protection
file control detect and optionally block the transmission of file types
Protection
advanced malware protection (AMP)
detect, track, and optionally block the transmission of malware
Malware
10-1ASA FirePOWER Module User Guide

Chapter 10 Controlling Traffic Using Intrusion and File Policies Inspecting Allowed Traffic For Intrusions and Malware
Inspecting Allowed Traffic For Intrusions and MalwareLicense: Protection or Malware
Intrusion and file policies govern the system’s intrusion prevention, file control, and AMP capabilities as a last line of defense before traffic is allowed to its destination. Security Intelligence-based traffic filtering, decoding and preprocessing, and access control rule selection occur before intrusion and file inspection.
By associating an intrusion or file policy with an access control rule, you are telling the system that before it passes traffic that matches the access control rule’s conditions, you first want to inspect the traffic with an intrusion policy, a file policy, or both. Access control rule conditions can be simple or complex; you can control traffic by security zone, network or geographical location, port, application, requested URL, and user.
The system matches traffic to access control rules in the order you specify. In most cases, the system handles network traffic according to the first access control rule where all the rule’s conditions match the traffic. An access control rule’s action determines how the system handles matching traffic. You can monitor, trust, block, or allow (with or without further inspection) matching traffic; see Using Rule Actions to Determine Traffic Handling and Inspection, page 6-6.
Note that an Interactive Block rule has the same inspection options as an Allow rule. This is so you can inspect traffic for malicious content when a user bypasses a blocked website by clicking through a warning page. For more information, see Interactive Blocking Actions: Allowing Users to Bypass Website Blocks, page 6-8.
Traffic that does not match any of the non-Monitor access control rules in a policy is handled by the default action. Note that the system can inspect traffic allowed by the default action for intrusions, but not prohibited files or malware. You cannot associate a file policy with the access control default action.
Note Sometimes, when a connection is analyzed by an access control policy, the system must process the first few packets in that connection, allowing them to pass, before it can decide which access control rule (if any) will handle the traffic. However, so these packets do not reach their destination uninspected, you can use an intrusion policy—called the default intrusion policy—to inspect them and generate intrusion events. For more information, see Setting the Default Intrusion Policy for Access Control, page 13-1.
For more information on the above scenario and instructions on associating file and intrusion policies with access control rules and the access control default action, see:
• Understanding File and Intrusion Inspection Order, page 10-2
• Configuring an Access Control Rule to Perform AMP or File Control, page 10-3
• Configuring an Access Control Rule to Perform Intrusion Prevention, page 10-4
• Setting Default Handling and Inspection for Network Traffic, page 4-4
Understanding File and Intrusion Inspection OrderLicense: Protection or Malware
Note Traffic allowed by an Intrusion Prevention default action can be inspected for intrusions, but cannot be inspected for prohibited files or malware. You cannot associate a file policy with the access control default action.
10-2ASA FirePOWER Module User Guide
Chapter 10 Controlling Traffic Using Intrusion and File Policies Inspecting Allowed Traffic For Intrusions and Malware
You do not have to perform both file and intrusion inspection in the same rule. For a connection matching an Allow or Interactive Block rule:
• without a file policy, traffic flow is determined by the intrusion policy
• without an intrusion policy, traffic flow is determined by the file policy
Tip The system does not perform any kind of inspection on trusted traffic.
For any single connection handled by an access control rule, file inspection occurs before intrusion inspection. That is, the system does not inspect files blocked by a file policy for intrusions. Within file inspection, simple blocking by type takes precedence over malware inspection and blocking.
Note Until a file is detected and blocked in a session, packets from the session may be subject to intrusion inspection.
For example, consider a scenario where you normally want to allow certain network traffic as defined in an access control rule. However, as a precaution, you want to block the download of executable files, examine downloaded PDFs for malware and block any instances you find, and perform intrusion inspection on the traffic.
You create an access control policy with a rule that matches the characteristics of the traffic you want to provisionally allow, and associate it with both an intrusion policy and a file policy. The file policy blocks the download of all executables, and also inspects and blocks PDFs containing malware:
• First, the system blocks the download of all executables, based on simple type matching specified in the file policy. Because they are immediately blocked, these files are subject to neither malware cloud lookup nor intrusion inspection.
• Next, the system performs malware cloud lookups for PDFs downloaded to a host on your network. Any PDFs with a malware file disposition are blocked, and are not subject to intrusion inspection.
• Finally, the system uses the intrusion policy associated with the access control rule to inspect any remaining traffic, including files not blocked by the file policy.
Configuring an Access Control Rule to Perform AMP or File ControlLicense: Protection or Malware
An access control policy can have multiple access control rules associated with file policies. You can configure file inspection for any Allow or Interactive Block access control rule, which permits you to match different file and malware inspection profiles against different types of traffic on your network before it reaches its final destination.
When the system detects a prohibited file (including malware) according to the settings in the file policy, it automatically logs an event. If you do not want to log file or malware events, you can disable this logging on a per-access-control-rule basis. After you associate the file policy with the access control rule, clear the Log Files check box on the Logging tab of the access control rule editor. For more information, see Disabling File and Malware Event Logging for Allowed Connections, page 25-7.
The system also logs the end of the associated connection, regardless of the logging configuration of the invoking access control rule; see Connections Associated with File and Malware Events (Automatic), page 25-3.
10-3ASA FirePOWER Module User Guide

Chapter 10 Controlling Traffic Using Intrusion and File Policies Inspecting Allowed Traffic For Intrusions and Malware
To associate a file policy with an access control rule:
Step 1 Select Configuration > ASA FirePOWER Configuration > Policies > Access Control.
The Access Control Policy page appears.
Step 2 Click the edit icon ( ) next to the access control policy where you want to configure AMP or file control using access control rules.
Step 3 Create a new rule or edit an existing rule; see Creating and Editing Access Control Rules, page 6-2.
The access control rule editor appears.
Step 4 Ensure the rule action is set to Allow, Interactive Block, or Interactive Block with reset.
Step 5 Select the Inspection tab.
The Inspection tab appears.
Step 6 Select a File Policy to inspect traffic that matches the access control rule, or select None to disable file inspection for matching traffic.
You can click the edit icon ( ) that appears to edit the policy; see Creating a File Policy, page 24-9.
Step 7 Click Add to save the rule.
Your rule is saved. You must save and apply the access control policy for your changes to take effect; see Applying an Access Control Policy, page 4-10.
Configuring an Access Control Rule to Perform Intrusion PreventionLicense: Protection
An access control policy can have multiple access control rules associated with intrusion policies. You can configure intrusion inspection for any Allow or Interactive Block access control rule, which permits you to match different intrusion inspection profiles against different types of traffic on your network before it reaches its final destination.
Whenever the system uses an intrusion policy to evaluate traffic, it uses an associated variable set. Variables in a set represent values commonly used in intrusion rules to identify source and destination IP addresses and ports. You can also use variables in intrusion policies to represent IP addresses in rule suppressions and dynamic rule states.
Tip Even if you use system-provided intrusion policies, Cisco strongly recommends you configure the system’s intrusion variables to accurately reflect your network environment. At a minimum, modify default variables in the default set; see Optimizing Predefined Default Variables, page 2-14.
Although you can associate a different intrusion policy-variable set pair with each Allow and Interactive Block rule (as well as with the default action), you cannot apply an access control policy if the target devices have insufficient resources to perform inspection as configured. For more information, see Simplifying Rules to Improve Performance, page 4-15.
Understanding System-Provided and Custom Intrusion Policies
Cisco delivers several intrusion policies with the ASA FirePOWER module. By using system-provided intrusion policies, you can take advantage of the experience of the Cisco Vulnerability Research Team (VRT). For these policies, the VRT sets intrusion and preprocessor rule states, as well as provides the
10-4ASA FirePOWER Module User Guide

Chapter 10 Controlling Traffic Using Intrusion and File Policies Inspecting Allowed Traffic For Intrusions and Malware
initial configurations for advanced settings. You can use system-provided policies as-is, or you can use them as the base for custom policies. Building custom policies can improve the performance of the system in your environment and provide a focused view of the malicious traffic and policy violations occurring on your network.
In addition to custom policies that you create, the system provides two custom policies: Initial Inline Policy and Initial Passive Policy. These two intrusion policies use the Balanced Security and Connectivity intrusion policy as their base. The only difference between them is their Drop When Inline setting, which enables drop behavior in the inline policy and disables it in the passive policy. For more information, see Comparing System-Provided with Custom Policies, page 11-7.
Connection and Intrusion Event Logging
When an intrusion policy invoked by an access control rule detects an intrusion, it generates an intrusion event. The system also automatically logs the end of the connection where the intrusion occurred, regardless of the logging configuration of the access control rule; see Connections Associated with Intrusions (Automatic), page 25-2.
To associate an intrusion policy with an access control rule:
Step 1 Select Configuration > ASA FirePOWER Configuration > Policies > Access Control.
The Access Control Policy page appears.
Step 2 Click the edit icon ( ) next to the access control policy where you want to configure intrusion inspection using access control rules.
Step 3 Create a new rule or edit an existing rule; see Creating and Editing Access Control Rules, page 6-2.
The access control rule editor appears.
Step 4 Ensure the rule action is set to Allow, Interactive Block, or Interactive Block with reset.
Step 5 Select the Inspection tab.
The Inspection tab appears.
Step 6 Select a system-provided or custom Intrusion Policy, or select None to disable intrusion inspection for traffic that matches the access control rule.
If you select a custom intrusion policy, you can click the edit icon ( ) that appears to edit the policy; see Editing Intrusion Policies, page 19-4.
Caution Do not select Experimental Policy 1 unless instructed to by a Cisco representative. Cisco uses this policy for testing.
Step 7 Optionally, change the Variable Set associated with the intrusion policy.
You can click the edit icon ( ) that appears to edit the variable set; see Working with Variable Sets, page 2-13.
Step 8 Click Save to save the rule.
Your rule is saved. You must save and apply the access control policy for your changes to take effect; see Applying an Access Control Policy, page 4-10.
10-5ASA FirePOWER Module User Guide

Chapter 10 Controlling Traffic Using Intrusion and File Policies Tuning Intrusion Prevention Performance
Tuning Intrusion Prevention PerformanceLicense: Protection
Cisco provides several features for improving the performance of your system as it analyzes traffic for attempted intrusions. You configure these performance settings on a per-access-control-policy basis, and they apply to all intrusion policies invoked by that parent access control policy.
For more information, see:
• Limiting Pattern Matching for Intrusions, page 10-6 describes how you can specify the number of packets to allow in the event queue, and enable or disable inspection of packets that will be rebuilt into larger streams.
• Overriding Regular Expression Limits for Intrusion Rules, page 10-7 describes how you can override default match and recursion limits on Perl-compatible regular expressions (PCRE).
• Limiting Intrusion Events Generated Per Packet, page 10-8 describes how you can configure rule processing event queue settings.
• Configuring Packet and Intrusion Rule Latency Thresholds, page 10-9 describes how you can balance security with the need to maintain device latency at an acceptable level with packet and rule latency thresholding.
• Configuring Intrusion Performance Statistic Logging, page 10-15 describes how you can configure basic performance monitoring and reporting parameters.
Limiting Pattern Matching for IntrusionsLicense: Protection
You can specify the number of packets to allow in the event queue. You can also, before and after stream reassembly, enable or disable inspection of packets that will be rebuilt into larger streams.
To configure event queue settings:
Step 1 Select Configuration > ASA FirePOWER Configuration > Policies > Access Control.
The Access Control Policy page appears.
Step 2 Click the edit icon ( ) next to the access control policy you want to edit.
The access control policy editor appears.
Step 3 Select the Advanced tab.
The access control policy advanced settings page appears.
Step 4 Click the edit icon ( ) next to Performance Settings, then select the Pattern Matching Limits tab in the pop-up window that appears.
10-6ASA FirePOWER Module User Guide
Chapter 10 Controlling Traffic Using Intrusion and File Policies Tuning Intrusion Prevention Performance
Step 5 You can modify the following options:
• Type a value for the maximum number of events to queue in the Maximum Pattern States to Analyze Per Packet field.
• To inspect packets which will be rebuilt into larger streams of data before and after stream reassembly, select Disable Content Checks on Traffic Subject to Future Reassembly. Inspection before and after reassembly requires more processing overhead and may decrease performance.
• To disable inspection of packets which will be rebuilt into larger streams of data before and after stream reassembly, clear Disable Content Checks on Traffic Subject to Future Reassembly. Disabling inspection decreases the processing overhead for inspection of stream inserts and may boost performance.
Step 6 Click OK.
You must save and apply the access control policy for your changes to take effect; see Applying an Access Control Policy, page 4-10.
Overriding Regular Expression Limits for Intrusion RulesLicense: Protection
You can override default match and recursion limits on PCRE that are used in intrusion rules to examine packet payload content. See Searching for Content Using PCRE, page 23-34 for information on using the pcre keyword in intrusion rules. The default limits ensure a minimum level of performance. Overriding these limits could increase security, but could also significantly impact performance by permitting packet evaluation against inefficient regular expressions.
Caution Do not override default PCRE limits unless you are an experienced intrusion rule writer with knowledge of the impact of degenerative patterns.
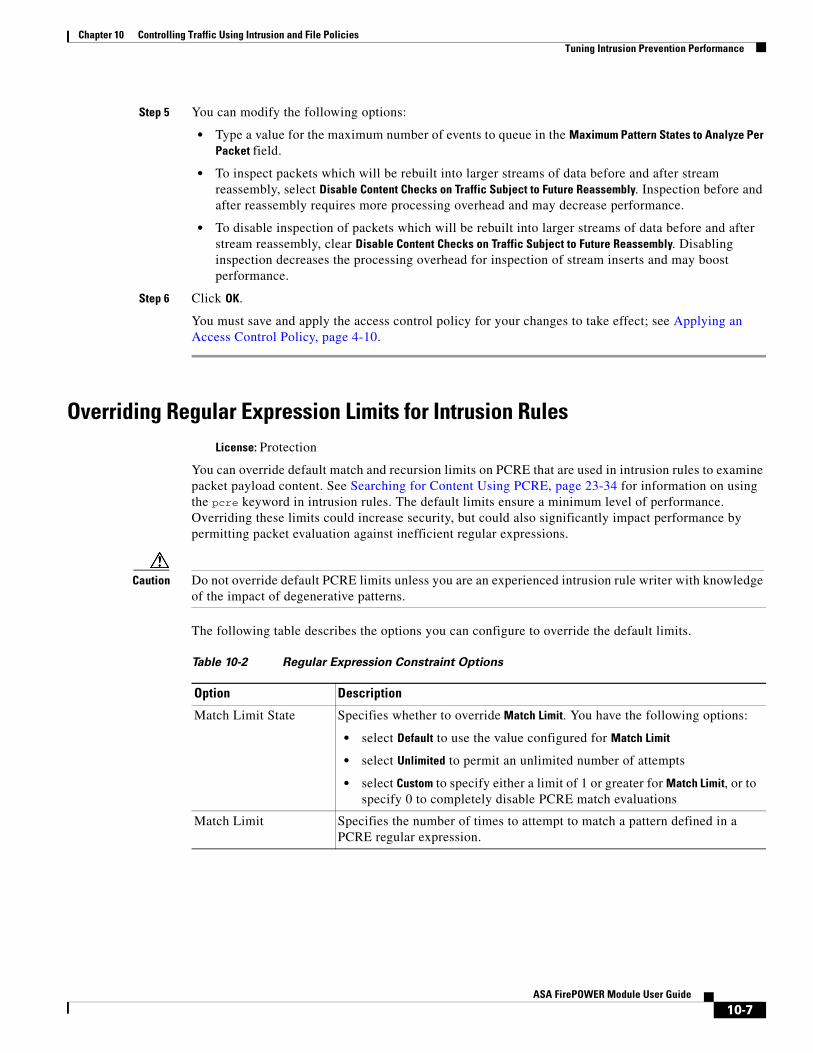
The following table describes the options you can configure to override the default limits.
Table 10-2 Regular Expression Constraint Options
Option Description
Match Limit State Specifies whether to override Match Limit. You have the following options:
• select Default to use the value configured for Match Limit
• select Unlimited to permit an unlimited number of attempts
• select Custom to specify either a limit of 1 or greater for Match Limit, or to specify 0 to completely disable PCRE match evaluations
Match Limit Specifies the number of times to attempt to match a pattern defined in a PCRE regular expression.
10-7ASA FirePOWER Module User Guide

Chapter 10 Controlling Traffic Using Intrusion and File Policies Tuning Intrusion Prevention Performance
To configure PCRE overrides:
Step 1 Select Configuration > ASA FirePOWER Configuration > Policies > Access Control.
The Access Control Policy page appears.
Step 2 Click the edit icon ( ) next to the access control policy you want to edit.
The access control policy editor appears.
Step 3 Select the Advanced tab.
The access control policy advanced settings page appears.
Step 4 Click the edit icon ( ) next to Performance Settings, then select the Regular Expression Limits tab in the pop-up window that appears.
Step 5 You can modify any of the options in the Regular Expression Constraint Options table.
Step 6 Click OK.
You must save and apply the access control policy for your changes to take effect; see Applying an Access Control Policy, page 4-10.
Limiting Intrusion Events Generated Per PacketLicense: Protection
When the rules engine evaluates traffic against rules, it places the events generated for a given packet or packet stream in an event queue, then reports the top events in the queue to the user interface. You can elect to have the rules engine log more than one event per packet or packet stream when multiple events are generated. Logging these events allows you to collect information beyond the reported event. When configuring this option, you can specify how many events can be placed in the queue and how many are logged, and select the criteria for determining event order within the queue.
Match Recursion Limit State
Specifies whether to override Match Recursion Limit. You have the following options:
• select Default to use the value configured for Match Recursion Limit
• select Unlimited to permit an unlimited number of recursions
• select Custom to specify either a limit of 1 or greater for Match Recursion Limit, or to specify 0 to completely disable PCRE recursions
Note that for Match Recursion Limit to be meaningful, it must be smaller than Match Limit.
Match Recursion Limit Specifies the number of recursions when evaluating a PCRE regular expression against the packet payload.
Table 10-2 Regular Expression Constraint Options (continued)
Option Description
10-8ASA FirePOWER Module User Guide

Chapter 10 Controlling Traffic Using Intrusion and File Policies Tuning Intrusion Prevention Performance
The following table describes the options you can configure to determine how many events are logged per packet or stream.
To configure how many events are logged per packet or stream:
Step 1 Select Configuration > ASA FirePOWER Configuration > Policies > Access Control.
The Access Control Policy page appears.
Step 2 Click the edit icon ( ) next to the access control policy you want to edit.
The access control policy editor appears.
Step 3 Select the Advanced tab.
The access control policy advanced settings page appears.
Step 4 Click the edit icon ( ) next to Performance Settings, then select the Intrusion Event Logging Limits tab in the pop-up window that appears.
Step 5 You can modify any of the options in the Intrusion Event Logging Limits Options table.
Step 6 Click OK.
You must save and apply the access control policy for your changes to take effect; see Applying an Access Control Policy, page 4-10.
Configuring Packet and Intrusion Rule Latency ThresholdsLicense: Protection
You can balance security with the need to maintain device latency at an acceptable level with packet and rule latency thresholding. For more information, see:
• Understanding Packet Latency Thresholding, page 10-10
• Configuring Packet Latency Thresholding, page 10-11
• Understanding Rule Latency Thresholding, page 10-12
• Configuring Rule Latency Thresholding, page 10-14
Table 10-3 Intrusion Event Logging Limits Options
Option Description
Maximum Events Stored Per Packet
The maximum number of events that can be stored for a given packet or packet stream.
Maximum Events Logged Per Packet
The number of events logged for a given packet or packet stream. This cannot exceed the Maximum Events Stored Per Packet value.
Prioritize Event Logging By
The value used to determine event ordering within the event queue. The highest ordered event is reported through the user interface. You can select from:
• priority, which orders events in the queue by the event priority.
• content_length, which orders events by the longest identified content match. When events are ordered by content length, rule events always take precedence over decoder and preprocessor events.
10-9ASA FirePOWER Module User Guide

Chapter 10 Controlling Traffic Using Intrusion and File Policies Tuning Intrusion Prevention Performance
Understanding Packet Latency Thresholding
License: Protection
You can balance security with the need to maintain latency at an acceptable level by enabling packet latency thresholding. Packet latency thresholding measures the total elapsed time taken to process a packet by applicable decoders, preprocessors, and rules, and ceases inspection of the packet if the processing time exceeds a configurable threshold.
Packet latency thresholding measures elapsed time, not just processing time, in order to more accurately reflect the actual time required for the rule to process a packet. However, latency thresholding is a software-based latency implementation that does not enforce strict timing.
The trade-off for the performance and latency benefits derived from latency thresholding is that uninspected packets could contain attacks. However, packet latency thresholding gives you a tool you can use to balance security with connectivity.
A timer starts for each packet when decoder processing begins. Timing continues either until all processing ends for the packet or until the processing time exceeds the threshold at a timing test point.
As illustrated in the above figure, packet latency timing is tested at the following test points:
• after the completion of all decoder and preprocessor processing and before rule processing begins
• after processing by each rule
If the processing time exceeds the threshold at any test point, packet inspection ceases.
Tip Total packet processing time does not include routine TCP stream or IP fragment reassembly times.
10-10ASA FirePOWER Module User Guide

Chapter 10 Controlling Traffic Using Intrusion and File Policies Tuning Intrusion Prevention Performance
Packet latency thresholding has no effect on events triggered by a decoder, preprocessor, or rule processing the packet. Any applicable decoder, preprocessor, or rule triggers normally until a packet is fully processed, or until packet processing ends because the latency threshold is exceeded, whichever comes first. If a drop rule detects an intrusion in an inline deployment, the drop rule triggers an event and the packet is dropped.
Note No packets are evaluated against rules after processing for that packet ceases because of a packet latency threshold violation. A rule that would have triggered an event cannot trigger that event, and for drop rules, cannot drop the packet.
For more information on drop rules, see Setting Rule States, page 20-19.
Packet latency thresholding can improve system performance in both passive and inline deployments, and can reduce latency in inline deployments, by stopping inspection of packets that require excessive processing time. These performance benefits might occur when, for example:
• for both passive and inline deployments, sequential inspection of a packet by multiple rules requires an excessive amount of time
• for inline deployments, a period of poor network performance, such as when someone downloads an extremely large file, slows packet processing
In a passive deployment, stopping the processing of packets might not contribute to restoring network performance because processing simply moves to the next packet.
Configuring Packet Latency Thresholding
License: Protection
The following table describes the options you can set to configure packet latency thresholding.
Many factors affect measurements of system performance and packet latency, such as CPU speed, data rate, packet size, and protocol type. For this reason, Cisco recommends that you use the threshold settings in the following table until your own calculations provide you with settings tailored to your network environment.
Determine the following when calculating your settings:
Table 10-4 Packet Latency Thresholding Options
Option Description
Threshold (microseconds) Specifies the time, in microseconds, when inspection of a packet ceases. See the Minimum Packet Latency Threshold Settings table for recommended minimum threshold settings.
Table 10-5 Minimum Packet Latency Threshold Settings
For this data rate... Set threshold microseconds to at least...
1 Gbps 100
100 Mbps 250
5 Mbps 1000
10-11ASA FirePOWER Module User Guide

Chapter 10 Controlling Traffic Using Intrusion and File Policies Tuning Intrusion Prevention Performance
• average packets per second
• average microseconds per packet
Multiply the average microseconds per packet for your network by a significant safety factor to ensure that you do not unnecessarily discontinue packet inspections.
For example, the Minimum Packet Latency Threshold Settings table recommends a minimum packet latency threshold of 100 microseconds in a one gigabit environment. This minimum recommendation is based on test data showing an average of 250,000 packets per second, which is 0.25 packets per microsecond, or 4 microseconds per packet. Multiplying by a factor of twenty-five results in a recommended minimum threshold of 100 microseconds.
To configure packet latency thresholding:
Step 1 Select Configuration > ASA FirePOWER Configuration > Policies > Access Control.
The Access Control Policy page appears.
Step 2 Click the edit icon ( ) next to the access control policy you want to edit.
The access control policy editor appears.
Step 3 Select the Advanced tab.
The access control policy advanced settings page appears.
Step 4 Click the edit icon ( ) next to Latency-Based Performance Settings, then select the Packet Handling tab in the pop-up window that appears.
Step 5 See the Minimum Packet Latency Threshold Settings table for recommended minimum Threshold settings.
Step 6 Click OK.
You must save and apply the access control policy for your changes to take effect; see Applying an Access Control Policy, page 4-10.
Understanding Rule Latency Thresholding
License: Protection
You can balance security with the need to maintain latency at an acceptable level by enabling rule latency thresholding. Rule latency thresholding measures the elapsed time each rule takes to process an individual packet, suspends the violating rule along with a group of related rules for a specified time if the processing time exceeds the rule latency threshold a configurable consecutive number of times, and restores the rules when the suspension expires.
Rule latency thresholding measures elapsed time, not just processing time, in order to more accurately reflect the actual time required for the rule to process a packet. However, latency thresholding is a software-based latency implementation that does not enforce strict timing.
The trade-off for the performance and latency benefits derived from latency thresholding is that uninspected packets could contain attacks. However, rule latency thresholding gives you a tool you can use to balance security with connectivity.
A timer measures the processing time each time a packet is processed against a group of rules. Any time the rule processing time exceeds a specified rule latency threshold, the system increments a counter. If the number of consecutive threshold violations reaches a specified number, the system takes the following actions:
10-12ASA FirePOWER Module User Guide
Chapter 10 Controlling Traffic Using Intrusion and File Policies Tuning Intrusion Prevention Performance
• suspends the rules for the specified period
• triggers an event indicating the rules have been suspended
• re-enables the rules when the suspension expires
• triggers an event indicating the rules have been re-enabled
The system zeroes the counter when the group of rules has been suspended, or when rule violations are not consecutive. Permitting some consecutive violations before suspending rules lets you ignore occasional rule violations that might have negligible impact on performance and focus instead on the more significant impact of rules that repeatedly exceed the rule latency threshold.
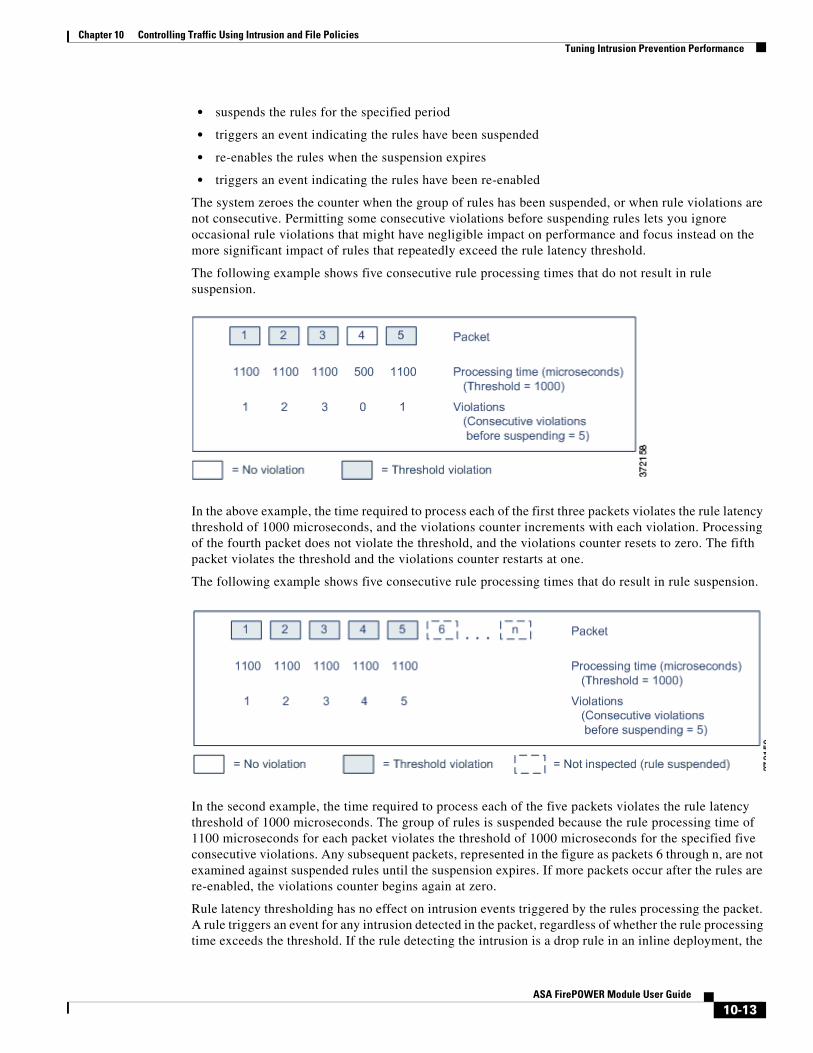
The following example shows five consecutive rule processing times that do not result in rule suspension.
In the above example, the time required to process each of the first three packets violates the rule latency threshold of 1000 microseconds, and the violations counter increments with each violation. Processing of the fourth packet does not violate the threshold, and the violations counter resets to zero. The fifth packet violates the threshold and the violations counter restarts at one.
The following example shows five consecutive rule processing times that do result in rule suspension.
In the second example, the time required to process each of the five packets violates the rule latency threshold of 1000 microseconds. The group of rules is suspended because the rule processing time of 1100 microseconds for each packet violates the threshold of 1000 microseconds for the specified five consecutive violations. Any subsequent packets, represented in the figure as packets 6 through n, are not examined against suspended rules until the suspension expires. If more packets occur after the rules are re-enabled, the violations counter begins again at zero.
Rule latency thresholding has no effect on intrusion events triggered by the rules processing the packet. A rule triggers an event for any intrusion detected in the packet, regardless of whether the rule processing time exceeds the threshold. If the rule detecting the intrusion is a drop rule in an inline deployment, the
10-13ASA FirePOWER Module User Guide

Chapter 10 Controlling Traffic Using Intrusion and File Policies Tuning Intrusion Prevention Performance
packet is dropped. When a drop rule detects an intrusion in a packet that results in the rule being suspended, the drop rule triggers an intrusion event, the packet is dropped, and that rule and all related rules are suspended. For more information on drop rules, see Setting Rule States, page 20-19.
Note Packets are not evaluated against suspended rules. A suspended rule that would have triggered an event cannot trigger that event and, for drop rules, cannot drop the packet.
Rule latency thresholding can improve system performance in both passive and inline deployments, and can reduce latency in inline deployments, by suspending rules that take the most time to process packets. Packets are not evaluated again against suspended rules until a configurable time expires, giving the overloaded device time to recover. These performance benefits might occur when, for example:
• hastily written, largely untested rules require an excessive amount of processing time
• a period of poor network performance, such as when someone downloads an extremely large file, causes slow packet inspection
Configuring Rule Latency Thresholding
License: Protection
You can modify the rule latency threshold, the suspension time for suspended rules, and the number of consecutive threshold violations that must occur before suspending rules.
Rule latency thresholding suspends rules for the time specified by Suspension Time when the time rules take to process a packet exceeds Threshold for the consecutive number of times specified by Consecutive Threshold Violations Before Suspending Rule.
You can enable rule 134:1 to generate an event when rules are suspended, and rule 134:2 to generate an event when suspended rules are enabled. See Setting Rule States, page 20-19 for more information.
The following table further describes the options you can set to configure rule latency thresholding.
Table 10-6 Rule Latency Thresholding Options
Option Description
Threshold Specifies the time in microseconds that rules should not exceed when examining a packet. See the Minimum Rule Latency Threshold Settings table for recommended minimum threshold settings.
Consecutive Threshold Violations Before Suspending Rule
Specifies the consecutive number of times rules can take longer than the time set for Threshold to inspect packets before rules are suspended.
Suspension Time Specifies the number of seconds to suspend a group of rules.
10-14ASA FirePOWER Module User Guide
Chapter 10 Controlling Traffic Using Intrusion and File Policies Tuning Intrusion Prevention Performance
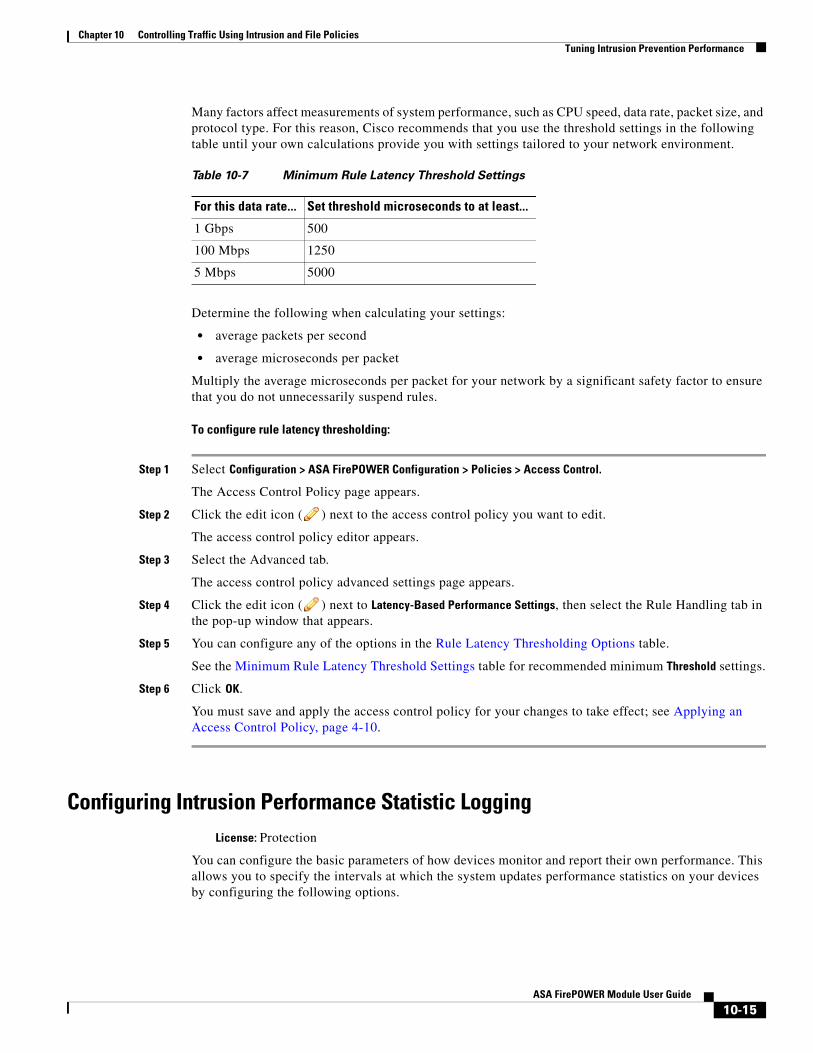
Many factors affect measurements of system performance, such as CPU speed, data rate, packet size, and protocol type. For this reason, Cisco recommends that you use the threshold settings in the following table until your own calculations provide you with settings tailored to your network environment.
Determine the following when calculating your settings:
• average packets per second
• average microseconds per packet
Multiply the average microseconds per packet for your network by a significant safety factor to ensure that you do not unnecessarily suspend rules.
To configure rule latency thresholding:
Step 1 Select Configuration > ASA FirePOWER Configuration > Policies > Access Control.
The Access Control Policy page appears.
Step 2 Click the edit icon ( ) next to the access control policy you want to edit.
The access control policy editor appears.
Step 3 Select the Advanced tab.
The access control policy advanced settings page appears.
Step 4 Click the edit icon ( ) next to Latency-Based Performance Settings, then select the Rule Handling tab in the pop-up window that appears.
Step 5 You can configure any of the options in the Rule Latency Thresholding Options table.
See the Minimum Rule Latency Threshold Settings table for recommended minimum Threshold settings.
Step 6 Click OK.
You must save and apply the access control policy for your changes to take effect; see Applying an Access Control Policy, page 4-10.
Configuring Intrusion Performance Statistic LoggingLicense: Protection
You can configure the basic parameters of how devices monitor and report their own performance. This allows you to specify the intervals at which the system updates performance statistics on your devices by configuring the following options.
Table 10-7 Minimum Rule Latency Threshold Settings
For this data rate... Set threshold microseconds to at least...
1 Gbps 500
100 Mbps 1250
5 Mbps 5000
10-15ASA FirePOWER Module User Guide
Chapter 10 Controlling Traffic Using Intrusion and File Policies Tuning File and Malware Inspection Performance and Storage
Sample time (seconds) and Minimum number of packets
When the number of seconds specified elapses between performance statistics updates, the system verifies it has analyzed the specified number of packets. If it has, the system updates performance statistics. Otherwise, the system waits until it analyzes the specified number of packets.
Troubleshooting Options: Log Session/Protocol Distribution
Support might ask you during a troubleshooting call to log protocol distribution, packet length, and port statistics.
Caution Changing the setting for this troubleshooting option will affect performance and should be done only with Support guidance.
Troubleshooting Options: Summary
Support might ask you during a troubleshooting call to configure the system to calculate the performance statistics only when the Snort® process is shut down or restarted. To enable this option, you must also enable the Log Session/Protocol Distribution troubleshooting option.
Caution Changing the setting for this troubleshooting option will affect performance and should be done only with Support guidance.
To configure basic performance statistics parameters:
Step 1 Select Configuration > ASA FirePOWER Configuration > Policies > Access Control.
The Access Control Policy page appears.
Step 2 Click the edit icon ( ) next to the access control policy you want to edit.
The access control policy editor appears.
Step 3 Select the Advanced tab.
The access control policy advanced settings page appears.
Step 4 Click the edit icon ( ) next to Performance Settings, then select the Performance Statistics tab in the pop-up window that appears.
Step 5 Modify the Sample time or Minimum number of packets as described above.
Step 6 Optionally, expand the Troubleshoot Options section and modify those options only if asked to do so by Support.
Step 7 Click OK.
You must save and apply the access control policy for your changes to take effect; see Applying an Access Control Policy, page 4-10.
Tuning File and Malware Inspection Performance and StorageLicense: Protection or Malware
10-16ASA FirePOWER Module User Guide

Chapter 10 Controlling Traffic Using Intrusion and File Policies Tuning File and Malware Inspection Performance and Storage
If you use file policies to perform file control or malware detection or blocking, you can set the options listed in the following table. Keep in mind that increasing the file sizes can affect the performance of the system.
To configure file and malware inspection performance and storage:
Step 1 Select Configuration > ASA FirePOWER Configuration > Policies > Access Control.
The Access Control Policy page appears.
Step 2 Click the edit icon ( ) next to the access control policy you want to edit.
The access control policy editor appears.
Step 3 Select the Advanced tab.
The access control policy advanced settings page appears.
Step 4 Click the edit icon ( ) next to Files and Malware Settings.
The Files and Malware Settings pop-up window appears.
Step 5 You can set any of the options in the Advanced Access Control File and Malware Detection Options table.
Step 6 Click OK.
Table 10-8 Advanced Access Control File and Malware Detection Options
Field Description Default Value Range Notes
Limit the number of bytes inspected when doing file type detection
Specify the number of bytes inspected when performing file type detection.
1460 bytes, or the maximum segment size of a TCP packet
0 - 4294967295 (4GB)
Set to 0 to remove the restriction.
In most cases, the system can identify common file types using the first packet.
Do not calculate SHA-256 hash values for files larger than (in bytes)
Prevent the system from storing files larger than a certain size, performing a Collective Security Intelligence Cloud lookup on the files, or blocking the files if added to the custom detection list.
10485760 (10MB)
0 - 4294967295 (4GB)
Set to 0 to remove the restriction.
Allow file if cloud lookup for Block Malware takes longer than (seconds)
Specify how long the system will hold the last byte of a file that matches a Block Malware rule and that does not have a cached disposition, while malware cloud lookup occurs. If the time elapses without the system obtaining a disposition, the file passes. Dispositions of Unavailable are not cached.
2 seconds 0 - 30 seconds Although this option accepts values of up to 30 seconds, Cisco recommends that you use the default value to avoid blocking traffic because of connection failures. Do not set this option to 0 without contacting Support.
10-17ASA FirePOWER Module User Guide

Chapter 10 Controlling Traffic Using Intrusion and File Policies Tuning File and Malware Inspection Performance and Storage
You must save and apply the access control policy for your changes to take effect; see Applying an Access Control Policy, page 4-10.
10-18ASA FirePOWER Module User Guide