cooking ria crud with flex and blazeds - · pdf filecooking ria crud with flex and blazeds in...
TRANSCRIPT

Cooking RIA CRUD with Flex and BlazeDS In today’s cooking class you’ll add to your cookbook a delicious recipe. It’s quick and won’t cost you a dime. I’m sure you’ve been in one of these situations when you have unexpected guests arriving in 20 minutes and need to make a good impression. Let’s do it.
Ingredients 1. Eclipse IDE for Java Developers: http://www.eclipse.org/downloads/
2. Adobe Flex Builder 3 plugin version: http://www.flex.org
3. Adobe BlazeDS 3.0: http://opensource.adobe.com/wiki/display/blazeds/download+blazeds+3
4. Clear Data Builder 3.0 Beta plugin for Eclipse from Farata Systems: http://www.myflex.org/beta/site.zip
5. Apache Tomcat 6.0 http://tomcat.apache.org/download-60.cgi
6. IBM DB2: http://www-306.ibm.com/software/data/db2/express/ . If DB2 is not spicy enough for you, replace it with other seasonings like MySql Server, SQL Server or Oracle.
Out of these ingredients only Flex Builder 3 is not free unless you are a student, faculty or are willing to cook it with a 60-day trial version.
Time of cooking After all ingredients are installed, creation of a basic CRUD should take you less than 10 minutes. If you prefer to start with watching the video of how this CRUD was cooked, you can download the screen cast in avi (6MB) format.
Serves more than 10,000 people With this tasty RIA CRUD recipe you can feed more than 10,000 people. Tomcat 6.0 uses a non-blocking I/O, and apparently there are benchmarks showing that it can withstand as much as 16,000 concurrent connections (see http://weblogs.java.net/blog/sdo/archive/2007/05/how_to_test_con.html ).
Preparing the cooking table
1. Eclipse JEE installation is as simple as unzipping it to a folder on your hard disk. This recipe requires JEE version of Eclipse because we’ll be using nice Web tools that come with it. 2. Installing of the plugin version of Flex Builder 3 is also easy, as long as you’ll be able to find it

online. Adobe is flirting with you girls, by hiding it behind the standalone Flex Builder distribution, but savvy housewives can always find the exact ingredients they are looking for. Just follow the link by the text “Have Eclipse already installed…” on Flex Builder download site. 3. Register at www.myflex.org and get the license to Clear Data Builder (CDB) - it’s free. The version for Flex 2 was and still is on sale, but CDB 3.0 will be offered at no charge. Download the CDB 3 beta version at http://www.myflex.or/beta/site.zip. Unzip it into any folder on your disk and install CDB plugin by selecting Eclipse menu Help | Software Updates | Find and Install. Select the radio button “Search for new features to install”. Press the button New Local Site, give it a name (i.e. Local CDB) and point at the directory where you’ve unzipped the file site.zip.
Install CDB license in Eclipse by using the Menu Window | Preferences |Flex |My Flex | License Management |Install License. The CDB license goes under the name daoflex, which was an open source predecessor of CDB.
4. Download the binary edition of BlazeDS , which is a relatively small (4Mb) zip file. Just unzip it into some folder, say in c:\blazeds like I did.
It goes without saying, that any respected chef has JDK 1.5 or later. Yes, we need JDK, not JRE for today’s class . Use Eclipse menu Window | Preferences | Java | Installed JREs and point it to your JDK installation directory, for example:

5. Download Tomcat 6 - select Windows Service Installer from the Core Downloads section. Run the install accepting all defaults.
6. The last preparation step is like DB2. Remember old days? Mainframe, Cobol, DB2… It’s 21st century and IBM offers a free version of DB2 Express that works just fine on your PC. During the installation you’ll need to pick a user name and the password. I’ve selected dba as a user id and sql as a password.
If you prefer MySQL Server, I do not mind. But when other girls will be selecting the DB2 radio button on CDB configuration screen, you pick My SQL. We’ll be using the Employees table that comes with the sample DB2 database. You use whatever table you like. That’s all. I’ve got a little surprise for you. Our today’s cooking class is video recorded, and you’ll be able to watch it over and over again at your own pace.
Let’s start.
Directions
1. Start Eclipse JEE and create a new instance of the Tomcat 6 server. Right-click in the tab Servers, select New, Tomcat 6, and then click on Finish.
2. Create a new Dynamic Web Project in Eclipse using the menus File | New | Other | Web | Dynamic Web Project. Let’s name the project RIA CRUD. Specify the Target Runtime (we’ll use Apache Tomcat 6.0) in the Dynamic Web Project configuration screen:

Press the button Next.

3. Select Clear Data Builder and Flex Web Project facets as shown below:
Press Next.
4. Leave the next screen the suggests RIA_CRUD as a context, WebContent as a content directory and src as a directory for the Java code. Press the button Next.

5. Now you need to specify that we are going to use BlazeDS and where your blazeds.war is located:
Press the button Next.
6. Finally, we need to specify that the application will be deployed under Tomcat, select and configure the database connection . Select the database driver, name the connection pool, and enter the URL of your database. By default, DB2 is running on port 5000 and the name of the sample database is SAMPLE.
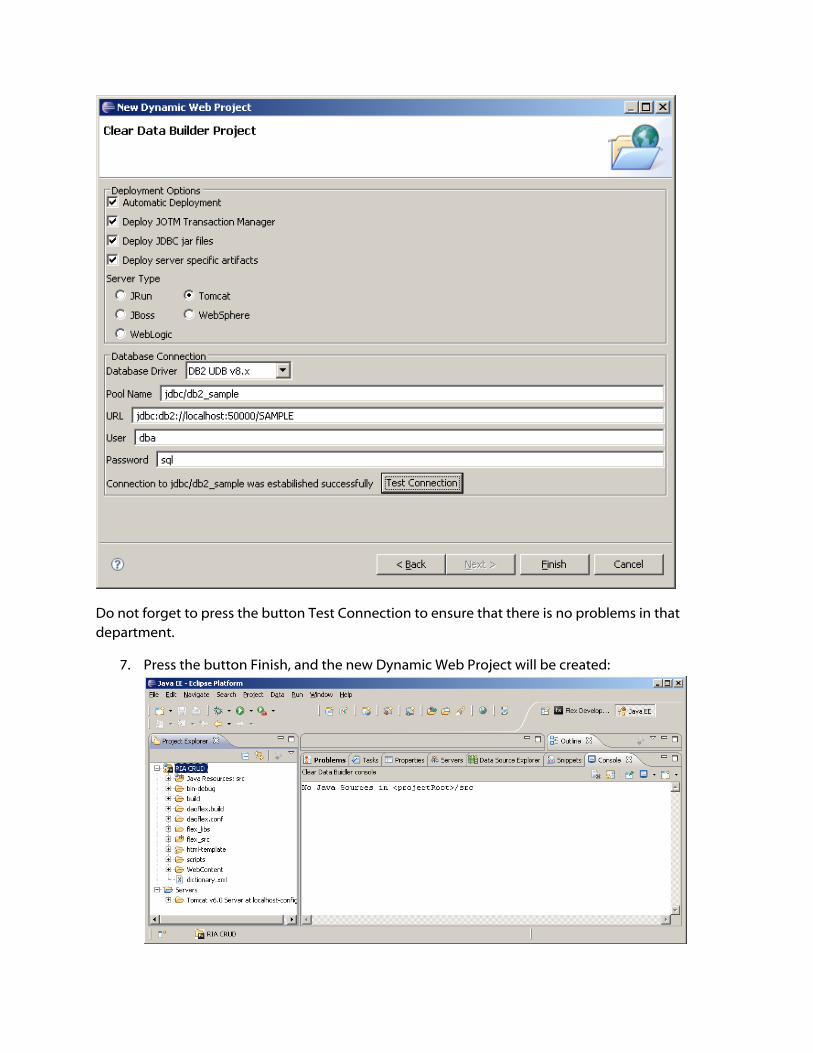
Do not forget to press the button Test Connection to ensure that there is no problems in that department.
7. Press the button Finish, and the new Dynamic Web Project will be created:

8. Create a new abstract class Employee (right-click on Java Resources). Let’s enter com.farata as the package name:
The code of the class Employee will look like this: package com.farata; public abstract class Employee { }
9. It’s time for Clear Data Builder to chime in, but we need to prepare a method signature annotated (we use doclets) with our SQL statement that will bring the data to our CRUD application. We’ll need a couple of more lines of code to specify what’s the table to update and what’s the primary key there. Since I did it a number of times, I’ll just show you how

the resulting class may look like: package com.farata; import java.util.List;
/** * @daoflex:webservice pool=jdbc/db2_sample */ public abstract class Employee { /** * @daoflex:sql * pool=jdbc/db2_sample * sql=::select * from yf.EMPLOYEE * :: * transferType=EmployeeDTO[] * keyColumns=EMPNO * updateTable=yf.EMPLOYEE */ public abstract List getEmployees(); }
Double colons are used to specify the start and end of the SQL statement. But since it’s your first exposure to CDB, right-click inside the curlies in the class Employee, and you’ll see a Clear Data Builder’s menu.
Select Inject SQL sync template if you need a CRUD application or Inject SQL fill template if you are planning to create a read-only application. CDB will insert commented code that will help you to write similar code on your own.
Here’s a screenshot of the Control Center of the DB2 SAMPLE database. Please note, that on my PC the table EMPLOYEE was created in the schema YF, which happened to be my user id on my laptop.

Since we configure the database connection pool using dba as a user id, we’d need to fully qualify the table name: select * from yf.employee. Accordingly, the name of the table to update should be also fully qualified. To eliminate this annoyance, you can use DB2 Control Center and create an alias Employee in the dba schema to point at the table Employee in the schema yf:

Now we can go to the Eclipse menu Project an perform Clean , which will start the CDB code generation and build process. The Clean process invokes the ANT build script located under the folder daoflex.build. The only proper outcome of this process is BUILD SUCCESSFUL. If you do not see this message, most likely you’ve done something wrong or in the wrong order. After this build, the Java DTO and data access classes where generated and deployed in our Tomcat servlet container.
To see the Java code generated by CDB, switch to the Flex Builder perspective, click on a little triangle in the Flex Navigator view, select the Filters option and uncheck the “gen” checkbox as shown below:
The generated Java code is located under the folder .daoflex-temp\gen. Re-run the Ant script to regenerate the code. If you do not see this folder immediately, refresh your Eclipse project by pressing F5. Technically, you do not need keep these source files as they are going to be jar’ed by CDB build process and deployed in the lib directory of your servlet container under WEB-INF\lib in the files daoflex-runtime.jar, services-generated.jar and services-original.jar.

On the client side, CDB has generated the EmployeeDTO.as, an ActionScript peer of the generated EmployeeDTO.java. It’s shown on the next screen shot. Clear Data Builder also generates a number of test Flex applications, which can be used as the front end of our RIA CRUD application.
In a minute, we’ll use the one of the generated Flex applications called Employee_getEmployees_GridTest.mxml.

10. Add your project to Tomcat server: right click on your Tomcat Server, select Add or Remove projects, and add the project RIA CRUD to the Configured projects panel.
11. Start the server by using its right-click menu.
12. This Beta version of the CDB 3.0 has a bug that we are working on, and this step is just a quick workaround to get us moving. In the Flex perspective, open the file org.eclipse.wst.common.components in the .settings folder, just enter a space character somewhere and save it. In Java perspective, restart the server. This step won’t be needed in the production release of CDB 3.0.
13. Switch to the Flex Perspective, and copy the file Employee_getEmployees_GridTest.mxml from test.rpc.com.farata to flex_src directory, set it as a default application, right-click and run it as Flex application.

The basic RIA CRUD application is ready!
14. To test the database updates, modify, say the last name of an employee. After you tab out of the last name field, the button Commit becomes enabled, and you’ll be able to apply your changes to the database. The button Fill is for data retrieval from the server side. The Add button is for adding new data. The button Remove becomes enabled when you select a row in the data grid. The source code of our RIA CRUD application is available, and you can use it as a foundation of your future project just add the required components to the code shown

below.
The server-side code is deployed under Tomcat server, and the relevant classes are located under the folder WebContent in your project. While generating this project, CDB has added a library component.swc to the build path. It contains the class library called theriabook created by Farata Systems. It includes a number of handy components that enhance standard controls of Flex framework and a number of classes simplifying communication with the database layer. theriabook is a non-intrusive class library allows you to mix and match original Flex components with the ones that come with Flex framework. The difference between theriabook and all other Flex frameworks is that a) it’s not a framework but a class library; b) while other frameworks require you to add some extra code to your application, theriabook makes your codebase smaller. For example, the following auto-generated code from Employee_getEmployees_GridTest.mxml uses an object DataCollection from theriabook, which is nothing else but a subclass of Flex class ArrayCollection. Look at the code in the onCreationComplete() function below. DataCollection is a smart data-aware class that combines the functionality of Flex ArrayCollection, RemoteObject and some functionality of the Data Management Services that are available in LiveCycle Data Services. Just set the destination and the method to call, and call it’s methods fill() or sync(). No need to define the RemoteObject with result and fault handlers, no server-side configuration is required.
<mx:Button label="Fill" click="fill_onClick()"/>

<mx:Button label="Remove" click="collection.removeItemAt(dg.selectedIndex)" enabled="{dg.selectedIndex != -1}"/> <mx:Button label="Add" click="addItemAt(Math.max(0,dg.selectedIndex+1)) "/> <mx:Button label="Commit" click="collection.sync()" enabled="{collection.commitRequired}"/> …
import com.theriabook.rpc.remoting.*; import com.theriabook.collections.DataCollection; import mx.collections.ArrayCollection; import mx.controls.dataGridClasses.DataGridColumn; import mx.events.CollectionEvent; import mx.formatters.DateFormatter; import com.farata.dto.EmployeeDTO; [Bindable] public var collection:DataCollection ; [Bindable] private var log : ArrayCollection; private function onCreationComplete() : void { collection = new DataCollection(); collection.destination="com.farata.Employee"; collection.method="getEmployees"; //getEmployees_sync is the default for collection.syncMethod log = new ArrayCollection(); collection.addEventListener( CollectionEvent.COLLECTION_CHANGE, logEvent); collection.addEventListener("fault", logEvent); fill_onClick(); } private function fill_onClick():void { collection.fill(); } private function addItemAt(position:int):void { var item:EmployeeDTO = new EmployeeDTO(); collection.addItemAt(item, position); dg.selectedIndex = position; } private function logEvent(evt:Event):void { if (evt.type=="fault") { logger.error(evt["fault"]["faultString"]); } else { if (evt.type=="collectionChange") { logger.debug(evt["type"] + " " + evt["kind"]); } else { logger.debug(evt["type"]); } } } Even though this code was auto-generated, nothing stops you from modifying it to your liking. CDB and theriabook library gives your project a jump start and the resulting code base is small –

the Employee_getEmployees_GridTest.mxml is only about 90 lines of code, which includes 10 empty lines and the code for logging!
The other freebee that CDB gives you is an automated ANT process of building and deploying your project both on the client and the server. You do not need to worry about creating compatible Java and ActionSript DTO objects. If the structure of the result set of the server side data is changing, just change the SQL statement in your Java abstract class and re-run the daoflex-build.xml.
Our cooking class is over. Today’s recipe is one of the best practice techniques that we that we use while working on the projects for our clients. Originally, Clear Data Builder was released as a command-line open source code generator called daoflex. It was submitted to Adobe Flex component exchange about two years ago and quickly became one of the most downloadable components. Its next incarnation was a commercial plugin CDB 1.1 for Flex 2 (see http://www.myflex.org ). And the upcoming release of CDB 3.0 plugin will become a freely available Eclipse plugin, which is a yet another contribution of Farata Systems to Flex community. The other free products that Farata Systems will release this Summer include: - Fx2Ant 3.0 – a generator of optimized Ant build scripts for your Flex projects - Log4FX 3.0 – an advanced log facility for Flex/Java projects - DTO Creator – a utility that can take any Java data transfer object (formerly value object) and create an efficient and customizable matching ActionSript DTO
Stay tuned.