corbin handbook of bullet swaging no. 9 · pdf file1 corbin handbook of bullet swaging no. 9...
TRANSCRIPT

1
Corbin Handbookof
Bullet SwagingNo. 9
Revised September 2012
by
David R. Corbin
Corbin Manufacturing & Supply, Inc.PO Box 2659
White City, OR 97503 USA
www.Corbins.com

2
Corbin Handbook of Bullet Swaging, No. 9
Revised September 2012
© Copyright 2004, 2012 David R. Corbin
All rights reserved.May not be reproduced by any means, including electronic and
mechanical, without the expressed written permission of the copyrightholder.
Published by:
Corbin Manufacturing & Supply, Inc.PO Box 2659
White City, OR 97503 USA
541-826-5211Mon-Thurs 10am-6pm
Fax: 541-826-866924/7
E-mail: [email protected]

3
Table of Contents
1. Introduction to Bullet Swaging ..................................................... 5
2. What is Bullet Swaging? .............................................................. 10
3. Bullet Swaging Secrets ................................................................ 25
4. Tubing Jackets ............................................................................. 48
5. Drawn Strip Jackets .................................................................... 67
6. Base-Guard Bullets ...................................................................... 77
7. Draw Dies ..................................................................................... 82
8. Making Lead Cores ...................................................................... 97
9. Swaging with a Reloading Press ............................................... 106
10. Bullet Swaging Presses ............................................................ 127
11. Lead, Base-Guard, Gas-Checked and
Paper Patched Bullets ............................................................ 156
12. Jacketed Semi-Wadcutters ..................................................... 172
13. Full-Jacket, Flat Base Bullets ................................................. 183
14. Lead Tip Bullets ....................................................................... 196
15. Rebated Boattails ..................................................................... 205
16. Shotgun Slugs and Airgun Pellets ........................................... 212
17. Bullet-Makers� Tools ................................................................ 217
18. Custom Toolng ......................................................................... 228
19. Lubricants and Chemicals ...................................................... 240
20. Books and Software ................................................................ 248
21. Delivery Information .............................................................. 253
22. Warranty ................................................................................... 260
23. Non-Disclosure Agreements .................................................. 263

4

5
1. Introduction to Bullet Swaging
Good morning! I�m Dave Corbin, and for over 40 years I�ve had thesecond best job in the world: I help people make the state-of-the art bul-lets that you�ve read about in the gun magazines. Nearly every custombullet maker started with equipment developed at the Corbin die-works.They have the best job in the world!
All you have to do is scan the pages of nearly any magazine cateringto handloaders, and you�ll see dozens of ads from our clients; the articlesare constantly talking about the bullets our clients make, and the majorammunition firms are buying the bullets made on Corbin equipment foruse in their premium ammo. There has been a lot more research anddevelopment that you don�t read about, because it isn�t intended for thegeneral shooting public. I can now include a small amount of that infor-mation in this edition.
Corbin Manufacturing publishes an e-book called the �World Direc-tory of Custom Bullet Makers� listing hundreds of individuals and firmswhose names you may recognize if you are familiar with handloading.When I read the list, I remember someone�s enthusiasm for the new busi-ness venture they were able to start, thanks to the power of bullet swag-ing.
Olympians and world champions in every field of firearms sports,from benchrest to air gun competition, using everything from paper-patched blackpowder bullets to custom fin-stabilized shotgun slugs, havecome to the die-works where we have toiled for the last quarter centuryand into the first quarter of this one, some just to improve their already-outstanding achievements, and some to help others become better shoot-ers by manufacturing new ideas in how a given bullet should look and beconstructed.
Engineers from the Department of the Army, Air Force ArmamentLabs, Sandia National Laboratories, DuPont, Northrop, Lockheed, Mar-tin-Marietta and other defense-related organizations have visited us overthose years, sometimes sketching ideas on napkins during lunch. Toolsand designs we worked on are in use today all over the world, wherever along range, high precision projectile or a very special purpose bullet thatcould only be made efficiently by the high precision techniques of swaging,is needed for the job.
Whether it is protecting an important public figure at long range orpicking a pine cone from the top of an experimental tree, whether it issurveying a dense mountain jungle with remotely launched flare projec-tiles designed for vertical firing stability, or stitching mirror-based bullets

6
in an arctic ice sheet from a low-flying aircraft so a laser beam can mea-sure the depth and estimate the strength of the ice to hold a transportplane, or whether it is the grim responsibility of instantly stopping a ter-rorist before he can take the life of another hostage�regardless of thepurpose, we sat through many meetings pouring over blueprints, com-puter readouts, and sketches, helping design projectiles for visitors fromthe far corners of the earth.
Yet, this work is only the continuation of development begun by otherpioneers of bullet swaging: people like Ted Smith, who founded the oldSAS Dies in the 1950�s; Harvey Donaldson, who experimented with someof the first dies to make .224 bullets from fired .22 cases; Walt Astles andRay Biehler, who developed the principle of upward expansion and thetwo-die swage technique which replaced the RCBS single-die take-apartsystem; Charlie Heckman, a pioneer swage maker; and so many otherswhose names are probably unknown to modern shooters, but to whom allshooters owe a debt for their contributions to the perfection of bullets.
You may know that the RCBS company (initials of which mean RockChuck Bullet Swage) got started making bullet swaging equipment, butsoon dropped it in favor of more easily produced reloading dies. You mayeven have heard Speer Bullets was started by Vernon Speer swaging .224caliber bullets from fired .22 LR cases.
But bullet swaging played a much larger part than just that, in leadingto the products and companies you use today: Hornady, Sierra, Nosler,Barnes, Swift and a host of other mass production operations owe theirvery existence to the concept of bullet swaging. Today, more than fourhundred custom bullet firms�operated by people who probably differfrom yourself only in having taken the step of putting their intense inter-est in firearms to work at a profitable and enjoyable occupation�producespecialty bullets. We call this field �custom bullet making�, the elite corpsof bullet manufacturing providing initial concept advances sometimescopied years later by the larger �mass production� bullet makers.
So, what is bullet swaging and how do you do it? What do you need toget started? How much does it cost? What are the advantages and draw-backs compared to casting or just buying factory bullets? Can you swagehard lead, make partitioned bullets, make your own jackets, make plainlead bullets or paper patched slugs?
I answer those questions a thousand times a week and I never gettired of it. But to save you a lot of time on the phone, I�ve written most ofthose answers here. If you read through this book and think I have leftsomething out, you are absolutely right: I left out about seven more booksof information! Those are available if you care to read further.

7
Swaging is so simple you can do it correctly after just a couple oftries. Then you�ll see it�s also extremely versatile and powerful: you cando one more thing, and then one more after that, and soon you will havethe whole top of your loading bench covered with one-of-a-kind bullets,some of which no one in the world has ever made before. That�s why ittakes at least seven more books to make a dent in the vast array of thingsyou might do, could do, if you wished. Only your imagination limits thepossibilities.
A deeper study of the specifics of bullet swaging technique and tool-ing, including products made by people other than Corbin, can be foundin the book �Re-Discover Swaging�, so named because swaging was, infact, discovered once before and then almost lost: during the period of1948-1963 there were many die-makers who produced swaging equip-ment, but none of them offered a comprehensive enough range of prod-ucts to insure their own survival, or that of the swaging arts.
Corbin Manufacturing was the first comprehensive effort to preserveand further the technology with information, supplies and tools from onesource. Whereas other die-makers tended to be secretive and often diedwith their secrets of bullet making, Corbin began publishing informationthat would help advance the field, from our beginning days.
Bullet swaging, by the way, is pronounced �SWAY-JING� and rhymeswith �paging�. There is a blacksmith technique for pounding hot metalaround a form that is called �swedging� but it is a different sort of thingaltogether.
If you want to really dig into the subject and learn things most peoplenever discover, then order the Book Package. You get another copy of thisbook free, with it. Give this copy to a friend. Who knows: maybe betweenthe two of you, a new bullet making business may develop that rivals thefame of some of our other clients? It could happen: it has happened over400 times so far!
Warning! While the majority of handloaders say that they enjoyreading the additional side trips that clutter my books, some have com-plained that I don�t get �to the point� and just tell them 1-2-3 how tomake a bullet. I agree that this would be a good idea, if only I had someway to know exactly which bullet they wanted to make.
You see, every bullet can be described with a step-by-step, cookbookapproach, but there are tens of thousands of different styles and shapesyou can make, and not all of them are made the same way! The samebullet may be made in slightly different ways with different presses andthe dies which fit them.

8
Instead, I try to teach the principles involved. That way, you knowthe terminology and won�t be confused by thinking a die is a punch or apunch holder is a die. You will understand that every swaging operationexpands the components upward in size, so that you won�t try to put alarger part into a smaller hole except when drawing down (which you willknow is different from and opposite to swaging).
You will know that in a swaging press, the die screws into the ram andthe external punch fits into the press top, in a floating punch holder, whereasin an ordinary reloading press used for swaging, the die fits the top andthe external punch fits the ram. You will understand that a smooth, step-less ogive requires a set of dies that includes a point forming die, whereasa shouldered semi-wadcutter style bullet can be made in a single die.
All these things will be familiar to you before you start. You won�tneed to be told specifically how to make every possible bullet, becauseyou will understand the basic principles and how to apply them to anybullet.
When we ship orders for dies, they come with specific, simplified 1-2-3 instructions that apply to the design you ordered. Sometimes theseinstructions are applicable to many calibers in a popular style, so we printthe instructions on a form. Sometimes your bullet design needs specific,handwritten details and tips we discovered while developing the dies, andthen we write special instructions for you. But in all cases, if you areprepared with a good background of general swaging principles, you canavoid damaging the tools and begin making bullets with higher confi-dence.
Swaging versus Casting
Everyone seems to be familiar with bullet casting (melting metal andpouring the molten liquid into a split mould, letting it cool and shrink,and then opening the split mould halves so that the frozen bullet metalcan drop out).
Casting involves a lot of time and introduces quite a few potentialsources of inaccuracy, but it works reasonably well within a limited rangeof capabilities. You have to have a lead pot and a supply of lead, a mouldand mould handles, then a lubricator and sizer machine to prepare thebullets. The sizer machine needs sizer dies and base and nose punches tofit the shape and caliber of bullet. It also require lubricant to apply to thebullet.
The first thing you have to do with casting is to melt a pot of lead,flux it and stir it, make sure that the dross and dirt is cleaned from thelead, ventilate the room and make sure no moisture gets into the pot and

9
blows the hot lead out with a bang. You need to be reasonably carefulabout fire and burns, and about potentially toxic fumes (no eating or smok-ing, plenty of good ventilation). After about half an hour of this meltingand preparation, you are ready to start casting bullets.
The first few attempts usually make incomplete or frosty bullets, untilthe mould is warmed up. During the casting process, the mould containsliquid metal that is cooled to solidify on every single bullet made, so it isconstantly changing diameter from thermal expansion.
When you open the split halves, part of the mould is exposed to roomtemperature air while the rest is protected from it, which cannot fail toslightly warp the roundness of the mould. The two halves of the mouldcannot be put together with zero tolerance, as they would be far too hardto swing open and closed again, so there is some degree of �slop� in the fitof the pivot and the alignment pins. Add up all these factors and you cansee that a cast bullet has a limit of roundness and diameter control basedon physics, rather than skill or quality of manufacture.
In contrast, a swaging die runs at room temperature and does notcontact hot metal. It flows the metal under tons of pressure, squeezingout all air pockets and voids. The bullet takes its shape and finish from thediamond-lapped hardened surface of the die. The die is not split, but is asolid tube or cylinder with thick walls to hold the pressure. The bulletmaterial goes in one end, and is pushed back out the same way. Twoprecisely fitted punches seal both ends of the die. One moves in and outto load material, and the other acts as an ejector.
The problems associated with heat expansion, swinging split sectionalignment, and the time required to prepare are absent or minimized withswaging. In addition, the die can make a wide range of weights depend-ing on how much material you put into it. A mould makes approximatelyone weight because you must fill it to make a bullet. These are just a fewof the differences between casting and swaging.
There is one thing you can do more quickly and easily with castingthan with swaging: you can form a lead bullet with grooves for lubrica-tion. With swage dies, the bullet goes in and then comes back out thesame hole in the die. If you think about that for a minute, you will under-stand that it would not be possible to swage a groove into the side of thebullet and then push it back out of the die. The die would have to be�split� like a mold. While this is possible, it is not cost effective. Fortu-nately, you can roll grooves into a swaged lead bullet with a grooving toolmade by Corbin, or use better bullet designs or surface lubricants thateliminate the need for grooves. And you can swage jacketed bullets, sothat separate lubricant is not required.

10
2. What is Bullet Swaging?
Before we talk about swaging a bullet, we need to make sure the con-cept of a bullet is clear. When we say �bullet�, we mean the projectile orpart of the cartridge that is propelled through the air. The news media andpopular movies and magazines often refer to a �bullet� as the entire car-tridge with powder, primer, bullet and case. Bullet swaging has nothing todo with the rest of the cartridge, but concentrates on the part that flies tothe target. In some countries, shooters refer to the bullet as the �head� orthe �bullet head� and call the entire cartridge a �bullet�.
There is a good reason not to call the cartridge a bullet, as popularmedia seems inclined to do. The bullet is inert metal without any propel-lant involved, which means that it should be treated as a precise metalproduct, not some dangerous component subject to transportation re-strictions and tariffs. A bullet is as safe as a writing pen, probably safer:people have been stabbed with uncapped ball-point pens. I accidentlystabbed myself once, stupidly, reaching quickly into a coat pocket.
Finding a �bullet� in the possession of an airline traveller should be nomore cause for alarm than finding a coin. Unfortunately, through igno-rance and imprecise language, the term �bullet� causes problems where itshould not. Some of them are of practical concern to those who showtheir products and must carry samples. More than one new bullet makerhas run up against unrealistic insurance, business licensing and zoningproblems because of ignorance about what a �bullet� actually means.
A bullet maker is a precision metal product manufacturer, who couldjust as well be making precision bearings or electronic fittings. But try toexplain that to a bureaucrat who just found out you intend to make bul-lets in the home enterprise, or the hysterical airline security guard whoscanned a couple of samples in your pocket, or the customs agent whoseeyes widen as he reads your declaration of �bullet-making� equipmentbeing taken into the country! Such a pity these things happen. The wisebullet-maker soon learns to discuss precision formed parts rather thanbullets, around those who know nothing about the field.
Corbin equipment can swage bullets from .123 diameter up to about1-inch diameter (.998-inch is the 4-bore blackpowder elephant cartridge,for example). The �bullet� can be an airgun pellet, a swaged round ball, ashotgun slug, a fragmenting shot or powdered metal filled jacketed pistolbullet, a partitioned or multi-jacketed projectile, and it can be made ofpure lead, various lead alloys, powdered metals pressed together with orwithout a jacket, conventional jacketed bullets with a lead core with orwithout other inserts such as penetrators or light plastic fillers to shift the
11
center of gravity and create fast, light but long projectiles. In short, justabout anything that can be launched from a small arm, be it airgun, shot-gun, rifle or pistol, and some kinds of machine guns and cannons, can beswaged and is considered a bullet.
Bullet swaging (SWAY-jing, sounds like �paging�) is the process of ap-plying extremely high pressures (from 15,000 PSI for soft, unjacketedbullets to as high as 150,000 PSI for solid copper bullets) to materialscontained in a very tough, extremely well finished die, so that the mate-rial will flow at room temperature and take on the shape of the die and theends of the punches.
A die is a vessel to hold the pressure. A punch is a rod that fits into thehole in the die and seals off the end. If you refer to a punch as a die andvice versa, you may cause some interesting errors when placing orders.One of the first things to learn is the right names for the basic parts in-volved in the swaging process. You wouldn�t call a pistol a shotgun, wouldyou? Probably not, or else you might get some odd-looking mail-orderholsters!
A business that is good at making swage dies probably will be buriedin orders, with long waiting lists. Waiting up to a year to get your �die�and finding out everyone thought you wanted the �punch� that you askedfor may be frustrating. Use the right terms and avoid this problem.
In swaging bullets, you will always be putting a smaller diameter ob-ject (lead, jacket, or a combination of both) into a slightly larger die cav-ity or hole. Each step in swaging increases the diameter of the compo-nents, until they reach the final diameter in the last die. Swaging neverreduces the diameter. You will only have stuck bullets and hard ejection ifyou try to push a slightly larger part into a slightly smaller hole. This isthe difference between swaging and drawing. You never swage anything�down�. You never draw anything �up�.
In drawing, you do push a larger part through a smaller hole, to re-duce the diameter. This kind of die is a ring, not a cylinder closed on oneend. The jacket or bullet that you are reducing is pushed through the ring,and is decreased in diameter when it comes through the other side.
We use drawing to make longer, smaller caliber jackets from shorter,larger diameter ones. Also, within some narrow limits, it is possible tomake a smaller caliber bullet from a larger one, although this degrades thequality of the bullet unless special conditions are observed. Usually thedifference in diameters has to be within 0.006 thousandths of an inchwhen you reduce finished bullets by drawing. Jackets can be drawn muchmore than this, usually up to 30% smaller in one draw.

12
A jacket is the �skin� of a bullet, usually made of copper or a copperalloy with zinc (most commonly 5% to 10% zinc). Jackets can be used, ornot, depending on the bullet design. A jacket isolates the lead core fromcontact with the barrel, and allows the bullet to be shot much faster with-out friction melting the core and smearing it in the barrel, which is called�lead fouling�. Enough of that spoils the accuracy and is hard to remove.We�ll discuss jackets in detail later.
Bullet jackets properly designed for home swaging are always madesmaller than the finished caliber, then expanded by putting lead insidethem and compressing it with a punch. The lead flows to fill the jacket,then pushes the jacket out a few thousandths of an inch to meet the diewall, which stops the expansion. One end of the die is sealed with a punch,which stops the end from popping off the jacket. If you try to use a jacketlarger than the die hole, it can�t spring back slightly when you release thepressure. In fact, if you push a jacket into a die that is too small for it, thejacket will be trying to spring back to original size, and thus pressingitself firmly against the die walls. This causes difficult ejection and is hardon the equipment.
The right way to swage bullets is to use jackets that fit easily into thedie by hand, and lead cores which are small enough to easily drop into thejacket. Jackets of course have some wall thickness, generally from 0.015to 0.035 inches (although there is no rule that says you can�t make muchthicker jacket walls if you want them). To determine the diameter of leadcore which fits inside, you must subtract two times the wall thicknessfrom the caliber, and then subtract an additional five to ten thousandthsof an inch to allow for easy insertion, tolerances in the lead wire diameter,and the fact that you may have two or three steps with a small amount ofexpansion in each, to get to final caliber.
Basic swage dies
There are two basic designs of swaging dies made by Corbin. All thespecific styles of dies are patterned after one or the other of these basicdesigns. One design is a cylinder with a straight hole through it. The otheris a cylinder with a semi-blind hole, having the shape of the bullet exceptthat at the tip, there is a tiny hole (.052 to .120 inches is a typical range)fitted with a strong piece of tempered spring wire.
The first design can be used for any sort of operation where two punchescan form the desired shape on the end of the enclosed materials. An ex-ample would be a �Core Swage� or �CSW-� die, which takes in a piece ofcut lead wire or cast lead pellet (the �core� of a bullet) and gives it aprecise diameter with smooth flat ends and extrudes off whatever sur-
13
plus lead there might be for the weight you desire. Three little bleed holesin the sides of the die, at 120 degree intervals, allow surplus lead to spurtout as tiny wires which are sheared off during ejection. Core swages areused to make the lead filling (core) a precise weight after it has been castfrom scrap lead, or cut from a piece of lead wire.
This kind of die can also be equipped with a punch having the shapeyou want for the bullet base, and another punch, at the opposite end,having the shape you want for the nose. Both shapes will be in reverse:the bullet nose is formed in a cavity in the punch, and a hollow base bulletwould use a convex or projecting punch. This is what we call a �LeadSemi-Wadcutter� or �LSWC-� type of die. That doesn�t mean you have tomake a particular shape that you know as a semi-wadcutter bullet; it�s justa short-hand way of saying you could do that, or make any other shapethat has the entire nose right out to the full bullet diameter formed bypushing the lead into a cavity in the end of the nose forming punch.
With most swaging dies, one punch always stays partly inside the die.It slides back until a ledge within the swaging press ram stops it. To ejectthe bullet out of the die, this punch is pushed forward toward the diemouth. It can be pushed by a pin or knockout bar incorporated in thedesign of the press (with a Corbin swage press), or it can be pushed by aplunger (with a standard reloading press). We call this punch the �InternalPunch� because it always stays in the die. It is �internal� or inside, andnever comes out during normal operation. It merely slides up and down,a distance slightly less than the die length, and stops within the die so asto close one end for swaging. It has to move from this position to the diemouth, in order to push out the finished bullet.
The other end of the die accepts the material to be swaged. Obvi-ously, that end has to be fitted with a punch that comes out all the way, orthere would be no way to put the material inside. The punch which comesout, so you can insert material into the die, is the �External Punch�. It isexternal to the die during the time you are placing the components in thedie, and when you move the ram back to eject the bullet. The �Ram� isthe moving tubular steel part of the swaging press that holds the die andthe internal punch (in any Corbin press).
With Corbin swaging presses, the external punch fits into an adjust-able �Floating Punch Holder� in the press head or top plate. This assem-bly is often mistaken for the swage die, because in reloading, a similar-appearing reloading die fits the head of your reloading press. Swaging is�upside-down� from reloading, for reasons that will be clear by the timeyou finish this book.

14
Again, the steel rods that push the material into the die, and seal thedie against all that pressure during swaging, are called �punches�. Theround cylinder with the hole in it is called the �die�. If you fit punches toa particular die, you have just made a �die set�, because it is a set ofmatching parts that work together. You can have several dies and punchesin a given set, because all the various dies in that set are designed to workin succession, one after another, to yield a final bullet shape, weight, andconstruction.
The only difference between a �Core Swage� die, which we call a�CSW� die in the language of swaging, and a �LSWC� die, is the use ofpunches which have the final bullet base and nose shape machined ontheir ends, and of course the diameter of the die is made to form the finalbullet diameter in the LSWC die. Usually the LSWC type of die makeseither lead bullets, gas checked, or �Base-Guard� bullets (a superior kindof gas check that scrapes fouling out of your barrel with every shot fired).It isn�t used for bullets that have the jacket covering up the bleed holes inthe die wall, which includes most jacketed rifle bullet designs.
The core swage die generally has flat punch ends and a diameter farless than the final caliber. It is used to prepare the lead core to fit inside abullet jacket, in most cases (although you don�t have to use a jacket�you can just swage the lead core to final shape in the next die if youdesire to make a high quality lead bullet, such as a paper-patched or Gase-Guard style). Lead bullets can be made either in one die (the LSWC) or intwo dies (the CSW and CS types, or the CSW and PF types). Jacketedbullets generally require at least two and sometimes three or more dies.
When we make the die, we need to know what it will be used for. Ifyou say you want a .308 core swage die, you probably do not want thehole to be .308 inches because a core swage has to make a core that fitsinside a jacket, and the jacket will usually be about .3065 inches on theoutside before swaging. The wall thickness of the jacket might be .028inches at the base, so the core would have to be no larger than .3065minus twice .028 (twice the wall thickness), or .2515 inches. So, we needto have a sample jacket or at least know what jacket you intend to use, orat the very least to know the diameter you really want for the lead core. Ifyou supply a jacket, or specify one of ours, then we can determine thebest core diameter to fit into it.
You can cast scrap lead in a core mould, or cut pieces from a spool of.247 inch diameter lead wire to easily drop into this .2515 bore die, swagethem up to .2515 inch diameter, and then they�d fit nicely into the bulletjacket. Actually we use .250 inches for the core size to allow for an easierfit and avoid any trapped air in the jacket bottom.

15
There are two more steps to expand the core inside the jacket, blow-ing the jacket out like the skin of a balloon, and then form the ogive onthe bullet to finish it. That is for flat base open tip bullets.
But if you wanted to make a lead .308 diameter bullet for a .30 Mauserpistol, then we�d make almost the same kind of die but we�d make it witha bore of .308 inches, and fit it with the right kind of nose and base punches.So you see that even if the dies look similar and work in a similar way,their purpose really makes them different dies. That�s why we need twodifferent names for them. It helps avoid a lot of unnecessary explanationand errors.
Perhaps you might order a .308 LSWC die, maybe with an �Auto-loader� nose and a �Cup Base�. We would use the short-hand �AL� forAuto-loader, a sort of rounded semi-wadcutter shape, and �CB� for CupBase, which is a shallow concave base form. To us, the term �semi-wadcutter� is a general description for a bullet style that can be madeusing a punch to form the nose, instead of a point forming die. The Tar-get Wadcutter, Button-Nose Wadcutter, Keith, Auto-Loader, and even roundnose SWC styles are all subsets of the semi-wadcutter group, since everyone of these styles is made in the same die just by changing the nosepunch.
Two other kinds of dies that are made with a straight hole and twofull-diameter punches are the �Lead Tip� die and the �Core Seat� die.These don�t have any bleed holes around their middle. The core seat dieis also called a �Core Seater� and abbreviated �CS�. The lead tip die is alsocalled a �Lead Tip Former� and is abbreviated �LT�. It is not the samething as a point former or �PF� die.
The purpose of a core seat die is to expand the jacket, which is madeslightly less than final diameter, and at the same time achieve a very tightfit between the core and jacket. You can use either a punch that fits intothe jacket, to make open tip style bullets, or you can use a punch that fitsthe die bore, and thus make large lead tips. The use of a CS die to makelead bullets (after first swaging the lead core to exact weight in the CSWdie) is a perfectionist�s way to build lead wadcutter or semi-wadcutterbullets: it can be more precise because you separate the pressure neededto extrude surplus lead from the pressure required to form the edges ofthe bullet nose and base.
In a LSWC die, the pressure stops building when the lead begins toextrude through the bleed holes. Thus, some shapes of bullets with deepnose cavities or hollow bases and sharp edges may not receive enoughpressure to fully take on the exact punch shape, if that pressure is higherthan the pressure which causes lead to spurt out the bleed holes. By first
16
using a CSW die to adjust the weight, and then using a separate CS die toform the nose and base, the pressure issue is resolved for all shapes andstyles.
A punch with a cavity in the end makes the bullet with a semi-wad-cutter shoulder (the edge of the punch must be in the neighborhood of.02 inches thick in order to stand the high swaging pressures). A coreseating punch with a projection on the end, usually conical, makes a hol-low point cavity in the lead core. Of course, you can use flat, domed,slightly convex, or highly pointed punch shapes to suit your desires, andmake virtually any kind of base you want just by changing the punch.Often this will be the internal punch, but you can have the die built withthe base punch being external if you wish. The reason we normally makethe nose punch external to the die is because usually people change thenose shape much more often than the base, and it is easier to change theexternal punch in seconds without removing the die from the press ram.Technically it would not matter which punch made the nose and whichmade the base.
The purpose of the lead tip forming die is to finish the very end of apointed (spitzer) bullet, and it isn�t normally used for semi-wadcutter orlarge lead tip bullets. It looks just like a core seater, but the bore diameteris slightly larger than the final bullet size, whereas the core seater diam-eter is just slightly smaller than final bullet size. The internal punch of alead tip die is designed with a cavity to reshape the extruded lead tip of asharp-pointed rifle bullet so that it looks perfect. It cannot form the entireogive because the edge of the punch, which must withstand tons ofswaging pressure, cannot be paper-thin and survive.
We started this section talking about two general die designs, onewith a straight hole through it, and one with a semi-blind hole. This sec-ond kind of die came about because, try as you will, there isn�t a reliableway to make a straight-hole die form a smooth curve from shank to tip.(The bullet nose curve is called the �ogive�, pronounced OH-jive, andcomes from the French ogee which is the bullet shaped curve over a door-way). That punch with the cavity machined in the end must have somethickness at the edge, and this edge will impress itself on the bullet tomake a shoulder.
There�s even more to it than that: if you try to push a jacket into thecavity in the punch, the edge of the jacket will strike the edge of thepunch. It won�t reliably jump over that edge, but instead either the jacketor the punch will be crumpled up. In Corbin dies, the jacket is far weakerthan the punch, so it folds up. So, that leaves the problem of how to make

17
a typical rifle-style bullet, or a smooth rounded or angled bullet nose ofany type, not having a lead tip from where the jacket stops to the end ofthe bullet.
The semi-blind hole die is used whenever the nose or base of thebullet has to turn inward, away from full bore diameter, without a shoul-der or step. Conventional rifle bullets, boattail bullets, and modern jack-eted handgun bullets with the jacket curving or angling smoothly inwardfrom the shank to the ogive all require the use of this die design.
By �semi-blind hole�, I mean that the hole in the die is not straightthrough the die, but is shaped like the bullet itself. At the tip is a verysmall punch to push the bullet out by its nose, and this punch is retracteda short way up into its little access hole so there is no possibility of thebullet material pressing against it (which might otherwise bend the smalldiameter punch under those tons of pressure).
The �Point Forming� die, which we abbreviate �PF�, accepts either alead core, or the seated lead core and jacket combination swaged in thecore seat die. A full-diameter external punch shoves the material into thepoint forming die. The material is compressed inward in the small end ofthe die, giving the bullet its smooth curve or angled nose (the ogive). Thepressure also expands the shank slightly to final diameter.
The bullet material follows the die wall, right up to the ejection pinhole and into it, if you push too far. This would put a little parallel �pipe�on the tip of the bullet, which means you need to back off the depthadjustment (the punch holder) just a little. The smallest tip which youcan put on the bullet using the PF die is the diameter of the ejection pin.The smallest ejection pin that can be used is one that will withstand theejection pressure without bending. If you happen to forget to apply swaginglubricant, or if the jacket is larger than the die cavity diameter, the pres-sure required to eject the bullet can go considerably higher than the de-sign parameters. This means that the ejection pin needs a little extra di-ameter as a safety margin.
A typical ejection pin (the internal punch for a point forming die isusually called an ejection pin) for .224 or .243 caliber might be in the .062to .081 inch diameter range, depending on the expected ejection pres-sures and the abuse expected for the die. Dies made for professional bul-let makers, who know how to stop short of bending the punch if anythinggoes wrong and who won�t be upset if they do need to replace the ejec-tion pin now and then, might tend to be closer to .062 inch; dies made forexperimenters who will be exceeding the design limits frequently tend tohave larger ejection pins, as do dies made especially for lead tip bullets.

18
If you make a round nose bullet, a truncated conical pistol bullet, oreven a flat tip rifle bullet in the PF die, it works very nicely for either opentip or lead tip, depending on how much lead you put into the jacket. Ifyou make a bullet with the jacket curved around to the diameter of theejection pin, then the pin will press down against the end of the jacket andpush the bullet out of a well-finished, diamond-lapped swage die withrelatively low force. But if you want a small, sharp or rounded lead tip,the ejection pin spoils your plan by making its own flat circle on the verytip of the bullet.
To form a small lead tip on the bullet, you would need to leave a littleextra lead projecting from the end, which the ejection pin will deformsomewhat during ejection, and then use a �lead tip forming� die, or �LT�die, to shape up any extra lead. The lead tip die accepts the nearly-com-pleted bullet from a point form die, so it has a bore diameter slightlylarger than the finished bullet size. This works only because the pressureneeded to shape the lead tip is so low that the bullet shank will not ex-pand. In fact, since the lead tip die is just minutely larger than the pointforming die, perhaps only .0005 inches, it can assure that the bullets willbe more parallel and have almost no �pressure ring� at the base.
The internal punch of the lead tip die has a cavity that is shaped notexactly to the same outline as the bullet ogive, but with a slightly shorterradius. For instance, if the bullet had an 8-S ogive (we�ll explain this indetail later, but the ogive radius is the length of the radius used to swingthe arc that gives the bullet ogive its shape), the radius of the cavityshape inside the lead tip forming punch would be perhaps 7-S. That is ashorter radius.
The result is that the lead tip is formed and the surplus lead pusheddown at a slight shear angle between the wall of the punch and the ogiveof the bullet. If you leave the right amount of exposed lead, the punchwill form a neat lead tip with a very slightly different ogive curve fromthe rest of the bullet. If the punch shape were made precisely the same asthe point forming die, the edge of the punch would strike the ogive of thebullet and create a ring, instead of neatly reshaping the tip.
Bear in mind that the LT die is not used by itself, nor is it used insteadof a PF die. If you use one at all, it would be to follow a point forming die.Remember, the jacket edge won�t jump over the punch edge. If you al-ready have a curved jacket, from the PF die, then the edge will slip pastthe cavity and let you shape the lead tip.
A LT die can also be used, in some cases, to help close the open tip ofa jacketed bullet more tightly than could be done in the PF die alone.With care, a bullet maker can learn to push the open end of the jacket

19
nearly closed, by gently using trial and error adjustment of the punchholder. Not every ogive shape or design lends itself well to this operation,but enough of them do so that it is worth mentioning.
Rebated Boattails
What about bevel bases or boattail bullets? Those also have the bulletsmoothly angled away from full shank diameter. So, they also require avariety of the point forming die which is used to shape the base instead ofthe nose. The boattail bullet has largely been replaced in swaging circlesby the superior �rebated� boattail, abbreviated �RBT� as opposed to themore conventional �BT� for boattail.
Why are most custom bullet makers using the RBT instead of thestandard boattail base? There are three reasons:
1) A regular boattail bullet tends to act like the focusing nozzle of awater hose during the moment it emerges from the barrel. Hot powdergas rushes around that boattail angle, flow up the sides of the bullet, andcontinue in a smooth, laminar low pattern right around the front, wherethey break up into turbulent flow and make a fireball of gas�right in thepath of the bullet! You can get up to 15% increased dispersion at thetarget just from the buffeting the bullet gets by shooting through this ballof gas. A flat base bullet deflects most of the gas in a circle of fire, ex-panding rapidly out from the bore with a clear space directly in front ofthe bullet. The edge of the flat base acts like a �spoiler� to break up thelaminar flow before it can get started. And so does the sharp shoulder ona rebated boattail! How does a 15% improvement in accuracy sound as abenefit of using the RBT design?
2) The boattail bullet tends toward more bore erosion than the re-bated boattail, because gas pressure on the boattail tends to peel it backaway from the bore and let some gas up past the bottoms of the riflinggrooves, where it cuts the bullet and the barrel like a hot cutting torch.The rebated boattail has a 90 degree shoulder that takes the pressure par-allel to the bore, instead of at a compression angle away from it. Howdoes increased barrel life strike you as a second reason for using RBTbullets instead of the regular BT style?
3) The tooling lasts longer, costs less to build, and is more easily builtto high standards of precision. Corbin Manufacturing has perfected amethod of using two dies, which we call the �Boattail 1� and the �Boattail2� dies, as a set, to produce a virtually flawless and highly repeatable
20
rebated boattail. Instead of making the boattail angle so it can be higheron one side or at a little slope like some of the factory production you seetoday, this system guarantees that the boattail will start precisely at thesame point on one side of the bullet as it does on the other, every time.
With all these benefits, there is hardly any reason to make standardboattail dies these days. The RBT has been proving itself all over theworld for more than 30 years to those who are wise enough to give itattention. However, if you were to ask what base design I would generallyrecommend for jacketed bullets up to 250 yard range, I would be unhesi-tating in saying a flat base. Rebated or not, a boattail does not give yousuperior accuracy in and of itself. It gives you less base drag. Whether ornot that translates into better accuracy than a flat base hinges on whetherthe increased drop or higher trajectory arc gives you any problem hittingyour target, and whether there is much cross wind to push the bullet offcourse.
Usually at subsonic velocities, the rebated boattail gives you a muchgreater benefit in comparison to other drag factors, than it does at Mach Iand above. The shock wave causes far more percentage of total drag atsupersonic velocities, so making the nose more pointed produces moreeffect than streamlining the base. The best silenced, subsonic bullets forspecial ops have been rebated boattails with a blunt round nose (and otherspecial features for expansion).
Bevel Bases
Bevel base bullets are made by seating the core in a special �pointforming� die instead of the usual core seating die. The jacket is put intothe die, and the lead is pushed into the jacket. The base of the bullet flowsdown into the short, beveled section of the die (it can�t be a punch cavity,remember, because the edge of the punch would cut the bottom of thejacket). You could also seat the bullet in a normal core seating die, andthen reform the base in this die, but it would be redundant.
A lead bevel base bullet could be made in two steps: swage the leadcore using a rather large, almost finished diameter core swage, and thenpush the bullet into the special point forming die backward, using a nosepunch as the external punch. Come to think of it, any lead bullet with asmooth ogive (no semi-wadcutter shoulder) can best be made by usingfirst a CSW die to adjust the weight, and then a PF die to form the ogive.Without a jacket, you don�t need the CS die, the purpose of which is toexpand the core into the jacket and form a tight, parallel shank.

21
Dies Classified by Press Type
We�ve talked about the basic design of bullet swage dies, in regard totheir function. There is another category for classification of swage dies,and that is by the kind of press used to operate them. Swaging dies can bedesigned to operate in a reloading press (with severe limitations on pres-sure and precision), or in a number of different models of bullet swagingpresses, both hand and hydraulic-electric powered.
Years ago, we worked out a system of making standard parts for diesthat would cover a wide range of calibers, and thus cut the cost of swagingthrough efficient use of what I call �semi-custom production�. We de-signed presses and die sets so that we could build similar punch and dieblanks for certain ranges of calibers and bullet lengths, and then chooseamong perhaps three die body lengths for every caliber from .12 to .458in the hand presses, or from .224 to .998-in the dies for our big hydraulicpresses.
We didn�t have to design and build each die from scratch, because webuilt a standardized system for determining the minimum requirementsof strength, die length, stroke length, punch geometry and strength, steelsand heat treatment. We could run hundreds of blanks for each of thevarious presses, then hand-finish the cavities and hone the rough-finishedpunch blanks to a perfect fit during the custom phase of each order. Itcombined the economy of mass production with the flexibility and preci-sion of custom tooling.
Corbin swaging dies are up to ten times less costly than competitivedies without any sacrifice in precision because of this semi-custom pro-duction technique, and the fact that we design and build several differentpresses to take full advantage of the kind of operations you might want toundertake.
The classification by press type also defines the die thread and diam-eter. The last letter in the catalog number identifies this classification.Dies with a catalog number ending in -R (such as the PRO-1-R) fit astandard 7/8-14 thread reloading press with an RCBS-type button shellholder ram. The die screws into the press head like a reloading die. Theexternal punch slips into the T-slot of the ram. You do not also use a shellholder, since the punch base is made to simulate one.
Dies with a catalog number ending in -M fit either the discontinuedSilver Press, or the current S-Press. They are being phased out of stock-ing status in favor of the -S dies, which are larger and stronger, and fit thecurrent S-Press or its predecessor, the Series II press (discontinued). How-ever, we will continue to make them on special order, just not as a stockitem. The -M dies have a 3/4-inch diameter main body, a thrust-adsorbing
22
shoulder, and a 5/8-24 threaded tenon. The die screws directly into thepress ram, and the external punch is held in a Corbin floating punch holderin the press head. An example of an -M type die is the LSWC-1-M, a leadsemi-wadcutter die.
The current type -S dies fit the discontinued Series II press or its re-placement, the S-Press (Catalog number CSP-1). An example of a set of-S dies is the FJFB-3-S, a three-die set. The -S dies have a longer andlarger diameter body than the -M type, being 1-inch diameter. By usingthe same 5/8-24 threaded tenon, the thrust shoulder is wider and thusspreads the force over a wider area (the top of the industrial chromedalloy steel ram in Corbin presses). This also means the S-Press can acceptboth the older -M dies and the current -S dies. A bench-type hydraulicpowered version of the S-Press, called the �Hydro-Mite�, also uses these -S dies.
Finally, the type -H dies are made to fit the Corbin Hydro-Press, orthe Mega-Mite hand press. These dies are typically made in a 1.50 inchdiameter, with a length appropriate to the maximum bullet weight to beproduced (up to three inches). The thread tenon is made with a 1-inch 12thread (meaning 12 turns per inch) to screw directly into the press ram.The external punch fits into the huge FPH-1-H floating punch holder, inthe press head. A �positive stop� FPH-2-H punch holder is also availablefor extreme high precision weight control.
Dies for Other Presses
Special diameters of dies can be built to order, either to fit Corbinpresses or other presses. Diameters of up to four inches with nearly anydesired thread can be made. Usually it is best to use a standard die thatfits one of the Corbin presses, rather than to spend very much on customwork to fit some other press. In the first place, the cost of special replace-ments and additions can quickly use up any savings in using an existingpress versus buying a standard swaging press.
Often I have heard �I already have a press that I want to use� and themeaning is, �I don�t want to spend money for another press.� I agree, andwould do the same, but only if the cost of building the custom dies andpunches and making them work in this nonstandard press (for swagingpurposes) is still less than just buying a regular swaging press. Often itcosts more to fiddle around with special jobs than it does just to buy astandard swaging press. And then, from that point on, you don�t have toworry about any special replacement parts, or additions that also have tobe custom made (meaning both fairly long production delays and addi-tional cost).
23
Usually, the design of a swaging press gives you a big advantage inspeed, accuracy, and safety over using other kinds of presses. After all, apants press, a wine press, a full court press, and a printing press all arevariations on the term �press�, and they are not suitable for reloading.Having said this, it is still possible to have custom dies built for just aboutany press you own. Just bear in mind that there is time involved in mak-ing working drawings, checking the stroke and ejection position, gettingspecial thread taps and dies (sometimes), setting up the tooling for a one-time job, and other costs that have long been amortized over thousandsof dies when you choose a standard production design instead.
Besides, we may have spent a couple of decades and tens of thou-sands of dollars in testing and improving our standard tools and presses.Building something for the first time in a different design often requiressome investment in development, which may be a waste of your moneyif we�ve already done it a thousand times before in a different and bettersystem, which would be yours if you just got the right platform to run it(the proper press). With a different, special tool, you get to pay for anyunforseen development requirements. With our own products, we alreadypaid for development and you get to benefit from that. It�s usually a betterdeal.
Swaging Principles
1. Always swage �up�, never �down�. Swaging down is a contradic-tion. You �draw� down, by pushing something through an open endedring die, like our JRD-1 jacket drawing die, or BRD-1 bullet reducing die.Drawing makes the part smaller in diameter and longer. It can also causeseparation of the core and jacket if done to excess. Swaging makes thepart shorter and larger, and tightens the grip of the jacket on the core.
2. Pay attention to the instructions. If there are special written noteswith your die, they are important because they modify or improve thegeneral instructions and replace them. If there is a difference betweenspecific notes sent with your set of dies, and anything published in gen-eral (as in this book or in general printed literature), follow the specialwritten instructions in any respect where they may differ. Swaging is partlyan art, and various materials or sizes may react differently to the samegeneral kind of operations.
3. Use the right terminology! I cannot stress enough how important itcan be to read what you have before you start to use it, and order the rightpart numbers and names of parts. People call the external punch every-thing from a �pin� to a �ram� to a �die� to a �die punch�. How are wesupposed to know what you mean? If you order it wrong, you get to pay

24
a restocking fee or, if it is custom made for you, then it may not be return-able. A die is the vessel or cylinder that holds the material. A punch fitsinto the end of the die and pushes on the material. A �pin� is part of thepivot system of the press, or the wire ejection pin that fits into a pointforming punch. A �ram� is the moving steel drive component of yourpress into which the swage die screws. There is no such thing as a �die-punch� or a �punch-die�: putting terms together to suit yourself just con-fuses everyone.
4. Use the right materials! A set of dies made for a specific jacket, acertain lead hardness, or a certain alloy and size of copper tubing, may beable to work with other materials but probably not without adjustmentsto the punch and/or die dimensions and possibly not without developingdifferences in technique. Nearly all problems with broken dies and stuckparts or improper sizes comes from the use of materials other than thosewe used to develop the tools. Hardness, grain and dimensions make ahuge difference in your success.

25
3. Bullet Swaging Secrets
Before I start telling you about the various kinds of swaging pressesand dies that work with them, and why you might want to select a giventype of press and die for a certain kind of bullet making, it would be usefulfor you to know some facts that have taken decades to figure out, andwhich most of the people who have figured them out wish to keep fromyou, since it might affect their own income if you knew.
If you don�t care to wade around in the backwaters of history, skipthis chapter and go on to the �How To� chapters that follow. It isn�t abso-lutely necessary to be aware of all the misconceptions, phony physics,and junk science that is tossed about as if it were gospel. A lot of peoplemake a good living based on these misconceptions, whether on purposeor because they believe it too, and it is not helping them a bit if youbecome aware of the errors in thinking that make this possible. But Isuppose someone has to support those people: you can, if you wish!
The Myth of Exclusion
The most common misconception about bullet swaging is that only afew people really have the money and expertise to do it right�that equip-ment to make a good bullet is far too costly for you to buy, and the tech-niques are filled with �secrets� that only a few bullet-makers are smartenough to understand. In other words, stay away from swaging because(1) you are not smart enough and (2) you cannot afford the right equip-ment. Leave it to the �experts� who know best, in other words... the same�experts� who are eager to tell you this, and to scoff when you mentionthat you might have found a way to try it yourself.
The reason this myth is repeated in print every year is simple. Thinkabout it: if you were making a reasonably good income from selling yourown custom swaged bullets and someone asked you to tell a magazineaudience all about your business, would you tell them �It�s easy: anybodycan do it with a little reading and a few hours of experimenting withmoderately priced equipment!�
Or, would you be more likely to think about it and then say �Man, it�shard: the only equipment that works costs thousands of dollars and takesyears to figure out. You guys are way better off just to pay me to do it foryou and keep on buying my bullets!�?
Always remember to consider the source when you read anything,and follow the money trail. (Yes, I�m aware of the irony, but you alreadybought this book so I can afford to be honest in the writing of it!) It works

26
in almost everything in life, not just bullet swaging. Before you read some-thing, try to figure out who wrote it, who pays them, and why they mightbe influenced in their comments and opinions by the source of their in-come.
It�s not a conspiracy: it�s just how life works. Everyone has an interestin protecting their source of income. The more unusual the occupation,the less likely it is that the person will say anything that would encourageyou to go into competition. Successful people learn early how to get goodinformation from shaded stories without necessarily accepting everythingat face value.
All this means is that when you read articles by or about bullet makersor their products, be aware that the products were made by human be-ings, not mythological Titans. Odds are pretty good that, given the rightequipment and information, you could do the same thing. Or maybe,even better.
The Myth of the Shortcut
In a long and largely successful business career, I�ve found that theonly reliable income is that generated from trading good information,services and products. Perhaps some have become wealthy by chance, orby trickery, or by other transient opportunities, but by and large whatworks is providing consistent good value. The surprise is that so manypeople think otherwise, and spend their lives looking for shortcuts. Somuch effort is expended in the search to avoid putting out any effort! Itisn�t fast or easy to build a reputation for good value, but the alternativesare too unreliable, even putting moral considerations aside.
This myth isn�t just for bullet makers, but it seems to come up fre-quently in discussing a new bullet business with someone who wants tomake back his investment in a hurry. �What�s the hot item to make?What would make the most money in the shortest time?�
Well, here is where I could take a shortcut myself and make up somefoolishness that would insure a quick or bigger sale. I could speak elo-quently about whatever this client was sure to have seen on the covers ofthe latest gun magazines, and it would be easy to make a good case forwhatever caliber, style, or gun was featured as the magic carpet one couldride to riches by making that particular bullet, or one for that particulargun. But unless it was true, I wouldn�t do it, and while there is some truthto the idea of following the latest trends, it isn�t likely to result in imme-diate riches.

27
There are not enough potential bullet makers to treat clients like usedcar buyers, even if I could somehow justify acting that way. Either myclients have to be successful, and continue to purchase equipment andsupplies as they grow, or the swage die business will not work well enoughto be viable.
After more than four decades of providing income for six families ofCorbin employees, it�s fairly obvious that there must be something reli-able and long-term behind the ideas I am discussing here. It�s not verylikely that thousands of handloaders would come back, year after year, forproducts and ideas that didn�t meet or exceed their expectations.
Many people do, in fact, make a good living using Corbin equipmentto produce high quality custom bullets for other shooters. You see theirads every time you pick up a gun magazine. They start small, often justas a hobby, and their interest and business grows and expands to otherequipment, which Corbin designs and manufactures. Our design and en-gineering work, as well as marketing help, is critical to the success ofmost of our clients (there are some who had everything figured out fromthe start, but not many).
Because a substantial part of our income and reason for our own suc-cess has been based on appropriate advice and honest dealing with ourclients, your trust is a critical factor in Corbin�s very existence. We con-tinue to have backlogs for our work primarily because people know thatthey can trust in the essential facts that are spelled out in our books.
The myth that you can get there by some shortcut inspires countlessother people to try, year after year, making a brief appearance and thendisappearing forever. In their wake are abandoned and disgruntled would-be bullet makers, who may get such a bad taste for swaging from theexperience that they never want to try it again. That is, of course, mymain worry from a business point of view. It doesn�t take too many short-cut takers to spread a bad feeling about what can be a marvelous technol-ogy when done correctly with well-made tools.
Shortcuts are what allows equipment to be made more cheaply, byusing cheaper materials, taking less time to fit and finish the components,or skipping most of the tests and rework that might be necessary if areasonable quality control procedure was in use. But a bullet-maker couldforget the reason cheap copies of good equipment are cheaper, and thinkall such equipment is equally flawed. The same myth can affect the bul-let-maker, even when he is wise enough to purchase good equipment.Taking shortcuts in the process of making bullets, in order to make themfaster, can result in less satisfactory bullets. The custom bullet market isnot interested in cheap bullets: it exists because of the need for bullets ofsuperior performance.
28
Today, you can hardly pick up a gun magazine without reading some-thing about one of my clients who makes a better custom bullet. Custombullet making has been elevated by these people from a dark art to aserious, mainstream part of the firearms industry. But these bullet-mak-ers, by and large, did not take shortcuts. They spent an average of 18months building up to the point where they could show a profit. Some didit in less than a year, others took two or more years. They built a business,they didn�t trick one into existence.
You might not care at all about the commercial possibilities for cus-tom bullet making, but it affects you anyway. The mass producers havebeen forced to come up with their own premium lines of bullets and haveoften purchased bullets from my clients instead of trying to come up withtheir own. The fact that hundreds have turned to bullet swaging as a wayto make a living, and thousands more use it as a way to make a little sparecash on a part-time basis, means that your bullet selection has improvedvastly in the past few years.
Guns of a type that you might not have considered using for defensetwenty years ago can now be put into service, since the bullets have im-proved their performance so much. Game animals that you might havewounded and lost twenty years ago can be cleanly taken without the suf-fering and without the long hikes to the bottom of canyons where thegame was able to run and finally die a lingering death because of poorbullet performance. Hunting is more humane when the bullets performflawlessly on the first shot.
Your scores at benchrest, metallic silhouette, IPSIC, and evenblackpowder matches can be higher than they were �back then� becauseof the tremendous amount of research and testing done by all the custombullet-makers. Laws have been passed or modified based on certain kindsof custom swaged bullets that did not come from any mass producer. Ifyou don�t think you have some interest in commercial swaging already,think again! None of this happened by taking shortcuts, either in the mak-ing of the equipment, or in the using of it.
The Myth of Carbide
There is a great deal of emphasis placed on the buzzword �carbide� atthis time. Carbide is a rather generic term that covers a lot of ground,rather like the word �chlorophyll� back in the 1960�s, or any other semi-technical term that is turned into an advertising catchword.

29
There is no such thing as a single kind of die material called �carbide�,except in the minds of ad writers. When you heat any tool steel to a highenough temperature, some of the carbon in the material dissolves in thenearby iron, and forms a ferric carbide material which can be captured inthe frozen matrix of the steel if the temperature is lowered quickly enough.
The ferric carbide trapped in the steel mixture is primarily what givesthe steel its hardness. The structure also has a matrix of iron and otherelements, which form complex compounds that give the steel ductility,ability to remain hard at higher temperatures, and corrosion and shockresistance. All hardened steels have �carbide� in them: that�s what makesthem hard.
If you systematically reduced the amount of iron and increased theamount of carbon that dissolved in the iron that was left, you would windup with a very hard, but also very brittle material. It might be almost�solid carbide� but it wouldn�t be very strong. By forming compounds oftungsten and other metals with carbon, the General Electric company(and others) developed commercially acceptable variations of �carbide�in a wide variety of grades. General Electric�s trade name of �Carboloy�was applied to some of these.
The important thing to note is that there are variations that are nearlyas soft as hardened tool steel, and others that are so brittle that they shat-ter like glass if force is applied incorrectly. Some carbide materials canhandle high temperatures and some fracture when heated and cooled dur-ing use. Some make good tool bits, and some are only good for a thincoating on the surface of a hardened steel bit. Some are reasonable tomachine accurately, and some cost a fortune to machine compared tomaking the same shape from a good tool steel.
If you were to be faced with the decision of a material from which tobuild dies for a high speed punch press, working at 40 strokes per minuteor more, and making several million bullets, then one of these grades ofcarbide material could give you higher temperature operation and thuslonger life than a tool steel die. Because the harder materials are moreabrasion resistant, you would be able to run the dies for a longer timebefore replacing them.
They would still need to be lubricated: the idea that carbide dies needno lubrication is foolish. It is like saying that because your car enginemight run 100,000 miles without changing the oil, you don�t need tochange the oil. It might run 250,000 miles if you did!
It is necessary to consider value to make a good decision about diematerials. Value is the cost of the die amortized over the number of bul-lets you expect to make, considering the amount of wear which will takeplace before the bullets are no longer acceptable quality. It is somewhat

30
subjective, since one person might consider a die �worn out� when thebullet diameter increased by 0.001 inches, and another might find thatthe 0.3090 bullet shot even better than the standard 0.3080 in his gun.The point where you no longer consider the bullet diameter acceptabledetermines the life of the die, for your application. Wear is related to heatand abrasion.
If you operate your dies in a hand-fed system of any type, it will beimpossible to make more than five or six bullets a minute. At those strokerates, any heat from friction would dissipate into the air before the nextstroke. There would be minimal heat buildup, so that normal swaginglubricant (Corbin Swage Lube) would be sufficient to protect the die andthe components from frictional abrasion not caused by dirty componentsor by polishing compounds embedded in the jacket material.
In a power-fed system, it is possible to stroke the press so fast thatheat cannot radiate away into the air as quickly as it is generated, until thedie becomes quite warm. It reaches a stable high temperature by radiat-ing heat into the air, and into the frame of the press. Swaging lubricantsmay not stand this high temperature, so the metal surface needs to bemade of something that will remain hard and resist abrasion without asmuch lubrication. Certain grades of carbides will handle the job.
Value is indicated by first estimating the tolerances which are accept-able for the bullets, and then figuring out how long a set of dies will givethat range of tolerances, and how many bullets are made with each set,for what price. The lowest cost per bullet indicates the best value, allother things being equal.
In the high speed punch press, a set of dies might easily cost $3000.They might slowly wear to an unacceptable tolerance after two millionbullets were made, at a cost per bullet of three thousand dollars dividedby two million bullets. This is a cost of 0.15 cents (not fifteen cents, butfifteen hundredths of a cent) per bullet. In this kind of operation, properlymade tool steel dies might only last 50,000 bullets, at a cost of about$300 for the dies. That is 0.60 cents (sixty hundreds of a cent) per bullet.
Obviously, the value is four times greater for using the carbide dies inthis application. One might reasonably expect to make two million bul-lets on a punch press system: at 40 strokes a minute, and a bullet perstroke, that is only about 104.167 days or about 3.5 months�assumingthe punch press is run eight hours a day, which isn�t unreasonable.
But even the largest and most successful custom bullet maker seldomturns to punch presses. The average custom bullet operation (if one couldever say these outstanding operations are anything close to �average�)turns out about 50,000 bullets a year. After all, the market is limited andthe price is fairly high (worth it, but not cheap). You probably wouldn�t
31
make one million bullets in a lifetime of hand swaging. If you could maketwo bullets a minute, and worked at it every weekend for four hours,you�d only be making 24,960 bullets a year.
When run at less than ten strokes a minute with proper lubrication,the high-carbide content die steels used by Corbin hold acceptable toler-ances for at least 500,000 bullets, and some have made over 1,500,000bullets in commercial operations started years ago. Assuming the dieswould make 500,000 bullets, this means your $300 investment in dieswould last for over 20 years if you made two bullets a minute, workingevery weekend for four hours, every week of those years.
If you are just now turning 20 years old, you�d be 40 before you neededto buy another set at that rate. If you expected to live to be 100 years old,you would have a lifetime of bullet making on just three sets of dies, for atotal cost of $900. Now, most people don�t make anywhere near 24,960bullets a year unless they are in business to make bullets. The odds aregreat you�d never make 500,000 bullets in a lifetime. But just supposeyou did.
Your cost per bullet for determining die value would be $300 dividedby 500,000 bullets, or .06 cents (six hundredths of a cent) per bullet. Inyour lifetime, if you made 1.5 million bullets, you�d use up three sets ofdies, so your total cost per bullet would be $900 divided by 1.5 millionbullets, or .06 cents. This is for using tool steel dies.
If you purchased $3000 carbide dies, you would not get one bit moreaccuracy or any better die, other than the fact that long-term abrasionresistance would be less, so you could get by with one set of dies for yourlifetime. We assumed you might live 100 years, and make 1.5 millionbullets. Your cost per bullet with a carbide die set would be .20 cents perbullet ($3000 divided by 1.5 million bullets). The steel dies are three anda third times better value for this application! That is 333% more value foryour money with the steel dies.
The reason I�ve gone so long into this is not any animosity toward�carbide�, but because of the widely-held perception that just stampingthe word �carbide� on a die automatically blesses the product with super-natural powers and makes it somehow more accurate.
A die is only as accurate as you can make the hole. It is a lot easier tomake a good die from a material that can be worked in its annealed state,then hardened and given its final adjustment in size with diamond lap-ping in the hard state. The easier a job is to do, the less it has to cost. So,you get more value: the same accuracy for far less money.

32
Obviously, it is much easier to promote the myth, than to explain thefacts. Advertising is sold by the column inch or fractional page, or by theword...and it costs a lot more to educate than to dazzle the reader. Fortu-nately, a book has plenty of space for education and you�ve chosen thatpath rather than just allowing yourself to be dazzled.
Following the �carbide worship� path, the term �ECM� or �EDM�sometimes is waved about as a sort of accuracy magic wand. The termsrefer to �electrochemical machining� or �elecrical-discharge machining�.ECM is a form of �reverse plating� where metal is removed from thesurface of the work by a strong flow of electricity through a conductiveelectrolyte solution. EDM is a form of �spark erosion� where an arc burnsaway tiny pits in the surface and eventually removes it in a controlledmanner, often under an insulating solution that carries away the erodedmetal.
Electrochemical machining is a last resort, not a step up. It is usedwhen there is no other practical way to machine a part, because it is verycostly, slow and difficult to make the hole precisely the right diameterand shape without going to much higher expense than with traditionalmachining techniques. ECM has its uses, one of which is to machinecarbide materials that simply cannot be cut any other way. There is noth-ing inherently more accurate about ECM. It costs fortunes in equipmentjust to make it the same accuracy as lathe boring, reaming, and diamondlapping. Using ECM makes sense when you can�t cut the material in amore traditional way. People who sell ECM machines are the first to tellyou this.
There is nothing inherently �more accurate� in using electrical ma-chining as opposed to diamond lapping. Thin, fragile sheets of metal orbrittle, hard carbide materials are best machined by ECM, but materialswhich can be machined with a faster traditional method should be. Onewho simply swallows the advertising hype is set up to spend extra moneywithout getting the extra value.
If I thought that there was better value for my clients in selling them$3000 dies, I�d certainly have no reason NOT to do it! I�d rather get tentimes as much for a set of dies, if I could justify it to myself and to mycustomers. But for the past 40 years I�ve been proving over and over thatit isn�t good value for this application. What, exactly, is the benefit, otherthan making more money for me? I�ll just have to rely on the good judge-ment of ten more handloaders, instead, to make the same amount!

33
The Myth of Equating BC with Accuracy
Another myth is that aerodynamic shape is synonymous with accu-racy. Years ago, I made some bullets that were just cylinders without anyogive at all, and fired them from a benchrest rifle in .224 caliber into agroup that measured about 0.2 inches center to center. Then I fired an-other group made with 6-caliber ogive spitzer bullets made exactly thesame way, with the same weight and diameter and the same materials.These made almost exactly the same size group. The gun was at its limitand the bullet shape had no effect on accuracy, except that the cylinderslanded a little lower on the target (more drag, so they dropped slightlymore).
In our work for various government agencies, Corbin made dies thatwe called the �Ultra Low Drag� or �ULD� design, many years before thepopularity of the so-called �VLD� design of the late 1990�s. The two de-signs are quite similar. In fact, nearly all low drag designs that are practi-cal utilize a long ogive and some kind of boattail. Ours used a nine-degreerebated boattail, and a 14-caliber radius curve that was offset by 0.014inches from the tangent (a secant ogive, in other words). There is nothingmagical about the numbers. There are dozens of variations which wouldwork approximately as well, better in some guns, worse in others.
There is a problem with promoting these buzzword designs: peopletend to believe that they solve all problems of accuracy, when in realitythey are very special designs made for certain kinds of loads, rifling twistrates, and purposes. They are not always more accurate nor are they evenuseful in some guns. Here are some of the problems with the very lowand ultra low drag designs (which means �high BC�, the ballistic coeffi-cient):
To offer less air resistance, the bullet needs to be more streamlined,which in turn makes it longer for the same weight, or lighter for the samelength as a conventional design. To keep the amount of shank in approxi-mate balance with the extra long nose (which would fill up with all theavailable lead in a normal or light weight design and leave nothing for theshank), these bullets are usually made in the heavier weights for the cali-ber.
This means that the long, heavy bullet has the center of balance shiftedtoward the rear, so it wants to turn over more easily than the conventionalbullet, and thus requires a higher twist rate to stay nose first. If you havea barrel with the appropriate faster twist, you may get a flatter shootingbullet with equivalent accuracy to a normal design. Since the customswaged bullets are usually made with more care than mass produced bul-

34
lets, you may even get superior accuracy plus a flatter trajectory. But ifyou don�t have a faster twist rate, you may find accuracy actually is worsethan that of a shorter bullet having lower BC.
The longer ogive and boattail (or rebated boattail) combine to makethe same weight of bullet longer than in a conventional shape, whichmeans that the bullet may not chamber or feed in some guns, and mayactually be too long for the throat in the barrel. This might require settingthe base of the bullet far down into the cartridge, intruding into the pow-der space, and possibly requiring the case neck to be partly encircling thestart of the ogive. This means the bullet may not be held securely on acenter line with the cartridge, but instead might be able to tip and startinto the rifling at a slight angle, which does no good for accuracy.
Bullet jackets need to be longer for the same weight, since the longthin nose doesn�t hold as much volume (and thus weight) as a morerounded shape. And if you wish to make a light weight bullet, you�ll needto use low density core material such as Corbin bullet balls, because ifyou fill the long ogive with lead, you�ll need to at least balance the nosewith a reasonable shank length. Having a long nose and balancing it withthe shank means the minimum weight is higher than with a more roundednose. In other words, you trade a somewhat flatter shooting bullet designfor versatility in range of weight. A more traditional 6-S ogive or a roundnosed shape will give you both heavier and lighter weight possibilities.
On the other hand, extremely efficient airframes do give you a flattershooting bullet, because they drop less in the same amount of flight time.While less trajectory isn�t necessarily the same as more accuracy, it con-tributes to your ability to judge distance and hold the sights in the rightplace. It helps you be a better shooter, rather than actually improving theaccuracy of the bullet, but the effect is the same.
My point is that if you use accuracy and flat shooting as synonyms,you�ll be just far enough off the mark so that you�ll fall for some of theadvertising hype about bullet shape. You may be like the fellow who heardthat three of the top benchrest shooters won that year using bullets thathappened to have a 7-S ogive (a nose shape formed by a curve that has aradius of seven calibers) instead of the more common 6-S, so he passedup good buys on both 6-S and 8-S ogive die sets to wait for a custommade 7-S set. In truth, any of those sets would have been fine, and the 8-S would be slightly flatter shooting yet.
I�d like to let you in on another secret: there is no inherent differencein accuracy between spire points, truncated conical points, round noses,spitzers, and secant ogives, if you make all of them from equal qualitymaterials with the same level of care. A round nose or what we would call

35
a 3/4-E (elliptical ogive with a length of 0.75 times the caliber) handgunbullet is inherently no less accurate than the regular 9 or 10 degree trun-cated conical bullet (truncated means cut off, and the TC is a spire shapewith the end cut off, usually at about 40% of the caliber). Whichever youlike best and feeds best in your gun is the one to use.
A common request is for dies to make a bullet with some arbitrary BCnumber, usually higher than anything else on the market from mass pro-ducers. But this is a little like spending all your money on a great set ofmagnesium wheels for your car, so you have nothing left for the engine orbody work. Lots of teenagers did that when I was of that age. Today Ihear the thumping of huge, overpowered speakers from expensive ste-reos coming from cars that could use a paint job and a tune-up, usuallywith the same genre of fuzzy-minded youthful driver who spent his burger-flipping paycheck for �cool mags� back in the �fifties.
Putting all your attention on the ballistic coefficient and ignoring mostof the other factors is very little different. The real goal is usually to hitthe target at long range with greater reliability. Confusing the real goalwith some narrow part of the total package that will get you there is aproblem created by the myth that somehow, an arbitrary BC numberbigger than anything available currently means the bullet will be moreaccurate.
Sorry, but the BC is only a relative measure of inverse air resistancecompared to some standard bullet, such as the one-inch artillery projec-tile that has been considered a 1.0 on the BC scale for decades. The BCmeans nothing by itself. You must also know the standard against whichit is compared, and advertising sometimes plays on this fact to overstatethe comparison or ratio by subtle use of a different standard projectile.
For example, I could easily publish BC numbers of 2.50 or 3.59 oranything else I wanted, whereas most BC numbers are less than 1.0. How?By noting in the fine print, which no one reads, that the standard projec-tile used for comparison is a five grain wad of newspaper chewed to asoggy consistency and fired from a pursed pair of lips (yes, a spitball).More subtle yet, I could simply assume that everyone �knew� I was usinga conventional 6-S 168 grain spitzer flat base bullet as my �standard�, andthen publish comparison BC numbers relating the bullets I was attempt-ing to market to this standard.
Not drawing any particular attention to the standard just reinforcesthe myth that BC has some independent value as a figure of merit. It is infact a ratio, so it requires two items for comparison and has no meaningotherwise. Stating the BC alone is like saying the odds of the AtlantaBraves winning the next game against the Giants is �3�. But three com-pared to what? You might assume 3 to 1. Maybe the Giants fan meant 3 to
36
6, or 2 to 1 in favor of the Giants! Normally we would assume the otherbullet in the implied BC figure is the old military standard one-inch pro-jectile, but remember the old saying, �Assume makes an Ass of U andMe�.
Seeking a high BC is not a foolish quest, but it is foolish to think somenumber higher than that you read about a factory bullet will solve all yourproblems and improve the accuracy of your new bullet. How are yougoing to measure it? If you use the dual chronograph method, your mea-surements can be off by a very wide tolerance unless you fire a largenumber of rounds. Sometimes the variance is greater than the amount ofsupposed gain. The best way to achieve good accuracy is to judge it bythe holes in the target. That is, use anything that improves the group anddon�t put on blinders in the quest for one specific part of the accuracyformula.
High BC is desirable, but the higher spin rate it may require of thelonger bullet can exaggerate normal eccentricities in the bullet, and wipeout any accuracy gains from a flatter trajectory. Each factor in the designof a bullet is part of an equation that tends to be self limiting: making anyone factor too large automatically makes the others too small. You get theoptimal performance by achieving the right balance of factors for yourparticular application, not by pushing one of them to the limit and ignor-ing the rest.
The Myth of Critical Diameter
There can be a significant difference in accuracy between bullets ofdifferent diameter, but there is no cut and dried rule about it except thatundersized bullets (compared to the rifling groove-to-groove depth ofyour particular gun, not to some arbitrary industry standard) generallydon�t shoot as well as bullets with a diameter at or slightly larger than thegroove-to-groove depth.
Oversized bullets tend to have minor problems in some guns withcase swelling and chambering. The pressure difference is insignificant fora 0.308 inch bullet compared to a 0.309 inch bullet until you reach thoseloading intensities where the gun is about to come apart anyway. If it willfeed and fit the chamber with the larger bullet seated in the case, it willprobably shoot better than with a smaller bullet (if everything else isequal and the load is generally accurate and safe).
For my money, if I were to decide on a given diameter for my swagedies, I would always choose either right on the money for diameter com-pared to my gun�s rifling groove-to-groove depth, or slightly larger (be-

37
tween half and one thousandth, depending on whether it is an Auto-loaderor not�some pistols have a problem with slightly larger bullets whichbulge the case and cause feeding failures).
On the other hand, if I had a bullet that shot well in a given gun, Icouldn�t care less if the bullet was undersized, lopsided and backward!The goal is to hit where you aim, and if the bullet does that, forget aboutwhat it ought to be and just be happy that it works so well. Some arm-chair ballisticians tend to wind themselves up so tightly in their theoriesthat they miss the fun and the point of it all: shooting. If it works, it mustbe right by definition.
Many factory barrels of the same caliber are far different from eachother in diameter. The differences in bore diameter at various points evenin the same barrel can be far more than the wildest tolerances in anybullet. Since the whole idea of controlling bullet diameter and toleranceis to make it fit into the bore, or the rifling grooves, there�s a problemhere!
Why worry about an overly precise bullet diameter if the bore isn�t atleast that precise? We�ve had clients send us sample bullets, pushed througha factory barrel, that came out as much as .41 caliber from a .40 caliberpistol! In one instance, the client sent the gun back twice and got twodifferent oversized barrels, both different by as much as 0.005 inchesfrom each other. I won�t mention the gun-maker, but it is a respectedname and the problem isn�t unique.
This doesn�t mean that it isn�t important to have good control overbullet diameter. It merely means that you should not take the �publishedspecifications� for granted. Measure your gun if you really want to specifythe bullet correctly to fit it. If you don�t know how to measure it, you canfire a low velocity slug through it and capture the slug in water, and sendus the slug to measure. By low velocity, I mean just enough pressure toget it out of the barrel reliably.
Measuring a barrel is an art. Firing the bullet through it only givesyou an idea of the diameter at the point where the bullet came out. Sup-pose your barrel has �waves� in the bore, where it varies 0.002 incheslarger than the average, but the muzzle is actually tight at 0.001 smallerthan the standard specifications. The bullet might expand when it passedthrough the big areas, but it would be drawn down again when it hit thetight spots. Which dimension is really the size of your bore? Who knows�it all depends on your meaning. Average? Mean? Tightest point? Loosestpoint? Standard deviation?
You want a bullet to fit so it won�t be distorted and so powder gaswon�t escape around it and cut the jacket or lead like a torch. It�s worse tohave gas jetting around the bullet in the loose places than it is to have the

38
bullet slightly elongated by the tight ones (since the amount of distortionis so tiny, yet the damage by gas cutting can be so harmful to both boreand accuracy). That�s why I lean toward large bullets so long as theydon�t cause any other problems.
The fellow who says he must have a 0.2240-inch bullet for his .224rifles could be right, if every one of them has a barrel with a .2240 maxi-mum groove- to-groove diameter. But unless he actually knows that for afact, he could be just as well off or perhaps better with a bullet from .2242to .2245 diameter.
The Myth of the Pressure Ring
You�ve probably heard this one: a good accurate handmade bulletmust have a pressure ring slightly larger than the rest of the shank, whereasa factory bullet doesn�t have one and that is why factory bullets are lessaccurate. Lots of shooters believe this one.
Actually, the pressure ring on the back end of a swaged bullet is therefor two reasons. The difference in diameter between the core seating die,which is used to make the bullet expand to nearly final diameter in acylinder form by pressing the lead core into the undersized jacket, and thepoint forming die, which forms the ogive on the bullet, must be verysmall, but still the point forming die should be slightly larger than thecore seating die (in diameter of hole).
If the core seating die is the same size or larger, the bullet will tend tostick in the point forming die. People who don�t know much about swagingwill assume the point forming die is bad, when it is likely that the coreseater is producing a bullet too large to easily slip into the hole of thepoint former. The difference is very small. A typical .224 bullet would bemade using a core seating die of about 0.2238 inch diameter, or at leastthe bullet would come out of the core seater at that size (the hole mightbe slightly different because of material springback).
A desirable range of diameters for a .224 bullet would be from 0.2240to 0.2245 inches in the parallel shank section. Right at the base, the bulletmight measure from 0.2242 to 0.2248. This �pressure ring� is the lack ofspringback across the solid disk of metal that makes the bullet base, com-pared to the springy tubular sides of the jacket. Having a large differencebetween core seater and point former die cavities will make the pressurering larger, and if the difference gets too large, then the bullet will start tocome out with a �wasp-waist� shape, like the old Herter �Super-SonicWasp-Waist� bullets of long ago.
39
(A note about those Herter�s bullets: these were most likely rejectbullets made because of a severe mismatch in a set of commercial swagedies, but Herter�s was innovative enough to turn someone else�s rejectsinto their �Model Perfect� offering of the season. Strange advantages weretouted for this bullet: it was said that the air went in a sort of circle aroundthat hourglass shape and somehow whipped around behind the bullet,whacked it in the rear and drove it faster! If this were true, Herter�s dis-covered a perpetual motion machine with a new twist. Imagine whatwould happen if you accidently gave one of those bullets a thump withyour finger while it rested on the table: the air would start accelerating itfaster and faster until it was zipping around the room at supersonic speed,blowing holes in all observed physics!)
The pressure ring is not a design feature: it is a physical fact of life thatgets in the way of having a nice parallel shank on the bullet and canexpand the case neck as the bullet base passes through, leaving the bulletslightly loose. In a short-necked round like the .300 Savage, the pressurering is a real problem, since the case holds part of the ring and part of theshank, and the bullet flops around as a result.
Most of the time, the pressure ring doesn�t hurt anything but if therewere a way to get rid of it without hurting accuracy in some other way, itshould be done. The best way to minimize it is to match the core seaterand point former dies very closely, more closely than you can do with aregular micrometer. You can also make the bullets slightly oversized andtapered, so the dies really eject easily, and then push the bullet through aring die that irons the sides perfectly straight: now you�ve got a factorybullet! That�s the way it�s done. But that also tends toward a loose fitbetween jacket and core: the core pushes in and stays there, while thejacket springs back a tiny bit and loosens its grip on the core.
If you bond the core (using Corbin Core Bond flux and melting thelead core into the jacket for a permanent adhesion), you can draw downthe shank of the bullet without any springback effect. But all this is notnecessary for target shooting and barely necessary for anything else solong as the ring is only slightly 0.001 inch or less) larger than the rest ofthe shank. If you have any problem with the bullet in a short necked case,then this is worth some consideration.
The main thing is, don�t be suckered into thinking that you must havethis mysterious feature in order to have a top-quality benchrest bullet. It�sjust how they come out, no design required or intended, and rather thanadmit it, many bullet makers in the past have turned it into a �feature�.This is rather like the software bug that the technical support person claimsis actually a feature: it�s supposed to work that way, didn�t you know?(Good thing software companies don�t design cars. Cars might have be-

40
come 100 times cheaper and get 200 miles to the gallon if they followedthe improvements made in computers, but I�m not sure I�d want to driveone that crashed four times a day!)
The Myth of Magic Jacket Alloys
Here�s another myth that needs to be shot down: copper fouls yourbore, and brass is too hard on it, so you have to use a mysterious metalcalled �gilding metal� that only the factories have. In the first place, gild-ing metal is 95% copper and 5% zinc, whereas the brass most people referto is 70% copper and 30% zinc. Copper is normally 99.95% copper and atrace of silver or other elements, sometimes phosphorus, sometimes ar-senic. You can have any of them for the going price, any time you like.Corbin stocks various kinds of bullet materials and can get others if youorder the minimum run. Our jacket drawing equipment can use any ofthem (we may have to �tweak� it for a particular material, though).
The factories normally use either gilding metal or commercial bronzefor bullet jacket material. Commercial bronze is really not bronze at all. Itis another kind of brass, made with 10% zinc and 90% copper. It is cheaperthan gilding metal, slightly tougher and can be made harder. Any of thesemetals can be used to make good jackets. None of them necessarily hasto foul the bore any more than the others.
Pure copper, properly annealed, makes a fine jacket material but it is alittle more �sticky� in the punch press dies and harder to draw to deepcups, so it is seldom used in high speed mass production. A little zincmakes the material easier to draw, but more brittle when it strikes thetarget. When it comes to a choice between helping the mass producerproduce the product, or making the product work better for you, guesswhich way it goes! (To be fair, the price you pay is based on how fast thejacket can be produced and the price of the metal used, and the massmarket is by definition interested in the best price.)
Why do people think copper fouls more than gilding metal, then? Iwondered about that for a long time, since we are involved with shootinglots of bullets made with copper and have not noticed any unusual foul-ing problems. (We get into all kinds of calibers, from .12 to 25mm. We�veshot .50�s made from everything you can imagine, and fouling isn�t anyworse with copper.) I think a big part of it is the finish of the material usedto make the bullets, and the treatment it gets during the process.
Copper tubing is a traditional material for making bullets. It tends tohave a slightly soft, powdery surface after it is annealed. Annealing withgas heat, or in an oxygen atmosphere, will oxidize the surface and cause areddish or blackish oxide to form. These tend to be flaky and loose. When
41
the copper is drawn down and shaped into a jacket, it will harden slightlybut the surface may not be burnished enough to get rid of the porouslayer. I think this layer is what comes off in the bores.
Nearly all metals will leave something of themselves in the bore, butwe are talking about fouling bad enough so that it is a problem, an excep-tional amount of fouling. And with properly drawn and polished bullets, Ihave not seen any significant problem. With the highly finished copperstrip that we use for making drawn bullet jackets, there is no problemworth consideration.
Some of the rumor probably comes from the fact that people who dothis sort of experimental work with bullets are more curious and inspecttheir guns more carefully than people who just buy factory bullets, andthey notice even a small amount of fouling sooner. Some of it comesfrom the loose, porous finish that experimenters may get on their torch-annealed copper tubing jackets. So, use annealed copper instead of an-nealing it with a torch, or polish the jackets so that the outer surface isremoved down to the hard underlying metal. Don�t worry about it unlessyou actually experience a problem, which you probably won�t.
The Myth of Mysterious Rites of Swaging
I�ve heard all these tales about how you have to let the bullets �rest�overnight before you shoot them, or how you have to swage cores andthen put them in a jar and give them a day to �normalize� (whatever thatmeans) before putting them into the jackets. Hardened lead alloys oftenchange hardness over a period of time after having been subjected tostress, such as swaging, but if you are interested in accuracy you prob-ably use pure lead wire (which has no such time-related hardness change).
Most of this is purely in the mind of the person who believes it, andcame about either because someone else said it, or because the personhappened to shoot a great group one day after doing something of thekind and from that day forth will always give the ritual credit. I wonder ifa hunter who dropped his rifle and had it go off and by sheer luck shot adeer with that stray bullet would henceforth go into the woods and tosshis loaded rifle on a rock?
I suppose we all know people who got lucky one time with totallyinappropriate equipment or techniques, and without any further testingjust assumed that the thing they did incorrectly was responsible for thegood fortune of that day. Likewise, bad results are sometimes blamed oncoincidental precursors. A statistic says that 80% of all people killed incar wrecks ate carrots during the previous twelve months. So, does this

42
mean that eating carrots causes you to get killed in a car crash? If youdon�t eat carrots, do you thus avoid such a fate? If you think so, maybe itis time for a refresher course in syllogisms.
The Myth of Weight Tolerance Versus Accuracy
Once Friday I made a pile of bullets and wanted to shoot a goodgroup so much that I spent all afternoon weighing and sorting them intotwo piles. The first pile had almost no weight variation that I could mea-sure: they were right on. The other pile had the other bullets, which couldvary as much as three grains plus or minus from my desired weight. Aftersupper, I went back out to the bench and I carefully loaded cartridges formy heavy barrel .222 Remington on a nice Sako action, weighing everycharge, and seating those bullets with the greatest of care. I was ready forSaturday�s match.
Saturday was a great success, and my group was as small as I couldhave hoped. I was now positive that absolute bullet weight control wasthe secret of small groups. Upon my triumphant return home, the firstthing I noticed was the pile of bullets on my loading bench. It lookedsuspiciously small. Weighing a few, then a few more, it finally dawnedupon me that I had loaded the rejects and shot them, instead of the se-lected ones. Come to think of it, there were a lot of loaded rounds! So Iguess a six grain range of weight variation didn�t make all that muchdifference in group size, after all.
If a bullet is unbalanced, so that one side is heavier than the other, itwill tend to spiral in flight and will land at different points around its axisof flight. That much is well proven and has been known for years. If thedifference in weight between two bullets is caused by a bullet jacket thatis thicker on one side (eccentric jacket walls) or if it is caused by an airpocket or void within the core of one bullet which is off-center, then theweight variation is a way of telling us about eccentric construction.
Note that we don�t know which of the two bullets is built incorrectly.With air pockets, the lighter bullet is probably the bad one, but with ec-centric jacket walls, we don�t really know if the heavy bullet has a thickerwall on one side, or if the lighter one has a thinner wall on one side. If thelighter bullet has a thinner wall but it is concentric, then provided we hadfive more like it, we could shoot just as good a group as we could with aconcentric, thicker-wall jacket. If we had bullets with air pockets that wereperfectly centered, such as you get with a hollow base or hollow pointthat is correctly swaged, then there is also no problem with eccentricweight or balance.

43
Mixing bullets that have eccentric weight variations into a group thathas none will increase the group size. Mixing thin walled concentric jack-ets with thicker ones can change the group size only because the frictionof the jackets as they pass through the bore may be different, so the pow-der burns a little differently, and the velocity may vary. This can cause thebullets to drop more or less depending on their velocity. The variationdue only to difference in weight, meaning the gravitational drop, is soslight at 100 yards on a few grains (such as 2% or so of the bullet�s weight)that you can disregard it. You may as well talk about the effects of anairplane flying over and its gravitational pull shifting the bullet impact asthe weight variation in a 2% or less situation.
If you make your own bullets, and you have jackets that not onlyweigh the same but have walls that are the same on all sides, and you seatthe lead cores to the same pressure so there is no loose core and no airpockets, then you will be able to ignore weight variations of less than 1%of total weight for any kind of shooting, and below 2% for anything buttop level benchrest competition. Any weight variation in this range wouldbe simply more or less core, concentric to the bullet center line, and wouldhave no serious or noticeable effect on group size.
If you have the same weight variation and it can be shown that thecause is eccentric walls or anything else that causes the weight to beshifted in an eccentric manner, then you will probably notice an increasein group size. So, weight variation is not an absolute measure of quality,but it is an indicator of a possible problem.
Eccentric bullets are easy to make by putting a known weight of ny-lon string down one side of the jacket before swaging in the core�youcan control the weight and position of the variation this way. We find thegroups of bullets made with concentric weight variation (more or lesscore weight) are within the average size for the control bullets, whereasthe eccentrics tend to fall outside in proportion to the amount of eccen-tricity.
My point is that weight is not some absolute number that tells you�good� or �bad� about a bullet. After all, a 2 grain plus or minus variationon a 50 grain .224 is plus or minus 4% of the total weight and may havesome noticeable effect, whereas the same variation on a 500 grain .458bullet is only 0.4% and is below the limit of accuracy of most electronicmeters and chronographs, and is unlikely to have any affect that can bemeasured.
Get out the instruction manual for any high precision digital scale,and you will probably find a �specifications� section that tells you theaccuracy of the scale is from 1% to 5% of full scale reading, plus or minusthe final digit. That is, if you are using a scale that goes to 500 grains, and

44
the scale has an accuracy rating of 1% of full scale reading, that meansthe scale itself cannot tell the difference, reliably, between 495 and 505grains! Not only that, but if the scale reads out to 0.01 grains, the lastdigit can be anything from 0 to 2 and still be within the range of accuracyguaranteed.
Years ago, I established and ran a precision calibration laboratory aspart of an electronics company that I had founded. We needed to certifyaccuracy of commercial and law enforcement radio transmitters to a cer-tain accuracy, and sign our names to the tests on forms that would standup in court in case of any problems with radio interference or licensingissues. Digital equipment was just starting to become affordable outsideof the military, and we used the latest products from Hewlett-Packardand Tektronics, which were the best available. I was somewhat taken abackto learn that much cheaper equipment was advertised as having far greaterprecision, until I read the fine print and found that readout accuracy wasbeing touted, not instrument precision.
Most people wouldn�t know the difference, and would be fooled bythis bit of deceptive advertising (which the major brands avoided). Thedigital readout is �accurate� to whatever last digit is offered, but connect-ing a readout with 0.0001 mile final digits to your car odometer cablecertainly does not give you distance measuring to that fine level! All thetolerances and inaccuracies in turning the cable, sliding the tires, play inthe gears, and so much more, would make that kind of readout accuracya joke as far as precision of measurement. But it is still a good way for acompany to sell cheap instruments to people who do not read the fineprint! Even medium-priced digital micrometers sometimes tout read-outaccuracy without mentioning actual instrument precision and repeatabil-ity.
As a rule of thumb, strive for a maximum of 1% plus or minus weightvariation in your best target bullets, and don�t worry if you make huntingor defense bullets with a 2% variation. To get this figure, divide the differ-ence between the heaviest bullet and the lightest bullet by the averagebullet weight, and multiply by 100. The average bullet weight is the totalof all weights divided by the number of bullets that you weighed. Youcan hold the tolerance to about 1/2% if you take extra care with consis-tent timing on the core swaging operation, and sort all your bullet jacketsinto similar weights before seating the cores. It only matters to the peoplewho buy your bullets, because the one fairly accurate tool most handloadersown is a powder scale. No matter that it reads to about 1% of full scale,plus or minus. If your only tool is a hammer, every problem looks like a

45
nail. If the only thing a person can measure with high accuracy is weight,then weight becomes the answer to every problem. Only, it isn�t. At worst,it can be an indicator of other problems.
The Myth of the Infallible Micrometer
One last example is the myth of the infallible micrometer. I think thatat least once a month we hear from someone with the world�s most accu-rate micrometer. That remarkable tool certainly gets around. Since theadvent of digital electronic readouts of reasonable price, and the avail-ability of micrometers and calipers with stated accuracy of either 0.0005or 0.0001 inches (or sometimes 50 millionths, or whatever the ad writersfeel like writing that week) there have been more than a few people whocall to note that they expect to order a bullet that measures some ridicu-lously precise figure and wonder if we�ll guarantee it.
In the first place, Corbin makes the most precise bullet swages youcan buy because we have put literally decades into building the only full-time, full-line bullet swaging equipment and die-works in the world, andyou can�t run one without the best measuring instruments. Each of ourdiamond lapping machines has a gauge mounted on it that cost severalthousands of dollars, and is tested and set with a setting fixture that isperiodically sent in for NBS calibration. The setting fixture alone costsmore than most people would pay for their second car. The diamondprobes that fit into the precision bore gauges cost several hundred dollars,and each one only covers a narrow range such as .204 to .210 inches, sowe have thousands more in all these little diamond probe sets.
I am not reciting all this to impress anyone with what we spend onmeasuring tools, so much as to make this point: if there were anythingbetter that was appropriate to this application, we�d buy it. That�s ourbusiness. We have to know the limits and uses of precision measuringtools to survive. Those salesmen who call on Corbin certainly are morethan anxious to sell us the latest and best technology, and they keep usappraised of it. Precision measurement isn�t something we only read aboutin an old copy of Machine Tool magazine at the dentist�s office.
I also don�t mean to imply that we know it all and no one could pos-sibly measure anything better. I�m sure that at NASA or Sandia Labs orCal-Tech there are tools of greater precision than we need or can afford.But what I do mean to point out is that someone with a digital microme-ter that costs a hundred bucks or so isn�t even close to the state of the artin measurement precision, and if this high priced equipment we use isonly guaranteed to give plus or minus 50 millionths of an inch precision,

46
you can darn well bet that the micrometer isn�t going to actually give youanything like an absolute precision of plus or minus a half thousandthinch, which is 500 millionths.
So, how can the ads in the machine tool catalogs say that the readoutis accurate to 0.00001 inches or whatever they claim? Easy: they are talk-ing about the readout. The digital readout is the thing that displays thenumbers. If it says a given number, you can bet it means exactly thatnumber, to the last digit it can display plus or minus one digit (since anydigital tool has no finer division than 0 or 1 on its last number displayed,you never know for sure if the last number is half way between 0 and 1).
But the trick�the secret, if you will�is in that wording. The readoutaccuracy has nothing to do with the instrument accuracy. You can connecta digital readout to anything, and the numbers will click off just fine, butthey mean nothing more than the mechanical limit permitted by the ac-tual instrument itself.
Digital readout on a moderately priced instrument is a way to foolgullible buyers into thinking they bought the world�s most accurate toolfor a few dollars, while the �uninformed� laboratories continue to spendthousands to get the same kind of accuracy. It�s the stuff headlines insupermarket checkout magazines are built from: �Man Survives Fall FromSpace Shuttle: Doctors Baffled�. It�s human nature to want to think thatall the experts are wrong, because it gives the average fellow�s ego a littleboost. Sometimes the experts are wrong, of course, in some particularcircumstance where their theory turned out to be off the mark. But, re-ally, if it were possible to get dependable accuracy in the tenths of athousandth inch with cheap tools, why would anyone in business wastemoney on anything else?
I will never convince the person who is so proud of his new digitalmike that he can�t repeatedly and accurately tell what the diameter of abullet is to five places, and probably not to four. The limit of accuracy ofa lead-screw micrometer, which nearly all of them are unless you buylaser or magnetic track instruments (for thousands of dollars) is the physicalaccuracy of the mechanical screw thread itself, not the digital readout.This cannot honestly be guaranteed to be better than 0.0005 inches in thevery finest of instruments, (such as the Starrett �Last Word� bench mike)and more likely is only accurate to 0.001 inches. Of course they read tozillionths of an inch (well, at least 0.0001 inches) but being able to dis-play a tiny number does not mean the tool really sees it repeatedly oreven sees it at all.
For all practical purposes, a micrometer you can hold in your handwill give you the nearest thousandth plus or minus about half a thou-sandth. So if you specify a bullet of 0.308 inches plus or minus 0.0005

47
inches, you have some chance of telling it is between 0.3085 and 0.3075inches. If you buy a gauge block with guaranteed traceable dimension of0.3080 inches plus or minus 0.0001 inches, you can set your mike as acomparator to see if your bullet is .3081 to .3079 inches.
But you can�t tell if you have a .30805 or a .30795 inch bullet. Ascrew thread measuring system just won�t repeat any closer than that. Allit can do is give you a readout where the numbers themselves are guaran-teed to be whatever the ad says, not that they represent what the mea-sured part actually is. That is how many precision tool brands are sold tothe public today. The difference between readout and instrument preci-sion is just complex enough so that some people don�t care to understandit. It�s much easier to believe you bought the precision of a $5,000 labtool for $150.
What matters is that the bullets land in the same hole, or as close to itas possible, and there is no way yet devised to determine if they will dothat before shooting them! Bullets that are undersized to the bore by evenhalf a thousandth may show signs of lower accuracy, whereas bullets thatare a thousandth oversized from this ideal usually shoot as well as the�right� size bullet.
But we don�t really know in advance what is �right� because it de-pends on your particular barrel. We do know that in general, if you wantmaximum accuracy, you should strive for a tolerance range of minuszero, plus one thousandths of an inch from the groove-to-groove depth.You may not find this is �right� for every gun or load, but it is a goodstarting point.

48
4. Tubing Jackets
Before you can make a jacketed bullet, you need the jacket. The jacketwall thickness, length, and size determines the dimensions and some-times even the number and type of other dies you will be using. The issueof what jacket you plan to use comes first, assuming you are using ajacket of course. Not all swaged bullets need a jacket. We will discusspaper-patched, lead, and other types later.
You can buy some sizes and lengths of ready-made jackets (the cupsor empty skins for the bullets). Corbin offers the high precision VersatileBenchrest VBTM jackets in popular rifle calibers, and nearly all standardcalibers of handgun jackets. Bullet jackets are from .001 to .005 inchessmaller than the caliber, so they can be expanded upward when you insertand seat the lead core.
Because of the limited size of the market and the high cost of makingand stocking good quality jackets, you can�t always buy the calibers,lengths, and thicknesses you want to use. There are good alternatives tobuying them. You can make your own, or you can buy something that isavailable and draw it down to make a smaller diameter, greater or lesslength (by pinch trimming), and thinner or thicker wall (by design of thepunch to die clearance).
Commercially made bullet jackets normally contain from 5% to 10%zinc, with the balance of the alloy being copper. The 5% zinc alloy iscalled �gilding metal�, and the 10% zinc alloy is called �commercialbronze�, even though it isn�t a bronze at all (bronzes are tin-copper al-loys). The advantage of the zinc is that it makes the jackets easier to drawinto deep tubes, starting with flat strip, without breaking through at theend or wrinkling. But for shooting purposes, pure copper tends to holdtogether better on impact and has about the same level of fouling if thesurface finish is equally good.
Corbin makes two different systems to form your own bullet jackets,one system using tubing, and one using flat strip. Tubing dies cost lessand fit more kinds of presses, but strip jackets have the accuracy edge andcan be made with greater control over the wall tapers and thickness. Corbinoffers deep-drawing grade copper strip in 5-pound bundles of cut sections(typically 2-foot pieces), and in 50-pound pancake coils with a 16-inchcenter, which fit on our automatic uncoiler for automatic feeding.
We also offer supplies of copper tubing in 1/4-inch, 5/16- inch, 3/8-inch, and 1/2-inch diameter from stock, and nearly any diameter on spe-cial order. All calibers from .224 to .512 can be made with the stock sizes.Jacketed shotgun slugs can be made with 3/4-inch tubing, and 1-inch
49
Gatling or 4-bore (.998) bullets can be made with 1-inch tubing. We donot stock these larger sizes but by the time the dies are ready, we wouldhave a special order ready for you.
For big game hunting, the tubing jacket may have the edge since it iseasier to build thicker walled, tougher jackets with tubing (after all, thedeep drawing operation is done for you in tubing and all you have to do isround over one end and adjust the diameter in a draw die). Jacket drawingfrom strip can be done easily in a hand press only for the shorter jacketlengths, because punching out a disk and turning it into a cup requires alot of power early in the stroke. Hand presses generate almost all theirpower at the end of the stroke. Hydraulic presses are used for rifle jacketlengths, in order to get full power at the start of the stroke.
Copper Tubing Jacket Maker Sets (CTJM-1-S, and -H)
You can make jackets from copper tubing (or almost any other metal,but copper, aluminum, brass, and mild steel are the most practical thingsto use, and of these, copper works best for most shooting needs). To dothis, you could use copper water tubing (yes, the same kind used to hookup wash basins), boiler tubing, or refrigeration tubing. Corbin has preci-sion drawing grade tubing available also, if you want �good stuff � fortesting.
The cost of new tubing generally means that you won�t save moneyover buying jackets if the jacket you want is already available on themarket. But most large caliber jackets for rifles, or heavy walled jackets ofany sort, are simply not available unless you make them, so the cost ofthe jacket is secondary to whether or not you want a better bullet! If youcan get a reasonably good quality surplus tubing from contractors or plumb-ers, and the wall thickness variation is not too great, construction sitesand contractors might be a low-cost source.
Regardless of the size or type, you would cut the tubing to length,deburr one end, put the piece over a precision punch and round the endover in the proper diameter end-rounding die (looks like a blunt pointforming die), anneal the tube, draw it to smaller diameter, and then flat-ten the end with a special punch in your normal core seat die. All the toolsyou need to form the cut tubing pieces are included in the CTJM-1 tubingjacket maker, with the exception of the tubing saw to cut the tubing tolength, and the proper core seating die to flatten the end of the tubing (orto form the boattail base). The core seating die (or boattail base formerdie) is part of the bullet swage set, so it is normally assumed that youhave this die already.

50
If you only want to make the jackets, and do not have the bulletswage die, tell us so that we can recommend the proper die to finish thejacket and add this to your package. Generally, if you want to make atubing jacket it is because you also want to make the bullet. It would beredundant to charge you for two of the same dies, one to complete thebase and the same one again to seat the lead core. But sometimes a per-son only wishes to make and sell jackets, not finished bullets. If this is thecase, we need to know it. You can�t finish the jacket without one of thedies used in the normal bullet swaging set, and that die is not normallyincluded in the CTJM-1 set.
The tubing jacket maker set will include whatever additional compo-nents are needed in order to seat the core into the jacket. For example, ifyou order the tubing jacket maker for .458 caliber, we will provide a propersize core seating punch to fit the jacket for a given weight of flat basebullet. However, if you plan to make a rebated boattail bullet, you mightneed to purchase one additional punch, an adjustable length core seatingpunch. This is a shouldered punch, which presses against the end of agiven length of jacket and keeps it from extruding forward while the leadis being seated. Sometimes a RBT design will cause the copper tubing toextrude forward, which not only elongates the jacket but stretches andthins it at the base, where it may separate within the die. Using the adjust-able length core seating punch holds the jacket in place and prevents thisfrom happening.
Tubing Jacket Advantages Over Drawn Jackets
The advantages are (1) the tooling is lower cost, (2) the number ofoperations is relatively small and easy to learn, (3) tubing is fairly lowcost in modest quantities compared to buying large rolls of strip material,and (4) the process makes excellent bullets for big game shooting.
In a Corbin hydraulic-powered press such as the CHP-1 Hydro-pressusing the -H family of high pressure dies, you can completely close thebase so no hole appears. In the -S family of hand press dies, which fit theCorbin S-Press CSP-1, or when using an -H die in the Mega-Mite CSP-2hand press, you usually cannot generate enough pressure to completelyclose the base, so a tiny hole remains, but it is far smaller than mostmilitary open base bullets and causes no problem.
Tubing jackets are not just pieces of tube shaped into a bullet: theyare almost identical to a normal closed-base jacket. Generally, they havethicker walls with no taper toward the front. You can make almost any
51
reasonable length and wall thickness, if you use the correct press anddies. In each diameter, we stock one wall thickness, which varies with thediameter from .028 to .035-inch.
Tubing jackets are most often used with hunting bullet designs, andnearly all commercial bullet makers today use Corbin Core Bond to cre-ate a bullet that will not shed its core, and can be shot �inside out� with-out losing much of its total weight. Core Bond is inexpensive, fast, andworks much better in actual big game hunting than a partitioned design.The entire core is secured to the jacket, rather than just protecting half ofthe core. In my eclectic bullet collection, I have a bonded tubing jacketbullet that William McBride (founder of Star Custom Bullets) broughtback from South Africa. It had been shot at a charging Cape Buffalo�shead, penetrating the thick horn and skull (probably more than six inchesof solid horn and bone).
It killed the animal with this difficult brain shot, and the 0.065-inchthick brass jacket was turned inside out from the impact but still retainednearly 100% of the bonded lead core. He also brought me a full metaljacket military bullet that was formed into a U-shape from being shot intoa Cape Buffalo. The bullet came back out the same side. Either it oranother one like it struck one of the South African professional hunters inthe leg (and in typical fashion, the jolly fellow insisted on stopping at abar before going to the hospital!).
I have dozens of other examples of amazing and possibly lifesavingperformances from bonded core bullets using our Core Bond process, com-pared with other designs which failed. There is no doubt in my mind that,given the choice, every bullet I fired at a dangerous game animal wouldbe a bonded core design.
Disadvantages of tubing jackets:
1. The walls are straight, rather than tapered, so that without specialoperations the jacket will not be the �controlled expansion� type.
2. Tubing jackets larger than .257 caliber generally are not practicalto make below .030 wall thickness (sometimes you can get .025 walltubing, but it is harder to find and doesn�t always form, in every caliber orshape, without buckling).
3. It is not practical to build precision benchrest grade bullets usingreadily available tubing. This is not to say tubing jackets are �inaccurate�,but only that a deep drawn jacket can be made with closer tolerancesgiven the materials available on the market today. Tubing jacket bulletscan, and have, set match records. But they probably will never set high

52
level competitive benchrest records. On the other hand, they certainly dobring home a lot of big game every year where the thinner and morebrittle drawn jackets fail and let it get away!
4. Tubing jacket makers do not lend themselves to automatic produc-tion as easily as strip jacket makers. The initial step in making a tubingjacket is to cut a piece of tubing to a specific length. From this point on,it is handled as an individual component. Strip can be fed into a stacked orprogressive die system that allows some of the operations to be done tothe jacket in a continuous feed procedure, as the strip itself provides someof the conveyance of the forming jacket. On the other hand, there are lesssteps involved in making tubing jackets than in forming strip into a jacket.
Copper Tubing Jacket Maker sets:
The CTJM-1-S (Copper Tubing Jacket Maker, type -S) uses 1-inchdiameter dies, and fits the S-Press (CSP-1) or the CSP-1H Hydro-Mite.This set can make jackets up to 1.3 inches long, although you must movethe punch holder back and forth to load longer pieces and form them, oruse the optional FPH-QC-S quick change punch holder. The wall thick-ness is limited to 0.035 inches (the standard type L copper tubing nor-mally has 0.028 to .035 inch thick walls). Only �pure� (not alloyed orbrass) copper tubing is recommended.
Jackets can be made in .22 to .458 caliber in this die family. In theory,you could also make smaller calibers from tubing, but it is cheaper andeasier to make them from fired .22 cases. At this time, tubing is availablefrom over 200 primary sources in the USA alone, but almost all the avail-able sizes are 1/2 inch, 3/8 inch, 5/16 inch and 1/4 inch O.D. withoutpaying for custom drawn production runs. These can be used to make allcalibers in the range mentioned
The CTJM-1-H (Copper Tubing Jacket Maker, type -H) uses 1.5 inchdiameter dies, and fits the CSP-2 Mega-Mite press and the CHP-1 CorbinHydro-Press. There is almost no limit to the kind, thickness, and lengthof material you can form in these dies. Mild steel, copper, brass, alumi-num�all are candidates for a set of tooling to make good jackets. How-ever, you cannot interchange them with abandon. A set of dies developedfor the characteristics of one metal, one wall thickness and diameter oftubing will not necessarily work with different material or dimensions.
You can order tubing made from nearly any material, but unless it iscommonly available from the mills, and stocked by the distributors, youmay pay a hefty premium for the use of such materials. Corbin stockscopper tubing in the proper grades, tolerances, anneals, and diameters tomake nearly any caliber within our standard range. Unless you really have
53
a strong desire to dive into deeper waters, and do not mind that it willcost extra for both the material and possibly for the development of cor-rect dimensioned tooling that is nonstandard, it is best to stay with provenmaterials and dimensions.
Changing jacket lengths:
You can change the length of a tubing jacket, if you also purchase anadditional punch per length. The end rounding punch has a turned-downsection that is just shorter than the desired length by half the diameter ofthe tubing, so that enough metal protrudes to be rolled over into a basewithin the first die. Normally you can use the same end flattening punchfor a modest change in length, if it is longer than the punch tip. The wholeidea of these punches is that enough unsupported tubing projects pasttheir end to roll over into an angle or curve (in the end rounding die) andthen flatten by pressing firmly in the core seating die (without a core).
If your jacket projects a little more past the end than the sample sentwith the punch, it will probably work anyway, until it gets long enough sothat a lot of jacket is unsupported and collapses inward on itself whenyou try to round the open end. But if the jacket is even a little too short,the punch will come up against the end of the die and there won�t be anyjacket there to be rounded. Thus, you have wider base openings, incom-plete closures, and might even damage the die or punch trying to get thebase to close up.
The right length to cut the piece of tubing is marked on the side ofthe end-rounding punch. You want the cut tube to rest on the punch shoul-der, be supported by the reduced diameter tip up to about half a caliberthat projects beyond the punch end. You are going to fold half a caliberper side to close up the base. The length of the cut tubing is critical towithin about 0.01 inches for a given punch.
An alternative to buying specific length end-rounding punches is topurchase one adjustable length punch. The adjustable length punchescan be set so that the shoulder section moves, like the barrel of a mi-crometer, and allows more or less of the tip to project beyond it. Thepressure is tremendous, stress on the parts is high, and the punch has tobe made very strong if it is to last. An adjustable punch will cost morethan a solid one-piece punch.
The cost advantage is twofold. First, if you want three or more lengthsof tubing, the adjustable punch will usually pay for itself over buyingindividual punches. Second, if you don�t know for sure what length youwant, but only have a rough idea based on approximate weight and amount

54
of exposed lead or open tip, then the adjustable punch avoids mistakesand lets you use whatever length eventually proves to be best for yourideas and weights of bullet.
Changing Tubing Dimensions:
A CTJM-1 tubing jacket maker set is designed for a specific diameterand wall thickness of tubing. The length is easy to adjust by using differ-ent end rounding punches (within reason). The actual tubing diametercontrols the size of the dies, and the wall thickness of that diameter oftubing controls the diameter of the punches. Therefore, changing tubingdiameter means getting a different tubing jacket maker set, and changingthe wall thickness means changing the punches with possible exceptionof the punch that draws down the jacket to actual caliber requirement(sometimes this punch will work with thinner walls than the original jacketdesign).
Note also that if you change the diameter of tubing, or the wall thick-ness, you will probably need different components from the separate bul-let swage set. The core swage die accepts a specific size of lead wire andexpands it so it fits properly into a given jacket. If you change the jacketinternal diameter, the same core may no longer fit inside. This wouldmean getting a different core swage die. If the wire that you used before isnow too large to fit the new core swage die, then you will also need toobtain smaller wire diameter.
Also, the core seating punch probably will not fit a different diameterof jacket I.D. since it must be a pressure-sealing fit to the jacket. Chang-ing wall thickness almost always requires a new core seating punch forthe core seat die. You can see that going from a .030 to a .050 jacket wallthickness could require different lead wire, different core swaging die, anddifferent core seating punch. Going the other direction, you may be ableto get by with just a larger diameter core seating punch, because thesmaller core probably will still fit into the jacket well enough.
If, on the other hand, you were to change jacket materials from a .050to a .030 wall thickness, there is no doubt you would need new smallerdiameter lead wire, core swage die, and core seating punch, in addition tothe end rounding punch, jacket drawing punch, and end flattening punch.If you have multiple lengths or adjustable length punches for the .050tubing, you may wish to replace them all to have the same length capa-bilities for the new .030 tubing.
In order to build the new components, we will need the entire sethere. This is especially true if you obtain your own tubing, since it mayreact differently than ours to the same pressures and dimensions of tool-
55
ing. A development fee usually applies because of the amount of time ittakes to build and test different punch diameters and to develop the infor-mation we need with tubing different from that we have thoroughly ex-amined for years. Normally this is two hours at current shop rate.
The two most common problems clients have using tubing jacketmakers is failure to use the same material that was used to design thetools, and failure to follow directions about length and annealing steps.The problems often show up further down the processing line, instead ofimmediately (at least to the inexperienced jacket maker). Bullets maystick in the point forming die, and the bullet maker is ready to condemnthe swage die when in reality the entire problem is a skipped annealingstep when the jacket was being formed. Jackets may wrinkle, deform,crack at the base, or stick fast to the end flattening punch, and the prob-lem is simply that the operator believes his tubing, obtained locally, isequivalent to the tubing used to develop the die set when it is far differentin some respect.
Even if the dimensions are the same, the hardness or grain structureof the metal may be different enough to cause problems during precisionredrawing and base forming. When we build a jacket maker set, it is bestif we start with the material you plan to use. If you change materials, wecan add punches (so you build a wider range of working supplies) or modifyyour existing punches (probably not as cost effective, since it takes closeto the same labor cost to change them as it does to make new ones).
Selecting the right tubing:
The standard sizes of tubing that are available, and which we stockfor resale, are 1/2 inch O.D., 3/8 inch O.D., 5/16 inch O.D., and 1/4 inchO.D. We can also make custom diameters. They are more expensive thanthe standard sizes but we can draw them for you. The wall thicknesses arenormally .028 or .035 depending on the diameter and standard tubingindustry practice. We can obtain .050 and .065 or close to these diam-eters in the 3/8 and 1/2 inch sizes, on special order. We can also customorder anything you want that a copper tubing mill will make, but it maybe subject to minimum quantity and must be prepaid. You are probablywell advised to buy it for yourself and make your own best deal, thensend us sample material to build the tools, once you step outside of thesizes and thicknesses that are popular enough for us to stock.

56
I�ll be glad to act as a buyer agent for you, but judging from pastexperience, a person who hasn�t been shopping for custom tubing tendsto rapidly change from vertical to horizontal orientation upon learningthe price... and it is less stressful for me to be the one hearing about itfrom you, than conversely. All that having been said, people do buy cus-tom tubing now and then, and although it is normally higher than whatwe stock, if it does the job better than anything else, and you are satisfiedwith the performance (or can sell the bullets for a reasonable profit) thenobviously the tubing price isn�t too much.
In each caliber, the closest larger diameter of tubing is selected as thestarting point. The 1/2 inch tubing is used to make all calibers from .512down to just above .375 (for instance, the .400 caliber). Both rifle andhandgun calibers can be made, although you need end rounding punchesfor each length. The first step, rounding the tubing end, is the same for allof the calibers that a given diameter of tubing can make. It uses the sameend rounding die.
For example, if you wanted to make both a .458 rifle jacket and a .429pistol jacket, you could start with exactly the same .458 CTJM-1 die set,because both of them use 1/2 inch diameter tubing. You would need twodifferent end rounding punches, assuming the .429 was a short pistol jacketand the .458 was a longer rifle jacket. Otherwise, if the length is the same,and you are using the same diameter and wall thickness of tubing, thenthe same end rounding die and punch can be used for both.
If you plan to get your own tubing somewhere else, we must have atleast six feet of it on hand before we can start your order. We will cut itinto pieces and test the tooling. The length and diameter, whether thetubing sticks or releases from the punches, the concentricity and even-ness all depend on the temper, grain, alloy, tolerances, wall thickness, anddiameter of your tubing.
Plumbing is not especially precise in these factors. If you get a largequantity at one time, it will probably be consistent enough to make goodbullets, but if you change suppliers there is no guarantee that the samenominal sizes you get will be anywhere near identical. The jacket makerpunches may need some adjustment, or different punches need to be made,in case you change vendors or your vendor changes specifications.
Corbin�s tubing is higher cost than some of the tubing you will find inthe hardware stores, but not by a great deal. We are very strict with ourspecifications and order large lots of high quality tubing just for bulletmaking. We recommend that, unless you have a good source of tubing inmind, you use our standard tubing to get started. We can help you obtainlarger quantities when your needs outgrow a few dozen feet at a time, butuntil then, the odds are good that you won�t find much better pricing.

57
My recommendation is that you establish prices for your custom bul-lets that allow you to make a profit even with the higher cost material,purchased initially in small quantity. Then, by the time you can afford thelarger mill orders, you�ll have already guaranteed a higher margin andyour success will be just that much greater.
The range of calibers for each size of tubing
Custom sizes frequently used:7/8: .787 down to .750 such as 20mm and similar slugs.3/4: .75 down to .626, such as 12-gauge jacketed bullets.5/8: .625 down to .510, such as .600 Nitro, .577 Snyder.7/16: .438 down to .380, such as .40 caliber or .44 Magnum
Standard (stocked) sizes:1/2: .510 and .458 down to .380 diameter.3/8: .380 down to .318. Best in .375, .358.5/16: .318 down to .264 caliber. Best for .308.1/4: .257 down to .224 (but free .22 cases are available)
To cut copper tubing cleanly and accurately, at a good productionrate, Corbin builds a power tubing cutter saw (SAW-1). We also make aversion for continuous lengths (no limit to the cut length on either side ofthe blade) called the SAW-2. A standard, roll-type tubing cutter usuallyrolls the end so much it won�t fit over a punch.
You can also use either a lathe, or a metal cutting blade in a saw. Someof the more successful methods include a fine tooth metal cutting bladein a chop saw, table saw, miter box saw, jig saw, or band saw. A home-built stop, consisting of nothing more elaborate than a block of woodclamped to the saw table, will give you reasonably accurate lengths. Thenumber of teeth per inch should be from 32 to 40 on a hacksaw blade.The rule of thumb is �three teeth in the material at all times�. Copper is alittle �sticky� so you may wish to use a blade with a special tooth set orwith a reverse rake on the teeth.
There are some low cost modified circular chop saws available thatare supposed to be made for tubing, but I have tried them and they leavemuch to be desired from the standpoint of precision, clean cut, or safety.If I thought they were any good, I would simply buy and resell themrather than build our own.
To get a good clean cut without vibration and burning, we use a highspeed steel blade that has been cyrogenically treated and dry film lubecoated. The blades have a rake that lets them cut copper smoothly, and

58
no set to the teeth so you get a minimum amount of waste with each cut.To reduce the risk of kickback and for other safety concerns, we use a 3-inch diameter blade and secure it to a ball bearing shaft supported at bothends, driven by a toothed rubber drive belt, in the manner of a tool postgrinder.
The precision spindle assembly reduces wobble and drift to nearlyzero. On the continuous length model, we use two such spindles so thetubing can clear the drive assembly and be infinitely long. On the stan-dard bullet-makers� model, you can cut up to about 3 inch long pieces,more than sufficient for any reasonable bullet that doesn�t require a mo-bile platform gun!
We also have tubing in 2 foot lengths, easy to mail or ship anywherein the world. You can save some labor cost by chopping these up yourself.Tubing normally comes in either 20 foot pieces in big boxes of 200 to500 pounds each, or in coils (annealed tubing). We use hard drawn or 3/4-hard, as it is called, because it is easy to handle in a lathe for cutting.
How to make tubing jackets:
First, you cut a supply of tubing to the length specified on the endrounding punch. If it says �1-1/4� on the side of the punch, that is thelength to cut the tubing. It will make shorter jackets because the end willbe rolled over. But it may also become longer in the process of drawingdown to size, so you can�t really tell exactly how long the jacket will beuntil you have made a few with a given material.
Step 1, End Rounding:Make sure the cut tubes will slip over the end rounding punch. They
may fit snugly, but if they can�t be forced on by hand, it is probably due toa burr or rolled edge from the cutting operation. This will need to beremoved using a countersink or a chamfering tool. Jackets cut with theSAW-1 normally are burr-free unless the blade has become worn out.(Blade life can be greatly extended by making sure a light oil or tool cool-ant is used on the felt pad that rubs the sides of the blade, inside theguard, and is frequently refreshed).
To round the end of the tubing, first install the die marked �J� (forjacket making die) in the ram of your press. This die has an ejection punch,similar to a point forming die. It fact, it is a modified version of a pointforming die. The internal punch needs to be �trapped� by the stop pin inthe S-Press. To easily do this, remove the internal punch from the die andgrasp it by the tip of the ejection pin. Hold the punch so that you can seeabout how far down the hole or slot in the punch head has to be, within
59
the ram, in order to put the stop pin into it. (Older -M type dies have aslotted punch that uses the short stop pin, current dies use a hole throughthe punch and a long stop pin.)
I like to hold the pin between my thumb and forefinger on the outsideof the press, and slide it so that the hole in the head lines up with the stoppin with my finger tips just level with the top of the ram. Then withoutchanging my grip, I move the pin into the ram, lower it until my fingertiptouches the ram top, and insert the stop pin. With very little jiggling upand down or turning, I can always get the stop pin to pass through thehole this way.
If the internal punch (or, if you prefer, ejection pin punch) is secured,you can pull it and it won�t come out of the press ram. Now, align thehole in the threaded end of the die with the punch tip, slide the die down,and screw it into the ram. The punch is now centered by the hole in thedie, and is secure within the ram by means of the stop pin. Insert theexternal end rounding punch into the punch holder in the top of the press.
If you are using the -H dies and larger presses, then a retraction pingoes through the hole in the punch, and the knockout bar goes under thepunch head, through the slot in the ram. All swage dies (not draw dies)work this way. Some do not require the retraction pin, but the end round-ing die does.
Lubricate the inside of the jacket with a swab, using Corbin SwageLube. Wipe a little of the same lube on the outside. You can use yourfingertips for this. The amount isn�t critical, as long as you have somepresent. Some people lubricate the outside of the top punch (the externalpunch). This really isn�t as good. When you push the tube over the punch,the snug fit probably will shove all the lube up and fail to get inside thetube at all. Then the tube may try to stick on the punch. A swab saturatedwith swage lube is a quick and easy way to get plenty of lube inside thetube, where it will do some good.
Adjust the floating punch holder so that the punch is rather high inthe press, and allows the ram to go all the way up without any contactinside the die. With the ram all the way up, lower the punch holder untilyou can�t turn it by hand because the jacket is against the end of the diecavity. Lower the ram slightly, and give the punch holder a slight turn,perhaps a quarter to an eighth of a rotation, toward the die. Then raise theram. Repeat this adjustment process until you feel some resistance. Lowerthe die and inspect the jacket. You have gone far enough when the end ofthe jacket is rolled over so it makes a hole slightly smaller than the diam-eter of the ejection punch. If there is enough length to the jacket, it will
60
be possible to just start to form a little �pipe� on the end of the jacket,where the jacket tries to go up the ejection pin hole. That is nearly perfectadjustment.
Lower the ram, and you should be able to turn the jacket by hand andslide it off the punch. If it sticks on the punch and cannot be removedwith only mild force, by hand, then it means the tubing wall is too thickfor the punch diameter or you did not lubricate the tube properly. Thelatter is easy to fix, the former means you need a different punch or differ-ent jacket material.
Step 2, Annealing:You must anneal the tubing jacket after you have formed the rounded
end and before drawing it down to correct diameter. If you fail to heat thejacket red hot and let it cool (annealing it), then you will have problemswith cracking, sticking on punches, uneven or difficult forming. A regularpropane torch is all it takes. Just sit a few jackets on a couple of fire bricks,arranged in an �L� shape so the flame is reflected back, and heat them byplaying the flame directly on the jackets, one by one.
Corbin offers a ceramic block �kit� for heat treating and annealing,consisting of two low thermal density ceramic blocks and a template fordrilling a pattern of 32 holes, to support the tubing jackets for annealingand for bonding cores. The soft ceramic material is easy to drill with apocket knife or a wood bit (not a new one unless you plan to resharpen it).One block can be used as a reflector to direct heat to the opposite side ofthe jackets. All it takes is a few seconds to heat them and let them cool fora few minutes before further handling.
A great many of the problems that some bullet makers have withtubing jackets and bullets comes from skipping the annealing stage. Forwhatever reason�maybe because it takes extra work�they assume thestep is unnecessary. Wrong! Skip it and you will have problems with tub-ing that sticks in the dies or on the punches, bullets coming out the wrongdiameter, or bullets that come out the wrong length! Maybe you will getaway without annealing in some rare case, but by and large, it is a re-quired step that affects the rest of the operation severely if skipped.
We also offer electronic-control, electric heating furnaces with digitalreadout. The HTO-2 Heat Treatment Oven runs on 120 volts or, option-ally, 240 volts, and can safely generate 2000 degrees F. and hold the tem-perature within a few degrees. All you need to anneal the tubing is about1400 degrees F. for a few seconds. Just a visible red glow is enough. Noneed to keep it hot past that.

61
You must anneal before attempting to draw down the jacket material.The only exception to this is with rimfire jacket cases, because of thehead unfolding. In this case only, you must anneal after drawing, neverbefore drawing. Annealing a rimfire jacket before drawing it can cause thedrawing punches to break, if the soft thin jacket tries to bunch up aroundthe punch. But copper tubing is tough and thick, and needs to be annealedbefore you do any more to it so it won�t become too brittle. I thought Ishould mention this exception, so you don�t get confused later when wereverse this procedure in making free jackets from fired .22 cases.
Softened copper tubing expands better and generally is less likely tofragment on impact. It also picks up a scale that comes off in the bore,unless you tumble or vibrate the bullets in a polishing media to remove it.This scale may be what causes some kinds of custom bullets to �foul�worse than a gilding metal jacket.
To eliminate this soft surface scaling or powdery finish on the tubingjacket, we make the BPK-1 Bullet Polisher Kit. It is a kit consisting of avibrator motor prewired with thermal cutout, line cord and switch, a mount-ing bracket and anti-vibration hardware, instructions and a package ofpolishing media. Mounting this motor to the bottom of a coffee can orbucket is the usual procedure, with the container suspended from a shelfbracket or a door spring hooked to some kind of hanger. Vibratory polish-ers tend to move the media around and carry the bullets in it, instead ofrolling the bullets against each other.
You do not need to polish the jackets yet. Wait until they are finished.When you do polish them, it is best to use walnut shell without any addi-tional abrasive. Abrasives used to polish bullets will embed themselves inthe surface of the jacket, and be carried to the bore, where they tend to�lap� the bore and thus cause unnecessary wear on the rifling.
Lapping is not always desirable! Once the bore surface has been pol-ished, further lapping is just wearing it out. I mention this because somepeople have suggested that abrasives embedded in bullets could be usedas �fire lapping� treatment.
Great idea, but wait until I start selling replacement barrels beforeyou try it! It�s a little like saying �If a little wear is good, a lot of wear isbetter!� Better for the guy waiting to sell you another barrel, that is.
Lapping is just controlled wearing away of the high points. Toolingchatter makes high points and low points, and lapping wears away thehigh points so they come closer to matching the low points. But rifling isthe ultimate high point in your bore, and continued lapping is just wear-ing that away until it matches the groove depth and you have a some-what larger bore shotgun. Geeez...you�d think this was obvious but be-lieve me, not everyone gets it.
62
Where was I? Oh, yeah, I was getting to the point of copper tubingbullets and fouling. It bears repeating, since I probably mentioned it inother places: copper tubing doesn�t foul your bore any worse than factorybullets, unless the material was left in a poor surface condition. Now, Iknow, you have probably used tubing jacketed bullets before, and maybeyou got some that had not been burnished or polished correctly (or at all).These bullets probably did leave some excess copper wash. So the endresult is that you may have equated copper jackets with fouling.
But it doesn�t have to be that way. Just polish them with walnut shellor other non-embedding media (corncobs will work, much more slowlythan walnut). This removes the loose, flaky surface finish, and gets youdown to the work-hardened surface. It glides along on top of the riflingjust fine, and leaves no more of itself behind than any decently finishedgilding metal jacket.
Step 3. Drawing to Size:You now have a tubing-diameter �jacket� with one end rounded over
but not flattened. The next step is to draw this original diameter jacketdown to a size that fits into the core seating die. For this, a punch is usedwhich screws into the press ram, instead of into the floating punch holder.The punch holder is removed from the press, and instead the JRD-1 jacketdraw die is installed. In a hand press, this die is set relatively high, engag-ing at least two or more threads fully, but set to use the maximum lever-age at the end of the stroke just as the jacket clears the constriction of thedie. In a power press, this isn�t so important, because there is full powerall through the stroke.
In the S-Press, it is generally desirable to change the stroke into thelong mode (move the pin that fastens the ram to the toggle arms so itmoves in the widest arc). Be certain to remove the Stop Pin, in the frontof the press, or else you will not be able to use the full stroke and maypossibly shear off the stop pin if you try hard enough! The stop pin isonly used for bullet swaging, in the short stroke. If you do not use thelong stroke, you may not have enough ram travel to push the jacketthrough the draw die, or even to load another jacket onto the punch.
With jacket drawing, you may or may not have to put any more lubeinside the jacket. Play it by ear unless the instructions that come with theset say otherwise. If the jackets stick on the punch, lube them inside witha swab. But otherwise, skip it. It is a good idea to wipe a little lube on theoutside of the jacket, since this part of the material will be in heavy con-tact with the die. Slip the jacket over the end of the punch, with the ramall the way down. Raise the ram and push the jacket through the die. If it

63
doesn�t pop out the top, use the next one to push it out. But generally, it isbest to get out jacket all the way �free� even it if is still sitting in the top ofthe die.
Drawing punches are somewhat long and of small diameter, so trynot to ever side-load them by cocking the jacket sideways or running thejacket into the die face instead of into the hole. These things would be aresult of hurrying too fast and not paying attention to the alignment.Drawing is straightforward: in the bottom, and out the top. The jacketshould be easy to remove from the punch after drawing.
If the jacket is reduced too much for the punch, it will pinch the punchand may pull the punch apart on the down stroke. This would be a matterof possibly selecting the wrong punch when you have several that looksimilar, or using a jacket with walls that are too thick... assuming of coursethat the die and punch and jacket combination worked when it was testedand shipped. Change any of the three, and it might not work.
The jacket drawing step is the first point where you can add morecalibers to an existing die set. There are two ways to do this.
First, you can change the draw die, and get a different end flatteningpunch as well, and then use the reduced jacket in the new caliber coreseating die. This method is the most likely to always work with all cali-bers.
The second way is to go ahead and finish the jacket at the larger cali-ber, for which the set was built, and then draw down the finished jacket.This method still requires a draw die (with different dimensions) but doesnot require a new end flattening punch. And usually it works. But some-times the base tries to unfold when a tubing jacket is drawn down too far,because the punch diameter supports only a small part of the jacket basewhile pushing against the resistance of the reducing die.
(Someone in the back row yells out �Well, make the punch bigger!�about now, forgetting that the punch has to fit easily inside the jacket afterit has been reduced, and thus if the difference in reduction is great, thepunch will be relatively small...or else, relatively stuck! Never mind: heworks for the government.)
Within the normal range for a given diameter of tubing, you can sim-ply add a JRD-1 jacket reducing die for the tubing, and a matching EndFlattening (�E�) die for your existing core seater die, and turn a CTJM-1set into a different caliber, either smaller or larger than the original design.In some cases, you can finish the jacket and then draw it to a smaller size(not larger) with a JRD-1. When deciding which way to go, it is wise tofigure on the first method. Sometimes we can get the second way to workreliably, but not always.

64
Step 4. Finish the Base:Now you have a round-ended jacket, annealed, and drawn to the cor-
rect diameter to fit within a core seating die (or the BT-1 boattail formingdie). The final step is to finish the base, either making it flat, or shaping itinto a rebated boattail.
The punch marked �E� is similar in appearance to the �J� punch (jacketmaker or end rounding punch). It has a reduced diameter section fromthe tip back to a shoulder. However, it has a smaller diameter in bothsections than the �J� punch. The end flattening punch presses against thebase of the copper tube jacket, from the inside, and forces it against theinternal core seat punch within the core seating die, flattening the basebetween the two punches. Or, in the case of a rebated boattail base, theend flattening punch is actually a boattail forming punch. It has an angleon the tip, matching the inside dimensions of the boattail shape. Therounded base is formed both with a flat and a boattail angle, in the BT-1die. The rebated boattail is formed later, after the core has been seatedinto the jacket.
Normally, only one �E� punch is required for a wide range of jacketlengths. The shoulder on this punch usually performs only the function ofcentering the punch within the die, and does not push on the end of thejacket. We are not shoving the jacket material by the bottom edge, be-cause we now have the rounded end to push against. The exception is theshouldered punch, which is often made in adjustable style, and is used tostop the jacket from growing longer as a boattail base is formed. Somematerials and calibers tend to extrude the tubing jacket forward as youform the boattail base. It can be severe enough to stretch the base angleto the breaking point, so that the base pops off the jacket. The shoulderedpunch prevents the jacket from moving or extruding forward and solvesthe problem.
Remove the jacket reducing die and punch, and install the floatingpunch holder. If you are using the S-Press, shift the ram pin into the shortstroke position again, and put the stop pin back in the press. If you forgetthe stop pin, the internal punch for the core seating die will drop downinto the ram and you may have to pull the ram out and turn it over todrop the punch out. Speaking of removing the ram, remember that whenyou pull out the ram-to-toggle pin without the stop pin in the front of thepress, nothing holds the ram but luck and friction. It is a good idea toinsert the stop pin before removing the ram pin. That way, the ram can�tdrop out and land on your foot.
With the normal core seating die, or the BT-1 boattail preforming die,in the press ram, the press back in short stroke position (hand press), andthe �E� end flattening punch in the floating punch holder, lubricate the
65
inside of the jacket and wipe a little lube on the outside as well, and putthe jacket over the punch. Raise the ram, and then bring the punch holderdown until contact is made between the jacket and the die. Adjust thepunch holder so that the base just closes or forms the boattail shape witha flat base. This operation should take place at the end of the stroke,using the best leverage, in a hand press. But stop adjusting closer andcloser, once the base forms. If the base isn�t totally closed, do not try tomake it close further in this operation. It will not do so, and the attemptmay break the die or bend the punch. If further closure is desired, it mustbe done by making the tubing slightly longer prior to the first step, andthen creating more of a �pipe� on the end of the tubing jacket while roundingthe end.
Sometimes, in the boattail operation, the jacket may stretch or slipback and open up the base hole beyond what it was before flattening. Inthat case, an adjustable end flattening (or actually, boattail forming) punchmay solve the problem. However, the hole in the base is much smallerthan with military full jacket bullets, which are often fired in hot-runningmachine guns. If the lead doesn�t �melt out� of these bullets, it surely willnot in a civilian target or hunting gun.
Also, if you calculate the amount of force on the exposed core area,versus the amount of force on the rest of the rolled-over jacket, you willfind it runs better than 100 to 1 in favor of pushing the jacket rather thanthe core. The issue is whether the core can be �shot out� of a tubing jacketbullet. Of course, it can, if the force on the core is greater than the forceaccelerating the jacket. To make sure this cannot happen, tubing jacketbullets should either be bonded, or should use an ogive that wraps thejacket material around the nose so that looking at the bullet straight on,the jacket covers at least 1/2 of the total cross-sectional area.
To put this potential problem in perspective, we�ve been making tub-ing jacket bullet sets for about 30 years, and our clients have made mil-lions of tubing jacket bullets in that time. So far, we�ve had about...let�ssee, ummm...zero instances reported of a core being shot out of the tub-ing jacket. Looks like a fairly safe bet to say it isn�t likely to happen. Butstill, it could, if you made a non-bonded bullet with a wide open, nearlycylindrical nose shape and not much of a roll-over at the base. Fortu-nately, there isn�t much interest in that shape, in the calibers and stylesthat people typically want to use with tubing jackets.
There is no step 5. You just finished the jacket. Now, regardless ofwhether it is a flat base or a boattail, you�ll want to seat the lead core intoit just as if it were a commercial flat base jacket. That is, swage the core,then seat the core in either the CS-1 core seater die (flat base), or the BT-1 boattail preform die. The reason for seating the core is to expand the
66
jacket from internal lead pressure, and form a tight fit between the jacketand core. If you want to bond the core, it would be done now, prior toseating the core.
But before you do anything else, clean the jacket of any internal lube.Swage lube inside the jacket will either unbalance the bullet, cause thecore to slip when the bullet is fired, or burn into a film that prevents corebonding. Very hot water with a little detergent in it will remove the CorbinSwage Lube. Organic solvents like alcohol, benzene, acetone, and similarnon-oily (not kerosene) solvents can be used. Slosh the jackets around inthe hot water or solvent, and then let them dry. Lube on the outside isOK, but lube inside is not.
The lead cores will also need to be cleaned before insertion into thejacket, whether or not they are to be bonded. To bond the core, drop thecore into the jacket, add one or two drops of Corbin Core Bond, and thenquickly heat the jacket until the lead melts. Let the core cool, and thenwash in hot water with a teaspoon of baking soda per quart. Spread thebonded cores/jackets out to dry before you seat the cores. I�ll discusscore bonding in more detail later.

67
5. Drawn Strip Jackets
A second form of jacket making uses flat strip instead of tubing. Thisis the method used by the mass producer of bullets. Strip material gener-ally costs less per bullet than tubing, and lets you make exactly the wallthickness, wall taper, and length of jacket you desire. In a hand press, thejacket must be kept relatively short, generally under 3/4 inch. But inCorbin�s CHP-1 Hydro-Press, you can make 20mm jackets, .50 BMG jack-ets, or jacketed 12-gauge shotgun slugs if you wish (as well as all thesmaller calibers, and jacket walls thicknesses up to virtually solid mate-rial).
I�m especially pleased with the work that we have done in bringingthe costly high-speed production system down to an affordable, lower-volume operation. Until our years of work brought about the JMK- seriesof tools to make flat strip into quality bullet jackets, you would have beenfaced with rebuilding old transfer presses that cost at least twenty thou-sand dollars each, building progressive dies with a shuttle feed for anotherfive to ten thousand dollars, and then buying all the feeder and handlingequipment to make it work, plus hiring a die-maker to keep it operatingand fix it when it failed. There was no affordable, turnkey package thatyou could just purchase. You had to design and build it yourself, or hiresomeone to do it.
But now, with a considerably smaller investment, you can make ev-ery bit as good a jacket, usually better. More importantly, you can makethese jackets in the specific way that will perform best, not just some waythat lets them feed fast through an automatic machine. And, you can useductile, pure copper if you wish, which is normally too sticky for the highspeed punch presses: it tends to break out at the base as you slam it througha progressive die. This is the main reason why a five or ten percent zinccontent is used in factory jackets. Adding zinc makes the material stron-ger so it can resist the end-tearing force of drawing, and makes it a littleharder and slicker so it won�t stick quite as much on the punch or in thedie.
By using the relatively low impact of a slower-moving hydraulic ram,Corbin�s system eliminates the problem of breaking out the bases withductile copper material. You no longer have to use copper tubing to getthe large mushroomed bullets that don�t crack apart on impact.
Changing calibers or operations is quick and simple in comparison toa punch press. Twenty minutes would be a long time to set up the Hydro-press for jacket making. Five minutes would be slow for changing cali-

68
bers. Fifteen hours might possibly give you enough time to get a punchpress retooled for another caliber, including the tedious testing and ad-justment period.
As with most things in life, there is a balance to be made. The punchpress system costs as much as a new car and takes days to tool up, so youmust make hundreds of thousands of the same part once you have itworking. Otherwise, the set up time eats up all the benefit and there is nogain. Your cost per jacket would be astronomical. But most shooters andcustom bullet makers don�t need to make more than twenty thousand toperhaps as many as a hundred thousand jackets a year. That would be aday or two in punch press production time.
If you need millions of jackets, the cost and time involved with fullautomatic presses make good sense. If you need a more moderate quan-tity, it can�t be justified. The Hydro-press can easily justify its own costwith the kind of quantities a custom bullet maker requires. Bear in mindthat the goal of making custom bullets is, in fact, the custom feature. Ifthe bullet you want is available from a mass producer and the price isreasonable, buy it. But if you want to fine tune some particular combina-tion of features to make the best possible bullet for a certain purpose,then you need the kind of control over components that a jacket drawingsystem can give you.
Copper Strip
Copper strip can be purchased from Corbin, or from over 200 coppermill outlets in the United States and Canada. Many of the large coppermills have outlets around the world. Names such as Olin and Revere sharespace in our �World Directory of Custom Bullet Makers� with the makersof precision brass, gilding metal, German Silver, bronze, and aluminumtubing and strip. You can find their addresses and write for a list of outletsclose to you, or direct shipment terms and prices.
Generally, for moderate size lots, our prices will be reasonable. But Iwould encourage you to shop around. Sometimes our prices are far better,during high copper market prices, because we stockpile when the marketis low. Copper isn�t a bad investment when you have reason to take deliv-ery of the actual material. You just have to know the historical price swingsand buy when it is cheaper, or buy futures options and sell them when itgoes higher. Sometimes, if you find the market for copper is low, you canbuy strip at a better price elsewhere. But generally, the minimum millpurchase will be too much for a lower-volume bullet maker to justify. We

69
sell in five pound bundles or fifty pound coils, for example. Most mills areinterested in 500 pound coils, and usually a truck or railcar load mini-mum gets you into the wholesale pricing ranges.
In most cases, if a bullet jacket is selling for eight cents, you can makeit from strip for about five cents. But the custom bullet you can makefrom this jacket typically gets another two or three cents worth of leadadded, and then sells for a dollar and a half ! Typically you would makefrom 50 to 100 bullets an hour, depending on the complexity of the bul-let. But let�s say you could only manage to complete twenty bullets anhour. Your hourly cost is what you could pay to replace your own labor.Just for illustration, let us assume you could hire someone to push thebuttons for six dollars an hour. Prices tend to move in relationship withwages over the years, so the example will hold true even if the numbersdo not.
The one hour labor costs you six dollars, and the material cost fortwenty bullets is eight cents each, or one dollar and sixty cents. So thehour�s production cost you seven dollars and sixty cents, and the averageprice a serious shooter will pay for custom bullets is a dollar fifty each.That means thirty dollars for your hour�s work. Subtract the seven sixtycost, and your profit is actually $22.40. The return on your investment is294.74 percent!
And you wonder why people become custom bullet makers? Are yougetting anything close to 200 percent on your money now, sitting in asavings account or in mutual funds, insurance, or any other typical in-vestment? You are the best investment you can ever make: bet on your-self and be a winner! You know the horse, the rider, and the trainer, in amanner of speaking, since your mind owns them all.
You can use gilding metal (5 percent zinc) or commercial bronze (10percent zinc) like the factories do, but you don�t have to (and they do).These zinc alloys are a little harder, but they are also harder to obtain insmall lots because they are binary alloys which can be made in a virtuallyunlimited number of alloy mixes, grain structures, and tempers. Copperis just one element, and it comes as annealed (dead soft), three-quarterhard, half-hard, and full hard drawn. It comes in a standard and a deep-drawing (non-earing) grade.
The non-earing grade isn�t completely free from the little lobes or earsthat grow on the edge in a deep drawn tube (like a jacket), but the amountof this waste is minimal compared to standard strip used for flashing,welding transformer windings, and other non-drawing operations. Anuneven edge is caused by tiny differences in grain or hardness which showup as greatly stretched differences in a deep drawn part. The more uni-form the grain, the less earing will occur.

70
The edges need to be finished, so that there is very little burr or wavi-ness in the edge of the strip. If the edges are curled, as they might bewhen cut with shears or tin snips, the strip thickness appears to be muchgreater so it won�t feed through the slot in the disk cutting die. If the edgeis rough or wavy, it will be difficult to pull the strip through the guide slot.A die set is made for a certain width and thickness of strip, as well as acertain material. If we have plenty of your material, we can make specialdies for it. Otherwise, we offer the dies made for our own material, andcannot recommend or guarantee operation with anything else. Fortunately,our material is a standard around the world, so you can get it from hun-dreds of other suppliers.
When we design your dies, we will also calculate the correct thicknessand width of copper to use for the jacket. You can also do this with asoftware program called �DC-CUPS�, available from Corbin. This pro-gram can record specific jacket designs, including details on every step ofdrawing, and print out a production process giving all the parameters.You can calculate strip width and thickness for any jacket, and even de-sign the jacket given a certain bullet weight, style, caliber and shape. Theprogram works with both strip and tubing.
CU-5 (Copper Strip, 5-lb bundle):Corbin offers copper strip in two packages. First, you can purchase a
five-pound bundle of strip, in pieces cut to 18 or 24 inch lengths. Weprovide our standard .030-thick deep drawing grade pure copper, in a 1inch width. This is a very practical and versatile size, which can be usedfor Base-Guard disks, gas checks, half jackets, and all calibers of handgunjackets, and the smaller rifle jackets. We also can provide other widthsand thicknesses as needed from our normal stock.
CU-50 (Copper Strip, 50-lb coil).The most economical weight is the 50 pound size, which we stock in
several widths and thicknesses. These are flat, pancake coils with a large�eye� or center hole, which fit on the Corbin Strip Uncoiler machine (CSU-1) for automatic feed into the press.
I should point out that the CSU-1 can be used with either the auto-matic feed die set, or the manual feed set. If you purchase large coils,you�ll either need the CSU-1 or something like it to uncoil the strip with-out kinking it, or you will need to chop it into easily handled pieces. Thewhole idea of the continuous coil is to let you run the blanking and cup-ping stage in the �automatic� mode, which really means you keep an eye

71
on it but it runs by itself until you have made the desired count of jacketcups. A counter on the Hydro-press lets you know how many pieces youhave made.
Jacket Maker Kits (JMK-1-S, -1-H, -2-H)
Corbin makes all the tooling you need for any kind of jacket imagin-able, from a .14 caliber to a 20mm cannon. The process can be done in aregular jacket-maker die set, or an automatic strip feed system that blanksand cups the strip at better than 600 per hour, no hand feeding requiredfor the first stage. Both systems require handfeeding of the cups into theredrawing and pinch trimming (to exact length) stages. The demand world-wide for these sets has been overwhelming. As a consequence, we oftenhave delivery times that can be over a year. This is not always the case, ofcourse, but it has been in the past and may be again at times (wheneverpanic sets in because of some harsh new ammunition or firearms law).Find out whether we have anything available in stock, or whether ourbacklog of orders is extremely long, before you plan a business aroundthe strip jacket making equipment, or schedule a trip to see it or take itback with you.
JMK-1-S (Jacket Making Kit for S-Press):Corbin hand presses make jackets from .030 inch (or less) thick strip.
That covers most handgun jackets, and some smaller caliber rifle jacketslike the shorter .22, 5mm, .17, and .14 calibers. It leaves out the largerrifle lengths of bullet jackets with thicker walls and larger diameters, whichtypically run from .75 to 1.3 inches in calibers below the .50 BMG. Forthese, you need the Hydro-press.
A hand press just doesn�t have the starting pressure at the bottom ofthe stroke to punch and coin a blank of copper, then draw it into a deepcup longer than about 7/10 inch. Sorry: that�s just physics. If peoplewere made with 20 foot long arms and legs, then we could build handpresses with bigger strokes. But once you�ve made a .45 caliber jacketabout 0.7 inches long, you can redraw it and make it smaller and longer.So long as a fairly thin jacket is acceptable, you can make long jackets incalibers from about .308 downward in diameter by redrawing.
The first stage is a blanking die. You pull the strip of copper through aslot, and work the press handle up and down to punch out little disks. Thesecond stage is a cupping die, which turns the disk into a short, thick cup.The third stage redraws the cup to make it longer and thinner, and thefinal stage trims the cup, while giving it the final diameter. Detailed in-structions are put with each set.

72
The standard kit makes a .45 pistol jacket, from which you can drawother jackets by adding additional JRD-1-S jacket reducing die sets. Be-cause it is necessary to blank and cup the jacket at a larger diameter andshorter length than the final trim, we will, in most cases, have to passthrough the step of making the cup close to .45 caliber at some earlystage, even if you want a 9mm or .32 jacket. Rather than have a lot ofdifferent prices or charge what would cover the maximum number ofdraws for the set, we sell the set to make .45 caliber jackets, and thensimply let you add one or more JRD-1-S draw dies and ET-2-S trim diesto produce various diameters and lengths.
A .452 jacket can be reduced to .40 caliber or anything in betweenwith one draw. To get down to .38 or 9mm caliber would require a sec-ond draw die (you can only reduce so much in a single draw). From .40down to .354 or anything in between is one additional draw. To get from9mm down to .30 or anything in between in another draw. And from .30down to .224 or anything in between is another draw.
However, we can switch to a .224 caliber JMK-1-S die using a 5/8-inch wide strip, which makes a better .224 jacket with fewer steps and lesscost for tooling. If you want to make .224 or smaller calibers, it is a goodidea to start with this scaled-down strip width.
If we try to push too big a jacket through too small a hole, the bottomjust pops out. On the other hand, if you wanted to make .44 Magnum(.429) and .41 Magnum (.410) jackets, we would make the basic JMK-1-S in .452 and two additional draw dies, and you would go directly from.45 to .44, and .45 to .41. The draw dies have a �nest� or guide section,which is designed to align the jacket while it is at a certain initial diam-eter, and guide it evenly into the reducing section. If you were to makesome .429 jackets and then try to reduce them to .41 in the .45 to .41reducing die, the .429 jacket would not be properly guided and aligned,and you might be some lopsided jackets at .41 diameter.
Each draw die is marked with a starting and ending diameter, and itmeans what it says. Likewise, if you decide to reduce a jacket with adifferent wall thickness, this could be a problem. For instance, if our JMK-1-S made a .452 jacket with a .015 inch thick wall, and a jacket reducingdie was made to take these down to .400 diameter, the clearance betweenthe punch and the die would be such that the thin wall jacket fit easily.
But if you found some .452 jackets with a wall thickness of .020 inches,and tried to push them through, they might become stretched out exces-sively or even generate so much pressure that the die or punch could bedamaged. Jacket making tools are precision devices. As long as they areused with the materials intended, they deliver excellent results.

73
JMK-1-H (Jacket Maker Kit, Manual Strip Feed):Hydraulic power presses, such as our Hydro-press, have full power
from the bottom of the press stroke to the top. The JMK-1-H is designedfor use on the CHP-1 Hydraulic press. The CHP-1 is designed with elec-tronic sensors that can accurately determine the stroke length and thepressure, and can interface with the CSU-1 Corbin Strip Uncoiler. You canset up both pressure and position stops, which will prevent the ram frombending the various punches and crushing the pressure pad springs usedto hold flat strip so it will not fold as it is drawn into a cup shape. TheCSP-2H does not have all the controls of the CSP-1 nor does it haveautomatic pressure transducers, but it does have position sensors, whichallow it to be used safely with this manually-fed die set.
In the JMK-1-H kit, there are usually four stages, but the exact num-ber depends on the length, thickness, caliber, and taper of the jacket wall.We can build almost anything for you, working backward from the jacketyou want to get the proper strip width and thickness. The first stage is ablanking die. It cuts a disk from the strip of copper. You simply pull thestrip through a slot in the die, as the ram goes up and down. Disks, likecoins, are punched out.
The second stage is a cupping die, which has a spring-loaded pressurepad around a punch. The disk is put into the die face, in a recess made tohold it. The pressure pad is run up against the disk, and it holds the diskby its edge while a punch travels up and draws the disk into the die,pulling it from under the pressure pad. This keeps it from folding or bend-ing.
A third stage redraws the short, thick cup into a longer, thinner jacket.This stage could be the final one, for short jackets. Or it might be repeatedone or more times for longer and thinner ones. Until we know preciselywhat dimensions your jacket is to have, we cannot say how many steps itwill take to make it.
The last stage is a trim. The trim die is normally the ET-2-H, which isadjustable over a reasonable range of lengths. This means you can makejust about any reasonable range of lengths from one set of tooling. Westill would like to know the range of lengths or the main length that youwant, so we can see if you will need additional trim dies to cover it.
Each jacket maker kit is designed around one specific caliber, walltaper, and a specific material. The dies control diameter at each step, andthe punches control the wall thickness and wall geometry such as taper orlength of straight section. If you change these parameters, it means achange in the associated tooling. We would need a supply of the initialcups in order to change the rest of the set and to develop the correct
74
dimensions for the punches and dies. Most of this work is experimental,in the sense that we need to actually draw your cups to see how best toconfigure the punches for any given stage. It is partly art and partly math.
So, you can see that jacket drawing equipment is not easy to designand may be difficult to modify, or quite easy, depending on what kind ofjacket dimensions it is originally made to produce, and what kind of modi-fication you intend. Sometimes you can draw down an existing jacket tosmaller calibers, longer lengths, and thinner walls just by adding a stageor two to the operation.
This may result in two or more practical jackets from the same dieset. But don�t count on it in every case! If you initially budget one com-plete die set for each length, each caliber, and each wall taper or thickness,you may be pleasantly surprised to save money by using fewer tools toachieve a few of the different effects. But if you count on using one die setfor a wide range of jackets, it might not be possible, and then your budgetwould be shot, your plans ruined and your dog might scorn you, too.
We�ll let you know any time we see a good way to save money byusing any of our tools for multiple purposes, and ask if you want to changeyour order to accomplish that. As I said earlier, your success is what buildsour future, too, and I�d rather take the long view and save you money nowso you�ll be a bigger success tomorrow and buy more equipment from uswhen you need to.
JMK-2-H (Jacket Maker Kit, Automatic Strip Feed)The Hydro-press has special plugs and screw holes made so that you
can install this rather amazing system. It has a lubrication roller system toput lube on the strip, a roller-cam hitch-feeder, and an interesting kind ofblanking and cupping die all combined into one unit. The jacket materialis automatically fed in, lubricated, blanked into a coin, drawn into a thick,short cup, and carried out into your container, ready for redrawing to alonger, smaller diameter jacket.
The entire assembly replaces the head (and in some designs, the ram)of the Hydro-press. You remove the rear cover of the press, unfasten twonuts that hold the press head and rods onto the base plate, unscrew theram from the cylinder, and pull the head and guide rods off the pressalong with the ram (again, in some versions). Then you install a new head(and ram, if required), and put the hitch-feed mechanism on it accordingto directions that come with the system.
The CSU-1 Corbin Strip Uncoiler is used with this system to providea steady source of material without undue drag on the feed. The uncoileris controlled by the amount of sag in the strip, which loops from the 50pound coil to the press head over a seven foot distance. A separate sensor

75
stand has upper and lower limit switches that detect when the strip ispulled snug. The upper limit switch then trips, turns on the uncoiler for abrief, quiet partial turn, feeding out a few more inches of strip. This letsthe strip sag until it trips the lower limit switch, and stops the uncoiler. It�sfun to watch this run, because it is almost silent and seems to anticipatethe needs of the press.
Without this device, you would have to devise some other way tokeep the hitch feed from lifting or pulling more than a pound or two ofresistance. Otherwise, you would not have reliable feeding, and the die orpunch assembly might be damaged unless you cleared the partially cutdisks before another stroke mashed the parts together. The press can alsocontrolled by the strip feed, with a sensor that detects the metal�s pres-ence and shuts off the press when the strip begins to run out. The op-tional sensor package can also detect non-movement of the strip and stopthe press if a jam occurs.
The JMK-2-H consists of three separate parts that you can use to mixand match with other calibers in some cases. The automatic press headassembly can be used with any caliber or size of blanking and cupping dieset. It is the hitch feed, strip lubricator, die holder, and all the other gen-eral machinery that makes the system work, except for caliber-specificdies themselves. The blanking and cupping die might also be used forseveral calibers, and can be changed separately from the head assembly.It is made for a certain width and thickness of material, which will bedrawn down to make a certain caliber, taper, wall thickness, and lengthrange of jacket.
Each jacket has one blank diameter and width that maximizes the useof material. But often, there are other calibers you could make with it. Ashort, heavy walled jacket might be possible in a large caliber, such as .45ACP, using the same strip that makes a longer, thinner, but smaller diam-eter caliber such as the .308 rifle. I can�t publish a table here that showswhat is possible, because all the various parameters make it too complex.
When we make a jacket maker set, it is designed for one specific jacketonly. Then, after that is working fine, we try to figure out if there might besome other useful calibers in certain lengths and wall thicknesses thatcould be gotten with the same blanking and cupping die, by using differ-ent redrawing and trimming dies. You can purchase the DC-CUPS soft-ware program (for any MS-DOS or Windows compatible computer with ahard drive) to calculate all this and much more, including costs of jackets,and recording and printing the operation steps for making any jacket.

76
The redrawing and pinch trimming dies are the same in the JMK-1-Hand the JMK-2-H. In fact, you can add the automatic feeding die headassembly and the blanking and cupping die that fits it, to an existingJMK-1-H set, to create a new JMK-2-H set. That�s the same as saying youcan upgrade the manual jacket maker just by adding the head and firststage die assembly (which is a significant part of the total price for theauto-feed jacket-maker kit).
You can also buy just the redrawing dies or final trim die, if yourparticular jacket set would be practical to convert into another caliber (wehave to figure that out on a case by case basis). Generally speaking, youwould want to plan for one complete JMK-2-H set for your style of jacket,and then just the dies (both the first stage and the redraw and trim dies)for any other jackets. If we get lucky, maybe some of the jackets can bemade using the same original strip width and thickness, which means youdon�t need another first-stage die.
I hope that isn�t too badly explained. Just think of the pages I�d needto write to explain how the factory 12 station jacket maker press works!This one only has from three to six steps, typically four steps, dependingon the length and thickness and caliber of jacket.
The e-book �WD-1-E� or �World Directory of Custom Bullet Makers�also lists wholesale suppliers of copper and lead, custom bullet makersfrom around the world, and has a wealth of information about the com-mercial aspects of custom bullet making.
When we build a jacket making kit, we send you full instructions andpictures of the set up and operation. You are also welcome to visit beforewe pack the equipment for shipment (which takes most of a day). If youcan come to the die works when we have just finished building your jacketmaking outfit, and while it is still set up on either your new Hydro-Pressor on a test press, then we can show you in person how to set it up and runit. You are always welcome to visit.

77
6. Base-Guard Bullets
You can swage bullets without jackets, using just the lead, or you canswage jacketed bullets, but there is a kind of hybrid design that reducesthe cost and increases production speed while extending the usable ve-locity range beyond that of a lead bullet. In fact, this special design, calledthe �Base-Guard�, can let you shoot pure, soft lead bullets at up to 1,400feet per second without fouling the bore, without using any lubricant what-ever, and even cleans fouling from your bore as you shoot!
Years ago, the Harvey Prot-X-Bore bullet stirred up some mild inter-est because it made similar promises. The bullet was a plain lead pistolslug with a zinc washer swaged to the base. The lead would extrude throughthe hole in the washer, and form a rivet head by flowing into a largerdiameter, shallow dome-shaped cavity in the face of the base punch.
We made many of these die sets for clients, but I was never convincedthe design worked as well as some people claimed. The National RifleAssociation tested it at least twice and both articles concluded that therewas no difference between using the zinc washer and shooting a plainlead bullet. Both fouled their bores. But people kept buying the zinc wash-ers and dies, so someone must have had good luck.
Shooters don�t generally keep doing something that doesn�t work, yetI was not having much luck with it. So, with the help of several relativelyfamous shooting friends, people who set world records and were seriousabout their bullets, I conducted a long series of experiments to find outwhether the zinc base bullets really worked or not.
I found out, after thousands of rounds, that zinc itself has little to dowith the fouling or not fouling. Aluminum, sheet steel, brass, copper�allof these materials would work, or not work, equally well. It all dependedon two factors. When both were right, the washer bases worked wonder-fully, making it possible to eliminate the jacket and build bullets that keptthe barrels clean, at very low cost and at high speed. When either one wasabsent, the idea was a miserable failure with fouling that just about pluggedthe bore!
Here are the two factors. First, the washer or disk has to be preciselythe diameter of the bullet. Even a ten thousandth of an inch undersized istoo much. At the pressure developed by even the lower powered hand-guns, lead will flow back under the disk unless the disk fills the barrel tothe very bottom of the rifling grooves.
When I measured the zinc washers (which are stamped out of sheetzinc in a high speed punch press), I found variations of up to 0.002 inches!That is twenty times greater than the minimum required to work! But
78
once in a while, I found a short run of zinc washers that actually mea-sured a little oversized, or perhaps right on. Those worked, provided theother factor was present.
The second necessary design factor is that the washer must have botha sufficient thickness and strength to resist bending under the drag forceon its edge as it speeds along the bore, and at the same time it must havea sharp, burnishing-tool kind of edge facing forward to seal and scrapefouling out.
If the edge is rounded, or if the material is thin enough to bend back-ward under the stress of firing, the lead will flow under it, and be smearedalong the bore, filling the rifling with fouling. But when the diameter isperfect and the edge is sharp, and facing forward, a thick enough disk willwork wonderfully, making an astounding bullet that is cheap, fast, easy tobuild, and that works without the need for any lubrication, at least up tothe speed where the material is bent back from drag and inertia and effec-tively quits presenting its scraper tool edge to the fouling.
The metal did not matter. We used barn siding, tin cans, shim stockbrass, and copper jacket material as well as zinc. In fact, copper seemed towork better. The main thing was the difficulty in holding such tight diam-eter tolerances on a low-cost part. The high precision disks were just toocostly to make, but they worked fine. They worked better than a halfjacket on handgun bullets and on .45-70 rifle bullets.
So, the problem was how to make them almost perfect zero tolerancediameter and also how to form the sharp edge without a lot of expense.We realized that if the disk were cut slightly oversized and made coneshaped, the diameter would effectively be reduced so it would easily dropinto the swage die. But when pressure flattened the conical disk again, itwould grow back to original size! The die wall would stop the growth, andany extra material would be forced to extrude forward, into the soft leadbullet, just below the edge. The other side would be backed up by a hardsteel punch, blocking any extrusion in that direction.
We had the answer! Just make the disks conical and slightly over cali-ber before the cone shape is applied. Then, the cone will drop into the die,grow to full diameter plus a burnishing tool edge, and there will be abso-lutely zero tolerance between the diameter of the bullet (the lead part)and the diameter of the base disk! It could be no other way: both partsreceive their final diameter from the swaging action, within the same die,at the same moment.
A second benefit is that the disks work in a wider range of calibers. Adisk made for the 9mm pistol would also work in a .357 Magnum, and adisk made for a .45 ACP would grow enough to fit a .458 or a .45-70(which has a groove to groove diameter about 0.006 inches larger than

79
the pistol). The .41 caliber disks worked fine in .40 caliber barrels. Andthey all worked amazingly well in nearly every gun, provided the borewas in good shape and the bullet diameter was either exactly groove togroove or slightly larger.
One of the special advantages of using no lubricant is that there is nopuff of lubricant smoke, which means that the Practical Pistol shootersdon�t have to try for double-taps while looking at an obscured sight pic-ture on the second shot. When you are firing two shots that come so fastthey sound like one, lubricant smoke can be a problem.
The big advantages of the Base-Guard are that you can make thebullet in one, or at most, two, strokes of the press, and the cost is almostthe same as a cast bullet without the disadvantages of lubricant, extrahandling, hard lead alloys, and rejects. I have made four hundred bulletsin just under an hour, including cutting the lead wire, swaging the bulletsand making the Base-Guards!
Base-Guards are superior to gas checks and half jackets in three ways.First, they cost less, usually about half the price of gas checks and afourth the price of half jackets. Second, they turn with the rifling on theircentral axle instead of being pinched against the bullet, so if the bulletslips in the rifling, the Base-Guard keeps tracking and seals the gas. Third,they scrape fouling out of the bore, instead of ironing over it again andagain.
Gas checks and half jackets rub more lead on the bore and then passover it with the smooth side of the copper. Base-Guards are like a tool bit,presenting their sharp edge to the fouling and machining it off like a lathebit. Try turning a lathe bit sideways to the work: that�s how a gas checklooks to the fouling plastered along your bore!
If you use preformed Base-Guards, which we offer in bags of 1000 ata very low cost (barely more than the cost of material to make them),you can turn out up to 500 bullets an hour. Or, you can use .030 to .040inch thick copper strip and punch out the Base-Guards yourself, using aBGK-1-R, BGK-1-S, or BGK-1-H Base-Guard kit. The BGK-1-R works inyour reloading press (assuming it is similar to the RCBS Rockchucker).
BGK-1-R (Base-Guard Kit, type -R)
This tool is a threaded die with a slot cut more than half way acrossone end. The section below the slot is closely fitted to a punch. The punchscrews into the press ram. You would use it by stroking the ram up anddown only enough to move the punch past the slot and back down to leta piece of copper strip pass through.

80
As you stroke the ram up and down this short distance, you wouldadvance the copper strip through the slot, always making sure that youbring the last hole past the edge of the punch before the punch comes upand cuts out another Base-Guard disk. The disks begin to come out thetop.
BGK-1-S (Base-Guard Kit, type -S)
The die screws into the press head from the bottom, up. This is justthe opposite of most kinds of dies that fit the press head. The threadspoint UP, not down. The slotted end of the die faces the ram. The punchis never removed from the ram during operation, so there is no possibilityof it striking the edge of the die and breaking the portion below the slot.
The press ram is stroked up and down just enough to push the punchthrough the strip and cleanly cut out a disk, then the ram is lowered toclear the punch from the hole in the strip, and the strip is pulled forward.Repeat this process until you are buried alive in as many Base Guard disksas you can ever shoot. Corbin sells the .030 X 1-inch wide copper strip infive pound bundles and 50 pound coils.
BGK-1-H (Base-Guard Kit, Type -H)
This die set works in any Corbin press designed for -H dies, such asthe Hydro-Press or Mega-Mite. It is substantially the same design as the -S and -R sets, with dimensions and threads scaled up to fit the largerpresses. The operation is the same: pull strip through the slot while thepress is made to stroke up and down in short strokes, punching out diskswhich eventually emerge from the top.
If you wish, we can build a feed chute for the die, so that cut piecesare fed by gravity down the sloped channel and into a waiting container.This is not a stock part, but it can be built with your die.
Converting Dies to BG base:
You can add the Base-Guard option to any of your existing sets ofdies, just by ordering the appropriate base punch. The Base-Guard punchdoes no harm if you use it for lead or conventional jacketed bullets: theonly difference is that your bullet will have a little round bump projectingfrom the very center of the base, which only serves to identify your bulletand has no other effect.
Here is what you would need to order, if you want to add the Base-Guard capability to any set of dies:

81
For any LSWC-1 set (Lead, Semi-Wadcutter single die), you wouldwant (1) PUNCH-M (or -S, or -H depending on the die), Internal, BG, andspecify the diameter. The BG base only works with a flat base. It is inef-fective or worse with boattails, hollow bases, or paper patch (undersized)bullets. We have, however, made tooling to produce rebated boattail (RBT)lead bullets, with the BG disk formed at the rebate, using a much largerthan standard hole in the disk. This would be a special order item.
For any FJFB-3 set (Full-jacketed, Flat Base three-die set), you wouldwant (1) PUNCH-M (or -R, -S, or -H), Internal Core Seat (CS), BG, plus(1) PUNCH-M (or -R, -S, or -H), External Point Form (PF), BG. Wheneveryou apply the Base-Guard in the core seater and then shape a smoothogive in the point former, you must use a matching base punch for bothdies, or the little rivet head will be smashed flat and made less effective atretaining the Base-Guard.
82
7. Draw Dies
Drawing dies have a hole all the way through, and they fit into thepress head. You push a jacket or a bullet through them, in one side andout the other, to make the part smaller in diameter. Since the die screwsinto the press head, there is really no difference in the 7/8-14 threadeddie body for type -R or type -S sets. The only difference is the punch,because a reloading press (-R) uses a T-slot ram and Corbin presses usethreaded rams (5/8-24 TPI for the S-Press).
The -H dies utilize tougher materials that stand up under greater forceand speed. Part of the reason they cost more is because of the additionaltime it takes to form and heat treat this material. You can adapt a -M or -R draw die to a Hydro-press, but it is not as economical as it may seembecause of the possibility of breakage and less efficient use of the avail-able stroke for alignment and guidance of the components.
The JRD-1-S, -R, or -H is designed for drawing jackets smaller withutchanging the wall thickness, and for operations which do not significantlyaffect the run-out. For reducing jacket walls and maintaining high preci-sion wall concentricity, the JRD-2-S or -H is recommended. This versionhas a special punch with precision guide sleeve, which mates with a nest-ing cavity in the bottom of the draw die. The design pre-aligns the punchwith the axis of the die, so that the jacket is centered and the punchcontacts jacket exactly in the middle of the base.
When a certain jacket drawing operation needs the benefit of the JRD-2 design, we quote that instead of the lower cost JRD-1. But there aresome operations which can be done just as well with the lower cost die,and we use that instead when appropriate. It isn�t a selection betweentwo levels of quality so much as between two different kinds of require-ments in the drawing operation.
Die life with any draw die or swage die is to some extent subjective: itdepends on what you consider �worn out�. A high precision benchrestbullet maker might consider a die worn out when the wall concentricityincreases by 0.0001 inches, or the diameter of the jacket increases by0.0002 inches. This might happen after 25,000 to 50,000 jackets havebeen drawn, or it might not happen until 100,000 or more have beendrawn, depending on ambient conditions and use of lubricant. Dust, heat,and abrasive airborne materials in some locations can cut die life in half.
On the other hand, a person making premium hunting bullets mightfind that even 0.0005 inch wall run-out or 0.001 inch jacket diameterchange has no effect on the practical accuracy of the bullet. In fact, if thejacket fits into the core seating die easily enough, there is hardly any
83
effect on final parameters no matter what the actual jacket size, since thebullet diameter is only slightly affected by big changes in jacket diameterprior to core seating. The jackets are always smaller than the bullet, be-fore swaging.
When an operation is expected to be especially high volume, certainhigher wear resistance materials can be used for the punch and die. Thiswill cost more because the materials are harder to machine and heat treatthan the die and punch steels we normally use. It may or may not be agood value, and we�ll suggest the use of special materials if we think itwould be a good trade between cost and tool life, for a high volume com-mercial operator. Everyone else will probably get a lifetime of use fromthe standard version, if the jackets are kept clean and properly lubricated.
Type -R dies are only available in the standard design, because it isnot practical to use a reloading press for high precision or high productionwork. A reloading press would be incredibly hard to use for productionwork (think hydraulics!) and to attempt to use one for high precision jacketdrawing of the benchrest class would be an exercise in futility.
It seems curious that people are willing to spend several thousands ofdollars on �benchrest� swaging dies, and then use them in a reloadingpress, which has no bearings, no hardened ram, no hard chrome groundfinish to help keep the ram from wearing out of alignment, and an align-ment which, though adequate for reloading, is hardly in the class of anactual swaging press. (To be fair, some people do spend hundreds moredollars having a conventional cast iron frame press re-bored for betteralignment and put a different ram into it. But wouldn�t it be cheaper andbetter to start with a press that had high precision and long life designedin, instead of tacked on?)
JRD-1 and JRD-2 Jacket Reducing Dies
You can produce special jackets by drawing down an existing largercaliber to produce a smaller diameter, longer jacket. This method is oftenused to make some of the less popular calibers, or to make heavy-walled.224 jackets by drawing down a .243 jacket. It is also used with a CorbinJMK-1-S jacket maker set to reduce the .45 caliber jacket which this kitinitially produces, to other sizes.
A .45 caliber jacket can (usually) be made into a .44, a .41, or a 40 inone stroke. A .44 can be made into a .41 or .40 caliber. A .40 (10mm) canbe made into a 9mm or a .357 caliber. A .30 can be made into a .284,.270, .264, or .257 jacket. Each reduction makes the jacket longer, smallerin diameter, and tends to make the jacket wall somewhat thicker up to the

84
limit of the base material itself, since it pulls base material into the wallarea. Wall thickness can be controlled by the punch to die clearance, how-ever.
Drawing is the opposite of swaging. People sometimes ask about�swaging down� a bullet to make a smaller one. That is wrong. Makingsomething get smaller is called �drawing�, and it is done by pressing thejacket or bullet through an annular die (a �ring die�, we call it). The partgoes in one side and pops out the other, where it springs back slightlylarger than the hole size.
We need to have sample material to draw down if you want the partsto come out precisely, since different materials and lots will spring back alittle different amount. Swaging always expands a smaller component tobecome larger. If you try to push a larger bullet into a closed swaging diewith a hole even slightly smaller than the bullet, you�ll make it stick in thedie. The material wants to spring back toward original size, so if it wasoriginally larger than the hole, it will keep trying to grip the die walls.
On the other hand, if you do it right and use a component smallerthan the hole you are about to shove it into, it will go in easily, expandunder pressure until it hits the die walls, and as soon as you relax thepressure, the component will spring back slightly toward its original smallerdiameter, releasing its grip on the die walls.
In a drawing die, you can apply a lot of pressure to the full diameterof the bullet, or to the inside diameter of the jacket, and push it right onthrough, even though it is trying to grip the die walls. In a swage die,especially a point forming die which relies on a tiny ejection pin, this isn�tpossible.
Benchrest shooters often ask about concentricity of a drawn jacket.Since all jackets are drawn at some point, this isn�t a unique issue withredrawing. Concentricity is measured in thousandths of inches of run-out, the difference in the jacket wall thickness as you measure around thejacket at any given distance from the end. A typical tubing jacket mighthave a run-out of 0.001 to 0.002 inches, which is fine for hunting applica-tions but about 10 times greater than you would desire for benchrest shoot-ing.
With higher quality tubing, the run-out of the jacket is improved overordinary plumbing, which can have a run-out greater than .003 inches.Still, ordinary plumbing has been used for decades to make good huntingbullets. The original Barnes bullets built by Fred Barnes used nothingmore than plumbing copper tube for jackets, and Barnes was quite suc-cessful. I remember that Fred used to pull tubing through a home-builtdie by chaining a bar of steel to a tree, said bar of steel having a funnel-shaped hole in it, and then forcing the crushed down end of a piece of

85
copper tubing through it, clamping the end of the copper tube to anotherchain tied to his car bumper, and pulling a 20 foot section of tubing throughthat �die� with his car! It was after World War II and things were tough!Successful people were resourceful. But the point is, it worked.
How much better we have it today! �Precision equipment is avail-able to use high grade tubing that you can get in a few days with a phonecall to Corbin! Fred would have traded two cars for the convenience, notto mention the additional accuracy (of course, he�s long departed thisworld, but I get the feeling that his spirit peeks down and chuckles withglee at how far his original tubing bullets have come, now and again).
The run-out of a jacket drawn from flat strip starts with the cuppingoperation, and is caused by a number of factors. The first is the quality ofthe strip that you use. If it is thinner on one side, it will draw a jacket withmore run-out than if it is closely matched in thickness across the width.Also, if the grain structure of the material is consistent, and properlyaligned and sized, it will draw more evenly than, say, roofing copper ordecorative copper sheets cut into strips.
One a cup has been formed, it is drawn smaller in diameter, whichputs the material volume into length. The thickness of the cup walls usu-ally is reduced in the drawing, so that the base material remains aboutwhat it started in the strip, and the jacket walls can either taper or simplybe drawn to a more or less straight wall of less thickness than the originalmaterial.
Drawing a cup to smaller diameter means that the punch which mustfit inside and push the cup through the die has to fit inside after the cuphas been reduced. Therefore, the punch will be smaller than the inside ofthe cup before it is reduced, and may not be perfectly centered. This is amajor source of jacket wall eccentricity or run-out.
To help solve the problem, Corbin jacket reducing dies feature a �nest�,which is the term for a section of the die that accepts the original jacketdiameter for a sufficient length to insure that the jacket is perfectly alignedwith the smaller hole that will reduce it. The nest aligns the jacket beforeit starts into the actual draw. This greatly reduces the amount of run-outin the jacket walls. The JRD-2 system goes further with a sliding sleevearound the punch, which in turn aligns the punch with an extended nestin the die mouth prior to the jacket entering the drawing constriction.
In a simple drawing die, the punch still is able to wander slightlyinside the cup even if the cup is aligned perfectly with the die, and it mayforce the material to draw slightly heavier on one side as a result. Theeffect is minimal with a nested die, but to further reduce run-out, thepunch can be a special guided or sleeved design as in our JRD-2 system.

86
A steel button is placed around the punch. This button is a very closefit to the punch, so the punch just slides through it. On the top side of thebutton, a thin shoulder is machined so that it slips inside the jacket andfits very closely. You press the jacket over the top of the button, so theraised shoulder fits inside.
Now the jacket mouth is aligned on the button, and the button isaligned on the punch. The punch will contact the center of the jacket orcup, and cannot wander off to the side. In another version of the tool, aspring around the punch supports the shouldered button. The thin part ofthe button is not long enough to fit inside the smaller diameter of the die.It remains within the nest area during the draw.
Recently, the stripper system has been simplified and improved, andthe alignment system has been improved with a special nested guide sys-tem, so that the JRD-2-S and JRD-2-H dies now include these as standardfeatures.
The jackets are stripped off the punch when the punch pushes thempast the top surface of the draw die, and a slotted steel plate is moved soit will slide under the jacket mouth. Lowering the ram brings the jacketmouth against this steel plate, so the jacket is forced off the punch auto-matically. An electric solenoid can be added to the Hydro-Press to oper-ate an automatic jacket stripper. It plugs into the accessory power plugon top of the press and is activated at the top of the stroke.
BRD-1-R, -S, -H (Bullet Reducing Dies)
You can draw down existing bullets, but only within very small lim-its: if you try to reduce an existing bullet more than about .006 inches,the amount of lead you are moving becomes significant enough to mate-rially spoil the accuracy and looks of the bullet, and the stresses in thejacket material will begin to cause serious �banana-shape� distortion.
This means making a 9mm (.355 inches) bullet from a .38 (.357 inches)slug is easy and practical, while making a .41 caliber from a .44 caliber(.429 inches) gives miserable results. A practical limit is making a .318inch diameter 8mm bullet from the modern standard 8mm of .323 inchdiameter.
There is a huge difference between drawing a jacket, and drawingdown a bullet. A jacket is just the empty cup. You put it over a punch, andshove it through the die by pressing on the inside of the base, so it isdrawn over the sides of the punch. You can reduce a jacket by up to 30%less than the original diameter in most instances.

87
Don�t confuse the .006 inch reduction limit for bullets with the vastlylarger potential reduction for bullet jackets. Also, like most things in life,this rule isn�t written in stone. Some few bullets with nice soft jackets androom for the lead to go into a hollow cavity or base can be reduced morethan .006 inches. But you are asking for trouble if you want to do that asa general rule. What might work sometimes on a particular experiment,may fail almost all the other times with other materials.
This gets some people into trouble: just because something happensto work one time, they think it will work in every instance. Not just inbullet swaging, this is a common mistake. A fellow takes a big elk with a.243 target bullet, and from that day forth he is convinced that a 6mm isbig enough for game the size of an elk. He might have used a targetbullet. So he thinks that there isn�t any problem using bullets constructedfor target shooting, with their thin jackets and non-bonded cores, on noblegame.
Sure, you might do it once. If you are a great shot and a superb hunter,you might do it all the time, but I couldn�t. The odds are overwhelminglyin favor of most people just wounding the animal and having it get away.
In swaging, if something works that maybe shouldn�t have, then that�sa reason to carefully experiment and find out why. It�s bad judgement toassume it will always work in every instance, especially if others whohave spent years in the field are dubious. You may have found somethingnew, but try it on several calibers, styles, and materials before you counton it always working.
Drawing down bullets is certainly one area where you can find allkinds of exceptions that work, but only because the material, hardness,and style are just right in a particular instance. Corbin will make tools foryou to your specifications, against our own advise and experience, pro-vided you take responsibility if they don�t work. If we design and recom-mend the tools, then of course we guarantee they will work.
Draw dies for the Hydro-press (type -H dies) are more sophisticatedand can produce results that may not be possible in a hand press. Thelong stroke and great power of the Hydro-press give us room to buildspecial guide sections and ejecting punches that won�t work on a handpress. In drawing, full power is generally required at the start of the stroke,not just at the end (as with most swaging operations).
Since nearly all the hand operated presses have about half an inch ofextremely high pressure travel toward the end of the stroke, and progres-sively lower pressure as you retract the ram, it follows that drawing op-erations which may require high pressure over a longer travel than about7/10 inch may not be practical in a hand press.
88
Can you draw down a solid copper bullet or a full jacket military bul-let? Probably. If you want to order a bullet reducing die, you really needto send us five or six samples of the same bullet that you plan to drawdown. Then we can test the idea, and use your bullets to adjust the die sothat it produces the correct diameter, given the amount of springback inyour particular bullets.
For some reason, there seems to be a general reluctance to send samplebullets. Maybe it is the desire to get the dies faster, not waiting for achance to go get the bullets and ship them. Maybe it is a feeling that thisis a waste of time and not necessary. Or maybe it is just to save the costof shipping them.
But for whatever reason, it isn�t that unusual for someone to balk atthe idea of sending samples to draw down. When that happens, we haveno way to tell if your particular bullet will come out the same size as theones we must then use to test and adjust the die. Also, we don�t know ifyou are not telling us about a special base shape that might be distorted ifwe just make a normal flat base punch. In fact, we just have to go on blindfaith that your bullets are actually close to what we can make or get easilyhere for testing.
When you don�t send samples, the only thing we can do is guaranteethat the die is in fact a nice draw die that makes the size you said with thebullets we choose to use. We can�t guarantee that the die will make thesame size with your bullets. If it doesn�t, then it is your problem. You canorder another die and send samples this time, but the first die is still yoursand can�t be traded back in (because the next person who sends in samplebullets will want a die make properly to fit them, not your die).
If you know this, accept it beforehand, and will be happy with theresults even if there is a difference of up to .001 or so inches betweenwhat the die makes with our test samples and whatever bullet you chooseto push through it, then we are happy to skip the samples.
If you tell us that you want a draw die to reduce a Sierra .338 bulletdown to .333, and instead of sending us the sample bullets, you send usthe Sierra stock number, then you�ll also have to send enough extra pay-ment so that one of our die-makers can drive into town and shop for a boxof those particular bullets, which is a minimum of about an hour plus thecost of the box of bullets. We will be glad to send the rest of the bulletsalong with your die, and of course the drawn samples used to make andtest it. But that extra hour of the die-maker�s wages might seem steep,and I agree. Die makers are paid for making dies, not shopping for bullets,usually. I don�t have a position here for �bullet shopper�, so I have to usethe people available.
89
It is probably much cheaper for you to send us the sample bullets thanfor us to try and locate them. Still, whatever you want is fine, so long asthe cost of doing it is acceptable. That is the bottom line for anything thatis moral, legal and safe.
Bullet drawing dies are used by screwing the die into the top of thepress, and putting the punch into the press ram. The die should be sethigh in the press, when starting. Two or three threads of engagement areenough. Put the bullet on top of the punch and guide it into the die mouth.If the bullet does not draw down or pass through the tight part of the die,lower the die until it does so at the end of the press stroke (for handpresses).
In a power press, you can set the stroke length and position for yourconvenience, since you have enough power anywhere in the ram travel.For a hand press, the job becomes much easier when you use the very endof the stroke to get the hard work finished.
In most cases, the bullet will need to pass through the tightest pointin the die on one pass. It may not necessarily emerge from the top of thedie, but it should be loose inside, not stuck halfway through the draw,before you insert another one. One bullet can �lift� another one up, but ifyou try to actually use one bullet to finish drawing another, it is likely thatthe nose will be damaged on the second bullet. Corbin Swage Lube isalways a good idea, applied just by touching the lube and then rolling thebullet between your finger and thumb as you insert it.
With special base shapes, you may need a special matching punch.For instance, a rebated or conventional boattail bullet may suffer somebase damage and expansion if you push it through a draw die with a flatpunch. A punch with a �socket� to accept the base of the bullet will stillneed to be smaller than the original bullet, since it must pass through thedie. This means the angle has to be very close to the original bullet, orelse the edge of the punch might press into the tail of the bullet and marit.
In some sample bullets, we find that pushing the bullet through nosefirst doesn�t work as well as making a special punch to fit the nose, andpushing it through the die base first. This isn�t something we can knowbefore trying your bullet. It�s not predictable. But it is consistent oncediscovered. If we discover this is true for your sample bullets, we�ll makethe punch so it fits the bullet nose, and push the bullets through base first.
To expedite production, especially on the Hydro-Press, we can makea sleeved punch with a spring loaded collar. The spring goes around thepunch, and the collar sits on top of the spring, helping to hold and guidethe bullet into the die. In fact, the collar might be made so it fits into arecess in the die, pre-aligning the punch so its fragile edges will not be

90
damaged by hitting the die face. This sort of work is available as customjobs, usually quoted and not found in the price list, because we don�tknow in advance in every case just how much time and effort will berequired to design and build a given solution. Typically, though, the addi-tional cost of a custom punch is all it takes, which at this writing is about3 times the cost of a standard punch. The difference in speed of use isoften quite remarkable with certain kinds of bullets.
We can put a metal chute on top of the die, as well, to roll the bulletsdown into a bucket or other container, so you do not have to handle eachone as it comes out of the die. All these things are overkill for the hobby-ist, who is only doing a hundred bullets or less at one sitting, but theyquickly make the difference to a custom bullet maker who is salvaging50,000 pulled 50 BMG bullets and needs to process them as quickly andeasily as possible. The cost of doing these things is not significant com-pared to the time they save in commercial applications, but the price of agood die without the speed features may already be right on the edge ofwhat a hobbyist could justify.
I understand. That is why we don�t build everything possible intoevery product, but offer many of them as options for people who findthem valuable, while keeping the basic tool prices as low as we can withhigh quality work and material. It is no problem to add features to a goodtool. I�ve never regretted buying anything that was too good for what Iwas doing. All it did was cost a little more than I might have spent other-wise. But often I found later that there were other, new things it could do,and I was glad I spent a little more for it.
My wife bought me a very high resolution digital camera for a birth-day present, and I seldom use more than its lower middle range of resolu-tion, and not many of its special features. But every so often, I am glad itcan deliver a high quality, big format photo, or do some trick that I haveto break out the manual to accomplish, even if a much lower priced cam-era would do 90% of my work. Just having the option of doing more iscomforting. I can add options to it that work right, whereas adding themto my lower priced cameras would be frustrating, since the basic toolitself would be too limited to really take advantage of things like sharptelephoto lenses, macro flash attachments and microscope adapters.
The same is true with swaging tools. If they are built better than youprobably need today, then tomorrow when you decide to try somethingmore demanding, they will deliver. But it is frustrating to add features totools that are working right at their limit, as with a poorly built die set ora reloading press used for swaging. (Have I mentioned that swaging pressesdo a much better job? Really? I must be getting forgetful in my old age,and starting to repeat things!)

91
RFJM-22 -R, -S, -H (Rimfire Jacket Maker, 224 caliber)
One of the most popular tools we�ve ever made is the Rimfire JacketMaker set, which turns fired .22 cases into excellent jackets to make .22centerfire bullets. You�ve probably read about this before. RCBS, Speer,Hornady and many other firms got their start by doing just this. You cando it today, and with the price of bullets, it is more popular than ever.
Fired .22 short cases make great 40 grain Hornet jackets. Fired .22long or long rifle cases make the standard .705 inch long 52 to 60 grainopen tip or small lead tip bullets for all flavors of centerfire .22 cartridges,from the .222 to the .225. Some shooters don�t realize that all modern .22caliber centerfires, including the 5.56mm, actually use the same diameterbarrel (a nominal .224 bullet size fits them all).
The .22 high velocity loads such as the �Stinger� use a case slightlylonger than the standard long rifle, which will produce a little heavierbullet. You can make 65 to 70 grain .224 bullets using these for jackets.
The process is simple. You wash the fired cases to remove grit. I liketo boil them in a mixture of water and some detergent, plus a little vin-egar to help restore the shine. Then, I pour off the water, and spread thecases out on an old cookie sheet. I fire up the kitchen oven and heat thejackets quickly to drive off the water.
Shortly, I have a tray full of clean, dry cases. I take them out, and putthe jacket maker die in my press. The die itself is the same for both re-loading presses and for our S-Press. The -R differs from the -S versiononly in the punch.
In the reloading press, the punch has a T-slot head or button, like ashell-holder. In the -S version, to fit our S-press, the punch has a kind ofdie body attached that screws directly into the ram. The die screws intothe press head in all versions.
Use a little Corbin Swage Lube on your fingertips and give the puncha quick wipe of lube, then pick up a case and put it over the punch tip.Adjust the die so it is very high in the press threads. Raise the ram care-fully. The rim of the case should just barely start to go into the die as youreach the end of the ram stroke.
Lower the die until this point of adjustment is reached, and then lowerit just another quarter turn or less. Lower the ram, as necessary to adjustthe die, and then raise the ram. Little by little, you should be finding thepoint where the rim is ironed out cleanly, leaving no ridge behind. Thencontinue to carefully adjust the die downward, until you can just push thejacket through the tightest part of the die and out the top with one smoothbut powerful and rapid stroke.

92
Do not operate the press with the die so low that it takes all your effortto push the cases through! This is not necessary and will only strain yourbench mountings and your patience. A firm one hand push will do thejob, in a single pass.
These little jackets represent a lifetime of free components, so it isworth spending a little time to learn the fine points. Once you have drawnthe jackets, you may have to anneal them. One fine point is that the an-nealing temperature can be critical. If you make a wide open tip or a largelead pointed bullet, you may not have to anneal at all. But if you try tomake a small open tip bullet, or even a small lead tip, you may find thatthe end of the bullet folds over with a little flap of metal instead of draw-ing to a smooth curve.
This is a sure sign that the jacket material is not annealed sufficiently.Actually, annealed may be the wrong word because that implies a deadsoft condition. You can just soften the brass to a lesser degree, more of astress relief heat treatment. If you overheat the cases, they will turn dis-colored and may become rough on the surface. You can always heat thema little more, but you cannot undo the damage from overheating. Somepeople use a tuna can floating in a molten lead pot to hold the cases forannealing. I like to use the self-cleaning oven, or a propane torch with oneof those fishtail flame spreaders and just heat the cases until they arebarely red in a dimly lighted room. It only takes a few seconds to getthem that hot. You can do a small group of twenty or so at one time.
You can try skipping this, but make one bullet all the way to comple-tion before you seat all the lead cores in those jackets: you may find outthat you need to heat a little more. If that happens, your seated coresmake it harder to do (but not impossible).
If you find that the jackets have circular rings in the shank area, likebadly-made cannelures, this is a sure sign that you have overheated thecases to the point where they are rough and dead soft. Then they will nothave enough strength to resist folding like an accordion against the pres-sure needed to shape the ogive or nose. This kind of folding usually hap-pens in the point forming operation, as does the flap of metal that folds atthe ogive when the jacket is too hard.
Sounds tough, eh? Too soft, and the shank gets rings in it. Too hard,and the nose folds over. But there is quite a wide range between thoseextremes where the bullet forms very nicely, with barely any suggestionof the little fold lines you would see on all commercial spitzer bullets (lessso on round noses) if they were not polished out in a tumbler before beingboxed. The ogive curve on the spitzer shaped bullets brings the metalclose at the tip and thickens it, and it tends to develop lines that look likescratches but are actually folds. This is normal, but not commercially
93
attractive. So, commercial bullets are polished to remove or burnish overthis minor cosmetic flaw, and you don�t see it. (If you inspect the bulletsvery closely, you may in fact see some remaining signs.)
The Corbin RFJM-22 dies have gone through a number of versionsover the years. At one time, we built a tube and disk ejector that slippedover the ram, to strip the jackets off the punch on the down stroke. Now,we make the punch long enough so you can find that point of adjustmentto push the jacket all the way through the die at the end of the stroke, andwe make the top of the die with a square, sharp junction between theedge of the hole and the die insert.
When the jacket mouth passes through the die, the jacket springs backslightly toward original diameter. The jacket mouth becomes larger thanthe hole, so that when you pull the punch back, the top of the die pushesthe jacket off the punch. Of course, it cannot do this if you do not pushthe jacket all the way through the die.
The rimfire case starts with a diameter of about 0.225 or .0226 inches,which is too large because the jacket must be smaller than the finishedbullet. To unfold the rim and draw it evenly into a smooth cylinder, aspart of the jacket wall, we must reduce the jacket to about 0.219-0.220inches. This happens to work out very well for a .224 jacket diameter. Thepunch diameter to fit inside a .22 rimfire case and accomplish this drawneeds to be about 0.199-0.200 diameter. By the magic of subtraction, wecan see that this leaves a difference of about 0.020 inches, which meansthat each wall of the jacket must be about 0.010 inches thick.
Commercial bullet jackets for .224 caliber are usually made from stripthat starts out 0.026 to 0.030 inches thick, with walls that taper forwardto perhaps as little as 0.012-0.015 inches at the mouth. But the greaterpart of the jacket wall is more likely to be from 0.020 to 0.026 inchesthick. This means that your free .22 rimfire jacket is about half as thick, ingeneral, as the commercial bullet jacket. It is also made of a higher zinccontent brass, having nearly 30% zinc as compared to the 5% to 10% zincin the commercial bullet jacket. This means it is slightly harder but morebrittle, as well as thinner.
These factors result in an excellent varmint shooting bullet, with littleor no ricochet odds (when the thin, brittle jacket hits the ground, it usu-ally explodes or pops open into a four pointed �star� all the way to thebase, even at modest speeds). But the speeds must be kept relativelymodest, or else the thin jacket will come apart in flight. I usually recom-mend that you maintain a velocity of 3200 fps or less. Some people shootthem faster and get away with it. It probably depends on the depth andsharpness of the rifling in a given barrel, and whether it cuts into the thinjacket or irons the grooves without weakening the jacket even further.

94
Making rimfire case jackets is one of those operations where I canhonestly say that our smallest hydraulic power press does the best job(the big ones do OK, but they really are overkill). The CSP-1H Hydro-Mite press can push those jackets out all day long and never get tired. Fordecades, one of our clients has made a nice retirement income building224 bullets with free rimfire cases, using a manual press. I�ve tried to gethim to go to a power press, but he�s happy with three manual presses. Imention this because it shows that you can make a business doing every-thing the opposite of what I recommend and it still works for some people!I generally do not recommend a standard design of .224 bullet for a busi-ness, because there are plenty of mass produced .224 bullets that sell fora low price. But if your materials are free, and the price you get just paysyour labor, then it must work.
Probably by now the ancient fears about fouling, barrel wear, andaccuracy have long been settled, and forgotten. I should mention them incase there is still someone, somewhere, who has the idea that fired .22cases cause any problems in these areas. Yes, once, all these things wereissues. The reason: mercuric priming.
Fulminate of mercury was one of the earliest of rimfire priming com-pounds. It is easy to make and gives reliable ignition. But the mercuryreacted with brass cases, and made them brittle. Therefore, it wasn�t longbefore center-fire cases, which could be reloaded easily, were the cause ofa demand for non-mercuric primers. Otherwise, the cases would be toobrittle for reloading, and reloading is one of the major benefits for center-fire cases.
But rimfire cases are almost impossible to reload. You�d have to some-how get the dent out where the firing pin hit the rim, or else that would beone spot where you�d get unreliable or no ignition the second time around.And you would have to figure out how to make a priming compoundslurry and spin it into the rim again, evenly deposited in just the rightamount. It could be done, but the expense and trouble just doesn�t seemworth the result, not to mention the danger of blowing one�s fingers off orworse, while mixing up priming compounds.
So, rimfire cases are not reloaded by most shooters (in fact, I�ve onlymet one who even tried it). That meant mercuric priming gave no par-ticular problem to shooters of rimfire cases. Who cares if they get brittleafter being fired? They are thrown away or left on the ground, anyway.Except some few brave souls began to pick them up, and turn them intojackets for .224 center-fire bullets! Now you can see where the fouling,accuracy, and even barrel wear issues came about, right? Until the late1960�s, there were still mercuric primed .22 rimfire cases being made.
95
Since then, issues with health (from the mercuric vapors mixed in thepowder gas, fired in indoor ranges, where lots of kids learn to shoot withrimfire rifles) have largely gotten rid of any mercuric priming. Tin-basedpriming compounds replaced the mercury compounds. For decades, theproblem has been buried, but not forgotten. People still remember andtalk about the old days when fired .22 cases made into bullets used toflake off in the barrel, or come apart in midair for no particular reason.Just because it has not happened for thirty or forty years is no reason tolet go of a good rumor!
That takes care of the fouling and accuracy issues. A fired .22 casesmade into a bullet is actually less likely to cause fouling than a commer-cial jacket. It has more zinc, which makes it harder, slicker, and tougher,and less likely to come off in the bore. Accuracy is well known by now.Some brave souls even won benchrest matches with fired .22 case bullets.If you select high grade brass and sort them into lots, fired from the samegun, such as those you might pick up at your indoor target range aftersomeone you know, or yourself, has finished a match, then you can getjust as good a quality including jacket run-out as the best commercialjackets. Ely Club ammo used to be the best for quality rimfire case jack-ets.
But flyers do happen when you pick up cases off the ground, andsome were fired in different guns, some were dented more or less thanothers or even cut through by the firing pin, and some are different brands.The stress history of the metal will change it slightly, even if you annealit. The firing pin dent, which is ironed out and virtually invisible in thefinal bullet, might be an issue with extreme accuracy, and certainly willbe if it varies from one case to the next. Cases cut through by the firingpin probably will not shoot to the same point of impact as those not cutthrough.
For all these reasons, I would not recommend going to the Nationalswith winning in mind if you use .224 bullets made with fired .22 cases.But I would expect a good shooter with a winning rifle to do very well, inany case, and probably to win most of the local matches. Rimfire casebullets are much better than they might appear to the casual reader. Infact, they can be surprisingly good, better than many factory bullets. Itdepends on the care taken in making them, and the quality of the diesused to form the bullets.
A clever and analytical reader might at this point say, �This is all veryfine, but I think you skipped over the issue of barrel wear: the jackets maynot be brittle any more, but you said they were harder and tougher thancommercial jackets.�

96
Right you are. The additional zinc content makes the jacket harder bya modest amount. It is still far softer than the barrel, far softer than a steeljacketed military bullet. But it also is half the thickness, so it pushes in-ward much more easily than a commercial jacket. When the rifling (ofabout 0.004 inch height) pushes against the rimfire jacket, is meets theresistance of a mere 0.010 inch thick wall, instead of the typical 0.026 to0.030 wall of a commercial jacket. Subtract the rifling land height from acommercial jacket wall, and you still have 0.022 to 0.026 inches of metalunder the rifling groove in the jacket, supporting it and pushing it againstthe barrel. Subtract the 0.004 inch land from the 0.010 rimfire case jacket,and you have a mere 0.006 inches of support. The difference in metaltoughness is not nearly enough to make up for this, and the rimfire jacketflexes under the rifling to a much greater degree with a resulting lowerfriction and wear rate.
Not only that, but the coefficient of friction of the high zinc contentalloy is lower than with the typical gilding metal or commercial bronzejacket (5% or 10% zinc/copper alloys are used for most bullets, with the�commercial bronze� being a total misnomer that is in standard usageanyway: there is no gold in gilding metal, no tin in commercial bronzebecause it is not bronze but just another brass ratio). That is, the metalsurface is �slicker� and causes less heat and wear as a result.
Bottom line: rimfire case jackets are easier on your barrel, just as ac-curate, and probably foul less, than commercial jackets. Their main draw-back is that they are thin and therefore cannot be driven so fast. Likewise,their thinness makes them unsuitable for big game. But most of us are notthat good a shot or a stalker to allow us to use a .224 for big game and stillcall ourselves good sportsmen. (Some are, and I applaud them, but thefirst time they lose a deer or an elk that a medium or large bore rifle wouldhave taken cleanly, they should have the good grace to quit using a smallbore rifle.)
Their advantage over commercial jackets is cost: they are free. If youwant to make a good varmint bullet that blows up like it was going 4,000fps when it hits at a mere 3,000 fps, then that is another advantage �notto mention how much fun it is to out-shoot your buddies, who paid goodmoney for their bullets and refuse to believe that anything you can makefrom free materials could possibly work as well or better!

97
8. Making Lead Cores
Lead is the most commonly used core material for bullets. What is acore? We call the material that fills up the jacket a core, but even if youdon�t use a jacket, the piece of lead that will form the swaged bullet isalso called a core. Swaging requires that you prepare the core so that itwill fit inside the swage die. You can�t shove a huge billet of lead into thedie, of course, but you can melt the lead and cast it in a multi-cavity �coremould� to form the right diameter and length of ready-to-swage cores, oryou can simply purchase lead wire. With Corbin power presses and op-tional extruder die, you can make your own lead wire.
Lead Wire (LW-10)
Lead wire in 10 pound spools, LW-10, is available from Corbin insizes from .100 to .430 inch diameter. Lead wire is by far the most conve-nient and time saving way to produce bullets. It eliminates all of the riskfrom hot lead. All you do is chop the lead wire into the correct lengthsusing a tool called a �core cutter�. Since Corbin lead wire is 99.995%pure, you can use it as a sample for hardness testing (Bhn 5.0). It is pro-vided in single rolls, or in case lots of four rolls for a discounted price(provided the four are the same diameter).
Lead wire comes in .100, .125, .170, .185, .218, .247, .275, .312,.340, .365, .390, and .430 diameter. It is provided in pure form only, notas alloys. Alloyed lead can be cast, but it is more difficult to extrude. Inmost cases, there is no advantage to hard lead for swaging. Soft lead ismore dense, expands better without breaking apart, and bonds very wellto the jacket.
Four cavity core mould (CM-4a)
If you prefer to cast lead cores, the CM-4a four-cavity core mould canbe adjusted for any practical weight of core by setting the displacementof four pistons in their matching, honed cylinders. It is rather like a straight-line automobile engine: the sprue cutter is a long handle similar to theengine head; the four pistons slide up and down inside of matching cylin-ders to eject the cores as soon as you rotate the sprue cutter to one side;the cylinders are machined in a special iron alloy block with a long mountinghandle, in the manner of a car�s engine block.
98
The pistons rest upon a �rest plate� which in turn is supported by twothreaded rods, but loosely, so it can move up and down. There are twopair of nuts on each of the rods, which form a stop that adjusts the posi-tion of the rest plate in the down position. This sets the piston displace-ment, which in turn sets the weight of lead core you will make in eachcylinder.
The CM-4a core mould mounts to your bench with two screws so thepistons and cylinders hang over the edge. I like to mount it on a shortpiece of two by four wood, and clamp this wooden block in a bench viseso the mould is held parallel to the floor. In fact, by mounting the mouldwith a common door hinge instead of directly to the bench top, the mo-tion of opening the sprue cutter can also be used to tip the mould over sothe cores fall out into a box.
You do not need to cut the cores which are cast with a core mould,because core moulds are designed so that you can adjust the length of thecore as it is cast. Core moulds let you take advantage of existing suppliesof scrap lead, provided it isn�t too hard for the kind of swage dies youhave. Any hardness of lead can be swaged, but you need type -H dies foralloys over about Bhn 10-12 hardness to avoid die breakage. Generallythere is no advantage to hard lead for swaging, because swaging givesyou so many other ways to eliminate bore leading.
The CM-4a core mould comes in standard diameters of .185, .218,.247, .275, .312, .340, .365, .390, .430, and .489 inches. Smaller diam-eters are not practical to cast (use lead wire or an extruder die). Largerdiameters can be made to custom order. The weight is adjustable.
Precision Core Cutter (PCS-1):
Corbin core cutters mount to your bench, so that the lead wire is fedstraight down, into the top of the cutter. A stop screw is adjusted to stopthe wire at the desired projection below the shear line of the cutter. This iswhat gives you the desired core weight (plus a little for final adjustment inthe core swage die or LSWC-1 die�usually 2 to 5 grains more than de-sired weight is enough to assure a good final weight control).
Core cutters quickly shear the lead as you feed it down into the deviceand move the handle back and forth with the other hand. Usually it iseasiest to cut about eighteen inches of wire, or whatever amount willstand up straight in the air without sagging over to one side. Then insertthis length into the cutter and let gravity feed it down as fast as you canchop off pieces. A gentle support with one hand is usually all it takes to
99
give good feeding. You can also mount rolls of lead on a simple pipestand, so they feed down into the core cutter and lengths can be pulled offquickly.
The PCS-1 core cutter is designed to use PCS-1D die inserts, whichlook very much like drill bushings. These half-inch diameter hardenedsteel dies come in pairs. One mounts in the top bar of the cutter, and theother mounts directly under it in the moving arm. The standard sizes are.125, .185, .218, .247, .312, .340, and .365 (size of wire that easily slipsthrough the hole, not the hole size).
Each cutter comes with one set of dies for a given caliber of yourchoice, and you can add other standard sizes at low cost, or order custommade sizes at a reasonable price. If no size is specified, we will send what-ever size we feel is appropriate based on our best guess of what you planto do with it, usually based on the caliber of your other orders.
Magnum core cutter (PCS-2):
For cutting lead wire diameters larger than .365 inches, the PCS-2Magnum Core Cutter is recommended. It is nearly three times the size ofthe PCS-1, and uses specially made individual hardened die inserts, PCS-2D, for each range of wire sizes up to 0.5 inches. This larger cutter canalso handle sizes down to .185 inches but the minimum length of core ishalf an inch, because this is the thickness of the steel frame holding thedies.
Thus, for lighter weight cores in the .224 or smaller caliber, and forlight cores in 9mm and .38 caliber, the PCS-2 cannot be used. If the corecan be at least 0.5 inches long, it works very nicely and is highly recom-mended because of its great strength and leverage. But if you need coresthat might be shorter than 0.5 inches, the PCS-1 is the correct choiceprovided that the core diameter can be .365 inches or less. Stock sizes ofdies are .365, .390, and .430. If you do not specify the diameter of die,we will send either .390 or .430, because these are the most popular forthe large cutters. Dies can be custom made in any diameter.
Lead Extruder Die (LED-1-H):
The CHP-1 Hydro-Press can be used to extrude lead wire in virtuallyany diameter. Only pure, soft lead can be extruded with this die set. Thedie is actually part of a kit that includes two billet moulds (for casting softlead into cylinders that fit inside the extruder die) and a mould base, thedie, three sizes of die inserts for different wire sizes, the extruder punchand a lock nut.
100
The die screws into the top of the press, replacing the floating punchholder. The punch screws into the press ram. It is designed to be easilyremoved and replaced, to facilitate loading the lead billets up into the die.
First, mount the mould base on a sturdy bench. Then push one of thebillet tubes over the base, and pour hot lead into the tube. Wait until themould cools slightly, then pick it up with a padded glove or other heat-resistant material, and give it a rapid shake to slide the lead out. As thelead cools it will shrink away from the billet tube and come out easily.
You can set the lead-filled tube aside if the lead won�t slide out yet,and fill the second tube. By the time you remove the second tube, thefirst one will probably be cool enough for the lead to come out. Place theempty tube back on the base and continue filling and rotating tubes untilyou have made enough.
After the lead has cooled enough to handle safely, you can then spreada thin film of Corbin Swage Lube on the surface of the cylinder, and pushthe lead cylinder up into the bottom of the extruder die. Replace theslide-out punch, and align it with the die (the lead will probably rest onthe punch end). With the proper diameter of die insert in the top of thedie body, and the retainer bushing screwed firmly down against the dieinsert, start the ram moving upward.
The punch should smoothly enter the die mouth and start to com-press the lead. The pressure should be turned up until the lead starts toextrude from the top of the die. Usually this takes 1,800 to 2,000 psi onthe gauge. Do not place any part of your body over the top of the die.Lead may be expelled with great force if any air is trapped in the die.When the lead wire starts to move, it will heat the die insert, and this willin turn cause the lead to move even faster. In a second or so, the lead willspurt out rapidly and will come out very hot. Do not touch it withoutusing a glove. The entire billet should extrude in a few seconds.
When the lead is extruded, lower the ram. Loosen the retainer in thetop of the die, and remove it. You should be able to pull the die insert outof the die body by grasping the lead wire and pulling up. Push the leadback through the die just far enough to allow you to clip off the enlargedflange of lead remaining. Then reload the die and extrude another lengthof wire. Do not try to join the wires together by loading before the lastbillet is cleared from the die. It will make a bad joint that comes apartlater.
You can specify any three diameters to come with your extruder, fromour standard sizes. Or you can order a custom diameter of LED-1D ex-truder die. Additional billet mould tubes can also be ordered for higherproduction. If you want to extrude hard alloys, we can build a custom

101
extruder with a smaller bore, which generates higher pressure with thesame ram thrust. Some alloys, however, are just too hard to extrude reli-ably. We will need a test sample before we know if your alloy will extrude.
Core accuracy (weight control):
There is no difference in the accuracy of bullets made with cast orwire cores, if you process the cores with either a core swage die or theLSWC-1 style of die (both have bleed holes to adjust the core weightprecisely). In theory, lead wire would be slightly more precise because ithas been extruded at high pressure and probably does not contain any airbubbles or voids, but the core swaging operation takes care of that in anycase.
If you do not use a core swage or LSWC-1 die to adjust the coreweight, then your core variation should be less than 2% of the total bulletweight with careful casting or cutting technique. Bear in mind that per-centage of total bullet weight is what matters, not absolute weight differ-ence. Five grains makes no practical difference in a 500 grain bullet, but itis very significant in a 50 grain bullet. Swaged cores typically are held toless than 1% of total bullet weight, and perfectionists achieve less than0.5% tolerances. This could be any amount of grains, of course.
With nearly any set of swage dies, the first die should be a CSW-1core swage. This die extrudes a small amount of lead through bleed holesin the die, leaving a fixed volume which you can set with the punch holder(the distance between punch ends controls the volume, and thus theweight, of the core). The core swage only works if you go to the end ofthe stroke each time, so that a fixed distance is established between thetop and bottom punch. This in turn established a fixed volume within thedie. Any additional volume of lead is extruded through the bleed holes.Holding the pressure for a constant amount of time at the end of thestroke also helps make more accurate weights. Double swaging adds atiny bit more precision to the weight control process, but is usually over-kill except for perfectionists (you know who you are!).
In a power press, the top of the stroke can be set by an electronicsensor, which shuts off the fluid power flow when it sees the ram guideplate. This is a convenient way to adjust the press for the shortest stroke(ram travel) that will do the job, making the job go faster than if you usedthe entire stroke. But there is a slight variance in the final stopping point,due to differences in the trip point of the sensor, ambient temperaturechanges that affect both the electronics and the hydraulics, inertia in thehydraulic system, and other physical causes.

102
To eliminate these sources of weight error, you can either use theentire stroke and stop the cylinder against the end of its housing (a posi-tive, unchanging position) and use the pressure reversing mode to controlthe press stroke, or you can get the Positive Stop Punch Holder, FPH-2-H.This punch holder is made of hardened steel, drilled all the way throughthe center. The punch drops in from the top, and rests on a thick ledge atthe bottom of the hole. A long, hardened steel threaded rod is then screwedinto the top of the holder. The position of this rod controls how far theexternal punch can travel back up in the holder.
The punch holder is then adjusted so that the face of the swage dieactually contacts it, and stops the ram movement in the upward direc-tion. The punch holder is designed to withstand all the force that thepress can generate. By stopping the ram this way, there is nearly perfectconsistency in the volume left in the die at the end of the stroke, and thusnearly perfect core weight. So why don�t we supply this holder instead ofthe regular one? It is much slower to load the punch, and for most pur-poses, you do not need this degree of weight control. But, if you do needit, the optional FPH-2-H will deliver.
Core size (diameter):
Because there are differences in jacket walls depending on how youmake or where you acquire the jacket, it isn�t possible to absolutely specifya proper diameter for each caliber. The rule of thumb is that the lead wireor cast lead core should drop easily into the jacket, to the bottom. If itcontacts the jacket wall before that point, then air can be trapped behindthe core. If you seat the core you can compress the air to 30,000 psi, andit may be trapped in the base, but I�ve seen cores pop out of the jacketswith considerable force after the seated cores and jackets have been lefton the bench for a few minutes, especially if the sun happens to fall onthem through a nearby window! The right size of lead wire or cast core isthat which fits easily by hand into the core swage die (CSW-1) or theLSWC-1 (for lead bullets) and yet isn�t too long and thin to fit completelyinto the die prior to swaging. The right size of core swage is whatevermakes a core that drops into your jacket all the way. So you can see thatthe core size, for jacketed bullets, fits the core swage, and the output ofthe core swage fits the jacket.
In general, if you use the jackets most often available for these cali-bers, here is a table of core sizes, core swages, and calibers that wouldwork, assuming normal or thinner than normal jackets (extra thick jack-ets require smaller cores):
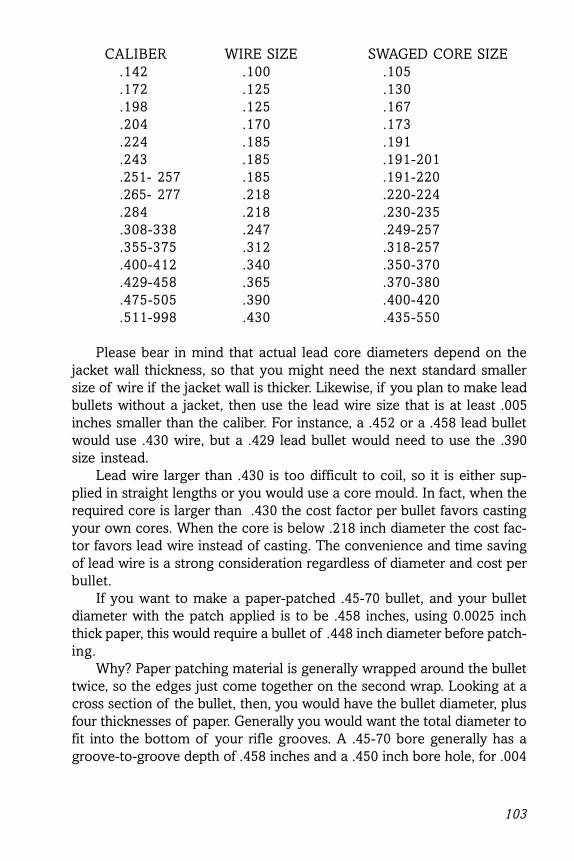
103
CALIBER WIRE SIZE SWAGED CORE SIZE.142 .100 .105.172 .125 .130.198 .125 .167.204 .170 .173.224 .185 .191.243 .185 .191-201.251- 257 .185 .191-220.265- 277 .218 .220-224.284 .218 .230-235.308-338 .247 .249-257.355-375 .312 .318-257.400-412 .340 .350-370.429-458 .365 .370-380.475-505 .390 .400-420.511-998 .430 .435-550
Please bear in mind that actual lead core diameters depend on thejacket wall thickness, so that you might need the next standard smallersize of wire if the jacket wall is thicker. Likewise, if you plan to make leadbullets without a jacket, then use the lead wire size that is at least .005inches smaller than the caliber. For instance, a .452 or a .458 lead bulletwould use .430 wire, but a .429 lead bullet would need to use the .390size instead.
Lead wire larger than .430 is too difficult to coil, so it is either sup-plied in straight lengths or you would use a core mould. In fact, when therequired core is larger than .430 the cost factor per bullet favors castingyour own cores. When the core is below .218 inch diameter the cost fac-tor favors lead wire instead of casting. The convenience and time savingof lead wire is a strong consideration regardless of diameter and cost perbullet.
If you want to make a paper-patched .45-70 bullet, and your bulletdiameter with the patch applied is to be .458 inches, using 0.0025 inchthick paper, this would require a bullet of .448 inch diameter before patch-ing.
Why? Paper patching material is generally wrapped around the bullettwice, so the edges just come together on the second wrap. Looking at across section of the bullet, then, you would have the bullet diameter, plusfour thicknesses of paper. Generally you would want the total diameter tofit into the bottom of your rifle grooves. A .45-70 bore generally has agroove-to-groove depth of .458 inches and a .450 inch bore hole, for .004
104
inches of rifling per side. Subtract four times the paper thickness from thebarrel�s groove-to-groove diameter, and this gives you the correct bulletdiameter to make.
In this example, .458 less 4 times .0025 gives us .458 -.010 or .448inches for the bullet. You can use .390 lead wire, since this is the largestpractical coiled diameter available. But if you were to have an extrudermade, or a core mould, it would be even better to use .440 to .445 inchdiameter cores. Any diameter that fits into the die nicely and is not toolong, at the weight you desire, to be enclosed completely in the die beforeany pressure is applied, will work.
The upper limit of core diameter is whatever fits easily into either thejacket, or the die (for lead bullets). The lower limit is whatever just fitscompletely in the die without sticking out the die mouth, and allows atleast one caliber of length for inserting the external punch before anypressure is created. If you use too long and thin a core, it will contact theexternal punch before the punch can be aligned at least a full caliber depthin the die. This can cause the punch to be tipped or bent when you applypressure to compress the core. Any core diameter between these two ex-tremes works, but the closer the core is to finished diameter, the less fold-ing and wrinkling takes place and the less work it is to compress it smoothlyand evenly.
Core lubrication
When a core is swaged, it is first lubricated with Corbin Swage Lube,simply by applying a drop to your fingertips and rolling the core back andforth once or twice as you pick it up. No detailed ritual is required. A thinfilm of lube transferred to the lead surface is sufficient. If you want tolubricate a large quantity, put half a teaspoon of Corbin Swage Lube in-side a clean tumbler and load it with as many cores as your tumbler willspin without overloading it. Then turn it on and let them tumble for halfan hour, or until all the cores are evenly lubricated.
The film of lube greatly reduces swaging pressure, helps insure longdie life and eliminates lead fouling of the die and punches. Once you haveswaged the cores, the lubrication must come off before you put them intojackets. Corbin Swage Lube will wash off by boiling the cores in a pot ofhot water with a little strong detergent added. In fact, just the hot waterworks reasonably well. I like to use boiling water, because the heat quicklydrys the cores once you pour them out onto an old towel to dry. You don�twant them to sit around very long with moisture, because they will tendto oxidize, and this prevents a good core to jacket fit.

105
Swaging lubricant is not the same as bullet lubricant. Swaging lubeacts as a high pressure film between the die and the bullet, reducing fric-tion and lowering the pressure needed to form the part. It is not designedfor use under high temperature, and it is designed to be easily removed insolvents or water. It is clean, and is normally quite safe to handle (in rarecases someone may be allergic to the castor oil or lanolin components).Corbin Swage Lube is made from medical grade compounds designed forcosmetics.
Swage Lube forms a hard lacquer film when heated to annealing tem-peratures for copper jackets, however. This film prevents Corbin CoreBond from working, so be sure to wash off the lube from any bullet jacketand core which are intended to be bonded using the Corbin Core Bondprocess.
Core bonding is a process of melting the lead, within a jacket, in thepresence of the liquid Core Bond. The Core Bond lowers the surface ten-sion of the melted lead so that it can easily penetrate into the copperjacket, forming an actual alloy that is shallow but stronger than solder orglue by a considerable margin. The advantage of the diffusion junctionbetween the lead and jacket is that there is a gradient of tensile strengthcreated, instead of a sharp junction between the 1000 psi lead and the18,000 to 22,000 psi jacket material.
A sharp junction, such as exists under a layer of solder or glue, acts asa point of concentration for sudden stress. When the bullet strikes, a tre-mendous amount of stress is created within the bullet in a very shortamount of time. The force is channelled to areas where there is a bigdifference in tensile strength, and tends to separate them. When the ten-sile strength of the materials flows through a gradient, becoming differ-ent over a distance rather than suddenly, the force of impact can flowwith it, and cause less concentration at that point.
The bottom line is that a bonded core bullet can usually be shot insideout and still retain nearly all of the core, whereas glued and soldered orplain unbonded bullets often separate at the junction of the core and jacket.Microphotographs taken of bonded jackets, under a scanning electronmicroscope, show atoms of lead within a one to two micron depth be-yond the inner surface of the jacket wall. You don�t get that with any kindof glue or other surface adherent bonding. That is the technical reasonbehind the fact that 90% of the world�s custom bullet makers who buildhunting bullets use our bonded core process. It is fast, low cost, and itworks better than the alternatives.

106
9. Swaging with a Reloading Press
Some Corbin dies are designated type -R. This stands for �ReloadingPress�, and means that the die set was designed to fit into a regular single-station, slotted ram reloader with standard 7/8-14 threads. Any of ourtools that have the -R suffix are meant for use in a reloading press. Thedies screw into the press head, like a reloading press die. The externalpunch snaps into the slotted ram like a shell holder.
Why would you want to use dies modified for use in a reloading press,when swaging presses are so much faster and more versatile? The reasonis economic: if you already have a reloading press, and don�t wish tomake benchrest quality bullets but will settle for a reasonably good bullet(about equal to or slightly superior to standard factory bullets), then youmight want to use the -R dies.
Disadvantages of using a reloading press
1) The pressure required for swaging larger calibers places a severeburden on the unhardened screw-stock rams used in most reloading presses,which can cause undue wear and distortion of the ram. Most reloadingpresses are not equipped with any bearings, so the pivot pins, ram, andother moving parts are placed under high frictional forces when harderalloys or larger calibers are swaged. Therefore, Corbin reloading pressdies are built only for use with pure soft lead cores. If you use alloy lead,the pressure will be considerably higher, and could break the die or dam-age the press.
2) A reloading press has no built-in floating alignment, and in fact isgenerally quite sloppy compared to the alignment of an actual swagingpress. This is fine for reloading because there is no real need for highprecision alignment: the shell holder and fit of the cartridge case both areso sloppy that there is no gain in making the press highly aligned betweenhead and ram. But in swaging, better bullets result from precise align-ment of the press head and ram. The forces are considerably higher, sothat a little off-center torque can make a difference in punch life and bulletquality. The lack of high alignment precision means that certain styles,such as the rebated boattail, are not available for the reloading press.
3) A reloading press has no built-in way to eject the bullet from theswage die. You need to use a small plastic mallet and tap the plungerprovided with the swage die, to knock out the bullet (and catch it with
107
your other hand). Actual swaging presses have automatic built-in ejec-tion when used with dies designed to fit the ram, and are considerablyfaster to operate.
4) A reloading press has less than half the leverage of any Corbinswaging press, since it must use about four inches of ram travel. Swagingonly requires about two inches, for most of the calibers and styles thatcan be made by hand. Therefore, by simple physics we can double theforce with the same amount of handle travel. This makes swaging with areal swaging press far easier (less than half the effort required).
5) A reloading press does not generally have any bearings, so theytend to wear and become quite loose under heavy loads. Corbin swagingpresses such as the S-Press or the Mega-Mite travel on needle bearingswith the rams guided in long oil-impregnated bushings. This extends thelife and lowers the friction, which in turn reduces your effort for a givenamount of thrust output.
Most loading presses have sufficiently heavy frames but rather weak,soft screw-stock rams and pins which are sometimes reduced to half theirvisible diameter inside the hole, as safety links, to prevent damage to therest of the press. Corbin swaging presses use full-diameter, hardened al-loy steel links which turn inside high-pressure bearings. The swaging presscan be physically smaller and yet still be considerably stronger, especiallythose which built from alloy steels. The S-Press, for instance, uses 130,000PSI steel, whereas the most popular large reloading presses advertise�35,000 PSI tensile strength� for their cast iron frames.
All this being said, a reloading press that you already own is far cheaperthan purchasing a new swaging press! So Corbin makes some kinds ofdies for swaging bullets in a 7/8-14 threaded head, RCBS-style T-slottedram reloading press (single station). The kinds of bullets you can swageare limited by the press accuracy and strength, stroke and power, butwithin those limited, the dies will do a nice job. If you only need to makea limited quantity of bullets, in one or two calibers, then reloading typeswage dies (type -R) may be your best value.
Available tooling for reloading presses
One type of -R die comes in any standard caliber from .224 to .540inch diameter for soft lead, semi-wadcutter style bullets (that is, bulletswhich have their noses made entirely from lead, and which have a smallstep or shoulder between the nose and the shank). These dies are calledthe �Pro-Swage� dies. They are only made in the design of a core seater,

108
not point form, lead tip, core swage, or lead semi-wadcutter. Weightcontrol (extrusion of surplus lead) is done by means of an optional weight-adjusting punch (bleed-hole punch).
You can get flat base, cup base, dished base, or hollow base styles, orthe Corbin �Base-Guard� base. The internal nose-forming punch is avail-able in Keith, 3/4-E (a typical pistol round nose shape), 1-E (a typicalWinchester or Sharps rifle nose shape), target wadcutter, button-nose wad-cutter, hollow point (which is then followed by another punch to get boththe HP cavity shape and the nose curve shape), auto-loader (a sort ofbell-shaped round nose that feeds nicely in most autoloaders), and coni-cal.
We also build -R dies in two, three, or four die sets to make jacketedrifle or handgun style bullets. The two die set normally consists of a CS-1-R core seating die, and a matching PF-1-R point former. The three dieset adds a CSW-1-R core swage die for more precise lead core weights.The four die set adds a LT-1-R lead tip forming die for a professionallyfinished lead tip. These are available in the following calibers, in the 6-Sogive shape: .224, .243.
For larger jacketed rifle calibers, you need to step up to one of Corbin�sswaging presses and the dies to fit it. If you use type -S dies, there is nodifference in die cost (well, actually, the -S dies cost less than -R type forthe same function). The big difference is the swaging press, and it makesso much difference in speed and ease of use that you will surely thank melater for not even attempting to start you with a reloading press. Everytool and process has its practical limits.
I know that other people have made designs that I would not recom-mend, and some may even be trying it as you read this. I suppose thething to do is scan through the old gun magazines and look at all theoutfits who used to make swaging dies. You�ll see Corbin tools, of course,but you�ll also see a number of other brands offering those designs whichare absent in our line. Try to find those other firms today. They are not inbusiness now, you say? Really! And they made the designs that Corbindoes not recommend?
Perhaps there is something to be learned from that. There will alwaysbe a few new comers touting the same reinvented square wheel, who willshine in the spotlight of publicity and win a few converts, then suddenlydisappear when enough of their work comes back to bite them. It is al-ways sad to see someone fail in business�which is why I am happy aftertalking to my clients (with their 98% plus success rate in the custombullet business).

109
There is always a tiny but fairly steady trickle of challenging phonecalls and letters from people who have glowing stories about the use ofdesign ideas that we long ago ruled out as a reliable good value to ourclients. Honestly, after decades of patiently explaining why they are notgood ideas in spite of the fact that Cousin Joey had great luck with one orsome temporarily famous shooter or mechanic is getting rave reviewsfrom some niche of the shooting fraternity at the moment, I really don�tcare to spend any time debating it.
There will always be dark corners where long term value and scien-tific fact is excluded by blind exuberance. A goodly number of these ideasrevolve around using a reloading press in some way that is technicallypossible, but not a good long term value. The lure of getting by cheaperis strong enough to overpower good reasoning, sometimes.
I am not doubting that some of the ideas work, at least from time totime, in specific situations, when run by very careful operators. But thereason we do not offer them, and would prefer not to be �talked into�making special exceptions, is that there is a better way. Better might meanmore cost effective, giving you the same or better value, as with usingsolid carbide versus a high carbide die steel in non-automated presses.
Better might mean less likely to stick, jam, or break if a person getsforgetful or careless about lubrication, alignment or pressure, as with ourstandard ejection pin sizes. Or, better could mean equal in final result butstandardized for replacement parts, service, and knowledge accumulatedto help you with various situations. Sometimes, better means it actuallyworks every time, consistently, and has enough history behind the designto warranty the product, even if there seems to be a cheaper alternativeor one with fewer steps. Still, we do a lot of custom work, and take eachrequest on its own merits. No harm is done by asking!
Reloading presses suitable for swaging
For the fired .22 long rifle cases drawn to make .224 or .243 bullets,you can use almost anything that will accept the dies and the punches.The little RCBS Junior press was one we used to demonstrate swaging atgun shows, in the old days. It doesn�t take a big press to swage smallercaliber bullets. You can use Rockchuckers or Pacific Multi-Powers or C-HChampions, of course. They are sturdy, standard design presses. Any presswith a single station head and ram, which accepts standard RCBS-typebutton shell holders, and has a 7/8-14 threaded top, with a physical lay-out similar to the Rockchucker, should be fine.

110
The ones you can�t use are those which have special mechanical shellholder devices instead of a slotted ram, or those which have a handle thatswings over the top of the press, like the Bonanza Co-Ax press (the handleparks itself right over the die, where you need to tap on the swaging die�sknockout rod to push the bullet out of the die). I prefer not to use turret orprogressive presses because of inherent alignment and strength problems.Swaging puts a lot of strain on that pivot! Aluminum and light duty re-loading presses may be usable for smaller caliber swaging, but are notideal for it.
The popular Dillon progressive reloading presses are not made forbullet swaging, and could be damaged if you try. Most progressive ormulti-station presses are best used for their intended purpose, not swaging.This is in no way a criticism of the press. Most presses that sell in goodvolume over a long time period are good, solid presses, or else peoplewould soon find out and quit buying them. The lightweight Lee pressesare very sturdy and entirely suitable for their intended jobs. But swagingplaces unusual forces on the top of the ram, and on the pivot pins, links,and toggle. Designs that work just fine for reloading may not last or pro-vide enough alignment and rigidity for swaging.
I wish it could be otherwise, because it would simplify my work con-siderably if I didn�t have to design and build swaging presses, and couldjust concentrate on making the tools and dies. We are of the same mindwhen it comes to making the equipment as affordable as possible: I couldinterest even more shooters if bullets could be swaged with a wine corkpress or a garlic press! Unfortunately, neither of these presses is suitablefor reloading or swaging, and many reloading presses are not suitable forswaging (although with minor changes any of them could press garlic).
Types of dies suitable for a reloading press
Corbin makes virtually every sort of bullet and jacket reducing die inthe range of .224 to .458 in the -R type (such as the BRD-1-R to turn a.357 into a 9mm, or the JRD-1-R to draw a .452 jacket into a longer,heavier jacket for a .40-65 bullet). These are discussed under the �DrawDies� chapter. We also make type -R draw dies to turn fired .22 rimfirecases into .224 or .243 caliber jackets, and to turn fired shotgun primersinto .25 pistol jackets or partitions for use in .30 caliber jackets.
Gas checks can be punched and drawn from flat copper strip (.030-thickness, 1-inch wide strip is available from Corbin). The tool to accom-plish this is called the Gas Check Maker, or GCM-1-R. It consists of twodies, a blanking die that punches out a round circle of copper, called the

111
disc or coin, and a cupping die that turns this disk in to a short-sided cupand finishes the gas check. I can make this die set for a reloading press,but it works better (less effort, more precision) in our S-Press.
Although gas checks are useful for cast bullets, the Base Guard is evenbetter for swaged bullets. It does everything that the gas check is sup-posed to do in protecting the bullet base, and in addition, helps to keepyour barrel clean by actually scraping fouling out of the bore with eachshot. The Base Guard is made from the same material as a gas check, buttakes only one stroke in a single die.
In a reloading press, you can use the BGK-1-R Base Guard Kit. This isa single die and punch, with a slot in the side of the die through whichyou pass the inch-wide strip of copper while you stroke the press up anddown in a short stroke. The punch never actually leaves the die, but sim-ply drops below the slot so you can move the copper strip. Then you raisethe punch and poke out a new disk, with a hole through the exact enter.This small hole allows lead to be extruded through during the swagingprocess, to form a rivet head, holding the gas check in place but allowingit to turn with the rifling (unlike a gas check, which is clamped to thebullet so that if the bullet �skids�, so does the gas check).
Bullet jackets can be trimmed to exact (and adjustable) length usingthe ET-2-R die set. This is an �Expand/Trim� type of die, which pushesthe existing jacket up into a 7/8-14 threaded die that has an adjustablestop screw in the top. The jacket contacts the end of the stop screw, and isheld from moving any further, while the punch (in the press ram) contin-ues upward. The punch is made with a small guide tip that fits inside thejacket mouth, and a long tapered cone.
When the jacket comes to a stop and the punch continues upward, thecone is forced into the jacket mouth and expands the jacket until thepunch finally reaches the die mouth. The jacket is pinched between themouth of the die and the punch, and is deeply scored, almost cut throughbut not quite. The flared portion comes off easily by tumbling, twistingor pulling.
The reason you should not try to cut through is that the thin web ofjacket between the sharp die edge and the tapered punch is all that keepsthe punch edge from being peened over. If you run the punch right intothe die edge, it rolls the edge and then you have to resharpen it by takinga light grind on the die face. Since you can set the length anywhere youwish, nearly any length of jacket can be made shorter.
Actual bullet swage dies include the PRO-1-R Pro-Swage design, andthe -R type swage dies that make up the two, three, and four die sets forspitzer rifle bullets of the ogival type (no shoulder).

112
The Pro-Swage Die
The Pro-Swage is normally used for paper-patched bullets in rifle cali-bers, so we supply it with a cup base and a 1-E round nose ogive punch forrifle calibers unless you specify something different. A popular use of thePRO-1-R is for centerfire pistol and blackpowder rifle Base-Guard bullets.Generally, a pistol swage set would be supplied with a Keith SWC nosestyle and a BG base style unless you specify something else. The Base-Guard base punch can be used without a Base-Guard disk. It simply cre-ates a small rivet head in the exact center of the bullet base, which hurtsnothing (and serves to identify your bullet among others recovered later).
A die designed to make lead bullets may also be used with gas checks.Base-Guards are much more effective at keeping the bore clean, however.Once you�ve used Base-Guards, it�s doubtful you�d ever go back to gaschecks. If you wanted to use the same die for gas checks, half jackets, orthree-quarter jackets, you can do it without any change in tooling. If youdon�t want the little bump on the bullet base that results from using theBG punch, just order a flat, cup, or dish base punch and use it instead.
The PRO-1-R die itself is threaded 7/8-14, so that it fits the reloadingpress top. The upper half of the die is screwed onto this hardened 7/8-14body in a semipermanent way (held with a thread locking compound).The top of the die is threaded for an adjustable bushing that can be re-moved to replace the internal punch, which is held captive within the diebody by this bushing. A knockout rod in the top of the die pushes theinternal punch down (using a plastic mallet or length of wood as a ham-mer) to drive out the swaged bullet. The internal punch is usually thenose (we can make it the base if you prefer, but you have to keep track ofit for future punch orders and make sure to specify �internal� punch).
Other -R type bullet swage dies
The -R type core swage die (CSW-1-R) is actually made the same as acore seating die, without bleed holes in the die itself. The diameter issmaller than the same caliber of core seating die, of course, so that a leadcore can be swaged to fit inside the jacket, which in turn fits inside thecore seating die (CS-1-R). Lead weight is adjusted by using an externalpunch with a hole through the center, so that lead can be extruded throughit. The lead goes into the ram slot, just like a spent primer, except that itmay remain attached to the core like a thin lead wire antenna. This iseasily snipped off with a pen knife or nail clippers.
The reason that a -R type core swage does not have bleed holes in thedie itself, as the -S and -H dies do, is because of the geometry of thetypical reloading press. Unlike a swaging press, which has a ram stroke
113
that stops considerably short of the press head, leaving room for the die,a reloading press ram is made to stop just below the press top. In order touse the end of the stroke (both for maximum power and also as the posi-tive stopping point necessary to establish constant weight from one coreto the next), the -R die cannot be adjusted so that the die extends belowthe press head. The die is positioned in the middle of the press threads, infact, so putting bleed holes in the side of the die would spurt lead directlyinto the threads!
Decades ago, I made core swage dies with angled ports and reducedlower diameter to clear the threads and extrude lead at about 45-degreesto the bore, but the dies were not successful in the long run. Using hardlead has never been recommended with -R dies, but it positively blewthese angled port dies to bits (although nothing flew around, since thepressure was instantly relieved when the die fell apart). The -R core swagedie works reasonably well, but it does require an extra step of snipping offthe single wire extrusion. Core swages used in our swaging presses auto-matically shear off the extrusions on the down stroke.
The -R core seating die (CS-1-R) is nearly the same design as the coreswage, except the bore is larger and the external punch either makes alead nose and fits the die bore, or makes an open tip and fits inside acertain wall thickness of jacket. All of the -R dies are 5/8-24 thread andhave a 5/8-inch body, which screws into a black 7/8-14 thread adapter.This adapter is bored nearly through the other end, but the hole stopsshort of going all the way. A quarter-inch diameter hole does go through,and takes the ejector rod which is tapped firmly to eject the component.The internal punch is captive within the adapter, and can be changed byunscrewing the die from the holder.
The -R point forming die (PF-1-R) uses a music wire coil spring tokeep the ejection pin pushed to the top position within the adapter body.Ejection pins are typically .081 inch diameter for these dies, which aremade in .224 and .243 caliber in 6-S ogive shape.
The -R lead tip forming die (LT-1-R) is nearly identical to the CS-1-Rcore seating die, except that the bullet goes into it facing upward, tiptoward the die. The internal punch has a cavity shaped like the bullet tip,and reshapes the lead to make a sharper end than can be made with the.081-inch diameter ejection pin in the point forming die.
Those four dies can be combined to make two-die sets (CS-1-R andPF-1-R) as with our standard .224 and .243 bullet making kits, a three-dieset by adding the CSW-1-R core swage, or a four-die set by adding the LT-1-R to make nice sharp lead tips. The CSW-1-R and CS-1-R can be usedas a pair, also, to make semi-wadcutter bullets. However, the PRO-1-R die

114
can do the same thing by using a weight-adjusting punch (with a holethrough it) to set the exact core weight and then changing to a nose punchto create the actual nose shape.
General instruction for swaging in a reloading press
Some folk have complained that there was no simple, 1-2-3 instruc-tion for swaging bullets, and they didn�t want to read a lot of details abouthow to do it right. For those who might feel this way, here are the simple1-2-3 instructions for making a lead rifle or pistol SWC type bullet of anynose or base shape using the PRO-1-R or CS-1-R die:
1. Cut or cast cores to desired weight, and lubricate them with CorbinSwage Lube. A little lube on your fingertips will be all you need.
2. Put the die in the press head and the bottom punch in the pressram, and then put a lubricated lead core in the die.
3. Adjust the die so you form a finished bullet at the end of the stroke,with the press ram all the way up just as the bullet forms completely.Make as many bullets as you need once you have the die adjusted.
And for jacketed bullets made in a core seater and point forming die(ogival shape, no shoulder), the most basic operation skips the core swagedie and uses a cast or cut core directly in the jacket:
1. Cast or cut the core to the desired weight (bullet weight minus thejacket weight) and put the clean, unlubricated core into the jacket. Lubri-cate the jacket lightly with Corbin Swage Lube, and put it into the coreseating die.
2. Use a core seating punch that snugly seals the jacket and pressgently to expand the lead inside the jacket, until the jacket expands andcontacts the die walls evenly. The jacket and core must stay up in the diewhen you lower the press ram. Eject the seated core and jacket by tappingon the knockout rod placed in the top of the die.
3. Remove the core seating die after you have seated a quantity ofcores in the jackets, and replace it with the point forming die (which has aspring-loaded internal punch you can feel by pushing the knockout rod byhand).
4. With the point forming die high in the press threads, place the openjacket and core mouth upward, open end facing the die, into the die cav-ity. Use the largest diameter punch in the set, which just fits into the die,to push on the closed base of the jacket. Raise the ram all the way or untilyou encounter resistance.

115
5. If you do not encounter any resistance with the ram at the top of itsstroke, turn the die to lower it until you cannot turn it any further by hand.If you do feel some resistance, lower the ram and inspect the bullet to seeif the ogive has formed. If not, or if you felt no resistance, lower the ramslightly and give the die another 1/4 turn lower. Raise the ram, then lowerit and knock out the bullet.
6. Examine the bullet, and if the tip is not yet closed down to the sizeof the ejection pin (.081 inches in most dies), continue to lower the die insmall increments and re-form the tip until it reaches this point. If you gotoo far, the bullet will acquire a little pipe on the tip from extruding thejacket up the ejection pin hole. Just short of this, it makes a nice bullet tipand you have finished!
Detailed swaging instructions for a reloading press
For those of you who would like to know both why and how to do itright, here are the details and the reasons behind them:
Remove any shell holder from your reloading press, and clean out theslotted ram with a swab to remove any accumulated primer residue andshavings. These can prevent alignment of the swaging punch and die.Snap the reloading press punch into the ram (like a shell holder). Don�ttry to use a shell holder in addition!
Screw the die into the top of the press just a few turns. Don�t try to setup as you would a reloading press die (against the end of the ram). Justbarely get it started. We want to use the top of the stroke for a positivestopping point, and adjust the die up and down to get the right pressureand nose shape, so we have to start with the die too high, and slowlybring it down while making our initial adjustment.
Cut the lead wire, or cast scrap lead cores to the right weight. If youare using a core swage die, add about five grains to the desired final weight.For jacketed bullets, put the jacket in the scale pan, cut a piece of leadwire and adjust the length so that the total weight (jacket and core) are afew grains more than you desire for the finished bullet. Without a coreswage die, the total of bullet jacket and core is the finished weight.
Open a bottle of Corbin Swage Lube. Put a tiny bit of lube on yourfinger tip, and when you pick up the lead core, give the core a turn be-tween your thumb and finger tip. That�s all the lubricant you need. (If youare using a core swage die, that is.)
116
(Please note that PRO-SWAGE dies are basically core seaters, madein final diameter with nose and base punches. They are a single-die sys-tem, not including a core swage, point former, or lead tip die. Thoseother dies are part of the ogive-style rifle die sets, not the simple semi-wadcutter style of the PRO-SWAGE. It adjusts the lead core weight byusing a separate weight adjusting punch with a bleed hole in it.)
Put the core into the mouth of the core swage die, then carefully raisethe ram of the press until you can remove your finger and let the punchhold the core. Gently raise the ram all the way. If the punch is stoppedbefore you get to the end of the press stroke, raise the die slightly. If youare not using a core swage die, then put a clean, unlubricated core into thejacket, lube the OD of the jacket, and put it into the core seat die. Followexactly the same adjustment procedure.
With the ram of the press as high as it can go, lower the die (screw itdown, toward the ram) until you can�t turn it by hand any further. You�vejust pushed the lead core up against the end of the internal and externalpunches. It is important to understand why you are doing this initial ad-justment: it is to use the end of the press stroke, where you have maxi-mum power, and to provide a consistent point of reference so all yourcores will be made exactly the same. If you stop short of the press top,then the distance between the top and bottom punches is arbitrary andwill change from stroke to stroke. This leaves different amounts of vol-ume within the die on each stroke, so naturally you don�t get the samebullet weight in a core swage, or amount of closure in a point form die.
Lower the handle of the press very slightly, and turn the die abouthalf a turn closer to the ram, then raise the ram again. When you feel aslight resistance on the handle, lower the ram all the way and inspect thecore (or seated core, or finished bullet, depending on the die you are us-ing). To eject the bullet, put the knockout rod into the top of the die andtap it firmly with a plastic mallet.
When the lead forms completely (square ends, sharp edges, full diam-eter of the die with parallel sides), you have found the correct adjust-ment. If, during this process, you feel that the pressure is too great (toomuch force on the handle�you should not feel more than about what ittakes to seat a bullet or expand the mouth of a cartridge case), stop andinspect the lead. Perhaps it is much harder than you thought. Only pure,soft lead is really suitable for reloading press swage dies. If lead spurtsaround the punch, you are using too small a punch diameter for the op-eration.
Lock down the locking rings on the die, and proceed to swage all thecores you wish. Use care to insure that the punch tip goes into the die anddoesn�t strike the edge. (Make sure it doesn�t pinch your finger, either:

117
that hurts!) When swaging lead cores in a reloading press, it is importantthat each stroke is exactly the same distance, so you leave the same vol-ume or spacing between the top and bottom punches inside the die. Theextra lead will be extruded through a hole in the bottom punch.
With a core swage die, or a �bleed-off� punch used in a PRO-1-R die,you will note that there is a little �antenna� or bleed-off of lead on the endof each lead cylinder. Snip these off with a pocked knife or nail clippers. Ifyou don�t get this bleed-off, your cores may vary in weight. A core swagecan only remove extra lead�it can�t add more. That means your coresmust be cut, or cast, heavy enough so that all the variation is smaller thanthe amount of extra lead you left to swage off.
Clean the lubricant from the cores, if you intend to put them intojackets next. For lead bullets, you don�t need to clean them yet. To re-move the lubricant, you can slosh the bullets around in a can of organicsolvent such as acetone, or Corbin�s Cleaning Solvent. Or you can washthem in hot water with a little detergent added. Either way, roll them onadsorbent cloth or paper towel to dry them.
To make a Keith semi-wadcutter (a variety of truncated conical bul-let), you would select the CS-1-R or the PRO-1-R die and a nose punch ofthe desired shape. If you want a hollow base, cup base, flat base, or aBase-Guard base, select the punch having the face that is machined totransfer that shape to the bullet. The punch trapped inside the die body isthe internal punch. The punch that snaps into the ram slot is the externalpunch. Both can be changed, to change the base or nose shape.
Place the cleaned cores into jackets. Just set them in the jackets. Youwant to avoid getting any lubricant inside, since it will just keep the corefrom pressing firmly against the jacket wall. Then, put a drop of lube onyour fingertip, and pick up the jacket (with core inside). Put the jacket intothe die, so that the lead faces the nose forming punch.
The lead core must drop into the jacket easily without stopping againstthe die wall (needs to fit to the bottom). If you try to mash the lead intothe jacket when it doesn�t fit correctly, you�ll trap air below it, and it couldpop the core out again later! Not all diameters of cores for a given caliberwill fit into all the jackets that could be available for that caliber: jacketscan have different wall thicknesses, and require different core sizes.
Swage as described previously for making the cores. One difference:if you are using a jacket and an external punch that forms a semi-wadcutteror a lead tip bullet, the length (and thus the weight) of the lead core mustbe such that the lead will be at least as long as the jacket after the core isfully seated. If you try to use too light a core for the jacket length, and apunch that requires lead to fill its cavity, the punch will push against theedge of the jacket and wrinkle the jacket. You could damage the punch.
118
Please note also that you only need as much pressure as it takes toexpand the jacket to fully touch the die ID. Using more pressure than ittakes to expand the jacket just stresses the die and could lead to breakage.Just use the minimum effort required to get the jacketed bullet to fill outproperly and become the proper diameter. This should require very littleeffort in smaller calibers, with increasing effort as you get above .308 andinto the large pistol or paper-patched rifle calibers. Proceed carefully soyou do not break the die from excess pressure.
Lead cores expand and become shorter as you seat them: you needsufficient length of lead so that there will be material to fill the cavity inthe external punch tip. If you are using a hollow point punch, use it firstto extrude lead forward, and then shape the lead with the second punch.If the hollow point is uneven, try flattening the lead core first with a flatpunch, then use the hollow point punch, and finally use the Keith or othersemi-wadcutter punch.
If you are making a BG (Base-Guard) style of base, you might wish topre-form the bullet without the copper disk first, then put the disk intothe die with the peak of the cone-shaped disk facing the lead. Push thebullet back into the die against the BG disk, so that the lead flows throughthe hole in the disk and forms a rivet head in the small depression in thecenter of the base punch. You can try forming the BG disk onto the bulletin one stroke, and it will probably work if the end of your lead core is flatenough. Typical cut cores have an angle, which may make it harder toget a good, straight alignment of the BG disk. Pre-shaping them solvesthat problem nicely.
You may be done at this point, if you are making semi-wadcutter stylebullets (which includes paper-patched rifle bullets or any other type hav-ing the SWC shoulder). If so, congratulations! Wipe the lube off the bul-lets and you are ready to load them. If not, it means you have one or twomore steps to perform to make a smooth ogive bullet or to form one witha small lead tip.
To form a smooth ogive, lead tip bullet, you need to make a seatedcore with exposed lead beyond the jacket. If you want a smooth ogive,open tip bullet, then you need to use a punch that fits inside the jacket,rather than just inside the die. The core is made shorter than the jacket.We call this the �open tip� style. A �hollow point� is something else: youmake a HP bullet by pushing a punch with a conical projection into thelead core, so that a hole is pressed in the lead. The core can be downinside the jacket at the time (making an open tip hollow point) or it can
119
extend beyond the jacket (making a lead tip hollow point). Press the coredown so it fills up the jacket, then stop pressing. Remove the core seatingdie, and replace it with the point form die (PF-1-R).
With the point form die in place, and a full-diameter base punch in thepress ram (which just slides into the point form die by hand with verylittle tolerance), put a small amount of lubricant on your fingertip and rollthe seated core and jacket between your thumb and forefinger. Put theseated core and jacket into the point forming die, so that the lead faces up(toward the die). Gently push the punch in behind the bullet and adjustthe die position so that you feel only a light resistance when swaging atthe end of the stroke. Eject and examine the bullet.
If there is a pipe or extension on the end of the bullet, it means thatyou have the die just a bit too low. Turn it counterclockwise very slightly.If the bullet won�t eject or has a large, rough and unfinished looking tip, itmeans you have not pushed it far enough into the die. There is a positionwhere you will get maximum tip closure before the lead flows up theejection pin hole. You can find it by trial and error. (Hint: save a goodbullet to use as a setting gauge next time. Put the bullet in the die, raisethe punch and ram, and screw the die down until it stops.)
To make a smooth flat tip on your bullet, just turn it over, push itbackward into the die, and gently bump it on the nose with the basepunch. It doesn�t take much pressure. You can make any size of flat pointthis way. If you are making a handgun bullet, you have finished. Wipe offthe lube, and load it. If you are making a lead tip rifle bullet, you mayneed to go to one more die: the lead tip forming die.
To finish a lead tip rifle bullet, remove the point forming die and in-stall the lead tip forming die. You�ll notice that the lead tip is deformedand mushroomed by the force of ejection. The secret of making a goodlead tip bullet is to leave plenty of lead: your core needs to be longer thanthe jacket and you need to make sure you don�t close the jacket down sosmall that it leaves no room for a strong stem of lead joining the tip withthe main body of the core. The wall thickness of the jacket, at the tip ofthe bullet, can use up a considerable distance across the total tip distance.The jacket walls need to be far apart at the tip, so that a strong stem oflead comes up between them and holds the tip in place.
Push the bullet up into the lead tip forming die and let the internalpunch reshape and shear off any extra lead extruded from the tip. If youpress very hard, a ring will be impressed in the ogive section. Find thatdelicate point where you just shave off the extra lead and leave no markon the jacket. It works very nicely.

120
Paper-Patched Lead Bullets
If you want to make a paper-patched bullet, just install the PRO-1-RPro-swage, cut or cast some lead cores of the right weight, and swagethem using the gentle, increasing pressure method until you get the rightshape. Typically, if you had 0.0025 inch thick paper, you�d want the bul-let to fill the grooves at .458 inch diameter with two complete wraps.That means you�d take .458 and subtract four times .0025 (two wraps,but doubled because it is on both sides of the bullet) and make the bullet.448- inches in diameter (before patching).
The only difference between a paper-patched bullet swage die, andone for making a bullet that will be dip-lubed or grooved and lubricated,is the diameter of the swage. Most paper-patched bullets also use a cupbase shape, so you can tuck the twisted end of the paper patch into it, butthat is entirely up to you. The formula for determining die size (D) for anycaliber of paper-patched bullet when you know the barrel�s diameter acrossthe grooves (G) and the thickness of the paper (T) is:
D = G - 4TIf you know the bore size (B) and depth of rifling (R), and paper thick-
ness (T) that you have available, then you can calculate bullet size (anddie diameter D) this way:
D = B + 2R -4TYou can purchase one swage die and a bullet grooving tool (similar to
a cannelure tool but with wider grooves for lead bullets) for lubricated fullsize bullets, and get a bullet reducing die for making paper patched bul-lets out of these, but the cost is just about the same as getting a seconddie. Also, you can try something interesting with two dies of differentdiameter that are made for paper patching and for shooting directly asswaged: you can wrap the smaller bullet with teflon pipe tape and swageit upward in size in the second die! This gives you the proper size bulletwith a teflon jacket swaged into place.
Of course, if you shoot in a match you�ll need to check the rules first.You can try this with paper, too, by using a slightly thinner paper than thesmaller die was originally designed to use, so the paper-patched bulletwill fit easily into the second die and pressure will shorten and expand thebullet, rather than scraping the paper off as you try to insert it.
You actually have the ability to make several kinds of bullets with twodiameters of the same shape bullet, rather than just the two styles. Swaginglends itself to experimentation and combinations that create new ideas,so long as you remember that anything going into a swage die should besmaller than the die bore. Never swage down, just like you never draw up.Always swage larger, with the odd exception of the dual diameter sizer
121
die which combines drawing and swaging in one tool (and has its limits,as you can read in the section that discusses this exception to the first ruleof swaging).
Full-jacket Open Base (military style) Bullets
Put the bullet jacket in the point forming die, with the open end fac-ing the die mouth. Push a piece of lead core into the jacket with a punchthat fits inside the jacket mouth. The seated core should be just below thejacket mouth, perhaps one eighth or less of an inch. Don�t try to make toosharp a point, because the jacket will just break through if you do. Ejectthe bullet. You�ll have formed the ogive on the normal base end of thejacket. (Having a flat ended jacket makes no difference: the pressure willexpand and reshape the end just as if the copper were a balloon skin.) Butto finish this bullet, you must do something else: you must roll the openend of the jacket over the core.
If you leave the base open, when the bullet is fired the muzzle gaspressure will peel the jacket away from the core and the bullet will be veryinaccurate. It might even cut ragged asterisks in the target instead ofround holes, from having the jacket expanded so much that it splits at thebase.
To get the muzzle gas to help you keep the jacket folded tightly on thebullet, reverse the bullet and put the open end into the point forming die.Gently push on the bullet nose with your punch. The curved die wall willmove the edges of the open jacket slightly inward. Eject the bullet again,turn it over once more, and push it back into the die. Now, you have anangle applied to the open base. The pressure of pushing the bullet backinto the die nose first, one final time while using a flat punch will flattenthis angle, folding the jacket over the core.
Gas pressure on the base of the bullet will help hold it shut, not tear itapart. For this to work, the empty projecting jacket needs to be just theright length. Too long, and you get a buckle or wrinkled line around thebase. Too short, and the lead spurts out and smears over the base. Justright, and you get perfect military style bases. This means you eitherhave to adjust the jacket length or adjust the bullet weight slightly to getthe right ratio of core to jacket. The jacket length can be adjusted with anET-1-R jacket trim die.
Let me summarize this quickly: 1) seat the core in the jacket using thepoint forming die, to form a full metal tip and open base, 2) turn thebullet over and push it backward into the point forming die with a flatbase punch to gently roll the open end into a slight boattail shape, 3) turnthe bullet over again and push it nose first into the point form die with a
122
flat punch to securely flatten the jacket edge over the core. If you want todo this more precisely, we can provide a �FMJ Base-Turning� punch thathas a concave face, in order to help make a better fold prior to using thefinal flat punch. This inserts a step between 2 and 3, where you apply thissharp fold point with the FMJ punch.
If you want to make somewhat sharper tips, or if the jacket is thin orbrittle so that the lead tends to break through the tip when seated, youmay need to get a custom point forming die that has a pressure-sealing,length synchronized ejector punch. This is a larger than normal ejectionpunch which is fitted carefully into a honed ejection pin hole, and ad-justed precisely to seal the end of the die cavity.
It is made to withstand the forming pressure, instead of just pushingthe bullet out of the die. Normal point forming dies use a wire ejectionpin which is retracted out of the main cavity of the die during bulletforming. It is brought against the tip of the bullet during ejection, on thedown stroke, and pushes the bullet out.
That�s all it has to do, so it is simple to build in comparison to apressure-sealing ejector. That is why all point form dies are not built withthe more costly kind of ejector: there is no purpose for it in an open tipbullet, or a lead tip that will be created in a following lead tip die. Nopoint making people pay for capability they don�t require.
It�s an option. But this is only suitable for dies used in the preciseCorbin swage presses, not in reloading press dies. The press dimensionsneed to be part of the equation in the more advanced designs, and theyare neither fixed or close enough tolerance if the press isn�t made by thedie-maker. Third party presses are whatever tolerance and design thethird party wishes to use, and can change at any time without askingpermission of any bullet swage die maker!
Changing the Nose and Base Shape
With semi-wadcutter and wadcutter styles, the nose shape is con-trolled by the punch you select. With smooth ogive bullets (those with-out a step between the shank and the nose), the ogive is controlled by theparticular point forming die that finishes the bullet.
To change nose shapes with a bullet that uses a point forming die, youneed a different shape of point forming die. That is the PF-1-R. If thebullet is finished in an PRO-1-R or a CS-1-R die, then all you need is adifferent nose punch. It is important to understand this, because it makesa big difference in planning and ordering. Point forming dies cost aboutsix times more than a punch, so if you can use a bullet with a little shoul-der and a lead nose instead of having a smooth curve without a shoulder

123
between ogive and shank, you�ll save money on tooling. If you need thesmooth ogive shape, then the matched pair (core seater and point former)is the only way to do it.
Spare punches can be purchased in standard shapes of flat base, dishbase, cup base, hollow base, or Base-Guard base. Nose punches can bepurchased in conical, Keith (semi-wadcutter, truncated conical), 3/4-Epistol round nose, target wadcutter, button nose wadcutter, hollow point(a universal HP punch that works in conjunction with any other punch),open tip, or 1-E rifle round nose. Other custom shapes can be specified(with dimensioned sketch or sample) at extra cost for the additional shoptime and tooling.
Open tip core seating punches must be made the correct diameter tofit into whatever jacket you plan to use. If you order a set for use with arimfire jacket, and then try to use a commercial jacket, you�ll find the coreseating punch is too large and will dig into the commercial jacket wall. Ifyou order a core seating punch to fit any specific jacket, either specify oneof ours to fit, or send us three or four samples so we can match the aver-age size to the punch. This is very important. If you try to use the wrongpunch diameter, lead can spurt out around the punch, the pressure won�tdevelop to expand the jacket, and you can get undersized or tapered bul-lets as a result.
Boattail and Partitioned Designs
Those are best done in swaging presses, not in a reloading press. Butyou can simulate a boattail by pushing a bullet backward into a pointforming die, thus applying a slope or angle to the base. Then form thenose in the same die by reversing the bullet. Because it takes less force toshape the open end of the jacket than to change the base shape (on mostjacket, the base is thicker), the same pressure will create a nose withoutmaterially removing the base angle. This doesn�t work for all bullet stylesand calibers, but you can try it.
To make a good partition style bullet, use another jacket small enoughto fit inside, and short enough to fill just a little more than half the largerjacket�s length. Or, in the .224 and .243 calibers, use fired primers as heavywalls between two short pieces of lead core! A .243 jacket makes a goodpartition in a .30 caliber jacket, and a short .30 jacket fits inside a .358 or.38 jacket. You can seat a core in the smaller jacket first, with lead ex-posed, then put the lead end down, into the larger jacket, and seat theassembly like a core to expand it in the larger jacket. Top that with a shortpiece of lead core, and finish as usual.
124
Fired .22 Case Jackets
Making bullet jackets for .224 and .243 caliber bullets from the spentcases of fired .22 ammunition is, even after all these years, a very popularway to make free bullets that perform as well, sometimes better, than theones you buy. Corbin builds the RFJM-22R Rimfire Jacket-maker to gen-tly unfold and redraw the rimfire case, making it into a jacket that looksfor all the world as if it were intended to be that way. Bullets made with arimfire case for a jacket have much more explosive expansion than thosemade with conventional jackets. Friction is lower in the bore, so yourrifled barrels last longer. Fouling is less, partly because of the higher zinccontent of cartridge brass and partly because the thin jackets need to beloaded to lower velocity to avoid coming apart in the air.
The performance of fired .22 cases used for jacketed bullets is out-standing. The price is right (free). About 1976, Wolfe Publishing�s�Handloader� magazine published an article wherein Rick Jamison (cur-rently with �Shooting Times� magazine) made some rimfire jacket bulletsand shot them from a benchrest rifle. The groups obtained were in the0.200 inch category, and the same gun and loads used with Sierra matchbullets got slightly larger groups, and slightly smaller groups with certainof the custom swaged benchrest bullets using commercial jackets.
The point is, rimfire jacket bullets are at least as accurate as the onesyou buy, produce less fouling, are easier on your gun�s bore, and cost younothing. Their only drawback is the need to load them to lower velocitybecause they are very thin and explosive. At 3200 feet per second, a rimfirejacketed .224 or .243 bullet performs more violently than a conventionalbullet driven to over 4,000 feet per second! Your varmint hunting expedi-tions are safer with them, because there is almost never a ricochet: oncethese bullets touch the ground, they disintegrate. (See the chapter onjacket drawing for instructions on the use of the RFJM-22 and RFJM-6Mdies.)
Briefly, rimfire jackets are made by lubricating and pushing cleaned.22 Long Rifle, Long, or Short cases through the proper die, using a punchwhich fits inside the jacket. The point of adjustment is somewhat critical:too high in the press and you can�t finish pushing the jacket through, sothe next one may jam into it, and too low in the press requires way toomuch effort, even to the point where you could pry the press off yourbench. (Rick Jamison actually broke his reloading bench, so if you didnot understand the importance of correct die adjustment, you are in goodcompany!) When you find that exact position where the force required is

125
leveraged by the press and quite manageable by the operator, and thejacket goes all the way past the tightest point in the die, you can processhundreds of jackets per hour as fast as you can push them through.
After drawing, they need to be annealed or softened, so that the tipswon�t fold over when you form the ogive. If you use enough lead tosupport the ogive fully and do not bring it to a small point, you can skipthis. But if the bullet you want to make gets a triangular flap of metalfolded over at the nose, then you need to anneal the rest of the jackets.This can be done by heating them briefly with a propane torch, just longenough to bring them to a slight red glow in a dimly lighted room. Noquenching, no lengthy heating is required. A few seconds will do it.
Corbin offers a heat treatment block kit, consisting of two high tem-perature ceramic blocks and a drill template that you can tape over one ofthem. Use a regular wood �spade� bit to drill a series of holes matchingthe template, and you have an efficient way to heat treat jackets or bondcores. One block holds the jackets and reflects the heat evenly aroundthem, and the other block is propped up behind the first one to act as abackstop and further reflect heat from the back side. I highly recommendthis procedure, because it is cheap and easy, and very fast.
Open Tip, Lead Tip, and Hollow Point
For open tipped bullets, you need to use a punch that slips inside thejacket (and a core length short enough to allow this). For lead tippedbullets, you need to use a punch that fills the die bore, not the jacket I.D.,or else seat the lead core very close to the end of the jacket. When theogive is formed on the bullet, the lead will move forward and extrudefrom the open end if there is enough lead.
A lead tipped bullet expands more quickly than an open tipped bullet,since the jacket is left with a larger opening. The jacket opening controlsthe expansion far more effectively than the amount of lead exposed. Ahollow point, on the other hand, may expand faster or not, depending onwhat it hits and whether the initial contact plugs up the cavity and turnsthe bullet into an effective solid nose.
To make a hollow point bullet, you would seat the core using a punchthat had a conical projection on the tip. This forces a hole into the lead,perfectly centered. This punch can fit either the die bore (for making leadtip hollow points) or it can fit the jacket I.D. (for making open tip hollowpoints). You can see why it is important that you use the terms �open tip�and �hollow point� correctly, since they require different equipment.

126
You can have an O.T.H.P. or a L.T.H.P. but you cannot, by definition,have a L.T.O.P. or an O.P.L.T. (same thing stated another way). This isbecause O.P. means open point, lead core shorter than the jacket. L.T.means lead tip, lead core longer than the jacket. It can�t be both at thesame time. But it can be shorter than the jacket with a hole poked into it,just as it can be longer than the jacket with a hole poked into it. The holeis the H.P. It�s not that hard to learn and it can save you mis-shippeditems and delays while the terms are restated correctly the second timearound! The problem is that many other bullet makers tend to mix up theterms. They do not need to be clear about it, since they are not sellingyou any tooling to make your own bullets. If Speer calls an open tip bulleta hollow point, it hardly makes any difference to you or to them. We haveto be more precise.

127
10. Bullet Swaging Presses
Corbin builds several models of bullet swaging presses. The presseseach have a range of capabilities, and dies of a size that match thosecapabilities. Some of our older literature refers to the Silver Press (CSP-3), or the Mity Mite press. These are discontinued, horizontal ram cast-frame models, which accepted a small diameter of die called the type -M.The -M dies used 5/8-24 threads, same as our -S dies, but had a body of3/4-inch instead of 1-inch. The -M dies can be made on special order tofit older Corbin presses.
More recent literature and published articles and advertising, espe-cially during from about 1995 to 2002, referred to the Series II press. Thishad the catalog number of CSP-1, and was replaced by our current S-Press, which looks similar. The Series II was built entirely of steel, andexcept for the first version, had needle bearings in the links. It used a stoppin and ejection system similar to the Silver Press, which in turn requireda slotted punch head on the ejection punches. The stop pin was supportedwith a hardened bushing pressed into the front of the frame, but did notextend through the ram. The ram was slotted only on one side.
Today, Corbin builds two hand-powered presses, the S-Press (CSP-1)and the Mega-Mite (CSP-2). The S-Press uses type -S dies, which havethe 1-inch main body with a 5/8-24 threaded shank, providing a wideshoulder to adsorb axial force against the top of the ram (instead of pass-ing the stress through the threads). The S-Press also uses a ram slottedthrough both sides, and a long stop pin that passes completely throughthe ram.
The punch heads for -S type ejection punches have a hole throughthem, rather than a slot. They are also larger in diameter than earlier -S or-M internal punch heads. Older -M and -S dies can still be used in the S-Press, however, by using a short stop pin with it. Current production in-ternal punches have a punch head too large to fit into the older presses,however. This is easily fixed by sending in your older press for an up-grade, which will bring it up to current standards for less than half theprice of a new press.
The Mega-Mite uses type -H dies, same as our larger power presses.The -H dies have threads of 1-12 (1 inch diameter, 12 turns per inch) ontheir shank, and have a 1.50-inch diameter main body. It is suggestedwhen you want to make bullets larger, longer, or from harder materialthan can be reasonably swaged in the S-Press, or when you want to movetoward a power press but would like to start with less investment (the diesinterchange with the larger power presses).

128
Corbin builds two models of power presses, which operate from ei-ther 115 volt 60 Hz single phase power (standard household supply in theUSA), or from 205-240 volt 50 or 60 Hz single phase power (optional, forexport to other countries). The power presses are the Hydro-Mite (CSP-1H), which uses -S dies and the Hydro-Press, a self-contained cabinetmodel with automatic timing, stroke control, and interfaces for automaticfeed of copper strip for jacket making operations.
Advantages of a swaging press
1. Self-ejection on the back stroke. Dies which fit into the ram, and havetheir internal punch automatically operated by a hardened stop pin,so that as you draw the handle (and ram) back, the stop pin contactsthe end of the punch and stops it, while the die continues back withthe ram. This pushes the bullet out of the die mouth, cutting severalseconds from the time required to make a bullet. Those seconds addquickly!
2. Self-alignment of external punch and die. The external punch is held inan adjustable floating punch holder, in the press head. The punch issecured by a hex bushing, threaded with hand pressure into theholder�s mouth so it pushes on the underside of the punch head, andholds it in the punch holder. A certain small amount of �float� takesplace, so that the punch can align perfectly with the die walls. Thisresults in less punch and die wear, and perfectly square bases (nottipped).
3. Less than half the effort, over 300% more strength. Most reloading pressesuse a four inch ram travel and are cast from 35,000 PSI grey iron oraluminum alloys. Corbin hand presses use half the ram travel withthe same amount of handle travel, doubling the available ram thrust.The industrial chromed alloy steel ram and special components ofCorbin presses result in at least 130,000 psi tensile strength. Corbinpower presses are �off the charts� on both power and strength com-pared with any reloading press. Yet, all Corbin presses ARE alsousable as high precision, benchrest quality reloading presses! Theycan even be purchased with optional arbor press anvil inserts, foruse with non-threaded benchrest type reloading dies. All come withadapters for standard 7/8-14 RCBS type reloading press dies andbutton-type shell holders, at no extra cost.

129
4. Built for the job. Corbin swaging presses are built from the ground up forthe stresses involved in high pressure swaging, and will maintainaccuracy while outlasting retail-trade reloading presses. Beingequipped with bearings in all moving joints, hardened alloy steelrams and other high strength features lacking in reloading presses,the Corbin press is a lifetime investment.
In addition to the press itself, the Corbin -S dies give you further rea-son to use this advanced swaging system. Since Corbin pioneered thesemi-custom manufacturing method for swaging, where standard pressesand die dimensions within broad families allow us to make large �blankparts� runs, and then finish the cavities and punches as your orders areentered, instead of �reinventing� each particular set of tooling from scratchwith every new design of bullet, it has become practical to manufacturecustom calibers, shapes and designs of bullet swages without paying hugeprices.
This is practical with all Corbin presses, because we can control thetolerances and dimensions of the entire swaging system and are not atthe mercy of dozens of different press manufacturers, each with theirown ideas of tolerances and dimensions for ram slots, press heads, ramtravel, ram diameters and leverage systems. Certain standard lengths ofdies and punches handle all the various calibers from .123 to .998 diam-eter in all practical lengths of bullets.
Thus, we can manufacture huge �runs� of die blanks in the appropri-ate lengths, matched to the standard punch blank lengths, and achievegreat cost savings over making all these one at a time. When your orderfor a special benchrest .243 with a 14-caliber secant ogive and an 8 degreeboattail comes in, we know right away that all we have to do is reach intothe bin of 2 inch long die blanks and pull out three of these, knurled andthreaded, center-drilled and ready for the die cavities.
We know for certain that we can use internal punch blanks manufac-tured while the machines were set up for a week�s total production ofnothing but these blanks. They�ll fit perfectly, once we diamond lap, heattreat and hand fit them to their die cavities. In other words, you savehundreds, perhaps thousands of dollars in some cases, and get the samequality of die, compared to fiddling with someone else�s press and com-ing up with a unique set of dies just to fit it, or compared to making lowvolume, single-unit custom parts from scratch on every order (as most ofthe bullet swage die firms have done in the past).
One final reason to get a Corbin Press instead of trying to buy customreloading press dies is that the price of the press and a complete set ofdies to fit it, is usually less than half the cost of any comparable quality

130
alternative. Those who make �benchrest� swage dies generally chargefrom $1500 to $3500 for a set of just the dies. They probably fit yourreloading press, since few die-makers today build actual bullet swagingpresses. But look at how much money you�d save by getting a press de-signed for precision bullet making, instead of buying the efforts of a die-maker who is attempting to design around the limitations of a reloadingpress!
S-Press, CSP-1
This is the most popular press today, because it not only accepts theoriginal type -M dies, but also uses 1 inch diameter type -S die (samethreaded shank size, 5/8-24 tpi) in the ram. The S-Press is a vertical de-sign, with the floating punch holder in the press head, which uses thesame 7/8-14 thread as conventional reloading dies. An adapter convertsthe ram to hold regular button shell holders, and arbor press anvil insertsare available for the punch holder and the ram, for use with benchrestreloading dies.
The S-Press looks like a Roman numeral II from the front. The maincomponents are machined from steel, not cast iron, so it is smaller andlighter than iron presses, which have less tensile strength and half thepower. The ram linkage can be quickly set for 4-inch or 2-inch stroke(reloading, or swaging). A set of four needle bearings in the links providessmooth operation. Bearings also surround the ram.
Bullets from .123 to .458 caliber, with a length limit of 1.3 inches, arewell within the range of most small arms calibers, and are also within thecapability of the S-Press. The advantage of the S-Press over conventionalreloading presses is the greater strength (up to 130,000 PSI versus 35,000PSI), higher leverage due to the full 180 degree arc of the handle traveland dual stroke length, more sophisticated engineering (all moving con-tact points use bearings, including the ram, which is surrounded by twoinch-long bearings mounted in a precision honed cylinder), and capabil-ity to do reloading. The CSP-1 press comes with a FPH-1-S floatingpunch holder and a reloading adapter (to hold standard RCBS shell hold-ers in the ram, extend the ram height, and provide a port for spent primersto drop into the primer catcher tray, also provided).
A stop pin, mounted in the front of the press, pulls out so you can usea long reloading stroke, and pushes back in so you can use it to stop thedownward movement of swaging punches and cause automatic bulletejection on the down stroke. The long stroke is set by removing a retainerpin (which looks a little like a hand grenade pin) from the link, pushing thesteel pin out of the ram and toggle, and moving the ram to a second set

131
of holes in the toggle, then pushing the pin back in and replacing theretainer pin. This is easily done by hand: just wiggle the toggle and ram abit as you push out or push in the pivot pin to help get it lined up in theram bearing.
The CSP-1 press would be the right choice if you plan to make bulletsfrom .123 to .458 diameter, in lengths of 1.3 or less inches, with a corematerial that is no harder than Bhn 12 (and this should become less as thepoint becomes sharper and the diameter becomes larger, so that a spitzer.458 would probably need to be no harder than Bhn 6 to Bhn 8) in thetype -S dies.
With harder alloys, the guiding factor is your tolerance for being care-ful, and the odds of breaking the die doing experiments. If you might usea little wheelweight alloy from time to time, might get in a hurry some-times and throw the handle pretty quickly when swaging, or want to playaround with some techniques that no one may have tried yet, then thetype -H dies and the larger CSP-2 press is a much better choice.
If you want a caliber over .458, or a length of bullet over 1.3 inches,or a hardness of material over Bhn 12 (such as a steady diet of wheelweight alloys or linotype) then you want type -H dies and the larger pressesthat use them. All the wishful thinking and rationalizations in the worldwon�t make you any happier later, when you break the die, no matter howmuch work it was to get the person on the phone to agree with you,eventually, that maybe, yes, you might be able to get away with the lessexpensive equipment for jobs it wasn�t designed to do.
You might also bag an elephant with a .22 long rifle, but I�m notgoing to stand in that elephant�s path while you try it. Sometimes a per-son will spend a hour on the phone trying to wheedle an admission thatsomething might work, so they can save a few dollars and buy an inap-propriate tool based on this �advice�, and then later on, when it finallybreaks from continued abuse, they can whine about it and try to get an-other one free (which will also break eventually).
Please! Give me a break, not the die. The -S dies do a great job for thematerials and dimensions for which they were designed, and that is whatthey are warantied to do. Anything else that works is just pushing theenvelope, and you might get away with it, but if it breaks, you still ownboth parts. The larger -H dies and presses are made because there aresituations where they are required for reliable operation, not just to makeunnecessary larger sales. I�ll be the first one to tell you that you don�tneed something larger, if the smaller one will be perfectly fine. Usually,getting a larger than necessary hand press isn�t a good idea because youwork harder than necessary operating it. A power press is a delight to useeven if you don�t really need it for the job, on the other hand.

132
Mounting the CSP-1 Press
The S-Press mounts directly to your loading bench, or you can pur-chase the optional CSP-B Bench Stand. This sturdy steel stand puts thepress about a foot higher than your bench top, so you can look directlyinto the area where the external punch enters the die, and so you gainsome extra leverage on the handle. The Bench Stand has a shelf to holdspare parts and dies and a thick steel reinforcing plate that mounts underthe top section. The press is held slightly forward, over the bench edge, tokeep the handle from striking the front of your bench.
Using the Bench Stand gives you room both under the stand and onthe shelf, so you wind up having more storage room than before, insteadof decreasing your bench space. But the main reason I like it is that mostreloading benches are the right height for reloading, where you want tolook down into the case during operations, and with swaging it is better tolook straight at the die during the swaging stroke, so you can watch thepunch and die come together.
Corbin also offers the CSP-S Floor Stand, which is a heavy steel as-sembly using a vertical post like a drill press to support an inch-thickmounting plate so you can view the operation from a standing or shopstool seated position. The same floor stand fits both the CSP-1 and CSP-2 presses. We drill and tap two sets of bolt hole patterns, just in case youwant to use the other press.
The Floor Stand needs no mounting: it has a deck on which you stand,and your own weight is sufficient to stabilize the operation. This makes itideal for rented spaces where you cannot put holes in the floor or build ina sturdy bench. It also makes the press somewhat portable, since you canslide the bench stand around to get it out of the way when you are notusing the press. The floor stand is heavy enough so it has to be shipped bytruck. If you order it with the other items, it usually doesn�t cost anymore to ship them all in the same carton.
Changing the Stroke Length
The CSP-1 press has two stroke �modes� or settings. The short strokeis two inches of ram travel, and the long stroke is four inches. For bulletswaging, where the die screws into the press ram, you want to use theshort stroke and the stop pin should be in place in the front of the press.But for jacket or bullet drawing, and for reloading operations where thedie goes into the press head (top), you want to remove the stop pin anduse the long stroke. The ram position at the end of the stroke is designed
133
to match the reloading adapter height and the use of shell holders ordrawing punch base lengths, so that you can get the proper position ofthe die at the end of the press stroke.
When changing the stroke length, I like to position the ram so that Ican insert the stop pin before I remove the pin that holds the ram to thetoggle. Nothing keeps the ram in the press, once you have removed theram to toggle pin, other than the stop pin, so you want to keep on hand onit to prevent it from sliding out of the press and falling on the floor (oryour foot!) or else make sure the stop pin holds it in place until the ram totoggle pin is back in place. Don�t forget to remove the stop pin in the longstroke mode, though. Otherwise you will wonder why you can only movethe handle through part of its travel!
The CSP-1 has a special feature not present on most reloading presses,and that is the offset toggle arms that straddle the ram, allowing for a full180-degree rotation of the toggle. This can add another 20 to 25% effec-tive leverage to the press, even in the same stroke mode as a conventionalreloading press. Many popular reloading presses have a 135-degree handlearc, which limits the amount of leverage (a ratio of distance times thedegrees of travel for the handle, divided by the distance moved by theram).
By increasing the �input� travel for the same amount of �output� travel,ram tonnage is increased for any specific integral of travel, since the pressleverage is designed around a log-function power curve. For instance, fora 1 inch arc movement of the handle at a given point in ram travel, youmight get a 1,000 times multiplier of force, whereas the next 1 inch move-ment of handle would get a 10,000 times multiplier of force, approachingnear infinite force as the ram movement approaches zero for the same 1-inch arc travel at the end of the stroke. But I don�t want to put anyone tosleep just yet, so let�s skip the math.
Mega-Mite Press, CSP-2 Model
The Mega-Mite is a huge version of the CSP-1 S-Press, weighing over75 pounds and having a triple stroke of 2, 3 and 6 inches. The press alsouses needle bearing links�much larger ones than the CSP-1 model�anda huge hardened steel ram guided at the top by a bearing-aligned steelplate which runs up and down on two massive hardened and ground guiderods.
The Mega-Mite uses type -H dies, and can be used with the reloadingadapter kit. The press head is removable, as it is in the S-Press, but uses a1.5 inch 12 tpi threaded plate for the FPH-1-H punch holder. The ramaccepts 1 inch 12 tpi threaded dies or punches, rather than the 5/8-24 tpi

134
of the S-Press (-S) dies. The standard type -H die is made with a 1.5 inchoutside diameter. Custom -HC dies can be ordered with 2 inch, 2.5 inch,or even 3 inch diameters where appropriate for the pressure.
The same dies which fit the powerful Corbin Hydro-Press also fit intothe Mega-Mite press. This does not mean every die set of type -H willwork in the Mega-Mite, because there are some calibers and materialsthat require much greater pressure to form. For example, the Mega-Mitepress has no problem accepting any lead hardness, but you cannot exertenough force to swage finned 12-gauge shotgun slugs (although this caneasily be done in the Corbin Hydro-Press using the same dies).
Also, the stroke length and power cycle affect some designs of bul-lets: you can swage a soft lead .600 Nitro bullet in the Mega-Mite, but youcan not make the same caliber with a spitzer nose, or with a hard leadcore, even though the press and dies can make long spitzer noses in smallercalibers, and even though the dies can handle harder lead without break-ing. The pressure in a hand press is primarily generated at the end of thestroke, so if you have bullets that form the nose in the last half inch oftravel, then you probably have plenty of force during the last half inch todo it.
If you made a .500 A.E. pistol bullet, the blunt nose and short lengthmeans you can use the end of the stroke, and thus apply force during themaximum power portion of the ram travel. That design of .50 caliberbullet can be swaged in the Mega-Mite press, provided you don�t also tryto use hard lead or a very thick jacket (over .035 inches for the walls, incopper). You might have trouble making an Ultra Low Drag nosed .50BMG bullet because that calls for a long, heavy slug with a nose that islonger than half an inch, and will require considerable force early in thestroke. You might do it by adjusting the top punch up and down so youget a couple of swings at it, first forming it half way and then adjustingthe punch down and forming it the rest of the way. But that is too muchwork for me. I�d rather get the Hydraulic press.
With the most blunt nosed, soft lead bullets, a .720 caliber short bul-let (under 1.5 inches) can probably be swaged, as can smaller ones. Leadwire extruders designed for the hydraulic presses will not work in theMega-Mite. Practical lead extrusion takes full power from the start of thestroke, not just at the end. No matter how large you make the press, if ituses practical leverage a normal human being can operate, it probablywill have about the same amount of final tonnage and power cycle. Thismeans about half an inch of the final travel will give you 90 percent ofthe power. Making everything larger does not give you more leverage.All it gives you is a stronger tool, not a more powerful tool. Some people

135
have a problem understanding the difference, and a few of them evenmake and sell presses with rather wishful thinking expressed in their speci-fications.
Press Design Considerations
Bear in mind that power output is just a simple physics equation: atany point in the stroke cycle, the instantaneous power available (or lever-age to apply the power) is the force you can apply to the end of the handlemultiplied by the ratio of how far the handle will travel (in an arc) tomove the ram a given distance. This is an ideal differential calculus prob-lem, but it can also be thought of logically without higher math. Lets saythat you want to move the ram up another 1/10 of an inch (.1 inches).How far does the end of the handle travel to get that amount of rammovement?
With a press linked through a swinging toggle, you have a compoundlever system that constantly changes the ratio of movement. As thehandle approaches the middle of its stroke, you might move the end ofthe handle in a 1 inch arc to get 0.1 inches of ram travel. That is a ratio of10 to 1. If you pushed fifty pounds on the handle, you would generate fivehundred pounds of thrust on the ram. But as the ram gets to the end ofits travel, the handle might swing another four inches while the ram onlymoved up 0.1 inches. At that point, you have a 40 to 1 ratio, so pressingthe same 50 pounds on the end of the handle gives the ram a thrust of2,000 pounds. If you need 2,000 pounds of thrust in order to start form-ing a long ogive, you may not have it early enough in the stroke cycle andthere isn�t a lot that can be done about it in a practical hand press. If youmake the handle longer, eventually you reach a point where you can�treach the handle!
With the Mega-Mite (and S-Press), we�ve maximized the arc length intwo ways. First, we make the longest practical handle that can still beconveniently reached at both ends of the stroke. Second, and more im-portant, we designed the toggle so it fits around the ram at the end of thestroke. This allows a full 180-degree arc, so you can input more handlemovement with the same length of handle. Most reloading presses canonly swing an arc of about 135 degrees.
Thus, with a three-foot long handle, you can input force through adistance of 9.425 feet (length of the arc of half a circle with a radius ofthree feet) on a Corbin press, but only 7.069 feet if you put the samelength handle on most reloading presses.
136
The reloading press has a total ram travel of about four inches, as itmust to handle rifle cartridge reloading. Four inches is 1/3 of a foot. Theoverall leverage ratio is 7.069 divided by 0.333 or 21.2. This doesn�tmean you have a 21.2 mechanical gain through the entire stroke, of course,because the specific ratio depends on where you are in the stroke. But itgives you a nice comparison figure for overall performance. This assumesthe use of a 3-foot handle, to make the comparison fair. Actually, mostreloading presses have much shorter handles and so their leverage is evenless.
In the Corbin press, the ram travels 3 inches in the CSP-2 press. Thatis 1/4 of a foot. The overall leverage ratio or mechanical advantage forthe press is 9.425 divided by .250, or 37.7. That is 16.5 more than thereloading press, or expressed as a percentage of improvement, the Corbinpress has 178% of the leverage of a reloading press, assuming the reload-ing press were to be equipped with the same handle. In reality, it probablyhas close to twice the power since reloading presses have typically shorterhandles.
Building the press twice as large would not change this ratio, andwould not change the power at all. It would only make the press largerand stronger. If the handle was moved in a bigger arc but the ram went alonger distance, by the same ratio, then no power is gained. We�re usingpower to mean mechanical advantage, which isn�t strictly true but amountsto the same thing for our comparison. Besides, if the press were madetwice as large, you�d need to climb on a ladder and grab the handle, andthen jump off to swing it through its full arc!
Making everything except the handle larger or longer would actuallydecrease the leverage. The Mega-Mite design is at the limit of practicalpower for a hand press, unless you want to add a crank and gears insteadof a handle, so that the cumulative distance you move the crank givesyou more input stroke for the same ram movement. An arbor press is astep toward a crank and gears (using a single drive rack and pinion gear).But the better answer is hydraulics. Adding gears and making you spinthem for each stroke is too much like making ice cream with a hand-cranked freezer! If you have done that, you know how long it takes to getgood results. Of course, electric motors do the job today. But adding anelectric motor to a mechanical gear press has its own problems, which Idiscuss in detail in the chapters on mechanical press design in the book�Power Swaging�. I won�t repeat it all here.

137
Roller Side-Bar Handle, CSP-2SH
The Mega-Mite press can be provided with either the long swaginghandle or a shorter handle with a side-bar grip. For reloading and swagingoperations that do not require maximum leverage, the short handle isconvenient and easy to use. It reduces the amount of movement youmust make with your arm on every stroke, at the expense of a lowermechanical advantage. Those who use the short handle are enthusiasticadvocates. But some operations, such as long bullet draws or tubing jacketend-forming operations, or very large calibers, require all the leverageyou can get in a hand press. For these jobs, the long handle (CSP-2LH) isrequired. Specify whether you want the short or long handle with thepress. The other is always available as an option. Handles are easy tochange. Most people who have the short handle also purchase the longone.
Floor Stand, CSP-S
The Mega-Mite press is available with the same CSP-S Floor Stand asthe S-Press. There is a separate set of bolt hole patterns in the top mount-ing plate of this stand, so you can use the same stand for either press (butnot both at the same time). The CSP-2 Mega-Mite press, without stand,can be shipped by United Parcel or by Air Freight. It is not mailable bystandard U.S. Postal Service. It can also be delivered by truck, and if ac-companied by the stand then truck or Air Freight are the only practicaldelivery methods.Using the Knock-Out Bars
The Mega-Mite comes with a set of knockout bars instead of using asteel pin passing through the ram to stop the movement of the internalpunch and cause ejection from the die on the down stroke. The bars arehardened and ground steel. They are different heights, but the same lengthand width.
The bars slip through a slot in the press ram, below a large steel springsurrounding the ram. The spring presses down on the top of this bar, andthe internal punch rests on the bar. The correct bar to use is the one that,together with the length of the internal punch, brings the internal punchto the mouth of the die at the end of the down stroke. Internal punchescome in different lengths. Longer punches are used for lighter or shorterbullets. Middle range lengths of bullets take a middle length of punch,and the heavier bullets, which are generally longer, take the shortest punch.The knockout bar which makes up the difference in punch length is theone to use with any given punch.

138
You can easily tell if you are using the right combination of knockoutbar and punch: the face of the punch should come even to the end of thedie on ejection (fully lowered ram position). If not, just change the knock-out bar until it does. The ram needs to be raised so you can get the barunder the spring.
Using the Retraction Pin and Spring
Most type -H punches have a quarter inch diameter hole through thehead, so that you can put a steel pin through the hole. The big springaround the ram goes on top of this quarter-inch diameter pin. The pur-pose of the pin is to let the big spring push down against the pin, which inturn pulls the internal punch down, keeping it out of the die cavity untilyou lower the ram to eject the bullet.
Not every -H punch uses this �retraction pin� or has a hole for it.Those operations which use the bullet or core to push the internal punchdown do not normally require spring retraction. But point forming dies,boattail forming dies, and certain other dies require that the internal punchbe pulled down by something other than the insertion of the bullet com-ponents. In the case of a point forming die, the ejection pin (which is theinternal punch) cannot be inside the open end of the jacket while it isbeing formed into a point (or else the pin would be trapped inside thejacket tip). The spring pulls down on the retraction pin, which in turnpulls down the internal punch, and thus keeps the wire pin portion of thepunch out of the main die cavity until you need it for ejection.
Reloading Adapter Kit, RLA-1-H
The CSP-2 Mega-Mite press is a very capable reloading press whenused with the appropriate adapter bushing and ram extender/shell holderadapter. It can accept .50 BMG reloading dies directly in the head (if theyare 1.5 X 12 thread). The RLA-1-H Reloading Adapter kit converts thepress for use with regular RCBS shell holders and 7/8-14 tpi reloadingdies. It also follows that you could use Corbin type -R dies for swaging inthis press, or in the S-Press. With an adapter kit, you can use some kindsof -S type dies in the larger -H type presses, but usually it is not a goodidea because the presses can so easily generate enough force to pop thesmaller dies. If you do this very often, you�d find a second press of propersize for the dies to be a better deal!
139
50 BMG Reloading and Priming (PT-50-H)
The Mega-Mite is ideal for .50 BMG reloaders and bullet makers. Corbinalso makes a special shell holder, the SH-50-H, which is threaded to fitinto the top of the reloading adapter�s ram extension. The shell holder ishardened, and glass bead peened, so that it will last and provide excellentgrip on the big 50 case rim. One of the shell holders also comes with thePT-50-H priming tool, which is designed so you can use it in the ram ofthe Mega-Mite, for precise adjustment of the seating depth, and also leaveit in place without adjustment for depriming!
To use the PT-50-H, first move the ram-to-toggle pin into the longstroke (reloading) position. Then place your depriming/sizing die in thepress head. Place the knockout punch for the PT-50-H in the press ram,resting on a knockout bar. Adjust the hardened hex-socket screw in theupper part of the tool so that the primer punch protrudes the desiredamount (you can fine-tune it later). Screw the priming tool body, with theshell holder in place, into the ram.
Place a case in the shell holder, and run it up into the depriming/sizing die. Adjust the die to do its job of knocking out the primer andresizing the case according to standard procedure. The spent primer willfall through the shell holder, into the priming tool base, and out an angledport hole. A plastic cup or shallow dish, like a margarine tub, with a holethrough the bottom to slip it over the ram, will catch the spent primers ifyou wish. Otherwise you can catch them as they come out of the prim-ing tool.
Lower the ram part way, to free the case from the die, and slip it out.Hold the primer pocket against a power primer brush or clean it by hand,then with the ram slightly raised, put a new primer in the center of theshell holder. If the ram is raised slightly, it will drop into the hole. Slip theshell case back into the shell holder, and lower the ram. Then remove andinspect the primer, and adjust the setting of the hex screw so that theprimer is set as desired. Once you have set the primer tool, it will main-tain accurate primer depth.
Arbor Press Adapter Kit, APA-2-H
The Mega-Mite press can also use the optional APA-2-H Arbor PressAdapter kit. This consists of two inserts, one for the floating punch holderin the press head, and one for the ram. Their faces are ground flat andpolished, so that inserting them gives you the equivalent of a very pow-erful arbor press with the ability to adjust the feel or the power dependingon where in the stroke the work takes place. For more �feel�, adjust thefloating punch holder lower. For more power, adjust it higher. Dies that
140
were designed without threads, for use in an arbor press (benchrest styledies) can be precisely operated by utilizing the APA-2-H kit. Unlike anarbor press, which has only one fixed power/feel ratio for the whole stroke,you can select the degree of feel and the ease of use by adjusting thepunch holder to the desired end-of-stroke position.
Quick Change Punch Holder, FPH-QC-H
If you make bullet jackets from copper tubing, and the jackets arequite long, you may find that getting them in and out of the die requiresadjustment of the punch holder on each stroke. This is slow and inconve-nient. A better answer is the FPH-QC-H Quick Change floating punchholder. Using it is much faster and easier than constantly adjusting thepunch holder up and down. Since the quick change punch holder is notnecessary with short and medium length components, has more partsand takes a little longer to set up, we do not supply it with the press. Butif you run into a situation where removing the top punch quickly wouldmake operation faster, it is a good option.
Stripper Kits, SK-1-H or SK-2-H
You may have noticed a pair of holes with bearings in the top plate ofthe press. These are used with the optional jacket stripper kits. The firstkind, SK-1-H, is a pair of long threaded rods with a series of heavy springclip pins through them at various points, and a heavy steel bar at the topjoining them. The SK-1-H is used in certain jacket drawing operations, toprovide a way to push down on a punch in the top of a drawing die andeject a component, or to hold a stripper plate below the draw die, throughwhich a long drawing punch passes.
The SK-2-H is similar but does not push down on an ejector. It sus-pends the steel bar with a key-hole cut-out across the top of the draw dieso that the larger, round hole is directly over the die top. The jacket,having been drawn to size on the punch, protrudes from the top of thedie. The jacket mouth is above the level of the stripper plate, which slidesback and forth on two steel pins which fit into the two holes in the presshead.
You simply tap the end of the plate to move it over so the narrow slotnow comes under the mouth of the jacket, then lower the ram. The slotis precisely sized to the caliber or diameter of jacket, so it strips the jacketoff as the ram and punch go down. In the Hydro-Press, an optional auto-matic electric operator can move the stripper bar as the press cycles.
141
Generally, the SK-1-H stripper kit will come with one plate or bushingto fit a certain punch, and additional plates or bushings can be ordered forother punches. Unless you need it, there isn�t any point in ordering one.It is a special purpose tool, which will be suggested if the tooling that wedevelop for you calls for it. But I thought you might be curious aboutthose holes! They are �just in case�, not something that everyone willuse. Nothing is missing, just because the holes are there when you getyour new press!
The JRD-2-H jacket maker dies come with the necessary stripper plateto fit the particular size of drawn jacket. A set of pins to support the plateare placed in the two holes in the top of the press. The plate does notneed to be secured, and in fact it is safer it if just rests over the die asdesigned. That way, if there is any misalignment, the plate is simplylifted up with the jacket and is not bent, nor does it place any stress on thepunch if you use the wrong stripper plate.
Hydro-Mite Press, Model CSP-1H
The Corbin CSP-1H Hydro-Mite is the smallest hydraulic poweredpress Corbin builds. It is the same general size and frame as the S-Press,but is equipped with a 3/4 HP 120 volt AC remote controlled powersystem. The smooth, quiet operation makes the normally long jobs ofjacket drawing, bullet reducing, or case sizing go quickly with almost nophysical effort. The press isn�t as well suited for bullet swaging as theother hydraulic or hand presses, however. I recommend it very highly formaking jackets and other redrawing operations, but not so highly for bul-let swaging.
Although the press can generate more force than hand presses, themain advantages are the lack of effort required (so that even disabledpersons can perform long runs of production without becoming tired)and full power from the start to finish of the stroke. It is a linear powerstroke rather than the log power stroke of a hand press, meaning that youcan do drawing operations, lead extrusion, and other jobs which use thesame power at the start as they do at the end.
The press has the same caliber and length limitations as the handoperated CSP-1 because the same dies (-S) are used. But jobs that nor-mally require adjusting the punch holder back and forth to get enoughforce at the end of the hand-operated stroke can be done in one passwithout moving the adjustments. For this reason, the CSP-1H Hydro-Mite can produce more jackets per hour (and the operator does not tirenearly as soon).

142
The Hydro-Mite is ideally suited to production runs of small parts,such as drawing .22 cases into jackets. Because you can generate suffi-cient power to easily pop a type -M die of nearly any caliber, it is notrecommended that you use anything except type -S dies in the Hydro-Mite press. This is not to say you would break -M dies or you couldn�tbreak -S dies. Any die can be broken with enough applied pressure, andpressure can be focused on a narrow point in any die by using hard mate-rials which do not spread out and distribute the force until high levels oflocalized pressure are reached.
This is why you can swage .375 rifle bullets from lead and copperjackets all day long and then break the die on a single attempt to form asolid copper .375 in the same die with the same applied pressure: thelocalized pressure at the contact point of that solid copper rod can exceeda hundred thousand pounds per square inch, whereas the same ram thrustspread out over the softer material contact area would result in perhaps40,000 PSI localized pressure. But drilling a 1/8-inch diameter holethrough the end of the solid copper rod, about halfway down the axis,allows the material some space to take up as it squeezes down in diam-eter, and thus reduces the pressure to a practical level.
Hydro-Press, Model CHP-1
The CHP-1 Hydro-press is used by more custom bullet firms thanany other press. It forms the basis for successful bullet making businessesaround the world, from Australia to South Africa, Nova Scotia to Para-guay. This press can be ordered with either 120 volt, 60 Hz power (1.5HP), or with your choice of domestic 60 Hz 220 volt or export 50 Hz 240volt power (1.5 HP). It weighs about 350 pounds, and is self containedwithin a sturdy steel cabinet having a colorful Lexan-overlay work sur-face, with color-coded indicator lights and controls.
The e-book �Power Swaging� describes in details how to set up andrun the press with various tools. I won�t repeat all that here. The catalognumber of the book is �TB-4�, because it was once published as the vol-ume of Technical Bulletins, No. 4, decades ago. Now it is published onCD-ROM as an e-book and is called �TB-4e�. Of course it is constantlyupdated as we develop new features for the Hydro-Press and other powerpresses. The book is part of our library of swaging, or is available sepa-rately. I will use this book to describe the features and design, rather thanrepeat the operating details (which would be hard to remember withoutactually having the press to try them).

143
The CHP-1 has an adjustable stroke of from zero to six inches, mak-ing it capable of loading the largest cartridges and forming bullets withcalibers as large as one inch diameter. There is no limit to the jacket wallthickness, other than practical considerations of performance. You canswage virtually solid jacket material with merely a tiny hole through thecenter, or in some cases even copper rod with an axial hole part waythrough the ogive end, if we are aware of your intentions and design thedies to handle the pressure.
The normal die size is 1.5 inches in diameter, but custom dies can bemade as large as three inches. Custom dies of 2-1/2 inch diameter aresometimes built to handle slightly higher than normal pressures. Suchdies are quoted individually depending on features needed.
The ram is threaded for 1 inch by 12 threads per inch (tpi), and movesinside precision fitted guide bearings. The press head is aligned and guidedby a heavy steel plate, which itself runs up and down on two high-techfrictionless bearings, on hardened and ground steel guide rods.
Instead of just providing raw power, the CHP-1 applies intelligent useof force to your bullet making operation. You can set the appropriatestarting point, for proper ejection of the bullet, by moving a non-contactelectronic position sensor. Then you can set a second point where the ramwill come up and stop, retracting the internal punch a short distance toallow easy insertion of the next part. This is set by a second proximitytransducer, mounted on a steel standard beside the press head.
The top of the stroke is set by yet another proximity transducer. Youcan define the precise amount of ram travel and end points of travel,which in turn defines the amount of space you have to load components,eject them, and form the bullet, jacket, or other component. Reloadingwith the Hydro-press is a pleasure because of this precise stroke controlfeature.
The press also features pressure transducers which monitor the ap-plied pressure and can be set to stop the travel of the ram at a predeter-mined pressure, hold that pressure for a given amount of time (adjustableprecisely in milliseconds, seconds, minutes, or even hours), then eitherwait for your manual command to retract, or follow a programmed strokecycle that can include automatic ejection, and return to a loading posi-tion.
With a key-locked automatic/manual mode switch, the press can beset for fully automatic stroke cycling. This allows you to meet safety stan-dards by controlling who will be allowed to run the press in automaticmode. It also lets us design electronic interfaces with the JMK-2 jacketmaker kit, so it can work with the CSU-1 Corbin Strip Uncoiler. You canset up a fully-automatic strip feed that handles 50 to 100 pound coils of

144
jacket material, and can lubricate, feed, punch disks and draw them intocups, chop up the scrap material remaining for easy handling and resaleto a metals dealer, and run the cups into a waiting container!
All of this may not be of great interest to the person just starting inthe bullet business, but it can be a valuable bonus feature later when thebusiness expands. Instead of buying new machinery, you can continue touse the versatile CHP-1 with optional add-on systems.
The CHP-1 is best used for making bullets from .224 to .720 caliber(12 gauge), although it can make bullets up to 1 inch diameter with cus-tom dies and punches, and some restrictions on the jacket materials andcore hardness. It can extrude a 14-ounce cylinder of lead in seconds,turning it into yards of bullet wire from .430 to as small as .040 inchdiameter (below about .125 inch; we use multiple die holes and extrudeseveral streams on the same stroke).
Jacket length is of little concern: the CHP-1 can make bullets for the.50 BMG or a .600 Nitro, or draw long jackets for 6.5mm bullets withequal ease. Even jacketed 12-gauge slugs are simple to build. The CHP-1is covered thoroughly in the book �Power Swaging�. This book is highlyrecommended before attempting to operate the press.
Safety is a primary concern with any powerful machinery. The safetyrecord of the CHP-1 is remarkable. No injuries have been reported sincethe first machine was shipped decades ago. The normal operation calls forone hand to press an �Energize� button, and the other to press on a large�UP� or �DOWN� button. A bright red light comes on when you put thepress in automatic mode, with the key lock switch. Even then, you mustfollow a correct sequence of pressing the �ENERGIZE� button, holding itdown, then pressing and releasing the �UP� button, and finally releasingthe �ENERGIZE� button, before the auto sequence will be recognized.
Ram speed can be controlled from zero to about 2 inches per second.This is fast enough to make over 400 lead bullets per hour, and yet slowenough so that occupational health and safety officials are not concernedexcessively about the need for elaborate guards on the machine. The presscomes with two bright orange metal guards that clip onto the movingram guide. Their main function is to intercept any lead extrusions whichpop out of the CSW-1-H core swage or LSWC-1-H lead semi-wadcutterdies, so that their energy will be expended and they cannot strike you.
The CHP-1 is designed so that the cabinet is part of the cooling sys-tem for the motor and hydraulics, and also holds the hydraulic fluid in aclosed, baffle-stabilized tank that is the lower portion of the cabinet. Air

145
is moved through the cabinet from two 100 CFM electric fans on the leftside, and drawn over the oil reservoir section, from a fixed-width gap thatcauses the air to expand slightly and thus adsorb heat from the tank.
The front panel of the cabinet comes off to expose the motor, controland logic panel, drive cylinder, and hydraulic plumbing. A hydraulic oilfilter of the canister, screw-on type, is mounted inside and will need to bechanged only once every five or so years of normal use. The closed sys-tem with vertical cylinder mounting puts very little wear on the cylinderseals and permits little or no contamination of the oil. Thus, maintenanceis reduced to virtually nothing: just keep the guide rods and ram reason-ably clean of grit and use a light oil to prevent rust in damp environ-ments, and don�t keep the machine in an unheated space where conden-sation can form inside. Operate at normal room temperatures of from 60to 85 degrees F. for best results. That�s it!
The CHP-1 press uses type -H dies. The cost of adapting -M or -S diesto this huge machine would be prohibitive, and it would be far too easy tocrack them from excess pressure. Reloading press dies, on the other hand,are easily fitted by using the RLA-1-H Reloading Adapter kit. This kitconsists of a 7/8-14 tpi to 1.5�-12 tpi bushing (for the press head), andthe combination of a ram extender and shell holder adapter (T-slot withprimer port, similar to the RCBS ram).
Optional accessories for the CHP-1 include the LED-1 Lead Extruderset, to make lead wire from scrap lead (soft lead only), anvils to screw intothe punch holder and ram so you can use the press as a high powered,precision arbor press, and both the JMK-1 and JMK-2 jacket maker kitsfor turning strip into drawn jacket, just like the factory�only better!
The Hydro-press can also be used to punch and form medals andcoins from gold, silver, brass, nickel-silver, and aluminum, and to stampand shape such items as gun sights, trigger guards, and other steel parts.It has been used to manufacture components from fishing tackle to powertransmission line connectors.
You can, of course, build as powerful a machine by connecting anappropriate size cylinder to a hydraulic pump and motor. But it would notbe designed with the various dies at hand nor with the years of experiencegetting the dimensions, control circuitry, and appropriate cycle timing.And if it cost less, the odds are extremely good that the components usedare not the same quality: we buy hundreds of pumps and cylinders fromtop makers like Vickers (The TJ-Aeroquip division is right around theblock from our plant) and generally it is more economical to buy a lotthan just one, a savings we pass along in pricing the machine.

146
The CHP-1 press is built to do everything from making your leadwire, to forming the jackets, to swaging the bullets, and even to reloadingthe cartridges, with the effort it takes to press a button. It is not a high-speed production machine, like a progressive loader, but is a high preci-sion, high power production machine for profitable, exotic bullet stylesthat are not offered in high volume by anyone (because their market issmaller and more exclusive).
Our purpose in developing the custom bullet market over the pastdecades has been to carve out a niche with appropriate tools, in the ap-propriate price range, so that individuals who wanted to have an inter-esting, profitable business at home could do so without the need for highrisk investments in high speed production and the huge markets that areneeded to support them. The custom bullet market is ideally sized for themachines we build, because we built the machines with the business con-cept of custom bullet sales and markets in mind. Then, we built the mar-kets by showing clients how to promote, advertise, and sell high perfor-mance, at a fair profit, instead of run-of-the-press mass production thatmust compete only by offering a lower price and thus virtually assuring alow profit.
The CHP-1 Press is the main tool used by hundreds of full-time com-mercial bullet makers today. It is not a mass-production, high volume,low profit machine. It is a custom production, high profit machine. Itstamps out profits for its owners, with every bullet you carefully assemble,because it can make bullets many shooters are willing to pay over a dol-lar, sometimes over two dollars, each to obtain. Almost every advertise-ment you see today for custom bullets is from one of our successful cli-ents. Some are quite famous now. It makes me feel very good about theswaging field.
For more information about the business aspects of custom swaging,we offer the �Marketing Information Package� or MIP. It provides infor-mation regarding return on investment, capitalization of labor, marketsize and so forth, plus a comparison of the casting and swaging busi-nesses, and spreadsheets and projections for starting a typical one-personbusiness at home. A Corbin book on disk you may wish to read is called�Turning Ideas Into Income� (Cat.No. DC-TIII). The nuts and bolts ofthe bullet business are covered, in detail, from the organization, market-ing, and logistical standpoints, with a lot of information on the thoughtprocesses, goals and strategy you can use both in this field and in manyother business ventures, turning ideas into income, and then turning in-come into wealth.

147
Questions about the CHP-1
How much maintenance does it require?
Virtually none. The system uses a vertical mounted cylinder with noside drag on the seals, and the hydraulic circuit is a closed system withrecirculation filter. People such as Swift Bullet Company who purchasedthese presses in their start-up stages, many years ago, have used them tomake millions of bullets with only cosmetic wear to the finish, some-times an early switch or position detector failure, minor items such as theindicator or work lamp bulbs. By and large, if a person stays out of thecabinet and does not play with the design, take the precision hydrauliccomponents apart and get dirt into the system, the presses will run de-cades with no more than indicator lamp replacement.
What has failed?
Very few presses ever have a problem, but of those few which have(over more than 20 years) the main items which were replaced have beenthe solenoid valve (direction control valve for the cylinder), the two-stagehydraulic pump (rarely), and the single-phase 60 Hz 1.5-HP motor. Fromdamage or misuse, the main item of failure would be the position trans-ducers (normally from someone adjusting them to stick so far out that themoving ram strikes one). But in most cases, the failure was either rightaway and covered by warranty, or it was after 10 years or more of harduse, well within the normal range of mechanical things.
Do you need spare parts, then?
I would not buy spare parts unless you are located in a land where it isdifficult to get air shipments, or the project is so critical or profitable thatbeing down a few days would cost more than the value of the parts andair shipment. The failure ratio is so low that most people will never needto replace anything for decades. If you really use the machine hard, suchas two shifts a day and six days a week, then maybe getting a secondmachine would be sensible. We do have a spare parts kit, which includesindicator lamps, relays, and the solenoid valve, plus a spare position sen-sor and dwell timer. But every year the reliability of the componentsseems to improve, with new solid state electronics replacing more of theearly components. Even the first machines were very reliable. The oneswe make now are remarkably solid, and I don�t say that just to sell them.If I thought you needed parts to keep them going, I�d say so. It doesn�t

148
hurt General Motors and Ford that there is a big aftermarket for parts. ButI just can�t honestly say there is much to go wrong, based on what reallyhappens to the ones we�ve sold all these years.
Do you need special hydraulic fluid, and how often do you change it?
You need to use the right fluid, but it isn�t that special. It is the sameas Chevron AW-40, a standard non-synthetic anti-foaming hydraulic fluid.Do not dump brake fluid or other nonspecific types of hydraulic oils intothe machine! If you can�t find an equivalent to the Chevron fluid, fromMobile or BP or whoever else is handy, then contact us and we can shipyou a gallon or two. But having said that, the only time I�ve found itnecessary to change the fluid was in cases where the machine sat in a coldunheated building and was subject to sweating and condensation whenthe heat was cycled on and off during the work week.
Or, if a person decided to tear into the guts of the machine and takethe thing apart, and lost fluid in the process, that would be another casewhere you need to add fluid. Or, in one final instance, where the machinewas dropped or tipped over during shipping, contrary to the instructionson the box that say clearly �DO NOT TIP PAST 15 DEGREES� and havea 15-degree angle printed on the box to illustrate how much that is. Thereis a filler and breather cap combination, just at the front of the machine,inside the front panel, on top of the hydraulic tank. The entire lower por-tion of the machine is a hydraulic tank. It holds about six gallons of fluid,although we may make design changes so follow the information thatcomes with the machine if it differs from this.
You would seldom if ever need to change the fluid. If you did, there isa plug at the rear, near the bottom, that lets the fluid drain out. But unlessit is contaminated from something dumb that someone decided to do toit, or unless it was subject to a lot of condensation that might have putwater in the tank, odds are you could run it forever on the same fluid.Most people do.
Do you need special power wiring?
No, but you need a line that can run a 1.5-HP motor without unduevoltage drop. Some household circuits share with a refrigerator, toaster, orair conditioner, and those lines will probably be overloaded when themachine reaches peak load, at the end of the stroke. Or the breaker mightblow when you first turn the machine on, if a high-current appliance isalso running at the same time on the same circuit. A normal 20-amperefused circuit is fine. You may even be able to run it from a 15-amp line,
149
assuming that the circuit breaker can handle momentary surges at thevery end of the press stroke and when the press is first is switched on.Generally there is no need to run a special line. But in some mobile homesand older houses where the wiring might be a little substandard, yes, youprobably will need a dedicated line.
Is the machine noisy?
It sounds somewhat like a vacuum cleaner. If you live in an apart-ment or your shop is next to the bedroom, I probably would suggest notrunning it while people were trying to sleep. If you find it annoying tooperate because of the noise, you can isolate the cabinet behind a woodenenclosure that has good air vents and soften it somewhat. Most peopledon�t think it is unpleasant to operate, but there is hardly anything asvariable as people, so I�m sure someone will. As a guide, you could turnon an average vacuum sweeper and figure that is about as loud as it gets.The machine gets slightly louder at the end of the stroke, and quieter as itruns on the high volume side of the two stage pump, moving the ram upand down. It has an idle mode where you switch off the pump but havethe cooling fans moving 100 cubic feet of air through its cabinet for amild fan sound. If your neighbors can�t hear you sweep the floor, theyprobably can�t hear the press run.
Is the press dangerous to operate?
Anything that applies a lot of force between two objects can be dan-gerous if you put your fingers in the way, but I have seen far more acci-dents of the pinched finger variety take place with a hand press. Peoplejust automatically seem to respect the fact that a big hydraulic press coulddo major modification to their fingers, and that helps keep them alert. Iwould not be operating it around small children, or while finishing thesecond six-pack of beer, or in any other circumstance where I couldn�tkeep my mind on the business at hand.
But so far, in decades of people using the machines, no one has re-ported an accident, not so much as a pinched finger. Based on history ofuse, I�d say it was pretty safe. Based on human nature, I�d say the personwho has not blown themselves up handloading is smart enough to avoidsticking their hand under the ram and leaving it there while holding the�Energize� button down with an elbow and pushing the �UP� button withthe other hand.
150
Some people have modified the safety features, and gotten away withit. I don�t recommend it. The press has an �Energize� button on the lefttop, and an �UP� and �DOWN� pair of buttons on the right of the toppanel. You have to push two buttons to make the press ram move up, andsince this should take both hands, it would seem hard to lean that far tothe back of the press and force your head into the space between the topplate and the ram. Or to get one leg up and stick your foot into the area ofdanger. But if one taped the �Energize� button down or put a brick on it,I suppose one could figure out a way to get hurt.
Does the pressure in the system pose any danger?
The hydraulic pressure generated is not like the pressure in an airsystem, or in a gun. In both of the latter cases, pressure is caused bycompressed gas, which wants to expand. If a crack should appear in agun barrel, or in an air line, the gas wants to rush through it and continueto blow until all the pressure is relieved. Tremendous power is stored inthe compress gas itself. It can rapidly widen the crack and tear hunks ofmetal out of the surrounding container, throwing them at high velocity.
But a hydraulic system uses a relatively incompressible fluid. All thepower is transmitted from the pump, through the medium of the fluid, tothe walls of the pipes and cylinder. If a crack occurs, the fluid leaks orsprays out, and the pressure instantly drops. Hydraulic fluid spraying outof a pinhole under high pressure could penetrate the skin, and it couldspray out as a mist that a spark could ignite (although the fluid isn�t nearlyas flammable as kerosene or other fuel oils).
But usually, if you have a leak, it is more of a seep and you noticefrom a drip inside the cabinet. And this is quite rare now, since we areusing flexible lines instead of steel lines (shipping would sometimes vi-brate the steel lines and cause them to loosen under the flare fittings,causing a seep of oil). There is no danger whatever of an explosion fromthe pressure, in the same sense as compressed air or powder gas in a guncan cause damage.
If the die should break from excess internal pressure, the pressure isrelieved the instant the die cracks. The die does not �explode� exceptthat in rare circumstances it might shatter and the physical stress in thedie metal might cause some of the pieces to fly out. But in hundreds ofbroken dies (some on purpose for testing, some I wish I could say �Imeant to do that!�), by far the most common breakage is a loud pop andno immediate visible sign of where it came from!

151
When a good die is broken (that is, a die that did not have a flaw in themetal, an extremely rare thing on a par with a politician who doesn�t wantto raise taxes and demands a smaller staff) the pressure simply distributesitself evenly around the die until it finds the weakest points, then forms astress crack along the axis and instantly relieves the pressure by allowingthe die to expand a few thousandths of an inch, like a collet opening.
Sometimes the die isn�t broken apart entirely, but is joined at one endand a visible crack like a pencil line can be seen nearly the full body of thedie. Usually the die actually breaks into two fairly even halves (if it is acore seat or point form type die) almost as if it were cut by a saw, andcomes apart when you unscrew it from the ram.
If the die has bleed holes, like a core swage or semi-wadcutter die, theholes form stress risers because the core was trying to extrude too rapidlythrough them. We use 120-degree hole spacing, so the die tends to crackinto three parts, with the cracks more or less radiating straight from theholes to either end of the die. These kind of breakages indicate a good diethat was overstressed.
But while it is possible, in theory, for the die to shatter and throw partsof itself with dangerous velocity, I have never seen it happen. I have seena punch strike the die face out of alignment with the hole, bend itself, andshatter, and the stored energy in the spring-like bend tossed part of thepunch with enough force to be painful, but not lethal. Lead wire extrudersare another thing entirely. They compress a billet of lead and extrude itthrough a small hole.
But if any air or lubricant is forced toward the extruder hole, it canpropel the lead in front of it with good velocity, and probably could drivea piece of lead through someone�s skull. With extruder dies, I alwaysrecommend putting a cardboard tube or some other shield over the top(they project straight up from the top of the press) to prevent anyonefrom reaching over the top while it is operating. When the lead starts toflow out, it moves fast and is hot, so I let it sag over and then guide it witha leather-gloved hand into a box. But I never, ever, look into the top of thedie or put my hand directly over the extruder while it is spurting out wire.I have witnessed a rare dangerous �big bang� of a piece of lead being shotinto the ceiling, so I know it can happen.
Conversion of manual presses to hydraulic
Neither the CSP-1 S-Press nor the CSP-2 Mega-Mite press can be�converted� easily to hydraulic operation. Hydraulic presses use differentrams and other components designed for the stresses applied. It wouldcost more to purchase the same quality and safety of components on a

152
single-unit order and try to build up a solitary prototype than it would totake advantage of the experience, tooling setups, and volume productionof a Corbin press, for which parts are readily available.
I mention this because we are sometimes asked if we could supplyhydraulic parts for someone to modify a press, or if we would providediagrams and specifications to help someone build their own press. Natu-rally, we�d rather sell ours, but beyond that, the dies are made to fit andoperate in a specific design of ram, stroke, and clearances. It is unlikelythat they would eject properly unless a press identical to ours in mostparameters and dimensions were to be used. By the time we provide allthe right parts on special order as individual components, we might aswell fit them to a frame and sell the completed unit: it costs about thesame either way.
Did you ever try to build a car by purchasing all the parts? We figuredthat in the days when a Volkswagon bug cost $5,000, the parts to buildone would cost you $20,000. Then you add your labor. Parts put intoinventory for future use are far more costly than parts that are scheduledto be assembled along with a matching set of other parts and sold as acompleted unit.
People who have no manufacturing business knowledge probably willnever understand why, but those of you who are familiar with the humanhours of labor involved in keeping track of inventory, physically protect-ing and storing it, paying the business property taxes on it, and providingexpensive indoor storage space by the cubic foot, will know what I mean.
A part that might take an hour to make might cost only $10 in mate-rial, but anyone who thinks the machinery, tool bits, machinist wages,benefits, insurance and taxes allocated to making that part are insignifi-cant would be out of business in short order. In fact, the material cost isthe least expensive component.
Labor related expenses (wages, insurance, benefits, taxes) are the high-est expense in making anything that you do not make yourself in yourgarage, where you can afford to do it for �nothing�. If you can make a lotof these parts at one time, then you can save both on the material cost (aminor savings) and on the labor (a big savings) because there is only onesetup of the machinery, and you only have to find or buy the tooling oncefor the entire run. Setting up to make one part can take more time thanmaking it.
Then, if you can plan well enough so that you make runs of all theparts that produce a certain number of finished products, without anyodd bits left over, then assemble and test them one after another, thepeople who are doing it get good at it quickly. They develop little ways tosave time and motion, which would not happen if they were only build-

153
ing one or two products and then going on to something else. Anyonewho has ever worked in an assembly and testing situation knows that youjust get better at the job if you do several at a time, so that you can do justas good a job in much shorter time than someone who has not done it fora while. (On the other hand, if that is all you do day after day, it canbecome so boring that errors creep in from lack of interest...there is anoptimal number to a production run where a person is able to learn fastermoves without hurting the quality of work, then enjoy applying his newskills for a while, before it starts to get old.)
Setting a few parts aside for individual sale doesn�t cost anything moreat that point. But it does cause a ripple effect on future costs, because nowthere are mismatched numbers of parts on hand which may or may notbe sold before the design is changed, which may or may not remain ininventory through one or more property tax cycles and accumulate ex-penses in states or counties where property tax is levied, and which inevery case will require valuable space in the building, labor to keep trackof the inventory count and location, protection against rust and dust andhandling, and of course represents all of that accumulated cost as a deadweight, earning nothing on the capital tied up, until it is sold.
That is why it must sell for more than the total of such parts in thefinished product. Otherwise, the business will slowly lose money on suchparts until it must either increase prices on the finished products to coverthe parts inventory carrying expense, or in extreme cases, go out of busi-ness.
I expound upon this because at one time, before I became a manufac-turer, I used to rail against the high price of parts as opposed to their likelypercentage of the finished product value. Checking the price, for instance,of a new print head for five-year-old dot-matrix printer, I found that buy-ing just this print head cost half the price of the printer (when new), andI was a bit put out by this. Now I know that the printer company wasprobably doing me a big favor just by having spare print heads in stock fora product that was designed for about a three year product cycle.
They probably are just about breaking even, having tied up their capi-tal and labor in stocking the old print head for five years, when most ofthe users of the printer have purchased newer, faster units and there islittle demand for parts. It doesn�t make me any more cheerful about pay-ing half the price of the printer for the part, but at least I know the reasonisn�t sheer greed, now that I am in almost the same situation with parts asthe printer maker (except my products have a much longer life cycle).
Sometimes a person will ask �Can�t you just sell me the parts and letme hook up my own hydraulic system?� And the answer is yes, we can,but I don�t plan to because it never stops there. I�ve done it, and regretted

154
it every time. It never fails that the same person who just wanted to �hookup� his power steering pump to our parts, finds that there is quite a bitmore to it just like I had been saying all along. And then they want moreparts made, special adapters, and yet more advice, and all this time theyare getting frustrated because they assumed it would be so simple to�hook it up�. But there are no �hooks�. You have to design and build them.We already did. In fact, we probably made every mistake in the book atleast twice before we got it right.
Every new product takes hundreds of hours of prototyping, throwingaway things that didn�t quite work right, rebuilding again and solvingproblems that no one even considered. Getting reliable suppliers for com-ponents is just part of it. Sometimes it is years before we�re ready toactually announce a product, from the time we start on the project.
But the person who just wants to �hook it up� to save money, doesn�tknow all that. He just assumes it must be easy because it looks easy tosomeone who has never done it. And by the time he has accumulatedenough experience to know it isn�t easy, he�s mad at the world and thinkssomeone hoodwinked him by reluctantly providing him what he askedfor. I can spend hours on the phone (free) trying to teach him about hy-draulic design and mechanical stress and whatever else he needs to know,but if he doesn�t have the machining skills and equipment at hand, it doesno good.
Usually, by the time the project is finished, the person has bought alot of parts that probably didn�t get used, and wound up trying to get meto buy them back after he has dinged them up and made them unsalable.By helping him �save money� instead of just buying one of our pressesthat we know works right and is guaranteed, I�ve actually helped himwaste a lot of his time and money, and a lot of my time on top of it,building something that probably doesn�t work right and certainly isn�tguaranteed. Instead of a happy customer making bullets, he may be an-gry and making no bullets. So I say, forget it. You would probably feelexactly as I do, after having been through that a few times!
At this point, the thoughtful wheedler may ask, �How about sendingme plans to build a copy of your equipment, then?� It never hurts to ask.And the answer is....
No, we don�t provide blueprints on how to make our equipment. AskCoca-Cola if they�d like to give you detailed instructions on how to brewtheir drink yourself ! Or Ford if they�d care to put an engineer on the phoneand tell you exactly how to build their latest engine? Or Krispy-KremeDoughnuts if they�d send you a copy of their famous doughnut recipe? Oreven McDonald�s if they�d like to give you some tips on how to organize

155
a fast food business? The response may give new meaning to the oldSimon and Garfunkel song �Sounds of Silence�. Or maybe it would justbe peals of laughter and a loud click.
But we�ll figure out how to make any bullet you wish to build, if thereis any way it can be done on our equipment, and give you not only theplans but even the right to market designs that we developed, withoutany royalty, recognition or other payment for the idea. We�ll even helpyou market your bullets, by providing free information about publicitycontacts and methods that have taken us decades to develop.
We sell solutions: free information and help with bullet design is partof our service. Some of the valuable information is only free to our cli-ents, meaning if you purchased equipment from us. A fellow who justbought a casting machine isn�t going to get thousands of dollars worth offree marketing data unless he also purchased a press and swaging diesfrom us! We may be generous with help, but I hope we have not becomesenile.
But if that fellow called and wanted to know how to make a betterlead bullet than he could cast, and needed to know if there was a marketfor it and how to reach it, I�d be glad to point him in the right direction. Iwould spend some time explaining how higher profit custom bullets canbe successfully marketed at lower volume but higher net than cast, howto reach that market, and what equipment he would need.
After he purchased equipment and was ready to start marketing thecustom bullets, I would be glad to provide an extensive and exclusivemailing list of publicity contacts, filling in the blanks with specific details.Very frequently, our clients who first went elsewhere to try and start theirswaging operation tell us that even if our equipment cost more, they�d beglad to buy it because of the support and service extras, some of whichcan mean the difference between a bullet business struggling for years orbeing profitable in a reasonably short time.

156
11. Lead, Base-Guard, Gas-Checkedand Paper Patched Bullets
Bullets which have a shoulder between the nose section and the shankcan be made in a straight cylinder kind of die, by using a punch that hasthe nose shape machined into a cavity. The edge of the punch cannot beknife-edge thin, because it would soon break off from the stress of beingpressed under tons of force against the die wall and then moved to ejectthe bullet. In fact, the edge would break off at a ragged point about .020inches thick.
This is why we build the punches with a nominal edge thickness ofabout .020 inches: it is the minimum practical thickness of edge that willwithstand being pressed outward by swaging pressure and then moved.
A common misconception is that one should somehow be able tomake a bullet in the straight cylinder and punch cavity type of die (whichwe would call the LSWC-1 style) with no shoulder�in other words, atypical rifle bullet or a full jacket style of handgun bullet. How? Well, theysuggest making the punch edge razor thin. Simple. No edge, no shoulder.
Too bad it doesn�t work. We could save untold thousands of dollarsinvested in machines and tools to build diamond-lapped point formingdies, with the shape of the bullet carefully reamed and lapped into thecavity itself instead of into a moving punch with an edge.
A straight hole, through the die cylinder, fitted with a close-fittingpunch that has the nose shape machined in reverse (a cavity), can formlead, gas check, Base-Guard, or paper-patched bullets with virtually anyshape of nose. You can make wadcutters, semi-wadcutters, big hollowcavities like the old Webley Man-Stopper, sawtooth bullets, and evenpointed rifle type bullets�provided the nose is all lead and the jacketstops where the punch begins, with a shoulder the width of the punchedge.
We call any bullet of this general type a �semi-wadcutter� or�wadcutter� depending on how much of a nose it has, if any. That doesn�tmean you can�t make a very nice .45 caliber round-nosed paper patchrifle bullet with the LSWC-1 die. It just means the nose will be joined tothe shank with a small shoulder, which you will probably just barely coverwith the edge of the paper patch.
To get rid of the shoulder, you would swage the bullet in a pointforming die, which is a semi-blind hole shaped like the bullet, having asmall ejection pin at the tip to push the bullet out. But this kind of die isnot sealed on both ends: the small ejection pin needs to be out of cavity

157
to avoid putting pressure on it during swaging, because it is, after all, verylong and thin. Since the die is not sealed, you cannot develop the samehigh, uniform pressure that is produced in a cylinder type of die.
So, to be able to extrude surplus lead, adjust the weight, and form amore nearly perfect diameter and roundness of shank, you would firstswage the lead slug in a CSW-1 core swage die. This would give you thehigh precision weight control and diameter you want in quality swagedbullets, and at the same time would put a nice flat on both ends, insteadof a rough cast or cut wire end. Then, the smooth flat end will shape itselfmore cleanly into a smooth round end in the next die.
No shoulder means two dies: a core swage, and a point form. A shoul-der means you can use one die: the lead semi-wadcutter. Yes, even forpaper-patched, round nosed rifle bullets: it is exactly the same kind ofdie, even if you make the nose cavity longer and don�t normally think ofthe bullet style as being a semi-wadcutter. We can�t call this die a �Lead,gas-check, Base-Guard, and paper-patch bullet swage that can makewadcutters, semi-wadcutters, and rifle type noses too�. That won�t fit inthe 8 character space our computer order system provides! So we�ll justcall them all �LSWC-1� dies.
In the -R (reloading press) dies, we have the Pro-Swage. It is similarto what we would otherwise call a �Core Seater� die or �CS-1� style, beinga cylinder fitted with punches to form the nose and base of the bullet onone stroke. Putting bleed holes in the side of the die makes it a �LSWC-1�,if it does in fact have nose and base punches so it can finish up the bulletin one stroke. (If it made the core for a bullet, and was fitted with flatpunches, it would be a �Core Swage� or �CSW-1� style of die.)
The Pro-Swage can�t have bleed holes in the side of the die, becauseit fits into a reloading press. The reloading press is designed for reloading,so the ram comes almost to the top. That is where all the power is devel-oped in the stroke, so that is where the die must be set to form the bullet.If the die is in the top of the press, there is no place for lead extrusions tobe spurted out of the die sides. The bullet is being formed inside the partof the die that is surrounded by threads of the press head. In the PRO-1-R die, you adjust the weight by casting or cutting the lead as accurately asyou can before swaging. Or you can order an optional weight-adjustingpunch, which has a flat end and a hole through it, so you can bleed leadfrom one end of the slug to adjust the weight precisely by volume.
In any of the Corbin presses, you would put the LSWC-1 die into theram, along with its internal punch. With the type -S dies, in the S-Press,there is a round stop pin projecting from the press. It has a knurled head.Normally you just leave this pin in place with all the dies except for thepoint forming die, which uses this pin to trap the ejection pin punch so it
158
is retracted from the die cavity when the bullet forms. All the other dieshave punches large enough so that they will be pushed back by the com-ponent when you raise the ram.
The stop pin pushes on the tail end of the internal punch when youpull the handle back down (retract the ram). This stops the punch frommoving back down with the die and ram. They continue down, the stoppin holds the internal punch and keeps it from moving, and so the bullet ispushed out of the die on the down stroke. This provides automatic ejec-tion.
In the Mega-Mite and Hydro-Press, a steel bar goes completely througha slot in the ram and serves the same purpose as the stop pin. The bar forthe press is made in different heights, so that the total length of the punchyou use and the height of the bar, combined, are always the same dis-tance. With a longer punch, you use a shorter knockout bar, and viceversa.
Punches are made longer or shorter to accommodate longer or shorterbullets. A .50 caliber bullet is quite a bit longer than a .224 bullet or a .38pistol bullet. A .308 rifle bullet is somewhere in the middle. There wouldbe no point and a lot of wasted metal in making a .22 or .38 die the samelength as a .50 BMG die, so that is why we have three standard lengths ofdies, which have matching length punches, which have correspondinglength knockout bars.
Installing the external punch
The external punch always goes into ram in a reloading press, just likea shell holder. But in Corbin presses, the external punch fits into a threadedbody called the �Floating Punch Holder� or �FPH-1�. The S-Press comeswith a 7/8-14 tpi punch holder, catalog number FPH-1-S. A larger 1.5�-12 tpi FPH-1 is used in the Mega-Mite and Hydro-Press. It is called theFPH-1-H.
A special high accuracy punch holder made of hardened steel with ahole all the way through it, so you can drop the punch in from the top,then screw in an adjusting stop bolt, is made for the Hydro-Press. It isdesigned to contact the die face and stall the press, providing almost zerotolerance weight control. This special punch holder is not provided withthe press, but is available as an option. It is called the �FPH-2-H� PositiveStop Punch Holder.
To make the insertion and removal of long components easier, with-out moving the punch holder up and down, a T-slot punch holder is avail-able. This punch holder is called the FPH-QC-S or FPH-QC-H, dependingon its size and threads. As you probably have learned by now, the -S

159
means S-Press and the -H fits the various large presses such as the CSP-2,Hydro Junior, and Hydro-Press. The quick change punch holder is alsouseful for jobs where you want to apply two punches in sequence, such asa hollow point and a toothed punch.
In the reloading press you would move the die up and down to adjustfor weight and changes in style. In any Corbin press you would move thepunch holder up and down. The external punch is held in the punch holderby a retainer bushing. In the early type -M and current -S dies, the exter-nal punch is identical and interchangeable, whereas the internal punch islonger with the type -S die.
Type -M and -S dies can have the retainer bushing (also called a �hexbushing� since it is hexagonal at the exposed end) fitted to the punchpermanently, if the punch tip is larger than about .375 inches. Smallerpunches use the retainer bushing that comes with the punch holder, whichcomes with the press. In earlier external punch designs, here is also a steelring or collar, which slips over the punch before you screw in the retainer.This collar allows the punch to move slightly under pressure for perfectdie alignment (hence the name �Floating� in the punch holder designa-tion). Current external -S punches do not require the ring.
No collar is used in the FPH-1-H. The retainer can be hexagon orround. Generally if it is made round it will have knurling or a pin wrenchhole to snug it down. Hand tightening is usually sufficient except for longproduction runs.
Moving the punch (or punch holder) down, closer to the die, is justlike using more powder in your handloads. You want to approach anychanges with care, use small changes and test the results, watch for riskypressure signs, and back off if it appears you are raising pressure too far.It�s not likely you�ll hurt anything but the die or punch with careless op-eration, but damaging either one of those will hurt your budget.
Setting the stroke mode
In the S-Press, with the die and internal punch in place in the ram,make sure the stop pin (the little knurled head with the short pin, fitted toa hole in the top of the press) is in place. This pin stops the internal punchfrom going back with the ram on the ejection stroke, which is what pushesthe bullet out of the die. If you don�t have the stop pin in place, you can�teject anything from the die.
Corbin hand presses have at least two stroke lengths, a short stroke forswaging, and a long stroke for reloading and drawing. The Mega-Mite hasthree, so you have an intermediate option balancing power and strokelength. Make sure the ram is in the short stroke mode. In the reloading

160
mode, the ram travel is too long and the position of the dies will be incor-rect for ejection, and too high in the upward position for good adjustmentof the punch holder. If you do use the press for reloading, you must re-move the stop pin, or else the stroke will be blocked by the pin.
To change the stroke, locate the single pin the fastens the end of theram to the toggle bar. There are two sets of holes in the toggle arms. Oneset is closer to the end of the toggle arms, and the other set is closer to thebar itself. The set closer to the bar (body of the toggle assembly) is forswaging. It gives the ram a shorter stroke and twice the power. The setof holes closer to the unsupported end of the toggle arms is for reloading.With the ram pinned to these holes, the travel is doubled.
If you put the pin in the long stroke set of holes, the stop pin in the S-Press will limit the ram travel so that you cannot move the handle all theway up or down without damaging the stop pin. Always remove the stoppin, if you plan to use the long or reloading stroke. But push the stop pinback when you switch to the swaging stroke. Some beginning swagersforget about the two strokes, and try to use the press in the wrong mode.Conversely, they may fail to put the press in the long stroke mode fordrawing jackets or reloading operations, which require more stroke withless power.
Generally, when the die fits the top or head of the press, you will wantto use the long stroke. When the die fits the ram, you want to use theshort stroke with the stop pin in place. But there may be exceptions, soread the instructions that come with each die to make sure. Regardless,never try to use a �cheater� bar on the handle! There is nothing you cando safely with this press that needs a cheater bar or handle extension: allthe components are designed and matched to the amount of torque andleverage you get with the normal handle in place.
Setup and adjustment
Cast or cut a piece of lead to approximately the right weight, plus afew grains (unless you are using the PRO-SWAGE, in which case youwant the right weight now). Put a small amount of Corbin Swage Lubeon your fingertips, and give the lead a turn between your fingers to spreadsome lube film on it. Then put the lead in the die, and gently move theram up so the punch enters it, pressing on the lead core.
I like to adjust the punch holder so that, with the ram all the way up,there is no contact with the bullet. Then I screw the holder down until Ican�t move it by hand, lower the ram slightly and give the punch holderabout a quarter turn further down. Raise the ram and swage. Inspect thebullet. If it isn�t formed out completely, keep lowering the ram in 1/4
161
turn increments until it forms, but don�t apply more than a comfortableamount of pressure on the handle. If the pressure goes way up, you havethe punch holder too close to the ram and have lost the point of highleverage that makes the operation easy. A five year old could do it if youadjust the position just right. A gorilla couldn�t do it if you go half an inchtoo low.
In every operation, with each kind of swage die, you will want tofollow this basic procedure unless there is a specific instruction suppliedto the contrary. Moving the external punch closer to the ram always re-duces the space between the internal and external punches at the end ofthe press stroke, and thus generates more pressure on the core. Approachthis just as you do when increasing the powder charges in a handload:work from a known safe level in small increments toward higher pres-sures, checking the results as you go. As soon as you see any signs ofexcess pressure, back off !
The signs you may see would be an increased effort without an in-crease in the diameter of the bullet shank, or excess lead extruding aroundthe punch. When the diameter of the bullet or core reaches that of the diecavity, you have done all that is necessary or wise, and should stop apply-ing any more pressure. Further force only stresses and eventually breaksthe die or bends the punch.
It is a good idea to test the actual diameter of any die by making apure, soft lead slug in that die and then measuring the diameter of theslug as a standard to compare with jacketed bullets formed in that die,and with the size of following dies to be used. In the case of the LSWC-1or PRO-SWAGE die, this isn�t necessary because you generally make leadbullets as the final product. But in a core seat or point forming die, boattaildies or lead tip forming dies, the difference between the component di-ameter formed in the previous die and the bore size of the next die iscritical.
You should always have a slightly larger hole into which to push thecomponent on the next operation. If the component is already at or largerthan the size of a lead slug formed in the die, you�ll probably get hardejection and stuck bullets. In the LSWC-1 or PRO-SWAGE die, however,the bullet is finished when it comes out of the die, and there are no moreoperations to perform on it.
Making hollow points
Hollow point noses in the lead SWC bullet can be made in two ways.First, you can use a separate HP type external punch to poke a hole in thenose, which of course displaces lead and changes the nose shape. You can

162
either use the HP punch first, on the flat end of the lead slug, forming abroad flat-end wadcutter with a large cavity, and then change punchesand wrap the nose around with the regular nose punch, or you can use theregular nose punch first and then push a HP punch only part way into it.Pushing a bullet all the way to the bottom of the die would totally changethe nose shape into a flat-end hollow point wadcutter.
The way you get consistent, partial-insertion shapes is to back off thepunch holder, moving the external punch higher, and then use that set-ting with the end of the stroke. Do not try to get good results by guessinghow far to raise the press ram on every bullet. I can�t do that either. Youneed to have a fixed reference point for the end of the stroke, because thatpositions the internal punch face precisely the same, so you have thesame volume between it and the external punch face on every stroke.
The second way to make a HP cavity is to get a custom punch withthe HP probe and nose cavity combined in one punch. This kind of punchcan have an adjustable HP depth if the probe is straight (rather than ta-pered), so you can adjust its position by changing a screw depth in thepunch head. The end of the punch can be tapered, but if you adjust thispart back into the punch body, lead will flow up around the taper andmake a nipple on the end of the bullet.
The advantage of a custom HP nose punch is that it can have adjust-able depth and still form the entire nose in one stroke, without changingpunches. The two drawbacks are increased cost for this more complexpunch, and the limited size of the hollow point diameter. It cannot bemade very large because if so, the probe that forms it would take upnearly all the room in the punch cavity. This would cause two problems:1) the lead would probably stick in that narrow gap between the punchcavity wall and the probe, and 2) lubricant would build up in the tightspace and prevent complete forming of the nose. Better to use a separateHP punch and two strokes per bullet when you need a very large HPcavity.
Gas checks and half jackets
For gas checks and half jackets, the lead slug that you use for the coremust fit inside the jacket or gas check before it is swaged to final size. Thejacket should always be slightly smaller than the final bullet diameter, soit will fit easily and expand upward, creating a snug fit on the lead whenyou release the pressure. If the jackets are, for instance, 0.3575 inch di-ameter and your die has a bore of 0.3570 inch diameter, all you get isdifficulty forming and loose cores or gas checks that pull off from basedrag on their way to the target.
163
On the other hand, if you use half-jackets or gas checks that measureat least 0.001 inches smaller than the desired bullet diameter (and bore ofthe die), they will be expanded nicely and then spring back slightly whenyou release the swaging pressure, gripping the lead tightly, coming out ofthe die easily, and preventing the lead from turning inside the jacket.
You can use jackets that are as much as .005 inches smaller than thebullet without any problem. Some jackets can be even smaller, dependingon their strength, temper and wall thickness. Corbin jackets are correctlysized for the caliber, but some jackets from other sources are not becausemass production techniques for making bullets do not always follow thesame procedures that you would. I once purchased a large quantity ofbullet jackets that turned out to be too large to fit into the correct caliberswage dies. The jackets were used by a company that made the bulletsoversized and then drew them down in a final operation (which can leavethe jacket a bit loose on the core because of the difference in springback).
I had to find a buyer who wanted them all, and then make him a jacketreducing die to bring these jackets down a couple of thousandths beforeusing them. But I learned that there are major bullet makers who do notmake bullets using the high precision techniques proven by early benchrestbullet makers, namely the �up-swage� principle expounded by Biehlerand Astles in the 1960�s. This is the principle upon which all modernbullet swaging is based, and it requires a jacket smaller than the finalbullet diameter.
Base Guards TM
Base-Guards are conical disks with a hole in the middle, like a verywide washer. The hole is usually about 1/8 inch in diameter. The Base-Guard is normally made of copper, about .030 inches thick. Because theyare conical, they will expand when compressed and become the exactsize of your swage die. Any surplus metal will be extruded forward toform a burnishing tool edge, because one side is backed by the steel punchand the other side only faces soft lead. This scraper edge will engage therifling and push fouling out ahead of it, making it unnecessary to use anybullet lubricant, up to reasonable velocities of 1,200 to 1,400 feet persecond.
The best way to make a Base-Guard bullet is to first swage the leadslug into the bullet shape using either a flat base punch or the special BGpunch, which has a shallow depression in the exact center. Then eject thebullet, drop a Base-Guard disk into the die with the cone tip facing out,toward the bullet, and swage the bullet again.

164
This double-swaging process does two things for you. First, it assuresthat the base is already square and flat before the Base-Guard disk is at-tached, and thus prevents the Base-Guard from having to bend and shapeitself to a rough or uneven lead core prior to attachment. Second, it helpsto adjust the weight and get the nose formed perfectly before worryingabout the correct pressure needed to extrude the lead stem through thehole in the Base-Guard and form a good rivet head in the punch depres-sion.
If you use cast cores, they are probably already flat on the end andyou can swage all in one step with just about as good results as double-swaging. If you cut lead wire, there is always a shear angle to the cut,which tends to tip the Base-Guard disk and can result in a few bulletsbeing made with the disk at an angle or pushed up along one side of thebullet. However, try it both ways and decide for yourself the best combi-nation. This should not be taken as a criticism of cut cores, though. Leadwire is far easier and faster to use than cast cores, and it is generally muchmore consistent in density than scrap lead, so the minor issue of a shearangle on the end does little to detract from the benefits. If you seat thecore into a jacket, this is of no consequence except with hollow pointpunches. My solution is to press them flat with a flat-end core seatingpunch and then perform any other operations.
To order or add the BG capability to any LSWC-1 die, just order theinternal punch with the specification �BG�. We�ll know exactly what youmean. You can add the Base-Guard capability to any set of dies, by theway, although for the RBT or �Rebated Boattail� base, the disk has to beembedded in the bullet and the boattail formed as a separate piece, whichrequires some custom punch and die work. But for any flat base die set,just order the internal core seating punch as a type �BG�, and if you use apoint forming die, also order an external punch for it in the type �BG�,because the little lead rivet head would be smashed paper-thin and prob-ably would not hold well if you used a regular flat punch on it whenforming the step-less nose in a point forming die.
Paper-patched bullets
For paper-patched rifle or handgun bullets, nothing special is requiredexcept that you may wish to use a cup-base (CB) internal punch, insteadof the usual flat base punch. There are actually three standard base cavityshapes that Corbin produces (as well as any custom dimension you wish,of course). These are: 1) Dish Base (DB), 2) Cup Base (CB), and 3)Hollow Base (HB).

165
The Dish Base is a shallow curve that extends from one side of thebullet to the other, with no flat �margin� on either side. It is used to slightlyforce the edges of the bullet against the rifling so that moderate loads ofslower burning powder will quickly expand the bullet into the bore andprevent early gas leakage. It is used when the pressure is fairly high (hotloads) and cup or hollow bases might become flared excessively from themuzzle gas pressure.
The Cup Base is a deeper curve with margins on the sides, designedto hold moderate muzzle pressures in blackpowder rifles and in moderntarget handguns firing typical target loads. The curve is less than onecaliber in depth (typically 0.02 inches). It is very useful in paper-patchedbullets as a place to tuck the extra paper gathered at the bullet base, andcan help fit a standard diameter bullet to various bores during firing.
The Hollow Base (HB) is the deepest curve, with margins that aredesigned to hold muzzle pressure so the base won�t expand excessivelywhen the bullet pops out of the barrel. The design is to shift weight for-ward and lighten the bullet for its length. Air gun pellets, shotgun slugs,and muzzle loader bullets that are made to slide down the bore and thenexpand into the rifling on firing generally work best with this design. It isnot usually employed for paper-patched bullets, but there is no particularreason why you should not do it if you want to. Just order the internalLSWC-1 punch with �HB� designation. (Usually, the top or external punchis the nose, and the base is inside the die or internal.)
Of course, the big difference between a paper-patched bullet and alead bullet is the diameter of the die. With a paper patched bullet, youwould want the die to be smaller than the groove-to-groove depth of thebore by four times the thickness of the paper. To illustrate, suppose youwanted to make a .45-70 paper patched bullet. If the bullet were to be aBase Guard, gas-checked, or have lube groove or knurling rolled into itwith a Corbin HCT-3 grooving tool or HCT-2 knurling tool, then youwould want the die to be .458 diameter.
But for paper-patched bullets, that would leave no room for the paper.The most generally used fit is to have the paper take up the space left bythe rifling grooves, so that the bullet sits on top of the rifling or fits theactual bore of the barrel, perhaps even loosely if you use black powder. Acommonly available cotton bond paper is 0.0025 inches thick (and pull-ing or stretching it will make more than 0.0005 inches difference in itsthickness, so it isn�t terribly important to have �precise� paper).
The paper patch is usually cut to be the length of the shank (parallelsided portion) of your bullet, plus enough extra paper to form a wraparound the base and tuck into the cup base cavity. This might be roughlyan inch, in a 1-E ogive 450 grain .45-70 bullet. So you would first cut

166
some of your 0.0025 thick cotton bond paper into inch-wide strips. Thenyou would take one of the strips and wrap it around the bullet so that itmade two complete turns, bringing the outer edge exactly matching theposition of the inner edge so the paper didn�t have a lump from any extraoverlap.
You�d mark that point on the strip with a pencil, and then slice thepatch with an angle of anywhere from 30 to 45 degrees across both ends,so that you start with a narrow tip, wrap the paper around the bullet, andwhen you get to the last of the paper, the edges just butt together withone layer between them. Some people wet the paper and wrap it, andsome dip it in a lubricant such as Corbin Dip Lube, which helps hold it onthe bullet and reduces friction when it goes down the bore.
The important thing for our purpose is determining the swage diediameter to make the right sized bullet. With a typical .45-70 barrel, suchas a Shiloh Sharps or other quality replica, the rifling plus bore measures.4580 across. Four thicknesses of paper (two complete wraps around thebullet) is 0.0025 times 4 = 0.010 inches. Subtract that from 0.458 andyou get 0.448 inches, which is exactly the standard size of swage diemost people use.
You can use a 0.451 or a 0.452 swage die, which happens to be theright size for a jacketed or BG style pistol bullet for most .45 caliber hand-guns. To do that, you would want a different paper thickness. Working inthat direction, subtract the bullet diameter from the desired rifling plusbore diameter, and divide by four. This would be 0.458 - 0.452 = 0.006,divided by 4 = 0.0015 inches. So you would want to use a very thinonion skin or perhaps the high grade linen or abaca fiber paper found inthe computer industry for polishing hard drive surfaces. If you did this,you would be able to use one set of dies for both handgun and rifle cali-bers. Should I be telling you this? Now you only need one, instead of two!
Hard lead alloys
In the Hydro-Press you can swage moderately hard lead in a LSWC-1-H die that is designed for the job. Be careful to use the orange press-fitguards around the die, however. The pressure that it takes to extrude thelead is very high, thousands of pounds, and can build up before the leadextrusions finally move through the bleed holes. When they do let go,they can fly out at fairly high velocity. They are generally light and notvery aerodynamic, so they lose velocity quickly and are easily stopped.Stopping them with your body could be painful when using hard lead,because of the higher pressure, and the guards work much better.
167
Never put your face down close to the die when you are swaging! Ifyou should happen to exceed the breaking point of the die by applyingtoo much pressure, generally there is a loud pop and the die either falls intwo (or three) fairly even pieces, or it cracks without any apparent change,and is held together at the threads.
Sometimes, though, there is enough lubricant or air under pressure inthe die to blow a piece of lead or broken die at high velocity in any direc-tion. If it hits you in the eye, it could blind you. This kind of thing hasnever happened in the years of my experience, but it is possible, so weareye protection and keep your face back from the die while swaging.
With hard lead, the pressure required to make the metal flow can beconsiderably greater than the pressure that makes pure lead flow. Somedies may not be suitable for use with hard lead, if they were designedusing normal soft lead. You need to let us know in advance, if you plan touse hard lead. We can make the bleed holes larger in those dies which usebleed holes, and we may be able to do other things to either reduce therequired pressure, or to build the die even stronger than usual. Some ofthe techniques used to make a die stronger are fairly expensive, becausethey may entail special metals that machine with more difficulty, use uptooling faster, and need special time consuming heat treatment processes.Rather than force everyone to pay more for their dies, when they don�tneed this additional pressure, we offer custom dies to those who do.
How hard is too hard for a standard die? That depends on the caliberand the bullet shape to a large extent. If the die cavity is very long andnarrow, as with sharply pointed spitzer bullets, the pressure required toforce hard material into the nose will go up quickly. The same materialmight form a round nosed bullet in the same caliber with relative ease.Soft lead is 5 on the Bhn scale. Each integer increase is a square functionof hardness, so going from Bhn 5 to Bhn 10 is not twice as hard, but morelike four times as hard. My experience has been that the pressure is relatedto the increase in hardness with most materials, including gold, silver,lead, aluminum, brass, copper and other commonly swaged materials.(Yes, we have made both gold and silver bullet swaging equipment forclients! The purpose of such bullets is not generally to be shot, but fordecorative purposes...though there is a small market for silver werewolfammo that could actually be fired, believe it or not!)
If a die has a breaking strength of 150,000 psi, and pure lead flows ina given shape completely at about 20,000 psi, then you can see that rais-ing the pressure four times probably will work but going up eight timeswould blow up the die. Therefore, if you increased the hardness to Bhn20, the die would probably crack before the metal formed into propershape. There is no hard and fast rule about hardness. The die wall thick-

168
ness helps increase strength, of course, but eventually the tensile strengthof the die material is reached, and then the thickness hardly matters. Anydie can be broken with enough pressure. The pressure required to formeven moderately hard lead can be too much for the smaller -R dies, sothey are warrantied only for use with soft lead.
The larger -S dies generally work with up to Bhn 8 to Bhn 10 hard-ness, but even this depends on the shape and the operator. If you jerk thehandle quickly, you can blow up nearly any die from the combined shockand pressure. A positive, smooth application of pressure only builds pres-sure from the straight math involved in the force divided by the cross-sectional area to which it is applied. But a rapid jerk of the press handleadds both inertial resistance to flow and kinetic energy from the velocitytimes the mass of the moving parts. The sum or end result of this, plusthe static pressure, is what we call �shock�. It is similar to what happenswhen you pull the trigger with a load of fast burning powder and a heavybullet. The pressure soars to a high peak and then drops off to a lowerlevel as the bullet starts to move. This sudden pressure peak can far ex-ceed the breaking point of the die, and is also one of the few reasons whyanyone would break a hardened link pin.
Some operations (including point forming and core swaging) whichwork best if you have a constant smooth stroke, not a jerky motion witha lot of stops and starts. Making the stroke very slow can increase thefriction, because moving lead generates a small amount of localized sur-face heat and lowers the pressure required to move the lead. As lead be-comes warmer, it flows more easily. This is obvious from the logical con-clusion that if you warm the lead up to its melting point, it takes no morepressure than its own weight to make it flow! But something below thepoint where the heat would destroy the temper of the die (below 250degrees F.) is certainly desirable. Therefore, if you move the handle in anassured, smooth stroke with the timing of saying �one-thousand and one�from start to finish, you�ll probably have the right idea. That puts the mildinternal heating from friction to work for you, while avoiding the inertia/momentum conflict of too high a stroke speed.
Don�t take this as meaning you have to be a master of timing toswaging anything. Most operations work over a very wide range of strokespeeds. But as the hardness of the material goes up, the speed plays ofbigger part. And very fast or jerky motion is never a great idea, if onlybecause it jars your equipment and loosens the settings, and doesn�t giveyou any time to notice a punch that isn�t aligned with the die before yousmash them together in an energetic manner.

169
Fit of the external punch
You should be able to put the external punch into the die by hand, solong as the punch is clean and lightly oiled. It may take a little gentleturning and pushing with some cavity-shaped punches, since the cavityarea will expand slightly after usage and fit itself snugly in the die. But ifyou cannot push the punch into the die by hand even with a moderateamount of force, don�t put it in the press and push it in! Send back the dieand punch and we�ll adjust the diameter by lapping and honing. Don�ttake sandpaper or a file to it, or turn it down in a lathe. Some punches aredesigned to be very snug fits, in order to protect their thin edges fromexpanding and cracking under pressure. The die wall supports a thinwall, but only if there is very little clearance, perhaps almost too hard toput in by hand. But not quite.
The internal punch can become too snugly fitted to easily remove byhand, because the three lead extrusion holes may still have a bit of leadin them from the last job. These little plugs of lead are bearing firmlyagainst the side of the punch, and can make it hard to move by hand.The fact that it is already in the punch means you can safely assume it isthe right diameter. If you try to put a different internal punch in the dieand it won�t go by hand, that is a different matter. Clean it very well, oilit, and gently turn it back and forth while applying a modest amount ofpressure by hand. If it still won�t go in, probably it is the wrong diam-eter: don�t force it with the press.
The fit of a nose punch (with a cavity) is critical in a LSWC-1 die. Ifyou try to use a punch that was not specifically built to work with thatdie, there is a good chance that the fit of the punch will be just enoughundersized so that the punch will expand slightly and crack. This is onlytrue with punches that have a cavity and therefore thin walls. The pres-sure of swaging the bullet works against the inside of the cavity, pushingthe thin walls against the die. The die supports the punch if it is a close,handmade fit. Otherwise, it may not. A hairline crack may occur as aresult. Using the wrong size punch would not really be a warranty issue,since it is a user option. Punches for LSWC-1 dies are usually markedwith the caliber and a �W� code that stands for �semiWadcutter� (wealready used the �S� code for a core Swage die).
Internal or external?
As a technical matter, it doesn�t really make any difference if theexternal punch is the nose, or the base. But since people normally changethe nose more frequently than the base, and the external punch is fasterto change, we generally supply the nose as the external punch, and the

170
base as the internal punch. Since we�ve done it this way for decades, ourinventory and job planning is set up to continue it. You can have it theother way around, but from that point on you must specify any futureadditional nose or base punches for that set as being external or internal.Left without specific instructions to the contrary, you�ll get external nosepunches and internal base punches.
In the Pro-Swage for the reloading press, we reverse this because re-loading presses are so poorly aligned that it is important to protect theedges of the punch that has the deep cavity (nose punch). Making it inter-nal gives it the protection of the die walls. The external punch may getdamaged if you smash it into the die face, but it is more sturdy and willtake more abuse than the nose punch.
Jackets that cover the bleed holes
A note about jackets that cover the bleed holes in the die: if you wantto use a 3/4-length or full jacket, you are welcome to try it in the -H dies.Chances are it will work unless the jacket is too thick or hard. Lead willsimply blow a hole right through the jacket wall and you�ll have threetiny, shiny dots of lead showing through that lock the core into the jacket.If you try it with the -M or -S dies, you are taking a risk of die breakage orat best hard ejection as the jacket bulges into the bleed holes but does notlet the lead pop through. In large calibers such as .40 to .45, the die wallsare thin enough that you will probably break the die if you keep this upvery long, and die breakage from overpressure is not a warranty problem.(If you do break a die, send back the punches and we can make just thedie body, thus saving you a fair amount of the total die cost.)
Jackets drawn from thin material, with walls of 0.018-inches or less atthe point of the bleed holes, probably can be used in a LSWC type of die.The pressure will usually pop three tiny discs from the jacket wall andpush them through the bleed holes along with the lead. But if you try thiswith a thicker jacket wall, it probably won�t work until the pressure hasdone bad things to the die. Note that jackets can be tapered from as little0.010 at the mouth to as much as 0.050 at the base. The only thing thatmatters is the thickness where the bleed holes are located. You can haveas thin a jacket mouth as you wish, and it has no effect on the thicknessfurther down, since the taper can be whatever the jacket was designed tohave. (Actually, the jacket cannot be any thinner, further down...so thereis at least some relationship between the mouth and the rest of the jacketwall).
171
Pistol jacket length and terminology
Most half-jackets are from 0.25 to 0.35 inches high. Most 3/4-jacketsare from 0.437 to 0.560 inches high, and most of the pistol caliber fulljackets are about 0.70 inches high. A point of confusion seems to be be-tween half-jacket and half inch jacket. A half-jacket is just the commonname given to the shortest length of jacket for a caliber, which normallygoes about halfway up the shank of a normal weight for that caliber. Ahalf inch jacket length could well cover the entire shank, and thus wouldbe called a three-quarter jacket (because the shank is normally about 3/4of the total bullet length). Hey, if firearms terminology was easy, every-one would be using it!
You can use Base-Guards to replace both gas checks and half-jackets.They work better and are cheaper, easy to apply and don�t require thatyour lead core is much smaller than the final bullet since you don�t haveto put the core inside the jacket. Base-Guards replace 3/4-jackets and fulljackets as long as the velocity remains somewhere below 1,400 feet persecond and the gun has a fairly good bore, and the bullet fits the boreclosely. If you need to use either 3/4-jackets or full jackets, then the LSWC-1 type of die is not the best one for your bullet. Instead use a two-die setconsisting of the CSW-1 and CS-1, or a three-die set that adds the PF-1 tothese. Swaging the lead core first, in a core swage die (CSW-1) and thenseating it in a die with no bleed holes, which is the core seating die (CS-1),means that the core can be precisely adjusted prior to insertion in thejacket. Then the bleed holes are in no way affected by jacket length. I willcover this in more detail in the chapter on jacketed semi-wadcutter bul-lets.

172
12. Jacketed Semi-Wadcutters
If you need to make a jacketed bullet, and the jacket must cover mostof the bullet�s shank, then the LSWC-1 style of die won�t work because ithas bleed holes to adjust the bullet weight right in the side of the die. Thelong jacket would block them. Instead, graduate to the next level of equip-ment, where you swage a lead core in one die, at a diameter that will fitinto the jacket for your caliber, and then seat the core into the jacket inanother die that makes the bullet full diameter.
These two dies are called the �Core Swage� and the �Core Seat� dies.The Core Swage (CSW-1) must be large enough to accept the lead corewire or cast core by hand, and not so large that it produces a finished coretoo big to fit all the way to the bottom of the jacket you wish to use.Different jackets may have different wall thicknesses and internal tapers,so changing the jacket might require a different size of core swage die.
On the other hand, core swage dies don�t have to be any specific sizeso long as you can get the core into the jacket easily and the core isn�t sothin that the weight of bullet you make requires the core to be so long itsticks out of the core seating die. This means you can save some moneyby getting one core swage die for a smaller caliber and using the same diefor larger calibers that are close enough in weight to permit such use.
A .40 caliber jacket, for instance, normally uses a .340 inch diameterlead core. While we would usually provide a core swage of about .370 to.380 diameter for a .44 or a .45 caliber bullet, you could use the .340 coreswage on all but the heavier bullet weights. A .38 Special and .357 Mag-num both use .357 inch bullets, and a 9mm, .380 ACP, .38 Super, andseveral other 9mm calibers use .355 inch bullets. All of these can use a.312 diameter cast or cut wire core, which swages to .315 in the coreswage die. This diameter fits most of the .38/9mm jackets available.
The same core swage die would work for .358 rifle and even .375 rifle(assuming the same jacket wall thickness), except that we normally makethe head of the internal punch longer for pistol length cores and may havebuilt the swage die itself somewhat shorter than you need for heavy riflebullets. If the swage die is long enough, we can just provide a differentinternal punch, so that the punch head is shorter and lets the punch slideback further into the ram. This gives you more usable space to make theheavier rifle cores.
When we build a core swage and core seater as a matched set to pro-duce jacketed semi-wadcutter style bullets, we call this combination a�JSWC-2-� set (with -M, -S, or -H added to indicate which kind of pressand die diameter). The JSWC-2 set is 2/3 of the next level: add a point
173
forming die (PF-1) and you will have built a FJFB-3- die set that makesfull jacket, open tip bullets. But there is a slight caveat regarding the di-ameter of the core seating die, which needs to be understood clearly.
An external punch (usually with the nose shaped cavity) made to fitthe typical core seating die probably will be slightly smaller than the propernose punch to fit the same caliber of LSWC-1 die, unless the core seatingdie was specifically made for producing the finished bullet rather thanpreparing it for completion in a point forming die. This difference in di-ameter is usually small, designed to allow the seated core and jacket to fitinto the point forming die. But when an external nose punch is used tocomplete the bullet in the same core seating die, that punch should fitproperly in the die. A typical core seat die for a .357 caliber might pro-duce a .3568 bullet diameter, whereas a typical lead semi-wadcutter diefor .357 caliber would actually produce a .3570 bullet.
The difference is normally insignificant as far as the effect on accu-racy, but it does mean that the punch built to allow your 3-die set to make3/4-jacketed or lead pistol bullets without using the point forming diewill be undersized for use in a lead semi-wadcutter die that you mightpurchase later.
If the core swage and core seating die were built specifically for mak-ing .3570 bullets of the jacketed or lead semi-wadcutter style, then ofcourse the nose punch would probably be identical to one for a .3570 leadsemi-wadcutter die. So it isn�t strictly correct to say that all core seat diesare slightly undersized for the caliber, since a few of them could be madeto produce the finished bullet instead of preparing it for the point formingdie. But most CS-1 dies are a couple of ten thousandths of an inch smallerthan their matching PF-1 dies, and most point forming dies make thefinal bullet diameter desired.
You can see that if you purchase a point forming die later, to expandthe JSWC-2 set and make it a FJFB-3 set, and the core seater currentlymakes bullet of, say, .3570 diameter, it is likely you will need to get apoint forming die that has a .3571 to .3572 diameter cavity in order tomaintain the principle of always swaging �up� in diameter. This is furthercomplicated by the fact that different jacket materials have various amountsof �springback�, so that the actual bullet diameter and the die that pro-duces it will probably be different. So, to make things simple for you, asa bullet maker, if you send a few sample seated cores and jackets fromyour existing core seating die along with your order for the point formingdie, we can use them to determine the actual die cavity size rather thanguessing what it ought to be.

174
Building sets from simple dies
We�ll discuss point forming dies in another chapter, but just be awarethat once you get past the LSWC-1 type of die, all the dies build to makethe next set in capability. The various combinations are just putting to-gether the same few basic types of dies in different ways, to make certainkinds of bullets, the way Taco Bell puts the same few basic ingredientstogether in different ways to offer you all sorts of menu options. TheLSWC-1 die doesn�t build toward any other sets because it is a combina-tion itself of the core swage and core seat into one single die.
The LSWC-1 is really a core swage die fitted with the nose and basepunches you want, and made in the final bullet diameter. A CSW-1 is thesame thing made in a diameter that produces a core, rather than a finisheddiameter bullet, and is fitted with flat ended punches. The CS-1 is like-wise a straight cylinder die, made in final bullet diameter or just slightlyunder (perhaps .0002 to .001 inches smaller), but it has no bleed holes forlead weight adjustment.
Because the CS-1 die doesn�t have bleed holes, you can build up con-siderable pressure inside it, enough to form all sorts of elaborate hollowcavities, deep hollow base skirts, and fancy nose shapes. Ridges, teeth,hexagon shaped hollow points, and much more, can be formed becausethere is no pressure escape route through bleed holes.
The LSWC-1 does not let you make certain shapes completely, be-cause thin or long sections of lead may take more pressure to form thanthe pressure needed to spurt lead through the bleed holes. Once you be-gin extruding lead, the pressure inside the die can�t go much higher. Allyou do by trying is to make lead come out faster, leaving partly finishednoses or partly filled-out skirts on deep cavities. For this reason, we some-times suggest a two-die JSWC-2 set even though you might be makingan all-lead bullet which in theory could be formed in the LSWC-1.
Making bullets in sets that use the CSW-1 core swage die
Cut or cast a piece of lead to approximately the right weight, plus afew grains. Put an empty jacket in the scale pan, and set the scale weightsfor the final bullet weight you want plus about three to five grains extra.Snip off a length of lead about equal to the jacket length or longer if youplan to make a semi-wadcutter. You can do this by trial and error the firsttime (measure a bullet length of the weight you want, as a starting point).Once you get the weight right, you can save one core as a gauge and useit to set the tools next time.
175
Lubricate the cores lightly with Corbin Swage Lube. You can roll themon a lube pad, handle them with a little lube on your fingers, or roll themin a tumbler with some lube added. Whatever suits you is fine. The lube isto keep the dies in good shape and reduce the amount of force and wear.It is removed before you put the cores into jackets or shoot the bullets.Swaging lube is not the same as bullet lube: it isn�t for reducing fouling inthe bore, but only for reducing pressure and friction in the dies.
Put the CSW-1 die and its internal punch in the press ram, and put theexternal punch in the press head (in the FPH-1 floating punch holder). Aretainer hex-bushing holds the punch in the long, threaded punch holder.(The FPH-1 punch holder looks like a reloading die and is sometimesconfused with a die by beginning bullet makers.)
Put the lubricated core into the die, and run the ram up so that theexternal punch slips into the die mouth. Make sure that the core is com-pletely inside the die before any pressure is needed, and that the core issmall enough to drop easily into the die. Also make sure the externalpunch is the correct one: it must fit easily into the die by hand, but be aclose enough fit so that if it were not for the bleed holes you could pull avacuum inside the die with the punch. Swage one core, weigh it, andadjust the punch holder position so that you get the desired core weight.The core weight plus the jacket weight should be exactly what you wantfor the final bullet weight. You should be bleeding off from three to fivegrains minimum. A little more does not hurt anything. Do not try toextrude it too fast, though. A gentle firm push that takes a full second ortwo is about right. Rapid extrusion can build pressure and generate ex-cessive �shock�, which is just another term for transient high pressuresurges. Enough of that can crack a die that would normally handle theload applied at a slower rate.
For the maximum benchrest precision in core weight, double swagethe cores. Swage them all once, and then put them back into the diewithout changing the setting and swage them all again. If you are using ahand press, try holding the pressure at the top of the stroke for just asecond or two. If you are using a Hydro-press, set the dwell time for asecond or so, and make sure that the pressure is high enough to extrudeimmediately, with no apparent delay. For the ultimate in precision, usethe FPH-2-H Positive Stop Punch Holder. It eliminates any drift in ramposition, and enforces an absolute stopping point by actually stalling theram, using the pressure-reverse feature of the Hydro-press to automatethe procedure.
Make as many cores as you need, then remove the CSW-1 core swagedie and install the CS-1 core seating die and punches. For 3/4-jackethandgun bullets, you want to use an external punch that fits into the die
176
closely, with a cavity in the end of the punch shaped like the bullet noseyou desire to form. The normal handgun set comes with either a 3/4-Eround nose or a Keith SWC nose punch. You can specify other shapes,standard or custom.
Seating the core
Seating the lead core into the jacket is a bit of an art: you need to learnhow much pressure expands the jacket to the size of the die, and howmuch more would be hard on the tooling. Normally, once the jacket ex-pands to the diameter of the die, you are done. Higher force only stressesthe die, and does not give you a better bullet.
I like to seat the core gently and see if the core and jacket stay in thedie, or if they come back out on the punch. If they stay in the die, oddsare good I have expanded the jacket enough to make it press against thedie walls, and that is about all you need to do. If you get lead bleedingpast the punch with light pressure, it just means that your core seatingpunch is too small. You cannot develop enough pressure to expand thejacket to correct diameter with an undersized core seating or nose form-ing punch.
You can make a lighter bullet in a longer jacket by using either a plas-tic �bullet ball� to take up some of the space in the bottom of the jacket,or filling the bottom part of the jacket with compressed cornstarch. Corn-starch can easily be compressed into the bottom of a small cardboard pillbox, using the lid of a telescoping box to hold the powder and the bottomas a piston to compress it.
This firm layer of cornstarch will take up about a quarter of the origi-nal height. You can then use the jackets like cookie cutters, pushing themdown into the firm layer to insert a specific amount of material into thejacket. One, two or three �cookies� can be pushed into the jacket, as neededto take up room without adding much weight. Then the lead can be seatedon top. Your bullet will have the length of a heavier projectile.
You can also make a heavier bullet in the same jacket, just by makinga longer nose, less of a hollow base (switch to cup or dish base to makethe bullet heavier in the same length), or by letting some of the lead coreextend past the jacket at full diameter. This is not necessarily the bestdesign, because lead touching the bore will cause fouling at some veloc-ity, eventually. You can even telescope two jackets end to end over asingle core, squeeze them in the core seating die with a wadcutter nosepunch, and make a fully jacketed bullet that is longer than any availablesingle jacket
177
With any Semi-Wadcutter design of bullet (which also coverswadcutters), it is very important that there be at least a tiny amount oflead extending past the end of the jacket. The reason is that there is noway for the jacket edge to jump over the punch edge. If you expect thepunch to last, it has to be made with a minimum of .020 inches of thick-ness at the edge. Otherwise, the force of moving the punch after applyingtons of swaging pressure to the bullet would simply expand the thin edgeagainst the inside of the die, and rip it off. You would have about .020inches of edge thickness, but it would be rough and broken. Better tomachine it neatly where it would normally break anyway.
This edge means you cannot make the jacket curve away from fullbore diameter in the LSWC-1 or CS-1 die (both of which use the punchcavity to form the entire bullet nose). Hence, both kinds of straight walldies, using a punch cavity to form the nose, are restricted by physics tomaking lead nosed bullets with a shoulder. Below the shoulder, it doesn�tmatter if you have a jacket or not because either lead or a jacket willexpand nicely against the die walls.
If you try to make a bullet that has too light a core for the jacketlength, the nose punch will compress the lead until the punch edge con-tacts the jacket edge, then proceed to crush the jacket. Making the leadcore heavier solves this problem. If you want to make the same weight ofbullet, you can use a hollow base, cup base, hollow point or a light filler inthe jacket. Any of these methods will displace some lead, cut down theweight (or keep it the same, depending on how you look at it) and movethe core forward so it has room to fill the entire cavity in the nose formingpunch.
If your bullets have an angle or uneven spot on the nose, it probablymeans that the core isn�t long enough to fill the entire nose cavity in thepunch, or the lead is too hard to flow at the pressure you can safely applywith that die, or there is trapped lubricant between the punch cavity andthe end of the bullet. Normally you won�t have this problem with theJSWC-2 die set, because swaging the core in the first die makes the endsquare and smooth, so it flows evenly into the nose punch in the nextoperation.
But, if you should have these symptoms, use pure lead just to see ifyour supposedly soft lead is really not so soft after all. Hard lead is muchmore difficult to flow than pure lead. Alloys that seem soft to you mightactually be fairly hard compared to pure lead. A rule of thumb is that each2 point increase in Brinell hardness number (Bhn) will just about doublethe pressure required to fill out the bullet completely. Soft lead is Bhn 5and Linotype is about Bhn 22. Most wheelweight metal ranges about Bhn10-15. Going from Bhn 5 to Bhn 7 may double the pressure needed to
178
make the edges form completely. This is fine if your dies will handle thepressure. The type -M dies can only handle pressure designed for Bhn 5to Bhn 6 hardness of lead, especially in the .40 to .45 caliber sizes. Type-S dies may handle up to Bhn 10-12 alloys, and type -H generally handlesany lead you can put into them (but that does not mean the dies willnever break, no matter what you do: they can be broken from applyingtoo much pressure or applying it too fast, just like any other die).
Changing nose and base shapes
You can use more than one nose punch on the same bullet, to achievespecial effects such as various diameters and depths of hollow points.Thousands of shapes that are not exactly the same as either of the punchescan be created by remembering one thing: after you have once appliedthe force needed to expand the jacket fully, you don�t have to apply thatlevel again. This means you can push the next punch into the die as lightlyor as short of full contact as you wish, and only partially make the bulletnose reform to the new shape.
The most versatile way to make a hollow point, for instance, is to usetwo punches. First, form a giant hollow cavity by seating the core onlywith the HP punch, which has a conical projection on its tip. You have justmade something like the famous old Webley �Man-Stopper�, excellentshort range defense bullet for revolvers, which might not feed in someautoloaders.
Now, pick out a second punch, be it round nose, or Keith, or any othershape of cavity (wadcutters are not as effective). Push this punch onlypartly into the die, lower the ram, and examine the bullet. Adjust thepunch holder so that the punch consistently forms the desired shape atthe very end of the ram travel, so you don�t have to guess how far to raisethe ram (just go all the way up, with the punch holder set high enough toprevent full pressure and complete reforming).
Play with the punch holder position, using the end of the stroke eachtime, and see how many interesting different bullets you can make withonly two punches! Change back to the hollow point punch and see howreversing the order of use makes a completely different shape bullet, evenif both punches are used to the same relative depth of insertion. In fact, ifyou have a cup base or hollow base punch (internal), try using a flat orwadcutter punch to push the base into the die, forming the nose againstthe internal punch, then reversing the bullet direction for a second passwith the punch holder set higher.

179
This is a source of fun in bullet making: you get instant results, somegood and some bad, but all of them interesting. You don�t have to spendany more money on tools to make these bullets, but just use your imagi-nation and the adjustment of the punch holder and order of differentpunches in the operation.
One of my favorites is the large HP punch, followed by a Saber punch(as in the Saber-tooth Tiger). This punch has a number of saw-teeth cutinto the steel of a concave curved surface. You get a sort of buzz-sawbullet that zips through targets. It is a crowd-pleaser, assuming the crowdis not made up of attacking wolves or feral pigs. Put a few of those onyour table at a gun show and see how fast they are picked up by handload-ers!
Six teeth is the optimum number for this kind of punch, because eightmakes the teeth too thin and they won�t stand up very long to the highend pressure. You can nick the edge of the jacket (on purpose) with theseteeth, to help it start expanding, but don�t try to actually cut down intothe jacket material very far. This will soon overstress the sharp edges andbreak them. As long as most of the Saber-teeth are formed from the leadextending beyond the jacket, this concept works very well.
We�ve also had good luck making the curve almost a half ball, cuttingsix teeth into it, and pushing it down against a jacket that has lead seatedeven with or below the mouth! The jacket buckles inward slightly, and thethin sharp teeth slide under the jacket, crimping it like a blank cartridgecase mouth. This lets it fold further inward, so that the jacket take on thehalf-ball shape of the punch end.
This is the only instance I have seen where it actually is possible tomake a full-jacket bullet in a straight-walled die. The crimped-in groovesstrengthen the jacket to impact along the edge, so that feeding difficultiesdisappear, yet cause stress lines that help the bullet peel back from a di-rect nose impact. All together, the design is a great defense bullet (espe-cially when the core is not solid lead, but swaged number nine lead shot).
Minimum and maximum weight limits
Core seating and core swage dies have a maximum and minimumweight limit, related to the length of the core and jacket. The heaviestpossible weight is reached when the core and jacket are so long they donot let you put the external punch at least a full caliber length into the die.You need at least one caliber length along the external punch to be sup-ported and guided by the die cavity before any pressure is encountered.Otherwise, the punch may be driven off to one side so that it is damagedby striking the die mouth, or pressure in a nose forming cavity or rebated

180
boattail cavity may build up to the bursting point of the thin punch walls,since they are supposed to be supported by the solid steel die walls whenpressure is applied.
The lightest core and jacket that you can make, and hence the lightestbullet, is determined by the minimum volume left in the die, between theinternal and external punch faces, when the ram is all the way forwardtoward the die. The length of the head on the internal punch determinesthe minimum and maximum weight for a given die. By using two orsometimes three different punches, with the same overall length but witha different punch head length, you can swage the widest possible range ofweights. Here is how that occurs:
In a reloading press die, the threaded die holder body is machined toaccept a die in one end, and a quarter inch diameter knockout rod in theother end. The internal punch has a head, half inch diameter, which keepsthe punch from falling out of the die.
In any of Corbin�s swaging presses, the threaded die holder is replacedby the ram itself. All the dies screw directly into the ram, so they do notneed an adapter. The ram is machined so there is room for a 3/8 inchdiameter head on the internal punch to slide back and forth for the lengthof the die. The part of the punch which fits into the die must be the samelength as the die or you could not eject the bullet fully. The overall lengthof type -M or type -S internal punches must be the same, or the stop pinwould not push the punch forward to the right point for ejection.
But the head of the punch can be different lengths. It is a larger por-tion of the punch that keeps the punch from dropping out of the die. Theback edge of the punch head contacts a shoulder in the ram, regardless ofthe kind of press. This shoulder and the head length together determineexactly how far back the internal punch will slide before it is stopped. Theshoulder inside the ram takes all the force applied when you swage thebullet, so there is a minimum necessary thickness or length to the head.However, by varying the head length, the amount of protrusion into thedie is also varied.
To swage a heavy core, you would want an internal punch with ashort head length, so the punch would slide back as far as possible insidethe die, offering as much volume to fill as possible. But if you used thispunch to swage a light core, the external punch might travel past thebleed hole location, blocking the bleed holes. Then you might crack thedie by trying to extrude lead through those holes, because no matter howhard you push, no lead can come out.
If you want to make a light core, very gently try to swage it andwatch to see if the external punch goes into the die so far that its facewould cover the bleed holes. You can easily determine this by holding the

181
punch beside the die, in the same position as it would be when swaging.Align the face of the punch just below the bleed holes, so they would beopen if the punch were inside. Use a marker pen or grease pencil to put aline on the shank of the punch, where it would just line up with the diemouth.
Now, when you try to swage the first light core, notice whether or notthe mark you made disappears into the die mouth. If it does, you cannotswage that short of a core with the internal punch currently installed. Youneed an internal punch with a longer head, so the punch is held furtherinto the die, closer to the die mouth. Then, the light core would be con-tacted before the external punch could cover the bleed holes.
You will also find this true of other dies besides the core swage. Ashorter head is used with heavy weights, and a longer head is used withlighter weights. Normally the range is great enough so that the division isroughly between �pistol� lengths and �rifle� lengths. Weight alone doesnot tell the story: you need to know the caliber and the weight to deter-mine whether it is a light or heavy core.
Generally, two punches will allow you to make any practical weight.Sometimes it takes three to cover special purpose light cores such astriple or double core or partition-style bullets using split cores. When youorder, let us know the heaviest and lightest bullet or core you want tomake, and we can determine how many core swage or core seat internalpunches it will require.
With the -H dies, you can use the bottom electronic position sensor(one of three adjustable sensors mounted along the press head on a stan-dard) to set the point of ejection. A single steel ejection bar slides througha slot in the ram and rides up and down with the ram. On the lower part ofthe down stroke, this bar comes to rest on the mounting plate for thepress head, and stops moving down. The ram continues down. The dieand internal punch go with the ram, but the internal punch head comesup against the top of this ejection bar and thus must stop moving. Thedie and ram continue down, which pushes the bullet out of the die mouth.
Longer bullets and cores use a shorter head on the internal punch.Shorter bullets and cores use a longer head. The adjustable ejection posi-tion, as well as adjustable stroke length of the Corbin Hydro-Press andHydro Junior, allow you to use one height of ejection bar. The manual-powered Corbin Mega-Mite only ejects at a fixed position at the bottomof its stroke. Thus, different heights of ejection bars are provided with thepress. The height of the ejection bar plus the punch length (from tip tohead, full measurement of the punch) must be the same for whatevercombination you use.

182
That is, a short punch uses the tallest ejection bar. A medium lengthpunch uses the middle height bar. The longest punches use the shortestheight of ejection bar. If you set them alongside each other, they wouldall measure the same total, combined length when properly paired. If youshould use the wrong height ejection bar with a punch, in the CSP-2 Mega-Mite (manual) press, you would not get good ejection of the bullets, orthe punch would project beyond the end of the die on the down strokeinstead of just coming even with the face of the die.

183
13. Full-Jacket, Flat Base Bullets
In the previous chapter, we described a 2-die set called the JSWC-2using a CSW-1 Core Swage and a CS-1 Core Seater. This set could makejacketed or lead bullets, but the bullets could not have the jacket curvedinward away from the shank because a step was required between thenose and the shank. The edge of the jacket would strike the edge of thenose punch, and be crushed, if you tried to make too light a bullet or forcethe jacket into the nose punch. By adding one more die, we can eliminatethe shoulder.
If you take the JSWC-2 set, and add a PF-1 �Point Former�, you havejust built what we call the �FJFB-3� set. We call this a �Full Jacket FlatBase� set because that is the main or basic bullet design that it makes.Using various techniques, this set builds both rifle and pistol bullets. Itcan make open base military-type full jacket, or closed base open tip fulljacket bullets. In the closed base full jacket style, it can produce both opentip and soft point bullets, with some limitations on the sharpness of thesoft point (which are overcome by adding a fourth die).
Everything that applied to the JSWC-2 set still applies here, exceptthat we can build the ogive or nose on the jacket, if we wish. The PF-1point forming die has a cavity shaped just like the bullet we want to make,instead of forming the nose in a punch cavity. This eliminates the edge ofthe punch, and thus eliminates the need for a shoulder on the bullet.
In bullet swaging, we refer to �open tip� and �hollow point� as twocompletely separate features. The open tip (OT) is made by pushing alead core into a jacket, so that the core is shorter than the jacket by enoughto allow the point to form and leave the core short of the bullet tip. Thecore just stops and the jacket continues, leaving an open space inside thetip. You can fill this with a plastic �Bullet Ball� or leave it open. This is theopen tip. It is made with an open tip core seating punch, supplied as astandard item with rifle caliber 3-die sets. This punch fits the inside diam-eter of a particular jacket, at a certain distance from the mouth, and sealsthe pressure at that point to let you seat the core.
The hollow point (HP) is made by pushing a conical-shaped projec-tion machined on the core seating punch down into the lead core. You cando this regardless of the length of core compared to the jacket. If the HPpunch fits down inside the jacket, then you can make an open tip bulletthat is also a hollow point. We call that OT-HP in our terminology, whichmeans Open Tip Hollow Point.

184
If the HP punch is made large enough to fit the die bore, instead ofgoing into the jacket, then it requires a lead core longer than the jacketafter seating. The lead projects beyond the jacket, so it will form a softpoint with a hollow point cavity. The hollow point punch supplied bydefault is the soft point variety, and is most often used with pistol calibers.If we don�t know whether you intend the set to be rifle or pistol, wenormally provide an open tip core seating punch. If we are sure it is for apistol and you don�t specify anything to the contrary, we would probablyprovide a HP punch that is a soft point type, which fits the die bore.
It is not uncommon for people to use the term �hollow point� in refer-ring to what we call �open tip� bullets. That is fine unless you are orderingequipment. Be sure you understand the difference and order what youreally want to make. You can make an open tip hollow point, an open tip,a lead tip, or a lead tip hollow point. It would not be possible to make anopen tip lead tip: those two terms contradict each other. Either the lead islonger than the jacket (soft point or lead tip) or it is shorter (open tip). Itcannot be both.
Technically speaking, you can seat the lead so it comes to exactly thesame length as the jacket after the ogive is formed. But this is just a littlebit too fine an argument to create a new name, because in order to ac-complish this, the core will be seated below the jacket in the open tipstyle prior to forming the ogive. The lead always moves forward to someextent, and this is just a matter of setting the open tip style so that thelead moves right the jacket edge when you process it through the PF-1die. Call that a �flush tip� if you like. Nosler calls that design a �ProtectedPoint� since the lead is more or less protected by the jacket.
Jacket and core seating punch fit
Now that we are putting the lead and the external punch down intothe jacket during core seating, a new consideration arises: fitting the punchto the internal diameter of the jacket at the point where the lead will beseated. Most jackets are tapered inside, getting thicker toward the base.Copper tubing jackets are usually not tapered. You can probably use thesame core seating punch with almost any weight of core, when you buildyour own copper tubing jackets. But drawn jackets require that the punchdiameter fit closely to the jacket I.D. at the point where the lead will even-tually come to rest.
With a tapered jacket, you will need different diameter core seatingpunches if you plan to make both light and heavy bullets in the samejacket. Some latitude is possible. The limits are reached when a punchlets too much lead spurt out around it (reducing pressure below that re-

185
quired to expand the jacket), or sticks tightly in the jacket, possibly plow-ing up jacket material. Usually there is enough range so that two or threecore seating punches will make every practical range of weights with anyjacket.
If you change jackets, going from a thin one to a thicker one, you willalso need to change core seating punches (to a smaller diameter, in thiscase). If we build a set of dies and test it with 150 grain open tip bullets,and you decide to make 125 grain open tip bullets, the odds are good youwill want a smaller diameter core seating punch for that. Likewise, if webuild the set for 100 grain bullets and you try making 140 grain bullets,you may find the punch is too small at that point in the jacket.
Again, the Bullet Balls can come to the rescue by moving the leadforward, so that a large diameter punch still fits at the same point in thejacket even with a shorter lead core. Corn starch does the same job. Anylight material that is stable under swaging pressure can be used to take upvolume without adding much weight. Bullet Balls are good because theyare very accurate in weight and size, so you can depend on them to giveyou consistent bullets.
However, in practice you have enough weight range so that a smallamount of the bullet weight can be shifted (plus or minus 10 percent)around the core seating punch�s perfect point of contact. If the punch isjust a little small, or just a little large, it either lets an insignificant leakageof lead around it or it makes a very tiny amount of jacket displacement,and will probably release from the jacket if there is some lubricant on thepunch and you expand the jacket so it firmly contacts the die walls.
A very tapered wall with sharp angle will allow less adjustment ofweight without changing punch sizes. A shallow taper will allow a greatdeal more. You can only tell by trying it. If the lead leaks around thepunch and the jacket won�t expand to the same size as a lead slug does, inthe same die, then probably you need either a shorter core, a thicker jacket,or a larger diameter core seating punch.
If the punch sticks into the jacket, or the jacket comes out shorter andnot expanded enough in diameter, it probably means that the punch istoo large. This can stop the punch too early, so that there isn�t enoughpressure developed in the core to expand the jacket properly. You then gettapered, undersized bullets in the point forming operation, which is thesame thing that happens if the punch is too small.
A punch that is too small, or too large, will prevent you from develop-ing enough pressure to expand the lead core during core seating, and thisin turn makes the jacket and core undersized for the point forming die.
186
When you form the ogive on the bullet in the next die (point former), thebase expands to contact the die wall, but the undersized shank probablywill not expand evenly.
Instead, it may expand near the contact point on the ogive, and becurved inward like a Coke bottle in the shank area. The amount of curveis very small, usually just the difference between the original seated coreand jacket diameter and the final bullet diameter at its largest point. But itcan cause the bullet to be a loose fit in the case neck after you load it. Thismay not be a problem in a single shot, but in a repeating rifle or magazinefed handgun it may cause trouble in feeding. In a revolver it may causethe bullet to slip forward during recoil and lock up the cylinder.
The answer is to experiment with the particular jacket and core lengthcombination you are using, and if you are having any of these problemswith expansion, make sure that you are using a punch that fits correctly.To correct the problem, use a different core length, a different jacket, putsome filler behind the core (such as a bullet ball or corn starch), or get anew punch that fits your combination correctly. There is no wrong orright punch by itself: each punch is only right or wrong for the particularlength of core and jacket wall thickness.
Corbin offers the VB (Versatile BenchrestTM) jacket design, which hasa thin, parallel-wall (constant ID) mouth section, joined to a thicker, slightlytapered shank and heavy base. This design lets you use the same diam-eter core seating punch over a wider range of weights (from the mouth tothe junction between the thin and thicker sections of the wall). If youtrim the jacket shorter or seat the core below the parallel-wall mouthsection, then you will need a smaller diameter punch to fit and seal thesmall inside diameter in the bottom portion of the jacket.
Making a lead bullet without a shoulder
Point forming dies can also be used with just a core swage to makelead bullets which do not have the semi-wadcutter shoulder. Paper-patchedbullets or lead pistol bullets can be made either in the LSWC-1 type of die(in all but reloading presses) or in a combination of CSW-1 and PF-1 dies.
In theory you could put holes in the side of a point forming die andmake the core and the ogive all in one operation, but in actual practice thelead tends to flow up the ejection pin hole about as fast as it extrudesthrough the weight-adjustment holes. We can build a custom point form-ing die with bleed holes and an adjustable ejection pin designed to sealoff the end of the die. This custom die trades an increased cost of toolingfor a faster production rate by eliminating one step and finishing the leadbullet in one stroke.
187
The ejection pin in a point forming die pushes the bullet out by its tip.This means that a bullet with a blunt or flat tip probably will look good,with perhaps a small circle where the ejection pin pushes on the lead tip.But a sharp spitzer tip bullet isn�t practical with the PF-1 die as a finalstep, because the ejection pin crushes the tiny point. In the next chapterwe discuss the LT-1 lead tip die and how it is used to solve this problem.
Custom point forming dies with adjustable length ejection punchescan be ordered instead of the lead tip forming die. The ejection punch hasan adjustable length and a larger than usual diameter, with the curve ofthe die wall machined into a cavity in the tip of the punch. The punch isadjustable in length so that tiny variations in different press rams can be�tuned out�, allowing the die wall curve to smoothly match the curve inthe punch tip. The advantage of using this custom point forming die ishigher production speed, since you do not need to follow it with the leadtip forming die in order to get a perfect lead tip. The disadvantages aresomewhat higher cost, and less versatility (the end of the bullet must takeits form from the shape of the ejection punch, and cannot be varied un-less this special punch is replaced by a different one).
A standard point forming die costs less to make, and allows some-what more flexibility in how the tip will be formed (smaller or larger, asyou adjust the punch holder to push the bullet material further or less farinto the die). However, it does require the LT-1 lead tip die, as a finaloperation, if you wish to make perfectly formed lead tip bullets. Thisadds one more operation, which may be significant enough in regard toproduction time to justify the cost of a custom point forming die. Thereis no right or wrong way: it depends on the individual circumstance anddesign of the bullet, as well as the variations in design that you wish tomake.
Full metal jacket bullets
Full metal jacket (military style) bullets can also be made by turningthe jacket backward, so the base faces the cavity of the PF-1 die, andactually seating the lead core into the jacket in the PF-1 instead of in theCS-1 core seater. The pressure changes the flat jacket end into a pointedshape, conforming to the die outline. But the base is still wide open (thelead core should come just about 1/8 inch below the jacket mouth).
To make a proper base, eject the bullet, turn it over and push it backinto the point forming die. But use a special �base-turning� punch thathas a shallow concave face. This punch doesn�t do anything a flat punchwouldn�t do at this point, but it will in the next step and it saves you fromchanging punches yet again. You want to just barely push the open end of

188
the jacket into the ogive portion of the PF-1 die, so it acquires just thestart of a curve. Then, eject the bullet and turn it over one more time.Press more firmly this time, using the �base-turning� punch. Because thejacket edge has already been curved inward, it will contact the face of thisconcave punch closer to the center than the very edge, and will be curledinward and nearly flattened.
Press firmly enough so that the jacket takes on a radius that matchesthe curve of the punch face. Process all the bullets this way and thenchange to the normal flat-faced external point former punch. Put the bul-let into the PF-1 die one last time, and press firmly with the flat punch(against the almost-flat base). This finishes off the base, rolling the edgefirmly over against the lead core.
If you made the core length just right for the jacket length, the basewill be flat and even with a silver circle of lead brought cleanly to thesurface, aligned perfectly with the jacket surface at the base. No extra leadwill spurt out and be flattened unevenly across the base. No folding orwrinkling of the jacket near the base will occur from lack of sufficientfilling of core. Chances are it will take you a couple of trys to get thisideal combination, and the weight may not be precisely what you in-tended (a grain or so either way usually makes the base come out per-fectly).
To use a standard length jacket, and still make whatever weight ofFMJ bullet you desire, you can use Corbin�s plastic Bullet Balls in the tip,or you can fill part of the jacket with compressed corn starch to adjust theweight and maintain proper core length. If you just made the open basein one step and shot it, the gas pressure at the muzzle would flare thejacket open, and you would be shooting a bullet that had an asterisk shapedbase, easily determined by looking at the ragged holes in a paper target.You might be able to skip the final, flat-faced punch operation if you likethe appearance of the �base-turned� bullet, but you should never skip the�base-turning� step.
Bullet tip closure and ejection pin size
Point forming dies have an ejection pin that is designed for the mini-mum tip closure possible, consistent with long punch life and proper ejec-tion. If the ejection pin is made smaller than the optimum design diam-eter, it becomes very weak in relation to the required ejection force for thecaliber, ogive shape and material. You will experience bent ejection pinstoo often in that case.

189
There is no problem with making the ejection pin too large exceptthat you cannot close the bullet tip any smaller than the ejection pindiameter. If you want to make flat or blunt round nose lead tip bullets, abig pin is actually desirable since it has less tendency to penetrate andmark up the soft lead nose. Using a die designed for the sharpest possiblespitzer tip and minimum jacket closure on open tip bullets to make leadtip bullets can be a problem, since the ejection pressure might exceed thestrength of the jacket or lead tip. In that case, the pin will penetrate intothe bullet instead of pushing it out of the die.
If you feel the need to close the tip smaller than the standard ejectionpin diameter for the die, we can either build a custom point forming die,or you can use the lead tip forming die to gently nudge the tip of the openjacket closer together. Remember, though, that the minimum tip pos-sible is twice the jacket wall thickness! Sometimes it is better to go to alead tip if you really want a sharp point without any special expense ortrouble. If you want a harder tip, drop a chilled lead shot into the openjacket and swage that into a lead tip. A bullet ball can be put into the tip ofthe jacket, if you allow enough open space between the core and the endof the jacket to hold the ball once the ogive has been formed (rather likea ball-point pen design).
Each caliber or range of calibers is matched to a standard size ejectionpin, which is based on the industry standard sizes of oil-tempered springwire. There is nothing about a .080 diameter ejection pin that would makeany practical difference from the standard .081 size, for instance. It wouldbe wasteful of your money to specify small differences, since that wouldput your order into the custom category, require special non-stock diesand additional labor, and if you needed replacement parts, the margin forerror is tremendous unless you specify exactly what you have (whereaswe would know from experience and the standard charts what size tosend you if you had a standard caliber and left it to us to determine thepin size for it.
Ejection pin sizes usually vary in 0.010 inch increments, as that isabout as small a difference as makes any significant difference in strength,and it is also the standard differential size in readily-available spring wirestock. We match the caliber to the nearest wire size that would make areliable ejection from the die, assuming that most people will want toclose the tip as small as it is practical to do without having to put up withtoo many bent pins or penetrating the core if you forget to use enoughswage lube. Naturally, the smaller the pin size, the less area is supportingthe ejection force under its tip, and therefore the greater the chance for a

190
�dry� bullet to stick in the die and cause the small pin to push into thebullet core, penetrating it and possibly even going through the jacketbase.
Removing a stuck bullet
If a bullet should stick in the point form die, don�t panic! The firstthing to do is to stop, take the die out of the press, and gently turn andpull the ejection punch out of the die. If it is stuck too hard to pull out, itmay have to be driven out by pushing on the wire tip, but usually you cantwist and pull carefully, and free it from the stuck bullet. The next thing todo if you want to ruin the die and buy another one, is to get out a drill ortap extractor or a torch, and drill, tap, or melt the bullet out. This is thebest way to insure a good retirement income for the die-makers, becauseit normally ruins the die surface or temper of the carefully heat treateddie. It seems to be the first thing inexperienced bullet-makers do, otherthan panic and break the ejection punch by continued attempts to ejectthe bullet.
The right way to get the bullet out is to push it in further! Leave theejection punch on the bench, and put the die back into the ram withoutany internal punch. Use the normal external (top) punch to push the bul-let down just a tiny bit further, which closes the hole in the bullet, pushesthe jacket edges at the tip closer together, and gives the ejection pin (if itwere present) something to push against. Then unscrew the die from thepress, and use a short piece (about an inch long) of the same diameterwire as the ejection punch to drive the bullet out of the die.
If you have a micrometer and can compare the ejection pin size to asmall nail or other suitable round wire, you can probably locate an inch-long bit of the right diameter material. If not, contact us and ask for a bitof the same diameter spring wire as your ejection pin (if it is a standarddie, we know by the caliber what size to send, but if it is custom, with aspecial ejection diameter size, you need to let us know what you have. Donot pound an oversize wire, nail, or hex key wrench into the hole! Youprobably will just make the problem worse in that case.
Once you have obtained the right diameter of wire to use, set themouth of the die over a hole that will let the bullet drop free of the die,and put the wire into the ejection pin hole (at the threaded end of the die).Then use a small hammer to tap the wire into the hole and either drive thestuck bullet out, or drive the wire into the bullet but leave at least a quar-ter of the wire length sticking out of the die. If the bullet comes out, thejob is done. If the short wire simply penetrates the bullet, you have morework to do.

191
Grasp the end of the wire that you did not drive entirely into the diewith a pair of Vise-Grip pliers, or clamp the end of the wire in a benchvise. Turn and pull the die to remove it from the wire. In some cases a flatscrewdriver blade inserted between the top of the die and the device grip-ping the end of the wire may serve to pry the wire free. Once the wire isremoved, put the die back into the press (without the internal punch) andpush the bullet back firmly into shape, closing the hole in the tip. Try notto extrude material too far up the ejection pin hole, so that there is noroom to put the wire back into it. If this happens, you may have to care-fully drill out a short length of the ejection pin hole using the same sizedrill as the ejection pin diameter or slightly smaller.
Remove the die from the press, put it over a hole in the bench or theslightly opened jaws of your vise, and insert the short wire again, anddrive it in part way. If the bullet does not come out, you may have torepeat this sequence over and over again, until the jacket gets fatiguedand loses its grip on the die. If you have two or more short wire pins, youmay be able to drive the first pin all the way through the bullet with asecond one, then remove the second one, and thus bit by bit reduce thevolume of the bullet as you push it back into the die and then drive thepins through it again and again. Eventually, this tedious-sounding pro-cess works and the bullet almost falls out of the die. Sometimes is actu-ally falls out, after sufficient cycles of pushing it in and poking a holethrough the middle.
Of course, you are always welcome to just send us the die and punches,and we will remove the bullet for you at no charge other than the returnshipping and insurance cost. Sometimes, I must admit, we do drill a holein the bullet and screw a self-tapping screw into the hole, and then use apry to pull the screw and bullet out. You may be able to do that withoutharming the die, but if the drill or screw is forced against the highly pol-ished die wall, and causes a mar in the finish, it is not a warranty problem(unless we do it ourselves, in which case the die-maker will quietly spendall night making you a new die at his expense and you�ll never know hescrewed up). I would at least try the push and short pin method first. Ithas very little risk, and almost always works in two to five cycles.
If you should happen to push an empty jacket into the point formingdie, or if the bottom should break out of a jacket, then there may be nocore left to push against. You may be able to insert another seated coreand jacket, with plenty of lube on it, and use this to collapse the emptyjacket into a ball, which in turn provides material under the ejection pintip for ejection.

192
Matching the bullet and die length
A point forming die contains a semi-blind cavity, which is full diam-eter at one end, has a parallel section that must be longer than the longestbullet you want to make, and then has a curved ogive section that comesdown almost to a point, joining a small ejection pin hole that passes throughthe turned-down and threaded shank of the die. The longest possible bul-let that can be formed in this die is primarily limited by the length of theparallel section of the hole.
If you try to push a straight cylinder (the seated core and jacket) thatis, say, 1.30 inches long, into a die that has a 1.20 inch straight section,there will be 0.10 inches of unsupported bullet sticking out of the diemouth at the moment the open end of the jacket encounters the start ofthe ogive curve. The main resistance in the point forming operation comesfrom forcing the full diameter cylinder into this ever-smaller tapered hole.Unsupported, the jacket base may start to mushroom outward in sizefrom the pressure.
If this happens, either the base will be damaged as you try to force itback into the die cavity, or you simply won�t be able to push it any furtherwithout severely expanding the base (we call it �nail-heading� the bullet).If you don�t mention the weight or length of bullet, you will get a die thatmakes the normal range for the caliber. This die may not make the ex-treme heavy (or light) end of the scale. If you specify a very heavy bullet,and we know you plan to do that, we can make a longer die (up to thestroke limitations imposed by the press) and we can bring the cavity as fartoward the threaded end of the die as strength and safety margin permits.
Sometimes, with very long bullets, we can push the envelope (or de-sign limit) of the press just a bit, by using a quick-change punch holder.This lets you slide a punch in and out of the holder quickly, so that youcan put the long component into the die with the punch removed, thenslide the punch into position behind it. Normally, the press stroke has tobe about 1.54 times the length of the component in order to allow forloading, alignment of the punch into the die, and forming within the die.In other words, if the press has a 2-inch stroke, then a 1.3-inch bulletcould be put into it and formed, provided the die and punch were madefor this length. Another way to figure it is that the stroke times about 0.65is the maximum bullet length for that press.
But if you can put the component into the die without having to addmost of its unsupported length to the formula, then you could reasonablymake a bullet just a little shorter than the press stroke (some stroke isneeded for compression of the material and some for alignment of thepunch prior to any pressure being generated). Alignment and compres-

193
sion reasonably use about 0.25 of the stroke, so we are left with about 75percent of the stroke for bullet length. That means a two-inch long pressstroke might, under ideal circumstances, form a bullet of 1.50 inch length,with the quick-change punch holder.
Some of these numbers are �soft�, in the sense that they can be sub-jective to the extent of how much alignment is deemed necessary for thepunch prior to any force being delivered, and how much a given caliber ormaterial might compress in expanding to proper diameter. Therefore, wecannot state with authority that they are exact and will always apply toeach instance. But we can use them as a general approach, until the spe-cific tooling and bullet lets us refine them more exactly.
The Corbin CSP-2 �Mega-Mite� press uses a 3-inch swaging stroke,which means that with a normal punch holder you can get up to a 1.95-inch long bullet and with a quick-change punch holder, a 2.25-inch bullet.Again, these are subject to some variation depending on the caliber, ma-terial compression, and the distance used in alignment. A hollow point orbase might limit the bullet length whereas a rebated boattail might allowit to be slightly longer (provided most of the punch is supported insidethe die before any pressure is generated).
Rebated boattail bullets, and bullets that form the nose in a punchcavity (such as a lead paper-patch bullet), require the thin punch edge andwalls to be well supported inside the die cavity prior to generating anypressure. If you make longer and longer bullets in these dies, eventuallyyou will reach a length where the punch is not adequately supported bythe die cavity, and it will expand and crack from the pressure (even ifsome of the punch is inside the die when the pressure is generated).
Another cause of broken punches is using the wrong diameter of punch,just small enough to let the punch expand along with the bullet so thatthe punch cracks. The extremely close fit of a nose punch into a leadsemi-wadcutter die means that the same punch probably will be just a bittoo large for the same caliber of core seating die. And a nose punch de-signed to make semi-wadcutter bullets with a core seating die may fail ifused in a LSWC-1 die, because of the very small difference in diameter(core seaters usually are 0.002 or more smaller than the final caliber, asthey anticipate using a point forming die to finish the bullet).
Relationship of die bore to caliber
Point forming dies are not designed by making the die a certain cali-ber, but by making sure that the materials inserted will expand and thenspring back slightly to a specified final dimension. The same die that makesperfect .3080 bullets when used with the specified materials (such as .035

194
wall annealed copper tubing) may produce a .309 or .307 bullet when youuse a tapered-wall commercial gilding metal jacket, or hard copper, orbrass.
Changing materials, core seating dies, and sometimes even the weightbeyond a certain range can affect the bullet diameter. A point forming dieis part of a closely-integrated package or system, designed to work to-gether. It isn�t something you can make in isolation and expect to workcorrectly with any kind of material. This is another reason why so fewdie-makers offer bullet swaging equipment of high precision.
The client and die-maker need to work closely together on the design,and make sure that everyone understands the weights, materials, and pro-cesses that will be used. Then, it is possible to deliver tooling that formstruly outstanding bullets. Otherwise, you may be headed for a frustratingexperience because the bullets will stick, come out tapered or in the wrongdiameter. Yet the dies may be excellent, when used with the right mate-rial, weight range, and style of bullet.
If your bullets come out smaller than you wish, make sure that thematerials you are using are the same as those for which the die was built.Using copper tubing when the dies were built for tubing jackets is a start,but you still need to match the temper, wall thickness, and diameter. Of-ten a set of dies that works nicely with a standard hard-drawn 1/2-inchdiameter tubing that varies only .003 inches in diameter and has walls of.035 with a tolerance of .002 inches, may fail to produce the right diam-eter, have stuck bullets, or other problems when the tolerances or tempervary more than this.
The key to getting the proper diameter and operation of the dies ismaking sure that you send us samples of the same materials you plan touse, or else use materials that we furnish (or exact equivalent). We findthat most problems are traced to misunderstanding, rather than materialor design defects. The person having a problem believes that his materialis the same, when in fact it may be quite different by the close standardsof swaging. A shooter new to the sport might protest that he won thematch because he hit the target every time, not realizing that �hitting thetarget� really means putting them all in the X-ring when you get to thechampionship level. Likewise, a person who is positive that his lead is�soft� when in fact it is Bhn 10 hardness rather than Bhn 5, is both rightand wrong. He is right that it is soft by casting standards. But by swagingstandards it is hard.
I recall a Woody Allen film in which a psychiatrist asked the girl friendhow often she and her partner had sex, and she complained, �All the time!Three times a week!�. Then later, he asked her partner the same question,and he complained �Hardly ever: Three times a week...�. So it is with

195
many perceptions. People tend to look at issues in light of what theyprefer or what is convenient. If a material is easy to get and plentiful, andthe basic dimensions are close, then it must be the right thing and anyproblem has to be something else. In fact, if the dimensions or otherparameters are close but not close enough to work with the tools as theyare delivered, there is still a good chance that by making some modifica-tions in the tools, that plentiful source of material may still be used. But itis faster and cheaper to do it the first time, using samples of that material.Samples, by the way, need to be in enough quantity to actually make anumber of bullets. One inch of the material isn�t going to help very much.Usually it takes at least a few feet, a meter or so, to build enough jacketsand bullets for a good trial.
Sometimes sample material comes in such bad condition that it isuseless for building any dies and punches. If the material is tubing orstrip, and it is put into an envelope without much padding, it will prob-ably be so bent, smashed, scratched and otherwise mutilated by the ship-ping and handling that we will be lucky to determine its original dimen-sions at all. Package samples with plenty of padding, in a tough enoughpackage so that the ends won�t be broken out or the sides torn through ifa former quarterback decides to hurl the box into a truck and then pileseveral hundred pounds of smashed computer monitors marked �Fragile�on top of it.

196
14. Lead Tip Bullets
The LT-1 lead tip forming die is available in type -R, -S, or -H sizes. Itis similar to a CS-1 core seating die, in that the die has a straight hole allthe way through, and punches that are full bore size of the die. However,the diameter is just slightly larger than the finished bullet, whereas thecore seater is slightly smaller. The internal punch has a cavity machinedin the end, shaped similar to the ogive curve of the bullet you wish toform, but with a slightly wider angle.
To make a large round or flat tipped lead nose bullet, you may notneed this die. You can just seat the lead core so that it projects beyond thejacket you are using. Then, form the nose in the point forming die, andyou�ll be done. If the point forming die is designed especially for lead tipbullets, we will have made it with a larger than usual ejection punch. Thisspreads out the force of ejection over a wider area, and reduces the visibil-ity of the mark which the punch makes in the bullet nose. Normally it isacceptable even if you can see a little circle where the ejection pin pushedagainst the lead nose.
However, if you wish to make a sharper lead tip, the strength of thetip might not be enough to avoid being mushroomed as the bullet isejected from the point forming die. This is where the lead tip forming diecomes into play. Go ahead and eject the bullet and accept the deformedblob of lead that comes out of the point former die. You want that lead tobe enough so it will fill up the cavity in the lead tip forming punch, in thenext operation.
The lead tip forming die has a slightly different curve than the actualbullet it is designed to form. We catalog LT-1 dies by the bullet ogive,such as 6-S or 8-S, but the actual curve in the punch might be 5.5-S or7.5-S instead. This lets the punch meet the jacket at a slight angle, so itcan shape the tip before the edge of the punch contacts the jacket andpresses a ring into it. This slightly broader angle also lets you use the dieto push the tip of an open tip bullet closer together.
Lead tip bullets require that you leave the jacket open sufficiently sothat the tip is connected to the main core by a substantial stem of corematerial. If you try to close the jacket down to a tiny tip, in order to makea very small lead tip, you will push the two jacket walls so close togetherthat nothing is left to hold the tip to the core. It can actually fall off thebullet when you try to load it into the cartridge case, or even when thegun cycles and pushes the cartridge out of the magazine.

197
To illustrate this, just subtract twice the jacket thickness from yourbullet diameter at the end of the jacket, after forming to a small tip. Thedifference is all that holds the tip to the core. As an example, imagine thatyou want a tiny lead tip on a .308 bullet, but you want this bullet to bemade with a .035 inch thick copper tubing jacket for big game hunting.This is quite reasonable, if you reconsider what �tiny� means in such alead tip design.
The two jacket walls together measure .070 inches in width, so thismeans no matter how hard you push, you will never succeed in gettingthe tip smaller than .070 when completely closed. A lead rod that is .050inches thick can be twisted apart fairly easily by hand pressure, so youwould probably want at least 0.100 inches of lead joining the exposed tipto the lead core.
Add the two jacket walls to the minimum practical stem of lead, andyou have a tip diameter of 0.170 inches where the jacket ends. The leaditself can be shaped to a needlepoint beyond the jacket, as long as thediameter across the position of the jacket end is 0.170 or wider. The moralof this story is simply to make sure that you leave a nice, wide openingwith plenty of lead protruding from it in the point forming die, so there isboth plenty of lead to shape in the tip forming die and also a nice thickstem to hold it onto the core. In other words, don�t forget about the jacketwall thickness and how it takes away from the core diameter at all points,including the tip.
The LT-1 die helps do one other operation: it not only shapes exposedlead tips into factory-finished appearance, but it also sizes the base por-tion of the bullet to minimize the �pressure ring� at the base. This is avery subtle amount of sizing, not the same as removing body taper froma mass production operation by shoving bullets through a ring die (whichtends to loosen the cores). It is useful in hunting rifles and autoloadinghandguns because it helps keep the case neck snug and parallel to thebullet.
Lead tip forming dies can be added to any set that uses a PF-1 pointformer. Added to the FJFB-3 set, the combination is called the �LTFB-4�which simply stands for �Lead Tip, Flat Base� four die set. It can stillmake open tip or full metal jacket bullets, of course, just as it did beforeyou added the fourth die. Only now it can also make better quality leadtip bullets.
We have not yet discussed the RBTO-4 set, but that will be coveredsoon. It stands for �Rebated-Boattail, Open Tip� four die set. It uses a coreswage, and a point form die, but instead of the usual core seater it has twoother dies. One is a boattail preformer, and the other is a rebated boattailfinisher. A four die set, then, is not always a lead tip set. If you added a LT-
198
1 die to the RBTO-4, you would create a five die set capable of both opentip and lead tip rebated boattail bullets. It would be called the �RBTL-5�five die set.
Please keep in mind that any die set having the �L� as part of itscatalog number just means you have got an extra die to make nice leadtips. It does NOT mean you can ONLY make lead tips. Any such set canalso make open tips and full jacket bullets as well as lead tip bullets. TheLT-1 die just adds one more thing you can accomplish.
There is another kind of five die set. We left the normal flat base coreseating die out of the RBTO-4 and also out of the RBTL-5 sets. Thesetwo sets make only the rebated boattail base. Suppose you wanted to addthe normal core seater (CS-1) so you could also make flat base bullets?Fine, that would be the �FRBO-5� or the �FRBL-6� package of dies. Youcan probably guess that �FRBL-5� stands for �Flat base, Rebated Boattail,Lead tip� five die set. The �FRBL-6� means you can do everything inregard to �Flat base, Rebated Boattail, Lead tip� with those six dies.
Adding the �F� for flat base does not mean some strange combinedflat and boattail base: it means you can make either kind of bullet. Thesame is true of the �L�, which means you have an extra die that canproduce nice lead tips. You can still make open tips, full metal jackets, andanything else that you made with sets having less dies in them. Also, a sixdie set does not require that you use all six dies on one bullet. It meansyou might use two, three, four, or possibly even five dies.
You could use two dies (CSW-1 and CS-1) to make a Keith nose pistolstyle bullet, with the appropriate nose punch. You could use three dies(CSW-1, CS-1, and PF-1) to make an open tip, flush tip, or full metaljacket bullet with a flat, cup, dish, or hollow base, jacketed or lead. If youmade a lead bullet, you could probably skip the CS-1 and just use theCSW-1 and PF-1.
You could also use the CSW-1, BT-1 and BT-2 dies (more about theselater: they form the RBT-2 pair), and the PF-1 to make open tip, rebatedboattail bullets. Finally, in the most complex operation, you would usethe CSW-1, BT-1, BT-2, PF-1 and finally the LT-1 to form a rebated boattaillead tip bullet. Each step is similar to the others in how you install the dieand punches, how you adjust and work your way up by applying pressurein small increases and inspecting your work to see how it is going, andfinally how you lock down the setting of the punch holder and process asmany pieces as you need for the next stage.

199
Changing ogive shapes
The LT-1 die itself is made in a specific caliber (diameter) but theogive or nose shape can be changed by getting a different internal punch.The internal punch in the LT-1 die has a cavity that matches whateverlead tip shape you desire. If you want a semi-spitzer shape, this meansthe ogive is a spitzer but the lead tip ends with a very perceptible radius.If you want a spitzer tip, then the lead tip cavity will end with a smallradius. Generally, we find it best to make spitzer lead tips with a smallradius. This helps the lead fill out to the same consistent length. Lubri-cant buildup can sometimes block a very sharp cavity, so that some tipscome out needle-sharp and others come out with a poorly formed end,either angled or flattened. Unless given other instructions and drawingswith dimensions, the spitzer lead tip punch ends with a tiny radius.
To order a different lead tip shape, specify the ogive of the point form-ing die that you will be using to make the bullet and then tell us if youwant a flat tip, semi-spitzer, or spitzer shape, or some special shape. Ifyou want a flat tip or special shape, we will need a drawing with thedimensions or a few samples. One sample is fine except that it doesn�tgive us any idea of the tolerance range. In the absence of any other in-struction, we will use our standard practice as a guide.
All you do to change shapes is change the internal punch. Some peoplehave suggested using a larger LT-1 die for smaller bullets, such as form-ing a .284 lead tip using a .308 die. It isn�t a good practice, because thebullet can be randomly expanded and the tip may not be perfectly cen-tered with the axis of the bullet. It comes under the heading of �ThingsYou Might Get Away With Sometimes�. And often, not.
Tip Closers
A tip closing die is a lead tip die equipped with a special hardenedpunch made of a tough, wear resistant steel alloy. The cavity in the punchis made so that the tip of the open jacket will contact it first, and the forcewill move the jacket tip inward. Sometimes the jacket will be strongenough to allow the tip to be almost completely closed in this manner.Usually the jacket only allows a reduction in the open tip size, not com-plete closure, because the jacket will collapse, fold, or take on the edgeshape of punch and thus create a shoulder on the ogive.
We designate this die as a LT-1-SC or LT-1-HC, with the �C� meaningcustom and indicating that the punch is custom made to close or reducethe opening of an open tip bullet. The die is exactly the same as anyother lead tip forming die, other than this special punch being provided.You can add the punch to an existing standard LT-1 die any time.

200
ULD METAL TIPS
The ULD or �Ultra Low Drag� bullet design was first made by Corbinback in the days of the Viet Nam conflict, for long range sniper rounds. Itcombined a rebated boattail with a relatively heavy bullet having a secantogive with a 14-caliber radius offset 0.014-inches from tangent. For anygiven weight and caliber, this shape provided the best compromise be-tween ballistic coefficient and accuracy within practical recoil and pres-sure levels.
Fast forward a few decades, and the ULD design has been copied un-der a half-dozen other names, but all retain most of the features found inthe original design (except for the rebated boattail, since so much equip-ment, advertising, and customer conditioning has been put into the con-ventional boattail by this time, and the conventional boattail base is easierto load in automatic equipment than a flat or RBT base). But two newfeatures have been developed, tested, and are now available to handloadersand bullet makers.
The first additional feature is a blending of the secant and tangentogives in a �hybrid� design, which reduces the slight chance that a sec-ondary shock wave might be momentarily generated at the ogive-shankjunction under exactly the right combination of velocity and air density.This improves the BC by a very small amount for a given weight anddiameter of bullet. (Remember, BC is reduced by the square of the diam-eter, and increased directly with weight, so you can always get higher BCby making the same design and caliber of bullet heavier or using thesame shape and weight in a smaller caliber -- if the internal ballistics andthe firearm mechanics safely permit it. Keep in mind also that BC andaccuracy will always go in different directions at some point, if you try toincrease BC beyond certain limits by making the bullet longer and heavier.)
When you order a standard �ULD� point forming die from Corbintoday, you get the hybrid style ogive rather than a conventional secant,although it may be hard to tell much difference by eye. The main differ-ence is the blending of the angle or junction between shank and ogive.
The second additional feature, which is optional and requires somespecial equipment (different kind of point forming die, extra punches) isthe �ULD TIP� design, using a CNC-machined high precision metal tipinsert having a needle point. The conventional ULD point forming diecannot seat this tip properly. A special PF-1-ST or PF-1-HT tip seatingand ogive forming, with two different ejector punches used in sequence,is employed.

201
In addition to the ULD TIP point form die, with its two specialpunches, there are also special punches used in the core swage die and inseating the lead core into a jacket. The purpose of these punches is tocreate a center hole or alignment dimple in the core that is exactly cen-tered, and then to use this to insure that the lead core is pressed into thejacket in a manner that creates a deeper hole to accept and eventually gripthe grooved stem of the ULD tip insert.
The tip inserts are little cones with the precise angle of the ULD ogiveas it approaches the centerline of the bullet. This angle is the same for allULD ogive bullets regardless of caliber. Therefore the same tip insertscan be used on a wide range of calibers, limited only by the diameter andlength of the tip compared to the rest of the bullet. At this writing, twodifferent tips are available, the TIP-50 and the TIP-30.
The TIP-30 is made to fit into calibers around the .308 size, usuallyfrom about .284 (7mm) up to around .323 (8mm). The limiting factor isappearance and balance on the smaller caliber side: the tip can be toomuch of the total ogive if the diameter of the bullet is too small. Thelimit on the upward side is the thickness of the bullet jacket at the openend, which typically is much heavier in larger calibers. The differencebetween the diameter of the stem on the insert, and the base of the coneto which it is attached is twice the wall thickness of the jacket, or more.
If there is, for instance, .015 inches between the stem and the edge ofthe cone (start of the actual metal nose projecting from the bullet), then itmeans the maximum possible amount of jacket thickness that could beused with this tip insert is .015 inches at the end of the jacket. Anotherlimitation is the appearance and ease of assembly. From about .338 up to.510 caliber (50 BMG), the TIP-50 is more satisfactory than the TIP-30.
There may at some future time be smaller sizes, for .277, .264, andother small centerfires. However, at this time, the cost of producing themquickly enough, in high enough volume, in the required high level ofprecision, prices them out of reason for civilian applications. They can bemade, of course, but not on the high speed CNC lathes that allow highenough unit production to keep their cost in line with what you�d feelcomfortable paying, considering their benefit for long range shooting. Thebasic reason is that practical materials will bend or deflect too much whenturned with the forces needed for high production volume, making accu-racy unacceptable. With the larger two sizes, this has been solved byusing specific alloys with the proper strength so that high precision andhigh production are simultaneous. For now, the ULD TIP design is lim-ited to calibers from .284 to about .510 (or slightly larger).
202
To produce these special, high BC bullets, you would want a RBTO-4-S or RBTO-4-H die set. Lead tips are of course not feasible or desiredhere, and flat bases defeat the idea of the highest practical BC. You caneither order the RBTO-4 die set with the special ULD TIP point formingdie instead of the standard point former, and the special ULD seating andcore swaging punches instead of the standard ones, or you can add theseitems to an existing set (in the same caliber, of course).
Remember, though, that the standard ULD ogive bullet cannot bemade using the ULD-TIP point former, and the ULD-TIP bullet cannotbe made using a conventional ULD point former. These are separate,non-interchangeable concepts, which use different tooling. The ULD-TIP point former has a large ejection pin, much larger than the typical.081 to .091 diameter pin on a standard .308 ULD point form die. And itdoesn�t just have one: there are two used in sequence.
There are also two special punches, one for the core swage and one forthe RBT dies. The core swage punch is an internal punch, with a �centerpunch� design. It can be used instead of a conventional flat internal punchin any standard core swage die made for this jacket and caliber, even ifyou don�t make a ULD-TIP bullet. It puts a perfectly centered alignmenthole in the end of the lead core.
The second special punch is a ULD-TIP core seating punch, which ismade to fit your specific jacket diameter near the mouth area, and has alonger �probe� machined on the end. This extension or probe finds thecenter hole in the core, when you seat the core into the jacket. It thenmakes a centered cavity or open tip hollow point in the core. This cavitycan also be used as a normal hollow point, if you should wish to use thesame punch to seat cores used in any other conventional point form dieof that caliber. But the real purpose is to create a hole for the stem on thetip insert.
These two special punches cost the same as the normal flat endpunches, and can be substituted for them at no extra cost when you get anew die set. If you have an existing die set, you can simply add these twopunches, plus the ULD-TIP point form die.
The jacket and seated core, which now has a cavity formed in it, is putinto the ULD-TIP point form die and the die itself is installed in yourpress with the first ejection punch, which has a small probe or tip ma-chined on the end of a fairly large ejection punch (for example, some aremade at 0.210 inches, but this is determined for the actual caliber). Youform the ogive up to the point where the jacket just comes up against thelarger diameter of the ejection punch, which forces the lead core to formaround the smaller machined portion of the punch and create an exactdepth and diameter of hole.

203
Then, you would eject the bullet, make sure it is formed as desired,and process the rest of your run of bullets through this stage. Then un-screw the ULD-TIP point form die, and change the ejection punch for theone having a cavity in the end, shaped like the reverse of the tip insert.Since this punch faces upward in the Corbin press, once the die and punchare back in the press ram you can place the pointed end of the tip insertinto this cavity, and it will stay there. Or, if the instructions sent withyour particular set don�t indicate otherwise, you may put the tip insertinto the end of the bullet by hand or with a simple pushing tool (to avoidsticking your fingers with the sharp end of the insert).
Once the tip is set in the punch cavity, or pushed lightly into thebullet, you can then put the bullet into the die and raise the ram, adjustingthe punch holder for the base punch (a RBT base punch, usually) to pushthe bullet just far enough into the die at the top of the stroke so that thetip is seated securely, the jacket is formed to a smooth seamless junctionat the base of the tip�s cone, and thus the lead in the jacket is squeezedinto the little grooves machined around the stem of the insert, holding itsecurely.
This method both secures the tip, aligns the tip precisely on axis withthe bullet, and finishes the ogive curve into a smooth transition with thetip, in one stroke. The bullet is now assembled and is ready to shoot.
Since this concept was introduced, the ULD-TIP bullets have beenused around the world in innumerable matches and long range shootingsituations (some having to do with paper targets, others involving targetswith an additional two dimensions). The feedback has been overwhelm-ingly positive.
In very rare instances, the accuracy was not acceptable because thebullet was too heavy for the spin rate of the barrel used. This is no differ-ent from any other long, heavy bullet. At one point we had tried alumi-num alloy for the TIP-30, and this reduced the bullet weight just enoughso some marginal load combinations did shoot well in the same twist thatfailed to stabilize the steel alloy tips. However, the aluminum tips did nothave the bending resistance in the .308 caliber size to allow them to beproduced on practical, high speed CNC machines at a fast enough rate,and time is indeed money when it comes to commercial production.
The TIP-50 can have a heavy enough stem so that an aluminum alloyworks nicely and can be produced at practical cost. The TIP-30 uses ahigher strength steel to get reasonable production speed. If you adjustthe bullet weight slightly downward, or use a slightly faster twist barrel,the accuracy is restored assuming it was compromised from the weight

204
difference in the steel versus aluminum TIP-30. This is merely a matterof how long a bullet you can spin in, for instance, a 1-10 twist versus a 1-9 twist and achieve stable flight.
The ULD design, with or without a tip, is not a universal cure forevery load, caliber, and twist rate. It is simply the highest practical BCdesign regarding the bullet shape, incorporating about 15% higher poten-tial accuracy due to the reduction in muzzle gas redirection caused byconventional boattails (both flat base and RBT base bullets tend to blowthe muzzle gas away in an expanding ring, where as the boattail tends tofocus the base or at least some of it into a ball in front of the emergingbullet, causing some buffeting with the turbulence created right in frontof the bullet). The conventional boattail has slightly higher BC, but theRBT makes up for that with a bit more potential accuracy or at leastpartial elimination of a source of bullet dispersion brought about by theboattail.
We�ve discussed BC at length, and it should be clear that so long asaccuracy is acceptable, higher BC is better. But at some point the factorsthat create ever higher BC reach a level that will adversely affect accu-racy. Once you have the most efficient possible shape, such as the ULD-TIP design, then in a given diameter of bullet, all you can do to furtherincrease the BC is to make the bullet heavier. This can be done by usinghigher density material (tungsten, gold, silver, osmium, uranium, and soforth) instead of lead, or it can be done by using more lead.
Obviously, if you use enough lead, your bullet gets too long to bestable in any practical twist rate. Let me know if you ever find a rifle thatwill fire the 3-inch long 350-grain .308 and I�ll be happy to give you oddsthat the bullets will not group within one zip code, much less on a foot-square target over 100 yards distant.
But what a fantastic BC that bullet will rack up! Dial this down tosomething people might actually try, and you can see that somewherealong the sliding scale of BC and accuracy, the two part company. Don�tbecome obsessed with BC for its own sake. It means nothing if you can�thit the target. If I put them all in one hole at the desired range, I couldn�tcare less about the BC. Now doping the wind -- that�s a tale for anotherday.

205
Rebated Boattails
A flat based bullet is formed by seating the lead core into a jacketusing a CS-1- core seat die. The jacket base is flat. It pushes against a flatpunch and stays flat. A rebated boattail refers to a bullet having the baseof the jacket formed in a truncated conical shape, with a small step orshoulder between the shank of the bullet and the start of the boattailangle. A conventional boattail bullet has no step. The boattail angle,usually from eight to twelve degrees relative to the centerline, just startsat the end of the shank and tapers back to a smaller flat base about sixtypercent of the bullet diameter.
There are two purposes for a boattail. The most important is to re-duce the amount of drag that occurs when air rushes back to fill the voidleft by the moving bullet. Turbulence occurs when the sharp right angleof a flat base bullet passes a given point in the air, and the molecules ofair rush in a chaotic way to equalize the pressure back to normal atmo-spheric levels. In a simplified way of looking at base drag, you could saythat moving the bullet through the air creates a vacuum behind the bulletthat �pulls back� on the bullet.
An angle on the bullet shank near the base, shaped like a boat prow,helps the air to smoothly flow back together. In effect, this reduces theamount of vacuum or turbulence and thus cuts down on the �pull� at thebase of the bullet. As a result, you get less loss of speed over the samerange, and more energy on target, plus a flatter trajectory.
A second purpose for the boattail base is to help get the bullet into thecase neck without catching the case edge and bending it. A slight bevelwould do as well, but these would not have as much effect on reducingdrag.
Theory behind base drag reduction
A conventional boattail base is most useful when a bullet is fired oververy long ranges, or when a bullet is fired at speeds below that of sound.As soon as a bullet breaks the first sound barrier (about 1130 feet persecond at sea level under standard conditions), it compresses air mol-ecules so rapidly that they don�t have time to get out of the way, and theyform a dense V-shaped pattern of highly compressed air that seems totravel along with the bullet.
This big V-shaped cone of packed air molecules is constantly leakingoff at the edges and picking up new molecules, transferring energy fromthe bullet to the air at a high rate. The shock wave, which is the extended

206
V-shaped cone, acts like a big extension of the bullet itself. In effect, youare dragging along the outline of a much larger bullet. The velocity atwhich this happens varies depending on the density of the air, because itis essentially caused by the mass and thus the inertia of the moleculesthat make up air.
Even something as small as a nitrogen atom has some mass, whichmeans it has inertia. Air is mostly nitrogen, with some oxygen and othergasses. The average inertia of this thin soup we breathe every day varieswith temperature and atmospheric pressure. Sound travels as vibrationsthrough the air, at a speed that depends on how close together and thushow much effective inertia the air has. When a bullet moves faster thansound, the air cannot pick up speed fast enough to maintain a normaldensity. The molecules that are struck by the bullet are accelerated so fastthat they jam into other molecules and those have enough inertia so theyare not gently moved aside, but jam into yet others.
At some distance from the bullet, the speed of the molecules andatoms has slowed down enough to let them move adjacent ones moregently. The result is a normal whiz of sound. But if your ear happens to bein the path of the highly compressed shock wave, you hear a very loudand sharp CRACK! The distance you can hear this very loud noise givesyou an idea of just how big a cone of compressed air is being movedalong with the bullet.
When the bullet goes supersonic, it feeds energy to the air so fast thatthe base drag is a small portion of the total loss. The base drag is just asbig a loss as ever, but now the bullet has something much bigger to worryabout. Since you can�t do much about the shock wave except to make thebullet as streamlined as possible (which shapes the shock wave to be morestreamlined as well), you can work on the base drag.
At high velocity, the base drag component might cause up to 15% ofthe total loss of velocity, but when the bullet slows down to below thespeed of sound, the base drag may cause up to 40% of total velocity loss.Pistol bullets, which travel much closer to subsonic speeds, and rifle bul-lets for muzzle loaders, benefit far more in total drag reduction from aboattail design than would a high velocity rifle bullet.
On the other hand, a high speed rifle bullet generally is used at longerranges. This means that even though the boattail benefit is much smallerthan for slower bullets, it has a long time to act, or at least a longer rangeover which crosswinds can work on it. A 40% improvement in ballisticcoefficient at 100 yards would only be a few inches of vertical distance onthe target. A 15% improvement in ballistic coefficient in a 1000 yardbullet might mean hitting the target or missing it.

207
Disadvantages of the boattail base
The boattail adds some length to the bullet, and makes a cup or hol-low base ineffective for sealing the bore. Very light short bullets mightnot be able to use a boattail base without losing their small bearing sur-face. Boattails also contribute to inaccuracy in two ways. First, they tendto direct muzzle blast gasses into sharp focus like the central post of awater nozzle directs water into a stream. The result is that instead of theexpanding ring of gas that you get from a flat base, a ball of turbulent gasis blown around the bullet and breaks up just as the bullet flies through it,adding from 10 to 15% more dispersion than a comparable flat base bul-let would experience.
Second, the boattail angle tends to focus hot gas in the bore towardthe junction of the rifling and the bullet, as gas pressure, acting at rightangles to all surfaces containing it, is vectored at 90 degrees to the BTangle and attempts to peel the boattail and barrel junction apart. If suc-cessful, the gas compresses the boattail portion of the bullet slightly, pullsthe bullet jacket slightly away from the bore, and lets more gas rush pastthe bullet along the rifling bottom, cutting the bullet and eroding rifling.
This gas-cutting factor can be plainly observed by making a 45 cali-ber pistol bullet with a boattail angle and firing various loads, then recov-ering the bullets and examining the edges of the rifling grooves under amedium power lab microscope. The edges typically have solidified dropsof previously molten copper deposited along them, showing where hotgas has rushed past the jacket along each rifling groove. A flat base bullet,or a rebated boattail bullet, of identical weight and shape, fired with thesame velocity in the same gun with the same loads, shows little or noneof this gas-cutting.
Advantages of the rebated boattail base
If the angle of the boattail is interrupted by a small but fairly sharpright angle, just as the boattail joins the rest of the bullet shank, both thegas cutting and the muzzle blast focusing effect are greatly reduced, eveneliminated. The shoulder acts as a �spoiler� to the laminar flow of muzzlegas, which tends to follow the bullet outline because of the smooth boat-tail shape, just as the air follows it in the other direction.
The shoulder also changes the gas pressure vector angle inside thebore, from the complement of the boattail angle to one acting parallelwith the bore. This vector has no �leverage� to peel the jacket back fromthe bore. It can only push gas past the jacket if the jacket is undersized orfouling cuts a groove in the jacket, or the bullet is driven so fast that it�skids� over the rifling and opens a wider than usual engraved path for gas

208
to leak out. In other words, the RBT design captures some of the inherentadvantages of the flat base, long considered more accurate for 100-yardbenchrest shooting.
A minor advantage to the RBT design over the BT is that the exitfrom the muzzle effectively takes place much faster. How so? Because aboattail exiting the muzzle is like a tapered cork being pulled out of abottle of sparkling wine: it releases gas slowly as the gap widens little bylittle, and any slight difference on one side of the gap changes the pres-sure acting on the bullet and shifts the bullet path slightly.
The RBT is more like a flat base bullet, in that the moment the rebateedge passes the muzzle, the restriction drops away instantly to a smaller�cork� and gives the gas a much larger orifice for escape. This gives lesstime and lower pressure for a slight angle or dent in the muzzle area todirect gas unevenly around the bullet, and helps to insure consistent straightexits from the barrel.
Corbin’s precision RBT technique
To build a good rebated boattail bullet, we use two dies. Instead ofseating the lead core in the jacket using a straight cylinder die (CS-1), weuse a die that has a boattail angle toward the bottom. The normal flatjacket can be used, because it will be shaped by internal lead pressure justlike it is in the point forming die.
We cannot use a rebated boattail shape in this die, because the shoul-der in the die would catch the bottom edge of the jacket. The jacketwould be ripped or crumpled. First, we form a conventional boattail. Then,in a second die, we get the base of the bullet past the RBT shoulder andexpand the jacket into the shoulder at 90 degrees, again using lead pres-sure with a second core seating operation. We are using the internal pres-sure of the �fluid� lead, at room temperature, to shape the jacket outwardinto the die wall and receive the desired shape.
To maintain the shoulder during point forming, we make an externalpunch that has a cavity matching the boattail angle and depth. The cavitydepth is important: too short, and the boattail will be compressed andbuckled, too long and the shoulder will be torn or forced forward. If theangle is not perfect, the bullet will have two boattail shoulders instead ofone, adding unnecessary drag. This RBT external PF punch is includedwith the two RBT dies.

209
The RBT die package is called �RBT-2� and can be ordered as an add-on to any conventional flat base set. Any set of dies that includes theletters �R� or �RB� in the catalog number includes these dies and theexternal PF RBT punch.
If the jacket is thin enough so it will expand into the first boattail die(called the �BT-1�), then you simply use the regular core seating punchand seat the lead core in this die instead of using the CS-1 flat base coreseating die. But if the jacket is copper tubing, it normally will be too thickto flow nicely from internal lead pressure and will not form a good boattailangle before the end opens up.
In that case, we provide a punch shaped like the boattail core. It isused inside the jacket, without a lead core, to shape the boattail angle.Then, the core is seated as usual in the BT-2 die with the regular coreseating punch. If you are using copper tubing jackets and commercialdrawn jackets in the same dies, you will probably need the boattail form-ing punch only for the tubing jackets. Seating the lead core in the drawnjackets will work much better to form them because they have a solidbase that can stand more pressure and because they are thinner and canexpand more readily.
Adjustable seating punches
Soft copper tubing makes a fine jacket, but it may flow forward whenyou try to form the RBT. The thick tubing material extrudes toward theonly point of relief for the pressure: the open, unsupported space aheadof the jacket mouth. If the jacket only grew longer as a result, you couldlive with that (by allowing for it or trimming it). But the material comesfrom the base section, which gives up material and becomes thinner, untileventually it separates. And that no bullet maker can live with!
To avoid breaking out the base when forming a RBT bullet with softjacket materials, such as copper tubing, you can use a shouldered punch.The shoulder blocks off the only pressure escape route in the die by press-ing against the end of the jacket. Now the jacket cannot flow forward,cannot grow longer, and will not separate. But a solid machined shoulderon the core seating punch only allows one specific depth for seating thecore. You probably will want to make more than one bullet weight. Ratherthan buying an assortment of core seating punches with shoulders ofdifferent lengths, you could use a single, adjustable shoulder punch.
Adjustable punches are made in two pieces. The shoulder turns on thethreaded tip, so that the amount of tip that extends beyond it can beprecisely set to any position. The hardened precision honed parts thatmake up the adjustable punch are more time consuming to make than a

210
solid punch. The cost of one adjustable punch is less than four solid punches,so if you are certain that you will never want to make more than threeweights or lengths of bullets, the solid punches are more cost effective. Ifyou think you may want to make four or more weights or lengths, theadjustable punch is a better buy.
Available RBT die sets
Rebated boattail die sets are made in the type -S, and -H dies, but notin type -R because of the fragile point forming punch edges and relativelypoor alignment of the slotted reloading press ram and head. If you wantto make RBT bullets, you are getting serious about swaging and need areal swaging machine.
The die sets that make rebated boattails include the RBTO-4 (Re-bated Boattail Open tip four die set), the RBTL-5 (Rebated Boattail Leadtip five die set), the FRBO-5 (Flat and Rebated Boattail Open tip five dieset), and the FRBL-6 (Flat and Rebated boattail Lead tip six die set).These would need the final die type designation of -S, or -H for a com-plete catalog number.
Because the boattail base angle is formed in a tubing jacket by puttinga steel punch all the way to the bottom of the jacket, and pressing it intothe BT-1 die, it is not practical to make a partition style tubing bulletusing a rebated boattail. The partition is formed by pressing both ends ofthe jacket against a shoulder on each of two punches inserted inside them,inside a straight-walled core seating die. Once the partition has formed, itis impossible to put the boattail punch to the bottom of the jacket.
A better answer than partitioning the jacket is to use Corbin CoreBond and make a bonded core. Since bonded cores are formed by meltingthe core in the jacket, and then seating the core after the jacket has beencooled and cleaned, it may be necessary in some cases to seat a short corefirst, at the base of the jacket, in the BT-2 die, just to form the RBT base.Then the rest of the core can be inserted by hand, bonded, and finallyswaged again in the same die. This would only be necessary if the jacketmaterial and thickness made it difficult to expand the base once the fullcore had been inserted and bonded.
Rebated boattail pistol bullets
A short pistol bullet such as the .45 ACP can sometimes be made as arebated boattail by seating the core in a truncated conical (TC) shapepoint form die, just as you would to make a FJM bullet, but then using aKeith nose punch to push the bullet backward into the same die, open endfirst. The solid end of the jacket, having already been formed into a fairly

211
good boattail shape, fits down into the Keith punch well enough so that itcan expand sideways and take on the shoulder. The open end takes on theshape of the point forming die.
This simplified, low cost way to make a RBT bullet does NOT work ifthe ratio of bullet length to diameter is much over 1.7 to 1. That is, a .452inch bullet that is less than .7684 inches long probably will form a reason-able boattail without too much taper in the shank portion. But an inch-long .458 probably will not. This is a short cut method, which doesn�talways work, but is worth a try anyway. If it works for your particularbullet, you�ve got a cheap and easy way to produce RBT bullets. Other-wise, no harm done and you just need the right equipment.

212
16. Shotgun Slugs and Airgun Pellets
Shotgun slugs are just bigger calibers to the bullet swager. EverythingI�ve said about other bullets applies to them. You can make jacketed slugsusing 3/4 inch O.D. copper tubing or pipe caps for jackets, or you candraw jackets from strip copper. You can make lead slugs of conventionalor exotic designs. But regardless of what you make, if the slug is 16 gaugeor larger, it will require -H type dies and one of the larger Corbin presses.The more simple shapes, in soft lead, can be swaged in the Mega-Mitehand press, even as large as 12 gauge. Small shotgun slugs, such as the.410 gauge, are below .458 diameter and can therefor be swaged in the S-Press.
The 20 gauge, 16 gauge, 12 gauge, 10 gauge, 8 bore, 6 bore and eventhe huge 4 bore can all be made rather easily using any of the hydraulicpresses that accept type -H dies. We can even build special dies that makehelical fins on the slugs, to spin them from the muzzle blast gas flow andkeep them spinning all the way to the target. These use punches withbuilt-in ejectors, not a standard set of tooling by any means, but entirelypractical. A number of successful businesses have been founded on theuse of these tools. You can find their products in mail order catalogs andon the internet, as well as in some better-equipped gun stores.
Lead cores for such big bullets can be made using special single cav-ity core moulds or three-cavity adjustable moulds. Lead wire isn�t usuallypractical because it is too large to coil and hard to cut. Lead shot or thincoiled lead wire wound around a spool and then swaged into what ap-pears to be a solid slug makes interesting fragmentation bullets.
In most cases, you would want to swage the core in a CSW-1-H coreswage die, then put it into a CS-1-H core seater and form the specialfeatures such as a post in a hollow base (keeps the wad from being blowninside the cavity) or a Saber-tooth hollow point. Finally, you might putthis into a PF-1-H point form die to shape the ogive.
A simple style of slug such as a hollow base round nose or wadcutter,with or without hollow point, can be made in a single step in the LSWC-1-H die. Slugs that carry a payload in a hollow cavity are formed bymaking a deep cup in the CS-1-H die and then filling it with material to bedelivered to the target, and finally rolling the walls around in an ogiveshape in a PF-1-H die. We have made airfoil-stabilized (finned) slugs thisway with good success. The usual cost of special shotgun slug dies hav-ing fins and other fancy features is from 2 to 3 times the price of a stan-dard three-die set. Compared to the selling price of these slugs, it can be

213
a very profitable investment: such slugs often sell for 400 percent morethan they cost to make, because it is a special and limited market withouta lot of competition.
There is a great deal of similarity in design between certain shotgunslugs and air gun pellets. In regular -S dies, the air gun pellets can dupli-cate the slugs. But the airfoil-stabilized design is just too delicate to workin a scaled-down version. The parts become far too fragile compared tothe required swaging pressure (works fine on paper, however). Dual diam-eter pellets offer excellent performance in a design similar to a Fostertype shotgun slug, but with a short Keith SWC nose.
A dumbbell or �diablo� style shotgun slug can be swaged by using asplit sleeve around a lead core, the assembly of which goes into a CS-1-Hdie. The larger head and base are swaged to the diameter of the die, andthe split sleeve maintains a smaller waist in the middle. After forming andejecting the slug and sleeve, a thin-edged tool is used to pry apart the twohalves of the sleeve, revealing the slug with the hourglass shape. Thisdoes not work for small calibers because the sleeve becomes too fragilefor the pressures, but it works well enough for shotgun slugs.
Airgun pellets differ from other lead bullets in respect to the propel-ling pressure and velocity, which is generally much lower than with eithermodern cartridge guns or blackpowder muzzle loaders. Pre-charged highpower airguns are moving toward these levels, however. Today, we makedies for airgun projectiles that fit .25, 9mm, .45, and .50 caliber airguns.Most of these larger bore airguns carry compressed air in a reservoir thatis filled from SCUBA tanks, with pressures of 2,000 to 5,000 psi and higher.
The main concern of the airgun pellet designer is obturation withminimal friction. Working with relatively low pressure, the airgun pelletmust put as much of it to work as possible. Sealing the bore immediatelyagainst any pressure leaks around the pellet (obturation) is critical, but sois minimizing the amount of friction produced by forcing the pellet throughthe bore. Because the pressure is relatively low, the pellet typically needsto be light weight for the diameter. These design parameters point towarda deep hollow base with thin edges.
Two designs have proven themselves in international match compe-tition, and the choice between them is a subject for debate. One is thestraight-sided hollow base with a thin base edge, having a fairly sharpinternal angle near the base that joins a more gentle angle as the wallsbecome thicker, toward the nose. The shape of the hollow cavity can be aradius at the end, a flat, or even a sharp point (for heavier pellets).

214
The sharper inside angle near the open base helps direct the air pres-sure to push the thin �skirt� of the pellet into the rifling quickly, so thatvery little air pressure escapes before the base is sealed. Making the angletoo sharp reduces the effective area and thus decreases the total forcepushing the skirt outward, whereas making the angle too shallow or blend-ing it into the same angle as the rest of the hollow base cavity vectors theair pressure force closer to the axis of the bore, so that a point is reachedwhere the total force acting to expand the skirt at the open edge is againreduced, and air pressure escapes around the base.
The ideal shape is subject to mathematical analysis to find the bestangle, balancing the area against the force vector acting to push the skirtoutward. But even so, there are compromises with skirt thickness versusmuzzle pressure at exit, which might flare out a very thin skirt, and issuesof bore roughness or fouling versus tearing off portions of a very thinskirt in the bore. Debate and opinion still reign over strictly scientificmethods, partly because there are so many variables that it is impracticalto factor them all into the equation. Even changing from one brand ofgun to another, in the same caliber, can shift the point of maximum re-turn. A thicker skirt and sharper angle in one gun might prove moreaccurate, whereas in another gun a thinner skirt and a shallower anglemight add a few feet per second to the velocity without changing theaccuracy.
Fortunately, airgun pellet swages are inexpensive experimental toolscompared to exotic shotgun slug shapes. A simple LSWC-1 die and low-cost base or nose punches can be tried without undue cost, and the bestdesign for each gun in one�s arsenal can be determined experimentally.The simple, single diameter pellet that is essentially a lead semi-wadcutterhollow base projectile may work best with the flat tip, round nose shapeor even the truncated conical (or Keith) nose.
Regardless of the hollow cavity and nose shape, the diameter is ex-tremely critical to obtaining best results. The ideal diameter of pelletvaries with the pressure, as well as the rifling depth and bore size. Unlikemost of the cartridge gun calibers, there is a considerable variation inbore diameter and rifling depth among makers of airguns. Commonlyused calibers, such as the .177 and the .221, typically depend on a bore-riding projectile that can be as small as .169 for the .17 caliber, and .214for the .22 caliber. The thin skirt expands almost immediately into thebottom of the rifling (this is the purpose of the design, at least) and causesboth obturation and engagement of the rifling at the rear of the bullet,while the rest of the pellet expands less or not at all, depending on thepressure.
215
Airgun pellets represent a challenge to the person ordering their diesin this regard: diameter is entirely up to you. There is no way the die-makers can guess what will be best for your gun. Even with the samebrand and model, there are enough variations in manufacturing to voidany suppositions about what might prove to be the most accurate diam-eter. Generally, the best starting point for a custom die would be the di-ameter of an existing pellet that seems to work well in it. It is not uncom-mon for a custom pellet maker to order two or three different diametersof dies for a given caliber of airgun pellet, since some guns will work bestwith one diameter and other guns with another.
One solution is to order a set of tools for the largest suitable diameter,and then to get bullet reducing dies to bring this size down for guns thatwork better with a smaller pellet. The cost of a good bullet reducing die isthe usually close to or the same as the cost of a simple swage die, but ifone has a large number of nose and base punches fitted to a given die,then reducing the pellet is far less costly than duplicating all the punchesin another diameter. This is especially true of the second kind of pellet,which is also very popular: the dual diameter pellet.
Dual diameter pellets are made either in two dies (the standard LSWC-1 as described above for the single diameter pellet is the first operation,followed by a DDS-1 dual diameter sizing die), or in one special pelletforming die that combines the weight adjusting features of the LSWC-1with the dual diameter features of the DDS-1. This is called the DDS-1-SC or DDS-1-HC, depending on which press it is made to fit. The customdie has both weight adjustment, and adjustable ratio of the length of thetwo diameters. A special adjustable length internal punch controls theposition of the nose within the die, which in turn controls how long theminor diameter section will be compared to the major diameter or skirtsection.
The dual-diameter pellet is designed to sit atop the rifling for most ofits length, engaging the rifling with the larger diameter band at the base.Whether it is first swaged in the LSWC-1 die at full diameter, or formed allat once with both diameters in the custom DDS-1-SC or DDS-1-HC typedie, the end result is that you can adjust the height of the driving orrotating band, and the over-all length of the bullet to make a bullet thathas exactly as much obturation and engagement as you wish. You canchange the length of the bullet (and thus its weight) as well as the lengthof the major diameter section.
This design does not depend on chamber pressure for the amount ofobturation and friction, since the skirt is designed to be at rifling depthbefore pressure is applied. By making the walls of the skirt section thickerthan with the conventional single diameter pellet, the amount of addi-
216
tional expansion is controlled or stopped entirely, so that regardless ofthe pressure (up to a reasonable point) the pellet will still engage the sameamount of rifling along its length, that being the length of the majordiameter driving band.
In this respect, the dual-diameter pellet is much like a conventionalartillery shell with a driving band (which is raised, and made of a softermaterial such as brass or copper, compared to the bore-riding body of theshell which is made of steel or iron). Whether the additional cost of thedual-diameter die is worth the results is a matter of debate. Some shoot-ers say that it is, because it gives a more consistent engagement withvariations in air pressure. Others say that hardly matters, because varia-tions in air pressure are going to change the point of impact as much ormore than the amount of rifling engagement. It is likely that some guns,with a closer fit to the pellet, benefit from the dual-diameter design morethan others, depending on how well they match the bore dimensions.
My best advice would be to try the lower cost solution first. Experi-ment with weight, nose and base shapes, and then with diameters. Whenthe best combination of these factors is found, see if the results are goodenough or if a possible improvement in bullet design would actually havea noticeable effect on the score. If you are already shooting 499 out of500 possible, and are fairly sure that sometimes you throw a shot byimproper technique, then it may be a waste of money to try to make abetter pellet. If you are getting lower scores and are fairly sure that yourown ability and technique would deliver better ones if it were not for theunexplained flyers now and again, perhaps a different bullet design willprove to be useful.
I know when I shot on a military pistol team, my practice sessionsalmost always resulted in very slight improvements in score, even whenI thought I had done badly or just the same as last time. The improve-ments were small, steady, and usually a surprise, because I concentratedupon whatever it was that made some of the rounds miss the x-ring, andtended to forget about all the ones that went almost through the samehole. Working to improve put the emphasis on the shots that were notright, so by the end of the session, those thoughts were the only oneswhich stood out. The aggregate score just marched along on its own,seemingly oblivious to whether I felt good or bad about one particularpractice. When it leveled out, I felt that my equipment or load neededwork, and usually, it did. As long as I was improving, I didn�t change thetools!

217
17. Bullet-Makers� Tools
Some of the dies and equipment that bullet makers use are not neces-sarily part of a basic swaging set, but are used to make special features inthe bullets and may be used with several kinds of basic swaging sets.Features such as the dual diameter, or serrated jackets, or cannelures, canbe added to nearly any style of bullet. New ideas are constantly beingdeveloped, so there may well be other tools now which are not describedin this book. But here are the ones currently being made as I write....
Dual diameter sizer die (DDS-1)
This die is made for all of the Corbin presses, in type -M, -S, and -H.The purpose is to form a bullet that has two diameters. The nose or ogivesection of the bullet rides on top of the rifling to align and guide thebullet with very little friction, while the rear portion of the bullet is leftfull diameter to engage the rifling.
This is a much better design than a tapered bullet, which only alignsproperly at two points. A dual-diameter bullet aligns full length, first inthe bore and second at the bottom of the rifling grooves. Compared to atapered bullet, it is far more stable in the bore, giving consistent frictionfrom shot to shot without as much affect from the �upset� of the bulletcaused by its inertia when the charge goes off.
The DDS-1 die is a final step. It is used with other dies, not by itself,except in special custom versions for pellets and lead bullets. You firstmake the bullet at its major diameter. Then you push it into the DDS-1die to whatever length you wish to have reduced. You can reduce nearlythe entire bullet, or just a little of it.
An internal punch, with a matching cavity to the bullet nose shape,ejects the bullet. You can change the internal punch for different noseshapes of bullets in the same caliber. The base punch can be the same oneyou would use in the final point forming die, but generally a special punchwith a stop shoulder is used, so that you cannot accidently push the punchinto the smaller section of the die bore and ruin the punch or crack thedie.
A typical use would be in making an air gun pellet. First, a LSWC-1die forms the basic hollow base SWC style bullet. Then the bullet is pushedinto the DDS-1 so that most of the bullet is drawn down to slide on top ofthe rifling, leaving only a small driving band. Another example would be
218
a heel-type bullet. In this case, the bullet is pushed backward into theDDS-1, and the internal punch matches the base shape while the externalpunch matches the nose.
To make a DDS-1 die, we need to know four things: (1) the majordiameter (bore plus twice the rifling depth), (2) the minor diameter (boresize), (3) nose shape, and (4) base shape. A few sample bullets are impor-tant, so we can test the die with your materials and make sure the baseand nose are proper, and for jacketed bullets, that the jacket springbackhas been considered in the size of the die cavity.
Jacket trimming die (ET-2)
The ET-2 die makes it possible for you to precisely trim a long bulletjacket to shorter lengths. High quality bullet jackets are expensive to pro-duce and stock, making it more likely that a company could stay in busi-ness by making the longest practical jackets for each caliber and stockingthem, than by investing in every possible length in each caliber. You caneasily trim the longest jacket to make any shorter length, using the ET-2,making it unnecessary for you or the jacket company to tie up money inmore than one length per caliber. You may be able to get enough of onelength to break into the discount volume, and the jacket company may beable to stay in the jacket business (most of them have dropped out of itfor economic reasons).
The ET-2 comes in -S and -H versions, for any Corbin press. To use it,adjust the internal punch length so that it leaves the desired length ofjacket in the die. A simple polished rod and collar with a little thumb-screw come with the die, and act as a transfer gauge. Set the collar on therod so that one end of the rod is exactly as long as you want to make thebullet, then insert the rod in the die mouth and adjust the punch so it willdrop back exactly that far when the press ram is raised. The punch has ahead that rests on the internal shoulder within every Corbin press ram.
When the shoulder is exactly the same distance from the die as itwould be in the press ram, the body of the punch can be screwed up ordown in relation to the shoulder (which in -S dies is a self-locking hex nut,and the end of the punch is fitted with a hex wrench cavity so you canhold it easily with the provided Allen wrench).
The -H type die is really the -S with an adapter kit for use in the largerpresses. You can get one adapter and several -S dies, and use them all inyour -H type press. The external punch is a very fat, rapidly tapered shortpunch that fits into the floating punch holder directly. It screws in, replac-
219
ing the normal retainer bushing. The die is raised all the way up with theram, to the end of the stroke. The punch holder is then screwed downuntil the punch just touches the die mouth.
A jacket is then pushed down into the die (by hand). It should fiteasily. If the jacket requires much force, it is too large and needs to bereduced (by passing through an appropriate size jacket draw die). Corbinjackets will be the correct size and will fit easily by hand. In order to getthe jacket into the die, the ram will need to be raised part way, droppingthe internal punch.
The portion of the jacket that will be trimmed off projects out of thedie mouth. The ram is raised until the pilot or reduced guide section onthe external punch enters the jacket mouth. The jacket needs to have awall thickness that allows this to happen: if you have a jacket with suchthick walls that the pilot will not fit into it, then the ET-2 cannot be usedwith it. A different punch may solve this, but such thick jackets mightrequire a modified die set as well.
Run the ram up to the end of the stroke. Chances are the jacket willexpand and perhaps split in the portion to be cut off, but will not becleanly trimmed yet. Adjust the floating punch holder down, very slightly,to increase the contact. The jacket will be pinched between the hard diemouth edge and the tapered hardened punch so only a very thin filmholds them together. They can be separated easily by tumbling, or a lighttwist with the fingers or small pliers.
The ET-2-S and ET-2-H are for moderate to light use, for the homebullet maker and for prototype runs. For high production use in a custombullet business, the ET-2-HC is recommended. This is very similar to theET-2-H in appearance, but the materials are considerably harder and moretime consuming to machine, and the heat treatment takes considerablylonger. This makes the ET-2-H more expensive to build, which is why ifyou don�t really need high production we offer lower cost versions that dojust as good a job but would not last as long if you started making, say, athousand bullets a day.
We even make a jacket trim die for use on a reloading press: the ET-2-R. This is a different design, upside down to suit the press design. Thetrim die is in the press head, and is not self ejecting (a plunger pushes thebullet out). The trim punch is in the ram. Therefore, this kind of die onlyworks with reloading presses that have a design to the RCBS Rockchucker.If you have something else, you probably need to consider getting anactual bullet swaging press.
220
Cannelure, knurling, and bullet grooving tools
Cannelures are serrated grooves rolled into a jacketed or lead bullet,either to help identify the bullet, to strengthen the jacket, to use for crimpingthe case mouth, or just to tighten the bullet�s grip on the case. The wordis pronounced �CAN-a-loor�, which might make a good name for a Cana-dian Fishing Lure company. There are two kinds of Corbin cannelure tools.
The Corbin Hand Cannelure Tool, HCT-1, handles calibers from .172to .458. A new version introduced in July 2002 has an extra set of holesfor the pivot shaft, which are raised to allow the caliber range to extendbeyond .458, all the way to a .72 caliber, so long as the bullet lengthdoesn�t interfere with the crank handle. You can assembly the tool withthe upper section hinged by either set of holes, for two ranges of overlap-ping calibers.
It can put adjustable depth and adjustable position cannelures oncopper or gilding metal jackets as well as hard or soft lead bullets. TheHTC-1 Hand Cannelure Tool uses a roller V-way to support the bullet,and a padded handle that pivots a U-shaped channel down over the bul-let, and presses a hardened roller wheel against the bullet shank. Turninga crank shaft rolls the cannelure into the bullet in one or two turns. I canusually do four or five bullets a minute with one.
A special version of the hand cannelure tool is used to make a waffle-pattern or knurled surface on lead bullets, which holds far more lubricantthan a ring. This tool is called the HCT-2 Lead Knurling Tool. The maindifference between it and the HCT-1 is that the HCT-2 has three diamondpattern knurling wheels instead of a pair of smooth V-way rollers and asingle cannelure wheel. A number of firms have used this pattern, includ-ing Hornady and Buffalo Bullets, in their lead swaged bullets.
Another version of the hand tool is the HCT-3 Bullet Grooving Tool.This tool rolls two grooves at a time onto the bullet. The grooves arewider than those on the cannelure tool, which is really made for jacketedbullets or straight pistol cases. I like to swage a lead bullet in a die that isa little smaller than the final caliber, or even just in a core swage die, knurlor groove it, apply bullet lube, and then swage it to final size in a coreseating or point forming type of die. This maintains perfect lube grooveswith no air pockets in the lube, compressing them slightly and bringingthe lube right to the surface of the bullet so it looks like it was machinedinstead of squished in.
When you roll a groove into a bullet, the material is moved, not re-moved. It has to go somewhere. The volume of lead displaced from thegroove usually shows up as two higher rings around the groove (in otherwords, if you make a groove that is .020 inches deep, you will probably

221
have two .010 high rings around the groove). If you know this, you caneither use the grooving or knurling process to increase bullet size depend-ing on how you set the depth, compensating for it by buying a smallerswage die, or you can handle it by reswaging or drawing back to precisediameter again. Reswaging works reasonably well. Using two diametersof dies is even better, because you always push the diameter straight outrather than pushing it back, as with drawing or reswaging in the same die.
The PCM-2 Power Cannelure Machine can process up to 50 bullets aminute, as fast as you can feed them into one side of a rotating wheel.This production-quality machine features a 120 volt 60 Hz or 240 volt50/60 Hz motor coupled through a heavy shaft mounted in a strong thrustbearing. The unit weighs about 23 pounds and is about a foot high with asix by eight inch footprint. Cooled by forced air, it is designed for continu-ous operation.
The PCM-2 uses different diameters of wheels to cover the rangefrom .19 to .510 caliber. Custom wheels and back plates extend the rangeup to 4 bore (.998 inches). Knurling wheels in the same range of calibersas the cannelure wheels put diamond-pattern knurls on lead bullets.
Multiple grooves can be rolled by ordering the cannelure wheel builtto order. If you don�t specify, the wheel will come with a standard .050-tall straight knurled groove. (Actually, the wheels have a raised ridge thatcreates a groove in the bullet.) The PCM-2 processes bullets so quicklythat many commercial bullet makers incorporate it as part of their pro-duction line, with their own automatic feeder dropping bullets into it.
To increase the reliability of automatic drop feeders, we do make acarousel device that supports each bullet individually and keeps it fromtipping over. This is a �spider� design with a number of notches in athick, round metal plate, with hard steel rods or pins that project down-ward, parallel to each other, from holes beside each notch. A bullet can bedropped into the notch, and the steel fingers will support it as it movesthrough the canneluring track (a half circle gap between the backing plateand the cannelure wheel).
The PCM-F feeder is not a complete automatic feed device, but amanual feed guide that greatly reduces tipping, falling, and speeds up theprocess of feeding bullets, especially bullets that are very long for theircaliber or have boattails. Any bullet that tends to fall over easily can befed much more rapidly by slipping the proper caliber of PCM-F over theshaft of the PCM-2. Each feeder device is made for a given bullet caliber.However, if the difference in diameter is but a few thousandths, such as a.355 or a .357, the same device could be used. It wouldn�t work to use a.308 feeder with .277 bullets, for example, while it might work with .284

222
and would probably work reliably with .300 diameter. If you tell us inadvance what you plan to use with it, we may be able to fine tune thedimensions to give you more versatility. After all, these are hand madetools.
Heat treatment oven
Melting lead cores for bonding to the jacket, and heat treating eitherjackets or lead itself can be done in the HTO-2 Heat Treatment Oven,which features a digital control with thermocouple sensing and feedback.The oven normally runs on 120 volts AC, but can also be ordered in a 240volt model. Capable of up to 2100 degree F. temperatures, the HTO-2offers gunsmiths and tool makers a convenient, fast-heating furnace thatcan melt gold, aluminum and lead alloys or heat treat tool steels. Thefurnace has a cavity size of about 4.5 x 5 x 6 inches deep. It has a lowthermal density ceramic liner that allows rapid heating and fast cyclingtime, and is highly desirable for fast cycle time so you can process a lot ofjackets in a hurry at low operating cost.
Flameless heat gun
A handy way to generate up to 1000 degree temperatures at low costwithout flames is the Flameless Heat Gun, FHG-1. Like an overpoweredhair dryer, the FHG-1 uses a fan and electric heating elements to blow astream of superheated air for annealing, bonding, and heat treatment. It isslower than a propane torch, but also heats more evenly without risk ofgoing over temperature and burning the parts. The heat gun runs on 120volts AC.
SDD-1 Serrator Draw Die (full length)
The SDD-1 is a �crown-of-thorns� draw die, with small, sharp adjust-able points projecting inward. A bullet jacket is typically placed over adrawing punch and pushed through the die. The points cut a fine, shallowgroove in the outside of the jacket, so that it will tend to separate andpeel back in evenly divided petals along these stress-relief lines.
Typical applications include making fragmenting bullets, which havelimited penetration. These might be used in security and police work, asfor example in a prison where a ricochet is almost certain among all theconcrete and steel with conventional bullets, or in varmint hunting, wherethe bullet needs to disintegrate when it hits the ground to avoid skippingoff over the horizon and punching a �cancel� hole in the shooter�s wel-come ticket to that particular farm.
223
The design of the SDD-1 is similar to a jacket drawing die, exceptthat it usually does not reduce the jacket diameter. The serration pointsraise a slight ridge which would cause problems fitting the jacket into thecore seating die, except that the SDD-1 has a close-fitted reducing sectionnear the top, where it redraws the ridges back to normal size, pushing thematerial back into the groove so that the grooves are just barely visibleand cause no problem with obturation or gas sealing by the bullet.
SDD-2 Serrator Draw Die (adjustable, partial length)
Sometimes, a person wishes to make a bullet that opens quickly andreliably with good even expansion, but then stops expanding about mid-way or just past the ogive. A jacket thick enough to resist expanding mayalso resist opening, especially at lower velocities (which may be the resultof long range impact or perhaps just a low muzzle velocity). Subsonicrounds with boattail bases and blunt round noses may fall into this cat-egory. So do many conventional hunting bullets.
The answer is to serrate only the forward portion of the jacket. Thiscan be done two ways. A special broaching punch can be made to cut intothe jacket from the inside, as you push it down from the open mouthtoward the base. This works if the jacket is thick and tough enough towithstand the force, without collapsing in front of the broach teeth. Mostcopper tubing jackets can be serrated this way.
But thinner, more conventional drawn jackets would accordion foldfrom the necessary cutting force. To make precise serrations, the jacketneeds to be cut from the outside. The SDD-1 has no provision for ejectingthe jacket, and must push the jacket all the way through the die. TheSDD-2 is built more like a core seating die, and fits into the press ram.Usually, the core is seated into the jacket first, in the conventional CS-1core seater, or the rebated boattail core seating set. Then the jacket ispushed mouth first into the SDD-2 die.
The distance that you push the jacket into the die determines howmuch of the ogive will be serrated. This is precisely set by the floatingpunch holder position. A flat-ended punch within the die (internal punch)pushes the bullet back out again, and irons the ridges flat. This die, likethe SDD-1, is made for a specific diameter of jacket rather than a caliberof bullet, except that in cases where it is made to fit the jacket after a coreis seated, it is very close to accepting the final caliber size. The SDD-1 onthe other hand accepts the jacket prior to seating a core, which means thedie bore is usually several thousandths of an inch smaller than the finalcaliber.
224
The six hardened steel points are individually adjusted for depth whenthe die is built and tested. They are replaceable, and adjustable, but un-less there is good reason it should not be done. Without an alignmentprobe, which fits the bore and has a reduced section held concentric withthe bore against which the points can be gently run to set them, it isdifficult to get the points set the same depth. Some people try to set thedepth to cut further into the jacket, but this is not wise because the metaldisplaced by the cut has to go somewhere, and the force and wear on thepoints becomes much greater as you go deeper. There is no practicaladvantage to cutting more than a shallow groove in the jacket, since evena shallow cut will channel the impact force and concentrate it along thestress lines.
DCD-1 Disk Cutter Die
The disk cutter die is used to make round disks out of flat strip. It canbe made to cut copper strip, cardboard or felt to make wads. The copperdisks are sometimes used as a seal, pushed to the bottom of a tubingjacket to close off the little hole that may be left, for purposes of bondingthe core. Cardboard and felt may be cut into disks to make grease wads,over-powder protection wads for lubricated bullets, or shotshell wads.
The typical disk cutter die is built for a given material thickness andwidth. Some materials can be cut even with the power of a reloadingpress, while others may require a Hydro-Press. The dies are similar indesign, however. They screw into the press from the bottom side of thehead, which is different from nearly all other kinds of dies. In other words,you would hold the die below the press head, and put it up into the threadedhole, rather than screwing it down into the hole from the top (the normalway).
A slot is cut more than halfway through the side of this die, near thebottom end. The material to be �coined� is fed in a strip through this slot,which should be fairly close to the thickness of the material. A punch,which fits the press ram, is carefully inserted into the hole in the bottomof the die, and the press is operated so that this punch never has to dropout of the hole. That way, there is no chance that you will accidentlysmash the punch into the lower portion of the die and snap it off (since itis only held on by one side, below the slot).
All the force of cutting is between the punch and the solid, threadedtop section of the die, above the slot. If the die were to be installed upsidedown, with the solid threaded portion facing the punch, not only would
225
the wrong edge of the hole be used to cut the material, but the stress ofcutting would be against the part of the die that was separated from themain body by the slot.
The remaining connection would be put under huge stress, like a hingethat wasn�t meant to be opened. Sooner or later, the part of the die that isnow above the slot would snap off. So, to keep the die in one piece, installand operate it in accordance with the instructions. It will punch out thou-sands of disks for you, which will pass up through the threaded portionand out the top.
BGK-1 Base Guard TM Maker
The Base Guard maker is similar to the disk cutter die, except that ituses 0.030-inch thick copper strip, and the cutter punch has a small pinprojecting from the face which penetrates the strip just before the disk iscut free.
The use of Base Guard disks has been covered in previous chapters. Itscrapes fouling from the bore with each shot, and helps keep the boreclean, while sealing the chamber gas behind the bullet to prevent gascutting and leading. It is a sort of �super� version of a gas check, only it iseasier to make and uses slightly less copper, and helps clean the boreinstead of just protecting the bullet. BGK-1 dies can be built in type -R, -S, and -H, for all types of suitable presses.
The BGK-1 die goes into the press from the bottom side of the topplate or head, just exactly the same as the disk cutter die and for the samereasons. Since you only need to punch through the strip and raise the diskpast the top of the slot, the stroke can be very short. Operating the pressso that the punch never pulls completely out of the die until you arefinished and ready to put it away is a good way to insure against puttingundue force on the face of the die, and breaking the junction between thelower guide portion and the main die body.
BSK-1 Ball Swage Kit
The ball swage kit can be made in type -S or -H. It consists of twodies, a CSW-1 core swage die with rounded concave punch ends and aspecial hemispherical guided swage die. Each size of ball swage comeswith instructions that tell you the proper weight of lead to make a givenperfect round ball out of pure lead. You can adjust this weight slightly tocompensate for slight differences in lead density.
Once you have formed the proper weight of cores, they are lightlylubricated and placed in the lower half of the hemispherical die. The dieis an assembly with two sliding halves, guided by a pair of rods. The top
226
part of the die screws into the floating punch holder (without the usualretainer bushing) and the lower part screws into the press ram. Specificinstructions come with each die, and supercede any earlier printed mate-rial, since it is possible that improvements and changes may be madefrom time to time.
The press is operated up and down, according to the instructions, anda round ball is formed between the two hemispherical halves of the die.You can pick up the ball, turn it 90 degrees on a horizontal axis, andswage a second time, to insure absolute roundness. If there is too muchlead, it will spurt out a tiny bleed hole or notch between the two hemi-spheres. If there is not enough lead, the ball will not completely form andyou will probably see that it has flats or unfilled areas.
Balls from .25 caliber to 1-inch diameter have been made in variousBSK-1 die sets, with a degree of perfection seldom found in casting. Thespeed of operation, even using three strokes of the press, far exceeds thetotal time required to make an equal number of balls by melting lead, ifyou consider the total project time and not just the pouring of hot leadinto the mould. With the BSK-1 you do not have to melt any lead, nor doyou have to wait for equipment to cool down so you can clean it up andput it away. Even if it were not for the more perfectly formed, spruelessballs, that would be enough to convince me!
FX-1 Bullet Fixer Kit
The FX-1 can be made in type -S or type -H. It is for the enterprisingperson who has purchased a truck load of pulled military bullets of theconventional lead-filled variety (not pyrotechnic or explosive rounds, norarmor-piercing ones that have a core too hard to be moved around), andwishes to make them more accurate, to remove or minimize the pullmarks, and to improve the appearance for resale. It is also for the personwho has a quantity of bullets that have been in some way damaged, suchas culls or pulled bullets from a commercial loading operation, who wishesto fix them.
The bullet fixer can appear to perform miracles when circumstancesare right. Not every damaged bullet is repairable, but we have processedbullets that have actually been fired, and made them shootable again withreasonable accuracy. We have processed surplus 50 BMG bullets and7.65mm bullets, not to mention 5.56mm, into nice looking accurate shoot-ers, when they were badly marked with deep gouges and ridges, werebadly out of round, and had uneven, partly filled bases.
227
The kit consists of two dies, a bullet reducing die (BRD-1) that mayor may not require a custom spring-loaded guide punch depending on thebullet base design, and a high pressure two-piece die that forms a specialpressure chamber, applying tons of force through the bullet base, into thecore material, and pushing outward into the sealed vessel.
In order to build the kit properly for a give lot of bullets, we need halfa dozen samples of the worse damaged. There are special �tweaks� thatwe make to the set depending on the bullet design and the nature of thedamage. In each case, the set first makes the bullet as round as possible,and then squares up the base (with open base military boattails, it squaresup the material within the boattail while maintaining the boattail shape)while pushing out any dents or depressions in the outline of the bullet.The shape of the bullet can be changed, with certain limits, as well. Insome cases, the bullet can be completely reversed so that a full jacketbecomes a soft point (but this depends on the core material and bulletjacket).
The FX-1 can be a complete business opportunity in itself, under theright circumstances, but we should talk about it and get samples beforedeciding whether it is worth going forward with a business plan! There aresome bullets such as hard metal core armor piercing designs that simplycannot be reformed under any reasonable pressure, and others with pyro-technic charges or explosive military payloads that would be too danger-ous to subject to high pressures in a closed die.
Other Tools and Dies
Lead wire extruders, core cutters, and core moulds were discussedback in chapter on making lead cores. Jacket and bullet draws dies werecovered, and so were the copper tubing and strip jacket drawing dies. Gaschecks and Base Guards were discussed. I think that only leaves one thing,and it entails more of a service issue than merely a product discussion, soI will save �Custom Dies� for a new chapter!

228
18. Custom Tooling
Corbin also builds custom dies and tools. The published prices are forstandard calibers and nose shapes which are our own designs. We are gladto make custom diameters and shapes of punches, which have an addi-tional custom work charge because they are made individually to yourspecifications by a die-maker, rather than programmed into our normalproduction runs and made by the hundreds all at one time.
If you want to make a custom shape of bullet, send us a drawing withdimensions indicated. Use our fax number or the mail, or send us a sampleof a bullet you want to duplicate. You can even make a model out ofwood, aluminum or plastic if you wish, or send us a photocopy of a pic-ture from a gun book or article. However, it is time consuming and some-times impractical for us to go find a certain picture of a bullet in a certainbook you happened to read, especially when we are picking up the phoneabout as fast as it can ring all day long.
Making a bullet �just like the Hensley and Gibbs number such andsuch� can be a confusing order, too, because specifications may changeover time. As an example, the H&G 68 shape has changed at least threetimes that I know about over the last two decades, and our sample orpicture might be from a different time period than yours. Again, insteadof referring to something that we may or may not have here to look at,send a drawing, sketch, picture, sample, or write down the dimensions. Ifwe can�t figure it out, we will make our own drawing of what we thinkyou mean and put question marks on it for the dimensions about whichwe are in doubt.
Very often we receive custom orders that have mutually exclusivedimensions indicated. Just the other day I got an order for a bullet thatwas .577 diameter with a hollow base indicated. The client wanted thewidth of the hollow base cavity to be .357 inches across, which is smallfor that caliber but not remarkable.
In the accompanying letter, he also said that the skirts or width of thebase walls surrounding the hollow cavity should be 0.020 inches thick toallow for easy expansion in the bore. Again, this is quite reasonable for ablack powder bullet with a long barrel and consequently low muzzle pres-sure (a modern load might flare out the thin base walls upon exit from thebarrel).
But adding the two skirt dimensions together gives 0.040 inches, andadded to the width of the hollow cavity gives only 0.397 inches. Oops!The caliber is not 0.397 but 0.577. Where did the client expect us to hide

229
the extra 0.120 inches? I called to find out. After a few minutes of vigor-ously defending the skirt width and desire for a small diameter hollowcavity, the client suddenly stopped talking. The phone appeared to godead.
�Hello?� I said. �Are you there?��Yeah, I�m here...�, the answer came back. �I meant to say 0.537, not
0.357. I have a lot of .38 pistols that are .357 diameter and I guess thenumber just sticks in my mind.�
A commonly requested custom item is a 2-E or even 3-E nose shapefor a handgun. This almost never works out: the elliptical nose curve isnot practical for rifles at three calibers length, and certainly a two caliberlong elliptical nose curve is beyond the practical limit for most revolversand autoloaders. A 1-E nose is pushing it, for handguns.
On paper, long elliptical noses look good. But in three-dimensionalreality, so much weight is shifted to the nose that the bullet becomesmassively heavy and long. Elliptical curves are not measured in the sameway as spitzer (tangential ogive) curves. Elliptical noses are measuredalong the axis. Spitzers are designated by the radius of the curve formingthe ogive. Big difference.
More is not always �better�. Sometimes it is impractical. This is just avery simple example of something that looks good on paper but may notbe practical when you try to actually build it. The limits of tooling strengthin thin sections or small diameters, the great pressures needed to flowmetal perfectly through small areas, and the fact that the bullet has tocome back out of the die after swaging it to shape often cause designissues that must be solved. And solving it is a service we offer in threestages.
Three stages of custom design
First, there is the feasibility study, to make sure that the tooling hasany chance at all of working and that there isn�t already a better way toaccomplish the goal. Second, there is the research and development stage,to work out the dimensions and the engineering math, possibly to makesome preliminary tests with mock-up tooling built to try concepts outwithout spending any more than necessary for longevity or speed of op-eration. Third, if the first two stages have not ruled out the idea for tech-nical, economic, production speed, or some other reason, then there is theactual production of the prototype tooling, testing and refining and possi-bly some redesigning of it after testing, and the resulting final product.
230
What to expect
Our work is limited to developing the tooling that can produce yourdesign of bullet. We do not, cannot and will not make any promises orguarantees concerning the performance of your bullet in regard to accu-racy, marketability or legality. The performance of a bullet is subject tomassive influences by the shooter, the other load components, the fire-arm, the conditions of firing and the kind of target struck. There are justtoo many variables for us to guess which ones might not be exactly thesame as those we could duplicate here for testing, so we don�t even try.
Marketability includes such issues as whether someone else has a simi-lar design, a patent (which gets into the legality aspect as well), or whetherwe think there is a great market for your new idea. I may or may not thinkso, and if you ask I will give an opinion that is strictly just that, an opin-ion. I will not make any guarantee or warrant that your bullet will be agood seller, will not violate any laws or patents, or in any way be heldresponsible if for any reason you cannot sell the bullet. All I can do isguarantee that if we make the tools, the bullet can be built using them. Ofcourse, if I am convinced that the idea has been done before or is pat-ented or if I believe that the product itself would be illegal to make or sellwithout proper licenses, I would certainly mention it.
You are entirely responsible for obtaining the proper licenses, patentreleases and permissions, and for complying with state and federal lawsregarding the making, using and selling of the bullet. We will not know-ingly help anyone break the law, nor will we do it ourselves. There areproducts which are legal to make, possess, and sell to the right people ifthe proper licenses and permissions are obtained. It is up to you to obtainthem, and to make sure your clients also meet the requirements for legalpurchase.
We are not a law firm, and can offer no legal opinion. Go to a lawyerfor legal advice. If we think the product is likely to be misused or mightreflect badly upon us, regardless of whether our opinion is correct, wereserve the right to decline the order. I would rather lose the sale than riskour reputation or help someone get into trouble with the law.
If I believe that the bullet would be a colossal failure, in regard to notperforming as the client believes it will, then of course I would try to talkthe client out of making it. But I want to make it perfectly clear that, justbecause I do not bring up any objections to developing the tooling, itdoes not mean I am making any guarantee that it will sell, be legal, notinfringe another person�s patent, or perform to the expectations of theclient. I may think it has a good chance, or I may think it has no chance,and that is all I can say. You have to proceed based on what you think, andnot rely on my opinion. Reasonable and prudent people will never pro-
231
ceed based on one person�s opinion, but should study the field and deter-mine for themselves the likely competition, applicable rules and laws,probable market and then never invest more than they can afford to lose.
I expand so many words about this because, in decades of doing thiswork, there have been a few people who are so blinded by the brilliance oftheir idea that they cannot see past the imagined riches it cannot possiblyfail to produce. I am reminded of Thompson�s Seedless Corn. There wasn�tmuch of a market for instant cobs, with the advent of toilet paper. (Imade that up, by the way.) Thompson�s Seedless Grapes worked out OK.Too bad about the Skinless Watermelon, though, not to mention the pa-thetic sight of the Boneless Chicken slithering around the barnyard. I won�tmention backpacker�s dehydrated water packets.
I have been browbeaten by clients who can only hear the future ka-ching of cash registers, not the present reasons why the idea is too similarto a dozen cheaper alternatives. When it becomes obvious that there is nogetting through the exuberance to the core logic, and there is even a chancethat the idea may in fact do something remotely similar to what the clientexpects, who am I to crush the dream, darken the rainbow, snatch awaythe promise of a life of luxury and ease? I�ll probably give up trying anddo the project. And who knows, it may actually be as good as the clientsaid all along! It has happened before. I�m not omnipotent in matters ofjudgement. Ask my wife. My opinion is not a guarantee.
What we guarantee is that finished tooling will make a bullet that is,within standard practice in our industry, to the dimensions ordered. Ifyou order tooling to make 160 grain .333 diameter 7-S spitzer bulletswith a 12-degree boattail base, then the tooling will be able to make thosebullets if operated according to instructions. We do not guarantee thatanyone can create a match-winning, trophy-elk killing bullet with toler-ances beyond NASA lab specs using this equipment. We only guaranteethat the equipment makes the bullet shape and weight you ordered, withinour normal tolerances, when operated properly.
If you send us specifications that say �must produce groups within0.1 inches at 100 yards� or some other silly, out-of-our-hands specifica-tion, then you might as well forget placing the order, because there is noway any reputable and honest die-maker will make any kind of guessabout what some other person with their own gun and load will do withany bullet, even if the same bullet just won the Nationals last week. Oth-erwise, why bother to hold matches at all? Just buy the bullets and claimthe prize, because obviously they are guaranteed to win anyway.
Those kinds of ideas are not silly, of course, when taken as goalsrather than specifications. They are the reason you want to make a specialdesign of bullet in the first place. But it is your design, and the die-makers

232
cannot guess how it will perform other than in a general way. Any reason-able design can be highly accurate, or not, depending on how carefullyyou make the bullet, the quality of material put into it, and the matchingof the bullet with the rifling twist, velocity, range, and a myriad of othertechnical and personal skill factors.
The silly part is in expecting the die-maker to bless the whole opera-tion up to and including the target. Often, we could get away with doingthat, because so many of our clients do have excellent ideas, and wemake excellent dies. Still, I cannot rely on someone else�s skill or ideas forour reputation. If you win the nationals, you deserve all the credit. If youlose, guess what? Either way, the tools you use are going to be the samequality.
People around the world know we deliver tooling that does what it issupposed to do. Whether or not the bullet does what you think it should,based on your design ideas, is entirely within your realm and outside ofours. If it wins the match or gets the trophy, you get full credit. Our creditis that it makes the dimensions you specified, whether or not those di-mensions add up to a success for a certain use. Here is a breakdown ofwhat you might expect if you called about building a custom product:
Feasibility Study
This could be as short and sweet as my pointing out some error indesign that would prevent the bullet from being formed or from perform-ing, in my opinion, as you expect. I won�t guarantee it will perform anycertain way, and I won�t say that it absolutely cannot perform that way,either, but I will give you my best estimate of whether it has any chanceof doing what you want.
This is NOT a guarantee of performance. I�ll proceed if you are con-vinced it will work, unless I am convinced it is dangerous, or perhaps thatsomething about it lies too far outside our field of expertise, such as re-quirements for some kind of machine work that we are not equipped toperform. Also, if we have too much work pending to give you deliverywithin a time you consider reasonable, I may have to decline the work.
In the case where you just want some other angle or shape of nose, ora different kind of hollow point that really doesn�t vary all that muchfrom what we�ve done before, then of course the word �study� is overkill.I can just say �Yeah, we can do that.� We�ve probably done hundreds ofprevious studies and made that custom design or something close to itbefore, so we can dispense with any formal work that requires billablehours to come up with the answer.

233
Here are some of the things I will need to know in order to go forwardwith a feasibility study:
1. Physical dimensions with maximum acceptable tolerances.2. Samples of the material to be used, if we do not provide it.3. Minimum acceptable initial rate of production.4. Maximum acceptable initial cost per unit.5. Acceptable time for project completion.6. Available budget for development, and for equipment.
If you say, �OK, go ahead and let me know if it is feasible or not,� thenwe ask for a deposit for two hours at current shop rate. This is a consultingfee, some of which may be applied to the next stage if the project looksfeasible after some study. The worst that could happen at this point is thatwe will spend two hours and discover some reasons why the design can-not be made, and produce a report for you outlining those reasons.
The report could save you hundreds or thousands more dollars, be-cause you might see from the report exactly why the idea is not practical.The reason might be economic: perhaps it could be done, but the toolingwould be more than you said you wanted to spend. It might be technical,such as too great an ejection pressure or short tooling life. It might beproduction related, such as the only way to do the job would be with toomany steps. Perhaps we could not possibly deliver the development andthe production of tooling within your time limit, once we know what itwill require.
You can see that there are many reasons a project might not work outfor you, and some of them have nothing to do with the actual bulletperformance. The most important ones are usually economic, either forinitial tooling cost or for the production rate within your investment limit.But until someone spends the time to think of various ways to produceyour bullet, and then calculates the approximate production rates andestimated costs, it is all just a wild guess. You don�t want to proceed orstop on a wild guess.
Like going to the doctor and paying $200 to find out nothing is wrongwith you, it is a mixed blessing to find out your project is not feasible. Buthearing that you do not have a fatal disease, after all, is worth something,is it not? So is knowing that a typical contract die shop might have chargedhundreds or thousands of dollars to make tooling that, in the end, prob-ably would not have worked.

234
But let us assume that, after having tried hard to find anything thatmight jump out and bite us, we have not found anything. Then we canwrite a proposal for you with an estimated cost and suggested startingpoint for tooling. You can decide whether to proceed or not, based on theestimations.
If you decide to proceed, then we go to the next stage. If there isunused time from the feasibility study fee, this will be carried forward tothe next stage.
Research and Development
The R&D stage starts with the proposal from the feasibility study.Payment for the estimated development cost, as outlined in the proposal,will launch this stage. Having decided that it is practical to try to buildthe tooling, after a careful study of your production, cost, and time re-quirements, and of the physical parameters of the bullet, we begin theengineering and construction of initial models, try out the ideas, see ifthey turn up any problems that were not evident before, and work onsolving them.
Changes in methods or tooling design, or perhaps suggested changesin the bullet itself, may come about as a result of this stage. Of course,every standard product we produce has gone through weeks, or months,or sometimes even years of the R&D stage before being offered for sale.The R&D stage really never stops for our standard products, because evenafter a successful tool or die is developed and sold for years, new materialsand techniques may come to light, new ideas may be developed, whichcould improve the product.
Usually, this stage is immediately prior to production, and flows intoit. If the idea is successful and substantially is the same cost and design asthe proposal suggested, with only minor changes, then the next thing youhear is the doorbell when the delivery man brings your new tools.
If the R&D turns up some problems, or suggests more substantialchanges which could modify the price or procedures in ways that youneed to approve, then the next thing you would receive is a report withthis information, asking if we should proceed based on the new informa-tion. At this point, the doubt is largely gone, and you can be fairly certainthat the tooling can be built to make your bullet. Now it is just a matter ofgetting through all the prior orders in the queue. I don�t know how longthat takes, because most of those jobs are like yours, unique. Ask a re-searcher how long it will take to find a cure for some disease. He doesn�tknow because it hasn�t been done yet. I don�t know how long it takes tocome up with excellent solutions to two or three hundred design prob-
235
lems and then manufacture the dies for each of them, until they are done.That�s about how many orders we probably have pending at any givenmoment.
On the other hand, some of these ideas do use similar machine set-ups, and so we do get openings where we can finish a year-old order anddo at least part of the work for a current one on the same setup. Thisdoesn�t put the other orders behind, and it speeds up some orders bymonths. But it is quite unpredictable, because people do change theirminds and what was planned may become different in an instant.
The bottom line is, I do not know how long an order takes. It takeshowever long it takes. If you need a time, figure three years. That oughtto cover it. But if you really do need it sooner, and do not mind the over-time cost, I can ask the die-makers if they would give up their weekendand finish your order instead. That almost always takes less than 45 days,sometimes as little as a week.
You can expedite an order to �rush overtime� basis at any time. Theorder will then be guaranteed to be finished by a certain date, dependingon how many other rush orders are scheduled and how many die-makersare available to do your work on a given weekend. We close during theChristmas season for a two-week period, so this would not be the besttime for a rush order. But it is always possible that your order might beready soon enough in the regular order queue. If we doubled the prices,we�d still be charging less than shops with far less experience in bulletswaging, and I�d be able to hire more die-makers and get the orders donesooner. But you see, you can already have faster delivery for that price.Hiring more die-makers would take away the lower priced option (50%discount, if you want to look at it that way).
Now assume that we launched the second stage, spent hours workingout the math and designing the tooling, built some test models and triedit, and found that it almost worked, but something popped up that no oneexpected. The project came to a screeching halt, while we tried to workaround the issue. Maybe it was a hollow point cavity so large that thematerial left was too thin to support nose ejection, or maybe the shapeyou wanted sticks fast in the nose die because there isn�t enough of a draftangle. In reality it would probably be far more obscure than these prob-lems: these are ones I can already think of, so we would have coveredthem during stage one.
So we spend a few more hours studying and testing other ideas, andwe come up with a few, but all of them violate one or more of your initialcriteria for cost or production speed. We have put considerable time intothe project, because it appeared to be feasible. But now it turns out to beotherwise, according to your criteria. What do we do?
236
We contact you, and give you a report. If you decide not to pursue theproject, then we refund the payment except for the actual hours used inreaching this point. For example, let us say our shop rate at the time ofyour initial order was $80/hour. The first stage, or feasibility study, wasfor two hours or $160. But after only 1 hour we could find nothing furtherthat looked like a problem, and so we had $80 in the first stage cost. Theproposal estimated that the development cost would be $2000. You had$80 credit left, so you signed a development agreement and sent the dif-ference, $1920.
So now, after spending four hours working hard on the developmentstage, we are at a decision point. If you decide that the cost of additionaltools needed or the lesser production rate that the tools will produce is astopper, then of the $2000 advance, we have only used $320 in shop timeand materials. You get a report of what we have done, any prototypes ortest parts that might be useful in case you wanted to pursue it further onyour own, any samples produced, and a check or bank card credit for theunused balance of $1680.
No one believes that their project could possibly fail. Everything issimple and obvious until you start to cut metal and apply pressures of30,000 to 100,000 psi. Then things happen that were not obvious. Mate-rials start to behave in ways that they never did in a drawing. And some-times, a potentially great idea just does not work out in real life. If youknow this is possible from the start, then it is not quite such a blow. But ifyou are already planning how to spend your first million from sales ofyour new product long before the ink is dry on the sketch, it becomes a bitmore traumatic to bring the project to a halt.
Fortunately, by the time we get to the development stage, most ofthe potential problems have been solved, or else they will be solved byexperienced engineering. So, it is extremely rare to see a project stoppedduring R&D. I only mention it because it is possible.
It is also possible that we may discover a faster or lower cost way todo the job. In that case, we would make sure the new method does notcompromise any of the initial criteria established in our proposal. TheR&D stage ends as soon as the best design is developed, any decisionsthat would cost additional amounts to implement or would violate any ofthe original criteria are resolved, and the project is either ended or is readyfor production. At this point, you receive a report of what we have dis-covered, and usually a quote for production of all the necessary customtooling, including the supplies and standard equipment that you will need.
If you get a quote for production, you might say that you have gambledand won. It means we are fairly sure we can build the tools to make yourbullet design, and we know what it will cost and are willing to guarantee

237
the production for that price. You do not have to proceed. You may wantto use this report and quotation as the basis for selling your idea to some-one, because they now have independent verification that the productionis practical under written terms. It is no longer speculation whether thebullet can be made with practical tooling of known cost.
If the research turned up reasons not to proceed, you have gambledand perhaps won in another way. Now you have reasons why the ideacould not proceed, based on concrete evidence and specific criteria. Thereport may even have turned up ways to work around the problems bychanging certain criteria. Perhaps you cannot initially use Kryptonite cores,at least until you can find some. Perhaps using tungsten or even lead willwork in the same design. Or maybe the cost is too high but if you changeone of the features, it drops. Now you know it, while others would haveto spend time and money to discover it. What you do with the knowledgeis up to you.
Production stage
In this stage, there are many drawings made, with material and peopleallocated for the various operations to make the components. We have avery good idea of what should work best. The amount of work put intoplanning, buying materials, making calculations and drawings for the die-makers, and recording the results of experiments and tests is, by thistime, extensive. The price quotation included a certain amount of nonre-fundable deposit to cover some of the work that would not be readilymarketable to someone else.
I mention this because, rarely, a person will call during the productionstage and say they had a run of bad luck, got a divorce, or fell off ahorse�for some reason they would like to cancel now and get a refund.But actual expenses have been incurred, and must be deducted. The non-refundable deposit has in most cases been used by now and there is noth-ing left to refund. It may be better to go ahead and finish, if the idea hadany income potential. The temporary problems will go away, but theearning potential of a good idea only gets better as you develop the mar-ket.
Semi-Custom Tools
Some items are only slightly different from our regular, stock produc-tion, and do not require the full custom development cycle. For example,changing the ogive from the standard 6-S to a custom 8-S or 10-S shapedoes not require any feasibility or development time. All it takes is a setof reamers and laps, which we build by hand, in order to cut the die cavity

238
and finish it with diamond powders. This means a few hours work makingthe tools, but we�ve done it a thousand times before and know it willwork. You pay a custom price for the die, which is already established, tohelp cover some of the cost of the special tooling to make it.
Likewise, a specific shape of nose or base, or a specified boattail angle,or a certain shape of hollow point cavity that is different from our stockon the shelf will require a custom charge because it is far more expensiveto make just one part to order than to build a quantity of them for stock toour normal specs. Part of the cost will be the time to make dimensioneddrawings with tolerances, since this time is used entirely for the one cus-tom part, whereas our stock parts are made from a quick photocopy orcomputer printout of a standard design drawing, and the time is amor-tized over hundreds or thousands of identical parts.
Then there are those stock items which are more time consuming toproduce than a similar stock item, so they cost more. These would in-clude adjustable punches, saber-tooth punches (which put a series of teethon the edge of a hollow point bullet), and commercial versions of thedraw dies, jacket trim dies, or other dies that are built with harder thanusual materials, which cost more to machine and use a more expensiveheat treatment process, but are only necessary for heavier productionwork. These items are not really custom, but they are a bit more thanstandard. I guess you could call them �semi-custom�. At least, that seemsa good way to classify them.
This category of custom items has a listed price, and does not requireany development or other experimental fees. Examples are priced catalogitems which end with the letter �C�, which can stand for �Custom� or�Commercial Grade�, meaning that if we offer two versions, one with the�C� prefix, then you have a choice of two levels of strength, wear-resis-tance, and durability. Why not just make one with the toughest design,material, or heat treatment? Well, it is a matter of value.
Value is the benefit for a given cost. If an item costs less for the samebenefit, then the value is higher. It is a simple math ratio, with admittedlysubjective overtones. The problem with spending far more time and ef-fort to build something even tougher than it needs to be for a given amountof work is that the price goes up as a result. Something that takes twodays to machine and heat treat probably is going to cost almost twice asmuch as a version that only takes one day. If the lower cost version willdo the job for you, and last as long as you will probably use it, then it isbetter value. But if your application is for so many bullets per day that atougher version, costing perhaps twice as much, would last three times aslong, then it is the better value for you.

239
It is nice to have a choice. I do not want to force anyone to buy a moreexpensive version, if the lower cost one will do just as well for a given setof circumstances. None of the lower cost versions are built in a less satis-factory way. They are more than adequate for the vast majority of ourcustomers. But every so often, someone has a higher volume require-ment, where the life expectancy of the standard tool isn�t enough to givegood value. That is why there are commercial versions of a few tools.The rest are already tough enough so that the need has not come up foranything tougher. If it does, we�ll make it!

240
19. Lubricants and Chemicals
Corbin offers a number of chemical products, from lubricants to clean-ers, that we feel are better values or more suited to the swaging field thansomewhat similar retail products. These are not available through chainstores or distributors.
Corbin Swage Lube
This high pressure, clean lubricant washes off easily with hot waterand soap, yet withstands tons of pressure to protect the die surface fromfouling and galling.
Each operation, from drawing a jacket to seating a core, requires athin film of CSL to reduce friction and improve the surface finish. Noother lubricant is guaranteed to work the Corbin Swage Dies; some may,but we know from decades of experience that CSL does the job correctly.
Application is simple: touch your finger tip to the lube and spread athin film on your thumb and fingertip. Then when you handle the jacketsor cores, just roll them slightly back and forth as you pick them up. That�sall it takes. Wipe your fingertip over the punch as you swage each bullet.
Once you have swaged cores, clean them in hot water and detergentand dry them, then put them into clean jackets with clean hands beforeyou begin seating cores. This keeps lubricant out of the jacket insides,where it does not help accuracy., and keeps it on the outside, where itextends die and punch life, lowers friction and pressure, and prevents foul-ing of the dies. It is NOT a bullet lubricant and should not be left on thebullets when you load them. It can be left on bullets that are to be storedfor a long time, unloaded, because it prevents corrosion.
Although the ingredients in CSL are medical grade cosmetic compo-nents, a few people may have a reaction to them such as a rash or itching.If this occurs, wash immediately and use rubber gloves. This would beextremely rare but possible. Most people will find that handling CSL ac-tually softens hard skin and is beneficial in preventing hangnails. CorbinSwage Lube comes in 2-ounce and 16-ounce containers, Cat.No. CSL-2and CSL-16.
Corbin Bore Cleaner
Used by top shooters at Wimbledon and Camp Perry for many years,long before recently introduced and heavily marketed cleaners becamepopular, Corbin�s Benchrest Bore Cleaner is treasured by a select group of

241
shooters, and virtually unknown to the rest. We have only made smalllots for top shooters and our own clients, which includes police, profes-sional gunsmiths and the military. It works by mechanical scrubbing: leav-ing it in the bore will not cause rusting or corrosion.
Millions of tiny (20 micron) flat plates of synthetic sapphire crystalsalign with the bore under pressure, and shear off any projections such asrust, powder, lead, plastic, or even the rough edges of machine marks leftin the bore. It is an oil-based product, which contains no ammonia orcorrosive salts.
One pass on a cleaning cloth wrapped around the next smaller size ofbore brush does the job: move forward two inches and pull back one inch,until you reach the muzzle. Then follow up with a cloth patch dipped ineither Corbin Dip Lube or Corbin Five-Star Gun Oil, to remove the borecleaner and the particles it has loosened.
Do not repeat this more than three times: that is more than enough toremove anything that needs to come out. If that doesn�t do the job, youmay need to use Corbin Bore Lap instead. Corbin Bore Cleaner is avail-able in 4-ounce, 16-ounce (pint), and 128-ounce (gallon) containers ascatalog numbers CBC-4, CBC-16, and CBC-128.
Corbin Dip Lube
Also known as �liquid jacket� because it forms a tough, clear film ofhard wax on the surface of lead bullets, which helps reduce leading andfriction and prevents corrosion, Dip Lube can be applied by dipping orspraying. This product has been completely redesigned as a non-flam-mable, water-based solution that is safe to handle, ship, and will not burn.
Dip Lube can be applied to wood or metal to repel water and protectthe surface. It drys to a slightly foggy finish. I also pour a little of it in theseam between the sold and upper leather of my hunting boots to waterproof them, use it on wood screws in fences and gates where it easesentry and helps prevent splitting of the wood as well as retarding rust,and as a carrier for mixing with molybdenum disulfide powder. This lattermix is messy but gives excellent anti-leading protection to a gun barrel:coat the bullet with it and fire the bullet after it drys.
Corbin Dip Lube is available in 4-ounce bottles, pints and gallons,as catalog numbers CDL-4, CDL-16, and CDL-128.
Corbin Bore Lap
This is a 40 micron synthetic sapphire compound for smoothing bar-rels and actions. It is much smoother cutting than valve grinding com-pound, which is typically made of silicon carbide crystals. Bore Lap lasts

242
longer and is less aggressive in removing metal. In extreme cases of foul-ing it can be used to clean the barrel of all lead, copper, plastic, and pow-der residue, but do not use it as a regular procedure or else the bore will belapped to a larger size over time.
Some manufacturers of bore cleaners use a natural aluminum oxideparticle of 40 micron size as their main ingredient, but the flat crystals ofsynthetic sapphire that we use in Bore Lap do not cut in all directions, andare safer to use in a bore. They tend to line up parallel with the bore underthe pressure of the lap, cutting more off the surface than digging into itlike a rough natural crystal does.
The way to use the product is to find a brass bore brush that is eitherone caliber smaller than the bore, or else has been worn down so it nolonger fits the bore properly. Then wrap this brush with a cloth patch thatcovers the bristles completely with one layer. Use a cotton sheet material,not a synthetic fiber.
Dip the cloth-wrapped patch in Bore Lap, and squeeze out excessliquid against the bottle mouth. Make sure the breech mechanism is pro-tected with cloth or plastic wrap so that excess lap will not run down intoit. Push the patch into the bore, and move it forward two inches, then pullit back one inch. Repeat this for the full bore length until the patch emergesfrom the barrel. Remove the patch, and replace it with a clean patch thathas been lightly oiled. Pull the oiled patch back through the bore. Thiswill remove rust, fouling, leading, copper streaks, and just about anythingelse that projects from the surface of the bore.
Do not repeat this process more than three times: if you have notsolved the bore problem by then, it isn�t solvable this way. Further lap-ping only increases the bore size, which is not desirable in most cases.There are barrels which are beyond help! But for the rest of them, CorbinBore Lap is available in 4-ounce, pint, and gallon sizes. The catalog num-bers are CBL-4, CBL-16, and CBL-128.
Five Star Gun Oil
This is the same high grade ISO-15 oil we use for lathe spindle oil andfor lubrication of our presses, a non-gumming, purified oil that handleslow temperature well, Five Star Gun Oil saves you money over the priceof those little 1-3/4 ounce containers, where most of the cost is the con-tainer. You can use it for firearms or to lubricate our presses and dies forstorage. Corbin Swage Lube also is a rust-inhibiting lubricant for pressesand dies, but it is more of a soft grease than an oil. Five Star Gun Oil isavailable only in pint containers. The catalog number is FSO-16.

243
Corbin Core Bond
This product makes bullets that expand and retain their weight farbetter than any partitioned design. You have probably used bullets thatwere made using Core Bond: nearly every custom bullet maker in theworld uses our process today. Very simply, you melt the lead core in thebullet jacket, in the presence of the Core Bond, which turns to vapor andinduces the lead to penetrate into the copper, forming an alloy junctionby diffusion, the same general process used in making semiconductors.All you need is a propane hand torch and a fireproof block to hold thejackets. We offer a ceramic block kit that gives you two blocks, one to actas a reflector for the flame and one to drill as a 32-hole support block (thelight ceramic material drills easily with an ordinary wood bit).
Swage a lead core that is a loose fit in the intended jacket. This isimportant. If the core fits tightly, it may be blown out when you heat thelead, often with a loud pop. Also, no bonding will take place where thelead is jammed tightly against the jacket. An important part of the bond-ing mechanics is the way that the hot bonding agent flows by capillaryaction and surrounds the core, moving it to the center of the jacket whenthe liquid expands and turns to vapor.
Clean the jackets and the lead cores in a good solvent or by boilingthem in hot water, detergent, and a little vinegar and salt (be prepared forjokes by bystanders about bullet soup). Rinse the jackets and cores inclean, boiling water to remove the detergent, vinegar, salt and any debris,and spread them out to dry on a rough towel. It is wise not to use the bestguest towel, even if you are the guest.
The material should dry from its own heat in short order. Then, placea core inside each jacket, and place them in a fireproof holder made eitherfrom a magnesium oxide fire brick with holes drilled in it, or pack thejackets into a box built from four fireplace bricks pushed up against eachother and placed on top of three or four other bricks to protect whatever isunder them. A block of potter�s clay can be used to hold copper tubingjackets: the clay will plug that little hole in the base and keep lead fromrunning out. Or use the previously-mentioned heat treatment block kitthat consists of two ceramic blocks and a drilling template, so you canmake your own high efficiency holder for about 32 jackets at a time.
Now, at this point if not before, you need to have a pair of goggles orother eye protection suitable for chemical and mechanical protection, andprobably should be wearing gloves that are at least moderately chemicalresistant and heat resistant. One way to get both cheaply is to slip on apair of thin plastic gloves, such as the disposable type used for paint orchemicals or even dishwashing, and then cover those with a pair of thicker

244
flame-resistant woven gloves. If you do not wear gloves, be careful not toreach over and straighten up a jacket that you just heated! It is easy toforget and just react automatically. At least with gloves, the smoke yousee rising from your fingers is just charred cotton.
Do not let the Core Bond touch your skin. It is powerful agent andmust not be gotten into your eyes, taken internally, or left where childrencould play with it. If any of this should happen, apply plenty of water andsee a doctor immediately. If you get it on your skin, wash it off quickly. Ihave gotten it on my skin frequently without any ill effects, but somepeople may have more sensitive skin. We use an improved formula nowthat does not become very active until it is heated, reducing the risk bothfor shipping and handling. Still, the eyes, mouth, ingestion... those wouldpose a serious health risk.
Once you have all your jackets secured in a vertical position with acore placed loosely by hand into each one (NOT swaged into the jacket�how will the bonding agent get between the core and jacket wall?), placetwo good-sized drops of Core Bond in each jacket. Let the liquid rundown around the cores. There must be a slight gap between the jacketand core to allow this, or bonding won�t take place.
Use a propane torch to apply heat as evenly as you can to the jackets,moving the flame slowly back and forth so that the lead is heated to themelting point as quickly as possible. The idea is to melt the lead before allthe flux boils away, so there is hot Core Bond vapor between the moltenlead and the copper jacket wall. This lowers the surface tension of thelead so much that it can actually penetrate between the copper atoms andform an alloy junction.
The diffusion junction, similar to the concept of doping silicon crys-tals to make transistors, is stronger than the lead core, forcing the bulletto open in the core rather than separating from the jacket. When the jack-ets have cooled, you should have a hole or depression in the middle ofeach core and should see the edges of the lead core rise up along thejacket wall to a small extent. If you see a domed core with the edgespointing down, it means that there is a poor or no bond. If the bondingtakes place correctly, a shrink hole will appear in the middle of the core,because the edges of the hot, expanded core are held fast to the jacket.When the core cools, the only place for the material to shrink is in themiddle. I like to use a hollow point punch to clean up this shrink hole,when I seat the core (later).
You can easily test the bond by cutting one of the jackets in halflengthwise with a fine-tooth saw, then attempting to crush the jacket in avise until the core pops out. If you are successful in popping out the core,you do not have a bonded core. If you can mash the jacket into a square

245
and still the core will not separate, you have a bonded core. If you did itright, there will be no possibility of removing that core unless you melt itout.
When you have finished, and the cores have cooled, place them all ina pot of boiling water and add a tablespoon of baking soda to the water.Let them boil for a few minutes to neutralize any remaining flux and washoff the dross. Then add a couple of tablespoons of salt and a half cup ofstrong vinegar and boil for a few more minutes to remove discoloration.This is optional and has no effect on the bond or bullet quality.
Finally, dump the water and boil one last time in plain water to re-move the salt and vinegar. If you skipped the salt and vinegar, you canskip the final boiling rinse as well. Spread out the jackets to dry on yourbig fluffy old towel. They ought to dry quickly from their own heat.
Now, seat the lead cores in the usual way. Again, I like to use a hollowpoint core seating punch because of the shrinkage hole in the middle ofthe core. The punch evens up the hole and makes it look like we meant todo it all along. If you do not want a hollow point, just close the tip downin the point forming operation and the cavity will be pushed shut or nearlyso.
When you are heating the cores, make sure that none of them is pressedsnugly down into the jacket. Trapped air and liquid will turn to vapor,building pressure under the core that can blow it out with surprising speed.One issue that can arise is the snug fit of a core at the bottom of a jacket,especially a copper tubing jacket that has thickened slightly toward thebase. The normal size core fits fine, but if you try to make the bondedcore it will trap lube under the core and then blow the core out when youapply heat.
An easy way to avoid having to buy a smaller core swage die is to geta punch for the core swage, having a conical cavity machined in the end.This punch will create a core with a conical tip, and usually the length ofthis tip will raise the main body of the core above the tight spot, prevent-ing the undesired seal. Corbin Core Bond comes in 2-ounce, pint, andgallon sizes, under catalog numbers CCB-2, CCB-16, and CCB-128.
Corbin Cleaning Solvent
This is used to remove oil, grease and lubricant from bullet compo-nents. It also strips dried oil from the interior working of guns, removesleftover bore cleaning compound from the barrel, and prepares metal sur-faces for a fresh film of new oil. If you don�t want to boil bullet jackets inhot water and detergent to clean them, you can use a little Cleaning Sol-vent in a can and slosh them around in it, then drain them with a mesh

246
scoop or strainer. This is a �hot� solvent in the chemical sense: it cancause burning and rashes so wear eye and skin protection. Wash immedi-ately with plenty of water if you get it on your skin or in your eyes. It isflammable, so do not use around open flame. Corbin Cleaning Solventcomes in pints and gallons, as CCS-16 and CCS-128.
Corbin Silver Lube
This is a high temperature lubricant that can withstand the heat ofmolten lead, and is used to lubricate the hinges and pistons of core moulds.A thin film of this silver colored lubricant will protect against seizing,rusting, and galling. Available in 4-ounce containers, Silver Lube isCat.No. SL-4.
Walnut Shell Media
This is not exactly a chemical, but more of a bullet-making aid. It is aground walnut shell polishing media for use in vibratory bullet polisherssuch as the Corbin BPK-1 Bullet Polisher Kit. One bag comes with the kit.You can purchase any weight, ten pounds, fifty pounds, or a ton if youwish. The discount is the number of pounds, from 5 to 50. That makes iteasy to remember. Less than five pounds is standard price, fifty poundsand over is half the one-pound price per pound. Walnut Shell is pack-aged in one pound bags, Cat.No. WS-1.
Corbin Hydraulic Fluid
This is used in all Corbin hydraulic presses. It is the equivalent ofChevron AW46. You do not normally need to add more to a new press,and the original fluid lasts for years of normal use, but if you shouldhappen to need more, CHF-128 comes in gallon cans.
Atomized Copper
Fine copper powder with a .25% lithium stearate coating flows andcompacts into a solid, lead-free projectile inside a bulet jacket, or can beused without a jacket if heat treated (sintered) to fuse the grains together.Copper powder may be mixed wtih tungsten to increase density. Copperalso binds well with powdered tin. Compressed at 20,000 psi, the copperforms a solid that can be handled without breaking. However, it requiressintering to withstand shattering when subjected to pressure without sup-port of a jacket. When compressed into a jacket, the resulting bullet canpenetrate deeper than a lead core bullet at the same velocity. Weight is

247
about 3/4 that of a lead bullet of the same volume. Available in 8-oz (wt)in a 2 fluid ounce bottle, 4-lb or 64-oz (wt) in a pint bottle, or 100-lbcanisters. Catalog numbers are CUP-8, CUP-64, and CUP-100.
Jacket Drawing Lube
Jacket drawing lube is the product that works in Corbin JMK-2-Hautomatic jacket drawing equipment, for the copper strip lubricator. Itflows through the system and saturates felt roller pads, which transfer afilm of lube to the copper strip on both sides prior to blanking and cup-ping operations.
This lube could also be used for other kinds of jacket drawing opera-tions, but it is an oil rather than a thin paste like our regular swaging lube,and is therefore more messy to use by hand. The regular swaging lube iswater soluble in hot water, and is made of cosmetic grade materials thatmost people find good for the skin rather than the contrary. (Some peoplemay be allergic to lanolin, one of the components of our swage lube, butit is a rare thing.) The JDL-16 drawing oil is neither water-soluble nor is ita cosmetic ingredient. But it has the ability to flow easily at room tem-perature in an automatic lubrication system. And that is the primary rea-son we offer it here. JDL-16 comes in pints.
SIM-TESTtm Ballistic Test Media
Testing bullets in a media that is stable and simulates animal muscletissue is the purpose of this product. It is a flexible gel that melts at about180 degrees F., pours and re-casts into blocks, and is made using beefprotein with stablizing and anti-bacterial agents for long shelf life withoutrefrigeration. Available in either 10-lb. blocks or cartons of six blocks,SIM-TESTtm gives you a realistic simulation of animal muscle tissue with-out the refrigeration and mixing requirements of ballistic gellatin. ST-1is a single block, and ST-6 is a carton of approximately 60 lbs.
248
20. Books and Software
Technical Bulletins, Volume 1
TB-1 is a collection of newsletters or bulletins that was sent to sub-scribers of the old �Corbin Technical Bulletin� years ago. The chaptersaddress questions about specific technical issues in bullet making, such asa comparison of casting and swaging for time and cost of making bullets.Most of the information is still valid today, though some of the tools andideas have been greatly improved and updated.
TB-2-E Technical Bulletins, Volume 2
TB-2-E is a collected set of papers that were published in magazinesover a ten year period, relating to bullet swaging. Specific experiments,technical articles and monographs, some published only in foreign maga-zines, are all translated to English and reproduced with permission of thepublishers. These are articles written by Dave Corbin about experimentalwork that lead to many commercial products you see offered today byCorbin clients. Published on CD-ROM.
Technical Bulletins, Volume 3
TB-3 covers the calibers from .14 to .50 BMG with a chapter on eachrange of calibers, explaining the things that you can do in that particularrange to make better bullets for different purposes. There is a detailedstudy of an experimental long range big bore, notes about the wildcat .22Flea (a reloadable .22 Magnum built in both a Browning FN 1922 Modelautoloading pistol and a Remington Rolling Block rifle) and other inter-esting features.
TB-4-E Power Swaging
This e-book has been a guide for other bullet swaging tool makers fordecades. It describes the math and principles used in developing bothdies and presses. Discussion of both mechanical and hydraulic, electricand pneumatic presses is included. If you wish to build a swaging orextruding press, read this e-book on CD-ROM.

249
TB-4-E covers the use and operation of the CHP-1 Hydro-Press, aswell as other information about bullet making, jacket forming and leadwire extrusion. Inclujdes charts of die strength versus maximum safepressures and other technical data.
The Bullet Swage Manual
One of the first swaging books, by Ted Smith, dating from the start ofmodern bullet swaging. This book covers the old S.A.S. Dies and earlyCorbin swaging tools from the viewpoint of the old master die-maker,inventor of the first powder trickler and the original Mity Mite swagingpress.
WD-1-E The World Directory of Custom Bullet Makers
This is a collection of several booklets under one CD-ROM. It in-cludes sources for copper tubing and strip, lead wire and ingots, and infor-mation on the world�s custom bullet makers, marketing and testing ofbullets, how to design and specify bullets, and how to build jackets byfour different methods. Included in the book is �The Corbin Guide toJacket Making� and the names and addresses of hundreds of custom bul-let makers.
TIII Turning Ideas Into Income
The condensed knowledge of 40 years of marketing and businessmanagement are made available to custom bullet makers, inventors, in-vestors, or people who deal with them. Subjects such as marketing meth-ods, partnerships, non-disclosure agreements, patents, consultants andsalespeople, and ways to turn your idea into a stream of income using oravoiding some of these tools are exposed with a straight-forward honestysure to offend some and enlighten others.
This is also a guide to mental preparation for building a secure finan-cial future and keeping life enjoyable while you balance priorities, applyproven principles and become wealthy as a direct and inevitable result. Itexplains clearly why many people feel they must ignore the very thingsthat can make them financially secure and provide a happy life. Availableas an e-Book on CD-ROM.

250
HB-9-E
You are reading it now! The condensed how-to info with a little busi-ness advice, warranty info, product descriptions, and more.
BP-7 Multi-Media Pack
This is a special package of information with all the technical bulle-tin publications, handbook, swage manual, and a DVD movie showingthe production of jackets and bullets on several Corbin tools, with de-tailed close up explanation. You get printed books, e-Books, and video, acollection of seven titles, at a discount price.
Software
Corbin produces software for personal computers that operate on theWindows system. Included are programs to design bullets, calculate theparameters for extruding lead wire, determine the breaking point of diesand the ram thrust and hydraulic pressures of presses
DC-1015
This is a Bullet Engineer�s Design Kit of software. It consists of theDC-1001, DC-1003, DC-1004 and DC-TWIST software . Self-starting withautomatic installation menu, or can be run from the distribution disk with-out installation, if desired.
DC-TWIST
Twist rate calculator on CD-ROM, for Windows, goes beyond thelimits of the Greenhill formula. Calculates stable twist rates for bulletsmade of any materials, including lead-free designs, in any caliber. In-cludes density tables, metric/English conversion, printed reports to in-clude with custom bullets, and calculations that include any kind of plas-tic or metal tip.
DC-1001
Bullet engineering 101 might be a better name for this powerful soft-ware package. Select any of the basic nose shapes, enter the ogive lengthor curve, bullet weight and caliber, select the desired base design and tipform, enter the desired jacket parameters (for jacketed bullets), and thecore material. The program then calculates the various parameters suchas twist rate, nose length, boattail length, and ballistic coefficient over a
251
range of velocities. Graphic images illustrate the various shapes. Bothrifle and handgun shapes are included, as well as boattail, rebated boattail,flat, cup, hollow, heel base, and tangent, secant, spire, elliptical, wadcutterand semi-wadcutter noses. For Windows, on CD-ROM.
DC-1003
This is the paper patch and multiple materials bullet design software,which calculates diameters and weights for bullets to fit various boreswith different patch thickness, or parameters for bullets made from up tofour different core materials in the same bullet.
DC-1004
This program plots the real time air resistance (drag) and shows anumber of parameters such as BC and Ingalls coefficient on a chart ofdistance travelled versus velocity. It fires any bullet you wish to designstraight up, plots the drag until the bullet reaches zero forward velocity,then drops the bullet so you can see how much force is generated when itstrikes the ground. Used to calculate lethality of falling bullets fired overfriendly troops, it is a new tool to understand bullet performance. You canquickly change one parameter and see how the drag functions change inproportion, with any caliber, weight, or shape.
DC-DIES
Not an obituary, but the catalog number for the die pressure calcula-tor, a program which figures out safe die pressure and bursting point forany diameter or caliber of swage die, the ram thrust, the internal diepressure, and the cylinder or system pressure using various sizes of cylin-ders. This is useful for the person who wishes to avoid breaking dies orwants to build their own press. Windows-based software on CD-ROM.Highly recommended for users of hydraulic presses.
DC-LEAD
This is a lead wire extrusion calculator that figures out the pressure,volume, and lengths of any diameter wire from any diameter of billet,with various sizes of hydraulic cylinders. Also calculates the length oflead wire for any given caliber or diameter of core, of any density alloy,for a given weight. Windows-based software on CD-ROM. Very conve-nient for determining the length of wire to cut for any weight of bullet.

252
DC-SALES
Helps custom bullet makers determine their cost, distributor, dealer,and retail pricing based on packaging, labor, and material costs. Calcu-lates the price per bullet and for a box of any quantity of bullets fromeither material price per pound and bullet weight or from combinationsof price per pound and individual item price (jackets, cores, additionalcomponents). Figures in the cost of boxes, labels, packaging time, con-struction time, and other factors automatically. For Windows, on CD-ROM.
DC-WEB
If you want all of our published brochures, operating guides, techni-cal tips, and the content of the Handbook of Swaging in PDF format withfree Acrobat Reader software, you get that and more on this CD-ROM. Italso contains the entire content of our extensive web site with hot linksthat activate when you connect to the internet (log onto the BAFT licens-ing site or see the latest firearms news stories, among other things... viewroad cameras on Oregon roads, get local weather for hunting and fishing,search for words and phrases on our website, or use the megabytes ofcolor images and illustrations in your own bullet-making business withthe limited license agreement provided.
DC-JPG-1
Royalty-free bullet images for your advertising or website, on a CD-ROM. Higher resolution than downloading from our website, always atyour fingertips when you feel creative! In the standard JPEG format.
DC-JPG-2
Royalty-free inages of landscapes, forrests, game animals, dramaticskys, mountains, waterfalls, and more. Need a picture of a deer lookingright into the camera? A black bear? A great background from Montanaor Oregon mountains or forrests? It�s here, no need for credits or royaltypayments. Release and right to use agreement included.

253
21. Delivery Information
Corbin Manufacturing is a small, family business. The tools and diesare hand built in our plant in White City, Oregon. Corbin equipment isused by nearly every custom bullet making firm in the world, as well asdefense agencies, research and development labs, Olympic championsand international world championship level competitors, with backlogsthat can run over a year at times, sometimes two or three years even.
Although we try to keep inventory on hand, some items are sold fasterthan they can be replaced. To be fair with everyone, we work on the old-est order first. Clients are served in the sequence that their orders areentered. There is no way to tell how long some of these orders will take.They might take a day, or they might take two weeks to finish. Some arefor a simple punch or die that we have made thousands of times beforeand can build in a few hours, once we get to it. Other orders are for newconcepts that have never been tried before, and may be tens of thousandsof dollars worth of equipment.
Therefore, it simply isn�t possible to predict when the 200th or 300thorder will be ready. It will be done when the orders that came first arefinished, or perhaps it will be close enough to one of them to �double up�and make it alongside the earlier one, using the same setup time and thussaving everyone time in the waiting list.
We can make no promise of delivery by any given date, nor withinany specific time period, for orders built on the normal sequence or queue,for which the standard prices are published. Once you place the order inthe regular queue, it is understood that delivery will take an unknownamount of time, and you should make no commitments based on deliv-ery that could result in any economic loss to yourself or others. Corbin isnot responsible for any such potential loss of income based on any as-sumptions about delivery.
In short, don�t go out and sell ten thousand bullets and promise youwill deliver them by next month, when you don�t have the equipment tomake them yet. Wait until you have equipment, learn how to use it, andthen knock yourself out with sales, production, promotions, whatever.Don�t try to browbeat me into saying I might have the equipment readynext month when I have already said that it is not possible to accuratelypredict when a given order will be done. I�d rather not have the order inthe first place, than to have someone calling me every few days to beg,

254
whine, threaten, and cajole. The orders will all be done eventually. Theless time I have to spend saying that over and over again, the sooner theywill be done.
I can easily give you faster delivery by raising the price several times.This would push the price of equipment beyond the reach of some cli-ents, leaving more time to make your order. If you don�t mind payingthree or four times as much as the current prices, then that would be agood option.
Other dies of similar quality to ours do cost from six to eight timesmore, and that is another reason why we are constantly buried in work.But I�ve always felt that bringing the price of thousand dollar swage diesdown to the hundred dollar level was a good goal, and the only way wecould do it and maintain the world-class quality for which we are famousis to limit ourselves to a small staff of highly motivated and skilled people.That translates into longer delivery times.
There are three sides to the production triangle: price, quality, andspeed.
If we make products faster, it takes more people and the price sky-rockets to pay the salaries, taxes, buy more machinery for them to oper-ate, and cover the benefits and other expenses of having more peoplemaking dies. Price and speed of delivery are locked to each other, if qual-ity is to remain high. Faster costs more. Slower costs less. These are hand-made products, and the economy of scale really doesn�t kick in until weget into much higher volumes of identical items made at the same time.
With presses, accessory items, standard supplies, and even to someextent on a few standard size and shape dies, we have already achieved anoptimum speed/price point and usually have all these things in stock forimmediate delivery. It is the dies, which are made in over 500 calibersand millions of possible shape/size combinations, that introduce the un-certainty in delivery.
This isn�t strictly true for each individual order. If we are making a258 die set with a 8-S ogive that has been pending for six months, andthere are two more orders just like it that came in yesterday, there isn�tany harm done by making three sets at once. No one is put behind, be-cause the biggest amount of time is the preparation, paperwork, setup ofmachinery, allocation of people and time, procurement and allocation ofmaterials... actually making the product is one of the least time consum-ing stages. The people who have orders that come in the next day are, infact, moved ahead that much further since we won�t have to go throughall that setup two more times for the other two similar orders.

255
So, while I cannot guarantee or even estimate that we might haveyour new order done with someone else�s by next week, it could happen.Even though I may have to say that we have, say, thirty months of workpending, that does not necessarily mean the orders that come in todaywill all take the full time to finish. It just means they might, if no othersimilar jobs are in the queue ahead of them.
Why can�t I just look at the list and see if there is something pendinglike your new order? I can, but it doesn�t mean by the time we get to thatorder, it will still be the same. People call and change their orders, whichwastes a lot of our preparation and planning work, but it happens. I can-not say with any certainty that the order just like yours that is coming tothe shop floor tomorrow will, in fact, not be changed or cancelled beforeit gets there. So I cannot promise you anything about delivery other thanthat it will happen with the certainty of the sun rising, even if it isn�t thesunrise that ushers in tomorrow.
Overtime “rush” orders
However, if you do not mind paying for overtime work, which doublesthe cost of the items which are not in stock and must be built with over-time labor, we can sometimes schedule a weekend or nighttime job overseveral evenings and give you not only fast delivery but a guarantee ofdelivery by a certain time.
I do not and cannot guarantee that we will have people available to doovertime work for any future order, but if a die-maker is willing to give uphis weekend or evenings to finish your work on a tight schedule (for over-time pay, which with taxes and payroll-linked benefits and shop overheadbrings the labor cost to twice that of regular jobs) then we can promisedelivery on most die sets within 45 days.
Overtime or �rush� jobs do not put anyone else behind. They aredone using time that would not be otherwise worked. If a die-maker, or ateam of die-makers for larger jobs, comes in two weekends in a row andworks 20 or 30 hours on overtime, that has no effect on the orders in theregular queue, except perhaps to get them out faster because now there isone less order in front of some of them.
Therefore, if you want to �bump up� your pending order to overtimestatus, all it takes is prepayment of the order to get it going for the verynext available weekend. If we know by Wednesday of that week, we canprobably talk someone into giving up their weekend and working on yourdies instead. If you wait until Thursday, it is usually too late, plans havebeen made, people are not going to want to tell their wives and kids sorry,can�t go on that trip after all. There is more to life than just business.

256
Why prepayment for overtime? Well, for one thing, if you changeyour mind after we have put in overtime work to finish the job, or thecredit card is overdrawn when it comes time to ship it that coming Mon-day, then we have overtime expenses in an order that we can only sell tosomeone else at regular price. The die-maker still gets his overtime pay,and the IRS still gets their cut on top of that.
Without the certainty of payment, we are just too small a business totake the risk. After surviving nearly four decades, I�d like to be around forthe next one! Besides, overtime indicates the order will be going outshortly and would have to be paid for anyway, so it should not be a prob-lem.
You do not have to place the order initially on overtime basis. You canplace it on regular basis, and see if delivery comes fast enough that way.If you suddenly get a big order potential and want to take advantage of it,and the income would more than cover the overtime rate, give us a call atthat time and see if we could do the job on overtime. If so, you can bankon it and make your deal. If not, do not make any commitments based ona possibility. The word implies its own negation. If something might pos-sibly happen, it also might possibly not happen.
But, you know, people do this all the time to their ultimate regret.That is why I am hammering away about it. If you had seen as manyupset, crushed, despondent, suicidal clients as I have, all because theywished something to be true so hard that they could only hear what theywanted to hear, you�d join the chorus and help spread the gospel. Waituntil you have the means of production in your hands and have learnedhow to use them before you make any deals. Unforeseen events canhappen. And they do. Your order is only accepted with the condition thatyou understand and agree to the uncertainty of delivery time. Overtimerush jobs are the one exception since, for the space of at least a weekend,your order is the only order in the queue.
The conversation I have with clients who engage in wishful thinkinggoes something like this:
�When will my dies be ready?��I don�t know. We have an average backlog of six months right now.
Probably sometime within the next six months.��Well, will they be ready in a month?�I don�t know. We have about 550 orders in the works right now and
yours is one of them. It could be much sooner, or it could be that some ofthese will take much longer than estimated and our six month estimatemay be too short.�
�Will they be reading in two months, or six months?�

257
�I don�t know. All I can say is that they will be ready when their turncomes up, and my best guess is about six months worth of work is pend-ing, and the oldest order is about a year old at this moment. You placedyour order today, so in theory it could even be a year. But more likely itwill be in the next six months.�
�You mean it will take six months to get anything?��No, we have lots of things on the shelf that could go out today. But
one of the dies on your order is not on the shelf, so we have to build it. Ifyou want the other items, we can ship them today. And it may not takesix months for your die. I just can�t tell. It depends on how fast we candevelop new tools for the custom orders ahead of yours, and how fast wecan make all the other standard tools that we don�t have on the shelf butfor which there are prior orders pending.�
�Well, I need to be making bullet before hunting season.��Then, place your order on rush overtime basis. Those items we do
not have available will be done on the next available weekend, guaran-teed within 45 days, and those will be priced at 2 times standard rate.Everything else that is in stock is still at standard price, of course. May Ihave your bank card now so we can get started?�
�What! Twice the price! No way!��It is your choice to minimize delivery time or price. Check around
and you�ll find that our overtime price is still a lot cheaper than othercomparable quality dies... and if the dies are any good, they�ll take justabout as long as ours to make anyway. If this were not so, we wouldn�thave backlogs with people willing to wait.�
This conversation could drag on and on, with the client trying to pinme down to a guaranteed delivery date that I have already stated I haveno way of knowing. Instead of spending money on the phone to have thisconversation, clients so inclined can just read it here at their convenience,and we can use the time to work on dies (every call just slows us downthat much).
If someone really will suffer terribly without the dies before this hunt-ing season, then overtime rush is a good solution. All they have to do issay, �Well, do it on overtime, then. Here�s my bank card to use...�.
Lest some unkind person accuse me of excess greed for offering over-time work, let me be quick to point out that this would be true if I chargedthree times or four times the regular price, for then we would be actuallygetting additional pay ourselves. But to charge twice the regular priceonly pays the actual costs incurred. The die-maker isn�t even being greedywhen he gives up his weekend for you, because the Federal Wage andHour Laws and the Oregon Department of Business and Industry (or
258
whatever department name gets attached to the agency currently admin-istering the so-called �Labor Relations� laws) insist that any hours over40 shall be paid at time and a half.
Then the various payroll tax agencies, of which there are an amazingnumber with more joining the party every year, take their additional sliceon top of that new and improved payroll. And of course the normal ben-efits that are a percentage of payroll, such as unemployment insuranceand workers compensation insurance and.... well, you get the picture...are all made larger as a result of the overtime. So, when you add up all thepetty and not so petty additional costs, overtime is much more like twotimes regular labor cost.
It is the work of the die-maker that turns a few dollars worth of mate-rial into a tool worth many times its raw material cost. In addition, youhave the use of heat treating compounds, furnace power, the varioustools and reamers which can only make a certain number of dies beforethey have to be thrown out, and a tiny portion of the huge investment inland, building, and machinery that gives the die-maker a place to workand tools to do the work. You rent hundreds of thousands of dollars worthof assets for a few dollars. But of all these factors, direct labor for a skilleddie-maker is by far the largest.
My point is, it really doesn�t make any difference to the business bot-tom line whether you get the die on regular time, or overtime. Eitherway, you are paying what it costs to build that tool. The margin built intothe price is the same. Speed, cost, quality: pick any two, but leave thequality high! When you put your order on overtime rush basis, it helpsthe people who ordered later, since your order is moved out of their way,so to speak. The time that would have been spent during the regular workweek is now available for the next person on the list. So it is with thoseahead of your order, who decide to go to the overtime rush basis. Yourorder moves up the list for every person who does that.
It seems the most fair, honest, and equitable way to take care ofpeople�s needs. If you do not need the speed, you can take a 50% discountin effect from the overtime rate, and the trade-off is a nonspecific deliv-ery time. If you need guaranteed delivery by a certain time, then thetrade-off is a higher price that pays for the labor to do it. No one is being�pushed aside� or delayed to make room for someone with more availablemoney. Quite the contrary: those who elect to spend more for speedydelivery actually move out of the way of those who don�t, and inadvert-ently give them a little boost in speed of delivery as a side benefit.

259
Everyone wins. And it is all the same to us, other than the particulardie-maker who trades the possibility of a grumpy spouse for a little higherpaycheck that week. If you need speed, it is available. If you prefer lowercost, that is also available. Time is the proof of ideas. This has beenworking for decades.

260
22. Warranty
Corbin equipment is warranted against defects in material and work-manship. If you receive a defective product, do not try to remedy it your-self. Call, write, or fax for a Return Material Authorization number. In-clude a legible return address inside the package, along with a brief de-scription of the problem or defect and the RMA number. Corbin will re-place or repair such defects without charge other than shipping and insur-ance. (Normal wear or abuse is not a defect.)
The number to call is 541-826-5211, Monday to Thursday from 9:00AM to 6:00 PM Pacific Time. The fax number is 541-826-8669. Themailing address is CORBIN, PO Box 2659, White City, Oregon 97503USA. For UPS delivery, ship to CORBIN, 600 Industrial Circle, WhiteCity, OR 9503.
Items which you ordered by mistake or about which you changedyour mind may be returned within 30 days in unused condition. A 15%checking, cleanup, and repackaging fee (also called a restocking fee) maybe deducted from the refund to cover the cost of the extra work.
Be certain that when you order, you specify the diameter rather thanjust the caliber. A .45 caliber bullet could be .452 for the .45 ACP, .454 forthe .45 Long Colt, or .458 for a .45-70 rifle. Or, it could be .448 for apaper-patched .45-70 rifle bullet. When you order a die or punch, specifythe family type (-R, -M, -S, or -H).
When you order a punch, state which kind of die it fits (such as CSW-1, CS-1, LSWC-1, or PF-1) and whether you want the internal or externalpunch. If you ask for a diameter that later turns out to be incorrect foryour application, it may not be returnable if it is a size that is not com-monly built, or may incur a restocking fee if returnable.
Airgun pellets are notoriously the �wrong� size on arrival, though theywere the �right� size when ordered, built and shipped. If you order a .221diameter pellet and it turns out that your gun actually works much betterwith a .218 pellet, we can help you sell the .221 die by offering a free adon our web site. Of course, if someone else just called and ordered a .221pellet die, we would be more than glad to make an exchange, but other-wise not. If you ordered a .218 and we sent you a .220 or a .217, that is awarranty situation, and our responsibility.
If you order the wrong item by misusing the terminology or catalognumber, this would not be a warranty problem and a restocking fee mayapply. Please call the items by their proper names. A die is a die, and apunch is not a die, rod, stick, shaft, or anything other than a punch. If you

261
order a die and really want a punch, or order a punch and want a die, thenwe may or may not be able to exchange it, depending on whether it canbe sold in unused condition as a stock item.
Tools or dies broken from excessive pressure, bent or cracked fromimproper use are not covered by warranty. Any die can be broken by theapplication of excessive pressure, regardless of the hardness or softnessof the material put into it. You can put a piece of steel in a swage die, andif you do not apply a force that would burst the die, the die will not burst.Likewise, you can put a ball of cotton in a swage die, and if you applyenough force to it, you will break the die. Dies break because they areoperated beyond their pressure limit. Improper operation is not a war-ranty situation.
In no event will Corbin Manufacturing or its associates, officers orrepresentatives be responsible for any damages including but not limitedto lost profits or other incidental or consequential damages arising fromthe use of or inability to use any Corbin product. It is expressly stated andmade a condition of sale that delivery cannot be guaranteed for any spe-cific date or before any specific period of time. Corbin makes no represen-tation whatever as to the performance of any bullet made by a client inour dies. Accuracy, penetration, performance on game, and similar issuesof performance are subject to outside influences beyond the control ofthe die-maker, and are not a proper subject for warranty.
Corbin tools and dies are held to our customary close tolerances. Thebullets produced are warrantied to be of a given diameter and shape withinthe bounds of these tolerances when used with the materials recommendedand used to test them, and operated in the approved manner. Improperoperation or the use of materials other than those specifically used intesting and development of the tooling may cause out of tolerance di-mensions on the finished bullet or component, and are beyond the scopeof warranty.
Any dimension, angle, or tolerance not specified by the client in writ-ing to Corbin prior to the production and delivery of the tooling shall bedeemed acceptable at the dimension, angle, and tolerance Corbin pro-vides. Standard shapes and diameters for stock calibers of dies and punchesare subject to minor change over time, depending on changing marketacceptance and manufacturing improvements. Dimensioned drawings withtolerance range must be provided when ordering custom shapes and cali-bers, or the dimensions provided by Corbin in lieu of such written speci-fications shall be deemed acceptable.
262
Any shape or dimension ordered to client specifications is a custompart, and subject to custom production fees. A non-custom, standard, orstock item is one which can be taken off the shelf at random and shipped,subject to the customary and usual tolerances and dimensions for Corbin�sstandard production runs, and is deemed to be acceptable if it meets thegeneral description of the item as published in our handbook and pricelist, subject to changes from time to time which may supercede olderpublished information.
Standard shapes and definitions of named styles or dimensions areprovided on Corbin�s web site. If there is any doubt about what you areordering, ask for a picture or drawing before placing the order. Often thereare photos or drawings of standard shapes, on the web site, that will dowhat you want without the cost of custom tooling.
In most cases, Corbin makes the even-numbered spitzer ogives, suchas 2-S, 4-S, 6-S, 8-S, and 10-S radius rather than the odd-numbered radiuslengths. The difference between a 6-S and a 7-S, or between a 7-S and an8-S, is so slight that it would have no practical effect on flight or accuracy.The even sizes are usually �stock� in the sense that the reamers and lapsto make those cavities are more likely to be build and ready to use. Thatmeans we don�t have to charge the tooling fee for the custom shape, andthe odds of faster delivery are higher as well.
A warranty replacement of a standard shape, as defined on our website, is also faster than a custom shape since the custom shape may re-quire re-making the tooling. Tooling for standard shapes, which are usedfrequently for a large number of orders, is more costly because it is builtto last longer for more production, compared to a one-off custom shape.
The tooling to make a special or non-standard shape is usually builtto make one or two dies before wearing out, because that reduces thecustom tooling cost. This is why it is not true that if we�ve ever made acertain custom shape in the past, we�ll forever afterward have that toolingavailable to make another die. The custom, one-off tooling doesn�t lastvery long in actual use.
The standard tooling is built to last, and costs more but the cost isspread over a larger number of dies. The custom fee does not cover theentire cost of making special tooling, since we sometimes can make asecond die. In summary, the costs are averaged over typical productionlife, and are not subject to negotiation on a case by case basis. They areas fair and as low as we can make them and still offer the service ofcustom tooling. The alternative is simply to not offer a service that costsmore than it is worth to provide.

263
23. Nondisclosure Agreements
(This information is covered in detail in the book �Turning Ideas IntoIncome�. But I will discuss it here since you may not have that book yet.)
Sometimes we are approached by a person who has what he believesis a potential wealth-creating new idea for a bullet design or application,and the first thing he wants is to have us sign a nondisclosure agreementso he can see what we think of it and have us produce some prototypes toshow investors. I have to decline for these reasons, some to protect us,some to protect him:
We do not know if we may have already worked with this idea untilwe see it, and if we cannot see it until we sign a nondisclosure agreement,we are saying we won�t do something that we may already have done! Infact, if the idea is actually practical, we probably have produced some-thing like it before.
After all these years, thousands of inventors and ideas, and hundredsof successful businesses arising from them with our help, it is highly likelynone of us can even remember if we saw the idea before or not. I canhardly remember whether I saw my wife�s note to bring home a carton ofmilk or not (at least the handwriting still looks familiar...). After all theseyears of helping thousands of people with their projects and never steal-ing any of them, I can only say that if our reputation for honesty isn�tenough assurance, then our signature on that paper would be equallyworthless.
A person looking for investors (which is nearly always the motivationbehind the nondisclosure paperwork, the patent filings, and so forth) isattempting to sell an idea in a mature (you could say �ancient�) marketwhich has achieved a high level of success with the ideas that have al-ready evolved over the past 200 years of firearms history.
What we would rather do is help someone turn one of those ideas intoa product, and sell the product themselves, proving the idea has an actualmarket and is profitable in production. Then, if he is inclined to find in-vestors, he has a much more attractive set of options, including selling abusiness opportunity rather than just a design concept. A going businessis far more marketable than an idea for a bullet, no matter how good theidea may be.
Everyone has an idea for a better bullet. The only profitable ideas arethose that get produced. Very few custom bullets are unprofitable whenmarketed in a reasonable way, whereas very few bullet ideas�as ideas

264
only�are marketable at all. For us to encourage the whole �intellectualproperty� marketability concept by participating in the trappings, such asnondisclosures and so forth, is a bit of a sham and I�d rather not do it.
We specialize in the custom bullet market and have so many clientswho need our help that we cannot afford to waste resources in the field ofmass marketing. Firearms is a very conservative, slow-moving field atthe mass market level, where the technical merits of a new bullet can befar down the list of desirable features. At the top would be low-cost high-volume production, which means not making significant changes to thetooling or the marketing system.
Mass producers have already spent over 200 years, in some cases,building a product line, distribution system, and brand image. It worksfine, so why buy outside ideas? (Products, maybe: you may sell a massproducer 100,000 special bullets a year for a niche market, since it mightbe just the ticket compared to them developing the idea and producing itthemselves in such low quantities.)
Again, getting involved in legal paperwork that is primarily of benefitand concern in regard to the mass market, when our specialty and reasonfor existence is something else, would just complicate our lives unneces-sarily and imply support or participation in an area where we really haveno expertise to offer.
If you think it is likely this idea is original with you, and we�ve neverseen it before, and if we did see it you would need some kind of legalprotection to keep us from disclosing it to others, then please don�t evenbother to bring it around. Take it to a mass producer straight away and letthem sign. If they steal it, you can have all the fun of suing them, andyour lawyer can have all the fun of billing you by the hour... for years tocome!
We don�t make bullets for a living: we help others do it, and mostlikely we have seen anything that is likely to work many times before. Wehave yet to steal any of them and get rich and retire in the Grand Cay-mans beyond the reach of the local attorney who drew up the nondisclo-sure paperwork. If that had happened, would I be writing this now? Here�sa flash: people who make custom bullets seldom get rich. They can makea nice living, maybe even better than average. But get rich?
The incentive to steal your idea is nonexistent. See that file cabinet,over behind the reception desk? Yes, that five-foot tall beige one with fourdrawers. Well, it is full of ideas of our own that have no risk of belongingto a client. I don�t have time to work on more than a tiny fraction of themeach year.

265
What do we need with more ideas? Give me more die-makers; thoseare worth stealing away from you if you happen to bring one along! Butideas? Please, we�re overstocked. We give them to clients, free. Here, takea bag full! Then disclose as much of it to as many people as you desire...theonly thing that makes money is selling the bullets, not thinking up moredesigns.
I can�t even count the number of people who have sat across the deskfrom me with fevered eyes and breathlessly whispered their secret, get-rich schemes based on an idea will never make them a dime, but will helppay for various lawyers� next vacations, and help enrich patent attorneys,providers of non-disclosure boilerplate, contract printers, and businessplan developers.
All of it will come to nothing for the poor fellow bubbling over withexcitement at the greatness of his idea. Meanwhile, someone else whoactually gets some equipment, makes some bullets, and markets them,will be doing just fine. Not getting rich, mind you: just making a niceliving doing something he or she enjoys. This is the person I can actuallyhelp.
And there is no need for a patent, nor contracts. You just need a will-ingness to be patient, keep plugging away, and eventually build a nicemarket for the product that the idea produces. And yes, perhaps someonewith far more money may buy the business out later. Meanwhile, it isestablished beyond a doubt that the idea works, and you will have mademoney instead of just spending it, even while waiting for the deep pocketbuyer who may or may not ever show up. The bullet maker is a winnereither way. This is our kind of customer. Together, we manufacture suc-cess.
The End