coreblox token service install and configuration … token service install and ......
TRANSCRIPT

© 2014 CoreBlox LLC All Rights Reserved
CoreBlox Token Service Install and Configuration Guide
Version 1.0 Build V3
Date 13-Jan-2014
877#879#2569(|(617#275#7860((
www.coreblox.com(|(www.ssohelp.com(
www.linkedin.com/company/coreblox(
www.facebook.com/coreblox(
@coreblox(|(@ssohelp(

This Documentation, which includes embedded help systems and electronically distributed materials, (hereinafter referred to as the “Documentation”) is for your informational purposes only and is subject to change or withdrawal by CoreBlox LLC at any time. This Documentation may not be copied, transferred, reproduced, disclosed, modified or duplicated, in whole or in part, without the prior written consent of CoreBlox. This Documentation is confidential and proprietary information of CoreBlox and may not be disclosed by you or used for any purpose other than as may be permitted in (i) a separate agreement between you and CoreBlox governing your use of the CoreBlox software to which the Documentation relates; or (ii) a separate confidentiality agreement between you and CoreBlox. Notwithstanding the foregoing, if you are a licensed user of the software product(s) addressed in the Documentation, you may print or otherwise make available a reasonable number of copies of the Documentation for internal use by you and your employees in connection with that software, provided that all CoreBlox copyright notices and legends are affixed to each reproduced copy. The right to print or otherwise make available copies of the Documentation is limited to the period during which the applicable license for such software remains in full force and effect. Should the license terminate for any reason, it is your responsibility to certify in writing to CoreBlox that all copies and partial copies of the Documentation have been returned to CoreBlox or destroyed. TO THE EXTENT PERMITTED BY APPLICABLE LAW, COREBLOX LLC PROVIDES THIS DOCUMENTATION “AS IS” WITHOUT WARRANTY OF ANY KIND, INCLUDING WITHOUT LIMITATION, ANY IMPLIED WARRANTIES OF MERCHANTABILITY, FITNESS FOR A PARTICULAR PURPOSE, OR NONINFRINGEMENT. IN NO EVENT WILL COREBLOX BE LIABLE TO YOU OR ANY THIRD PARTY FOR ANY LOSS OR DAMAGE, DIRECT OR INDIRECT, FROM THE USE OF THIS DOCUMENTATION, INCLUDING WITHOUT LIMITATION, LOST PROFITS, LOST INVESTMENT, BUSINESS INTERRUPTION, GOODWILL, OR LOST DATA, EVEN IF COREBLOX IS EXPRESSLY ADVISED IN ADVANCE OF THE POSSIBILITY OF SUCH LOSS OR DAMAGE. The use of any software product referenced in the Documentation is governed by the applicable license agreement and such license agreement is not modified in any way by the terms of this notice. The manufacturer of this Documentation is CoreBlox LLC. Provided with “Restricted Rights.” Use, duplication or disclosure by the United States Government is subject to the restrictions set forth in FAR Sections 12.212, 52.227-‐14, and 52.227-‐19(c)(1) -‐ (2) and DFARS Section 252.227-‐7014(b)(3), as applicable, or their successors. Copyright © 2013 CoreBlox LLC. All rights reserved. All trademarks, trade names, service marks, and logos referenced herein belong to their respective companies.

Contacting CoreBlox Contact Information: 420 Lexington Avenue, Suite 455 New York, NY 10170 Toll Free: 1-‐877-‐879-‐2569 (1-‐877-‐TRY-‐BLOX) Direct: 1-‐617-‐275-‐7860 Fax: 1-‐508-‐405-‐2273 Email: [email protected] Web: www.coreblox.com Community: SSO Help: http://ssohelp.com CoreBlox Blog: http://www.coreblox.com/blog

CoreBlox Token Service Install and Configuration Guide – Version 1.0 Build V3
Page 1
Contents
Chapter 1: Overview ..................................................................................................................................... 3 CoreBlox Token Service Overview ......................................................................................................... 3 Workflow ............................................................................................................................................... 5 Components ........................................................................................................................................... 6 CA SiteMinder® Integration ................................................................................................................... 6
CA SiteMinder Policy Server ............................................................................................................ 6 CA SiteMinder Policy Store .............................................................................................................. 7 CA SiteMinder Session Store ........................................................................................................... 7 CA SiteMinder Administrative User Interface ................................................................................. 7
Platform Support ................................................................................................................................... 7 Chapter 2: CoreBlox Token Service Standalone Install For SiteMinder ........................................................ 8
Install Package Overview ....................................................................................................................... 8 CTS Directory Structure ......................................................................................................................... 8 CoreBlox Token Service File Details ....................................................................................................... 9 Creation of the CA SiteMinder Policy Server Objects .......................................................................... 10
SiteMinder Policy Base Object Creation ........................................................................................ 10 Update the CTS Domain for Your Environment ............................................................................. 12 Configure Additional Agent Config Oject Settings ......................................................................... 13
CA SiteMinder SDK Installation and Setup ........................................................................................... 14 Download and Install the CA SiteMinder SDK ............................................................................... 14 Copy the Required Libraries to the CTS lib folder ......................................................................... 15 Register the CTS with the CA SiteMinder Policy Server ................................................................. 15
Certificate & KeyStore for Mutual Authentication .............................................................................. 17 CoreBlox Token Service Configuration Parameters ............................................................................. 17
cts.properties File .......................................................................................................................... 17 jetty.xml File .................................................................................................................................. 18
Chapter 3: Starting the CTS Service ............................................................................................................ 19 Chapter 4: Configuring Mutual Client Certificate Authentication .............................................................. 20
Client Side Certificate Generation ....................................................................................................... 20 Generate a Client Certificate Key Pair ........................................................................................... 20
Export client certificate without Private Key for use on server side (.cer file) .................................... 21 Export the Certificate for Use on the CTS Server .......................................................................... 21 Convert the Certificate to pem Format ......................................................................................... 21 Extract the Private Key .................................................................................................................. 22 Files Generated ............................................................................................................................. 22
Server Side Certificate Generation and Mutual SSL Configuration ...................................................... 23 Generate a Keystore Key Pair ........................................................................................................ 23 Copy the Client Certificate to the Server ....................................................................................... 23 Import the Client Certificate into the keystore as a Trusted Certificate ....................................... 24 Verify the Certificate in the Keystore ............................................................................................ 24 Add Client Certificate Serial Number to the authenticateusers.txt File ........................................ 25
Chapter 5: CoreBlox Token Service Interface ............................................................................................. 26 Generic URL ......................................................................................................................................... 26

CoreBlox Token Service Install and Configuration Guide – Version 1.0 Build V3
Page 2
Authentication ..................................................................................................................................... 26 userAttributes Authentication ...................................................................................................... 26 User Id and Password Authentication ........................................................................................... 28 Optional Authentication Attributes ............................................................................................... 29
Validation ............................................................................................................................................. 35 Input .............................................................................................................................................. 36 Responses ...................................................................................................................................... 36
Get Session Info ................................................................................................................................... 36 Input .............................................................................................................................................. 37 Responses ...................................................................................................................................... 37
Authorize Resource .............................................................................................................................. 38 Delete (Logoff) ..................................................................................................................................... 39
Chapter 6: Sample CoreBlox Token Service Calls ....................................................................................... 41 Authenticate ........................................................................................................................................ 41
userAttribute Authentication: ....................................................................................................... 41 userId and Password Authentication ............................................................................................ 41
Validate ................................................................................................................................................ 41 Get Session Info ................................................................................................................................... 41 Authorize ............................................................................................................................................. 41 Logout .................................................................................................................................................. 41
Chapter 7: Deploying the CoreBlox Token Server to an Existing Application Server ................................. 42 Un-‐jar the coreblox-‐tokenservice-‐1.0.war File ..................................................................................... 42 Rename the _cts.properties File and Update the CTS Settings ............................................................ 42 Re-‐jar the CTS and Deploy to the Application Server .......................................................................... 42

CoreBlox Token Service Install and Configuration Guide – Version 1.0 Build V3
Page 3
Chapter 1: Overview
This section contains the following topics:
§ CoreBlox Token Service Overview § Workflow § Components § CA SiteMinder® Integration § Platform Support
CoreBlox Token Service Overview The CoreBlox Token Service (CTS) provides an affordable entry point to application integration by leveraging a concept known as secure token exchange. As application access continues to expand beyond the desktop and out to mobile devices and the cloud, CTS can designate a single policy store as the master decision maker so that there is no confusion on how inter-‐application transactions should be securely handled. CTS is lightweight and flexible. It is an ideal addition to environments that have deployed Identity & Access Management (IAM) solutions from multiple vendors. CTS delivers federation-‐like capabilities without the time, expense and code overheard. Anyone who has ever coordinated a federation setup understands the complexities and, all too often, the politics involved in such an exercise. In fact, there are cases where it may not be feasible to configure one of the applications as the identity provider. Why struggle with federation when you can use CTS to enable a secure token exchange in minutes. CTS leverages a Representational State Transfer (REST) web services API using JavaScript Object Notation (JSON) for data interchange. The CoreBlox Token Service (CTS) delivers a unified hub for access to and routing of identity and other data in a secure, highly available and high performance REST-‐based framework. The services allows for the translation of various token types and to ensure that those tokens are valid. At a high-‐level the CTS provides:
§ Integration of services that require security related session information without creating or
maintaining custom code § “On the fly” session generation for access to protected resources § Single Sign-‐On (SSO) across disparate security environments without the need to share
encryption keys § Easy resource authorization based upon your existing policies (no agent or custom code
required)

CoreBlox Token Service Install and Configuration Guide – Version 1.0 Build V3
Page 4
The following examples highlight a few of the possible use cases for the CTS:
1. Integration with services that require details about SiteMinder sessions without the need to
create custom code 2. The ability to create SiteMinder sessions for single sign-‐on into SiteMinder protected resources 3. Single sign-‐on across disparate SiteMinder environments without the need to share encryption
keys or use federation 4. Authorization of access to resources based upon existing or new SiteMinder policies
Additionally, the service’s pluggable interface allows for additional token types to be easily added into the CTS framework.
CA SiteMinderPolicy Server
Other TokenServices
SecuritySystems
CoreBloxTokenService
RESTClients

CoreBlox Token Service Install and Configuration Guide – Version 1.0 Build V3
Page 5
Workflow The SiteMinder Web Service can be deployed using the approach in the following diagram:
SiteMinder capabilities are delivered through a REST-‐based web service. Authentication of credentials and evaluation of authorization requests are delegated to the SiteMinder Policy Server for resolution. At a high level, here is the general flow for accessing the CoreBlox Token Service:
1. The client determines the required type of request to submit to the CoreBlox Token Service 2. The client submits the credential token (either username or username and password) to the CTS 3. The client certificate is validated against the CTS key database 4. The client certificate serial number is validated to ensure that it is an approved client 5. The CTS passes the token to the Policy Server for evaluation 6. The Policy Server validates the credentials and returns the result and result to the CTS 7. If the credentials are invalid, the response and reason code are returned to the calling client 8. The client receives the session token and submits the token along with additional requests in
place of the credential providing the following functions: a. The CTS can validate the token returning an updated token b. The CTS can provide session data for an existing token c. The CTS can authorize access to both existing and new policies
9. The result and reason code are returned to the client 10. The client calls the logout interface with the session token which destroys the user session (note
that this requires a SiteMinder session server to fully delete the session token)

CoreBlox Token Service Install and Configuration Guide – Version 1.0 Build V3
Page 6
The service can also be deployed to an existing application server environment. Details on this configuration are included later in this documentation.
Components Component Function Description
CA SiteMinder® Policy Server
§ Authentication § Authorization § Policy Management § CTS SiteMinder Token
Provider Configuration § Session Management
Central engine that provides authentication, authorization and session management services.
SiteMinder Policy Store Storage of Policy and Key data
The existing Policy Store and Key Store are leveraged by the CTS SiteMinder connector.
SiteMinder Session Store Storage of session data Stores session data related to federation, session state, etc. Needed for logout.
SiteMinder Administration UI Administrative UI Used for managing SiteMinder policies and related components.
Jetty Application Server Application server that hosts the CoreBlox Token Service
Used to host the CoreBlox Token Service components when not deployed to an in-‐house application server.
CoreBlox Token Service CoreBlox Token Service component
Web service that provides token management functionality (including SiteMinder sessions tokens).
CA SiteMinder® Integration
CA SiteMinder Policy Server Authentication The SiteMinder Policy Server will enable authentication of users. These authentication requests do not interact directly with the Policy Server and are facilitated by the CoreBlox Token Service. Validation of SiteMinder tokens is a subset of the authentication process. Authorization The SiteMinder Policy Server will enable authorization of users. These authorization requests do not interact directly with the Policy Server and are facilitated by the CoreBlox Token Service. Session Information The CoreBlox Token Service can return the session details contained in a SiteMinder token. Both the native and formatted details are returned by the CTS.

CoreBlox Token Service Install and Configuration Guide – Version 1.0 Build V3
Page 7
SiteMinder Header Responses SiteMinder header responses will be used to return information back to the client. These responses will be incorporated into the returned JSON in addition to any default SiteMinder responses.
CA SiteMinder Policy Store The customer must configure a Policy Store that is leveraged by SiteMinder to store its policies information. In SiteMinder 12.5, the Policy Store also contains federation related certificates and keys. There is no direct interaction between the SiteMinder Web Service and the Policy Store. For SiteMinder 12.5 customers, the recommended Policy Store is CA Directory.
CA SiteMinder Session Store The customer must configure a Session Store that is leveraged by SiteMinder to store session related information for customers that want to leverage stateful session management. There is no direct interaction between the SiteMinder Web Service and the Session Store. For SiteMinder 12.5 customers, the recommended Session Store is CA Directory. SiteMinder versions prior to 12.5 will require a supported database to store session related data.
CA SiteMinder Administrative User Interface There is no direct interface to the SiteMinder Administrative UI. The admin UI is leveraged for the management of the SiteMinder environment and to create and manage security policies.
Platform Support
Operating Systems System Support Minimum Recommended Hardware
§ Windows 2008 (32-bit) § Windows 2008 R2 § Solaris 10 (SPARC) § Solaris 10 (x86) § HPUX 11.23 (IA64) § HPUX 11.31 (64-bit IA64) § AIX 5.3 (64-bit) § AIX 6.1 (64-bit) § RedHat 5 § RedHat 6 § Suse Linux 10 § Suse Linux 11 (64-bit)
§ Sun Java 1.6.0_30 or higher § IBM/HP Java 1.6 § Standalone Jetty application
server § ASF Tomcat 6 § ASF Tomcat 7 § IBM WebSphere 6.1 § IBM WebSphere 7.0 § IBM WebSphere 8.0 § NewAtlanta ServletExec 6 § Oracle WebLogic Server 11g R1 § RedHat JBoss 5.1.2
§ SiteMinder 12 SP3 § SiteMinder 12.5
§ Windows requirements: § CPU: x86 or x64 § Memory: 2 GB RAM § Available disk space:
§ 2 GB free disk space in install location
§ 0.5 GB free disk space in the temp location
§ Linux/UNIX requirements: § CPU:
§ x68 or x64 § Solaris: SPARC § HPUX: IA64
§ Memory: 2 GB RAM § Available disk space:
§ 2 GB free disk space in install location
§ 0.5 GB free disk space in the temp location

CoreBlox Token Service Install and Configuration Guide – Version 1.0 Build V3
Page 8
Chapter 2: CoreBlox Token Service Standalone Install For SiteMinder This section contains the following topics:
§ Install package overview § CTS directory structure § Creation of CA SiteMinder Policy Server objects § CA SiteMinder SDK installation and setup § Certificate and Keystore for mutual authentication § CTS configuration parameters
Install Package Overview Unzip the contents of the cts.zip file into a designated location from where the CoreBlox Token Service will be executed. The install is packed in the following structure:
Folder Name Description of Contents cts Contains the main war file, start script and config directory Sample Client Certificate Contains sample client certificates script Contains a perl script that is used to create the SiteMinder base objects
on the Policy Server
CTS Directory Structure Once unzipped, the CTS structure is outlined in the following table:
Name Type Description
config Folder Contains the configuration files that is used by CTS
lib Folder Contains the SiteMinder SDK library files run.sh / run.bat File Shell script to run CTS coreblox-‐tokenservice-‐<version number>.war
File CTS war file
config/authenticatedUsers.txt File Contains a list of certificate serial numbers for mutual authentication
config/SmHost.conf File The smhost.conf file generated by running the smreghost.sh / smreghost.bat script. Note: The name of this file needs to be referenced in the cts.properties file
config/cts.properties File The main configuration file that is used by CTS when it is deployed as a standalone application
config/jetty-‐coreblox-‐ssl.keystore File Contains the certificate keystore. Note: The name of this file needs to be referenced in the jetty.xml file

CoreBlox Token Service Install and Configuration Guide – Version 1.0 Build V3
Page 9
Name Type Description
config/jetty.xml File Standard Jetty.xml file Defines the server configuration when running as a standalone CTS application. Parameters like Port, keystore, password to the keystore, ssl are defined in this file.
CoreBlox Token Service File Details The following section lists the context of the example files used by the CTS. Contents of run.sh: java -‐DINFO -‐cp config:lib/smagentapi.jar:lib/cryptoj.jar:coreblox-‐tokenservice-‐1.0.war:. Launch config/jetty.xml
Contents of run.bat: java -‐cp config;lib\smagentapi.jar;lib\cryptoj.jar;coreblox-‐tokenservice-‐1.0.war;. Launch config\jetty.xml Example contents of authenticatedUsers.txt: 00C33C6C513105A65A 013B0A151EDA
Example contents of cbSmHost.conf: # Host Registration File -‐ cbSmHost.conf # # This file contains bootstrap information required by # the SiteMinder Agent API to connect to Policy Servers # at startup. Be sure the IP addresses and ports below # identify valid listening Policy Servers. Please do not # hand edit the encrypted SharedSecret entry. hostname="tokenservices_hn" hostconfigobject="tp_hco" policyserver="172.16.246.181,44441,44442,44443" requesttimeout="30" sharedsecret="{RC2}2g1I/+2JdSiPhGHFxbnVrGAla2LaetSOr8Chd0yUxoy19XKfaMABkokyPtP8cDk4FfwNORZ4ycsFg6KmYUpR+mfgNXsG1kcwlMhJNvph2TmA/F4QI2G7PqyZ8ft79LmCYJqevtUt34lZxQpkf0XR+4uRJjggEEHG0ZzRNsokKxz+08Vr22LT4500AoCEIOGO" sharedsecrettime="1353116491" fipsmode="COMPAT"

CoreBlox Token Service Install and Configuration Guide – Version 1.0 Build V3
Page 10
Example Contents of jetty.xml: <!DOCTYPE Configure PUBLIC "-‐//Mort Bay Consulting//DTD Configure//EN" "http://jetty.mortbay.org/configure.dtd"> <Configure id="Server" class="org.mortbay.jetty.Server"> <Call name="addConnector"> <Arg> <New class="org.mortbay.jetty.nio.SelectChannelConnector"> <Set name="host"><SystemProperty name="jetty.host" /></Set> <Set name="port"><SystemProperty name="jetty.port" default="8585"/></Set> <Set name="maxIdleTime">30000</Set> </New> </Arg> </Call> <Call name="addConnector"> <Arg> <New class="org.mortbay.jetty.security.SslSocketConnector"> <Set name="Port">8586</Set> <Set name="maxIdleTime">30000</Set> <Set name="keystore"><SystemProperty name="jetty.home" default="./" />config/jetty-‐coreblox-‐ssl.keystore</Set> <Set name="password">password</Set> <Set name="keyPassword">keypassword</Set> <Set name="needClientAuth">false</Set> <Set name="wantClientAuth">true</Set> </New> </Arg> </Call> </Configure>
Creation of the CA SiteMinder Policy Server Objects The CoreBlox Token Service CA SiteMinder connector requires a set of policies to exist in the environment. In addition to the configuration steps outlined here, a User Directory and a Host Configuration Object must exist. The items are not created in this section. There are two steps for configuring the SiteMinder policies:
1. Run the cts-‐install.pl script 2. Update the CTS Domain for your environment 3. Configure additional Agent Config Object settings
SiteMinder Policy Base Object Creation The cts-‐install.pl Perl script is used to create the base SiteMinder policies leveraged by the CTS SiteMinder connector. The following steps outline the process for creating the base objects:

CoreBlox Token Service Install and Configuration Guide – Version 1.0 Build V3
Page 11
1. Copy the <CTS Home>\script\cts-‐install.pl or <CTS Home>/scripts/cts-‐install.pl file to the Policy
Server 2. Run the Perl Script to create the SiteMinder Policy Server Objects using the following command
(NOTE: SiteMinder’s CLI Perl installation should be used to run this command in <SiteMinder Policy Server Home>\CLI\bin or <SiteMinder Policy Server Home>/CLI/bin directory): perl cts-‐install.pl
3. The installer begins 4. When prompted, enter the username and password of a siteminder admin user (e.g.
siteminder): *********** CoreBlox Token Service Policy Server Installer *********** Enter Policy Server Administrator credentials --------------------------------------------- Administrator ID: siteminder Administrator Password: <siteminder password>
5. The CTS uses a SiteMinder Domain to create its objects. The Domain name must be unique. Enter the name of the Domain to be created: Enter unique CTS Domain Name -------------------------------- Name (or X to exit): CoreBlox Token Service Domain
6. An existing user directory is configured for authentication of user tokens. Specify the user
directory to authenticate users that will be using CTS: Select User Directory Used for Authenticating Users --------------------------------------------------- [1] FederationWSCustomUserStore [2] SAML2FederationCustomUserStore [3] FedBCCustomUserStore [4] FedBCCertUserDirectory [5] Demo User Directory [X] Exit install script Enter number or X to exit: 5
7. For username tokens, a search lookup is required to locate the user identity in the user directory. For details on the format of this lookup, refer to the CA SiteMinder Windows Authentication Scheme documentation. Specify the user search lookup: Enter the user lookup search query for locating users Use %{UID} for the user ID Optionally use %{DOMAIN} to further restrict the search For example: (sAMAccountName=%{UID}) ----------------------------------------------------- User lookup (or X to exit): (uid=%{UID})
8. Confirm the installation parameters:
Confirm Installation Parameters ------------------------------- [1] CTS Domain Name: CoreBlox Token Service Domain [2] Selected User Directory: Demo User Directory [3] User search query: (uid=%{UID})

CoreBlox Token Service Install and Configuration Guide – Version 1.0 Build V3
Page 12
Enter [Y]es to continue, [X] to exit or number to modify value: y
9. The installation begins: Creating CTS objects...Creating CTS Agent Identity...Done Creating CTS User Attribute Authentication Scheme...Done Creating CTS Agent Configuration Object...Done Adding CTS Agent Configuration Parameters...Done Associating User Directory object...Done Creating CTS Configuration Domain - CoreBlox Token Service Domain...Done Creating ptokenresource Realm...Done Creating vtokenresource Realm...Done Creating uatokenresource Realm...Done Creating ptokentresource GET Rule...Done Creating vtokentresource GET Rule...Done Creating uatokentresource GET Rule...Done Creating CTS Policy...Adding rules to CTS Policy...Done
10. The installation is complete
The configuration is now complete. Press the Enter key to exit.
Update the CTS Domain for Your Environment Once the base policies have been created, the objects can be updated to reflects your specific requirements. To update these policies:
1. Log into the SiteMinder Policy Server Administration Console 2. Navigate to the domain specified in step 5 above
3. Click on Policies

CoreBlox Token Service Install and Configuration Guide – Version 1.0 Build V3
Page 13
4. Modify CoreBlox Token Service Policy
5. Add the list of authorized CTS users to the Policy
6. Submit the Changes to save the update
Configure Additional Agent Config Oject Settings The CTS Agent Config Object (ACO) settings can further refine the behavior used by the CTS SiteMinder connector. The default ACO name for the CTS is coreblox_tokenservices_aco. The following table lists the ACO settings used by the CTS SiteMinder connector:

CoreBlox Token Service Install and Configuration Guide – Version 1.0 Build V3
Page 14
Parameter Default Description
CookieDomain N/A Reserved for future use CookieName N/A Reserved for future use CookiePath N/A Reserved for future use DefaultAgentName None Defines a name that the agent uses to
process authorization requests. The value for DefaultAgentName is used for requests on an IP address or interface when no agent name value exists in the AgentName parameter.
IdentityAttribute None Header value to look for to override the ID passed to client.
AgentName None Used to map a submitted resource to agent name for authorization.
DefaultAction GET Default action to use when evaluating requests against the Policy Server (e.g. GET|POST|PUT).
password /ptokenresource Default resource to use when evaluating requests against the Policy Server to map password tokens.
ServiceAgentName coreblox_tokenservices_wa Agent name to use for default service requests to the Policy Server.
userAttributes /uatokenresource Default resource to use when evaluating requests against the Policy Server to map userAttributes tokens.
ValidationResource /vtokenresource Default resource to use when validating SiteMinder session tokens.
CA SiteMinder SDK Installation and Setup The SiteMinder SDK is required for registration of the CTS SiteMinder connector with the SiteMinder Policy Server and for the agent libraries used to communicate between CTS and the SiteMinder Policy Server. The SDK is not included with CTS and must be downloaded separately. The following steps are required:
1. Download and install the CA SiteMinder SDK 2. Copy the required libraries to the CTS lib folder 3. Register the CTS with the CA SiteMinder Policy Server
Download and Install the CA SiteMinder SDK The CA SiteMinder SDK can be downloaded from CA’s Technical Support Site:
http://support.ca.com The list of latest SDK builds is found at:

CoreBlox Token Service Install and Configuration Guide – Version 1.0 Build V3
Page 15
https://support.ca.com/irj/portal/anonymous/phpsupcontent?contentID=5ae61e29-‐c3de-‐405e-‐9151-‐9eea72d965ce&productID=5262#smsdk
Follow the SDK documentation for installation instructions.
Copy the Required Libraries to the CTS lib folder The SDK agent libraries must be copied to the lib directory under the <CTS HOME> directory. The following files are required:
§ cryptoj.jar § smagentapi.jar
NOTE: You must copy the 32-‐bit or 64-‐bit files depending on the JDK being used. Use the following:
§ If you are using the 32-‐bit version of the JDK, user the files from the <SITEMINDER SDK HOME>\java directory or <SITEMINDER SDK HOME>/java directory depending on the Operating System
§ If you are using the 64-‐bit version of the JDK, user the files from the <SITEMINDER SDK HOME>\java64 directory or <SITEMINDER SDK HOME>/java64 directory depending on the Operating System
Register the CTS with the CA SiteMinder Policy Server The SDK must also be used to register the CTS with the Policy Server and generate a SmHost.conf file. To generate the SmHost.conf file, use smreghost.bat or smreshost.sh depending on the Operating System being used. The file can be found at <SITEMINDER SDK HOME>\bin directory or <SITEMINDER SDK HOME>/bin directory depending on the Operating System. Before using the smreghost.bat or smreghost.sh files, the file for the OS must be edited. For Windows Operating Systems, modify the file as follows: @echo off REM ######################################################################################### REM ## Copyright (c) 2006 CA. All rights reserved. ## REM ## This software may not be duplicated, disclosed or reproduced in whole or ## REM ## in part for any purpose except as authorized by the applicable license agreement, ## REM ## without the express written authorization of CA. All authorized reproductions ## REM ## must be marked with this language. ## REM ## ## REM ## TO THE EXTENT PERMITTED BY APPLICABLE LAW, CA PROVIDES THIS ## REM ## SOFTWARE “AS IS” WITHOUT WARRANTY OF ANY KIND, INCLUDING ## REM ## WITHOUT LIMITATION, ANY IMPLIED WARRANTIES OF MERCHANTABILITY, ## REM ## FITNESS FOR A PARTICULAR PURPOSE OR NONINFRINGEMENT. IN NO EVENT ## REM ## WILL CA BE LIABLE TO THE END USER OR ANY THIRD PARTY FOR ANY LOSS ## REM ## OR DAMAGE, DIRECT OR INDIRECT, FROM THE USE OF THIS MATERIAL, ## REM ## INCLUDING WITHOUT LIMITATION, LOST PROFITS, BUSINESS ## REM ## INTERRUPTION, GOODWILL, OR LOST DATA, EVEN IF CA IS EXPRESSLY ## REM ## ADVISED OF SUCH LOSS OR DAMAGE. ## REM ######################################################################################### setlocal set JAVA_HOME=<PATH TO JAVA JDK FOLDER> set SM_SMREGHOST_CLASSPATH=<PATH TO SDK JAVA FOLDER FOR JDK bit depth>\smagentapi.jar; <PATH TO SDK JAVA FOLDER FOR JDK bit depth>\cryptoj.jar set PATH=%JAVA_HOME%\bin;%PATH%

CoreBlox Token Service Install and Configuration Guide – Version 1.0 Build V3
Page 16
java -classpath "%SM_SMREGHOST_CLASSPATH%" com.ca.siteminder.sdk.agentapi.SmRegHost %* endlocal
For example, if my JDK folder is located at C:\java\jdk and my SDK folder for a 32-‐bit version of the JDK is located at C:\CA\sdk\java then the file would look as follows: @echo off REM ######################################################################################### REM ## Copyright (c) 2006 CA. All rights reserved. ## REM ## This software may not be duplicated, disclosed or reproduced in whole or ## REM ## in part for any purpose except as authorized by the applicable license agreement, ## REM ## without the express written authorization of CA. All authorized reproductions ## REM ## must be marked with this language. ## REM ## ## REM ## TO THE EXTENT PERMITTED BY APPLICABLE LAW, CA PROVIDES THIS ## REM ## SOFTWARE “AS IS” WITHOUT WARRANTY OF ANY KIND, INCLUDING ## REM ## WITHOUT LIMITATION, ANY IMPLIED WARRANTIES OF MERCHANTABILITY, ## REM ## FITNESS FOR A PARTICULAR PURPOSE OR NONINFRINGEMENT. IN NO EVENT ## REM ## WILL CA BE LIABLE TO THE END USER OR ANY THIRD PARTY FOR ANY LOSS ## REM ## OR DAMAGE, DIRECT OR INDIRECT, FROM THE USE OF THIS MATERIAL, ## REM ## INCLUDING WITHOUT LIMITATION, LOST PROFITS, BUSINESS ## REM ## INTERRUPTION, GOODWILL, OR LOST DATA, EVEN IF CA IS EXPRESSLY ## REM ## ADVISED OF SUCH LOSS OR DAMAGE. ## REM ######################################################################################### setlocal set JAVA_HOME=C:\java\jdk set SM_SMREGHOST_CLASSPATH=C:\CA\sdk\java\smagentapi.jar;C:\CA\sdk\java\cryptoj.jar set PATH=%JAVA_HOME%\bin;%PATH% java -classpath "%SM_SMREGHOST_CLASSPATH%" com.ca.siteminder.sdk.agentapi.SmRegHost %* endlocal
For non-‐Windows Operating Systems, modify the file similar to the above. NOTE: Do not use smreghost executable in the <SITEMINDER SDK HOME>\bin directory or <SITEMINDER SDK HOME>/bin directory depending on the Operating System as it will cause handshake errors later. Once the file has been modified, run it to register the CTS with the policy server and to create the required SmHost.conf file. For Windows SDK installed in C:\CA\sdk\bin, run the command as follows: C:\CA\sdk\bin>smreghost.bat -i ipAddress[:port] -u username -p password -hn hostname -hc hostconfigobject -i <ipAddress[:port]> -hn <Name for host to be registered> -hc <Name of host configuration object> [-sh <Shared secret for the host>] [-rs (enable shared secret rollover for host)] [-u <Administrator username>] [-p <Administrator password>] [-f <File to store registration data in (defaults to ./SmHost.conf)>] [-o <Overwrite existing Trusted Host>] [-cf <Crypto FIPS140 mode (COMPAT or MIGRATE or ONLY)>]
NOTE: Any <value> that contains spaces should be surrounded by quotes. For example: C:\CA\sdk\bin>smreghost.bat -i 10.10.10.10 -u siteminder -p siteminderpassword -hn cts -hc dev-hco

CoreBlox Token Service Install and Configuration Guide – Version 1.0 Build V3
Page 17
Where:
§ The Policy Server is installed at the IP Address: 10.10.10.10 § The SiteMinder administrator ID is: siteminder § The SiteMinder administrator password is: siteminderpassword § The hostname to register is: cts § The host config object to use to connect is: dev-‐hco
Once the file is generated:
1. Move the SmHost.conf file to the <CTS HOME>\config directory or <CTS HOME>/config directory depending on the Operating System
2. Rename the file to: cbSmHost.conf The CTS registration with the Policy Server is now completed.
Certificate & KeyStore for Mutual Authentication Generate a Certificate KeyStore for mutual authentication. Details on how to configure the certificate and keystore are detailed in the following section.
Import client certificate to be used into KeyStore
NOTE: The install comes with a pre-‐configured sample keystore on the client and server side. This can be used as a demo if needed without any further configuration.
CoreBlox Token Service Configuration Parameters By default, nothing needs to be changed if the steps above are followed.
cts.properties File The CTS configuration is store in the cts.properties file under the config directory. The following table outlines the CTS configuration parameters: Parameter Description Example agentSmHostConfigFile Absolute or relative
location of the cbSmHost.conf file
config/cbSmHost.conf
agentConfigObject Agent Configuration Object to be used
coreblox_tokenservices_aco
authenticatedUserSerialNumberPath Absolute or relative location of the text file containing the list of certificate serial numbers to be used in mutual
config/authenticatedUsers.txt

CoreBlox Token Service Install and Configuration Guide – Version 1.0 Build V3
Page 18
authtentication authRequestURI This is the string that is
used for mutual authentication. Do not change this value
/tokenservice-‐simulator/1/token/
jetty.xml File The jetty.xml file under the config directory contains the Jetty server configuration. The following table outlines the critical configuration parameters:
Parameter Description Example Non-‐SSL Port: <Set name="port"><SystemProperty name="jetty.port" default="8585"/></Set> SSL Port: <Set name="Port">8586</Set>
Server port to use when connecting to the Jetty server.
Non-‐SSL Port: 8585 SSL Port: 8586
keystore Location of the keystore contain the required SSL certificates.
<Set name="keystore"><SystemProperty name="jetty.home" default="./" />config/jetty-‐coreblox-‐ssl.keystore</Set>
password Key Store password to use when accessing the Key Store
<Set name="password">password</Set>
keyPassword The password for the imported key
<Set name="keyPassword">keypassword</Set>
The file should be modified based upon the imported key and certificate.

CoreBlox Token Service Install and Configuration Guide – Version 1.0 Build V3
Page 19
Chapter 3: Starting the CTS Service The included run.bat or run.sh files start the CTS. The files are located in the <CTS HOME> directory. The files can be run directly or through the command line.

CoreBlox Token Service Install and Configuration Guide – Version 1.0 Build V3
Page 20
Chapter 4: Configuring Mutual Client Certificate Authentication To configure the CoreBlox Token Service for mutual SSL, certificates must be configured both on the client and server side to ensue that the client is authorized to request tokens and also for it to be able to connect securely to the CTS. The following tools are used to create the and import the certificates in this section:
§ Java keytool § openssl
Other tools can be used for this purpose. However, those tools are not documented in this guide. The keytool can be found at <JDK HOME>\bin or <JDK HOME>/bin depending on the Operating System. The following steps are leveraged to configure mutual SSL:
Client Side: 1. Generate a client certificate key pair 2. Export client certificate in .cer format 3. Export client certificate in .pem format 4. Export client certificate private key in .pem format
Server Side: 1. Generate a keystore keypair 2. Import client certificate into keystore as a trusted certificate 3. Obtain certificate serial number from client certificate and add to authenticateusers.txt file
Client Side Certificate Generation
Generate a Client Certificate Key Pair Keytool can be used to generate the client private key and certificate. Keytool is run from the command prompt. The format for generating the certificate with keytool is as follows:
keytool -genkeypair -alias <ALIAS NAME> -keystore <KEY STORE NAME> -storetype pkcs12 -keyalg RSA
For example:
keytool -genkeypair -alias client -keystore client.p12 -storetype pkcs12 -keyalg RSA After running the command, you will be prompted for several values. These values are specific to your environment. For example:
> keytool -genkeypair -alias client -keystore client.p12 -storetype pkcs12 -keyalg RSA > Enter keystore password: keystorepassword > Re-enter new password: keystorepassword > What is your first and last name?

CoreBlox Token Service Install and Configuration Guide – Version 1.0 Build V3
Page 21
[Unknown]: Client Certificate > What is the name of your organizational unit?
[Unknown]: Client Services > What is the name of your organization?
[Unknown]: coreblox.com > What is the name of your City or Locality?
[Unknown]: New York > What is the name of your State or Province?
[Unknown]: NY > What is the two-letter country code for this unit?
[Unknown]: US > Is CN=Client Certificate, OU=Client Services, O=coreblox.com, L=New York, ST=NY, C=US correct?
[no]: yes
The result of this example will generate the following file: client.p12
Export client certificate without Private Key for use on server side (.cer file) The client certificate must then the imported into the Jetty server so that the CTS can validate the client is authorized to make token requests. Keytool is run from the command prompt.
Export the Certificate for Use on the CTS Server The format for exporting the certificate using keytool is as follows:
keytool -exportcert -alias <CERTIFICATE ALIAS> -file <CERTIFICATE FILE NAME> -keystore <KEY STORE NAME> -storetype pkcs12 -storepass <KEY STORE PASSWORD>
So, for our example, the command is:
keytool -exportcert -alias client -file client_cert.cer -keystore client.p12 -storetype pkcs12 -storepass keystorepassword
The following file is generated for this example: client_cert.cer Copy this file to the server where the CoreBlox Token Service is being executed. This certificate will be used as a trusted certificate in the keystore used by the CoreBlox Token Service.
Convert the Certificate to pem Format For our example, openssl is used to convert the certificate to pem format. This certificate will be used later in the document with curl for testing the operation of the CTS. Openssl is run from the command line. On Windows, openssl can be downloaded. Other options also exist for obtaining openssl (e.g. cygwin). The format for generating the pem certificate is as follows:
openssl x509 -inform der -in client_cert.cer -out client_cert.pem
So, for our example, the command is:
openssl x509 -inform der -in client_cert.cer -out client_cert.pem
The following file is generated: client_cert.pem

CoreBlox Token Service Install and Configuration Guide – Version 1.0 Build V3
Page 22
Extract the Private Key For our example, openssl is used to extract the private key. This key will be used later in the document with curl for testing the operation of the CTS. Openssl is run from the command line. On Windows, openssl can be downloaded. Other options also exist for obtaining openssl (e.g. cygwin). The format for extracting the private key is as follows:
openssl pkcs12 -in <KEY STORE> -out <KEY FILE NAME> –nodes
After running the command, you will be prompted for the key store password. So, for our example, the command is:
> openssl pkcs12 -in client.p12 -out clientkey.pem –nodes > Enter Import Password: keystorepassword
MAC verified OK The following file is generated: client_key.pem
Files Generated The following files were generated for the documented example steps.
§ client.p12 § client_cert.cer § client_cert.pem § client_key.pem

CoreBlox Token Service Install and Configuration Guide – Version 1.0 Build V3
Page 23
Server Side Certificate Generation and Mutual SSL Configuration
Generate a Keystore Key Pair Keytool is used to configure SSL for the Jetty server. This allows clients to connect to the CTS over SSL to ensure that the communication is encrypted. On the server where the CoreBlox Token Service is to be executed, go to the <CTS HOME>\config or <CTS HOME>/config directory depending on the Operating System. The format for generating the certificate with keytool is as follows:
keytool -genkey -alias <ALIAS> -keyalg RSA -keyStore <KEY STORE NAME> -keysize 2048 -sigalg "SHA1withRSA"
For example:
keytool -genkey -alias cts -keyalg RSA -keyStore cts_server.keystore -keysize 2048 -sigalg "SHA1withRSA"
After running the command, you will be prompted for several values. These values are specific to your environment. For example:
> keytool -genkey -alias cts -keyalg RSA -keyStore cts_server.keystore -keysize 2048 -sigalg "SHA1withRSA"
> Enter keystore password: keystorepassword > Re-enter new password: keystorepassword > What is your first and last name?
[Unknown]: CoreBlox Token Service > What is the name of your organizational unit?
[Unknown]: Services > What is the name of your organization?
[Unknown]: coreblox.com > What is the name of your City or Locality?
[Unknown]: New York > What is the name of your State or Province?
[Unknown]: NY > What is the two-letter country code for this unit?
[Unknown]: US > Is CN=CoreBlox Token Service, OU=Services, O=coreblox.com, L=New York, ST=NY, C=US correct?
[no]: yes > Enter key password for <cts>
(RETURN if same as keystore password): keypassword > Re-enter new password: keypassword
The following file is generated: cts_server.keystore Copy the generated key store to the <CTS HOME>\config or <CTS HOME>/config directory depending on the Operating System. If another location is used, the jetty.xml file must be updated to reflect the new location.
Copy the Client Certificate to the Server In order validate the client connecting to the CTS, the certificate generated in the client certificate section above. Copy the client certificate into the <CTS HOME>\config or <CTS HOME>/config directory depending on the Operating System. For the example in this document, copy the client_cert.cer file generated in the previous steps into the config directory

CoreBlox Token Service Install and Configuration Guide – Version 1.0 Build V3
Page 24
Import the Client Certificate into the keystore as a Trusted Certificate The client certificate must be imported into the keystore so that the client can be validated during calls to the CTS. Keytool is run from the command line. The format for importing the certificate is as follows:
keytool -importcert -keystore <KEY STORE NAME> -alias <ALIAS> -file <CERTIFICATE FILE> -v -trustcacerts -noprompt -storepass <KEY STORE PASSWORD>
After running the command, you will be prompted for the key store password. So, for our example, the command is:
> keytool -importcert -keystore cts_server.keystore -alias client -file client_cert.cer -v -trustcacerts -noprompt -storepass keystorepassword
> Certificate was added to keystore [Storing cts_server.keystore]
Verify the Certificate in the Keystore Once the certificate is imported, the key store contents should be validated to ensure that the certificate imported correctly. This step is also used for obtaining the client certificate serial number. This serial number is added to the authenticatedusers.txt file. The file contains the list of client certificates allowed to query the CTS. Keytool is run from the command line. The format for validating the certificate is as follows:
keytool -v -list -keystore <KEY STORE NAME> -storepass <KEY STORE PASSWORD>
So, for our example, the command is:
> keytool -v -list -keystore cts_server.keystore -storepass keystorepassword Keystore type: JKS Keystore provider: SUN Your keystore contains 2 entries Alias name: client Creation date: Apr 30, 2013 Entry type: trustedCertEntry Owner: CN=Client Certificate, OU=Client Services, O=coreblox.com, L=New York, ST=NY, C=US Issuer: CN=Client Certificate, OU=Client Services, O=coreblox.com, L=New York, ST=NY, C=US Serial number: 51802ddb Valid from: Tue Apr 30 13:47:23 PDT 2013 until: Mon Jul 29 13:47:23 PDT 2013 Certificate fingerprints: MD5: E2:D2:31:B8:FE:87:AE:5F:41:94:FF:DD:73:1D:8F:35 SHA1: BC:F6:09:3A:E6:DE:42:A7:C4:30:3C:A0:98:59:74:CB:2F:4B:E0:ED Signature algorithm name: SHA1withRSA Version: 3 ******************************************* ******************************************* Alias name: cts Creation date: Apr 30, 2013 Entry type: PrivateKeyEntry Certificate chain length: 1

CoreBlox Token Service Install and Configuration Guide – Version 1.0 Build V3
Page 25
Certificate[1]: Owner: CN=CoreBlox Token Service, OU=Services, O=coreblox.com, L=New York, ST=NY, C=US Issuer: CN=CoreBlox Token Service, OU=Services, O=coreblox.com, L=New York, ST=NY, C=US Serial number: 51802e94 Valid from: Tue Apr 30 13:50:28 PDT 2013 until: Mon Jul 29 13:50:28 PDT 2013 Certificate fingerprints: MD5: 81:8B:51:B7:11:3B:A2:45:7D:C6:99:01:FB:35:35:AB SHA1: F5:FA:EC:46:45:99:18:12:6C:DF:AA:EB:22:44:3E:01:49:F7:11:B2 Signature algorithm name: SHA1withRSA Version: 3 ******************************************* *******************************************
For this example, the serial number required is bolded in the response above.
Add Client Certificate Serial Number to the authenticateusers.txt File The client certificate serial number is added to the authenticatedusers.txt file. The file contains the list of client certificates allowed to query the CTS. Copy the serial number from the client certificate alias. Open the authenticateusers.txt file and add the value into the file. For the documented example, the value is: 51802ddb

CoreBlox Token Service Install and Configuration Guide – Version 1.0 Build V3
Page 26
Chapter 5: CoreBlox Token Service Interface The CoreBlox Token Service Leverages the URL’s, verbs and responses described in this section. JSON is used to pass information to the CTS. NOTE: Brackets “[“ and “]” are used to indicate optional parameters and are not part of the URL format.
Generic URL The general service URL to access the CoreBlox Token Service is:
http://<servername>:<port>/<version number>/token/[operation][?token_type=<TYPE>] Where:
servername The name of the server hosting the CTS port The port on which the CTS is running version number The CTS interface version number token The base URL for the CTS token interface Operation (Optional) Operational methods for tokens created or validated by
the service token_type (Optional) Indicates the type of token passed to and requested from
the CTS
NOTE: All token returned by or submitted to the CTS are BASE64 encoded.
Authentication The CTS supports authentication using user attributes or a user ID and password combination. Mutual SSL (client certification) authentication to the service is required for authentication using user attributes.
userAttributes Authentication URL: http://<servername>:<port>/1/token/[?token_type=SMSESSION] Method: POST Where:
token_type (Optional) The type of token requested from the CTS (only SMSESSION is currently supported)
Input {"userAttributes":{"userId":"<User ID>"[,"userId-‐qualifier":"<QUALIFIER>"]}} Where:
User ID The ID used to query the identity system for generation of the requested token type
Qualifier (Optional) Used to restrict the scope of the search used to location the user ID in the identity system
For example, if the JSON POST’ed to the CTS was:

CoreBlox Token Service Install and Configuration Guide – Version 1.0 Build V3
Page 27
{"userAttributes":{"userId":"bob}}
The identity system invoked by the CTS could then translate the request into an LDAP query used to locate the user:
(uid=bob) Similarly, if the JSON POST’ed to the CTS was:
{"userAttributes":{"userId":"bob","userId-qualifier":"HR"}}
The identity system invoked by the CTS could then translate the request into an LDAP query used to locate the user:
(&(uid=bob)(department=HR))
Responses The following information is returned by the service: Session Created:
HTTP Response: 201 Created {"token":"new_token", "tokenType":"SMSESSION", "userAttributes":{"department":"engineering","userId":"jsmith",”nativeUserId”:”jsmith”,…} ["serviceAttributes":{"smReasonCode":"<value>","smReasonCodeDescription":"<value>"}] } Where:
Token The session token returned from the identity system nativeUserId The ID used to authenticate user to the identity system userId The same value as nativeUserId unless overwritten by the backend
identity system tokenType The type of token being returned by CTS … Additional attributes for the user set by the backend identity
system (e.g. department in the sample above) serviceAttributes Identity system specific codes returned during the authentication
event (for SMSESSION it is smReasonCode and smReasonCodeDescription)
Invalid User Credentials:
HTTP Response: 400 Bad Request {"errorCode":"UNKNOWN_USERID","errorMessage":"The passed userId is invalid."} UserId Not Passed In Request:
HTTP Response: 400 Bad Request {"errorCode":"MISSING_USERID_PARAMETER","errorMessage":"The request did not contain a userId value."} No Connection To Identity System:
HTTP Response: 500 Server Error {"errorCode":"NO_CONNECTION","errorMessage":"The service cannot connect to the backend server"}

CoreBlox Token Service Install and Configuration Guide – Version 1.0 Build V3
Page 28
Timeout Connecting To Identity System:
HTTP Response: 500 Server Error {"errorCode":"TIMEOUT","errorMessage":"The service timed out connecting to the backend server"} Failure Message Returned From Identity System
HTTP Response: 500 Server Error {"errorCode":"FAILURE","errorMessage":"The service received a failure from the backend server"}
User Id and Password Authentication URL: http://<servername>:<port>/1/token/login[?token_type=SMSESSION] Method: POST
token_type (Optional) The type of token requested from the CTS (only SMSESSION is currently supported)
Input {"password":{"userId":"<User ID>","password":"<PASSWORD>"}} Where:
User ID The ID used to query the identity system for generation of the requested token type
Password The password for the submitted user ID
For example, if the JSON POST’ed to the CTS was:
{"password":{"userId":"bob","password":"password123"}} The identity system invoked by the CTS could then translate the request into an LDAP bind with those credentials for validation.
Responses The following information is returned by the service: Session Created:
HTTP Response: 201 Created {"token":"new_token", "tokenType":"SMSESSION", "userAttributes":{"department":"engineering","userId":"jsmith",”nativeUserId”:”jsmith”,…} ["serviceAttributes":{"smReasonCode":"<value>","smReasonCodeDescription":"<value>"}] } Where:
Token The session token returned from the identity system nativeUserId The ID used to authenticate user to the identity system userId The same value as nativeUserId unless overwritten by the backend
identity system tokenType The type of token being returned by CTS … Additional attributes for the user set by the backend identity
system (e.g. department in the sample above) serviceAttributes Identity system specific codes returned during the authentication
event (for SMSESSION it is smReasonCode and smReasonCodeDescription)

CoreBlox Token Service Install and Configuration Guide – Version 1.0 Build V3
Page 29
Invalid User Credentials:
HTTP Response: 400 Bad Request {"errorCode":"INVALID_CREDENTIALS","errorMessage":"The passed user credentials are invalid."}
UserId Not Passed In Request:
HTTP Response: 400 Bad Request {"errorCode":"MISSING_USERID_PARAMETER","errorMessage":"The request did not contain a userId value."}
No Connection To Identity System:
HTTP Response: 500 Server Error {"errorCode":"NO_CONNECTION","errorMessage":"The service cannot connect to the backend server"}
Timeout Connecting To Identity System:
HTTP Response: 500 Server Error {"errorCode":"TIMEOUT","errorMessage":"The service timed out connecting to the backend server"}
Failure Message Returned From Identity System
HTTP Response: 500 Server Error {"errorCode":"FAILURE","errorMessage":"The service received a failure from the backend server"}
Optional Authentication Attributes Previously, in version 1.0 any authentication request made from CTS whether userAttributes or password based only used the default ACO settings: * ACO: ServiceAgentName used for agent identity * ACO: /uatokenresource or /ptokenresource used for authentication resource (depending on whether userAttributes or password) * ACO: DefaultAction used for agent action This meant that any request coming from CTS would hit one of the realms in the default CTS domain, and only the directory specified in the default domain could be used to authenticate users. But, say you have other partner sites that need to access certain applications in your company domain without using federation, and you want to authenticate those users against specific policy domains and directories? In version 1.3, in order to increase versatility CTS was enhanced to accept a URI category in the JSON request that contains three optional attributes:
• Resource

CoreBlox Token Service Install and Configuration Guide – Version 1.0 Build V3
Page 30
• Action • Instance
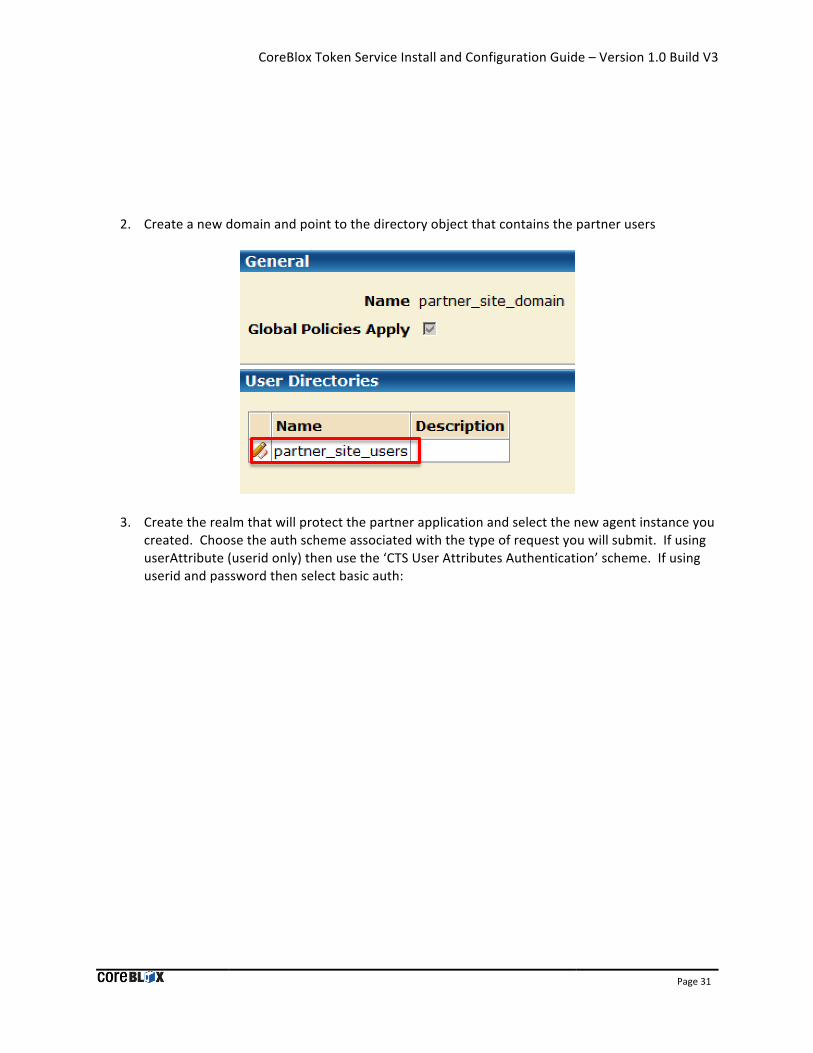
This allows you to hit different realms in different domains depending on the resource/action/instance combination. These are optional, so if they are not specified the request will always default to the CTS realms. Ie, if a standard request contains only the UserID it will default to the /uatokenresource realm. UserID and Password requests will default to /ptokenresource, etc. For instance, say you create a new domain for external users coming from a partner. The application resides under an application called /partner_application with a rule of /* protecting all contents. All of these users are stored in a particular directory called partner_site_users, which will be tied to the new domain. The policy allows access to only these users. There is a new agent identity called partner_site_agent. This agent identity will need to be added to the default CTS ACO's AgentName parameter for agent identity mapping. New Objects: Agent: partner_site_agent (instance) Directory: partner_site_users Domain: partner_site_domain Realm: /partner_realm Resource: /partner_application /partner_landing.html (resource)
1. Add the new agent instance to the coreblox_tokenservices_aco
CoreBlox Token Service Install and Configuration Guide – Version 1.0 Build V3
Page 31
2. Create a new domain and point to the directory object that contains the partner users
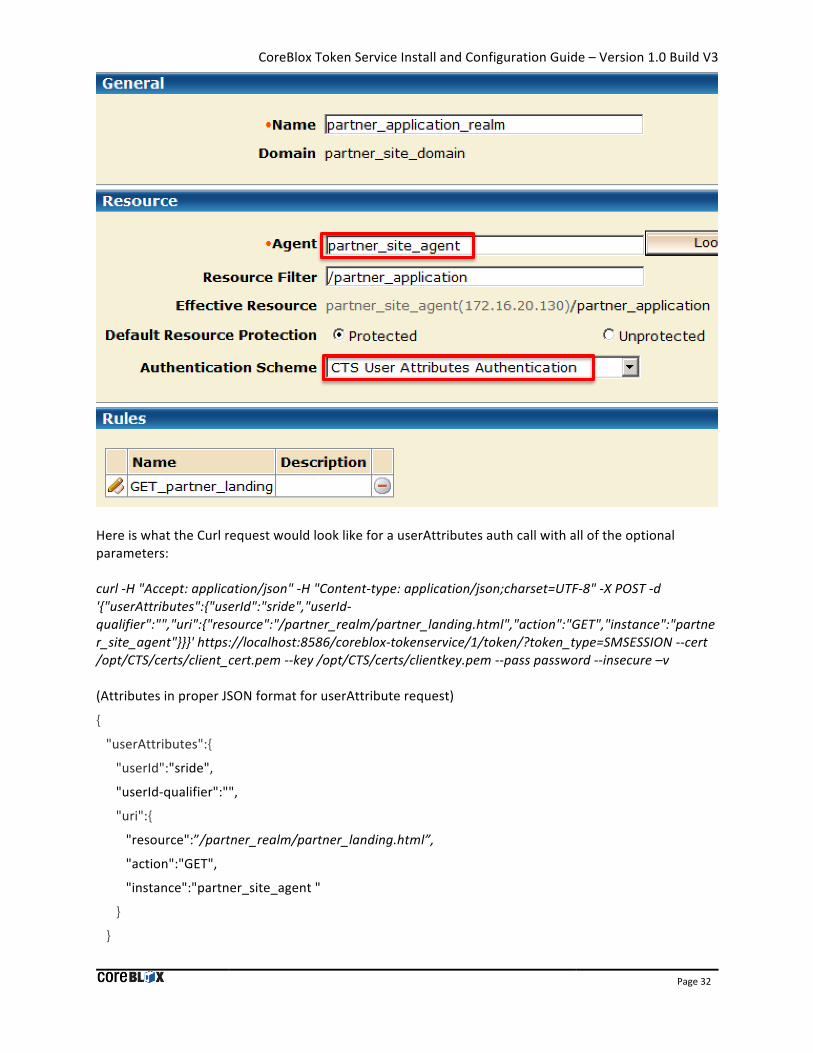
3. Create the realm that will protect the partner application and select the new agent instance you created. Choose the auth scheme associated with the type of request you will submit. If using userAttribute (userid only) then use the ‘CTS User Attributes Authentication’ scheme. If using userid and password then select basic auth:
CoreBlox Token Service Install and Configuration Guide – Version 1.0 Build V3
Page 32
Here is what the Curl request would look like for a userAttributes auth call with all of the optional parameters: curl -‐H "Accept: application/json" -‐H "Content-‐type: application/json;charset=UTF-‐8" -‐X POST -‐d '{"userAttributes":{"userId":"sride","userId-‐qualifier":"","uri":{"resource":"/partner_realm/partner_landing.html","action":"GET","instance":"partner_site_agent"}}}' https://localhost:8586/coreblox-‐tokenservice/1/token/?token_type=SMSESSION -‐-‐cert /opt/CTS/certs/client_cert.pem -‐-‐key /opt/CTS/certs/clientkey.pem -‐-‐pass password -‐-‐insecure –v (Attributes in proper JSON format for userAttribute request)
{
"userAttributes":{
"userId":"sride",
"userId-‐qualifier":"",
"uri":{
"resource":”/partner_realm/partner_landing.html”,
"action":"GET",
"instance":"partner_site_agent "
}
}

CoreBlox Token Service Install and Configuration Guide – Version 1.0 Build V3
Page 33
}
(Attributes in proper JSON format for password request)
{
"password":{
"userId":"sride",
"password":"******",
"uri":{
"resource":”/partner_realm/partner_landing.html ",
"instance":"partner_site_agent",
"action":"POST"
}
}
}
Below is what it would look like when the curl request gets executed with the new attributes. It is a
successful call which returns a token:

CoreBlox Token Service Install and Configuration Guide – Version 1.0 Build V3
Page 34
Below is what the request results look like in the CTS log. As you can see the user is authenticated in the new domain against the new directory based on the AgentName (instance), and Resource passed in the request:
Here are some examples of SUCCESSFUL requests omitting certain optional parameters

CoreBlox Token Service Install and Configuration Guide – Version 1.0 Build V3
Page 35
(Contains NO Action) curl -‐H "Accept: application/json" -‐H "Content-‐type: application/json;charset=UTF-‐8" -‐X POST -‐d '{"userAttributes":{"userId":"sride","userId-‐qualifier":"","uri":{"resource":"/ping_realm1","instance":"ping_agent1"}}}' https://localhost:8586/coreblox-‐tokenservice/1/token/?token_type=SMSESSION -‐-‐cert /opt/CTS/certs/client_cert.pem -‐-‐key /opt/CTS/certs/clientkey.pem -‐-‐pass password -‐-‐insecure -‐v (Containes NO userId-‐qualifier, and NO Action) curl -‐H "Accept: application/json" -‐H "Content-‐type: application/json;charset=UTF-‐8" -‐X POST -‐d '{"userAttributes":{"userId":"sride","uri":{"resource":"/ping_realm1","instance":"ping_agent1"}}}' https://localhost:8586/coreblox-‐tokenservice/1/token/?token_type=SMSESSION -‐-‐cert /opt/CTS/certs/client_cert.pem -‐-‐key /opt/CTS/certs/clientkey.pem -‐-‐pass password -‐-‐insecure -‐v (Contains NO Action, and NO Resource) -‐-‐> defaults to /uatokenresource curl -‐H "Accept: application/json" -‐H "Content-‐type: application/json;charset=UTF-‐8" -‐X POST -‐d '{"userAttributes":{"userId":"sride","uri":{"instance":"ping_agent1"}}}' https://localhost:8586/coreblox-‐tokenservice/1/token/?token_type=SMSESSION -‐-‐cert /opt/CTS/certs/client_cert.pem -‐-‐key /opt/CTS/certs/clientkey.pem -‐-‐pass password -‐-‐insecure -‐v Here is an example of a FAILED request. If you specify a particular non-‐default resource but no instance the policy server will return NOT protected: (Contains NO Action, and NO Instance) -‐> FAILS should be NOT protected curl -‐H "Accept: application/json" -‐H "Content-‐type: application/json;charset=UTF-‐8" -‐X POST -‐d '{"userAttributes":{"userId":"sride","uri":{"resource":"/ping_realm1"}}}' https://localhost:8586/coreblox-‐tokenservice/1/token/?token_type=SMSESSION -‐-‐cert /opt/CTS/certs/client_cert.pem -‐-‐key /opt/CTS/certs/clientkey.pem -‐-‐pass password -‐-‐insecure -‐v
Validation The CTS can validate existing tokens and return details about the submitted session. The session token is updated during validation and returned to ensure that any associated timeout values are refreshed. URL: http://<servername>:<port>/1/token/<SSO TOKEN>[?token_type=SMSESSION] Method: POST Where:
SSO TOKEN The identity system token to validate token_type (Optional) The type of token submitted to the CTS (only SMSESSION
is currently supported)

CoreBlox Token Service Install and Configuration Guide – Version 1.0 Build V3
Page 36
Input None. No JSON input is submitted
Responses The following information is returned by the service:
Valid Token HTTP Response: 200 OK {"token":"new_token", "tokenType":"SMSESSION", "userAttributes":{"department":"engineering","userId":"jsmith",”nativeUserId”:”jsmith”,…} ["serviceAttributes":{"smReasonCode":"<value>","smReasonCodeDescription":"<value>"}] } Where:
Token The updated session token returned from the identity system nativeUserId The ID initially used to authenticate user to the identity system userId The same value as nativeUserId unless overwritten by the backend
identity system tokenType The type of token being returned by CTS … Additional attributes for the user set by the backend identity
system (e.g. department in the sample above) serviceAttributes Identity system specific codes returned during the authentication
event (for SMSESSION it is smReasonCode and smReasonCodeDescription)
Expired Token HTTP Response: 400 Bad Request {"errorCode":"EXPIRED_TOKEN","errorMessage":"The passed token has expired."}
Invalid Token HTTP Response: 400 Bad Request {"errorCode":"INVALID_TOKEN","errorMessage":"The passed token is invalid."}
No Connection To Identity System HTTP Response: 500 Server Error {"errorCode":"NO_CONNECTION","errorMessage":"The service cannot connect to the backend server"}
Timeout Connecting To Identity System HTTP Response: 500 Server Error {"errorCode":"TIMEOUT","errorMessage":"The service timed out connecting to the backend server"}
Failure Message Returned From Identity System HTTP Response: 500 Server Error {"errorCode":"FAILURE","errorMessage":"The service received a failure from the backend server"}
Get Session Info The CTS can return session related data for submitted tokens. The session token is not updated during this process. The userID in the associated response is always equivalent to the nativeUserId is other calls since there is no ability for the identity system to override the value. URL: http://<servername>:<port>/1/token/<SSO TOKEN>[?token_type=SMSESSION] Method: GET

CoreBlox Token Service Install and Configuration Guide – Version 1.0 Build V3
Page 37
Where:
SSO TOKEN The identity system token to validate token_type (Optional) The type of token submitted to the CTS (only SMSESSION
is currently supported)
Input None. No JSON input is submitted
Responses The following information is returned by the service:
Valid Token HTTP Response: 200 OK {"token":"", "tokenType":"SMSESSION", "sessionInfo":{ "sessionid":"", "userdn":"", "userId":"", "nativeUserId":"", "currentServerTime":"", "startSessionTime":"", "lastSessionTime:"", "maxSessionTimeOut":"", "idleSessionTimeOut":"", "currentServerFormattedTime":"", "startSessionFormattedTime":"", "lastSessionFormattedTime:"", "maxSessionTimeRemaining":"", "idleSessionTimeRemaining":"" } } Where:
Token The updated session token returned from the identity system tokenType The type of token being returned by CTS userdn The unique identity for the user in the underlying LDAP directory userId The same value as nativeUserId nativeUserId The ID initially used to authenticate user to the identity system currentServerTime The server’s current time in seconds since the epoch startSessionFormattedTime The time in seconds since the epoch the session token was created lastSessionFormattedTime The time in seconds since the epoch the session was last updated maxSessionTimeOut The time in seconds indicating the maximum validity for the session
token idleSessionTimeout The time in seconds indicating how long the session can be idle currentServerFormattedTime The server’s current time in GMT startSessionFormattedTime The time in GMT the session token was created lastSessionFormattedTime The time in GMT the session was last updated maxSessionTimeRemaining The time in seconds for which the token is still valid idleSessionTimeRemaining The time in seconds for which the token is valid before is must be
refreshed
Expired Token HTTP Response: 400 Bad Request {"errorCode":"EXPIRED_TOKEN","errorMessage":"The passed token has expired."}

CoreBlox Token Service Install and Configuration Guide – Version 1.0 Build V3
Page 38
Invalid Token HTTP Response: 400 Bad Request {"errorCode":"INVALID_TOKEN","errorMessage":"The passed token is invalid."}
Authorize Resource The CTS can validate existing tokens are return details about the submitted session. The session token is updated during validation and returned to ensure that any associated timeout values are refreshed. URL: http://<servername>:<port>/1/token/authorize/<SSO TOKEN>[?token_type=SMSESSION] Method: POST Where:
SSO TOKEN The identity system token to validate token_type (Optional) The type of token submitted to the CTS (only SMSESSION
is currently supported)
Authorize By URI
Input {"uri":{"resource":"<REQUESTED RESOURCE>","instance":"<INSTANCE IDENTIFIER>","method":"<ACTION>"}} Where:
resource The resource requested for which to authorize the identity in the associated session token
instance The hostname, fully qualified domain name or IP address of the virtual server hosting the resource
action The operation being performed against the resource (e.g. GET or POST)
These values must match a rule authorizing a user in the backend identity system. For example, if the JSON POST’ed to the CTS was:
{"uri":{"resource":"/protectedpages","instance":"www.server.com","action":"GET"}} The identity system invoked by the CTS authorize the identity in the passed token for to see if the identity can perform a HTTP GET against resources under /protectedpages on the www.server.com server.
Responses The following information is returned by the service: Valid Token: HTTP Response: 200 OK {"token":"new_token", "tokenType":"SMSESSION", "userAttributes":{"department":"engineering","userId":"jsmith",”nativeUserId”:”jsmith”,…} } Where:

CoreBlox Token Service Install and Configuration Guide – Version 1.0 Build V3
Page 39
Token The updated session token returned from the identity system nativeUserId The ID initially used to authenticate user to the identity system userId The same value as nativeUserId unless overwritten by the backend
identity system tokenType The type of token being returned by CTS … Additional attributes for the user set by the backend identity
system (e.g. department in the sample above)
Expired Token: HTTP Response: 400 Bad Request {"errorCode":"EXPIRED_TOKEN","errorMessage":"The passed token has expired."} Invalid Token: HTTP Response: 400 Bad Request {"errorCode":"INVALID_TOKEN","errorMessage":"The passed token is invalid."} Token not passed in request HTTP Response: 400 Bad Request {"errorCode":"MISSING_TOKEN_PARAMETER","errorMessage":"The request did not contain a token value."} No Connection To Identity System: HTTP Response: 500 Server Error {"errorCode":"NO_CONNECTION","errorMessage":"The service cannot connect to the backend server"} Timeout Connecting To Identity System: HTTP Response: 500 Server Error {"errorCode":"TIMEOUT","errorMessage":"The service timed out connecting to the backend server"} Failure Message Returned From Identity System HTTP Response: 500 Server Error {"errorCode":"FAILURE","errorMessage":"The service received a failure from the backend server"}
Delete (Logoff) The CTS can logoff tokens in the underlying identity system. The underlying identity system is then responsible for ensure the token is invalidated. This may require extra components. For example, SiteMinder requires the use of a session server to support this functionality. URL: http://<servername>:<port>/1/token/<SSO TOKEN>[?token_type=SMSESSION] Method: DELETE Where:
SSO TOKEN The identity system token to validate token_type (Optional) The type of token submitted to the CTS (only SMSESSION
is currently supported)
Input None. No JSON input is submitted
Responses The following information is returned by the service:

CoreBlox Token Service Install and Configuration Guide – Version 1.0 Build V3
Page 40
Valid Token HTTP Response: 200 OK {"token":"LOGGEDOFF", "tokenType":"SMSESSION"} Where:
token The updated session token value returned from the identity system for deleted sessions
tokenType The type of token being returned by CTS
Expired Token: HTTP Response: 400 Bad Request {"errorCode":"EXPIRED_TOKEN","errorMessage":"The passed token has expired."} Invalid Token: HTTP Response: 400 Bad Request {"errorCode":"INVALID_TOKEN","errorMessage":"The passed token is invalid."} No Connection To Identity System: HTTP Response: 500 Server Error {"errorCode":"NO_CONNECTION","errorMessage":"The service cannot connect to the backend server"} Timeout Connecting To Identity System: HTTP Response: 500 Server Error {"errorCode":"TIMEOUT","errorMessage":"The service timed out connecting to the backend server"} Failure Message Returned From Identity System: HTTP Response: 500 Server Error {"errorCode":"FAILURE","errorMessage":"The service received a failure from the backend server"}

CoreBlox Token Service Install and Configuration Guide – Version 1.0 Build V3
Page 41
Chapter 6: Sample CoreBlox Token Service Calls The following section contains sample calls to the CTS using curl. Other tools can also be used for this purpose. However, the use of those tools is not documented in this guide. The certificate and key generated above are used for these CTS calls. NOTE: These calls are specific to the CA SiteMinder connector.
Authenticate userAttribute Authentication:
curl -H "Accept: application/json" -H "Content-type: application/json;charset=UTF-8" -X POST -d '{"userAttributes":{"userId":"<USER ID>","userId-qualifier":"<OPTIONAL USER ID QUALIFIER>"}}' https://<ipaddress>:<port>/coreblox-tokenservice/1/token/?token_type=SMSESSION --cert client_cert.pem --key clientkey.pem --pass keystorepassword --insecure
userId and Password Authentication
curl -H "Accept: application/json" -H "Content-type: application/json;charset=UTF-8" -X POST -d '{"password":{"userId":"<USER ID>","password":"<PASSWORD>"}}' https://<server>:<port>/coreblox-tokenservice/1/token/login?token_type=SMSESSION --insecure
Validate
curl -H "Accept: application/json" -H "Content-type: application/json;charset=UTF-8" -X POST https://<server>:<port>/coreblox-tokenservice/1/<TOKEN>/?token_type=SMSESSION --insecure
Get Session Info
curl -H "Accept: application/json" -H "Content-type: application/json;charset=UTF-8" -X GET https://<server>:<port>/coreblox-tokenservice/1/<TOKEN>/?token_type=SMSESSION --insecure
Authorize
curl -H "Accept: application/json" -H "Content-type: application/json;charset=UTF-8" -X POST -d '{"uri":{"resource":"<RESOURCE>","instance":"<INSTANCE IP OR HOST NAME>","action":"<ACTION>"}}' https://<server>:<port>/coreblox-tokenservice /1/token/authorize/?token_type=SMSESSION --insecure
Logout
curl -H "Accept: application/json" -H "Content-type: application/json;charset=UTF-8" -X DELETE https://<server>:<port>/coreblox-tokenservice/1/token/?token_type=SMSESSION --insecure

CoreBlox Token Service Install and Configuration Guide – Version 1.0 Build V3
Page 42
Chapter 7: Deploying the CoreBlox Token Server to an Existing Application Server To deploy the CoreBlox Token Service to an existing application server, several steps are required. Refer to the vendor documentation for details on how to deploy applications to the application server in your environment. The following steps are required:
1. Un-‐jar the coreblox-‐tokenservice-‐1.0.war file 2. Rename the _cts.properties file in the <CTS Home>\WEB-‐INF\Classes or <CTS Home>/WEB-‐
INF/Classes directory depending on the operating system to cts.properties 3. Update the settings in the cts.properties file 4. If necessary, re-‐jar the war file 5. Deploy the file/folder to the application server
Un-‐jar the coreblox-‐tokenservice-‐1.0.war File To un-‐jar the coreblox-‐tokenservice-‐1.0.war file, run the following command from the command line:
<Java Home>\bin\ jar xvf coreblox-‐tokenservice-‐1.0.war or:
<Java Home>/bin/ jar xvf coreblox-‐tokenservice-‐1.0.war depending on the operation system. Note: create a directory for extracting the files prior to running the command above.
Rename the _cts.properties File and Update the CTS Settings Rename the _cts.properties file in the <CTS Home>\WEB-‐INF\Classes or <CTS Home>/WEB-‐INF/Classes directory depending on the operating system to cts.properties. This is needed so that the application server can locate the correct settings when starting the CTS. Refer to the CoreBlox Token Service Configuration Parameters section above for details on how to configure the cts.properties file. Leave the file in the same location. Note: Ensure that the paths to the SmHost.conf and the authenticatedUsers.txt are full paths and not relative. You may want to create a specific directory for those files.
Re-‐jar the CTS and Deploy to the Application Server If necessary, re-‐jar the CTS by running the following command from the command line:

CoreBlox Token Service Install and Configuration Guide – Version 1.0 Build V3
Page 43
<Java Home>\bin\ jar cvf coreblox-‐tokenservice-‐1.0.war <name of extracted directory>
or:
<Java Home>/bin/ jar cvf coreblox-‐tokenservice-‐1.0.war <name of extracted directory> depending on the operation system, where:
<name of extracted directory> is the directory where you extracted the coreblox-‐tokenservice-‐1.0.war above. Refer to your application server’s documentation for details on how to deploy the war file.