coronado radiator mounts, update—epa10 20-72 · fig. 10, fan shroud installation coronado...
TRANSCRIPT
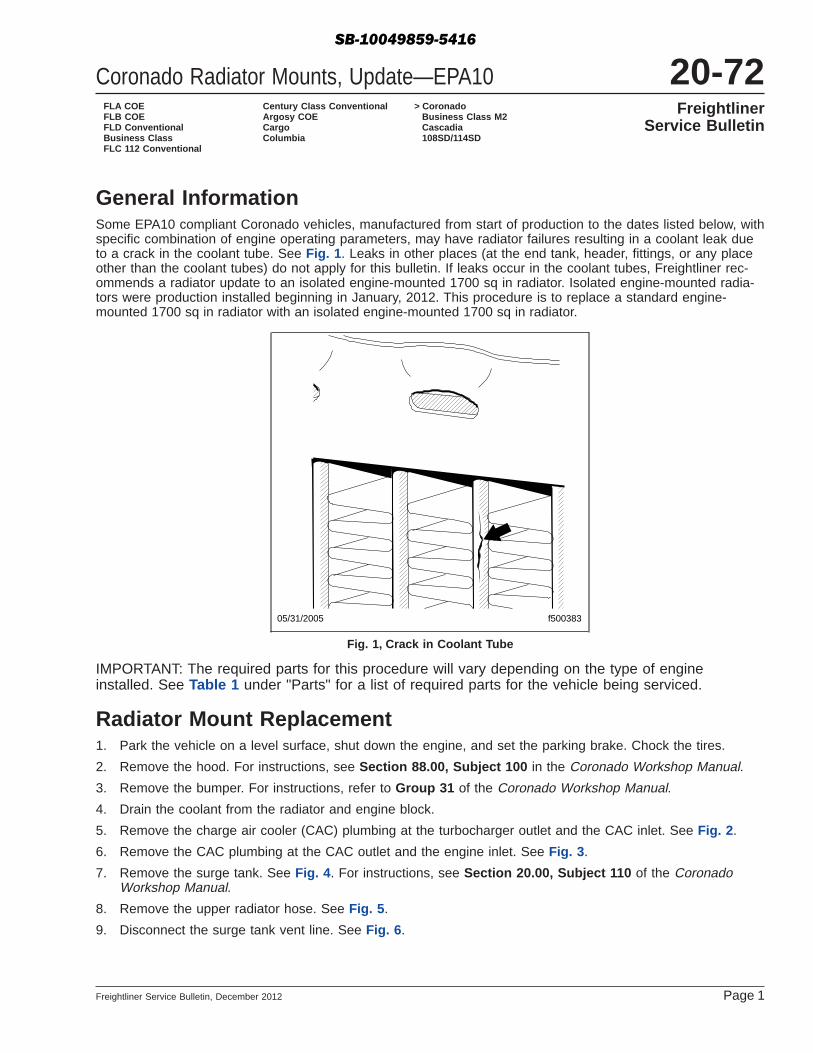
General InformationSome EPA10 compliant Coronado vehicles, manufactured from start of production to the dates listed below, withspecific combination of engine operating parameters, may have radiator failures resulting in a coolant leak dueto a crack in the coolant tube. See Fig. 1. Leaks in other places (at the end tank, header, fittings, or any placeother than the coolant tubes) do not apply for this bulletin. If leaks occur in the coolant tubes, Freightliner rec-ommends a radiator update to an isolated engine-mounted 1700 sq in radiator. Isolated engine-mounted radia-tors were production installed beginning in January, 2012. This procedure is to replace a standard engine-mounted 1700 sq in radiator with an isolated engine-mounted 1700 sq in radiator.
IMPORTANT: The required parts for this procedure will vary depending on the type of engineinstalled. See Table 1 under "Parts" for a list of required parts for the vehicle being serviced.
Radiator Mount Replacement1. Park the vehicle on a level surface, shut down the engine, and set the parking brake. Chock the tires.
2. Remove the hood. For instructions, see Section 88.00, Subject 100 in the Coronado Workshop Manual.
3. Remove the bumper. For instructions, refer to Group 31 of the Coronado Workshop Manual.
4. Drain the coolant from the radiator and engine block.
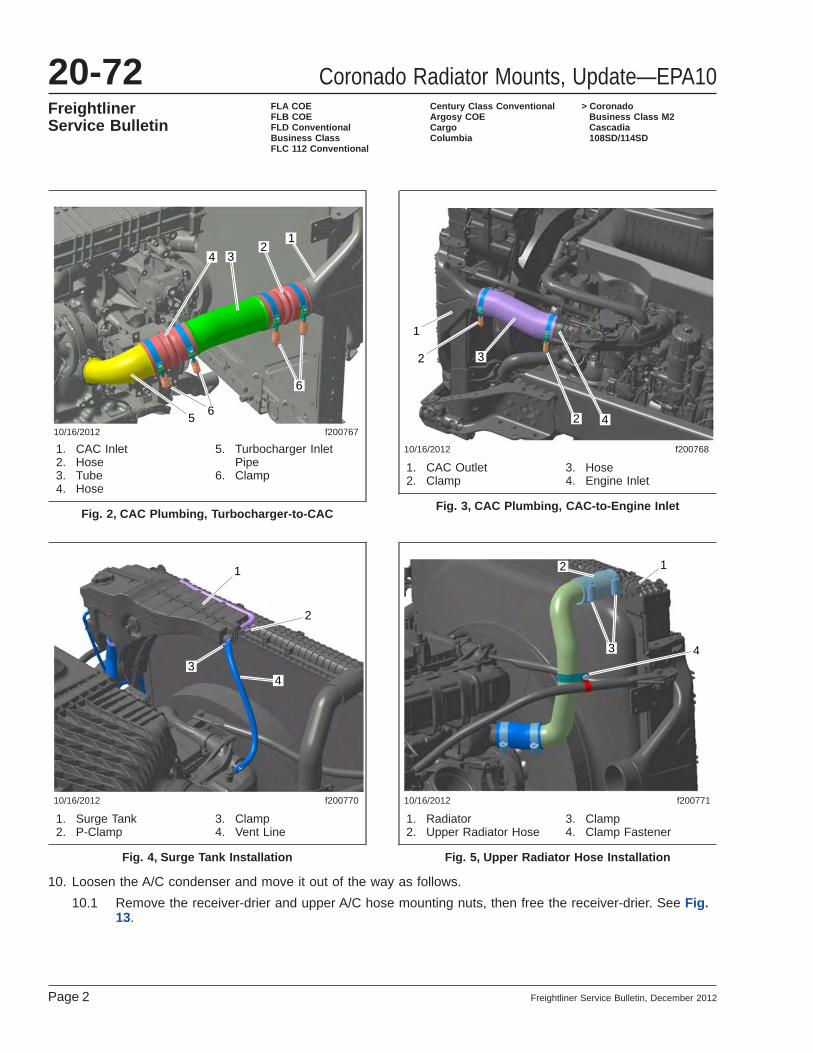
5. Remove the charge air cooler (CAC) plumbing at the turbocharger outlet and the CAC inlet. See Fig. 2.
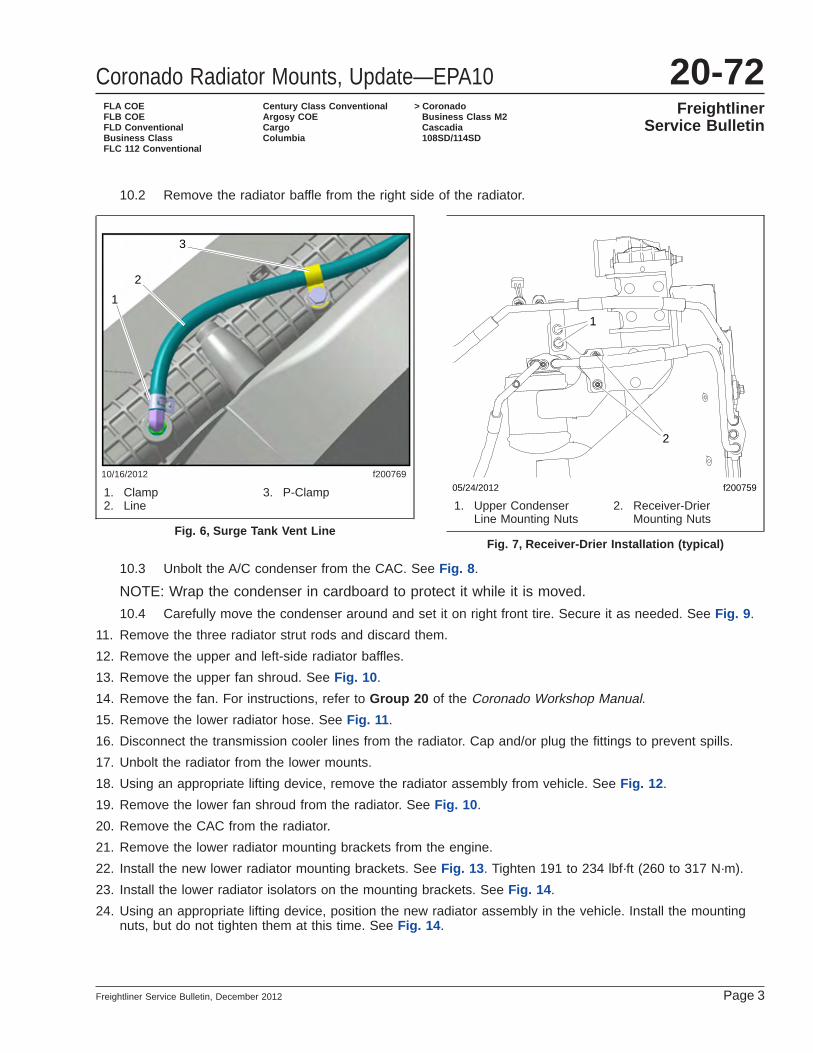
6. Remove the CAC plumbing at the CAC outlet and the engine inlet. See Fig. 3.
7. Remove the surge tank. See Fig. 4. For instructions, see Section 20.00, Subject 110 of the CoronadoWorkshop Manual.
8. Remove the upper radiator hose. See Fig. 5.
9. Disconnect the surge tank vent line. See Fig. 6.
05/31/2005 f500383
Fig. 1, Crack in Coolant Tube
Coronado Radiator Mounts, Update—EPA10 20-72Freightliner
Service BulletinFLA COEFLB COEFLD ConventionalBusiness ClassFLC 112 Conventional
Century Class ConventionalArgosy COECargoColumbia
> CoronadoBusiness Class M2Cascadia108SD/114SD
Freightliner Service Bulletin, December 2012 Page 1
SB-10049859-5416
10. Loosen the A/C condenser and move it out of the way as follows.
10.1 Remove the receiver-drier and upper A/C hose mounting nuts, then free the receiver-drier. See Fig.13.
10/16/2012 f200767
12
4 3
56
6
1. CAC Inlet2. Hose3. Tube4. Hose
5. Turbocharger InletPipe
6. Clamp
Fig. 2, CAC Plumbing, Turbocharger-to-CAC
10/16/2012 f200768
1
2 3
2 4
1. CAC Outlet2. Clamp
3. Hose4. Engine Inlet
Fig. 3, CAC Plumbing, CAC-to-Engine Inlet
10/16/2012 f200770
1
2
43
1. Surge Tank2. P-Clamp
3. Clamp4. Vent Line
Fig. 4, Surge Tank Installation
10/16/2012 f200771
12
3 4
1. Radiator2. Upper Radiator Hose
3. Clamp4. Clamp Fastener
Fig. 5, Upper Radiator Hose Installation
Coronado Radiator Mounts, Update—EPA1020-72FreightlinerService Bulletin
FLA COEFLB COEFLD ConventionalBusiness ClassFLC 112 Conventional
Century Class ConventionalArgosy COECargoColumbia
> CoronadoBusiness Class M2Cascadia108SD/114SD
Page 2 Freightliner Service Bulletin, December 2012
10.2 Remove the radiator baffle from the right side of the radiator.
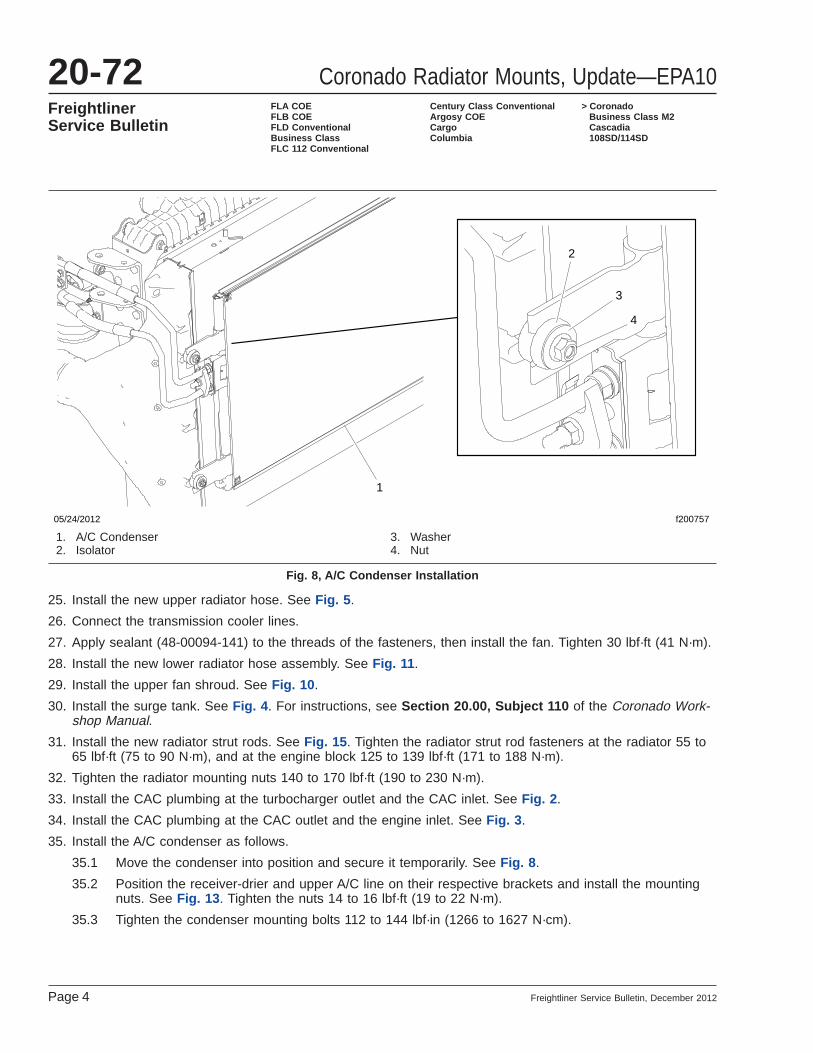
10.3 Unbolt the A/C condenser from the CAC. See Fig. 8.
NOTE: Wrap the condenser in cardboard to protect it while it is moved.
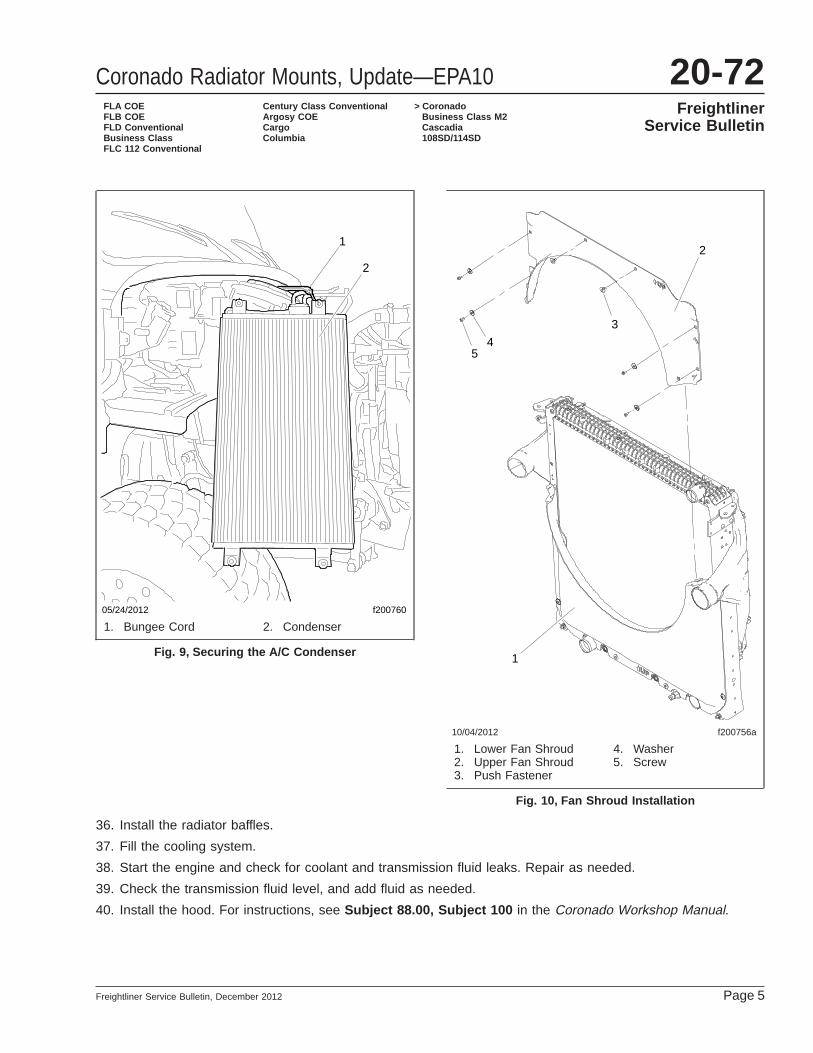
10.4 Carefully move the condenser around and set it on right front tire. Secure it as needed. See Fig. 9.
11. Remove the three radiator strut rods and discard them.
12. Remove the upper and left-side radiator baffles.
13. Remove the upper fan shroud. See Fig. 10.
14. Remove the fan. For instructions, refer to Group 20 of the Coronado Workshop Manual.
15. Remove the lower radiator hose. See Fig. 11.
16. Disconnect the transmission cooler lines from the radiator. Cap and/or plug the fittings to prevent spills.
17. Unbolt the radiator from the lower mounts.
18. Using an appropriate lifting device, remove the radiator assembly from vehicle. See Fig. 12.
19. Remove the lower fan shroud from the radiator. See Fig. 10.
20. Remove the CAC from the radiator.
21. Remove the lower radiator mounting brackets from the engine.
22. Install the new lower radiator mounting brackets. See Fig. 13. Tighten 191 to 234 lbf·ft (260 to 317 N·m).
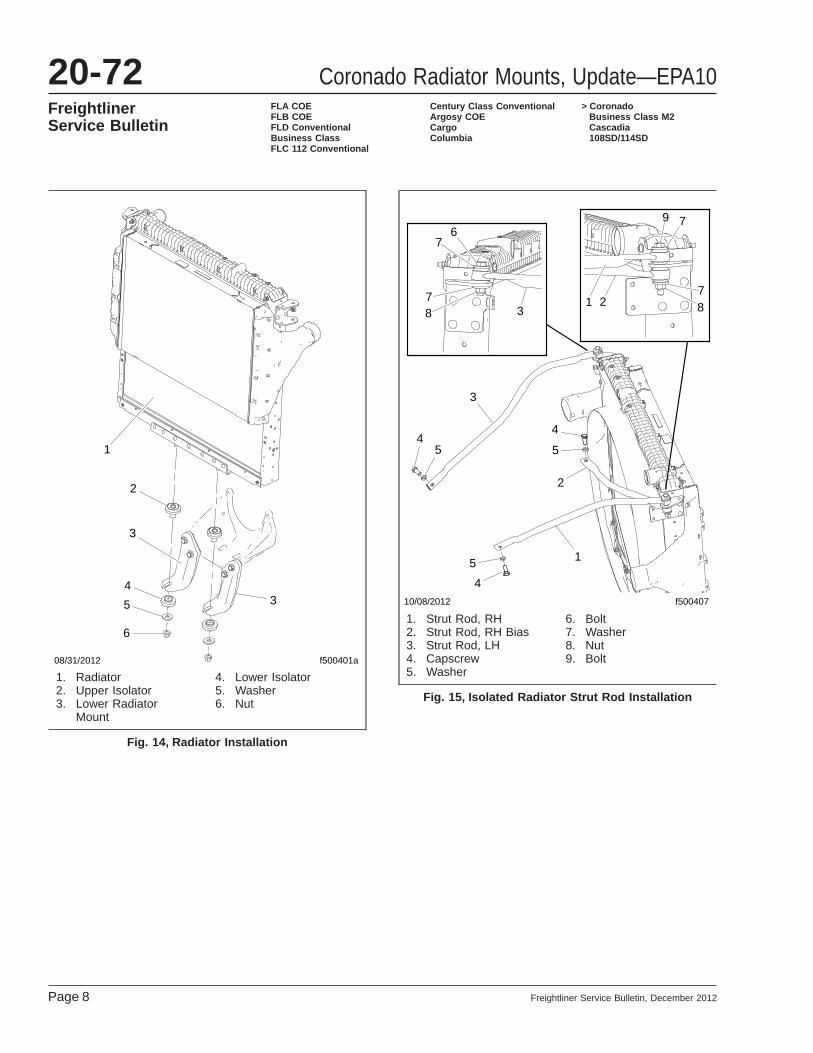
23. Install the lower radiator isolators on the mounting brackets. See Fig. 14.
24. Using an appropriate lifting device, position the new radiator assembly in the vehicle. Install the mountingnuts, but do not tighten them at this time. See Fig. 14.
10/16/2012 f200769
1
2
3
1. Clamp2. Line
3. P-Clamp
Fig. 6, Surge Tank Vent Line
05/24/2012 f200759
1
2
1. Upper CondenserLine Mounting Nuts
2. Receiver-DrierMounting Nuts
Fig. 7, Receiver-Drier Installation (typical)
Coronado Radiator Mounts, Update—EPA10 20-72Freightliner
Service BulletinFLA COEFLB COEFLD ConventionalBusiness ClassFLC 112 Conventional
Century Class ConventionalArgosy COECargoColumbia
> CoronadoBusiness Class M2Cascadia108SD/114SD
Freightliner Service Bulletin, December 2012 Page 3
25. Install the new upper radiator hose. See Fig. 5.
26. Connect the transmission cooler lines.
27. Apply sealant (48-00094-141) to the threads of the fasteners, then install the fan. Tighten 30 lbf·ft (41 N·m).
28. Install the new lower radiator hose assembly. See Fig. 11.
29. Install the upper fan shroud. See Fig. 10.
30. Install the surge tank. See Fig. 4. For instructions, see Section 20.00, Subject 110 of the Coronado Work-shop Manual.
31. Install the new radiator strut rods. See Fig. 15. Tighten the radiator strut rod fasteners at the radiator 55 to65 lbf·ft (75 to 90 N·m), and at the engine block 125 to 139 lbf·ft (171 to 188 N·m).
32. Tighten the radiator mounting nuts 140 to 170 lbf·ft (190 to 230 N·m).
33. Install the CAC plumbing at the turbocharger outlet and the CAC inlet. See Fig. 2.
34. Install the CAC plumbing at the CAC outlet and the engine inlet. See Fig. 3.
35. Install the A/C condenser as follows.
35.1 Move the condenser into position and secure it temporarily. See Fig. 8.
35.2 Position the receiver-drier and upper A/C line on their respective brackets and install the mountingnuts. See Fig. 13. Tighten the nuts 14 to 16 lbf·ft (19 to 22 N·m).
35.3 Tighten the condenser mounting bolts 112 to 144 lbf·in (1266 to 1627 N·cm).
05/24/2012 f200757
1
2
3
4
1. A/C Condenser2. Isolator
3. Washer4. Nut
Fig. 8, A/C Condenser Installation
Coronado Radiator Mounts, Update—EPA1020-72FreightlinerService Bulletin
FLA COEFLB COEFLD ConventionalBusiness ClassFLC 112 Conventional
Century Class ConventionalArgosy COECargoColumbia
> CoronadoBusiness Class M2Cascadia108SD/114SD
Page 4 Freightliner Service Bulletin, December 2012
36. Install the radiator baffles.
37. Fill the cooling system.
38. Start the engine and check for coolant and transmission fluid leaks. Repair as needed.
39. Check the transmission fluid level, and add fluid as needed.
40. Install the hood. For instructions, see Subject 88.00, Subject 100 in the Coronado Workshop Manual.
05/24/2012 f200760
1
2
1. Bungee Cord 2. Condenser
Fig. 9, Securing the A/C Condenser
10/04/2012 f200756a
1
2
3
45
1. Lower Fan Shroud2. Upper Fan Shroud3. Push Fastener
4. Washer5. Screw
Fig. 10, Fan Shroud Installation
Coronado Radiator Mounts, Update—EPA10 20-72Freightliner
Service BulletinFLA COEFLB COEFLD ConventionalBusiness ClassFLC 112 Conventional
Century Class ConventionalArgosy COECargoColumbia
> CoronadoBusiness Class M2Cascadia108SD/114SD
Freightliner Service Bulletin, December 2012 Page 5
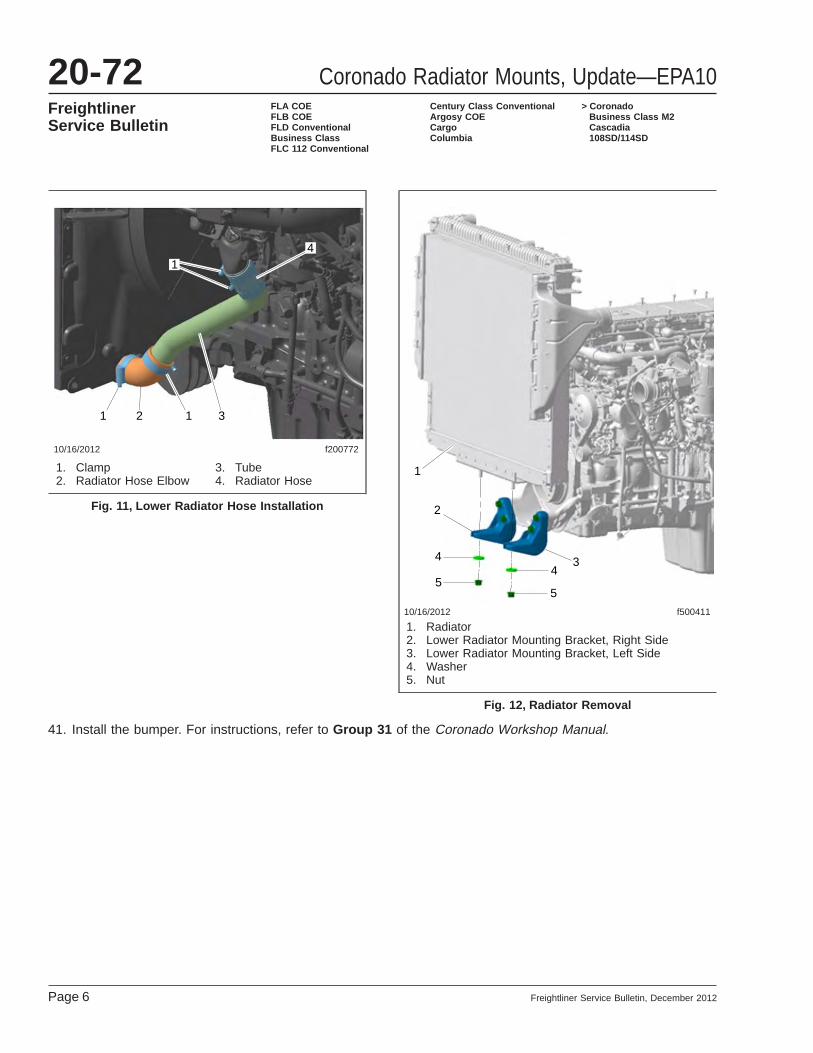
41. Install the bumper. For instructions, refer to Group 31 of the Coronado Workshop Manual.
10/16/2012 f200772
14
21 1 3
1. Clamp2. Radiator Hose Elbow
3. Tube4. Radiator Hose
Fig. 11, Lower Radiator Hose Installation
10/16/2012 f500411
1
2
344
55
1. Radiator2. Lower Radiator Mounting Bracket, Right Side3. Lower Radiator Mounting Bracket, Left Side4. Washer5. Nut
Fig. 12, Radiator Removal
Coronado Radiator Mounts, Update—EPA1020-72FreightlinerService Bulletin
FLA COEFLB COEFLD ConventionalBusiness ClassFLC 112 Conventional
Century Class ConventionalArgosy COECargoColumbia
> CoronadoBusiness Class M2Cascadia108SD/114SD
Page 6 Freightliner Service Bulletin, December 2012

10/16/2012 f500412
1 2
3
1. Fastener2. Lower Radiator Mounting Bracket, Right Side3. Lower Radiator Mounting Bracket, Left Side
Fig. 13, Lower Isolated Radiator Mounting BracketInstallation
Coronado Radiator Mounts, Update—EPA10 20-72Freightliner
Service BulletinFLA COEFLB COEFLD ConventionalBusiness ClassFLC 112 Conventional
Century Class ConventionalArgosy COECargoColumbia
> CoronadoBusiness Class M2Cascadia108SD/114SD
Freightliner Service Bulletin, December 2012 Page 7
08/31/2012 f500401a
1
3
35
6
2
4
1. Radiator2. Upper Isolator3. Lower Radiator
Mount
4. Lower Isolator5. Washer6. Nut
Fig. 14, Radiator Installation
10/08/2012 f500407
1
2
3
4
44
5 5
5
321
67
7
7
7
8 8
9
1. Strut Rod, RH2. Strut Rod, RH Bias3. Strut Rod, LH4. Capscrew5. Washer
6. Bolt7. Washer8. Nut9. Bolt
Fig. 15, Isolated Radiator Strut Rod Installation
Coronado Radiator Mounts, Update—EPA1020-72FreightlinerService Bulletin
FLA COEFLB COEFLD ConventionalBusiness ClassFLC 112 Conventional
Century Class ConventionalArgosy COECargoColumbia
> CoronadoBusiness Class M2Cascadia108SD/114SD
Page 8 Freightliner Service Bulletin, December 2012
PartsParts are available through the PDC. See Table 1 for required changeover parts for the vehicle being serviced..
Coronado - AF 1700 Radiator, Required PartsPart DD13 DD15 ISX Quantity
Radiator 05-30350-003 05-30350-003 05-30350-002 1Upper Support (Left) A05-30370-000 A05-30303-000 A05-30373-000 1
Upper Support (Right) A05-30371-000 A05-30304-000 A05-30374-000 1Upper Support (Bias) A05-30372-000 A05-30305-000 A05-30375-000 1Lower Support (Left) 05-30368-000 05-30368-000 05-30368-000 1
Lower Support (Right) 05-30368-001 05-30368-001 05-30368-001 1Fan KYS 010024426 KYS 010024426 KYS 010024426 1
Isolators (kit) BCD 27463 14 BCD 27463 14 BCD 27463 14 2Screw-Cap,Hex,1/2-13,GR8,ZNDI 23-11751-250 23-11751-250 23-11751-250 1Screw-Cap,Hex,1/2-13,GR8,ZN 23-11751-400 23-11751-400 23-11751-400 1Nut-Hex,PT,1/2-13,C,ZN/AL,.448 23-13833-108 23-13833-108 23-13833-108 2
Washer-Hardened,Steel, .66X2.75" 01-20963-000 01-20963-000 01-20963-000 2
Table 1, Coronado - AF 1700 Radiator, Required Parts
PartsPro Global AnnotationIt is highly recommended that a Global Annotation regarding this modification be entered in PartsPro. Globalannotations give users a way to record and check after-factory installations and modifications for a particularvehicle. It is connected to a specific VIN, and is visible to anyone who views that serial number in PartsPro.Create and view Global Annotation as follows.
1. In PartsPro, enter the serial number (the last six characters of the VIN) in the "Vehicle" tab and press"Enter," or click the "Retrieve Design Group" button.
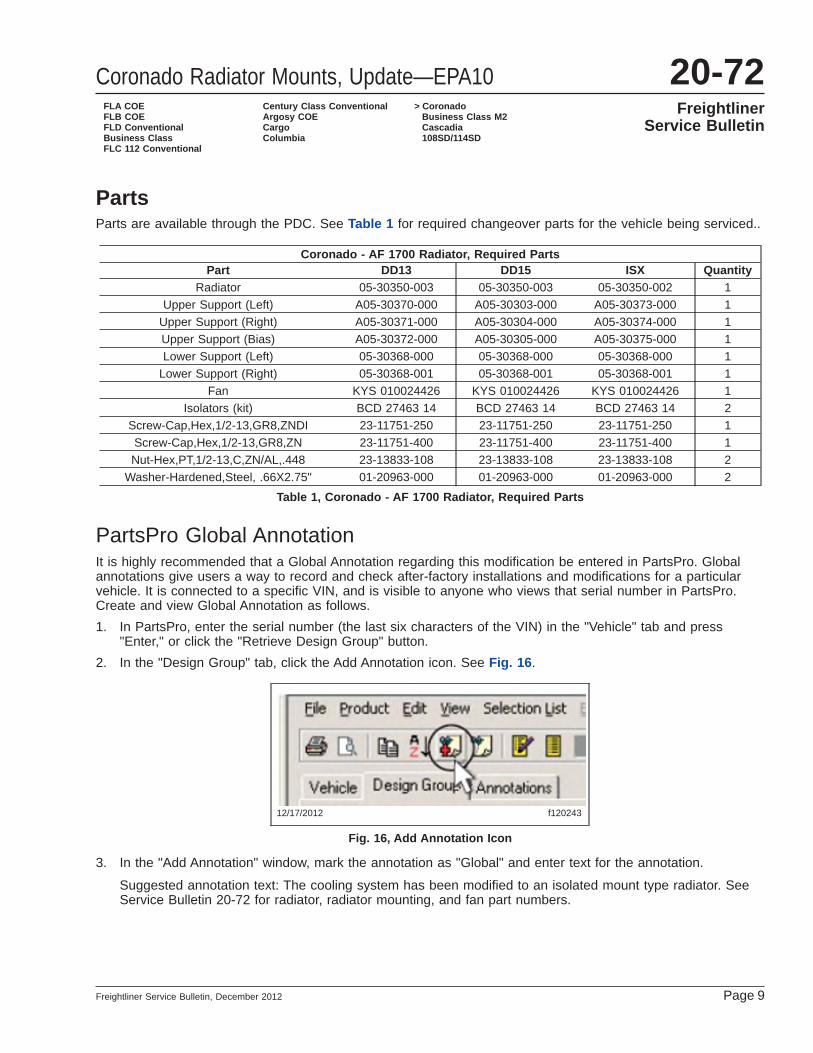
2. In the "Design Group" tab, click the Add Annotation icon. See Fig. 16.
3. In the "Add Annotation" window, mark the annotation as "Global" and enter text for the annotation.
Suggested annotation text: The cooling system has been modified to an isolated mount type radiator. SeeService Bulletin 20-72 for radiator, radiator mounting, and fan part numbers.
12/17/2012 f120243
Fig. 16, Add Annotation Icon
Coronado Radiator Mounts, Update—EPA10 20-72Freightliner
Service BulletinFLA COEFLB COEFLD ConventionalBusiness ClassFLC 112 Conventional
Century Class ConventionalArgosy COECargoColumbia
> CoronadoBusiness Class M2Cascadia108SD/114SD
Freightliner Service Bulletin, December 2012 Page 9
4. Click the "OK" button to submit.
Daimler Trucks North America will review the content for publication.
For additional information, click the "Help" button or Help → Contents in the top menu bar, and view the"Annotations" topic in PartsPro help, or refer to Freightliner or Western Star Parts Technical Bulletin: 00-009for instructions.
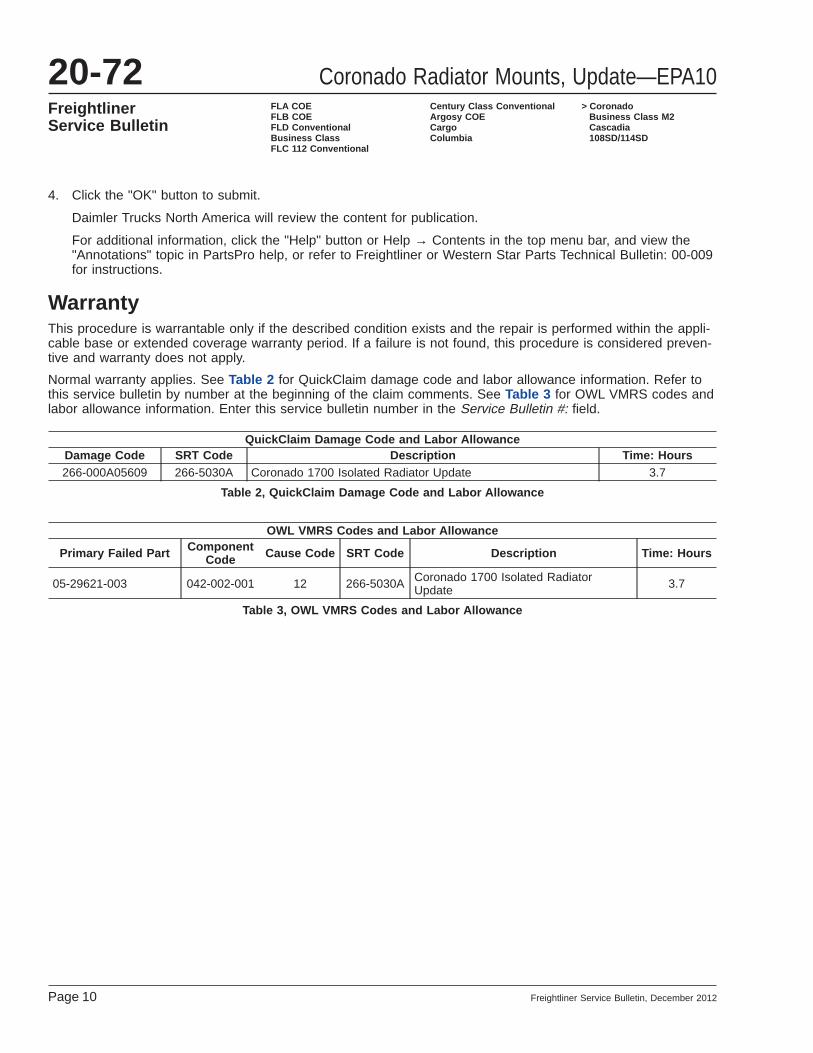
WarrantyThis procedure is warrantable only if the described condition exists and the repair is performed within the appli-cable base or extended coverage warranty period. If a failure is not found, this procedure is considered preven-tive and warranty does not apply.
Normal warranty applies. See Table 2 for QuickClaim damage code and labor allowance information. Refer tothis service bulletin by number at the beginning of the claim comments. See Table 3 for OWL VMRS codes andlabor allowance information. Enter this service bulletin number in the Service Bulletin #: field.
QuickClaim Damage Code and Labor AllowanceDamage Code SRT Code Description Time: Hours266-000A05609 266-5030A Coronado 1700 Isolated Radiator Update 3.7
Table 2, QuickClaim Damage Code and Labor Allowance
OWL VMRS Codes and Labor Allowance
Primary Failed Part ComponentCode Cause Code SRT Code Description Time: Hours
05-29621-003 042-002-001 12 266-5030A Coronado 1700 Isolated RadiatorUpdate 3.7
Table 3, OWL VMRS Codes and Labor Allowance
Coronado Radiator Mounts, Update—EPA1020-72FreightlinerService Bulletin
FLA COEFLB COEFLD ConventionalBusiness ClassFLC 112 Conventional
Century Class ConventionalArgosy COECargoColumbia
> CoronadoBusiness Class M2Cascadia108SD/114SD
Page 10 Freightliner Service Bulletin, December 2012