corporate online. - westpachelp.westpac.com.au/help/content/col/documents/pdfs/olr... ·...
TRANSCRIPT

Corporate
Online. Using Receipts
Effective as at April 2015
Westpac Corporate Online is an internet-based electronic platform, providing a single point
of entry to a suite of online transactional services specifically designed for major Australian,
New Zealand and international corporations and government bodies.
By working closely with customers like you, Westpac has developed Corporate Online as a
portal environment that delivers greater control, productivity and flexibility to your business.
Control how your organisation uses Corporate Online, including which applications and
features staff members can use and which accounts and services they have access to.
Increase productivity by getting straight to work with Corporate Online’s easy-to-use
interface and simple workflows.
Use Corporate Online’s flexibility to create a setup that matches your business needs and can
grow and change as your business does.
Corporate Online employs a “best of breed” security model, using a range of protective
technologies to guard your organisation’s information and to assist you in better managing
the risks of fraudulent activity. These include 128bit encryption and SecurID® Tokens
For detailed information on Corporate Online’s extensive security features, please ask your
Westpac relationship manager.
This user guide forms part of your Agreement with us and provides information for your use
of this product within Westpac Corporate Online.
Certain words used throughout the user guide may have a defined meaning in the Glossary.
Copyright © 2015 Westpac Banking Corporation ABN 33 007 457 141 AFSL and
Australian credit licence 233714.


This guide describes how to use the Receipts functionality of Westpac Corporate Online.
It is one of a suite of guides that cover the wide range of applications and features that are
available through Corporate Online.
Where can I find a copy of this guide?
The most up-to-date versions of this and other Corporate Online user guides can be found on
the User guides screen of Corporate Online.
Click on a link to display the user guides for that application
If you must print this document, always download the PDF from Corporate Online then
print from that: don’t print a saved PDF or photocopy a paper copy as it may not be current.
What else should I read?
As well as reading this guide, we strongly recommend you read the Corporate Online User
Guide, which covers topics such as logging on and security.
What if I’m in a hurry?
If you need information in a hurry, you might like to start with the following sections:
Quick Tour: Main Receipts Screens starting on page 7
Viewing Voucher Images starting on page 10
There is an index and glossary at the back of the guide.

Receipts provides the access to the large volumes of transaction information that are
consolidated for convenience into single statement lines by services such as:
EFTPoS (Electronic Funds Transfer at Point of Sale), which provides terminal by
terminal EFTPoS reporting in a single receipt file
RECall, which provides receivables information from multiple receivables products
(including POST billpay, Remittance Processing, BPAY, ERPACS Over the Counter
(OTC), PNP Net and PNP Phone) in a single receipt file
INDISH (Inward dishonours), which provides information about dishonoured cheques in
a single receipt file
DERPS (Direct Entry Returns Processing Service), which provides information on
individual Direct Entry transactions returned to the Bank in a single file.
NZRRP (New Zealand Receivables remittance processing), which provides information
on inward cheque payments in a single file which is available to export only.
For example, suppose you use the BPAY and POST billpay products to collect payments
from your customers, and choose to access the receivables information using a RECall
service via Corporate Online.
After each receivables cycle (usually daily), one transaction line is posted to your bank
statement. You can view this transaction via Corporate Online Accounts. The large volume
of individual customer transactions that net together to make up that single line on your
statement are available from Corporate Online Receipts for viewing or export.
AUD TRADING ACCOUNT STATEMENT
DATE TRANSACTION DEBIT CREDIT BALANCE
15Oct DEPOSIT 129 10.00 60100.34
15Oct RECALL 12345 ER654321 10020.06 70120.40
15Oct WITHDRAWAL 673 30.00 70090.40
15Oct WITHDRAWAL 674 40.00 70050.40
15Oct DEPOSIT 131 50.00 70090.40 RECall FILE ID = ER654321
DATE Client ref Receipt# Origin Amount
15Oct 111123456789 CBA674 IB 40.00
15Oct 122223456789 NAB131 IB 50.00
15Oct 177723456789 AP4445 AP 40.00
15Oct 155523456789 WBC321 IB 50.00
etc… … … … …
Total 10020.06
Corporate Online allows you to merge multiple receipt files from the same service into a
single file which you export out of Corporate Online and then process using your own
systems. You can also create your own export in CSV format.

The Receipts functionality is broken down into a number of features to allow you to manage
which tasks can be performed by which users in your organisation (according to their job
role). The features are:
Feature (as allocated in
Administration)
which allows you to…
View and print receipt
information View transaction information for receipts
— see The Receipts screen on page 7.
Create scheduled reports and view them
— see Reporting on page 23.
Voucher images View voucher images for paper-based transactions
— see Viewing Voucher Images on page 10
Export Export data from receipts
—see Exporting Receipts on page 14
Create export schedules
—see Export Schedules on page 19
Merge export files Merge data from more than one receipt into a single file
— see Exporting Receipts on page 14
These features are allocated to users by your Corporate Online administrators.
Receipt information remains available in Corporate Online for 24 calendar monthsVoucher
images are available for as long as the related transactions are available.
Reports generated by scheduled reports and exports generated under export schedules are
available for the retention period specified when the relevant schedule was created.
Voucher image fees are charged per voucher. Before a fee is incurred, Corporate Online
displays a warning and asks you to accept the fee. There is no charge for viewing a voucher
a second or subsequent time within seven calendar days of an initial fee-incurring view.
Fees are billed to the office in which the relevant activity occurred.
For more information on fees and charges, refer to the Corporate Online Product Brochure
which is published on the Westpac internet site, or talk to your Westpac relationship
manager.

This section gives you a quick tour of the main screens you will encounter when using the
Receipts features.
From the Receipts menu, select View > Receipts.
Corporate Online displays the Receipts—List of available receipts screen, which shows
receipts for the currently selected service type. For example:
For more information on using the features shown, see:
Searching for Receipts transactions on page 30
Filtering transactions on a list screen on page 28
Printing with Print preview in Receipts on page 33
To use this screen you need access to the Receipts > View and print receipt information
feature, an office, and any service IDs you want to view.
Use the Office and Service type drop-down lists and the Calendar to filter the list displayed.
Click on a Service ID link to view the transactions for that service
After changing the filter, click to refresh the screen.
View the receipt totals
Click to search for a transaction
Click to preview then print
Click the column header to sort receipts by that value

From the Receipts menu, select View > Receipts,
then click on a Service ID link. For example
Corporate Online displays the Receipts—Transaction list screen, which shows all
transactions for the current filter criteria. For example:
For more information on using the features shown, see:
Searching for Receipts transactions on page 30
Filtering transactions on a list screen on page 28
Printing with Print preview on page 33
Viewing Voucher Images on page 10
To use this screen you need access to the Receipts > View and print receipt information
feature, an office, and at least one service ID.
To view vouchers you need access to the Receipts > Voucher imaging feature.
Click the column header to sort transactions by that value
Use the Office and Service type lists and the Calendar to filter the list displayed.
After changing the filter, click to refresh the screen.
Click to preview then print.
Click to search for a transaction.
Click on a client reference link to view the transaction details.
Use the navigation links to browse transactions for the current filter.

To view or browse receipts, use the Receipts screen (from the Receipts menu, select
View > Receipts).
For more information, see The Receipts screen on page 7 and The Receipts—
Transaction list screen on page 8
The Receipts screens include links to more information. Use these links to navigate to
screens containing more detailed information, then use a button to navigate back.
For example, clicking on a Service ID to take you to a list of transactions…
and clicking on a client reference takes you specific transaction information…
Remember that you cannot use your internet browser’s back button to return to the screen on
which you clicked such a link. Always use Corporate Online’s navigation buttons.
For example, there may be buttons that take you to a specific screen…
or back to the previous screen…
To print information, use the Print preview button that appears on most screens.
For more information, see Printing with Print preview in Receipts on page 33.
To search for a transaction, use the Search button that appears on most screens.
For more information, Searching for Receipts transactions on page 30.

Corporate Online’s Voucher imaging feature allows you to view and print an image of the
paper vouchers associated with transactions. Both sides of the voucher are displayed.
Viewing voucher images incurs a fee. Corporate Online asks you to confirm that you want
to perform an action that incurs a fee.
The vouchers are presented for viewing as PDFs, which can be printed, saved, and emailed.
Use this procedure to view the voucher image(s) associated with a RECall transaction.
For RECall transactions, vouchers are available for paper based remittances. This includes
ERPACS Over the Counter remittances and Lock box remittances.
To perform this procedure you need access to both the Receipts > View and print receipt
information and Receipts > Voucher imaging features, an office, and at least one RECall
service.
Start from anywhere in the Receipts application:
1. From the left-hand navigation menu, select Receipts > View > Receipts.
Corporate Online displays the Receipts—List of available receipts screen.
Hint: Use filters to find the relevant receipt
2. Click the Service ID link for the receipt that contains the transaction you are investigating.
For example
Corporate Online displays the View receipts—Transaction list screen.
3. Find the transaction you want to view voucher images for.
For information on searching, see Searching for Receipts transactions on page 30.
4. Click on the Client reference link for the relevant transaction. For example:

Corporate Online displays the View receipts—Receipts transaction information screen.
The bottom of this screen shows a list of the detailed transactions that made up the
remittance. Transactions with links have vouchers available. For example:
5. Click the Account details link. For example
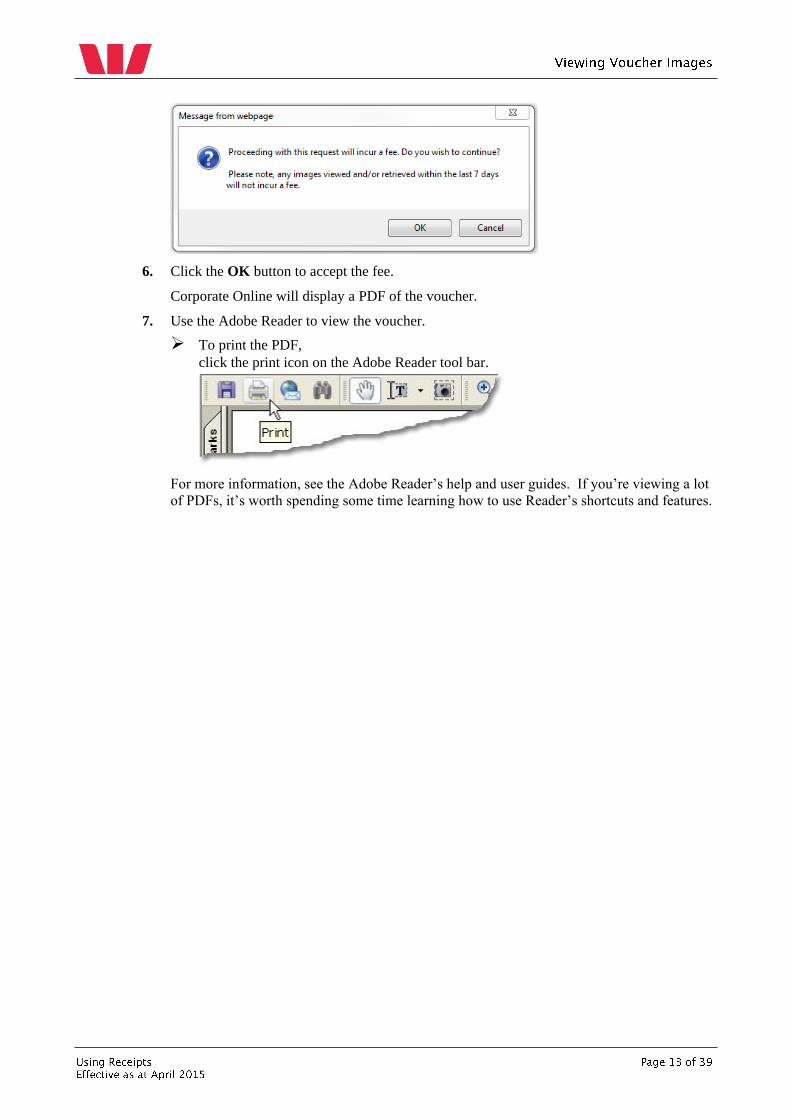
Corporate Online displays a fee warning.
6. Click the OK button to accept the fee.
Corporate Online will display a PDF of the voucher.
7. Use the Adobe Reader to view the voucher.
To print the PDF,
click the print icon on the Adobe Reader tool bar.
For more information, see the Adobe Reader’s help and user guides. If you’re viewing a lot
of PDFs, it’s worth spending some time learning how to use Reader’s shortcuts and features.

Use this procedure to view the voucher image(s) associated with an Inward dishonour
transaction.
For Inward dishonours, vouchers are available for cheques you have banked to your account
what have subsequently been dishonoured by the drawing Bank.
To perform this procedure you need access to both the Receipts > View and print receipt
information and Receipts > Voucher imaging features, an office, and at least one Inward
dishonour service.
Start from anywhere in the Receipts application:
1. From the left-hand navigation menu, select Receipts > View > Receipts.
Corporate Online displays the Receipts—List of available receipts screen.
Hint: Use filters to find the relevant receipt
2. Click the Service ID link for the receipt that contains the transaction you are investigating.
For example
Corporate Online displays the View receipts—Transaction list screen.
3. Find the transaction you want to view voucher images for.
For information on searching, see Searching for Receipts transactions on page 30.
4. Click on the Client reference link for the relevant transaction. For example:
Corporate Online displays the View receipts—Receipts transaction information screen.
5. Click the View transaction image link. For example
Corporate Online displays a fee warning.
6. Click the OK button to accept the fee.
Corporate Online will display a PDF of the voucher.
7. Use the Adobe Reader to view the voucher.
To print the PDF,
click the print icon on the Adobe Reader tool bar.
For more information, see the Adobe Reader’s help and user guides. If you’re viewing a lot
of PDFs, it’s worth spending some time learning how to use Reader’s shortcuts and features.

Export allows you to export one or more receipt files out of Corporate Online and onto your
network or local drive.
Once the data leaves Corporate Online, you will be responsible for its safe keeping and data
integrity.
For each receipts service, one receipt file is generated each receivables cycle (usually daily).
The reports export screen provides summary information about each receipt file.
Date file was created by the Bank
Number of transactions in the file
The net value of transactions in the file
Service ID shows the type of service and the ID…
and a unique number to identify this particular receipt file
status tells you if you can export or if already have
Each receipt file has a status to help you keep track of your exports: These are:
Not ready for export
Ready for export
Exported.
You can export any particular receipt file more than once, but Corporate Online will ask you
to confirm you want to re-export before it allows you to do so.
Each receipts service type (e.g. RECall, DERPS, INDISH, EFTPOS, NZRRP) has its own
export file format. Technical specifications for each format are available from your Westpac
relationship manager.
In addition to these standard Receipts exports, you can create your own CSV format exports
(excluding NZRRP and Commercial Cards). See Export Schedules starting on page 19

Use this procedure to export receipt data from Corporate Online and save it onto your
computer or network. Exports may be generated from the following sources:
a Receipts service
an export schedule
To perform this procedure you need access to the Receipts > Export feature, an office, and at
least one service ID.
Start from anywhere in the Receipts application.
1. From the left-hand navigation menu, select Receipts > Export.
Corporate Online displays the Export—List of export files screen. For example:
2. Select criteria for the receipts to display, then click the Update list button.
Corporate Online displays any receipts that match the selection criteria.
3. Select the receipts you want to export. For example:
then click the Export button

If you selected only one receipt, Corporate Online displays the Download being
processed screen.
Skip down to step 5.
If you selected more than one receipt, Corporate Online displays the Export – Selected
receipts screen.
4. Review the receipts selected, then click the Export selected receipts button.
If you have selected any files with a status of Exported, Corporate Online displays a
warning. For example:
Click the OK button to proceed.

5. Corporate Online displays the Download being processed screen.
Shortly after this, Corporate Online displays a File download dialog. Wait for it to appear.
For example:
6. Click the Save button on the File Download dialog.
Corporate Online displays a Save As dialog. For example:
7. Navigate to the appropriate location on your network or local drive, alter the file name if
appropriate (the one offered is unique), then click the Save button.

Corporate Online exports the data to the specified location. This may take some time,
depending on your internet bandwidth and the size of the file. You can perform other tasks
while the file is downloading.
This dialog closes when the download is complete.
8. Meanwhile, underneath these dialogs Corporate Online is still displaying the Download
being processed message. For example:
When you have initiated the download (steps 6 and 7),
click the OK button on the Corporate Online Export screen.41
Corporate Online updates the status of the receipt to “Exported”. Corporate Online allows
you to re-export data you have already exported, but it will warn you at the time. Standard
exports remain available for export for up to 100 calendar days. Exports generated under
export schedules remain available for the retention period specified when the schedule was
created.

Export schedules allow you to schedule regular data exports in CSV format, which you can
download from Corporate Online to a local or network drive.
Unlike standard exports, you get to determine which Receipts fields are included in an
export schedule. For example, you may need a RECall export that includes only the date,
client reference and amount, for loading into an invoicing system.
Once a schedule is created, Corporate Online generates data for it overnight. This export
data is available for download the next day from 7.00am (AEST). Corporate Online runs
Receipts export schedules only if there is data to export.
After Corporate Online has generated data and made it ready for export, you can download it
to a local or network drive (see Procedure: Exporting receipt data on page 15). This is
the same procedure you use for exporting standard Receipts data.
Export data remains available for export for the retention period selected when the schedule
is created (from 7 to 100 calendar days).
Use this procedure to create an export schedule under which Corporate Online will generate
regular exports of data which you can then download from the Export screen.
To perform this procedure you need access to the Receipts > Export feature, an office, and
those Receipts services you want to include in the export schedule.
Start from anywhere in the Receipts application:
1. From the left-hand navigation menu, select Receipts > Manage > Export schedules.
Corporate Online displays the Manage export schedules screen.
2. Select the office to create the schedule in.
3. Click the Create button (at the bottom of the screen).
Corporate Online displays the Manage export schedules—Export schedule details screen.
4. Enter the export schedule details…
Field Notes
Office You must select the office before you click the Create button!
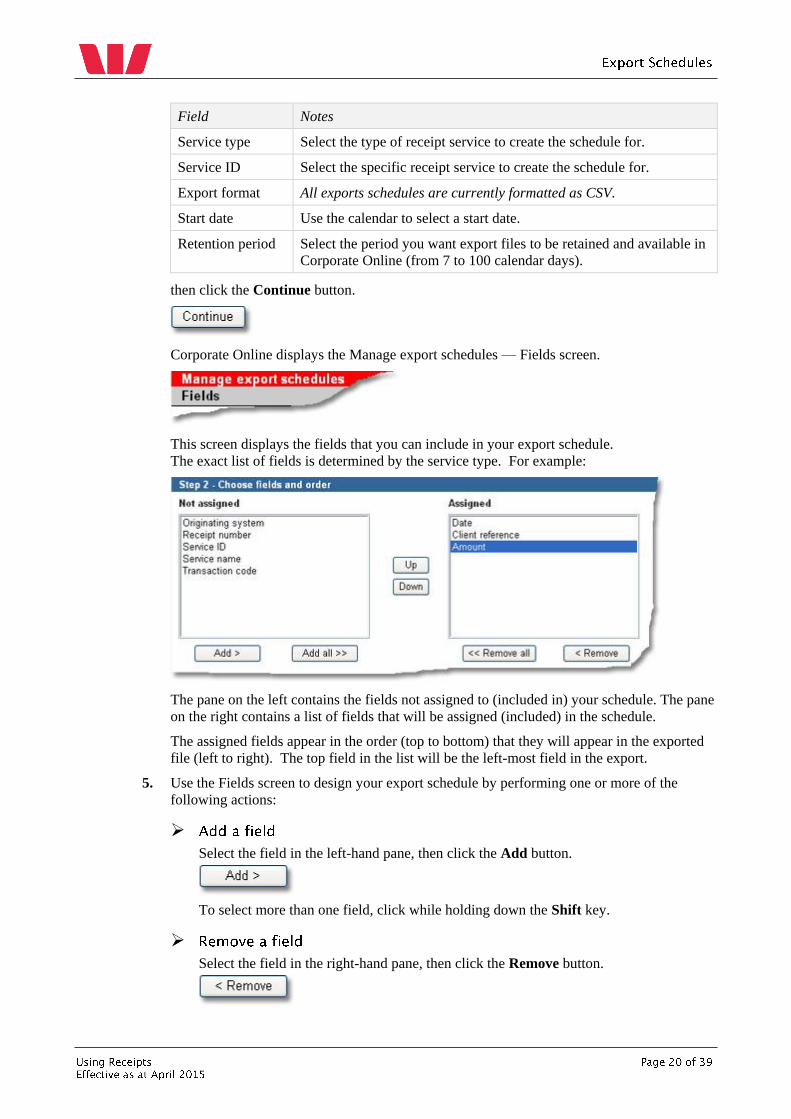
Field Notes
Service type Select the type of receipt service to create the schedule for.
Service ID Select the specific receipt service to create the schedule for.
Export format All exports schedules are currently formatted as CSV.
Start date Use the calendar to select a start date.
Retention period Select the period you want export files to be retained and available in
Corporate Online (from 7 to 100 calendar days).
then click the Continue button.
Corporate Online displays the Manage export schedules — Fields screen.
This screen displays the fields that you can include in your export schedule.
The exact list of fields is determined by the service type. For example:
The pane on the left contains the fields not assigned to (included in) your schedule. The pane
on the right contains a list of fields that will be assigned (included) in the schedule.
The assigned fields appear in the order (top to bottom) that they will appear in the exported
file (left to right). The top field in the list will be the left-most field in the export.
5. Use the Fields screen to design your export schedule by performing one or more of the
following actions:
Select the field in the left-hand pane, then click the Add button.
To select more than one field, click while holding down the Shift key.
Select the field in the right-hand pane, then click the Remove button.

Select a field in the right-hand pane, then click the Up or Down buttons to move it to
the required position.
When you have designed your export schedule, click the Submit button.
Corporate Online saves your new export schedule.
Corporate Online generates the first export of data under the new schedule overnight:
data will be available to download the following morning (See Procedure: Exporting
receipt data on page 15).
Use this procedure to amend an export schedule. Amending an export schedule does NOT
amend any export data already available within Corporate Online.
To perform this procedure you need access to the Receipts > Export, an office, and the
Receipts services to include in the schedule.
1. From the left-hand navigation menu, select Receipts > Manage > Export schedules.
Corporate Online displays the Manage export schedules screen.
2. Select the office.
3. Select the export schedule to amend…
then click the Amend button.
Corporate Online displays the Manage export schedules—Export schedule details screen.
4. Amend the schedule details (as per step 4 in the create procedure above),
then click the Continue button.

Corporate Online displays the Manage export schedules — Fields screen.
5. Amend the field list (as per step 5 in the create procedure above),
then click the Submit button.
Corporate Online saves your new export schedule.
Corporate Online generates the first export under the amended schedule overnight:
data will be available to download the following morning (See Procedure: Exporting
receipt data on page 15).
Use this procedure to delete an export schedule. Corporate Online does NOT delete the
associated exports: these remain available for their retention period.
To perform this procedure you need access to the Receipts > Export, an office, and the
Receipts services to include in the schedule.
1. From the left-hand navigation menu, select Receipts > Manage > Export schedules.
Corporate Online displays the Manage export schedules screen.
2. Select the office.
3. Select the export schedule to delete…
then click the Delete button.
Corporate Online displays the Manage export schedules—Export schedule details screen.
4. Confirm this is the export schedule you want to delete, then click the Delete now button.
Corporate Online deletes the export schedule.

Scheduled reports allows you to schedule regular reports, which Corporate Online delivers
as PDF (Adobe Portable Document Format) files for printing, saving, or emailing.
Once a scheduled report is created, Corporate Online generates a PDF report for it each time
there is data available (usually at the end of each business day). This is done overnight and
the reports are available the next day from 7.00am (AEST).
The PDF reports generated are available from the Viewing scheduled reports screen (See
Procedure: Viewing reports on page 25). The PDF reports remain on the view screen for
the retention period selected for the schedule (from 7 to 100 calendar days).
Once a PDF leaves Corporate Online, you are responsible for its safe keeping.
What reports are available?
The following table summarises the reports available in Receipts:
Report What’s in the report?
Receipt list Details all receipts available for the day for the office selected,
including: service ID, service name, date, item count, and total
amount.
Direct Entry returns
transaction list
Details of all transactions in the DERPS receipt file, including:
date, client reference, original payment date, transaction code,
remitter name, lodgement reference, source BSB and account,
original user ID, return code and item amount.
EFTPoS reporting
transaction list
Details of all transactions in the EFTPoS receipt file,
including: date, client reference, transaction date, card type,
transaction number, authorisation number, transaction type,
entry method, and amount.
Inward dishonours
transaction list
Details of all transactions in the INDISH receipt file,
including: date, client reference, deposit details (date and serial
number), and cheque details (serial number, BSB, account,
bank, reason, and amount).
RECall transaction list Details of all transactions in the RECall receipt file, including:
date, client reference, originating system, receipt number,
transaction code and item amount.
A report schedule produces one transaction list report PDF for each receipt file.
Use this procedure to create a scheduled report that Corporate Online will use to generate
regular PDF reports which you can view and download (see Procedure: Viewing reports
on page 25)
To perform this procedure you need access to the Receipts > View and print receipt
information feature, an office, and those service IDs you want to include in the scheduled
report.

Start from anywhere in the Receipts application:
1. From the left-hand navigation menu, select Receipts > Manage > Scheduled reports.
Corporate Online displays the Manage scheduled reports screen.
2. Select the office you want to create the report in.
3. Click the Create button (at the bottom of the screen).
Corporate Online displays the Schedule details screen.
4. Enter the report details…
Field Notes
Office You must select the office before you click the Create button!
Description Enter a meaningful name for this report.
This is the name that will appear on the View screen for the PDFs
generated under this schedule.
Report Select the report to create for this office.
Corporate Online takes a moment to update the screen.
Service ID Select the service ID to report on.
Report retention
period
Select the period you want the reports generated under this schedule
to be retained and available in Corporate Online.
Choose sort
order…
Select the details of how you want the data in the report to be sorted.
The options shown depend on the report selected above.
then click the Submit button.
Corporate Online saves your new scheduled report.
Corporate Online generates the first report under the schedule overnight:
the PDF will be available to view and download the following morning
(See Procedure: Viewing reports on page 25).

Use this procedure to view or download a PDF report generated under a schedule.
To perform this procedure you need access to the Receipts > View and print receipt
information feature, an office, and the service IDs included in the reports you want to view.
Start from anywhere in the Receipts application:
1. From the left-hand navigation menu, select Receipts > View > Scheduled reports.
2. If required, set search criteria for the list of reports to display,
then click the Update list button.
Corporate Online displays a list of reports that match the search criteria.
3. Click on a report name link.
Corporate Online displays the report in a new browser window.
4. Use the Adobe Reader functions to perform one or more of the following actions:
To print the PDF,
click the print icon on the Adobe Reader tool bar.

To save the PDF,
click the save icon on the Adobe Reader tool bar
For more information, see the Adobe Reader’s help and user guides. If you’re viewing a lot
of PDFs, it’s worth spending some time learning how to use Reader’s shortcuts and features.
Use this procedure to amend a scheduled report’s description, retention period and sort
order. Report type and service ID cannot be amended.
To perform this procedure you need access to the Receipts > View and print receipt
information feature, an office, and the service IDs included in the report you want to amend.
Start from anywhere in the Receipts application:
1. From the left-hand navigation menu, select Receipts > Manage > Scheduled reports.
Corporate Online displays the Manage scheduled reports screen.
2. Select the office.
3. Select the scheduled report you want to amend…
then Click the Amend button.
Corporate Online displays the Schedule details screen.
4. Amend the report details (as per step 4 in the create procedure),
then click the Submit button.
Corporate Online amends the schedule.
Corporate Online generates the first report under the amended schedule overnight:
the PDF will be available to view and download the following morning (See
Procedure: Viewing reports on page 25).

Use this procedure to delete a scheduled report. Corporate Online does NOT delete the
PDF reports generated under the schedule: these remain available for their retention period.
To perform this procedure you need access to the Receipts > View and print receipt
information feature, an office, and the service IDs included in the scheduled report you want
to delete.
Start from anywhere in the Receipts application:
1. From the left-hand navigation menu, select Receipts > Manage > Scheduled reports.
Corporate Online displays the Manage scheduled reports screen.
2. Select the office.
3. Select the scheduled report you want to delete…
then Click the Delete button.
Corporate Online displays the Manage export schedules—Export schedule details screen.
4. Confirm this is the scheduled report you want to delete…
then click the Delete now button.
Corporate Online deletes the scheduled report.

This section introduces some of the basic skills that apply to many of the screens you will
encounter when using the Receipts features.
These basic skills can be used anywhere the feature (e.g. the Print preview button) appears.
They may not be referred to specifically in the procedures.
Many of the screens in Corporate Online display a list of items (usually transactions).
For example:
The filter criteria determine…
what is displayed in the list.
To filter the list displayed:
1. Select criteria from a number of fields at the top of the screen. For example:
2. Click the Update list button to apply the new filter criteria.
Corporate Online re-displays the screen. For example:

The only way to enter a date into most Corporate Online screens is by using the pop-up
calendar. Using the calendar ensures you won’t enter dates that are inappropriate for the
context of the screen, e.g. by entering payment value dates for weekends, searching for
transactions too far in the past, etc.
To use the calendar to enter a date:
1. Click on the Calendar icon to the right of the date you want to alter. For example:
Corporate Online displays a calendar pop-up window. For example:
The colour of the individual days on the calendar tells you whether they are appropriate for
the context of the screen you are working on. The calendar takes into account how far in the
past or future a date can be and most holiday restrictions (except for international payments).
2. If required, change the month by using the arrows or the drop-down box at the top of the
pop-up window. For example:
3. Select a valid date by clicking on a black date. For example:
Corporate Online now displays the date selected. For example:

The view screen in Receipts includes a search button to allow you to search for one
transaction or a group of transactions.
To search for transactions:
1. Click the Search button (at the bottom of the screen).
Corporate Online displays the Transaction list search screen. For example:
2. Select the office, service type, and service ID to search.
Field Notes
Office Select the office that contains the service ID you want to search from the
drop-down list.
Service Type Select the service type from the drop-down list.
Service ID Select the service ID to search from the drop-down list.
Corporate Online displays additional search criteria depending on the service type selected.
3. Enter additional search criteria (as little or as much as you need – they’re all optional)…
Criteria
heading
Notes on fields
Date Use the calendars ( ) to set a date range.
Service search
details
(depends on
the service
type selected
in step 2)
DERPS Client reference Enter the client reference number
supplied in the direct entry file (e.g.
client name)
Lodgement
reference
Enter the lodgement reference from
the direct entry file
Transaction code Enter a valid payments transaction
code
Return code Enter a Direct Entry return code

Criteria
heading
Notes on fields
EFTPoS Client reference Enter the card number used to make
the transaction
Transaction type Select a transaction type from the
drop-down list
Card type Select the card type from the drop-
down list
INDISH Client reference Enter the client reference (e.g.
cheque drawer)
Deposit serial Enter the serial number from the
related deposit
Reason code Enter an inward dishonour reason
code
RECall Client reference Enter the client reference number
you supplied to your bill payer
Receipt number Enter the receipt number issued by
the bill collector. This will depend
on the receivables service.
Originating system Select the originating system from
the drop down list.
Amount Enter either a specific amount to search or a range of amounts.
Valid reason codes are listed in the online help.
4. Click the Submit button.
Corporate Online searches the receipts for the Service ID selected, based on the criteria and
displays them on the Transaction list screen. For example:
5. Perform one of the following actions:
To view a particular transaction’s details,
click a Client reference link. For example:
Corporate Online displays the Receipts transaction information screen.
Click the Back button to return to the search results screen.
To clear the search criteria,
click the Clear button.

Corporate Online clears the search criteria, then redisplays the screen and shows all
transactions for the current list filter (office, service type, service id and dates).
When Corporate Online displays lists of things (e.g. transactions), it does so in blocks of up
to 20 items. At the bottom of such list is a grey band containing the links that allow you to
navigate through the items in the list. For example:
If a link cannot be used, it is greyed out. For example, if Corporate Online is displaying the
first 20 transactions in the list, “Start of list” and “Previous 20” are greyed out.
If there are 20 or fewer transactions in the list, all the navigation links are greyed out.
To navigate the list:
1. Click on a “navigation” link. For example:
Corporate Online redisplays this screen with the selected part of the list.

Many of the screens in the Receipts application include a Print Preview button to allow you
to preview then print the details displayed on the screen.
To print:
1. Click the Print preview button.
Corporate Online pops up a print preview window. For example:
2. Click the Print this page button.
Your computer pops up a Print dialog. For example:
3. Make the appropriate printer selections and adjustments, then click the Print button.
Your computer should now print the previewed information.
4. Click the Close button.

Set preferences allow you to set the default values displayed by Corporate Online Receipts
to the screens, offices and services you use the most. This can save you time and hassle.
Each user can set their own preferences. Preferences must be set for each Corporate Online
application (e.g. Receipts, Accounts) individually.
Use this procedure to set your individual preferences for the Receipts application.
All users with access to Receipts can perform this procedure.
Start from anywhere in the Receipts application.
1. From the left-hand navigation menu, select Receipts > Set preferences.
Corporate Online displays the Set preferences –Receipts preferred settings screen.
2. Set your preferences by selecting them from the drop down lists displayed.
Heading Notes on fields
Select a Receipts screen from the drop down list.
Corporate Online will display this screen each time you
navigate to the Receipts application.
Select an Office and a Service type from the drop down
lists.
Corporate Online will use these preferences each time you
navigate to the Receipts screen.
Select an Office, Service type and Export format from the
drop down lists.
Corporate Online will use these preferences each time you
navigate to the Export screen.
3. Click the Submit button.
Corporate Online updates your preferences. This will not affect the preferences of any other
user or any of your preferences for other applications (e.g. Payments).

1. From the Receipts menu,
select View > Receipts.
2. To view a particular service ID,
click a Service ID link.
3. To view details of a transaction,
click a Client reference link.
The Receipts screen (p7)
1. From the Receipts menu,
select View > Receipts.
2. Click Search.
3. Enter search criteria.
4. Click Retrieve.
5. To view details of a transaction,
click a Client reference link.
Searching for Receipts transactions
(p30)
1. From the Receipts menu.
select Manage> Scheduled reports.
2. Select the office.
3. Click Create.
4. Enter the report details,
then click Submit.
Corporate Online starts generating
reports under the schedule overnight.
1. From the Receipts menu.
select View > Scheduled reports
2. Set a filter and click Update list.
3. Click on a report name.
Procedure: Viewing reports (p25)
1. From the Receipts menu.
select View > Receipts.
2. Click on a Service ID.
3. Click on the transaction.
(you may need to use search to find it)
4. Click the account details.
5. Accept the fee by clicking OK.
6. Use Adobe reader to view the voucher.
Procedure: Viewing a voucher image
for a RECall transaction (p10)
1. From the Receipts menu,
select Export.
2. Select one or more receipts to export
If you selected one receipt, click Export
Go to step 4.
If you selected several receipt, click
Export preview.
3. Click Export.
4. Corporate Online displays a Download
screen, then pops up a dialog.
5. Click Save on the File Download dialog
6. Click Save on the Save As dialog
Wait for the download to complete. 7. Click OK (on the download screen).
Exporting Receipts (p14)
1. From the Receipts menu.
select Manage> Export schedules.
2. Select the office.
3. Click Create.
4. Enter the export schedule details,
then click Continue.
5. Assign the fields to include,
then click Submit.
Corporate Online starts generating
exports under the schedule overnight.

The following terms are used in the Corporate Online Receipts user guides.
An application is a high level group of functionality offered by Corporate Online.
BPAY receivables are a product that allows bill payers to make bill payments via their own
financial institution. BPAY receivables information is accessible via the RECall service.
BSB and account number identify an Australian domiciled bank account. The BSB is a six
digit number that identifies the Bank, State and Branch (e.g. 032000). The account number
identifies the account. We always require both to correctly identify an account.
In Corporate Online, business day means any weekday (Monday to Friday) that is not a
public holiday in the jurisdiction(s) relevant to the payment type or service.
Please refer to the terms and conditions of the specific product or service you are using.
A Corporate Online administrator is a user within your organisation who has access to
Administration and can manage the assignment of applications, features, accounts, and
services to users and offices within your organisation.
CSV stands for comma separated values, a commonly used data format, especially for
importing data into spreadsheets.
DERPS stands for Direct Entry Returns Processing Service. A DERPS service provides
information on individual Direct Entry transactions returned to the Bank up to five banking
days after the Direct Entry (DE) file was processed in a single file. This information nets to
a single transaction on the relevant bank account statement. Corporate Online users can
access DERPS services via the Receipts application.
EFTPoS stands for Electronic Funds Transfer at Point of Sale. An EFTPoS service provides
terminal by terminal EFTPoS reporting in a single file. This information nets to a single
transaction on the relevant bank account statement. Corporate Online users can access
EFTPoS services via the Receipts application.
ERPACS Over the Counter (OTC) is a product that allows bill payers to make bill payments
at any Westpac branch or agency. ERPACS Over the Counter (OTC) information is
accessible via the RECall service.
A feature is a logical group of application functionality offered by Corporate Online.
A filter is something you apply to a long list to view only a subset of that list.

INDISH stands for INward DISHonours. An INDISH service provides information about
cheques that were dishonoured by the payee’s financial institution (e.g. due to insufficient
funds) in a single file. This information nets to a single transaction on the relevant bank
account statement. Corporate Online users can access INDISH services via the Receipts
application.
See Remittance Processing receivables.
NZRRP stands for New Zealand Receivables remittance processing. NZ Remittance
processing is a service where Westpac receives and processes your inward cheque payments
on your behalf and then sends you a data file of all transaction details at the end of the
processing day. Corporate Online users can export NZRRP services via the Receipts
application.
An office is a flexible logical entity used to segregate payments, billing, beneficiaries,
templates, and trade finance agreements within an organisation in a Corporate Online setup.
An organisation is the highest level entity that can be represented in a Corporate Online set
up.
See POST billpay receivables or ERPACS Over the counter receivables.
PnP Net is a product that allows bill payers to make payments via the billers own website.
PnP Net receivables information is accessible via the RECall service.
PnP Phone is a product that allows bill payers to make payments over the phone via an
automated system hosted by the Bank but using the biller’s own phone scripts. PnP Phone
receivables information is accessible via the RECall service.
POST billpay receivables is a product that allows bill payers to make bill payments at any
Australia post office or agency, by phone, or over the internet. POST billpay receivables
information is accessible via the RECall service.
Preferences define a set of default values (e.g. screens, offices, accounts) for a particular user
for a particular application.
A RECall service provides receivables information from multiple receivables products in a
single file. This information nets to a single transaction on the relevant bank account
statement. A RECall service may include receivables from POST billpay, Remittance
Processing, BPAY, ERPACS Over the Counter (OTC), PNP Net and PNP Phone. Corporate
Online users can access RECall services via the Receipts application.
Remittance Processing receivables is a product that allows bill payers to mail their payment
with a remittance slip to a Remittance processing address (where it is processed by the

Bank). Remittance Processing receivables are sometimes called Lock box receivables.
Remittance Processing receivables information is accessible via the RECall service.
A service is a particular type of banking facility accessed via a Corporate Online feature.
Corporate Online provides access to two groups of services: import services and receipt
services.
A user is an identifiable person registered to access Corporate Online whose identity has
been verified either by the bank or a Corporate Online administrator.
A voucher image is the image of the paper voucher used to effect a paper-based transaction
(e.g. a cheque, a deposit slip, a remittance advice).

about
export schedules, 17
exporting, 12
receipts, 5
voucher images, 10
Adobe
troubleshooting, 33
basic skills
calendar, 27
entering dates, 27
filtering transactions, 26
navigating lists, 30
print preview, 31
searching, 28
browsing
receipts, 9
voucher images, 10
buttons
print preview, 31
search, 28
calendar
basic skills, 27
data types
exporting, 12
dates
basic skills, 27
DERPS
reports, 21
EFTPoS
reports, 21
entering
dates, 27
export schedules
about, 17
exporting
file formats, 12
file information, 12
receipts, 12
receipts list, 12
status, 12
features
receipts, 6
fees
voucher images, 6
file formats
exporting, 12
filtering transactions
basic skills, 26
INDISH
reports, 21
lists
navigating, 30
navigating lists
basic skills, 30
PDFs
troubleshooting, 33
preferences
setting, 32
print preview
printing, 31
printing
print preview, 31
receipts, 9
voucher images, 10
procedures
amending a print schedule, 24,
25
amending an export schedule,
19
amending your Adobe reader
settings, 34
creating a scheduled report, 21
creating an export schedule, 17
deleting an export schedule, 20
exporting receipt data, 13
printing a RECall voucher
image, 10
setting receipts preferences, 32
viewing (and downloading) a
print schedule, 23
viewing a RECall voucher
image, 10
quick tour
receipts screen, 7
receipts—transaction list
screen, 8
RECall
reports, 21
viewing voucher image, 10
receipts
about, 5
browsing, 9
exporting, 12
features, 6
printing, 9
reports, 21
screen, 7
viewing, 9
voucher images, 10
receipts—transaction list
screen, 8
reports
DERPS, 21
EFTPoS, 21
INDISH, 21
RECall, 21
receipt list, 21
troubleshooting, 33
screen
receipts, 7
receipts—transaction list, 8
searching
basic skills, 28
setting
preferences, 32
skills
calendar, 27
entering dates, 27
filtering transactions, 26
navigating lists, 30
print preview, 31
searching, 28
transactions
filtering, 26
searching, 28
vouchers, 10
troubleshooting
Adobe, 33
PDFs, 33
reports, 33
voucher images, 33
user guide, 4
viewing
receipts, 9
voucher images, 10
voucher images
about, 10
fees, 6
troubleshooting, 33