corvette brakes for street and track - … brakes for street and track ... carbon-ceramic setup. ......
TRANSCRIPT

CORVETTE BRAKES FOR STREET AND TRACK
Wilwood Engineering’s new W6AR Big Brake Kit for C5 and C6 Corvettes
The Wilwood part number 140-10163 frontbrake installation kit comes complete withthe W6AR calipers, caliper mountingbrackets, the pads, the rotors and hats, andall of the hardware required to finish theinstallation.
The Wilwood part number 140-9119 rearbrake installation kit comes complete withthe Billet Narrow Superlite 4 calipers,caliper mounting brackets, the pads, therotors and hats and all of the hardwarerequired to finish the installation.
Very few automobile marques come from thefactory in greater need of a brake upgrade than astandard Corvette. That is not to say thatCorvettes come from the factory with inferiorbrakes, actually the standard brakes are some ofthe best you will find on any factory car and caneasily handle the demands of spirited dailytransportation. Ah, but there’s the rub; adisproportionate number of Corvette owners aren’tsatisfied with just spirited daily transportation.Consequently many find themselves on weekendexcursions to their local racetrack. The demandsput on your brake system after a few laps aroundLaguna Seca can quickly point out theweaknesses that are inherent in any factory streetset up.One of the ironies of home building a competentperformance car is how much emphasis is almostalways placed on going fast and how little isplaced on stopping. In order to record fast laptimes at the track, you have to have brakes thatwill allow you to go as deep into the turns on thelast lap, as you did on your first lap. It won’t matterhow much power you have if your brakes won’t letyou use it.Fortunately for those of you who appreciate totalperformance, there are aftermarket companiesthat produce very credible alternatives to your
stock brakes. Now we will admit that Corvetteaftermarket kits in general are not on a par with theawesome binders on the new ZR1; but it would takea professional driver, driving the car at its absolutelimits, to appreciate the difference. I should alsomention that the typical aftermarket kit will dip intoyour wallet only one tenth as deep as the ZR1’scarbon-ceramic setup. One of the better-known names in racing and aftermarket brakes is Wilwood Engineering and theinstallation of their new “W6AR Big Brake Kit” forthe C5 and C6 Corvettes, is the subject of thisarticle. The W6AR Caliper was designed for thespecific purpose of providing big capacity brakingfor show and dual purpose street and track vehicles.The caliper incorporates race technology into abody design with radial mounting and a maximumrotor diameter of 14.25-inch. The caliper generatesbig brake clamping force with six differential borestainless steel pistons. Stainless steel is used for itshigh resistance to corrosion. The differential borepattern balances pad loading to help maintain evenpad wear. The calipers are anodized to protect themfrom corrosion, but you can get them polished orwith a gloss red, black, blue or yellow finish if youprefer a little more bling. The rotors are a two-pieceassembly; 14.25-inch in diameter with staggeredvanes that provide maximum cooling for sustainedhigh heat durability. The aluminum alloy hat

contributes to a significant weight reduction inunsprung weight from the stock suspensionsystem. The kits listed for Corvettes are fullycompatible with OE master cylinder output andABS function. The brake system kits featured inthis story are as follows, the kit for the front isWilwood part number 140-10163 and the rear kit is140-9119. Also ordered were the Wilwood partnumber 220-9100 Flexlines for the front and partnumber 220-9101 Flexlines for the rear.The W6AR kit is complete, right down to shims,instructions, and brake pads appropriate for streetuse and the occasional track day. Wilwoodrecommends persons experienced in theinstallation and proper operation of disc brakesystems should only perform the installation of thiskit. A hobby builder can install this kit if he hasgood mechanical knowledge and ability, carbuilding experience and a good assortment of
tools. You will need a jack and jack stands; a basictool kit with SAE and metric wrenches and sockets;a foot pound torque wrench, an inch pound torquewrench, an impact gun, PTFE thread tape (orpaste), Loctite 271 and replacement fluids such asWilwood Hi-Temp 570 Racing Brake Fluid orWilwood EXP 600 Plus Super Hi-Temp RacingBrake Fluid. Tony Porto, Wilwood’s own R&DTechnician performed this Corvette installation.Follow along as he does this installation to see if itis something you are capable of doing or if it wouldbe better to have a professional install the kit foryou. You will probably run into a few photos in thisstory that show different color rotors and calipersand that is due to the fact that the front installationand rear installation were done in the Wilwood R&Ddepartment at different times and on different cars.We joined them together to show you a completeCorvette front and rear Wilwood disc brake
The car was raised using the floor jack and then jackstands were placed underneath in a safe Corvettespecified place. The two tires that were still resting on theground were chocked to keep the car from moving. Thewheels and tires were removed and here you can see theoriginal Corvette caliper and rotor assembly.
The two caliper mounting bolts were disconnected andthen the rotor was lifted away from the brackets. Theoriginal brake line can be removed from the chassisbracket and the line should be capped to prevent fluidfrom leaking out.
After the caliper was disconnected and shelved, the rotorcould be removed from the hub assembly.
The face of the hub assembly and the lug nut threads werecleaned with a wire brush. Any debris left on the hub cankeep the rotor from properly seating, resulting in run-out.Here you can also see the original caliper mounting earswhere the new caliper bracket will be connected.
1
2
3
4
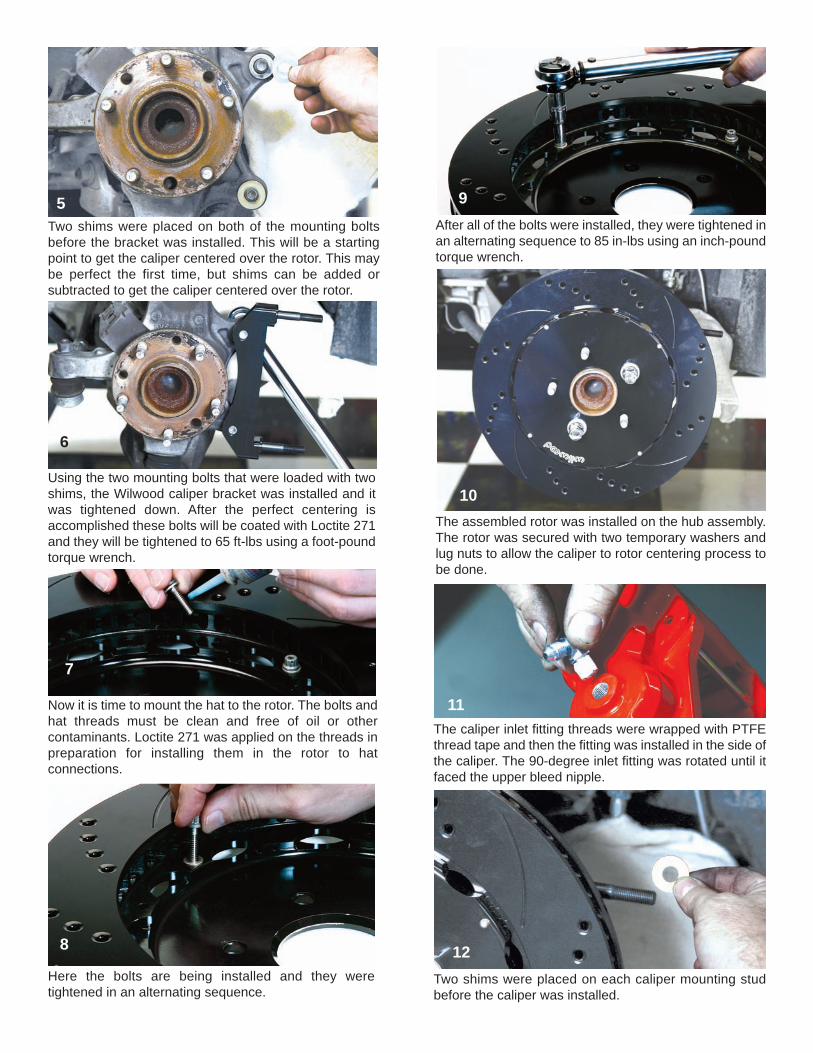
Two shims were placed on both of the mounting boltsbefore the bracket was installed. This will be a startingpoint to get the caliper centered over the rotor. This maybe perfect the first time, but shims can be added orsubtracted to get the caliper centered over the rotor.
Using the two mounting bolts that were loaded with twoshims, the Wilwood caliper bracket was installed and itwas tightened down. After the perfect centering isaccomplished these bolts will be coated with Loctite 271and they will be tightened to 65 ft-lbs using a foot-poundtorque wrench.
Now it is time to mount the hat to the rotor. The bolts andhat threads must be clean and free of oil or othercontaminants. Loctite 271 was applied on the threads inpreparation for installing them in the rotor to hatconnections.
Here the bolts are being installed and they weretightened in an alternating sequence.
After all of the bolts were installed, they were tightened inan alternating sequence to 85 in-lbs using an inch-poundtorque wrench.
The assembled rotor was installed on the hub assembly.The rotor was secured with two temporary washers andlug nuts to allow the caliper to rotor centering process tobe done.
The caliper inlet fitting threads were wrapped with PTFEthread tape and then the fitting was installed in the side ofthe caliper. The 90-degree inlet fitting was rotated until itfaced the upper bleed nipple.
Two shims were placed on each caliper mounting studbefore the caliper was installed.
5
6
7
8
9
10
11
12

The caliper was installed on the studs and it was tightenedusing a socket wrench. Now the caliper to rotor centeringprocess was done to make sure rotor is centered in thecaliper. The caliper can be moved inside or outside just alittle by adding or subtracting shims. After the centerposition was achieved, the caliper mounting bolts werecoated with Loctite 271 and were tightened to 85 in-lbs.
After the centering was achieved, the BP-10 Smart Padswere installed in the caliper and then the two retainingclips and snap rings secured the pads.
After the centering was achieved, the BP-10 Smart Padswere installed in the caliper and then the two retainingclips and snap rings secured the pads.
To finish off the front brakes, the braided steel flex linecoming from the caliper inlet fitting is connected to thehard-line that rests in the chassis mounted bracket.
Here is the Wilwood front brake system finished andready for some track time. This system features redcalipers and black E-coated rotors.
The wheels were installed and the brakes were beddedin. The bedding process removed the E-coat from therotor surface leaving a nice silver rotor face while the restof the rotor remains coated and protected.
The original Corvette hubcaps were removed to accessthe lug nuts. Using the correct size socket and an impactgun, the lug nuts were disconnected and the wheels wereremoved.
13
14
15
16
17
18
19

Here is the Corvette independent rear suspension systemcomplete with the stock brake system. The newer Corvettesare much more sophisticated than they were in the past.
In order to access the OEM hard to hose connector, the twobolts that secure the OEM Automatic Suspension ControlModule to the fender well were removed and the unit wasmoved out of the way.
With the Automatic Suspension Control Module out of theway, the bracket that secured the hard line to hose lineconnection was easy to access. Using a line wrench, thetwo lines were disconnected. This is the same locationwhere the Wilwood rear Flexlines will be connected afterthe brakes are installed.
Using a socket wrench and the appropriate size socket,the two bolts that secure the caliper to the upright bracketwere disconnected and removed.
After the bolts were removed from the caliper bracket, theloose caliper was removed from the bracket assembly andthen it was set aside.
The rotor face was tapped on the backside to release it fromthe centering ring. When it was loose it was removed fromthe assembly. If you look closely you can see the twomounting ears that will be used to secure the Wilwood caliperbracket.
The caliper bracket mounting bolts were placed through theears and then they were loaded with two shims per bolt.
Here is the caliper bracket after it was secured to the originalmounting ears. The bolts should be tight but just enough tocheck the rotor to caliper centering. After the centering isfound, the bolts should be coated with Loctite 271 andtightened to 65 ft-lbs using a torque wrench.
20
21
22
23
24
25
26
27

Before the assembly could go any further, the hat to rotorconnection was made. The small bolts that make theconnection were coated with Loctite 271.
The hat assembly is being lined up with the tabs on therotor. This hat is designed to work with the originalCorvette internal parking brake assembly.
The small bolts that were included in the kit and werepreviously coated with Loctite 271 were used to connectthe rotor to the hat assembly. The bolts were tightenedin an alternating sequence to 85 in-lbs. After the boltswere tight, they were safety wired following the diagramin the instruction sheet.
All of the Wilwood rotors are currently E-coated blackfor protection but in this photo a rotor that was zinccoated was used. This rotor is drilled and slotted for anice appearance and to displace heat and brake dust.
The rotor was attached to the rear hub assembly and herethe caliper is ready to be installed. Notice that the rotorbolts are loaded with a two 0.035-inch shim washers perbolt. The calipers were tightened with a washer and self-locking nut per stud. Four piston calipers are used in therear and they provide a good front to rear balance.
The rotor was attached to the bracket and the centeringwas checked and achieved. After the centering wasperfect, the caliper mounting bolts were coated with Loctite271 and were tightened to 65 ft-lbs using a torque wrench.
The rotor was attached to the bracket and the centering waschecked and achieved. After the centering was perfect, thecaliper mounting bolts were coated with Loctite 271 and weretightened to 65 ft-lbs using a torque wrench.
28
29
30
31
32
33
34

The Wilwood Engineering Flexline was routed from thecaliper inlet fitting to the rear frame bracket that securesthe original hard line. Here the two are being attached.
The brake pads were installed and secured with thecenter bridge pad retaining bolts. Here is the rearbrake assembly ready for action. This system is greaton the street but it is also track ready.
Wilwood Engineering4700 Calle BoleroCamarillo, CA 93012
805/388-1188www.wilwood.com
Copyright © 2010 Wilwood Engineering, Inc. -All Rights Reserved
35
36