course: digital author success: how to write and … digital author success: how to write and...
TRANSCRIPT

Work-At-Home Success University
Course:
Digital Author Success:
How to Write and Publish
eBooks On Kindle Lesson 2
NOTICE: You Do NOT Have the Right to Reprint or Resell
this Report!
You Also MAY NOT Give Away,
Sell or Share the Content Herein
If you obtained this report from anywhere other than http://www.WorkAtHomeSuccess.com, you have a pirated copy. Please help stop Internet crime by reporting this to: mailto:[email protected] © 2014 Copyright Leslie Truex ALL RIGHTS RESERVED. No part of this report may be reproduced or transmitted in any form whatsoever, electronic, or mechanical, including photocopying, recording, or by any informational storage or retrieval system without express written, dated and signed permission from the author. DISCLAIMER AND/OR LEGAL NOTICES: The information presented herein represents the view of the author as of the date of publication. Because of the rate with which conditions change, the author reserves the right to alter and update his opinion based on the new conditions. The report is for informational purposes only. While every attempt has been made to verify the information provided in this report, neither the author nor his affiliates/partners assume any responsibility for errors, inaccuracies or omissions. Any slights of people or organizations are unintentional. If advice concerning legal or related matters is needed, the services of a fully qualified professional should be sought. This report is not intended for use as a source of legal or accounting advice. You should be aware of any laws, which govern business transactions or other business practices in your country and state. Any reference to any person or business whether living or dead is purely coincidental. Some link resources may offer affiliate compensation. EARNINGS DISCLAIMER: Every effort has been made to accurately represent this product and its potential. Even though this industry offers the possibility to earn money, there is no guarantee that you will earn any money using the techniques and ideas in these materials. Examples in these materials are not to be interpreted as a promise of guarantee of earnings. Earning potential is entirely dependent on the person using the product, ideas and techniques. I do not purport this product as a “Get Rich Scheme”. Any claims of actual earnings or examples of actual results can be verified upon request. Your level of success in attaining the results claimed in these materials depends on the time you devote to the business, ideas and techniques mentioned, your finances, knowledge and various skills. Since these factors differ according to individuals, we cannot guarantee your success or income level. Nor am I responsible for any of your actions.

Introduction
Welcome to Work-At-Home Success University and Digital Author Success!
I’m excited to have you as a valued student in this four-week training program!
Amazon has revolutionized the way people read and has created opportunities for budding writers to get their work into the world without an agent or traditional publisher. Self-publishing through Kindle (as well as Nook and other e-readers) is affordable and fairly easy. It is possible to earn a good (or great) income from self-publishing ebooks if you do the work that is necessary to produce a great manuscript and market it. Or, use ebooks to add an additional revenue stream to an existing business (i.e. a blog or service business). Before we begin with the lessons, there are three important things that I need to mention to you... 1) Worksheets - The course comes with instructional materials as you see here, but it also includes worksheets. These handouts are crucial to your success so don't skip them. They are designed to help you gather and organize information so that you can use it to be a successful blogger. 2) Audio and Video Materials - When appropriate, you'll find audio or video supplements to the instructional materials. These are designed to assist in providing the information in a clear and concise manner. 3) Weekly Lessons - Here is the schedule of lessons: Week 1 - Ebook Overview and Set-Up
eBook factoids Why ebooks? Overview of the process Writing your book Platform building
Week 2 - Preparing Your Book
Beta readers and editing Formatting Cover creating ISBN
URGENT: Your Email Address … Potential Delivery Problems
There are a couple of ISPs that are spam trigger happy and unfortunately yours may be one of them. Oftentimes whitelisting [email protected] will remedy this. However, in some cases it is necessary to use a different email address.

Week 3 - Publishing Your eBook Choosing a distribution method Formatting for publisher Writing a sales-generating description Keywords and tags Pricing
Week 4 - Marketing Your Book (and Making Sales)
Getting honest reviews Marketing strategies
Some of the information will be technical, but every effort has been made to walk you through the steps one-by-one. Now that we’ve gotten the housekeeping out of the way, let’s get to the reason why you’re here … the lesson!

Preparing Your Book
There is a writer in my writers group who wrote a full-length suspense novel back in the days of typewriters. He wrote it, sent it to a publisher, got a rejection and then put it away. When the local writer group started, he read the book to us and it became clear that while the idea and plot were good, he hadn’t done much editing. After each reading, we’d give feedback, which he in turn translated into “they don’t like it.” Here are a couple of hard truths about writing: 1) You can’t publish a first draft... well you can, but it won’t be your best work. 2) You can’t be your own editor, for content or grammar. I know many writers that don’t heed these two truths (I broke rule #2 myself), thinking their work is good enough. But all you have to do is read reviews of indie authors on Amazon to see that readers are tough critics. They’re paying money. They don’t want “good enough”. “But Leslie, I see errors and formatting problems in traditionally published books.” Yes, I see them more and more myself, but as my mom used to say, “If traditional publishers jumped off a cliff, would you follow?” Your goal should be to put forth the very best book possible. It will not only increase sales of this book, but also of future books. If your book will be supporting a business (i.e. coaching or freelancing), it will increase your credibility and customers. It will also help make selling subsequent books easier. You have one shot to make a great first impression, so don’t blow it by submitting a subpar book. This week you’ll learn how to get free editing for content and some errors, and how to find an affordable, quality professional editor for the final draft. We’ll also cover basic formatting, creating a cover and getting an ISBN.
Getting Your Manuscript Pre-Read Beta Readers You may have heard about beta testing. In the technological world, it’s when software or equipment is tested by a small group of users prior to the official launch. For writers, beta readers are people you trust who read your work for content, flow and errors prior to your publishing it. Beta readers are fairly easy to find, but not all give you the feedback you need. I have beta readers that find a few errors, but for the most part say they love the work. Of course I like to get gushing comments on my work, but the goal of beta reading is to get feedback on what can be done to make the book better. You want your beta readers to do the same. They should have the ability to say what they like, don’t like or didn’t understand about your work (which means they need to feel safe in giving you constructive criticism). They don’t need to be writers necessarily, but they should be readers. You can find beta readers among your friends or family, or through your network. For example, you can have a few of your social media or blog followers beta read for you.

Writers Groups Another way to get good feedback is through writer groups. You can check your local area activities announcements or join groups online. Every group is different in that some will allow you to read a snippet during the group while others will have you submit writing to the group in advance of the meeting. Writers groups often have speakers that talk about their own writing journey or share information related to writing. For example, I belong to the Sisters In Crime writers association, which had a field trip to the state crime lab. Anytime you get a group of people together, it can go well or bad. For example, most of the writers in my writer’s group aren’t trying to publish or make a career from writing, which is fine. But for me, I need feedback that will help me publish and sell books, so sometimes I feel I’ve outgrown the group. You’ll want to talk with the group leader about how the group is run and the dynamics. A visit will help you get a good sense of the other writers and their goals. If it’s not a fit, find a different group. By the way, your group doesn’t need to be specifically in your genre or niche. My group has poets, essayists, memoirists, novella writers, fantasy writers, sci-fi writers, and more. Writing Buddy Finally, you can get feedback by finding a writing partner. I think having feedback from multiple people is best to make sure your manuscript or story is understood; however, a writing partner can help you iron out details during the initial writing. Plus, you can keep each other accountable and cross promote when your books are done. But writers are touchy breed. We like the positive accolades, but not always the criticism. Find a buddy who can give you constructive criticism (he/she needs to know about writing) and can take it as well. You can find a buddy in your writers group or in an online forum. Feedback and Critique When I send a manuscript (or parts of a manuscript) to my beta readers, I let them know that I’m looking for their impressions and feedback on content, flow and errors (these could be grammar, factual or continuity errors). Sometimes I get great feedback and other times I get “It’s great. Love it.” The same thing happens at writers group, as well. Some people will say I need to flesh something out and other times I hear, “It was good.” I’ve learned that I need to help my readers and group members out. If there are specific areas I’m concerned about, I’ll let them know. For example, I might ask if a character’s action makes sense based on what we know about him. In the case of non-fiction, I might ask if the steps make sense... could the reader follow them?

Accepting Critique You might be surprised at how defensive you feel when you get feedback. You’ll start to explain what you meant or how that piece of the story or content will make sense later. However, if you have to explain your writing to a reader, then you haven’t done your job in the manuscript. It should all be in the writing. Granted not all feedback is helpful and often it’s subjective based on the reader’s preferences. But since you asked for it, you need to take it. It doesn’t mean you need to use it, but you need to take it. I’ve taught myself to listen and even ask questions to critiques I receive. My beta readers send manuscripts back with notes, changed phrasing etc. I look at and analyze them, then I decide if their feedback will help what I’m trying to say or do. Often it does. Many times it doesn’t. Sometimes their changes are good, but reflect their style or voice of writing, not mine. I never let beta readers know what I used and what I ignored of their feedback, but I’m always thanking them for taking the time to read and evaluate the work. If you can step back from your work and try to be objective when you get feedback, you can learn things that will improve your writing and the content. But you have to be open to it. Don’t automatically assume your readers don’t know what they’re talking about or simply misunderstood your writing. After all, if your beta readers don’t get it, odds are people who buy the book won’t get it either. And if they don’t get it, they’ll leave bad reviews. Editing Here are two more truths!
Writers never catch all their errors! Beta readers never catch all the errors either!
If you want to make epublishing something you do for a living, hire an editor to edit your book. Trust me on this. I don’t care how many times you’ve read the book, you won’t see all the errors. Your mother or best friend won’t either, unless they happen to be a professional editor. I have stuff I wrote and “polished” years ago after 4, 5, 6 edits and I’ll still find errors if I read them today. Professional editing is probably the most expensive part of self-publishing, but it’s well-worth cost. You don’t want to lose sales because readers are leaving negative feedback about typos and errors...and they will. Trust me on this! In fact, poor editing is one of the biggest gripes (next to formatting) readers have about ebooks. There are a variety of types of editing services available. If you trust your beta readers, writers group and/or writing buddy to give you feedback on content and flow, then you can go with straight-forward editing for grammar and errors. However, if you want feedback on the content, there are editors who will do that, as well. Since I’m stingy, I work with my beta readers and group to get the content right and use my editor just to find the boo boos. And because my beta readers find some (though not all) errors, I spend less money on editing because there is less to fix.

Hiring An Editor When it comes to hiring an editor, I recommend getting a referral. You don’t want to spend a fortune on bad editing or with someone who doesn’t act professional (i.e. doesn’t deliver on time). There are many writer’s resources that list editors or forums that have members who can share who they use. I’ll give you two names, one who edits my books and the other is a guest writer for Digital Writer Success. When you contact editors, let them know what you want (i.e. just editing), how long the book is (i.e. 50,000 words), what the book is about, and an anticipated publishing date. Sometimes, editors will want to see a sample of your work to help determine a price quote. Obviously, books with more errors will require more time than those that are cleaner (which is another reason to have beta readers find errors). Most editors charge by the hour, but using your sample and their past experience, they can tell you how much they anticipate the project to be. For example, my editor charges $25 per hour, but she quoted me $400 based on a sample of my story and knowing the book was 103,000 words. Be sure to give your editor plenty of time to edit the book, before you want to publish it. Once you get it back, you’ll want to go through it again and prepare it for publishing, before uploading it. Working With An Editor Did you know that not all rules of grammar are set in stone? And there are a variety of writing styles? In most cases, your editor will let know what style (i.e. Chicago Manual of Style) she uses. If there are specific rules you want followed, you need to let her know. For example, I have a character in a book who’s name ends with an ‘s’. The rule to indicate the possessive can be ‘s or just an ‘ (i.e. Bess’s or Bess’). I told my editor I preferred just the apostrophe (‘) and not the apostrophe s (‘s), so she wouldn’t change it in my story. Editing also covers spelling, but you might want to ask if the editor checks spelling of unusual words. For example, I used the word doo-dad in one of my books. I spelled it doo dad, but my editor later told me that she looked it up and correct spelling is doo-dad. (Now you know!) BTW...it’s nice to put a thank you to your editor in the acknowledgements of your book.
Formatting Each publishing platform has its own rules about formatting. Some want the manuscript in .doc, others in PDF and others in .htm. But before you get to formatting for each publisher, you want to do some basic formatting that will fit across platforms. Scrub the Document of Formatting In this section, I’m going to help you scrub your document of hidden code that can make your masterpiece look wonky in ereaders, plus show you steps on creating a table of contents (TOC), and using images. I’ll be providing step-by-step information using Word 2007. If you have a different version of Word, odds are the steps are the same, but the menu items might be in a different place. These directions should work with Open Office, as well. If you have a different word processing program, you will still be able to do all this, but you’ll need to figure out where the commands are in your program. For example, you might need to use the help option to search “compress pictures”.

Let’s start by covering a couple of don’ts. There are some items that don’t format well no matter what you do. Bulleted/numbered lists (using your word processors list feature), tabbing, tables, and columns don’t work well in ereaders. The reason is that the reader can adjust the size of the font, which will reformat the book and reposition your content. If you want a list in your book, type the number, press the space bar and add your content. Do the same for bullets using a hyphen (-) instead of a bullet. If you want columns, tables or tabbed content, turn them into .jpeg graphics. I use a screen capture program called Jing to grab content from my book and turn it into a graphic. (see information below about graphics) Most word processing programs have code going on in the background that you don’t see. This code can impact how your book is interpreted and formatted online. What looks right on your document screen could end up wonky on an ereader. The best way to get rid of hidden code is to “scrub” the document. The easiest way to make sure your manuscript is easy to format, is to start with a clean slate and setting the style, margins and paragraph information before you start writing. But odds are, you already have a completed manuscript. Further, it’s easy for styles to get messed up during the writing process. For that reason, it will help to follow the steps below, even if you set your style before you began writing. I find the easiest way to get rid of all the hidden gobbily-gook is to do a full-out formatting purge. Here’s how: Purge It All Method: Before starting, make a new copy of your document so if something goes wrong, you have an old copy to go back to. Part One: 1) Open a new blank Word Document (or Open Office or whatever you use) 2) Turn off AutoCorrect and AutoFormat features. In Word versions older than 2007, go to “Tools”, “AutoCorrect,” click on the “AutoFormat As You Type” tab and then uncheck most of the boxes. Finally, click on the “AutoFormat” tab and uncheck the four boxes under “Apply.” In Word 2007 or newer, click the round Microsoft office button in the upper left corner. Choose “Word Options,” “Proofing,” and then click the button at the right for AutoCorrect Options. Part Two: 1) Open your manuscript document. 2) Click on “CTRL+A” or Select All” to highlight your document. Next click “CTRL+C” or “Copy” to copy it. 3) Open Notepad or whatever text editor program you have. 4) Put your cursor in Notepad, then right click your mouse and select “Paste” (or do “CTRL+V”). Now your document is in your text editor and all formatting is removed.

5) Press “CTRL+A” to select all the text in Notepad again. Then type “CTRL+C” (or right click and choose “Copy”) to copy all the text in Notepad 6) Paste your Notepad copy into the new document you created in Part One. Put your cursor in the new document, then press “CTRL+V” or right click your mouse and choose “Paste”. Part Three 1) In your new manuscript file, click on “CTRL+A” or Select All” to highlight your document. Keep the document highlighted as you do the next steps 2 – 4. 2) Set your “Style” (I use “Normal No Spacing”). 3) Set your “Font” and “Size” (I use Times New Roman, 12 pt) 4) Set your paragraph tab. For digital books, the standard 5 spaces is too much. Instead I use 2 or 3. You’ll want to use indented paragraphs for fiction. You can use block paragraphs in non-fiction, but then you might have an issue with spacing between paragraphs, so I always use the indent option.
Format Your Document Right now you have a document with a little bit of formatting, but you probably think it could use more. The next steps will help you add formatting without messing up the overall document so that it looks nice and doesn’t go wonky on e-readers. 1) In your new open document (you might want to save it just in case), click on the “Show/Hide” button. It looks like a paragraph icon (see graphic below). If it’s not in your tool bar, try “Tools”, “Options”, “View” and then under “Formatting Marks” click “All”.
You’ll see all sorts of codes that tell you what format directions the word processing program is using. (see below)
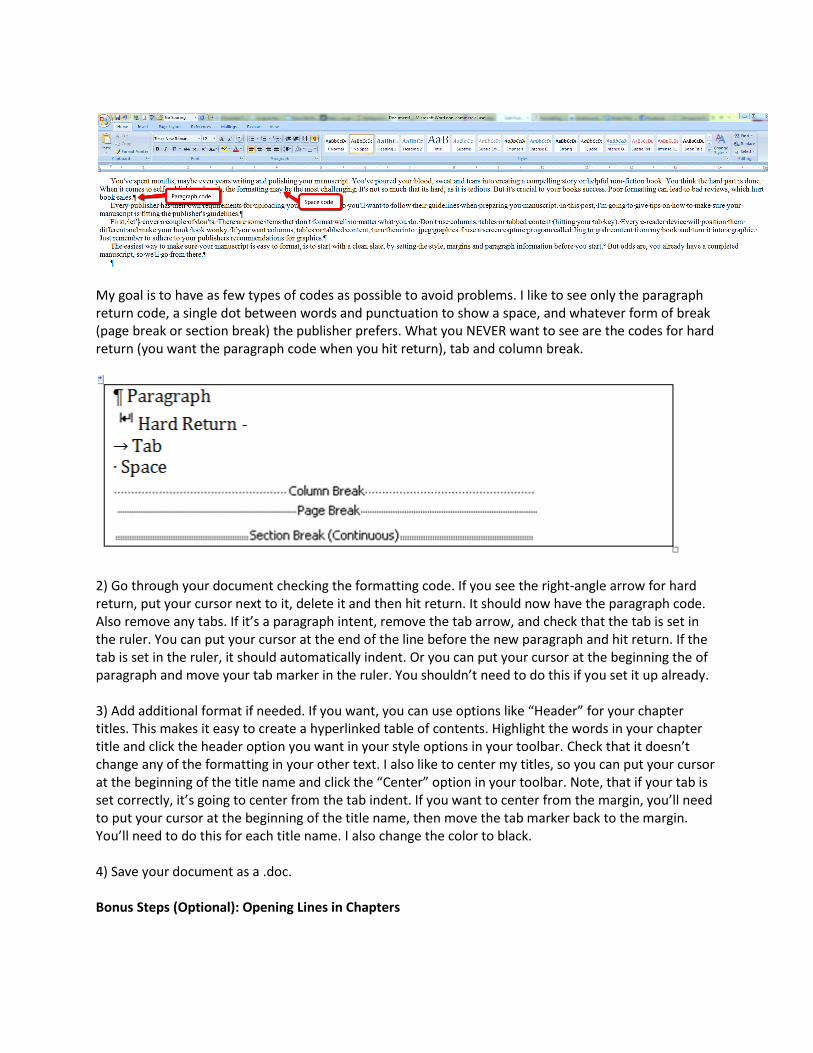
My goal is to have as few types of codes as possible to avoid problems. I like to see only the paragraph return code, a single dot between words and punctuation to show a space, and whatever form of break (page break or section break) the publisher prefers. What you NEVER want to see are the codes for hard return (you want the paragraph code when you hit return), tab and column break.
2) Go through your document checking the formatting code. If you see the right-angle arrow for hard return, put your cursor next to it, delete it and then hit return. It should now have the paragraph code. Also remove any tabs. If it’s a paragraph intent, remove the tab arrow, and check that the tab is set in the ruler. You can put your cursor at the end of the line before the new paragraph and hit return. If the tab is set in the ruler, it should automatically indent. Or you can put your cursor at the beginning the of paragraph and move your tab marker in the ruler. You shouldn’t need to do this if you set it up already. 3) Add additional format if needed. If you want, you can use options like “Header” for your chapter titles. This makes it easy to create a hyperlinked table of contents. Highlight the words in your chapter title and click the header option you want in your style options in your toolbar. Check that it doesn’t change any of the formatting in your other text. I also like to center my titles, so you can put your cursor at the beginning of the title name and click the “Center” option in your toolbar. Note, that if your tab is set correctly, it’s going to center from the tab indent. If you want to center from the margin, you’ll need to put your cursor at the beginning of the title name, then move the tab marker back to the margin. You’ll need to do this for each title name. I also change the color to black. 4) Save your document as a .doc. Bonus Steps (Optional): Opening Lines in Chapters

You may not have noticed, but in print books, the first line of every chapter is aligned left and sometimes the first letter is a large drop cap.
You’ll notice that most indie authors don’t worry about that. I didn’t. Only recently did I decide to make the change and have been going back and redoing previously published books. Why bother? Vanity. Basically, this is how traditional publishers do it and so if you do it too, you look professional. If you’d like to do this, it’s easy, although time consuming depending on how many chapters you have. Justify first line of each chapter to the left: 1) Put your cursor in front of the first letter of the first word in the first paragraph of the chapter. 2) Move the tab back to the starting point. The line should move with it and that FIRST paragraph is all justified left (see graphic above). 3) Repeat for the first line of every chapter. Add a drop cap to the first letter of each chapter: 1) Highlight the first letter of the chapter. 2) Click on “Insert” from your menu. 3) Click on “Drop Cap” from the section marked “Text” 4) Choose the middle “Dropped” option. 4) Repeat for the first letter of each chapter.

Add a Table of Contents First, don’t worry about page numbers, as ebooks don’t have them. However, you can have a table of contents with links that take readers directly to the chapter they want to read. For fiction, this isn’t as big of a deal as most readers read from beginning to end. But if you write non-fiction, you might want to include chapters with chapter names so readers can find what they need quickly. To make a table of contents: (see below) 1) Make sure all your chapter titles use the same type of heading (i.e. “Title” or “Heading 3”) 2) Create a new page where you want the table of contents to be 3) Click on “References,” “Table of Contents” and at the bottom of the box click, “Insert Table of Contents” 4) Uncheck “Show Page Numbers” on the Print Preview side. 5) Change show levels to 1 under the General Section on the Print Preview side. 6) Check that one heading is listed under the Print Preview side. 7) Check that “Use Hyperlinks instead of page numbers” is checked. 8) Click “OK” 9) If necessary, you can change the font of your TOC to match your book by highlighting the TOC and using the “Font” option to change it.

Using Graphics This ecourse is focused on books that are primarily text. But you might have reasons for including graphics. To avoid problems with formatting, follow these rules for using images: 1) Always have permission to use images that are copyrighted. Just because it’s online, doesn’t mean you can use it. 2) You can use royalty-free images that are approved for commercial use (see sources in the resource section). You should credit the images either with the image or in another section of your book. 3) Images should be less than 500 px wide. 4) Images need lots of contrast because not all readers show color. You want your image to look good in black and white. 5) Compress your image so it’s not too big. Kindle’s 70% royalty program charges for the size of the download. Large pictures mean large files which means less you earn per book. To compress your image, click on the image in your document. The “Picture Tools” tab should open at the top of your word processing menu.
6) Click on the “Picture Tools” and a new menu appears. Click on “Compress Pictures”
7) Leave the “Apply to selected pictures only” unchecked to compress all images.

8) Click “OK” How to Embed Captions into Your Images If you have a caption that goes with your image or want to give image credit with the image, you need to embed the caption with the image. If you simply write text under or over the image, the text may not appear with the image. Here’s how to embed captions into your images. 1) Right click on the image. 2) From the drop down menu, click on “Insert Caption” 3) Enter your text in the “Figure” box (in the drop down list “Label” you can change “Figure” to “Table” or “Equation” if you’d rather. 4) Set where you want the caption to show up (below or above) 5) Click “OK”
Figure 1 How to Create an Embedded Caption
Creating a Catchy Cover Think about when you walk into a book store. You go to the section that has the books you want, you look at the books on the shelves, pull one out and analyze it. What makes you decide to look at one book over another? The title and the cover, right? It’s the same for digital readers. They use keywords to
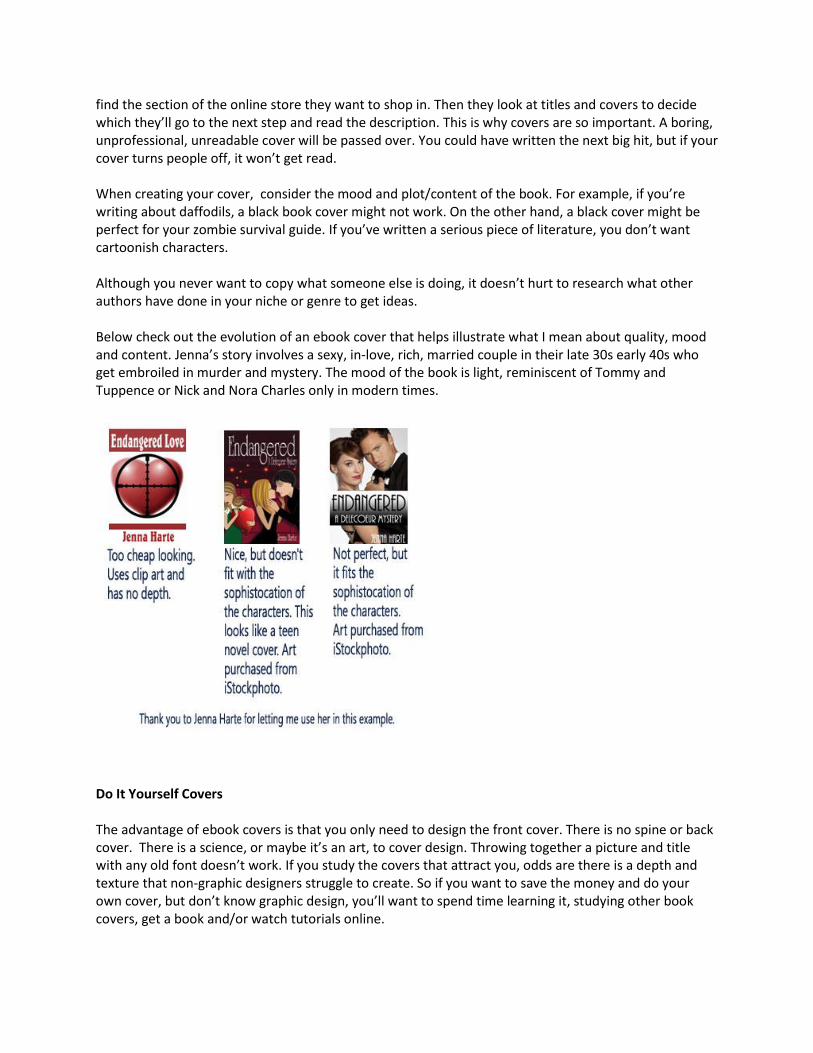
find the section of the online store they want to shop in. Then they look at titles and covers to decide which they’ll go to the next step and read the description. This is why covers are so important. A boring, unprofessional, unreadable cover will be passed over. You could have written the next big hit, but if your cover turns people off, it won’t get read. When creating your cover, consider the mood and plot/content of the book. For example, if you’re writing about daffodils, a black book cover might not work. On the other hand, a black cover might be perfect for your zombie survival guide. If you’ve written a serious piece of literature, you don’t want cartoonish characters. Although you never want to copy what someone else is doing, it doesn’t hurt to research what other authors have done in your niche or genre to get ideas. Below check out the evolution of an ebook cover that helps illustrate what I mean about quality, mood and content. Jenna’s story involves a sexy, in-love, rich, married couple in their late 30s early 40s who get embroiled in murder and mystery. The mood of the book is light, reminiscent of Tommy and Tuppence or Nick and Nora Charles only in modern times.
Do It Yourself Covers The advantage of ebook covers is that you only need to design the front cover. There is no spine or back cover. There is a science, or maybe it’s an art, to cover design. Throwing together a picture and title with any old font doesn’t work. If you study the covers that attract you, odds are there is a depth and texture that non-graphic designers struggle to create. So if you want to save the money and do your own cover, but don’t know graphic design, you’ll want to spend time learning it, studying other book covers, get a book and/or watch tutorials online.

Artwork Get the best you can afford. While there is free royalty-free art work, it’s often not as good as the paid stuff. You don’t want your book to look like you’ve used clipart or a poor quality image. I have listed image sources in the reference area of the book. When you use stock photos, you run the risk of using a photo someone else has used. To avoid having your cover look like someone else’s using the same photo, change the image by adding or taking elements away. Jenna used a stock photo for one of her covers and paid someone at Fiverr to change the hair color of the people in the photo.
Hint: Some places, like iStockphoto allow you to download a copy of the photo for free (it has a watermark on it) so you can test the image on your project before buying.
Using your ideas around the mood and theme of your book, plus what you’ve see other authors do, come up with image ideas and search the various photo sites for pictures that will meet your cover goals. Graphic Design Creating a cover on your own requires the ability to edit graphics. The most robust graphic editing software is expensive, except for GIMP, which still offers a lot of features, but is free. Each publishing distribution channel (Kindle, Nook etc) has their own recommendations for cover size. At this writing, Amazon says, “Requirements for the size of your cover art have an ideal height/width ratio of 1.6,” and recommends, “1563 pixels on the shortest side and 2500 pixels on the longest side.” Barnes and Noble recommends 1333 x 2000 and Smashwords (which distributes to major ebook retailers) suggests 1600 x 2400. You’ll notice that I said, “At this writing,” because ebook publishers change their requirements sometimes. When you’re ready for a book cover, visit the publishers to check what they’re recommending at that time. The next question is, can you make one cover and resize it? Resizing doesn’t always work, so I’d say, “no.” But I will also say that you should start with Amazon first, and then if you want to add the other publishers, make new covers for them. Why? Because Amazon sells more ebooks than anyone. You should start there. Creators and Templates Need more help, but don’t want to hire a designer? You can use a program to create your cover. The advantage of a creator program is that you don’t need a fancy graphic design program. You add text, colors and images, and the creator makes it for you. The disadvantage is that creators don’t look as professional as custom options. I have a cover made using a creator and I think it’s noticeably less professional looking than my other covers. (Something I plan to remedy soon!) Another problem is that your cover may end up looking like someone else’s cover. Even so, creators and templates are improving and are an acceptable option if you have a tiny budget.

An easy, free option is to use Amazon’s Kindle Cover Creator. To use it, you need to have a Kindle Direct Publishing account. When you’re ready to publish, click on “Add New Title” and the create cover design will be there as well (we’ll go over creating a Kindle Publisher account next week). The only problem with this option is that you can’t use the cover at other sites, such as Barnes and Noble Nook. If you plan to publish only at Amazon (we’ll discuss the pluses and minuses of this next week), then this option is fine. Or you can try KDRenagade, which has a cool creator you can test out. It’s not free, but it’s cheaper than hiring a designer. You can search for more cover creator services on Google. Another option is to buy a template and edit it yourself. You would need a graphic design software like Photoshop or Gimp. This option is usually affordable and allows you greater customization over a creator program. I’ve used Book Cover Genius, but there are others. Because pricing and quality can vary, research options. A hands-off option to using templates is to buy one and then hire someone through Fiverr to edit it for you. Hiring a Graphic Cover Designer The easiest way to get a high quality cover is to hire a designer. The downside is that it can cost hundreds of dollars. If professional writing is your career goal, then it may be worth it. Covers attract (or detract) readers, so a great cover is worth a couple of hundred of dollars. Find a good cover designer the same way you find a good editor, through referrals. Visit writer forums and see what members recommend. At Kindle Boards, many writers have their books in their signature line, so if you see a book cover you like you can ask that author who created it. Some ebook cover designers offer a lower-price from custom cover creation, by using one of their templates. You can select a template from the designer’s options, give information about your desires for the cover and the designer will create the cover. Tips to Great Covers 1) Make the title and author test is large enough that it can be read at a size of 80 px wide, which is what the cover is resized to in thumbnail shots used on Amazon. 2) Test out different fonts for legibility, as well as fit with the mood and content of the book. You can use two different fonts. Avoid script fonts as they may be difficult to read. 3) Add interest and depth to the title using effects like drop shadow. But don’t overdo it either. 4) Include your brand. If you write non-fiction, consider adding your logo, same font or tagline that shows of your brand.
5) Link series books. If you’re planning more books in the same line, create a cover to brand the series. For example, you know a Dummies book because they’re all yellow and black, with the same format. You can do this for fiction and non-fiction series. Getting Feedback You’ll probably think your cover is awesome (and it probably is!), but it never hurts to get an object opinion. If you post your cover for feedback at KindleBoards, you’ll learn whether or not your font looks right, the image and colors fit the mood and more. It’s very helpful to see what potential readers think of your cover. (Note you don’t have to be a Kindle publisher to use the board. Writers on the board also publish on other platforms.)
ISBN An ISBN or International Standard Book Number, identifies a book by its country, publisher and title. The ISBN isn’t associated just with a title. Every version of the same book has its own ISBN. For example, an ebook can have an ISBN, but if you want to do a print or audio version, each of those will have its own ISBN, as well. In fact, there is some suggestion that you need an ISBN for different ebook versions, such as Mobi (Kindle) and Epub (Nook and others). At $125 a pop, that’s a lot of ISBNs for a single title. Free ISBNs Fortunately, in some cases, you don’t need an ISBN or you can get one free. If you publish with Amazon Kindle or Barnes and Noble Nook, you don’t need an ISBN. Each of these companies assigns its own tracking number to ebooks. You can get free ISBNs through Amazon and Smashwords (which distributes ebooks to a variety of ebook retailers); however, they aren’t transferable. You can’t use a Smashwords ISBN on Amazon and vise versa. If you want to distribute through iBook, Kobo and others, you’ll need a unique ISBN, but since Smashwords will distribute to these retailers, the book will go to them with the ISBN given by Smashwords (this is if Smashwords sends the book to iBook etc). Paid ISBNs The challenge of ISBNs comes when you want to distribute across platforms and who you want listed as the publisher. If you use an ISBN given for free by Amazon or Smashwords, they will be listed as the publisher of the book. There are some authors who feel this is a red flag to indicate an indie author, which some readers might not be willing to buy from. Other authors don’t think readers play that close attention. I’ve done both. I have some books published using an ISBN given by Amazon and some I’ve bought. However, while the Amazon one says “Sold by Amazon Digital Services, Inc.,” under Publisher I put my publishing company name during the book set-up process. So, at least on the listing at Amazon, you can mask that Amazon is the publisher.

Buying ISBNs makes more sense if you plan to make authorship and publishing your career and want to publish different versions (i.e. print, audio etc). Starting out as a beginning epublisher, you can get away with not having an ISBN at Kindle and Nook, and taking a free one through Smashwords, and still get distributed across multiple ebook platforms. If you want to buy ISBNs, you can through Bowker for $125 apiece. A better deal is to buy 10 for $250. You read that right, for the price of two you can get ten ISBNs. That’s what I did. If you do buy ISBNs, you need to associate the numbers with a publishing company. You can use your given name, but if your goal is to look professional and not give away too easily that you’re self-publishing, you should use a different name. At that point, you’re basically starting a business (writing career is a business regardless). Here are steps to creating a business: 1) Choose a publishing company name. 2) Check with the Trademark Office and the Secretary of State (that regulates business corporations) in your state that the name isn’t already in use. 3) Obtain a business permit/license from your city or county. 4) File a fictitious name statement (sometimes called assumed name or doing-business-as statement) with your county clerk’s office. 5) Open a business bank account. 6) Use your publishing business name when you obtain your ISBNs, in your book and with the publishing distribution sources (i.e. Amazon).
Note: You should open a separate bank account even if you don’t purchase ISBNs. If you want to take tax deductions related to your writing career, you need to keep your writing income and expenses separate from your personal ones.
Resources Below are resources for editors and royalty-free images.
Editors
Anne’s River Media, LLC - Laurie Jenson: Laurie edits all my fiction.
Nitty-Gritty English - Jacqueline Myers: Jacqueline has vast experience in college English. She is a regular
contributor to Digital Writer Success.

Royalty-Free Image Resources
Royalty-free doesn’t mean the graphic is free. It means you don’t have to pay royalties to use it. The
best graphics aren’t free, but I’ve included both paid and free options. Note, if you use a free option, be
sure to read the terms of use. For example, some don’t allow use for commercial purposes (which is
what you need). Others require a credit. Follow all terms of use to avoid legal hassles.
Paid Images
Big Stock Photo - A little more affordable than other options.
iStockPhoto - Not cheap, but there are tons of great photos.
123rf.com - Another more affordable option.
Free Images
If you use these free sources, read the rules about whether you can use images commercially and how
to give credit to the image you use.
Flickr Creative Commons
Stock.xchng
FreeDigitalPhotos.net
Bing Images: I’d use this option as a last resort, as I’m not sure how Bing verifies that an image is
available for royalty-free use. Plus, you can’t always find how to credit the image. Below is a screen shot
for finding royalty-free images on Bing.
1. Type your search term or phrase.
2. Click on “License” and then “Free to modify, share and use commercially”.
What’s Next....
Next week, you’ll finish readying your manuscript, and then upload and publish your book!