course of network security man-in-the-middle laboratory · 2016-05-02course of network security...
TRANSCRIPT
Course of Network Security
Man-in-the-Middle Laboratory
Phạm Anh Linh Đoàn, Meisyarah Dwiastuti, Manish Kumar & Mario Rafael Vuolo
April 27, 2016
1. Introduction People when connect to a computer often take for granted the protocols used to find the destination machine, most people don’t even know them. In a LAN the method of resolving an IP address to a MAC to send a packet to its destination is by ARP (Address Resolution Protocol). In this report we will show how to poison victims ARP table and passively sniff connections. Thanks to a powerful tool, called Ettercap, we will perform ARP poisoning, SSLstrip and SSH downgrade. The objective of the laboratory is to give the students basic understanding about how MITM attacks are performed using existing tools. The students will perform the attacker role as well as the two victims role who are having a conversation. Together with Wireshark the students will be able to track the victims’ conversation and understand what Ettercap does. Finally, we are also going to explain some countermeasures that the victims may perform in order to protect their conversation from these attacks. 2. Lab Set-up For this laboratory, there are 3 Virtual Machines (VMs) needed that will take role as Alice (victim), Bob (victim) and Eve (attacker). The victims will both have the roles of client and server through the laboratory. Alice is a Lubuntu 15.10 machine with IP address 192.168.56.7 and MAC address 08:00:27:04:60.

Bob is a Windows 7 server with IP address 192.168.56.8 and MAC address 08:00:27:9d:c7:20.
Eve is a Lubuntu 15.10 machine with IP address 192.168.56.9 and MAC address 08:00:27:0d:ac:f4.

These three machines are in the same network set up as internal network with interface named enp0s3. Since there is no internet connection in the laboratory, some webpages that are going to be accessed during the implementation are provided locally on the server and are not the real website found on Internet. 2.1 Tool: Ettercap Ettercap is a free and open source network security tool for man-in-the-middle attacks on LAN used for computer network protocol analysis and security auditing. Ettercap has three main strengths:
1. It is capable of fully automating some of the MitM attacks, such as ARP spoofing (also known as ARP poisoning).
2. It is capable of "filtering" packets, where it intercepts, changes, and resends packets on the fly. This could be as simple as changing all occurrences of the word "accept" to "refuse" in all web traffic, or as complex as exchanging the encryption keys in a secure transmission.
3. It is capable of conducting active eavesdropping against a number of common protocols, capturing credentials: TELNET, FTP, POP, IMAP, rlogin, SSH1, ICQ, SMB, MySQL, HTTP, NNTP, X11, Napster, IRC, RIP, BGP, SOCKS 5, IMAP 4, VNC, LDAP, NFS, SNMP, Half-Life, Quake 3, MSN, YMSG!
2.2 Tool: Wireshark Wireshark is a free and open source network packet analyzer used for network troubleshooting, analysis, software and communications protocol development, and education. This tool lets the user put network interface controllers into promiscuous mode, so he can see all traffic visible on the interface. This ability will help us to track the traffic between the victims, especially the packets sent that contain information we want.
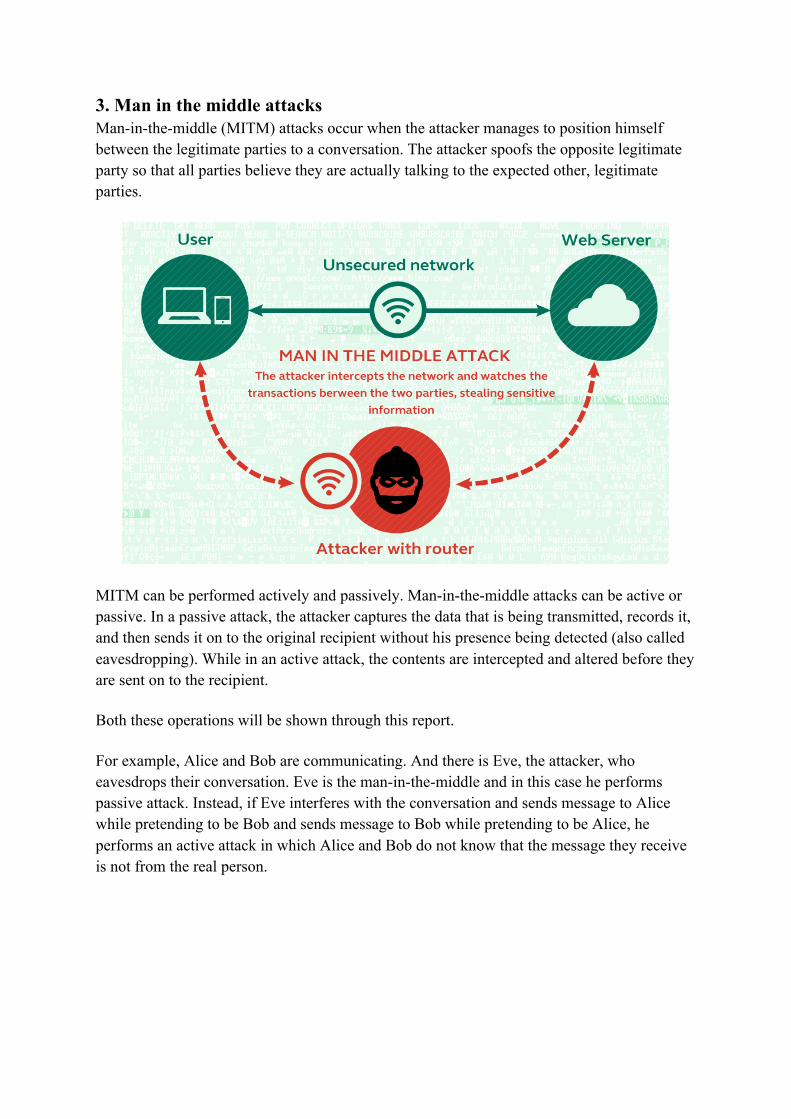
3. Man in the middle attacks Man-in-the-middle (MITM) attacks occur when the attacker manages to position himself between the legitimate parties to a conversation. The attacker spoofs the opposite legitimate party so that all parties believe they are actually talking to the expected other, legitimate parties.
MITM can be performed actively and passively. Man-in-the-middle attacks can be active or passive. In a passive attack, the attacker captures the data that is being transmitted, records it, and then sends it on to the original recipient without his presence being detected (also called eavesdropping). While in an active attack, the contents are intercepted and altered before they are sent on to the recipient. Both these operations will be shown through this report. For example, Alice and Bob are communicating. And there is Eve, the attacker, who eavesdrops their conversation. Eve is the man-in-the-middle and in this case he performs passive attack. Instead, if Eve interferes with the conversation and sends message to Alice while pretending to be Bob and sends message to Bob while pretending to be Alice, he performs an active attack in which Alice and Bob do not know that the message they receive is not from the real person.
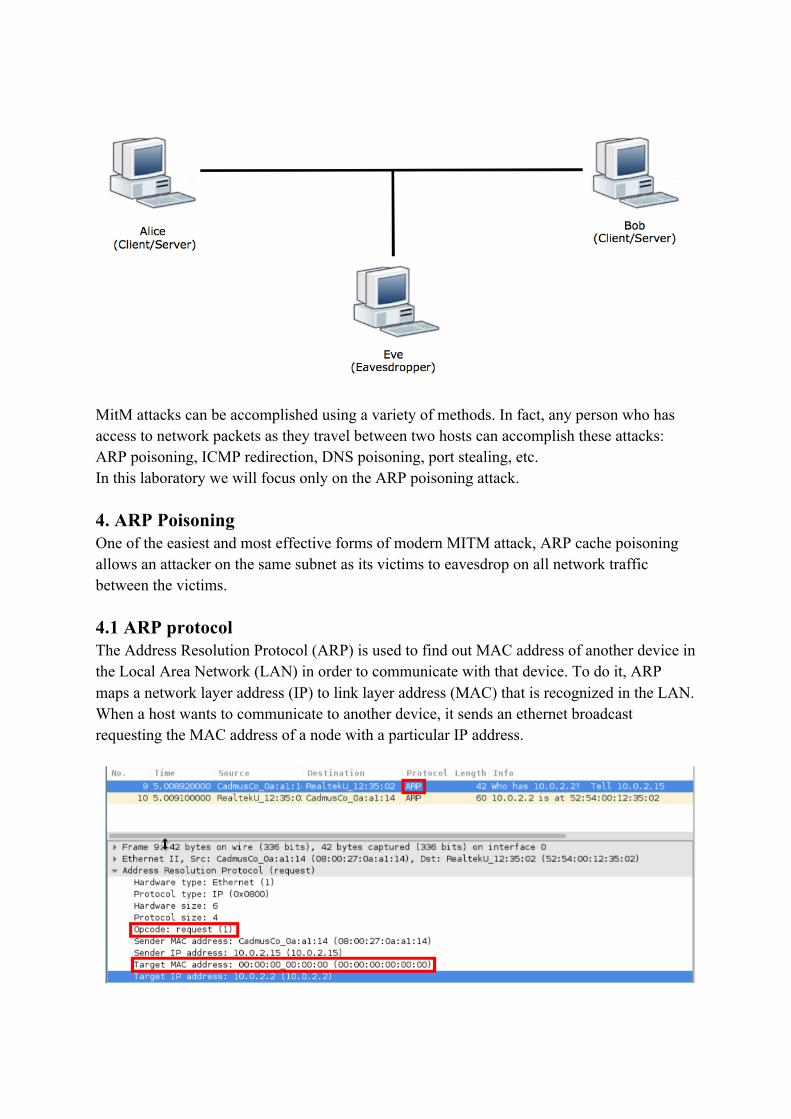
MitM attacks can be accomplished using a variety of methods. In fact, any person who has access to network packets as they travel between two hosts can accomplish these attacks: ARP poisoning, ICMP redirection, DNS poisoning, port stealing, etc. In this laboratory we will focus only on the ARP poisoning attack. 4. ARP Poisoning One of the easiest and most effective forms of modern MITM attack, ARP cache poisoning allows an attacker on the same subnet as its victims to eavesdrop on all network traffic between the victims. 4.1 ARP protocol The Address Resolution Protocol (ARP) is used to find out MAC address of another device in the Local Area Network (LAN) in order to communicate with that device. To do it, ARP maps a network layer address (IP) to link layer address (MAC) that is recognized in the LAN. When a host wants to communicate to another device, it sends an ethernet broadcast requesting the MAC address of a node with a particular IP address.
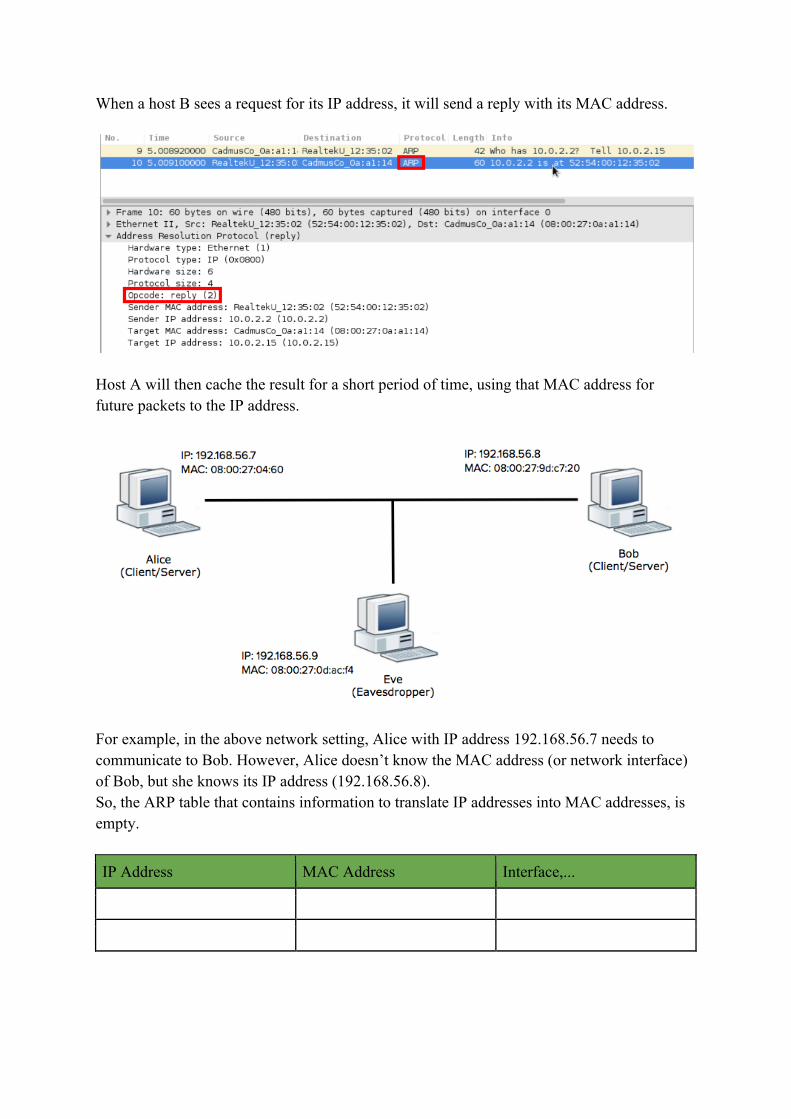
When a host B sees a request for its IP address, it will send a reply with its MAC address.
Host A will then cache the result for a short period of time, using that MAC address for future packets to the IP address.
For example, in the above network setting, Alice with IP address 192.168.56.7 needs to communicate to Bob. However, Alice doesn’t know the MAC address (or network interface) of Bob, but she knows its IP address (192.168.56.8). So, the ARP table that contains information to translate IP addresses into MAC addresses, is empty.
IP Address MAC Address Interface,...
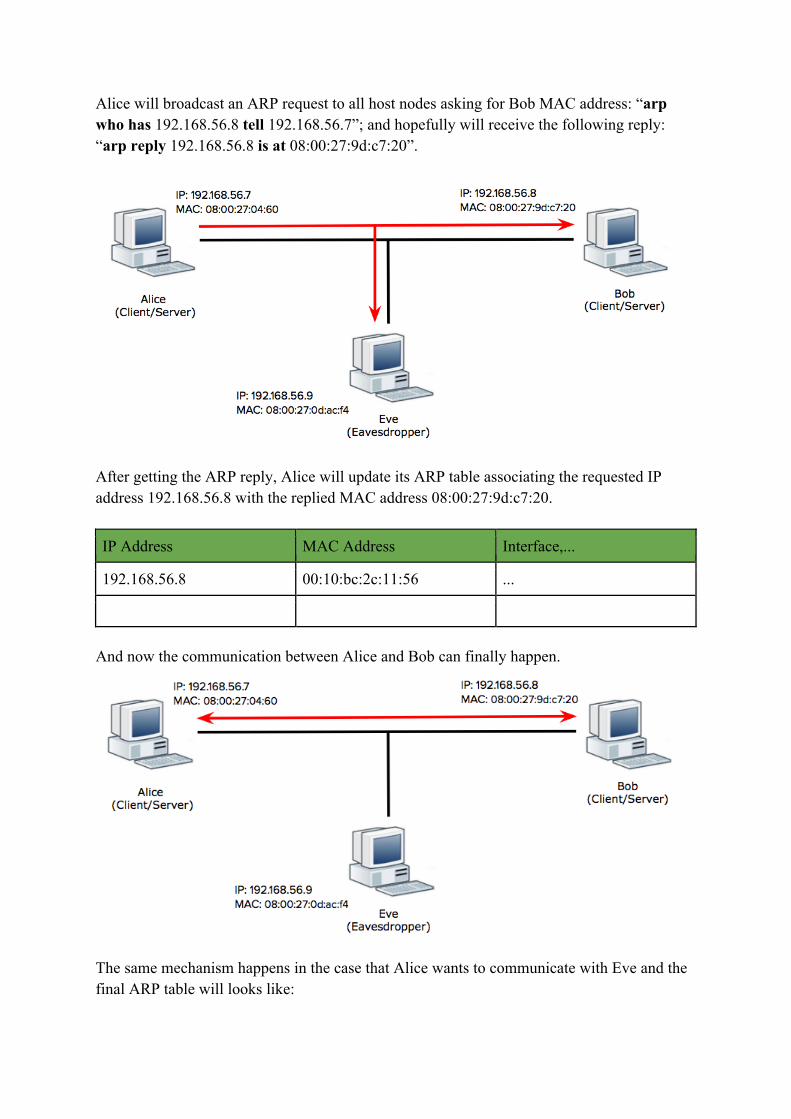
Alice will broadcast an ARP request to all host nodes asking for Bob MAC address: “arp who has 192.168.56.8 tell 192.168.56.7”; and hopefully will receive the following reply: “arp reply 192.168.56.8 is at 08:00:27:9d:c7:20”.
After getting the ARP reply, Alice will update its ARP table associating the requested IP address 192.168.56.8 with the replied MAC address 08:00:27:9d:c7:20.
IP Address MAC Address Interface,...
192.168.56.8 00:10:bc:2c:11:56 ...
And now the communication between Alice and Bob can finally happen.
The same mechanism happens in the case that Alice wants to communicate with Eve and the final ARP table will looks like:
IP Address Mac Address Interface,...
192.168.56.8 08:00:27:9d:c7:20 ...
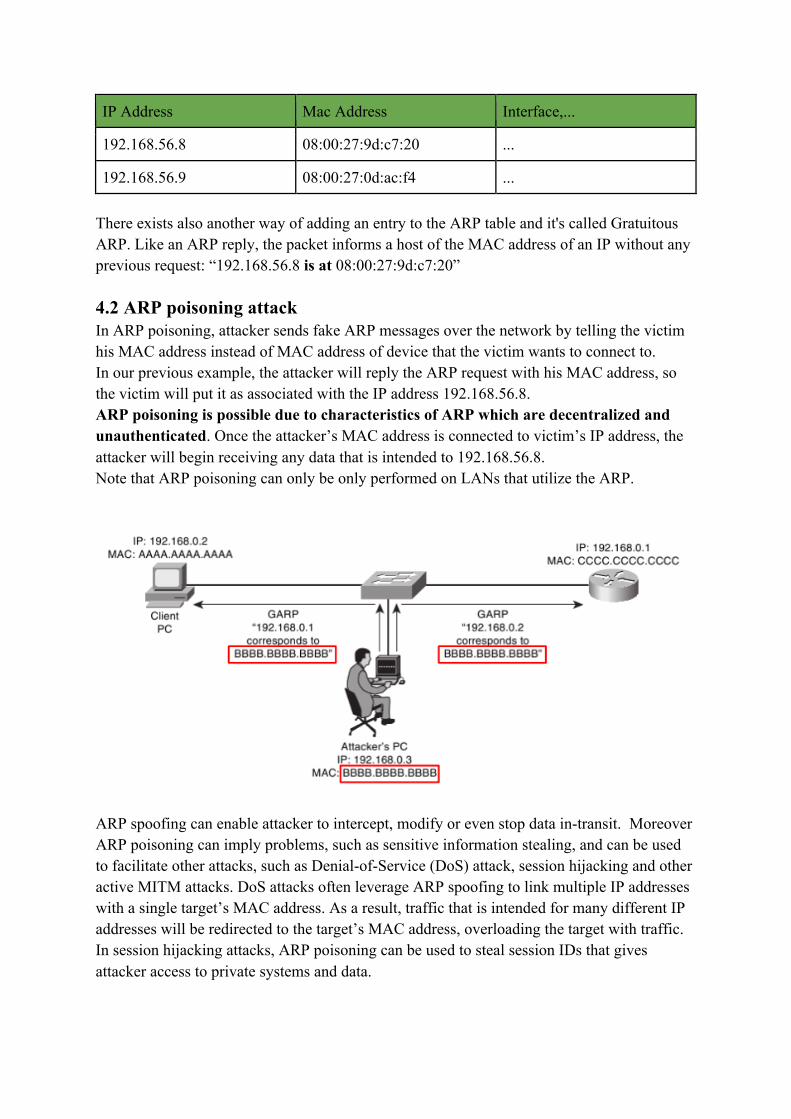
192.168.56.9 08:00:27:0d:ac:f4 ... There exists also another way of adding an entry to the ARP table and it's called Gratuitous ARP. Like an ARP reply, the packet informs a host of the MAC address of an IP without any previous request: “192.168.56.8 is at 08:00:27:9d:c7:20” 4.2 ARP poisoning attack In ARP poisoning, attacker sends fake ARP messages over the network by telling the victim his MAC address instead of MAC address of device that the victim wants to connect to. In our previous example, the attacker will reply the ARP request with his MAC address, so the victim will put it as associated with the IP address 192.168.56.8. ARP poisoning is possible due to characteristics of ARP which are decentralized and unauthenticated. Once the attacker’s MAC address is connected to victim’s IP address, the attacker will begin receiving any data that is intended to 192.168.56.8. Note that ARP poisoning can only be only performed on LANs that utilize the ARP.
ARP spoofing can enable attacker to intercept, modify or even stop data in-transit. Moreover ARP poisoning can imply problems, such as sensitive information stealing, and can be used to facilitate other attacks, such as Denial-of-Service (DoS) attack, session hijacking and other active MITM attacks. DoS attacks often leverage ARP spoofing to link multiple IP addresses with a single target’s MAC address. As a result, traffic that is intended for many different IP addresses will be redirected to the target’s MAC address, overloading the target with traffic. In session hijacking attacks, ARP poisoning can be used to steal session IDs that gives attacker access to private systems and data.
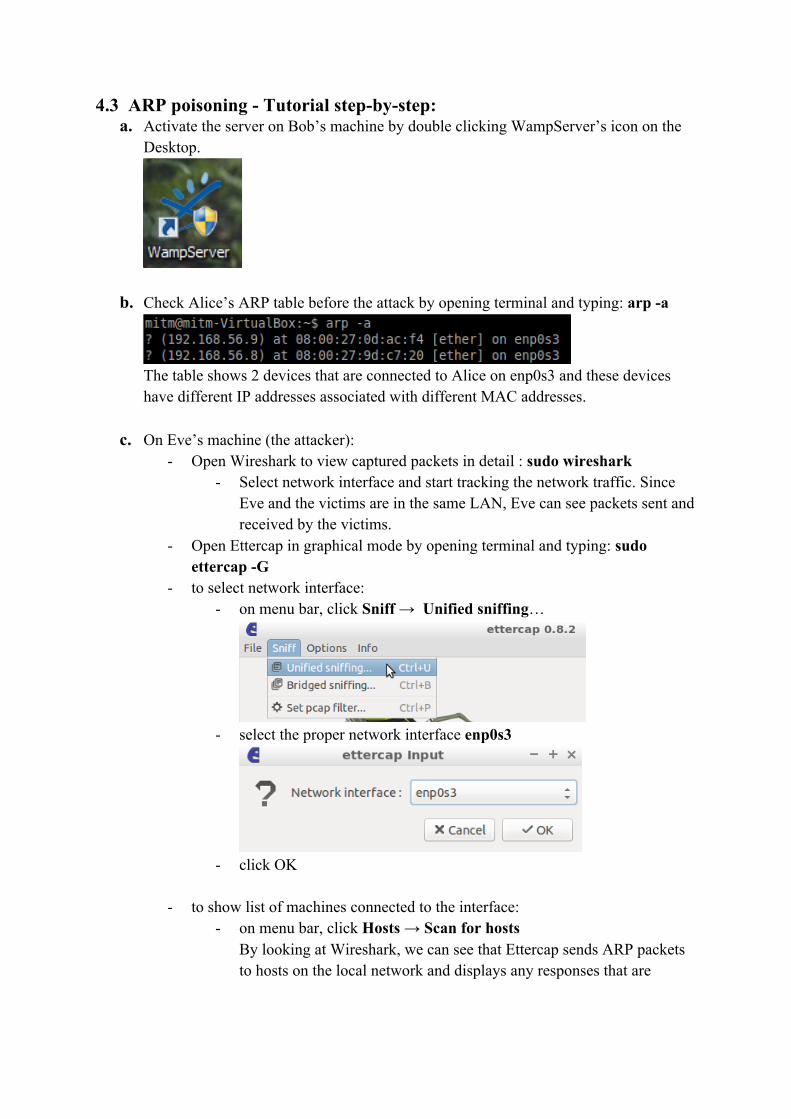
4.3 ARP poisoning - Tutorial step-by-step: a. Activate the server on Bob’s machine by double clicking WampServer’s icon on the
Desktop.
b. Check Alice’s ARP table before the attack by opening terminal and typing: arp -a
The table shows 2 devices that are connected to Alice on enp0s3 and these devices have different IP addresses associated with different MAC addresses.
c. On Eve’s machine (the attacker): - Open Wireshark to view captured packets in detail : sudo wireshark
- Select network interface and start tracking the network traffic. Since Eve and the victims are in the same LAN, Eve can see packets sent and received by the victims.
- Open Ettercap in graphical mode by opening terminal and typing: sudo ettercap -G
- to select network interface: - on menu bar, click Sniff → Unified sniffing…
- select the proper network interface enp0s3
- click OK
- to show list of machines connected to the interface:
- on menu bar, click Hosts → Scan for hosts By looking at Wireshark, we can see that Ettercap sends ARP packets to hosts on the local network and displays any responses that are
received. Here are the first 5 ARP request packets.
- Hosts → Hosts list
- to select the targets for the attack - select server’s IP address, click Add to Target 1* - select victim’s IP address, click Add to Target 2*
*can be viceversa, as there is no concept of source and destination machine. Note that if you do not select any machines as target, all the machine inside the subnet will be ARP poisoned. Depending on the size of the network, this operation could crashed the network.
- to see our current target:
- on menu bar, click Targets → Current targets - Here we can see both the IP address in their sets depending on our
previous selection.
- to perform the ARP poisoning attack: - on menu bar, click Mitm → ARP Poisoning… - check Sniff remote connections
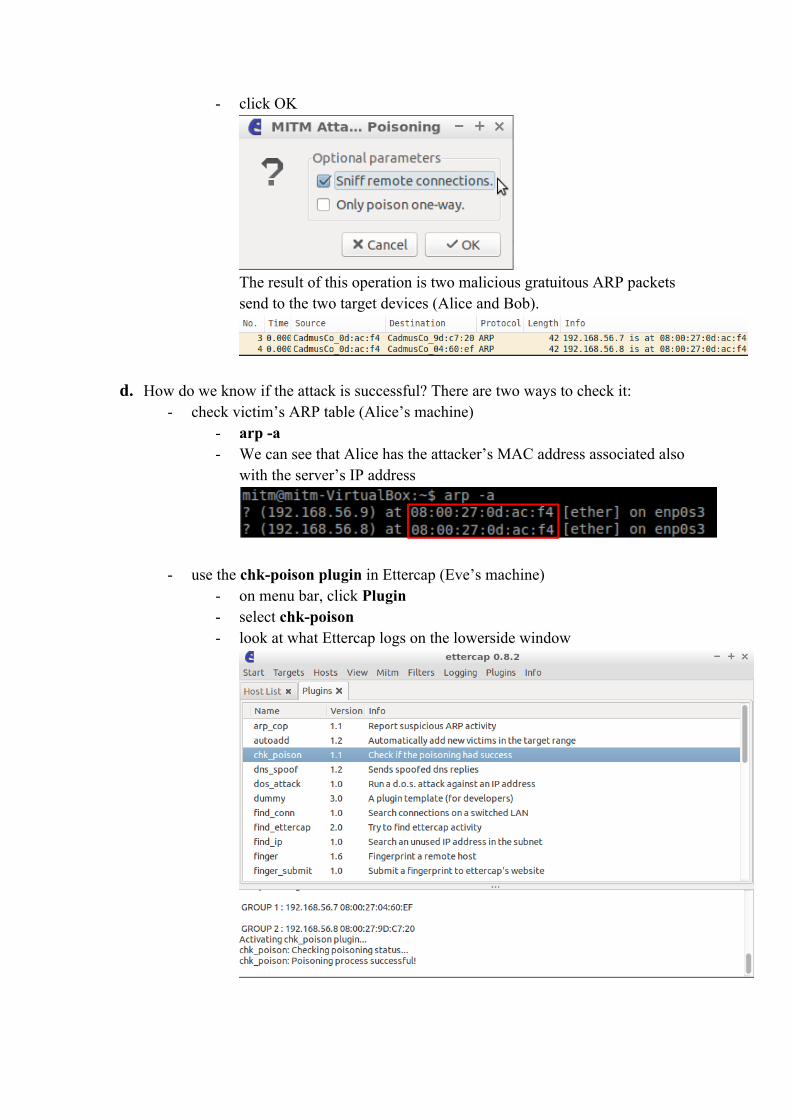
- click OK
The result of this operation is two malicious gratuitous ARP packets send to the two target devices (Alice and Bob).
d. How do we know if the attack is successful? There are two ways to check it: - check victim’s ARP table (Alice’s machine)
- arp -a - We can see that Alice has the attacker’s MAC address associated also
with the server’s IP address
- use the chk-poison plugin in Ettercap (Eve’s machine) - on menu bar, click Plugin - select chk-poison - look at what Ettercap logs on the lowerside window

e. Now that the victims have been poisoned, if we track their traffic from Wireshark on Eve’s machine, we can see packets from both victims are dropped to Eve’s machine.
f. There is an interesting case when Eve can capture sensitive information from the
victim! First, we need to do this in Alice’s machine:
- Open the browser and insert the following URL: 192.168.56.8/ab. The page will show a form with two fields, firstname and lastname, and a
submit button. - Enter any value and click submit button. If it directs Alice to a page with text
“Hello from the other side”, it means the submission is successful. Then, in the Eve’s machine:
- Open Wireshark and refresh the traffic window by clicking green icon with
reload sign on icon bar. - We can filter the traffic by typing http on filter field, since the page accessed
by Alice is an http page, and click apply button. The window will only show packets sent over http protocol.
- Find the packet with POST in the info column. - If the packet has been found, double click on the packet to see its information.
There will be some information shown in the middle window (below the main window).
- On the last point of information, line-based text data, we can see the firstname and the lastname that Alice has submitted (as it is shown in the next image).
Why does this happen? The page that Alice accessed is an http page. Http is not a secure protocol because it is not encrypted. Therefore the attacker is able to see what Alice has entered as plaintext.
g. In this step, we are going to do the same activities as the previous one, but with different page that use https in their login page.
So, in Alice’s machine: - Open the browser and insert the following URL: 192.168.56.8/wordpress - Find and click login link at the bottom on the right. It is supposed to direct
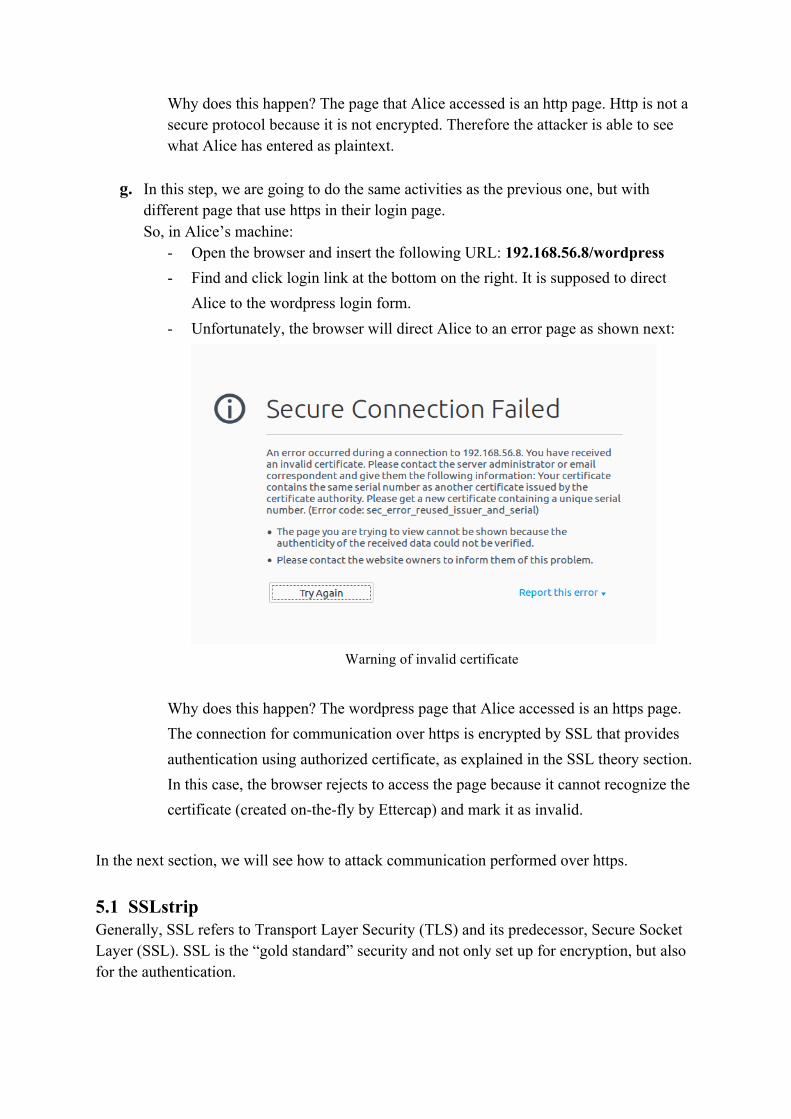
Alice to the wordpress login form. - Unfortunately, the browser will direct Alice to an error page as shown next:
Warning of invalid certificate
Why does this happen? The wordpress page that Alice accessed is an https page. The connection for communication over https is encrypted by SSL that provides authentication using authorized certificate, as explained in the SSL theory section. In this case, the browser rejects to access the page because it cannot recognize the certificate (created on-the-fly by Ettercap) and mark it as invalid.
In the next section, we will see how to attack communication performed over https. 5.1 SSLstrip Generally, SSL refers to Transport Layer Security (TLS) and its predecessor, Secure Socket Layer (SSL). SSL is the “gold standard” security and not only set up for encryption, but also for the authentication.

SSL uses certificates that utilize public key and private key as a way to perform authentication. Https (http over SSL protocol) is an example of SSL implementations. By using SSL certificate, web users are convinced that they are communicating with the right web server, not an attacker that pretends to be a website. A valid certificate is signed by a “trusted” Certificate Authority (CA) which is recognized by the browser. If an attacker tries to make his own certificate, browser will warn the user that the certificate is not trustworthy and the user would better cancel the website visit due to a man-in-the-middle attack possibility. If the user ignores the warning (as the one shown in 4.3 point g), it is the user’s fault or the interface having a poor usability, not the protocol’s weakness.
According to a Google research in 2015, 70% of Google Chrome users were willing to ignore the warnings about an expired SSL certificate and “proceed anyway”. The more tech-savvy the user, the more likely they would be to ignore it...
Nowadays, most of websites use https. And most of them are designed to be able to receive request both from http (port 80) and https (port 443). The http site can not be trusted since it does not provide any authentication. The site on port 80 usually is only a gate to the real secure site on port 443. For example, if the user accesses the site via port 80, so he types www.website.com instead of https://www.website.com, the server will give him a link or a redirect response to the https URL. If the user does not have knowledge or pay attention to protocol used by the website he accesses, the attacker will be able to perform his attack when the user is still in http site, which is not secure. SSLstrip is a tool invented by Moxie Marlinspike, which exploits the fact that https is regularly negotiated over http. It performs a man-in-the-middle attack over http with intention to attack websites protected by https. This tool prevents redirection from http to https by changing the response from the server so that user will be still on http page.
This is how SSL stripping works:
1. Suppose that Eve is intercepting all traffic on the network. 2. Alice visits the webpage http://bob.com 3. http://bob.com sends back a redirect to https://bob.com 4. Eve intercepts the redirect and acts as the other end of the TLS (https) session with
https://bob.com, sending an unencrypted version of the content back to Bob (by removing the ‘s’). Eve also makes all requests on Alice’s behalf over its TLS connection with https://bob.com.
5. As far as https://bob.com is concerned, Alice is using the site over a TLS (https) connection.
6. As far as Alice is concerned, she's using the site over a regular HTTP connection. An internet-savvy Alice would perhaps notice the lack of a padlock icon. The padlock icon could be actually sent by Eve and shown in Alice’s browser (see the video in the references for more information about this).
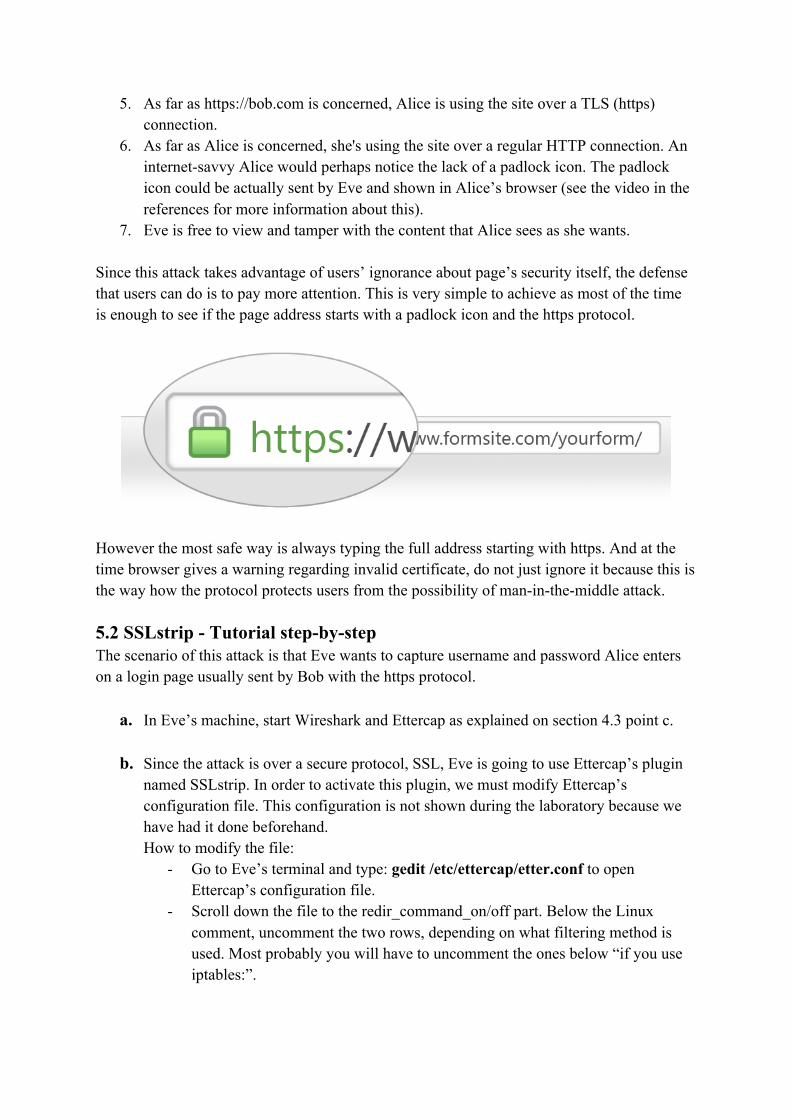
7. Eve is free to view and tamper with the content that Alice sees as she wants. Since this attack takes advantage of users’ ignorance about page’s security itself, the defense that users can do is to pay more attention. This is very simple to achieve as most of the time is enough to see if the page address starts with a padlock icon and the https protocol.
However the most safe way is always typing the full address starting with https. And at the time browser gives a warning regarding invalid certificate, do not just ignore it because this is the way how the protocol protects users from the possibility of man-in-the-middle attack. 5.2 SSLstrip - Tutorial step-by-step The scenario of this attack is that Eve wants to capture username and password Alice enters on a login page usually sent by Bob with the https protocol.
a. In Eve’s machine, start Wireshark and Ettercap as explained on section 4.3 point c.
b. Since the attack is over a secure protocol, SSL, Eve is going to use Ettercap’s plugin named SSLstrip. In order to activate this plugin, we must modify Ettercap’s configuration file. This configuration is not shown during the laboratory because we have had it done beforehand. How to modify the file:
- Go to Eve’s terminal and type: gedit /etc/ettercap/etter.conf to open Ettercap’s configuration file.
- Scroll down the file to the redir_command_on/off part. Below the Linux comment, uncomment the two rows, depending on what filtering method is used. Most probably you will have to uncomment the ones below “if you use iptables:”.
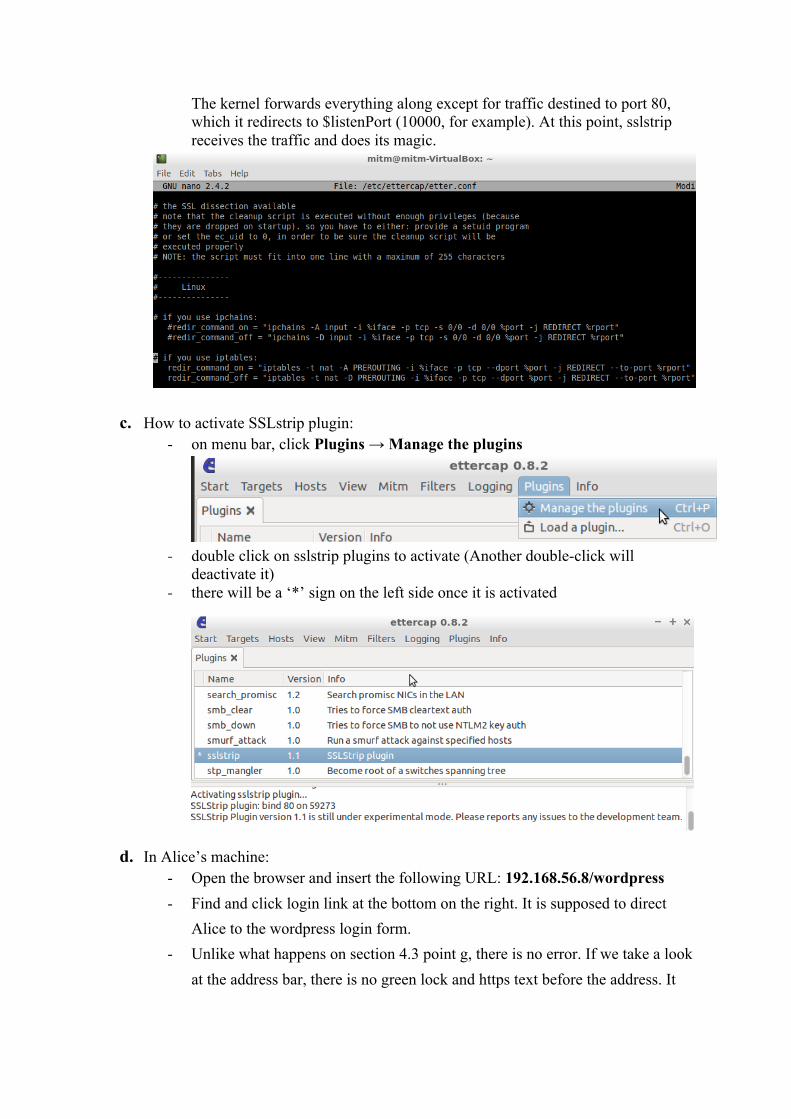
The kernel forwards everything along except for traffic destined to port 80, which it redirects to $listenPort (10000, for example). At this point, sslstrip receives the traffic and does its magic.
c. How to activate SSLstrip plugin: - on menu bar, click Plugins → Manage the plugins
- double click on sslstrip plugins to activate (Another double-click will
deactivate it) - there will be a ‘*’ sign on the left side once it is activated
d. In Alice’s machine: - Open the browser and insert the following URL: 192.168.56.8/wordpress - Find and click login link at the bottom on the right. It is supposed to direct
Alice to the wordpress login form. - Unlike what happens on section 4.3 point g, there is no error. If we take a look
at the address bar, there is no green lock and https text before the address. It
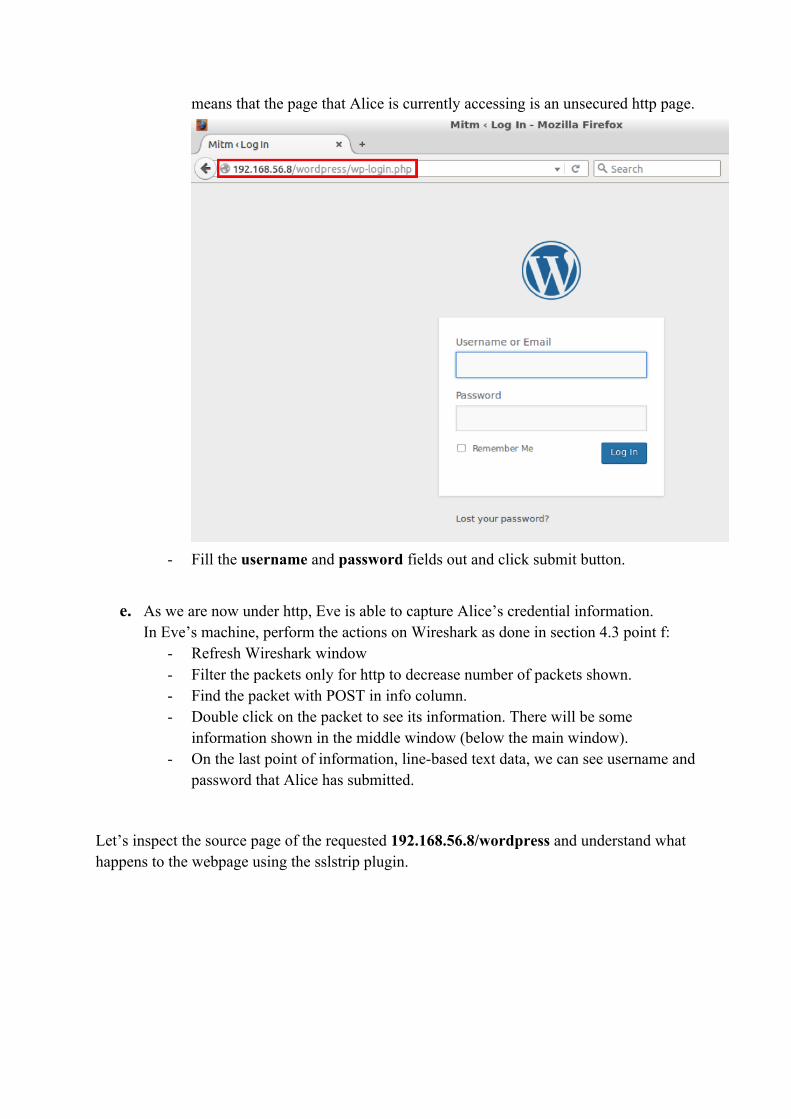
means that the page that Alice is currently accessing is an unsecured http page.
- Fill the username and password fields out and click submit button.
e. As we are now under http, Eve is able to capture Alice’s credential information. In Eve’s machine, perform the actions on Wireshark as done in section 4.3 point f:
- Refresh Wireshark window - Filter the packets only for http to decrease number of packets shown. - Find the packet with POST in info column. - Double click on the packet to see its information. There will be some
information shown in the middle window (below the main window). - On the last point of information, line-based text data, we can see username and
password that Alice has submitted.
Let’s inspect the source page of the requested 192.168.56.8/wordpress and understand what happens to the webpage using the sslstrip plugin.
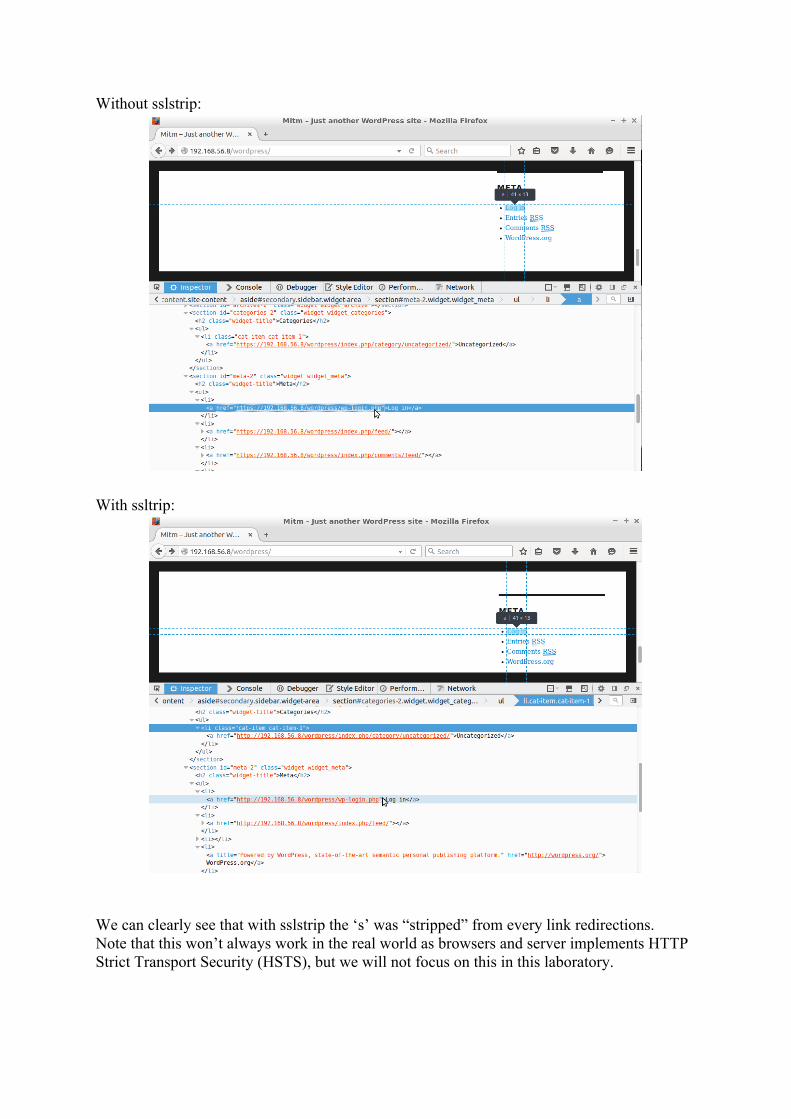
Without sslstrip:
With ssltrip:
We can clearly see that with sslstrip the ‘s’ was “stripped” from every link redirections. Note that this won’t always work in the real world as browsers and server implements HTTP Strict Transport Security (HSTS), but we will not focus on this in this laboratory.
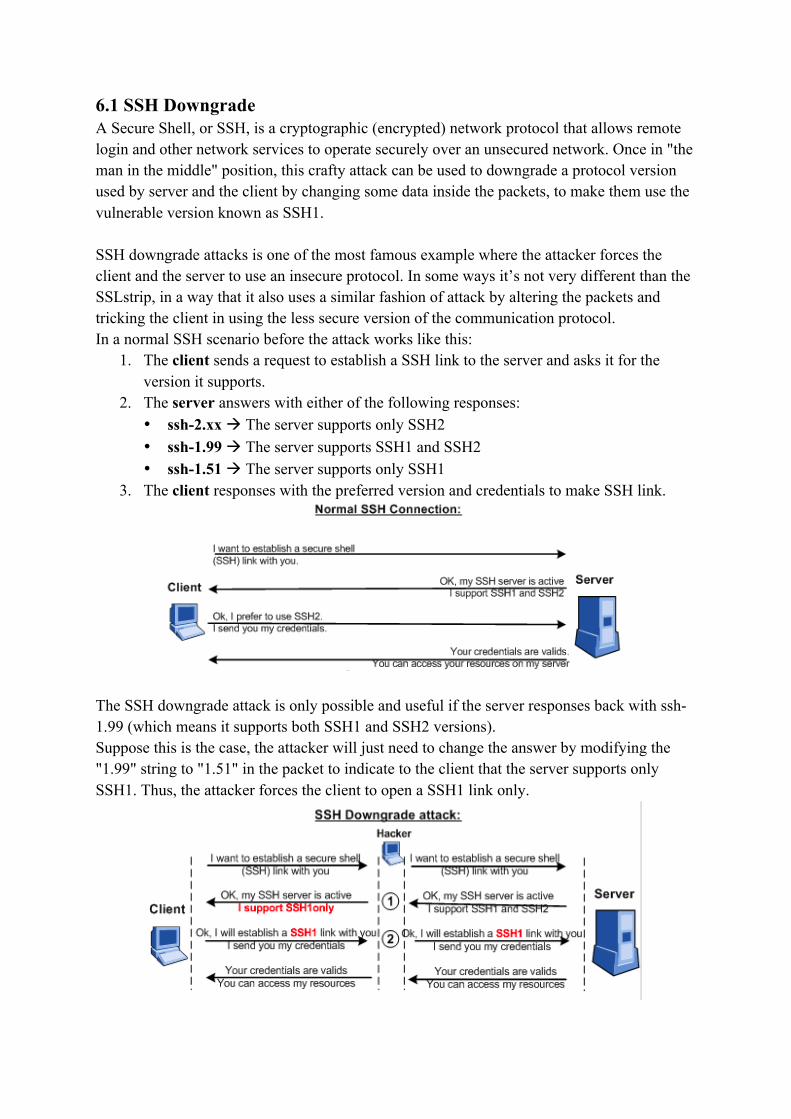
6.1 SSH Downgrade A Secure Shell, or SSH, is a cryptographic (encrypted) network protocol that allows remote login and other network services to operate securely over an unsecured network. Once in "the man in the middle" position, this crafty attack can be used to downgrade a protocol version used by server and the client by changing some data inside the packets, to make them use the vulnerable version known as SSH1. SSH downgrade attacks is one of the most famous example where the attacker forces the client and the server to use an insecure protocol. In some ways it’s not very different than the SSLstrip, in a way that it also uses a similar fashion of attack by altering the packets and tricking the client in using the less secure version of the communication protocol. In a normal SSH scenario before the attack works like this:
1. The client sends a request to establish a SSH link to the server and asks it for the version it supports.
2. The server answers with either of the following responses: • ssh-2.xx à The server supports only SSH2 • ssh-1.99 à The server supports SSH1 and SSH2 • ssh-1.51 à The server supports only SSH1
3. The client responses with the preferred version and credentials to make SSH link.
The SSH downgrade attack is only possible and useful if the server responses back with ssh-1.99 (which means it supports both SSH1 and SSH2 versions). Suppose this is the case, the attacker will just need to change the answer by modifying the "1.99" string to "1.51" in the packet to indicate to the client that the server supports only SSH1. Thus, the attacker forces the client to open a SSH1 link only.
The credentials are captured finally captured by the attacker because of a SSH1 vulnerability, named SSH insertion attack, exploited by Ettercap. In particular, the protocol, when used in CBC and in CFB modes, it allows remote attackers to insert arbitrary data into an existing stream between an SSH client and server by using a known plaintext attack and computing a valid CRC-32 checksum for the packet. For more info about the vulnerability look at the references section. 6.2 Lab Preparation In our laboratory, the server is configured to support both SSH1 and SSH2 and the client is set to use SSH2 and SSH1, but SSH2 as preferred. In this part of the laboratory, Alice VM (Linux) will act as the SSH server and Bob VM (Win) will be the SSH client. For the SSH server we use OpenSSH on the Linux operating system. OpenSSH is the premier connectivity tool for remote login with the SSH protocol. It encrypts all traffic to eliminate eavesdropping, connection hijacking, and other attacks. In addition, OpenSSH provides a large suite of secure tunneling capabilities, several authentication methods, and sophisticated configuration options. To install it you can type apt-get install openssh-server in your terminal By default, OpenSSH server has only SSH2 enabled. To activate SSH1, you have first to open the /etc/ssh/sshd_config file and update the line about "Protocol 2” to “Protocol 1,2” You also need to create a SSH1 key pair, otherwise you will have the following error after the SSH server reboot: ERROR: Disabling protocol version 1. Could not load host key. For generating the key pair we used ssh-keygen with RSA encryption. To generate the key, type in your terminal ssh-keygen -t rsa1 -f /etc/ssh/ssh_host_key -N "" and follow the onscreen instructions to generate the key. Now add the key path into the sshd_config file: I.e -> HostKey /etc/ssh/ssh_host_key
Finally, restart the server: # /etc/init.d/ssh restart
* Restarting OpenBSD Secure Shell server sshd The SSH server is now configured to accept SSH1 and SSH2 and thus provides a "ssh-1.99" response. We can check it with the following command:
#telnet server_ip_address 22
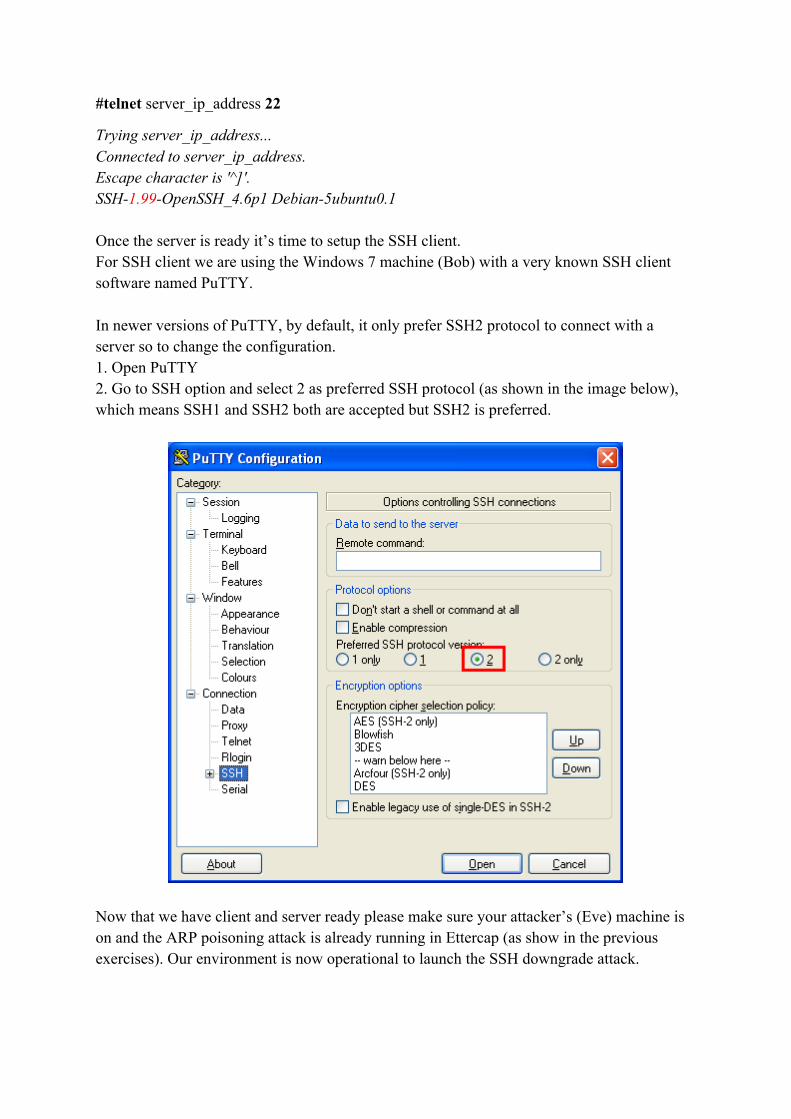
Trying server_ip_address... Connected to server_ip_address. Escape character is '^]'. SSH-1.99-OpenSSH_4.6p1 Debian-5ubuntu0.1 Once the server is ready it’s time to setup the SSH client. For SSH client we are using the Windows 7 machine (Bob) with a very known SSH client software named PuTTY. In newer versions of PuTTY, by default, it only prefer SSH2 protocol to connect with a server so to change the configuration. 1. Open PuTTY 2. Go to SSH option and select 2 as preferred SSH protocol (as shown in the image below), which means SSH1 and SSH2 both are accepted but SSH2 is preferred.
Now that we have client and server ready please make sure your attacker’s (Eve) machine is on and the ARP poisoning attack is already running in Ettercap (as show in the previous exercises). Our environment is now operational to launch the SSH downgrade attack.
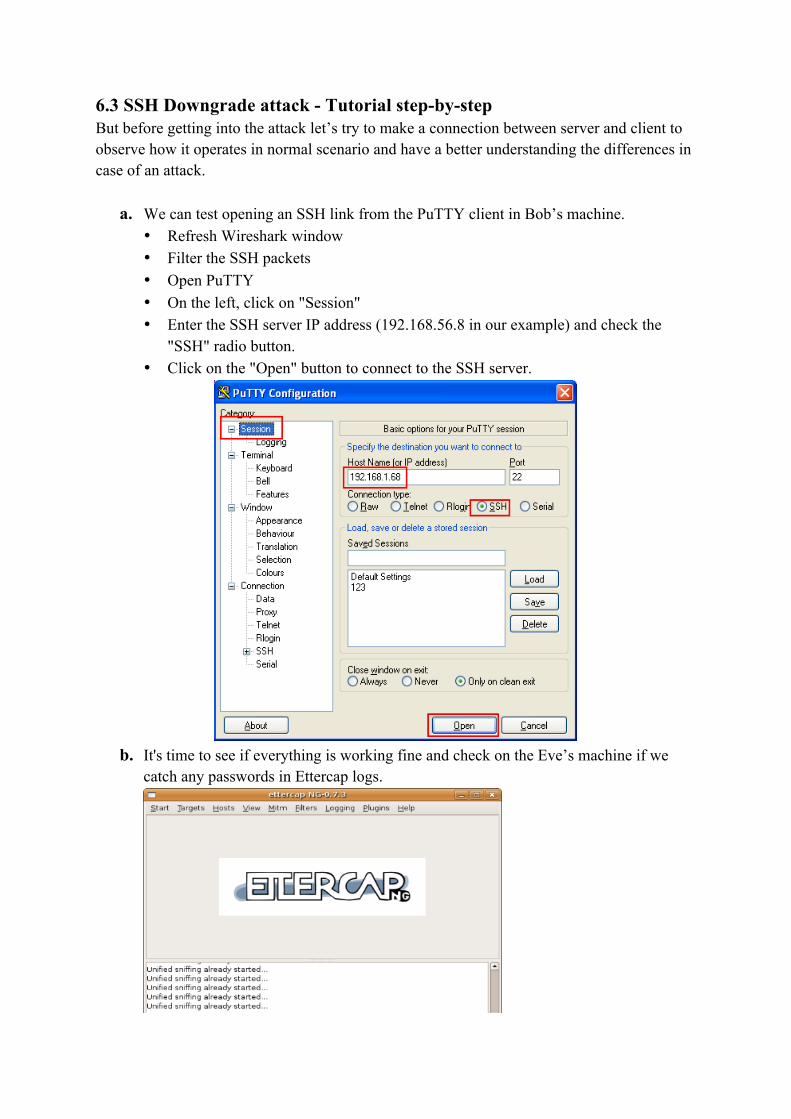
6.3 SSH Downgrade attack - Tutorial step-by-step But before getting into the attack let’s try to make a connection between server and client to observe how it operates in normal scenario and have a better understanding the differences in case of an attack.
a. We can test opening an SSH link from the PuTTY client in Bob’s machine. • Refresh Wireshark window • Filter the SSH packets • Open PuTTY • On the left, click on "Session" • Enter the SSH server IP address (192.168.56.8 in our example) and check the
"SSH" radio button. • Click on the "Open" button to connect to the SSH server.
b. It's time to see if everything is working fine and check on the Eve’s machine if we
catch any passwords in Ettercap logs.

We can also observe Wireshark packets from the SSH server during the SSH link establishment. Here we can also notice that the connection happened with SSHv2 protocol and we can see that all packets are encrypted.
c. Let’s start the attack saying that Ettercap’s modular architecture makes it possible to write attacks in form of filters. Along with that it also offers a wide range of predefined filters. One of them is ours SSH downgrade attack. • You can find file at this path /usr/share/ettercap/etter.filter.ssh
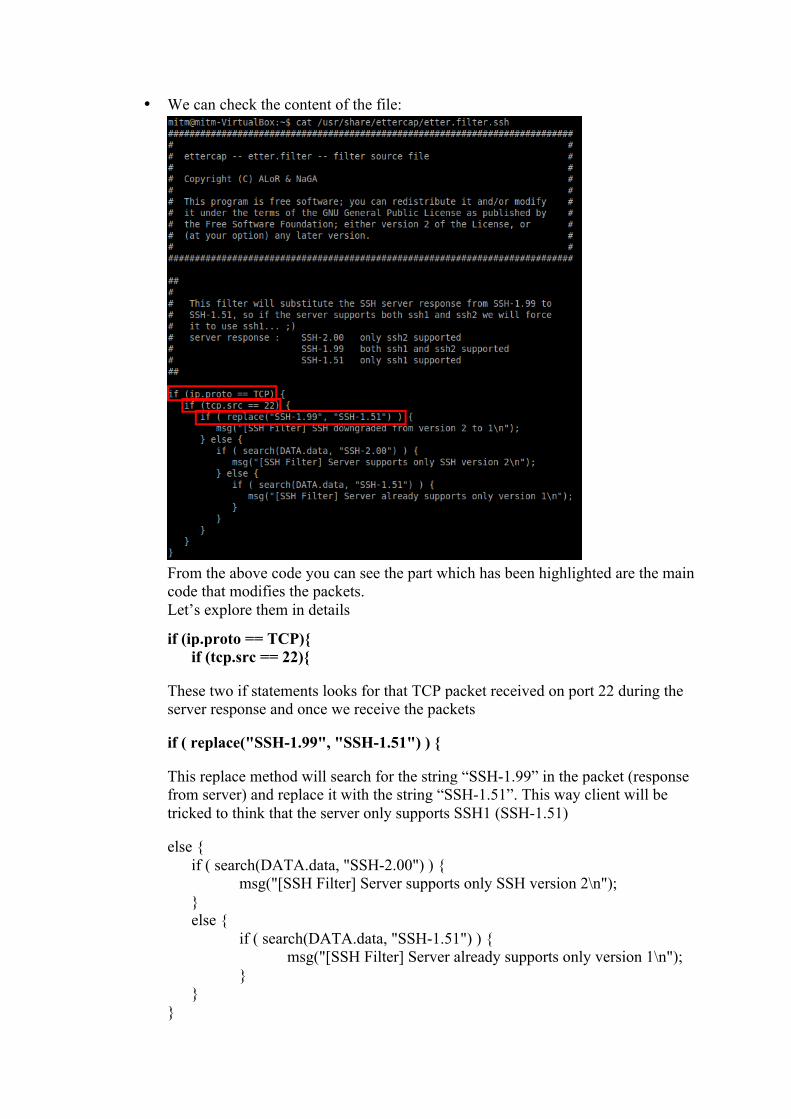
• We can check the content of the file:
From the above code you can see the part which has been highlighted are the main code that modifies the packets. Let’s explore them in details
if (ip.proto == TCP){ if (tcp.src == 22){ These two if statements looks for that TCP packet received on port 22 during the server response and once we receive the packets if ( replace("SSH-1.99", "SSH-1.51") ) { This replace method will search for the string “SSH-1.99” in the packet (response from server) and replace it with the string “SSH-1.51”. This way client will be tricked to think that the server only supports SSH1 (SSH-1.51) else { if ( search(DATA.data, "SSH-2.00") ) { msg("[SSH Filter] Server supports only SSH version 2\n"); } else { if ( search(DATA.data, "SSH-1.51") ) { msg("[SSH Filter] Server already supports only version 1\n"); } } }

And the remaining code (above) just adds some logs in case replace method don’t find the string “SSH-1.99” in the packets then it searches for other possible strings like “SSH-1.51” and “SSH-2.0” and logs the messages accordingly
• To use filters with Ettercap you need to compile the source code with ettercap’s
compiler called etterfilter. So let’s type in the terminal: etterfilter usr/share/ettercap/etter.filter.ssh -o etter.filter.ssh.co
• You can now load the compiled filter in Ettercap by going on the menu bar and clicking Filters → Load a filter…
• Select the compiled filter etter.filter.ssh.co from the path you saved.
• If you see a success message in ettercap logs “The filter has been loaded”, we are ready to open an SSH link from the client.
d. We can do again the activities we did on 6.3 point a. So, opening an SSH link from the PuTTY client in Bob’s machine.
e. It's time to see if everything is working fine and check on the attacker’s machine (Eve) if we catch the SSH1 password.
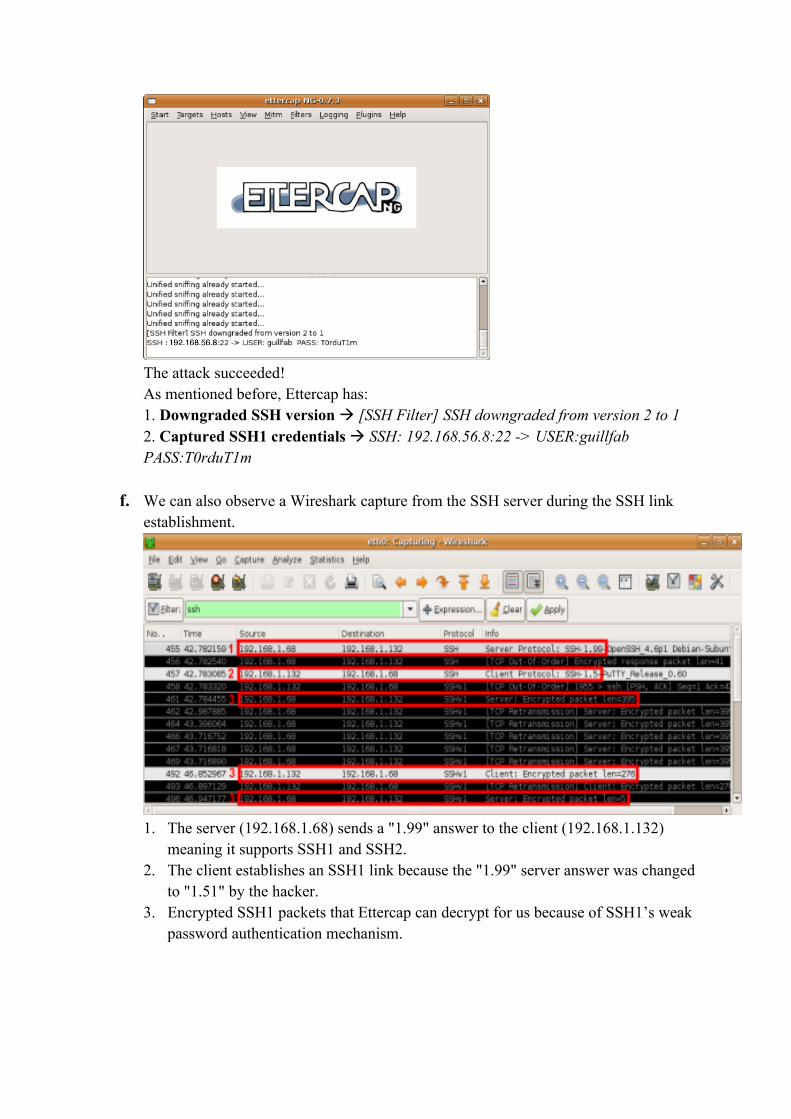
The attack succeeded! As mentioned before, Ettercap has: 1. Downgraded SSH version à [SSH Filter] SSH downgraded from version 2 to 1 2. Captured SSH1 credentials à SSH: 192.168.56.8:22 -> USER:guillfab PASS:T0rduT1m
f. We can also observe a Wireshark capture from the SSH server during the SSH link
establishment.
1. The server (192.168.1.68) sends a "1.99" answer to the client (192.168.1.132)
meaning it supports SSH1 and SSH2. 2. The client establishes an SSH1 link because the "1.99" server answer was changed
to "1.51" by the hacker. 3. Encrypted SSH1 packets that Ettercap can decrypt for us because of SSH1’s weak
password authentication mechanism.
g. How can we avoid SSH downgrade attacks ? • SSH1 must NEVER be used on a SSH server and SSH2 forced on the client
By default, only SSHv2 is enabled on the OpenSSH server while it is frequent to see SSHv1 and SSHv2 enabled on the clients such as Putty. Let's see how we can secure the SSH client and server:
Ø To secure the SSH server (Alice VM): Open /etc/ssh/sshd_config file and check that only the SSH2 protocol is enabled. If not, vim /etc/ssh/sshd_config and insert “Protocol 2” If you make a change, don’t forget to restart the server with "#/etc/init.d/ssh restart". Then to be sure your server really supports only SSH2, do the following telnet command: $telnet server_ip_address 22 Trying server_ip_address... Connected to server_ip_address. Escape character is '^]'. SSH-2.0-OpenSSH_4.6p1 Debian-5ubuntu0.1 The value in red must not be under 2.0.
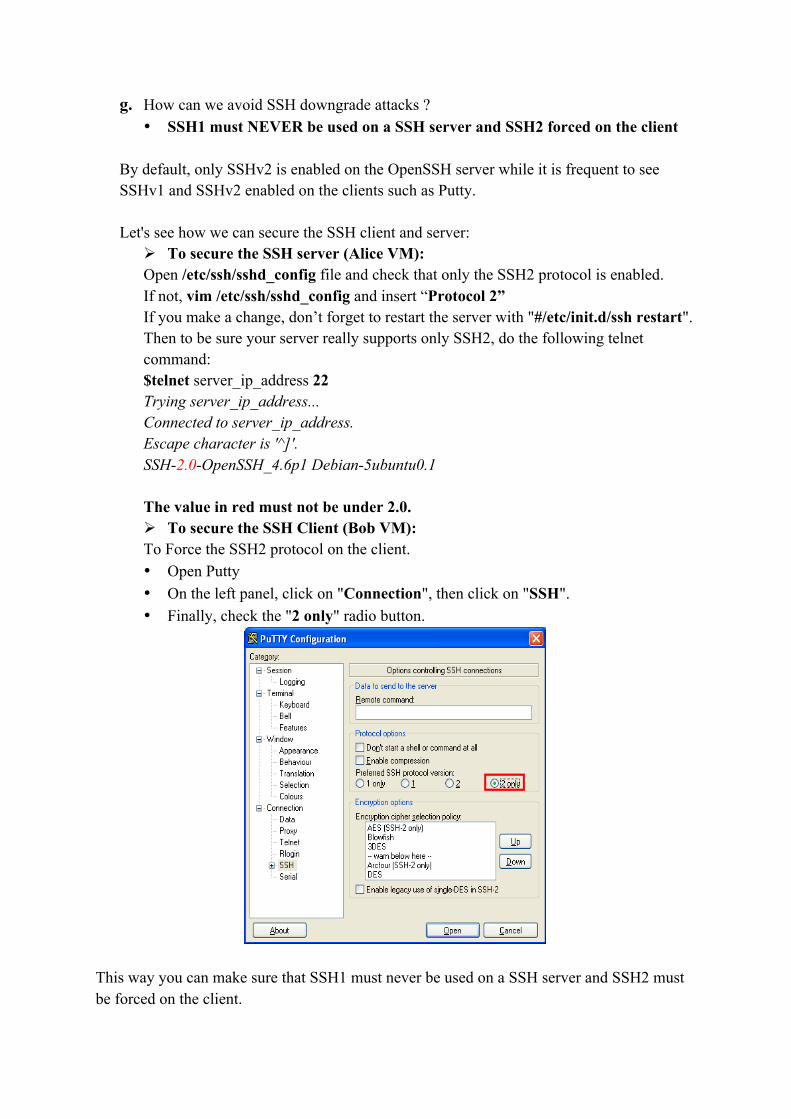
Ø To secure the SSH Client (Bob VM): To Force the SSH2 protocol on the client.
• Open Putty • On the left panel, click on "Connection", then click on "SSH". • Finally, check the "2 only" radio button.
This way you can make sure that SSH1 must never be used on a SSH server and SSH2 must be forced on the client.
7. Countermeasures 7.1 ARP Spoofing Fighting effectively against ARP poisoning with efficiency is not an easy task because the ARP protocol provides no possibilities to establish the authenticity of the source of incoming packets.
Despite all, there are some ways to protect your machines against spoofers/poisoners by using:
• Static ARP
• Surveillance tools (such as Arpwatch, Ettercap or Snort IDS) 7.1.1 Static ARP Static ARP-ing is a prevention action in which we manually configure IP to MAC mappings and are kept in the cache on a permanent basis (as for the communication with a known router). Therefore, it cannot be modified with ARP reply. The following is the steps for implementing static ARP:
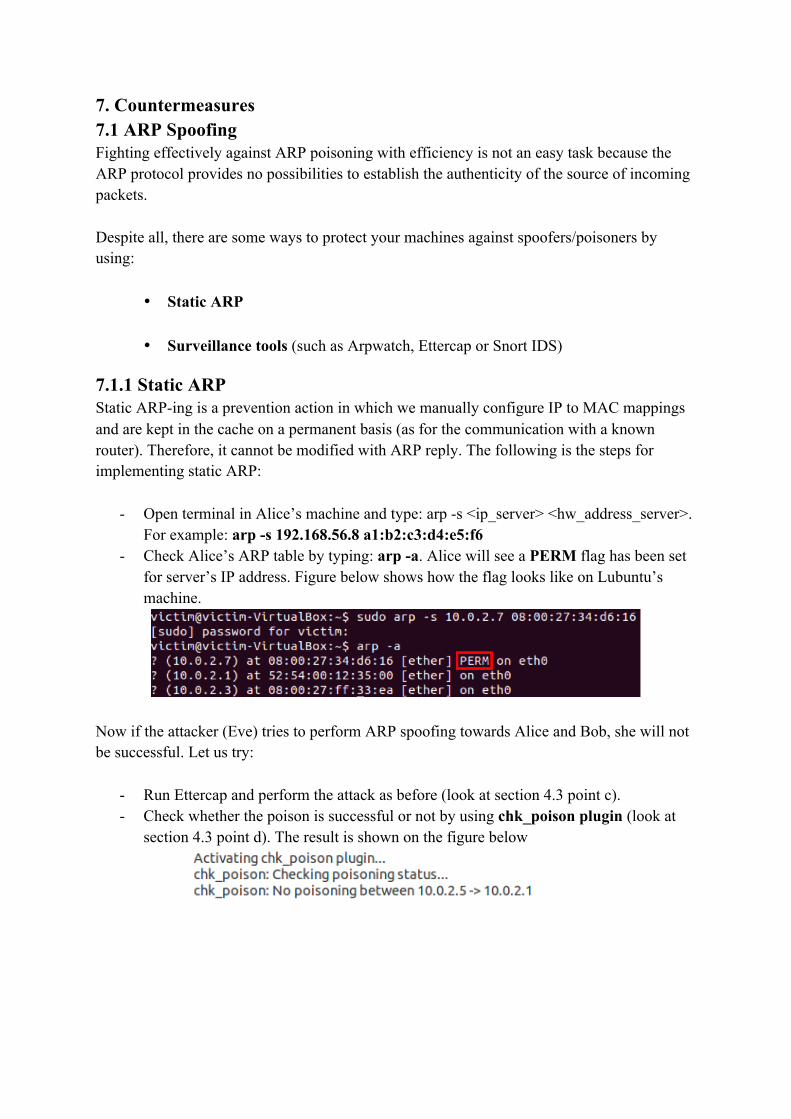
- Open terminal in Alice’s machine and type: arp -s <ip_server> <hw_address_server>. For example: arp -s 192.168.56.8 a1:b2:c3:d4:e5:f6
- Check Alice’s ARP table by typing: arp -a. Alice will see a PERM flag has been set for server’s IP address. Figure below shows how the flag looks like on Lubuntu’s machine.
Now if the attacker (Eve) tries to perform ARP spoofing towards Alice and Bob, she will not be successful. Let us try:
- Run Ettercap and perform the attack as before (look at section 4.3 point c). - Check whether the poison is successful or not by using chk_poison plugin (look at
section 4.3 point d). The result is shown on the figure below
7.1.2 Surveillance tools In this laboratory we will just focus on Ettercap as a surveillance tools. scan_poisoners plugin scan_poisoners checks the hosts list, searching for equal mac addresses. It also sends ICMP packets to see if any IP-MAC association has changed. Now, suppose that Alice has Ettercap installed in her machine. Now, imagine the victim as an user trying to defend from ARP poisoning attacks. The following is the scenario for using the plugins:
a. In attacker’s machine (Eve): • Perform the ARP poisoning attack (look at section 4.3 point c)
b. In victim’s machine (Alice):
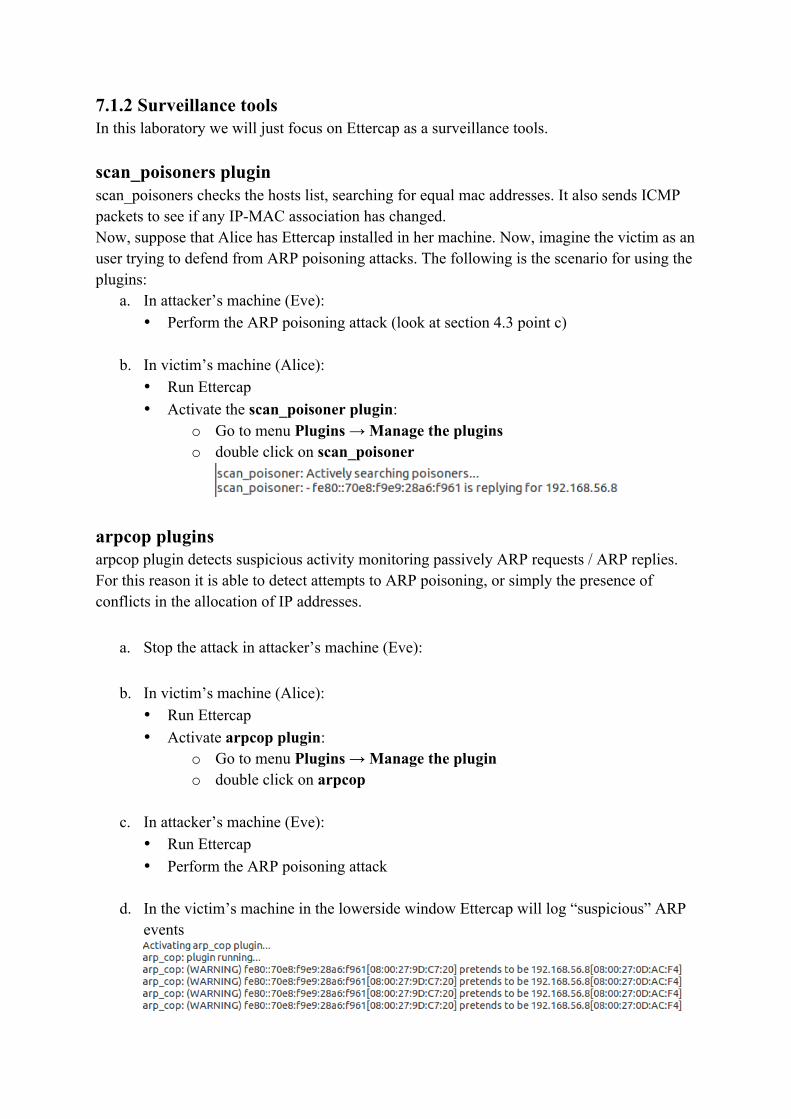
• Run Ettercap • Activate the scan_poisoner plugin:
o Go to menu Plugins → Manage the plugins o double click on scan_poisoner
arpcop plugins arpcop plugin detects suspicious activity monitoring passively ARP requests / ARP replies. For this reason it is able to detect attempts to ARP poisoning, or simply the presence of conflicts in the allocation of IP addresses.
a. Stop the attack in attacker’s machine (Eve):
b. In victim’s machine (Alice): • Run Ettercap • Activate arpcop plugin:
o Go to menu Plugins → Manage the plugin o double click on arpcop
c. In attacker’s machine (Eve):
• Run Ettercap • Perform the ARP poisoning attack
d. In the victim’s machine in the lowerside window Ettercap will log “suspicious” ARP
events
8. More from Ettercap... Ettercap offers a lot of others features we couldn’t discussed. Before concluding let’s see another filter we found during our research. 8.1 Image filtering We saw that Ettercap can use filters to find specific portions of bytes in the packets, alter and then easily replace information with whatever the attacker wants. In specific, this filter is going replace all web images within a requested webpage with an image selected by us (attackers).
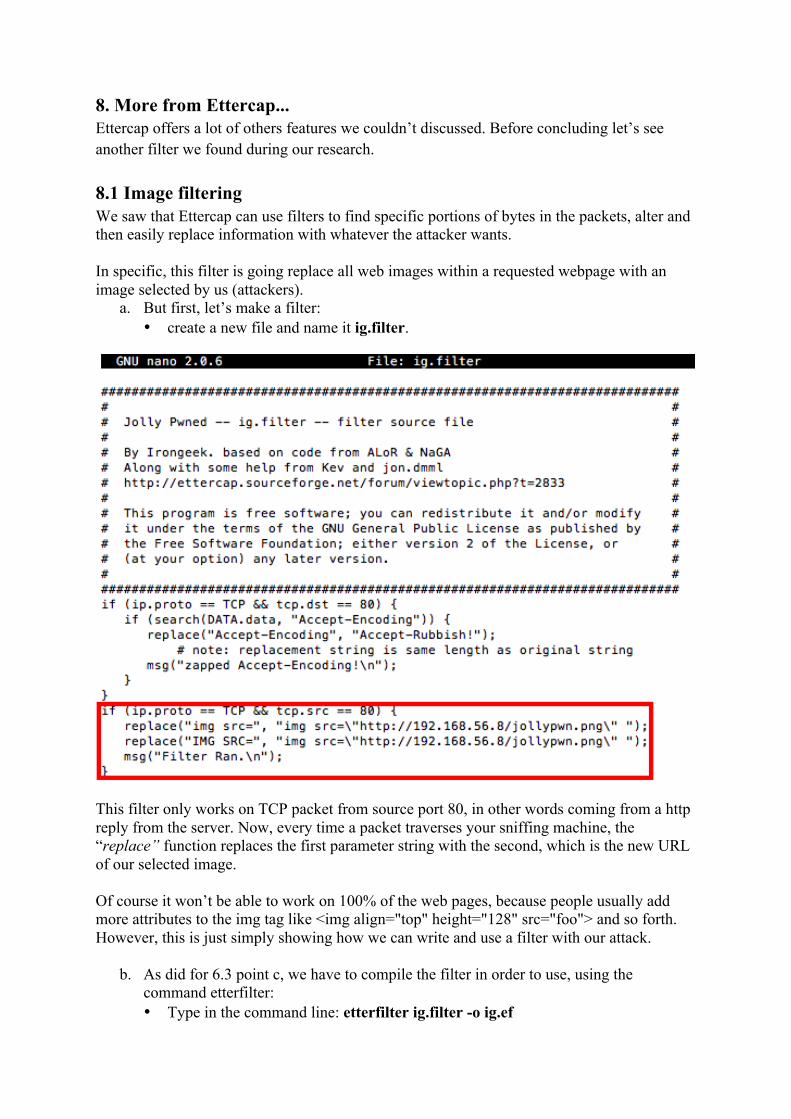
a. But first, let’s make a filter: • create a new file and name it ig.filter.
This filter only works on TCP packet from source port 80, in other words coming from a http reply from the server. Now, every time a packet traverses your sniffing machine, the “replace” function replaces the first parameter string with the second, which is the new URL of our selected image. Of course it won’t be able to work on 100% of the web pages, because people usually add more attributes to the img tag like <img align="top" height="128" src="foo"> and so forth. However, this is just simply showing how we can write and use a filter with our attack.
b. As did for 6.3 point c, we have to compile the filter in order to use, using the command etterfilter: • Type in the command line: etterfilter ig.filter -o ig.ef
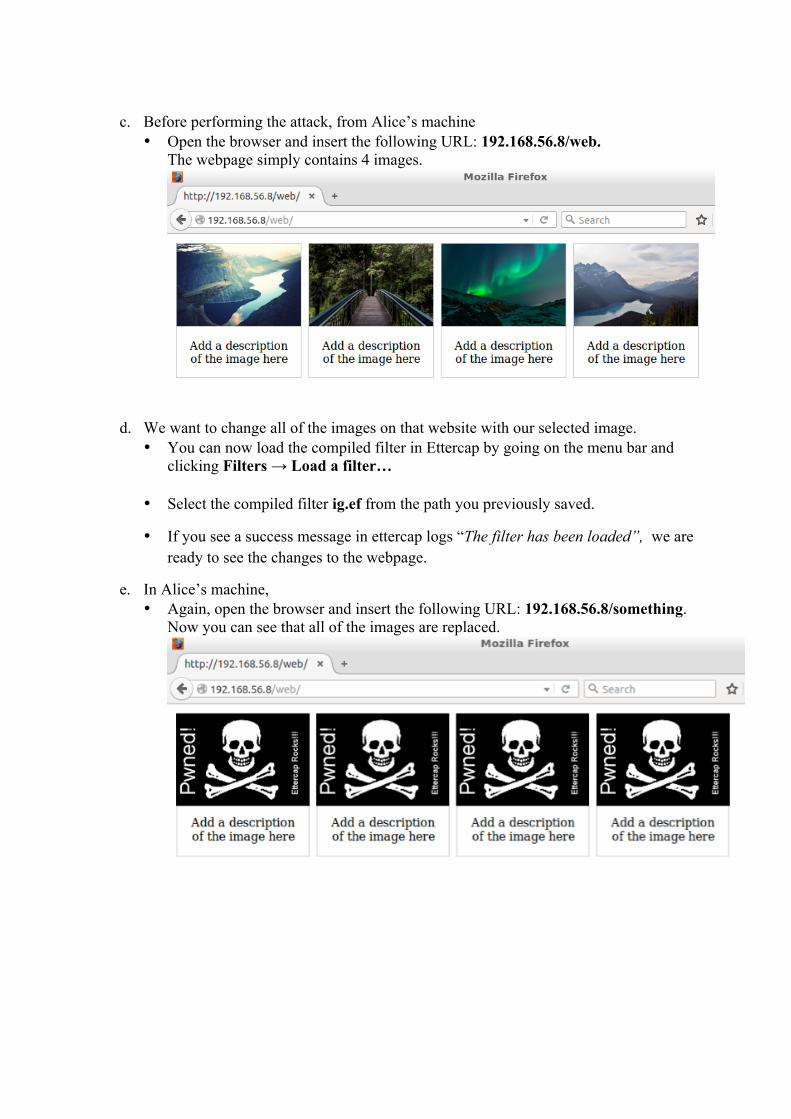
c. Before performing the attack, from Alice’s machine
• Open the browser and insert the following URL: 192.168.56.8/web. The webpage simply contains 4 images.
d. We want to change all of the images on that website with our selected image. • You can now load the compiled filter in Ettercap by going on the menu bar and
clicking Filters → Load a filter…
• Select the compiled filter ig.ef from the path you previously saved.
• If you see a success message in ettercap logs “The filter has been loaded”, we are ready to see the changes to the webpage.
e. In Alice’s machine, • Again, open the browser and insert the following URL: 192.168.56.8/something.
Now you can see that all of the images are replaced.
7. References ● ARP: https://tools.ietf.org/html/rfc826 ● ARP poisoning:
http://mathcs.slu.edu/~chambers/spring11/security/assignments/lab04.html ● Ettercap repository: https://ettercap.github.io/ettercap/ ● Good Ettercap tutorial: http://openmaniak.com/ettercap.php ● TLS - RFC 5246: https://tools.ietf.org/html/rfc5246 ● SSLstrip by Moxie Marlinspike script: https://moxie.org/software/sslstrip/ ● SSLstrip original Blackhat talk:
https://www.youtube.com/watch?v=MFol6IMbZ7Y ● SSLstrip: http://www.ilmuhacking.com/web-security/mitm-attack-mandiri-internet-
banking-using-sslstrip/comment-page-1/ ● Google redesigns security warnings after 70% of Chrome users ignore them:
https://nakedsecurity.sophos.com/2015/02/03/google-redesigns-security-warnings-after-70-of-chrome-users-ignore-them/
● HSTS - RFC 6797: https://tools.ietf.org/html/rfc6797 ● SSH – RFC 4252: https://tools.ietf.org/html/rfc4252 ● Image filtering: https://www.irongeek.com/i.php?page=security/ettercapfilter ● “SSH insertion attack”:
http://www.kb.cert.org/vuls/id/25309 http://www.coresecurity.com/content/ssh-insertion-attack http://cve.mitre.org/cgi-bin/cvename.cgi?name=1999-1085 http://www3.physnet.uni-hamburg.de/physnet/security/vulnerability/SSH_vulnerabilities.html